G Tek Electronics MIP Wireless IP Phone User Manual Gtek PWG500 UM
G-Tek Electronics Corporation Wireless IP Phone Gtek PWG500 UM
Users Manual
MIP-100
User Manual
Menu
Select
ABC
DEF
JKL
GHI
PQRS
MNO
WXYZ
TUV

Menu
Select
ABC
DEF
JKL
GHI
PQRS
MNO
WXYZ
TUV
Table of Contents --- iii
TABLE OF CONTENTS
Welcome
Overview of the MIP-100 .................................................. 1
Features...................................................................... 1
Front view................................................................... 2
Side views................................................................... 5
Display indicators ......................................................... 7
Package contents ............................................................. 9
Specifications ................................................................ 10
Using the menu.............................................................. 12
Menu map..................................................................... 13
Getting started
Inserting the battery ....................................................... 17
Charging the battery....................................................... 18
Connecting the wired earphones ...................................... 19
Turning the phone on/off ................................................ 19
Locking/unlocking the keypad.......................................... 19
Entering text.................................................................. 20
Making calls
Making a call ................................................................. 22
Using the keypad to dial.............................................. 22
Using the phone book to dial........................................ 22
Making an international call ......................................... 23
Adjusting the volume .................................................. 23
Answering or rejecting a call............................................ 23
Redialing a number ......................................................... 24
Speed dialing a number ................................................... 24
Making an emergency call ............................................... 24
Call logs........................................................................ 25
Returning a missed call ............................................... 26
Deleting call logs ........................................................ 26

iv --- Table of Contents
Menu
Select
ABC
DEF
JKL
GHI
PQRS
MNO
WXYZ
TUV
Call options.................................................................... 27
Using the speaker phone.............................................. 27
Putting a call on hold................................................... 27
Answering/rejecting a waiting call................................. 28
Conducting a conference call........................................ 28
Transferring a call ....................................................... 28
Call waiting................................................................ 29
Call forwarding........................................................... 29
Call barring ................................................................ 29
Caller ID .................................................................... 30
DTMF........................................................................ 30
Prefix dialing .............................................................. 30
Using the phone book
Adding contacts ............................................................. 31
Creating a new entry................................................... 31
Storing a number ........................................................ 31
Searching for a contact ................................................... 32
Modifying contact information.......................................... 32
Assigning a speed dial number ......................................... 33
Deleting contacts............................................................ 33
Setting tones
Selecting a profile........................................................... 34
Personalizing a profile...................................................... 34
Saving a profile .............................................................. 35
Configuring the settings
General settings ............................................................. 36
Language................................................................... 36
Power saving mode..................................................... 36
Keypad light............................................................... 36
LCD sleep interval....................................................... 37
Backlight ................................................................... 37
Alarm clock................................................................ 37

Menu
Select
ABC
DEF
JKL
GHI
PQRS
MNO
WXYZ
TUV
Table of Contents --- v
Wi-Fi settings ................................................................ 38
General settings ......................................................... 38
Profiles ..................................................................... 38
VoIP settings ................................................................. 41
General settings ......................................................... 41
Call control................................................................ 41
Profiles ..................................................................... 41
GPRS settings................................................................ 42
Clock settings................................................................ 43
Saving settings .............................................................. 43
Viewing the status
Using the status menu .................................................... 44
Advanced features
Connecting to the PC...................................................... 46
Installing the USB drivers and WIM ............................... 46
Upgrading the firmware............................................... 47
Using WIM ................................................................ 48
Appendix
Additional Information..................................................... 55
FCC Regulations............................................................. 55
European regulations ...................................................... 56
RF exposure regulation (SAR)........................................... 57

vi --- Table of Contents
Menu
Select
ABC
DEF
JKL
GHI
PQRS
MNO
WXYZ
TUV

Menu
Select
ABC
DEF
JKL
GHI
PQRS
MNO
WXYZ
TUV
Overview of the MIP-100 --- 1
1. WELCOME
Congratulations on your purchase of the MIP-100, a
VoIP (Voice over Internet Protocol) phone that also func-
tions as a personal wireless gateway for connecting to
wireless networks. Read this user manual carefully to
understand how to operate the product and take
advantage of its useful features.
Overview of the MIP-100
The MIP-100 enables you to make phone calls using
VoIP networks. You can also connect to Wi-Fi (802.11b)
networks.
Features
• Seamless voice and data communication
• Standalone mode lets you use the MIP-100 as a
Wi-Fi phone to make and receive phone calls with-
out using a PDA or portable computer
• USB port to connect to PC or PDA for phone appli-
cations and high-speed data transfer
• Mobile extension for IP-PBX IP telephony
2 --- Overview of the MIP-100
Menu
Select
ABC
DEF
JKL
GHI
PQRS
MNO
WXYZ
TUV
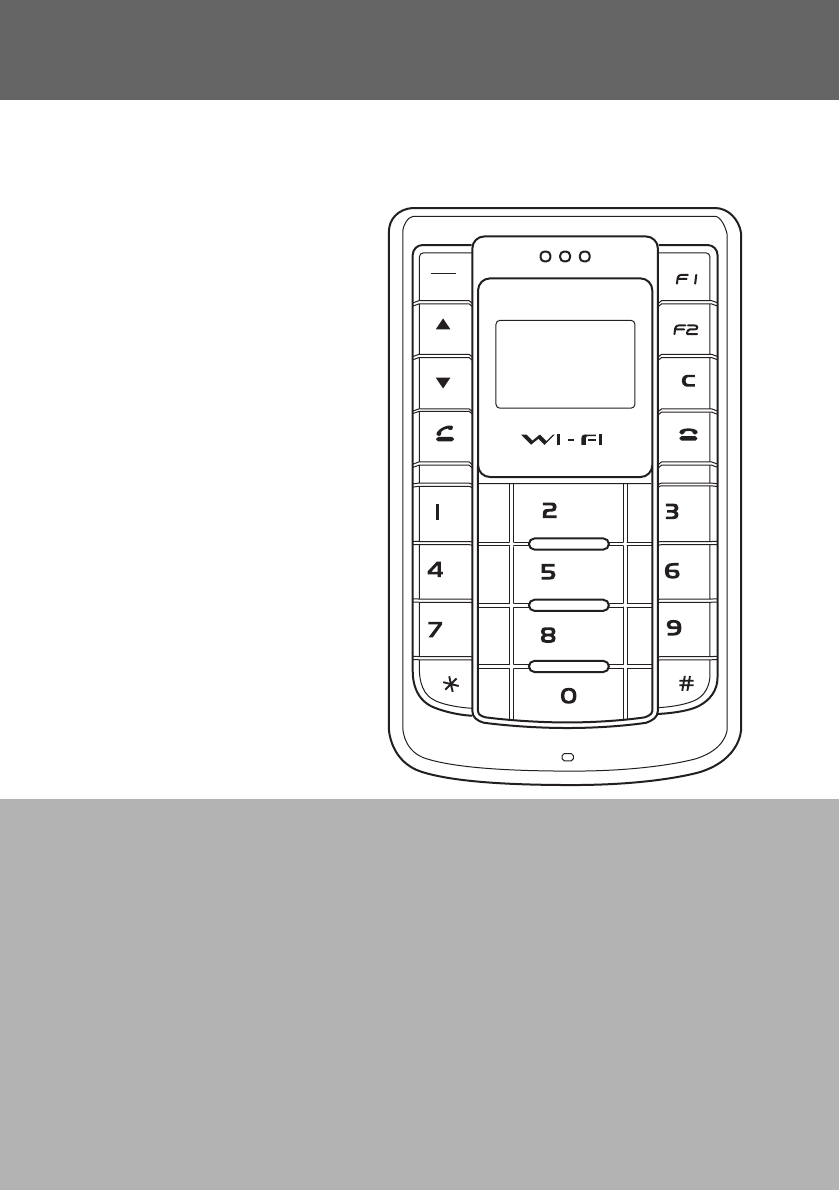
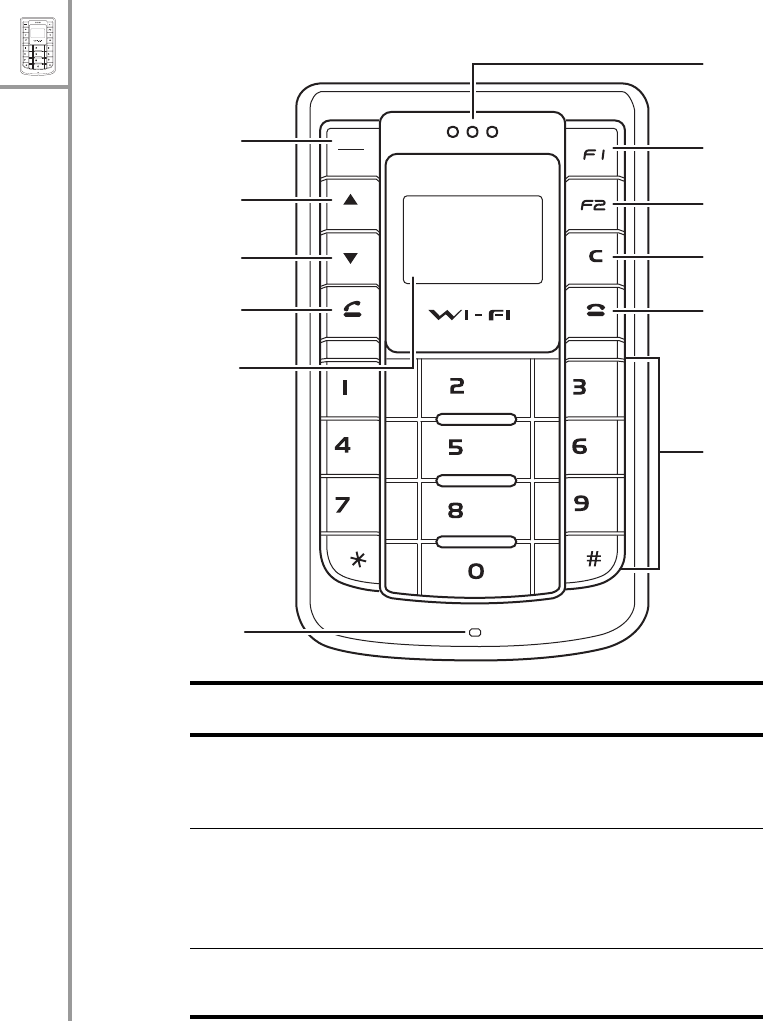
Front view
Name Description
1. Menu/Select
key
Press to access the menu or
select an option from the
menu.
2. Up arrow key
S
• Press to scroll up through
menu items.
• From standby mode, press
to display the phone book.
3. Down arrow
key T
Press to scroll down through
menu items.
Menu
Select
ABC
DEF
JKL
GHI
PQRS
MNO
WXYZ
TUV
1
2
3
4
5
6
12
11
10
9
8
7

Menu
Select
ABC
DEF
JKL
GHI
PQRS
MNO
WXYZ
TUV
Overview of the MIP-100 --- 3
4. Send/Answer
key
• Press to dial a phone num-
ber.
• Press to answer an incom-
ing call.
• From standby mode, press
to display a list of recently
dialed numbers.
5. Display screen Displays call and status infor-
mation.
6. Microphone For talking during phone calls.
7. Speaker For listening to phone calls.
8. Wi-Fi profiles
key
Press to activate stored Wi-Fi
profiles as required.
9. Status key Press to display the Wi-Fi sta-
tus, current channel, transfer
rate, SSID, Wi-Fi strength,
link quality, network mode,
enc status.device MAC
address, AP MAC address,
battery strength, auth status,
VoIP strength, or version
number.
10. Clear/Delete
key
• Press to cancel your selec-
tion and go to the previous
menu.
• While entering text or num-
bers, press to erase charac-
ters.
Name Description

4 --- Overview of the MIP-100
Menu
Select
ABC
DEF
JKL
GHI
PQRS
MNO
WXYZ
TUV
11. End/Reject key • Press to end a call.
• Press to reject an incoming
call.
• In menu mode, press to can-
cel your selection and return
to standby mode.
12. Alphanumeric
keypad
Use these keys to enter
phone numbers and text.
Name Description
Menu
Select
ABC
DEF
JKL
GHI
PQRS
MNO
WXYZ
TUV
Overview of the MIP-100 --- 5
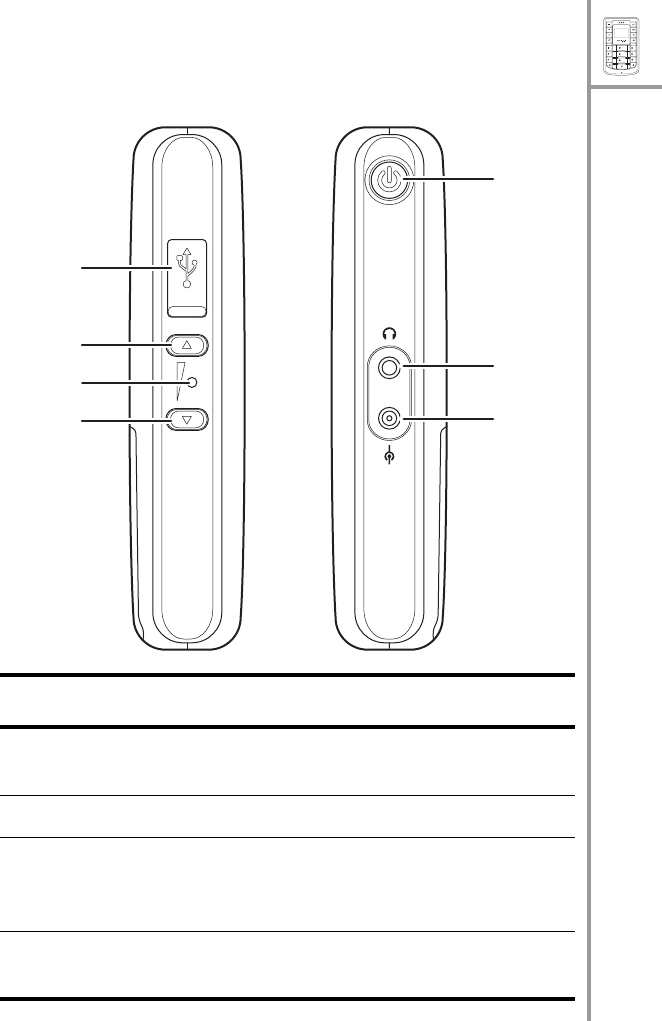
Side views
Name Description
1. USB port Connect to USB port of your
PC using USB cable.
2. Volume up key Press to increase the volume.
3. Reset button Use a small pointed object
such as a pin to reset the
MIP-100 if it locks up.
4. Volume down
key
Press to decrease the volume.
1
2
3
47
6
5
Left view Right view

6 --- Overview of the MIP-100
Menu
Select
ABC
DEF
JKL
GHI
PQRS
MNO
WXYZ
TUV
5. Power button Press to turn the MIP-100 on
or off.
6. Earphone socket Connect the provided ear-
phones here.
7. Power in Connect the power adapter to
this socket to charge the bat-
tery.
Name Description
Menu
Select
ABC
DEF
JKL
GHI
PQRS
MNO
WXYZ
TUV
Overview of the MIP-100 --- 7
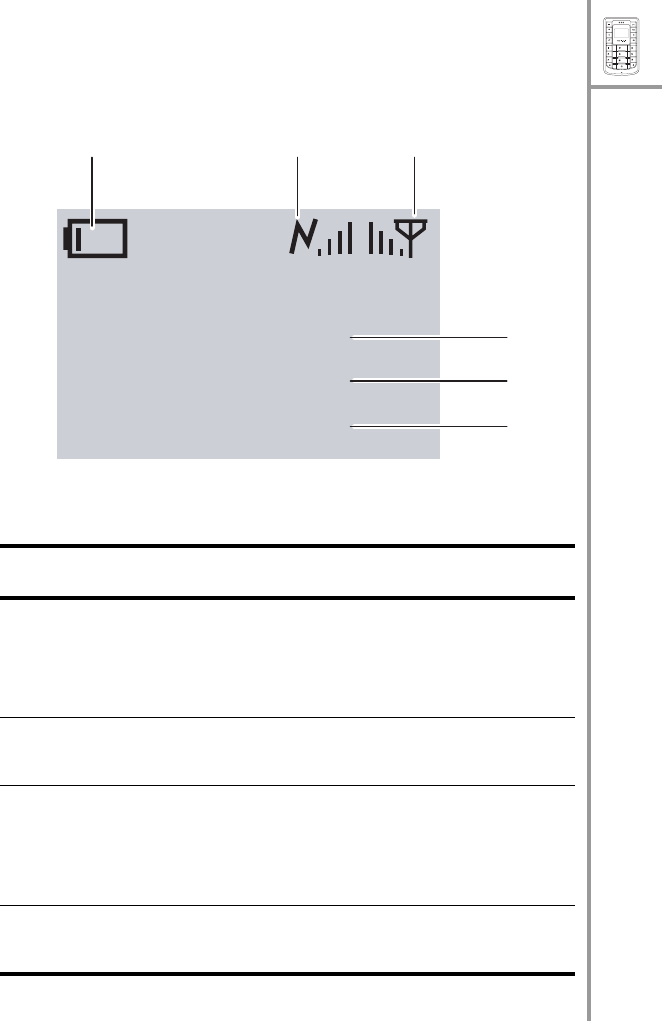
Display indicators
In standby mode, the MIP-100 screen displays the fol-
lowing icons:
Name Description
1. Battery
charge
Displays the charge level of the
battery. Five bars indicate that
the battery is fully charged or has
100% charge.
2. VoIP band-
width
Displays the available bandwidth
for VoIP.
3. Wi-Fi signal
strength
Displays the signal strength for
Wi-Fi networks available at the
current location. Five bars indi-
cate maximum signal strength.
4. Wi-Fi access
point
Displays the name of the Wi-Fi
access point.
,PTSGI-AP,
Default0
12:33 AM
123
4
5
6

8 --- Overview of the MIP-100
Menu
Select
ABC
DEF
JKL
GHI
PQRS
MNO
WXYZ
TUV
5. VoIP profile Displays the name of the current
VoIP profile.
6. Time Displays the current time.
Name Description
Menu
Select
ABC
DEF
JKL
GHI
PQRS
MNO
WXYZ
TUV
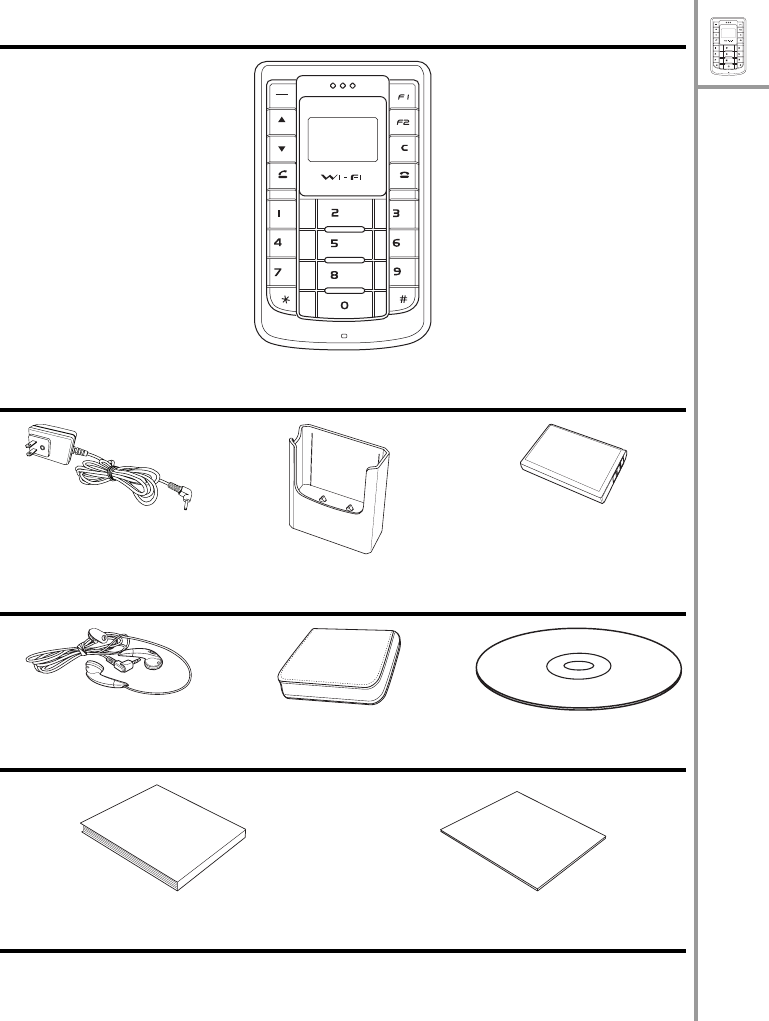
Package contents --- 9
Package contents
MIP-100
AC adapter Desktop charger Li-ion battery
Wired headset Pouch Utility CD
User manual Quick start guide
Menu
Select
ABC
DEF
JKL
GHI
PQRS
MNO
WXYZ
TUV
User Manual
Quick Start Guide

10 --- Specifications
Menu
Select
ABC
DEF
JKL
GHI
PQRS
MNO
WXYZ
TUV
Specifications
Wi-Fi characteristic
• IEEE 802.11b
• Frequency range: 2.4 ~ 2.497 GHz
• Wireless output power: 25mW maximum
• Operating range: Outdoor up to 300m; indoors up
to 75m
• Supports infrastructure (public) mode and Ad-hoc
mode (optional)
• QoS support TOS/DiffServ
VoIP features
• Codec supported: G.711a, G.711u, G.723.1,
G726, and G.729ab
• Adaptive jitter buffer and echo cancellation
• G.168 echo cancellation
• Silence suppression
• Voice Activity Detection (VAD)
• Comfort Noise Generation (CNG)
• DTMF detection and relay
Network and protocols
• SNMP manager
• DHCP or static configuration option
• Alternate TFTP support
• SIP (RFC 3261) version 2
• SDP (RFC2327)
• RTCP (RFC1890)
• Supports outbound proxy for NAT traversal
• Site survey, trace route (hidden feature), seamless
secure roaming, and VLAN support
Security
• IEEE 802.1x authentication: Optional password
prompt at power up
• 40 and 128 bit static Wired Equivalent Privacy
(WEP)
• Optional phone lock password

Menu
Select
ABC
DEF
JKL
GHI
PQRS
MNO
WXYZ
TUV
Specifications --- 11
Power
• Replaceable and rechargeable 1300 mAH Li-ion
battery
• Talk time: 4 hours talk time, 72 hours standby
• AC adapter 100~240V, 50~60Hz, 5V 650mA
DC output
Calling features
• Caller ID display, call waiting, call forward, Call
transfer
• Pre-dialing before sending
• Call mute
•Redial
• Call hold/resume
• Call park
•Conference call
User interface
• Color STN display 96 x 64 RGB pixels with white
LED backlight, 4K color resolution, pixel size:
0.219mm x 0.219mm
• Four multi-function soft keys provide easy user
operation dynamically
• Keys: Power, Volume, Menu/Select, Send/End, 12
keys dialer pad
• Selection of menu, user profiles, languages, and
ring types by soft keys
• Hotkey for keypad lock
• Hotkey for voice mail access, call logs
• Ten configurable speed dial numbers
• Idle/call state-based soft keys
• Local phone book
• Time/date display
• Keypad lock, vibration icon indicators
• RF level and battery gas gauge indication
• Polyphonic ringer, vibrator, and visual display alert
• Pocket PC 2002/2003; Windows-based WIM man-
agement and network configuration utility

12 --- Using the menu
Menu
Select
ABC
DEF
JKL
GHI
PQRS
MNO
WXYZ
TUV
Physical specifications
• Dimensions (H x W x D): 100mm x 60mm x 22mm
• Weight (with standard battery): 128g
• Built-n speaker, MIC
• Built-in real time clock (RTC) in 12/24-hour format
• USB 2.0 slave
• Jacks for headset and DC charging
• Certifications: FCC, CE, BQB
• Accessories: AC adapter, desktop charger, Li-ion
battery, wired headset, pouch, utility CD, user
manual, quick start guide
Environmental specifications
• Operating temperature: 32~113°F (0~45°C)
• Storage temperature: –22~140°F (–30~60°C)
• Relative humidity: 10~95% (non-condensing)
• Thermal shock: –30°C, 24 hours to +70°C, 24
hours
Using the menu
The MIP-100’s menu lets you access the product set-
tings and set up the device according to the network
conditions. The menu is set up in a simple and easy-to-
understand manner. Follow these steps to access the
menu and menu items.
1. In standby mode, press the Menu/Select key to
access the menu. The first menu option, Phone
Book, is displayed.
2. Scroll through the main menu options using the S
or T arrows keys and press the Menu/Select key
to view the submenu. For example, scroll to Mes-
sages and press Menu/Select to view text mes-
sages.
3. Repeat the previous step to browse through the
menu items, submenus and options. For instance,
to write a text message, select Messages and then
Create New.

Menu
Select
ABC
DEF
JKL
GHI
PQRS
MNO
WXYZ
TUV
Menu map --- 13
4. To choose a menu setting, press the Menu/Select
key to save it.
Menu map
• Phone Book
•Search
•Add
•Edit
• Delete
• Delete One by One
• Delete All
• Assign Speed Dial
• Modify
•View
• Delete
• Call Logs
• Missed Calls
• Received Calls
• Dialed Calls
• Recent Calls
The following submenu options are available when you
select a number from any of the Call Logs:
•Call
• Delete
•Save
• Delete Recent Calls
•All
• Missed Calls
• Dialed Calls
• Received Calls

14 --- Menu map
Menu
Select
ABC
DEF
JKL
GHI
PQRS
MNO
WXYZ
TUV
•Tones
• General
• Silent
• Meeting
• Outdoor
• Pager
The following submenu options are available for each of
the Tones:
• Activate
• Personalize
• Ringtone
• Ring Volume
•Alert Type
• Key Beep
•Edit Name
• Save to Flash
• Settings
• General
• Language
•Power saving
• Keypad Light
• LCD Sleep Interval
• Backlight On/Off
•Help on/off
•Alarm Clock
•Wi-Fi
• General
•Wi-Fi On/Off
• Wi-Fi Connectivity
• Profiles
• Manual
• Configuration
• Operating Mode
•Channel
•User Name

Menu
Select
ABC
DEF
JKL
GHI
PQRS
MNO
WXYZ
TUV
Menu map --- 15
• Password
•ESSID
• Auth. Protocol
•Encryption
•Protocol
•WEP Key
• Advanced
• Power Saving
• RTS/CTS Threshold
• Frag. Threshold
• Transfer Rate
• Use DHCP (If you select No, the
following options are available
for modification: IP Address,
Subnet Mask, Default Gateway,
Primary DNS, Alternate DNS)
• Restore defaults
•Default
•Activate
• Personalize
• Edit Profile Name
•VoIP
• General
•VoIP On/Off
•Stun Server
• Speaker Volume
• Microphone Volume
• Preferred Codec
• Call control
• Call Waiting
• Call Forward
• When Busy
•No Reply
• Unconditional
• Call Barring
• Caller ID

16 --- Menu map
Menu
Select
ABC
DEF
JKL
GHI
PQRS
MNO
WXYZ
TUV
•DTMF
•Prefix Dial
• Profiles
• Default 0-9
•Activate
• Personalize
•User Number
• Password
• Registrar
•Domain Name
• Outbound Proxy
• Mail Address
• Restore Defaults
• Edit Profile Name
•Clock
•Set Time
•Set Date
• Set Time Format
• Set Date Format
• Save to Flash
•Status
•Wi-Fi Status
• Channel
• Transfer Rate
• SSID
• Wi-Fi Strength
• Link Quality
•Network Mode
• Encryption Status
• Device MAC Address
•AP MAC Address
• Battery Strength
• Auth. Status
•VoIP Strength
• Version Number
Menu
Select
ABC
DEF
JKL
GHI
PQRS
MNO
WXYZ
TUV
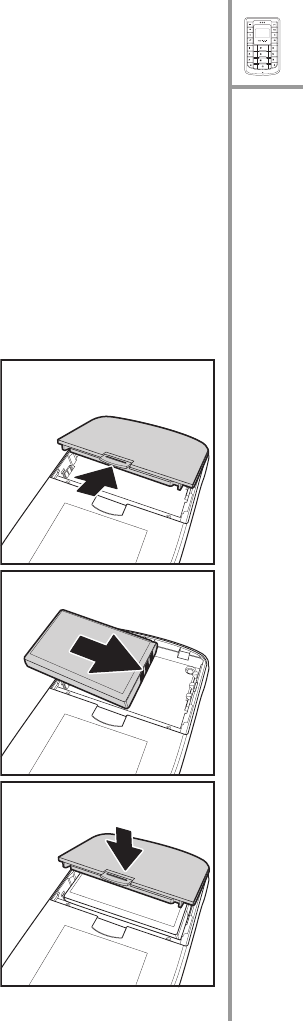
Inserting the battery --- 17
2. GETTING STARTED
Refer to this section to learn more about setting up the
MIP-100 before you start using it.
Inserting the battery
The MIP-100 is equipped with a rechargeable Li-ion bat-
tery that can be charged using the supplied battery
charger.
To insert the battery, do the following:
1. Push down the tab on the
back to remove the battery
cover as shown.
2. Place the battery in the bat-
tery slot with the metal con-
tacts properly aligned.
3. Replace the back cover as
shown and snap into place.
18 --- Charging the battery
Menu
Select
ABC
DEF
JKL
GHI
PQRS
MNO
WXYZ
TUV
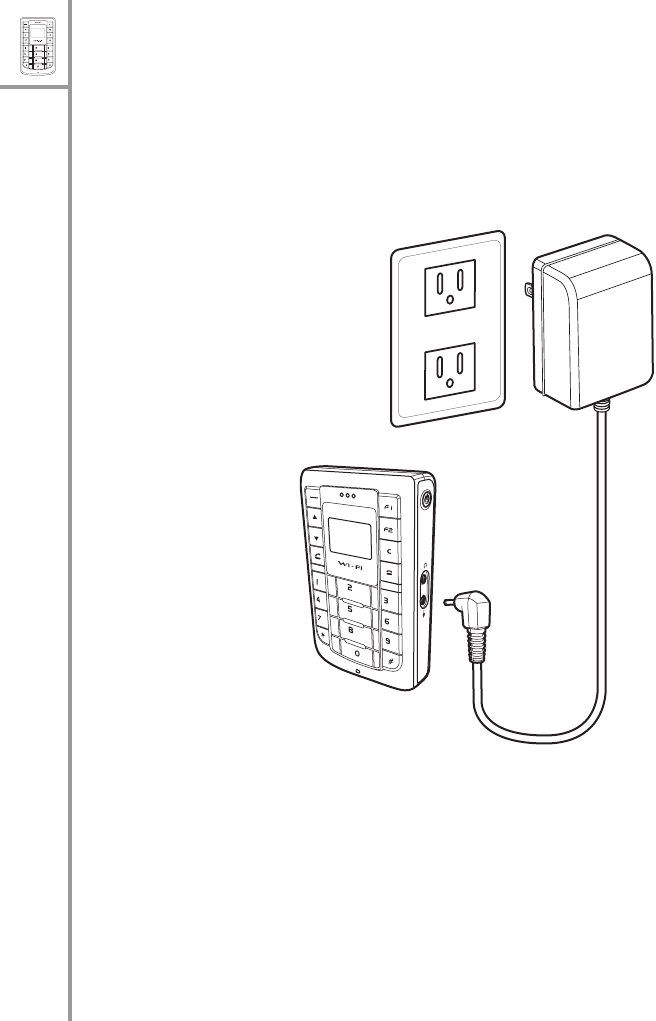
Charging the battery
The MIP-100 is provided with a rechargeable Li-ion bat-
tery with 3 hours talk time and 70 hours standby time.
To charge the battery, connect the battery charger to
the Power in slot and insert the power connector into a
power outlet.
Note: You can also charge the battery using the desktop
charger after connecting it to the power outlet. Insert the MIP-
100 in the charger making sure that the contacts touch those
of the charger.
Menu
Select
ABC
DEF
JKL
GHI
PQRS
MNO
WXYZ
TUV
Menu
Select
ABC
DEF
JKL
GHI
PQRS
MNO
WXYZ
TUV
Connecting the wired earphones --- 19
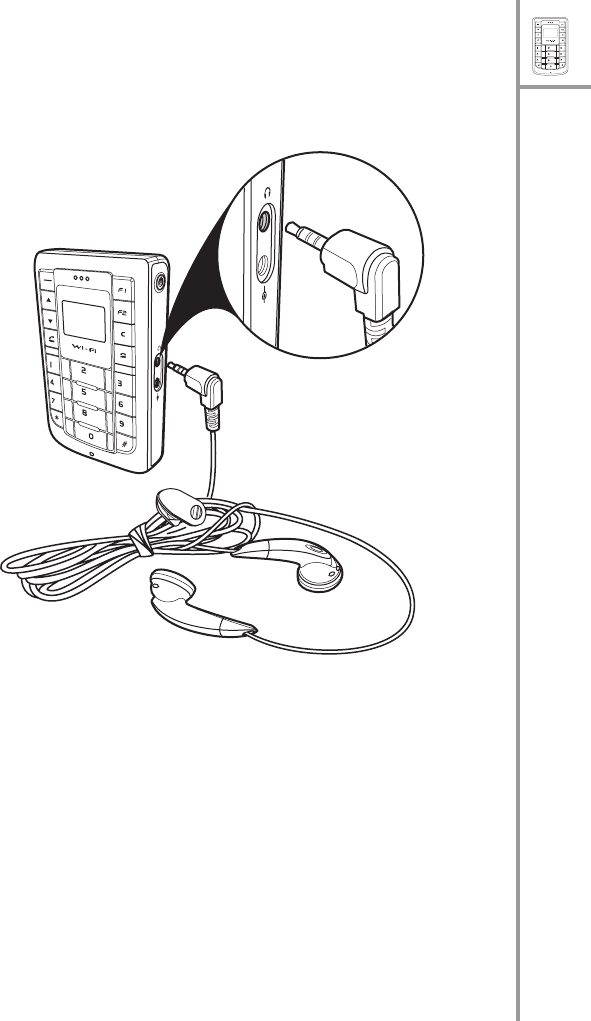
Connecting the wired earphones
Connect the wired earphones to the earphone jack to
enjoy handsfree operation, and answer or place calls
with ease.
Turning the phone on/off
Press the Power button on the right side of the MIP-100
to turn the device on or off.
Locking/unlocking the keypad
You can lock the keypad to prevent the keys from being
pressed accidentally, for example, when your phone is in
a bag or in the pocket.
Menu
Select
ABC
DEF
JKL
GHI
PQRS
MNO
WXYZ
TUV

20 --- Entering text
Menu
Select
ABC
DEF
JKL
GHI
PQRS
MNO
WXYZ
TUV
• To lock the keypad, press the Menu/Select key and
then press the *key.
• When the keypad is locked, press the Menu/Select
key and then press * to unlock the keypad.
Entering text
The MIP-100 has an alphanumeric keypad for keying in
the numbers you are dialing, typing your text messages,
and adding contact information to your phone book.
Each key represents a combination of letters and num-
bers. The following table shows the character represen-
tation for the alphanumeric keys:
Key Characters
1 1 : . – _
22 A B C a b c
3 3 D E F d e f
44 G H I g h i
5 5 J K L j k l
66 M N O m n o
7 7 P Q R S p q r s
88 T U V t u v
9 9 W X Y Z w x y z
0 0 [space] ? ! @
** +
# Switch between lower case
(abc), upper case (ABC), and
numeric (123) characters.

Menu
Select
ABC
DEF
JKL
GHI
PQRS
MNO
WXYZ
TUV
Entering text --- 21
To enter text, follow these guidelines:
1. Enter the numbers and characters as desired from
the keypad, using the preceding table for your ref-
erence.
2. The characters 123, ABC, or abc are displayed at
the bottom of the screen indicating the current
mode for text entry. To switch between lower case
(abc), upper case (ABC), and numeric (123) char-
acters, press the # key at any time. The type of
text entry changes.
3. Press the Menu/Select button when you are done
entering text.

22 --- Making a call
3. MAKING CALLS
Now that you are familiar with the MIP-100, you are
ready to start making calls and take full benefits of its
calling features.
Making a call
The MIP-100 supports VoIP calls. In VoIP mode, the
MIP-100 offers voice connectivity to users over the
Internet with the help of a VoIP server.
Using the keypad to dial
1. Key in the phone number using the keypad. If you
key in an incorrect digit, press the Clear/Delete (C)
key to delete the character to the left of the cursor.
2. Press the Send/Answer key to call the number.
3. Press the End/Reject key to terminate the call
after you finish talking.
Note: You can also end a call by pressing Menu/Select and
then selecting End.
Using the phone book to dial
You can call your contacts using the contact information
from the phone book. To make a call to a person from
the phone book, do the following:
1. Press the Menu/Select key to display the menu.
2. Select Phone Book, Search, and press the Menu/
Select key to locate a contact.The Search screen is
displayed.
3. Key in the first few letters of the name. Press the
Menu/Select key to search for the contact. A list of
names that correspond most closely to your search
criteria is displayed.

Answering or rejecting a call --- 23
Note: If the current mode of text entry is set to numeric, you
may have to change the text entry mode. See “Entering text”
on page 20.
4. Scroll through the list until you find the contact
you want to call.
5. Press the Send/Answer key to call the number.
6. Press the End/Reject key to terminate the call
after you finish talking.
Making an international call
To dial an international number, you need to know the
country code of the international location.
1. Press the * key twice to enter the + character.
2. Key in the country code followed by the phone
number.
3. Press the Send/Answer key to call the number.
4. Press the End/Reject key to terminate the call
after you finish talking.
Adjusting the volume
While talking on the MIP-100, use the Volume up/down
keys to increase or decrease the volume according to
your preference. You can also adjust the ring tone using
the keys when not talking on the phone. For adjusting
microphone or speaker volume separately, see “Wi-Fi
settings” on page 38.
Answering or rejecting a call
An incoming call is indicated by a ringing tone and a
vibration if selected. Choose one of the following
options:
• Press the Send/Answer key to answer an
incoming call.
24 --- Redialing a number
• Press the End/Reject key to reject an incoming
call. The call is forwarded or transferred if you
have activated call forwarding. See “Call forward-
ing” on page 29.
Redialing a number
To dial a number quickly that you have dialed recently,
do the following:
1. Press the Send/Answer key from standby
mode. A list of your most recent calls is displayed.
2. Press S and T to scroll through the numbers to
select the number you wish to call.
3. Press the Send/Answer key to call the number
again.
Speed dialing a number
You can assign a speed dial number from the keypad to
the most commonly dialed numbers in your phone book
and use that number to dial the number quickly instead
of keying in the complete number. See “Assigning a
speed dial number” on page 33.
To call a number using speed dialing, do the following:
1. Press the number or hotkey that has been assigned
to the phone number from the numeric keypad.
2. Press the Send/Answer key to call the number.
3. Press the End/Reject key to terminate the call.
Note: You can also speed dial a number by pressing and hold-
ing down the hotkey.
Making an emergency call
You can make an emergency call to a number that has
been set in the SOS numbers setting. You can save up
to three emergency numbers using the WIM applica-

Call logs --- 25
tion’s configuration feature from your PC or PDA. See
“Config. Stat” on page 54.
To make an emergency call, do the following:
1. Press and hold the Volume up and Volume down
keys simultaneously for three seconds.
2. The first SOS number is dialed. If the call is
answered, the call gets established and you can
have a voice conversation with the called party.
One of the following may take place when a call does
not get established:
• If the call remains unanswered by the called party,
the second SOS number is dialed. If the second
SOS call also remains unanswered, the third SOS
number is dialed. If the call to the third number
remains unanswered, the emergency call operation
is cancelled. Repeat the same procedure to initiate
the emergency call again.
Call logs
The MIP-100 stores information about all calls made or
received. Your phone keeps lists of the calls you recently
received and dialed, even if the calls did not connect.
The lists are sorted from newest to oldest entries. The
oldest entries are deleted as new entries are added.
Press Menu/Select and then select the Call Logs menu to
view call information. The following calls are listed:
• Missed Calls
• Received Calls
• Dialed Calls
• Recent Calls
Up to 20 calls can be saved for each of the missed,
received, and dialed call logs.

26 --- Call logs
The Recent Calls list consists of the most recent calls
from the missed, received, and dialed call logs. Up to
250 calls can be saved. The recently dialed numbers,
received numbers, and missed numbers are indicated by
different icons.
Select a call from a call log and press the Menu/Select
key. Select one of the following options:
•Call: call the selected number
•Delete: delete the number from the call log.
•Save: save the number to your phone book.
Returning a missed call
If you miss a call, it is indicated on the screen. To return
a missed call, do one of the following:
• Press the Menu/Select key when you see the
missed call indication on the screen. The missed
call log is displayed. Select the missed call and
press the Send/Answer key to call the number.
• Press the Menu/Select key and then select Call
Logs, Missed Calls. Select the missed call and
press the Send/Answer key to call the number.
Deleting call logs
You can delete any of the call logs that are not needed.
To delete call logs, press Menu/Select and then select
Call Logs, Delete Recent Calls. Choose the type of calls
that you want to delete from the following options:
• All
• Missed Calls
• Dialed Calls
• Received Calls

Call options --- 27
Call options
While a call is in progress, a number of additional options
are available. Press the Menu/Select key to view these
options.
Using the speaker phone
For handsfree operation, you can use the built-in speaker
to talk on the phone. Do one of the following to use the
speaker phone.
• Press the Clear/Delete (C) key to enable the
speaker phone. Press the key again to disable the
speaker phone.
• While talking on the phone, press Menu/Select and
then select Speaker On from the options. The
speaker is enabled. To disable the speaker phone,
either terminate the call or press Menu/Select and
Speaker Off.
Putting a call on hold
You may want to put a call on hold temporarily while
doing some work or attending to a second incoming or
outgoing call. To put a call on hold, do one of the follow-
ing:
• Press Menu/Select and select Hold.
• When you receive a second call, press the Send/
Answer key to attend to the new call. The first
call is automatically put on hold.
• Dial a call using the keypad. The first call is auto-
matically put on hold.

28 --- Call options
Answering/rejecting a waiting call
If you have enabled call waiting, you can answer a sec-
ond incoming call while the first one is still in progress.
The new incoming call is indicated by a beeping tone.
Press the Send/Answer key to answer the incoming
call. Press the End/Reject key to reject the call.
Conducting a conference call
The call waiting and holding functions also help you to
conduct a conference call using the MIP-100 as follows:
1. Call the first participant of the conference call as
described in “Making a call” on page 22.
2. Put the first participant on hold as described in
“Putting a call on hold” on page 27.
3. Call the second participant of the call.
4. Press Menu/Select and then select Conference to
include all participants in the call.
5. Press the End/Reject key to end the call.
Transferring a call
To transfer a call to another phone number, do the fol-
lowing:
1. While a call is in progress, press Menu/Select and
select Transfer from the options.
2. Dial the number to which you want to transfer the
call and then press the End/Reject key to hang
up and transfer the call.

Call options --- 29
Call waiting
You can answer a call while you have another call in
progress if you activate the call waiting function. To
answer the call waiting press the Send/Answer key.
The first call is put on hold.
To activate the call waiting function, press Menu/Select
and then select Settings, VoIP, Call Control, Call Wait-
ing, and Enable.
Call forwarding
If you do not answer a call or reject a call, the call can be
forwarded to a specified number.
To activate the call forwarding feature, do the following:
1. Press Menu/Select and then select Settings, VoIP,
Call Control, and Call Forward.
2. Select an option from the following options:
–When Busy: to forward calls when your phone
is busy.
–No Reply: to forward calls when you do not
answer the phone.
–Unconditional: to forward all incoming num-
bers.
3. Key in the number to which the selected calls are
to be forwarded.
Call barring
You can enable call barring of all incoming or outgoing
calls. This may be useful to block all incoming calls
when roaming.
To activate call barring, press Menu/Select and then
select Settings, VoIP, Call Control, and Call Barring.
Select Incoming or Outgoing calls and then select On to
enable call barring.

30 --- Call options
Caller ID
To enable the display of the number when you receive
an incoming call, press Menu/Select and then select Set-
tings, VoIP, Call Control, Caller Id, and Enable. The num-
ber is displayed on the screen.
DTMF
You can select DTMF (Dual Tone Multi Frequency) for
your outgoing calls depending on the type of network
being used by the recipient. To select DTMF options,
press Menu/Select and then select Settings, VoIP, Call
Control, DTMF to choose from one of the following
options:
•Inband: Select this option if the person you are
calling uses only PSTN networks.
•Outband: Select this option if the person you are
calling links to a VoIP server.
Prefix dialing
The prefix dial is a useful feature if you dial numbers in
an international location frequently. The prefix dial func-
tion memorizes the prefix required for dialing the calls
and appends them to all outgoing calls. Thus you do not
need to key in the prefix every time you make a call.
To activate the prefix dial, press Menu/Select and then
select Settings, VoIP, Call Control, Prefix Dial, and
Enable. Key in the prefix and press Menu/Select to save
the prefix.

Adding contacts --- 31
4. USING THE PHONE BOOK
The phone book is an important component of the MIP-
100 for storing contact information about your friends,
relatives, and colleagues. This eliminates the need for
you to memorize important phone numbers.
Adding contacts
The phone book feature enables you to create new
entries for your contacts and edit their contact informa-
tion. It also enables you to store a number from a missed
or received call in your phone book.
Creating a new entry
1. Press Menu/Select and then select Phone Book,
Add to add a new entry to the phone book.
2. Type the name of the new contact. See “Entering
text” on page 20.
3. Press Menu/Select to save the name.
4. Enter the phone number of the new contact.
5. Press Menu/Select to save the number.
Storing a number
To store a number from your received, missed, or dialed
call logs, do the following:
1. Select the number you want to store from the call
log and press Menu/Select. See “Call logs” on
page 25.
2. Select Save from the options.
3. Key in the name of the new contact and press
Menu/Select.
4. The selected number is displayed again. Make sure
that the number is correct or edit it if required and
press Menu/Select.

32 --- Searching for a contact
The selected number and corresponding contact name is
stored in the phone book.
Searching for a contact
1. Press Menu/Select and then select Phone Book,
Search to start searching for contacts.
2. Key in the first few letters of the contact that you
are looking for and press Menu/Select.
Phone book entries that closely match your search crite-
ria are displayed. For example, if you key in the letters
SU while searching, the first phone book entry starting
with SU and successive entries are displayed. Press
Send/Answer to dial the entry or press Menu/Select
and select an option from Edit, Delete, or Call as
required.
Modifying contact information
1. Press Menu/Select and then select Phone Book to
view the phone book entries.
2. Scroll through the phone book to select an entry or
use Search to locate the entry you want to modify.
3. Press Menu/Select and select Edit to make changes
to the phone book entry.
4. Change the name and phone number as required
and press Menu/Select to save the entry to the
phone book.

Assigning a speed dial number --- 33
Assigning a speed dial number
You can use speed dialing to assign a shortcut or hotkey
(2 ~ 9) to the phone numbers that you dial most fre-
quently. You can then press the speed dial number to
quickly dial a number instead of keying in the entire
phone number or searching for the contact number from
the phone book. See “Speed dialing a number” on
page 24.
1. Press Menu/Select and then select Phone Book and
Assign Speed Dial. A list of phone book entries
with the speed dialing number assigned to each
entry is displayed. The keys that haven’t been
assigned to a phone number are displayed as
Empty.
2. Select a hotkey entry and press Menu/Select, Mod-
ify to change the speed dial key assigned to a num-
ber. Press the new speed dial number to assign it
to the phone book entry.
3. Select an Empty hotkey and press Menu/Select.
The list of contacts is displayed. Select a contact
and press Menu/Select to assign a hotkey to that
contact. Press the new speed dial number to
assign it to the phone book entry.
Note: You can also select View to view the hotkey details or
Delete to delete a hotkey.
Deleting contacts
You can delete all the contacts in the phone book one at
a time or all at once as follows:
1. Press Menu/Select and then select Phone Book.
2. Press Menu/Select and then select Delete.
3. Select Delete One by One to delete entries one at a
time.
4. Select Delete All to delete all entries.
Note: You can also select an entry from the phone book and
press Menu/Select, Delete to delete the current entry.

34 --- Selecting a profile
5. SETTING TONES
The MIP-100 has a set of profiles, each customized for
different scenarios of usage. For example, you can use
the Silent profile when in a movie theatre, the Meeting
profile while attending business meetings, or the Out-
door profile when travelling outdoors or in a noisy envi-
ronment. You can also personalize each profile and
change the tone settings to suit your preferences.
Selecting a profile
To select a profile, do the following:
1. Press Menu/Select and select Tones. A list of the
profiles is displayed.
2. Select the profile you want to use and press Menu/
Select.
3. Select the Activate option and press Menu/Select
to set the profile for the MIP-100.
Personalizing a profile
Each profile has a specific ringtone, ring volume, and
alert tone. You can customize your profile and change
the various sound tones according to your preferences
as follows:
1. Press Menu/Select and select Tones to display a
list of profiles.
2. Select the profile that you want to modify and
press Menu/Select.
3. Select Personalize and press Menu/Select to
change the profile. The following options can be
changed when personalizing:
–Ringtone: change the ringing tone that alerts
you when you receive an incoming call.
–Ring volume: adjust the ring tone volume.

Saving a profile --- 35
–Alert type: specify the type of alert for receiv-
ing instant messages. For instance, you can
choose a combination of vibration and audio to
alert you when you receive a message.
–Key beep: enables or disables the tone
sounded every time you press a key.
4. Select an option from the list above and use Menu/
Select to modify each option. When you change
the ringtone or the alert type, you can hear the cur-
rent ringtone or alert tone to help you choose a
tone.
5. Return to previous menu (Actions) and select Edit
Name to change the name of the current profile.
Use the keypad to change the name and press
Menu/Select when done.
Saving a profile
To save a profile to the MIP-100’s internal flash mem-
ory, do the following:
1. Press Menu/Select and select Tones to display a
list of profiles.
2. Select the profile that you want to save and press
Menu/Select.
3. Select Save to Flash and press Menu/Select to
save the profile to the phone’s internal memory.

36 --- General settings
6. CONFIGURING THE SETTINGS
The settings menu provides a number of options to con-
figure the MIP-100, operating mode, network settings,
and preferences. Read this section carefully to learn how
to configure your phone.
General settings
The general settings provide options to customize the
MIP-100 according to your preferences.
Language
Use the language setting to specify the interface lan-
guage. Press Menu/Select and select Settings, General,
Language. Select the language of your choice from these
options: English, Spanish, German, and Chinese.
Power saving mode
The power saving mode prevents excess use of power.
Press Menu/Select and then select Settings, General,
Power Saving, and On to enable power saving mode.
Note: Power saving mode is only enabled when Wi-Fi mode is
disabled.
Keypad light
The keypad lights can be disabled to prevent excess use
of power. Press Menu/Select and then select Settings,
General, Keypad Light, and Off to disable the keypad
lights. The keypad lights are useful when you want to
use the phone in the dark.

General settings --- 37
LCD sleep interval
The LCD can be disabled after a specific time interval to
prevent excess use of power. To specify the time inter-
val, press Menu/Select and select Settings, General, LCD
Sleep Interval. Then select the time interval from the
time options ranging from 20 seconds through 160 sec-
onds.
Backlight
The LCD screen backlight can be disabled when not in
use to conserve power. To disable the backlight, press
Menu/Select, and select Settings, General, Backlight On/
Off, and Off when Inactive. Alternatively, select the
Always On option to always keep the backlight enabled.
Alarm clock
The MIP-100 has a real time clock that keeps track of
the time and also lets you set an alarm. To set an alarm,
press not in use to conserve power. To disable the back-
light, press Menu/Select, and select Settings, General,
and Alarm. If an alarm has been set before, the previous
alarm time setting is displayed. Press Menu/Select and
choose the Adjust option. Use the arrow and Menu/
Select keys to adjust the time setting. If you want to dis-
able the alarm, select the Off option.

38 --- Wi-Fi settings
Wi-Fi settings
The Wi-Fi settings enable you to set up the MIP-100 for
wireless mode. Use this setup to specify and personalize
a wireless profile and security settings.
General settings
The general settings for Wi-Fi mode specify the type of
wireless connectivity and enable you to turn on Wi-Fi
mode. Press Menu/Select and choose Settings, Wi-Fi,
General and choose one of the following options:
•Select Wi-Fi On/Off and select On to enable Wi-Fi
mode.
•Select Wi-Fi Connectivity and select Automatic to
connect to a wireless network in the vicinity auto-
matically. The MIP-100 scans for wireless hotspots
automatically. Alternatively, select Manual to con-
nect to a wireless network manually. A list of
hotspots is displayed. Select a hotspot to connect
to the corresponding wireless network.
Profiles
The Wi-Fi profiles are sets of wireless parameters that
can be used for different networks. You may want to
create separate profiles with different security settings
for use in different networks, each of which may have
its own security settings. Press Menu/Select and choose
Settings, Wi-Fi, and Profiles to view and modify the pro-
files.
The MIP-100 provides three Default profiles which you
can activate and personalize as needed. Select Default
and then Personalize to adjust the settings or Activate to
activate the profile. You can also use the Manual profile
to individually set up each parameter needed for wireless
setup.

Wi-Fi settings --- 39
Each profile has the following parameters that can be
further set up as desired.
Configuration:
This option provides various options to set up the basic
wireless configuration as follows:
•Operating mode: specifies the mode of operation
for wireless connectivity. Choose Ad Hoc to con-
nect to a wireless node or access point directly.
Choose Infrastructure to become a part of a wire-
less network.
•Channel: specifies the channel to be used for the
wireless network. Fourteen channels are available.
•User Name: specifies the user name used when
signing into a wireless network. Use the keypad to
edit the name. See “Entering text” on page 20.
•Password: specifies the password for authentica-
tion while logging into a network. Use the keypad
to edit the name. See “Entering text” on page 20.
•ESSID (Extended Service Set Identification): speci-
fies the unique ID assigned to the device for com-
municating with other wireless devices.
•Auth. Protocol: specifies the protocol or communi-
cation criteria used for authentication when joining
a wireless network. Choose from Off, Sim1 Based,
Sim2 Based, EAP-MD5, and EAP-MSCHAPv2.
Encryption
This specifies the encryption settings to allow entry into
an encrypted or secure wireless network. Encryption
provides an additional level of security for wireless net-
works, protecting them from data corruption. The fol-
lowing options are available for modification:
•Protocol: specifies the encryption protocol. Select
from Disable, 64 Bit Open, 128 Bit Open, 64 Bit
WEP, and 128 Bit WEP.
•WEP Key: specifies the WEP (Wired Equivalent Pri-
vacy) key. Choose from Key #1 through Key # 4.

40 --- Wi-Fi settings
Advanced
This option enables you to make advanced settings for
the wireless mode. The following options are available:
•Power Saving: Select the On option to enable
power saving when the MIP-100 is connected in
Wi-Fi mode.
•RTS/CTS Threshold: specifies the threshold for
RTS and CTS parameters. Key in a numeric value
using the keypad.
•Frag. Threshold: specifies the fragment threshold.
Key in a numeric value using the keypad.
•Transfer Rate: specifies the rate at which data
transfer takes place. Select Auto to let the MIP-
100 to set the transfer rate automatically.
•Use DHCP: Select this option to set the DHCP pro-
tocol parameters. Select Yes if you want to use
DHCP and a DHCP server in the network assigns IP
addresses dynamically to the device. Select No if
there is no DHCP server or if you want to assign
the IP properties manually. The following parame-
ters have to be set:
–IP Address
– Subnet Mask
– Default Gateway
– Primary DNS
– Alternate DNS
Restore Defaults
Choose this option to restore all settings to their default
factory values.

VoIP settings --- 41
VoIP settings
The VoIP settings are provided to set up the VoIP param-
eters.
General settings
These settings provide the basic setup for VoIP mode.
Press Menu/Select and select Settings, VoIP, and Gen-
eral to configure these settings as follows:
•VoIP On/Off: enables or disables VoIP mode.
•Stun Server: specifies the Stun server for VoIP
mode. Key in the server name using the keypad.
See “Entering text” on page 20.
•Speaker Volume: Adjusts the speaker volume in
VoIP mode. Choose from Level 1 through Level 10.
•Microphone Volume: Adjusts the microphone vol-
ume in VoIP mode. Choose from Level 1 through
Level 10.
•Preferred Codec: specifies the codec to be used for
VoIP calls. Select from GSM, a Law, H Law, G726,
G729, and G723.1.
Call control
The call control options set up the call waiting, call bar-
ring, call forwarding, caller ID, DTMF, and prefix dialing
options for the phone. See “Call options” on page 27 for
details about these options.
Profiles
The MIP-100 provides ten default profiles for the VoIP
mode. Select a profile and press Activate to make the
selected profile active. Press Personalize to change the
profile settings. Press Edit Profile Name to change the
profile name.

42 --- GPRS settings
If you select the Personalize option, the following param-
eters can be modified:
•User Number: specifies the number used to make
VoIP calls. You must enter a number to be able to
make calls.
•Password: specifies the password for VoIP authen-
tication.
•Registrar: specifies the registrar name for the VoIP
mode.
•Domain Name: specifies the domain name through
which VoIP calls are made.
•Outbound Proxy: specifies the proxy server for out-
ward VOIP calls.
•Mail Address: specifies the mail address for VoIP
mode.
•Restore Default: restores all settings to their fac-
tory default values.
Note: For more information about VoIP settings, consult your
service provider.
GPRS settings
GPRS is a network service that allows you to use your
phone for sending and receiving data over an IP network.
The GPRS settings enable you to set up the MIP-100 for
GPRS mode. Press Menu/Select and select Settings,
GPRS to configure the GPRS settings. The following
options are available:
•Access Point Name: Key in the name of the access
point to be used for GPRS mode.
•IP Address: Key in the IP address of the access
point to be used for GPRS mode.

Clock settings --- 43
Clock settings
The clock settings enable you to set the time and date
on the MIP-100. The MIP-100 displays the time on the
screen after the LCD sleep interval if the power saving
mode is set. If the power saving mode is disabled, the
screen remains blank. Press Menu/Select and select Set-
tings, Clock to view the clock settings. The following
options are available:
•Set Time: sets the time. Use the arrow keys to
move between the hour, minute and AM/PM fields.
Use the keypad to key in the time.
•Set Date: sets the date. Use the arrow keys to
move between the day, month and year fields. Use
the keypad to key in the time.
•Set time format: specifies the time format. Choose
from 12 hours and 24 hours format.
•Set date format: specifies the date format. Choose
from MMD/DD/YYYY, DD/MM/YYYY, YYYY/MM/
DD, and YYYY/DD/MM.
Saving settings
To save all the changes to the MIP-100’s internal flash
memory, press Menu/Select and then choose Settings,
Save to Flash. All settings are saved.

44 --- Viewing the Status
7. VIEWING THE STATUS
Using the status menu
The Status menu enables you to view the status of all
the MIP-100’s configuration settings at a single glance.
To view the MIP-100’s status, press Menu/Select and
then select Status. A list of the configuration settings is
displayed. Scroll to the required setting and press Menu/
Select to view the status of the setting. The following
settings are displayed:
•Wi-Fi Status: displays the status of the Wi-Fi net-
work.
•Channel: displays current Wi-Fi channel. Wi-Fi is
available in various frequency bands and in differ-
ent channels.
•Transfer Rate: Displays the rate of data transfer.
•SSID: Displays the SSID or identification tag of the
device. This is null when you are not connected to
a Wi-Fi network. A unique SSID or tag is required
for identifying the device in Wi-Fi networks.
•Wi-Fi Strength: Displays the strength of the Wi-Fi
signal.
•Link Quality: Displays the quality of the link.
•Network Mode: Displays the networking mode.
•Enc Status: Displays the wireless encryption sta-
tus. If this is Open, it means that the connection is
not encrypted and is open to all persons accessing
it. If it is Closed, it means that the encryption has
been enabled to prevent unauthorized users from
accessing the network.
•Device MAC Addr: Displays the MAC address of
the MIP-100.
•AP MAC Address: Displays the MAC address of
the access point in the wireless network.

Viewing the Status --- 45
•Battery Strength: Displays current battery
strength.
•Auth Status: Displays if he communication channel
is authenticated or not.
•VoIP Strength: Displays the intensity of the avail-
able VoIP signal.
•Version Number: Displays current firmware ver-
sion.
46 --- Connecting to the PC
8. ADVANCED FEATURES
You can connect the MIP-100 to your PC using a USB
cable and use the device to connect to a wireless net-
work. This section provides details about how to use the
MIP-100 with your PC or PDA.
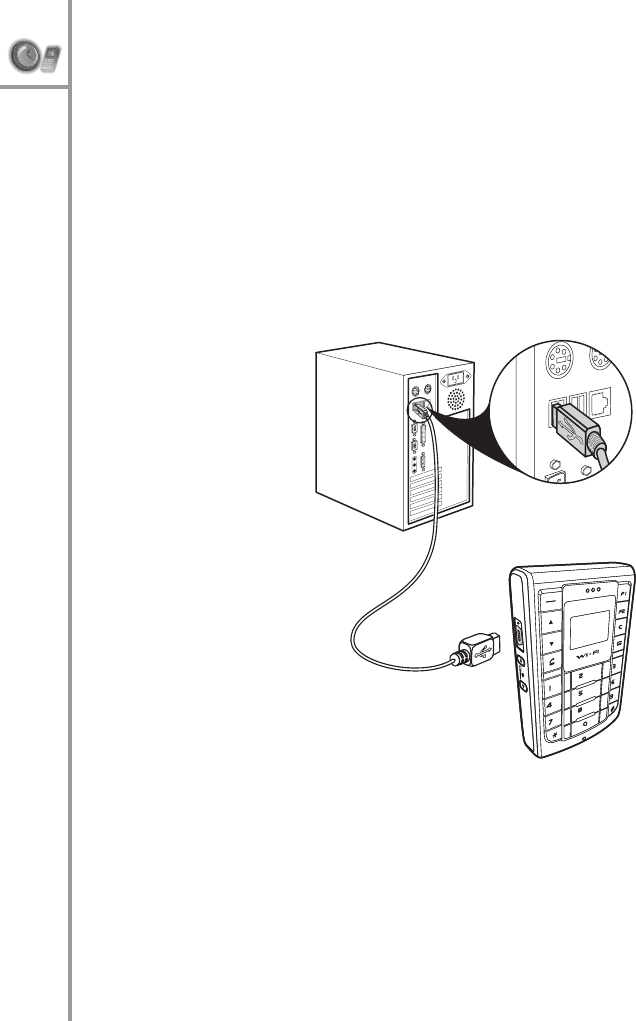
Connecting to the PC
Use a mini USB cable to connect the MIP-100 to the PC
as shown.
Installing the USB drivers and WIM
To use the MIP-100 as a USB modem for your PC, you
need to install the drivers for the device. When you con-
nect the device to the PC, the PC detects the new hard-
ware and starts the New Hardware Found Wizard.
Follow the instructions on the screen to locate and
install the USB drivers for the MIP-100 on the PC. The
Menu
Select
ABC
DEF
JKL
GHI
PQRS
MNO
WXYZ
TUV
Menu
Select
ABC
DEF
JKL
GHI
PQRS
MNO
WXYZ
TUV

Connecting to the PC --- 47
USB driver files can be found on the utility CD provided
in your package.
WIM (Wireless in Motion) is an application that helps you
configure and use the MIP-100. The utility CD contains
two versions of WIM, one for your PC and one for your
PDA (Pocket PC only). Select the appropriate version of
WIM from the utility CD and double-click Setup.exe. Fol-
low the instructions on the screen to install the soft-
ware. Refer to your PDA documentation for details about
installing software on your PDA.
Upgrading the firmware
You can upgrade the firmware of the MIP-100 if
required, from the PC using the USB cable. The follow-
ing files are needed to upgrade the firmware:
• Firmware file called bundle.bin
• Firmware application called uploader_usb.exe
Follow these instructions to upload the new firmware to
the MIP-100:
1. Press the Volume down key before you turn on the
MIP-100, and then press the reset key. The phone
enters the USB download mode. A message titled
Firmware upgrade (USB) appears on the screen.
2. Connect the MIP-100 to your PC using the USB
cable. If you have not installed the USB drivers on
your PC, you are prompted to install them now.
See “Installing the USB drivers and WIM” on
page 46.
3. Make a note of the COM port number being used
for connecting the MIP-100 to the PC. This can be
obtained by checking the Device Manager under
System on your PC. The COM port number appears
under the Ports item.
4. Open the command prompt, type uploader_usb.exe
COM port number and press Enter to start the
upload.
48 --- Connecting to the PC
The upload status is shown on the screen. Wait till the
screen shows Initializing before using the phone.
CAUTION: Do not remove the battery, turn off the device, or
operate the device while the firmware upgrade is in process.
Using WIM
The WIM application is a useful interface that lets you
set up and configure the MIP-100 from your PC or PDA.
You can personalize Wi-Fi profiles according to your net-
work specifications. You can also use the application to
download ringtones, configure SOS numbers for the
phone, and make any setup changes for the phone.
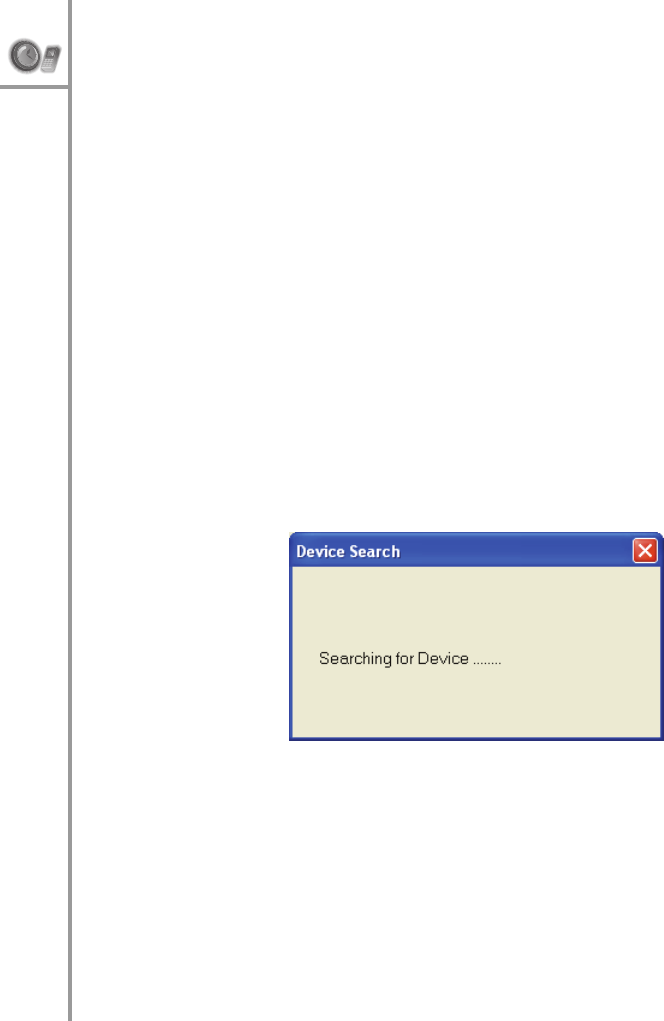
Double-click the WIM icon to start the application from
your PC or PDA.
The following screen is displayed when you open the
WIM Desktop application.
Please wait for a few seconds while the device is being
searched. You can start using the application once the
device is found.
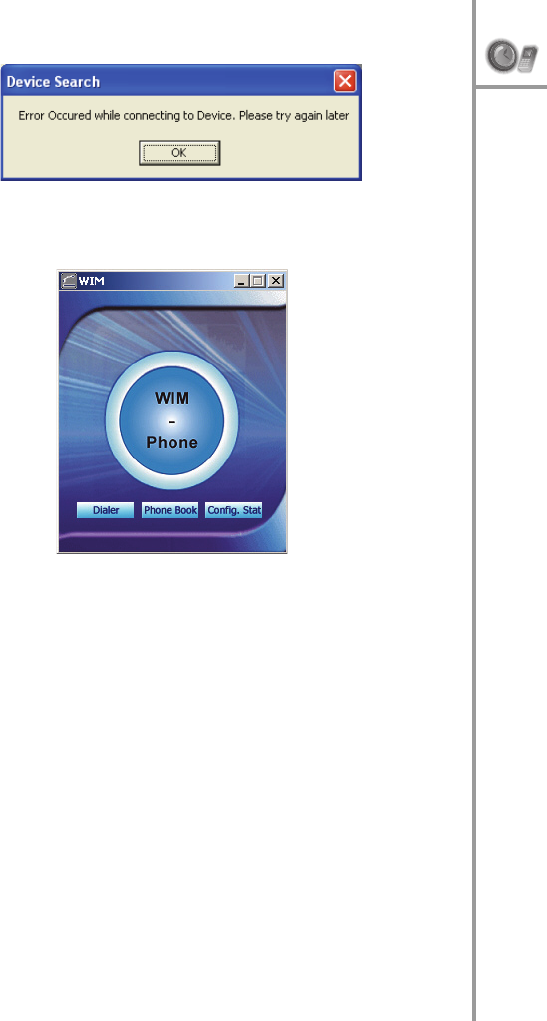
Connecting to the PC --- 49
If there is a problem connecting to the device the follow-
ing screen is displayed.
When the device is found, the following screen is dis-
played.
Phone book
Local Phone book
This phonebook is saved on the PC or PPC.
50 --- Connecting to the PC
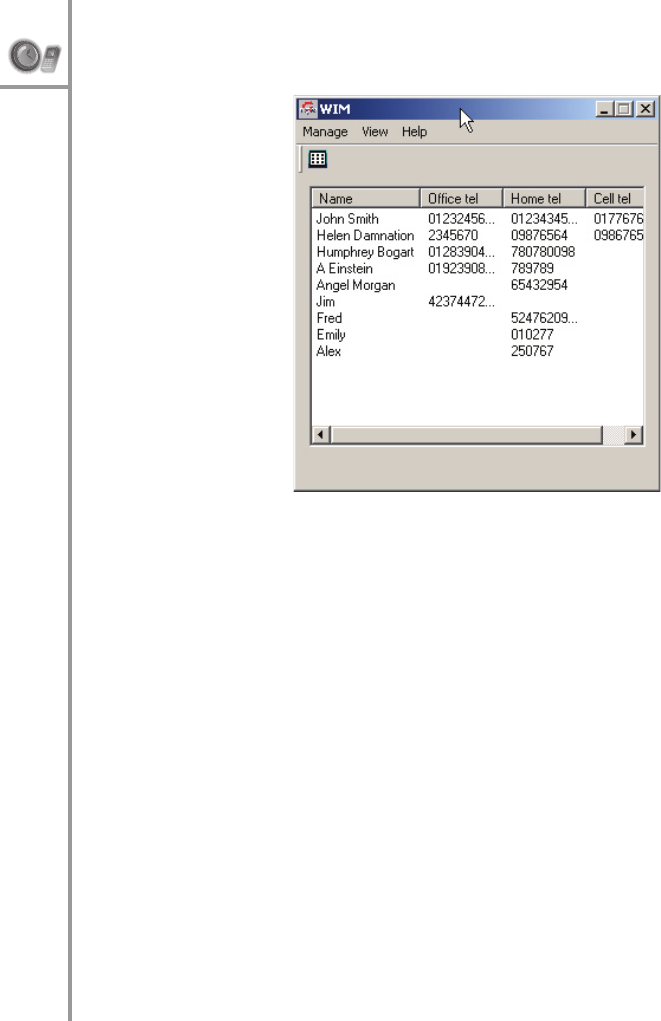
Click 'Phone Book' on the WIM start screen. The follow-
ing screen is displayed when you select "Local contacts"
from the "View" menu.
The following options are displayed when you click
"Manage" menu:
•Add contact: Click 'Add contact' and enter the
name, the office number, the home number, and
the cell number of the contact and click "Save".
•Edit: Click 'Edit' and enter the name, the office
number, the home number, and the cell number of
the selected contact and click "Save".
•Delete: Select the contact to be deleted from the
list shown in the screen and click "Delete" to
delete the contact.
•Find: Click "Find" and enter the name of the con-
tact to be searched. Click the 'Find' button.
•Copy: Click "Copy" to copy details of a selected
contact.
•Paste: Click "Paste" to paste details of a contact
that has been copied.
Connecting to the PC --- 51
•Assign ring tone: Click "Assign ring tone" to assign
a ring tone to a selected contact. Assign the ring-
tone from those displayed.
•Dial: Click "Dial" to call the selected contact.
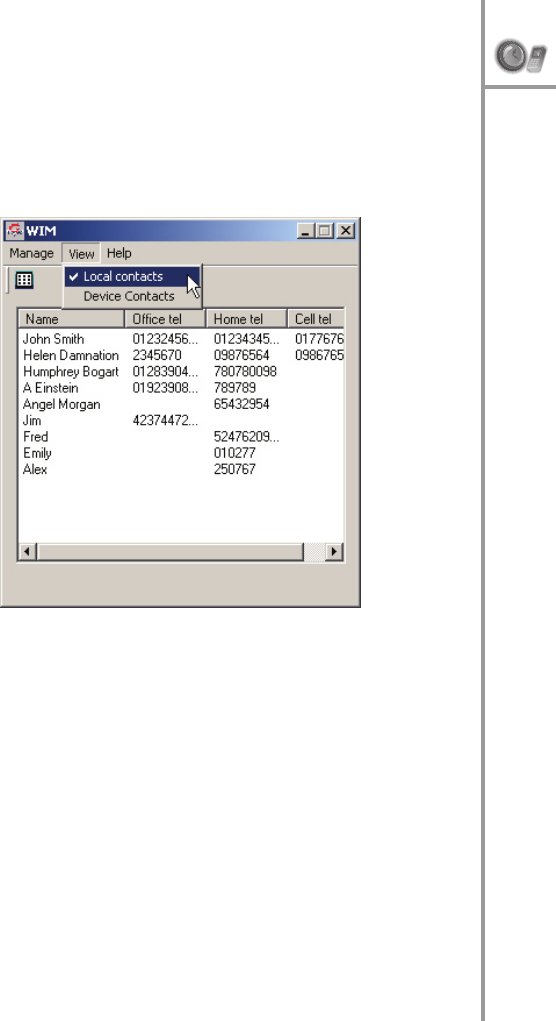
• Change local contacts path:
Click the "View" menu. The submenus as shown in the
following screen are displayed:
The description of the submenus is as follows:
Local contacts: Select this option to view the details of
contacts saved in the PC memory.
Device contacts: Select this option to view the details of
contacts saved on the device.

52 --- Connecting to the PC
Dialer
Click the "Dialer" button on the WIM start screen as
shown in Figure 2.
The dialer screen is displayed as follows:
The description of the various keys shown above is
given below:
• Scroll keys: Click this key to move the cursor to
the previous or the next menu.
• Answer key: Click this key to answer an incoming
call or to dial a phone number.
• End key: Click this key to terminate a call or to
reject an incoming call.
• Wi-Fi: Click this key to start using Wi-Fi.
• VoIP: Click this key to start using VoIP.
Scroll buttons
End key
Transfer call
End key
WiFi
VoIP
Answer key

Connecting to the PC --- 53
Click the "Settings" menu on the Dialer screen. A list of
submenus is displayed as shown below.
The description of the submenus is as follows:
•Ringtones: Select this menu to change the ring
tone of PWG-500. You can choose from the given
list of ring tones.
•Skins: Click the "Skin" submenu to change the
color of the dialer screen. There are two skins to
chose from.
•Gain settings: Select the "Gain settings" option to
change the volume of the speakerphone or the
microphone.
•Call log: Click the "Call log" submenu to view
details of dialed calls, missed calls, and received
calls.
•Speed dial: Click the "Speed dial" submenu to
speed dial a preset number.
•Call answer: Click the "Call answer" submenu to
answer an incoming call.
54 --- Connecting to the PC
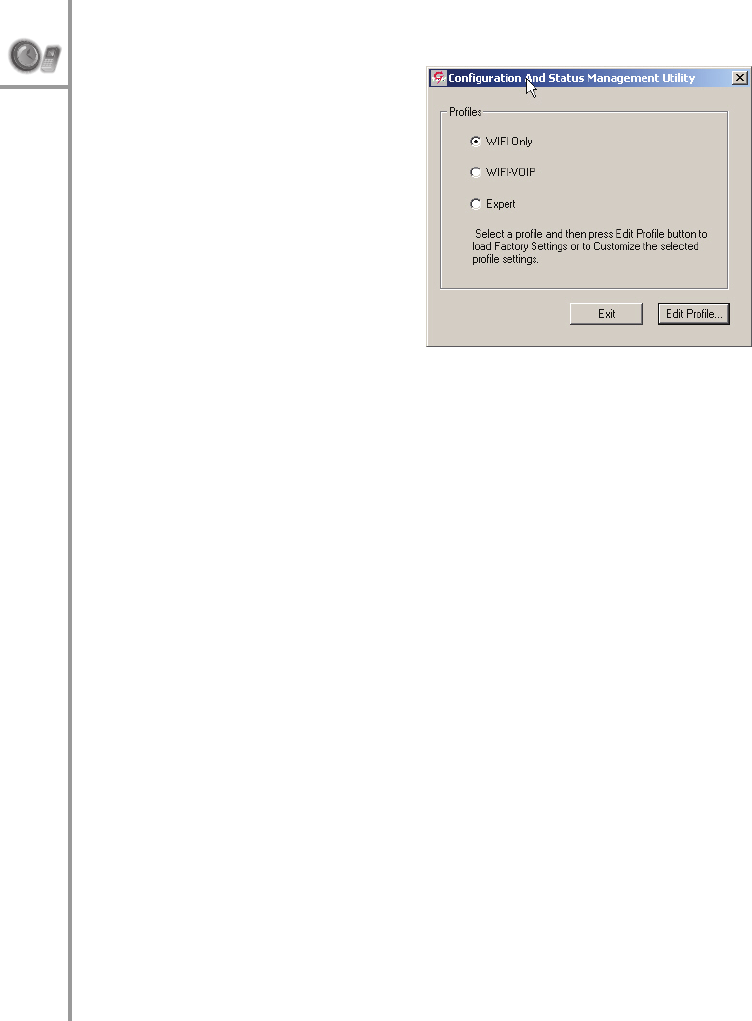
Config. Stat
To configure WIM,
click the Config.Stat
button.
This displays the
WIM configuration
utility. Select a pro-
file from the options
and click Edit Profile,
Personalize to mod-
ify the profile set-
tings. Alternatively,
click General to mod-
ify the general setup.
When you edit a profile, all the options and settings rele-
vant to the profile are displayed and are available for
modification. These options have been described in
“Configuring the settings” on page 36.

Additional Information --- 55
9. APPENDIX
Additional Information
The use of this equipment may be subject to local rules
and regulations. The following rules and regulations may
be relevant in some or all areas.
FCC Regulations
This model phone complies with part 15 of the FCC
Rules. Operation is subject to the condition that this
device does not cause harmful interference.
This device complies with Part 15 of the FCC Rules.
Operation is subject to the following two conditions:(1)
this device may not cause harmful interference and (2)
this device must accept any interference received,
including interference that may cause undesired opera-
tion.
This equipment has been tested and found to comply
with the limits for a Class B digital device, pursuant to
Part 15 of the FCC Rules. These limits are designed to
provide reasonable protection against harmful interfer-
ence in a residential installation. This equipment gener-
ates, uses and can radiate radio frequency energy and, if
not installed and used in accordance with the instruc-
tions, may cause harmful interference to radio communi-
cations.
However, there is no guarantee that interference will not
occur in a particular installation If this equipment does
cause harmful interference to radio or television recep-
tion, which can be determined by turning the equipment

56 --- European regulations
off and on, the user is encouraged to try to correct the
interference by one or more of the following measures:
• Reorient or relocate the receiving antenna.
• Increase the separation between the equipment
and receiver.
• Connect the equipment to an outlet on a circuit dif-
ferent from that to which the receiver is con-
nected.
• Consult the dealer or an experienced radio/TV tech-
nician for help.
Changes or modifications not expressly approved by the
party responsible for compliance could void the user‘s
authority to operate the equipment.
The antenna(s) used for this transmitter must not be co-
located or operating in conjunction with any other
antenna or transmitter.
This EUT is in compliance with SAR for general popula-
tion uncontrolled exposure limits in ANSI/IEEE C95.1-
1999 and has been tested in accordance with the mea-
surement methods and procedures specified in OET Bul-
letin 65 Supplement C.
European regulations
Products with the CE mark comply with the Radio &
Telecommunication Terminal Equipment Directive (1999/
5/EEC), the Electromagnetic Compatibility Directive (89/
336/EEC) and the Low Voltage Directive (73/23/EEC) -
as amended by Directive 93/68/ECC - issued by the
Commission of the European Community.
Compliance with these directives implies conformity to
the following European Standards:
• 1999/5/EEC Radio & Telecommunication Terminal
Equipment Directive (R&TTE) EN 301 511

RF exposure regulation (SAR) --- 57
• Specific Absorption Rate (SAR) Standard: EN
50360, EN 50361
• 73/23/EEC Low Voltage Directive (LVD) Standard:
EN 60950:2000
• 89/336/EEC Electromagnetic Compatibility (EMC-
Directive) Standard: EN301489-1/7
• The manufacturer cannot be held responsible for
modifications made by the user and the conse-
quences thereof, which may alter the conformity of
the product with the mark.
RF exposure regulation (SAR)
This model phone meets the government’s requirements
for exposure to radio waves. This phone is designed and
manufactured not to exceed the emission limits for expo-
sure to radio frequency (RF) energy set by the Federal
Communications Commission of the U.S. Government.

58 --- RF exposure regulation (SAR)