GDU Tech PD-RC03-0301 GDU Remote Controller User Manual
Prodrone Technology (Shenzhen) Co., Ltd GDU Remote Controller
GDU Tech >
User manual
GDU O2 user manual
Aircraft
The GDU O2 aircraft, featuring innovative sliding metal arm, aircraft and controller are combined in
one, making it portable to carry, easy to use. The three-axis mechanical gimbal camera can capture 4K
videos and 13.25 megapixel photos; and it is equipped with advanced binocular vision system, support
intelligent obstacle avoidance, visual tracking, gesture recognizing, and other funny functions.
1. Integrated gimbal Camera 7.Head LEDs
2. Downward Vision System 8. Propellers
3. Forward Vision System 9. Intelligent Battery
4. Parameter adjustment/ Data Interface
(Micro USB) 10. Battery Level indicators
5. Motors 11. Power Button
6.Tripods 12. Tail LEDs
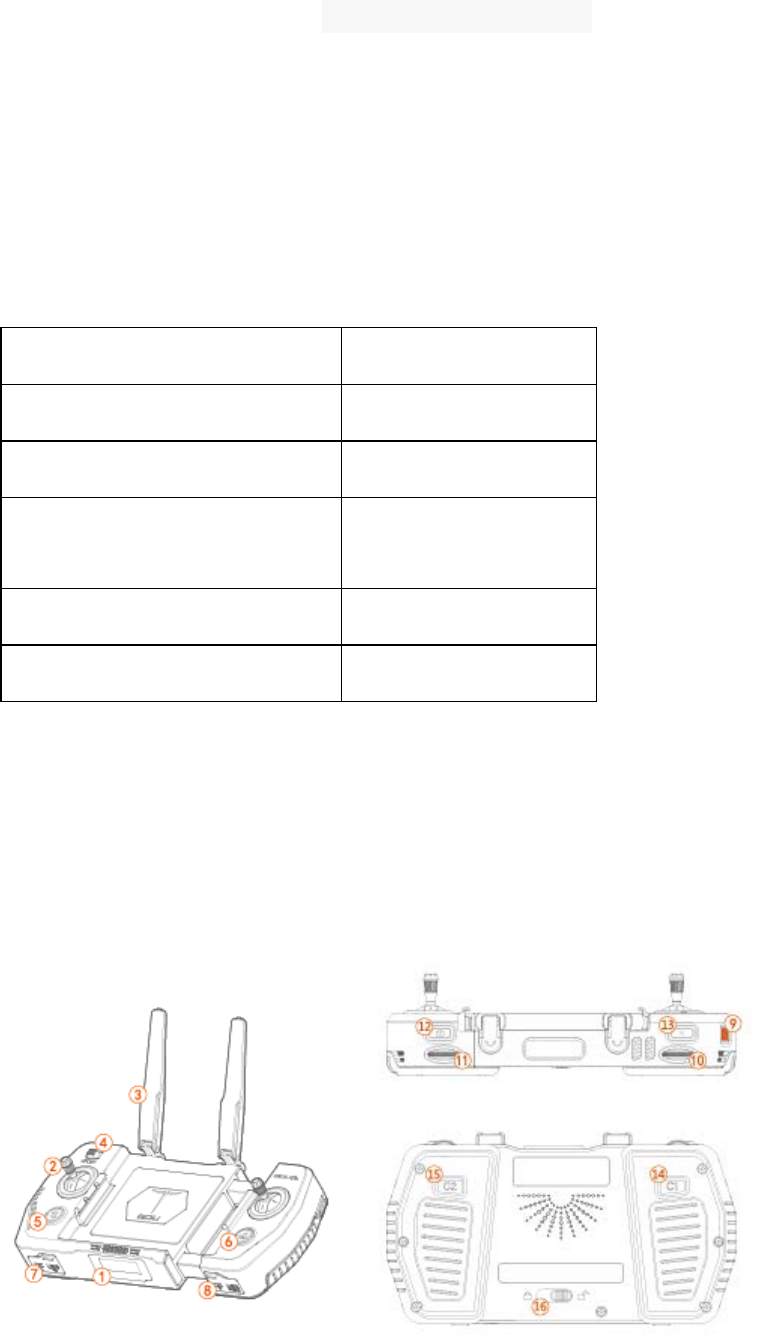
Remote Controller
O2 remote control is using pulling slide design, making it easy to place mobile devices. It can offer a
long-range and real-time data transmission, maximum distance of 2 kilometers. Maximum working
time is 1.5 hours.
Unfolded Remote Controller
1. LCD Screen 9. Power Button
2. Control sticks 10. Gimbal yaw dial
3. Antennas 11. Gimbal pitch dial
4. Flight Mode Switch 12. Shutter Button
5. One-button Take-off/Vertical landing 13. Record Button
6. RTH Button 14. Customizable Button C1
7. Power Port (Micro USB) 15. Customizable Button C2
8. USB cable Port 16. Remote Lock/unlock Button
The remote controller can reach to its maximum transmission distance (FCC standard) in a wide open
area with no electro-magnetic interference, and at height of 120m (400 feet). The maximum run-time
is tested under laboratory environment, only for your reference.
Specifications
Aircraft
Take-off weight (without cover) 703 g
Take-off weight (with cover) 820g
Max Ascent Speed 5m/s (Sport mode)
Max Descent Speed 3m/s
Max horizontal speed 15m/s (Sport mode, without wind)
Max flight altitude 3500m( 11482 feet)
Max Hovering Time 20 minutes (without wind)
Max Flight Distance 13km (without wind)
Operating Temperature 0℃ to 40℃
Satellite Positioning system GPS/GLONASS (dual modules)

Gimbal
Controllable range
Pitch: -80°~30°
Roll : -30°~30°
Yaw : -30°~30°
Forward Vision System
Sensing range 0.5 to 15 m
Operating Environment Obstacle with clear texture and adequate lighting ( lux>15
Common room lights)
Downward Vision System
Velocity Range
≤
10m/S(2m above ground,adequate lighting)
Altitude Range 0.3 to 13 m
Hovering range 0.3 to 13 m
Operating Environment Floor with clear texture and adequate lighting ( lux>15 Common
room lights)
Camera
Image Sensor 1/3 inch CMOS Effective pixels : 13.25 Megapixels
Lens FOV 75
°
, 28 mmf/2.2 , Focus range: 0.5 m to ∞
Distortion <1.5%
ISO Range 100 – 3200 (Video): 100 – 1600 (Photo)
Shutter Speed 8-1/8000 s
Max Photo Resolution 4000×3000
Video Recording Modes
4K: 3840×2160 @30/25fps
1080P:1920×1080@30fps
720P:1280×720@30fps
Max Video Storage Stream 60Mbps
Photo format JPG

Video format MP4
Supported SD card 32GB
Remote Controller and Aircraft
Digital transmission frequency
Operating Frequency 5.745GHz - 5.810GHz
Max Transmission distance 2km
Operating Temperature 0- 40℃
WIFI (Image transmission)
Transmitting frequency 2.412GHz - 2.462GHz
Control distance >1000m
Supported protocols and
standards
802.11 b /802.11 g /802.11 n 20
Battery 1200mAh
Working voltage
7.6 V
Supported Connector Port Lightning, Micro USB, Type-C
Charger
Voltage 13.05 V
Rated Power 39.15 W
Intelligent Battery
Capacity 4000 mAh
Voltage 11.4 V
Battery Type LiPo 3S
Energy 45.6 Wh
Net Weight Approx 240 g
Max charging Power 78W
Notice:
In order to avoid property loss or personal injury, please read through the following messages
carefully before using the drone for the first time:
Warnings:
- The Quick Start Guide is designed to help the user to perform the first
flight. For more flight experience, please read the User Manual online.
- It is prohibited for those who under 18 to use this product.
- It is prohibited to use this product in heavily populated areas.
- It is prohibited to use this product in legally restricted areas.
- Please put the product out of children’s reach.
- It is prohibited to use this product when you are drunk, tired or in poor
spiritual conditions.
- Please fly the drone in open outdoor space during good weather.
- All the images shown in this document are just for reference; subject to
our available products for more details.
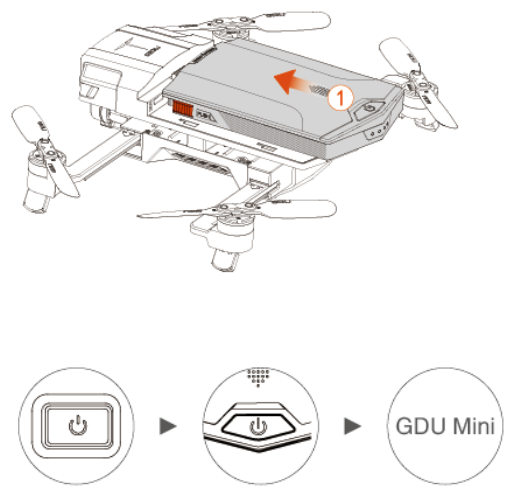
1. Download the GDU Mini App and Watch the Tutorial Videos
Search for “GDU Mini” on the App Store or Google Play, or scan the QR code to download the app on
your mobile device.
*Watch the tutorial videos at www.gdu-tech.com or in the GDU Mini App.
GDU Website GDU Mini APP
* GDU Mini APP required system version equal or above iOS9.0, Android4.4 .
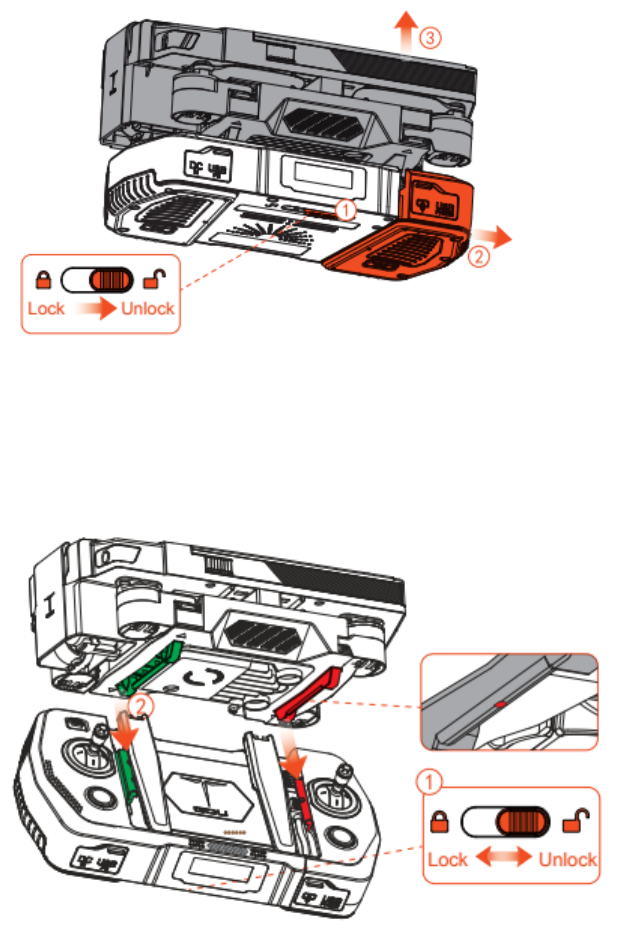
2. O2 Detachment & Combination
Detachment:Before operating O2, please unlock the limit switch of remote controller; then use index
finger to push the mobile end (where the C2 customizable button is on its back); remove the remote
controller and separate it from the drone; seen the pictures below
Combination: When packing O2, please unlock the limit switch of remote controller; then make
green& red points at the bottom of aircraft to be in parallel with mobile phone locking position on the
controller; push the mobile end (where the C2 customizable button is on its back) of the controller
and press the aircraft down slightly. Finally lock the limit switch of remote controller.
3. Check the Battery Levels:
Check the battery levels of aircraft: short press the power button to check the battery level. Press one
time first, and then press and hold the power button for another 2 seconds to power on/off the
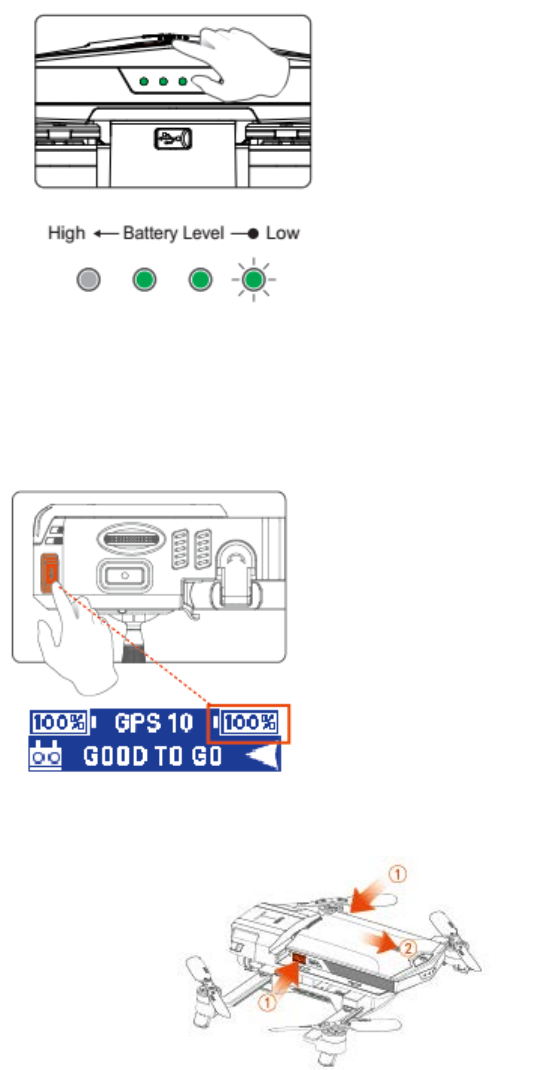
intelligence battery.
Check the Battery Levels of remote controller: Press and then hold the power button for three
seconds to turn on the remote controller. Check the battery level on screen (left side for remote
controller; right side for aircraft). Then again press and hold the power button for three seconds to
turn off the remote controller.
4. Charge the Batteries
Remove Intelligent Battery
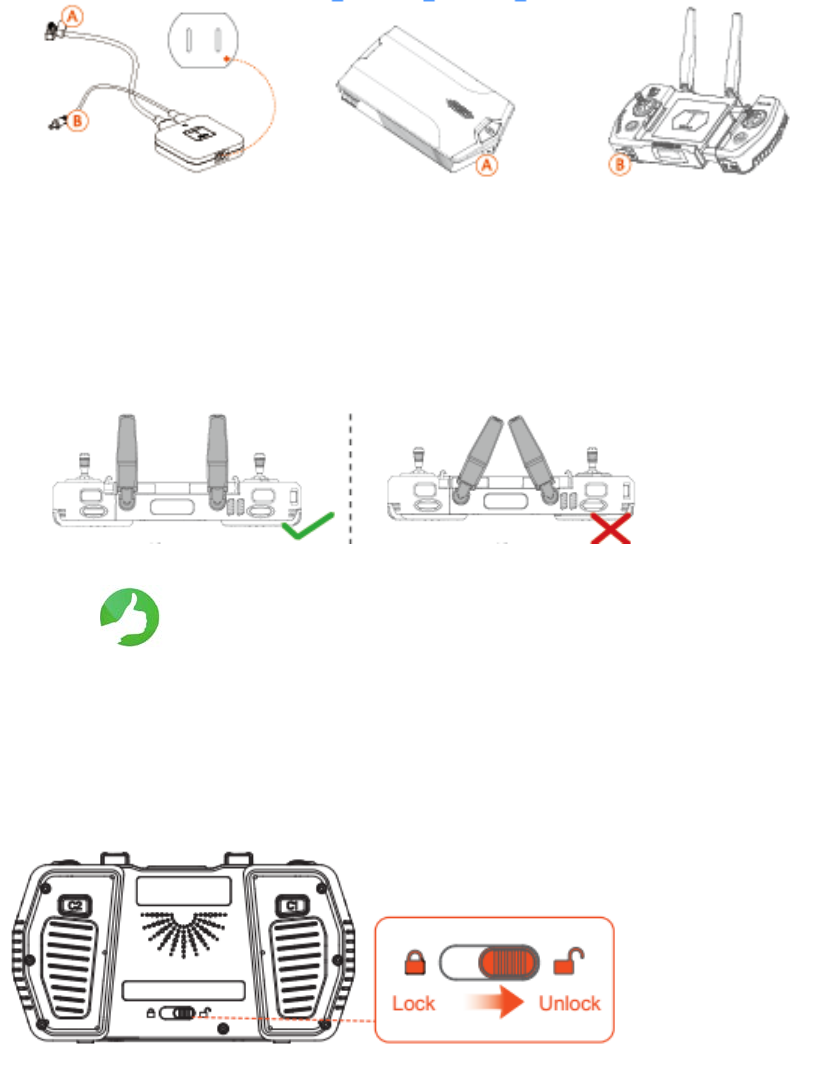
Input voltage: 100-240V Charge Time: 2 Hours Charge Time: 2 Hours
5. Prepare the Remote Controller
1) Unfold the Remote Controller Antenna
Strong signal Weak signal
2) Unlock the Remote Controller
3) Take out the right connecting cable, and get the smaller end go through
the slot first.
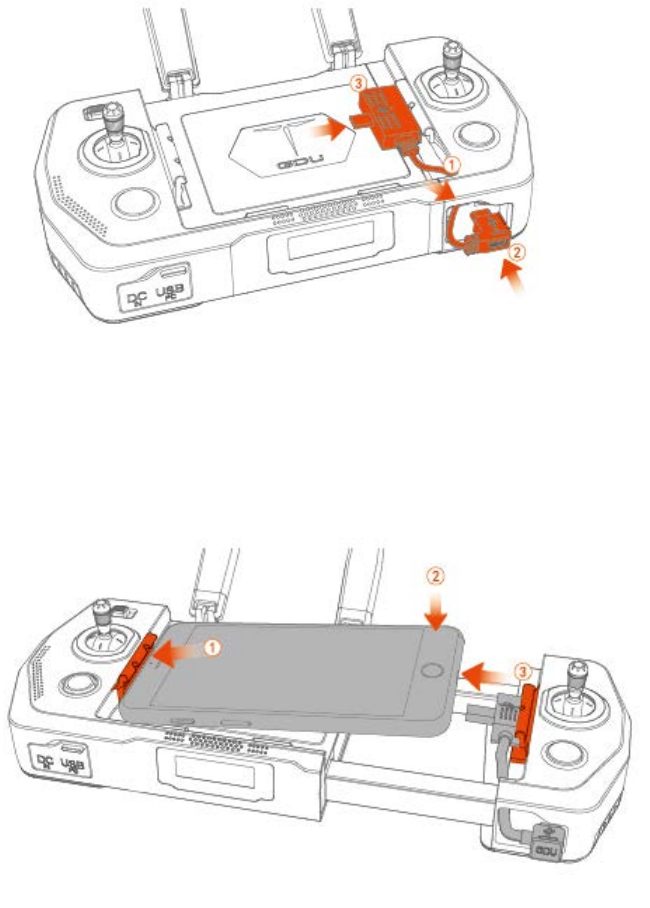
4) Lock the phone to its proper position and connect the larger end of the cable with the phone
charging port; make sure the backward switch is locked.
5) After use, please remove the mobile phone, and fix the connecting cable in the card hook
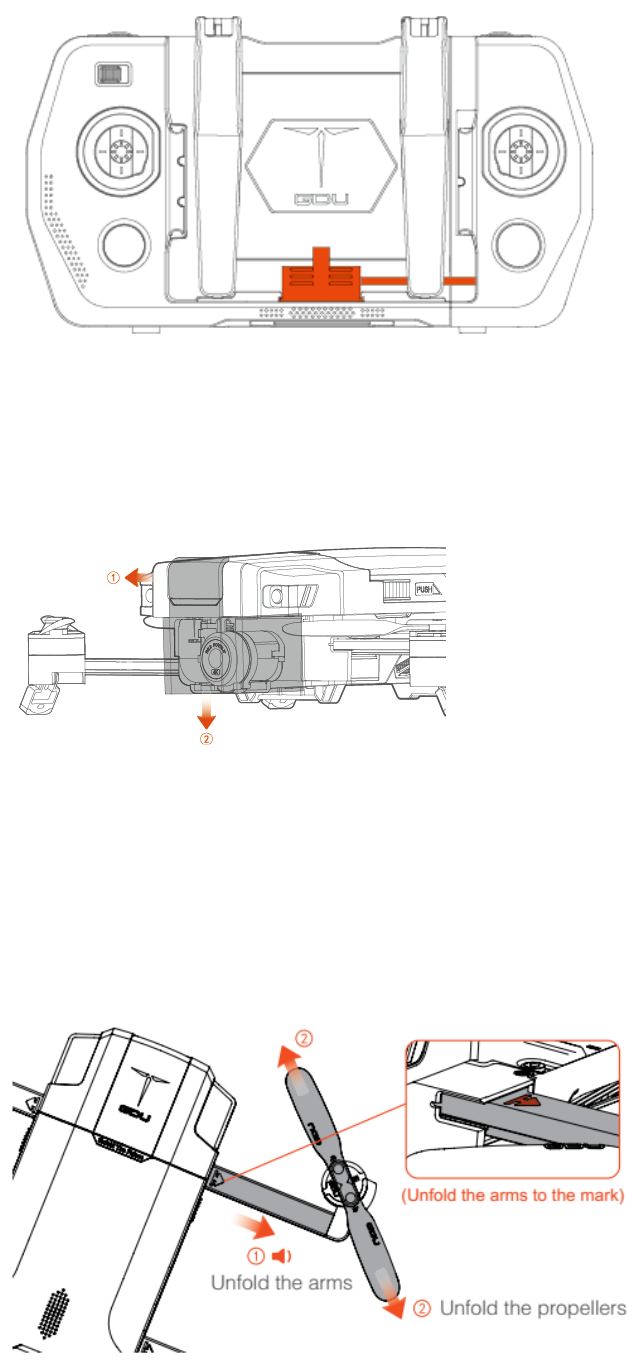
6. Prepare the Aircraft
1) Remove the gimbal protective cover.
* The gimbal protective cover is used to protect the gimbal; make sure the gimbal protective cover is
removed when you are ready to use the aircraft.
2) Unfold the arms and the propellers;
3) Install intelligent battery
7. Prepare for Takeoff
Power on Remote Power on Aircraft Launch GDU Mini App
* Ensure the arms and propellers are unfolded before taking off.
* The GDU O2 can be controlled by using the Remote Controller or the GDU Mini app. To switch
control mode, please restart the aircraft and then select control mode switch and the corresponding
device.
8. Flight
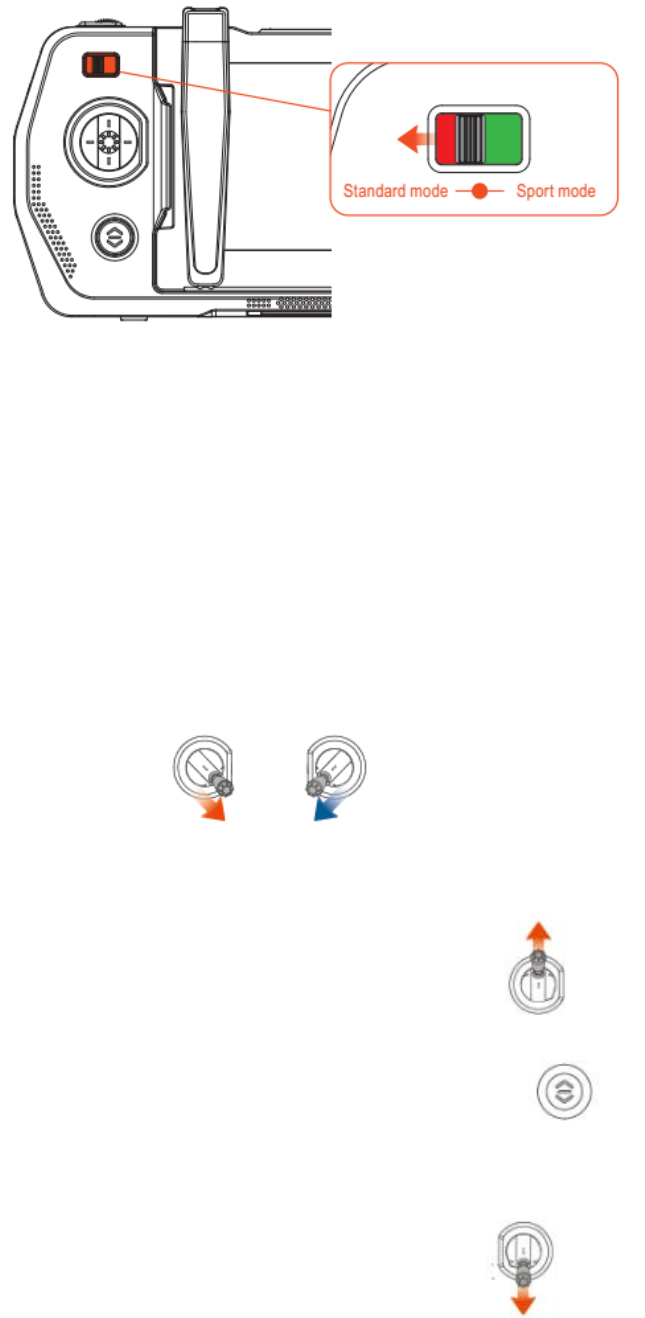
a) Switch the flight mode to standard mode.
The default setting of remote control is American mode.
b) Take off
Take off: Move the control sticks in the toe-in directions to unlock the aircraft and activate the
motors;
Push left stick up slowly to take off. Or press the AUTO TAKEOFF button on the remote controller.
Landing: push left stick down slowly until the aircraft lands on the ground. Hold a few seconds until
the motors stop. Or press the RTH button on the remote controller.
Unlock the Aircraft Unlock the aircraft motor (Toe –in)
Take off: ① push left stick up slowly
Or ② Press take-off button on Remote controller
Landing: ① push left stick down slowly until
Aircraft lands on the ground, and motors stopped
Or ② Press the RTH button smoothly
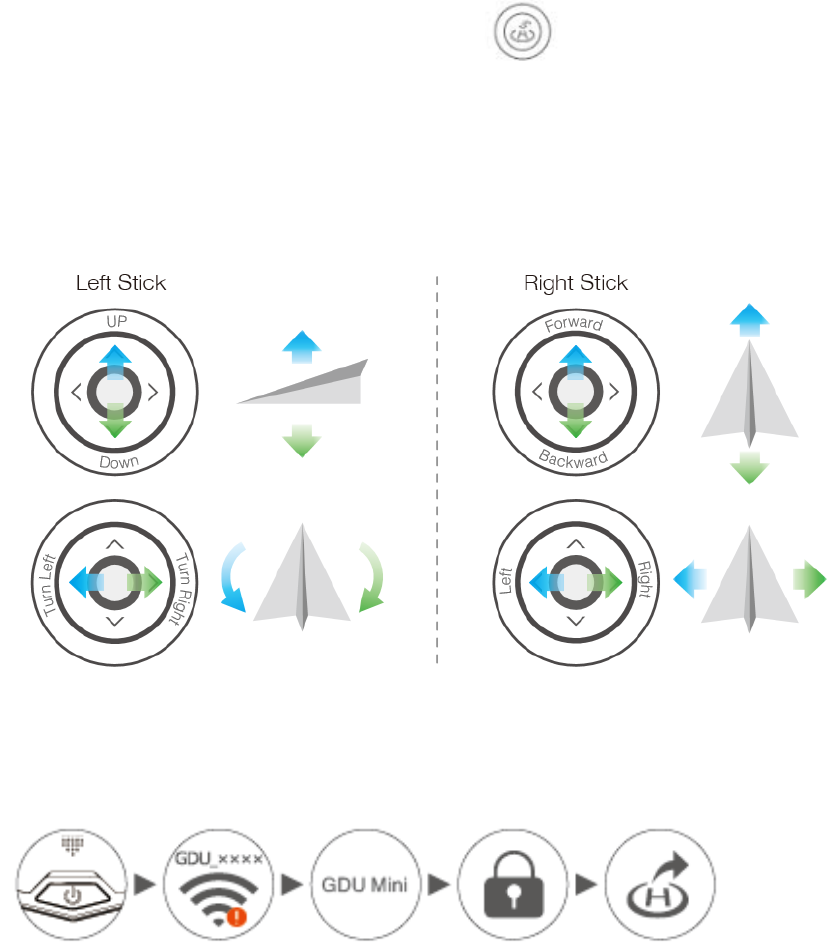
The default setting of remote control is American mode (including virtual buttons). The left stick
controls the aircraft’s altitude and rotation, while the right stick controls its forward, backward, left
and right movements.
*The motors can only be stopped mid-flight when the flight controller detects critical error.
2) Controlling flight with GDU Mini app.
1) Power on the aircraft
2) Turn on your mobile device‘s Wi-Fi, and connect to GDU-02-A-xxx through entering the Wi-Fi
Password: 12345678
3) Launch the GDU Mini app, then click to start shooting into the flight interface.
4) Tap One-button Take-off and the aircraft will hover at 2m height. At the same time the virtual sticks
will show up on the screen, it can control the flight.
GDU Mini App Operation Interface:
1) Shot mode: smart shot and classic shot mode. Smart shot mode is

designed for beginners and classic shot mode is for professionals.
Smart Shot Mode Classic Shot Mode
2) Classic Shot Mode
1. Home 5.Waypoint 9. Media in Cloud
2. Settings 6. RTH 10. Photo/Video switch
Button
3. Left stick 7.Auto landing 11.Photo/Video Button
4. Right stick
8. Camera settings 12. Dail for pitching
3) Route Planning
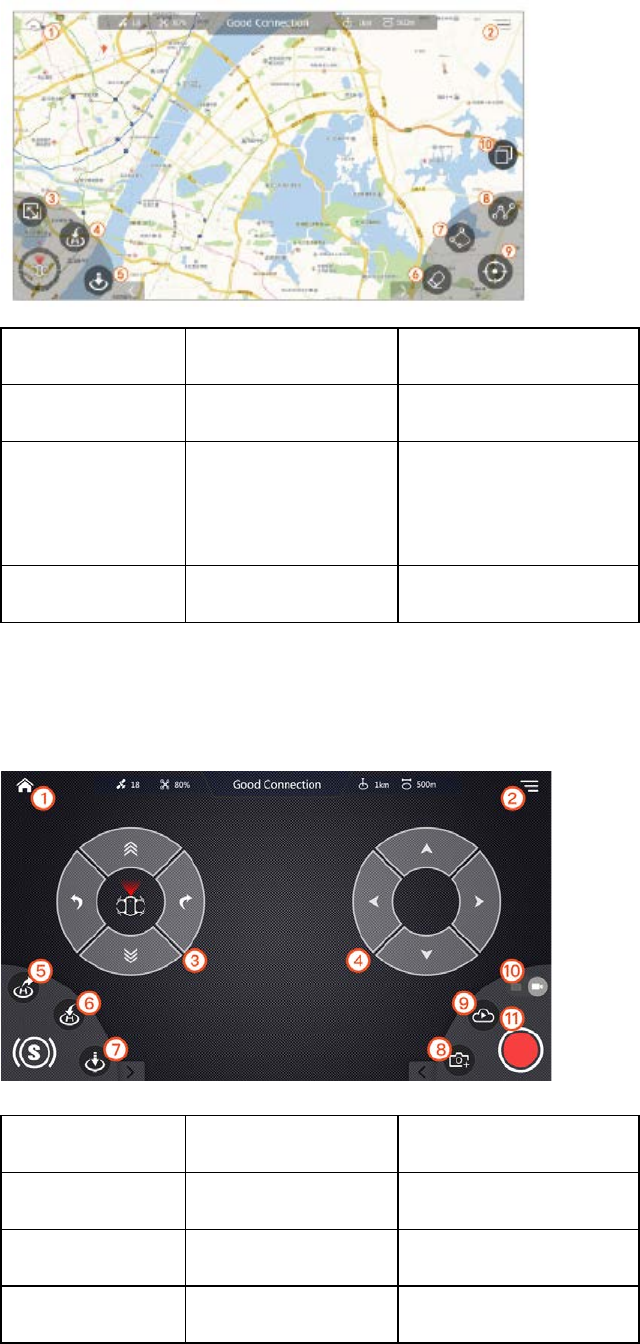
1. First Page 5.Auto Landing 9. Current location
2. Settings 6. Erase 10. Map Switch
3. Route
planning/Real-time
page exchange
7.Electronic fence
4. RTH 8. Plan Waypoints
*Please watch the tutorial videos on GDU Mini app or GDU official website www.gdu-tech.com so
that you can handle the aircraft and use the functions of intelligent following properly.
4) Instructions for Smart Mode
1. First Page 5.One-button Take-off 9. Media Cloud
2. Settings 6. RTH 10. Photo & Video Switch
3. Left Stick 7. Auto Landing 11.Photo/Video Button
4. Right Stick
8. Camera Settings
10. Fly Safe
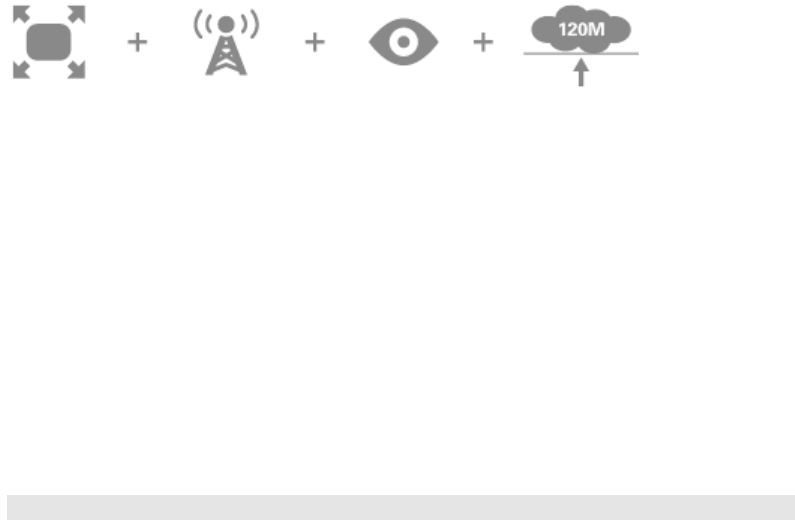
Open Areas Strong GPS signal Keep Within sight Height under 120m (400 feet)
Please fly the drone in wide-open area with good weather and strong GPS signal, and always keep the
drone within your sight.
Keep the height under 120m (400 feet).
For the safety of you and others around you and the environment, it’s very necessary to know No Fly
Zone and basic flight guidelines.
Please read the Disclaimer carefully.
FCC Compliance
This equipment has been tested and found to comply with the limits for a Class B digital device,
pursuant to part 15 of the FCC Rules. These limits are designed to provide reasonable protection
against harmful interference in a residential installation. This equipment generates, uses and can
radiate radio frequency energy and, if not installed and used in accordance with the instructions,
may cause harmful interference to radio communications. However, there is no guarantee that
interference will not occur in a particular installation. If this equipment does cause harmful
interference to radio or television reception, which can be determined by turning the equipment
off and on, the user is encouraged to try to correct the interference by one or more of the
following measures:
• Reorient or relocate the receiving antenna.
• Increase the separation between the equipment and receiver.
• Connect the equipment into an outlet on a circuit different from that to which the receiver is
connected.
• Consult the dealer or an experienced radio/TV technician for help.
Caution: Any changes or modifications to this device not explicitly approved by manufacturer
could void your authority to operate this equipment.
This device complies with part 15 of the FCC Rules. Operation is subject to the following two
conditions: (1) This device may not cause harmful interference, and (2) this device must accept
any interference received, including interference that may cause undesired operation.
GDU O2
This equipment complies with FCC radiation exposure limits set forth for an uncontrolled

environment. This equipment should be installed and operated with minimum distance 20cm
between the radiator and your body.
This transmitter must not be co-located or operating in conjunction with any other antenna or
transmitter.
GDU Remote Controller
This equipment complies with FCC radiation exposure limits set forth for an uncontrolled
environment. This equipment should be installed and operated with minimum distance 0mm
between the radiator and your body. This transmitter must not be co-located or operating in
conjunction with any other antenna or transmitter.