GE DSXH47EG1WW User Manual ELECTRIC DRYER Manuals And Guides L0807468
GE Residential Dryer Manual L0807468 GE Residential Dryer Owner's Manual, GE Residential Dryer installation guides
User Manual: GE DSXH47EG1WW DSXH47EG1WW GE ELECTRIC DRYER - Manuals and Guides View the owners manual for your GE ELECTRIC DRYER #DSXH47EG1WW. Home:Laundry & Garment Care Parts:GE Parts:GE ELECTRIC DRYER Manual
Open the PDF directly: View PDF ![]() .
.
Page Count: 48
ge.com
{J
Safety Instructions ............ 2-5
Operating Instructions
Care and Cleaning .................... 8
Controls ............................. 6
Features ............................. 7
Loading and Using the Druer .......... 8
Installation Instructions ..... 9-18
Electrical Installation for
Electric Druer ................... 16, 17
Electrical Requirements .............. 11
Exhausting the Druer ............. 12, 13
Gas Connection for Gas Druer ........ 18
Gas Supplu Requirements ............ 13
Location of Your Druer ............... 14
Mobile Home Installation ............. 15
Preparing to Install Your Druer ..... 9, 10
Reversing the Door Swing ............ 18
Troubleshooting Tips ........ 19-21
Consumer Support
Consumer Support .................. 24
Warrantu .......................... 23
DSXH4 7
134867300175D1807P581 49-90313-i01-07JR
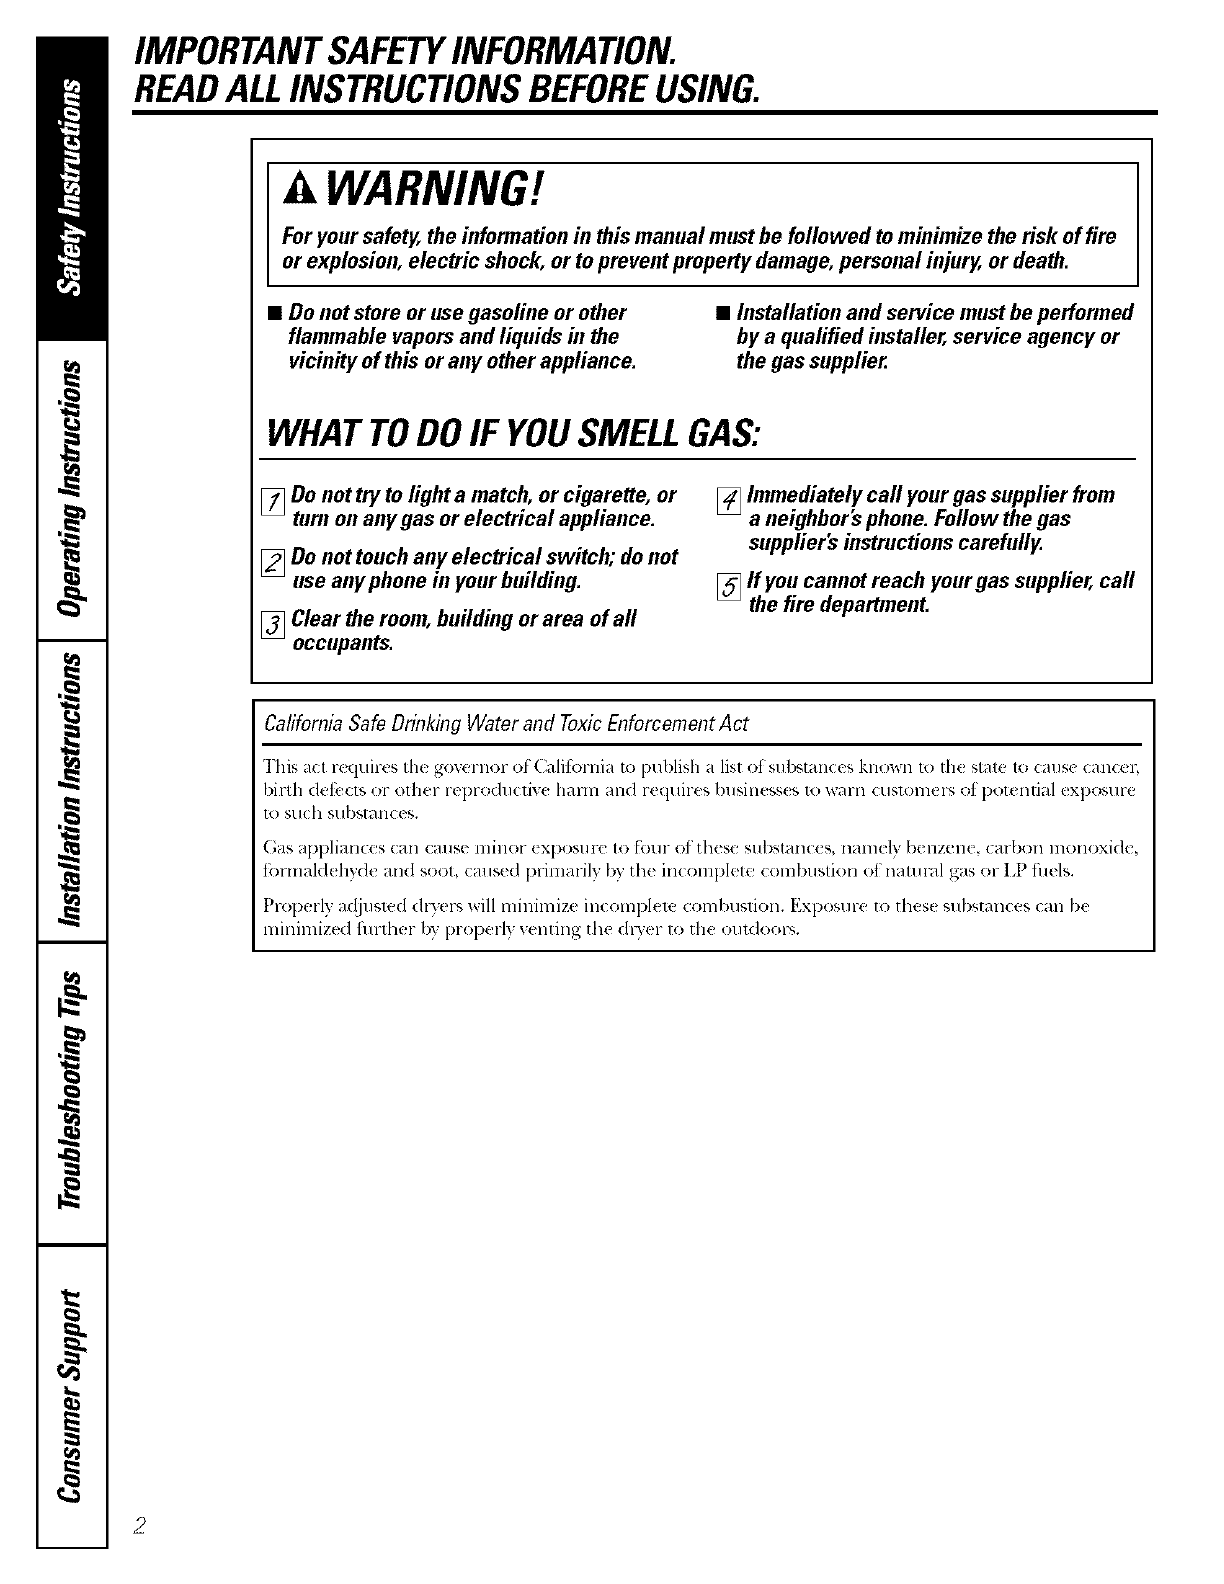
IMPORTANTSAFETYINFORMATION.
READALLINSTRUCTIONSBEFOREUSING.
AWARNING!
For your safety, the information in this manual must be followed to minimize the risk of fire
or explosion, electric shock, or to prevent property damage, personal injury, or death.
•Do not store or use gasoline or other
flammable vapors and liquids hi the
vicinity of this or any other appliance.
•Installation and service must be performed
by a qualified installer, service agency or
the gas supplier.
WHATTODOIF YOUSMELLGAS:
]Do not try to light a match, or cigarette, or
turn oll any gas or electrical appliance.
[]Do not touch any electrical switch; do not
use any phone in your building.
[]Clear the room, building or area of all
occupants.
[]Immediately call your gas supplier from
aneighbors phone. Follow the gas
suppfier's instructions carefully,
[] ff you cannot reach your gas suppfier, call
the fire departmenL
California Safe Drinking Water and Toxic Enforcement Act
This act r_quir(s Ihc governor of California to publish alist ofsul_tanc_s kno_n to th_ state to cause canc_ r,
birth def_ cts or ()they re[)l-Odll(liX,{ hal-Ill _tlld le(ltlil-e_, })ll';ille_,s_ _, to _V_?ll-ll C[iSlol)l_ l-s o_" DOt_ llt]_ll _ xl)oSt/l(:
10 SLIC}I SLI[)S[}?IIIC(?S.
G_/S _l[)])]i_/ll({!S ({/11 ({IllS(! lllillOf ( X[)I)SIlI'(1{) fO!/l" O_" [}I(!S(_ SIIbS[_III(CS, ll_lllle|y I){ llZ1211( C{/I'[)OII lllOlloxid_ _
formald_ hyd,_ and soot, cruised primalily by the incomplete combustion _,_tl'latU ml gas or I J) tilds.
Properly a(!jusled dlTers _dll minimize in< ompl_ le combustion, l_;xposure to th_:_s_substanc_:_s _an be
minimized filrth_:_r by l>rop_:_rlyventing the dl)'e r Io the ouvtool_,.
2
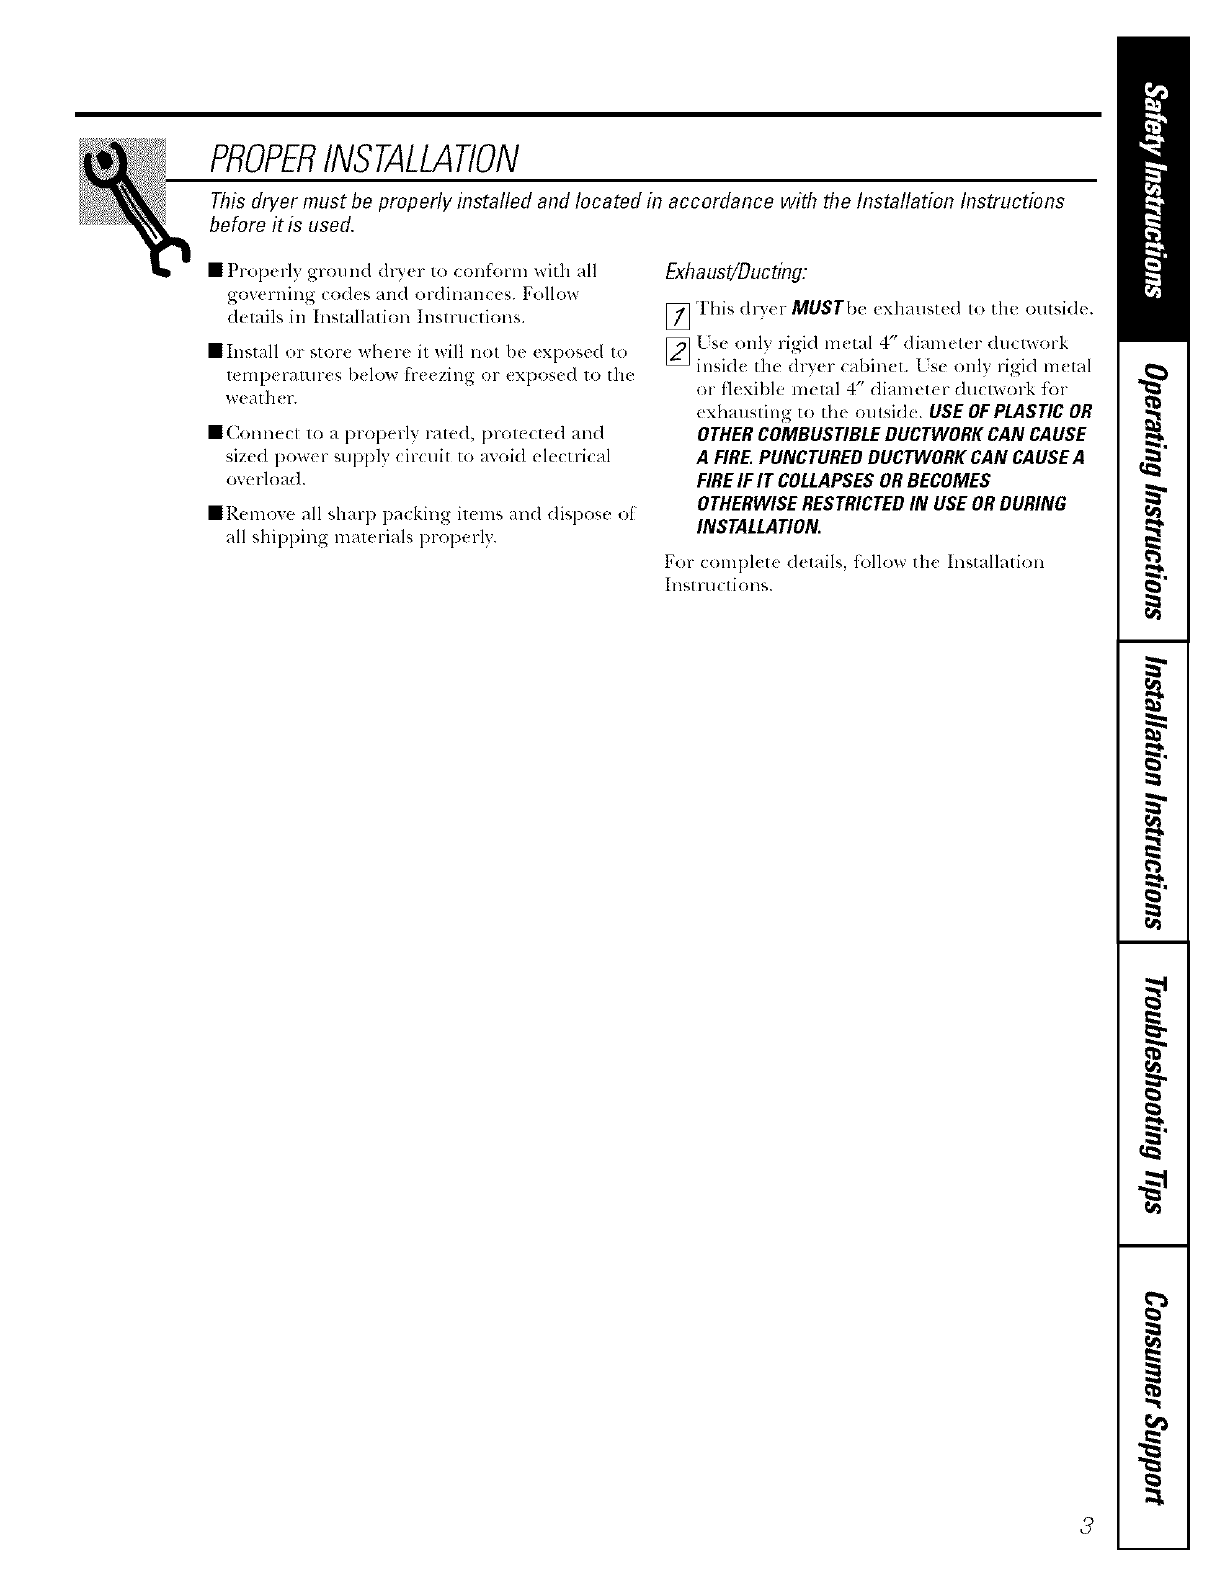
PROPERINSTALLAtiON
This dryer must be properly installed and located in accordance with the Installation Instructions
before it is used,
• Prol_,e rlv ,gr°und <hver to coliform with all
governing cod(s and ,.wdinan{ cs. F,.41ow
details in Installation ]llSIrllcliolls.
• Install or store wh(r{ it will nol b{ expos+d to
[{ IIlD( l-_/[lll-(s ]){ I(BV ['1"{!(Zillg Of {xposed 1o the
We_/[]l{ r.
I(_onnecl 1o a properly rated, F,rOleCt{ (t and
sized power supply circuit to avoid electrical
overl<)ad.
IRemove all sharp packing ilelns and dispose ol
all shipping malerials properly.
Exhaus_Ducting.
[_ "I'his drv(r MUSTbe exhm/sted Io th( outside.
[_Use only rigid m{tal 4" diameter ducl_{}rk
insid{ the dryer (abin{t. Use only rigid m{ml
or flexible metal 4" di_mlet( r ductx_ork l)}l-
exhausting to the outsid{. USE OFPLASTIC OR
OTHERCOMBUSTIBLEOUCTWORKCAN CAUSE
A FIRE PUNCTUREDBUCTWORKCAN CAUSEA
FIREIF IT COLLAPSESORBECOMES
OTHERWISERESTRICTEDIN USEORDURING
INSTALLATION.
For COlni}l{t{ details, fk}llow th{ Installadon
h]strt/( tions.
3
IMPORTANTSAFETYINFORMATION.
READALLINSTRUCTIONSBEFOREUSING.
AWARNING!
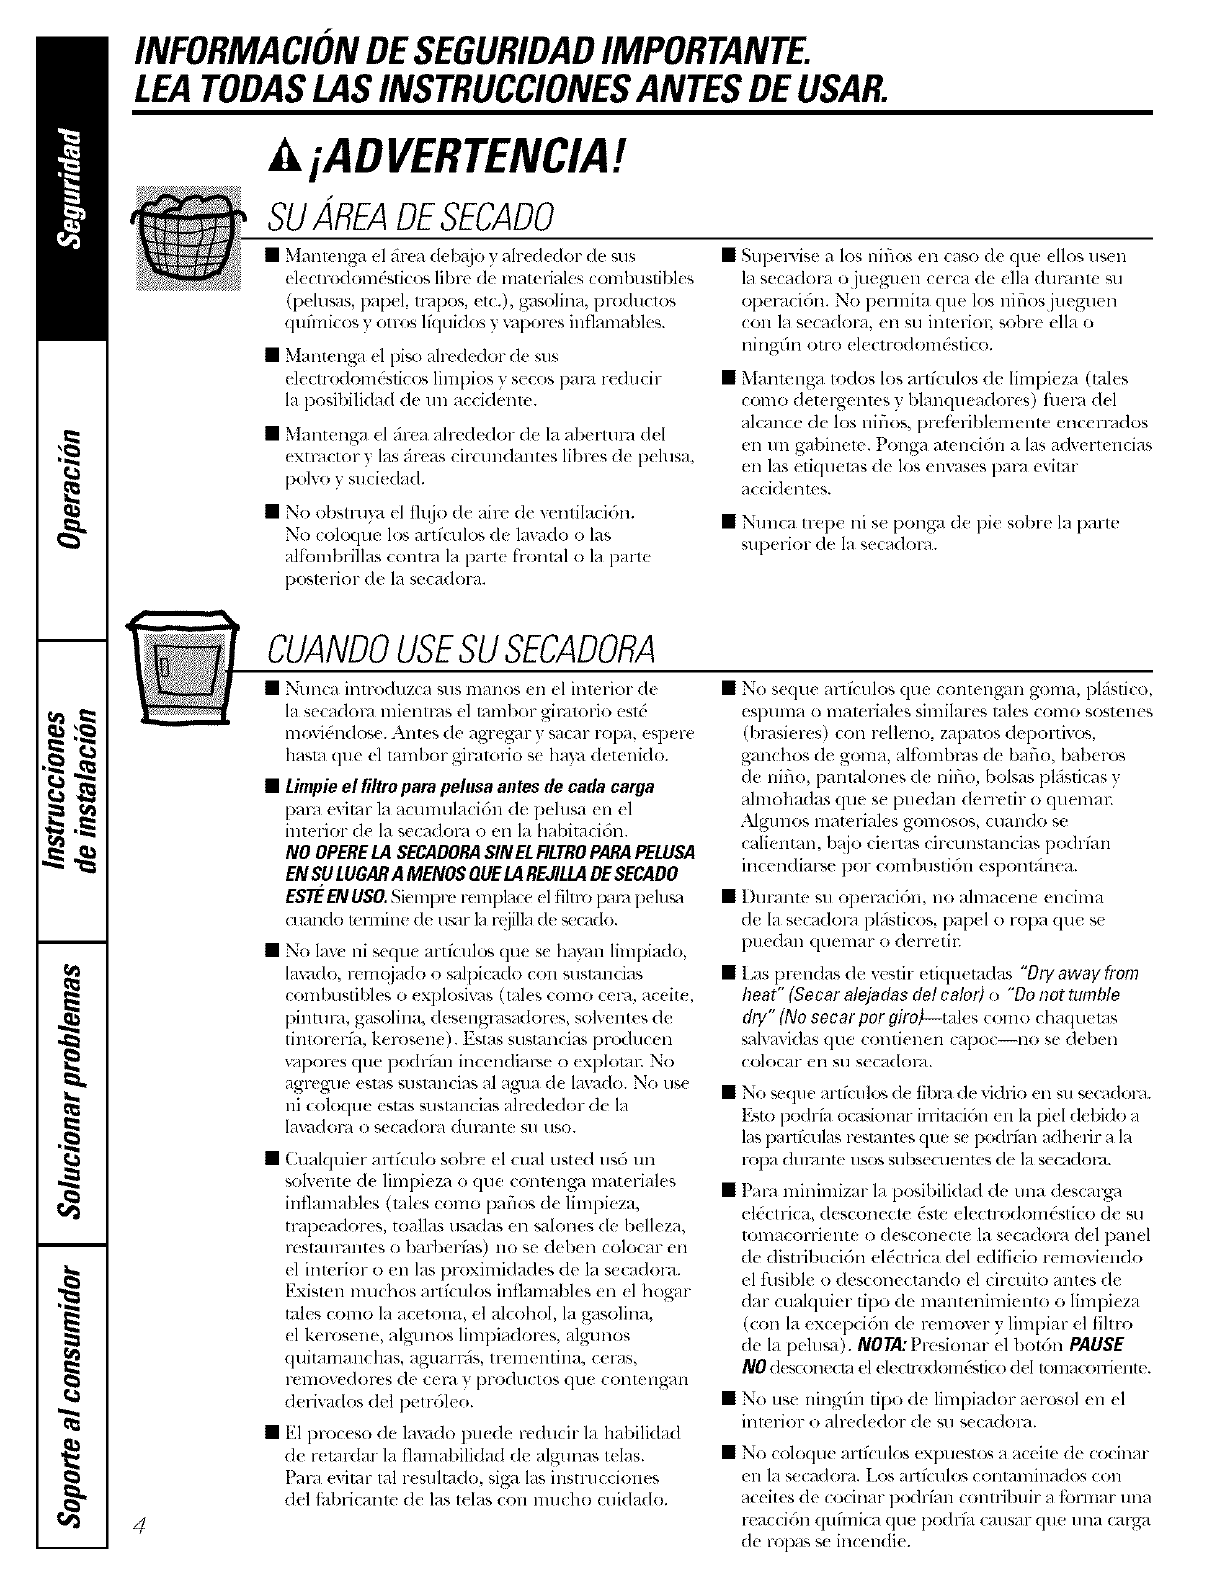
YOURLAUNDRYAREA
• I@ep tile area unden_eatl_ and around vour
appliances tree of combustible materials, such
as lint, papel; Fags and chemicals.
• Keep tile floor around your appliances clean and
dl3 to reduce the po*sibilily ot slipping.
• Keep arta artmnd the exhaust opening and
surrounding m-eas lYee fiom tile accumulation
ot lint, dust and dirt.
• Do not obstruct tile tlow of'ventilating all: Do not
stack or place lmnl(h y or throw lugs against the
front or back ot the dlTel;
• Close supelvision is necessal T it:tbis appliance is
used by or near children. Do not allow children
to play on, with or inside tbis or any other
appliance.
• Keep all lmmdl y aids (such as detelgents,
bk aches, _tc.) otlt o[ tile r_acll of children,
prd'erably ill a locked cabinet. Obselwe all
warnings on container labels to aw)id injtu y.
• Newt climb on or stand on tile dlT,er top.
WHENUSINGYOURDRYER
• Never reach into tile (h3er while tile <hum is
moving. Betbre loading, unloading or adding
clothes, wait until the drlllll has completely
stopped.
•Cleanthelint filterbeforeeachload to preve_t lint
a( (unmlation inside tile dl}er or ill Ill(' roonl.
DoNOTOPERATETHEDRYERWlmOOrmELINT
FILTERIN PLACE,UNLESSTHEDRYINGRACKIS IN
USE..Mwaysreplace the lint screen when finished
using tile dlying rock.
• Do not wash or (hw articles that have been
cleaned ill, washed ill, soaked in or spotted
with combustibl_ or explosive substances (sucll as
wax, oil, paint, gasoline, degreasee,, dl?-cleaning
solvents, kerosene, etc.). Tbese substances give
ell'vapors that may ignite or explode. Do not add
these substances to tile wash waml: Do not use or
plac_ these substances arou n(I your wash( r or
dlyer during opel-at[on.
• _"aly article on whicb you have used a cl(aning
solvent or that contains flammabl( mat(rials
(such as cleaning cloths, mops, towels use(1 ill
b(mlt 3 salons, restaurants or barber sbops, etc.)
nmst not be placed in or near lhe dla:er until
solvents or flammable materials haw' been
removed. Tbere art many highly flammable
it{ms tlsed ill bomes Sllch as acetone, denatured
alcobol, gasoline, k_ ros_ he, some bousehold
cleaners, some spot renlover% tull)entines,
waxes, x_x removers and products conlaining
petroleum distillales.
• Tim lmm& T process can r(duce tim flam_
retalxlancy ot fhbli(s. To avoid such a resuh,
carefi/llv follow the garment manui_caner's
care inStFtl( tiOllS.
• Do llOt dl3 articles containing lubbm; plastic
or similar mamrials such as padded bras, tennis
shoes, galoshes, bath reals, lug_, bibs, baby pants,
plastic bag_ and pillows that max meh or burn.
Some robber mamrials, when heated, can under
certain circumstances produce fire b}
spolltalleOIIS coin btlstioll.
• I)o not store plastic, paper or clothing that may
burn or nlelt Oil lop of tile dl)'_ 1 during
op< ration.
• Garmenls labeled OryAway from Heater Do
Not Tumble Dry (such as lit_:.jackets containing
kapok) lnllSt llOt be put ill your dlycl;
•Do llOt (113fibelgla_s articles ill }our duel:
Skin irritation could result tiom th_ remaining
particles ilia[ ma? be picked up by clothing
during subsequent (hTer us{s.
• "['o minimiz_ the pos,,ibililx of electric shock,
unplug this applianc_ tiom the power supply
or (lisconn_ ct tile d_)er at the household
distribution panel by removing tile flls_ or
switching oil tile circuit breaker betore
attempting any lnainmnance or cleaning
(except tim lVlnowl and ck an[rig of tile lint
filter). NOTE:Pr(sqng tile PAUSE button does
NOTdisconnect tile appliance from th( power
suppl)v
• Do llOt spray all) type ot aerosol into, Oll Ol-ll{al-
dwer at any time.
• I)o not place items exposed to cooking oils ill
your dlT,'en llems conlaminated witll cooking oils
lnav contribute 1o a chenlical reaction that could
cause a clothes load 1o catch fire.
4
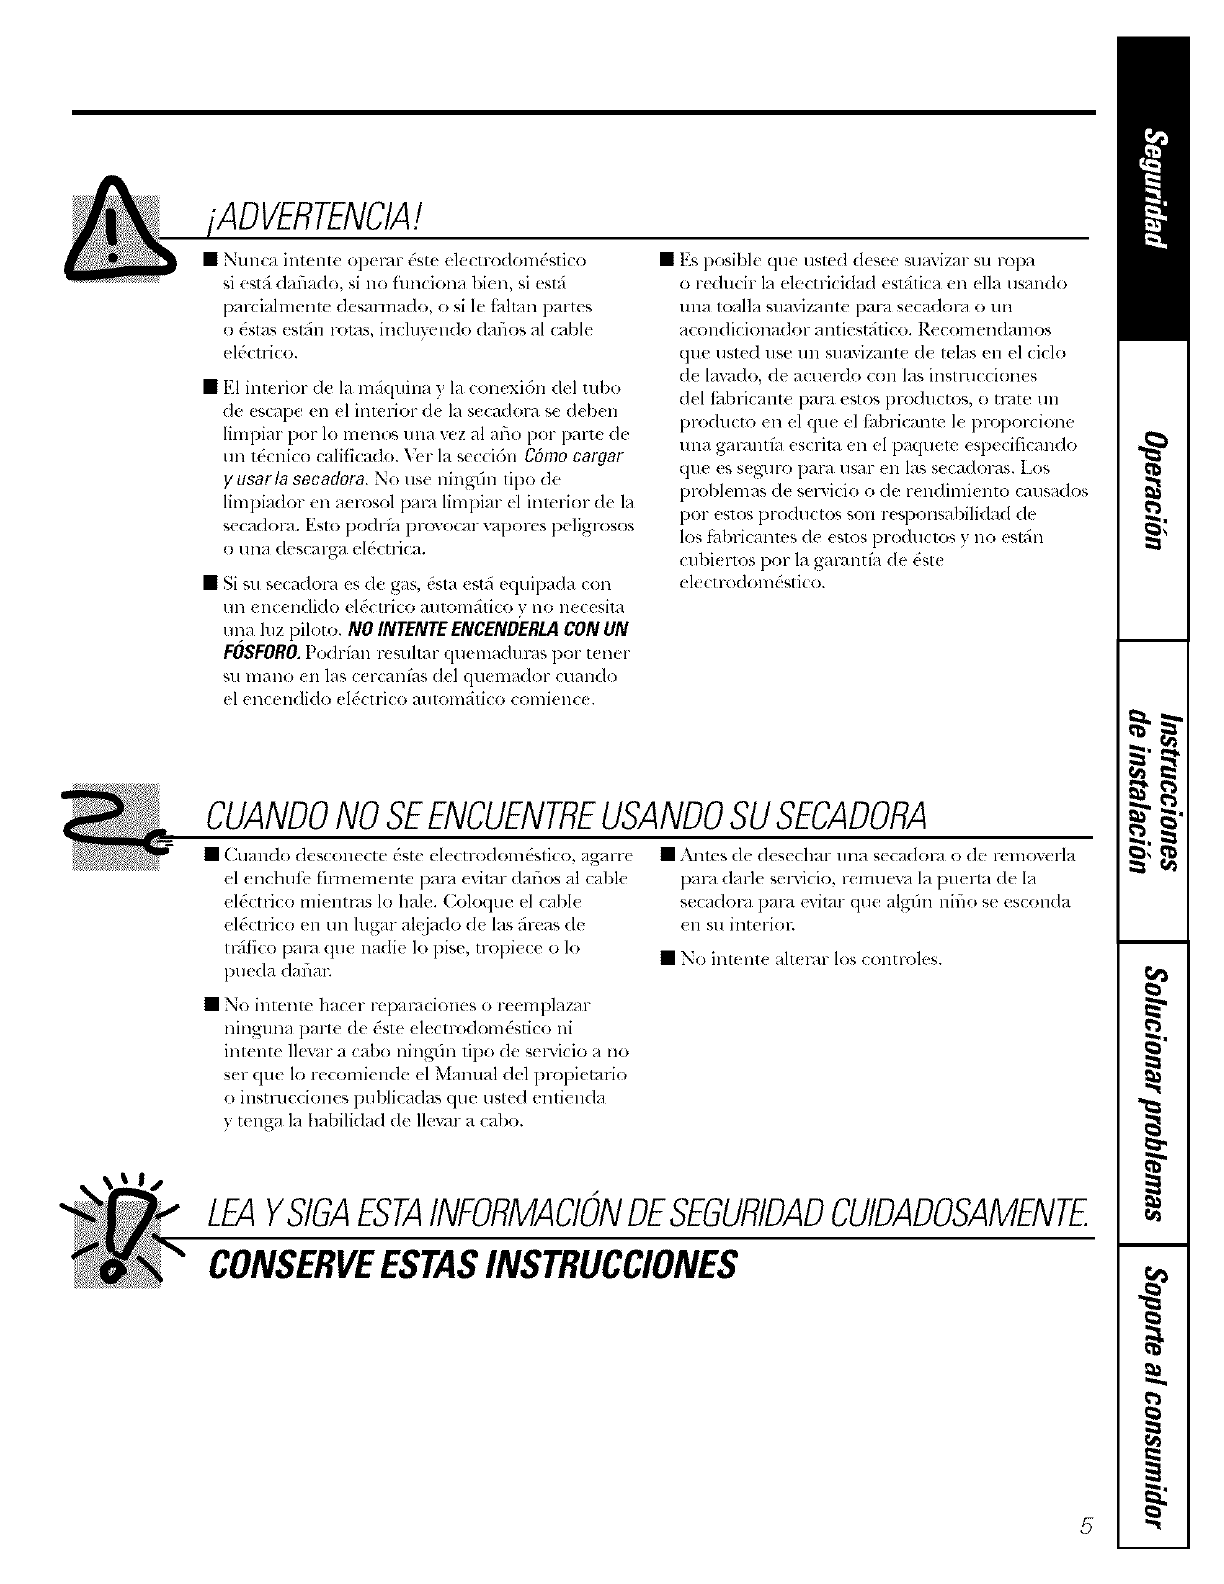
WARNING!
• Never attenlpt 1oopel-ate this al_pliance it
it is damaged, malfunctioning, partially
disassembled or has missing or broken parts,
including a danlaged cord or plug.
• The interior ol the machine and the exhaust
duct (onnection insid( tile (h3er should be
cleaned at least onc( a year by a qualified
technician. See tile Loa&Tg and Using the Dryer
section. I)o not use all) type of spray cleaner
when cleaning dlyer interion tlazardous flnnes
or electrical shock could occul:
• If?_)urs is a gas dl3el; it is equipped with all
mltomatic electric ignition and do(s not have a
pilot light. DO NOTATTEMPT TOLIGHT WITH A
MATCH. Burns Ira,) rcsuh tionl having v)ur hand
in the vicinity of the btll'lleF whell tile mltomatic
ignition turns on.
• Y_mma} wish to soften you r laundered fhbrics
or reduce tile static electficit_ in thenl by using
a (hTer-applied fhbric softener or all antislntic
conditionen We recommend you use either a
filbric softener ill lhe wash cycle, according to tile
nlanuti_cmrer's instructions tbr tho_,e products,
or tUa dlTer-added product for which th(
l]lallUtilCllllX'l" ,_iV( Swrittell asstll_tll(e oil tile
package that their product (:all be v/tbly used ill
your dD'en Selvice or pertbHnance problenls
caus(d b) use ot th(se products are tile
responsibili)" of lhe manu_hcltn-el_ of those
pl-OdllCtS alld art" llOt coveFed lllldel- the warl'dllly
1o this appliance.
WHENNOTUSINGYOURDRYER
• (;rasp the plug finnly whell disconnecting this
applianc( to aw:fid damage to the cord while
pulling. Place the coM away tionl trallic areas so
it will not b( stepped o11,nipped o,,er of
sul._jected to danlage.
• I)o llOt attenlpt to repair or rcpla( e ally part of
this appliance or attempt ally sel-dcing unl(ss
sl×'cifically rcconlmended ill this Owner's Manual
or ill publish_ d us(Hvpair instructions that }ou
under,rand and haw th_ skills to car W out.
• Befbre discarding a dlye_; or removing it fl-om
selvice, remove the dlwel- door to pl-(,Vell_
children from hiding inside.
• Do not tamper with conn-ols.
READANDFOLLOWTHISSAFETYINFORMATIONCAREFULLY.
SAVETHESEINSTRUCTIONS
5
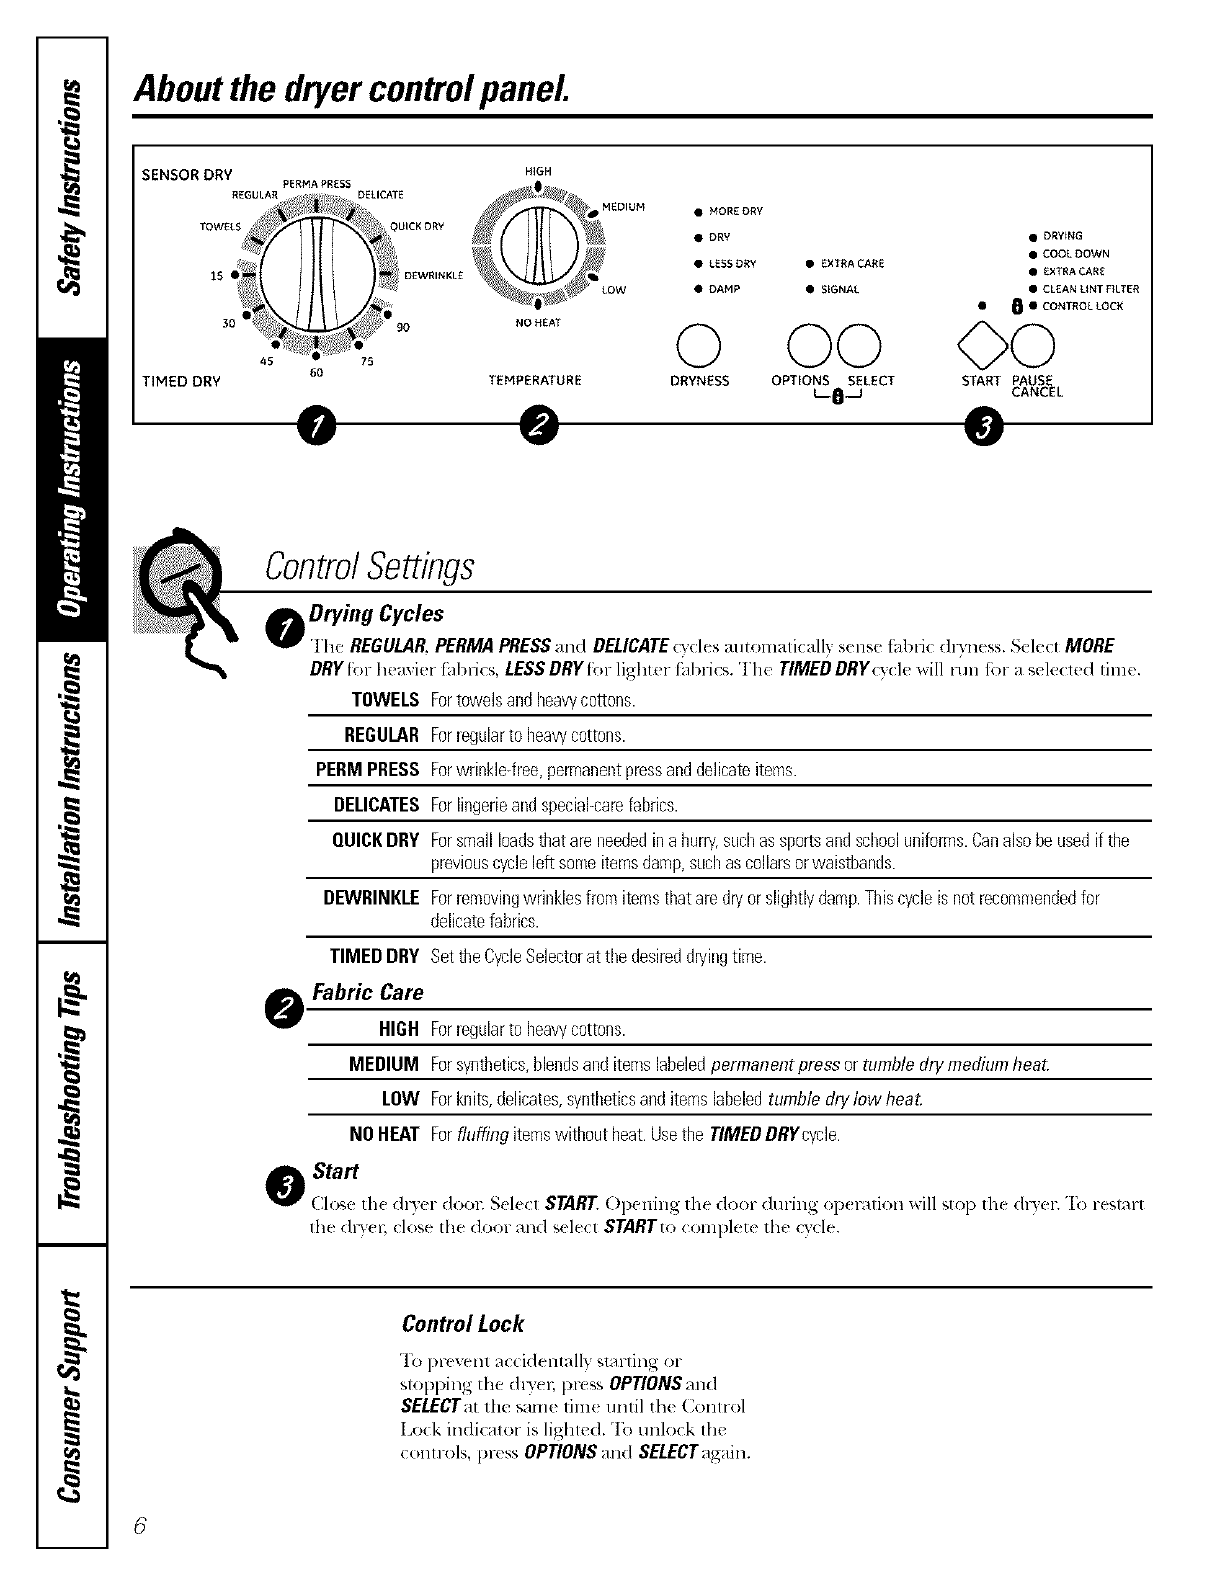
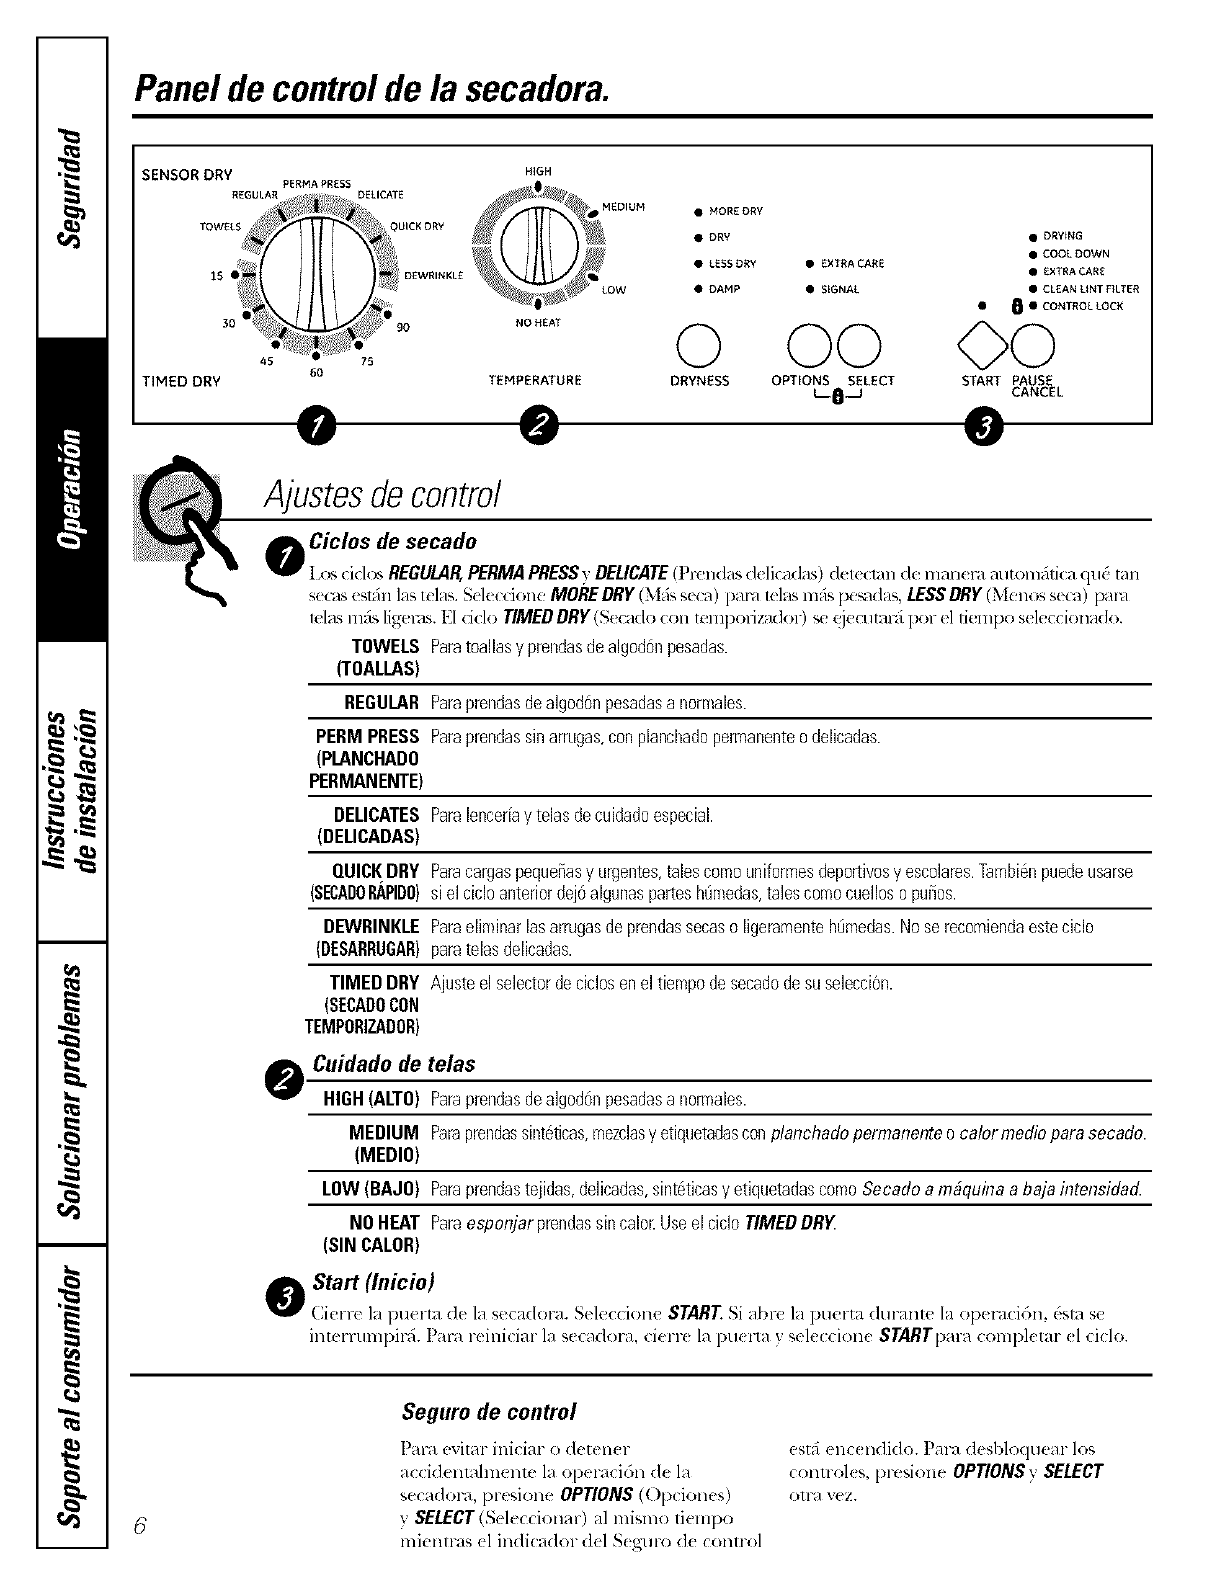
Aboutthedryercontrolpanel
SENSOR DRY HIGH
PERMA PRES
45 60
TIMED DRY
DELICATE
MEDIUM • MOR£DRV
• DRY • DRYING
• COOL DOWN
• LE_DR¥ • EXTRACARE •EXTRA CARE
• DAHP • SkGNAL • CLEAN UNT FILTER
• 8 • CONTROL _CK
,o.,,.0 O0 O0
TEMPERATURE DRYNESS OPTIONS SELECT S_ MUSE
_SJ CANCEL
ControlSettings
00rv',,.Cvo'e.
File REGULAR,PERMAPRESSand DELICATEcyclesaummaticall 7 sensefi,bdc dv,'ness.Select MORE
DRYR,r huaxiur fhbri_s, LESSDRYR,r lighter fhbrics, rI'|l_' TIMEDDRY(y(Iu will lun for a sele<led lime.
TOWELS Fortowelsandbeavycottons.
REGULARForregularto beawcottons.
PERMPRESS Forwrinkle-free,permanentpressanddelicateitems.
DEUCATESForlingerieandspeciabcarefabrics.
QUICKDRY Forsmallloadsthatareneededinahum/,suchassportsandschooluniforms.Canalsobeusedif the
previouscycleleftsomeitemsdamp,suchascollarsorwaistbands.
DBNRINKLE Forremovingwrinklesfromitemsthataredryorslightlydamp.Thiscycleis notrecommendedfor
delicatefabrics.
TIMEDDRY Setthe CycleSelectorat tbedesireddryingtime.
Fabric Care
HIGH ForieguJarto beavycottons.
MEDIUM Forsynthetics,blendsanditemslabeledpermanentpressor tumbtedry mediemheat.
LOW Forknits,delicates,wntbeticsanditemslabeledtumbledry low heat.
NO HEAT Forfluffing itemswithoutheat.Usethe TIMEDDRYcycle.
oStart
Close th< dl>er dool: S_'I_'_1 STARTOpuning 1he 4,:,_n-during op<mlion will stop th_ &}er. "I;_reslm-t
Ih{: (hT_'( 1_ close lhe door _]lld selecl STARTtocomplete 1heQ'cle.
Con_olLock
rl_(}prevent accidentally strutting or
stopping the &Tel, pru,,s OPTIONSand
SELECTatthe same fim_ until the Control
Lock indicator is lighted. To unlock the
controls, press OPTIONSand SELECTagain.
6
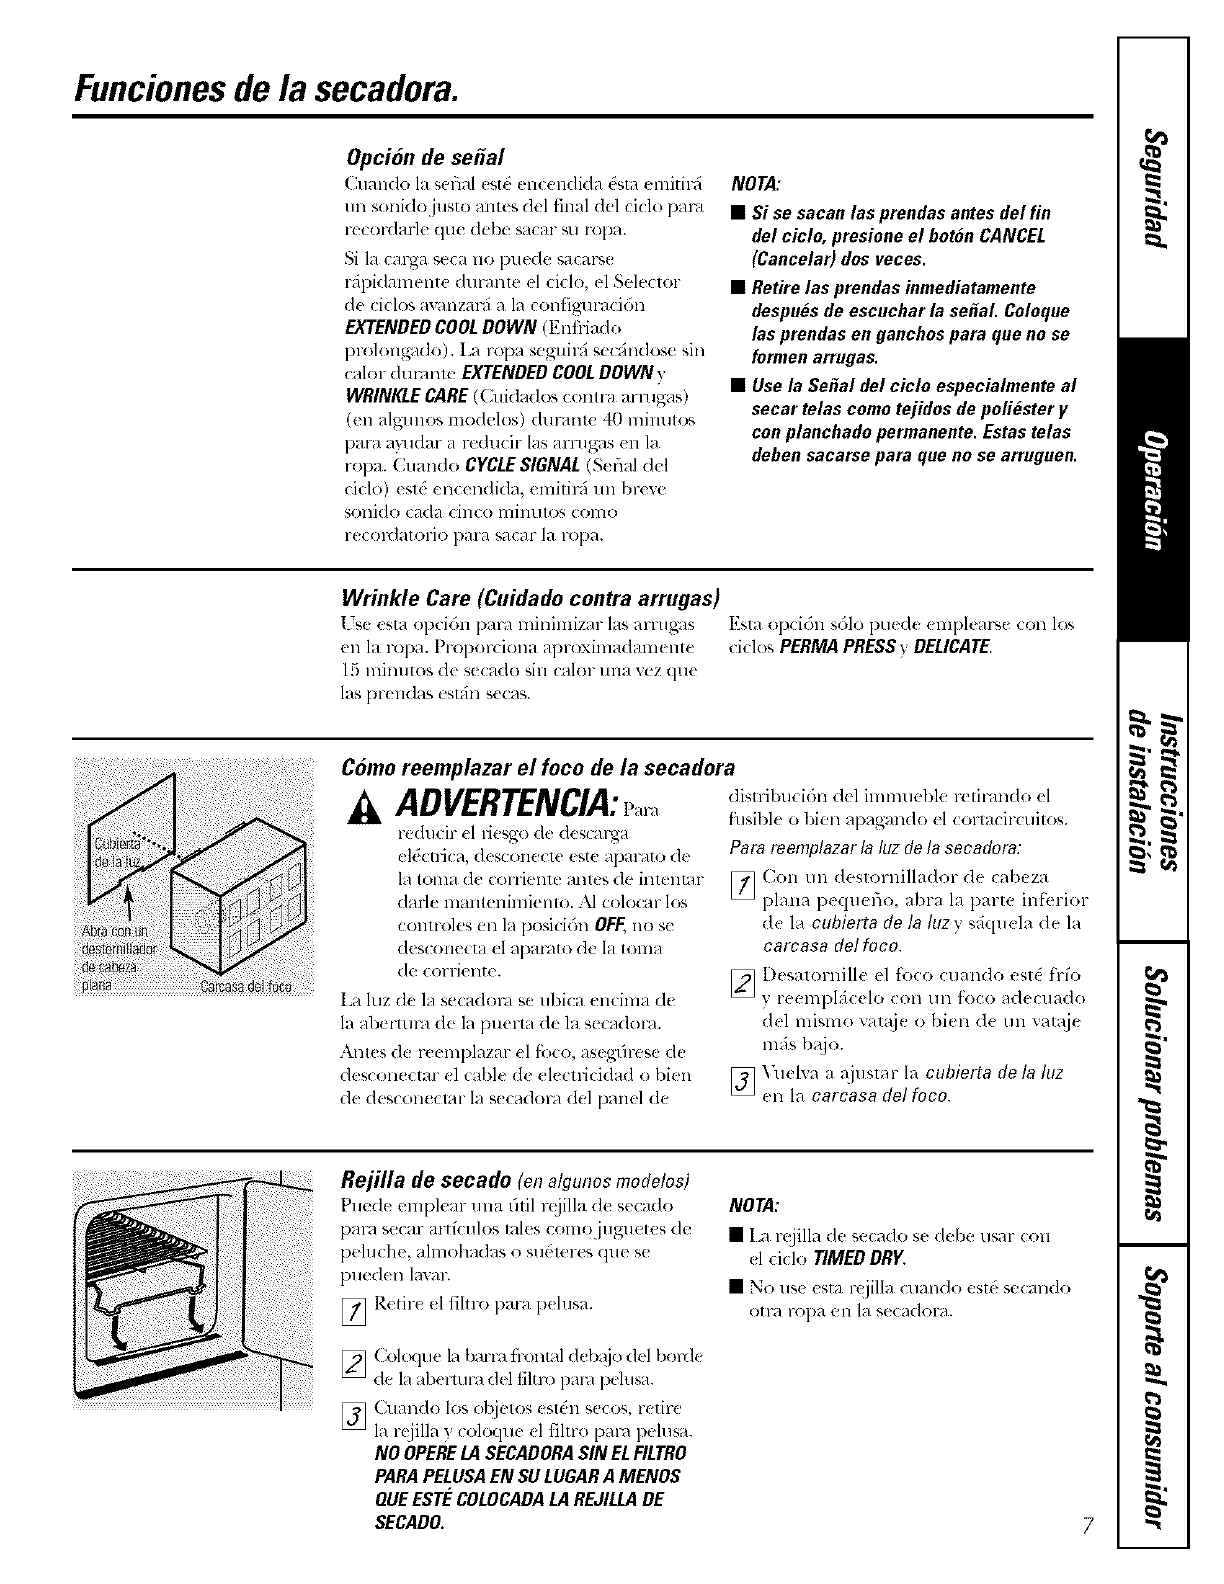
Aboutyourdryerfeatures.
Signal Option
When th(' signal is on it will soun(ljust
b(f'ore the end ot the (vole to remind
you to remove the clothes.
It the dried load cannot be removed
promptly during the cycle, the Cycle
Selector will advance to tile EXTENDED
COOLOOWNsetting. k nh(ated tumbling
contimles during EXTENDED COOL DOWN
and WRINKLE CARE (on some models)
for 40 minutes to help reduce wrinkling.
When the CYCLESIGNAL is OVl, it will
sound briefly ev(ry five minutes as a
reminder to remove the load.
NOTE:
•ffitems are removed before the end of
the cycle, press the CANCELbutton twice.
•Remove garments promptly at the sound
of the signal Place clothes on hangers
so wrinkles won't set in.
•Use the Cycle Signal especially when
drying fabrics like polyester knits and
permanent press. These fabrics should
be removed so wrinkles won't set in.
Wrinkle Care
l_s_. this _q)tion 1o minimize the wrinkles
in clothes. It l)rovid(s al)proximalel 3 15
minules of no-heat tumbling a_lt,r the
clothes are (h);
This option can onl 3 be used with the
PERMA PRESS and DELICATEcycles.
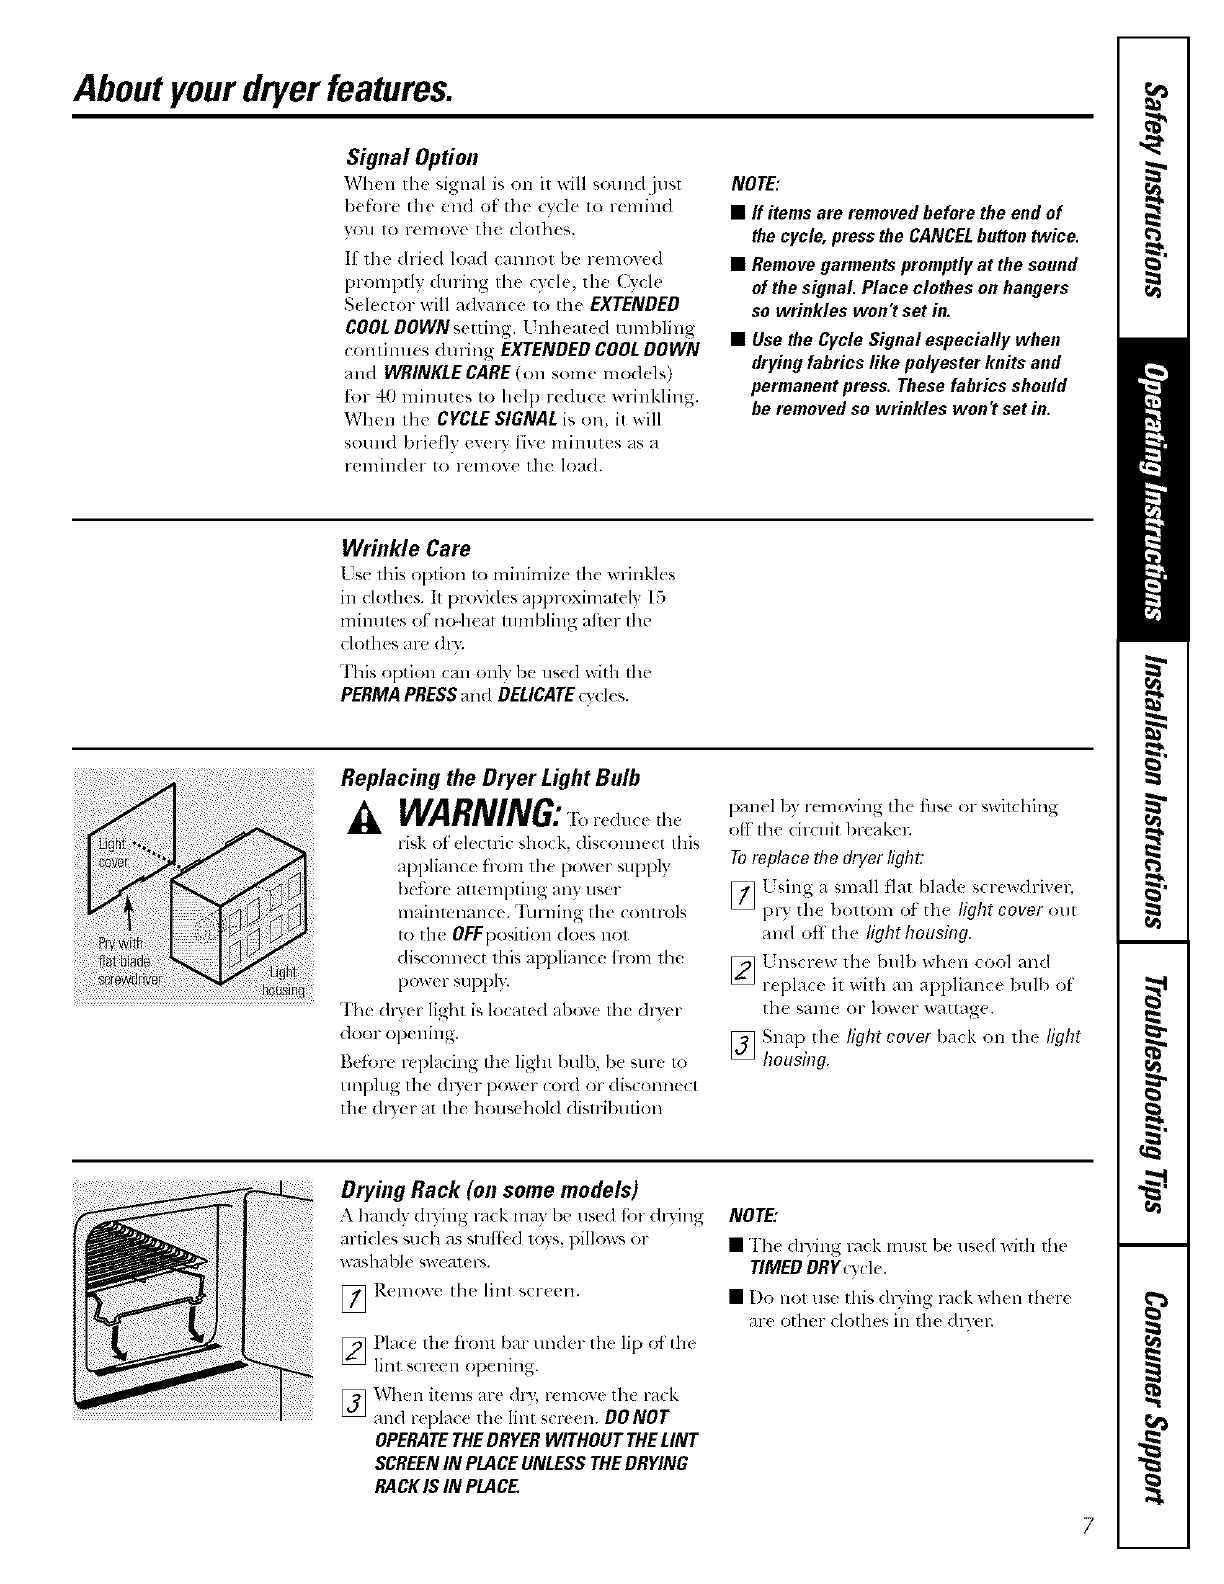
Replacing the Dryer Light Bulb
WARNING:
xisk ot clc(tri( shock, clis(olmt'ct this
appliance from the power suppl)
befim-e attempting any user
mainmnance. "Iilrning the controls
to the OEEposition does not
discolmect this al)pliance fr_nn the
p+_wer SUl)pl>
The (hyer light is located above tile (hy(r
door opening.
Beti)rt +replacing the light bulb, be sure to
unphlg the (h) er i)ower cord or disconne(t
the dt)er at tile hous(h(_l(I distlibution
panel 1)y r_ moving th( fuse or swilching
off Ill(! circuit 1)reakeL
Toreplace fl7e dryer fight:
[_ Lsing a small flat blade screwdriv( r,
l)ry the l)olloll] Of the light cover out
and off t he fight housing.
[_ 1_nscr(w lh(bull) wh(n cool and
r(l)lace il wilh an appliance bulb of
1he same or lower wattage.
[_ Snap the fight cover I)ack on lh( fight
housing.
Dryhlg Rack (on some models)
A handy (hTing ra(k may I)e used fi_n"(h}iv_g
articl( s such as stutt_ d lo?s, pillows or
washal)h, sw( alcl-_.
[_ ]_.elllove Ihe lint s(reen.
[_ Place th< fronl bar under the lip of th<
linl screen OlXning.
[_ When it(!ms are (hT, remov( th{ i'ack
_tll(l replace lh(: lira scr((n. DONOT
OPERATETHEDRYERWITHOUTTHELINT
SCREENIN PLACEUNLESSTHEDRYING
RACKIS IN PLACE,
NOTE,"
•rI'he (h3ing r,_ck must be used with the
TIMEDORgt)cle.
•[)l_ llOt fist' this dl3ing m(k when there
are other clothes in the dmq:
Loadingand usingthe dryer.
Always follow the fabric manufacturer's care label when laundering.
SortingandLoadingHints
.'_',a general lulc, if dothes aru sorted properly for the washm, [hcy are sorwd properly I_br the ill)el;
Do not add fabric softenersheets once d_eload has becomewarm Theymay cause fabricsoftener stains
Bounce®FabricConclltionerDryerSheets bave been approvedfor usein all GEDryerswhen used/Raccordance
with the manufacturer_ instructions
Do not overload. Thiswastes energyand causeswrinkling
De not dry the following items: fiberglassitems, woolens,rubber-coateditem& plastic'&items with plastic"trim and
foam-filled items
CareandCleaningof theDryer
The Exterior:'_,%)e or dust an) spills or washing
compounds with a damp cloth. Dwer control panel
and finishes may be damaged b) some laundl 3
pretl_eatlllellt soil and stain lelllOVel ])lodtlctS.
Apply these products away flom the dlTe_; The
fi_bric mav then be washed and dried normally
Damag_ to your d_?er caused by thes_ products is
llOt COV( l't*d bv VOl/l" w}II'I_IIID,\
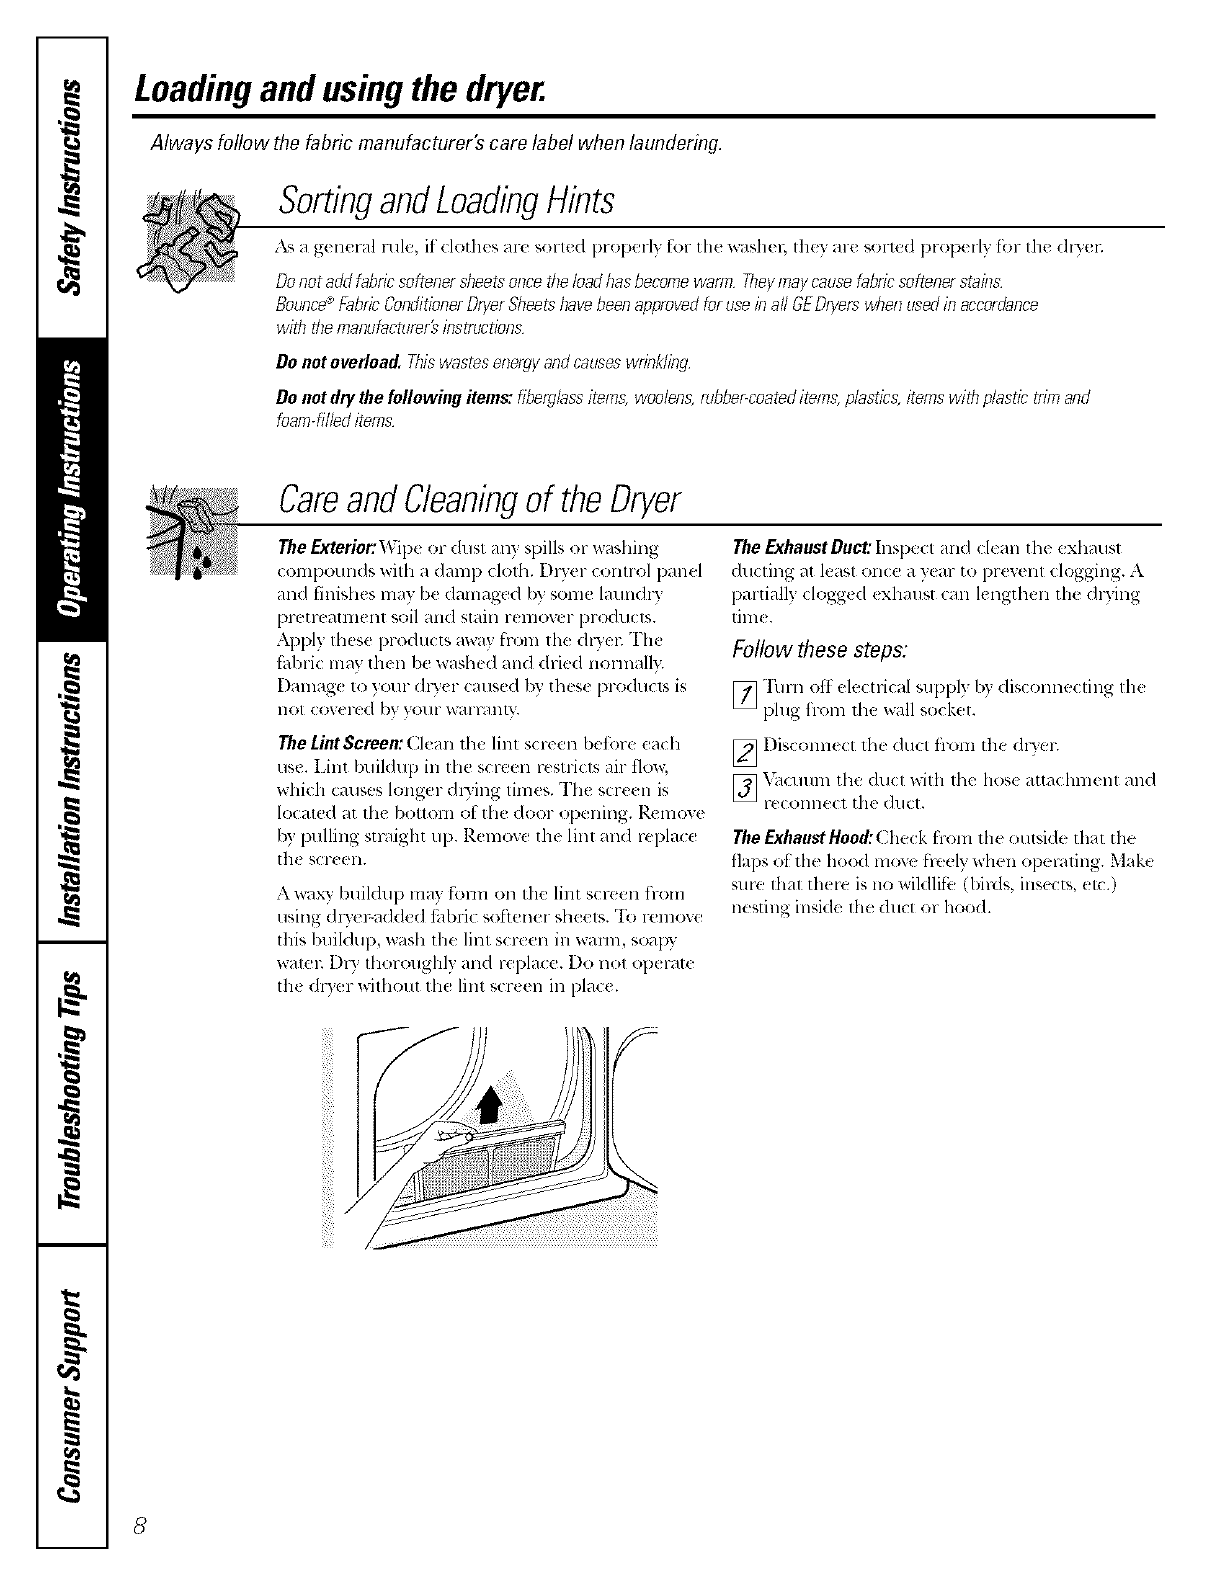
The Lint Screen: Clean the lint screen before each
use. Lint buildup in the screen restricts air flow,
which causes longer &3ing times. The scre_ n is
located at the bottom ot the door opening. Remove
by pulling straight up. Removc the lint and replace
t]l( SCI'( on.
A wax}' buildup may form on the lint scwen flom
using d_Ter-added thbric so[tenor sh_.el,,. "I'(I renlovc
this buildup, wash the lint sort en ill wmm, soapy
watel: DI3 thoroughly and replace. Do not op< l-at_
th_ dDer x_ithout the lint scr_ en in place.
The Exhaust Duct: h]specl and d(an the exhatlSl
duclillg _lt least OllC(t _/ y(_/l" it) l)l'eVelll dogging. A
partially dogg_ d <xhaust C_]lllengthen the dlying
tim_.
Follow these steps:
[_ "l'/l111()It ele(trica[ supply by disconnecling Iht
plug fl-om the wall socket.
[_ I)iscomlect lhe dtlCI flOlll the dl3'er.
[_ X{tCIlIlIII th(: dtlcl with lhe lies( atta< hment and
1"(}(O1111(}(1the (]IlC[,
TheExhaust Hood:Clmck Item lh{ outside that the
flaps of lh(? hood mo',e hedy when operating. Mak(
sure lhal there is no wildlife:: I)irds, insects, etc.)
nesting inside file duct or hood.
8

Installation
Instructions SpacemakerDryer
Model DSXH47
Iffyouhaveanyquestions, ca//800.GE.CARES(800.432.2737)or,_ito,,:Wet,siteat: ge.com I
BEFORE YOU BEGIN
Read these instructions completely and carefully.
• IMPORTANT - S_,_e,h,se
instrucuons fL,r local inspeclor's usc.
• IMPORTANT - Obs_,,e_,n
gOV( l-llil]_ (70(I(s alld or(lillall((s.
• Note to Installer - P,e sure lo leave rials*
illStl'tlcliOllS with lh( Consumel;
• Note to Consllnler - Keep lhese illstru(tions
fk)r f'uture ref_r(mce.
•Skill level -Instalhltion of this applian(,_ requires
basic me( hani(al _llld electri(al skills.
•Completion time - 1-'_ hour_
• F'roper installatioll is lh( r_sponsil)ility ot lh(
installer.
• t ro(hl(I lailur( (lu( to imf)rop( r installalion is not
covel-(_d llll(l( 1- [l](_ _Tal-l-all['_L
IN THE COMMONWEALTH OF
MASSACHUSETTS
• This producI must be installed by a licens(d
plumber or gas fitte_
• When using ball-type gas shut-offvalves, they
shall b( th( T-handle type.
• A fh'xible gas (onnc(tot, when used, must not
(x(e(d 3 t_et.
FOR YOUR SAFETY:
__ WARNING
This dlyer must b( exhm/sted to the ouldoors. [se
only rigid m(tal or t]exible metal 4" diamelt.r ductwork
ti-_rexhausting to the oul.side, l Jse out} ri_-id lnetal 4"
diameter ducn_'ork inside the dlycr cabinet.
• Nev(r us( I}laslic or other combustil)l( ductxvork. St(
Exhausting st (tion.
• This al)plianc( musl be l)rop(rly grounded and
install¢d as d(sclib(d in these h7statl,°,tio/7Instruction&
• Do 11ol install or stove aplMiance in an ar(a where it will
be exposed o x_a eriweath_ L Se( Locatio 7o(Your Drgor
S( clioll.
The National Fuel (his cod( restricts installations ot
gas appliances in garages. They must l)e 18" (45.7 cm)
otl tile ground _lnd prolt'ctcd trom xt'hicles by a
barrieL Se( Location o( Your Dryor section.
• The electrical s_rvice to the (h'+( r llnlsI COllfol 111x_ith
local cod¢s and ordinauc(s and the latesl (dilioi, ,.)f the
National Elecnical Cod(, ANSI/NFI_.R 70.
The _&'_service to the dz_'er must contktrm with local
codes and cmdil_ances or the latest edition of' the
National Fu_l (;_s Cod_ ANSI Z223.1. The gas (hy(r is
d(signed under ANSI Z 21.5.1 fl)r home use only. This
dlTer is not r( commended tiw commercial apl)lications
_,llCll aS l-t'stall l_llltS o1 beallt_" salollS.
9
Installation Instructions
TOOLS AND MATERIALS
YOU WILL NEED
F1 Phillips head screwdriver
0 .\t!justable pliers (a(!just leveling legs)
F]I C_llpenttT'S lexel
V] Flat or swaigbt blade screwdriver (ma} b( needed
for coM su;fin relie0
V] Duct tape
F] Ri_M or t IAisted flexible metal 4" (10.2 cm) duct
V1 Vent ho_M
FI 1/4" nut diner (remow' terminal block access
c(wer and install toM) (ELECTRIC DRYER)
F1 Pipe thread s_aler (GAS DRYER)
V1 L IAismd strain reli_ f (may be supplied
with cord)
V3 L IAiswd 30A, 240"L 3-wire, #10 AWG minimum
conducu)r power coM (existing structln-( )
F1 [ Misted 30A, 240";, 4-Mrc, #10 AWl;
minimmn conduclt_r po'_xer COld is, required
(n_w consmlction)
F] Flexible staink ss steel or plastk-coated brass
connnecting robe (if' allow(d by building code)
(GAS DRYER)
V] Open-end wrenches tot flexible robe and
connector (GAS DRYER)
PREPARING THE INSTALLATION SITE
AND UNPACKING YOUR DRYER
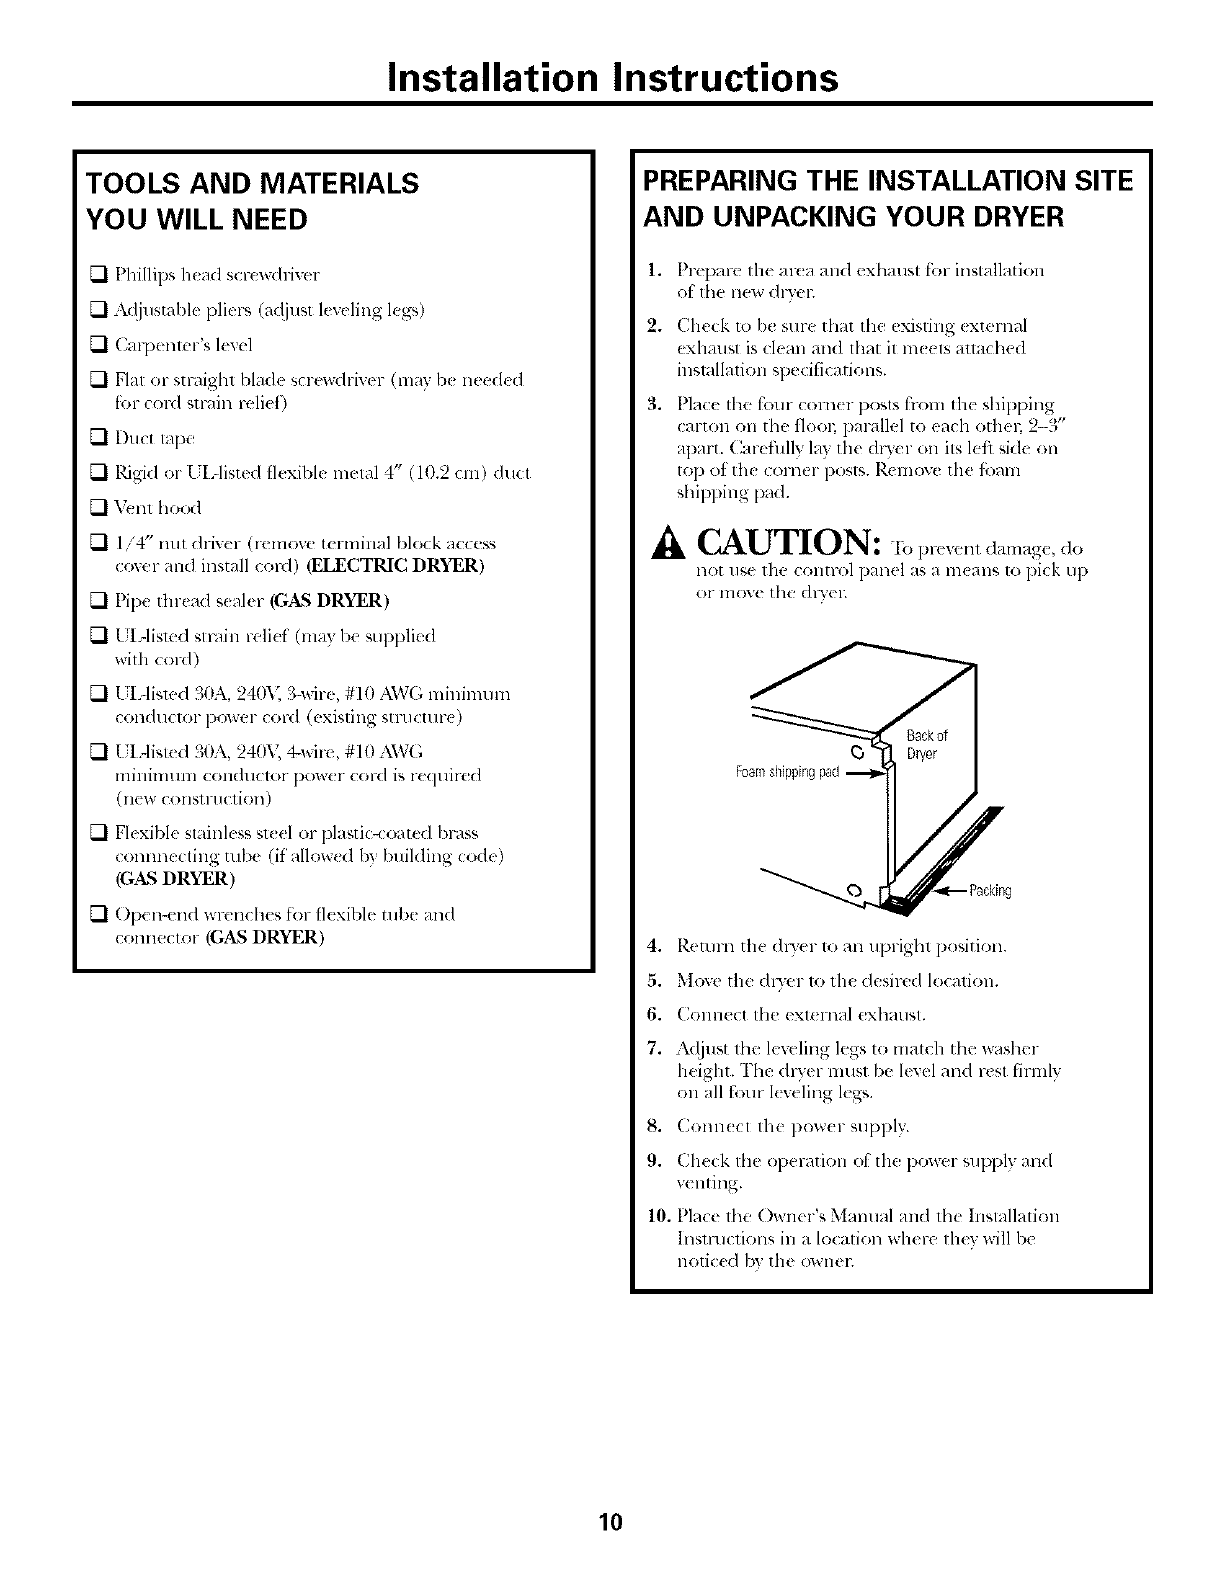
1,
2.
3,
Prepare tile ar_a and exbaust tor installation
of lhe new dlyel;
Check to be sure that the existing <xternal
exhaust is clean and flint it m_els auached
installation specifications.
Place lhe four comer posls f'lxm_tile shipping
carton on tbe flool; parallel to each othen 2-3"
apart. C,arefillly la7,tile (hler on its left side oil
top of tim comer posts. Remove tile tbmn
shipping pad.
.& CAUTION: "Ib prevenl damage, do
not use tile control panel as a re(arts 1opick up
or move tbe &wel:
4. Reunn tile (hTer 1o all uprigbt position.
5. Move the dlTer 1o tile desired location.
6. Collll(Ct tim ext(lnal exbaust.
7. A_!just tbe leveling legs to match tbe washer
height. The dlwer nlust be level and rest tirmlv
on all four kw ling k_*.
8. Conn(cl tile pow(r supply.
9. Check the operation of lhe power supply and
venting.
10. Place the Owner's Manual and the Installatkm
lnsnuctions in a location where thev will be
notic(d b3 tile ownel;
10
Installation Instructions
Read these instructions completely and carefully.
ELECTRICAL CONNECTION
INFORMATION FOR
ELECTRIC DRYERS
^_ WARNING - "r,,,-e,lu.,h,,-i¢,,_
fir_, cle,.:tric shock or p_ rsonal il!jury:
• DO NOT USE AN EXTENSION CORD _VITH
THIS APPLIANCE.
• THIS APPLIANCE MUST BE PROPERLY
GROUNDED.
Tiffs dryer mttst be electrically grounded in accordance
with local codes mad olxlinances, or in the absence of local
codes, in accordance with the NATIONAL ELECTRICAL
CODE, ANSI/NFPA NO. 70.
Electrical Requirements
• This dl_,er must be colmected to a20SV or 24(W
indivi(h/_d brancla cir( uit, protected by .'I0-;unp circuit
breakel_ or time<telay fuses.
• Pow(r SUl)ply: 3-wire 24(,Lvoh, singlc-phase, t_)-I tz,
z_dleFll_t lillg CII IT(:111.
• I se COl}IX r conduclol.'s only.
• lithe ele(tri( supl)lx does not meel tile aboxe
sp_ cifications, call alicensed electrician.
NOTE: A wiring diagram is located under the top l)anel.
ELECTRICAL CONNECTION
INFORMATION FOR GAS DRYERS
_k WARNING - l_>,-,.,1..,h,,-isko,
fir<, _leclric shock or l)ersonal injm-y:
• DO NOT USEAN EXTENSION CORD ORAN
ADAPTER PLUG WITH THIS APPLIANCE.
• DO NOT, UNDER ANY CIRCUMSTANCES, CUT OR
REMOVE THE THIRD GROUNDING PRONG FROM
THE PO_rER CORD.
This dryer must be electrically grounded in accolxtance
Mth local codes mid olxtinances, or hi the absence of local
codes, in accordance with the NATIONAL ELECTRICAL
CODE, ANSI/NFPA NO. 70.
Electrical Requirements
• This cider must be supplied with 120x,, 60-tlz,
and comlecled to a properl 3 grounded branch
circuit, protected I)y a 15- or 20-mnp circuit breaker
or lime-delay fuse.
• lithe el(ctric supply provided does not meet the
above specifications, it is recommended thai a licensed
<leclrician inslall an approved outlet.
_[nsure properground
existsbeforeuse
External Ground (if required)
An extertml _ound wire (not provided), which meets local
codes, may be added by attaclfing it to the _en _otmd
screw on the rear of the dryer in the upper left corner
above the cord, mid to gTounded metal cold water pipe
or other estabh'shed grotmd.
Attach groundwire
(obtain locally}
L"
NOTE: A wiring diagram is locat{ d under 1he top panel.
11
Installation Instructions
EXHAUST SYSTEM
REQUIREMENTS
Use only 4" (10.2 own)diameter (minimum) _fid metal
duct for best performance, ol- flexil)le m(la] duct, and
approved vcnt hood whkb has sxdng-out dmnpers thai
open when th( cheer is in opel;ition. When the dlTer
slops, th_ dampers automatically (:lose 1o pFevelll dl-,ifls
and the enmmce ot ins(cts and F(KIeIIIS.To avoid
restricting th( oullet, maintain a minimum of 12"
(30.5 cm) clem-,u_ce 1)elw_en the vent bood and the
gFOlllld OF an} oth{r obstFtlCtiOll,
It all rigid metal duct cannot be used, then flexible
all-metal w nting (an be used, but it will reduce the
maximum reconmmnde d ducl length. See Additional
Installation Instructions _bllowing.
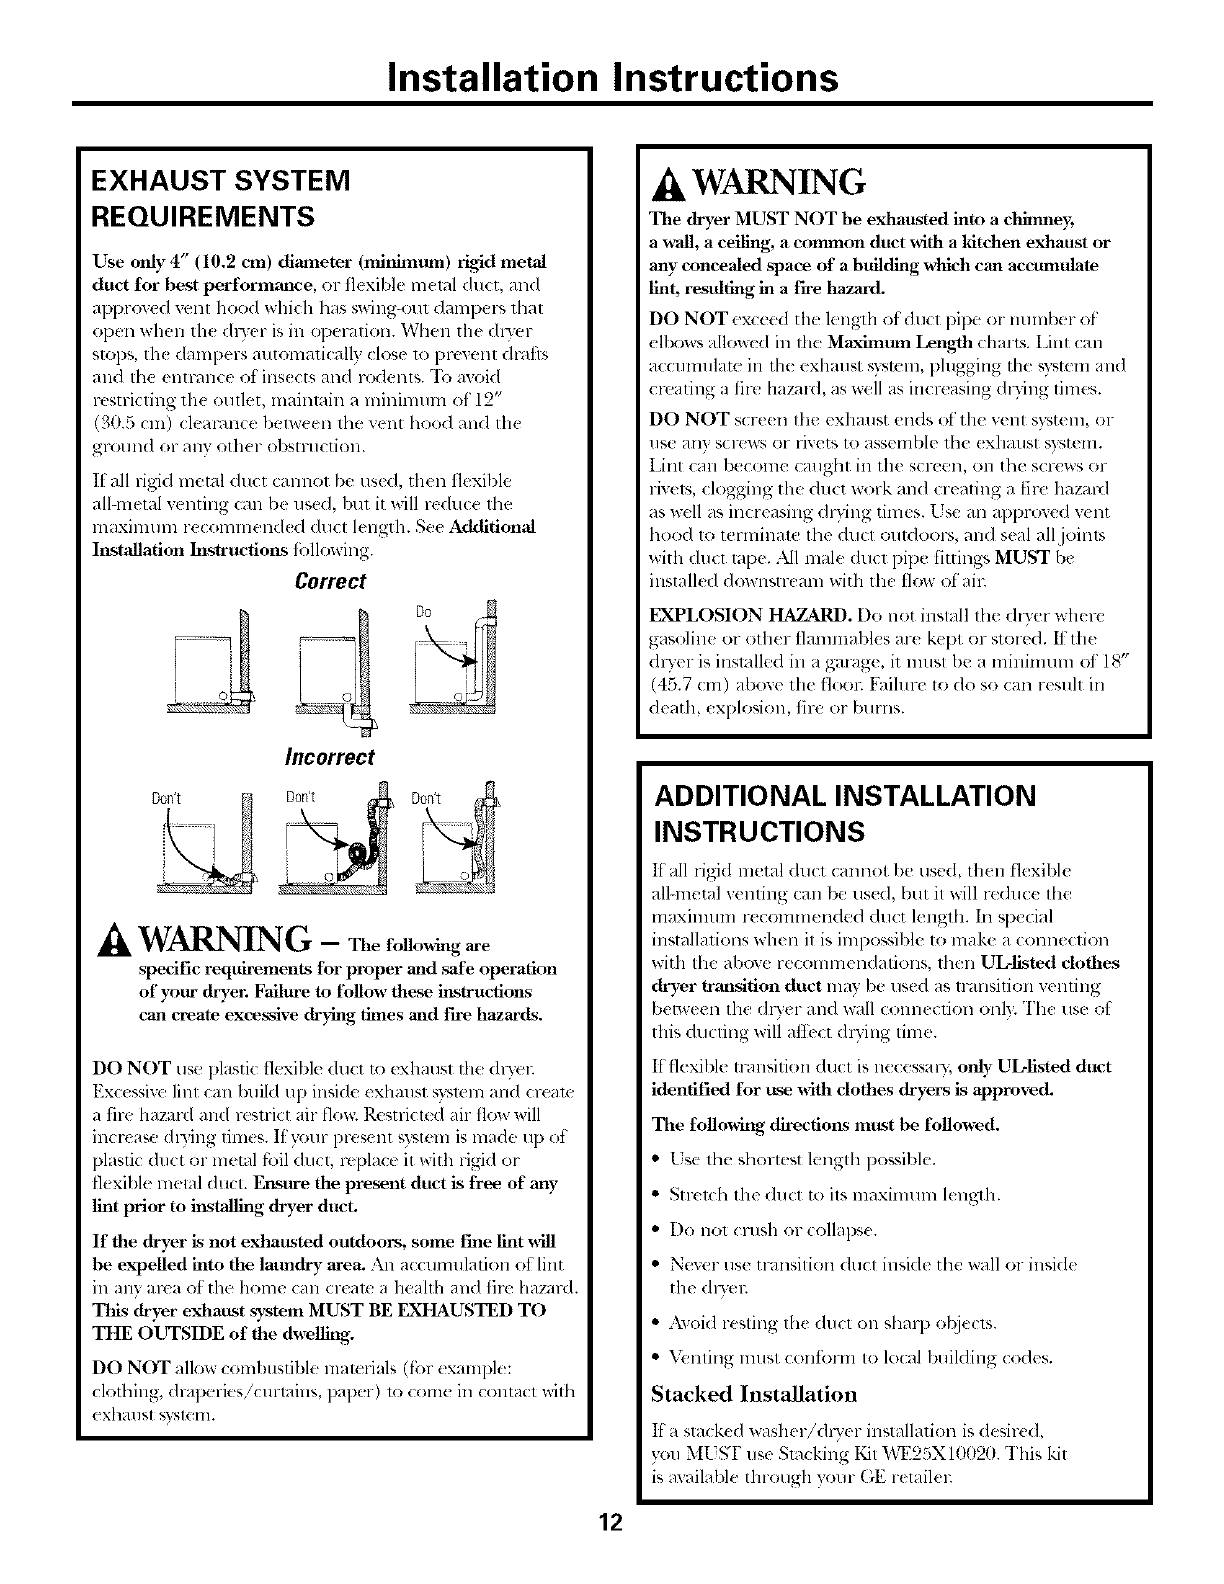
Correct
Incorrect
jDon't
WARNING - Thefidlowing are
spedfic requirements for proper and ,'safe operation
of yoar dryer. Failure m tbllow these instructions
can create excessive drying times and fire hazards.
DO NOT use plastic flexible duct to exhaust tile:dlTtq:
Excessive lint can build up inside exhaust sT,smmand cream
a ill> hazmxl and restrict air flow. Restrict_d air flow will
increa_*, dDing tim_ s. If }x)ur p_esent system is made up of
plastic duct or metal fi.filduct, replac{ it with rigid or
fl(xible metal duct. Ensure the present duct is free of any
lint prior to installing dryea_duct.
If the dryer is not exhausted outdoors, some Fme lint _11
be expelled into the latmdry area. An accumulation of lint
in any area of the home (an crealc a heahh and fire hazard.
This dryer exbattst system MUST BE EXHAUSTED TO
THE OUTSIDE of the dwelling.
DO NOT allow combustible malt*rials (fi:)rexample:
clothing, draperies/curtains, paper) 1ocome in contact xxith
exhmlst s}"-;leHL
.4, WARNING
The dryer MUST NOT be exhausted into a chimney,
a wall, a ceiling, acommon duct with a kitchen exhaust or
any concealed space of a building which can accumulate
lint, resulting in a fh'e hazard.
DO NOT <xceed the length of duct pip¢ or number of
ell×ms allowed in the MaxinlUnl Length (:haFts. Lint can
accmnulatt in lh_ exhaust,ysmln, phlgging tile _y_mm and
creating a fire hazald, as well as increasing d135ng times.
DO NOT scre_ n the exhmlst ends (A:the vent s}_tem, or
IlSL* HII} SCI'C_VS O1" rivets tO _tss('lnblc _hu (X]lHllSt sxst('ln.
Lint can be(onle (might in the s(reen, on the s(re>,s or
livets, clogging the duct work and creating a filv hazaM
as well as increasing dwing times, tse an approved wnt
hood to terminate the duct outdoor% and seal all joints
with duct rope. All male duct pipe fittings MUST be
installed downstremn with the flo_ ot all:
EXPLOSION HAZARD. Do not install the dwer where
gasoline or other flammables are kept or stored. It the
dwer is inslalled in a garage, it must be a minimum of 18"
(45.7 cm) above the flool: Faihlre to do so can resuh in
death, explosion, fire or burns.
ADDITIONAL INSTALLATION
INSTRUCTIONS
It all rig{d metal duct cmmot 1)eused, then flexible
all-metal xenting can be used, but it will reduce the
maxilnum r( commended duct length. In q)ecial
installations when it is impossible to make a connection
with the above recommendations, then UL-llsled dothes
dryer transition duct lnay be used as lransition venting
between the @yer alld wall conn_ cfion onl). The use ot
this ducting will at'Ib(t (hTing time.
It flexible transition duct is n_cessaQ; only ULlisted dtmt
identified tbr use with dothes dryers is approved.
The following directions mttst be followed.
• Use the shortest length possible.
• Stlx b.b the duct to its maximum length.
• Do not crush or collaps(.
• Nexer use mmsition duct inside the wall or inside
the <hTel:
• Axoid resting the duct on sharp objects.
• Venting must confi)un to local building codes.
Stacked Installation
If a stacked washer/@Ter installation is desired,
vou MUgI" use Stocking Kit "_,T25X10f12fl. This kit
is available through your GE retailel:
12
Installation Instructions
EXHAUST DUCTING LENGTH
The exhaust s}_mm shouM be inspecled and cleaned a
lllil]illlill]l 01"evel)" year with normal usage. The moa th(
dlwer is used, the more ofi_n you should check tile exhausl
sx_mm and _nt hood tot prop( r operation.
• DO NOT assemble th( duct work with thstenep, that
extend into the duct. They will s(lve as coll_ ction points
fi:,r lint.
• Instflation -Ductwork which runs through an unheated
area or is near an air conditioning duct should be
insulat(d to rcdu(x condensation and lint buildup.
MAXIMUM LENGTH
of 4" (10.2cm) Dia. FLEXIBLEMETALTUBING
PREFERREDVENT HOOD TYPE
4"(102cm) Louvered
Numbelturns_1 I
of 90°
I 2.5" I
4" (6.35
i]l,,q(lO.2cin)l-qlF- ---]l,,- ci,,) "_"
030" (9.14 m) 18' (5.49 m)
122" (6.71 m) 14' (4.27 m)
214' (4.27 m) 10' (3.05 m)
MAXIMUM LENGTH
of 4" (10.2cm)Dia. RIGIDMETALDUCT
PREFERRED VENT HOOD TYPE
4"(10,2cm) Louvered
Numbelturns_1 I
of90°
2.5" I
4,,°"ll ....I
(6.35
0 60" (18.28 m) 48' (14.63 m)
1 52" (15.84 m) 40' (12.19 m)
2 44' (13.41 m) 32' (9.75 m)
3 32' (9.75 m) 24' (7.31 m)
4 28' (8.53 m) 16" (4.87 m)
INSTALLMALE FITTINGS IN
CORRECTDIRECTION
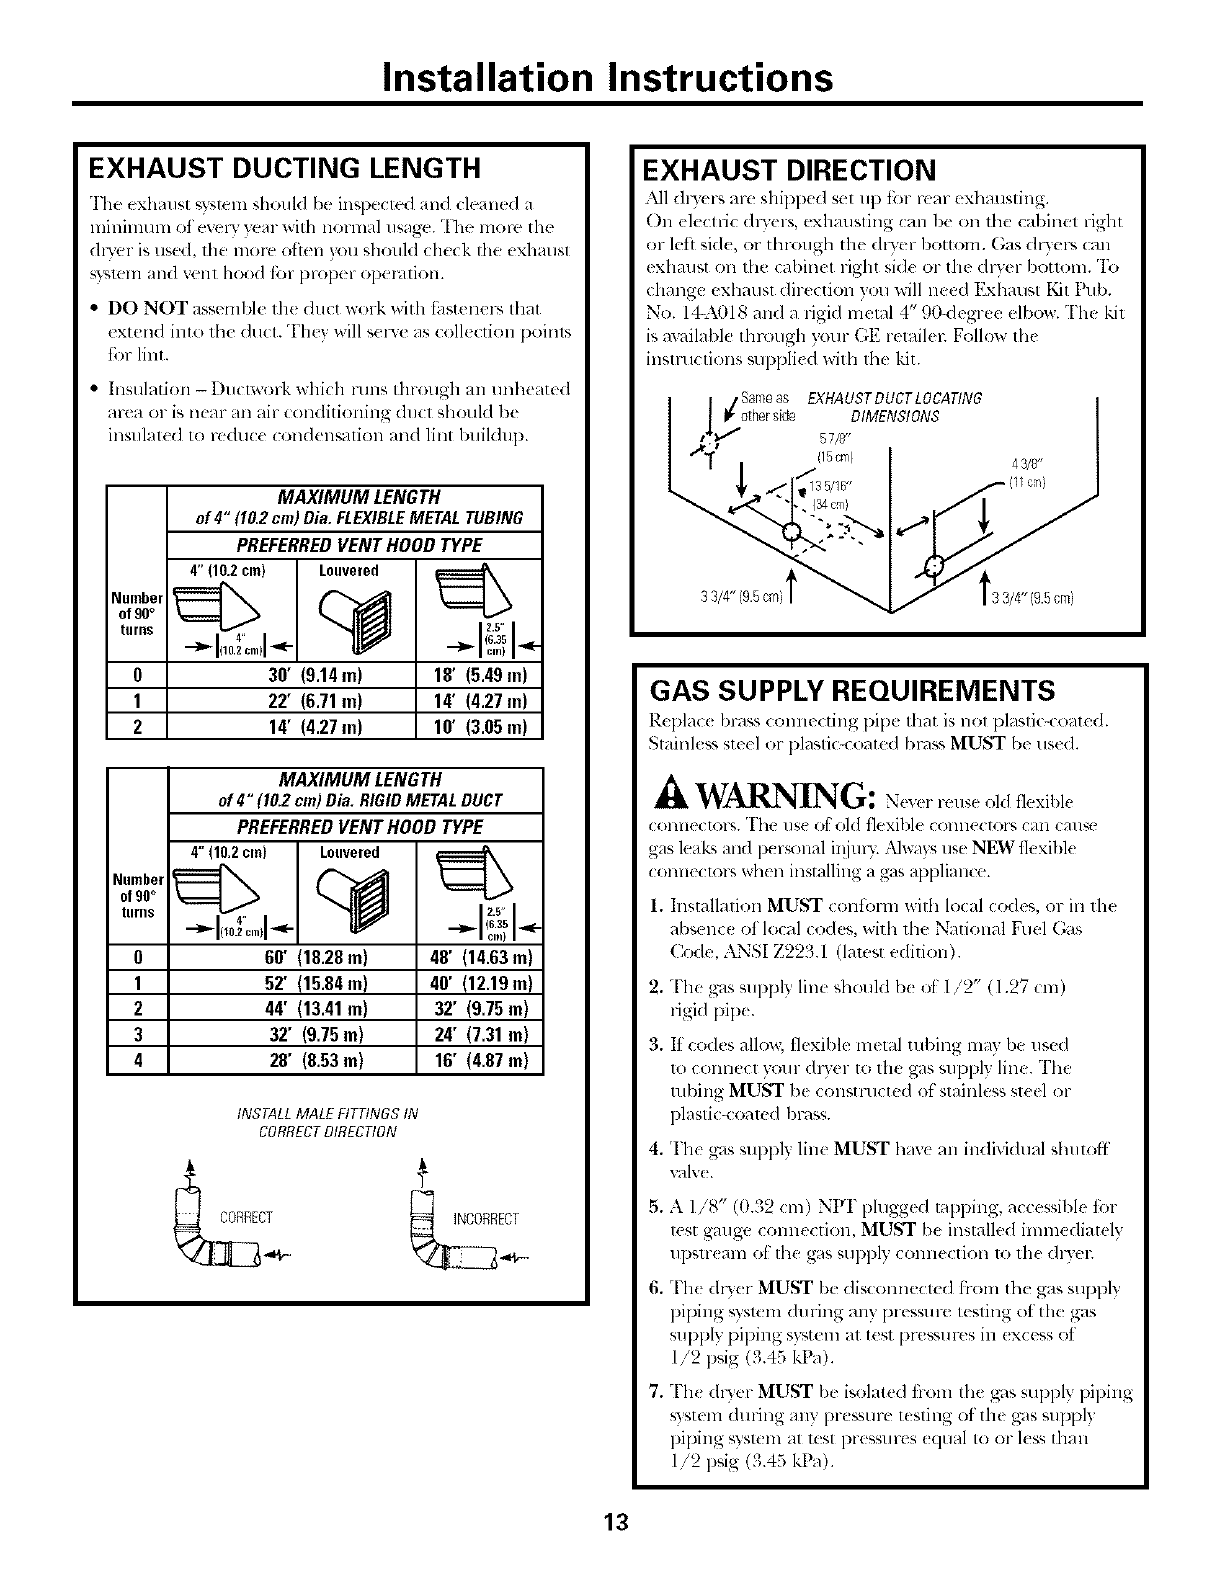
EXHAUST DIRECTION
All (hyers m-e shipped set lip till real- exhmlsling.
On electric (Iwers, exhmlsfing can be on the cabinet right
or left ski(, or through tile (hyer bottom. ()as dlyers (nil
exhmlst on the (abinet right si(l( or the dlwer bouom. To
dmnge exhaust dire(don )ou will need Exhmlst Kit Pub.
No. I_A018 and arigid metal 4" 90<legree elbow. The kit
is available through }our GE retailei: Follow the
instructions supplied with the kit.
Samo aS
/ _/other side EXHAUSTDUCTLOCATING
DIMENSIONS
fl'l 'l 57/_'
(15cm) 43/8'
3 3/4" (9.5cm)
GAS SUPPLY REQUIREMENTS
P.cpla(( hi'ass (Ollile(tiilg pipe that is llOt plastic-coated.
Stainless ste(l or l)lastic4"oated bl-<l_,sMUST be tlS((1.
WARNING: ,,l<lflexible
(OllIl('('tOl'% "I'ht" use ofoM flexible COlllR>(lOiS (all (_tl/qe
gas leaks and personal il!iuv,. Nways use NEW flexible
connectors when insmllillg a gas appliance.
1. Installation MUST confoml with local codes, or ill the
absence of local codes, with the National Fuel (;_s
Code, ANSI Z223.1 (lawst edition).
,
3.
The gas supply line should b( of 1/2" (1.27 cm)
rigid pip(.
If codes allow, tlexible metal tubing may be use(I
to connect your (hwer to the gas supply line. The
robing MUST be constructed of stainless st(el or
plastic-coamd bl-_lss.
4. The gas supply line MUST hay( an individual shutoff
xGIIv( .
5. A 1/8" (0.32 cm) NPI' plugged tal)ping, accessible tor
test gmlge c(mnection, MUST be installed immediately
upstr(am ot file gas supl)ly connection lo the dlyel:
6,
7.
Th_ dlTer MUST be disconnecled flom the gas supply
piping _)slem du ring any pressure testing of the gas
supply piping s}_tem at test pressurcs in (xcess of
1/2 psig (3.45 kPa).
Th( dryer MUST be isolated from the gas supply piping
sxstem during any pressure testing of the gas SUpl)ly
piping _?stem at It:st pressures ((lual to or kss than
1/2 psig (3.45 kPa).
13
Installation Instructions
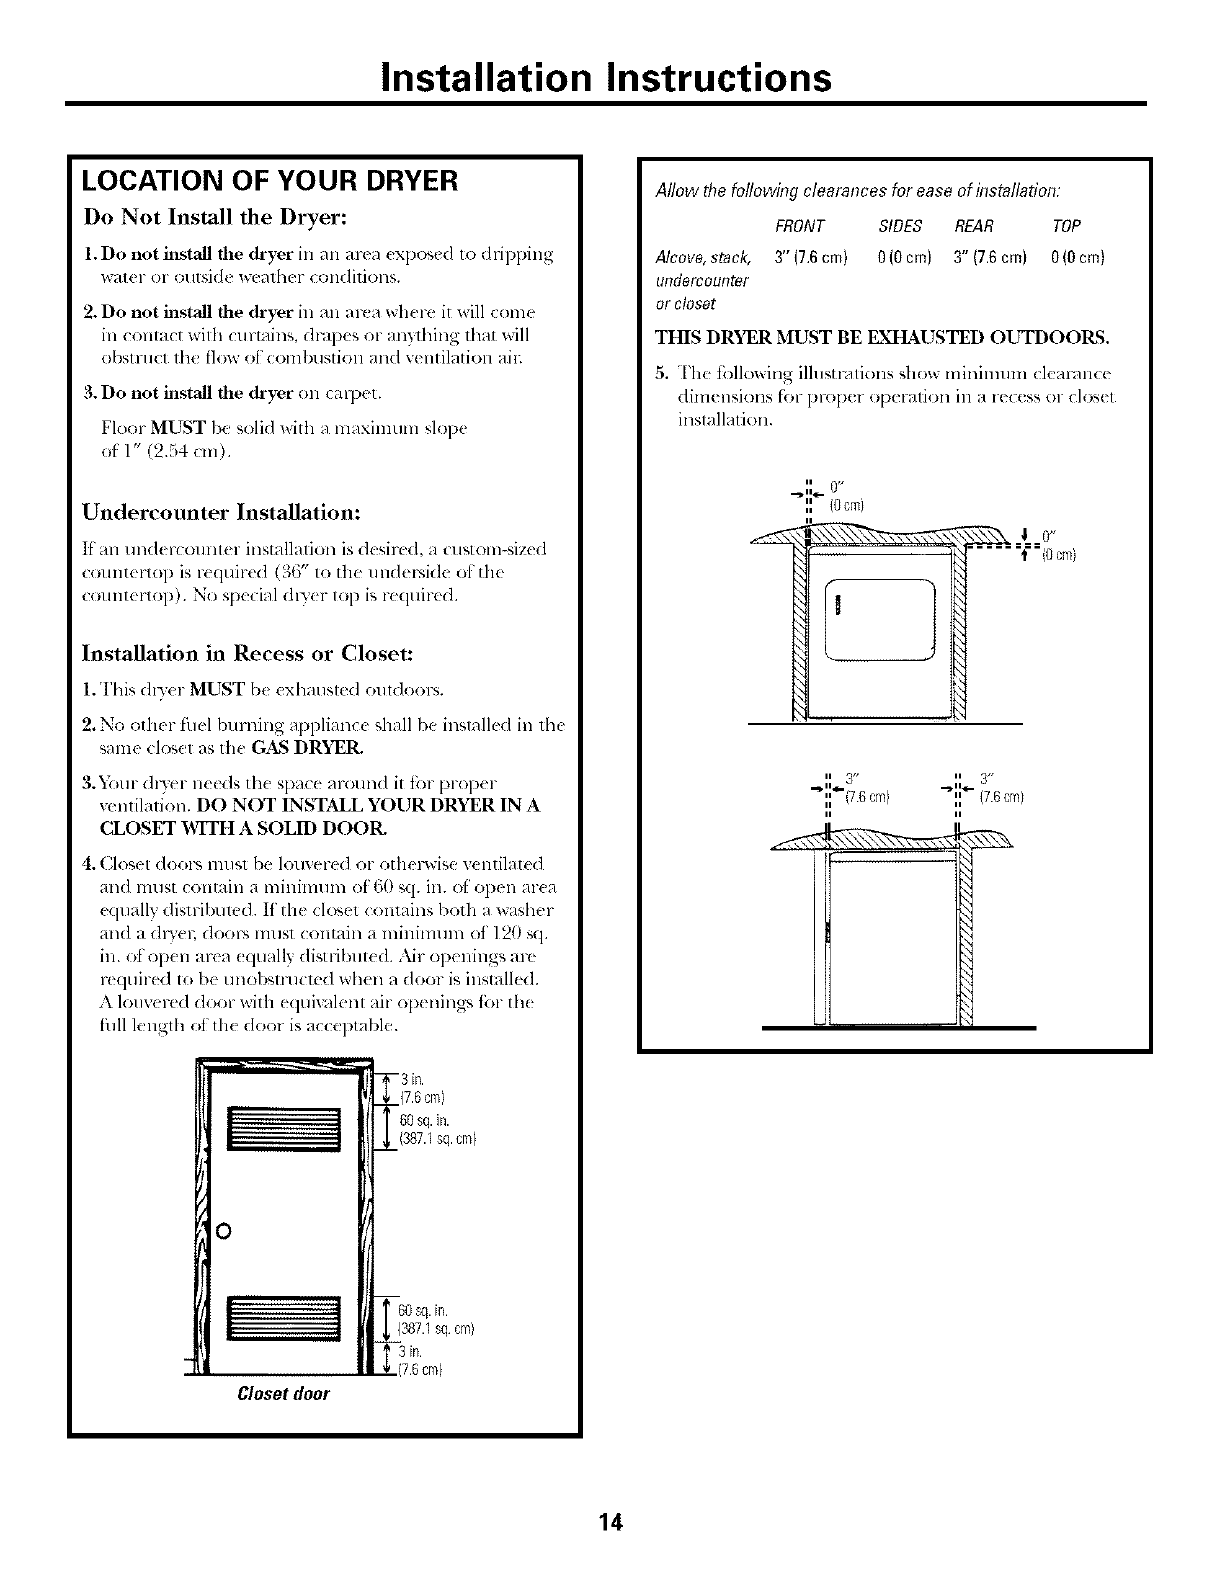
LOCATION OF YOUR DRYER
Do Not Install the Dryer:
1. Do not install tile dryer ill ;In area _xl)_e(I to dril)ping
water or outsid( _t_ather Colldilions.
2. Do not install the dryer in an area whert= it will come
in contact with curtains, dF4pes or anytlaing that will
obstruct th_ flow of conll)ustion and ventilation all:
3. Do not install the dryer (m carpet.
Floor MUST be solid with a maximum slope
of 1" (2.54 cm).
Undercounter Installation:
If an undercounter installation isdesirt,d, a custom-._ized
countertop is l-tquired (36" to the uudel',ide of the
countertop). No spe( ial dl)'_ r top is reqtfired.
Installation in Recess or Closet:
1. This dis'or MUST b_ exhausled outdoors.
2. No other fu_l/)urning appliance shall be insmlk d in lhe
sanlc cl_:_el ;asthe GAS DRYER.
3.'_i_tn- dl3'er n_eds th_ spac_ around it for prop_ r
_ ntilalion. DO NOT INSTALL YOUR DRYER IN A
CLOSET WITH A SOLID DOOR.
4. Closet dool-s must be louvered or othelsvise ventilated
and must contain a minimum of 60 sq. in. _1'open ar(a
equally distribumd. If the closet contains both a washer
and a dlT'en dooc_ lllust contain a minimum of 120 sq.
in. ot open area _qually disuqbut_ d. Nr openings arc
required t_ be unobsnalcmd when a door is installed.
A louvered door with equiv_llent air openilags R_r th_
fllll lenglh ot th_ door is acceptable.
- 3in.
7.6cm}
(387.1sq.cm}
0
!](387.1sq cm)
(7.6cm)
Closet door
Allow the following clearances for ease of installation:
FRONT SIDES REAR TOP
Alcove,stack, 3" (7.6cm) 0 (0cm) 3" (7.6cm) 0 (0cm)
UITdOKCOURtor
or closet
THIS DRYER MUST BE EXHAUSTED OUTDOORS.
5. The ibllowing illusu-mions show minimum clem-4nce
dimensions fi_r proper operation ill a re(ess or closet
installation.
II 0,/
"{Ocm}
ii /J ii 3/,
._1. II.r_ 3 ..,_ I1_-
" (78cm) "(7.6cm)
14

Installation Instructions
MOBILE HOME INSTALLATION
1.Dlyer MUST be exhausted oulside (outdoor% not
beneath the mobile home) using metal (lu(ling lhat will
not support combustion. Metal ducting must lye 4"
(10.16 cm) in diameter with no obstructions. Rigk/metal
duct is pl>fbrred.
2. ltlhe dlyer is _xhausted through 1he t]oon 1he exhaust
system MUST NOT lel-lllill_71[ebeneath Ill{!mobil_
home. "l_!rmination MUST be sectlr( Iv f_lSlelled lo Ih(
l]]O/)i[( h()l]](_ S[l'[l(tl]l'(.
3.When installing a gas dwer into a mobile home, a
provision must be made for out',ide makemp ain This
provision is to be not less than twice the ar(a of the dlwer
exhm_st outlet.
4. Gas (hyers MUST/)( fasten( d to th( lloor using Mobile
Ilame Installation Kil Pul). No. 14-D34(;-33.
5. See the ExhaustSystemRequirementssection for other
important xenling inR)rmation.
6. Installation MUST confi_)Hnto current Mamdactu red
Home Construction & Salbty Standard (which is a
Federal Regulation Title 24 CFR Part 32-80) on
when such smn(/m-d is not applicable, with Americm_
National Standard tbr Mobile Homes, ANSIiNFE\ No.
501 g.
Correct
Incorrect
Don't
The dryeris designedunderANSIZ21.5.I.
ROUGH-IN DIMENSIONS
..... :: V =
Electricalsupply < _
onrear0tunit
21/4"
Gassupplypip_
(5.7cm) f unit
'Z
I I
23/8" _ (34.3cm) +
Torearandbaseexhausts
27" 4=,,-I
i
(68.6cm)
FRONTVIEW
36_"
(91.4 cm}
n
48 1/2"(123.2cm)
toclearopendoor
\
_28 1/2"(72 4 cq_}
27 1/g'(69.2 cm}to front of cabinet
27 3/4" (70.5cm)to clearknobs
28 1/2" (72.4cq_}to dear doorhandle
SIDEVIEW
5"{12 7cm}
Centerline
heightfor rear,
4 3/8"(111 cm)
to side exhausts
to base exhaust
SERVICING- ()msidemlion must be gixen to l)roxid(
adequate cleal'all(Tes t'OFinstallation and s(rvicing.
15
Installation Instructions
ELECTRICAL INSTALLATION FOR
ELECTRIC DRYERS
re(luiremenls for proper and sate eleclfical installation of
your dp, el; Faihne 1o tollow flmse instructions cml (reale
tqectric_d shock and/or a fire hazard.
This appliance MUST be l)roperly grounded.
Elecnical sho(k can re,,uh if the dlTer is not properl)
grounded. Follow th( insualctions in this manual tbr prop( r
grounding.
DO NOT use an (xtension cord with this (h3el; Some
extension cords are not designed to withstand th( amounls
of electrical current this dlTer utilizes and can melt,
creating electrical shock and/or fir( hazm-d. Locate tile
(h)er within reach ot the wall outlet, taking into accounl
tile length of power cord 1o be l)urchased and allowing
s()me slack in tile cord. Refer to EtectricalRequiremontsill
this manual tbr th( prop( r power cord 1o be l)urdmsed.
A [ IAisted strain relid lntlst be instalk d onto pow(r cold.
If the strain relief is not attached, the cord can be pulled
out ol the dwer and can be cut by mw nlovement of the
cord, rcsuhing ill elecnical shock.
NOTE: DI3 e_.'sopec, ting on 208-voh power suppl) will
have longer dlTing tim(s than thos< operating
oil 240-w)h pow(r suppl>
A wiring diagram is locawd under the top panel.
GROUNDING REQUIREMENTS
ik WARNING: ot
the equipmenl_rounding conductor call resuh in a ask of
electric shock. Check with a licensed electrician if you arc in
doubt ms to whether the apl)liance is properly grounded.
The dm.r MUST b( gmtmded. In tile event of a
malftmction or breakdown, grounding will reduce the risk
ol (1( ctrical shock by creating a path ol least wsistance fi%
elecnJcal current.
Grounding nnlst be in accordance with local codes and
ordinan(es, or in the absence ot local c(Mes, in accordance
with the National Elecu-i(al C(Me ANSI!NFE-\ No. 70.
For a grounded, cord-comleclcd elecnic dlTer: It your
&)er is equipped with a power suppl) cold hming an
equipmenlNrounding conductor and a grounding plug,
tile plug MUST be plugged into an appropriate, coppet_
wired r( cel)mcle, in accordance with all local c(utes and
ordinan( es. It in doubt, call a licensed (l(ctviciml.
For a pelananently connected electric dryer:
• The dcvt,r MUST be connecmd to a grounded melal,
permanent wiring s)stem; or an equipnmnl-gromlding
conductor lntlst be llln with the cilvuit conduclol.-; and
connected to the equipm_ at-grounding terminal or lead
on tile applianc(.
For a grounded, cord<ormected _s dryer:
• This dlTer is equipl)ed with a tim,e-prong (grounding)
phlg for)'our promction against shock hazmd and should
be phlgged directly into a properly grounded three-prong
receptacle. I)o llOt ctlt or remove the grounding prong
fiom tills l)lug. I)o not modit_, tile plug on this appliance.
If it will not fit tile outlet, haxe a proper oullel installed
by a qualified electrician.
16
Installation Instructions
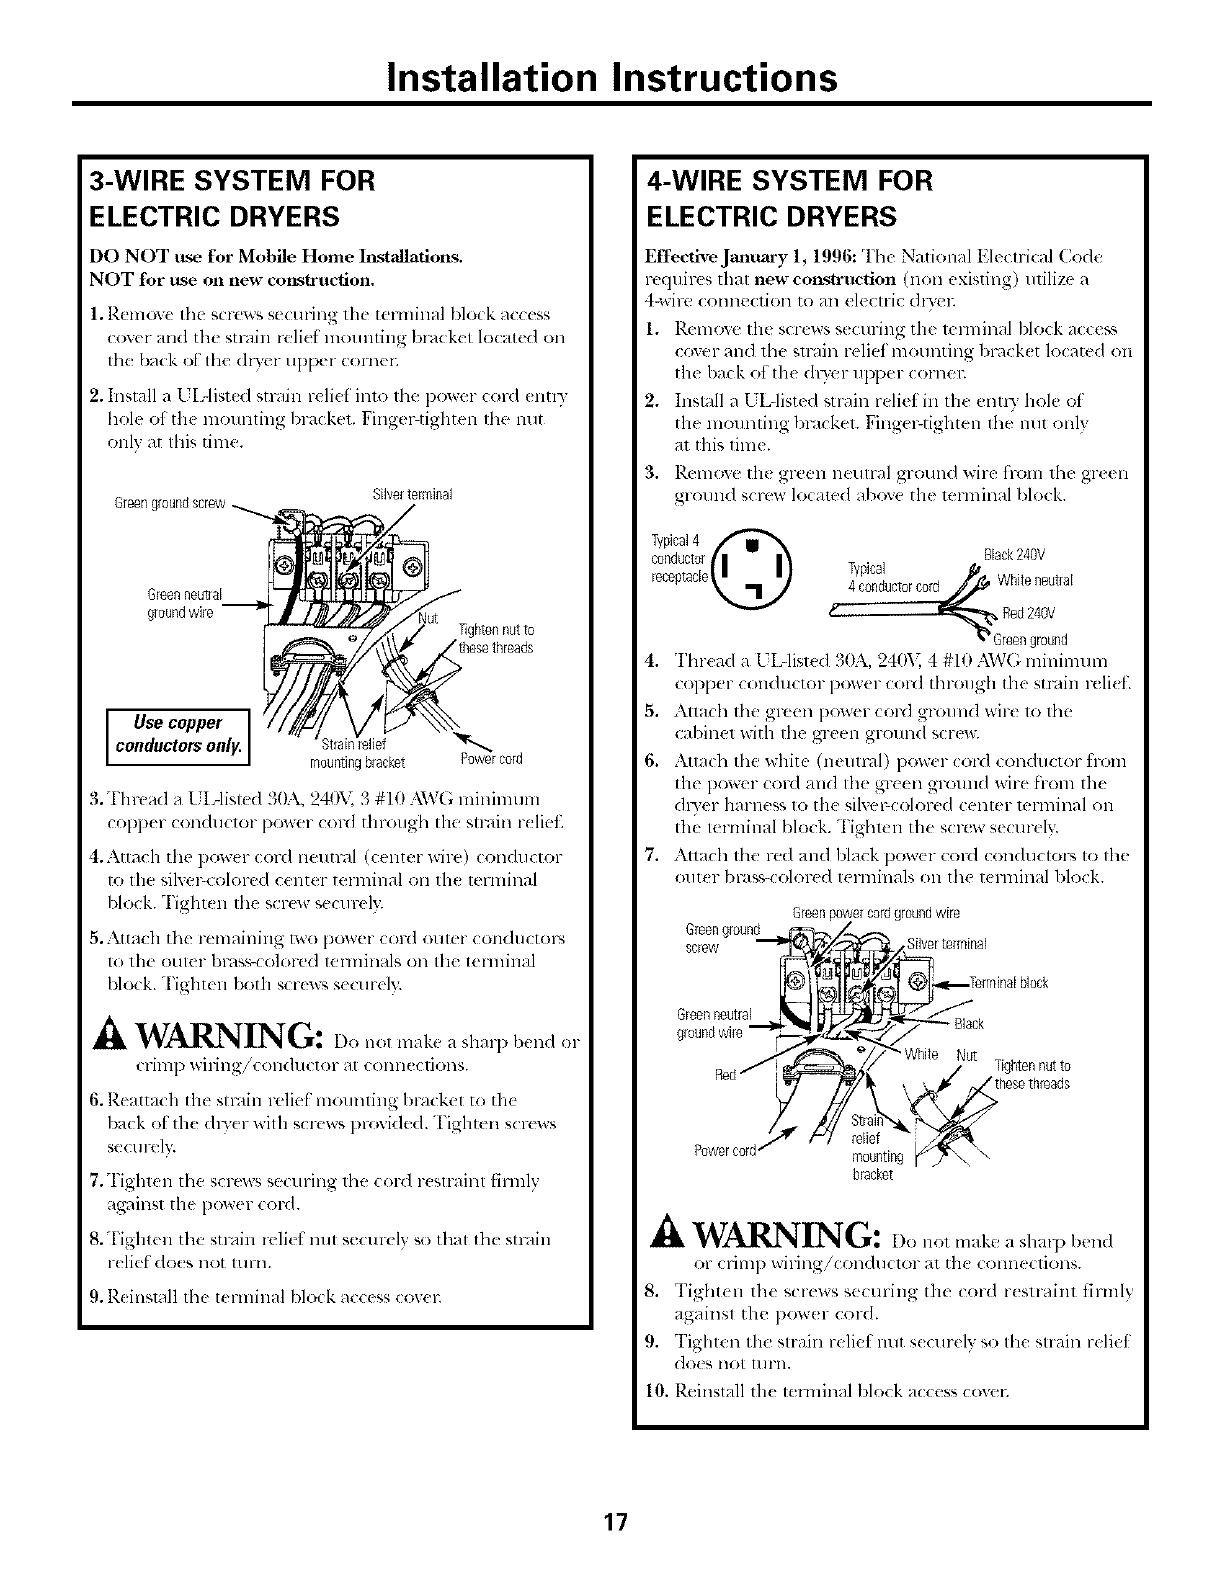
3-WIRE SYSTEM FOR
ELECTRIC DRYERS
DO NOT use for Mobile Home Inst'_ations.
NOT for use on new construction.
1. Remove the screws securing the terminal block access
cover and the strain relief re(ranting bracket located on
tbe back ol tile (h)er UpF,er colnen
2. Install a[I Aisted stalin reli(f into tile power cord (nt*5"
hole of the mounting bracket. Fingel_tighten file nut
only at tiffs time.
Green ground screw
Silverterminal
Greenneural
groundwke lighten nutto
Use copper
condoctorsonl_ _lief _rcord
mountingbracket
3. Thread a [I Aisted 30A, 240M 3 #l 0 AWG mininnml
copper coil(hi( lor power COl-r/through file strain reliet
4. Attach the pow(r co_*t neutral (center wire) conductor
to lhe silvel_colored center terminal on tile telnfinal
block. Tighten tile screw securel>
5. Attach tile remaining two power cord curer conductol_,
to the outer bnts_-colored telminals on the terminal
block. Tighten botll scrcwa s(curelv
WARNING: Do,l,,,,ll ,kesh<.,,.l,I,,,
Cl it,ll) Wil'illg/COll(lllC[Ol" 3t COlllleCliOllS,
6. Reattach tile strain relief mounting brackel m th(
back ot the dlT(r willl screws provided. Tighten s( rews
sectlrelv.
7. Tighten the screws securing tbe cord r(slraint firlnly
against the power cord.
8. Tighten tile stl'ain rclid nut securdy so that the strain
relief do(s not turn.
9. Rdnsmll tbe terminal block access cowl:
4-WIRE SYSTEM FOR
ELECTRIC DRYERS
Effective January 1, 1996: Tbe National Electrical Code
requires tllal new corLstruction (non existing) utilize a
4-wire connection to an elecu-ic dD'en
1. l_.cmoxe tile screws s(curing tile mmfinal block acce_._
c(a-cr and tile SlFdJnrelief mounting bmck(t located on
the back ot the dlTcr upper cornel:
9 Install a UfAisted strain relief in th_ enid3 hole ot
the mounting l)l-dcket. Fingel_tighten file nut only
at this time.
3. Rcmo',e th( green neutral ground wire fl-om tbe gr(en
ground screw localcd above tile mrminal block.
Back240V
Typical _ .
4 conductorcord Whiteneutral
Red240V
v Greenground
4. Thread a L L-list(d 30A, 240"L 4 #10 AWG nfinimum
copper conductor power cord tbrough tile stl'din rclid.
_. Attach tbe green power cord ground wire 1o tbe
cabinet with tile green ground screw.
6. Attach thewhite (neon'all) pow( r cord conductor from
tile power cord and tile green gr_mnd wire h-ore tile
(h_er harness to the silvel=colored center lerminal on
tile ternfinal block. Tigblcn tile scl*!w securdv
7. Attach tbe red and black pow(r cord conductors lo tile
outer bl-as_-colorcd telnfinals Oll the terminal block.
Greenpowercordgroundwire
:::el: gr0ur,d _;_/_/, SNverterminal
, £4 _Terminal block
Greenneutral t?__Blac
groundwire _'_ k
Powercord.,,._t_ fW rend _
mounting(J' _ \
bracket
WARNING: Do,lotm,,l,e ,,e.d
or crimp wiring!con(hlclor at tile connections.
8. Tight(n tile screws secm-ing tile cord r(straint firmly
against tile pow(r cord.
9. Tighten tile strain reliet nut s(curely so the strain relief
(lo(s llot tl]l'll,
10. Reinstall the lemlinal block access coven
17
Installation Instructions
GAS CONNECTION FOR
GAS DRYERS
1. Remove the shipping cap fl-om gas pipe at the rear of
the d13e_;
Conversion to LP Gas: DO NOT connect the (hTer to
LP gas selvice without converting lhe gas _dxe. An I3)
come_sion kit (Pub. No. 14-A038) MUST be installed
by a qualit]_ d gas technician.
a. (:onnect a 1/2" (1.27 cm) I.I). semi-rigid or approved
pipe from gas supply line to the 3/8" (0.1)6cm) pip(
located on the back at the duel: [sea 1/2" to 3/8"
(1.27 cm 1o0.96 cm) reduc( r t_n a connection.
Apply _ln approved lhread se_der their is resistant
to the corrosixe a(fion at liquefied gases on all
pipe connections.
b. Open the shutot] _dve in the gas supply line.
c. "I_:'stall connections by I)_ushing Oll a soal)y water
sohltion.
WARNING: NEVER'I ZST
FOR GAS LF.,AKS WITH AN
OPEN 1,IAME.
2. Connect th{ _.xhaust (hlct lt_ olltside (xhaust system.
I se duct rope to seal all.joints.
3. With the dlTer in its final position, av!just one or more
of the legs until lhe dlTer is resting solidly on all timr
legs. Place a level on lop of' lhe duel: THE DRYER
MUST BE LEVEL AND RESTING SOLIDLY ON
ALL FOUR LEGS.
4. Plug the pow(r cord into a grounded outlet.
NOTE: Check to en,,ure the power is attar circuit
breakerifilse box befit)re phlgRing the power cord
into the outlet.
5. Tt/rn on the power at the circuit breaker/fHse box.
.& CAUTION: ol,e, ti. the,
make sul-( the dla'er area is clear and kS-(e1S-am
Colnlmstible mamrials, gasoline, and oth(r flammable
v;ipors. _klsosee lhat l_othing (such as boxes,
clothing, etc.) obstlucts the flow of combustion
and wqltilation ai_;
6. Run tile d_yer through a c_cle check for proper
Ol)eration.
NOTE: On gas (hTel% 1)eti)re the burner will light, it is
n(cessal) tin- th{ gas line to b( Ned of ain It tile burner
do(!s liar light within 43 seconds th{ fip, t time the d13er is
ulrne(I on, the satbt)" swit(h will shut the burner ot1_ It this
lmpp(ns, ttlrn tile timer to OFF and wait 5 minut(s l>et;._re
making another attempt to light.
7. If)our dlTer does not opel_txe, please review the
Troubleshooting 77pssection in this manual betin-e
(ailing f)_r seP,'ice.
8. Place these instructions in a location near the dlTer for
filture l-efkq>nce.
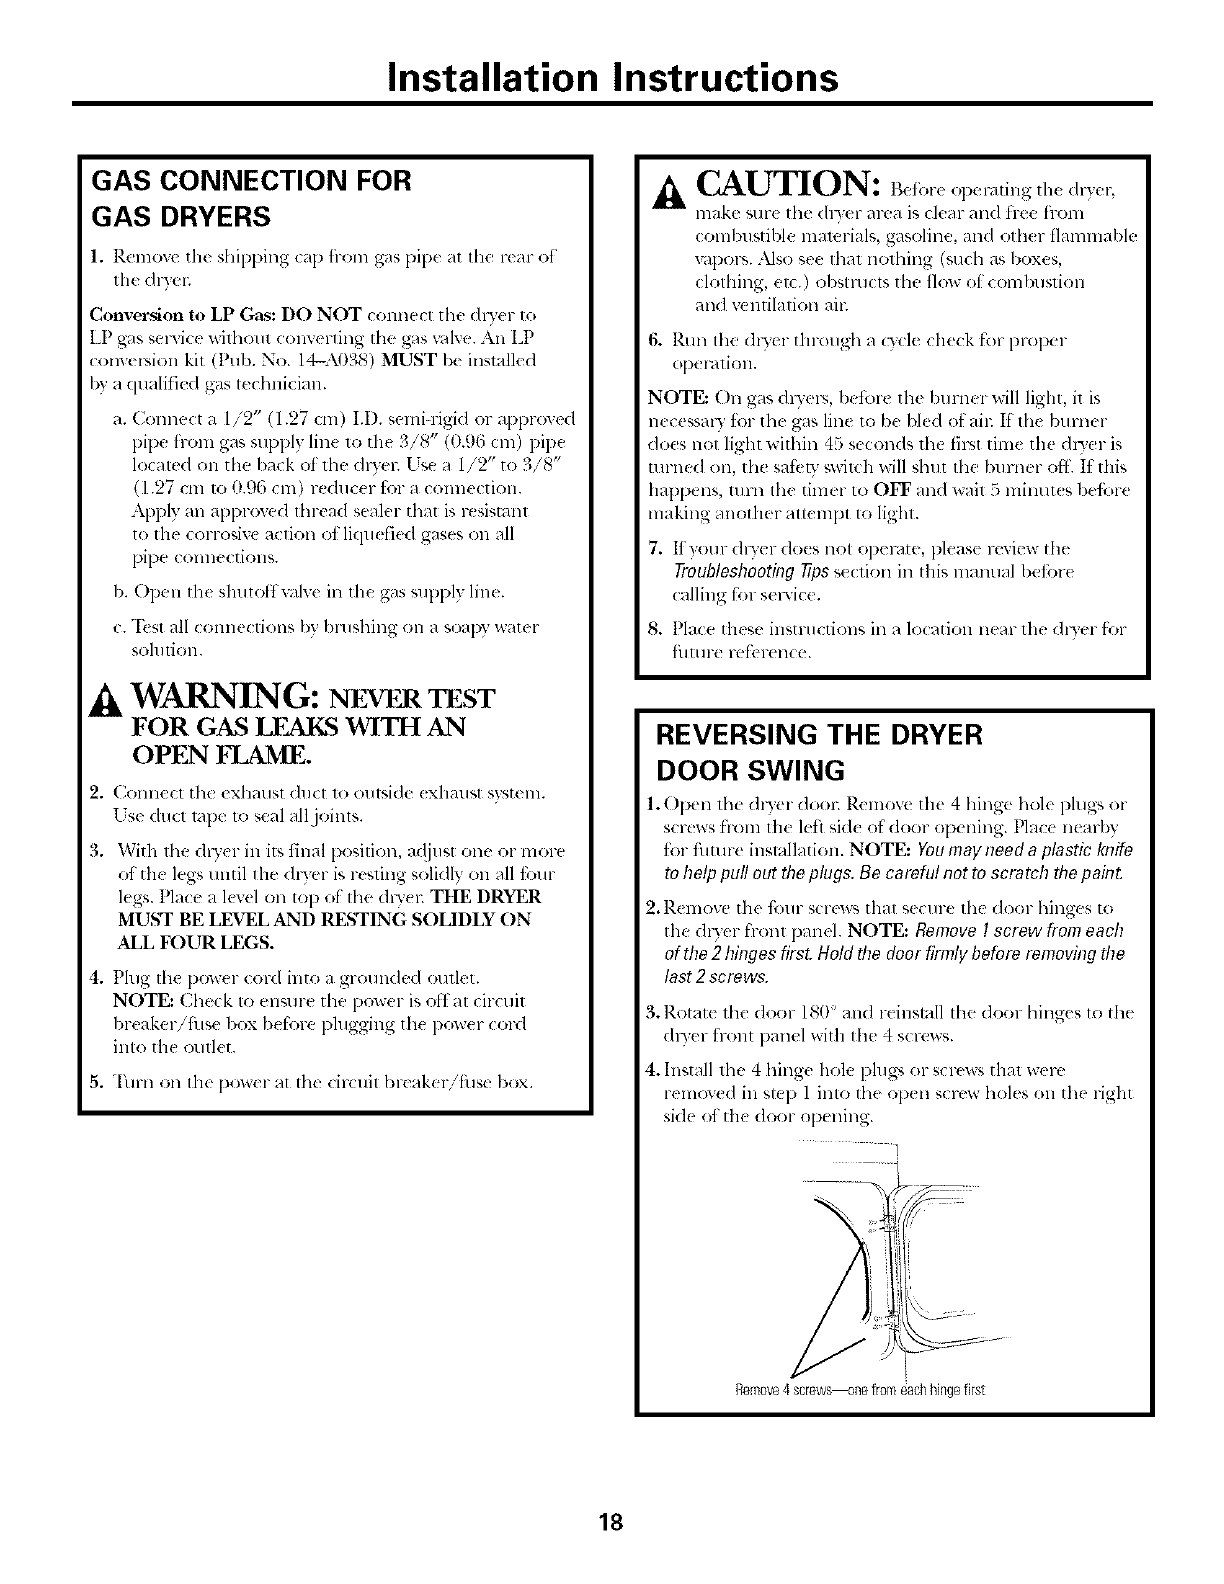
REVERSING THE DRYER
DOOR SWING
1.()pen the dicer dool: Remove the 4 hinge hole plugs or
screws from th_ l_ft si(l_ of door opel_ing. Plac( nearb?
tiw fimlre installation. NOTE: Youmay need a plastic knife
to help pull out the plugs. Be careful not to scratch the paing
2. Remove the t;mn-screws that secure the door hinges to
the d_Ter l¥ont panel. NOTE: Remove I screw from each
of the 2 hinges firsg Hold the door firmly before romouthg the
last 2 screws.
3. Rotate the door l S0 °and reinstall lhe door hinges to the
(h3er h-_mt panel with the 4 screws.
4. Install the 4 hinge hole plug', or screws that were
removed in step 1 into lhe open screw holes on the Hght
side of the door opening.
Remove4 scr_w_one from eachhingefirst
18
Beforeyoucall forservice...
Troubleshoo_ng tips
Save time and money! Review the charts on the following
pages first and you may not need to ca!l for service,
Possible Causes What ToDo
Dryer is tmpingged " .Make ,,ure the diver [_lug, i_'I)ushed (Oral)let( ly into
the outlet.
Fu_ is blovm/circuit hreaker is 'P Check tile building's fus( !(ircuit break(T box and
tripped r(pla(e f_/se or reset breaker. NOTE:Fle(tri( (hT( p_
use two ths(s/breakers.
Thermal limiter tripped • (]h( (k th( xenl fc)r any obstnlctions. Call authorized
sel_ice person tbr replacement, it necessaly.
Fuse is blown/circuit breaker is * Ch(ck the building's thseicircuit breaker box and
tripped, the (hTer may tumble replace h/se or reset breaken D)u l dwer may tumble
but not heat if only one fuse is blown or one breaker tripped.
Gas service is off" **Mak_ sure gas shutoff at dwer and main shutoff are
flflly o[)en.
LP gas supply tank is empty **Retill or replal e tank. Dwer should h(at when utilit)
or flmre has been a utility selvice is restol-ed.
interruption of natural gas
(gas models)
Some shaking/noise is normal. * Mo_,e (hw¢r to an e,,(n floor spa((, or a(!jusl
Dryer may" he sitting tmeveilly ltv(ling legs as n(( (ssalT unlil (xen.
Improper u_ of fabric softener * V(,llo,, clir( (tions on t d),-i, s(,ftener l)a(kage.
Drying dirtyitems wifll clean ones * [ s( }our (hyer to (/13' only cl(an itt ms. Dinv items (an
stain (ltan it(ms and th( (by( l:
Clothes were not completely clean * S()metim( s stains which cannot I)( seen wh(n Ihe
(lofllts at( wet appoarafier (hying. Ls( l)roper
washing l:)ro( edures b( l(n-e dlTing.
Lint f'flter is fuil • CI( an lint screen hefor(, ca( h load.
ImproperOverloading,"Staticelectricitysorting can ath.act lhat *'*'*Separal(S(eSort(likesugg( slionslint(orduroy).l)r(xlu(ersIra-g( loadsin tiffs(Ilk(intos( (tionoh( hill( )small( rund(rones.fi_omSTATIc.lint(olle( Iors
Paper, tissue_ etc., left in pockets * Eml) Wall pot'k( ts before laundering clolhes.
/9
Before you call for service...
Possible Causes What To Do
Overdcying " "fit a thbric s(fft( n_ l:
•,\_!just ('Olltl'ols for less dlying.
No fabric softener was ttsed • "I't) a ihbric soften(t;
Synthetics, permanent press and •"I}ya _hbrie soflenel;
Mends can cause static
Type of heat • Aulomatic drying tinlcs will ,alT a((ording to Ihe tylx.
o[' heal used (electric, natural or LP gas), size ot load,
l}l)es of fal)lJcs, wemess of clothes and condilion ot
_ xhallSl (hl(?ls,
Improper sorthhg • Separate heavy inms trom light_eighl inms (genemlly,
a well-sorted washer load is a well-sotled <liTer load).
Large loa(N of hea+Q_-fabrics (like •I_mge, hea_.Tthbricsconlainmor(mi)islur(an(Itake
t_each towels) long(r to d_y. Separate lalg(, heavy fhbfics into small(r
loads to spe(d (hTing time.
Coll[]l*Ols improperly set • Match control s(ttings to the load you arc dl3ing.
Lint Nter is full • Clean lint fiher bel%re evel_: load.
hnproper or oh,strutted ducti=g • Check hTstallation hTstructions %r proper
du( ring/vetoing.
• Make sure ducting is d_an, fi-ee of kinks and
unobstructed.
• Check to see if outside wall damper operates (asily.
• Check the Installation Instructions to make sur_ the dla:er
VelHillg is COI'I'CC[,
Blown fu_s or/ripped circuit •l_xplac( ti/ses or reset circuit I)reakel_,. Since most
breaker d_?el _,use lwo fus_ s/breakers, make sul-( both art
operating.
Overloading/combining loads • Do not put more than one washer load in the dlser at
a tim(.
Underloadii N • If you are (hTing only one or m-o it(ms, add a fbw items
to ellstll-t' l)l-oI)( 1- tumbling.
Overdrying • S(le(:t asholler dlTing lira(.
• Remove items while thcy still hold _aslight mnotmt of
moisture. Select a LESS I)RY s_ tting.
Lettit_ items sit in dryer after • R(move ilems when cycle ends and tbld or hang
cycle ends immediately.
Overloading • S(pamte lalNe loads inlo smaller ones.
CIothes are wrinkled
Some fabrics will naturally shrink
Mmn w_shed. Others can be
safely w&shed, but will sla'hlk
in the dryer
• "Ib avoid shrinkage, tollow garment cm-t. labels exactl3:
• Som_ imms may 1)e l)ressed back inlo shape after dlTing.
• If you are concerned al)out shrinka_v in a particular item,
do not machine wash or tuml)le (115"it.
2O
ErrorCodes
If the dryer stops, the status lightsflash and the signal beeps, an error has occurred. Press PAUSE/CANCEL Consult the
Error Code Chart below for the possible cause and solution. Make the correction, select a cycle and press START If the
dryer stops, status lightsflash again and the beeping continues, please contact service for assistance.
Possible Causes What To Do
Lint I_ther blocked, ventilation • Remove lint; wash th(' lint t_]lt'r to remove sof_cn('r sh('(t
system dogged or dryer residue. Cl<m ()lit Ihe ventilalion svsleln. R( duc( load
overloaded size.
Push button held too lolg or • Pr('ss buttons lightl7,m_d release. I)isengagc the button.
wedged in the control panel
21
m
Notes.
i
i
i
kt_.
22

GEDryerWarranty.
A# warranty service provided by our Factory Service Centers,
or an authorized Customer Care®technician. Toschedule service,
on-line, 24 hours a day, visit us at ge.com, or call 800.GE.CARES
(800.432.2737).Please have serial number and model number
available when calling for service.
Staple your receipt here.
Proof of the orighlal purchase
date is needed to obtain service
under the warrant_
GE Will Replace:
Anypart ot the dlx(r which t_lils due to a d(fcct in materials o1 workmanship. During this
limitedone-year warranty, (;E will also provide, free of charge, all labor and related sel_dce
costs to r(pla(( tht' (h,lu(tiv(, part.
• Service triDs to your home to teach you how to use
the product.
•Improper hlstallation, delivery or maintenance.
•Faihu-e of the product if it is abused, misused, or used for
other than the hltended pm]_ose or used conmlercially.
• Replacement of the light btdb.
•Replacement of house fuses or resetting of circuit
breakers.
• Damage to the product caused by accident, fire, floods
or acts of God.
•[nddental or consequential daInage cartsed by possible
defects _4th this appliance.
•Damage caused after delivel T.
• Product not acce_ible to provide required service.
EXCLUSION OFIMPLIED WARRANTIES--Your sole and exclusive remedy is product repa# as provided in this
Limited Warranty. Any implied warranties, including the implied warranties of merchantability or fitness for a
particular purpose, are limited to one year or the shortest period allowed by law. I
This warranty is extended to the orighTa! purchaser and any succeeding owner for products purchased for home
use within the USA. If the product is located in an area where service by a GEAuthorized Servicer is not available,
you may be responsible for a trip charge or you may be required to bring the product to an Authorized GE Service
location for service. In Alaska, the warranty excludes the cost of shipphTg or service calls to your home.
Some states do not al!ow the exclusion or limitation of incidental or consequential damage& This warranty gives
you specific legal rights, and you may also have other rights which vary from state to state. Toknow what your
legal rights are, consult your local or state consumer affairs office or your state's Attorney General
Warrantor: General Electric Company. Louisville, KY 40225
23
ConsumerSupport.
gEAppliancesWebsite ge.com
_7 •• T •.....
I ta',x a (lU{stion or n{ed assistance with your al)p]ian( e? "by Ihe (,L Apl)h m({s 1_{/)Slt_ 24 houls a da b
ally (lay o[" ill( V( al-! For gl-ea[el- COllVelli( 11(( _lll(I _sl( l- s( ivi((, yotl Call llO_ (lo'_ll]oa(1 ()'*Mlel"S ._allllals,
Ol-(ler parts or (V(ll s(hedlll( sel_,i(( Oil-lille,
ScheduleService de.corn
Exlx'r GE repair s(IM(e is only ore' slep away ['tom your (Iool; (,(t on-line and schedul( yore- smM(e a your
' ': ' '(( 3' '"'_
cony( nience 24 hours any day of Ill(!v(ar! ()r call 80t).GL(._M_.ES (8 !).4. 2.9 loll during nonnal business hom:s.
RealLifeDesignStudio de.com
GE supports the Lnivm_,al Design concept--l)roducts, sel-,'ices and environments that can/x used by people ot all
ages, sizes and capabilities. _._. recogniz( the need to design for a wide c,mge ot physical and menial abilities and
impairmenls. For details of GE's I nivcrsal Design applications, inchlding kitchen design ideas lot people with
disabiliti(s, ch(ck out our Wet)site t(ulav For the h(aring impair(d, please call 800.TDD.GEAC (800.833.4322).
ExtendedWarranties ge.com
Purchase a GE (xl( n(led warcan y and l(m-n abou special dis¢ounls tha arc available while vour warranty is still
ill (]'t(:CI. 52}11C_tlllmrchas( it on-lin{ allylillle Of call 81)0.626.2224 during normal I)usin¢ ss hotllS. (;E C()llSlllll( 1"
I tome N{rvic(s will still be there ati( 1yOllF "_alTtl41[} 'expires.
PartsandAccessories ge.com
Individuals qualifi(d to service their OWll appliances can have parts or acce_,sories sent directly to their homes
(VISA, MasterCard and Discover cards arc acc_ pted). Olxler ondin_ toda}, 24 houl_, ev(l T day or b) phone at
800.626.2(X)2 during normal busin_ ss hours.
Instructions contained in thN manual cover procedures to be performed by any user. Other servicing generally should be
referred to qualified service personnel. Cautionmust be exercised since improper servicing may cause unsafe operation.
ContactUs ge.com
It you are llOtsatisfied with tile selM(e you receive fi-om GE, contact us on (nn-X_2bsite with all th( d(tails
inchldingyom l)hone numbel; or wl-it( to: General Managel; CllstollleF Relations
(;E Appliances, Appliance Park
Louivdlle, tx_"40225
RegisterYourAppliance ge.com
Register your new appliance on-line--at your convenience! Timely l_roducl registration x_illallow for (nhanc(d
('Ol_lllllllliCaliOll alld I)lOllll)t s( l-vi_( Illl(lel the lel_llS ot VOl/l wall_/llt}', sholll(I the llee(I aFise. YtIll Ilia} also
mail ill the l)r(-prim(d regislration card includ(d in the pa( king lnat(rial.
24
ge.com
{J
L)
L!I
Instrucciones de seguridad ... 2-5
Instrucciones de operaci6n
C6mo cargar U usar la secadora ....... 8
Controles ........................... 6
Cuidado U limpieza ................... 8
Funciones ........................... 7
Instrucciones
de instalaci6n ................. 9-18
C6mo invertir el lado al que
abre la puerta ...................... 18
C6mo prepararse para
la instalaci6n de su secadora ...... 9, 10
Conexi6n de gas para
la secadora de gas .................. 18
Extracci6n de la secadora ........ 12, 13
Instalaci6n el_ctrica
para secadora el_ctrica .......... 16, 17
Instalaci6n en casas rodantes ........ 15
Requisitos del abastecimiento
de gas ............................. 13
Requisitos el#ctricos ................. 11
Ubicaci6n de su secadora ............ 14
Consejos para la soluci6n
de problemas ................. tg-2t
Soporte al consumidor
Garantia ........................... 23
Soporte al consumidor .............. 24
DSXH4 7
®
134867300175D1807P581 49-90313-i01-07JR
f
INFORMACIONDESEGURIDADIMPORTANTE.
LEATODASLASINSTRUCCIONESANTESDEUSAR.
AiADVERTENCIA!
Por su seguridad, debe seguir las indicaciones de este manual para minimizar el riesgo
de incendio o explosidn, descarga electrica, o para evitar da_os a la propiedad, lesiones
personales o muerte.
•No almacene ni use gasolina u otros
vaporesy liquidos inflamab/es en las
proximidades de este o cualquier otro
electrodomestico.
•La instalacidn y el servicio/o deben Ilevar
a cabo un instalador ca/ificado, la agencia
de servicio o el proveedor de gas.
QUEHACERSI USTEDHUELEGAS:
]No hltente encender un fosforo,
oun cigarrillo, o encender cualquier
electrodomestico electrico o de gas.
]No toque ningun interruptor electrico;
no use ningun telefmlo en el edificio.
[] Desocupe el habitacidn, edificio o area
afectada.
[] Llame inmediatamente a su proveedor de
gas usando el te/efono de algun vecino.
Siga /as instrucciones del proveedor de
gas cuidadosamente.
[] Si usted no puede ponerse en contacto
con su proveedor de gas, Ilame a/
departamento de bomberos.
Decreto para hacer cumpfir las leyes sobre tSxicos y agua potable de California
Este decreto requiere que (1 Gobernador de Califi)rnia publique una lista de las sustancias que
el estado sabe que (mlsan c_incel; def_,clos de nacimienlo v otto,, dafios l*_pl-oductivos } requiere clue
los (olnelcianms le adviertan a sus consumidores sobre el potencial de exposici(m a tales susmncias.
Los electrodolm:sticos de gas pueden causar la exposici(m a cuatro d( estas sustancias, concretamente
benc(no, mon6xido d( ca_¢)ono, tl)rmaldehRlo y h4lfn, principahnente causados por la (ombusti6n
incompleta d(l gas natxnv_lo de combustibles El{
Cuando las s(cadoms est_in ajusladas apropiadamenle, se minimiza la combusli(_ll incomplela. La
(xposiciGn a {:slassustancias pued( minimizarse adn m_isventilando aprol:fiadament( la secadora ha(ia
(l '_!XI( FiOl2
2
/NSTALACIONAPflOPIADA
Antes de usarse, la secadora se debe instalar apropiadamente de acuerdo con las Instrucciones
de instalaciSn.
• ( OlleCm la s(ca<hmd a tiell_/de lnallel-d
apropiada que cumpla con todos los c6digos y
,.wdenanzas r_ guladoras. Siga covi (ui,:lado las
Instru( (Jones de inslNaci(m.
•Inslfik la c, ahnac&lela donde no esl£ _XFqlCst:-i
a t_ nlp_ raturas pi)r d(b@_ del punto d(
(Ollg( I_](ii(Hl 0 expt/esla a In illtelllDeli(,
• COl]ecte a till [Olll_tCOITielll{ (lel [_t111a1_1o y d(1
ca]ible aplo[)ia(Ios para evi[ar tllla sO])l_ecar_l
(l&:ltica+
• Remu(va lOdOs los ol_jetos de €mpaqtlelado
ydeshfigase apropiadamente (h todos los
l]]at(?l-i_tles (1(¢ (¢11v1o,
Escape/Ductos.
[_ L}?lS sec_ldOl_s BEBE_ COll[_ll coil escape
_lJ ext elJoE
[_ So|anlenlc use ducto _,de nlelal rfgido de 4" de
('Ii}/111( 11"0 dellllO de l}/s( (}1dOl_l, Sol}tin( 1][( [Ise
ductos de m(tal r(_,ido o flexible de 4" (10.2 cm)
de di_hnetro pard es(al?e h_(ia el exteriol:
ELUSO DE DUCTOS PLASTICOS U OTROSDUCTOS
DE MATERIALESCOMBUSTIBLESPODRiA CAUSAR
UN INCENDIO. LOSDUCTOS PERFORADOS
PODRIAN CAUSAR UN INCENDIO SI COLAPSAN
0 SI OCURREALGUNA OBSTRUCCIONDURANTE
ELUSO 0 DURANTE LA INSTALACION.
Para los detalles compl(tos, siga las Instmccion(s
de inslalacidn.
3
f
INFORMACIONDESEGURIDADIMPORTANTE.
LEATODASLASINSTRUCCIONESANTESDEUSAR.
iADVERTENCIA!
SUAREADESECADO
• Mant( riga el fireadebajo y ah(d(dor (le sus
electrodomdsfit os libre de matefi_des combustibles
(pelusas, papel, lrapos, el(;.), gas4ina, priiduct<_
(lufini(os y oux_s lkluidos y xvlpol>s inflmnables.
• Mantenga el piso alrcdcllor de sus
elecux_/omdsfico,_ limpios y secos pm-,t reducir
la posil)ilklad de u n accidenm.
• Mantenga (1 firea alfededor de la abermra del
extractor y las _h-eascircundantes libres de pehlsa,
polvo y suci(dad.
• No obstm)a el t]ujo (le aire de ventilaci6n.
No cokNue los artf_ulo', de lava&) o las
allbmbrillas (ontra Ix part( fronlal o Ix parte
posterior (/e la secadoF4.
• Supel-vise a los nifios en caso de que ellos usen
Ix secadora o jueguen cerca de ella dumnw su
oper, lcidn. No pennita que los niflos jueguen
con 1asecadora, en su interiol; sobre ella o
ningtin otro (lecn-odonldstico.
• Manmnga todos los artfculos de limpieza (tales
como detmgenms y blanqueadol>s) thera del
alcance de los niflos, plvtbriblemente encen-ados
eel un gabinele. Ponga atencidn alas advertencias
eel las etiquelas de los envas(s pro-4 evitar
acci(lenms.
• Nunca trepe eli se ponga de pie sobre la parte
supelior (/e la secadoe-,i.
4
CUANDOUSESUSECADORA
• Nunca introduzca sus manos en el interior de
In secadoF4 lnientl-as el lmnbor gimlorio esld
moxidndose. Antes de agreg,_r ) sacar rol)a, espere
hasm que el tambor gJralorio s( haya d_tenido.
•Limpie el filtro para pelnsa antes de cada carga
pm_l cximr la _l(umulacidn de pelusa cn cl
interior de la seca(lom o en 1_ habitaddn.
NO OPERELA SECADORASIN ELFILTROPAPAPELUSA
EN SULUGARA MENOS QUELAREJILLADESECADO
EST_EN USO.Siempre leml;,la( e el tilm-_ l;,am lX hill
(umldo t,.q-min(' dc u_n 1_1rcjilla dc _x'ado.
• No law! ni seque artfcuk_ que se ha}vm limpiado,
lavado, remojado o salpicado con suslancias
conlbustibles o explosi_ls (lales como cel-a, aceite,
lfinmm, gasolina, (l_s( ngFasa(lores, solventes d(
tintorerfa, kerosene). E',tas sustancias pr_hlcen
wpores que podrfxn incendiame o (xploml: No
agregue estas suslmlcias _11_Iguade lava&). No us(
ni coloque (stas sustancias ahededor de la
Iax_/(loe'd ose(adom (llll_/llt(_ Sll ILK().
• Cualquier am'culo sol)re (1 cual usted us6 un
solveme de limpieza o que conmnga mateliales
inflamables (roles como patios de limpieza,
mlpeadores, toallas usadas eel salones de belleza,
restmlnmtes o 1)aO)er/as) no se deben colocar en
el interior o ell las pro>:imidades de la secadora.
Existen nmchos art/_ ulos ilffiamables {n (l hogar
tales como 1aa((tona, el al(ohol, la gasolina,
el kerosene, alRunos liml)iadores, algunos
quitamanchas, aguarr,_s, trementina, ceras,
l-eIllovedol-cS de cel'd y peodtlc[os qtle COlltt'tl_an
defivados del peudleo.
• El proceso de lavado pu(de reducir la habilidad
de r(mrdar la fiamabilidad de algunas telas.
Pare evitar tal resultado, siga las instrucciones
del fffl)ficanm de las telas con mucho cuidado.
• No seque aVth ulos que conteng',m soma, plfistico,
espt/llKI o nlmeliales sinlilares roles COll]O SOSt( lies
(blasieres) con relleno, zapalos depolliw_s,
ganchos (le goma, altbmbms el( baflo, baber(_
de nifio, pantalones (1( niflo, bolsas plfisficas y
almohadas que se puedan denetir o quemal:
,_d_tlllOS lllateriales gOlllOSOS, (tlalldo se
calientan, b@) ciertas circunstancias podrfan
ineendiarse por eomlmstidn espont_inea.
• I)urmm. su opemcidn, no almacene encima
de la secadol-a plfisticos, pap(l o ropa que s(
puedan (luemar o derretil:
•Has prendas de vestir etiquetadas "Dryaway from
heat" (Secaralejadas delcalor) o "Donot tumble
dry" (No secarpor giroJ--tales _omo cl'laquetas
salvavidas que (onticnen capo(--no se deben
(olocar ell S[I secadol_.
• No seque arti_ulr_,de libra de vidfio ell SUv'cado_'a.
Esto podria oc_tqonar irrimcidn _n la piel deN&) a
las palti_ ulas w_,lanms (lue s( po(hfan adhefir a la
iT}pa (liil_lelle llS(_; s/Ibse(llellt(% (le la secadol-4.
• Par4 nfinimizar la posibilidad de una (lescarg,_
elOctrica, (lescon{ cte _sm elecn-odom_stico de su
tomacorfiente o d(seonecte la secadom del panel
de distribucidn el_ctrica del editicio removiendo
{1 filsible o descon{ ctando el circuito antes de
dar cualquier tipo (le mantenimiento o limpieza
(con la excepci(m (le wmovcr y liml)iar el tiltro
de la pehlsa). NorA, Pre_,ionar el l)otdn PAUSE
NO (l( s(x)ne(_l el ch,ctr(xlom('sli(x )d(l toma(on i(,ntc.
• NO use ningdn dpo d( limpiador aerosol (n (1
interior o xlrededor de su se(a(lon_.
• No coloque artl'( ulos expue_,tos a aceile de cocinar
(11 la sec_ldOe'd, Los mtf_ ulos COlltalllillados COil
aceites de cl)cinar p(_lrian conn-ibuir a tbnnar una
reaccidn qufmi(a que po(Iria causar que una cmga
de ropas s( incendie.
• Nunca intente opemr dste electrodom_stico
si est_ d_lflado, si no fimciona bien, si estfi
pavci_dmente desmmado, o si le t,than pmtes
o _;slas esl_n lol_ls, inchlyendo daflos al cable
eldcuico.
• El interior de la m_kluina ) la conexi6n del tubo
de es{ape en el interior d( la secadora se (l(b(n
limpiar pot lo mcnos una vez al aflo por pare, dc
un tdcnico calificado. "Q'r la sec(idn COmocargar
yusarla secadora. No use ning6n fipo de
limpiador en a_ rosol l)am limpiar el inmrior de la
secadora. Esto l)odrf_l provocar vapores peligrosos
o tma descmga eldctrk;a.
• Si su secadoca es de gas, Osta est_iequipada con
un en((ndi(Io el& tri_ o mltomfitil o v no necesiht
ut}a hlz piloto. NO INTENTEENCENDERLACONUN
FOSFORO.P_xh/an rcsultar qucmadums pot tenor
Sll lnallO ell las Cel-Calli_lsdel quelna(lor CUalldo
el encendido el6ctrico mltom;itico comienc(.
•Es posible que usted d(see _,uavizar su ropa
o reducir la electricidad est_ilica en ella usando
lllla loalla suavizante pal'd secadom o 1111
acondieionador antiest_kico. Recomen(lanlos
que usted use m_ suaxizant( d( telas ell el cielo
de lavado, de a(t/el-dO ((ill Ins illStltl(( iOlleS
del fid)ricante pal'd estos pl-_Muctos, o tmte un
producto en el que el f_tbricante 1( prol)orcione
mla gamntf_ escrim en el pnquele especifleando
que es seja_tll-Opara HSaF ell las secadol'dS. Los
pvol)lemas (le selxicio o de rendimiento causados
pot estos productos son responsabilidad de
los t_d)ficanms de eslos produclos y no estfin
(ubi( rtos pot la garantfa de dste
d{ cux_domdstico.
CUANDONO 'JSANDOSUSECADORA
•Cuando desconecte _ste electvodomdstico, agarr(
el (nchut_, firmemenm para evimr dafios al cable
el_cu'ico mientrds 1o hale. Coloque el cabl(
el_ctrico ell un hlgar alejado (k las fireas de
mifico pare que nadie 1opise, tropiece o lo
pueda daflal;
•No intenlc hacer relxmlciones o reemplazar
ninguna parte de _ste elecn-odonldstico ni
intente llm_n-a cabo ningun tipo de selvicio a 11o
set que 1orecomiende el Manual del propietmio
o instrucciones publicadas que usted entienda
y tenga la habilidad de llevm-a cabo.
•._m,s de desechar una secadom o tie removcrla
pare darle se_vicio, remue_a la puerul de In
secadom para evimr que algdn niflo se esconda
(11 Sll interi<m
•Yo intent( alt_ 1"drlos controles.
LEAYSIGAESTAINFORMACIONDESEGURIDADCUIDADOSAMENTE.
CONSERVEESTASINSTRUCCIONES
5
Panelde controldela secadora.
SENSOR DRY HIGH
PERMA PRES
DELICATE
45 60
TIMED DRY
MEDIUM • MOR£DRV
• DRY • DRYING
•COOL DOWN
• LE_DR¥ • EXTRACARE •EXTRA CARE
• DAHP • SIGNAL •CLEAN UNT FILTER
• 8 • CONTROL _CK
0 O0 <GO
TEMPERATURE DRYNESS OPTIONS SELECT S_ MUSE
LSJ CANCEL
@ @ *,
Ajustesdecontrol
Ciclos de secado
Ix)s d(l(_ REGULAR,PERMAPRESSyDELICATE(]'run&Is ddi(adas) del(,.xan de man( cam/tom;_ti,,aqxl_ tan
sc_vlscslzhl las wlas. S(:I('(donu MOREDRY(MJssc<l) pm-a Iclas In;is l×"V_das,LESSDRY(Munos sc<O pwa
leb_smils ligems. El ciclo TIMEDDRY (Secado con tempofizado19 s*'cjecutnl:i por el tiempo seleccionado.
TOWELS Paratoallasy prendasdealgod6npesadas.
(TOALLAS)
REGULARParapren@s@algod6npesadasanormales.
PEHMPRESS Paraprendassinarrugas,conpianclladopermanenteodeiicadas.
(PLANCHADO
PERMANENTE}
DELICATESParaienceriay telasdecuidadoespecial.
(DELICADAS)
QUICKDRY Paracargaspequei]asy urgentas,talescomouniformesdeportivosy escoiares.Tambi_npuedeusarse
(SECADORAPIDO)si elcicloanteriordej6algunaspartesh@/edas,talescomecuellosopufios.
DE'WRINKLEParaeliminarlasarrugasdeprendassecaso ligeramentehdmedas.Noserecemiendaesteciclo
(DESARRUGAR)paratelasdelicadas.
TIMEDDHY Ajusteei selectordecicloseneitiempodesecadodesuseiecci6n.
(SECADOCON
TEMPORIZADOR)
Cnidado de
HIGH(ALTO)
MEDIUM
(MEDIO)
telas
Paraprendasdeaigod6npesadasanormales.
Paraprendassinteticas,mezciasy etiquetadasconplanchadopermanenteocalormedioparasecado.
LOW(BAJ0)Paraprendastejidas,deiicadas,sinteticasy etiquetadascomoSecadoa m4quina abaja intensidad.
NO HEAT ParaesponjarprendassincaloEUseelcicloTIMEDDRE
(SINCALOR)
OStart (Inicio)
Cienx la puerta &, la se(adora. Sole( (lone STARTSi abre la puerta (hn'anle la op_ raddn, 6sla se
)
int( rrumpitS, t am r(iui(iar Ia so( adora, (ierr( la l)U(tlay s¢I(colon( STARTparacompl_ tar (l dclo.
6
Segnro de control
Pare evilar inicim"o deten(r
accidenl*dmenw la ol)eraci6n de la
secadora, presione OPTIONS(Opciones)
ySELECT(Seleccionar) al mismo tiempo
mientras (1 indicador del S(guro d( conlrol
est;i eric( ndi(/o. ]'m-adesl)loquear los
conlFol( s, i)resione OPTIONSvSELECT
oll'a V(!Z.
Funcionesdela secadora.
Opcion de serial
(iuando la serial (std (n(en(Ikia _sta (nfitirfi
un sonidojusto ant_s dd final del ddo l)m_t
l-e(ol-d_l-l( qtl( debe sa(al-Sl/ lOI)_L
Si la carla seca no puede sacars(
r_ipidmnente dm-,mm el ciclo, el Selector
de cicl(_s avm_zm-,i a la configul-,wi(m
EXTENDED COOLDOWN (Ent)iado
prolongado). La rOl)a seguirfi se(_hlclose sin
calor dm',mm EXTENDED COOLDOWNy
WRINKLE CARE ((hli(lados ,.ontra ;Ulalgas)
(en algunos modelos) durante 40 nlinut_
para apMar a reducir las armgas en la
rol)a. (]uando CYCLESIGNAL (Serial del
ciclo) estd encendida, emiticJ un breve
sollido (ada (iIlcO lXlillU[OS COIXlO
recoMatorio para sacar la l-opa.
NOTA:
•Si sesacan las prendasantes del fin
del ciclo, presioneel bot6nCANCEL
(Cancelar)dosveces.
•Retire las prendas inmediatamente
despu6s de escuchar la serial Coloque
/as prendas en ganchos para que no se
formen arrugas.
•Use la Serial del ciclo especialmente al
secar telas como tejidos de poli_ster y
con planchado permanente. Estas telas
deben sacarse para que no se arruguen.
Wrinkle Care (Cuidado contra arrugas)
(sc csta opd6n pare minimizm-las HI'I'II_'dS
en la ropa. t)roporciona aproximadamente
15 minutos de secado sin calor una vez (lue
las prendas est_h_ se( as.
Esta olxi{51l s6lo l)tl( (le ( lll])l( ars, c (Oll los
ciclos PERMA PRESSyDELICATE.
Come reemplazar el foco de la secadora
ADVERTENCIA:ea ,,
re(hlcir el fiesgo de desca_ga
eldcnJca, desconecm este apac, m) de
la toma (k corrienlc antt_ de illlt llhlr
darle nmntenilnielm). N colocar los
controles en la posicidn OFF,no se
desconecta el apm',lto de la toma
de corriente.
La luz de la secadom se ubica _ncima de
la ab_ mlc, i de la puerta de la secadora.
Ames de rcemplazar el tbco, asegMese de
desconectar (1 cable d( ( lectricidad o bien
de desconecmr la s( cadoc, I del panel de
distribucidn del immueble r¢lirando el
fusible o 1lien apagando el cortacircuilos.
Parareemplazarla luz dela secadora:
[_Con un deslornilla(Ior de cal)eza
plana pequerio, a/)ra la ])al'le intl.!riot
de la cubierta de la luzy sfi(luela de la
carcasa del foco.
[_ De%alornille el tk>co cuando esl_ frfo
y reemplfic( 1o (on un f:oco adecuado
del mismo val@ o bien de un vat_je
[_ "_kl(Iva a ajtlSlaF la cubierta de la luz
en la carcasa del foco.
Rejilla de secade (onalgunos modetos)
Puede emplear una titil r@lla de secado
pare secar art/culos lales comojuguetes de
pehlche, almohadas o sudmres que se
pueden lawn:
[_ Retire el fihro para pelusa.
[_ Colt_lU¢ la Harm frontal d(b@)(kl I)(nxl(
de la ;Ib(mira d(l fihm l)aca lx:lusa.
[_ Cuando los ol)j(Ios (stUn s,e(os, retire
la rqjilla ycol(xlue (I fihro l)_tla pelusa.
NOOPERELASECADORASIN ELFILTRO
PARAPELUSAEN SULUGARA MENOS
QUEESTECOLOCADALAREJILLADE
SECADO.
NOTA:
•HI r@lla de st'(_ld,., s( debe usm (on
(1 cklo TIMED DRY.
•No us( esta l@lla cumMo t'std st,( mMo
Comocargary usarla secadora.
Siempre siga las instrucciones del fabricante de la ropa cuando lave.
Ideaspara/a c/asificaciOny cargade/a ropa
Como regla g(n(ml, si la l-Opa cs clasificada apropiadam( rite pare la laxadom, estm5 clasificada
No agf_guetoallitas suavizantesonavezla ropase hayacalentadoEstopodriacausarquela ropasemanche
LastoallitassuavizantesacondicionadorasBounce®se banaprobadoparausarsecon todaslas secadorasGEde acuerdo
con lasinstruccionesdd fabricante
Nosobrecargue. Estodesperdiciaenergfay causaarrugas
No sequelossiguieetes articulos:artl2ulosdefibrade vidrio,prendasdolanaquonoseanbvables,artfculos
coorocubrimbntosd_,goma,plbsticos,artfculoscoobofd_,,_plasticoso rdlenosdeospuma
Cuidadoy limpiezadela secadora
El exterior:, Pfisele un u'apo y elimine el polvo
o ru_llquier (lermme du productos de laxm_der/_
COIl till [I'Hpo hlhnedo. Los pl-odtlct()s de
tmtamiento pal-,i quitar mugre y manchas podrfan
daflar el panel de conu-ol de la secadom v afk,ctar
su apafiencia..\plique eslos pro(luclos
a(ierm di_tancia d( la secadora. Luego las lelas
podr_in lax'rose y secal'_e nonnalmenm. Los daflos
callsados a la seca£lol-_ pot estos pl-odtlctos llO est_ll
cubierlos bajo su garantfm
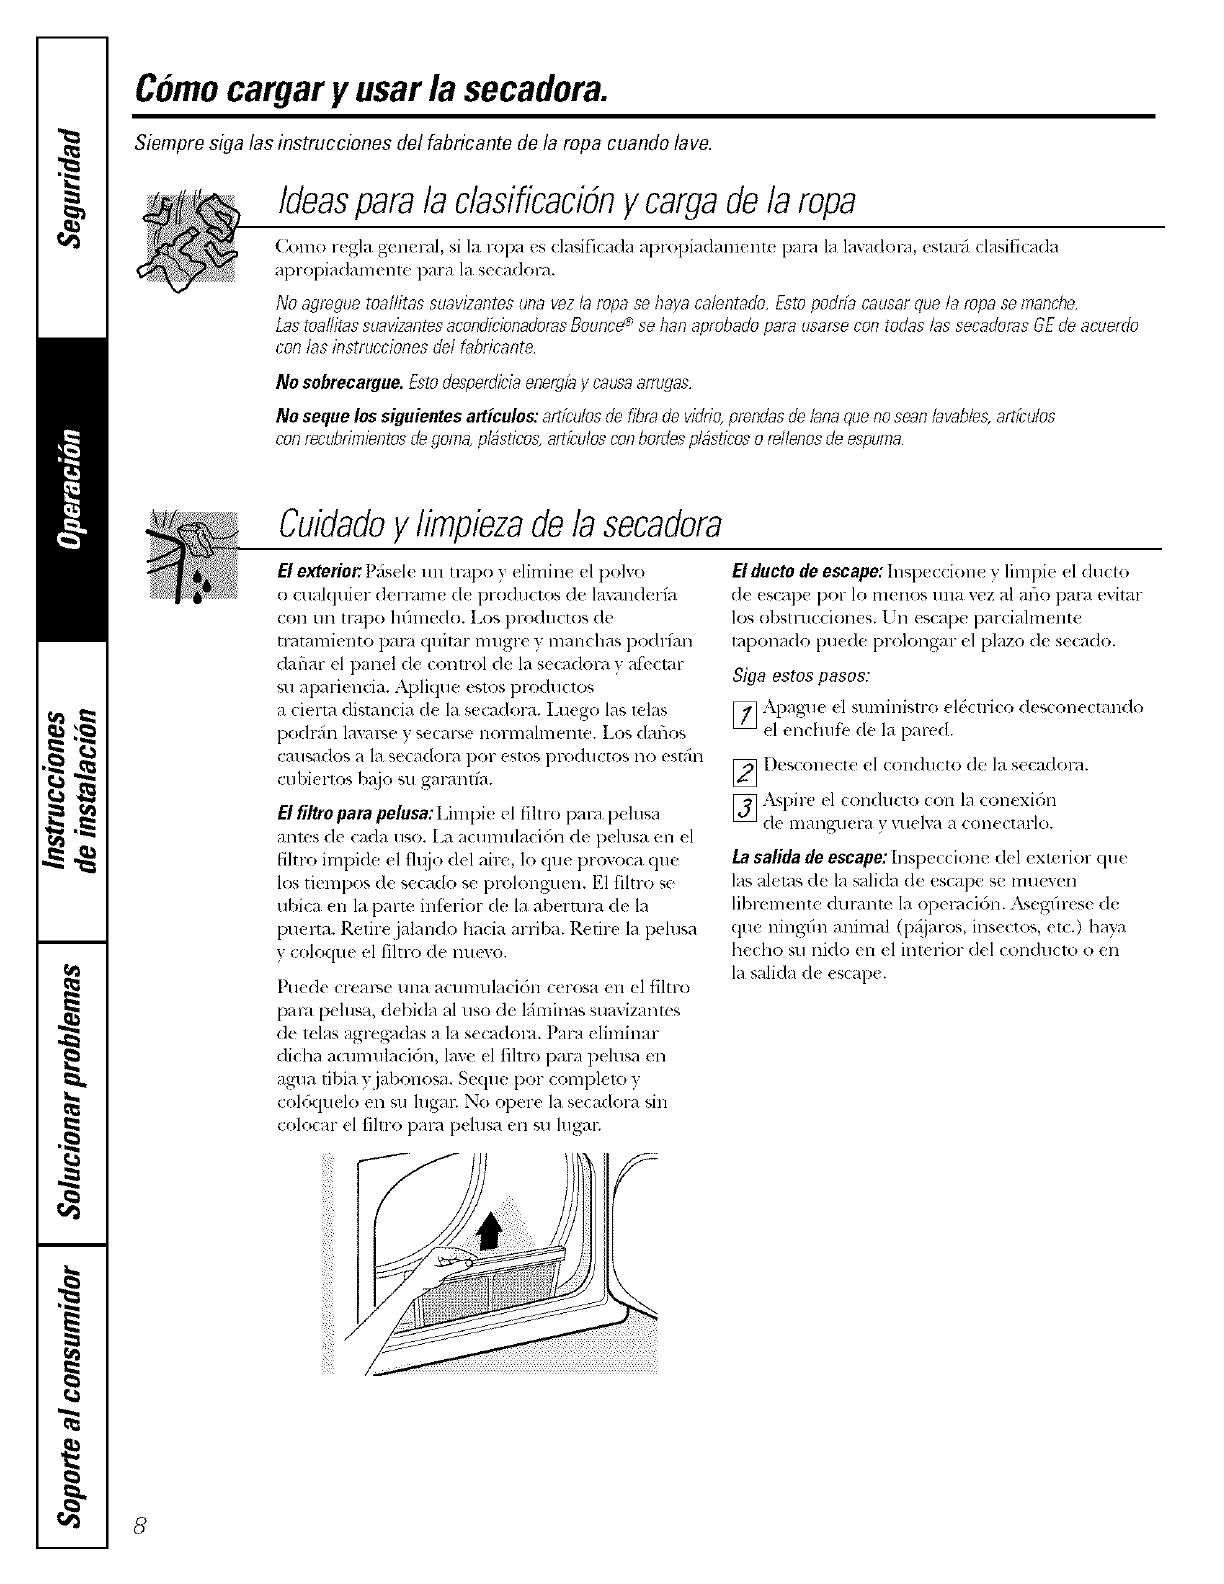
El filtro para pe/usa: Limpi( el fihro pare pehlsa
anws de cada uso. La acumulacidn (h, l)elusa t'n cl
filtro impide el flqjo del nilt*, lo que provoca que
los tiempos (le secado se pvolonguen. E1 filtro se
ubica (11 la parm infbrior de la aberml-,t (le la
puelta. Relirejalando hacia arriba. Retire la pelusa
y colo(ltle el filtro (le micro.
Puede crear_e tma acumulacidn cerosa en el filtro
pal'4 pehlsa, d(bida al uso de lfiminas suavizanms
de telas agregadas a la s(cadol-4. Para eliminar
dicha a(umulacidn, line el filtr()i)am pelusa en
agua tibia yjabonosa. Seque por compleu) y
coldquelo en su lugal_ No opere la secadola sin
colo(ar el fihro pare pelusa en su lugal;
El ducto de escape: ]nspeccione y limpie el ducto
de escape [)oF Io ltlellOS lllla XeZ al aflo ])al-_Jevital-
los obstlucciones, l Jl_ escape pm-ciahnente
mponado puede pl-olongm- el plazo de secado.
Siga ostos pasos:
X )aOll(! (1 SlllllilliSlro (l_clri(o (]es(Oll((Hllldo
[] (l[(_llChll_¢ ' (l(_ la p_ll-e(],
_[)(!S(Oll(([O OI (olldllc[O (1(2 la secadom.
[_ J_l)ir(! el (X)lldllC[O coil 1_1 ('OlleXiOll
La salida de escape: Inspeccione d(l exterior (lue
las alems de la salida de es(ape se mueven
librcmente duranm la opel',lcidn. _¥_eg6r(,se de
(lue ningdn animal (p_]jaros, ins(cto% etc.) ha)a
hecho su nido ell el int(rior (1(1 conduclo o en
la salida de escape.
8
Instrucciones
de instalacion Secad0raSpacemaker
Modelo DSXH47
Si tiene algunapregunta,Ilame a 800.GE.CARES(!.800.432.2737)ovisitenuestrositioWeben: ge.com ]
ANTES DE COMENZAR
Lea detenidamente todas las instrucciones.
• IMPORTANTE -
illStlll((iolleS I)_ll-_ llSO (1(1 ills1)( (tof lo(al.
• IMPORTANTE - C..,pla
los c6digos y ordezmnzas regulalorias.
•Nota aJ instalador - As(gdrese (1_ (kjar _stas
ilISIFIICCiOIleS al IlSllHFiO.
•Nota al usuario - (;uard( (stas inslru((ion_s
I)al_t collstlltas ftl[lll-_lS.
• Nivel de habilidad - la instalaci(m (1( esle
_ lectrodom&lico r(qui_ re habilidades mecfinicas
y(l&:lri( as b_sicas.
•Duracidn - de 1 a 3 horas
• La inslalacidn adecuada es responsabilidad
del inslalador.
• La garamfa no (ubr_ fhllas l)rodu(i(las por
la instalaci6n inadecuada del producto.
EN EL ESTADO DE MASSACHUSETTS
• Este producto debe set instalado por un
plom(ro o insmlador dc gas ccrtiticado.
• Cuando use wilvulas de desa(tiva(idn de gas
tipo bola, dcl)en set de mango tipo "E
•Si usa till (on('( [o[ de g_ts, (*'sit! llo d(!H(" ex(cd('l
los 3 pies (7.6 _m).
PARA SU SEGURIDAD:
ADVERTENCIA
Esta secadol_/(lebe COlltaF con (Xtl_/CtOf al extel-iol;
[7s( 6nicamente metal r/gido obien (hlctos de metal
flexible de 4" de di_hnetro para dicha extmccidn. Us(
ductos (le metal flexible d( 4" de difimetro dentro del
g',_binete de la secadora.
• Nunca useduclos de l)l_:slico uon'o lipo de material
(oml)ustible. Consulte la se((idn Extraccidn.
• Esle al)acato debe estar des(m-gado a tierm y (leber_
instalarse (omo 1o describ( n las presentes Instrucciones
de instalaci6n.
•No instal( o _/llil_lCell( (1 _/l)_/l'dtO elx till _1"({1 (11 dollde
esld (xp:/esto al agua o ala inlenllx:lie. (_onsult( la
s((:ci(m UbicaCiOll do 8U Secador&
El Cddigo Nacional de Gas Combustible (National Fuel
(his (o&) lvstringe las instalaciones de aparams de gas
en coch_ r,_s. Deben estar a 18" (45.7 cm) de distancia
del piso )estar protegidos de los mltos con algdn tip()
de barr(ra. Consulte In s(ccidcl Ubicaci6n do su secodoro.
El servido el6ctrico de la secadol-4 debe cuml)lir con
lo'_ c@/igos y regTuladon( s locales, asf como con la edicidn
mils reciente del Cddigo National sobr_ Elecn-icidad
(National Electrical (ode), ANSI/NFPA 70.
El servicio de gas d( la secadora debe cumplir con 1o_,
cddigos y regulaciovies locales, asf COlllO 1011 la edicidn
m_s reci( nte del Cddigo National de Gas Combustible
(Nalional Fuel (;as Code), ANSI Z223.1. Ia secadom
a gas est_i disefla(la 1)_!joANSI Z 21.5.1 yes pare uso
domfisdeo exdusivamenle. Esm secadom no se
recomienda pac, i aplicaciones (omerciales tales como
wstan c,mtes o salones de belleza.
9
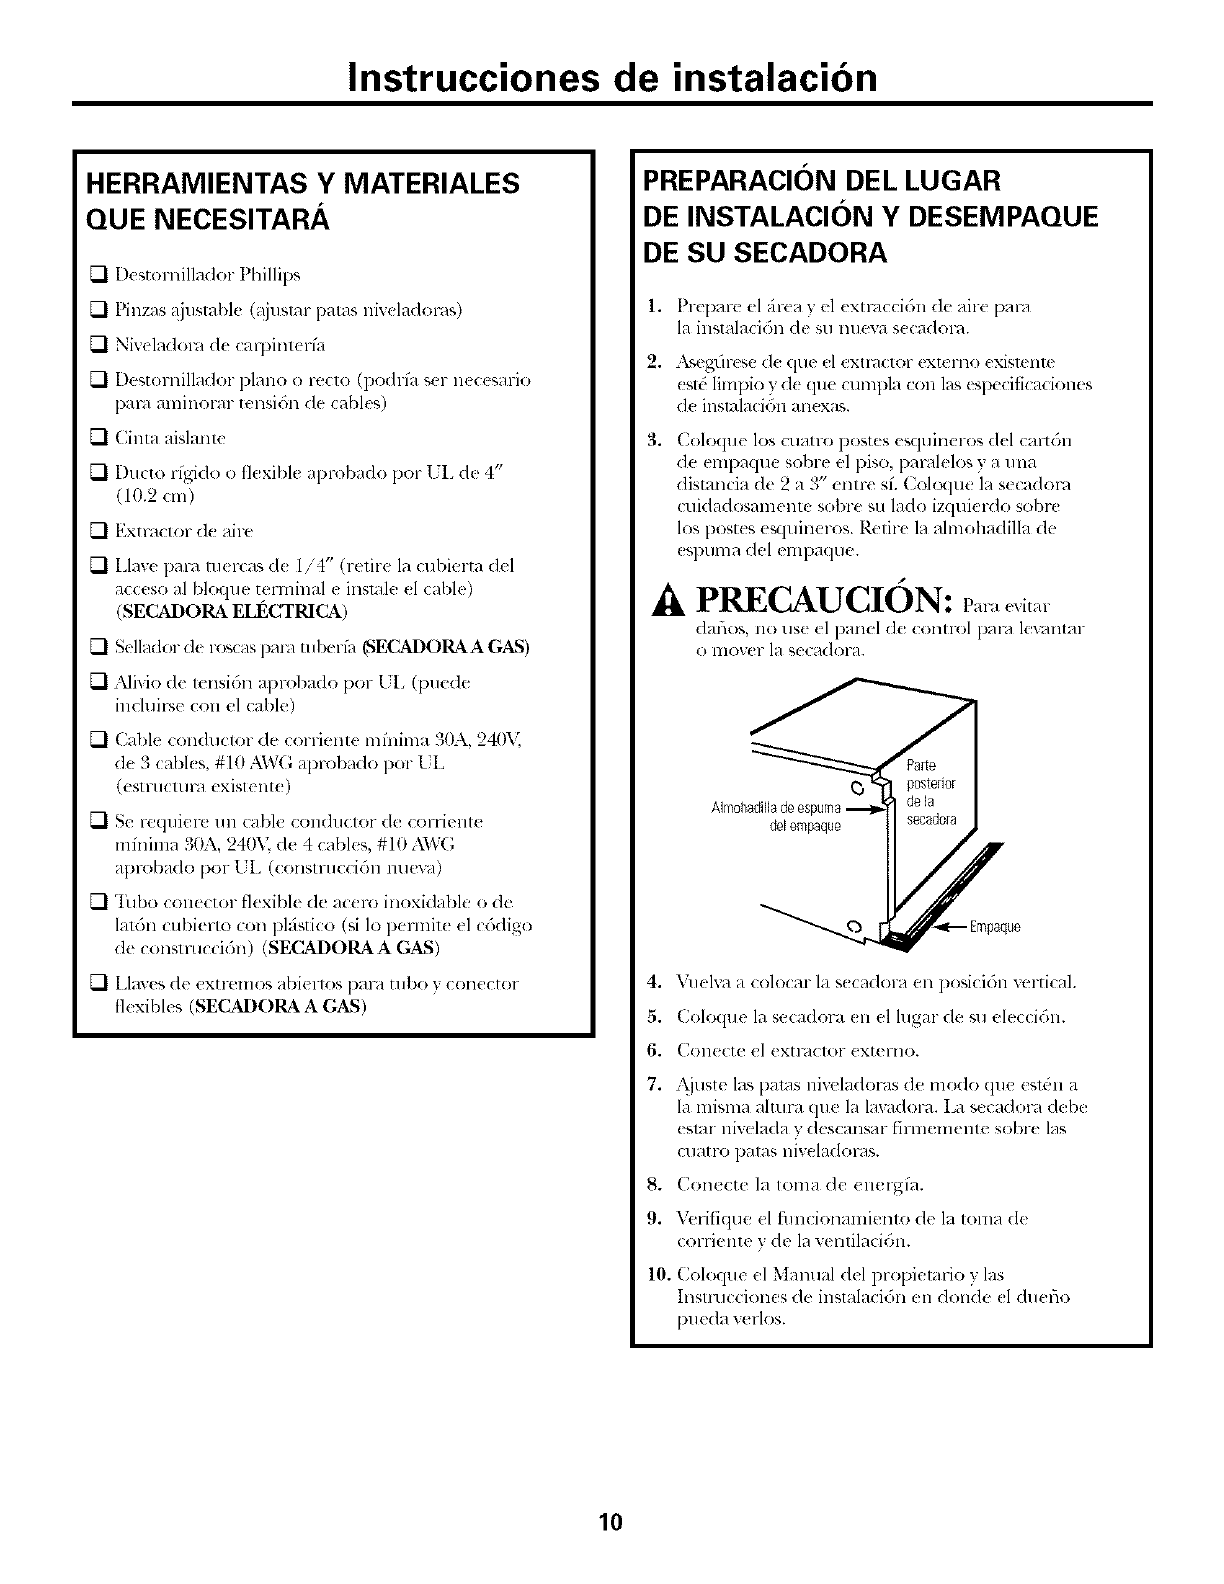
Instrucciones de instalacion
HERRAMIENTAS Y MATERIALES
QUE NECESITARA
U1 Destornillador Pbillips
U1 Pinzas @1stable 0!justar patas niveladoms)
U1 Niveladora de carpint( ri;J
UI Destornillador piano o reclo (podrfa ser n(cesario
pare aminorm- tensidn de cables)
UI (lima aislm_te
F] Ducto rfgido ,.) ilexible aprobado F,or l JL de 4"
(10.2 (m)
[7 Fxtmctor (1_ aire
[7 Llave pare IIl( Fcas ([( 1/4" (relire la cubierm del
acceso al bloqu_ telminal e inslale _1cable)
(SECADORA ELI_CTRICA)
U1Sdl;Idor d( lOSC}lSpare tulx lfa (SECADORAA GAS)
[7 _Miviode lensidn al)robado pot [L (puede
inchlirs( con el cable)
. .. o (
V] Cable (ondu((ol de (Olllellle I]]IIIlD],I O{}:k, 24(A,
d( 3 (II)I(s,#10A\_,G I) ob d >)( UL
(esl FIICIII 1_1 exislen[( )
[7 Se l-eqlliel-e 1111cable COll(hlctOF d_. COFliellt(
minima 30A, 240X de 4 cables, #10 AWG
aprobado por'UI. (COIIStYtlCCiOII IllleV_/)
U1 Tubo COllector flexible de acero inoxidable o de
laldn cubierto con plfistico (si 1o permit( (1 cddigo
de construccidn) (SECADORAA GAS)
KI Llm'es d< ex[I'(_lllOS abi( rlos l)al-_) [llbO y collec[or
fI( xibl( s (SECADORA AGAS)
PREPARACI()N DEL LUGAR
DE INSTALACION Y DESEMPAQUE
DE SU SECADORA
1. Prepare el firea y el Cxlmccidn de aire pare
la insudacidn de su mleva s( cadora.
2. 2'_,(gl]l'(S{ (l( (11/( _1(!XIl'd([Ol" (X[(I'IIO (XiSN 111(
(sl( _limpio 7"d( que cumpla con la_(specificaciones
(1( insmlacidn an(xas.
3, Coloque los cuam, postes esquineros &l cal-tOll
de empaque sobre el piso, pamlelo _,y a una
distancia de 2 a 3" entrc sL C4(xlU_ la s(cadol-,i
cuidadosamente sot>re su lado izquierdo sobre
los postes e_luineros. Retire la almohadilla de
(spuma del empaque.
(!_/l_lOS, llO US( (1 l)allel (le (OllH-ol p_ll_t lev_lll[al-
O I]IOV( 1" l{l seca(Iora.
Almohadilladee!
delempaque
4. Vuelva a colocar la s( cadora en posicidn vertical.
5. Coloque la secadol-,i (11el lugar de su eleccidll.
6. Conecte el extmcior (xterno.
7. Aiuste las paros niw'ladoFas de modo que esldn a
la misma almra que la lmadora. La secadom debe
esmr nivelada v descansar firmemente sobre las
cuatro paras niveladoms.
8. Conecte la toma de (nergl'a.
9. \\qilique el funcionamiento de la toma de
corriente y de la ventilacidn.
10. Coloque el Manual del propietafio y las
Instmcciones de instalacidn en donde (1 duefio
pueda verlos.
10
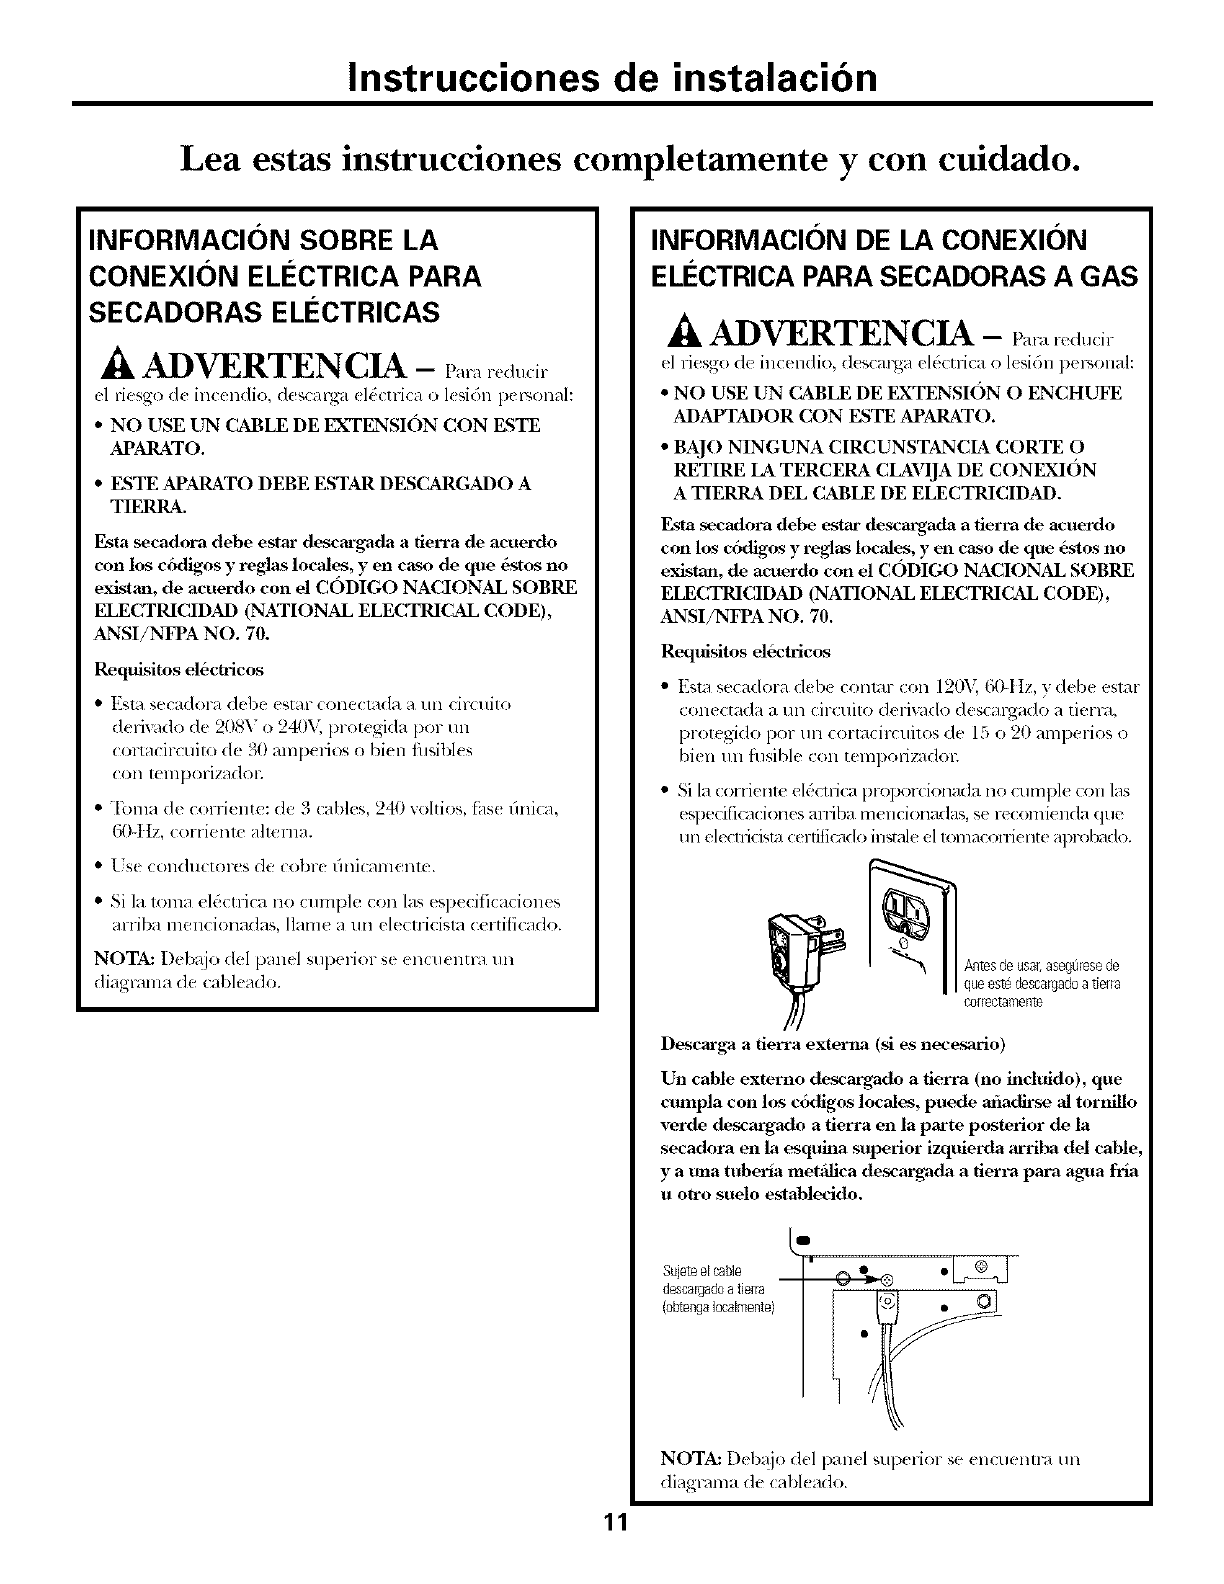
Instrucciones de instalacion
Lea estas instrucciones completamente y con cuidado.
INFORMACION SOBRE LA
CONEXION ELI_CTRICA PARA
SECADORAS ELI_CTRICAS
AADVERTENCIA -
el riesgo d_ incendio, descalga d_ ctrica ol_sidn p,_l_onal:
• NO USE UN CABLE DE EXTENSION CON ESTE
APARATO.
• ESTE APARATO DEBE ESTAR DESCARGADO A
TIERRA.
Esta secadora debe estar descm-gada afierra de acuerdo
con los c6digos y reglas locMes, yen caso de que 6stos no
existan, de acuerdo con el cODIGO NACIONAL SOBRE
ELECTRICIDAD (NATIONAL ELECTRICAL CODE),
ANSI/NFPA NO. 70.
RequL_itos el6ctricos
•Esl_ secadol-a debe est_lr (one(l_da a 1111cir_uito
deriv_ldo de 208V o 240X; prolegida pot un
<ortacircuito de 30 amperios o bien fusibles
(2011 teln[)oFizadol;
•"I))ma & c<)rrient{: de 3 (aMes, 240 voltios, fas< 6nica,
60-11z, (orrient,.: ah,.:rna.
•_S( (Olldll([Ol'(!sde cobFe/]lli(_ll_l(!llle.
• Si la loma el_ctrica no cumple con las esp(cificaciones
arliba mencionadas, llame a un eleclticisla (ertificado.
NOTA: I)eb@) del panel superior s_ _ncuentm un
diagmma de cableado.
11
INFORMACION DE LA CONEXION
EL¢CTRICA PARA SECADORAS A GAS
,ik ADVERTENCIA -
el riesgo de incendio, (1(scarga eld(trica o 1(sidn pel:solml:
• NO USE UN CABLE DE EXTENSION O ENCHLWE
ADAPTADOR CON ESTE APARATO.
BAJO NINGUNA CIRCUNSTANCIA CORTE O
RETIRE LA TERCERA CLAVIJA DE CONEXION
A TIERRA DEL CABLE DE ELECTRICIDAD.
Esta s_cadora debe estar descargada a tierra de acuerdo
con los codigos yreglas locales, y en caso de que dstos no
existan, de acuerdo con el CODIGO NACIONAL SOBRE
ELECTRICIDAD (NATIONAL ELECTRICAL CODE),
ANSI/NFPA NO. 70.
Requlsitos eldctricos
• Esm secadora (let)( conmr con 120V, C_-tlz, ) debe estar
conectnda a un circtfito defi_ldo descargado a tierm,
prot(gido por un cortacircuitos de 15 o 20 amperios o
bien un filsible con tempovizadol:
• Si la corrienle eldcll-i(a propor(ionada no cuml)le con las
esl)eci[iGiciones arl'iba lllellCiOlla_las, se F(COIlli( llda qtle
un electficista c_ rtificado instale el lonlacolli{ rite apr_)l)ado.
Antesde usa);aseguresede
queestedescargadoa tierra
corlectamente
Descarga a tierca exterIm (si es necesa_o)
Un cable externo descargado a tierra (no inchfido), que
cumpla con los cddigos locales, puede afiadirse al tornillo
verde de_argado a tierra en la parte posterior de la
secadora en la esquina superior izquierda arriba del cable,
y a una tuberia met'Alica descargada a tierra para agua fria
uotto suelo establecido.
L"
descargadoatierra
NOTA: I)eb@) del panel superior se encuenlra un
diagmnm de cabl_ ado.
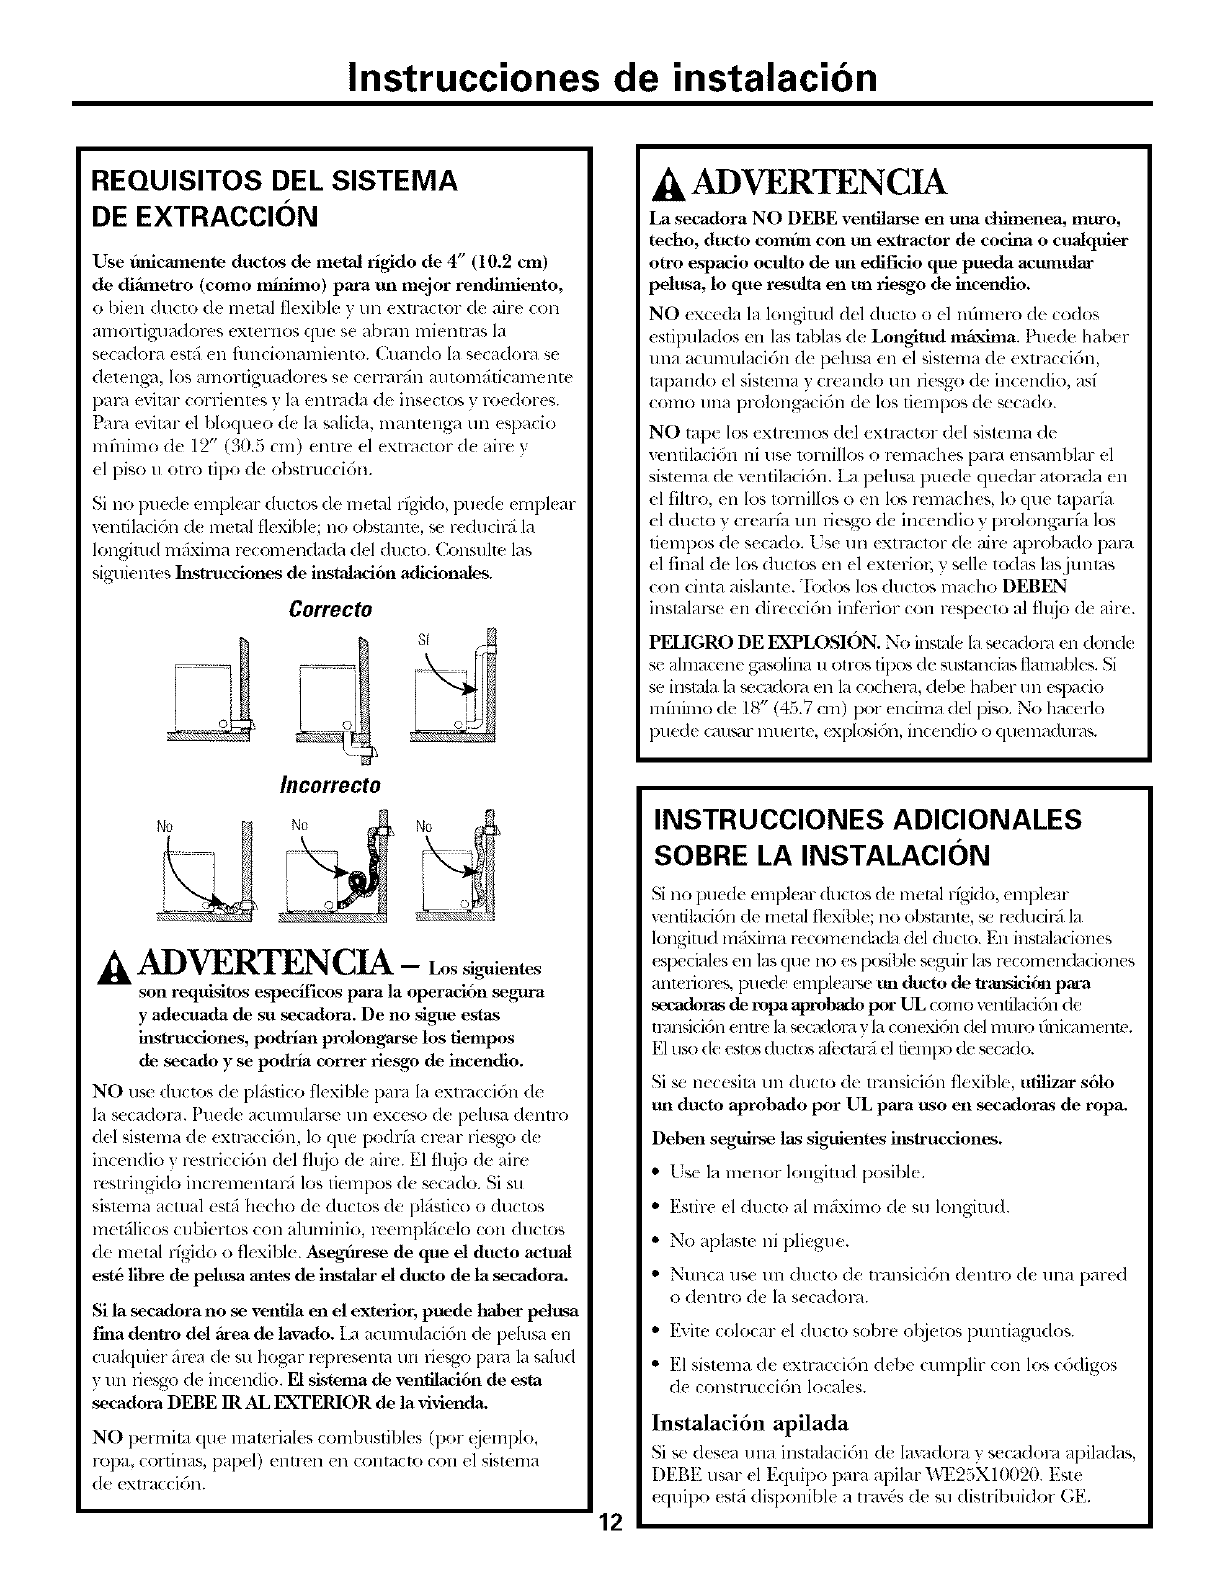
Instrucciones de instalacion
REQUISITOS DEL SISTEMA
DE EXTRACCION
Use 6nicamente ductos de metal rigido de 4" (10.2 cm)
de diSxnetro (como nfinimo) para ml mejor rendimiento,
o bi(n ducto de metal flexible y un exlFd_ lor de aJre (oil
alllOl-tiy2,11a(lol-t.s,extel-llOS qlle se abl_lll lllielltt-_Js la
secadora est5 en fimcionanliento. (]uando la secadom se
detenga, los amortiguador(s se cerrm-,in amom_ificamente
pare evimr corrientes y la entmda de insectos y roedores.
Pare eximr el bloqueo de la salida, manmnga un espacio
mfilimo de 12" (30.5 cm) entre el exmlctor d( aire v
(1 piso u otvo tipo de obstruccidn.
Si no pucde emplear ductos de metal rl'gido, pu(de empk ar
w,ntilaci61_ d( metal flexibk ; no obstanm, se reducini In
longimd mfixima recom( ndada del ducto. Consulte las
siguienms lrtstrucciones de ins'talacidn adicionales.
Correcto
Incorrecto
--it,ADVERTENCIA - Lossiguientes
son requisitos esloecificas para la operaci6n _g_a
y adecuada de su secadora. De no siglle estas
instrucdones, podrlan prolongarse los fiempos
de secado y se podrla correr riesgo de incendio.
NO tl_ ductos de pl_istico flexibl( pm',_ la extraccidn d(
la secadora. Puede acumulm-_(' un exceso de pehlsa d( ntro
del sistema de extraccidn, 1o que podrla crtar riesgo d_
incendio } wstriccidn del fll{jo de airc. El fh{io de aire
restringido incrcm_ ntarfi los tiempos de secado. Si su
sismma iculal _stfi hecho de ductos de plfistico o ductos
metfilicos cubieru)s con ahuninio, l-cemplficelo con ductos
de metal rlgido o flexible. As_ese de que el ducto actual
est6 llbre de pehLsa antes de instalar el dtmm de la secadora.
Si la secadora no se veaztilaen el exterior, puede haber pehtsa
f'ma dentro del fireade lawado. La acumulacidn dc pchlsa cn
cualquk r _irca de su hogar leprt:s_.qlla[111 ri_,sgo l)al',/ la vlhld
y un fi(sgo de incendio. El sistema de ventilad6n de esta
seeadora DEBE IR AL I!XFERIOR de la vivienda.
NO permiln que malcriales combustibles (por @mq)lo,
rol)a_ cortinas, papel) enH*m ell contacto con el sistema
de extracci_;n.
.6, ADVERTENCIA
La secadora NO DEBE ventilarse en tufa chime_ea, muro,
techo, ducto comfin con un extractor de codna o cuakluier
otto espacio oculto de un edificio que pueda acttmtdar
pehtsa, 1o que resulta en tm riesgo de hlcendio.
NO exc(da la longimd del ducto o el nfimero de codos
esfipulados en las mblas de Longitud maxima. Puede hal×r
una acumulacidn de pelusa en el sistcma de exn-accidn,
mpando el sistt may crcando un riesgo de incendio, asf
como una prt+)ngacidn d( los fiempos de st cado.
NO tape los extrcmos del exmlctor (1_1sistema de
vcntilaci(m ni use lornillos o remaches pare ensamblar el
sistema de ventilacidn. La pehlsa puede quedar aloi',lda (ix
el fihro, en los tornillos o en 1o_,remaches, 1oque tapaffa
el ducto y crearfa ml liesgo de incendio y prolongari_ los
lieml)os de secado. Use un exmtclor de aire aprobado pm-a
el tinal tle los ductos ell el (xterio_; ) stile todas lasjmllas
con cinta aislante. "Ii,'(l_ los ducu_,, macho DEBEN
instalars( (n dirccci6n infbrior con r_q)ecto al flujo de aire.
PELIGRO DE EXPLOSION. No instale la _,ecadom en dond{
se ahnacene ,_lsolina u otros tipos de ausmncias flamables. Si
se in_l_flala secadol-,i ell la c(,'dlem, (lel_ _halter un e_,pacio
mfifimo de 18" (45.7 cm) l_l endma del piso. No hacedo
puede cml_sunluerte, explo,;idn, in(endio o quemadum_,.
12
INSTRUCCIONES ADICIONALES
SOBRE LA INSTALACION
Si no pued( empl(ar ductos de meted r_gido,emplear
w_ntiladdn de metal flexible; no obsmnte, s*_r_ducinl la
longiuld m£%na recomendada del ducto. Ell insmladones
eslx.ciales en lasque no es lx_sil)leseq3firlas wcomendndones
antefiores, puede emplem's**tm ducm de trmMd6n para
s_a&_ras de mpa Nx_obadotx_rUL cotno xv:lllila(i(3n(le
mmsicidn enlrc la _*.cat/cn_ty la conexidn del muro fini(amenm.
E1tl_ de est(_s(hlct_,bNi:ctm_iel fiem[x) (It'_*'cado.
Si se n(cesim 1111(lucto de tlansicidn flexible, u"_zar s61o
un ducm aprobado por UL para ttso en secadora_ de ropa.
Deben seg_irse las sig_ientes hlstruccione_.
• Lse la menor l(mgimd posil)l(.
• Estire el ducto al m_ximo de su longimd.
• No aplasm ni pliegue.
• Nunca use m_ ducto de tmnsicidn (lenu-o de una pared
o delltl-O d(: la s( cadol-,_.
• Evim colocar el duclo sobre ol_jetos punliagudos.
• El sistema de extr,_ccidn debe cumplir con los cddigos
de constru(cidn locales.
lnstalacidn apilada
Si se desea una instala_ idn dc lmv_dora y s_cador, i apiladas,
DEBE usar el Equipo pm-a apilar "_,_25X10020. Este
equipo estfi disponible a traxds de su distribuidor GE.
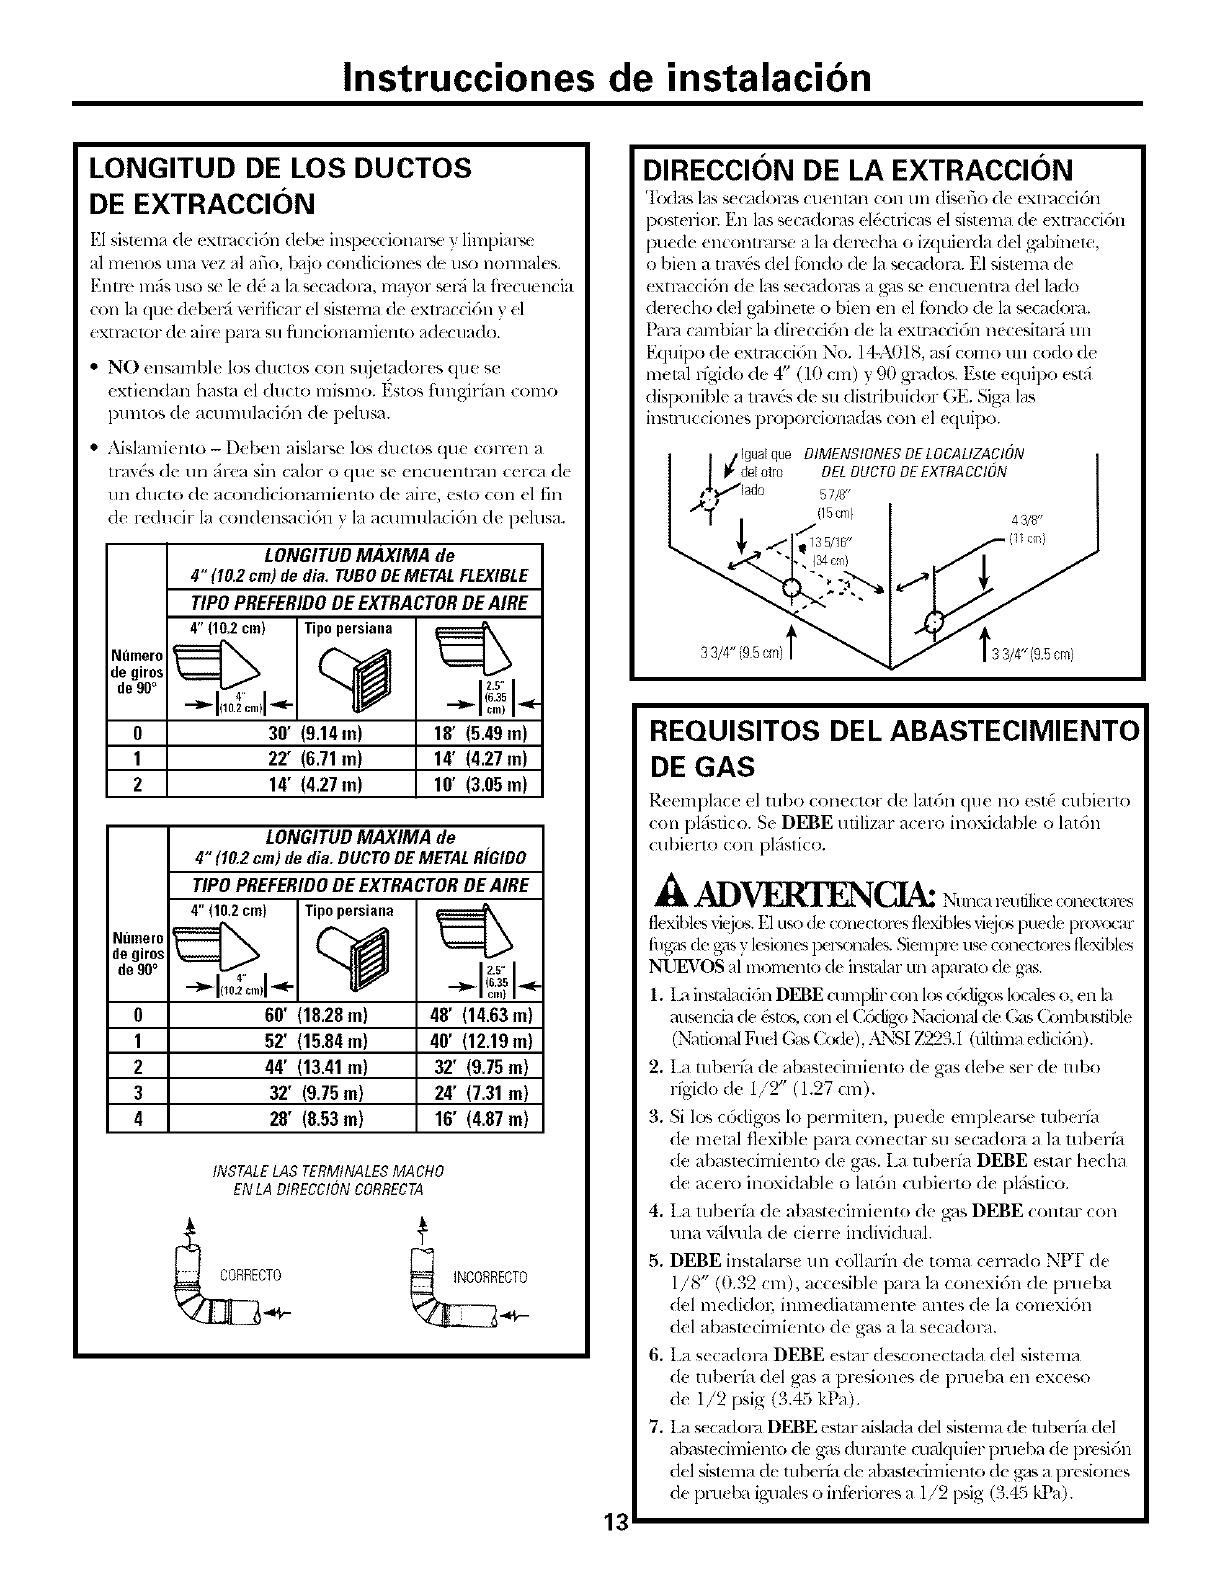
Instrucciones de instalacion
LONGITUD DE LOS DUCTOS
DE EXTRACCION
El sismma de extraccidn dell. inspeccional_' )linlpiar_!
al menos t/na ¥cz al aflo, bajo condiciones de uw nonnales.
Entre lllfis llSOM'le d(_ a la secadora, mayor seni la fl-ccuencia
con la que de[x:F,i vcfificar el sislema de extraccidll y el
extractor de aiw para su fhncionamiento a&*:uado.
•NO ensamble los ductos con sl!jetadores que se
_xtiendan hasla _1ducto mismo. Estos fimgirfml como
puntos de acumulaci6n de pehlsa.
• Aislamiento -Deben aislarse los ductos que COl-l-(qla
travds (le till _{l-ca Sill calor oque se ell(llelltl_lll cerca d(
un ducto de acondicionalniento de aire, esto con el fin
de rvducir la condensacidn y la acunluladdn de pelusa.
LONGITUDMAXIMA de
4"(10.2cm)dedia.TUBODEMETALFLEXIBLE
TIPOPREFERIDODEEXTRACTORDEAIRE
4" (102 cm) Tipo persiana
NumerOde90° _1 I
de giros
I2.5" I
4,.
"-_lll02o,,,11_- o,,,I_
(6.35
030" (9.14m) 18' (5.49m)
122" (6.71m) 14' (4.27m)
214' (4.27m) 10' (3.05m)
LONGITUDMAXIMA de
4" {I0.2cm)dedia.DUCTODEMETALRIGIDO
TIPOPREFERIDODE EXTRACTORDEAIRE
4" (10,2 cm) Tipo persiana
Numer_ _
degiro_
4" I 25" Ide90°"-'_ I(_o.2c,,,)l_ ....)
O 60" (18.28m) 48' (14.63m)
1 52" (15.84m) 40' (12.19m)
2 44' (13.41m) 32" (9.75m)
3 32" (9.75m) 24' (7.31m)
4 28" (8.53m) 16" (4.87m)
tNSTALELAS TERMtNALESMACHO
EN LA DIRECCIONCORRECTA
DIRECCI(SN DE LA EXTRACCION
'I_glas las s((adoms cuenmn <on un disefio dc exu'acd6n
posterkm En las v*cadol-as eh:ctricas el _,ist(ma de extracd6n
[xle(le enconmlz.-se a la derecha o izquiel_la del gvllfin(te,
o bien a wards del timdo de la secadol',l. El qstema de
extr, lvci6n de las secadoms a _ls v* (ncuenm_ del lado
d( l>cllo de1gabinem o bien en el lbndo de la s(cadora.
Pare cambiar la direcci6n de la exmlccidn neceqmc, i un
Eqllipo de exu',u cidn No. 14-A018,asf como un codo de
metal rf<ido de 4" (10 cm) y 90 grados. Esle equipo est_i
disponible a mwds de su disn-ibuidor GE. Sigv110s
instluccion(_ propo_vionadas con {1(quipo.
]gualque DIMENStONESDELOCALIZACION
_'del otro DELDUCTODE EXTRACCION
57/d'
(15cm} 43/8"
33/4" (95 cm}
13
REQUISITOS DEL ABASTECIMIENTO
DE GAS
Rcempla(e el tul)o (one(tor de l;m;n qm' no est_ cubierto
con pldslico. Se DEBE ufilizar acero inoxidable olatdn
cubierto con plfistico.
flexiblesviejos.E1u'_ de con( ctorcs tle.,dI.,l,.'svi@*,puede prov(_ar
fhgasdc gasy lesionesl_ t_nal¢'s.Siempre u_e cone_loa s flexibles
NUEVOS al momento de instalarun apamto de g',ls.
1. Ix, instalacidn DEBE cumplir con 1o'_c&ligo,_kx'vdeso, en lu
ausz.nda d( &t(_;,con el CSdigo Nacional (It.Gas C*_mbustible
(National Fuel Gas Code), ANSI 7223.1 (dhima edMdn).
2,
3.
4,
5.
6,
7.
La tuberia de abastecinfienlo de gas debe ser de tubo
rfgido de 1/2" (1.27 cm).
Si los c6digos 1o permiten, puede emplearse mbeffu
de metal tlexible pare conectar su secadora a la tubeffa
de al)asmcimiento de gas. La mberia DEBE (star hecha
de acero inoxidable o latdn cubierto de pl_islico.
La tubeffa de abastecimiento de g'as DEBE contar con
una xfih_fla de cierre individual.
DEBE instalarse uu collaffn de toma cen-,,do NlrF de
1/8" (0.32 cm), ac(esible par, i la conexidn de prueba
del me(lidos; imnediatam( nm anles de la conexidn
del abaswcimiento de gas a la s(cador, i.
Ha se( adorn DEBE estar descone(tada del sistema
de tuber_a del gas a pwsiones d( prueba en exce';o
de 1/2 psig (3.45 kPa).
Ia secadora DEBE esmr aiqada del sismma de mbeffa del
abastcdmiento de g'as dural_t( (_mlquier pmeba de presidn
del sNema de ulbeffa de abasl_ cimiento de gv_sa prcsiones
de pruO_a igalales o intk riorcs a 1/2 F, ig (3.45 kPa).
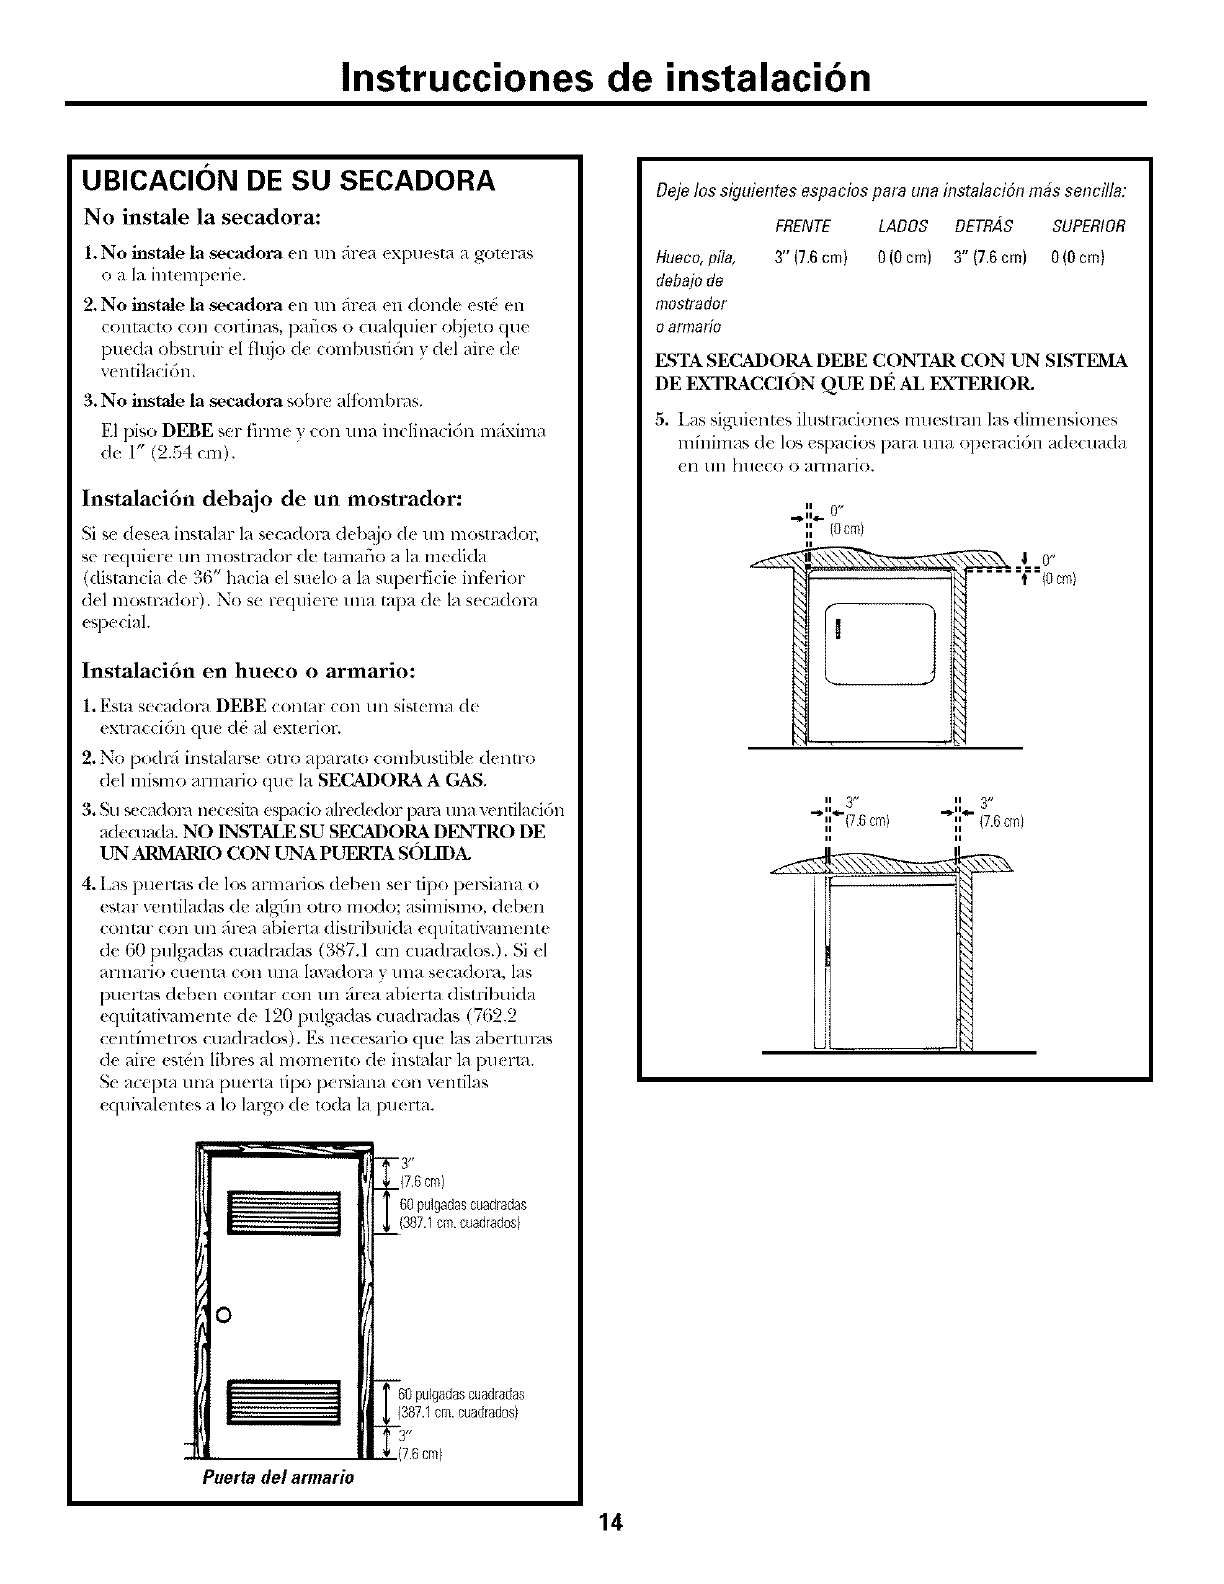
Instrucciones de instalacion
UBICACION DE SU SECADORA
No instale la secadora:
1. No hast,ale la secadora en un ;_r{a ( xpuesta ;1goleras
o a la int(mperie.
2. No instale la secadora en un firea en donde esi6 en
CoIqtDC[O ((}11 COltill_/S, I)_/I_IOS O Cll_dquit'r objcto (lUC
pueda obstruir el fh_jo dc (ombustidn v del aire de
ventilaci6n.
3. No mstale la secadora s b t ,lio nb ,s.
El piso DEBE ser firm{ 7"con una inclinacidn m_ixima
de 1" (2.54 cm).
Instalaci6n debajo de un mostrador:
Si se desea insl_dar la secadom deb_!jo de un mosu:_dol;
se requier( un mostmdor de tamaflo a la medida
(distancia de B6" hacia el suelo a la superficie intbrior
del mosmldor). No se requierc una mpa de la secadom
eq)ecial.
Instalaci6n en hueco o armario:
1. Esla s(!([/(IOl-_lDEBE Coil[ill" Co11Ill] sistema (le
{Xll'dCci6n qu( (1(_al {xterior.
2. No po{hvi instalars{ olr{} apamto colnbuslibl( d{ ntro
d(l mismo armario que la SECADORA A GAS.
3. S s{{ d v _(_s'l is) 1"o Itxl({I )m ] _{ t'l ('{
ade{llada. NO INSTALE SU SECADORA DENTRO DE
UN ARMARIO CON UNA PUERTA SOL1DA.
4. Las puertas de los armarios deben ser tipo persiana o
estar vcntiladas de al_lh_ otro menlo; asimismo, deben
contar con un firta abierta (listribui{la equitativamente
de 60 pulgadas cuadl-d£1as (387.1 cm cua(hados.). Si el
al lllaliO Ctlelll_l COil lllla lav_l£toF, I y lllla seca(]Ol_t, las
puertas (leben contar con un _hea al)ierta {list_ibuida
equitativamente de 120 pulgadas cuadl-ddas (762.2
centfinetros cuadPd(Ios). Es necesario que las aberlulaS
de airc e,,lt%nlibrcs al moment(} de instalar la pu( rm.
Se acepta una puerta tipo pelsiana con vendlas
equiwdentes a 1olingo de loda la puerta.
, 1
0
I t
Puertadel armario
- 3_,
7.6 cm)
60 pulgadascuadradas
(387.1cm.cuadrados)
(7.6cm)
Dejelos siguientesespaciospara unainstalacidnm&ssencilla:
FRENTE LADOS DETR/_S SUPERIOR
Hueco,pila,
debajode
mostrador
o armario
3"(7.6cm) O(Ocm) 3"(7.6cm) O(Ocm)
ESTA SECADO1L&DEBE CONTAR CON UN SISTEMA
DE EXTRACCION QUE Dl_AL EXTERIOR.
5. I2_ssi_!lJ(:nl(s ihlsll-aciolles IIItI{_S[ITlll las (lilll{ llSiOll(S
{!11 till hll(_CO o ;_l-lllaYi¢).
n 0,*
" (Ocm)
n 3_' n 3_,
" (76cm) ',', (7.6cm)
II
14
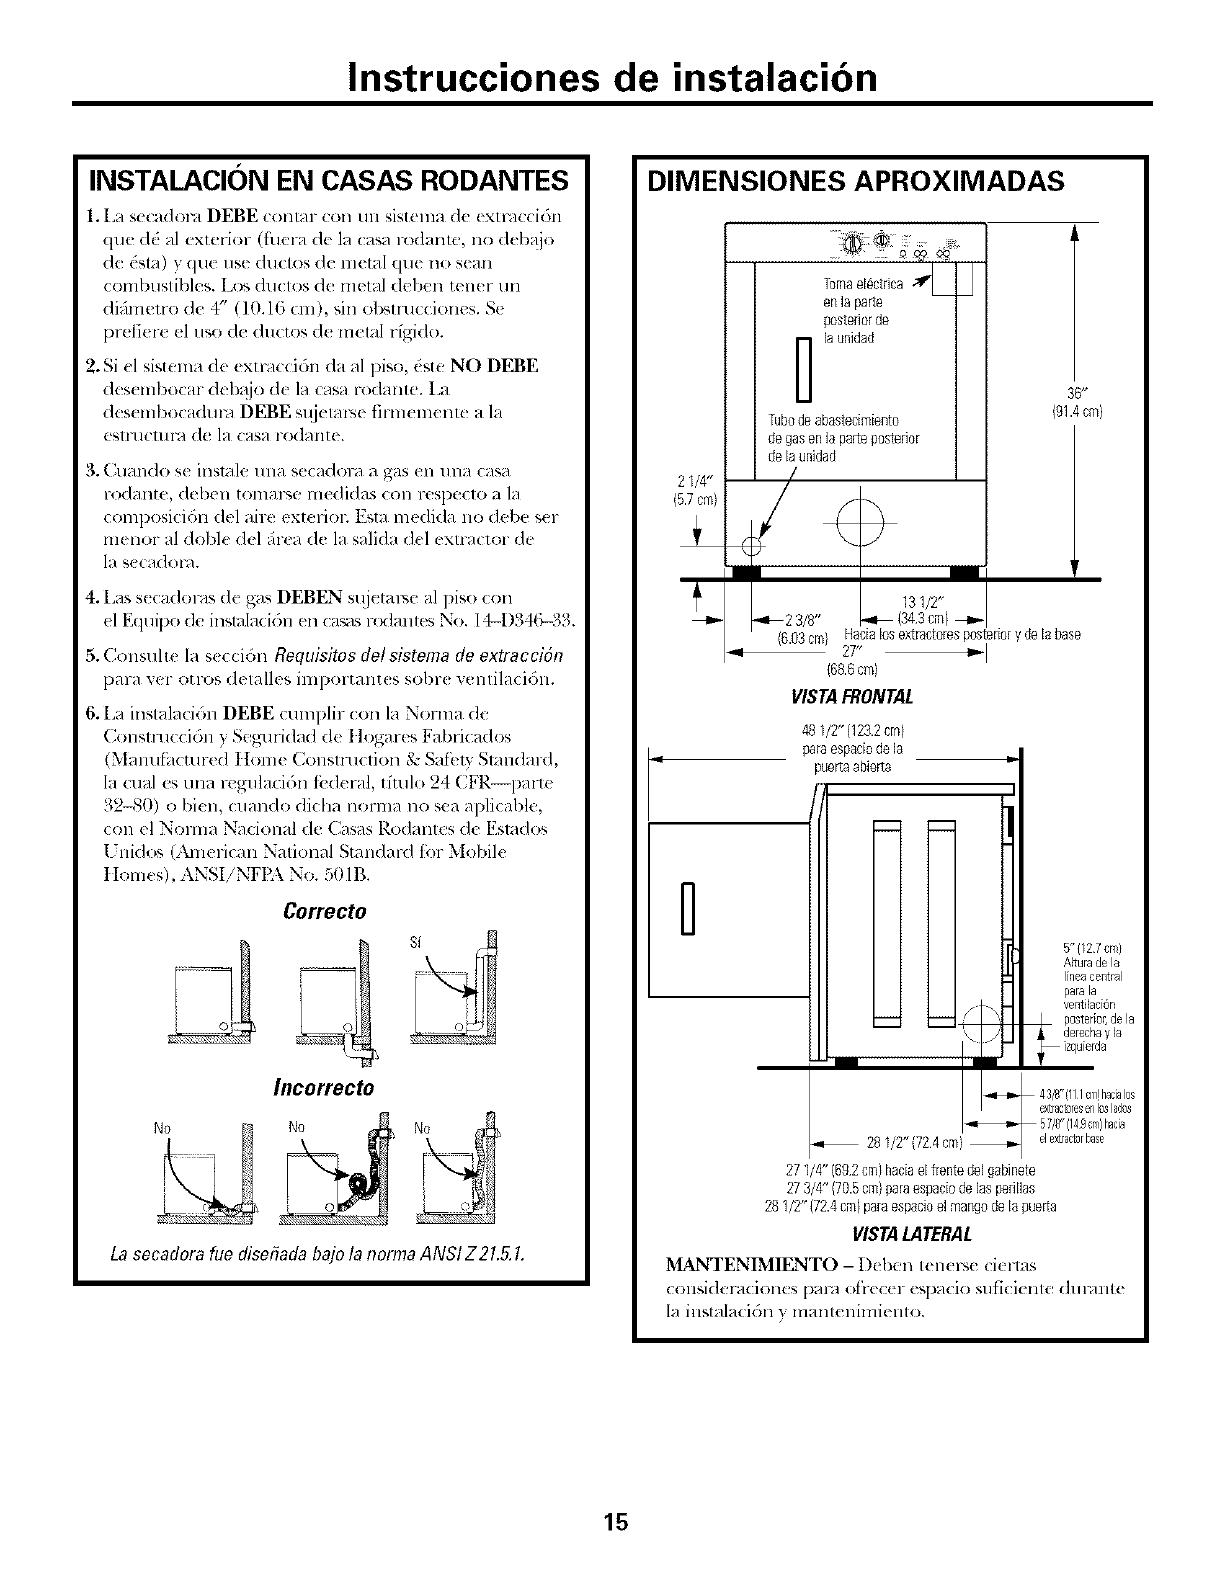
Instrucciones de instalacion
INSTALACION EN CASAS RODANTES
1.La s_cadora DEBE contm- con un sistema de extcdccidn
que d(: al exterior (ftlera de la <_s,arodamc, no deb@)
de dsta) y qu_ use ductos d( metal que no sean
combustibles. L_ ductos de metal deben tener un
difimen-o de 4" (10.16 cm ), sin ol_stmcciones. S_
prefiere el uso de ductos d_ metal rfgido.
2. Si (1 sistema de extcdcci6n da al i)iso, dste NO DEBE
des_ mbocar dek_jo d_ la casa rodante. La
des_ mbocadm-d DEBE st!jetm-se firm_ mentc a la
estlucm_-d de la casa rodante.
3. C[l_llldo se illSlxlle llll_] sec_ldOl-_l H gas ell IlHH (HSa
rodante, deben tomarse medidas con respeclo a la
composicidn del airc exterion Esta medida no debe set
menor al dobl( del fir(a de la salida d(l extractor de
la s( cadol'd,
4. Lass{ cadoms de gas DEBEN st_j_tm_e :31piso con
d Equipo de inslalad('m _n cas_s l-_xlalll(SNo. 14-1)34(%33.
5. Consuh{ la s( cci6n RequJsitos dot sistema do extraccid/7
D;IYH V{:I" Otl'O':, d( lalk s illlpOl'tallt( S SOl)F( _,{ lllilaCi(_ll,
6. La instalacidn DEBE cumplir con la Norma de
Consnuccidn )Seguridad de Ilogares Fabricados
(Manut icmred tIome Consnuction & Safbl) Slandard,
la cual es una lvgulacidn tbd(ral, tfuflo 24 (FR [)al_(
32_'40) o bien, cuando dicha norma no sea aplicable,
con el Norma Naciolml de Casas Rodantes de Esmdos
[ nido', (i'unel-ican National Standard tot Mobile
I {omes), ANSI!NFE\ No. 501B.
Correcto
Incorrecto
Lasecadorafue disefiadabajola normaANSI Z21.5.I.
DIMENSIONES APROXIMADAS
2 1/4"
(5.7cm)
o::
..... :: V =
TomaelOctrica<
en laparte
posteriorde
la unidad
0
Tubode abastecimiento
de gasen la pate posterior
de la unidad
36_"
(91.4 cm}
131/2"
(6.03cm} Hacialosextractoresposteriory de la base
27" _"'1
(68.6cm)
VISTARqONTAL
B
48 1/2" (123.2cm)
pataespaciode la
puer[aabierta
\
L281/2"(724cm}
27 1/4"(692 cm}haciael frentedelgabinete
273/4" (70.5cm}paraespaciodelas perillas
28 1/2'(72.4 cm}paraespacioelmangode lapueria
VISTALATERAL
5"{/2 7cm)
Altu[ade la
Ifneacentral
pa[ala
ventilaci6n
posterio_]de la
demchay la
43/8"{111cs,)hacialos
extractoresenloslados
elextradarbase
MANTENIMIENTO- Deben I1II(I'S( Ci(llaS
(()llSi(]el'_/(_iOll(_S [)HI%I O_I'C(( l" ('S[)EI( iO s/Ifi( i(_lll(! (]lll_/llt(!
la instaladdn y mant( nimi¢ nto.
15
Instrucciones de instalacion
INSTALACION ELI CTRICA PARA
LAS SECADORAS ELI CTRICAS
A ADVERTENCIA:
re(luisitos especHicos pare la instalacidn el_ctrica adecuada
y segul'd de su secadol',_. El no seRuir esms insmlcciones
puede prow)car descargas el&:tricas y/o riesgo de in(x ndio.
Este al)m-dto DEBE estar d( scargado a tierl-d
adecuadamente. Si la seca(Iot-d no est;i descargada a lierm
corrcctamente, pu ede o(u rrir u na shock el_ctfico. Siga las
illStlllCCiOll(S ell eslt' lllanllal para/llla descar_a a ti( rl'd
ad(cuada.
NO use un cable de exmnsidn pal'd esm seca(Iot-d. Algunos
cables (le exmnsidn no est_hl disefiados pal'd sopormr las
cantidades de corrieme eldctvica empleadas pot esta
secadom y 1)o(h-fm_ derrctir',e, 1o qu< puede l)rovocar un
sbock eldcu-ico y/o riesgo de incendio. Localice la secadord
d_ ntro del alcance de mm toma de conienlc en la par_ d,
tomando en cuenm la longitud (l(l cable de corlienm que
va a coml)mrse y pelmitiendo que _ste cuelgue u n poco.
Consuhe lo +,Requisitos el_ctricos en (sle manual pare
adquirir el (:able d( corrienle adecuado.
D_be instalap, e un alivio de tensidn aprobado por LL en
el cable de coHienlc. Si el alivio de tensidn no se instala,
el cable puede z;diuse (le la secadom y l)o(Ir/a roml)erse
con cualquier movimient_) (lel cabl(, lo que resulmrf_l
en un sbock el_cuico.
NOTA: Las secadocds que opecdn con una 1urea de
corriente de 208 voltios ten(h_hl tiempos (k secado m_s
lal_g_)s qtle aqu_llas qtle O[)el'dll CO11 lllla tOllla de COFFiellte
de 24(1 voltios.
Deb@) del panel SUlx'riol se encuenu-a un diagrama
d{ cableado.
REQUISITOS PARA LA DESCARGA
A TIERRA
A ADVERTENCIA: (:o.,xi,',.
inadecuada del conduclor (le desca_ga a fierra del { quipo
podr/a provocar un shock elOcn-ico. (_ongt/lte a till
d_ ctricism ceNificado si tiene dudas sobre la descal;_,'d
a tierl"d d(l apacdto.
La secadord DEBE estar descmgada a tierm. En e_so de un
real funcionalniento o desc(.nposmcd, la descarg'd a tierm
reducic.;, el riesgo de un shock el&:tvico al crear una luta
de rcsistencia mhlima l)am In corri_ ate el&xrica.
La deseal-ga a tien-a debe cumplir con los c6digos y r_glas
locales, yen caso de que 6stos no exismn, con el Cddigo
National solm. Electricidad (National Electrical Code),
ANSI/NFPA No. 70.
Pare tma secadol-d eldctrica desealgada a tien-d con cable
conector: Si su se(adoFd esld equipada con un cable de
lOllla (le corl-iellte COll 1111 (Oll(l/l(lOF (/e descarga a liel-l-a
del equipo y un enehufb (le conexidn a tien-d, &t( dhimo
DEBE conecmrse a un re( ept_iculo adecua(Io y de cables
de cobre, de acuerdo con to<los los cddigos y reglas locales.
Si tiene alguna duda, consuhe a un elecn-i( ista celtificado.
Pm'a una secadol_ el6ctrica de conexidn permmmn|e:
• I+a secadol'd DEBE esmr conectada a un sistema de
cableado l)ermanente met_]lico desca_gado a tierl-d, o
bien debe collCl_e 1111conducu)r de d( sca+ga a fierl'd
del equipo con los conductorcs d(l cir( uito v con(ctarse
a la mrminal {1( descalga a tierm d(l equipo del apaFdto.
Para rum _adora a gas descargada a fierra con conexi6n
de cable:
• Esta secadom estg equipada con un enchufc de tr(s
clavijas (descargado a lierra) pm'd SU proteccidn conm,
choques y debe conectm-se dirccmment( a un
recept;iculo de ues clavijas descal_gado a tien-d de lnan( 1_1
adecuada. No corte Ill retire la clav!ja d_ descarga a tierra
de (ste enchulc. No m(Milklue el enchulc de esm
aparalo. Si no se @lsta a la lonm de corriente, haga que
un electlq(isl_l ( ertilicado insl_lle tma loma adecuada.
16
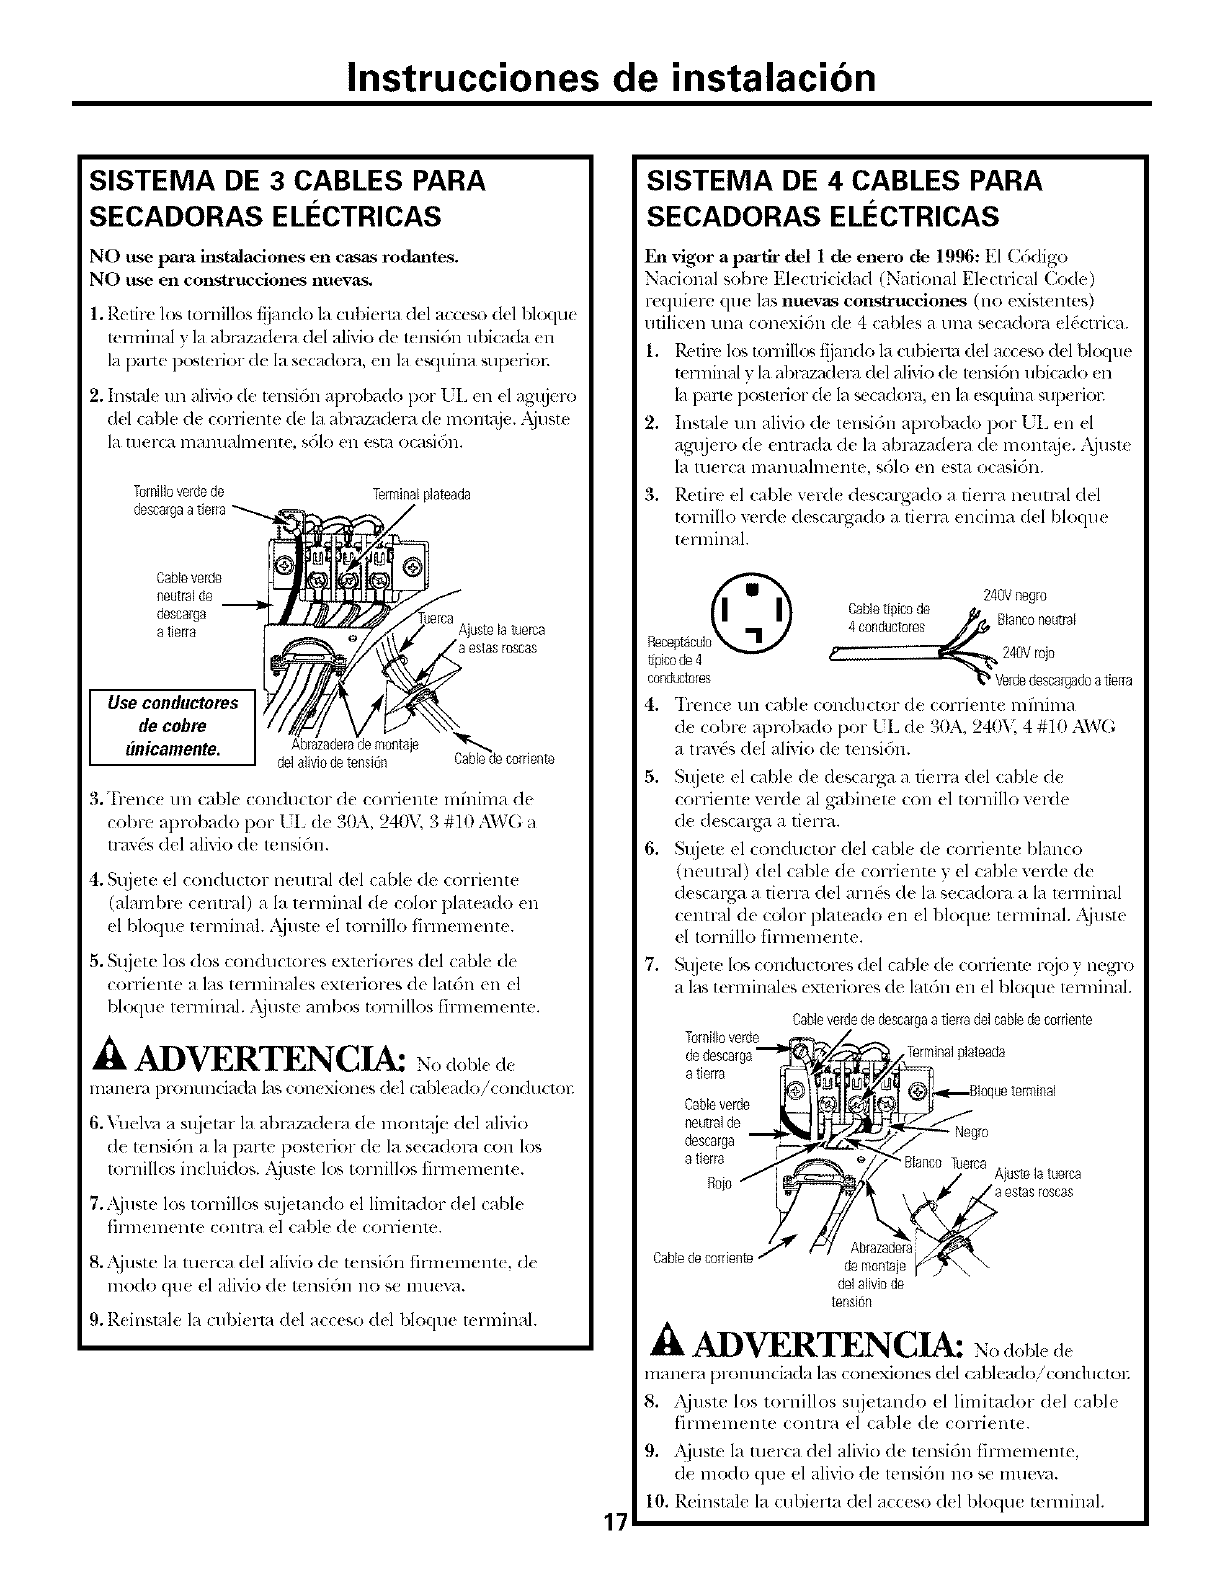
Instrucciones de instalacion
SISTEMA DE 3 CABLES PARA
SECADORAS ELI CTRICAS
NO use para irtstzdaciones en casas rodantes.
NO use en cortstrucciones nuev&s.
1. Rt*th'e los tonfillos fiinndo la cubierm del acceso del bhxlu(
terminal } la abr, lzaderd del alivic, de t_ nsi6n ubkada (n
la palte I),._,t(fior de la seca,clor, Len la e_luina sup_ riol:
•Inslale un alivio de tensi6n apmlxtdo por EL en el agujero
del cable de eorliente de In al)mzadera de mont;_je..kjuste
la tuerca naanuahnente, sdlo en esm ocasidn.
Tornilloverdede Terminalplateada
descargaa tierta
Cablevade
neutralde
descarga
a derra
Use conductores
de cobre
#nicamente. e montaje
delaliviode tensi6n
3.'I}-enc( un cable condtlclor de corriente mfnima de
eobre aprobado pot [ 7Lde 30A, 240\; 3 #10 AWG a
tray,s del alivio de tensi6n.
4. Sl_jete el conductor neutral del cable de con-ienle
(alambre centr, ll) a la t( nninal d( color plateado en
el bloque terminal. Ajuste el tomillo firlnemente.
5. St!jete los (los conduclores exmriorus del cable de
corriente a Ins tenninales exteriores de latdn en el
bh_lue terminal. Ajuste ambos tomillos firmemente.
-4,ADVERTENCIA: N,,dobl( de
lnanel'a pronunciada Inscc,nexic,n(s del caNeado/cc, nducml:
6. Vuel_a a sujelar la abr, lzadera de lnolm!je del alivio
de tensi6n a In parte posterior de la secadora cola los
tornillos incluidos..\iust( lo_,tornillos firmemente.
7. Ajuste los tomillos sqjetando el limitador &l cable
{11"111_lllellte COlltl_l el cable de (OITi( llte.
8..\juste la tue_va del alivio de tensi6n tirnlelnent_, d(
modo que el alivio d_ tensi6n 11ose 111[1(vH.
9. Rdnslale In cub\ l_ del acceso del blo(lue tcrnfinal.
17
SISTEMA DE 4 CABLES PARA
SECADORAS ELI CTRICAS
Faavigor a partir del 1 de enero de 1996: El Cddigo
National sobrt El((xficidad (National Electrical Code)
requi( re que las nuevas construcciones (no exislenles)
ufilicen una conexidn de 4 (ables a una sec_ldor',l el& trica.
1. Retire los tol nillo'_tijando la cubieml del ace( so del bl(_lue
terminal _ la abrazndenJ d(1 alivio de temidn ubicado en
la pmle post( riot de In s**cadoc,ben la esquina ,,up_riot:
t. lnstale un alivio de tensi6n aprubado pot LL en el
agujero d( emr, Ma de la abF,,zad( m (le montaje. Ajuste
Ia tu(r(a lllallllallll( Ilte, sdlo ell esta o( nsi()ll.
3. Retire el cable verd( descargado a tien-,i neutral del
tomillo verde (lescargado a tierm encima del bloque
ternfinal.
240Vnegro
Cabletipicode _/$
4 conductores Blanconeutral
tipicode4 K- _ 240Vrojo
cor_Jta:tores "_ Verdedescar%deatierra
4. "hcnce un cable conductor de corfielltC lnfninla
de cot)re aprobado por UL de 30A, 240"_.4 #10 AW(;
a lmvds del alivio de tensidn.
5•
6.
St{jete el (:able de descarga a fierm del cable de
corrient( veMe al gabinete con el tornillo verde
d( descal-ga a flea-4.
Sl!jete el conductor del cable (1( coniente Mnnco
(neuu-al) d(l cable (/e coniente y el cable veMe de
descmga a tierra del arnds de In secadora a la temfinal
central de color plateado (n el bloque terminal. Ajuste
el tornillo t]rmem(nte.
7. Sujete los con&mtores del cable de corfiente rojo y negro
a Insternfinales exlcriorcs de lat6n ell el blo(lue t( nninal.
Cableverdededescargaa tierradelcabledecorriente
Tomilloverd_ _ Terminalplateade
neutralde _'_Negro
Cablede corriente
delaliviode
tensidn
ADVERTENCIA: o, ol,le(I,,
manem pronunciada las conexiones del cableudo/con(lucto_;
8. Ajuste los mrnillos sujetando el limitador del cable
f'irmemente conn-a el cable de corriente.
9. Ajusm la merca del alivio de mnsidn t_rmemente,
de modo que el alivio de tensidn no se nme_l.
lO. Rcinstale la culfierta (l(l acceso (l(l bloque terminal.
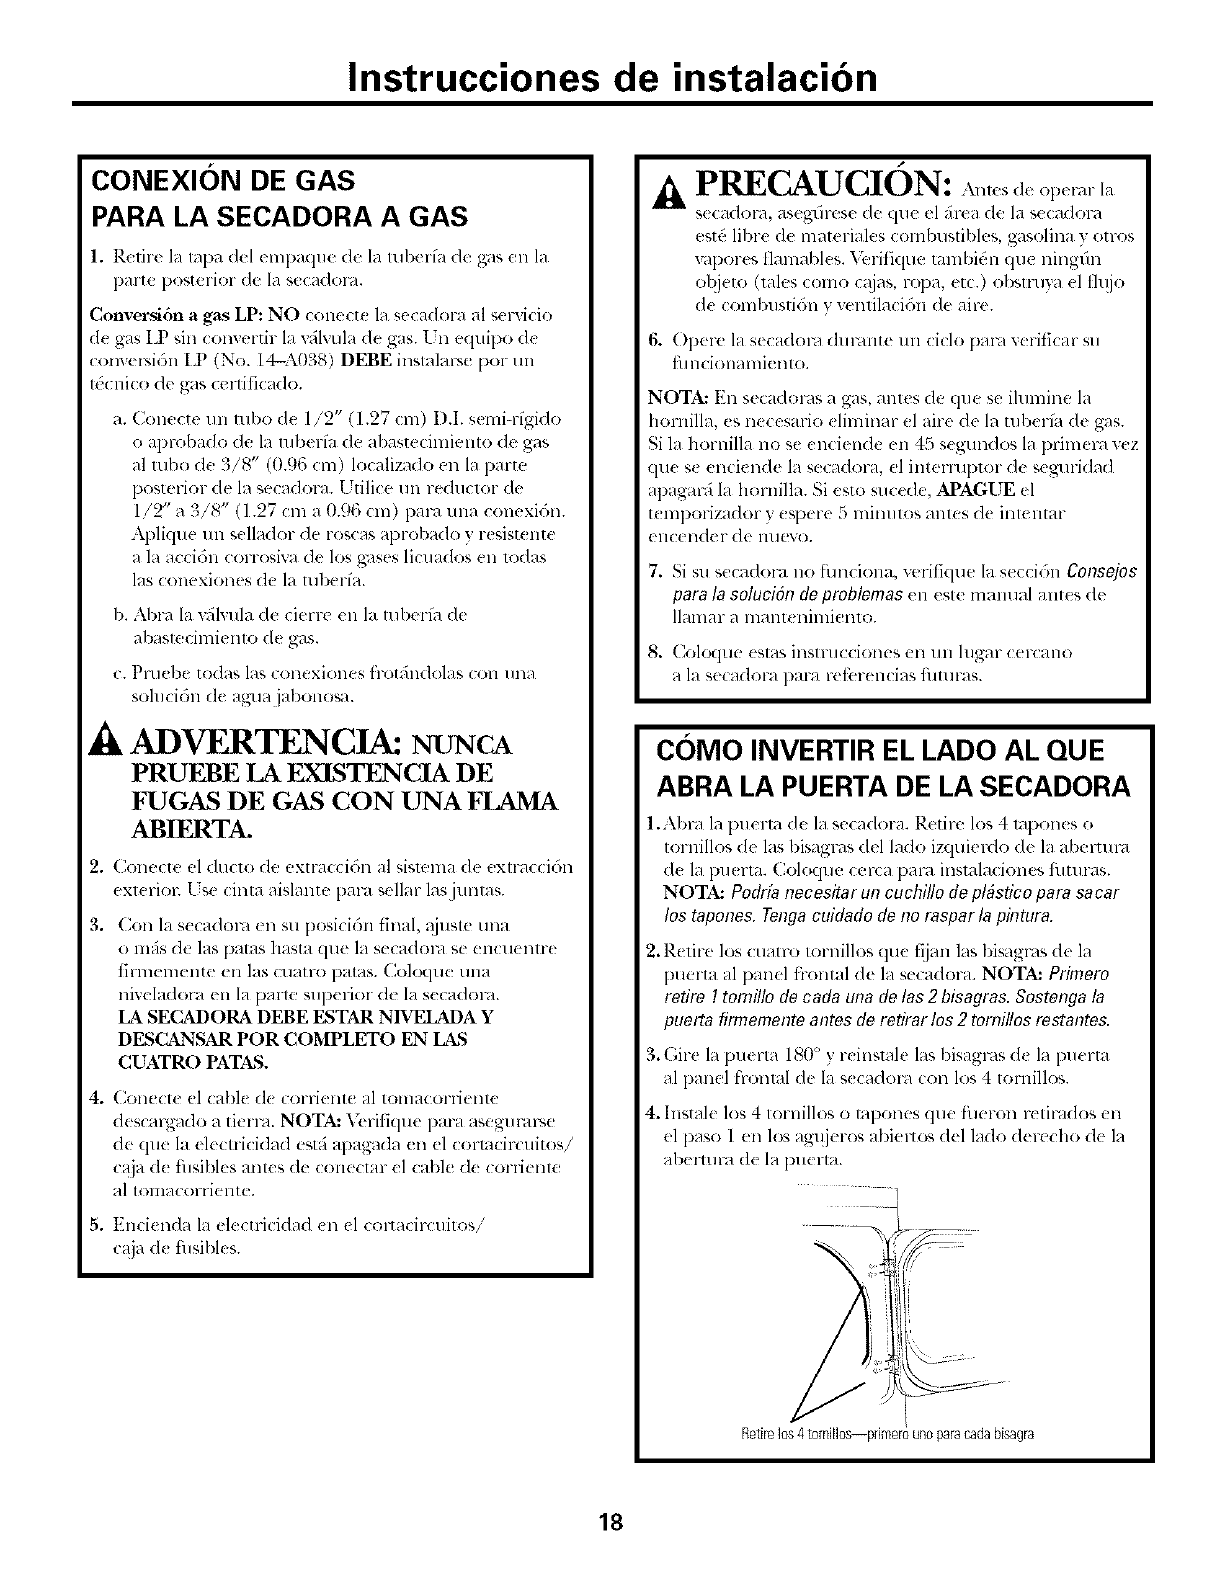
Instrucciones de instalacion
CONEXION DE GAS
PARA LA SECADORA A GAS
1. Retire la tapa del empaque de la tuberfa de g_,ls_!11la
parle posterior de la secador4.
Converd6n a gas LP: NO conecte la secadora al selwicio
de gas I.P sin comerth- la vfilvula de gas. [n equipo de
cam e_si6n LP (No. 14-A038) DEBE instnlar:,e per un
tc(Tnico de gas certificndo.
a. Conecte ml robe de 1/2" (1.27 em) D.I. semi-rfgido
o aprobado de la mberfa de almstecimiento de gas
al robe de 3/8" (0.96 cm) localizado en la parle
postelior (le la secadoF4.1 Ttili(e un reductor de
l/2" a 3/8" (1.27 em a 0.{)6cm) pac,_ mm conexidn.
Aplique un sellador de roscas aprobado y resist{me
a la accidn corrosiva de los gases lieuados en lodas
las conexiones de la mberla.
b. Abra la %lvula de cierre en la tnber[a de
abnslecimienlo de gas.
c. Pluebe todas Ins conexiones frot_indolas con una
sohlcidn de agua jabonosa.
ADVERTENCIA: NUNCA
PRUEBE LA EXISTENCIA DE
I_1JGAS DE GAS CON UNA HAMA
ABIE TA.
2. Conecte el (lucto de exmtccidn al sislcma (le extraccidn
ext( viol: kse cinta aislante pal-4 sellar los juntas.
3. Con la s_cadora _n su posicidn final, @lste una
o mils d_ Ins paras hasta que la secadol-4 se encu_ rare
liI'Illelll{ II[e ell los Cl/a[l'O pat;Is. (_ol_ltl_. t/Ila
niveladora en la parle superior de la s_cadora.
LA SECADORA DEBE ESTAR N1VELADA Y
DESCANSAR POR COMPLETO EN LAS
CUATRO PATAS.
4. Conect_ el cable (1_corriente al tomacorriente
descalgndo a tierra. NOTA: Verilique para asegu c,u_e
de qu_ la electricidad estfi apagada ell el cormcircuitos/
caja d_ fusibles antes de conectar el cable (1_(7OFl-ielltt!
al tOlllaCOlTiellte.
5. Encienda la electricidad <n el coltacircuitos/
c_!jad( fusibles.
,D
.4, PRECAUCION: A,.esde
S( cadol'2i, aseg!/l-es(, de (llAe el ;h-cade la s(( a_lola
cstt: librc de matcrialcs conlbusliblcs, gasolina y arras
v@ores tlamabl_ s. Vt,rifique tambKn que ningfin
el@to (tales come c_!jas,ropa, etc.) obsuuya el t]ujo
de comlmstidn v ventilaci6n de aire.
6. Operc la secadol-a dul-ante un ciclo pare w:riflcar su
fu ncionamiento.
NOTA: En secadol-as n gas, antes de que se ihmfine la
hornilla, es necesario (liminar el aire de la tuberfa de gas.
Si la hornilla no se enciende en 45 s_gundos la primem wz
qu_ s_ enciende la secadora, el intermplor de sevulklad
apagal-,i la hornilla. Si esto sucede, APAGUE el
t(mporizador y eq)ere 5 minutes antes de intentar
enc_ rider de nueu).
7. Si su secadol-,t no timciona, vefifique la seccidn Consejos
pare la soluci6n de problomas en este mmmal antes de
llanlar n lllall[t llillliff!lltO.
8. Col*.Kl!le esI;ts illSWtlC(iOlleS ell 1111 hlgaF (el-calla
a la secadora para retbrencias flmnas.
COMO INVERTIR EL LADO AL QUE
ABRA LA PUERTA DE LA SECADORA
1.Abm la puerto de la secadora. Retire los 4 mpon(s o
tornillos de los 1)isagms del lade izquierdo de la abelmm
de la pu( rta. (:oloque cerca pare instalaciones thturas.
NOTA: Podrfa necesitar un cuehillo de pldstico para sacar
los tapones. Tenga cuidado de no raspar la pintura.
2. Retire los cuatm tornillos que t_jan los bisagms de In
puerto al panel fi-ontal de In secadora. NOTA: Primate
retire I tornillo de coda una delos 2 bisagras.Sostengala
puerto firmementeantes deretirar los 2 tomiltosrestantes.
3. Gire In puertn 180 ° y reinsmle los bisagl'as de la puerto
al panel fl-onml de la s< cador4 con los 4 tornillos.
4. lnstale los 4 tornillos o tapones que tileron retil-4dos ell
el paso 1 en los agujeros abimtos del lade del>cho de la
abertum (le la puerta.
Retilelos 4 tomillos--pdmero unoparacadabisagra
18
Antesde Ilamarparasolicitar servicio...
Consejos para la soluciSn de problemas
iAhorre tiempo y dinero! Consulte primero las tablas de las
p@inas siguientes y quiz#s no necesite Ilamar a! servicio,
Causas posiflles Qu# hacer
La secadora estfi desenchufada * _¥wgti rcsc dc quc tq Cll( hutt (std ( oml)l(talnCnt(
(olocado en el lOlna(orri( nte.
Fufflble quemado/disTtmtor ,, Revise la caja de filsibles/di,,yuntores } re(replace
desconectado el fusible o reconecte el di_7,untol: NOTA:Secadoras
elt:ctlicas usan dos fllsibles/disyunlor(s.
Linfitador t6rnfico acfivado * x,\.lJfiqu( que no haul obsml(ciones en la ventilacidn.
Liana( a un instaladi)r aulorizado pare reemplazar su
equipo, si es necesario.
Fusible quemado/disytmtor • lx%vis( In c_{jade ftlsibles/di,,yunu:_res ) re(replace ambos
desconectado; es posible que filsibles y reconecte ambos diwunlores. Es po_,ible que la
la secadora gire sin cMentar secadol-a girt si linicamenle un filsible se ha (luemado
o un solo dis}untor ha saltado.
Se ha cortado el suministro •±\segtir(.se (lue la v_ilvula (le cierre en la seca(lom y
tie gas la vfilx_fla lnaestra estfi completamente abierta.
El tanque de stnafinistro de gas; LP • Rellene o reemplace el tanque. La seca(lol-,i se debel-J
estai vacio o se ha producido tma calentar cuando se reesmblezca el selvicio de gas.
interrupci6n en el servicin de gas
natural (en los modelos a gas)
Un poco de temblor/ruido • Coloque In seca(lol-,i en un lugm- con piso niv(,lado,
es norm',d. La secadora podria o @lste las palas niveladoras segain s(a necesario hasla
estar disnivelada que est_ nivelada.
Uso iwapropiado de suavizador " Siga las dire(cion_ s (n (1 envase del sumizador de telas.
de reins
Secado de m'ticulos sudos " L tili( (su set adora para setm- tinicamentc aloft tllos
con limpios limpios. Los alsfcul_ sucios l)u_.d( n manchar los
arffculos lilnpios y la secadom.
L&s prendas no estfin • Jklgunas manchas (lUe no se pueden vet ctlall(]<) las
completmnente limpias prendas (slfin moja(las aparecen (lespu(_sdel seca(lo.
L tilice proc(dimientos al)l-Ol)iados de lavado antes
del s( cado.
El f'dtro de pelusa est/t lleno '* Limpie el fihro antes de cada ca_ga.
Clasifieaddn incorrecta • Clasifique las prt, ndas que producen pehlsa (como
R,lpilla) de las pren(l_ts (lue junmn pelusa (como la pana).
La deetricidad estittica puede • Collstlhe las sugerencias en esta seccidn b_!jo ESrArlCa.
atraer pelusa
Sobrecarga • Separ( las calgas mils gr;mdes en 111(11Ol-mlllal_l(i.
Papel, servillet&s, etc., quedan • X,hcie todos los bolsillos antes de lavu- la ropa.
dentro de los bol_tllos de la ropa
19
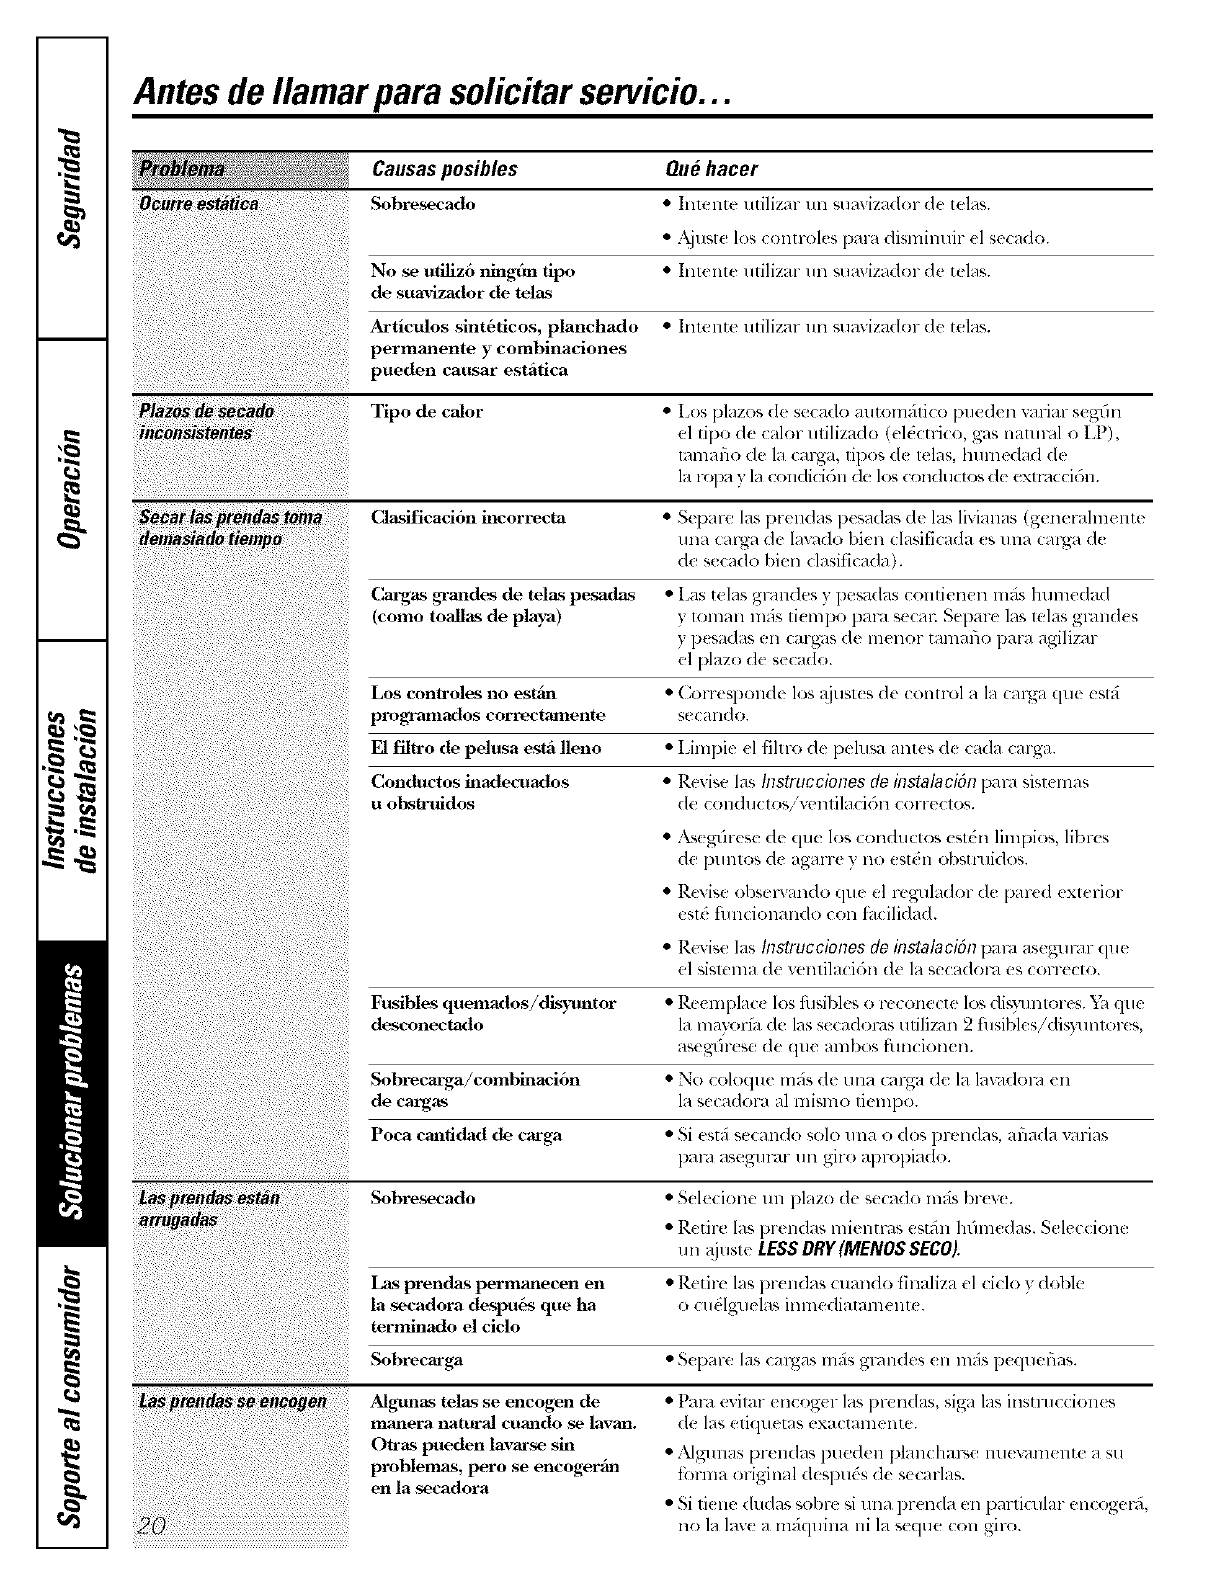
Antesde Ilamarparasolicitarservicio...
Causas posibles Qu# hacer
Sobresecado *Inlentc utilizm- un suavizador oh' tclas.
•.kjuste los controles pma dismimfir (1 se(ado.
No se utiliz6 ningun lipo * Intente utilizar un sumizador de telas.
de suavizador de telas
Articulos sint6Iicos, planchado * Inmnte utilizar un suavizador de telas.
permanente y combinaciones
pueden causar esthfica
Tipo de calor *I.os plazos de secado automfifico pued_ n variar s_.gdn
el tipo de calor milizado (el&:trico, gas namml o LP),
lamafio (1( la (arga, lipos d( lelas, humedad (k
la ropa y la con(licb:;ll de los (-:,-)rMuct(_de extraccidn.
Clasifiead6n ineorreeta * Separc las prell(las pesadas de las livianas (generalmente
una carga d,._la_ldo bien clasificada _s una _arga de
de secado bien clasificada).
Cargas gTandes de Ielas pesadas *Las telas gmndes y pesadas contienen mils humedad
(como toallas de playa) y loman mils ti(mpo pal-4 secal: Sepm-e las lelas gl",md( s
y pesadas en cmgas de lnenor tamafio para agilizar
el plazo de secado.
Los cona-oles no estfin • Corresponde los @lst(s de control a la (arga (lue est_i
programados correctamenle secando.
El filu-o de pelusa estfi lleno
Conductos inadecuados
uobstruidos
• Limpie (1 lihro (1( [xlusa HIII(S d( c_l(la Cal'ga.
•Revise las Instrucciones do instalacidn pare sisl(nlas
(le condll( tos/'v(!lllil_lci(')ll (oITe(los.
•zLs(gdr¢se (/( (lU( los conductos (stdn limpios, libr( s
(/e [mntos de agarre yno est&l obstmi(los.
•R('dsc ol)smvando que el r( gulador ,:l( par(d (xterior
{:st(? fmlcionando con f Icilidad.
•Revise las hTstrucciolTos de instalacJ6n pare as(gumr (lU(
el Sislel_la (le velllila( i()ll (le 1_3se(Tadol'a es (OITeClO.
Fusibles quemados/dis:ramtor *Re(!mplac( los fhsibl,._ o rcconccte los db,yunlor( s. Ya que
desconectado la mayoda de las so(adorns udlizan 2 "1s ) (s/d sy 11o-(s,
_)S( _IL/I'(S(! (l(_ (Ill( _/]]lbOS _iAll(ioll(ll.
Sobrecarga/combinaci6n " No (oloqu( mils d( tma (arga d( la lavadom (n
de cargas la s(('adora al mismo fiempo.
Poca canfidad de carga * Si estfi s(cando solo u na o dos pr( ndas, al_la(la Val-ias
])am _lsegtll-al- till gir() apropiado.
Sobresecado * S( le( ione un plazo de secado ImPs br( v(.
• R(tirc las pr( ndas lni( lltras, estfin hfim(das. Selc(cione
un @lst( LESSDRY (MENOS SECO).
Las prendas permanecen en * Retire las pr(ndas (uando finaliza el (i(lo y doble
la secadora despu_ que ha o(udlguelas innlediatament(.
terminado el ciclo
Sobrecarga * S( pare las (ragas mils grandes (11 lll_S p((lueflas.
Algmms telas se encogen de " Pare ex ilar en( og( r las l)rendas, siga las instru((ion(s
manera natural cuando se lavan, de lag eli(llletas exa(talllellt(.Otras pueden lavarse sin
problemas, pero se encoger'im
en la secadora
•L'td_/lll_/S [2q't2ll(I}?lS l)tl(tdell [)]all(hal\',(t llll('v'dlll(?ll[(_ _ S(I
forma original despu& (1( s(carlas.
• Si li(ne dudas sol)r( si una pr(nda ell particular encoget_5,
no la lay( a mfiquina ill la seque (on giro.
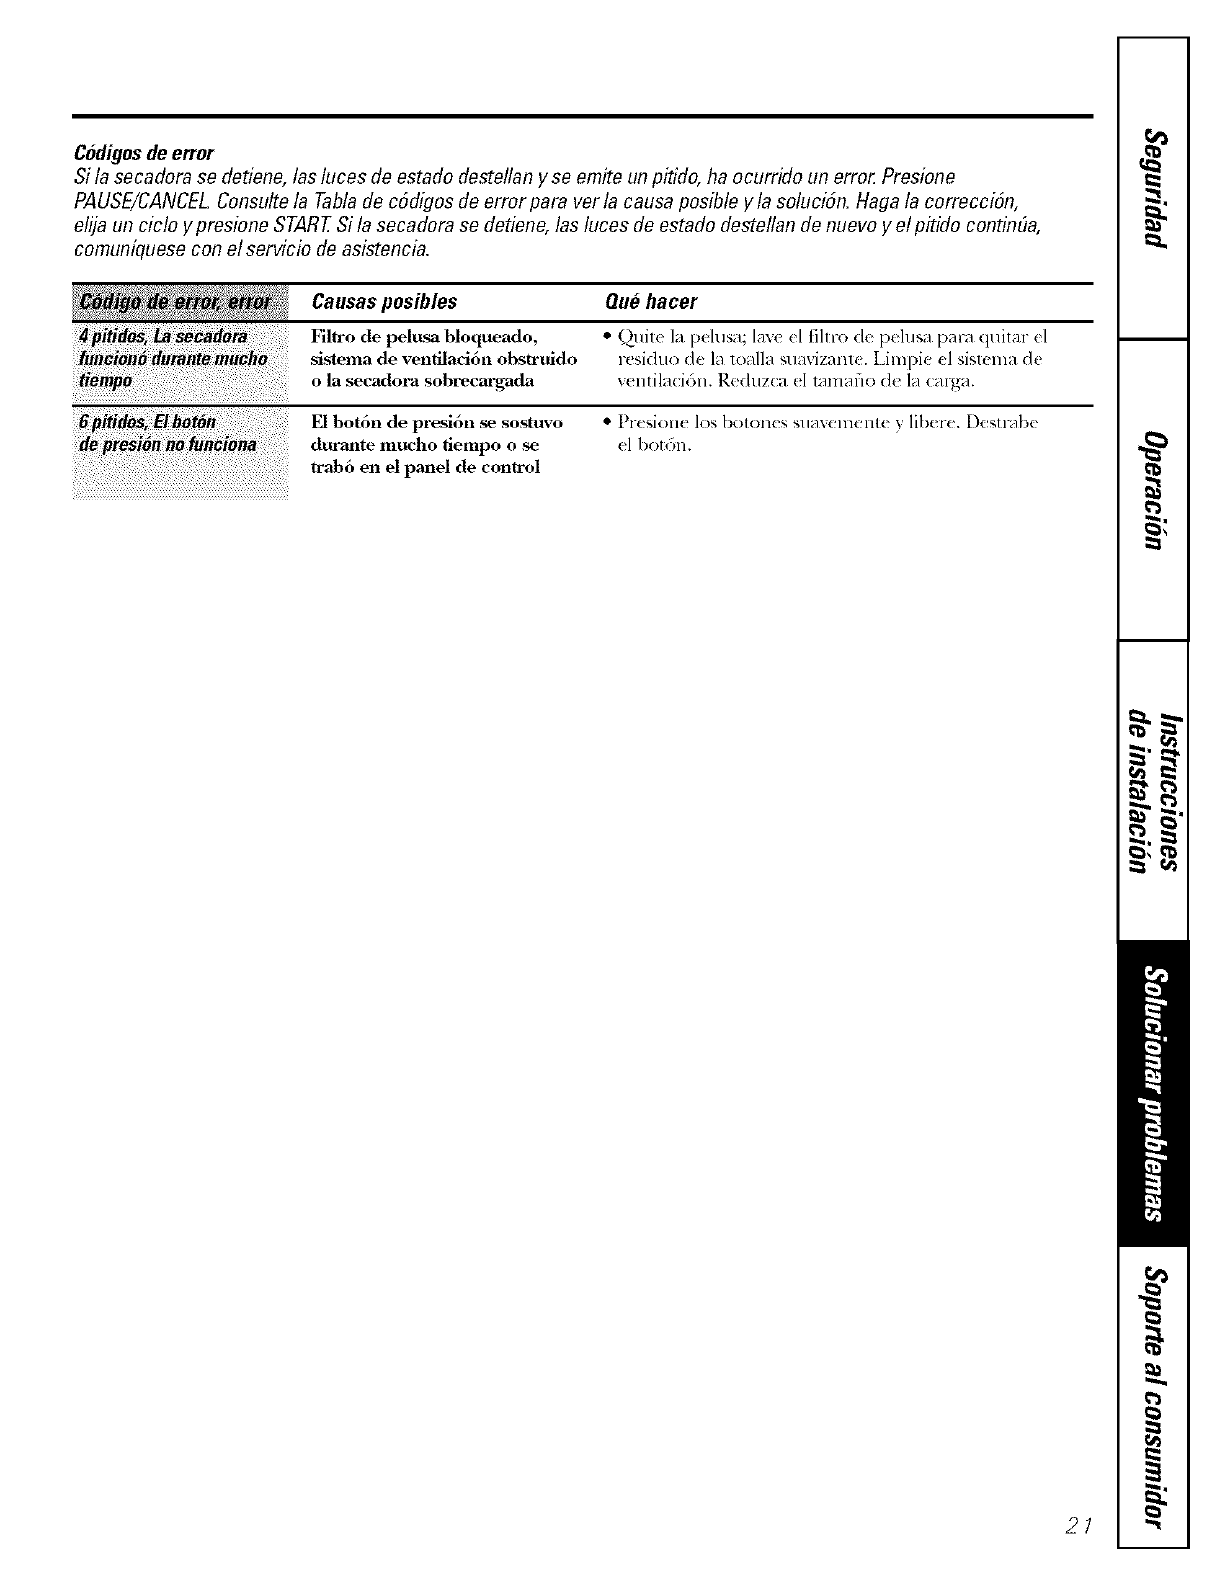
Codigosde error
Si la secadora se detiene, las luces de estado deste!lan y se emite un pitido, ha ocurrido un erro_ Presione
PAUSE!CANCEL Consulte la Tabla de cSdigos de error para ver la causa posible y la soluciSn, Haga la correcciSn,
elija un cic!o y presione STAR7?Si la secadora se detiene, las luces de estado destellan de nuevo y e! pitido contin#a,
comun[quese con el servicio de asistencia,
Causas posibles Que hacer
Filtro de pelusa bloqueado, *Quit( 1_1l:)('lus_l;lax'e (l fihlx; d(_pclu';a pm_aquilm (1
sistema de ventilaci6n obstruido rcsiduo (lu 1_1l,)all:J su_lviz_mtu.Liml)ic cl siswm_l de
o la secadora sobrecargada _,(lltil_(i6n. R(!duz(a (1 lx_ln_flod,: la (:al-g_.
depresi#nh_fu_io_ El bot6n de presi6n se sostuvo
durante mucho fiempo ose
trab6 en el panel de control
• Presiolle los botones suavemente y libere. DcsH-,ibe
el botdn.
21
NOta$,
m
€_
m_
q_
_ lqw
_r MI
m
_L
€_
€_
_D
Garantiade la secadoraGE.
Todoslos servicios de garant[a se ofrecen a trav#s de nuestros
centros de asistencia t#cnica o un tecnico autorizaflo de Customer
Care_. Para programar servicio de asistencia t_cnica, en Ifnea y las
24 horas, visite la p#gina ge.com o flame a1800.GECARES
(1.800.432.2737).Cuando flame para solicitar servicio, pot favor tenga
a mano el n6mero de serie y el n6mero de model&
Engrape et recibo aquL
Se necesita et comprobante
con la fecha de compra origflTal
para que ta garanffa cubra
los servicios.
GE reemplazara:
Cua/quierparte de la secadom que t_dle debido a d_ fi_,clos en los materiales oen la _tblicaci6n.
Dinant{ esla garantia limitada de on aft& (;E tmnl)i6n proporcionan_, sin costo alguno, loda
1_ mm_o de olmt v sctvicios rel_<:iona&_s (on el reemphtzo &' las pmtes dct}._(ulo_,_s.
IViajes del personal de servido a su c:tsa para ertsefiarle
cbmo ttsar su produc|o.
• Instalaci6n, entrega omantenimiento hmpropiada.
IFall&s del producto si es maltratado, mal ttsado, ousado
para ml prop6sito diferente del que se cre6 o si es usado
para usos comerciales.
• Cambio de los fusibles de su c:tsa o reajttsle dd circuito
de hlterruptores.
•Dafios al producto causados por accidentes, incendios,
inundaciones o ac|os de la natttraleza.
• Dafios imprevistos resul 'tantes causad_s por posibles
defectos con este electrodom6sfico.
•Dafios causados despu6s del envio.
• Producto no acce_ble para facilitar d servicio requerido.
EXCLUSION DE GARANTiAS IMPLJCITAS--Su #nice y exclusive derecho es la reparaci6n del producto, tal
y come se indica en esta Garantia limitada. Cualquiergarantia implicita, incluyendo las garantias implicitas
de comerciabilidad o adecuaci6n para on fin determinado, estan limitadas a un a#o o el periodo de tiempo mas
breve permitido por la ley.
Esta garantfa se extiende al comprador original y a cualquier propietario subsecuente para productos comprados
para uso dom#stico dentro Estados Unidos. Si el producto est# situado en un #rea que no dispone de servicio por
parte de un proveedor de servicio autorizado de GE,podria tener que hacerse cargo de los costes de envio o bien
podria solicit#rsele que fleve el producto a un centro de servicio de GE autorizado para realizar la reparacidn.
EnAlaska, la garantfa excluye el costo de envio o las visitas de servicio a su casa.
Algunos estados no permiten la exclusidn o limitacidn de dafios imprevistos. Esta garantia le da sus derechos
legales especfficos, yes posible que usted tenga otros derechos legales que varian de estado a estado. Para
flfformarse de cu#les son sus derechos legales, consulte a su oficina de asuntos del consumidor local o estatal
o pdngase en contacto con la Oficina de su Procurador General
Garante: General Electric Company.Louisville, KY 40225
23
Soporteal consumidor.
PgginaWebdeGEAppliances ge.com
{Tiene alguna pregunta sol)r( su electro(Ioln_stico? iPlaml)( la l)_igina Web de (;E A1)l)lianc(s 24 horas al
dia, (ual(lui(r (Ira del aflo! Para mayor conveniencia y selxicio m_is l_l)i(Io, ya l)uede (les(argm- los Mamlales
de los Prol)i( ratios, pedir l)i( zas oinchlso hac(r una (ira en lfilea l)al-a que xengan a realizar una rel)amci6n.
Soliciteunareparaci6n
El s(rvicio (1( eXl),.:rtos (;E (stfi a tml sdlo un paso lie su F,uerta, iEntr( (n lfnea y soli(ile su reparaci(;ll
(8(11).4_;2.21.-,1)
cuan(lo le venga bien 24 horns al (lia cual(luier (!ia del afi,.)l O llam( al 800.(;E.C_kRES '_ _ -"_
d/ll'alll( hol_S llOl'lll_lles (]e o_](illa,
ge.com
RealLifeDesignStudio(Estudiodedisefioparalavidareal) ge.com
(;E aF,oya el concepto de Dis(rio [7nivel-sal--pr<Muctos, s(lvicios y ambientes que puedelt usar genre de
todas las ella(lea, tamafios y capacidades. Reconocemos la necesidad d( disefiar pm-,tuna gT'angama de
habilidades v dilicuha(les fisicas v mentales. Para mils detalles col)r( Ins aplicaciones de GE Disefio 1_ltiv(rsal,
inchlyendo id(as de diseflo pare la cocina pare personas (:oll discapacidades, mir( nuestl-a p;_gina Web ho?
nfismo. Pare pee, onas cola dilicuha(les auditiwls, thvor d( llamar al 800.TDD.GEA(I (8(_).833.4322).
garantfasampliadas ge.com
Conlpr_ una garanlfi_ aml)lia(la yobtenga delalles sol)re d(scuentos (_sl)eciales disponibles nlienll-_ls su
gamntfa est_i aria a(tiva, t uede (oml)rarla en linea en cualquier momenlo, o llamar al 800.626.2224 (hnanle
horas normales d( oficina. GE (2msum(r ]Iome Selvices ( sl_ll-_i_lt]ii _?hl"ctlall(lO Stl gal'alllf_l [el'lllille.
Piezasyaccesorios ge.com
Aquellos individuos con la calificacidn nec(!salia F,am rt*par_wsus i)ropios electrodom_sficos pueden
pedir que se lea man(lea las piezas o accesorios dirccmmente a sus hogares (aceptamos las mrjetas VISA,
Masml_Calxl y Discover). IIaga su pedido ell lfnea ho> 24 hoe, Is (:a(la dfa o llamar pot teldfono al
800.626.2002 dumnte hol-,is nolmales de oficilla.
Lasinstrucciones descritas en este manual cubren lospmcedimientos a seguir por cualquier usuario. Cualquier otto
reparaci6n deberia, por regla general, referirse a personal calificado autorizado. Debe ejercerse precauci6n ya que
/as reparaciones incorrectas pueden causar condiciones de funcionamiento inseguras.
Pbngaseencontactoconnosotros ge.com
Si no est_ satisfi.'cho con el selMcio que recil',e d( GE, pdngase ell c(mtacto con nosolros ell nuestm pfigina
Web indicando to(los los d( tall(s asf (201110sHltfimero de leldfono o escrfl)anos a:
(;enel-,d Manag(l; (Mstom( r Relations
(;E Appliances, Applianc( Park
Louisville, I**'Y4t)225
Registresuelectrodom_stico ge.com
iRegistre su nuevo electrodom6stico en llnea---cumldo usted pretiera! El regismu- su producto a tieml)O
le proporcionm-A, si surgiel-,i la ne(esidad, una llmjor comunicacidn y tm selvicio mils l-,_t)i(Iobajo los
tdrlninos de 9.1gamntfa. "Iambi4n p'_le(le enviar su tmjeta (l( registro pre-iml)rt*sa qu( s( incl'dye en
el mate*ial de embalaje.
24
