GE GFWR2700H1WW User Manual WASHER Manuals And Guides 1508274L
User Manual: GE GFWR2700H1WW GFWR2700H1WW GE WASHER - Manuals and Guides View the owners manual for your GE WASHER #GFWR2700H1WW. Home:Laundry & Garment Care Parts:GE Parts:GE WASHER Manual
Open the PDF directly: View PDF ![]() .
.
Page Count: 2

-.,h. C_4 .. O( Y t,,
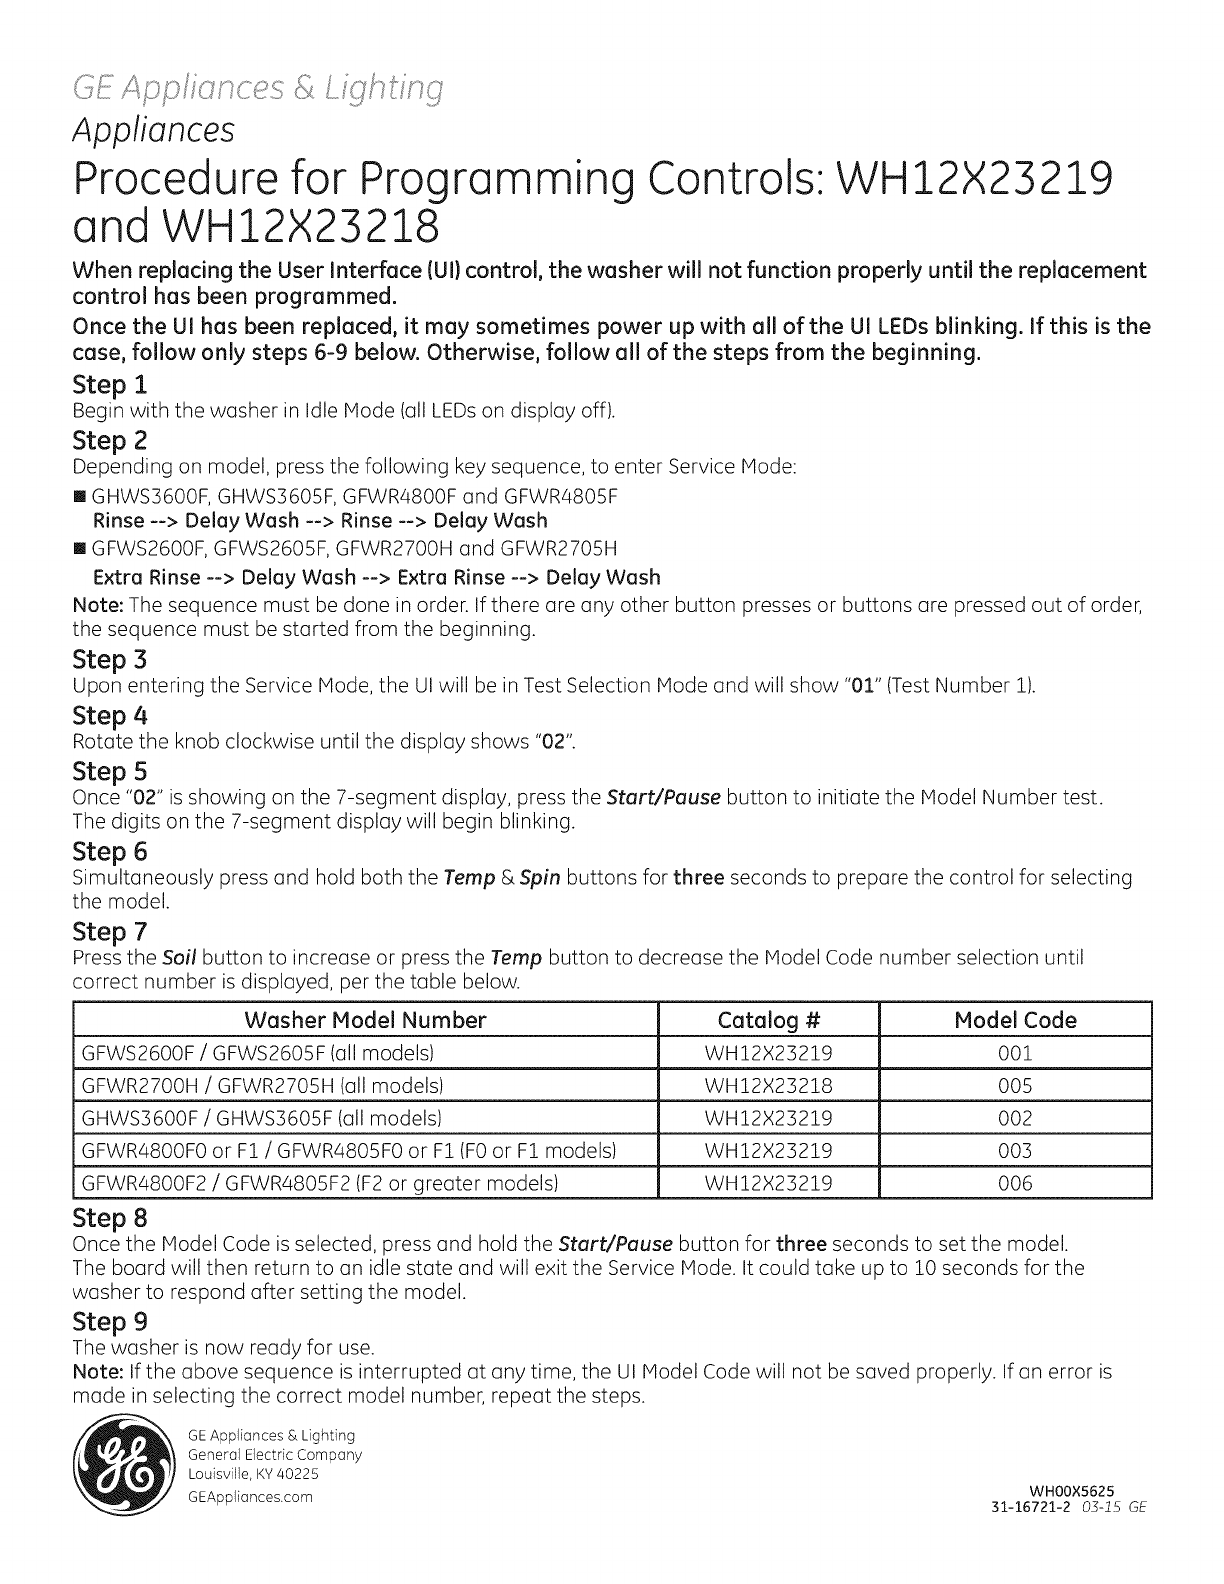
Appliances
Procedure for Programming
and WH12X23218 Controls: WH12X23219
When replacing the User Interface (UI) control, the washer will not function properly until the replacement
control has been programmed.
Once the UI has been replaced, it may sometimes power up with all of the UI LEDs blinking. If this is the
case, follow only steps 6-9 below. Otherwise, follow all of the steps from the beginning.
Step 1
Begin with the washer in Idle Mode (all LEDs on display off).
Step 2
Depending on model, press the following key sequence, to enter Service Mode:
[] GHWS3600F, GHWS3605F, GFWR4800F and GFWR4805F
Rinse--> Delay Wash --> Rinse--> Delay Wash
[] GFWS2600F, GFWS2605F, GFWR2700H and GFWR2705H
Extra Rinse--> Delay Wash--> Extra Rinse--> Delay Wash
Note: The sequence must be done in order. If there are any other button presses or buttons are pressed out of order,
the sequence must be started from the beginning.
Step 3
Upon entering the Service Mode, the UI will be in Test Selection Mode and will show "O1" (Test Number 1).
Step 4
Rotate the knob clockwise until the display shows "O2".
Step 5
Once "02" is showing on the 7-segment display, press the Start/Pause button to initiate the Model Number test.
The digits on the 7-segment display will begin blinking.
Step 6
Simultaneously press and hold both the Tamp &Spin buttons for three seconds to prepare the control for selecting
the model.
Step 7
Press the Soil button to increase or press the Tamp button to decrease the Model Code number selection until
correct number is displayed, per the table below.
Washer Model Number Catalog # Model Code
GFWS2600F /GFWS2605F (all models) WH12X23219 001
GFWR2700H /GFWR2705H (ell models) WH12X23218 005
GHWS3600F /GHWS3605F (all models) WH12X23219 002
GFWR4800F0 or F1 /GFWR4805F0 or F1 (F0 or F1 models) WH12X23219 003
GFWR4800F2 /GFWR4805F2 (F2 or greeter models) WH12X23219 006
Step 8
Once the Model Code is selected, press and hold the Start/Pause button for three seconds to set the model.
The board will then return to an idle state and will exit the Service Mode. It could take up to 10 seconds for the
washer to respond after setting the model.
Step 9
The washer is now ready for use.
Note: If the above sequence is interrupted at any time, the Ul Model Code will not be saved properly. If an error is
made in selecting the correct model number, repeat the steps.
GEAppliances & Lighting
General Electric Company
Louisville, KY40225
GEAppNances.com WHOOX5625
31-16721-2 05-15 GE
-.,h. C_4 .. O( Y t,,
Appliances
Procedure for Programming
and WH12X23218 Controls: WH12X23219
When replacing the User Interface (UI) control, the washer will not function properly until the replacement
control has been programmed.
Once the UI has been replaced, it may sometimes power up with all of the UI LEDs blinking. If this is the
case, follow only steps 6-9 below. Otherwise, follow all of the steps from the beginning.
Step 1
Begin with the washer in Idle Mode (all LEDs on display off).
Step 2
Depending on model, press the following key sequence, to enter Service Mode:
[] GHWS3600F, GHWS3605F, GFWR4800F and GFWR4805F
Rinse--> Delay Wash --> Rinse--> Delay Wash
[] GFWS2600F, GFWS2605F, GFWR2700H and GFWR2705H
Extra Rinse--> Delay Wash--> Extra Rinse--> Delay Wash
Note: The sequence must be done in order. If there are any other button presses or buttons are pressed out of order,
the sequence must be started from the beginning.
Step 3
Upon entering the Service Mode, the UI will be in Test Selection Mode and will show "O1" (Test Number 1).
Step 4
Rotate the knob clockwise until the display shows "O2".
Step 5
Once "02" is showing on the 7-segment display, press the Start/Pause button to initiate the Model Number test.
The digits on the 7-segment display will begin blinking.
Step 6
Simultaneously press and hold both the Tamp &Spin buttons for three seconds to prepare the control for selecting
the model.
Step 7
Press the Soil button to increase or press the Tamp button to decrease the Model Code number selection until
correct number is displayed, per the table below.
Washer Model Number Catalog # Model Code
GFWS2600F /GFWS2605F (all models) WH12X23219 001
GFWR2700H /GFWR2705H (ell models) WH12X23218 005
GHWS3600F /GHWS3605F (all models) WH12X23219 002
GFWR4800F0 or F1 /GFWR4805F0 or F1 (F0 or F1 models) WH12X23219 003
GFWR4800F2 /GFWR4805F2 (F2 or greeter models) WH12X23219 006
Step 8
Once the Model Code is selected, press and hold the Start/Pause button for three seconds to set the model.
The board will then return to an idle state and will exit the Service Mode. It could take up to 10 seconds for the
washer to respond after setting the model.
Step 9
The washer is now ready for use.
Note: If the above sequence is interrupted at any time, the Ul Model Code will not be saved properly. If an error is
made in selecting the correct model number, repeat the steps.
GEAppliances & Lighting
General Electric Company
Louisville, KY40225
GEAppNances.com WHOOX5625
31-16721-2 05-15 GE
