GENIUS TOY 7447-W85-A Remote-Control Machines Farm Vehicle-Remote control Unit User Manual RCM Farm Manual Cover REVIEW
GENIUS TOY TAIWAN CO., LTD Remote-Control Machines Farm Vehicle-Remote control Unit RCM Farm Manual Cover REVIEW
Users Manual
EXPERIMENT MANUAL
Franckh-Kosmos Verlags-GmbH & Co. KG, Pfizerstr. 5-7, 70184 Stuttgart, Germany | +49 (0) 711 2191-0 | www.kosmos.de
Thames & Kosmos, 301 Friendship St., Providence, RI, 02903, USA | 1-800-587-2872 | www.thamesandkosmos.com
Thames & Kosmos UK LP, 20 Stone Street, Cranbrook, Kent, TN17 3HE , UK | 01580 713000 | www.thamesandkosmos.co.uk

Kosmos Quality and Safety
More than one hundred years of expertise in publishing science
experiment kits stand behind every product that bears the Kosmos
name. Kosmos experiment kits are designed by an experienced team
of specialists and tested with the utmost care during development
and production. With regard to product safety, these experiment
kits follow European and US safety standards, as well as our own
refined proprietary safety guidelines. By working closely with our
manufacturing partners and safety testing labs, we are able to
control all stages of production. While the majority of our products
are made in Germany, all of our products, regardless of origin,
follow the same rigid quality standards.
1st Edition 2018 Thames & Kosmos, LLC, Providence, RI, USA
Thames & Kosmos® is a registered trademark of Thames & Kosmos, LLC.
This work, including all its parts, is copyright protected. Any use outside the specific limits of the copyright law without the consent of the publisher is prohibited and punishable by law.
This applies specifically to reproductions, translations, microfilming, and storage and processing in electronic systems and networks. We do not guarantee that all material in this work
is free from copyright or other protection.
Technical product development: Genius Toy Taiwan Co., Ltd., Taichung, Taiwan, R.O.C.
Author: Camille Duhamel
Manual Layout: Camille Duhamel and Mark Geary
Editing: Ted McGuire
Additional Graphics and Packaging: Dan Freitas
Manual design concept: Atelier Bea Klenk, Berlin
Manual illustrations: Genius Toy Taiwan Co., Ltd., Taichung, Taiwan, R.O.C., and Thames & Kosmos
Manual photos: askaja (all paper clips); Jamie Duplass (all tape strips); picsfive (all push pins); p. 15 (compass) Titelio: (all previous © fotolia.com);
p. 4 (top left), p. 14 (top right), p. 64 (top right) (red tractor) vrstudio, p. 4 (top right), p. 18 (middle left) (disk harrow) dechevm, p. 4 (bottom left), p. 50 (middle right) (combine with
tractor) Wolfgang Jargstroff, p. (bottom right), p. (top) (hay rake on back of tractor) Poulsons Photography, p. 14 (bottom) (engine cut in half) Stephen Sweet, page 14 (bottom left) (axe
cutting wood) sergzsv, p. (bottom right) (plow) strannik9211, p. 14 (tractor with cultivator) zorandim75, p. 26 (bottom) (fertilizer) Davizro Photography, p. 31 (middle) (gears stock
photo) Alexandr Mitiuc, p. 50 (middle left) (combine with red header) stefan1179, p. 50 (top) (GPS) “A”, p. 50 (bottom) (drone) ekkasit919, p. 64 (top right) (blue old tractor) Jenny
Thompson, p. 64 (middle) (driverless tractor) ekkasit919, p.64 (bottom) (drone) Alexander Kolomietz,
p. 14 (top, right-middle) (Carnot heat engine) Eric Gaba (Public Domain), p. 14 (left middle) (steam tractor) Bill Whittaker (CC BY-SA 3.0), p. 22 (middle) (three point hitch) bdk (CC BY-SA
3.0), p. 22 (bottom) (power takeoff shaft) bdk (CC BY-SA 3.0), p. 26 (seeder) Mahlum (Public Domain), p. 31 (windrows) Daniel Plazanet (Daplaza) (CC BY-SA 2.5), p. 31 (insect) Fritz
Geller-Grimm (CC BY-SA 2.5), p. 31 (bottom) (insect gear SEM image) University of Cambridge (profs. Malcolm Burrows & Gregory Sutton) (CC BY-SA 3.0), p. 50 (top) (grain and chaff
image) National Plant Germplasm System (USDA/ARS) (Public Domain), (all previous: Wikipedia);
p. 50 (archimedes’ screw) Friedrich Werth;
All remaining images: Thames & Kosmos, Franckh-Kosmos Verlags-GmbH & Co. KG, and Genius Toy Taiwan Co., Ltd.
The publisher has made every effort to locate the holders of image rights for all of the photos used. If in any individual cases any holders of image rights have not been acknowledged,
they are asked to provide evidence to the publisher of their image rights so that they may be paid an image fee in line with the industry standard.
Distributed in North America by Thames & Kosmos, LLC. Providence, RI 02903
Phone: 800-587-2872; Web: www.thamesandkosmos.com
Distributed in United Kingdom by Thames & Kosmos UK LP. Cranbrook, Kent TN17 3HE
Phone: 01580 713000; Web: www.thamesandkosmos.co.uk
We reserve the right to make technical changes.
Printed in Taiwan / Imprimé en Taiwan
› › › SAFETY INFORMATION
Safety Information
Warning! Not suitable for children under 3 years. Choking hazard — small
parts may be swallowed or inhaled.
Store the experiment material and assembled models out of the reach of
small children.
The models are intended for indoor use. Do not use your models in a
sandbox.
Keep packaging and instructions as they contain important information.
Safety for Experiments with
Batteries
››› The wires are not to be inserted into socket-outlets. Never perform
experiments using household current! The high voltage can be extremely
dangerous or fatal!
››› To operate the models, you will need eight AA baeries (1.5-volt, type
AA/LR6), which could not be included in the kit due to their limited shelf
life.
››› The supply terminals are not to be short-circuited. A short circuit can
cause the wires to overheat and the baeries to explode.
››› Different types of baeries or new and used baeries are not to be
mixed.
››› Do not mix old and new baeries.
››› Do not mix alkaline, standard (carbon-zinc), or rechargeable (nickel-
cadmium) baeries.
››› Baeries are to be inserted with the correct polarity. Press them gently
into the baery compartments. See page 2.
››› Always close baery compartments with the lid.
››› Non-rechargeable baeries are not to be recharged. They could
explode!
››› Rechargeable baeries are only to be charged under adult supervision.
››› Rechargeable baeries are to be removed from the toy before being
charged.
››› Exhausted baeries are to be removed from the toy.
››› Dispose of used baeries in accordance with environmental provisions,
not in the household trash.
››› Be sure not to bring baeries into contact with coins, keys, or other
metal objects.
››› Avoid deforming the baeries.
As all of the experiments use baeries, have an adult check the
experiments or models before use to make sure they are assembled
properly. Always operate the motorized models under adult supervision.
After you are done experimenting, remove the baeries from the baery
compartments. Note the safety information accompanying the individual
experiments or models!
Notes on Disposal of Electrical
and Electronic Components
The electronic components of this product are recyclable. For the sake of
the environment, do not throw them into the household trash at the end of
their lifespan. They must be delivered to a collection location for electronic
waste, as indicated by the following symbol:
Please contact your local authorities for the
appropriate disposal location.
Dear Parents and Supervising
Adults,
Before starting the experiments, read through the
instruction manual together with your child and discuss
the safety information. Check to make sure the models
have been assembled correctly, and assist your child with
the experiments.
We hope you and your child have a lot of fun with the
experiments!
FCC Part 15 Statement
This device complies with Part 15 of the FCC Rules. Operation is subject to the
following two conditions: (1) this device may not cause harmful interference, and
(2) this device must accept any interference received, including interference that
may cause undesired operation.
FCC warning: Changes or modifications not expressly approved by the party
responsible for compliance could void the user’s authority to operate the
equipment.
Note for RC car with receiver: This equipment complies with FCC radiation
exposure limits set forth for an uncontrolled environment and meets the FCC radio
frequency (RF) Exposure Guidelines. This equipment has very low levels of RF
energy that it deemed to comply without maximum permissive exposure
evaluation (MPE). But it is desirable that it should be installed and operated
keeping the radiator at least 20cm or more away from person’s body.
Note for hand-held RC unit: This equipment complies with FCC radiation exposure
limits set forth for an uncontrolled environment and meets the FCC radio
frequency (RF) Exposure Guidelines. This equipment has very low levels of RF
energy that are deemed to comply without testing of specific absorption ratio
(SAR).
IC Statement
This device complies with Industry Canada’s license-exempt RSSs. Operation is
subject to the following two conditions:
(1) This device may not cause interference; and
(2) This device must accept any interference, including interference that may
cause undesired operation of the device.
Son fonctionnement est soumis aux deux conditions suivantes:
(1) Cet appareil ne peut pas provoquer d’interférences et
(2) Cet appareil doit accepter toute interférence, y compris les interférences
qui peuvent causer un mauvais fonctionnement du dispositif.
This device complies with the ISED radiation exposure limit set forth for an
uncontrolled environment. This device should be installed and operated with
minimum distance 20cm between the radiator and your body. This transmitter
must not be co-located or operating in conjunction with any other antenna or
transmitter.
Cet équipement est conforme avec l’exposition aux radiations ISED définies pour
un environnement non contrôlé. Cet équipement doit être installé et utilisé à une
distance minimum de 20 cm entre le radiateur et votre corps. Cet émetteur ne doit
pas être co-localisées ou opérant en conjonction avec une autre antenne ou
transmetteur.
Race Cars
No. Description Qty. Item No.
1 Body plate left, green 17392-W10-L1
2 Body plate right, green 17392-W10-L2
3 Large body plate 37398-W10-C1
4 Large body plate B 37398-W10-C2
5 Flat body plate 27407-W10-D1
6 Small body plate C, right 27407-W10-D2
7 Small body plate C, left 27407-W10-D3
8 U-shaped body plate 17396-W10-I1B
9Gripper 17411-W10-G1D
10 Button pin 87061-W10-W1TY
11 Anchor pin, red 10 7061-W10-C1R
12 Short anchor pin, blue 100 7344-W10-C2B
13 Shaft plug 17026-W10-H1R
14 Joint pin 81156-W10-A1R
15 Axle rod connector 21 7410-W10-C1S
16 Two-to-one converter 27061-W10-G1D
17 90-degree converter X, black 47061-W10-X1D
18 90-degree converter Y, black 47061-W10-Y1D
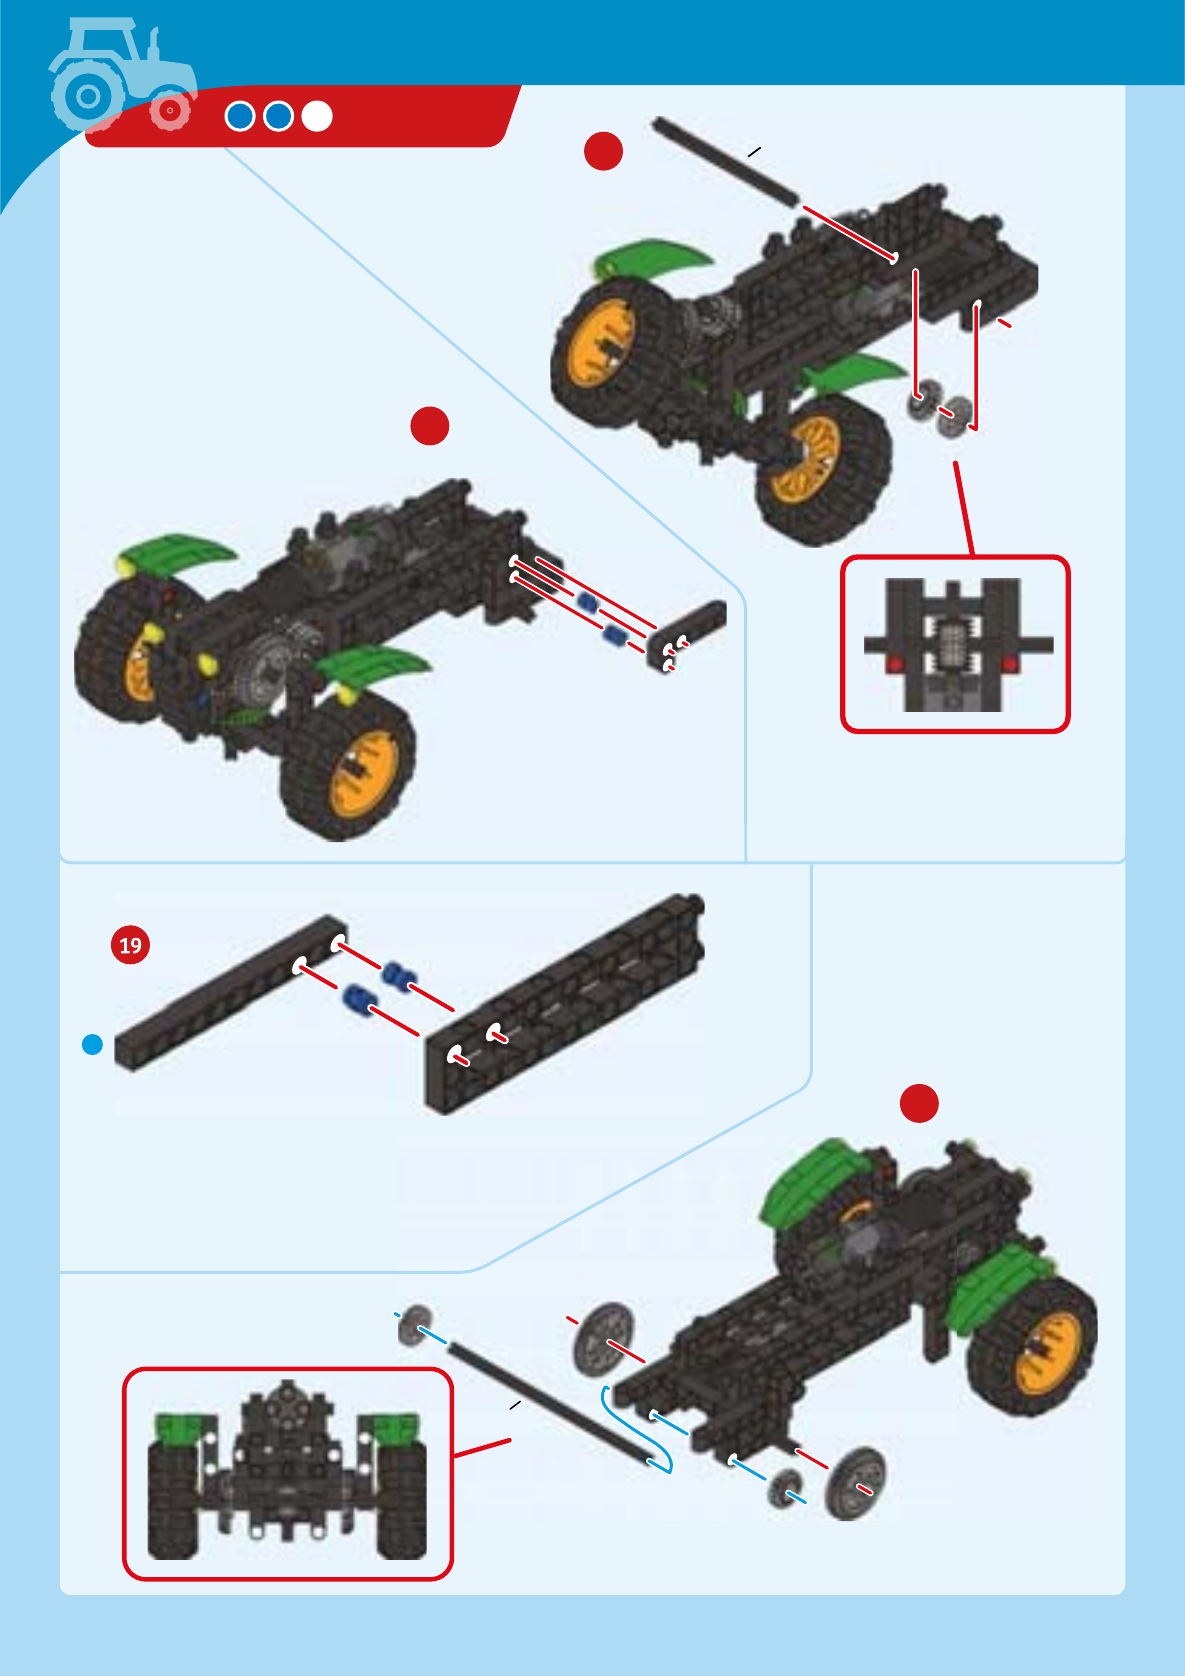
19 1-hole connector 29 7430-W10-B1D
20 Curved rod 27061-W10-V1D
21 3-hole rod 17026-W10-Q2D
22 3-hole cross rod 67026-W10-X1D
23 3-hole dual rod 67413-W10-Y1D
24 5-hole rod 27413-W10-K2D
25 5-hole cross rod 17413-W10-R1D
26 5-hole dual rod C, black 27413-W10-X1D
27 5-hole dual rod B, black 37413-W10-W1D
28 3-hole wide rounded rod 57404-W10-C1D
29 7-hole wide rounded rod 57404-W10-C2D
30 7-hole flat rounded rod 57404-W10-C3D
No. Description Qty. Item No.
31 9-hole rod 57407-W10-C1D
32 11-hole rod 87413-W10-P1D
33 15-hole dual rod 27413-W10-Z1D
34 3x13 dual frame 27406-W10-A1D
35 Rounded short frame 17411-W10-E1 ( )
36 3-hole bolt rod, black 97406-W10-B1D
37 5-hole L rod 97406-W10-B2D
38 Worm gear 27344-W10-A1D
39 35-mm axle 47413-W10-O1D
40 60-mm axle 5 7413-W10-M1D
41 70-mm axle 67061-W10-Q1D
42 100-mm axle 97413-W10-L2D
43 150-mm axle 17026-W10-P1D
44 Axle lock 23620-W10-A1D
45 Small gear, gray 12 7026-W10-D2S
46 Medium gear, gray 77346-W10-C1S
47 Medium gear, green 57408-W10-D1G
48 Pulley wheel, small 1 7344-W10-N3S1
49 Rubber O-ring 1R12-08S
50 70-mm tube 27337-W16-A1D
51 Tube bolt 27404-W10-G1O
52 Tube bolt cap 27404-W10-G2O
53 Flange 2 7398-W10-E1S
54 Washer 3 R12#3620
55 Anchor pin lever 1 7061-W10-B1Y
56 Wheel 4 7407-W10-B1Y
57 Tire 4 7408-W10-C1D
58 4-channel remote control unit 1 7447-W85-A
59 RC Receiver 1 7447-W85-B
60 Motor (35x Motor) 2 7447-W85-C
6
20381-02-xxxx1
8
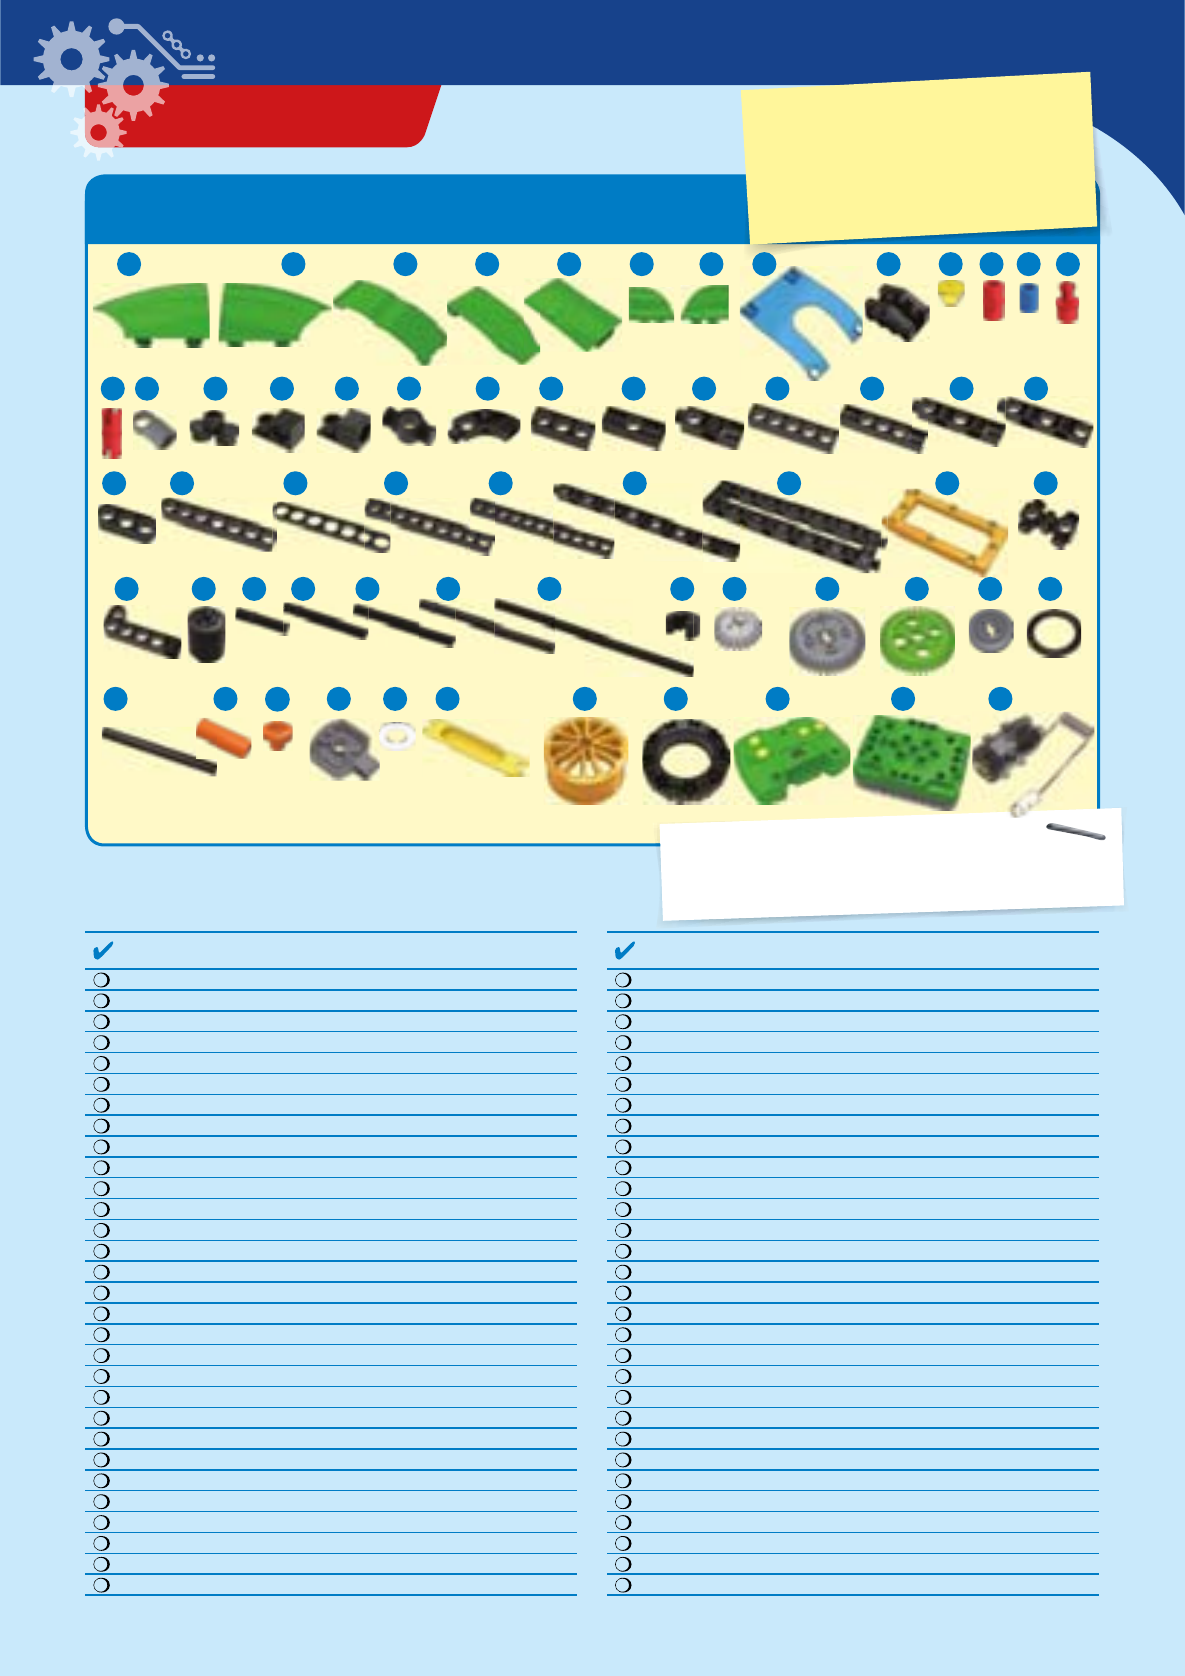
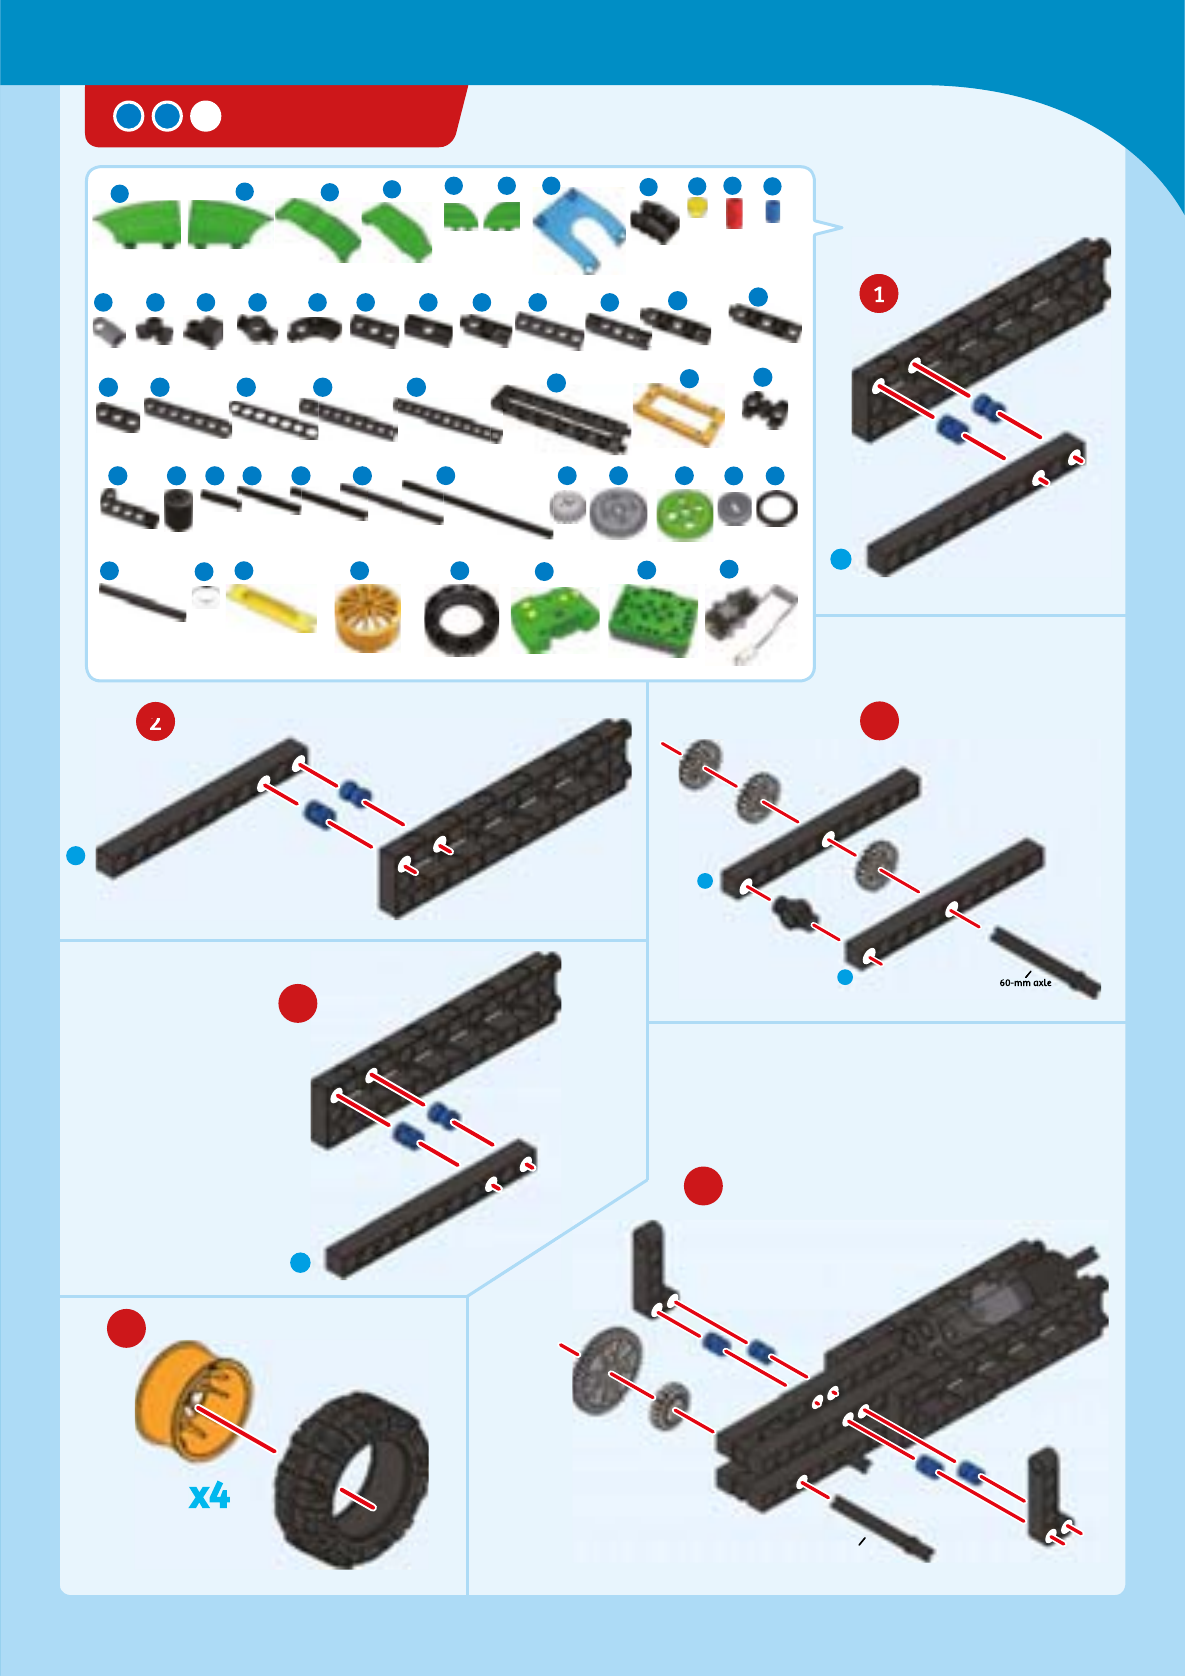
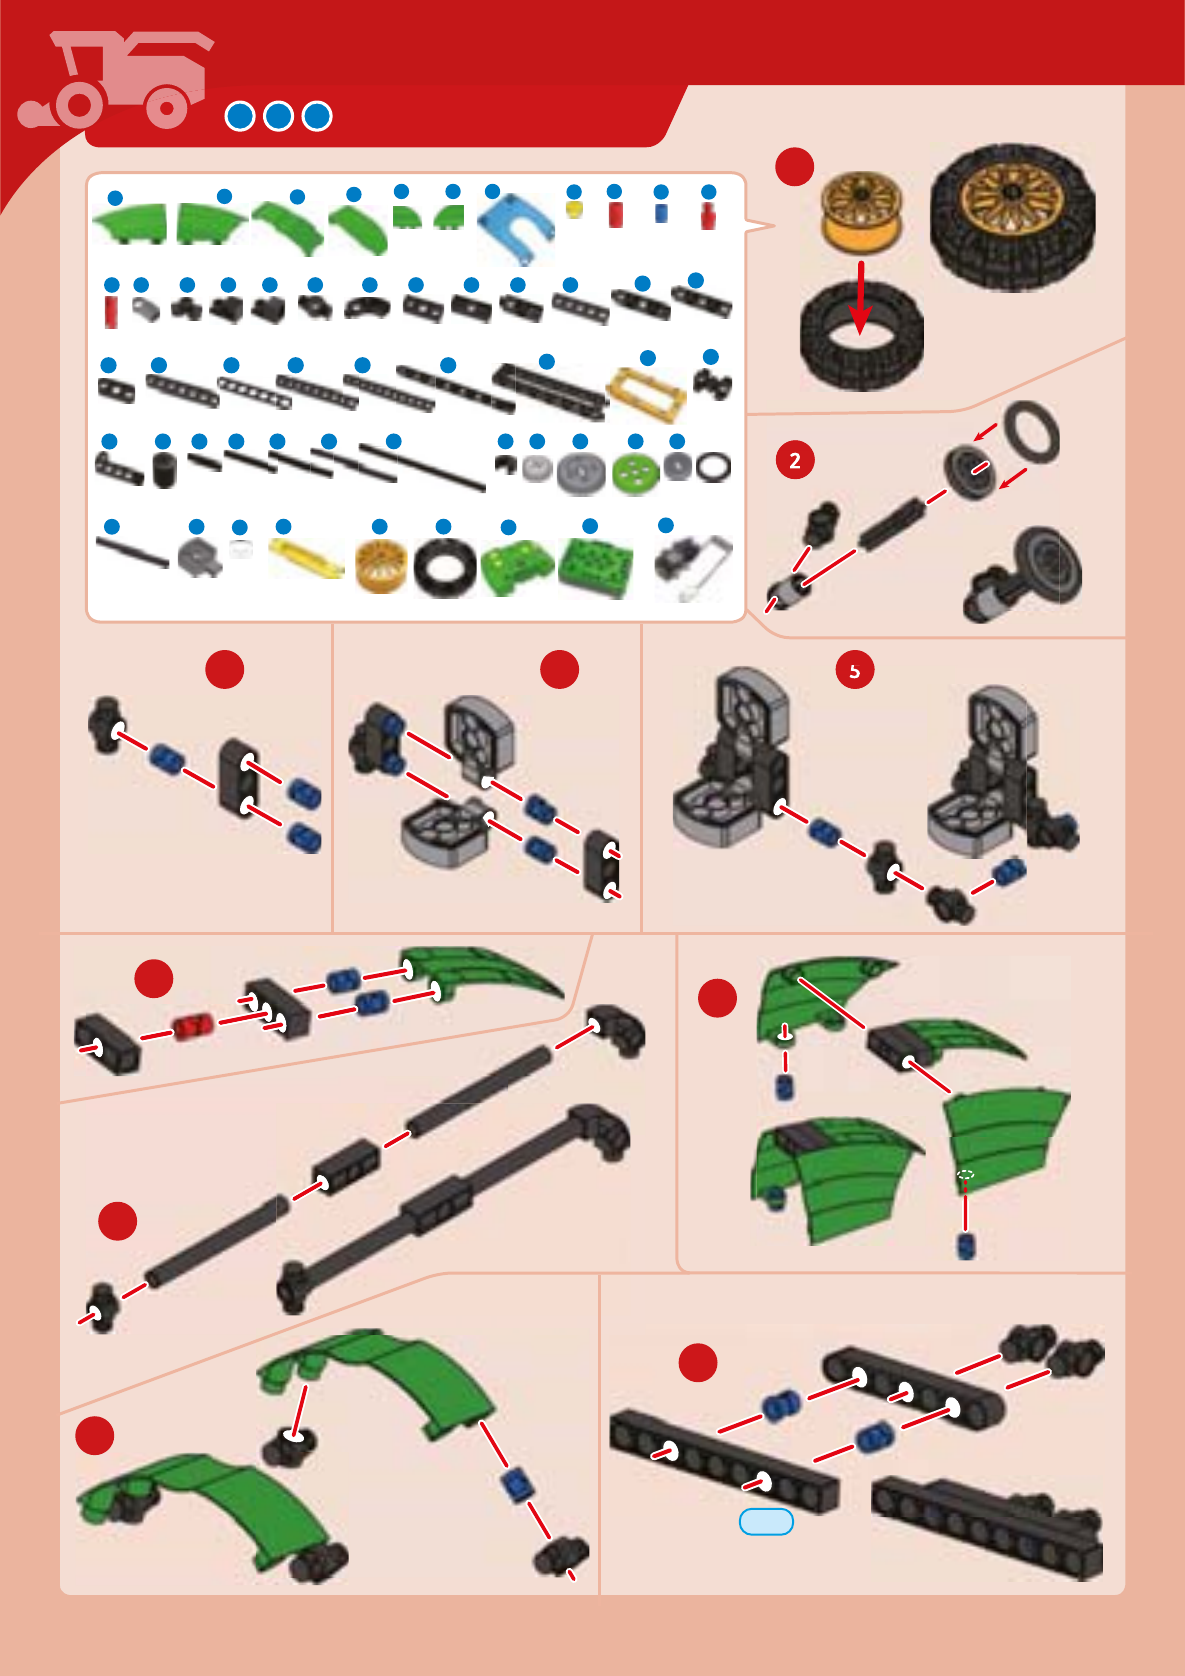
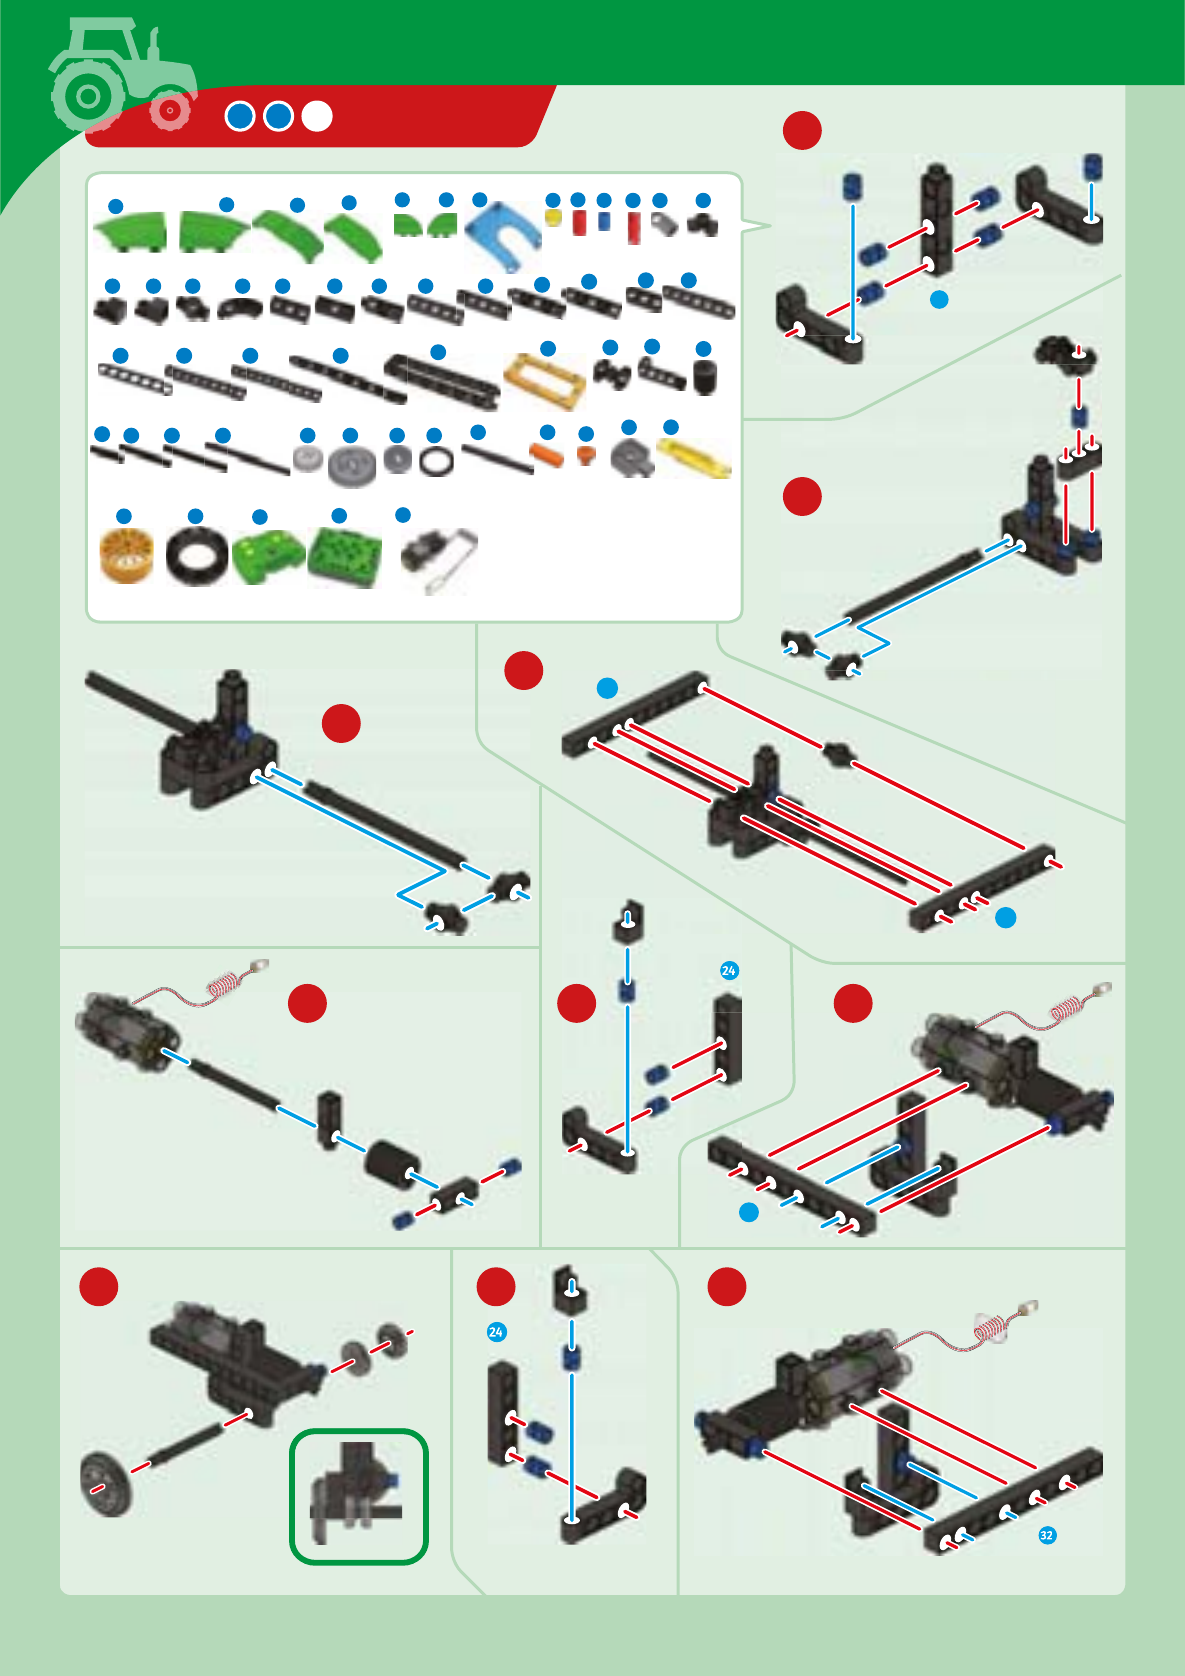
What’s inside your experiment kit:
Checklist: Find – Inspect – Check off
› › › KIT CONTENTS
GOOD TO KNOW! If you are missing any
parts, please contact Thames & Kosmos
customer service.
US: techsupport@thamesandkosmos.com
UK: techsupport@thamesandkosmos.co.uk
You will also need:
8 x AA batteries (1.5-volt, type AA/LR6), and a small
Phillips-head screwdriver to open the battery compartment
push
pull
push
pull
switch
buon
channel
switch
socket
ON OFF
x
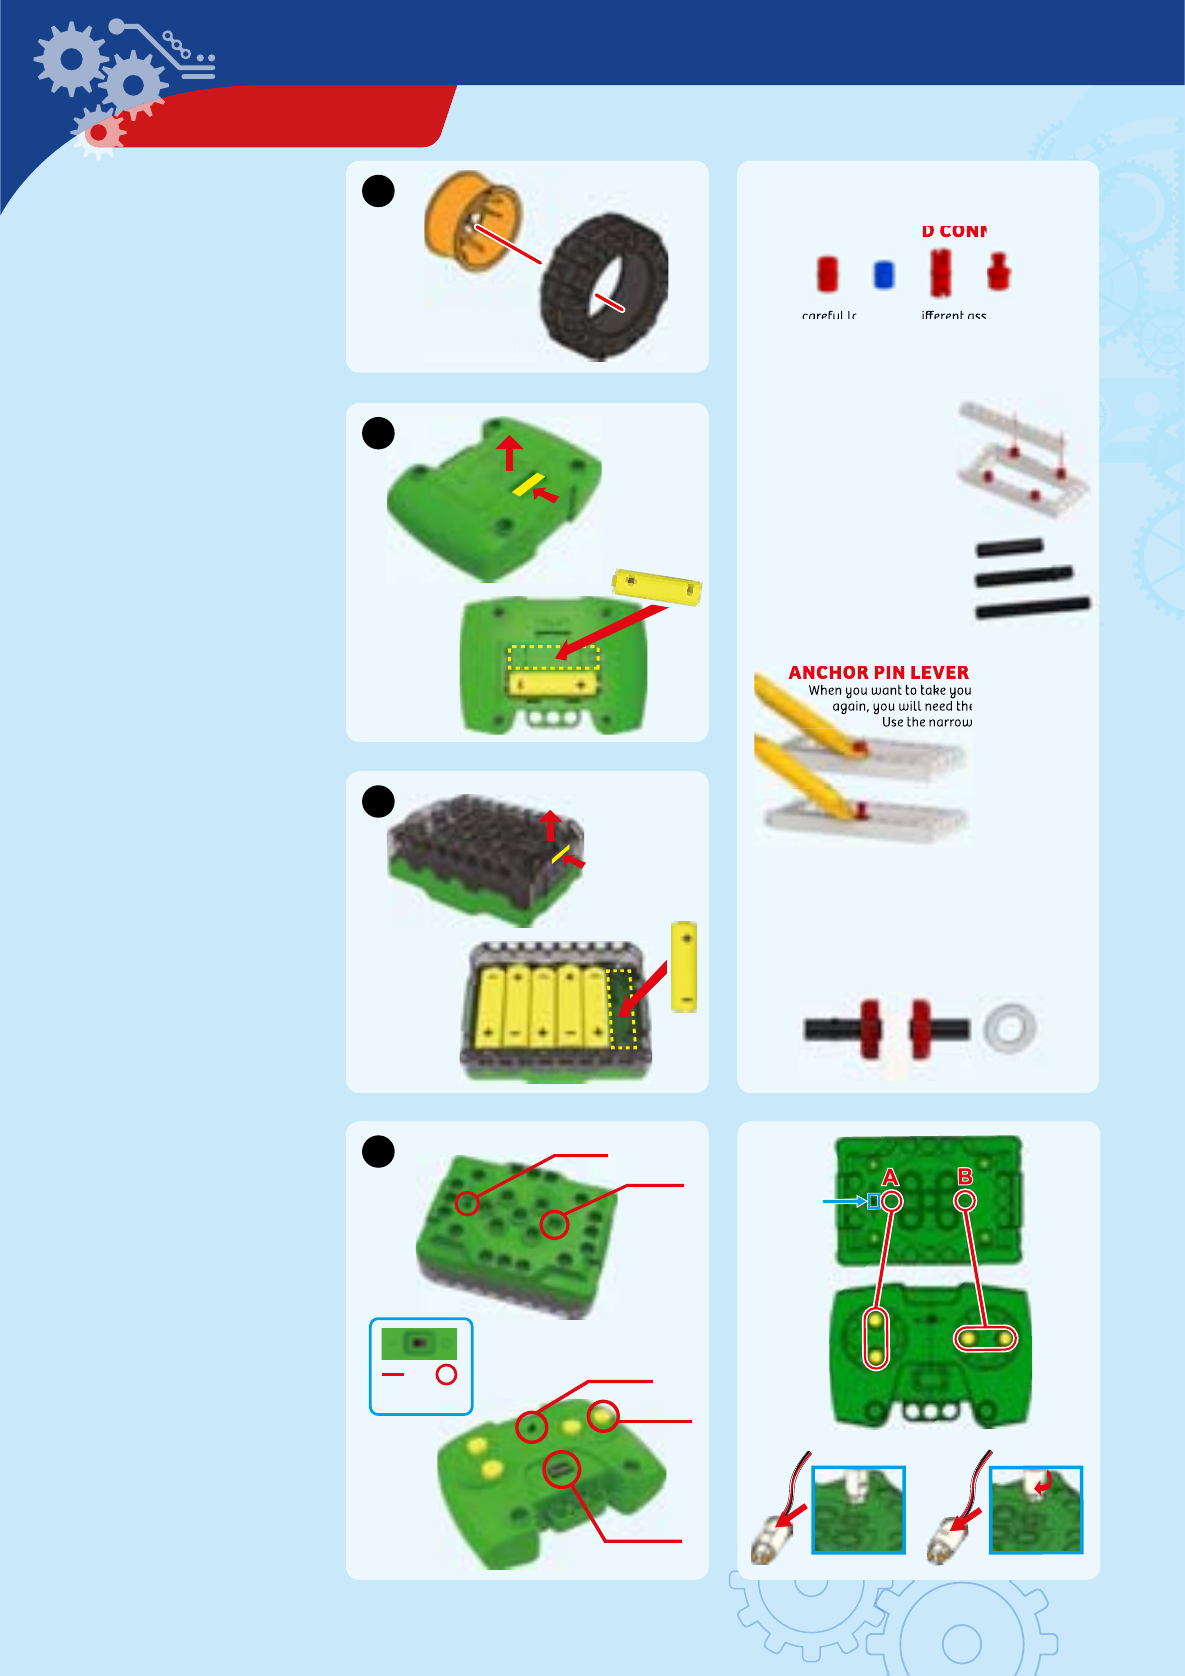
Here are a few tips for assembling
and using the models. Read them
carefully before starting.
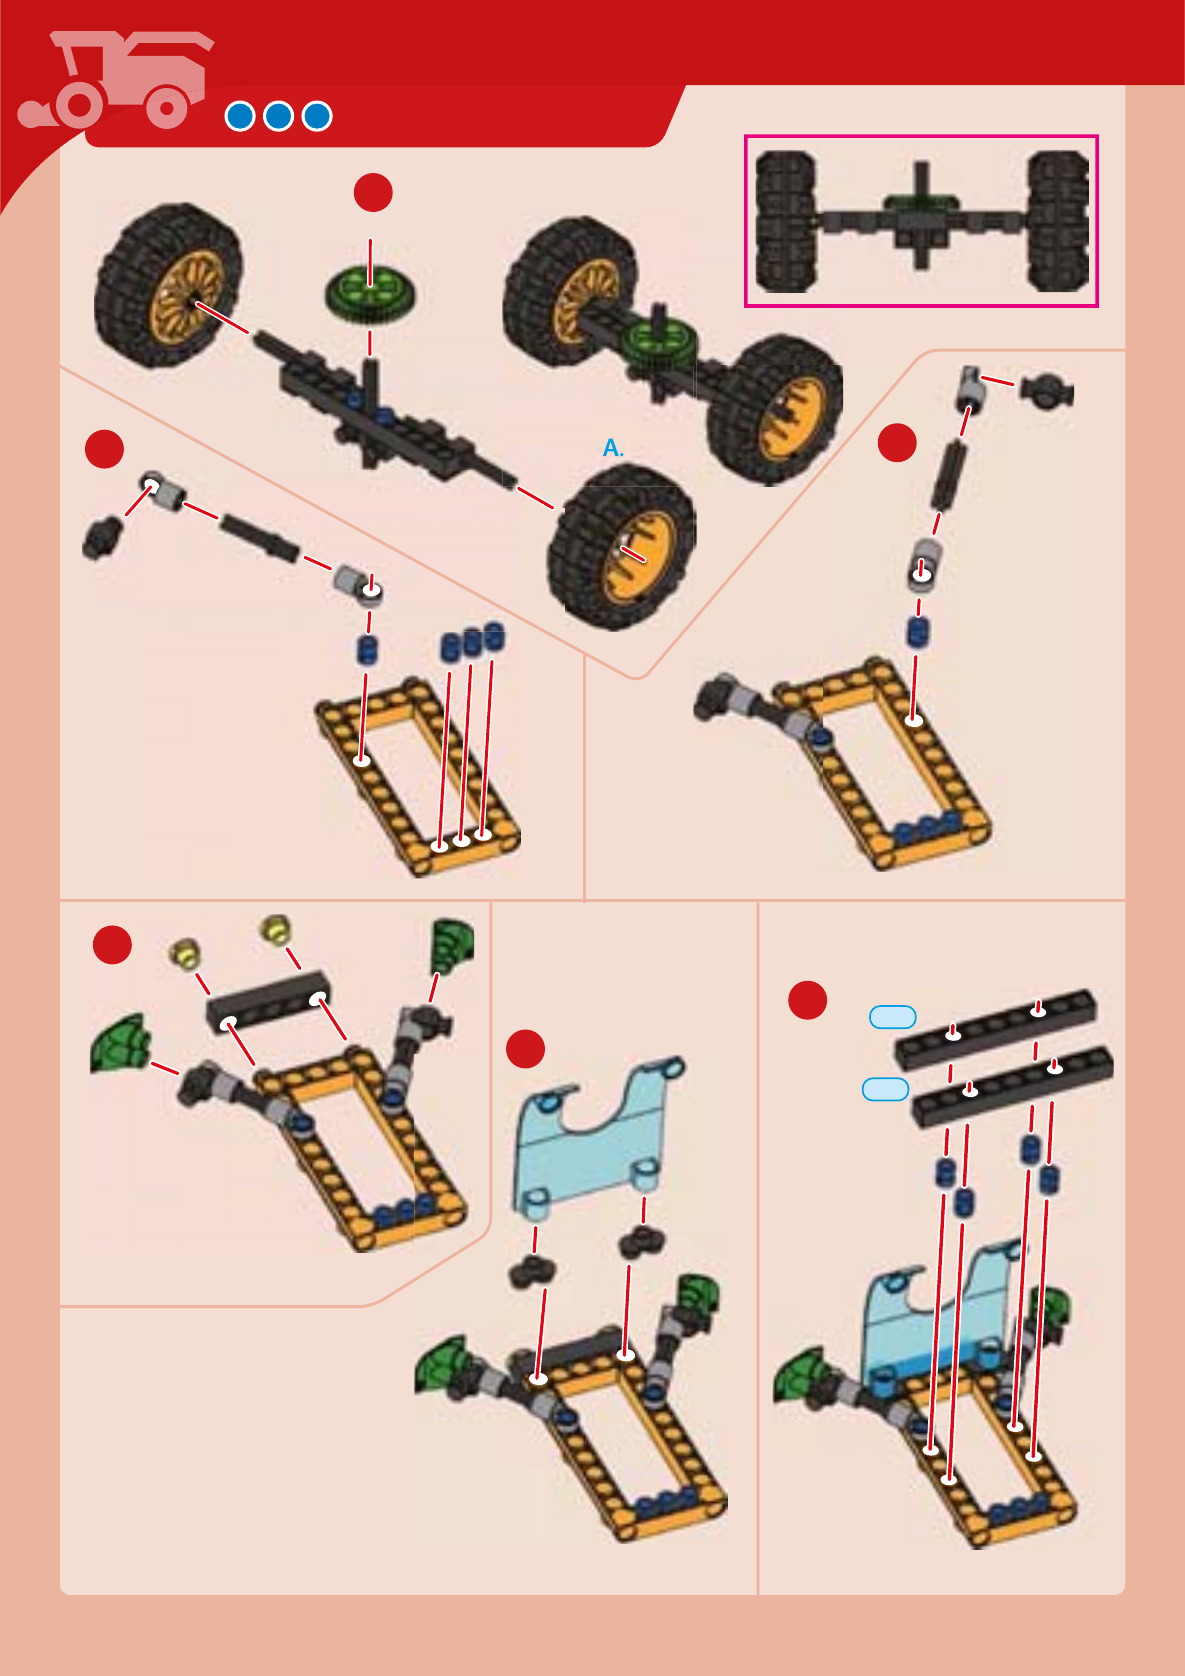
A. Place the tires on the
wheels
Place a tire over each of the four
wheels before you build the first
model.
B. Batteries in RF remote
control unit
Open the baery compartment by
pushing on the tab on the back of
the RF receiver unit and lifting the
back panel up. Insert two AA
baeries, paying aention to the
polarity indicated in the
compartment and on the
baeries. Close the compartment
again.
C. Batteries in RF receiver
Open the baery compartment by
pushing on the tab on the boom
of the RF baery box. Insert six
AA baeries, paying aention to
the polarity indicated in the
compartment and on the
baeries. Close the compartment
again.
D. Using the RF remote
control
To control a model, turn on both
the motor unit and the remote
control unit by moving their
switches from the “off” position
(O) to the “on” position (–). The
lights will flash on the RF remote
control unit and receiver while
they establish a connection. Once
a connection is established the
lights on the receiver will turn off
and the light on the remote
control unit will be solid. If you
are using multiple RF remote
control units and baery boxes in
the same area, set the remote
control units to different channels
and then establish connections to
the baery.
The left side of the RC unit
controls the socket on the left
side of the baery box. The right
side of the RC unit controls the
socket on the right side of the
baery box.
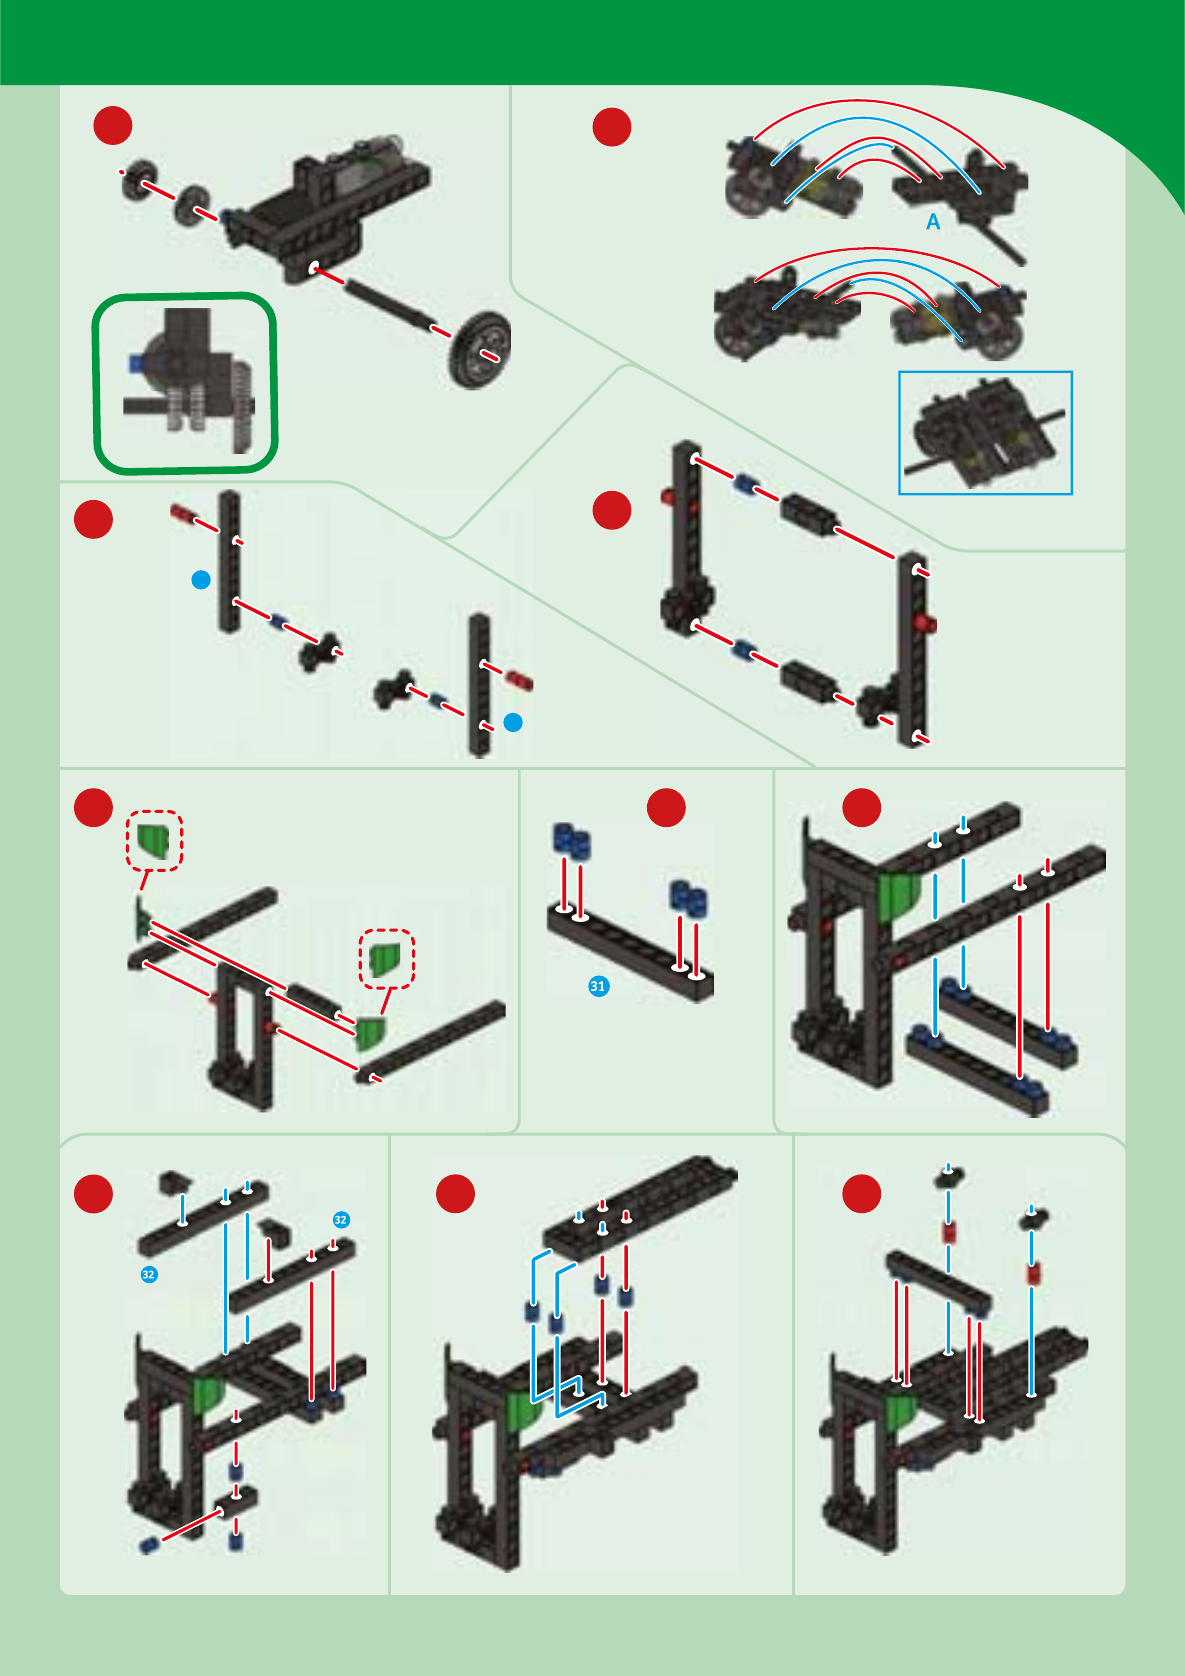
If you want your model to
move in the opposite direction
when you press one of the RC unit
buons, you can simply rotate
the direction of the plug in the
socket degrees.
SWITCH
POWER
rounded
flat
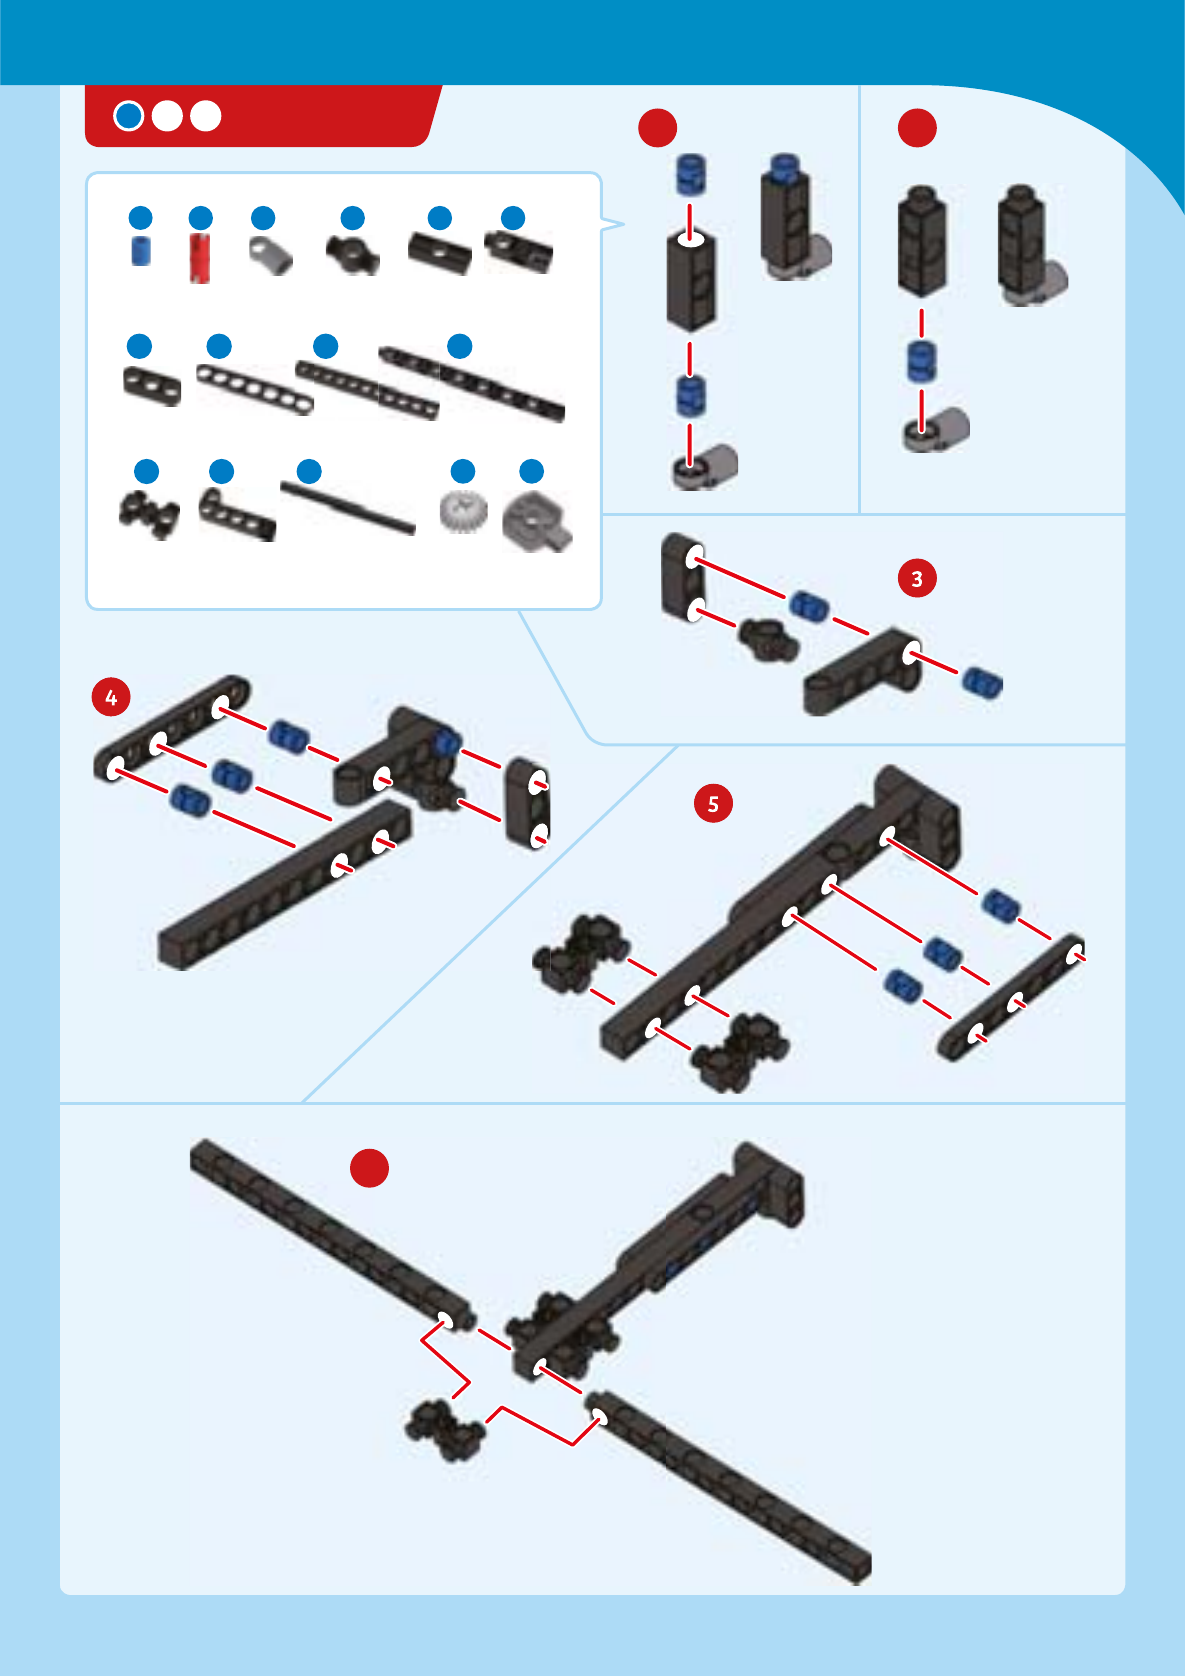
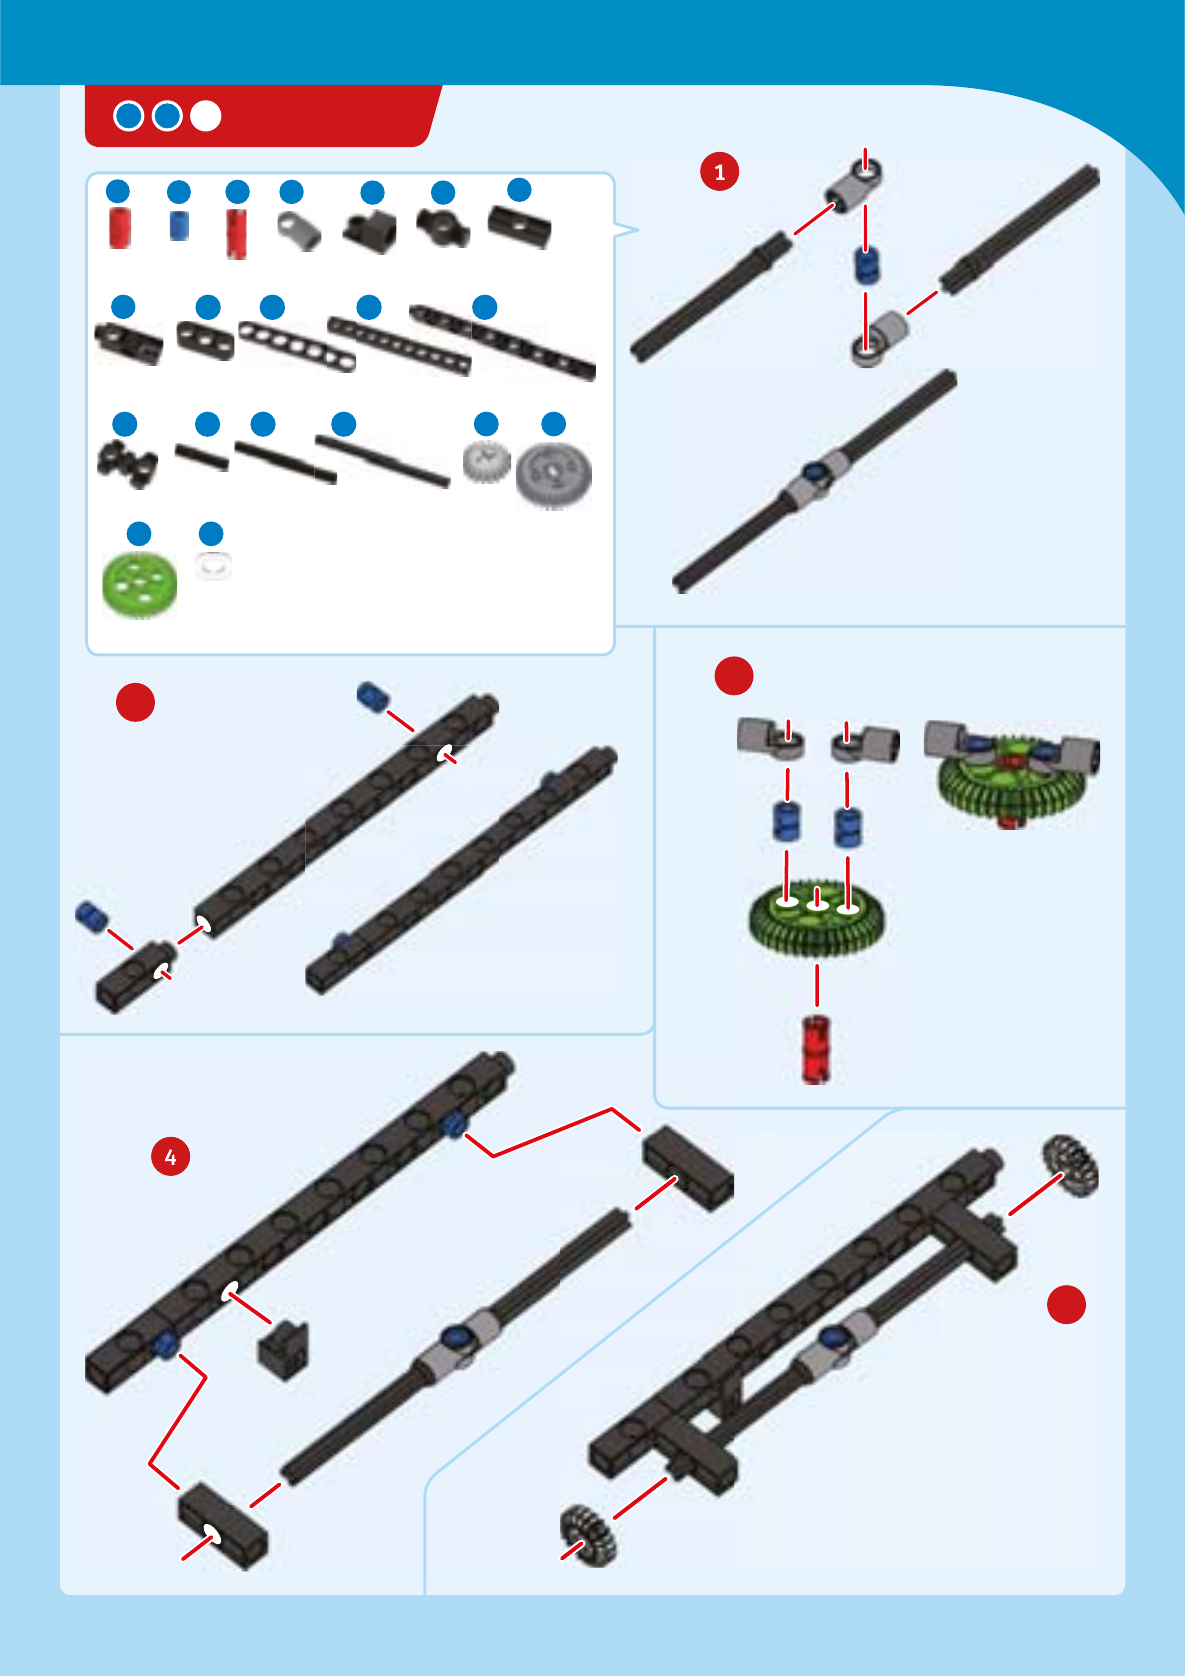
GENERAL BUILDING TIPS
ANCHOR PINS AND CONNECTORS
Take a careful look at the different assembly
components. Red anchor pins, blue anchor pins,
joint pins, and shaft plugs all look prey similar
at first glance. When you assemble the models, it’s
important to use the right ones. The blue anchor pins
are shorter than the red ones.
CONNECTING
FRAMES AND RODS
Use the anchor pins to connect
frames and rods.
AXLES
The building system contains
axles (also called shafts) of
various lengths. When assembling
the model, always be sure that
you’re using the right one.
ANCHOR PIN LEVER
When you want to take your model apart
again, you will need the anchor pin lever.
Use the narrow end of the lever
to remove the
anchor pins. You
can use the wide
end to pry out
shaft plugs.
PULLEYS AND GEARS
If pulleys or gears are mounted too tightly against
other components, they can be hard to turn. If you
leave a gap of about 1 mm between the gear or
pulley and an adjacent component, it will turn easily.
In some of the models, a washer is used to ensure this
kind of spacing. (There are no gears included in this
kit.)
A
B
› › › TIPS AND TRICKS
x AA
x AA
C
D
Race Cars
TIP!
Above each set of assembly
instructions, you will find a red bar:
››› It shows you the difficulty level for
the model’s assembly:
easy medium hard
Safety Information ........................................................... Inside front cover
Kit Contents......................................................................................................
Tips and Tricks ................................................................................................
Table of Contents............................................................................................
Introduction
Agriculture and Agricultural Engineering ...............................................
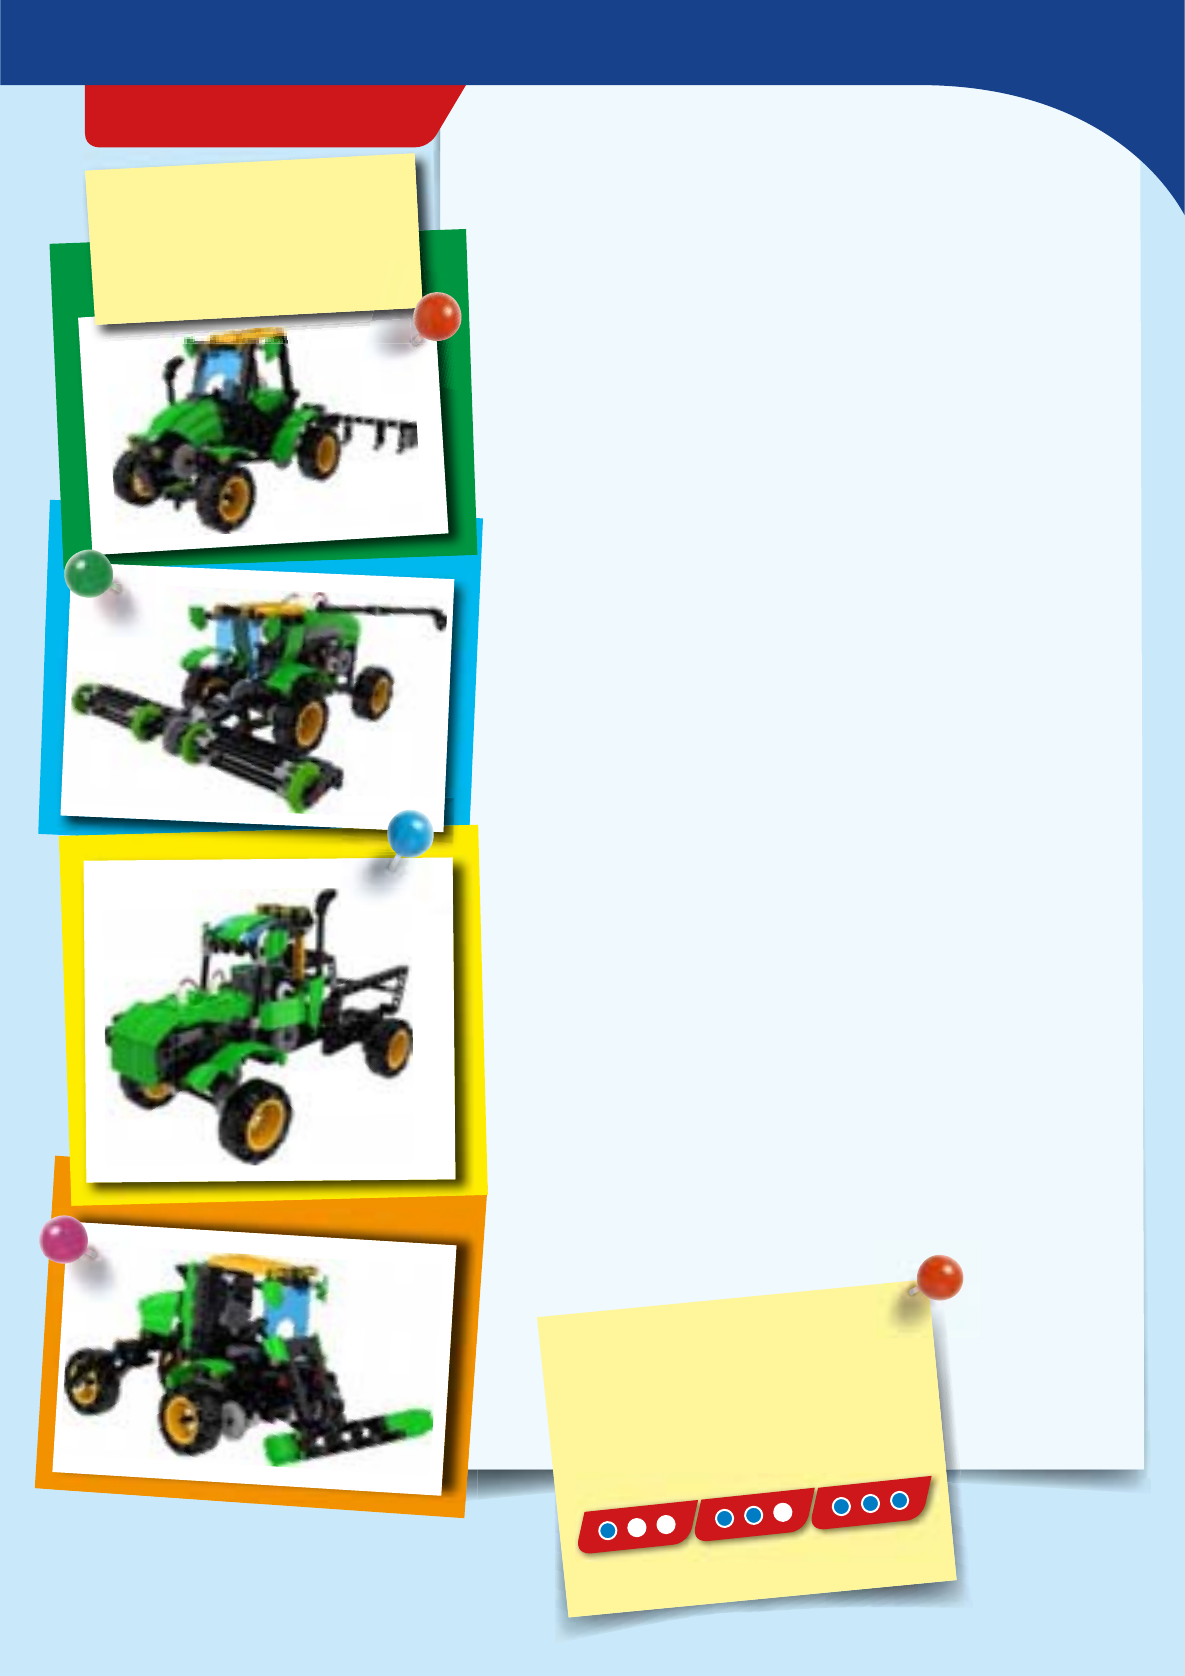
Tractors.............................................................................................................
In this section build a tractor and four different attchments for the
tractor. You will also learn about how each attachment works and their
importance in farming.
The models:
Tractor .....................................................................................................................
Disc Harrow .........................................................................................................
Cultivator ..............................................................................................................
Seeder ....................................................................................................................
Hay Rake ...............................................................................................................
Combine Harvester.......................................................................................
Build a combine harvester and learn how it is used on a farm to harvest
crops.
The models:
Combine Harvester ............................................................................................
Farm Truck ....................................................................................................
Build a farm truck which is used to move materials around a farm, and
learn about how farmers are using remote sensing technology.
The models:
Farm Truck.............................................................................................................
Windrower .....................................................................................................
Build a windrower and learn about how new technologies, such as
drones, are being used on farms.
The models:
Windrower .............................................................................................................
Publisher’s Information ...................................................Inside back cover
TIP!
You will find additional
information in the “Check it out”
sections on pages , , , ,
, , , and .
› › › TABLE OF CONTENTS
Remote-Control Machines: Farm
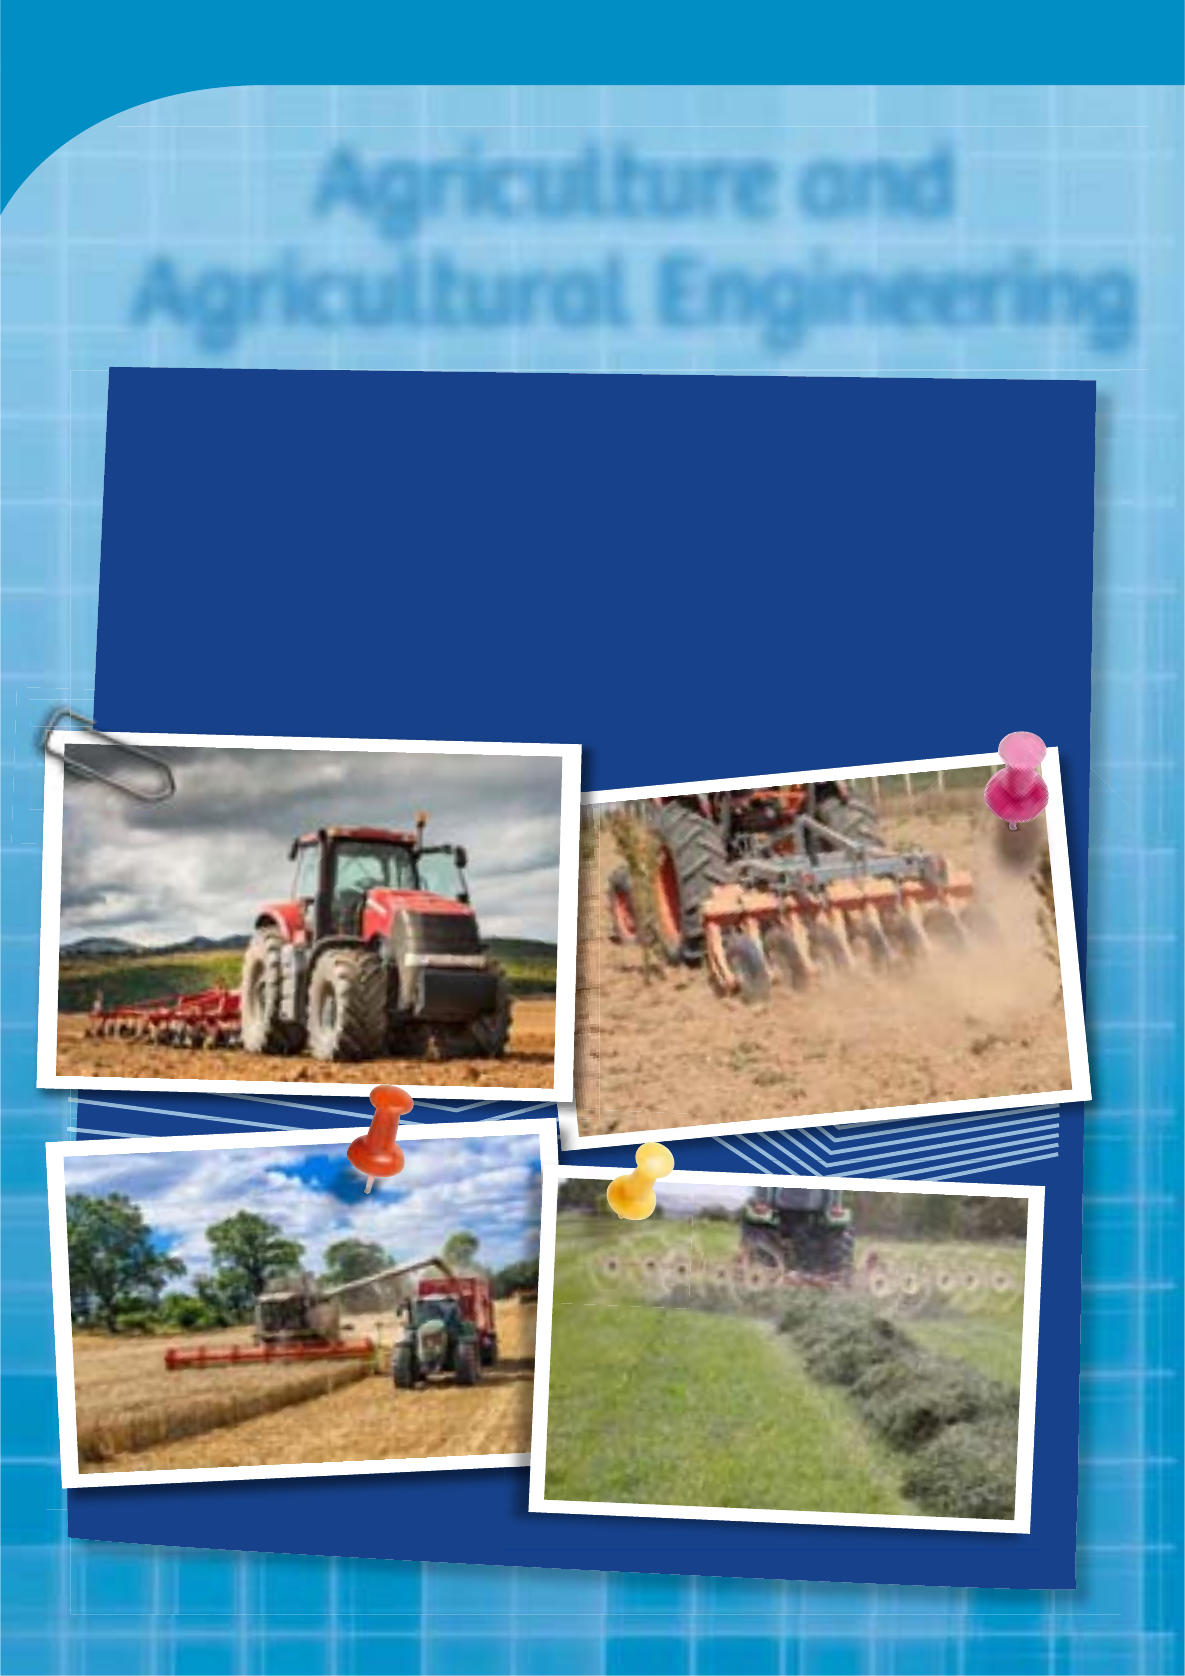
Agriculture and
Agricultural Engineering
Agriculture is the cultivation of crops or raising of animals for food or raw
materials. To make farming task easier farmers use many different tools and
specialized equipment. Currently, farmers are under increasing pressure to
harvest as much as possible from their land due to climate change, population
grown, and limited resources. To overcome these challenges farmers and
agricultural engineers have developed new innovations and technology. In this
kit, you will build some of these farm vehicles and learn about how they function.
Race Cars
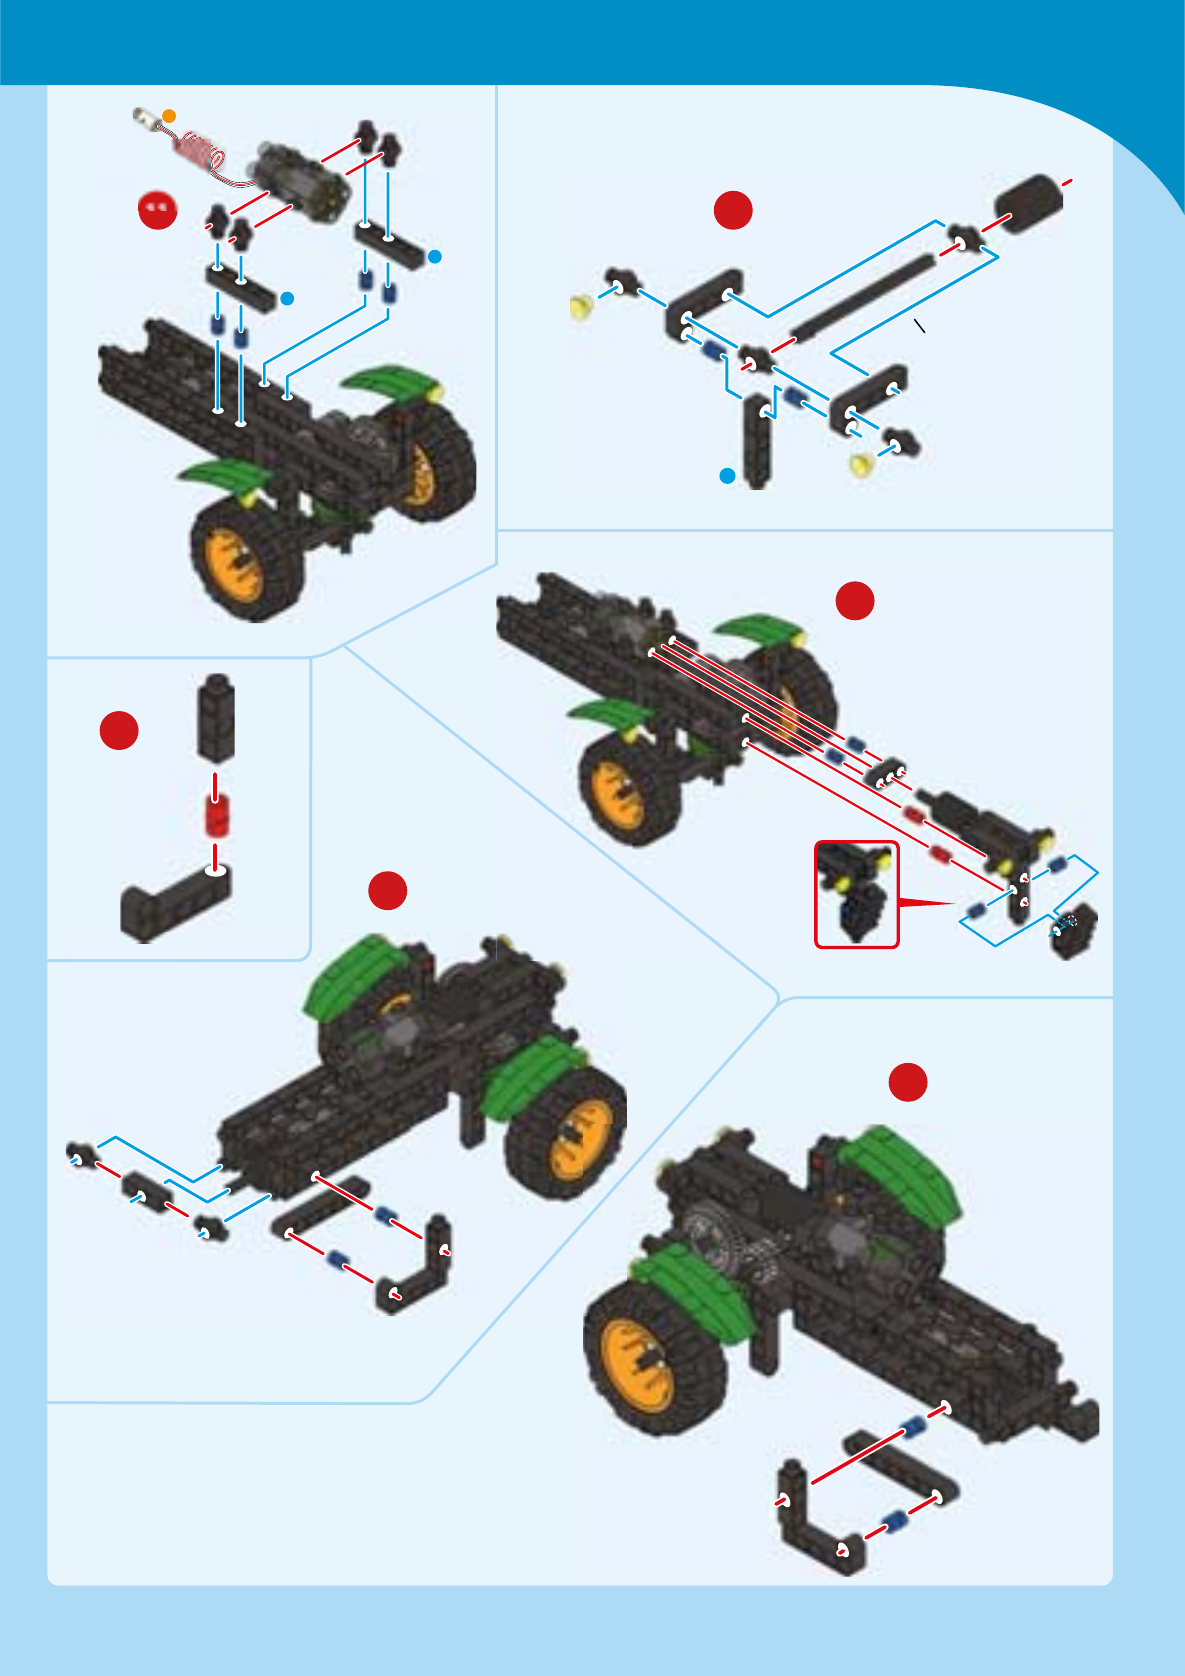
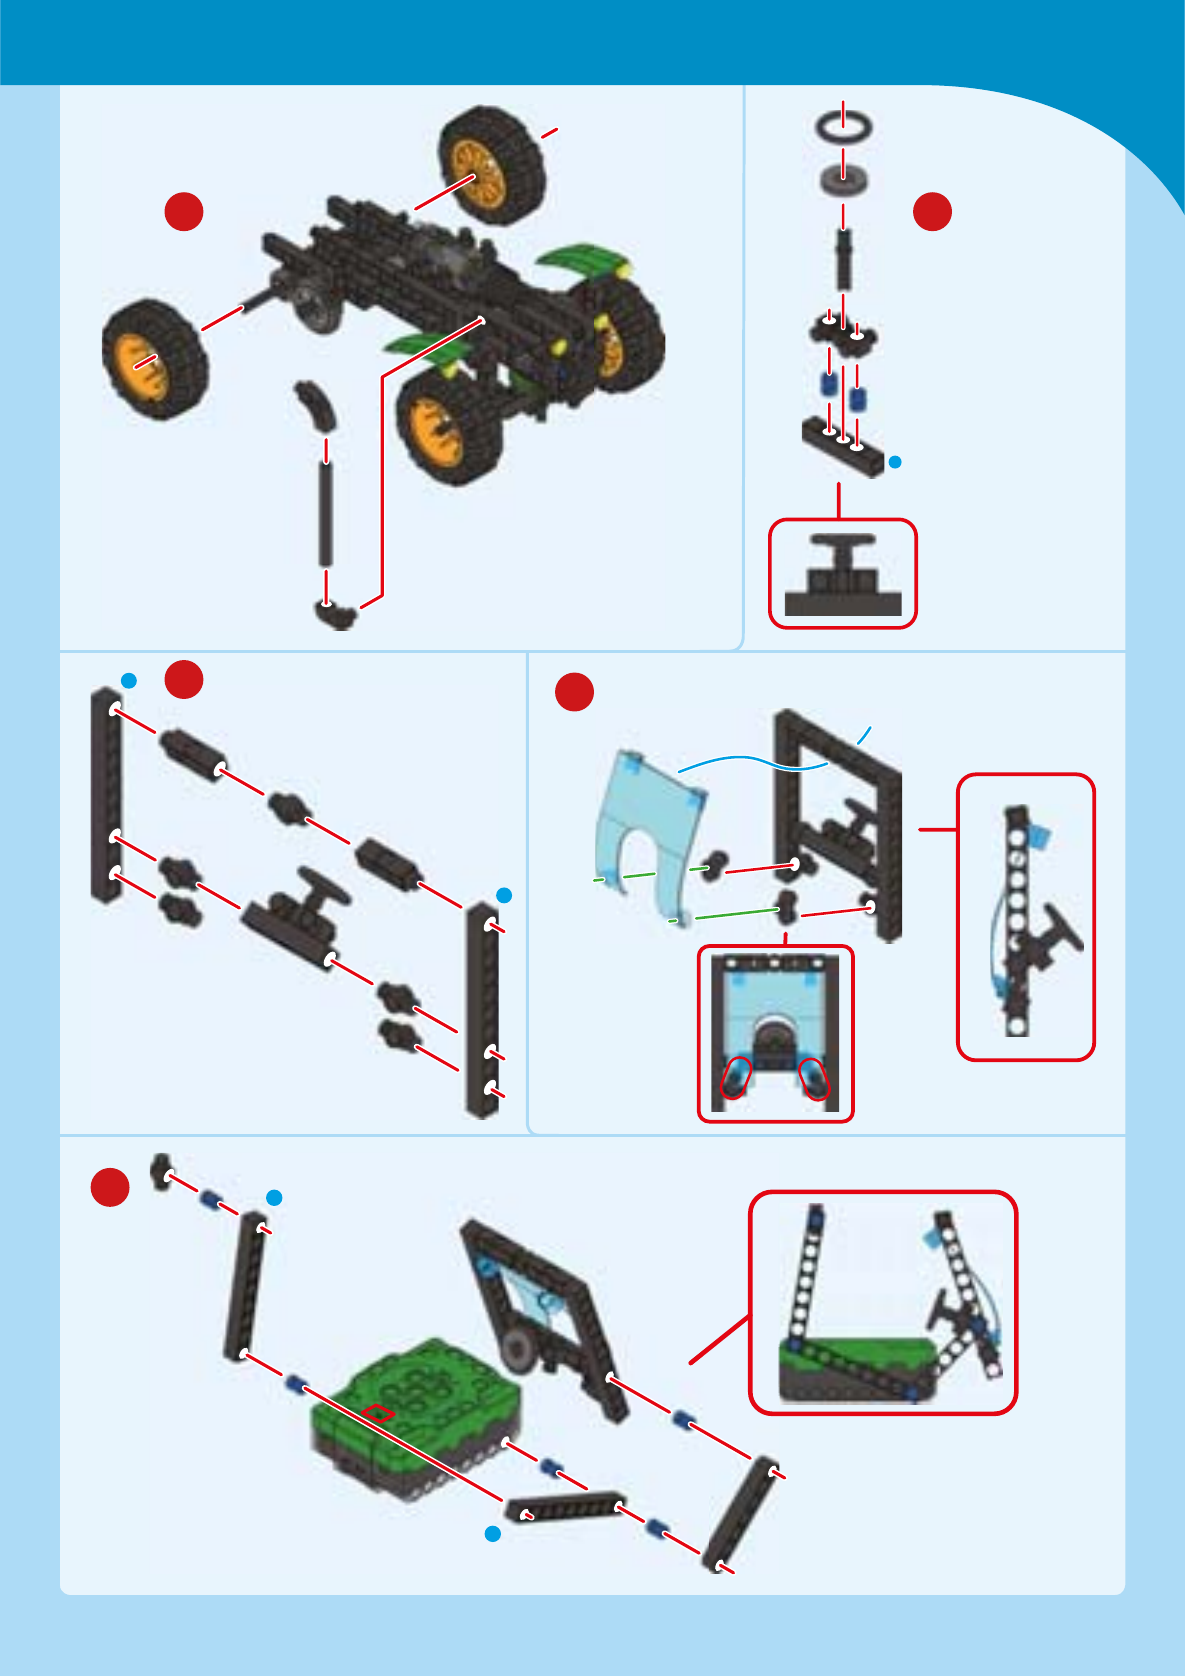
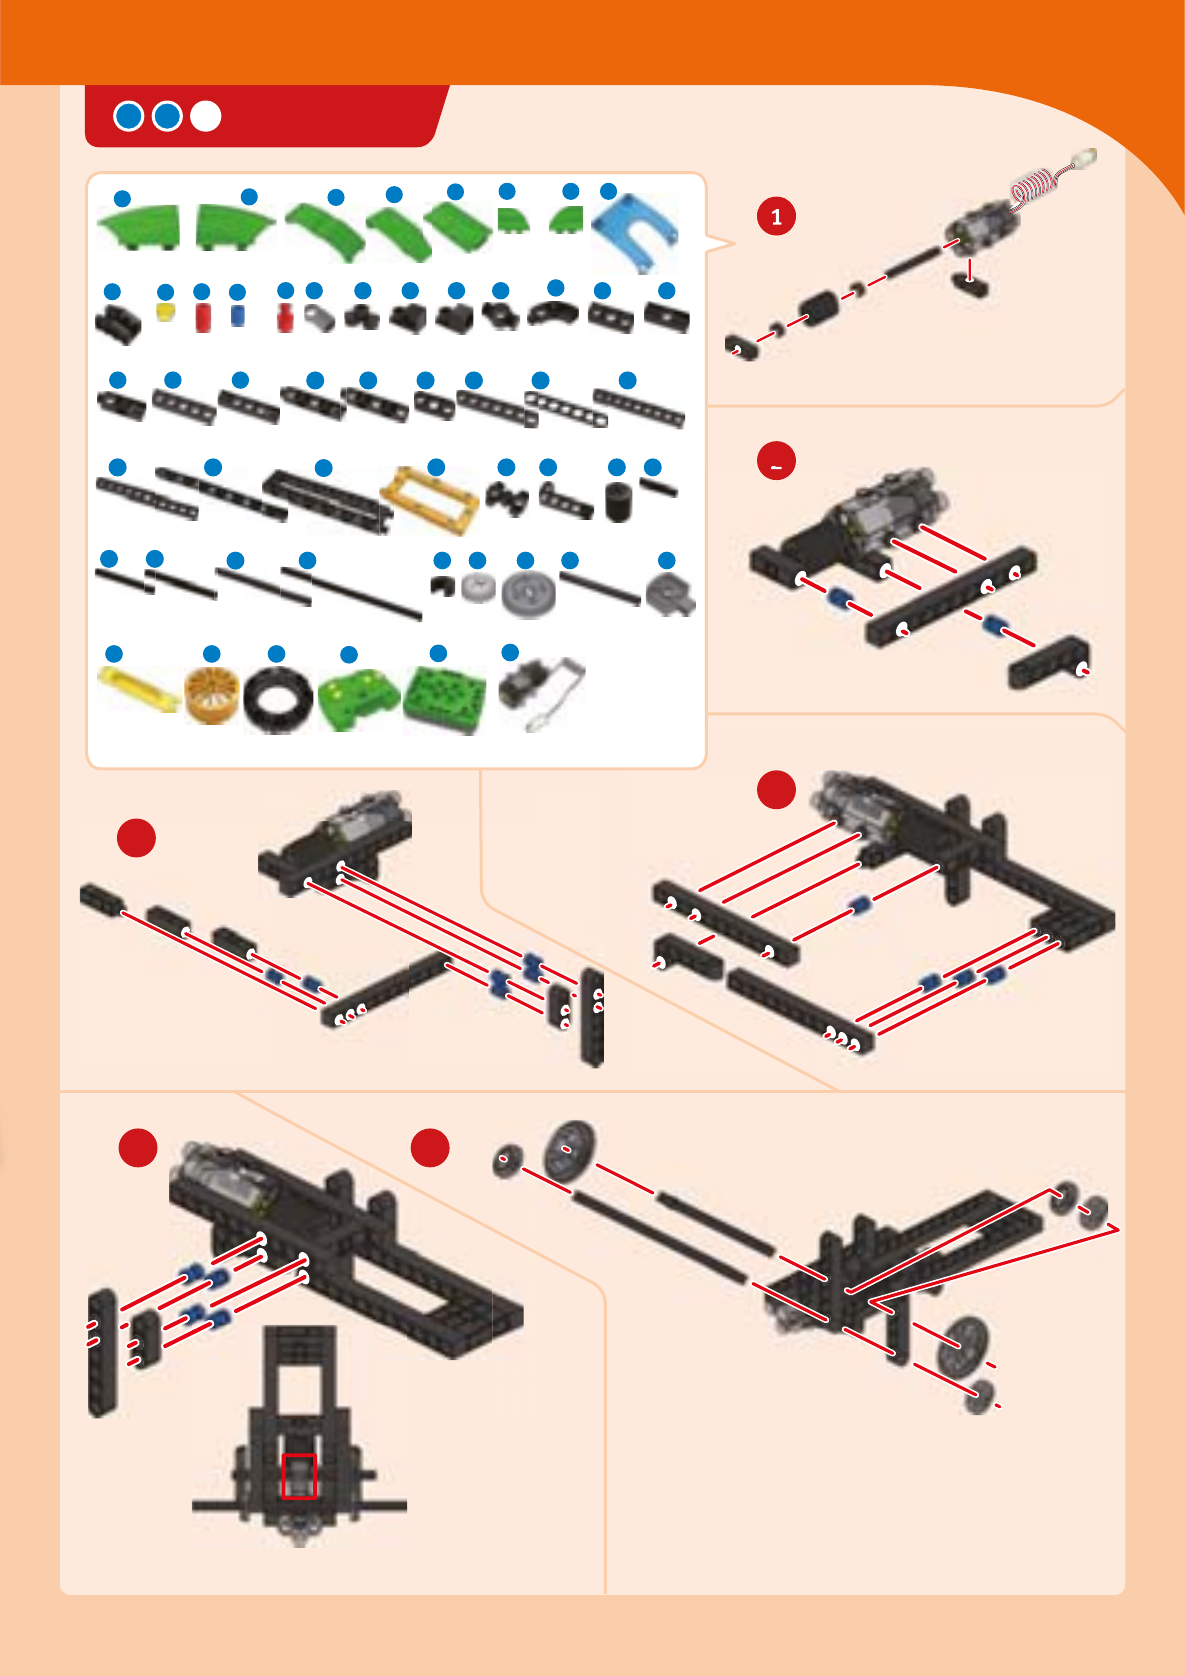
TRACTOR
x
x
32
32
60-mm axle
32
32
60-mm axle
x
x
x x
x x x
x x x
x x x x x x x x x x x x
x x x x x x x x
x x
x x x x x x x x x x
x x
x
x x x x x
32
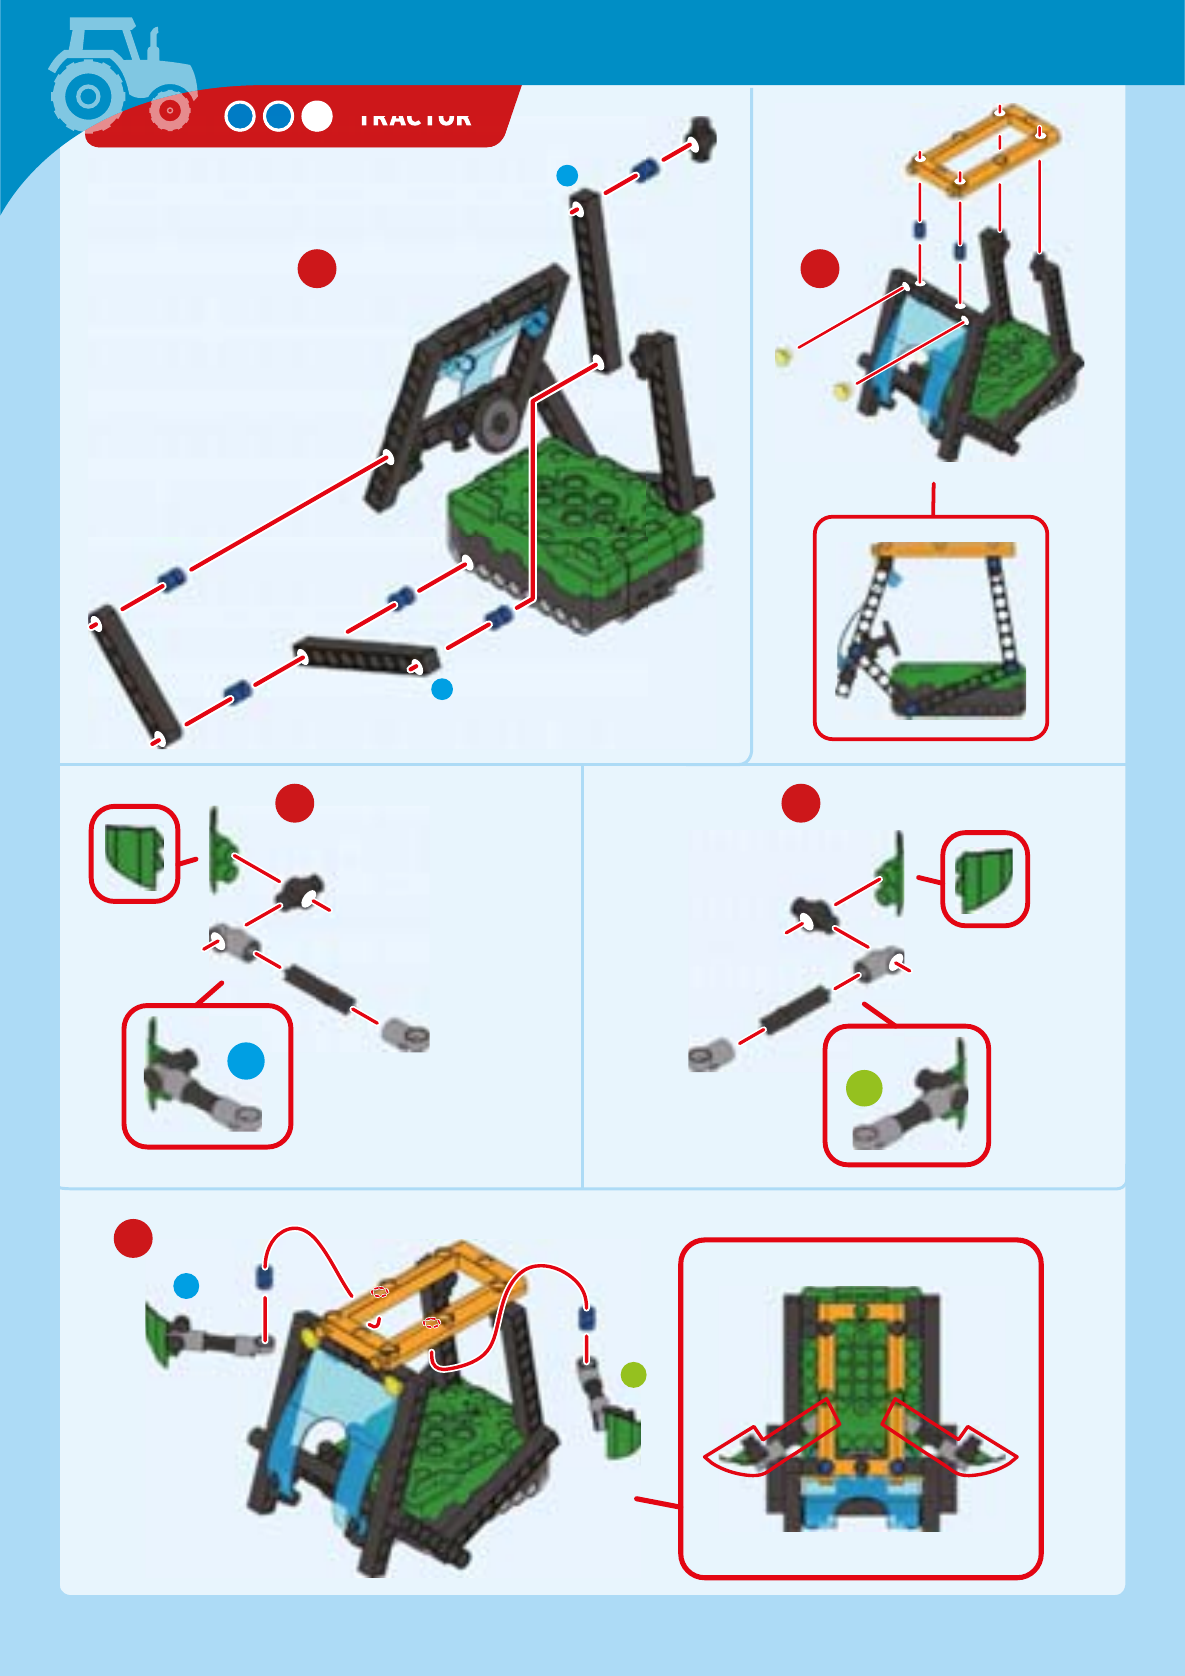
Tractors

27
x
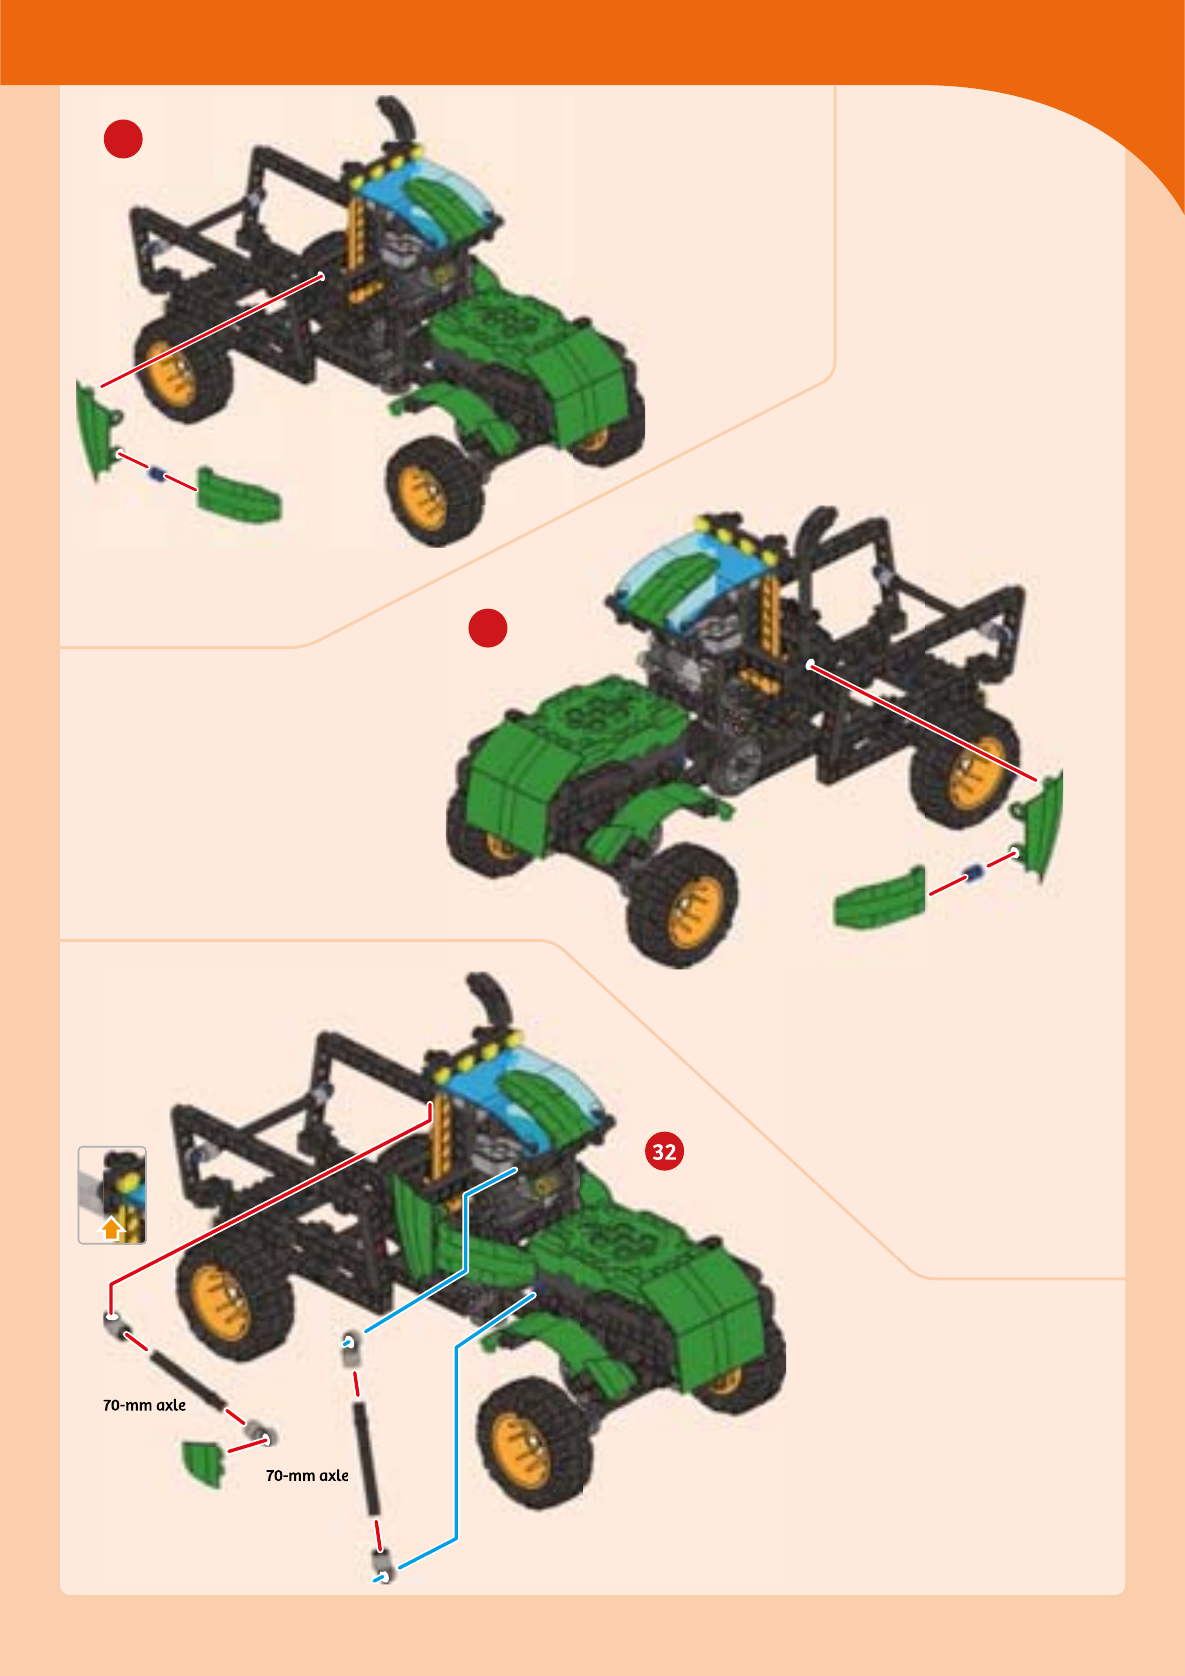
70-mm axle
70-mm axle
Step 1
Step 2
Step 3
32
60-mm axle
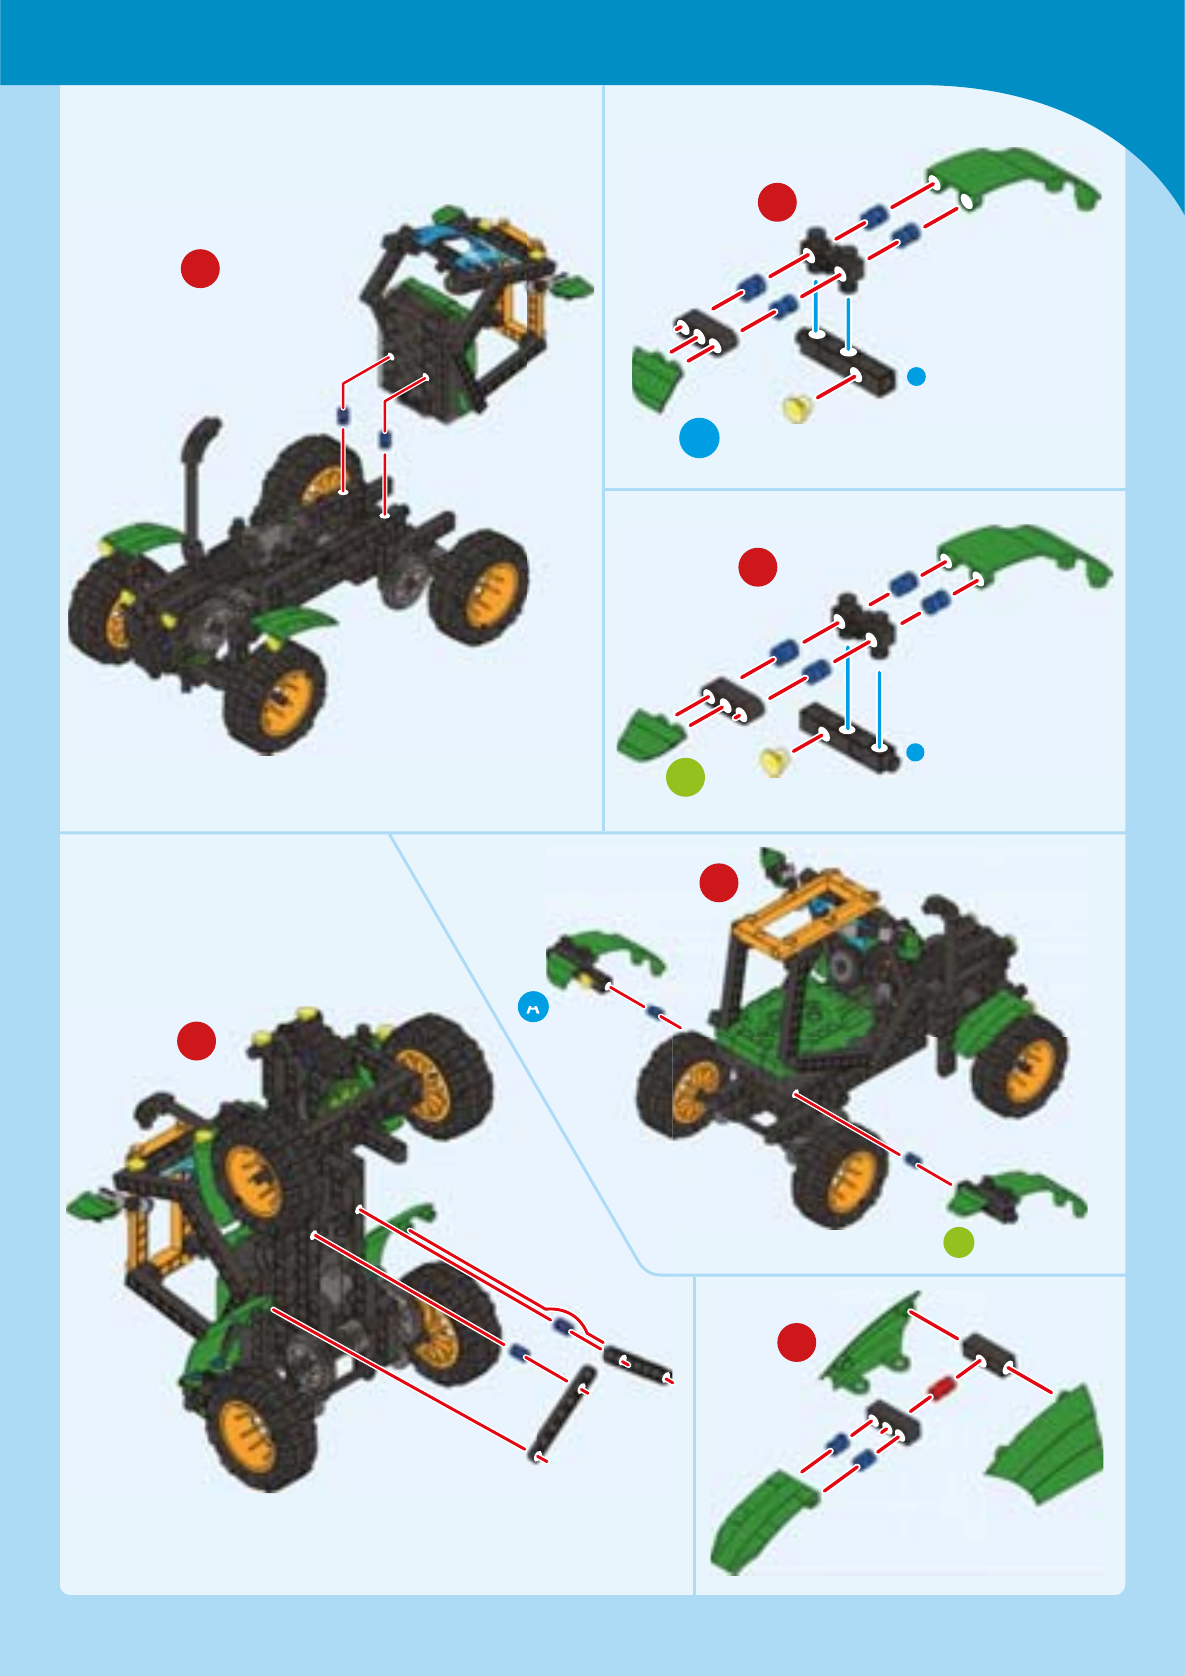
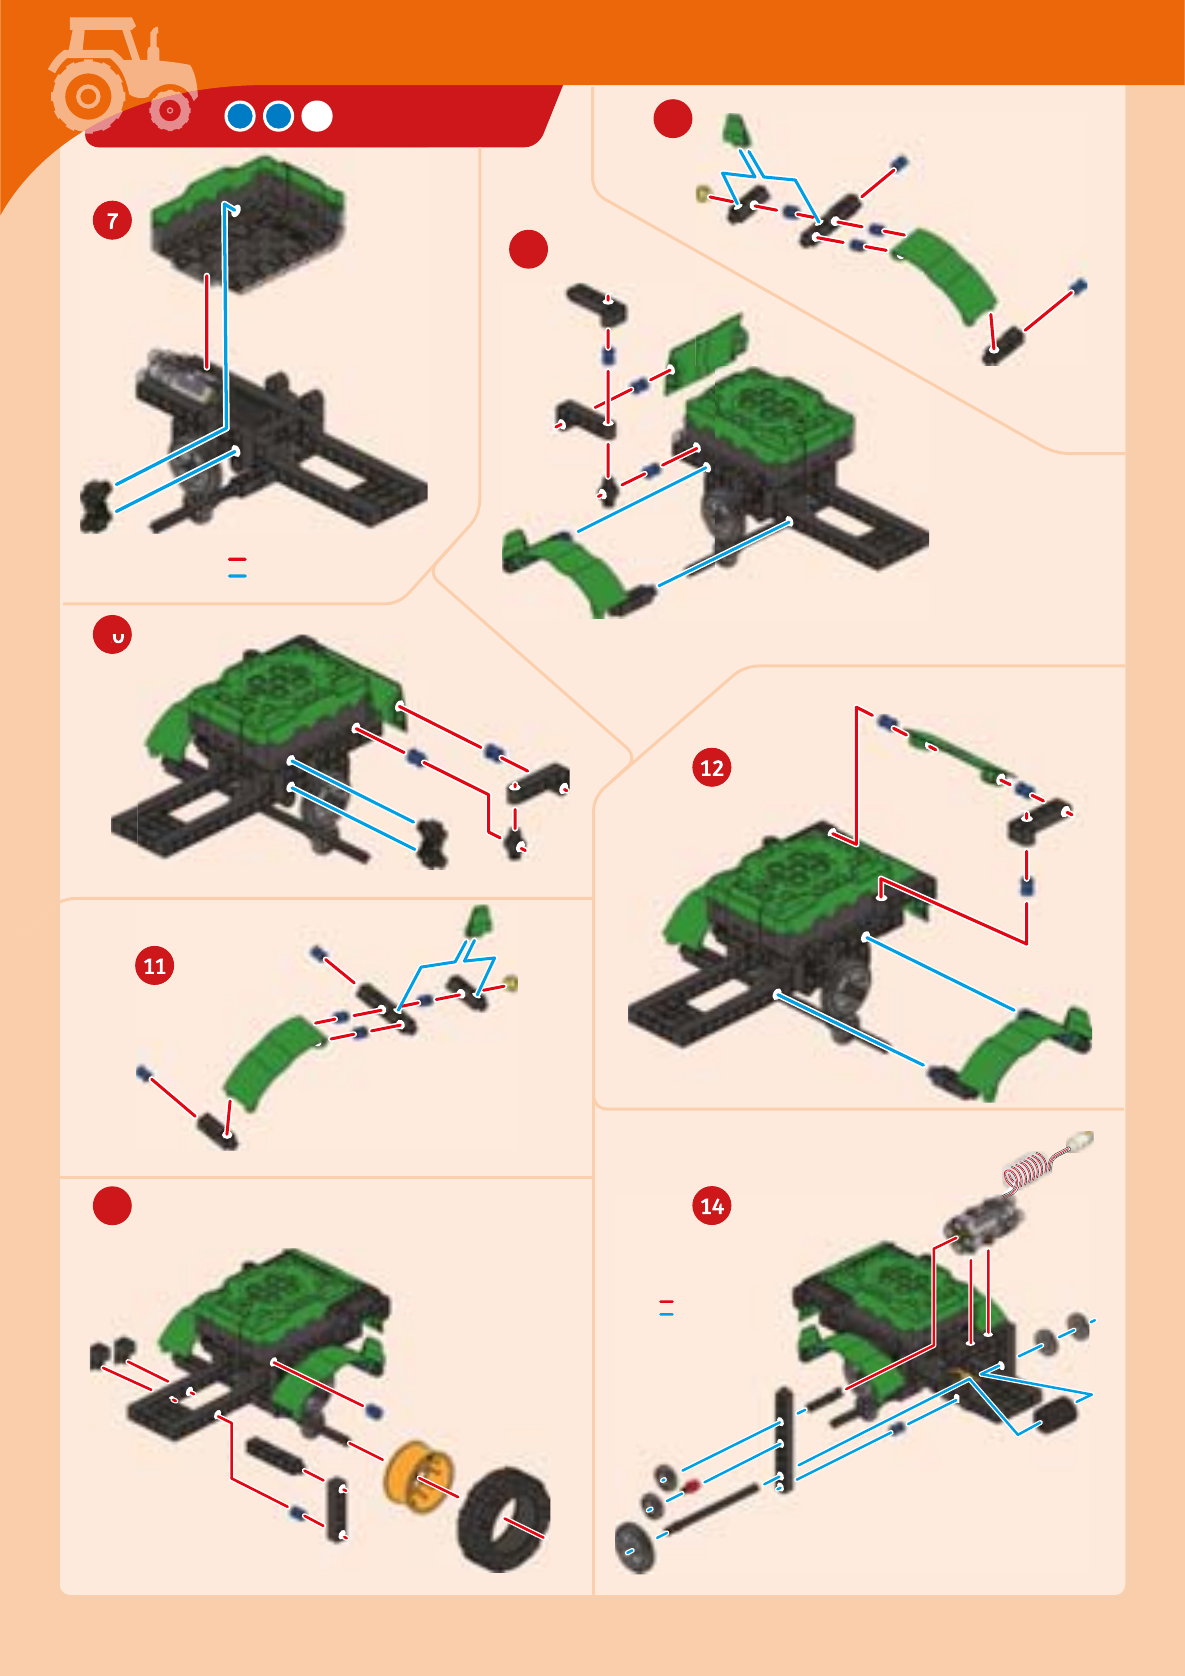
TRACTOR
Race Cars
B
24
24
100-mm axle
Step 2
Step 1
27
x
Tractors
150-mm axle
100-mm axle
32
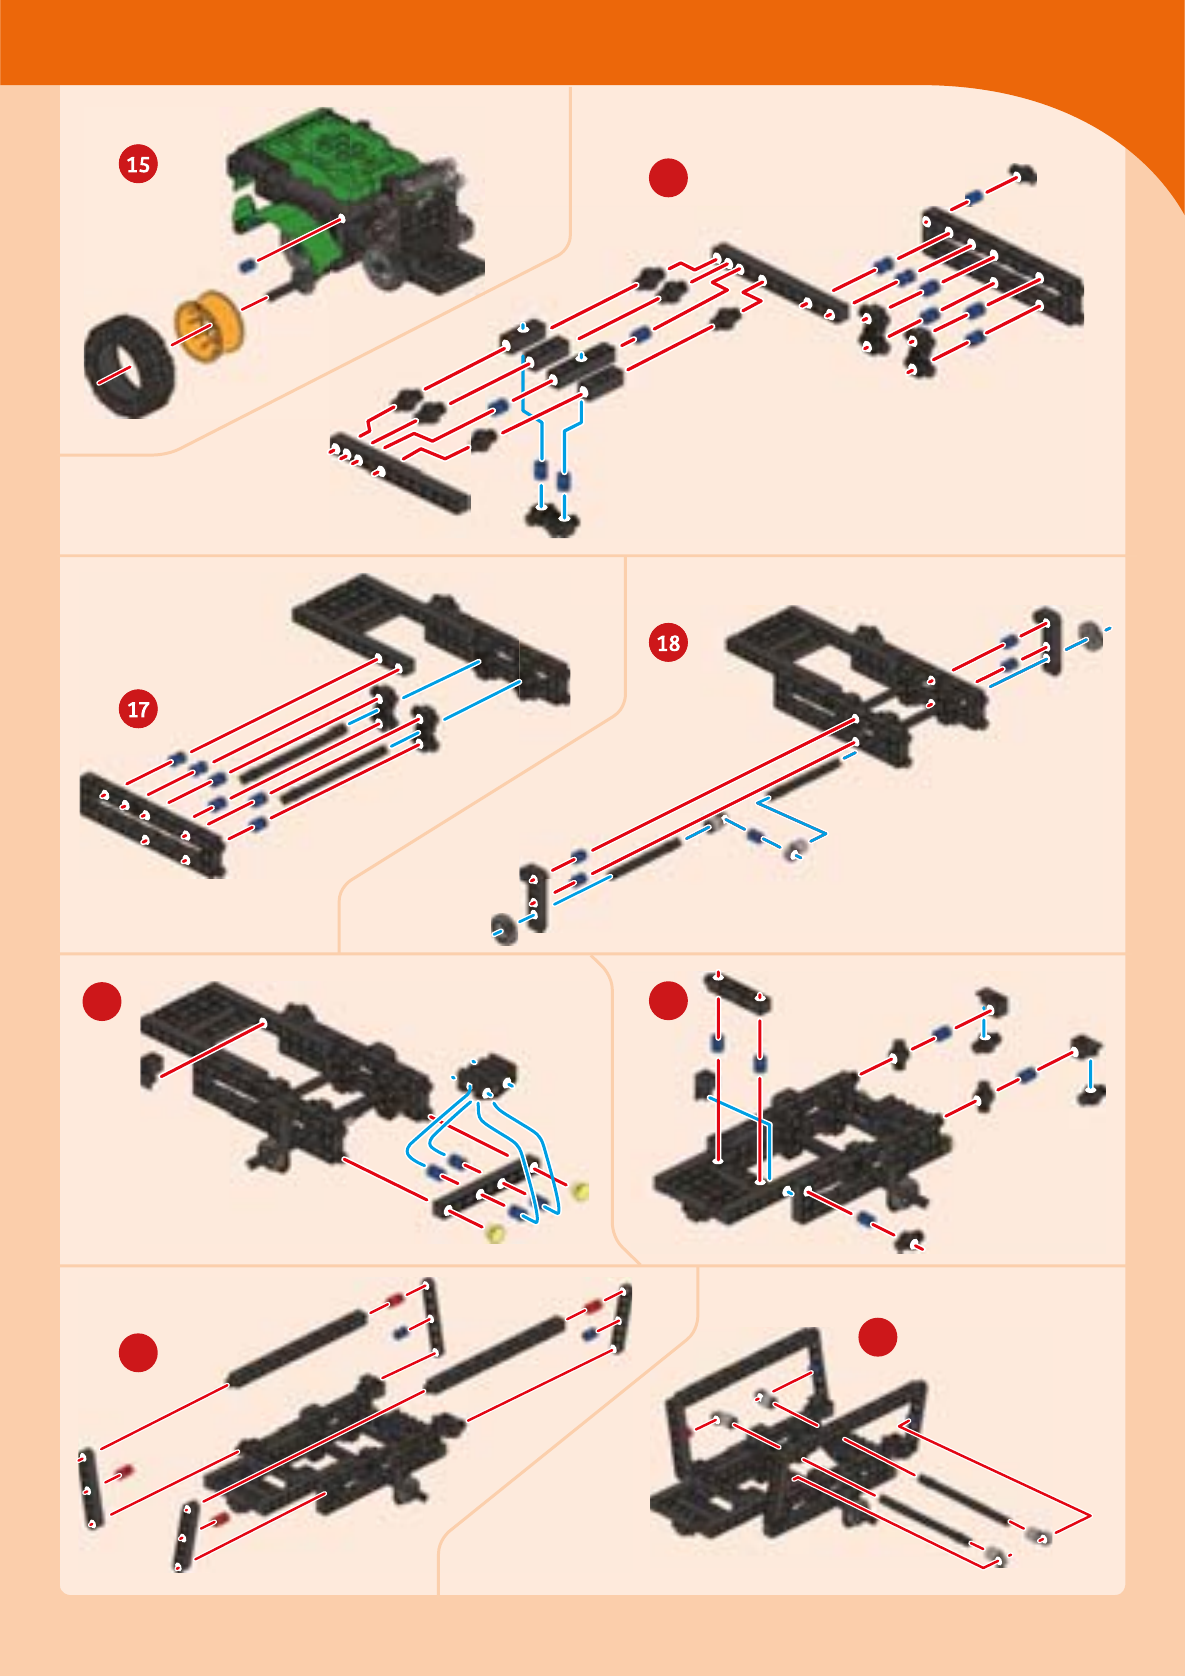
TRACTOR
Race Cars
35-mm axle
25
32
32
pass the blue part through
before step 3
step 2
step 3 step 1
31
31
Tractors
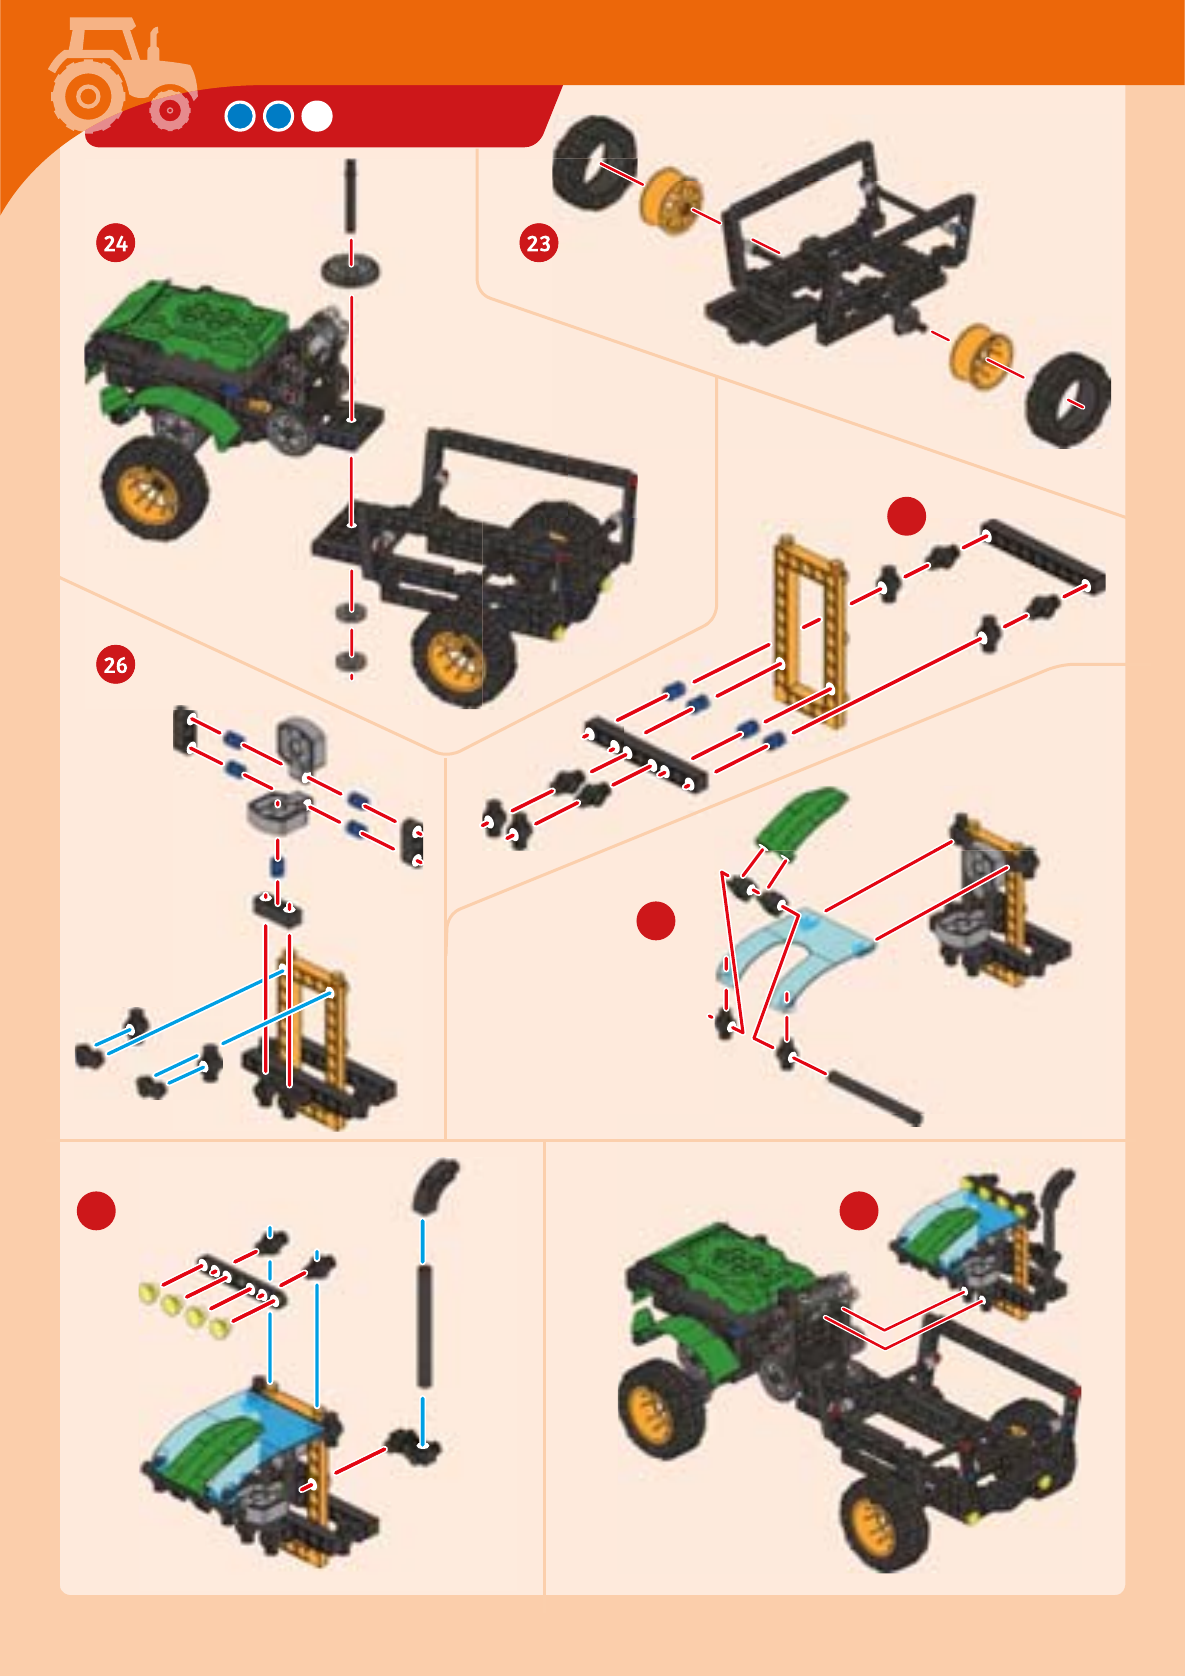
TRACTOR
35-mm axle
A
35-mm axle
B
A
B
31
31
Race Cars
Tractors
A
26
B
26
A
B

EXPERIMENT 1
Done!
TRACTOR
A
A
B
B
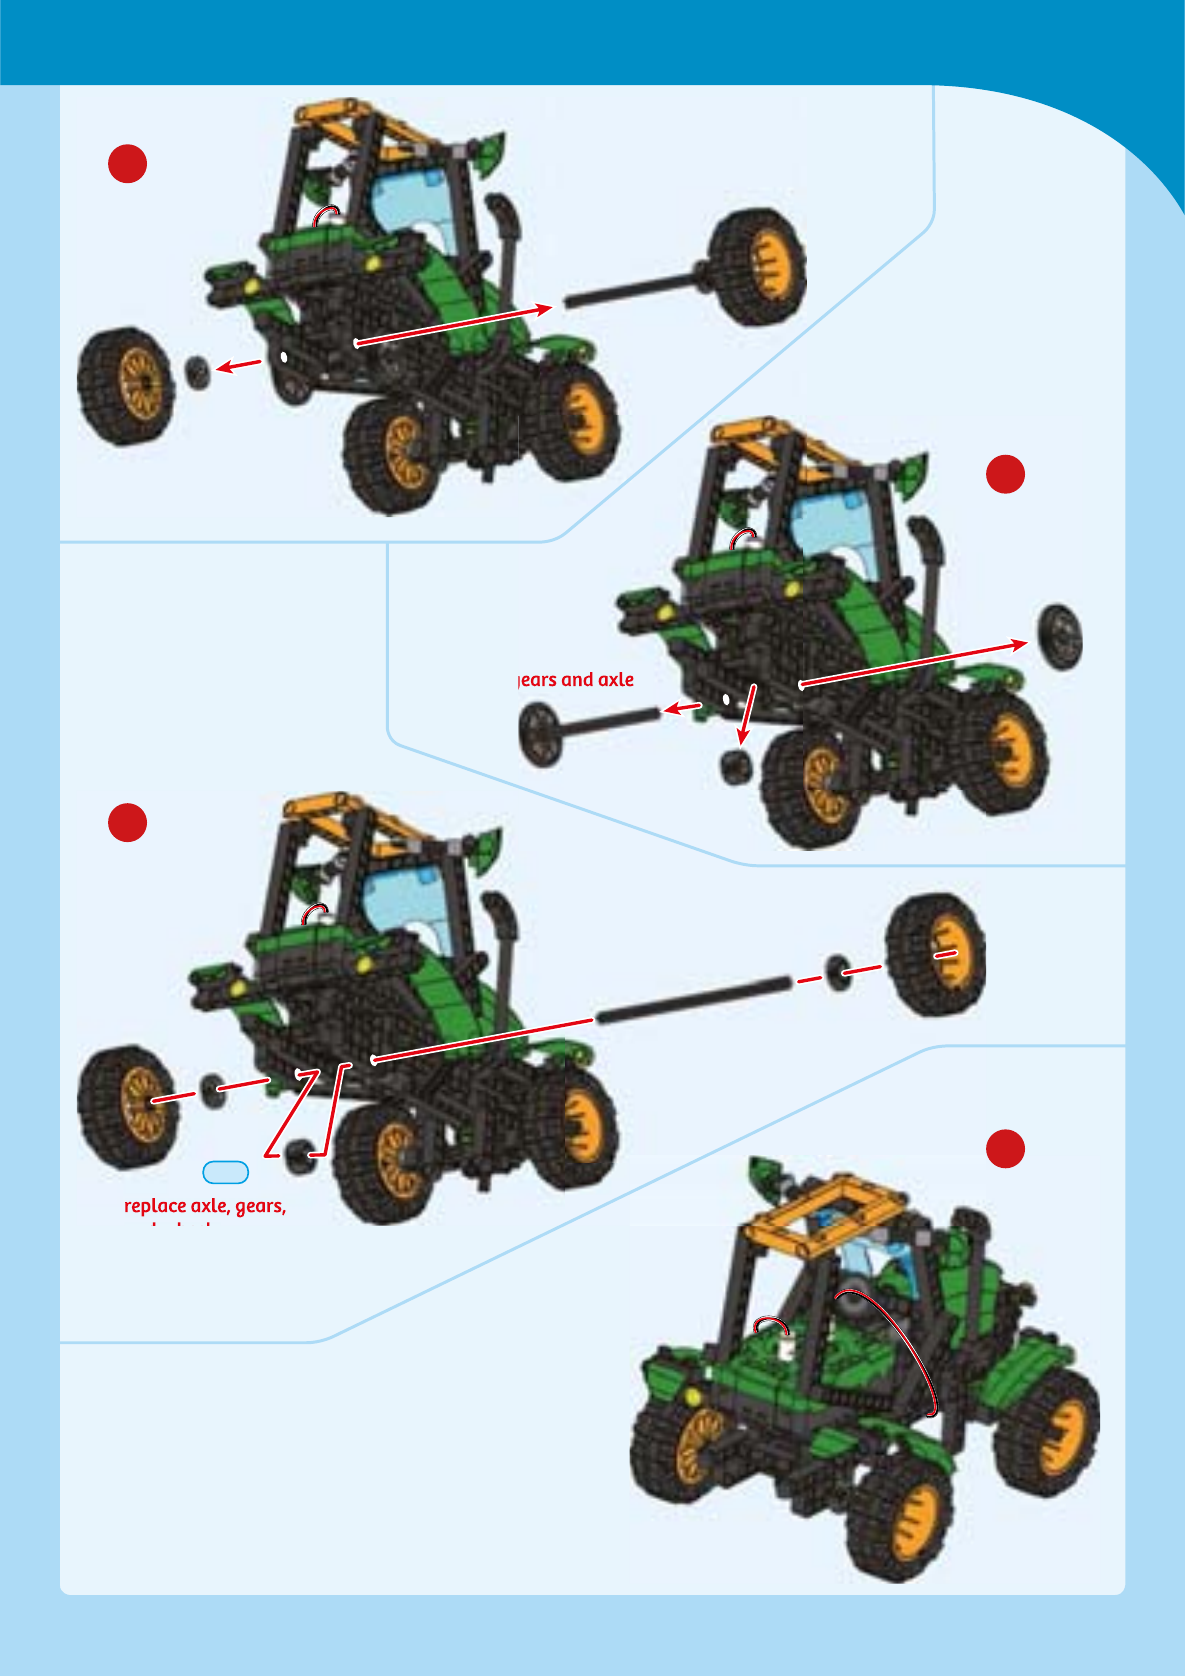
HERE’S HOW
Measure a set distance on your
floor, for example two feet. Use a
stop watch to measure the
amount of time that it takes the
tractor to travel this set distance.
Then use the instructions on page
to change the gear ratio of the
tractor. Repeat the previous
experiment with modified tractor.
What happens to the time it takes
for the travel this distance?
Speeding up and
slowing down?
Race Cars
Done!
remove wheels, gears,
and axle
remove gears and axle
replace axle, gears,
and wheels
#45 x2
150-mm axle
Tractors
Engines
How do tractors produce enough traction to
pull large pieces of machinery through
different conditions, such as muddy or sandy
soil?
CHECK IT OUT
The ability of a tractor to preform work comes from the
engine. The type of engine used in tractors and cars are
called heat engines, because they convert thermal
energy, or the energy from heat, into mechanical
energy, or the energy of motion. Heat engines
accomplish this by heating up a fluid, called the
working Fluid.
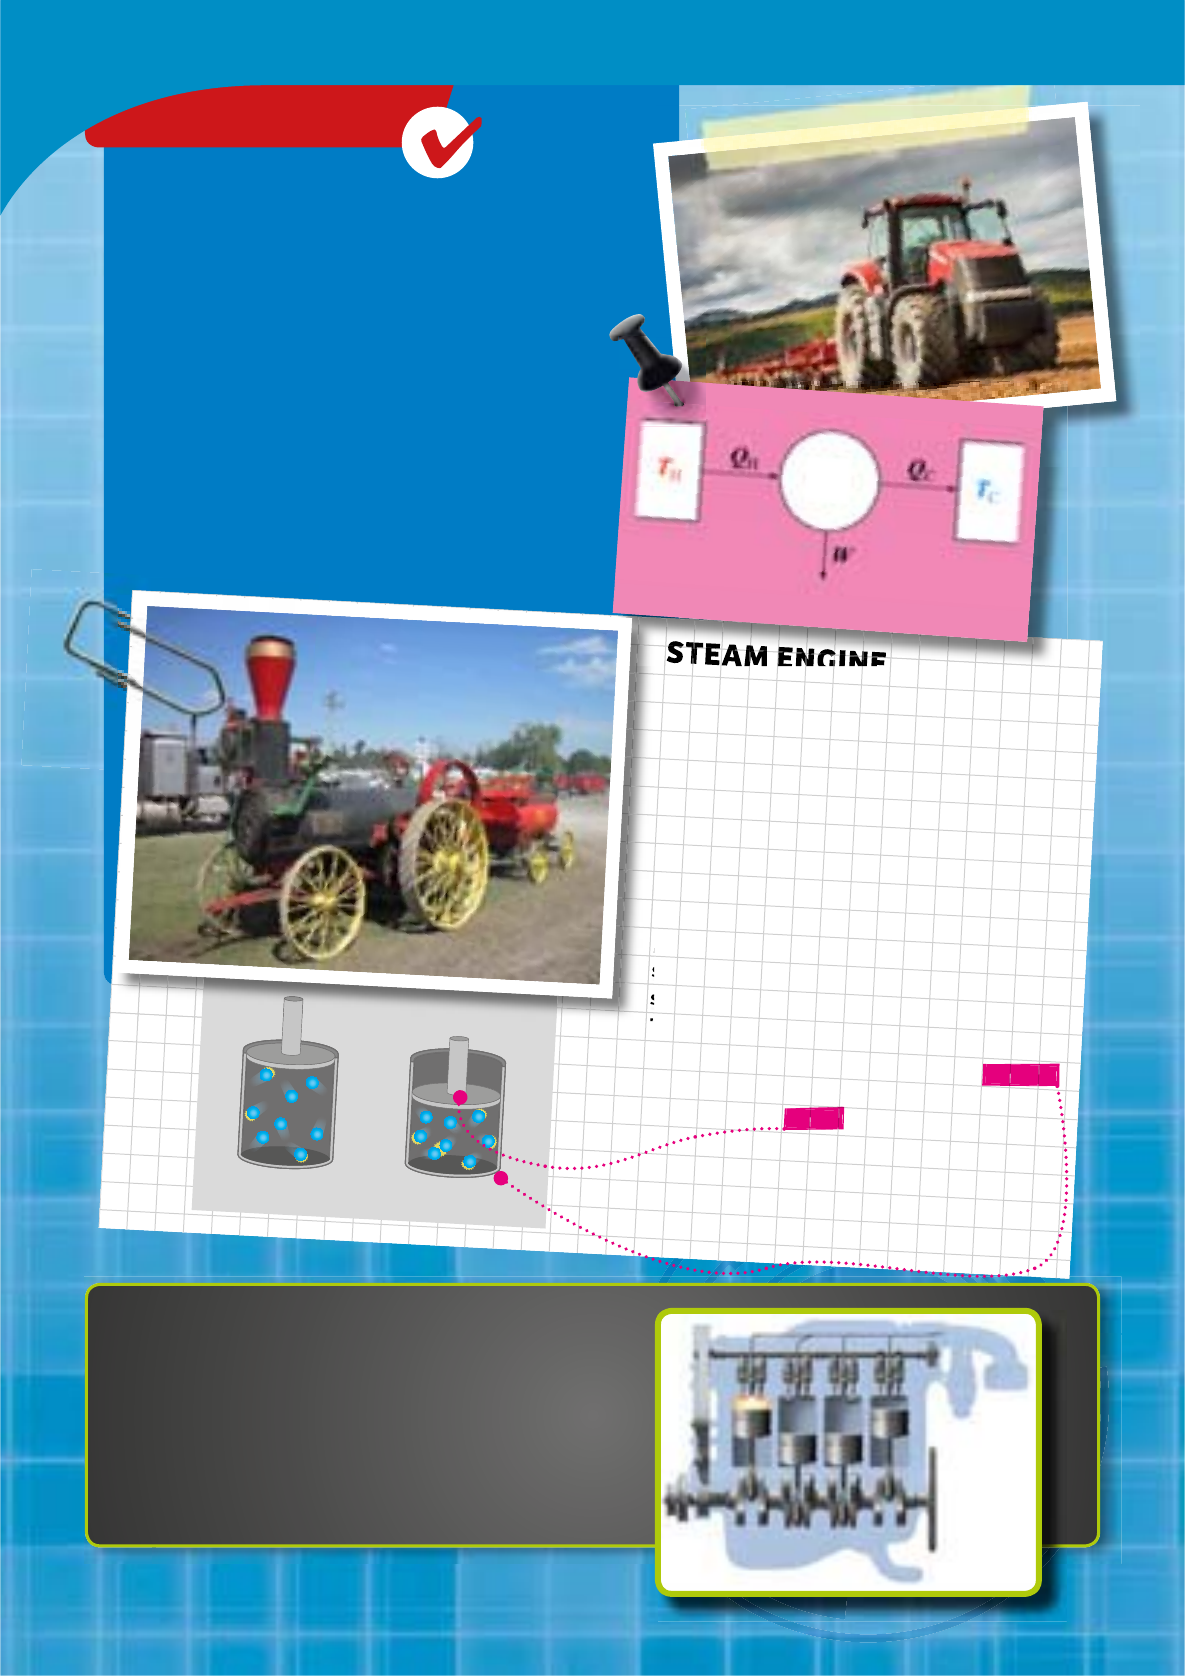
STEAM ENGINE
LOW PRESSURE HIGH PRESSURE
Carnot heat engine
The first powered farm machines used steam
engines. In a steam engine, the working fluid is
water, which is heated until it is steam.
Water is made up of many very small water
molecules. When water is heated the water
molecules move around faster, take up more
space, and bump into their container more
increasing the pressure. The steam can then be
put into a sealed container which has only one
surface that can move up and down as the
steam expands and contracts, turning the
thermal energy of the steam into mechanical
energy! This sealed container is called a cylinder
in an engine and the part that moves up and
down is called a piston.
Steam engines are external combustion engines
because the steam is separate from what is used
to heat the steam, such as burning coal.
Now tractor engines use internal combustion engines
that use a fossil fuel, usually gasoline or diesel. They
are called that because fuel is ignited inside the
cylinder and, just like the water in a steam engine,
expands pushing on the piston. This cause the piston to
turn the crankshaft which is used to turn the wheels of
the tractor.
cylinder
de
l
piston.
.
st

Done!
DISC HARROW
Tractors
x
x
100-mm axle
A.
A.
A.
x x x x x
x x x
x x x x

DISC HARROW
remove one rear wheel
100-mm
EXPERIMENT 2
Done!
HERE’S HOW
Have the tractor drag the disk
harrow aachment through a
thin layer of fine sand. Flaen
the sand and then run the disk
harrow aachement through the
sand again but with the disk
closer together. What do you
observe happens to the paern
formed in the sand?
Tilling soil
Tractors
WHAT IS A SIMPLE MACHINE?
A simple machine is a mechanical device that
changes the direction or magnitude of a force.
Aforce is simply a push or a pull. A simple
machine takes one input force and produces
an output force, which is used to do work.
Simple machines are used to make doing work
easier.
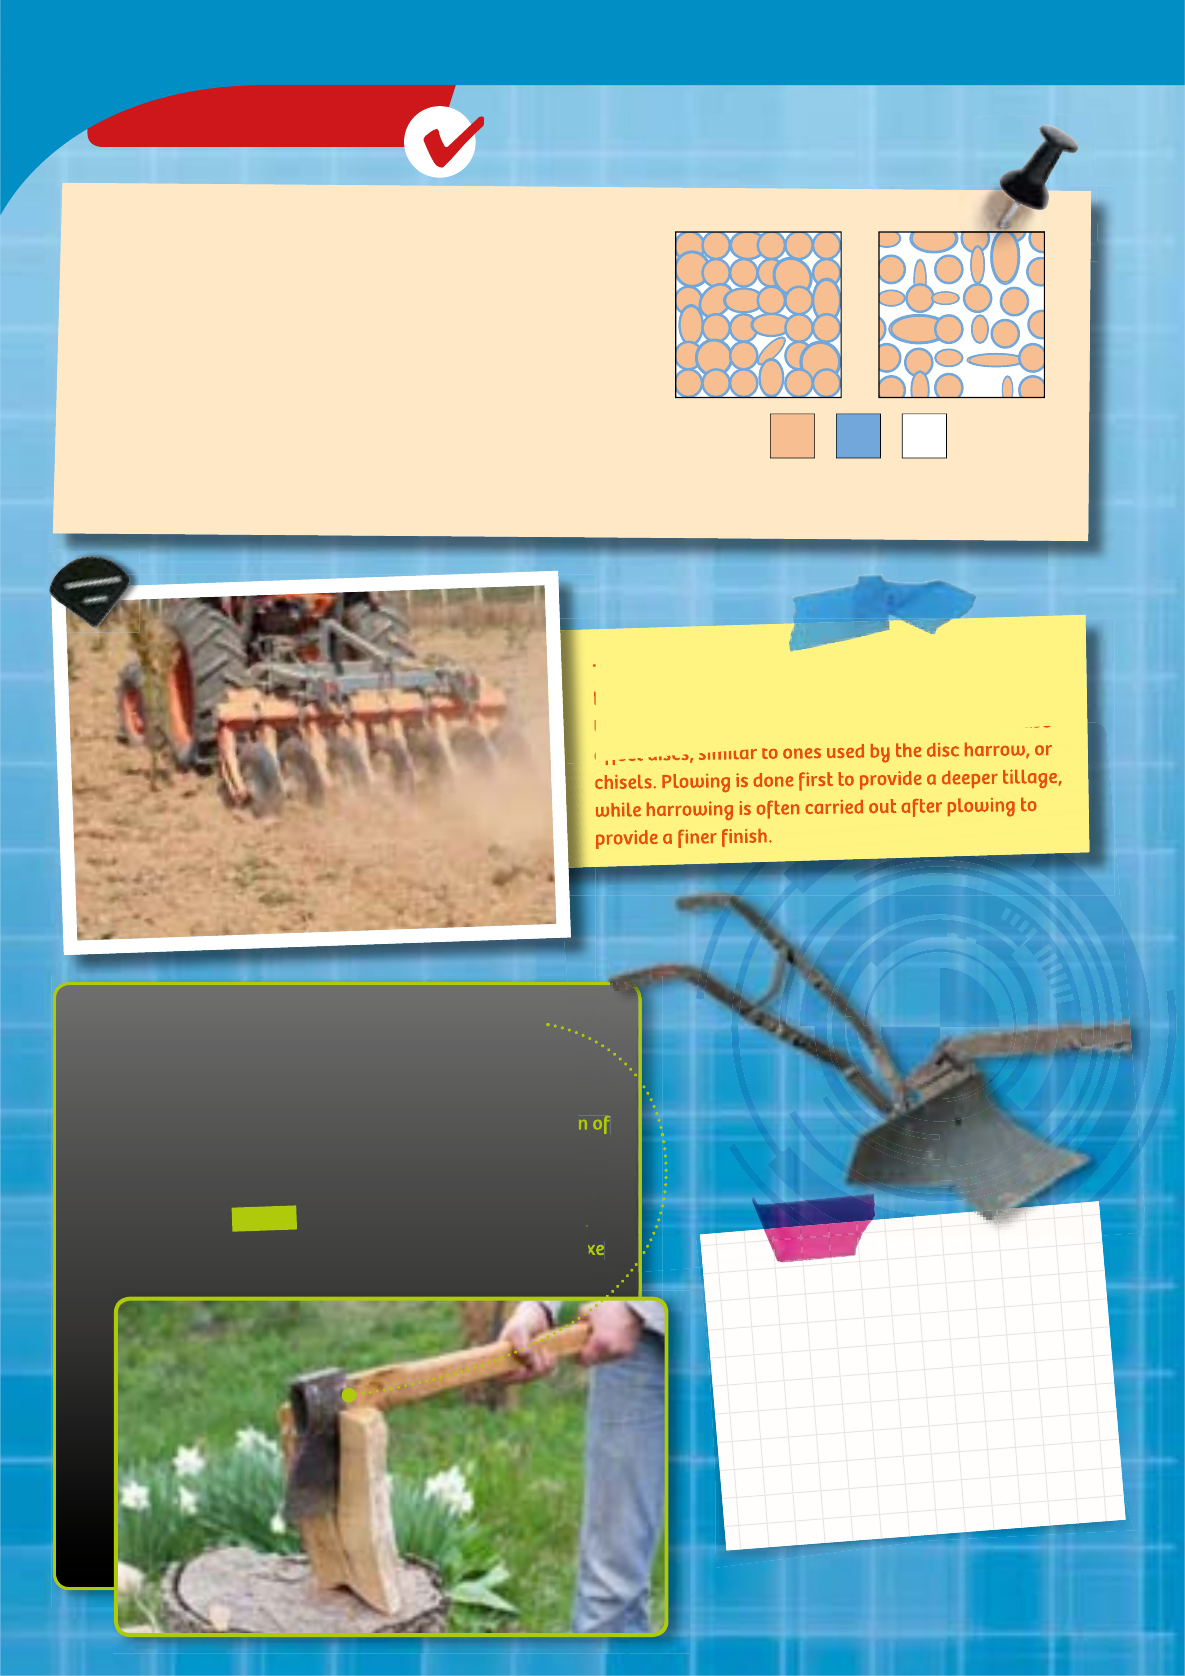
The physical characteristics of soil are very important for the
growth of plants. Soil consists of very small particles of
organic matter with spaces in-between the particles. The size
of these spaces, determine the ability of soil to hold and
conduct water, nutrients, and air to the roots of plants. If the
soil particles are spaced to close together (called soil
compaction) water and air can’t pass through the soil easily.
Soil compaction also makes it harder for the roots of plants to
break through the soil.
Farm machines, such as tractors or disc harrows, are very
complex machines. To make it easier to understand and
analyze them, you can break them down into a combination of
many simple machines that work together.
The blade of a plow or the disc of a harrow are a simple
machine called a wedge. Wedges are used to make splitting,
pushing apart, or cutting materials easier. The blade of an axe
is another example of a wedge.
The process of preparing the soil for planting is called
tilling. The best-known tillage device is the plow. In the
U.S. plows have been replaced by implements that use
offset discs, similar to ones used by the disc harrow, or
chisels. Plowing is done first to provide a deeper tillage,
while harrowing is often carried out after plowing to
provide a finer finish.
SIMPLE MACHINES: THE WEDGE
PREPARING THE SOIL FOR PLANTING
Soil Solid Water Air
Compacted Soil Ideal Soil
CHECK IT OUT
A. B.
x x x x x
x x x
x
x x x x x
x
Tractors
CULTIVATOR
x
x
CULTIVATOR
remove one rear wheel
100-mm
Tractors
Done!

Just like the disc harrow, cultivators are
also used for secondary tillage after a
field has been ploughed. However,
cultivators are designed to disturb the soil
surface in specific patterns so that crop
plants are spared and weeds are killed.
Cultivators that are attached to tractors
using what is called a three-point hitch. If
the cultivator needs mechanical power
from the tractor it can also be attached to
a power takeoff (PTO) shaft on the tractor.
Three-point Hitch
The three-point hitch is used to attach implements to
tractors. The three attachment points of the three-point
hitch are positioned like the points of a triangle. The lower
two attachment points are often connected to the
hydraulic system of the tractor allowing the attachment
to be lifted up and down.
The three-point hitch is used because it is the simplest way
to attach an implement to a tractor, in which the
implement is held in a fixed position with respect to the
tractor. An advantage of using a three-point hitch is that it
transfer some or all of the weight of the attachment to the
tractor.
A power takeoff is a drive shaft which is connected to the
engine of the tractor. It can be used to transfer mechanical
power to farm implements that are attached to the tractor.
Power takeoff (PTO)
CHECK IT OUT
SEEDER
A.
B.
C.
x x x x x x
x x
x x x
x
Tractors
x
x
x
x x
x x
SEEDER
A.
A.
B.
C.
Done!
Tractors
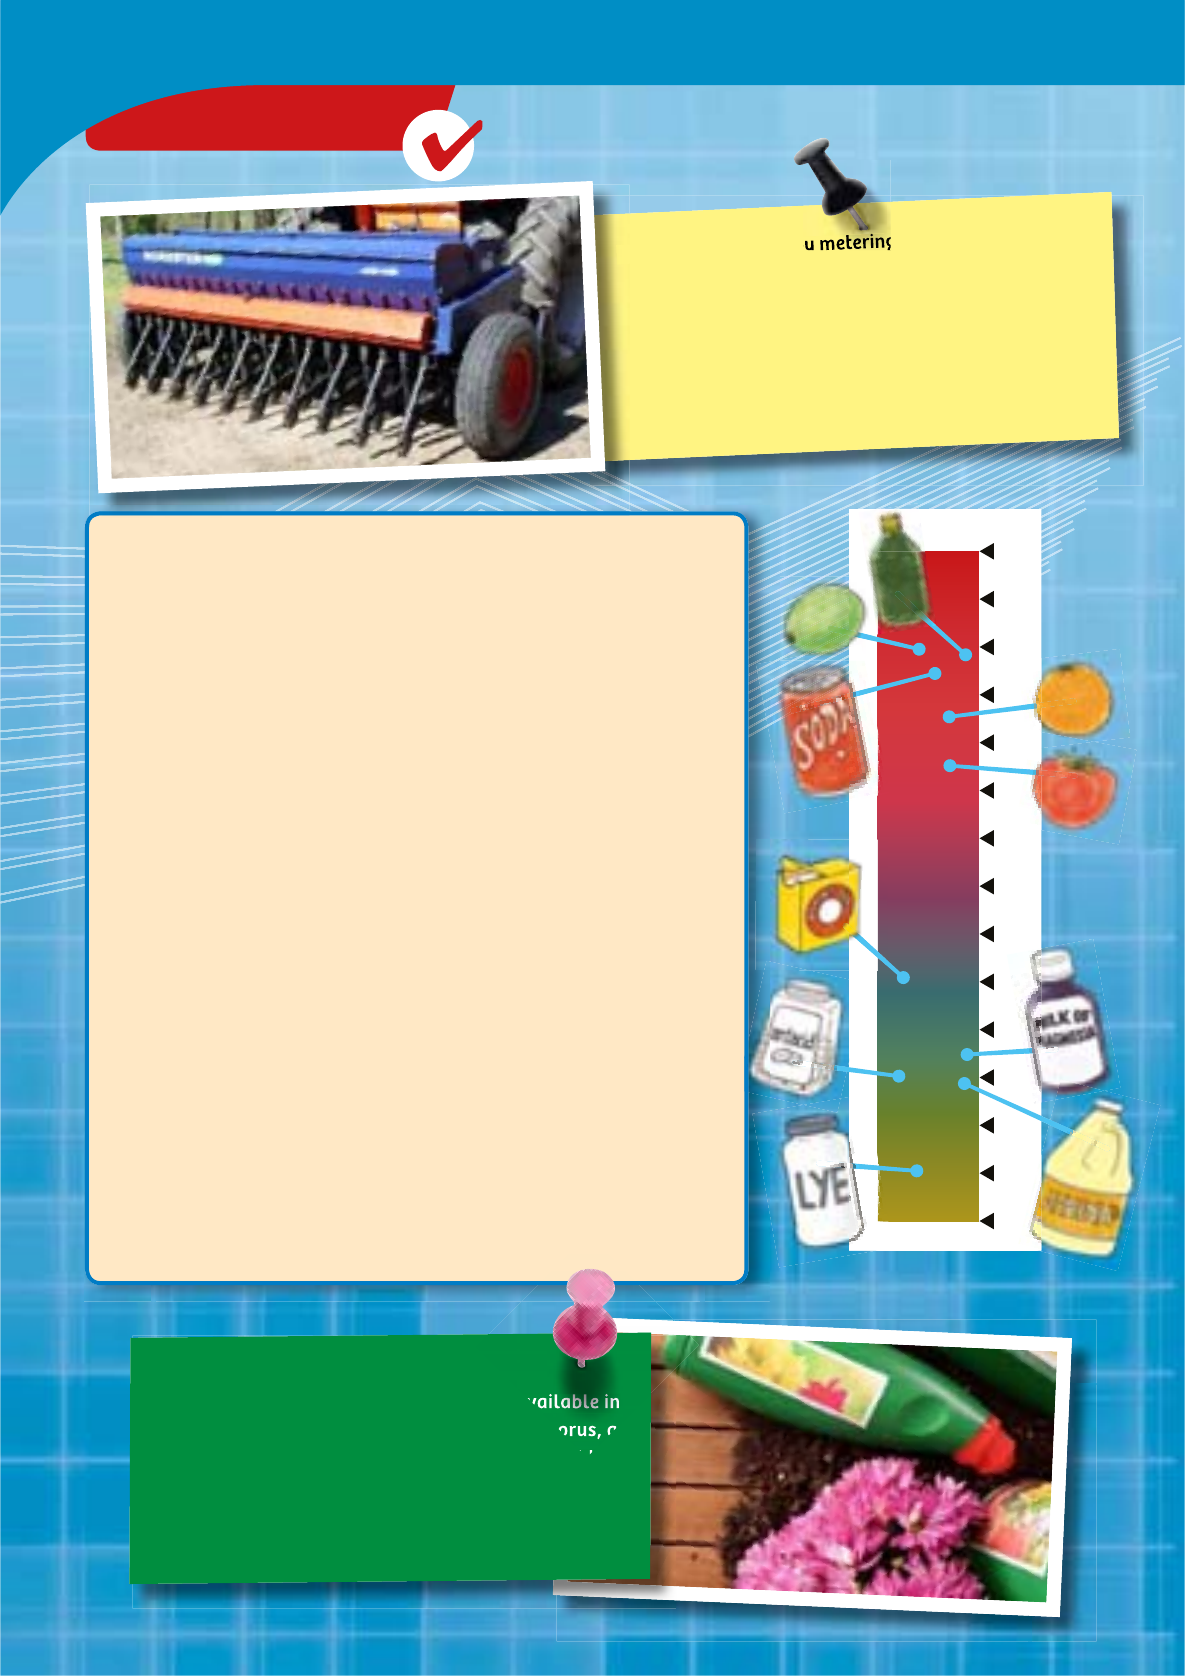
pH scale with the pH of
some common items.
To ensure proper plant growth soil must also have the
correct soil chemistry. The two fundamental factors in
soil chemistry are fertility and pH.
SOIL CHEMISTRY
pH is a measure how acidic or basic a solution is. An acid is a
substance that gives off hydrogen ions (H+) when dissolved in
water. While bases are substances that give off hydroxide ions
(OH–) when dissolved in water. You encounter many acids and bases
every day. Vinegar and lemon are examples of acids, while baking
soda and ammonia are bases.
The pH scale goes from to . Values below are acidic and
values above are basic. Pure water has a pH of , which is
considered neutral — neither acidic or basic.
The pH of soil is measured by mixing the soil in water and using an
indicator. The indicator changes color if it is placed in an acid or
base. pH is important for plant growth and health because it
influences many different chemical process. For example, pH
affects the availability of different nutrients. The proper pH range
for most plants is between . and ..
pH
pH
0
1
2
3
4
5
6
7
8
9
10
11
12
13
14
The fertility is a measure of the nutrients available in
soil, primarily the amount of nitrogen, phosphorus, and
potassium or NPK. These three elements are vital to the
growth of plants. You can often see the amount of NPK
in fertilizers on their label.
Fertility
A seeder sows seeds by metering out individual seeds,
placing them in the soil, and then covering them up. A
seeder ensures that the seeds are planted at the correct
depth and space from each other and ensures that they
are not eaten by birds. The use of seeders makes sure that
more of the seeds grow into plants, increasing crop yield.
CHECK IT OUT
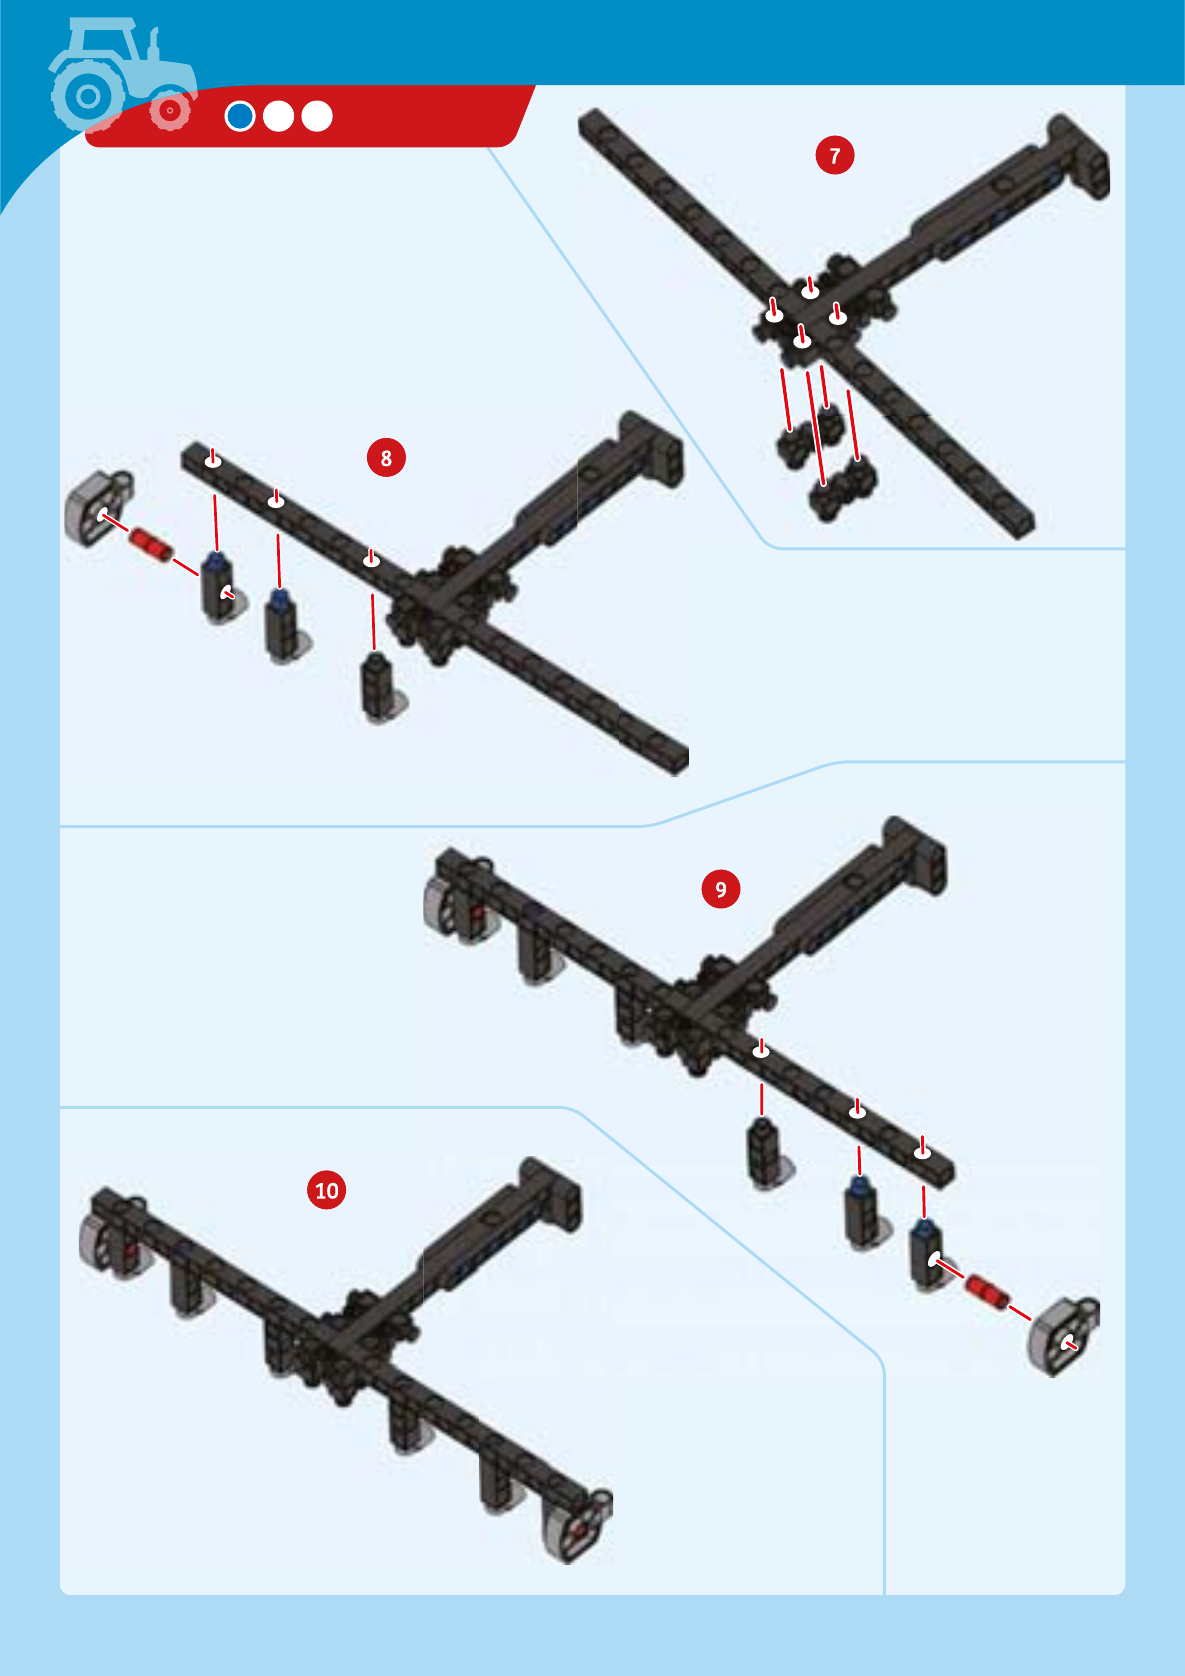
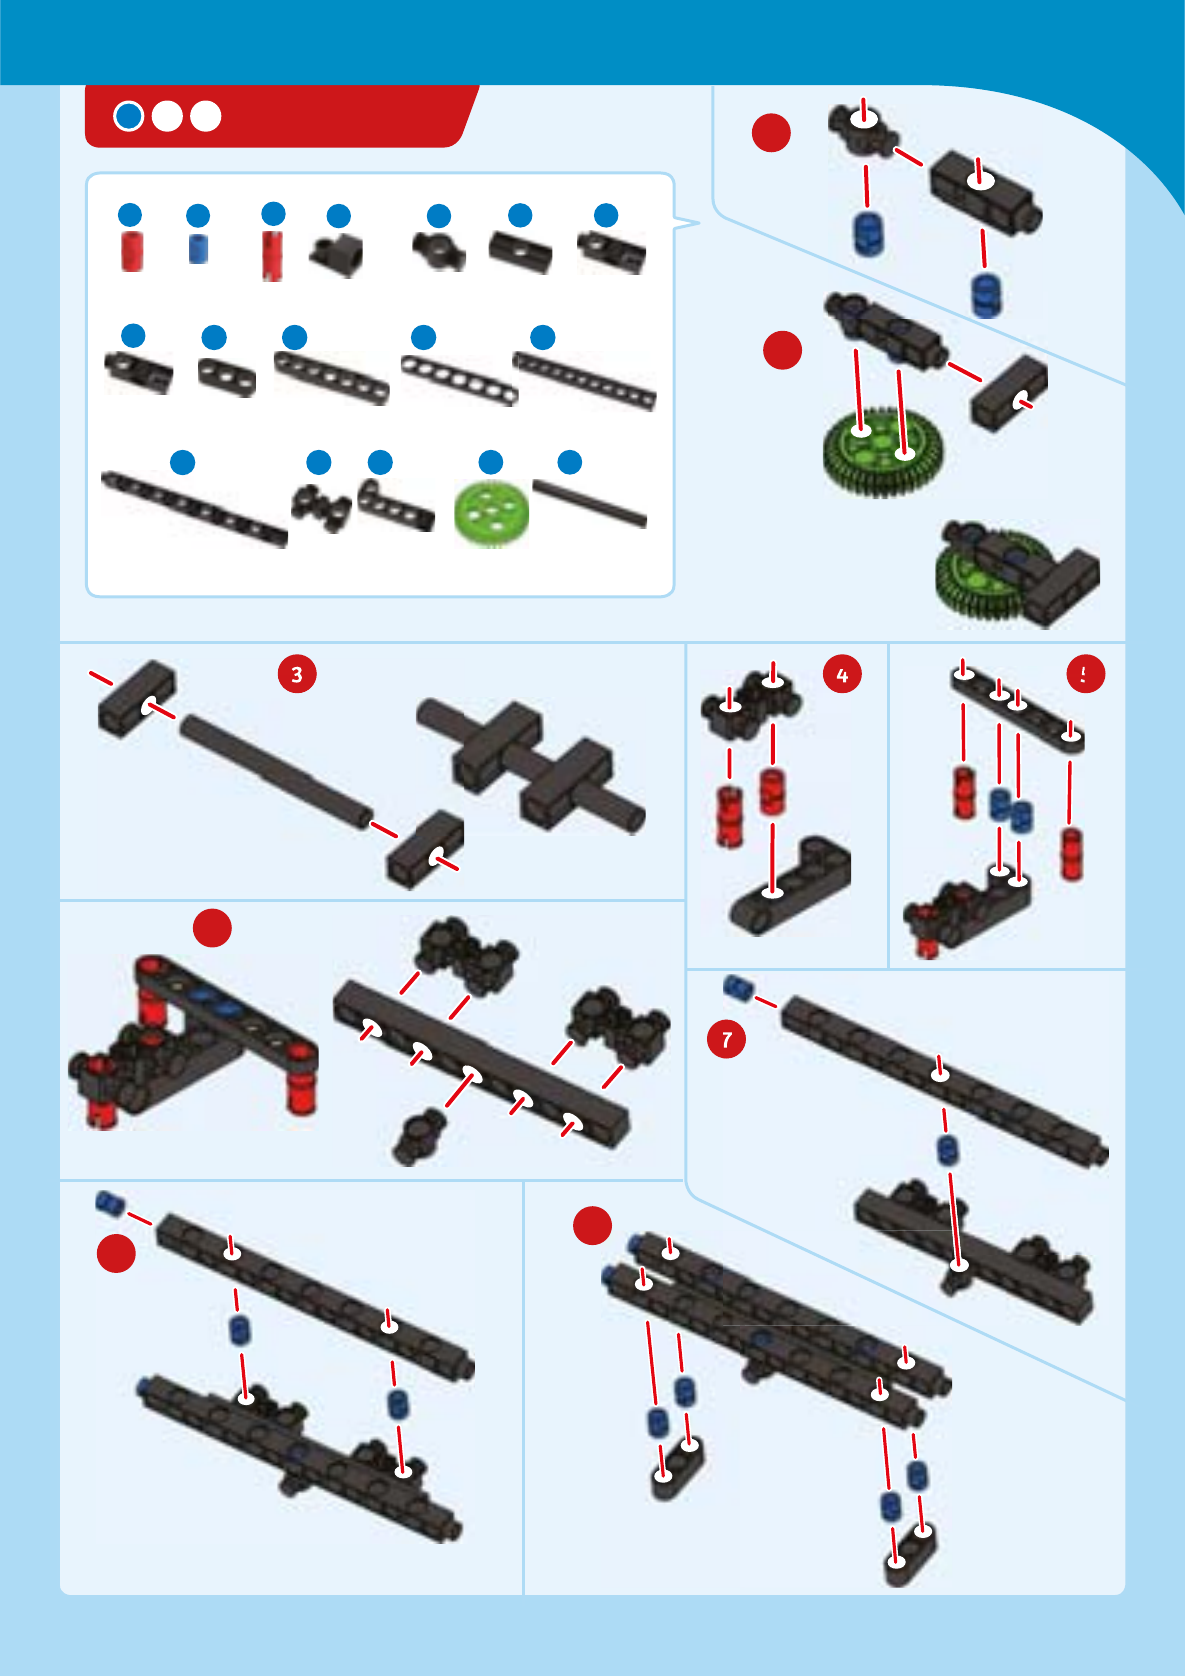
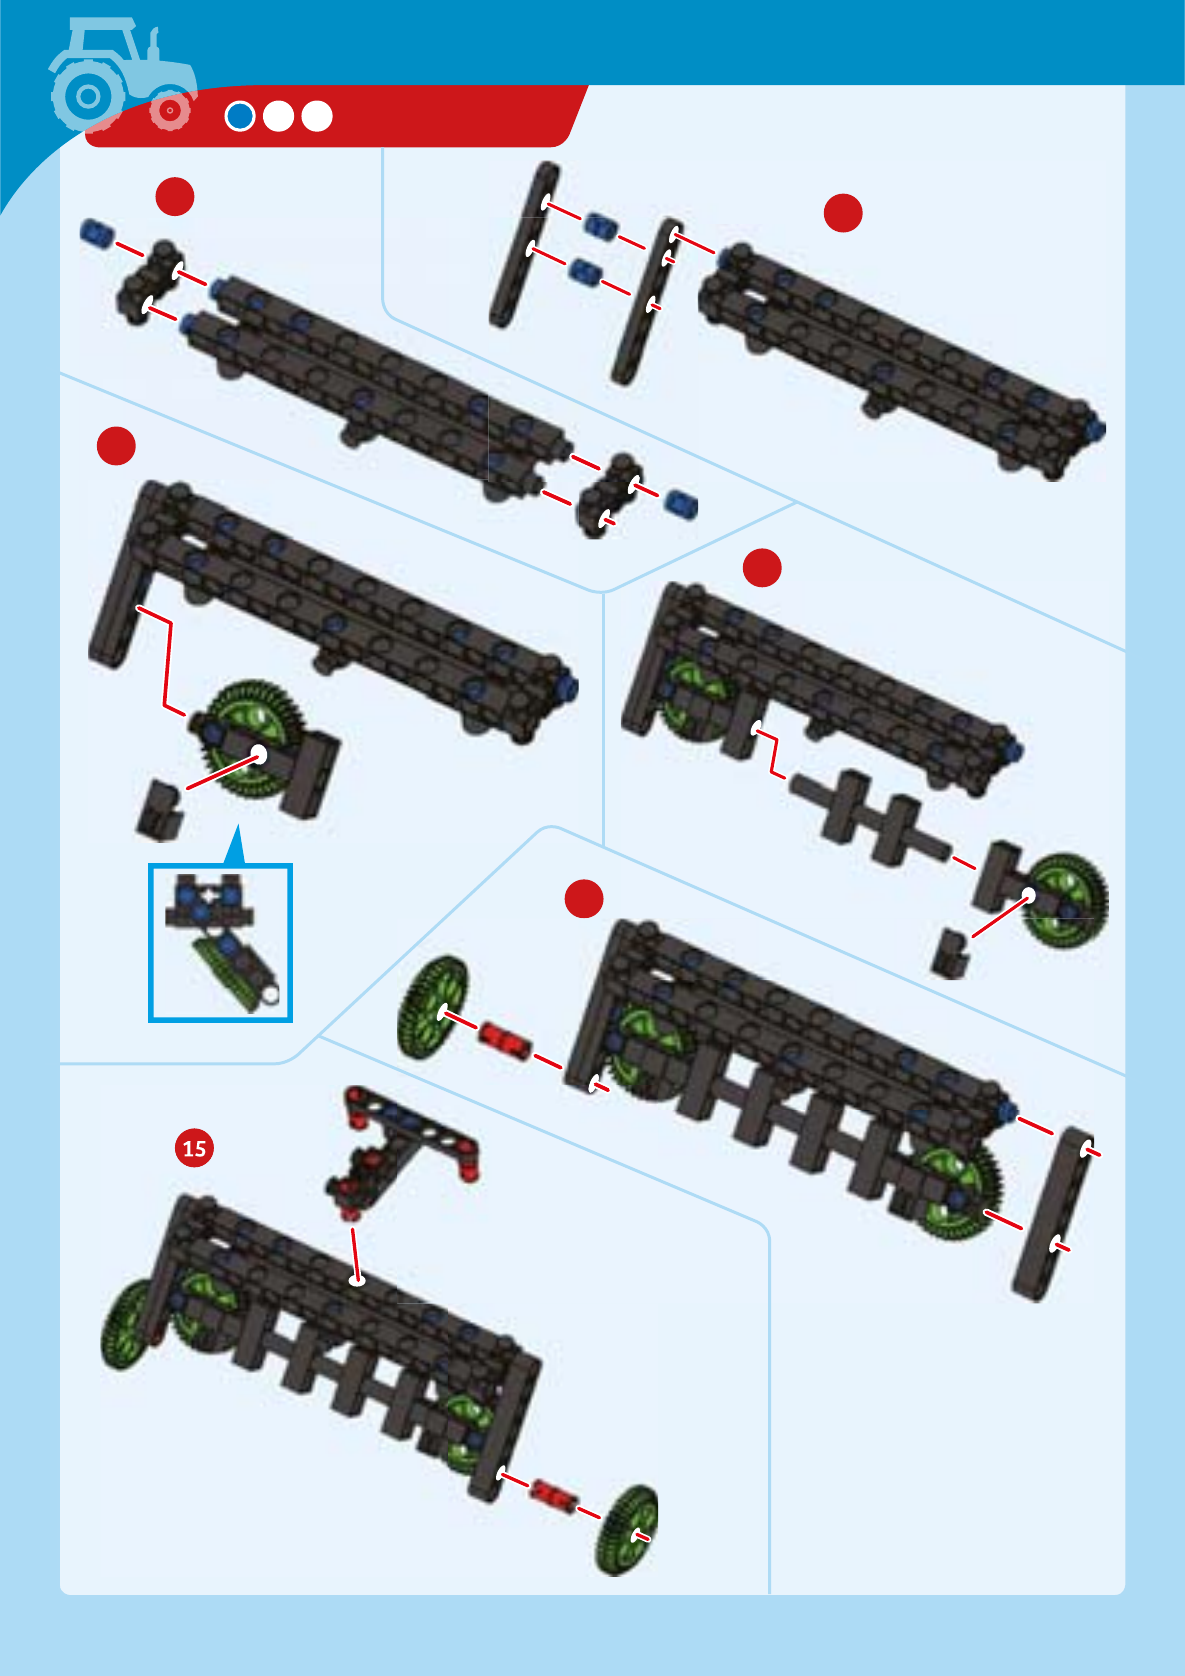
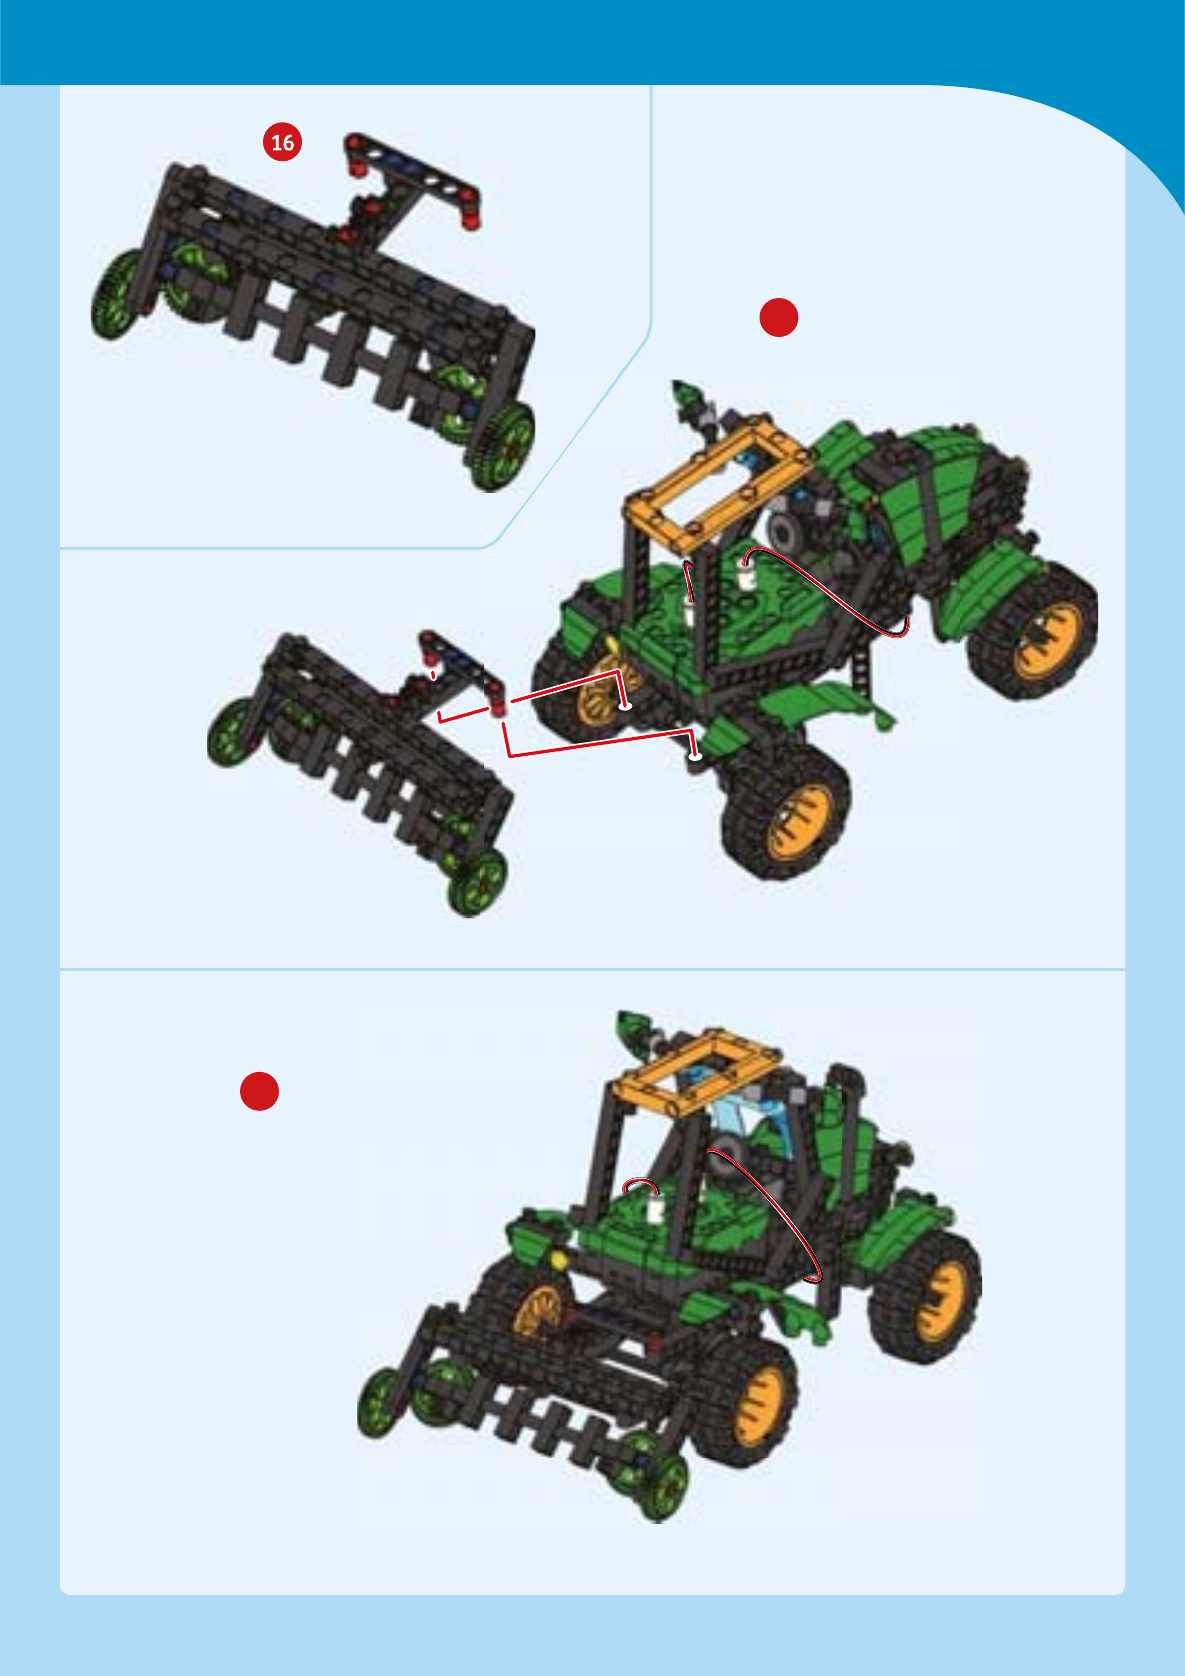
HAY RAKE
70-mm
70-mm
A.
B. C.
B.
x
x
x x x x x x x
x x x x x
x x
x x x
x
x
x
Tractors

35-mm
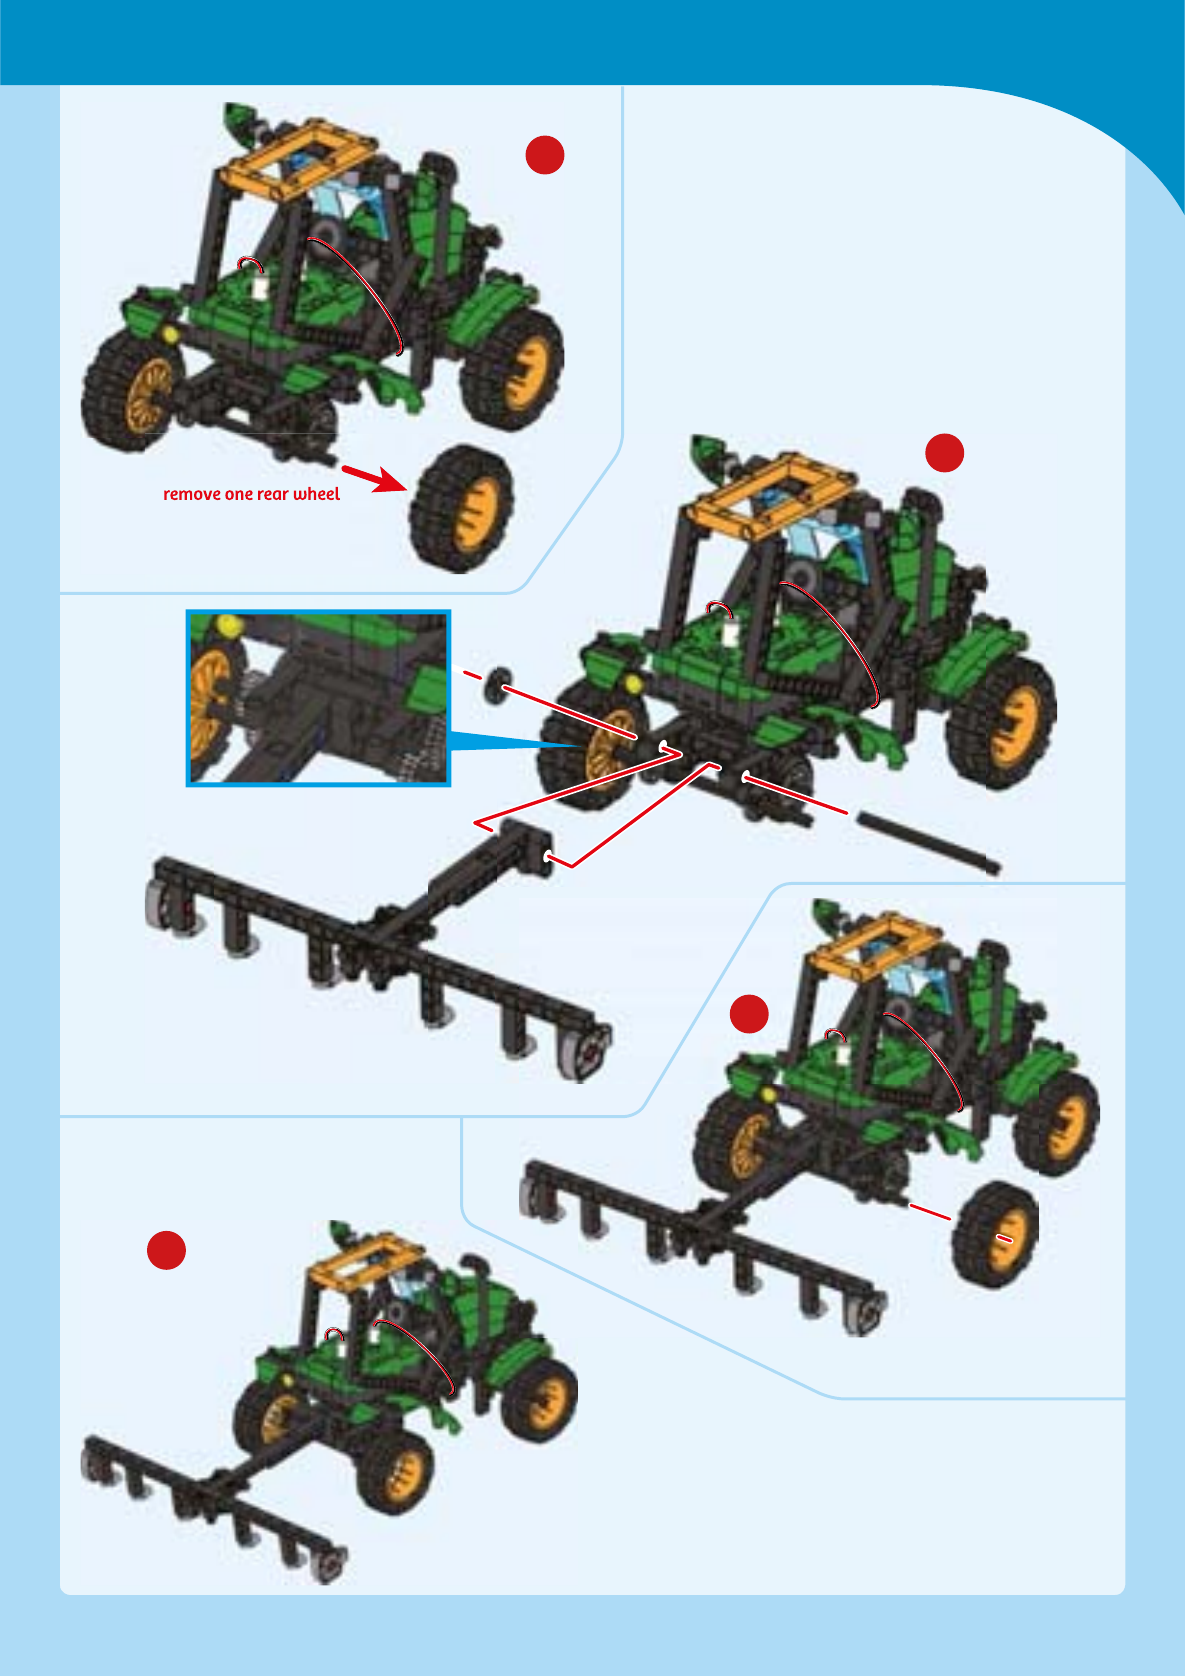
HAY RAKE
70-mm

remove one rear wheel
Tractors

EXPERIMENT 3
HERE’S HOW
As the gears on the hay rake turn
look at the speed of the different
different gears. What do you
observe about the speed of the
small gray gears and large green
gears?
Spinning gears
HAY RAKE
100-mm
Done!
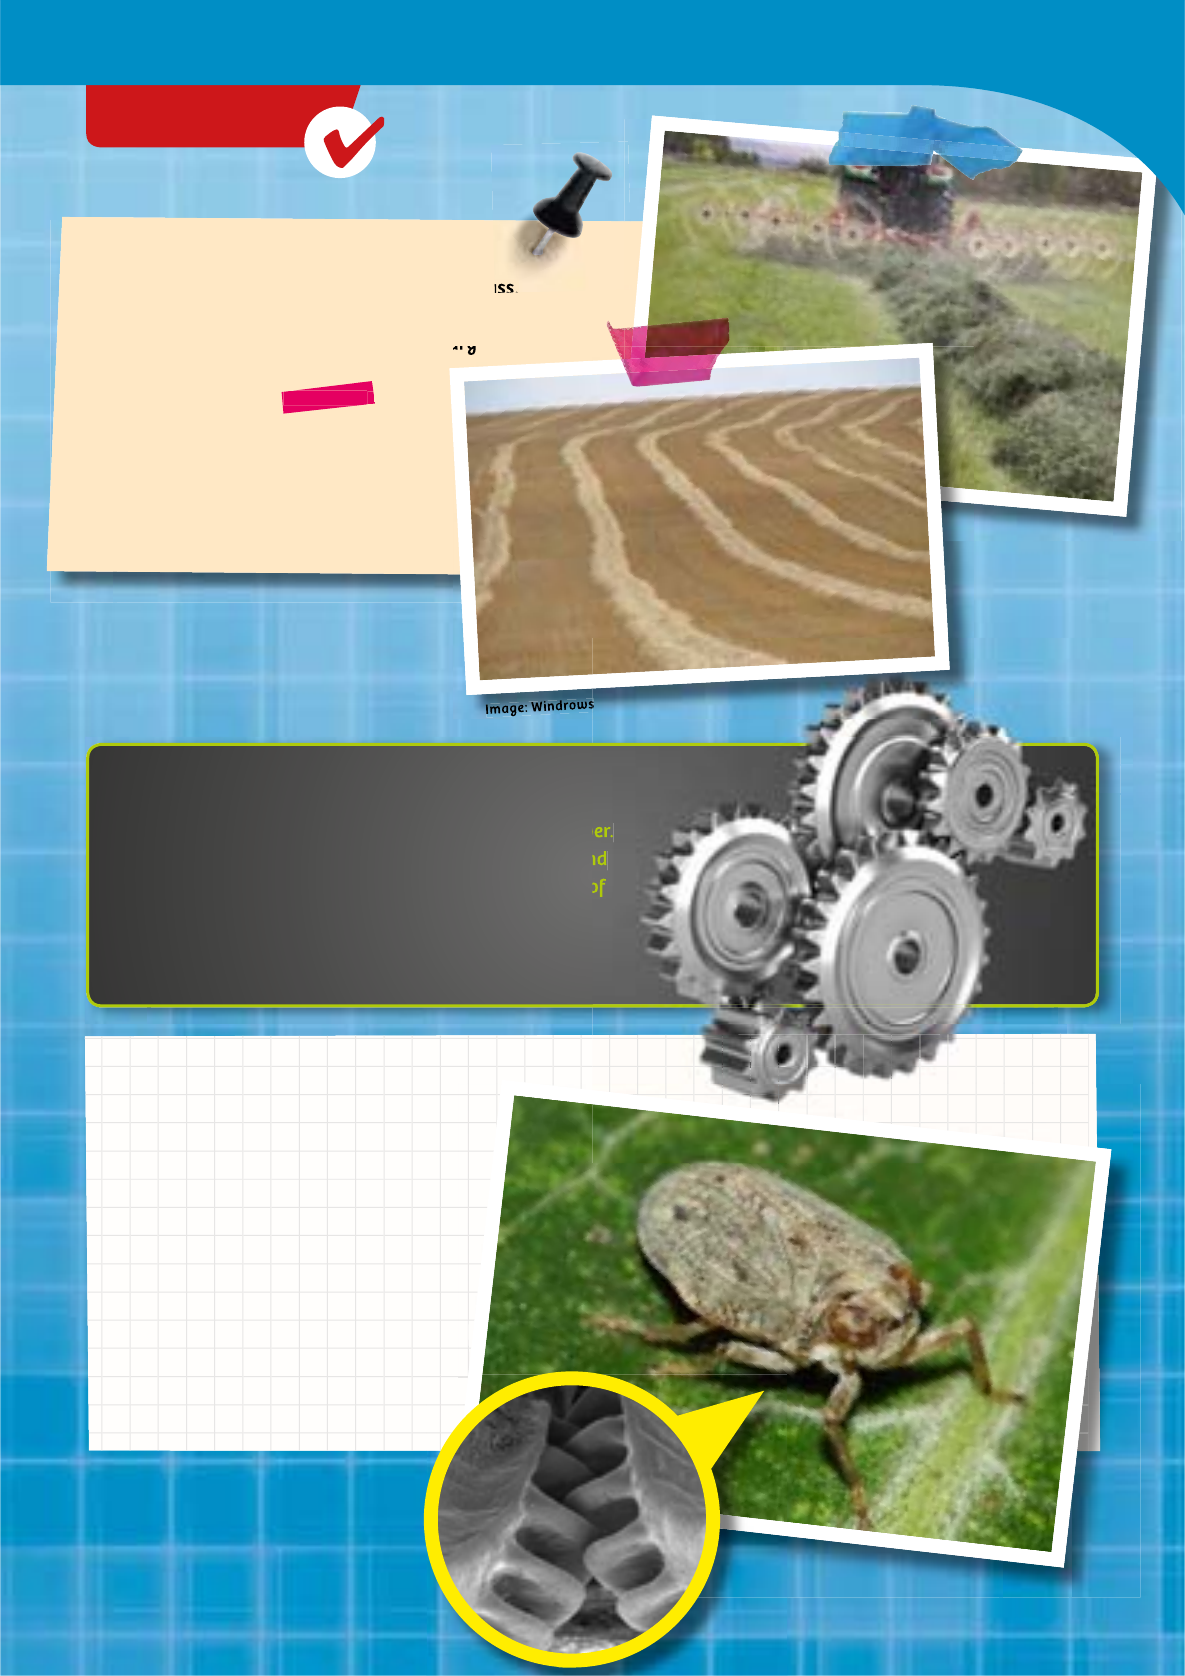
Did you know...
...that gears have been found in
insects? In , scientists from
the Universty of Cambridge found
gears (right) in the rear legs of the
juvenile for of Issus celoptratus.
The gears make it so that the
insect’s legs are synchronized
when it jumps. The gear
mechanism also gives the insect
more power when it jumps.
Hay is made from herbaceous plants, such as grass,
and is used to feed animals. Making hay is a multi-step
process. First the hay is cut and allowed to dry
in the sun. Then it is collected into long,
narrow rows known as windrows by a
hay rake. A hay rakes works just like a
garden rake that is used to collect leaves.
However, the forks of the rake are driven
by gears. Finally, the hay is turned into
hay bales and stored until it is used.
Tractors
MAKING HAY
Image: Windrows
Gears are used in many different devices to transfer power.
A gear is a rotating wheel that is connected to an axle and
has teeth or cogs that are intermeshed with another set of
teeth. Gears transfer power by changing the direction,
speed, or torque of another gear.
SIMPLE MACHINES: GEARS
windrows
b
CHECK IT OUT
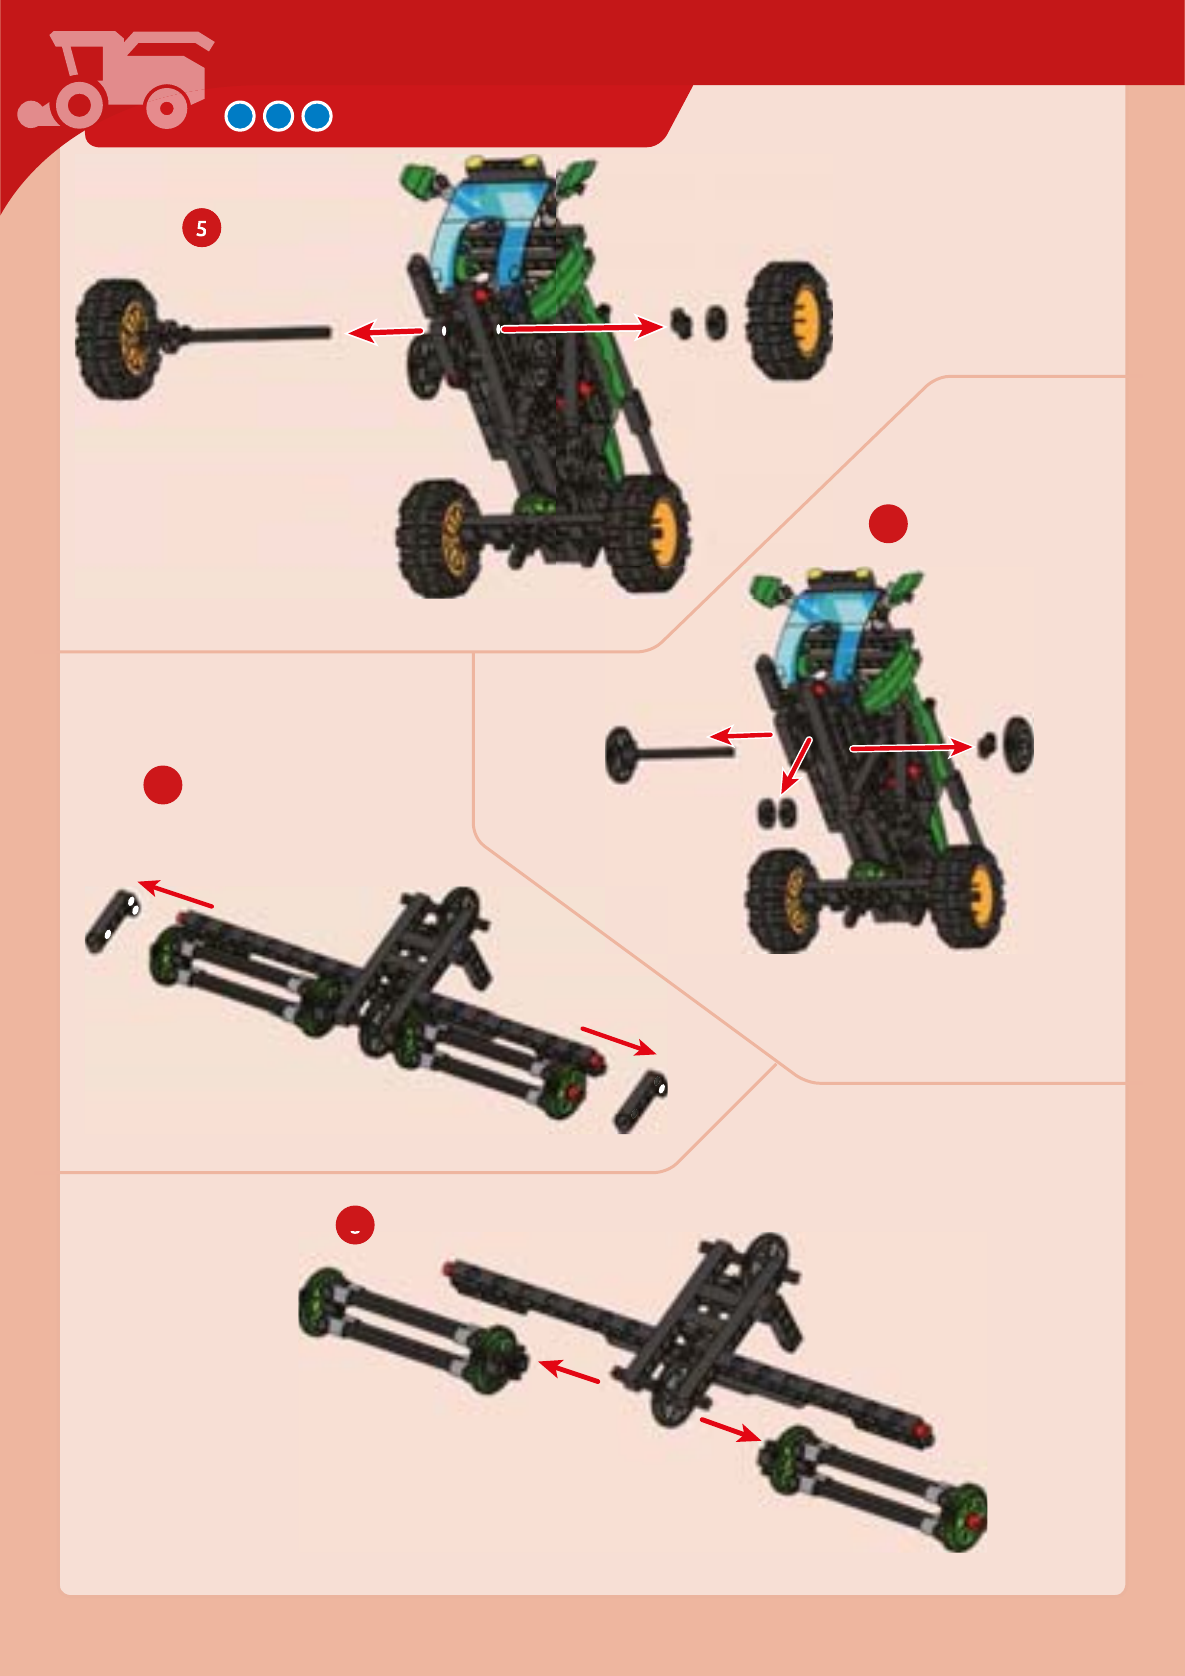
COMBINE HARVESTER
35-mm B.
C.
D.
E.
F.
#31
G.
x
x x x x
x x x
x
x
x
x x
x x x x x x x x x x x x
x x x x x x x x x
x x
x x x x x x x x x x x
x
x
x x
x x x x x
Combine Harvester
F.
G.
step 1
step 2
push into the
last hole
H.
#31
J.
I.
I.
J.
step 1
step 2
push into the
last hole
K.
70 mm
#32
70-mm
60-mm
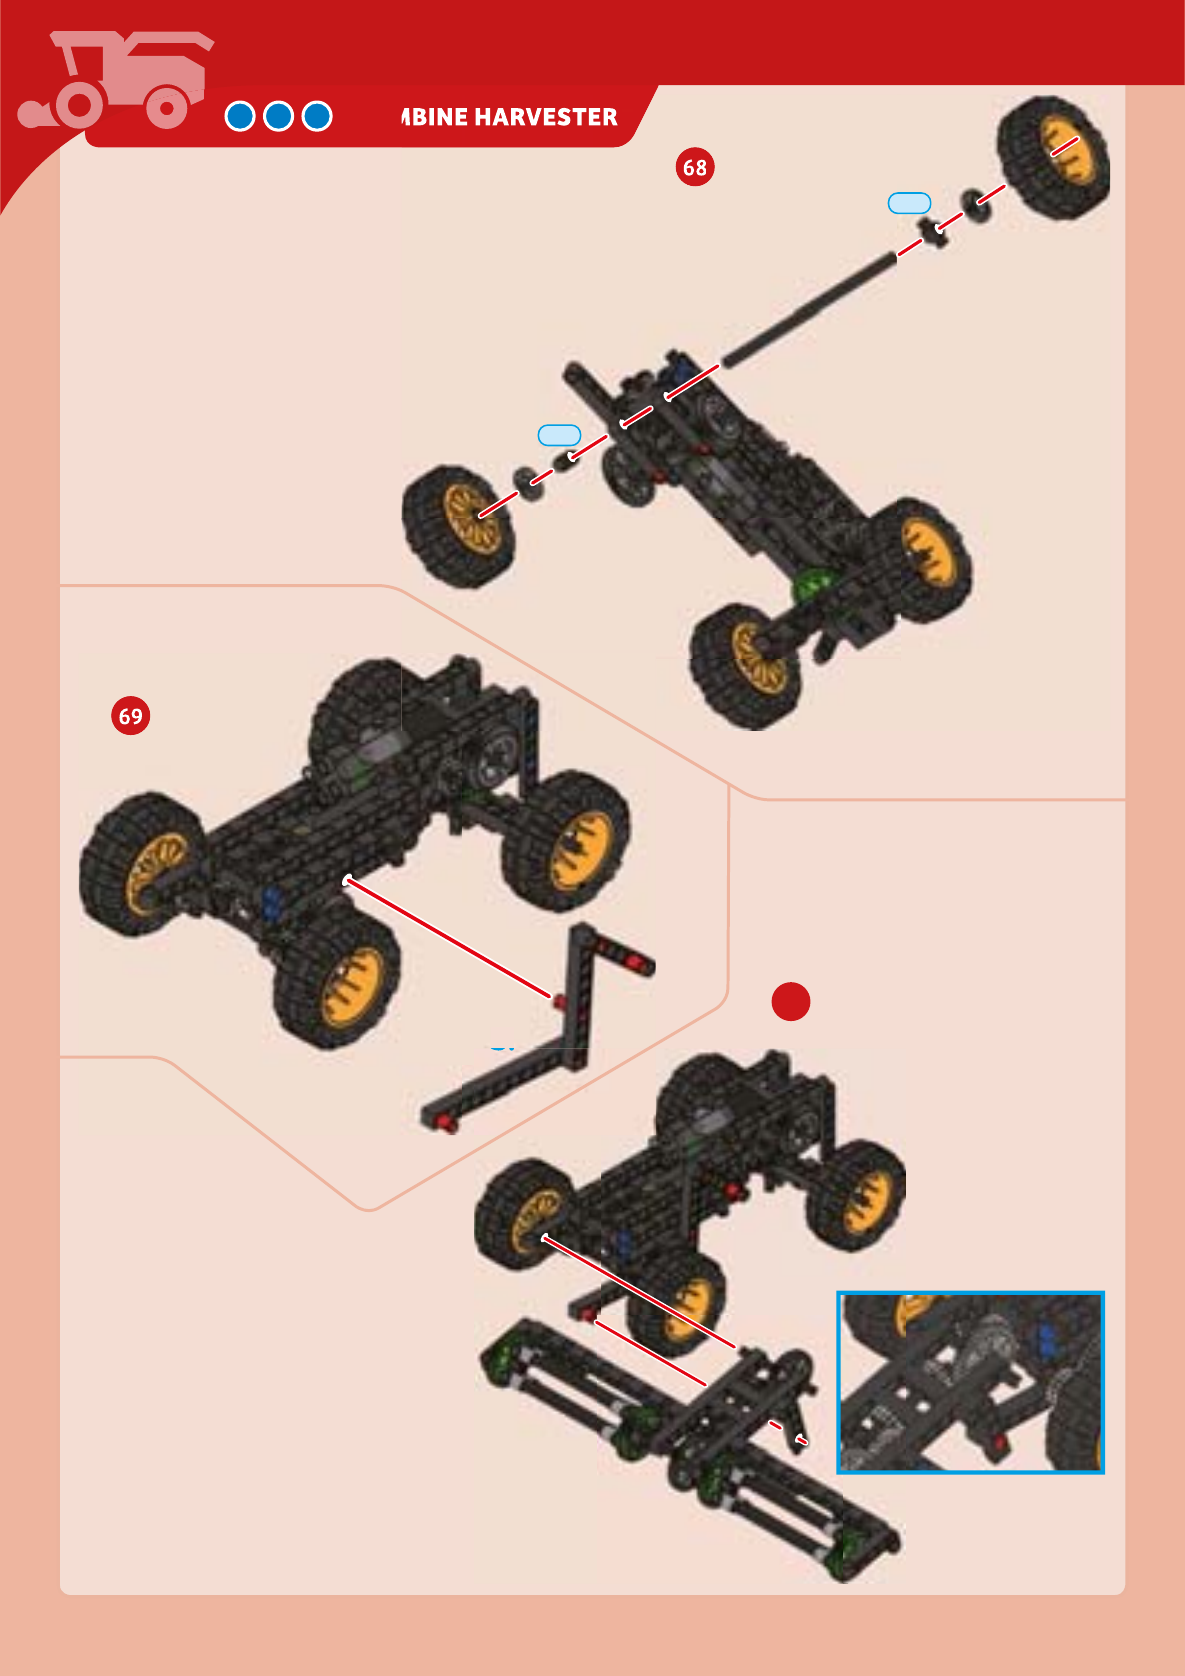
COMBINE HARVESTER
A.
A.
L.
35-mm
35-mm
#31
#31
Combine Harvester
M.
M.
100-mm
x
N.
O.
P.
x
x
x
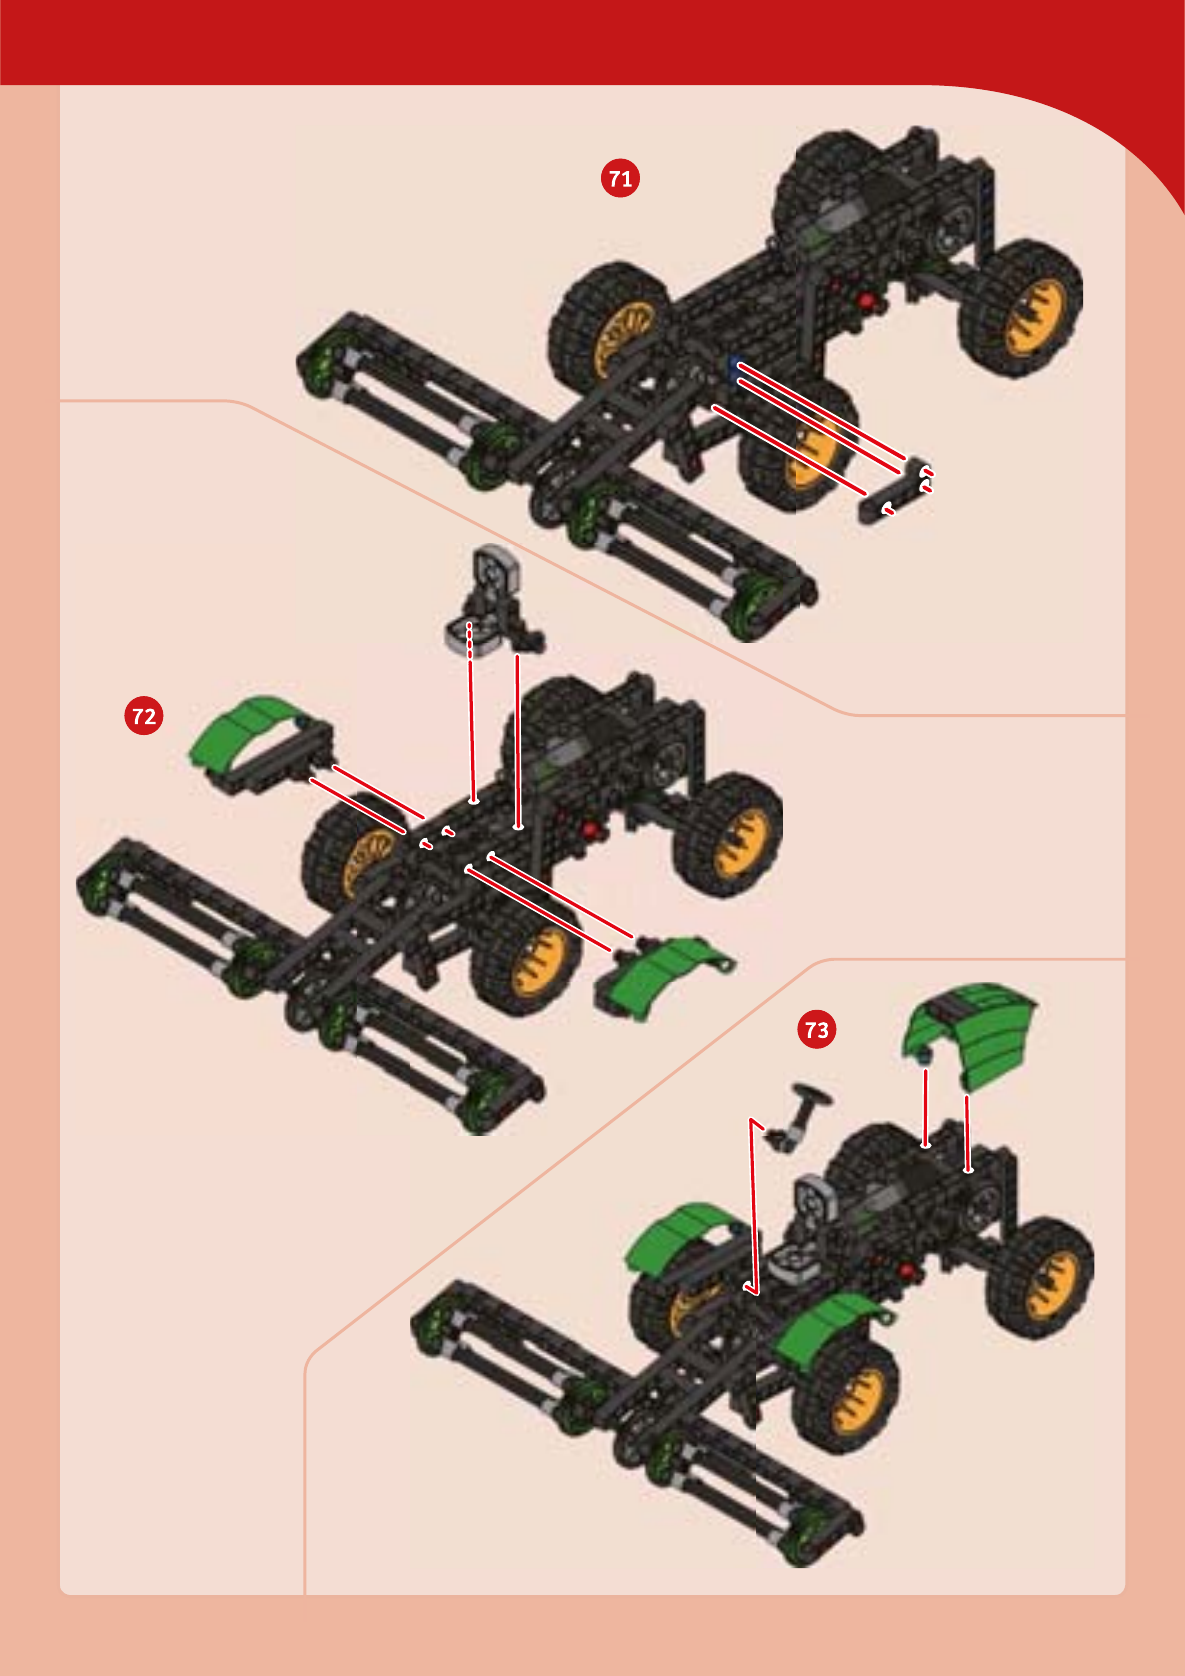
COMBINE HARVESTER
Q.
R.
#32
S.
#32
60-mm
#32
TIP!
Note the gear direction.

Combine Harvester
70-mm
N.
N.
70-mm
T.
make sure that all
gears rotate smoothly
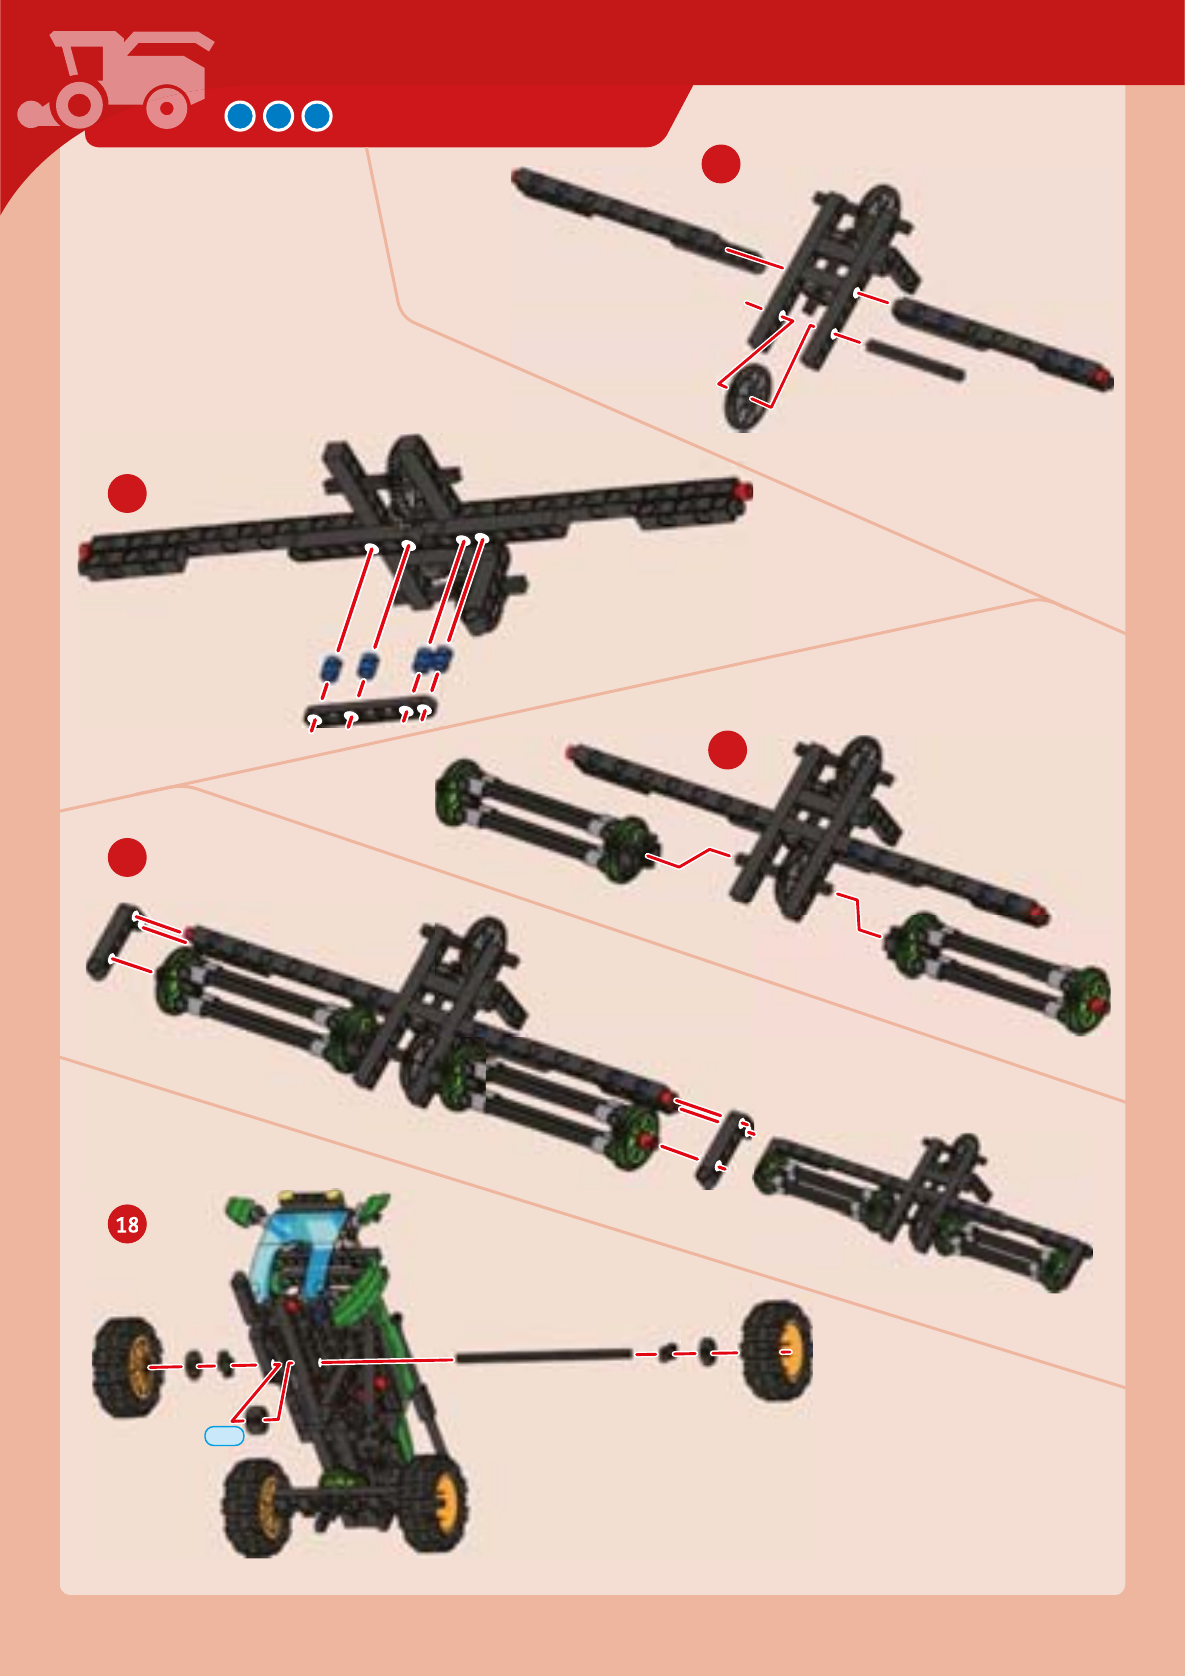
COMBINE HARVESTER
#32
#18
#32
70-mm
#36
#19
#19
#32

#32
57
60-mm
60-mm
Combine Harvester
#18
COMBINE HARVESTER
R.
Q.
U.
70-mm
M. E.
V.
U.
P.
O.
#45 x2
#19
#19
100-mm
Combine Harvester
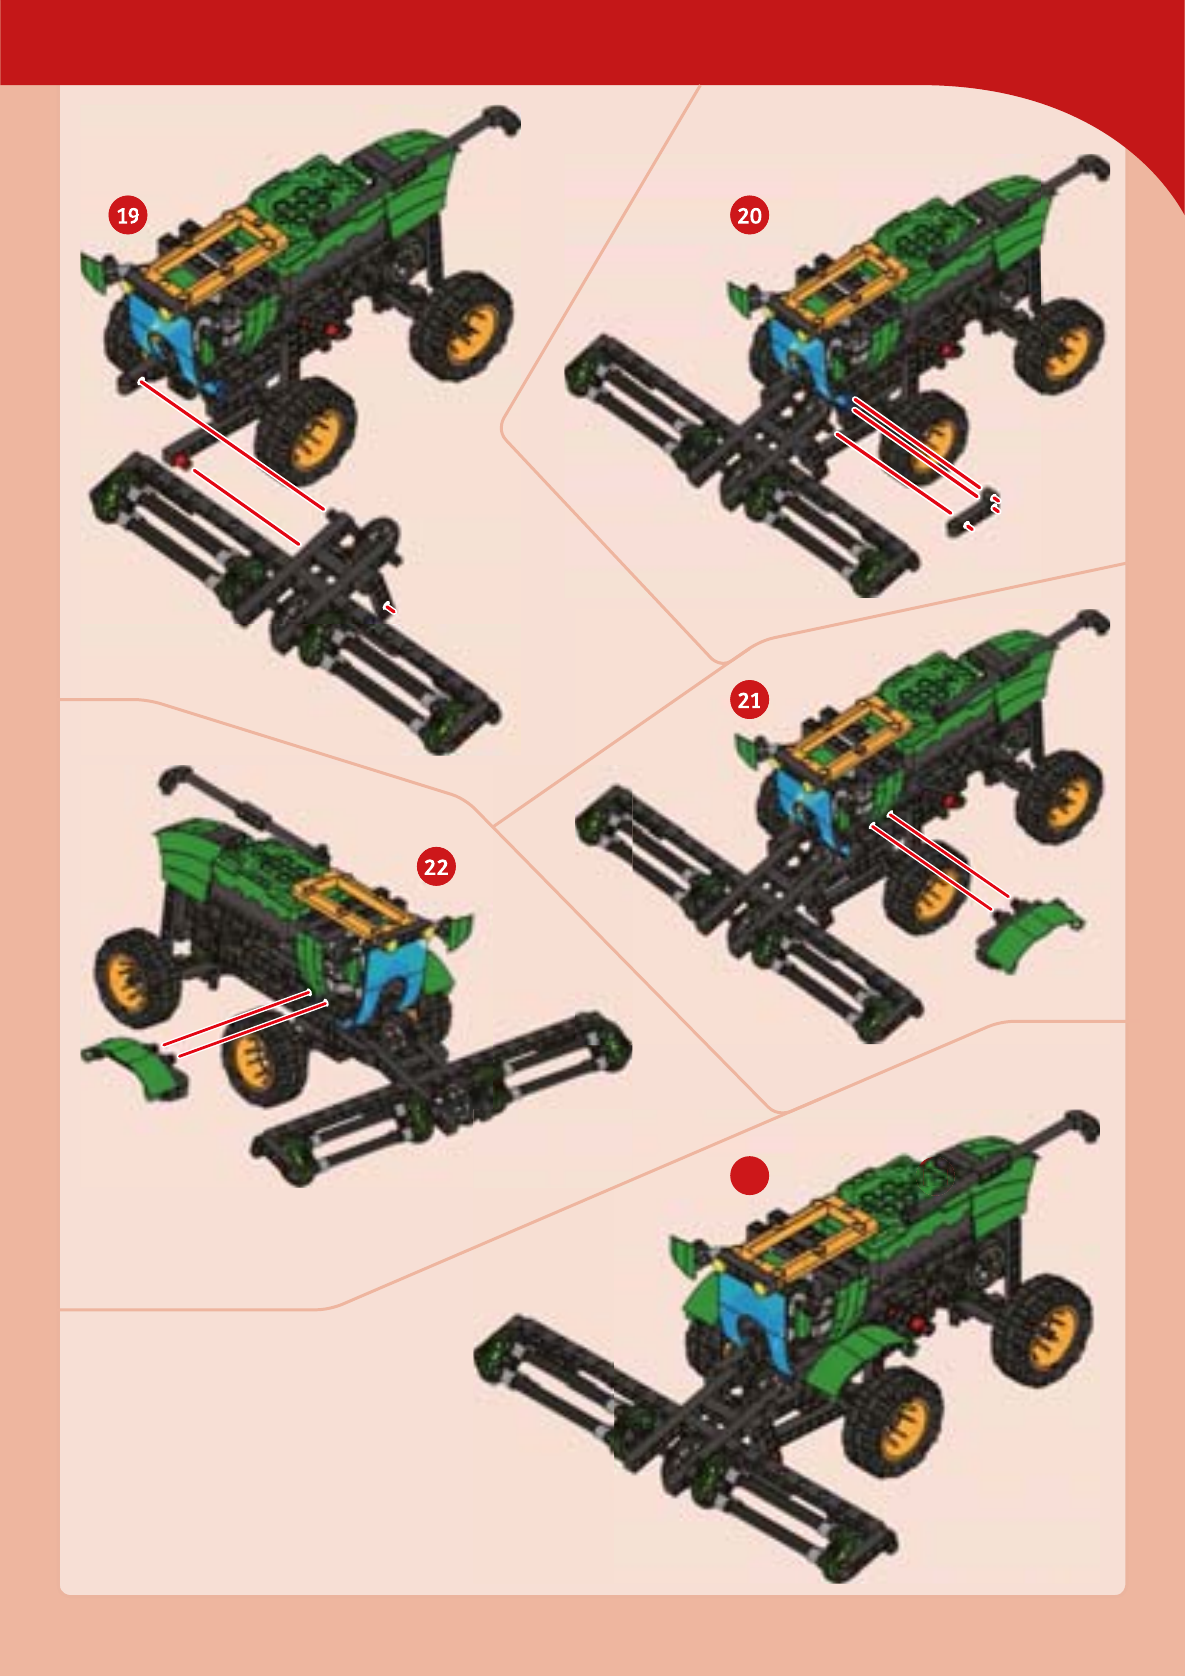
COMBINE HARVESTER
S.
T.
A.
A. #19
#19
150-mm
C.
K.
H.
B.
D.
Combine Harvester
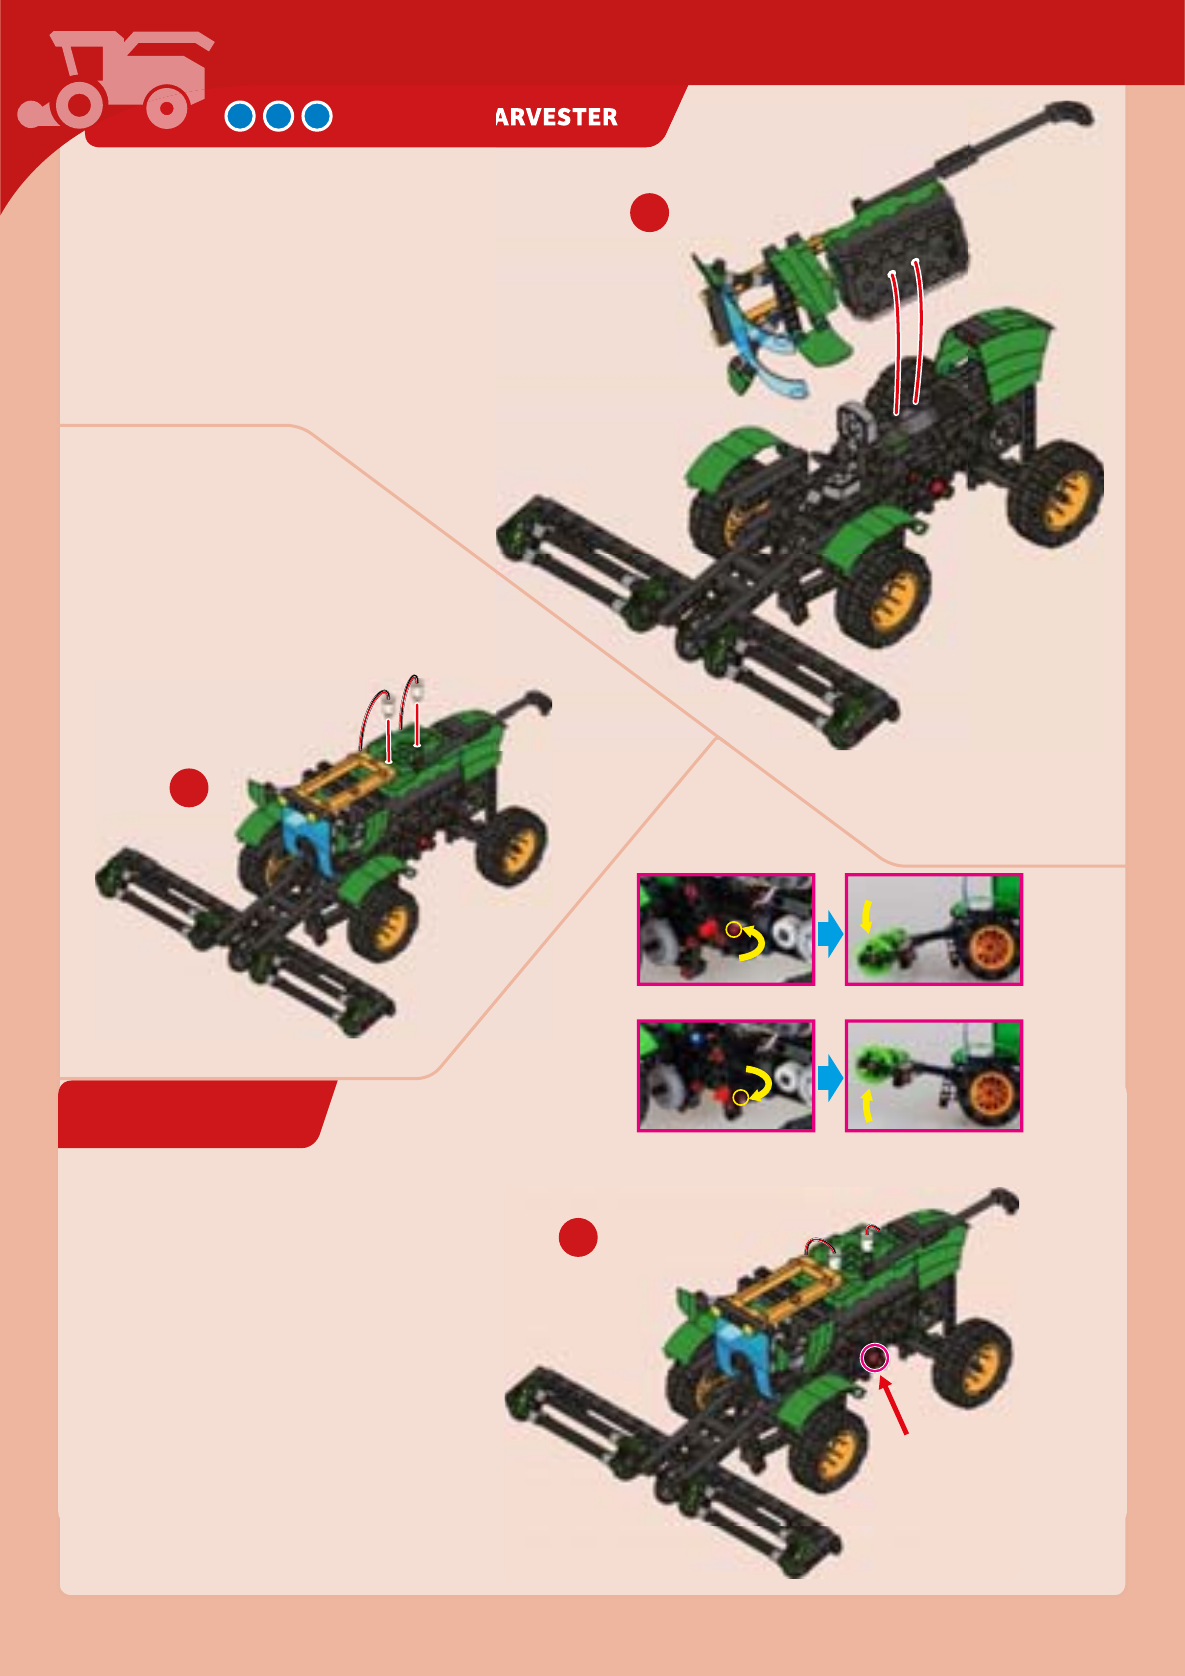
COMBINE HARVESTER
EXPERIMENT 5
handle
Pulling up on the joint pin will make the head move down.
Pulling down on the joint pin will make the head move up.
V.
HERE’S HOW
Have the combine harvester go
through a small patch of dry
grass with the front of the
combine harvester down. What
do you obeserve happens to the
grass at the front of the combine
harverster as it goes over it.
Reaping grass
Done!
remove
remove
remove
remove
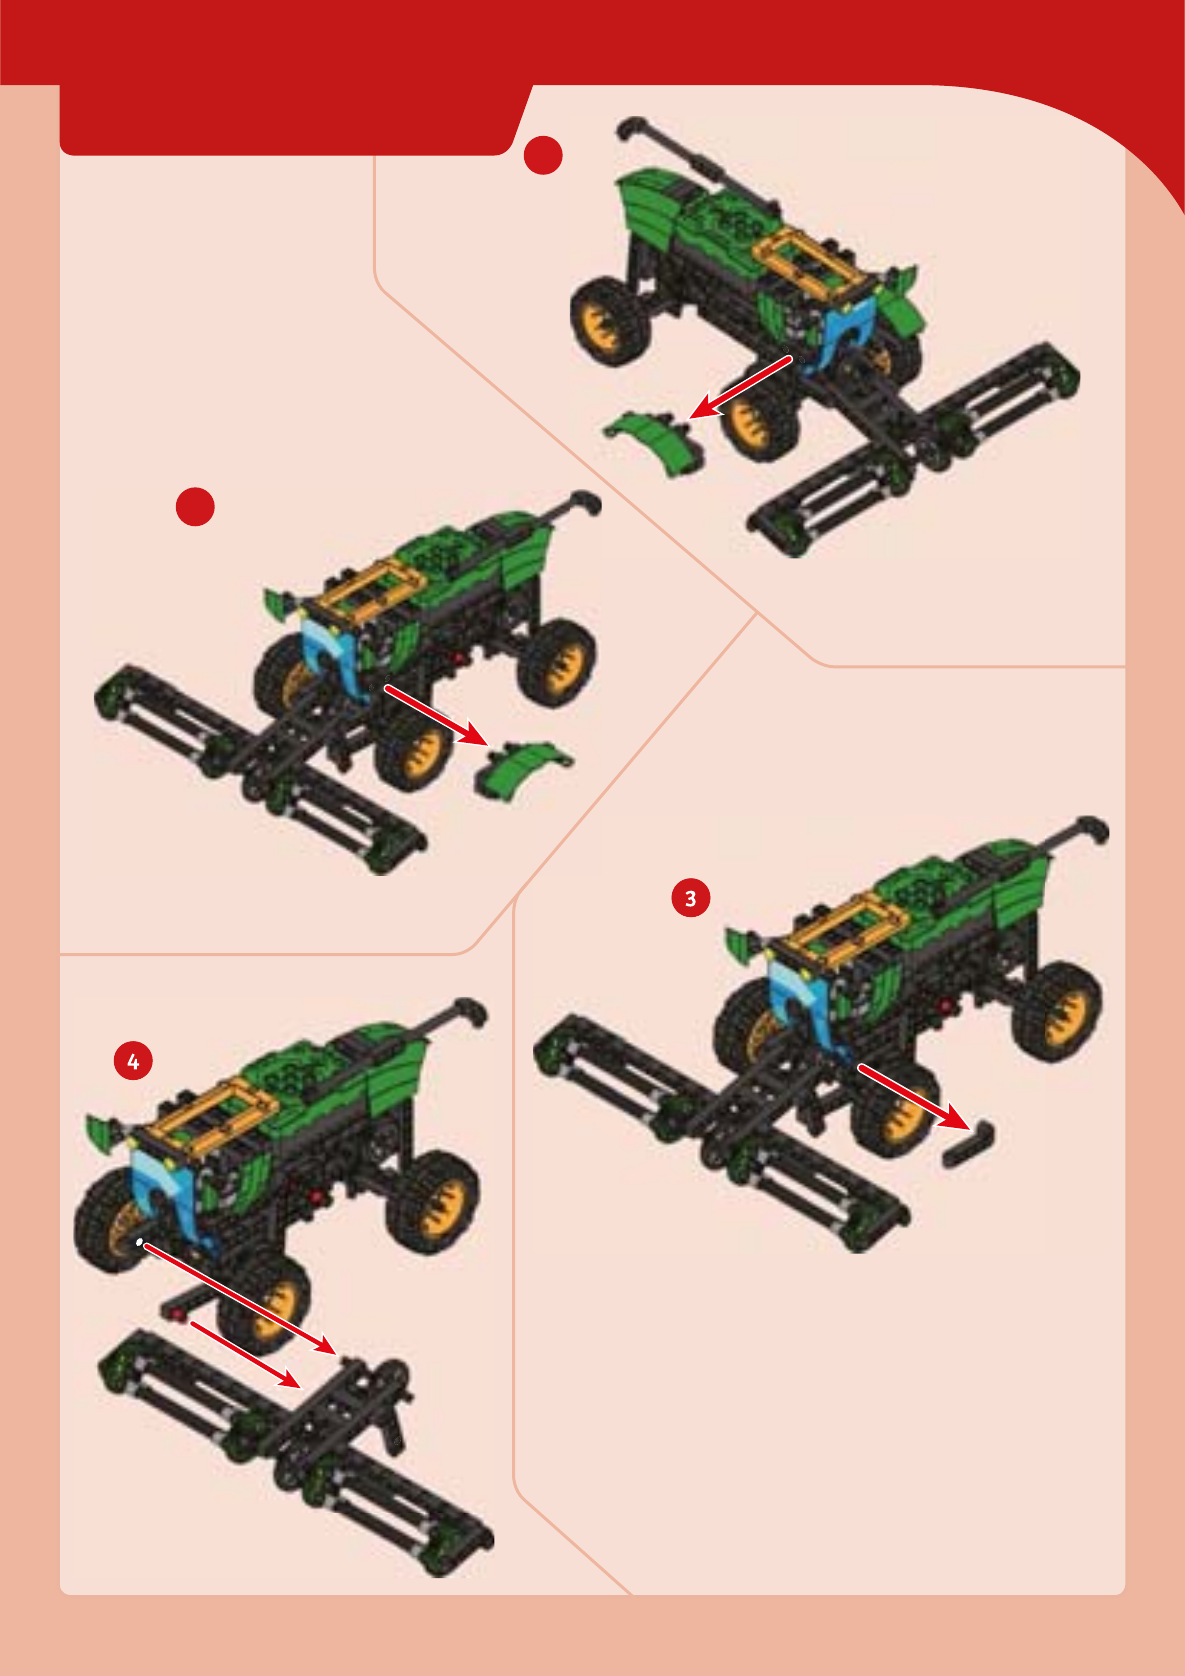
CHANGING THE GEAR RATIO
Combine Harvester
COMBINE HARVESTER
remove large gray gear
remove axle
remove small gears
remove
remove
remove
remove
remove axle and wheel
remove

remove
remove the parts
remove the parts
remove the parts
remove
Combine Harvester
70-mm
A.
Make that sure all the gears
rotate smoothly.
150-mm
#45x2
COMBINE HARVESTER
A.
Done!
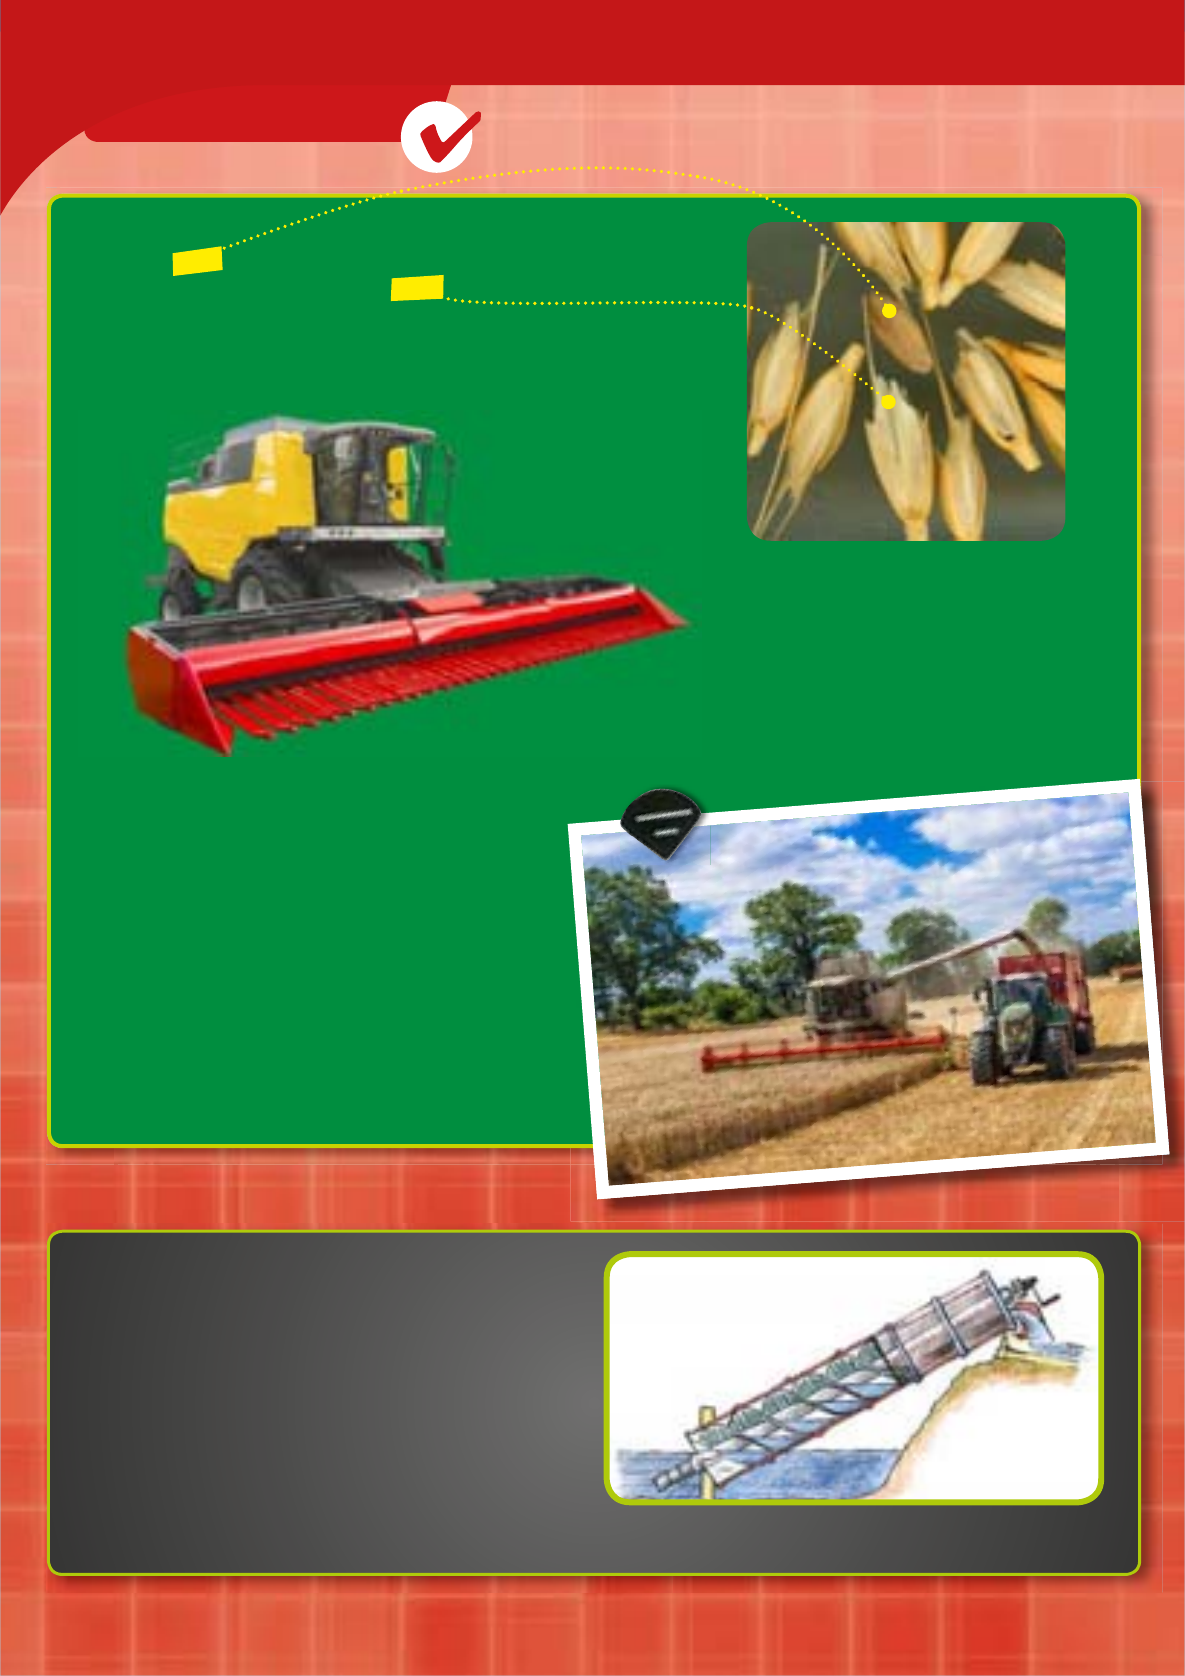
Once the grain has been separated from the chaff it is
stored in a tank in the combine. When the tank is full the
grain is emptied into a trailer through a pipe called an
unloader. Inside the pipe is a screw or auger conveyor
which moves the grain up the tube. A screw is simply a
spiral blade around a shaft. As the screw turns it pushes
the grain up along the tube.
SIMPLE MACHINES: THE SCREW
The edible grain portion of crops such as wheat, corn, barley, and rye are
covered by an inedible casing called chaff. To use the grain it has to be
separated from the chaff. Before the use of machines this was a very labor
intensive process. The combine harvester gets it’s name because it combines
three processes in preparing grain crops: reaping, threshing, and winnowing.
The first step in the process is to cut the
grass when it is ripe, called reaping. At the
front of the combine harvester is the
header, which gathers the plants into the
combine. Behind the header is the cutter
bar, which functions like a giant electric
razor and cuts the base of the plants.
The next step is to remove the head of the stalk and
loosen the grain from the chaff by threshing, which is
accomplished by hitting the grain against a surface. In
a combine harvester this is done by the threshing
drum. The threshing drum is a cylinder with large bars
that hit the grain as the cylinder rotates at high speeds.
The grains is finally separated from the chaff by
winnowing. Under the threshing drum the grain and the
chaff move over a grate. Air is blown through the chaff
and grain, and the heavier grain falls through the grate
while the chaff is blown towards the back of the combine.
HOW A COMBINE HARVESTER WORKS
CHECK IT OUT
FARM TRUCK
Farm Truck
60-mm axle
MOTOR A
100-mm axle
150-mm axle
place the 20T gears in the middle
x
x x x x
x
x x
x
x
x x x x x x x x x x x x
x x x x x x x x
x
x x x x x x x
x
x x x x
x x x
x x
x
x x
x x
FARM TRUCK
FIRST
SECOND
MOTOR B
FIRST
SECOND
35 mm axle
100-mm axle
Farm Truck
100-mm axle 70-mm axle
70-mm axle
100-mm axle
FARM TRUCK
60-mm axle
Farm Truck
70-mm axle
70-mm axle

FARM TRUCK
EXPERIMENT 6
Lifting materials
MOTOR A
MOTOR B
70-mm axle
70-mm axle
Done!
HERE’S HOW
Se up an incline using materials like
books and cardboard. Time how long
it takes for the farm truck to go up
the incline. Then place a small heavy
object in the back of the farm truck
and measure the time again. What
happens to the amount of time it
takes the truck to go up the inlcine?
Graders
USING REMOTE SENSING
TECHNOLOGY
Modern farmers have access to much more information about their land and crops due to two
important information systems : Global Positioning Systems (GPS) and Geographic
Information Systems (GIS). Using these systems farmers are able to understand how different
farming techniques influence their crops. This allows farmers to make better decisions about
their land and water usage.
GLOBAL POSITIONING SYSTEM (GPS)
The Global Positing System or GPS is a navigation system,
which is often used for finding the directions to a location.
Many farmers now use GPS to make a map of their field.
This can be used to plan field boundaries, roads, and
irrigation systems.
GPS is also used in farm equipment, such as tractors and
combine harvesters, to keep track of where they have and
haven’t been. This allows farmers to follow the same path
again and again with different machines. For example,
after tilling the ground with a disc harrow, the farmer can
follow the same path with a seeder. This ensures that the
seeds are only placed in the areas that have been tilled.
GEOGRAPHIC INFORMATION SYSTEMS (GIS)
GIS is a tool used to visualize and analyze
geographical data. The power of GIS comes
from it’s ability to analyze different types of
data together. For example a farmer can
combine rainfall, elevation, slope, and soil type
data together using GIS to plan drainage and
irrigation in a way that will prevent flooding.
CHECK IT OUT
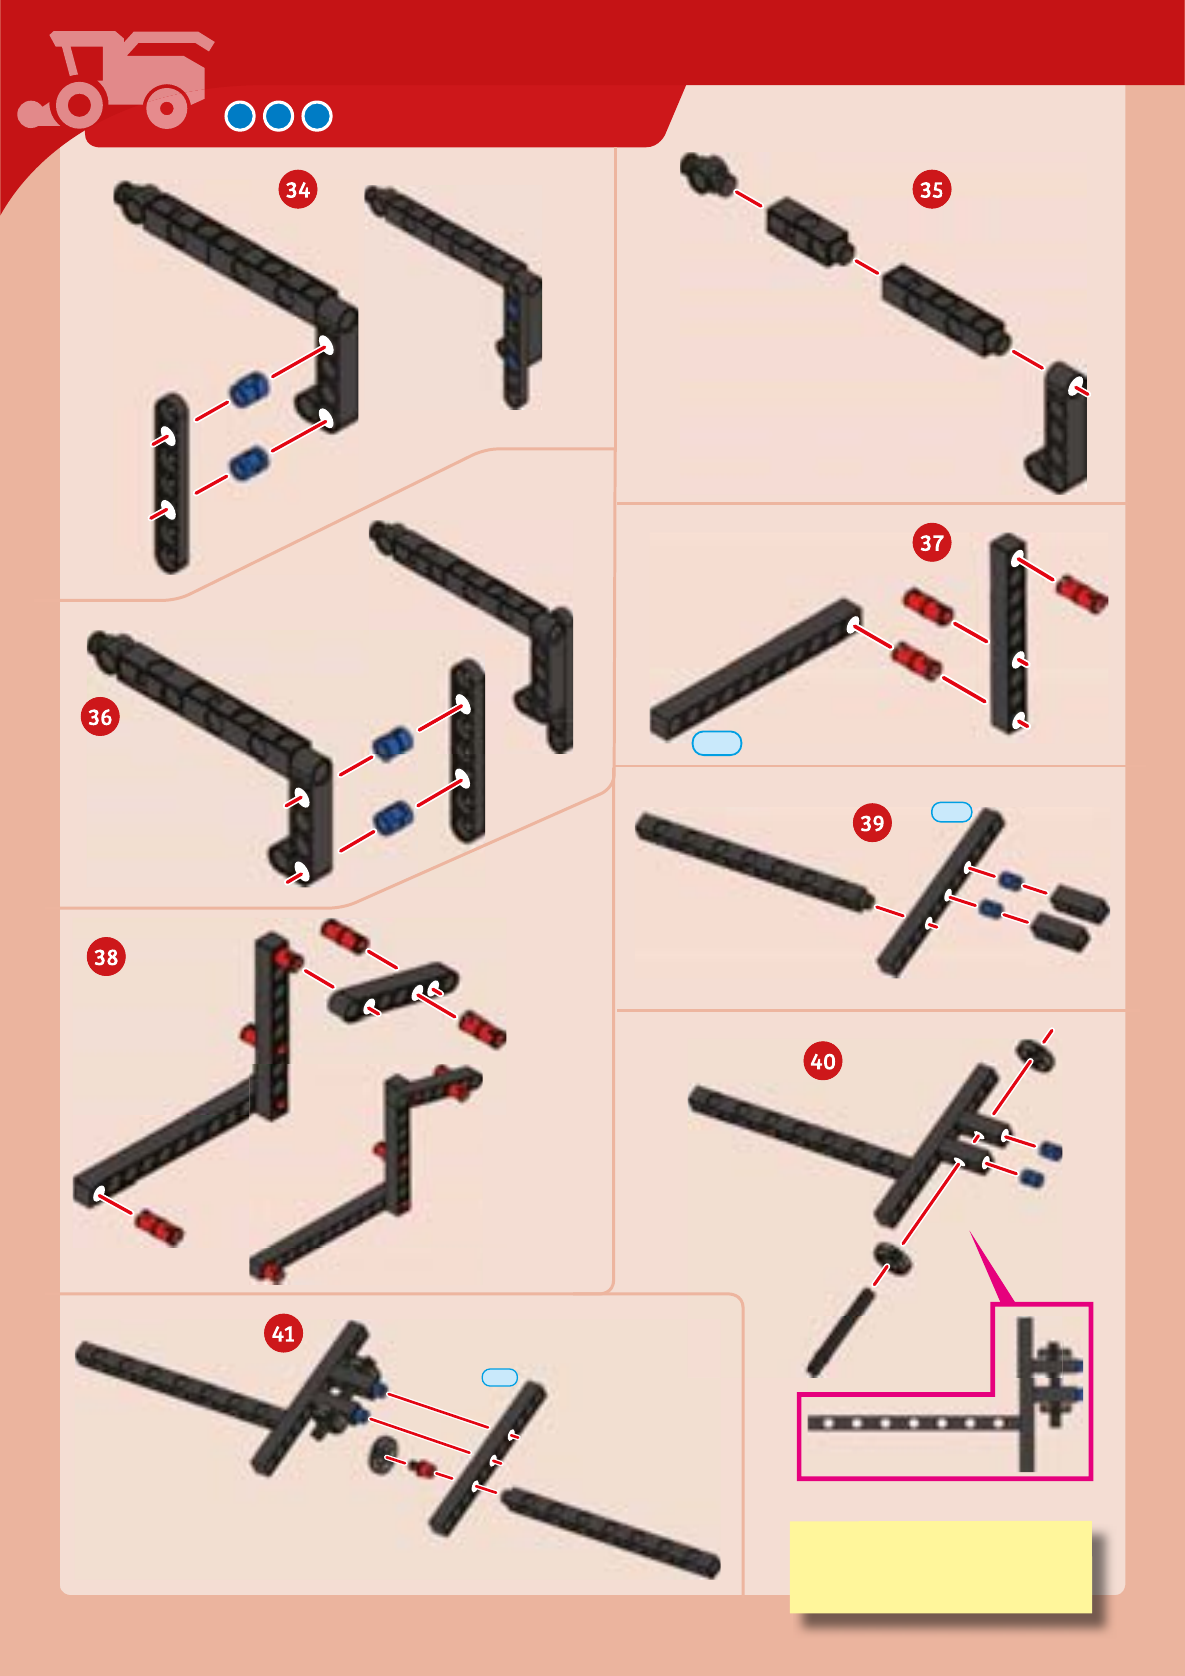
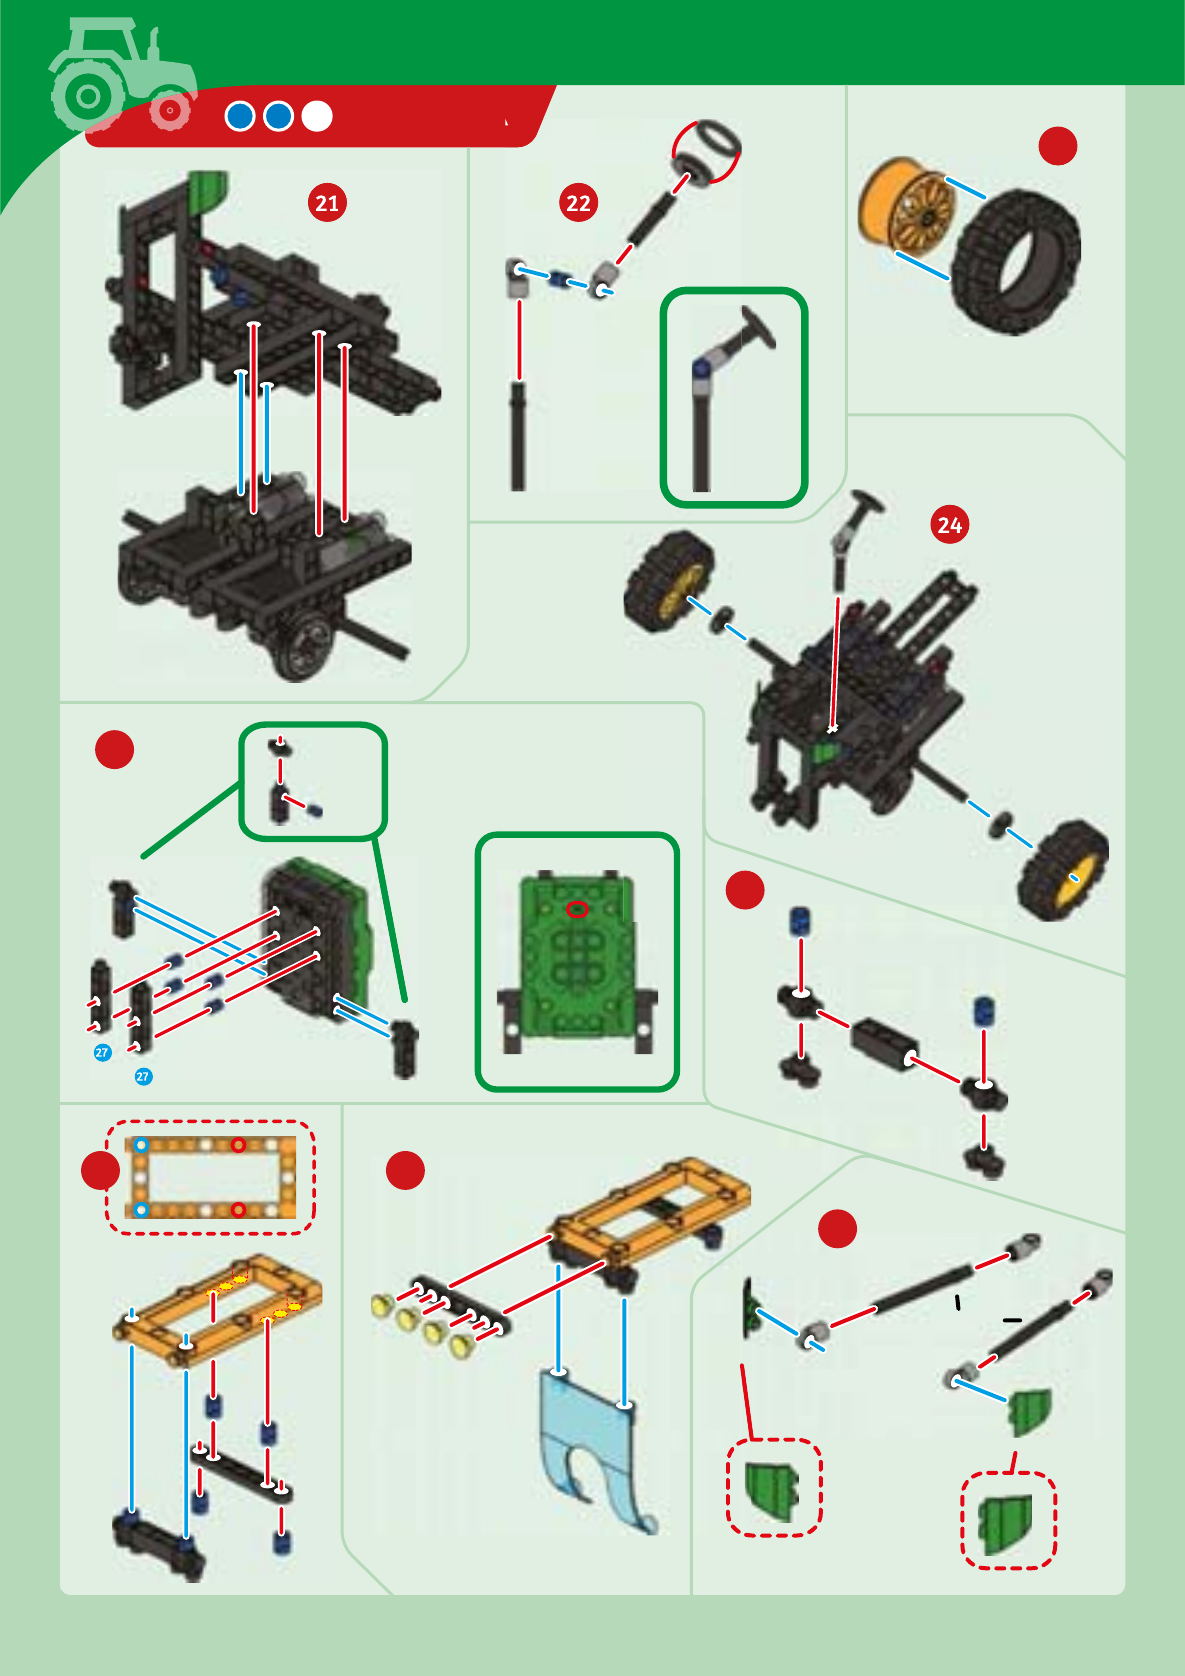
WINDROWER
27
100-mm axle
100-mm axle
32
32
70-mm axle
24
32
60-mm axle
24
32
x x x
x
x x
x
x x x x x x
x x x x x x x x x x
x x x
x x x x x x x x x
x x x x x x x x x x
x
x x
x x
x
x
x
x
Windrower
60-mm axle
32
32
31
32
32
x
C
A
B
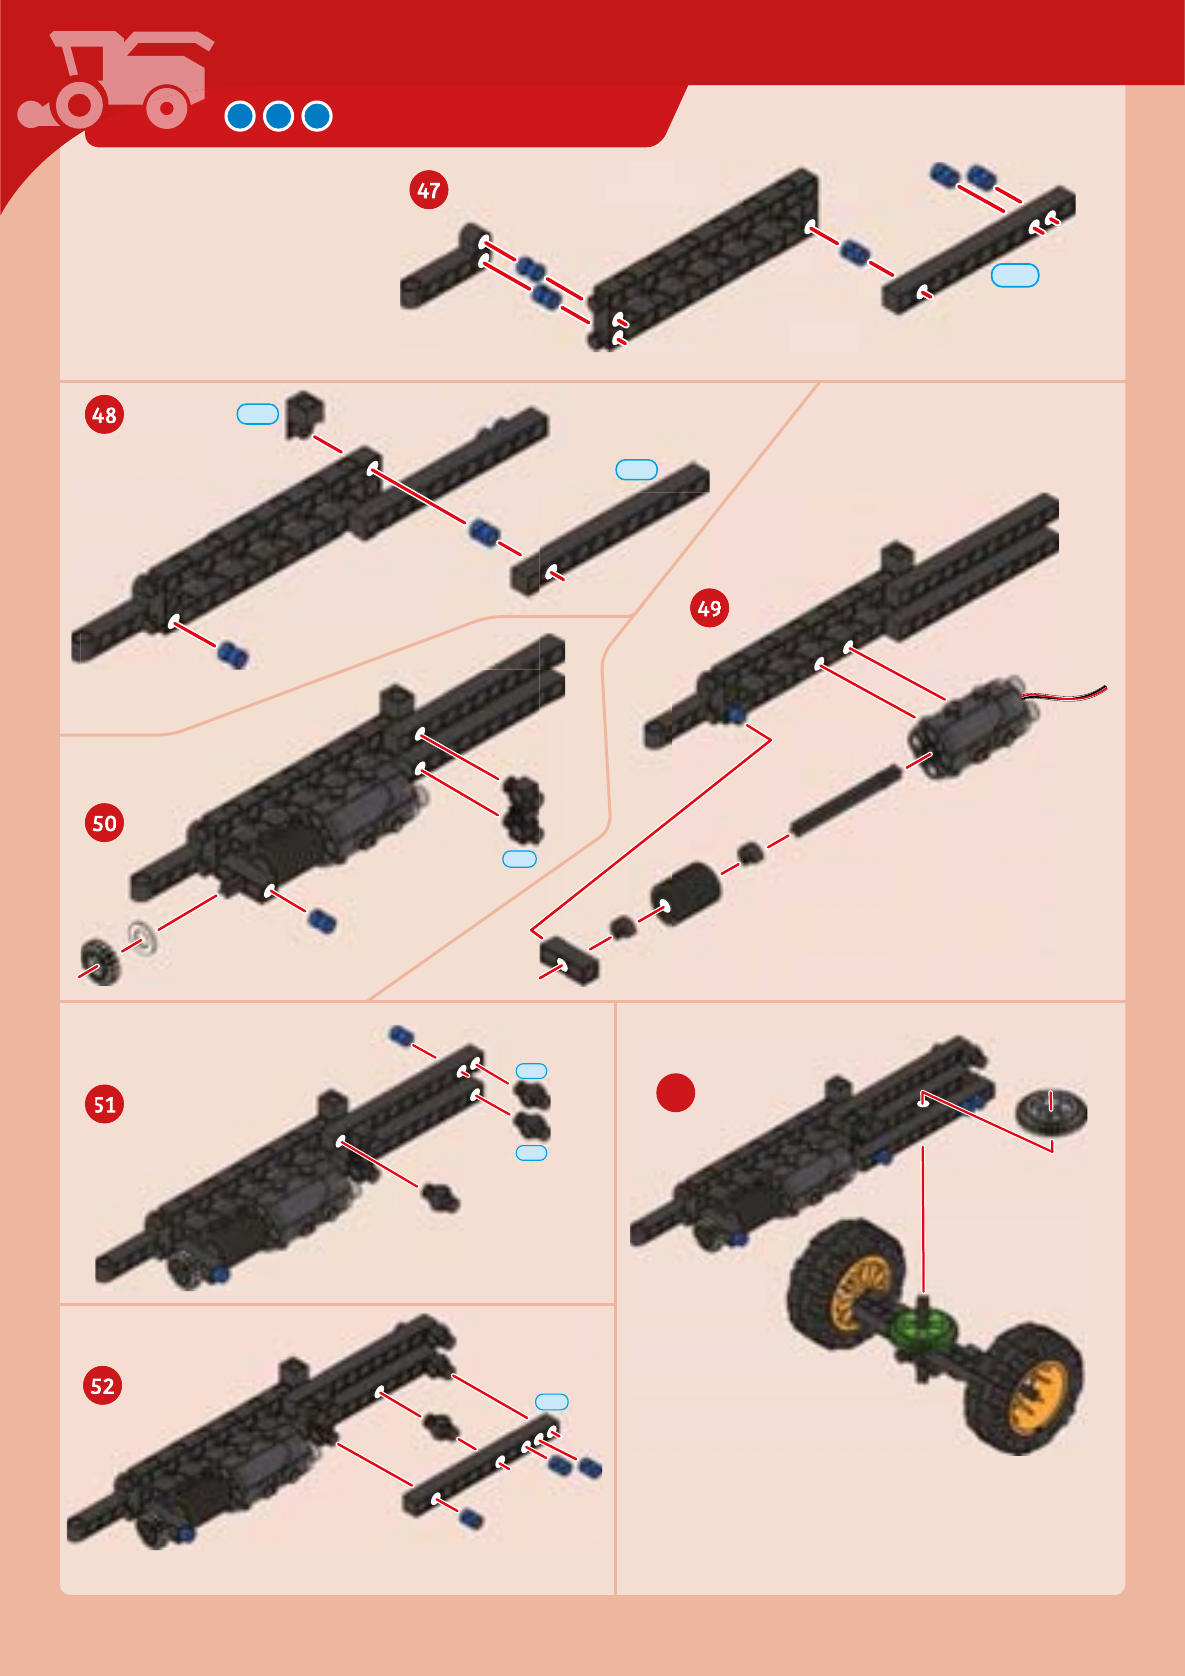
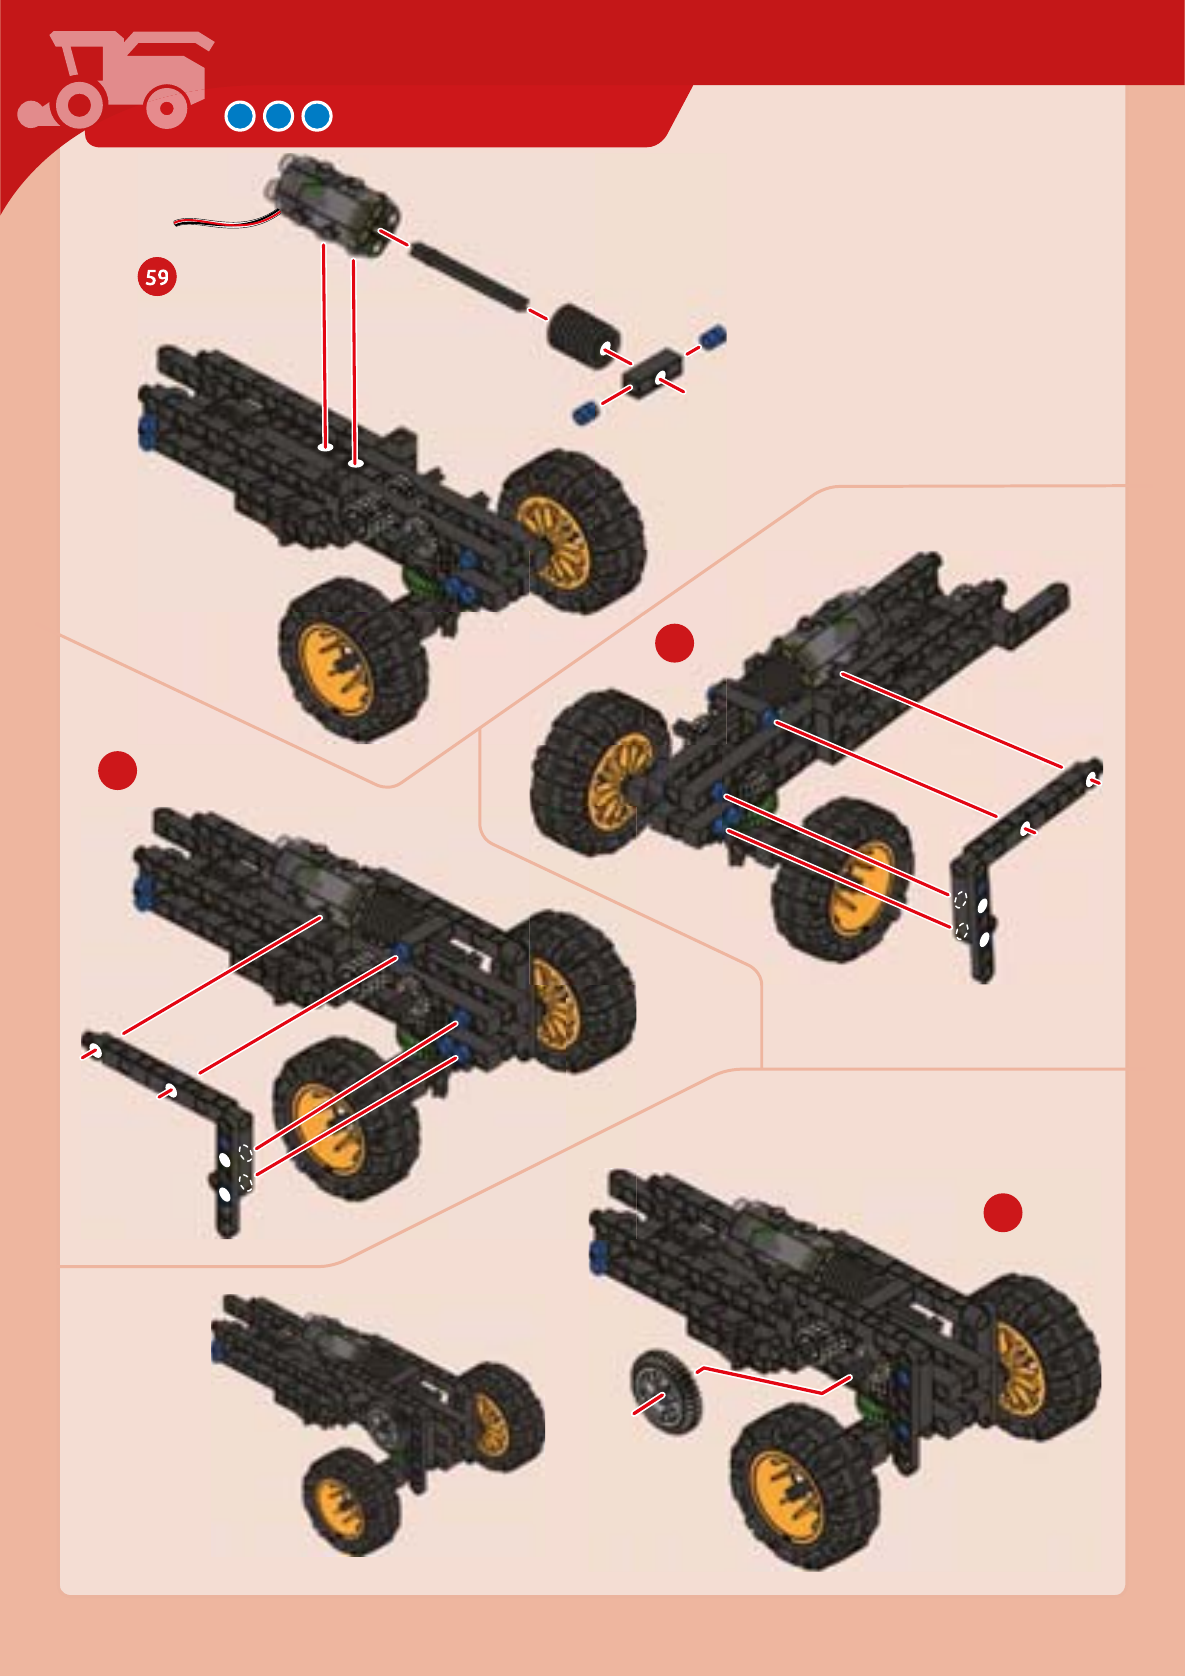
WINDROWER
27
27
70-mm axle
60-mm axle
35-mm axle
x
x

Windrower
31
31 26
11-mm
70-mm axle
x
x
x

WINDROWER
38
39
34
step 1
step 2

HERE’S HOW
Place small light objects
around a room. Use the front
of the windrower model to
move all the objects into one
area.
Moving materials
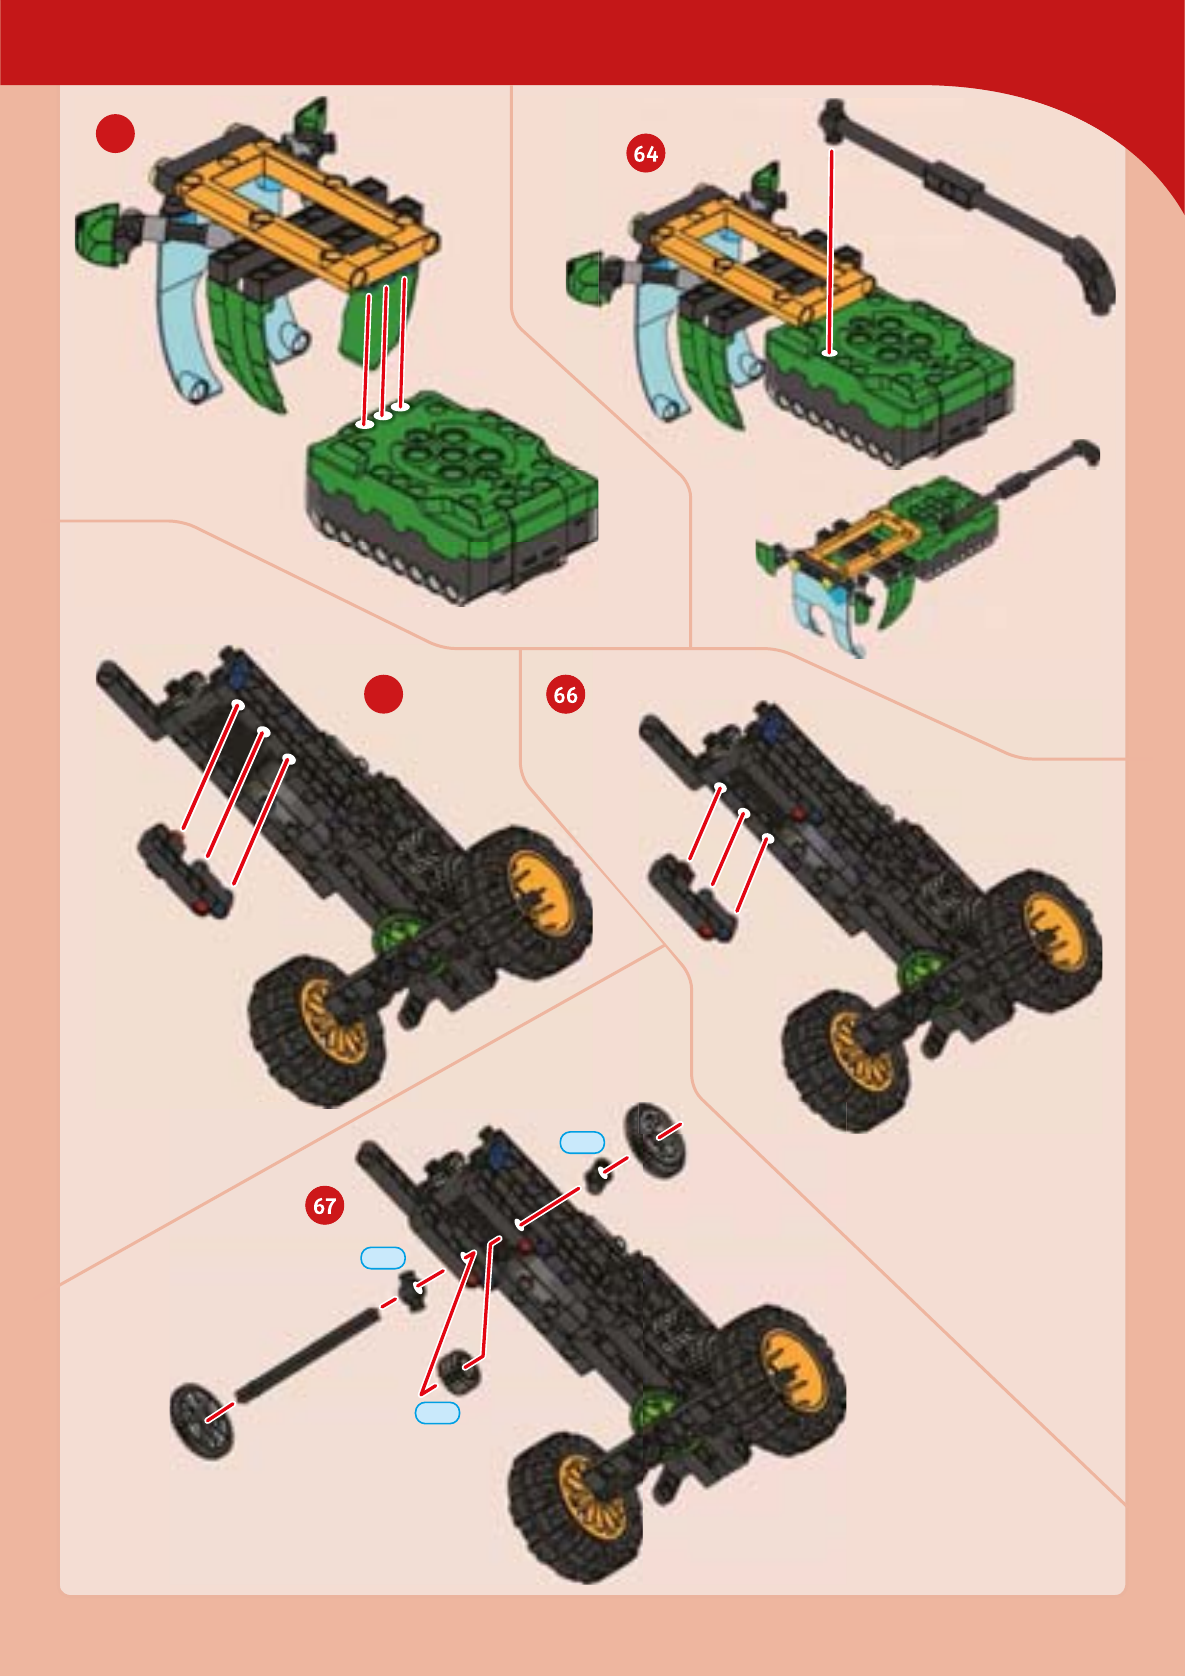
Windrower
Use the handle to make the front of the
windrower go up and down.
Done!
EXPERIMENT 7
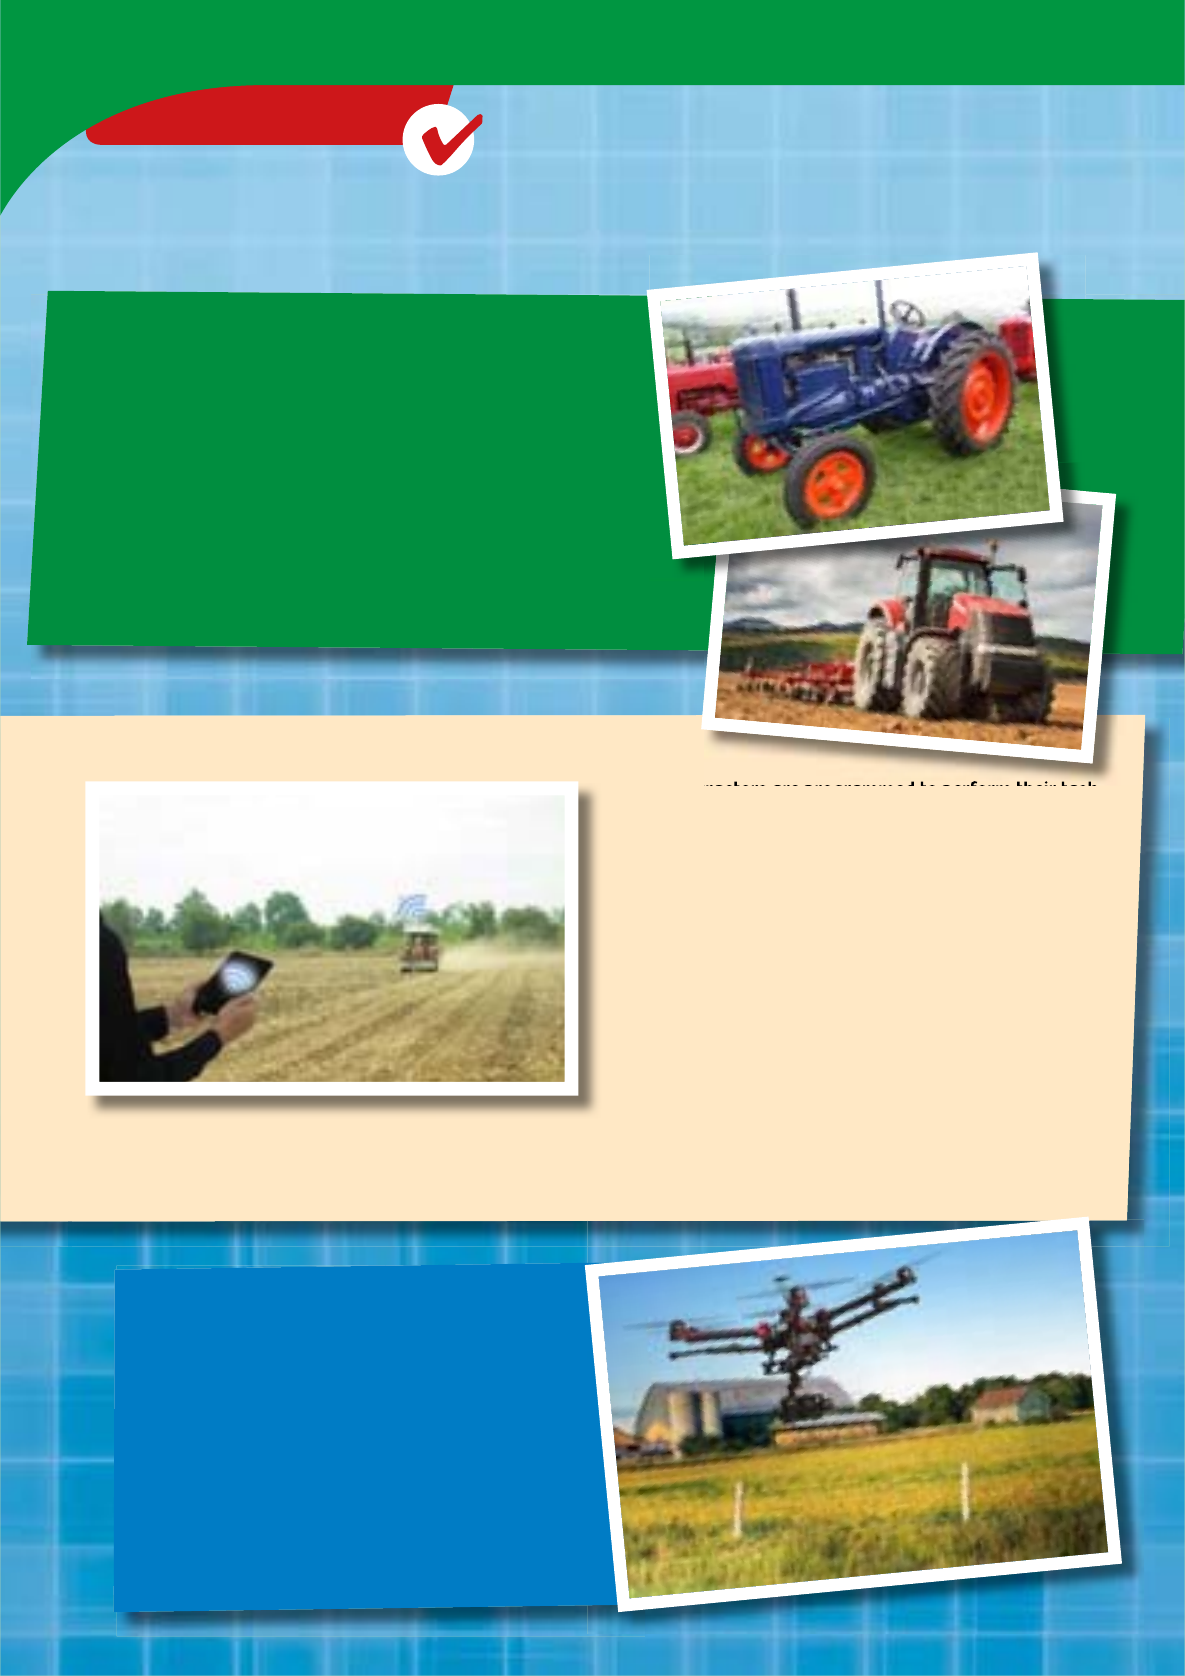
THE FUTURE OF FARMING
DRIVERLESS TRACTORS
Driverless tractors are programmed to perform their task
without the presence of a human. Driverless tractors
have developed within the last years because of their
reliance on GPS and advances in computers and
computer programing.
Developing driverless tractors is challenging because
they need to imitate human abilities such as visual
observation and decision making. For example, driverless
tractors must be able to determine their path, react to
unknown situations, and make decisions all in an
appropriate amount of time. This is accomplished
through the use of sensors that relay information to the
tractor, which is then processed by complex computer programs. For example, the position information from GPS is
used by driverless tractors to determine the route and speed that the tractor should follow.
As you have learned, agricultural machinery has
made farming much easier and less labor
intensive. These machines about have developed
and changed over the last years. This trend
continues today with the development of new
ways to automate farming using technologies such
as driverless tractors and drones.
DRONES
A new area of development in agricultural
technology is the use of drones. In combination with
sensors and imagining technology drones can be
used to gather information about fields. For
example, drones can capture infrared and visual
spectrum images of crop plants. Infrared light lies
beyond the visual spectrum, or the light that human
eyes can see. Using these images farmers are able to
tell if plants are healthy or unhealthy.
CHECK IT OUT