GEOVISION 0OPAL000000 Cloud FishEye Camera User Manual
GEOVISION INC. Cloud FishEye Camera
User manual
i
Contents
Preface ..................................................................................................... iii
Caution..................................................................................................... iv
Federal Communication Commission Interference Statement .......... v
Important Notes ...................................................................................... vi
Chapter 1 Introduction ........................................................................... 1
1.1 Key Features ............................................................................................................2
1.2 Packing List ..............................................................................................................3
1.3 Camera Overview .....................................................................................................4
1.3.1 Camera Body .................................................................................................4
1.3.2 Bottom Battery Docking ..................................................................................6
1.4 Charging the Camera ...............................................................................................7
1.5 Inserting the SD card ................................................................................................9
1.6 Loading Factory Default .........................................................................................11
Chapter 2 Getting Started .................................................................... 12
2.1 Installing myGVcloud CamApp ...............................................................................13
2.2 Registering a myGVcloud Account .........................................................................14
2.2.1 Registration via Signing Up ..........................................................................14
2.2.2 Registration via Gmail ..................................................................................15
2.3 Accessing the Camera ...........................................................................................16
Chapter 3 myGVcloud CamApp .......................................................... 17
3.1 Logging onto myGVcloud Account ..........................................................................17
3.2 Main Screen of myGVcloud CamApp .....................................................................18
3.3 Adding GV-OPAL Cameras to myGVcloud Account ...............................................19
3.4 Accessing Camera Live View .................................................................................24
3.5 Configuring the Camera Settings ............................................................................28
3.6 Playing Back Recordings .......................................................................................32
3.7 Notification .............................................................................................................34
3.8 Configure myGVcloud CamApp Settings ................................................................35

ii
Chapter 4 myGVcloud Portal ............................................................... 36
4.1 The Main Screen ....................................................................................................38
4.2 The Live View Window ...........................................................................................40
4.3 Camera Settings .....................................................................................................42
4.4 Cloud Service .........................................................................................................47
4.5 Remote Playback ...................................................................................................49
4.6 Timeline (Cloud) .....................................................................................................50
4.7 General Account Settings .......................................................................................51
Chapter 5 myGVcloud CamAppTV (Android TV) .............................. 52
5.1 Logging onto myGVcloud Account ..........................................................................53
5.2 Multiple Live Views .................................................................................................55
5.3 Single Live View .....................................................................................................57
5.4 Latest Events..........................................................................................................59
5.5 Setting ....................................................................................................................61
Chapter 6 myGVcloud CamApp (Apple TV) ....................................... 62
6.1 Logging onto myGVcloud Account ..........................................................................63
6.2 Multiple Live Views .................................................................................................65
6.3 Latest Events..........................................................................................................67
6.4 Settings ..................................................................................................................69
Chapter 7 myGVcloud CamApp (Windows 10).................................. 70
7.1 Logging onto myGVcloud Account ..........................................................................71
7.2 Configuring the Camera Settings ............................................................................72
7.3 Accessing Camera Live View .................................................................................73
7.4 Playing Back Recordings ........................................................................................75
7.5 Configure myGVcloud CamApp (Windows 10) Settings..........................................76
Appendix ................................................................................................ 77
A. Settings for Internet Explorer 8 or Later....................................................................77
B. Changing the Default Media Player for Event Playback ...........................................78
C. Setting Live Streaming on YouTube or UStream ......................................................80
iii
Preface
Welcome to the GV-OPAL S1 User’s Manual.
This Manual is designed for the following applications and versions.
Application Version
GV-OPAL S1 V1.00
GV-OPAL S1 – Plus V1.00
myGVcloud Portal V1.0.7.0
myGVcloud CamApp (iOS / Android) V3.0
myGVcloud CamAppTV (Android TV) V1.0
myGVcloud CamApp (Apple TV) V1.0.1
myGVcloud CamApp (Windows 10) V1.0

iv
Caution
RISK OF EXPLOSION IF BATTERY IS REPLACED BY AN INCORRECT TYPE. DISPOSE
OF USED BATTERIES ACCOORDING TO THE INSTRUCTIONS.
v
Federal Communication Commission
Interference Statement
This equipment has been tested and found to comply with the limits for a Class B digital
device, pursuant to Part 15 of the FCC Rules. These limits are designed to provide
reasonable protection against harmful interference in a residential installation. This
equipment generates, uses and can radiate radio frequency energy and, if not installed and
used in accordance with the instructions, may cause harmful interference to radio
communications. However, there is no guarantee that interference will not occur in a
particular installation. If this equipment does cause harmful interference to radio or television
reception, which can be determined by turning the equipment off and on, the user is
encouraged to try to correct the interference by one or more of the following measures:
Reorient or relocate the receiving antenna.
Increase the separation between the equipment and receiver.
Connect the equipment into an outlet on a circuit different from that to which the receiver
is connected.
Consult the dealer or an experienced radio/TV technician for help.
FCC Caution: Any changes or modifications not expressly approved by the party
responsible for compliance could void the user's authority to operate this equipment.
This device complies with Part 15 of the FCC Rules. Operation is subject to the following two
conditions: (1) This device may not cause harmful interference, and (2) this device must
accept any interference received, including interference that may cause undesired operation.
This device and its antenna(s) must not be co-located or operating in conjunction with any
other antenna or transmitter.
For product available in the USA/Canada market, only channel 1~11 can be operated.
Selection of other channels is not possible.

vi
Important Notes
FCC Radiation Exposure Statement
This equipment complies with FCC radiation exposure limits set forth for an uncontrolled
environment. This equipment should be installed and operated with minimum distance 20cm
between the radiator & your body.
IC Warning Statement
This device complies with Industry Canada’s licence-exempt RSSs. Operation is subject to
the following two conditions:
(1) This device may not cause interference; and
(2) This device must accept any interference, including interference that may cause
undesired operation of the device.
Le présent appareil est conforme aux CNR d'Industrie Canada applicables aux appareils
radio exempts de licence. L'exploitation est autorisée aux deux conditions suivantes : (1)
l'appareil ne doit pas produire de brouillage, et (2) l'utilisateur de l'appareil doit accepter tout
brouillage radioélectrique subi, même si le brouillage est susceptible d'en compromettre le
fonctionnement.
IC Radiation Exposure Statement
This equipment complies with IC RSS-102 radiation exposure limits set forth for an
uncontrolled environment. This equipment should be installed and operated with minimum
distance 20cm between the radiator & your body.
Cet équipement est conforme aux limites d’exposition aux rayonnements IC établies pour un
environnement non contrôlé. Cet équipement doit être installé et utilisé avec un minimum de
20cm de distance entre la source de rayonnement et votre corps
This device and its antenna(s) must not be co-located or operating in conjunction with any
other antenna or transmitter.
vii
Note for Memory Card
1. A memory card must be detected in the GV-OPAL Camera in order to store recordings
to cloud storage.
2. The supplied micro SD card is provided as a complimentary item without warranty.
3. Mind the following when using a memory card for recording:
a. Recorded data on the memory card can be damaged or lost if the data are accessed
while the camera is under physical shock, power interruption, memory card
detachment, or when the memory card reaches the end of its lifespan. No guarantee
is provided for such causes.
b. The stored data can be lost if the memory card is not accessed for a long period of
time. Back up your data periodically if you seldom access the memory card.
c. Memory cards are expendable and their durability varies according to the conditions
of the installed site and how they are used. Back up your data regularly and replace
the memory card annually.
d. Replace the memory card when its read/write speed is lower than 6 MB/s or when
the memory card is frequently undetected by the camera.
4. It is recommended to use memory cards of the following specifications:
a. Micro SD cards of MLC NAND flash, Class 10 for better performance.
b. SD/SDHC cards only. SDXC and UHS-I cards are not supported.
Introduction
1
1
n
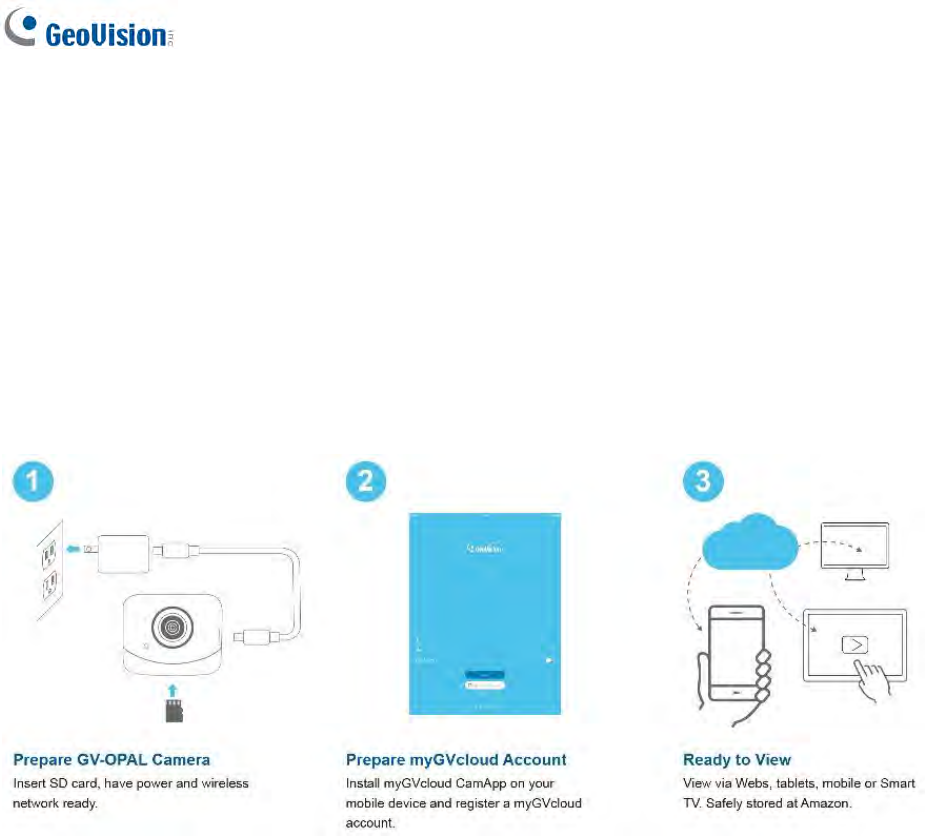
Chapter 1 Introduction
GV-OPAL S1 is an easy-to-install, wireless Cloud FishEye Camera designed for home
security. With no extra cabling required, the camera can be paired with a 802 b/g/n WiFi
router using its power key for a hassle-free setup. The camera is magnetically anchored for
easy mounting, removal or repositioning.
GV-OPAL S1 provides a 180° field of view to cover the widest area in one single image. Its
PIR sensor can detect human motion by sensing temperature changes over the scene even
in complete darkness. When motion is detected, the camera saves the surveillance videos in
the micro SD card, which can be stored in GeoVision’s cloud storage.
There are many ways to remotely access GV-OPAL S1 from your PC and mobile devices.
You can watch live view and play back recordings of multiple GV-OPAL S1 cameras.
myGVcloud Portal: Log in www.mygvcloud.com using Web browsers on PC
myGVcloud CamApp: Install myGVcloud CamApp on Android or iOS mobile devices
myGVcloud CamAppTV (Android TV): Install myGVcloud CamAppTV (Android TV) on
your Android TV
myGVcloud CamApp (Apple TV): Install myGVcloud CamApp (Apple TV) on your Apple
TV
myGVcloud CamApp (Windows 10): Install myGVcloud CamApp (Windows 10) on your
Windows 10 PC
Figure 1-1
2
1.1 Key Features
1/3” progressive scan CMOS
Dual streams in H.264
Up to 15 fps at 2560 x 1440, 30 fps x 1920 x 1080
Ease of use
100% wire-free
Cloud storage
YouTube live streaming
Recording upon motion detection
Accurate event notification
180° field of view
Remote live viewing from web browser and app (iOS / Android)
Two-way audio
802.11 b/g/n wireless LAN capability with WEP/WPA/WPA2 encryption
Passive infrared (PIR) sensor for detecting movement and activating the alarm LED in
low night
LED indicators for power, charging, Wi-Fi and pairing
Built-in micro SD card slot (SD/SDHC/SDXC) for local storage
Flexible docking options
Power Source
GV-OPAL S1 5V DC
GV-OPAL S1 Plus 5V DC or charged by battery docking with a
capacity of 5800 mAH
Up to 2 months standby time if the recording time is 5 minutes a day (for battery locking)
Introduction
3
1
n
1.2 Packing List
GV-OPAL S1 Camera Screw and Anchor
8 GB micro SD card (MLC, SDHC, Class
10)
Installation Page
Micro USB to USB Cable
Warranty Statement
5V/2A USB Adapter
Double-sided Sticker
Magnetic Stand
Bottom Battery Docking (only for GV-
OPAL S1 Plus)
4
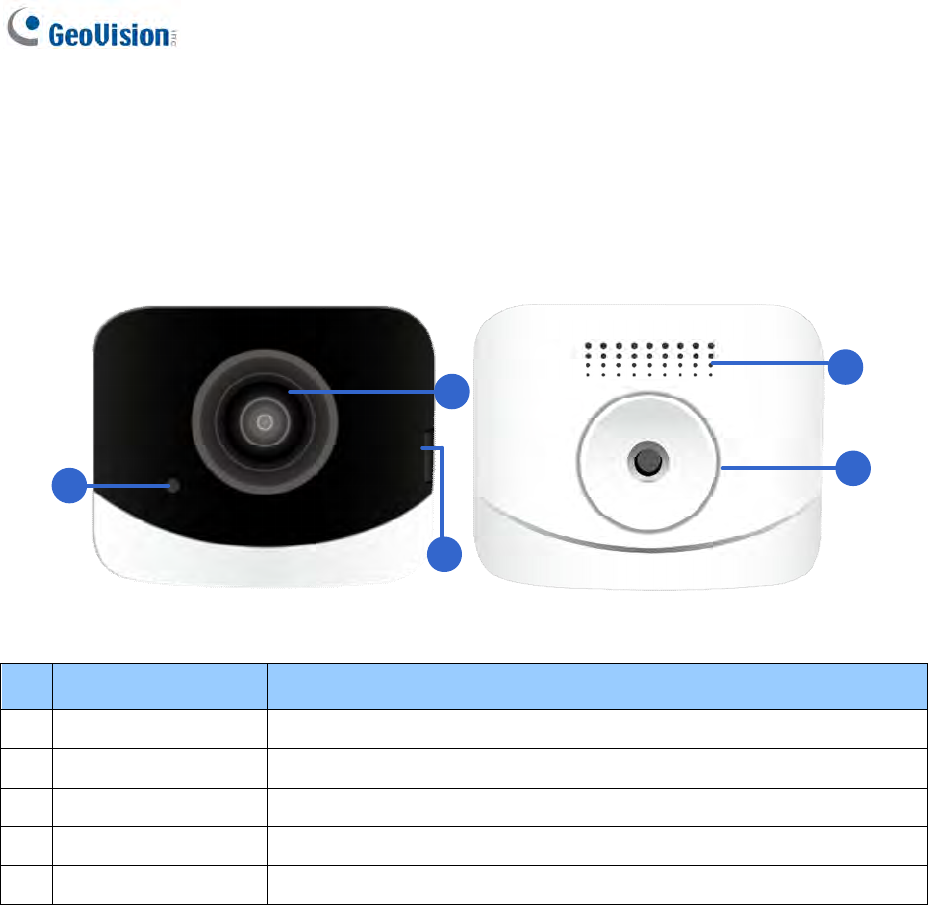
1.3 Camera Overview
1.3.1 Camera Body
1
2
3
4
5
Figure 1-2a
No.
Name Function
1 Microphone Receives sound.
2 Lens Receives image inputs.
3 Power port Connects to the supplied power adapter.
4 Speaker Plays sound.
5 Mounting area Hangs the magnetic stand.
Introduction
5
1
n
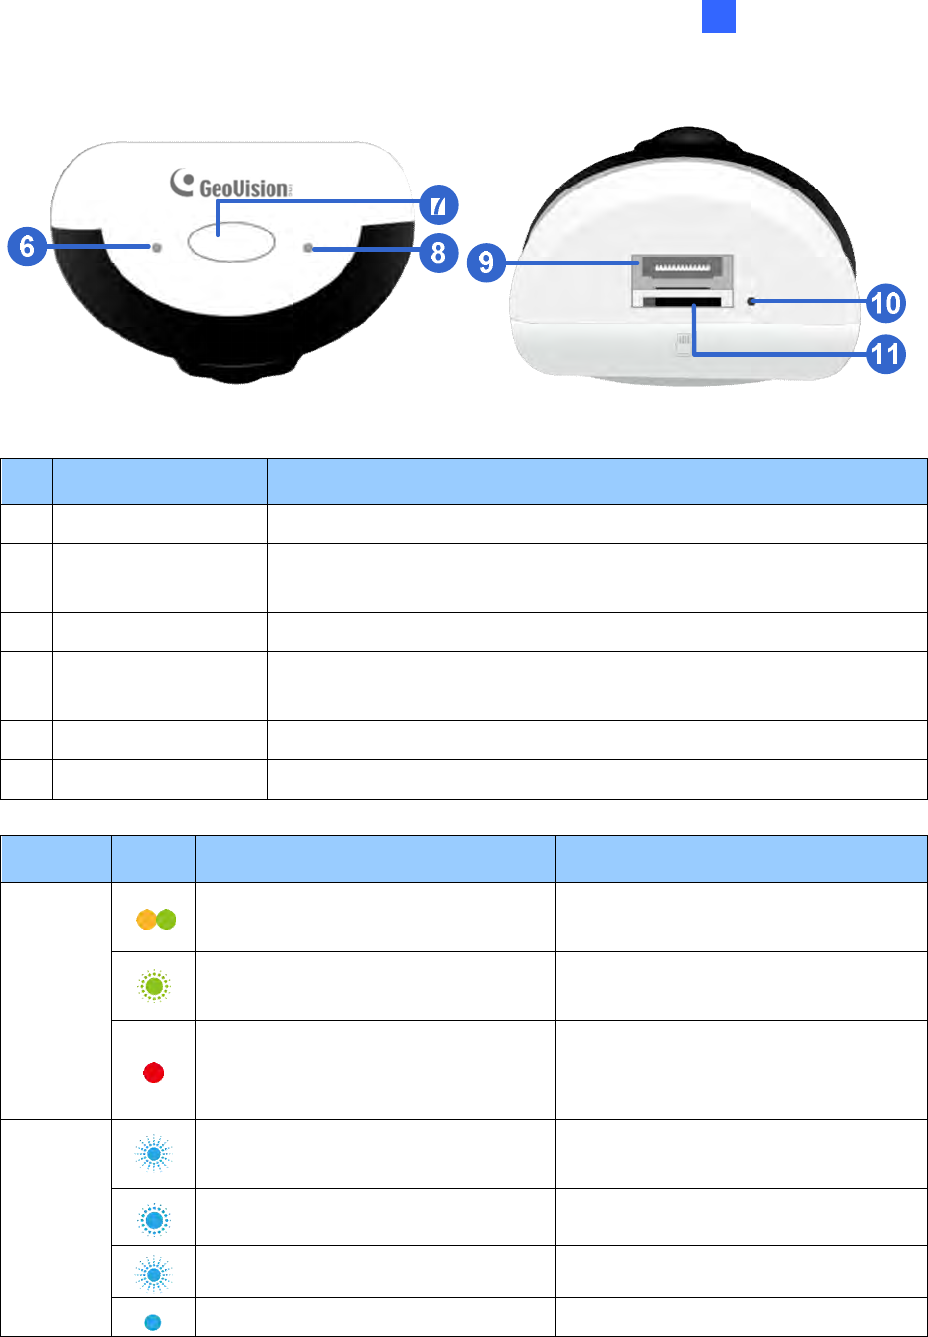
Figure 1-2b
No.
Name Function
6 Ready LED Shows the system status of the camera. See the table below.
7 Power button Turns on/off the power. Presses twice rapidly to enter into Access
Mode to enable local network access.
8 Network Status LED
Shows the LAN status of the camera. See the table below.
9 Docking port Connects GV-OPAL S1 to your bottom battery docking. See 1.3.2
Bottom Battery docking.
10
Default Resets the camera settings to factory defaults.
11
Memory card slot Inserts a micro SD card to store recording data.
LED Status
Action Description
Ready
Showing orange/green
momentarily. At camera startup.
Blinking green every other few
seconds. The camera is powered on.
Solid red
You have pressed the Power button
for around 10 seconds before the
camera is powered off.
Network
Status
Fast blinking blue The camera is attempting to connect
to WiFi.
Slow blinking blue The camera is in Access Point mode.
Fast blinking blue for 3 seconds The camera loses WiFi connection.
Solid blue The camera is connected to WiFi.
6
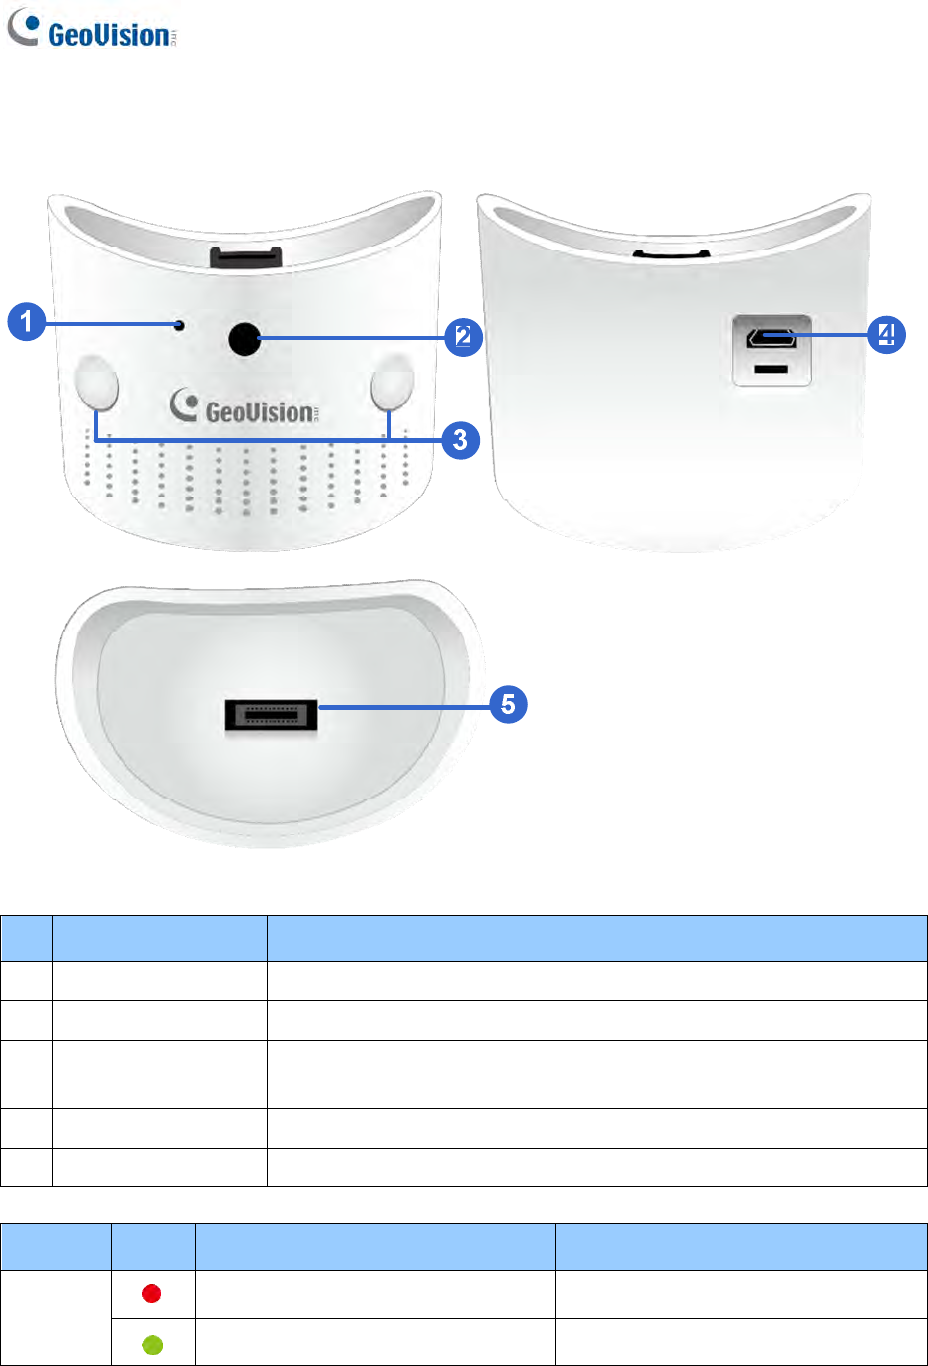
1.3.2 Bottom Battery Docking
Figure 1-3
No.
Name Function
1 Charging LED Shows the charging status of the battery docking.
2 Light sensor Detects the brightness based on surrounding lighting.
3 PIR sensor Passive infrared sensor for detecting movement up to 5 meters
away.
4 Power port Connects to the supplied power adapter.
5 Docking port Connects the bottom battery docking to your GV-OPAL S1.
LED Status
Action Description
Charging
Solid red The battery is charging.
Solid green The battery is full charged.
Introduction
7
1
n
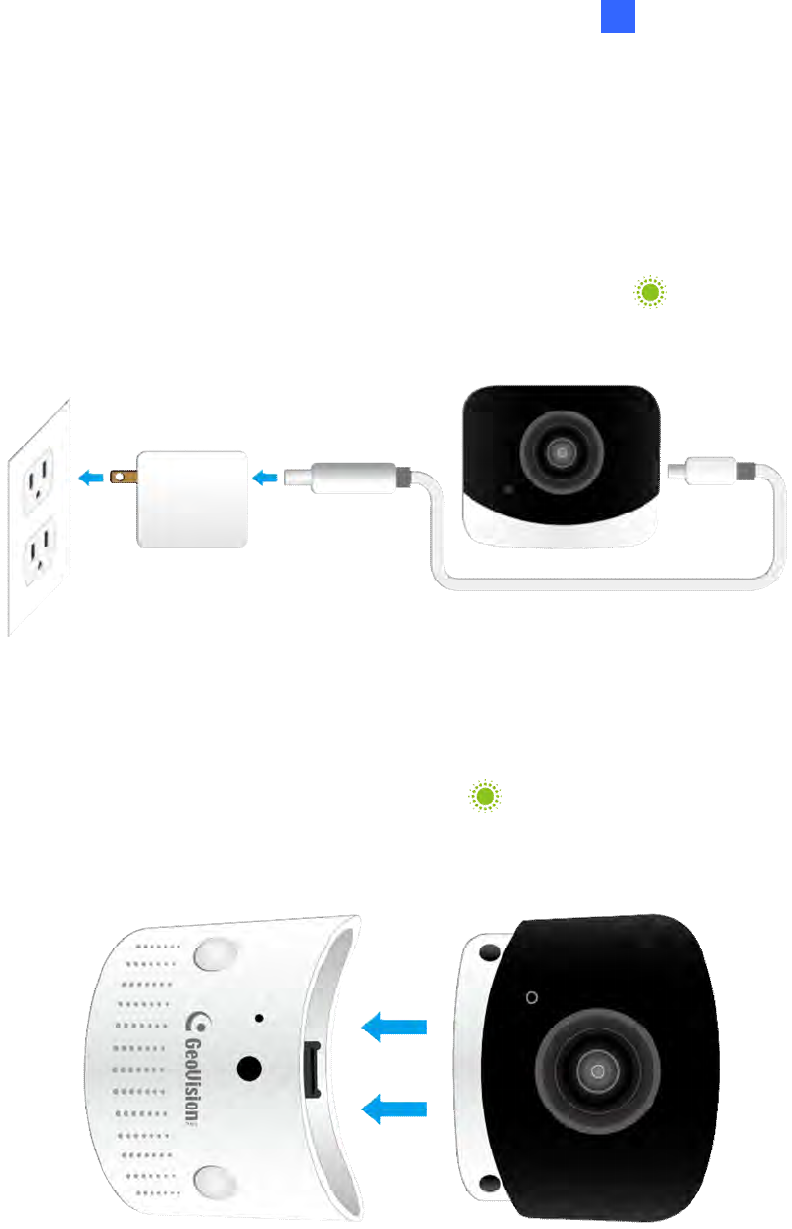
1.4 Charging the Camera
Follow the steps below to connect the camera to power.
Use the supplied 5V 2A USB adapter to connect the camera to power. Press the
Power button for 3 to 5 seconds. The Ready LED will blink green when the
camera is powered on.
Figure 1-4
For GV-OPAL S1 Plus only, snap your camera into the docking port of the bottom
battery docking. The Ready LED will blink green when the camera is powered
on.
Figure 1-5
8
Note:
1. To charge the battery for the first time or recharge the battery, plug the supplied
5V 2A USB adapter into the power port of the bottom battery docking. The
charging LED will be solid green when the battery is fully charged.
The diagram below shows how to properly charge your bottom battery docking.
2. Use the supplied power adapter to power your OPAL camera or charge your
bottom battery docking. For a self-prepared power adapter, make sure it is
capable of outputting 5V 2A.
Introduction
9
1
n
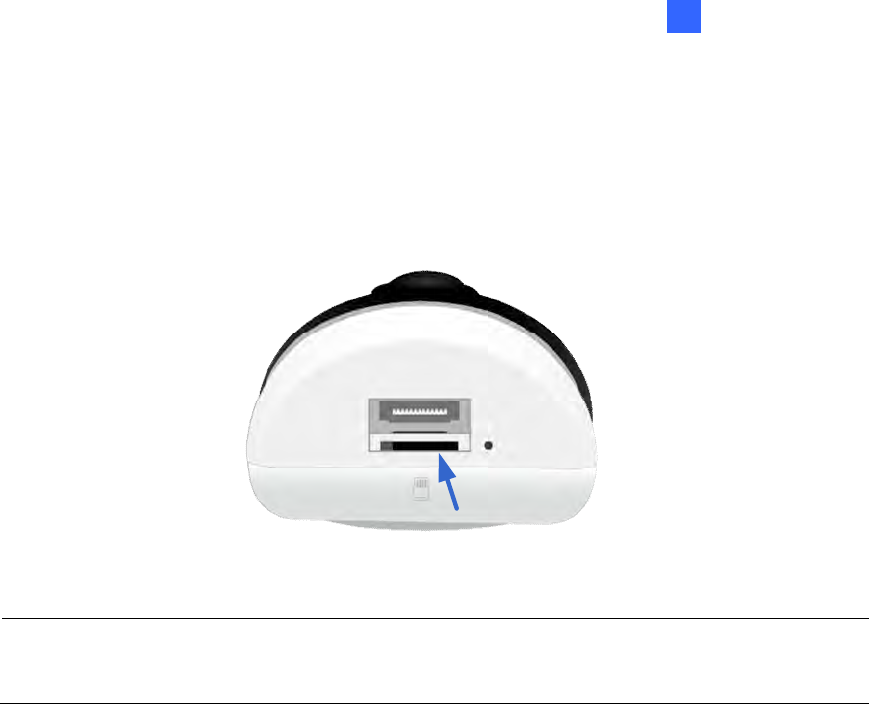
1.5 Inserting the SD card
A micro SD card is needed to save recording data from the GV-OPAL Camera in the cloud.
Insert the supplied micro SD card as shown.
Figure 1-6
Note: To prevent the micro SD card from any potential damage, put the protective cap
back on the camera if the bottom battery docking is not installed.
10
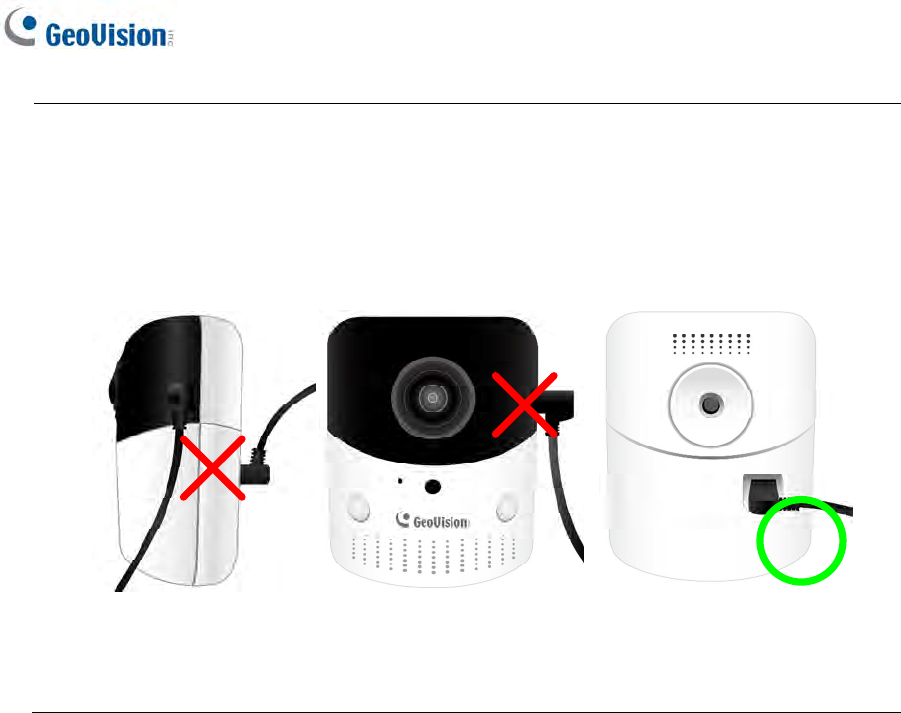
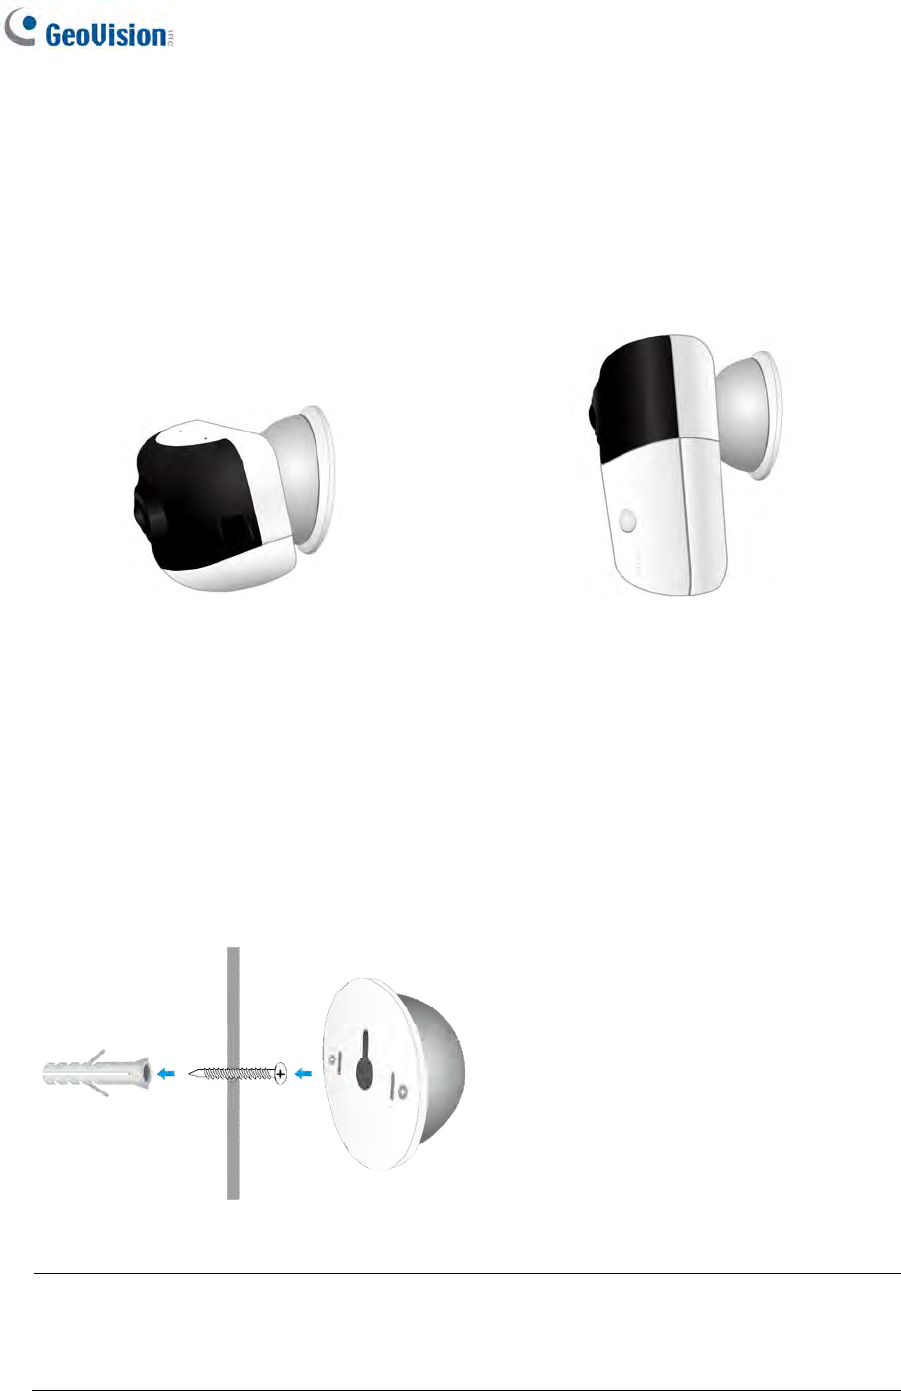
1.6 Mounting the Camera
You can mount the camera magnetically to a metal surface or install it to a wall. For wall
mount installation, follow the steps below:
GV-OPAL S1 GV-OPAL S1 Plus
Figure 1.7
1. After the location of the camera is decided, make a mark on the wall for the supplied
anchor.
2. Drill a hole slightly smaller than the anchor provided.
3. Insert the supplied anchor in the drilled hole.
4. Fasten the supplied screw into the wall and hang the magnetic stand on the screw.
Figure 1-8
Note: You can also place the supplied double-sided sticker on the magnetic stand
instead of using the screw. To use the sticker, press down the magnetic stand onto it
for at least 30 seconds.
5. Snap the camera onto the magnetic stand.
Introduction
11
1
n
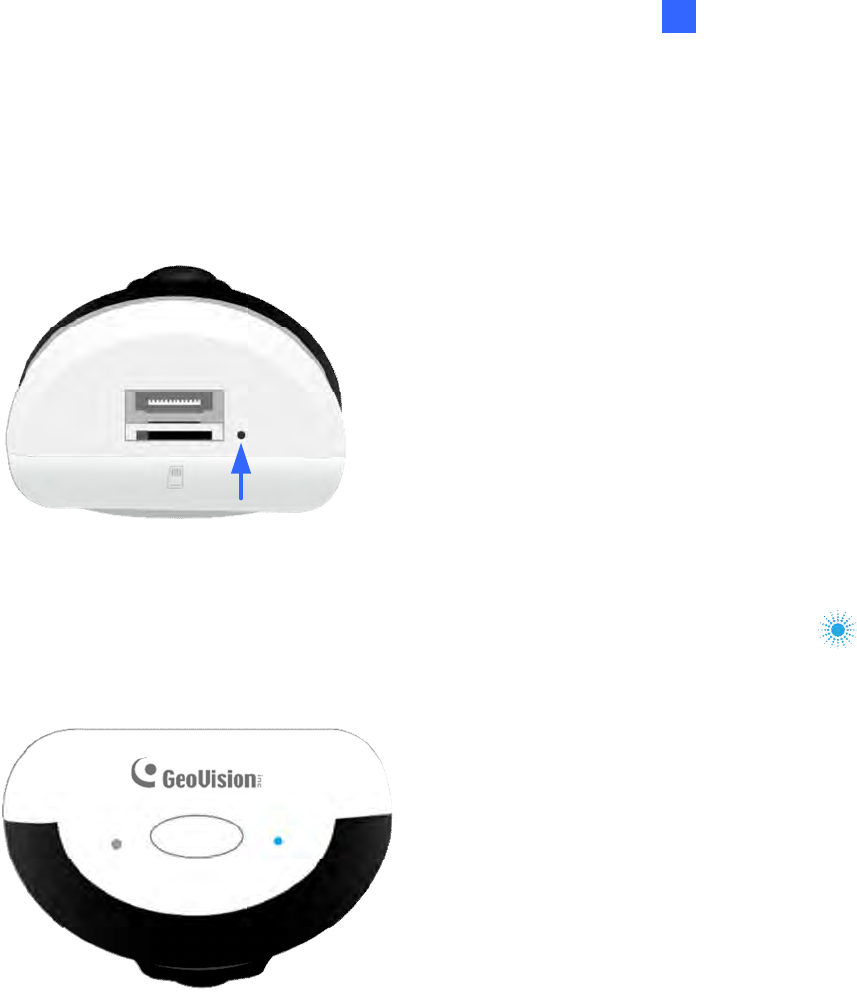
1.6 Loading Factory Default
1. Keep the power adapter connected to the camera.
2. Use a pointy object such as the tip of a pen to hold down the Default button.
Figure 1-9
3. Release the Default button when the Network status LED shows fast blue blinking .
This shall take about 3 to 5 seconds.
Figure 1-10
4. When the Network status LED stops blinking, the process of loading default settings is
completed and the camera reboots automatically.
12
Chapter 2 Getting Started
Before the GV-OPAL Camera can be accessible on a network, you must add it to
myGVcloud account using myGVcloud CamApp. After setup is complete, you can choose to
see the live view of your camera(s) from Android or iOS mobile devices or through a Web
browser.
Getting Started
13
2
2.1 Installing myGVcloud CamApp
myGVcloud CamApp is a free mobile application that allows you to access GV-OPAL
Cameras. Search for myGVcloud in Google Play or Apple Store or scan the QR codes
below. Next, install myGVcloud CamApp on your mobile device.
Supported Operating Systems:
Android version 5.0 or later
iOS version 9.0 or later
Note: The following instructions are based on iOS devices.
14
2.2 Registering a myGVcloud Account
Your GV-OPAL cameras are assigned to a myGVcloud account. There are two ways to
register a myGVcloud Account on myGVcloud CamApp.
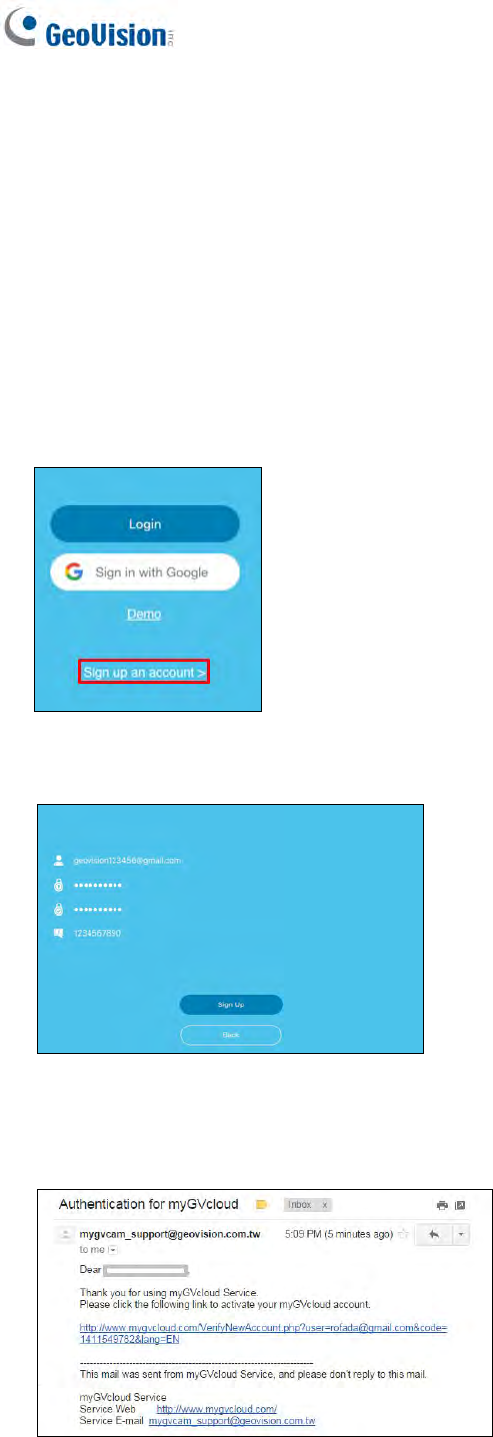
1. Registration via signing up
2. Registration via Gmail
2.2.1 Registration via Signing Up
1. Tap Sign up an account.
Figure 2-1
2. Type your E-mail account for the Username, a Password and a Hint for your password.
Figure 2-2
3. An e-mail with a confirmation link will be sent to your e-mail account. You must click the
link to activate your myGVcloud account.
Figure 2-3
Getting Started
15
2
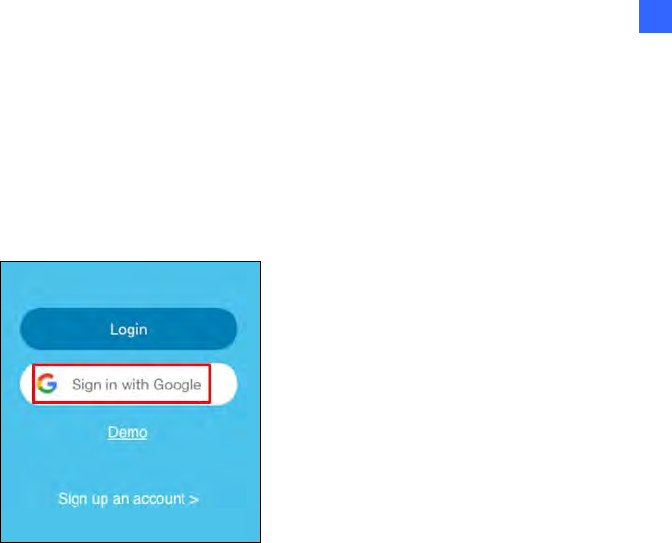
2.2.2 Registration via Gmail
You can use your Gmail account to sign up with myGVcloud CamApp.
1. Tap Sign in with Google.
Figure 2-4
2. Type your Gmail username and password that you want to use for logging into
myGVcloud Cam App.
After singing into your Gmail account, it will provide instant login to myGVcloud CamApp.

16
2.3 Accessing the Camera
Once you have a registered myGVcloud account, you are ready to access the camera(s):
Adding GV-OPAL Camera(s), see 3.3 Adding GV-OPAL Cameras to myGVcloud
Account.
Watching your surveillance image on your Android or iOS devices, see 3.4 Accessing
Camera Live View.
Configuring the camera settings on your Android or iOS devices, see 3.5 Configuring
the Camera Settings
Watching your surveillance image on your computer, see 4.2 The Live View Window.
Configuring the camera settings on your computer, see 4.3 Camera Settings.
myGVcloud CamApp
17
3
Chapter 3 myGVcloud CamApp
3.1 Logging onto myGVcloud Account
Log into your myGVcloud account to access the cameras registered to the account.
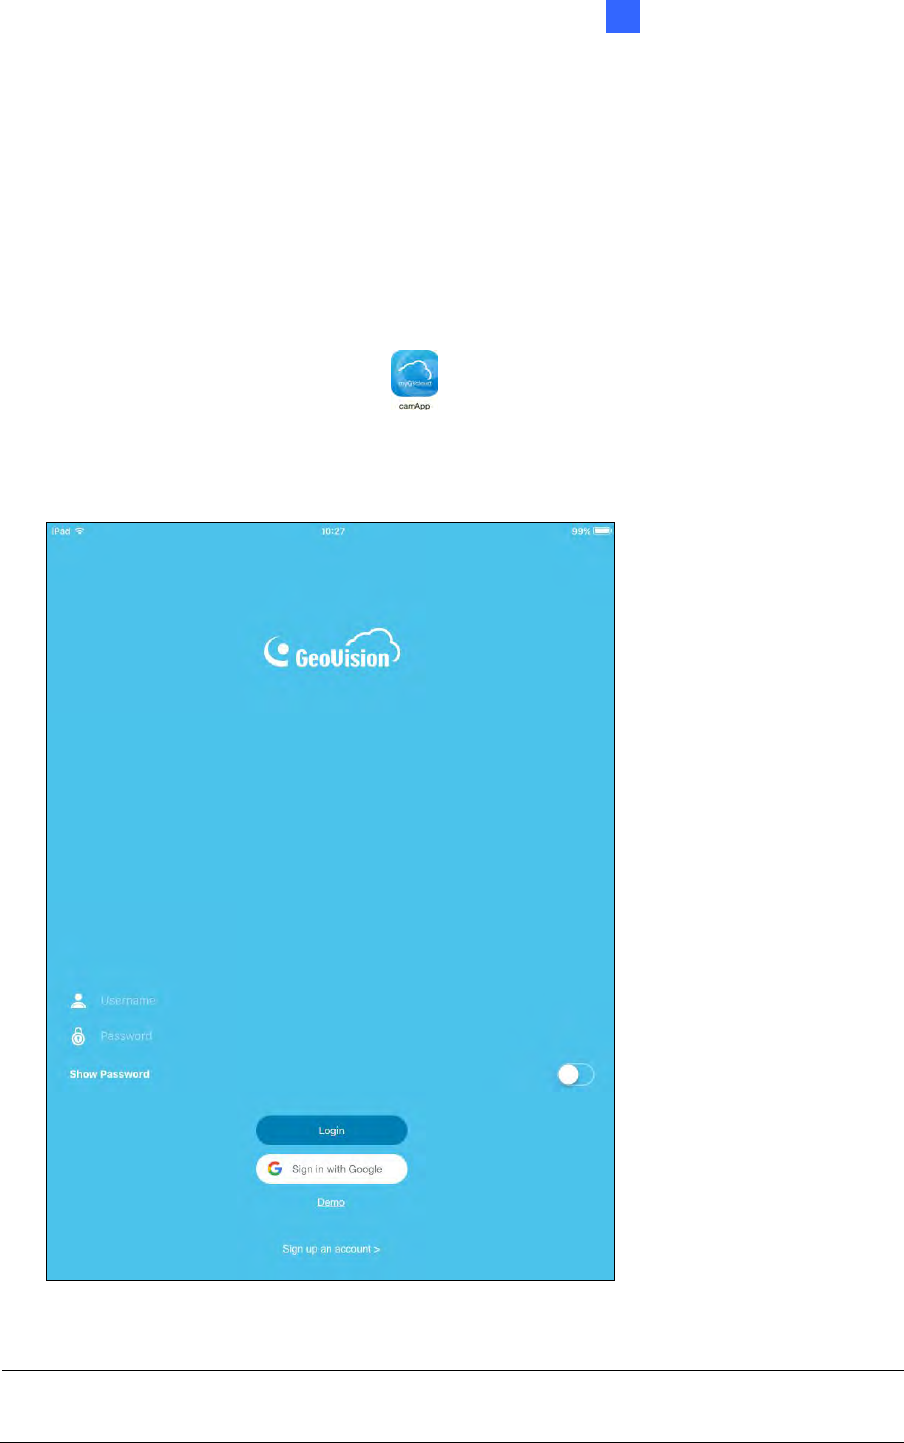
1. Tap the myGVcloud CamApp icon on the desktop of your mobile device.
2. Type the ID and password of your myGVcloud account. Or you can log in with your
Google account by tapping Sign in with Google.
Figure 3-1
Note: Users can click Demo on the login page to experience the conveniences brought by
myGVcloud cameras and the user interface of myGVcloud CamApp.
18
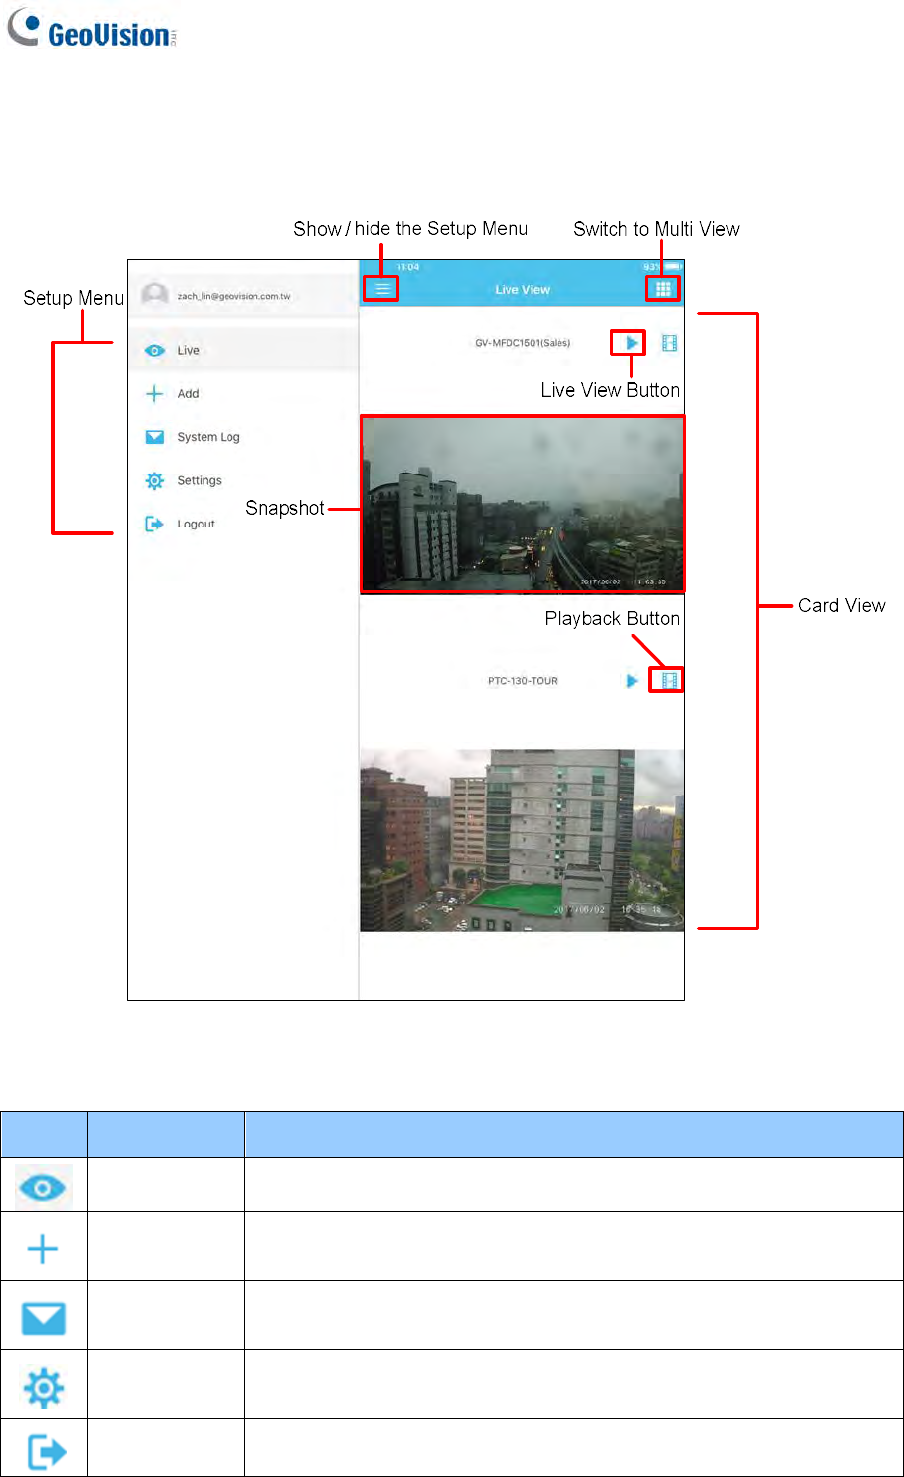
3.2 Main Screen of myGVcloud CamApp
Figure 3-2
Following is the functions in the Setup Menu.
Icon Name Function
Live See camera live view. See 3.4 Accessing Camera Live View.
Add Add GV-OPAL Cameras to myGVcloud account. See 3.3 Adding
GV-OPAL Cameras to myGVcloud Account.
System Log See the list of motion and system events from the cameras. See
3.7 Notification.
Settings Configure the camera settings. See 3.5 Configuring the Camera
Settings.
Logout Log out of the myGVcloud account.
myGVcloud CamApp
19
3
3.3 Adding GV-OPAL Cameras to myGVcloud Account
You can only add the GV-OPAL Cameras into your myGVcloud account through myGVcloud
CamApp V3.0.
1. On the Setup Menu, tap Add.
Figure 3-3
2. Click Next.
Figure 3-4
20
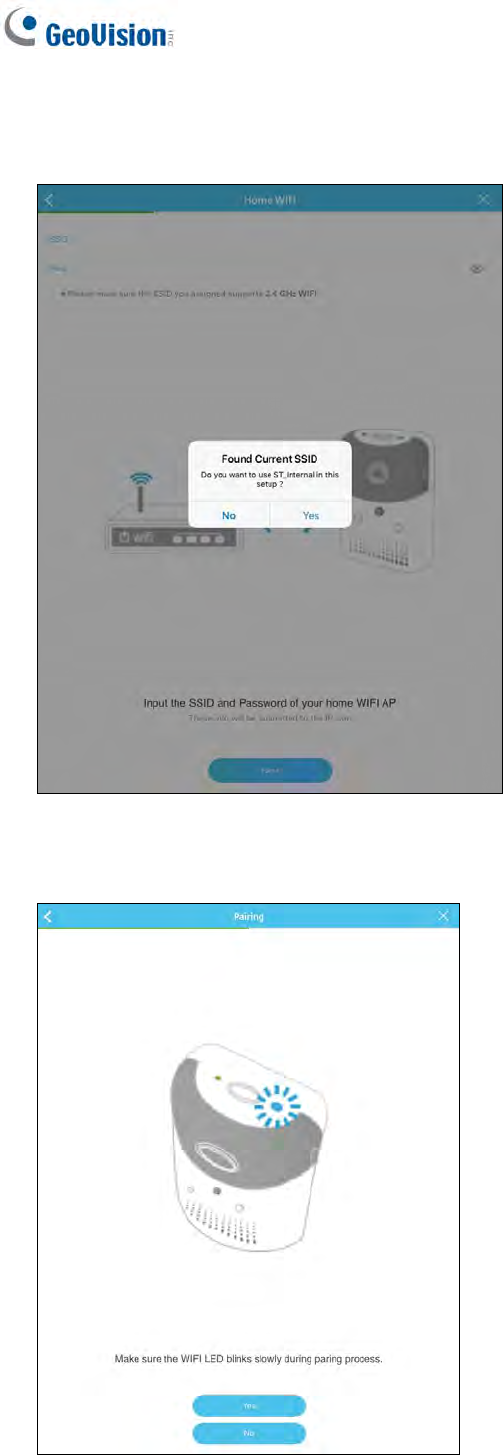
3. Click Yes to use the WiFi router that your mobile device is currently connected to, or click
No and type the SSID of your WiFi router. Type the password. Click Next.
Figure 3-5
4. Check whether the blue light on the camera is slowly flashing. Click Yes.
Figure 3-6
myGVcloud CamApp
21
3
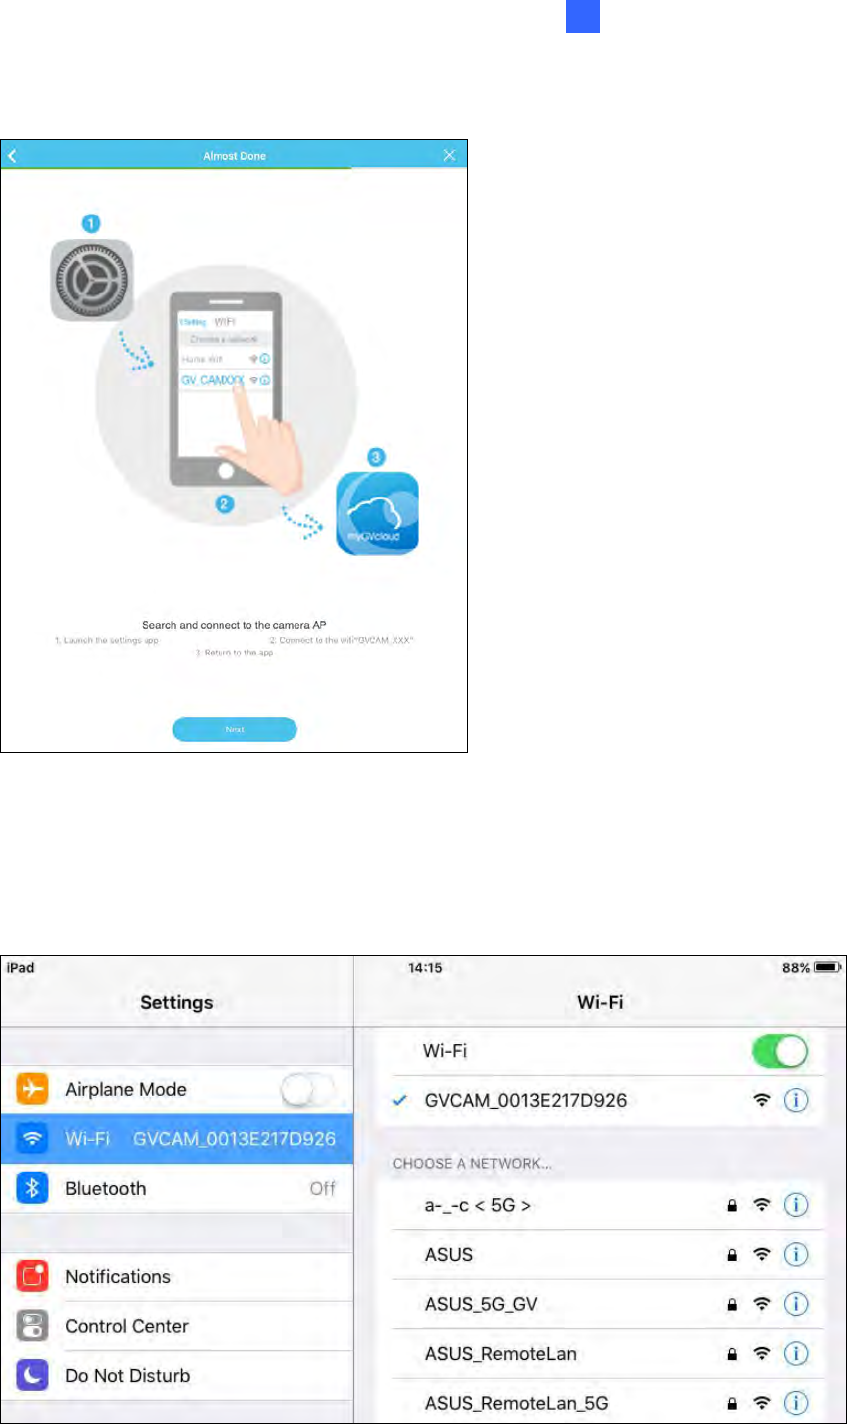
5. Before clicking Next, go to the Settings of your mobile device.
Figure 3-7
6. On the WiFi setting page, search and click the SSID of your GV-OPAL Camera. The
SSID will be like this: GVCAM_(Mac address of your GV-OPAL Camera), for example,
GVCAM_0013E217D926.
Figure 3-8
22
7. Return to your myGVcloud CamApp. On this page, click Next.
Figure 3-9
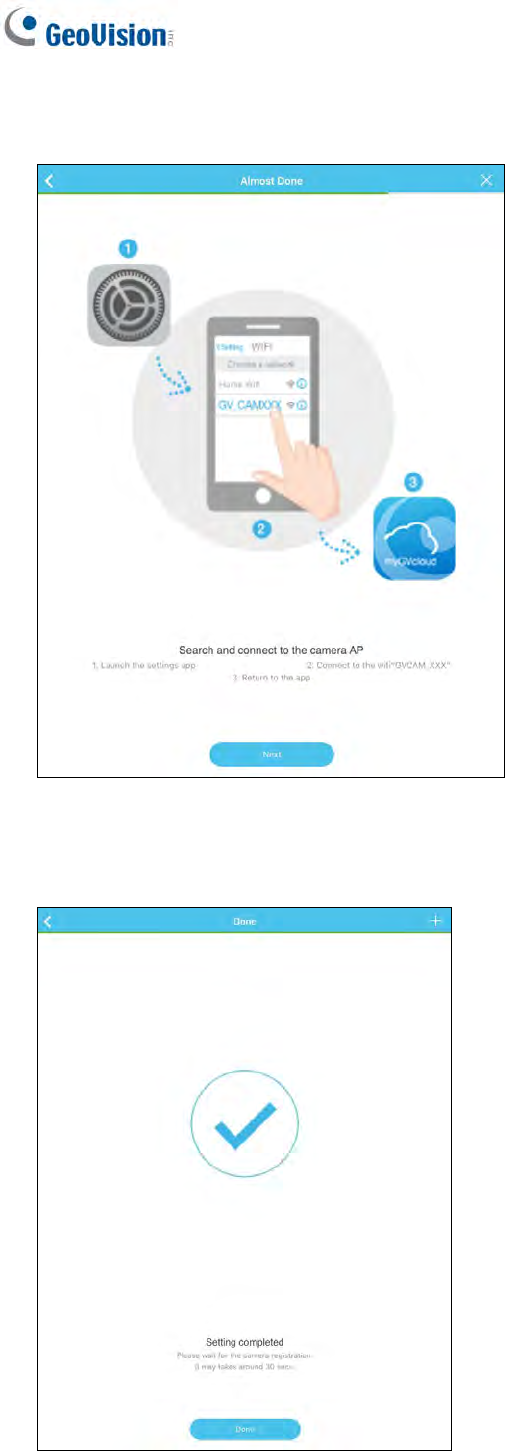
8. Click Done. The GV-OPAL Camera is added to your myGVcloud account.
Figure 3-10

myGVcloud CamApp
23
3
9. If you want to change the WiFi router pairing to your GV-OPAL Camera, press the power
button twice rapidly to let the camera enter the Access Point Mode. After the blue light
next to the power button slowly flashes, go through step 1 to 8 within five minutes.
24
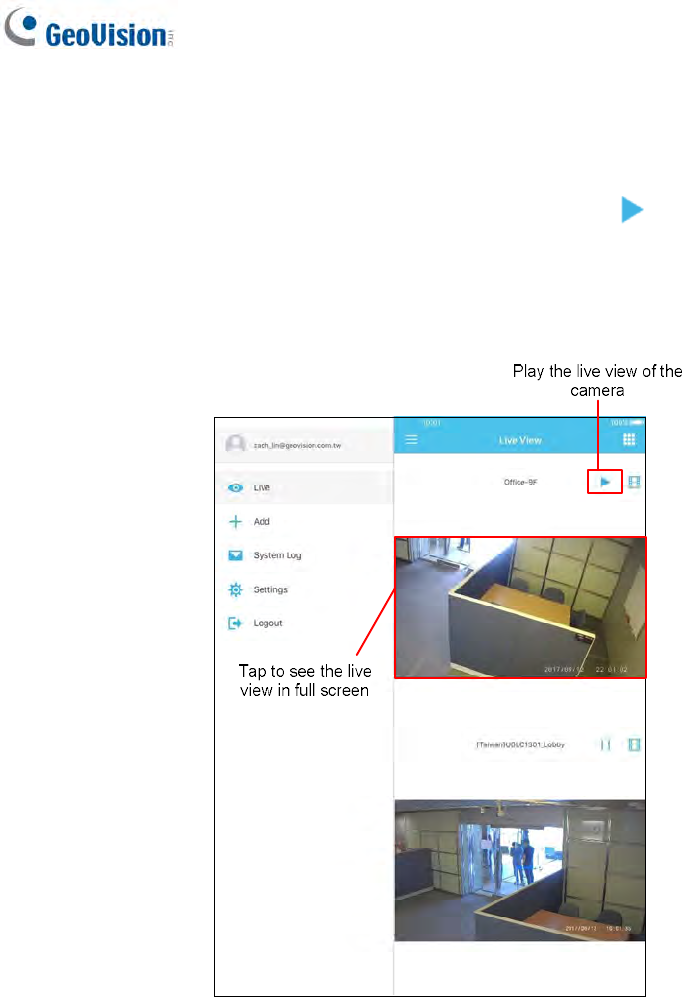
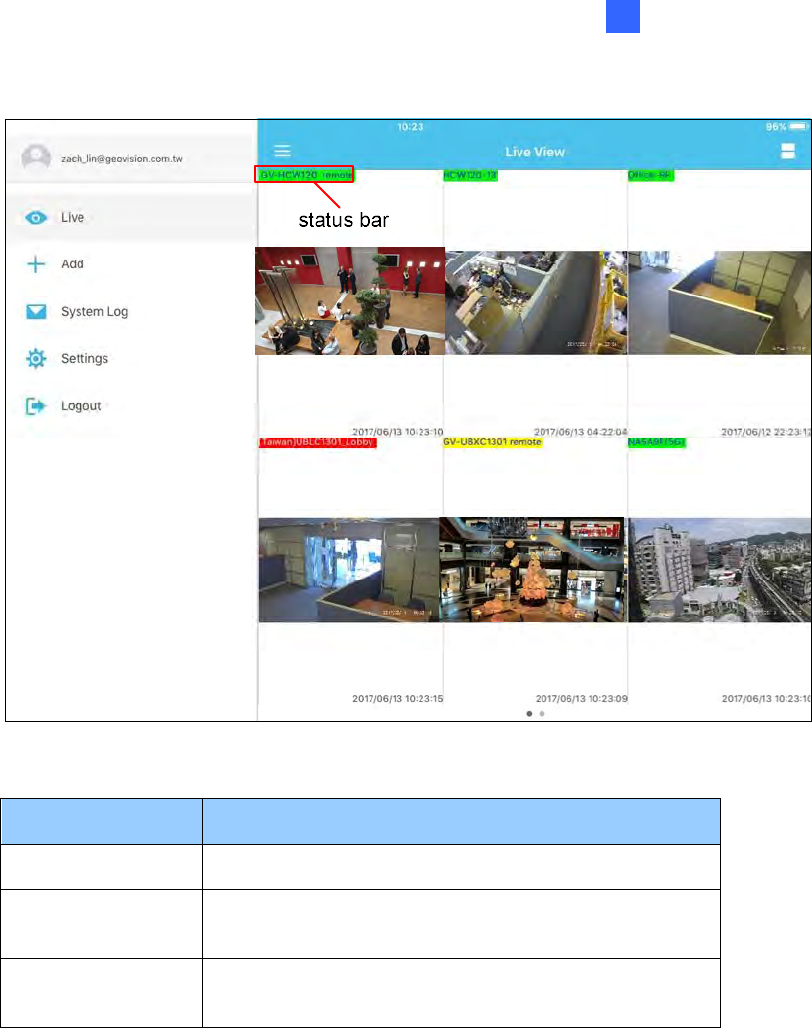
3.4 Accessing Camera Live View
You can see the camera live view on the Multi View. Or tap the on the Card View to
access the camera live view.
Card View
Figure 3-11
myGVcloud CamApp
25
3
Multi View
Figure 3-12
Status Bar Color Definition
Green The monitoring function is disabled.
Yellow The monitoring function is enabled but the camera
is not recording.
Red The monitoring function is enabled and the camera
is recording.
26
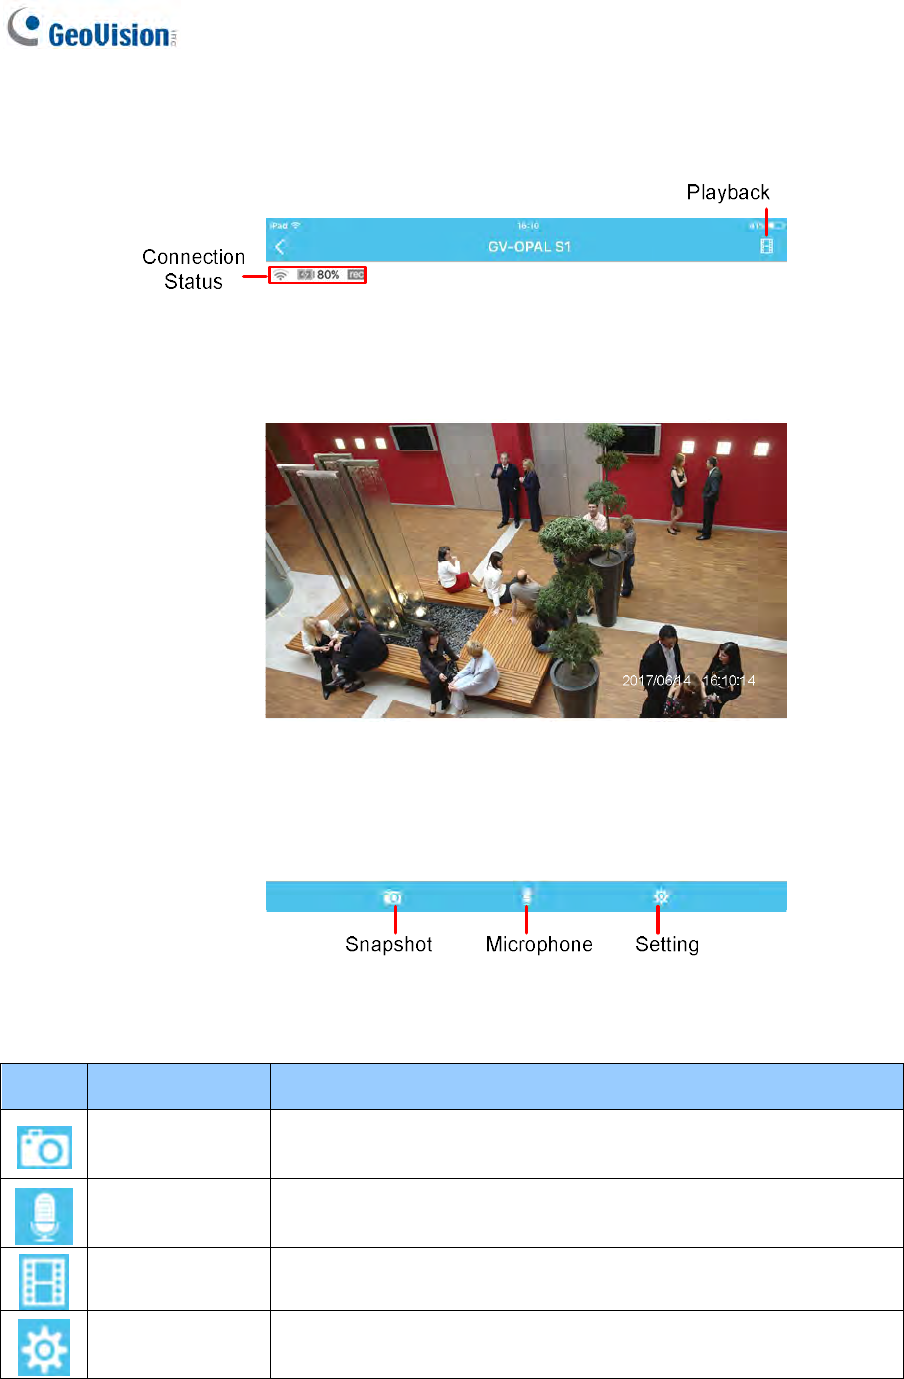
See the live view in full screen and to access the following functions.
Figure 3-13
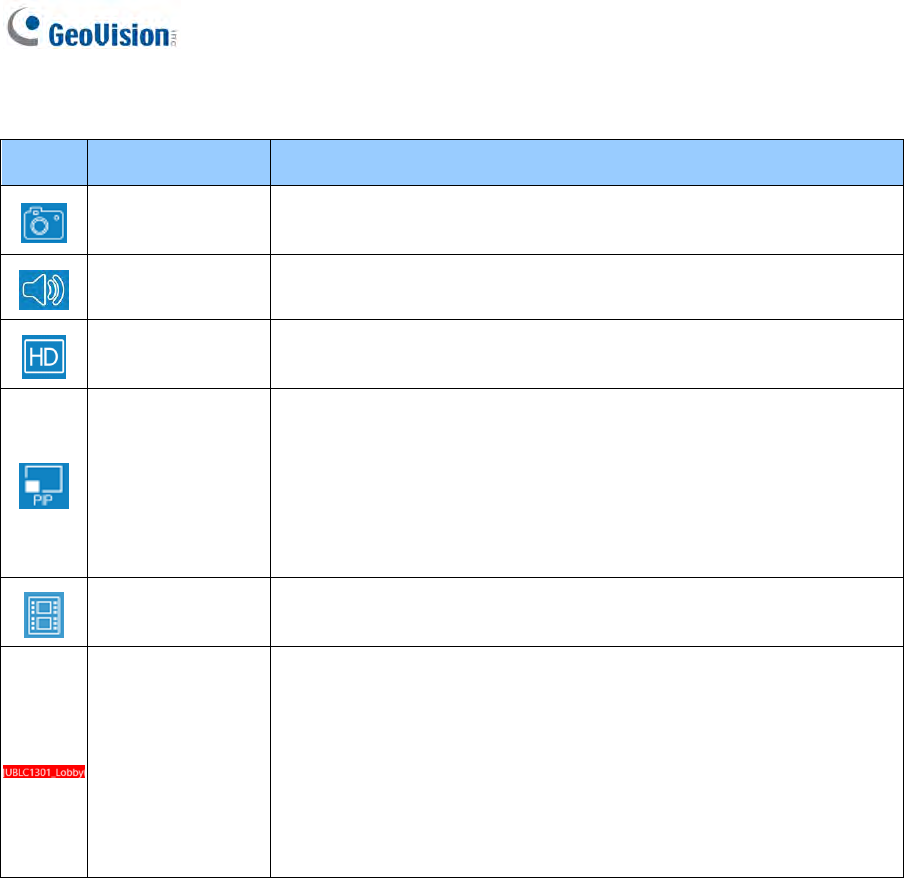
Icon Name Function
Snapshot Capture and save the current live view image in the mobile
device.
Microphone Enable the microphone, allowing you to broadcast sounds to
the surveillance site.
Playback Play back recorded videos. See 3.6 Playing Back Recordings.
Settings Configure the camera settings. See 3.5 Configuring the
Camera Settings.
myGVcloud CamApp
27
3
Connection Status
Icon Definition
The camera is not recording.
The camera is recording.
Show the WiFi signal strength.
The camera is connected to the power adapter.
The camera is connected to the battery.
The camera is connected to the battery and the battery is
being charged.
The battery level is too low.
The camera is disconnected.
28
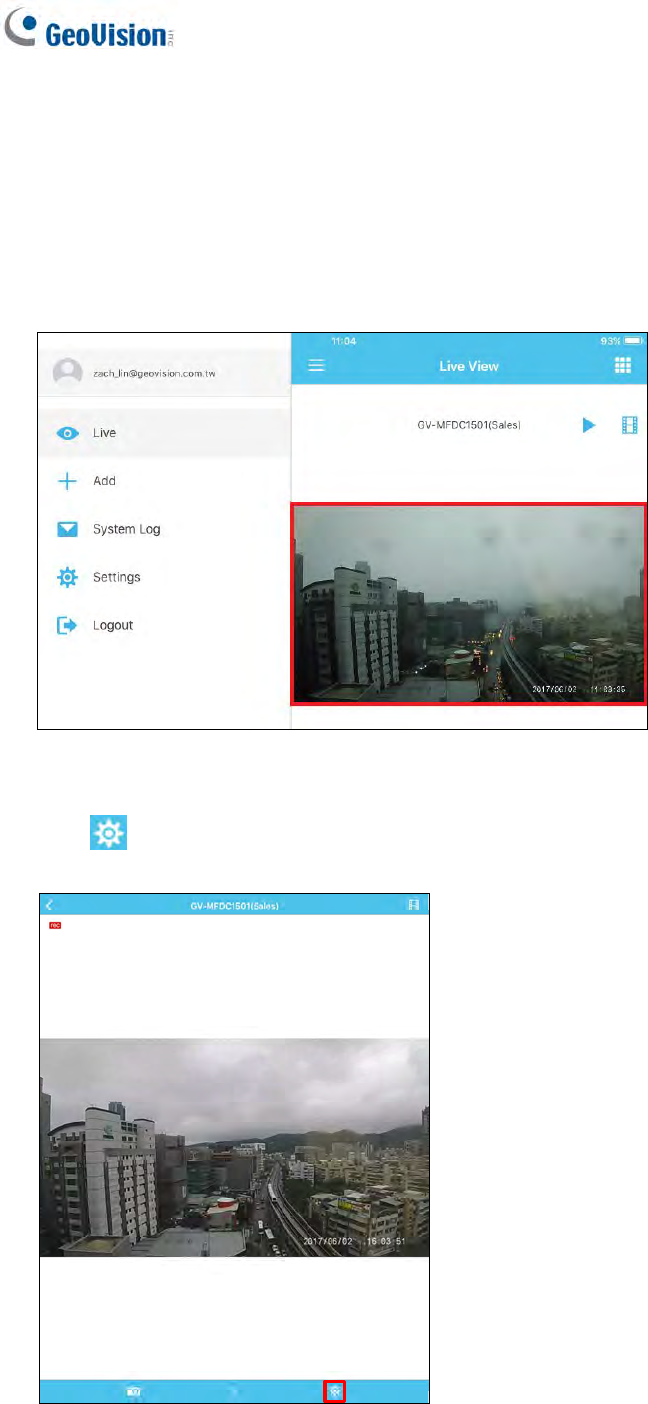
3.5 Configuring the Camera Settings
After logging into your myGVcloud account, you can configure the camera settings.
1. Tap the snapshot of a camera on the Card View.
Figure 3-14
2. Click to see the camera’s setting page.
Figure 3-15

myGVcloud CamApp
29
3
3. You can change the current settings of the camera.
Name: Tap the camera name to change the name if needed.
Time Zone: Select your desired time zone.
Motion Alert: Turn on or off notification of motion events from this camera.
IR LED: Turn on or off the IR LED for night vision.
Orientation: Select the orientation of the live view. There are two options: Normal,
and Rotate 180.
Video Quality: Select the resolution. There are two options: Full HD (1080P) or
WQ HD (4M)
Motion Zone: Drag the area of motion detection.
Figure 3-16
Tap to clear the detection region.
30
Tap to select the whole image.
Tap to revert to the last saved detection region.
Tap to save the detection region.
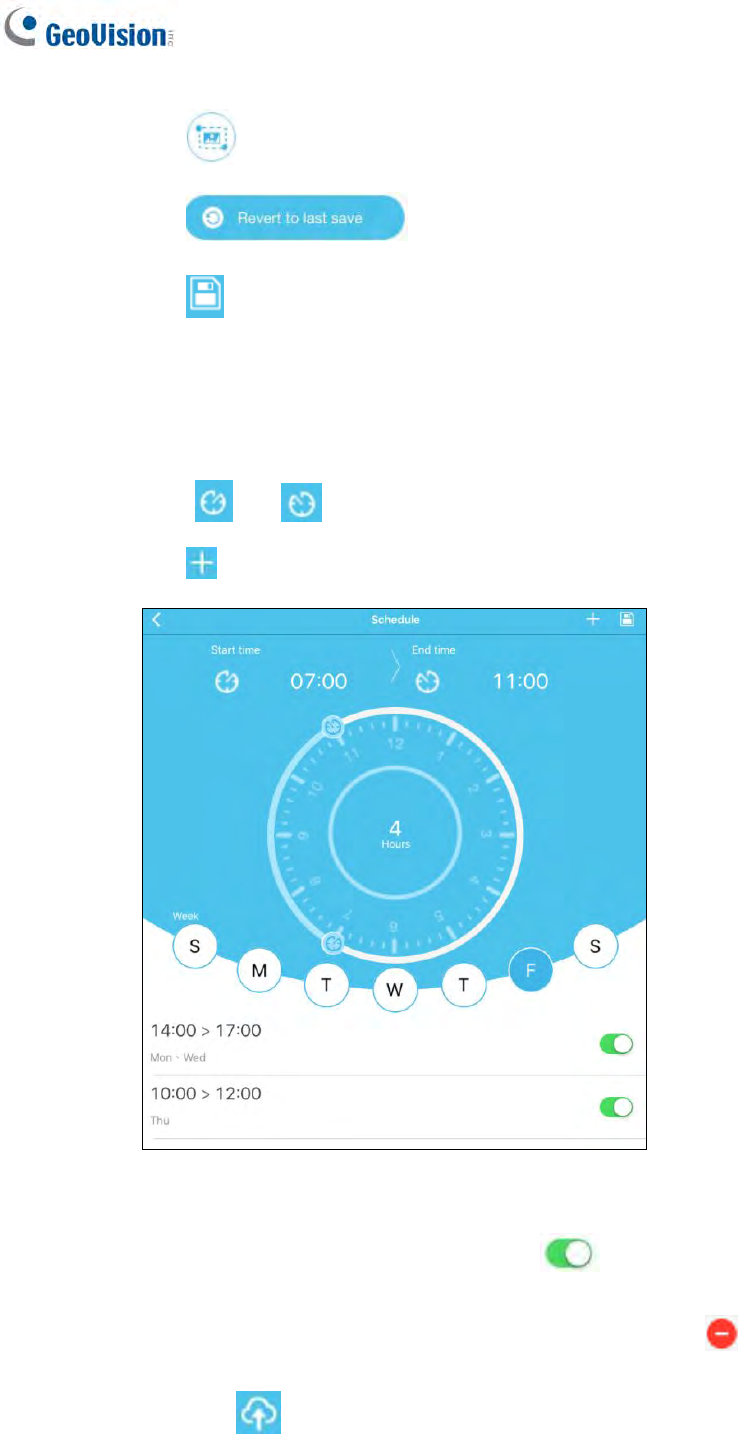
Monitor Schedule: Configure the monitoring schedule.
Tap the day you want to monitor first, for example, tap F to monitor on Friday.
Drag and on the clock to configure the monitoring hours.
Tap to add the schedule.
Figure 3-17
To turn off the added schedule, tap
To delete the added schedule, tap the schedule, tap , and tap Delete.
Tap to save the schedule.
Update Firmware: Upgrade the camera’s firmware.
myGVcloud CamApp
31
3
Note: A micro SD card is required for the firmware update.
Unpair Camera: Delete the camera.
4. Tap to save the settings.
32
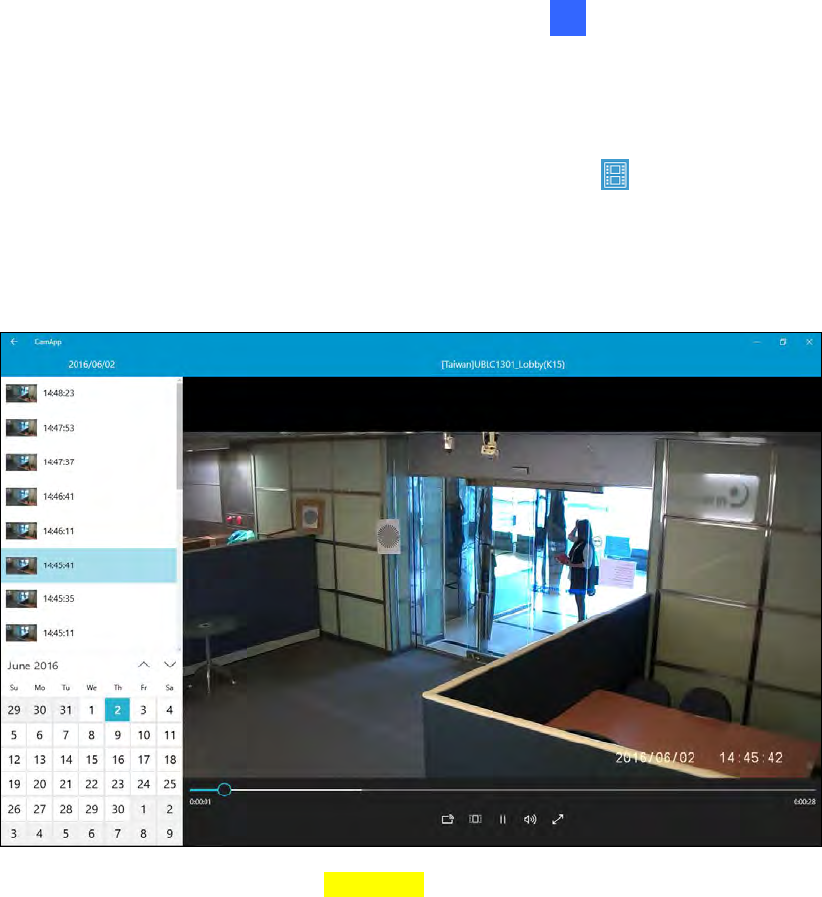
3.6 Playing Back Recordings
1. To play back recordings of a camera, tap the Playback icon (see Figure 3-13) from
the live view page.
2. Select a date and an hour of the day. Tap a video recorded in that hour to start playing
back the videos.
Figure 3-19
myGVcloud CamApp
33
3
3. You can select to hide the media player toolbar. Tap to take a snapshot or tap
to export the video to the “Photos” of your mobile device.
Figure 3-20
34
3.7 Notification
To see the list of system and alarm events from all connected cameras, tap System
Log on the Setup Menu of the myGVcloud CamApp.
Figure 3-21
1. Under System Log, tap All Devices to see events from all cameras or select a camera.
2. The notifications are separated into two categories.
All: Includes alarm events such as tampering alarm and system events such as
camera disconnection and SD card issues.
Unread: Includes all unread events.
3. You can tap Edit at the top-right corner and tap Delete All to clear all events or Read All
to mark all events read.
myGVcloud CamApp
35
3
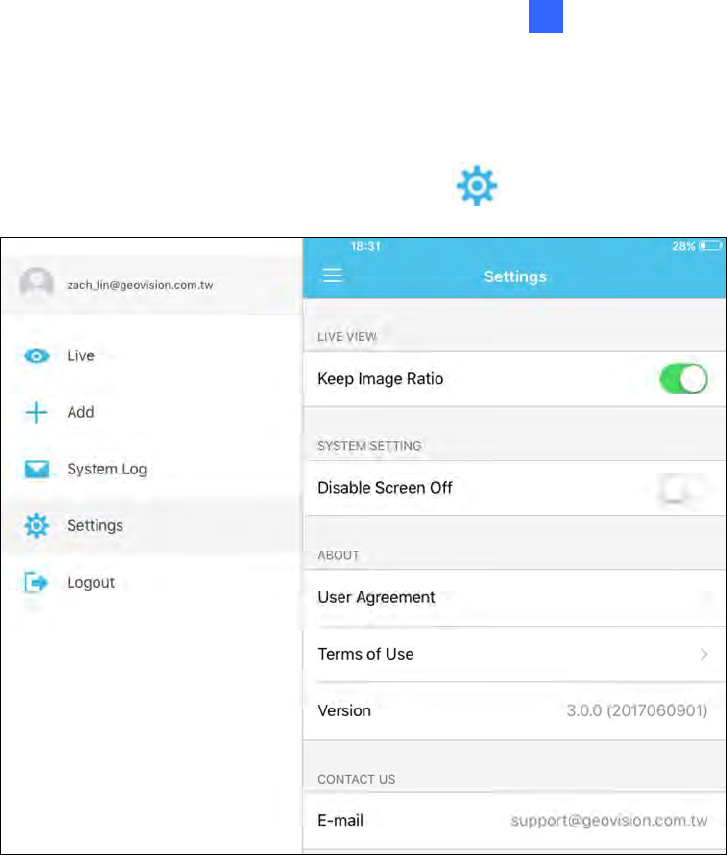
3.8 Configure myGVcloud CamApp Settings
To configure the settings of myGVcloud CamApp, tap Settings on the main page.
Figure 3-22
[Live View]
Keep Image Ratio: Displays the live view in the device’s original image ratio.
[System Setting]
Disable Screen Off: Turns off sleep mode of the mobile device when myGVcloud
CamApp is running. This function is disabled by default.
36
Chapter 4 myGVcloud Portal
Through myGVcloud Portal, you can remotely access your GV-OPAL camera using a Web
browser. Use the myGVcloud account you registered when running the myGVcloud CamApp
to log into to myGVcloud Portal.
Supported Web browsers:
Internet Explorer 10.0 or later
Microsoft Edge 25 or later
Mozilla Firefox 21.0 or later
Safari 6.0.5 or later (Mac only. Safari for Windows is not supported.)
Google Chrome 49.0 or later
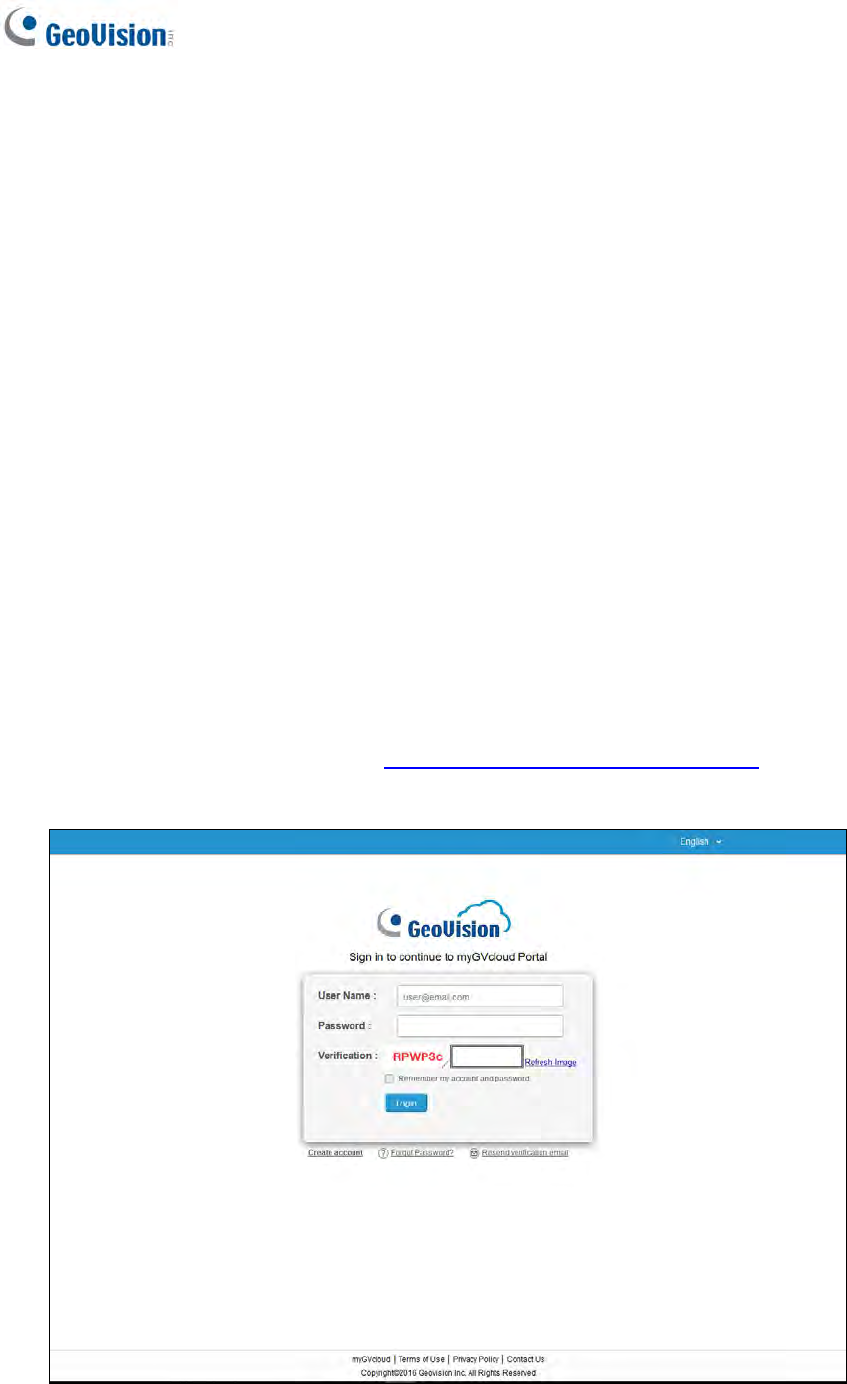
Follow the steps below to sign into myGVcloud.
1. Start your Web browser and go to https://www.mygvcloud.com/Login.php. This page
appears.
Figure 3-1
myGVcloud Portal
37
4
2. Type the Username (an e-mail address you registered with myGVcloud CamApp) and
Password of your myGVcloud account.
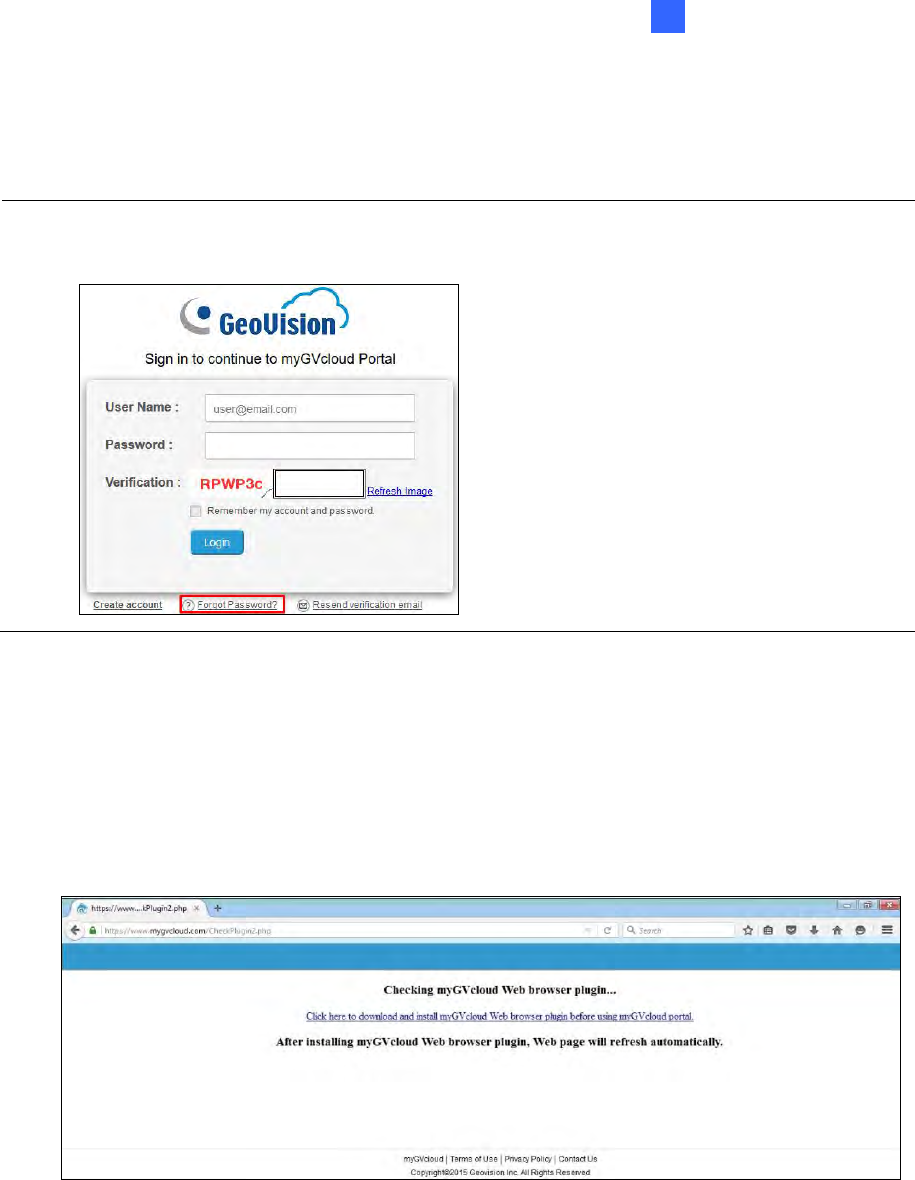
Note: If you use your Gmail address to sign in with myGVcloud CamApp, you must click
Forget password? to obtain a new password so you can log into myGVcloud Portal.
3. Type the Verification code.
4. Click Login.
When logging in myGVcloud for the first time, you will be prompted to allow plugin installation.
Click to allow installation of Add-on and ActiveX components.
Figure 3-2
Depending on the security setting of your browser, you may need to repeat this process
more than one time. For IE users, you may need to change the security settings to install
ActiveX. Refer to Appendix A for details.
38
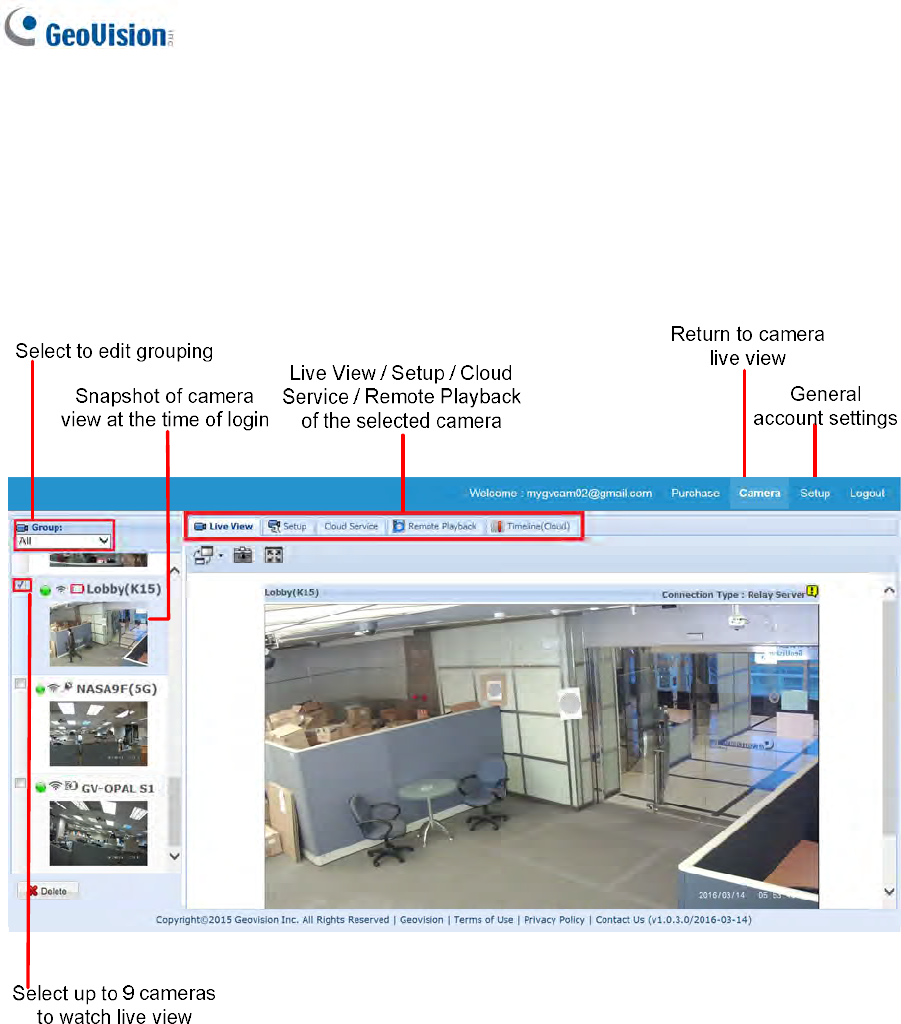
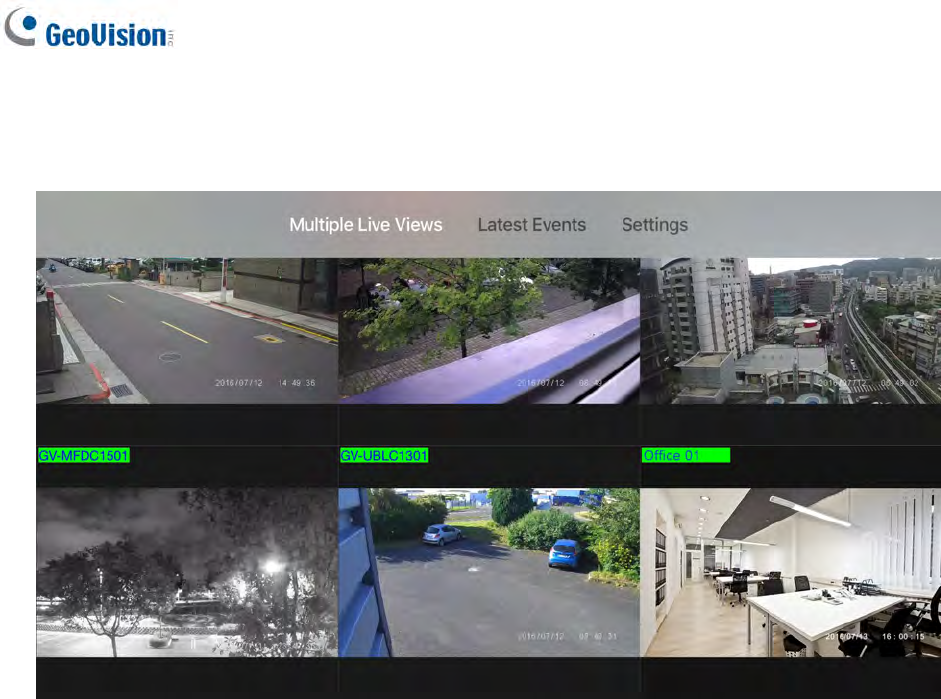
4.1 The Main Screen
After logging on, you will see the live view of the first camera and a list of all cameras
assigned to your myGVcloud account. You can select up to 9 cameras in the Camera Group
to watch their live views simultaneously.
Figure 4-3
myGVcloud Portal
39
4
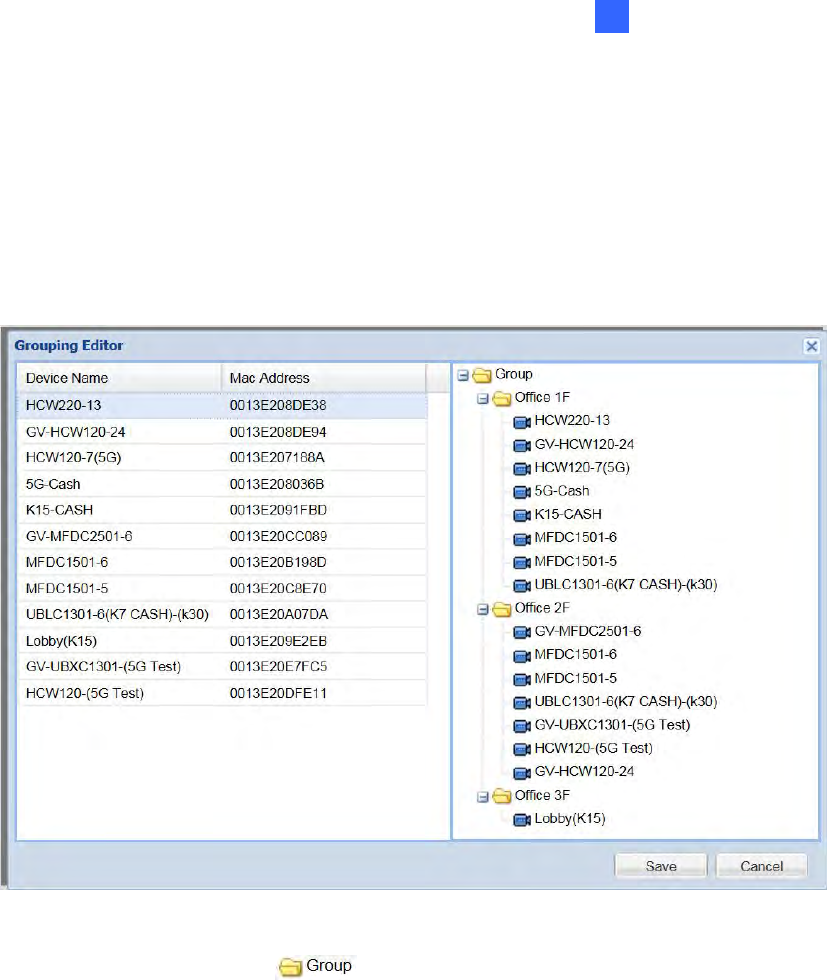
Grouping Cameras
You can group the cameras assigned to your myGVcloud account by following the steps
below.
1. Select Edit Grouping in the drop-down list at the top-left corner of the main screen.
This window appears.
Figure 4-4
2. Right-click the Group folder . Select Add A Group and name the group.
3. To add any listed camera to a group, drag the camera to the folder of the group. A
camera can be dragged into multiple groups.
4. To change the order of the cameras within a group, drag them up or down.
5. To remove certain cameras or groups, right-click them and select Delete.
6. Click Save after any modifications.
Once groups are established, to see the live view of the cameras listed in a certain group,
you can select its group name in the drop-down list at the top-left corner of the main screen.
40
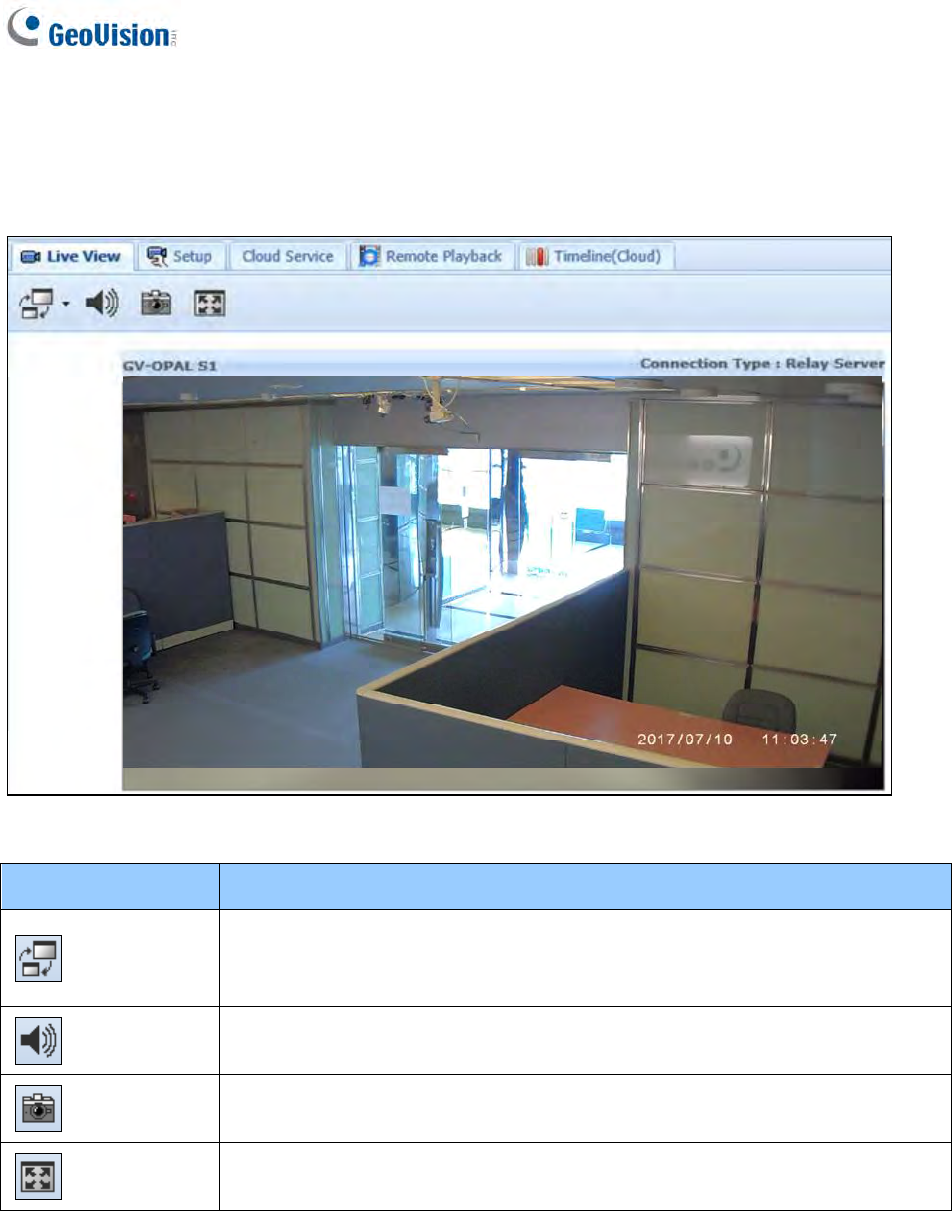
4.2 The Live View Window
When you access the live view, the following window appears.
Figure 4-5
Function Description
Video Size
Set the live view resolution to Record Streaming or Preview Streaming.
The record resolution can be modified in Camera Setup page (Figure 4-
15).
Audio Listens to the audio around the camera.
Snapshot Takes a snapshot of the live view.
Full screen Switches to full screen view.
myGVcloud Portal
41
4
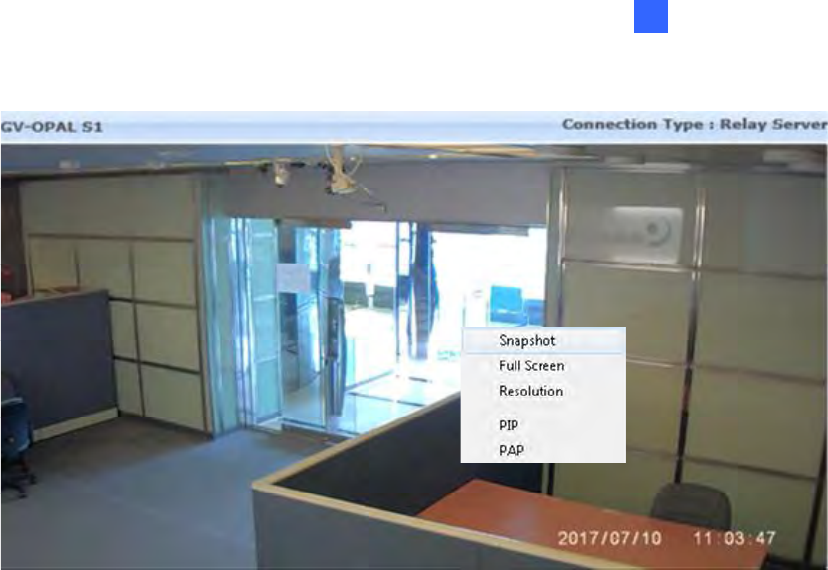
Right-click the live view to access additional functions.
Figure 4-6
Snapshot: Saves the current live view image.
Full Screen: Switches to full screen view.
Resolution: Shows the current resolution in the bottom-right corner.
PIP (Picture-in-Picture): Select an area to get a close-up view of the selected area.
PAP (Picture-and-Picture): Select up to 7 close-up views by drawing a navigation box
on the live view.
42
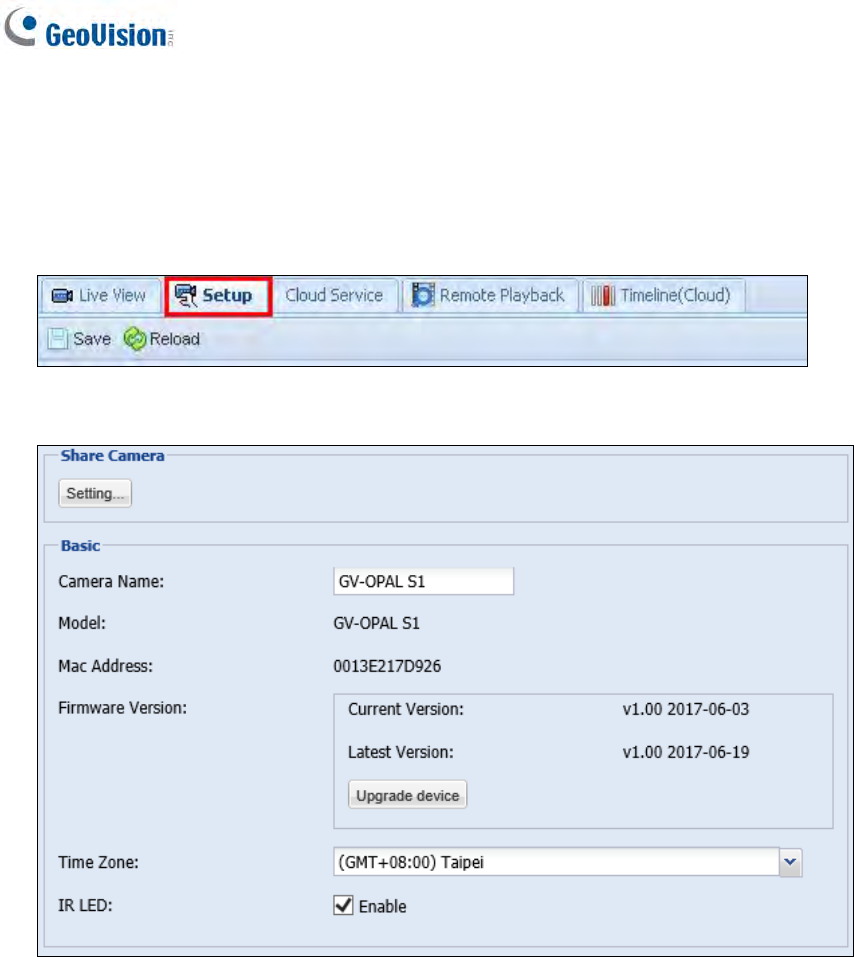
4.3 Camera Settings
Click the Setup tab on the top to modify camera settings such as starting recording,
changing resolution and enabling LEDs. Remember to click Save after modifying the settings.
Figure 4-12
Figure 4-13
myGVcloud Portal
43
4
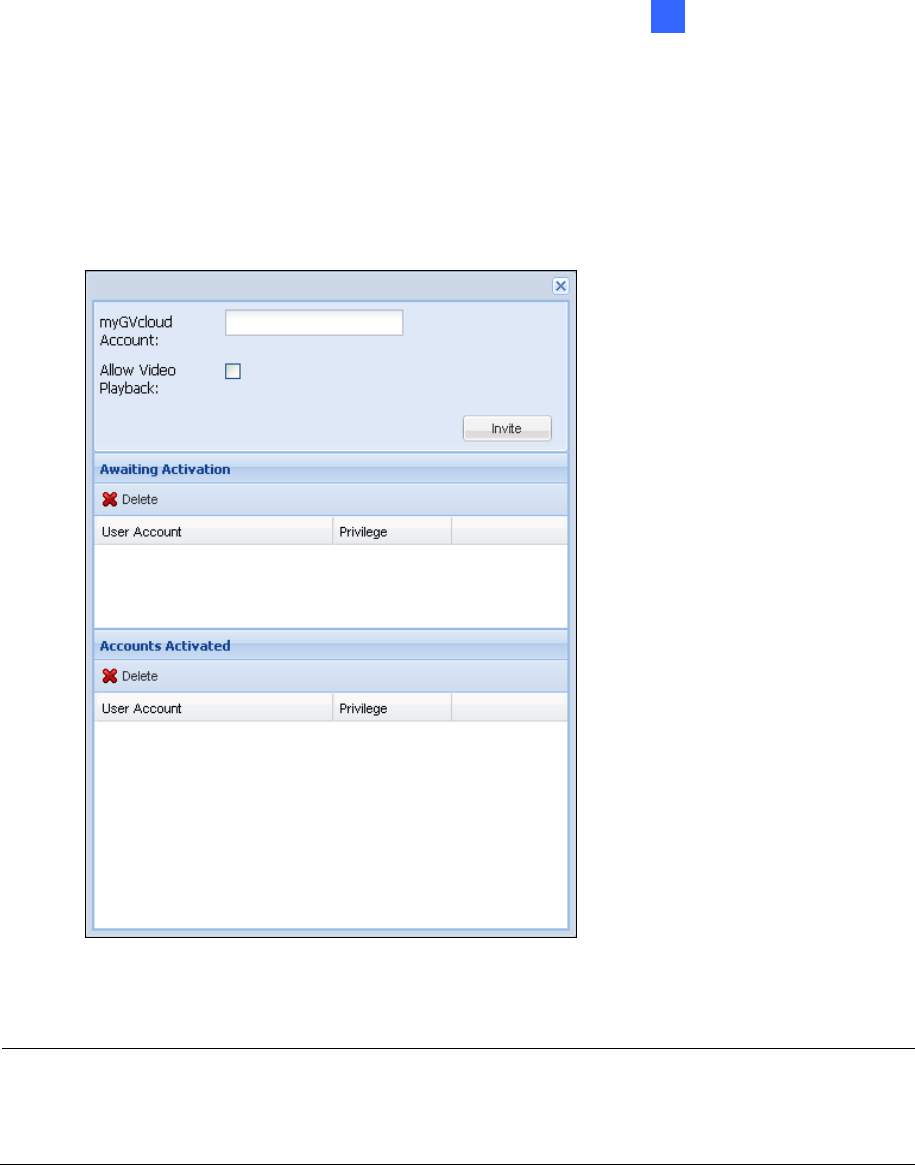
[Share Camera] Click Setting to share the cameras assigned to your myGVcloud account to
up to 4 other myGVcloud accounts. Type the myGVcloud account and click Invite to send a
confirmation e-mail with activation link to the account. After activation, the other myGVcloud
account will be able to access the live view of the selected camera. If Allow Video Playback
is selected, they will also be able to play back motion events.
Figure 4-14
Note: If the user was previously logged into a myGVcloud account on the same PC, be
sure to log out of the previous account before clicking the activation link. Otherwise, the
user will be directed to the previous account instead of the account in the activation link.
[Basic]
Camera Name: Change the display name of the camera if needed.
Model: Show the camera model.
Mac Address: Show the MAC address of the camera.
Firmware Version: Show the current firmware version of the camera. You can click
Upgrade Device to upgrade to the latest firmware if available.

44
Note: A micro SD card is required for the firmware update.
Time Zone: Set the time zone of the camera.
IR LED: When enabled, the IR LED on the camera lights up under low lights to allow
night vision.
Figure 4-15
[Video / Audio]
Record Streaming Resolution: Set the recording resolution for the camera. The Large
resolution (Stream 1) of the camera will be used.
Orientation: You can adjust the image orientation by selecting Normal, Horizontal
Mirror, Vertical Flip or Rotate 180.
Figure 4-16
[Event Monitor]
Record upon Motion: Select Enable to record video upon motion detection. The Large
resolution (Stream 1) of the camera will be recorded to the micro SD card. Make sure the
SD card is inserted and formatted.
myGVcloud Portal
45
4
Motion Sensitivity: Set the sensitivity level for motion detection. This function is not
available for GV-HCW Cameras.
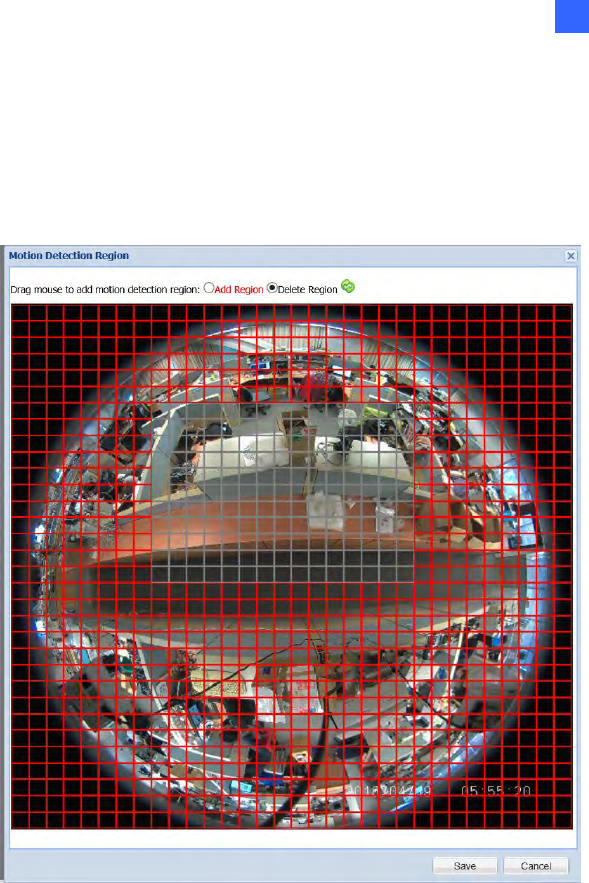
Motion Detection Region:
1. Click Motion Detection Region. This window appears.
Figure 4-17
2. By default, the whole red area is selected for motion detection. Select Delete
Region and drag your mouse to specify the areas where you do not wish to detect
any motion. The grey area will not be detected.
3. Select Add Region to specify the detection area.
[Mobile Notification]
Motion Event: Select Enable to send notifications to mobile devices upon motion
detection. For this function to work, myGVcloud CamApp needs to be installed on the
mobile device. See Chapter 3 for details.
Notification Interval: Set an event interval to limit the frequency of notifications to mobile
devices during continuous motion detection. For example, if motion is detected
continuously and event interval has been set to 1 minute, notifications will be sent to
mobile devices once every minute.
46
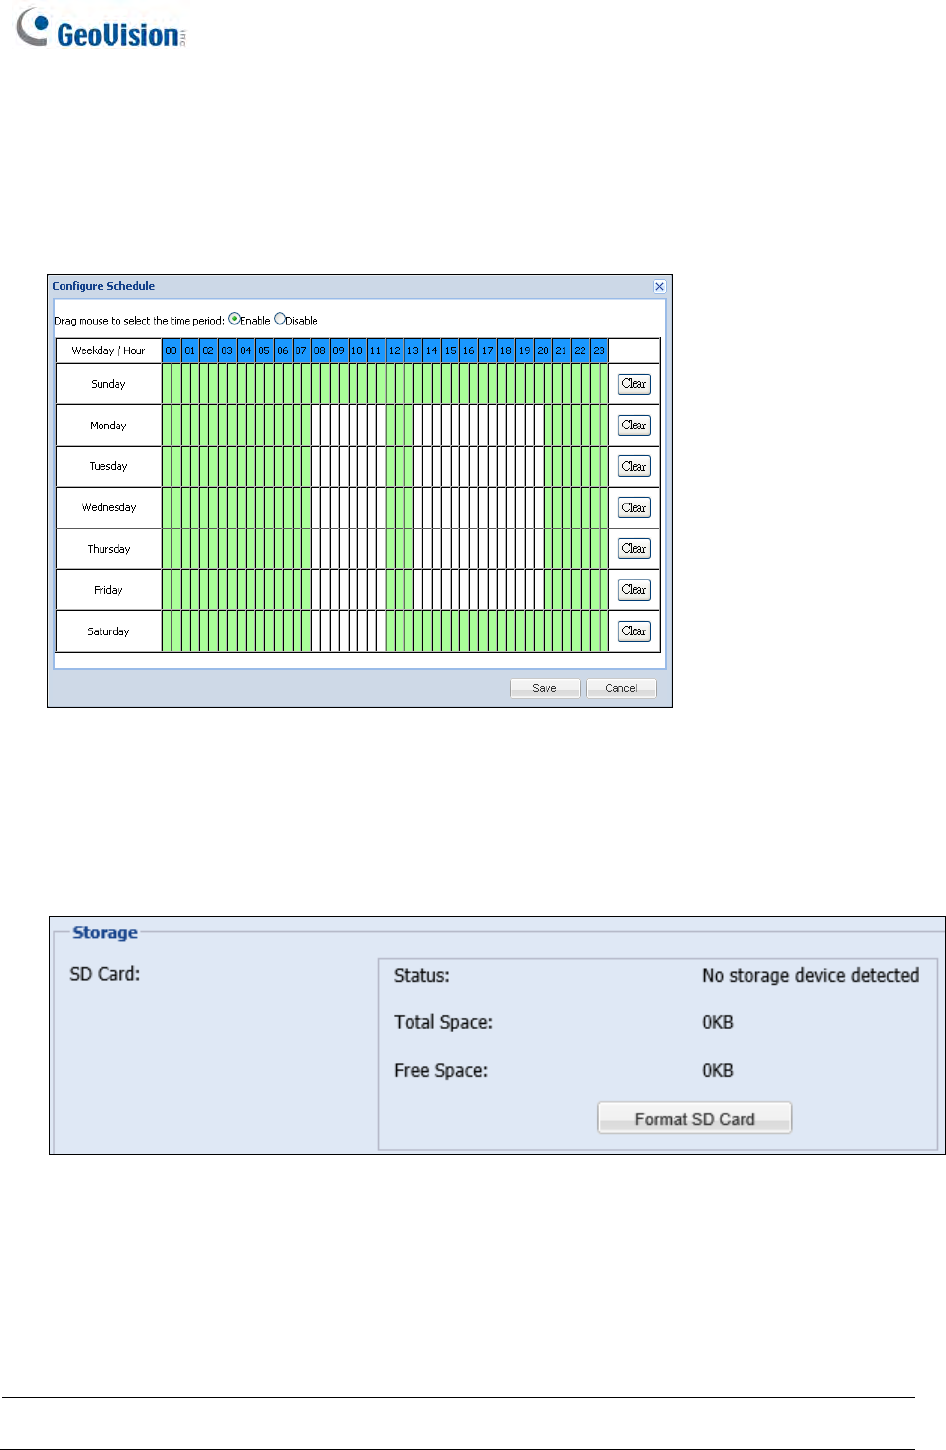
Notification Schedule: Click Enable to enable notification to mobile devices only during
the scheduled times. Click Configure Schedule and drag across the weekly schedule to
highlight where you want mobile notification to be enabled. You can also click Disable at
the top and drag on the weekly schedule to disable notification during these time periods.
Figure 3-18
Below the Event Monitor section, you can click Show advanced settings to see the storage
related settings.
Figure 3-19
[Storage]
SD Card: To format the micro SD card, click Format SD Card.
Note: Saving recordings to cloud storage is only functional when an SD card is detected.
myGVcloud Portal
47
4
4.4 Cloud Service
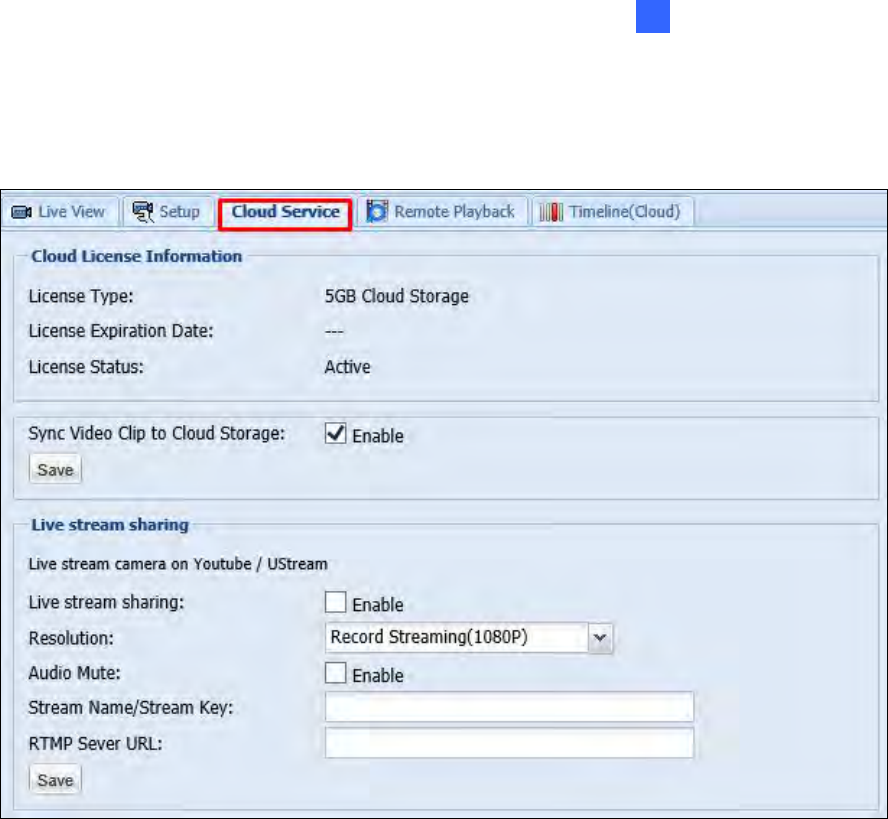
To enable Cloud Service for the selected camera, click the Cloud Service tab.
Figure 4-20
[Cloud License Information] Shows information of the cloud license acquired for this
camera. GeoVision’s Cloud Service allows you to store recordings in the cloud storage. To
manage cloud license, click Purchase in the top-right corner.
[Sync Video Clip to Cloud Storage] Enable (Default) or disable recorded videos to
to be uploaded to Cloud storage.
[Live Stream Sharing] You can live stream the camera image on YouTube or UStream. You
will need to have an account for YouTube or UStream and complete the required settings to
obtain the stream name / key and RTMP server URL. For details, refer to Appendix C.
Setting Live Streaming on YouTube or UStream.
Live stream sharing: Select Enable to live stream the camera live view.
Resolution: Select the resolution of the live stream. The resolution selected must be
equal or larger than the resolution selected in YouTube or UStream.
48
Audio Mute: Select Enable to mute the audio of the live stream.
Stream Name / Stream Key: Paste the Stream Name / Stream Key obtained from the
setup page of YouTube or UStream. Refer to Appendix C for details.
RTMP Server URL: Paste the RTMP Server URL obtained from the setup page of
YouTube or UStream. Refer to Appendix C for details.
Note:
1. When streaming camera live view, it is recommended not to play music close to the
camera to avoid copyright infringement. You can also select the Audio Mute function
to avoid this issue.
2. To stream live view in real time, it is recommended to have a minimum upload
bandwidth of 3 Mbps.
myGVcloud Portal
49
4
4.5 Remote Playback
To look up and play back recorded videos of the camera selected, click the Remote
Playback tab. You can select recorded videos stored in the micro SD card or in the cloud
storage.
Figure 3-21
1. Under Query, select a Start Time and an End Time.
2. Next to Position, select whether to retrieve events from the Local SD card or from
Cloud storage.
3. Click Query. The events recorded within the Start Time and End Time are displayed.
4. To play back video, select the check boxes next to the time of the videos, and click the
Play button . You can select up to 20 videos for a consecutive playback.
5. You can click the Download button and save the selected events in a zip file.
6. You can play the videos in different speed rate by selecting a rate from the drop-down
list . The default speed rate is 1.0x.
Note:
1. You can also click the Timeline (Cloud) tab to locate the events saved in cloud
storage from a timeline. See 4.6 Timeline (Cloud) for details.
2. To change the default media player for event playback, refer to Appendix B for more
details.
50
4.6 Timeline (Cloud)
To look up and play back recorded videos stored in Cloud Storage, click the Timeline
(Cloud) tab.
Figure 4-22
Videos recorded during the selected time period will be displayed in a timeline. You can
select a time, or click the All day summary button to see when events are recorded
throughout the selected day. Click the Play button on the timeline to play back recorded
videos.
myGVcloud Portal
51
4
4.7 General Account Settings
To modify the password of myGVcloud account or to set e-mail notification for camera
disconnection, click Setup at the top-right corner.
Figure 4-23
[User Account]
Change Password: Click Edit to change the password of your myGVcloud account.
Hint: Modify the password hint if needed.
Last Login Time: Shows the time this account logged into myGVcloud Portal.
[General Setup]
E-mail: Set the e-mail to receive notification upon camera disconnection.
Nick Name: Change the account display name at the top-right corner.
Camera disconnection notification: Select Enable to send e-mail notification upon
camera disconnection.
Click the Save button after modifying the settings.
52
Chapter 5 myGVcloud CamAppTV (Android
TV)
You can access your myGVcloud account on your Android smart TV by using myGVcloud
CamApp TV.
1 Search for myGVcloud CamApp TV in Google Play Store.
2 Install myGVcloud CamApp TV on your Android smart TV.
Supported Operating System: Android TV 5.0 or later
myGVcolod Portal
53
5
5.1 Logging onto myGVcloud Account
You can log onto your myGVcloud account to access the cameras registered to your account.
1. Select myGVcloud CamAppTV icon on the main menu of your Android TV.
Figure 5-1
2. Type the ID and password of your myGVcloud account.
Figure 5-2
3. Select Login.
54
4. Multiple Live Views, Single Live View, Latest Events and Setting are listed on the left-
side menu.
Figure 5-3
Note: Once you log on with View Demo (see Figure 5-2), the system logs you on
automatically. So as to log on with another account, you need to log off first.
myGVcolod Portal
55
5
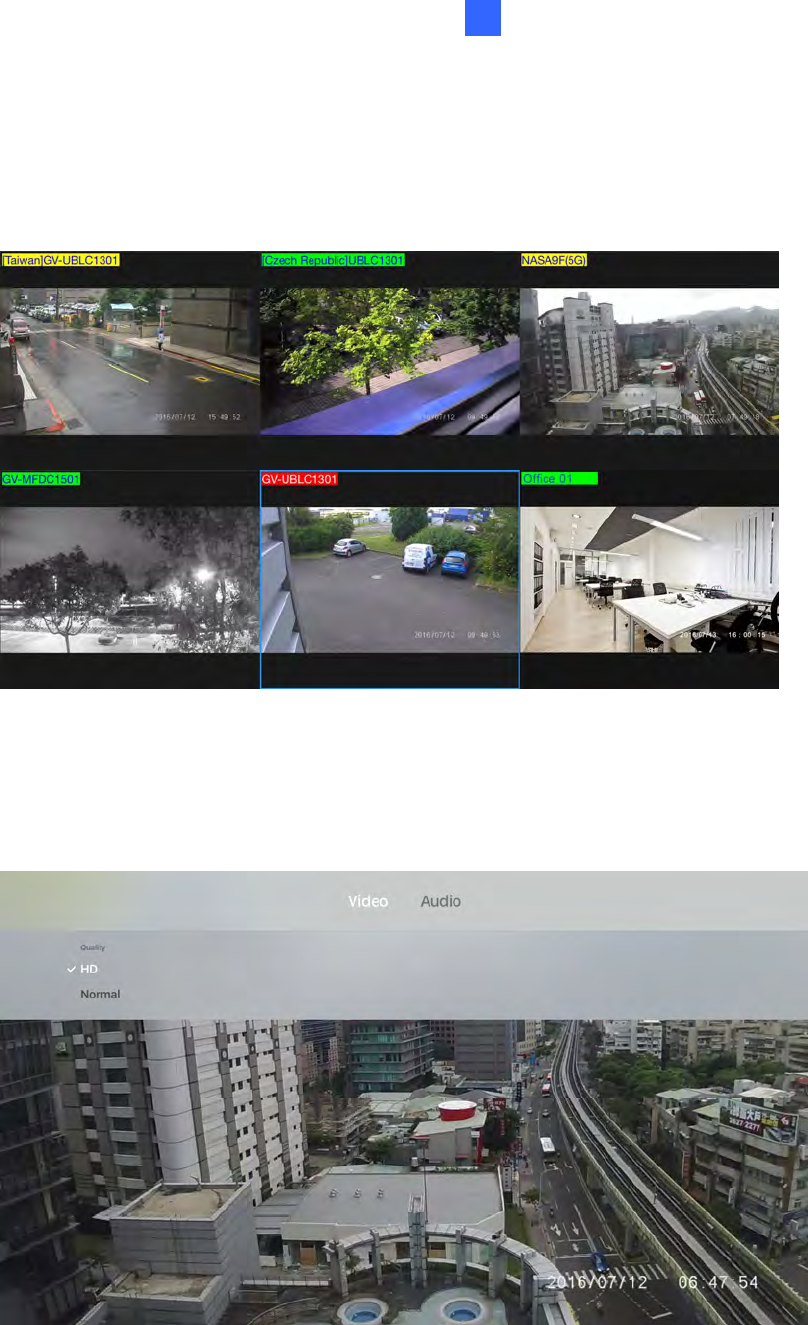
5.2 Multiple Live Views
You can see numerous live views from Multiple Live Views. There can be 1, 4, 6, 9, 12, 16
screen divisions. The number of the configured cameras determines the number of the
screen divisions.
1 On the left-side menu, click Multiple Live Views.
Figure 5-4
2 You can see multiple displays of your cameras.
Figure 5-5

56
Tip: From Multiple Live Views, you can select any listed camera to view its Single Live
View and Events by pressing down, instead of going back to the main menu.
myGVcolod Portal
57
5
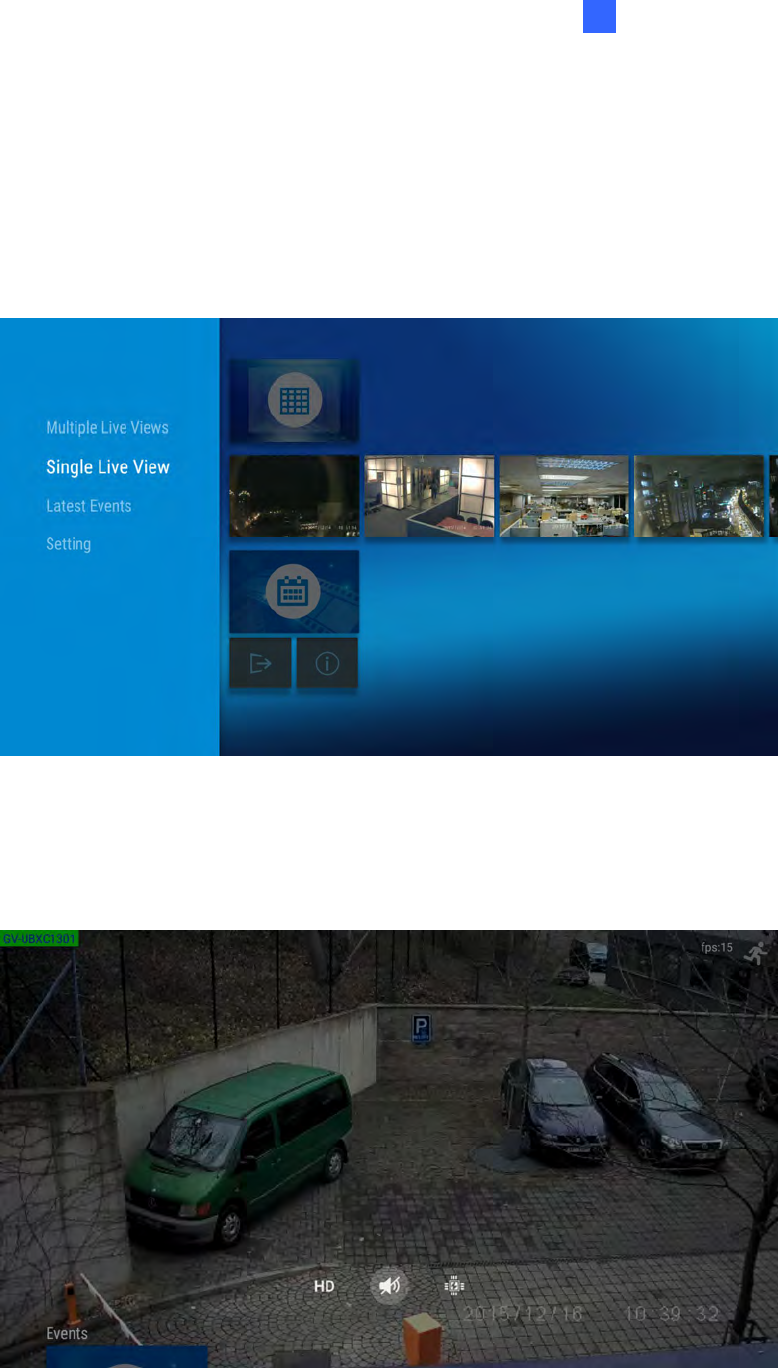
5.3 Single Live View
You can see the live view of interest to you from Single Live View.
1 On the left-side menu, select Single Live View and select any listed camera to see its
single live view.
Figure 5-6
2 In Single Live View, there are three functions available: HD, Audio, and Hardware
Decoding.
Figure 5-7
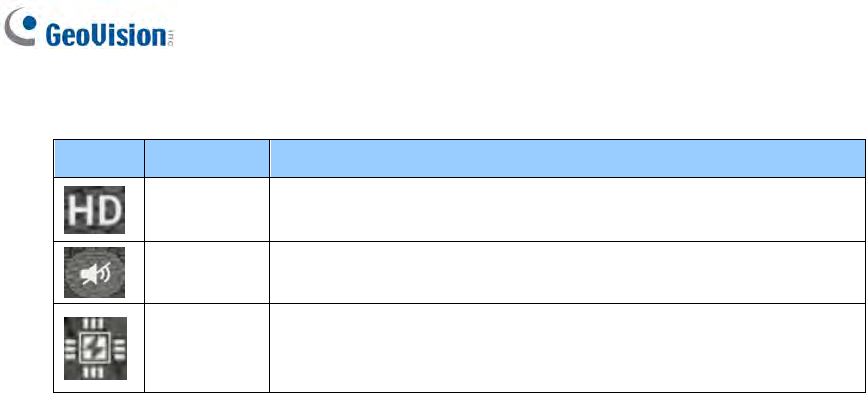
58
Icon Function Description
HD Presents you the high-definition video by switching to
stream one (higher resolution)
Audio Allows you to hear the sound from the surveillance site.
Hardware
Decoding
Presents you a smoother live view. The function will
enable GPU decoding to lower CPU load and is only
supported by some Android TV.
3 Select the desired function.
myGVcolod Portal
59
5
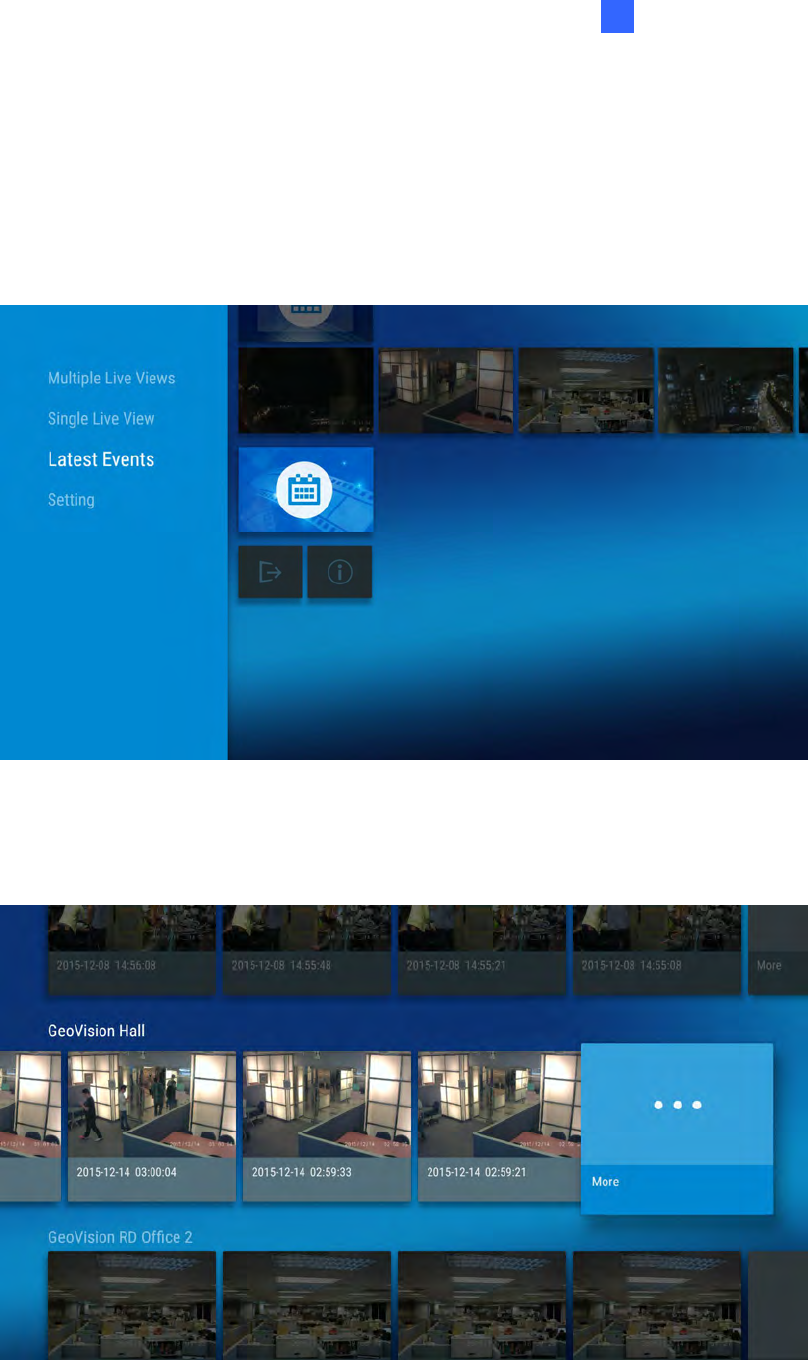
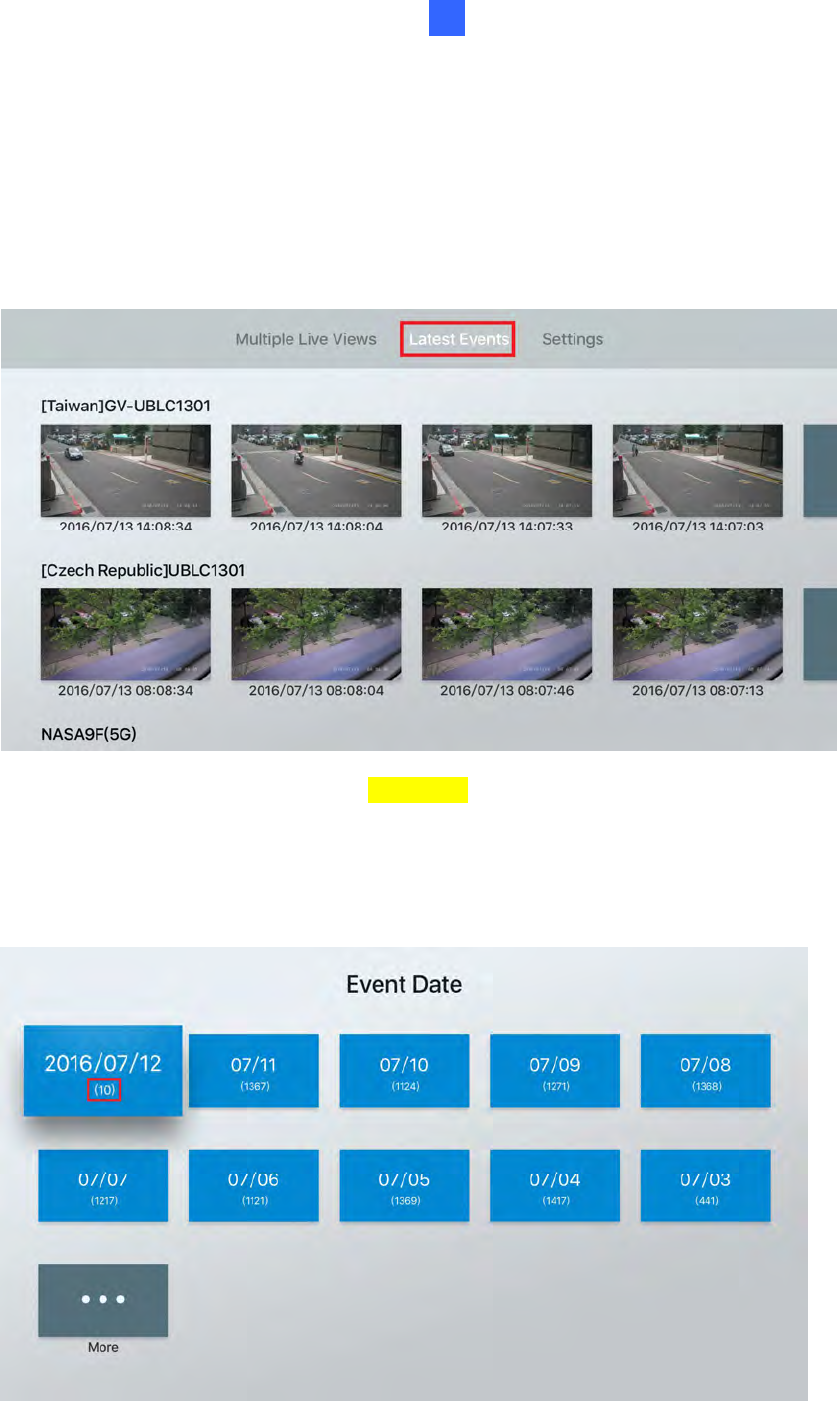
5.4 Latest Events
You can access the latest recordings of any configured cameras from Latest Events.
1. On the left-side menu, click Latest Events to play back the latest recordings of a camera.
Figure 5-8
2. The recorded videos are listed in reverse chronological order. If the video of your choice
is not among the latest four, click More for other previous events.
Figure 5-9
3. In More, the recordings are listed by date. The number below the date signifies the
number of events recorded on that day.
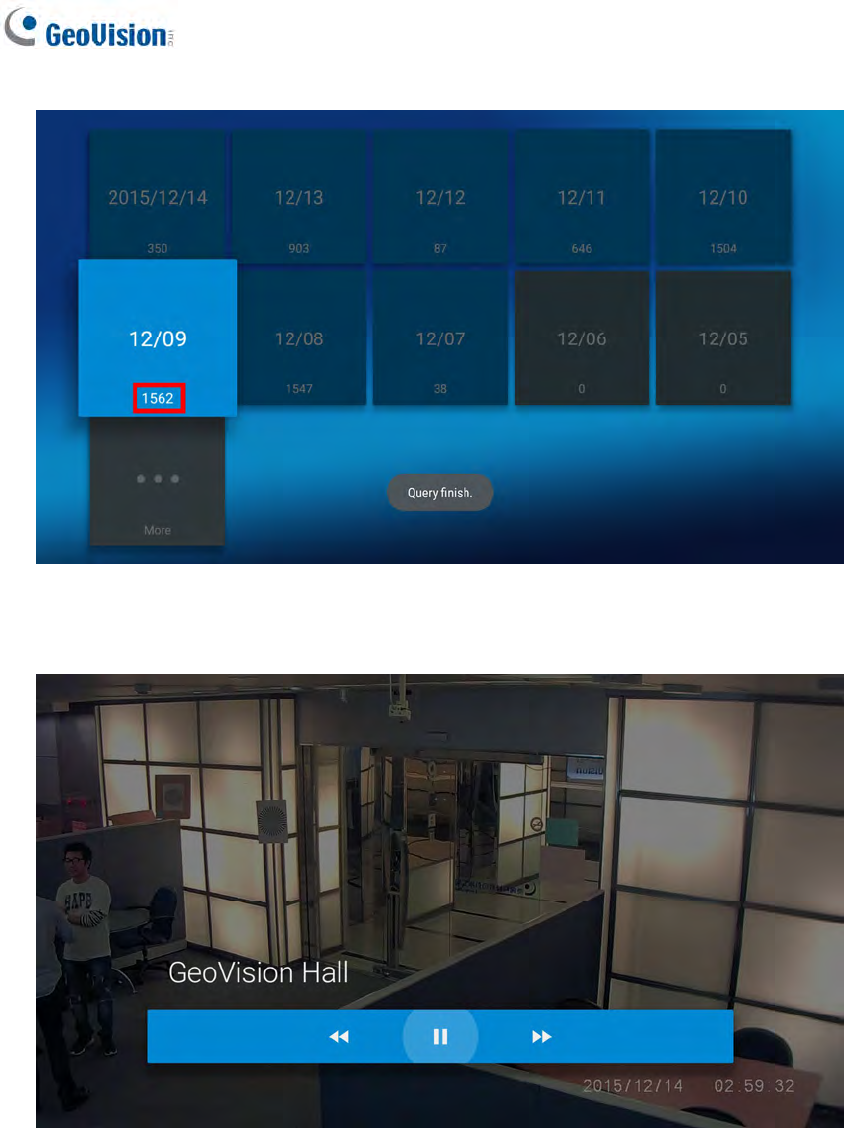
60
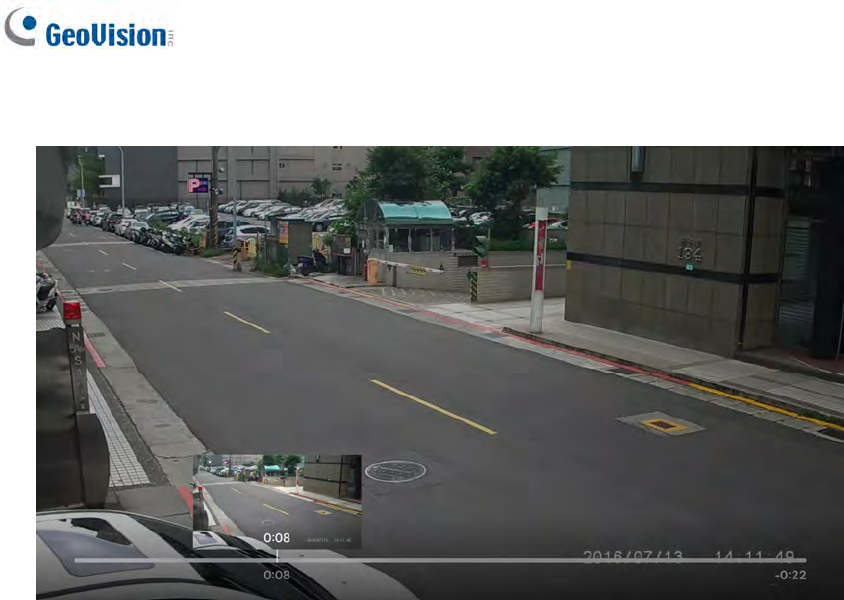
Figure 5-10
4. Select any listed event and you can pause, rewind, or fast forward the video clip.
Figure 5-11
myGVcolod Portal
61
5
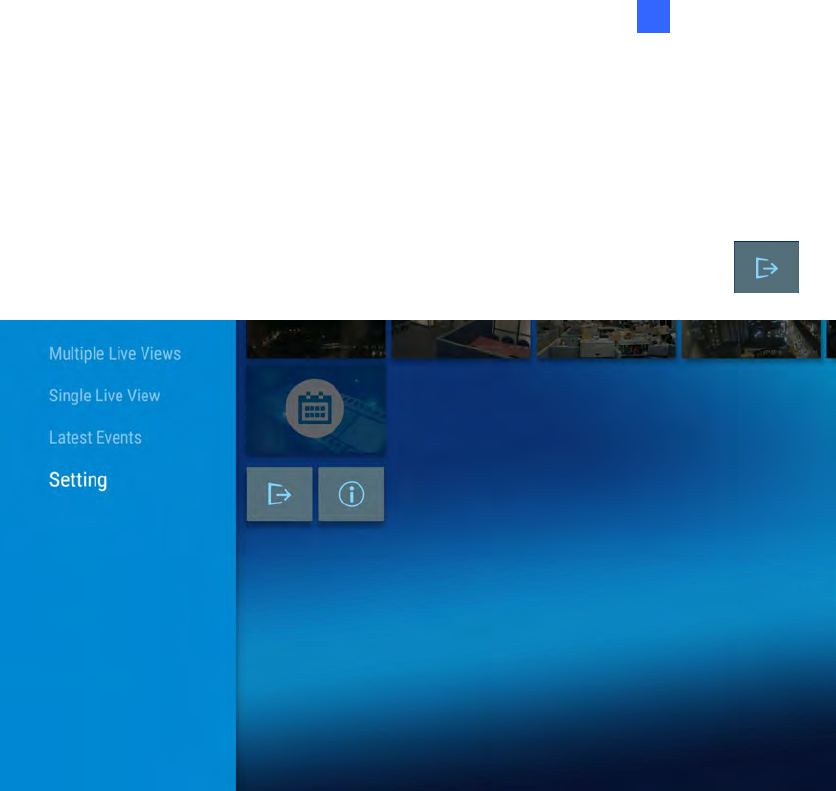
5.5 Setting
You can log off from Setting. On the left-side menu, click Setting and click to log off.
Figure 5-12
62
Chapter 6 myGVcloud CamApp (Apple TV)
You can access your myGVcloud account on your Apple TV by using myGVcloud CamApp
(Apple TV).
1 Search for myGVcloud CamApp in App Store.
2 Install myGVcloud CamApp on your Apple TV.
Minimum System Requirements:
Apple TV Model Fourth Generation
OS Supported tvOS 9.2 or later
myGVcloud CamApp (Apple TV)
63
6
e
6.1 Logging onto myGVcloud Account
You can log onto your myGVcloud account to access the cameras registered to your
account.
1. Select myGVcloud CamApp icon on the main menu of your Apple TV.
Figure 6-1
2. Type the ID and password of your myGVcloud account.
Figure 6-2
3. Select Login.
64
4. You can select Multiple Live Views, Latest Events and Settings listed on the menu
above.
Figure 6-3
myGVcloud CamApp (Apple TV)
65
6
e
6.2 Multiple Live Views
There can be 1, 4, 6, 9, 12, 16, and 25 screen divisions when you access Multiple Live Views.
The number of the configured cameras determines the number of the screen divisions.
Figure 6-4
To adjust the video quality and audio setting, click any camera to see its live view in full
screen. There are two functions available: Video and Audio. Select the desired function.
Figure 6-5
66
Function Name Description
Video
HD Presents you the high-definition video by switching to
stream one (higher resolution)
Normal
Reduces bandwidth and lowers system load by
switching to stream two.
Audio On Allows you to hear the sound from the surveillance site.
Off Turns off the sound.
Camera Status
Different colors on the camera names indicate different
status of the cameras.
Yellow: the monitoring function is disabled.
Green: the monitoring function is enabled but
the camera is not recording.
Red: the monitoring function is enabled and the
camera is recording.
myGVcloud CamApp (Apple TV)
67
6
e
6.3 Latest Events
You can access the latest recordings of any configured cameras from Latest Events.
1. On the menu above, select Latest Events.
Figure 6-6
2. The recorded videos are listed in reverse chronological order. If the video of your choice
is not among the latest four, click More for other previous events.
3. The number below the date signifies the number of events recorded on that day.
Figure 6-7
68
4. Select any listed event and you can pause, rewind, or fast forward the video clip.
Figure 6-8
myGVcloud CamApp (Apple TV)
69
6
e
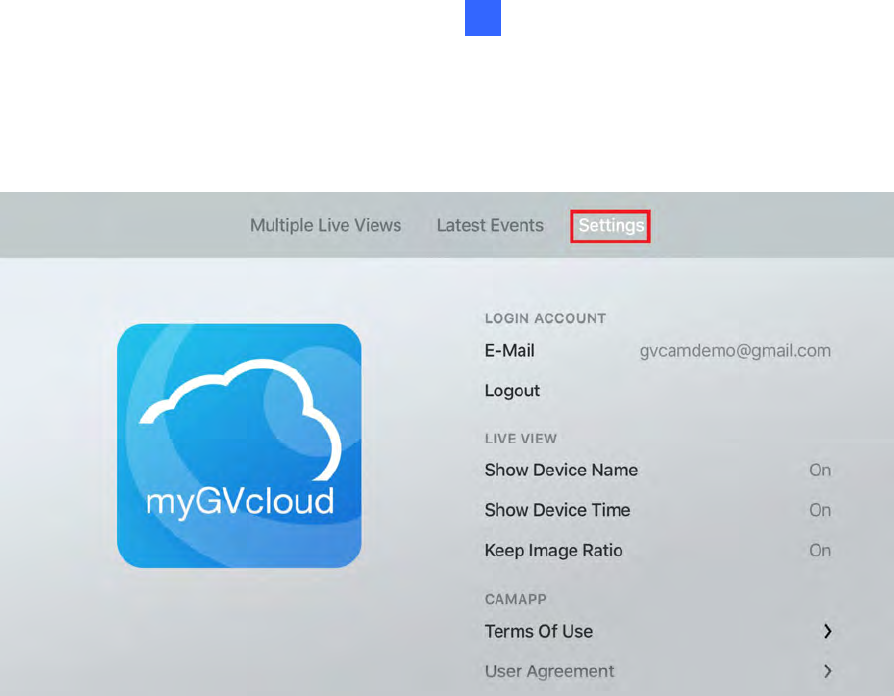
6.4 Settings
On the menu above, select Settings.
Figure 6-9
You can log out or configure the settings of the camera live view.
Show Device Name: Displays device name on live view.
Show Device Time: Displays device time on live view.
Keep Image Ratio: Displays the live view in the device’s original image ratio.
70
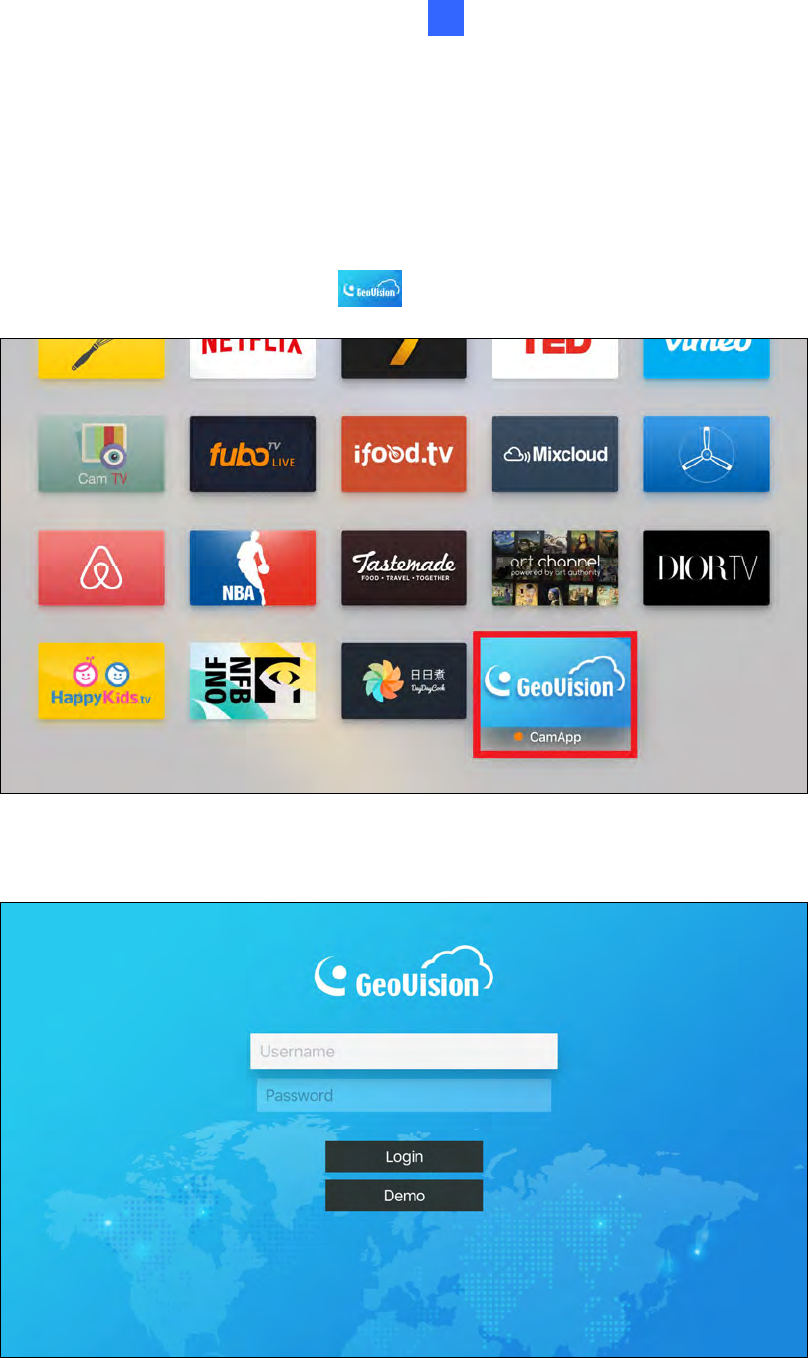
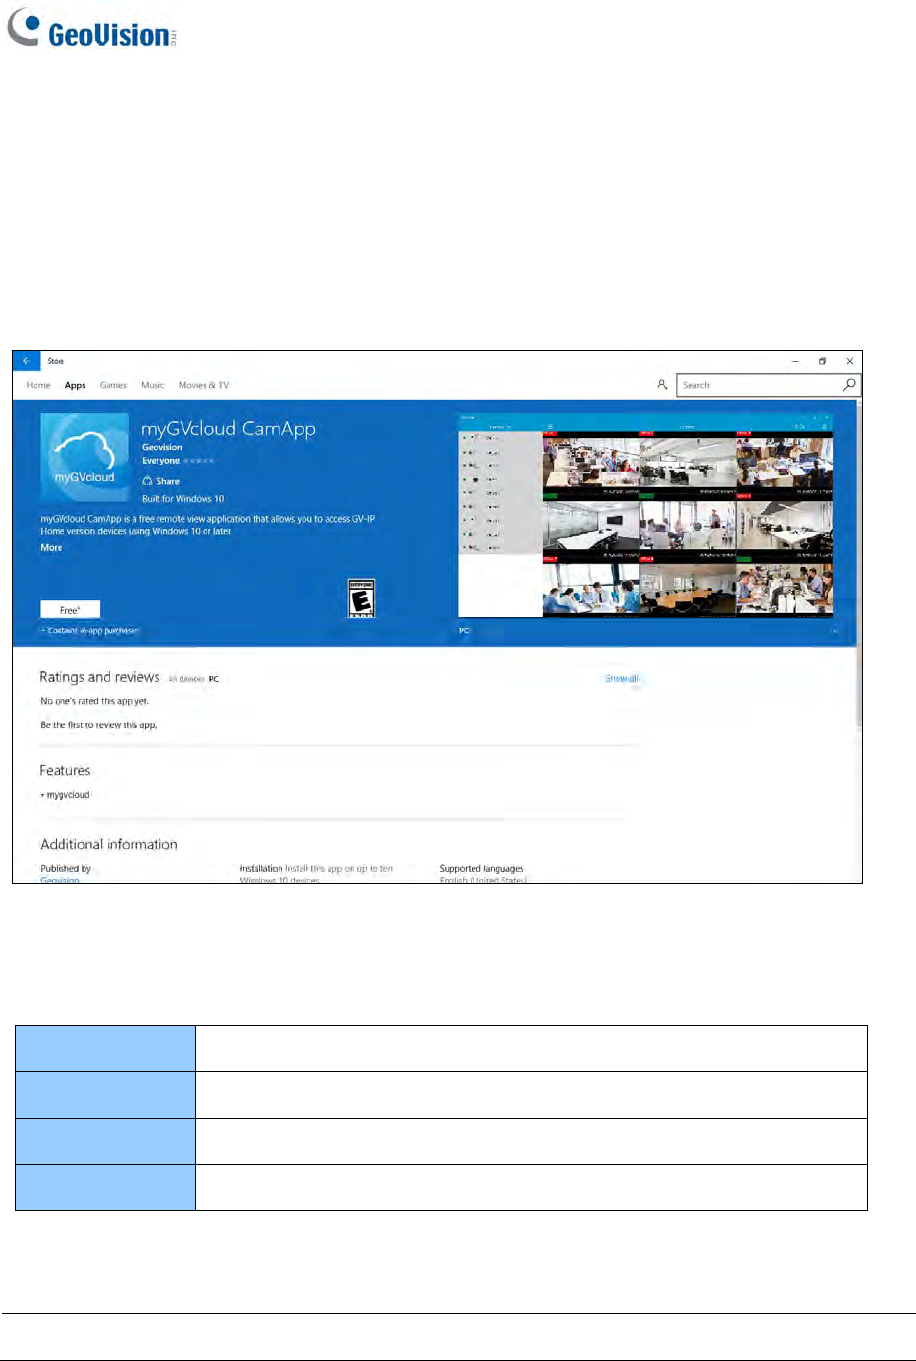
Chapter 7 myGVcloud CamApp (Windows 10)
You can access your GV-Cloud Cameras from Windows 10. Search for myGVcloud
CamApp in Windows Store. Next, install myGVcloud CamApp (Windows 10) on a
Windows 10 Computer.
Figure 7-1
Minimum System Requirements:
OS Supported Windows 10
CPU Intel Sandy Bridge i3 2100, 3.1 GHz
RAM 2 GB
Graphics Card
GPU with DirectX 11
Note: myGVcloud CamApp (Windows 10) is not supported by Windows 10 mobile devices.

myGVcloud CamAppTV
71
7
7.1 Logging onto myGVcloud Account
Log onto your myGVcloud account to access the cameras registered to the account.
1. Click the myGVcloud CamApp icon on the All apps List of Windows 10.
2. Type the ID and password of your myGVcloud account.
Figure 7-2
3. Click Login. The cameras associated with the myGVcloud account are listed in the
Camera List on the left.
Figure 7-3
Note: Users can click Demo on the login page to experience the conveniences brought by
myGVcloud cameras and the user interface of myGVcloud CamApp (for Windows 10).
72
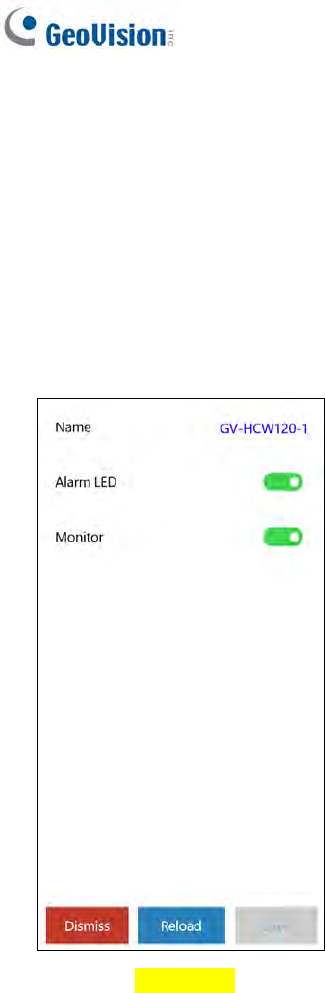
7.2 Configuring the Camera Settings
After you log onto your myGVcloud account, cameras associated with the account will be
listed in the Camera List. You can access the camera live view and configure camera
settings.
1. In the Camera List, select a camera to see its setting page.
Figure 7-4
2. You can change the current settings of the camera. The options available vary for
different camera models.
Name: Click the camera name to change the name if needed.
Monitor: Start or stop recording the camera.
3. Click Save after you modify the setting. Click Reload to access the latest setting of the
camera.
4. Click Dismiss to exit this page.
myGVcloud CamAppTV
73
7
7.3 Accessing Camera Live View
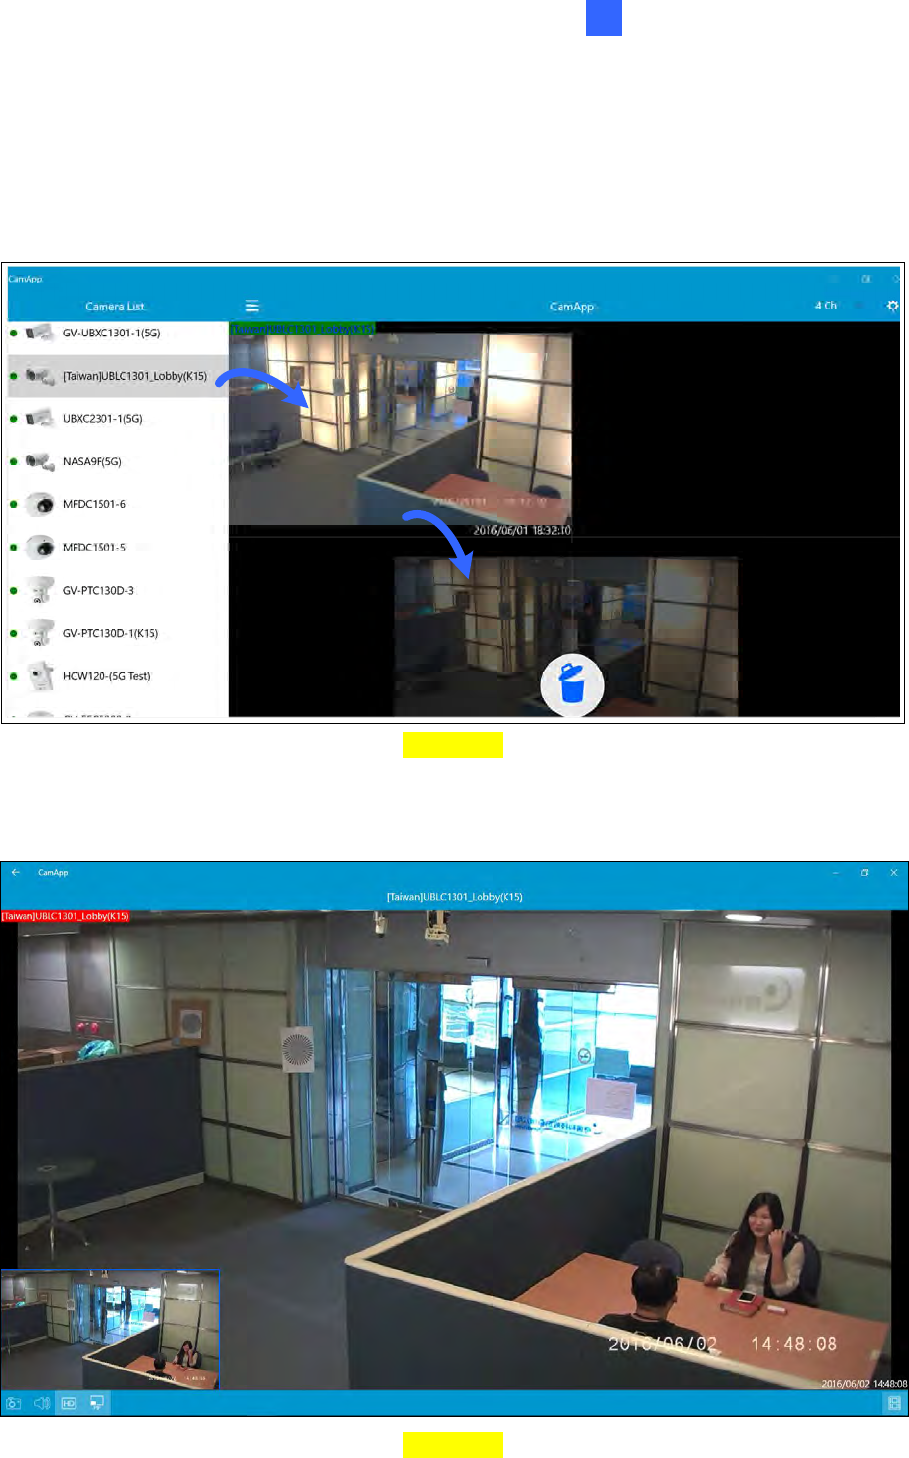
To access camera live view, drag the cameras from the Camera List to the live view grid. To
disconnect a live view, click and hold the live view grid and drag the live view into the trash
can icon.
Figure 7-5
Click the live view grid to see the live view in full screen and to access the following functions.
Figure 7-6
74
Icon Name Function
Snapshot Captures and saves the current live view image in your
computer.
Audio Allows you to listen to sounds from the surveillance site.
High Definition Switches to stream 1 (higher resolution). By default, stream 2
(lower resolution) is connected.
PIP
Shows a picture-in-picture view. On the main live view, if you
scroll the mouse to zoom in, a navigation box will appear in the
PIP window to indicate the zoomed in region. You can then
move the navigation box around to see closed-up views of
different parts of the live view. This function is enabled by
default.
Playback Plays back recorded videos. For details, see Playing Back
Recordings later in this chapter.
Camera Status
Different colors on the camera names indicate different status
of the cameras.
Yellow: the monitoring function is disabled.
Green: the monitoring function is enabled but the
camera is not recording.
Red: the monitoring function is enabled and the camera
is recording.
myGVcloud CamAppTV
75
7
7.4 Playing Back Recordings
1. To play back recordings of a camera, click the Playback icon from the bottom right
corner of the live view page. The recorded videos are listed.
2. Select an entry to play back the video.
Figure 7-7

76
7.5 Configure myGVcloud CamApp (Windows 10) Settings
To configure settings of myGVcloud CamApp, click the setting icon on the main page.
Figure 7-8
[Login Account]
Logout: Logs out of the myGVcloud account.
[Live View]
Show Device Name: Displays device name on live view.
Show Device Time: Displays device time on live view.
Keep Image Ratio: Displays the live view in the device’s original image ratio.
Appendix
77
Appendix
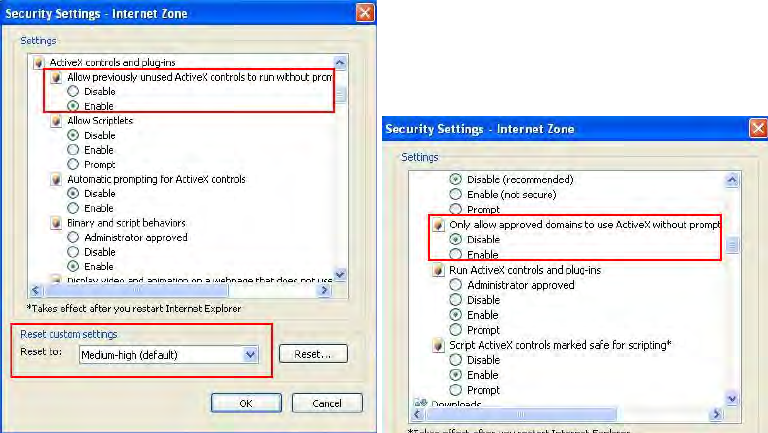
A. Settings for Internet Explorer 8 or Later
If you use Internet Explorer 8 or later, it is required to complete the following setting.
1. Set the Security to Medium-high (default).
2. Enable Allow previously unused ActiveX controls to run without prompt.
3. Disable Only allow approved domains to use ActiveX without prompt.
78
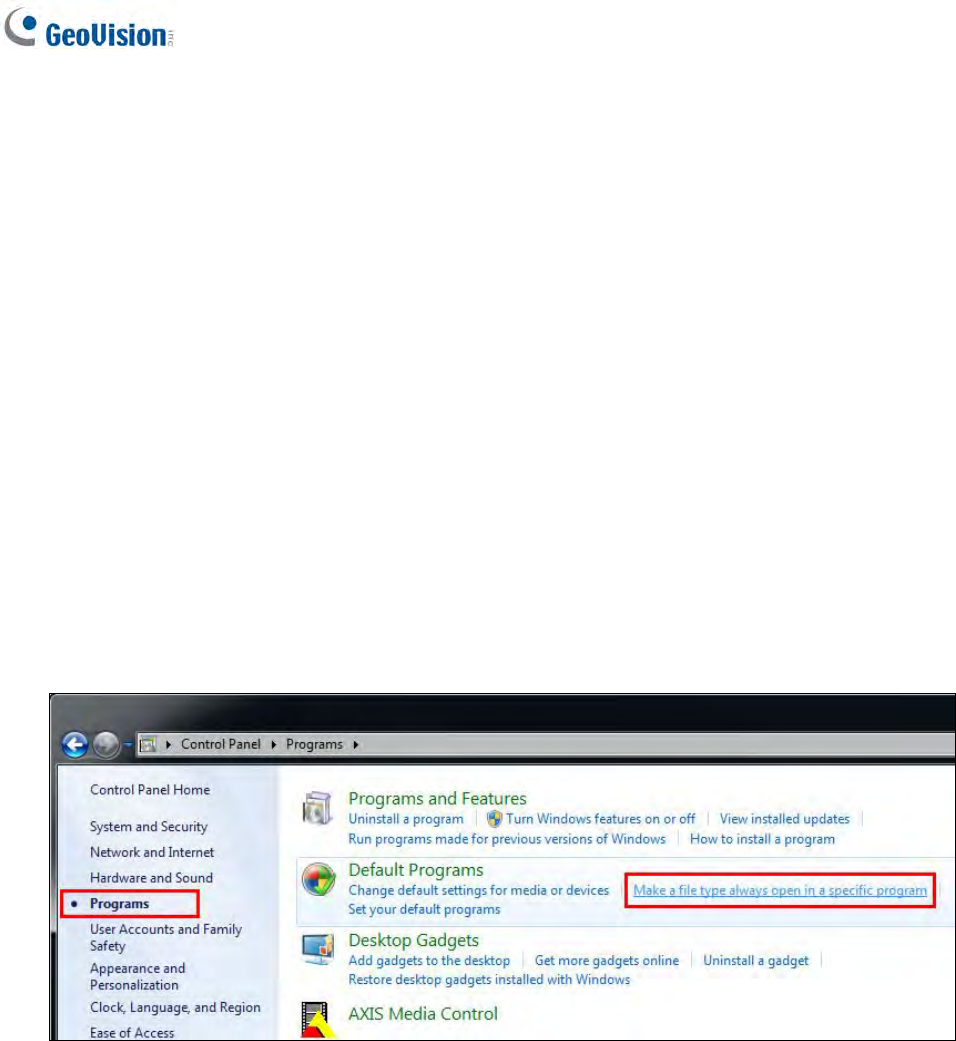
B. Changing the Default Media Player for Event Playback
The motion events in myGVcloud Portal are recorded in .mp4 format, and thus can be played
back using any media player that supports .mp4 format. The following media players have
been tested for compatibility with myGVcloud Portal:
Quick Time V7.7.2 or later
VLC Media Player V2.1.0 or later
Windows Media Player V11.0 or later
KMPlayer V3.7 or later
To change the default media player for playback:
1. Go to Window’s Control Panel, go to Programs and select Make a file type always
open in a specific program.
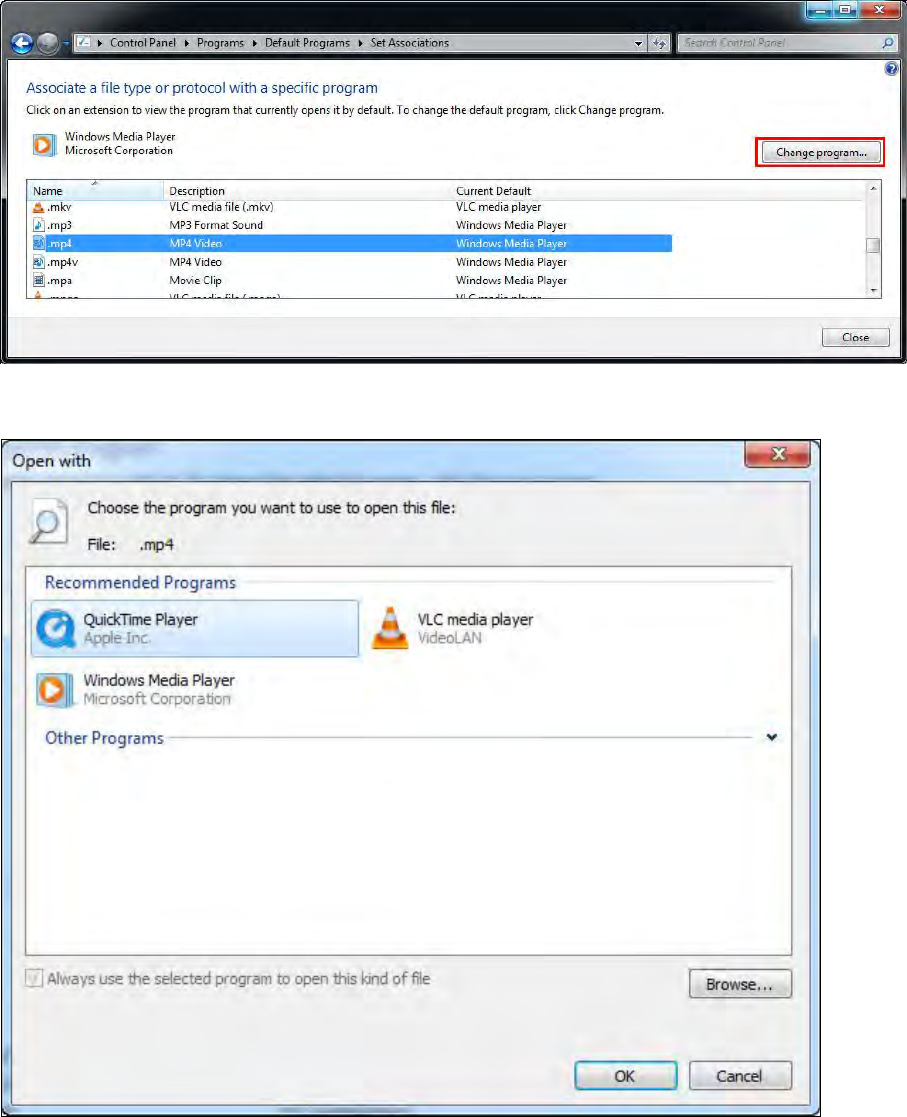
Appendix
79
2. Find the .mp4 file type and click the Change Program button.
3. Choose the program you want to use to open .mp4 files and click OK.
80
C. Setting Live Streaming on YouTube or UStream
To live stream camera live view, you need to have an account for YouTube, or UStream, and
complete the required settings to obtain the stream name / key and RTMP server URL. Copy
and paste the obtained stream name / key and RTMP server URL to myGVcloud Portal
(Cloud Service tab > Live streaming sharing).
YouTube:
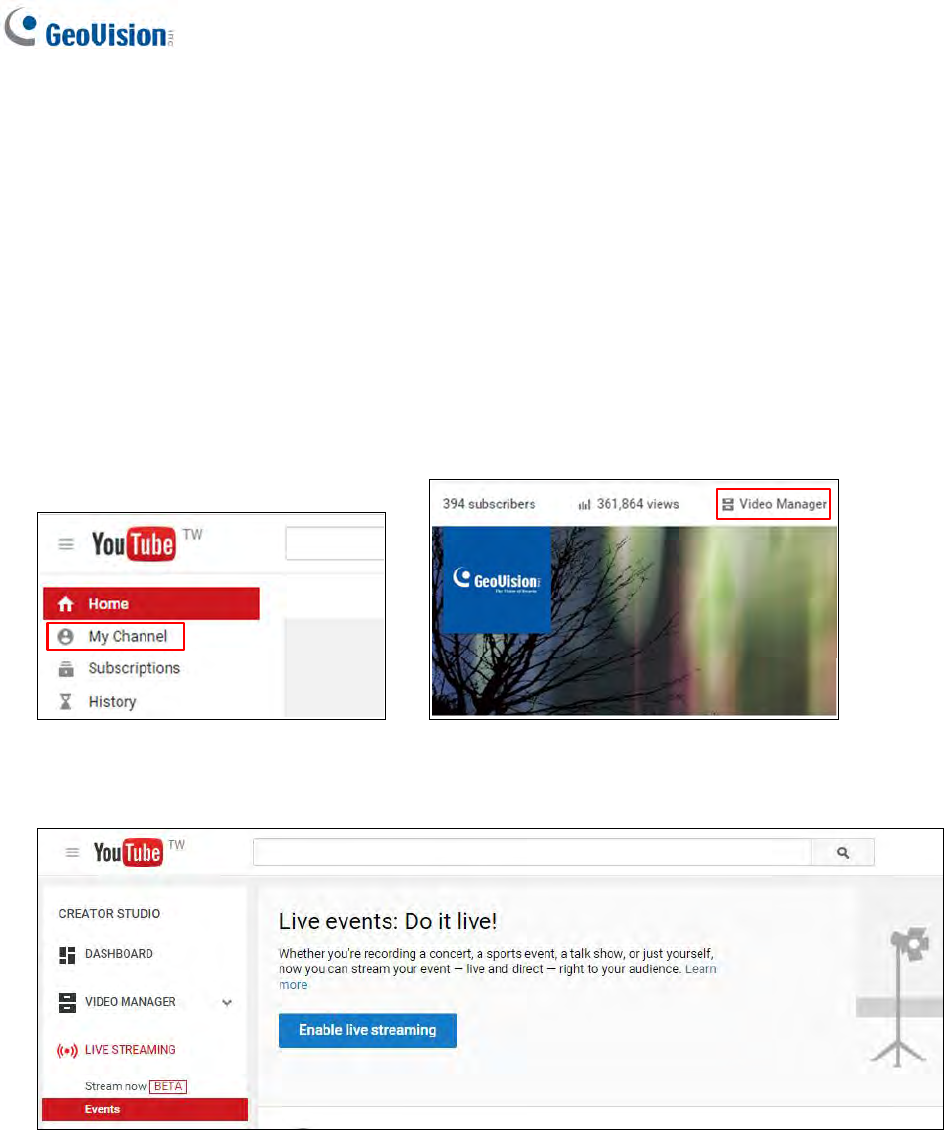
1. Log in your YouTube account, select My Channel, and click Video Manager.
2. Under Video Manager, click Live Streaming, click Events, and click the Enable live
streaming button.
Appendix
81
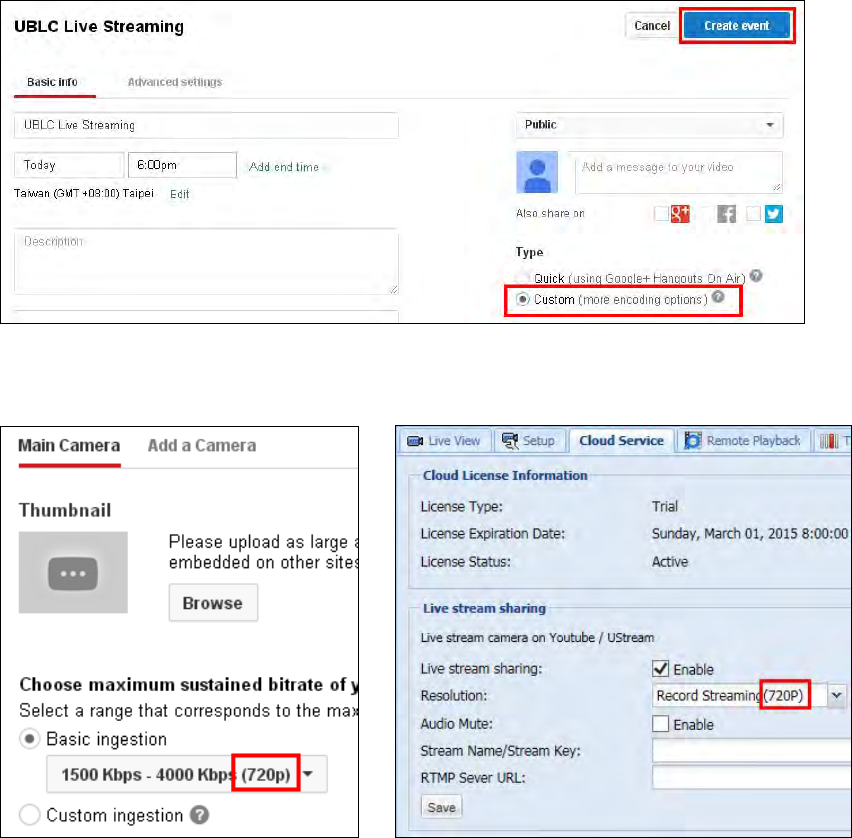
3. Name the live stream, set the Type to Custom and click the Create Event button. Make
sure the video is set to Public or Unlisted.
4. Under Basic ingestion, select a resolution that is equal to or smaller than the camera’s
resolution.
82
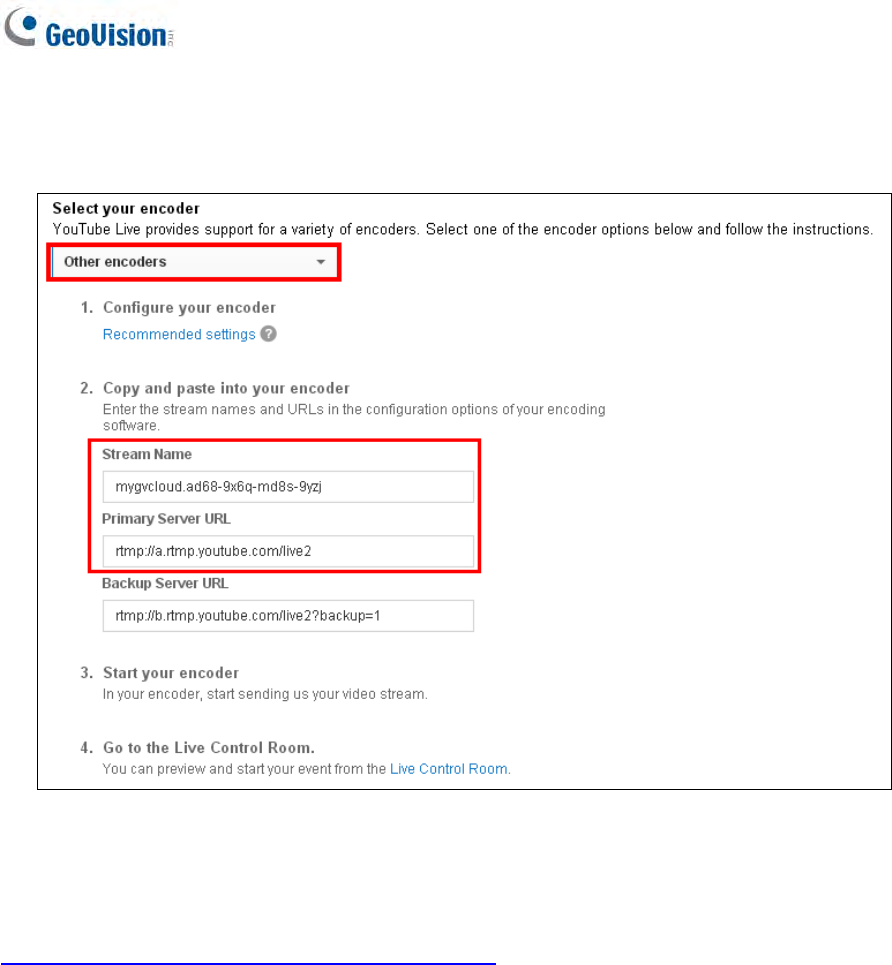
5. Select Other encoders and copy and paste Stream name and Primary Server URL to
myGVcloud Portal.
6. Click Live Control Room to preview and start streaming.
You can also watch the demo video below to see how to set up live stream.
https://www.youtube.com/watch?v=gMGNp5735_Y

Appendix
83
UStream
Refer to the instructions below on how to set up live stream:
https://ustream.zendesk.com/entries/21649743-How-to-stream-to-Ustream-using-Wirecast-
FMLE-TriCaster-or-any-RTMP-encoder