GEP TECHNOLOGY C1 IP Camera User Manual
GEP TECHNOLOGY CO.,LIMITED IP Camera
User Manual

GEP C1 User Manual
Important notes:
Use only the power adaptor attached with the product. Use unauthorized power adapter
may cause damage to your IP Camera.
IP Camera terminal shall be installed in an indoor environment where the rain or snow
could not pour it.
Do not touch the lens of the IP Camera at will. The optimum focus range has been set
before it is delivered out of the factory. If you turn the lens, it may cause incorrect focus
and vague images.
Do connect your mobile device to local Wi-Fi network firstly before initially installation of a
new camera.
RESET BUTTON functions when it was pressed and hold for at least 8 seconds.
Blue LED status:
Flash fast: Device automatic configuration. At this time, you can’t operate the device.
Flash slowly: Waiting for a Wi-Fi connection. At this time, you can find the camera SSID in
the Wi-Fi list and start to connect the camera.
Light on and no flash: Working condition. At this time, the camera has been connected to
a local Wi-Fi network. You can view and control the camera.
1 WELCOME
GEP C1 is a high-resolution (720P), feature-rich digital wireless IP Camera, designed for
superior performance in home/office environments. It combines a high quality digital
Video Camera with network connectivity and powerful android/IOS Apps to bring clear live
video to you wherever you are over the Internet.
You can use this IP Camera to monitor some special places such as your home and your
office. Also controlling and managing images are simple by clicking the app through the
network.
2 Features
☆ 720P HD Streaming video
☆ 4-split screen display
☆ Free on line Dropbox recording
☆ Pure wireless Wi-Fi settings.
☆ Support wireless network (WI-FI/802.11/b/g/n)
☆ Real time streaming
☆ Snapshot and synchronize with Album in your smart devices
☆ Event triggered notifications, Intelligent alerts give alarm in cause of motion detection
☆ Video recording and playback
☆ Enterprise-level security for data transference support WEP/WPA/WPA2 encryption
☆ Optimized H264 video compression for transmission
3 Packing List
Untie the pack and check the items contained against the following list:
☆ Camera X1
☆ User Manual X1
☆ DC Power Supply X1
☆ Suction Cup X1
NOTE: Please contact us immediately in case of any damaged or short of contents.
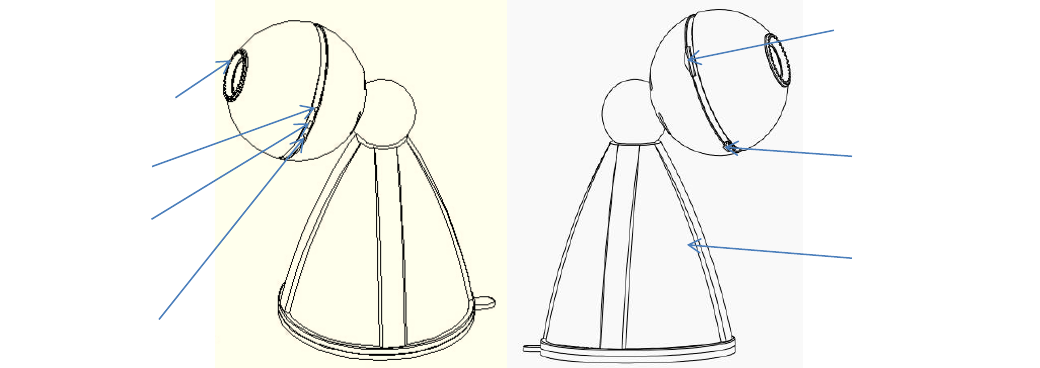
Mic
Indicator LED
Micro USB POWER
Micro SD Card slot
Reset Button
Lens adjustment knob
Suction Cup

4. Camera installation
4.1 For software, please scan below QR Code to install app “MyCam Pro” into mobile
device.
IOS Android
4.2. Plug the power adaptor into camera.
4.3. It takes approx 60 seconds to boot up the camera, and the indicator blue led will keep
flashing.
4.1 For hardware installation, please follow below steps.
Step1. Place the suction cup on a smooth surface (such as
glass, marble or metal etc.), and press the cup tight onto the
surface.
Step2. Hold and rotate the cup body 90° until it was
fastened.
Step3. Attach the camera to the metal ball on top of the
suction cup.
** Please be noted that the camera can be separately
adhered to a surface made of iron, as there is a magnet
inside *
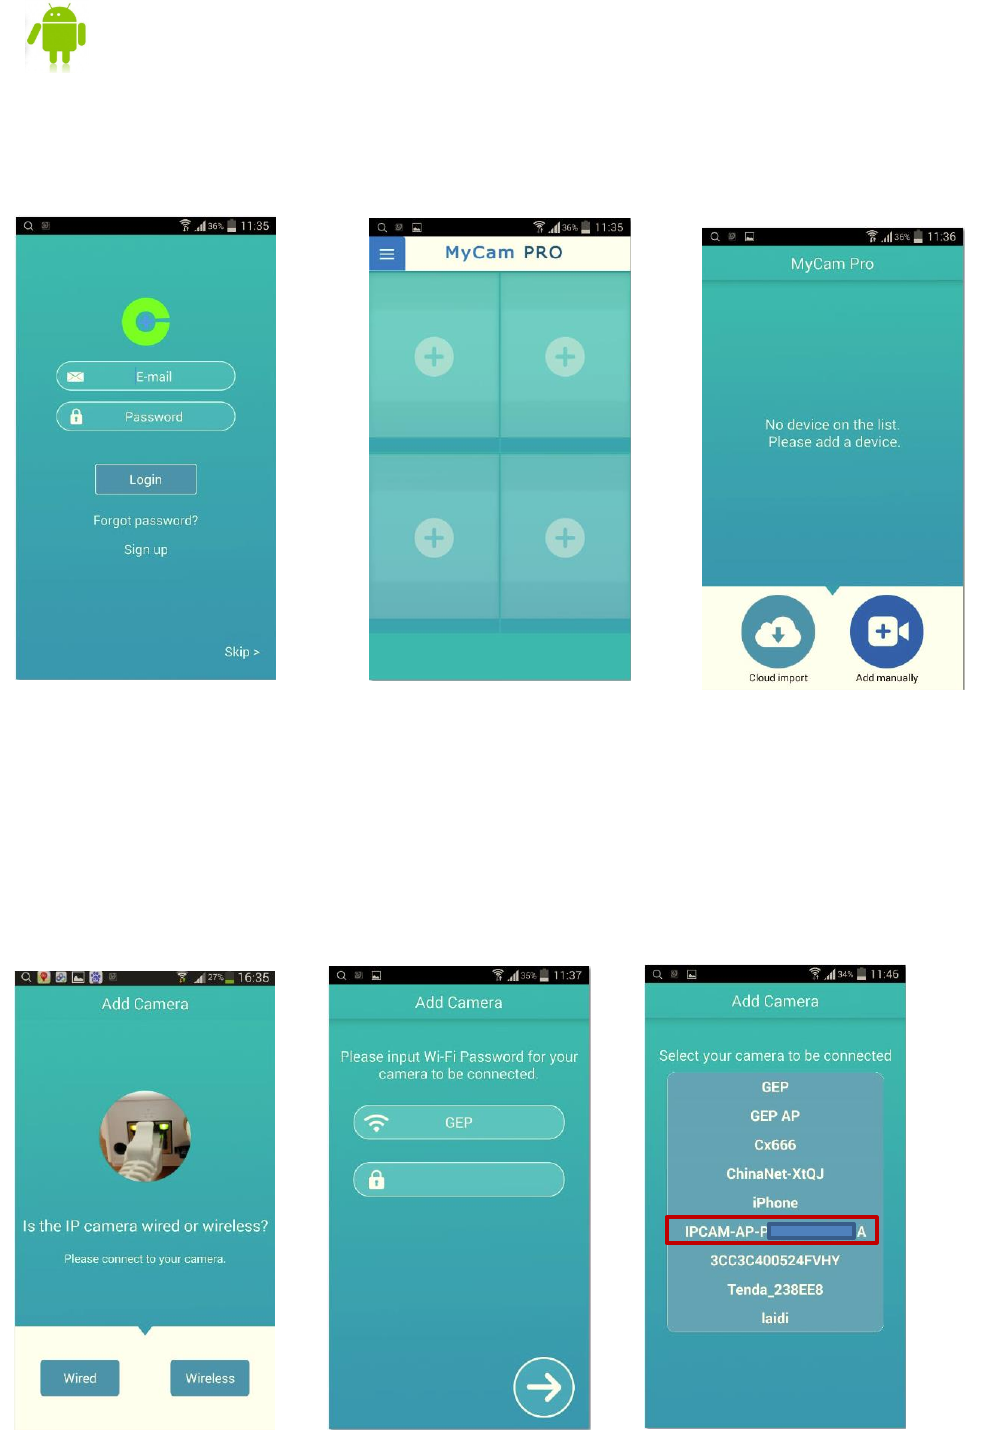
4.4 For Android user:
(Please make sure your mobile device has been connected to a local Wi-Fi)
1. Sign up to use “cloud”
Functions or “skip” to
process
2. Press “+” at the center of
each view window to add
camera
3. Select “add manually” for the
first time installation. Press “Cloud
import” for users who already
added camera at personal cloud.
4. Press “Wireless” for Model
C1 and C3
5. Input your local Wi-Fi
password
6. Connect to the camera by selecting Camera
Wi-Fi SSID “IPCAM-AP-XXXXXXXXXXX”
Note: a. Camera Wi-Fi SSID can be found in the
list when camera Blue LED flashes slowly.
b. Camera is connected to local Wi-Fi when
Blue LED stops flashing. At this time, Camera
Wi-Fi SSID can’t be found.
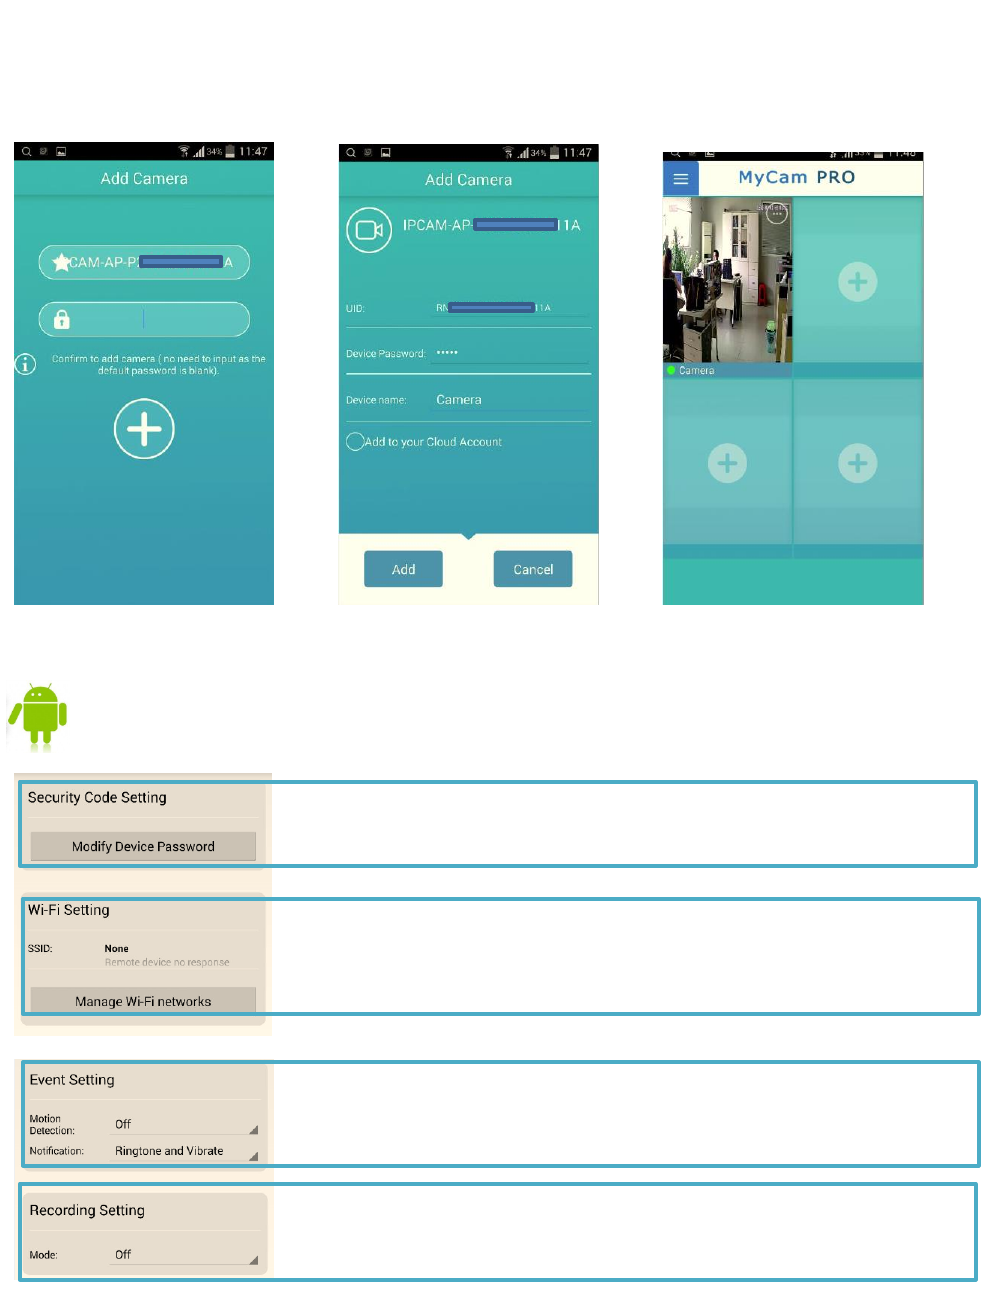
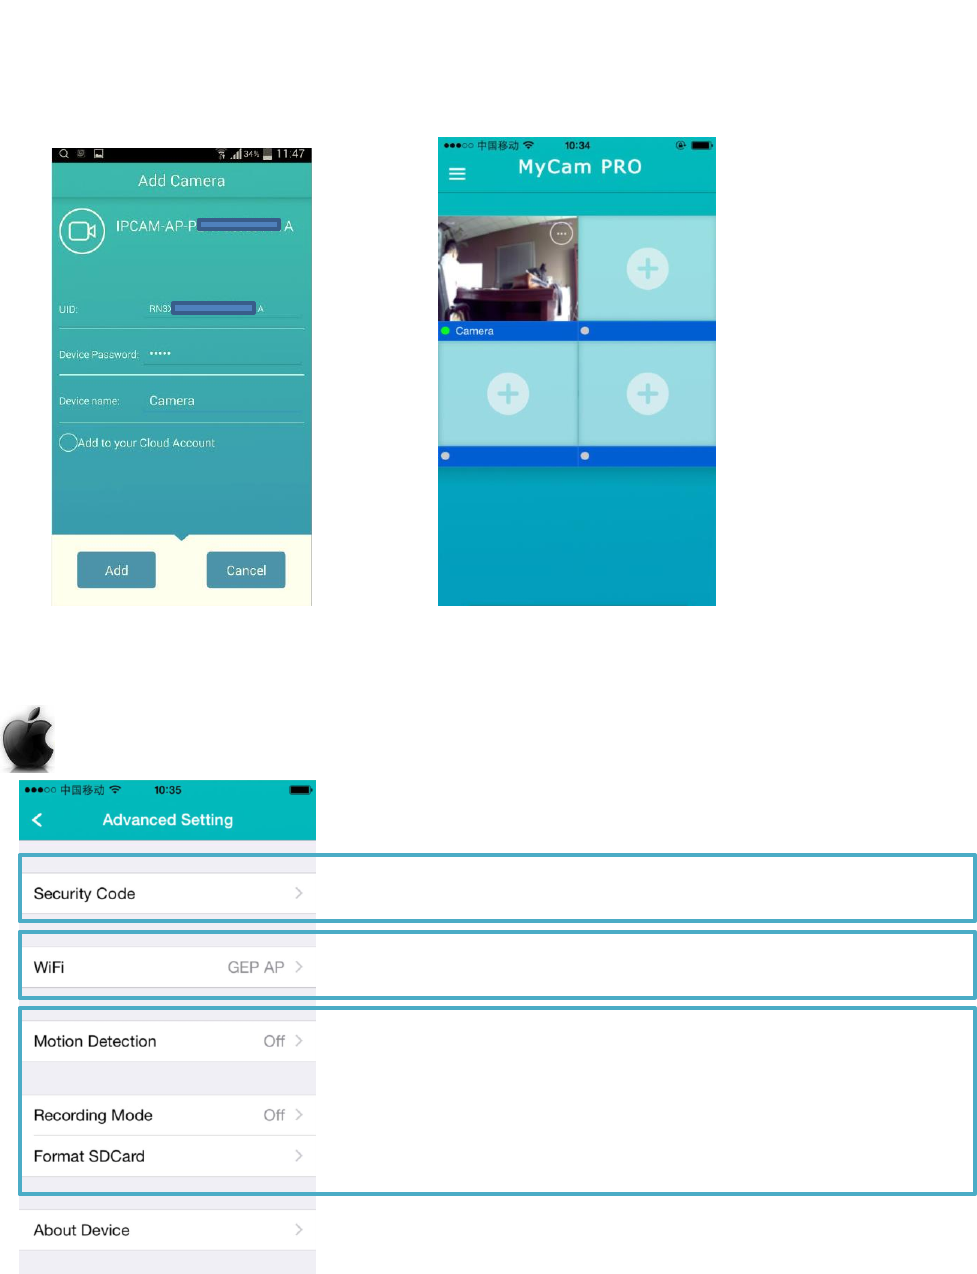
4.5 “Android” Advanced setting
7. Press “+” to proceed
8. Input device password, the
default is “admin”. This password
needs to be changed later for
safety reason.
9. Done and ready for Real
time streaming
Device Security Code (Device Password) must be reset after initial
installation to enhance safety.
Users can alter Wi-Fi connections remotely by selecting the
detachable wifi signal around the camera and input wifi password.
Users can active /close motion detection function. And can also select
type of notifications such as by ringtone and/or vibration.
This function works only when using micro SD card. By selecting
“ALARM” mode, less storage will be occupied. Please be noted that
this “Alarm” mode only valid when “motion detection” is NOT “off”.
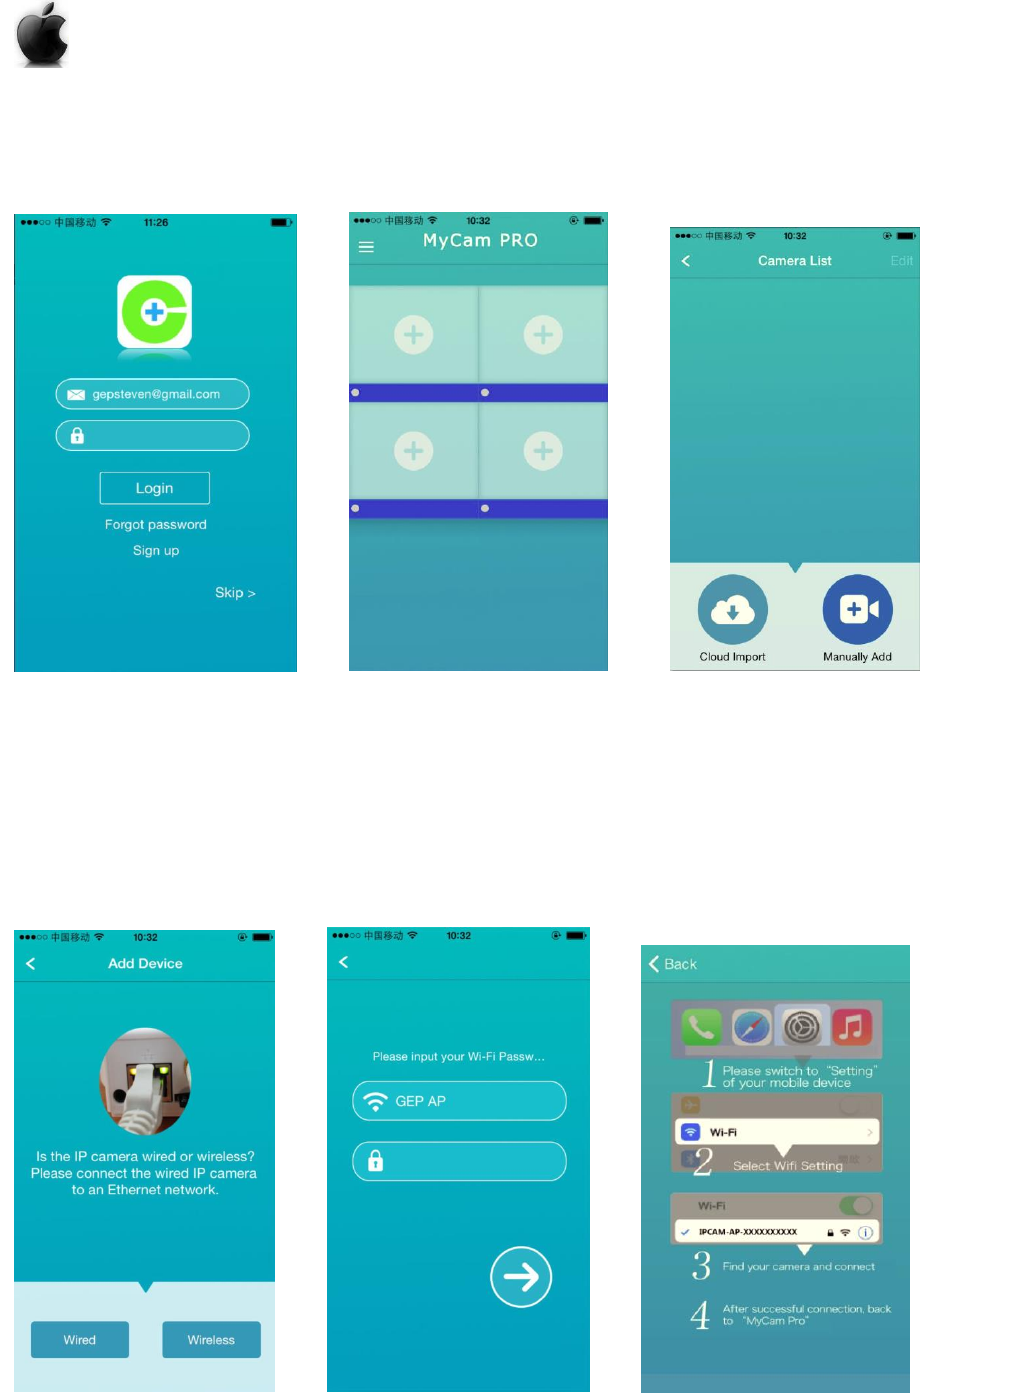
4.6 For Apple IOS user:
(Please make sure your mobile device has been connected to a local Wi-Fi)
2. Press “+” at the center of
each view window to add
camera
1. Sign up to use “cloud”
Functions or “skip” to
proceed
3. Select “Manually Add” for the
first time installation. Press “Cloud
import” for users who already
added camera in personal cloud.
4. Press “Wireless” for Model
C1 and C3
5. Input your local Wi-Fi
password
6. Follow below instruction to connect to the
camera at “setting” page of mobile devices.
Note: a. Camera Wi-Fi SSID is “IPCAM
-AP-XXXXXXXXXXX”. b. Camera Wi-Fi SSID can
be found when Blue LED flash slowly. c.
Camera is connected to local Wi-Fi when Blue
LED stops flashing. At this time, Camera Wi-Fi
SSID can’t be found.
4.7 “IOS” Advanced setting
7. Input device password, the
default is “admin”. This password
needs to be changed later for safety
reason.
8. Done and ready for Real
time streaming
Device Security Code (Device Password) must be reset after initial
installation to enhance safety.
Users can alter Wi-Fi connections remotely by selecting the
detachable wifi signal around the camera and input wifi password.
With Micro SD card, users can record the video stream locally.
By selecting “ALARM” recording mode, less storage will be occupied.
And this “Alarm” mode only valid when “motion detection” is NOT
“off”.
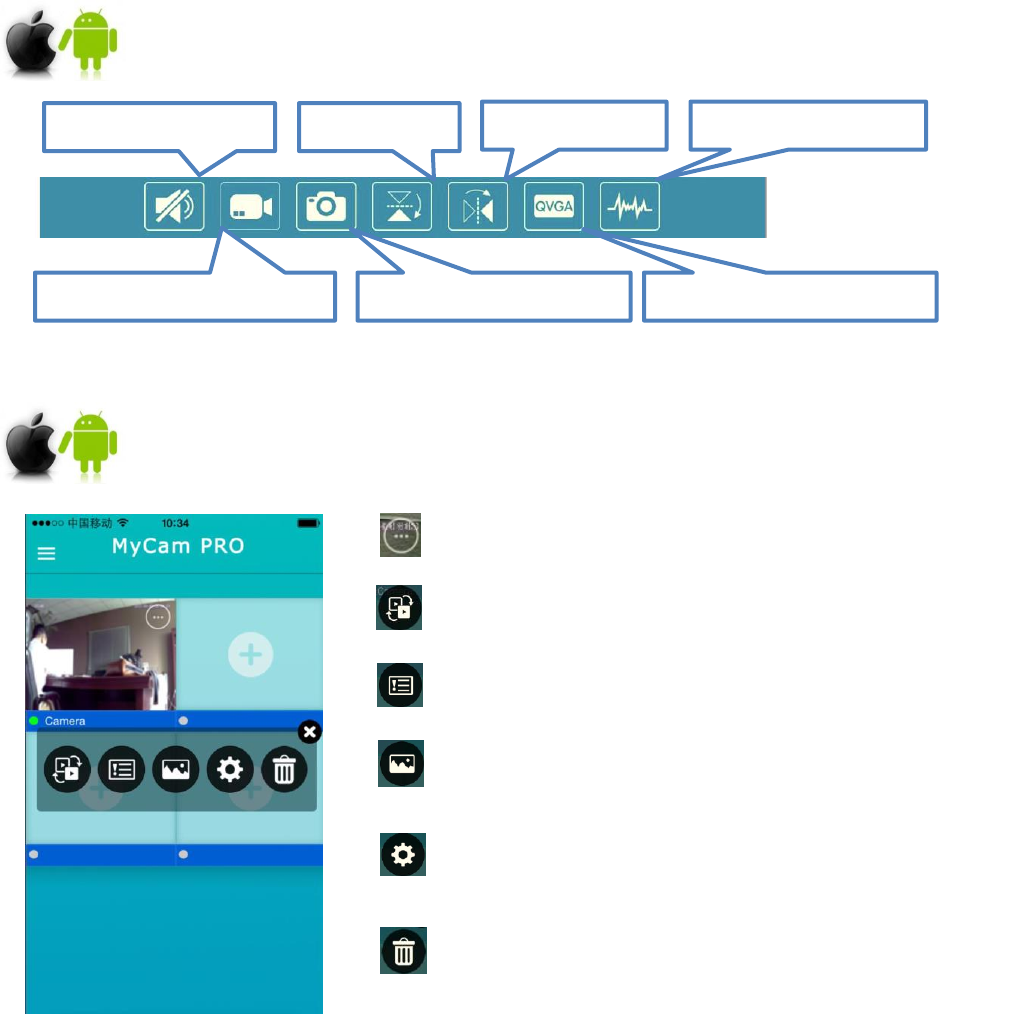
5 “View window” settings
6 “Device” settings
“Mic”; default is close
“Flip” the view
“Mirror” the view
view
“Environment” settings
Record video at mobile phone
Snap shoot at mobile phone
Adjust video quality manually
Press the circle at up-right corner of each living view
window to active the device setting panel.
“Device list” which shows all cameras connected to this app.
Users can remove cameras. This support up to 16 devices.
“Event list” which shows all motion detection notifications by
this camera. This function works only with micro SD card
“Record list” which shows recorded videos and snapshots by
this camera
“Advanced setting” by which users can modify device
password, set motion detection, change wifi connection, set
SD Card recording etc.
“Delete” which removes this view only. will not remove the
camera from APP

7 Trouble shooting
7.1 Have forgotten the device password.
--To reset the password, press and hold down the RESET BUTTON for at least 8 seconds.
(Please keep the power on when do RESET). Default device password: admin
7.2 Can’t find the camera Wi-Fi name “IPCAM-AP-XXXX” in mobile Wi-Fi list during initial
installation process.
-- Wait about 2 to3 minutes after power on the camera until the indicator LED flash slowly.
7.3 Can’t install the camera
-- Be sure your mobile device has been connected to a local Wi-Fi and you know the
password;
7.4 The video stream getting delay
-- The image frame rate is subjected to network bandwidth. You can adjust the video
quality to resolution of 640*360.
7.5 The video image getting vague
-- The most possible reason is the focal length of the camera lens changes. You can adjust
lens by rotate the Lens adjustment knob slightly until the image clear.
7.6 Can’t hear when press the “Mic” button .
-- You need to increase the sound volume of your mobile device.
7.7 Can’t talk when press the “Mic” button .
-- This function does not work at this model (C1).
7.8 Can’t add the same camera to another mobile device
-- Please select “WIRED” at step 3. If the mobile device is within the same LAN network as
the camera, just use “Search” function. If not, input the UID and device password to add.
Device UID can be found at “Device Setting” page.
7.9 The camera didn’t connect to local Wi-Fi after the installation process.
-- You need to delete the device from you app from the “device list” and install the camera
following the instruction from the 1st step. Until the blue LED stops flashing, that indicates
that the camera is connected to local Wi-Fi.
7.10 I am an expert and want to configure the camera further.
-- You can visit 192.168.234.1 after connecting to the camera through Wi-Fi using IE. The
camera will be at AP mode if not connected to an existing Wi-Fi router.

8. Specifications
Certification
Warranty
CE, FCC, RoHS
Limited 2-year warranty(Not including US and China mainland)
Environment
Operating Temperature
-10°C ~ 50°C (14°F ~ 122°F)
Operating Humidity
20% ~ 85% non-condensing
Storage Temperature
-20°C ~ 60°C (-4°F ~ 140°F)
Storage Humidity
0% ~ 90% non-condensing
Power
Power Supply
DC 5V/2.0A
Power Consumption
7 Watts (Max.)
Physical
Dimension(LxWxH)
93*70*106 mm
Net Weight
170g
Other
Features
Motion Detection
Intelligent notification
Privacy Zone
Set privacy zone manually (using PC)
Storage
local storage, support up to 32GB Micro SD card
Firewall
Supports IP Filtering
Reset
Reset button is available
Operating System
Microsoft Windows 2000/XP, Vista, 7, 8;Mac OS
iOS, Android
Wi-Fi
Wireless Standard
IEEE802.11b/g/n
Data Rate
IEEE802.11b: 11Mbps(Max.);
IEEE802.11g: 54Mbps(Max.);
IEEE802.11n: 150Mbps(Max.).
Wireless Security
WEP, WPA, WPA2
Remote Access
P2P
Network Protocol
IP, TCP, UDP, HTTP, HTTPS, SMTP, FTP, DDNS, UPnP
Audio
Input
Built-in Mic
Audio Compression
G.726
Video
Image Compression
H.264
Image Frame Rate
30fps maxmium, downward adjustable
Resolution
720P(1280 x 720), VGA(640 x 480)
Stream
Dual stream
Image adjustment
brightness/contrast adjustable by device automaticlly
Flip image
flip and mirror adjustable by user
Lens
Lens Type
2.8mm Glass Lens
Angle of View
95°
ITEMS
GEP C1
Image
Sensor
Sensor
High Definition Color CMOS Sensor
Display Resolution
1280 x 720 (1 Mega pixels)
FCC Statement
This equipment has been tested and found to comply with the limits for a Class B digital device,
pursuant to Part 15 of the FCC Rules. These limits are designed to provide reasonable
protection against harmful interference in a residential installation. This equipment generates
uses and can radiate radio frequency energy and, if not installed and used in accordance with
the instructions, may cause harmful interference to radio communications. However, there is
no guarantee that interference will not occur in a particular installation. If this equipment does
cause harmful interference to radio or television reception, which can be determined by turning
the equipment off and on, the user is encouraged to try to correct the interference by one or
more of the following measures:
-- Reorient or relocate the receiving antenna.
-- Increase the separation between the equipment and receiver.
-- Connect the equipment into an outlet on a circuit different from that to which the receiver is
connected.
-- Consult the dealer or an experienced radio/TV technician for help.
Changes or modifications not expressly approved by the party responsible for compliance
could void the user's authority to operate the equipment.
This device complies with part 15 of the FCC Rules. Operation is subject to the following two
conditions:
(1) This device may not cause harmful interference, and
(2) this device must accept any interference received, including interference that may cause
undesired operation.
The antenna(s) used for this transmitter must be installed to provide a separation distance of at least 20 cm
from all persons and must not be co-located or operating in conjunction with any other antenna or
transmitter.