GIGA BYTE TECHNOLOGY GN-BC01 802.11g PCI Wireless Router User Manual User s manual rev 2
GIGA-BYTE TECHNOLOGY CO., LTD. 802.11g PCI Wireless Router User s manual rev 2
Contents
- 1. Users Manual 1
- 2. Users Manual 2
Users Manual 1
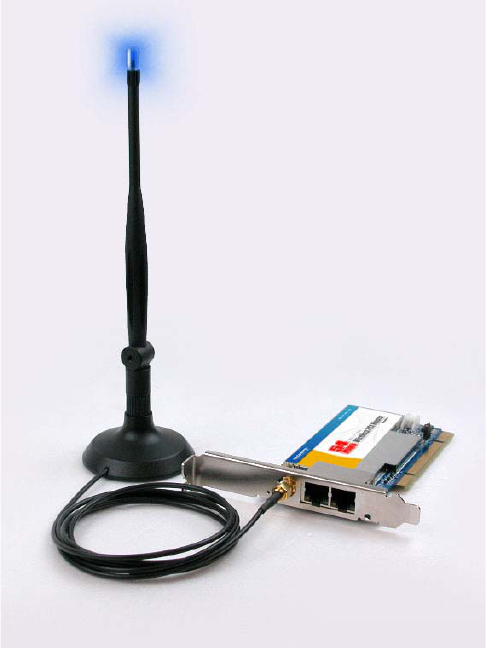
AirCruiser G Desktop Router
1
ʳ
ʳ
ʳ
AirCruiser™ G Desktop Router
GN-BCO1
ʳ
ʳ
User’s Guide
2
Contents
Chapter 1 Introduction..................................................... 1
Overview..........................................................................................1
Features...........................................................................................1
Package Contents ..........................................................................2
AirCruiser G Desktop Router Rear Panel ....................................2
Chapter 2 Installation .................................................... 3
Installing the Router.......................................................................3
Chapter 3 Connections & Configuration ........................ 7
Making a Wired Connection ..........................................................7
Chapter 4
Configuring the AirCruiser G Desktop Router ........... 9
Chapter 5 AirCruiser G Desktop Router Settings ........ 12
Login to the AirCruiser G Desktop Router.................................12
AirCruiser G Desktop Router Configuration Utility ..................13
Chapter 6 Advanced Settings..................................... 14
The Network Configuration Screen ............................................14
The Wireless Configuration Screen ...........................................20
The Static Routing Table Screen ................................................25
The Virtual Server Screen............................................................26
The Firewall Rule Screen.............................................................28
The DNS Configuration Screen...................................................29
Remote Access Screen................................................................31
Chapter 7 Using Management Tools ............................ 32
The PPP Monitor Screen..............................................................32
Manage Port Configuration Screen ............................................33
The Reboot Screen.......................................................................34
AirCruiser G Desktop Router
3
The Initialization Screen ..............................................................35
The Change Password Screen....................................................36
The Change WAN MAC Screen ...................................................37
The Upgrade Firmware Screen ...................................................38
The Backup / Restore Screen......................................................39
The Log Information Screen........................................................40
The Ping Screen ...........................................................................41
The About Screen.........................................................................42
Configuration Buttons .................................................................43
Smart Setup Button......................................................................43
Setup Wizard Button ....................................................................43
The Status Button.........................................................................44
WAN Ethernet Status....................................................................46
ARP Table......................................................................................47
Routing Table................................................................................48
The Logout Button .......................................................................49
Chapter 8 Troubleshooting............................................ 50
Appendix A: Connection Troubleshooting .................. 52
Appendix B Glossary ..................................................... 56
Appendix C Regulatory.................................................. 59
Appendix D Specifications ............................................ 61
Appendix G Warranty..................................................... 62

AirCruiser G Desktop Router
1
Chapter 1 Introduction
Overview
The AirCruiser G Desktop Router, also known by its model name GN-BC01,
has all the features a modern wireless router should. It’s a single port
10/100Mbps Wi-Fi access point, firewall and ADSL router in a PCI board. Yes,
that’s correct – a wireless router on an averaged sized PCI board. Don’t be
fooled by its striking similarity to a typical wireless PCI adapter; two Ethernet
ports plus an antenna connector are the key to distinguish it from an ordinary
wireless adapter.
The antenna that comes included with the AirCruiser G Desktop Router is
unlike any other - there is a blue LED atop the tip which will flash at intervals –
fast flashing indicates faster transmissions. It has a beefed up 3dBi gain
compared with the 2dBi antennas that are bundled with most standard routers
on the market and that translates into better wireless performance!
The AirCruiser G Desktop Router’s PCI form factor is a breakthrough in
wireless networking technology. Now, end-user’s can realize significant
space-saving benefits on their desks, shelves or wherever they’d traditionally
deploy a wireless router. Once installed and connected, the AirCruiser G
Desktop Router allows users to share network resources over the 10/100Mbps
LAN port as well as enjoy wireless speeds of up to 54Mbps. For added
versatility, it is also compatible with the 802.11b wireless standard.
GIGABYTE raises the bar on easy-to-use and setup wireless home networking
user experience with the AirCruiser G Desktop Router.
Features
• Interoperability with 54Mbps (802.11g) and 11Mbps (802.11b) devices
• Single 10/100Mbps Ethernet LAN port
• Built-in SmartSetup 3
• Wake On LAN function
• Hardware reset button
• 64 / 128-bit WEP
• Wi-Fi® Protected Access (WPA)
• Dynamic DNS
• UPnP™ (Universal Plug and Play)
• Network Address Translation (NAT)
• VPN pass-through
• 802.1x RADIUS Authentication
Package Contents
Please check that the AirCruiser G Desktop Router package contents include:
x AirCruiser G Desktop Router
x LED equipped 3dBi high gain magnetic mountable antenna
x Cat. 5 Ethernet patch cable
x AirCruiser G Quick Installation Guide
If there are any missing or damaged parts, please contact your local distributor
or dealer immediately. If a replacement unit is needed, return the device with
the original packing material, otherwise the warranty will be voided.
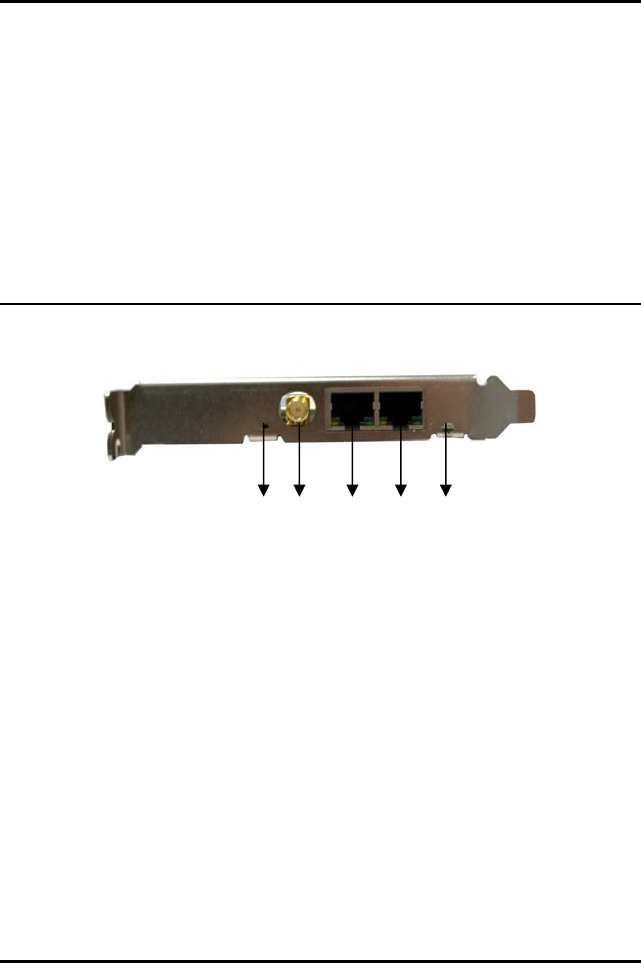
AirCruiser G Desktop Router Rear Panel
Figure 1-1 – AirCruiser Connectors
X Reset
Press and hold for 5 seconds to reset to factory default.
Y External Antenna Connection
The dipole-type 2.4GHz antenna is removable
Z Internet Connection (WAN port)
Connect your broadband RJ45 cable from your DSL modem.
[Local Area Network Connection (LAN port)
Connect the Router to other PCs on your wired network or other Ethernet
network devices.
\Power LED
Solid green LED indicates OK.
XY Z [ \

AirCruiser G Desktop Router
3
Chapter 2 Installation
This chapter covers the installation of the AirCruiser G Desktop Router. The
AirCruiser G Desktop Router uses standby power from your PC to stay ‘always
on’, and receives power from the PCI bus – even with your computer off – when
working normally; you should see the power LED become steady green. Please
take note of this as you reach Step 3.
AirCruiser G Desktop Router - Factory Default Settings
SSID (Network Name) GIGABYTE
Broadcasting SSID YES
Wireless Security Open System (OFF)
IP Address of Web Configuration Utility 192.168.1.254
Configuration Utility Username/Password admin/admin
Installing the Router
Step 1: Power off your PC.
Step 2: Plug the AirCruiser G Desktop Router into an open PCI slot
on the motherboard and press gently until the card edge
connecter is fully inserted into the PCI slot.
Step 3: If working normally, you should see a green power LED
(see figure 2-1 below) and installation is complete! If
there is no green power LED please continue with Step
4.
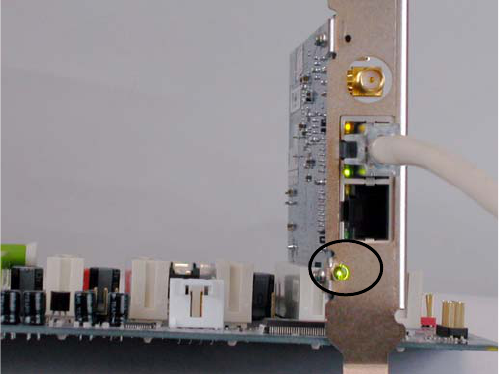
Figure 2-1 – Green power LED indicates normal state.
Step 3: [Steps 3 – 5: Older Motherboards Only]
Some older motherboards don’t deliver power through the
PCI bus, in this case the green LED will not illuminate and
you will need to install the power adapter interconnect.
Unplug the main power cable from the motherboard. Attach
the AirStream power adapter interconnect (included) to the
PC MAIN power cable, and then plug the other end into your
motherboard. (See Figures 2-2 & 2-3)

AirCruiser G Desktop Router
5
Figure 2-2 – Connect Power adapter interconnect (on right) to PC MAIN power
cable.
Figure 2-3 – Connect Power adapter interconnect to motherboards ATX power
connector.
Step 4: On the power adapter interconnect, locate the two pin power
connector wire, and attach it to the two pin power connector
on the AirCruiser G (Figure 2-4).
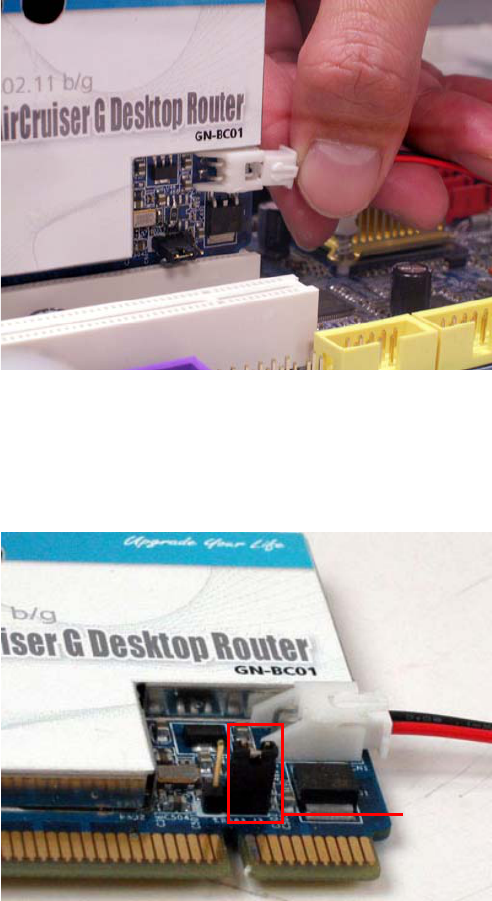
Figure 2-4 – Attach AirCruiser G power connector
Step 5: Locate the 3-pin jumper next to the power connector, and
move it so as to cover the two rightmost pins. (Figure 2-5)
Figure 2-5 – Move pin jumpers to match position as shown
Hardware Installation Finished!
Please proceed to Chapter 3 – Connections & Configuration.
Jump pins 2 & 3

AirCruiser G Desktop Router
7
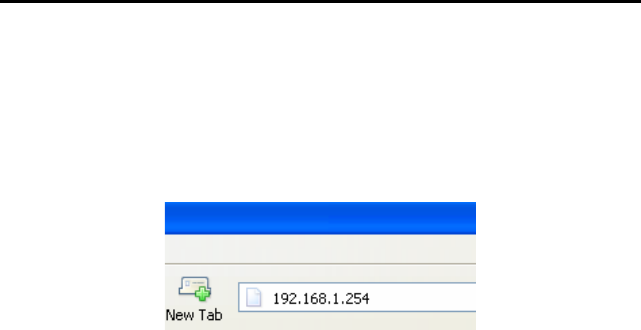
Chapter 3 Connections & Configuration
Making a Wired Connection
Now that you’ve installed the AirCruiser G, like any other router, you’ll need to
configure it with your ISP internet connection. This section will help you
through the process, which is made easier by SmartSetup 3.
The AirCruiser G has one WAN (Internet) port and one LAN (network) port.
(The WAN port being the one closest to the antenna connector). You can
configure the AirCruiser both wirelessly or wired, however we strongly
recommend using the wired connection for initial setup, as it will make the
procedure less error prone.
Step 1 Screw in the antenna, and then connect the Internet cable coming
from your ADSL/Cable modem into the WAN port of the AirCruiser
Wireless PCI Router. (See figure 3-1 below)
Figure 3-1 – WAN (Internet) cable
Step 2 Using the RJ45 patch cable provided, plug one end into the LAN port
of the AirCruiser G, and the OTHER END into the LAN port of your
Desktop NIC or your LAN port of a Notebook PC. (See figure 3-2
below)
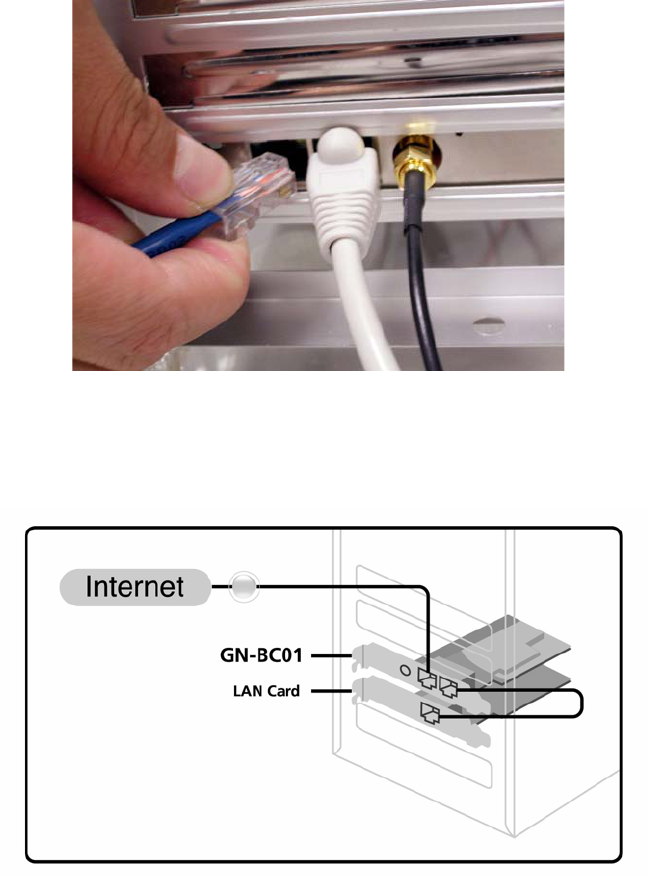
Figure 3-2 – LAN (network) cable for initial setup.
The other end will go into your Notebook PC or Desktop NIC.
Your wired configuration at this point should look like the figure 3-3 below.
Later, you can remove the short Ethernet patch cable, and install a switch,
creating your own private LAN.
Figure 3-3 – Cabling for initial setup.
Please proceed to Chapter 4 – Configuring the AirCruiser G
Desktop Router to complete installation.
AirCruiser G Desktop Router
9
Chapter 4
Configuring the AirCruiser G Desktop Router
Step 1 Power ON your computer, and then launch the web browser of your
choice. In the examples below, we use Mozilla Firefox.
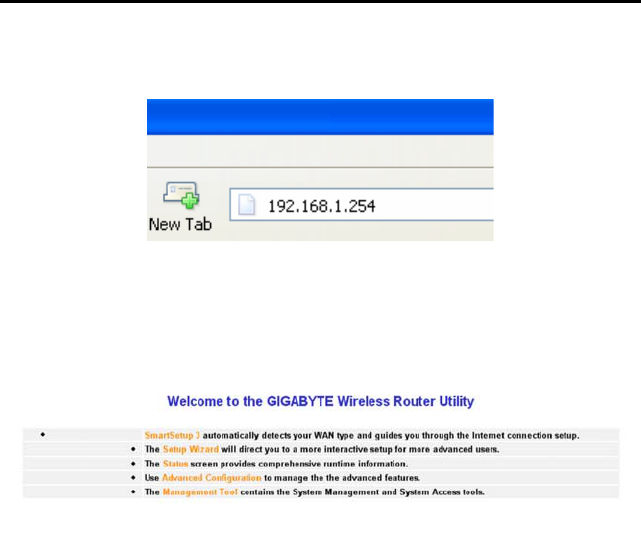
Step 2 SmartSetup 3 should automatically detect your wireless network
and open up the web-based configuration screen. If it does not,
simply type 192.168.1.254 into the address bar of your web
browser.
Figure 4-1 – Access the AirCruiser G
configuration menu using any web browser.
Step 3 SmartSetup 3 should open the web-based configuration screen,
and auto detect your type of Internet Connection (PPPoE, Static,
Dynamic, etc.) if it does not, simply type 192.168.1.254 into the
address bar of your web browser. When prompted for
username/password type: admin for both.
Types of Broadband Internet connections automatically detected by
SmartSetup 3:
Dynamic IP Address If you use a dynamic IP address, you can directly
connect to Internet without having to login. The
Router will then automatically restart.
PPPoE Most common type of ISP Connection. If you use a
PPPoE connection, please enter your ISP user ID
and password.
Static IP address If you use a static IP address, please enter your
WAN IP address, WAN subnet Mask, WAN
Gateway, and DNS information provided by your
ISP.
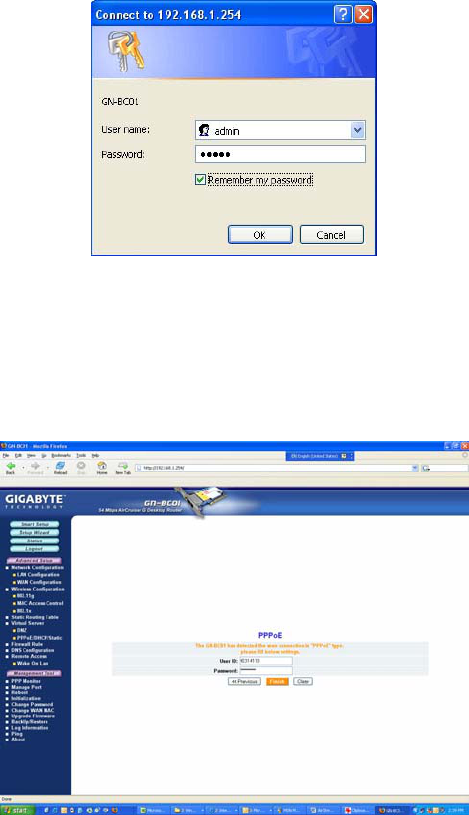
Step 4 When prompted by the dialog box for username and password, key
in the default user name: admin and the default password: admin
Press OK.
Figure 4-2 – The username/password is admin/admin.
Step 4 The AirCruiser G Desktop Router’s web browser based
configuration screen will prompt you for certain ISP related
information (Figure 4-3). You can contact your ISP service
provider for this information at any time. After entering the ISP
information, click the Finish button. The Router will save and
restart automatically.
Figure 4-3 – Initial ISP Internet setting for the AirCruiser G.
The AirCruiser G Desktop Router is now active! The SSID (Network
Name) is GIGABYTE, and should now be visible from any wireless
11b or 11g adapter.
AirCruiser G Desktop Router
11
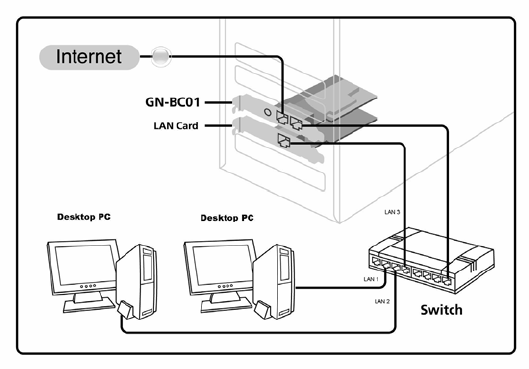
Optional: Setting up a home LAN configuration using the AirCruiser
G Desktop Router
Setting up a Local Area Network using the AirCruiser G is exactly the same
as you would do for any other wireless router, just connect a switch to the
LAN port of the AirCruiser G, and then attach your network devices to the
switch (figure 4-4). By connecting PC’s to the 10/100 Switch as shown,
we have three nodes on the new LAN - the two Desktop PC’s (LAN 1 &
LAN 2) and the NIC Card in your main Desktop (LAN 3).
Figure 4-4 – Typical home LAN using AirCruiser G.
Chapter 5
AirCruiser G Desktop Router Settings
The default settings of your AirCruiser G Desktop Router generally do not
require modification. However, from time to time you may want to change
settings such as firewall or SSID number. You can change AirCruiser Wireless
PCI ROUTER wireless router settings using an Internet browser (Internet
Explorer or Netscape Navigator) and accessing the web-based utility.
Login to the AirCruiser G Desktop Router
Whenever you want to change Router settings, you’ll need to open the
AirStream web configuration utility. In the address bar of your browser, type
192.168.1.254 and then press the ENTER key.
When you login, you will be greeted by the AirCruiser Welcome Screen (Figure
5-1). On the left panel are the Advanced Settings, Management Options, and
SmartSetup wizards which allow easy access to the AirCruiser G configuration
settings.
Figure 5-1 – AirCruiser G Main Login Screen

AirCruiser G Desktop Router
13
AirCruiser G Desktop Router Configuration Utility
In Chapter 6 below, each of the configuration options will be introduced and its
parameters explained. Normally, users will not need to adjust any of the
AirCruiser G Desktop Router settings, however GIGABYTE recommends you
setup some form of security, or at least hide your SSID (Network Name).
After you have completed making modifications to the configuration settings of
your AirCruiser G, please click the Logout button to end your session.
Note: For security reasons, you will be automatically logged out of the
Configuration Utility after 5 minutes of inactivity.
Chapter 6 Advanced Settings
In this chapter, details for configuring the advanced settings of the AirCruiser G
Desktop Router are explained.
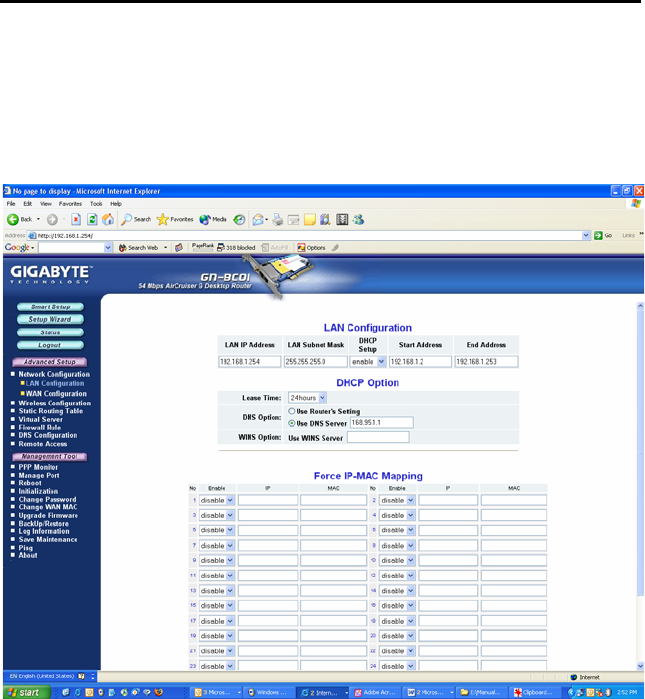
The Network Configuration Screen
The Network Configuration screen consists of two sub-areas: LAN
Configuration (which also includes DHCP Options, and Forced IP-MAC
Mapping), and WAN Configuration in which you can configure up to 4 backup
WAN connections (other internet service providers accounts) in the event your
primary WAN connection fails.
The LAN Configuration Tab
Figure 6-1 – LAN Config Screen
AirCruiser G Desktop Router
15
LAN Configuration
Allows you to modify the LAN parameters, and if you want to enable DHCP
automatic IP address assignments, you can enable it here, and specify a
Start and End address for the IP range.
DHCP Option
The DHCP server "leases" out address for specific times (Time To Live) to
the various hosts. If a host does not use a given address for some period
of time, that IP address can then be assigned to another machine. When
assignments are made or changed, the DHCP server must update the
information in the DNS server. The AirCruiser G DHCP Lease Table
displays the associated IP/MAC assignment and Time To Lease.
Force IP-MAC Mapping
Allows you to manually assign a specific IP address to a specific network
device (MAC address) on the network. This will be updated in the ARP
table automatically.
Verify the settings, and then apply these to your router, click the Submit button.
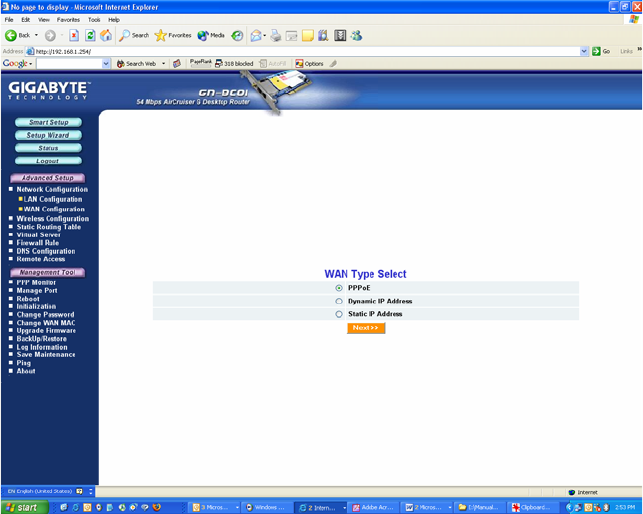
The WAN Configuration Tab
Select the type of Internet Service you are using, and press the NEXT>> button
to continue with modifications.
Note: If you don’t know which type of Internet connection you have, click
SmartSetup button, and it will auto detect this for you.
Figure 6-2 –WAN Config Screen
A screen based on the Internet (WAN) connection type you selected will appear
and provide parameter fields.
AirCruiser G Desktop Router
17
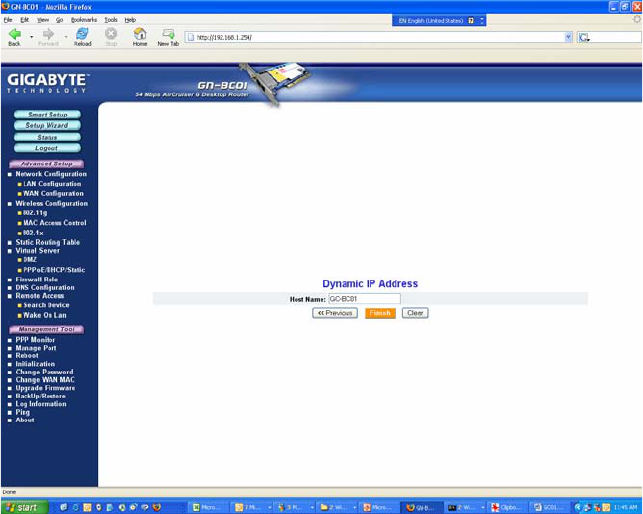
WAN Configuration – Dynamic IP Address
Figure 6-3 – Dynamic IP Config
Host Name
This is a free form field (Default BC-01) which assigns a host name to your IP
connection. You may choose a name of your preference, or leave the default.
Press Finish.

WAN Configuration - PPPoE
Figure 6-4 – PPPoE Config Screen
Your Internet Service Provider will supply you with the following account
information you will need:
xISP Name
xUser ID/Password
xService Name
xAC Name
xDNS1 and DNS2 Address
xDNS Domain Name
Enter the information provided by your ISP in the fields provided.
AirCruiser G Desktop Router
19
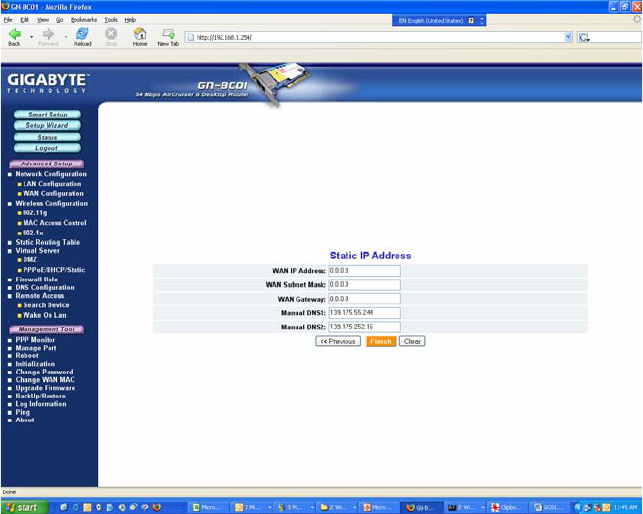
WAN Configuration Tab - Static IP Address
Figure 6-5 – Static IP Config screen
Your Internet Service Provider will supply you with the following account
information you will need:
xISP Name
xWAN IP Address
xWAN Subnet Mask
xWAN Gateway
xDNS1 and DNS2
xDNS Domain Name
This information is all provided by your ISP. In the event that your ISP has
assigned you several Static IP addresses, you will only need to one.

The Wireless Configuration Screen
The Wireless Configuration screen allows you to configure the Router’s
WLAN function.
The 802.11g Tab
Figure 6-6 – 802.11g Main Config Page
Region
Indicates the geographical region you are in. Verify that the region
indicated is correct. If not, please contact your local distributor or dealer
immediately.
802.11g Only Mode
The mixture of both 11b and 11g traffic on your wireless network results
in the reduction of the network performance. For this reason, the
802.11g Only Mode allows you to restrict all traffic to 11g (54Mbps)
traffic only. Keep in mind, however that enabling this feature comes at
the expense of eliminating all 11b based traffic by the AirCruiser G.
Enable will restrict all traffic to 802.11g traffic, while disable will allow a
mixture of both 11b and 11g. The default setting is Disable.

AirCruiser G Desktop Router
21
Auto Channel Select
The Router uses channel 6 as the default channel. Enabling Auto
Channel Select allows the Router to auto-select a non-conflicting
channel.
Channel
The channel may be manually changed (if there are other wireless
networks operating in your area) by selecting a channel from the
drop-down list.
SSID
The SSID (Service Set Identifier) is the name of your wireless network.
The SSID is up to 32 ASCII characters in length and case sensitive (i.e.
Letters in upper case “A~Z” and lower case “a~z” are unique). The
default SSID is “GIGABYTE”. To change the SSID, type in the SSID you
want to use in the SSID field and click Submit. If you make a change to
the SSID, any wireless devices on your network must also be
reconfigured to connect to the new network name.
Rate
Select a wireless data transmission rate from the drop- down list. The
default setting auto/best automatically detects and sets the optimum
transmission rate.
Hidden SSID
For security purposes, you may choose to hide your network’s SSID by
selecting enable from the drop-down list. This will prevent computers
scanning for the presence of wireless networks to detect your network
name. The default setting is disable.
Authentication Type
Select an authentication type from the drop-down list. The default setting
is Open System.
Open System: The sender and the receiver do NOT share a secret key.
Each party generates its own key-pair and asks the receiver to accept a
randomly generated key. Once accepted, this key will only be used for a
short period of time. Afterwards, a new key will be generated and agreed
upon.
Shared Key: Authentication is based upon a secret key shared by both
the sender and the receiver. If Shared Key is selected, you cannot
choose the WEP disable option.

WPA Pre-shared key:, The WPA Pre-shared Key authentication
standard uses a password or “ key” between 8 and 32 characters. This
encryption key is changed after every dialog box using the Temporary
Key Integrity Protocol (TKIP), which allows users to change keys based
on dialog box and automatically synchronize keys between devices on
the network. The TKIP encryption algorithm is stricter than the one
used by WEP but is based on the same standard.
WPA: The 802.1x authentication protocol, allows users to authenticate
wireless network access through a RADIUS Server and is a required by
WPA standard. If no RADIUS Server exists in your network environment,
you still can use WPA through the use of WPA Pre-shared Key.
WEP Key
The AirCruiser G supports two WEP standards: 64-bit,152-bit. Select
either 64-bits or 152-bits from the drop-down list activate WEP
encryption. The 64-bits encryption uses 40 bits as a secret key,
(user-defined) and the remaining 24 bits are reserved. The 128-bits
encryption uses 104 bits as a secret key, (user-defined) and the
remaining 24 bits are reserved.
WPA Re-key
Enabling the requirement for WPA rekeying of a Passphrase for
increased security. Default is disable.
WEP Re-key Timer
Specify time (in minutes) for expiration of the current WPA Key.
WPA PSK Passphrase
The Passphrase must be between 8 and 64 characters.
WPA PSK Re-key
A user without a RADIUS server, may specify generating a new WPA
PSK key more frequently than each time he connects to the network.
WPA PSK Re-key Timer
Specify time (in minutes) for expiration of the current WPA PSK key
AirCruiser G Desktop Router
23
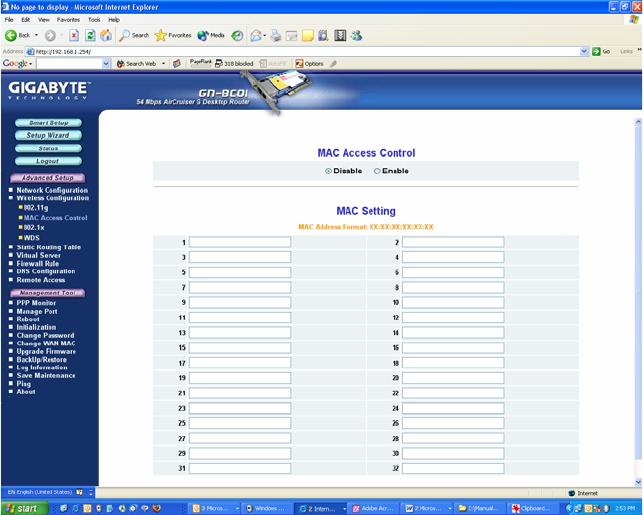
The MAC Access Control Tab
Figure 6-7 – MAC Access Control
The MAC Access Control screen allows you to specify the Media Access
Controller (MAC) address of up to 32 devices on your network. Only those
devices listed in the table will have access to transmit data through the
AirCruiser G. In this way, even if someone manages to obtain all the
information necessary to connect to your network, if their MAC address is not
permitted, they still cannot connect. Keep in mind, however that MAC
addresses can be spoofed, so it is not a panacea but rather another component
of your existing security process. Enable the feature, then key in the MAC
addresses to be allowed. Enter the MAC in the form separated by colon.
The default setting is Disable.
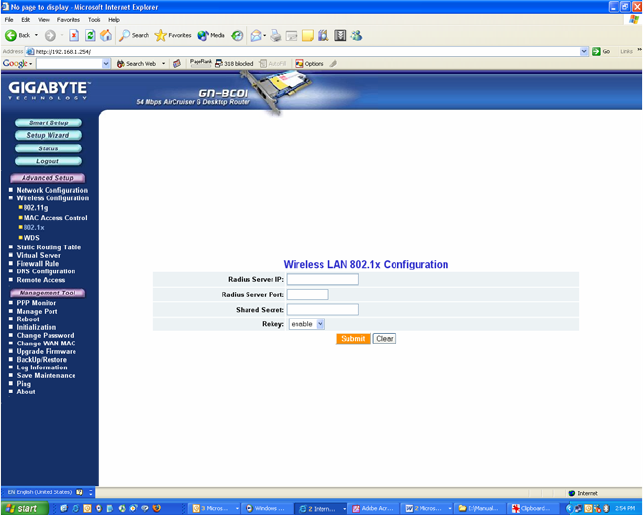
The RADIUS Server Configuration Tab
Figure 6-8 – RADIUS Config
Your AirCruiser G supports 802.1x and RADIUS Server authentication.
RADIUS provides a centralized, server-based authentication of client access to
the network.
RADIUS Server IP Assign an IP address for the RADIUS Server.
RADIUS Server Port Enter a value within the range 1~65536 for the
port.
Shared Secret Enter a password up to 256 characters
(uppercase “A~Z”, lowercase “a~z” or numeric
“0~9”) in length.
Verify the settings, and then to apply these to your network, click the Submit
button.
AirCruiser G Desktop Router
25
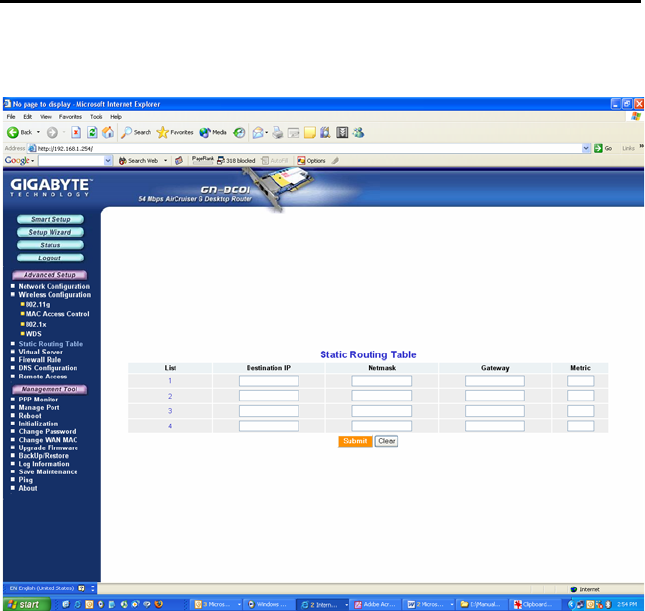
The Static Routing Table Screen
The Static Routing Table displays the AirCruiser G Desktop Router routing
settings. To add or modify, enter a value into the field and click the Submit
button.
Figure 6-9 – Static Routing Table
Destination IP
Enter the Destination IP address that will be assigned to a specific network
or host.
Netmask
Enter the netmask associated with the Destination IP.
Gateway
Enter an IP address that will be assigned to the interface connecting to
subnets.
Metric
The “Metric” value is a number between 1 and 15 that represents the
number of Routers between your network and the destination. Generally,
setting the Metric value as either 2 or 3 is sufficient for most applications. If
this is a direct connection, please set the value to 1.
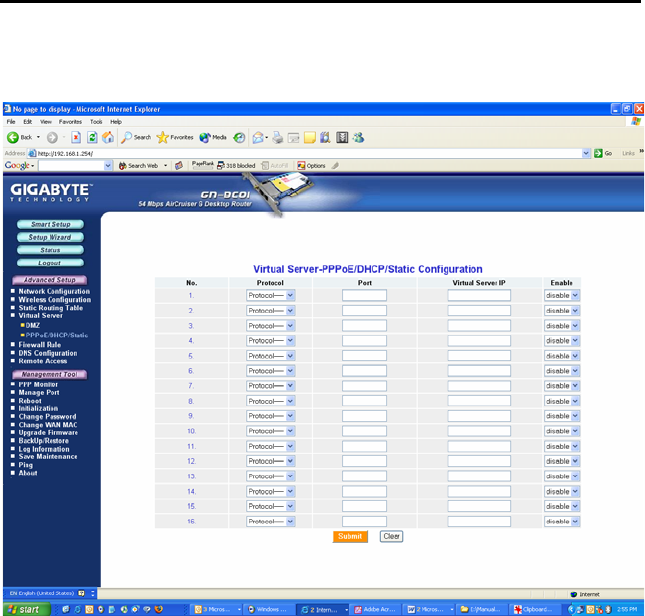
The Virtual Server Screen
The PPPoE/DHCP/Static Tab
A Virtual Server allows computers on the WAN side of the network to connect
with a PC server on the LAN side of the network.
Figure 6-10 – Virtual Server setup
For example, a PC on the LAN side with an IP address of 192.168.1.1 would
have the following virtual server settings:
¾Protocol: TCP
¾Port: 21
¾Virtual Server IP: 192.168.1.1
¾Enable: enable
In this case, any PC on the WAN side of the network can connect to the internal
FTP server (192.168.1.1) using the IP address on the WAN end of the
AirCruiser G Desktop Router.
AirCruiser G Desktop Router
27
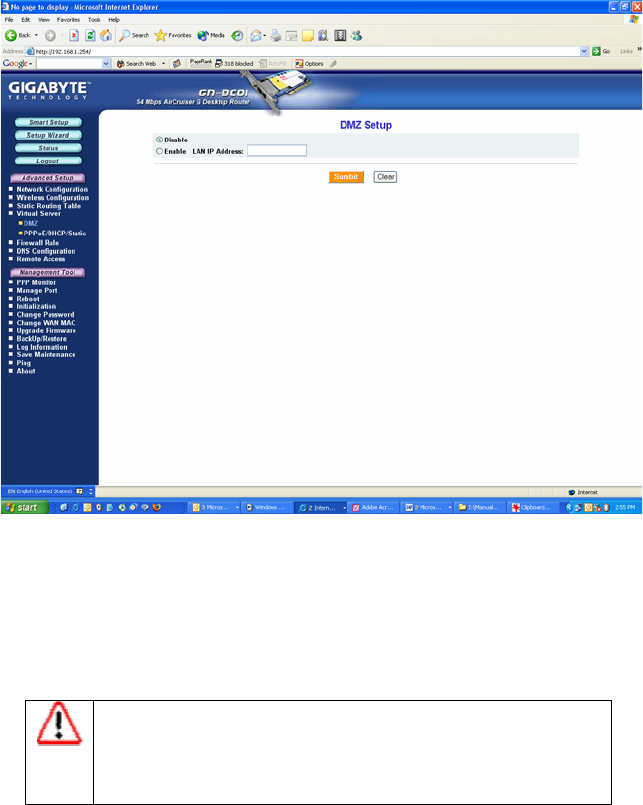
The DMZ Tab
The DMZ feature allows you to specify the IP address of the computer that will
be placed outside the firewall of your network.
Figure 6-11 – DMZ setup
With a firewall setup, it is often necessary to place some clients outside of the
firewall while leaving the others protected. You can do this using a
Demilitarized Zone (DMZ) to test or configure some applications (e.g. Internet
games, video conferencing, or VPN connections) or create a server connecting
to the Internet through the Intranet. Enter the IP Address of your computer
(e.g. 192.168.1.2) into the LAN IP Address field and click the Submit button.
Note: DMZ servers pose a security risk. A computer
designated as the default DMZ server loses much of the
protection of the firewall, and is exposed to exploits from the
Internet. If compromised, the DMZ server can be used to
attack your network.
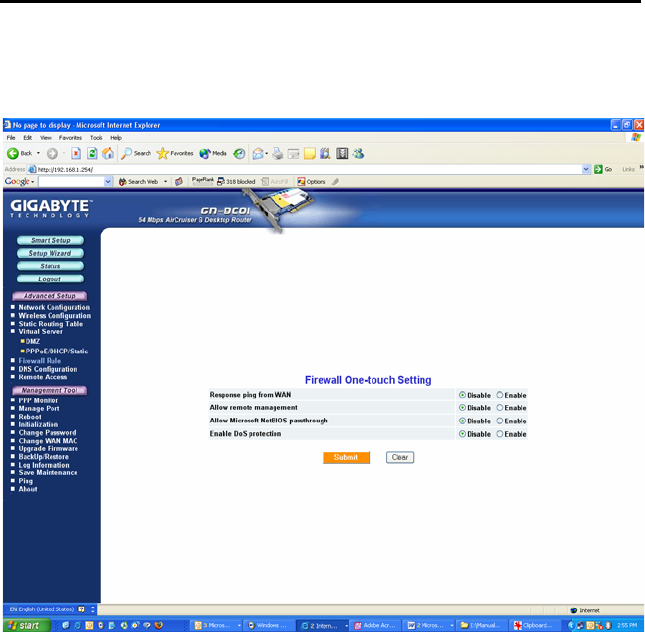
The Firewall Rule Screen
The Firewall Rule screen displays your network security settings. Use this
screen to quickly create network security policies to prevent unauthorized
access to your network.
Figure 6-12 – Firewall One Touch settings
Response Ping From WAN
When enabled, prevents this Router and its privately assigned IP
addresses from being broadcasted to the Internet.
Allow Remote Management
When enabled, allows remote configuration access via the Internet
(WAN), else only local (LAN) access is allowed.
Allow Microsoft NetBIOS Pass-through
A File and Printer sharing security, that when enabled, only allows
NetBIOS.
Enable DoS Protection
When enabled, Denial of Service type attacks are prevented.
AirCruiser G Desktop Router
29
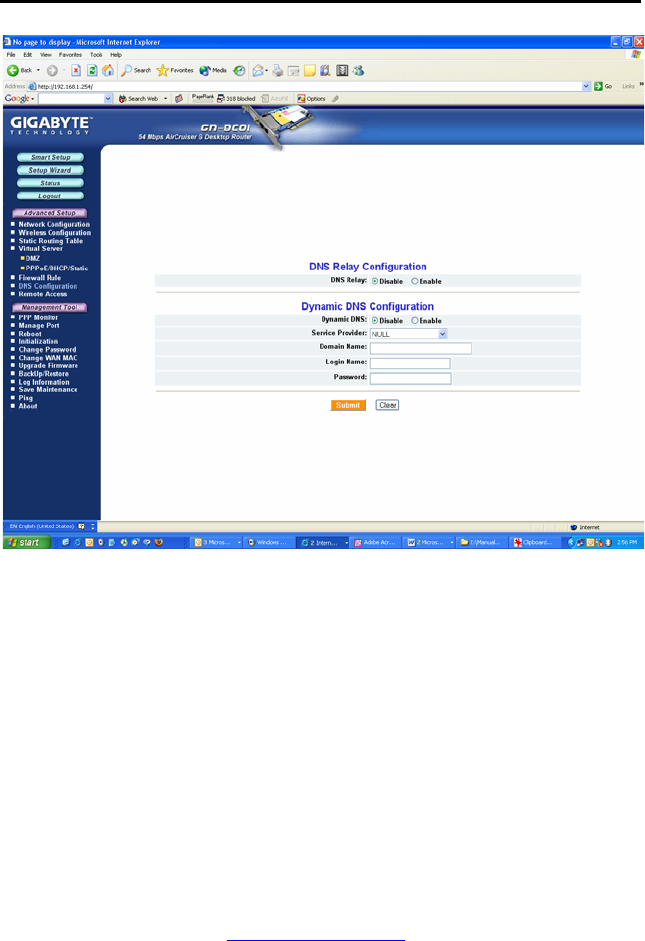
The DNS Configuration Screen
Figure 6-13 – DNS Config screen
DNS Relay
DNS Relay will set your PC's DNS entries to point to the Router’s
Gateway address, which will then forward DNS queries to the DNS server
used by the Router. This is needed when using DHCP to assign IP
address to the PC’s in you LAN. The default value of DNS relay is Enable.
Dynamic DNS
The AirCruiser G Desktop Router offers a Dynamic Domain Name Server
(DDNS) service that allows you to assign a fixed host and domain name to
a dynamic Internet IP address. This gives Internet users the ability to
connect with a virtual sever using a FQDN, rather than with an IP address.
Before using this feature, you must first register an account with the
dynamic DNS service. (http://www.dyndns.org)
Service Provider
From this pull down menu, enter the DDNS service with which you have
membership.
Domain Name
This is the DDNS URL assigned by the DDNS service.
Login Name
Enter the User Name for your DDNS account.
Password
Enter the Password for your DDNS account.
Wildcards
If your dynamic DNS provider allows using wildcards in resolving
your URL, you may select Enable to activate this function.
AirCruiser G Desktop Router
31
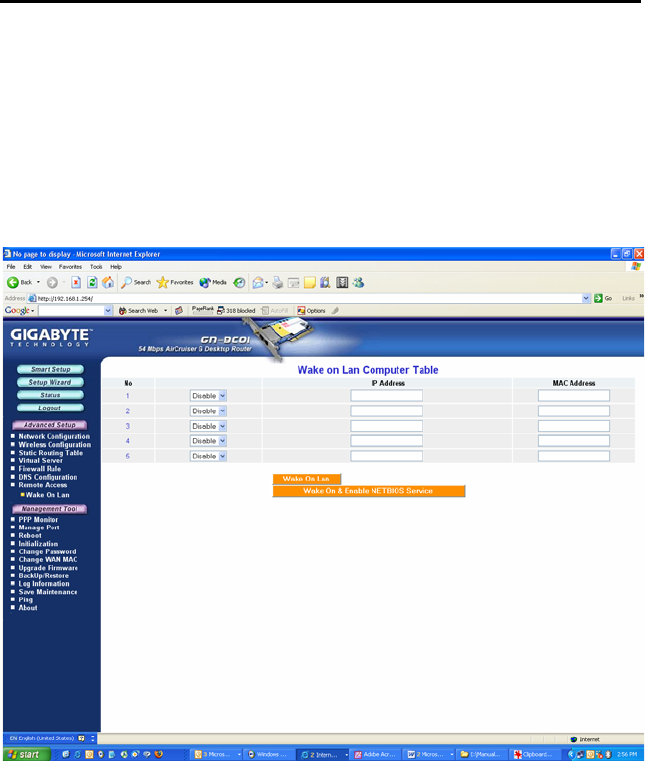
Remote Access Screen
Wake On LAN Table
With Wake-on-LAN, a router user can keep his systems turned off while away
and simply click the Wake On LAN activation button on this page to remotely
instruct the AirCruiser Gto boot up the host system. You also have the option
of Wake On & Enable NETBIOS services of any PC in the local LAN Domain.
For this feature, you need either the IP address or the MAC address of your
LAN devices. Key in either values, click enable, and press Wake On LAN to
perform the function.
Figure 6-14 – Wake on LAN
IP Address
The IP Address of the LAN network device which you want to wakeup
MAC Address
The MAC Address of the LAN network device which you want to wakeup