GIGA TMS SF650 SmaFinger,Fingerprint Reader with Ethernet Interface User Manual SmaFinger
GIGA-TMS INC. SmaFinger,Fingerprint Reader with Ethernet Interface SmaFinger
GIGA TMS >
manual

SmaFinger.NET®
Quick Start
September6,2010
1
TM951256A
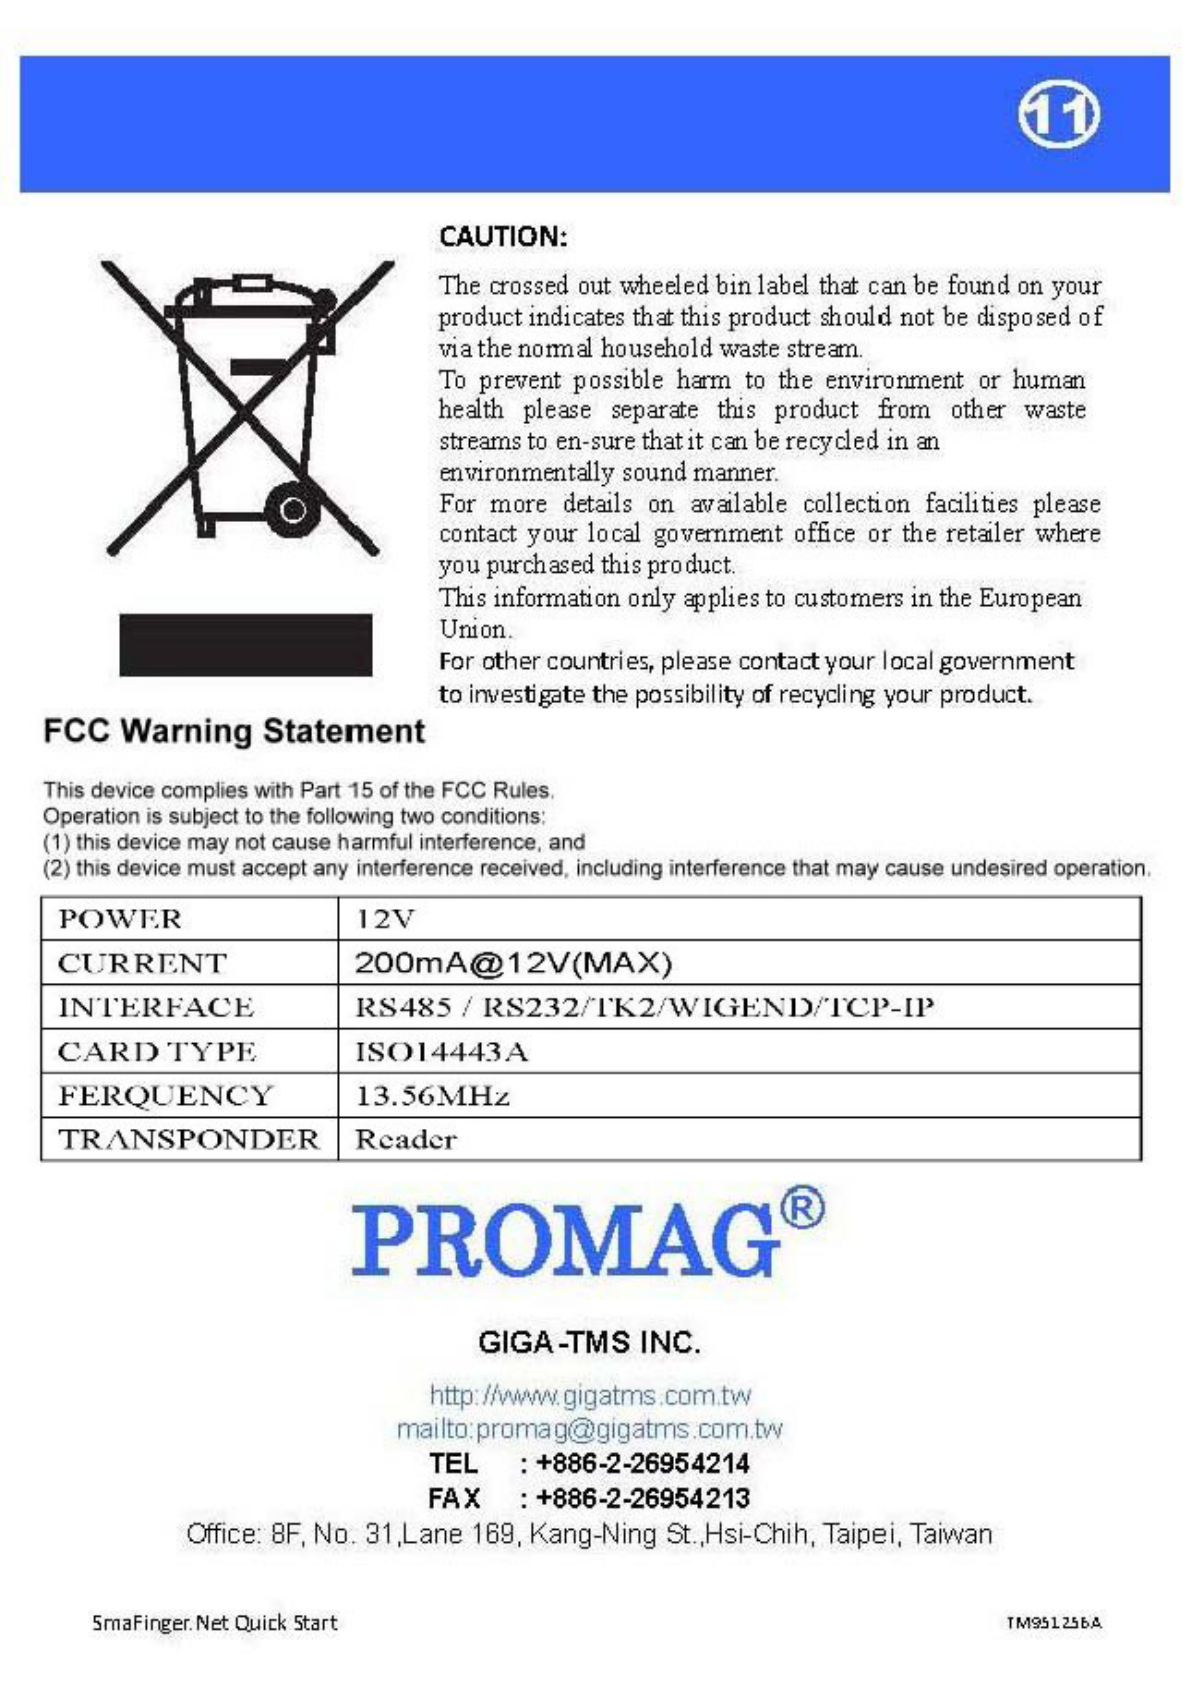
Quick Start to connect the SF650 on the Ethernet
Quick Start to connect the SF650 on the Ethernet
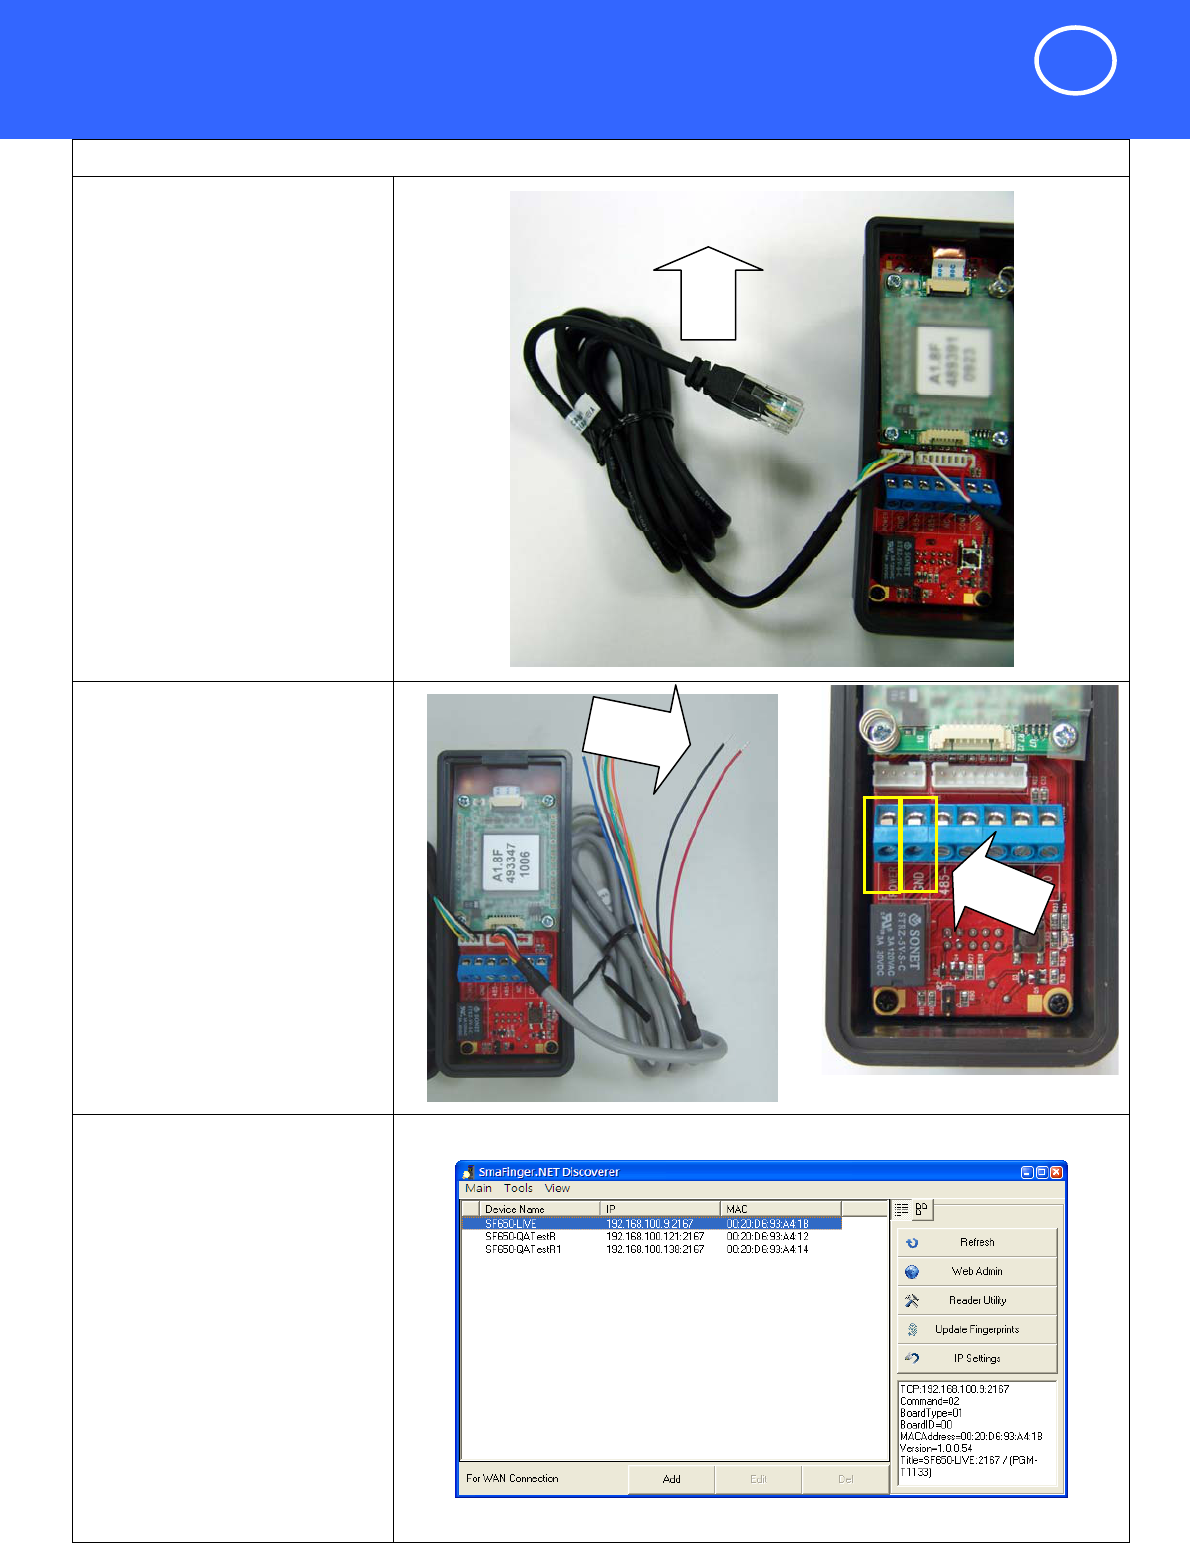
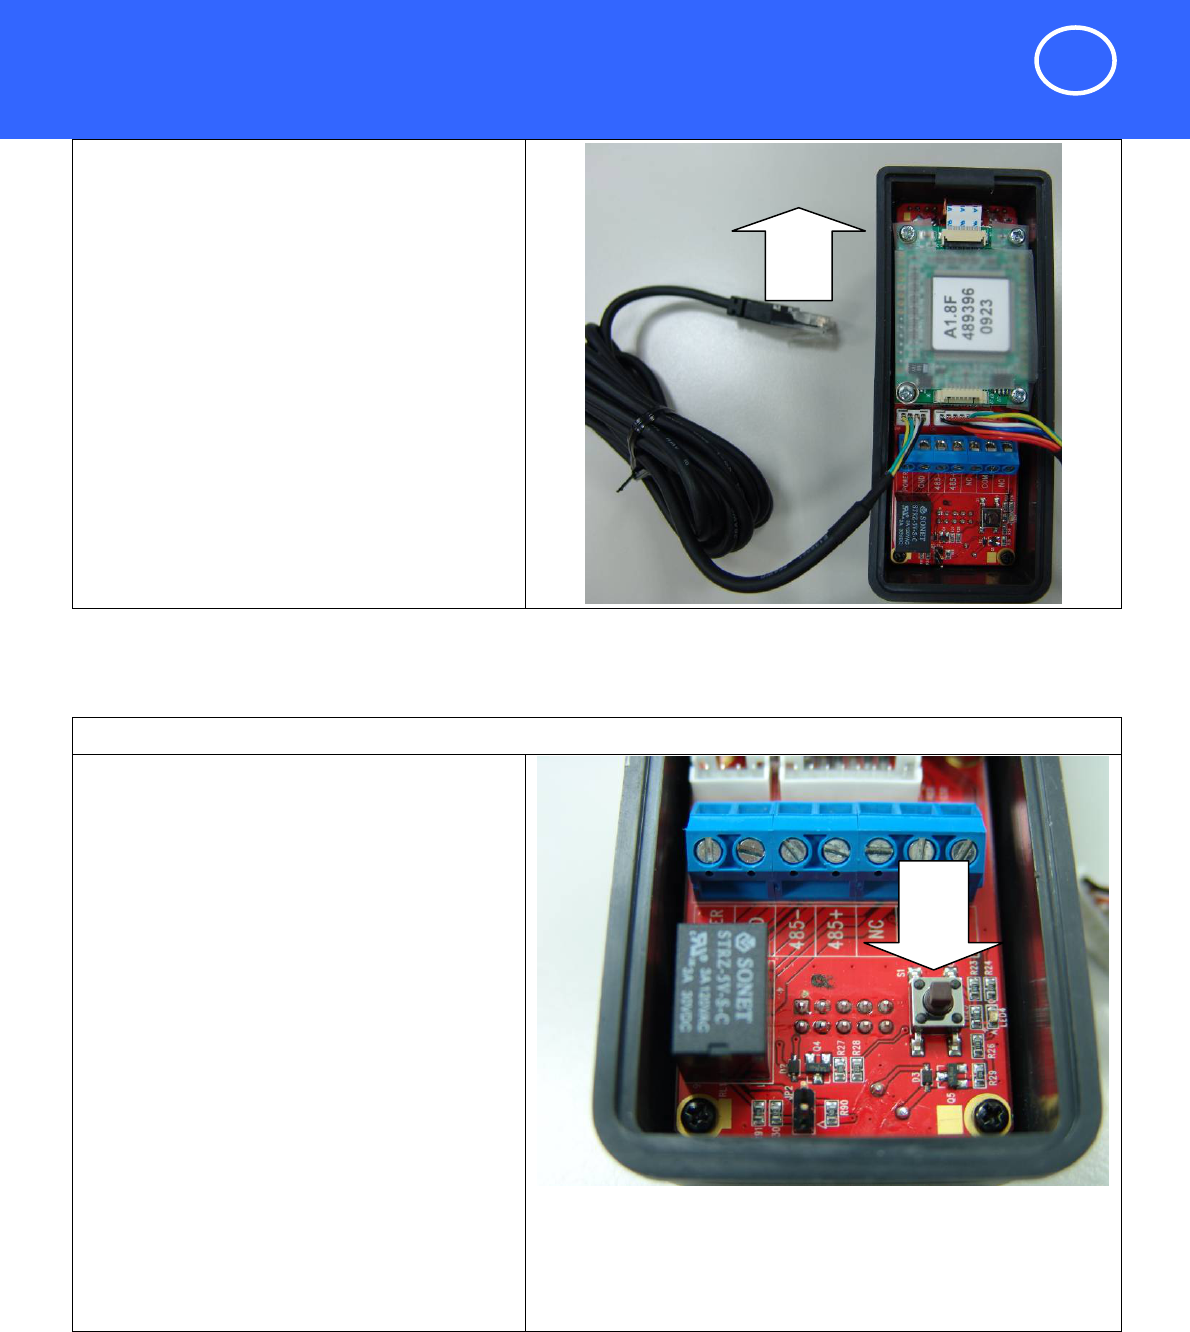
Step 1
Connect SF650 to Ethernet HUB
with (WAS-T0413) cable.
Note:
You can also connect SF650 to
your PC or Laptop directly with
same cable.
Step 2
Connect Power DC12V with
(WAS-T0132) Cable
Remark:
The WAS-T0132 can be used for
Power.
Or, you can connect the power
to the PIN VCC and GND (blue
connector of SF650).
Step 3
Use “SmaFinger.NET Discoverer”
utility to search all
SmaFinger.NET device(s) on the
network.
(The utility can be found in the CD
disk5406).
ORDC12V
‐
+
+
DC12V ‐
To
Hub
SmaFinger.NetQuickStart

2
TM951256A
Quick Start to connect the SF650 on the Ethernet
Step 4.
Click “Refresh” to refresh the
SmaFinger.NET list.
Step 5.
Click “IP Settings” to change the
new device name.
Step 6.
Edit the SF650 device name for
easy recognition.
Click "Save" to change the
settings.
NOTICE: If you need use
manual IP, you can click
"Manual" and setup the correct
IP you used.
SmaFinger.NetQuickStart
3
TM951256A
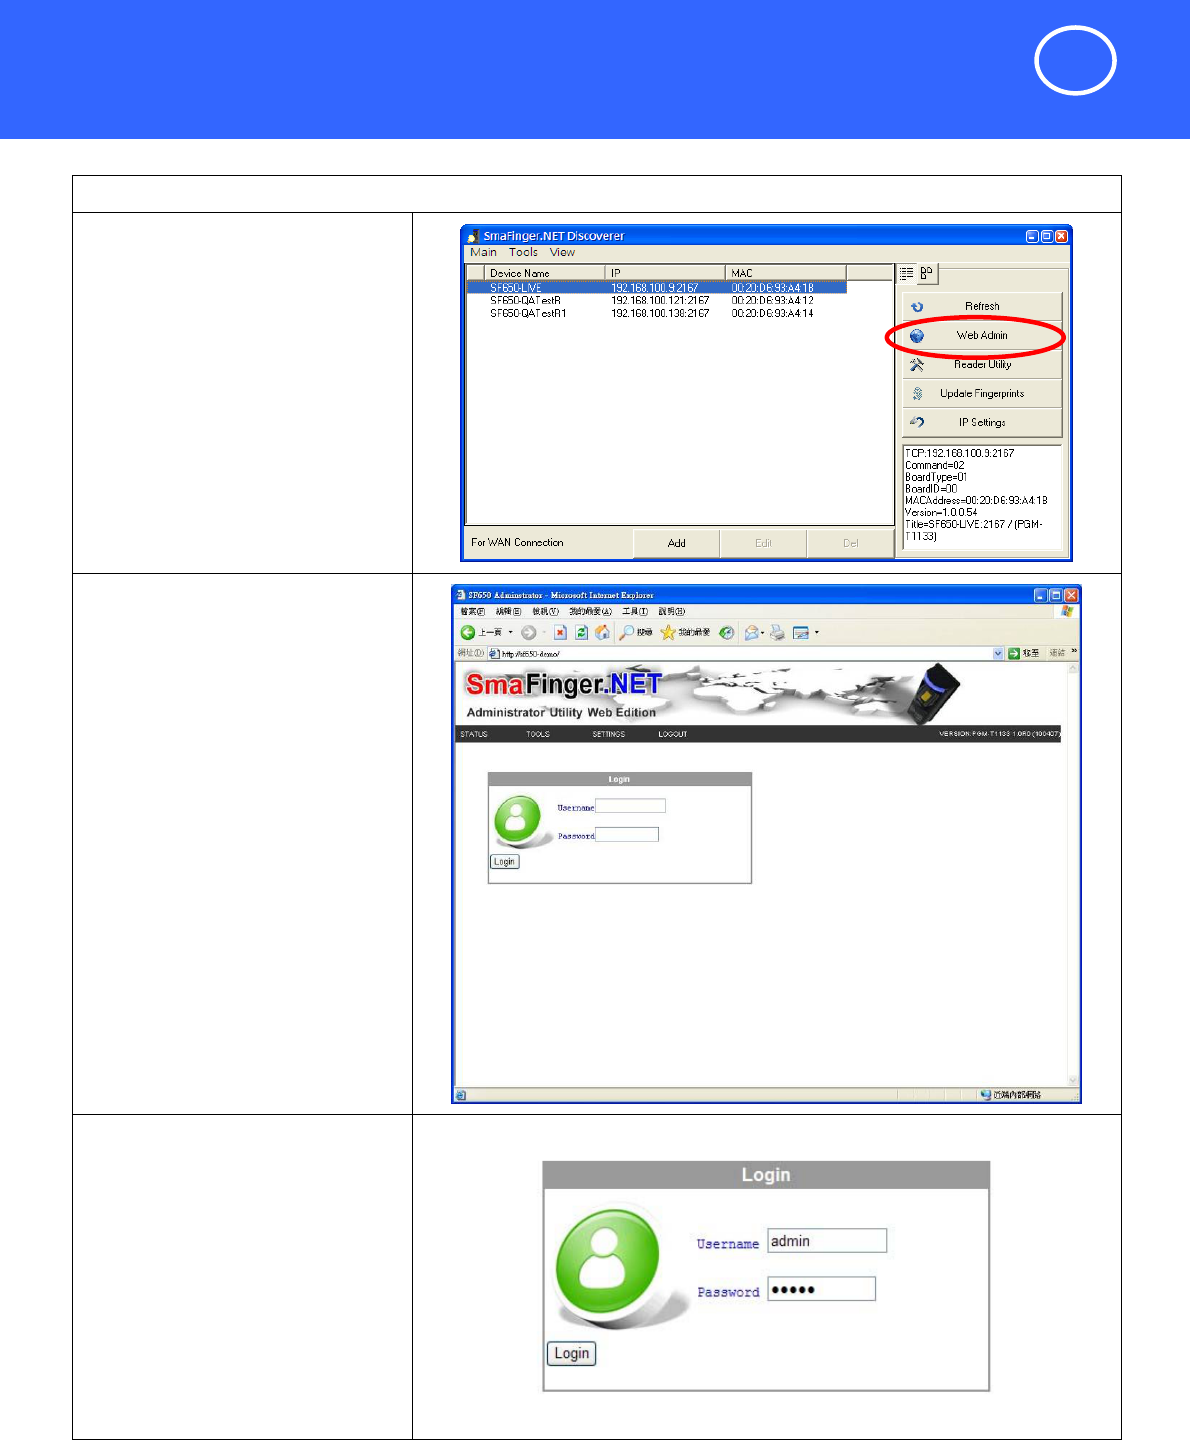
Control Device with Internet Browser
Control Device with Internet Browser
Step 1
Use “SmaFinger.NET Discoverer”
utility to search all available
SmaFinger.NET device(s) on the
network.
Click “Web Admin” to go to the Web
Administrator Utility.
Step 2
On Login page, to login to the
SF650 device.
Step 3
Login on the SF650
Default username & password:
username: admin
password: admin
SmaFinger.NetQuickStart
4
TM951256A
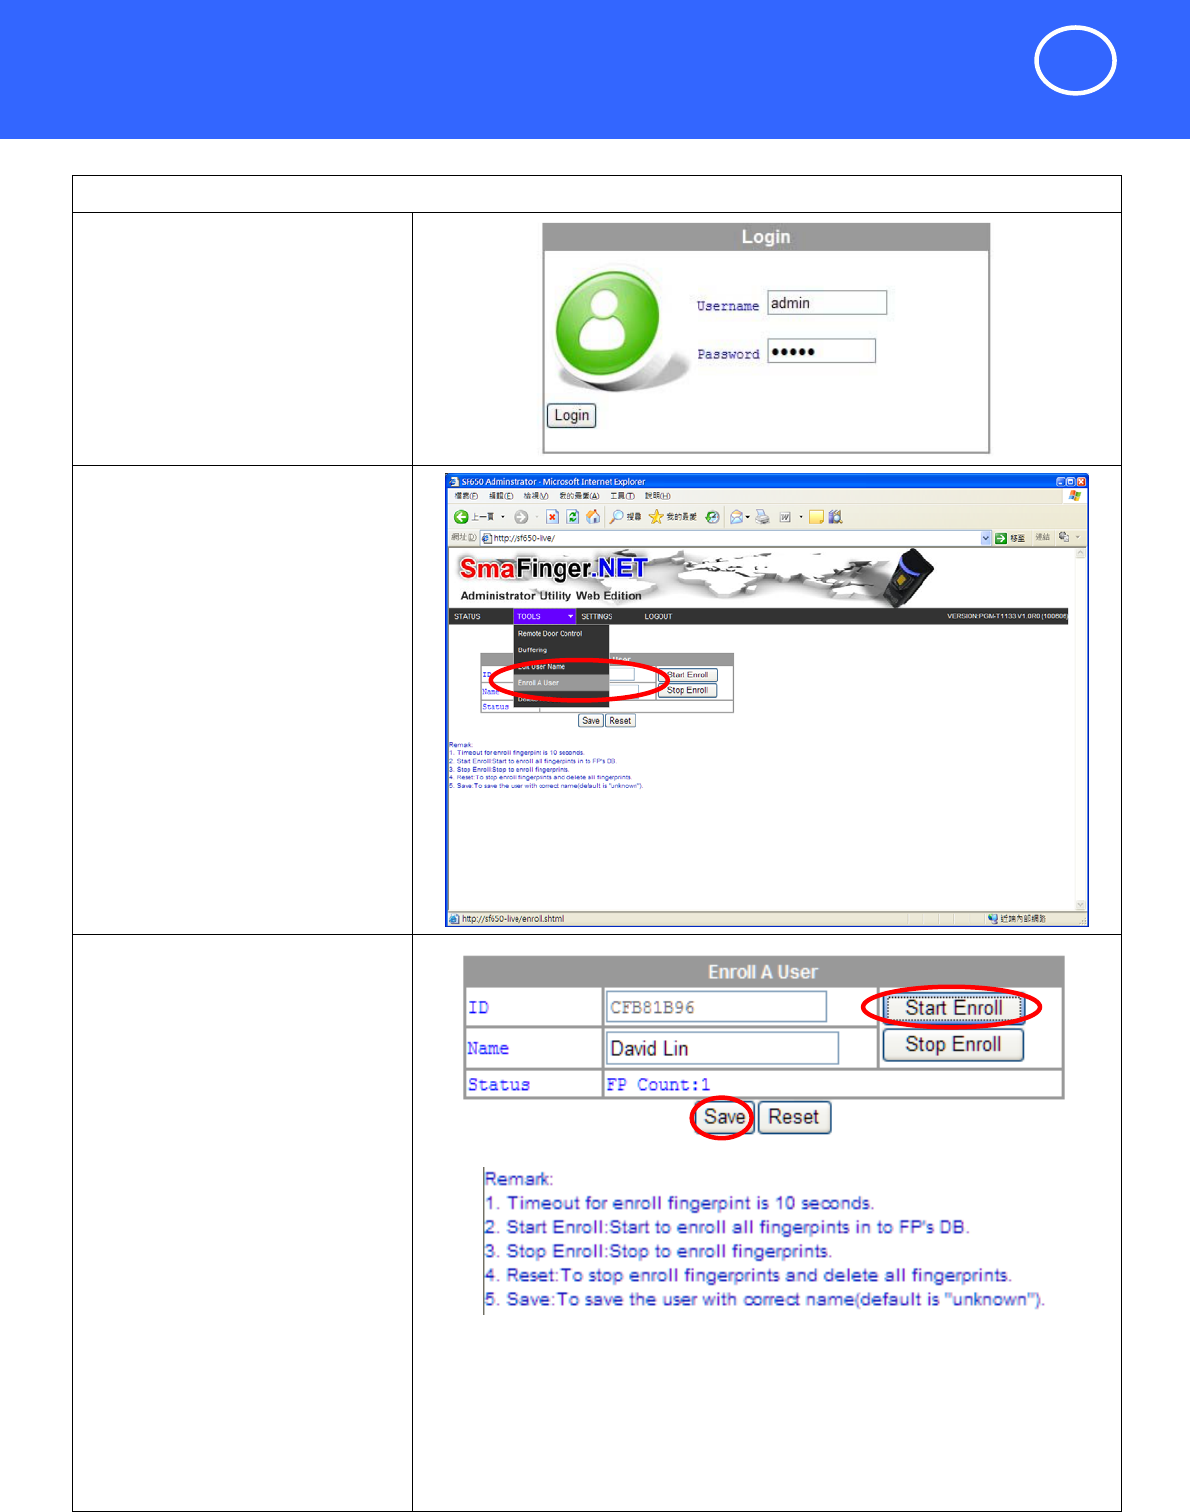
Add a new user and fingerprints with Internet
Add a new user and fingerprints with Internet Browser
Step 1
Login Web Admin Page.
Refer to " Control Device with
Internet Browser"
Step 2
Click “Enroll A User” on the "Tools"
menu of SF650 Administrator utility
page.
Step 3
Click the “Start Enroll” to start the
enroll process.
Please put the fingerprint on reader
twice and the "Status" will show how
many fingerprints enroll success.
Type in the new user's name and
click the "Save" to finish a new user
adding.
Note:
If you want to cancel the process,
please click "Stop Enroll" or click
"Reset" to cancel all fingerprints
enroll with this user.
SmaFinger.NetQuickStart
5
TM951256A
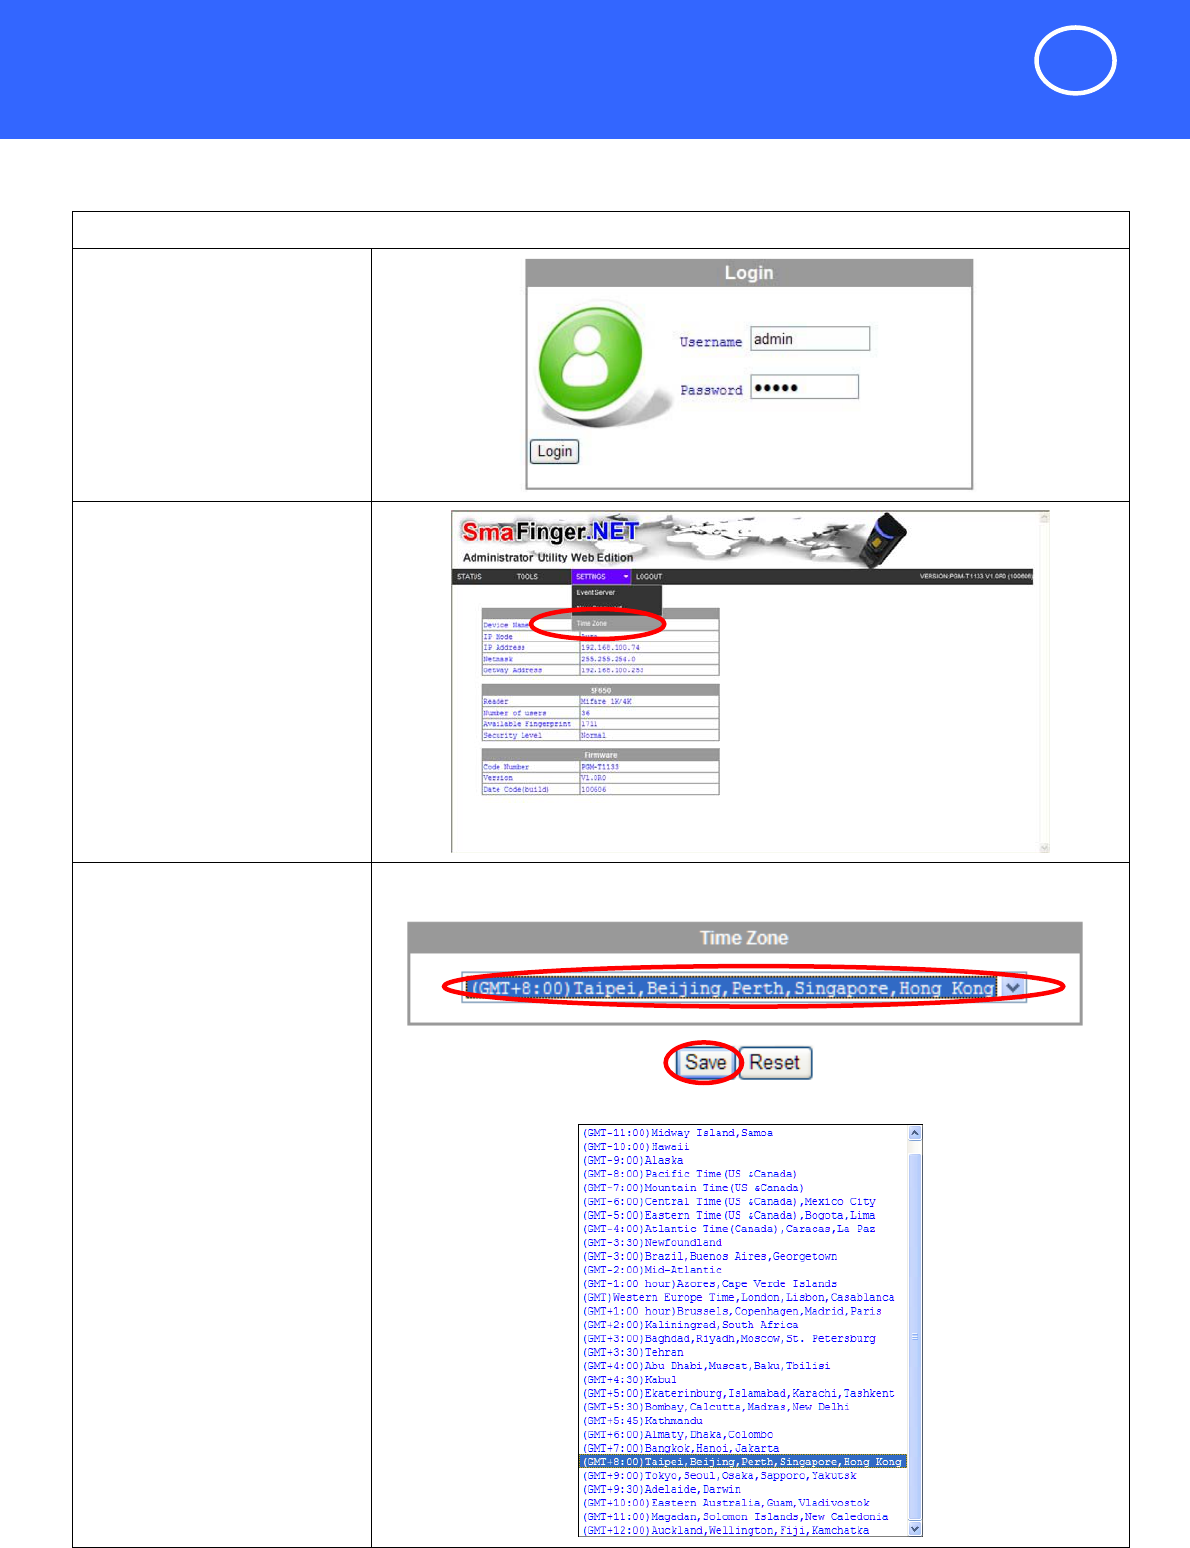
Setup time zone with Internet Browser
Setup time zone with Internet Browser
Step 1
Login Web Admin Page.
Refer to " Control Device
with Internet Browser"
Step 2
Click “Time Zone” on the
"Settings" menu of SF650
Administrator utility page.
Step 3
Choose the time zone for local.
Click "Save" to setup the
current time zone
SmaFinger.NetQuickStart
6
TM951256A
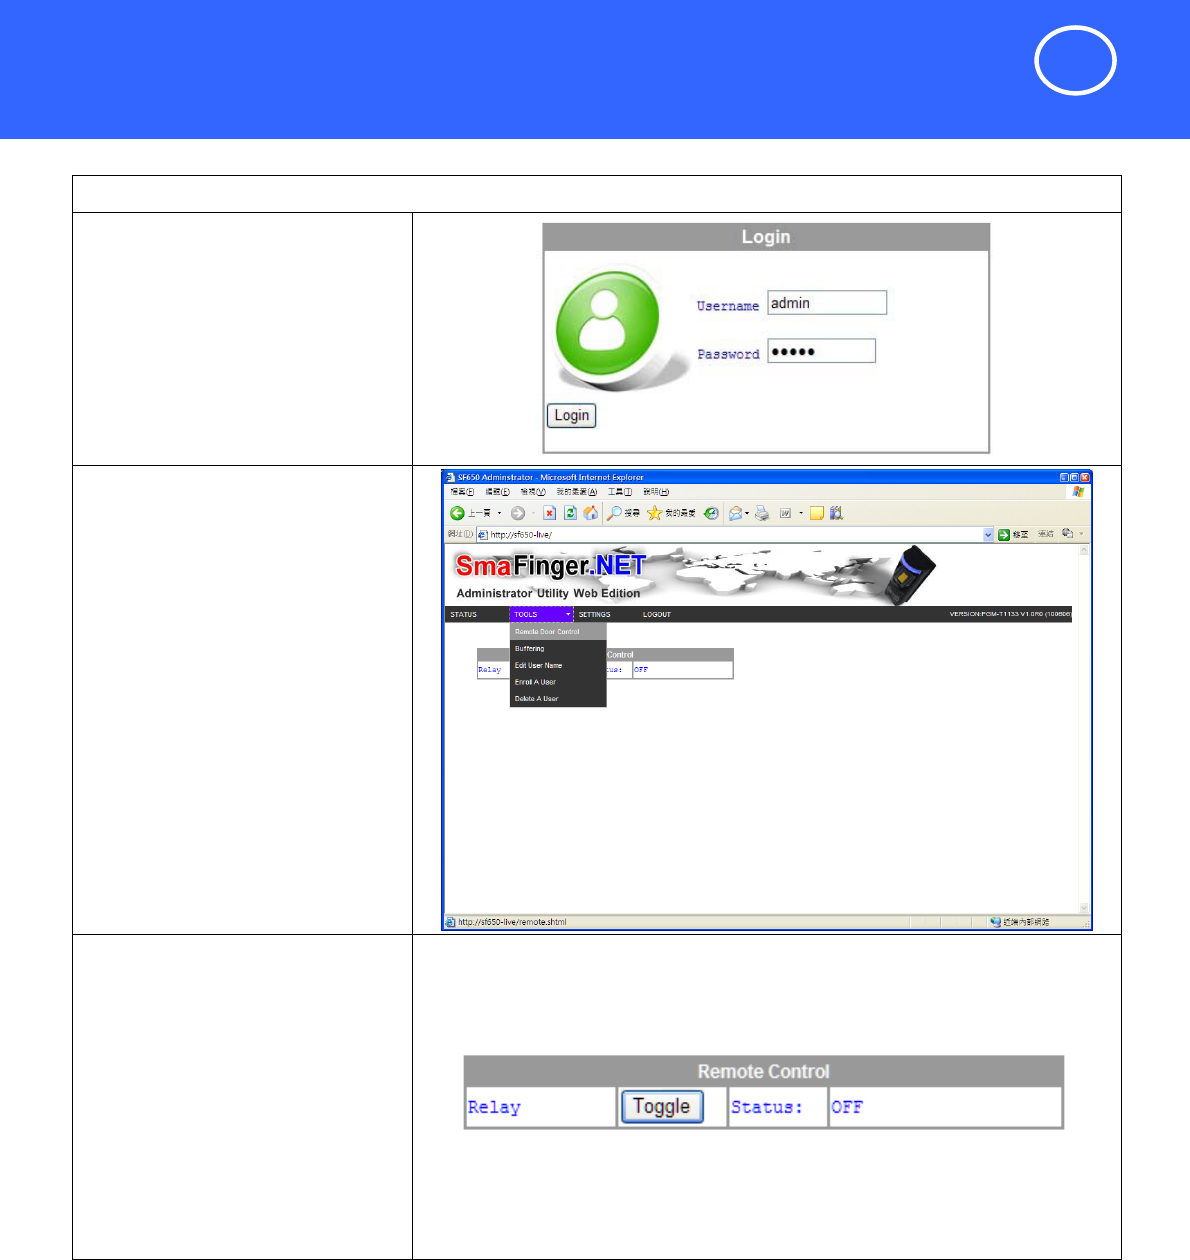
Remote Control the door lock with Internet
Remote Control the door lock with Internet Browser
Step 1
Login Web Admin Page.
Refer to " Control Device with
Internet Browser"
Step 2
Click “Remote Control” on the
"Tools" menu of SF650
Administrator utility page.
Step 3
Click the “Toggle” to toggle the relay
of SF650.
Note:
The SF650 supports the AJAX
technology which displays the relay
status automatically.
SmaFinger.NetQuickStart
7
TM951256A
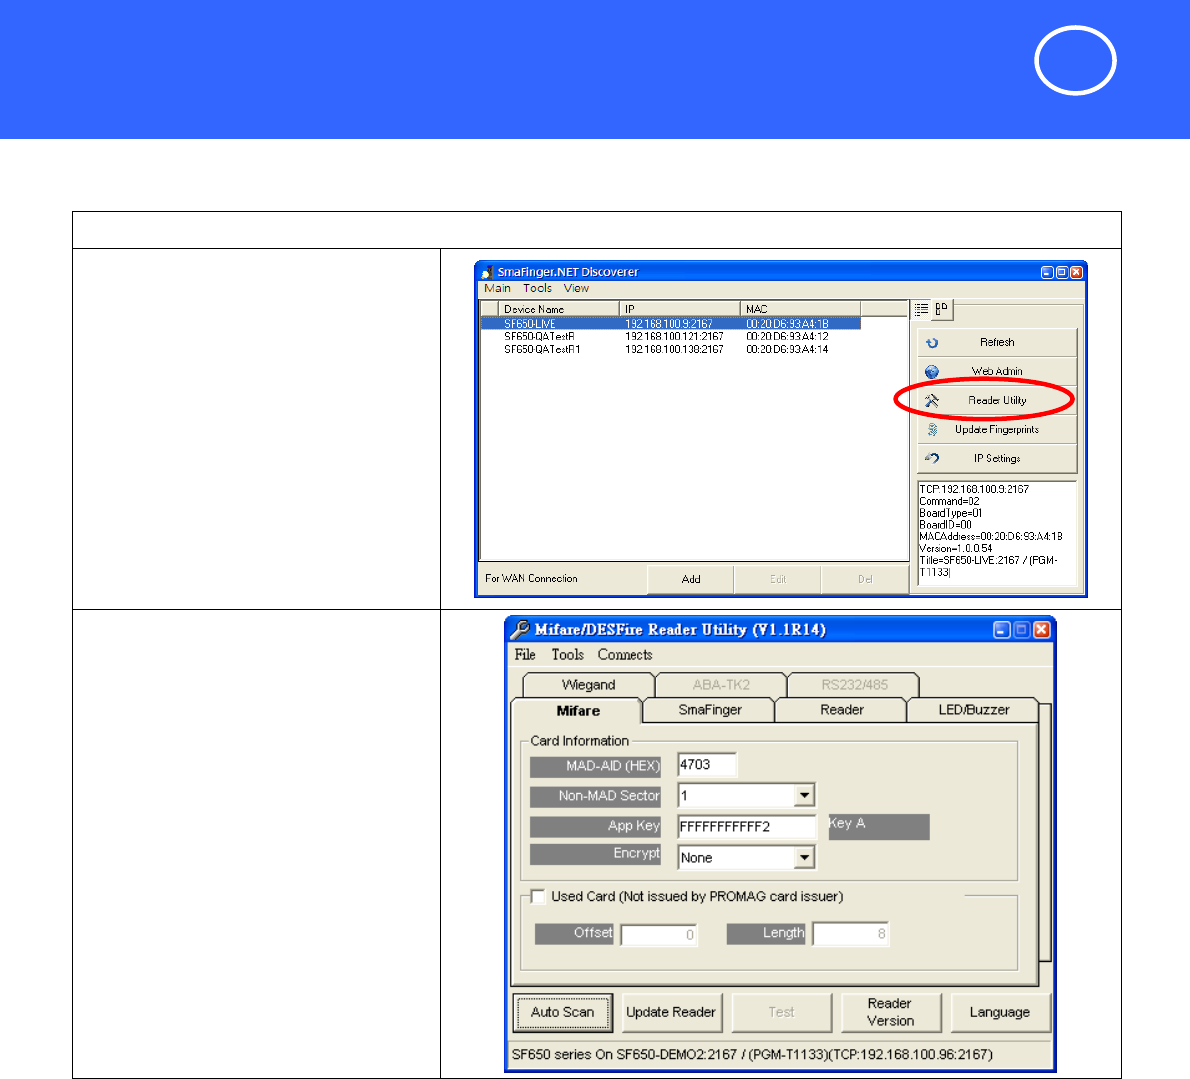
Configure the SF650 reader functions
Configure the SF650 reader functions
Step 1
Use “SmaFinger.NET Discoverer” utility
to search all available SmaFinger.NET
device(s) on the network.
Then select the device you want to
configure the reader functions and
click the “Reader Utility”
Step 2
The discoverer utility will execute the
“Mifare/DESfire Reader Utility” and
display the selected SF650 device.
SmaFinger.NetQuickStart
8
TM951256A
Trouble Shooting
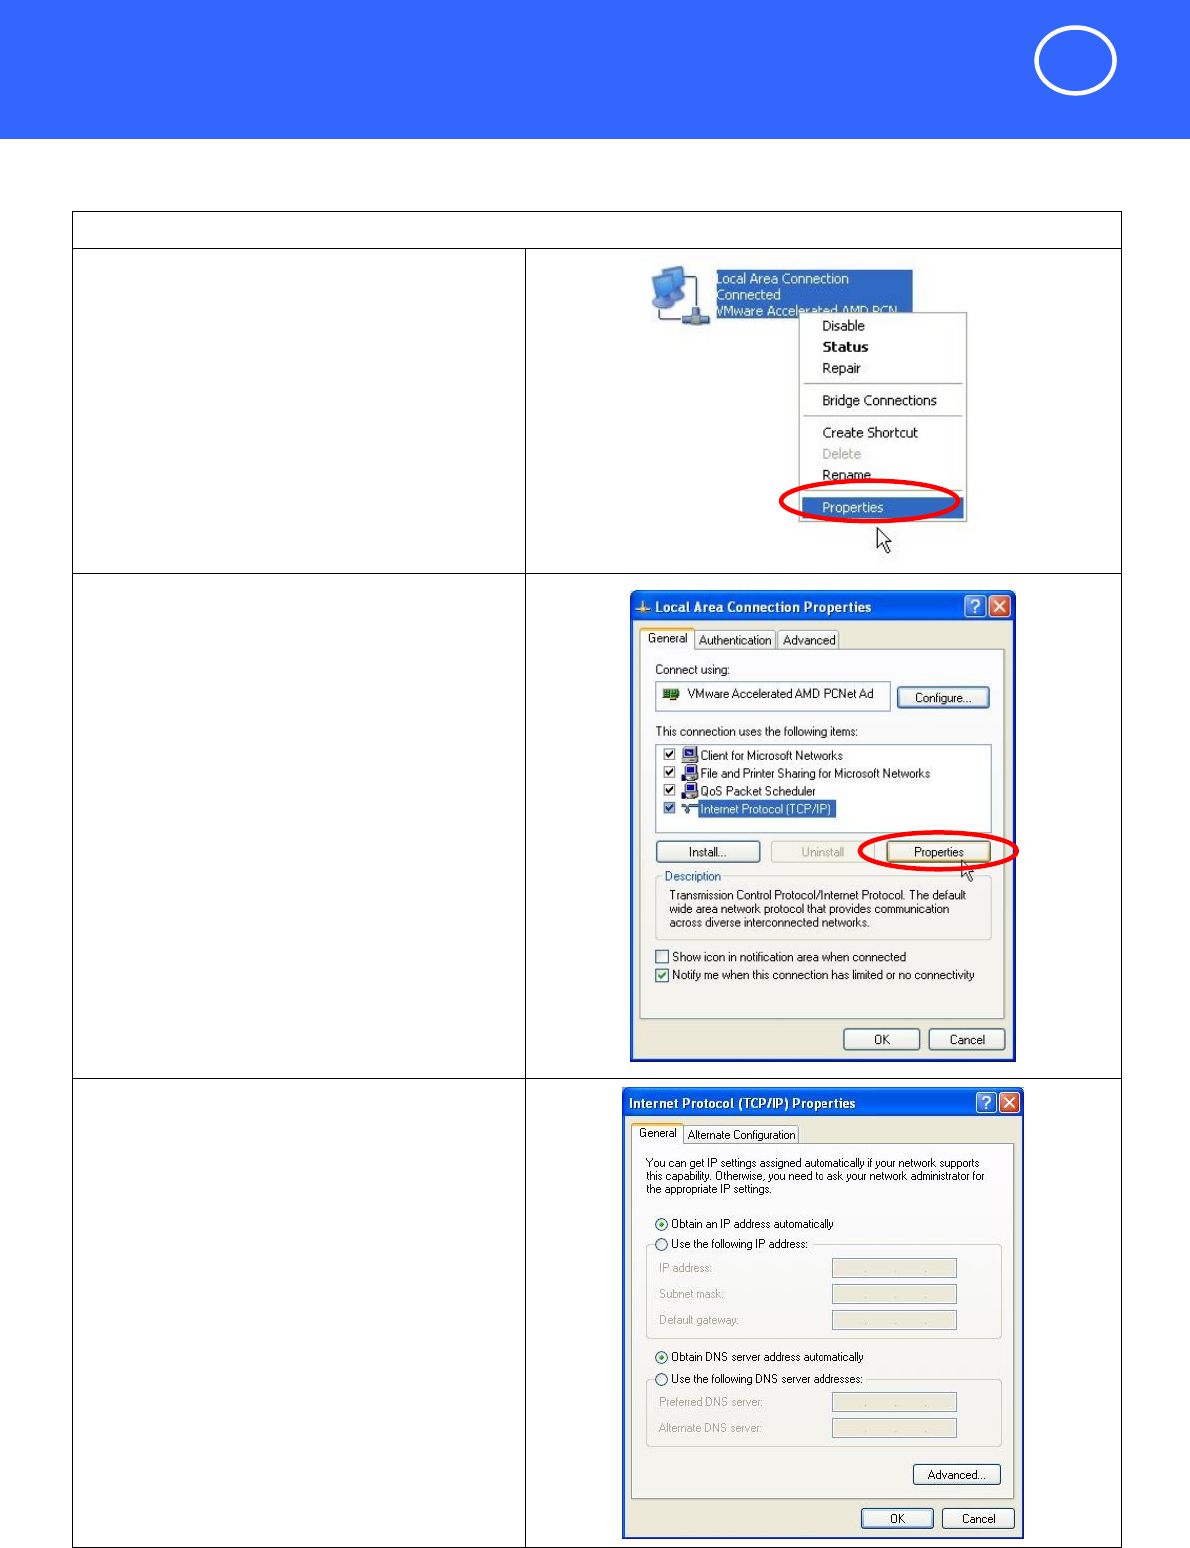
How to change PC/Laptop network setting to support the Auto IP mode
Step 1
Most of the PC/Laptop network default setting is
“Obtain an IP address automatically” (auto IP
mode). If not, you can follow the steps to change
the network setting to auto IP mode.
Go to:
Control Panel > Network and Internet Connections >
Local Area Connection Properties
Step 2
General select Internet Protocol (TCP/IP) and click
Properties.
Step 3
Select the “Obtain an IP address automatically.
then click “OK”.
SmaFinger.NetQuickStart
9
TM951256A
Trouble Shooting
Step 4
Connect the SF650 to PC/Laptop via Ethernet cable
then Power On the SF650.
To
Laptop
How to go back to default settings
When password is lost, forgotten or need to reset
the device to the auto IP mode.
You can press the Reset-Key for 5 seconds, the
SF650 will reset automatically and go back to
default setting. The password is “admin” and IP
mode will set to auto IP mode.
Some settings will remain the same when reset
to default:
1. Device name
2. MAC address
3. Reader functions
4. Fingerprint Template database
5. User Data
Reset
Key
SmaFinger.NetQuickStart
10
TM951256A
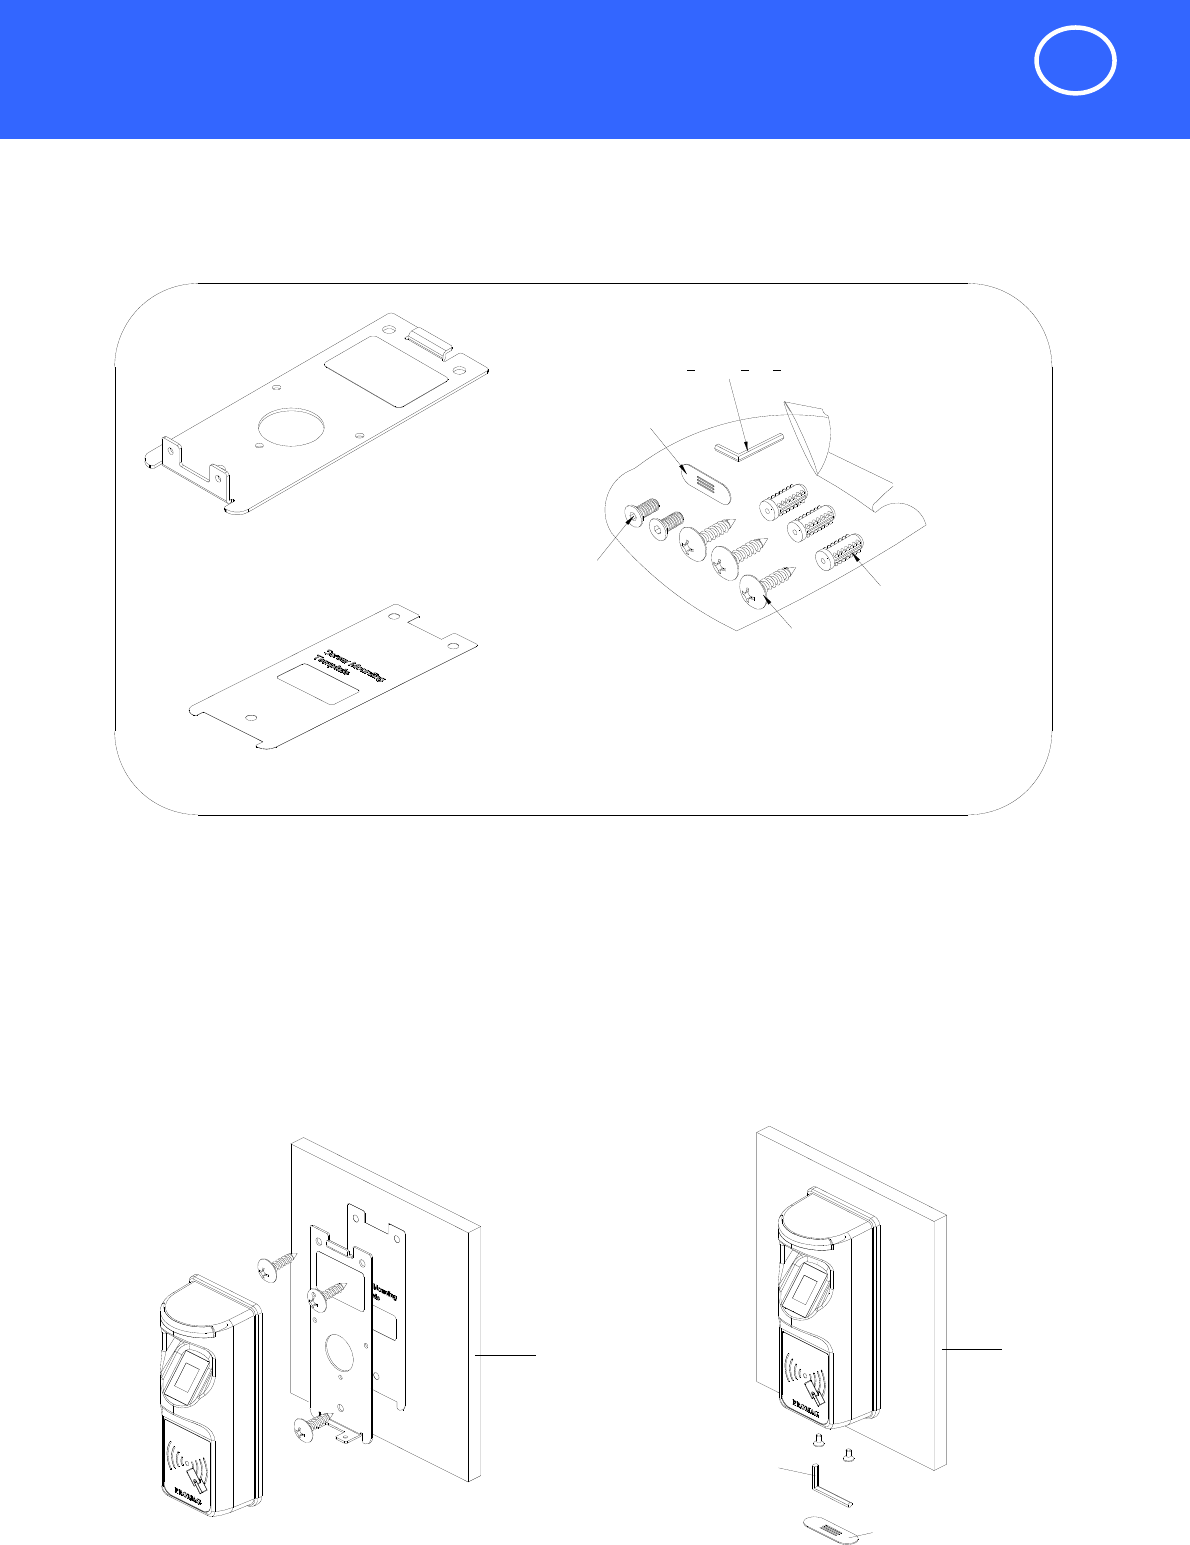
Installation Manual
screw cover plate
After fixing SmaFinger with attached screws
(using the L-shape spanner)
,apply screw cover plate for completion
Attach the bottom plate label on the target position.
Drill the holes to match the bottom plate then fix
SmaFinger reader.
2.
L-shape
LSHAPE SIX ANGLE SPANNER
WALL
WALL
BOTTOM PLATE
BOTTOM PLATE LABEL
Buzzer Hole Plate
PLASTIC PLUG FOR WALL
Required Items
SCREW BAG
M3*6L 2PCS
M4*15L 3PCS
Secure Mounting Installation
1.
SmaFinger.NetQuickStart