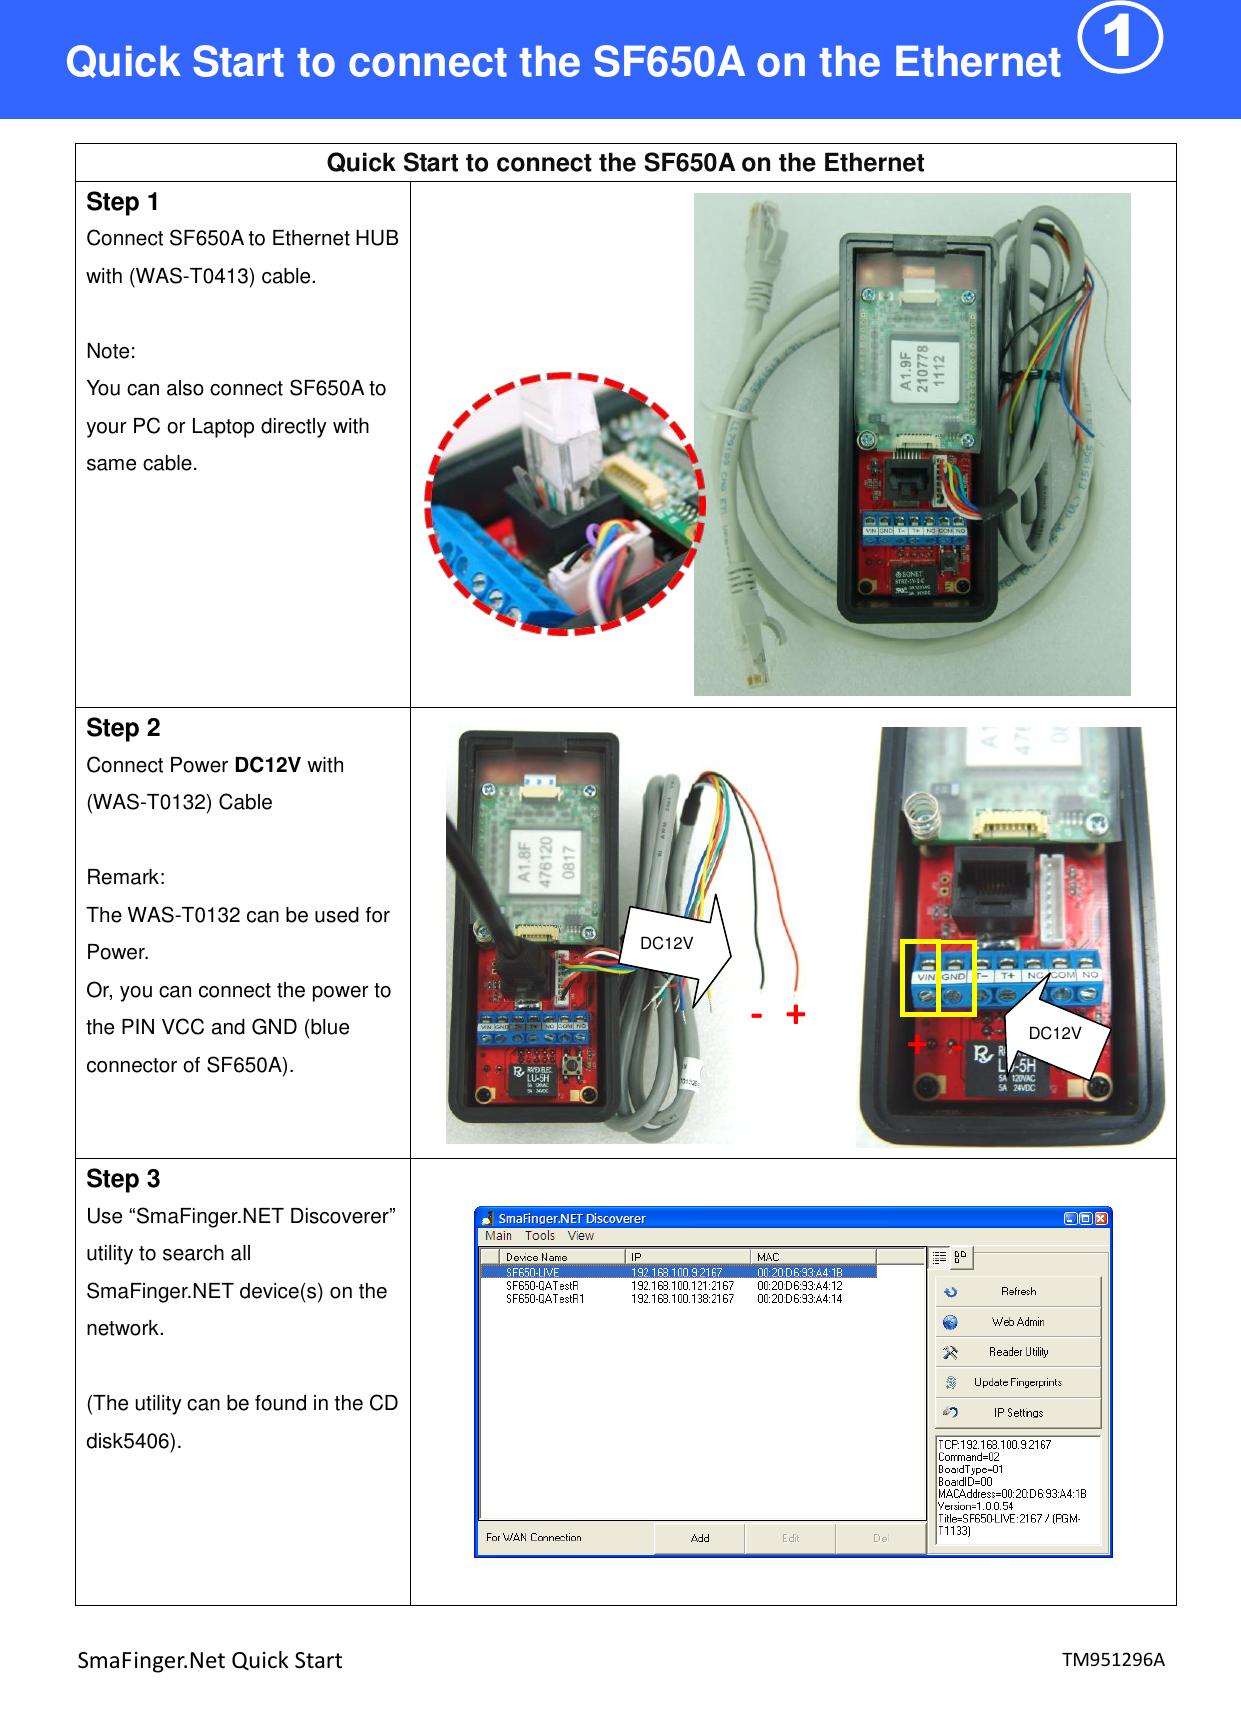
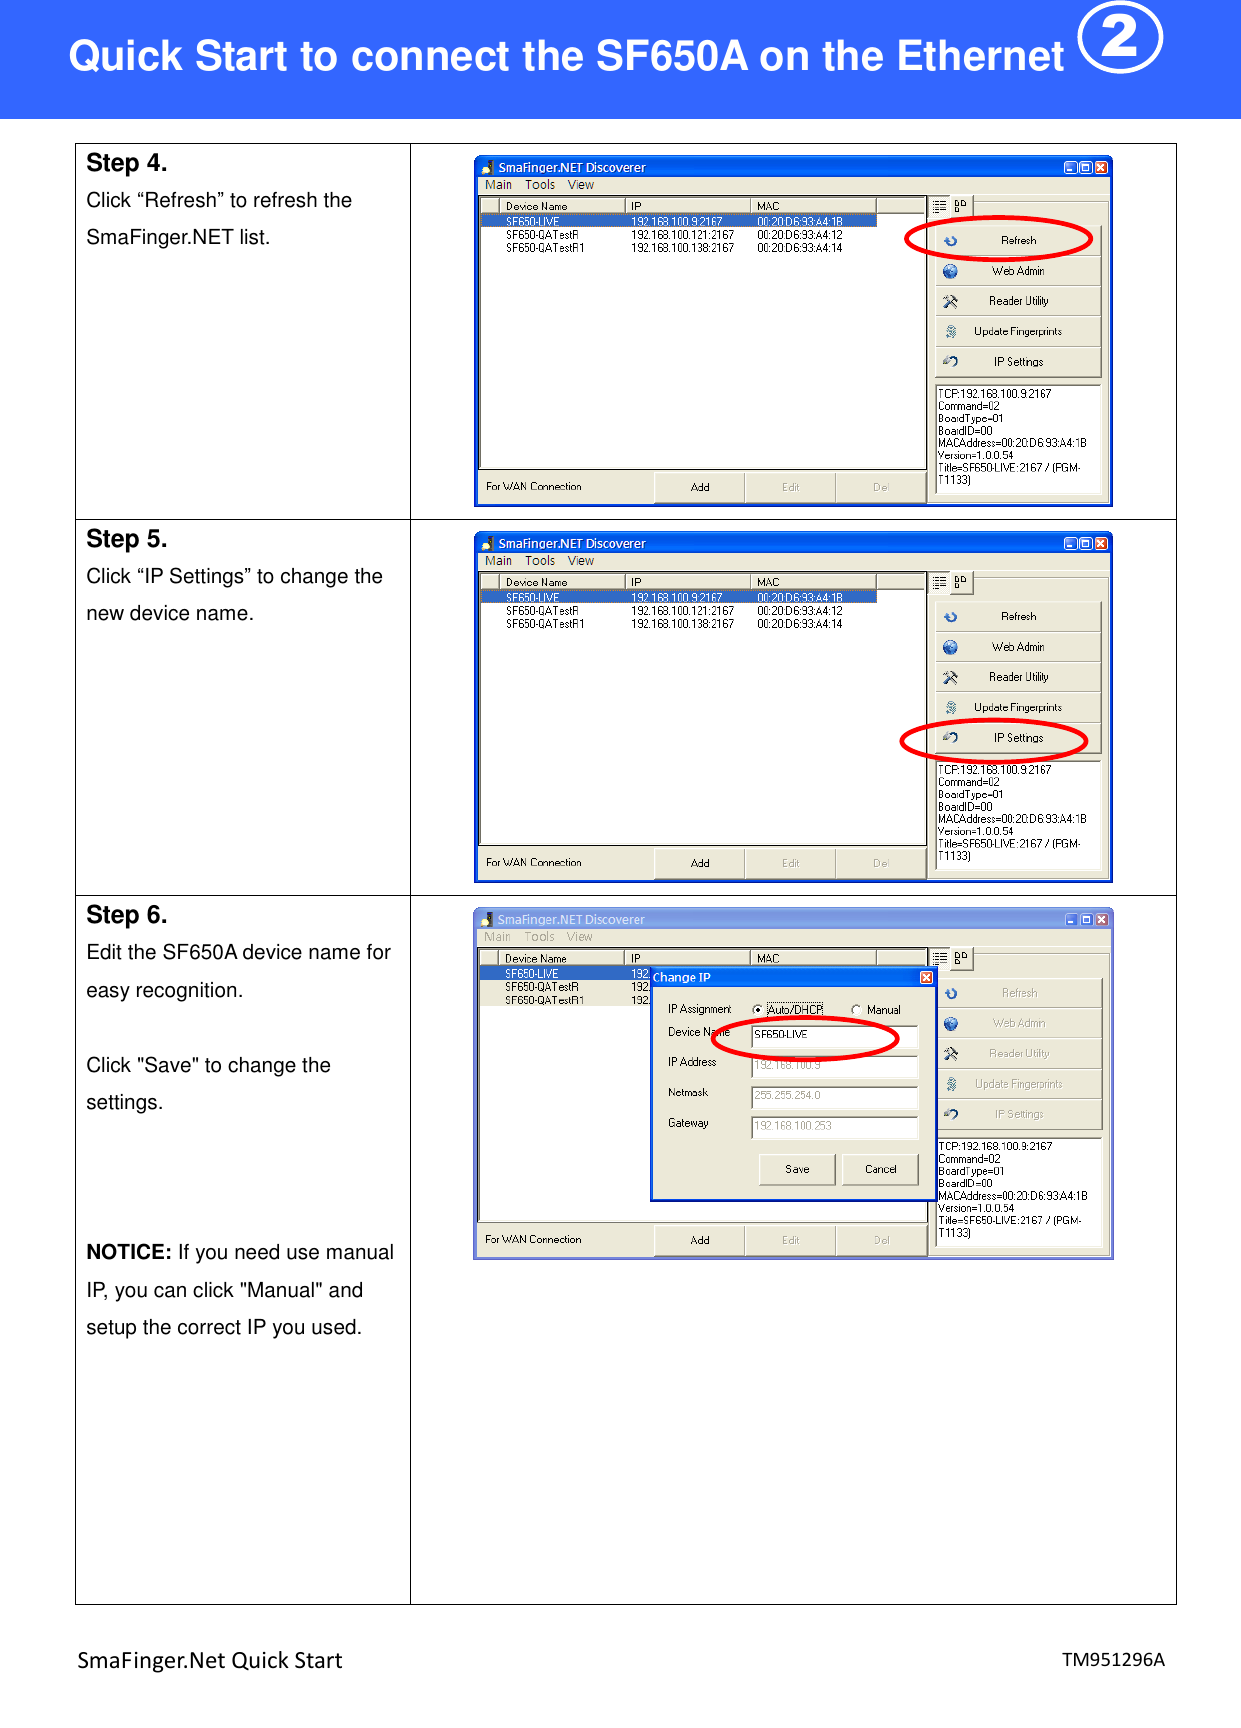
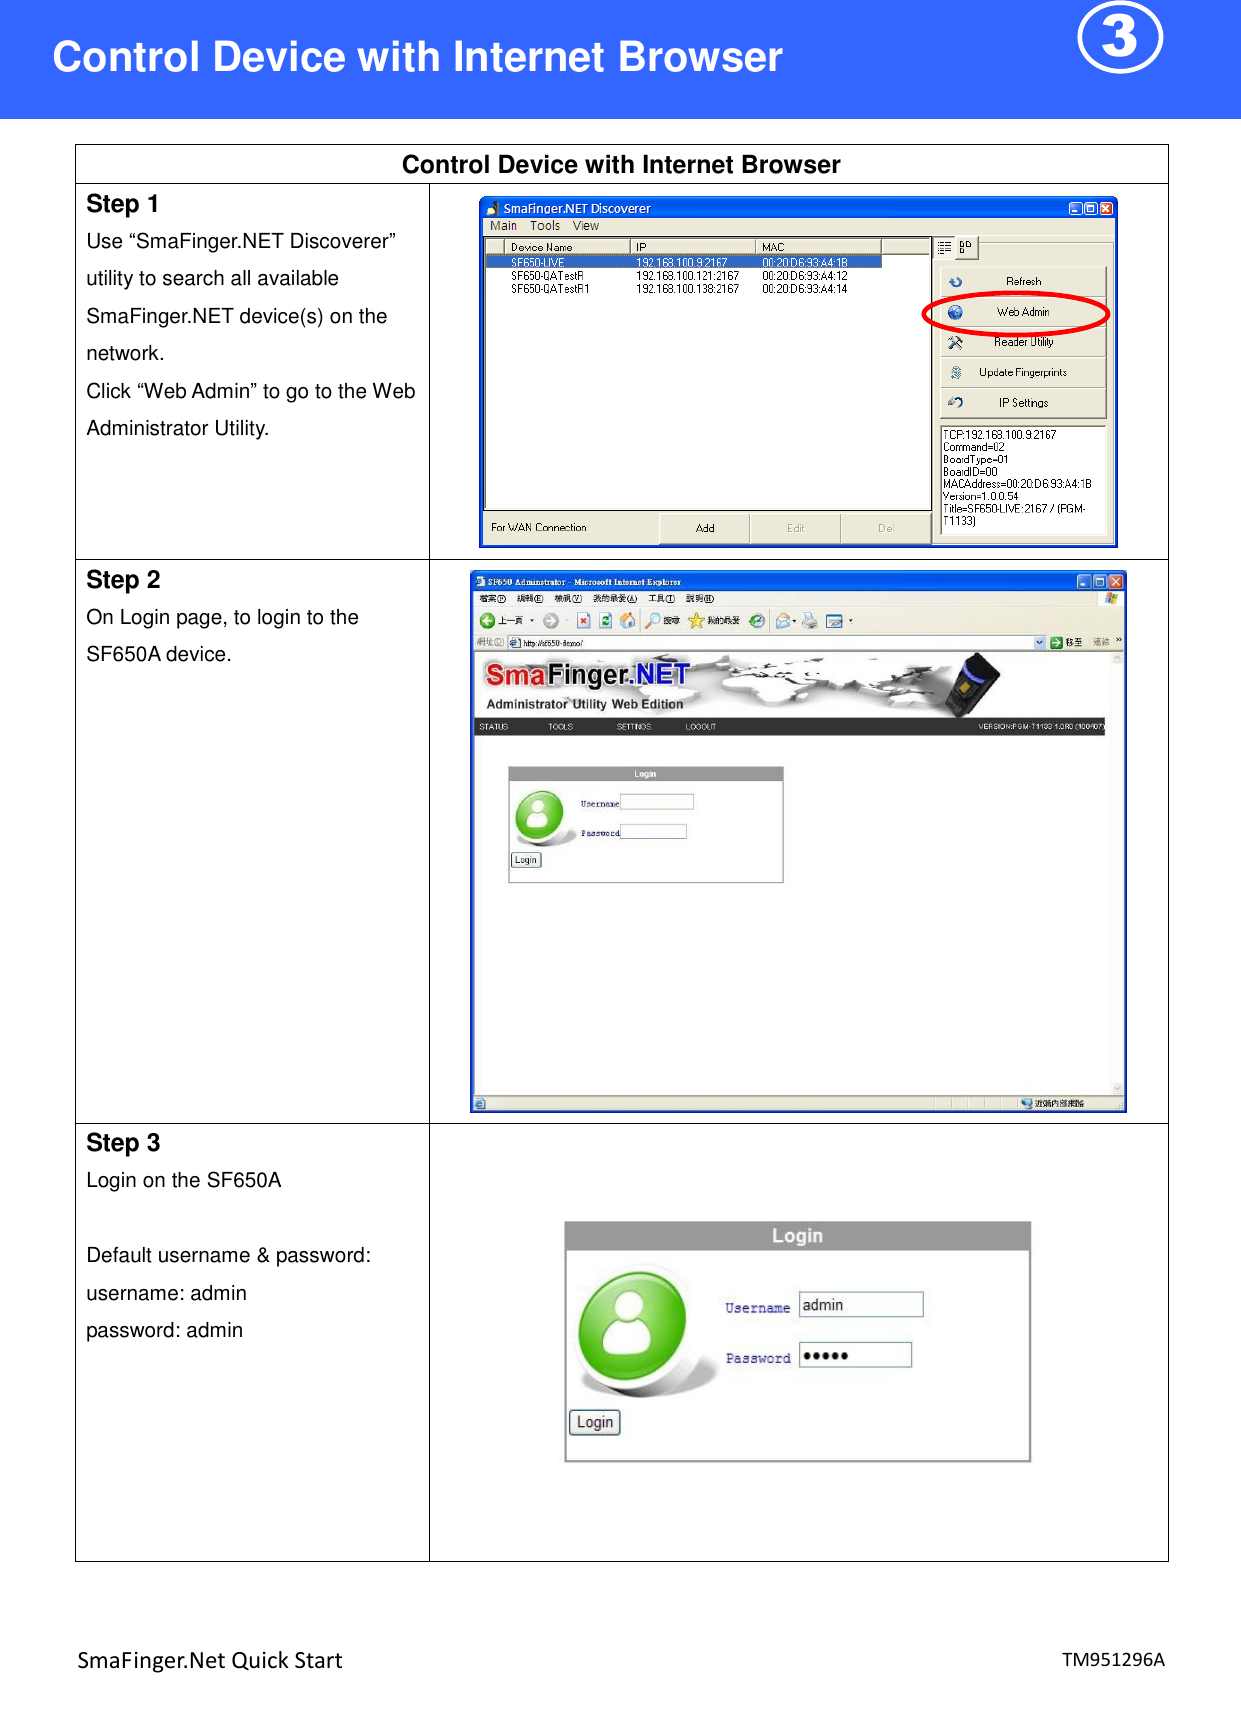
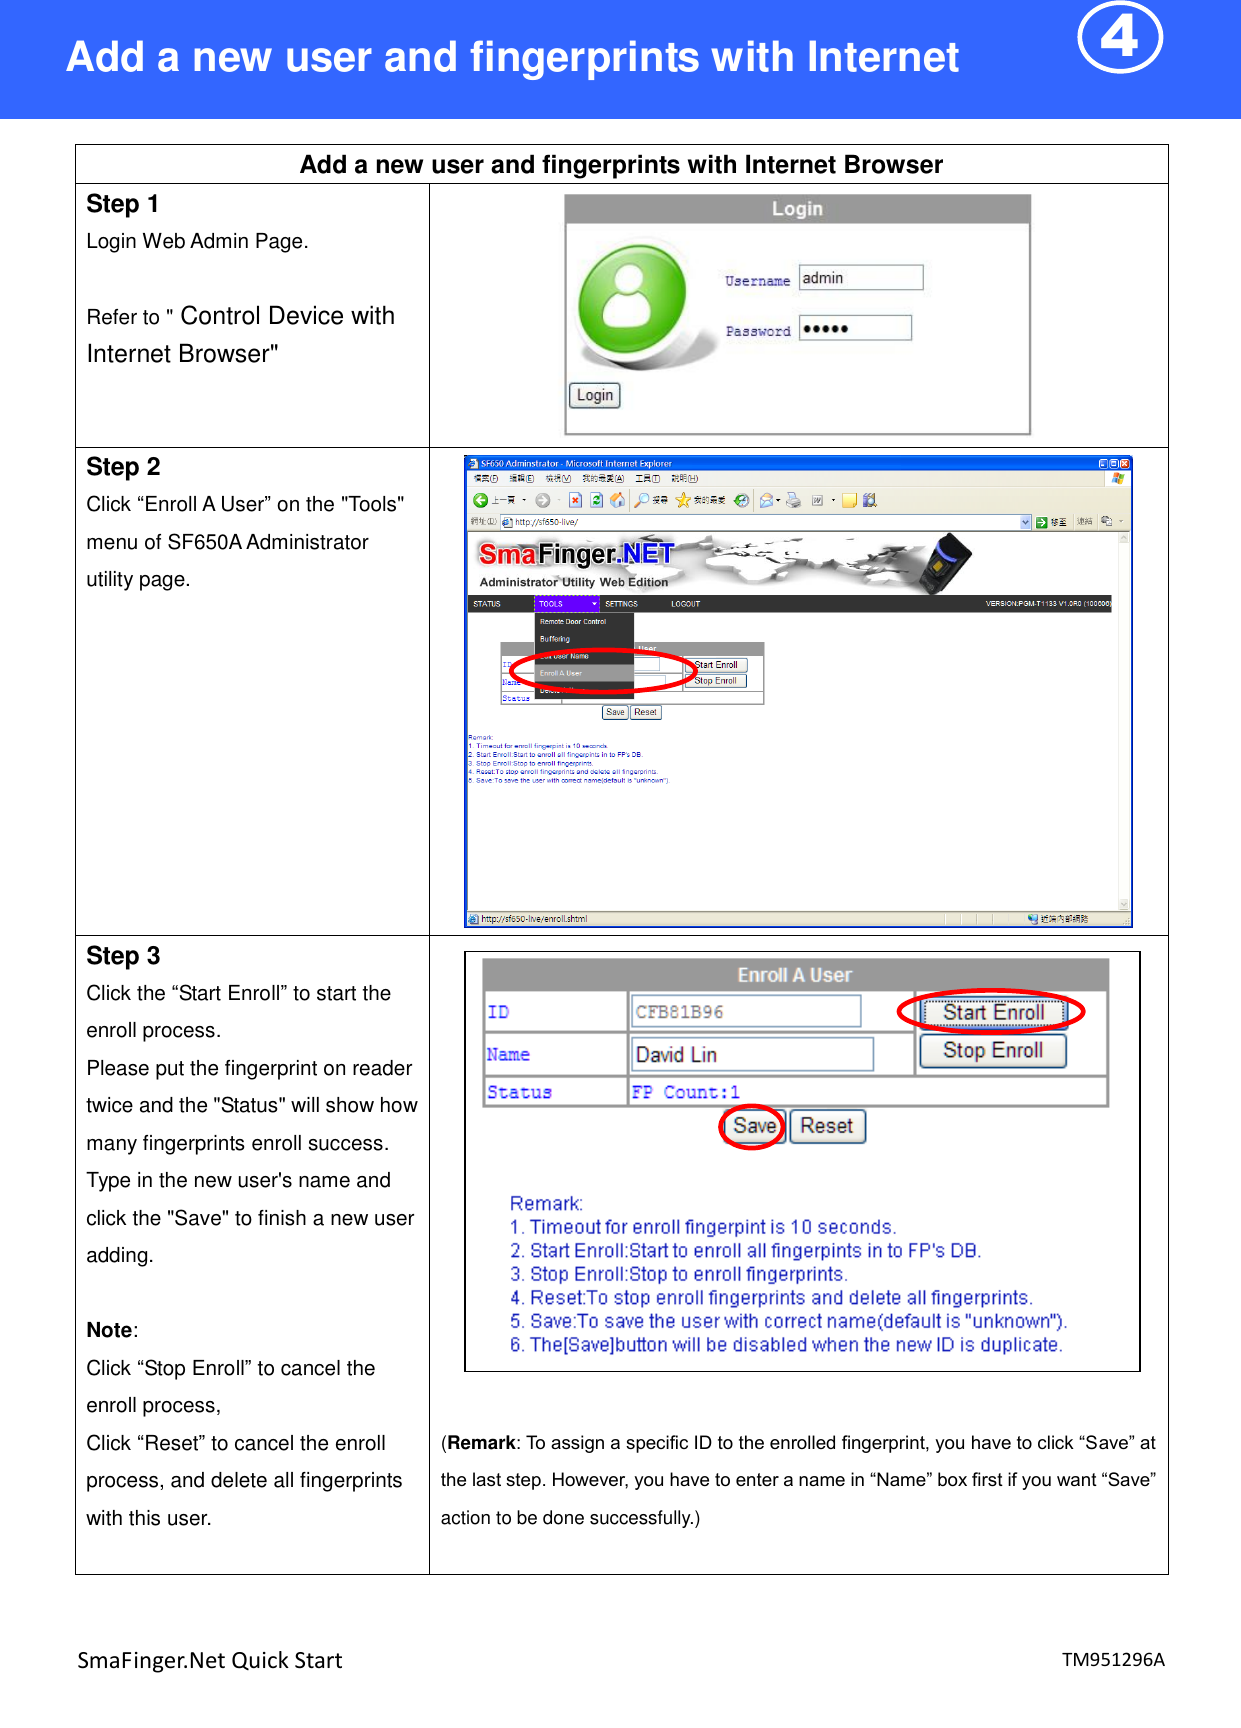
GIGA TMS SF650A Fingerprint Reader With RJ45 Connector Ethernet Interface User Manual

GIGA-TMS INC. Fingerprint Reader With RJ45 Connector Ethernet Interface

user manual

                  SmaFinger.NET® Quick Start
1  TM951296A SmaFinger.Net Quick Start Quick Start to connect the SF650A on the Ethernet Step 1 Connect SF650A to Ethernet HUB with (WAS-T0413) cable.  Note: You can also connect SF650A to your PC or Laptop directly with same cable.                      Step 2 Connect Power DC12V with (WAS-T0132) Cable    Remark: The WAS-T0132 can be used for Power. Or, you can connect the power to the PIN VCC and GND (blue connector of SF650A).   Step 3 Use “SmaFinger.NET Discoverer” utility to search all SmaFinger.NET device(s) on the network.  (The utility can be found in the CD disk5406).  Quick Start to connect the SF650A on the Ethernet + - DC12V + - DC12V
2  TM951296A SmaFinger.Net Quick Start Step 4. Click “Refresh” to refresh the SmaFinger.NET list.  Step 5. Click “IP Settings” to change the new device name.   Step 6. Edit the SF650A device name for easy recognition.  Click "Save" to change the settings.    NOTICE: If you need use manual IP, you can click "Manual" and setup the correct IP you used.  Quick Start to connect the SF650A on the Ethernet
3  TM951296A SmaFinger.Net Quick Start  Control Device with Internet Browser Step 1 Use “SmaFinger.NET Discoverer” utility to search all available SmaFinger.NET device(s) on the network. Click “Web Admin” to go to the Web Administrator Utility.  Step 2 On Login page, to login to the SF650A device.  Step 3 Login on the SF650A  Default username & password: username: admin password: admin     Control Device with Internet Browser
4  TM951296A SmaFinger.Net Quick Start  Add a new user and fingerprints with Internet Browser Step 1 Login Web Admin Page.  Refer to " Control Device with Internet Browser"  Step 2 Click “Enroll A User” on the "Tools" menu of SF650A Administrator utility page.   Step 3 Click the “Start Enroll” to start the enroll process. Please put the fingerprint on reader twice and the "Status" will show how many fingerprints enroll success.   Type in the new user's name and click the "Save" to finish a new user adding.    Note: Click “Stop Enroll” to cancel the enroll process, Click “Reset” to cancel the enroll process, and delete all fingerprints with this user.     (Remark: To assign a specific ID to the enrolled fingerprint, you have to click “Save” at the last step. However, you have to enter a name in “Name” box first if you want “Save” action to be done successfully.)   Add a new user and fingerprints with Internet Browser
5  TM951296A SmaFinger.Net Quick Start  Setup time zone with Internet Browser Step 1 Login Web Admin Page.  Refer to " Control Device with Internet Browser"  Step 2 Click “Time Zone” on the "Settings" menu of SF650A Administrator utility page.   Step 3 Choose the time zone for local.  Click "Save" to setup the current time zone   Setup time zone with Internet Browser
6  TM951296A SmaFinger.Net Quick Start  Remote Control the door lock with Internet Browser Step 1 Login Web Admin Page.  Refer to " Control Device with Internet Browser"  Step 2 Click “Remote Control” on the "Tools" menu of SF650A Administrator utility page.   Step 3 Click the “Toggle” to toggle the relay of SF650A.  Note: The SF650A supports the AJAX technology which displays the relay status automatically.    Remote Control the door lock with Internet Browser
7  TM951296A SmaFinger.Net Quick Start  Configure the SF650A reader functions Step 1 Use “SmaFinger.NET Discoverer” utility to search all available SmaFinger.NET device(s) on the network. Then select the device you want to configure the reader functions and   click the “Reader Utility”  Step 2 The discoverer utility will execute the “Mifare/DESfire Reader Utility” and display the selected SF650A device.    Configure the SF650A reader functions
8  TM951296A SmaFinger.Net Quick Start  How to change PC/Laptop network setting to support the Auto IP mode Step 1 Most of the PC/Laptop network default setting is “Obtain an IP address automatically” (auto IP mode). If not, you can follow the steps to change the network setting to auto IP mode.  Go to: Control Panel > Network and Internet Connections > Local Area Connection Properties  Step 2 General select Internet Protocol (TCP/IP) and click Properties.   Step 3 Select    the “Obtain an IP address automatically.   then click “OK”.    Trouble Shooting
9  TM951296A SmaFinger.Net Quick Start Step 4 Connect the SF650A to PC/Laptop via Ethernet cable then Power On the SF650A.       How to go back to default settings  When password is lost, forgotten or need to reset the device to the auto IP mode.  You can press the Reset-Key for 5 seconds, the SF650A will reset automatically and go back to default setting. The password is “admin” and IP mode will set to auto IP mode.  Some settings will remain the same when reset to default: 1. Device name 2. MAC address 3. Reader functions 4. Fingerprint Template database 5. User Data      To Laptop Reset Key Trouble Shooting
10  TM951296A SmaFinger.Net Quick Start Installation Manual
11  TM951296A SmaFinger.Net Quick Start    CAUTION:   The crossed out wheeled bin label that can be found on your product indicates that this product should not be disposed of via the normal household waste stream. To  prevent  possible  harm  to  the  environment  or  human health  please  separate  this  product  from  other  waste streams to en-sure that it can be recycled in an   environmentally sound manner.   For  more  details  on  available  collection  facilities  please contact  your  local  government  office  or  the  retailer  where you purchased this product. This information only applies to customers in the European Union. For other countries, please contact your local government to investigate the possibility of recycling your product.          PROMAG® GIGA-TMS INC. http://www.gigatms.com.tw mailto:promag@gigatms.com.tw TEL  : +886-2-26954214 FAX  : +886-2-26954213   Office: 8F, No. 31,Lane 169, Kang-Ning St.,Hsi-Chih, Taipei, Taiwan  TM951128
FCC Statement : THIS DEVICE COMPLIES WITH PART 15 OF THE FCC RULES. OPERATION IS SUBJECT TO THE FOLLOWING TWO CONDITIONS: (1) THIS DEVICE MAY NOT CAUSE HARMFUL INTERFERENCE AND (2) THIS DEVICE MUST ACCEPT ANY INTERFERENCE RECEIVED, INCLUDING INTERFERENCE THAT MAY CAUSE UNDESIRED OPERATION. Federal Communications Commission Requirements The equipment has been tested and found to comply with the limits for Class B Digital Device, pursuant to part 15 of the FCC Rules. These limits are designed to provide reasonable protection against harmful interference in a residential installation. This equipment generates uses and can radiate radio frequency energy and, if not installed and used in accordance with the instruction, may cause harmful interference to radio communication. However, there is no guarantee that interference will not occur in a particular installation. If this equipment does cause harmful interference to radio or television reception, which can be determined by turning the equipment off and on, the user is encouraged to try to correct the interference by one or more of the following measures: ●Reorient of relocate the receiving antenna. ●Increase the separation between the equipment and receiver. ●Connect the equipment into an outlet on a circuit different from that to which the receiver is connected. ●Consult the dealer or an experienced radio/TV technician for help.  THE CHANGES OR MODIFICATIONS NOT EXPRESSLY APPROVED BY THE PARTY RESPONSIBLE FOR COMPLIANCE COULD VOID THE USER'S AUTHORITY TO OPERATE THE EQUIPMENT. This device complies with Part 15 of the FCC Rules. Operation is subject to the following two conditions: (1) This device may not cause harmful interference, and receiver. (2) This device must accept any interference received, including interference that may cause undesired operation.  FCC Radiation Exposure Statement The equipment complies with FCC radiation exposure limits set forth for uncontrolled equipment and meets the FCC radio frequency (RF) Exposure Guidelines in Supplement C to OET65. The equipment has very low levels of RF energy that it is deemed to comply without testing of specific absorption ratio (SAR).

Navigation menu