GN Audio USA BIZ2400 Corded headset with Bluetooth (BT) and USB interface User Manual UserMan
GN Netcom Inc Corded headset with Bluetooth (BT) and USB interface UserMan
UserMan
1
Jabra BIZ 2400 USB
USER MANUAL
www.jabra.com
2
3
Thank you
Thank you for purchasing the Jabra BIZTM 2400 USB headset. We hope you enjoy it! This instruction manual will
get you started and ready to make the most of your headset.
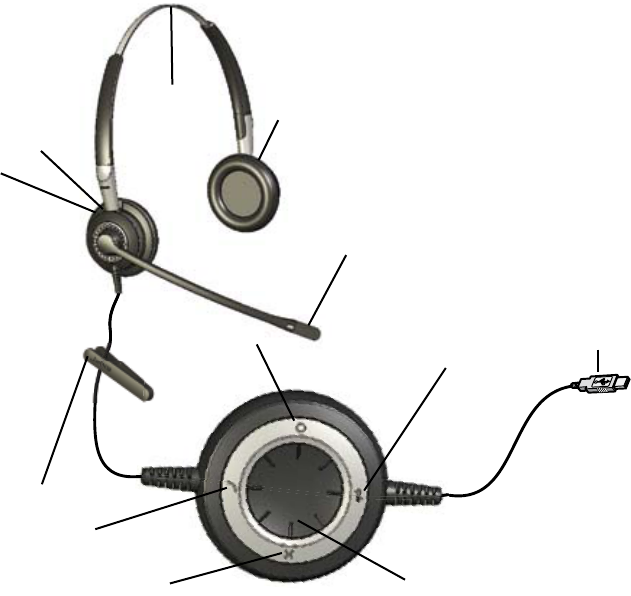
abouT your Jabra bIZ 2400 uSb hEaDSET
Headset
1 Microphone
2a Right speaker
2b Left speaker
3 Headband
4 USB Headset
5 USB plug
6 Clothing clip
7 Mute button
8 Soft button (×)
9 Soft button (O)
10 Hookswitch
11 Volume control
© 2008 GN Netcom A/S. All Rights Reserved.
This user guide is published by GN Netcom A/S.
The information in this user guide is furnished for informational use only, is subject to change without notice,
and should not be construed as a commitment by GN Netcom A/S. GN Netcom A/S assumes no responsibility
or liability for any errors or inaccuracies that may appear in this user guide.
Written and designed at GN Netcom A/S, Lautrupbjerg 7, 2750 Ballerup, Denmark, www.jabra.com.
5
9
10
811
7
6
1
4
3
2a
2b
4
5
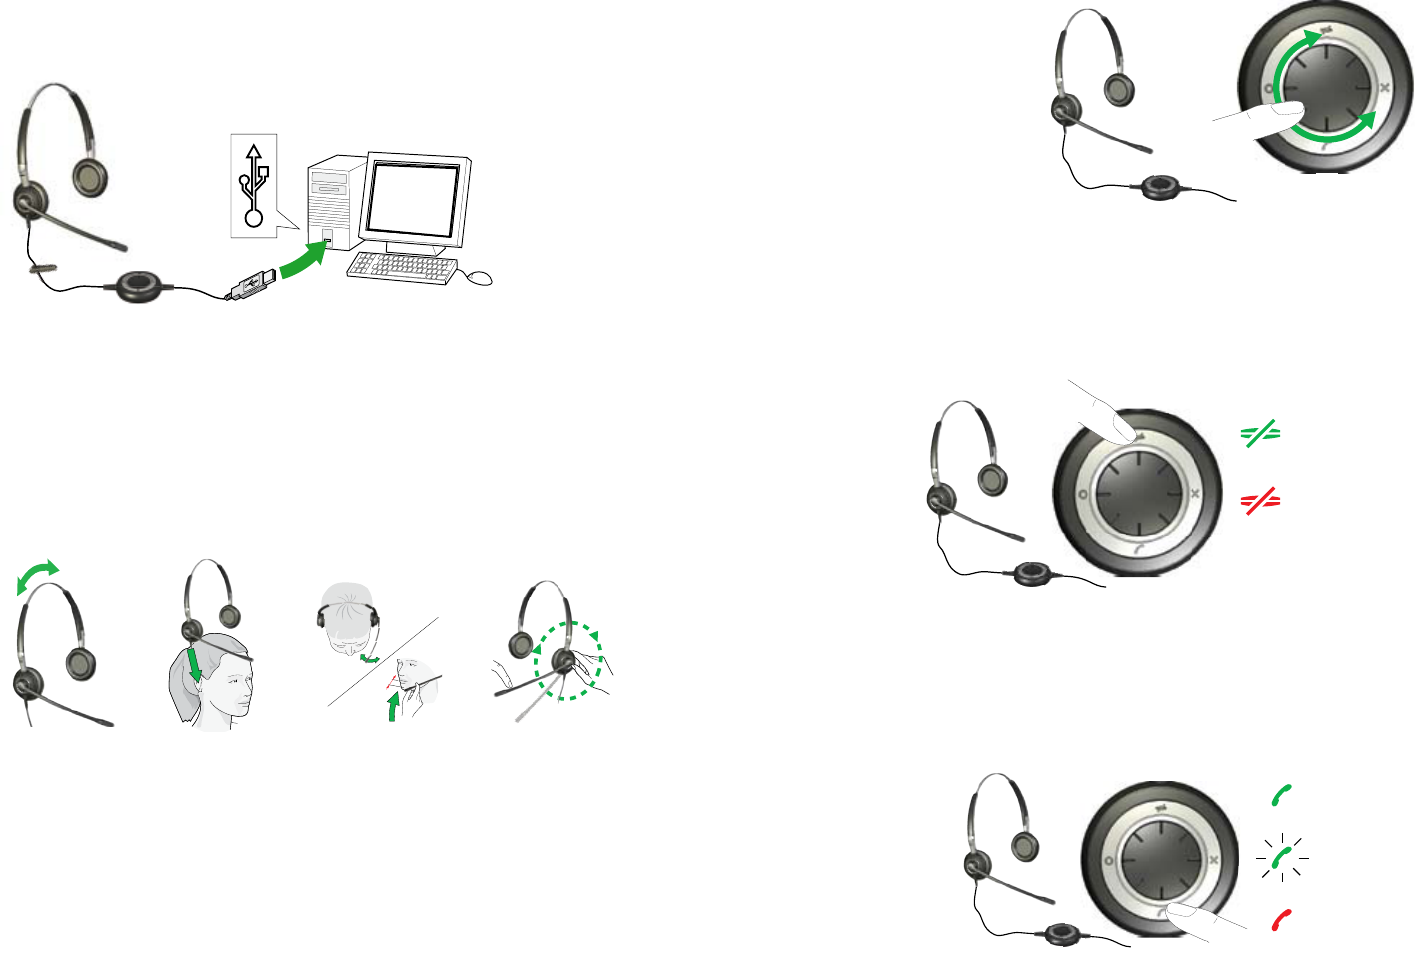
how To aDJuST volumE on ThE hEaDSET
Use the wheel at the center of the USB
controller to adjust the volume. Turn
clockwise to turn up and counterclock-
wise to turn down. You will hear a soft
click in the headset each time you adjust
the volume.
When you reach maximum volume, the
headset will beep twice as a warning.
We recommend that you do not use the
headset at full volume.
how To muTE ThE hEaDSET
It is possible to mute the microphone on the headset so that no sound/voice will be transmitted from the head-
set to the PC.
By tapping the mute button the microphone is now muted. The lights will go from a solid green to pulsating red.
It will continue to pulsate red while muted.
To un-mute tap
the mute button
again and the
light will go from
pulsating red to
solid green.
Green when not muted
Red when muted
how To anSwEr a call from your Pc SofTPhonE
When a softphone call arrives, you will hear a ring tone in the headset. If you are using a Jabra-supported soft-
phone*, then answer by tapping on the hook-switch button on the USB controller; tap again to hang up when
you are done. Softphone control requires that you install Jabra PC Suite (described later in this manual)**.
For other softphones, use the native interface on your computer to answer and hang up.
When you are using a supported softphone, the USB controller lights work as indicated to the right.
You also have the
option of rejecting an
incoming call by pressing
and holding the assigned
Soft button. The incoming
call will then be rejected.
how To connEcT hEaDSET To Pc
Plug the headset into a free USB port on your PC. Once connected, the headset's active mute and hookswitch
buttons will be illuminated.
The rst time connected, your PC displays a small pop-up message in the task bar to indicate that a new device
has been found. You are now ready to use the headset.
how To wEar ThE hEaDSET
1 Adjust the headband length.
The headband is adjustable in length. Push or pull the top section of the band until the headset ts comfort-
ably.
2. Wear the headset.
Position one speaker over each ear with the band going over the top of your head, just as with a traditional
pair of headphones.
3. Position the microphone.
Adjust the microphone by rotating it around the headset and exing the boom arm until it is positioned less
than 2 cm (3/4") from your mouth. (The boom is free to rotate 360° or more.)
2 cm
3/4"
3.23.121
*) See www.jabra.com for an up-to-date list of supported softphones. Support for Microsoft Oce Communicator requires the
Oce Communicator version of the Jabra BIZ 2400 USB headset.
**) If using Microsoft Oce Communicator you do not need to install Jabra PC Suite.
Solid green while idle
Flashing green/
blue on incoming
call
Red while on a call
6
7
how To acTIvaTE oPTIonal fEaTurES
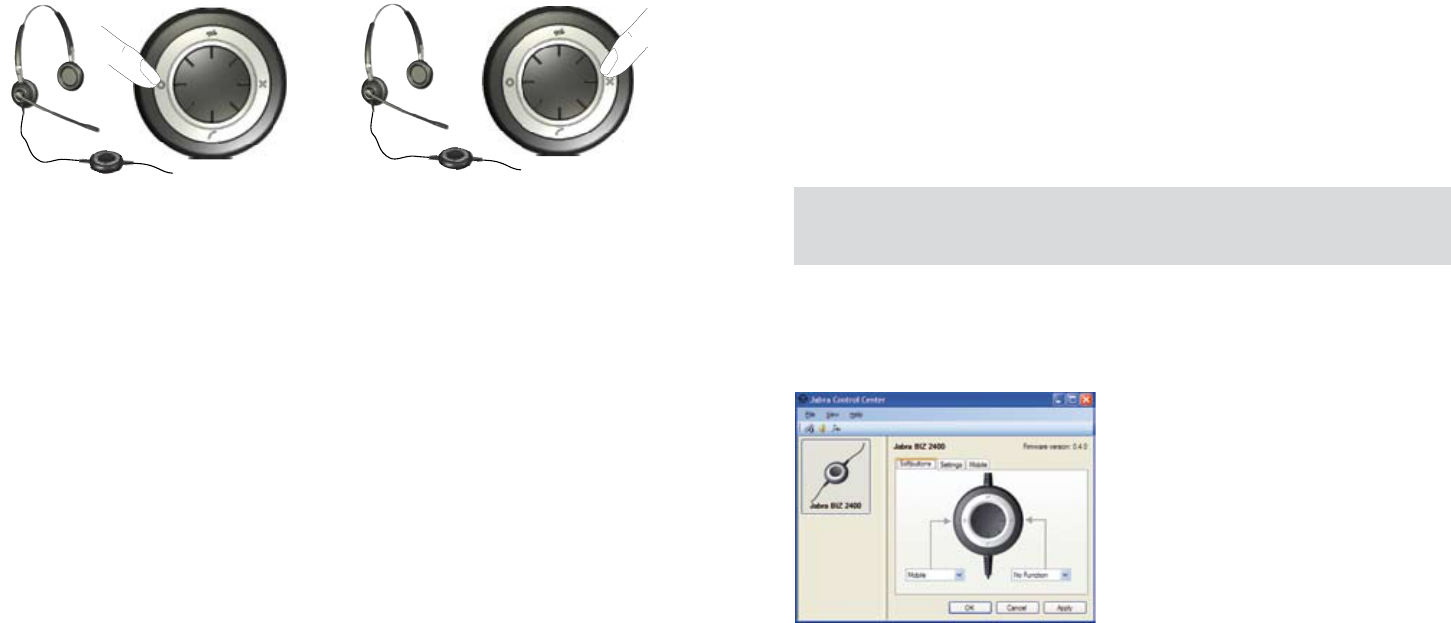
how To uSE ThE SofT buTTonS.
The USB controller includes two soft buttons, labeled × and O, respectively. You are able to program the headset
to use these two buttons for any of several functions. For example, you can congure one of the soft buttons to
control the Bluetooth connection to a mobile phone
See the section about using Jabra PC Suite, below, for details.
how To InSTall anD uSE ThE Jabra Pc SuITE
The Jabra PC Suite is a collection of programs that support and expand your headset’s features. It is available as a
free download from www.jabra.com.
Jabra PC Suite enables you to:
- Control several types of softphone programs from your headset via dedicated softphone drivers.
- Assign function to the programmable × and O buttons of the USB controller.
- Set the hearing-protection level for the headset.
- Update the rmware for headset,
InSTallIng ThE Jabra Pc SuITE
To install the Jabra PC Suite, do the following:
1. If you have not already installed your softphone, then we highly recommend that you do so before you install
Jabra PC Suite. This will ensure that Jabra support is correctly added to your softphone program. If you add
a new softphone program to your computer after installing Jabra PC Suite, then we recommend that you
reinstall Jabra, which is quite easy.
2. Download the Jabra PC Suite installer from www.jabra.com.
3. Run the setup.exe program included with the download. This will install Jabra PC Suite on your computer.
4. Follow the instructions on your computer screen. Installation is very simple and should take just a minute or
so. Please note the following as you work through the installation wizard:
- Jabra PC Suite requires Microsoft .NET Runtime 3.5. If this is not already installed on your PC, then the setup
program will automatically download and help you install it (requires an Internet connection).
- The wizard will ask which components of the Jabra PC Suite you would like to install. Usually, you should
install all of them.
- If you are using Microsoft Windows Vista, you may see a “user account control” message; just click on “Allow” to
continue with the installation.
- The wizard will ask if you would like to start the Jabra Device Service when Windows starts (see also the de-
scriptions of these programs below). If you will often use your headset with a softphone, then we recommend
that you enable the Device Service.
- At one point, you may see a warning from Windows that the software "has not passed Windows Logo testing.”
This is expected and does not indicate a problem. You can safely click on the “Continue Anyway” button.
Jabra Pc SuITE ProgramS
After installing the software, you will have an All Programs > Jabra > Jabra PC Suite folder in your Windows
Start menu. It provides links to the following programs:
- Jabra Control Center
Enables you to congure your headset from your PC.
- Jabra Device Firmware Updater
Enables you to update the headset rmware.
- Jabra Devices Service
Runs in the background and monitors your USB ports for Jabra devices. It makes sure that Windows will recog-
nize these devices and enables the Jabra Control Center and Softphone drivers to interact with them.
In addition to the above programs, the PC Suite also provides drivers for several types of softphones, including
Skype, Cisco IP Communicator and others. Support for Microsoft Oce Communicator is also available if you are
using the Oce Communicator version of the headset.
When you are using a supported softphone, you will be able to control that softphone using the buttons of the
headset USB controller. You can also talk using any softphone using its native graphic interface on your computer.
Note: Jabra is constantly evaluating the softphone market to see which new programs should be sup-
ported with a dedicated driver. Contact your Jabra representative or see the Jabra web site for the latest
news on softphone driver development.
uSIng Jabra conTrol cEnTEr wITh ThE Jabra bIZ 24oo hEaDSET
Jabra Control Center is the Jabra Control Suite program that enables you to congure your headset. To run the
program, click on the Windows Start menu and select All Programs > Jabra > Jabra PC Suite > Jabra Control
Center.
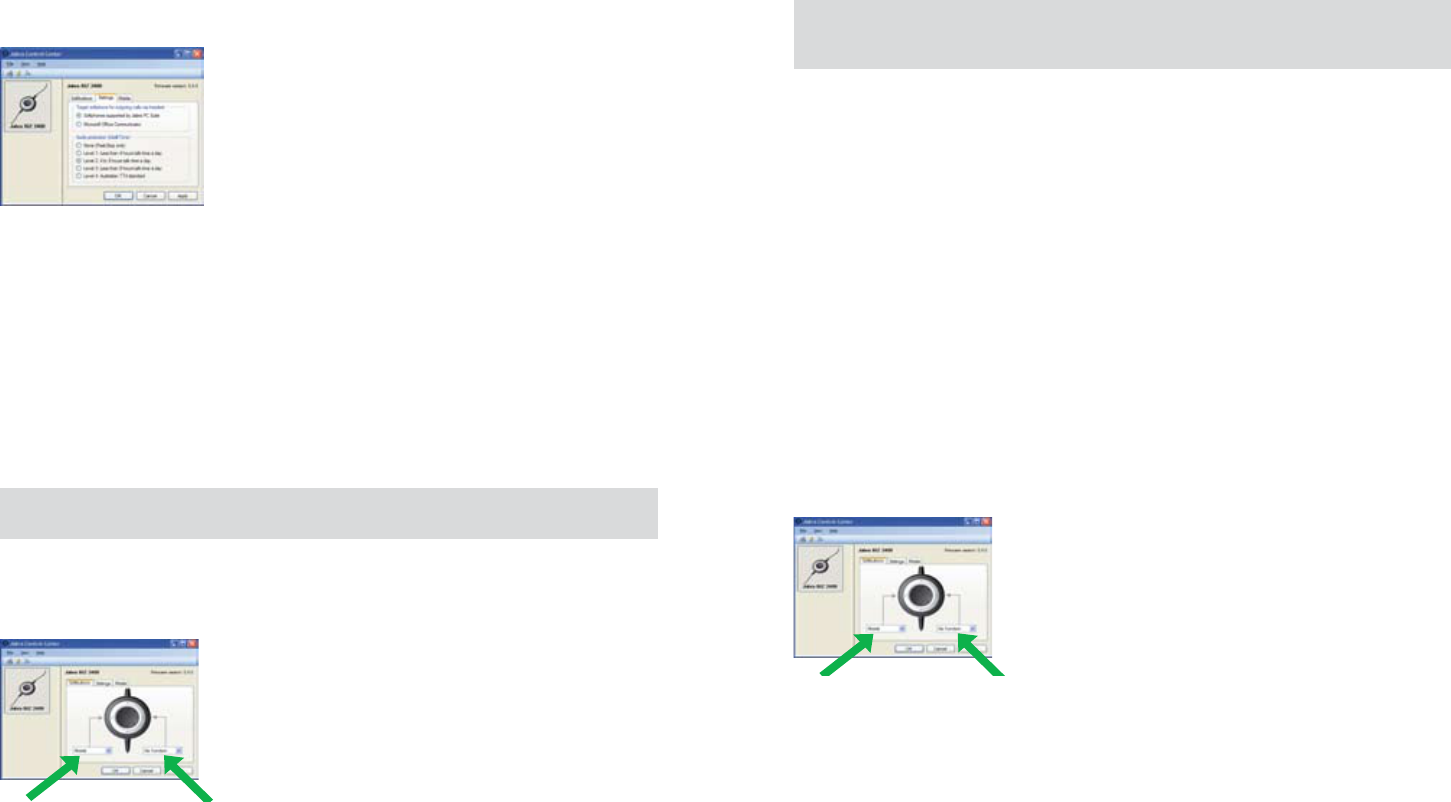
When the headset is connected to your computer, you will see the settings that are relevant for that headset.
These settings are divided into three tabs: Softbuttons, Settings, and Mobile (only when activated).
Each of these is described below.
8
9
The Settings Tab
The options on the Settings tab enable you to control the Audio protection (Intellitone).
Use the settings in the Audio protection (Intellitone) area of the Settings tab to set the hearing-protection
level of your headset.
Hearing risk is evaluated as a function of both volume and duration. Therefore, the maximum sound level should
be lowered as the number of hours you spend using the headset increases. The headsets oer a choice of ve
protection levels. These features protect your hearing by preventing acoustic shocks and limiting the maximum
noise exposure from the headset during your workday. This system is called Intellitone™, which is only available
from Jabra. All protection levels (including “none”) also feature Peakstop™, which oers protection against sud-
den, loud audio spikes.
All four Intellitone levels above (other than “none”) meet and exceed de facto global protection levels, and are
compliant with NIOSH standards and EU health and safety codes of 85 dB(A). The TT4 protection level is compli-
ant with pertinent Australian recommendation.
In the Audio protection (Intellitone) area, mark the radio button for the Intellitone level that matches the number
of hours in which you use the headset each day (Australian users should choose TT4).
If you are using a Microsoft Oce Communicator softphone you need to switch to MS Oce Communicator in
the Settings tab as the primary target softphone for your calls.
Important: Check your local laws or regulations to nd out whether a specic protection level is
mandated in your area.
The Softbutton Tab
The settings on the Conguration tab enable you to assign functions to the soft buttons of the USB controller
(labeled × and O, respectively).
Use the drop-down lists here to select from the available functions for each of the two soft buttons. Once cong-
ured, you will be able to trigger these functions by pressing the corresponding button on the USB controller.
Often, you will congure these buttons to control the Bluetooth connection to your mobile phone. *See “Pairing
the Headset with Your Mobile Phone”, below, for details about how to do this.
If you want stereo sound for playing music, your phone needs to support A2DP.
Updating the Headset Firmware
Firmware updates can sometimes improve the performance of your headset and/or add new features. Visit the
Jabra web site to nd out if rmware updates are available for any of your Jabra products. You will be able to
download the updates from there as they become available.
WARNING: Do not remove the headset from your PC while the rmware is being updated and make
sure your computer will not shut down or go into sleep or standby mode during the process. (Should a
disconnection unintentionally occur, please retry from step 1)
To apply a rmware update:
1. If you have not already done so, then attach your headset to your computer.
2. If you have not already done so, then download the rmware update from Jabra and save it on your hard disk
or network in a location where you can see it from your computer.
3. On your PC, use the Start menu to run the rmware-update application of the Jabra PC Suite.
4. Follow the instructions on your screen to identify your headset model, select the rmware update le and
apply it. See also the Jabra PC Suite online help for more details.
how To uSE ThE hEaDSET wITh a mobIlE PhonE
The USB controller on the headset includes a Bluetooth circuit, which enables the headset to connect directly
wirelessly to a mobile phone or another Bluetooth sound source. When connected to a mobile phone, you will
be able to answer and end calls using the buttons of the of the Jabra BIZ 2400 USB controller.
Pairing the Headset with Your Mobile Phone
To use your headset with a mobile phone, you must pair the headset with your phone. Once they are paired, the
headset will automatically connect to the mobile phone whenever it is in range (i.e., you should only need to pair
the two devices once). The headset must remain connected to your computer, because it requires power from
the USB connection.
To pair your headset with a mobile phone:
1. Connect your headset to your computer and run the Jabra Control Center (see above).
2. Go to the Softbuttons tab of the Jabra Control Center. Here you see two drop-down lists for assigning
functions to each of the soft buttons of the headset controller.
3. Decide which of the two soft buttons you would like to use to control your mobile phone. Open the matching
drop-down list and select Mobile from the list.
4. The USB controller on the headset now lights blue, which indicates that the headset is in pairing mode. This
means that it is advertising itself for pairing with other Bluetooth devices.
5. Make sure that Bluetooth is active on your mobile phone and put your phone into Bluetooth nding mode.
The exact procedure for doing this varies by mobile phone manufacturer and model—see your mobile phone
manual for details.
6. Your phone now looks to see if any nearby Bluetooth devices are advertising themselves for pairing—this
should include your headset. Use your phone’s controls to identify and select the “Jabra BIZ 2400” device.
Your phone may also ask for the headset’s pass code. The pass code for all Jabra devices is 0000 (four zeros); if
necessary, enter this code into your phone and commit the code (e.g., by pressing on an OK button).
7. Your phone will now attempt to connect to the Jabra BIZ 2400 USB controller and then shows you the result
of the attempt. If the attempt fails, please try again. If you are still having trouble, please check your mobile
phone documentation and/or contact technical support for Jabra and/or your mobile phone.
*check you mobile manual for instruction on how to pair to headsets.
10
11
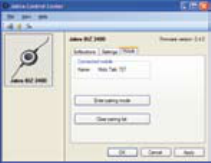
Once you have selected the mobile as one of the functions for your softbuttons, a Mobile tab will appear in the
Jabra Control Center.
You will be able to clear your paring list, thereby deleting the mobile phones paired to the headset. Once you
have clicked Clear pairing list – the headset will automatically enter a pairing mode.
By clicking on Enter pairing mode, the headset will enter pairing mode and you are now able to pair the headset
to a mobile phone – see the section on pairing your headset to a mobile phone, above.
Answering an Incoming Mobile Call
When a call arrives at your mobile phone, you will hear a ring tone in the headset and the USB controller will ash
blue and green. To answer the call, tap the soft button that you assigned to the mobile phone. When you are
done talking, tap the same button again to hang up.
Placing a Call over Your Mobile
To place a call with your mobile phone while using your headset, simply dial your mobile phone as usual. Usually,
the audio will be sent to your headset automatically whenever it is in range of your mobile phone.
Please see your mobile phone manual for details about how your specic mobile phone interacts with a Blue-
tooth headset and which, if any, conguration settings are available for this feature.
TroublEShooTIng & faQS
Q: I have pairing problems?
A: Make sure that the Headset is in paring mode, indicated by a solid blue light. See the instructions in the user
manual of that particular mobile to make sure that the mobile is also in paring mode.
Q: I cannot hear anything in my headset?
A: Make sure that the headset is selected as audio device on both the computer in the Control Panel and in the
application you are using.
Q: My computer does not detect the headset?
A: Try to insert the headset in another USB port.
Q: The computer does not automatically toggle between the headset and the mobile phone for audio?
A: You can always select the headset as your default audio device manually.
- Go to the Control Panel on your computer
- Open the menu Sound and Audio devices. When inserted you can select the headset (It should appear as
BIZ 2400) as your default device for Sound playback and Recording.
- Press Apply and then press OK.
If you are using Macintosh – Go to System preferences on your computer. When inserted you can select the
headset in the Sound menu under Output and Input.
nEED morE hElP?
European customer service information:
Web: www.jabra.com (for the latest support info and online User Manuals)
Phone:
Belgique/Belgium 0800722 52272
Danmark 70252272
Deutschland 08001826756
Die Schweiz 00800 722 52272
España 900 984572
France 0800 900325
Israel 00800 722 52272
Italia 800 786532
Luxembourg 00800 722 52272
Nederland 0800 0223039
Norge 800 61272
Österreich 00800 722 52272
Portugal 00800 722 52272
Suomi 00800 722 52272
Sverige 020792522
United Kingdom 0800 0327026
USA and Canada warranty
Web: www.jabra.com (for the latest support info and online User Manuals)
E-mail: Technical support: techsupp@jabra.com Information: info@jabra.com
Phone: 1 (800) 327-2230 (toll-free in USA and Canada)
Asia Pacic customer contact information
Web: www.jabra.com (for the latest support info and online User Manuals)
Toll Free Australia: 1-800-083-140 (Monday to Friday 10:00 – 19:00)
China: 800-858-0789 (Monday to Friday 08:00 – 17:00)
Hong Kong: 800-968-265 (Monday to Friday 08:00 – 17:00)
Indonesia: 001-803-852-7664 (Monday to Friday 08:00 – 17:00)
Japan: 0034-800-400-594 (Monday to Friday 09:00 – 18:00)
Malaysia: 1800-812-160 (Monday to Friday 08:00 – 17:00)
New Zealand: 0800-447-982 (Monday to Friday 12:00 – 21:00)
Singapore: 800-860-0019 (Monday to Friday 08:00 – 17:00)
Taiwan: 0080-186-3013 (Monday to Friday 08:00 – 17:00)
12
13
cErTIfIcaTIon anD SafETy aPProvalS
CE
This product is CE marked according to the provisions of the R & TTE
Directive (99/5/EC). Hereby, GN, declares that this product is in compliance
with the essential requirements and other relevant provisions of Directive
1999/5/EC. For further information please consult http://www.jabra.com
Within the EU this device is intended to be used in Austria, Belgium, Cyprus,
Czech Republic, Denmark, Estonia, Finland, France, Germany, Greece, Hungary, Ireland, Italy, Latvia, Lithuania,
Luxembourg, Malta, Poland, Portugal, Slovakia, Slovenia, Spain, Sweden, The Netherlands, United Kingdom, and
within EFTA in Iceland, Norway and Switzerland.
FCC
This device complies with part 15 of the FCC Rules. Operation is subject to the following two conditions: (1) This
device may not cause harmful interference, and (2) this device must accept any interference received, including
interference that may cause undesired operation.
Users are not permitted to make changes or modify the device in any way. Changes or modications not ex-
pressly approved by Jabra will void the user’s authority to operate the equipment.
This equipment has been tested and found to comply with the limits for a Class B digital device, pursuant to part
15 of the FCC Rules. These limits are designed to provide reasonable protection against harmful interference
in a residential installation. This equipment generates, uses and can radiate radio frequency energy and, if not
installed and used in accordance with the instructions, may cause harmful interference to radio communications.
However, there is no guarantee that interference will not occur in a particular installation. If this equipment does
cause harmful interference to radio or television reception, which can be determined by turning the equipment
o and on, the user is encouraged to try to correct the interference by one or more of the following measures:•
Reorient or relocate the receiving antenna.
- Increase the separation between the equipment and receiver.
- Connect the equipment into an outlet on a circuit dierent from that to which the receiver is connected.
- Consult the dealer or an experienced radio/TV technician for help.
- The user must place the base 8” (20cm) (need to verify if this is true) or more from any personnel in order to
comply with FCC RF exposure requirements.
Industry Canada
Operation is subject to the following two conditions: (1) This device may not cause interference and (2) This
device must accept any interference, including interference that may cause undesired operation of the device.
The term “IC:” before the certication/registration number only signies that registration was performed based
on a Declaration of Conformity indicating that Industry Canada technical specications were met. It does not
imply that Industry Canada approved the equipment.
Bluetooth
The Bluetooth® word mark and logos are owned by the Bluetooth SIG, Inc. and any use of such marks by Jabra is
under license. Other trademarks and trade names are those of their respective owners.
gloSSary
Bluetooth
A radio technology that connects devices, such as mobile phones and headsets, without wires or cords over a
short distance (approximately 33 feet). Learn more at www.bluetooth.com.
Pairing
Creates a unique and encrypted link between two Bluetooth devices and enables them to communicate with
each other. Bluetooth devices will not communicate if they have not been paired.
Jabra PC Suite
A GN Netcom software communication control center.
DFU
Device Firmware Update
Firmware
The software that is embedded in a hardware device, for example the Jabra BIZ 2400 USB headset. Like software,
rmware is a computer program, which is executed by a computer.
IP telephony
(Voice over Internet Protocol) The routing of internet voice conversations or through other IP-based networks.
© 2008 GN Netcom A/S. All rights reserved. Jabra® is a registered
trademark of GN Netcom A/S. All other trademarks included
herein are the property of their respective owners. The Bluetooth®
word mark and logos are owned by the Bluetooth SIG, Inc. and any
use of such marks by GN Netcom A/S is under license. (Design
and specifications subject to change without notice).
www.jabra.com
MADE IN CHINA
87-00746 B