GN Audio USA GN6110 GN6110 User Manual GN6110 contents EU 21 10 03 indd
GN Netcom Inc GN6110 GN6110 contents EU 21 10 03 indd
UserManual.wiki
>
GN Audio USA
>
GN6110 User Manual
UserMan
Navigation menu
Upload a User Manual
Namespaces
Wiki Guide
HTML
PDF
Info
Views
User Manual
Discussion / Help
Navigation
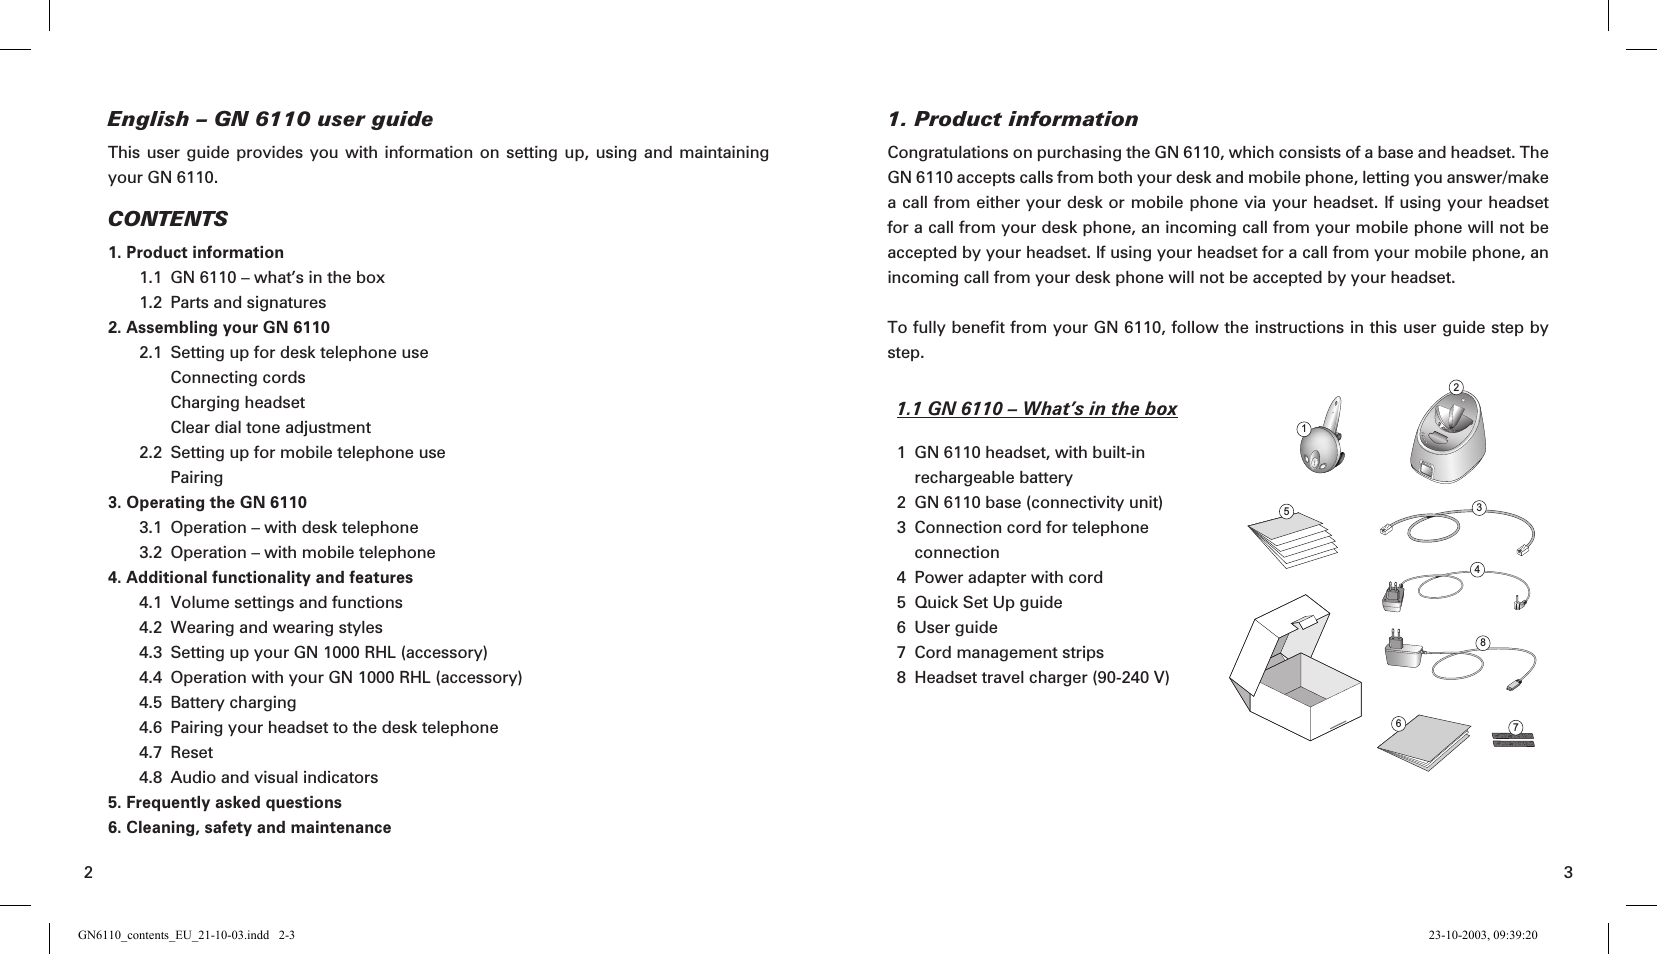
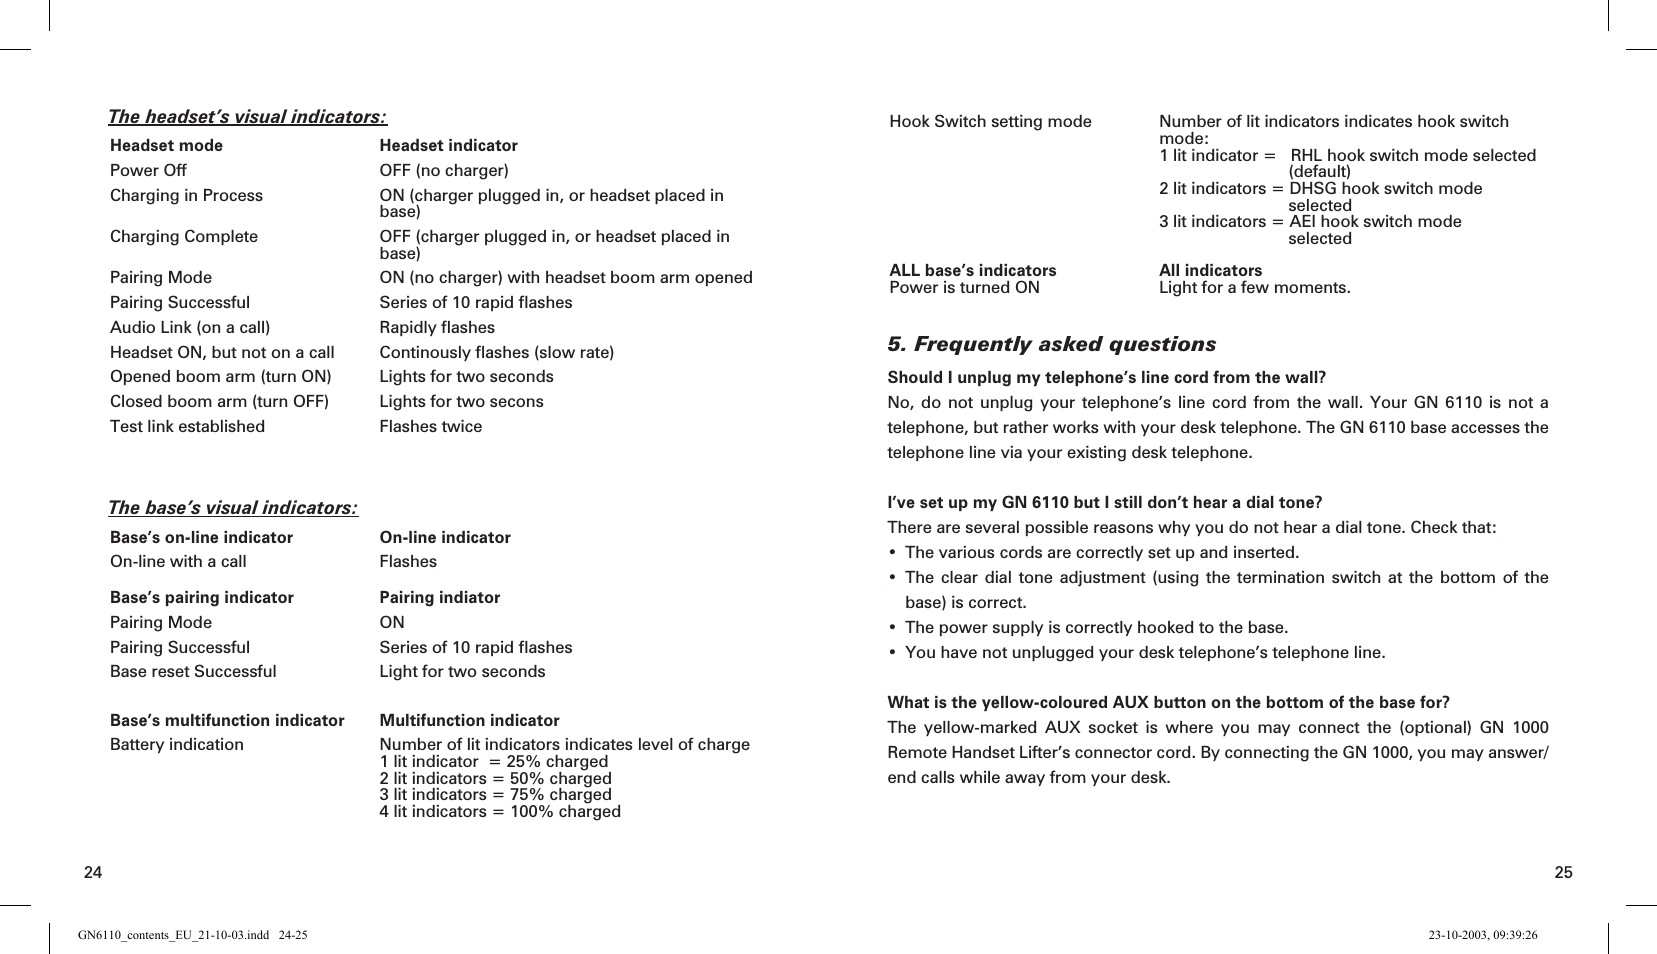
![4 51.2 GN 6110 – Parts and signatures1 Power adapter socket2 Telephone socket3 Handset socket4 Hook switch [AUX] socket (accessory) 5 Additional functionality port6 Volume match dial7 Microphone volume dial8 Reset button9 Clear dial tone termination switch10 Base Multifunction Button (MFB)11 Pairing indicator12 Battery indicator13 On-line indicator14 Charging cradle15 Headset release button16 Headset boom arm17 Earhook18 Charging port19 Speaker20 Volume buttons21 Headset Multifunction Button (MFB)22 Microphone23 Headset indicator2. Assembling your GN 6110First assemble your GN 6110 to work with your desk telephone, and then set it up to work with your mobile phone. The GN 6110 supports the GN 1000 Remote Handset Lifter for desk telephones as well as newer telephones with built-in electronic hook switches. See Section 4.3 for hook switch set up instructions and use.2.1 Setting up for desk telephone useConnecting cordsTo set up your GN 6110, connect the cords by completing the following instructions:1. Connect the power adapter cord to the socket marked 2 [A]. All of the base’s indicators will fl ash once when power is connected.2. Unplug your telephone’s handset from the handset port on the bottom of your tele-phone and plug its cord into the base’s socket marked 0 . [C]3. The blue colored cord will go from the blue socket on the base back to the now free hand-set port. [B].4. Place all cords into the base’s slots to ensure a fully functional product. [D] GFEDCBAAUX2116121017622341411781519211820231359AUXABCDEAUXGN6110_contents_EU_21-10-03.indd 4-5 23-10-2003, 09:39:21](https://usermanual.wiki/GN-Audio-USA/GN6110/User-Guide-375930-Page-3.png)
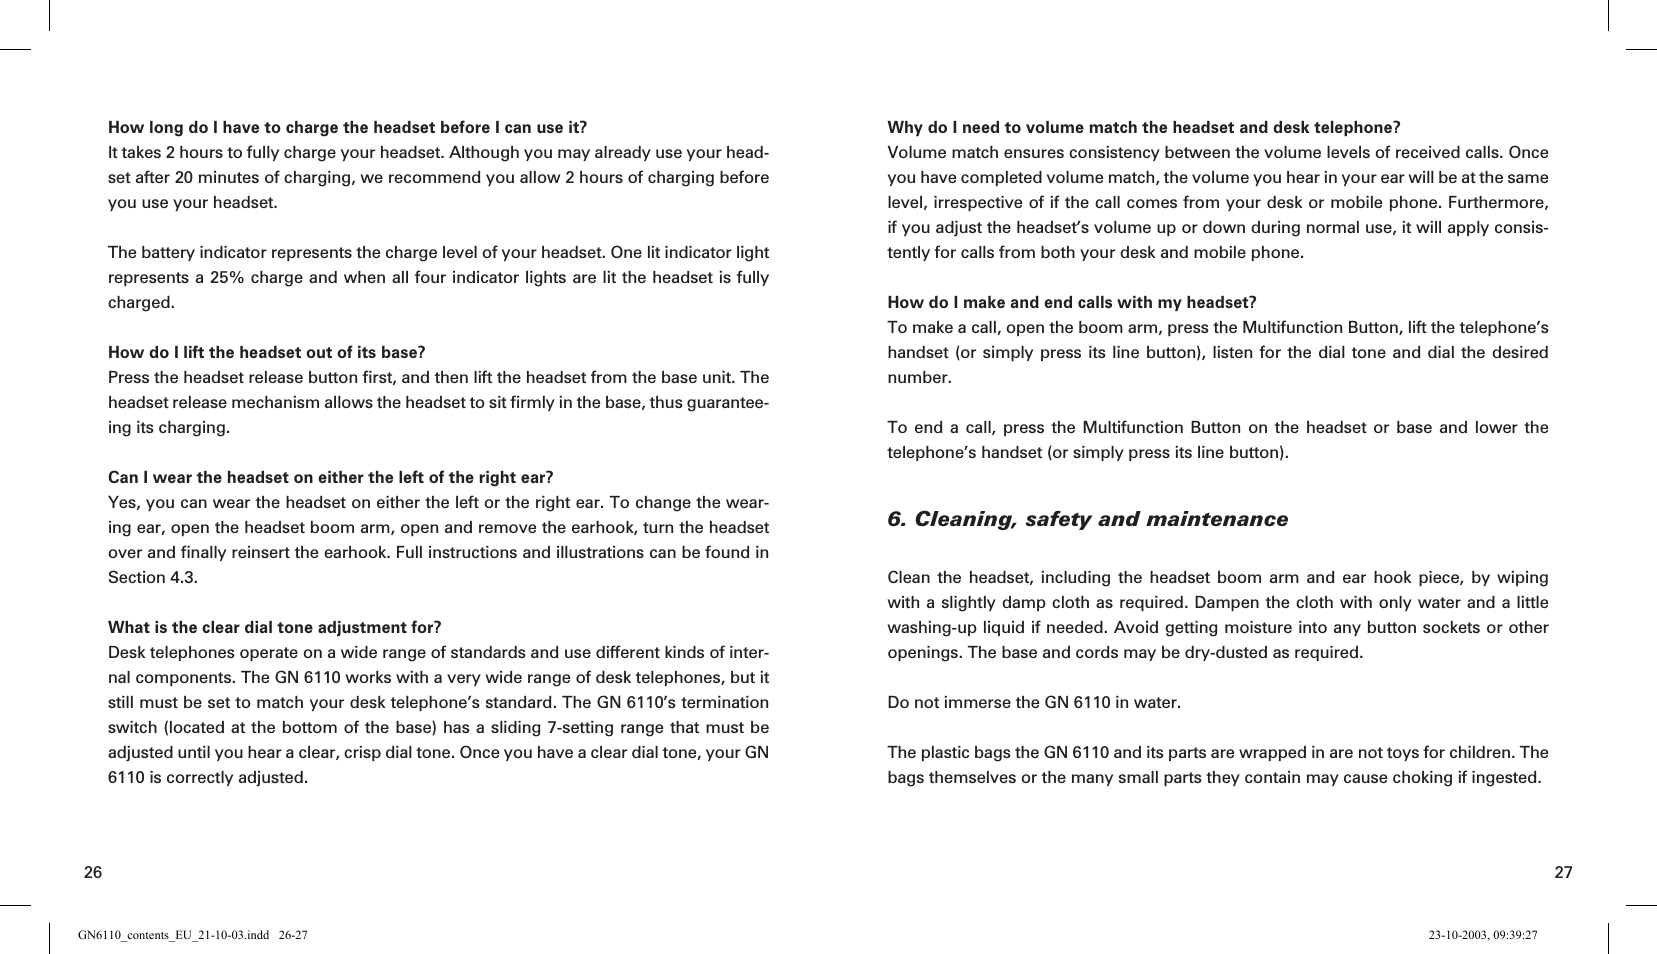
![6 7 Note: For your convenience, you may also feed the telephone cord through the base’s right or left slot, depending if your desk telephone is positioned to the right or left of the base.5. Use the cord management strips to fasten and organise the cords. [E]Charging headsetBefore using your headset, charge it for a minimum of two hours. You may charge the headset by placing it in the base or with the travel charger cord. During initial (and subsequent) charging, you may con-tinue to use your desk telephone as normal.See Section 4.5 for full details on charging batteries and the battery charge level indication. Pairing of headset to the desk telephone and verifying pairingThe headset and the base in their original product box have been factory-paired to ensure proper functioning of your GN 6110. You do not need to pair these two devices, and you may now proceed to the Clear dial tone adjustment section. If original pairing is lost (by resetting the base, changing your headset or changing your base), you will have to pair your headset to the base again. You may also verify pairing between the headset and base at any point (except during telephone conversations). See Section 4.6 for these instructions.Clear dial tone adjustmentDesk telephones operate on a range of standards. In order for your GN 6110 to work with your desk telephone and to hear a clear, crisp dial tone, you must set the correct dial tone setting. Consult the inside back cover of this user guide for the most common telephone models and settings. Complete the following instructions to set the correct dial tone adjustment:1. Open the compartment cover on the bottom of the base and locate the termination switch [A].2. Put on your headset and press the base’s Multifunction but-ton. An audible tone will shortly be heard.3. Lift the telephone’s handset from the cradle and listen for a dial tone in your headset. 4. If there is no dial tone or it is not clear, stepwise slide the termination switch through all 7 settings (along the A-G range), listening for the clearest possible dial tone. If the dial tone is just as clear in position A as in position G, leave the switch in position A.5. When you hear the clearest dial tone, you have located the correct termination set-ting. Microphone volume adjustmentIn order to ensure that your voice is neither too loud nor too soft when calling others, adjust the transmit sound volume. You will need to make a call with your desk tele-phone to adjust it. Complete the following instructions to adjust the transmit volume:1. Open the compartment cover on the bottom of the base and locate the blue microphone volume adjustment button [A].GFEDCBAGFEDCBAAGFEDCBAAGN6110_contents_EU_21-10-03.indd 6-7 23-10-2003, 09:39:21](https://usermanual.wiki/GN-Audio-USA/GN6110/User-Guide-375930-Page-4.png)
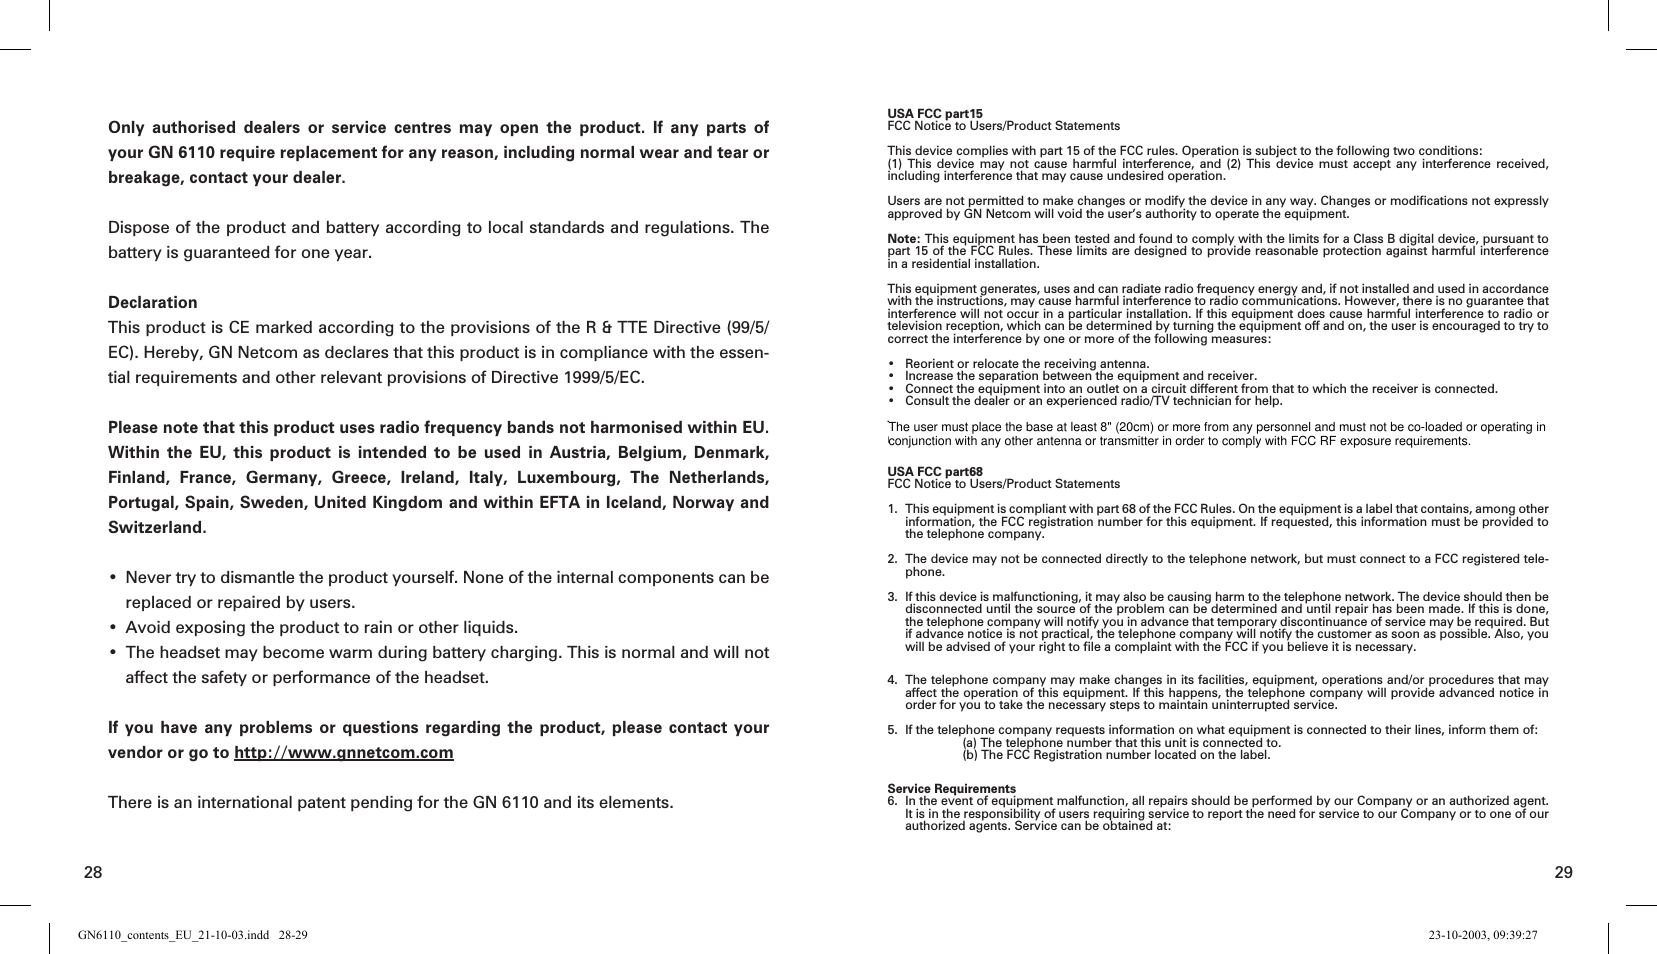
![8 92. Put on your headset and press the Multifunction Button on the base. An audible tone will shortly be heard.3. Lift the telephone’s handset from the cradle and listen for a dial tone in your headset.4. Using your desk telephone, make a call to someone who will act as your test person.5. While speaking with your test person, adjust the blue microphone volume adjust-ment button until he/she hears your voice at an appropriate level. 2.2 Setting up for mobile telephone useThe GN 6110 headset is also compatible with Bluetooth mobile phones. The mobile phone you use with your GN 6110 must be Bluetooth technology-equipped.Setting up the headset to a mobile phone (pairing) Before using your headset for the fi rst time with a mobile phone, you must pair your headset and mobile telephone by completing the following:1. Press and hold down the Multifunction Button on the headset for 5 seconds, after which the headset indica-tor will light. [A] 2. Within 3 seconds, open the headset boom arm. The headset can be paired within the next 5 minutes.3. Put the mobile phone into pairing mode, according to your mobile phone’s user manual. [B] Note: Your mobile phone must be Bluetooth-equip-ped in order to pair it with the GN 6110.4. From your mobile phone, perform a device discovery so that your mobile phone will fi nd your headset and pair to it. This may take several seconds. Note: Ensure that the mobile device and the headset are within 1 metre of each other. [C]5. When your mobile phone prompts you, enter the following 4-digit passkey code: 0000. The mobile phone will now begin pairing and store your GN 6110 headset in its memory. Your mobile phone screen will advise that pairing has been successful. The headset indicator will rapidly fl ash 10 times, and a beep will be heard in the headset to indicate successful pairing.After successful pairing, your headset is ready to use with your mobile phone. Consult your mobile phone’s user guide for full details on utilising a Bluetooth headset with your mobile phone.3.0 Operating the GN 61103.1 Operation – with desk telephoneIf your headset is in its base, press the release headset button to free the headset before using it. Turning headset ON:Open the headset boom arm. The headset indicator will light for 2 seconds, and then continue to fl ash slowly as long as the headset is on. Turning headset OFF:Close the headset boom arm. The headset indicator will light for 2 seconds, after which it will turn off.ABCmax1mBluetooth™ is a trademark owned by Bluetooth SIG, Inc. USA and licensed to GN Netcom.GN6110_contents_EU_21-10-03.indd 8-9 23-10-2003, 09:39:22](https://usermanual.wiki/GN-Audio-USA/GN6110/User-Guide-375930-Page-5.png)
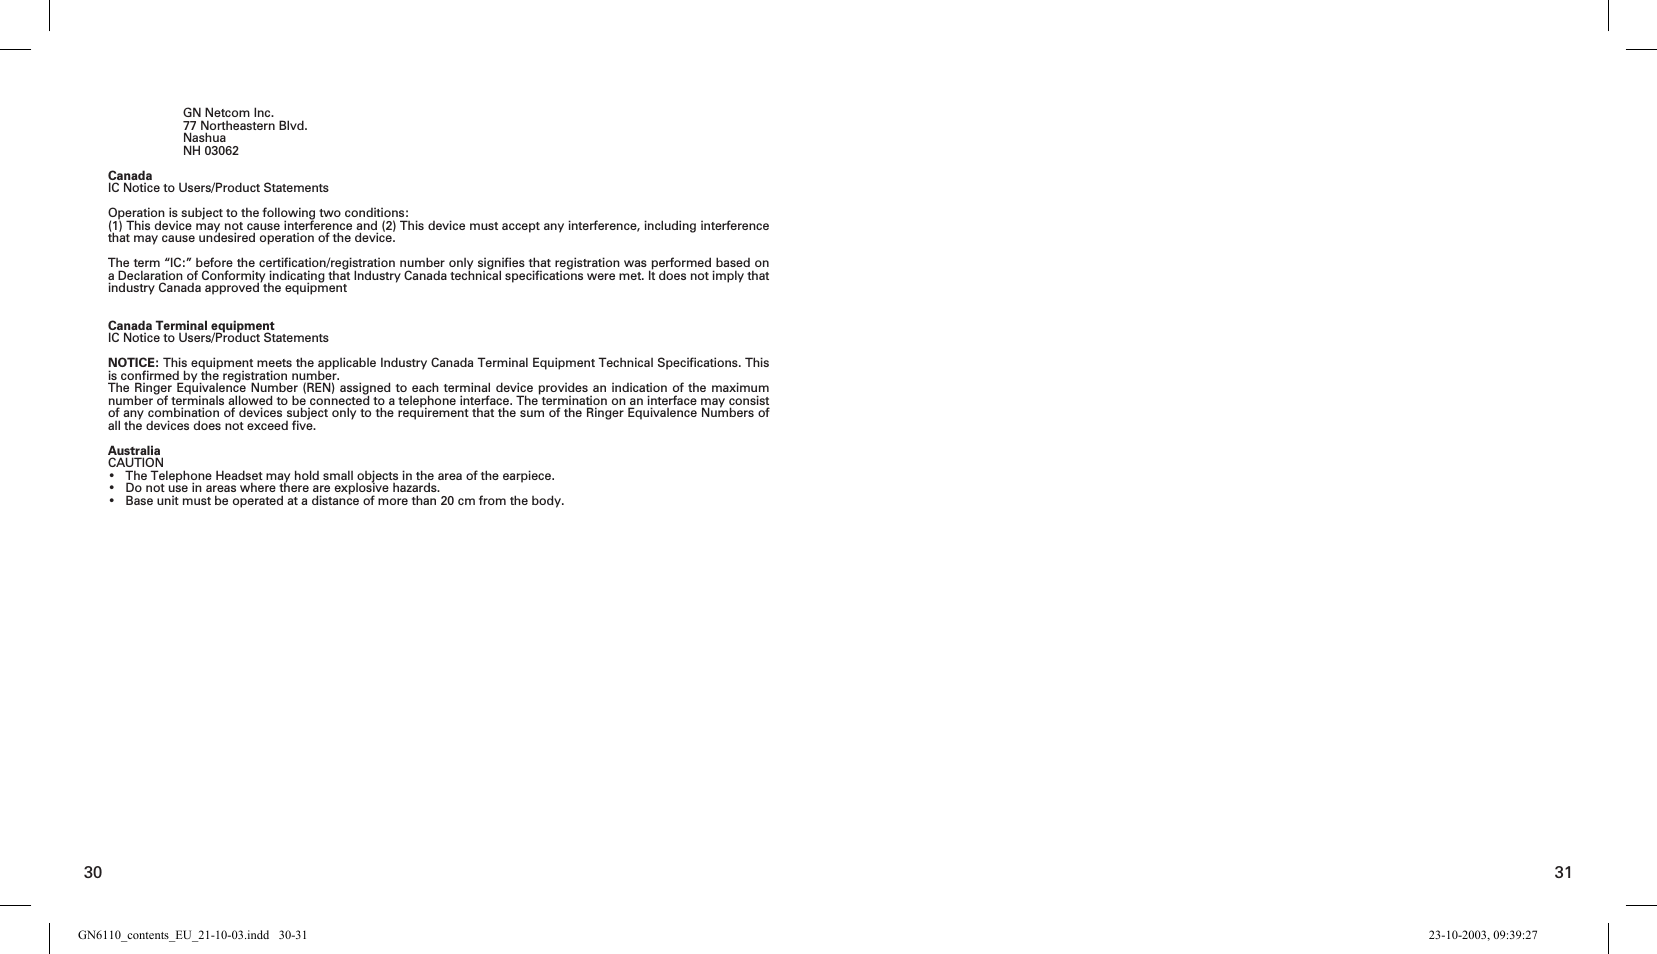
![10 11Making calls:1. With the boom arm open, press the Multifunction Button on either the headset [C] or the base [B]. An audible tone will be heard and the connection will be established shortly.2. Lift the telephone’s handset, or press the telephone’s line button if your telephone has one. A dial tone will be heard.3. Dial the desired number when the dial tone is heard in your headset.The headset indicator and the on-line indicator will fl ash rapidly for the duration of the call.Answering calls: 1. With the boom arm open, press the Multifunction Button on either the headset or the base. An audible tone will be heard and the connection will be established shortly.2. Lift the telephone’s handset, or press the line button if your telephone has one. The headset indicator and the pairing indicator will fl ash rapidly for the duration of the call.Ending calls: 1. Press the Multifunction Button on either the base or the headset.2. Lower the telephone’s handset, or press the line button if your telephone has one.Headset handset switching (while on a call). To switch from using the headset to the handset during a call: 1. Terminate the link between the head-set and the base by either closing the headset boom arm [A] or pressing the Multifunction Button on the base [B] or the headset [C].2. The call is now terminated in the headset, and can be continued in the handset.3. To end the call, hang up the telephone handset. To switch from using the handset to the headset during a call:1. With the boom arm open, press the Multifunction Button on either the headset or the base. An audible tone will be heard and the connection will be established shortly.2. The call is now terminated in the handset, and can be continued in the headset.3. To end the call, press the Multifunction Button on either the base or the headset, or close the headset boom arm.4. Lower the telephone’s handset. On telephones equipped with a line button, press the line button to end the call.5. You may continue wearing the headset, or place it in the base (with the boom arm closed) for recharging. ABCDBCAGN6110_contents_EU_21-10-03.indd 10-11 23-10-2003, 09:39:23](https://usermanual.wiki/GN-Audio-USA/GN6110/User-Guide-375930-Page-6.png)
![12 133.2 Operation – with mobile telephoneIf your headset is in its base, press the release headset button to free the headset before using it.Turning headset ON:Open the headset boom arm. The headset indicator will light for 2 seconds, and then continue to fl ash slowly as long as the headset is on. Turning headset OFF:Close the headset boom arm. The headset indicator will light for 2 seconds, after which it will turn off.Making calls:1. Open the headset boom arm and place the headset on the ear.2. Dial the desired number on your mobile, and press the mobile’s Yes/Send/Call button to begin calling.The headset indicator will fl ash rapidly for the duration of the call.Making voice-activated calls: Note: Before making voice-activated calls, voice dialling must be activated on your mobile phone and voice tags stored. Consult your mobile phone’s user guide for full details.To make voice-activated calls:1. Open the headset boom arm and place the headset on the ear.2. Press the Multifunction Button on the headset for 3 seconds. The headset will go into voice command mode, and an audible tone will be heard indicating that the headset is expecting a voice command.3. Give the desired voice command.The headset indicator will fl ash rapidly for the duration of the call.Answering calls: 1. Press the Multifunction Button on the headset, or open the headset boom arm if not already opened. The connection will be established shortly.2. An audible tone will be heard, and you are now connected to your caller.The headset indicator will fl ash rapidly for the duration of the call. Ending calls: Press the Multifunction Button on the headset. An audible tone will be heard.The call will also terminate if the mobile phone’s End Call button/functionality is used, or if the second party hangs up.Headset mobile phone switching (while on a call). To switch from using the headset to mobile phone during a call:1. Terminate the link between the headset and the mobile phone by closing the headset boom arm [A] Note: do not press the Multifunction Button.2. The mobile phone will prompt you to continue the call [B]. ABGN6110_contents_EU_21-10-03.indd 12-13 23-10-2003, 09:39:23](https://usermanual.wiki/GN-Audio-USA/GN6110/User-Guide-375930-Page-7.png)
![14 153. You have 30 seconds to accept the transfer to your mobile phone; after accepting continue the call on your mobile phone.4. To end the call, use the mobile phone’s End Call button/functionality.To switch from using the mobile phone to the headset during a call:1. With the boom arm open, press the Multifunction Button on the headset.2. An audible tone will shortly be heard, and the connection will be established mo-mentarily.3. Continue the call on your headset.4. To end the call, press the Multifunction Button on the headset.5. You may continue wearing your headset, or close the headset boom arm and place in the base for charging. Consult your mobile phone’s user guide for full details.4.0 Additional functionality and features4.1 Volume settings and functionalityVolume adjust [A]There are two volume buttons, one on each side of the headset’s Multifunction Button. The GN 6110’s headset comes equipped with intelligent volume re-orientation, so no matter which ear you wear the headset on, the topmost of the two volume buttons is always volume + (up) and the lower button is always volume – (down). Press the volume + (up) or volume – (down) button until the desired volume level has been reached. If minimum/maximum volume is reached, an audible tone will be heard in the headset.Volume matchFor your own comfort, match the volume level of your desk telephone to that of your mobile phone. This will ensure that you get a consistent volume level for all of your calls, no matter which device you use. After the initial volume match, subsequent vol-ume level changes made on your headset will be replicated on your desk and mobile phones. You will need to make 2 calls to adjust the volume match, one using your mobile phone and the other using the desk telephone.1. Open the compartment cover on the bottom of the base and locate the black volume match button [A]2. Using your mobile telephone, make an initial test call to some-one and have a brief conversation, keeping in mind the volume level of the conversation.3. Using your desk telephone, make a second test call to the same person. 4. While speaking with your test person, again adjust the black volume match adjust-ment button until the volume level of this conversation matches that of the fi rst mobile phone’s test conversation. 4.2 Wearing and wearing stylesChoosing right or left ear wearing stylesThe GN 6110’s headset comes confi gured for wearing on your right ear. +GFEDCBAAGN6110_contents_EU_21-10-03.indd 14-15 23-10-2003, 09:39:24](https://usermanual.wiki/GN-Audio-USA/GN6110/User-Guide-375930-Page-8.png)
![16 17To change for left ear wearing, use the instructions as follows:1. Open the headset boom arm.2. Put the headset’s earhook in its opened position.3. Gently lift and pull the top of the earhook up from the upper hinge pin and pull away to remove [A].4. Turn the headset over [B].5. Hook the bottom of the earhook on to the lower hinge pin and lift and pull the top of the earhook over the upper hinge pin [C]. The volume + (up) or volume – (down) buttons will re-orient automatically.Placing the headset on your ear [A]In order to wear the headset follow these instructions:1. Open the headset boom arm.2. Put the earhook in its opened position (90° away from the headset).3. Loop the earhook behind your ear.4. Close the headset boom arm towards your ear. The headset boom arm will then point towards your mouth.4.3 Setting up your GN 1000 RHL (accessory)The GN 6110 can be connected to GN Netcom’s GN 1000 Remote Handset Lifter (acces-sory). This gives you the additional convenience of answering and ending calls even while away from your desk.To connect your GN 1000 to the GN 6110, complete the following:1. Connect the GN 1000’s connector cord to the yellow-marked hook switch [AUX] socket on the bottom of the base [A].2. Consult the GN 1000 user guide to complete the set up. Note: If you cannot locate the GN 1000 product box and/or user guide, consult GN Netcom’s web pages at www.gnnetcom.dk. Your GN 6110 is now ready to use with your GN 1000, and you may proceed to Section 4.4.4.4 Setting up your GN 1000 RHL (accessory)Turning headset ON:Open the headset boom arm. The headset indicator will light for 2 seconds, and then continue to fl ash slowly as long as the headset is on. Turning headset OFF:Close the headset boom arm. The headset indicator will light for 2 seconds, after which it will turn off.Making calls:1. With the boom arm open, press the Multifunction Button on either the headset [C] or the base [B]. An audible tone will be heard and the connection will be established shortly.AABCBCAGN6110_contents_EU_21-10-03.indd 16-17 23-10-2003, 09:39:24](https://usermanual.wiki/GN-Audio-USA/GN6110/User-Guide-375930-Page-9.png)
![18 192. The hook switch will be activated, and your telephone’s handset will be lifted.3. Dial the desired number when the dial tone is heard. The headset indicator and the base’s on-line indicator will fl ash rapidly for the dura-tion of the call.Answering calls: 1. Press the Multifunction Button on either the headset [C] or the base [B], or open the headset boom arm [A] if not already opened. If the headset is already being worn, an audible beep will indicate an incoming call, after which press the Multifunction Button.2. An audible tone will be heard, and you are now connected to your caller. The headset indicator and the pairing indicator will fl ash rapidly for the duration of the call.Ending calls: 1. Press the Multifunction Button on either the base or the headset, or close the head-set boom arm. Your call is now terminated.2. You may continue wearing your headset, or replace the (closed) headset boom arm in the base for charging.Headset handset switching (while on a call)To switch from using the headset to the handset during a call: 1. Pick up the telephone’s handset [A].2. Close the headset boom arm [B], or press the Multifunction Button on the base [C] or the headset [D] to continue the call on the hand-set.3. To end the call, hang up the telephone handset. Note: Closing the boom arm gives you a few seconds to pick up the telephone handset. To switch from using the handset to the headset during a call:1. With the boom arm open, press the Multifunction Button on either the headset or the base. The connection will be established shortly.2. When the hook switch is activated, place the handset on the lifter arm.3. To end the call, press the Multifunction Button on either the base or the headset, or close the headset boom arm. 4. You may continue wearing the headset, or place it in the base (with the boom arm closed) for recharging.4.5 Battery charging With an initial full battery charge and continual daily charging, the GN 6110’s battery will give you years of reliable service.Charging in the base chargerTo charge in the base, place the headset into the base. The headset indicator will light to indicate charging, and will turn off when fully charged.Note: To ensure optimal charging, ensure that the headset is placed fi rmly and com-pletely into the base.BCDAGN6110_contents_EU_21-10-03.indd 18-19 23-10-2003, 09:39:25](https://usermanual.wiki/GN-Audio-USA/GN6110/User-Guide-375930-Page-10.png)
![20 21To use your headset, press the release headset button to free the head-set from its base.During initial (and subsequent) charging, you may use your desk tele-phone’s handset.Battery charge indicationThe headset indicator will light to indicate charging, and will turn off when fully charged. The 4 lights of the battery indicator show the approximate battery charge level of the headset: • 1 lit indicator represents 25% of a full charge • 4 lit indicators represent a full charge.Charging with the travel chargerThe travel charger works universally (90-240 V), letting you charge the headset in any country. You will need to purchase separately any required electrical outlet plug-in adapters. To charge with the travel charger, insert the travel charger cord’s electrical plug into the electrical outlet and the cord’s mains plug into headset.Note: To ensure optimal charging, ensure that the mains plug of the travel charger is placed correctly into the headset. The headset indicator will light when the headset is charging. Battery saving mode To save power, the headset enters snooze mode after 1 minute of inactivity. This will in no way affect the normal use of the headset, and it will re-activate itself immediately when used or when a call is received.4.6 Pairing your headset to the desk telephonePairing your headsetIn order for your GN 6110 to work correctly, the headset and the base must be paired together. For your convenience, these two devices in their original product box have been factory-paired. If this original pairing is lost (by resetting the base, changing your headset or changing your base), you will have to pair your headset again to the base. Complete the following steps to pair your headset again to the base:1. Press and hold down the Multifunc-tion Button on the headset for 5 seconds [A], after which the headset indicator will light [B].2. Within 3 seconds, open the headset boom arm. The headset can now be paired within the next 5 minutes [B].3. Press and hold down the Multifunc-tion Button on the base for 5 seconds, after which the pairing indicator will light. [C] Note: Ensure that the headset and base are within 1 metre of each other. After 5 seconds, the base will automatically pair with the headset.Successful pairing will be indicated by 10 rapid fl ashes of both the headset indicator and the pairing indicator. A beep will also be heard in the headset.AB~ 5 sec~ 5 secCGN6110_contents_EU_21-10-03.indd 20-21 23-10-2003, 09:39:26](https://usermanual.wiki/GN-Audio-USA/GN6110/User-Guide-375930-Page-11.png)
![22 23Verifying pairingTo verify pairing, create an audio link between the headset and base by completing the following: 1. With the boom arm open, press the Multifunction Button on either the headset [C] or the base [B]. An audible tone will be heard, and the headset indicator and online indicator will fl ash rapidly.2. To end the audio link, press the Multifunction Button on either the headset or base, or close the headset boom arm. Note: You may verify pairing at any point. However, during telephone conversa-tions, verifying pairing is not possible. 4.7 ResetYou may reset the base to remove pairing settings and return to the default hook switch solution setting (RHL) if needed. To reset the base, complete the following:1. Open the compartment cover on the bottom of the base and locate the reset button.2. With a pointed object (such as an unfolded paperclip), press the reset button on the base for 10 seconds [A]. When the base is reset, the pairing indicator will light for 2 seconds.Note: If you reset the base you will have to pair your headset to the base again. See Section 4.6 for pairing instructions.4.8 Audio and visual indicatorsThe GN 6110’s headset and base have audio and visual indicators, which represent various actions and aspects associated with setting up and operating the product. The headset gives audio indicators and various visual indicators via its headset indica-tor. The base gives various visual indicators via its on-line, link and general indicators. Familiarise yourself with these indicators to fully benefi t from your GN 6110.The headset’s audio indicators:Headset action Audio indicationVolume Limit Repeated single high tone when min. or max. limits achieved (when button is pressed)Low Battery Tone Two rapid high tones repeated every 20 secondsOut of Range No audio indications; gradual deterioration of audio qualityIncoming Call from Mobile Ring tone A (when using mobile phone or hook switch)Incoming Call from desk phone Ring tone B (only when using hook switch)Pairing Confi rmation Single high toneEstablish Audio Link Series of tones, low to highInitiate Voice Dial Single low toneVoice Tag not Recognised Dual high-low toneEnd Call/Audio Link Closed Series of tones, high to lowPower ON/OFF No audible toneBCAGFEDCBAA~ 3 secGN6110_contents_EU_21-10-03.indd 22-23 23-10-2003, 09:39:26](https://usermanual.wiki/GN-Audio-USA/GN6110/User-Guide-375930-Page-12.png)