GN Audio USA HSC018W Bluetooth Headset (Mono/Stereo) User Manual Part 4
GN Netcom Inc Bluetooth Headset (Mono/Stereo) Part 4
Contents
- 1. user manual Part 1
- 2. user manual Part 2
- 3. user manual Part 3
- 4. user manual Part 4
- 5. user manual part 1
user manual Part 4

58
PORTUGUÊS
2 COMO USAR
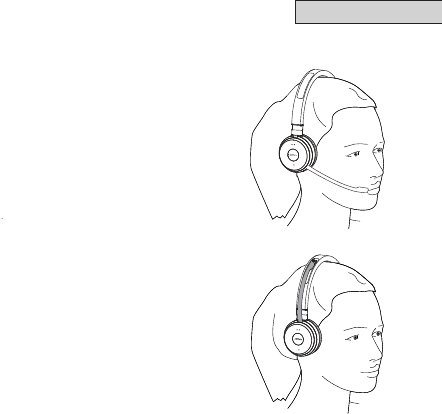
POSICIONAR O MICROFONE
Recomenda-se posicionar o braço
boom do microfone perto da boca. O
braço boom do microfone é dobrável
para preferências pessoais.
USO AO AR LIVRE
Ao ouvir música ou quando estiver ao
ar livre, o braço boom do microfone
pode ser guardado no encaixe da
bandana de cabeça.

59
3 COMO USAR
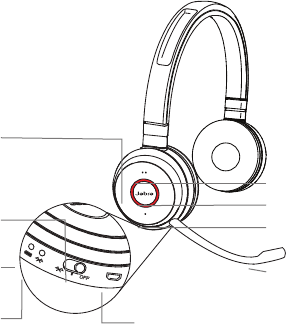
VOCÊ SABIA?
Você pode baixar o manual do usuário completo em jabra.com/evolve65
Indicador de luz
de ocupado
Indicador de
bateria
Indicador de
Bluetooth Porta USB/carregamento
Interruptor
Ligar/Desligar/
Pareamento
Braço boom do
microfone
Aumentar o volume
Diminuir o volume
Botão Atender/
Terminar

60
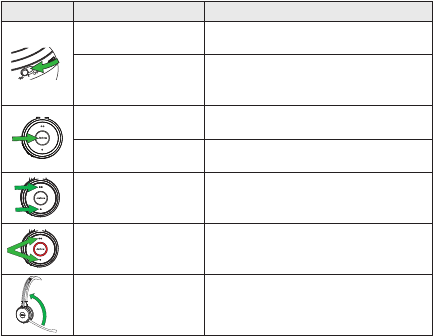
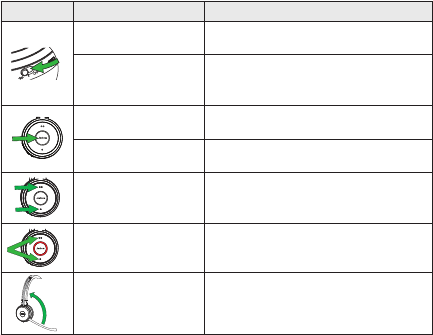
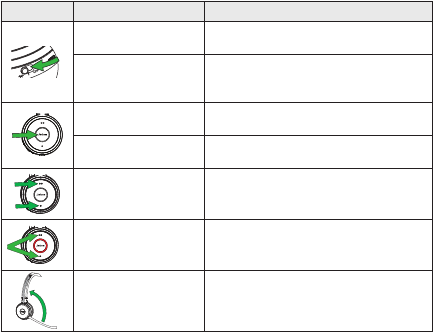
FUNÇÃO AÇÃO
Headset ligado/
desligado
Deslize o interruptor Ligar/Desligar/
Pareamento
Modo de
pareamento do
headset
Segure (3 segundos) no interruptor
Ligar/Desligar/Pareamento na
posição de pareamento
Atender/Terminar
chamada Toque no botão Atender/Terminar
Rejeitar chamada Toque duas vezes no botão Atender/
Terminar
Ajustar o volume do
alto-falante
Toque no botão Aumentar volume
ou Diminuir volume
Luz de ocupado
ligada/desligada
Toque simultaneamente no botão
Aumentar volume e Diminuir volume
Colocar/retirar a
chamada do mudo
Mova o braço boom do microfone
totalmente para cima (mudo) ou
totalmente para baixo (retirar do mudo)
CARREGANDO O HEADSET
O headset será carregado quando for conectado a um PC ou quando estiver usan-
do qualquer carregador de parede USB fornecido com o seu dispositivo móvel.
Leva aproximadamente 3 horas para carregar.

61
1 ПОДКЛЮЧЕНИЕ
( JABRA LINK 360)
Jabra Link 360 USB-
. Jabra Link 360
.
( BLUETOOTH)
(3 ) ./
./ ,
Bluetooth
.
( USB-)
USB-
USB- ,
.

62
2 СПОСОБЫ НОШЕНИЯ
.
.
,
.

63
3 ИСПОЛЬЗОВАНИЕ
,
jabra.com/evolve65
Bluetooth /USB-
./
./
/
64
/
././
(3 )
././
/
/
/
/
/
()
()
USB-
, .
3 .

65
1 CÓMO SE CONECTA
CONEXIÓN CON PC
(CON JABRA LINK 360)
Conecte el dispositivo Jabra Link 360 a
cualquier puerto USB disponible en su
PC. Los auriculares y Jabra Link 360 están
presincronizados.
CONEXIÓN CON UN DISPOSITIVO MÓVIL
(CON BLUETOOTH)
Mantenga el interruptor Encendido/Apagado/
Sincronización en la posición de sincronización
durante 3 segundos hasta que el indicador
de Bluetooth parpadee en azul y oiga las
instrucciones de sincronización por voz.
CONEXIÓN CON PC (CON CABLE USB)
Conecte los auriculares a cualquier puerto
USB de su PC utilizando el cable USB y
asegúrese de que los auriculares están
encendidos.
66
ESPAÑOL
2 CÓMO SE COLOCA
COLOCAR EL MICRÓFONO
Recomendamos colocar el brazo del
micrófono cerca de la boca. Es exible
para que pueda ajustarlo a su posición
preferida.
USO EN EXTERIORES
Al escuchar música o cuando está en el
exterior, el brazo del micrófono puede
guardarse en la ranura de la diadema.
67
3 CÓMO SE USA
¿LO SABÍA?
Puede descargar el manual completo en jabra.com/evolve65
Luz indicadora de
ocupado
Indicador de la
batería
Indicador
Bluetooth Puerto de carga/USB
Interruptor
Encendido/
Apagado/
Sincronización
Brazo del
micrófono
Subir volumen
Bajar volumen
Botón Responder/
Finalizar
68
FUNCIÓN ACCIÓN
Encender/Apagar los
auriculares
Deslice el interruptor Encendido/
Apagado/Sincronización
Modo de
sincronización de los
auriculares
Mantenga el interruptor Encendido/
Apagado/Sincronización en la posición
de sincronización durante 3 segundos
Responder/Finalizar
llamadas Pulse el botón Responder/Finalizar
Rechazar una
llamada
Pulse dos veces el botón Responder/
Finalizar
Ajustar el volumen
del altavoz
Pulse el botón Subir volumen o
Bajar volumen
Encender/Apagar luz
de ocupado
Pulse los botones Subir volumen y
Bajar volumen simultáneamente
Silenciar/Activar
llamada
Eleve el brazo del micrófono hasta la
posición más alta (silenciar) o hasta la
más baja (activar)
CÓMO CARGAR LOS AURICULARES
Los auriculares se cargan al conectarlos a un PC o al utilizar un cargador
de pared USB de su dispositivo móvil.
Tardan aproximadamente 3 horas en cargarse.

69
1 CÓMO CONECTARLO
CONEXIÓN A PC
(UTILIZANDO JABRA LINK 360)
Conecte la llave electrónica de Jabra Link
360 en cualquier puerto USB disponible en
su PC. El auricular y Jabra Link 360 ya están
pre-sincronizados.
CONEXIÓN A DISPOSITIVO MÓVIL
(CON BLUETOOTH)
Mantenga el interruptor de Encendido/
apagado/sincronización 3 segundos en
la posición de sincronización hasta que
el indicador de Bluetooth parpadee en
color azul y escuche las instrucciones de
sincronización por voz.
CONEXIÓN A PC (CON CABLE USB)
Conecte el auricular a cualquier puerto
USB en la PC con el cable USB incluido, y
cerciórese que el auricular esté encendido.

70
ESPAÑOL
2 CÓMO USARLOS
COLOCACIÓN DEL MICRÓFONO
Se recomienda colocar el brazo del
micrófono cerca de su boca. El brazo
del micrófono se puede doblar para
acomodar su preferencia personal.
USO EN EXTERIORES
Cuando escuche música o esté al
aire libre, puede guardar el brazo del
micrófono en el surco de la cinta para
la cabeza.

71
3 CÓMO UTILIZARLO
¿SABÍA QUE...?
Puede descargar el manual de usuario completo en jabra.com/evolve65
Indicador
Busylight
Indicador de
batería
Indicador de
Bluetooth Puerto USB para el cargador
Botón Encendido/
Apagado/
Sincronización
Brazo del
micrófono
Volumen +
Volumen -
Botón Responder/
Finalizar

72
FUNCIÓN ACCIÓN
Encendido/apagado
del auricular
Deslice el interruptor Encendido/
apagado/sincronización
Modo de
sincronización del
auricular
Mantenga el interruptor de Encendido/
apagado/sincronización 3 segundos en
la posición de sincronización
Responder/Finalizar
llamadas Pulse el botón Responder/Finalizar.
Rechazar llamadas Pulse dos veces el botón Responder/
Finalizar
Ajustar el volumen
del altavoz
Pulse el botón de Volumen + o
Volumen -.
Encendido/apagado
de Busylight
Pulse simultáneamente el botón de
Volumen + y Volumen -.
Activar/desactivar la
función de silencio
en llamadas
Mueva el brazo del micrófono
completamente hacia arriba (activar
función de silencio) o completamente
hacia abajo (desactivar función de
silencio)
CARGAR EL AURICULAR
El auricular se cargará cuando se conecté a una PC o cuando utilice
cualquier cargador de pared USB incluido con su dispositivo móvil.
Lleva aproximadamente 3 horas cargarlo.

73
1 BAĞLANTININ KURULMASI
PC'YE BAĞLANMA (JABRA LINK 360 İLE)
Jabra Lnk 360 adaptörünü PC'nzdek br
USB grşne takın. Kulaklık ve Jabra Lnk
360, eşleştrlmş olarak gelr ve yenden
eşleştrlmelerne gerek yoktur.
MOBİL CİHAZA BAĞLANMA
(BLUETOOTH İLE)
Aç/Kapat/Eşleştr düğmesn, Bluetooth
gösterges mav yanıp sönmeye
başlayıncaya ve sesl yönlendrmel
eşleştrme talmatlarını duyana dek,
eşleştrme konumunda tutun (3 sn).
PC'YE BAĞLANMA (USB KABLOSU İLE)
Kulaklığı, ürünle gelen USB kablosuyla
PC'nzdek herhang br USB grşne takın
ve kulaklığın açık olduğundan emn olun.

74
TÜRKÇE
2 TAKMA ŞEKLİ
MİKROFONU KONUMLANDIRMA
Mkrofon kolunu, mkrofon ağzınıza
yakın duracak şeklde ayarlamanız
önerlr. Mkrofon kolu, terch ettğnz
takdrde büküleblr.
DIŞ MEKÂNLARDA KULLANIM
Mkrofon kolu, müzk dnlerken veya
dışarıdayken taç bandındak yerne
yerleştrleblr.

75
3 KULLANIM
BUNU BİLİYOR MUYDUNUZ?
Kullanım kılavuzunun tümünü, jabra.com/evolve65 adresnden ndreblrsnz
Busylght meşgul
gösterges
Batarya
gösterges
Bluetooth
gösterges USB/şarj grş
Aç/Kapat/Eşleştr
düğmes
Mkrofon kolu
Ses Sevyesn Düşür
düğmes
Cevapla/Sonlandır
düğmes
Ses Sevyesn
Yükselt düğmes
76
FONKSİYON YAPILMASI GEREKEN
Kulaklığı açma/
kapama Aç/Kapat/Eşleştr düğmesn kaydırın
Kulaklık eşleştrme
modu
Aç/Kapat/Eşleştr düğmesn
eşleştrme konumunda tutun (3 sn)
Aramayı cevaplama/
sonlandırma Cevapla/Sonlandır düğmesne basın
Aramayı reddetme Cevapla/Sonlandır düğmesne çft
basın
Hoparlörün ses
sevyesn ayarlama
Ses Sevyesn Yükselt veya Ses
Sevyesn Düşür düğmesne basın
Busylght meşgul
göstergesn açma/
kapama
Ses Sevyesn Yükselt ve Ses
Sevyesn Düşür düğmelerne aynı
anda basın
Aramayı sessze
alma/ses açma
Mkrofon kolunu tamamen yukarıya
kaldırın (sessze almak çn) veya
tamamen aşağıya ndrn (ses açmak çn)
KULAKLIĞIN ŞARJ EDİLMESİ
Kulaklık, PC'ye bağlandığında veya cep telefonunuzla gelen USB duvar
şarj aletne takıldığında şarj olur.
Chazın şarj olması, yaklaşık 3 saat sürer.
FCC statements:
This device complies with part 15 of the FCC rules. Operation is subject to the
following two conditions: (1) this device may not cause harmful interference, and (2)
this device must accept any interference received, including interference that may
cause undesired operation.
NOTE: The manufacturer is not responsible for any radio or TV interference caused
by unauthorized modifications or changes to this equipment. Such modifications or
changes could void the user’s authority to operate the equipment.
NOTE: This equipment has been tested and found to comply with the limits for a
Class B digital device, pursuant to part 15 of the FCC Rules. These limits are designed
to provide reasonable protection against harmful interference in a residential
installation. This equipment generates uses and can radiate radio frequency energy
and, if not installed and used in accordance with the instructions, may cause harmful
interference to radio communications. However, there is no guarantee that
interference will not occur in a particular installation. If this equipment does cause
harmful interference to radio or television reception, which can be determined by
turning the equipment off and on, the user is encouraged to try to correct the
interference by one or more of the following measures:
‐ Reorient or relocate the receiving antenna.
‐ Increase the separation between the equipment and receiver.
‐Connect the equipment into an outlet on a circuit different from that to which the
receiver is connected.
‐Consult the dealer or an experienced radio/TV technician for help.
IC statement:
This device complies with Industry Canada licence‐exempt RSS standard(s). Operation is
Subject to the following two conditions: (1) this device may not cause interference, and (2)
this device must accept any interference, including interference that may cause undesired
operation of the device.
Le présent appareil est conforme aux CNR d'Industrie Canada applicables aux appareils
radio exempts de licence. L'exploitation est autorisée aux deux conditions suivantes : (1)
l'appareil ne doit pas produire de brouillage, et (2) l'utilisateur de l'appareil doit accepter
tout brouillage radioélectrique subi, même si le brouillage est susceptible d'en
compromettre le fonctionnement.