GN Otometrics A S 1053 Medical Bluetooth Device User Manual 7 60 046xALL
GN Otometrics A/S Medical Bluetooth Device 7 60 046xALL
User Manual
AURICAL SpeechLink 100
Reference Manual
Part No. 7-60-04800
Doc. No. 7-60-0480/01
Copyright notice
No part of this Online Help or program may be reproduced, stored in a retrieval system, or trans-
mitted, in any form or by any means, electronic, mechanical, photocopying, recording, or other-
wise, without the prior written consent of GN Otometrics A/S.
Copyright© 2006, GN Otometrics A/S
Printed in Denmark by GN Otometrics A/S, Denmark
All information, illustrations, and specifications in this manual are based on the latest product in-
formation available at the time of publication. GN Otometrics A/S reserves the right to make
changes at any time without notice.
Technical support
Please contact your supplier.

GN Otometrics A/S iii
Contents
1 Introduction to AURICAL SpeechLink 100
1.1 AURICAL SpeechLink 100 ............................................................................................................ 7
1.1.1 Intended use................................................................................................................. 8
1.1.2 AURICAL SpeechLink 100 interfacing with OTOsuite Visible Speech Module ......... 8
1.1.3 Bluetooth...................................................................................................................... 8
1.2 About this manual....................................................................................................................... 8
1.2.1 Installation.................................................................................................................... 9
1.2.2 Safety ............................................................................................................................ 9
1.2.3 Training......................................................................................................................... 9
1.3 Typographical conventions......................................................................................................... 9
1.3.1 Navigation .................................................................................................................. 10
2 When you receive AURICAL SpeechLink 100
2.1 Unpacking.................................................................................................................................. 11
2.2 Storing SpeechLink 100............................................................................................................. 11
2.3 Views of SpeechLink 100 and charger ..................................................................................... 12
2.3.1 Front view................................................................................................................... 13
2.3.2 Reverse side view ....................................................................................................... 14
2.3.3 The charger................................................................................................................. 15
2.3.4 The probes .................................................................................................................. 16
2.4 Assembly and installation ......................................................................................................... 16
2.4.1 Location ...................................................................................................................... 17
2.4.2 Charger assembly ....................................................................................................... 17
2.4.3 Mounting the NOAHlink charger on the AURICAL SpeechLink 100 charger base
plate19
2.4.4 SpeechLink and probe assembly ............................................................................... 20
2.4.5 Fitting SpeechLink 100 with NOAHlink .................................................................... 23
2.4.6 Fitting SpeechLink 100 with counterweights ........................................................... 25
2.5 Powering.................................................................................................................................... 25
2.5.1 Powering AURICAL SpeechLink 100.......................................................................... 26
2.5.2 Powering the charger ................................................................................................ 26
2.5.3 Batteries...................................................................................................................... 27
2.5.4 Inserting the battery .................................................................................................. 27

Reference Manual OTOsuite
iv GN Otometrics A/S
2.5.5 Switching on SpeechLink 100 .................................................................................... 28
2.5.6 Switching off SpeechLink 100 ................................................................................... 29
2.5.7 Charging SpeechLink 100 .......................................................................................... 29
2.5.8 Powering status.......................................................................................................... 30
2.6 Communication with the OTOsuite Visible Speech Module via Bluetooth ........................... 31
3 Preparing AURICAL SpeechLink 100 for testing
3.1 Preparing AURICAL SpeechLink 100......................................................................................... 33
3.2 Preparing for tube calibration.................................................................................................. 33
4 Service and Maintenance - AURICAL SpeechLink 100
4.1 Equipment failure ..................................................................................................................... 35
4.2 Service and repair...................................................................................................................... 35
4.3 Maintenance.............................................................................................................................. 36
4.3.1 Calibration .................................................................................................................. 37
4.3.2 Replacing a probe ...................................................................................................... 37
4.3.3 Replacing an ear cord ................................................................................................ 37
4.4 Troubleshooting ........................................................................................................................ 38
4.4.1 Powering problems .................................................................................................... 38
5 AURICAL SpeechLink 100 Safety
5.1 Symbols used ............................................................................................................................. 39
5.1.1 AURICAL SpeechLink 100 symbols............................................................................. 39
5.1.2 Charger unit symbols ................................................................................................. 40
5.2 Warning notes ........................................................................................................................... 41
5.2.1 AURICAL SpeechLink 100 warning notes.................................................................. 41
5.2.2 Charger unit warning notes ...................................................................................... 43
5.3 Manufacturer............................................................................................................................. 43
5.3.1 Responsibility of the manufacturer .......................................................................... 43
6 Technical Specifications - AURICAL SpeechLink 100
6.1 AURICAL SpeechLink 100 .......................................................................................................... 45
6.1.1 Interface...................................................................................................................... 45
6.1.2 Type identification ..................................................................................................... 45
6.1.3 Power supply .............................................................................................................. 45

OTOsuite Reference Manual
GN Otometrics A/S v
6.2 Charger unit............................................................................................................................... 45
6.3 Power adaptor........................................................................................................................... 46
6.4 Operating environment ............................................................................................................ 46
6.5 Storing and handling ................................................................................................................ 46
6.6 Dimensions................................................................................................................................. 46
6.7 Weight ....................................................................................................................................... 47
6.8 Standards ................................................................................................................................... 47
7Index

Reference Manual OTOsuite
vi GN Otometrics A/S
AURICAL SpeechLink 100 Online help
GN Otometrics A/S 7
1 Introduction to AURICAL SpeechLink 100
•1.1 AURICAL SpeechLink 100, p. 7
•1.2 About this manual, p. 8
•1.3 Typographical conventions, p. 9
1.1 AURICAL SpeechLink 100
•1.1.1 Intended use, p. 8
•1.1.2 AURICAL SpeechLink 100 interfacing with OTOsuite
Visible Speech Module, p. 8
•1.1.3 Bluetooth, p. 8
Thank you for purchasing AURICAL SpeechLink 100.
SpeechLink 100 is a desktop or wall-mounted advanced 4-channel
frequency analyzer that wirelessly transfers measurement data to a
PC via Bluetooth. The four channels are used for measuring the
sound pressure level close to a client’s eardrum as well as outside
the ear by the pinna for both ears simultaneously. In this way,
SpeechLink 100 enables you to perform true binaural measurements
providing you with valuable information when you adjust Hearing
Instrument settings in the suppliers’ fitting software.
SpeechLink 100 cannot be used without the OTOsuite Visible Speech
Module PC application. When you have set up SpeechLink 100 for
testing, install the relevant software on your PC. When the PC appli-
cation has been installed, run the Configuration Wizard and you will
be able to connect to SpeechLink 100. For specific instructions on
how to use SpeechLink 100 with the OTOsuite Visible Speech Mod-
ule, please see the OTOsuite Visible Speech Module Online Help.
SpeechLink 100 integrates closely with the latest generation of GN
Otometrics test devices by offering real time presentation of test re-
sults and full test control directly from a PC with comprehensive
user interface.

8GN Otometrics A/S
Online help AURICAL SpeechLink 100
1.1.1 Intended use
SpeechLink 100 is intended for audiologists, hearing instrument dis-
pensers, ENTs, speech therapists and other health care professionals.
The intended use is that the user is able to visualize the amplified
signal recorded in the ear(s) of persons with a hearing loss in order
for the user to have an objective basis for adjusting the Hearing In-
strument settings. Note also that SpeechLink 100 is designed for use
in combination with NOAHlink - HIMSA’s wireless hearing instru-
ment programming device. See Section 2.4.5, ‘Fitting SpeechLink
100 with NOAHlink” on page 23.
1.1.2 AURICAL SpeechLink 100 interfacing with OTOsuite Visible Speech Module
OTOsuite Visible Speech Module is designed to operate with AURI-
CAL SpeechLink 100 as the test device (produced by GN Otometrics
A/S.
AURICAL SpeechLink 100 is a compact device, which offers a com-
plete range of test capabilities for Speech Mapping. AURICAL
SpeechLink 100 is controlled directly from the OTOsuite Visible
Speech Module software program.
1.1.3 Bluetooth
SpeechLink 100 connects with the OTOsuite Visible Speech Module
via BluetoothTM. Bluetooth is a wireless communication standard,
which allows devices such as computers, PDAs, mobile phones and
headsets to communicate and send data to each other in real-time,
without the need for wires or cables to link together the devices. De-
vices can typically communicate at ranges of up to 10 metres (ap-
prox. 33 ft).
1.2 About this manual
This Reference Manual is your guide to installing, calibrating and
using AURICAL SpeechLink 100. The key features of the device as
well as working scenarios for performing tests and viewing and
printing test results are described in detail in the OTOsuite Visible
Speech Module online help.
We strongly recommend that you read this Reference Manual care-
fully before using your SpeechLink 100 for the first time.

GN Otometrics A/S 9
AURICAL SpeechLink 100 Online help
The Reference Manual contains a description of the main functions
of SpeechLink 100. GN Otometrics recommends that you make
yourself familiar with the following issues:
•1.2.1 Installation, p. 9
•1.2.2 Safety, p. 9
•1.2.3 Training, p. 9
1.2.1 Installation
Section 2.1, ‘Unpacking” on page 11 and Section 2.4, ‘Assembly and
installation” on page 16 contain a full description of unpacking in-
structions, and how to install the software program.
1.2.2 Safety
This Reference Manual contains information which must be fol-
lowed to ensure the safe performance of SpeechLink 100. Local gov-
ernment rules and regulations, if applicable, should also be followed
at all times.
Safety information is stated where it is relevant, and general safety
aspects are described in Section 5, ‘AURICAL SpeechLink 100 Safe-
ty” on page 39.
1.2.3 Training
It is recommended that you read this Reference Manual and try out
test scenarios in the OTOsuite Visible Speech Module Reference
Manual before you start operating SpeechLink 100 so that you are
familiar with both the device and the software program before test-
ing a patient.
•1.3 Typographical conventions, p. 9
1.3 Typographical conventions
The use of WARNING, CAUTION and NOTE
For safety reasons and appropriate use of the SpeechLink 100, the
manual contains WARNINGS, CAUTIONS and NOTES, which you
should read carefully. The use of these headings is denoted as fol-
lows:
WARNING:
A warning indicates that there is a risk of danger to persons and da-
ta.

10 GN Otometrics A/S
Online help AURICAL SpeechLink 100
Caution:
Caution indicates that there is a risk of damage to data.
Note:
A note indicates that you should take special notice.
1.3.1 Navigation
When you navigate the software related to this test device, in the
.pdf version of the manual, menus, icons and functions to select are
shown in bold type, as for instance in:
•Click the Measurement Settings icon on the toolbar or
select Measurements > Settings...
•Chapter 2, “When you receive AURICAL SpeechLink 100” on
page 11

AURICAL SpeechLink 100 Reference Manual
GN Otometrics A/S 11
2 When you receive AURICAL SpeechLink
100
•Section 2.1, ‘Unpacking” on page 11
•Section 2.2, ‘Storing SpeechLink 100” on page 11
•Section 2.3, ‘Views of SpeechLink 100 and charger” on page 12
•Section 2.4, ‘Assembly and installation” on page 16
•Section 2.5, ‘Powering” on page 25
•Section 2.6, ‘Communication with the OTOsuite Visible
Speech Module via Bluetooth” on page 31
2.1 Unpacking
1. Unpack your SpeechLink 100 carefully.
When you unpack SpeechLink 100, it is a good idea to keep
the packing material in which it was delivered. If you need to
send the SpeechLink 100 in for service, the original packing
material will protect against damage during transport, etc.
2. Inspect the equipment for possible visual damage.
If damage has occurred, do not put the SpeechLink 100 into
operation. Contact your supplier for assistance.
3. Check with the list accompanying the package to make sure
that you have received all necessary parts and accessories. If
your package is incomplete, contact your supplier.
•Section 2.2, ‘Storing SpeechLink 100” on page 11
2.2 Storing SpeechLink 100
If you need to store SpeechLink 100 before you put it into operation,
follow the guidelines below:
12 GN Otometrics A/S
Reference Manual AURICAL SpeechLink 100
• Store SpeechLink 100 and accessories in the box provided to
protect the equipment from damage.
• Store SpeechLink 100 as stated in the Technical Specifications,
Section 6.5, ‘Storing and handling” on page 46.
For views of SpeechLink 100 go to Section 2.3, ‘Views of SpeechLink
100 and charger” on page 12
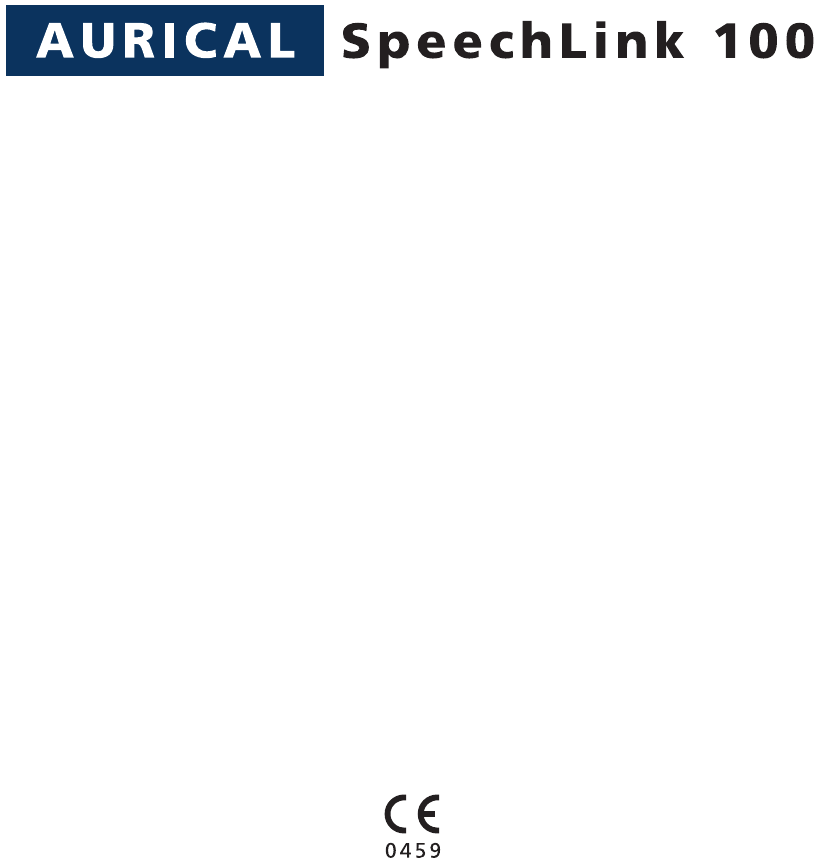
2.3 Views of SpeechLink 100 and charger
•Section 2.4, ‘Assembly and installation” on page 16
This section provides you with views of SpeechLink 100 and its
charger from various angles
Section 2.3.1, ‘Front view” on page 13
Section 2.3.2, ‘Reverse side view” on page 14
Section 2.3.3, ‘The charger” on page 15
Section 2.3.4, ‘The probes” on page 16
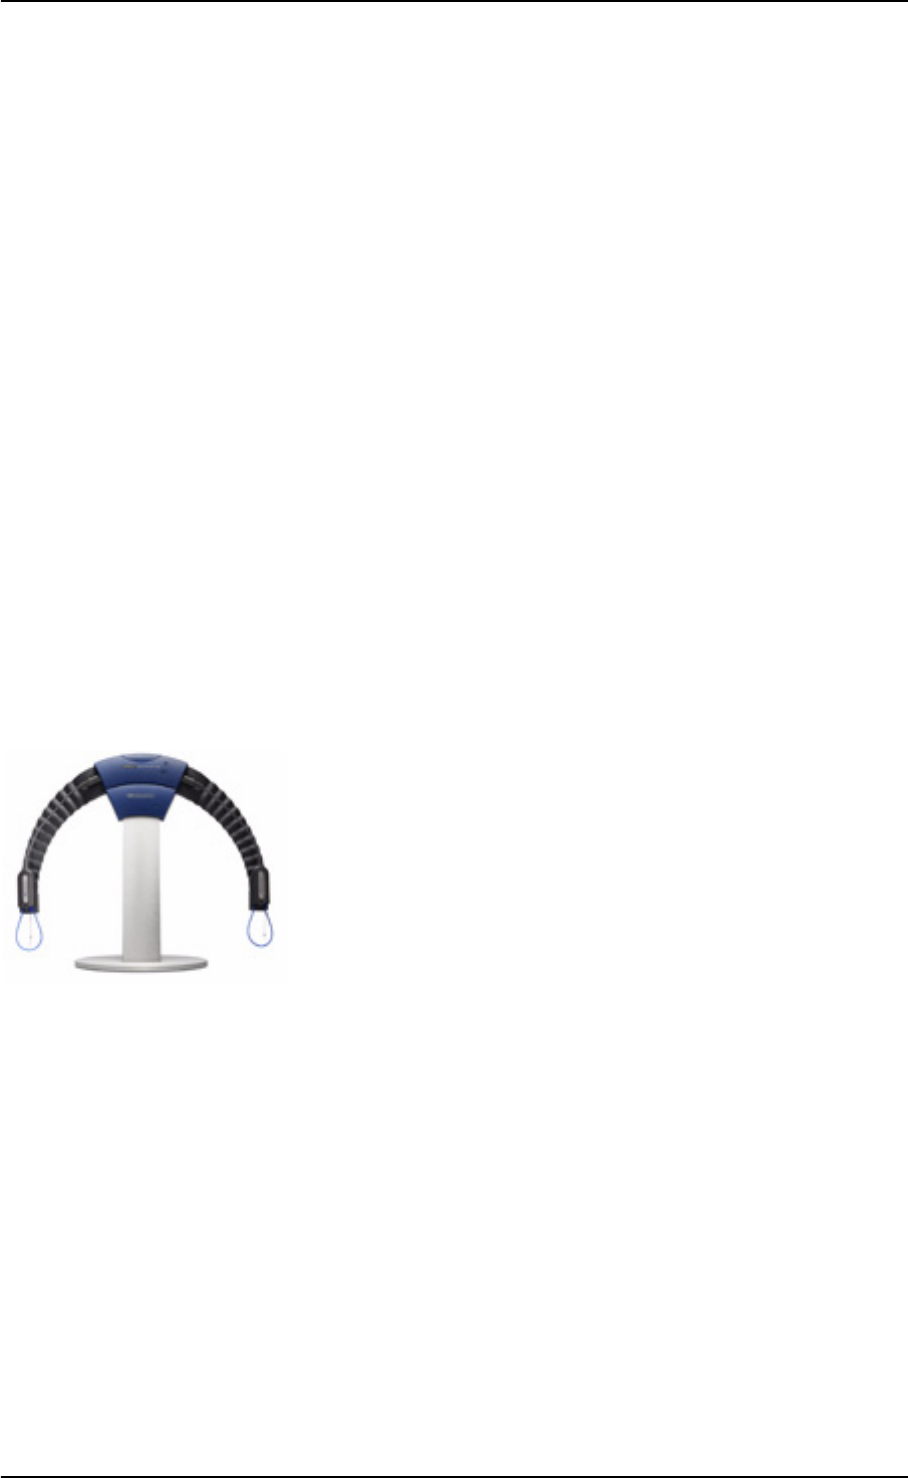
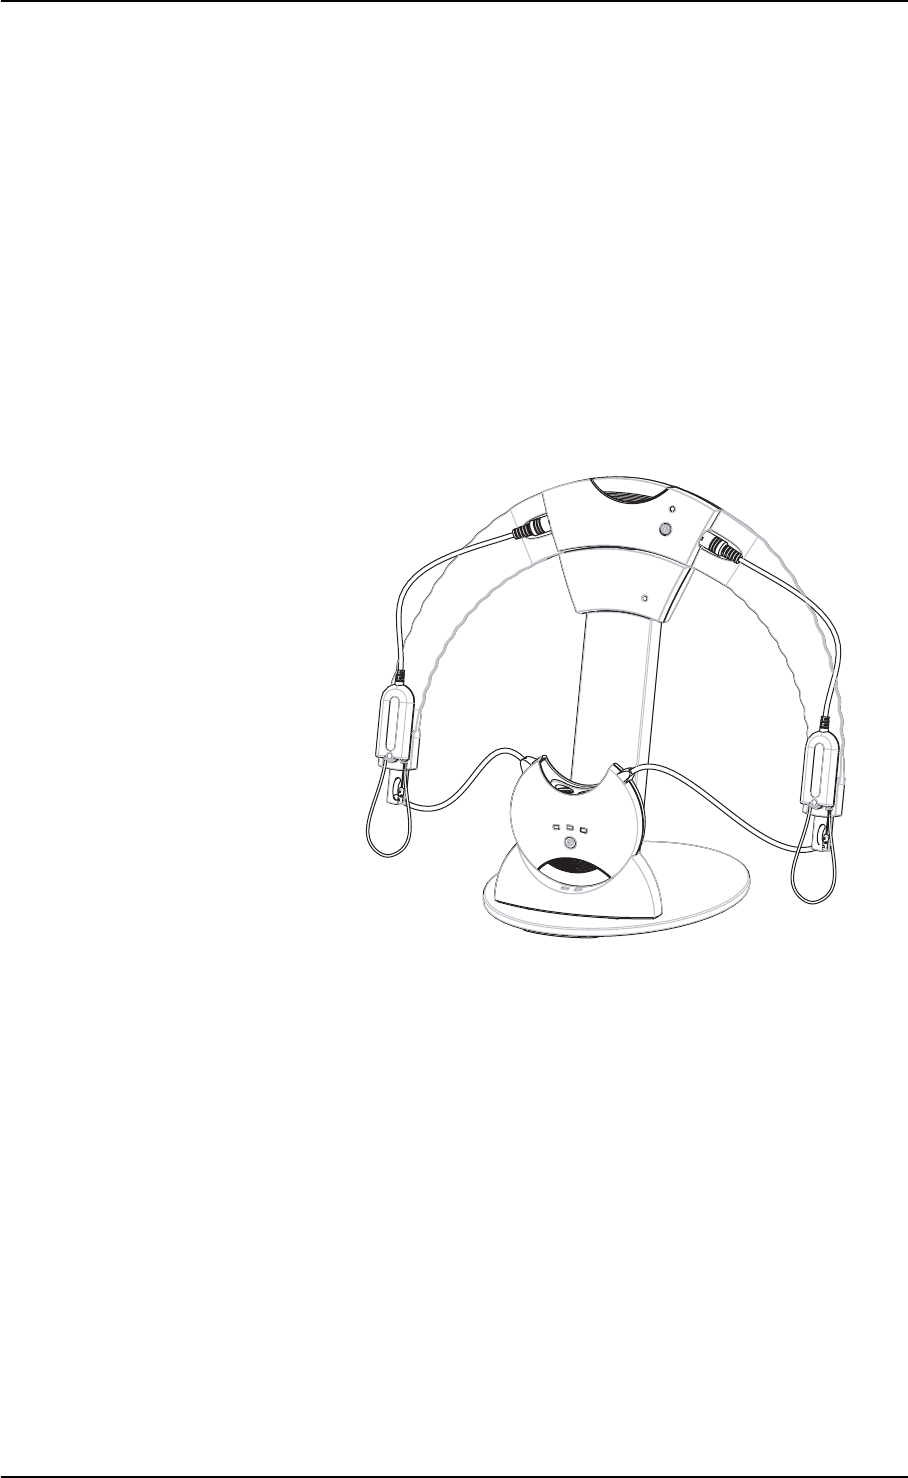
SpeechLink 100 is designed to be placed around the shoulders of the
client. It consists of a main unit and two REM probes which are sup-
plied with the unit. When not in use, it should be placed either in its
desktop or wall-mounted charger.
SpeechLink 100 is supplied partly assembled. To complete the as-
sembly, see
Section 2.4.2, ‘Charger assembly” on page 17,
GN Otometrics A/S 13
AURICAL SpeechLink 100 Reference Manual
Section 2.4.3, ‘Mounting the NOAHlink charger on the AURI-
CAL SpeechLink 100 charger base plate” on page 19,
Section 2.4.4, ‘SpeechLink and probe assembly” on page 20,
and
Section 2.4.5, ‘Fitting SpeechLink 100 with NOAHlink” on
page 23.
Section 2.4.6, ‘Fitting SpeechLink 100 with counterweights” on
page 25.
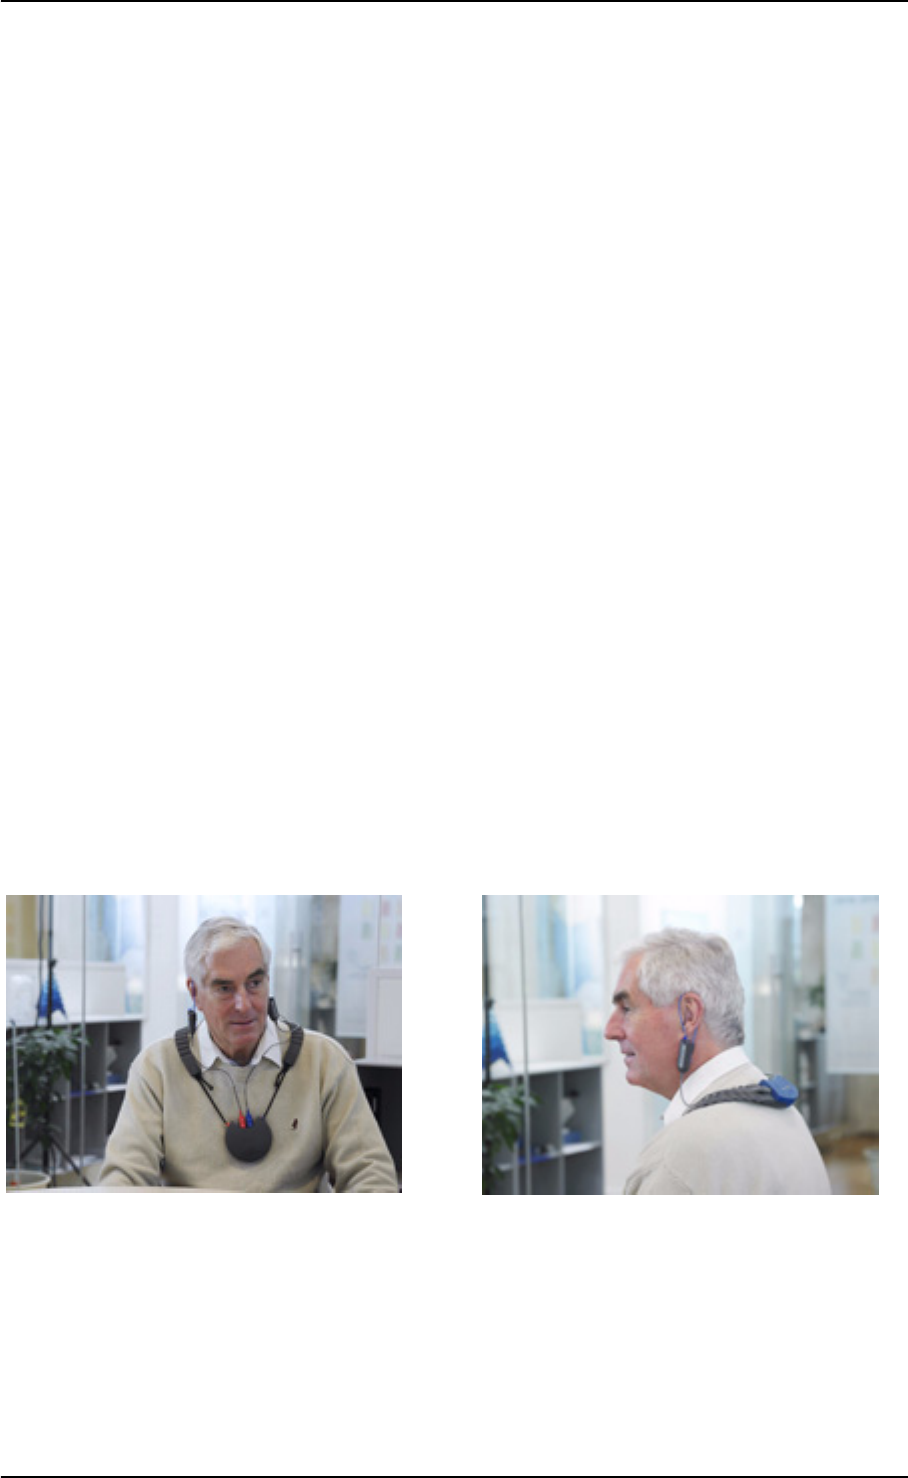
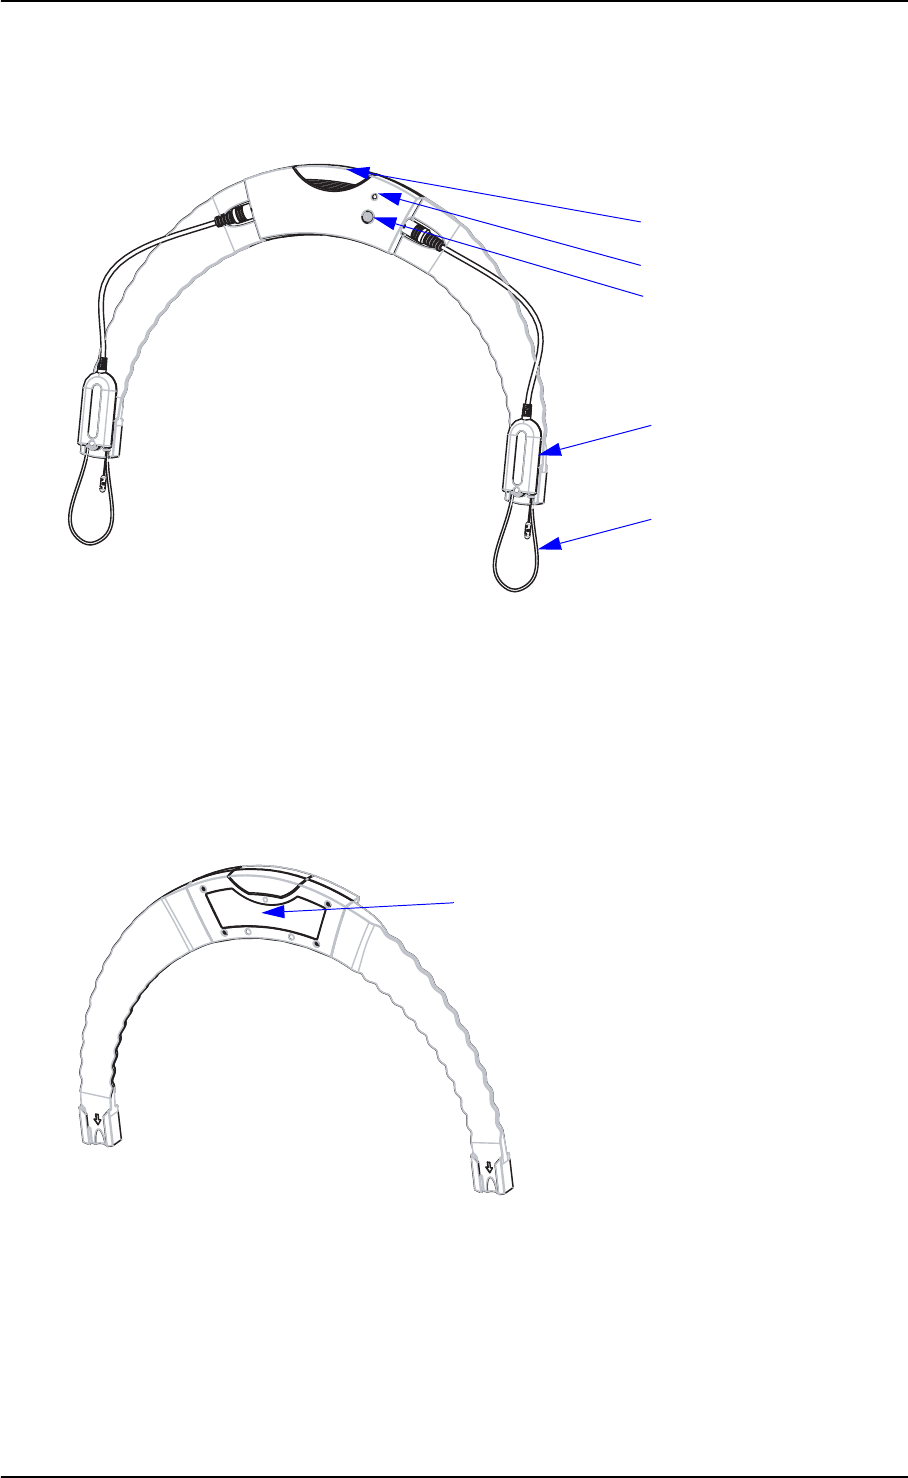
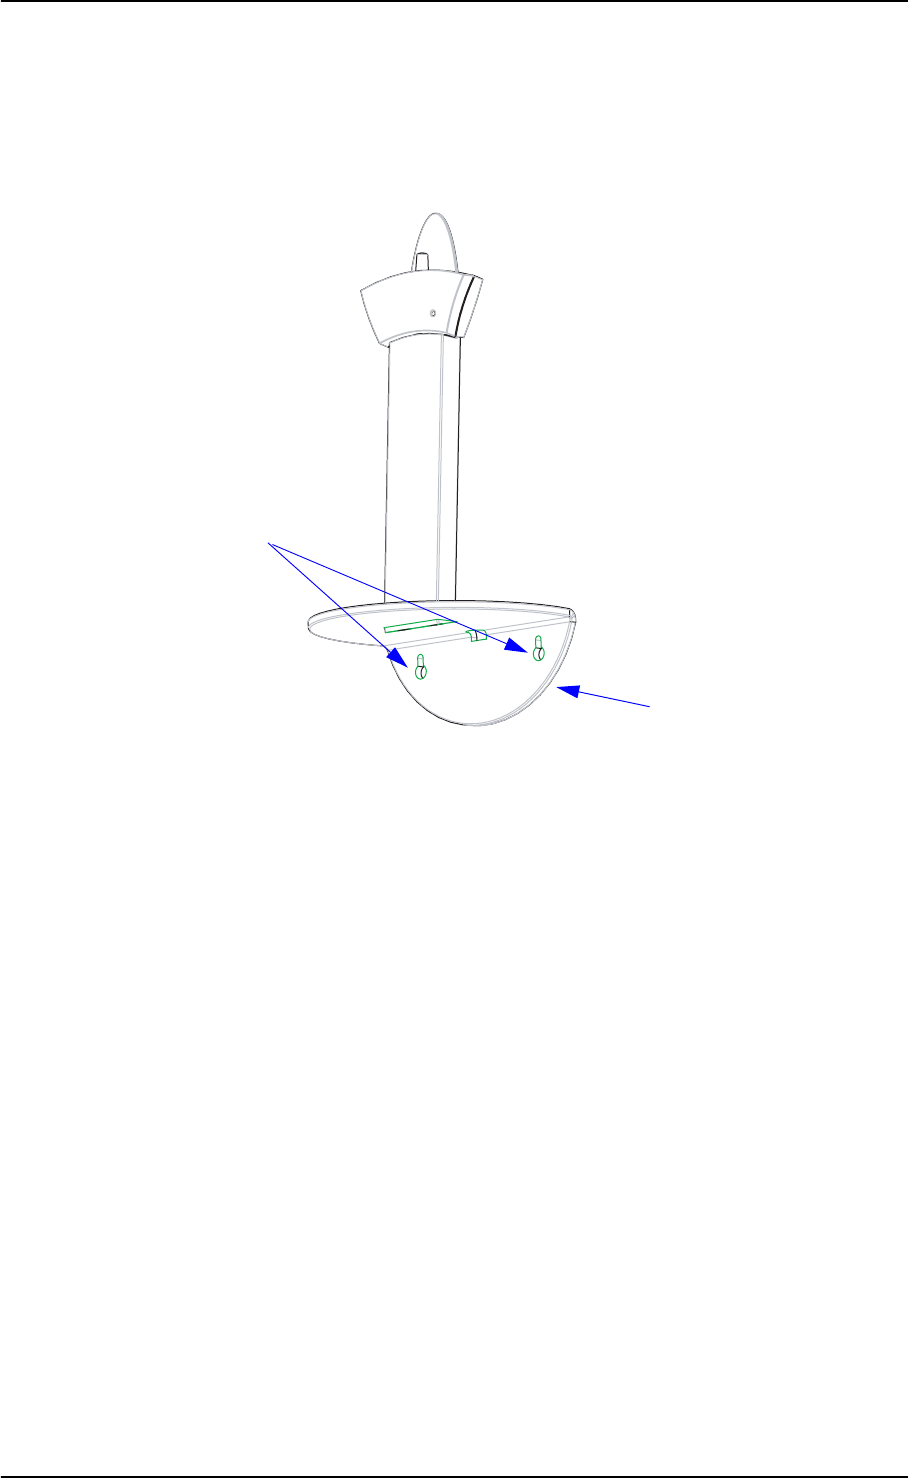
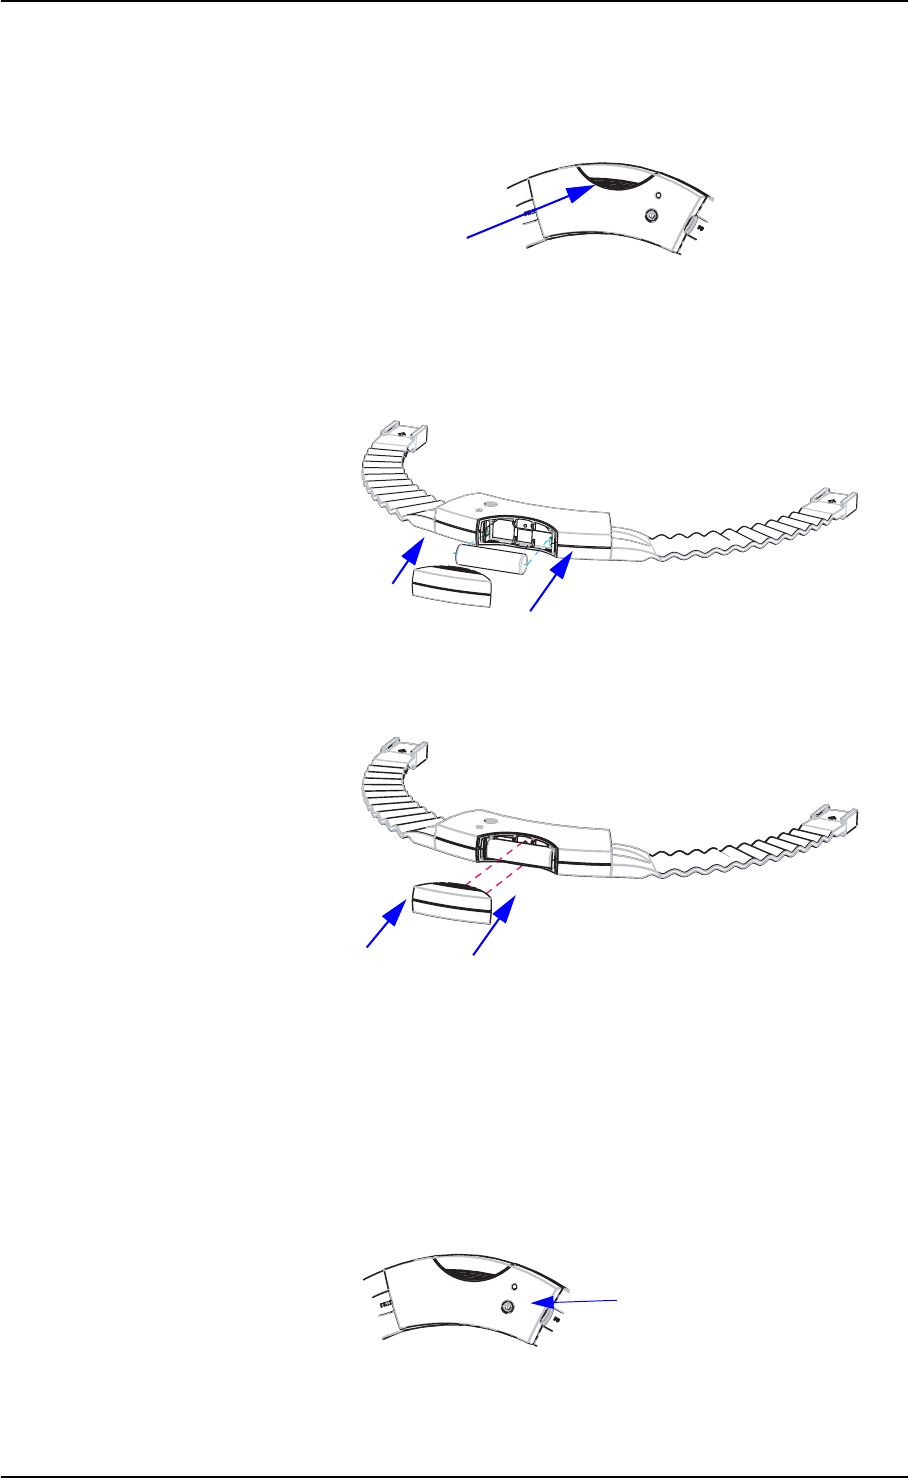
2.3.1 Front view
Device
Probes
Charger
Charger base plate
14 GN Otometrics A/S
Reference Manual AURICAL SpeechLink 100
Section 2.3.2, ‘Reverse side view” on page 14
Section 2.3.3, ‘The charger” on page 15
Section 2.3.4, ‘The probes” on page 16
2.3.2 Reverse side view
Section 2.3.3, ‘The charger” on page 15
Section 2.3.4, ‘The probes” on page 16
Status indicator
Cord
Battery compartment
On/Off button
Probe
Label
16 GN Otometrics A/S
Reference Manual AURICAL SpeechLink 100
2.3.4 The probes
2.4 Assembly and installation
This section provides you with:
Instructions on how to assemble the charger
•Section 2.4.2, ‘Charger assembly” on page 17
•Section 2.4.3, ‘Mounting the NOAHlink charger on the AURI-
CAL SpeechLink 100 charger base plate” on page 19
Instructions on how to assemble the probe and tube
•Section 2.4.4, ‘SpeechLink and probe assembly” on page 20
•Section 2.4.5, ‘Fitting SpeechLink 100 with NOAHlink” on
page 23
•Section 2.4.6, ‘Fitting SpeechLink 100 with counterweights” on
page 25
Powering instructions
•Section 2.5, ‘Powering” on page 25
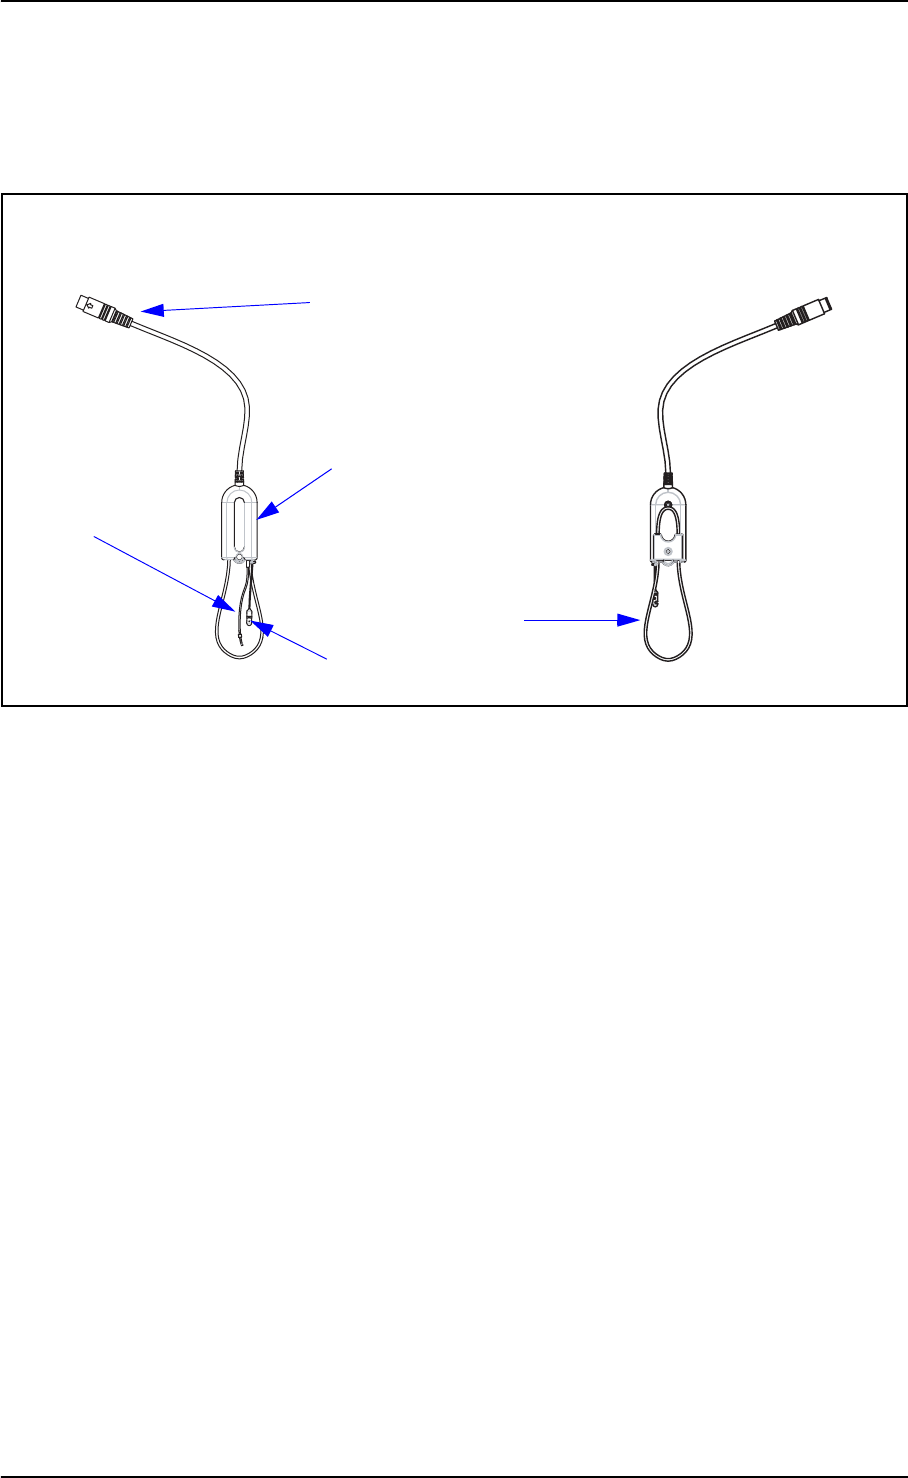
Probe body
Connector
Front view
Silicone tube
Back view
Cord
Silicone tube guide

GN Otometrics A/S 17
AURICAL SpeechLink 100 Reference Manual
2.4.1 Location
A sound cabin or sound treated room is not necessary, but it is rec-
ommended that you use a room where reverberation time is not too
long.
To ensure safe performance, the SpeechLink 100 must be correctly
installed and the requirements listed in Chapter 5, “AURICAL
SpeechLink 100 Safety” on page 39 and Chapter 6, “Technical Spec-
ifications - AURICAL SpeechLink 100” on page 45 must be complied
with.
WARNING:
Always keep the charger cradle away from the patient area.
Apart from the above warning, the SpeechLink 100 can be used with
no specific requirements to location. However, keep SpeechLink 100
away from all liquids and sources of heat (for detailed specifications,
see Section 6.4, ‘Operating environment” on page 46.
2.4.2 Charger assembly
Mount the charger on the base plate. You can choose between the
base plate for desktop use, or the base plate for wall-mounting. See
• ‘‘Base plate assembly” on page 17
• ‘‘Wall mount installation” on page 19
For use with NOAHlink, you can mount the NOAHlink charger on
the SpeechLink 100 base plate. See
• ‘‘Mounting the NOAHlink charger on the AURICAL Speech-
Link 100 charger base plate” on page 19
Base plate assembly
Mount the charger on the charger base as shown below. This proce-
dure applies both to desktop and wall mounting solutions.
For wall mounting purposes, mount the wall mount base plate on
the wall mount back plate. See ‘‘Wall mount installation” on page
19.
1. Use the hexagonal key to screw the hexagonal screws into
place as shown below.
18 GN Otometrics A/S
Reference Manual AURICAL SpeechLink 100
2. Make sure that you tighten the screws well so that the charger
is stable when you place SpeechLink 100 in the charger.
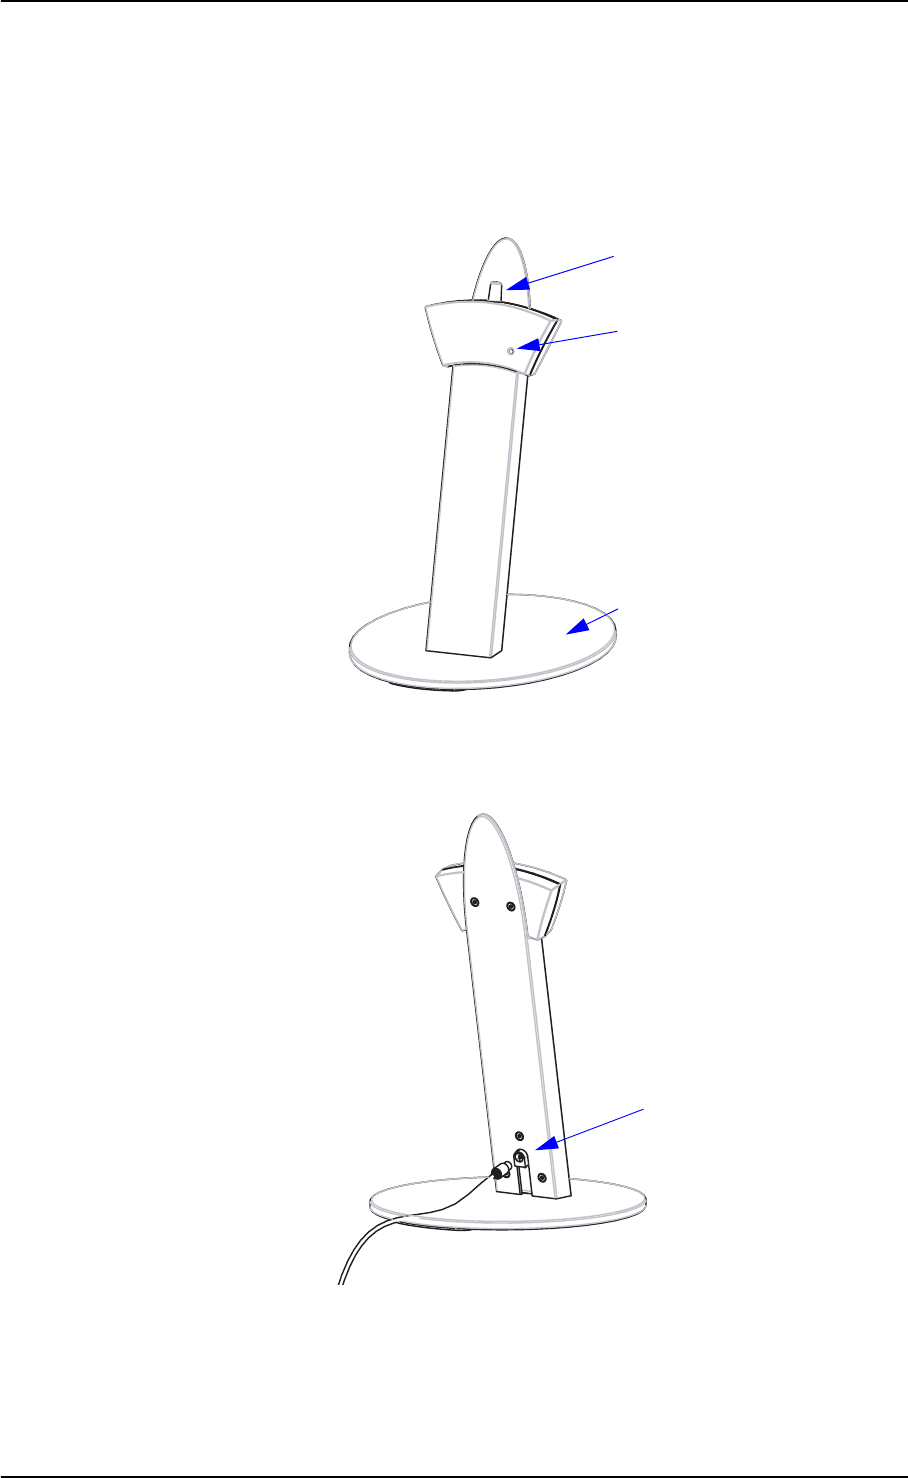
Charger body
Base plate
Hexagonal screws
Hexagonal key
GN Otometrics A/S 19
AURICAL SpeechLink 100 Reference Manual
Wall mount installation
1. Drill 2 x 6 mm diameter holes 110 mm (4.33") apart.
2. Insert rawl plugs.
3. Fit the screws through the backplate of the wallmount.
2.4.3 Mounting the NOAHlink charger on the AURICAL SpeechLink 100 charger
base plate
If you plan to use AURICAL SpeechLink 100 with NOAHlink (HIM-
SA’s product for hearing instrument fitting), you can attach NOAHl-
ink to AURICAL SpeechLink 100.
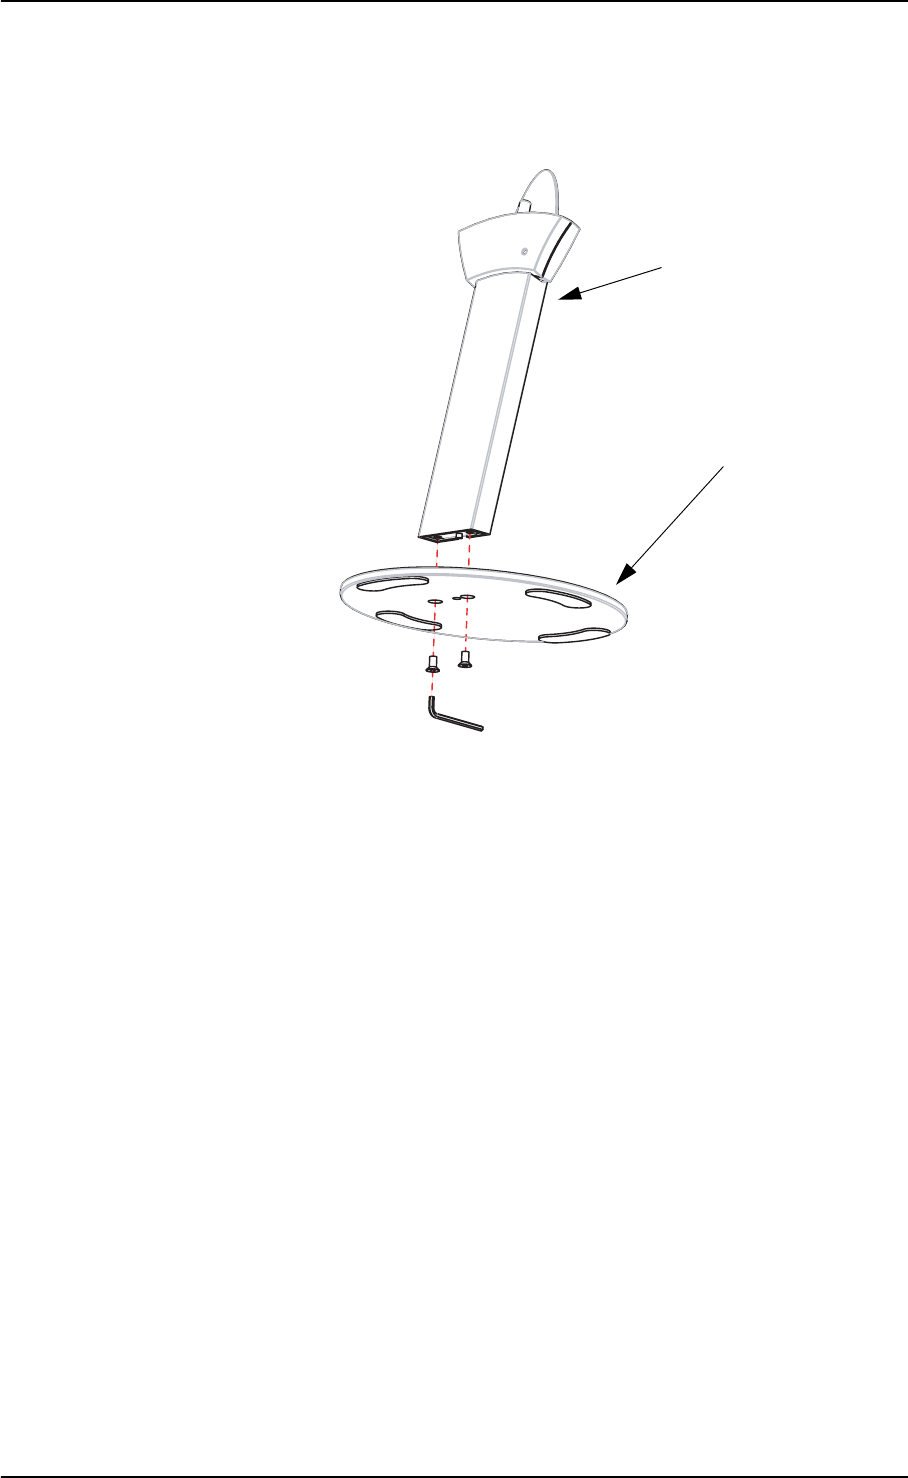
Start by mounting the NOAHlink charger on the base plate of the
AURICAL SpeechLink 100 charger. See the following description.
1. Fix the mounting pads supplied with AURICAL SpeechLink
100 on the bottom of the NOAHlink charger.
mounting
wallmount backplate
2 rawl plugs,110 mm (4.33”)
Locations for
20 GN Otometrics A/S
Reference Manual AURICAL SpeechLink 100
2. Remove the protective foil from the two adhesive pads and
carefully place the NOAHlink charger on the AURICAL
SpeechLink 100 base plate as shown below.
3. For testing purposes you can fit NOAHlink on the AURICAL
SpeechLink 100 shoulder strap. See Section 2.4.5, ‘Fitting
SpeechLink 100 with NOAHlink” on page 23.
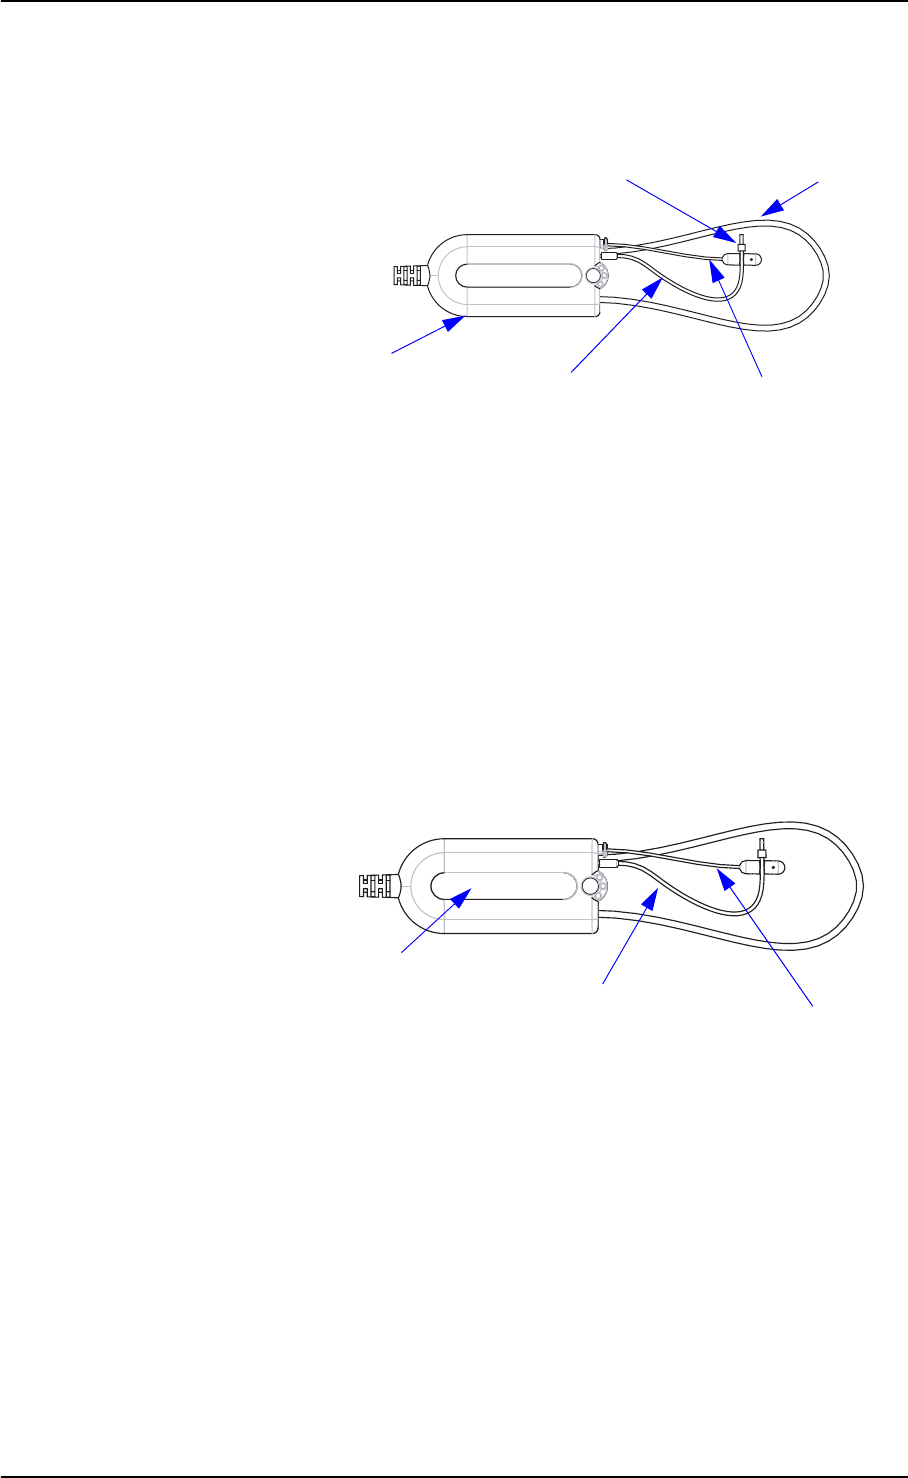
2.4.4 SpeechLink and probe assembly
The SpeechLink 100 is designed for easy attachment of the probe(s)
used during the test.
Fitting silicone tubes on the probes
A bag of silicone tubes is supplied together with SpeechLink 100.
The silicone tube is used for probe microphone measurement, where
it is inserted into the ear canal together with the hearing instrument.
The silicone tube has a black marker ring for marking how far into
the ear canal the tube should be inserted.
Pads
NOAHlink charger
GN Otometrics A/S 21
AURICAL SpeechLink 100 Reference Manual
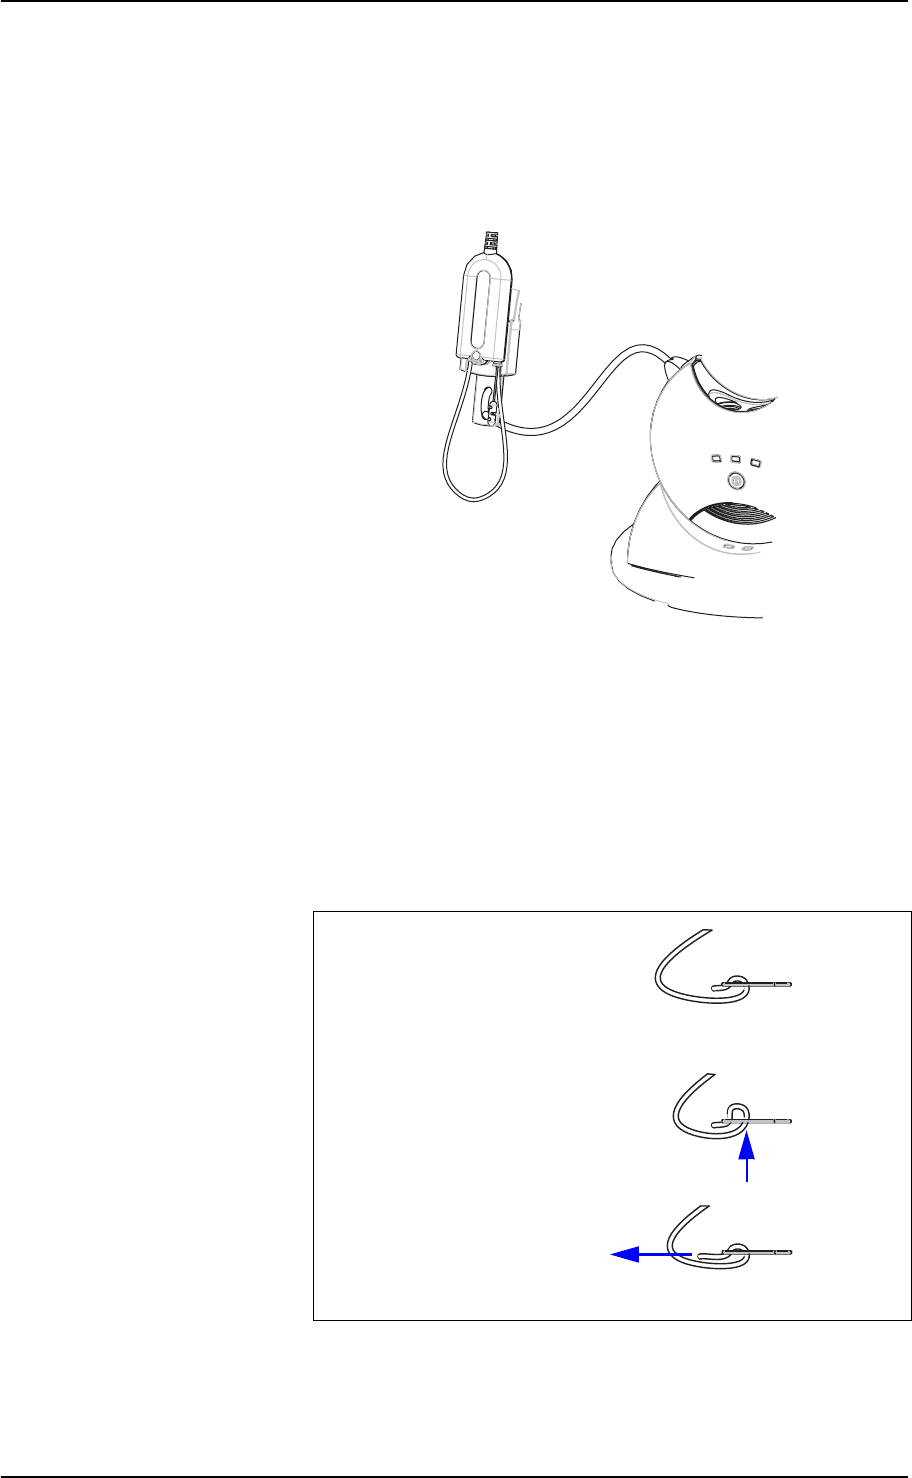
1. For test purposes fit a silicone tube to the thin metal tube at the
top of the probe housing. Gently push and twist the silicone
tube down as far as possible over the metal tube.
It is much easier to fit and remove the silicone tube if you twist
it gently. When you do so, make sure that you hold the probe
by the probe housing and not by the cable.
Note:
Accurate testing is only guaranteed if you use the silicone tubes designed
specifically for SpeechLink 100 by GN Otometrics A/S.
2. Repeat for the second probe housing, if required.
3. A tube guide can be attached to each probe. The tube guide is
designed to hold the silicone tube in place in the ear. Five tube
guides are supplied with SpeechLink 100.
The tube guide are easily to remove or replace: Grip the tube
guide by the base and pull.
4. To adjust the ear cord simply pull to correct length for a com-
fortable fit over the client’s ear.
Probe
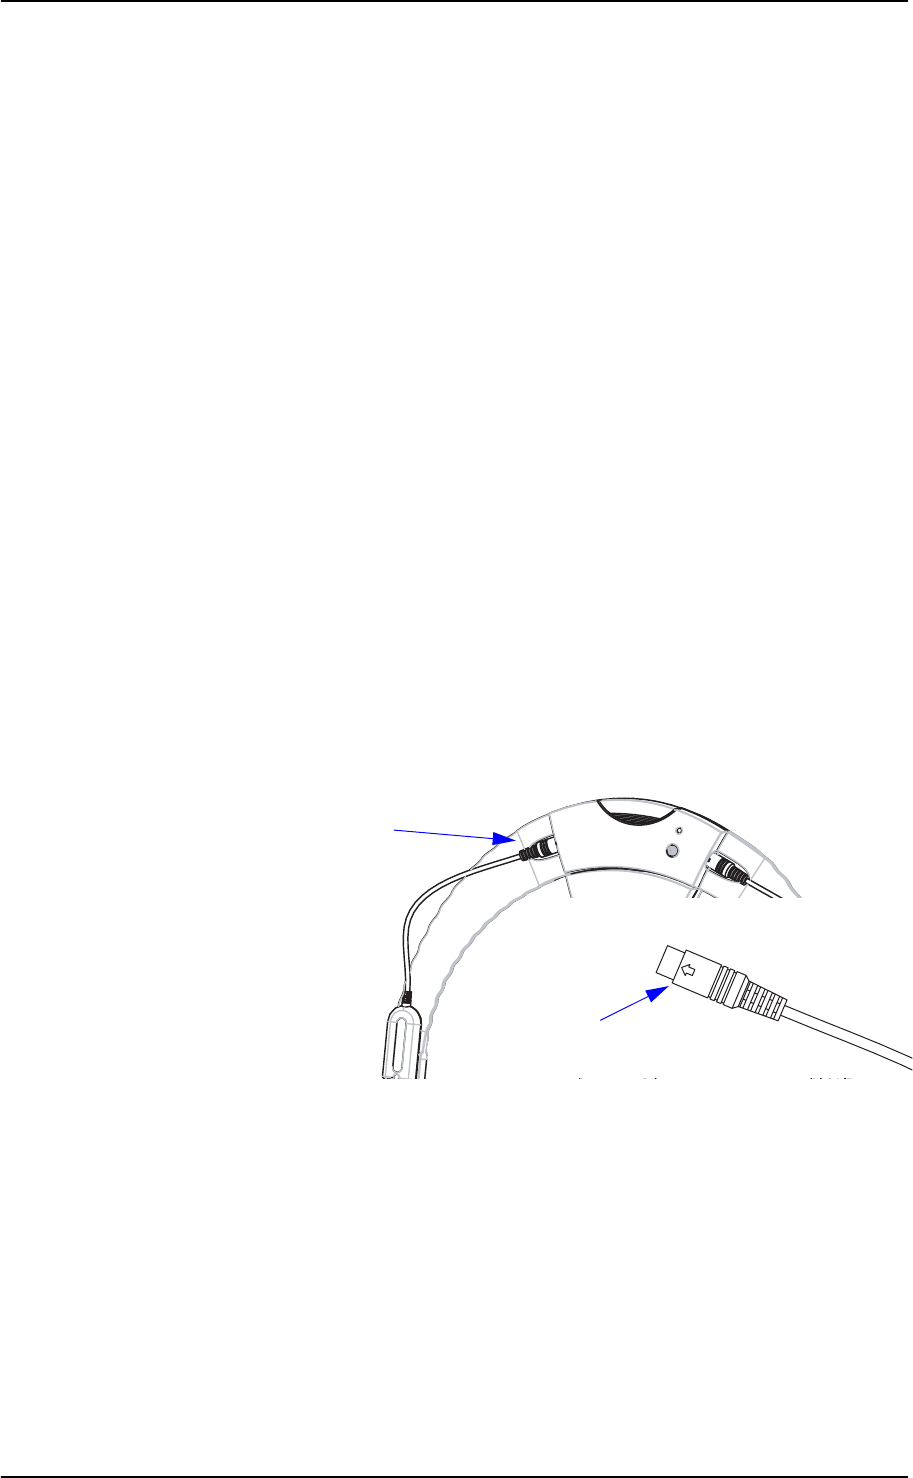
housing Tube guide
Silicone tube
Ear cord
Mar
k
er r
i
ng
Probe
housing
Tube guide
Silicone tube
22 GN Otometrics A/S
Reference Manual AURICAL SpeechLink 100
5. Repeat for the second probe housing, if required.
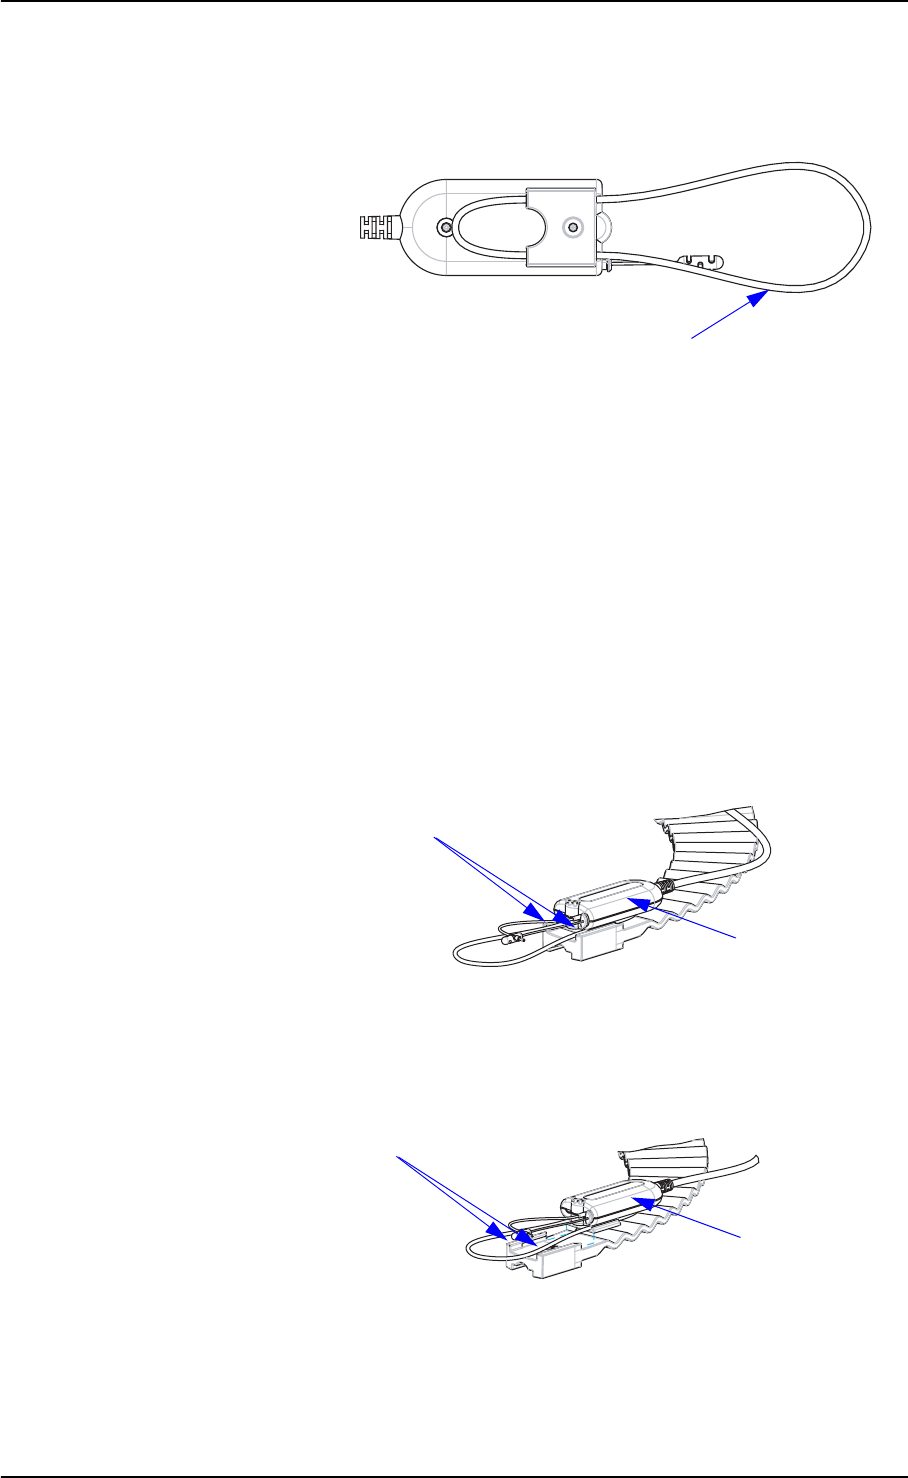
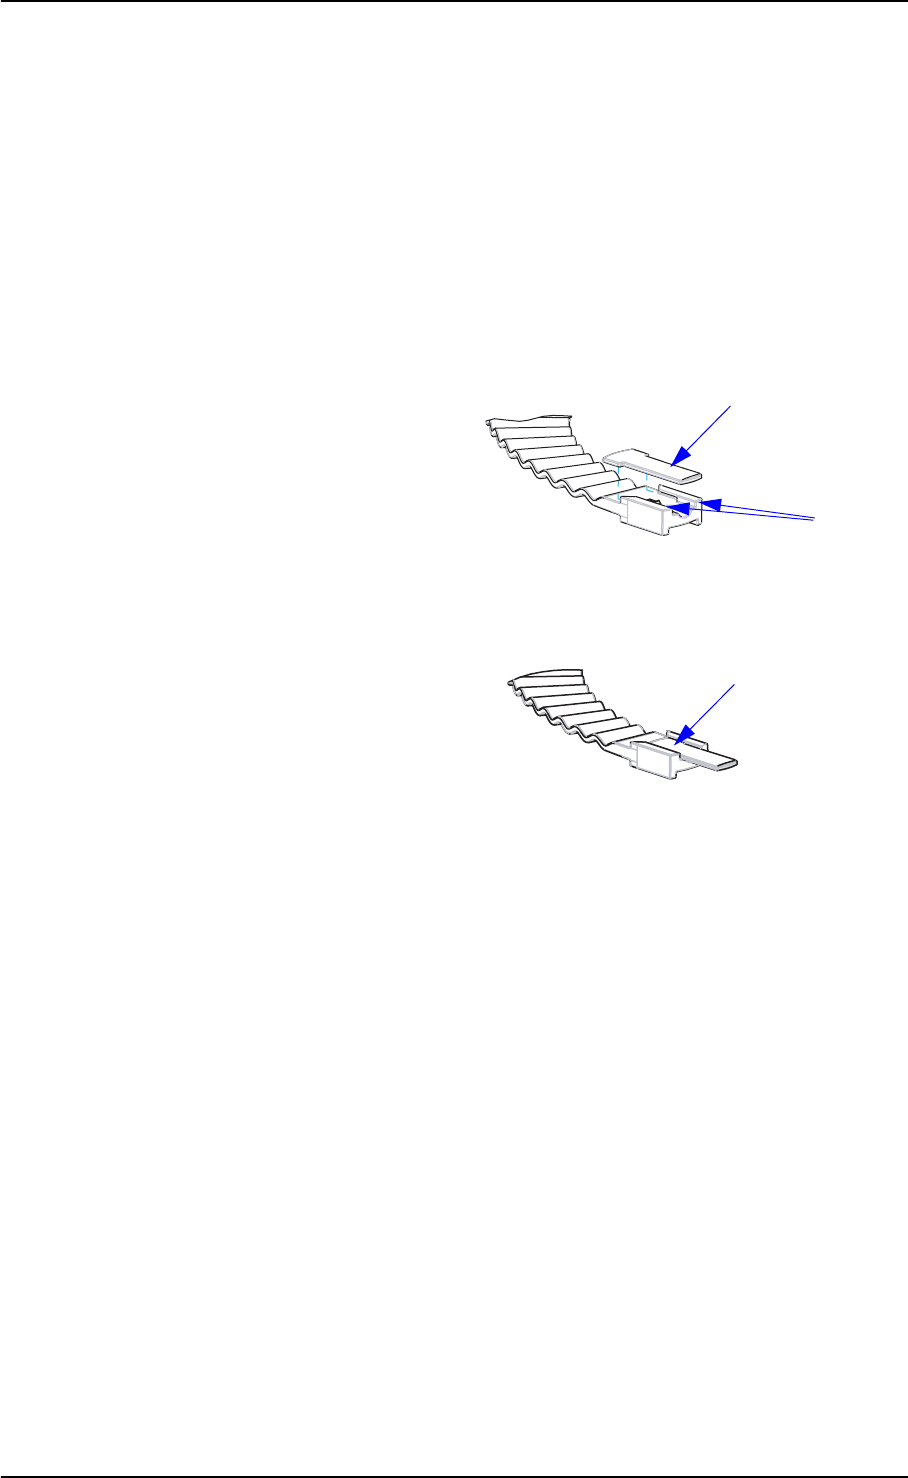
Fitting the probes on the SpeechLink 100 shoulder strap
When the probes are not fitted on the ears of the client, they are best
kept on the shoulder strap of SpeechLink 100 for safe keeping.
1. Place SpeechLink 100 face up.
2. With the ear cord facing downwards, slide the probe housing
into the grooves at the end of the shoulder strap.
3. Repeat for the second probe housing, if required.
4. To remove the probe housing, simply pull it out of the
grooves.
Ear cord
Probe
Grooves
Grooves
Probe
GN Otometrics A/S 23
AURICAL SpeechLink 100 Reference Manual
2.4.5 Fitting SpeechLink 100 with NOAHlink
If you use AURICAL SpeechLink 100 with NOAHlink (HIMSA’s
product for hearing instrument fitting), attach NOAHlink to AURI-
CAL SpeechLink 100. See the following description.
When AURICAL SpeechLink 100 and NOAHlink are not in use,
they should each be placed in their charger cradle for charging. You
can mount the NOAHlink charger on the AURICAL SpeechLink 100
charger. See Section 2.4.3, ‘Mounting the NOAHlink charger on the
AURICAL SpeechLink 100 charger base plate” on page 19.
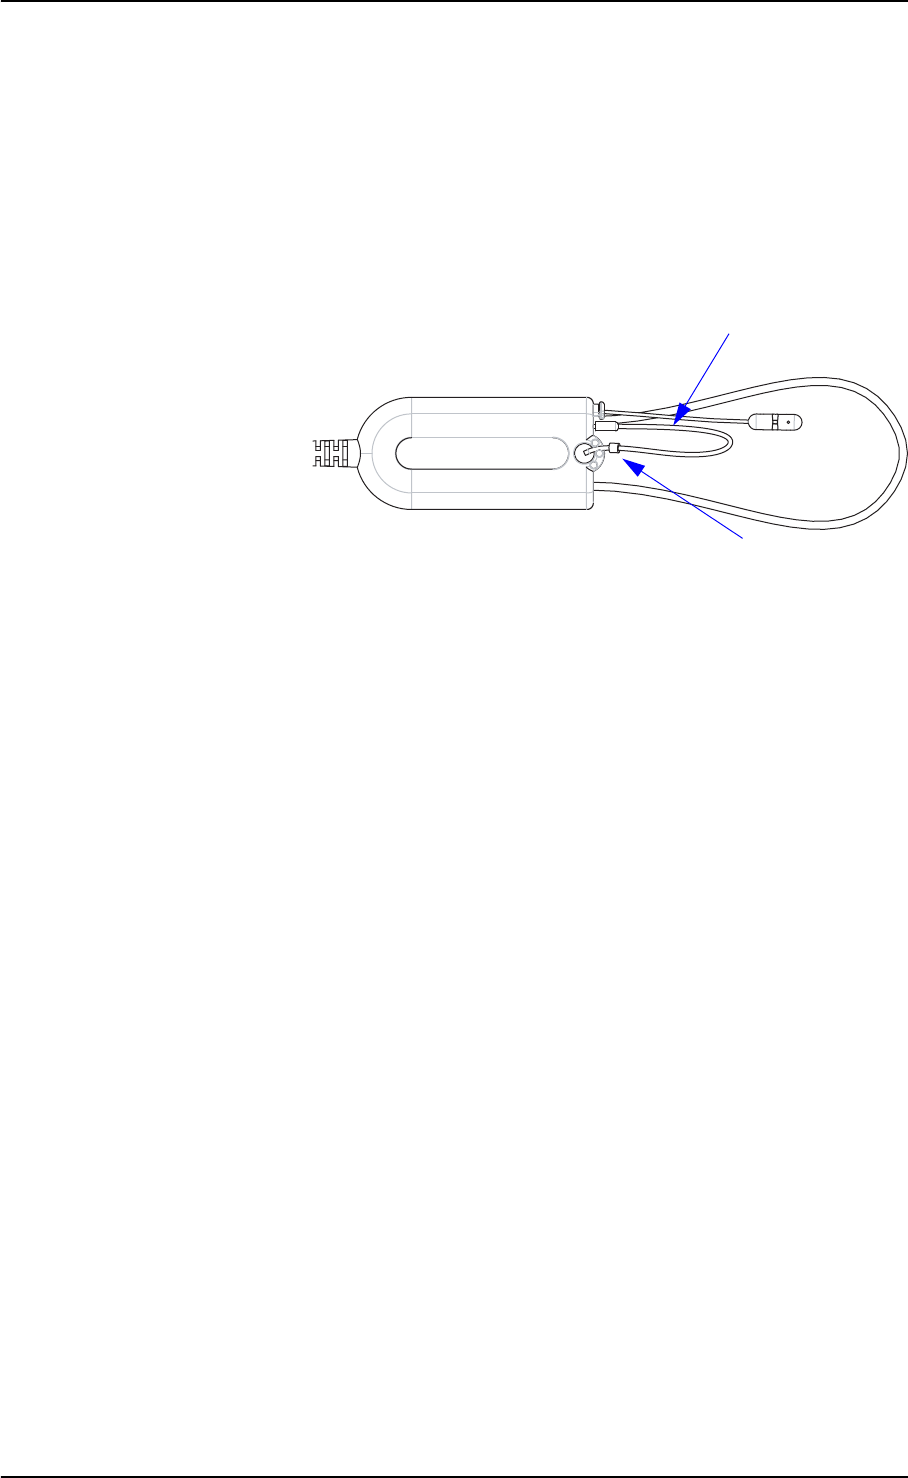
Fitting NOAHlink
To attach NOAHlink to AURICAL SpeechLink 100, do as follows:
1. Remove the NOAHlink neck string from NOAHlink.
24 GN Otometrics A/S
Reference Manual AURICAL SpeechLink 100
2. Attach the blue and red NOAHlink plastic attachment buttons
on the end of the NOAHlink strap to NOAHlink.
Adjusting the NOAHlink straps
The length of the NOAHlink strap can be adjusted, if required. To
adjust the length of the strap, pull the string loop to loosen the string
and then pull at either the end of the string or NOAHlink until the
length is appropriate.
Side view
Push string up through
Pull on short end of string
hole from below
to tighten
GN Otometrics A/S 25
AURICAL SpeechLink 100 Reference Manual
2.4.6 Fitting SpeechLink 100 with counterweights
If you use AURICAL SpeechLink 100 without NOAHlink, attach the
counterweights to AURICAL SpeechLink 100. See the following de-
scription. This will balance the weight of AURICAL SpeechLink 100
when it is placed on the shoulders of the client, to keep it from slid-
ing off.
1. Place SpeechLink 100 facing downwards.
2. Slide the counterweight into the grooves at the end of the
shoulder strap.
3. Repeat with the second counterweight.
Removing the counterweights
• To remove the counterweight, simply lift it out of the grooves.
2.5 Powering
•2.5.1 ´Powering AURICAL SpeechLink 100’ on page 2.5.1.26
•2.5.2 ´Powering the charger’ on page 2.5.2.26
•2.5.3 ´Batteries’ on page 2.5.3.27
•2.5.4 ´Inserting the battery’ on page 2.5.4.27
•2.5.5 ´Switching on SpeechLink 100’ on page 2.5.5.28
•2.5.6 ´Switching off SpeechLink 100’ on page 2.5.6.29
•2.5.7 ´Charging SpeechLink 100’ on page 2.5.7.29
•2.5.8 ´Powering status’ on page 2.5.8.30
Counterweight
Grooves
Counterweight
26 GN Otometrics A/S
Reference Manual AURICAL SpeechLink 100
2.5.1 Powering AURICAL SpeechLink 100
Device
• AURICAL SpeechLink 100 device is powered by a battery. See
2.5.3 Batteries, p. 27.
Charger
• The SpeechLink 100 charger is connected to a mains adapter,
which is connected to the electrical power outlet. See 2.5.2
Powering the charger, p. 26.
It is recommended that you leave the SpeechLink 100 in the charger
when you are not using it so that the device is always ready for use.
See the following descriptions for powering.
2.5.2 Powering the charger
Powering the charger
Caution:
Use only the DC power adapter supplied with the unit to power the charger.
1. Plug the DC plug of the DC power adapter (A) into the DC
inlet on the charger (see below).
2. Select the appropriate mains plug adapter from the “Mains
plug adapter kit” supplied with the SpeechLink 100 to fit your
mains outlet, and slide it into the mains adapter until it clicks.
A

GN Otometrics A/S 27
AURICAL SpeechLink 100 Reference Manual
3. Connect the DC power adapter to a mains power outlet. When
you switch on power to the charger, the green power indicator
on the charger front is lit.
2.5.3 Batteries
Caution:
Use only the battery types listed in Chapter 6, “Technical Specifications -
AURICAL SpeechLink 100” on page 45.
NiHM rechargeable batteries The SpeechLink 100 is delivered with a rechargeable NiHM battery.
Before you can operate SpeechLink 100, insert the battery in the
SpeechLink 100 (see Section 2.5.4, ‘Inserting the battery” on
page 27).
First time charging
Charging applies only if you use a rechargeable battery.
The rechargeable NiHM battery may not be charged when you re-
ceive the SpeechLink 100. You may therefore have to charge the bat-
tery for some hours, and preferably overnight, before you switch on
the SpeechLink 100.
A fully discharged battery must be charged in the SpeechLink 100
charger for 14 hours before it is fully charged.
A new rechargeable battery may not reach full capacity until it has
been recharged a couple of times.
Alkaline batteries If required, the SpeechLink 100 can be powered by a non-chargeable
Alkaline battery.
WARNING:
If you use the SpeechLink 100 with an Alkaline battery, always switch off
the power supply to the charger. Even though charging will normally be
switched off automatically when an Alkaline battery is detected, charging
an Alkaline battery may cause the battery to leak and cause damage to the
SpeechLink 100.
2.5.4 Inserting the battery
1. Remove the SpeechLink 100 from the charger.
2. To insert the battery, press the grooved area on the front of the
battery cover at the top of the SpeechLink 100 and gently tip
the lid backwards off the compartment.
28 GN Otometrics A/S
Reference Manual AURICAL SpeechLink 100
3. Insert the battery as shown below. A label inside the battery
compartment shows which way the battery fits.
4. Put the battery cover back in place.
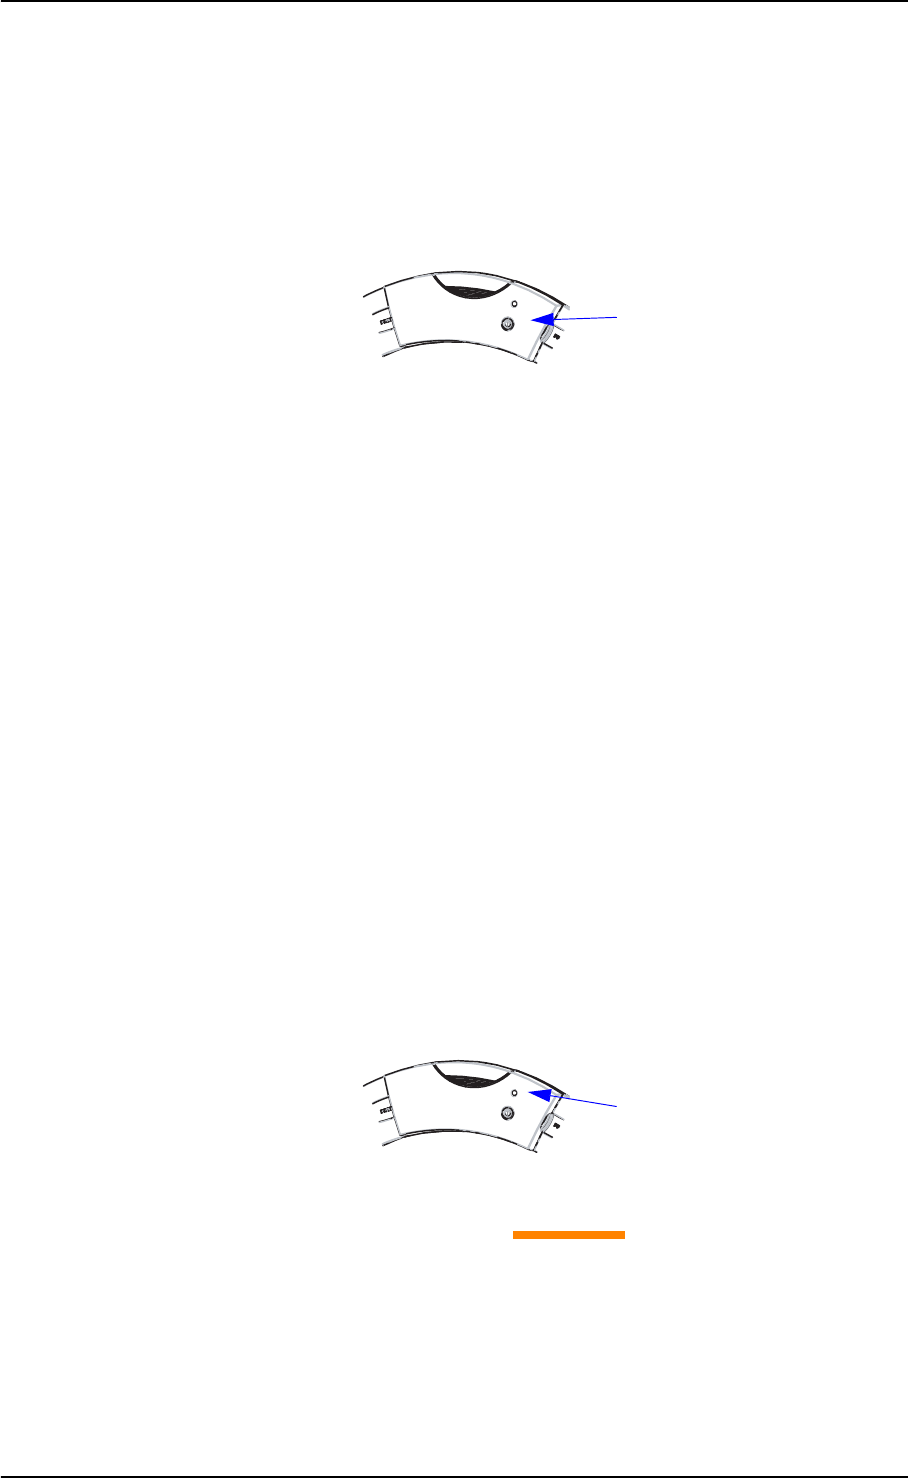
2.5.5 Switching on SpeechLink 100
To switch on SpeechLink 100, press and hold the On/Off button on
top of the device until the status indicator light turns on. The status
indicator will light for about 3 seconds, and then go into periodical
flashing. The various light indications are described in ‘‘Powering
status” on page 30.
Press to open
+
+
On/Off button
GN Otometrics A/S 29
AURICAL SpeechLink 100 Reference Manual
2.5.6 Switching off SpeechLink 100
To switch off SpeechLink 100, press and hold the On/Off button on
top of the device until the status indicator light turns off.
2.5.7 Charging SpeechLink 100
It is recommended that you place SpeechLink 100 on the charger
when it is not in use. This will ensure that the batteries are always
charged, and the charger is a convenient cradle for SpeechLink 100.
If SpeechLink 100 is switched on when you place it on the charger, it
will automatically be switched on again when you remove it from
the charger.
If SpeechLink 100 is switched off when you place it on the charger,
it will be switched off when you remove it from the charger.
Charging status
When SpeechLink 100 is placed on the charger, it will automatically
disconnect from OTOsuite Visible Speech Module and go into charg-
ing mode.
Note:
It is not possible to use SpeechLink 100 while it is being charged.
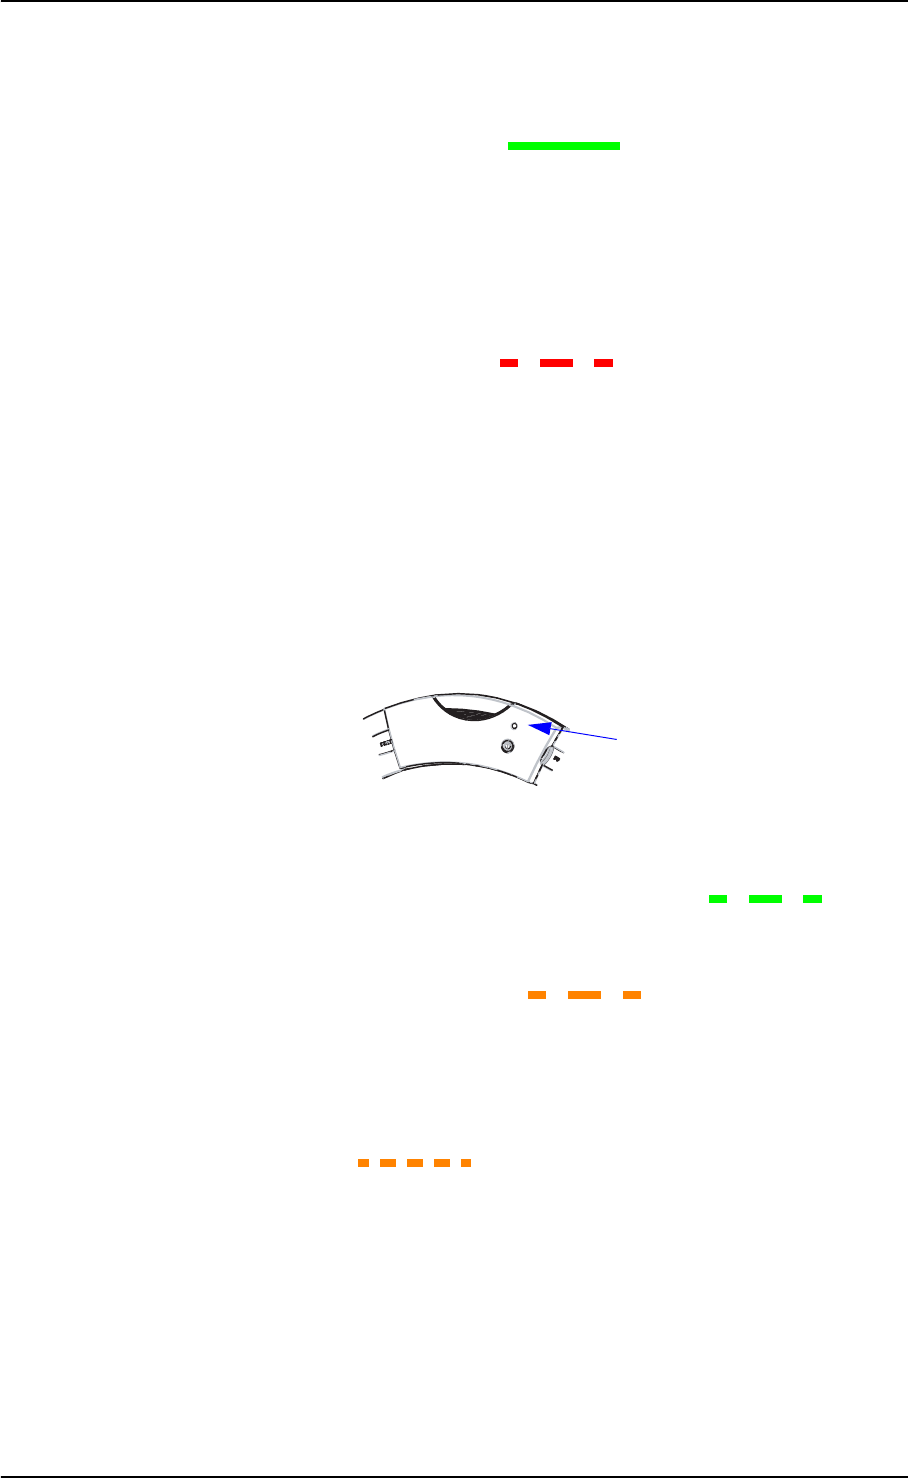
When SpeechLink 100 is placed on the charger, you can follow the
status of the charging process on the front of SpeechLink 100. The
status indicator shows the following states:
Amber, steady
• SpeechLink 100 is charging.
Note that charging is automatically discontinued after 14
hours of charging. This is done to ensure that batteries are
not being over-charged.
On/Off button
Status indicator
30 GN Otometrics A/S
Reference Manual AURICAL SpeechLink 100
Green, steady
• The SpeechLink 100 is not charging.
The SpeechLink 100 enters this state after 14 hours of con-
tinuous charging or if an Alkaline battery has been
detected.
Note that charging is resumed when the device is placed on
the charger.
Red, flashing
• An error has occurred in SpeechLink 100 during charging.
Most likely, the battery is defective. Replace the battery
and try charging again. If the error continues, contact your
supplier.
2.5.8 Powering status
Shown on the SpeechLink 100
When the SpeechLink 100 is powered on, you can check the status
on the status indicator on the front of the SpeechLink 100.
The status indicator shows the following states:
Green, flashing (every 2 seconds)
• The SpeechLink 100 is turned on and ready for use. Bat-
tery status is OK.
Amber, flashing
• The SpeechLink 100 is turned on but the battery status is
low. The SpeechLink 100 can be used in this mode for a
period of time, but needs to be recharged or fitted with a
new Alkaline battery as soon as possible.
Amber, flashing (more than every 2 seconds)
• SpeechLink 100 is turned on and is communicating with
OTOsuite Visible Speech Module.
SpeechLink 100 can be used in this mode for a period of
time, but must be recharged or fitted with a new Alkaline
battery as soon as possible.
Status indicator

GN Otometrics A/S 31
AURICAL SpeechLink 100 Reference Manual
Blue, flashing (every 2 seconds)
• The SpeechLink 100 is turned on and a Bluetooth connec-
tion with the OTOsuite Visible Speech Module has been
established. Battery status is OK.
Blue, flashing (more than every 2 seconds)
• SpeechLink 100 is turned on and is communicating with
the OTOsuite Visible Speech Module. Battery status is OK.
Red, flashing
• An error has occurred in SpeechLink 100. Wait for the unit
to power off automatically or remove the battery to turn
off the unit. Power on the unit again. If the error continues,
contact your supplier.
“Battery low” indication in OTOsuite Visible Speech
Module
When a battery low state is detected in the SpeechLink 100, this is
signalled by the SpeechLink 100 status indicator by the amber colour
described in ‘‘Amber, flashing” on page 30.
If SpeechLink 100 is connected to the OTOsuite Visible Speech Mod-
ule, a “Battery low” indication is shown in the bottom right corner
of the screen. Also, a bubble notification will appear.
When the “Battery low” warning occurs, there will be approximate-
ly ½ hour of continuous use left. The time left will, however, vary de-
pending on how the SpeechLink 100 is used, and the state of the
battery. If the rechargeable battery is fairly old, the time left will be
shorter than for a new battery.
Note:
For Alkaline batteries, the “Battery low” indication may not leave as much
testing time as a rechargeable battery would.
2.6 Communication with the OTOsuite Visible Speech
Module via Bluetooth
Communication via Bluetooth is established automatically from the
OTOsuite Visible Speech Module, when you wish to use SpeechLink
100.
Note:
1. SpeechLink 100 must be switched on to be able to communi-
cate with the OTOsuite Visible Speech Module.

32 GN Otometrics A/S
Reference Manual AURICAL SpeechLink 100
2. The OTOsuite Visible Speech Module cannot communicate
with SpeechLink 100 while the device is placed in the charger
and the power to the charger is connected.

AURICAL SpeechLink 100 Reference Manual
GN Otometrics A/S 33
3 Preparing AURICAL SpeechLink 100 for
testing
• ‘‘Preparing AURICAL SpeechLink 100” on page 33
• ‘‘Preparing for tube calibration” on page 33
The following section describes how you prepare the AURICAL
SpeechLink 100 for testing.
For actual testing scenarios, see the OTOsuite Visible Speech Mod-
ule Online Help.
3.1 Preparing AURICAL SpeechLink 100
1. Start up your OTOsuite Visible Speech Module and Visible
Speech Module software on the computer.
2. Switch on AURICAL SpeechLink 100. When you switch on
AURICAL SpeechLink 100 to start testing:
Battery status 3. Check the battery status of SpeechLink 100 to make sure that
the device is ready for testing. See Section 2.5.8, ‘Powering sta-
tus” on page 30.
4. Fit silicone test tubes to the probes you will be using. See ‘‘Fit-
ting silicone tubes on the probes” on page 20.
Tube calibration 5. Perform a tube calibration if you have fitted AURICAL
SpeechLink 100 with new silicone tubes. See Section 3.2, ‘Pre-
paring for tube calibration” on page 33.
3.2 Preparing for tube calibration
It is recommended that you perform a tube calibration whenever
you change silicone tubes on the probe.
1. Fit a new silicone tube on the probe. See ‘‘Fitting silicone
tubes on the probes” on page 20.
34 GN Otometrics A/S
Reference Manual AURICAL SpeechLink 100
This is to make calibrate the acoustic influence of the individ-
ual tubes on the frequency response.
2. Insert the free end of the silicone tube in the test cavity in the
probe.
3. Run the tube calibration from the OTOsuite Visible Speech
Module. For instructions, see the OTOsuite Visible Speech
Module Online Help
Tube calibration
test location
Silicone
tube

AURICAL SpeechLink 100 Reference Manual
GN Otometrics A/S 35
4 Service and Maintenance - AURICAL
SpeechLink 100
•Section 4.1, ‘Equipment failure” on page 35
•Section 4.2, ‘Service and repair” on page 35
•Section 4.3, ‘Maintenance” on page 36
•Section 4.4, ‘Troubleshooting” on page 38
4.1 Equipment failure
WARNING:
Do not use a defective device.
If you believe the correct function or operation safety of the Speech-
Link 100 to be faulty in any way, disconnect SpeechLink 100 from the
power supply, remove the batteries, and make sure that it cannot be
used by others until it has been serviced.
WARNING:
Under no circumstances disassemble the SpeechLink 100 or SpeechLink
100 charger. Contact your supplier.
4.2 Service and repair
WARNING:
Under no circumstances disassemble the SpeechLink 100 or SpeechLink
100 charger. Contact your supplier. Parts inside the SpeechLink 100 or
SpeechLink 100 charger must only be checked or serviced by authorized
personnel.
WARNING:
Do not disassemble the SpeechLink 100 charger as there is a risk of electric
shock.
For the sake of safety and in order not to void the warranty, service
and repair of electromedical equipment should be carried out only
by the equipment manufacturer or by service personnel at author-

36 GN Otometrics A/S
Reference Manual AURICAL SpeechLink 100
ised workshops. In case of any defects, make a detailed description
of the defect(s) and contact your supplier.
The manufacturer reserves the right to disclaim all responsibility for
the operating safety, reliability and performance of equipment serv-
iced or repaired by other parties. Following repair, the equipment
should be tested by suitably qualified personnel.
On request, your supplier can obtain a Service Manual from the
manufacturer. The Service Manual contains electrical diagrams, de-
scriptions, lists of components and calibration information, etc.
4.3 Maintenance
Section 4.3.1, ‘Calibration” on page 37
Section 4.3.2, ‘Replacing a probe” on page 37
Section 4.3.3, ‘Replacing an ear cord” on page 37
Section 4.4.1, ‘Powering problems” on page 38
Caution:
Keep the unit away from liquids.
Do not allow moisture inside the unit.
Note:
Never immerse the SpeechLink 100 probes into water or other cleaning so-
lutions.
The SpeechLink 100 and charger unit require no preventive mainte-
nance. However, it is recommended that you observe the guidelines
below.
• The SpeechLink 100 and its component parts are in constant
contact with your patients so care should be taken to ensure
that they are kept clean and free from dust. Use a soft, slightly
damp cloth with a small amount of detergent to clean the unit
and the charger.
• The only part which is inserted into the ear canal in VSM test-
ing is the silicone tube. These tubes are disposable, and should
only be used once per patient.
There are no special requirements for disposal of the silicone probe
tubes, i.e. they may be discarded according to local regulations.
GN Otometrics A/S 37
AURICAL SpeechLink 100 Reference Manual
4.3.1 Calibration
SpeechLink 100 and probes are calibrated at the factory.
• The probe calibration values for the reference microphone are
saved in the probe assembly and follow the probe. Accord-
ingly, it is not necessary to keep track of left and right probes.
A probe can be plugged into any SpeechLink 100 and used
right away.
Annual calibration
The SpeechLink 100 device and probes must be calibrated once a
year by your authorized service department.
4.3.2 Replacing a probe
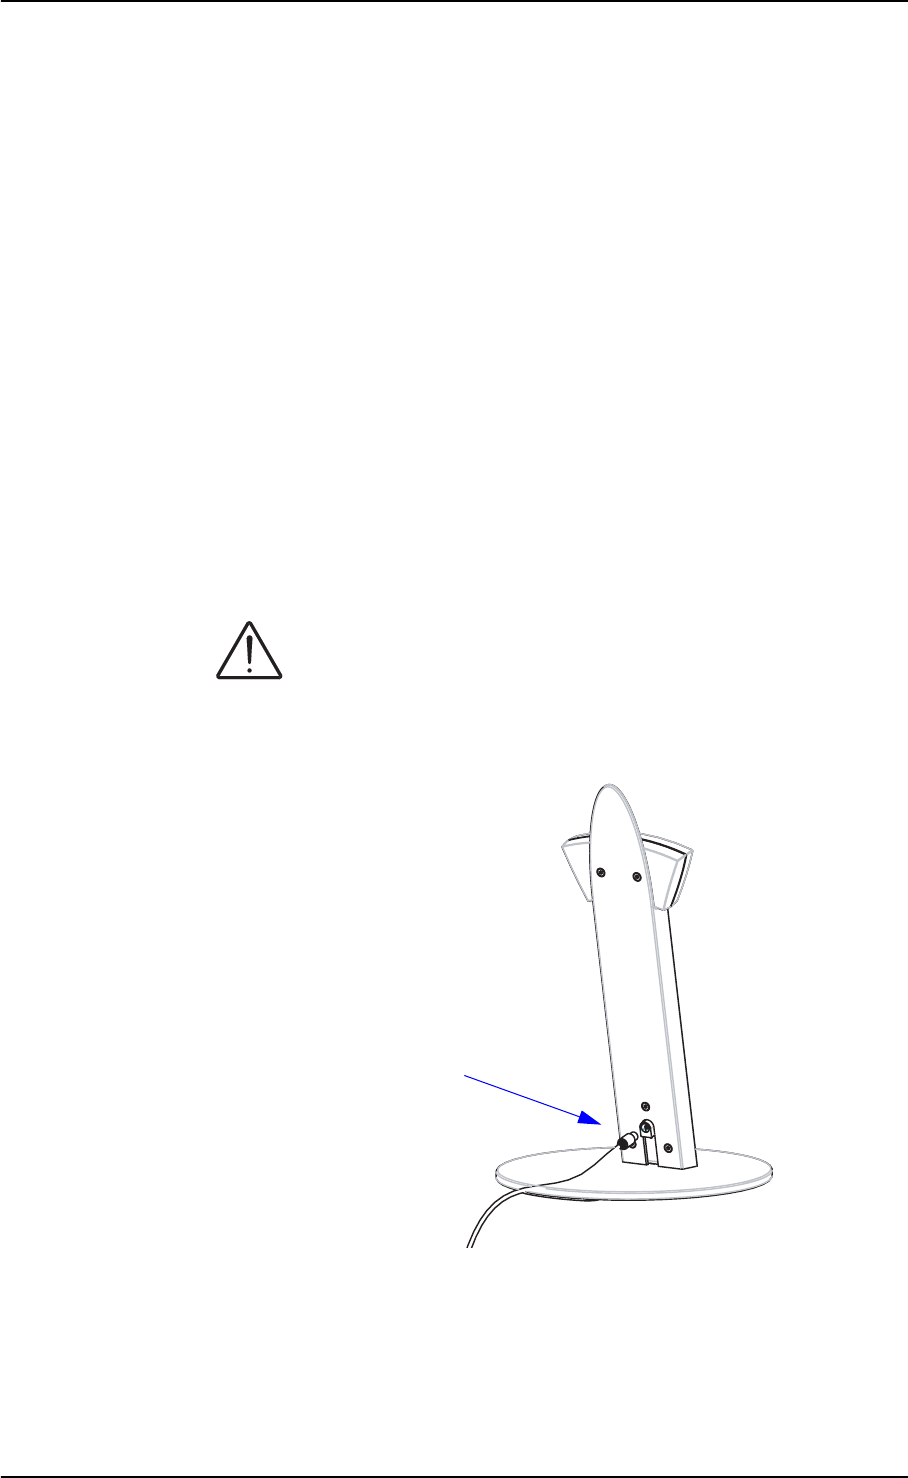
Disconnecting the probe from SpeechLink 100
1. Disconnect the probe from SpeechLink 100. Grip the probe
cable by the plug and free it by gently pulling it out of the
socket. Do not pull the plug by the cable.
Connecting the probe to SpeechLink 100
1. Insert the probe plug of the new probe in the probe socket on
the side of SpeechLink 100. The arrow stamped on the plug
must face outwards when you insert the plug.
4.3.3 Replacing an ear cord
The ear cords are mounted at the factory. If you need to replace an
ear cord:
• Remove the old cord, if required.
• Mount the new ear cord on the probe. To do so, pull on the
rubber cord and slide it into the groove.
Probe
plug in
socket
Arrow

38 GN Otometrics A/S
Reference Manual AURICAL SpeechLink 100
4.4 Troubleshooting
4.4.1 Powering problems
Problem Possible cause Solution
SpeechLink 100 does not
power on even though I press
the power button.
• The battery is inserted
incorrectly.
• The battery needs charging
or replacing.
• Insert the battery correctly.
• Charge the battery or fit
SpeechLink 100 with a new
battery.
SpeechLink 100 powers off
and cannot power on even
though I press the power but-
ton.
• The battery needs charging
or replacing.
• Charge the battery or fit
SpeechLink 100 with a new
battery.
The SpeechLink 100 status
indicator does not light up
when I place SpeechLink 100
in the charger.
• The charger is not con-
nected to the power adap-
tor, or the power adaptor is
not connected to the mains
power supply.
• Connect the power adap-
tor to the charger and to
the mains supply.
The SpeechLink 100 battery
lifetime is very low even
thogh the battery has been
charged.
• The battery is defect,
maybe because it is too old.
• Fit SpeechLink 100 with a
new rechargeable battery.
The SpeechLink 100 status
indicator changes from
amber (charging) to green
(charging complete), very
soon after I place SpeechLink
100 in the charger.
• An Alkaline battery has
been inserted in SpeechLink
100.
• No battery is fitted in
SpeechLink 100.
• The battery is defective.
• Fit SpeechLink 100 with a
new battery.
AURICAL SpeechLink 100 Reference Manual
GN Otometrics A/S 39
5 AURICAL SpeechLink 100 Safety
•Section 5.1, ‘Symbols used” on page 39
•Section 5.2, ‘Warning notes” on page 41
•Section 5.3, ‘Manufacturer” on page 43
This Reference Manual contains information and warnings, which
must be followed to ensure the safe performance of AURICAL
SpeechLink 100. Local government rules and regulations, if applica-
ble, should also be followed at all times.
5.1 Symbols used
•Section 5.1.1, ‘AURICAL SpeechLink 100 symbols” on page 39
•Section 5.1.2, ‘Charger unit symbols” on page 40
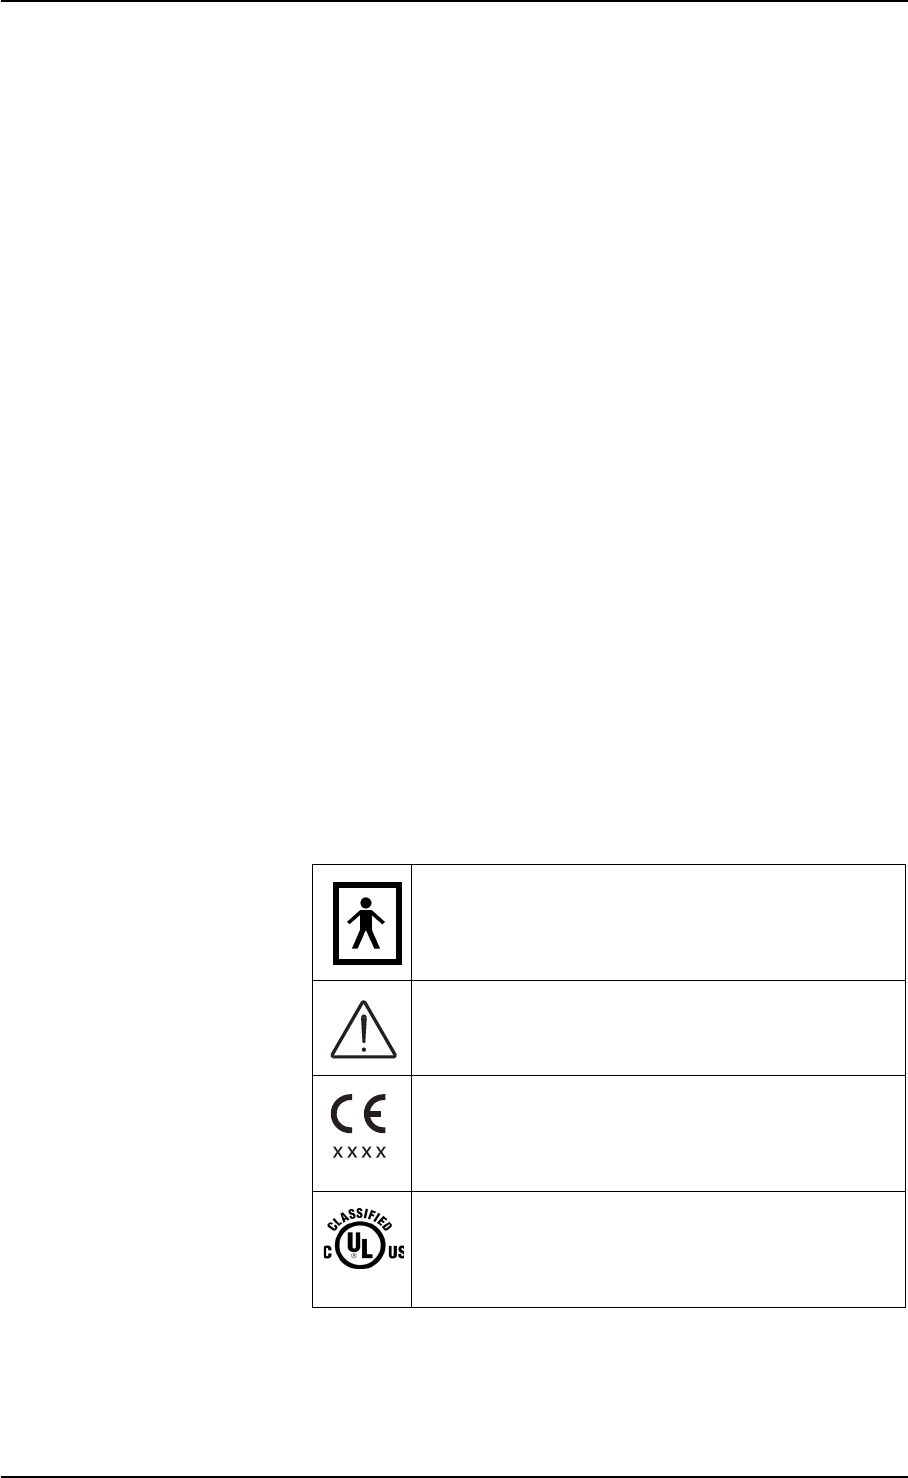
5.1.1 AURICAL SpeechLink 100 symbols
AURICAL SpeechLink 100 is marked with this sym-
bol to indicate compliance with Type BF of the safety
standard EN 60601-1. See Section 6.8, ‘Standards” on
page 47.
The AURICAL SpeechLink 100 is marked with this
symbol when it is important that the user refers to as-
sociated information given in this manual.
The AURICAL SpeechLink 100 is CE-marked accord-
ing to the Medical Devices Directive 93/42/EEC and
the Radio Equipment and Telecommunications Ter-
minal Equipment Directive 1999/5/EC.
Classified with respect to electrical shock, fire, me-
chanical and other specified hazards only in accord-
ance with UL2601-1 and CAN/CSA-C22.2 NO 601.1-
90
40 GN Otometrics A/S
Reference Manual AURICAL SpeechLink 100
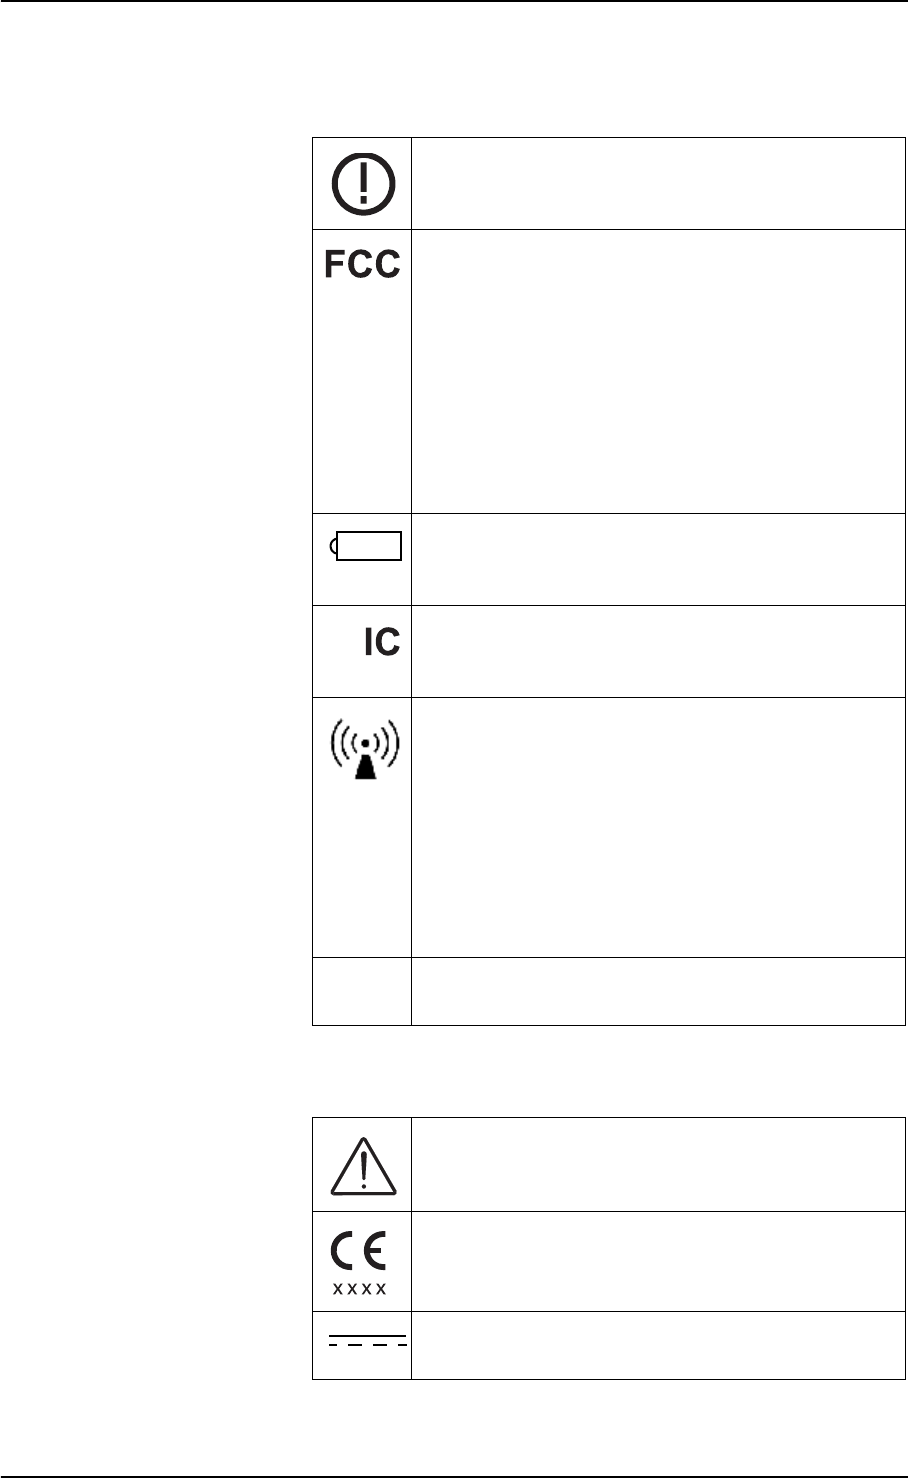
5.1.2 Charger unit symbols
The AURICAL SpeechLink 100 carries this symbol to
indicate that, in France, it is only permitted to use the
device indoors.
This device complies with part 15 of the FCC rules.
Operation is subject to the following two conditions:
1. This device may not cause harmful interference.
2. This device must accept any interference
received, including interference that may cause
undesired operation.
Refer to Notes 5 through 7 in Section 5.2, ‘Warning
notes” on page 41 for more details.
The AURICAL SpeechLink 100 carries this symbol to
identify the positioning of the battery inside the bat-
tery compartment.
The term”IC”: before the certification/registration
number only signifies that the Industry Canada tech-
nical specifications were met.
• Interference may occur in the vicinity of the
AURICAL SpeechLink 100. Local regulations
and precautions for other equipment in the
environment should always be followed to
avoid interference.
• The separation distance from the AURICAL
SpeechLink 100 to other devices complying
with standard immunity requirements in EN
60601-1-2 is minimum 0.35 m/1ft.
Symbols on buttons to operate AURICAL SpeechLink
100, see Section 2.3.1, ‘Front view” on page 13.
The charger unit is marked with this symbol when it
is important that the user refers to associated informa-
tion given in this manual.
The charger unit is CE-marked according to the Med-
ical Devices Directive 93/42/EEC.
The charger unit is marked with this symbol to indi-
cate that it is suitable for direct current only.
+
GN Otometrics A/S 41
AURICAL SpeechLink 100 Reference Manual
5.2 Warning notes
•Section 5.2.1, ‘AURICAL SpeechLink 100 warning notes” on
page 41
•Section 5.2.2, ‘Charger unit warning notes” on page 43
5.2.1 AURICAL SpeechLink 100 warning notes
Note 1: There are no user-serviceable parts inside the AURICAL SpeechLink
100 device cabinet. For the sake of safety, and in order not to void the
warranty, the cabinet should only be opened and serviced by au-
thorized service personnel. In case of defects, please make a detailed
description of the defect(s) and contact your supplier. Do not use a
defective instrument.
Note 2: Keep the AURICAL SpeechLink 100 away from liquids. Do not al-
low moisture inside the instrument.
Note 3: Do not use the instrument in the presence of flammable anesthetics
(gases).
Note 4: Unwanted noise may occur if the AURICAL SpeechLink 100 is ex-
posed to a strong radio field. Such noise may interfere with the proc-
ess of fitting a hearing instrument. Many types of electrical devices,
e.g. mobile telephones, may generate radio fields. We recommend
The AURICAL SpeechLink 100 should only be pro-
vided with prescribed battery types, see Section 6,
‘Technical Specifications - AURICAL SpeechLink
100” on page 45.
Place the battery as indicated in the battery compart-
ment, see Section 2.5.3, ‘Batteries” on page 27 for fur-
ther details.
Use only rechargeable batteries when AURICAL
SpeechLink 100 is placed in the charger unit. If you
are using an alkaline battery, do not attempt to charge
your AURICAL SpeechLink 100. Your alkaline bat-
tery may be damaged and leak, and this may in turn
cause damage to AURICAL SpeechLink 100.
Batteries should be removed if equipment is not likely
to be used for some time.
AURICAL SpeechLink 100 should only be connected
to the type 1053 Charger from GN Otometrics A/S.
1

42 GN Otometrics A/S
Reference Manual AURICAL SpeechLink 100
that the use of such devices in the vicinity of the AURICAL Speech-
Link 100 is restricted as much as possible.
Note 5: Changes or modifications not expressly approved by the manufac-
turer could void the user's authority to operate the equipment.
Note 6: This equipment has been tested and found to comply with the limits
for a Class B digital device, pursuant to part 15 of the FCC Rules.
These limits are designed to provide reasonable protection against
harmful interference in a residential installation. This equipment
generates, uses and can radiate radio frequency energy and, if not
installed and used in accordance with the instructions, may cause
harmful interference to radio communications. However, there is no
guarantee that interference will not occur in a particular installation.
If this equipment does cause harmful interference to radio or televi-
sion reception, which can be determined by turning the equipment
off and on, the user is encouraged to try to correct the interference
by one or more of the following measures:
• Reorient or relocate the receiving antenna.
• Increase the separation between the equipment and receiver.
• Connect the equipment into an outlet on a circuit different
from that to which the receiver is connected.
• Consult the dealer or an experienced radio/TV technician for
help.
Note 7: For use in Canada: To prevent radio interference to the licensed serv-
ice, this device is intended to be operated indoors and away from
windows to provide maximum shielding. Equipment (or its trans-
mit antenna) that is installed outdoors is subject to licensing.
Note 8: No parts may be eaten, burnt, or in any way used for purposes other
than audiometry or the fitting of hearing aids.
Note 9: The AURICAL SpeechLink 100 can be disposed of as normal elec-
tronic waste, according to local regulations. Please investigate local
regulations concerning the disposal of rechargeable and alkaline
batteries.
Note 10: For safety reasons, accessories connected to the equipment's outlet
fittings must be identical to the type supplied with the system.
Note 11: It is recommended that an annual calibration be performed on acces-
sories containing transducers. Furthermore, it is recommended that
calibration be performed if the equipment has suffered any potential
damage (e.g. transducers dropped on the floor).
Note 12: To comply with EN 60601-1-1 computer and printer must be placed
out of reach of the patient, i.e. not closer than approx. 1.5 meters/5 ft.
GN Otometrics A/S 43
AURICAL SpeechLink 100 Reference Manual
5.2.2 Charger unit warning notes
Note 1: The charger unit should be kept away from the patient area.
Note 2 There are no user-serviceable parts inside the charger unit cabinet.
For the sake of safety, and in order not to void the warranty, the cab-
inet should only be opened and serviced by authorized service per-
sonnel. In case of defects, please make a detailed description of the
defect(s) and contact your supplier. Do not use a defective instru-
ment.
Note 3 The charger unit can be disposed of as normal electronic waste, ac-
cording to local regulations.
5.3 Manufacturer
•Section 5.3.1, ‘Responsibility of the manufacturer” on page 43
GN Otometrics A/S
2 Dybendalsvaenget, DK-2630 Taastrup, Denmark
Phone: +45 72 111 555, Fax: +45 72 111 548
E-mail: info@gnotometrics.dk
www.gnotometrics.com
5.3.1 Responsibility of the manufacturer
The manufacturer is to be considered responsible for effects on safe-
ty, reliability, and performance of the equipment ONLY IF:
• All assembly operations, extensions, re-adjustments, modifica-
tions or repairs are carried out by the equipment manufacturer
or personnel authorised by the manufacturer.
• The electrical installation to which the equipment is connected
complies with EN/IEC requirements.
• The equipment is used in accordance with the instructions for
use.
The manufacturer reserves the right to disclaim all responsibility for
the operating safety, reliability and performance of equipment serv-
iced or repaired by other parties.
Do not attempt to use AURICAL SpeechLink 100 with
patients while it is placed in the charger unit. Use only
rechargeable batteries when AURICAL SpeechLink
100 is placed in the charger unit. If you are using Al-
kaline batteries, do not attempt to charge AURICAL
SpeechLink 100.

44 GN Otometrics A/S
Reference Manual AURICAL SpeechLink 100

AURICAL SpeechLink 100 Reference Manual
GN Otometrics A/S 45
6 Technical Specifications - AURICAL
SpeechLink 100
6.1 AURICAL SpeechLink 100
6.1.1 Interface
Wireless Bluetooth data transfer to PC, version 1.2, class 2 (10 meters).
6.1.2 Type identification
AURICAL SpeechLink 100 is type 1053 from GN Otometrics A/S
6.1.3 Power supply
Battery types: Rechargeable (Ni-MH type) AA (R6) 1.2V, 1 pc.
Use only rechargeable battery supplied by GN Otometrics A/S
Alkaline AA (R6) 1.5V, 1 pc.
Battery supply voltage: Nom. 1.30 V,
Max. 1.65 V,
Min. start-up: 1.10 V (Measured with instrument load)
Min. when running: 1.00 V
Low battery indicator level: When approximately 30 minutes of battery operating time re-
main.
Estimated battery life: 5 hours of continuous use. (This is based on a typical use scenar-
io. The actual use can influence the battery life time).
Mode of operation: Continuous.
6.2 Charger unit
Type identification: Charger unit is type 1053 Charger from GN Otometrics A/S
Nominal input voltage: 9 V DC
Min. input voltage: 6.5 V DC

46 GN Otometrics A/S
Reference Manual AURICAL SpeechLink 100
Max. input voltage: 12 V DC
Max. power consumption while charging: 300 mA (at 9 V input voltage)
Max. power consumption when not charging: 60 mA (at 9 V input voltage)
6.3 Power adaptor
Power supply
Input voltage range: 100-240 V AC, 50-60 Hz
Output voltage range: 9 V DC
Any IEC/UL 60601 or IEC/UL 60950 certified power adaptor supplying 9 V DC, min. 300 mA and with
a maximum available output of 15 W can be used.
6.4 Operating environment
Temperature: +15°C to +35°C (59°F to +95°F)
Rel. humidity: 30 to 90 %, non-condensing
Warm-up time: < 1 min.
Air pressure: 600 hPa to 1060 hPa
Operation at temperatures below -20°C or above +60°C may cause permanent damage.
6.5 Storing and handling
Temperature: -20°C to +60°C (-4°F to +140°F)
Rel. humidity: < 90 %, non-condensing
Air pressure: 500 hPa to 1060 hPa
6.6 Dimensions
AURICAL SpeechLink 100 (HxWxD):23 mm x 350 mm x 230 mm (0.91” x 13.7” x 9.1”)
Charger unit (HxWxD): 290 mm x 180 mm x 230 mm (11.4” x 7.1” x 9.1”) (with table plate mounted)
Charger unit (HxWxD): 350 mm x 180 mm x 230 mm (13.8” x 7.1” x 9.1”) (with wall plate mounted)

GN Otometrics A/S 47
AURICAL SpeechLink 100 Reference Manual
6.7 Weight
AURICAL SpeechLink 100: 0.180 kg/0.34 lb
Charger unit: 0.825 kg/1.8 lb
6.8 Standards
Safety: EN 60601-1, UL 2601-1, CAN/CSA -C22.2 NO 601.1-90
AURICAL SpeechLink 100: EN 60601-1, Internal Powered, Type
BF, IPX0
EMC: EN 60601-1-2, EN 300 328-2, EN 301 489-17

48 GN Otometrics A/S
Reference Manual AURICAL SpeechLink 100

AURICAL SpeechLink 100 Reference Manual
GN Otometrics A/S 49
7Index
A
Alkaline batteries 27
Assembly
SpeechLink 100 16
SpeechLink 100 base plate 17
SpeechLink 100 charger 17
SpeechLink 100 counterweights 25
SpeechLink 100 probes 20
SpeechLink 100 shoulder strap 22
SpeechLink 100 with NOAHlink 19, 23
SpeechLink 100, wall mounted 19
B
Base plate
assembly 17
Batteries
Alkaline 27
battery low status, SpeechLink 100 31
inserting in SpeechLink 100 27
batteries
Alkaline 27
NiHM 27
rechargeable 27
Bluetooth communication 31
C
Calibration
annual c., SpeechLink 100 37
preparing for tube c. 33
SpeechLink silicone tubes 33
CE marking 39
Charger
assembly 17
charging status, SpeechLink 100 29
desktop installation 17
first time charging 27
powering 26
views 15
charger
wall mount installation 19
Charging SpeechLink 100 29
Communication, Bluetooth 31
Counterweights
SpeechLink 100 25
G
Getting started
SpeechLink 11
I
Installation
SpeechLink 100 16
Installation location
SpeechLink 100 17
Intended use
AURICAL SpeechLink 100 8
M
Maintenance 35
Manufacturer
AURICAL SpeechLink 100 43
responsibility 43
N
NiHM batteries 27
NOAHlink
adjusting straps 24
fitting on SpeechLink 100 23
installation 19
O
on/off, SpeechLink 100 28
P
Powering
battery status 30
battery types 27
charger 26
device 26
problems, SpeechLink 100 38
SpeechLink 100 25
Powering off SpeechLink 100 29
Powering on SpeechLink 100 28
Powering status, SpeechLink 100 30
Preparing for testing
SpeechLink 100 33

50 GN Otometrics A/S
Reference Manual AURICAL SpeechLink 100
probe
view 16
Probes
assembly 20
replacement 37
tube calibration 33
view 16
R
rechargeable batteries 27
Replacement
probes 37
S
Safety
AURICAL SpeechLink 100 39
AURICAL SpeechLink 100 manufacturer 43
AURICAL SpeechLink 100 symbols 39
AURICAL SpeechLink 100 warning notes 41
CE marking 39
Medical Devices Directive 39
SpeechLink 100 39
Service and repair 35, 39
Shoulder strap
assembly 22
Specifications, technical, SpeechLink 100 45
SpeechLink 100
annual calibration 37
assembly 16
assembly with NOAHlink 19
assembly, wall mounted 19
battery low status 31
charging 29
charging status 29
counterweight assembly 25
equipment failure 35
inserting batteries 27
installation 16
installation location 17
NOAHlink assembly 23
powering 25
powering status 30
preparing for testing 33
probe assembly 20
probes 16
replacing probes 37
shoulder strap assembly 22
storing 11
switching off 29
switching on 28
troubleshooting 38
unpacking 11
views 12
SpeechLink 100 base plate
assembly 17
SpeechLink 100 charger
assembly 17
first time charging 27
SpeechLink 100 probes
assembly 20
SpeechLink 100 shoulder strap
assembly 22
Status indicator
battery low status 31
charging status 29
powering status 30
Storing 11
SpeechLink 100 11
Straps
adjusting, NOAHlink 24
Switching off SpeechLink 100 29
switching on device 28
Switching on SpeechLink 100 28
T
Technical specifications, SpeechLink 100 45
Test devices
views 12
Troubleshooting
SpeechLink 100 38
Tube calibration 33
preparing for 33
U
Unpacking
SpeechLink 100 11
W
Wall mounting
SpeechLink 100 19
Warning notes
AURICAL SpeechLink 100 41