GPI KOREA RECKONX RECKON-X User Manual
GPI KOREA, Inc RECKON-X
User manual
Users Guide
v.1.1
TABLE OF CONTENTS
1. Safety Information
- WARNING
- Warranty
2. Getting Started
- Contents
- BWC Viewer and Storage System Requirements
3. Introduction
- Camera and Cradle Features and Specifications
- Camera and Cradle Functions
- Viewer and Storage Features and Functions
4. Camera Operating Procedures
- LED Operation
- Basic Operation
- Status Check
5. Installation Steps for Reckon-X Programs
- Storage program
- Viewer program
6. Program Operating Procedures
- Starting the Programs
- Storage Screen Configuration
- Viewer Screen Configuration
- Setting the User Account
- Storage Setup
- Setting Storage Location
- Adding the Device
- Device Setting
- Playback
- Download
7. FCC/IC Compliance Statement

1. SAFETY INFORMATION
WARNING
Read the user’s guide before operating the unit.
Failure to follow these safety instructions could result in fire, electric shock, or other injury or damage to the unit
or other property.
DO NOT leave in your vehicle, as exposure to excessive heat or cold could affect the performance and/or reduce
the life of the battery.
DO NOT disassemble, open, crush, bend, deform, puncture, shred, microwave, incinerate, paint, or insert foreign
objects into the unit or sync cable.
DO NOT use the unit if it has been damaged.
DO NOT use the sync cable in rain, near wash basins, or in other wet locations.
DO NOT spill any food or liquid on the sync cable. If the sync cable gets wet, unplug from the unit and allow it to
dry thoroughly before using again. Damage to the sync cable caused by contact with liquid is not covered under
warranty.
DO NOT attempt to dry the unit or sync cable with an external heat source, such as a microwave oven or hair
dryer.
DO NOT force a connector into a port. Check for obstructions in the port. Make sure that the connector matches
the port and that you have positioned the connector correctly in relation to the port.
WARRANTY
This product is guaranteed against manufacturing defects for one (1) year from the original date of purchase. In
the event of such defects during this period is to repair or replace the defective part or product with a comparable
part or product at the manufacturer’s sole discretion. Except for such replacement, the sale, or other handling
of this product is without warranty, condition or other liability even though the defect or loss is caused by
negligence or other fault.
Damage resulting from use, accident, or normal wear and tear is not covered by this or any warranty. The
manufacturer assumes no liability for any accident, injury, death, loss, or other claim related to or resulting from
the use of this product. In no event shall the manufacturer be liable for incidental or consequential damages
relating to or resulting from the use of this product or any of its parts.
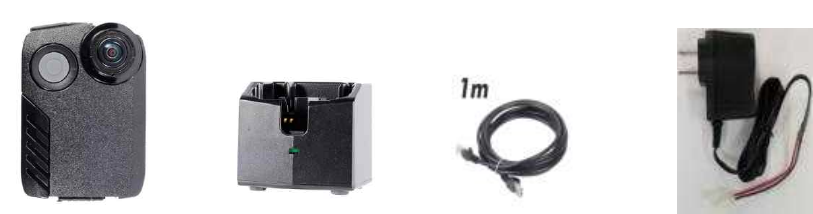
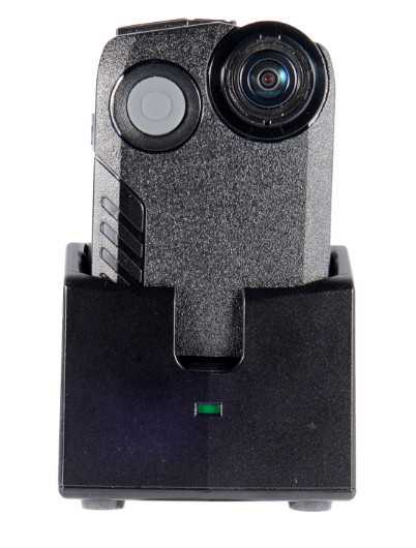
2. GETTING STARTED
Contents
Camera Cradle RJ45 Network Cable (1m) Power Adapter (12V 1A)
Viewer and Storage System Requirements
1. Windows compatible computer with the following specifications:
a) Operating System: Windows 7 or higher recommended
b) Processor: Intel Core i5 or higher recommended
c) Memory (RAM): 4GB or higher recommended
d) Display with 1152 x 864 resolution. 1280 x 1024 or higher recommended
2. Router connection is required

3. INTRODUCTION
BWC is a small, wearable recorder that can be used to capture HD video and audio. All the recorded files can be
downloaded to the back office server for storage, retrieval and management by the administrator.
Camera and Cradle Specifications
Camera Specification
Video
Video Resolution
(Recording
Speed)
1920x1080 30P, 1280x720 60P, 1280x720 30P, 720x480 30P
Video
Compression
H.264
Encoding rate
1920x1080 12 Mbps, 1280x720 6 Mbps, 720x480 4 Mbps
Encoding rate to
HD 4.3GB/one hour recording (8 Mbps VBR)
recording size
ratio
HD 3.2GB/one hour recording (6 Mbps VBR)
Video Container
MP4
Date and Time
Embedded Video Frame
External Camera
Port
Micro USB 10P connector
Lens
Viewing Angle
Horizontal 107˚ / Diagonal 133˚
Audio
Resolution
128 Kb/s
Encoding Format
AAC
Sampling Rate
at least 44.1 KHz
Mute
Yes
Recording
Pre-Event
Recording Time
off, 5, 10, 30sec
Recording Time
4~5 hours subject to configuration
Sleep mode (or
Power-saving
mode)
Recording not available. File upload not available.
Pre-event not available
Camera is placed into Cradle
Battery
Battery Capacity
Li-ion polymer / 1,800 mA
Battery Life
Recording time 4-5 hours - Subject to configuration
Standby(Sleep Mode) - 5 hours (48 hours)
Approximate
Battery Life
at least 300 charging cycles
Charging Time
2.5 hours
General
Time Sync
Server time sync
GPS time sync
Normal(Using RTC in Camera)
GPS
For Time Sync and Location Data
Video Transfer
Type
Wired IP Network Download
802.11 Wi-Fi Auto Download (for PRO)
Status Indicator
2pcs dual color LED, Beep, Vibrate
Indication Mode
Beep + VIB + LED

Beep + LED
VIB
Covert
Storage
Built-in 32GB Micro SD Card (MLC Class 10)
Wi-Fi
Yes
Bluetooth
Yes
Environmental
Ingress
Protection(IP)
Rating
IP65 compliant
Temperature
Operating: -20 to 50 °C
Survival: -30 to 75 °C
Humidity
5 to 95 % RH
Dimension
mm: 58(W)mm x 82.5(H)mm x 23(D)mm
inch: 2.28” x 3.25” x 0.91”
Weight
120g
Operating
Temperature
-20℃ ~ 60℃ (-4℉ ~ 140℉)
Mount
Rotatable Belt Clip
Belt clip
Cradle
Interface
RJ45, 10/100Mbps Ethernet
LED Indicator
Green to show the power status of cradle
Weight
104g
Power
DC 12V or PoE (48V)
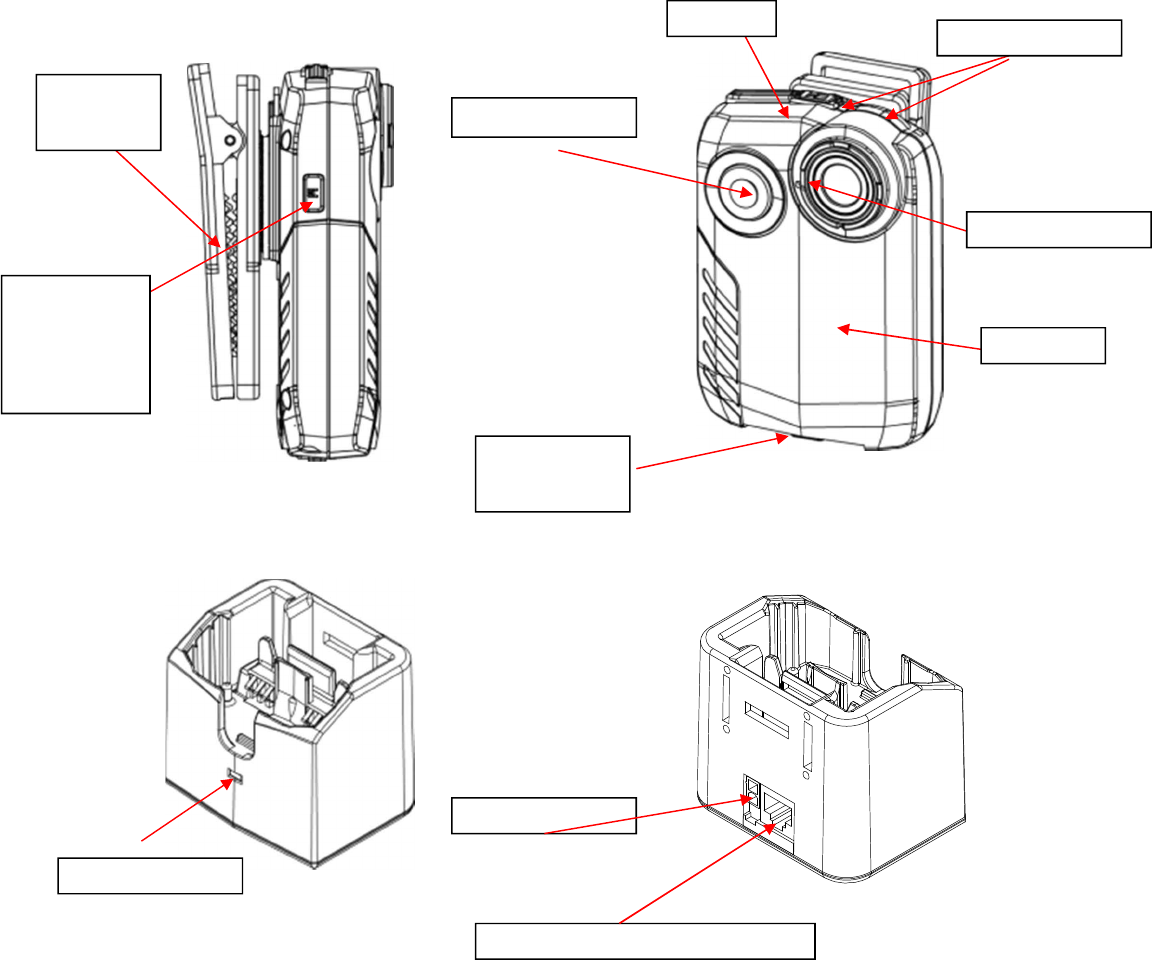
Camera Functions
Cradle and Functions
Viewer and Storage Program Features
The program is designed to help users to manage the recorded data.
Viewer and Storage Program Functions
- Search video data by conditions (Name, ID, Date/Time)
- Delete downloaded video data
- Playback
- Download video data from the camera
- Delete video data in the camera
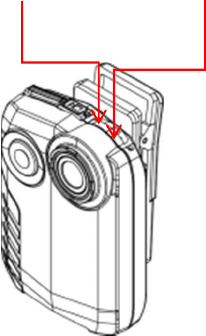
Clip Holder
360°
Rotatable
Mode Key
Beep + Vibe
Beep
Vibe
Covert Mode
Wi-Fi
Record & Stop Key
GPS
Audio Mic
LED Indicators
Power Switch
Reset Switch
Power LED
PWR 12VDC
IP DATA downloading Port
- Change the IP address (camera)
- Configuring the camera
4. Camera Operating Procedures
LED Operation
LED 1
- Recording : Flashing Red (1 second intervals)
- Mute : Flashing Red (300ms intervals)
LED 2
- Standby : Solid Green
- Charging : Solid Red
- Charge Complete : Solid Green (No LED indication while charging if the power is off)
Basic Operation
When LED, vibration and beep modes are enabled. (Default mode)
Record: Press the Record & Stop button once to start recording (1 short beep + 1 short vibration + LED1 flashing
Red with 1 second intervals)
Stop: Press and hold the Record & Stop button for more than 2 second to stop recording (2 short beeps + LED2
solid Green+ Vibration)
Audio Mute: Press and hold the Mode button for more than 2 seconds (LED1: Flashing Red with 300ms intervals)
NOTE: Enable only during operation. Mute will disable automatically at the end of the recording.
Status Check
LED 1
LED 2
SD Card Error: 3 beeps (300ms) every 3 seconds repeated 3 times, LED1continuously flashes alternating Red and
Green.
SD Card Full: Occurs when 2GB of disk space remains. 3 beeps (300ms) every 3 seconds repeated 3 times, LED1
continuously flashes Amber.
When the SD card is full, the recording will stop andLED1 will turn solid Amber.
Low Battery: When the battery is less than 3.55V. 3 beeps every 300ms repeated 3 times, LED2 continuously
flashes Red every 3 seconds repeated 5 times.
Full Battery: When charging is complete, LED2 turns solid Green.
Data Transmission: LED1 turns solid blue. No beeps. (did not apply yet)
Disk Format: LED1 turns solid Red.
GPS On: Blink LED1/second (50ms)
Command Transfer Setting: LED1 flashes once to 500ms speed (Green)
Setting Connection or Device Access: LED1 flashes Green every 500ms.
1 beep will occur if the unit is charging on the cradle and connected to the network.
If power is not supplied to the cradle, the green LED indicator on front of the cradle is off and turns solid Green
when the power is established.
**Factory Default: Simultaneously press and hold the Record and Mode button for 2~3 seconds.
5. Installation Steps for Programs
Storage Program
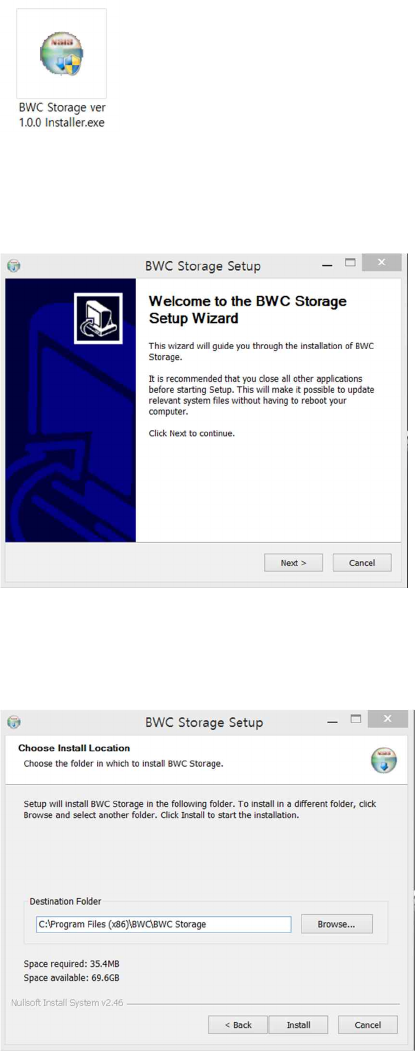
Step 1
Run the BWC Storageinstaller.exe
Step 2
Click the “Next” button.
Step 3
Click the “Install” button.
Step 4
Click the “Finish” button.
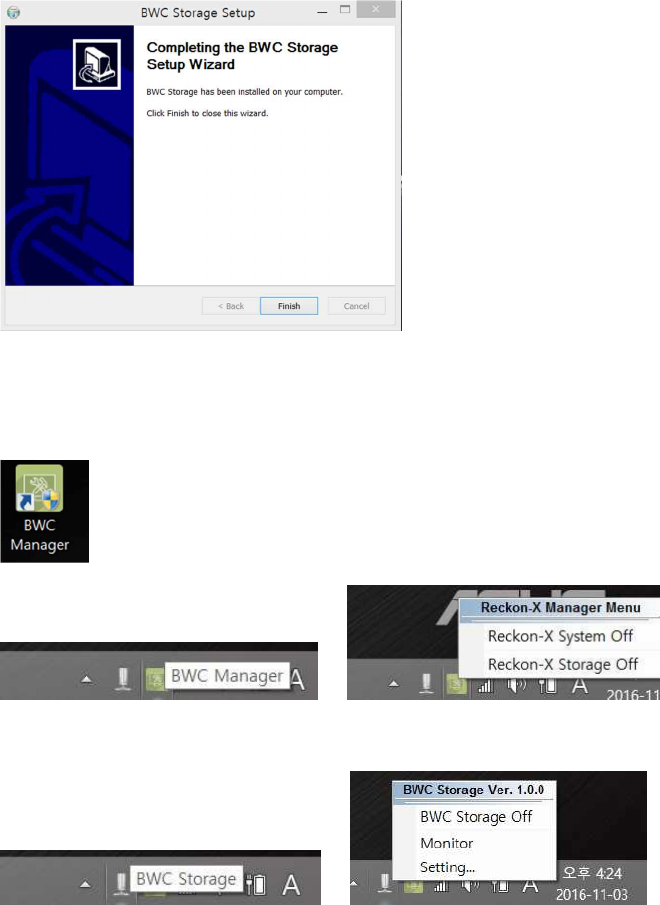
Step 5
To open the Storage program, double click the Manager icon on the desktop to start the program. Find the
Storage icon in the taskbar and right click the mouse to access the menu settings.
Viewer Program
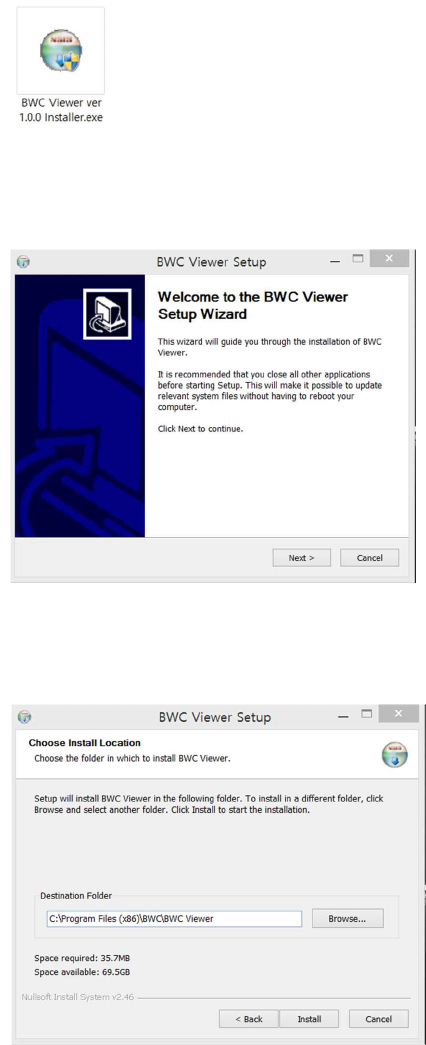
Step 1
Run the BWC Viewerinstaller.exe
Step 2
Click the “Next” button.
Step 3
Click the “Install” button.
Step 4
Click the “Finish” button.
Step 5
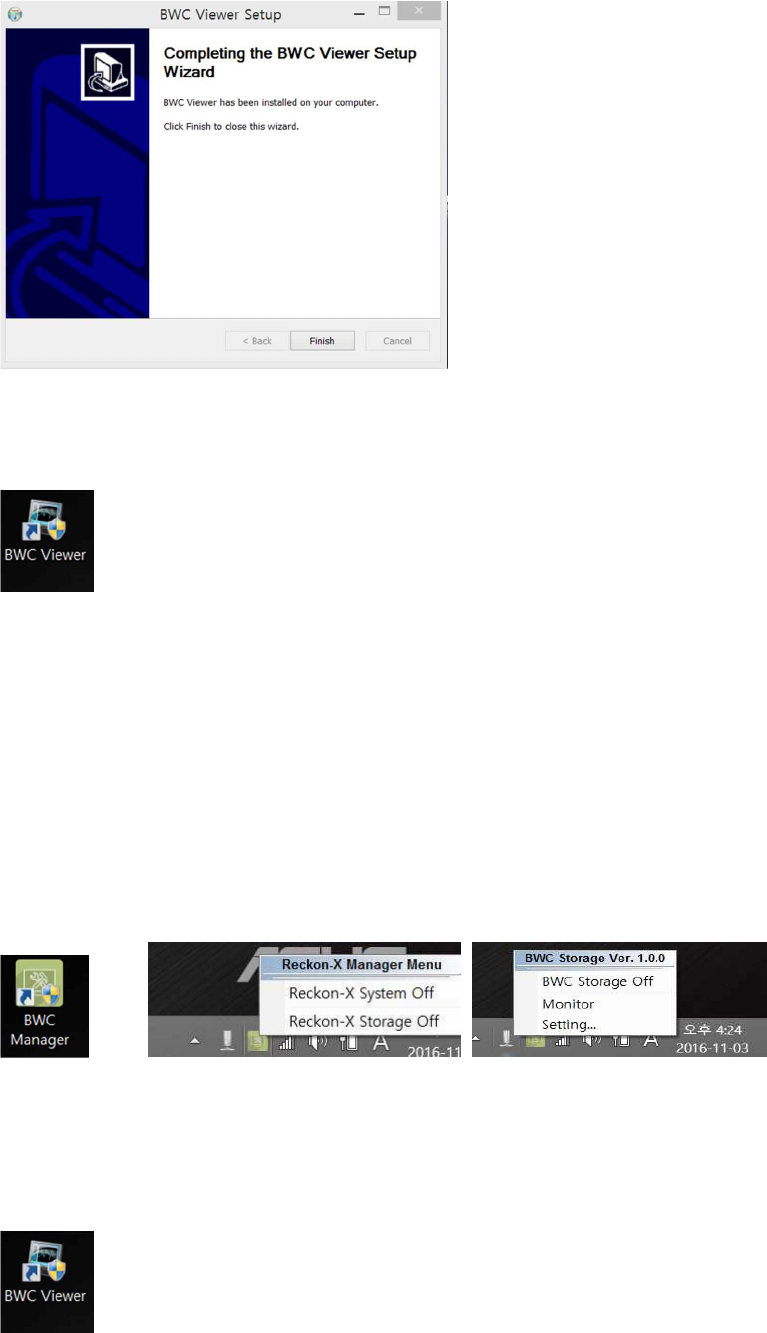
To open the Viewer program, double click the BWC Viewer icon on the desktop to start the program.
6. Program Operating Procedures
Starting the Storage program
The user must check their IP address first. (ex. 192.168.0.5)
Right click the icon and select “Run as Administrator” to start the Storage program.
* Storage program has to be ON at all times when using the Viewer program.
Starting the Viewer program
Right click the icon and select “Run as Administrator” to start the Viewer program.
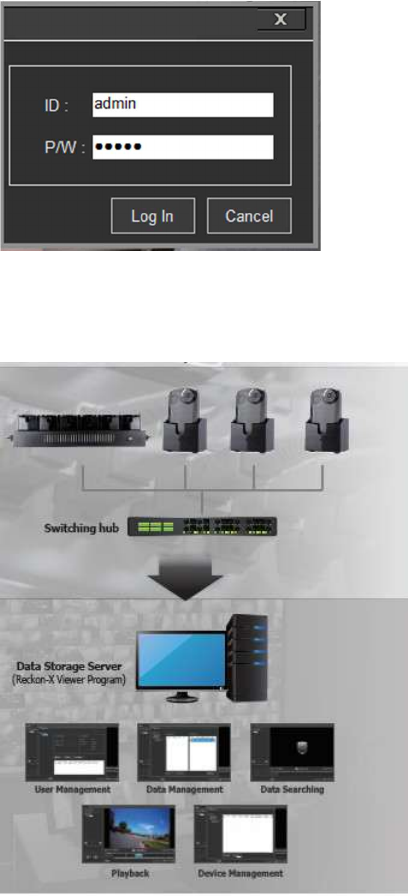
Input ID and Password
ID: admin
P/W: admin
System Configuration.
* Make it sure the device is properly connected before starting operation.
***This section is for the Storage Program***
Storage Screen Configuration
Used to check Network settings and the status between the Storage and Viewer programs.
To access the Reckon-X Storage menu settings, right click the icon in the taskbar
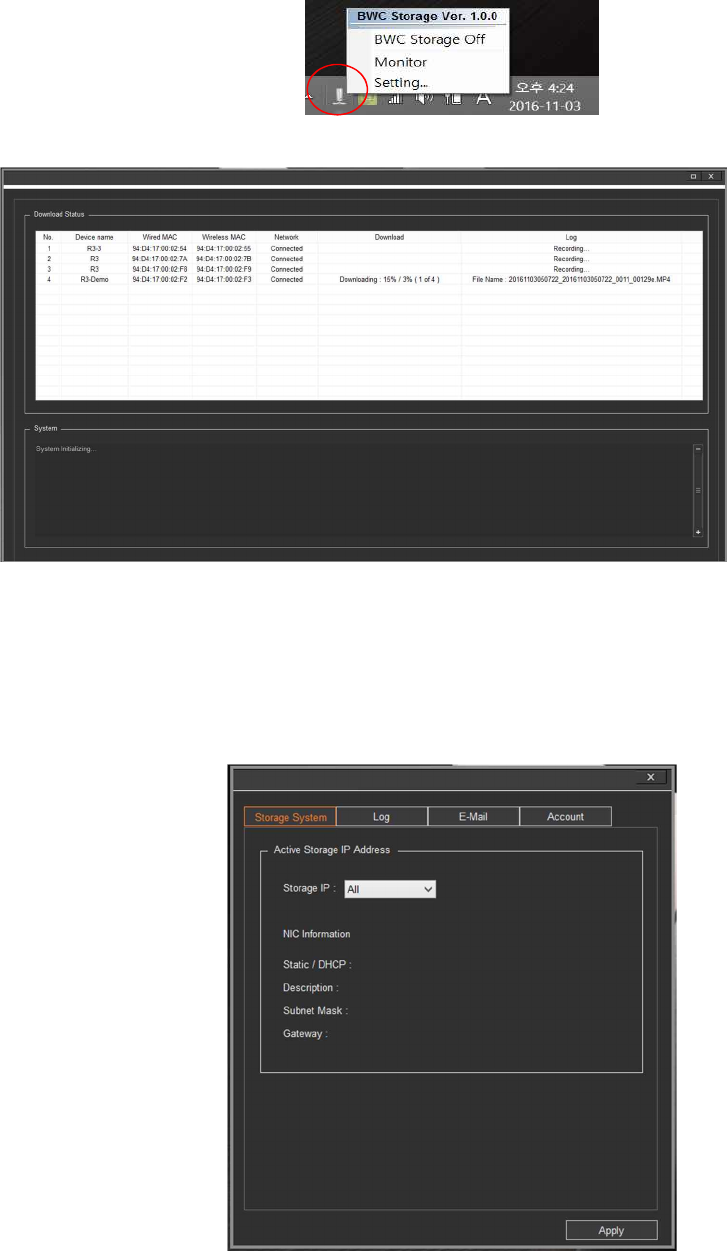
The following is the window to show the data downloading status of each device.
NOTE: ID and PW are required to change the settings and to close the storage program.
ID: admin
P/W: admin
The following is the window to show the storage setting.
***This section is for the Viewer Program***
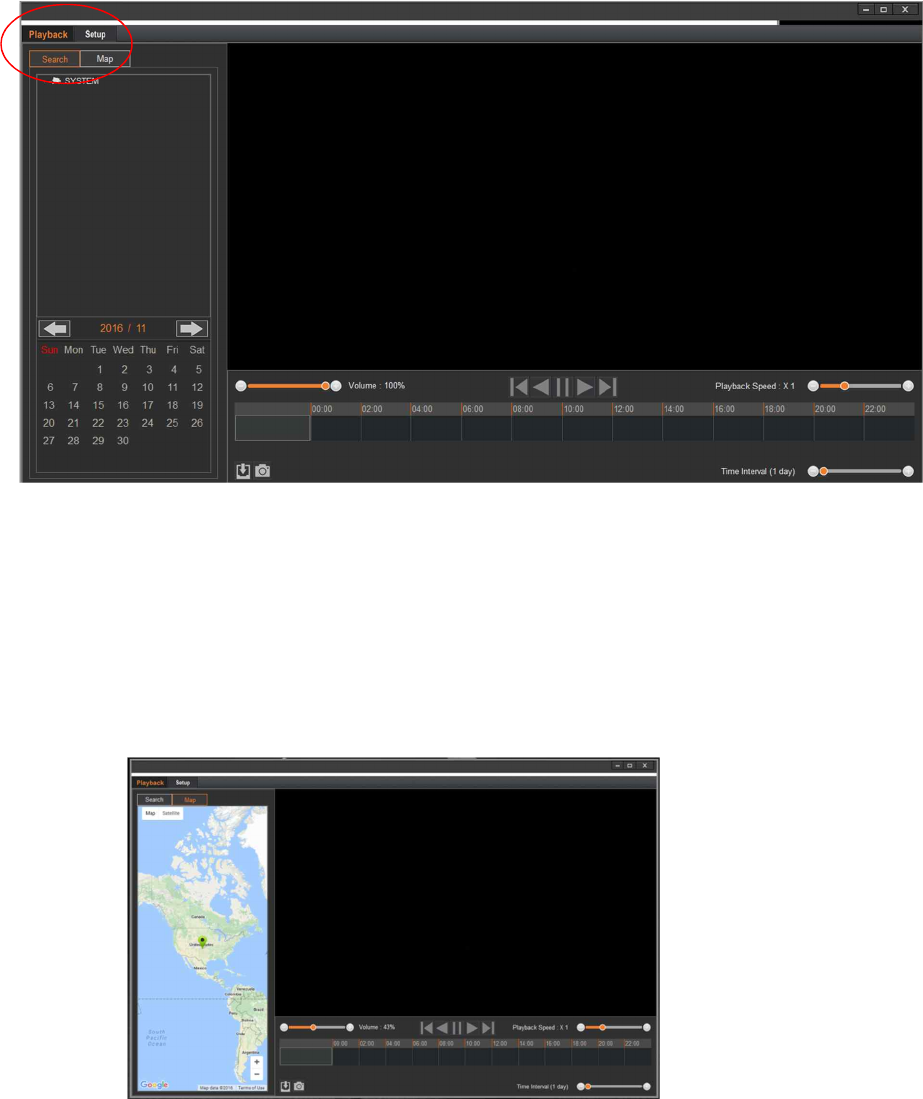
Viewer Screen Configuration
Playback Tab
- Shows the selected BWC with recorded file
- To search and download the video data
Search
- Search video files
Map
- Current or recorded location using GPS data
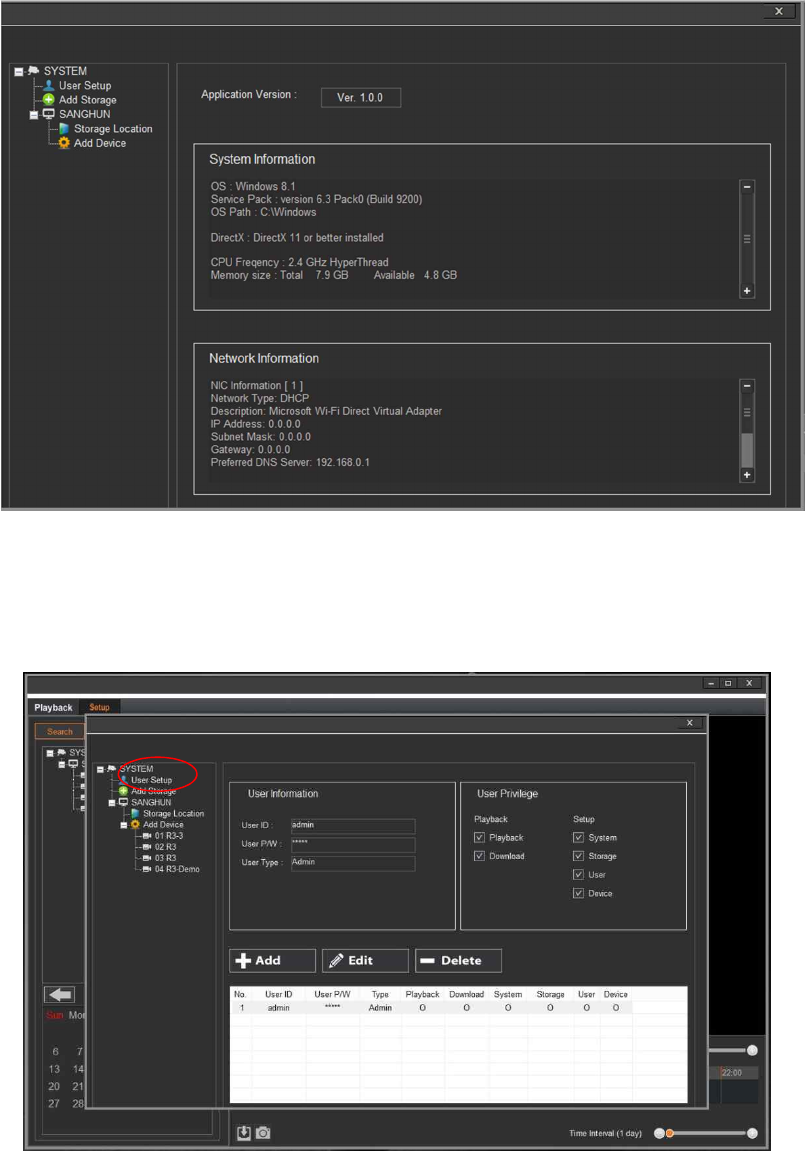
Setup Tab
- To set the System and Storage
- User info and privilege
- Device setup
- Storage info setup
Setting the User Account
1. Click "User Setup"
2. User’s can be configured differently depending on each user’s privileges.
(Adding or deleting users, setting privileges for Playback, Download, System, Storage and Device).
Storage Setup
1. Click “Add Storage”.
2. Click the “Add” button to pull up the Add Storage window.

3. IP Address: Input your storage's IP address. (Check the IP address of your PC. The following is the
example.)
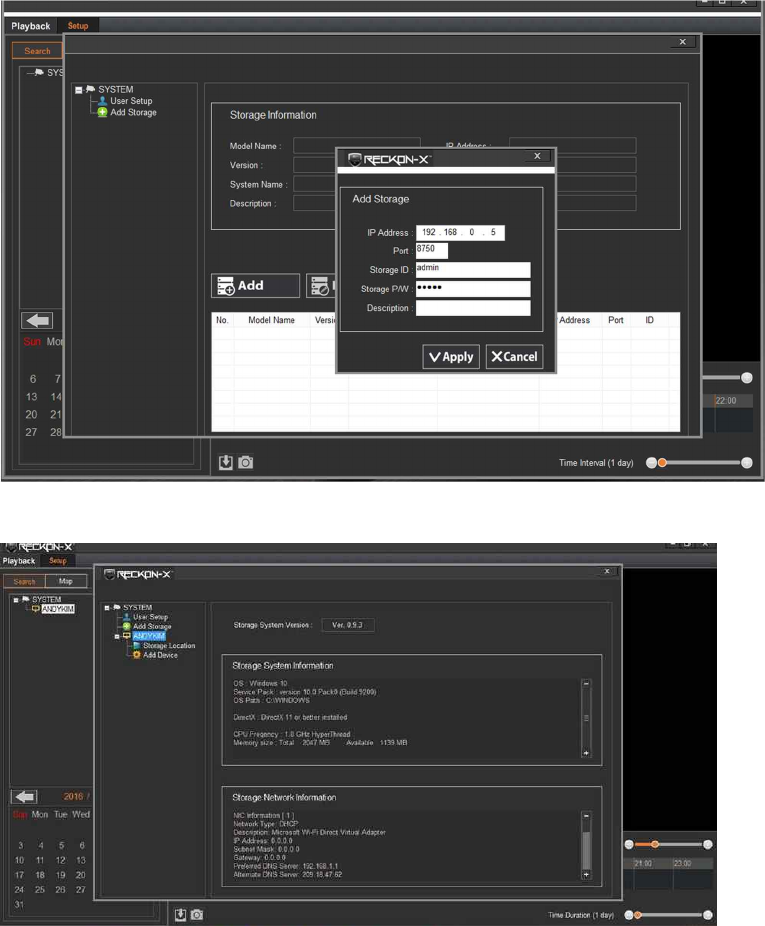
4. Enter Storage ID and PW (Default: admin/admin).
5. Click the “Apply” button.
NOTE: If the storage is added correctly, the storage list will appear in the directory.
Setting Storage Location
1. Set the download location for your device.
2. Disk information: your system information (C:/ or D:/ or E:/ etc…).
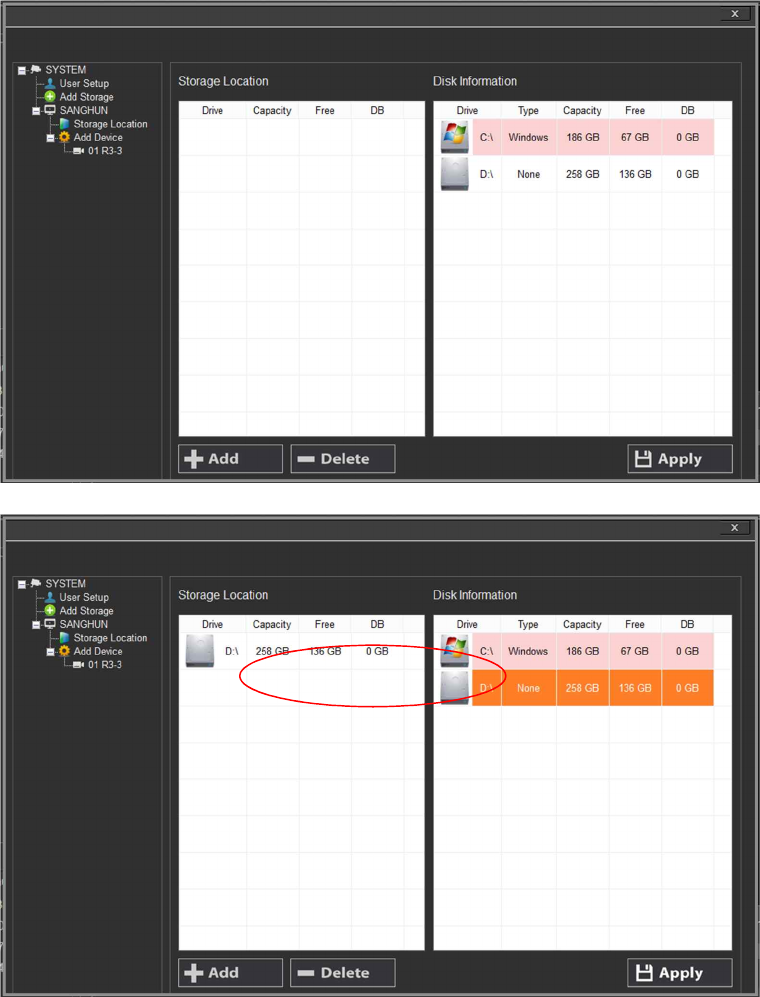
3. Storage location: set the storage location from the Disk information side and then click "add" button.
4. Selected storage will appear in the Storage Location.
Adding the Device
Within Storage find Add Device
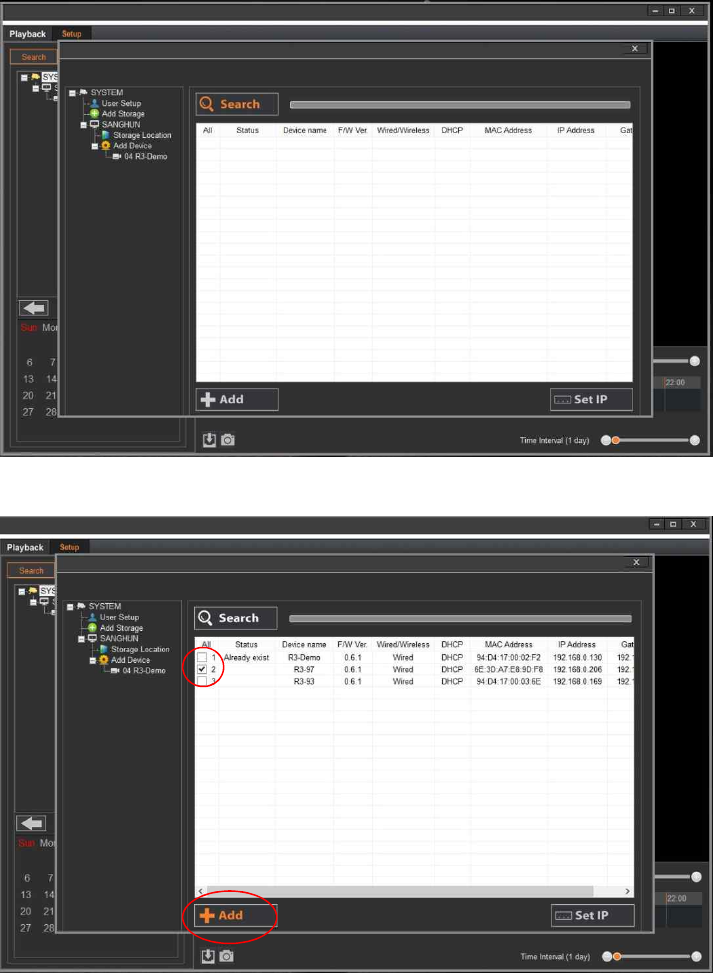
1. Click "search" button to find the connected device.
2. Check the box and click the “Add” button.
3. Verify the added device in the directory (under Add Device).
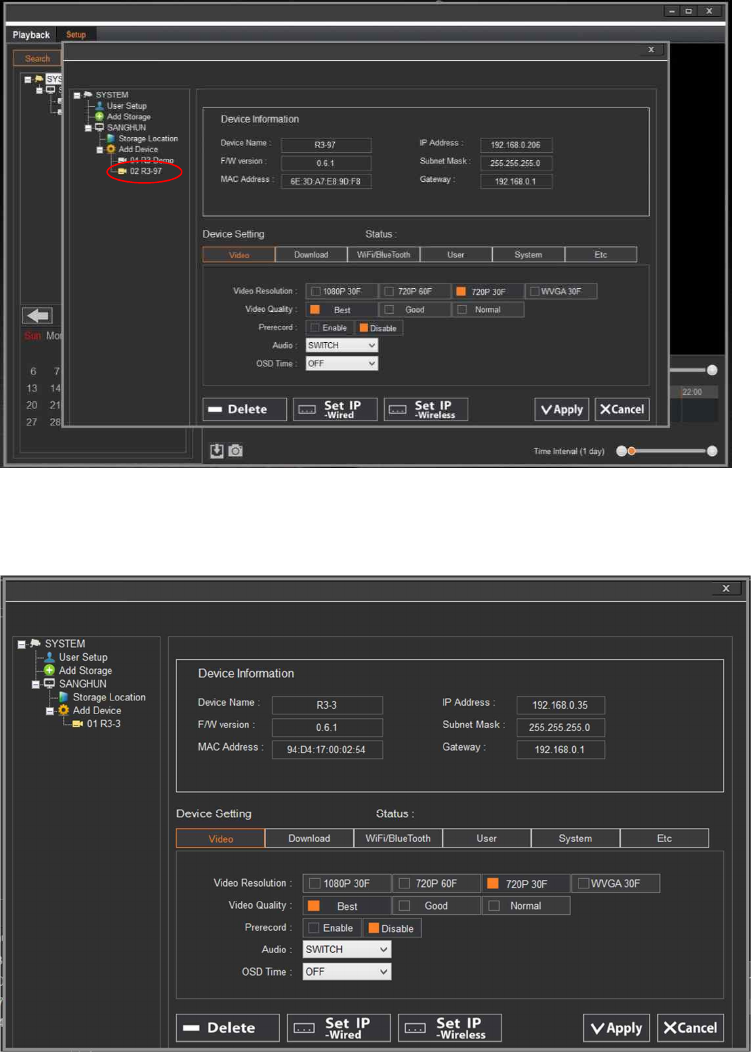
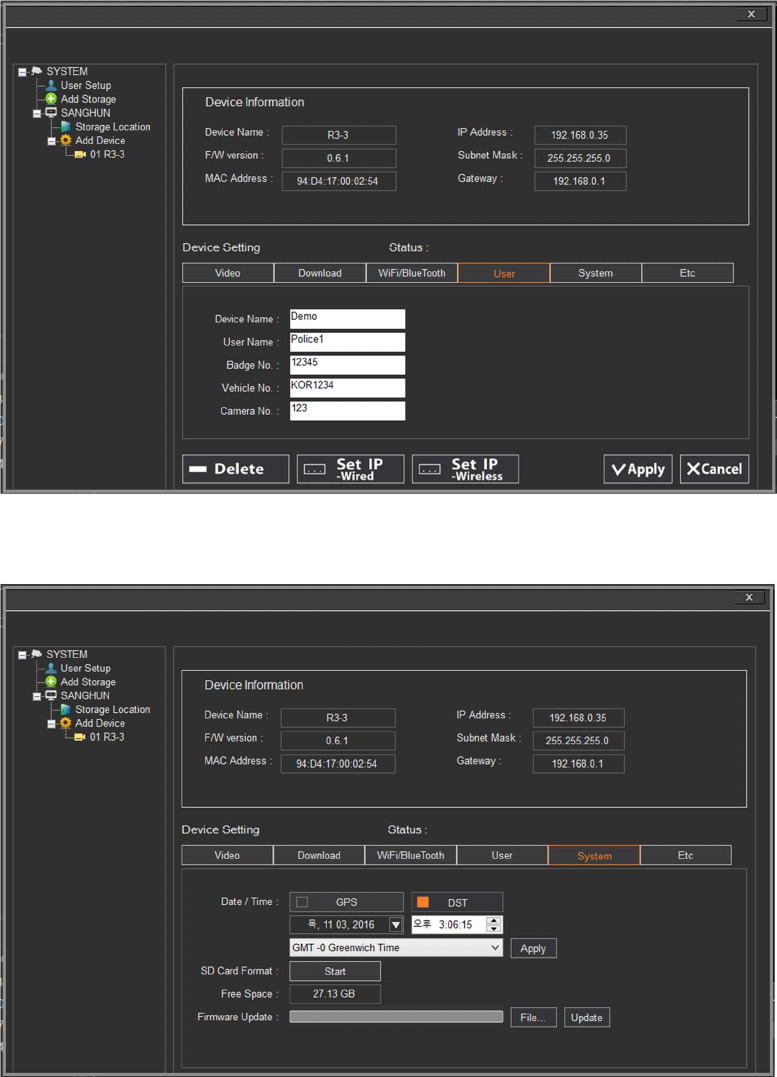
Device Setting (video, download, Wi-Fi and Bluetooth, system and etc)
1. Video: Resolution/Pre-record/Audio/OSD time.
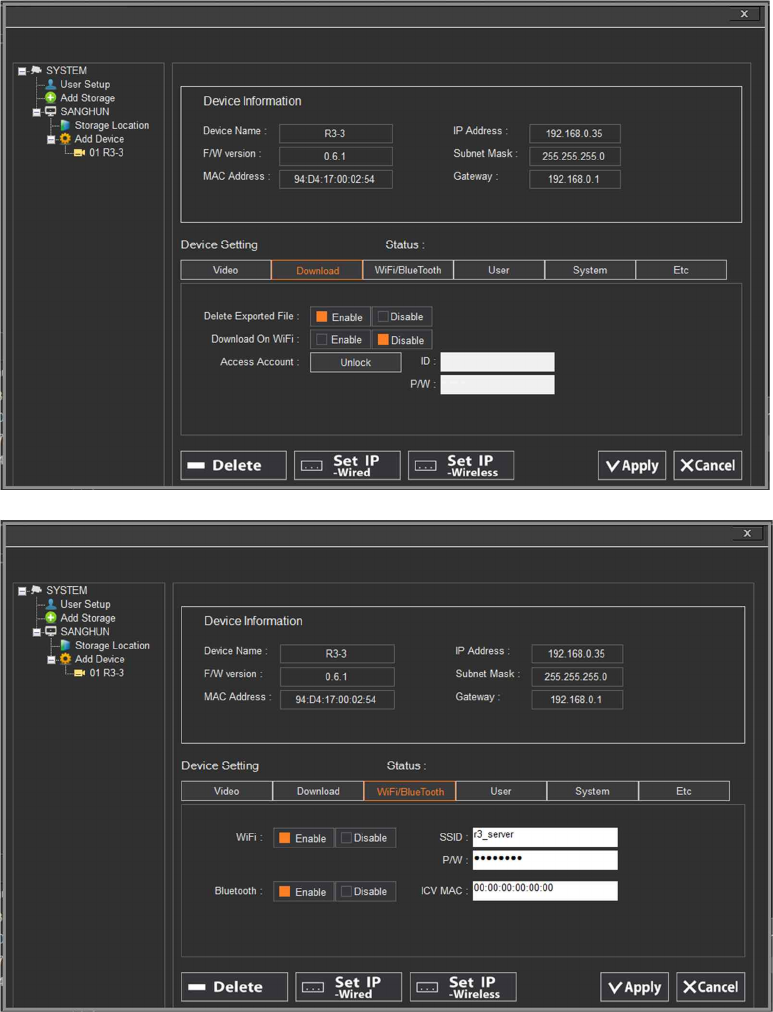
2. Download: Delete Exported File/ Download on Wi-Fi and Access Account.
3. Wi-Fi and Bluetooth. (This is only for integration with In-Car Video System)
4. User info.
5. System: Data and Time/SD Card Format/Free Space Check/Firmware Update.
DST (Day Light Saving Time)
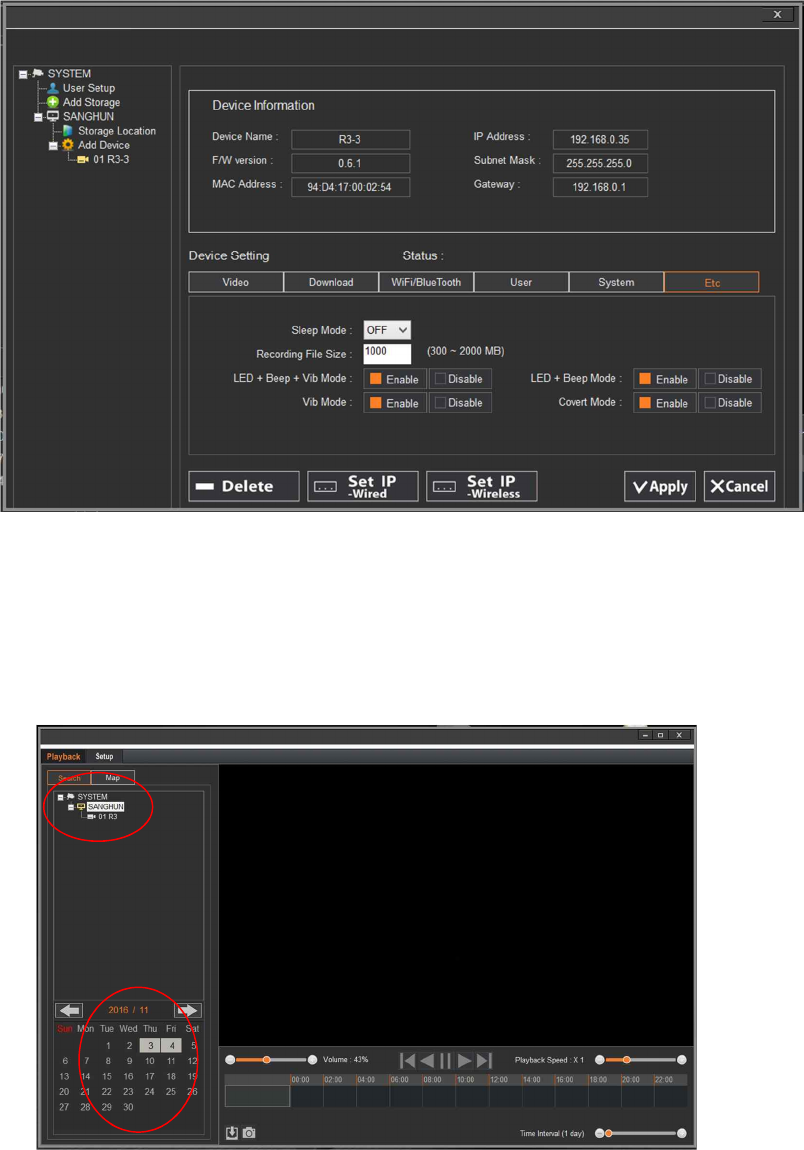
6. Etc: Sleep mode/File size/Beep and Vibration/LED brightness.
Playback
Within Playback the Search tab will be found.
1. Select the camera which you want to play.
2. Recorded files will be highlighted on the calendar.
3. Select any of the highlighted dates on the calendar. Will change to orange and the timeline will
become active.
4. Click the timeline or use the video playback buttons to view the recorded file.
- Play/Pause the video
- Stop the video
- First (move to the beginning of the video)
- Last (move to the end of the video)
** Play bar color:
Blue: Video recorded
Yellow: Audio recorded
Red: Audio muted
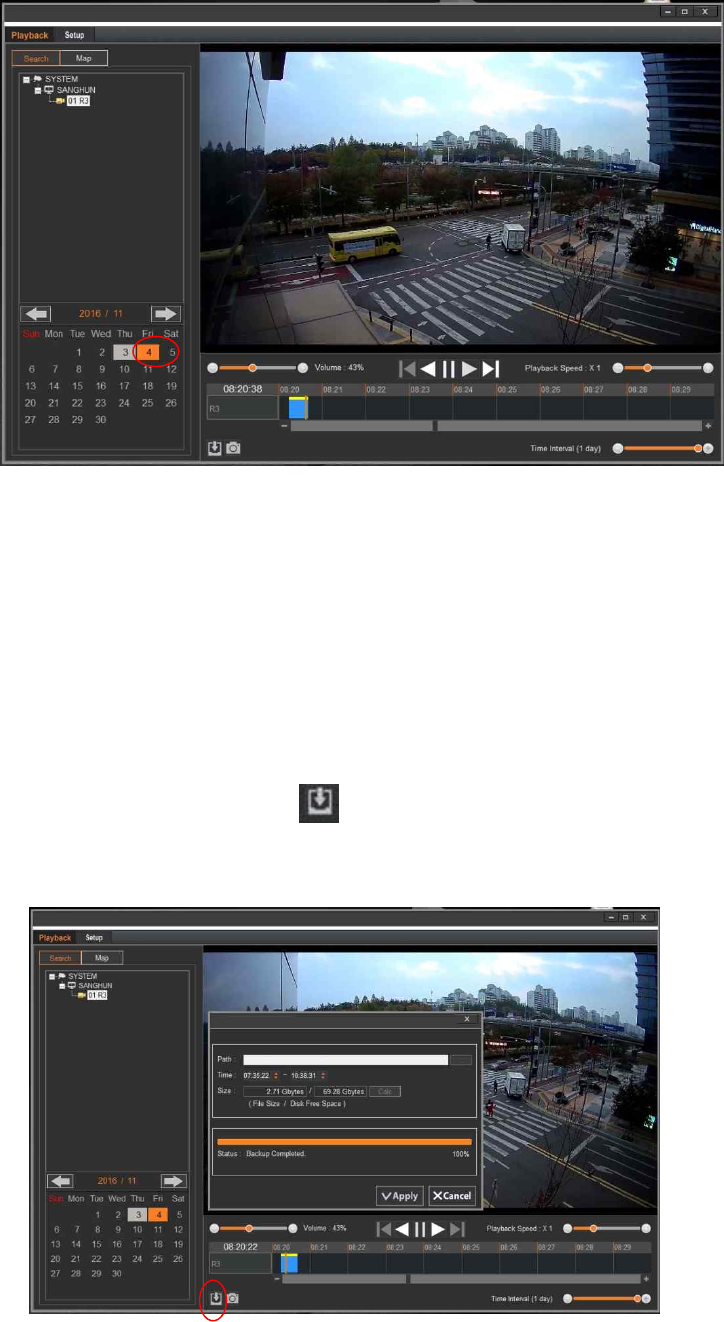
Download
Original files will be downloaded to the selected storage location; Rx_Data folder.
ex. C:\Rx_Data\94D417000250\RxDB
To save a video within a specific time range, click to open and configure the download settings.
Click “Calc” button, then click “Apply” button.
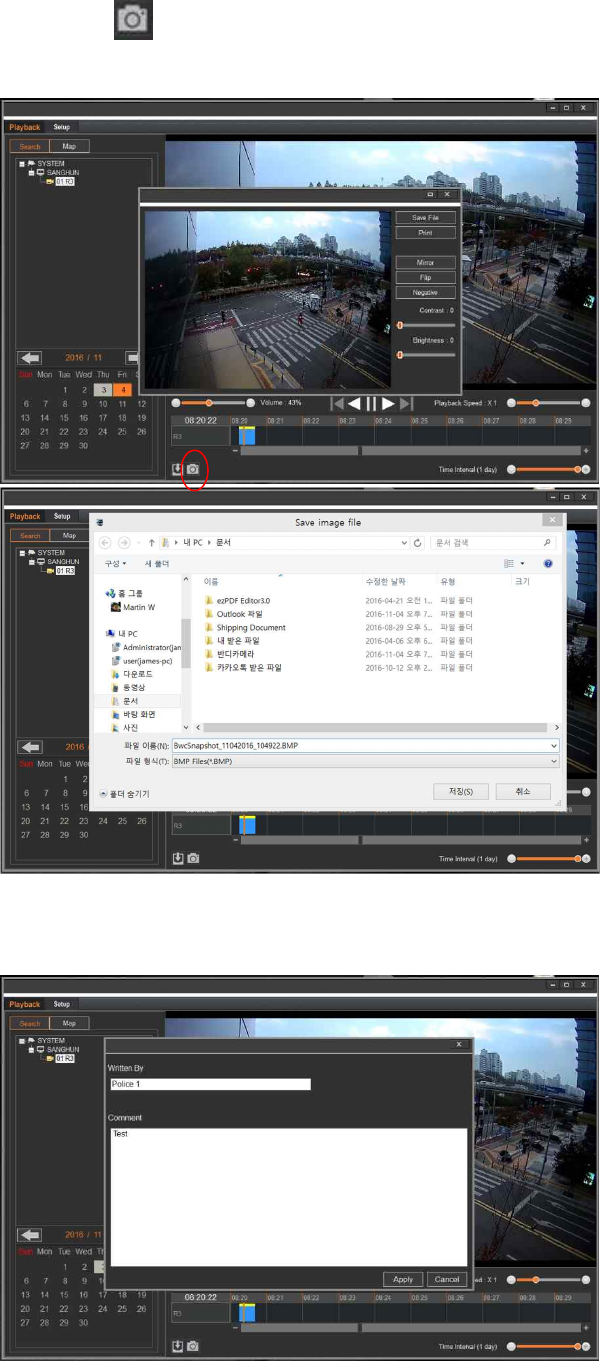
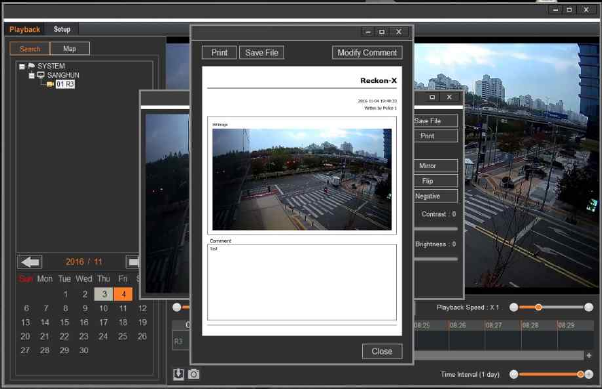
To capture an image, click to take a snapshot.
- Save File
- Print
7. FCC/IC compliance statement
FCC Compliance Statement
This device complies with part 15 of the FCC rules. Operation is subject to the following two
conditions: (1) This device may not cause harmful interference, and (2) this device must accept any
interference received, including interference that may cause undesired operation.
FCC Interference Statement
This equipment has been tested and found to comply with the limits for a Class B digital device,
pursuant to part 15 of the FCC Rules. These limits are designed to provide reasonable protection
against harmful interference in a residential installation. This equipment generates, uses and can
radiate radio frequency energy and, if not installed and used in accordance with the instructions,
may cause harmful interference to radio communications. However, there is no guarantee that
interference will not occur in a particular installation. If this equipment does cause harmful
interference to radio or television reception, which can be determined by turning the equipment
off and on, the user is encouraged to correct the interference by one of the following measures:
• Reorient or relocate the receiving antenna.
• Increase the separation between the equipment and receiver.
• Connect the equipment into an outlet on a circuit different from which the receiver is connected.
• Consult the dealer or an experienced radio/TV technician for help.
FCC Caution
Any changes or modifications not expressly approved by the party responsible for compliance could
void the user's authority to operate this equipment. This transmitter must not be co-located or
operating in conjunction with any other antenna or transmitter.
FCC Radiation Exposure Statement
To comply with FCC RF exposure compliance requirements, please use the supplied belt clips
provided by the manufacturer. This device must not be co-located or operation in conjunction with
any other antenna or transmitter except complying with FCC multi-transmitter requirements.
This equipment has been tested and found to comply with the limits for a Class B digital device,
pursuant to part 15 of the FCC Rules. These limits are designed to provide reasonable protection
against harmful interference in a residential installation.
Industry Canada Statement
This device complies with RSS-247 of the Industry Canada Rules. Operation is subject to the
following two conditions: (1) This device may not cause harmful interference, and (2) this device
must accept any interference received, including interference that may cause undesired operation.
Ce dispositif est conforme à la norme CNR-247 d’Industrie Canada applicable aux appareils radio
exempts de licence. Son fonctionnement est sujet aux deux conditions suivantes: (1) le dispositif ne
doit pas produire de brouillage préjudiciable, et (2) ce dispositif doit accepter tout brouillage reçu,
y compris un brouillage susceptible de provoquer un fonctionnement indésirable.
Industry Canada Radiation Exposure Statement
To comply with IC RF exposure compliance requirements, please use the supplied belt clips provided
by the manufacturer. This device must not be co-located or operation in conjunction with any other
antenna or transmitter except complying with IC multi-transmitter requirements.
Déclaration d’exposition aux radiations
Afin de se conformer avec ces exigences de conformite d'exposition, s'il vous plait utiliser les clips
de ceinture fournie fournies par le fabricant. Ce dispositif ne doit pas etre situe a proximite ou a
l'exploitation en conjunction avec une autre antenne ou emetteur, sauf conforme aux exigences IC
multi-emetteur.