GREAT WORLD GW6088 Electric Heater User Manual
GREAT WORLD LTD Electric Heater
UserManual.wiki
>
GREAT WORLD
>
GW6088 User Manual
User manual
Navigation menu
Upload a User Manual
Namespaces
Wiki Guide
HTML
PDF
Info
Views
User Manual
Discussion / Help
Navigation

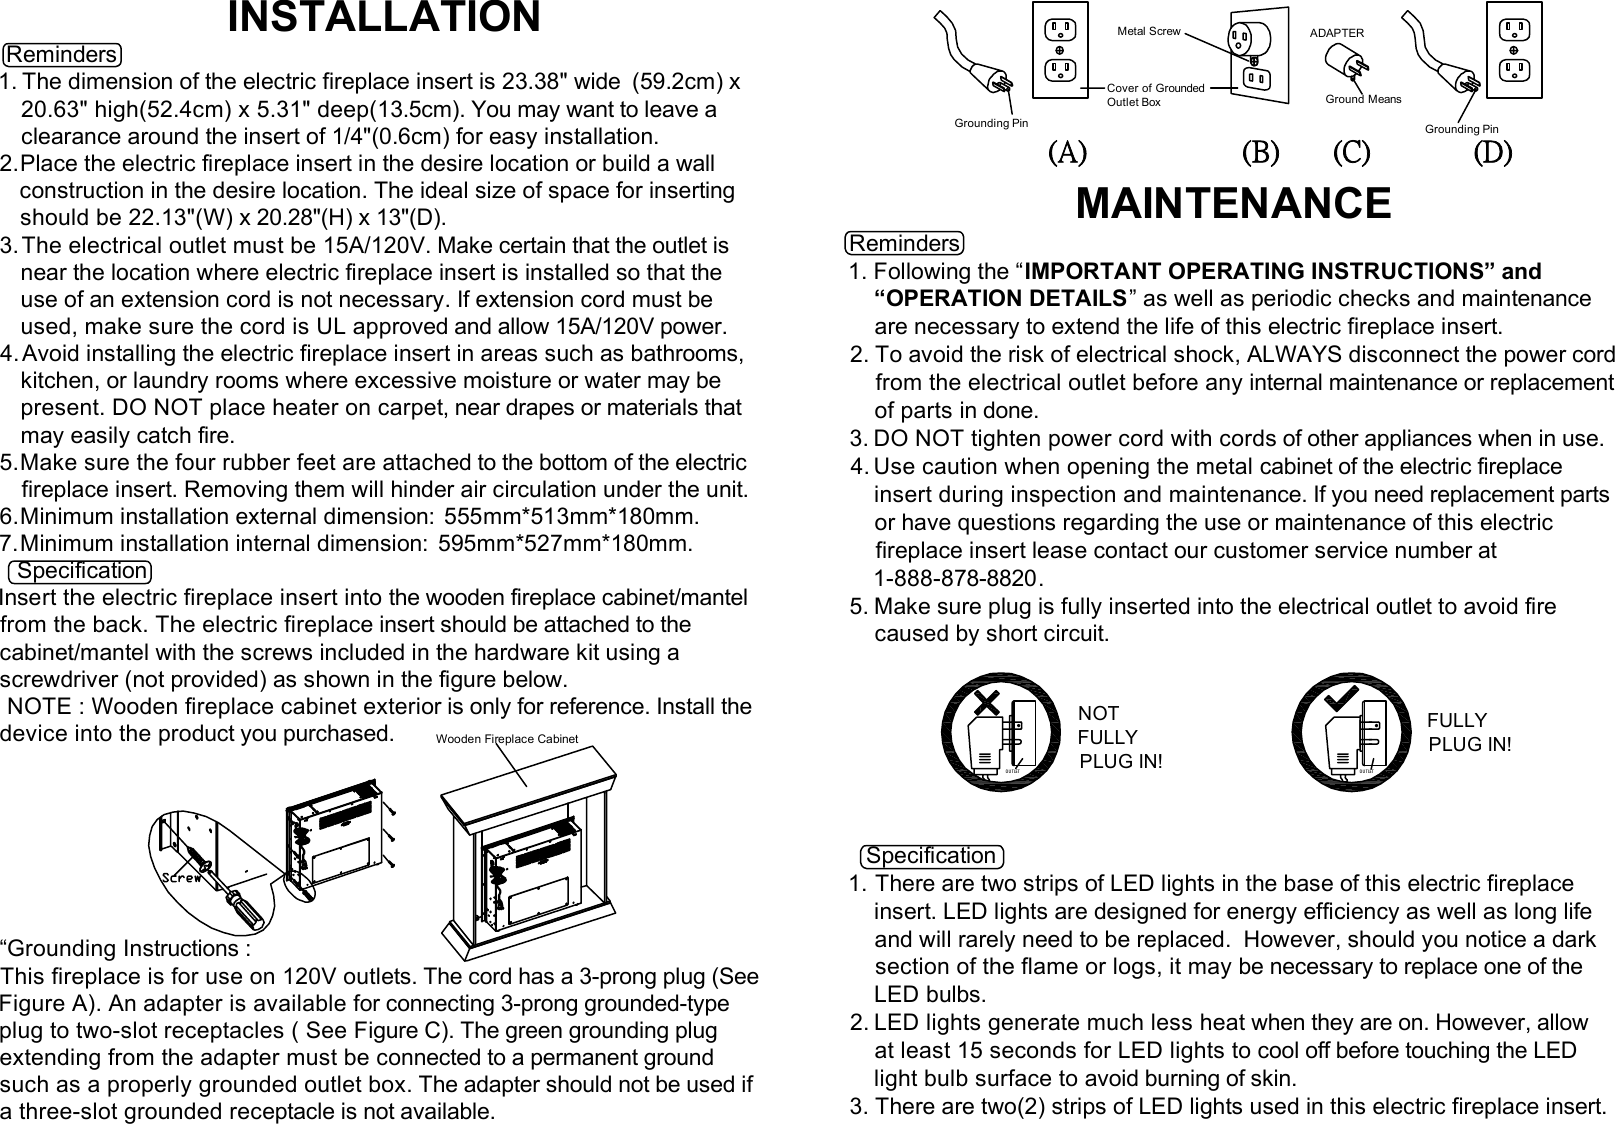
![Remote Control Battery InstallationRemote Control Function Remote Control Control PanelReminder: There are 2 indicators at the right side of control panel, whenthe heater has its initial use and heater function is set at the high level,both L and H indicators will light up; when the heater is set at the low level,only L indicator will light up. This model has thermostat function,when theenvironment temperature reaches the desired temperature, heater will shutdown automatically; however, the indicator will still light up to let usersknow the heater mode is still active, not the current heater working level.-There are six(6) buttons on the remote control and six(6) correspondingbuttons on the control panel of the electric fireplace insert.1. [POWER( or )] turns the electric fireplace insert either on or off.When the heater is off, press this button once to turn the heater on;press it again to turn the heater off.2.[DIMMER( or )] controls the brightness of flame and lo g, there are 5levels. When heater is turned on the first time, flame and log is at theirbrightest level. Press the button and the brightness of the logs will beginto change, from the brightest level to the weakest level. Thecorresponding digital display will blink , , , , for a period of time.If there is no other operation, digital display will go back to defaulttemperature setting and show environmental temperature.3.[HEATER( or )] controls the heating element. Press once, the heatReceiverLow heat level Indicator1. Pull out the battery holder fromthe bottom of the remote control.2. Place cell battery in the battery holderwith “+”(positive) mark face up tocorrespond the “+” mark on the batteryholder, then push it into the remotecontrol.3. Assembly complete.UPDOWNDigital Display is at the high level, H and L indicator will both light up; press again, the heat is at the low level, L indicator will light up; then press again, heat stops, and heating element is turned off, both H and L indicator are off.4. [TIMER( or )] is the timer setting button. Press once, the digitaldisplay will blink which indicate the time can be entered, so touch [UP]or [DOWN] button may increase or decrease the time in between 0-12hours.5. [UP( or )] increases the time and temperature. When the mode is attimer setting, press once, the digital display will increase by 0.5(half) hour. Long press this button, time will go up continuously. The options are between 0-12 hours; when the mode is at temperature setting, press once, temperature will increase by 1℉. Long press this button, temperature will go up continuously. The options are between 60℉-97℉.6. [DOWN( or )] decreases the time and temperature. When the mode is at timer setting, press once, the digital display will decrease by 0.5(half) hour. Long press this button, time will go down continuously. The options are between 12-0 hours; when the mode is at temperature setting, press once, temperature will decrease by 1 ℉. Long press this button, temperature will go down continuously. The options are between 97℉-60℉.7. [ ] indicates the Bluetooth connection is successfully paired if the indicator is on. Refer to the operation manual in the APP to continue. Other Important Features8. To protect the heater, the fan will continue turning for quite a few seconds after heater is shut down.9. When the [POWER] is firstly turned on, only the flame and log work; to have the heat to blow out, you have to press [HEATER]. Other than [POWER] button, all other operation button will function when the power is turned on.10. If the temperature inside of the electric fireplace insert becomes abnormally high, the temperature protection mechanism will turn on automatically and the heater will be shut down within a few seconds (fan will be stopped in around 15 seconds of retardation). Any operation are prohibited. Please remove the power cord from outlet and wait a few minutes for heater to cool down or till temperature protection mechanism reconnect, then plug in the power cord to resume the condition before the abnormality of the electric heater. Temperature setting and operationDOWNUPHigh heat level IndicatorBluetooth connection Indicator](https://usermanual.wiki/GREAT-WORLD/GW6088/User-Guide-3404964-Page-3.png)
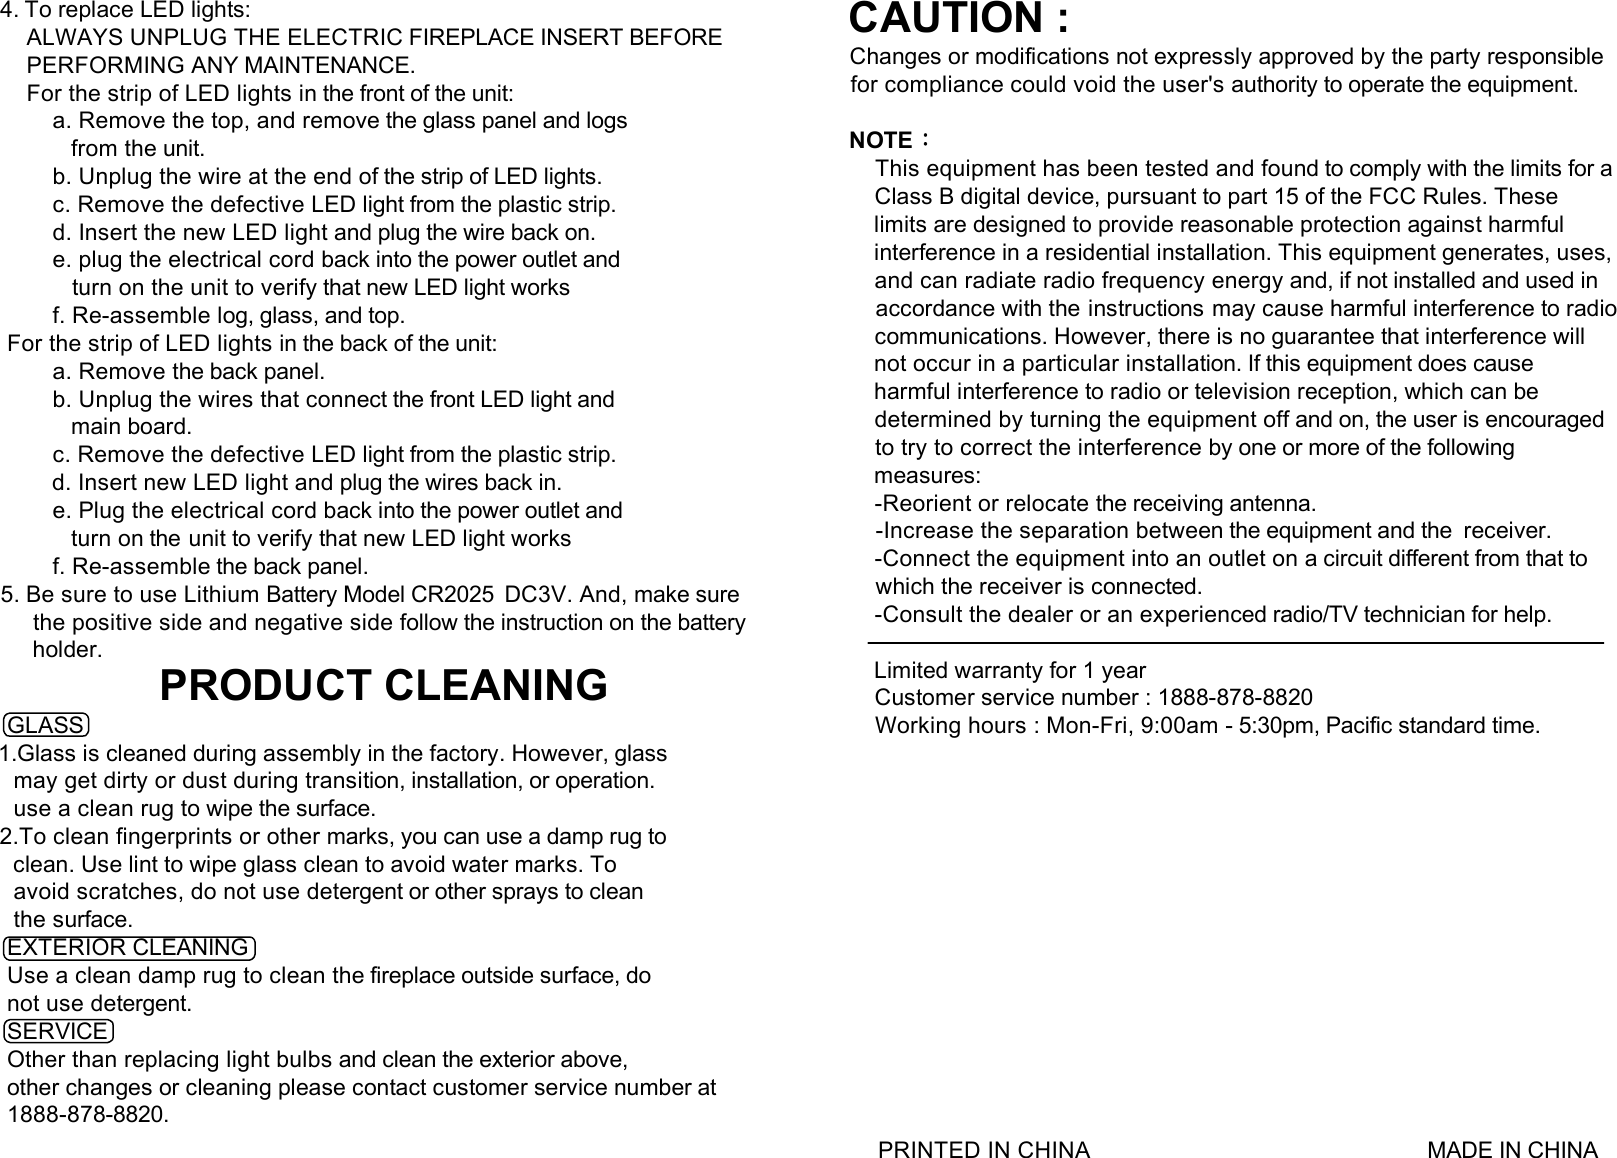
![Under the use of electric fireplace, touch [UP] or [DOWN], if the temperature shownon digital display is greater than the environmental temperature, heater will be turnedon, hot air will start blowing; if temperature shown on digital display is less than theenvironmental temperature, heater will not turn on, but fan will turn and blow cold airfor a while and then stop. Touch [UP] or [DOWN], the digital display will blink, desiredtemperature can be adjusted between 60-97 ℉, each time they are touched,temperature will increase or decrease by 1 ℉, temperature on the digital display willblink several seconds and stop, then desired temperature is automatically set. Longtouch [UP] or [DOWN] willcontinuously increase or decrease the temperature to reach your desiredtemperature faster. After turning on the electric fireplace by pressing [POWER], touching[HEATER], [UP], or [DOWN] will turn on the heater; however, when thedetector detects the environmental temperature is greater than or equal toyour desired temperature, heater will stop. When environmentaltemperature descend and is lower than the desired temperature, heater willstart working after a while, and it will not stop until the environmentaltemperature is reached desired temperature.IMPORTANTUnder the condition that the default setting of desired temperature is 77 ℉,there are 2 possibility:1. When the insert detects the environment temp. lower than 77 ℉, theheater will begin to work at high heat status automatically.2. When the insert detects the environment temp. higher than 77 ℉, theheater will first blow cold air for a few seconds, and then stop. a. If you want to let the heater to work, simply set the desired temp. from 77℉ to be higher than the environment temp(this will show on the display panel when the power is turned on). NOTE: Default setting of desired temperature is 77 ℉. If the environmentaltemperature is greater than 77℉, heater will not turn on, only cold air willblow; if the environmental temperature is less than 77 ℉, heater will turn onand start blowing hot air. REMINDER: When the environmental temperature is greater than 97 ℉,heater will stop immediately. Timer setting Under the condition when the electric fireplace is turned on, press[TIMER] to switch to timer setting mode. Time on digital display will blink.Press [UP] or [DOWN] to adjust the hour, which will be the time for heaterto work and heater will be automatically turned off beyond the hours youset. When the desired time is determined, the digital display will blink for afew seconds, then the time is automatically set. Long press [UP] or[DOWN], time will continuously to go up or down so that you may reachyour desired hour faster. To cancel timer, press [UP] or [DOWN] till the digital display show "0 .0H". REMINDER: a. When time reaches 10 hour, then press [UP], time increase by 1 hour from 10:00, 11:00, to 12:00. b. When time reaches 12 hour, then press [DOWN], time decrease by 1 hour from 12:00, 11:00, to 10:00. Display panel hibernate mode Under the status that the electric fireplace is turned on, if there isn't anyoperation in 12-15 seconds, any numbers or indication light shown ondigital display will all disappear. At this condition, touch any buttons(eitherthose on remote control or control panel), digital display will show up thecurrent environmental temperature. Children lock-Touch [UP] and [DOWN] buttons on the control panel at the same time formore than 2 seconds, the electric fireplace will be locked, preventingmisuse by children and interference by other remote controls of other homedevices. Also, the remote control function of this electric fireplace will alsobe locked. Digital display will show up "L" and blink 5 times before showingback to environmental temperature.-To unlock, again, touch [UP] and [DOWN] buttons on the control panel atthe same time for more than 2 seconds.-When children lock function is activated, display panel will show up "L"and blink, indicating the electric fireplace is locked.-When electric fireplace is locked, and display panel hibernates after 12seconds, if the electric fireplace is waken up by touching any button on thecontrol panel, display panel will show up "L" and blink 5 times beforeshowing back to environmental temperature.Attention1. When first used, the electric fireplace insert may emit a slight odor. Thisis normal and harmless and will go awayafter the first few uses.2. The outlet must be 120V / 60Hz / 15A.3. DO NOT touch the vent when heater is turned on.HeaterVentDo nottouch](https://usermanual.wiki/GREAT-WORLD/GW6088/User-Guide-3404964-Page-4.png)