GREAT WORLD GW6088 Electric Heater User Manual
GREAT WORLD LTD Electric Heater
User manual
VERSION: 23-FY17-V03
MODEL : GW-6078TBT
OPERATING MANUAL
CUSTOMER SERVICE NO
1-888-878-8820
IMPORTANT
OPERATING INSTRUCTIONS
When using this or any electrical device, precautions should always be
taken to reduce the risk of fire, electric shock, injury to persons, and/or
damage to property. Please study the following instructions carefully
PRIOR to using this device.
1. Read ALL instructions contained in this Operating Manual BEFORE
using this electric fireplace insert.
2. This electric fireplace insert is hot when in use. To avoid burns, never
allow bare skin to touch hot surfaces. Use handles (if provided) when
moving this electric fireplace insert. Keep all flammable / combustible
materials, including (but not limited to) furniture, pillows, bedding, papers,
clothes, and curtains a minimum of 3 feet (0.9m) from this electric fireplace
insert at all times.
3. Proper ventilation is required when operating this electric fireplace insert.
NEVER cover this device with anything which could restrict air circulation
to or from the unit.
4. To prevent a possible fire, DO NOT install or use this electric fireplace
insert directly on carpet, beds, or similar soft surfaces as this may block air
intakes, exhaust outlets or otherwise restrict air circulation beneath the
heater.
5. Extreme caution is necessary when this electric fireplace insert is used
by or near children or individuals with restricted mobility.
6. NEVER leave this electric fireplace insert unattended when in use.
7. Always unplug this electric fireplace insert when not in use. Turn off all
controls prior to removing the plug from the power source.
8. This electric fireplace insert is designed for indoor use only. NEVER use
this device outdoors.
9. Connect this electric fireplace insert only to properly grounded outlets.
10. Use caution and do not strike the glass on this electric fireplace insert.
11. NEVER use this device in bathrooms, laundry areas, or similar
locations where it may come into contact with water.
12. Avoid placing the power cord in high traffic areas where it could
become damaged or be a trip hazard.
13. DO NOT run the power cord under carpeting, furniture, or appliances.
14. NEVER cover the power cord with throw rugs, runners, or similar
coverings.
15. DO NOT operate this device with a damaged power cord or plug.
16. DO NOT operate this device if the cord becomes damaged,
Note: This fireplace can be controlled via Bluetooth using your Apple or
Android device. Visit the APP Store or Google Play and enter “S.W. Link”
in the search bar to download the APP.
Electric Heater

after the units malfunctions in any way, has been dropped, o r becomes
damaged in any manner. If this happens, discard the unit or return to an
authorized service facility to inspection and/or repair.
17. DO NOT insert or allow foreign objects to enter any ventilation or
exhaust opening as this may cause an electric shock, fire, or damage to
this electric fireplace insert.
18. This electric fireplace insert utilizes sparks and arcing in its internal
operation. NEVER use this device in areas where gasoline, paint, or other
flammable liquids are used or stored.
19. Always plug heaters directly into a wall outlet/receptacle. Never use
with an extension cord or relocatable power tap (outlet/power strip).
20. NEVER burn wood or other materials of any kind in this electric
fireplace insert.
21. Always use a licensed electrician for any maintenance to this device.
22. Always use properly grounded, fused, and polarized outlets.
23. Always use ground fault protection where required by local electrical
code.
24. Always disconnect the device from its power source before moving the
device or performing any cleaning or maintenance.
25. To avoid damage when transporting or storing this electric fireplace
insert, always keep both the insert and its power cord in a dry place and
free from excessive vibration.
26. Use this electric fireplace insert ONLY as described in this Operating
Manual. Using this device in a manner other than recommended by the
manufacturer may cause fire, electric shock, injury to persons, and/or
damage to property.
27. To reduce the risk of fire, do not store or use gasoline or other
flammable vapors and liquids in the vicinity of the heater.
28. To disconnect heater, turn controls to off, and turn off power to heater
circuit at main disconnect panel.
29. To prevent a possible fire, do not block air intakes or exhaust in any
manner.
30. Warn that the heater must be properly installed before it is used.
31. If the product is not used for a long period of time, please unplug the
power cord from wall outlet to assure safety .
SAVE THESE INSTRUCTIONS
OPERATION DETAILS
Reminders
1. Please make sure to read through “ IMPORTANT OPERATING
INSTRUCTIONS” above before operating this electric fireplace insert.
2. To avoid malfunction, please be certain that the input voltage of the
electric fireplace insert and the voltage of your outlet are identical
before plugging.
3. Check the unit for any damage that may exist (such as missing screw,
dents, etc) before using this device.
4. This product undergoes strict examination and testing before
packaging to insure that all parts are in good working condition.
Should any defect be noticed, call our customer service number at
1-888-878-8820.
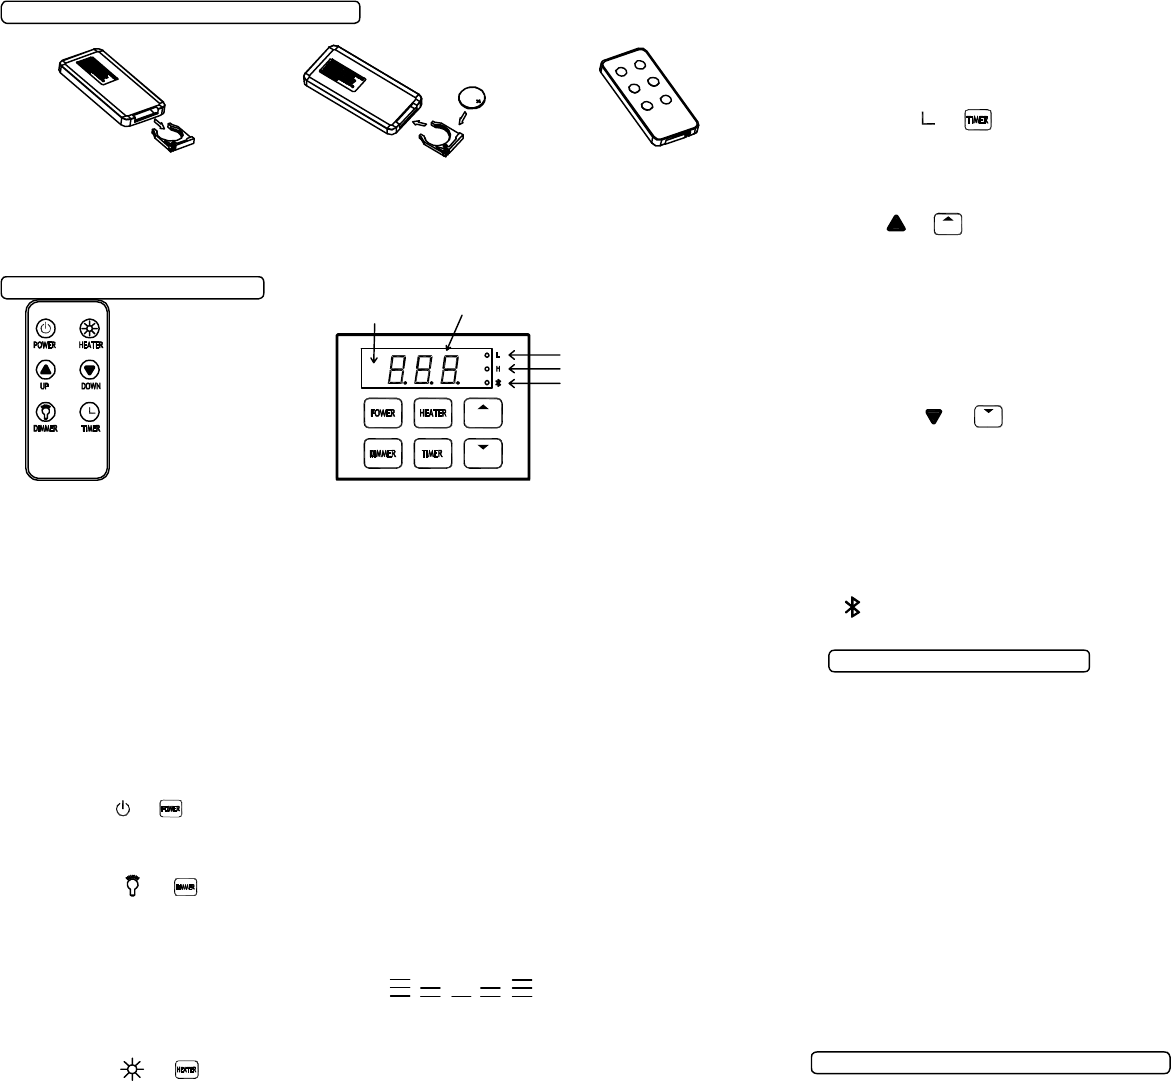
Remote Control Battery Installation
Remote Control Function
Remote Control Control Panel
Reminder: There are 2 indicators at the right side of control panel, when
the heater has its initial use and heater function is set at the high level,
both L and H indicators will light up; when the heater is set at the low level,
only L indicator will light up. This model has thermostat function,when the
environment temperature reaches the desired temperature, heater will shut
down automatically; however, the indicator will still light up to let users
know the heater mode is still active, not the current heater working level.
-There are six(6) buttons on the remote control and six(6) corresponding
buttons on the control panel of the electric fireplace insert.
1. [POWER( or )] turns the electric fireplace insert either on or off.
When the heater is off, press this button once to turn the heater on;
press it again to turn the heater off.
2.[DIMMER( or )] controls the brightness of flame and lo g, there are 5
levels. When heater is turned on the first time, flame and log is at their
brightest level. Press the button and the brightness of the logs will begin
to change, from the brightest level to the weakest level. The
corresponding digital display will blink , , , , for a period of time.
If there is no other operation, digital display will go back to default
temperature setting and show environmental temperature.
3.[HEATER( or )] controls the heating element. Press once, the heat
Receiver
Low heat level Indicator
1. Pull out the battery holder from
the bottom of the remote control.
2. Place cell battery in the battery holder
with “+”(positive) mark face up to
correspond the “+” mark on the battery
holder, then push it into the remote
control.
3. Assembly complete.
UP
DOWN
Digital Display
is at the high level, H and L indicator will both light up; press
again, the heat is at the low level, L indicator will light up; then
press again, heat stops, and heating element is turned off,
both H and L indicator are off.
4. [TIMER( or )] is the timer setting button. Press once, the digital
display will blink which indicate the time can be entered, so touch [UP]
or [DOWN] button may increase or decrease the time in between 0-12
hours.
5. [UP( or )] increases the time and temperature. When the mode is at
timer setting, press once, the digital display will increase by 0.5(half)
hour. Long press this button, time will go up continuously. The options
are between 0-12 hours; when the mode is at temperature setting, press
once, temperature will increase by 1℉. Long press this button,
temperature will go up continuously. The options are between
60℉-97℉.
6. [DOWN( or )] decreases the time and temperature. When the mode
is at timer setting, press once, the digital display will decrease by
0.5(half) hour. Long press this button, time will go down continuously.
The options are between 12-0 hours; when the mode is at temperature
setting, press once, temperature will decrease by 1 ℉. Long press this
button, temperature will go down continuously. The options are between
97℉-60℉.
7. [ ] indicates the Bluetooth connection is successfully paired if the
indicator is on. Refer to the operation manual in the APP to continue.
Other Important Features
8. To protect the heater, the fan will continue turning for quite a few
seconds after heater is shut down.
9. When the [POWER] is firstly turned on, only the flame and log work; to
have the heat to blow out, you have to press [HEATER]. Other than
[POWER] button, all other operation button will function when the power
is turned on.
10. If the temperature inside of the electric fireplace insert becomes
abnormally high, the temperature protection mechanism will turn on
automatically and the heater will be shut down within a few seconds (fan
will be stopped in around 15 seconds of retardation). Any operation are
prohibited. Please remove the power cord from outlet and wait a few
minutes for heater to cool down or till temperature protection mechanism
reconnect, then plug in the power cord to resume the condition before
the abnormality of the electric heater.
Temperature setting and operation
DOWN
UP
High heat level Indicator
Bluetooth connection Indicator
Under the use of electric fireplace, touch [UP] or [DOWN], if the temperature shown
on digital display is greater than the environmental temperature, heater will be turned
on, hot air will start blowing; if temperature shown on digital display is less than the
environmental temperature, heater will not turn on, but fan will turn and blow cold air
for a while and then stop. Touch [UP] or [DOWN], the digital display will blink, desired
temperature can be adjusted between 60-97 ℉, each time they are touched,
temperature will increase or decrease by 1 ℉, temperature on the digital display will
blink several seconds and stop, then desired temperature is automatically set. Long
touch [UP] or [DOWN] will
continuously increase or decrease the temperature to reach your desired
temperature faster.
After turning on the electric fireplace by pressing [POWER], touching
[HEATER], [UP], or [DOWN] will turn on the heater; however, when the
detector detects the environmental temperature is greater than or equal to
your desired temperature, heater will stop. When environmental
temperature descend and is lower than the desired temperature, heater will
start working after a while, and it will not stop until the environmental
temperature is reached desired temperature.
IMPORTANT
Under the condition that the default setting of desired temperature is 77 ℉,
there are 2 possibility:
1. When the insert detects the environment temp. lower than 77 ℉, the
heater will begin to work at high heat status automatically.
2. When the insert detects the environment temp. higher than 77 ℉, the
heater will first blow cold air for a few seconds, and then stop.
a. If you want to let the heater to work, simply set the desired temp.
from 77℉ to be higher than the environment temp(this will show on
the display panel when the power is turned on).
NOTE: Default setting of desired temperature is 77 ℉. If the environmental
temperature is greater than 77℉, heater will not turn on, only cold air will
blow; if the environmental temperature is less than 77 ℉, heater will turn on
and start blowing hot air.
REMINDER: When the environmental temperature is greater than 97 ℉,
heater will stop immediately.
Timer setting
Under the condition when the electric fireplace is turned on, press
[TIMER] to switch to timer setting mode. Time on digital display will blink.
Press [UP] or [DOWN] to adjust the hour, which will be the time for heater
to work and heater will be automatically turned off beyond the hours you
set. When the desired time is determined, the digital display will blink for a
few seconds, then the time is automatically set. Long press [UP] or
[DOWN], time will continuously to go up or down so that you may reach
your desired hour faster.
To cancel timer, press [UP] or [DOWN] till the digital display show "0 .0H".
REMINDER:
a. When time reaches 10 hour, then press [UP], time increase by 1 hour
from 10:00, 11:00, to 12:00.
b. When time reaches 12 hour, then press [DOWN], time
decrease by 1 hour from 12:00, 11:00, to 10:00.
Display panel hibernate mode
Under the status that the electric fireplace is turned on, if there isn't any
operation in 12-15 seconds, any numbers or indication light shown on
digital display will all disappear. At this condition, touch any buttons(either
those on remote control or control panel), digital display will show up the
current environmental temperature.
Children lock
-Touch [UP] and [DOWN] buttons on the control panel at the same time for
more than 2 seconds, the electric fireplace will be locked, preventing
misuse by children and interference by other remote controls of other home
devices. Also, the remote control function of this electric fireplace will also
be locked. Digital display will show up "L" and blink 5 times before showing
back to environmental temperature.
-To unlock, again, touch [UP] and [DOWN] buttons on the control panel at
the same time for more than 2 seconds.
-When children lock function is activated, display panel will show up "L"
and blink, indicating the electric fireplace is locked.
-When electric fireplace is locked, and display panel hibernates after 12
seconds, if the electric fireplace is waken up by touching any button on the
control panel, display panel will show up "L" and blink 5 times before
showing back to environmental temperature.
Attention
1. When first used, the electric fireplace insert may emit a slight odor. This
is normal and harmless and will go away
after the first few uses.
2. The outlet must be
120V / 60Hz / 15A.
3. DO NOT touch the vent
when heater is turned on.
Heater
Vent
Do not
touch
INSTALLATION
Reminders
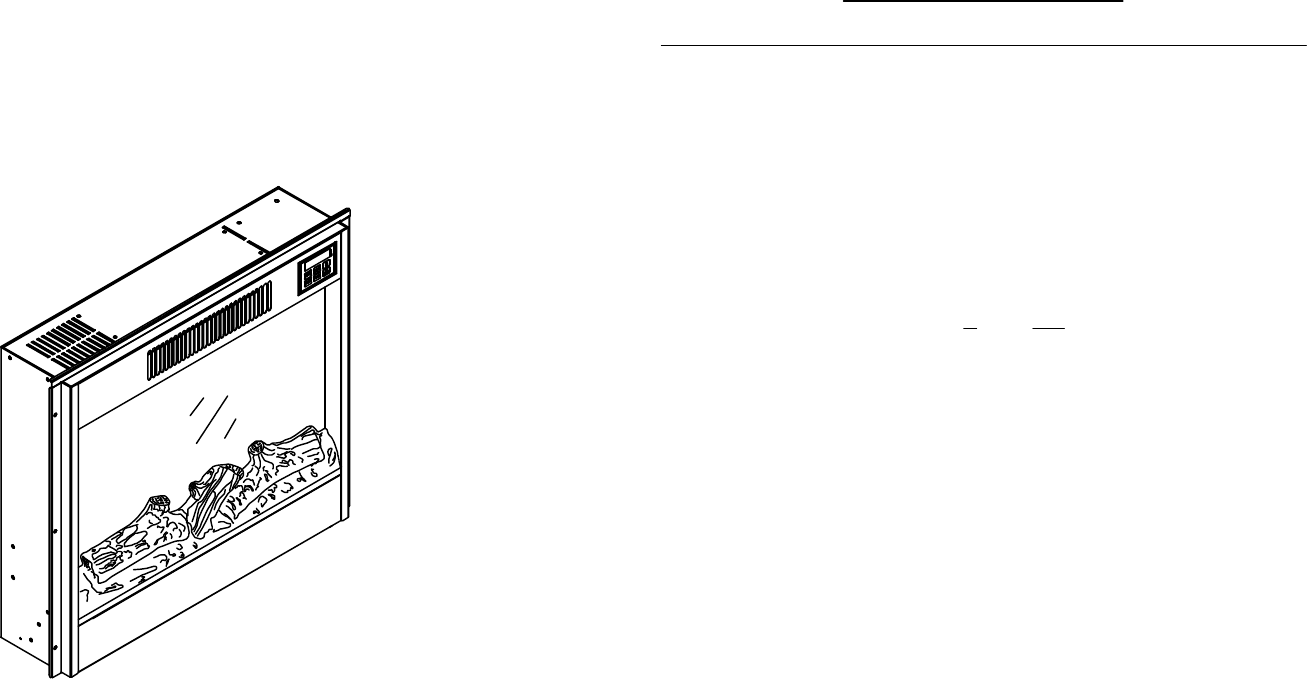
1. The dimension of the electric fireplace insert is 23.38" wide (59.2cm) x
20.63" high(52.4cm) x 5.31" deep(13.5cm). You may want to leave a
clearance around the insert of 1/4"(0.6cm) for easy installation.
2.Place the electric fireplace insert in the desire location or build a wall
construction in the desire location. The ideal size of space for inserting
should be 22.13"(W) x 20.28"(H) x 13"(D).
3. The electrical outlet must be 15A/120V. Make certain that the outlet is
near the location where electric fireplace insert is installed so that the
use of an extension cord is not necessary. If extension cord must be
used, make sure the cord is UL approved and allow 15A/120V power.
4. Avoid installing the electric fireplace insert in areas such as bathrooms,
kitchen, or laundry rooms where excessive moisture or water may be
present. DO NOT place heater on carpet, near drapes or materials that
may easily catch fire.
5.Make sure the four rubber feet are attached to the bottom of the electric
fireplace insert. Removing them will hinder air circulation under the unit.
6.Minimum installation external dimension: 555mm*513mm*180mm.
7.Minimum installation internal dimension: 595mm*527mm*180mm.
Specification
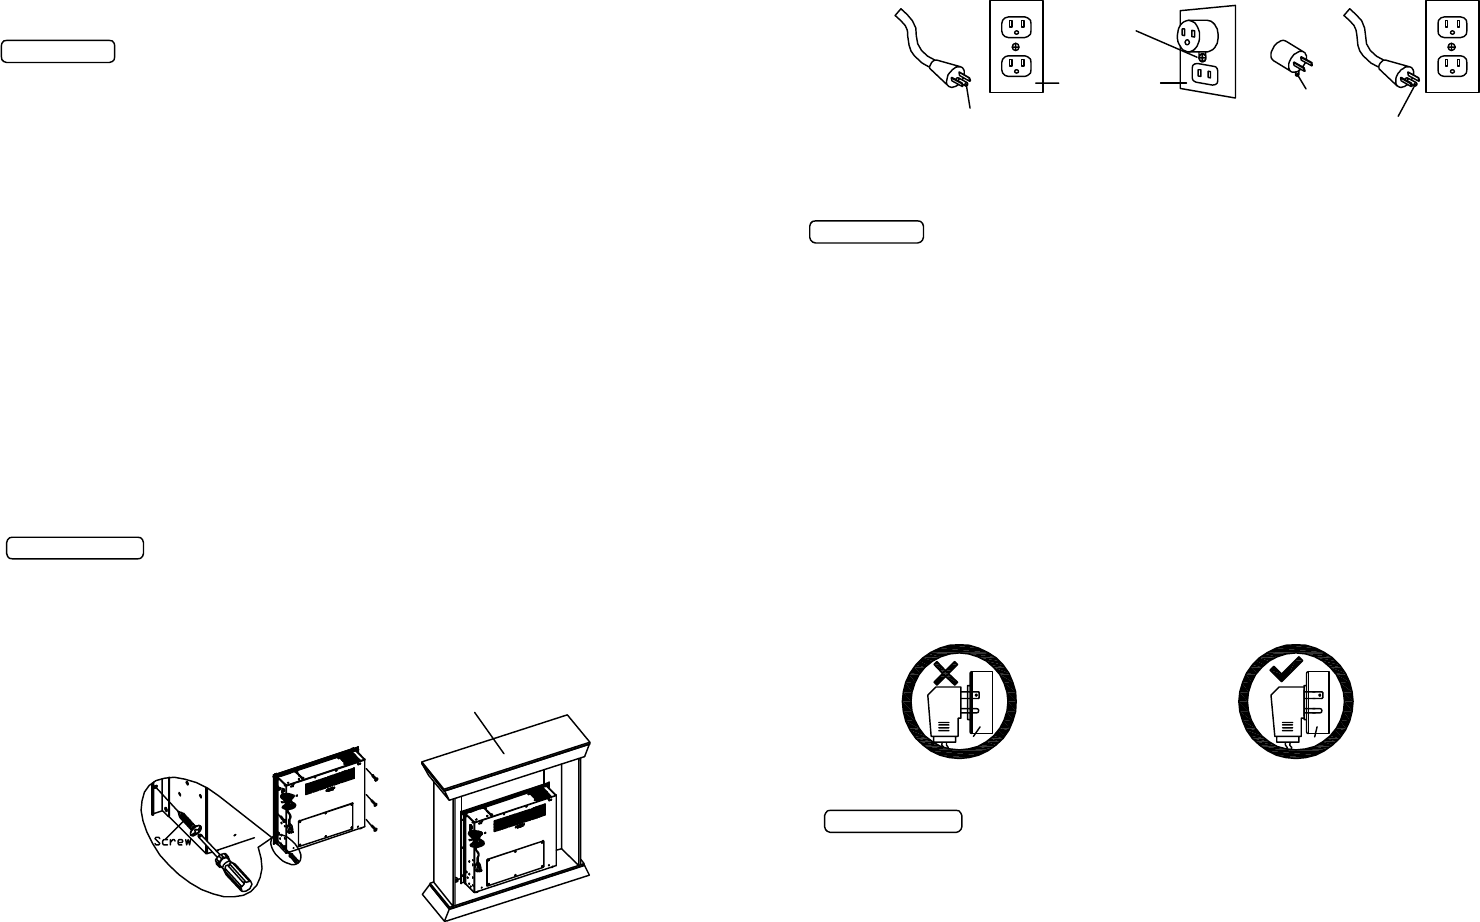
Insert the electric fireplace insert into the wooden fireplace cabinet/mantel
from the back. The electric fireplace insert should be attached to the
cabinet/mantel with the screws included in the hardware kit using a
screwdriver (not provided) as shown in the figure below.
NOTE : Wooden fireplace cabinet exterior is only for reference. Install the
device into the product you purchased.
“Grounding Instructions :
This fireplace is for use on 120V outlets. The cord has a 3-prong plug (See
Figure A). An adapter is available for connecting 3-prong grounded-type
plug to two-slot receptacles ( See Figure C). The green grounding plug
extending from the adapter must be connected to a permanent ground
such as a properly grounded outlet box. The adapter should not be used if
a three-slot grounded receptacle is not available.
MAINTENANCE
Reminders
1. Following the “IMPORTANT OPERATING INSTRUCTIONS” and
“OPERATION DETAILS” as well as periodic checks and maintenance
are necessary to extend the life of this electric fireplace insert.
2. To avoid the risk of electrical shock, ALWAYS disconnect the power cord
from the electrical outlet before any internal maintenance or replacement
of parts in done.
3. DO NOT tighten power cord with cords of other appliances when in use.
4. Use caution when opening the metal cabinet of the electric fireplace
insert during inspection and maintenance. If you need replacement parts
or have questions regarding the use or maintenance of this electric
fireplace insert lease contact our customer service number at
1-888-878-8820.
5. Make sure plug is fully inserted into the electrical outlet to avoid fire
caused by short circuit.
Specification
1. There are two strips of LED lights in the base of this electric fireplace
insert. LED lights are designed for energy efficiency as well as long life
and will rarely need to be replaced. However, should you notice a dark
section of the flame or logs, it may be necessary to replace one of the
LED bulbs.
2. LED lights generate much less heat when they are on. However, allow
at least 15 seconds for LED lights to cool off before touching the LED
light bulb surface to avoid burning of skin.
3. There are two(2) strips of LED lights used in this electric fireplace insert.
Ground Means
Cover of Grounded
Outlet Box
Metal Screw
Grounding Pin
(A)
Grounding Pin
(B) (C) (D)
ADAPTER
OU TLET OUTLET
NOT
FULLY
PLUG IN!
FULLY
PLUG IN!
Wooden Fireplace Cabinet

4. To replace LED lights:
ALWAYS UNPLUG THE ELECTRIC FIREPLACE INSERT BEFORE
PERFORMING ANY MAINTENANCE.
For the strip of LED lights in the front of the unit:
a. Remove the top, and remove the glass panel and logs
from the unit.
b. Unplug the wire at the end of the strip of LED lights.
c. Remove the defective LED light from the plastic strip.
d. Insert the new LED light and plug the wire back on.
e. plug the electrical cord back into the power outlet and
turn on the unit to verify that new LED light works
f. Re-assemble log, glass, and top.
For the strip of LED lights in the back of the unit:
a. Remove the back panel.
b. Unplug the wires that connect the front LED light and
main board.
c. Remove the defective LED light from the plastic strip.
d. Insert new LED light and plug the wires back in.
e. Plug the electrical cord back into the power outlet and
turn on the unit to verify that new LED light works
f. Re-assemble the back panel.
5. Be sure to use Lithium Battery Model CR2025 DC3V. And, make sure
the positive side and negative side follow the instruction on the battery
holder.
PRODUCT CLEANING
GLASS
1.Glass is cleaned during assembly in the factory. However, glass
may get dirty or dust during transition, installation, or operation.
use a clean rug to wipe the surface.
2.To clean fingerprints or other marks, you can use a damp rug to
clean. Use lint to wipe glass clean to avoid water marks. To
avoid scratches, do not use detergent or other sprays to clean
the surface.
EXTERIOR CLEANING
Use a clean damp rug to clean the fireplace outside surface, do
not use detergent.
SERVICE
Other than replacing light bulbs and clean the exterior above,
other changes or cleaning please contact customer service number at
1888-878-8820.
PRINTED IN CHINA MADE IN CHINA
CAUTION :
Changes or modifications not expressly approved by the party responsible
for compliance could void the user's authority to operate the equipment.
NOTE:
This equipment has been tested and found to comply with the limits for a
Class B digital device, pursuant to part 15 of the FCC Rules. These
limits are designed to provide reasonable protection against harmful
interference in a residential installation. This equipment generates, uses,
and can radiate radio frequency energy and, if not installed and used in
accordance with the instructions may cause harmful interference to radio
communications. However, there is no guarantee that interference will
not occur in a particular installation. If this equipment does cause
harmful interference to radio or television reception, which can be
determined by turning the equipment off and on, the user is encouraged
to try to correct the interference by one or more of the following
measures:
-Reorient or relocate the receiving antenna.
-Increase the separation between the equipment and the receiver.
-Connect the equipment into an outlet on a circuit different from that to
which the receiver is connected.
-Consult the dealer or an experienced radio/TV technician for help.
Limited warranty for 1 year
Customer service number : 1888-878-8820
Working hours : Mon-Fri, 9:00am - 5:30pm, Pacific standard time.
This device complies with Part 15 of the FCC Rules. Operation is subject to the following two
conditions: (1) this device may not cause harmful interference, and (2) this device must accept any
interference received, including interference that may cause undesired operation.
Changes or modifications not expressly approved by the party responsible for compliance could
void the user's authority to operate the equipment.
NOTE: This equipment has been tested and found to comply with the limits for a Class B digital
device, pursuant to Part 15 of the FCC Rules. These limits are designed to provide reasonable
protection against harmful interference in a residential installation. This equipment generates, uses
instructions, may cause harmful interference to radio communications. However, there is no
guarantee that interference will not occur in a particular installation. If this equipment does cause
harmful interference to radio or television reception, which can be determined by turning the
equipment off and on, the user is encouraged to try to correct the interference by one or more of
the following measures:
-- Reorient or relocate the receiving antenna.
-- Increase the separation between the equipment and receiver.
-- Connect the equipment into an outlet on a circuit different from that to which the receiver is
connected.
-- Consult the dealer or an experienced radio/TV technician for help.