GSL Solutions ICABR01 INTCV01 User Manual part 2 of 2
GSL Solutions, Inc. INTCV01 part 2 of 2
UserManual.wiki
>
GSL Solutions
>
ICABR01 User Manual
>
User Manual part 2 of 2
Contents
1.
User Manual part 1 of 2
2.
User Manual part 2 of 2
User Manual part 2 of 2
Navigation menu
Upload a User Manual
Namespaces
Wiki Guide
HTML
PDF
Info
Views
User Manual
Discussion / Help
Navigation
![INTELLICAB USER MANUAL GSL-ISUM-02.0-RETAIL October 2011 © 2011 GSL Solutions, Inc. Page 57 of 103 CHAPTER 8. GENERATE A REPORT - REPORTS [ F10 ] 8.1. Report Types. The System makes it possible to generate a wide variety of reports. Stored information can be sorted based on Patient Name, Location, Aging Status, Partially Delivered orders, etc. 8.2. Report by Patient Name. This report provides the user with a list of all active locations sorted alphabetically by last name. The Patient Report should be printed each night at closing. In the event the IntelliSys system is down, the printed Patient Report may be used for manual search and retrieval of prescriptions until the system is back up. 8.3. Report by Location. This report provides the user with a list of all active locations sorted by the location in numeric order. 8.4. RX Aging Report. Provides the user with a list of all active locations sorted by age of prescription (date scanned into the system). 8.5. Report by Drug. This report provides a list of drugs in the IntelliSys system. 8.6. Volume Summary. Gives a count of total prescriptions processed. The report can be broken down monthly, daily, and hourly. This report is useful to generate work counts. 8.7. Volume by Operator. This report is similar to volume summary, but it further breaks down the data to individual users. 8.8. History. A simplified version of the History [F7] tab. The user is able to export the history report to a Microsoft® Excel spreadsheet or print directly to a printer. 8.9. Partially Delivered Orders. Provides the user with a list of active prescriptions which were partially delivered such as a “Temporarily Out of Stock” (TOS). 8.10. HIPAA Notices. Provides a list of HIPAA Notices delivered to patients and HIPAA Notices signed by patients.](https://usermanual.wiki/GSL-Solutions/ICABR01.User-Manual-part-2-of-2/User-Guide-1636885-Page-1.png)
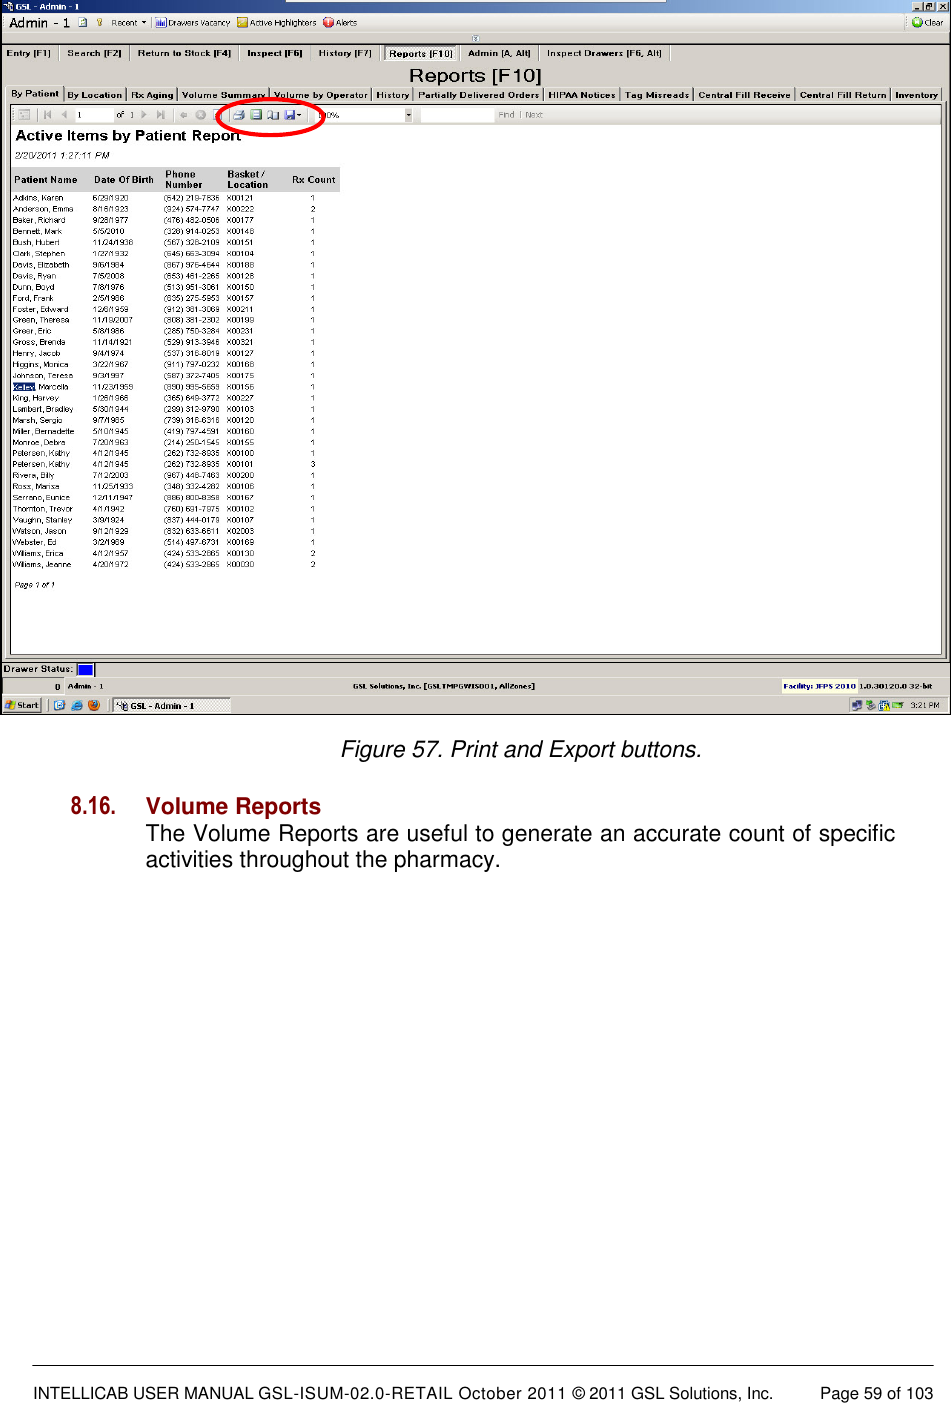
![INTELLICAB USER MANUAL GSL-ISUM-02.0-RETAIL October 2011 © 2011 GSL Solutions, Inc. Page 58 of 103 8.11. Tag Misreads. Gives a report of the general health of a drawer. GSL personnel may ask a user to look at this report if the pharmacy is having issues with a drawer. 8.12. Central Fill Receive. Provides information about prescriptions received from a central fill facility. 8.13. Central Fill Return. This report shows prescriptions returned to the central fill facility. 8.14. Inventory. Provides information about current inventory in the GSL system. 8.15. Steps to Generate a Report. Use your badge to identify yourself and access the database. Press the Reports tab or [F10] button to access the Reports screen. To print a report, select your print preferences from the menu bar, such as zoom, page width, etc., and then send your report to the printer or to a file (Figure 57). You can select a specific printer or print layout, page setup, or export the report to a Microsoft® Excel spreadsheet or to an Acrobat® PDF file.](https://usermanual.wiki/GSL-Solutions/ICABR01.User-Manual-part-2-of-2/User-Guide-1636885-Page-2.png)
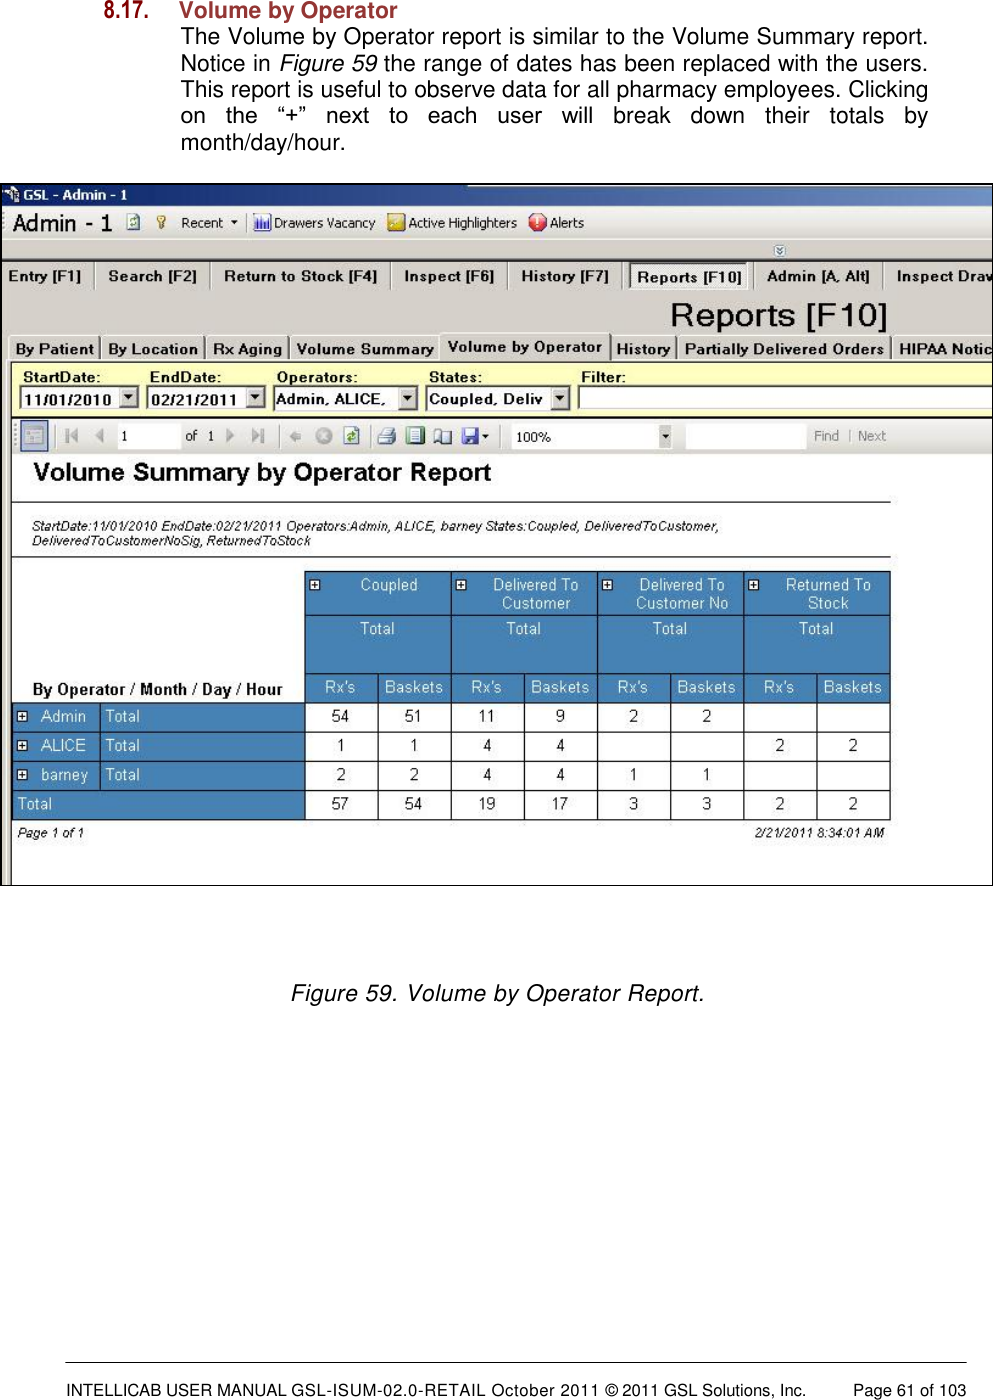
![INTELLICAB USER MANUAL GSL-ISUM-02.0-RETAIL October 2011 © 2011 GSL Solutions, Inc. Page 60 of 103 Figure 58. Volume Summary Report. Use the StartDate and EndDate boxes to set the date range of the report (Figure 58). To further breakdown each month into daily totals, click the small “+” next to the corresponding month. Daily totals can also be broken down hourly by again clicking the small “+.” The small ”+” across the top of the report will break the data down to each specific pharmacy, if multiple pharmacies are associated with the IntelliSys server. Site totals can be further broken down to specific workstations and coupling stations. To view data specific to a user(s), check their name in the Operators drop down box. The data contained along X axis is selectable in the States drop down box. For more info on the filter bar, see section 7.1 in the History [F7] section.](https://usermanual.wiki/GSL-Solutions/ICABR01.User-Manual-part-2-of-2/User-Guide-1636885-Page-4.png)
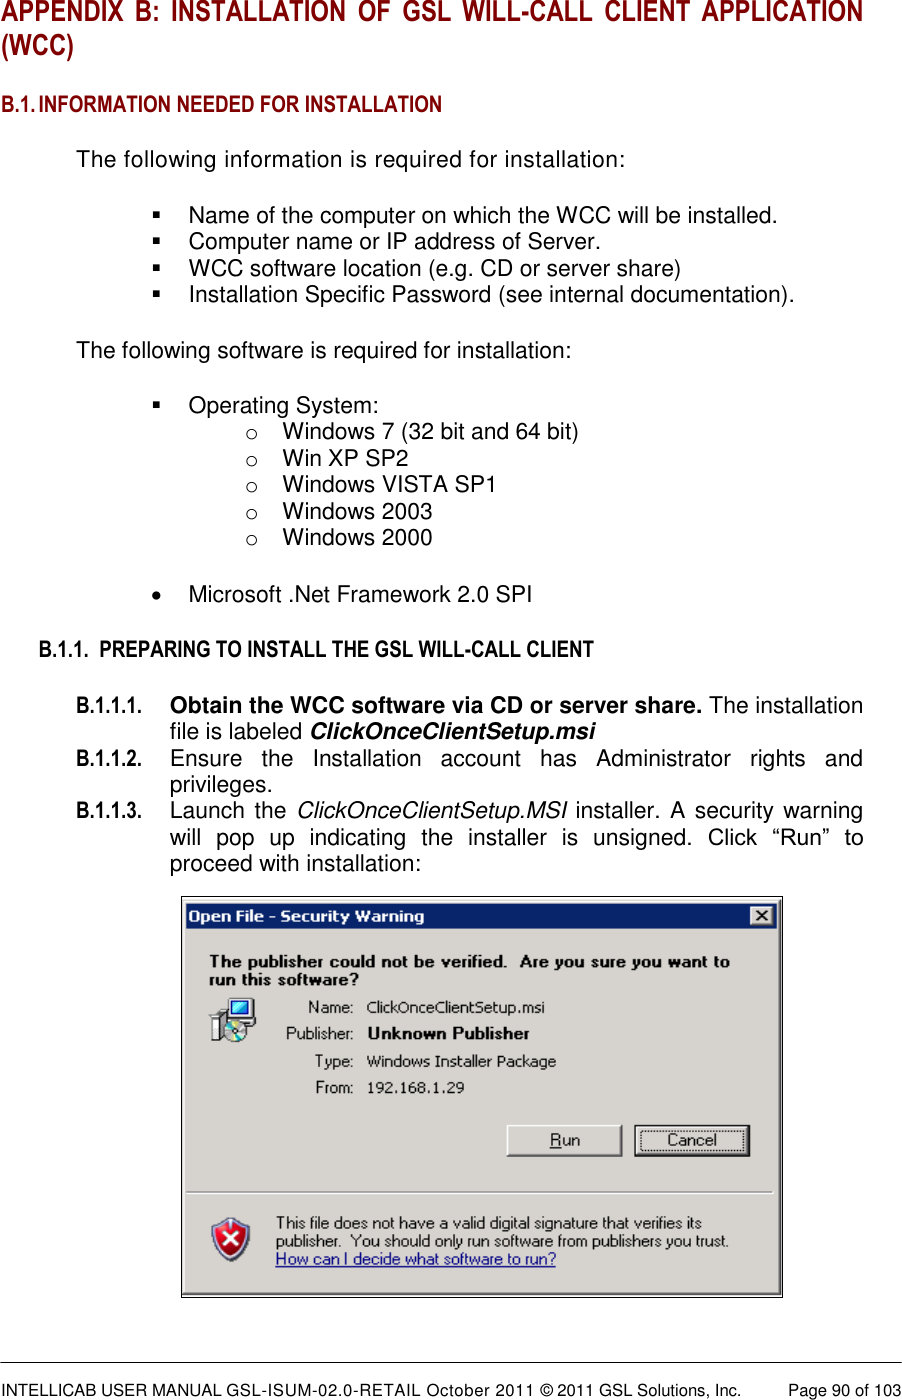
![INTELLICAB USER MANUAL GSL-ISUM-02.0-RETAIL October 2011 © 2011 GSL Solutions, Inc. Page 62 of 103 CHAPTER 9. THE SYSTEM ADMINISTRATOR 9.1. INITIAL SET UP AND ADMINISTRATOR FUNCTIONS Once the System is installed and all components are working correctly, the software can be prepared for use. To begin, use the default supervisor log-in information provided by the installer, and go to the Admin screen [A + Alt]. The Admin [Alt + A] screen is used whenever the Administrator needs to: 1. Identify new users or update existing ones; 2. add SmartBadges; 3. reset, place drawer online, and offline; 4. access diagnostic logs for troubleshooting; and 5. automatically upload data logs to GSL support staff. Individuals who are allowed to access the software, open SmartDrawers, or add or remove prescriptions must have a SmartBadge. Each badge contains an RFID tag and a barcode which allows the SmartBadge to be “read” by scanners. The System is capable of monitoring an infinite number of users. However, the System is configured to allow only 4 simultaneous users to access drawers, file or retrieve prescriptions, perform RTS functions, etc. 9.2. ACCESS LEVEL 9.2.1. ADMINISTRATOR - Pharmacy staff member(s) responsible for maintaining the GSL System. The Administrator(s) have access to all GSL Will-call Client settings. 9.2.2. SUPERVISOR - Pharmacy staff member with privileges to override user warnings. The supervisor does not have access to user settings or the Administrator tab [A+Alt]. 9.2.3. RPH - Usually reserved for the Pharmacist. The Pharmacist(s) can override user warnings,but, like the Supervisor, cannot access the Admin [A + Alt] screen. 9.2.4. OPERATOR - Operators are also known as technicians.This group has access only to basic system functions and cannot override any user warnings.](https://usermanual.wiki/GSL-Solutions/ICABR01.User-Manual-part-2-of-2/User-Guide-1636885-Page-6.png)
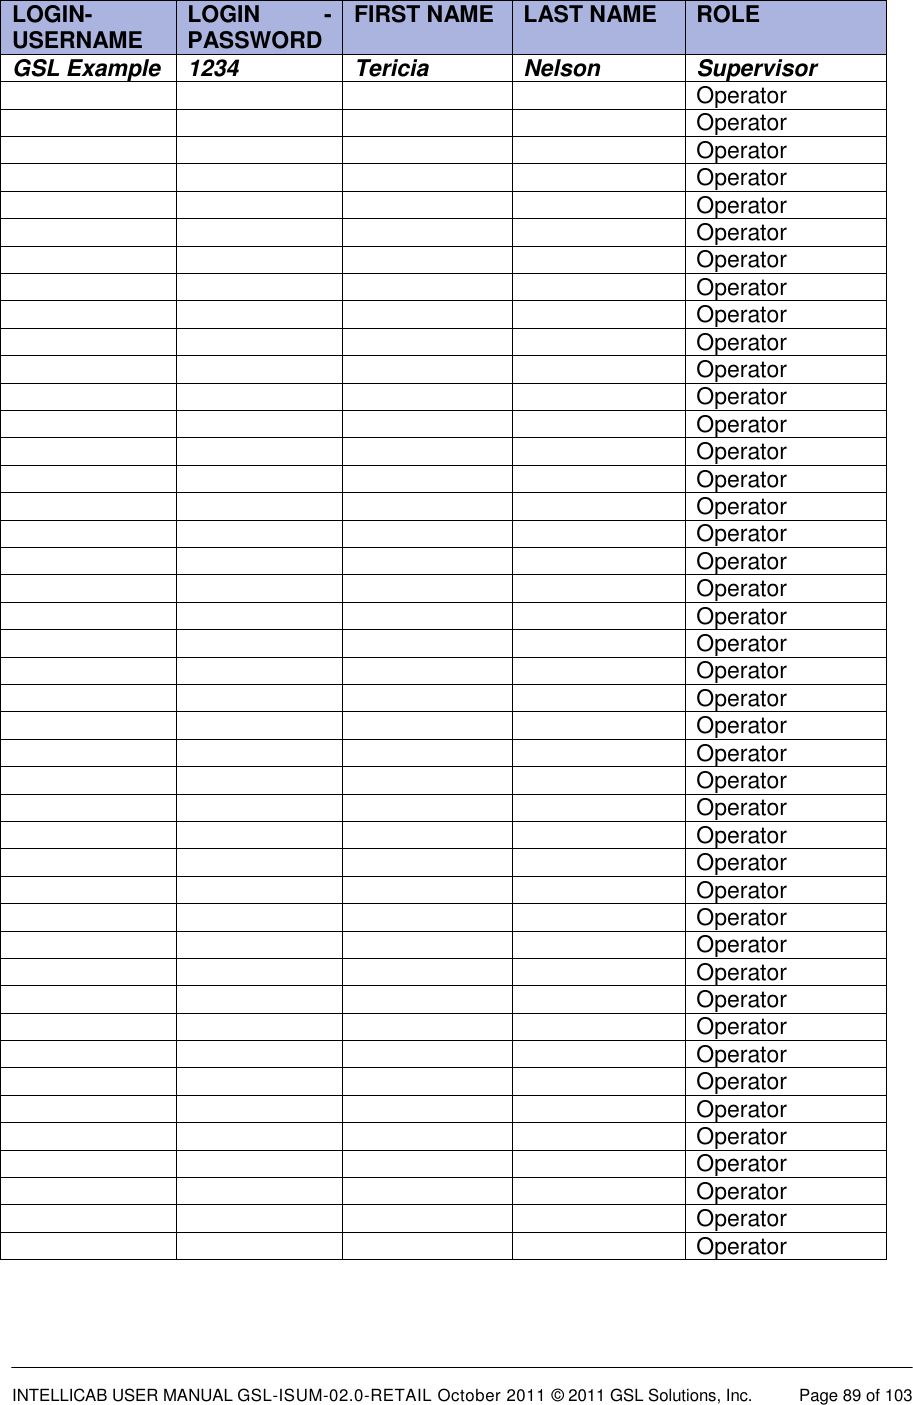
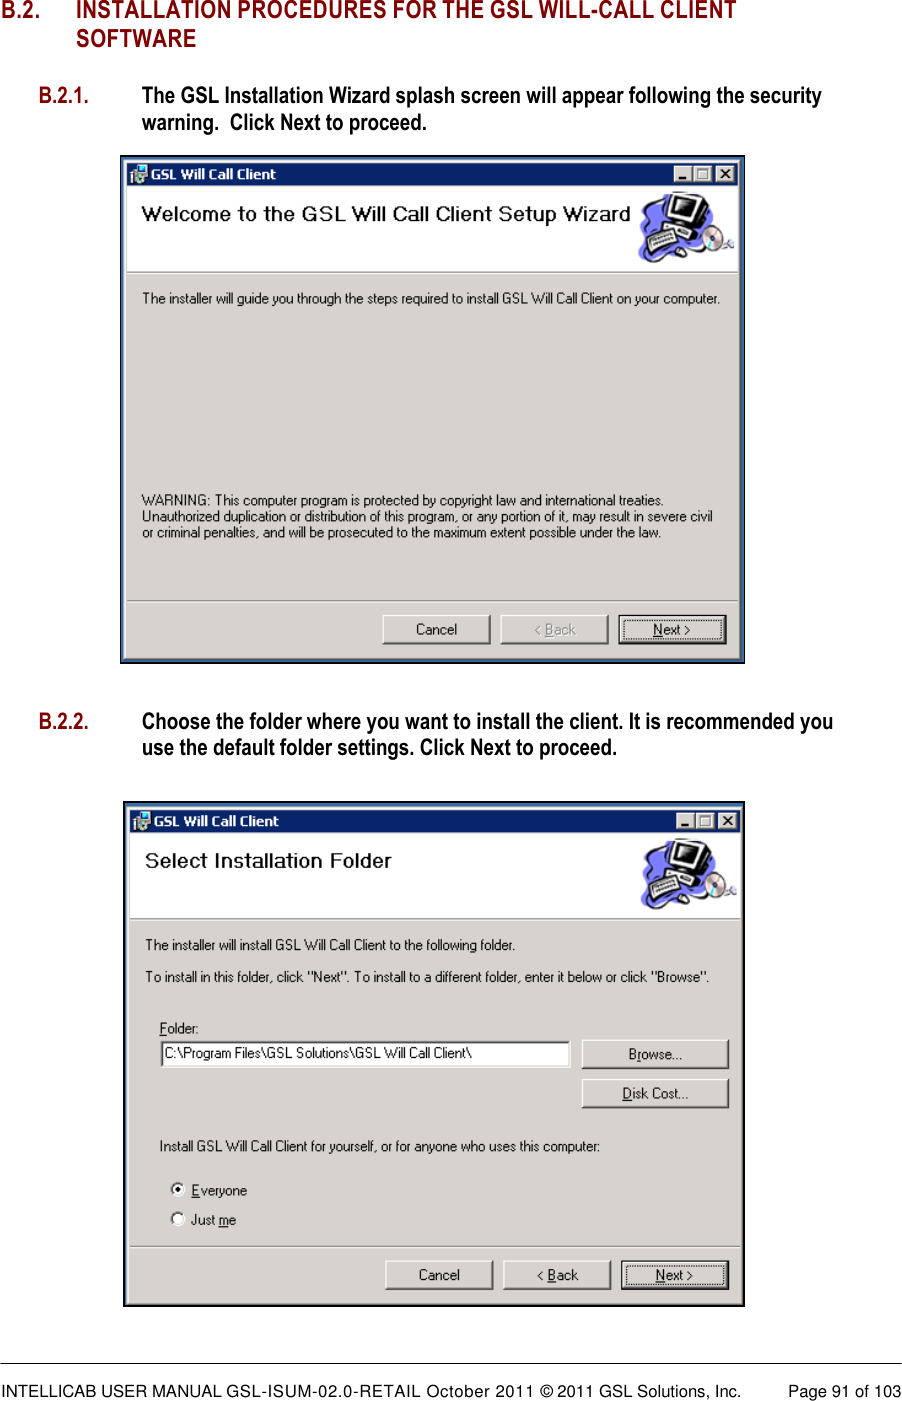
![INTELLICAB USER MANUAL GSL-ISUM-02.0-RETAIL October 2011 © 2011 GSL Solutions, Inc. Page 63 of 103 Figure 60. Administrator [A + Alt] – Add or Edit Users screen 9.3. IDENTIFY NEW USER OR UPDATE AN EXISTING USER 9.3.1. To add or update users, follow the steps shown below: Log-in to any workstation client (requires administrator privileges). Click once on the Admin [A + Alt] Tab. Click once on the Users sub tab. 9.3.2. To edit a user: Type username or last name, first name to find the person you want to edit. Highlight the desired user and click to populate the editable fields. Edit desired field and click save. 9.3.3. To enter a new user: Click on the Create New User Check Button (see Figure 64). Populate all fields per level of access. Click on Save to save the user. NOTE: NEVER DELETE OR EDIT THE ADMINISTRATOR ACCOUNT.](https://usermanual.wiki/GSL-Solutions/ICABR01.User-Manual-part-2-of-2/User-Guide-1636885-Page-7.png)
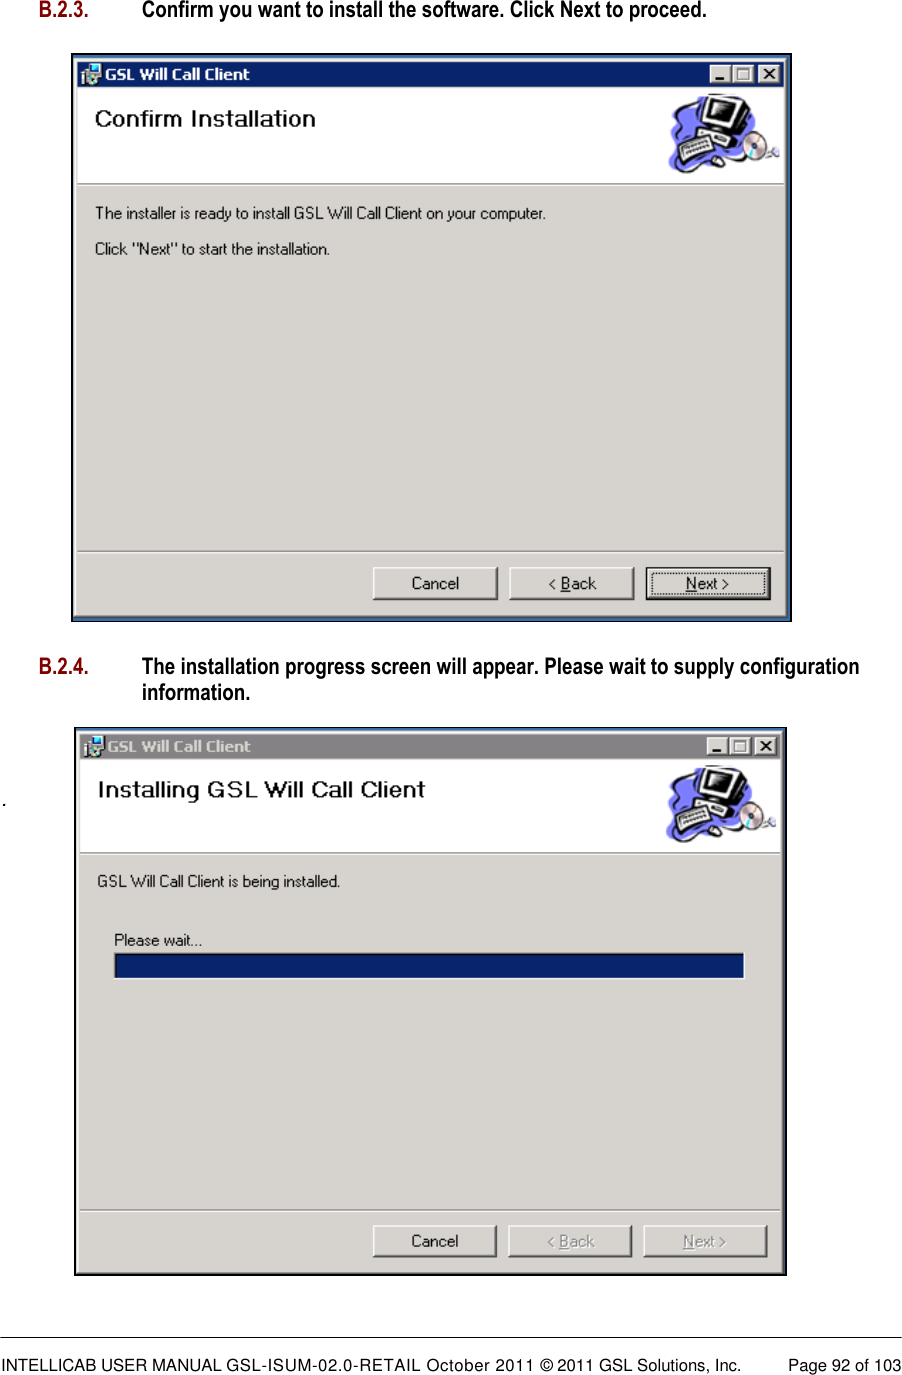
![INTELLICAB USER MANUAL GSL-ISUM-02.0-RETAIL October 2011 © 2011 GSL Solutions, Inc. Page 64 of 103 9.4. ADD SMARTBADGES 9.4.1. Before a SmartBadge can be used it must be added to the system. Follow these steps to add a SmartBadge to the system (see Figure 61): Log-in to any workstation client (requires Administrator privileges). Click once on the Admin [A + Alt] tab. Click once on the User I.D. Badges sub-tab. Simply place the SmartBadge on the RFID Reader. You should hear the happy “chirp” tone which indicates the SmartBadge was successfully accepted. Alternatively, the SmartBadge can be scanned by a Barcode scanner if an IntelliPad is not present or operating. Note: The SmartBadge can only be added at a Workstation Client with an IntelliPad or Barcode scanner present. To identify each SmartBadge with a specific person for documentation purposes, manually enter the 3-letter Badge I.D. in the Employee I.D. Field. Once the individual users and SmartBadges are identified to the system, you can begin entering customer information and filing and retrieving prescriptions. Figure 61. Administrator – Add SmartBadges screen.](https://usermanual.wiki/GSL-Solutions/ICABR01.User-Manual-part-2-of-2/User-Guide-1636885-Page-8.png)
![INTELLICAB USER MANUAL GSL-ISUM-02.0-RETAIL October 2011 © 2011 GSL Solutions, Inc. Page 65 of 103 9.5. RESET OR PLACE A DRAWER ON OR OFFLINE Occasionally, a drawer may need to be restarted or taken offline for a number of reasons. Following are steps to perform this function (see Figure 62). Log-in to any workstation client (requires administrator privileges). Click once on the Admin [A + Alt] tab. Click once on the System Status sub-tab. Select the drawer either by drawer number or by number range of the drawer. To take the drawer offline, simply click on the tab “Take Offline.” To bring the drawer online, simply click on the tab “Bring Online.” To restart the drawer, simply click on the “Restart” tab. Figure 62. Administrator – Drawer Status screen.](https://usermanual.wiki/GSL-Solutions/ICABR01.User-Manual-part-2-of-2/User-Guide-1636885-Page-9.png)
![INTELLICAB USER MANUAL GSL-ISUM-02.0-RETAIL October 2011 © 2011 GSL Solutions, Inc. Page 66 of 103 9.6. UPLOAD LOGS GSL uses the logs to troubleshoot and debug IntelliSys remotely. The logs contain only the actions taken by the system and the users to help us better identify a problem. NO PATIENT DATA IS SENT WITH THE LOGS. To upload the log files a GSL representative will inform you which logs to include by checking the boxes at the top of the screen, and then click the Start UploadLogs button. The rest of the process is automated. Figure 63. Upload Logs—for remote troubleshooting. Note: All users have the ability to upload logs through the Admin [A + Alt] tab. However, the Admin tab contains many other features that are not available to all users and will only appear for certain roles. For example, Operators are not allowed to create new users, so this feature will not appear on the workstations into which they are logged.](https://usermanual.wiki/GSL-Solutions/ICABR01.User-Manual-part-2-of-2/User-Guide-1636885-Page-10.png)
![INTELLICAB USER MANUAL GSL-ISUM-02.0-RETAIL October 2011 © 2011 GSL Solutions, Inc. Page 67 of 103 CHAPTER 10. USER ALERTS ALERTS DISPLAYED ON SCREEN. On-screen alert messages inform users of situations that require some user intervention or corrective action. The following table lists the on-screen alert messages users are likely to encounter, along with an explanation of the cause of the alert, and the steps necessary to correct the problem. TABLE OF USER ALERTS 10.1.1 ALERT: Basket(s) with unknown contents present. Isolate basket(s) and then Go to Entry [F1] screen. Place basket on pad and press ‘Reset Basket’ after inspecting. REASON: A SmartBasket was shelved without being linked to its contents. SOLUTION: Press [F2] to open the Search window. Problem basket(s) will be highlighted in Pink. Click on highlighted “Unknown Contents.” All suspect baskets will be displayed at right. Press [F12] to perform a pull operation to remove the basket(s). Press [F1] to open the Entry screen, reset the basket, and then correctly link the basket with the contents. 10.1.2 ALERT: Unauthorized basket(s) removed from drawer. Call Supervisor, isolate basket(s). REASON: The wrong basket was removed and then A) was left in the cabinet, or B) was removed from the cabinet. Any unauthorized pull locks the system and requires a supervisor to clear the error. SOLUTION: DO NOT REMOVE THE CONTENTS FROM THE BASKET. Contact the supervisor to override the error message and alarm. Supervisor: Log on, then click to acknowledge the alarm and clear the error message. Follow the steps outlined in Alert message 10.1.3 to complete this operation. 10.1.3 ALERT: Basket(s) requiring reverification present. REASON: The wrong basket was pulled and A) left in the cabinet, or B) the wrong basket was removed from the cabinet, or C) no basket was pulled, but the RFID tag on the basket is not operating. In case of a bad tag, the basket should be removed and the contents unlinked from that basket and linked to a new, good basket. The bad basket should be turned over to a supervisor. Any unauthorized pull requires a supervisor to clear the system. Determine which condition, A, B, or C, caused the error, and follow the appropriate steps. SOLUTION: The wrong basket was pulled and then was put back in the cabinet: Press INSPECT [F6] and system will highlight basket(s) in Peach color. Select the basket(s). Press [F12] or click Pull and remove the basket(s). Press VERIFY [F3]. Scan each basket and visually inspect contents to ensure match. Click on Yellow User Verifies button on bottom of screen to clear error condition. Put basket back in cabinet.](https://usermanual.wiki/GSL-Solutions/ICABR01.User-Manual-part-2-of-2/User-Guide-1636885-Page-11.png)
![INTELLICAB USER MANUAL GSL-ISUM-02.0-RETAIL October 2011 © 2011 GSL Solutions, Inc. Page 68 of 103 The wrong basket was pulled and was not put back in the cabinet: Press SEARCH [F2] and visually determine which basket(s) need reverification. Locate the basket(s). Press VERIFY [F3]. Scan each basket and visually inspect contents to ensure match. Click on Yellow User Verifies button on bottom of screen to clear error condition. Re-shelve the baskets. The error resulted from a bad RFID tag on a basket. Press SEARCH [F2] and visually determine which basket(s) need reverification. Locate the basket(s). Press VERIFY [F3]. Scan each basket and visually inspect contents to ensure match. Unlink the contents and give basket to Supervisor for replacement. Link contents to new basket. Re-shelve the basket. 10.1.4 ALERT: Too many items on RFID pad. Please remove all but one. REASON: The IntelliPad has detected more than one basket, or a basket plus an I.D. Badge. This error can occur if a badge is worn at the hip or is close to the pad reader. SOLUTION: Check to make sure only one basket is on the pad, and that your I.D. badge is not close to it. Remove the extra basket or badge and proceed. 10.1.5 ALERT: Scan Rejected. An empty basket must be present on the IntelliPad before scanning Rx. REASON: No basket is present on the pad when an Rx is scanned. The scanner will beep continuously until corrected. Linking sequence is: basket on IntelliPad, scan barcode on Rx label. SOLUTION: Click OK in the upper right of the ENTRY [F1] screen to turn off alarm. Place basket on RFID pad and re-scan Rx. For oversized or refrigerated items, click the Allow Rx scan without basket button on the right side button bar, and then scan the location’s barcode. The system will return to normal operation after 60 seconds of inactivity. 10.1.6 ALERT: Basket may not contain items for more than one patient. REASON: During the linking process, Rxs for two different patients were scanned for a single basket. The scanner will beep continuously until corrected.](https://usermanual.wiki/GSL-Solutions/ICABR01.User-Manual-part-2-of-2/User-Guide-1636885-Page-12.png)
![INTELLICAB USER MANUAL GSL-ISUM-02.0-RETAIL October 2011 © 2011 GSL Solutions, Inc. Page 69 of 103 SOLUTION: Click OK in the upper right of the ENTRY [F1] screen to turn off alarm. Visually inspect the basket contents to make sure all prescriptions are for only one individual. Remove any Rxs intended for a different patient, and link them to a different basket. 10.1.7 ALERT: Please note: your Pick Number and color have changed since last time. REASON: Your Pick Number and Color are subject to change. If your number and color have changed since your last pull, this message alerts you to the change. SOLUTION: Note the current Pick Color and Number for this operation. Pick Numbers are only valid for one transaction and are subject to change. 10.1.8 ALERT: Unauthenticated drawer access. REASON: A drawer was opened without first presenting a valid I.D. Badge for authentication. SOLUTION: Close the drawer and authenticate. Reopen the drawer. 10.1.9 ALERT: A basket stopped responding while drawer was closed. Isolate basket [#] and hand to Supervisor. REASON: A basket previously stopped responding while drawer was closed. The alarm is suppressed until the drawer is opened. Alert message 10.1.2 will appear approximately 5 seconds after drawer is opened. SOLUTION: Click the button bar at the top of the screen to clear the overall system alarm. Expect to see the following error message: Unauthorized basket(s) removed from drawer. Call Supervisor, isolate basket(s). Follow the steps outlined for Alert message 10.1.2, above.](https://usermanual.wiki/GSL-Solutions/ICABR01.User-Manual-part-2-of-2/User-Guide-1636885-Page-13.png)
![INTELLICAB USER MANUAL GSL-ISUM-02.0-RETAIL October 2011 © 2011 GSL Solutions, Inc. Page 70 of 103 10.1.10 ALERT: SYSTEM UPDATE NOTIFICATION. REASON: Whenever this purple symbol appears in the bottom left corner of the status bar, it indicates an update has been performed and the client software needs to restart. SOLUTION: The user should finish the current task, log-out by pressing [F9], and then log back in. 10.1.11 ALERT: SIGNATURE PAD ERROR REASON: This indicates that the signature pad did not recognize the current action. SOLUTION: The user should finish the current task, log-out by pressing [F9], and then log back in. 10.1.12 ALERT: DUPLICATE FRIENDLY NAME REASON: A basket has the same 3-digit “friendly name” as another basket. To avoid confusion this basket should be removed from the system and taken out of circulation SOLUTION: Click the button reading This basket will no longer be used, then remove the basket from circulation.](https://usermanual.wiki/GSL-Solutions/ICABR01.User-Manual-part-2-of-2/User-Guide-1636885-Page-14.png)
![INTELLICAB USER MANUAL GSL-ISUM-02.0-RETAIL October 2011 © 2011 GSL Solutions, Inc. Page 74 of 103 11.5. STARTING THE FAIL-OVER SERVER. See section 12.2. 11.6. FIND PRESCRIPTIONS IF THE SYSTEM GOES DOWN. See section 12. 11.7 . LOCATE FAILED RFID TAGS WITH AN ELECTRONIC CUBBY REPORT. Note: This function is designed to help you find baskets that are not being read by the IntelliCab drawer, or a basket that may have been accidentally put into the IntelliDrawer backwards (with the RFID tag facing the front). The System will light cells it thinks are empty. When an RFID tag or SmartBasket is placed in the IntelliCab, the user receives audio and visual feedback that a RFID tag or SmartBasket was read correctly. However, in a few special circumstances the RFID tag may fail to read. For example, after opening and closing the IntelliDrawer, items within the SmartBasket may shift. If the SmartBasket contains Rx materials with any foil packaging, then the RFID tag may stop reading, or the RFID tag may be weak. If this occurs the user may not know the RFID or SmartBasket is now not reading within the IntelliDrawer. To verify all RFID tags or SmartBaskets are reading properly, the following steps should be followed: Figure 70. Inspect Drawers [Alt + F6] for correct operation.](https://usermanual.wiki/GSL-Solutions/ICABR01.User-Manual-part-2-of-2/User-Guide-1636885-Page-18.png)
![INTELLICAB USER MANUAL GSL-ISUM-02.0-RETAIL October 2011 © 2011 GSL Solutions, Inc. Page 75 of 103 Step 1. From the main menu click on the Inspect Drawer Tab or press [ALT+F6]. Step 2. Click on the first drawer, while holding down the left mouse button, move the mouse down until all the drawers are highlighted then release the left mouse button. Step 3. Next, simply click on Pull or press [F12] to activate a pull operation. Step 4. The light will illuminate on each cabinet with your Pick Number and Color. Authenticate yourself at the first drawer; once your number/color blinks, proceed to open the drawer. Step 5. Once the drawer is opened, the green LED lights turn on and scroll row by row from the top to the bottom. In this mode, the lights indicate that the System believes each lit cell to be empty. Should a light flash on a cubby that has a SmartBasket located in it, the user should remove this SmartBasket. This indicates the SmartBasket may have been put in backwards or is “bad” and is no longer being read by the System. As mentioned above, this is most likely due to metal interference and improper loading during the coupling process. If an empty location does not light up, this could indicate a bad LED light strip beneath that cell. Step 6. Once you have verified and removed any “bad” SmartBaskets from the drawer, close the drawer and repeat the step for the next drawer until all drawers are verified. Step 7. If any SmartBaskets were removed, the user should place the basket on an RFID Reader and verify the basket is empty. If the SmartBasket does not read, remove all the contents of the basket and try reading again. Step 8. If the SmartBasket is reading once the contents are removed, simply couple the contents to the SmartBasket again, ensuring no foil packaging is placed near the back left side of the SmartBasket. Step 9. If the RFID tag still does not read, even when all the items have been removed, the SmartBasket should be isolated and removed from production. The contents of that basket should then be recoupled to a different SmartBasket.](https://usermanual.wiki/GSL-Solutions/ICABR01.User-Manual-part-2-of-2/User-Guide-1636885-Page-19.png)
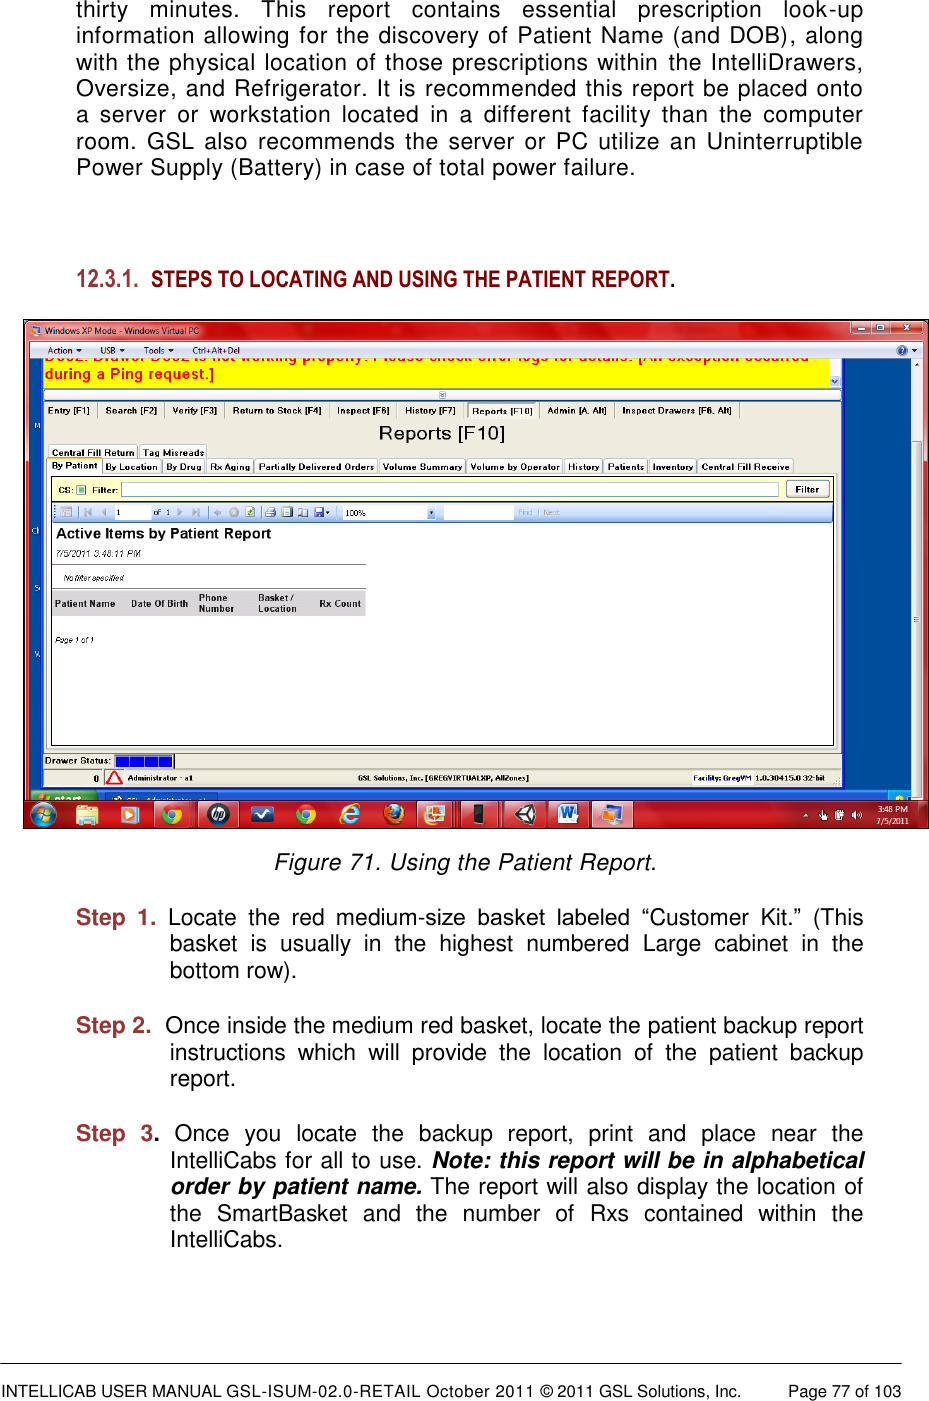
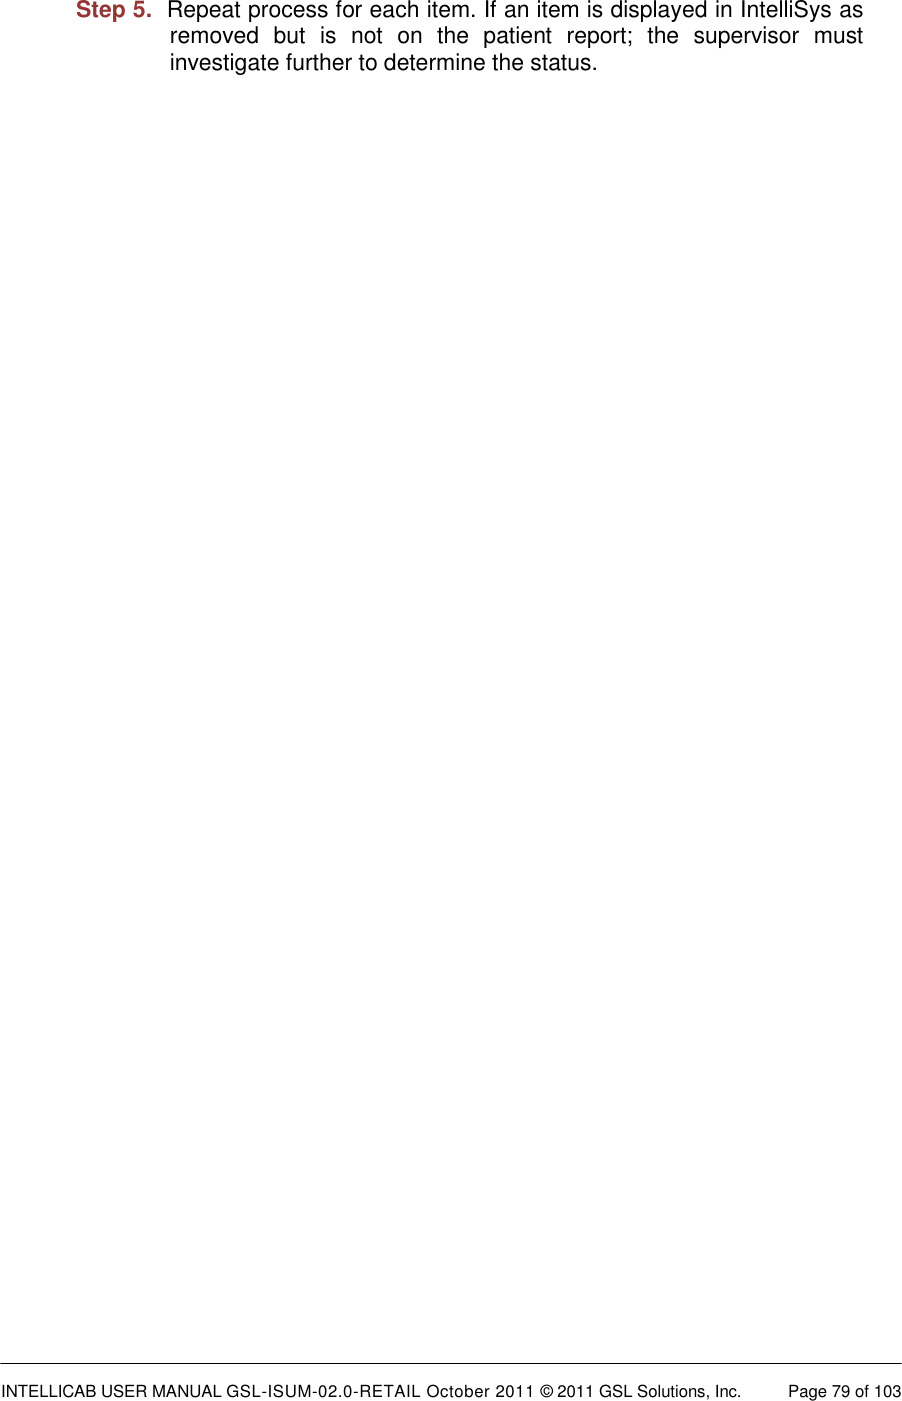
![INTELLICAB USER MANUAL GSL-ISUM-02.0-RETAIL October 2011 © 2011 GSL Solutions, Inc. Page 78 of 103 Step 4. Identify the patient on the report, identify the IntelliCab, open the drawer and identify the location of the basket(s). Example: patient name is John Doe and the location identified is W0120. The user will go to the drawer labeled 100-219. Once opened, locate cubby number 120 (see Figures 72a and 72b). Figure 72a and 72b. Locating the drawer and cubby containing the Patient Report – example from Step 4. Step 5. Once the SmartBasket is removed from the system, you will need to annotate the removal on the patient report by signing or initialing by the patient’s name. 12.3.2. STEPS TO UPDATE THE SYSTEM ONCE ALL INTELLICABS ARE BACK ONLINE. Step1. The IntelliSys application will display yellow alerts stating SmartBaskets are removed without authorization. Step 2. Click the [F2] function key. You will see a list of SmartBaskets that were removed from the system. These will be listed first. Step 3. Click on the first item; the item details will be displayed on the right side of the screen. Verify the item is checked or initialed on the patient report as being removed. Step 4. If the item was identified as being dispensed, simply click on the pull button or press [F12]. This will update the system to identify the Rx as being dispensed from the IntelliSys.](https://usermanual.wiki/GSL-Solutions/ICABR01.User-Manual-part-2-of-2/User-Guide-1636885-Page-22.png)
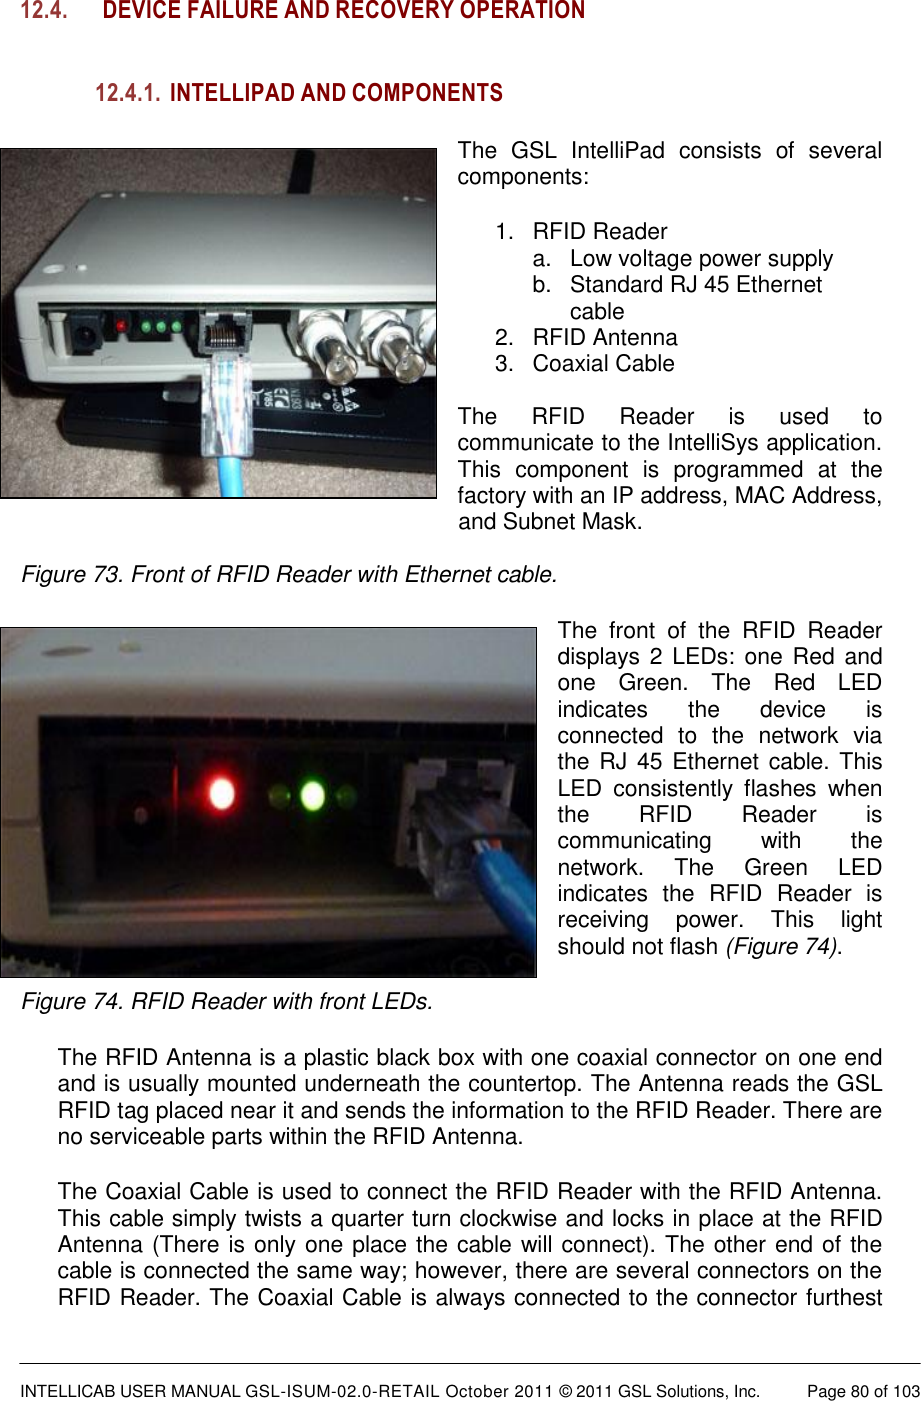
![INTELLICAB USER MANUAL GSL-ISUM-02.0-RETAIL October 2011 © 2011 GSL Solutions, Inc. Page 81 of 103 from the power and Ethernet connection (Figure 75). The Coaxial Cable should be run in a way that it does not coil or hang freely under the counter. A “zigzag” pattern usually works best in reducing interference. When troubleshooting the IntelliPad and components, you should always check the two LEDs, the Coaxial Cable connections, the “route of the cable,” and for any metal objects near any of the components. Metal objects will cause interference and may reduce the ability of the IntelliPad to read. Also, the IntelliPad has no user-level serviceable parts. Figure 75. Coaxial Cable is attached to connector on left side. 12.4.2. INTELLIPAD FAILURE An IntelliPad offers very fast electronic reading of SmartBaskets or RFID Badges by simply placing the item on the counter over the reader. If an IntelliPad fails for any reason, including power fail, network fail or device failure, the System will alarm and indicate which IntelliPad has failed. During the failure, normal system functions can occur via use of the barcode scanner. Every SmartBasket and SmartBadge contains a barcode specifically for this purpose. 12.4.2.1. INTELLIPAD FAILURE – ENTRY [F1] SCREEN With the IntelliPad unavailable, simply scan each prescription into the SmartBasket. After the last RX has been scanned, scan the barcode on front of the SmartBasket. If a barcode scanner is unavailable, manually type each RX into the RX/PatientName field and depress either [TAB] or [ENTER]. After the last RX is entered, click on the LOCATION field and then manually enter the 3 character SmartBasket I.D. into this field, then depress [ENTER]. In order to view basket contents on the ENTRY [F1] screen, use the barcode scanner and scan the barcode on the front of the SmartBasket. If a barcode scanner is unavailable; Click on the LOCATION field and then](https://usermanual.wiki/GSL-Solutions/ICABR01.User-Manual-part-2-of-2/User-Guide-1636885-Page-25.png)
![INTELLICAB USER MANUAL GSL-ISUM-02.0-RETAIL October 2011 © 2011 GSL Solutions, Inc. Page 82 of 103 enter the 3 character SmartBasket I.D. into this field, then depress [ENTER]. In order to clear the entry screen and ready for the next operation, switch screens to the Search Screen, AND THEN back to the ENTRY [F1] Screen. 12.4.2.2. INTELLIPAD FAILURE - LOGIN SCREEN If an IntelliPad is unavailable, use the barcode scanner to scan the SmartBadge. If a barcode scanner is unavailable, manually enter the 3-character Badge I.D., followed by username and password. 12.4.3. SCANNER FAILURE A wireless Bluetooth scanner’s battery may not hold a charge after two to three years, in which case the battery will need to be replaced (contact GSL Solutions for service). However, the scanner will still operate while on the cradle. When a barcode scanner is unavailable, then manual data entry can be used. Note that if there are multiple wireless scanners at a site, they are programmed specific to their respective cradles. First make sure that the wireless scanner is matched with its paired cradle. 12.4.4. SCANNER FAILURE- ENTRY SCREEN If a barcode scanner is unavailable, manually type each Rx into the Rx/PatientName field and depress either [TAB] or [ENTER]. After the last Rx is entered, click on the LOCATION field and then manually enter the 3 character SmartBasket I.D. into this field, then press [ENTER]. To view basket contents on the ENTRY [F1] screen, use the barcode scanner and scan the barcode on the front of the SmartBasket. If a barcode scanner is unavailable, click on the LOCATION field and then enter the 3-character SmartBasket I.D. into this field, then press [ENTER]. To clear the entry screen and prepare for the next operation, switch screens to the Search Screen, then back to the ENTRY [F1] Screen. 12.4.5. SCANNER FAILURE – LOG-IN SCREEN If a barcode scanner is unavailable, manually enter the 3-character Badge I.D., followed by username and password.](https://usermanual.wiki/GSL-Solutions/ICABR01.User-Manual-part-2-of-2/User-Guide-1636885-Page-26.png)
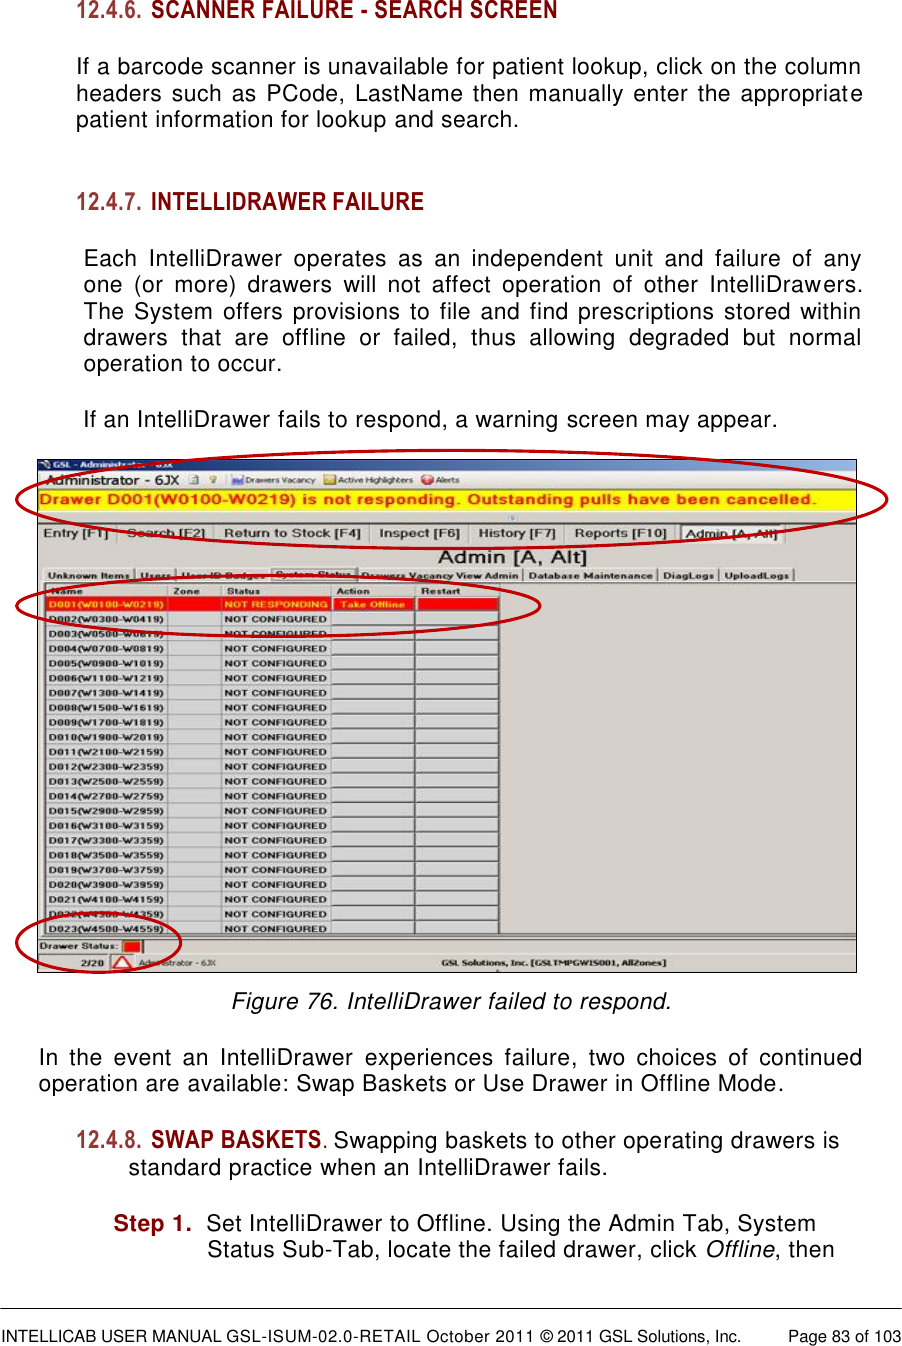
![INTELLICAB USER MANUAL GSL-ISUM-02.0-RETAIL October 2011 © 2011 GSL Solutions, Inc. Page 84 of 103 click on the YES button, or press the [Y] key on the keyboard, to bring the drawer into an offline condition. Once offline, the drawer will not attempt to electronically scan for SmartBasket insertion or removal. Step 2. Using the INSPECT screen, highlight all the baskets contained in the drawer just taken offline. Step 3. Press [F12] to initiate an Inspect Pull of all baskets in the IntelliDrawer. Step 4. Click on Confirm Pull which will indicate to the System all baskets are now out of the drawer. Step 5. Re-file the SmartBaskets just removed into any other IntelliDrawers. Step 6. Place a note on the failed IntelliDrawer indicating a DoNotUse condition to prevent anyone from filing new SmartBaskets into this drawer. Step 7. Contact GSL and follow the instructions to troubleshoot the failure ММ – 24/7 Support Line: 866.477.2682 12.4.9. USE DRAWER IN OFFLINE MODE. IntelliDrawers may also be used in Offline mode. In this mode, SmartBaskets can be removed from the drawer, and new SmartBaskets can be filed within the drawer. Set IntelliDrawer to Offline. Using the Admin Tab and the System Status Sub-Tab, locate the failed drawer, click Offline, then click on the YES button, or press the [Y] key on the keyboard, to bring the drawer into an offline condition. Once offline, the drawer will not attempt to electronically scan for SmartBasket insertion or removal. 12.4.9.1. SEARCHING FOR PATIENT PRESCRIPTIONS IN OFFLINE INTELLIDRAWERS When searching for patient prescriptions in offline mode, perform normal lookup functions via the SEARCH [F2] Screen. When the pick is initiated, there will be no lights to guide or follow and the system will follow the same procedure as if an Oversize item was selected. Step 1. Lookup patient per normal methods and perform a pick operation.](https://usermanual.wiki/GSL-Solutions/ICABR01.User-Manual-part-2-of-2/User-Guide-1636885-Page-28.png)