GSL Solutions ICABR01 INTCV01 User Manual part 2 of 2
GSL Solutions, Inc. INTCV01 part 2 of 2
Contents
- 1. User Manual part 1 of 2
- 2. User Manual part 2 of 2
User Manual part 2 of 2

INTELLICAB USER MANUAL GSL-ISUM-02.0-RETAIL October 2011 © 2011 GSL Solutions, Inc. Page 57 of 103
CHAPTER 8. GENERATE A REPORT - REPORTS [ F10 ]
8.1. Report Types.
The System makes it possible to generate a wide variety of reports.
Stored information can be sorted based on Patient Name, Location,
Aging Status, Partially Delivered orders, etc.
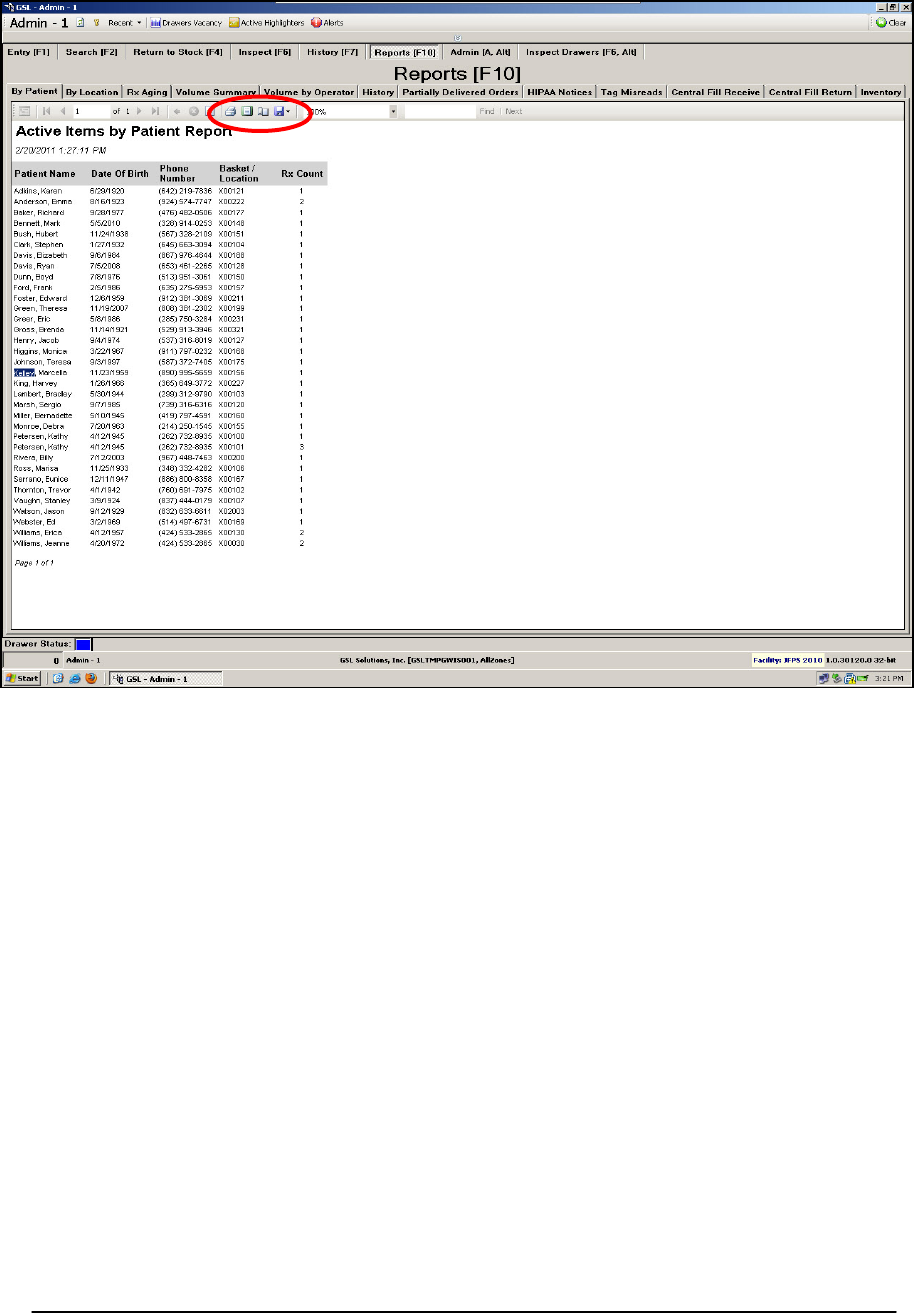
8.2. Report by Patient Name.
This report provides the user with a list of all active locations sorted
alphabetically by last name. The Patient Report should be printed each
night at closing. In the event the IntelliSys system is down, the printed
Patient Report may be used for manual search and retrieval of
prescriptions until the system is back up.
8.3. Report by Location.
This report provides the user with a list of all active locations sorted by
the location in numeric order.
8.4. RX Aging Report.
Provides the user with a list of all active locations sorted by age of
prescription (date scanned into the system).
8.5. Report by Drug.
This report provides a list of drugs in the IntelliSys system.
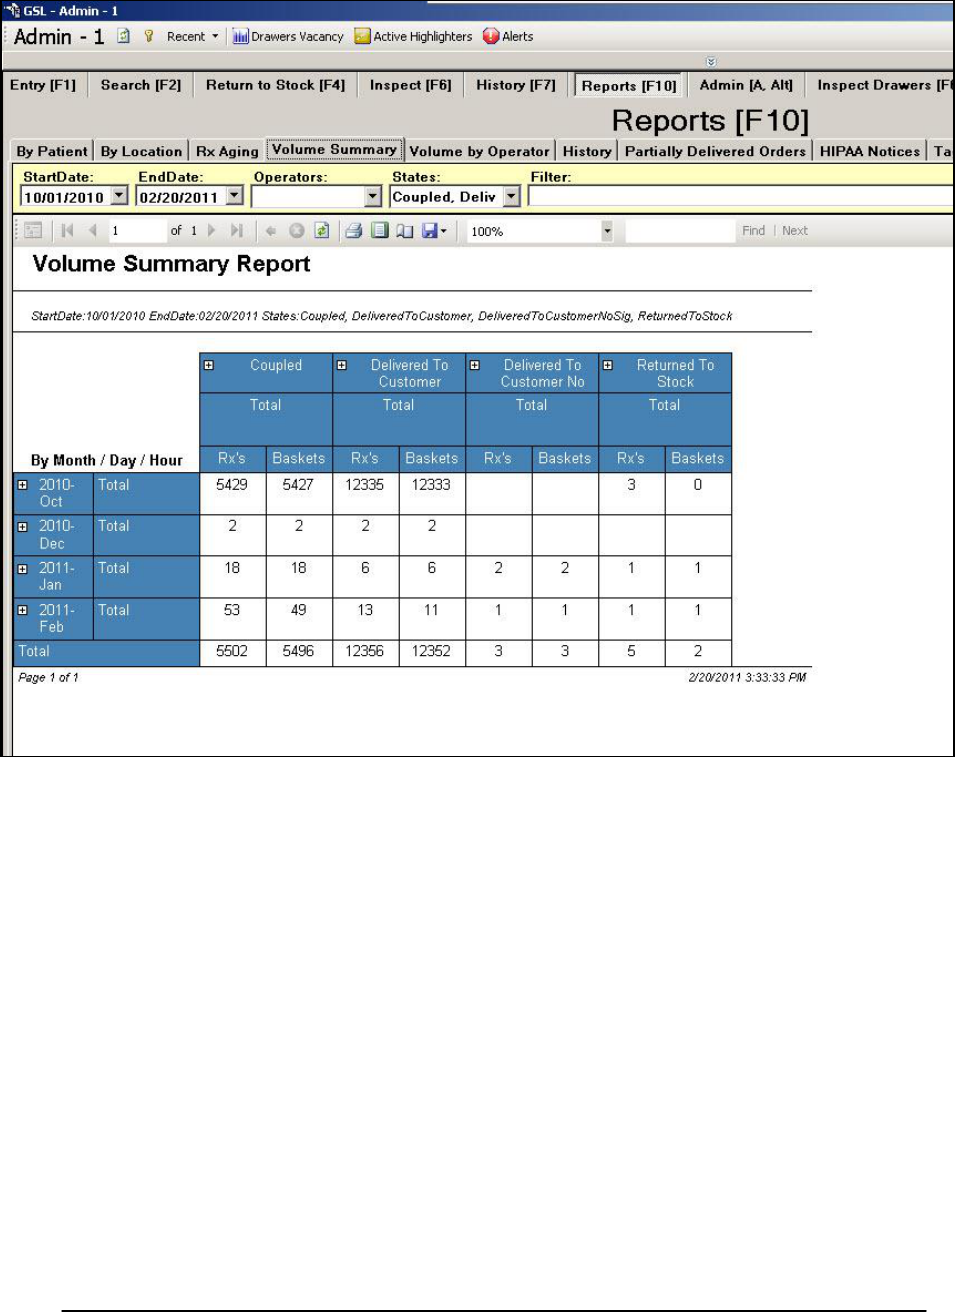
8.6. Volume Summary.
Gives a count of total prescriptions processed. The report can be broken
down monthly, daily, and hourly. This report is useful to generate work
counts.
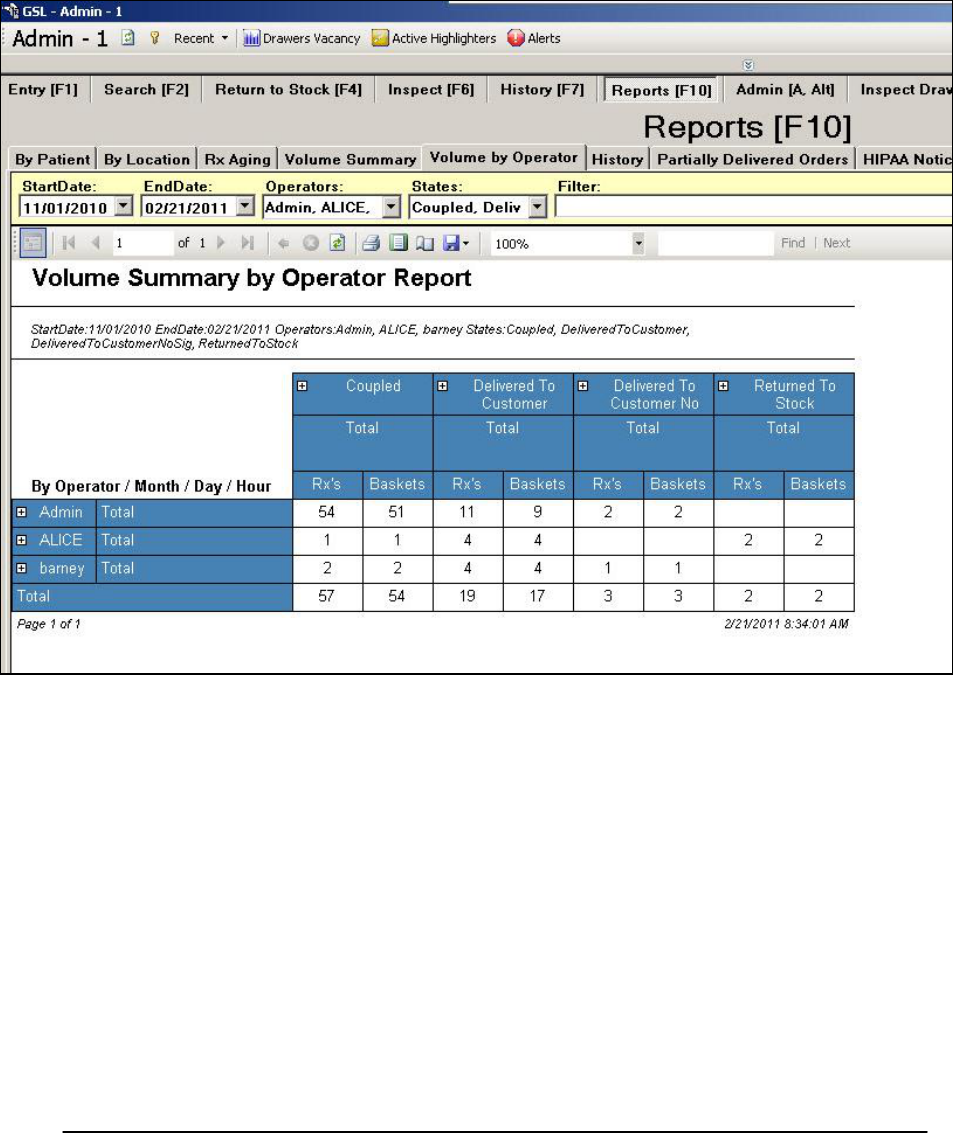
8.7. Volume by Operator.
This report is similar to volume summary, but it further breaks down the
data to individual users.
8.8. History.
A simplified version of the History [F7] tab. The user is able to export the
history report to a Microsoft® Excel spreadsheet or print directly to a
printer.
8.9. Partially Delivered Orders.
Provides the user with a list of active prescriptions which were partially
delivered such as a “Temporarily Out of Stock” (TOS).
8.10. HIPAA Notices.
Provides a list of HIPAA Notices delivered to patients and HIPAA Notices
signed by patients.

INTELLICAB USER MANUAL GSL-ISUM-02.0-RETAIL October 2011 © 2011 GSL Solutions, Inc. Page 58 of 103
8.11. Tag Misreads.
Gives a report of the general health of a drawer. GSL personnel may ask
a user to look at this report if the pharmacy is having issues with a
drawer.
8.12. Central Fill Receive.
Provides information about prescriptions received from a central fill
facility.
8.13. Central Fill Return.
This report shows prescriptions returned to the central fill facility.
8.14. Inventory.
Provides information about current inventory in the GSL system.
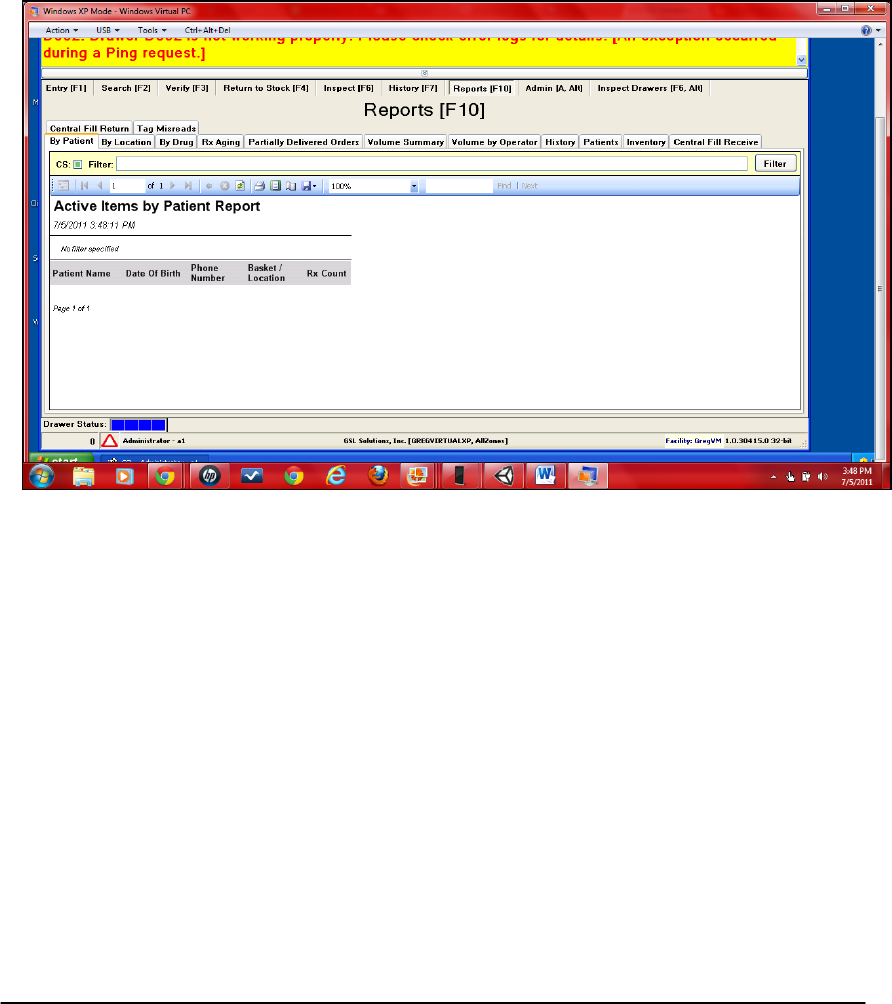
8.15. Steps to Generate a Report.
Use your badge to identify yourself and access the database.
Press the Reports tab or [F10] button to access the Reports screen.
To print a report, select your print preferences from the menu bar, such
as zoom, page width, etc., and then send your report to the printer or to a
file (Figure 57). You can select a specific printer or print layout, page
setup, or export the report to a Microsoft® Excel spreadsheet or to an
Acrobat® PDF file.
INTELLICAB USER MANUAL GSL-ISUM-02.0-RETAIL October 2011 © 2011 GSL Solutions, Inc. Page 59 of 103
Figure 57. Print and Export buttons.
8.16. Volume Reports
The Volume Reports are useful to generate an accurate count of specific
activities throughout the pharmacy.
INTELLICAB USER MANUAL GSL-ISUM-02.0-RETAIL October 2011 © 2011 GSL Solutions, Inc. Page 60 of 103
Figure 58. Volume Summary Report.
Use the StartDate and EndDate boxes to set the date range of the report (Figure
58). To further breakdown each month into daily totals, click the small “+” next to
the corresponding month. Daily totals can also be broken down hourly by again
clicking the small “+.” The small ”+” across the top of the report will break the
data down to each specific pharmacy, if multiple pharmacies are associated with
the IntelliSys server.
Site totals can be further broken down to specific workstations and coupling
stations. To view data specific to a user(s), check their name in the Operators
drop down box. The data contained along X axis is selectable in the States drop
down box. For more info on the filter bar, see section 7.1 in the History [F7]
section.
INTELLICAB USER MANUAL GSL-ISUM-02.0-RETAIL October 2011 © 2011 GSL Solutions, Inc. Page 61 of 103
8.17. Volume by Operator
The Volume by Operator report is similar to the Volume Summary report.
Notice in Figure 59 the range of dates has been replaced with the users.
This report is useful to observe data for all pharmacy employees. Clicking
on the “+” next to each user will break down their totals by
month/day/hour.
Figure 59. Volume by Operator Report.

INTELLICAB USER MANUAL GSL-ISUM-02.0-RETAIL October 2011 © 2011 GSL Solutions, Inc. Page 62 of 103
CHAPTER 9. THE SYSTEM ADMINISTRATOR
9.1. INITIAL SET UP AND ADMINISTRATOR FUNCTIONS
Once the System is installed and all components are working correctly, the
software can be prepared for use. To begin, use the default supervisor log-in
information provided by the installer, and go to the Admin screen [A + Alt]. The
Admin [Alt + A] screen is used whenever the Administrator needs to:
1. Identify new users or update existing ones;
2. add SmartBadges;
3. reset, place drawer online, and offline;
4. access diagnostic logs for troubleshooting; and
5. automatically upload data logs to GSL support staff.
Individuals who are allowed to access the software, open SmartDrawers, or add
or remove prescriptions must have a SmartBadge. Each badge contains an RFID
tag and a barcode which allows the SmartBadge to be “read” by scanners.
The System is capable of monitoring an infinite number of users. However, the
System is configured to allow only 4 simultaneous users to access drawers, file
or retrieve prescriptions, perform RTS functions, etc.
9.2. ACCESS LEVEL
9.2.1. ADMINISTRATOR - Pharmacy staff member(s) responsible for maintaining the GSL
System. The Administrator(s) have access to all GSL Will-call Client settings.
9.2.2. SUPERVISOR - Pharmacy staff member with privileges to override user warnings.
The supervisor does not have access to user settings or the Administrator tab
[A+Alt].
9.2.3. RPH - Usually reserved for the Pharmacist. The Pharmacist(s) can override user
warnings,but, like the Supervisor, cannot access the Admin [A + Alt] screen.
9.2.4. OPERATOR - Operators are also known as technicians.This group has access only to
basic system functions and cannot override any user warnings.
INTELLICAB USER MANUAL GSL-ISUM-02.0-RETAIL October 2011 © 2011 GSL Solutions, Inc. Page 63 of 103
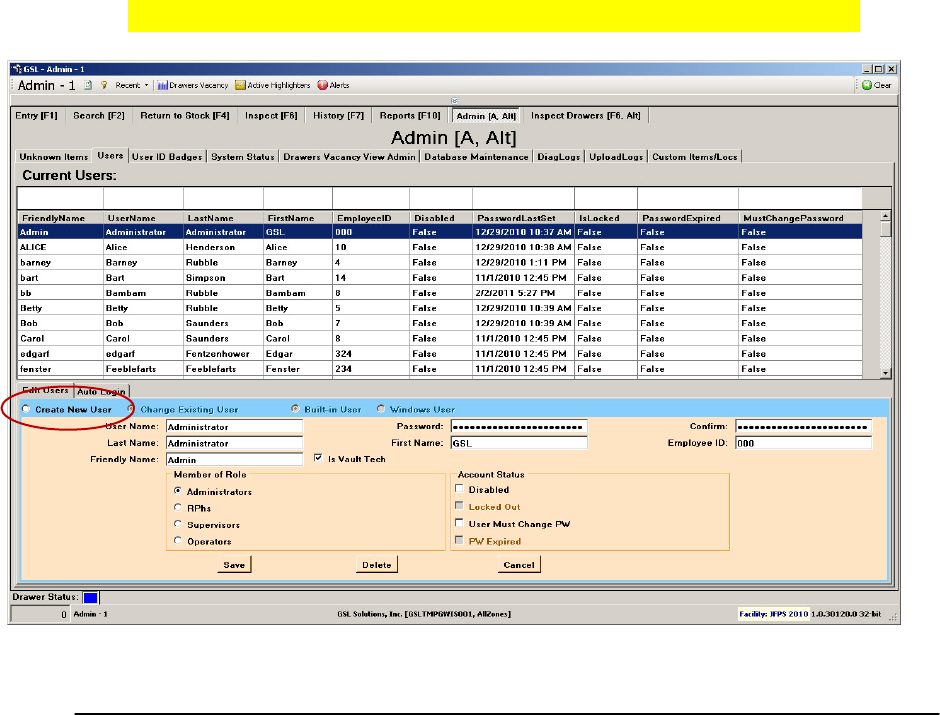
Figure 60. Administrator [A + Alt] – Add or Edit Users screen
9.3. IDENTIFY NEW USER OR UPDATE AN EXISTING USER
9.3.1. To add or update users, follow the steps shown below:
Log-in to any workstation client (requires administrator privileges).
Click once on the Admin [A + Alt] Tab.
Click once on the Users sub tab.
9.3.2. To edit a user:
Type username or last name, first name to find the person you
want to edit.
Highlight the desired user and click to populate the editable fields.
Edit desired field and click save.
9.3.3. To enter a new user:
Click on the Create New User Check Button (see Figure 64).
Populate all fields per level of access.
Click on Save to save the user.
NOTE: NEVER DELETE OR EDIT THE ADMINISTRATOR ACCOUNT.
INTELLICAB USER MANUAL GSL-ISUM-02.0-RETAIL October 2011 © 2011 GSL Solutions, Inc. Page 64 of 103
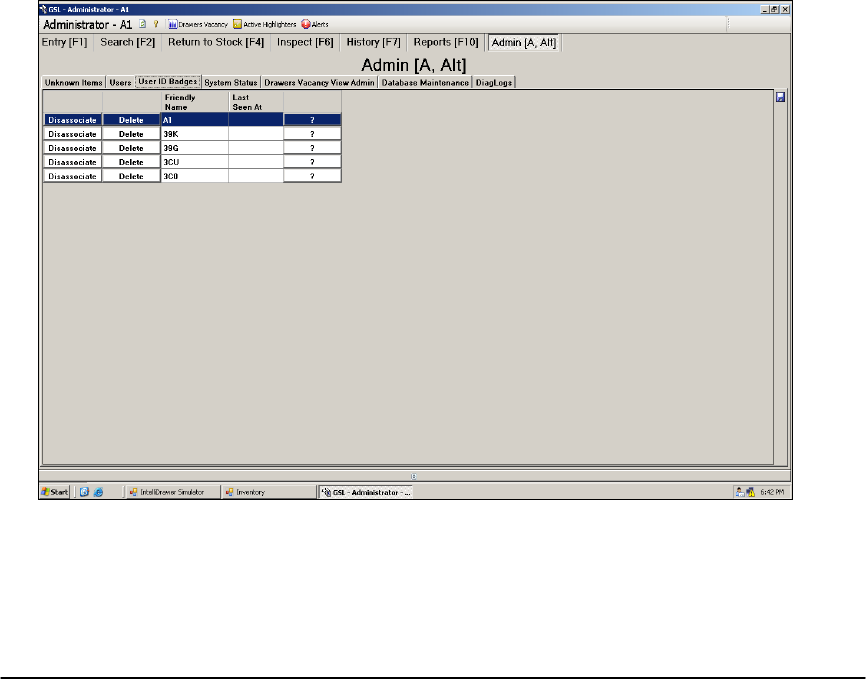
9.4. ADD SMARTBADGES
9.4.1. Before a SmartBadge can be used it must be added to the system.
Follow these steps to add a SmartBadge to the system (see Figure
61):
Log-in to any workstation client (requires Administrator privileges).
Click once on the Admin [A + Alt] tab.
Click once on the User I.D. Badges sub-tab.
Simply place the SmartBadge on the RFID Reader. You should hear
the happy “chirp” tone which indicates the SmartBadge was
successfully accepted. Alternatively, the SmartBadge can be scanned
by a Barcode scanner if an IntelliPad is not present or operating.
Note: The SmartBadge can only be added at a Workstation Client
with an IntelliPad or Barcode scanner present.
To identify each SmartBadge with a specific person for documentation
purposes, manually enter the 3-letter Badge I.D. in the Employee I.D. Field.
Once the individual users and SmartBadges are identified to the system,
you can begin entering customer information and filing and retrieving
prescriptions.
Figure 61. Administrator – Add SmartBadges screen.
INTELLICAB USER MANUAL GSL-ISUM-02.0-RETAIL October 2011 © 2011 GSL Solutions, Inc. Page 65 of 103
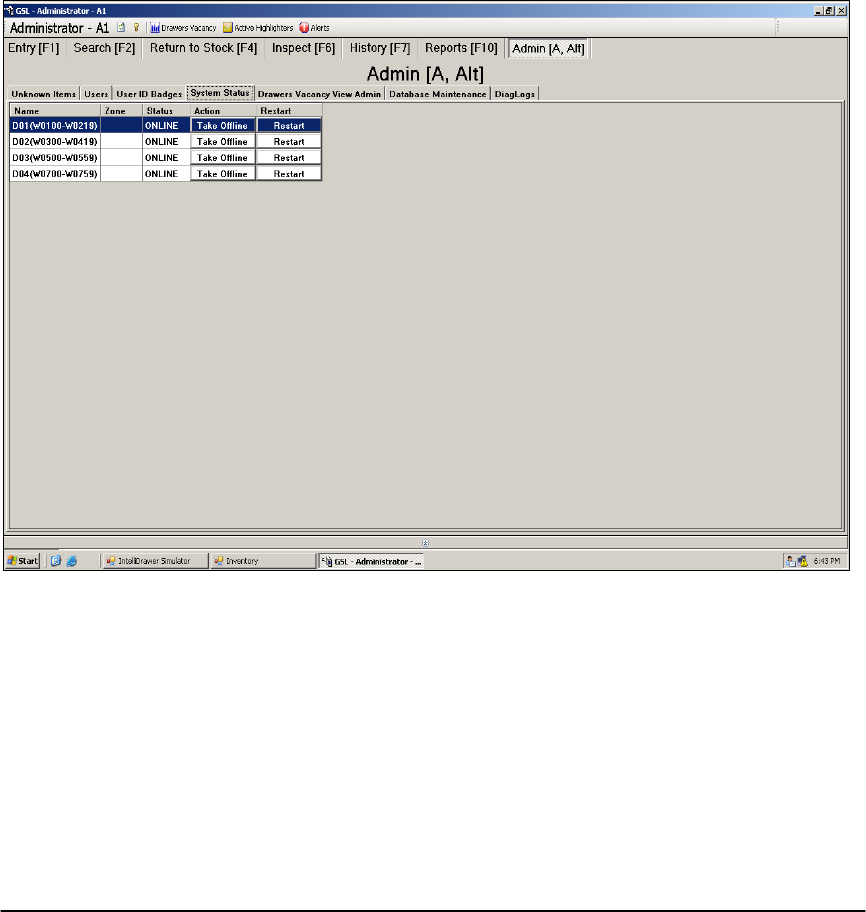
9.5. RESET OR PLACE A DRAWER ON OR OFFLINE
Occasionally, a drawer may need to be restarted or taken offline for a
number of reasons. Following are steps to perform this function (see
Figure 62).
Log-in to any workstation client (requires administrator privileges).
Click once on the Admin [A + Alt] tab.
Click once on the System Status sub-tab.
Select the drawer either by drawer number or by number range of the
drawer.
To take the drawer offline, simply click on the tab “Take Offline.”
To bring the drawer online, simply click on the tab “Bring Online.”
To restart the drawer, simply click on the “Restart” tab.
Figure 62. Administrator – Drawer Status screen.

INTELLICAB USER MANUAL GSL-ISUM-02.0-RETAIL October 2011 © 2011 GSL Solutions, Inc. Page 66 of 103
9.6. UPLOAD LOGS
GSL uses the logs to troubleshoot and debug IntelliSys remotely. The
logs contain only the actions taken by the system and the users to help us
better identify a problem. NO PATIENT DATA IS SENT WITH THE
LOGS. To upload the log files a GSL representative will inform you which
logs to include by checking the boxes at the top of the screen, and then
click the Start UploadLogs button. The rest of the process is automated.
Figure 63. Upload Logs—for remote troubleshooting.
Note: All users have the ability to upload logs through the Admin [A + Alt]
tab. However, the Admin tab contains many other features that are not
available to all users and will only appear for certain roles. For example,
Operators are not allowed to create new users, so this feature will not
appear on the workstations into which they are logged.
INTELLICAB USER MANUAL GSL-ISUM-02.0-RETAIL October 2011 © 2011 GSL Solutions, Inc. Page 67 of 103
CHAPTER 10. USER ALERTS
ALERTS DISPLAYED ON SCREEN. On-screen alert messages inform users of
situations that require some user intervention or corrective action. The following
table lists the on-screen alert messages users are likely to encounter, along with
an explanation of the cause of the alert, and the steps necessary to correct the
problem.
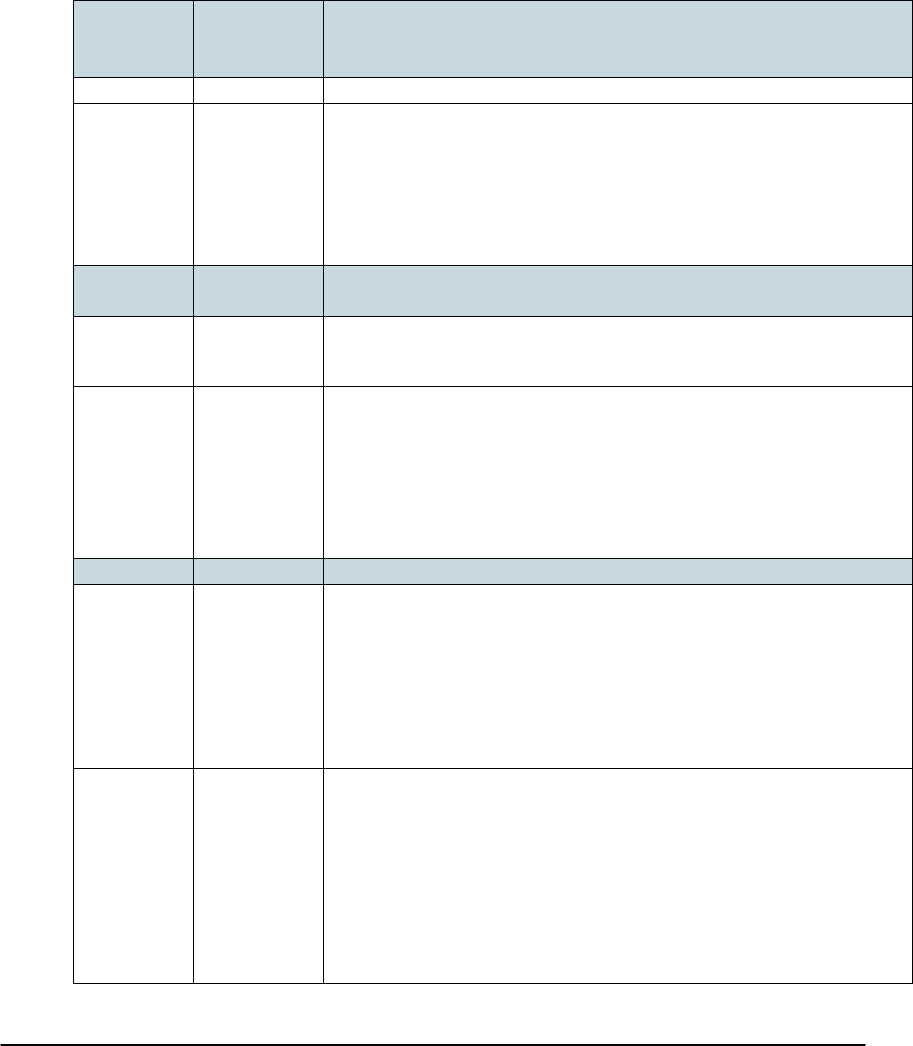
TABLE OF USER ALERTS
10.1.1
ALERT:
Basket(s) with unknown contents present. Isolate basket(s) and
then Go to Entry [F1] screen. Place basket on pad and press
‘Reset Basket’ after inspecting.
REASON:
A SmartBasket was shelved without being linked to its contents.
SOLUTION:
Press [F2] to open the Search window. Problem basket(s) will be highlighted
in Pink.
Click on highlighted “Unknown Contents.” All suspect baskets will be
displayed at right.
Press [F12] to perform a pull operation to remove the basket(s).
Press [F1] to open the Entry screen, reset the basket, and then correctly link
the basket with the contents.
10.1.2
ALERT:
Unauthorized basket(s) removed from drawer. Call Supervisor,
isolate basket(s).
REASON:
The wrong basket was removed and then A) was left in the cabinet, or B)
was removed from the cabinet. Any unauthorized pull locks the system and
requires a supervisor to clear the error.
SOLUTION:
DO NOT REMOVE THE CONTENTS FROM THE BASKET. Contact the
supervisor to override the error message and alarm.
Supervisor: Log on, then click to acknowledge the alarm and clear the error
message.
Follow the steps outlined in Alert message 10.1.3 to complete this operation.
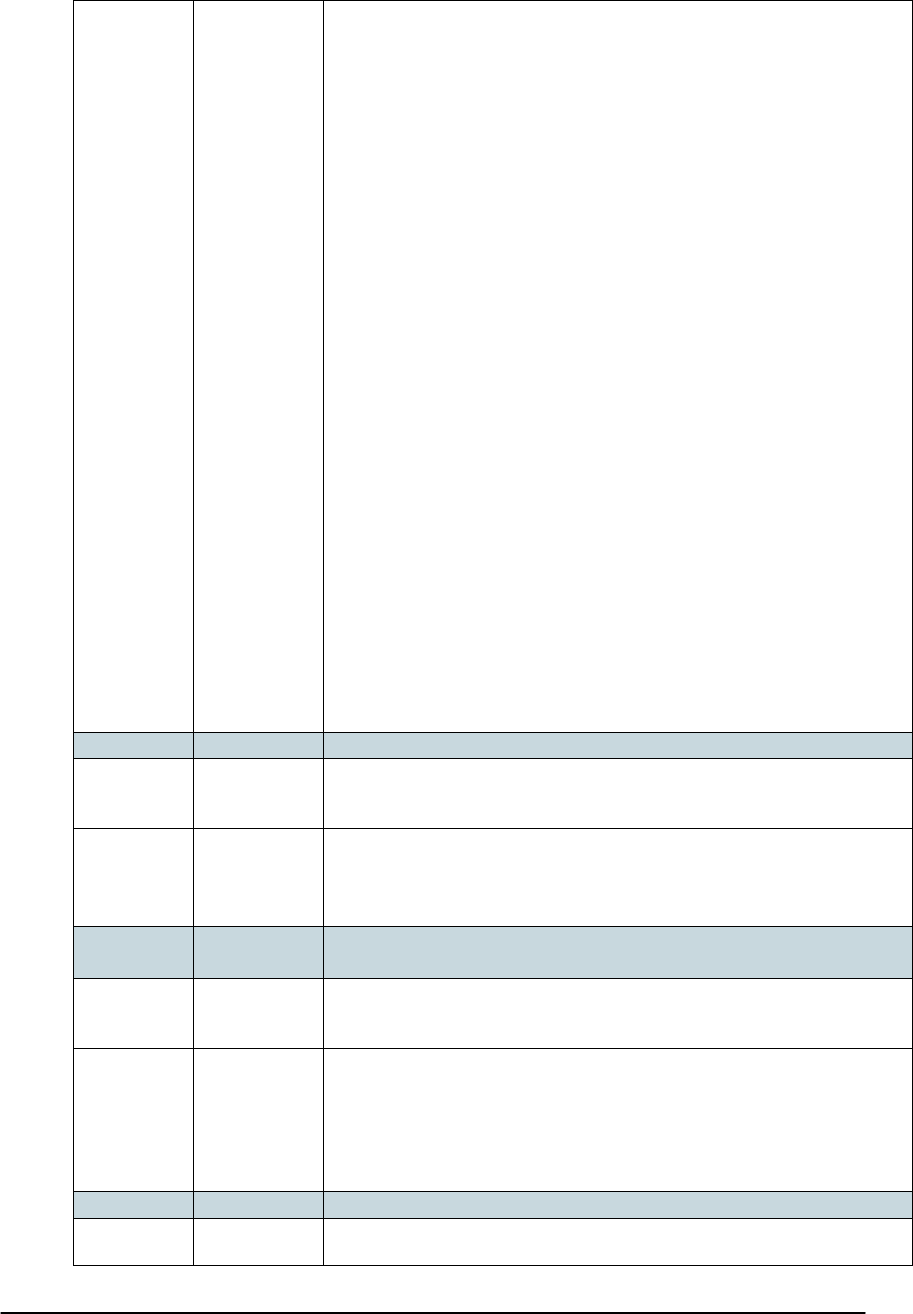
10.1.3
ALERT:
Basket(s) requiring reverification present.
REASON:
The wrong basket was pulled and A) left in the cabinet, or B) the wrong
basket was removed from the cabinet, or C) no basket was pulled, but the
RFID tag on the basket is not operating. In case of a bad tag, the basket
should be removed and the contents unlinked from that basket and linked to
a new, good basket. The bad basket should be turned over to a supervisor.
Any unauthorized pull requires a supervisor to clear the system. Determine
which condition, A, B, or C, caused the error, and follow the appropriate
steps.
SOLUTION:
The wrong basket was pulled and then was put back in the
cabinet:
Press INSPECT [F6] and system will highlight basket(s) in Peach color.
Select the basket(s). Press [F12] or click Pull and remove the basket(s).
Press VERIFY [F3]. Scan each basket and visually inspect contents to
ensure match. Click on Yellow User Verifies button on bottom of screen to
clear error condition.
Put basket back in cabinet.
INTELLICAB USER MANUAL GSL-ISUM-02.0-RETAIL October 2011 © 2011 GSL Solutions, Inc. Page 68 of 103
The wrong basket was pulled and was not put back in the cabinet:
Press SEARCH [F2] and visually determine which basket(s) need
reverification.
Locate the basket(s).
Press VERIFY [F3]. Scan each basket and visually inspect contents to
ensure match. Click on Yellow User Verifies button on bottom of screen to
clear error condition.
Re-shelve the baskets.
The error resulted from a bad RFID tag on a basket.
Press SEARCH [F2] and visually determine which basket(s) need
reverification.
Locate the basket(s).
Press VERIFY [F3]. Scan each basket and visually inspect contents to
ensure match.
Unlink the contents and give basket to Supervisor for replacement.
Link contents to new basket.
Re-shelve the basket.
10.1.4
ALERT:
Too many items on RFID pad. Please remove all but one.
REASON:
The IntelliPad has detected more than one basket, or a basket plus an I.D.
Badge. This error can occur if a badge is worn at the hip or is close to the
pad reader.
SOLUTION:
Check to make sure only one basket is on the pad, and that your I.D. badge
is not close to it.
Remove the extra basket or badge and proceed.
10.1.5
ALERT:
Scan Rejected. An empty basket must be present on the
IntelliPad before scanning Rx.
REASON:
No basket is present on the pad when an Rx is scanned. The scanner will
beep continuously until corrected. Linking sequence is: basket on IntelliPad,
scan barcode on Rx label.
SOLUTION:
Click OK in the upper right of the ENTRY [F1] screen to turn off alarm.
Place basket on RFID pad and re-scan Rx.
For oversized or refrigerated items, click the Allow Rx scan without basket
button on the right side button bar, and then scan the location’s barcode.
The system will return to normal operation after 60 seconds of inactivity.
10.1.6
ALERT:
Basket may not contain items for more than one patient.
REASON:
During the linking process, Rxs for two different patients were scanned for a
single basket. The scanner will beep continuously until corrected.
INTELLICAB USER MANUAL GSL-ISUM-02.0-RETAIL October 2011 © 2011 GSL Solutions, Inc. Page 69 of 103
SOLUTION:
Click OK in the upper right of the ENTRY [F1] screen to turn off alarm.
Visually inspect the basket contents to make sure all prescriptions are for
only one individual.
Remove any Rxs intended for a different patient, and link them to a different
basket.
10.1.7
ALERT:
Please note: your Pick Number and color have changed since
last time.
REASON:
Your Pick Number and Color are subject to change. If your number and color
have changed since your last pull, this message alerts you to the change.
SOLUTION:
Note the current Pick Color and Number for this operation.
Pick Numbers are only valid for one transaction and are subject to change.
10.1.8
ALERT:
Unauthenticated drawer access.
REASON:
A drawer was opened without first presenting a valid I.D. Badge for
authentication.
SOLUTION:
Close the drawer and authenticate.
Reopen the drawer.
10.1.9
ALERT:
A basket stopped responding while drawer was closed. Isolate
basket [#] and hand to Supervisor.
REASON:
A basket previously stopped responding while drawer was closed. The
alarm is suppressed until the drawer is opened. Alert message 10.1.2 will
appear approximately 5 seconds after drawer is opened.
SOLUTION:
Click the button bar at the top of the screen to clear the overall system
alarm.
Expect to see the following error message: Unauthorized basket(s)
removed from drawer. Call Supervisor, isolate basket(s).
Follow the steps outlined for Alert message 10.1.2, above.
INTELLICAB USER MANUAL GSL-ISUM-02.0-RETAIL October 2011 © 2011 GSL Solutions, Inc. Page 70 of 103
10.1.10
ALERT:
SYSTEM UPDATE NOTIFICATION.
REASON:
Whenever this purple symbol appears in the bottom left corner of the status
bar, it indicates an update has been performed and the client software needs
to restart.
SOLUTION:
The user should finish the current task, log-out by pressing [F9], and then log
back in.
10.1.11
ALERT:
SIGNATURE PAD ERROR
REASON:
This indicates that the signature pad did not recognize the current action.
SOLUTION:
The user should finish the current task, log-out by pressing [F9], and then log
back in.
10.1.12
ALERT:
DUPLICATE FRIENDLY NAME
REASON:
A basket has the same 3-digit “friendly name” as another basket. To avoid
confusion this basket should be removed from the system and taken out of
circulation
SOLUTION:
Click the button reading This basket will no longer be used, then remove the
basket from circulation.
INTELLICAB USER MANUAL GSL-ISUM-02.0-RETAIL October 2011 © 2011 GSL Solutions, Inc. Page 71 of 103
CHAPTER 11. TROUBLESHOOTING.
11.1. POWER
If cabinet power is not operating, check that the Uninterruptible Power Supply
(UPS) under the cabinets is powered “on.” The indicator lights at the front of
the UPS will be solidly lit. If the lights are flashing or not lit, reset the power
button. If the UPS still doesn’t turn on, check that it is plugged in. If the UPS
does not seem to be operable, you can plug the IntelliCabs directly into any
110v outlet. However, you will not have a battery backup should there be a
power failure.
11.2. INTELLICAB DRAWER REMOVAL
It is unlikely that IntelliCab users will ever need to remove or reinstall the
cabinet’s IntelliDrawers™. Never move or relocate an IntelliCab without first
calling GSL customer service for proper moving instructions. Moving an
IntelliCab may void your warranty with GSL Solutions. Should the need to
remove and reinstall the drawers arise, follow the following steps. The tools
needed to complete this task include:
Standard screwdriver
Small level
Step 1. To remove the drawers, start with the drawer on the left side of the
cabinet, and pull the drawer out of the cabinet until it stops, then push it back in
slightly.
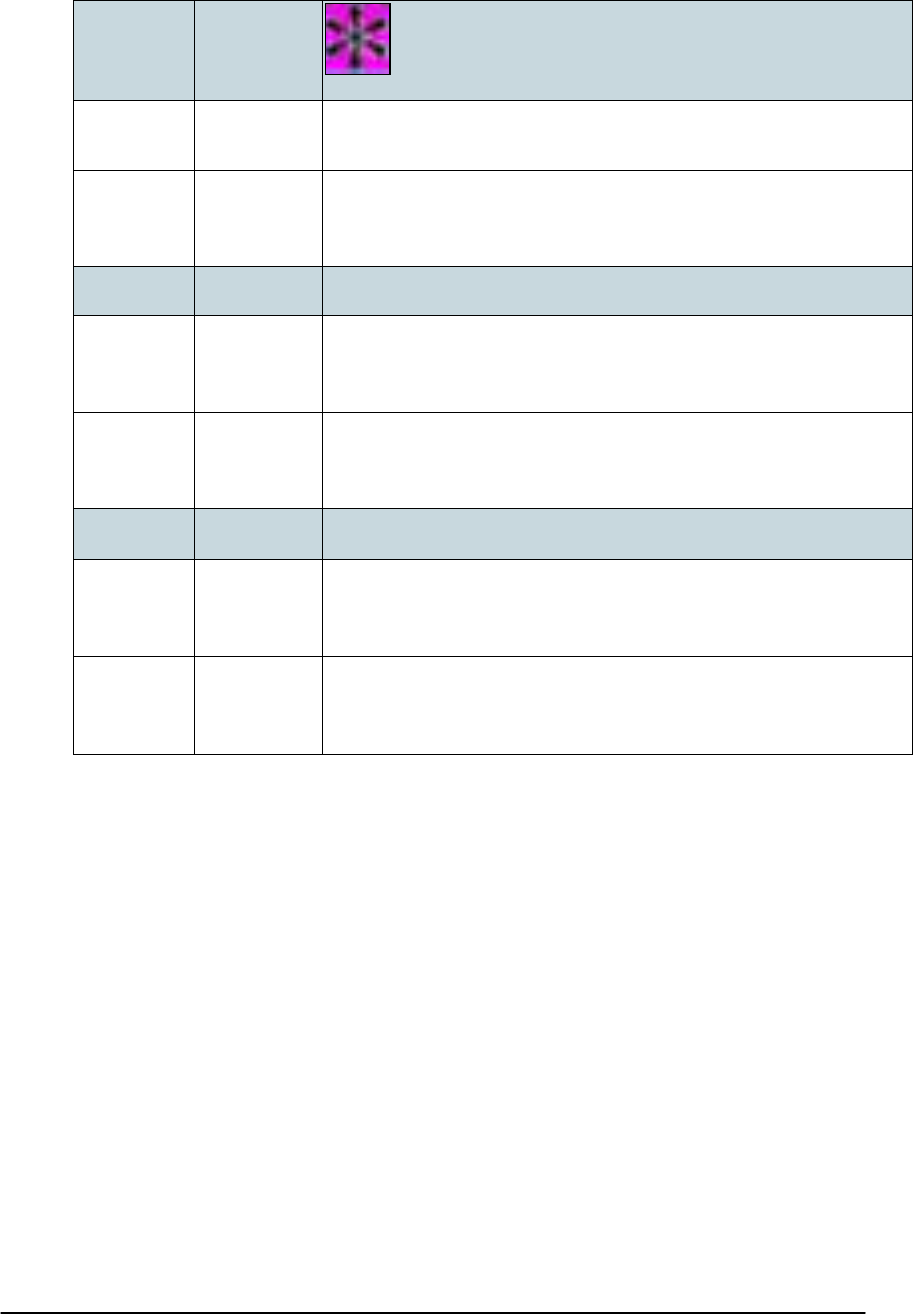
At the bottom rear of the drawer, be sure to unplug the network connection,
unscrew the black thumbscrew, and remove the tension plate attached to the
thumbscrew before proceeding (Figure 64).
Figure 64. Ethernet cable plugged in and plate screwed on (a); Ethernet
cable unplugged (b).
INTELLICAB USER MANUAL GSL-ISUM-02.0-RETAIL October 2011 © 2011 GSL Solutions, Inc. Page 72 of 103
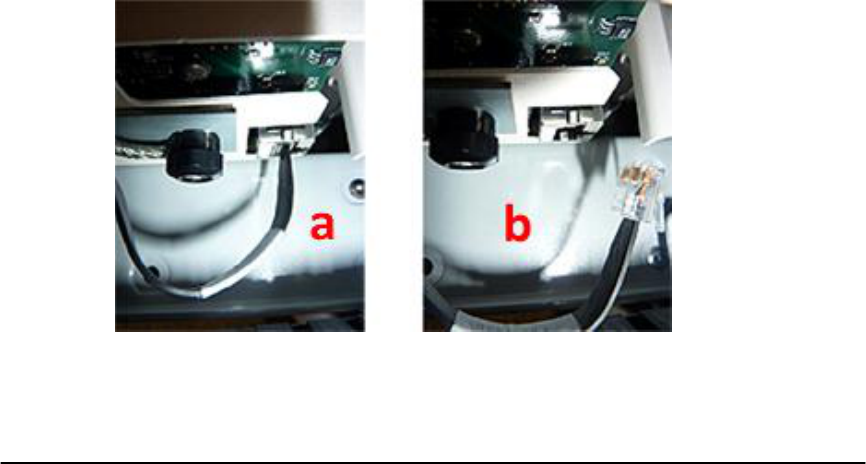
Figure 65. Slide extension stop.
Figure 66. Locking fork.
Figure 68. Insert the ears on bottom drawer
glide into roller guides (a); lift drawer to
clear the stop, (b).
a
b
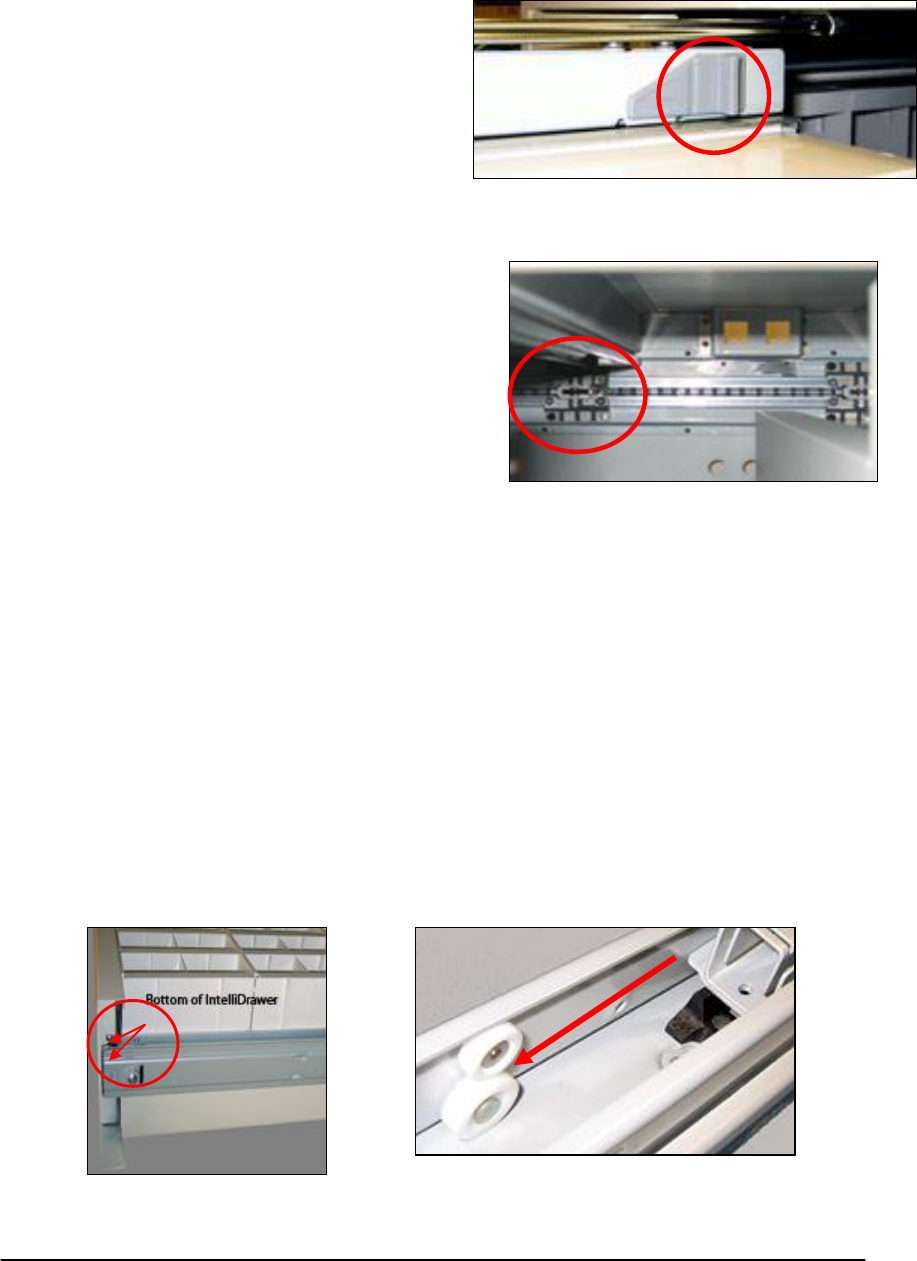
Figure 67. Ears on bottom of
drawer slide.
Step 2. Locate the rubber slide extension
stop (Figure 65) on the top of the drawer
and pull the slide extension stop forward
to release the upper slide. Push the
upper slide back into the cabinet, tilt the
drawer upwards and slide it out of the
cabinet.
Step 3. You must close the locking fork at
the back of the cabinet which
corresponds to the drawer you removed
before you can remove the next one (see
Figure 66). Place the drawer out of the way,
taking care not to damage the metal work,
and repeat the process for each drawer in the
cabinet. Once the cabinet is in position, the
drawers can be easily replaced after leveling
the unit.
11.3. INTELLICAB DRAWER REPLACEMENT
The IntelliCab System is equipped with drawer locks featuring an anti-tilt
mechanism to allow only one drawer to be opened at a time. Before replacing
a drawer that has been removed, make sure the locking fork (located on the
inside back wall of the cabinet –see Figure 66) for the drawer to be replaced
is open and can accept the drawer.
Step 1. To replace the drawers, you must first engage the bottom slide. Pull
the bottom slide out of the cabinet and insert a screwdriver through the two holes
on the side of the slide to keep the slide extended outside the cabinet. Lift the
drawer and insert the edges and “ears” on the bottom drawer slide (Figure 67)
into the guides at the front of the lower slide, and push the drawer onto the lower
slide until the drawer stop is engaged (Figure 68).
INTELLICAB USER MANUAL GSL-ISUM-02.0-RETAIL October 2011 © 2011 GSL Solutions, Inc. Page 73 of 103
Figure 69. Horizontal and
vertical alignment screws.
Step 2. Tilt the drawer up slightly to clear the stop, and insert the slide extensions
into the space between the slide rollers, continuing until the slide is completely
engaged.
Step 3. Attach the upper slide. Pull the upper slide forward until all four rollers
are in the slide U-channel and push the rubber slide into place until it locks.
Slowly close the drawer after inserting.
Step 4. Reconnect the network cable, insert the tension plate in place, and
tighten the black thumbscrew (see Figure 64).
Repeat the process for each of the drawers.
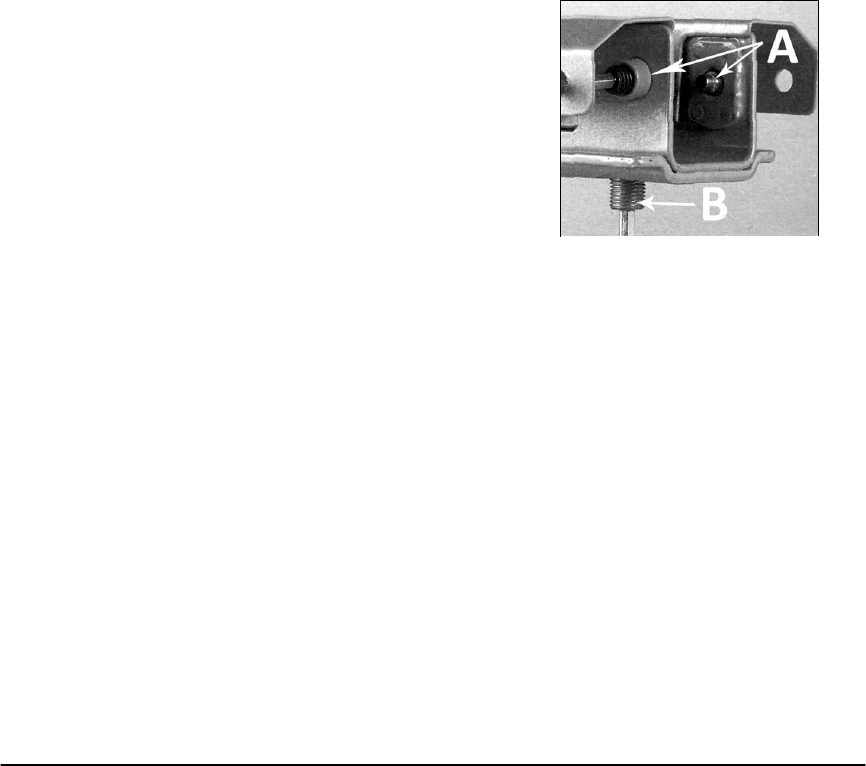
11.4. ALIGN THE DRAWERS
Prior to using the cabinet, each of the drawers should be aligned to ensure
smooth operation. Before aligning the drawers, make sure the cabinet has been
leveled and that it does not rock from side to side or from front to back. Alignment
screws are located on the underside of each drawer, at the front of the bottom
slide (Figure 69). These can be used to raise or lower the drawer and move it
from side to side.
To align the drawers, start with the drawer on the
left side of the cabinet. Using a 4mm Allen wrench,
loosen the side screws (Figure 69 - “A”), and then
raise or lower the drawer as needed by tightening
or loosening the vertical alignment screw (Figure 69
- “B”). The front face of the drawer should be
adjusted to allow approximately 0.15 inch of space
at the top of the drawer when it is closed. Make
sure the side alignment screws remain engaged in
the U-channel while aligning the drawers.
When the vertical alignment is complete, adjust the horizontal alignment by
tightening or loosening the horizontal alignment screws. To adjust the drawer to
the right, loosen the right screw and tighten the left; to move the drawer to the
left, loosen the left screw and tighten the right. When the horizontal position is
correct, with approximately 0.15 inch of space on the left edge between the
cabinet frame and the drawer, tighten the horizontal adjustment screws just
enough to ensure that the drawer is snugly locked into position. Repeat the
process for the drawer on the far right, leaving a 0.15 inch space between the
right edge of the drawer and the cabinet frame, and then adjust the middle
drawer(s) so that all of the drawers are spaced evenly and freely slide in and out
of the cabinet.
Note: IntelliCab drawer slides are tested at the factory prior to shipment and do
not require any additional lubrication. The application of any type of lubricant to
the slides by the customer may impair their operation and may void your
warranty.
INTELLICAB USER MANUAL GSL-ISUM-02.0-RETAIL October 2011 © 2011 GSL Solutions, Inc. Page 74 of 103
11.5. STARTING THE FAIL-OVER SERVER. See section 12.2.
11.6. FIND PRESCRIPTIONS IF THE SYSTEM GOES DOWN. See section 12.
11.7 . LOCATE FAILED RFID TAGS WITH AN ELECTRONIC CUBBY REPORT.
Note: This function is designed to help you find baskets that are not being
read by the IntelliCab drawer, or a basket that may have been accidentally
put into the IntelliDrawer backwards (with the RFID tag facing the front).
The System will light cells it thinks are empty.
When an RFID tag or SmartBasket is placed in the IntelliCab, the user
receives audio and visual feedback that a RFID tag or SmartBasket was
read correctly. However, in a few special circumstances the RFID tag
may fail to read. For example, after opening and closing the IntelliDrawer,
items within the SmartBasket may shift. If the SmartBasket contains Rx
materials with any foil packaging, then the RFID tag may stop reading, or
the RFID tag may be weak. If this occurs the user may not know the RFID
or SmartBasket is now not reading within the IntelliDrawer.
To verify all RFID tags or SmartBaskets are reading properly, the following
steps should be followed:
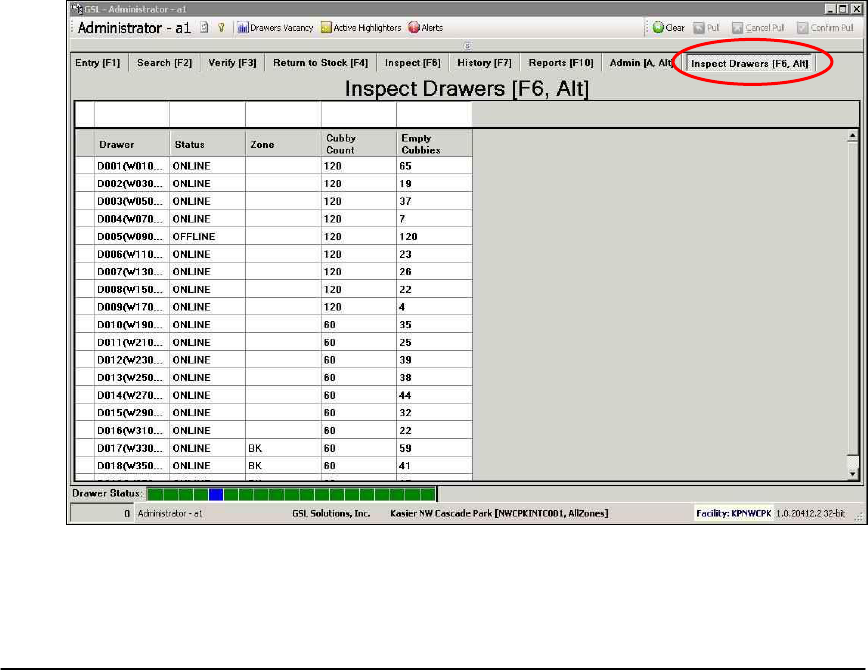
Figure 70. Inspect Drawers [Alt + F6] for correct operation.

INTELLICAB USER MANUAL GSL-ISUM-02.0-RETAIL October 2011 © 2011 GSL Solutions, Inc. Page 75 of 103
Step 1. From the main menu click on the Inspect Drawer Tab or press
[ALT+F6].
Step 2. Click on the first drawer, while holding down the left mouse button,
move the mouse down until all the drawers are highlighted then release the
left mouse button.
Step 3. Next, simply click on Pull or press [F12] to activate a pull operation.
Step 4. The light will illuminate on each cabinet with your Pick Number and
Color. Authenticate yourself at the first drawer; once your number/color blinks,
proceed to open the drawer.
Step 5. Once the drawer is opened, the green LED lights turn on and scroll row
by row from the top to the bottom. In this mode, the lights indicate that the
System believes each lit cell to be empty. Should a light flash on a cubby that
has a SmartBasket located in it, the user should remove this SmartBasket.
This indicates the SmartBasket may have been put in backwards or is “bad”
and is no longer being read by the System. As mentioned above, this is most
likely due to metal interference and improper loading during the coupling
process. If an empty location does not light up, this could indicate a bad LED
light strip beneath that cell.
Step 6. Once you have verified and removed any “bad” SmartBaskets from the
drawer, close the drawer and repeat the step for the next drawer until all
drawers are verified.
Step 7. If any SmartBaskets were removed, the user should place the basket
on an RFID Reader and verify the basket is empty. If the SmartBasket does
not read, remove all the contents of the basket and try reading again.
Step 8. If the SmartBasket is reading once the contents are removed, simply
couple the contents to the SmartBasket again, ensuring no foil packaging is
placed near the back left side of the SmartBasket.
Step 9. If the RFID tag still does not read, even when all the items have been
removed, the SmartBasket should be isolated and removed from production.
The contents of that basket should then be recoupled to a different
SmartBasket.

INTELLICAB USER MANUAL GSL-ISUM-02.0-RETAIL October 2011 © 2011 GSL Solutions, Inc. Page 76 of 103
CHAPTER 12. SYSTEM BACKUP AND RECOVERY
OVERVIEW
The GSL System contains numerous methods and functions enabling
continuous operation with little-to-no down time of operation personnel.
At the system level, Hot Server Standby along with nightly database
backups provides full system recovery options.
At the IntelliCab component level, each IntelliDrawer operates as a separate
functional unit. A failure of an IntelliDrawer does not affect the operation of
adjacent or other IntelliDrawers. For those failures that are temporary in nature,
such as a power failure, IntelliSys automatically creates a "PatientReport" every
thirty minutes onto a remote server of choice, thus enabling patient lookup via
paper.
At the Software Client level, failure of local or attached devices such as an
IntelliPad or barcode scanner are failed gracefully to other methods. If an
IntelliPad fails, then the barcode scanner can be used. If the barcode scanner is
also unavailable, then manual entry of information can occur.
12.1. DATABASE AND EVENT LOG BACKUP
Each night at 2300 the system automatically creates a set of backup data in a
Staging folder. This folder contains backups of all SQL Server databases and
event log-information per DISA standards. Database backups will be saved in
a rotating "last 7 days" mode, while System Event Log-information is
maintained for a minimum of one year. With the information contained in the
staging folder, customer provided backup utilities can safely copy this
information into a central repository of backup data.
12.2. STANDBY SERVER
GSL provides a Standby "Backup" server for customers purchasing
Enterprise or Enterprise Plus IntelliSys. GSL has partnered with
Doubletake Software, which enables the real-time backup of all
information from the Production Server to Standby. Upon fail-over, the
Standby system will reconfigure itself as a complete "clone" of the
production server, the original production server will be asked to
shutdown (if running) and the standby will reboot. Upon reboot, a
complete and exact copy of all data and configuration is produced,
resulting in a production system with few if any transactions lost.
12.3. PATIENT REPORT/PDF BACKUP
In case of complete system failure due to events such as power loss or
network failure, the System produces an electronic Patient Report every
INTELLICAB USER MANUAL GSL-ISUM-02.0-RETAIL October 2011 © 2011 GSL Solutions, Inc. Page 77 of 103
thirty minutes. This report contains essential prescription look-up
information allowing for the discovery of Patient Name (and DOB), along
with the physical location of those prescriptions within the IntelliDrawers,
Oversize, and Refrigerator. It is recommended this report be placed onto
a server or workstation located in a different facility than the computer
room. GSL also recommends the server or PC utilize an Uninterruptible
Power Supply (Battery) in case of total power failure.
12.3.1. STEPS TO LOCATING AND USING THE PATIENT REPORT.
Figure 71. Using the Patient Report.
Step 1. Locate the red medium-size basket labeled “Customer Kit.” (This
basket is usually in the highest numbered Large cabinet in the
bottom row).
Step 2. Once inside the medium red basket, locate the patient backup report
instructions which will provide the location of the patient backup
report.
Step 3. Once you locate the backup report, print and place near the
IntelliCabs for all to use. Note: this report will be in alphabetical
order by patient name. The report will also display the location of
the SmartBasket and the number of Rxs contained within the
IntelliCabs.
INTELLICAB USER MANUAL GSL-ISUM-02.0-RETAIL October 2011 © 2011 GSL Solutions, Inc. Page 78 of 103
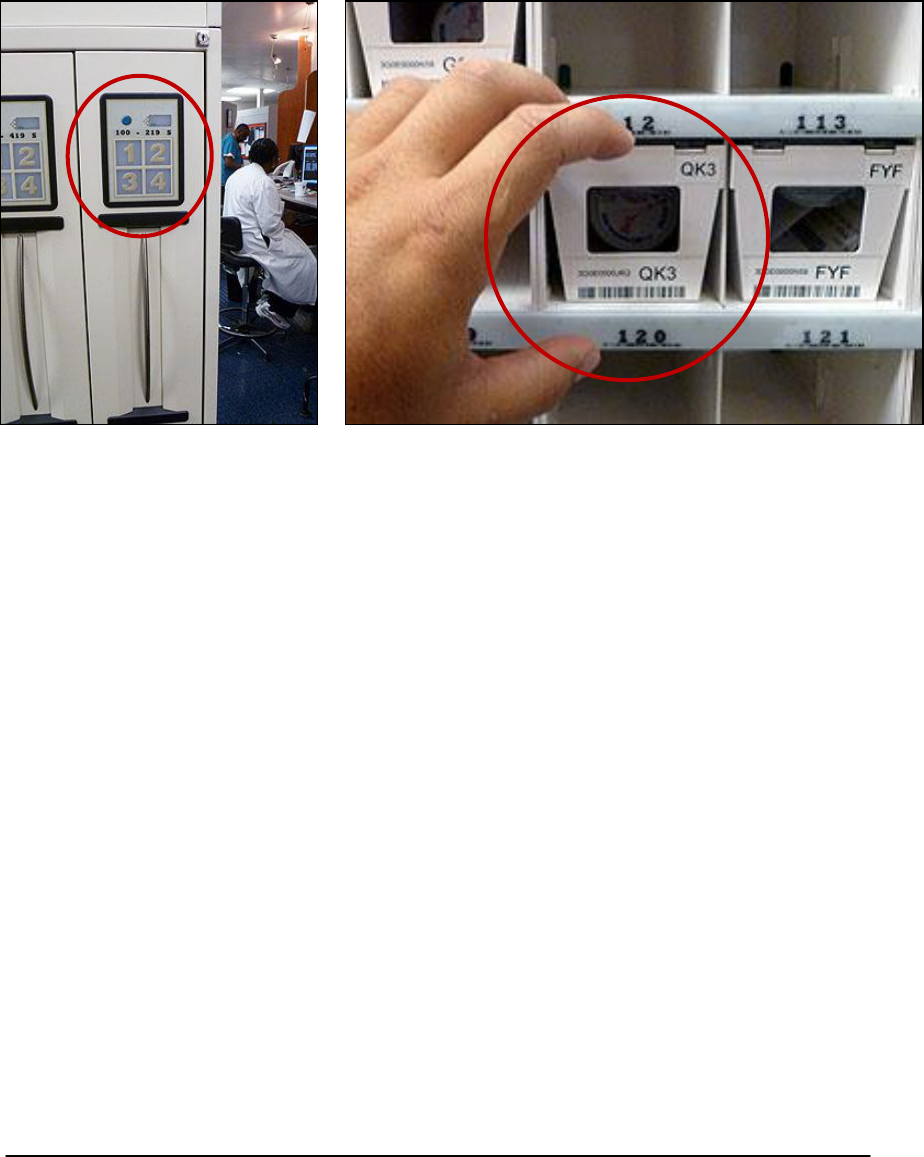
Step 4. Identify the patient on the report, identify the IntelliCab, open the
drawer and identify the location of the basket(s). Example: patient
name is John Doe and the location identified is W0120. The user
will go to the drawer labeled 100-219. Once opened, locate cubby
number 120 (see Figures 72a and 72b).
Figure 72a and 72b. Locating the drawer and cubby containing
the Patient Report – example from Step 4.
Step 5. Once the SmartBasket is removed from the system, you will need to
annotate the removal on the patient report by signing or initialing by
the patient’s name.
12.3.2. STEPS TO UPDATE THE SYSTEM ONCE ALL INTELLICABS ARE BACK
ONLINE.
Step1. The IntelliSys application will display yellow alerts stating
SmartBaskets are removed without authorization.
Step 2. Click the [F2] function key. You will see a list of SmartBaskets that
were removed from the system. These will be listed first.
Step 3. Click on the first item; the item details will be displayed on the right
side of the screen. Verify the item is checked or initialed on the
patient report as being removed.
Step 4. If the item was identified as being dispensed, simply click on the pull
button or press [F12]. This will update the system to identify the Rx
as being dispensed from the IntelliSys.

INTELLICAB USER MANUAL GSL-ISUM-02.0-RETAIL October 2011 © 2011 GSL Solutions, Inc. Page 79 of 103
Step 5. Repeat process for each item. If an item is displayed in IntelliSys as
removed but is not on the patient report; the supervisor must
investigate further to determine the status.
INTELLICAB USER MANUAL GSL-ISUM-02.0-RETAIL October 2011 © 2011 GSL Solutions, Inc. Page 80 of 103
12.4. DEVICE FAILURE AND RECOVERY OPERATION
12.4.1. INTELLIPAD AND COMPONENTS
The GSL IntelliPad consists of several
components:
1. RFID Reader
a. Low voltage power supply
b. Standard RJ 45 Ethernet
cable
2. RFID Antenna
3. Coaxial Cable
The RFID Reader is used to
communicate to the IntelliSys application.
This component is programmed at the
factory with an IP address, MAC Address,
and Subnet Mask.
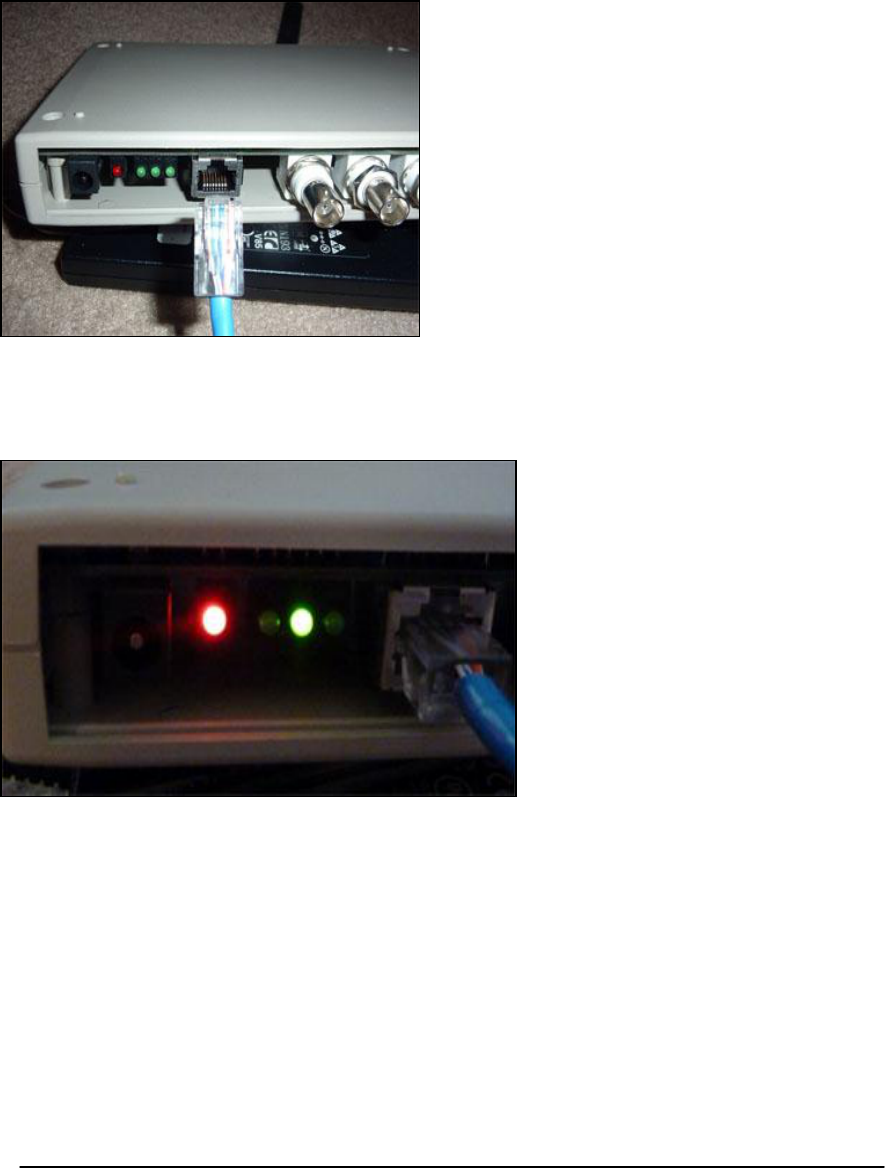
Figure 73. Front of RFID Reader with Ethernet cable.
The front of the RFID Reader
displays 2 LEDs: one Red and
one Green. The Red LED
indicates the device is
connected to the network via
the RJ 45 Ethernet cable. This
LED consistently flashes when
the RFID Reader is
communicating with the
network. The Green LED
indicates the RFID Reader is
receiving power. This light
should not flash (Figure 74).
Figure 74. RFID Reader with front LEDs.
The RFID Antenna is a plastic black box with one coaxial connector on one end
and is usually mounted underneath the countertop. The Antenna reads the GSL
RFID tag placed near it and sends the information to the RFID Reader. There are
no serviceable parts within the RFID Antenna.
The Coaxial Cable is used to connect the RFID Reader with the RFID Antenna.
This cable simply twists a quarter turn clockwise and locks in place at the RFID
Antenna (There is only one place the cable will connect). The other end of the
cable is connected the same way; however, there are several connectors on the
RFID Reader. The Coaxial Cable is always connected to the connector furthest
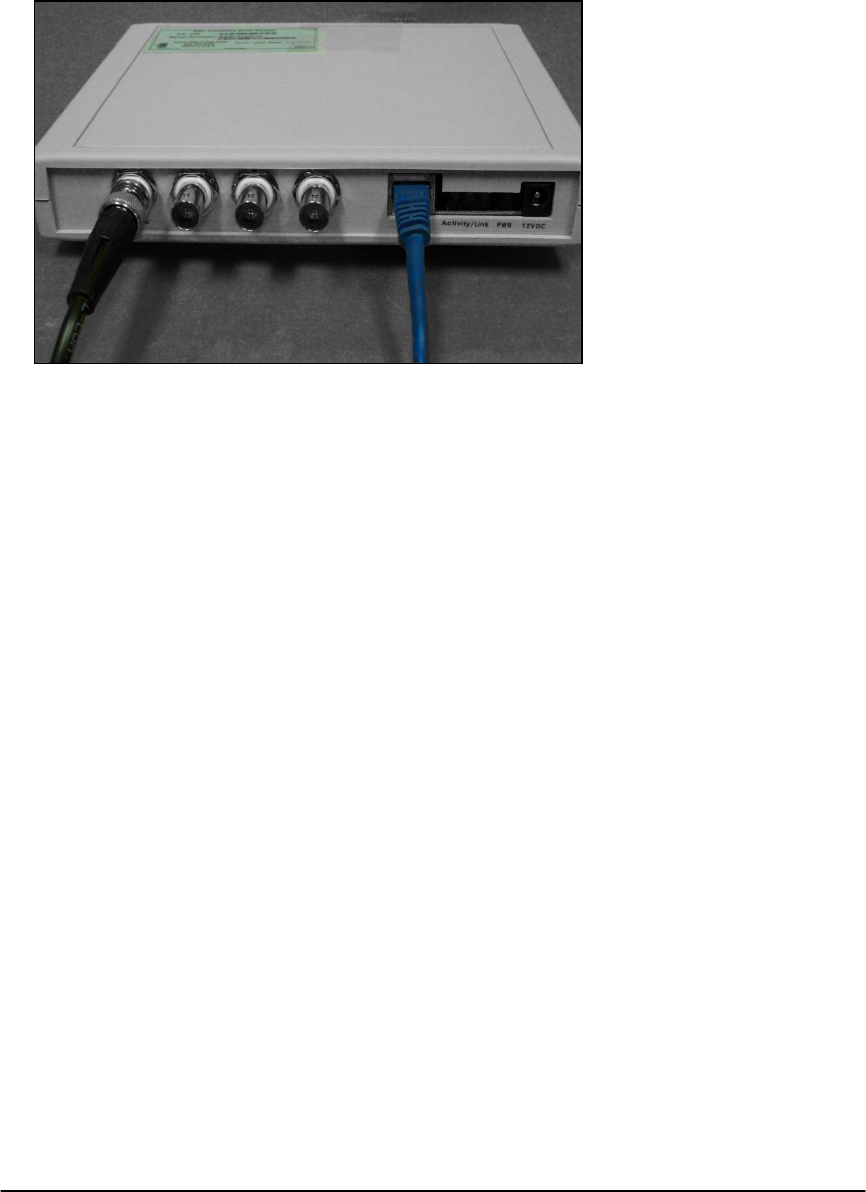
INTELLICAB USER MANUAL GSL-ISUM-02.0-RETAIL October 2011 © 2011 GSL Solutions, Inc. Page 81 of 103
from the power and Ethernet connection (Figure 75). The Coaxial Cable should
be run in a way that it does not coil or hang freely under the counter. A “zigzag”
pattern usually works best in reducing interference.
When troubleshooting
the IntelliPad and
components, you should
always check the two
LEDs, the Coaxial Cable
connections, the “route
of the cable,” and for
any metal objects near
any of the components.
Metal objects will cause
interference and may
reduce the ability of the
IntelliPad to read. Also,
the IntelliPad has no
user-level serviceable
parts.
Figure 75. Coaxial Cable is attached to connector on left side.
12.4.2. INTELLIPAD FAILURE
An IntelliPad offers very fast electronic reading of SmartBaskets or RFID
Badges by simply placing the item on the counter over the reader. If an
IntelliPad fails for any reason, including power fail, network fail or device
failure, the System will alarm and indicate which IntelliPad has failed.
During the failure, normal system functions can occur via use of the
barcode scanner. Every SmartBasket and SmartBadge contains a
barcode specifically for this purpose.
12.4.2.1. INTELLIPAD FAILURE – ENTRY [F1] SCREEN
With the IntelliPad unavailable, simply scan each prescription into the
SmartBasket. After the last RX has been scanned, scan the barcode on
front of the SmartBasket.
If a barcode scanner is unavailable, manually type each RX into the
RX/PatientName field and depress either [TAB] or [ENTER]. After the last
RX is entered, click on the LOCATION field and then manually enter the 3
character SmartBasket I.D. into this field, then depress [ENTER].
In order to view basket contents on the ENTRY [F1] screen, use the
barcode scanner and scan the barcode on the front of the SmartBasket. If
a barcode scanner is unavailable; Click on the LOCATION field and then

INTELLICAB USER MANUAL GSL-ISUM-02.0-RETAIL October 2011 © 2011 GSL Solutions, Inc. Page 82 of 103
enter the 3 character SmartBasket I.D. into this field, then depress
[ENTER].
In order to clear the entry screen and ready for the next operation, switch
screens to the Search Screen, AND THEN back to the ENTRY [F1]
Screen.
12.4.2.2. INTELLIPAD FAILURE - LOGIN SCREEN
If an IntelliPad is unavailable, use the barcode scanner to scan the
SmartBadge. If a barcode scanner is unavailable, manually enter the 3-
character Badge I.D., followed by username and password.
12.4.3. SCANNER FAILURE
A wireless Bluetooth scanner’s battery may not hold a charge after two to
three years, in which case the battery will need to be replaced (contact
GSL Solutions for service). However, the scanner will still operate while
on the cradle. When a barcode scanner is unavailable, then manual data
entry can be used.
Note that if there are multiple wireless scanners at a site, they are
programmed specific to their respective cradles. First make sure that the
wireless scanner is matched with its paired cradle.
12.4.4. SCANNER FAILURE- ENTRY SCREEN
If a barcode scanner is unavailable, manually type each Rx into the
Rx/PatientName field and depress either [TAB] or [ENTER]. After the last
Rx is entered, click on the LOCATION field and then manually enter the 3
character SmartBasket I.D. into this field, then press [ENTER].
To view basket contents on the ENTRY [F1] screen, use the barcode
scanner and scan the barcode on the front of the SmartBasket. If a
barcode scanner is unavailable, click on the LOCATION field and then
enter the 3-character SmartBasket I.D. into this field, then press
[ENTER].
To clear the entry screen and prepare for the next operation, switch
screens to the Search Screen, then back to the ENTRY [F1] Screen.
12.4.5. SCANNER FAILURE – LOG-IN SCREEN
If a barcode scanner is unavailable, manually enter the 3-character
Badge I.D., followed by username and password.

INTELLICAB USER MANUAL GSL-ISUM-02.0-RETAIL October 2011 © 2011 GSL Solutions, Inc. Page 83 of 103
12.4.6. SCANNER FAILURE - SEARCH SCREEN
If a barcode scanner is unavailable for patient lookup, click on the column
headers such as PCode, LastName then manually enter the appropriate
patient information for lookup and search.
12.4.7. INTELLIDRAWER FAILURE
Each IntelliDrawer operates as an independent unit and failure of any
one (or more) drawers will not affect operation of other IntelliDrawers.
The System offers provisions to file and find prescriptions stored within
drawers that are offline or failed, thus allowing degraded but normal
operation to occur.
If an IntelliDrawer fails to respond, a warning screen may appear.
Figure 76. IntelliDrawer failed to respond.
In the event an IntelliDrawer experiences failure, two choices of continued
operation are available: Swap Baskets or Use Drawer in Offline Mode.
12.4.8. SWAP BASKETS. Swapping baskets to other operating drawers is
standard practice when an IntelliDrawer fails.
Step 1. Set IntelliDrawer to Offline. Using the Admin Tab, System
Status Sub-Tab, locate the failed drawer, click Offline, then

INTELLICAB USER MANUAL GSL-ISUM-02.0-RETAIL October 2011 © 2011 GSL Solutions, Inc. Page 84 of 103
click on the YES button, or press the [Y] key on the
keyboard, to bring the drawer into an offline condition. Once
offline, the drawer will not attempt to electronically scan for
SmartBasket insertion or removal.
Step 2. Using the INSPECT screen, highlight all the baskets
contained in the drawer just taken offline.
Step 3. Press [F12] to initiate an Inspect Pull of all baskets in the
IntelliDrawer.
Step 4. Click on Confirm Pull which will indicate to the System all
baskets are now out of the drawer.
Step 5. Re-file the SmartBaskets just removed into any other
IntelliDrawers.
Step 6. Place a note on the failed IntelliDrawer indicating a
DoNotUse condition to prevent anyone from filing new
SmartBaskets into this drawer.
Step 7. Contact GSL and follow the instructions to troubleshoot the
failure ММ – 24/7 Support Line: 866.477.2682
12.4.9. USE DRAWER IN OFFLINE MODE.
IntelliDrawers may also be used in Offline mode. In this mode,
SmartBaskets can be removed from the drawer, and new
SmartBaskets can be filed within the drawer.
Set IntelliDrawer to Offline. Using the Admin Tab and the System
Status Sub-Tab, locate the failed drawer, click Offline, then click on
the YES button, or press the [Y] key on the keyboard, to bring the
drawer into an offline condition. Once offline, the drawer will not
attempt to electronically scan for SmartBasket insertion or removal.
12.4.9.1. SEARCHING FOR PATIENT PRESCRIPTIONS IN OFFLINE
INTELLIDRAWERS
When searching for patient prescriptions in offline mode, perform
normal lookup functions via the SEARCH [F2] Screen. When the pick
is initiated, there will be no lights to guide or follow and the system will
follow the same procedure as if an Oversize item was selected.
Step 1. Lookup patient per normal methods and perform a pick
operation.

INTELLICAB USER MANUAL GSL-ISUM-02.0-RETAIL October 2011 © 2011 GSL Solutions, Inc. Page 85 of 103
Step 2. Note the location(s) of the prescriptions on the screen. For
those prescriptions located within an IntelliDrawer that is
offline, the System will indicate this will be a manual pick
operation.
Step 3. Use the pick information and locate the SmartBasket within
the drawer and remove.
Step 4. Bring the SmartBaskets back and then use the barcode
scanner to scan each basket to verify the proper basket was
retrieved.
12.4.9.2. FILING SMARTBASKETS INTO OFFLINE INTELLIDRAWERS
If multiple drawers are not working, or an entire IntelliCab is down,
check the UPS (battery backup), and check the connections from the
UPS to the IntelliCab.
Filing SmartBaskets into offline IntelliDrawers can be performed using
the wireless scanner provided with the system. GSL recommends you
use a PC that is located close to the IntelliDrawers with an associated
wireless scanner.
For each SmartBasket to be filed, first scan the barcode located on
the front of the basket. Then place the SmartBasket into a cell and
scan the barcode for that location. Listen for the "happy chirp" tone to
be emitted from the PC for each operation.
When normal IntelliDrawer operation resumes, the system will check
the location of all the SmartBaskets within the drawer and will
automatically adjust for any discrepancies.

INTELLICAB USER MANUAL GSL-ISUM-02.0-RETAIL October 2011 © 2011 GSL Solutions, Inc. Page 86 of 103
CHAPTER 13. SUPPORT AND WARRANTY
13.1. ABOUT GSL SOLUTIONS, INC
GSL Solutions, Inc. designs and produces a variety of storage and tracking
products specifically designed for retail pharmacies’ will-call operations.
Headquartered in Vancouver, Washington, the Company’s Will-Call Storage and
Retrieval System cabinets and associated hardware and software components
improve safety and compliance, streamline workflow, and increase the efficiency
of your pharmacy operations.
13.2. WARRANTY
DISCLAIMER OF IMPLIED WARRANTIES AND LIMITATION OF
LIABILITY
GSL Solutions, Inc. warrants that the Will-Call Storage System delivered by GSL
Solutions, Inc. will be of the kind and quality described in the order or contract
and will be free of defects in workmanship or material. Should any failure to
conform to this warranty appear within ―1― (one) year of purchase, GSL
Solutions, Inc. shall, on notification, correct such non-conformity, including non-
conformance with the specifications, at its option, either by repairing any
defective part or parts, or by making available a repaired or replacement part.
For military bases outside the United States, GSL Solutions, Inc.’s obligation
under this warranty shall not include any transportation charges or costs of
installation. Any improper use, operation beyond capacity, substitution of parts
not approved by GSL Solutions, Inc., or any alteration or repair by others in such
manner that in GSL Solutions, Inc.’s judgment affects the product materially and
adversely shall void this warranty.
GSL Solutions, Inc., makes no other warranty, expressed or implied, as to any
matter whatsoever including, without limitations, the design or condition of the
equipment, its merchantability or its fitness or capacity or durability for any
particular purpose, the quality of the material or workmanship of the equipment or
the conformity of the equipment to the provisions and specifications of any
purchase order or orders relating thereto. GSL Solutions, Inc. shall have no
liability for any claim, loss or damage caused or alleged to be caused directly,
indirectly, incidentally or consequentially by the equipment or software, or by any
inadequacy thereof or deficiency or defect therein, by any incident whatsoever in
connection therewith, arising in strict liability, negligence or otherwise.
Correction of non-conformities, in the manner and for the period of time provided
above, shall constitute fulfillment of all liabilities of GSL Solutions, Inc. to its
customer, whether based on contract, negligence or otherwise, with respect to,
or arising out of, such equipment. Neither GSL Solutions, Inc. nor its customer
shall be liable for special, indirect or consequential damages, or damages due to
delay. The remedies set forth in this Section are exclusive, and are the limits of
any liability of GSL Solutions, Inc., with respect to any contract or sale or

INTELLICAB USER MANUAL GSL-ISUM-02.0-RETAIL October 2011 © 2011 GSL Solutions, Inc. Page 87 of 103
anything done in connection therewith, whether in contract, in tort, or under any
warranty.
13.3. HELP DESK
24/7 Support Line: 866.477.2682
Email: support@gslcorp.com
Corporate Address:
GSL Solutions, Inc.
2414 SE 125th Ave.
Vancouver, WA 98683
INTELLICAB USER MANUAL GSL-ISUM-02.0-RETAIL October 2011 © 2011 GSL Solutions, Inc. Page 88 of 103
APPENDIX A: USER IDENTIFICATION AND ROLES
GSL IntelliSys™ System
Initial User Identification and Roles
Site:
Date:
By:
GSL
Updated:
Updated:
Updated:
Use this table for preparing the initial system configuration.
Document staff and personnel access to the GSL IntelliSys System along with the various
roles to which personnel may be assigned.
Each person accessing the system must have credentials that are maintained within IntelliSys.
This information is only used within IntelliSys and is not related to any other sets of
information.
Each of the following columns must have information defined according to the following
parameters:
Login-Username
Recommend Last Name or FirstName.LastName or F.LastName.
Login-Password:
Recommend simple initial password and allow person to change during
training.
Note: Password complexity is site specific. Depending on Site Security
policies, the passwords may be relatively simple or complex.
First Name
Information used only within IntelliSys. May be used in reports.
Last Name
Information used only within IntelliSys. May be used in reports.
Role
Consider shift operations when assigning roles. Recommend at least one
person per shift have supervisor privileges so alarms can be
acknowledged.
ROLE DESCRIPTIONS
Administrator
Access to all configurable settings within the Will-Call Client.
Can add/disable system users, define security badges, place IntelliDrawers
Online / Offline.
Includes all functions within the RPh, Supervisor and Operator Roles.
RPh
Essentially equivalent to Supervisor Role. Future use for Pharmacist
verification of patient Rx (new prescriptions).
Supervisor
Ability to acknowledge system alarms such as "Unauthorized Basket
Removal."
Includes all functions available within the Operator Role.
Operator
Can perform all normal operational functions within IntelliSys, such as
Linking, Searching, Return to Stock (Non-Compliance), Put-away of
prescriptions, and Retrieving Prescriptions.
Vault Tech
The Vault Tech role is a secondary role that can be given to any user. This
role allows the pharmacy to define drugs that are controlled and gives the
Vault Tech special access to controlled substances. Only the Vault Tech
can perform non-compliance on drugs deemed to be controlled.

INTELLICAB USER MANUAL GSL-ISUM-02.0-RETAIL October 2011 © 2011 GSL Solutions, Inc. Page 89 of 103
LOGIN-
USERNAME
LOGIN -
PASSWORD
FIRST NAME
LAST NAME
ROLE
GSL Example
1234
Tericia
Nelson
Supervisor
Operator
Operator
Operator
Operator
Operator
Operator
Operator
Operator
Operator
Operator
Operator
Operator
Operator
Operator
Operator
Operator
Operator
Operator
Operator
Operator
Operator
Operator
Operator
Operator
Operator
Operator
Operator
Operator
Operator
Operator
Operator
Operator
Operator
Operator
Operator
Operator
Operator
Operator
Operator
Operator
Operator
Operator
Operator
INTELLICAB USER MANUAL GSL-ISUM-02.0-RETAIL October 2011 © 2011 GSL Solutions, Inc. Page 90 of 103
APPENDIX B: INSTALLATION OF GSL WILL-CALL CLIENT APPLICATION
(WCC)
B.1. INFORMATION NEEDED FOR INSTALLATION
The following information is required for installation:
Name of the computer on which the WCC will be installed.
Computer name or IP address of Server.
WCC software location (e.g. CD or server share)
Installation Specific Password (see internal documentation).
The following software is required for installation:
Operating System:
o Windows 7 (32 bit and 64 bit)
o Win XP SP2
o Windows VISTA SP1
o Windows 2003
o Windows 2000
Microsoft .Net Framework 2.0 SPI
B.1.1. PREPARING TO INSTALL THE GSL WILL-CALL CLIENT
B.1.1.1. Obtain the WCC software via CD or server share. The installation
file is labeled ClickOnceClientSetup.msi
B.1.1.2. Ensure the Installation account has Administrator rights and
privileges.
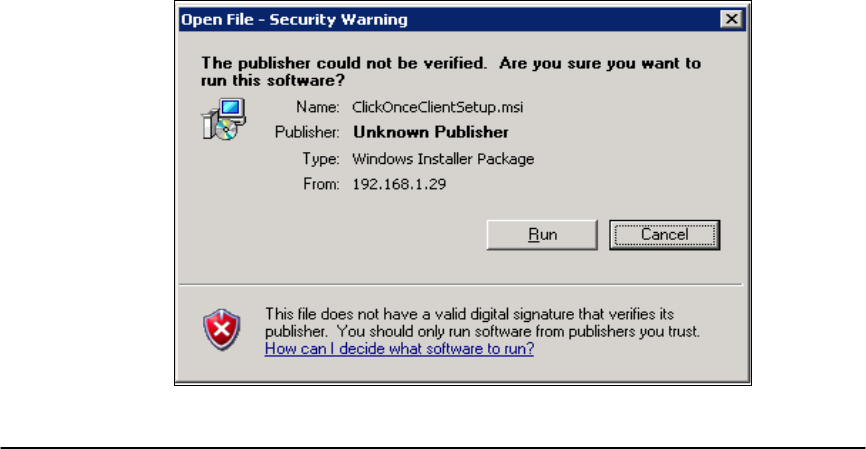
B.1.1.3. Launch the ClickOnceClientSetup.MSI installer. A security warning
will pop up indicating the installer is unsigned. Click “Run” to
proceed with installation:
INTELLICAB USER MANUAL GSL-ISUM-02.0-RETAIL October 2011 © 2011 GSL Solutions, Inc. Page 91 of 103
B.2. INSTALLATION PROCEDURES FOR THE GSL WILL-CALL CLIENT
SOFTWARE
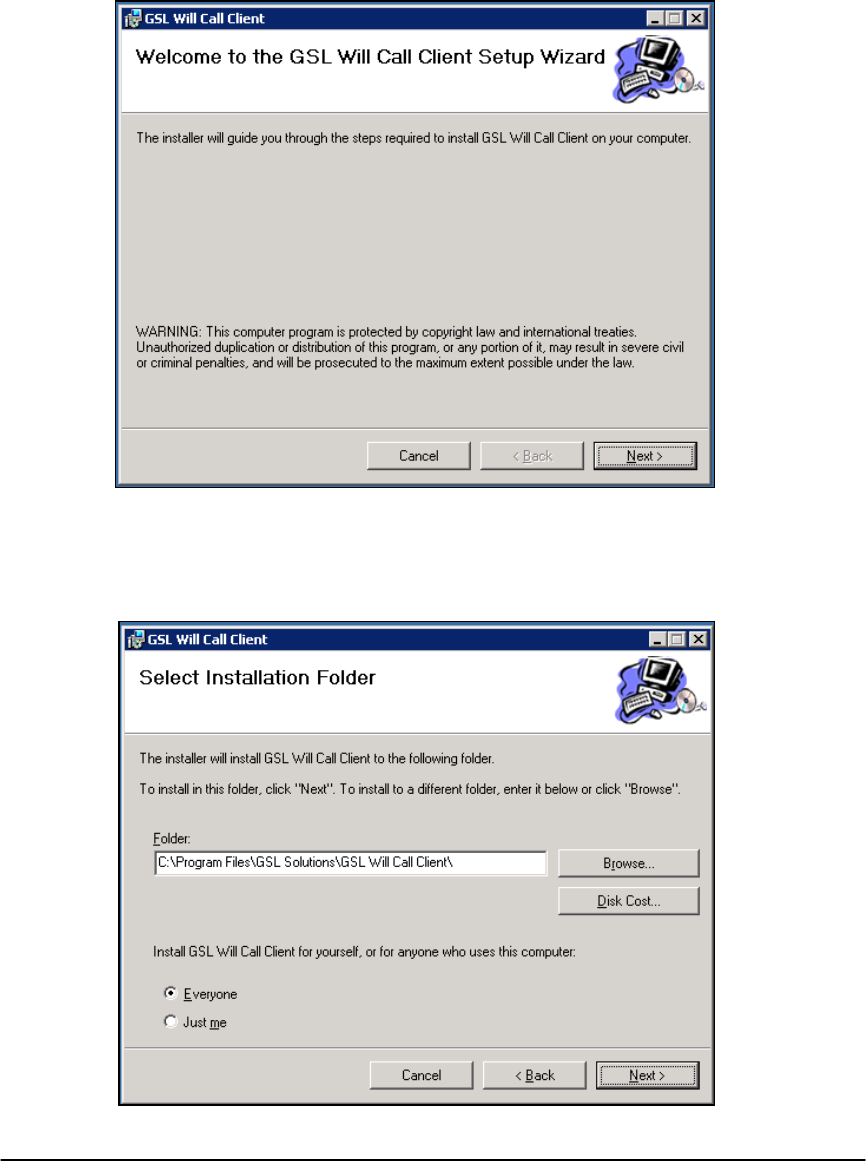
B.2.1. The GSL Installation Wizard splash screen will appear following the security
warning. Click Next to proceed.
B.2.2. Choose the folder where you want to install the client. It is recommended you
use the default folder settings. Click Next to proceed.
INTELLICAB USER MANUAL GSL-ISUM-02.0-RETAIL October 2011 © 2011 GSL Solutions, Inc. Page 92 of 103
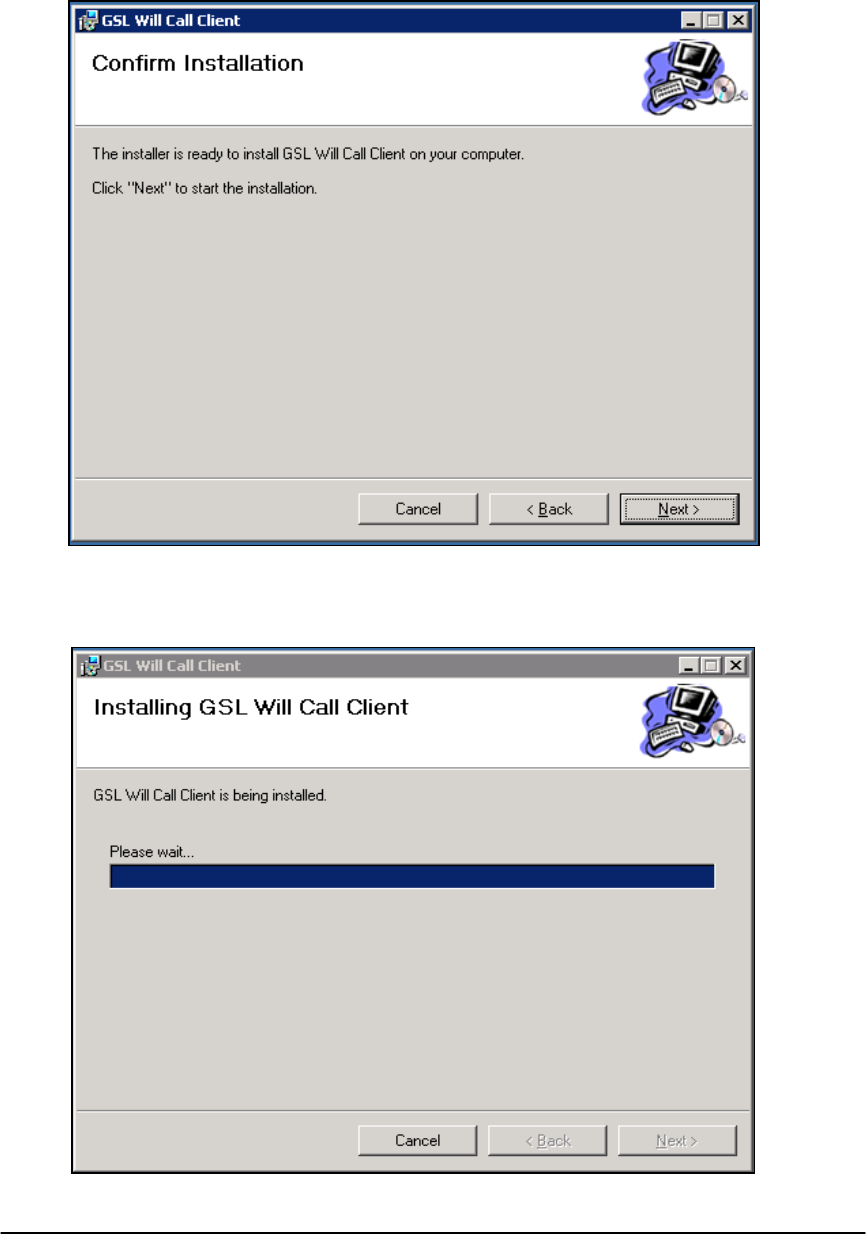
B.2.3. Confirm you want to install the software. Click Next to proceed.
B.2.4. The installation progress screen will appear. Please wait to supply configuration
information.
.
INTELLICAB USER MANUAL GSL-ISUM-02.0-RETAIL October 2011 © 2011 GSL Solutions, Inc. Page 93 of 103
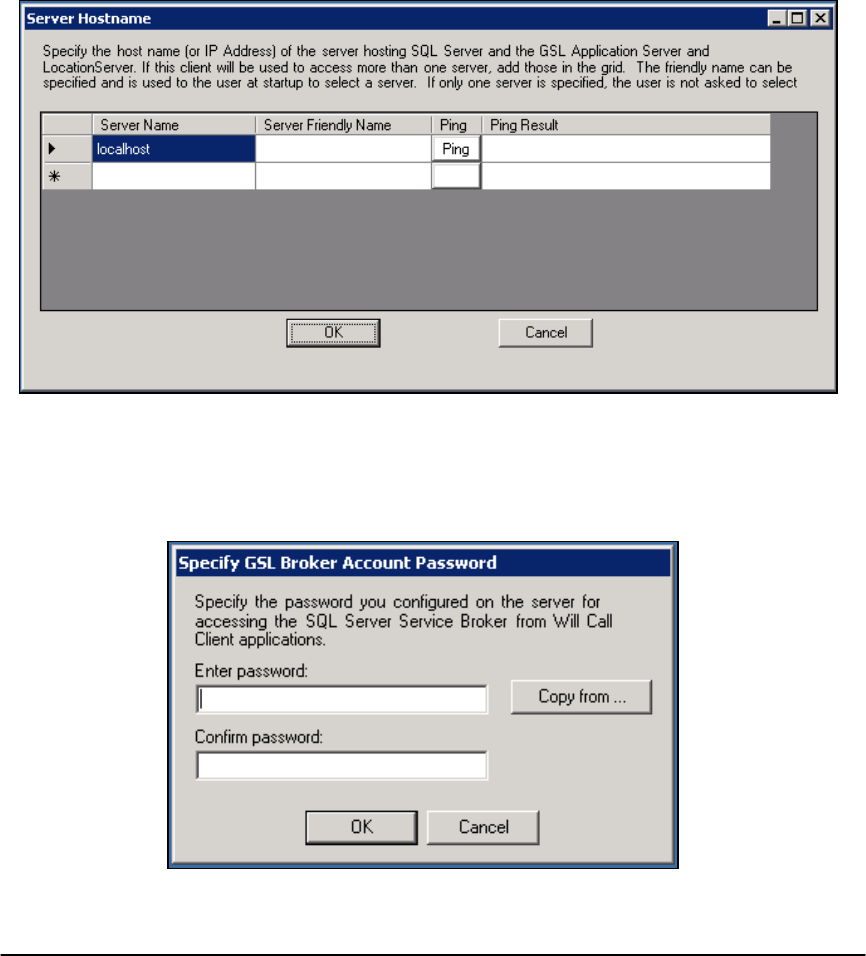
B.2.5. To complete the installation process, the user must supply final
configuration information. The next screen allows for multiple server
targets. For each GSL IntelliSys System, please provide the server name
or IP Address. For testing purposes, pressing the “Ping” button will confirm
that access to the server is available.
B.2.6. Server information is supplied in two columns: “Server Name” and “Server
Friendly Name.” Server Name refers to the IP Address or Computer Name
of the IntelliSys Server. Server Friendly Name can be associated with the
server and will be the name displayed at the top of the WCC Window in a
multi-System deployment.
B.2.7. When the information is complete, click OK.
B.2.8. A password was created when the server was initially configured. This
password must be used for the initial connection between the WCC
applications and the server. On the Specify GSL Broker Account
Password screen, please enter the password and password verification.
INTELLICAB USER MANUAL GSL-ISUM-02.0-RETAIL October 2011 © 2011 GSL Solutions, Inc. Page 94 of 103
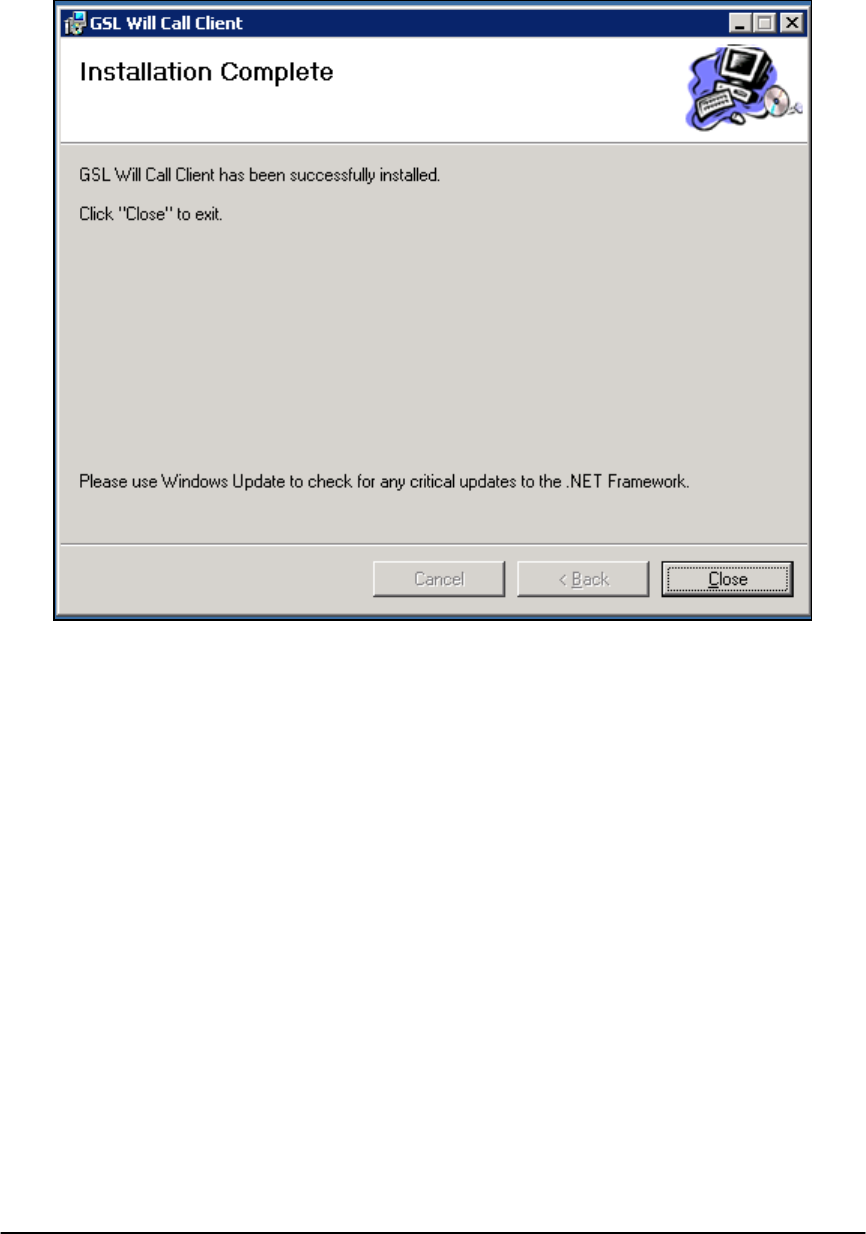
B.2.9. The final next screen will appear to indicate the successful installation of
the WCC application.
B.3. CONFIGURE THE WCC APPLICATION ON THE SERVER
B.3.1. SECURITY OF CONNECTION. Security established between the WCC
application and IntelliSys server consists of:
Password-protected initial communication.
Secure encrypted communication.
WCC configuration on IntelliSys server.
B.3.2. ACCESS THE INTELLISYS SYSTEM.
B.3.2.1. Login to the IntelliSys server (with Administrator privileges).
B.3.2.2. Launch the Configurator application.
B.3.2.3. Click Start -> All Programs -> GSL Will-Call Serve -> GSL
Will-Call Server Configurator.
B.3.3. Select the “Location Server” configuration level located on the left
panel. Click on Create Subcomponent.
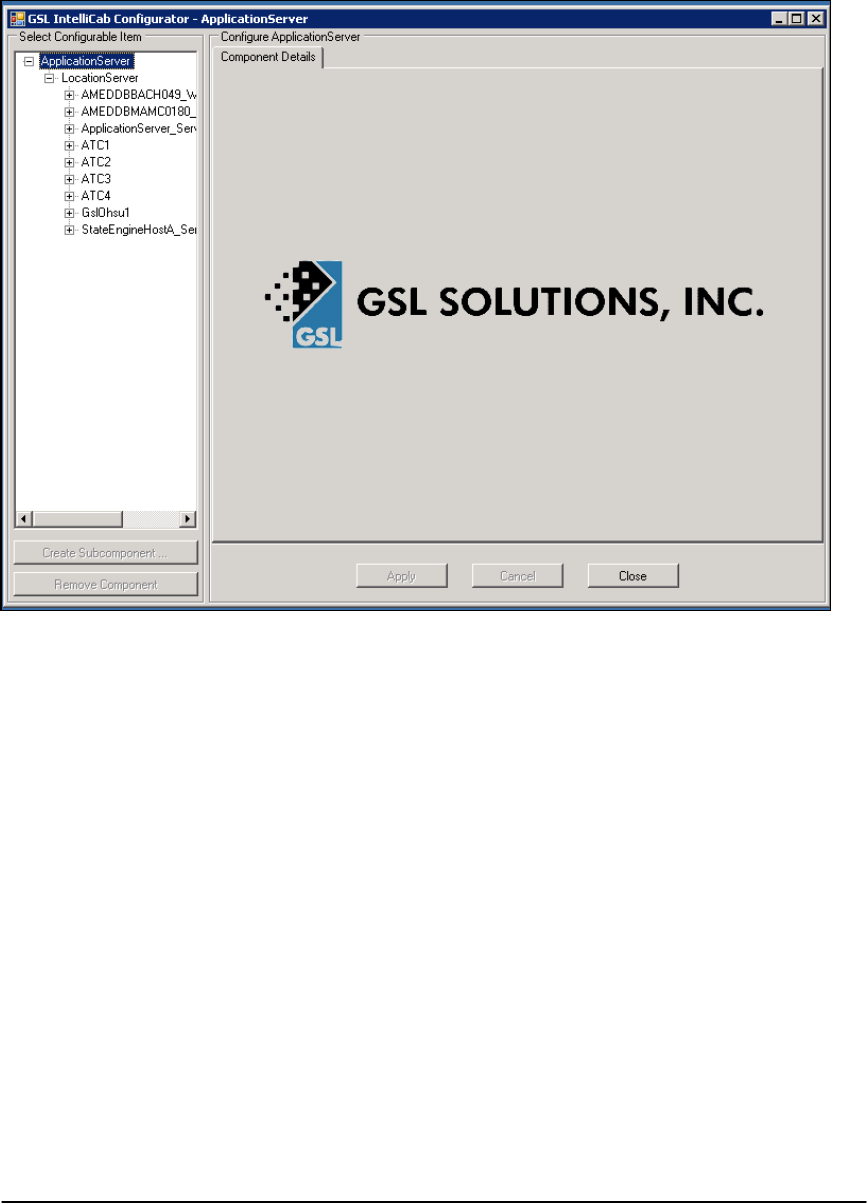
INTELLICAB USER MANUAL GSL-ISUM-02.0-RETAIL October 2011 © 2011 GSL Solutions, Inc. Page 95 of 103
B.3.4. The next window allows configuration of the WCC Application. Click
on the Will-Call Client check box.
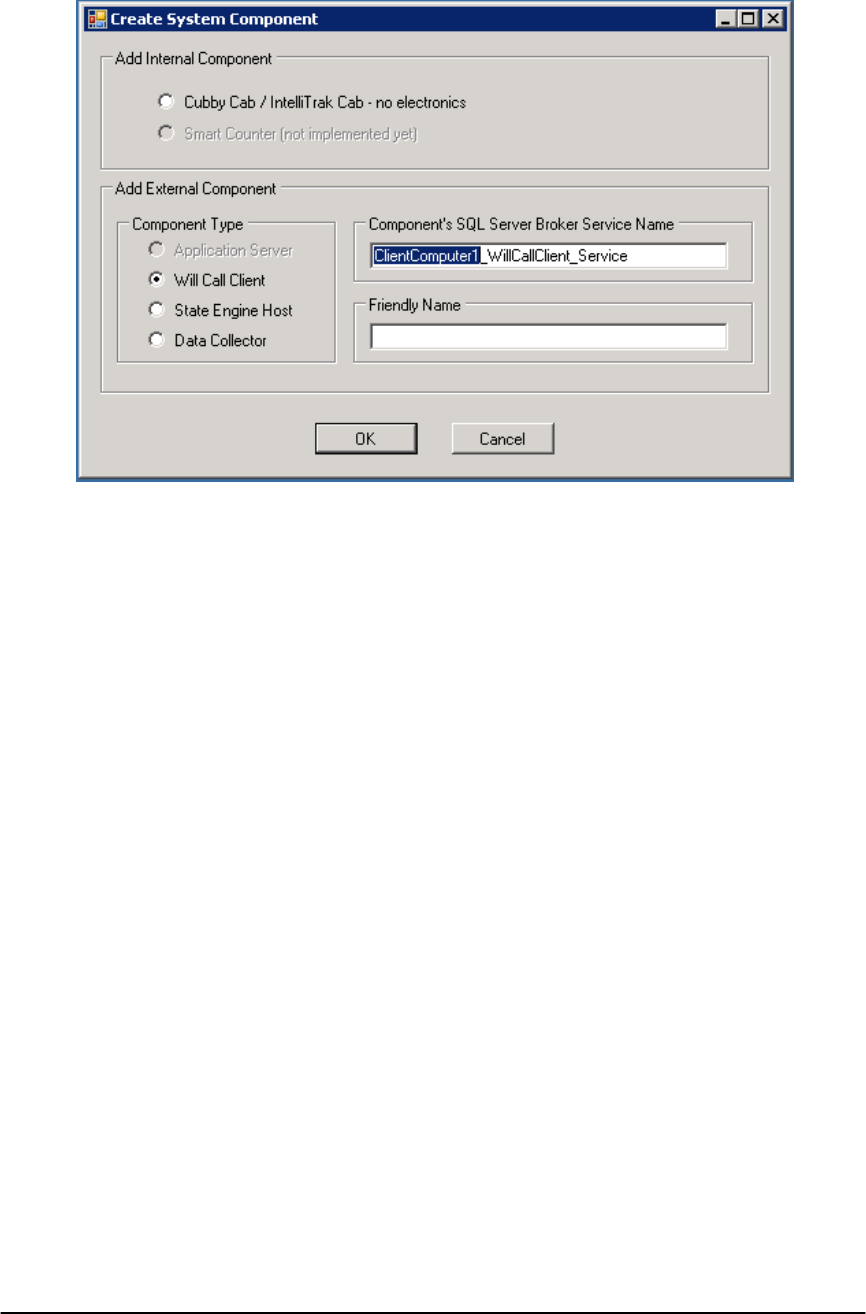
INTELLICAB USER MANUAL GSL-ISUM-02.0-RETAIL October 2011 © 2011 GSL Solutions, Inc. Page 96 of 103
B.3.5.1. Note the phrase ClientComputer1 is highlighted.
B.3.5.2. Replace the highlighted text with the name of the PC where
the WCC was installed. The example uses
AMEDWKESN01111.
B.3.5.3. Highlight the entire name:
(e.g., AMEDWKESN01111_Will-CallClient_Service) and paste
into the “Friendly Name” field.
B.3.5.4. Click OK.

INTELLICAB USER MANUAL GSL-ISUM-02.0-RETAIL October 2011 © 2011 GSL Solutions, Inc. Page 97 of 103
B.3.5.5. Notice that a new “node” is now present under the node “location
Server” and is called {MachineName}_Will-CallClient_Service.

INTELLICAB USER MANUAL GSL-ISUM-02.0-RETAIL October 2011 © 2011 GSL Solutions, Inc. Page 98 of 103
B.3.6. The next step is to create the Workstation and optional IntelliPad
and scanner components.
B.3.6.1. Click on the Workstation Button, then click OK. The Configurator
window will appear with “Component Details” pane.
B.3.6.2. De-select the “FinalVerificationWork” checkbox and click Apply.
INTELLICAB USER MANUAL GSL-ISUM-02.0-RETAIL October 2011 © 2011 GSL Solutions, Inc. Page 99 of 103
B.4. OPTIONAL SCANNER AND INTELLIPAD CONFIGURATION
B.4.1. For each desired component, click on the MachineName}_Will-
CallClient_Service Node, then click on Create Subcomponent.
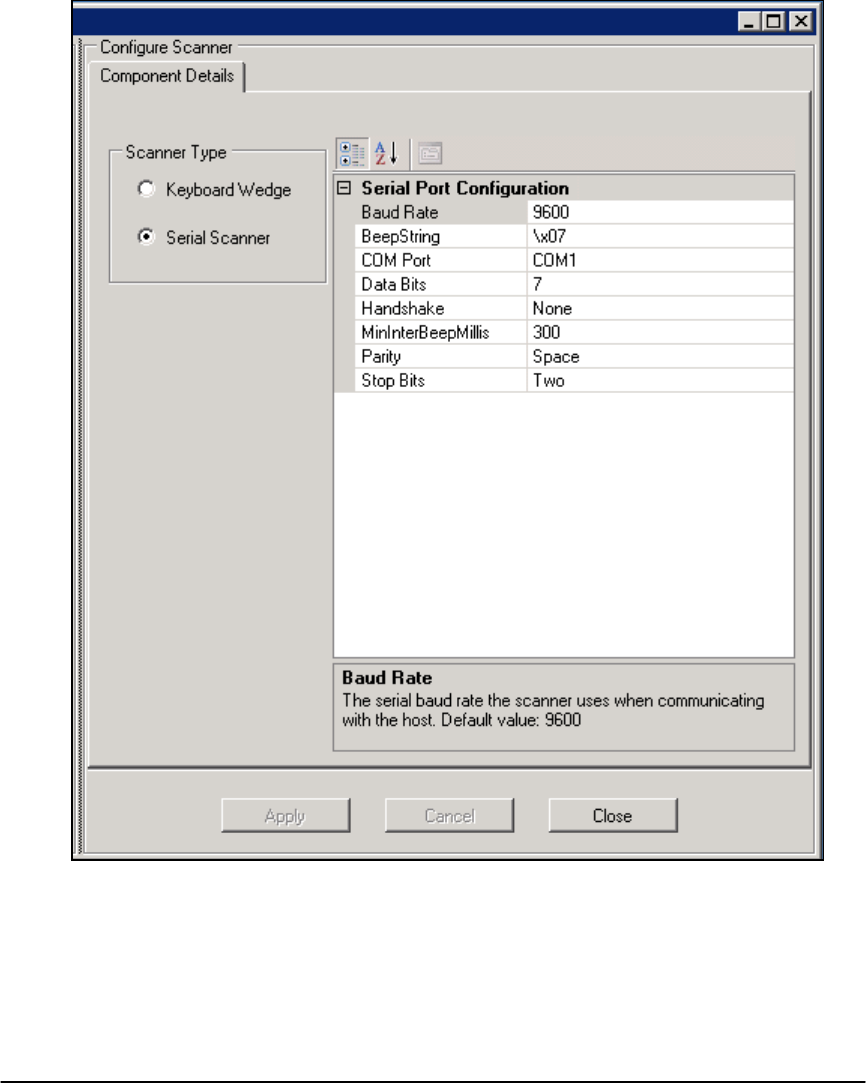
B.4.2. To add a scanner, click on Scanner, then OK. Configure the settings for
the Barcode scanner. Once the settings are complete, click on Apply.
INTELLICAB USER MANUAL GSL-ISUM-02.0-RETAIL October 2011 © 2011 GSL Solutions, Inc. Page 100 of 103
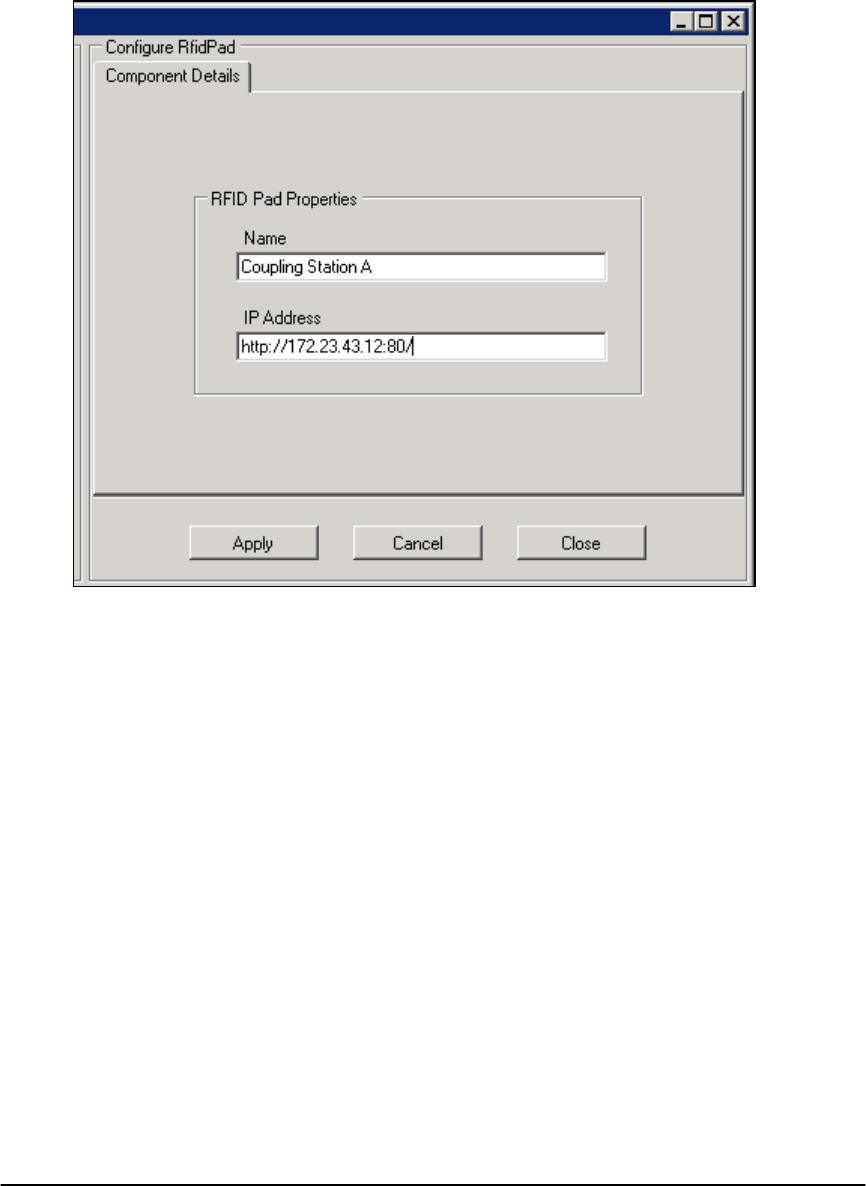
B.4.3. To add an IntelliPad, click on RfidPad, then OK. Enter the name of the
IntelliPad (e.g., Coupling Station A). Enter the IP Address of the
IntelliPad. Click on Apply.
B.4.4. Test the client for access and Scanner/IntelliPad functions.
INTELLICAB USER MANUAL GSL-ISUM-02.0-RETAIL October 2011 © 2011 GSL Solutions, Inc. Page 101 of 103
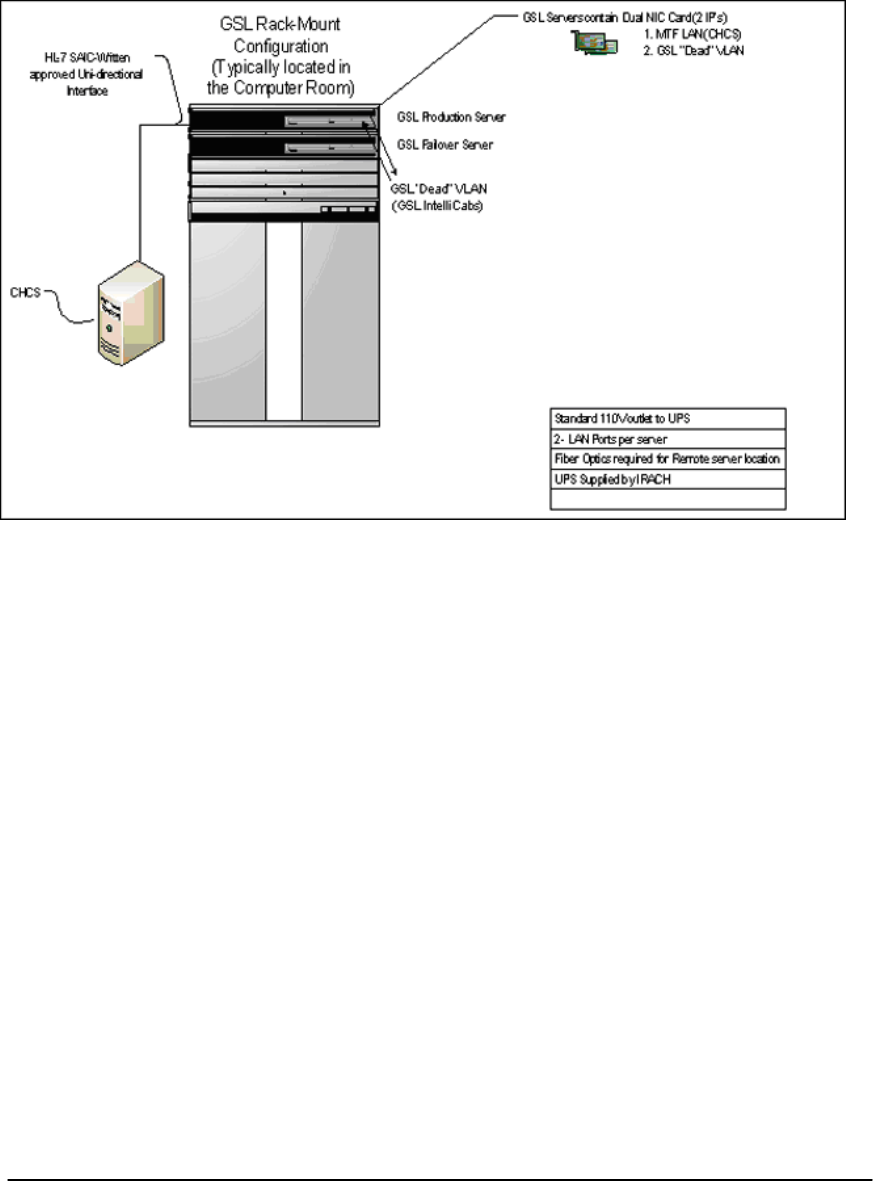
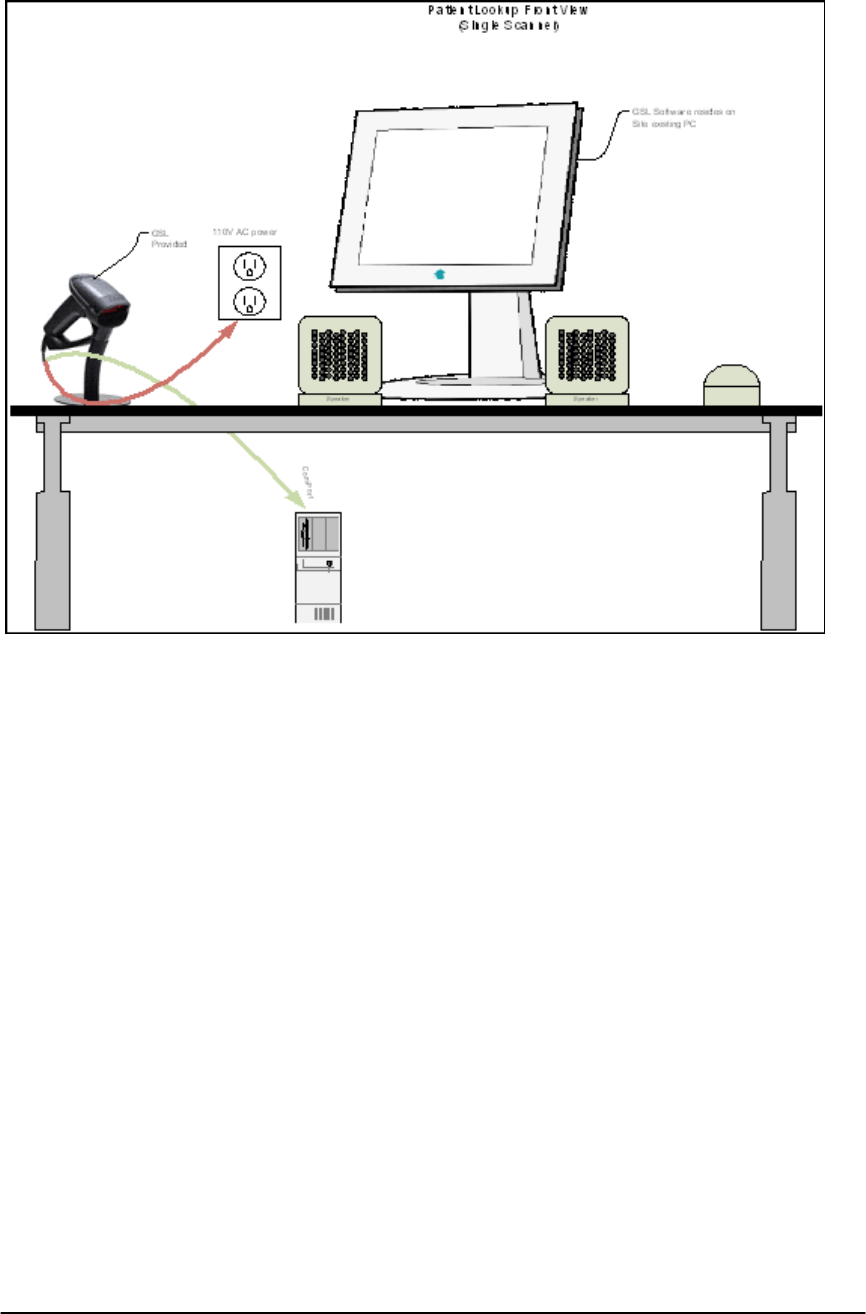
APPENDIX C: GSL SOLUTIONS WILL-CALL INTELLICAB™ SYSTEM
OVERVIEW
SYSTEM OVERVIEW
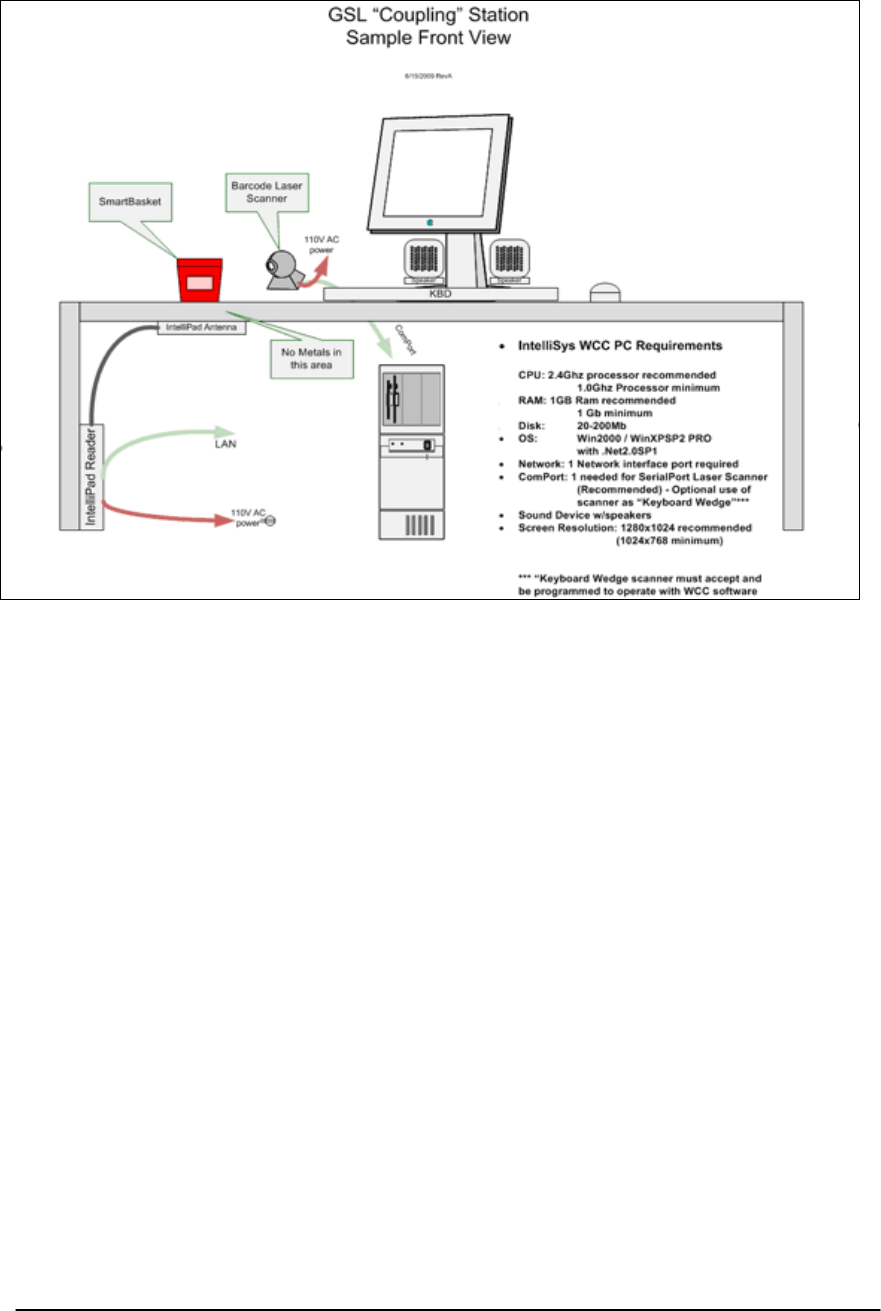
INTELLICAB USER MANUAL GSL-ISUM-02.0-RETAIL October 2011 © 2011 GSL Solutions, Inc. Page 102 of 103
INTELLICAB USER MANUAL GSL-ISUM-02.0-RETAIL October 2011 © 2011 GSL Solutions, Inc. Page 103 of 103