GUANGZHOU FLYAUDIO CAR AUDIO 76228H01B9 Car Navigation User Manual
GUANGZHOU FLYAUDIO CAR AUDIO CO.,LIMITED Car Navigation
user manual

V1.2
Before using the system, please carefully read this manual and properly keep for future
reference.
User Manual
To prevent accident, don’t watch video during driving.
Vehicle Infotainment System
76228H01B9
Ford Figo
STATEMENT
This manual mainly introduces the function, purpose and operating method, etc. of the
vehicle infotainment system;
This manual is only used as a user operating guide, not as a basis for maintenance services;
Due to continuous improvement of the product, the design and specifications are subject
to changes without further notice;
The information provided in this manual can be modified without statement, we reserve
the final interpretation right of it;
Pictures used in this manual are for reference only, we will not assume any liability for any
wrong understanding;
The actual product shall prevail. For details, please consult relevant dealers;
Brand name such as product name, etc. is the trademark or registered trademark owned
by each company.
FCC STATEMENT:
This equipment has been tested and found to comply with the limits for a Class B
digital device, pursuant to part 15 of the FCC Rules.
These limits are designed to provide reasonable protection against harmful interference in
a residential installation. This equipment generates, uses and can radiate radio frequency
energy and, if not installed and used in accordance with the instructions, may cause
harmful interference to radio communications. However, there is no guarantee that
interference will not occur in a particular installation.
If this equipment does cause harmful interference to radio or television reception, which
can be determined by turning the equipment off and on, the user is encouraged to try to
correct the interference by one or more of the following measures: —Reorient or relocate
the receiving antenna. —Increase the separation between the equipment and receiver.
—Connect the equipment into an outlet on a circuit different from that to which the
receiver is connected.
—Consult the dealer or an experienced radio/TV technician for help.
This equipment complies with FCC radiation exposure limits set forth for an uncontrolled
environment.
This equipment should be installed and operated with minimum distance 20cm between
the radiator &your body.
FCC NOTICE:
This device complies with Part 15 of the FCC rules. Operation is subject to the following
two conditions:
(1) This device may not cause harmful interference; and (2) this device must accept any
interference
received, including interference that may cause undesired operation.
FCC CAUTION
Caution the user that changes or modifications not expressly approved by the party
responsible forcompliance could void the user’s authority to operate the equipment.

1
1
2
2
3
5
5
5
6
6
6
7
7
7
7
7
7
8
8
8
9
9
10
10
10
10
10
10
10
11
11
7
7
9
9
11
11
11
11
11
11
11
11
12
Before using the system
Important safety information
Safety statement
Ensure safe driving
Other safety information
Preparations before use
Method to power on and power off
Navigation
Introduction
Tips for Reading Manual
Quick Start
Part 1: Getting Started
Touch Gestures
The Map View
Current Location Finder Button
Current Location Icon
Settings Button
Search Button
Part 2: Using Search Option
Searching a Place
Selecting a Place on Map
eLoc
POI Categories
Bookmark Icon
Home
My Places
Ford Dealers
Ford Service
Find Nearby POI
Navigation
Start Point Icon
Destination Icon
Route details window
Overview
Along Route
End
Route Stops
Add a New Route Stop
Removing a Route Stop
Directions
Part 3: Settings
Voice
Distance and Time
Map Appearance
Driver Assists
Speed Alerts
Traffic Signs
Catalogue

[operationUSB] instruction
MP3 playing
MP4 playing
[operationiPod/iPhone] [Bluetooth] flow chart
[[Radio] Phone] operation flow chart
Phone] instruction
[operation
Radio] instruction
[operation
Sound] [Clock]
[operation flow chart
Sound]
[operation instruction
Clock]
[ operation instruction
Display]
[ operation flow chart
27
31
36
37
38
38
25
27
27
29
30
30
30
33
34
35
36
[USB] operation flow chart
iPod ] instruction
[/iPhone operation
[Bluetooth] instructionoperation
[operationAUX] instruction
Display] [ operation instruction
prompt page
39
40
[General][Info] operation flow chart
[General] operation instruction
Function and media operation
Schematic diagram of the front panel
Function description of the front panel components
Function description of control keys on steering wheel
21
22
23
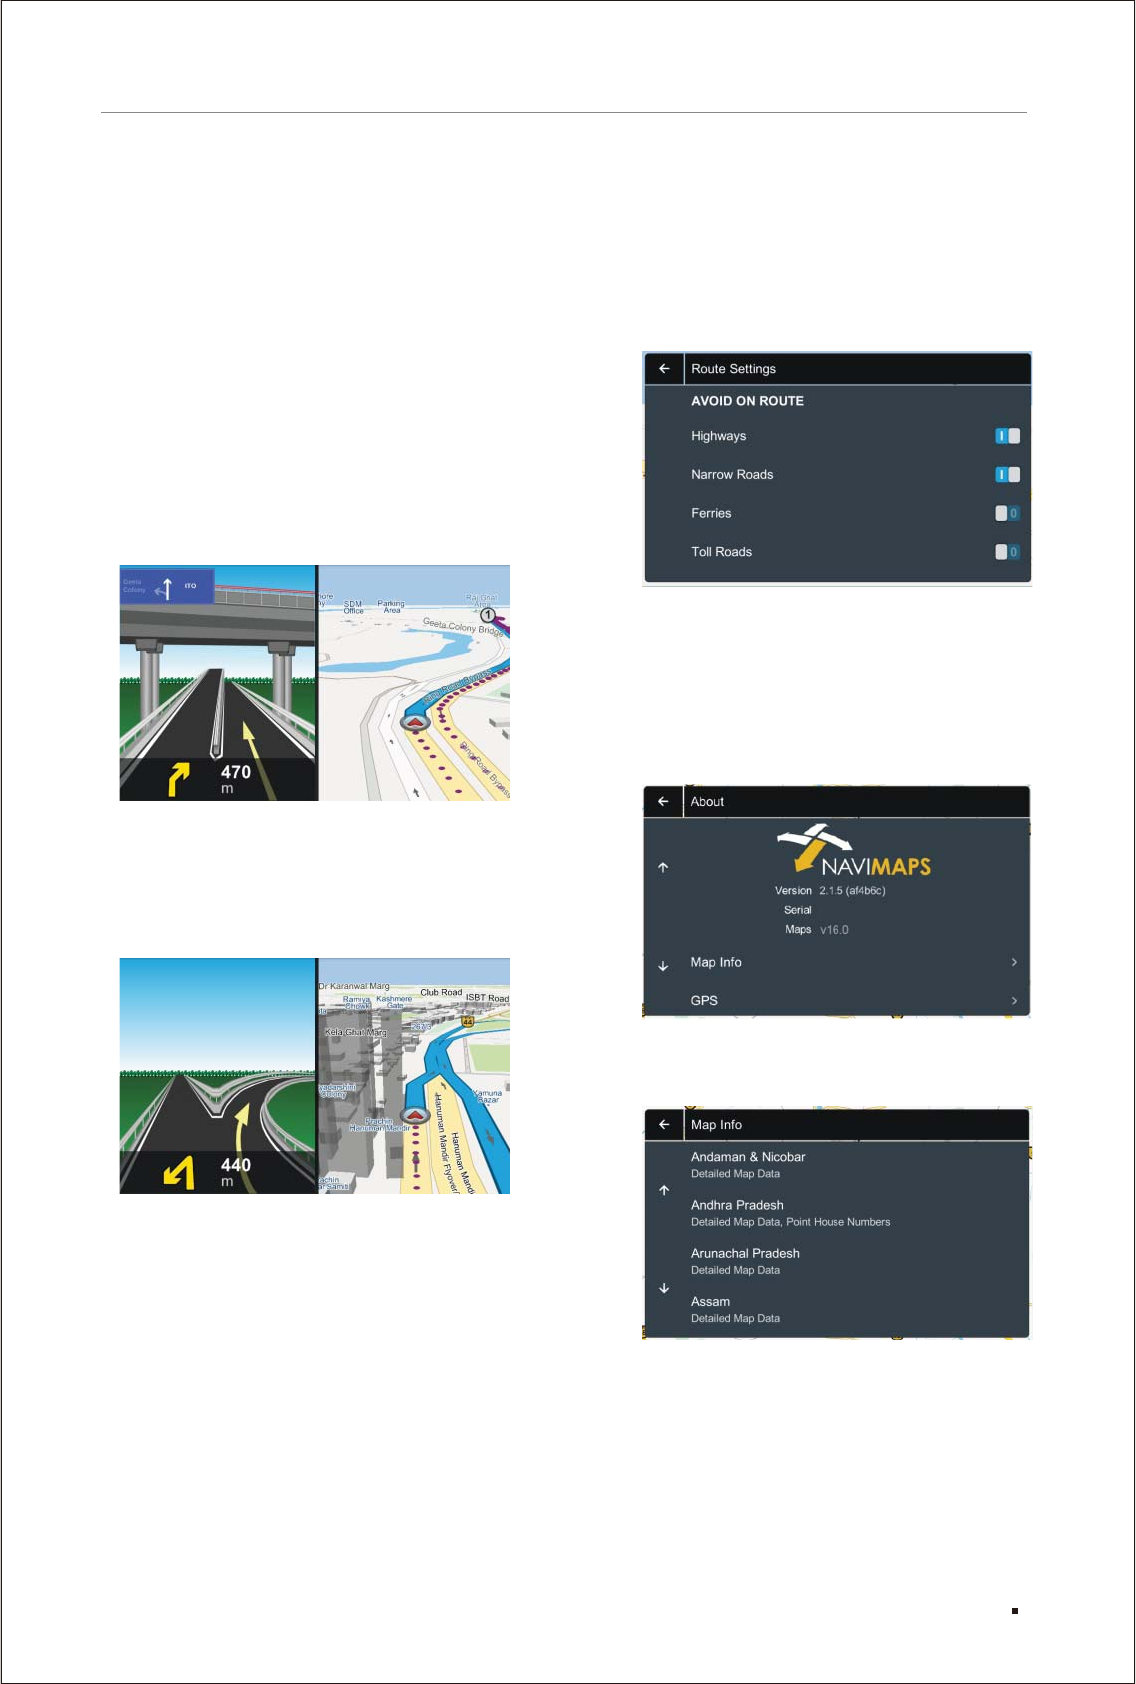
POI Along the Route
Signposts
Junction Views
Route Settings
Avoid on Route
Reset to Default
About
Map Info
GPS Info
End User License Agreement
Disclaimer
Appendix1
12
12
12
12
12
12
12
12
13
14
13
15
40
40
Standby interface
Info]
[ operation instruction

Appendix
The proper operation of touch screen
Attentions
About LCD screen
About TFT
About maintenance
42
42
42
42
42
In case of any failure
Common issues
Specifications
Universal
GPS
Power amplifier and audio components
43
43
45
45
45
FM tuner components
AM tuner components
Environmental protection
45
45
46
Phone Bluetooth compatibility list 47
Before using the system
Important safety information
Before using the system, be sure to carefully
read and understand the following safety
information, and put this manual in car, as the
reference for operating procedures and safety
information.
Warning
Do not install or repair your infotainment
system by yourself. If the personnel not
trained on electronic devices and auto
parts install or repair the system, it may
lead to electric shock or other dangers;
Relevant national laws and regulations
provide that no driver shall watch video
or operate infotainment system during
driving, in order to protect your and others’
life safety, please do not watch video or
operate infotainment system during driving;
Someone else shall not use the system,
unless they have read and understood the
operating instruction manual;
Do not use the infotainment system in an
emergency of driving to hospital, police
station or similar institutions;
Please pay special attention to all the
matters needing attention in this manual,
and strictly comply with the operating
instructions;
The infotainment system shall not be
exposed to any liquid material, otherwise
it will lead to electric shock, and may cause
damage, overheating and smoking, etc. of
the infotainment system.
Safety statement
The navigation function (as well as the optional
backing camera function) of the infotainment
system is only an auxiliary tool when you drive,
it doesn't mean that you can be distracted,
careless and even lose judgment when driving.
For the resulting safety accident, we do not
assume any legal liability;
The route and navigation information displayed
on the system is for reference only and may
not be able to reflect exactly the new and
approved routes, road situations, one-way
streets, road closures or traffic restrictions;
Currently implemented traffic restrictions and
traffic suggestions must have precedence
over the information provided by the infotainment
system. Therefore, please be sure to comply
with current traffic restrictions, even when the
navigation system provides opposite traffic
suggestions;
The map data stored in TF card belong to the
intellectual property of map supplier, and the
map supplier shall be responsible for such
contents.
Attentions
Do not install the infotainment system in case
of any one of the following circumstances:
It may obstruct the driver's line of sight;
It may affect vehicle operating system or
safety performance, including air bag,
danger alarm lamp button, etc.
If you fail to input accurate place name, it
may result in that the infotainment system
provides improper route and navigation
instructions;
This product shall not be exposed to moisture;
If the battery is power off or discharges
electricity, it will cause the system memory
to be cleared, and the system must be
reprogrammed.
Warning

Before using the system
Ensure safe driving
Be sure to abide by safe driving rules and
current traffic regulations;
If the operation of the navigation system
(and the optional backing camera function)
will distract you from safe driving, please
do not operate;
If you want to watch the display screen for
system operation, please park the car in a
safe place and brake, and then operate the
system;
Do not set the volume of the navigation
system to be too high, otherwise you can't
hear the traffic situations and emergency
rescue signals outside the car;
For safety, when driving, you will be unable
to operate some functions of the system.
Unless you stop the car or brake to standstill;
Please bear in mind that fasten your seat
belt when driving, otherwise in case of any
traffic accident, it will cause grievous injury
to you;
Do not wear earphones when driving;
In order to prevent traffic accident and avoid
possible violation of applicable laws, during
driving, please do not use the system for any
other purpose other than navigation;
In some areas, drivers or passengers inside
the vehicle watching the images on the display
screen may be illegal. Please comply with
these regulations when applicable;
This system can detect whether the stopping
brake of the vehicle is in service, and it will
prevent you watching the images on the
display screen during driving;
During vehicle running, you will be unable
to operate some menu of the navigation
system and some media functions. If you
want to watch the images on the front display
screen, please park the car in a safe place
and brake.
In order to avoid the battery exhaustion,
please ensure to start the engine when using
this system, otherwise the use of this system
may lead to battery exhaustion;
If this product can not work normally, please
consult the manufacturer’s customer service
department.
The right of final interpretation for the product
manual is owned by the manufacturer.
Other safety information
Preparations before use
Method to power on and power off
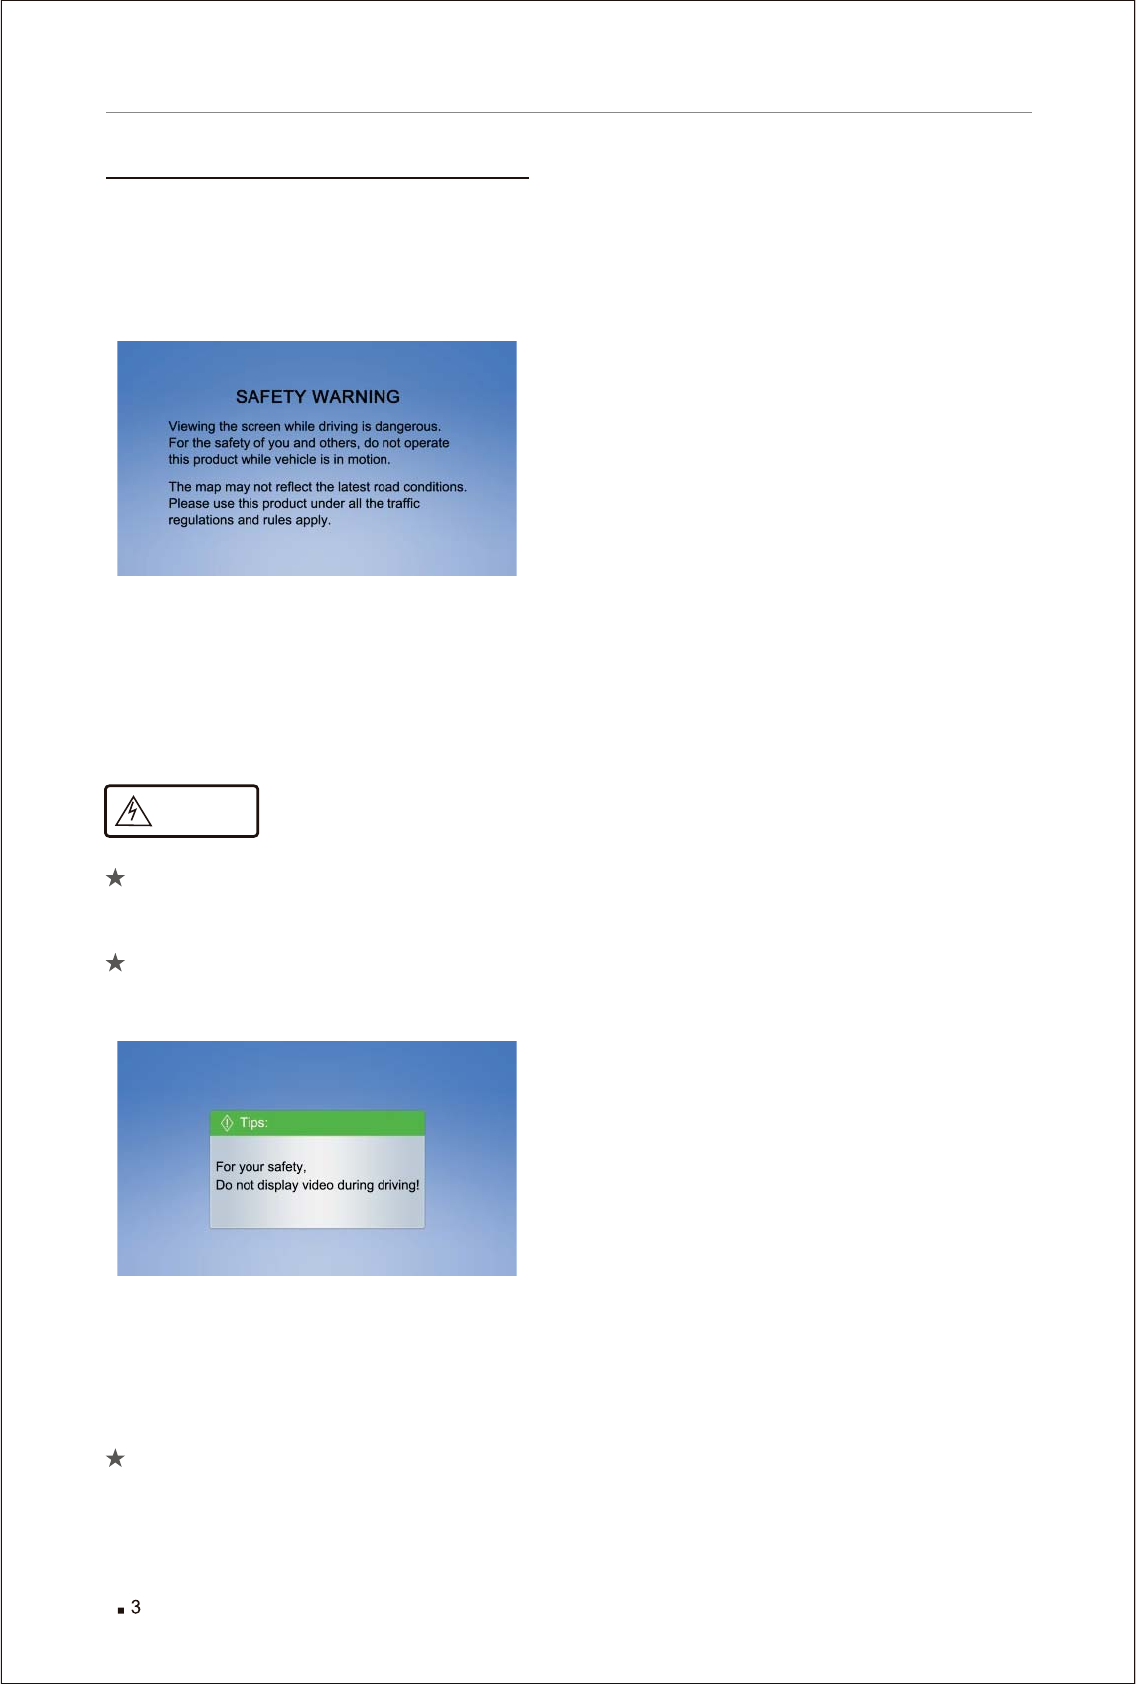
Adjust the ACC of the vehicle to ON or start the
engine, the power supply of the system will be
automatically turned on and the system will be
started, after a few seconds, the following
prompt box will appear:
After a few seconds, it will automatically enter
the interface at last shutdown, adjust ACC to
OFF or shut down the engine, the power supply
will be turned off. The system automatically
saves current media page, and it will enter the
media page at next starting.
For safety, the system is designed in the
following way: no destination setting or
other complex operations can be conducted
during driving;
Please operate after parking the vehicle in
a safe location and braking, the driver shall
never operate during driving.
Note:
When the vehicle speed is more than 8Km/h,
safety tips will pop up;
when the vehicle speed is less than 8Km/h,
the tips will disappear automatically.
The Infotainment System does not support
India languages.
Warning
Before using the system

Navigation
Navigation
5
Introduction
Navigation
The navigation system will make your journey
to your destination hassle free. It will guide you
throughout your journey with audio and visual
guidance.
This manual will explain the nitty gritty of all the
features available in your navigation system.
It will guide you to make the best use of the
navigation system according to your requirement.
So, let's get started!
Tips for Reading Manual
Take me to Destination, End the Route? Yes.
You’ll see sentences like these in the Part 2 of
the User Manual. This shortened formulation
represents much lengthier instructions that tell
you to open multiple nested screens in sequence,
i.e., “Tap the Start button. On the following
screen, tap End."
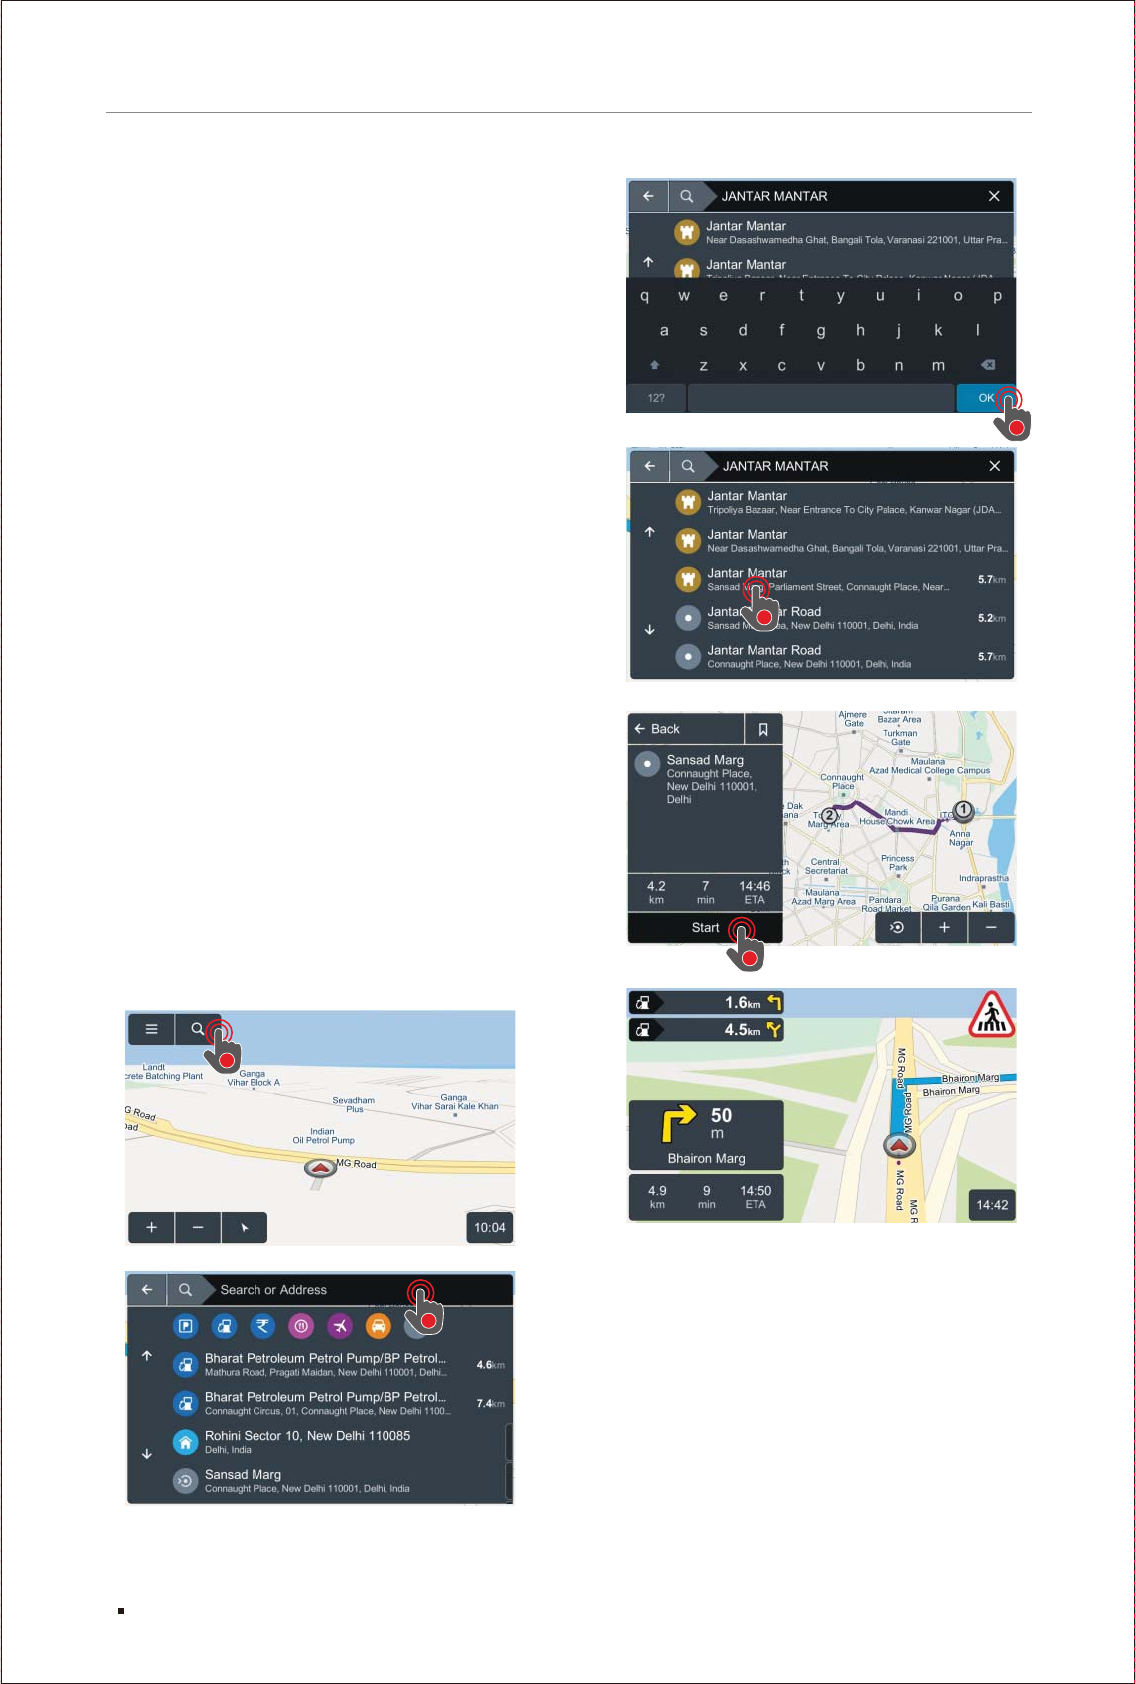
1. Tap Search button on map screen.
2. Enter your address in the Search or Address
field.
3. As you type, the search results are displayed
simultaneously. Tap on OK to complete the
search and hide the keyboard.
4. Tap on the desired result. This action will
create the route to the destination.
5. Tap Start and you will be automatically guided
from your present GPS location to your selected
destination.
Quick Start
Simple Search and Navigation
You’ve now started the navigation and want to
get to a certain address.
Here’s a quick, super-basic way to start navigating
immediately.
Finding and Navigating to a Destination
1
2
3
4
5
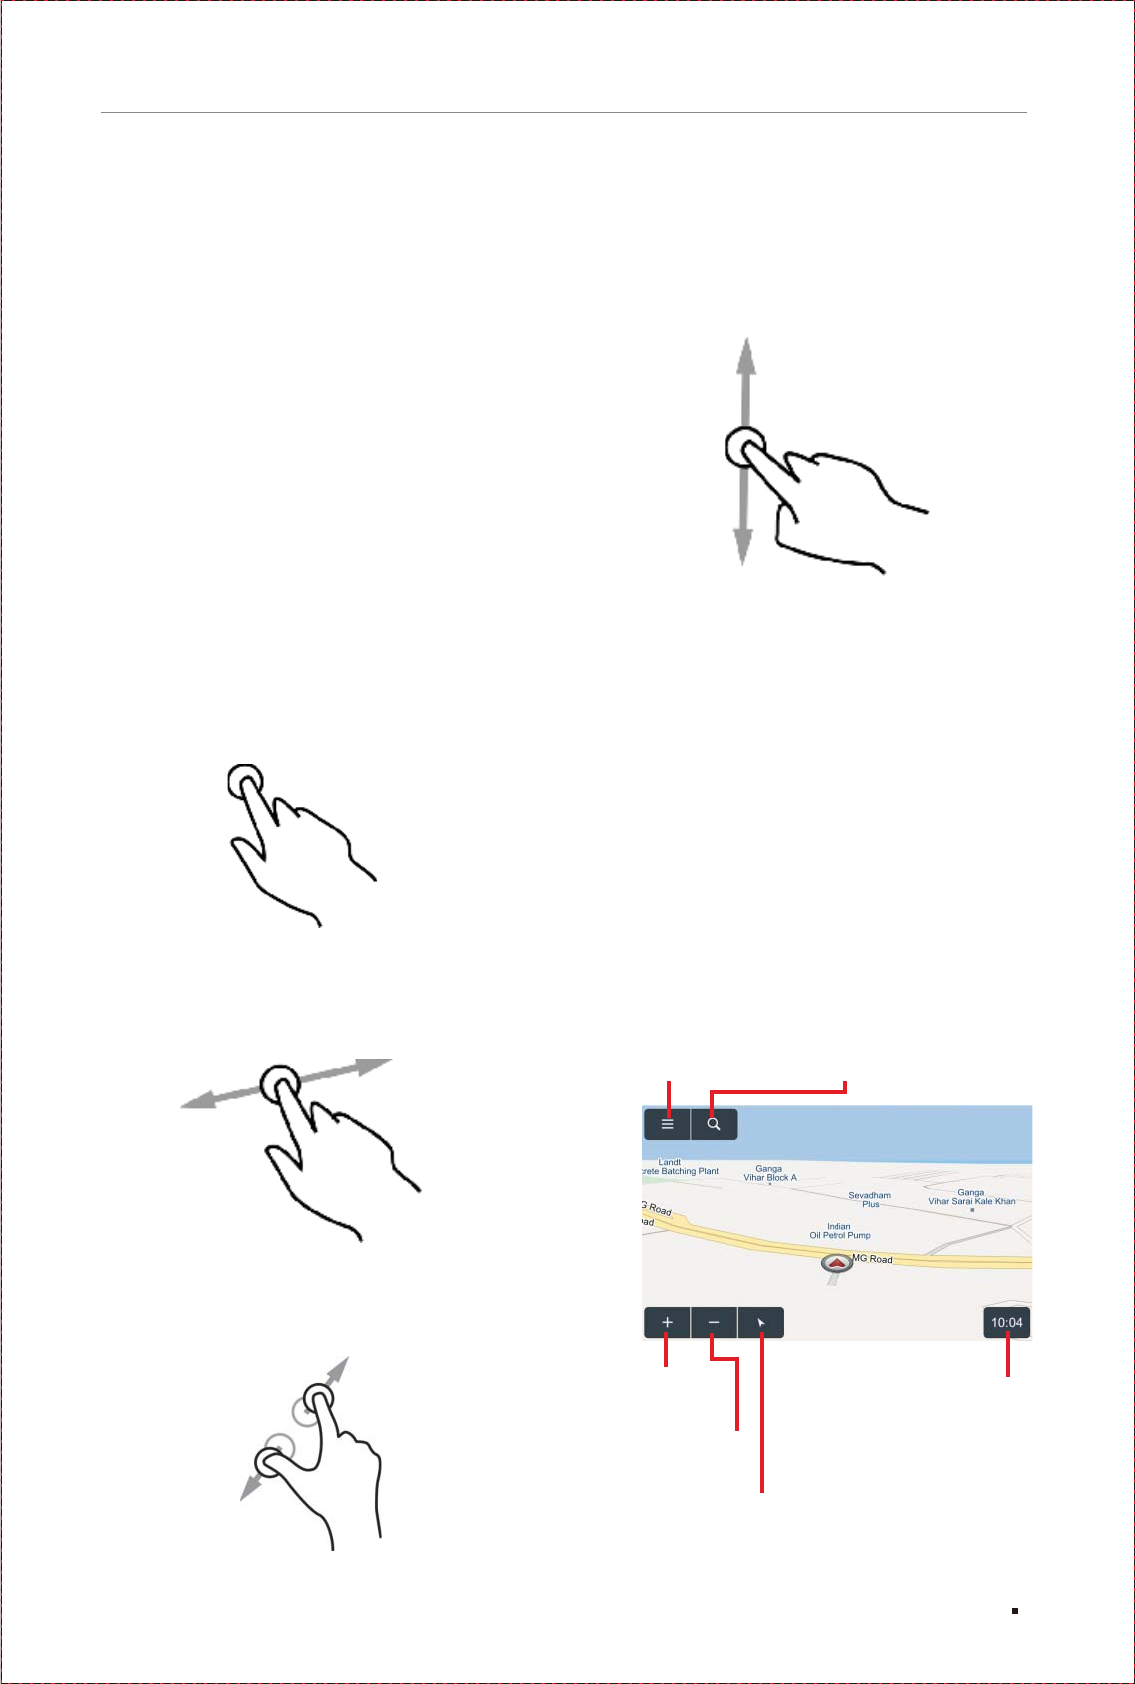
Search
Settings
Map Zoom In
Current Location Finder
Current Time
6
Navigation
Part 1: Getting Started
What the Heck Do All These Icons, Buttons
and Fields Mean?
At this point you’ve probably already opened
the app, eagerly tapped several buttons and
are now staring blankly at a bunch of unfamiliar
icons. Relax! This is the part where we show
you what all the nifty little buttons, icons, bars
and fields mean. We’ll also go through and
define some basic terminology (with pictures)
to make things easier to understand.
Touch Gestures
Using Touch Gestures in Map View
Use your fingers to control the map, icons and
page views in the app.
Selecting an Item: Tap the screen surface once
with a fingertip to select a button on the Control
Bar, a map icon, etc.
Panning the Map: Move or quickly brush your
fingertip across the screen surface to pan
across the map.
Zooming In/Out: Pinch or spread your fingers
on the screen to zoom in or out of the map.
Tap
Drag
Scrolling a Page: Move or quickly brush your
fingertip up and down the screen surface to scroll
up and down a page. Or you can use up and down
buttons at the bottom of the screen to scroll a page.
The Map View
This is the first screen you’ll see once you
press navi button on the device panel.
System will let you know where your are at
and you will see your location once the GPS
is fixed. This is the navigation's default start
screen and it’s called Map View.
Map Zoom Out
Pinch
Scroll

7
Navigation
Current Location Finder Button :
If you are unable to see your current position
on map, just tap once on map screen to bring
out all the hidden buttons. Then tap on arrow
head button at the bottom of the screen.
This will instantly bring your current location
in map vew. This button also helps you to toggle
between 2D-North Up and 3D-Heads Up view.
Current Location Icon :
This icon represents the user’s current location
when the device is getting a proper GPS signal.
Settings Button :
Tap Settings button to access various options
under the setting menu like Language, Voice,
Distance and time units, Map Appearance etc.
Return to the Map by tapping on the back button
given on the top left corner of the screen.
Search Button :
Tap on Search button to open the search window.
Searching a Place: Type the name, street,
address, POI, eLoc or longitude/latitude
coordinates in the “Search or Address”
field using the keyboard.
Selecting a Place on Map: Long
Press on the location you want to
select on map.
eLoc : eLoc is a 6 character digital address
that uniquely identifies any place and is linked
to various attributes like floor number, door
number, etc. Think of an eLoc as the pincode
to your doorstep, or a precise digital address
of any place, building, etc. User can also use
eLoc for finding the particular address. (For
more information on eLoc please visit - www.
mapmyindia.com/eLoc)
Part 2: Using Search Option
8
Navigation
As you start typing a place name in the search
box, application will start to suggest related
results.
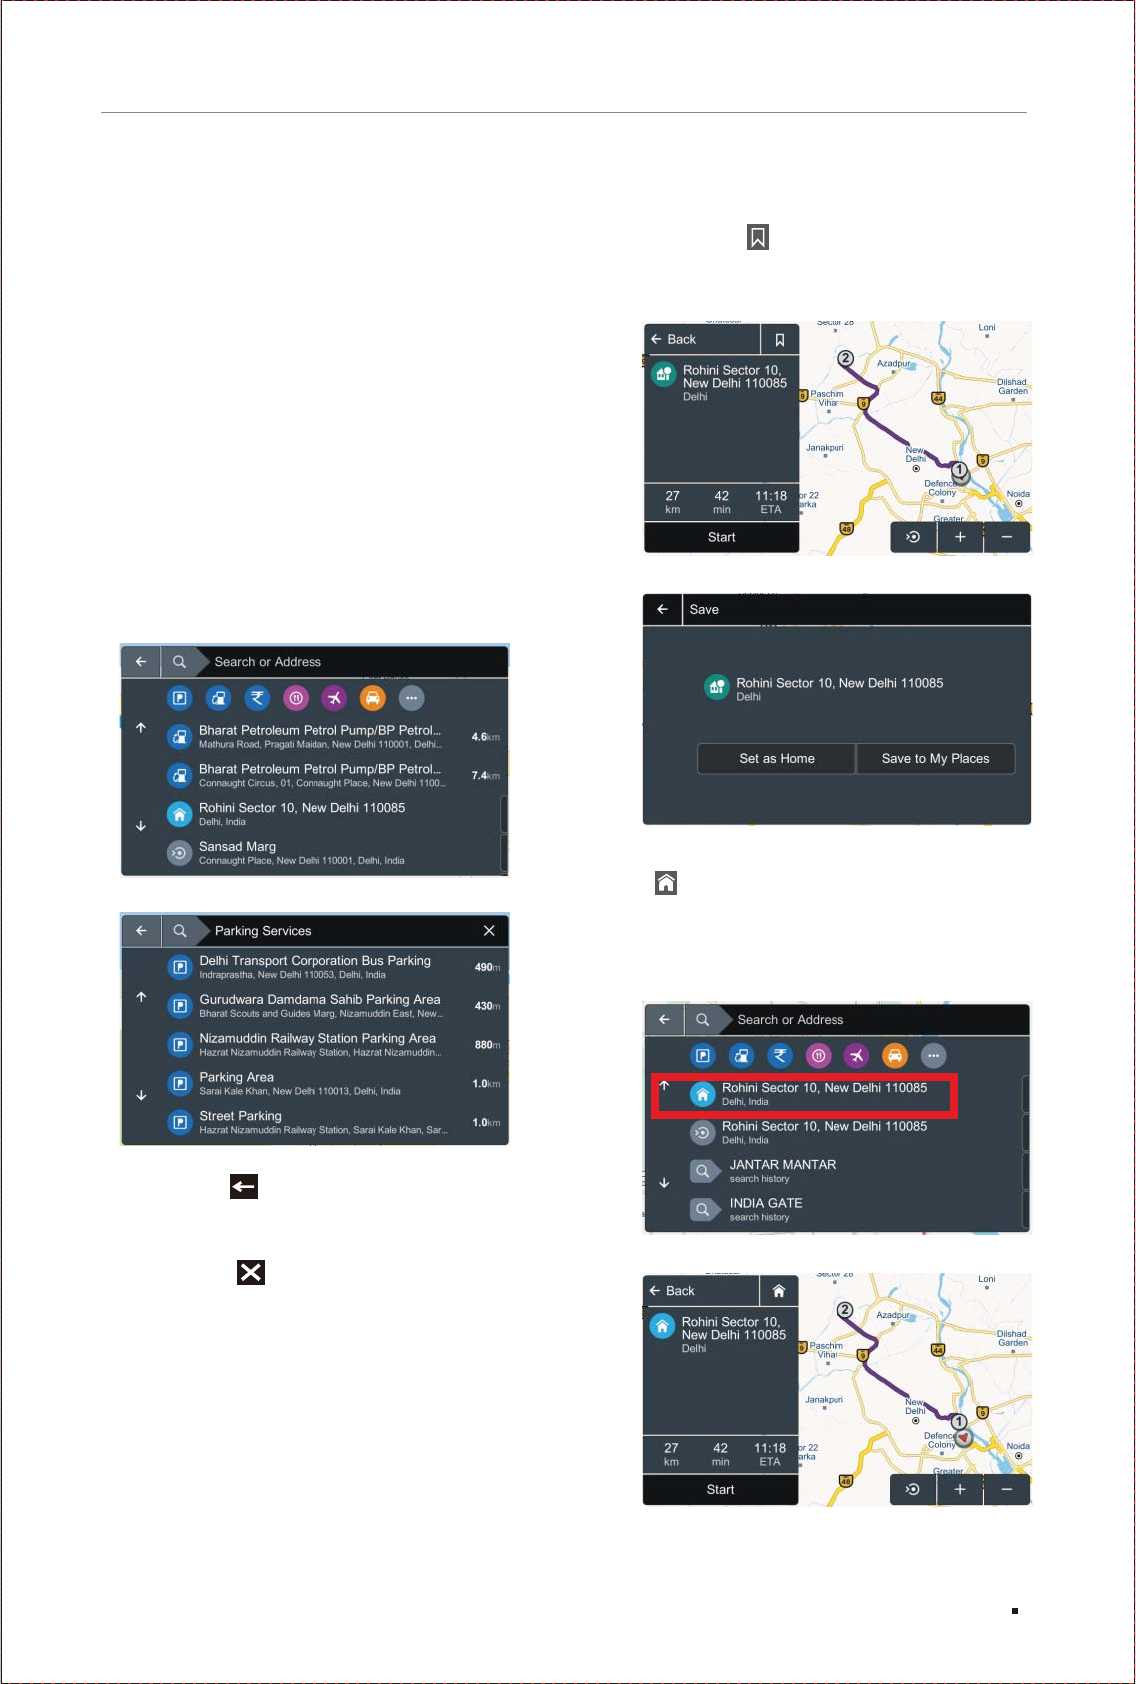
POI Categories:
User can search for nearest POI by tapping on
the various POI categories provided under the
search screen.
1. Assume you want to search for the nearest
parking location.
2. Tap (icon) of the parking category.
3. List of parking areas will be displayed on
the screen.
4. Tapping on any one of them will give user an
option to start navigation to that location.
Back button : Back button takes user to
the previous screen.
Close button : This button closes the
current screen and brings user to the main
POI categories screen.
Bookmark Icon : User can save a destination
as a Home or to My Places by tapping on the
bookmark button. This bookmark icon will be
visible when desired search result is tapped.
Home : User can save a place as home by
tapping on the Set as home button. The place will
appear under the search screen on the top & user
can start navigation to this destination just by
tapping on it.
9
Navigation
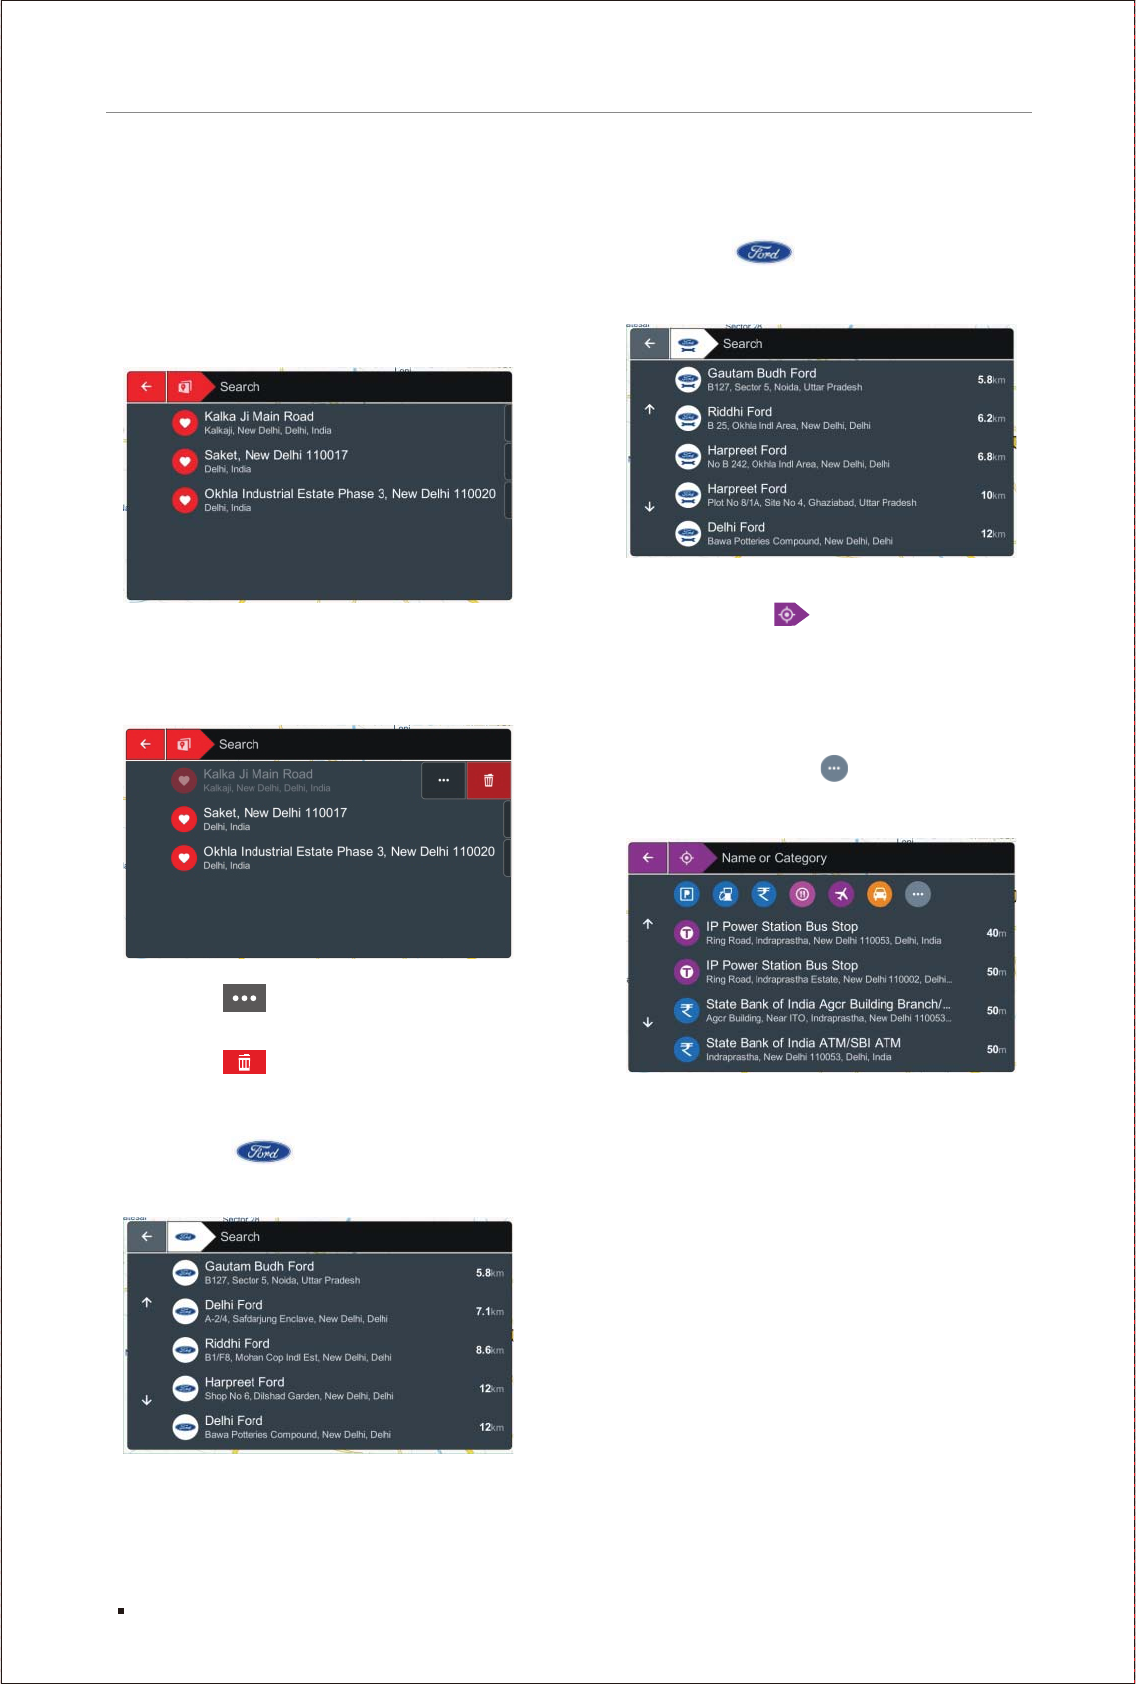
Ford Service : User can get list of nearby
Ford service stations by simply tapping on the
Ford Service option under the search screen.
Find Nearby POI : Through this option, you
may also search POIs available near your current
location either by searching via name or by tapping
any category. NaviMaps will show any POI falling
in that category near the user's current location:
e.g. to see the fuel stations, you need to click on
fuel stations icon. If the category icon is not listed
in shortcuts, then click button which will show
all the categories available in the application."
My Places: User can add various locations to
My Places by tapping on the "Save to My Places"
button on the above mentioned screen. My
Places can be accessed through the search
screen and shows the list of all the saved places.
User can remove any place from the list by just
swiping the saved place from right to left. This
will let two buttons to appear against the selected
place...
Tapping on ( ) button will give user an option
to start the navigation to that location.
Tapping on ( ) button will remove that place
from the My Places list.
Ford Dealers : User can get list of nearby
Ford dealers by simply tapping on the Ford
dealer’s option under the search screen.
10
Navigation
Tapping on a search result will bring out the
map screen with the possible route to that
location along with details of the whole route
like distance, Estimated Time of Arrival & time
for the journey and a Start Button.
Start: Instantly begins guiding you to the
selected location from your current GPS
location.
1.) Start Point Icon [ ]: The Start Point icon
represents your trip starting point in Map View.
2.) Destination Icon [ ]: The Destination icon
represents your trip destination in Map View.
Destination is shown by the maximum number
on the route inside a circle.
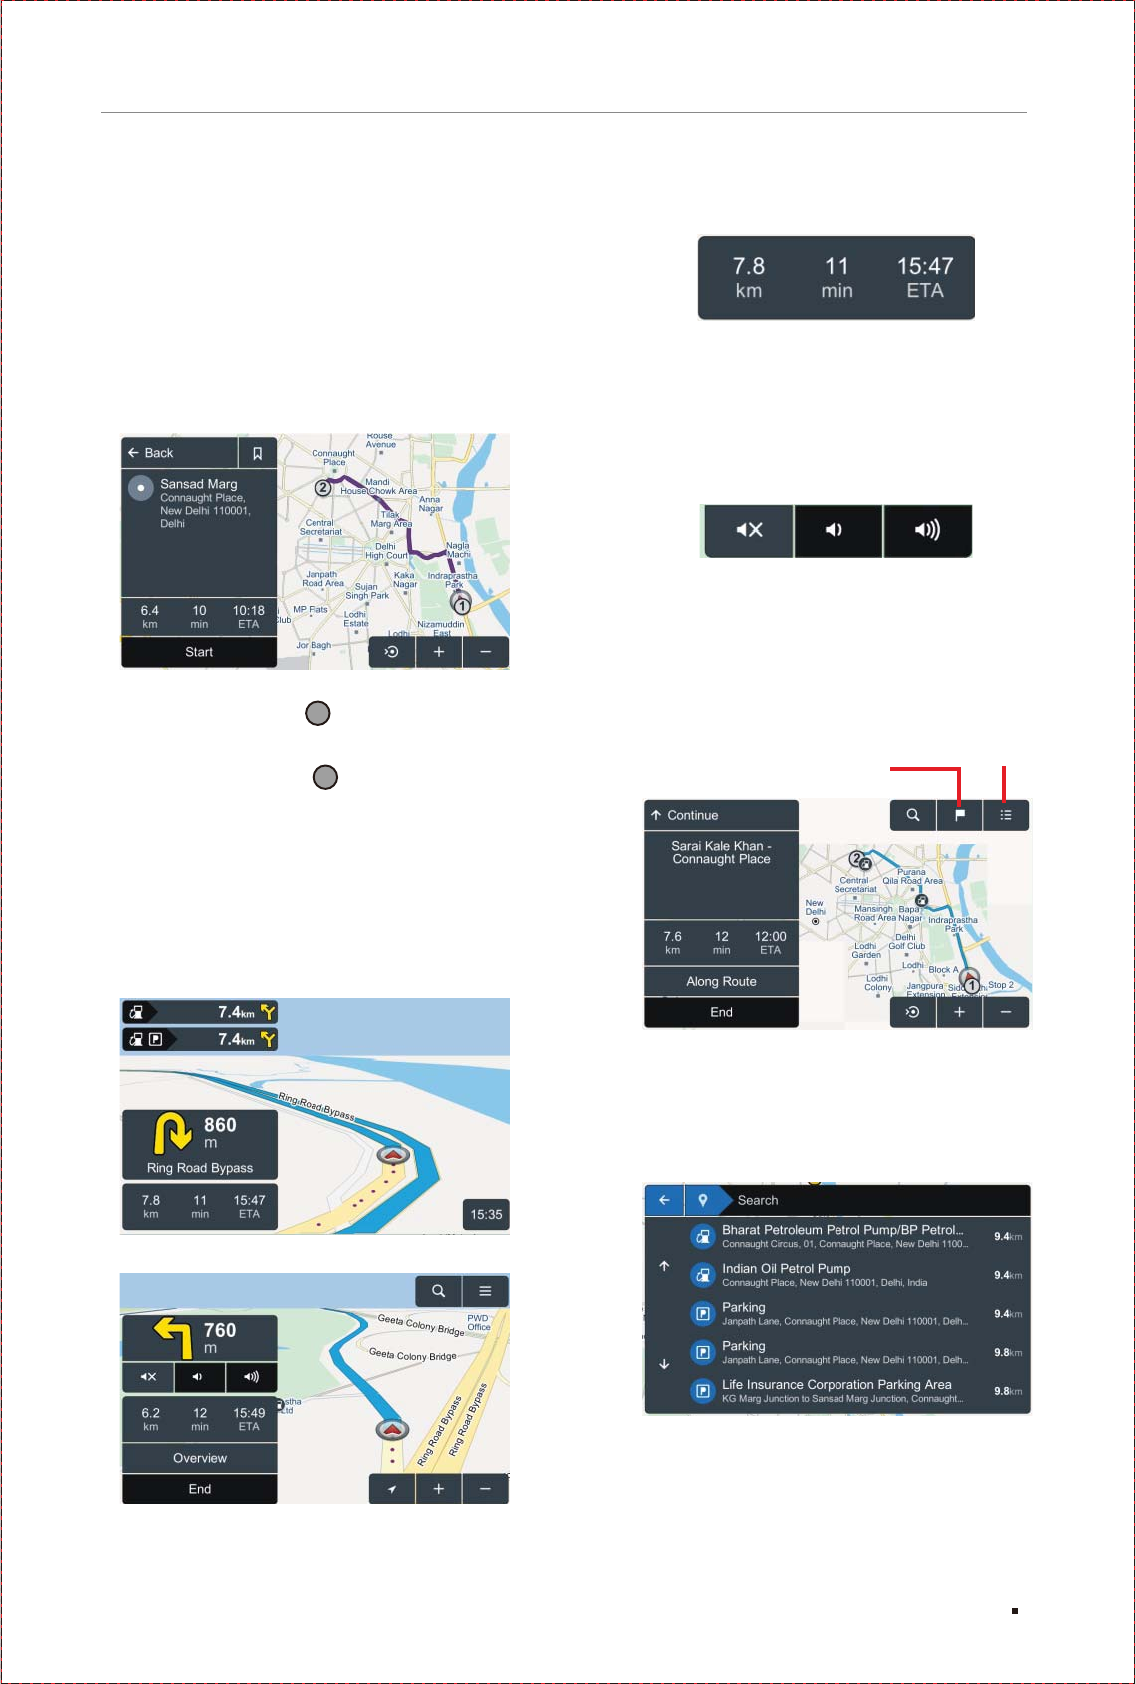
Route details window: Tap anywhere on the
map screen to expand the route detail screen
on the left side of the map screen. Here you can
access more options related to the route.
Total Distance to Destination: Active route estimated
travel distance.
Total Duration to Destination: Active route estimated
travel time.
ETA: Estimated Time of Arrival to the destination.
User can control the navigation application’s voice
prompts volume level (Mute, Increase, Decrease)
from these available options.
Overview: Tapping on the overview button will
display the small window with options; Along
Route, End buttons & detail about the route.
Along Route: Through this option, you can view
two of the most important POI categories: Fuel
Stations & Parking Places. On the opened screen
you can also filter among the listed POIs for any
preferred option you might like.
End: Cancels existing route.
Navigation
1
2Route Stops Directions
11
Navigation
Route Stops: Shows the order of Star Point,
Via Points and Destination of the current route.
User can change the order of the via points &
destinations by simply tapping on the up and
down arrow buttons given along each destination.
Add a New Route Stop: To add a route stop on
the current route, search for desired stop by
first tapping on search button on top & search
any place select ‘Add Destination’ option.
Application will now create a new route. Now
go to Route Route Stops. Here you can
change the order of the Via Points and Destination.
Removing a Route Stop: To remove a route
stop, user must have 2 or more stops already
in the route. Tap on the stop user wants to
remove. A window will open with the Remove
button at the bottom of it. Tap on the remove
button & stop will be removed. Since at-least
one point is mandatory, thus start point cannot
be removed.
Directions: Here you can view your route
directions as a list of turn-by turn textual
descriptions with corresponding descriptive
icons in sequence, by tapping on the Directions
button on top right side of the map screen.
Here you can customize your application use
according to your requirement.
Voice: Here you can select guidance voice
(including 10 regional voices) according to your
choice and use it during navigation .
Distance and Time: Here you can choose
distance unit and time format.
Map Appearance: Here you can choose out of
the three options, how map should be displayed
like day mode, night mode or automatic as per
the time.
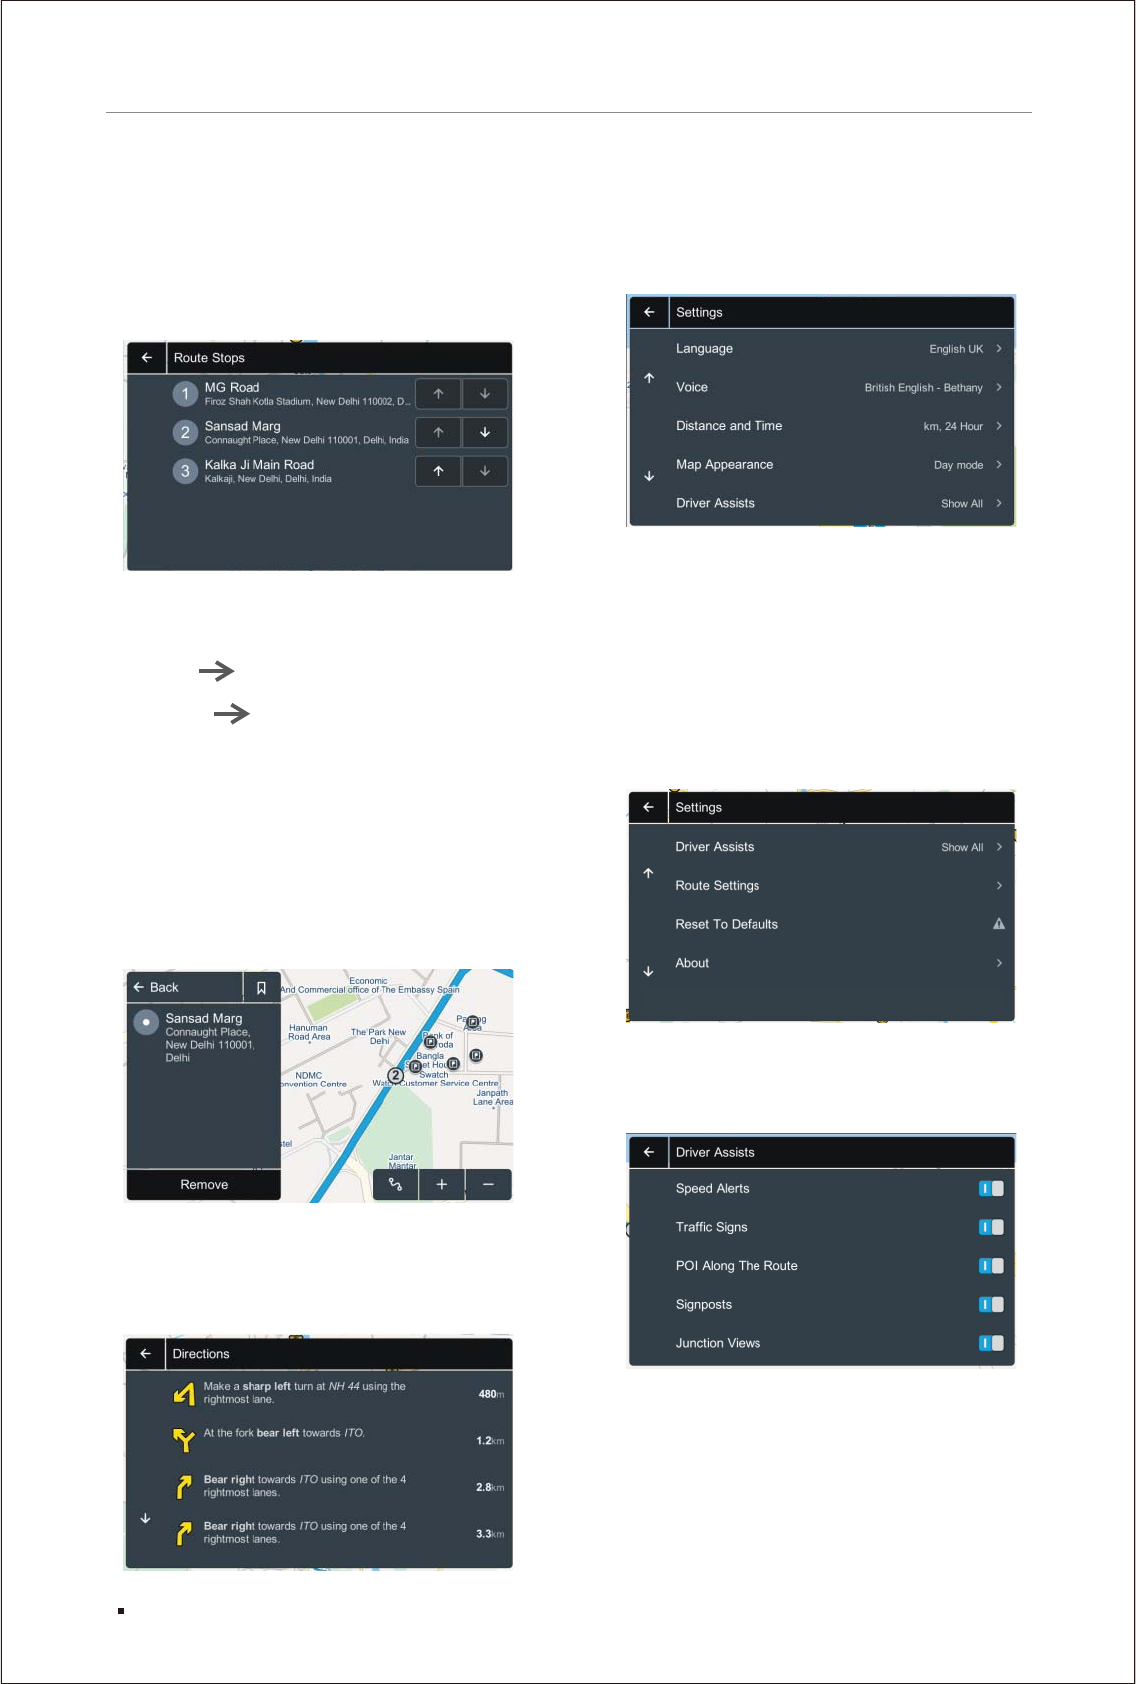
Driver Assists:
Speed Alerts: You can enable/disable the
speed alerts here, which comes during navigation
when you cross the current road limit.
(i)
Part 3: Settings
12
Navigation
(
(
ii) Traffic Signs: Traffic signs, including
mandatory, cautionary and informational signs
are displayed for enhanced driver assistance
and to help user’s abide by traffic regulations.
For details, see Appendix 1.
(iii) POI Along the Route: You can enable/
disable the POIs which appear on map during
live navigation. These POI can also be used
as pass through on a live route.
(iv) Signposts: Sign-As-Real Displays or
Overhead signs indicating directions to areas
are now displayed prominently within NaviMaps
to offer better guidance to the users.
v) Junction Views: A realistic representation
of an upcoming intersection or junction on the
route, presented alongside the map in a split
screen view that increases user’s situational
awareness.
Route Settings:
Avoid On Route: The Avoid option lets you choose
one, several or all avoidance options: Highways,
Toll Roads, Narrow Roads and Ferries.
Reset To Defaults: Tapping on this option will
reset the changes made in the application settings
to default.
About: The About page displays Map Info., GPS
information, Application Version, Serial Number,
Disclaimer, Privacy Policy and Copyright Information.
Map Info: Under map info user can view the list of
all the states.
13
Navigation
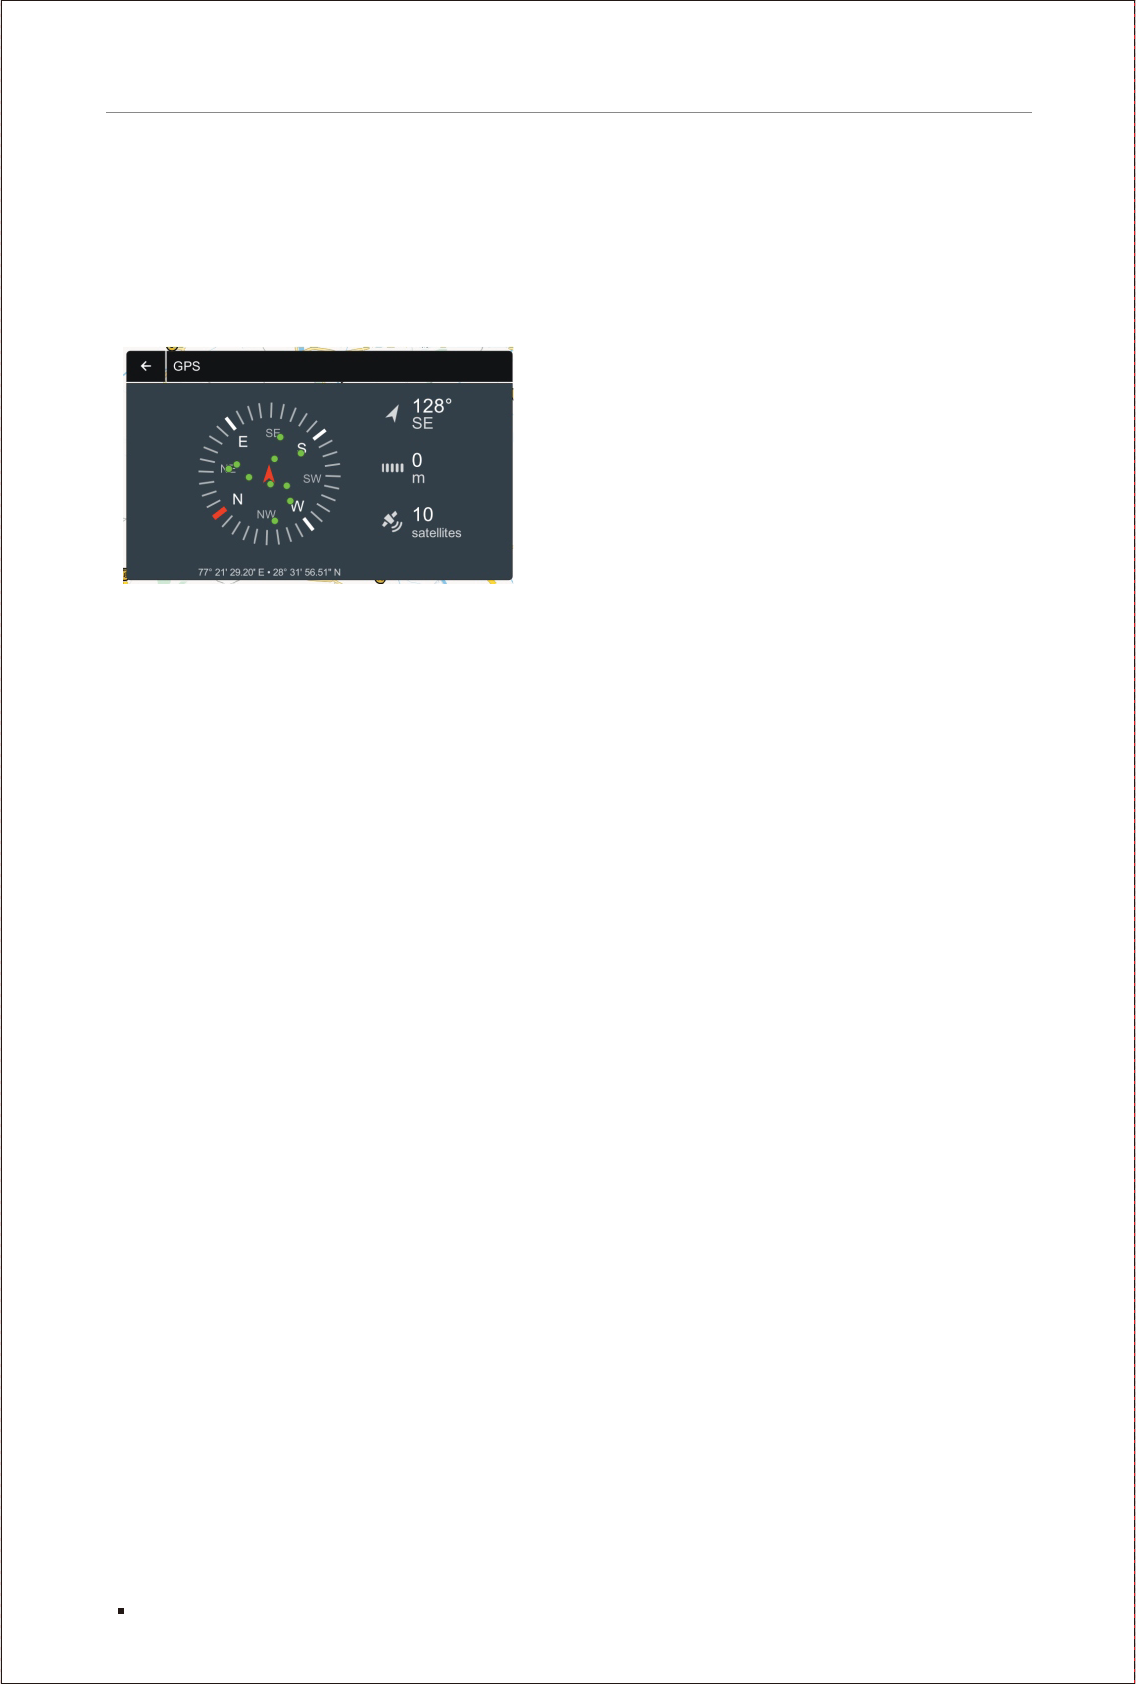
GPS Info: The GPS screen displays a compass,
along with the latitude & longitude of your
current location. User can also see the accuracy
of the GPS in meters and with how many satellites
your system is currently connected.
This End-User License Agreement (EULA) is a
legal agreement between you (either an individual
or a single entity) and CE INFO SYSTEMS PVT.
LTD. for the digital maps database and updates
hereof that run navigation in associated hardware
collectively the "MapmyIndia Maps” or “Maps").
By installing or using the MapmyIndia Maps, you
agree to be bound by the terms of this Agreement.
Use of the Maps without acceptance of this
Agreement is unauthorized and not permitted.
1. License Grant. CE INFO SYSTEMS PVT. LTD.
grants you a nonexclusive license to use your
purchased copy of the MapmyIndia Maps for
your own purposes of accessing the map database
and navigation by running the associated hardware
and not for service bureau timesharing, or other
similar purposes.
2. Limitations On Use. You are not permitted to
copy, modify, decompile, disassemble, or reverse
engineer any portion of the Maps.
3. Indemnity. You agree to indemnify, defend and
hold free and harmless CE INFO SYSTEMS PVT.
LTD., including its licensors, assignees, subsidiaries,
affiliated companies, and the respective officers,
directors, employees, shareholders, agents,
authorized dealers or sales agents, and repre-
sentatives of each of them from and against any
liability, loss, injury, demand, cost, expense, or
claim of any kind of character, including but not
limited to attorney's fees, arising out of (a) any
use or possession of the Maps, or (b) any breach
of any warranties or representations made by
you in this Agreement or of your obligations under
this Agreement.
4. Disclaimer of Warranty. CE INFO SYSTEMS
PVT. LTD. does not make any warranties or
representations, either express or implied, with
respect to the Maps, without limiting the foregoing,
CE INFO SYSTEMS PVT. LTD. expressly disclaims
any implied warranties of quality, performance,
merchantability, fitness for a particular purpose
or noninfringement.
5. Limitation of Liability. CE INFO SYSTEMS PVT.
LTD. shall not be held responsible for any actual,
anticipated or speculative loss of profit or direct,
indirect, incidental, special, or consequential
damages, including, without limitation, loss of
revenue, data, or use incurred by you or any third
party arising out of your use or possession of the
Maps, whether in an action in contract or tort or
based on a warranty, even if CE INFO SYSTEMS
PVT. LTD. has been advised of the possibility of
such damages.
MapmyIndia Maps End User License Agreement

14
Navigation
6. Warnings.
A. Copies of the Maps reflect conditions as
they existed at various points in time before
your receipt of such copies. Accordingly,
copies of the Maps may contain inaccurate
or incomplete data or information due to
inaccurate or incomplete source materials,
the passage of time, road construction,
changing conditions, and otherwise.
B. Neither the Maps nor the Software include,
analyze, process, consider or reflect any of
the following categories of information, i.e.,
neighborhood quality or safety; population
density; availability or proximity of law
enforcement, emergency, rescue, medical or
other assistance; construction work, zones,
or hazards; road and lane closures; various
legal restrictions (such as vehicular type,
weight, load, height and speed restrictions);
road slope or grade; bridge height, width,
weight or other limits; road, traffic or traffic
facilities safety or conditions; weather
conditions; pavement characteristics or
conditions; special events; traffic congestion;
or travel time.
C. Maps are strictly meant for use in India and
you are not allowed to export Maps or its copies
anywhere outside India.
7. Transfer. This Agreement, including all rights,
obligations and representations may be
transferred to another individual or single entity,
provided the same transfer includes the
simultaneous transfer of the associated hardware
in which the Maps are installed, and further
provided that such other individual or single
entity accepts all the terms of this Agreement.
In the event such individual or single entity to
which the Software is transferred does not
accept the terms of this agreement, then the
License herein automatically terminates.
Further use of the Maps is unauthorized and
not permitted.
8. Governing Law. This Agreement shall be
governed by the laws of India without giving
effect to its conflict of laws provisions.
CE INFO SYSTEMS PVT. LTD. Copyright
Notice – MapmyIndia Maps Copyright© 2018
CE INFO SYSTEMS PVT. LTD.
All rights reserved. This document and the maps
described in it are furnished under license and
may be used only in accordance with such license.
Information in this document is subject to change
without notice and does not represent a
commitment on the part of CE Info Systems
Pvt. Ltd.
MapmyIndia reserves all rights concerning the
information contained herein. This document or
any part thereof may not be reproduced, distributed,
or translated into other languages in any way or
form except with the written approval of MapmyIndia.
This document is provided to the user on an ‘as is’
basis. Although maximum care was taken during
preparation of this manual to provide accurate
information and to avoid errors, some technical
inaccuracies or editorial errors may occur, for
which MapmyIndia accepts no responsibility. In
the interest of improving the content of the document,
MapmyIndia reserves the right to modify, amend
or delete any part of the document at any time
without prior notice.
This is a generic version of the user manual. Some
of the features listed here may vary on your device .
In case of confusion, please contact us:
237 - Okhla Industrial Estate, Phase 3, New Delhi
- 110020
Ph: +91-11 4600 9900, +91-9999333223
Email: support@mapmyindia.com
Web: www.mapmyindia.com
Disclaimer

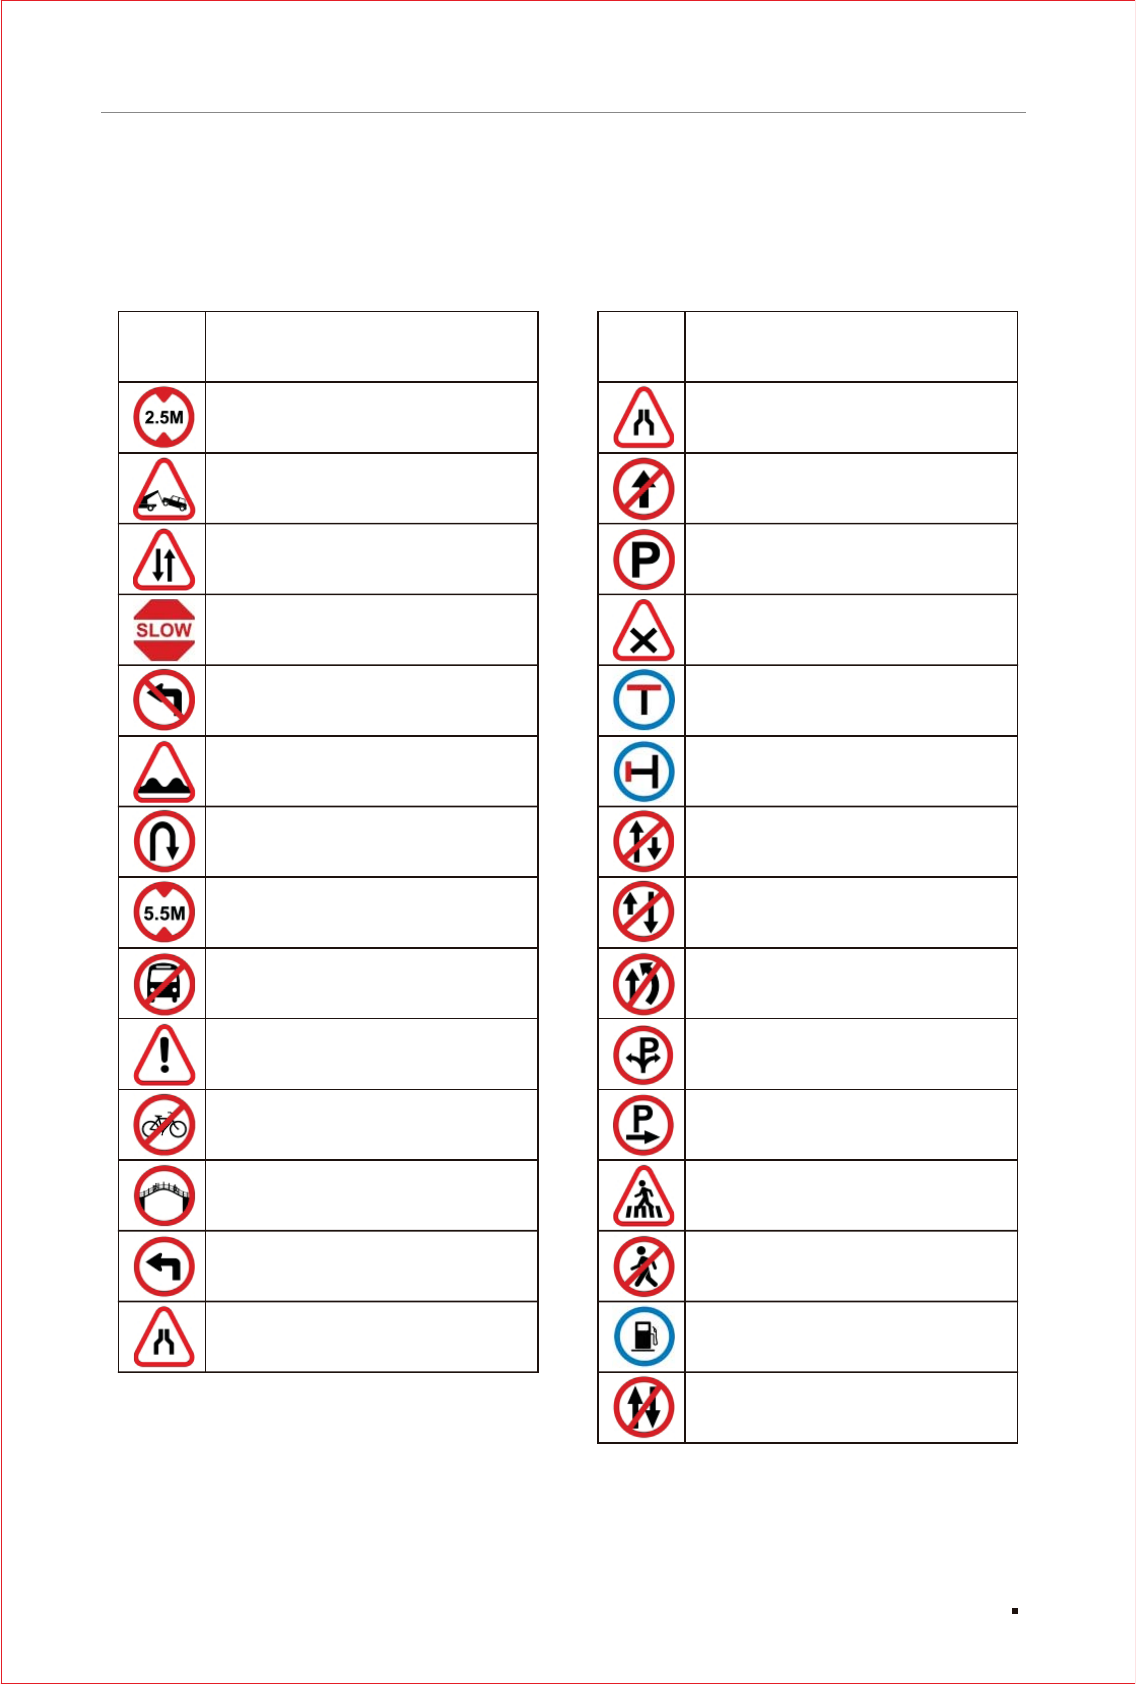
APPENDIX 1
APPENDIX 1
Types of Traffic Signs
15
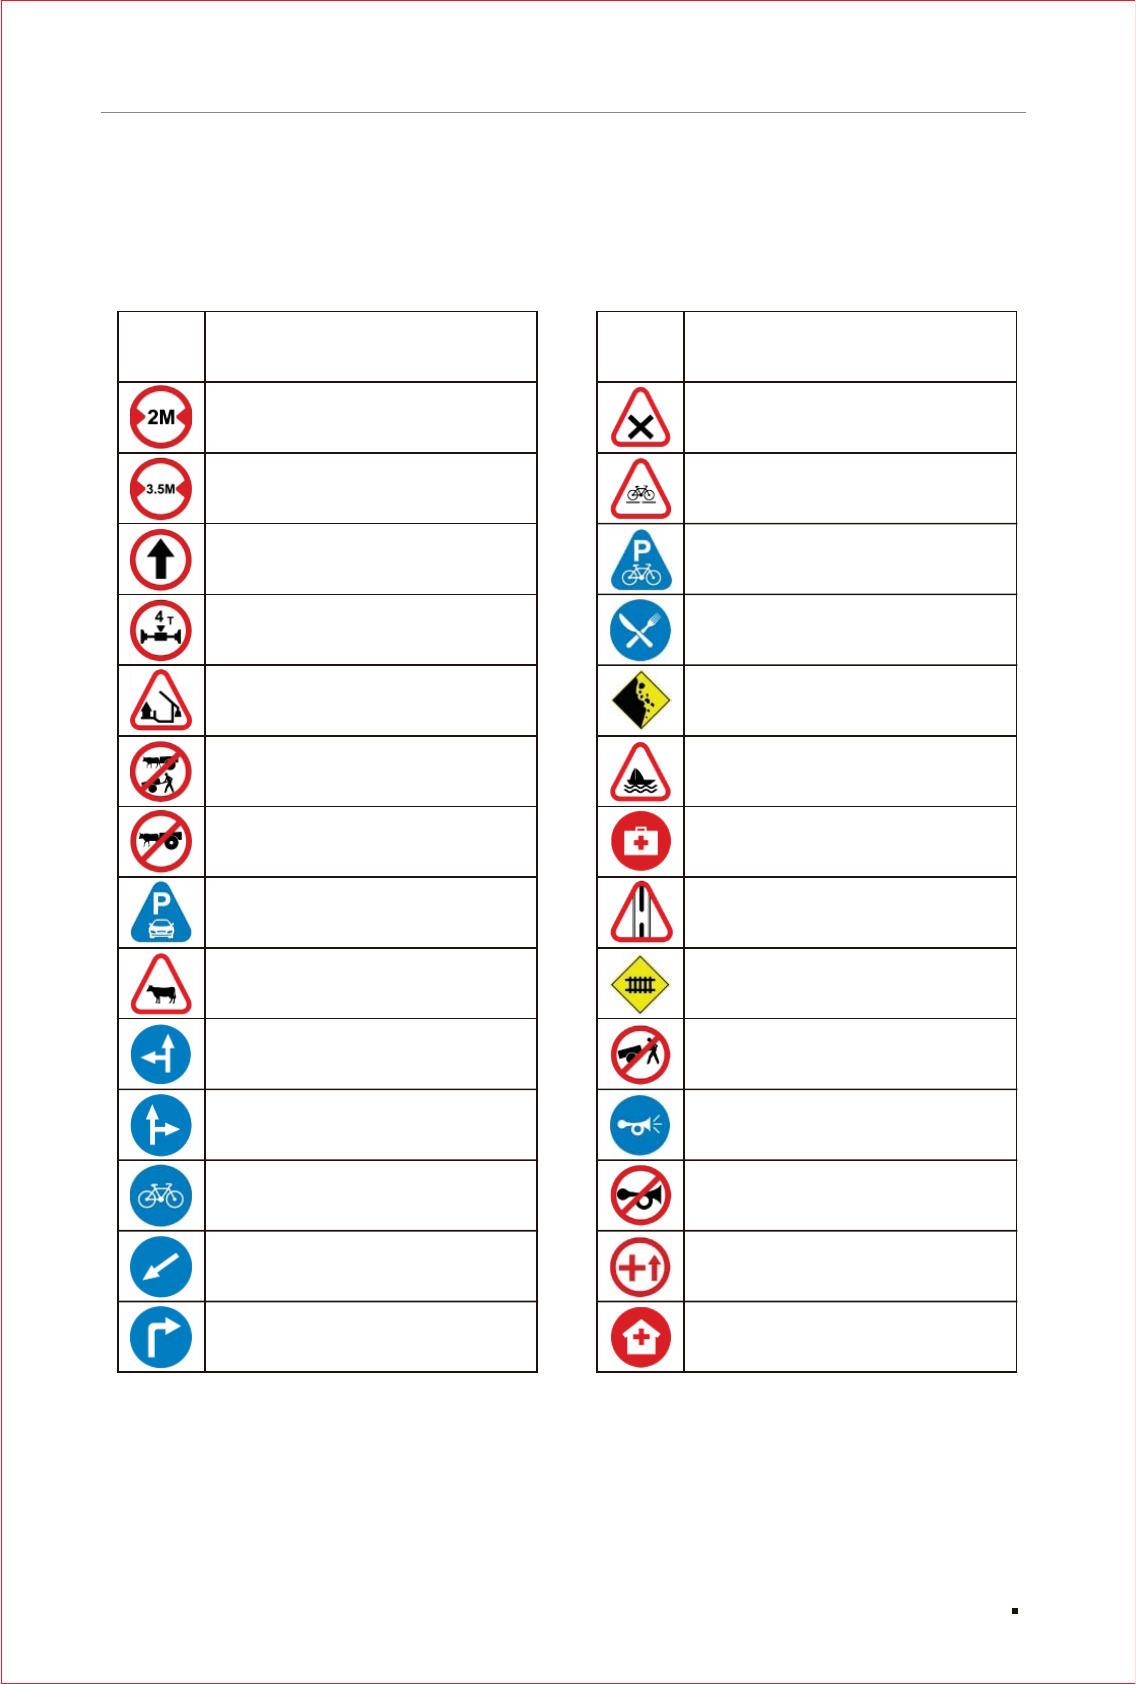
Icon Description
2 Meter Width
3.5 Meter Height
Ahead Only
Axle Weight Limit
Barrier Ahead
Bullock Cart and
Hand Cart Prohibited
Bullock Cart Prohibited
Car & Taxi Parking
Cattle Prohibited
Compulsory Straight
or Turn Left
Compulsory Straight
or Turn Right
Compulsory Cycle Track
Compulsory Keep Left
Compulsory Turn Right
Icon Description
Cross Road
Cycle Crossing
Cycle Parking
Eating Place
Falling Rocks
Ferry Ahead
First Aid Post
Gap in Median
Guarded Ahead
Hand Cart Prohibited
Horn Prohibited
Hospital
Horn Compulsory
Hospital Ahead
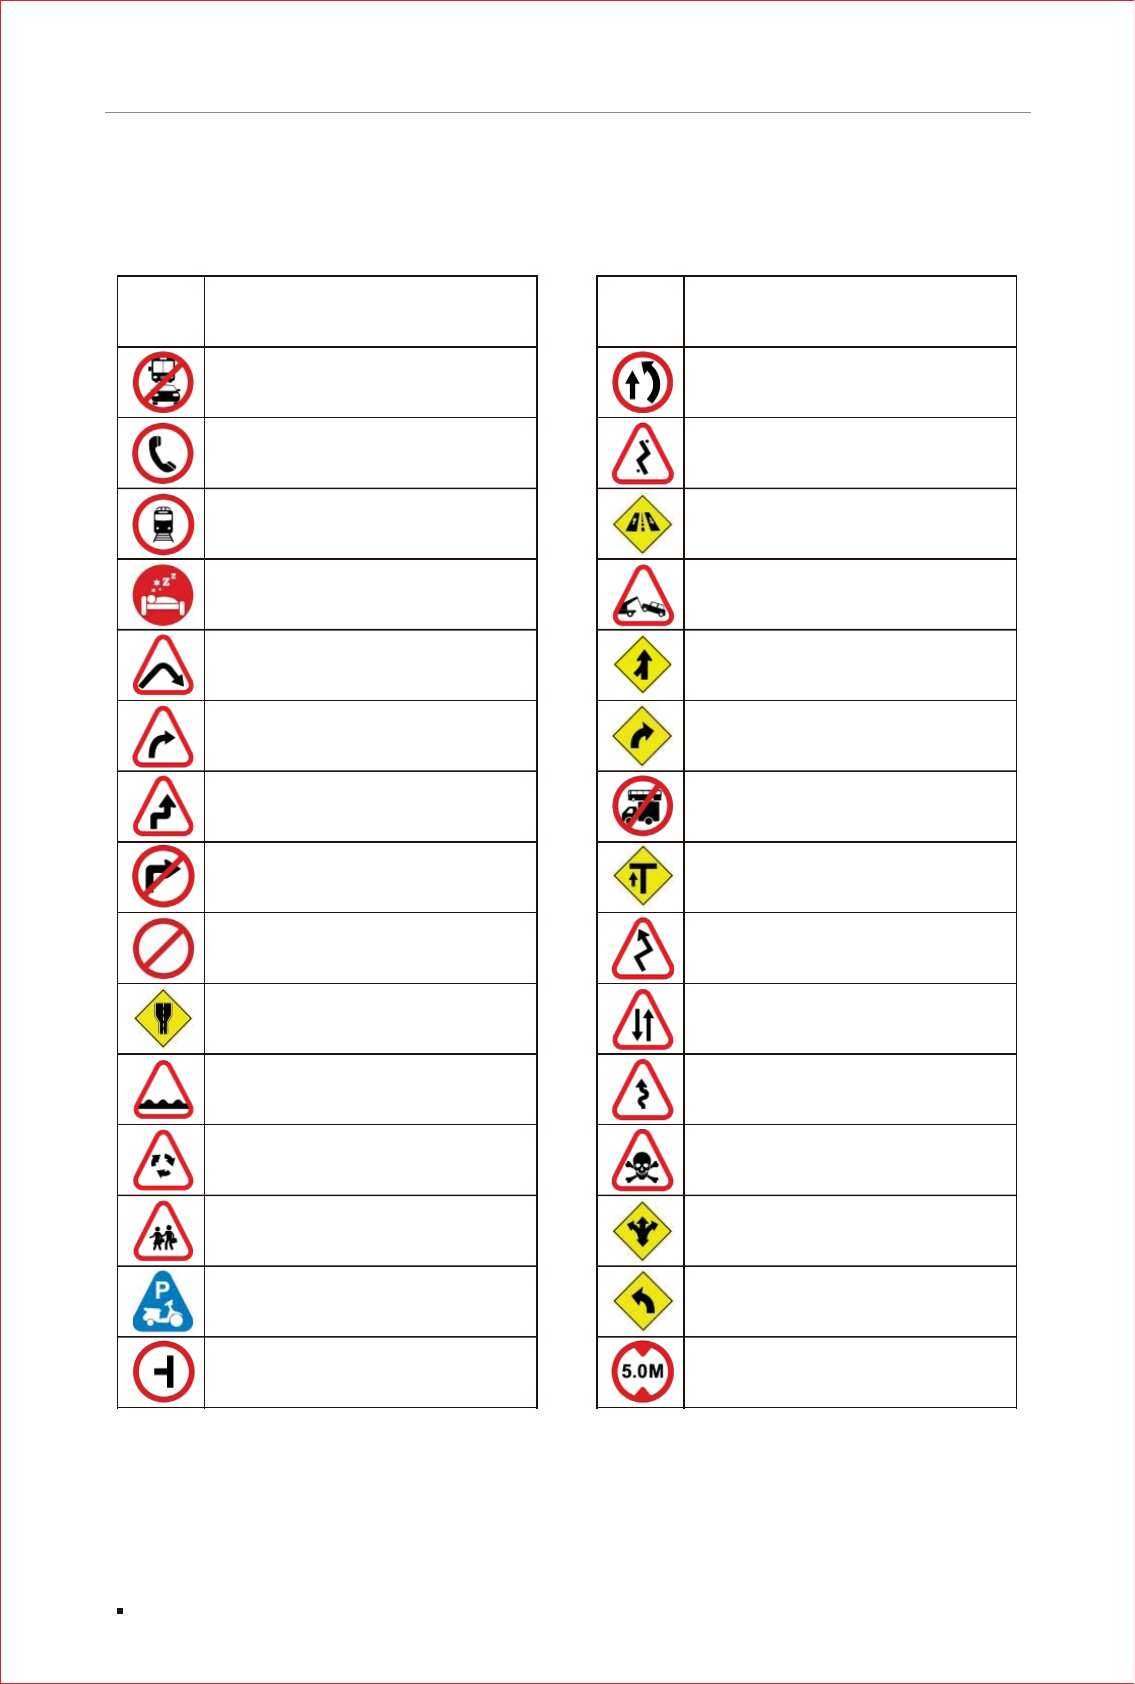
APPENDIX 1
16
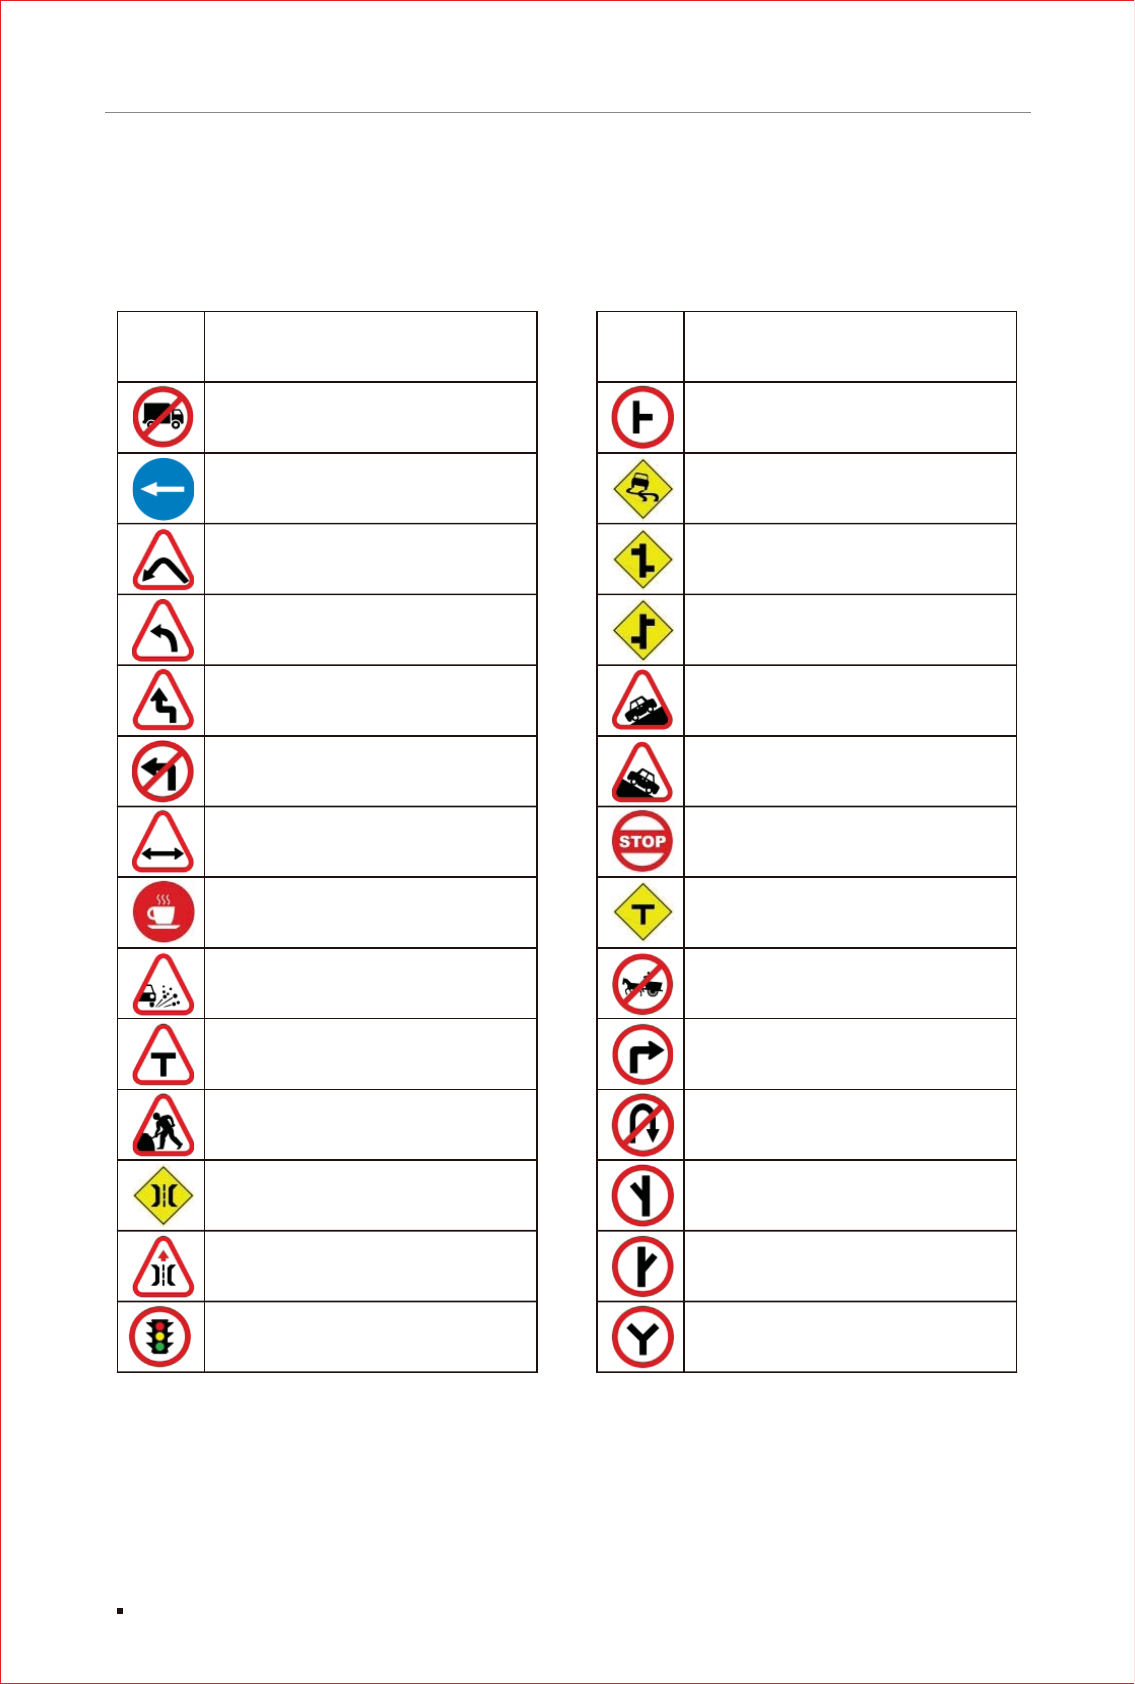
Icon Description
Side Road Right
Slippery Road
Staggered intersections
Staggered intersections
Steep Ascend
Steep Descend
Stop
T Junction
Tonga Prohibited
Turn Right
Y Inter Section Left
Y Inter Section
U Turn Prohibited
Y Inter Section Right
Icon Description
HTV Prohibited
Keep Left
Left Hair Pin Bend
Left Hand Curve
Left Reverse Bend
Left Turn Prohibited
Length Limit
Light Refreshment
Loose Gravel
Men at Work
Narrow Bridge
T Intersection Ahead
Narrow Bridge Ahead
Traffic Light Ahead
17
APPENDIX 1
Icon Description
2.5 Meter Height
Accident Zone
Give Way
Go Slow
No Free Left Turn
Speed Breaker
U Turn Allow
5.5 Meter Height
Bus Prohibited
Caution
Foot Over Bridge
Cycle Prohibited
Left Turn Ahead
Narrow Road Ahead
Icon Description
Narrow Road Ahead
No Entry
No Parking
No Stopping and
No Parking
No Thorough Road
No Thorough Side Road
One Way
One Way
Overtaking Prohibited
Parking Both Side
Pedestrian Crossing
Parking On The Right Side
Pedestrians Prohibited
Petrol Pump
Prohibited Both Side
18
APPENDIX 1
Icon Description
Prohibited Vehicles
Public Telephone
Railway Station Ahead
Resting Place
Right Hand Pin Bend
Right Hand Curve
Right Reverse Bend
Right Turn Prohibited
Road Closed
Road Widens Ahead
Round About Ahead
Rough Road
School Ahead
Scooter and Motor
Cycle Parking
Side Road Left
Icon Description
Over Take Always Right
Road Turn Ahead
Road with Service Lane
Towing Zone
Left Road Merging Ahead
Right Curve Ahead
Bus & Truck Not Allowed
T Point Ahead
Curve Road
Zigzag Road
Two way Road
Danger Zone
Junction Ahead
Left Hand Curve
5 Meter Height
19
APPENDIX 1
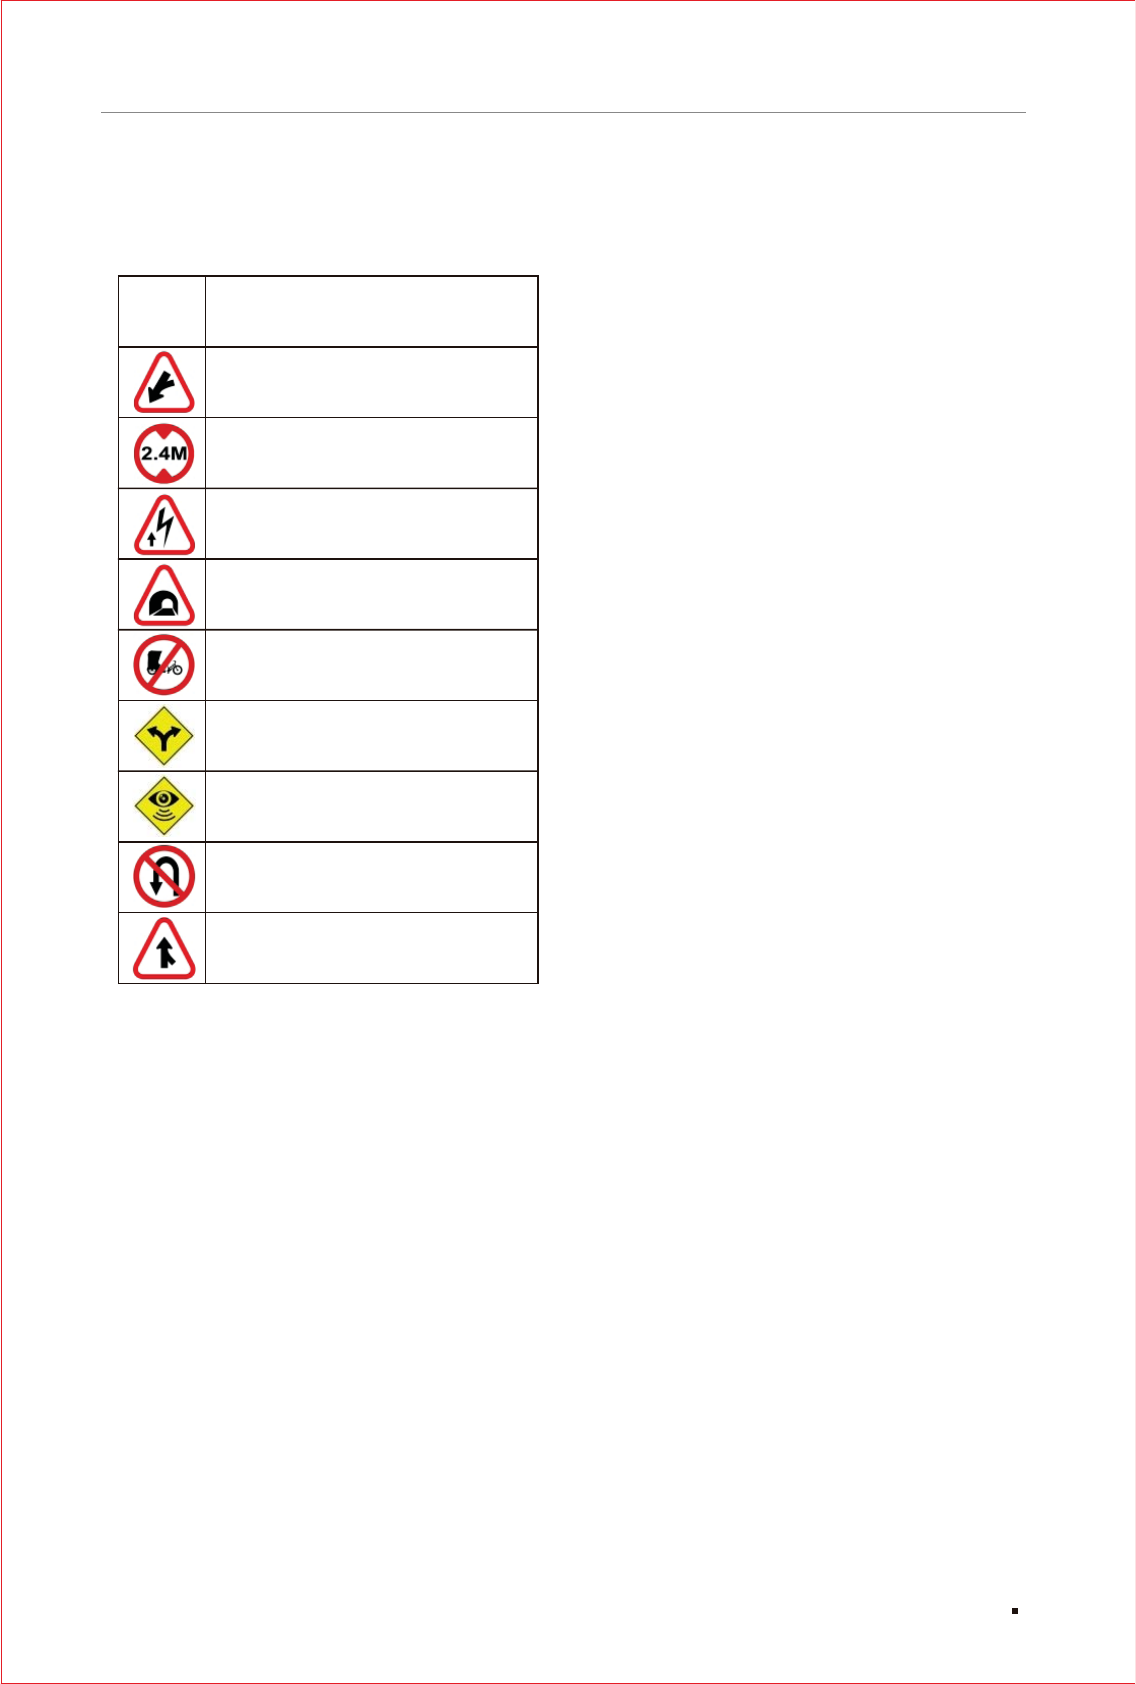
Icon Description
Merging Left Side
2.40 Meter Height
High Tension Wires Ahead
Tunnel Ahead
Cycle Rickshaw Prohibited
Divide Two Side
Speed Camera
Left U Turn Prohibited
Right Road Merging Ahead
20
APPENDIX 1
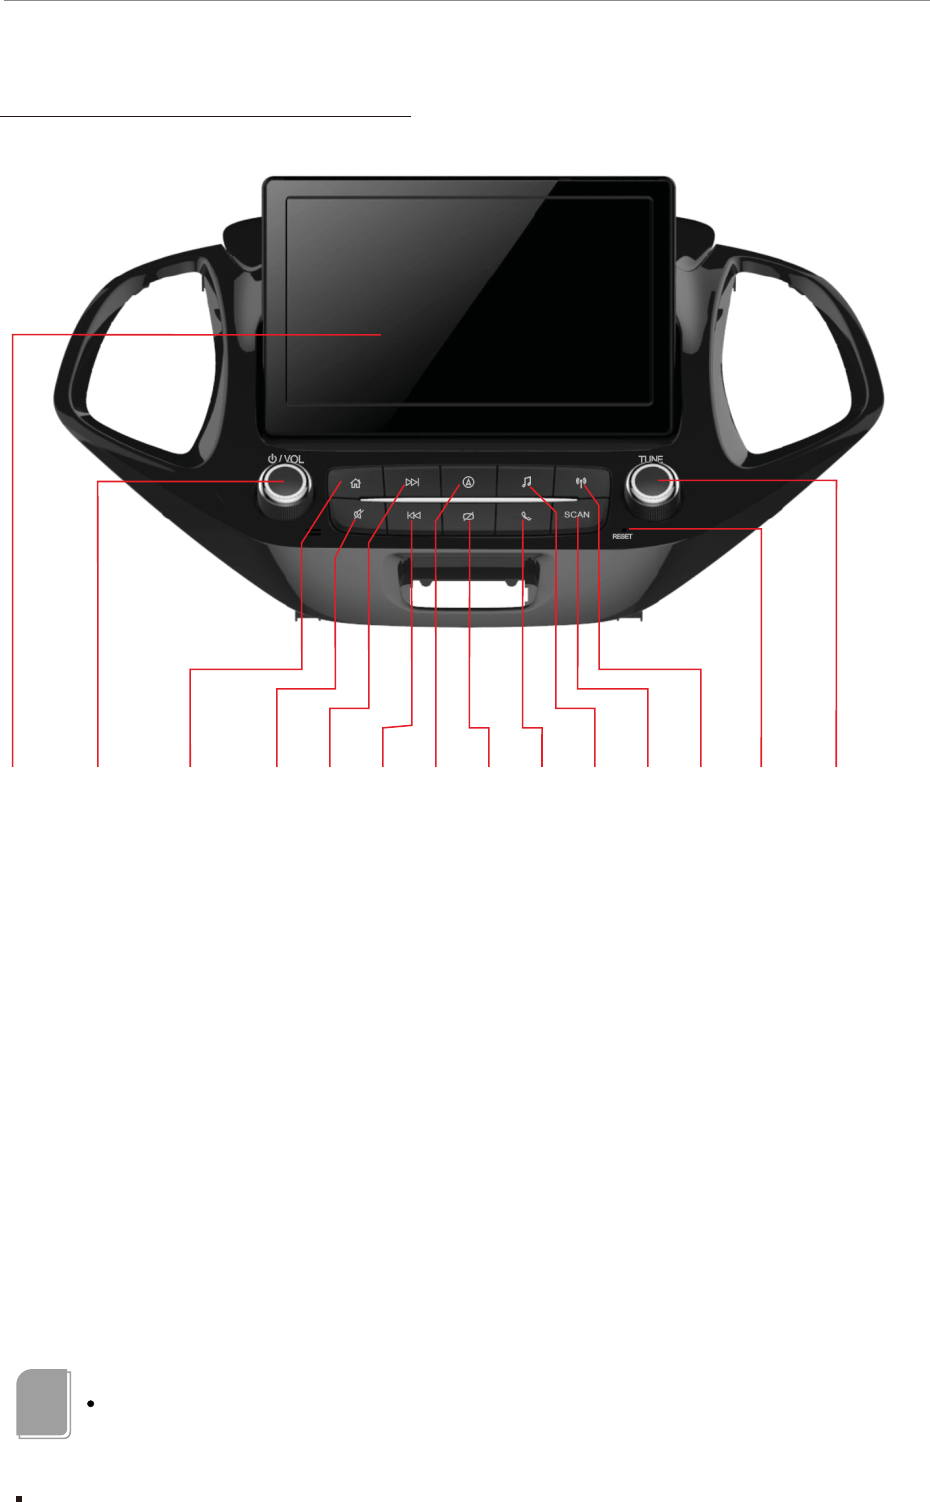
Schematic diagram of the front panel
Reset
Touch screen
Standby\restart\volume control knob
Main menu shortcut key
MUTE key
Navigation function shortcut key
Screen on / Screen off
Bluetooth phone key
Multimedia switch key
Radio frequency scan
Radio function shortcut key
FM \previous\next song\sound\navigation control knob
This picture is for reference only, the actual product appearance shall prevail!
Note
7.0 inch touch screen
21
Function description and media operation
Seek/Rewind key
Seek/Fast forward key

Function description of the front panel components
Touch screen
Display different images, click on the control
menu in the images to select the control items.
Standby\ volume control knob
1. Adjust the volume outputted from the
machine; turn it clockwise, the volume will
increase, turn it counterclockwise, the volume
will decrease;
2. Press the knob, the display screen will
enter standby interface; Press again to cancel
standby and return to current interface.
3. Press and hold for more than 5 seconds,
infotainment system will restart.
Main menu shortcut key【 】
Except at the backing, Bluetooth phone and
standby status, pressing this key at any other
pages can quickly switch to the main menu
interface.
Mute key【 】
Press the knob to open/cancel mute.
【 】
At the status of multimedia playing, press this
key to select the next song, press and hold this
key to skip forward; at the status of listening to
radio, press this key to automatically search next
frequency channel with signal, press and hold
this key , until release, it will stay
in a frequency channel with signal. In Bluetooth
music interface, press this key to enter next song,
press and hold has no function.
【 】
At the status of multimedia playing, press
this key to select previous song, press and hold
this key to skip backward; at the status of listening
to radio, press this key to automatically search
previous frequency channel with signal, press
and hold this key , until release,
it will stay in a frequency channel with signal.
Navigation function shortcut key 【 】
Enter GPS navigation screen shortcut key,
press this key to quickly switch to GPS navigation
map interface.
Screen on / Screen off
Click to turn off the screen, and click again to
turn it on.
restart\ 【 】
Seek/Fast forward key
to skip forward
Seek/Rewind key
to skip backward
In
Bluetooth music interface, press this key to enter
previous song, press and hold has no function.
【 】
Bluetooth phone key【 】
Press this button to enter the bluetooth phone
interface, you must first confirm the infotainment
system and mobile phone bluetooth connected
before operating the bluetooth phone related
functions.
Multimedia switch key【 】
Press this button to switch to the USB-iPod /
iphone-BT-AUX interface in sequence. If you jump
from the Media to another page, press this button
to switch to the last media playback screen.
Radio frequency scan key 【SCAN】
At the status of radio interface, press this key
to automatically scan radio frequency.
Radio function shortcut key 【 】
Enter radio screen shortcut key, press this
key to switch to radio operation interface.
FM \previous\next song\sound\navigation
control knob
1. When listening to the radio, turn the knob
for FM of radio channel;
2. Enter GPS navigation interface, this knob
can adjust the minification and magnification of
map;
3. Press this knob vertically to quickly enter
sound setting interface;
4. At the status of multimedia playing, turn
the knob clockwise to enter the next song, turn
the knob counterclockwise to enter previous song.
Reset
system will restart.
【TUNE】
Infotainment
22
Function description and media operation
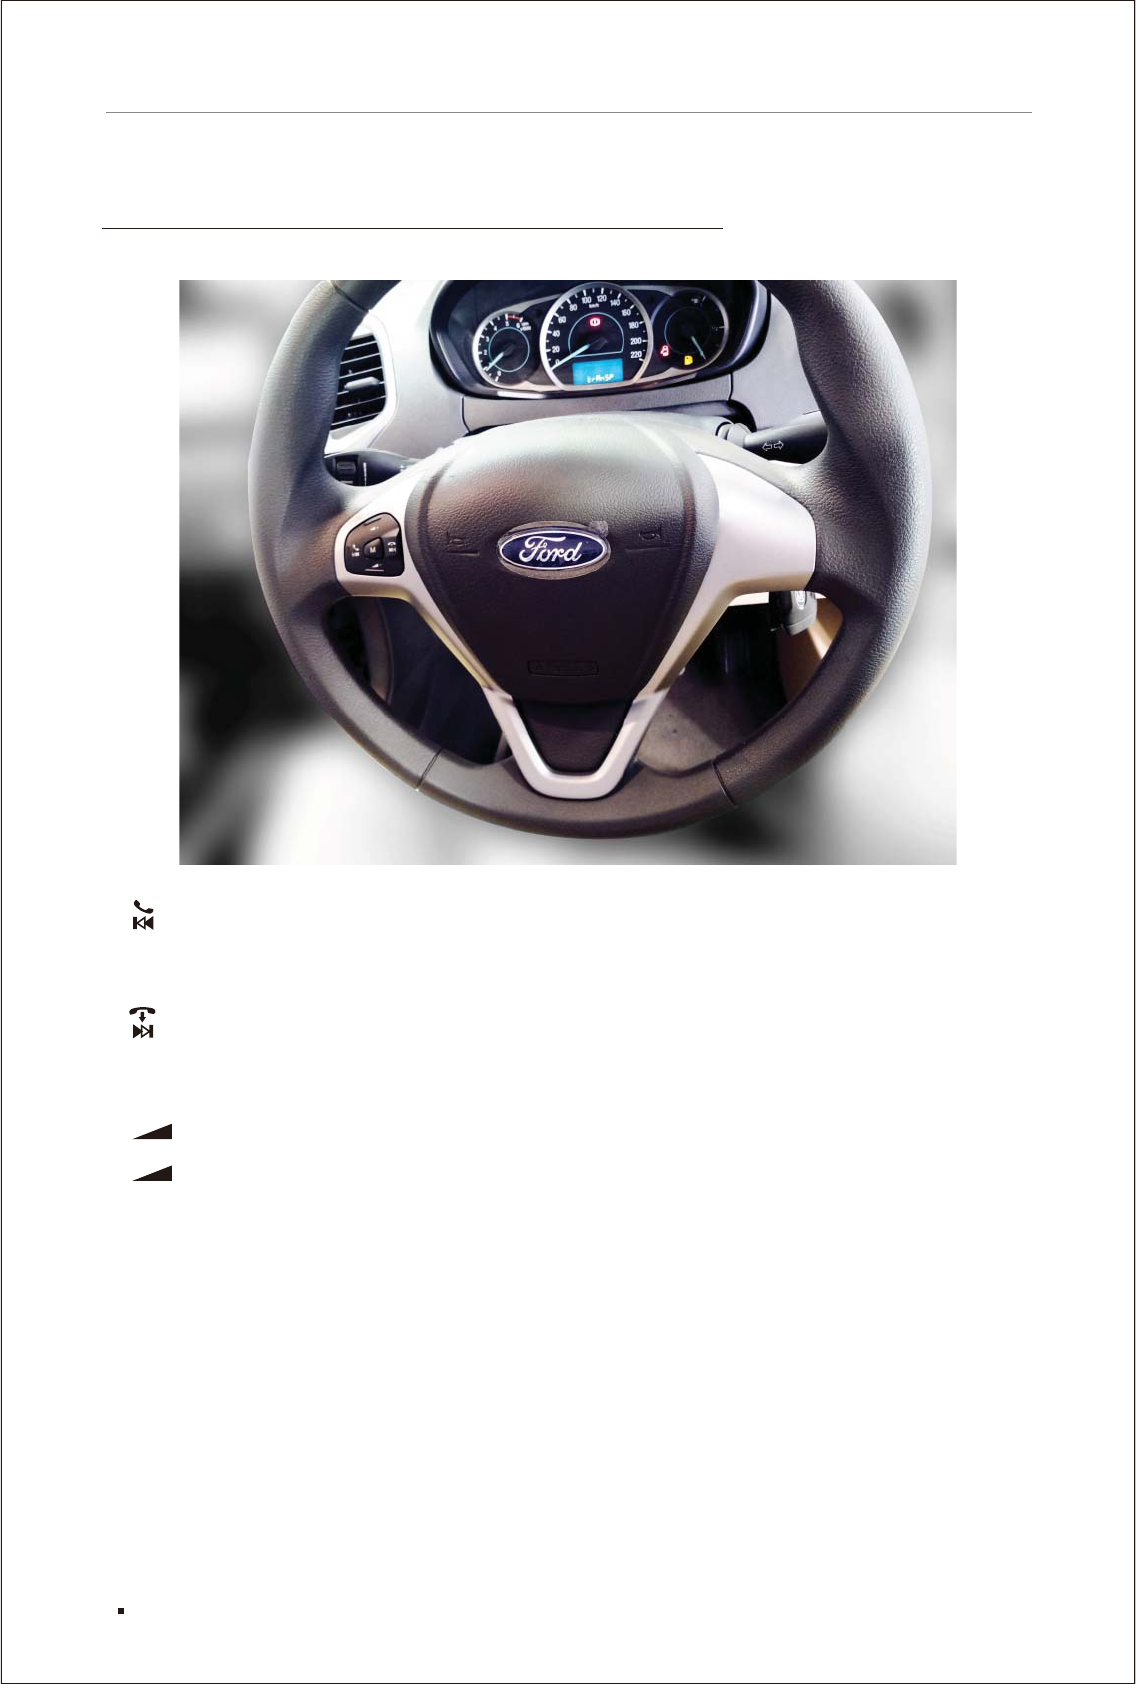
Function description of control keys on steering wheel
【 】:
seeking available station. In MP3, ipod, video and other interfaces, press this key to enter
previous song, press and hold this key to skip backward; in Bluetooth music interface, press
this key to enter previous song, press and hold has no function; at the status of being called,
press this key to answer the phone;
【 】:
available station. In MP3, ipod, video and other interfaces, press this key to enter next song,
press and hold this key to skip forward; in Bluetooth music interface, press this key to enter
next song, at the status of being called or answering the
phone, press this key to reject or hang off;
【 +】:This key is used to increase the volume; press for volume +1, press and hold to quickly
increase volume;
【 -】:This key is used to decrease the volume; press for volume -1, press and hold to quickly
decrease volume;
【M】:This key is for media function.
In radio interface, single press this key to previous stored station, long press this key for
In radio interface, single press this key to next stored station, long press this key for seeking
press and hold has no function;
23
Function description and media operation

24
Function description and media operation
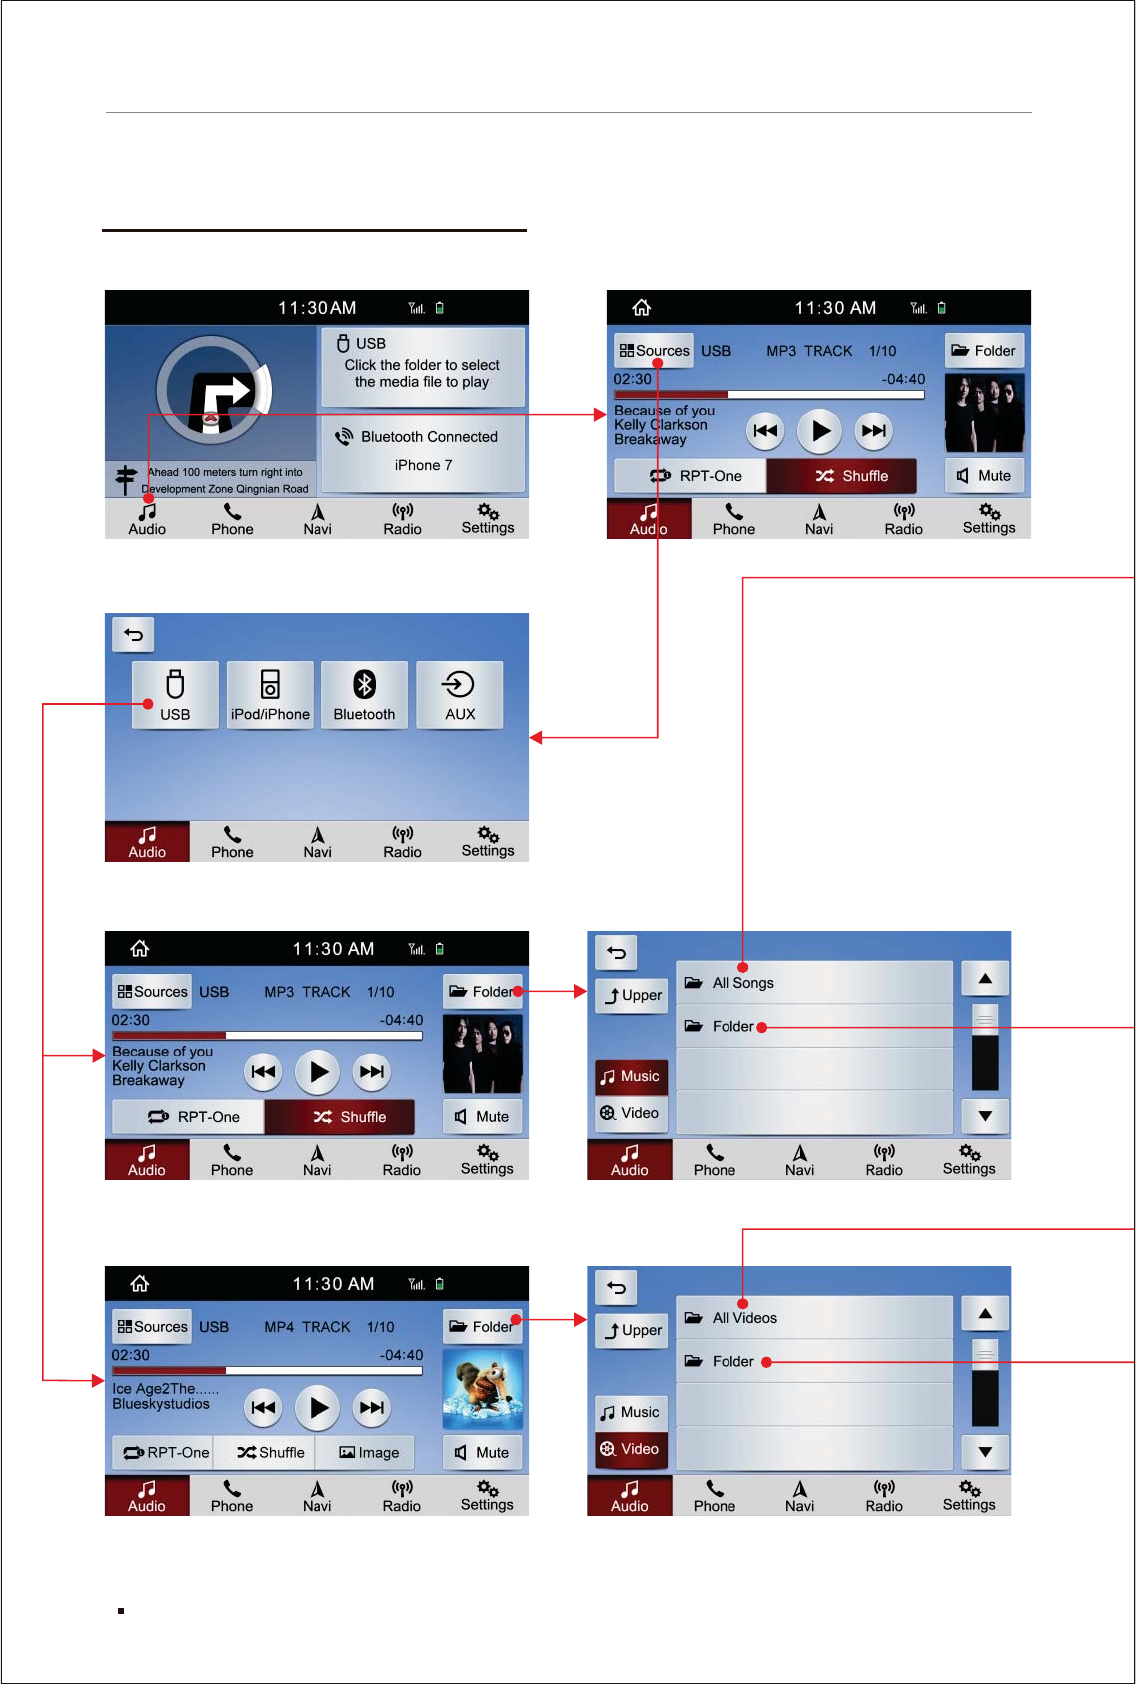
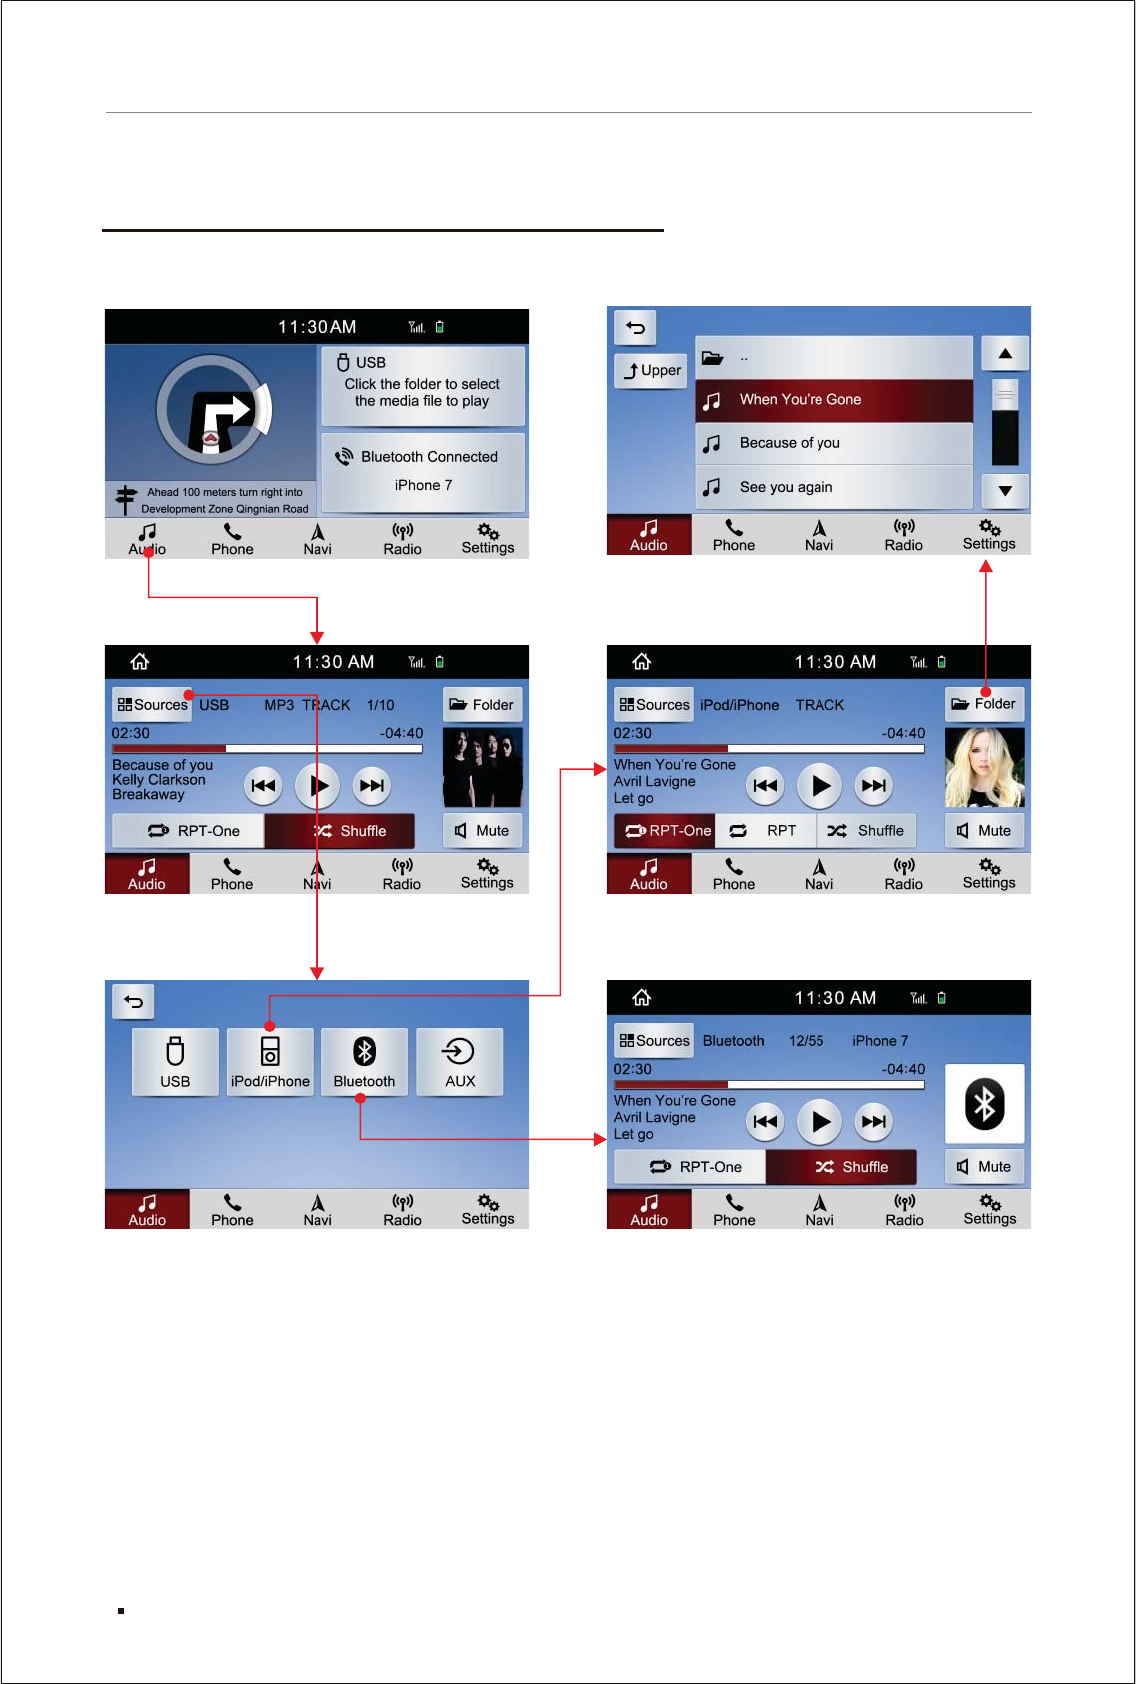
[USB] operation flow chart
Main menu Audio
Sources
USB MP3
USB MP4
Folder
Folder
25
Function description and media operation
26
Function description and media operation
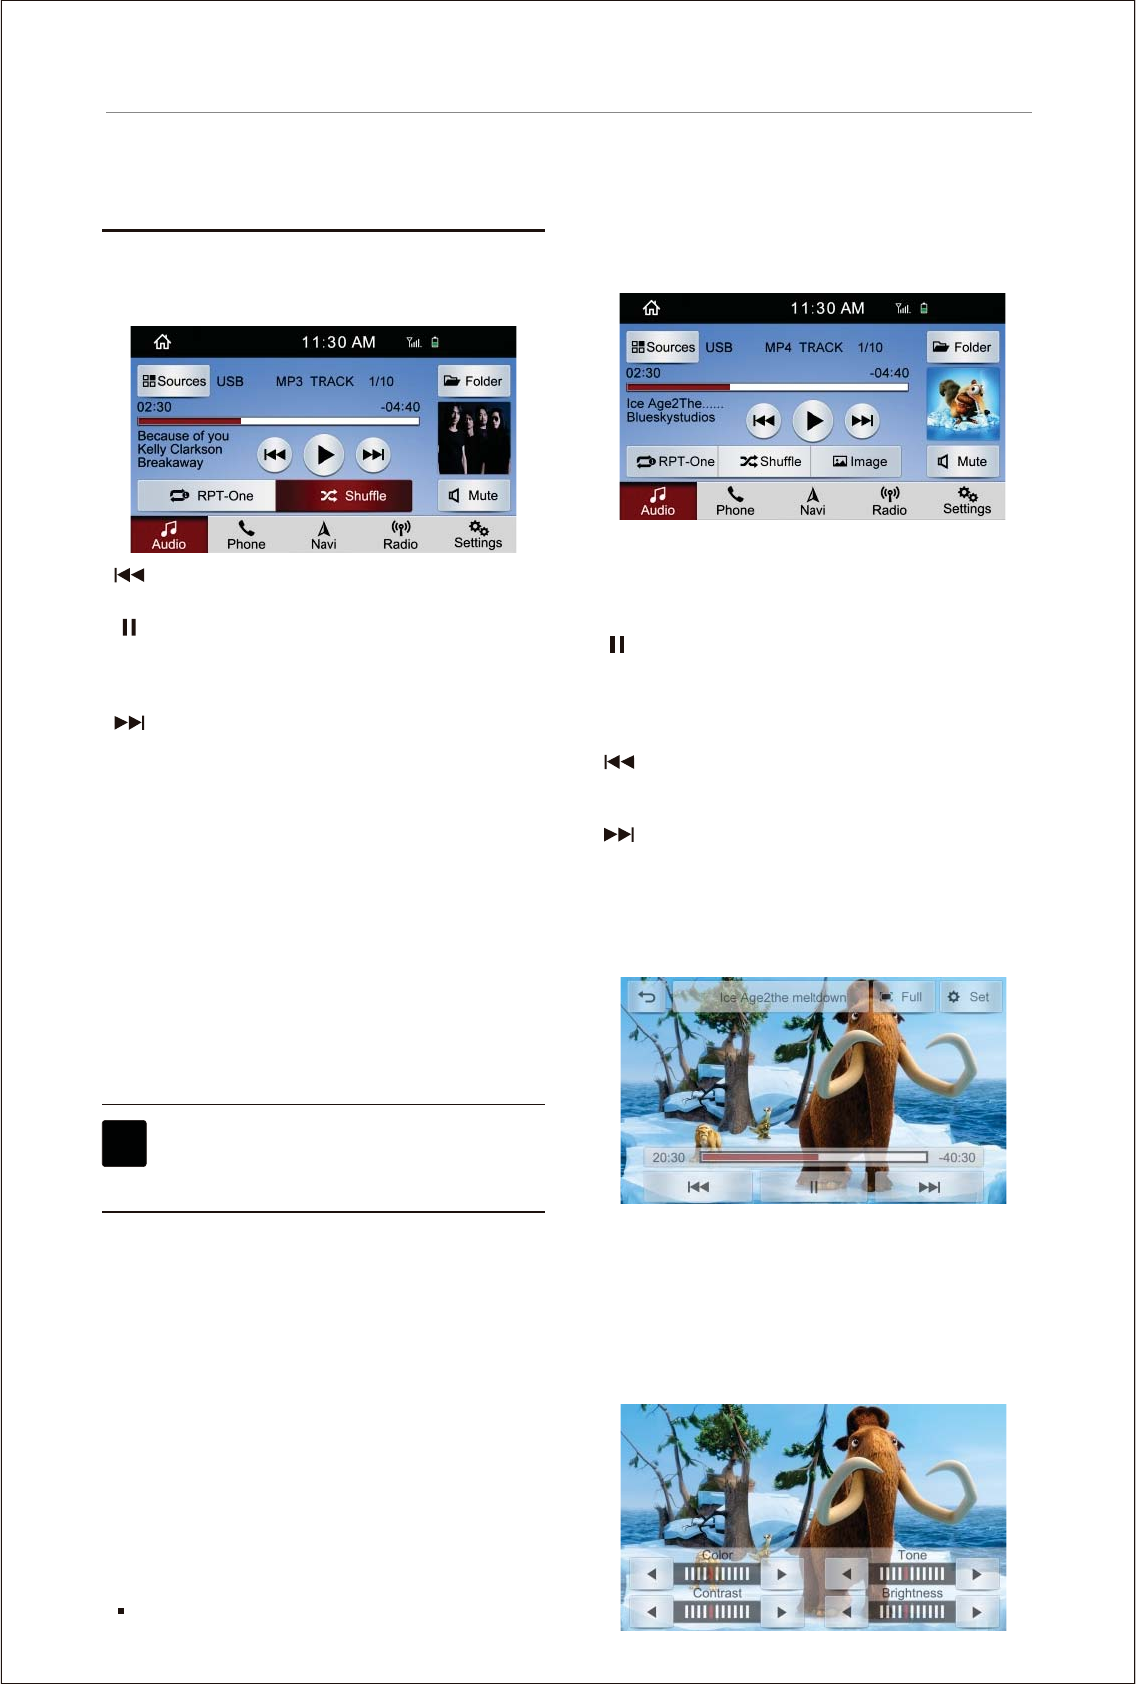
MP4 player
TRACK 1/10 Serial number of the track that
is being played.
02:30 Show the time for which the USB drive
has been played.
Under the condition that USB drive has
been inserted, pressing this key to start
playing, at the status of playing, press this
key to pause. Press this key during pause
or stop to return to normal playing.
Press this key to play previous track or
song, press and hold this key to skip
backward.
Press this key to play next track or song,
press and hold this key to skip forward.
Mute Press this key to enter the mute mode.
Image Press this key to enter the video images
and operation menu interface. As
shown below:
Adjust the color, contrast, tone and
brightness of video image. As shown
below:
[ ]:
[ ]:
[ ]:
[ ]:
[ ]:
[ ]:
[ ]:
[Full]: Press this key to display full screen video
interface. Press [Full] key again, the screen
will display normal video interface.
(Note: Associated with relevant format of videos
in USB drive)
[ Set ]:
MP3 playing
Click [USB] in [Sources] to enter the operation
interface of MP3 in USB drive, as shown below:
:Press this key to play previous song,
press and hold this key to skip backward.
:Press this key to start playing, at the
status of playing, press this key to pause.
Press this key during pause or stop to
return to normal playing.
:Press this key to play next song, press
and hold this key to skip forward.
:Press this key to enter the mute mode,
press again to return to the original
volume.
RPT-One :Automatically and repeatedly play
the track or song that is being played.
Shuffle :Randomly play the audio or video files
in USB drive.
Note: Under the condition of not selecting [RPT-
One] or [Shuffle], the system default will be
automatic list playing cycle.
Folder :Browsed playing of the audio or video
files in USB drive.
1. Android device does not support music
paying via USB cable.
2. For iPod/iPhone music playback, please
refer to [iPod/iPhone] function.
[]
[]
[]
[Mute]
[]
[]
[]
[USB] operation instruction
Note
27
Function description and media operation
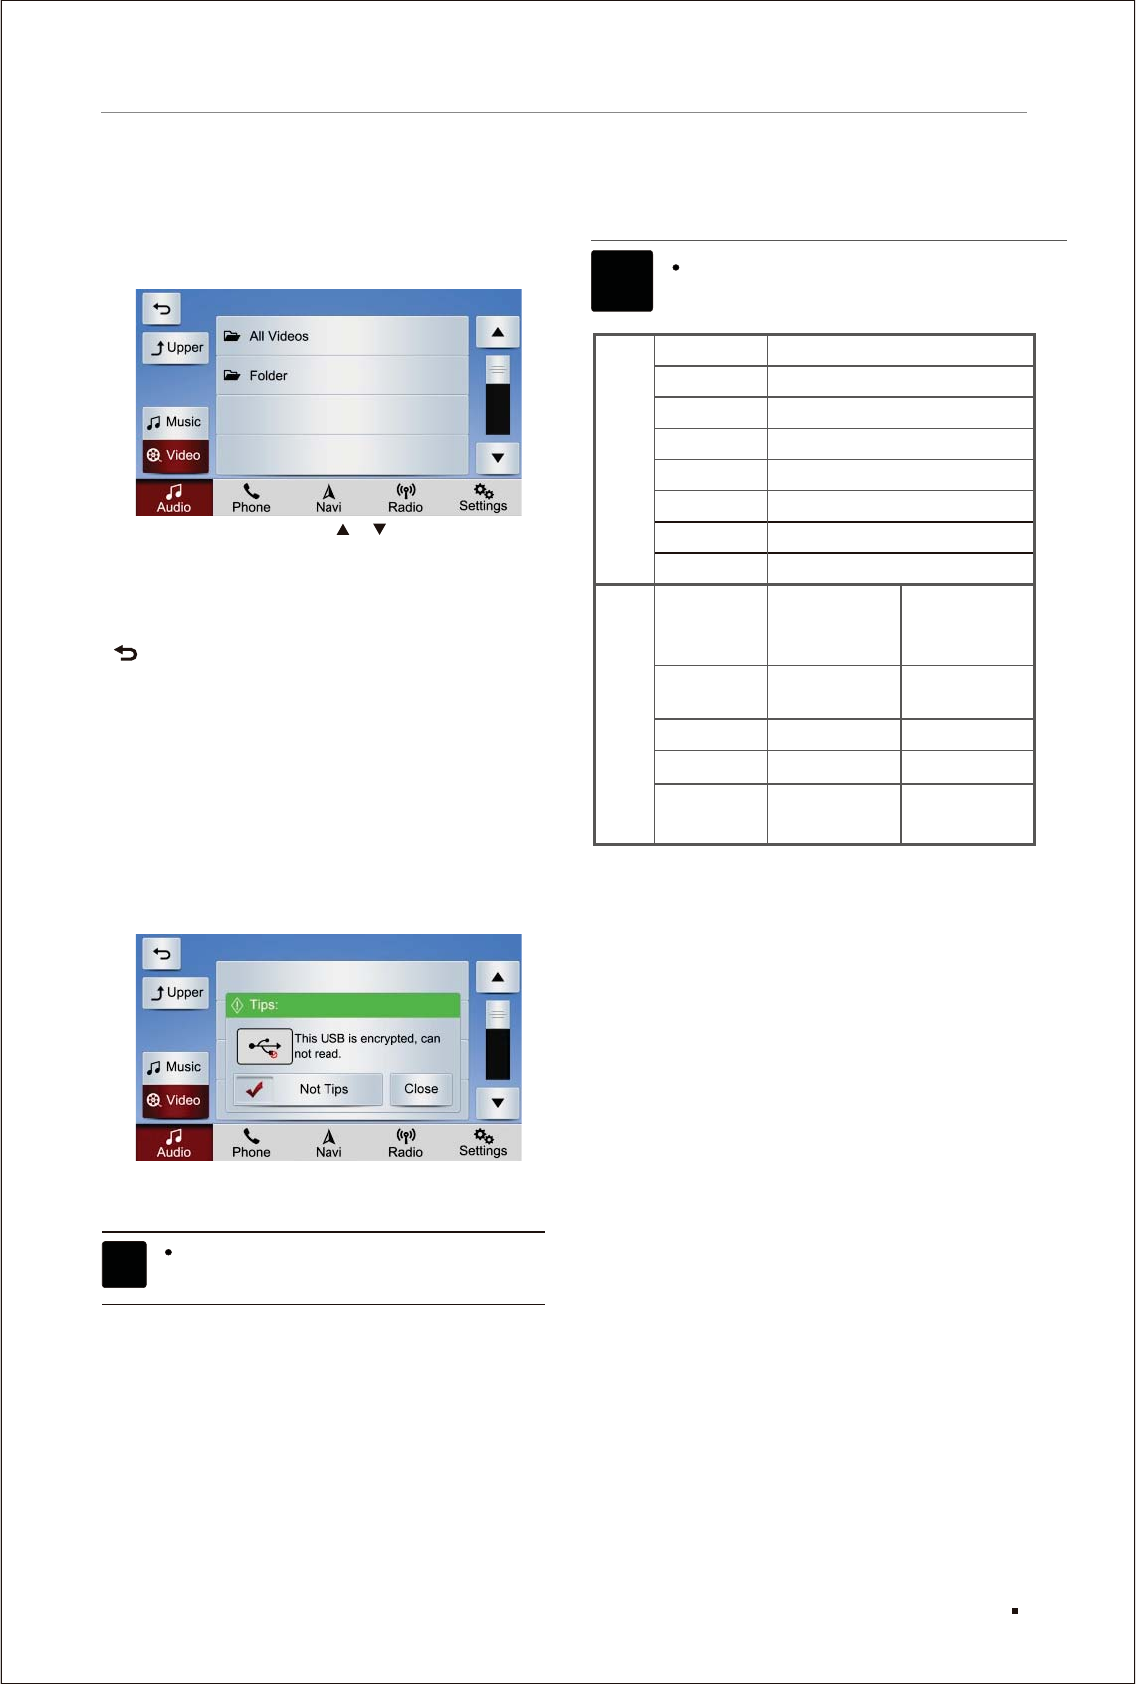
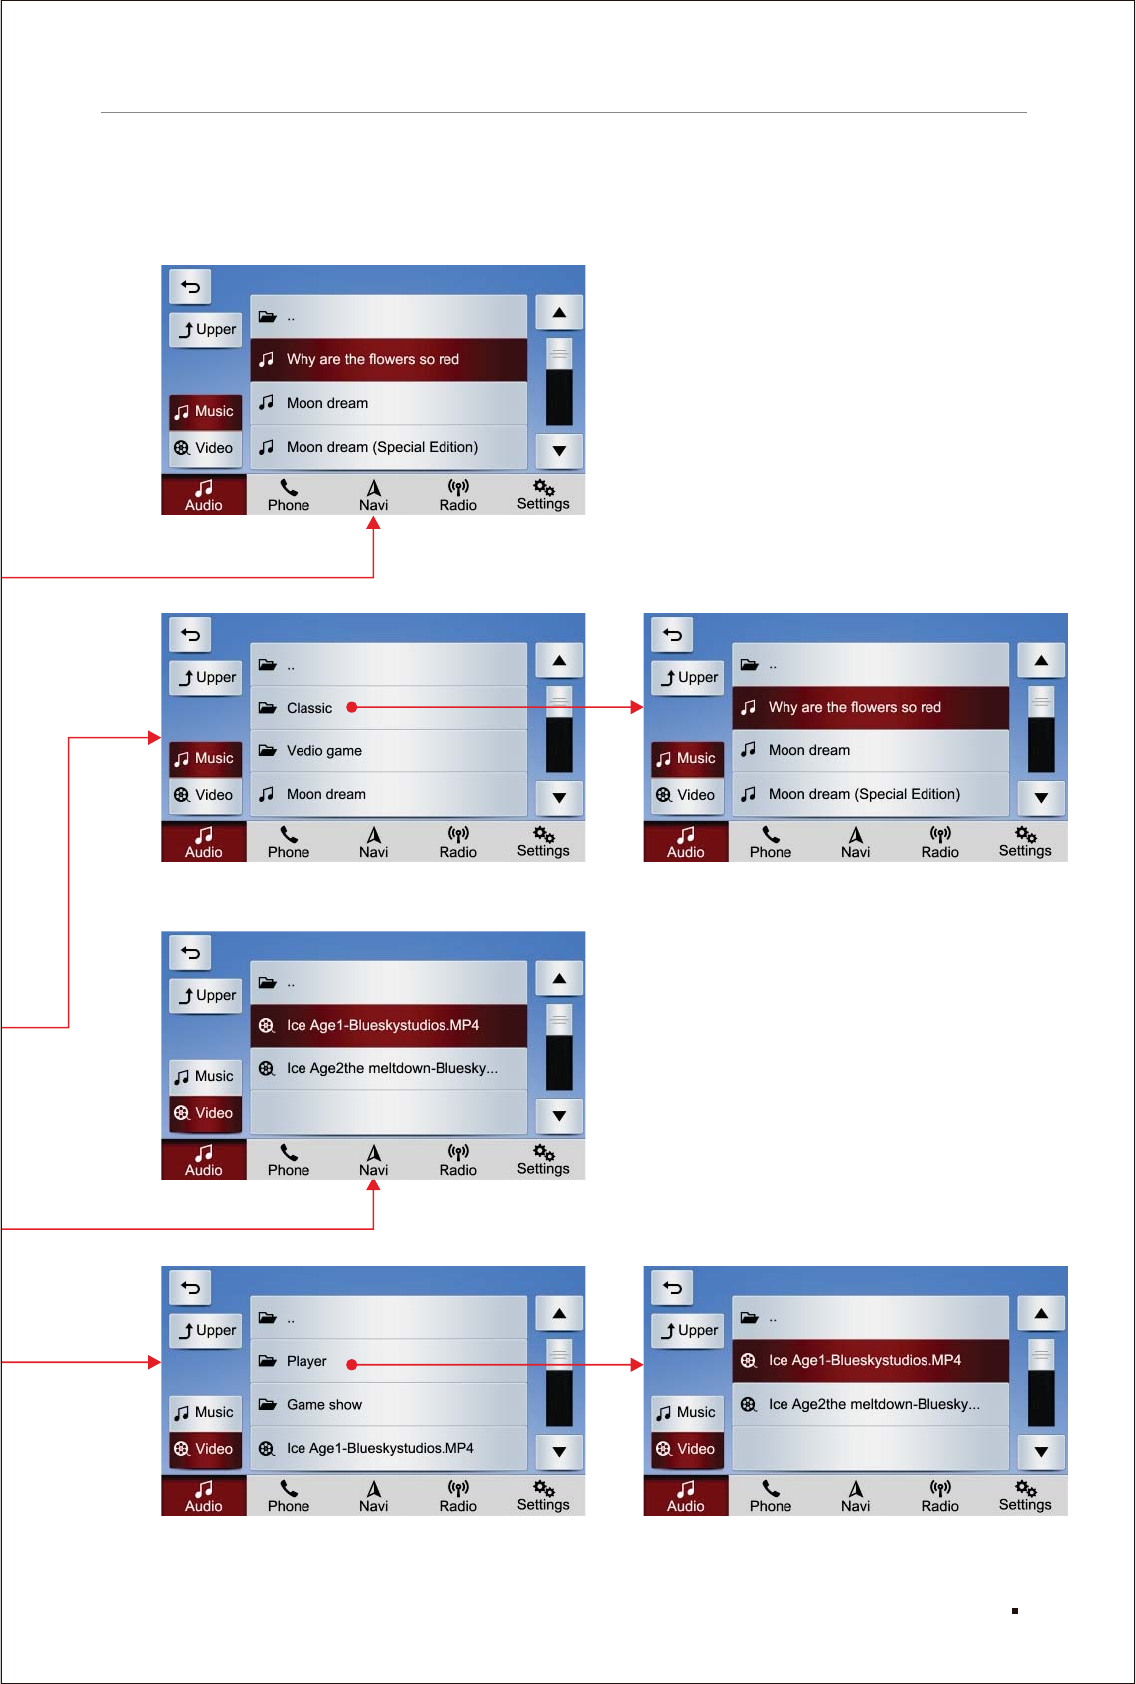
Press the [Folder], the image is as shown below:
Program browse: Press [ ] [ ] on the touch
screen to browse the file folder
list or file list.
Upper Press this key to return to the upper
interface.
Press this key to return to [USB] operation
interface.
[ ]:
[ ]:
[All Videos]/[All Songs]:Press [All Videos]/ [All
Songs] to view all the video/audio files in USB
drive, and select the favored media file to play.
[Folder]:Press [Folder] to browse all folder paths
into USB drive, and find the position of
favored video/audio files, and select
the media files to play.
Note: If encrypted USB drive is used, it can not
be read normally. As shown below:
The infotainment system can read only
the USB drive supporting FAT32 format.
Note
File format
Audio
AAC
MP2
MP3
FLAC
APE
M4A
RA
AVI
MP4
MPG
RMVB
The vehicle infotainment system supports
the following audio and video formats
as well as coding and decoding formats:
File format
Video
Coding and decoding formats
AAC
MPEG
MPEG
FLAC
MonKEY
AAC
Cooker
XVID
XVID
MPEG2
Realvideo
MP3
AC3\MP2
AAC
MPEG
Cooker
RAAC
Video coding
and decoding
formats
Audio coding
and decoding
formats
28
Function description and media operation
Note
iPod/iPhone
[ flowiPod/iPhone] [Bluetooth] operation chart:
Bluetooth
Sources
Audio
Main menu Folder
29
Function description and media operation

Click [iPod/iPhone] in [Sources] to enter the ipod/
iphone interface as shown below:
Press this key to play previous song,
press and hold this key to skip backward.
Press this key to start playing, at the
status of playing, press this key to pause.
Press this key during pause or stop to
return to normal playing.
Press this key to play next song, press
and hold this key to skip forward.
Press this key to enter the mute mode,
press again to return to the original
volume.
Press this key to enter the list cycle
playing.
Randomly play the MP3 songs in iPod.
Note: If none of [RPT-One] [RPT] [Shuffle] are
selected, the system is defaulted to
automatic list play cycle.
Browsed playing of the MP3 songs in
iPod/iPhone.
Press the [folder] to enter the following image:
1. Please connect iOS devices to head unit
by USB port before using this function.
2. Android devices does not support this
function.
[ ]:
[ ]:
[ ]:
[ Mute ]:
[RPT-One]:Automatically and repeatedly play
the track or song that is being played.
[ RPT ]:
[ Shuffle ]:
[ Folder ]:
Click [Bluetooth] in the [Sources] to enter
Bluetooth music interface, as shown below:
Press this key to play previous song.
Under the condition of connected to mobile
phone, press this key to start playing.
At the status of playing, press this key to
pause.
Press this key to play next song.
[ ]:
[ ]:
[ ]:
[ ]:
[RPT-One]:Automatically and repeatedly play
the track or song that is being played.
[ Shuffle ]:Randomly play the MP3 songs in
mobile phone.
Note:
1. Please note shuffle and repeat functions
may not work properly due to different Apps
and mobile phones
2. After a Android phone or iPhone is connected
to the BT of Infotainment System, open the
Map in the phone to navigate. Only the System
is switched to BT interface, can the navigation
voice broadcast be heared.
3. After the mobile phone is connected to
Bluetooth and when the head unit is playing
Bluetooth music, pull out and insert USB
data charging line:
a. iPhone Bluetooth music will pause, the
users need to manually click on the key to
continue to play.
b. Android phone Bluetooth music will pause
for 2 seconds, and then continue to play
automatically.
4. Music information may display inconsistence
on phone & head unit due to APP / phone
compatibility.
Click [AUX] in [Sources] to enter the auxiliary
input interface. (Some models have no this
function, the actual product shall prevail)
AUX has nothing connected to the
operation funtion except audio output
only.
[iPod/iPhone] Operation instruction [Bluetooth] operation instruction
[AUX] operation instruction
30
Function description and media operation
Note
Note
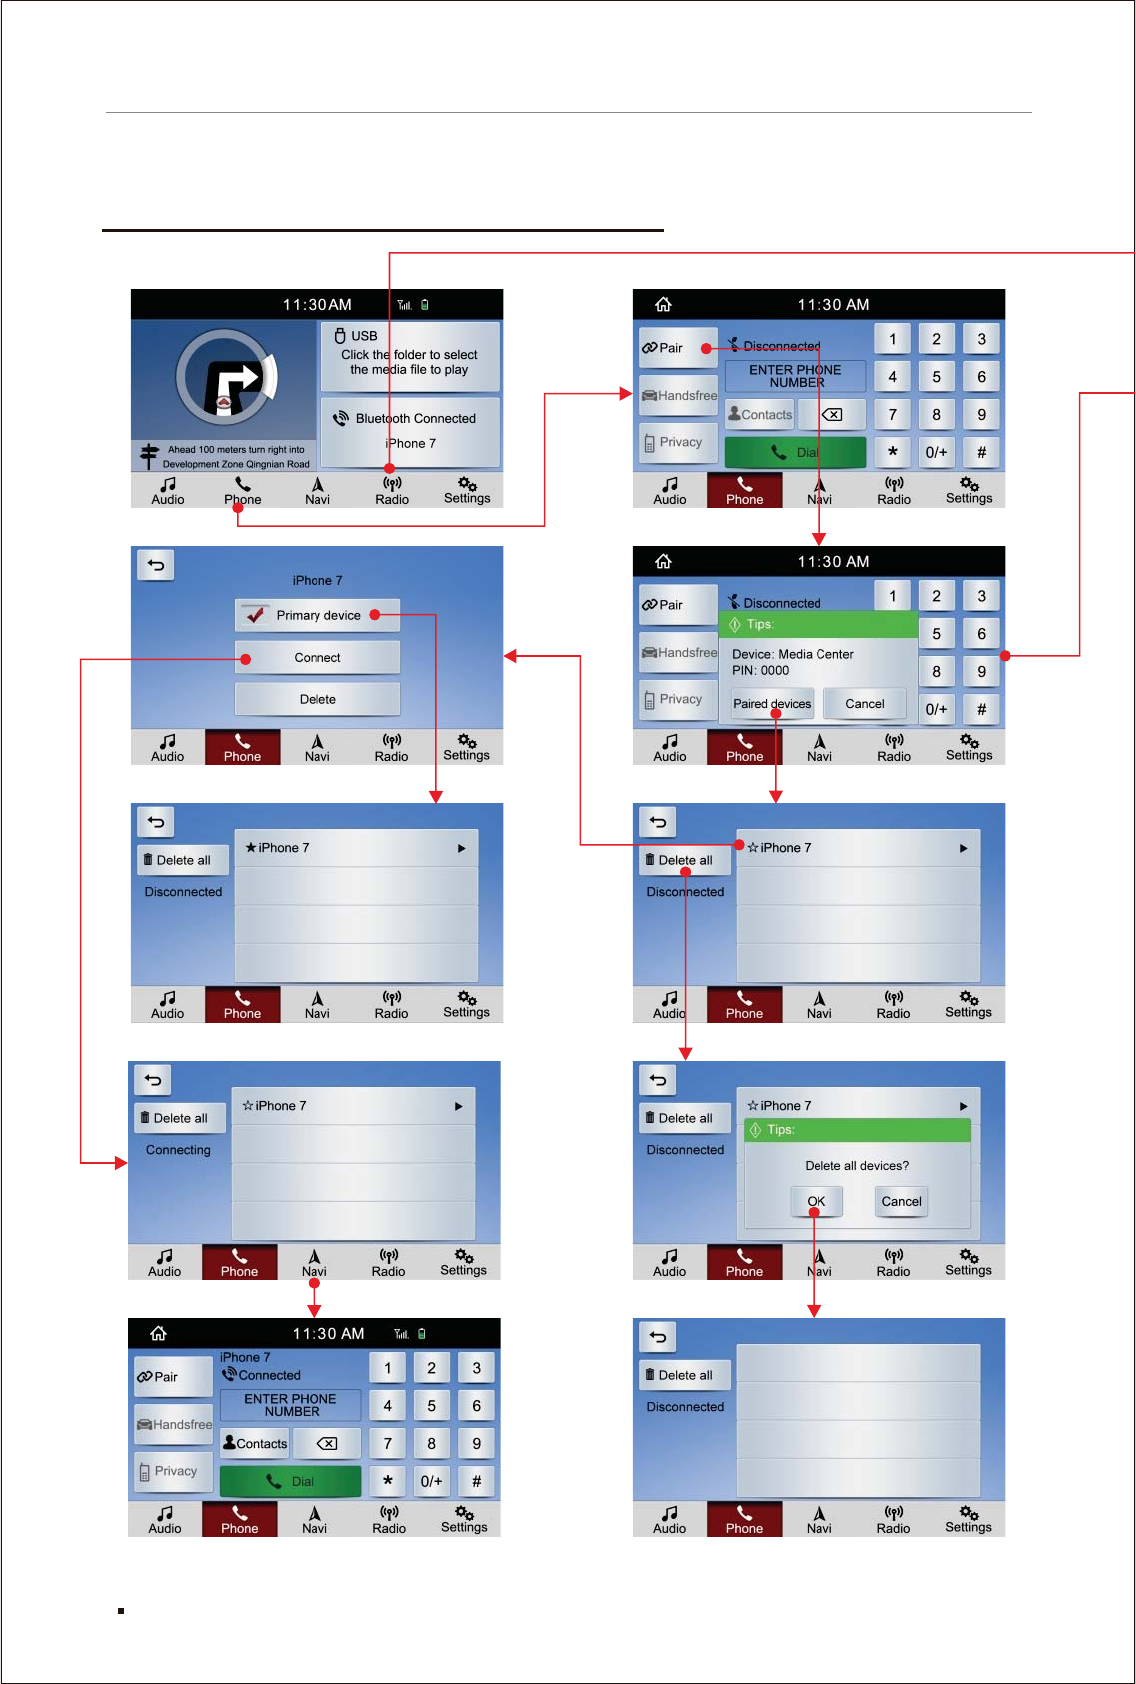
[Phone] [Radio] operation flow chart
Main menu Phone
31
Function description and media operation
Radio
32
Function description and media operation
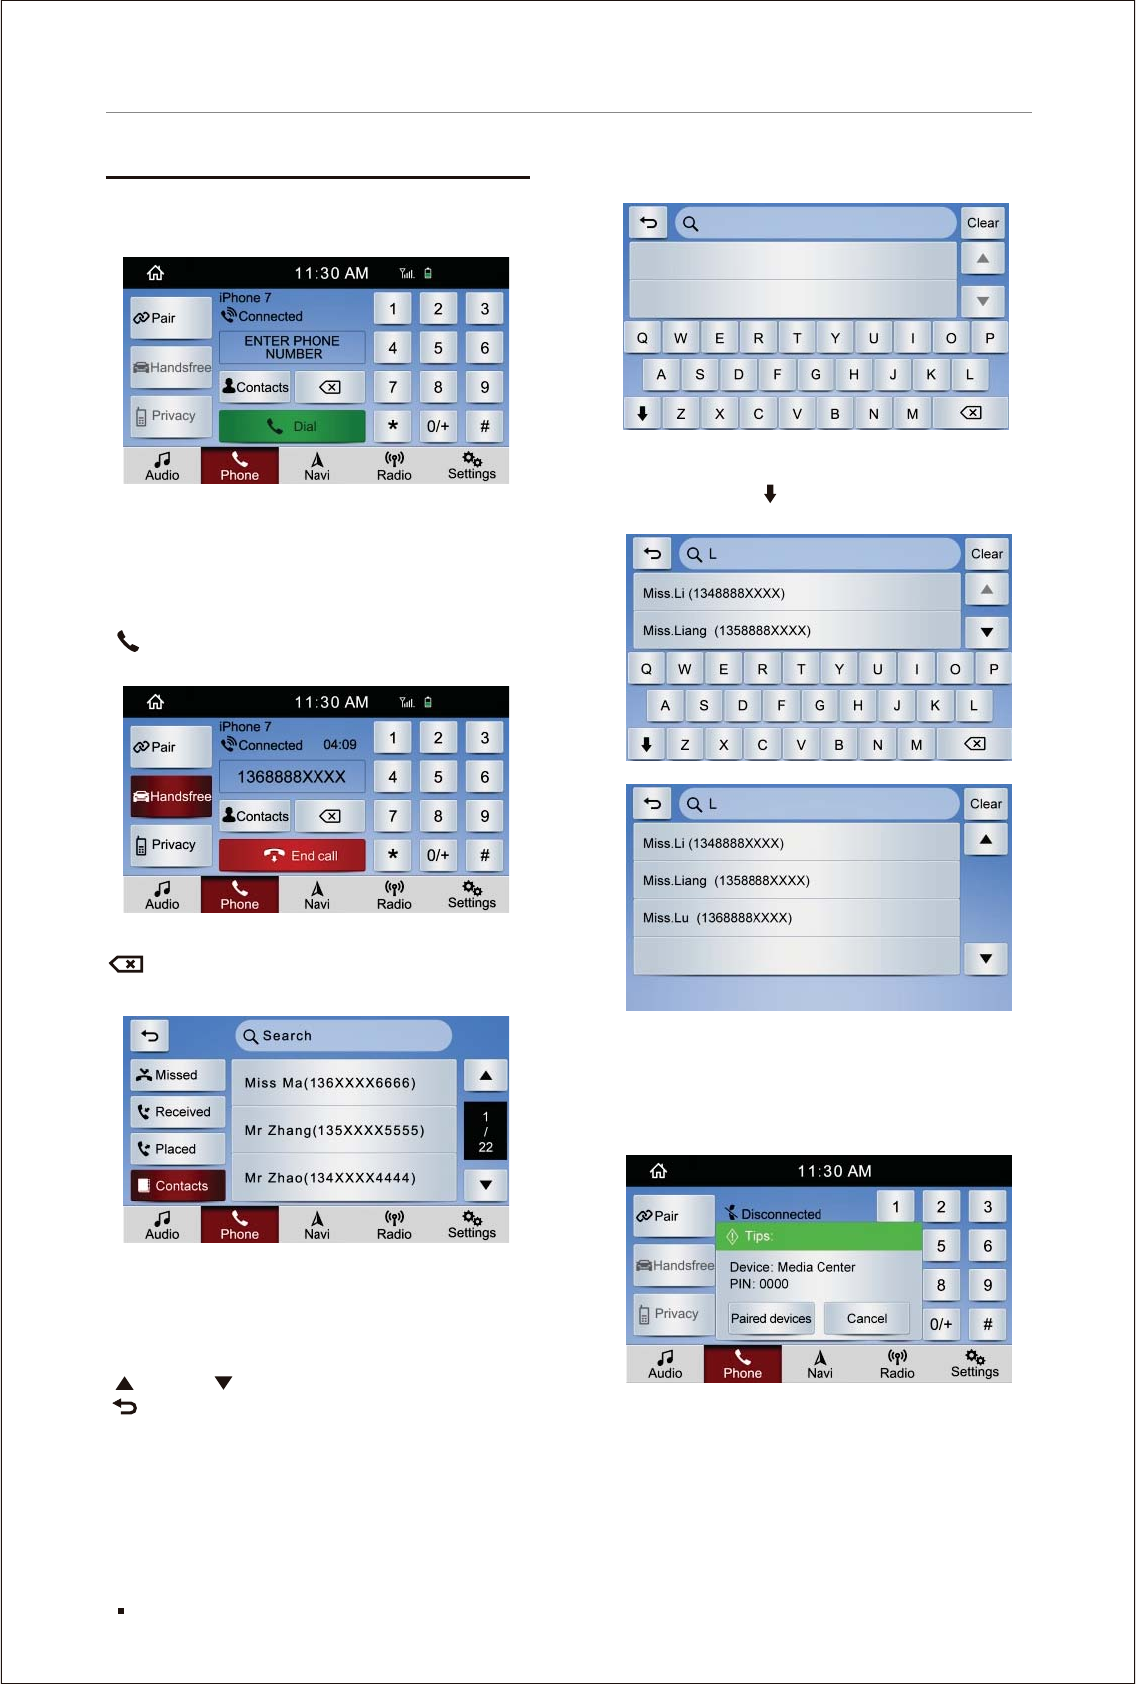
[]Phone operation instruction
Click the [Phone] in the main menu, the interface
is shown as below:
[Pair]: Click on this key to enter the Bluetooth
device pair page, this function will be
described below in detail.
[Handsfree]: Switch to navigation system call
status.
[Privacy]: Switch to phone answering.
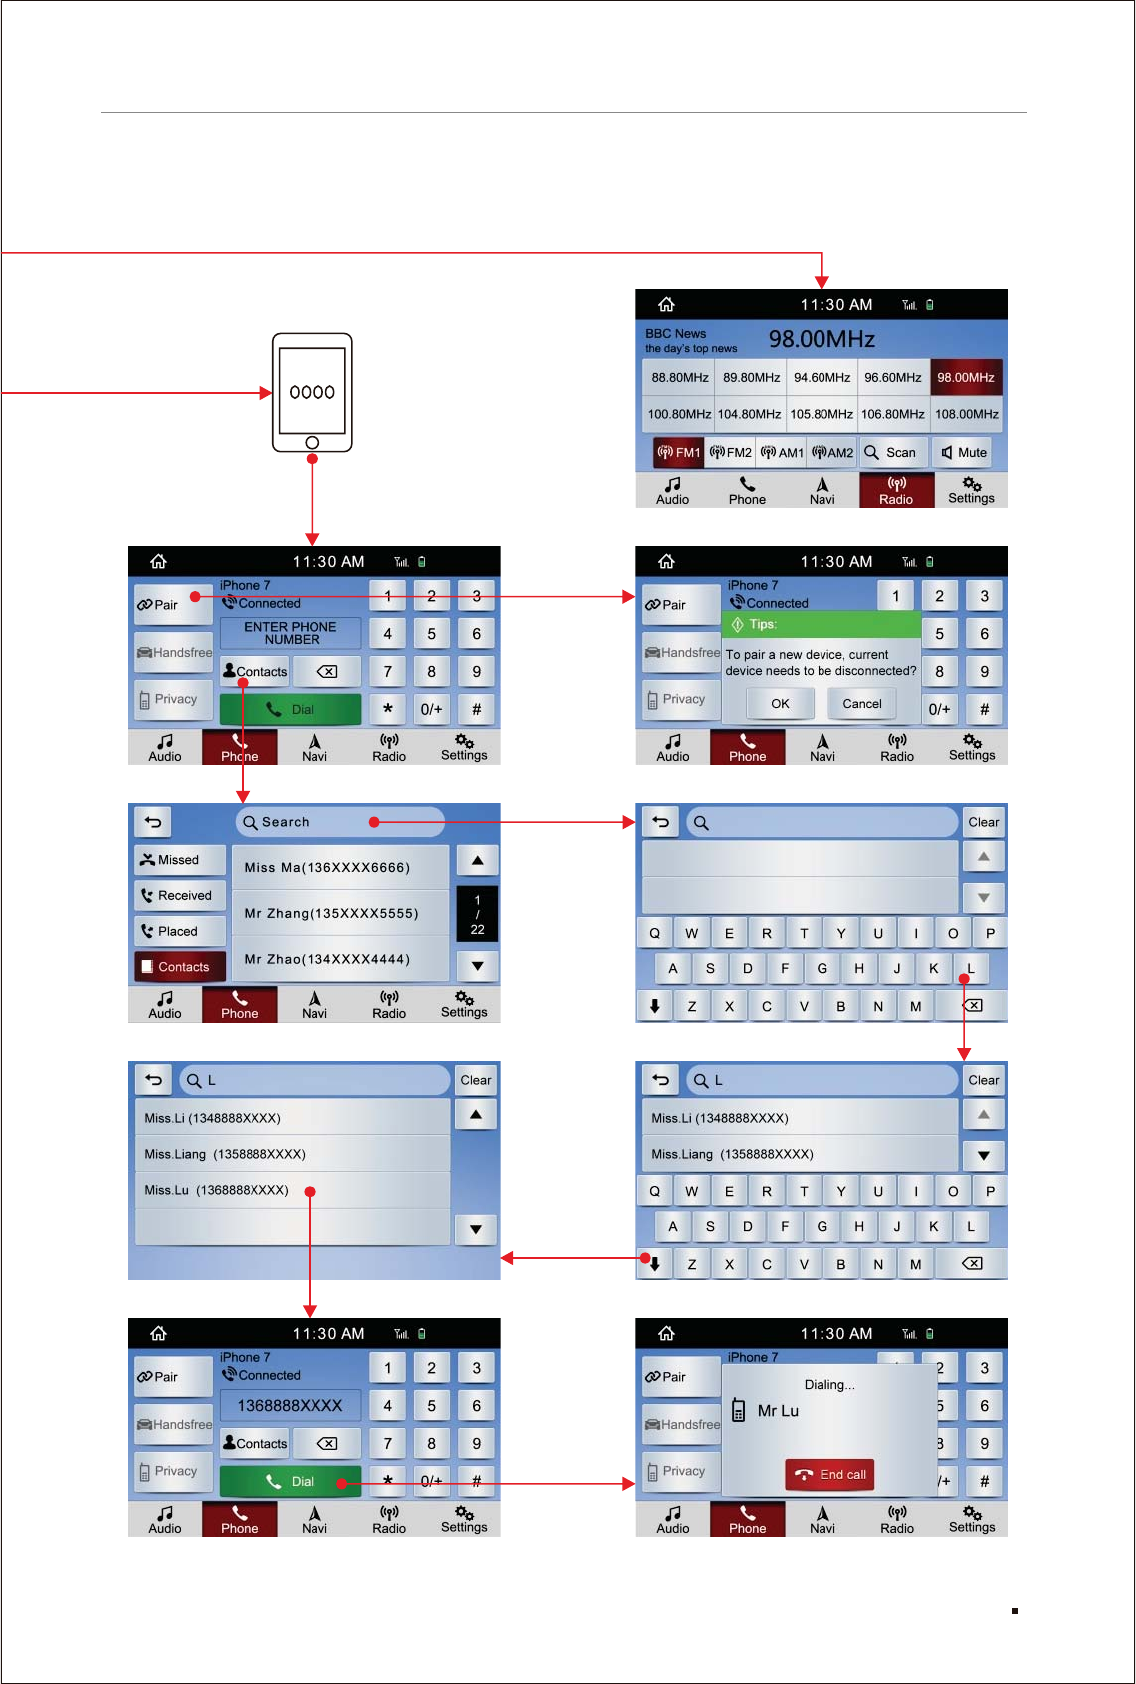
[ Dial]: Make a phone call. The calling interface
shown as below:
duration
[ ]: Delete the wrong number.
[Contacts]: Click on this key, the image is as
shown below:
[Missed]: List of missed calls.
[Received]: List of received calls.
[Placed]: List of dialed numbers.
[Contacts] Contacts stored in mobile phone.
(the device should support it)
[ ] And [ ] view recent calls.
[ ] Press this key to return to [Phone]
operation interface.
[Search] Click the search box at the top of
the page to enter the Contacts for
searching contacts, as shown
below:
[04:09]: Current Calling .
:
:
:
:
In the search box, input related letters of contact
name, related contact information will pop up.
Then click on the “ ” key on the keypad, the
keypad will be hidden. As shown below:
[Pair] operation instruction
Click [Pair] in the [Phone] interface to enter
the Bluetooth page, as shown below:
There are two methods for mobile phone pairing
1. Find out the corresponding device name of the
navigation system in the phone Bluetooth, click
it and input the pairing password to pair;
2. Click the "Paired devices" in the prompt box to
enter the device list page, select the previously
connected phones to connect.
33
Function description and media operation

Click the phone name in the device list to enter
the device connection setting, you can select
"Primary device", "Connect", "Delete" and other
setting options.
After the "Pair" is well fulfilled, click "Pair" key
again, then click "OK" in the prompt box to
disconnect current device:
Select frequency
Click "Scan" to automatically search, scan and
save the radio stations
[Manual Search]
In the radio interface, press button " " or
" " on the physical panel to select the desired
radio stations.
Click the relevant icons on the screen to switch
between FM and AM.
There are 10 blank cells provided to store frequently
used stations in each mode, which provides a
shortcut to enter them. Follow the steps below
to change or reset stations in the cells.
1. Search the desired radio stations.
2. Select one cell, touch and hold it for 2 seconds,
the desired radio station will be in the cell with
its frequency shows on.
[98.00MHz]: The frequency of the radio being
played.
[FM1/FM2]: Press this key to select the stored
FM radio.
[AM1/AM2]: Press this key to select the stored
AM radio.
[Mute]: Press this key to enter the mute mode,
press again to return to the original volume.
Current radio name
Radio Info.
In case of power failure due to
battery cut off or fuse blowing, the
prestored radio stations may be
erased.
[]
[BBC News]: .
[the day’s top news]: .
Auto Search
Noted
[]
Search radio stations
Radio operation instruction
Click on the [Radio] in the main menu to enter
the main page of radio. Search the previously
received stations.
Automatically preset the list display
of the radio stored in frequency
channel.
The received signal will be weak in
tunnels, behind mountains, building
interspace and other places where
the electric waves are easily blocked
and the electric waves are weak.
Even if the list displays, according
to current position and electric
wave situations, sometimes it can't
receive signal.
Noted
34
Function description and media operation
Noted The operating frequency of the
Bluetooth module is 2.402-2.480GHz
and the transmit power is 2-8dBm
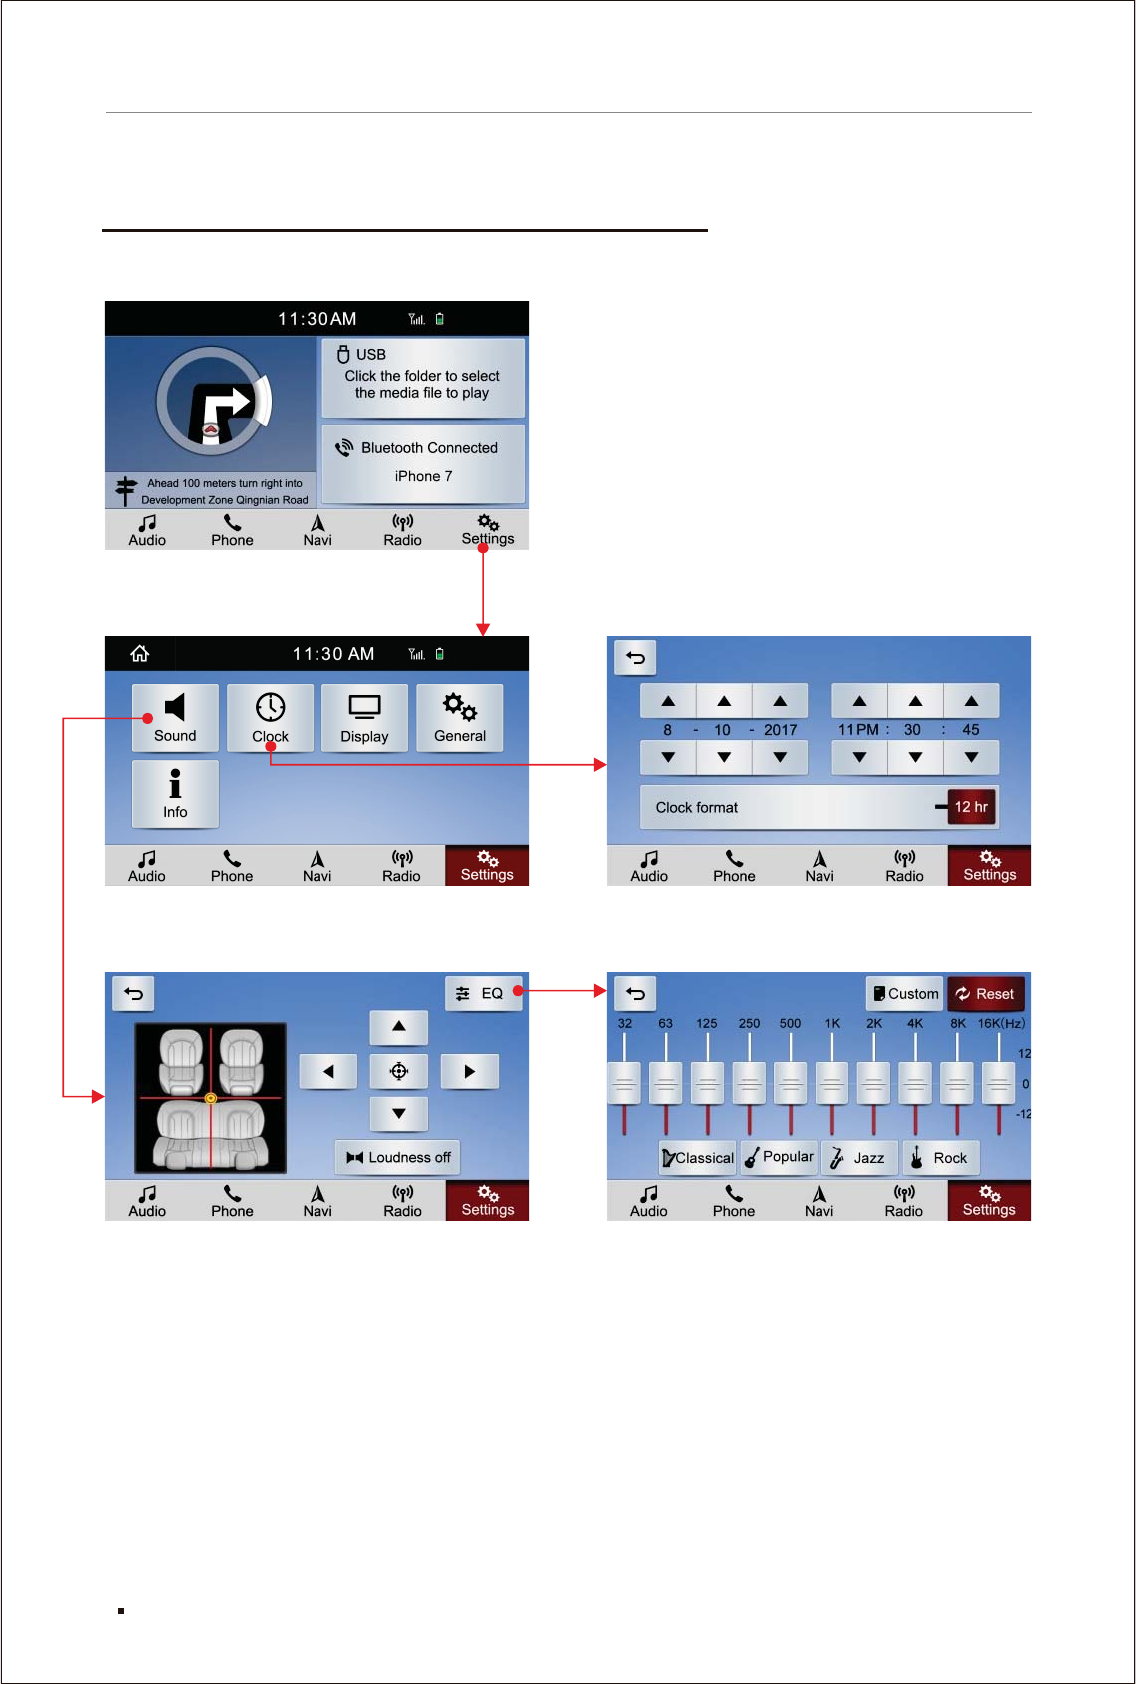
[Sound] [Clock] operation flow chart
Settings Clock
Sound EQ
Main menu
35
Function description and media operation
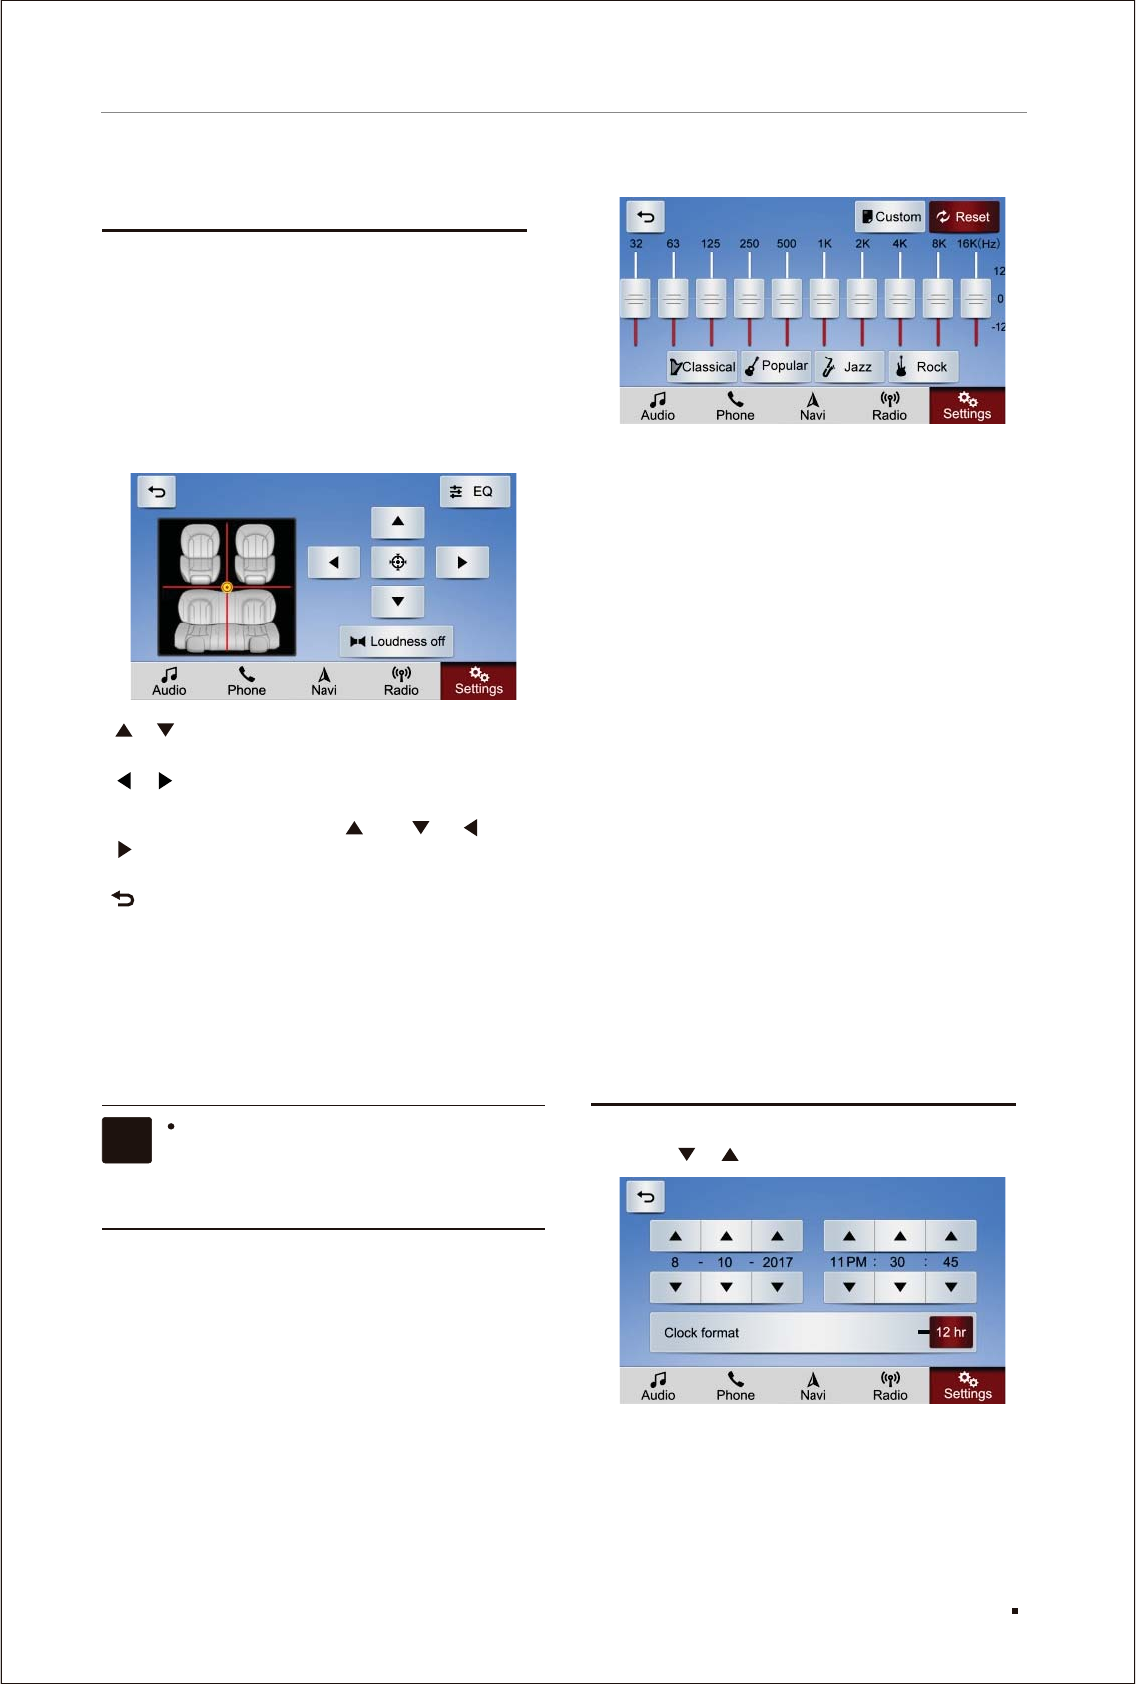
Classical : For classical music, it increases the
volume of high and low parts, and
mainly highlights the performance
of musical instruments.
Popular :For popular music, it requires the
combination of voice and instrumental
music to be equalized, so the fluctuation
of curve is not big.
Jazz : Jazz originated in the United States in the
late 19th century and early 20th century,
born in the southern port city New Orleans,
and the music foundation comes from
Blues and Ragtime. Jazz puts stress on
improvisation, based on the Shuffle rhythm
with the feature of swing, it is a combination
of African black culture and European white
culture.
Rock : Rock expresses emotion through its flexible
and bold manifestation and passionate
music rhythm.
Reset : Reset all the EQs.
[]
[]
[]
[]
[Custom]: Users adjust the EQ according to their
own preference.
[]
[]:
Note: After the custom function is set, press and
hold this key to save the custom settings.
Press [Clock] in the [Settings] to adjust the system
time by [ ] [ ], as shown below:
Clock format Press the [12 hr] /[2 4hr] keys,
set the system time as 12-hour system or 24-hour
system.
:Adjust the sound balance between
the front and rear speakers.
:Adjust the sound balance between
the left and right speakers.
Each time you press the [ ] or [ ], [ ] or
[ ], the red display bar will move towards
corresponding direction for one unit.
: Press this key to return to the upper
operation interface.
Loudness off It is to increase the volume of
high and low frequency components at low
volume so that the loudness ratio of the low,
medium and high parts remains the same as it’s
at the high volume.
When listening to the disc or broadcast
of stereo, changing the left/right balance
will increase the volume of one group
of sound and meanwhile decrease the
volume of the other group of sound.
Q
The sound effect depends largely on the combined
sound level of high and low sounds. In fact,
various musical and vocal programs will be more
fair-sounding through the combination of high
and low sounds of different sound levels. It's also
very important to maintain the best balance of the
left and right stereo sound channels as well as
the front and rear sound levels.
As shown below:
E
In audio equipment, EQ is a kind of electronic
equipment that can adjust the amplification of
electrical signals of different frequency
components. Through adjusting electrical signals
of different frequency, it can compensate the
defects of speakers and sound field, compensate
and beautify various sound sources, etc. EQ of
general sound console can only respectively
adjust the electrical signals of high, intermediate
and low frequency.
[][ ]
[ ][ ]
[ ]
[ ]:
[Sound] operation instruction
Note
[Clock] operation instruction
36
Function description and media operation
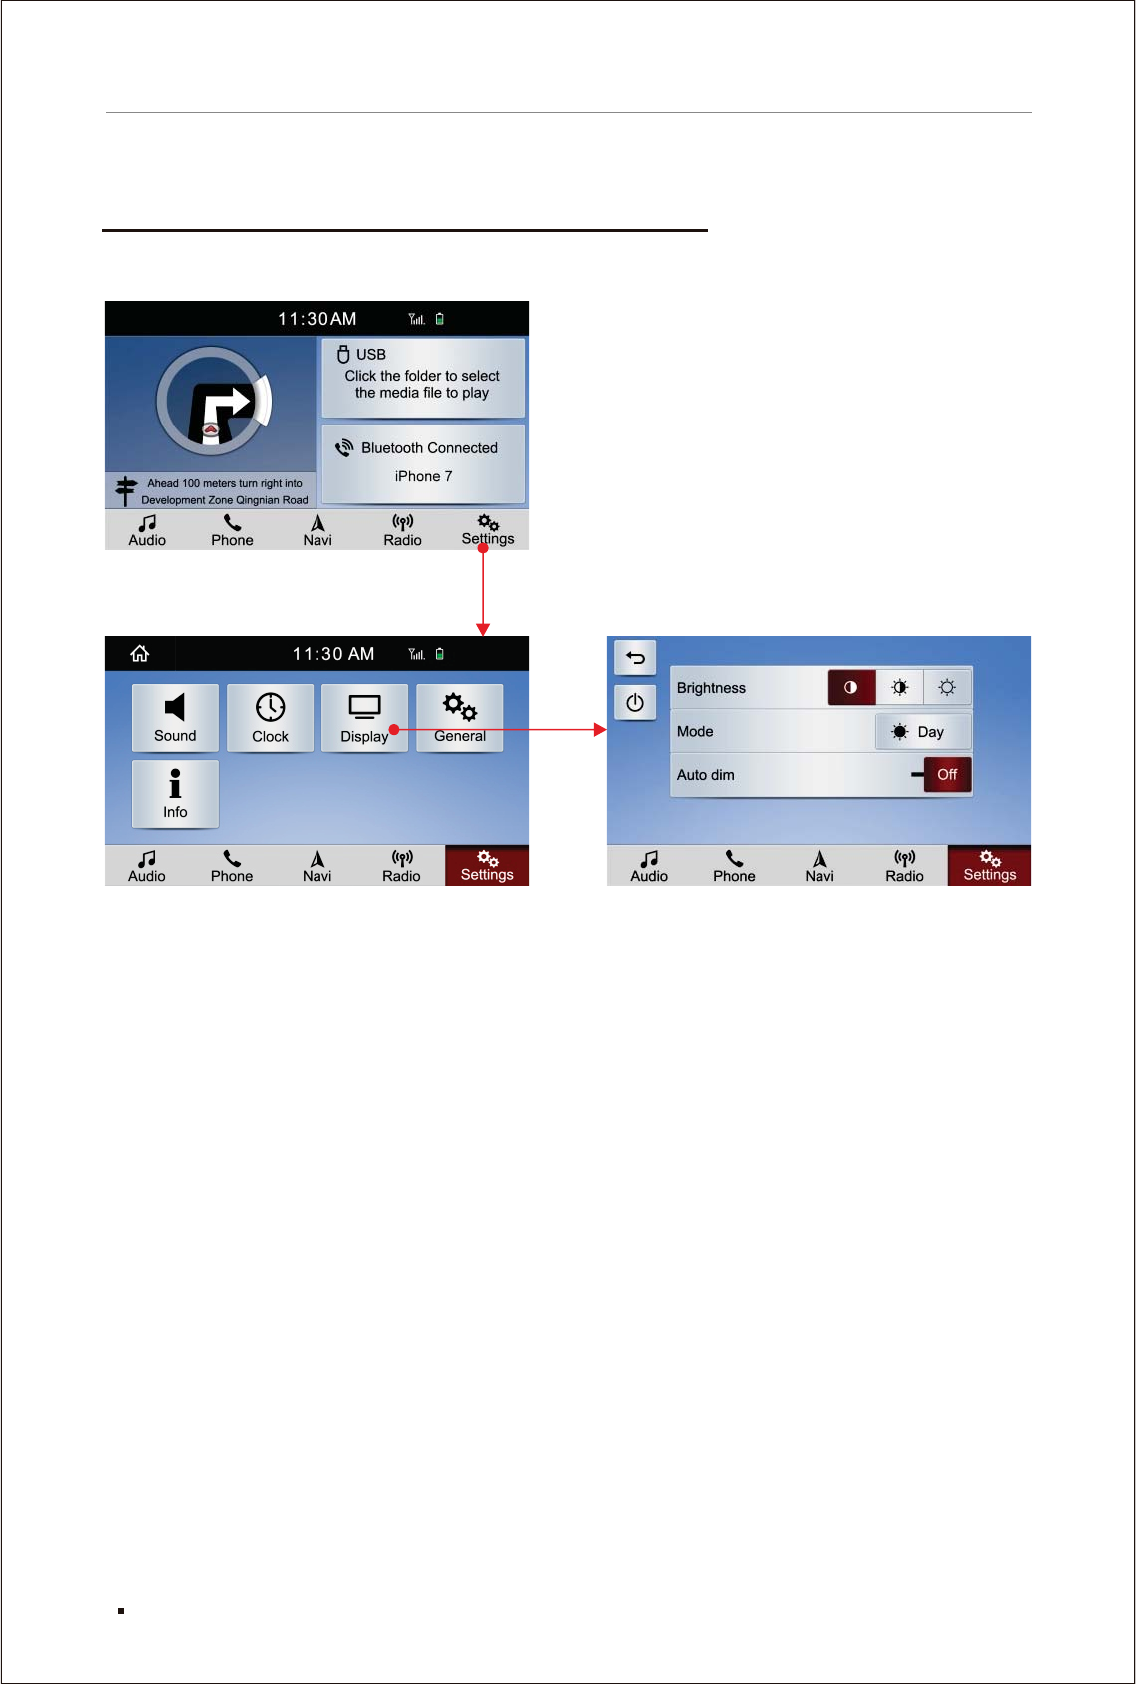
[Display] operation flow chart
Main menu
Settings Display
37
Function description and media operation
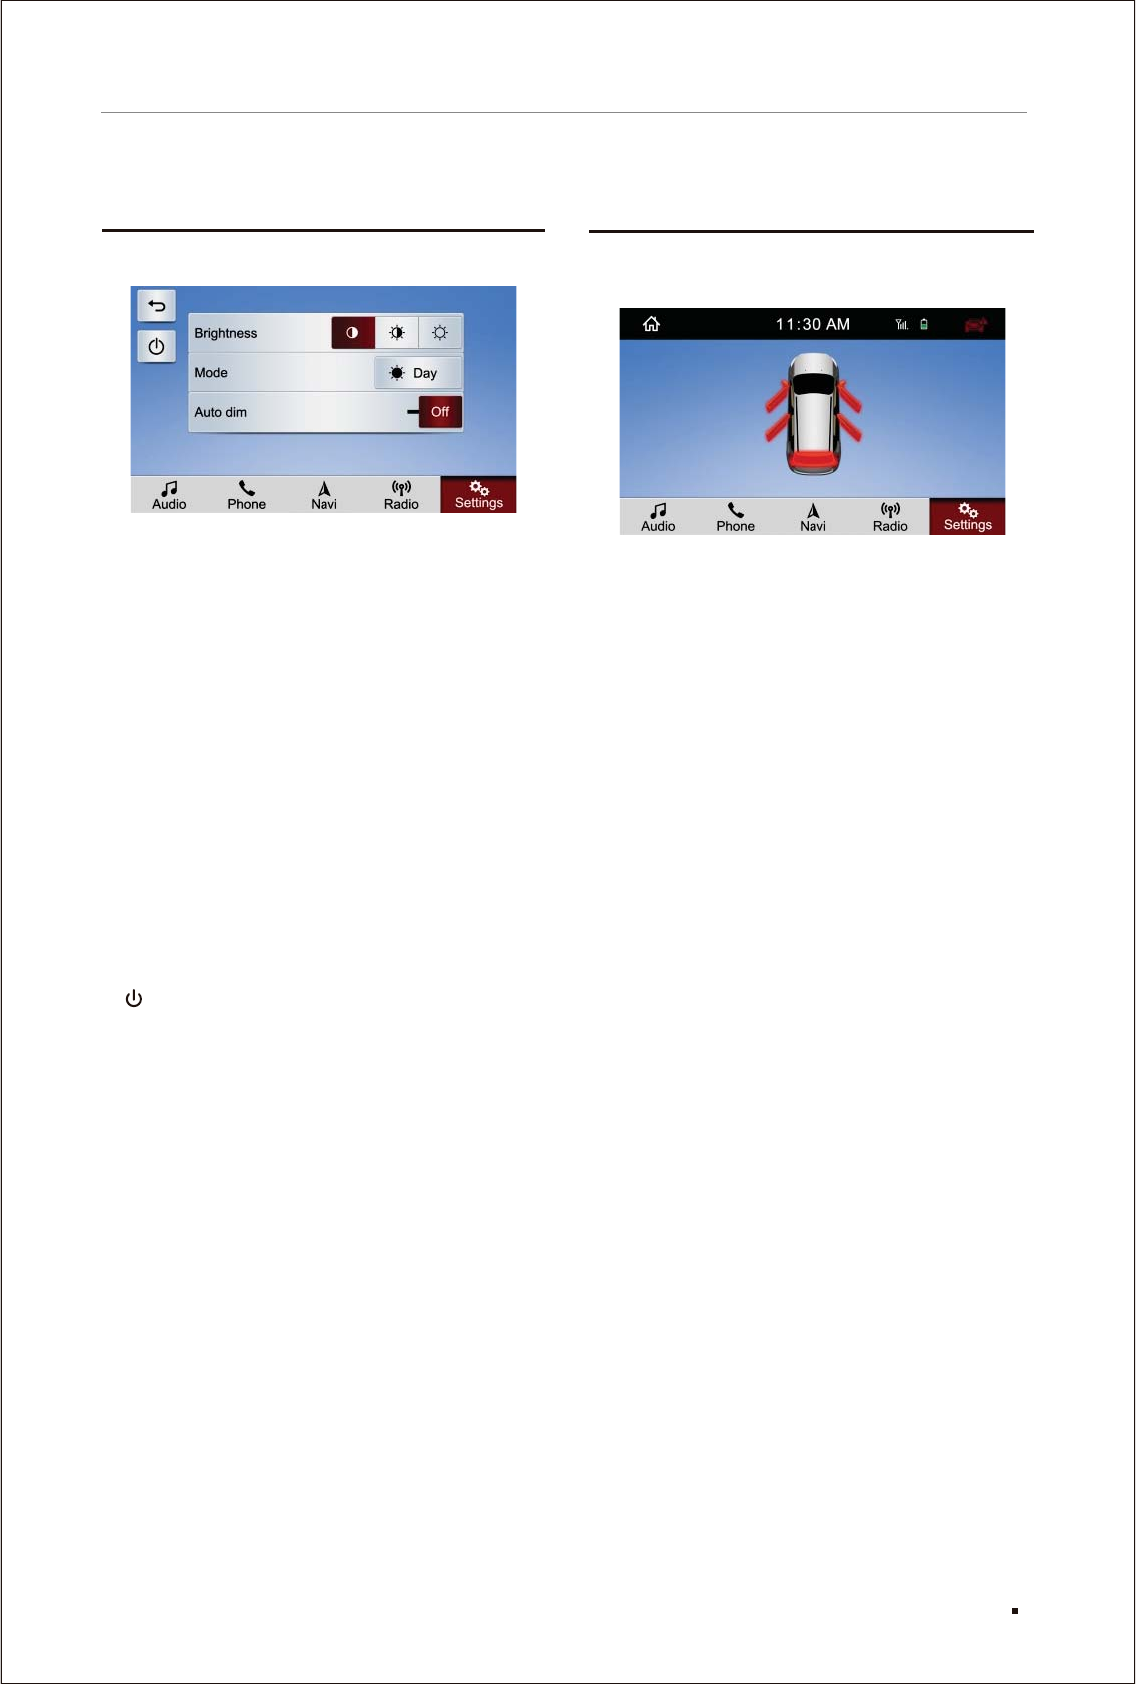
Press [Display] in the [Settings], as shown below:
[]
[]
[]
[]
Brightness : When the system is working, users
can set the screen to one of the
three brightness modes, [Dark]
[Mid] or [Bri] according to their
own needs.
Mode : Click on this key to set the navigation
screen to [Day] or [Night] .
Auto dim :
When it is set to [ON]:
[Mode] This function can not be manually set.
Only the car headlamps are turned on, also in
dark places, can it be switched to the night mode
with keypad backlight on and screen darkened,
otherwise it is in the day mode with keypad
backlight off and screen lightened.
When set to [Off]:
The day and night mode can only be set manually
by clicking the [Mode] on the screen, but can not
be controlled by car headlamps and light in
surroundings.
: Click this key to turn off the screen.
[Display] operation instruction
38
Function description and media operation
There will be a prompt page popped up automatically
when doors or trunk is not well closed.
Prompt page
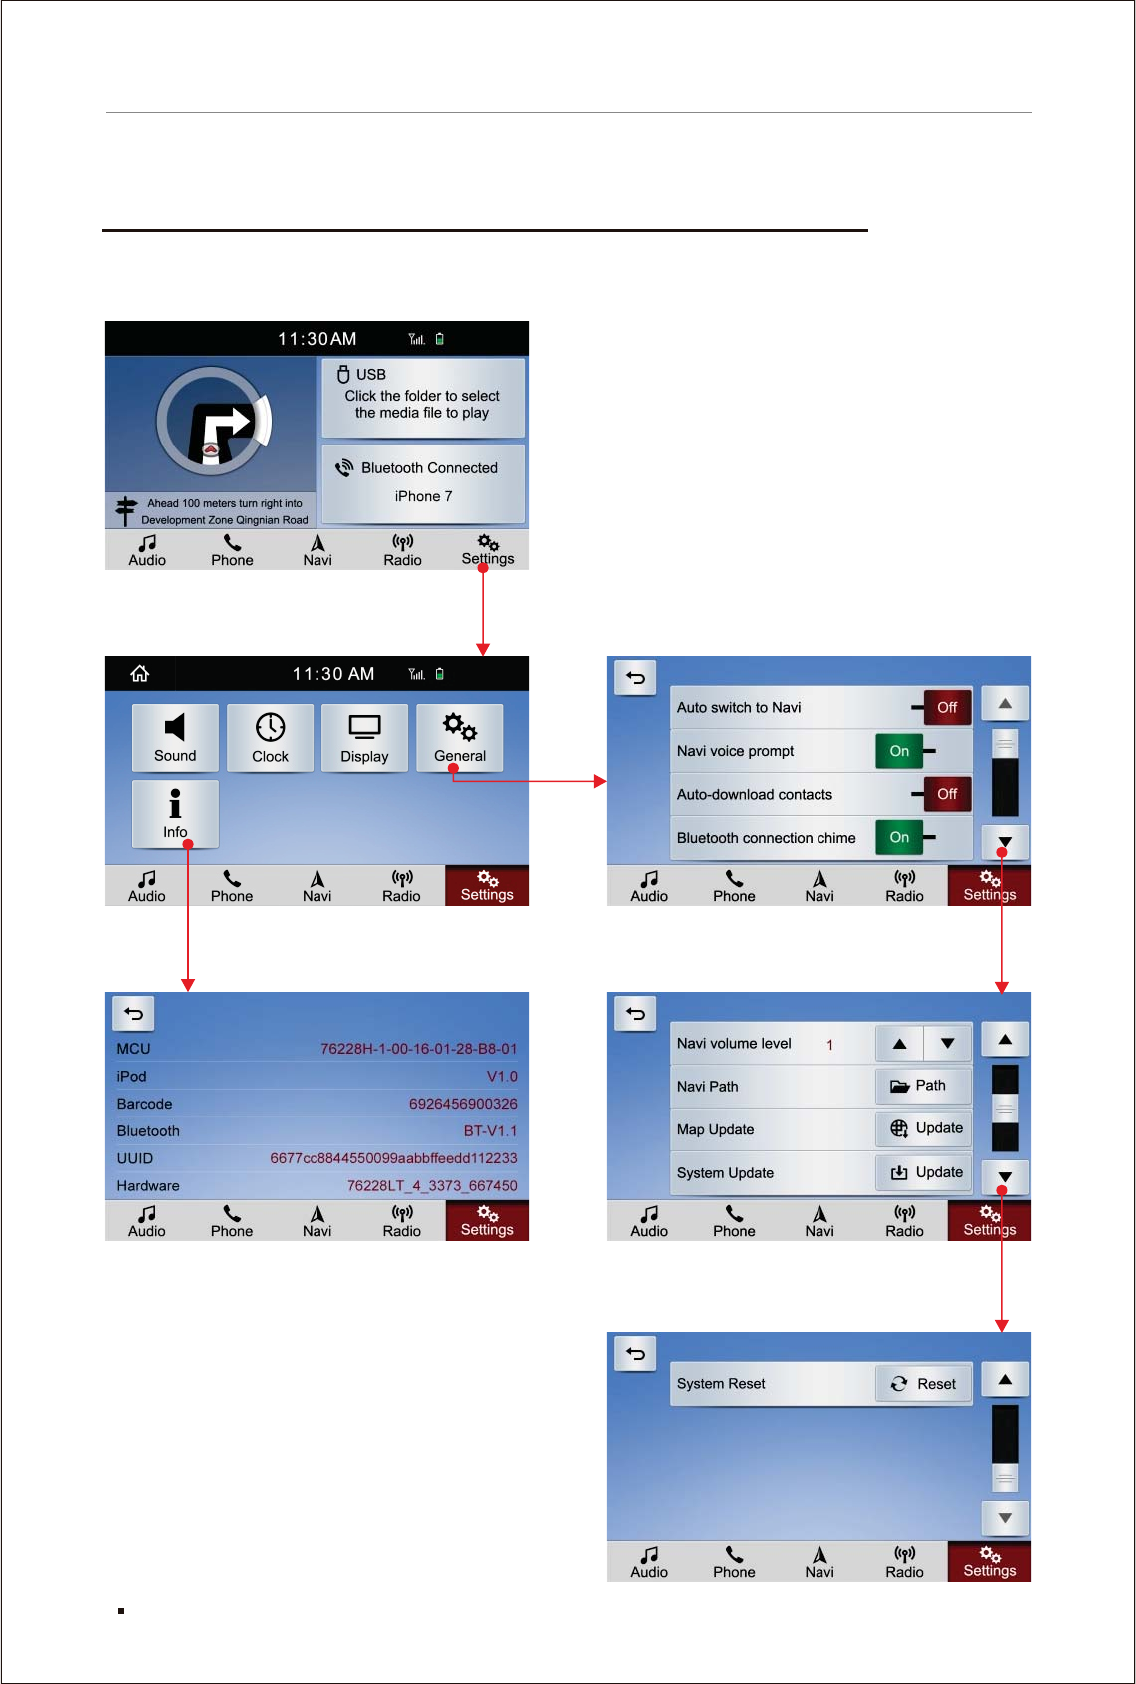
[General] [Info] operation flow chart
Main menu
Settings General
Info
39
Function description and media operation
Click [General] in [Settings] of the main menu to
enter the interface as shown below:
[][]
When it is set to [On], after 10 seconds since
the ending of other screen operation, it will
automatically switch from current operation
screen to navigation screen. When it is set to
[Off], this function will be closed.
[][]
[][]
[][]
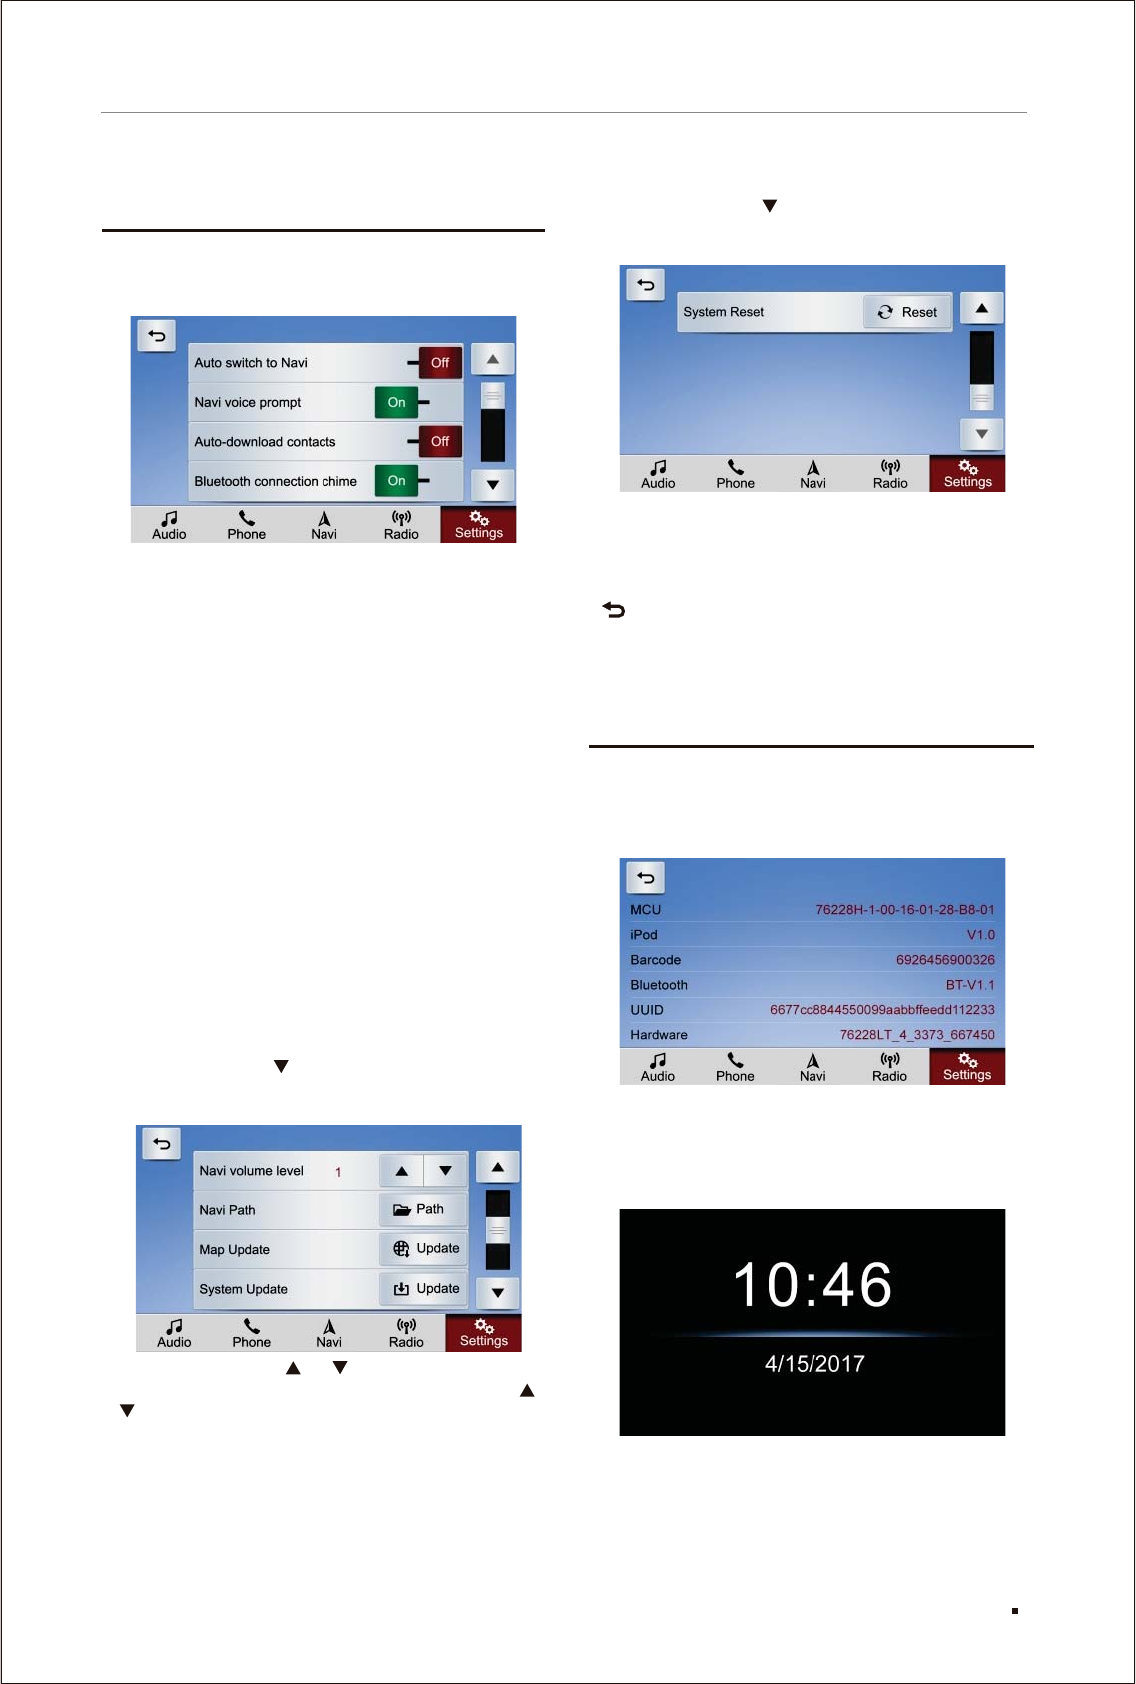
Navi volume level [ ] [ ]
Adjust the level of navigation volume by [ ]
[ ].
[]
[]
[]
Auto switch to navi On Off
Navi voice prompt On Off
When it is set to [On], the navigation voice
prompt will be turned on. When it is set to [Off],
the voice prompt will be turned off.
Auto-download contacts On Off
After bluetooth is connected when [on] is set,
infotainment system will automatically download
contacts, missed calls, answered calls, dialed
calls in cellphone. The function is shut down when
[off] is set.
Bluetooth connection chime On Off
After bluetooth is connected when [on] is set,
infotainment system will send out a hint.The hint
of bluetooth connection is shut down when [off] is
set.
Continue to click [ ] on the right of [General] to
enter the second page of [General] interface, as
shown below:
Navi Path : Click on the [Path] key to choose the
map path.
Map update : Click on the [Update] key to update
the map.
System Update : Click on the [Update] key to
choose whether to upgrade the
system.
Click on [Info] key to display relevant information
of MCU, iPod, Barcode, Bluetooth, UUID and
Hardware, as shown below:
Vertically press the centre of left knob from
head unit, the system will enter standby mode,
and press again to go back to current interface,
shown as above picture.
[General] operation instruction
[Info] operation instruction
Standby interface
40
Function description and media operation
[]
[]
Continue to click [ ] on the right of [General] to
enter the third page of [General] interface, as
shown below:
System Reset : Click on the [Reset] key to choose
whether to reset the system.
Press and hold this key to restore
factory settings.
: Press this key to return to the operation
interface of settings.

Appendix
Appendix
41

42
Appendix
The proper operation of touch screen
Attentions
* Do not place the display screen in direct
sunlight or high temperature for a long time,
otherwise it may cause screen failure; please
use the display screen within the following
temperature range:
Application temperature range: -10̊C~+50̊C
Storage temperature range: -20̊C~+80̊C
* Do not press hard on the display screen,
otherwise it may cause failure;
* For the vehicles equipped with air bags and
other safety devices, be careful not to interfere
with the work of safety devices.
About LCD Screen
* Sometimes there will be small dark spot or flare
spot (bright spot) on the LCD image of display
screen, it is a peculiar phenomenon of LCD
screen, not a failure;
* When used in cold area, the screen may be
dark after power on, after a while, it will restore
normal brightness;
* It will be difficult to clearly watch the LCD
image of display screen due to the reflection
of sunshine.
About TFT (Thin Film Transistor)
About maintenance
*
use TFT inside the display screen;
* The service life of the TFT is about ten thousand
hours (when used in cold area, the service life
will be shortened), at the end of its service life,
the screen will become dark or can not display
images, please consult the manufacturer’s
service department.
In order to ensure the backlight of LCD screen,
* When cleaning the dust or dirt from the display
screen, please first turn off power supply, then
use a soft cloth to wipe gently;
* When wiping the display screen, be careful
not to scratch the screen by nails;
* Do not use wet wiping cloth, volatile oil, diluent,
etc. to wipe the display screen;
* The display screen shall not be exposed to
corrosive materials.
Fail to turn on power
supply, it does not work
The touch key on the screen
is inactive or unresponsive
There is small dark spot or
bright spot on LCD screen
LCD screen is dark
There is no sound
It doesn’t display image
Trouble
The wires and connectors are
not properly connected.
Fuse is blown.
Due to noise and other factors, the
built-in computer is out of order.
Confirm again whether it is
properly and firmly connected.
Find out the cause for blown fuse,
please replace with the fuse of
the same capacity.
There is deviation between the
position on the screen and the
actual touch position.
Cause
Please conduct the setting of
touch screen calibration.
It is a peculiar phenomenon of
LCD screen, not a failure.
Adjustment of the bright degree
is improper.
Temperature in the car is low.
If the ambient temperature is low,
the LCD screen will become dark.
Please use heat to increase the
temperature in the car.
The volume is set to 0.
Audio line connection is wrong.
No parking brake.
Close the display screen. Press the power key or gently
click on the screen.
Please press the reset button.
Solution
Adjust the brightness.
Increase the volume.
Confirm whether it is wrongly
connected.
Conduct parking brake.
In case of any failure
In case of any failure,
before returning the
product for repair, please
refer to the following table
to find the cause.
If you can not repair it after
checking, please restore
factory settings of the
machine.
If it is still faulted, please
consult the manufacturer’s
customer service department.
Common Issues
Increase the volume.
The image is switched to the
navigation system.
Correctly adjust and set.
Decrease the volume.
The image is not switched to the
navigation system.
The adjustment of increasing or
decreasing the volume of the front
or rear speaker is improper.
The adjustment of increasing or
decreasing the volume of the left
or right speaker is improper.
The volume is low.
It doesn’t display the
navigation system interface
There is no sound from the
front or rear speaker
There is no sound from the
left or right speaker
43
Appendix

44
Appendix
Navigation
Navigation system does
not work or often loaded
into the path of the running
navigation interface.
Navigation path is not correct.
Please press the "Browse" key to
set the correct navigation path.
The correct path is "\SDMEM\
NaviMaps\Arthur.exe", and then
tick the "Auto run next time" key,
finally, press the "Run Navigation
" key for navigation.
Trouble Reason Solution
Map card is improperly installed
or damaged.
The map application has just
finished upgrading.
First, please restart the car
navigation system. If it does work,
please reinstall the map card. If
both do not work, turn to the
manufacturer for help.
Note: SD card is not alloweed to insert or withdraw when the head unit is swithed on.

45
Appendix
Specifications
(Due to continuous improvement of the product,
the specifications are subject to changes without
further notice)
Universal
Maximum current consumption: 10.0A
Power supply: DC14.4V (11V~16V can be used)
Grounding method: minus earth
External image input level: 1Vp~p/75
Maximum input level of external sound: 1.5V/22K
Image output level: 1Vp~p/75 (100% output of
white)
GPS
Method: L1, C/A code GPS SPS standard
positioning service
Reception mode: 12 channels
Receiving frequency: 1575.42MHz
Sensitivity: -130dBm
Test update time: about 1 time/s
Power amplifier and audio components
Rated power output: 48W (12Wx4)
Maximum power output: 120W (30Wx4)
Load impedance: 4Ω
FM tuner components
Wave band of receiving frequency: 87.5 MHz –
108.00 MHz
Practical sensitivity: ≤12 dBµV
Search sensitivity: 35 dBµV
S/N: more than 50dB (IHF-A network)
Harmonic distortion rate: 0.3%
Frequency response: ≥ 2KHz
Stereo separation degree: ≥ 27dB
AM tuner components
Wave band of receiving frequency:
522KHz ~ 1620KHz (9 KHz)
Practical sensitivity: ≤ 28 dBµV
46
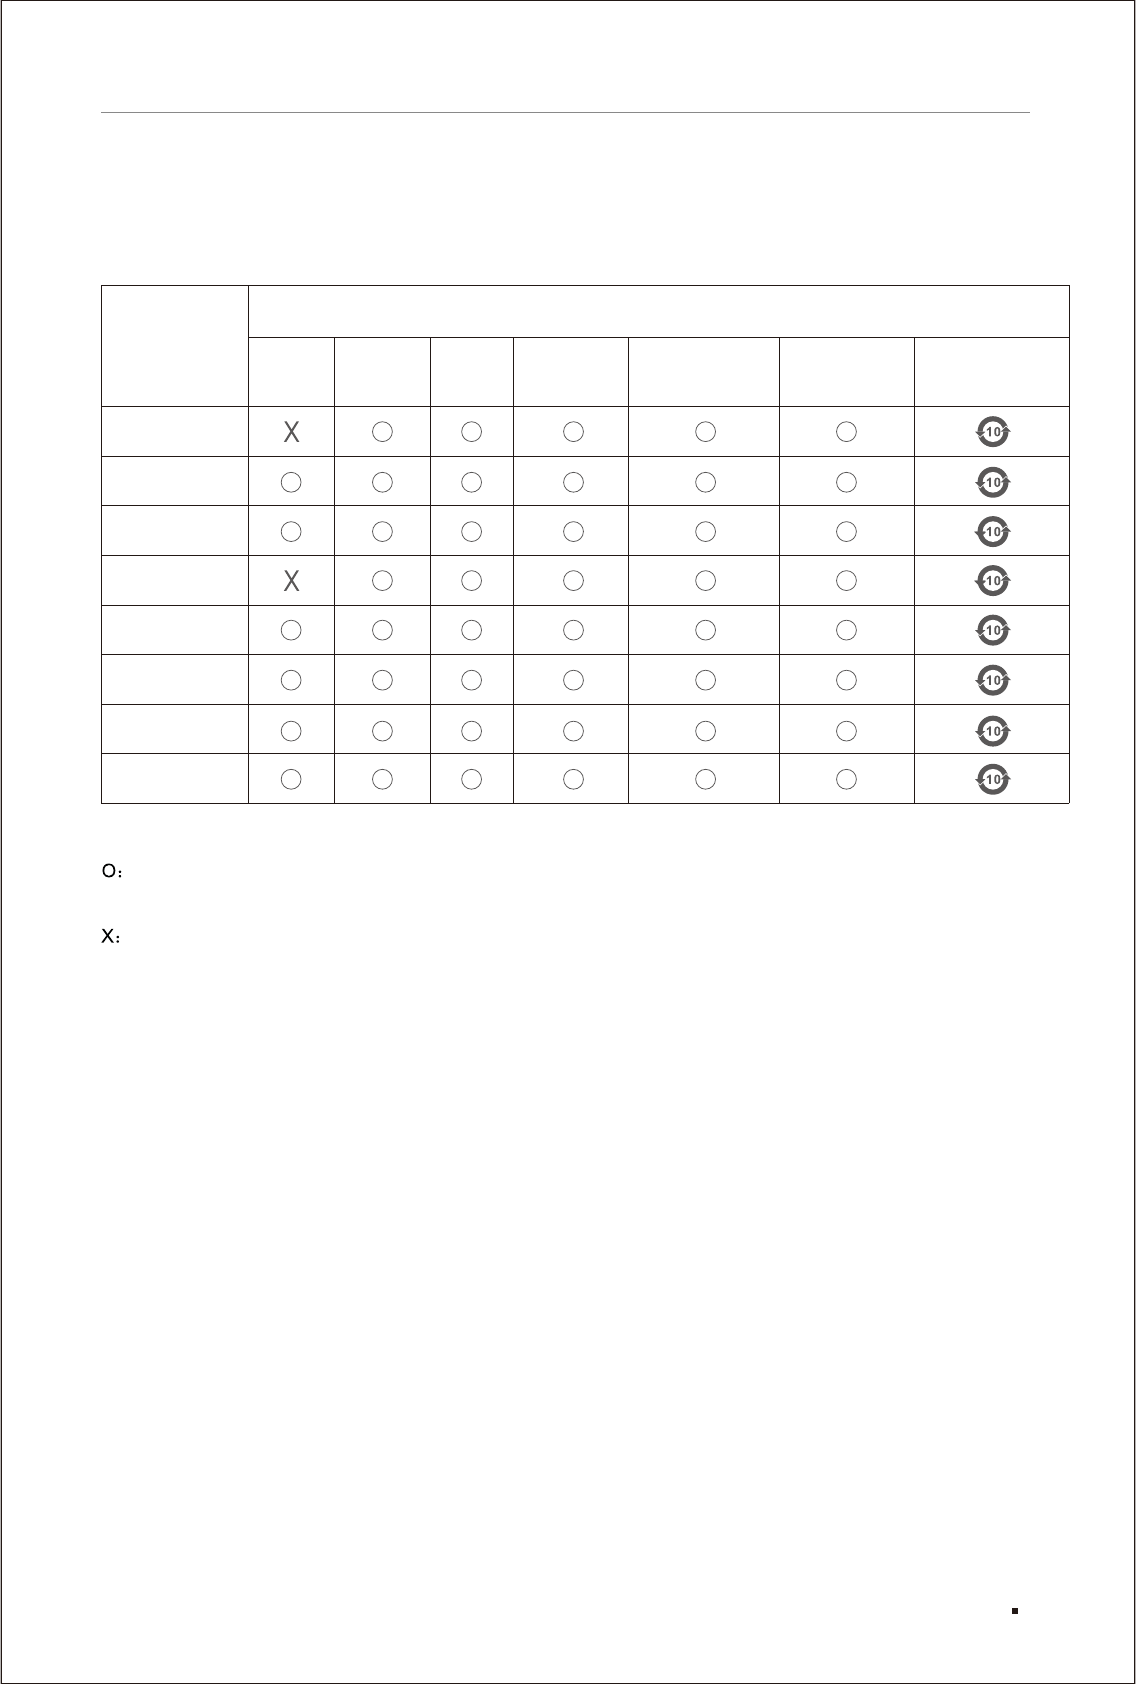
Poisonous and harmful substances or elements
Part Name
Mainboard
Display screen
Platstic
Metal
Nonmetal
Data line
Antenna
Accessories
Pb Hg Cd Cr6 PBDE PBB
Environment-
friendly use
period
Table of the name and content of poisonous and harmful substances or elements
It indicates that the content of the poisonous and harmful substance in all the homogeneous materials
of the part is below the limit specified in GB/26572-2011.
It indicates that the content of the poisonous and harmful substance in at least one homogeneous
material of the part is within the limit specified in GB/26572-2011.
Note: The reason for this product marked with "X": At present, there is no alternative technology or part
available.
The environment-friendly use period indicated on this product refers to the safe use period during which
there is no leakage of poisonous and harmful substances when using this product under the service
conditions specified in this information guide.
Environmental protection
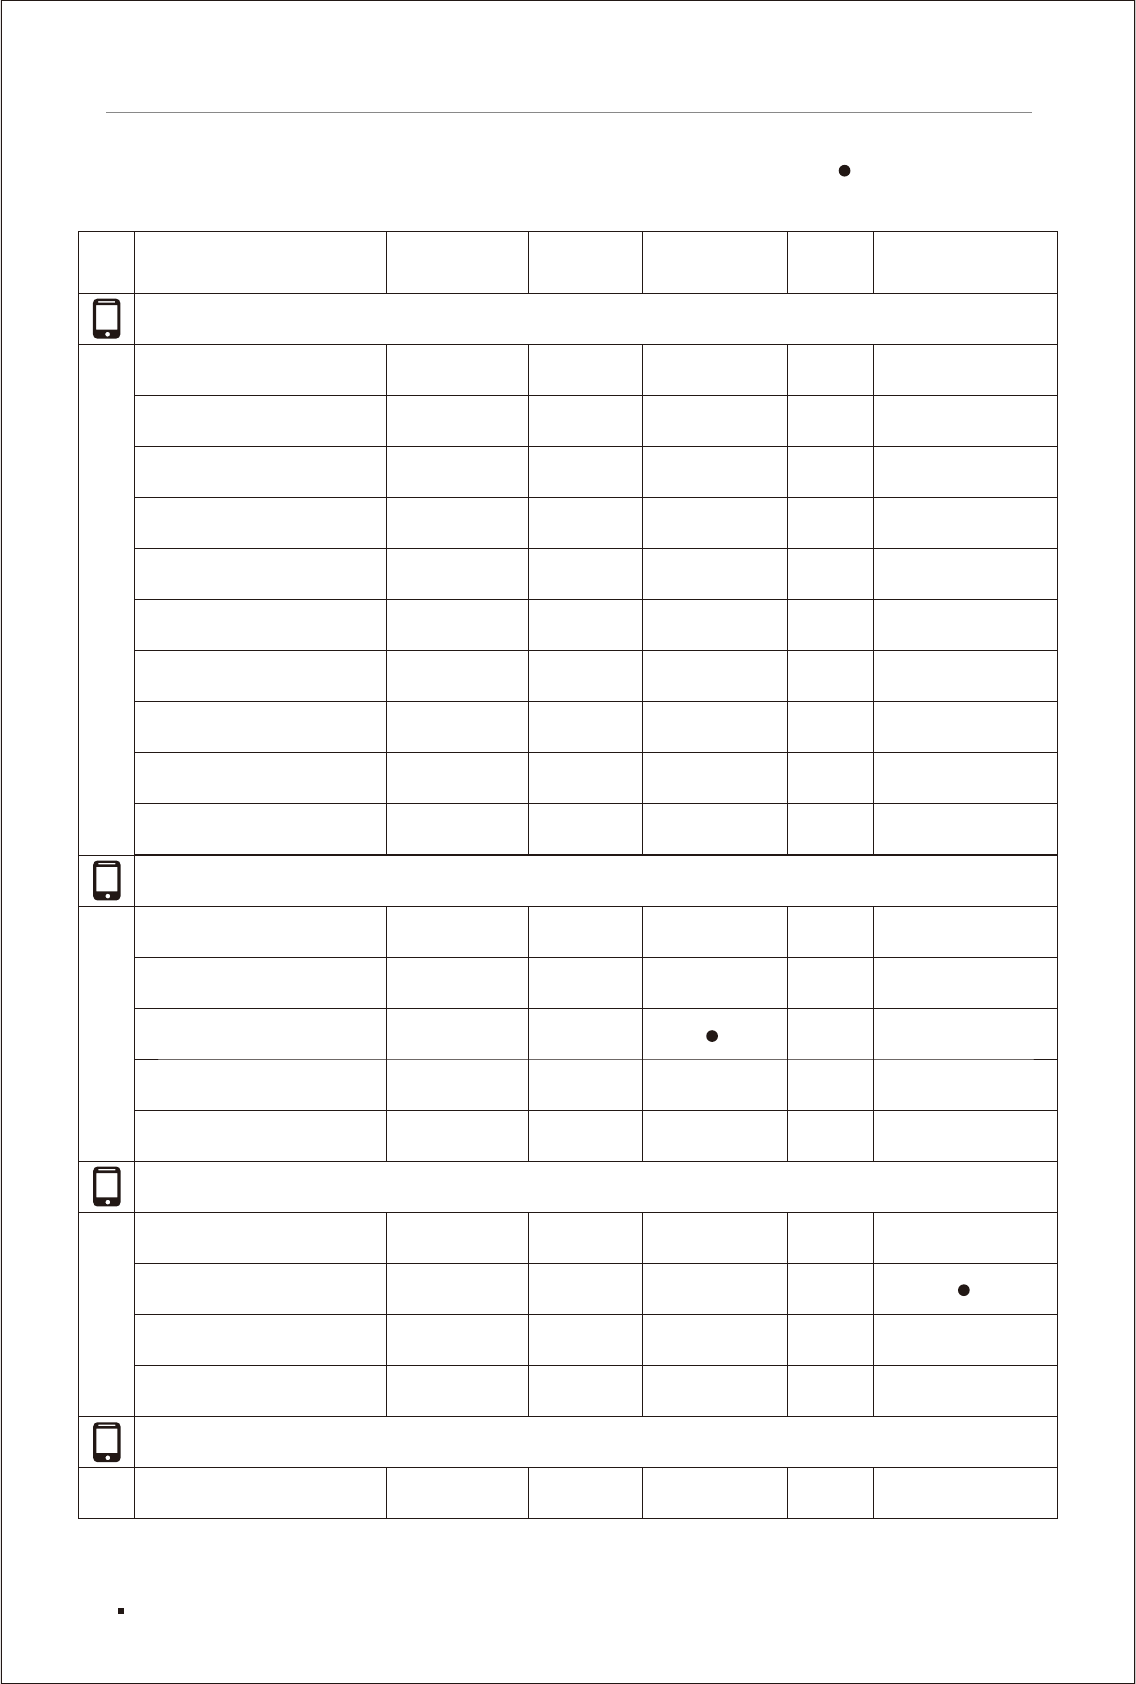
Phone Bluetooth compatibility list
Audio Streaming Phone Pairing Handsfree Calling
iPhone 6S
iPhone 7
iPhone 6S Plus
iPhone 7 Plus
iPhone 8
iPhone 8 Plus
iPhone SE
iPhone X
Caller ID
Apple
Phonebook Download
√
Asus
Zenfone Max ZC550KL
Zenfone 2 Laser ZE550KL
Zenfone 3 Max ZC520TL
Zenfone Live ZB501KL
Zenfone Selfie ZD551KL
Coolpad
Mega 2.5D Y83-100
Note 5 3600I
Cool 1 C103
Note 3 Lite
Gionee
A1
iPhone 6
iPhone 5S
Phone Bluetooth compatibility list
47
√√√ √
√√ √√ √
√√ √√ √
√√ √√ √
√√ √√ √
√√ √√ √
√√ √√ √
√√ √√ √
√√ √√ √
√√ √√ √
√√ √√ √
√√ √√ √
√√ √ √
√√ √√ √
√√ √√ √
√√ √√ √
√√ √√
√√ √√ √
√√ √√ √
√√√ √
Compatible
√
Not fully compatible
Unsupported
Blank

F103 Pro
Marathon M5 lite
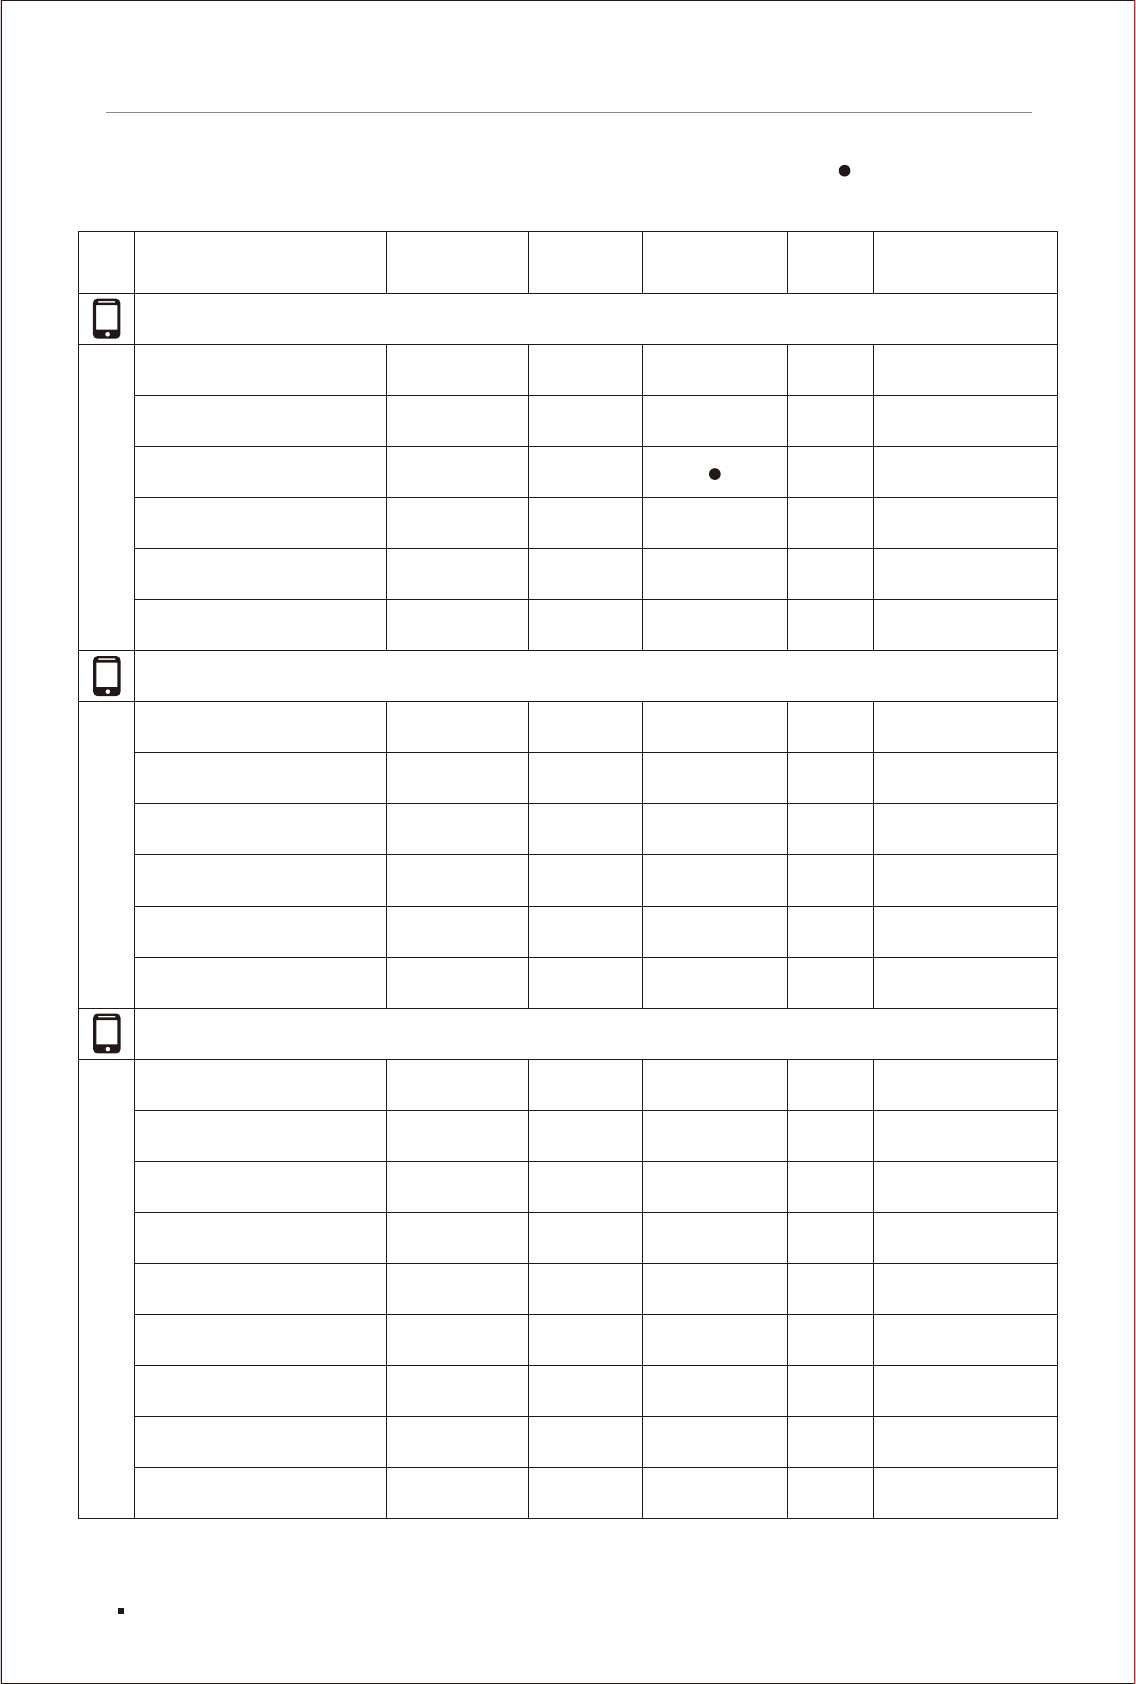
Phone Bluetooth compatibility list
Audio Streaming Phone Pairing Handsfree Calling
P5W
P7 Max
S6s
Pixel
Pixel XL
6X BLN-L21
8 Pro DUK-L09
Caller ID
Gionee
Phonebook Download
Honor
HTC
Desire 820s Dual SIM
InFocus
M260
Bingo 50 M460
EPIC 1
Intex
Aqua Ace
Cloud Cube
AQUA CRAZE
Cloud 4G Star
Cloud Jewel
Google
Phone Bluetooth compatibility list
48
√√√√ √
√√√√ √
√√√√ √
√√√√ √
√√√√ √
√√ √
√√ √
√√√√ √
√√√√ √
√√√√ √
√√√√ √
√√√√ √
√√√√ √
√√√√ √
√√√ √
√√√√ √
√√√ √
√√√√ √
Compatible
√
Not fully compatible
Unsupported
Blank
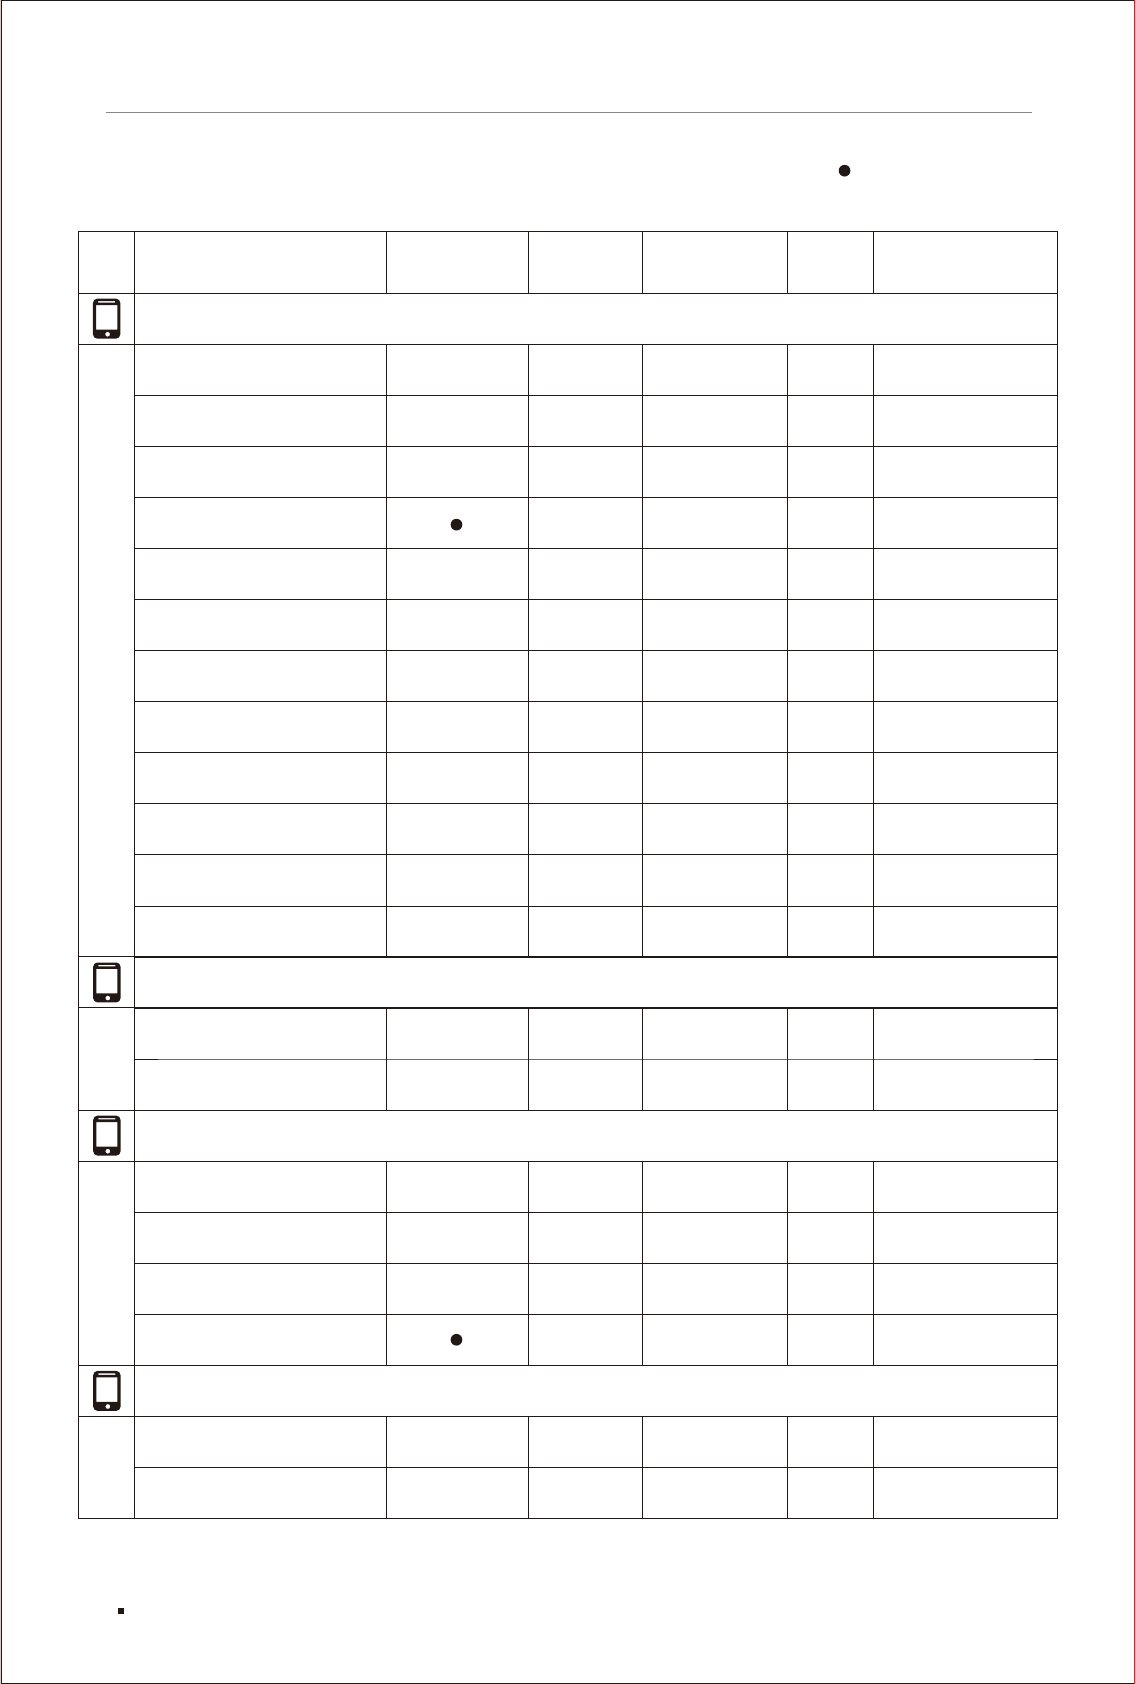
Phone Bluetooth compatibility list
Audio Streaming Phone Pairing Handsfree Calling
K9 Viraat
Quattro L50 HD
Titanium K9 Smart
Titanium MachFive
Titanium Moghul
TITANIUM S2
Caller ID
Karbonn
Phonebook Download
A72
P7
Pixel V2
V5
X50
K6 Power K33A42
Moto C Xt1755
Vibe P1
A2010
A6000 Plus
A7000
A7000 Turbo K50a40
K8 Note XT1902-3
Moto E4 Plus Xt1770
Lava
A77
Lenovo
Phone Bluetooth compatibility list
49
√√√ √
√√ √
√√ √√ √
√√ √√ √
√√ √√ √
√√ √√ √
√√ √
√√ √√ √
√√ √√ √
√√ √√ √
√√ √
√√ √√ √
√√ √√ √
√√ √√ √
√√ √√ √
√√ √√ √
√√ √√ √
√√ √√ √
√√ √√ √
√√ √√ √
(Note 3)
√√√√ √
Compatible
√
Not fully compatible
Unsupported
Blank

Phone Bluetooth compatibility list
Audio Streaming Phone Pairing Handsfree Calling
Moto Z Play XT1635-02
Vibe K5 A6020a40
Vibe K5 Note A7020a48
Vibe K5 Plus
A6600 Plus A6600d40
K6 Note K53a48
Moto E3 Power Xt1706
Caller ID
Lenovo
Phonebook Download
Vibe K4 Note A7010a48
Vibe B A2016a40
K3 Note K50a40
Moto G4 Plus Xt1643
Moto M Xt1663
Le 1s X507
Water 11 LS-5017
Canvas 5 E481
Canvas 6 Pro E484
Canvas Blaze Mt500
Canvas Evok E483
Canvas Juice 3 Q392
Le 2 X526
LeTV
LYF
Micromax
Phone Bluetooth compatibility list
50
√√√√ √
√√√√ √
√√√√ √
√√√√ √
√√ √
√√√√ √
√√√√ √
√√ √
√√√√ √
√√√√ √
√√ √
√√√√ √
√√√√ √
√√√√ √
√√√√ √
√√√√ √
√√√√ √
√√√√ √
√√√√ √
√√√√ √
Compatible
√
Not fully compatible
Unsupported
Blank
Phone Bluetooth compatibility list
Audio Streaming Phone Pairing Handsfree Calling
Canvas Mega 4G Q417
Canvas Nitro 2 E311
Canvas Xpress 4G Q413
Bolt Selfie Q424
Canvas Amaze 2 E457
Canvas Fire 5 Q386
Caller ID
Micromax
Phonebook Download
Canvas Juice 4G Q461
Canvas Juice 2 Aq5001
Canvas Xpress 2 E313
Canvas Unite 4 Pro Q465
Moto X Play Xt1562
5 A5000
2 A2003
3T A3003
X E1003
A37 A37F
A57 CPH1701
Canvas Infinity Hs2
Canvas Fire 4G+ Q412
Moto G 2nd Generation Xt1068
Motorola
OnePlus
Oppo
Phone Bluetooth compatibility list
51
√√ √√ √
√√ √√ √
√√ √√ √
√√√ √
√√ √√ √
√√ √√ √
√√ √√ √
√√ √√ √
√√ √√ √
√√ √√ √
√√ √√ √
√√ √√ √
√√ √√ √
√√ √√ √
√√ √√ √
√√ √√ √
√√ √√ √
√√√ √
√√ √√ √
√√ √√ √
Compatible
√
Not fully compatible
Unsupported
Blank

Phone Bluetooth compatibility list
Audio Streaming Phone Pairing Handsfree Calling
A71 CPH1717
F1 F1f
F1 Plus X9009
F1s A1601
F3 CPH1609
F3 Plus CPH1613
Caller ID
Oppo
Phonebook Download
Galaxy J2 (2016) J210F/DS
Galaxy J1 J100H/DD
Neo 7 A33F
Galaxy A7 (2016) A710F/DS
Galaxy A8 A800F
Galaxy J2 Pro J210F/DS
Galaxy J5 (2016) J510FN/DD
Galaxy J5 Prime G570F/DD
Galaxy J7 (2016) J710FN/DD
Galaxy J7 J700F/DD
Galaxy J7 Max G615F/DS
Galaxy J7 Nxt J701F/DS
Galaxy J2 J200G/DD
Galaxy J2 Ace G532G/DS
Galaxy J3 (2016) J320F
Galaxy J5 J500F/DD
Samsung
Phone Bluetooth compatibility list
52
√√√√ √
√√√√ √
√√√√ √
√√√√ √
√√√√ √
√√√√ √
√√√√ √
√√√√ √
√√√√ √
√√√√ √
√√√√ √
√√√√ √
√√√√ √
√√√√ √
√√√√ √
√√√√ √
√√√√ √
√√√√ √
√√√√ √
√√√√ √
Compatible
√
Not fully compatible
Unsupported
Blank

Phone Bluetooth compatibility list
Audio Streaming Phone Pairing Handsfree Calling
Galaxy J7 Prime G610F/DD
Galaxy J7 Pro J730G/DS
Galaxy On Nxt G610F/DD
Galaxy On5 G550FY/DS
Galaxy On7 G600FY
Galaxy On8 J710FN/DS
Caller ID
Samsung
Phonebook Download
Z1 Z130H/DS
Z3 Z300H
Z4 Z400F/DS
Galaxy A5 (2017) A520F/DS
Galaxy C9 Pro C900F/DS
Galaxy E7 E700H
Galaxy Grand Max G7202/D
Galaxy Grand Neo i9060
Galaxy Note5 N920G
Galaxy S8+ G955FD
Galaxy S III I9300
Galaxy S6 G920I
Z2 Z200F/DS
Galaxy A7 A700FD
Galaxy S6 Edge G925I
Galaxy A7 (2017) A720F/DS
Galaxy E5 E500H
Phone Bluetooth compatibility list
53
√√ √√ √
√√ √√ √
√√ √√ √
√√ √√ √
√√ √√ √
√√ √√ √
√√ √√ √
√√ √√ √
√√ √√ √
√√ √√ √
√√ √√ √
√√ √√ √
√√ √√ √
√√ √√ √
√√ √√ √
√√ √√ √
√√ √√ √
√√ √√ √
√√ √√ √
√√ √√ √
√√ √√ √
√√ √√ √
√√ √√ √
Compatible
√
Not fully compatible
Unsupported
Blank

Phone Bluetooth compatibility list
Audio Streaming Phone Pairing Handsfree Calling
Galaxy S8 G950FD
Galaxy Note 4 N910G
Galaxy S6 Edge+ G928G
Galaxy S7 Edge G935F
Xperia XZs G8232
Caller ID
Samsung
Phonebook Download
V5 1601
V3
Xperia XA1 G3116
Elite Plus
Y31L
Y53 1606
Y69 1714
V3 Max
V5 Plus 1611
V7+ 1716
Y66 1609
Y21L
V5s 1713
Y51L
Y55L 1603
Sony
Swipe
Vivo
Phone Bluetooth compatibility list
54
√√√√ √
√√√√ √
√√√√ √
√√√√ √
√√√√ √
√√√√ √
√√√√ √
√√√√ √
√√√√ √
√√√√ √
√√√√ √
√√√√ √
√√√√ √
√√√√ √
√√√√ √
√√√√ √
√√√√ √
√√√√ √
√√√√ √
Compatible
√
Not fully compatible
Unsupported
Blank

Phone Bluetooth compatibility list
Audio Streaming Phone Pairing Handsfree Calling
Mi 5
Mi Max
Mi Max 2
RedMi 2 Prime HM 2LTE-IN
Redmi 3S
Redmi 4A
Caller ID
Xiaomi
Phonebook Download
Redmi Note 4
Mi 4i
Note Prime
Yunicorn Yu5530
Redmi Note 3
Mi A1
Era 4K
Yunique Yu4711
Xolo
YU
Hot 4 Pro X5511
Infinix
Note 4 X572
Note: 1. Flyaudio does not support SIM Contacts for Phonebook Download.
2. Flyaudio does not support SMS or Text Messaging functions.
3. Karbonn Quattro L50 HD: Phone only pairs, need to establish manual connection via media system.
Phone Bluetooth compatibility list
55
√√ √√ √
√√ √√ √
√√ √√ √
√√ √√ √
√√ √√ √
√√ √√ √
√√ √√ √
√√ √√ √
√√ √√ √
√√ √√ √
√√ √√ √
√√ √√ √
√√ √√ √
√√ √√ √
√√ √√ √
√√√ √
Compatible
√
Not fully compatible
Unsupported
Blank

Manufacturer: Guangdong Creator & FlyAudio Ele & Tech Co., Ltd.
Address: Floor 3,Building F, Creator & FlyAudio Xinyong Sheng Industrial
Park, No.3 Industrial District, Gekeng Village, Hengli Town,
Dongguan City, Guangdong Province, China, 523460
Issue Date: 22nd Mar.2018
Execute Standard: Q/TYFG 1-2016
GSDB code : HH50A
BP02V0218R2
J7BJ 19C104 AC