Garmin Canada M6R4N Speed distance sensor User Manual 9328 2 SDM ENG
DynaStream Innovations Inc. Speed distance sensor 9328 2 SDM ENG
User manual Corrected

1
INSTRUCTIONS 1
SDM TRIAX 100
© 2000 Nike, Inc. All rights reserved.
Dynastream is a trademark of Dynastream Innovations Inc.
This device complies with part 15 of the FCC Rules. Operation is subject to the following
two conditions: (1) This device may not cause harmful interference, and (2) this device must
accept any interference that may cause undesired operation.
9328.2- SDM-ENG 6/13/00 5:51 PM Page 1

23
CONTENTS
Information is power.
Your SDM Triax 100 watch is designed to tell you how fast and how far you
have run, and provide quick, one-touch access to a variety of critical
information during training and in competition.
Nike Techlab is proud to be the first to provide athletes with this revolu-
tionary new training tool. Never before has the technology been sufficient
for a runner to accurately determine their pace and distance. Using an
ultra-modern accelerometer technology combined with an RF (Radio
Frequency) transceiver, the SDM Triax 100 can provide speed and distance
information to runners that is more than 97% accurate.
This manual combines step-by-step operational instructions to help you
identify the programmable features and functions of each specific mode. It
is not the goal of this manual to provide all of the information necessary to
embark upon a training regimen. There are numerous books on the subject,
good information on the Internet, and professional trainers affiliated with
most health clubs. Remember, this speed and distance monitor is just one
part of an intelligent exercise plan.
Before beginning any exercise regimen, you should consult your physician
or health professional. There are numerous factors to consider when
determining your pace limits and exercise intensity level. Some of these
factors include your age, the frequency with which you exercise and your
overall physical fitness.
Throughout this manual, look for the symbol to identify especially
useful and important information.
s
GETTING STARTED 4
THE SPEED SENSOR 6
OPERATING INSTRUCTIONS
MODES 9
MAKING ADJUSTMENTS TO MODE SETTINGS 10
TIME 11
RUN 12
GRAPH 14
CHRONOGRAPH 15
DATA 17
TIMER 18
ALARM 19
NIKE ELECTROLITE 20
SPECIFICATIONS 21
WARRANTY 21
REPAIR CENTERS 44
9328.2- SDM-ENG 6/13/00 5:51 PM Page 2
5
4
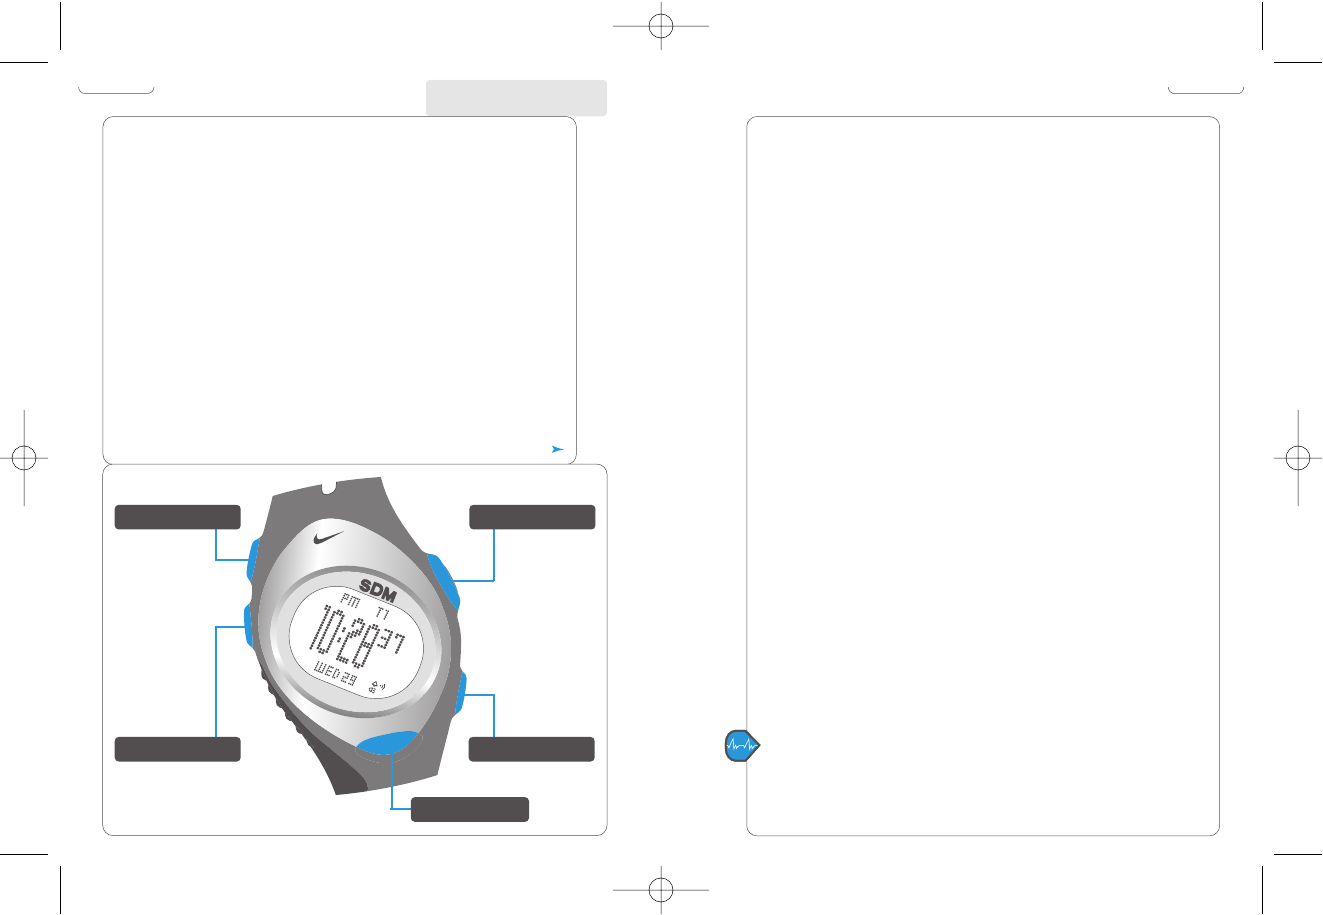
We’ve tried to make this watch as easy as possible to use. Great care has
been taken to make the button functions consistent and clear. Even if you
don’t read the whole manual, you should be able to work your watch if you
understand, in general, how the buttons work.
BUTTON FUNCTIONS, LEFT SIDE
ADJUST/EXIT
Think of ADJUST/EXIT as the button to use when you want to adjust, set or
reset something. For example, if you want to adjust the time, or reset the
chronograph. This button is a little different than the other buttons
because you usually have to press and hold it for a few seconds. This is so
you don’t accidentally reset or adjust something.
MODE/NEXT
The MODE/NEXT button will normally move you to the next mode. When
you are making adjustments or setting something, the MODE/NEXT button
will move you to the next adjustable element.
GETTING STARTED
BUTTON FUNCTIONS, RIGHT SIDE
The buttons on the right hand side of the watch have more functions than
the buttons on the left side. For that reason, we’ve included all the details
for quick reference.
START/LAP
You can think of the START/LAP button as the “go,” “plus,” or “move
forward” button. It also functions as an on/off switch in some modes.
• In TIME mode, press to turn the chime on and off.
• In CHRON mode, press to start the chronograph and mark lap
completion.
• In TIMER mode, press to start the countdown timer.
• In GRAPH mode, press to move forward through the list of data points.
• In DATA mode, press to move forward through the list of data points.
• In ALARM mode, press to turn the alarm on and off.
• When making adjustments, press to advance the blinking element.
STOP
The STOP button is the opposite of the START/LAP button. Think of it as the
“stop,” “minus,” or “go backwards” button. This button will also allow you
to alternate selections in some modes.
• In TIME mode, press and hold to select time zone 1 or 2.
• In CHRON mode, press to stop the chronograph and save run data to
memory.
• In TIMER mode, press to stop the countdown timer.
• In ALARM mode, press to select alarm 1 or 2.
• In DATA mode, press to select run number.
• When making adjustments, press to reverse the blinking element.
ELECTROLITE BUTTON
The ELECTROLITE button is used to turn on the light.
If you press and hold the ELECTROLITE button, you can make the light come
on at the press of any button. It’s great for night use. We call it auto-
Electrolite.
S
T
A
R
T
/
L
A
P
A
D
J
U
S
T
/
E
X
I
T
M
O
D
E
/
N
E
X
T
S
T
O
P
H20 RESIST 100M
STOP
START/LAP
MODE/NEXT
ADJUST/EXIT
ELECTROLITE
9328.2- SDM-ENG 6/13/00 5:51 PM Page 4

You can attach the speed sensor to either sneaker. It is important to be
consistent in how you attach it. Make sure it is attached it to the laces
securely enough that there is no “wobble” when you are running. Finally,
it should be aligned with the foot and secured well enough that the
alignment does not change during a run.
1. Lace the speed sensor clip into your
sneakers before you attach the speed
sensor itself.
2. Then attach the speed sensor to the clip as
shown.
DIRECTIONS FOR NORMAL USE
Follow these instructions for normal use of the
speed sensor.
The speed sensor is equipped with a power
button. When not in use, store the speed sensor
with the power off to conserve battery life.
TURN POWER ON
Press the power button. A light will indicate
that the speed sensor is activated. The watch
will begin linking when it receives a signal
from the speed sensor. When running or
walking, your speed and distance information
is automatically transmitted to your watch.
TURN POWER OFF
Press and hold the power button. The light will
turn off, indicating that the power is off.
7
ATTACHING THE SPEED SENSOR TO YOUR SNEAKER
Attach sensor to clip as shown.
6
The core of the SDM Triax 100 watch technology is housed in a speed
sensor, which you attach to one sneaker. A patented technology calculates
your speed and distance and transmits that information to your watch. Of
course, you can always use your watch without the speed sensor as a
multi-function sport timepiece. When running or walking, your speed and
distance information is automatically transmitted to your watch.
FIRST USE SETUP
IMPORTANT
The first time you use the speed
sensor, when you change the watch
battery, or when you reset the watch
by pressing all buttons, you will have
to "train" the watch to recognize the
speed sensor. (Reset the watch when
you replace the speed sensor with a
new one or borrow a friend's speed
sensor.)
FIRST TIME USE: “Training” the
speed sensor to recognize the
watch
1. Proceed to RUN mode by
pressing MODE on the
watch until RUN appears.
* The watch will prompt you
to press and hold the
button on the speed sensor
when it recognizes that
there is a new speed sensor
present. “HOLD speed sensor
button” will be displayed on the watch.
2. When the speed sensor is off, press and hold the button until the
watch stops scrolling the message. The “training” takes just a few
seconds, after which, your Triax SDM is ready to use.
THE SPEED SENSOR
Lace the speed sensor clip
into your sneakers before you
attach the sensor itself
LED
ON/OFF BUTTON
SPEED SENSOR
CHANGING THE CHANNEL
In the event that you receive “crosstalk” from another Triax SDM, you can
select a different channel.
With the power on, briefly press the button on the speed sensor. The
watch and speed sensor will begin linking on a new channel.
9328.2- SDM-ENG 6/13/00 5:51 PM Page 6

89
The various features of your watch are grouped into 8 different modes.
CYCLE TO A MODE
Press MODE/NEXT repeatedly until desired mode appears.
TIME
Time and calendar information for two time zones.
RUN
View pace, speed and distance, set and view zone
training information and calibrate the speed
sensor.
GRAPH
View graphic display of speed.
CHRON (CHRONOGRAPH)
Measure and record lap and split times.
DATA
Recall lap, split and speed/distance.
TIMER
5-segment countdown timer.
ALARM
Features 2 alarms.
DEMO mode provides a brief demonstration of each mode. While in TIME
mode, press START/LAP and STOP simultaneously. You will hear the sound
demonstration. The watch will cycle through the modes, briefly
demonstrating the functions of each. Press any button to exit DEMO mode.
OPERATING INSTRUCTIONS
CYCLE TO
A MODE
Press MODE/NEXT to select
desired mode.
T
X
E
N
/
E
D
O
M
S
T
O
P
S
T
A
R
T
/
L
A
P
T
I
X
E
/
T
S
U
J
D
A
S
T
A
R
T
/
L
A
P
A
D
J
U
S
T
/
E
X
I
T
M
O
D
E
/
N
E
X
T
S
T
O
P
H20 RESIST 100M
MODES
The SDM Triax 100 watch provides accurate speed and
distance information for most runners. However, if you
have a non-standard gait, like a pronating stride, you can
calibrate the speed sensor by running a known distance
and adjusting its display accordingly.
1. Go to a running track of any length. A 400
meter track is recommended as the most
common, but a longer track is better.
2. Press MODE/NEXT to select RUN mode.
3. Press and hold ADJUST/EXIT until “Hold to
Set” stops blinking.
4. Press MODE/NEXT until ”Calib.” appears.
5. Press START/LAP and circle the track on the
inside lane at a comfortable pace.
6. Press STOP when you pass the 400 meter
mark. The SDM Triax 100 will calculate the
distance that you have traveled.
7. If this does not equal the actual distance
you ran, use the START/LAP and STOP
buttons to adjust the distance display so
that it matches the distance you traveled.
8. Press MODE/NEXT to complete setup. Your
speed and distance will be automatically
calculated using the new calibration.
Or, press ADJUST/EXIT to return to the
original factory calibration.
BATTERY CHANGE
To replace the batteries, remove the two
battery cover screws on the speed sensor clip.
Pull off the battery cover and replace with 2
AAA batteries. Make sure the batteries are
correctly aligned. Then replace the battery
cover and battery cover screws.
Low battery power is indicated by a
rapidly flashing LED.
CALIBRATION
T
X
E
N
/
E
D
O
M
S
T
O
P
S
T
A
R
T
/
L
A
P
T
I
X
E
/
T
S
U
J
D
A
S
T
A
R
T
/
L
A
P
A
D
J
U
S
T
/
E
X
I
T
M
O
D
E
/
N
E
X
T
S
T
O
P
H20 RESIST 100M
ADJUSTING THE DISPLAY
If necessary, you can calibrate
your watch by running a
known distance and adjusting
the display accordingly.
S
T
A
R
T
/
L
A
P
A
D
J
U
S
T
/
E
X
I
T
M
O
D
E
/
N
E
X
T
S
T
O
P
H20 RESIST 1
00M
BATTERY CHANGE
Remove the two battery
screws to access the batteries.
9328.2- SDM-ENG 6/13/00 5:51 PM Page 8

11
TIME
In TIME mode, you can set the time and calendar information
for two time zones.
You can also set a chime to sound at the press of any button,
and on the hour, every hour.
SET TIME OF DAY AND CALENDAR
INFORMATION
See Making Adjustments to Mode Settings.
CHANGE TIME ZONES
1. In TIME mode, press and hold STOP.
The alternate time zone information appears.
2. Release the button when the time zone indicator stops flashing.
3. Follow instructions in Making Adjustments to Mode Settings to set
the time and calendar information for the alternate time zone.
Hold STOP for fewer than 3 seconds for a brief display of alternate time
zone information.
TURN THE CHIME ON/OFF
Press START/LAP.
The toggles on and off each time the button is pressed.
Most people like easy access to TIME mode. Press and hold MODE/NEXT
for one second in any mode for quick return to TIME mode.
S
T
A
R
T
/
L
A
P
A
D
J
U
S
T
/
E
X
I
T
M
O
D
E
/
N
E
X
T
S
T
O
P
H20 RESIST 1
00M
10
Within each mode, there are various settings which you can adjust. All
these settings are adjusted in a similar way.
1: Press MODE/NEXT to select the desired mode.
2: Press and hold ADJUST/EXIT for two seconds. A message like “HOLD to
ADJUST” or “HOLD to SET” is displayed. An element begins blinking. This
is the adjustable element. The symbols “+” and “-” will appear on the
display, indicating that START/LAP and STOP will increase or decrease
the adjustable element.
3: Press START/LAP to increase or advance the flashing element.
4: Press STOP to decrease or reverse the flashing element.
5: Press MODE/NEXT to cycle to the next adjustable element.
6: Repeat steps 3-5 until all adjustable elements are set.
7: Press ADJUST/EXIT to save changes.
When adjusting mode settings, the bottom line usually tells you what you
are adjusting!
ADJUSTABLE ELEMENTS IN EACH MODE
TIME MODE
Seconds, Hours, Minutes, Day, Month,
Day/Month, 12/24 and Year
RUN MODE
High Zone Limit, Low Zone Limit, Select Units
and Pace Alarm on/off, Calibrate Speed Sensor
GRAPH MODE
Sample Time
CHRONOGRAPH MODE
Auto Lap 0n/off, Auto Lap distance, Select Units
(Km/Miles), Primary Display
TIMER MODE
Seconds, Minutes, Hours and Segment Number
ALARM MODE
Hours, Minutes and Time Zone
T
X
E
N
/
E
D
O
M
S
T
O
P
S
T
A
R
T
/
L
A
P
T
I
X
E
/
T
S
U
J
D
A
S
T
A
R
T
/
L
A
P
A
D
J
U
S
T
/
E
X
I
T
M
O
D
E
/
N
E
X
T
S
T
O
P
H20 RESIST 100M
ADJUST
Press and hold ADJUST/EXIT
to adjust mode settings.
MAKING ADJUSTMENTS TO MODE SETTINGS
9328.2- SDM-ENG 6/13/00 5:51 PM Page 10

13
ABOUT ZONE TRAINING
You can set an upper and lower pace limit, and control the intensity of
your workout so that your pace stays within that limit. This is called “Zone
Training.” Zone training allows you to pace yourself more accurately, avoid
over-exertion and, in general, have a more targeted and therefore, more
productive workout.
Zone training is just one part of a structured fitness regimen. It is very
important that you train in a zone that is appropriate for your fitness level
and goals. Consult a doctor or health professional in order to determine
the best training zone for you.
The pace at which you run depends on your physical fitness and fitness
goals. The following describes the general benefits of training at various
intensity levels.
HIGH INTENSITY
Exercise at high intensity only if you are in excellent physical condition.
Exercise at this intensity to:
• increase your peak performance.
• accustom your body to competition-level performance.
• increase your tolerance to lactic acid.
MEDIUM INTENSITY
Exercise at this intensity to:
• increase cardiovascular health.
• improve endurance.
• lose weight.
LOW INTENSITY
Exercise at this intensity:
• after an injury.
• when beginning an exercise regimen.
• during recovery sessions.
• to improve overall health.
12
ADJUST RUN MODE DISPLAY
RUN mode features 3 display options.
Press START/LAP to select the display option that best
displays the information you need most.
PACE DISPLAY
• Shows a graphic display of your pace. If your pace is higher than
your upper limit, the word "HI" appears in the display with a . If
your pace is lower than your lower limit, the word “LO” appears in
the display with a .
DISTANCE DISPLAY
• Primary display shows your distance travelled in
miles or kilometers.
SPEED DISPLAY
• Primary display shows your speed in miles/hour or
kilometers/hour.
RESET THE DISPLAY
To reset the display at the very beginning of an exercise
session, press and hold ADJUST/EXIT for about 2
seconds. “HOLD to CLEAR” is displayed. The display
resets.
When the foot icon blinks, the watch is receiving a
signal and the display is activated.
SET ZONE LIMITS, PACE ALARM, UNITS AND CALIBRATION
Follow directions in Making Adjustments to Mode Settings to set zone
limits, activate an audible out-of-zone alarm, set units and calibrate the
speed sensor.
Note: Unit settings are also reflected in GRAPH and CHRONO modes.
In RUN mode, you can view pace, speed and distance, access
zone training information, and calibrate the speed sensor.
S
T
A
R
T
/
L
A
P
A
D
J
U
S
T
/
E
X
I
T
M
O
D
E
/
N
E
X
T
S
T
O
P
H20 RESIST 1
00M
RUN MODE
RUN MODE
Pace display
S
T
A
R
T
/
L
A
P
A
D
J
U
S
T
/
E
X
I
T
M
O
D
E
/
N
E
X
T
S
T
O
P
H20 RESIST 100M
/
9328.2- SDM-ENG 6/13/00 5:51 PM Page 12

15
START MEASURING A LAP
Press START/LAP.
MARK LAP COMPLETION AND START NEXT LAP
MEASUREMENT
Press START/LAP.
Lap/split time appears for 5 seconds, then the display returns to the
overall time.
STOP TIME MEASUREMENT
Press STOP.
The counting stops. The lap time and split time appear.
RESTART TIME MEASUREMENT
Press START/LAP.
The counting continues.
SAVE DATA FOR A RUN
The chronograph must be stopped to save data for a run. If the
chronograph is running, press STOP.
Press and hold STOP for 2 seconds. “HOLD to NEXT” is displayed. The
chronograph resets and the data is stored in memory. Your next times
will be stored as part of a new run.
In CHRONOGRAPH mode, you can view pace information, and
measure and record the lap, split and pace data for individual
runs. Runs are organized by date. Recorded data is accessed
in DATA mode.
Lap and split times are displayed simultaneously. The primary
display is centrally located and larger than the secondary
display. You can select whether lap, split or distance occupies
the primary display.
Lap time is the time required to go once around a track, or
complete a segment of a run. Split time is the total time
from the beginning of the run.
CHRONOGRAPH mode also features an Auto Lap Count feature.
S
T
A
R
T
/
L
A
P
A
D
J
U
S
T
/
E
X
I
T
M
O
D
E
/
N
E
X
T
S
T
O
P
H20 RESIST 100 M
CHRONOGRAPH
14
RESET THE BAR GRAPH
The bar graph will display your pace as soon as the watch begins
receiving a signal. You may want to reset the bar graph at the very
beginning of an exercise session.
Press and hold ADJUST/EXIT until the bar graph disappears.
DETERMINE SAMPLING INTERVAL
In order to adjust the sampling time, you must first reset the bar graph.
Press and hold ADJUST/EXIT until the bar graph disappears. Continue to
hold ADJUST/EXIT as “HOLD to SETUP” is displayed.
Follow directions in Making Adjustments to Mode Settings to select the
sample time.
VIEW EXACT VALUE OF EACH BAR IN
THE GRAPH
Press STOP or START/LAP.
The number at the base of the display represents your
pace at the beginning of each sample time. The number
at the top shows the time elapsed since the sample was
taken. In general, more dots indicates a faster pace.
After 10 seconds, the display returns to the current
pace and bar graph display.
Note: Select units (miles/Km) in RUN mode.
In GRAPH mode, you can view a graphic representation of your
pace over a period of time which you determine. This feature
provides you with a quick and simple view of your pace trend.
The bar graph can represent up to 28 data points. If you set a
sample time of 1 minute, the bar graph can show your pace
over the last 28 minutes. You can set a sampling time from 10
seconds to 10 minutes.
You can also view the exact value of each bar in the graph.
The value of each bar in the graph represents your pace at the
beginning of each sample time.
S
T
A
R
T
/
L
A
P
A
D
J
U
S
T
/
E
X
I
T
M
O
D
E
/
N
E
X
T
S
T
O
P
H20 RESIST 1
00M
GRAPH MODE
S
T
A
R
T
/
L
A
P
A
D
J
U
S
T
/
E
X
I
T
M
O
D
E
/
N
E
X
T
S
T
O
P
H20 RESIST 100M
GRAPH DISPLAY
Example of the bar graph
display
9328.2- SDM-ENG 6/13/00 5:51 PM Page 14

17
In DATA mode, you can recall timing and pace data for
saved runs.
The SDM Triax 100 watch has a 100 lap memory.
SELECT A RUN
Press STOP.
The run number and date of the run are displayed.
VIEW DATA POINTS
Press START/LAP repeatedly.
The following information is displayed:
• Total accumulated distance while running in RUN, GRAPH or CHRON
mode
• Date of run, run #, total run distance
• Lap and split times and distance at each lap count
• Maximum and average speed for each run
• Best lap time and average lap time
ERASE DATA FOR AN INDIVIDUAL RUN
The chronograph must be stopped to erase data.
Press the STOP button to select the run that you want to erase.
Press and hold ADJUST/EXIT. “HOLD to CLEAR” flashes and you will hear
a confirmation tone to indicate that the data for the selected run has
been deleted.
Note: When you delete a run, the next run takes its place. For example, if you delete
RUN 3 from memory, RUN 4 replaces RUN 3. If DATA memory becomes full during a
run, delete that run and begin a new run.
ERASE ALL DATA
Press and hold ADJUST/EXIT button for an additional 4 seconds after
erasing an individual run.
You will hear a continuous tone. “HOLD to CLEAR ALL” flashes in the
display. After 7 seconds, [-- --] indicates that all data has been erased.
S
T
A
R
T
/
L
A
P
A
D
J
U
S
T
/
E
X
I
T
M
O
D
E
/
N
E
X
T
S
T
O
P
H20 RESIST 100M
DATA MODE
16
RESET CHRONOGRAPH
You can reset the chronograph without saving any
data. The chronograph must be stopped to reset. If
the chronograph is running, press STOP.
Press and hold ADJUST/EXIT for 2 seconds. “HOLD
to CLEAR” is displayed. The chronograph resets.
SWITCH THE PRIMARY DISPLAY BETWEEN
LAP, SPLIT AND DISTANCE
Follow directions in Making Adjustments to Mode
Settings to adjust the chronograph display. The
chronograph must be stopped and reset to adjust
the display.
AUTO LAP COUNT
When activated, the Auto Lap Count feature will
automatically mark lap completion when you have
covered a distance which you determine. For
example, if you activate the auto lap feature and
set the lap distance at .4 KM (400 meters), your
watch will automatically mark lap completion every
400 meters.
Follow directions in Making Adjustments to Mode
Settings to activate the auto lap feature and set
the lap distance.
This revolutionary feature lets you monitor splits
on an unmarked course!
SELECT UNITS
You can select to display speed and distance data using Miles or
Kilometers.
Follow directions in Making Adjustments to Mode Settings to select the
units.
RESET
WITHOUT SAVE
Press and hold ADJUST/EXIT to
reset without saving any data.
T
X
E
N
/
E
D
O
M
S
T
O
P
S
T
A
R
T
/
L
A
P
T
I
X
E
/
T
S
U
J
D
A
S
T
A
R
T
/
L
A
P
A
D
J
U
S
T
/
E
X
I
T
M
O
D
E
/
N
E
X
T
S
T
O
P
H20 RESIST 100M
RESET
WITH SAVE
Press and hold STOP to reset
and save run data.
T
X
E
N
/
E
D
O
M
S
T
O
P
S
T
A
R
T
/
L
A
P
T
I
X
E
/
T
S
U
J
D
A
S
T
A
R
T
/
L
A
P
A
D
J
U
S
T
/
E
X
I
T
M
O
D
E
/
N
E
X
T
S
T
O
P
H20 RESIST 100M
9328.2- SDM-ENG 6/13/00 5:51 PM Page 16

SET AN ALARM
See Making Adjustments to Mode Settings.
Note: Each alarm is active only in the time zone for which it is set.
ADVANCE TO THE NEXT ALARM
Press STOP.
The next alarm number appears at the bottom of the display.
TURN THE ALARM ON AND OFF
Press START/LAP.
The word ON toggles off and on each time you press the button.
In ALARM mode, you can set two distinct alarms that will
sound for 20 seconds, or until any button is pressed.
S
T
A
R
T
/
L
A
P
A
D
J
U
S
T
/
E
X
I
T
M
O
D
E
/
N
E
X
T
S
T
O
P
H20 RESIST 1
00M
ALARM
19
18
TIMER mode features a 5 segment countdown timer. You can
use this as an interval training tool by exercising at a higher
intensity for a certain period of time, followed by a recovery
interval at a lower intensity level.
You can set up to 5 timed segments for your workout. As
each timer segment is completed, the next begins. Set
unused segments to zero.
SELECT A TIMER
Press STOP.
The selected timer will be the first to count down.
SET THE TIMERS
Follow directions in Making Adjustments to Mode Settings to set each
countdown timer.
START THE COUNTDOWN TIMER
1. Set any or all 5 segments.
2. Press STOP to advance to the segment you want to start with.
3. Press START/LAP.
Countdown begins. When the countdown reaches zero, the timer beeps,
and the countdown begins for the next segment. The number of
completed timer cycles appears below the countdown display.
NOTE: When the countdown is complete for all 5 segments, the cycle repeats. For
example, when segment 1 is completed, segment 2 will begin. If segments 3, 4 and 5
are set to zero, segment 1 will begin at the completion of segment 2.
STOP THE TIMER DURING COUNTDOWN
Press STOP.
RESET TIMER
When timer is stopped, press ADJUST/EXIT.
Display returns to the original starting point.
S
T
A
R
T
/
L
A
P
A
D
J
U
S
T
/
E
X
I
T
M
O
D
E
/
N
E
X
T
S
T
O
P
H20 RESIST 100M
TIMER
9328.2- SDM-ENG 6/13/00 5:51 PM Page 18
21
WARRANTY
One Year Limited Warranty
Your NIKE watch is warranted to be free of defects in materials or
workmanship, under normal use, for a period of one year from the
date of original retail purchase. This limited warranty excludes the
battery, crystal, strap, or damage resulting from improper care or
handling, accidents, modification, unauthorized repairs, or normal
wear.
Return the defective watch and the store receipt to the place of
purchase. If there is a covered defect, the defective parts or watch
will be repaired or replaced, at NIKE’s option, with the same
product (if available) or a similar product of equal price.
This limited warranty is in lieu of all other express or implied
warranties, and excludes refund of the purchase price. In no event
shall NIKE be liable for direct, indirect, incidental, or
consequential damages arising out of the use of the watch, and
any recovery is limited to the purchase price. No other person or
company is authorized to change this limited warranty, and your
dealer is solely responsible for any other warranties.
SDM Triax 100 Watch =
5ATM
Speed
Sensor=
Splash
Resistant
CRYSTAL = Mineral Glass
CASE = Plastic Resin
CASEBACK = Stainless Steel
STRAP = Polyurethane
BUCKLE = Stainless Steel
Watch:
CR2032
Battery life:
Approximately
1-2 years.
Speed Sensor:
Battery life:
20 hours on 2
AAA batteries.
SPECIFICATIONS
MODEL Materials
H20
Resistance
Battery
Type
Timer = 23:59'59"
Chrono = 23:59'59"
Mode
Limits
20
ILLUMINATE THE DISPLAY
You can illuminate the display by pressing ELECTROLITE.
Activating the auto-Electrolite display feature illuminates the display at the
press of any button.
ACTIVATE THE AUTO-ELECTROLITE FEATURE
Press and hold ELECTROLITE for about 2 seconds.
The symbol appears. The Electrolite display will illuminate at the press
of any button.
DE-ACTIVATE THE AUTO-ELECTROLITE FEATURE
Press and hold ELECTROLITE for about 2 seconds. The symbol disappears.
Note: To conserve battery life, the auto-Electrolite feature will automatically turn off
after 12 hours.
NIKE ELECTROLITE DISPLAY
9328.2- SDM-ENG 6/13/00 5:51 PM Page 20
22
9328.2- SDM-ENG 6/13/00 5:51 PM Page 22