Contents
- 1. User Manual
- 2. User Manual Rev
- 3. Quick Start Guide
User Manual
A01653
Installation Instructions.............................................................................. 2
Instructions d'installation............................................................................ 5
Istruzioni di installazione............................................................................ 8
Installationsanweisungen.........................................................................11
Instrucciones de instalación.....................................................................15
Garmin® and the Garmin logo are trademarks of Garmin Ltd. or its subsidiaries, registered in the USA and other countries. These trademarks may not be used without the express permission of Garmin.
NMEA® and NMEA 2000® are registered trademarks of the National Marine Electronics Association. Other trademarks and trade names are those of their respective owners.
El número de registro COFETEL/IFETEL puede ser revisado en el manual a través de la siguiente página de internet.
September 2016 190-02061-93_0APrinted in China
97
2.48
A01653 Series Installation
Instructions
Important Safety Information
WARNING
See the Important Safety and Product Information guide in the product box for
product warnings and other important information.
CAUTION
Always wear safety goggles, ear protection, and a dust mask when drilling,
cutting, or sanding.
NOTICE
When drilling or cutting, always check what is on the opposite side of the
surface.
Registering Your Device
Help us better support you by completing our online registration today.
• Go to http://my.garmin.com.
• Keep the original sales receipt, or a photocopy, in a safe place.
Contacting Garmin® Product Support
• Go to www.garmin.com/support for in-country support information.
• In the USA, call 913-397-8200 or 1-800-800-1020.
• In the UK, call 0808 238 0000.
• In Europe, call +44 (0) 870 850 1241.
Mounting Considerations
NOTICE
This device should be mounted in a location that is not exposed to extreme
temperatures or conditions. The temperature range for this device is listed in
the product specifications. Extended exposure to temperatures exceeding the
specified temperature range, in storage or operating conditions, may cause
device failure. Extreme-temperature-induced damage and related
consequences are not covered by the warranty.
When selecting a mounting location, you should observe these considerations.
• The location should provide optimal viewing as you operate your boat.
• The location should allow for easy access to all device interfaces, such as
the keypad, touchscreen, and card reader, if applicable.
• The location must be strong enough to support the weight of the device
and protect it from excessive vibration or shock.
• To avoid interference with a magnetic compass, the device should not be
installed closer to a compass than the compass-safe distance value listed
in the product specifications.
• The location must allow room for the routing and connection of all cables.
Antenna Mounting and EME Exposure
WARNING
Radio operators with cardiac pacemakers, life-support machines, or electrical
medical equipment should not be exposed to excessive radio-frequency (RF)
fields, because the RF field may interfere with the function of their medical
equipment.
CAUTION
This device generates and radiates radio frequency (RF) electromagnetic
energy (EME). Failure to observe these guidelines may expose people to RF
radiation absorption exceeding the maximum permissible exposure (MPE).
Garmin declares a MPE radius of m (9797 in.) for this system, which was
determined using 25 W output to an omni-directional, 6 dBi gain antenna. The
antenna should be installed to maintain a distance of m ( in.) between
the antenna and all people.
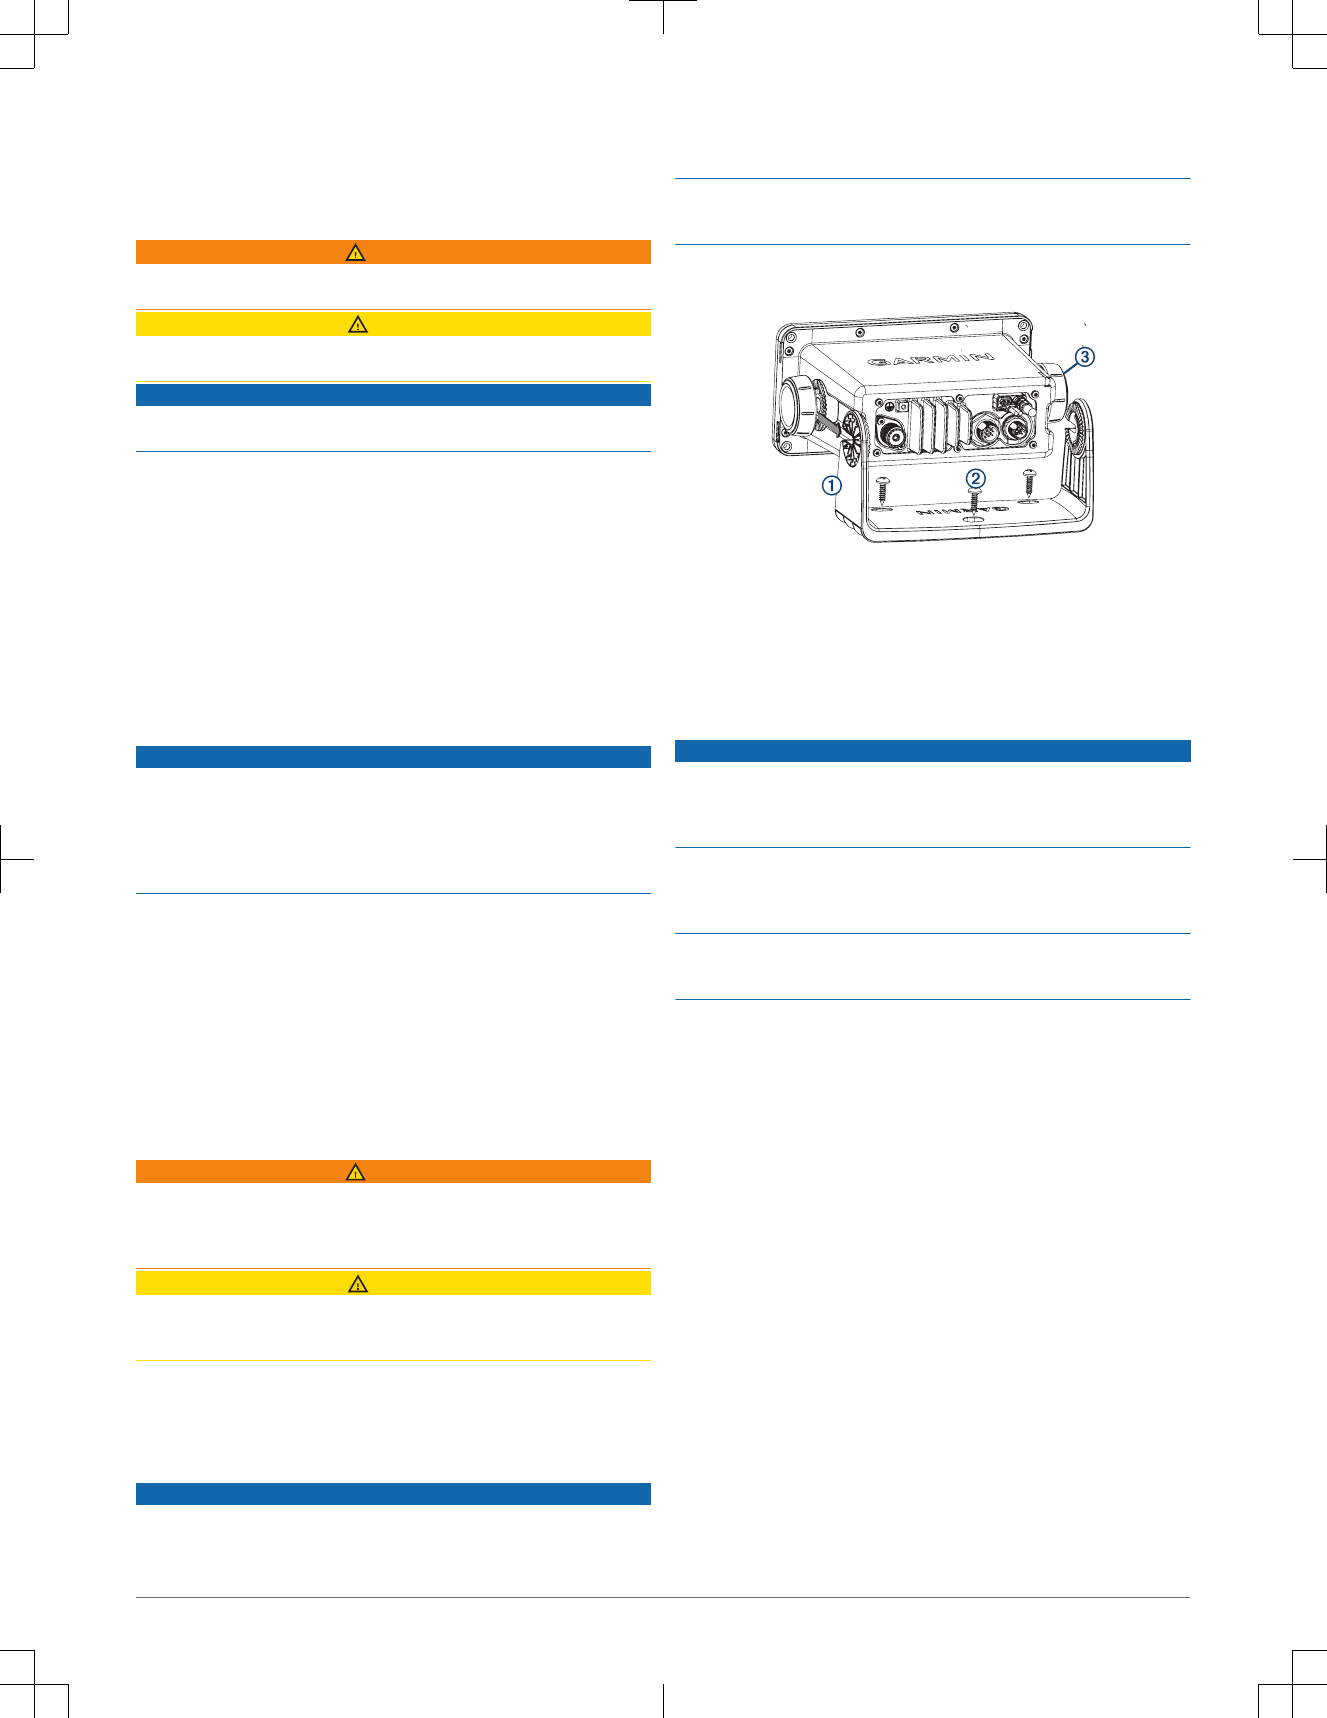
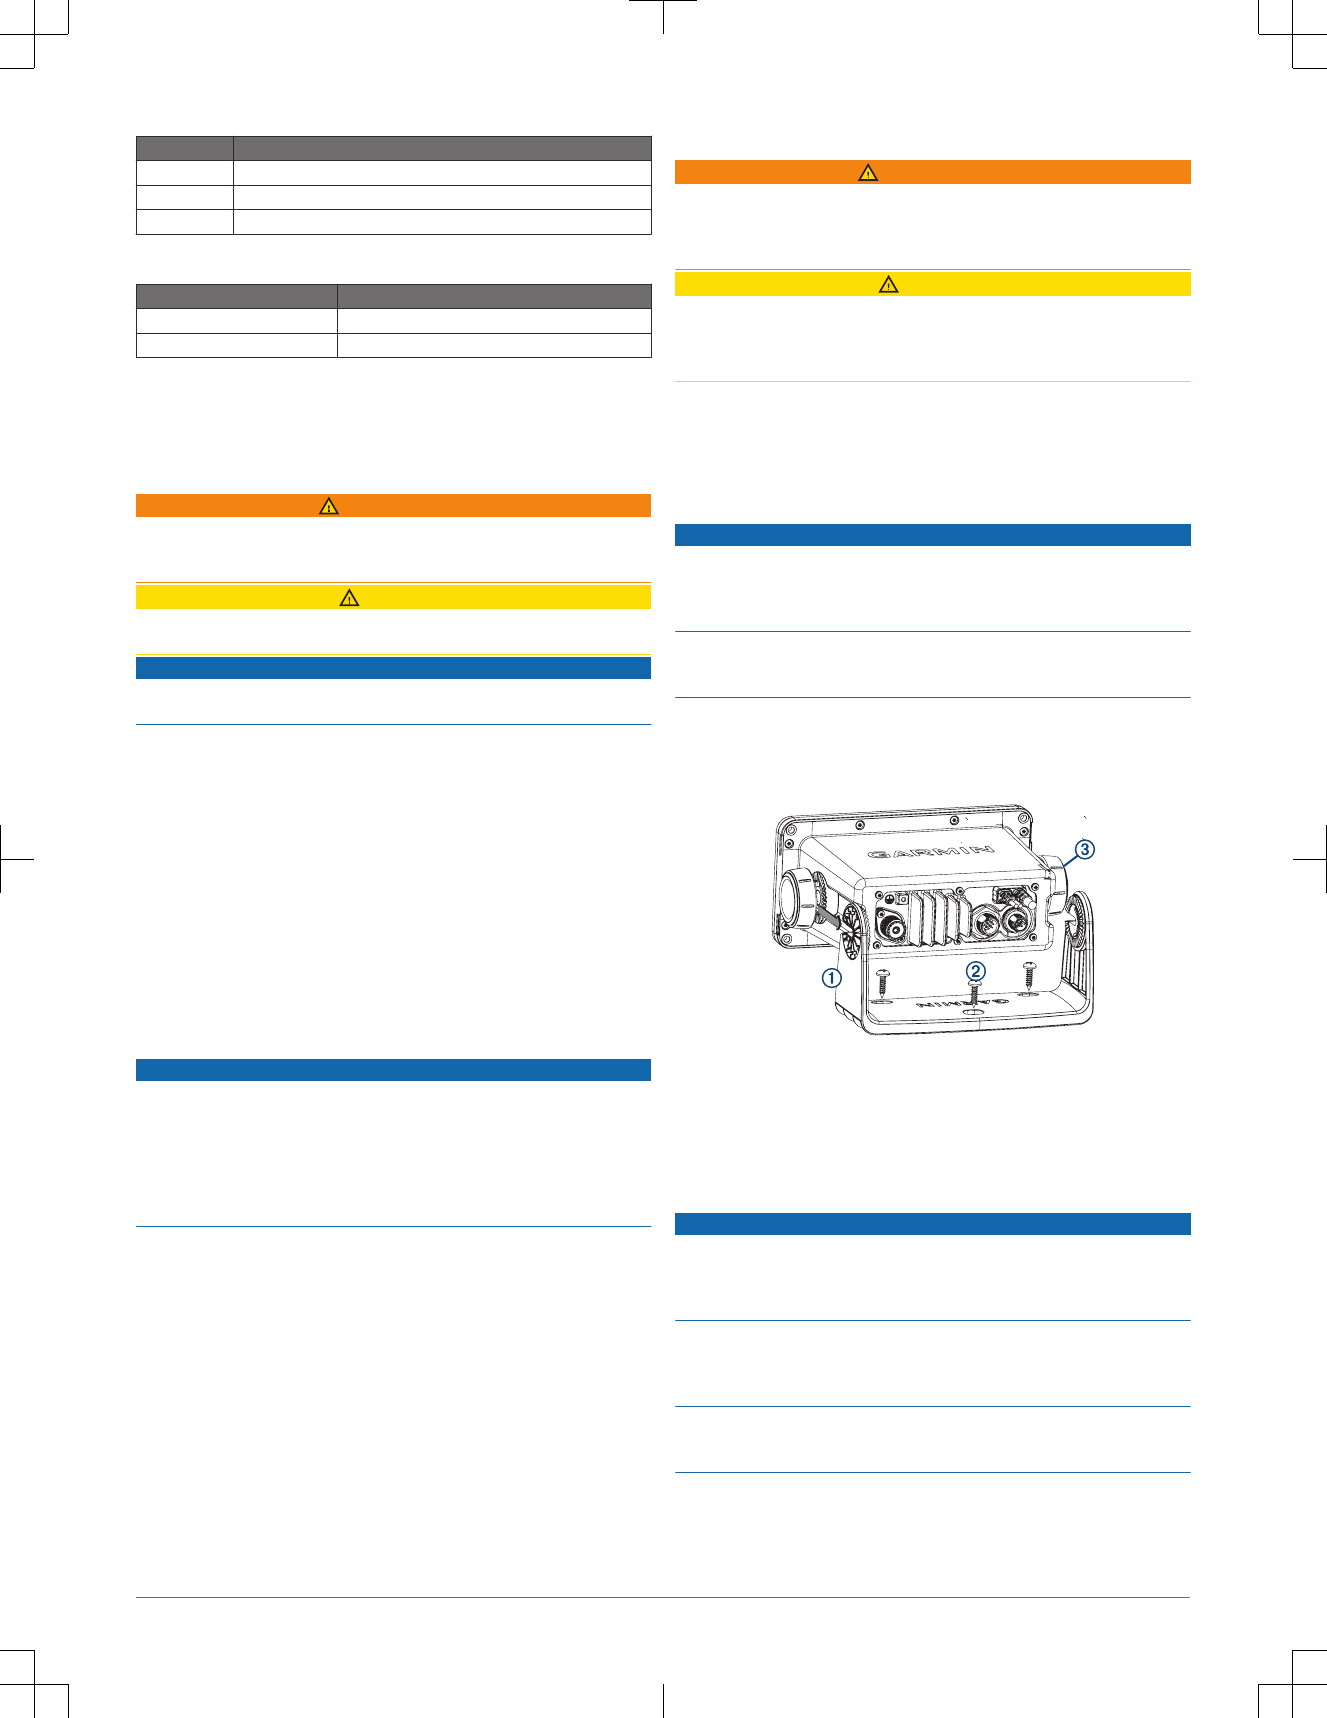
Bail Mounting the Device
NOTICE
If you are mounting the bracket on fiberglass with screws, it is recommended
to use a countersink bit to drill a clearance counterbore through only the top
gel-coat layer. This will help to avoid cracking in the gel-coat layer when the
screws are tightened.
Stainless-steel screws may bind when screwed into fiberglass and
overtightened. It is recommended to apply an anti-seize lubricant on the
screws before installing them.
You can use the included bracket to bail mount the device on a flat surface.
1Using the bail-mount bracket À as a template, mark the pilot holes.
2Using a 3.5 mm (9/64 in.) drill bit, drill the pilot holes.
3Using the included screws Á, secure the bail-mount bracket to the
mounting surface.
4Install the bail-mount knobs  on the sides of the device.
5Place the device in the bail-mount bracket and tighten the bail-mount
knobs.
Flush Mounting the Device
NOTICE
Be careful when cutting the hole to flush mount the device. There is only a
small amount of clearance between the case and the mounting holes, and
cutting the hole too large could compromise the stability of the device after it is
mounted.
If you are mounting the bracket on fiberglass with screws, it is recommended
to use a countersink bit to drill a clearance counterbore through only the top
gel-coat layer. This will help to avoid cracking in the gel-coat layer when the
screws are tightened.
Stainless-steel screws may bind when screwed into fiberglass and
overtightened. It is recommended to apply an anti-seize lubricant on the
screws before installing them.
The included template and hardware can be used to mount the device in your
dashboard.
1Trim the template and make sure it fits in the location where you want to
mount the device.
2Using a 9.5 mm (3/8 in.) drill bit, drill one or more of the holes inside the
corners of the solid line on the template to prepare the mounting surface
for cutting.
3Using a jigsaw or rotary tool, cut the mounting surface along the inside of
the solid line indicated on the template.
4Place the device in the cutout to test the fit.
5If necessary, use a file and sandpaper to refine the size of the cutout.
6After the device fits correctly in the cutout, ensure the mounting holes on
the device line up with the pilot holes on the template.
7If the mounting holes on the device do not line up, mark the new pilot-hole
locations.
8Using a 3.5 mm (9/64 in.) drill bit, drill the pilot holes.
9Remove the template from the mounting surface.
10 If you will not have access to the back of the device after you mount it,
connect all necessary cables to the device before placing it into the cutout.
11 If necessary, cover unused connectors with the attached weather caps to
prevent corrosion of the metal contacts.
12 Install the foam gasket À on the back of the device.
The pieces of the rubber gasket have adhesive on the back. Make sure
you remove the protective liner before installing them on the device.
2 Installation Instructions
2.48 97
13 Place the device in the cutout.
14 Secure the device to the mounting surface using the included screws Á.
15 Install the decorative bezel by snapping it in place around the edges of the
device.
Mounting the Microphone Hanger
NOTICE
If you are mounting the bracket on fiberglass with screws, it is recommended
to use a countersink bit to drill a clearance counterbore through only the top
gel-coat layer. This will help to avoid cracking in the gel-coat layer when the
screws are tightened.
Stainless-steel screws may bind when screwed into fiberglass and
overtightened. It is recommended to apply an anti-seize lubricant on the
screws before installing them.
You can mount the microphone hanger in a convenient location near the radio.
1Select a mounting location for the microphone within reach of the
microphone cable.
2Using the microphone hanger À as a template, mark the pilot holes.
3Drill the mounting holes using a 3 mm (1/8 in.) drill bit.
4Secure the microphone hanger to the mounting surface using the included
screws Á.
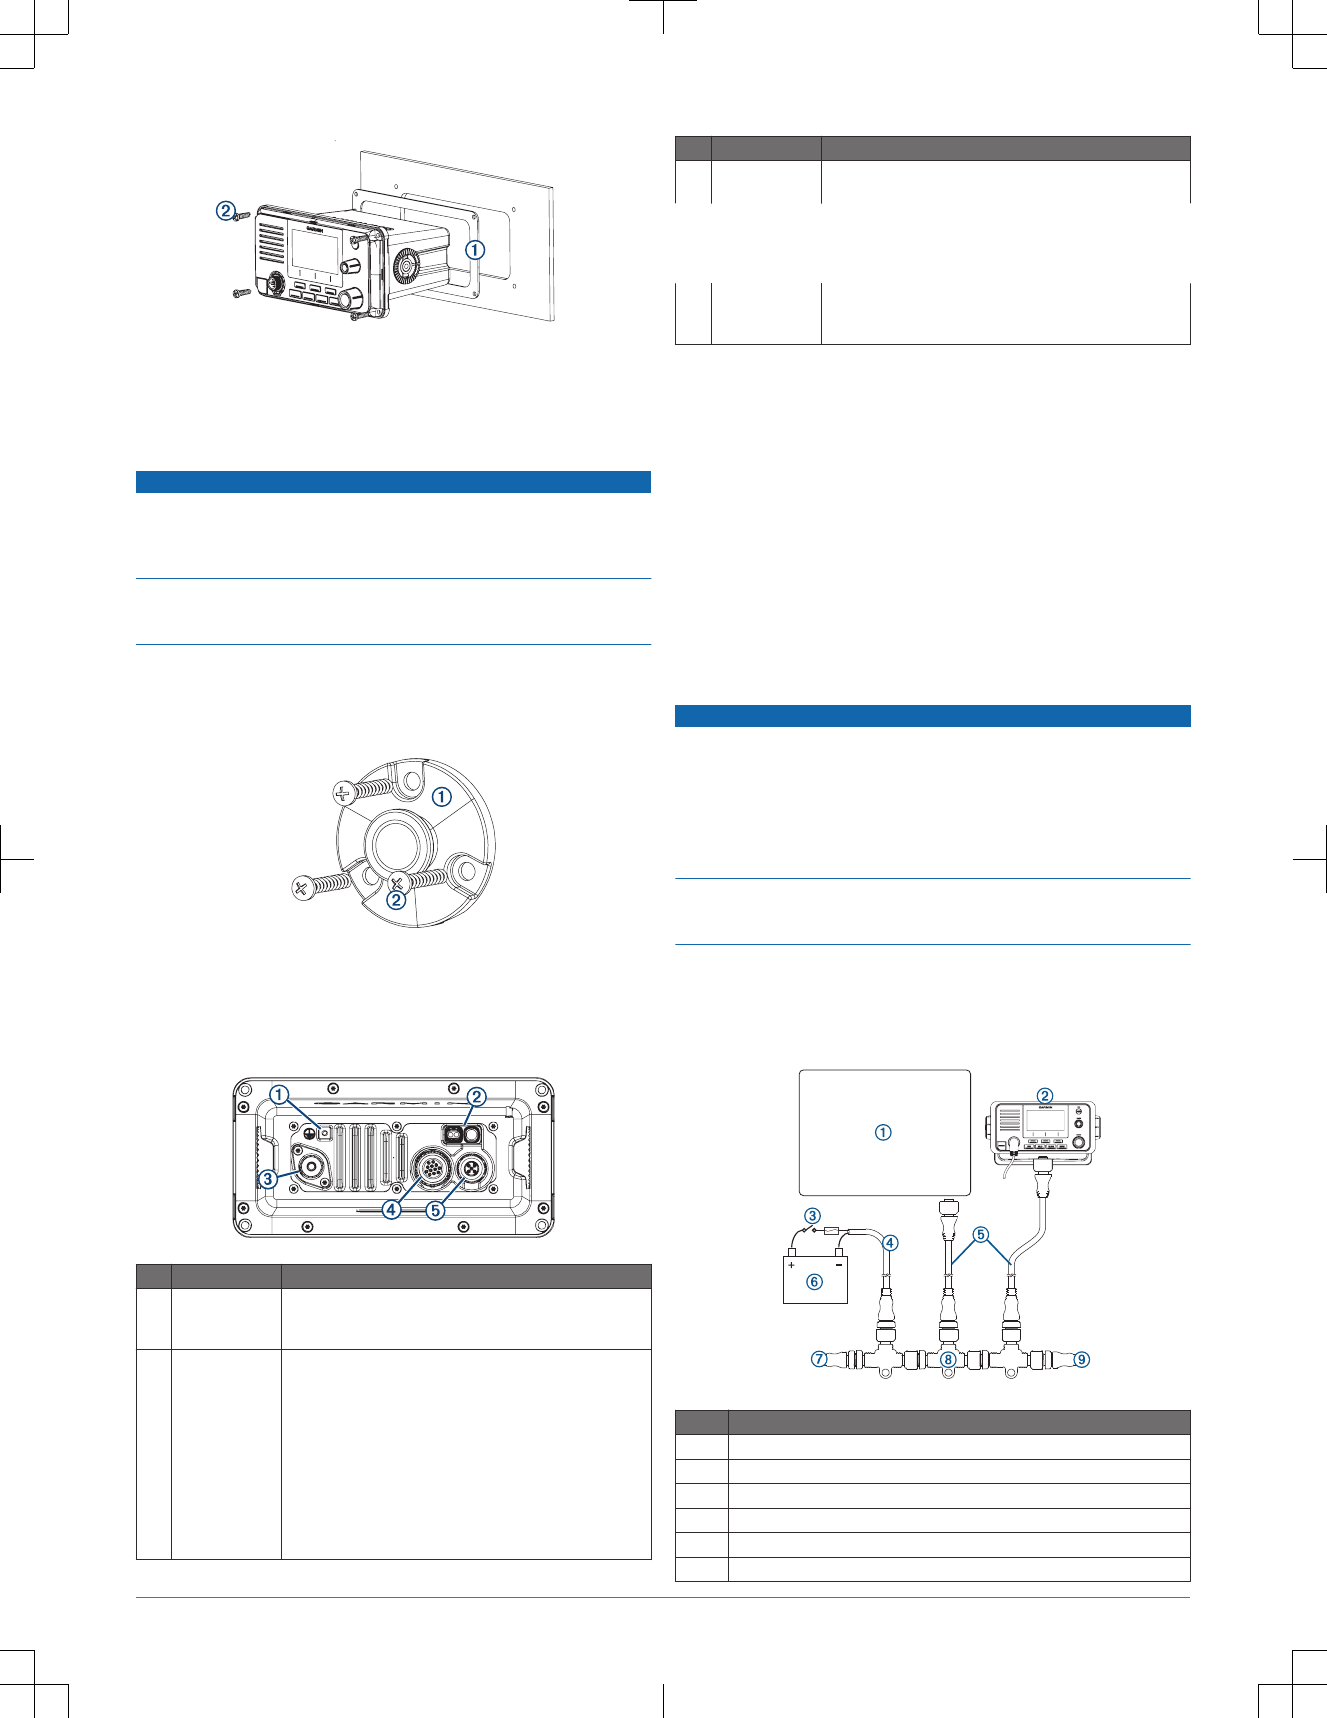
Connection Considerations
Item Description Notes
ÀGround
connection You can use the included grounding screw to connect the
device chassis to water ground, if needed (Additional
Grounding Considerations, page 3).
ÁPower, NMEA®
0183, and
speaker wiring
harnesses
You must connect the device to a 12 Vdc power source
(Connecting the Wiring Harness to Power, page 3).
You can connect this device to a NMEA 0183 device using
this wiring harness to share DSC and GPS information
(optional) (NMEA 0183 Device Connections, page 4).
You can connect this device to a hailer horn using this wiring
harness (optional) (Connecting to a Hailer Horn or PA
Speaker, page 4).
You can connect this device to an external speaker using this
wiring harness (optional) (Connecting to an External Speaker,
page 4).
Item Description Notes
ÂVHF antenna
connection You must connect the device to a VHF antenna (sold
separately) (Connecting a VHF Antenna, page 3).
ÄNMEA 2000®
connector You can connect this device to a NMEA 2000 network on your
boat to share DSC and GPS information (optional) (NMEA
2000 Device Connections, page 3).
Connecting the Wiring Harness to Power
1Route the wiring harness to the power source and to the device.
2Connect the red wire to the positive (+) battery terminal, and connect the
black wire to the negative (-) battery terminal.
Additional Grounding Considerations
This device should not need any additional chassis grounding in most
installation situations. If interference is experienced, the grounding screw on
the housing can be used to connect the device to the water ground of the boat
to help avoid the interference.
Connecting a VHF Antenna
1Mount the VHF antenna (sold separately) according to the installation
instructions provided with the antenna.
2Connect the VHF antenna to the antenna port on the back of the radio.
NMEA 2000 Device Connections
NOTICE
If you are connecting this device to an existing NMEA 2000 network, the
NMEA 2000 network should already be connected to power. Do not connect
the NMEA 2000 power cable to an existing NMEA 2000 network, because only
one power source should be connected to a NMEA 2000 network.
If you are connecting this device to an existing NMEA 2000 network or engine
network by another manufacturer, you should install a NMEA 2000 Power
Isolator (010-11580-00) between the existing network and the Garmin devices.
If you are installing a NMEA 2000 power cable, you must connect it to the boat
ignition switch or through another in-line switch. NMEA 2000 devices will drain
your battery if the NMEA 2000 power cable is connected to the battery directly.
To connect this device to your existing NMEA 2000 network, you must
purchase a NMEA 2000 cable and connector.
If you are unfamiliar with NMEA 2000, you should read the “NMEA 2000
Network Fundamentals” chapter of the Technical Reference for NMEA 2000
Item Description
ÀCompatible NMEA 2000 chartplotter or other device
ÁA01653 device
ÂIgnition or in-line switch
ÃNMEA 2000 power cable
ÄNMEA 2000 drop cable
Å12 Vdc power source
Installation Instructions 3
Item Description
ÆNMEA 2000 terminator or backbone cable
ÇNMEA 2000 T-connector
ÈNMEA 2000 terminator or backbone cable
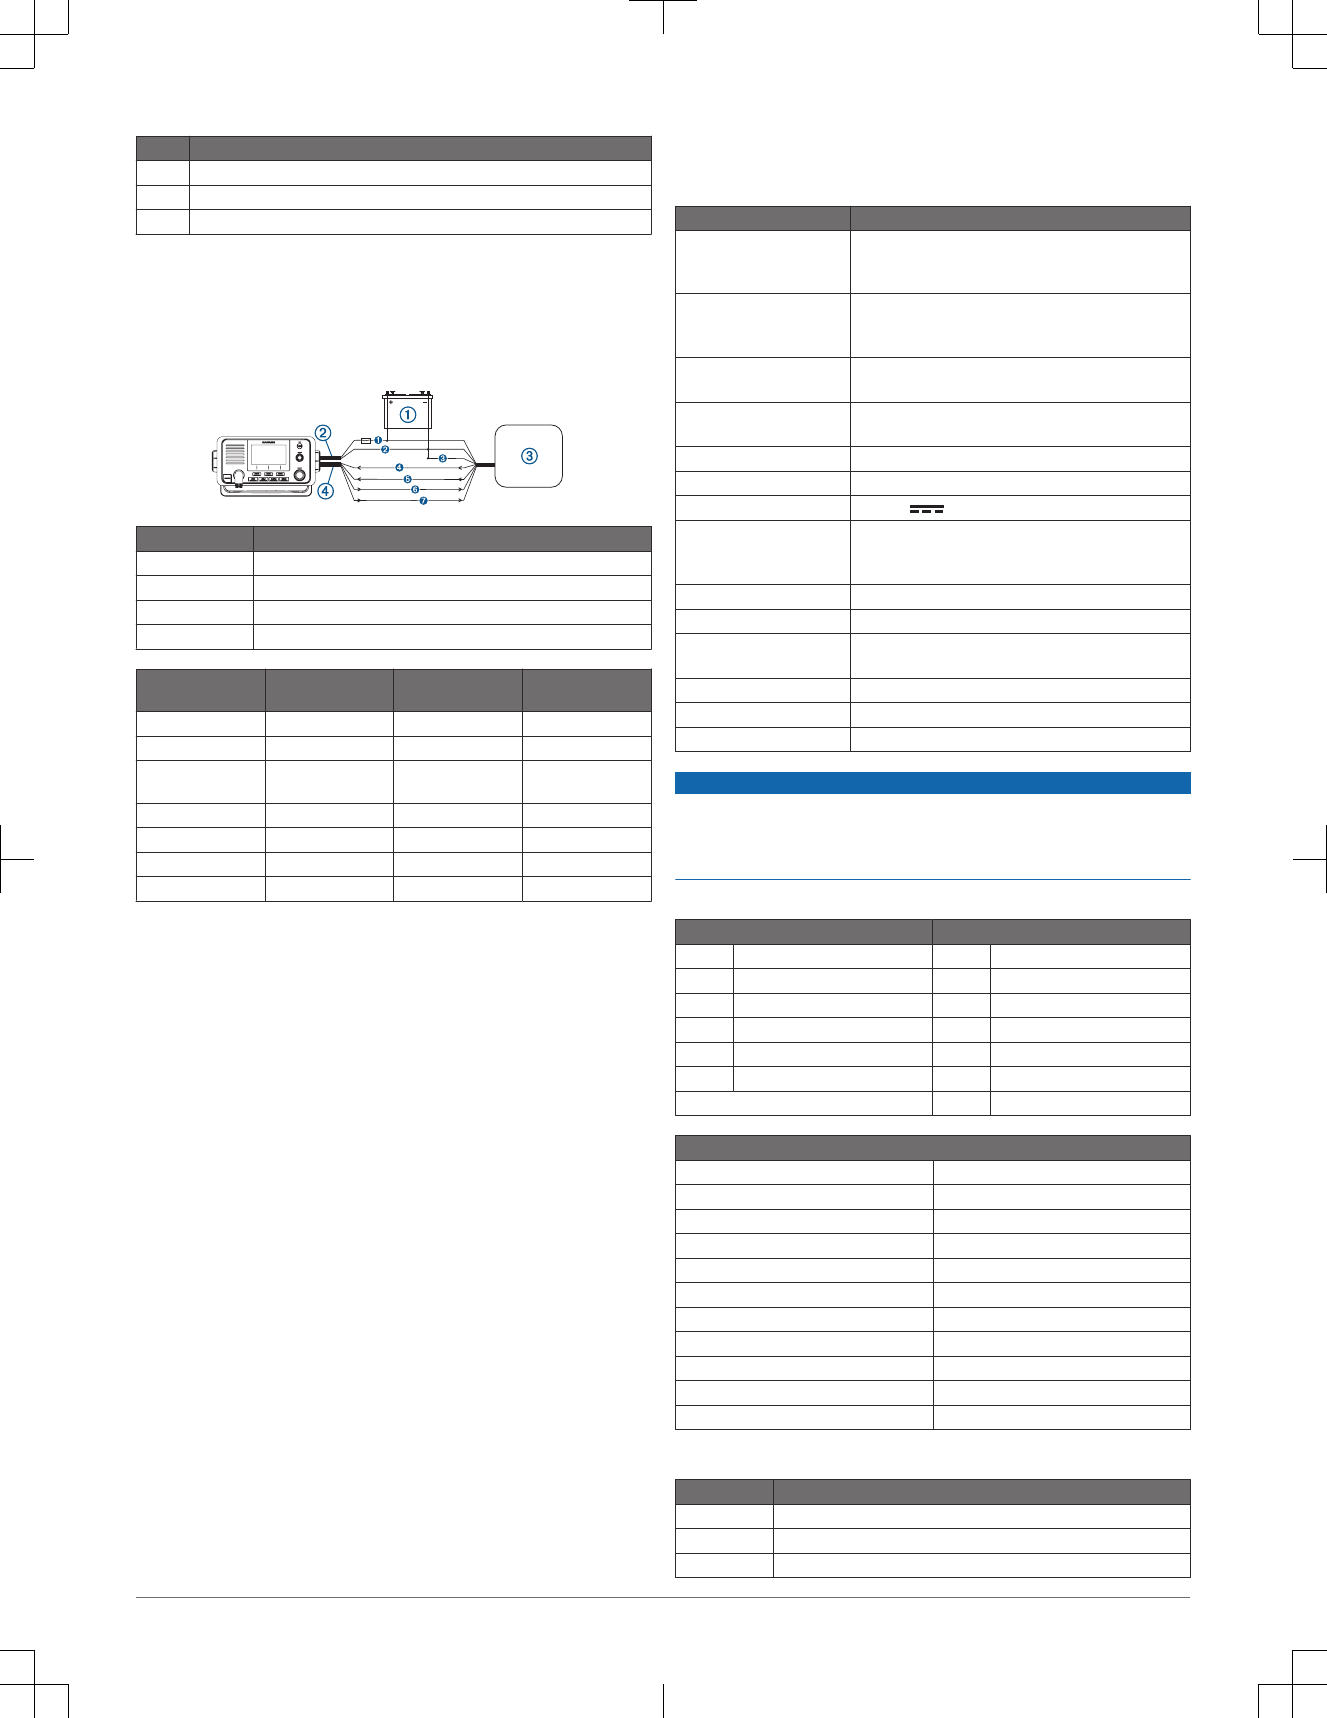
NMEA 0183 Device Connections
This diagram illustrates two-way connections for both sending and receiving
data. You can also use this diagram for one-way communication. To receive
information from a NMEA 0183 device on this device, refer to items Ê, Ë, Í,
and Î in the second table. To transmit information to a NMEA 0183 device
from this device, refer to items Ê, Ë, Ï, and Ð in the second table.
Item Description
ÀPower source
ÁPower cable
ÂNMEA 0183 device
ÃNMEA 0183 cable
Item Garmin Wire
Function Garmin Wire Color NMEA 0183 Device
Wire Function
ÊPower Red Power
ËPower ground Black Power ground
ÌNot applicable Not applicable Data ground (if
applicable)
ÍRxA (+) Purple TxA (+)
ÎRxB (-) Gray TxB (-)
ÏTxA (+) Blue RxA (+)
ÐTxB (-) Brown RxB (-)
Connecting to a Hailer Horn or PA Speaker
You can connect the radio to a hailer horn or public address (PA) speaker (not
included) to use the microphone or the handset to make announcements.
1If necessary, mount the hailer horn or PA speaker according to the
installation instructions provided with the device.
NOTE: To avoid feedback, you should mount the hailer horn or PA
speaker at least 3 m (10 ft) away from, and facing away from, the
microphone or handset.
2Route or extend the wire from the hailer horn or PA speaker to the radio.
3Connect the white wire on the radio wiring harness to the positive (+) wire
from the hailer horn or PA speaker.
4Connect the green wire on the radio wiring harness to the negative (-) wire
from the hailer horn or PA speaker.
5Cover the connections with a waterproof tape or heat-shrink tubing.
Connecting to an External Speaker
You can connect the radio to an external speaker (not included) to hear the
radio at a remote location.
1If necessary, mount the speaker according to the installation instructions
provided with the device.
2Route or extend the wire from the speaker to the radio.
3Connect the red wire on the radio wiring harness to the positive (+) wire
from the speaker.
4Connect the black wire on the radio wiring harness to the negative (-) wire
from the speaker.
5Cover the connections with a waterproof tape or heat-shrink tubing.
Appendix
Specifications
Specification Measurement
Dimensions (H x W x D) A01653: 8.5 x 17 x 14.6 cm (3.35 x 6.7 x 5.75 in.)
A01653: 9.8 x 19.7 x 14.9 cm (3.86 x 7.76 x 5.78
in.)
Weight A01653 (with microphone): 1.241 kg (43.77 oz.) A01653
(without microphone): 1.212 kg (42.75 oz.) A01653
microphone: 0.248 kg (8.75 oz.)
Temperature range Operating: From -15° to 70°C (from 5° to 158°F)
Storage: From -20° to 70°C (from -4° to 158°F)
Compass-safe distance A01653: 70 cm (27.6 in.)
A01653: 75 cm (29.5 in.)
Water rating* IEC 605290 IPX7
Antenna connector S0-239 (50 Ω)
Operating voltage 12.0 Vdc
Current draw Standby: 350 mA
Receive: 600 mA
Transmit: From 2.0 A to 6.0 A (from 1 W to 25 W)
Maximum antenna gain 6 dBi
Antenna port impedance 50 Ω
Audio output power Internal speaker: 1 W (with 4 Ω at 10% distortion)
External speaker (optional): 4 W (4 Ω/max)
Hailer output power 20 W at 4 Ω
External speaker impedance 4 Ω
Hailer horn impedance 4 Ω
NOTICE
The device is water resistant to IEC Standard 60529 IPX7. It can withstand
accidental immersion in 1 meter of water for 30 minutes. Prolonged
submersion can cause damage to the device. After submersion, be certain to
wipe dry and air dry the device before using or charging.
NMEA 2000 PGN Information
Receive Transmit
059392 ISO acknowledgment 059392 ISO acknowledgment
059904 ISO request 060928 ISO address claim
060928 ISO address claim 126208 NMEA request/command/ack
126208 NMEA request/command/ack 126464 PGN list
129026 COG/SOG, rapid update 126996 Product information
129029 GNSS position data 129799 Radio frequency/mode/power
129808 DSC call information
Transmit (AIS models only)
120938 Class A position report
120939 Class B position report
120940 Class B extended position report
129793 AIS UTC and date report
129794 AIS class A static and voyage related data
129798 AIS SAR aircraft position report
129801 AIS address safety message
129802 AIS broadcast safety message
129809 AIS class B static data part A
129810 AIS class B static data part B
129041 AtoN position report
NMEA 0183 IN Sentences Supported
Sentence Definition
GGA Global positioning system fix data
GLL Geographic position (latitude/longitude)
GNS GNSS fix data
4 Installation Instructions
Sentence Definition
RMA Recommended minimum specific Loran-C data
RMB Recommended minimum navigation information
RMC Recommended minimum specific GNSS data
NMEA 0183 OUT Sentences Supported
Sentence Definition
DSC DSC information
DSE Expanded DSC
VHF séries 110/210 AIS Instructions
d'installation
Informations importantes relatives à la sécurité
AVERTISSEMENT
Consultez le guide Informations importantes sur le produit et la sécurité inclus
dans l'emballage du produit pour prendre connaissance des avertissements et
autres informations sur le produit.
ATTENTION
Portez toujours des lunettes de protection, un équipement antibruit et un
masque anti-poussière lorsque vous percez, coupez ou poncez.
AVIS
Lorsque vous percez ou coupez, commencez toujours par vérifier la nature de
la face opposée de l'élément.
Enregistrement de l'appareil
Aidez-nous à mieux vous servir en remplissant dès aujourd'hui notre
formulaire d'enregistrement en ligne.
• Rendez-vous sur http://my.garmin.com.
• Conservez en lieu sûr l'original de la facture ou une photocopie.
Contacter l'assistance produit Garmin
• Rendez-vous sur le site www.garmin.com/support pour obtenir une
assistance par pays.
• Aux Etats-Unis, appelez le 913-397-8200 ou le 1-800-800-1020.
• Au Royaume-Uni, appelez le 0808 238 0000.
• En Europe, appelez le +44 (0) 870 850 1241.
Considérations relatives au montage
AVIS
Installez cet appareil à un emplacement qui n'est pas exposé à des
températures ou des conditions extrêmes. La plage de températures pour cet
appareil est indiquée dans les caractéristiques techniques du produit. Une
exposition prolongée à des températures dépassant la plage de températures
spécifiée, pendant le stockage ou en cours de fonctionnement, peut provoquer
une panne de l'appareil. Les dommages dus aux températures extrêmes et
leurs conséquences ne sont pas couverts par la garantie.
Lorsque vous sélectionnez un emplacement de montage, tenez compte des
considérations suivantes.
• L'emplacement de montage doit offrir une visibilité optimale en cours de
navigation.
• L'emplacement doit également permettre un accès aisé à toutes les
interfaces de l'appareil (clavier, écran tactile et lecteur de carte, le cas
échéant).
• L'emplacement doit être suffisamment résistant pour supporter le poids de
l'appareil et le protéger des vibrations ou des chocs excessifs.
• Pour éviter toute interférence avec un compas magnétique, l'appareil doit
être installé à la distance de sécurité au compas indiquée dans les
caractéristiques techniques du produit.
• L'emplacement doit permettre la connexion et l'acheminement de tous les
câbles.
Montage de l'antenne et exposition à l'énergie électromagnétique
AVERTISSEMENT
Les opérateurs radio portant un stimulateur cardiaque ou un équipement
électrique médical indispensable au maintien en vie ne doivent pas s'exposer
de manière excessive aux champs électromagnétiques, car ces champs
peuvent perturber le bon fonctionnement de leur équipement médical.
ATTENTION
Cet appareil génère et émet de l'énergie électromagnétique sous forme de
fréquences radio (RF). Le non-respect de ces directives peut exposer les
personnes à un rayonnement RF dont le niveau dépasse le maximum
autorisé.
Garmin annonce un rayon EMP (exposition maximale permise) de 3,14 m
(123 po) pour ce système, déterminé pour une puissance d'émission de 25 W
avec une antenne omnidirectionnelle d'une sensibilité de 6 dBi. Installez
l'antenne de façon à ce qu'elle se trouve toujours à au moins 3,14m (123 po)
des personnes.
Montage sur étrier de l'appareil
AVIS
Si vous montez le support de montage sur de la fibre de verre avec des vis,
nous vous recommandons d'utiliser un foret de fraisage pour percer un trou à
fond plat à travers le revêtement de la couche supérieure. Cela vous permettra
d'éviter de fissurer le revêtement au moment du serrage des vis.
Les vis en acier inoxydable risquent de se gripper lorsqu'elles sont vissées
dans la fibre de verre et qu'elles sont serrées outre mesure. Il est conseillé
d'appliquer un lubrifiant antigrippant sur chaque vis avant installation.
Vous pouvez utiliser le support de fixation fourni pour monter l'appareil sur un
support plat.
1En utilisant l'étrier de fixation À comme modèle, marquez les trous
d'implantation.
2A l'aide d'un foret de 3,5 mm (9/64 po), percez les trous d'implantation.
3A l'aide des vis fournies Á, fixez l'étrier sur la surface de montage.
4Installez les vis de montage sur étrier  sur les côtés de l'appareil.
5Placez l'appareil dans le support de fixation sur étrier et fixez les vis de
montage sur étrier.
Montage encastré de l'appareil
AVIS
Faites attention lorsque vous percez le trou pour encastrer l'appareil. Le
dégagement entre le boîtier et les trous de fixation est très réduit et en perçant
un trou trop grand, vous risquez de compromettre la stabilité de l'appareil
après son installation.
Si vous montez le support de montage sur de la fibre de verre avec des vis,
nous vous recommandons d'utiliser un foret de fraisage pour percer un trou à
fond plat à travers le revêtement de la couche supérieure. Cela vous permettra
d'éviter de fissurer le revêtement au moment du serrage des vis.
Les vis en acier inoxydable risquent de se gripper lorsqu'elles sont vissées
dans la fibre de verre et qu'elles sont serrées outre mesure. Il est conseillé
d'appliquer un lubrifiant antigrippant sur chaque vis avant installation.
Vous pouvez utiliser le modèle et le matériel fournis pour encastrer l'appareil
dans le tableau de bord.
1Découpez le modèle et assurez-vous qu'il est adapté à l'emplacement de
montage de l'appareil.
Instructions d'installation 5
Important Safety and Product Information........................................................................................................................................ 2
Informations importantes sur le produit et la sécurité....................................................................................................................... 3
© 2009–2016 Garmin Ltd. or its subsidiaries
September 2016 Printed in China 190-00720-17_0F

NOTICE:
Important Safety and Product Information
WARNING
Failure to heed the following warnings could result in an accident or collision resulting in death or serious injury.
Battery Warnings
The device uses an internal, non-user-replaceable battery for various purposes, such as the real-time clock.
If these guidelines are not followed, batteries may experience a shortened life span or may present a risk of damage to the
device, fire, chemical burn, electrolyte leak, and/or injury.
• Do not remove or attempt to remove the non-user-replaceable battery.
Marine Operation Warnings
•You are responsible for the safe and prudent operation of your vessel. This device is a tool that will enhance your
capability to operate your vessel. This device does not relieve you from the responsibility of safely operating your vessel.
Avoid navigational hazards and never leave the helm unattended.
• Use this device only as a navigational aid. Do not attempt to use the device for any purpose requiring precise measurement
of direction, distance, location, or topography.
• Always be prepared to promptly regain control of the vessel. Use caution near hazards in the water, such as docks, pilings
and other vessels.
• If the device has navigating capabilities, when navigating, carefully compare information displayed on the device to all
available navigation sources, including information from visual sightings, local waterway rules and restrictions, and maps.
For safety, always resolve any discrepancies or questions before continuing navigation.
FCC Warnings
Exposure to Radio Frequency Signals–Your device is a radio transmitter and receiver. When it is on, it receives and also
sends out radio frequency (RF) signals.
Antenna Care–Use only the supplied antenna or a recommended antenna accessory. Unauthorized antennas, modifications,
or attachments could damage the radio and may violate FCC regulations. Warning: Do not use any radio that has a damaged
antenna, because if it comes into contact with your skin, a minor burn can result.
Electronic Devices–Most modern electronic equipment is shielded from RF signals. However, certain equipment may not be
shielded against the RF signals from your wireless radio.
Pacemakers–The Health Industry Manufacturers Association (HIMA) and Wireless Technology Research recommend that a
minimum separation of six inches (6”) be maintained between a handheld wireless radio and a pacemaker to avoid potential
interference with the pacemaker. Persons with pacemakers should ALWAYS keep the radio more than six inches from their
pacemaker when the radio is turned on, should not carry the radio in a breast pocket, and should turn the radio off
immediately if you have any reason to suspect that interference is taking place.
Hearing Aids–Some digital wireless radios may interfere with some hearing aids. In the event of such interference, you may
want to consult your hearing aid manufacturer to discuss alternatives.
Posted Facilities–Turn your radio OFF in any facility where posted notices so require.
Vehicles–RF signals may affect improperly installed or inadequately shielded electronic systems in motor vehicles. Check
with the manufacturer or its representative regarding your vehicle. You should also consult the manufacturer of any equipment
that has been added to your vehicle.
Commercial Aircraft–Many commercial airlines prohibit the use of radios on board. Switch OFF your radio before boarding
an aircraft or check the airline rules.
Potentially Explosive Atmospheres–Turn your radio OFF and do not remove your battery when you are in any area with a
potentially explosive atmosphere. Obey all signs and instructions. Sparks from your battery in such areas could cause an
explosion or fire resulting in bodily injury or even death.
NOTICE
Failure to heed the following notice could result in personal or property damage, or negatively impact the device functionality.
Battery Notices
• Do not immerse the device or batteries in water or other liquids.
• Do not leave the device exposed to a heat source or in a high-temperature location, such as in the sun in an unattended
vehicle. To prevent the possibility of damage, remove the device from the vehicle or store it out of direct sunlight, such as in
the glove box.
• Do not operate the device outside of the temperature ranges specified in the printed manual in the product packaging.
• When storing the device for an extended time period, store within the temperature ranges specified in the printed manual in
the product packaging.
• Contact your local waste disposal department to dispose of the device/batteries in accordance with applicable local laws
and regulations.
Product Environmental Programs
Information about the Garmin® product recycling program and WEEE, RoHS, REACH, and other compliance programs can be
found at www.garmin.com/aboutGarmin/environment.
Radio Frequency Radiation Exposure
This device is a mobile transmitter and receiver that uses an internal antenna to send and receive low levels of radio
frequency (RF) energy for data communications. The device emits RF energy below the published limits when operating in its
maximum output power mode and when used with Garmin authorized accessories. To comply with RF exposure compliance
requirements, the device should be installed and used with the separation distance as described in the printed manual. The
device should not be used in other configurations. This device must not be co-located or operated in conjunction with any
other transmitter or antenna.
VHF Radio Information
All users are responsible for observing the regulations of their government and the regulations of foreign governments.
Breaches of such regulations are subject to severe penalties. The transmitting frequencies in your radio are reserved for
maritime use; any frequency you use for transmission must be specifically included on your ships license. A special license is
required to operate from land; this includes when your boat is in a trailer. The use of ATIS is prohibited outside the European
inland waterways covered by the Basel Agreement.
Licensing Requirements
Many countries and administrations require a ship radio license and require the user to be in possession of a suitable radio
operator license before transmitting equipment can be used for maritime communication. Contact your local administration for
details.
FCC Compliance
This device complies with FCC Rules and RF exposure limits with the minimum 2.48m and maximum antenna gain 6dBi .
This product does not contain any user-serviceable parts. Repairs should only be made by an authorized Garmin service
center. Unauthorized repairs or modifications could result in permanent damage to the equipment, and void your warranty and
your authority to operate this device under Part 15 regulations.
Innovation, Science and Economic Development Canada Compliance
This device complies with Innovation, Science and Economic Development Canada RSS standard(s) and RF exposure
limits with the minimum 2.48m and maximum antenna gain 6dBi .
Declaration of Conformity
Hereby, Garmin declares that this product is in compliance with the essential requirements and other relevant provisions of
Directive 1999/5/EC. To view the full Declaration of Conformity, go to www.garmin.com/compliance.
Software License Agreement
BY USING THE DEVICE, YOU AGREE TO BE BOUND BY THE TERMS AND CONDITIONS OF THE FOLLOWING
SOFTWARE LICENSE AGREEMENT. PLEASE READ THIS AGREEMENT CAREFULLY.
2
This device is intended for use in occupational/controlled conditions, where users have full knowledge
of their exposure and can exercise control over their exposure to meet FCC limits. This device is NOT
authorized for general population, consumer, or any other use.

Garmin Ltd. and its subsidiaries (“Garmin”) grant you a limited license to use the software embedded in this device (the
“Software”) in binary executable form in the normal operation of the product. Title, ownership rights, and intellectual property
rights in and to the Software remain in Garmin and/or its third-party providers.
You acknowledge that the Software is the property of Garmin and/or its third-party providers and is protected under the United
States of America copyright laws and international copyright treaties. You further acknowledge that the structure, organization,
and code of the Software, for which source code is not provided, are valuable trade secrets of Garmin and/or its third-party
providers and that the Software in source code form remains a valuable trade secret of Garmin and/or its third-party providers.
You agree not to decompile, disassemble, modify, reverse assemble, reverse engineer, or reduce to human readable form the
Software or any part thereof or create any derivative works based on the Software. You agree not to export or re-export the
Software to any country in violation of the export control laws of the United States of America or the export control laws of any
other applicable country.
Limited Warranty
Non-aviation products are warranted to be free from defects in materials or workmanship for one year from the date of
purchase. Within this period, Garmin will, at its sole option, repair or replace any components that fail in normal use. Such
repairs or replacement will be made at no charge to the customer for parts or labor, provided that the customer shall be
responsible for any transportation cost. This Limited Warranty does not apply to: (i) cosmetic damage, such as scratches,
nicks and dents; (ii) consumable parts, such as batteries, unless product damage has occurred due to a defect in materials or
workmanship; (iii) damage caused by accident, abuse, misuse, water, flood, fire, or other acts of nature or external causes;
(iv) damage caused by service performed by anyone who is not an authorized service provider of Garmin; (v) damage to a
product that has been modified or altered without the written permission of Garmin; or (vi) damage to a product that has been
connected to power and/or data cables that are not supplied by Garmin. In addition, Garmin reserves the right to refuse
warranty claims against products or services that are obtained and/or used in contravention of the laws of any country.
This product is intended to be used only as a travel aid and must not be used for any purpose requiring precise measurement
of direction, distance, location or topography. Garmin makes no warranty as to the accuracy or completeness of map data.
Repairs have a 90 day warranty. If the unit sent in is still under its original warranty, then the new warranty is 90 days or to the
end of the original 1 year warranty, depending upon which is longer.
This Limited Warranty also does not apply to, and Garmin is not responsible for, any degradation in the performance of any
Garmin navigation product resulting from its use in proximity to any handset or other device that utilizes a terrestrial
broadband network operating on frequencies that are close to the frequencies used by any Global Navigation Satellite System
(GNSS) such as the Global Positioning Service (GPS). Use of such devices may impair reception of GNSS signals.
TO THE MAXIMUM EXTENT PERMITTED BY APPLICABLE LAW, THE WARRANTIES AND REMEDIES CONTAINED IN
THIS LIMITED WARRANTY ARE EXCLUSIVE AND IN LIEU OF, AND Garmin EXPRESSLY DISCLAIMS, ALL OTHER
WARRANTIES AND REMEDIES, WHETHER EXPRESS, IMPLIED, STATUTORY, OR OTHERWISE, INCLUDING WITHOUT
LIMITATION ANY IMPLIED WARRANTY OF MERCHANTABILITY OR FITNESS FOR A PARTICULAR PURPOSE,
STATUTORY REMEDY OR OTHERWISE. THIS LIMITED WARRANTY GIVES YOU SPECIFIC LEGAL RIGHTS, AND YOU
MAY HAVE OTHER LEGAL RIGHTS WHICH VARY FROM STATE TO STATE. IF IMPLIED WARRANTIES CANNOT BE
DISCLAIMED, THEN SUCH WARRANTIES ARE LIMITED IN DURATION TO THE DURATION OF THIS LIMITED
WARRANTY. SOME STATES DO NOT ALLOW LIMITATIONS ON HOW LONG AN IMPLIED WARRANTY LASTS, SO THE
ABOVE LIMITATION MAY NOT APPLY TO YOU.
IN NO EVENT SHALL Garmin BE LIABLE IN A CLAIM FOR BREACH OF WARRANTY FOR ANY INCIDENTAL, SPECIAL,
INDIRECT, OR CONSEQUENTIAL DAMAGES, WHETHER RESULTING FROM THE USE, MISUSE, OR INABILITY TO USE
THIS PRODUCT OR FROM DEFECTS IN THE PRODUCT. SOME STATES DO NOT ALLOW THE EXCLUSION OF
INCIDENTAL OR CONSEQUENTIAL DAMAGES, SO THE ABOVE LIMITATIONS MAY NOT APPLY TO YOU.
Garmin retains the exclusive right to repair or replace (with a new or newly-overhauled replacement product) the device or
software or offer a full refund of the purchase price at its sole discretion. SUCH REMEDY SHALL BE YOUR SOLE AND
EXCLUSIVE REMEDY FOR ANY BREACH OF WARRANTY.
To obtain warranty service, contact your local Garmin authorized dealer or call Garmin Product Support for shipping
instructions and an RMA tracking number. Securely pack the device and a copy of the original sales receipt, which is required
as the proof of purchase for warranty repairs. Write the tracking number clearly on the outside of the package. Send the
device, freight charges prepaid, to the Garmin warranty service station provided to you. Go to www.garmin.com/support form
more information about contacting Garmin Product Support for warranty service. If you bought your device in the United
States, you can also call 1-800-800-1020.
Online Auction Purchases: Products purchased through online auctions are not eligible for rebates or other special offers
from Garmin warranty coverage. Online auction confirmations are not accepted for warranty verification. To obtain warranty
service, an original or copy of the sales receipt from the original retailer is required. Garmin will not replace missing
components from any package purchased through an online auction.
International Purchases: A separate warranty may be provided by international distributors for devices purchased outside
the United States depending on the country. If applicable, this warranty is provided by the local in-country distributor and this
distributor provides local service for your device. Distributor warranties are only valid in the area of intended distribution.
Devices purchased in the United States or Canada must be returned to the Garmin service center in the United Kingdom, the
United States, Canada, or Taiwan for service.
Marine Warranty Policy: Certain Garmin Marine products in certain areas have a longer warranty period and additional terms
and conditions. Go to www.garmin.com/support/warranty_marine for more details and to see if your product is covered under
the Garmin Marine Warranty Policy.
Australian Purchases: Our goods come with guarantees that cannot be excluded under the Australian Consumer Law. You
are entitled to a replacement or refund for a major failure and for compensation for any other reasonably foreseeable loss or
damage. You are also entitled to have the goods repaired or replaced if the goods fail to be of acceptable quality and the
failure does not amount to a major failure. The benefits under our Limited Warranty are in addition to other rights and
remedies under applicable law in relation to the products. Garmin Australasia, 30 Clay Place, Eastern Creek, NSW 2766,
Australia. Phone: 1800 235 822.
Informations importantes sur le produit et la sécurité
AVERTISSEMENT
Si vous ne respectez pas les avertissements suivants, vous risquez un accident ou une collision pouvant entraîner des
blessures graves, voire mortelles.
Avertissements relatifs à la batterie
Votre appareil contient une batterie interne non remplaçable par l'utilisateur pour diverses fonctions, telles que l'horloge en
temps réel.
Le non-respect de ces consignes peut causer une diminution de la durée de vie des batteries, endommager l'appareil ou
présenter un risque d'incendie, de brûlure chimique, de fuite d'électrolyte et/ou de blessure.
• N'essayez pas de retirer la batterie non remplaçable par l'utilisateur.
Avertissements d'utilisation en milieu marin
•Vous êtes responsable de l'utilisation sûre et prudente de votre bateau. Cet appareil est un outil qui optimisera votre
capacité de pilotage. Cet appareil ne vous dégage pas de vos responsabilités en cas de non-respect de la sécurité à bord.
Evitez tout danger de navigation et ne relâchez pas votre surveillance de la barre.
• L'appareil doit être utilisé uniquement comme une aide à la navigation. Ne tentez pas d'utiliser l'appareil à des fins exigeant
une mesure précise de l'orientation, de la distance, de la position ou de la topographie.
• Soyez toujours prêt à reprendre les commandes du navire. Soyez vigilant à proximité des points dangereux, tels que les
quais et les autres navires.
• En cours de navigation, et si l'appareil dispose de fonctions de navigation, comparez attentivement les informations
affichées par l'appareil à toutes les autres sources d'information disponibles, notamment les repères visuels, les règles et
restrictions locales relatives aux voies navigables, ainsi que les cartes. Pour votre sécurité, cherchez à résoudre tout
dysfonctionnement ou problème avant de poursuivre la navigation.
AVIS
Si vous ignorez cette notice, vous risquez de vous blesser, d'endommager votre bien ou d'affecter négativement les
fonctionnalités de l'appareil.
Avis concernant la batterie
• N'immergez pas l'appareil ni les batteries dans de l'eau ou dans d'autres liquides.
• Ne laissez pas l'appareil à proximité d'une source de chaleur ou dans un lieu où la température est très élevée, par
exemple dans un véhicule sans surveillance stationné en plein soleil. Pour éviter tout dommage, sortez l'appareil de votre
véhicule ou placez-le à l'abri du soleil, par exemple dans la boîte à gants.
• N'utilisez pas l'appareil si la température n'est pas comprise entre les plages de température indiquées dans le manuel
imprimé fourni avec le produit.
• Si vous devez ranger l'appareil pour une période prolongée, assurez-vous que la température ambiante du lieu de
stockage est toujours comprise entre les plages de température indiquées dans le manuel imprimé fourni avec le produit.
3

• Contactez la déchetterie locale pour plus d'informations sur la mise au rebut de l'appareil ou des batteries dans le respect
des lois et réglementations locales applicables.
Programmes environnementaux
Des informations relatives au programme Garmin de recyclage des produits ainsi qu'aux directives DEEE et RoHS, à la
réglementation REACH et aux autres programmes de conformité sont disponibles à l'adresse www.garmin.com/aboutGarmin
/environment.
Exposition aux rayonnements à fréquence radioélectrique
Cet appareil est un transmetteur/récepteur mobile qui utilise une antenne interne pour envoyer et recevoir des champs de
radiofréquences de faible puissance lors des communications de données. Les champs de radiofréquences émis par
l'appareil lorsqu'il fonctionne au maximum de sa puissance et qu'il est utilisé avec des accessoires approuvés par Garmin ne
dépassent pas les limites fixées par la réglementation. Pour être conforme aux exigences d'exposition aux radiofréquences,
l'appareil doit être installé et utilisé en respectant la distance indiquée dans les instructions du manuel papier. L'appareil ne
doit être utilisé dans aucune autre configuration. Cet appareil ne doit pas être placé ou utilisé en conjonction avec d'autres
antennes ou émetteurs.
Informations concernant la radio VHF
Tous les utilisateurs sont tenus de respecter les réglementations de leur gouvernement et celles des gouvernements
étrangers. Les violations de ces régulations sont passibles de lourdes sanctions. Les fréquences de transmission de votre
radio sont réservées à une utilisation marine ; toute fréquence que vous utilisez à des fins de transmission doit être
spécifiquement incluse dans la licence de votre bateau. Une licence spéciale est requise pour toute utilisation terrestre, y
compris lorsque votre navire se trouve sur une remorque. L'utilisation de l'ATIS est interdite en dehors des voies navigables
intérieures européennes couvertes par l'Arrangement de Bâle.
Conditions de licence
De nombreux pays et administrations exigent une licence de radio marine. De plus, l'utilisateur doit être en possession d'une
licence d'opérateur radio adéquate pour pouvoir utiliser du matériel de transmission marin. Contactez votre administration
locale pour obtenir de plus amples informations.
Innovation, Sciences et Développement économique Canada – Conformité
Cet appareil est conforme aux normes RSS sans licence du ministère Innovation, Sciences et Développement économique
Canada. Son fonctionnement est soumis aux deux conditions suivantes : (1) ce périphérique ne doit pas causer
d'interférences et (2) doit accepter toute interférence, y compris les interférences pouvant entraîner un fonctionnement
indésirable de l'appareil.
Déclaration de conformité
Par la présente, Garmin déclare que ce produit est conforme aux principales exigences et autres clauses pertinentes de la
directive européenne 1999/5/CE. Pour prendre connaissance de l'intégralité de la déclaration de conformité, rendez-vous sur
le site www.garmin.com/compliance.
Contrat de licence du logiciel
EN UTILISANT CE PRODUIT, VOUS RECONNAISSEZ ETRE LIE PAR LES TERMES DU PRESENT CONTRAT DE
LICENCE DE LOGICIEL. LISEZ ATTENTIVEMENT CE CONTRAT DE LICENCE.
Garmin Ltd. et ses filiales (« Garmin ») vous concèdent une licence limitée pour l'utilisation du logiciel intégré à cet appareil (le
« Logiciel ») sous la forme d'un programme binaire exécutable, dans le cadre du fonctionnement normal du produit. Tout titre,
droit de propriété ou droit de propriété intellectuelle dans le Logiciel ou concernant le Logiciel est la propriété de Garmin et/ou
de ses fournisseurs tiers.
Vous reconnaissez que le Logiciel est la propriété de Garmin et/ou de ses fournisseurs tiers et qu'il est protégé par les lois en
vigueur aux Etats-Unis d'Amérique et par les traités internationaux relatifs aux droits d'auteur. Vous reconnaissez également
que la structure, l'organisation et le code du Logiciel, dont le code source n'est pas fourni, constituent d'importants secrets de
fabrication de Garmin et/ou de ses fournisseurs tiers, et que le code source du Logiciel demeure un important secret de
fabrication de Garmin et/ou de ses fournisseurs tiers. Vous acceptez de ne pas décompiler, désassembler, modifier,
assembler à rebours, étudier par rétro-ingénierie ou transcrire en langage humain intelligible le Logiciel ou toute partie du
Logiciel, ou créer toute œuvre dérivée du Logiciel. Vous acceptez de ne pas exporter ni de réexporter le Logiciel vers un pays
contrevenant aux lois de contrôle à l'exportation des Etats-Unis d'Amérique ou à celles de tout autre pays concerné.
Garantie limitée
Les produits non aéronautiques sont garantis contre tout défaut de matériel et de fabrication pendant un an à compter de leur
date d'achat. Durant cette période, Garmin pourra, à son entière discrétion, réparer ou remplacer tout composant qui
s'avérerait défectueux dans le cadre d'un usage normal. Ce type de réparation ou de remplacement ne sera pas facturé au
client, qu'il s'agisse des composants ou de la main-d'œuvre, à condition que le client prenne en charge les frais de port. La
présente garantie limitée ne couvre pas : (i) les dommages esthétiques, tels que les éraflures, les rayures et les bosses ; (ii)
les consommables, comme les piles, à moins que le dommage ne soit dû à un défaut matériel ou de fabrication ; (iii) les
dommages provoqués par un accident, une utilisation abusive, une mauvaise utilisation, l'eau, une inondation, un incendie ou
toute autre catastrophe naturelle ou cause extérieure ; (iv) les dommages provoqués par des fournisseurs de services non
agréés par Garmin ; ou (v) les dommages sur un produit ayant été modifié sans l'autorisation écrite de Garmin ; ou (vi) les
dommages sur un produit raccordé à des câbles d'alimentation et/ou des câbles de données non fournis par Garmin. En
outre, Garmin se réserve le droit de refuser toute demande de service sous garantie relative à un produit ou service obtenu
et/ou utilisé en violation des lois de tout pays.
Ce produit est uniquement une aide à la navigation et il ne doit pas être utilisé à d'autres fins exigeant l'évaluation précise de
la direction, de la distance, de la position ou de la topographie. Garmin n'offre aucune garantie quant à l'exactitude ou à
l'exhaustivité des données cartographiques.
Les réparations sont garanties pendant 90 jours. Si l'unité envoyée est toujours couverte par la garantie d'origine, cette
nouvelle garantie court pendant un délai de 90 jours ou jusqu'à la fin de la période de garantie d'origine qui est d'un an, selon
la plus longue des deux périodes.
La présente garantie limitée ne couvre pas, et Garmin n'est pas responsable de, toute dégradation des performances d'un
produit de navigation Garmin si celui-ci a été utilisé près d'un appareil portable ou de tout autre appareil utilisant un réseau
terrestre à large bande fonctionnant sur des fréquences proches de celles utilisées par tout système de positionnement par
satellites (GNSS), comme le GPS. L'utilisation de tels appareils peut altérer la réception des signaux GNSS.
DANS LES LIMITES PREVUES PAR LA LOI, LES GARANTIES ET RECOURS CONTENUS DANS LA PRESENTE
GARANTIE LIMITEE SONT EXCLUSIFS ET REMPLACENT, ET Garmin EXCLUT EXPLICITEMENT, TOUTE AUTRE
GARANTIE ET RECOURS EXPRES, IMPLICITES, LEGAUX OU AUTRES, Y COMPRIS, MAIS DE MANIERE NON
LIMITATIVE, TOUTE GARANTIE IMPLICITE MARCHANDE OU D'ADEQUATION A UN USAGE PARTICULIER, TOUT
RECOURS LEGAL OU AUTRES. LA PRESENTE GARANTIE VOUS OCTROIE DES DROITS PARTICULIERS ET VOUS
BENEFICIEZ PEUT-ETRE D'AUTRES DROITS QUI PEUVENT VARIER D'UN ETAT A L'AUTRE. SI LES GARANTIES
IMPLICITES NE PEUVENT PAS ETRE EXCLUES, ALORS LESDITES GARANTIES SONT LIMITEES A LA DUREE DE LA
PRESENTE GARANTIE LIMITEE. CERTAINS ETATS INTERDISANT LA RESTRICTION DE LA DUREE D'UNE GARANTIE
IMPLICITE, LES RESTRICTIONS SUSMENTIONNEES PEUVENT NE PAS VOUS CONCERNER.
EN AUCUN CAS, LA SOCIETE Garmin NE SAURAIT ETRE TENUE RESPONSABLE EN CAS DE RUPTURE DE LA
GARANTIE DE TOUT DOMMAGE ACCESSOIRE, SPECIAL, INDIRECT OU CONSECUTIF RESULTANT DE
L'UTILISATION, DE LA MAUVAISE UTILISATION OU DE L'IMPOSSIBILITE D'UTILISER CE PRODUIT, OU RESULTANT
DE DEFAUTS DU PRODUIT. CERTAINS ETATS INTERDISANT L'EXCLUSION OU LA RESTRICTION DES DOMMAGES
ACCESSOIRES OU CONSECUTIFS, LES RESTRICTIONS SUSMENTIONNEES PEUVENT NE PAS VOUS CONCERNER.
Garmin se réserve le droit exclusif de réparer l'appareil ou le logiciel, de les remplacer (par un produit de remplacement neuf
ou entièrement révisé) ou de proposer le remboursement intégral du prix d'achat à son entière discrétion. CE TYPE DE
RECOURS SERA VOTRE RECOURS UNIQUE ET EXCLUSIF POUR TOUTE RUPTURE DE GARANTIE.
Pour bénéficier d'un service sous garantie, contactez votre revendeur agréé Garmin ou appelez le service d'assistance
produit de Garmin pour obtenir les instructions relatives à l'expédition du produit, ainsi qu'un numéro de suivi RMA. Emballez
avec soin l'appareil en y joignant une copie de l'original de la facture, qui fera office de preuve d'achat dans le cas de
réparations sous garantie. Inscrivez lisiblement le numéro de suivi sur l'extérieur du paquet. Envoyez le périphérique, frais de
port prépayés, au centre des services de garantie Garmin qui vous aura été indiqué. Rendez-vous sur www.garmin.com
/support pour en savoir plus sur la manière de contacter le service d'assistance produit Garmin au sujet de la garantie. Si
vous avez acheté votre appareil aux Etats-Unis, vous pouvez aussi appeler le 1-800-800-1020.
Achats dans le cadre d'enchères en ligne : les produits achetés au cours d'enchères en ligne ne peuvent faire l'objet de
rabais ou d'autres offres spéciales proposés par la garantie de Garmin. Les confirmations de vente aux enchères en ligne ne
sont pas acceptées dans le cadre d'une vérification sous garantie. Pour bénéficier d'un service sous garantie, l'original ou une
copie de la facture dressée par le premier revendeur doit être présenté. Garmin ne procédera à aucun remplacement de
composant manquant sur tout produit acheté dans le cadre d'enchères en ligne.
Achats internationaux : selon les pays, une garantie distincte peut être accordée par les distributeurs internationaux pour les
appareils achetés hors des Etats-Unis. Le cas échéant, cette garantie est fournie par le distributeur du pays d'achat et ledit
distributeur prend en charge les services locaux nécessaires pour votre appareil. Les garanties distributeur sont valides
uniquement dans les zones de distribution visées. En cas de problème, les appareils achetés aux Etats-Unis ou au Canada
doivent être renvoyés aux ateliers de réparations Garmin du Royaume-Uni, des Etats-Unis, du Canada ou de Taïwan.
Politique de garantie des produits marine : pour certains produits marine de Garmin de certaines régions du monde, la
période de garantie est plus longue et des conditions supplémentaires s'appliquent. Rendez-vous sur le site www.garmin.com
4

/support/warranty_marine pour plus de détails et pour savoir si votre produit est couvert par la garantie des produits marine de
Garmin.
5

A01653
Quick Start Manual................................................................................................................... 2
Manuel de démarrage rapide....................................................................................................7
Manuale di avvio rapido.......................................................................................................... 13
Schnellstartanleitung.............................................................................................................. 18
Guía de inicio rápido............................................................................................................... 24
September 2016 Printed in China 190-02061-92_0A

A01653 Series Quick Start Manual
Introduction
WARNING
See the Important Safety and Product Information guide in the product box for
product warnings and other important information.
Device Overview
A01653
A01653
Item Key Description
ÀDISTRESS Lift the door and select to send a DSC distress call with a
programmed MMSI number.
ÁVOL/SQ Press to switch between volume or squelch.
Rotate to adjust the volume or squelch level.
ÂSelect the key that corresponds to the on-screen item to select
the item.
ÃSELECT On the home screen, rotate to change the channel.
On the home screen, press to toggle weather channels.
Rotate to highlight an item in a list.
Press to select an item.
PWR
North America:
16/9
International: 16+
Hold to turn the radio on and off.
Select to toggle between preset channels.
DSC Select to view a menu of DSC options.
HI/LO Select to change the transmission mode and power settings.
CLEAR Select to return to the previous menu option.
Select to cancel or mute an incoming DSC call.
MENU From the home screen, select to view configuration options.
From a menu, select to return to the home screen.
2 Quick Start Manual
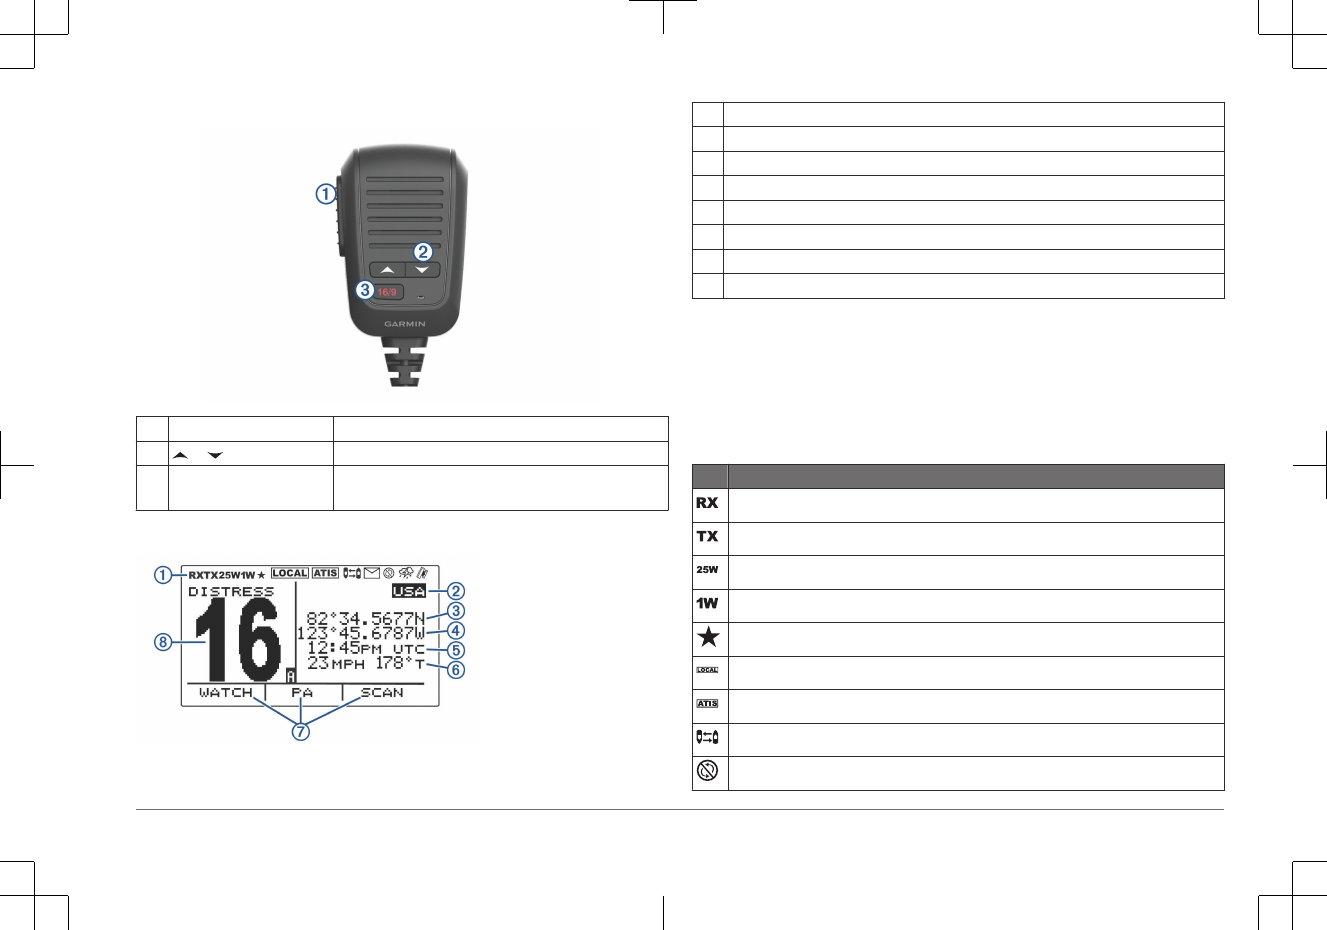
Handset Overview
ÀPTT Hold to broadcast.
Á or Select to change the channel on the radio.
ÂNorth America: 16/9
International: 16+
Select to toggle between preset channels.
Home Screen
ÀCurrent radio system status, settings, and alerts.
ÁCurrent international, Canadian, or U.S. frequency band
Â*Current latitude
Ã*Current longitude
Ä*Current time
Å**Current speed over ground (SOG) or course over ground (COG)
ÆSoft-key functions change depending on your current activity
ÇCurrent working channel
*The current latitude, longitude, and time appear when the transceiver is
connected to a GPS device. You can enter data manually when the transceiver is
not connected to a GPS device.
** The current SOG and COG appear when the transceiver is connected to a
GPS device, and the option is enabled in the menu.
System Status Icons
Icon Status
Receiving an incoming signal
Transmitting
Transmitting at 25 W
Transmitting at 1 W
Saved channel
Local receiver mode, often used in areas with radio frequency interference (harbors)
ATIS enabled
Position tracking enabled
Auto channel changing disabled
Quick Start Manual 3

Icon Status
Incoming or missed DSC call
Weather alert
External GPS connected
Basic Operation
Turning On and Off the Device
Hold PWR.
Adjusting the Radio Volume
1Set the squelch level to MIN before you adjust the radio volume (optional).
2Turn the VOL/SQ dial to increase or decrease the radio volume.
Adjusting the Squelch Level
You can adjust the sensitivity level of the squelch to filter out background noise.
When you increase the squelch level, you hear fewer weak background signals
when you are receiving.
1Press the VOL/SQ dial.
SQUELCH appears on the screen.
2Turn the VOL/SQ dial counter-clockwise until you hear audio.
3Turn the VOL/SQ dial clockwise until there is no background noise.
Selecting the Frequency Band
You can switch between the USA, International, or Canadian frequency bands.
NOTE: Not all frequency bands are available on all device models.
1Select MENU > CHANNEL > Frequency band.
2Select a frequency band.
Selecting a Channel
You can select an international, Canadian, or USA channel (page 4).
Select an option:
• To select a channel on the device, turn Channel clockwise or counter-
clockwise.
• To select a channel on the handset, select or .
Transmitting with the Radio or Handset
1Select an appropriate channel.
2Ensure the channel is clear.
NOTE: You cannot obstruct the communications of other people due to
Federal Communications Commission (FCC) and international guidelines.
3Select PTT on the handset.
appears at the top of the screen.
4Speak into the handset.
NOTE: Five minutes is the maximum time allowed for transmission. After five
minutes of transmitting, PTT is disabled until you release PTT.
5Release PTT.
Setting the Receiving Sensitivity
You can control the receiving sensitivity of the device. When you have noise in
high-traffic areas or areas with electromagnetic interference, such as near cell-
phone towers, you can set the receiving sensitivity to LOC to decrease receiver
sensitivity. In remote areas and on open water, you can set the receiving
sensitivity to DIST to ensure that you use the maximum range of the receiver.
1Select HI/LO.
2Select an option:
• Select LOC to enable local sensitivity.
• Select DIST to enable distant sensitivity.
4 Quick Start Manual

Switching Between 1 W and 25 W Transmitting Modes
You can control the transmitting power of the radio. LO (1 W) is used for local
transmissions, and HI (25 W) is used for distance and distress transmissions.
When two signals broadcast on the same frequency, a VHF radio receives only
the stronger of the two signals. You should transmit calls other than distress calls
using the lowest power setting that allows you to communicate, to reduce the
possibility that your transmissions interfere with the transmissions of others.
In the USA frequency band, transmissions on channels 13 and 67 must be low
(1 W) by default.
1Select HI/LO.
2Select 1W or 25W.
Digital Selective Calling
Digital Selective Calling
NOTE: Before you can use DSC capabilities, you must enter a Mobile Marine
Safety Identity (MMSI) number. An MMSI number identifies each DSC radio, like
a telephone number.
Digital Selective Calling (DSC) is a key component of the Global Maritime
Distress and Safety System (GMDSS). DSC enables VHF radios to place and
receive digital calls directly with other vessels and shore stations, including the
USA and Canadian Coast Guards. Your radio includes full Class-D DSC
capabilities.
For more information about DSC on your device, including using DSC for distress
calls, see the online owner's manual (page 7).
NOTE: The device disables DSC automatically when you turn on ATIS
(page 6).
Entering Your MMSI Number
NOTICE
You can enter your MMSI number only once. If you must change your MMSI
number after entering it, you must take your radio to your Garmin® dealer for
reprogramming.
The Mobile Marine Safety Identity (MMSI) number is a nine-digit code that acts
as a DSC self-identification number, and it is required in order to use the DSC
capabilities of your device. You can obtain an MMSI number from the
telecommunications authority or ship registry for your country. In the USA, you
can obtain an MMSI number from these sources.
•Federal Communications Commission (FCC): assignments are recognized
internationally
• BoatU.S.®, Sea Tow®, or United States Power Squadrons®: assignments are
for USA waters only
1Select MENU > DSC > MY MMSI.
2Turn SELECT clockwise or counter-clockwise to increase or decrease the
number.
3Press SELECT to accept the number.
4Repeat steps 2 and 3 for each number in the sequence.
5Select ACCEPT.
The device prompts you to confirm your identity.
6Enter your MMSI number again, and select ACCEPT.
If the MMSI numbers you entered do not match, a message appears.
7If necessary, select RETRY and enter the number again.
Quick Start Manual 5

Automatic Transmitter Identification System
Automatic Transmitter Identification System (ATIS) is a vessel identification
system used on certain inland waterways in some European countries. See your
Garmin dealer to program your VHF radio if you plan to use your radio on
waterways that are within the bounds of the Regional Arrangement Concerning
the Radiotelephone Service on Inland Waterways (the Basel Agreement). ATIS is
prohibited outside the European inland waterways that are covered by the Basel
Agreement.
When you enable ATIS, your radio sends a data signal identifying your station at
the end of every transmission. Data identifying your position is not sent, but your
position is calculated through the method of triangulation by coastal stations that
receive your transmissions.
To enable ATIS, you must enter your ATIS identification number (page 6), and
turn on ATIS. See your Garmin dealer to determine your ATIS identification
number and to learn about ATIS requirements for your region.
Your radio disables these functions when you enable ATIS.
• Digital Selective Calling (DSC)
• Dual watch and Tri watch
• Channel scanning
International channels 6, 8, 10, 11, 12, 13, 14, 71, 72, 74, and 77 restrict
transmitting to low-power (1 W) when you enable ATIS.
Entering Your ATIS Identification Number
NOTICE
You can enter your ATIS identification number only once. If you must change
your ATIS identification number after entering it, you must take your radio to your
Garmin dealer for reprogramming.
1Select MENU > ATIS > MY ATIS ID.
2Turn SELECT clockwise or counter-clockwise to increase or decrease the
number.
3Press SELECT to accept the number.
4Repeat steps 2 and 3 for each number in the sequence.
5Select ACCEPT.
The device prompts you to reenter your number.
6Enter your ATIS number again, and select ACCEPT.
If the ATIS numbers you entered do not match, a message appears.
7If necessary, select RETRY and enter the number again.
Turning On and Off ATIS
1Select MENU > ATIS > ATIS.
2Select ON or OFF.
appears on the screen when ATIS is enabled.
3Select an option:
•To save your changes and return to the home screen, select OK.
• To return to the home screen without saving your changes, select MENU.
Appendix
Contacting Garmin Product Support
• Go to www.garmin.com/support for in-country support information.
• In the USA, call 913-397-8200 or 1-800-800-1020.
6 Quick Start Manual

• In the UK, call 0808 238 0000.
• In Europe, call +44 (0) 870 850 1241.
Cleaning the Outer Casing
NOTICE
Avoid chemical cleaners and solvents that can damage plastic components.
1Clean the outer casing of the device (not the screen) using a cloth dampened
with a mild detergent solution.
2Wipe the device dry.
Cleaning the Screen
NOTICE
Cleaners containing ammonia will harm the anti-reflective coating.
The device is coated with a special anti-reflective coating which is very sensitive
to waxes and abrasive cleaners.
1Apply an eyeglass lens cleaner specified as safe for anti-reflective coatings to
the cloth.
2Gently wipe the screen with a soft, clean, lint-free cloth.
Getting the Owner's Manual
Go to www.garmin.com/manuals/A01653.
Elément Touche
À
Manuel de démarrage rapide 7