Garmin 01691 LOW POWER TRANSMITTER (2400-2483.5 MHz) User Manual 2
Garmin International Inc LOW POWER TRANSMITTER (2400-2483.5 MHz) Users Manual 2
UserManual.wiki
>
Garmin
>
01691 User Manual
>
Users Manual 2
Contents
1.
Users Manual 1
2.
Users Manual 2
Users Manual 2
Navigation menu
Upload a User Manual
Namespaces
Wiki Guide
HTML
PDF
Info
Views
User Manual
Discussion / Help
Navigation
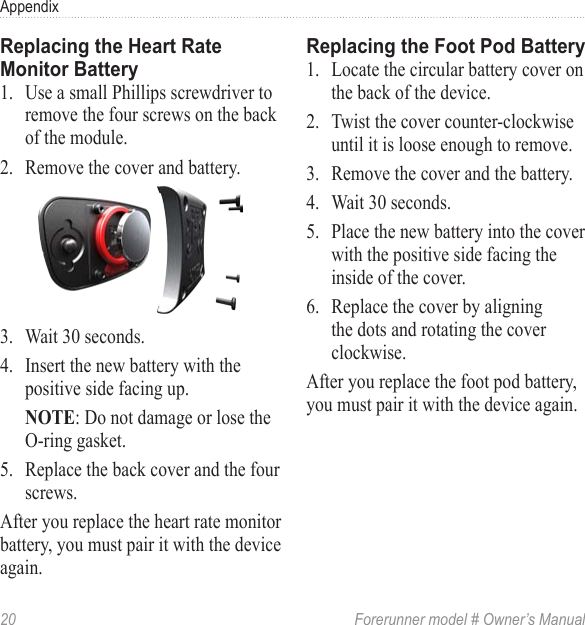
![2 Forerunner model # Owner’s ManualIntroductionAlways consult your physician before you begin or modify any exercise program. See the Important Safety and Product Information guide in the product box for product warnings and other important information.When using your Forerunner® the rst time, follow the setup instructions in the Forerunner model # Quick Start Manual.Help us better support you by completing our online registration today.• Go to http://my.garmin.com. • Keep the original sales receipt, or a photocopy, in a safe place.Each key has multiple functions. [product image here] Press to turn on the backlight.Press to search for a compatible weight scale. Press and hold to turn the device on and off. Press to start and stop the timer. * Press to scroll through menus and settings.](https://usermanual.wiki/Garmin/01691.Users-Manual-2/User-Guide-1357750-Page-4.png)


![Forerunner model # Owner’s Manual 19Appendix2. Plug the AC adapter into a standard wall outlet. 3. Align all four contacts on the back of the Forerunner with the four posts on the charging clip ➊.[insert image here]When you connect the Forerunner to a power source, the Forerunner turns on, and the charging screen appears.4. Charge the Forerunner completely. When the Forerunner is fully charged, the animated battery on the screen is solid ( ). Do not use a sharp object to remove user-replaceable batteries. Contact your local waste disposal department to properly recycle the batteries. Perchlorate Material – special handling may apply. See www.dtsc.ca.gov/hazardouswaste/perchlorate.](https://usermanual.wiki/Garmin/01691.Users-Manual-2/User-Guide-1357750-Page-21.png)