Garmin 01738 GPS- Enabled Cycling Computer User Manual users manual 1
Garmin International Inc GPS- Enabled Cycling Computer users manual 1
UserManual.wiki
>
Garmin
>
01738 User Manual
>
users manual 1
Contents
1.
users manual 1
2.
users manual 2
users manual 1
Navigation menu
Upload a User Manual
Namespaces
Wiki Guide
HTML
PDF
Info
Views
User Manual
Discussion / Help
Navigation


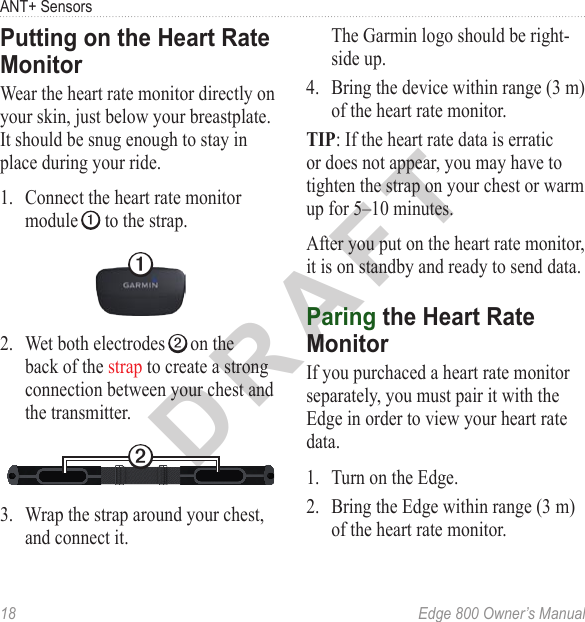
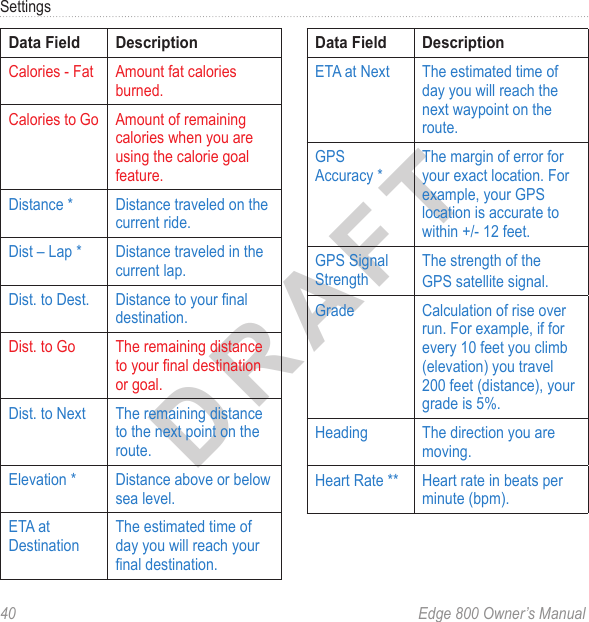
![DRAFTEdge 800 Owner’s Manual 25ANT+ SensorsUsing the GSC 101. Turn on the Edge. 2. Bring the Edge within range (3 m) of the GSC 10. 3. Press and hold MENU.4. Select Settings > Bike Settings > [Bike 1] > ANT+ Spd/Cad.5. Select Yes > Rescan.6. Press BACK to return to the main menu. When the GSC 10 is paired, a message appears, and the speed and cadence icons appear solid on the status page.7. Customize optional data elds (page 39).8. Go for a ride. About the GSC 10Cadence data from the GSC 10 is always recorded. If there is no GSC 10 paired, GPS data is used to calculate the speed and distance.Cadence is your rate of pedaling or “spinning” measured by the number of revolutions of the crank arm per minute (rpm). There are two sensors on the GSC 10: one for cadence and one for speed. For information about cadence alerts, see page 6.Non-Zero Averaging for Cadence DataThe non-zero data-averaging setting is available if you are training with an optional cadence sensor. The default setting is to exclude zero values that occur when you are not pedaling. To turn the non-zero averaging on or off, select MENU > > Bike Settings > Data Averaging > Cadence.](https://usermanual.wiki/Garmin/01738.users-manual-1/User-Guide-1335165-Page-29.png)
![DRAFTEdge 800 Owner’s Manual 27ANT+ Sensorsto www.garmin.com/intosports. Pairing Your Power MeterRefer to the manufacturer’s instructions. When the power meter is paired, a message appears, and the power icon appears solid on the status page.Calibrating Your Power MeterFor calibration instructions specic to your power meter, refer to the manufacturer’s instructions. Before you can calibrate your power meter, it must be properly installed and actively recording data.1. Select MENU > > Bike Settings > Bike Proiles. 2. Select a bike prole.3. Selec ANT+ Power > Calibrate. 4. Keep your power meter active by pedaling until a message appears.Viewing Your Power ZonesYou can set seven custom power zones using Garmin Connect or Garmin Training Center. If you know your FTP (functional threshold power) value, you can enter it and allow the software to calculate your power zones automatically. 1. Press and hold MENU.2. Select Settings > Bike Settings > [Bike 1] > Power Zones.Non-Zero Averaging for Power DataThe non-zero data-averaging setting is available if you are training with an optional power meter. The default setting is to exclude zero values that occur when you are not pedaling. To turn the non-zero averaging on or off, select MENU > > Bike Settings > Data Averaging > Power.](https://usermanual.wiki/Garmin/01738.users-manual-1/User-Guide-1335165-Page-31.png)