Garmin 02104 NEAR FIELD COMMUNICATIONS LOW POWER TRANSMITTER User Manual
Garmin International Inc NEAR FIELD COMMUNICATIONS LOW POWER TRANSMITTER
Garmin >
Contents
- 1. User Manual 1
- 2. User Manual 2
- 3. Users Manual 2
- 4. Users Manual 1
User Manual 1
Monterra™
Quick Start Manual
May 2013 190-01601-01_0A Printed in Taiwan
DRAFT
Introduction
WARNING
See the Important Safety and Product
Information guide in the product box for
product warnings and other important
information.
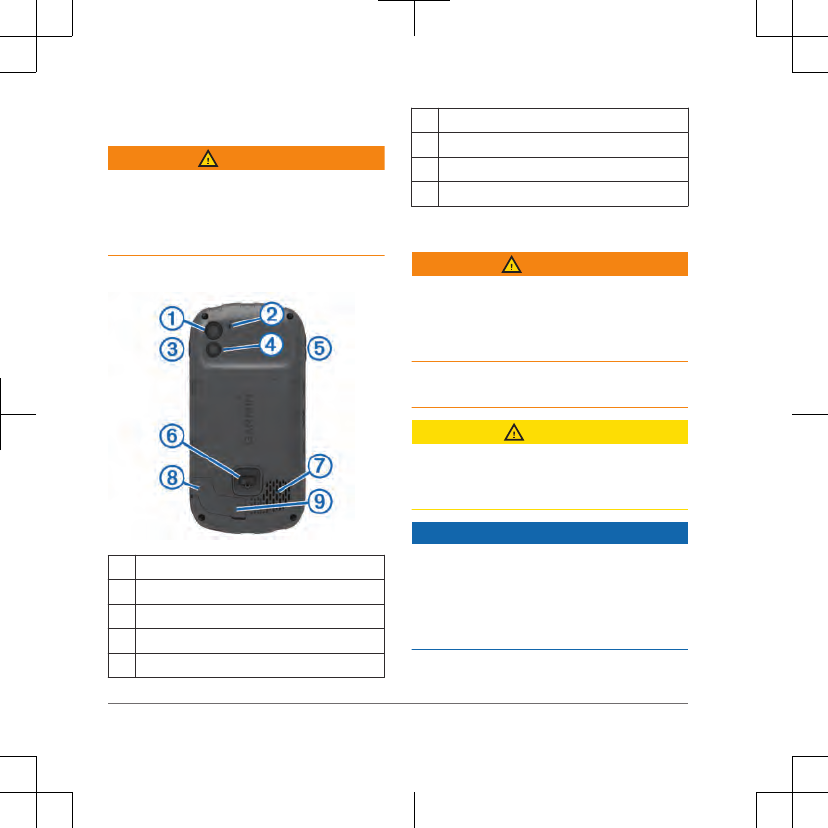
Device Overview
Camera
Microphone
Power key
LED flash
Volume keys
Battery cover D-ring
Waterproof speaker
Headphone port (under weather cap)
Mini-USB port (under weather cap)
Battery Information
WARNING
The temperature rating for the device may
exceed the usable range of some
batteries. Alkaline batteries can rupture at
high temperatures.
Do not use a sharp object to remove
batteries.
CAUTION
Contact your local waste disposal
department to properly recycle the
batteries.
NOTICE
Alkaline batteries lose a significant
amount of their capacity as the
temperature decreases. Therefore, use
lithium batteries when operating the
device in below freezing conditions.
2
DRAFT
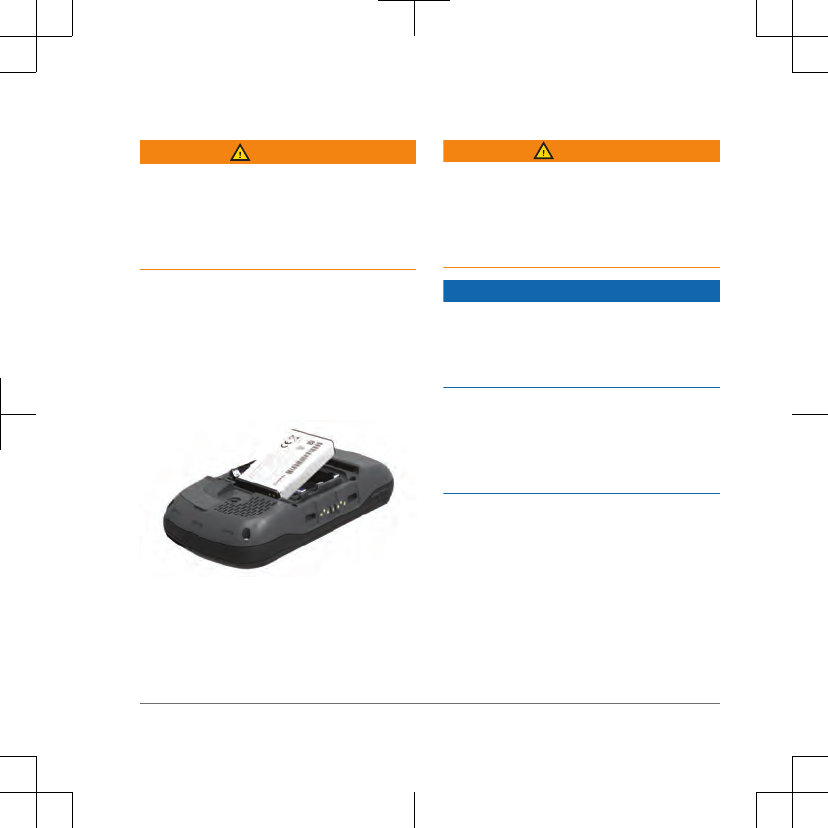
Installing the Battery Pack
WARNING
This product contains a lithium-ion
battery. To prevent the possibility of
personal injury or product damage caused
by battery exposure to extreme heat,
store the device out of direct sunlight.
1Turn the D-ring counter-clockwise,
and pull up to remove the cover.
2Locate the metal contacts on the end
of the lithium-ion battery.
3Insert the battery into the
compartment, contacts first.
4Press the battery into place.
5Replace the battery cover, and turn
the D-ring clockwise.
Charging the Battery Pack
WARNING
This product contains a lithium-ion
battery. To prevent the possibility of
personal injury or product damage caused
by battery exposure to extreme heat,
store the device out of direct sunlight.
NOTICE
To prevent corrosion, thoroughly dry the
mini-USB port, the weather cap, and the
surrounding area before charging or
connecting to a computer.
Do not attempt to use the device to
charge a battery that was not provided by
Garmin®. Attempting to charge a battery
that was not provided by Garmin can
damage the device and void the warranty.
Before you can connect the straight
connector of the USB cable to your
device, you may have to remove optional
mount accessories.
NOTE: The battery will not charge when
outside the temperature range of 32 to
122°F (0 to 50°C).
3
DRAFT

You can charge the battery using a
standard wall outlet or a USB port on your
computer.
1Pull up the weather cap from the
mini-USB port .
2Plug the small end of the USB cable
into the mini-USB port.
3Plug the USB end of the cable into the
AC adapter or a computer USB port.
4Plug the AC adapter into a standard
wall outlet.
When you connect the device to a
power source, the device turns on.
5Charge the battery completely.
Removing the Battery Pack
WARNING
Do not use a sharp object to remove
batteries.
1Turn the D-ring counter-clockwise,
and pull up to remove the cover.
2Pull up on the side of the battery pack
closest to the power button.
Installing AA Batteries
Instead of the battery pack (page 3), you
can use alkaline, NiMH, or lithium AA
batteries. This is useful when you are on
the trail and cannot charge the battery
pack. Use NiMH or lithium batteries for
best results.
NOTE: Standard alkaline batteries are not
recommended when using the camera
feature.
1Turn the D-ring counter-clockwise,
and pull up to remove the cover.
2Insert three AA batteries, observing
polarity.
4
DRAFT
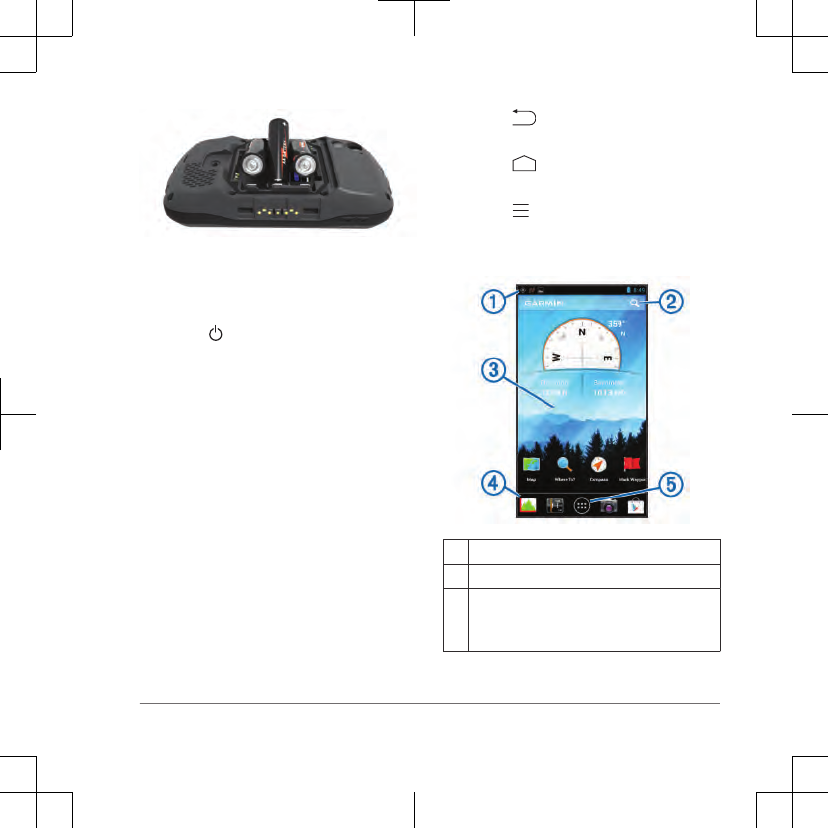
3Replace the battery cover, and turn
the D-ring clockwise.
Turning On the Device
Select .
Setting Up the Device
The first time you turn on the device, you
must set up basic device settings. You
can also set up accounts.
1Turn on the device.
2Follow the on-screen instructions.
Using the Touchscreen
• Drag or swipe your finger across the
screen to pan or scroll the screen.
• Pinch two fingers together to zoom
out.
• Spread two fingers to zoom in.
• Make each touchscreen selection a
separate action.
• Select to return to the previous
page.
• Select to return to the home
screen.
• Select to view additional options for
the page you are viewing.
Home Screen
Swipe down to view notifications.
Enter text to start a search.
Swipe left and right to switch pages.
Hold to customize shortcuts, widgets, or
wallpaper.
5
DRAFT

Hold to drag shortcuts in or out of the
dock.
Touch to view all installed apps.
Viewing Notifications
1Swipe down from the top of the
screen.
The list of notifications appears.
2Select an option:
• To launch the action or app
mentioned in the notification,
select the notification.
• To dismiss a notification, swipe the
notification to the right.
Enabling GPS
For more information about GPS, go to
www.garmin.com/aboutGPS.
Select Settings > Location services
> GPS satellites.
Connecting to a Wireless Network
1Select Settings > Wi-Fi.
2If necessary, select the toggle switch
to turn on Wi-Fi.
3If necessary, select Scan to scan for
available networks.
4Select a wireless network.
5If necessary, enter the encryption key.
The device connects to the wireless
network. The device remembers the
network information and connects
automatically when you return to this
location in the future.
Updating the Device Software
Before you can update the device
software, you must be connected to a
wireless network.
The device checks for software updates
periodically when it is connected to a
wireless network. A notification appears
when a software update is available. You
can also check for updates manually.
1Select an option:
• When a software update
notification appears, swipe down
from the top of the screen, and
select New software update
available.
• To check for an update manually,
select Settings > About Monterra
> System updates.
6
DRAFT

The device checks for available
updates. This may take several
minutes.
2Select Download, and follow the on-
screen instructions.
Locking and Unlocking the
Touchscreen
You can lock the screen to prevent
inadvertent screen touches.
1Hold the power key.
2Select Touch Lock to toggle the
screen lock on or off.
Waypoints
Waypoints are locations you record and
store in the device.
Creating a Waypoint
You can save your current location as a
waypoint.
1Select Mark Waypoint.
2If necessary, select Edit to change the
name or other waypoint data.
3Select Save.
Tracks
A track is a recording of your path. The
track log contains information about
points along the recorded path, including
time, location, and elevation for each
point.
Pausing Track Recording
1Swipe down from the top of the
screen.
The list of notifications appears.
2Select next to Track Recording
On.
Customizing Your Track Log
You can customize how your device
displays and records tracks.
1Select Settings > Tracks.
2Select Record to toggle track logging
on or off.
3Select Show on Map to toggle the
track log on the map on or off.
When this feature is enabled, a line on
the map indicates your track.
4Select Color, and select a color for
the track log on the map.
7
DRAFT

5Select Record Method.
6Select an option:
•To record tracks at a variable rate
that creates an optimum
representation of your tracks,
select Auto.
•To record tracks at a specified
distance, select Distance.
• To record tracks at a specified
time, select Time.
7Select Interval.
8Complete an action:
• If you selected Auto for the
Record Method, select an option
to record tracks more or less often.
NOTE: Using the Most Often
interval provides the most track
detail, but fills up the device
memory quicker.
• If you selected Distance or Time
for the Record Method, enter a
value, and select OK.
Navigating to a Destination
1Select Where To?.
2Select a category.
3Select a destination.
4Select Go.
The map opens with your route
marked with a magenta line.
5Navigate using the map (page 8) or
compass (page 9).
Navigating with the Map
1Begin navigating to a destination
(page 8).
2Select Map.
A blue triangle represents your
location on the map. As you travel, the
blue triangle moves and leaves a track
log (trail). You can change how the
track log appears on the map
(page 7).
3Complete one or more actions:
• Drag the map to view different
areas.
• Select and to zoom in and
out of the map.
• Select a location on the map
(represented by a pin), and select
the information bar at the top of
8
DRAFT
the screen to view information
about the selected location.
Navigating with the Compass
When navigating to a destination, points
to your destination, regardless of the
direction you are moving.
1Begin navigating to a destination
(page 8).
2Select Compass.
3Turn until points toward the top of
the compass, and continue moving in
that direction to the destination.
Following Your Track Log
While navigating, you can navigate back
to the beginning of your track log. This
can be helpful when finding your way
back to camp or the trail head.
1Select Track Manager > Current
Track > View Map > TracBack.
The map displays your route with a
magenta line, start point, and end
point.
2Navigate using the map or the
compass.
Stopping Navigation
From the map or compass, select >
Stop Navigation.
Camera and Photos
You can take photos and videos with your
device. If enabled, the geographic
location is automatically saved in the
photo or video information. You can
navigate to the location.
Taking a Photo
1Select Camera.
2Turn the device horizontally or
vertically to change the orientation of
the photo.
3If necessary, select one or more
options to customize the photo:
• To change shooting options,
including flash, exposure, white
balance, scene, or location
information, select .
• To zoom in or out, use the slider.
• To change the focus, select a part
of the image.
The device focuses on the area
inside of the square brackets.
9
DRAFT

When the photo is in focus, the
square brackets turn green.
4Select to take a photo.
Downloading Geocaches
1Connect your device to a computer
using the USB cable.
2Go to www.opencaching.com.
3If necessary, create an account.
4Sign in.
5Follow the on-screen instructions to
find and download geocaches to your
device.
Customizing the Device
Adjusting the Backlight Brightness
Extensive use of screen backlighting can
significantly reduce battery life. You can
adjust the backlight brightness to
maximize the battery life.
NOTE: The backlight brightness may be
limited when the battery is low.
1Select > Settings > Display >
Brightness.
2Use the slider to adjust the backlight
level.
The device may feel warm when the
backlight setting is high.
Adding a Shortcut or Widget to the
Home Screen
1From the home screen, swipe left or
right on the screen to select a page.
2Select .
3If necessary, swipe left or right to view
additional apps and widgets.
4Hold an app or widget, and drag it to
the desired location on the home
screen.
Changes to the home screen are saved to
the selected profile (page 10).
Profiles
Profiles are a collection of settings that
optimize your device based on how you
are using it. For example, the settings and
views are different when you use the
device for hunting than when geocaching.
When you are using a profile and you
change settings, such as data fields or
10
DRAFT
units of measurement, the changes are
saved automatically as part of the profile.
Selecting a Profile
When you change activities, you can
change the setup of the device by
changing the profile.
1Select Settings > Profiles.
2Select a profile.
3Select Make Current.
4Optionally, select the toggle switch to
enable profile switching from the
notifications.
This feature is useful if you switch
profiles frequently.
Creating a Custom Profile
You can customize your home screen,
settings, and data fields for a particular
activity or trip.
1Select > Settings > Profiles.
2Select .
3Enter a name, and select Done.
The new profile is saved and becomes
the active profile.
4Customize your home screen,
settings, and data fields.
Getting More Information
You can find more information about this
product on the Garmin website.
• Go to www.garmin.com/outdoor.
• Go to www.garmin.com
/learningcenter.
• Go to http://buy.garmin.com, or
contact your Garmin dealer for
information about optional accessories
and replacement parts.
Getting the Owner's Manual
You can get the latest owner's manual
from the web.
1Go to www.garmin.com/support.
2Select Manuals.
3Follow the on-screen instructions to
select your product.
Registering Your Device
Help us better support you by completing
our online registration today.
• Go to http://my.garmin.com.
• Keep the original sales receipt, or a
photocopy, in a safe place.
11
DRAFT
www.garmin.com/support
913-397-8200
1-800-800-1020
0808 238 0000
+44 870 850 1242 1-866-429-9296 +43 (0) 820 220 230
+32 2 672 52 54 +45 4810 5050 +358 9 6937 9758 + 331 55 69 33 99
+49 (0)180 6 427646 + 39 02 36 699699 0800 - 023 3937
035 - 539 3727 + 47 815 69 555
00800 4412 454
+44 2380 662 915 + 35 1214 447 460 + 34 93 275 44 97 + 46 7744 52020
Garmin International, Inc.
1200 East 151st Street
Olathe, Kansas 66062, USA
Garmin (Europe) Ltd.
Liberty House, Hounsdown Business Park
Southampton, Hampshire, SO40 9LR UK
Garmin Corporation
No. 68, Zhangshu 2nd Road, Xizhi Dist.
New Taipei City, 221, Taiwan (R.O.C.)
Garmin®, the Garmin logo, and TracBack® are trademarks of
Garmin Ltd. or its subsidiaries, registered in the USA and other
countries. Monterra™ is a trademark of Garmin Ltd. or its
subsidiaries. These trademarks may not be used without the
express permission of Garmin.
The Bluetooth® word mark and logos are owned by the Bluetooth
SIG, Inc. and any use of such marks by Garmin is under license.
microSD™ and the microSDHC logo are trademarks of SD-3C,
LLC. Other trademarks and trade names are those of their
respective owners.
© 2013 Garmin Ltd. or its subsidiaries
DRAFT