Garmin 02564 Low Power Transmitter 2402-2480 MHz User Manual
Garmin International Inc Low Power Transmitter 2402-2480 MHz
Garmin >
Contents
- 1. User Manual
- 2. User Manual 1
User Manual
Quick Start Manual
April 2015 Printed in Taiwan 190-01844-91_0A
DRAFT
Introduction
WARNING
See the Important Safety and Product
Information guide in the product box for
product warnings and other important
information.
Always consult your physician before you
begin or modify any exercise program.
Charging the Device
NOTICE
To prevent corrosion, thoroughly dry the
USB port, the weather cap, and the
surrounding area before charging or
connecting to a computer.
The device is powered by a built-in lithium-
ion battery that you can charge using a
standard wall outlet or a USB port on your
computer.
NOTE: The device will not charge when
outside the approved temperature range
(page 9).
1Pull up the weather cap À from the
USB port Á.
2Plug the small end of the USB cable
into the USB port on the device.
3Plug the large end of the USB cable
into an AC adapter or a computer USB
port.
4Plug the AC adapter into a standard
wall outlet.
When you connect the device to a
power source, the device turns on.
5Charge the device completely.
Installing the Standard Mount
For the best GPS reception, position the
mount so the front of the device is
oriented toward the sky.
1Select a secure location to mount the
device where it does not interfere with
safe operation.
2 Introduction
DRAFT

2Place the rubber disk À on the back of
the mount.
The rubber tabs align with the back of
the mount so it stays in place.
3Place the mount on the product.
4Attach the mount securely using
the two bands Á.
5Align the tabs on the back of the
device with the mount notches Â.
6Press down slightly
until it locks into place.
.
Installing the Other Mount
1Select a secure location to mount the
other device where it does not
interfere with the safe operation
.
2Use the hex key to remove the screw
À from the connector Á.
3If necessary, remove the two screws
on the back side of the mount Â,
rotate the connector Ã, and replace
the screws to change the orientation of
the mount.
Introduction 3
DRAFT
4Place the rubber pad around the
product:
• If the diameter is
25.4 mm, use the thicker pad.
• If the diameter is
31.8 mm, use the thinner pad.
5Place the connector around
the rubber pad.
6Replace and tighten the screw.
NOTE: Garmin® recommends a torque
specification of 7 lbf-in. (0.8 N-m). You
should check the tightness of the
screw periodically.
7Align the tabs on the back of the other
device with the mount notches Ä.
8Press down slightly
until it locks into place.
.
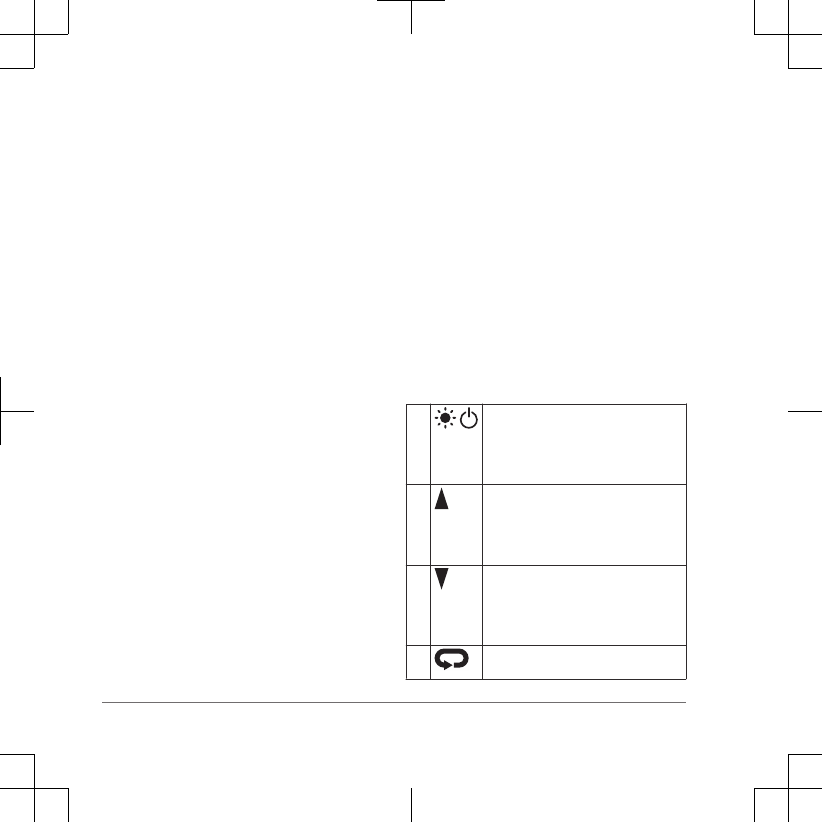
Keys
À Select to adjust the backlight
brightness.
Hold to turn the device on and
off.
ÁSelect to scroll through the data
screens, options, and settings.
From the home screen, select to
view the connections page.
ÂSelect to scroll through the data
screens, options, and settings.
From the home screen, select to
view the device menu.
ÃSelect to mark a new lap.
4 Introduction
DRAFT
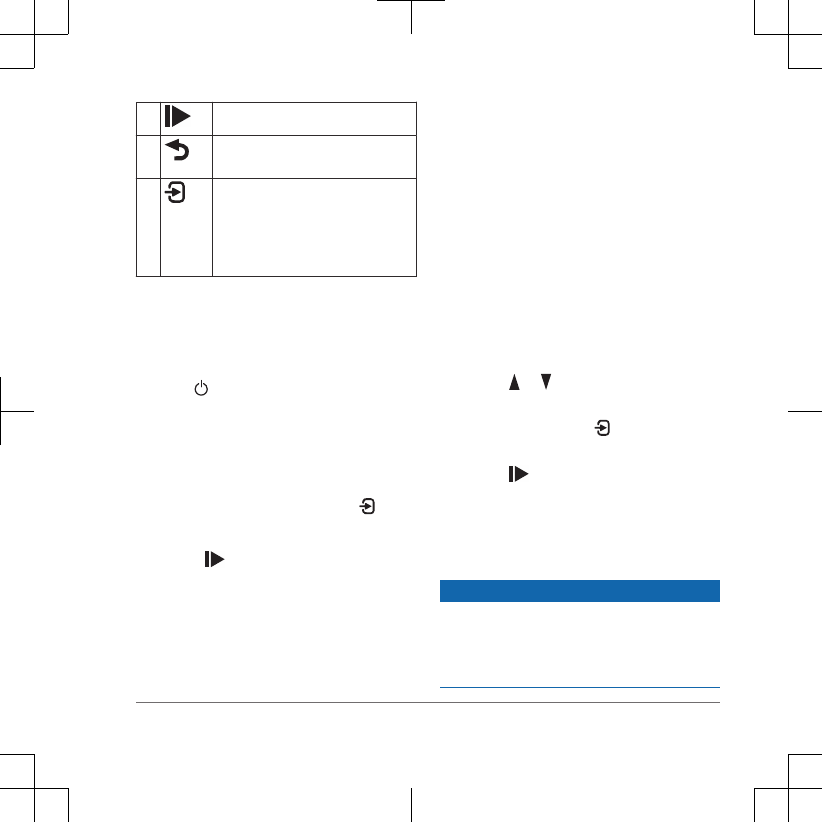
ÄSelect to start and stop the timer.
ÅSelect to return to the previous
screen.
ÆSelect to choose an option or to
acknowledge a message.
During use, select to view
menu options and
data fields.
.
If your device was packaged with an
.® sensor, they are already paired and
can be activated during initial setup.
1Hold to turn on the device.
2Go outside, and wait while the device
locates satellites.
The satellite bars turn green when the
device is ready.
3From the home screen, select .
4Select an activity profile.
5Select to start the timer.
NOTE: History is recorded only while
the timer is running.
6Select or for additional data
pages.
7If necessary, select to view menu
options such as alerts and data fields.
8Select to stop the timer.
9Select Save.
Sending to Garmin
Connect™
NOTICE
To prevent corrosion, thoroughly dry the
USB port, the weather cap, and the
surrounding area before charging or
connecting to a computer.
Introduction 5
DRAFT

1Pull up the weather cap À from the
USB port Á.
2Plug the small end of the USB cable
into the USB port on the device.
3Plug the large end of the USB cable
into a computer USB port.
4Go to www.garminconnect.com/start.
5Follow the on-screen instructions.
.
6 Introduction
DRAFT

Notifications: Displays
notifications and messages on your
device.
Sensors
Your device can be used with wireless
sensors. For more information
about compatibility and purchasing
optional sensors, go to
http://buy.garmin.com.
Putting On the Heart Rate Monitor
NOTE: If you do not have a heart rate
monitor, you can skip this task.
You should wear the heart rate monitor
directly on your skin, just below your
sternum. It should be snug enough to stay
in place during your activity.
1Snap the heart rate monitor module À
onto the strap.
The Garmin logos on the module and
the strap should be right-side up.
2Wet the electrodes Á and the contact
patches  on the back of the strap to
create a strong connection between
your chest and the transmitter.
3Wrap the strap around your chest, and
connect the strap hook à to the loop
Ä.
NOTE: The care tag should not fold
over.
The Garmin logos should be right-side
up.
4Bring the device within 3 m (10 ft.) of
the heart rate monitor.
After you put on the heart rate monitor, it is
active and sending data.
ANT+ Sensors 7
DRAFT

.
Device Information
Temperature Specifications
Operating temperature range:
From -20º to 60ºC (from -4º to 140ºF)
Charging temperature range: From
0º to 45ºC (from 32º to 113ºF)
Getting More Information
• Go to www.garmin.com/intosports.
• Go to www.garmin.com/learningcenter.
• Go to http://buy.garmin.com, or contact
your Garmin dealer for information
about optional accessories and
replacement parts.
Getting the Owner's Manual
You can get the most recent owner's
manual from the web.
1Go to www.garmin.com/manuals
/.
2View or download the full owner's
manual in your preferred format.
Device Information 9
DRAFT

DRAFT

DRAFT
www.garmin.com/support
+43 (0) 820 220230 + 32 2 672 52 54
0800 770 4960 1-866-429-9296
+385 1 5508 272
+385 1 5508 271
+420 221 985466
+420 221 985465
+ 45 4810 5050 + 358 9 6937 9758
+ 331 55 69 33 99 + 39 02 36 699699
(+52) 001-855-792-7671 0800 0233937
+47 815 69 555 00800 4412 454
+44 2380 662 915
(+35) 1214 447 460 +386 4 27 92 500
0861 GARMIN (427 646)
+27 (0)11 251 9999 +34 93 275 44 97
+ 46 7744 52020 +886 2 2642-9199 ext 2
0808 238 0000
+44 (0) 870 8501242
+49 (0)180 6 427646
20 ct./Anruf. a. d.
deutschen Festnetz,
Mobilfunk max. 60 ct./Anruf
913-397-8200
1-800-800-1020
Garmin®, the Garmin logo, ® are trademarks of
Garmin Ltd. or its subsidiaries, registered in the USA and other
countries. Garmin Connect™
is a trademark of Garmin Ltd. or its
subsidiaries. These trademarks may not be used without the express
permission of Garmin.
Other trademarks and trade names are those of their respective
owners.
© 2015 Garmin Ltd. or its subsidiaries
DRAFT