Contents
- 1. Users Manual part 1of2
- 2. Users Manual part 2of2
Users Manual part 1of2
Astro® 430 with T5/T5 mini
Quick Start Manual
May 2016 Printed in Taiwan 190-02079-01_0A
Introduction
WARNING
See the Important Safety and Product
Information guide in the product box for
product warnings and other important
information.
Device Overviews
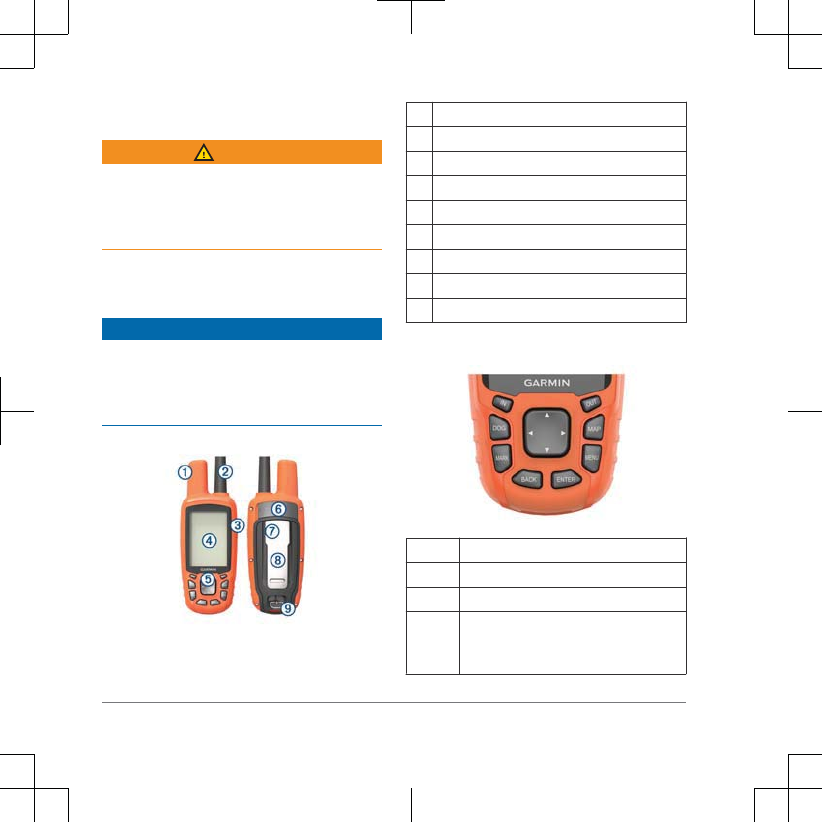
Astro 430 Handheld Device
NOTICE
Avoid using a high-powered radio (greater
than 5 watts) in close proximity to the
handheld device. It may cause irreversible
damage to the handheld device.
➀GPS antenna
➁VHF antenna
➂Power key
➃Display
➄Keypad
➅USB port (under weather cap)
➆microSD™ card slot (under battery door)
➇Mounting spine
➈Battery cover D-ring
Keypad
IN Select to zoom in on the map.
OUT Select to zoom out on the map.
MAP Select to view the map.
MENU Select to open the menu for the
active page.
Select twice to open the main menu.
2 Introduction
ENTER Select to select options and
acknowledge messages.
BACK Select to cancel data entry or return
to the previous menu or page.
MARK Select to mark your current location.
DOG Select to view the dog tracking page.
Select to view or scroll through
options and to move the map pointer.
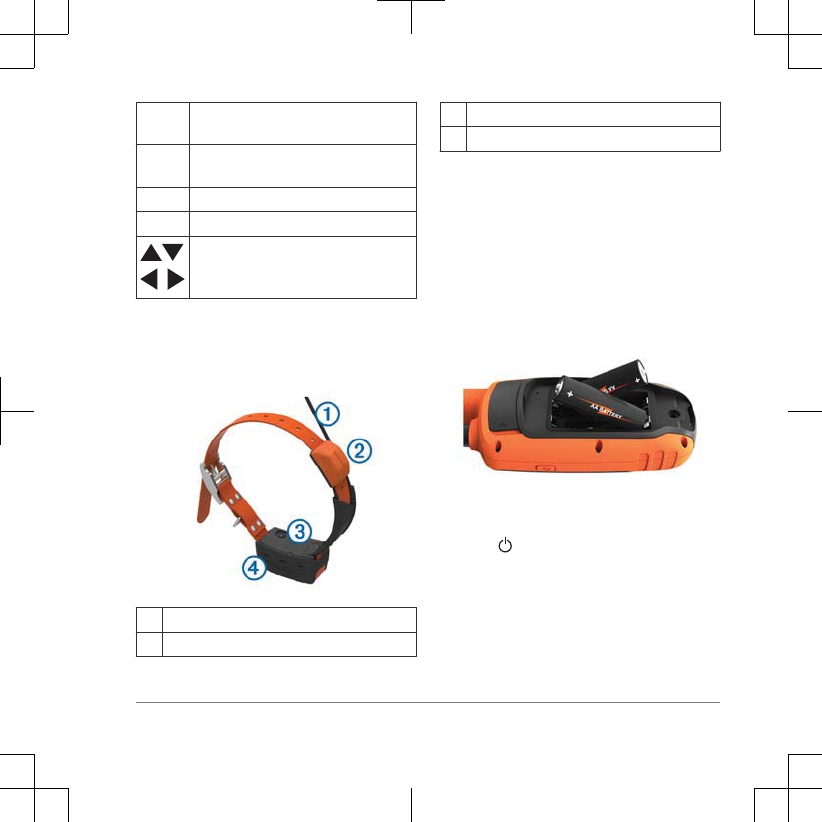
Dog Collar Device
NOTE: Your dog collar device may look
different than the device pictured.
➀VHF antenna
➁GPS antenna
➂Power key
➃Status LED and flashing beacon LEDs
Installing Batteries
The handheld device operates on two AA
batteries (not included). Use NiMH or
lithium batteries for best results.
1Turn the D-ring counter-clockwise, and
pull up to remove the cover.
2Insert two AA batteries, observing
polarity.
3Replace the battery cover, and turn the
D-ring clockwise.
4Hold .
5Select Setup > System > Battery
Type.
6Select Alkaline,Lithium, or
Rechargeable NiMH.
Introduction 3
Turning On the Devices
• On the handheld device, hold the
power key until the LCD display turns
on.
• On the dog collar device, hold the
power key until the status LED flashes
and the collar beeps.
Getting the Owner's Manual
Go to www.garmin.com/manuals
/astro430 .
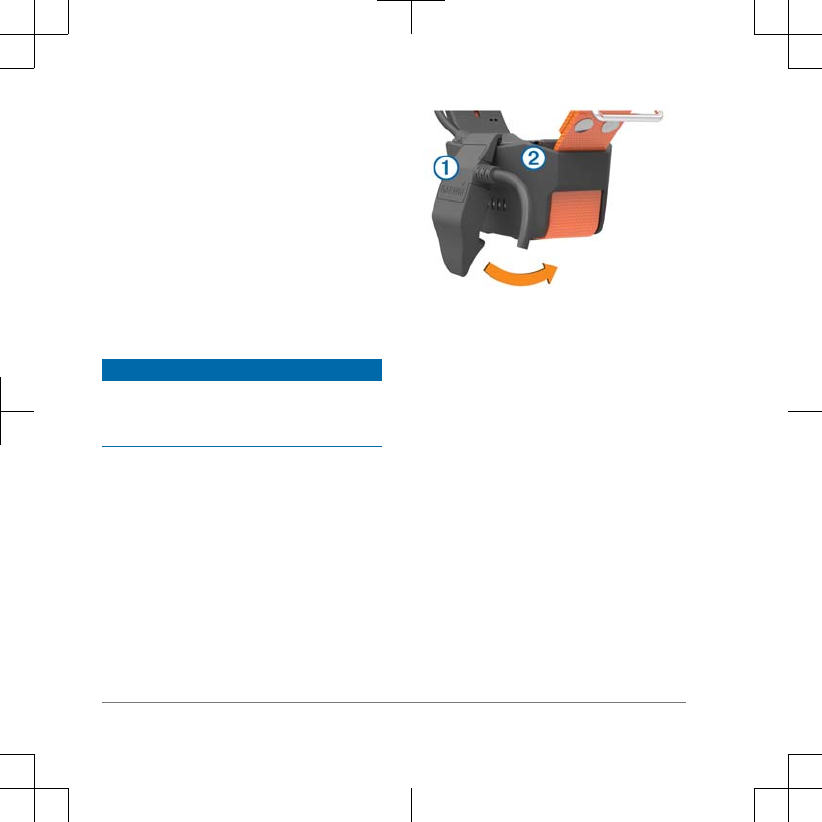
Charging the Dog Collar Device
NOTICE
To prevent corrosion, thoroughly dry the
contacts on the collar and the surrounding
area before connecting the charging clip.
NOTE: Your dog collar device may look
different than the device pictured.
You should fully charge the battery before
you use the device for the first time.
Charging a fully depleted battery takes
about five hours.
1Snap the charging clip ➀ onto the
device ➁.
2Plug the small end of the power cable
into the mini-USB port on the charging
clip cable.
3Plug the power cable into a power
source.
The status LED is solid red when the
collar is charging.
4After the status LED turns solid green,
remove the charging clip from the
collar.
Acquiring Satellite Signals
Both the collar and handheld device must
acquire satellite signals before you put the
collar on your dog. Acquiring satellites can
take a few minutes.
1Go outdoors to an open area.
2Turn on both devices (page 4).
4 Introduction
3Select the power key on the handheld
device.
shows the GPS signal strength.
When the collar has acquired satellite
signals, the status LED flashes a double-
blink or triple-blink in green.
Pairing a Dog Collar to the Astro
Device
Before you can pair devices to the
handheld device, the handheld device
must be close enough to the dog collar
device to touch it.
The handheld device can track up to 20
dogs with dog collar devices. If you
purchase additional dog collar devices,
you can link them to the handheld device.
1Select DOG.
2Select Add Dog.
3Follow the on-screen instructions.
By default, the new dog is named
“Dog” and an ID number is randomly
assigned.
An error message could appear if
there is a conflict with the ID number of
another dog.
After pairing is compete, you can add the
dog collar device to additional handheld
devices using the dog collar device track
code or control code.
Adjusting the Backlight Brightness
NOTE: The backlight brightness may be
limited when the battery strength is low.
Extensive use of screen backlighting can
significantly reduce battery life.
1Select .
2Select to cycle through the
brightness levels.
3Select ENTER.
Dog Tracking
The handheld device allows you to track
your dog, using the tracking compass or
map. The map displays your location and
your dog's location and tracks. The
compass pointer indicates the direction of
the dog's current location.
Fitting the Collar on Your Dog
CAUTION
Do not spray the device or collar with
harsh chemicals including but not limited
to flea or tick spray. Always ensure that
any flea or tick spray that is applied to the
Introduction 5
dog is completely dry before placing the
collar on the dog. Small amounts of harsh
chemicals can damage the plastic
components and collar laminate.
Before you can put the collar on the dog,
you must pair the handheld device and
collar (page 5) , and acquire satellite
signals (page 4).
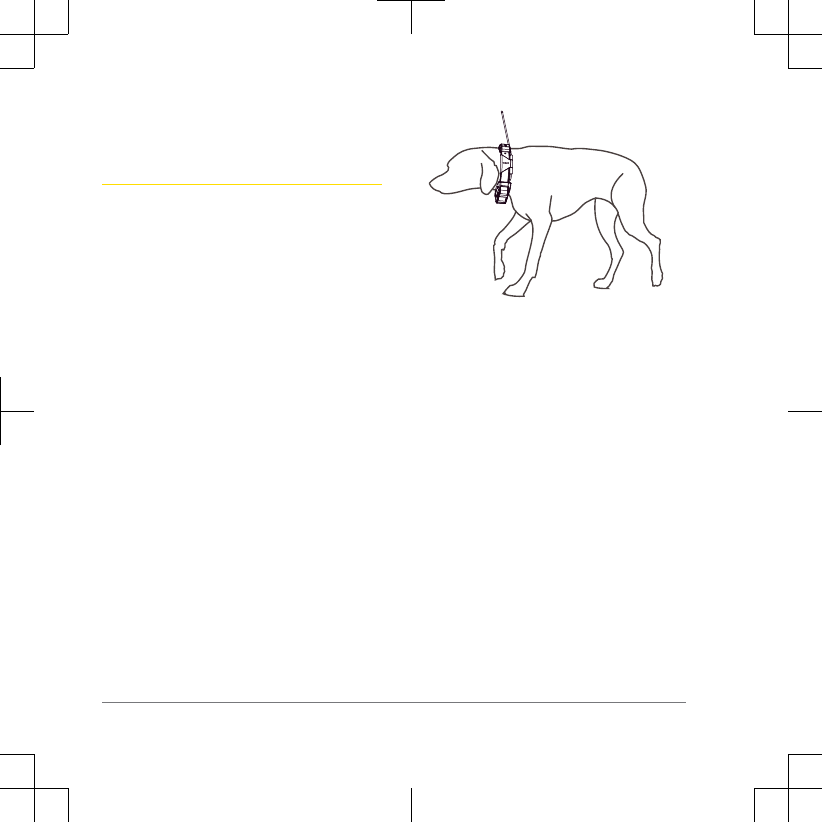
1Position the collar with the VHF whip
antenna pointing up, the GPS antenna
facing up, and the LEDs facing
forward.
2Place the collar around the middle of
the dog's neck.
3Tighten the strap so it is snug around
the dog's neck.
NOTE: The collar should fit tightly and
should not be able to rotate or slide on
the dog's neck. The dog must be able
to swallow food and water normally.
You should observe your dog's
behavior to verify the collar is not too
tight.
4If the strap is too long, cut off the
excess, leaving at least 3 in. (7.62 cm)
to spare.
Calibrating the Compass
NOTE: You must calibrate the electronic
compass outdoors. Do not stand near
objects that influence magnetic fields,
such as cars, buildings, or overhead
power lines.
The device has a 3-axis electronic
compass. You should calibrate the
compass after moving long distances,
experiencing temperature changes, or
changing the batteries.
1Select DOG > MENU.
2Select Calibrate Compass > Start.
3Follow the on-screen instructions.
6 Introduction

Hunt Metrics
Hunt metrics provides a collection of data
that helps you understand the hunting
patterns and behaviors of your dog. The
hunt metrics reset automatically at the
beginning of each new hunt.
Communication with the Collar
You should keep an unobstructed line of
sight between your handheld device and
the dog collar device to produce the best
communication signal. To achieve the best
line-of-sight conditions, you should move
to the highest elevation point in your area
(for example, on the top of a hill).
Best
Good
Poor
Device Information
Support and Updates
Garmin Express™ ( garmin.com/express )
provides easy access to these services for
Garmin® devices.
• Product registration
• Product manuals
• Software updates
• Map, chart, or course updates
Setting Up Garmin Express
1Connect the device to your computer
using a USB cable.
2Go to www.garmin.com/express.
3Follow the on-screen instructions.
Updating the Software
Before you can update the handheld
device or collar software, you must
connect the handheld device or the collar
to the computer.
You must update the software on the
handheld device and collar separately.
NOTE: Updating the software does not
erase any of your data or settings.
1Go to www.garmin.com/products
/webupdater.
2Follow the on-screen instructions.
Viewing Device Information
You can view the unit ID, software version,
regulatory information, and license
agreement.
Device Information 7

Select Setup > About.
VHF Radio Information
This product may be used only on specific
radio frequencies, which vary depending
on the country of use. The handheld
device and the dog device allow the user
to install a different antenna. Changing the
antenna can result in improved radio
performance and higher radiated power.
You must not use the device with a third
party antenna or an antenna not approved
by Garmin. Go to www.garmin.com
/tracking-legal for details about the
performance and radio frequency of this
product, lawful accessories, and power
limits for countries.
Specifications
Astro 430 Handheld Device
Specifications
Operating
temperature range From -20° to 70°C (from
-4° to 158°F)
Charging
temperature range From 0° to 50°C (from
32° to 122°F)
T5 Dog Collar Device Specifications
Operating
temperature range From -20° to 60°C (from
-4° to 140°F)
Charging
temperature range From 0° to 40°C (from
32° to 104°F )
T5 mini Dog Collar Device
Specifications
Operating
temperature range From -20° to 60°C (from
-4° to 140°F)
Charging
temperature range From 5° to 40°C (from
41° to 104°F)
Troubleshooting
My dog collar devices have conflicting
IDs
Each dog you track has its own ID
number. If two dogs within range of the
handheld device have the same ID, the
handheld device warns you of a conflicting
ID signal. Follow the on-screen
instructions to resolve the conflict.
When possible, you should allow the
handheld device to automatically assign
IDs. If necessary, you can manually assign
a new ID number to a dog.
8 Device Information

www.garmin.com/support
1800 235 822 +43 (0) 820 220230
+ 32 2 672 52 54 0800 770 4960
1-866-429-9296 +385 1 5508 272
+385 1 5508 271
+420 221 985466
+420 221 985465 + 45 4810 5050
+ 358 9 6937 9758 + 331 55 69 33 99
+ 39 02 36 699699 (+52) 001-855-792-7671
0800 427 652 0800 0233937
+47 815 69 555 00800 4412 454
+44 2380 662 915
+35 1214 447 460 +386 4 27 92 500
0861 GARMIN (427 646)
+27 (0)11 251 9800 +34 93 275 44 97
+ 46 7744 52020 +886 2 2642-9199 ext 2
0808 238 0000
+44 870 850 1242
+49 (0) 89 858364880
zum Ortstarif - Mobilfunk
kann abweichen
913-397-8200
1-800-800-1020
Garmin®, the Garmin logo, ANT+®, and Astro® are trademarks of
Garmin Ltd. or its subsidiaries, registered in the USA and other
countries. Garmin Express™ is a trademark of Garmin Ltd. or its
subsidiaries. These trademarks may not be used without the
express permission of Garmin.
microSD™ and the microSD logo are trademarks of SD-3C, LLC.
Other trademarks and trade names are those of their respective
owners.
M/N: A02994
© 2016 Garmin Ltd. or its subsidiaries