Garmin GARVHF3 Fixed Mount Class D DSC VHF Marine Radio User Manual 1
Garmin International Inc Fixed Mount Class D DSC VHF Marine Radio 1
Garmin >
Contents
- 1. User Manual 1
- 2. User Manual 2
- 3. User Manual 3
- 4. User Manual 4
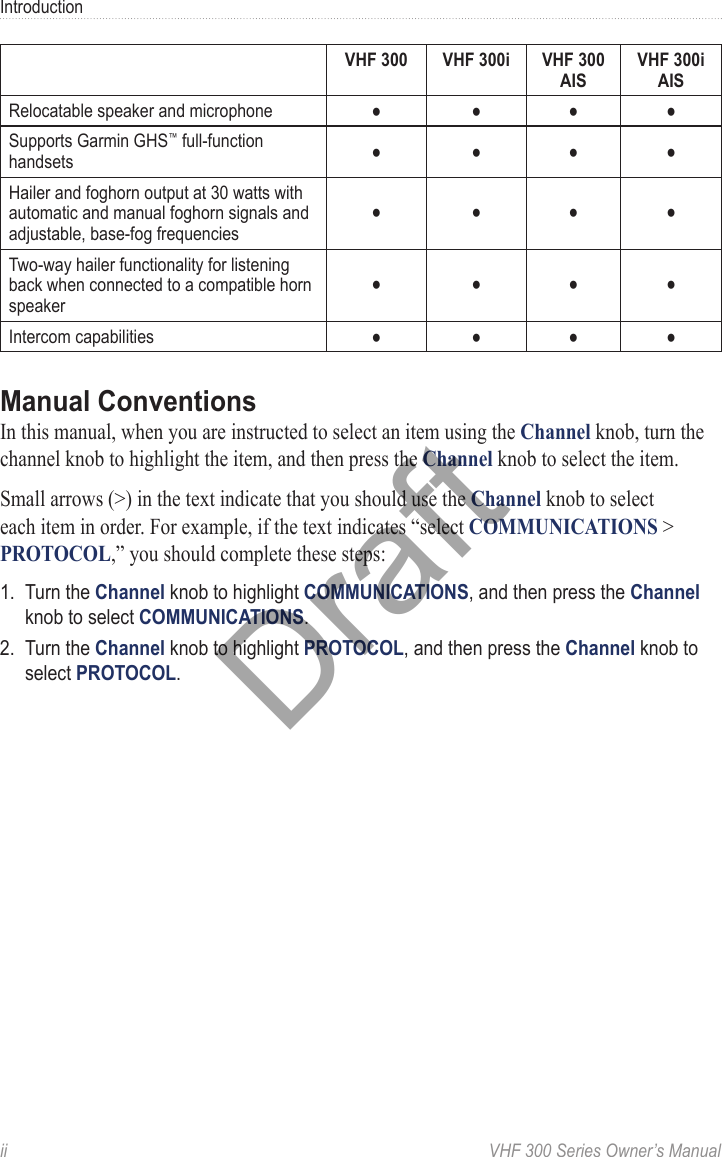
User Manual 1

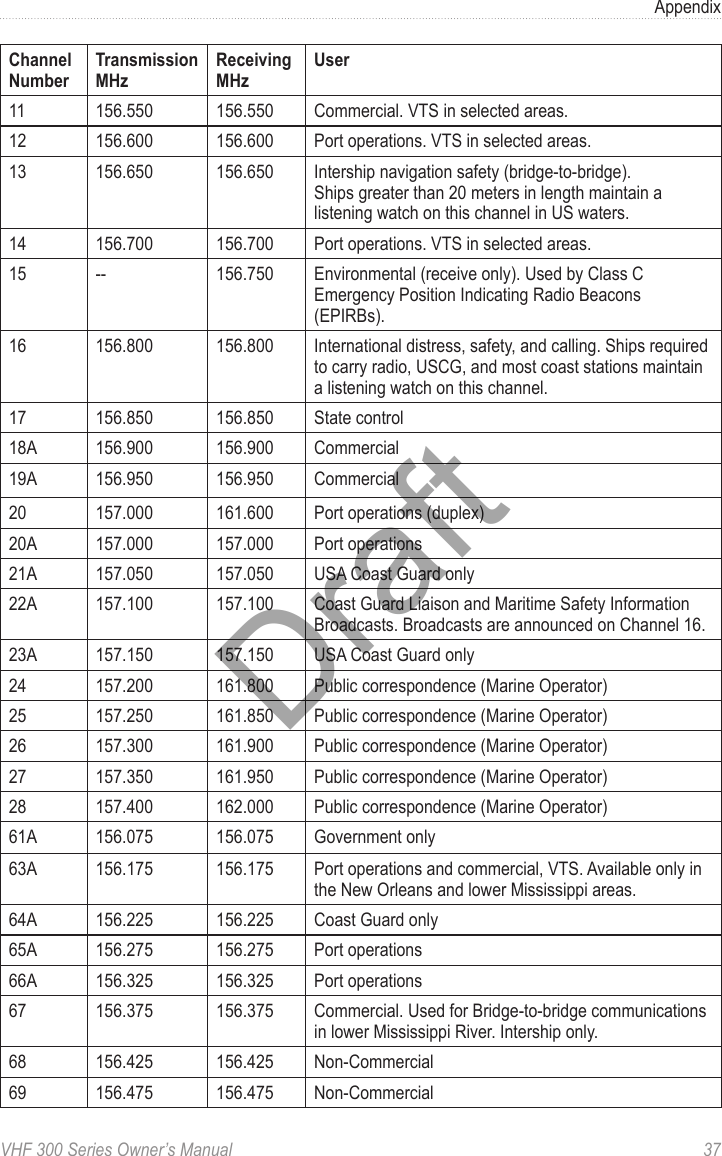
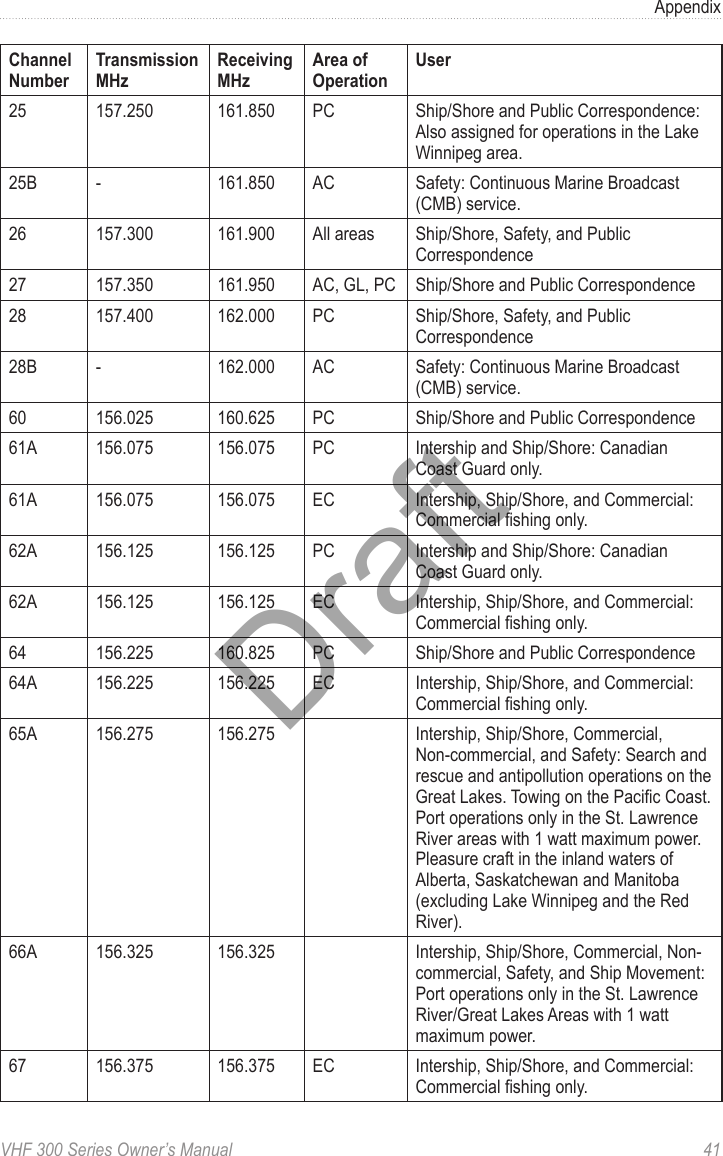
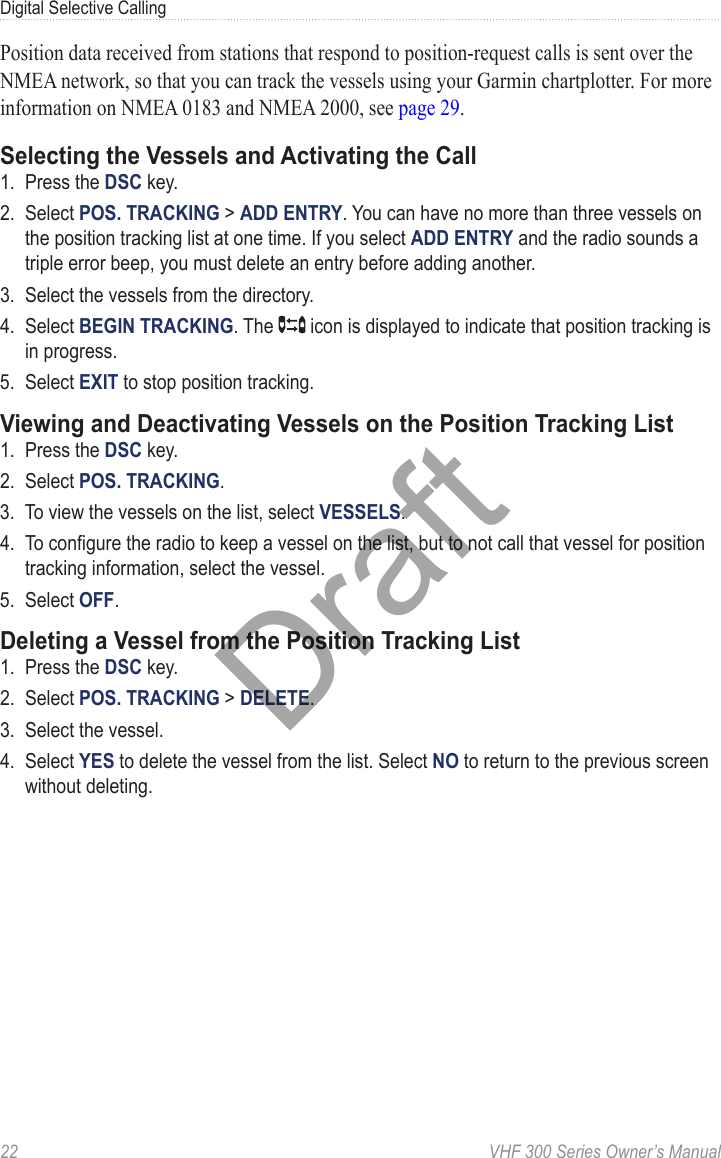
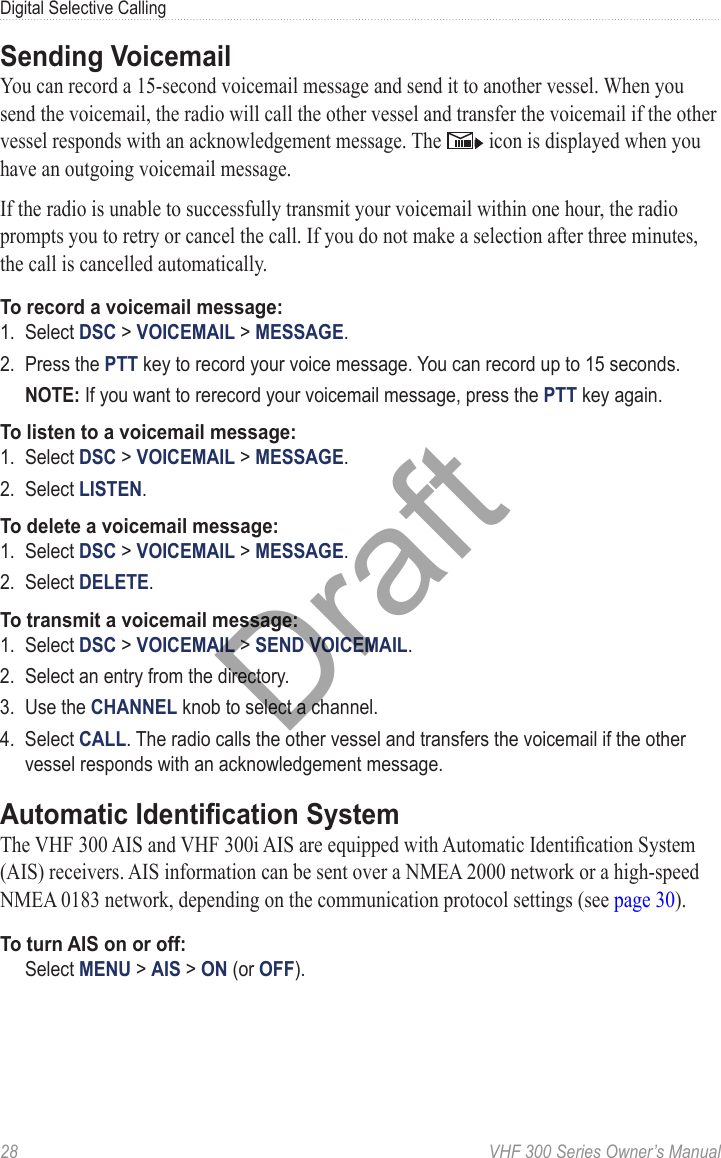
![VHF 300 Series Owner’s Manual 17Digital Selective CallingWaiting for a Distress Call AcknowledgementIf the radio does not receive a distress call acknowledgement, the radio retransmits the distress call at a random time between 3.5 and 4.5 minutes. This process is repeated continually until the radio receives an acknowledgement.Receiving a distress call acknowledgement:1. When the radio receives a distress call acknowledgment, the radio beeps and the screen displays “DISTRESS ACK”. Press any key to turn off the beeping.2. Select ] to view additional information. If the MMSI of the station transmitting the ACK signal is an entry in your directory, the name associated with the MMSI number is indicated on the screen. If not, the screen displays the MMSI number.3. Select ACCEPT.Stopping Automatic Retransmission of Distress CallsTo stop the radio from automatically retransmitting a distress call, select CANCEL. The radio remains tuned to Channel 16. Selecting CANCEL does not communicate to other stations that you no longer have an emergency. Selecting CANCEL only stops the automatic repetition of the call. For information on revoking a distress call, see below.Revoking a Distress CallA DSC distress call is not transmitted until you press and hold the DISTRESS key for at least three seconds. However, if you inadvertently make a DSC distress call or are no longer in distress, it is important to cancel the call immediately by transmitting a voice message to All Stations on Channel 16.1. Select CANCEL to cancel the distress alert.2. Press the 16/9 key. The radio tunes to the Channel 16.3. Press the PTT key on the handset and speak a voice message to cancel the false distress alert. The following is an example of an appropriate cancellation message: “All Stations, All Stations, All Stations, this is ________ (vessel name), MMSI number ________, Position ________ North (or South), ________ West (or East). Cancel my distress alert of ________ (date and time). This is ________ (vessel name), MMSI number ________, Out.”Draft](https://usermanual.wiki/Garmin/GARVHF3.User-Manual-1/User-Guide-1158391-Page-23.png)
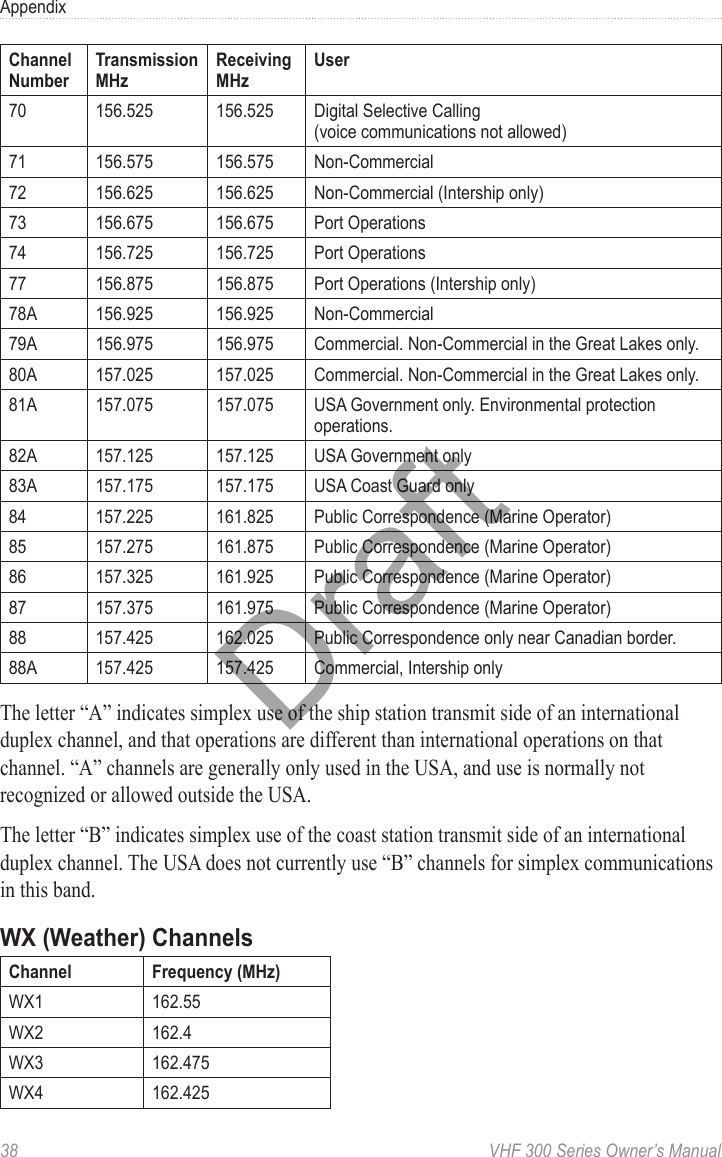
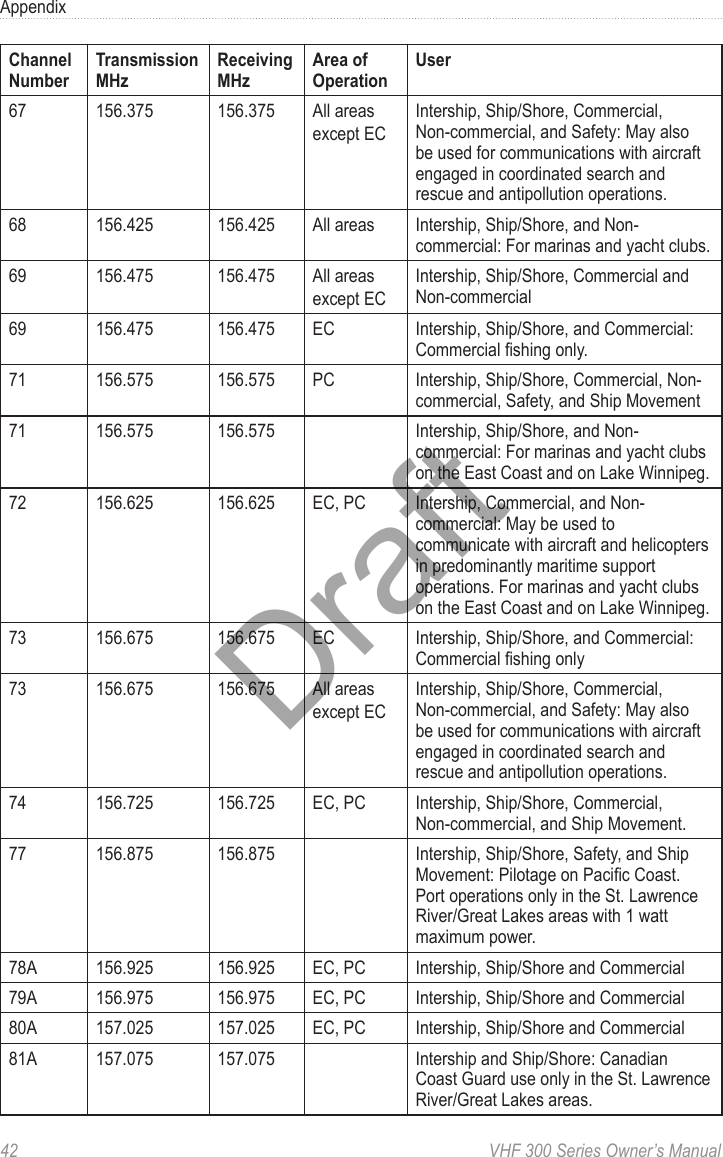
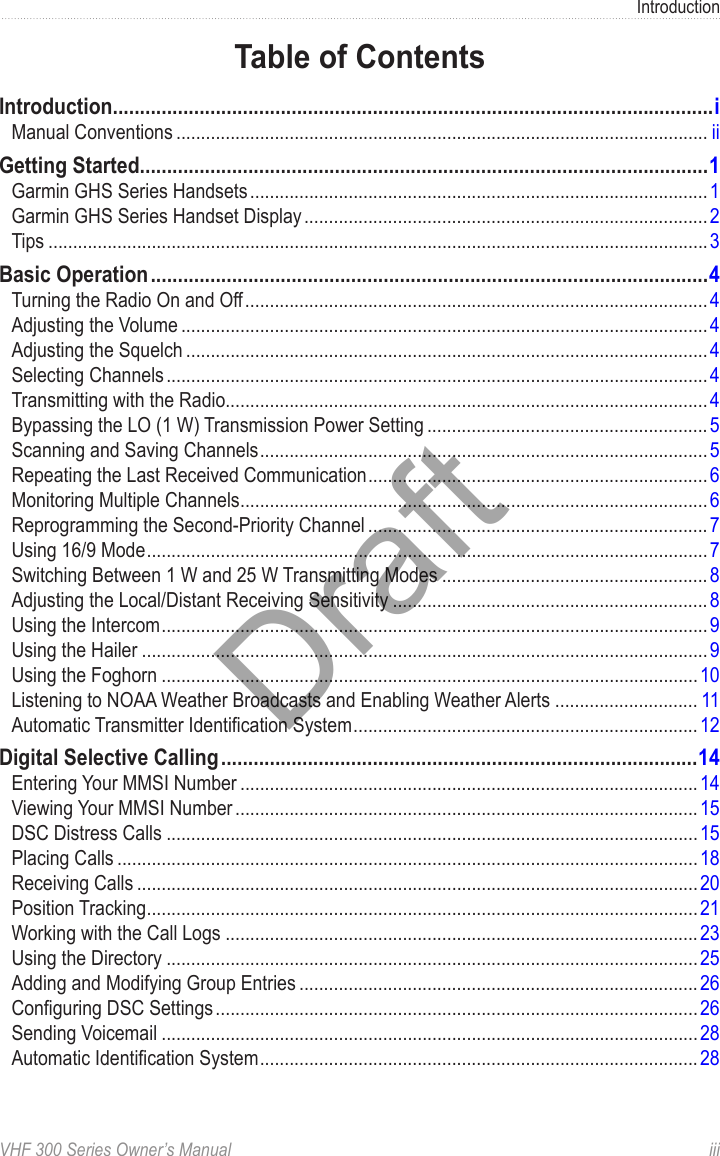
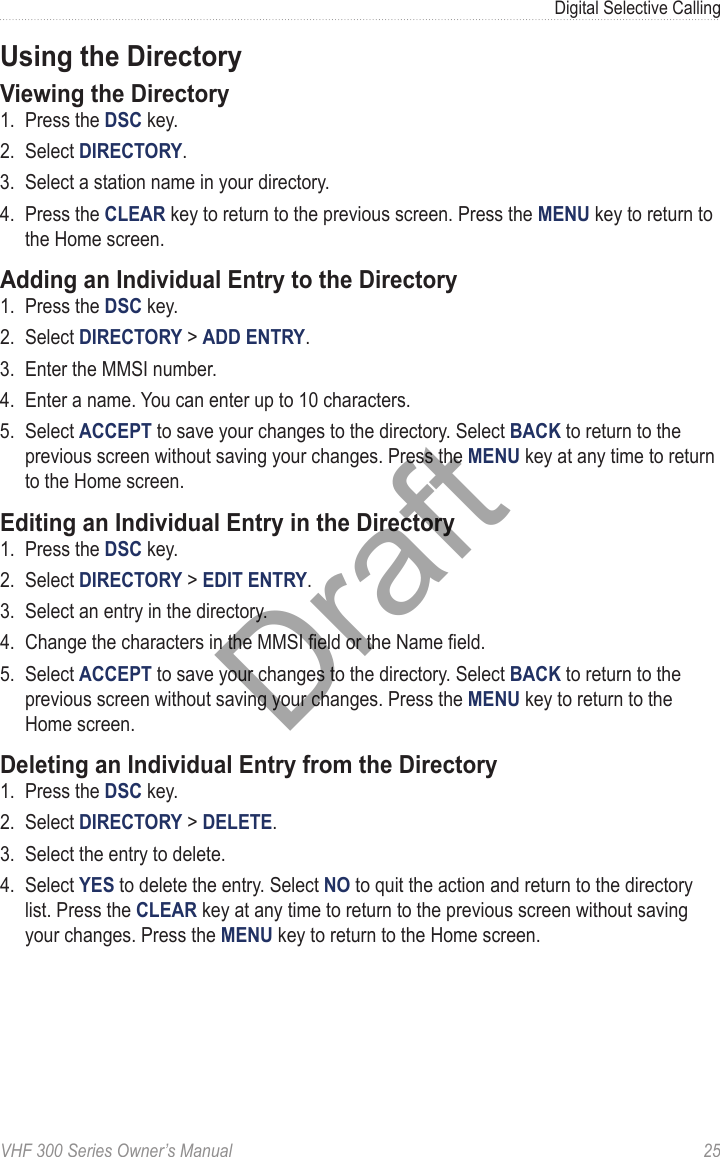
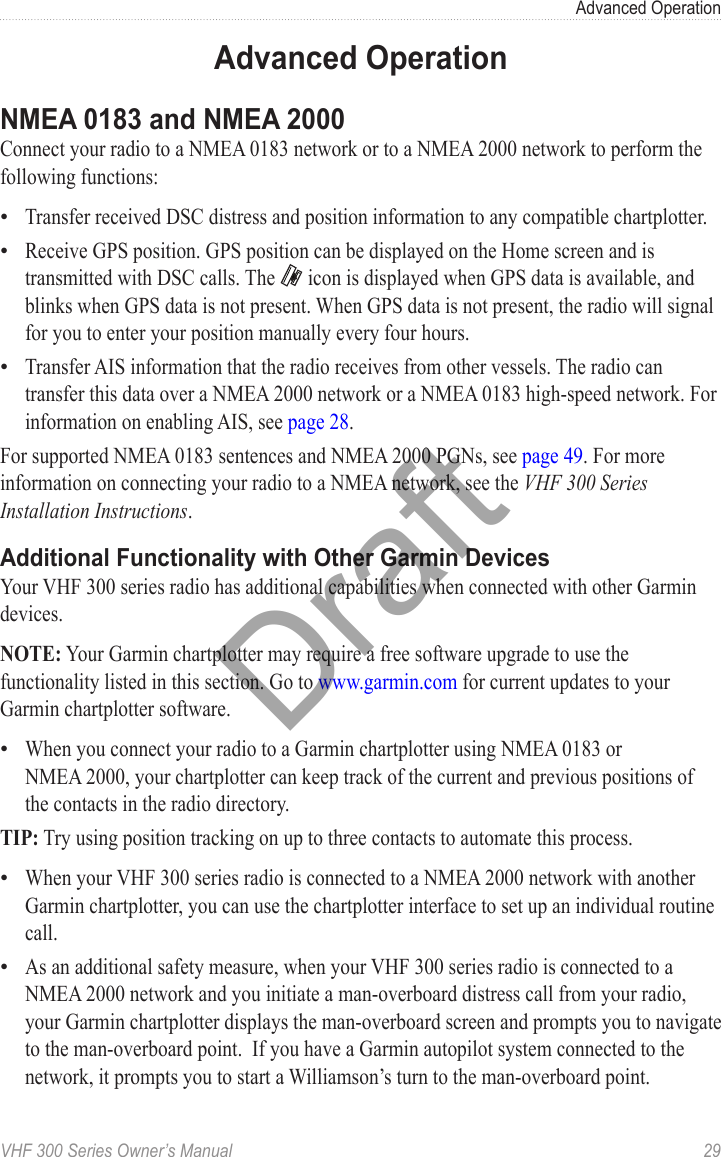
![20 VHF 300 Series Owner’s ManualDigital Selective Calling4. Select ACCEPT when you have entered your MMSI number.5. Select CALL. The radio transmits the call on Channel 70, and then switches to your current working channel. The screen displays “POS REQUEST WAITING FOR ACKNOWLEDGE”.Receiving CallsReceiving Distress Calls and Distress Relay CallsThe radio sends data relative to the call over the NMEA network based on how you have MMSI ltering congured. See page 30 for more information.1. When receiving a distress call or a distress relay call, the screen displays the “DISTRESS” or “DISTR RELAY” and information about the call (for example, the MMSI number and the nature of the distress). Select ] to view additional information.2. If necessary, select OK to tune to Channel 16. See page 27 for more information on conguring the auto channel-change setting. If you select CANCEL, the radio does not change channels and continues to receive on the current channel.3. Select OK to return to the Home screen on the new channel.Receiving All-Ships Urgency Calls1. When receiving an all-ships urgency call, “ALL SHIPS” is displayed on the screen. “URGENCY” is shown as the type of call.2. If necessary, select OK to switch to Channel 16. See page 27 for more information on conguring the auto channel change setting. If you select CANCEL, the radio does not change channels and continues to receive on the current channel.3. Select OK to return to the Home screen on the new channel.Receiving All-Ships Safety Calls1. When receiving an all-ships safety call, “ALL SHIPS” is displayed on the screen. “SAFETY” is shown as the type of call. Select OK to change the channel. If you select CANCEL, the radio does not change channels and continues to receive on the current channel.2. Select OK to return to the Home screen on the new channel.Receiving Individual Routine Calls1. When receiving an individual routine call, “INDIVIDUAL” is displayed on the screen. “ROUTINE” is shown as the type of call. If the channel request is for an invalid channel, “INVALID CH REQUEST” is displayed on the screen.2. If the channel request is for a valid channel, select OK to change channels. If you select CANCEL, the radio does not change channels and continues to receive on the current channel.Draft](https://usermanual.wiki/Garmin/GARVHF3.User-Manual-1/User-Guide-1158391-Page-26.png)
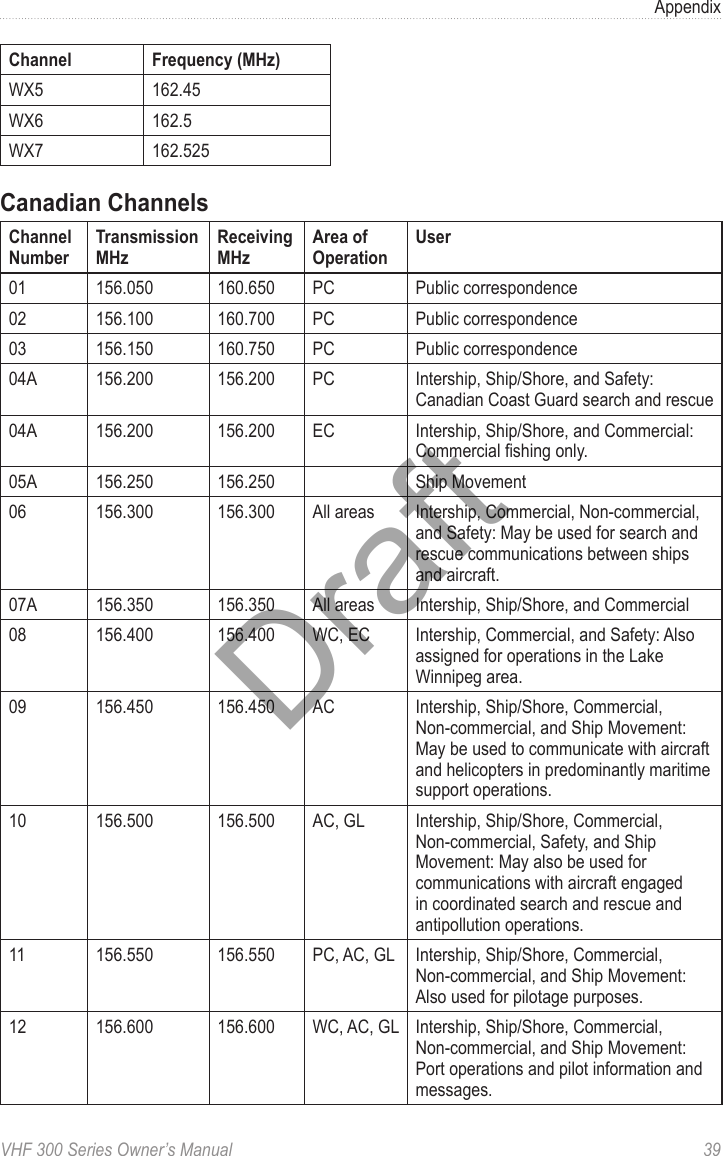
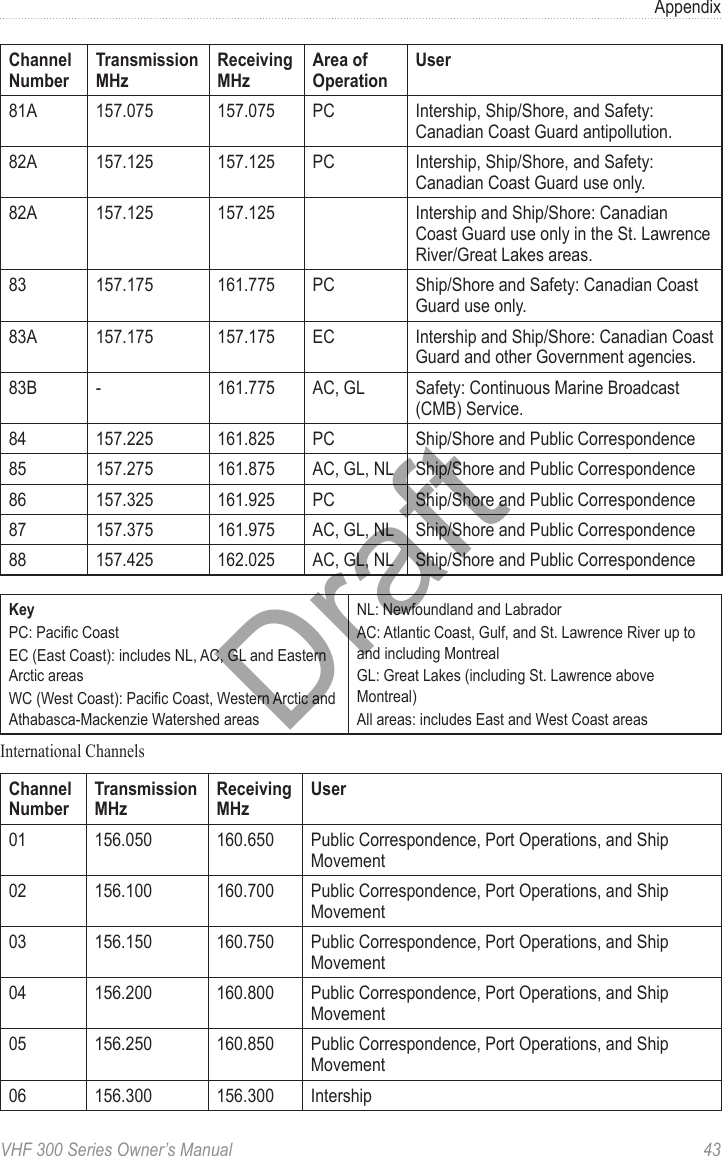
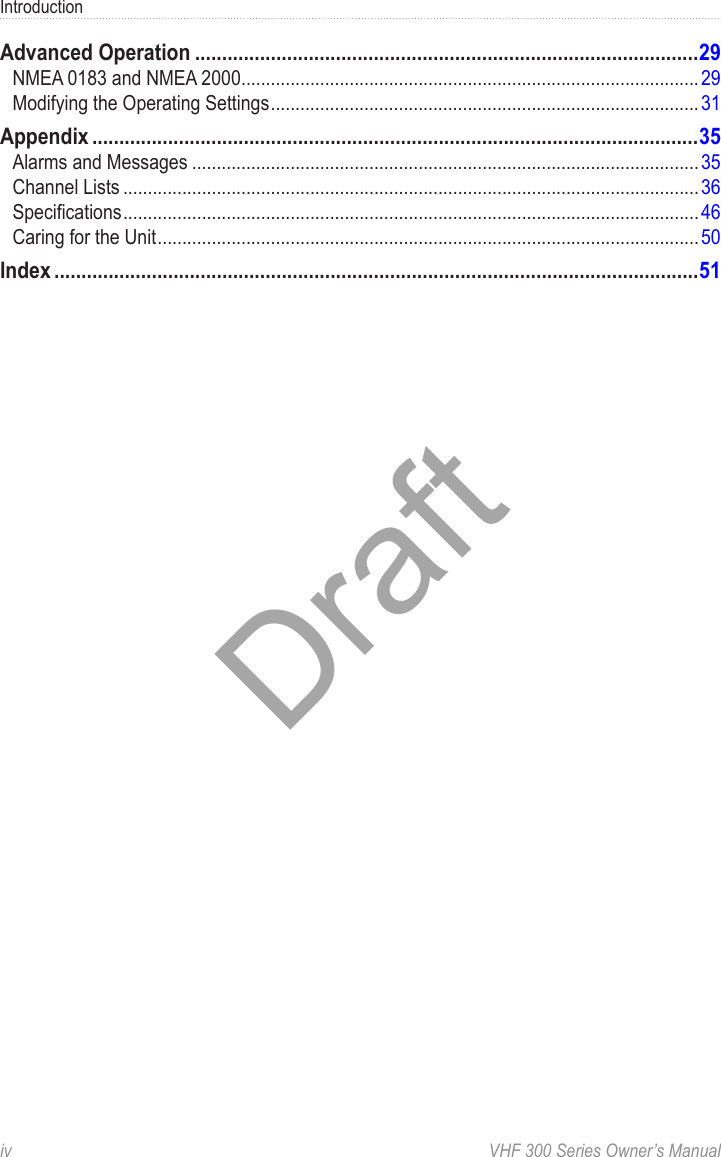
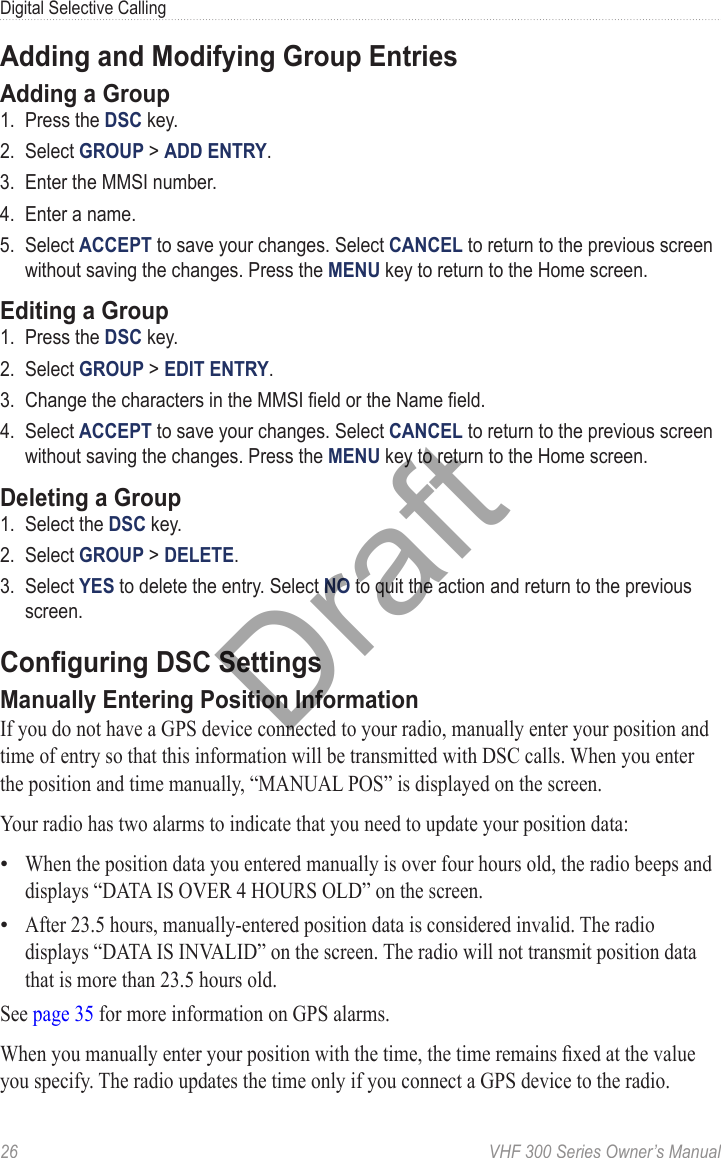
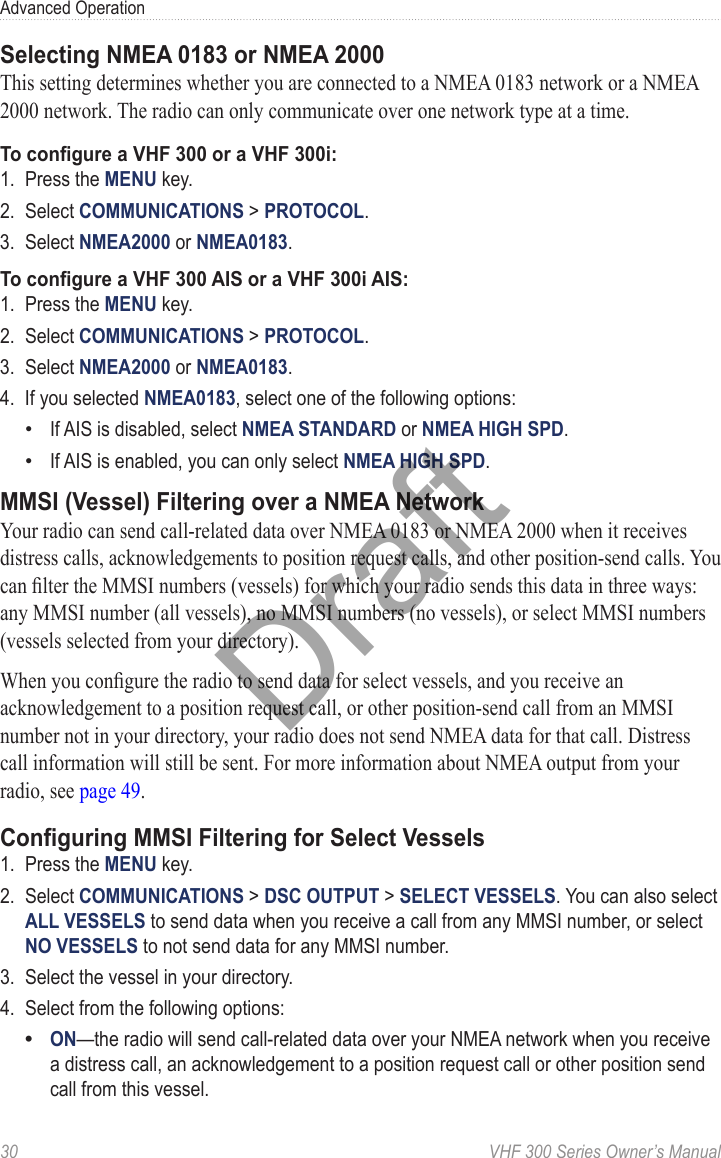
![VHF 300 Series Owner’s Manual 21Digital Selective CallingReceiving Position Request CallsYou can congure your radio reply automatically to incoming position requests, to prompt you to review and approve the incoming requests before replying, or to ignore incoming requests (see page 27 for more information).If you enable automatic position replies, the screen displays “SENDING POSITION CALLING” and sends your position when receiving a position request. After the call has been transmitted successfully, the screen displays “POSITION SENT”.When receiving a position request, “POS. REQUEST FROM [VESSEL NAME or MMSI NUMBER]” is displayed on the screen. If GPS data is available, press OK to send the position reply. If GPS data is not available, the screen displays “NO GPS DATA. UNABLE TO COMPLY”.Receiving Position Send CallsWhen receiving a position send call (position report), “POS. SEND FROM [VESSEL NAME or MMSI NUMBER]” is displayed on the screen with the position data. Select OK to return to the Home screen.Receiving Group Calls1. When receiving a group call, “GROUP ROUTINE” is displayed on the screen. The radio prompts you to change to the requested channel. If the channel request is for an invalid channel, “INVALID CH REQUEST” is displayed on the screen.2. Select OK to change the working channel.3. Select OK to return to the Home screen on the new channel.Position TrackingWhen you enable position tracking, your radio uses interval position-request calls to track up to three vessels. Regulations allow transmission of one position-request call every ve minutes. You can call up to three vessels that your radio will alternate calling at ve-minute intervals. If a vessel does not respond to ve consecutive position-request calls, the vessel is removed from the position-tracking list.The following timetable shows the polling sequence when you have three vessels in the position-tracking list. The radio continues to send position-request calls until you stop position tracking by selecting EXIT.Time 0 minutes 5 minutes 10 minutes 15 minutes 20 minutesVessel Polled Ship 1 Ship 2 Ship 3 Ship 1 Ship 2Draft](https://usermanual.wiki/Garmin/GARVHF3.User-Manual-1/User-Guide-1158391-Page-27.png)
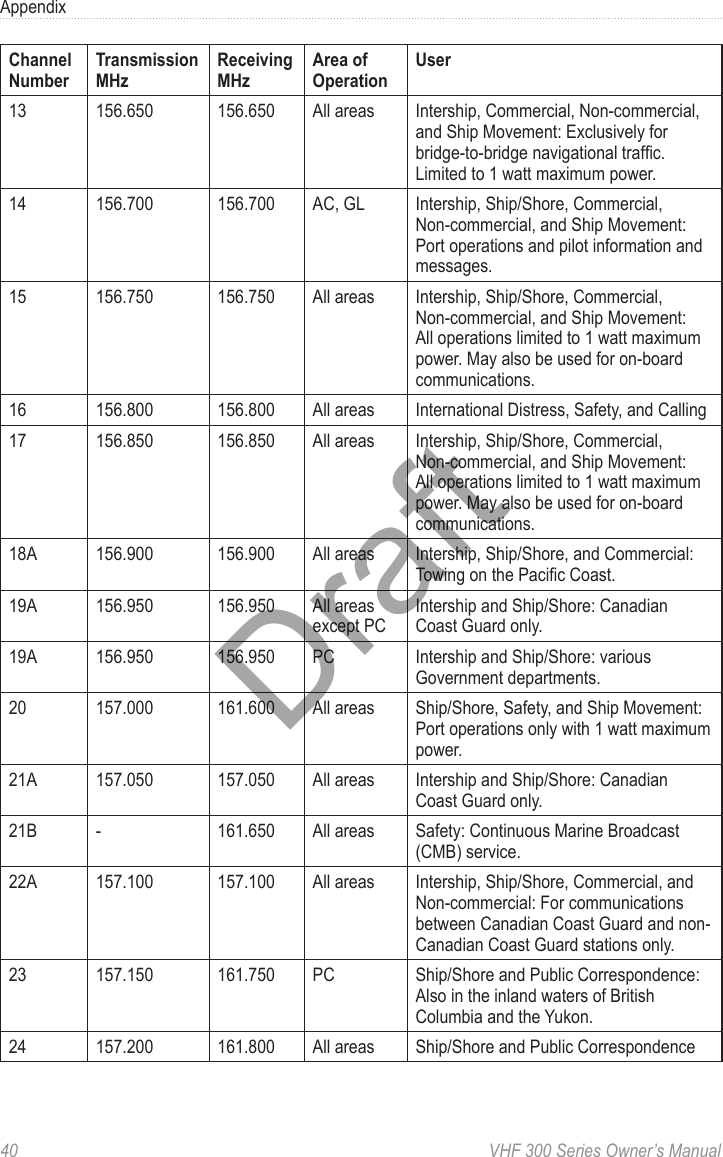
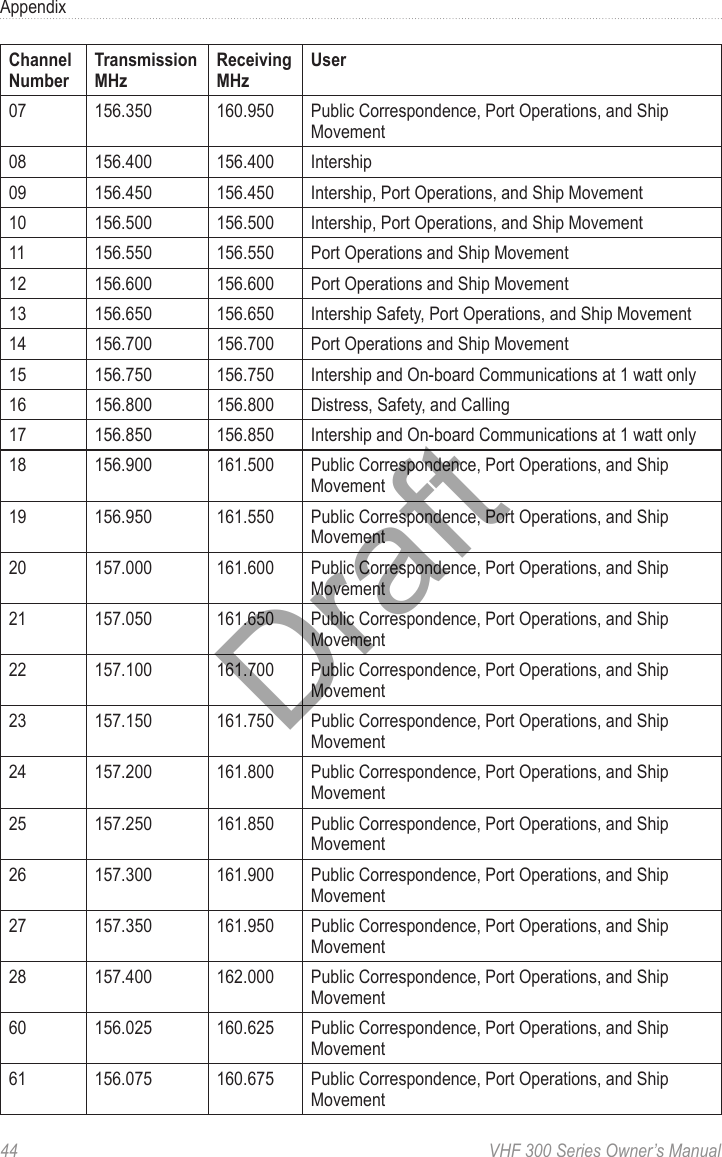
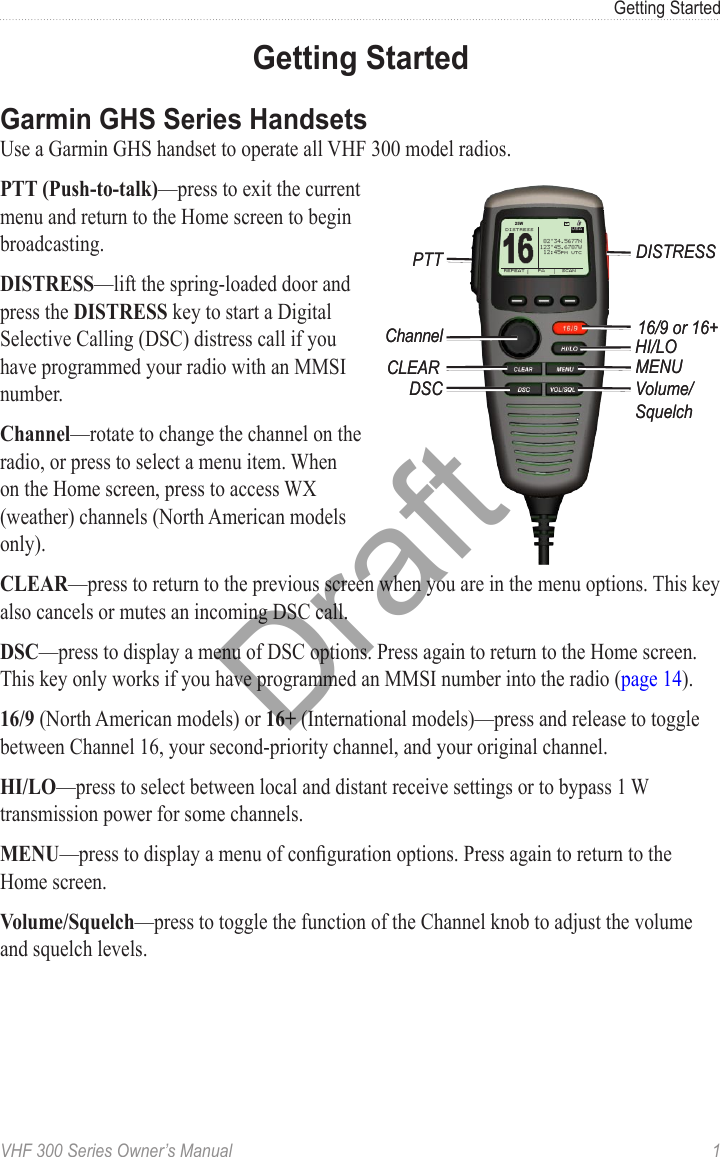
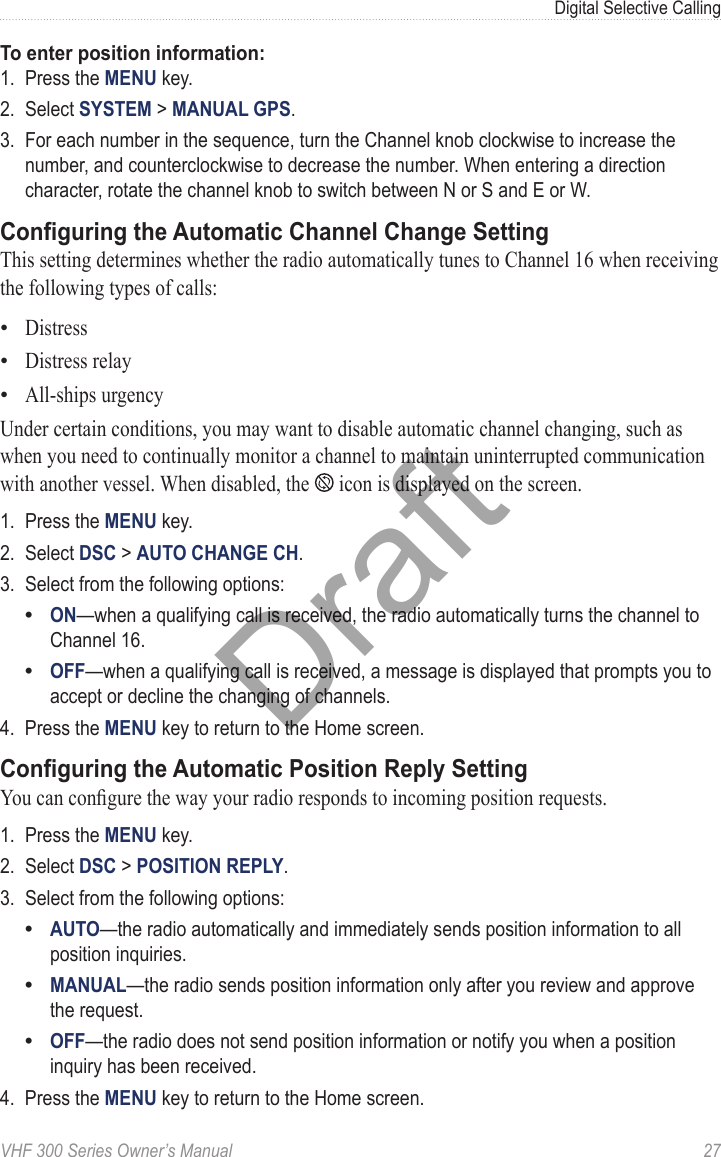
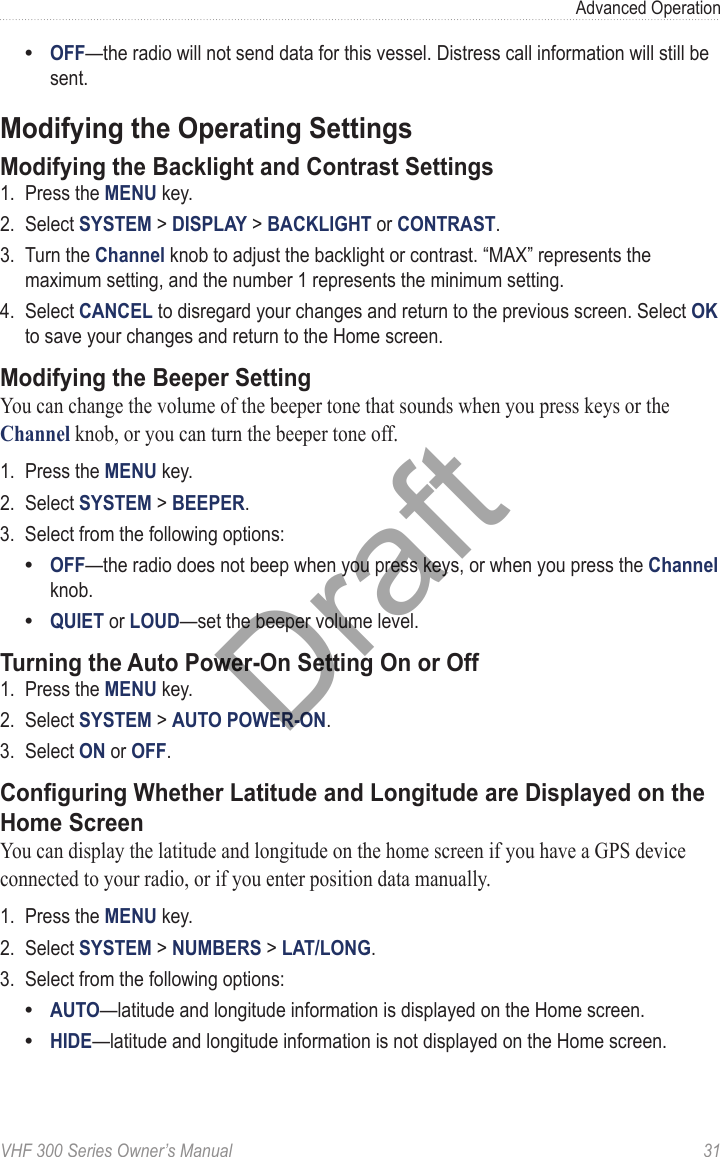
![VHF 300 Series Owner’s Manual 23Digital Selective CallingWorking with the Call LogsFor every DSC call that your radio receives, the calling station, type of call, and date and time of the call are recorded in the call logs. The latitude and longitude of the calling station are also recorded if they are transmitted with a call.There are three categories for calls that are logged: distress, position, and other. The following table indicates where each type of call is located in the call logs.Call Type Call LogDistress DistressDistress relay DistressDistress ACK DistressPosition send PositionPosition request PositionGroup OtherAll Ships OtherIndividual OtherIf you have entered the calling station in your directory, the name of the station is displayed in the list of calls. If not, the MMSI number is displayed. A symbol indicating the station type may be displayed to the left of the station name or MMSI number. The following table indicates the meaning of these symbols and the MMSI number format for different station types.Symbol Meaning MMSI Number Format$Ship station xxxxxxxxxGroup call 0xxxxxxxx&Coastal station 00xxxxxxxViewing the Calls Stored in the Call Logs1. Press the DSC key.2. Select CALL LOG > DISTRESS LOG, POSITION LOG, or OTHER LOG.3. Select the call. Information about the call is displayed on the screen. Select ] to scroll and view all of the information.Draft](https://usermanual.wiki/Garmin/GARVHF3.User-Manual-1/User-Guide-1158391-Page-29.png)
![24 VHF 300 Series Owner’s ManualDigital Selective CallingPlacing a Call from a Call LogAll calls placed from the call log are individual routine calls.1. Press the DSC key.2. Select CALL LOG > DISTRESS LOG, POSITION LOG, or OTHER LOG.3. Select the MMSI number or the station name.4. Select CALL. The screen indicates individual routine as the call type.5. Select the channel on which you want to communicate. The radio transmits this request with your call. See page 19 for information on selecting a channel.6. Select CALL.Saving a Vessel to the Directory from a Call Log1. Press the DSC key.2. Select CALL LOG > DISTRESS LOG, POSITION LOG, or OTHER LOG.3. Select the MMSI number. Select a station name if you want to edit the name in the directory.4. Select SAVE.5. To edit the name, turn the Channel knob to change the character. Press the Channel knob to select the character and move to the next character in the name. Select ab to return to a previous character. You can enter up to 10 characters.6. Select ACCEPT to save your changes. Select CANCEL to exit the edit screen without saving your changes.Deleting a Call Log Entry1. Press the DSC key.2. Use the Channel knob to select CALL LOG > POSITION LOG, DISTRESS LOG, or OTHER LOG.3. Use the Channel knob to select the MMSI number or station.4. Select ].5. Select DELETE.6. Select YES to delete the call. Select NO to cancel this action and return to the previous screen.Draft](https://usermanual.wiki/Garmin/GARVHF3.User-Manual-1/User-Guide-1158391-Page-30.png)

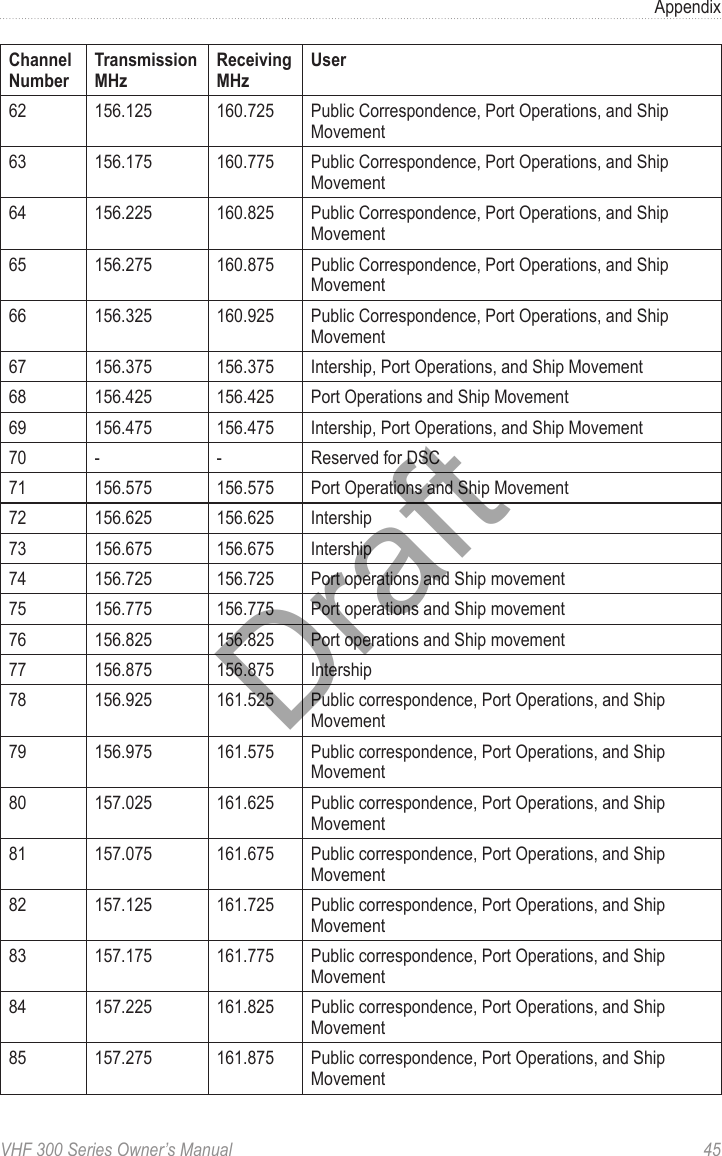
![36 VHF 300 Series Owner’s ManualAppendixSelect SET to enter a new position. See page 26 for more information on manually entering position data.Position TrackingAfter ve consecutive failed attempts to request position information from a vessel, “NO POS FOR [VESSEL NAME]” is displayed on the screen.Select RETRY to reattempt the position request.Select REMOVE to discontinue calling the vessel. When you take no action after three minutes, REMOVE is selected automatically.Channel ListsThe USA, Canadian, and International channel lists provided in this Appendix are for reference only. It is the responsibility of the radio operator to ensure that channels are used correctly according to local regulations.USA ChannelsFor the latest information on USA channels, visit www.navcen.uscg.gov/marcomms /vhf.htm. Also visit the Federal Communications Commission’s Marine VHF Radio Channels page at http://wireless.fcc.gov/services/index.htm?job=service _bandplan&id=ship_stations. The FCC page does not include frequency information, but has more complete information on the use of the channels.IMPORTANT: Boaters primarily should use channels listed as non-commercial. Use Channel 16 to call other stations or for distress alerting. Use Channel 13 to contact a ship when there is danger of collision. All ships of length 20 m or greater are required to guard VHF Channel 13, in addition to VHF Channel 16, when operating within USA territorial waters. Users may be ned by the FCC for improper use of these channels.Channel NumberTransmission MHzReceiving MHzUser01A 156.050 156.050 Port operations and commercial, VTS. Available only in the New Orleans and lower Mississippi areas.03A 156.150 156.150 Government only05A 156.250 156.250 Port operations or VTS in the Houston, New Orleans, and Seattle areas.6 156.300 156.300 Intership safety07A 156.350 156.350 Commercial8 156.400 156.400 Commercial (Intership only)9 156.450 156.450 Boater Calling. Commercial and non-commercial.10 156.500 156.500 Commercial•••Draft](https://usermanual.wiki/Garmin/GARVHF3.User-Manual-1/User-Guide-1158391-Page-42.png)