Ge Appliances Jbp45Gr Users Manual 1.0
JBP55GR to the manual d3ca3982-8996-4bda-a398-6eb98de8e98f
2015-01-23
: Ge-Appliances Ge-Appliances-Jbp45Gr-Users-Manual-256883 ge-appliances-jbp45gr-users-manual-256883 ge-appliances pdf
Open the PDF directly: View PDF ![]() .
.
Page Count: 34
HA02~3@~
........................................huem~
z............................uo~yimcqle!.ia~pue p3popy
z..................................uo!le.iyqfk~ awe!ldd~
Ss”””””””””””””””””””
SW3~AcM3$JMNMFMSU4C$0
Ls.......................................................... 6uy3Aa7
0s“..”.”-””-.s”””””CO””””””
a6ue~ aq~Japun tiu!.IooH
I.S ‘6Z %..................................aopa~ d!~-!puv
1.S-6Z.................................. kmg~e~ue~st!!g
W.............................wwY3n@v Jelsoumql
m‘Lz..................................... ~aMe4~f3f5e403~
9Z ......................................................wa~ uaAO
9Z...............................................leAoLua~Joocj
!lZ..........................................................doqooa
Elz.............................................ap!ng fh~ueal~
82-s2..’....””.”’”””””.”.pm am?~
92‘olJ......................................W@~Tamq.m~
cl ‘Zi...................................sd~l a.ieAAyoo~
S1 ‘Zt ....................................ap!ng fhpjoo~
Oi.........................................sf3u!~a~IOWOO
SI.-Q1 ................................... f3u!qoo~aaej.m~
17Z-zz---.-s suo~ymilsu~!hqueala-+[as
61-’81 ‘.....--....o-.”ap~n~fhJpseoH‘fh!lseo~
L1.‘9............................................. fiu~leaqa~d
Lz %1.
‘m.s-...o-....i-.luawaoelda~qln~ :w@!T
6‘8 ......................................sfki!uas 10J~UO~
8................................................Iaued jOJ~UO~
!.2’02..”.””...””..”.-””’”
apyg &l!~~OJ~‘6U~l!OJ~
L1-sl .............”.”..”.”..ap!ng ~u!ye~ ‘f?iu!qe~
bi%-ti~‘6‘8 ............................................... uaAc)
L‘9........................................................sa.mlea~
9.........................................sd!~fhJp’@@JaI,i~
6..............................................Jat.u!Jpue qaol~
11................................................. sd!~f%l!UUE?~
(z ‘b..........................................l!o~ u.mu!u,yyv
SMhJ
.-
—
—
c.
It is intendedto helpyou You’llfindthemon alabel
operateandmaintainyournew behindtherangedooror behind
rangeproperly. thestoragedrawer.
Keepit handyfor answersto Thesenumbersare alsoon the
yourQuestions. ConsumerProductOwnership
d
Myou’don’tunderstandsomething RegistrationCardthatcamewith
or needmorehelp,write(include yourrange.Beforesendingin
yourphonenumber): thiscard,pleasewritethese
numbershere:
ConsumerAffairs
GEAppliances
AppliancePark Model Number
Louisville,KY40225
Serial Number
Usethesenumbersin any
correspondenceor servicecalls
concerningyourrange.
If ‘you. lreceived
-.
arange...
m
Immediatelycontactthedealer(or
builder)thatsoldyoutherange.
savetimeand.money. .
Beforeyou. Ireql.mw
Serticee@
e.-
ChecktheProblemSolverin the
backof thisbook.It listscausesof
minoroperatingproblemsthatyou
cancorrectyourself.
Toobtainservice,seethe
ConsumerServicespagein the
backof thisbook.
We’reproudof ourserviceand
wantyouto bepleased.If for some
reasonyouarenothappywiththe
serviceyoureceive,herearethree
stepsto fol~owforfurtherhelp.
FIRST’,contactthepeoplewho FDLW.JX,if yourproblemis still
servicedyourappliance.Explain not resolved,write: ,
whyyouare notpleased.In most MajorAppliande~onsumer
cases,thiswillsohe theproblem. ActionPanel
NEXT,if youare stillnotpleased, 20 NorthWackerDrive
writeall thedetails-including Chicago,IL 60606
yourphonenumber—to:
Manager,ConsumerRelations
GEAppliances
AppliancePark
Louisville,KY40225
.
,, .,
,7
,.
Tk fibeigkiss insulationinsdf-ckxm Ovensgi’w%,
Offavery filial]amountd?
meCdh’1’ia safe Wahixand‘m&
ActrequirestheGovernord’
California
to aMofsubstmces knownto thedeahgcycle.13xposwecanibe by
theNatetocause birthdefects orckbfx “venting‘withml qxm window or wing a
ham, am!requires 13t3shNxu3eS1%Warn dfanorI’KixL
pmmtid exposuretoW3d’1. @
+.+
J.e*-
:x
Bit
+&..&
Iq
f
‘,,.=-.-/
,..—.
”.m — .—.
a.m. —. .—.——.
When using ekxtrical appliances,basic safety
precautionsshotddlx followed, includingthe
following:
eUS~ this d-g for1$s useas
described.inthismanual.
@~~ $u~ your is ~~~
byaqualifiedtechnicianinaccordance
withtheprovidedinstallationinstructions.
~~$j~9~ torepairorreplaceanypartQf
yourI-’mge l.mks$itis
in this book,AHotherservicingshouldberefereed
toaqualifiedtechnician.
~my service,
THE RANGE ATI’m
PANELBY
ItEmv’mvmGTHEFUSECR !WWTCHINGOFF
THECIRCUITBREAKER.
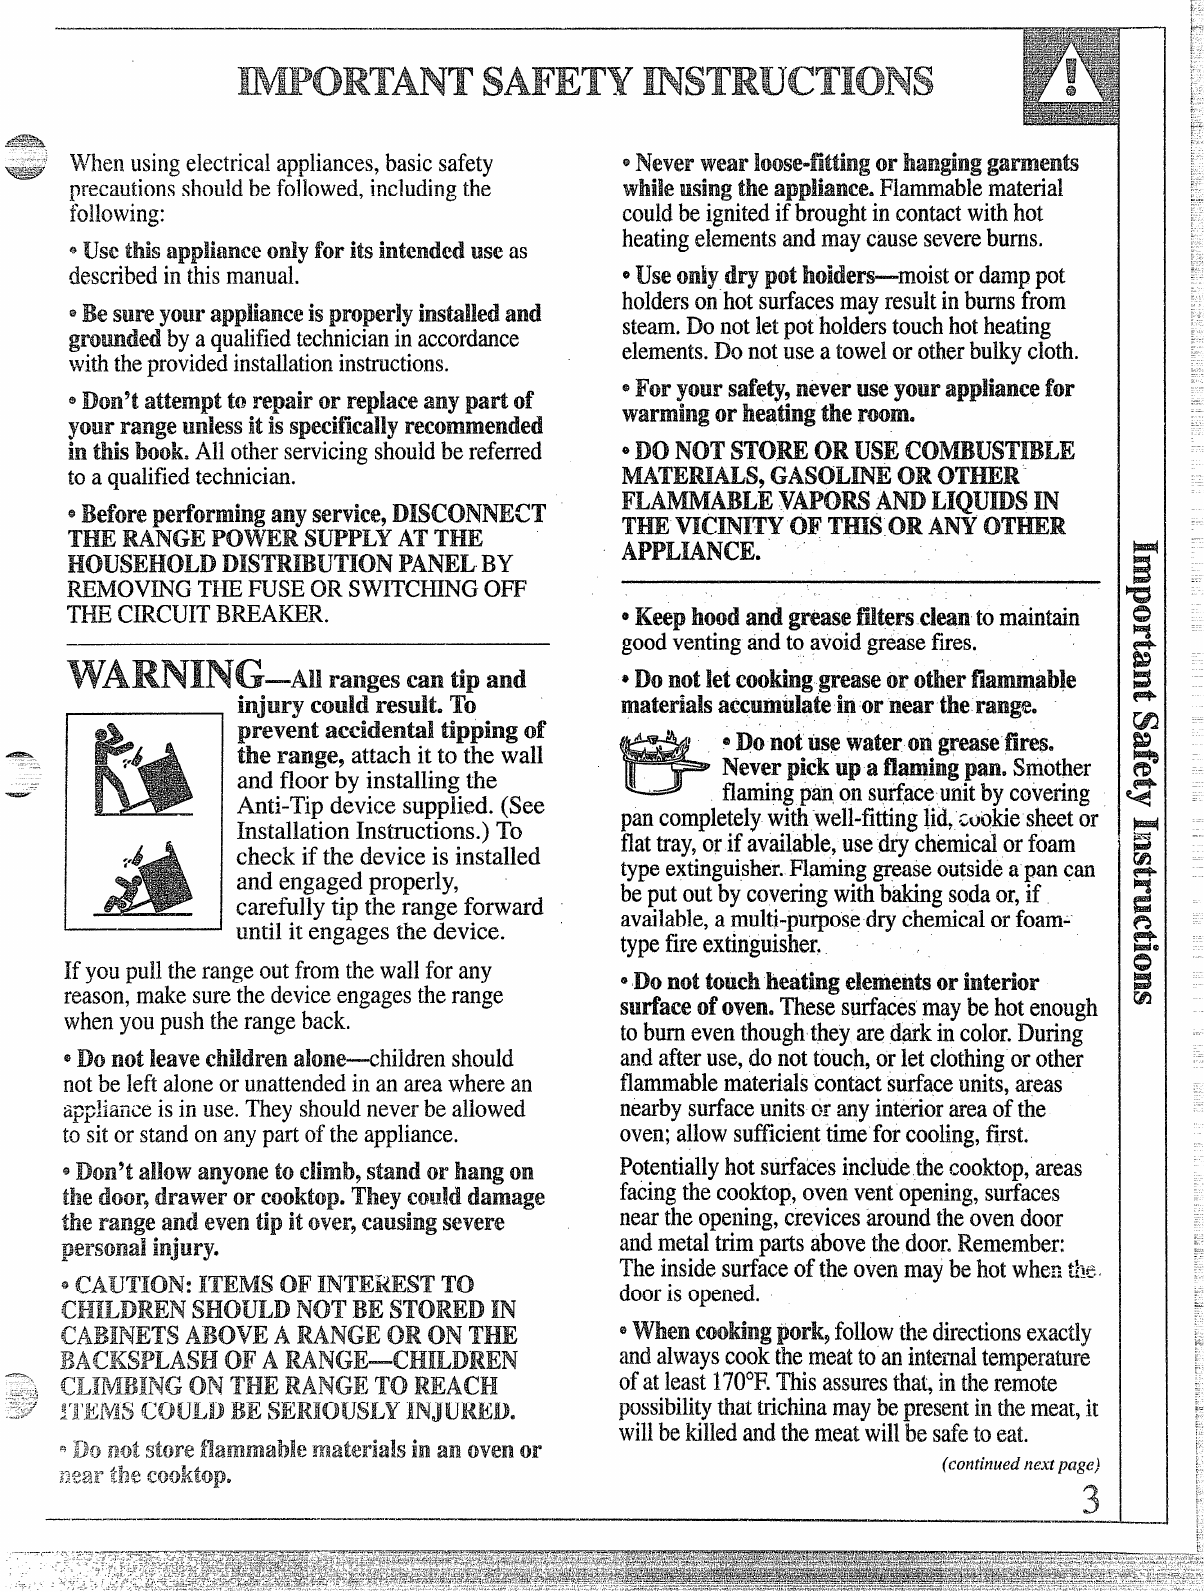
rangescantipim~
——
-.
—
L
injurymumr’esdt. To
prevent d’
the.nmge9 attach it to the wall
and floor by installing the
Anti-Tipdevice supplied.(See
InstallationInstructions.)To
check if the device is installed
and engagedproperly,
carefu}lytip the range forward
until it engages the device.
Ifyoupulltherangeoutfromthewallforany
~eason,makesurethedeviceengagestherange
whenyoupushtherangeback.
s~~ ~~~ ]gi~~~ ~~~~~—chi~dren s~~~~d
notbe leftaloneorunattendedinan areawherean
appliaxtiis in use.Theyshouklneverbeallowed
tositorstandonanypartoftheappliance.
“(yilfyrlolw: rrEMs (II? TO
NOT”BE IN
KzmABmlGONTEIERANGETo
~~@$@rWhf%?j?j’ or
whik usingthe Fkimable material
couldbeignitedif broughtincontactwithhot
heatingelementsandmaycausesevereburns.
eU$eOniydry pot hokkm++noistordamppot
holdersonhotsurfacesmayresultinburnsfrom
steam.Donotletpotholderstouchhotheating
elements.Donotuseatowelorotherbulkycloth.
@lj’oryour !%&@nt?veruseym.w’ f~~
or the Iroom.
~DO~~T fj~ ~~~OR
Am m
~m mORANY
oKeep and grease dean to mtirmin
goodventingandto avoidgreasefires.
$~~ not let cookinggreaseor other
in.or !m%31rtherangoe
~~~ ~Q~tisewateron’gK%MM?filx?se
I!WWIWpickup apan. Smother
flamingpaqonsurfa;e@bycovering
pancompletelywith“well-fitting~id,amkie sheetor
flattray,orif available,usedrychemicalorfoam
typeextinguisher.Flaminggreaseoutsideapancan
beputoutbycoveringwithbakingsodaor,if
available,amulti-purposedrychemicalorfoam--
typefireextinguisher.
@!~~~~~~@~& or
surfaceof’oven.Thesesurfacesmaybehotenough
tobumeventhoughthey aredarkincolor.During
andafteruse,donottouch,or letclothingorother
flammablematerialscontactsurfaceunits,areas
nearbysurfaceunitsoranyinterkkareaofthe
oven;allowsuf!licienttimeforcooling,first.
Potentiallyhotsurfabesincludethecooktop,areas
fadingthecooktop,ovenventopening,surfaces
neartheopening,crevicesk-omittheovendoor
andmetaltrimpa~~sabovethedoor.Remember:
Theinsidesurfaceoftheovenmaybehotwhentk
dooris opemxl.
~p0Fk9followthedirectionsexactly
(andalwayscookthemeattoani~temaltemperature
ofatlsastI’70W’.Thisassuresthat,intheremote
possibilitythattrichinamaybepresentinthemeat,it
willbekilledandthemeatwillbe safetoeat.
(continuedmzttpage)
6
3
——..,..”——..— ——....—-————
.
Owm
@p~~~gyOyem in whileoven
iscookIfshelves mustbehandledwhenhot,donot
Mpotholdercontactheatingunitsin theoven.
ew-henW&Rg tlr bagshKnwmy
followthemanufacturer’sdirections.
~Do nott,lsg?youroventodry If
overheated,theycancatchfire.
aDOIIOf USeWVWWBfbr astorage ma Itemsstored
in anovencanignite.
~‘Donotdean door gasket. ThedooIgasket is
essentialforagoodseal.Careshouldbetakennot
torub,damageor movethegasket.
~~Q q~~~~e gj~~~~~~eNoco~~erci~~oven
cleanerorovenlinerprotectivecoatingof anykind
shouldbeusedin oraroundanypartoftheoven.
5C.Mw’i!only part$ Med inthis useand
cm%!Book
,..—-....----------
units
%~
Use properpan@zx+This
<applianceis equippedwithdifferent
~sizesurfaceunits.Selectcookware
havingflatbottomslargeenoughtocoverthe
surfaceunitheatingelement.Theuseofundersized
cobkwarewillexposeaportionoftheheating
elementtodirectcontactandmayresultinignition
of’clothing.Properrelationshipofcookwareto
burnerwillalsoimproveefficiency.
~piJeveFkMVesurfaceunits at
heat settings.Boilovercausessmokingandgreasy
spilloversthatmaycatchonfire.
*Besuredrip pansand ventawenotCrowedand
are in.place.Theirabsenceduringcookingcould
damagerangepartsandwiring.
8D0~9tU,KW Mto linedrip pans or
anywhereintheovenexceptasdescribedinthis
book.Misusecouldresultinashock,firehazardor
ciwiiagetotheIange.
~only e(i!rtain types of gkMxJ9
earthenware mother glared are
for dxddq service; othersmaybreak
becauseofthesuddenchangeinter.perature.See
sectiononSurfaceCookingforsuggestions.
~T’ominidze the of bum+ ignitionof
flammablematerials,andspillage,thehandleof a
containershouklbeturnedtowardthecenterofthe
rangewithoutextendingovernearbysurfaceunits.
~A&aysIhll=nsUdkX!I.M%ittOOl?l?b&3N
txmkwam
~Keep an eye on foods being fried at HI or
heat settings.
UITo avoid the of abum or electric
shodi9 be certain that the for all
surface units mat OFIY and Mcoils
awecod before to Wor the
e~~~9t ~~s~~~ ~~~a~~
mm%puttheminaDonot
the armsinw? own,
@foodsareI.mderthehowi~turn
thefan(g. me flu%,if may
thefhmee
Qf(J(j&for lb asdryas
Frostonfrozenfoodsormoistureonfreshfoods
caflcausehotfattobubbleupandoversides
ofpan.
————
.—— —,—
(Corltinwd)
frying.Fillingthepan too Ml offatcancause
spikwerswhenfoodis added.
,.
@
~$edeep fat ~~ B
preventoverheatingfatbeyondthesmokingpoint. W
g
in stirtogetherbeforeheating,orasfats
meltslowly.
mG
ovencooking surface
~Preheatovenonlywhennecessary.Mostfoodswill ~Use cookwareof medium-weightaluminum?with
cooksatisfactorilywithoutpreheating.If youfind tight-fittingcovers,andflatbottomswhichcompletely
preheatingis necessary,watchtheovendisplay,and covertheheatedportionof the surfaceunit.
putfoodin ovenpromptlyafterthe selected ~Cookfreshvegetableswithaminimumamountof
temperatureis displayedandtheovensignals. waterin acoveredpan.
~Alwaysturnovenoff beforeremovingfood. ~Watchfoodswhenbringingthemquicklyto cooking
~Duringbaking,avoidfrequentdooropenings.Keep temperaturesat highheat.Whenfoodreachescooking
dooropenas shortatime aspossibleif it is opened. temperature,reduceheatimmediatelyto lowestsetting
~Cookcompleteovenmealsinsteadofjust onefood thatwillkeepit cooking.
item.Potatoes,othervegetables,and somedesserts ~Useresidualheatwithsurfacecookingwhenever
willcooktogetherwith amain-dishcasserole,meat possible.Forexample,whencookingeggsin their
loaf.chickenor roast.Choosefoodsthat cookat the shells,bringwaterandeggsto aboil,thenturnto
.
sametemperatureandin approximatelythe same OFFpositi~nandcoverc~okwarewithlidto complete
amountof time. thecooking.
@Useresidualheatin the ovenwheneverpossibleto
finishcookingcasseroles,ovenmeals,etc. Also add
roHsor precookeddessertsto awarmoven,using
residualheatto warmthem.
5
r
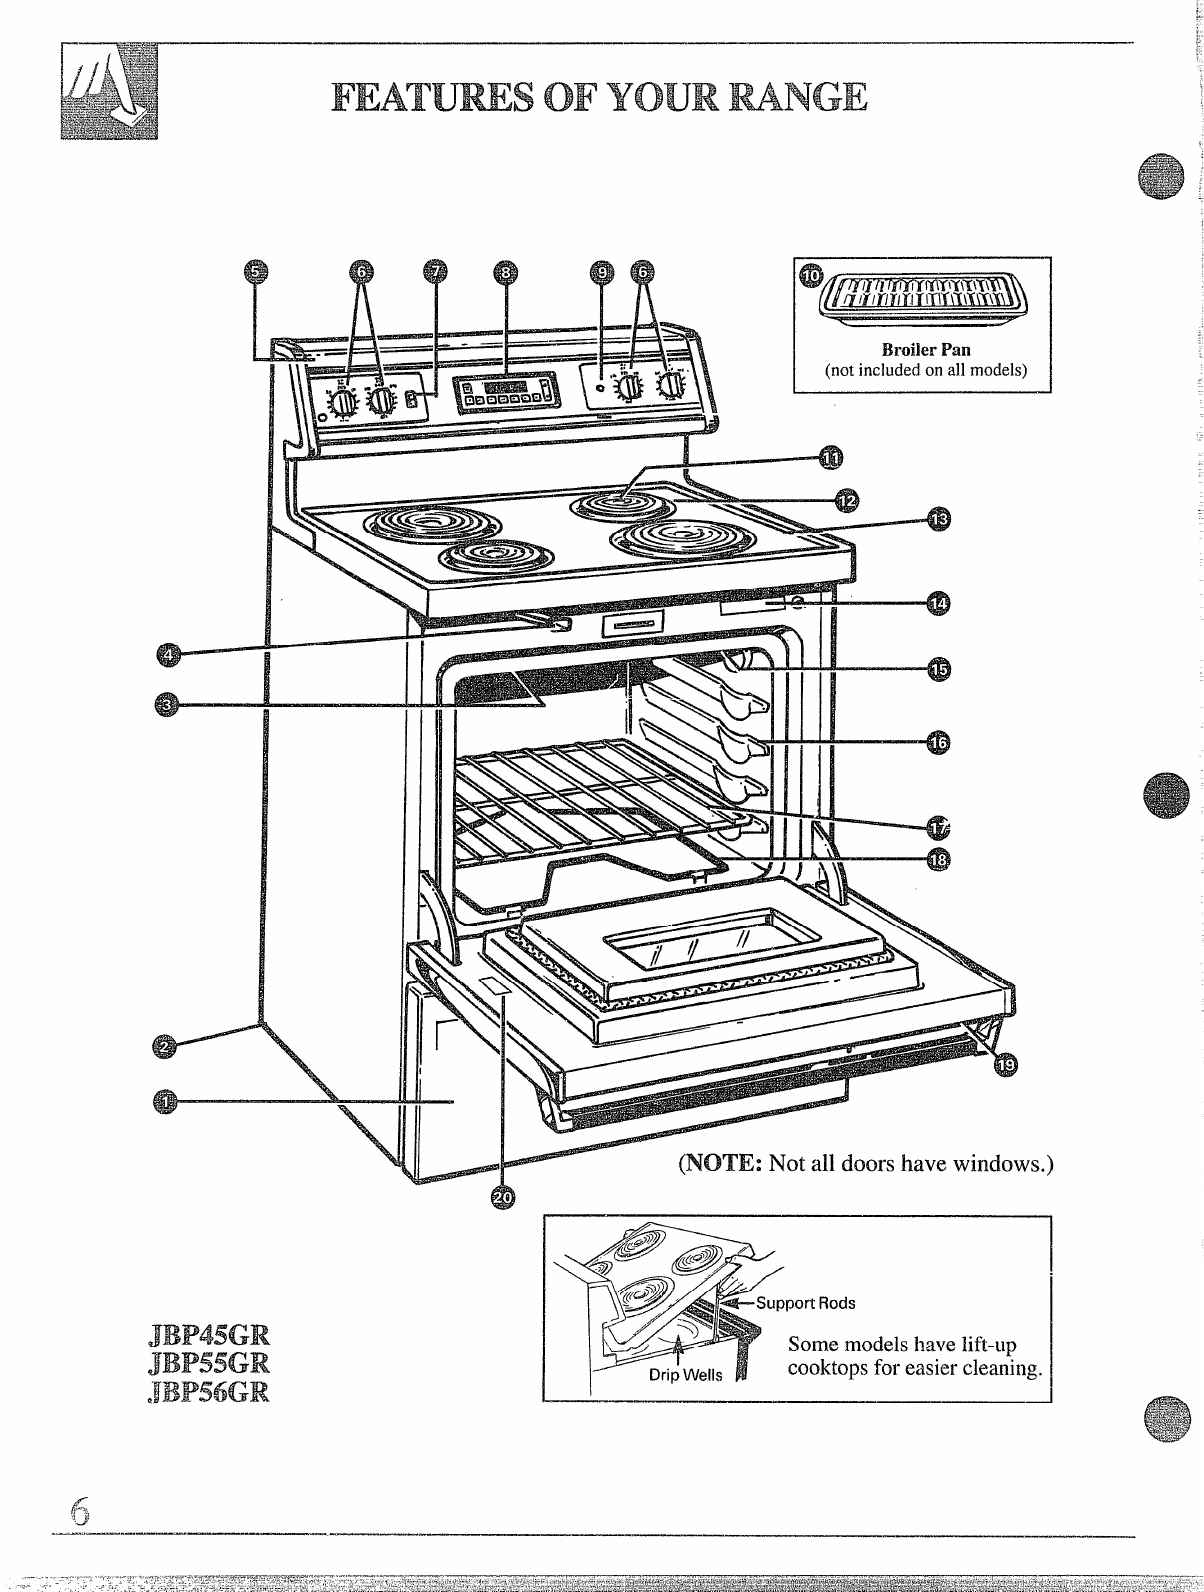
(NOTE; Notall doors have windows
portRock
Somemodelshavelift--up
cooktopsfol-easiercleaning.
Explained
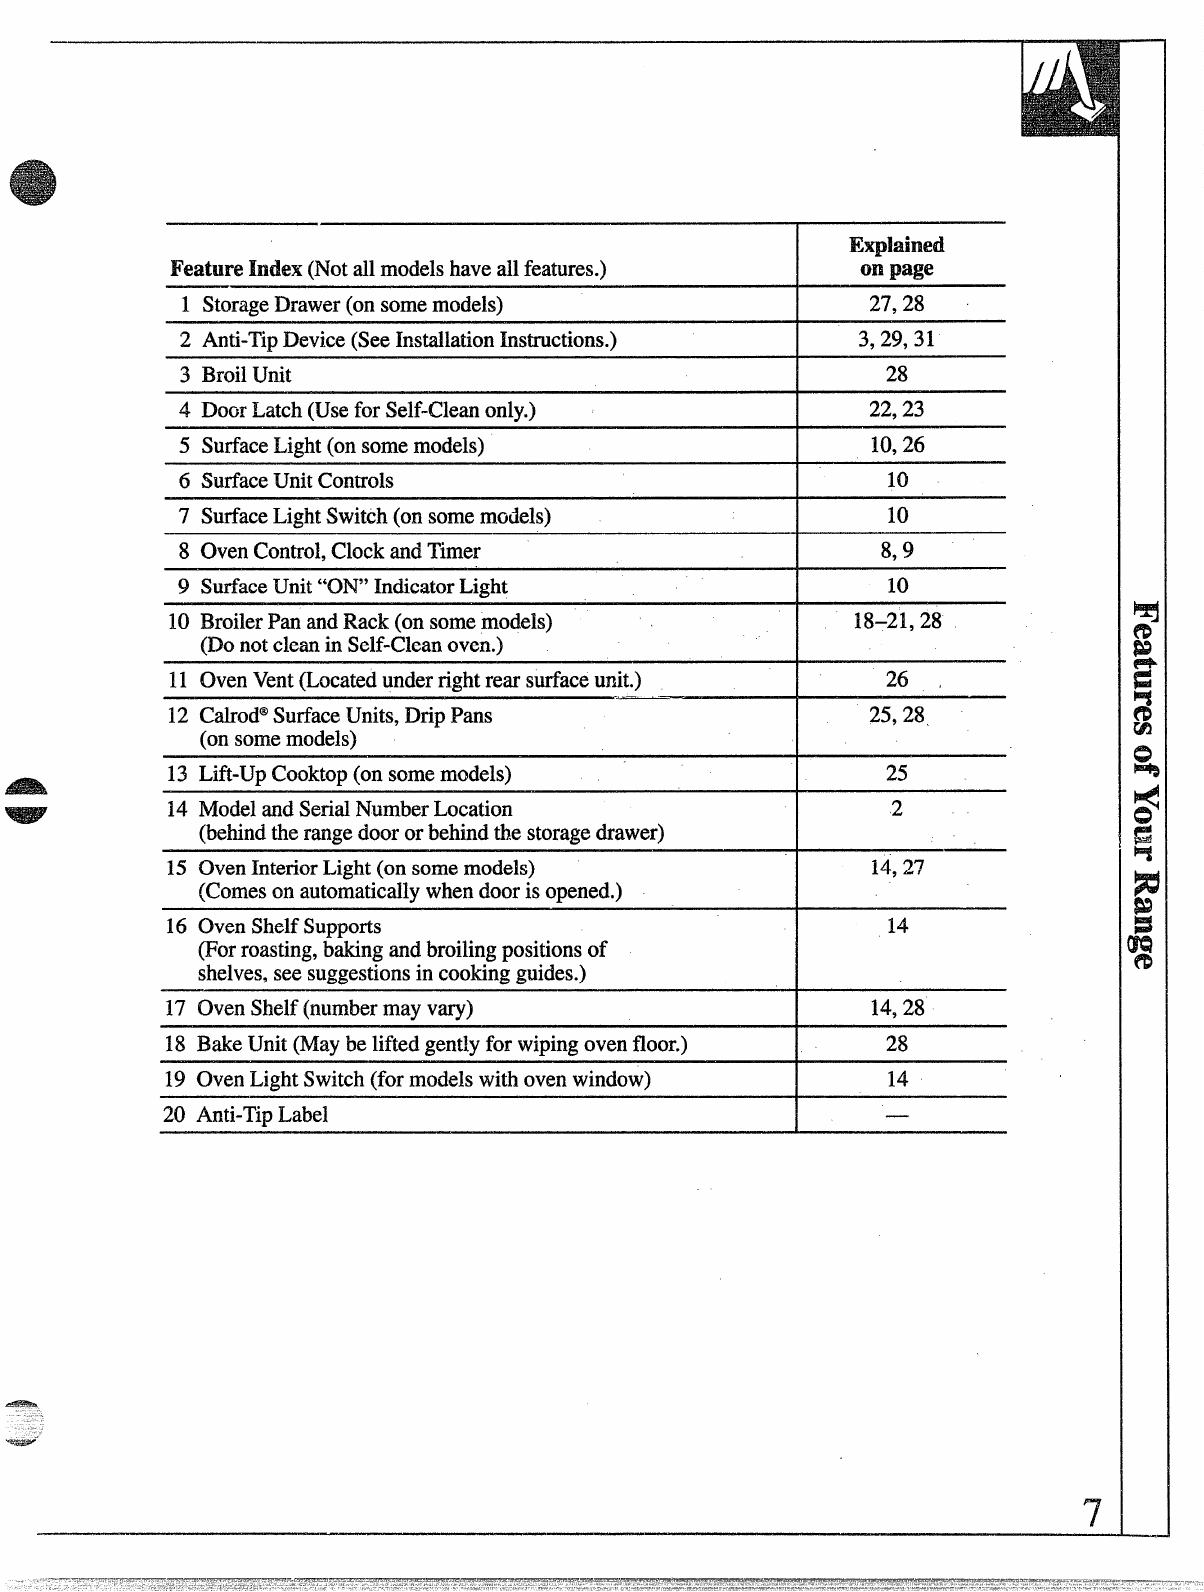
Feature Index (Notallmodelshaveallfeatures.) on page
1StorageDrawer(on somemodels) 27,28
2Anti-TipDevice(SeeInstallationInstructions.) 3,29,31
3BroilUnit 28
4DoorLatch(Usefor Self-Cleanonly.) 22,23
5SurfaceLight(onsomemodels) 10,26
6SurfaceUnitControls 10
7SurfaceLightSwitch(on somemodels)
8OvenControl,ClockandTimer 8,9
9SurfaceUnit“ON”IndicatorLight
10 BroilerPan andRack(on somemodels) 18–21,28
(Donotcleanin Self-Cleanoven.)
11 OvenVent(Locatedunderrightrear surfaceunit.) 26 ,
12 Ca.lrod@SurfaceUnits,DripPans 25,28
(onsomemodels)
13 Lift-UpCooktop(on somemodels) 25
14 ModelandSerialNumberLocation I2
(behindtherangedooror behindthe storagedrawer)
15 OvenInteriorLight(on somemodels) 14,27
(Comeson automaticallywhendooris opened.) !7s
16 OvenShelfSupports 14
(Forroasting,bakingandbroilingpositionsof
shelves,see suggestionsin cookingguides.)
17 OvenShelf(numbermayvary) 14,28
28
18 BakeUnit(Maybe liftedgentlyfor wipingovenfloor.)
19 OvenLightSwitch(for modelswith ovenwindow)
20 Anti-TipLabel
‘7
—
—
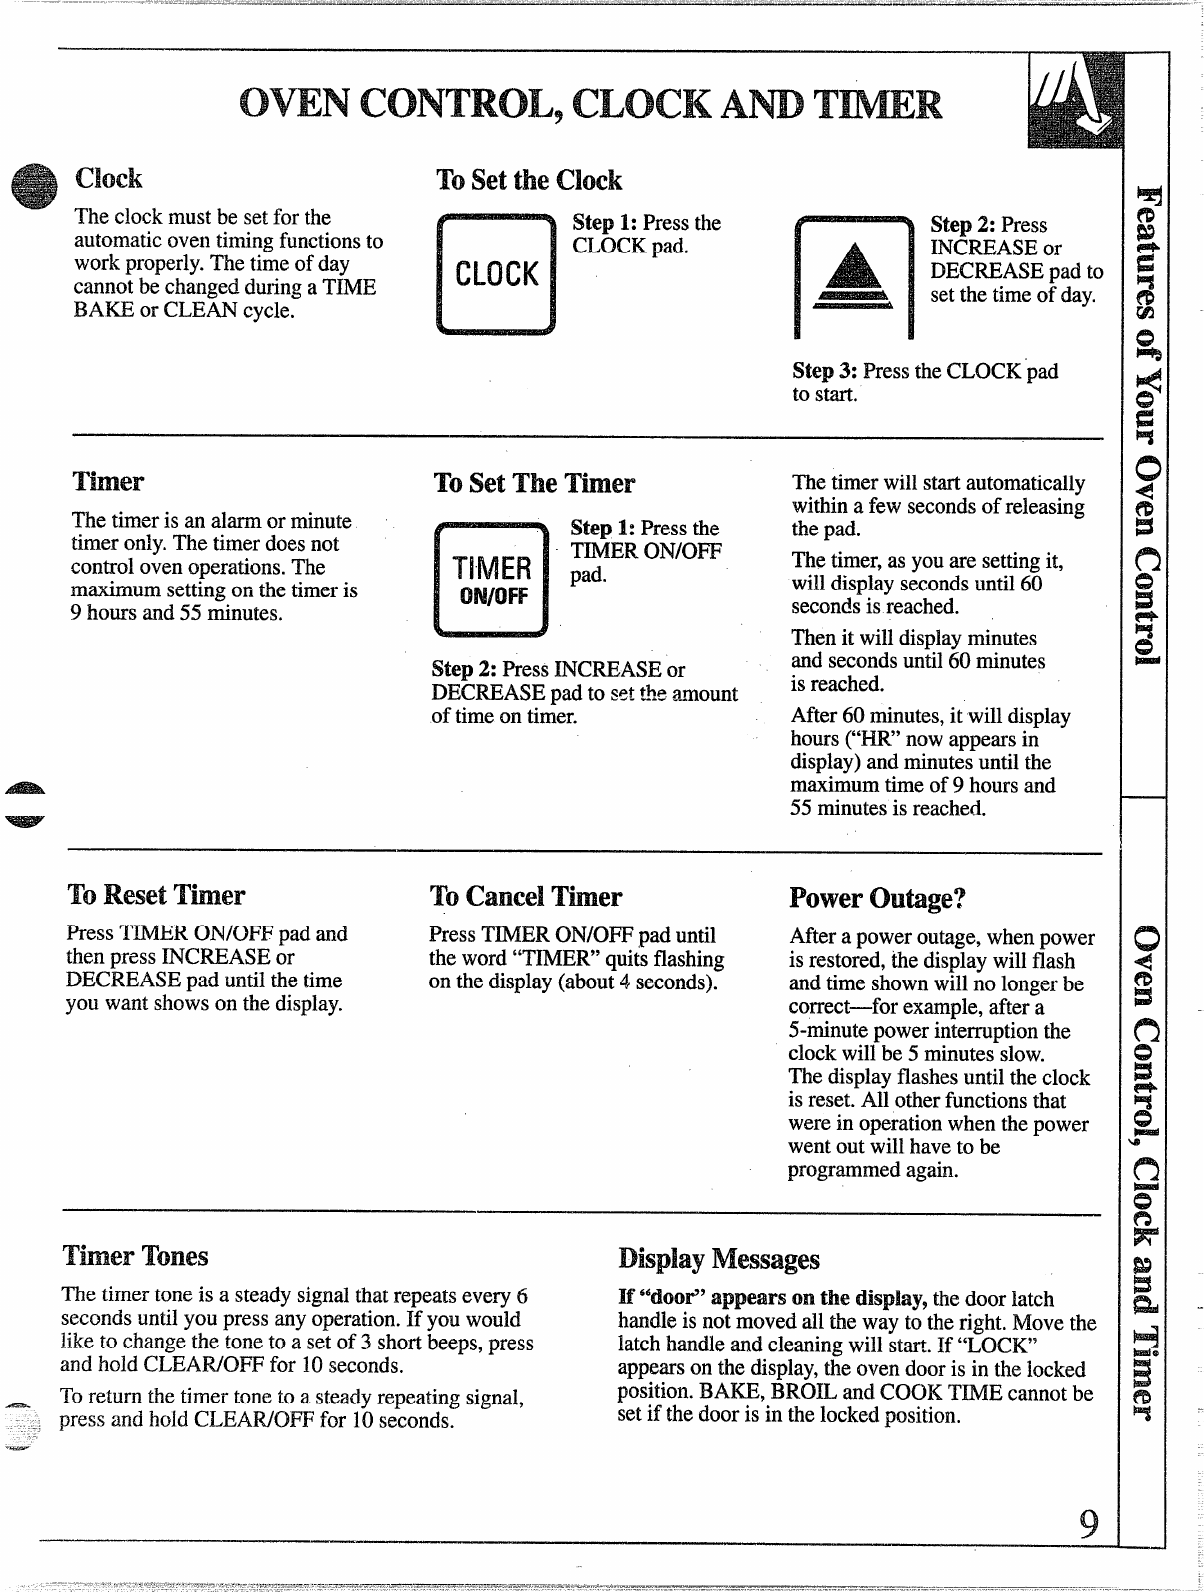
cklek Tosetthe!clock
Theclockmustbe setfor the Step 1: Pressthe
automaticoventimingfunctionsto CLOCKpad.
workproperly.Thetimeof day
cannotbe changed.duringaTIME CLOCK
BAISEor CLEANcycle.
~~ Step 2: Press
INCREASEor
DECREASEpad to
setthe timeof day.
Step 3: PresstheCLOCK’pad
to start.
mmer Toset‘me Timer Thetimerwillstartautomatically
Thetimeris an alarmor minute withinafew secondsof releasing
Step 1: Pressthe thepad.
timeronly.Thetimerdoesnot TIMEROIWOFF
controlovenoperations.The pad. Thetimer,as youare settingit,
maximumsettingon thetimeris oN/oFF willdisplaysecondsuntil60
9hoursand55 minutes. secondsis reached.
Thenit willdisplayminutes
Step 2: PressINCREASEor andsecondsuntil60 minutes
DECREASEpadto setthe arrount is reached.
of timeon timer. After60 minutes,it willdisplay
hours(“I-R”nowappearsin
display)andminutesuntilthe
maximumtimeof 9hoursand
55minutesis reached.
‘lb ResetTimer ml cancel ‘b-w Poweroutage?
Press TIMERONVOFFpad and PressTIMER01’+VOFFpaduntil Afterapoweroutage,whenpower
thenpressINCREASEor the word“TIMER”quitsflashing is restored,thedisplaywillflash
DECREASEpad untilthetime on thedisplay(about4,seconds). andtimeshownwillno longerbe
youwantshowson the display. correct-for example,aftera
5-minutepowerinterruptionthe
clockwillbe 5minutesslow.
Thedisplayflashesuntilthe clock
is reset.All otherfunctionsthat
werein operationwhenthepower
wentoutwillhaveto be
programmedagain.
Timer Tones
Thetimertoneis asteadysignalthatrepeatsevery6If “door” appears on the dk@ay9thedoorlatch
secondsuntilyou pressanyoperation.If you would handleis notmovedall the way to theright.Movethe
liketo changethe toneto aset of 3shortbeeps,press latchhandleand cleaningwill start.If “LOCK”
andholdCLEAR/OFFfor 10seconds. appearson the display,the ovendooris in the locked
Toreturn thetimer toneto asteadyrepeatingsignal, position.BAKE,BROILandCOOKTIIVIEcannotbe
press aridholdCLEAR/OFFfor 10seconds. setif thedooris in thelockedposition.
9

see surfacecookingGuide.
AtbothOFFandHI thecontrol“clicks”intoposition,Youmayhearslight
“clicking”soundsduringcooking,indicatingthecontrolis keepingtheunit
at theheatlevelor powerlevelyouset.
How tosetthe controls
—
Pushtheknobin Be sureyou turncontrolto OFFwhenyoufinish
andturnin either cooking.The surfaceunitindicatorlightwillglow
directionto the whenANYheaton anysurfaceunitis on.
heatsettingyou
want.
Heat (hide
ED-Used to begincookingor to bringwaterto a
boil.Reduceheat settingafterwaterboils. !:
OFF
MIHXUNIHBGH-(Setting halfwaybetweenHI and
MED)Maintainsafastboilon largeamountsof food.
IWID-+aute andbrown;keepsfoodat amedium
boilor simmer.
LOVV-(Setting halfwaybetweenMID
andLO) Cookafter startingat HI; cookswithlittle
waterin coveredpan.
LO—Usedfor longslowcooking(simmering)to UNV HIGH
tenderizeanddevelopflavors.Use this settingto melt
butterandchocolateor tokeep foodswarm. MED
NOTE: SurfaceIndicatorLightmay glowbetween
LO andOFF,but thereis nopowerto the surfaceunits.
Push andhold switchuntillightcomeson.
NOTE: Lightwillnot comeon as longas switchis held.Switchmustbe
pushed,heldfor severalseconds,andreleasedfor light to comeon.
wok
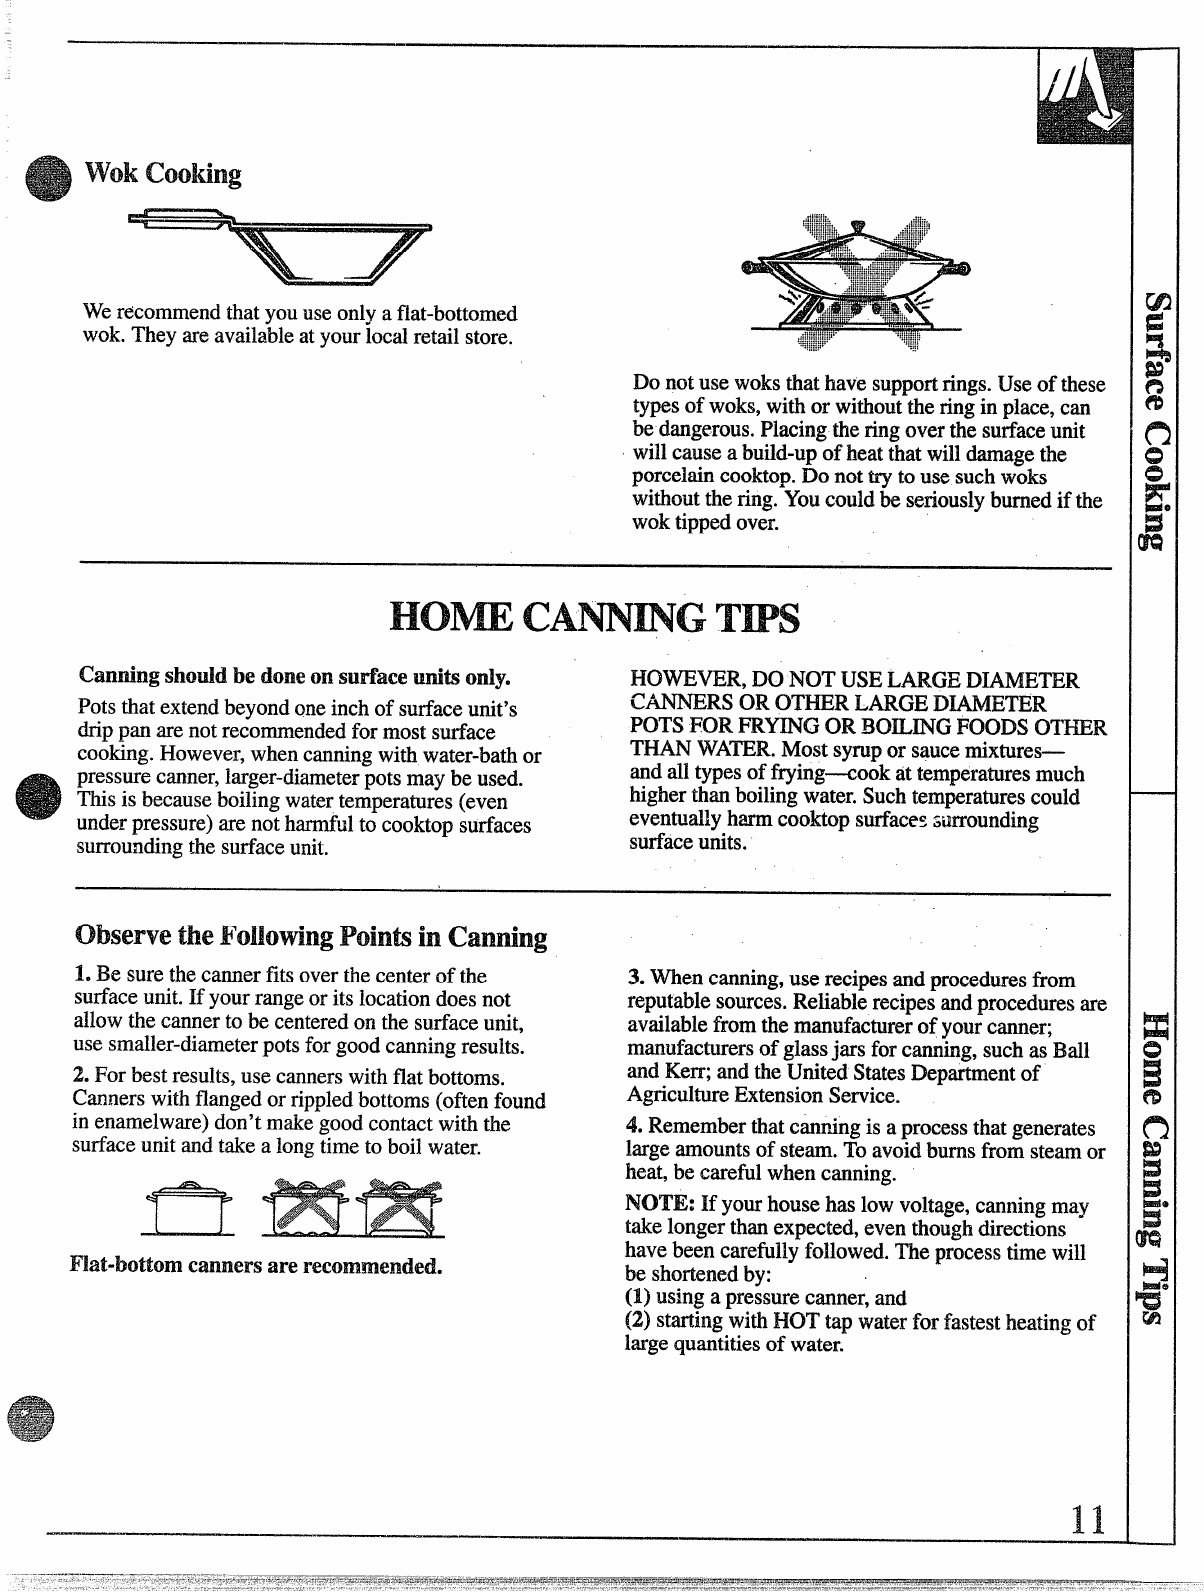
Werecommendthatyouuseonlyaflat-bottomed
wok.Theyareavailableatyourlocalretailstore.
Do notuse woksthathavesupportrings.Useof these
typesof woks,withor withouttheringin place,can
be dangerous.Placingtheringoverthe surfaceunit
willcauseabuild-upof heatthatwilldamagethe
porcelaincooktop.Do nottry to use suchwoks
withoutthering.Youcouldbe seriouslyburnedif the
woktippedover.
Gumirlg should h? doneonsmface Rmit$only, HowmR, DoI’wYrUSELARGEIxANwrm
Potsthat extendbeyondoneinchof surfaceunit’s cmRs OROTHERLARGEDI.AMEmR
drippan are notrecommendedfor mostsurface POTSFOR.FRYINGORBOILINGFoom OTHER
cooking.However,whencanningwithwater-bathor THANWATER.Mostsyrupor saucemixtures—
pressurecanner,larger-diameterpotsmay be used. andalltypesof frying-cook at temperaturesmuch
Thisis becauseboilingwatertemperatures(even higherthanboilingwater.Suchtemperaturescould
underpressure)arenotharmfulto cookto~surfaces eventuallyharmcooktopsurfacessurrounding
.
surroufidingthesurfaceunit. surfaceunits.
observe h! Pointsincanning
LBe surethecannerfits overthecenterof the
surfaceunit.If’yourrangeor its locationdoesnot
allowthe cannerto be centeredon thesurfaceunit,
use smaller-diameterpots forgoodcanningresults.
2. For bestresults,use cannerswithflatbottoms.
Cannerswithflangedor rippledbottoms(oftenfound
in enamelware)don’tmakegoodcontactwiththe
surfaceunitandtakealongtimeto boilwater.
Flat-bottom cannersaremxmmended.
3. Whencanning,use recipesandproceduresfrom
reputablesources.Reliablerecipesandproceduresare
availablefromthemanufacturerof yourcanner;
manufacturersof glassjars forcanning,suchas Ball
andKerr;andtheUnitedStatesDepartmentof
AgricultureExtensionService.
4. Rememberthatcanningis aprocessthatgenerates
largeamountsof steam.Toavoidburnsfrom steamor
heat,be carefulwhencanning.
NOTE: If yourhousehas lowvoltage,canningmay
takelongerthanexpected,eventhoughdirections
havebeencarefiily followed.Theprocesstimewill
be shortenedby: .
(1) usingapressurecanner,and
(2) startingwithHOT tap waterfor fastestheatingof
largequantitiesof water.
Tips
1.Usemedium-or heavy-weightcookware.
Aluminumcookwareconductsheatfasterthanother
metals.Cast-ironandcoatedcast-ironcookwareare
slowto absorbheat,butgenerallycookevenlyat low
tomediumheatsettings.Steelpansmaycook
unevenlyif notcombinedwithothermetals.
2. Toconservethemostcookingenergy,pans
shouldbeflat on thebottom,havestraightsidesand
tight-fittinglids.Matchthesizeof thesaucepanto the
sizeof thesurfaceunit.
DirectionsandSettings
tostart cooking DirectionsandSettings
to CompleteCooking Comments
Food Cookware
Cereal
Cornmeal,grits,
oatmeal MEDIUMLOWorLO,then
Covered
Saucepan HI.Incoveredpanbring
watertoboilbeforeadding
cereal.
Cerealsbubbleandexpand
astheycook;uselargeenough
saucepanto preventboilover.
Milkboilsoverrapidly.Watchas
boilingpointapproaches.
addcereal.Finishtiming
accordingtopackagedirections.
MED,tocook1or2minutes
to completelyblend
ingredients.
Cocoa Uncovered
Saucepan HI.Stirtogetherwateror
milkandcocoaingredients.
~~ngjust to aboil.
Coffee Percolator HI.At ftist perk,switch
heatto LO. LOto maintaingentle
butsteadyperk. Percolate8to 10minutesfor
8CUPS,lessforfewerCUPS.
Eggs
Cookedin shell
Friedsunny-side-up
Friedovereasy
LO.Cookonly3to4
minutesforsoftcooked;
15minutesforhardcooked.
Covered
Saucepan HI.Covereggswithcool
water.Coverpan,cook
untilsteaming.
MEDIUMHIGH.Mekbutte~
addeggsandcoverskillet.
Covered
Skillet Continuecookingat MEDIUM
HIGHuntilwhitesarejust set,
about3to 5moreminutes.
Ifyoudonotcoverskillet,baste
eggswithfat tocooktopsevenly.
HI.Meltbutter. LO,thenaddeggs.When
bottomsofeggshavejust
set,carefullyturnoverto
cookotherside.
Uncovered
Skillet
LO.Carefullyaddeggs.
Cookuncoveredabout5
minutesat MEDKJMHIGH.
RemovecookedeggswithW%ted
spoonorpancaketurner.
Poached
Scrambledoromelets
Covered
Saucepan HI.In coveredpanbring
watertoaboil.
Uncovered
Skillet HI.Heatbutteruntillight
goldenin color. MED.Addeggmixture.
Cook,stirringtodesired
doneness.
Eggscontinueto setslightlyafter
cooking.Foromeletdonot stir
lastfewminutes.Whenset,fold
in half,
Fruits Covered
Saucepan HI,In coveredpanbring
fruitandwaterto boil. LO.Stiroccasionallyand
checkforsticking. Freshfruit:Use 1/4to 1/2cup
waterperpoundoffruit.
Driedfruit:Usewateraspackage
directs.Timedependsonwhether
fruithasbeenpresoaked.If not,
allowmorecookingtime.
mats
Braised:Potroastsof
beef,lambor veal;
porkchopsandsteaks
Covered
Skillet HI.Meltfat,thenaddmeat,
SwitchtoMEDIUMHIGH
tobrownmeat.Addwateror
otherliquid.
MEDIUMLOW.Simmeruntil
forktender. Meatcanbe seasonedandfloured
beforeit is browned,if desired.
Liquidvariationsforflavorcould
be wine,fruitortomatojuice or
meatbroth.
Timing:Steaks1to 2inches:1to
2hours.BeefStew:2to 3hours.
PotRoast:2Xto 4hours.
Pan-fried:Tender
chops;thinsteaksup
to3/4inch;minute
steaks;hamburgers;
franksandsausage;
thinfishfillets
Uncovered
Skillet HI.Preheatskillet,then
greaselightly. MEDIUMHIGHor MED.
Brownandcookto desired
doneness,turningover
as needed.
Panfryingis bestforthinsteaks
andchops.If rareis desired,
preheatskilletbeforeaddingmeat.
12
Bight
NOTOVER1’ OVER1“
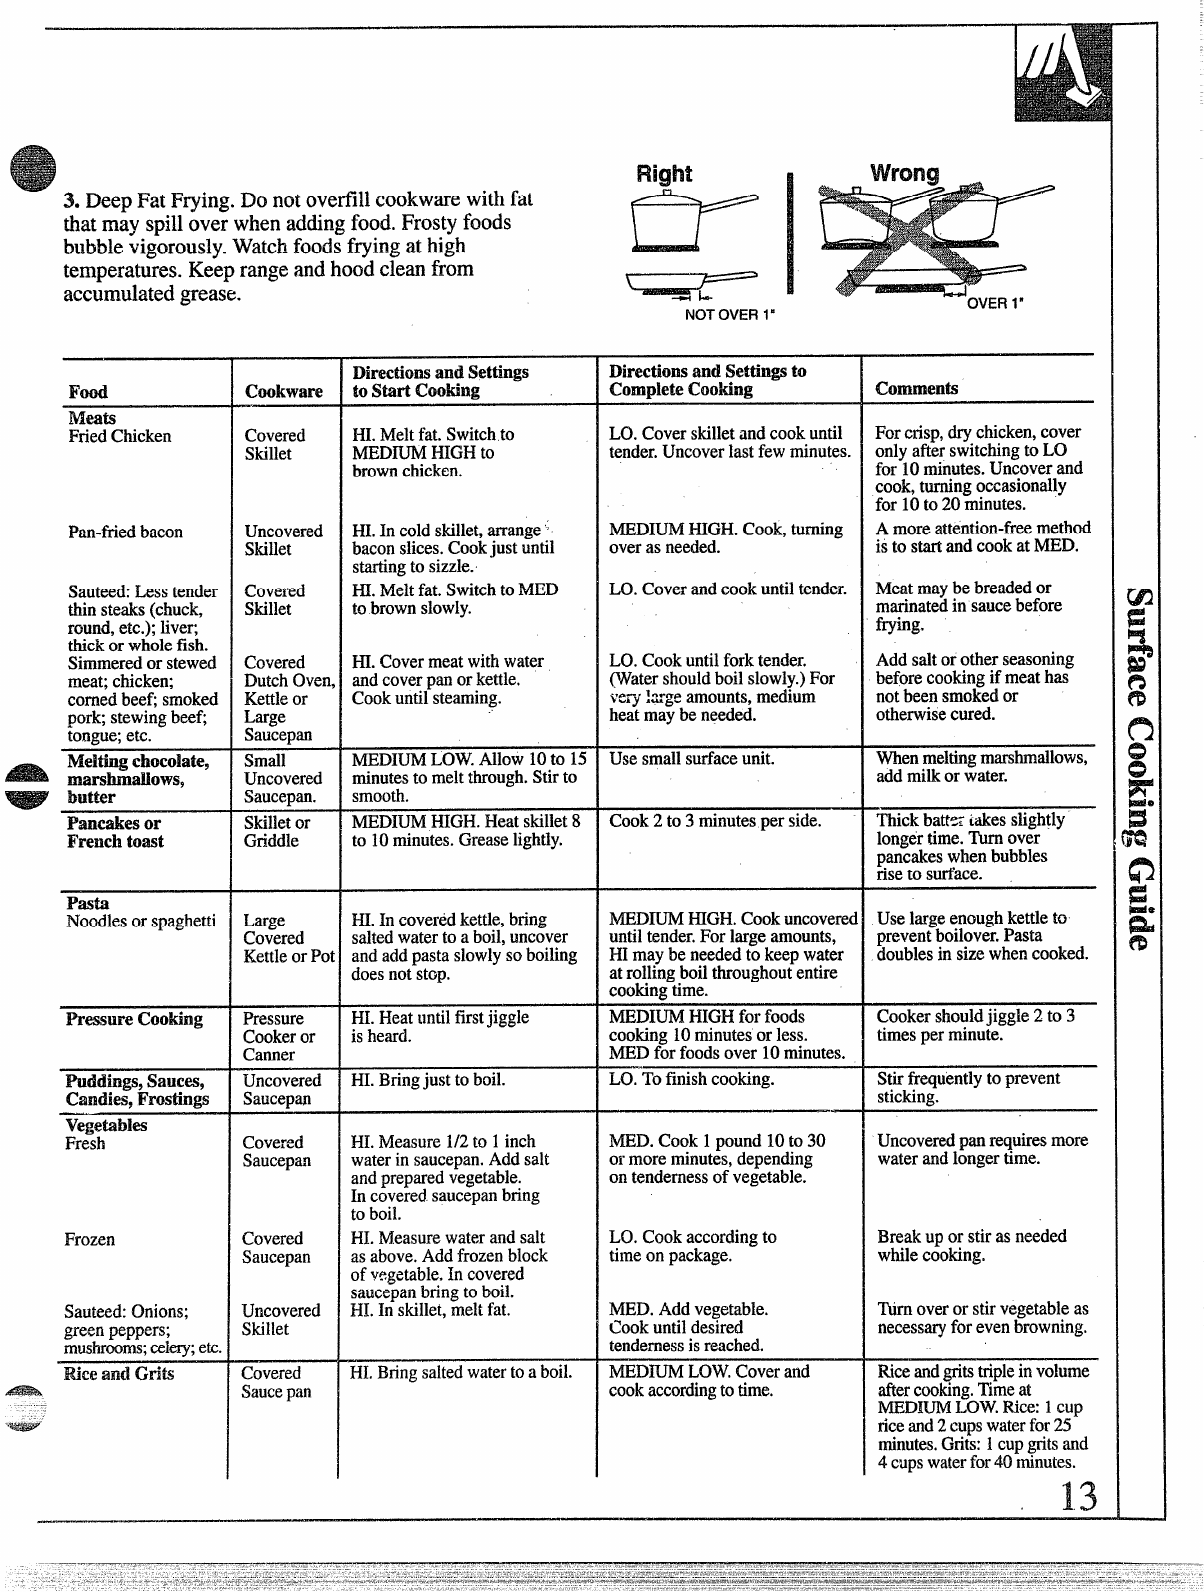
3. DeepFat Frying.Do notovertll cookwarewithfat
thatmayspilloverwhenaddingfood.Frostyfoods
bubblevigorously.Watchfoodsfryingathigh
temperatures.Keeprangeandhoodcleanfrom
accumulatedgrease.
comments
Directions
andSWiqgsto
CompleteCooking
DirectionsandSettings
tostart cooking
cookware
mod
Mews
FriedChicken HI.Meltfat.Switchto
MEDiUMHIGHto
brownchicken.
LO.Coverskilletandcookuntil
tender.Uncoverlastfewminutes. Forcrisp,drychicken,cover
onlyafterswitchingto LO
for 10minutes.Uncoverand
cook,turningoccasionally
for 10to20minutes.
Covered
Skillet
Uncovered
Skillet
Covered
Skillet
Covered
DutchOve~
Kettleor
Large
Saucepan
MEDIUMHIGH.Cook,turning
overas needed.
HI.In coldskillet,arrange
baconslices.Cookjust until
startingto sizzle.
HI.Meltfat.Switchto NIED
tobrownslowly.
Amoreattention-freemethod
is to startandcookat MED.
Pan-tied bacon
Meatmaybe breadedor
marinatedin saucebefore
frying.
LO.Coverandcookuntiltender.
Sauteed:Lesstender
thinsteaks(chuck,
round,etc.);liver;
thickor wholefish.
Simmeredorstewed
meat;chicken;
cornedbeef;smoked
pork;stewingbeef;
tongue;etc.
HI.Covermeatwithwater
andcoverpanorkettle.
Cookuntilsteaming.
LO.Cookuntilforktender.
(Watershouldboilslowly.)For
vtxy!L”geamounts,medium
heatmaybeneeded.
Addsaltor otherseasoning
beforecookingif meathas
notbeensmokedor
otherwisecured.
Whenmeltingmarshmallows,
addmilkorwater.
MEDIUMLOW.Allow 10to 15
MeltingchocoMe9
marshmaliows9
butter
Small
Uncovered
Saucepan.
Skilletor
Griddle
Usesmallsurfaceunit.
minutesto meltthrough.Stirto
smooth.
‘~ick battezhikesslightly
longertime.Turnover
pancakeswhenbubbles
riseto surface.
MEDIUMHIGH.Heatskillet8Cook2to 3minutesperside.
Pancakesor
‘Frenchtoast to10minutes.Greaselightly,
Pasta
Noodlesorspaghetti MEDIUMHIGH.Cookuncovered
untiltender.Forlargeamounts,
HImaybe neededto keepwater
at rollingboilthroughoutentire
cockingtime.
Uselargeenoughkettleto
preventboilover.Pasta
doublesin sizewhencooked.
Large
Covered
KettleorP{
HI.Incoveredkettle,bring
saltedwaterto aboil,uncover
andaddpastaslowlysoboiling
doesnotstop.
Cookershouldjiggle2to 3
timesperminute.
HI.Heatuntilfirstjiggle
is heard. MEDIUMHIGHforfoods
cooking10minutesor less.
MEDforfoodsover10minutes.
PressureCooking Pressure
Cookeror
Canner
Stirfrequentlyto prevent
sticking.
LO.”TOfinishcooking.
Puddhgs, Sauces,
C&dies,Frostings Uncovered
Saucepan HI.Bringjust toboil.
Vegetables
Fresh Covered
Saucepan
Covered
Saucepan
Uncovered
Skillet
HI.Measure1/2to 1inch
waterin saucepan.Addsalt
andpreparedvegetable.
Incoveredsaucepanbring
toboil.
HI.Measurewaterandsalt
asabove.Addfrozenblock
ofv~getable.Incovered
saucepanbringtoboil.
‘HI,In skillet,meltfat.
MED.Cook1pound10to 30
ormoreminutes,depending
ontendernessofvegetable.
Uncoveredpanrequiresmore
waterandlongertime.
Breakupor stiras needed
whilecooking.
LO.Cookaccordingto
timeonpackage.
Frozen
MED.Addvegetable.
Cookuntildesired
tendernessisreached.
Ttimoveror stirvegetableas
necessaryforevenbrowning.
Sauteed:Onions;
greenpeppers;
mushrooms;celery;etc.,
Riceandgritstripleinvolume
aftercooking.Timeat
MEDIUMLOW.R.iCR1CUD
HI.Bringsaltedwatertoaboil. MEDIUMLOW.Coverand
Eweam?(kits iCovered
Saucepan cookaccordingtotime.
riceand2cupswaterfor25r
minutes,Grits:1cupgritsand
4cupswaterfor40minutes.
1.3
I
1
.
Da RI(Mlock the ovendoorwith the door Mel-lexceptwhenSeIf-cleaning.
..-
Your oven
1.Lookat thecontrols.Be sureyouunderstandhow 3. Readoverinformationandtipsthatfollow.
to setthemproperly.Readoverthedirectionsfor the 4. Keepthisbookhandyso you canreferto it,
OvenControlsso youunderstandhowto usethem. especiallyduringthefirstweeksofusingyour
2. Checkoveninterior.Lookat the shelves.Takeanewrange. “
practicerun at removingandreplacingthemproperly,
to givesure,sturdysupport.
oven
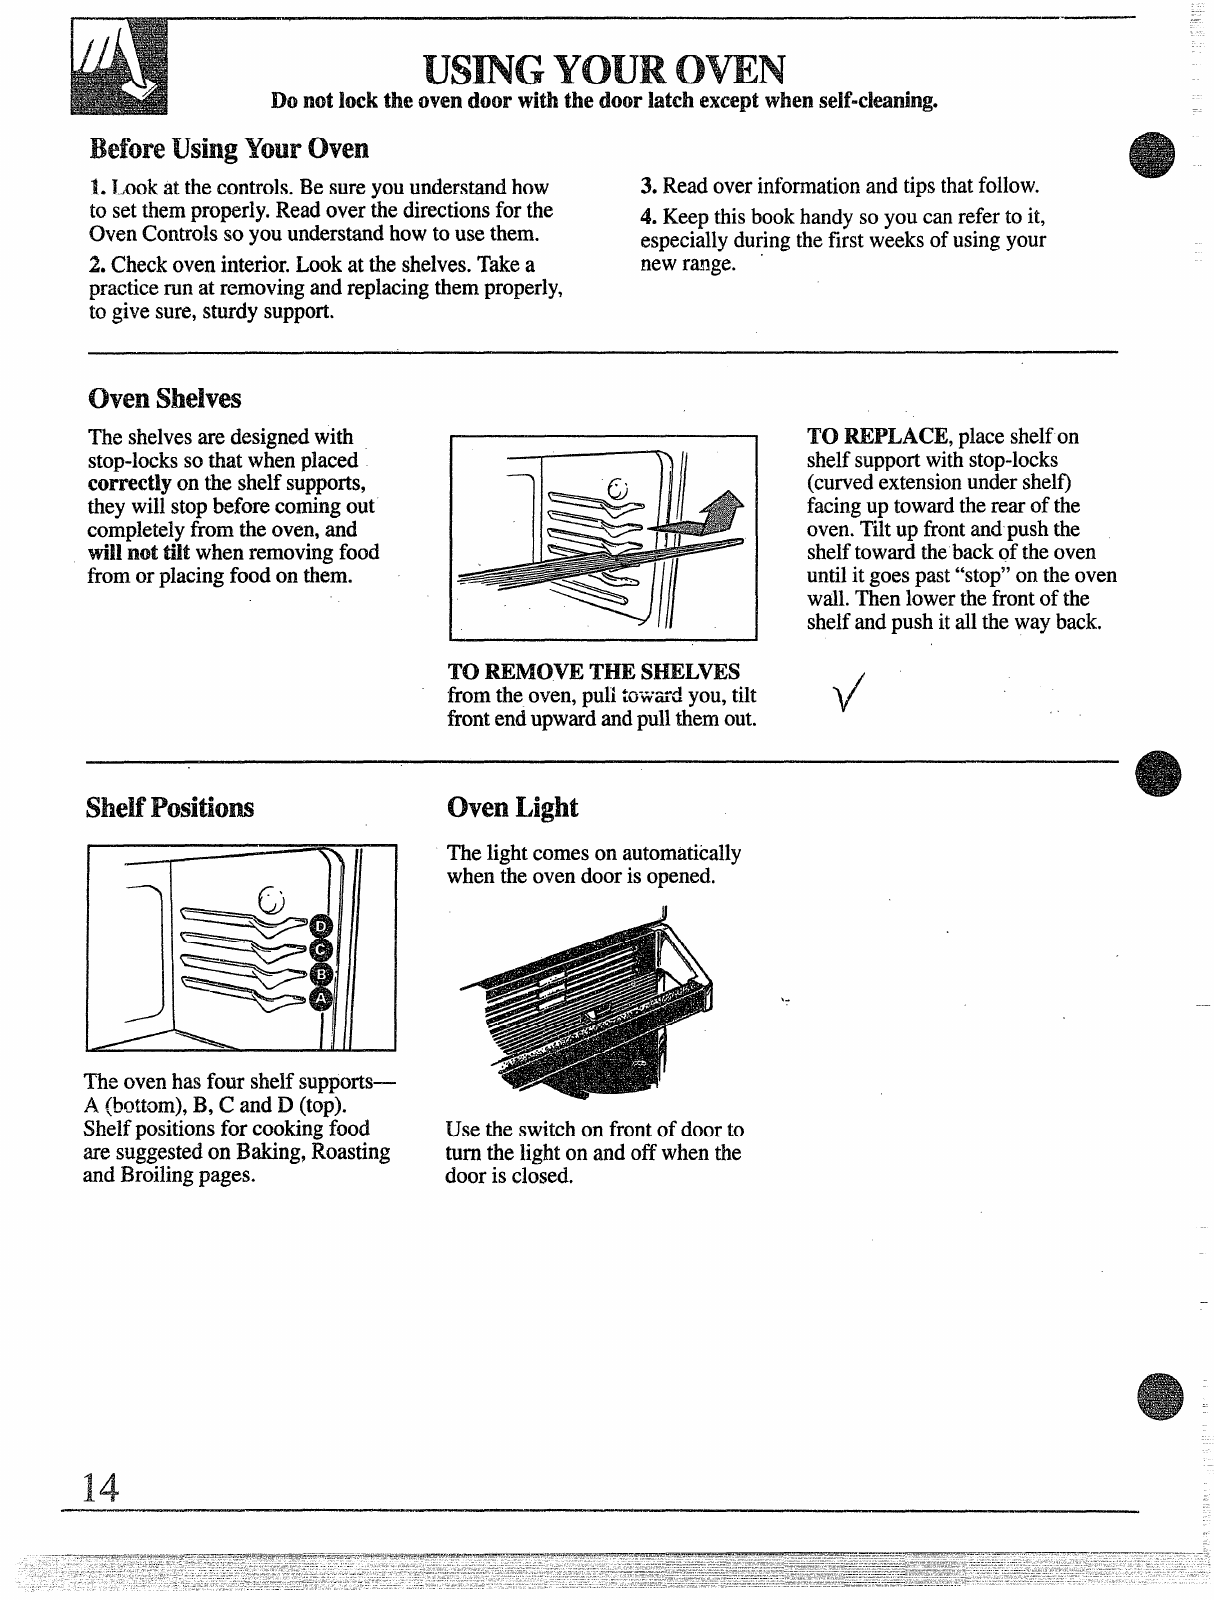
Theshelvesare designedwith
stop-locksso thatwhenplaced
correctly on the shelfsupports,
theywillstopbeforecomingout
completelyfromtheoven,and
till not tiIt whenremovingfood
fromor placingfoodon them.
InII TO REPLACE,placeshelfon
shelfsupportwithstop-locks
(curvedextensionundershelf)
facingup towardtherearof the
oven.Tiltup frontandpushthe
shelftowardthebackof theoven
untilit goespast“stop”on theoven
wall.Thenlowerthefrontof the
shelfandpushitallthewayback.
ml REMOWETHE smLvEs
fromtheoven,pulltowardyou,tilt v’
frontendupwardandpullthernout. ‘
ovenLight —
1‘h)II
Theovenhasfour shelfsupports–
A(bottom),B, Cand D(top).
Shelfpositionsfor cookingfood
are suggestedon Baking,Roasting
andBroilingpages.
Thelightcomeson automatically
whenthe ovendooris opened.
..
Usethe switchon frontof doorto
turnthelighton andoffwhenthe
dooris closed.
—
M
SeeBakingGuide.
Youroventemperatureis controlledveryaccuratelyusingan ovencontrol
system.Werecommendthatyouoperatethe rangefor anumberof weeks
usingthe timegivenon recipesas aguideto becomefamiliarwithyournew
oven’sperformance.If youthinkan adjustmentis necessary,seeAdjusting
OvenTemperaturesection.
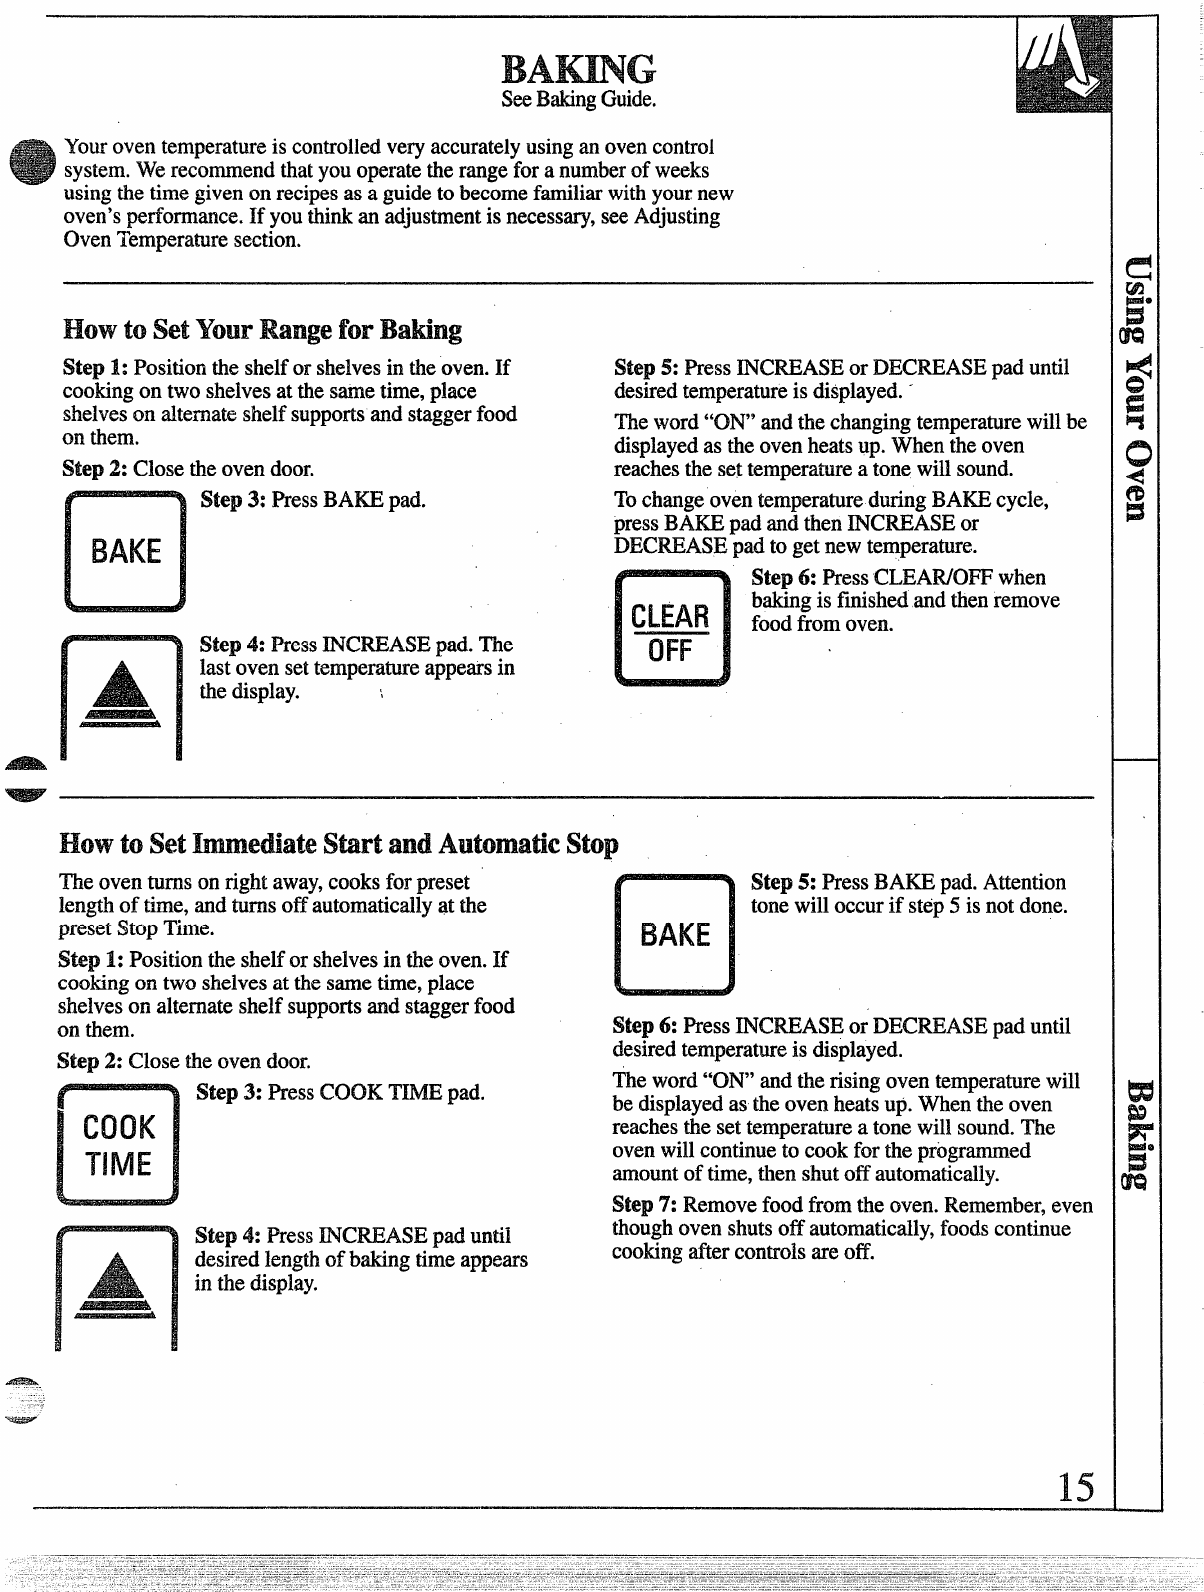
How toset‘YimrRangefor
Step 1: Positionthe shelfor shelvesin theoven.If Step 5: PressINCREASEor DECREASEpad until
cookingon two shelvesatthesametime,place desiredtemperatureis displayed.”
shelveson alternate.shelfsupportsand staggerfood Theword“ON”andthechangingtemperaturewillbe
on them. displayedas theovenheatsup.Whentheoven
$tep 2: Closetheovendoor. reachesthe set temperatureatone willsound.
Step 3: PressBAKEpad. TochangeoventemperatureduringBAKEcycle,
pressBAKEpadandthenINCREASEor
DECREASEpadto getnewtemperature.
Step4: PressINCREASEpad.The
lastovensettemperatureappearsin
thedisplay. \
CLEAR
OFF 1
Step 6: PressCLEAR.KN?Fwhen
bakingis finishedandthenremove
foodfromoven.
How toset startand stop
Theoventurnsonrightaway,cooksforpreset
lengthof time,andturnsoffautomaticallyat the
presetStopTime.
S%q 1: Positionthe shelfor shelvesin theoven.If
cookingon two shelvesat the sametime,place
shelveson alternateshelfsupportsand staggerfood
Step5:PressBAKEpad.Attention
tonewilloccurif step5isnot done.
BAKE
on.them. Step6: PressINCREASEor DECREASEpad until
Step 2: Closetheovendoor. desiredtemperatureis displayed.
Step 3: PressICOOKTI.MEpad. Theword“ON”and therisingoventemperaturewill
be displayedas theovenheatsup.Whenthe oven
reachesthe settemperatureatone will sound.The
ovenwillcontinueto cookfor theprogrammed
amountoftime,then shutoff automatically.
Step 7: Removefoodfromthe oven.Remember,even
Step4: PressINCREASEpad until thoughoven shutsoff automatically,foodscontinue
desiredlengthof bakingtimeappears cookingaftercontrolsare off.
in thedisplay.
15

G
(continued)
How toTim!
Theovencontrolallowsyouto turntheovenon or Tosetthe clock,fiist pressthe CLOCKpad.
offautomaticallyat specifictimesthatyou set. “TIME”willflashin thedisplay.PressINCREASEor
NOTE: l!h%ill%?be@lning make SWi%?theOVelilC~Of2k DECREASEpaduntilcorrecttimeof dayis displayed.
showsthe correct time of day.
How tosetDelay startand stop
Quick Reminder:
LPressCOOKTINIEpad.
2. PressINCREASWDECREASEpadto set
cookingtime.
3. PressSTOPTIMEpad.
4. PressNXEASE/ DECREASEpaduntil
desiredStopTimeappearsin display.
5. PressBAKEpad.
6. PressINCREASE/DECREASEpadto select
oventemperature.
DelayMartandStopis settingthe oventimerto turn
theovenon andoff automaticallyat alatertime than
thepresenttimeof day.
For example:Let’ssay it’s2:00anddinnertimeis
shortlyaf& 7:00.Th~recipesuggests3hoursbaking
timeat 325”F.Here’show:
$tep 1: Positionthe shelfor shelvesin theoven.If
cookingon twoshelvesat the sametime,staggerthe
pansfoi bestheatcirculation.
Step 2: Closetheovendoor.
ICOOK
TIME
STOP
16
Step 3: PressCOOKTIMEpad.
Step4: For 3hoursof cookingtime,
pressINCREASEpaduntil “3:00”
appearsin thedisplay.
Step5: Press STOFTIMEpad.
I“5:00”appearson
thedisplayand
A. -
controlautomaticallysetsStopTimeby addingthe
CookTimeto thetimeof day.In thisexample,the
timeof day is 2:00and theCookTimeis 3hours.
Adding3hoursto the timeof dayequals5:00.
Step 6: ChangeStopTimefrom5:00to 7:00by
pressingINCREASEpaduntil“7:00”appearsin
thedisplay.
Step7: PressBAKEpad.
u
BAKE
$tm8:PressINCREASEpad.Thelast ovenset
temperatureappearsin the~isplay.PressINCREASE
or DECREASEpad until“325°”is displayed.
At4:O0,the ovenwillturnon automatically.The .
word“CN’ andthe changingoventemperaturewill
be displayedasthe ovenheatsup.Theovenwill
continueto cookfor theprogrammed3hoursand shut
offautomaticallyat 7:00.
Step 9: Removefoodfromthe oven.Remember,even
thoughovenshutsoff automaticaHy,foodscontinue
cookingaftercontrolsareoff.
NOTE: The lowtemperaturezoneof thisrange
(between150”F.and 200°F.)is availableto keephot
cookedfoodswm. Foodkeptin theovenlonger
thantwo hoursat theselowtemperaturesmay spoil.
Whensettingyourovenfor adelaystart,neverlet
foodssuchas dairyproducts,fish,meat,poultry,etc.
sitformorethan 2hoursbeforeactualcooking
begins.Roomtemperaturepromotesthegrowthof
harmfulbacteria.Be suretheovenlightis off because
heatfrom thebulb willspeedbacteriagrowth.
G
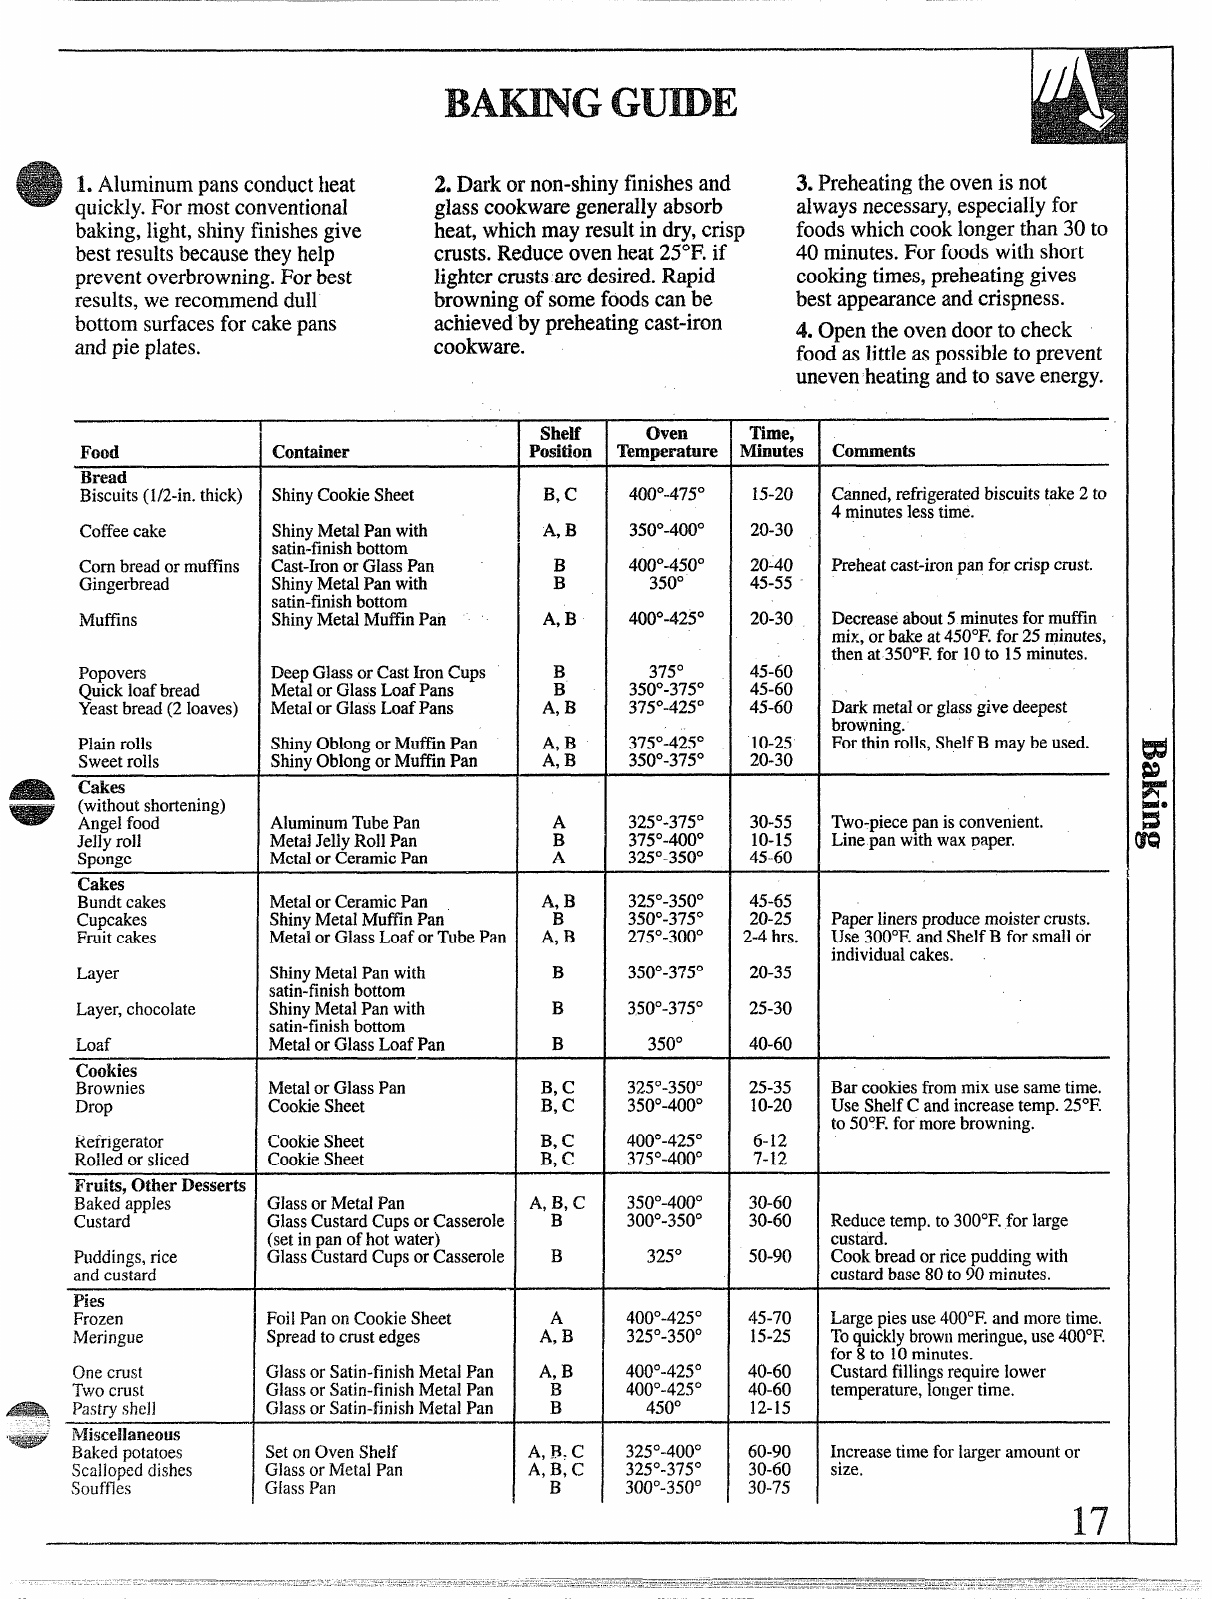
LAluminumpansconductheat 2. Darkor non-shinyfinishesand 3. Preheatingtheovenis not
quickly.Formostconventional glasscookwaregenerallyabsorb alwaysnecessary,especial~yfor
baking,light,shinyfinishesgive heat,whichmay resultin dry,crisp foodswhichcooklongerthan30 to
bestresultsbecausetheyhelp musts.Reduceovenheat250??.if 40 minutes.For foodswithshort
preventoverbrowning.Forbest lightercrustsare desired.Rapid cookingtimes,preheatinggives
results,werecommenddull browningof somefoodscan be bestappearanceandcrispness.
bottomsurfacesforcakepans —
achieved-bypreheatingcast-iron 4. C)pentheovendoorto check
andpieplates. cookware. foocfaslittleas possibleto prevent
unevenheatingandto saveenergy.
(hen
Temperature Cmnmerlts
Container Shelf
Position Time,
Minutes
Bred
Biscuits(1/2-in.thick) Canned,refrigeratedbiscuitstake2to
4minuteslesstime.
ShinyCookieSheet 400°-4750
350°-4000
400°-4500
350°
400°-4250
375°
350°-3750
375°-4250
375°-4250
350°-3750
15-20
20-30
20-40
45-55-
20-30
45-60
45-60
45-60
10-25
20-30
Coffeecake ShinyMetalPanwith
satin-finishbottom
Cast-IronorGlassPan
ShinyMetalPanwith
satin-finishbottom
ShinyMetalMuffk Pan
Cornbreadormufilns
Gingerbread Preheatcast-ironpan forcrispcrust.
Decreaseabout5minutesformufiln
mix,or bakeat450”F.for25minutes,
thenat 350°F.for 10to 15minutes.
Muffins
Popovers
Quickloafbread
Yeastbread(2Ioaves)
DeepGlassorCastIronCups
MetalorGlassLoafPans
MetalorGlassLoafPans Darkmetalor glassgivedeepest
browning.
Forthinrolls,ShelfBmaybe used.
Plainrolls
Sweetrolls ShinyOblongorMufllnPan
ShinyOblongorMuffh Pan
cakes
(withoutshortening)
Angelfood
Jellyroll
Sponge
AluminumTubePan
MetalJellyRollPan
MetalorCeramicPan
325°-3750
375°-4000
325°-3500
30-55
10-15
45-60
We-piece panis convenient.
Linepanwithwaxpaper.
Cakes
Bundtcakes
Cupcakes
Fruitcakes
A,B
A!B
B
B
B
325°-3500
350°-3750
275°-3000
350°-3750
350°-3750
350°
45-65
20-25
2-4k.
20-35
25-30
40-60
MetalorCeramicPan
ShinyMetalMuffMPan
MetalorGlassLoaforTubePan Paperlinersproducemoistercrusts.
Use300”F.andShelfBforsmallor
individualcakes.
ShinyMetalPanwith
satin-finishbottom
ShinyMetalPanwith
satin-finishbottom
MetalorG1assLoafPan
Layer
Layer,chocolate
Loaf
Cookies
Brownies
Drop Barcookiesfrommixuse sametime.
MetalorGlassPan
CookieSheet ;::
B, C
B, C!
32.5”-350°
350°-4000
400°-4250
375°-4000
25-35
10-20
6-12
7-12
UseShelfCandincreasetemp.25”F.
to 50°F.formorebrowning.
Refrigerator
Rolledor sliced CookieSheet
CookieSheet
Fruits,other Desserts GlassorMetalPan
GlassCustardCupsor Casserole
(setinpanofhotwatef)
GlassCustardCupsor Casserole
A,B, C
B
B
350°-4000
300°-3500
325°
30-60
30-60
50-90
Bakedapples
Custard Reducetemp.to300°F.for large
custard.
Cookbreadorricepuddingwith
custardbase80to90 minutes.
Puddings,rice
andcustard
Pies
Frozen
Meringue FoilPanonCookieSheet
Spreadto crustedges 400°-4250
325°-3500
400°-4250
400°-4250
450°
45-70
15-25
40-60
40-60
12-15
Largepiesuse400°F.andmoretime.
Toquicklybrownmeringue,use400”F.
for8to 10minutes.
Custardfillingsrequirelower
temperature,longertime.
Onecrust
TWOcrust
i%l.$myshell
Glassor Satin-finishMetalPan
Glassor Satin-finishMetalPan
Glassor Satin-finishMetalPan
Miscellaneous
Bakedpotatoes
Scaliopcddishes
Souffles
325°-4000
325°-3750
300°-3500
SetonOvenShelf
2ilassorMetalPan
GlassPan
A, B, C
A,B, C
B
60-90
30-60
30-75
Increasetimeforlargeramountor
size.
1’7
Roastingis cookingby dryheat.Tendermeator Roastingisreallyabakingprocedureusedfor meats.
poultrycanbe roasteduncoveredin youroven. Therefore,ovencontrolsare set for BAKEor TIME
Roastingtemperatures,whichshouldbe lowand BAKE.(Youmayhear aslightclickingsound,
steady,keepspatteringto aminimum.Whenroasting, indicatingtheovenis workingproperly.)Roastingis
it is notnecessaryto sear,baste,coveror addwater easy;just followthesesteps:
to yourmeat.
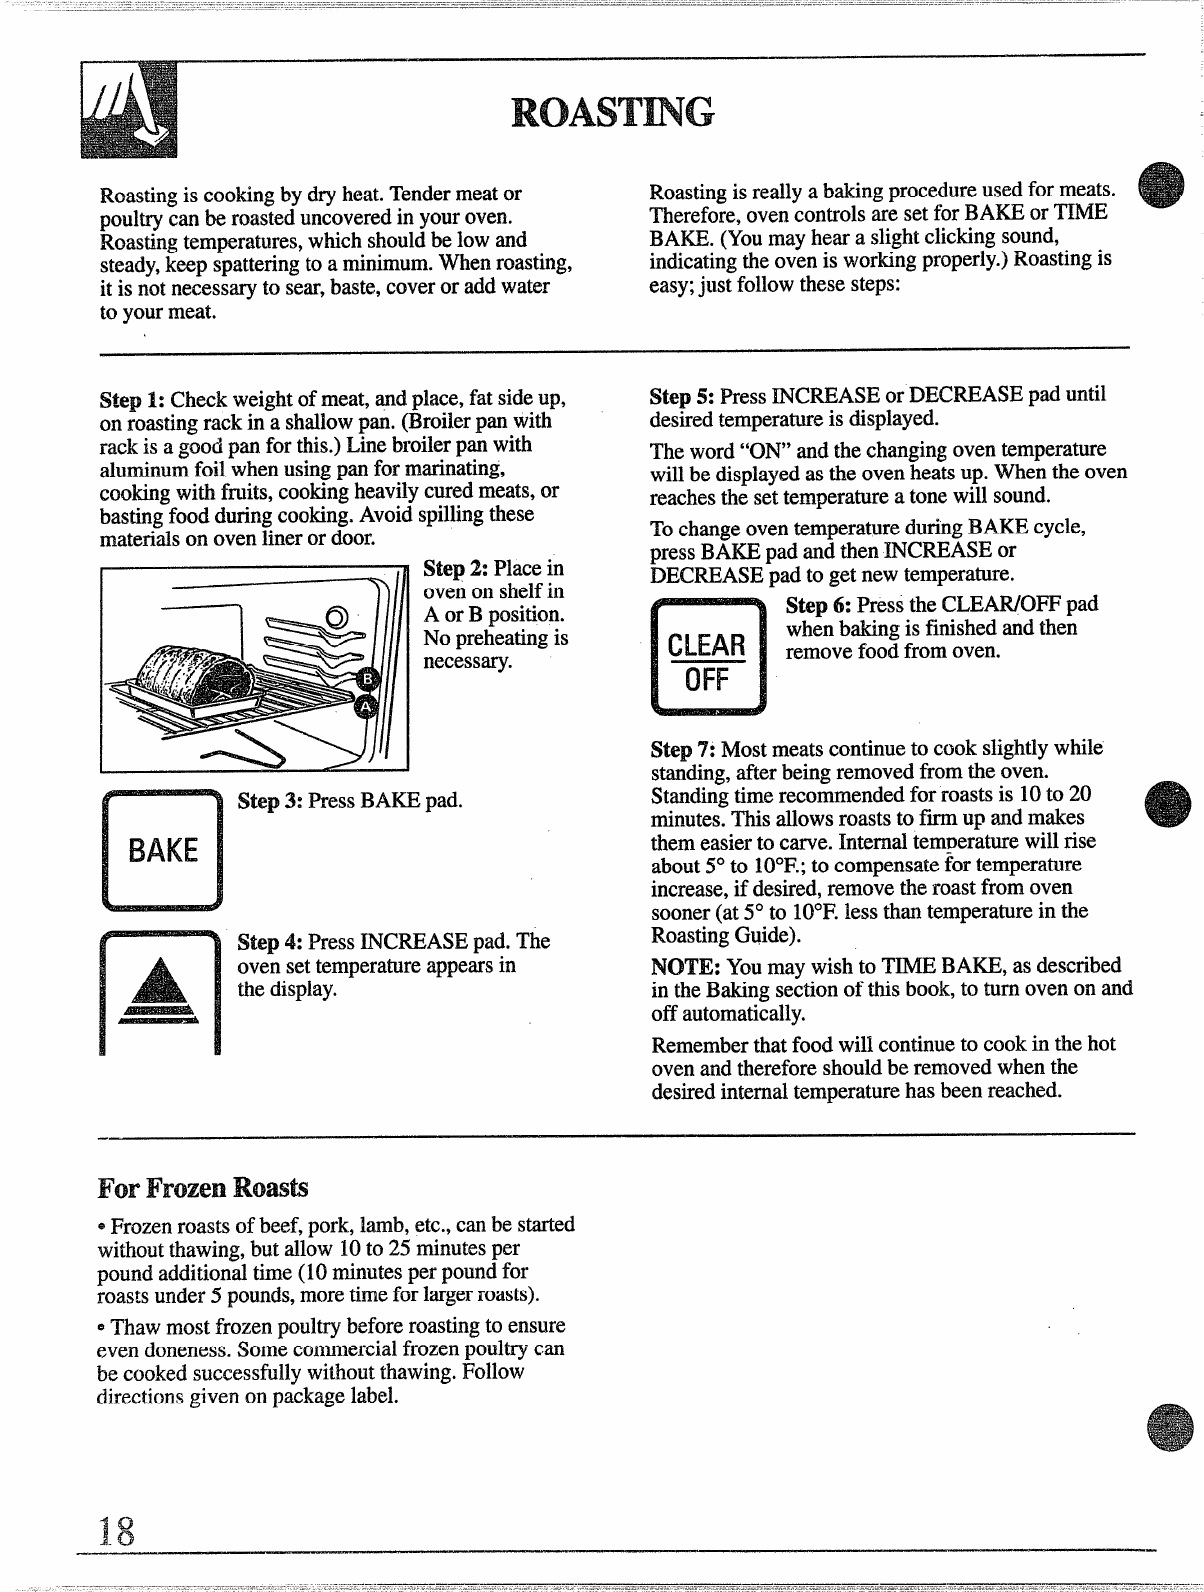
Step 1: Checkweightofmeat,andplace,fat sideup,
on roastingrack in ashallowpan.(Broilerpanwith
rackis agoodpanfor this.)Linebroilerpanwith
aluminumfoilwhenusingpanfor marinating,
cookingwithfruits,cookingheavilycuredmeats,or
bastingfoodduringcooking,Avoidspillingthese
materialson ovenlineror door.
Step 2: Placein
ovenon shelfin
AorBposition.
No preheatingis
necessary.
Step 3: PressBAKEpad.
Step 4: PressINCREASEpad.The
ovensettemperatureappearsin
thedisplay.
Step 5: PressINCREASEor DECREASEpaduntil
desiredtemperatureis displayed.
Theword“ON”and the changingoventemperature
willbe displayedas theovenheatsup.Whenthe oven
reachesthesettemperatureatone will sound.
TochangeoventemperatureduringBAKEcycle,
pressBAKEpad andthenINCREASEor
DECREASEpad to getnewtemperature.
Step6:PresstheCLEAR/OFFpad
CLEAR whenbakingis finishedandthen
removefoodfromoven.
Step 7: Mostmeatscontinueto cookslightlywhile
standing,afterbeingremovedfromthe oven.
Standingtimerecommendedfor roastsis 10to 20
minutes.Thisallowsroaststo firm up andmakes
themeasierto carve.Internaltemperaturewillrise
about5°to 10°F.;to compensatefor temperature
increase,if desired,removetheroastfrom oven
sooner(at5°to 10°F.lessthantemperaturein the
RoastingGuide).
NOTE: Youmaywishto TIMEBAKE,as described
in theBakingsectionof thisbook,to turn ovenon and
off automatically.
Rememberthatfoodwill continueto cookin thehot
ovenand thereforeshouldberemovedwhenthe
desiredinternaltemperaturehas beenreached.
For’FrozenRoa$ts
~Frozenroastsof beef,pork,lamb,etc.,canbe.started
withoutthawing,butallow 10to 25 minutesper
poundadditionaltime(10minutesper poundfor
roastsunder5pounds,moretimefor largerroasts).
~Thawmostfrozenpoultrybeforeroastingto ensure
evendoneness.Somecommercialfrozenpoultrycan
be cookedsuccessfullywithoutthawing.Follow
directionsgivenon packagelabel.
U!il
Q.Is it necessary to cheek for
doneness with ameat
A. Checkingthefinishedinternal
temperatureatthecompletionof
cookingtimeisrecommended.
Temperaturesare shownin the
RoastingGuide.Forroastsover
8lbs.,cookedat300°F.withreduced
time,checkwiththermometerat
half-hourintervalsafterhalfthe
cookingtimehaspassed.
Q. Why is my roast crumbling
vvhmItryto carveit?
A. Roastsareeasierto sliceif
allowedto cool 10to20minutes
afterremovingfromoven.Be sure
to cutacrossthegrainof themeat.
Q.Do Ineed topreheat my own
eachtimeIcookamastor
poultry?
A. It is rarelynecessaryto preheat
youroven.Preheatonlyfor very
smallroasts,whcihcookashort
lengthof time.
Q.When hying aroast,me
thereanyspecialtipsthat would
helpme cookit moreevenly?
A. Yes.Buyaroastas evenin
thicknessaspossible,or buyrolled
roasts.
Q. Can Iseal thesidesofrny foil
“tent”Whenroastingaturkey?
A. Sealingthefoilwillsteamthe
meat.Leavingit unsealedallows
the airto circulateandbrown
themeat.
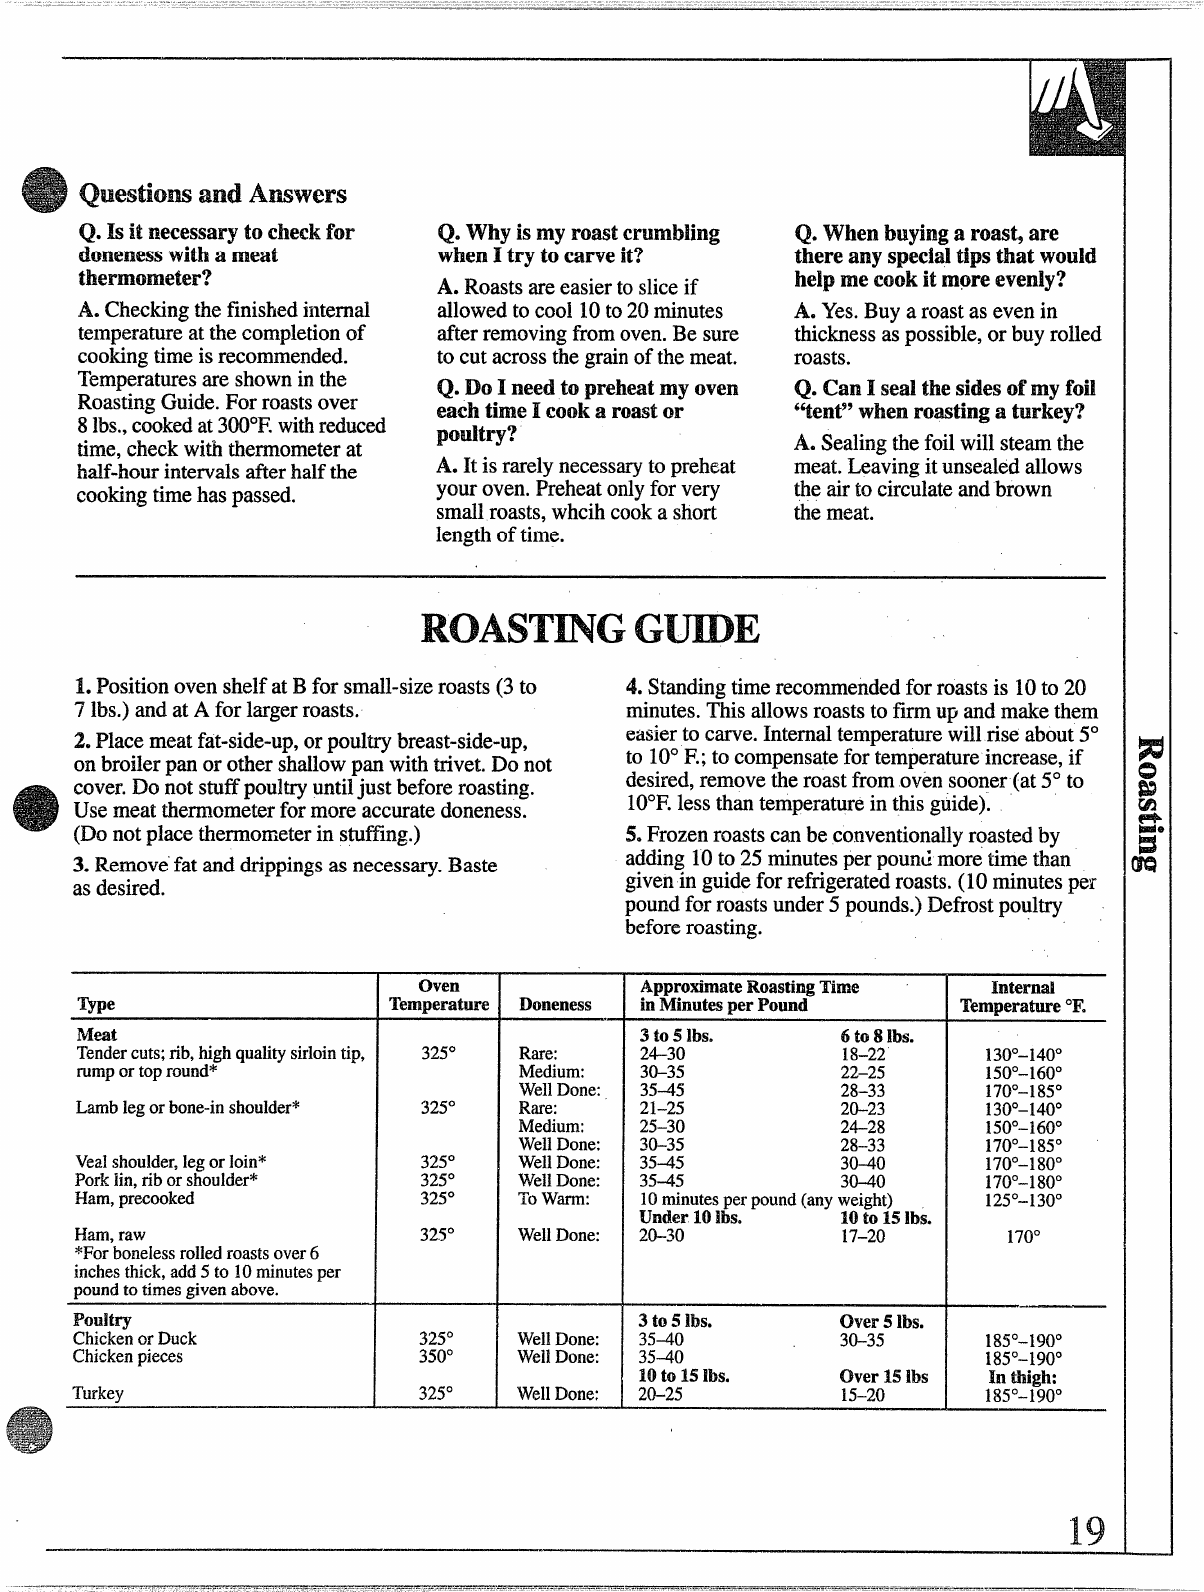
LPositionovenshelfatBfor small-sizeroasts(3 to 4. Standingtimerecommendedforroastsis 10to 20
7lbs.)andat Afor largerroasts. minutes.Thisallowsroaststo firmup and makethem
2.Hace meatfat-side-up,orpoultrybreast-side-up, easierto carve.Internaltemperaturewillrise about5°
onbroilerpanor othershallowpan withtrivet.Do not to 10°F.;to compensatefor temperatureincrease,if
cover.Do notstuffpouhryuntiljust beforeroasting. desired,removetheroastfromovensoor!er(at 5° to
Usemeatthermometerformore accuratedoneness. IO”F.lessthantemperaturein thisguide).
(I3onotplacethermometerin stuffing.) 5. Frozenroastscanbe conventionallyroastedby
as desired.
3. Removefat anddrippingsas necessary.Baste adding10to 25 minutesperpoundmoretimethan
givenin guideforrefrigeratedroasts.(10 minutesper
poundfo~roastsunder~ pounds.)Defrostpouhry”
beforeroasting.
Meat
Tendercuts;rib,highqualitysirlointip,
rumportopround*
Lamblegorbone-inshoulder*
Vealshoulder,legor loin*
Porklin,riborshoulder*
Ham,precooked
Ham,raw
*Forbonelessrolledroastsover6
inchesthick,add5to 10minutesper
~oundto timesgivenabove.
PouM’y
Chickenor Duck
Chickenpieces
Turkey
oven
Temperature
325°
325°
325°
325°
325°
325°
325°
350°
325°
Doneness
Rare:
Medium:
WellDone:
Rare:
Medium:
WellDone:
WellDone:
WellDone:
Towarm:
WellDone:
WellDone:
WellDone:
WellDone:
ApproximateWastingTime
inMinutesperPmmd
3to5lbs. 6to8NM.
24-30 18-22
30-35 22-25
35-45 28-33
21–25 20-23
25–30 24-28
30-35 28-33
35-45 30-40
3545 30-40
10minutesperpound(anyweight)
under 10U-M. 10to 15lbs.
20-..3o 17-20
3to 5lbs. Over 5NM.
35-40 30-35
35-40
10to MNM. CWer15NM
20-25 15-20
Internal
Temperature‘F.
130°-
150°-
170°-
130°-
150°-
170°-
170°-
170°-
125°-
170°
40°
60°
85°
40°
60°
85°
80°
80°
30°
185°–1900
185”–190°
In thigh:
185°-1900
Broilingis cookingfoodby intenseradiantheatfrom
theupperunitin the oven.Mostfishand tendercuts
of meatcanbe broiled.Followthesestepsto keep
spatteringand smokingto aminimum.
Step 1: If meathas fat or gristlenearedge,cut
verticalslashesthroughboth about2inchesapart.
if desired,fat maybe trimmed,leavinglayerabout
1/8inchthick
Step2:Placemeaton broilerrack inbroilerpan.
Alwaysuserack so fat dripsintobroilerpan;
otherwisejuices maybecomehotenoughto catchfire.
Step 3: Positionshelfonrecommendedshelfposition
as suggestedin BroilingGuide.Mostbroilingis
doneon Cposition,butif yourrangeis connectedto
208Volts,youmay wishto use ahigherposition.
Step4: Leavedoorajarafew inches.The doorstays
openby itself,yet propertemperatureis maintainedin
theoven.
Step 5: Press13R01Lpad.
Step6: SelectLOBroil(450”F.)by tapping
INCREASEpadonce.SelectHI Broil(550°F.)by
tappingINCREASEpadtwice.
TochangefromHI Broilto LO Broil,pressthe ‘
BROILpadthentapDECREASEpadonce.
.,.
11(=
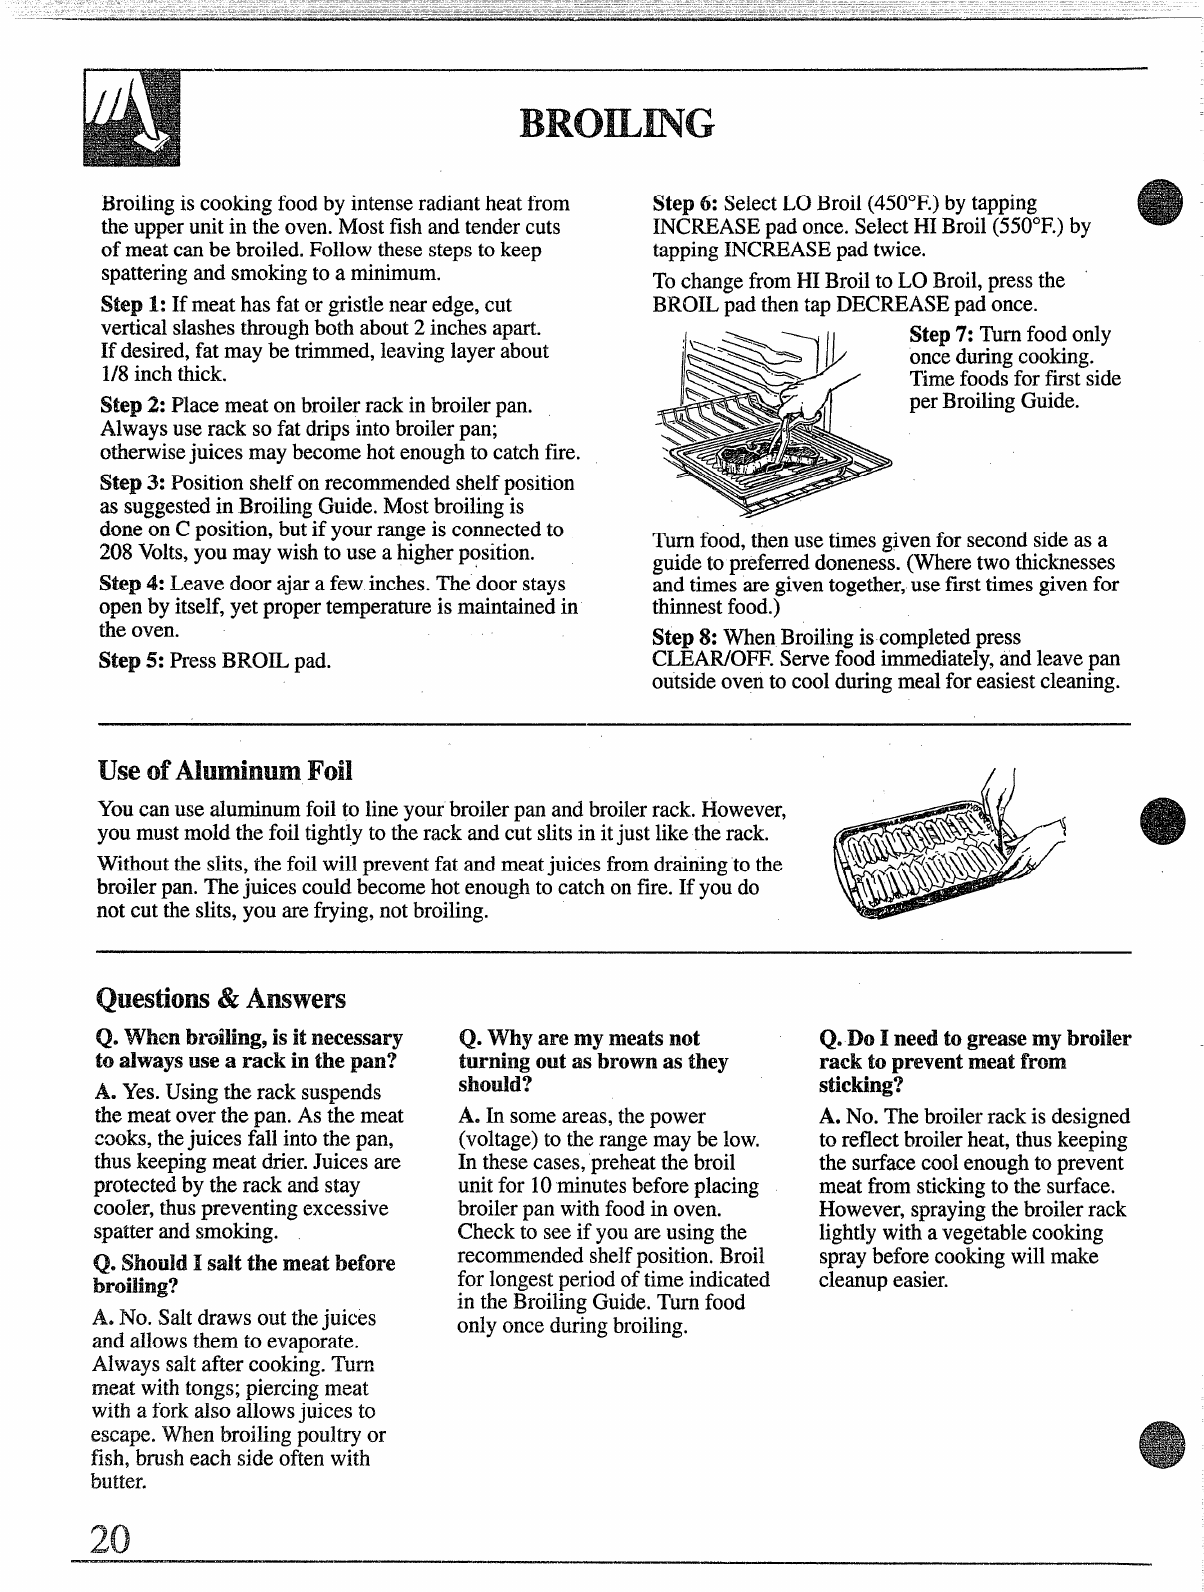
h=.~q /“”Step7: Turnfoodonly
onceduringcooking.
ll$X\>> KTimefoodsfor firstside
...-it perBroilingGuide.
Turnfood,thenusetimesgivenforsecondsideas a
guideto preferreddoneness.(Wheretwo thicknesses
andtimesaregiventogether,usefwsttimesgivenfor
thinnestfood.)
Step8: WhenBroilingis completedpress
CL13AR/OFF.Servefoodimmediately,andleavepan
outsideovento coolduringmealfor easiestcleaning.
use Foil /1
Youcanuse ah.u-ninumfoilto lineyourbroilerpanandbroilerrack.However,
youmustmoldthe foiltightlyto the rack and cutslitsin itjust liketherack.
Withouttheslits,the foilwillpreventfat andmeatjuicesfromdrainingto the
broilerpan.Thejuices couldbecomehot enoughto catchonfire. If youdo
notcuttheslits,you arefrying,not broiling.
i% Am$wers
Q. Whimbroiling, isitnecessary
toalwaysuse arackin the pan?
A. Yes.Usingtherack suspends
themeatoverthe pan.As the meat
cooks,thejuices fall intothe pan,
thuskeepingmeat drier.Juicesare
protectedby the rack andstay
cooler,thuspreventingexcessive
spatterandsmoking.
Q. Should 1salt the meat before
broiling?
A..No. Saltdraws out thejuices
and allowsthemto evaporate.
Alwayssaltafter cooking.Turn
meatwithtongs;piercingmeat
withaforkalso allowsjuices to
escape.Whenbroilingpoultryor
fish,brusheach sideoftenwith
butter.
P“
20
Q.my 2MX3my meatsnot
turningoutas browmas they
should?
A. In someareas,thepower
(voltage)to therangemaybe low.
In thesecases,preheatthebroil
unitfor 10minutesbeforeplacing
broilerpanwithfoodin oven.
Checkto seeif youareusingthe
recommendedshelfposition.Broil
for longestperiodoftimeindicated
in the BroilingGuide.Turnfood
onlyonceduringbroiling.
(). Do Ineed togrease my broiler
-
rackto preventmeatfrom
sticking’?
A. No. Thebroilerrackis designed
to reflectbroilerheat,thuskeeping
the surfacecoolenoughto prevent
meatfrom stickingto the surface.
However,sprayingthebroilerrack
lightlywithavegetablecooking
spraybeforecookingwillmake
cleanupeasier.
——
.—.—----
LAlwaysusebroilerpanandrack thatcomeswith
youroven.It is designedto minimizesmokingand
spatteringby trappingjuicesin the shieldedlowerpart
ofthepan.
5. Whenarrangingfoodon pan,do notlet fattyedges
hangoversides,whichcouldsoilovenwithfatdripping.
6. Broilerdoesnotneedto bepreheated.However,
for verythinfoods,or to increasebrowning,preheat
if desired.
2.Ovendoorshouldbe opento the broilstopposition
forallfoods. 7. Frozensteakscan be conventionallybroiledby
positioningtheovenshelfat nextlowestshelf
positionandincreasingcookingtimegivenin this
guideIX timesper side.
3. For steaksandchops,slashfat evenlyaround
outsideedgesof meat.TOslash,cutcrosswisethrough
outerfat surfacejust to theedgeof the meat.Use
tongsto turnmeatoverto preventpiercingmeatand
losingjuices. 8. If yourrangeis connectedto 208volts,rare steaks
maybe broiledby preheatingbroilheaterand
positioningtheovenshelfonepositionhigher.
4. If desired,marinatemeatsor chickenbefore
broiling,or brushwithbarbecuesaucelast5to 10 —
minutesonly.
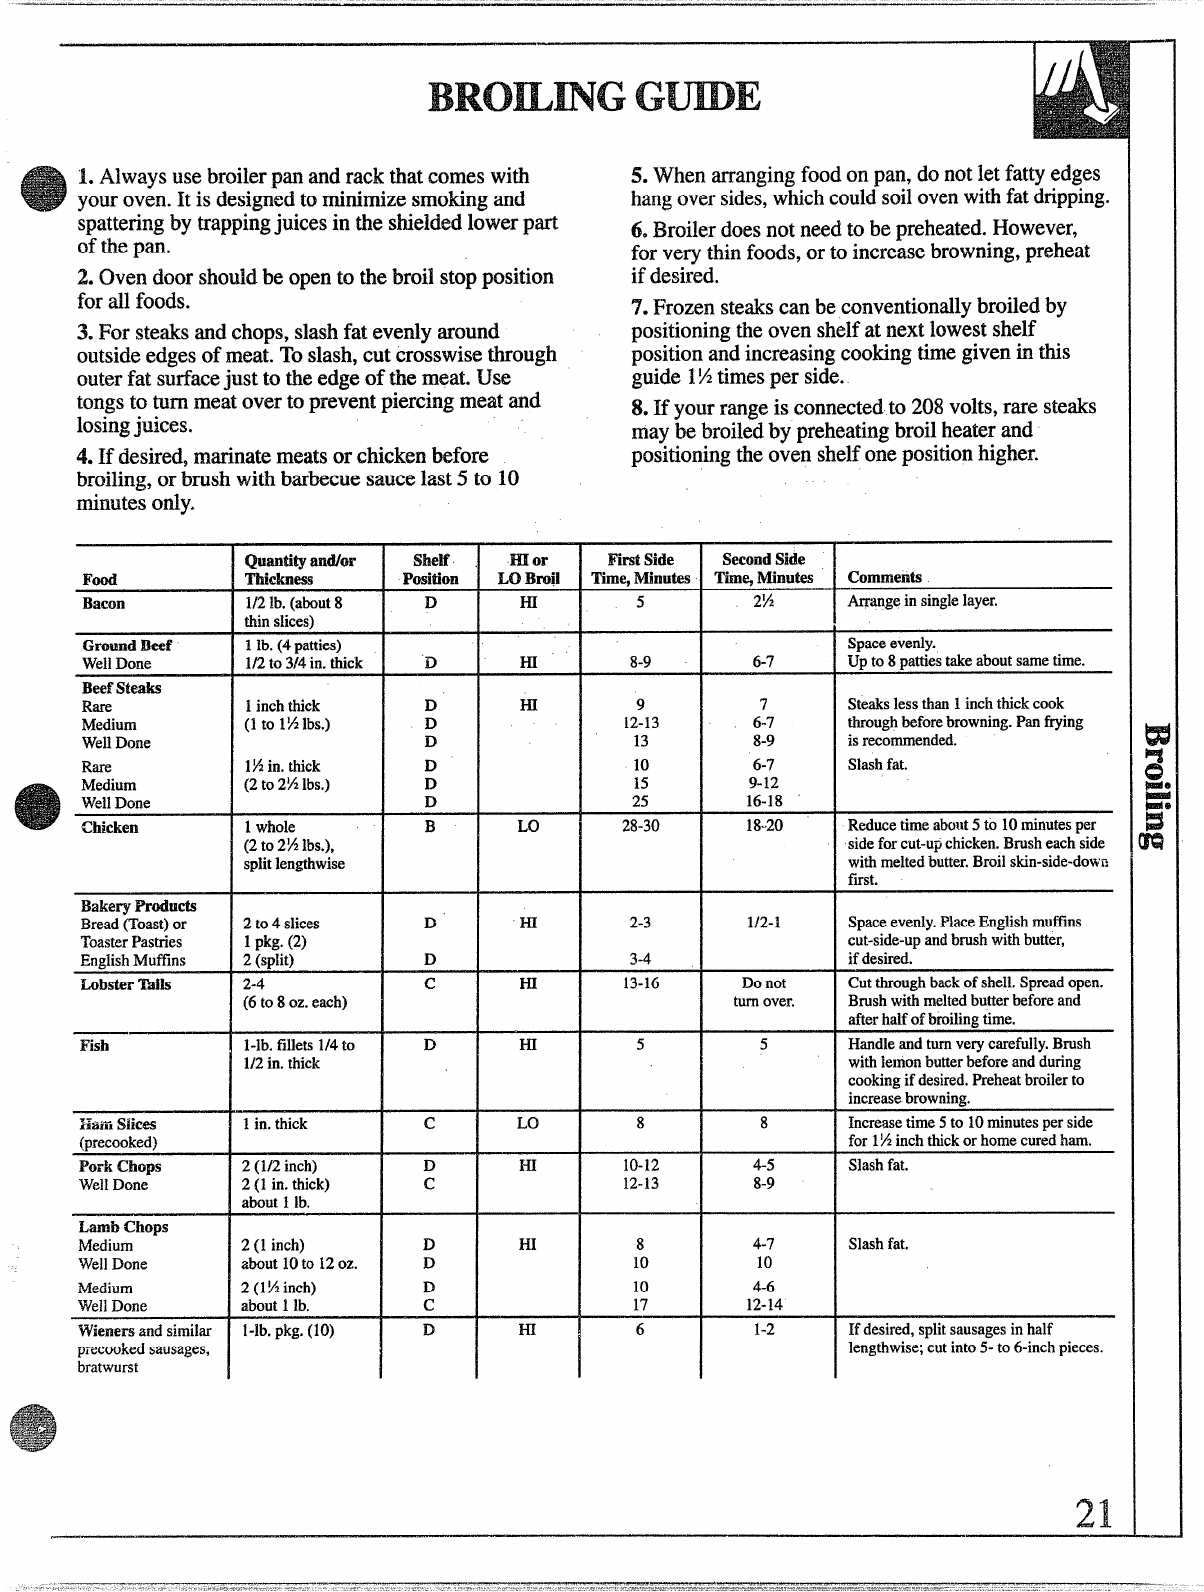
QWmtit.yandk Ishelf
Thickness Position mor
LOBroil
HI
Comments
mod
Bacon Arrangeinsinglelayer,
thinslices) !Spaceevenly.
Upto 8pattiestakeaboutsametime.
GroundBeef
WellDone 1lb. (4patties)
1/2to 3/4in.thick IDHr 8-9 I6-7
Beefsteaks
Rare
Medium
WellDone
Rare
Medium
WellDone
9
12-13
13
7
6-7
8-9
Steakslessthan 1inchthickcook
throughbeforebrowning.Panfrying
is recommended.
Slashfat.
iinchthick
(1to 1!4lbs.) D
D
D
HI
6-7
9-12
16-18
lfi in.thick
(2to 2Xlbs.) D
D
D
10
15
25
18-,20 Reducetimeabout5to 10minutesper
sideforcut-upchicken.Brusheachside
withmeltedbutter.Broilskin-side-dovm
first,
Chicken 1whole B
(2to 2!AIbs.),
splitlengthwise
LO 28-30
BakeryPro&Ms
Bread(Toast)or
ToasterPastries
EnglishMuff5ns
Lobster Tails
HI
2to4slices
1pkg.(2)
2(split)
2-4
(6to 8oz.each)
D2-3 1/2-1
3-4
Spaceevenly.PlaceEnglishmuftlns
cut-side-upandbrushwithbutter,
if desired.
D
13-16 IDonot Cutthroughbackof shell,Spreadopen.
Brushwithmeltedbutterbeforeand
afterhalfof broilingtime.
cHI
*Handleandturnverycarefully.Bmsh
Fish l-lb. fillets1/4to D
1/2in. thick HI withlemonbutterbeforeandduring
cookingif desired.Preheatbroilerto
increasebrowning.
Increasetime5to 10minutesperside
1in,thick c
ramWices
(precooked)
Pork(h~S
WellDone
LO
HI -41-+--for 1Xinchthickor homecuredham.
Slashfat.
12-13 I8-9
Limb Chops
Medium
WellDone
Medium
WellDone
Wienersandsimilar
precookedsausages,
bratwurst
2(1 inch) ID
about10to 12oz. DHI 8I4-7
10 10 Slashfat.
2(1!4inch) ID
about1lb. c10 4-6
17 12-14
l-lb. pkg.(10) IDm61-2 If desired,splitsausagesinhalf
lengthwise;cutinto5-to 6-inchpieces.
G
NormalCleaningTime:3hours
a) clean Cyck?
Quick Remimk?r:
1. Prepareovenfor cleaning.
2. Closeovendoor.
3. PressCLEANpad,
4. PressINCREASEor DECREASEpad to set
cleantime.
Therangemustbe completelycoolin orderto setthe
self-cleancycle.
Step 1: Removethebroilerpan,broilerrack,all
cookwareandanyahnninu~ foilfromtheoven—they
cannotwithstandthehighcleaningtemperatures.
@ven shelvesmaybe leftin oven.NOTE: Shelves
willdiscoloraftertheself-cleancycle.)
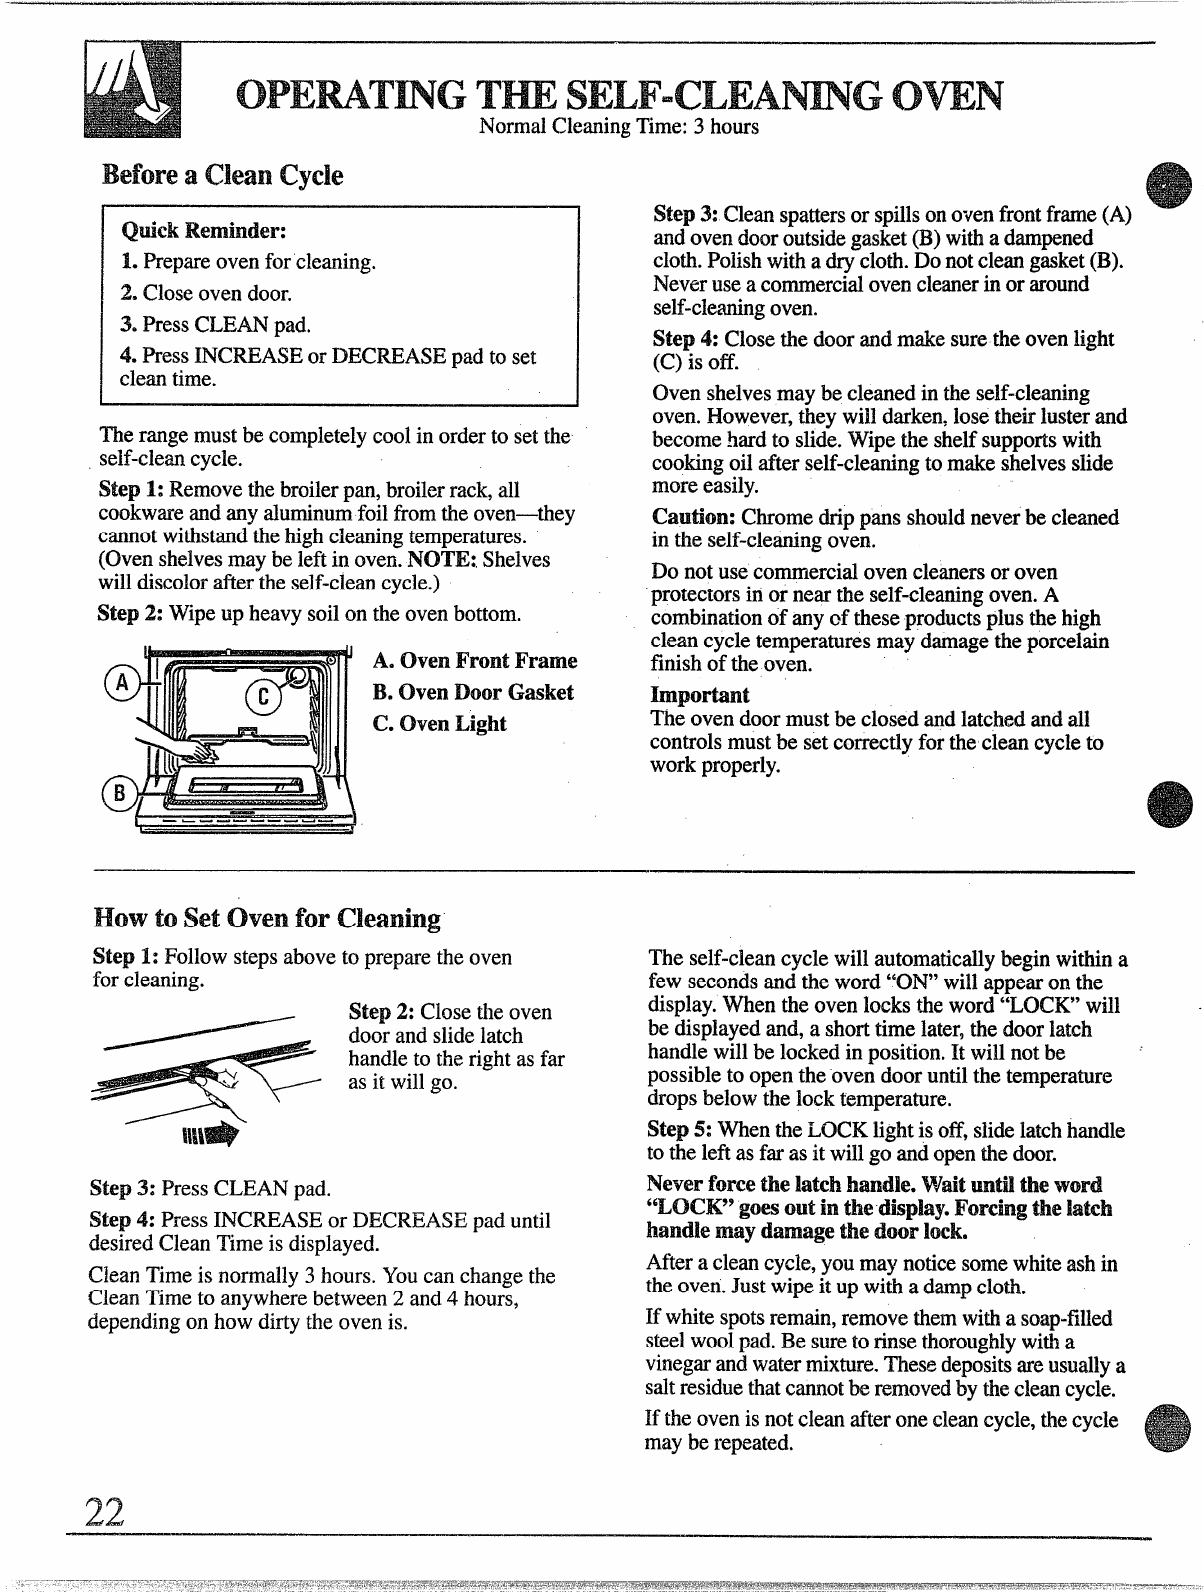
Step 2: Wipeup heavysoilon theovenbottom.
A. ovenFront Frame
‘B.Oven Door Gasket
c. oven Light
Step 3: Cleanspattersor spillsonovenfrontframe(A)
andovendooroutsidegasket(B)withadampened
cloth.Polishwithadrycloth.Donotcleangasket(B).
Neveruseacommercialovencleanerin or around
self-cleaningoven.
Step4: Closethedoorandmakesurethe ovenlight
(C) is off.
Oven shelvesmay be cleanedin the self-cleaning
oven.However,theywilldarken,losetheirlusterand
becomehardto slide.Wipethe shelfsupportswith
cookingoil afterself-cleaningto makeshelvesslide
moreeasily.
Caution: Chromedrippansshouldneverbe cleaned
in the self-cleaningoven.
Do notusecommercial oven cleaners or oven
protectors in or near the self-cleaning oven. A
combinationof anyof theseproductsplusthehigh
cleancycletemperaturesmay damagethe porcelain
finishof theoven.
Important
me ovendoormustbe closedandlatched~d dl
controlsmustbe setcorrectlyfor the cleancycleto
workproperly.
—
How tosetovenforckming
Step 1: Followstepsaboveto preparethe oven
for cleaning.
Step2: Closetheoven
$&n;:;::;;;:sfx
as it willgo.
Step 3: PressCLEANpad.
Step 4: PressINCREASEor DECREASEpad until
desiredCleanTimeis displayed.
CleanTimeis normally3hours.Youcan changethe
CleanTimeto anywherebetween2and4hours,
dependingon howdirtythe ovenis.
The self-cleancyclewillautomaticallybeginwithina
few secondsand the word “ON”willappearon the
display.Whenthe ovenlockstheword “LOCKy’will
.
be displayedand,ashorttimelater,thedoorlatch
handlewillbe lockedin position,It willnotbe
possibleto openthe ovendooruntilthe temperature
dropsbelowthe locktemperature.
Step 5: WhentheLOCKlightis off,slidelatchhandle
to theleftas far as it willgo andopenthedoor.
Never forcethelatchhandle.Wait.untiltheword
“LOCK” goesoutinthe display.Forcing the kwd-1
handle may dfunagethedoorlock.
Afteracleancycle,youmaynoticesomewhiteashin
theoven.Justwipeit up with adampcloth.
If whitespotsremain,removethemwithasoap-filled
steelwoolpad.Be sureto rinsethoroughlywitha
vinegarandwatermixture,Thesedepositsareusuallya
saltresiduethatcannotberemovedby thecleancycle.
If theovenis notcleanafteronecleancycle,thecycle
maybe i.epeated.
22
After al cycle
Whenthecleancycleisfinished,theword“CLEAN”willgo outin thedisplay
andthe.ovenwillbegintocool.Whentheoventemperaturehasfallenbelow
thelockingtemperature(about20-30minutesafiertheword“CLEAN”
goesoutat theendof thecleancycle),theword“LOCK”goesoutandthe
doorcanbe opened.
How to startof
DelayStartis settingtheoventimerto starttheclean
cycleautomaticallyat alatertimethanthepresent
timeof day.I?WHZ:Beforebeginning,makesurethe
ovenclockshowsthecorrecttimeof day.
1
‘@lickReminder-Delaystartfor’SW-ckfm:
1.Prepareovenforcleaning.
2. Slidethelatchhandleto therightas far as it
willgo.
3. PressCLEANpad.
4. PressINCREASEpad.
5. PressSTOPTIMEpad.
Timethatappearsis 3hourslaterthanthetimeof
day.PressINCREASEpaduntilthe StopTimeyou
desireappearsin thedisplay.Theself-cleancycle
willautomaticallybegin3hoursbeforetheStop
Timeyou select.
Forexample:Let’s.sayit’s7:00andyouwantthe
ovento beginself-cleaningat 9:00afteryou’re
finishedin thekitchen.Theovenisjust saileda
riorrnalamountso thenormalCleanTimeof 3hours
is preferred.
Step 1: Preparetheovenforcleaning.
Step 2: Closetheovendoor
andslidelatchhandleto the
rightas far as it willgo.
Step 3: PressCLEANpad.
‘&l #Step 4: PressINCREASEpad.
-w-
Step 5: CleanTimeforheavysoilcanbe setfor
4hours.If alongeror shorterCleanTimeis desired,
pressINCREASEor DECREASEpaduntildesired
CleanTimeis displayed.
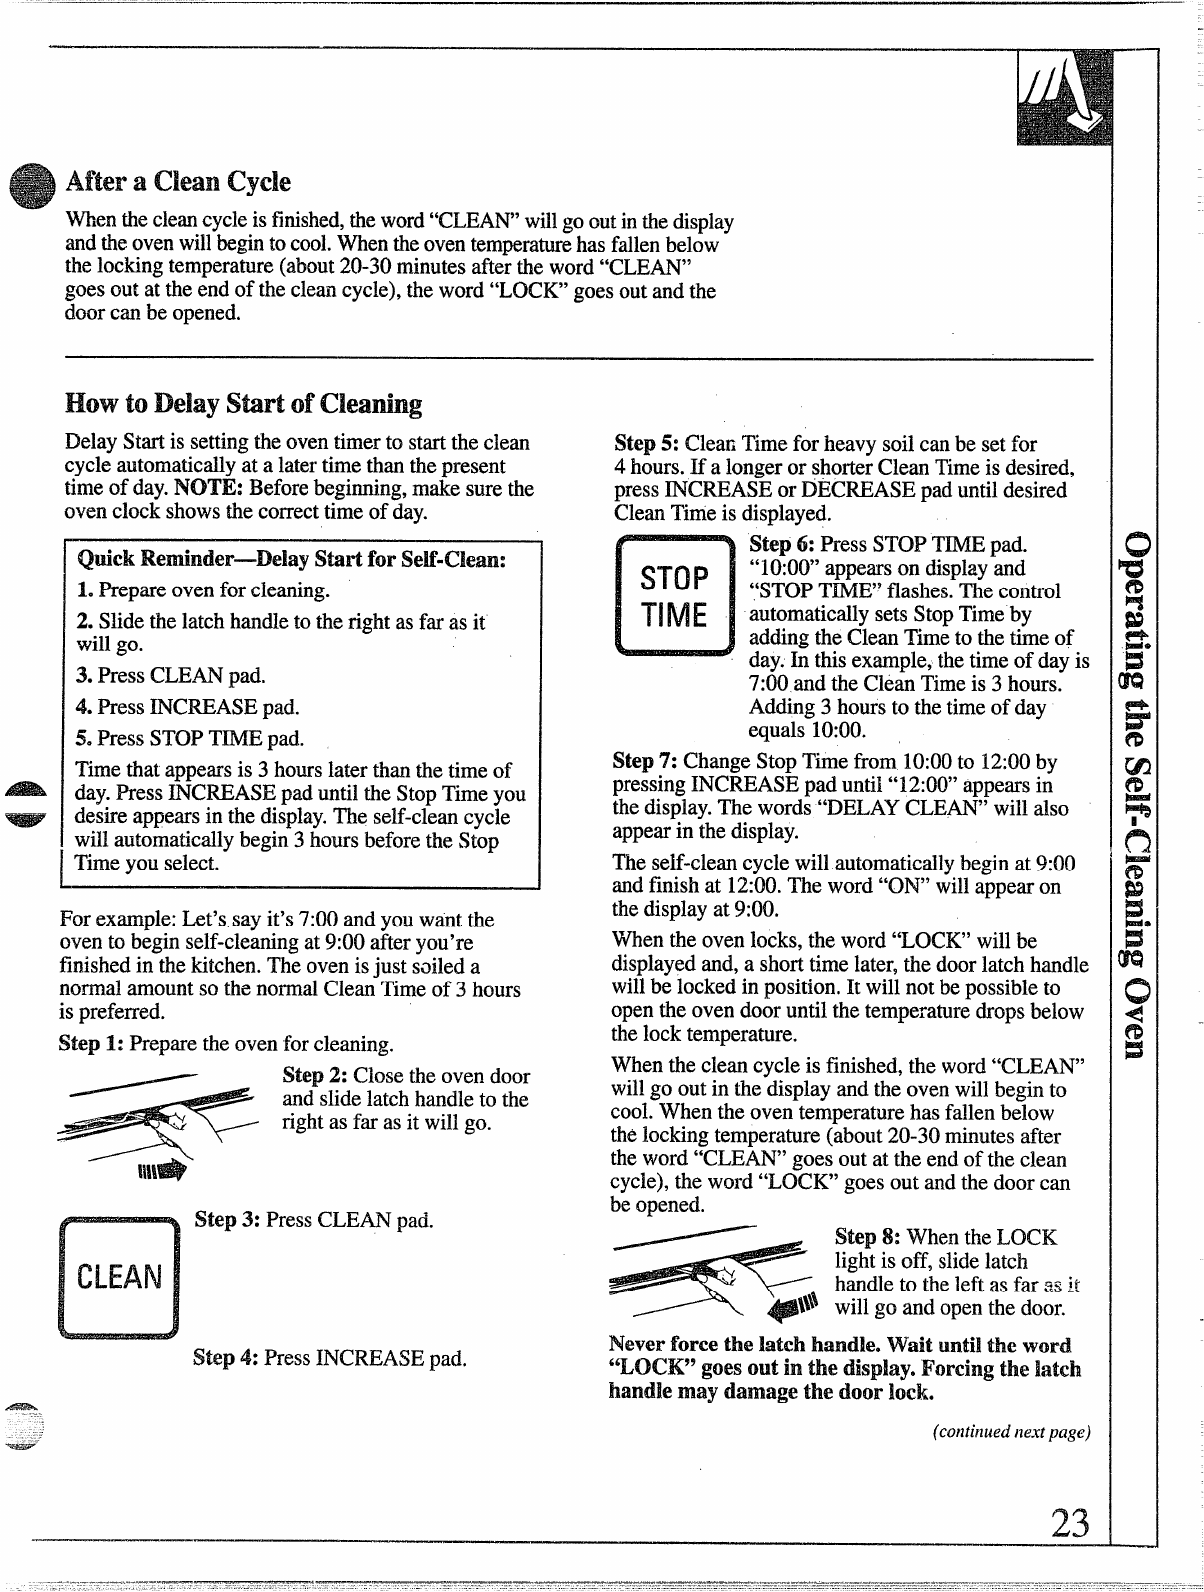
Step 6: PressSTOPTIMEpad.
u
STOP “1000” appearson display’md
“STOPTIME”flashes.Thecontrol
TIME automaticallysetsStopTimeby
addingtheCleanTimeto thetimeof
day.In thisexample,thetimeof dayis
7:00and theCleanTimeis 3hours.
Adding3hoursto thetimeof day
equals10:00.
Step 7: ChangeStopTimefrom 10:00to 12:00by
pressingINCREASEpad until“12:00”appearsin
thedisplay.Thewords“DELAYCLEAN”will also
appearin thedisplay.
Theself-cleancyclewillautomaticallybeginat9:00
andfinishat 12:00.Theword“ON”willappearon
thedisplayat 9:00.
Whentheovenlocks,the word “IXICK”willbe
displayedand,ashorttimelater,thedoorlatchhandle
willbe lockedin position.It willnotbepossibleto
opentheovendooruntilthe temperaturedropsbelow
thelocktemperature.
Whenthe cleancycleis finished,the word“CLEAN”
willgo outin thedisplayandthe ovenwillbeginto
cool.Whenthe oventemperaturehasfallenbelow
thelockingtemperature(about20-30minutesafter
theword “CLEAN”goesoutat the endof theclean
cycle),the word“H3CK”goesout andthedoorcan
beopened.
Step8: WhentheLOCK
lightis off, slidelatch
handleto theleftas far mit
}$ willg. and openthe door.
Neverforcethe latchhandle.Wait unti~the word
‘%OCK” goesout in the display.Forcing the latch
handle may damage the door lock.
(continuednextpage)
23

andAnswers
Q.mny ovendock is met
VwrkirlgUxm1Stiuself-dam
‘my oven?
ii. Ethe clockis notworkingthen
theentirecontrolis notworking.If
theclockis not setto thecorrect
timeof dayyouwillnotbe ableto
setadelaycleanto endat a
specifictime.
Q. canIuse mnmercid oven
dams on my partofmy seM-
ck%ningown-l?
A. No cleanersor coatingsshould
beusedaroundanypartof this
oven.If youdousethemanddo not
thoroughlyrinsetk ovenwith
water,wipingit absolutelyclean
afterwards,theresiduecan scarthe
ovensurfaceanddamagemetal
partsthenexttimetheovenis
automaticallycleaned.
Q. CanIdean the Woven
Gasketaroluldtheovendoor?
A. No,thisgasketis essentialfor a
goodovenseal,andcaremustbe
takennotto rub, darnageor move
thisgasket.
(continued)
Q. What should Ido if excessive
smokingoccurs during cleaning?
A. This is causedby excessivesoil.
PresstheCLEARKEFpad.Open
windowsto rid roomof smoke.
Waituntiltheovenhascooled
(about20-30minutes)andtheword
“LOCK”isoffin thedisplay.Wipe
up theexcesssoilandresetthe
cleancycle.
Q. 1sthe %radding”soundI
hearduringcleating no~al?
A. Yes.Thisisthesoundofthemetal
heatingandcoolingduringboththe
cookingandcleaningfunctions.
Q. $houki there be any’odor
duringthecleaning?
A. Yes,theremaybe aslightodor
duringthefirstfewcleanings.
Failureto wipeoutexcessivesoil
mightalsocauseastrongodor
whencleaning.
Q. mat causesthe.hair-like
lineson the enanxkd surfaceof
myoven?
A. Thisis anormalcondition,
resultingfromheatingandcooling
duringcleaning.Theselinesdo not
affecthowyourovenperforms.
I@Why do IhaveashMin my
ovenaftercleaning?
A. Sometypesof soilwillleave
adepositwhichis ash.It can
beremovedwithadampsponge
orcloth.
Q.My ovenshelvesdo notslide
easily.Whatis the ~at.ter?
A. Aftermanycleanings,oven
shel,vesmaybecomeso cleanthey
donotslideeasily.Tomakeshelves
slidemoreeasily,aftereach self-
cleaningfunctiondarnpenfingers
withasmallamountof cookingoil
andrub lightlyoversidesof shelf
wheretheycontactshelfsupports.
Q.My oven shelveshavebecome
grayafterthesdfmcieancycle.Is
thisnormal?
A. Yes.Aftertheself-cleancycle,
the shelvesmaylosesomeluster
andchangeto adeepgraycolor.
Q. Theword“door”appeared
on the disp~aywhenIsekted
the CleanCycle.What’swrong?
A. Thedoorlatchhandlemustbe
movedallthe wayto theright.
Movethelatchhandleandcleaning
willstart.
oven
Whencookingfoodfor thefirst timein yournew
oven,usetimegivenon recipesas aguide.Oven
thermostats,overaperiodof years,may “drift”from
thefactorysettingandthedifferencesin timing
betweenan old and anewovenof 5to 10minutesare
notunusual.Yourovenhasbeen setcorrectlyat the
factoryandis morelikelyto be accuratethantheoven
whichit replaced.
If youthinktheovenshouldbe hotteror cooler,you
can adjustit yourself.Todecidehowmuchto change
thetemperature,settheoventemperature25°F.higher
or lowerthanthetemperaturein yourrecipe,then
bake.Theresultsof this“test”shouldgiveyouan
ideaof howmuchthe temperatureshouldbe changed.
ToAdjustTemperature:
1.PressBAKEpad.
20Selectan oventemperaturebetween500°F.
and550°F.
3. Immediately,beforeBAKEindicatorstops
flashing,pressandholdthe BAKEpad for about4
seconds.Thered displaywillchangeto theoven
adjustmentdisp~ay.
4. Theoventemperaturecanbe adjustedup to
(+)35°F.hotteror (-) 35°F.cooler.Use the
INCREASEor DECREASEpadsto selectthedesired
changein thered display.
5. Whenyouhavemadetheadjustment,pressthe
CLEAR/OFFpadto go back to the timeof day
display.Useyourovenas you wouldnormally.
NOTE:Thisadjustnunt willnot affectBd or
CBm It will lbe w~em
power kBX%I’NWML
24
Am
seeCkming Chide.
Propercareandcleaningareimportantso yourrangewill giveyouefficient
andsatisfactoryservice.Followthesedirectionscarefullyin caringfor your
rangeto assuresafeandpropermaintenance.
Theporcelainenamelcooktopis sturdybutbreakable
if misused.Thisfinishis acid-resistant.However,any
foodspillswithahighacidcontent(suchas hit
juices,tomatoor vinegar)shouldnotbe permittedto
remainon thefinish.
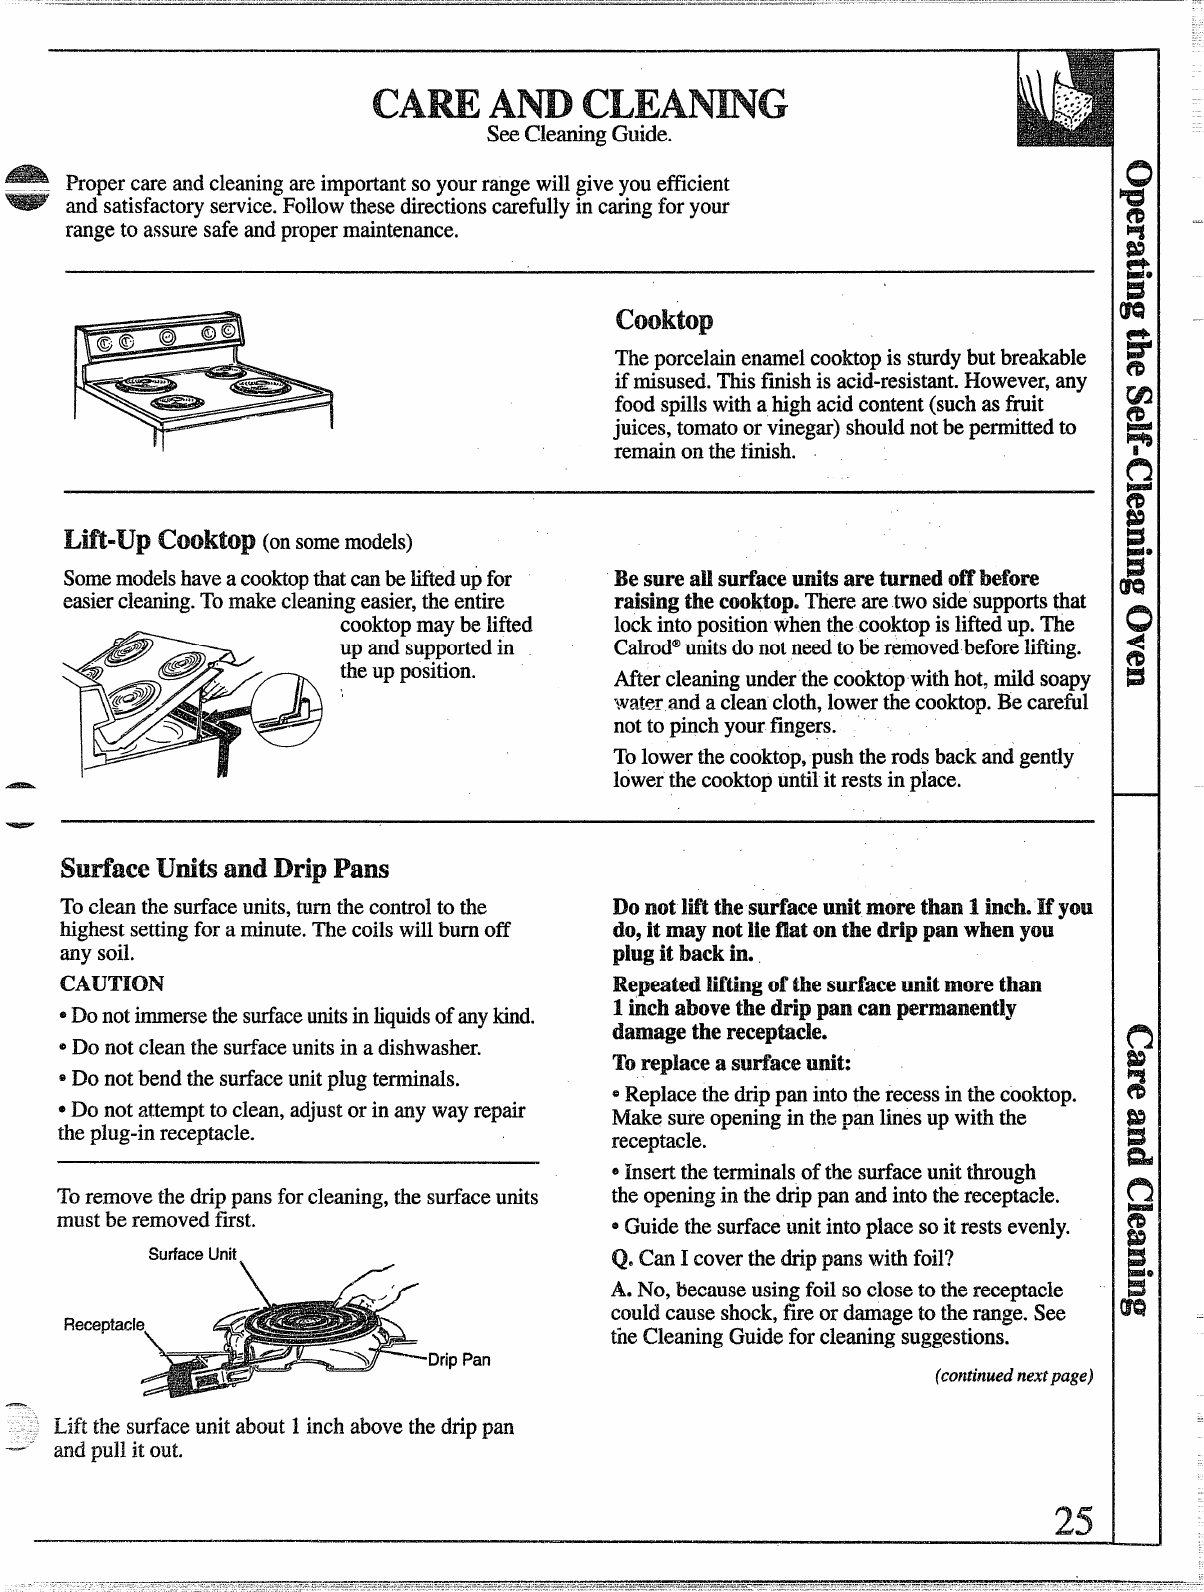
(onsomemodels)
SomemodelshaveacooktopthatcanbeIiiledupfor
easiercleaning.TOmakecleaningeasier,theentire
cooktopmaybe lifted
up andsupportedin
theup position.
Besameail surfaceunitsareturnedoff before
raisingthe cooktop.Thereare two sidesupportsthat
lockintopositionwhenthecooktopis liftedup.The
Calrod@unitsdo notneedtoberemovedbeforelifiing.
Aftercleaningunderthecooktopwithhot,mildsoapy
waterand acleancloth,lowerthecooktop.Be careful
notto pinchyourfingers.
Tolowerthecooktop,pushtherodsbackand gently
lowerthecooktopuntilit restsin place.
f!!?mrfkeunitsamDrip Pans
Tocleanthe surfaceunits,turnthecontrolto the
highestsettingfor aminute.Thecoilswillburnoff
any soil.
CAUTION
~Donotimmersethesurfaceunitsinliquidsof anykind.
eDo notcleanthe surfaceunitsin adishwasher.
*Do notbendthe surfaceunitplug terminals.
*Do not attemptto clean,adjustor in anywayrepair
theplug-inreceptacle.
Do notHftthe surke unitmore than 1inch. If you
do,itmay not.k? Mon the drip pan whenyou
plug it back in.
Repeated Ming d’ the surfaceunitmore than
1inchabove the drip pan cm permanently
dwnagethe rfeceptack.
Toreplaceasurfaceunit:
~Replacethedrippan intotie recessin the cooktop.
Makesureopeningin thepan linesup withthe
receptacle.
Toremovethedrippansfor cleaning,the surfaceunits
mustbe removedfirst.
Surface Unit
Fk3ceptacl
DripPail
@Inserttheterminalsof the surfaceunitthrough
theopeningin.the drippan and intothereceptacle.
~Guidethe surfaceunitintoplaceso it restsevenly.
Q. CanIcoverthedrip panswithfoil?
A. No, becauseusingfoil so closeto thereceptacle
couldcauseshock,fire or damageto therange.See
tiieCleaningGuidefor cleaningsuggestions.
(continuednextpage)
—
-.“ Lift the surfaceunitabout1inchabovethedrippan
--- ad. pullit out.
25
(continued)
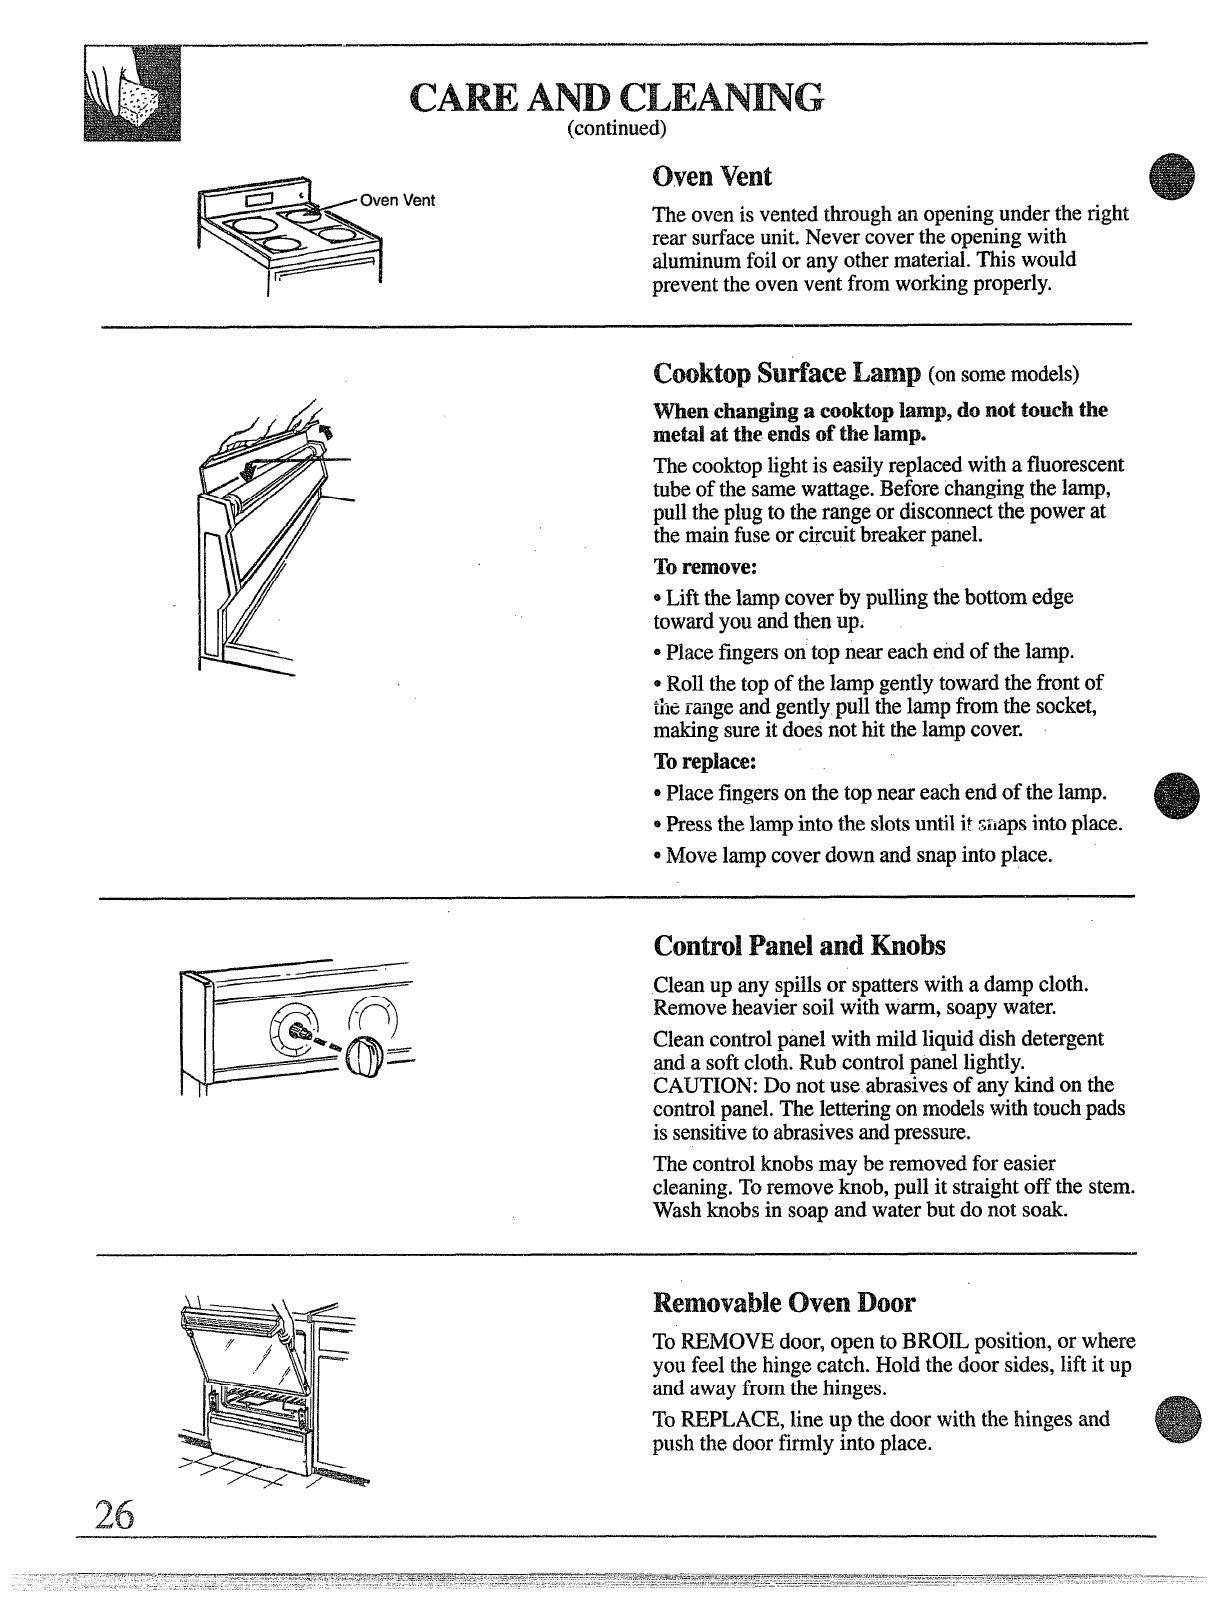
ownvent
Theovenis ventedthroughan openingundertheright
rearsurfaceunit.Nevercovertheopeningwith
aluminumfoilor any othermaterial.Thiswould
preventtheovenventfromworkingproperly.
SWf%’MX!I&Illp (onsomemodels)
WhmIIchangingacooktopk_uq9do nottouchthe
IX&3]attheendsof thelanq3.
Thecooktoplightis easilyreplacedwithafluorescent
tubeof thesamewattage.Beforechangingthelamp,
puHtheplugto therangeor disconnectthepowerat
themainfhseor circuitbreakerpanel.
Toremove:
~Liftthelampcover by pullingthebottomedge
towardyouandthenup.
~Placefingerson topneareachendof thelamp.
~Rollthetopof thelampgentlytowardthe frontof
therangeandgentlypullthelampfromthe socket,
makingsureit doesnothitthehunpcover.
Toreplace:
*placefingerson the topneareachendof thelamP.
~Pressthelampintotheslotsuntilit smipsintoplace.
eMovelampcoverdownandsnapintoplace.
Contrd Paneland Knobs
Cleanup anyspillsor spatterswithadampcloth.
Removeheaviersoilwithwarm, soapywater.
Cleancontrolpanelwithmildliquiddishdetergent
andasoftcloth.Rub controlpanellightly.
CAUTION:Do notuse abrasivesof anykind on the
controlpanel.Theletteringonmodelswithtouchpads
is sensitivetoabrasivesandpressure.
Thecontrolknobsmay beremovedfor easier
cleaning.Toremoveknob,pullit straightoff the stern.
Washknobsin soapandwaterbutdo not soak.
26
ovenDoor
ToREMOVEdoor,opento BROILposition,or where
youfeelthehingecatch.Holdthedoorsides,lift it up
andawayfromthehinges.
ToREPLACE,lineup the doorwiththe hingesand
pushthedoorfirmlyintoplace.
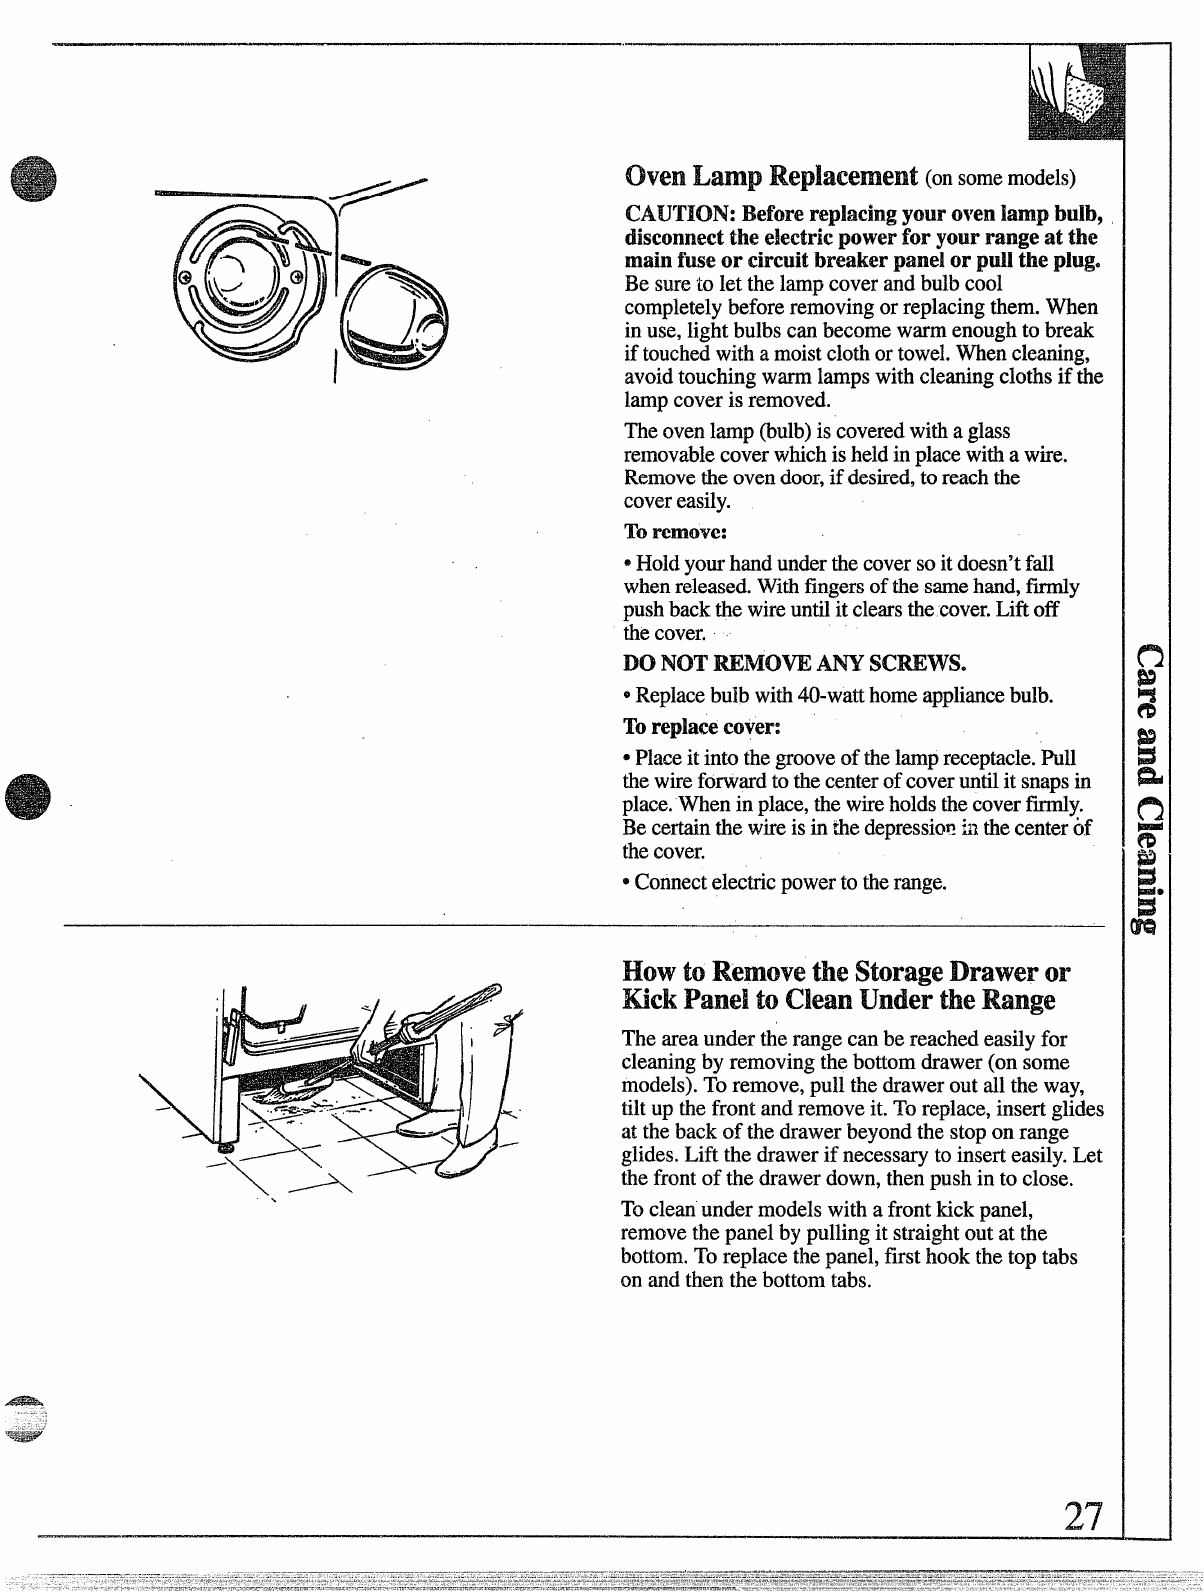
~F@~ ~tllll~ (onsomemodels)
CAUTION:13f2forereplacing ym.wovenkunphdb,
disconnectthe electricpowerfor yourrangeat the
mainfuseor circuitbreakerpanelorpuiithe plug.
Be sureto let thelampcoverandbulbcool
completelybeforeremovingorreplacingthem.When
in use,lightbulbscan becomewarmenoughto break
iftouchedwithamoistclothortowel.Whencleaning,
avoidtouchingwarmlampswithcleaningclothsif the
lampcoveris removed.
Theovenlamp(bulb)is coveredwithaglass
removablecoverwhichisheldin placewithawire.
Removetheovendoor,if desired,to reachthe
covereasily.
Toremove:
*Holdyourhandunderthecoversoit doesn’tfall
whenreleased.Withfingersofthesamehand,fiiy
pushbackthewireuntilit clearsthecover.Liftoff
thecover.
Do NOT REMOVE ANYSCxEwse
o
Replacebulbwith40-watthomeappliancebulb.
TOreplacecover:
aPlaceit intothegrooveof thelampreceptacle.Pull
thewireforwardtothecenterofcoveruntilit snapsin
place.Wheninplace,thewireholdsthecoverfirmly.
Becertainthewireisin thedepressioni:~thecenterdf
thecover.
IIIConnectelectricpowerto therange.
\\ /\
Ekn’vtoRemovethe StorageDrawer or
Kick Palld tomm under theRange
Theareaundertherangecanbereachedeasilyfor
cleaningby removingthebottomdrawer(on some
models).Toremove,pullthedrawerout allthe way,
tiltup thefront andremoveit.Toreplace,insertglides
at thebackof thedrawerbeyondthe stopon range
glides.Lift the drawerif necessaryto inserteasily.Let
thefrontof the drawerdown,thenpushin to close.
TOcleanundermodelswith afrontkickpanel,
removethepanelby pullingit straightoutat the
bottom.Toreplacethepanel,first hookthetop tabs
on andthenthe bottomtabs.
2’7’
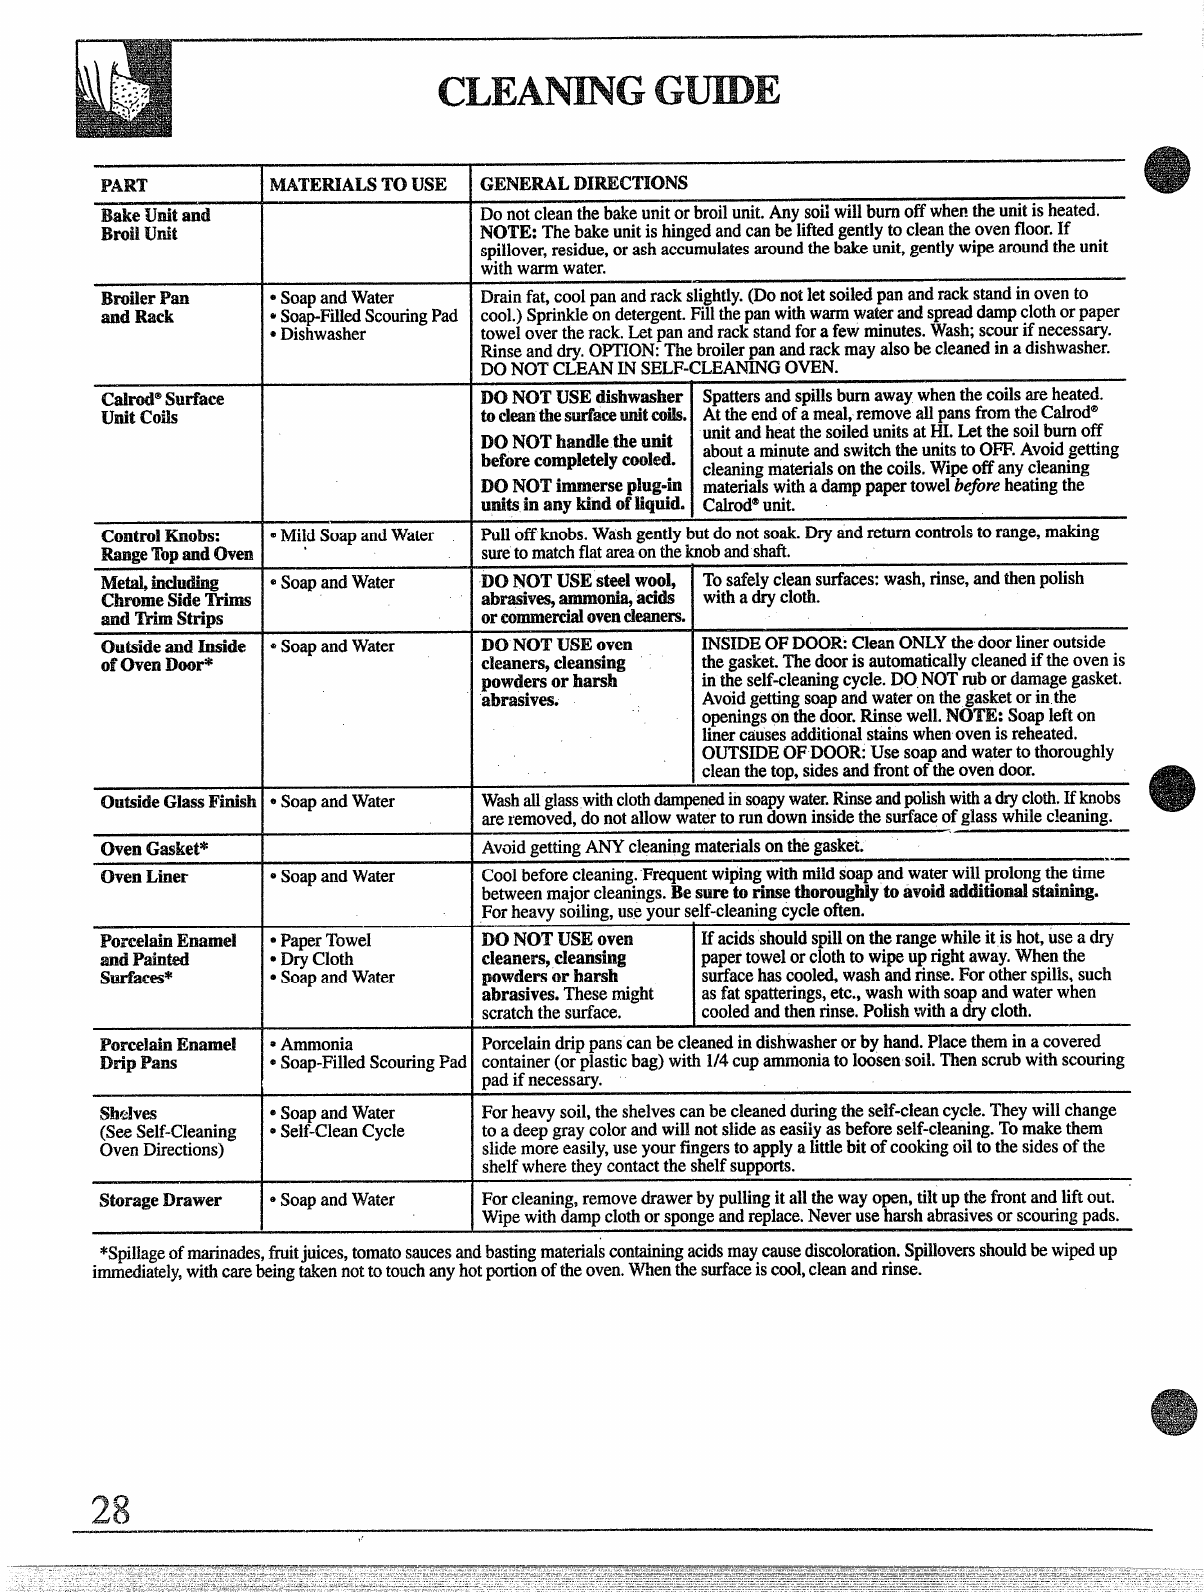
MATERIALSTO USE GENERAL
DIREC-TIONS
Donot cleanthebakeunitor broilunit.Anysoilwillburnoffwhenthe unitis heated,
I?KNE:Thebakeunitis hingedandcanbe liftedgentlyto cleantheovenfloor.If
spiilover,residue,orashaccumulatesaroundthebakeunit,gentlywipearoundthe unit
withwarmwater.
IR4Jin’
Bakewit id
Broil unit
Drain fat,coolpanandrackslightly.(Donotlet soiledpanandrackstandinovento
cool.)Sprinkleondetergent.Fillthepanwithwarmwaterandspreaddampclothorpaper
towelovertherack.Letpanandrackstandforafewminutes.Wash;scourif necessary.
Rinseanddry.CWTION:Thebroilerpanandrackmayalsobecleanedin adishwasher.
DONOTCLEANINSELF-CLEANINGOVEN.
BroilerPan
andRack eSoapandWater
~Soap-FilledScouringPad
eDishwasher
Spattersandspillsburnawaywhenthe coilsareheated.
Attheendofameal,removeailpansfromthe Cairod@
unitandheatthesoiledunitsat HI.Letthe soilbumoff
aboutaminuteandswitchtheunitsto OFF.Avoidgetting
cleaningmaterialsonthecoils.Wipeoffanycleaning
materialswithadamppapertowelbeforeheatingthe
Cairod@unit.
Gird” Swfa!e
wit coils ~~ ~()~ USECiiShW$’iSher
todeanthesurfaceunitcoils.
DO NOThandletheunit
beforecompletelycoded.
DO NOTimmerseplug-in
unitsinanykindOfliquid..
@MildSoapandWater Pulloffknobs.Washgentlybutdo notsoak.Dryandreturncontrolsto range,making
suretomatchflatareaontheknobandshaft.
~SoapandWater DO NIT USEsteelWOOi, Tosafelycleansurfaces:wash,rinse,andthenpolish
abrasiv%ammoni~acids withadrycloth.
OrcommercialOvencieaners.
Coa’ltrdKnobs:
RangeTopandOven
Me@ incid.ing
ChromeSideTrims
andTrim Strir.ls INSIDEOFDOOR:CleanONLYthe doorlineroutside
thegasket.Thedooris automaticallycleanedif theovenis
in theself-cleaningcycle.DO,NOTrubordamagegasket.
Avoidgettingsoapandwateronthegasketor inthe
openingsonthedoor.Rinsewell.IN(ITE:Soaplefton
linercausesadditionalstainswhenovenis reheated.
OUTSIDEOFDOOR:Use soapandwaterto thoroughly
cleanthetop,sidesandfrontof theovendoor.
(MsideandInside
ofOvenDoor* @SoapandWater DO NOT IJSBoven
cleaners9cleansing
powdersorhwh
abrasives.
@SoapandWater IWashallglasswithclothdampenedinsoapywater.Rinseandpolishwithadrycloth.Ifknobs
areremoved,donotallowwaterto rundowninsidethe surfaceofglasswhilec!eaning.
(MsideGiassFinish
AvoidgettingANYcleaningmaterialsonthegasket.
~SoapandWater Coolbeforecleaning.‘Frequentwipingwithmildsoapandwaterwillprolongthe time”—
betweenmajorcleanings.Be sure torinsethoroughlytoavoiddditiod stahbg.
Forheavysoiling,useyourself-cleaningcycleoften.
OvenGasket*
OvenLiner
Ifacidsshouldspillonthe rangewhileit is hot,useadry
papertowelorclothto wipeupright away.Whenthe
surfacehascooled,washandrinse.Forotherspills,such
asfat smatterings,etc., washwithsoapandwaterwhen
cooledandthenrinse.Polishwithadm cloth.
PoreeiainEnamel
andPainted
Surfaces*
0PaperTowel
●Drycloth
DSoapandWater
Ml NM’USEoven
cieaners,cieamdng
powdersOrharsh
abrasives.
Thesemight
scratchthe surface.
DAmmonia Porcelaindrippanscanbe cleanedin dishwasherorby hand.Placethemin acovered
~Soap-FilledScouringPad container(orplasticbag)with 1/4cupammoniato loosensoil.Thenscrubwithscouring
padif necessaxy.
I%rceiainEmunei
DripPans
oSoapandWater Forheavysoil,the shelvescanbecleanedduringthe self-cleancycle.Theywillchange
~Self-CleanCycle to adeepgraycolorandwillnotslideaseasilyas beforeself-cleaning.Tomakethem
slidemoreeasily,useyourfingersto applyalittlebit ofcookingoil to the sidesofthe
shelfwheretheycontactthe shelfsupports.
$~~]y’~
(SeeSelf-Cleaning
OvenDirections)
@SoapandWater Forcleaning,removedrawerbypullingit all thewayopen,tilt upthe frontandlift out. “
Wipewithdampclothorspongeandreplace.Neveruseharshabrasivesor scouringpads.
Mm-ageDrawer
*Spillageofmarinades,fruitjuices,tomatosaucesandbastingmaterialscontainingacidsmaycausediscoloration.Spiiioversshouldbewipedup
immediatdv.withcarebeingtakennottotouchanyhotwxtionoftheoven.Whenthesurfaceiscool.cleanandrinse.
,, . ..——,—.-
Readthese imtmctims Compk?tely
ad Carddy. savethese instrwtionsfor
the local ekctrid inspector%mm
(MEmwEALL
mm m
Nm mmm-R: L@mi?these
in-dons witht-heapphw!e!dk?r
institionisfcompktede
~m miifk~pti~ u~~ f3d
care Guide and Installation h3tlTlctions for
future use.
Channellockpliersor smallratchetwrench
with 7/32” socket (forlevelingrange) 1
clwrxm, FOR $MJ?EFY:
Do Nor Wm AN 13XTENSIONCORD
m
THIS13LPPmcE. IFUSEOROPEN
I?EMKERIm?cMtE
BEGImING
mmmmoNe
This appliancemustbesuppliedwiththeproper
voltageandfkquency,andcomectedtoan
individual,properlygroundedbranchcircuit
protectedbyacircuitbreakerortimedelayfuse,as
mted ontheratingplate.
WiringmustconformtoNationalElectricCodes.
Iftie electricserviceprovideddoesnotmeetthe
abovespecifications,itisrecomend~d thata
licensedelectricianinstallan approvedoutiet
Becauserangeterminalsarenotaccessibleallw
rangeisinposition,flexibleserviceconduitorcord
mustbeused.
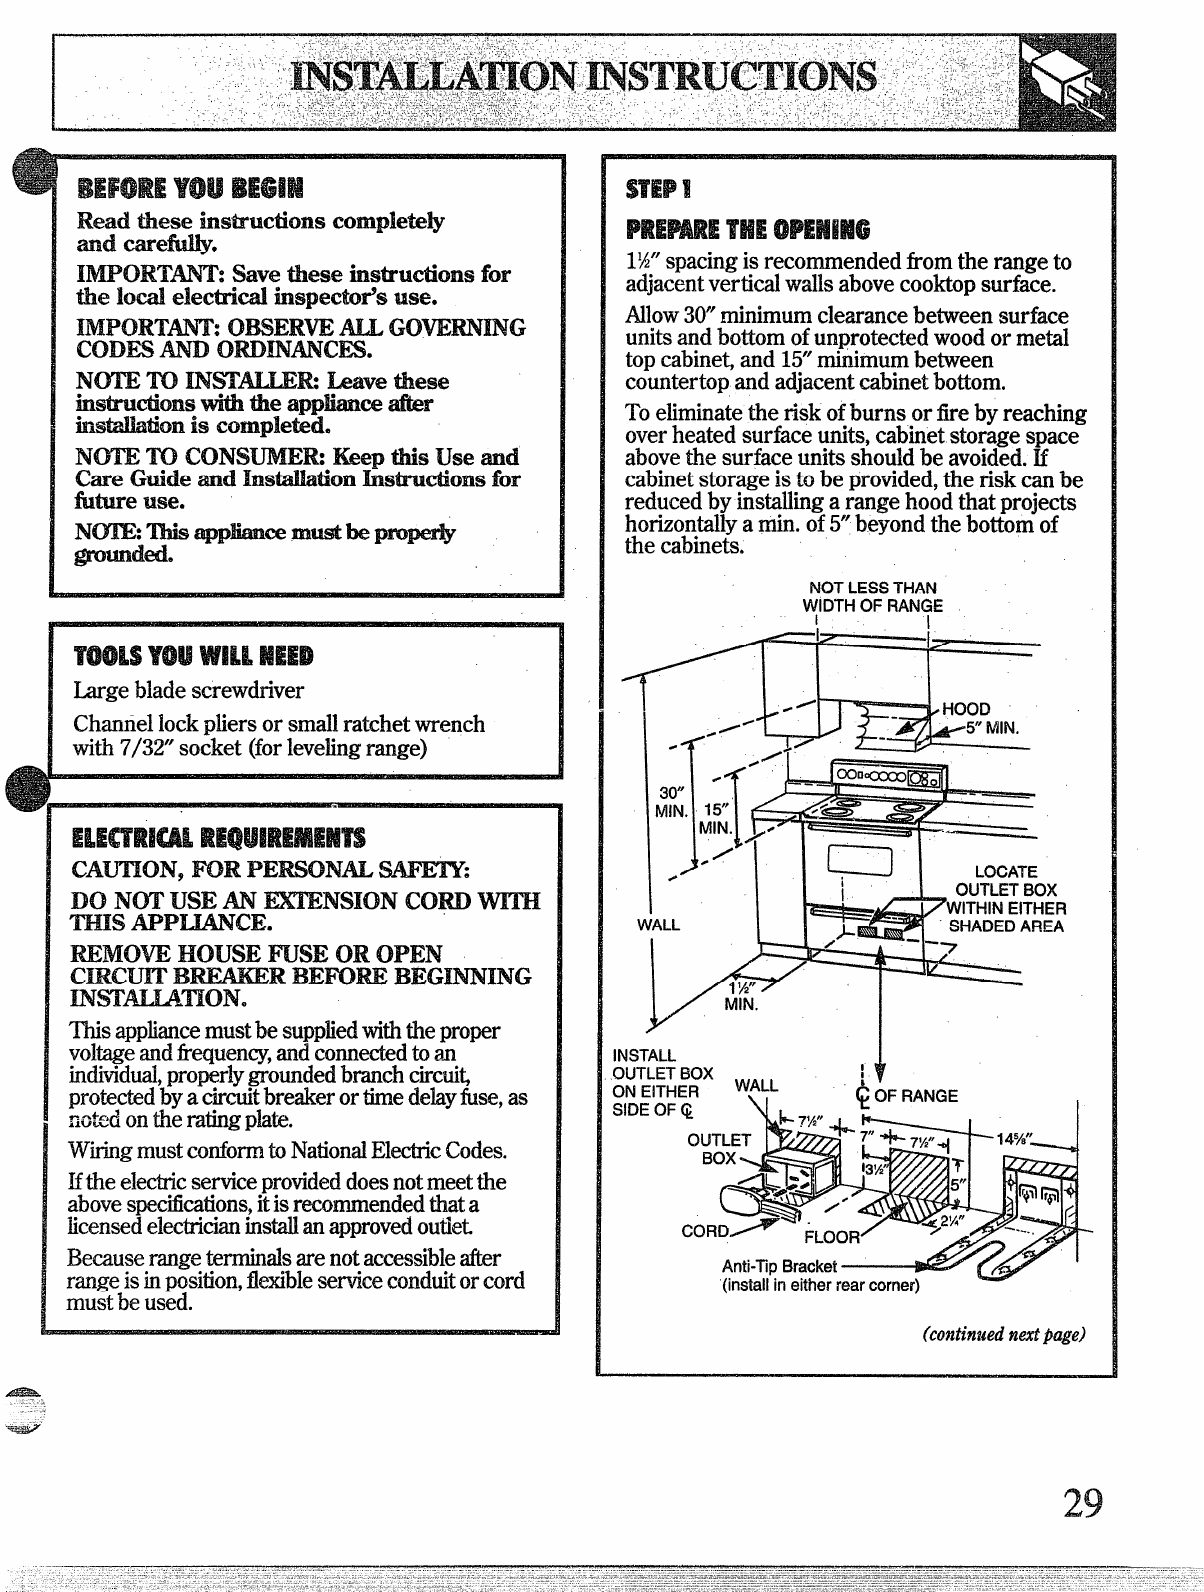
1?4”spacing is recommended fromthe rangeto
adjacentverticalwallsabovecooktopsurface.
Allow30”minimum clearance between wu-face
units and bottom ofunprotected wood or metal
top cabinet, and 15”minimum between
countertop and adjacent cabinet bottom.
To eliminate the risk ofburns or fire by reaching
over heated surface units, cabinet storage space
abovethe surface units should be avoided.If
cabinet storage is to be provided,the risk can be
reduced by installing arange hood that projects
horizontallyamin. of5“beyond the bottom of
the cabinets.
NOTLESSTHAN
WIDTHOF RANGE
I
1< I
1,
I / MIN. I
Y’ I
INSTALL
OUTLETBOX I
I
W~LL 4
ONEITHER .(h~1=
RANf2F I
SIDEOFQu L -9+,,,.:-’ “’’”--
BOX--J
Anti-TipBracket~w
(installin eitherrearcorner)
(cmthwed next@ge)
29
—
mSTmLAnON,mSTRUCTEONS ~
‘.~,-.,
,,,
!
,- ,
.!:. ‘‘.(tiqntinued) I
.,>. ., .,~
,’ J
Fkmil’lgIJmk?rthe Range
Your range, like many other household
items,isheavy and can settle into soft
floor c0vf3@&3such as cushioned vinyl or
carpdin~e Whenmovingthe range on this type
offlooring,use care, and followthese simple and
inexpensiveinstructions.
The range should be installed on a1/4 inch thick
sheet ofply-wood(or similar material) as follows:
when the floor coveting ends at the j’lwnto~tlw
range, the area thatthe rangewillrest onshould
bebuiltupwithplywoodtothe samelevelor
higherthanthe floorcovering.Thiswillallow
therangeto be movedforcleaningor servicing.
Useon~y
a3-conductor,or ifrequired a4
conductor range cord set as noted below.These
cord sets are provided with ring type terminals.
The electrical rating ofthe cord must be 125/250
volts minimum, 40 amperes.
NOTE: Only a4-conductorcord is to be used
when the appliance is installed in amobile home
or where local codes do not permit grounding
through the neutral.
3
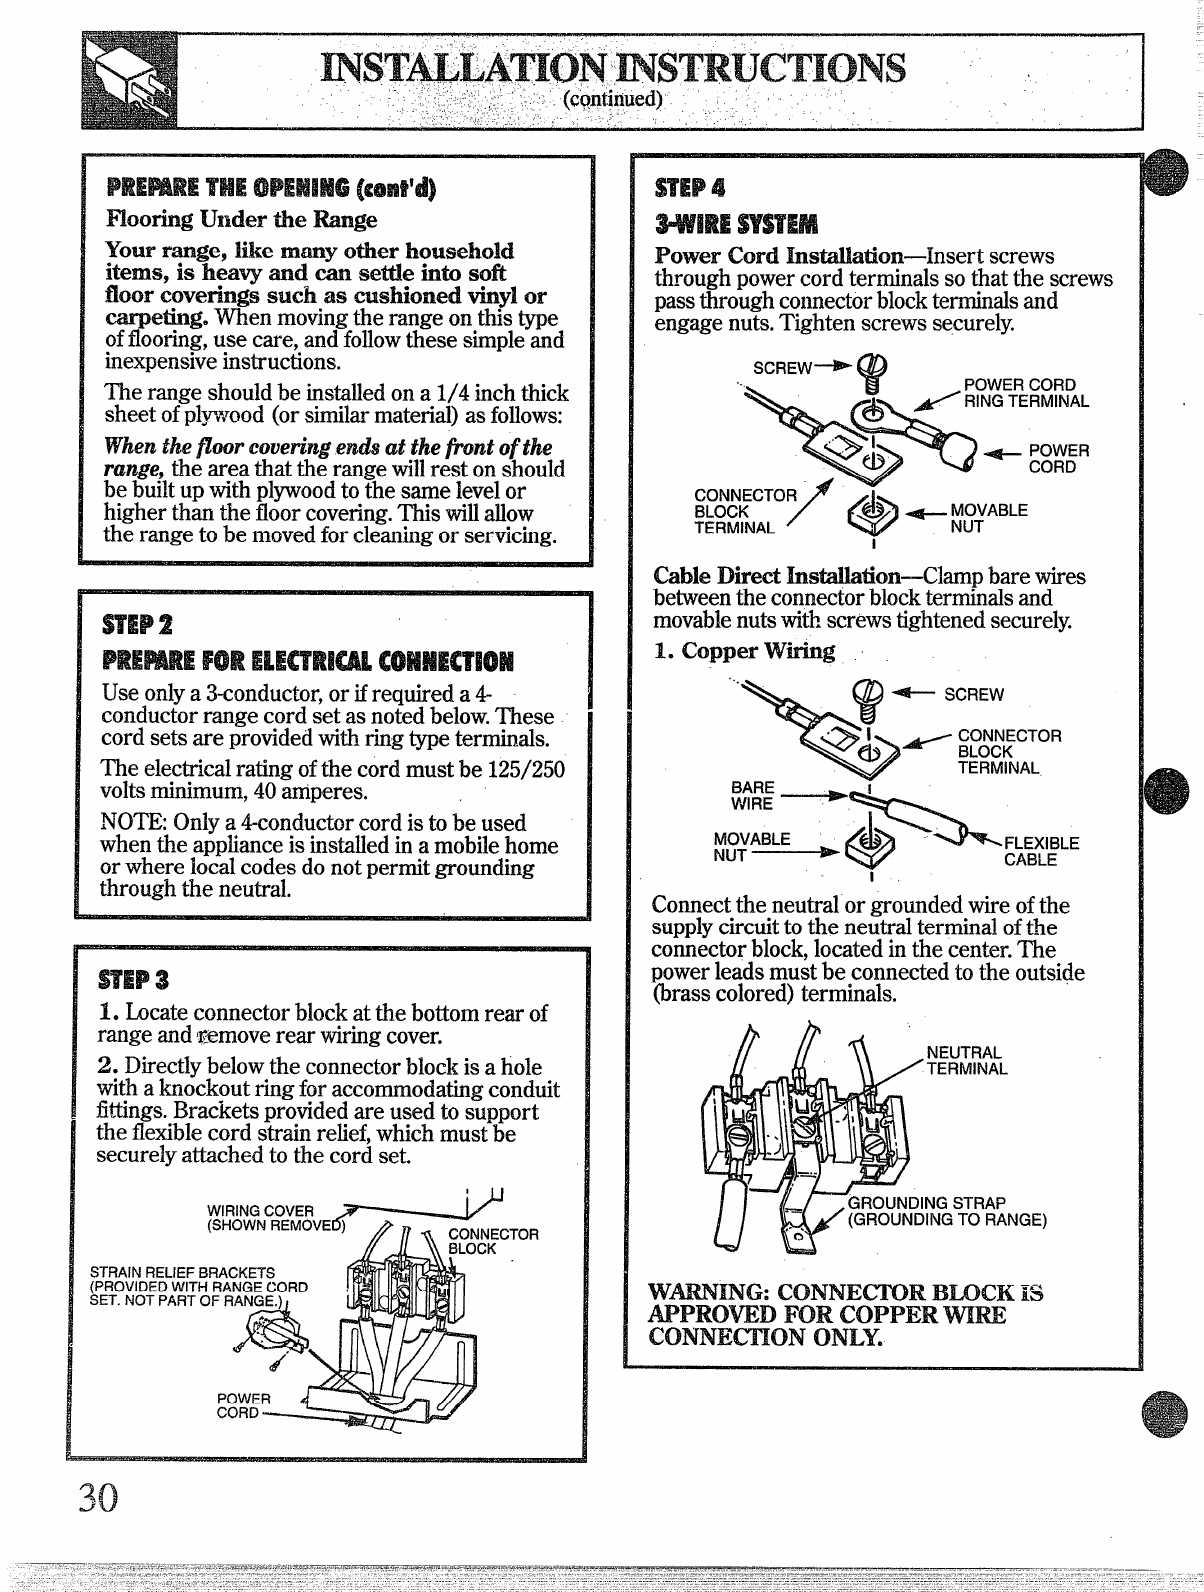
1. Locateconnector Mockat the bottom rear of
range and ‘Eemoverear wiring cover.
2. Directly below the connector block is ahole
with aknockout ring for accommodating conduit
fittings. Brackets provided are used to support
the flexiblecord strain relief, which must be
securely attached to the cord set.
TOR
STRAINRELIEF
‘PFIOVIDECIWIT
iET. NOT PART
Power Cord Im&dMiom4nsert screws
throughpowercordterminalssothatthe screws
passthroughconnectorblockterminalsand
engagenuts.Tightenscrewssecurely.
SCREW+ 9POWERCORD
>?
&/ RINGTERMINAL
+&+m&R
CONNECTOR
BLOCK ~~~~ABLE
TERMINAL I
Cable Direct I@a.Mien-Ckunp bare wires
betweentheconnectorblockterminalsand
movablenutswithscrewstightenedsecurely
1. copper wiring
..b$?
+SCREW
~i-CONNECTOR
BLOCK
TERMINAL
;~;: ~s
MOVABLE
NUT~\
&FLEXIBLE
CABLE
1
Connect the neutral or grounded wire ofthe
supplycircuit to the neutral terminal ofthe
connector block,located in the center. The
power leads must be connected to the outside
(brass colored) terminals.
coNNEmR 13UXK 1s
im%KwED Fat ‘COPPER VVn?E
ONLY’.
)2. AkmBinUmr!i
AConnectlengthofcopperbuildingwireto
rangeterminalblock.
B. Splicecopperwirestoahminumwiringusing
specialconnectorsdesignedandU.L.approved
forjoiningcopperto aluminum,andfollowthe
connectormanufacturer’srecommended
procedureclosely
NOTE:Wireused,locationandenclosureof
splices,etc.,mustconformtogoodwiring
practiceandlocalcodes.
!5
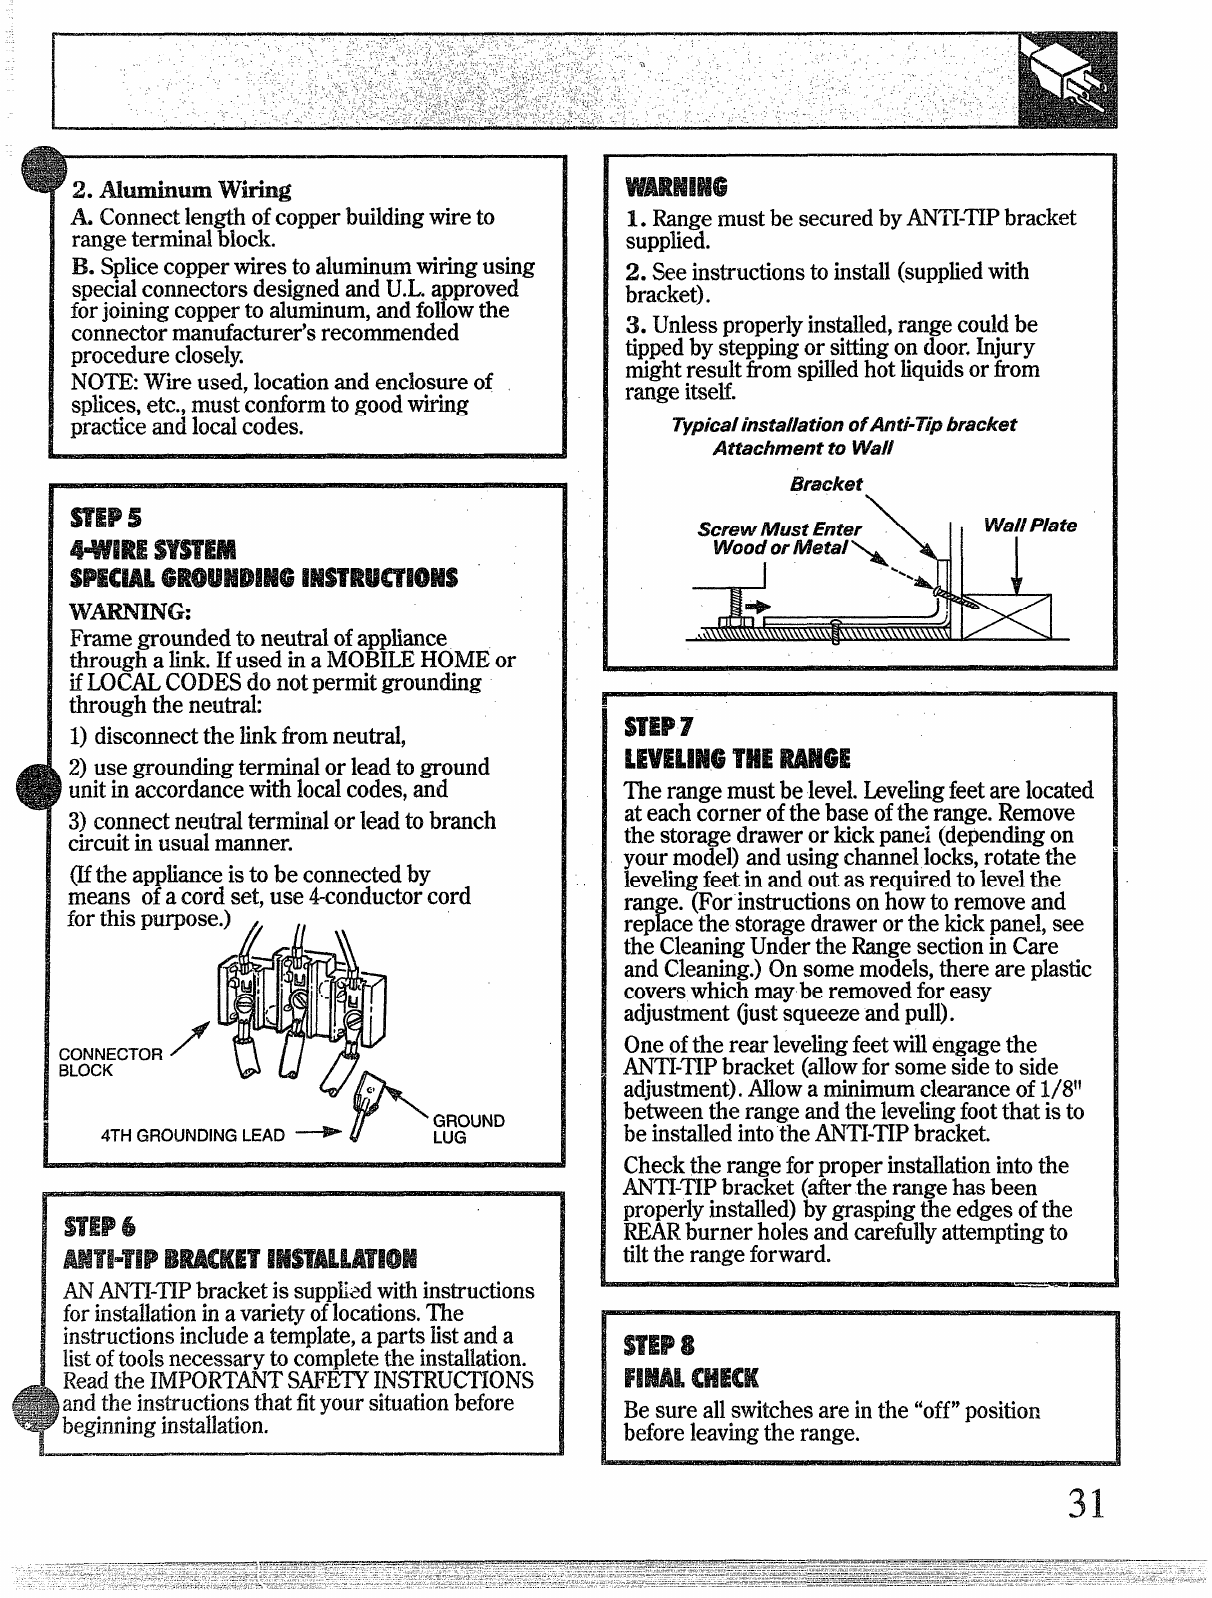
Frame groundedto neutralofappliance
throughalink.Ifused inaMOBILEHOMEor
ifLOCALCODESdo notpermitgrounding
throughthe neutral:
1)disconnectthe l.inkfromneutral,
2)use groundingterminalor leadtoground
1unitinaccordancewith~oc~codes,~d
3)connectneutralterminalor leadto branch
circuitin usualmanner.
(Ifthe applianceisto be connectedby
means ofa cordset,use 4-conductorcord
6
ANANTI-TIPbracketis supp&xlwithinstructions
forinstallationinavarietyoflocations.The
instructionsincludeatemplate,apartslistanda
listoftoolsnecessaryto completethe installation.
Readthe HVHWRTANTSAFHYDHHU.J(310NS
andthe.instructionsthatfityoursituationbefore
beginninginstdkitkm.
1. Rangemustbe securedbyANTI-TIPbracket
supplied.
2. Seeinstructionsto install(suppliedwith
bracket).
3. Unlessproperlyinstalled,rangecouldbe
tippedbysteppingor sittingondoor.Injury
mightresultffornspilledhotliquidsorfrom
rangeitself.
TypicalinstallatimofAnti-Tipbracket
AttachmenttoWall
Bracket
ScrewMustEnter WVaflFYate
W?/mdoriWeta/
1\
7
Therangemustbe leveLLevelingfeetarelocated
ateachcorner ofthe baseofthe range.Remove
the storagedraweror kickpanei(dependingon
yourmodel)andusingchannellocks,rotatethe
levelimfeetinandoutasreauiredtolevelthe
range.-(or instructionsonhhwtoremoveand
replacethe storagedrawerorthe kickpanel,see
the CleaningUnderthe RangesectioninCare
andCleaning.)Onsomemodels,thereare plastic
coverswhichmaybe removedforeasy
adjustment(justsqueezeandpull).
IOneofthe rearlevelingfeetwillengagethe
ANTI-TIPbracket(allowforsomesideto side
.. adjustment).Allow=aminimumclearanceofI/$tf
betweenthe rangeandthe levelingfootthat is to
be instded intotheANTI-TIPbracket.
ICheckthe rangeforproperinstdation intothe
ANTI-TIPbracket(afterthe ramzehasbeen
properlyinstalled)bygrasping&e edgesofthe
REARburner holesandcarefullyattemptingto
tiltthe rangeforward.
8
Besure allswitchesareinthe “off”position
beforeleavingthe range.
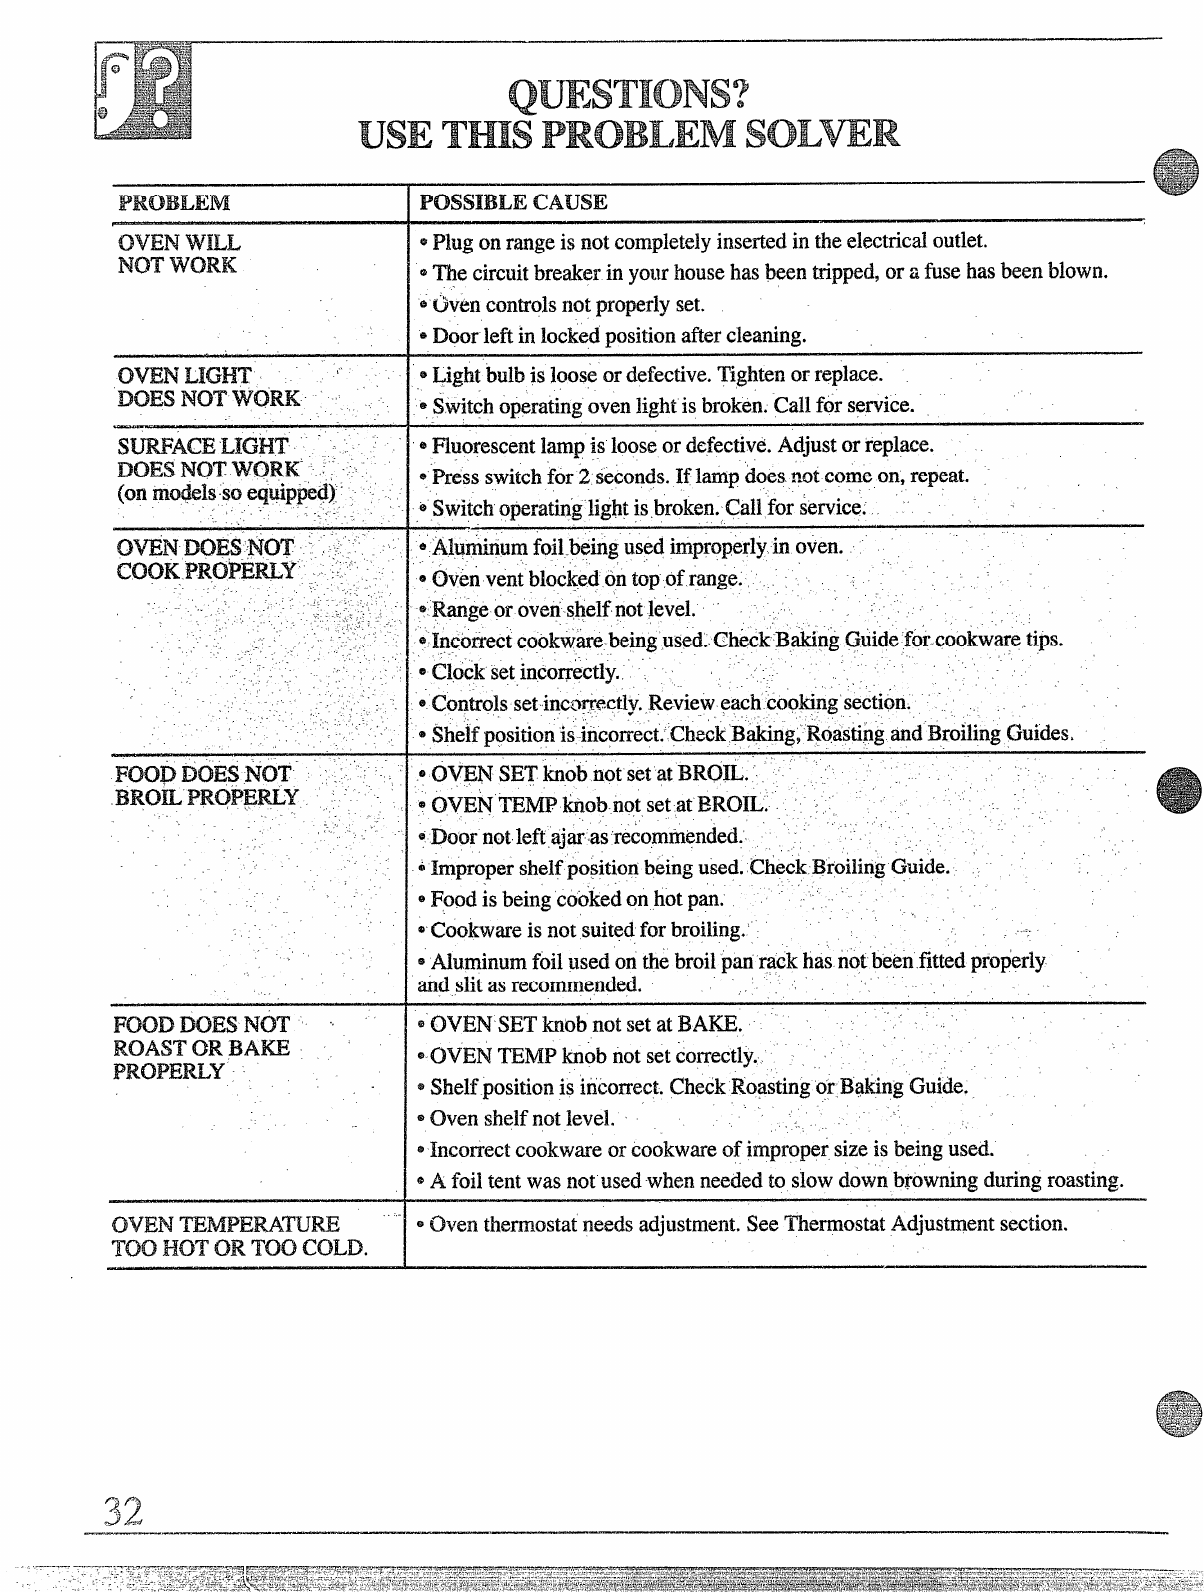
CWENWILL
Ncm WORK
OVENLIGHT ‘
DOES ‘
LK.WT -~
~
‘“: ~
(cmn’dekso equipgieq)‘
>. .=,-,
NOT ‘
Imm.4 :‘ -
..., .-
NOT “
ROASTORBAKE
CWEN
T’Cx3H(IT cmTOO COLD.
~L@t bulbisloose or defective.Tightenor repla=.
*$.wit@operatingovenlightis broken.Callf& service.
~~uores~entlap is loose or defective.Adjustorreplace.
~~r~ssswitchfor 2“sec~ndscIf lampdoes.notcomeOi2, repeat.
~SwitchoperatingIigbtis broken.Callfor service: .~
—-
*A~n&n~mfoil.beingusedimproperlyinoven.
~Ovenventblocked6ntopofrange.,
*~~ge Or oven ~~elfpotleveL
@Ip$otiectc@&re-being used.Ch&k-BakingGuidefbrcookwaretips.
,- ,.
~Clocksetincorrectly.. ‘.
~Con~o]s&inc<~fie~tly+Revieweach‘COOkiIIg Secti&n. .
.. ,. .
QJShelf p@tion is-~ficorrect.-Check Bt@g9 Wasting and.Broiling G~ides,
@(XM@I$M1’knob not set at ~~o~~. ~‘“ -.
*(X7EN ~MP l&ob not set at H?CNL. -,‘,,
~~ool. not left ajaras retiorn~enckxi.. ‘-,
~Impropershelfpositionbeingused.CheckBroilingGuide.
~Food&beingcookedon hotpan.
*Cookwareis not suitedfor broiling.’..
~Aluminumfoilusedon thebroil‘panrackhas notbetmfittedpro~erly
ahdslitas recommended. !.
,$ ,. .,
eOVEN SETkIIOb notset atBAKE.
~.~~~N ~Mp knobnotsetcorrectly. ,
~Shelfpositionis iiitiorrect.ChedkRoastingor BakingGuide.
*Oven shelfnotlevel. ,.
@Incorrectcookwareor cookwareof impropersizeis beingused.
@Afoil tentwasnot usedwhen neededto slowdownbrowningduringroasting.
~Clventhermostatneedsadjustment,SeeThermostatAdjustmentsection.
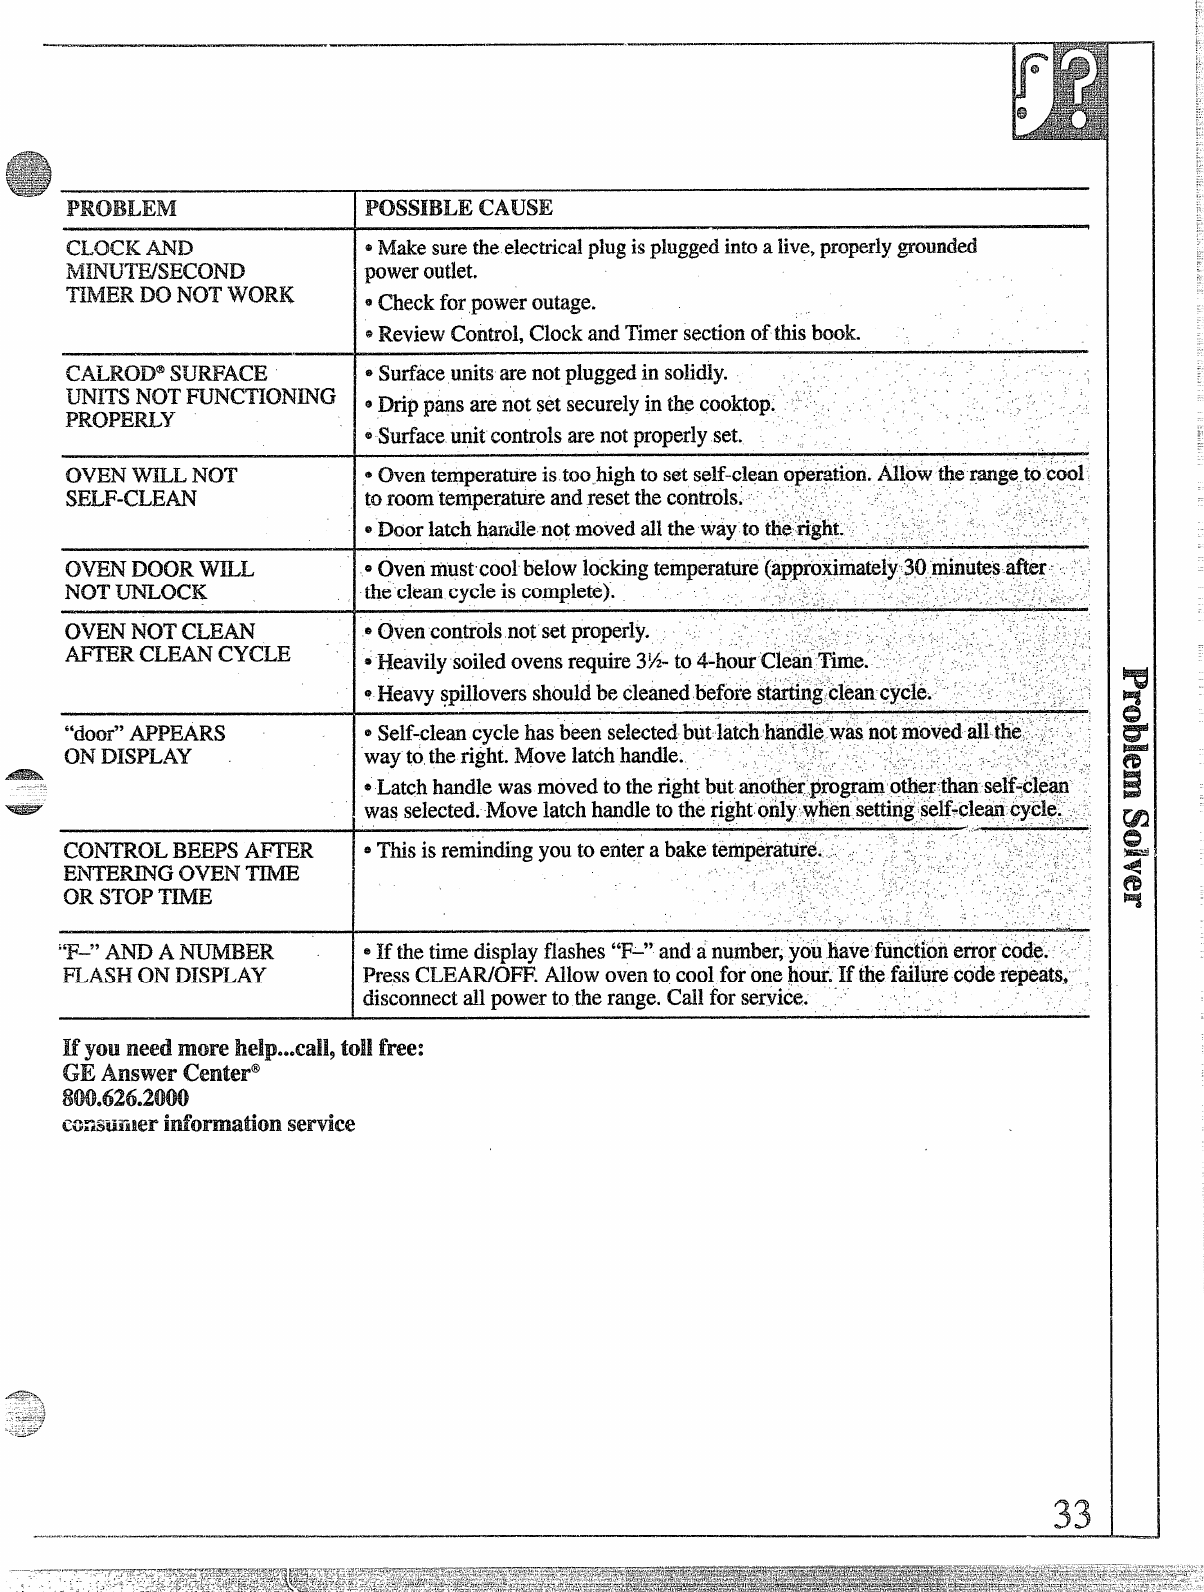
CLOCK A-ND
TIIMERDo NOT’WORK
OVEN V?mL Nor
SHJw’mMN
OVEN mm VvILL
Nor -U’!NLOCK
OWN Nor CLEAN
Z4.FTERCUL4N CYCLE
“door” APPEARS
ONDEWLAY
comfx 13mx AFrm
ImmRD?w OVEN ‘1’mf.E
OR STOPTIME
‘T-” AND Amwm
FLASHONDISPLAY
CAUSE
*hf~e SUre the ekixtricalplugispluggedintoalive, prOperly~~unded
poweroutlet.
*Checkfor poweroutage.
*Review C3mtrd, Clock and Timer section of this book.
*This isremindingyouto enterabaketemp&@lUd..< “-. . .’. ~. ,. ,
. ...
., ‘, . , !.“~,?-
,-, 2- -.
., ‘,1
,’ ,, . .
,, ..!
., -, ‘~
‘..
.~
~If thetimedisplayflashes“F-” andanumber,y“buhavefunctionerrorcodia ~
PressCLEARKX?F.Allowovento coolfor onehomlIf thefailurecoderepeats,,
di~~~~ect~1powerto therange.Callfor servide. ‘~,,-,
Ifyou needmom! Jheqhedl,Mfree:
GEAnswer Cmk?l-”
cww.mer service
33

AGE Gonstmer Service professiord
will provide expert repair service,
schedt.ded at atime that’s cormmient
for you. Many GE Consumer Service
company-operated locations offer you
service today or tomorrow, or at your
corwenience (’?:00am. to %00p.m.
weekda~ 9:00a.m. to 2:00p.m. Satur-
days).Our factory-trained technicians
know your appliance inside and out-
so most repairs can be handled in just
one visit.
Whatever your question about any GE
major appliance, GE Answer &nte@
information service is available to
help. Your call-and your question—
will be answered promptly and
courteously And you can call ally
time. GE Answer Gente@ service is
open 24 hours ada% days aweek.
Youcan have the securefeelingthat
GE Consumer %-vice will still be
there after your warranty ex@-es.Pt.n--
chse aGE contract while your wa=
rarity is still in effect and you’llreceive
asubstantial discount. TVitb.arnuitiple-
year contract, you’re assured of fiture
service at today’sprices.
TelecommunicationDevicefor theDeaf
Idividu.ds qudifkd toservicetheir
owma@itmces can haveneeded
parts or accessories sent directly to
their home. The GE parts system pro-
vides access to over 4’7,000parts.. and
all IGEGenuine Renewal Parts are
fi..dlywarranted. VISA, MasterCard
and~iscovercardsareaccepted.
Usermaintemmcekstietions
containedinthisbookletcoverproce=
dumshtended tobeperibmedby
any tniwr. Other
shouldbe E%&?mdtoqw-tnified.sm””
vicepersomei. CkN.RtioMRmustbe
RKmisd, sinceimpmp?rservicing
maycame ImL!id’eqxmtim.
7rT7°
-4“
Uponreques~ GE will provide Braille
controls for avariety of GE appliances,
and abrochure to assist.in phrming a
barrier--free kitchen for persons with
limited mobility TOobtain these items,
free of charge, call 800.626.2?000,.
Consumers with impaired hearing
or speech who have access to aTD.D
or acorwentioml t.elet~evn-iter may
Cd 800-TDD-G.EFK (860-833-4322)
to request imfix-matior]or service.
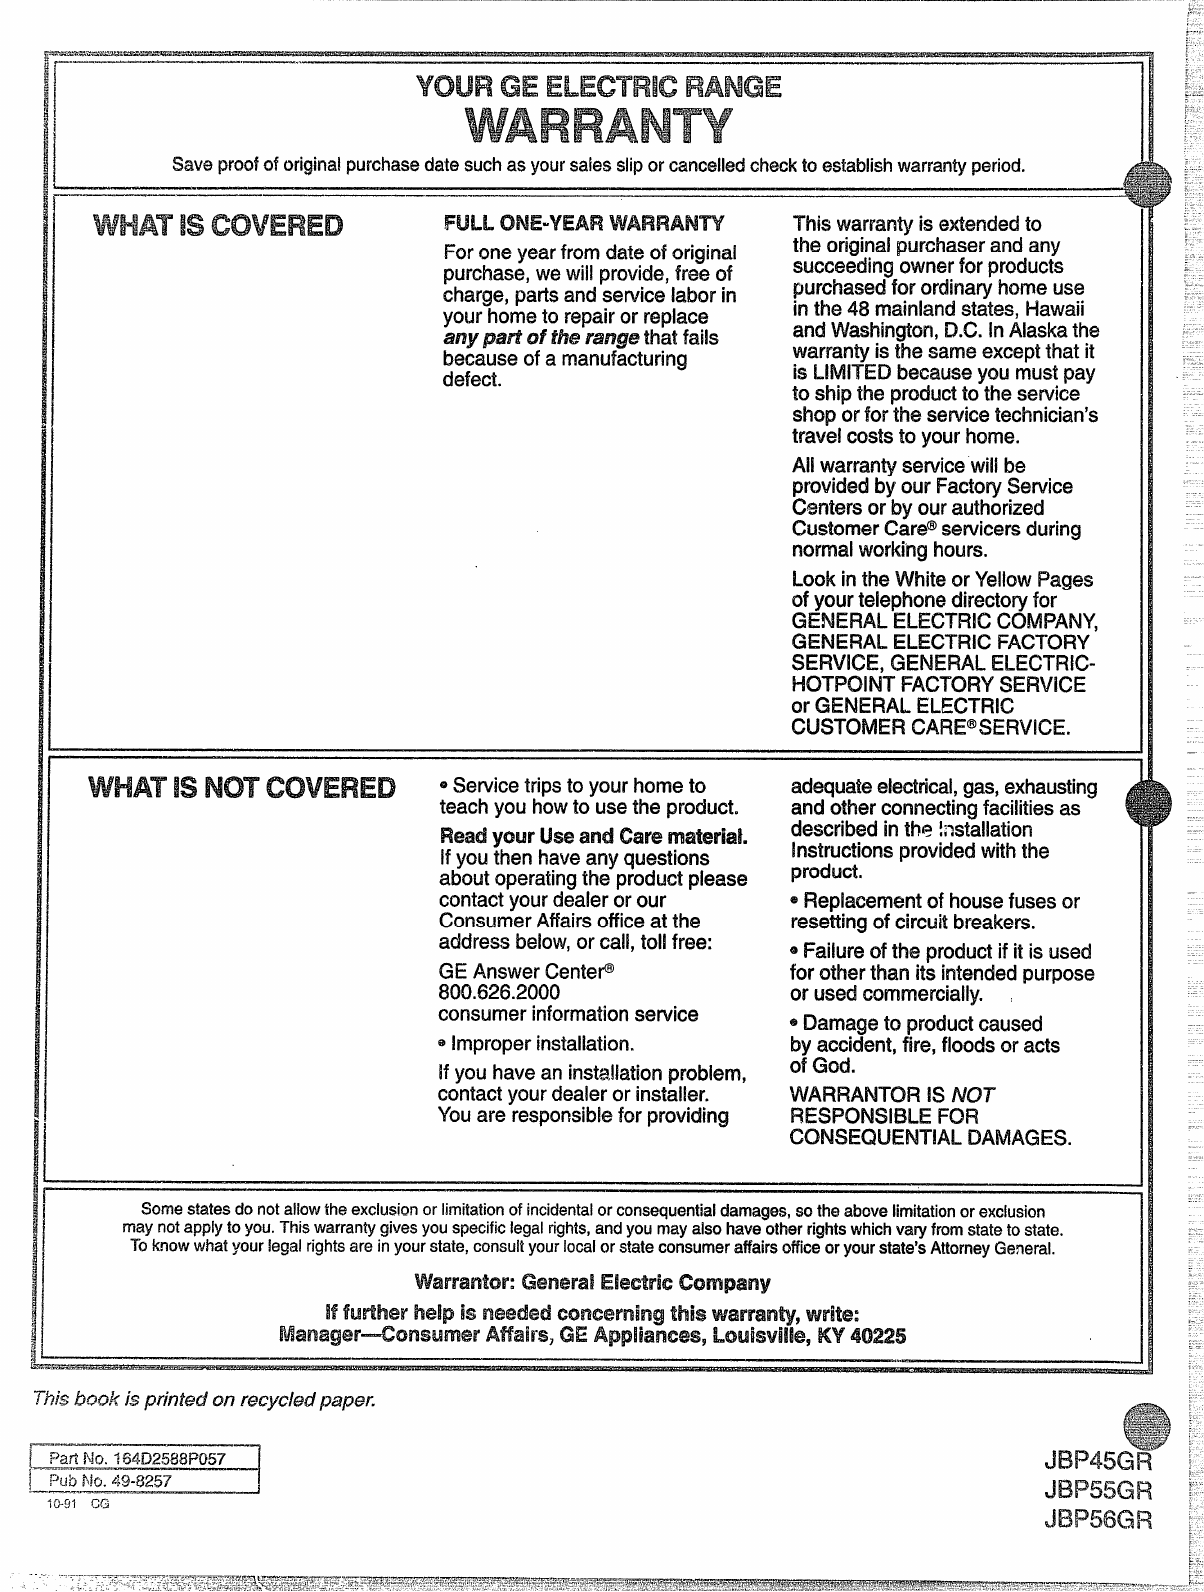
... .
..—.——— ——.—”. GE
WARRANTY
Skiveproofof originalpurchasedate suchasyoursalessliporcancelledcheckto establishwarrantyperiod.
F
Foroneyearfromdateof original
purchase,wewili provide,free of
charge,park andservicelaborin
yourhometo repairor replace
any part dthe range thatfails
becauseof amanufacturing
defect.
This warrantyis extendedto
the originalpurchaserandany
succeedingmvner for prcducts
purchased for ordinaryhomeuse
in the 48 rnainkmdstates,Hawaii
andWashington,DC. InAlaskathe
warrantyis the sameexceptthatit
is !JMITHI becauseyoumustpay
to shipthe productto theservice
shopor for the servicetechnician’s
travelcoststo yourhome.
AMwarrantyservicewiil be
providedby our FactoryService
Centersor by ourauthorized
CustomerCare@servicersduring
normalworki’nghours.
Lookin theWhiteor MMowPages
of yourtelephonedirectoryfor
GENERALE3S2TFW COMPANY,
GENERAL
ELECTRICFIVXXN’
SERVICE,GHflWWLELECTRIC-
HOTPOINTFACTORY
SERVKX
or GENEFL4LELECTRIC
WSKNVER cAFE@sERvlcE.
oServicetripsto yourhometo
teachyou howto usethe product.
Readyour Useand Care
Ifyouthenhaveany questions
aboutoperatingthe productplease
contactyourdealeror our
ConsumerAffairsofficeat the
addressbelow,or call,toll free:
GEAnswerCenteP
800.626.2000
consumerinformationsewice
@Improperinstallation.
Hyouhavean installationproblem,
contactyourdealeror installer.
Youare responsiblefor providing
adequateelectrical,gas,exhausting
and otherconnectingfacilitiesas
describedin the installation
Instructionsprovidedwiththe
product.
@Replacementcdhousefusesor
resettingof circuitbreakers.
~Failureof the productif it is used
for otherthan its intendedpurpose
or usedcommercially. ,
*Damageto productcaused
by accident,fire,floodsor acts
of (3M.
VVARRANTC)RHNOT
f?lX31XXVslBLEFC)FI
CONSEQUENTIALDAMAGES
Somestatesdo notaliowtheexclusionor limitationof incidentalor consequentialdamages,sotheabovelimitationor exclusion
maynotapplyto you.Thiswarrantygivesyouspecificlegalrights,andyoumayalsohaveotherrightswhichva~ fromstatetostate.
Toknowwhatyour!egalrightsarein yourstate,consultyourlocalor stateconsumeraffairsofficeoryourstate’sAttorneyGeneral.
Ek?ctrlc
MfWWUevhelp !!s this WB4te:
AHW”S, GE KY .
