GemTek Technology CISCO867VAE XDSL Router User Manual HIG880 860
Gemtek Technology Co., Ltd. XDSL Router HIG880 860
UserManual.wiki
>
GemTek Technology
>
CISCO867VAE User Manual
>
User Manual Part 2
Contents
1.
User Manual Part 1
2.
User Manual Part 2
3.
User Manual Statements Part 1
4.
User Manual Statements Part 2
User Manual Part 2
Navigation menu
Upload a User Manual
Namespaces
Wiki Guide
HTML
PDF
Info
Views
User Manual
Discussion / Help
Navigation
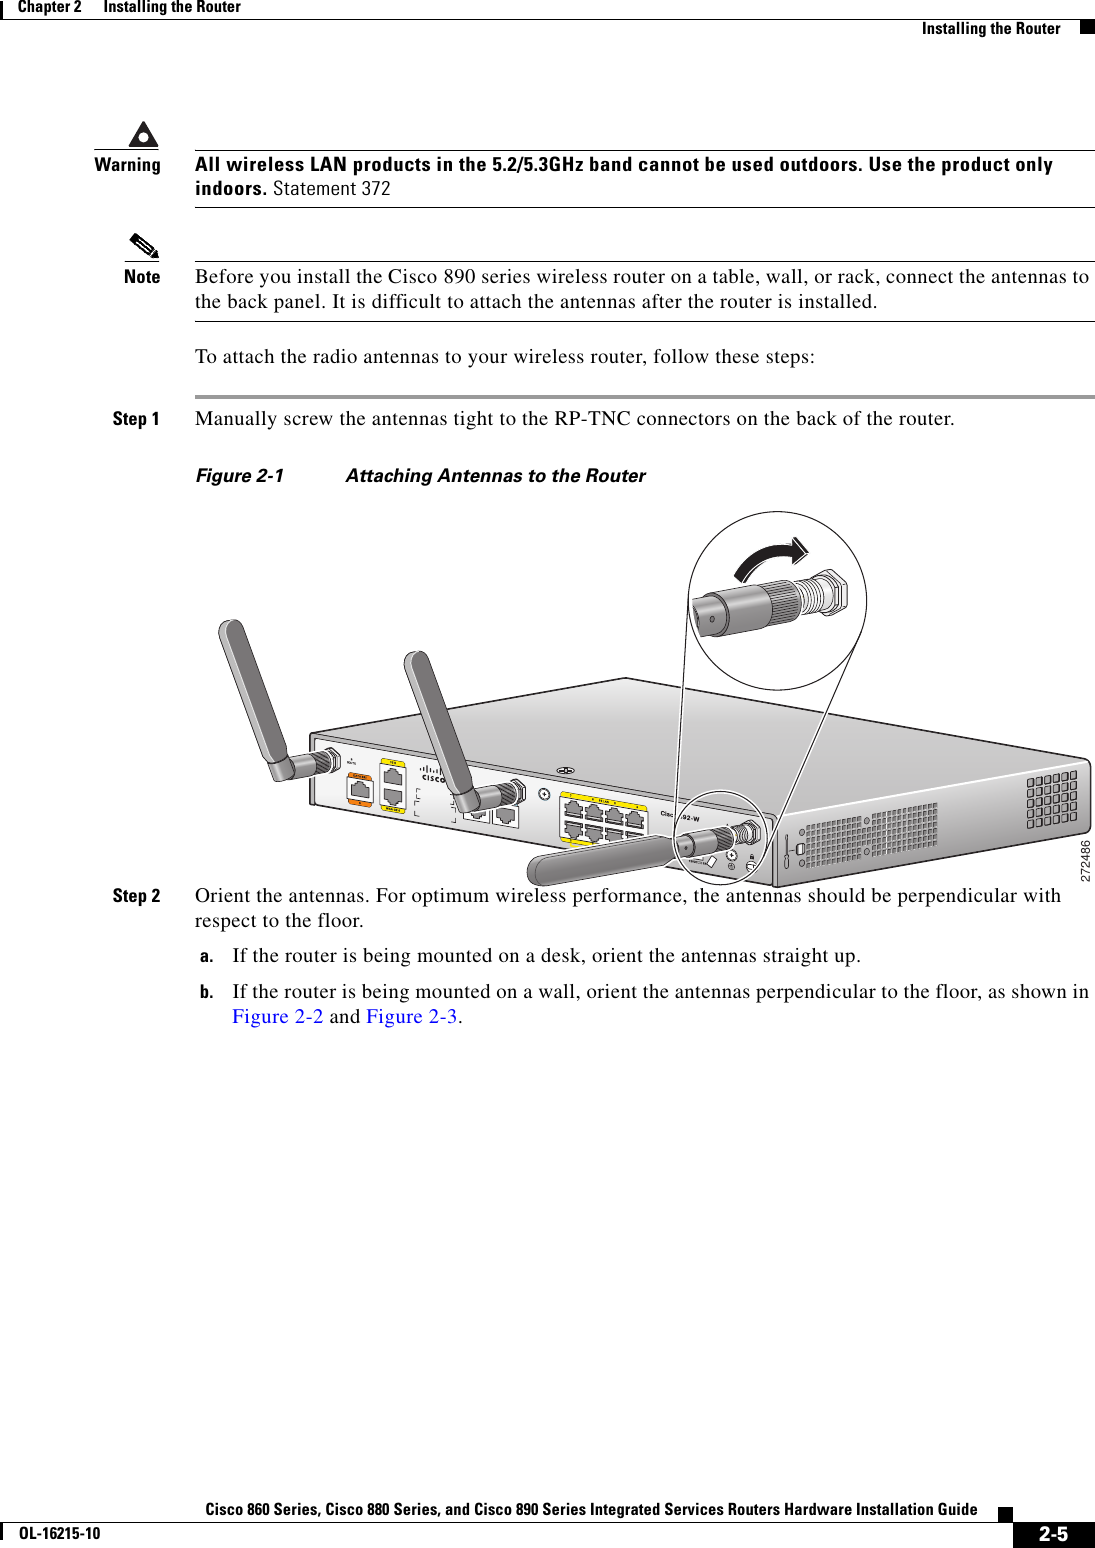
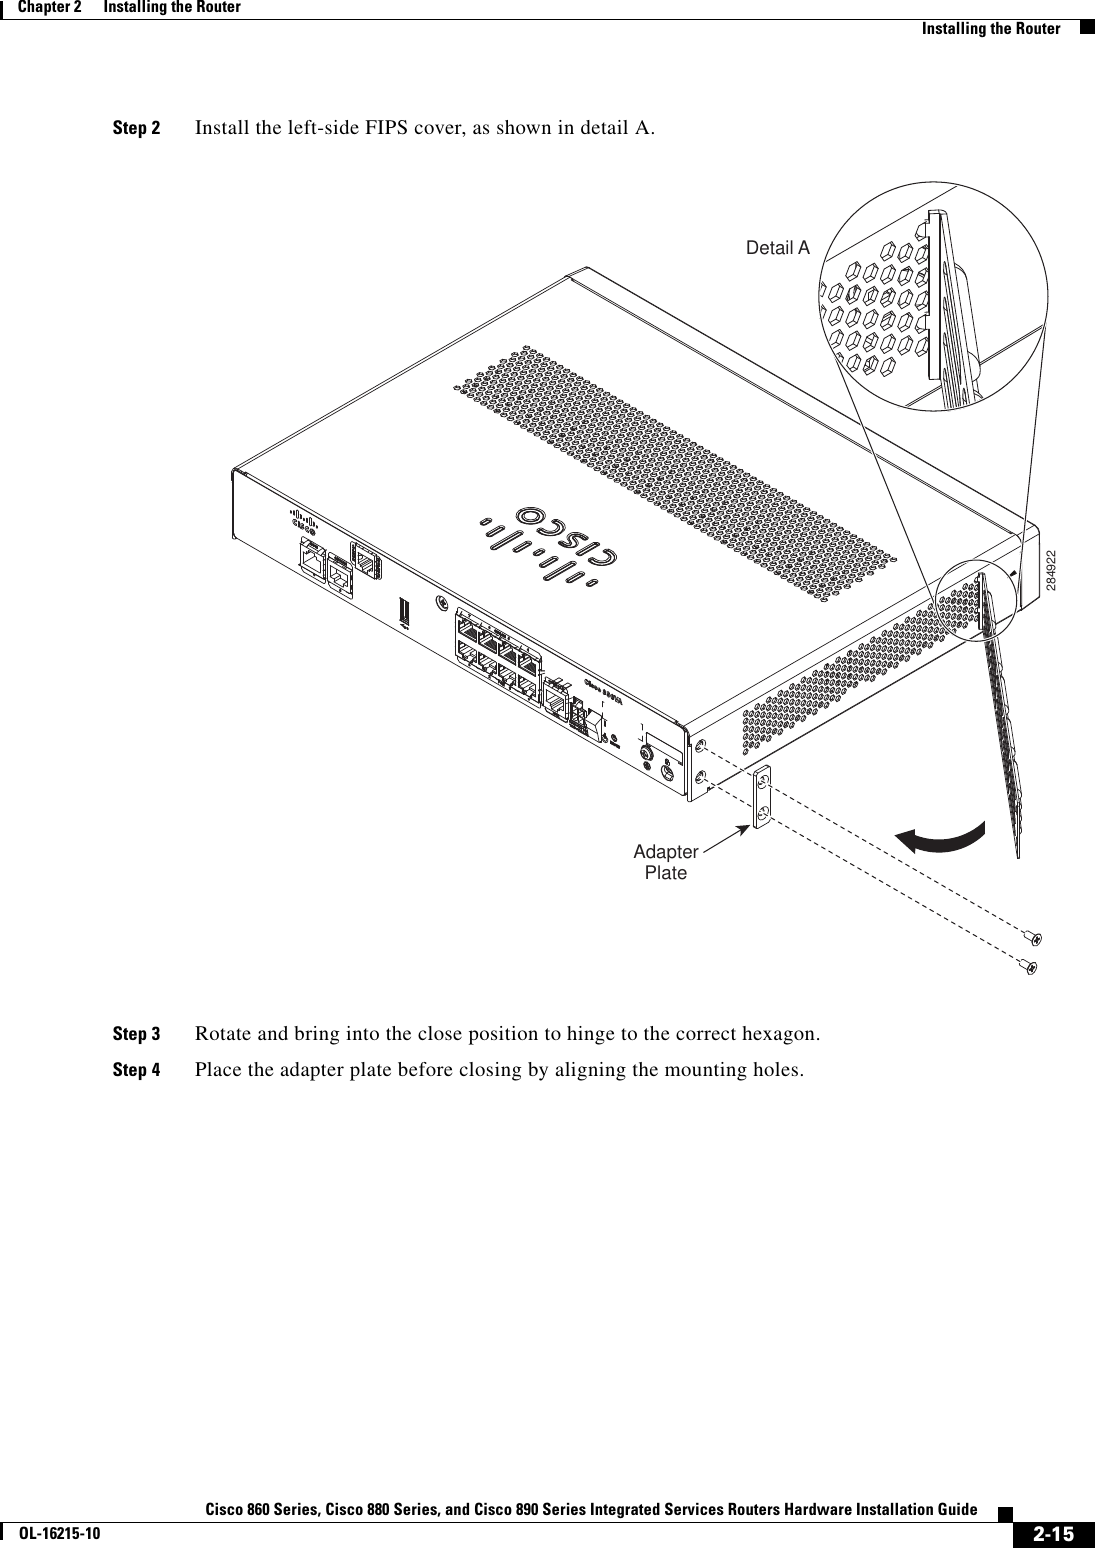


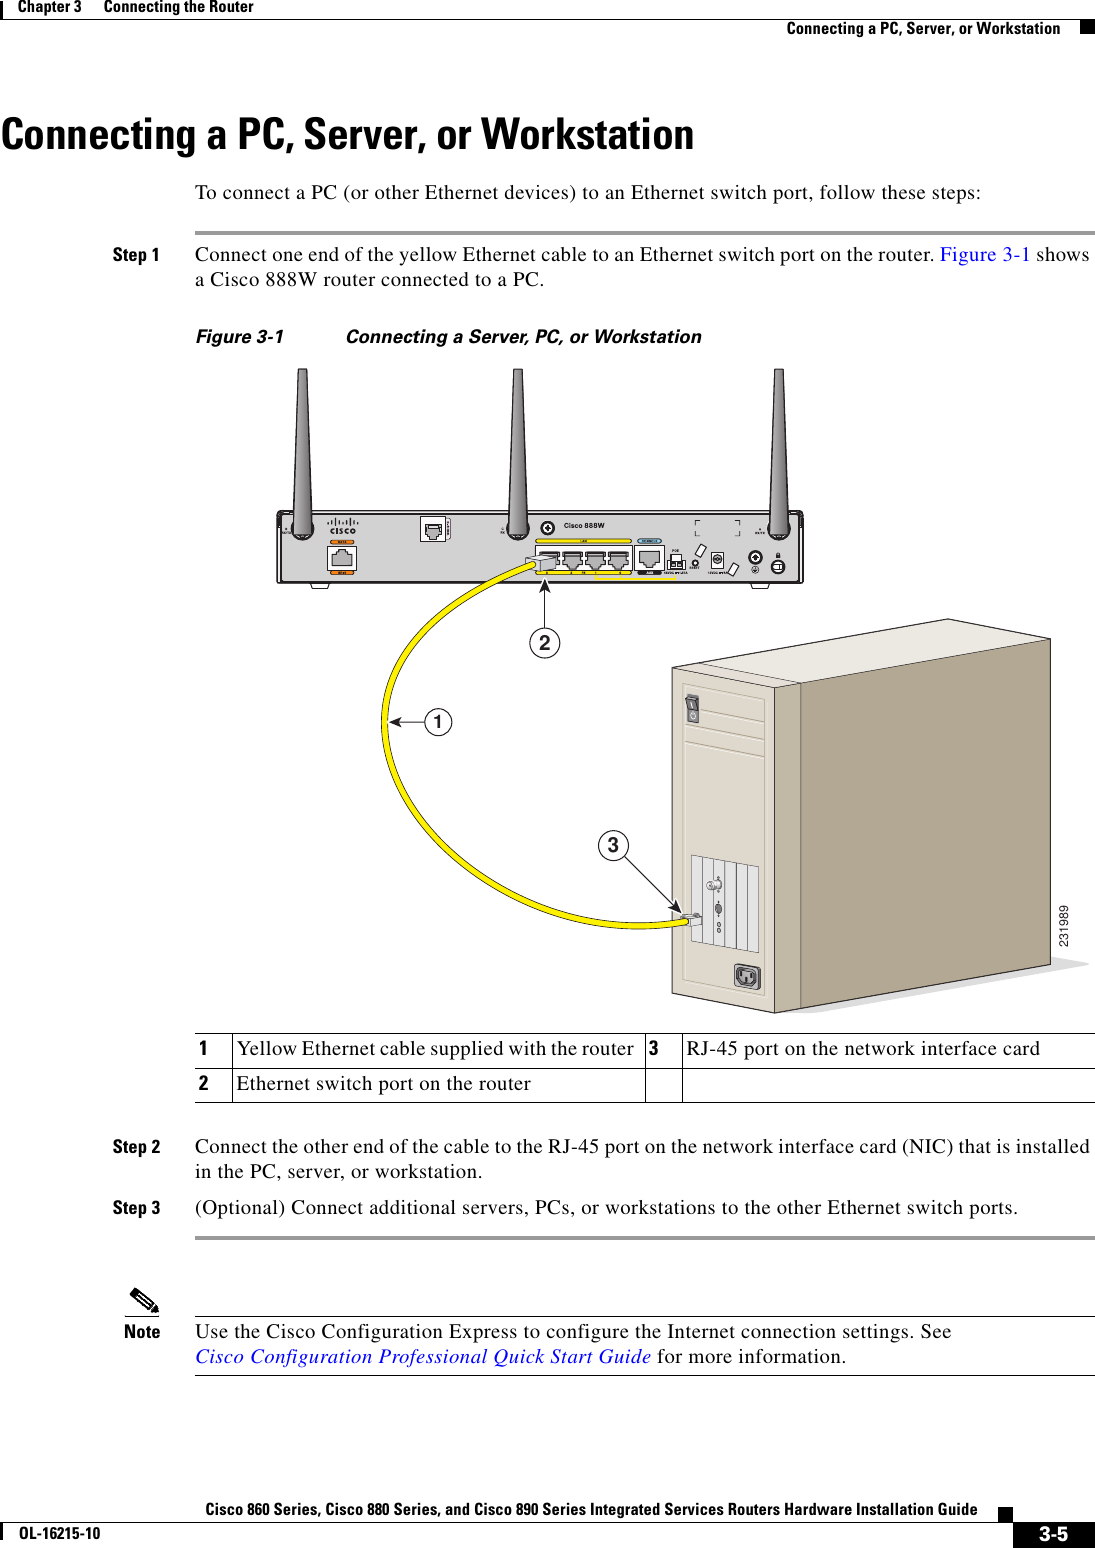
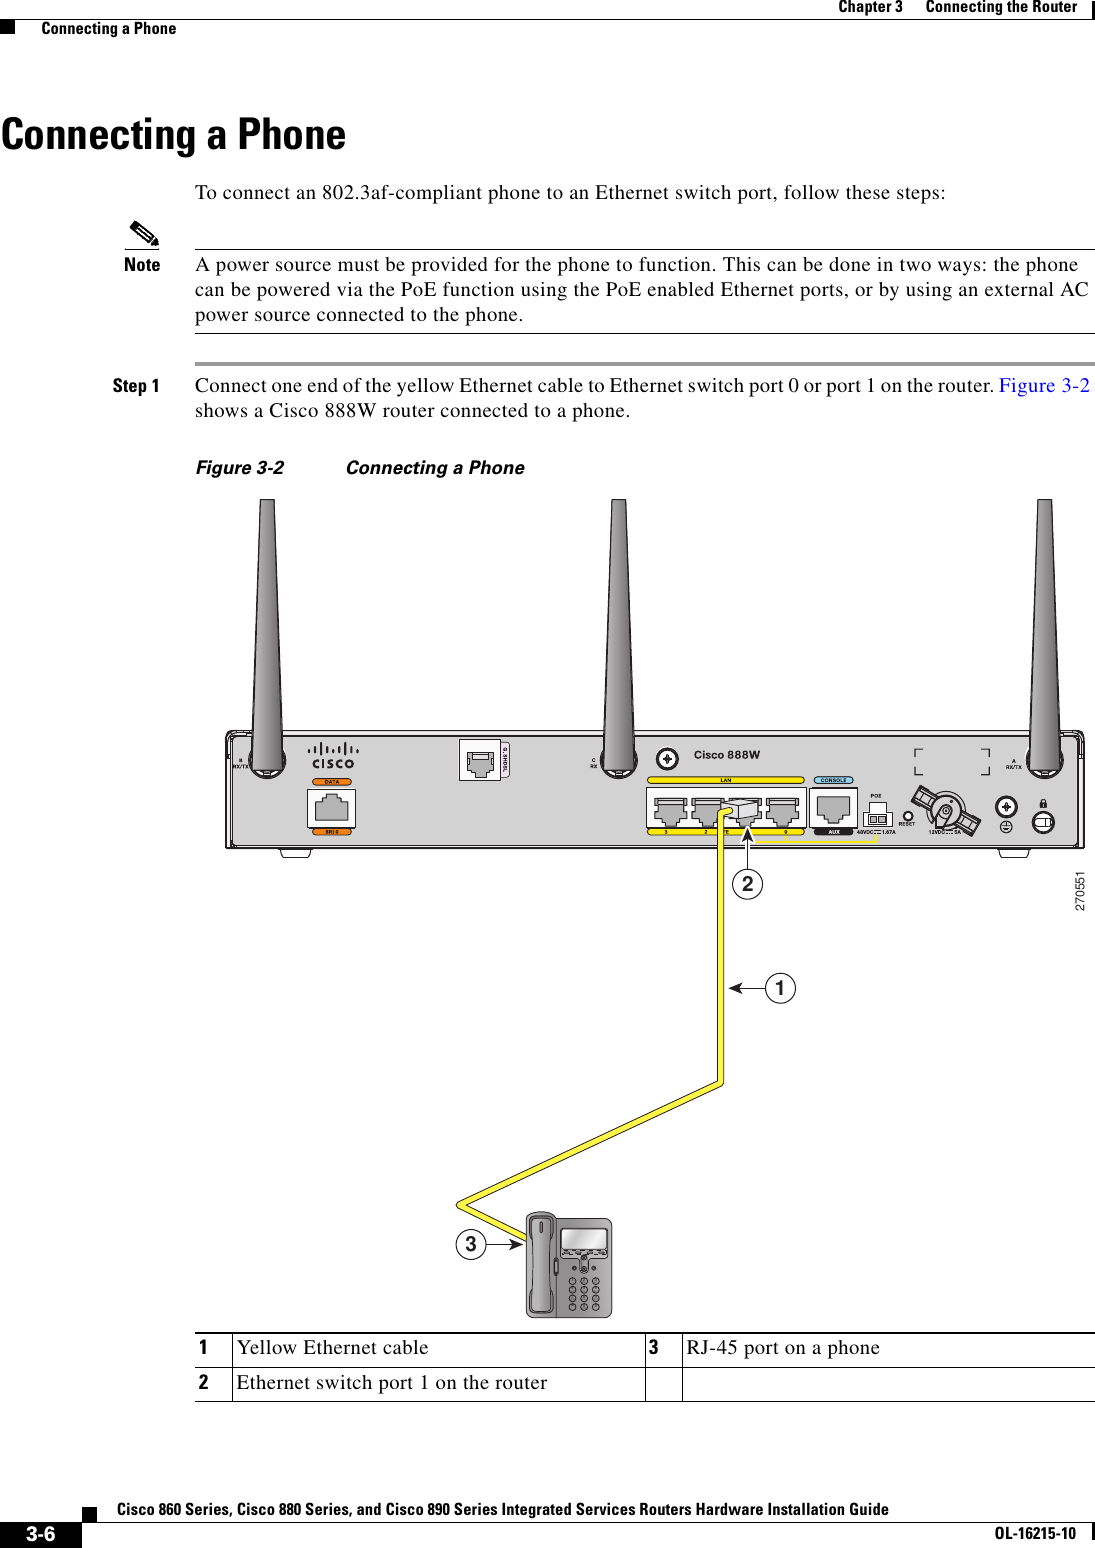
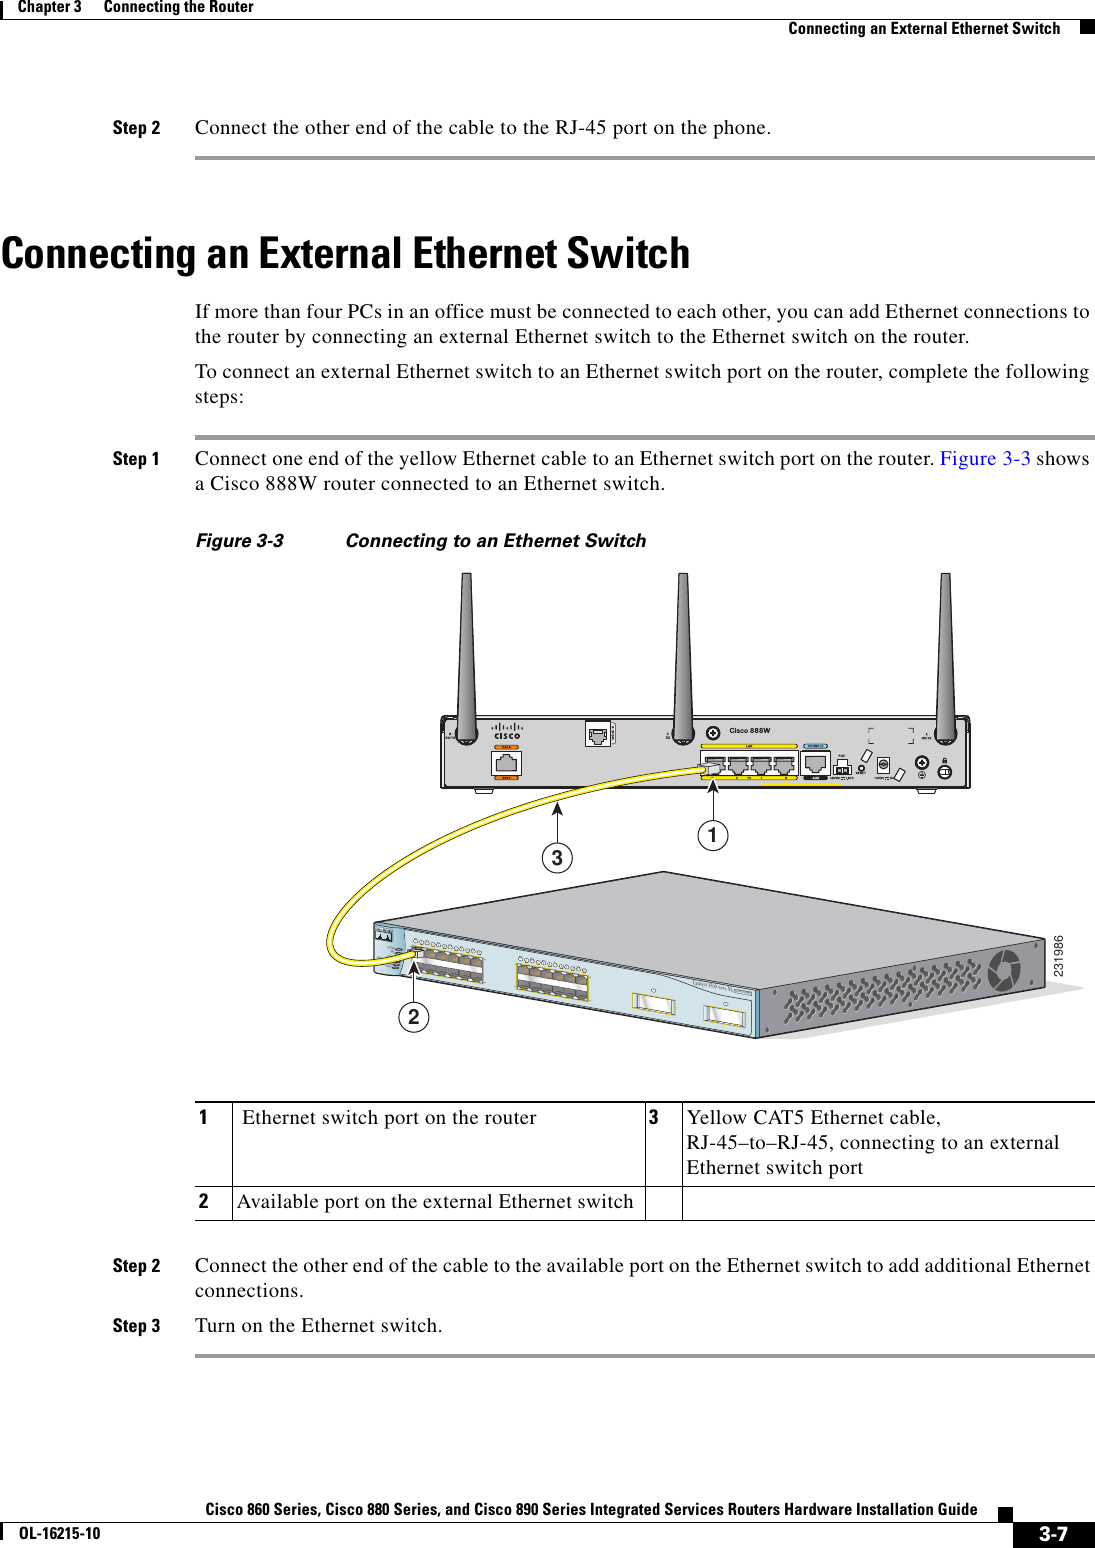
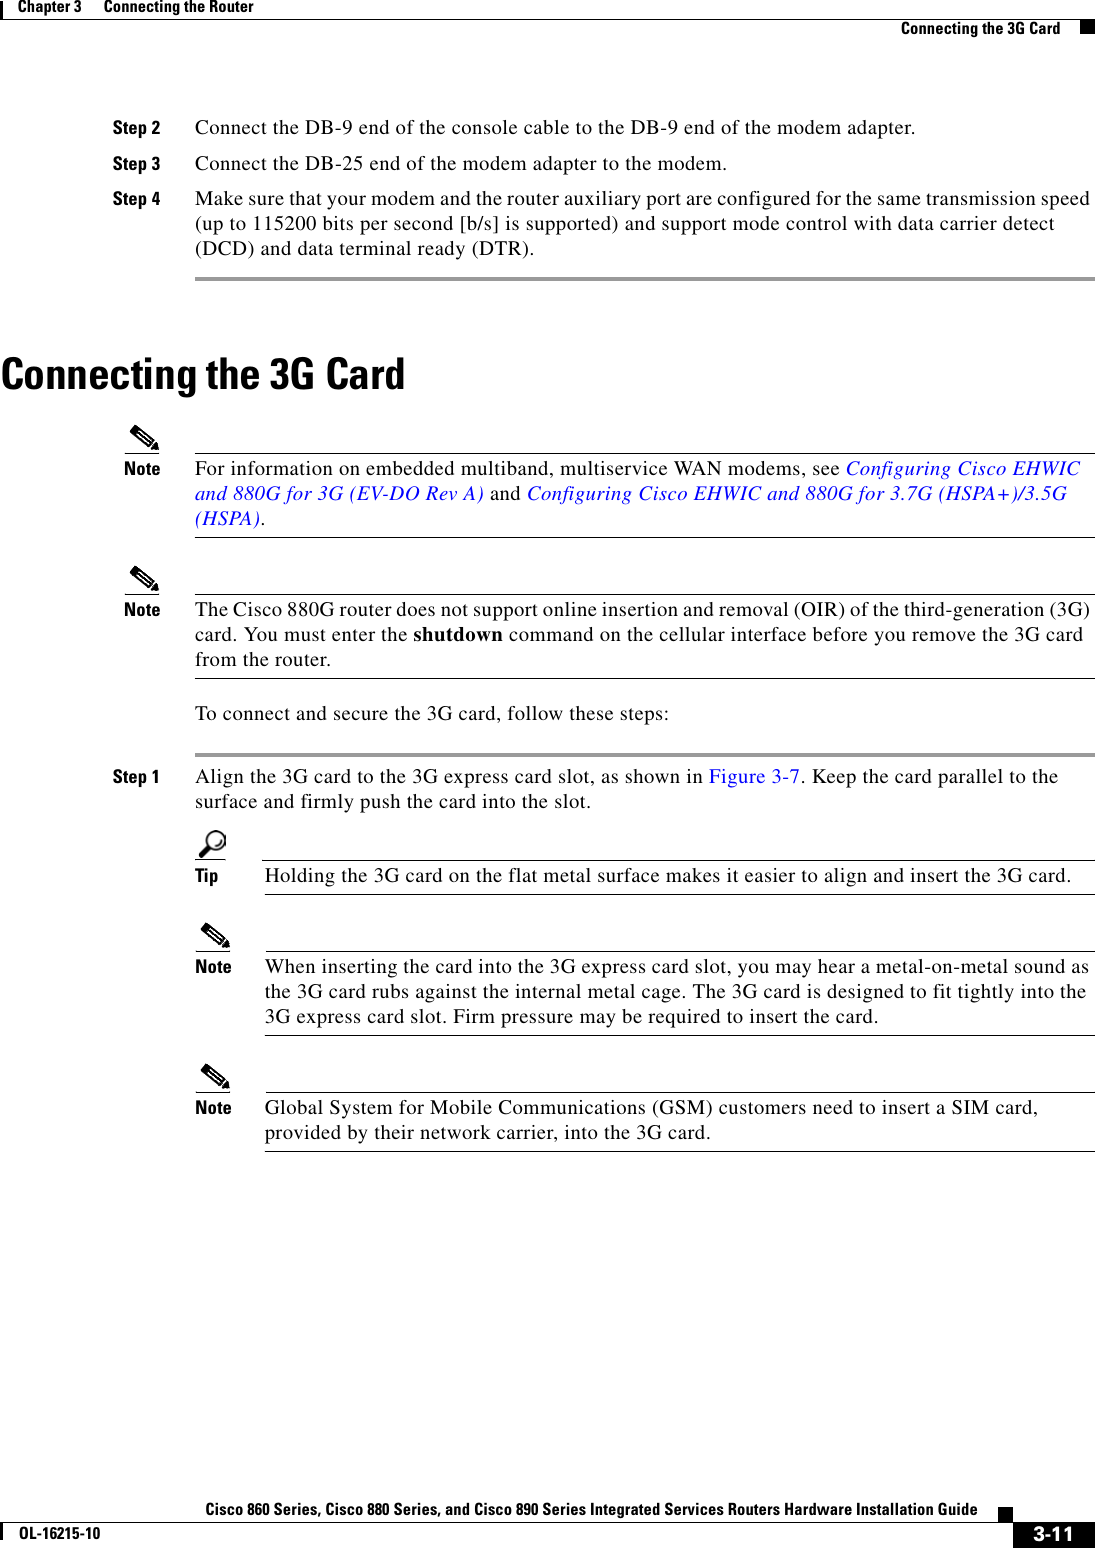

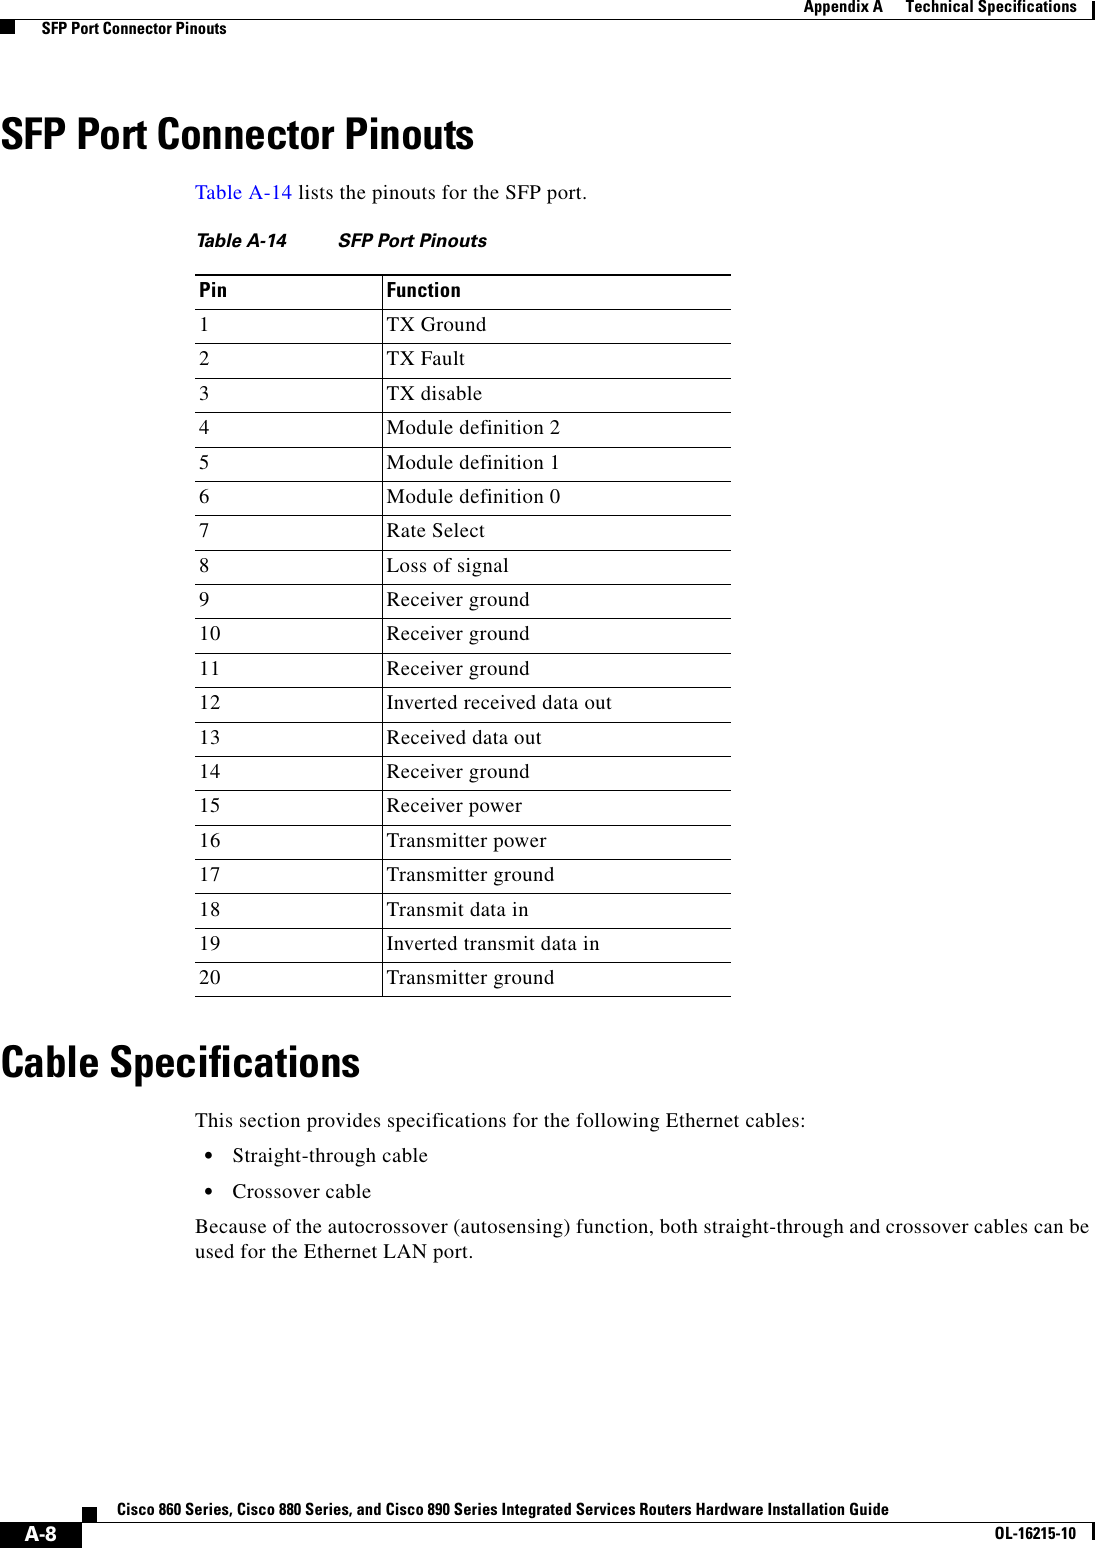
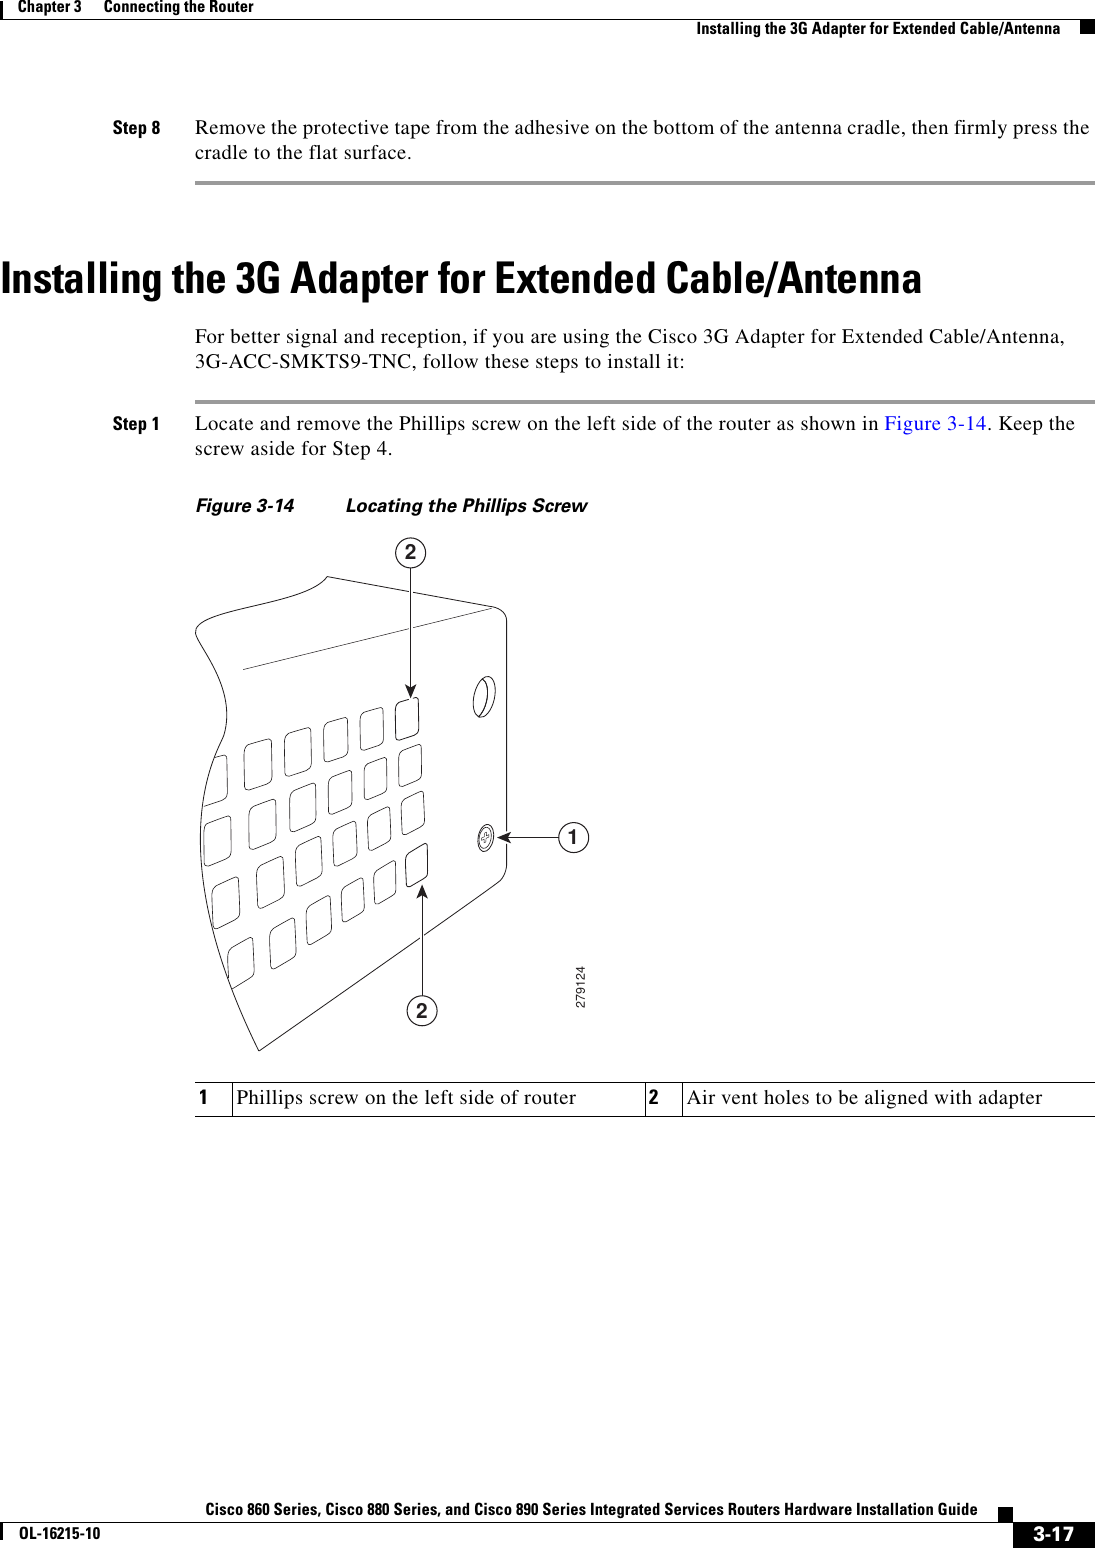
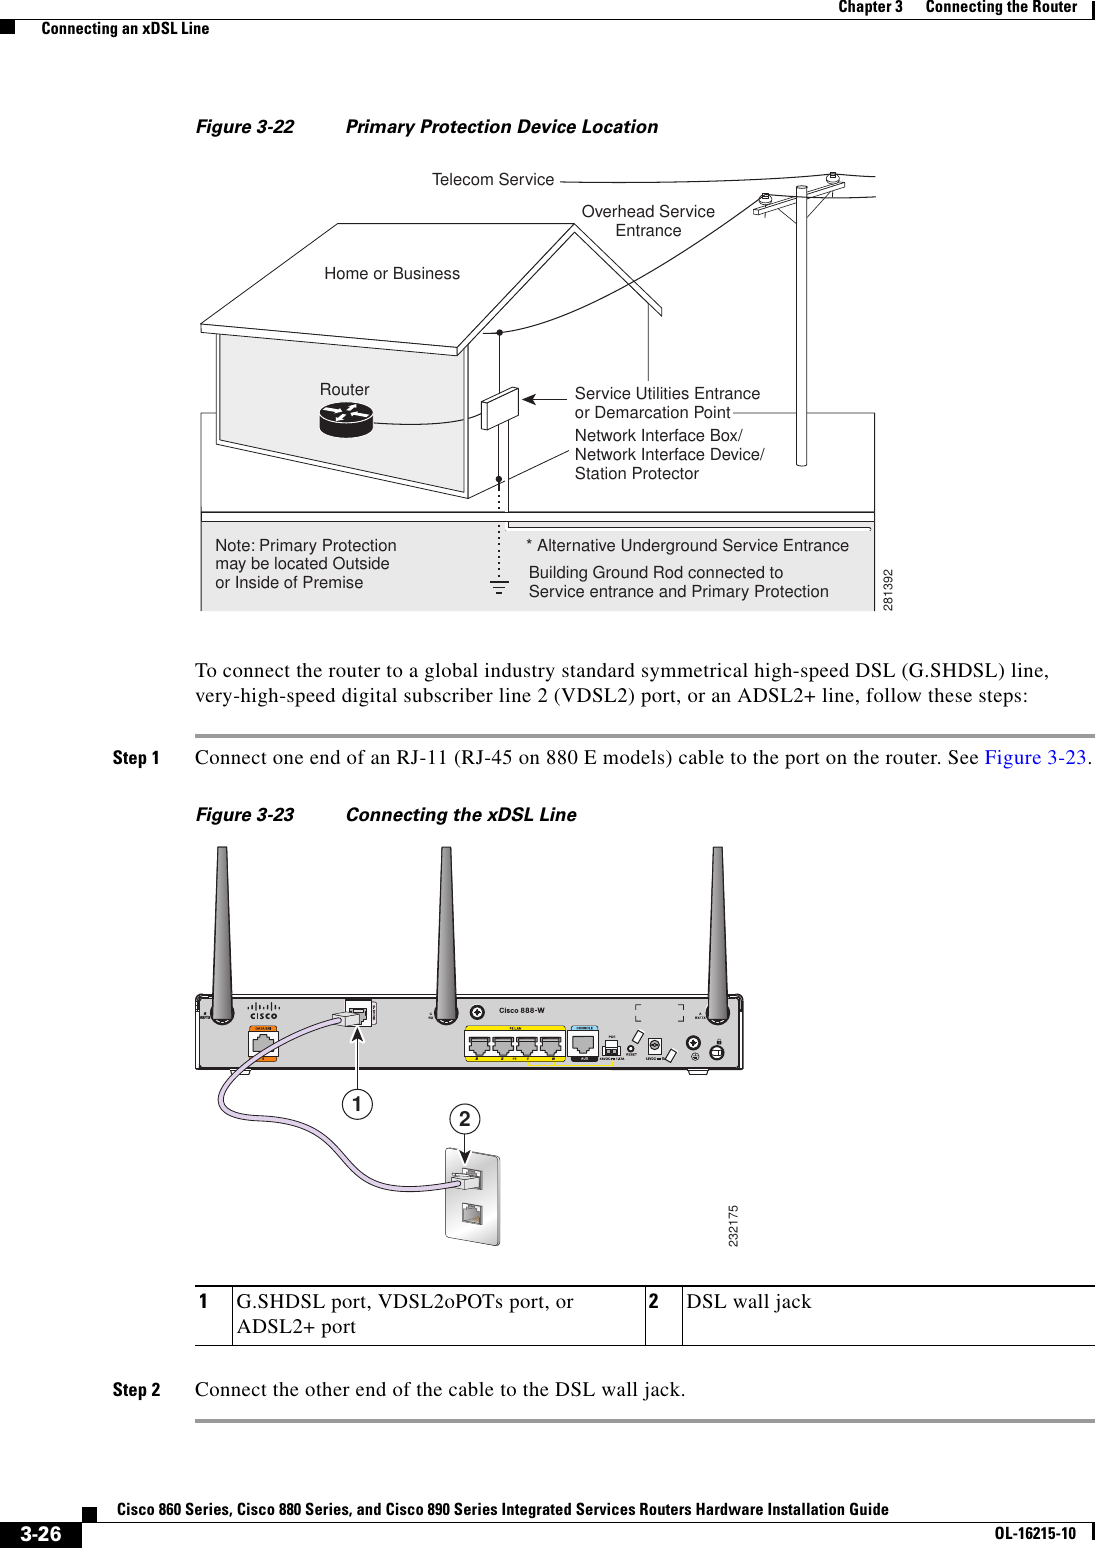
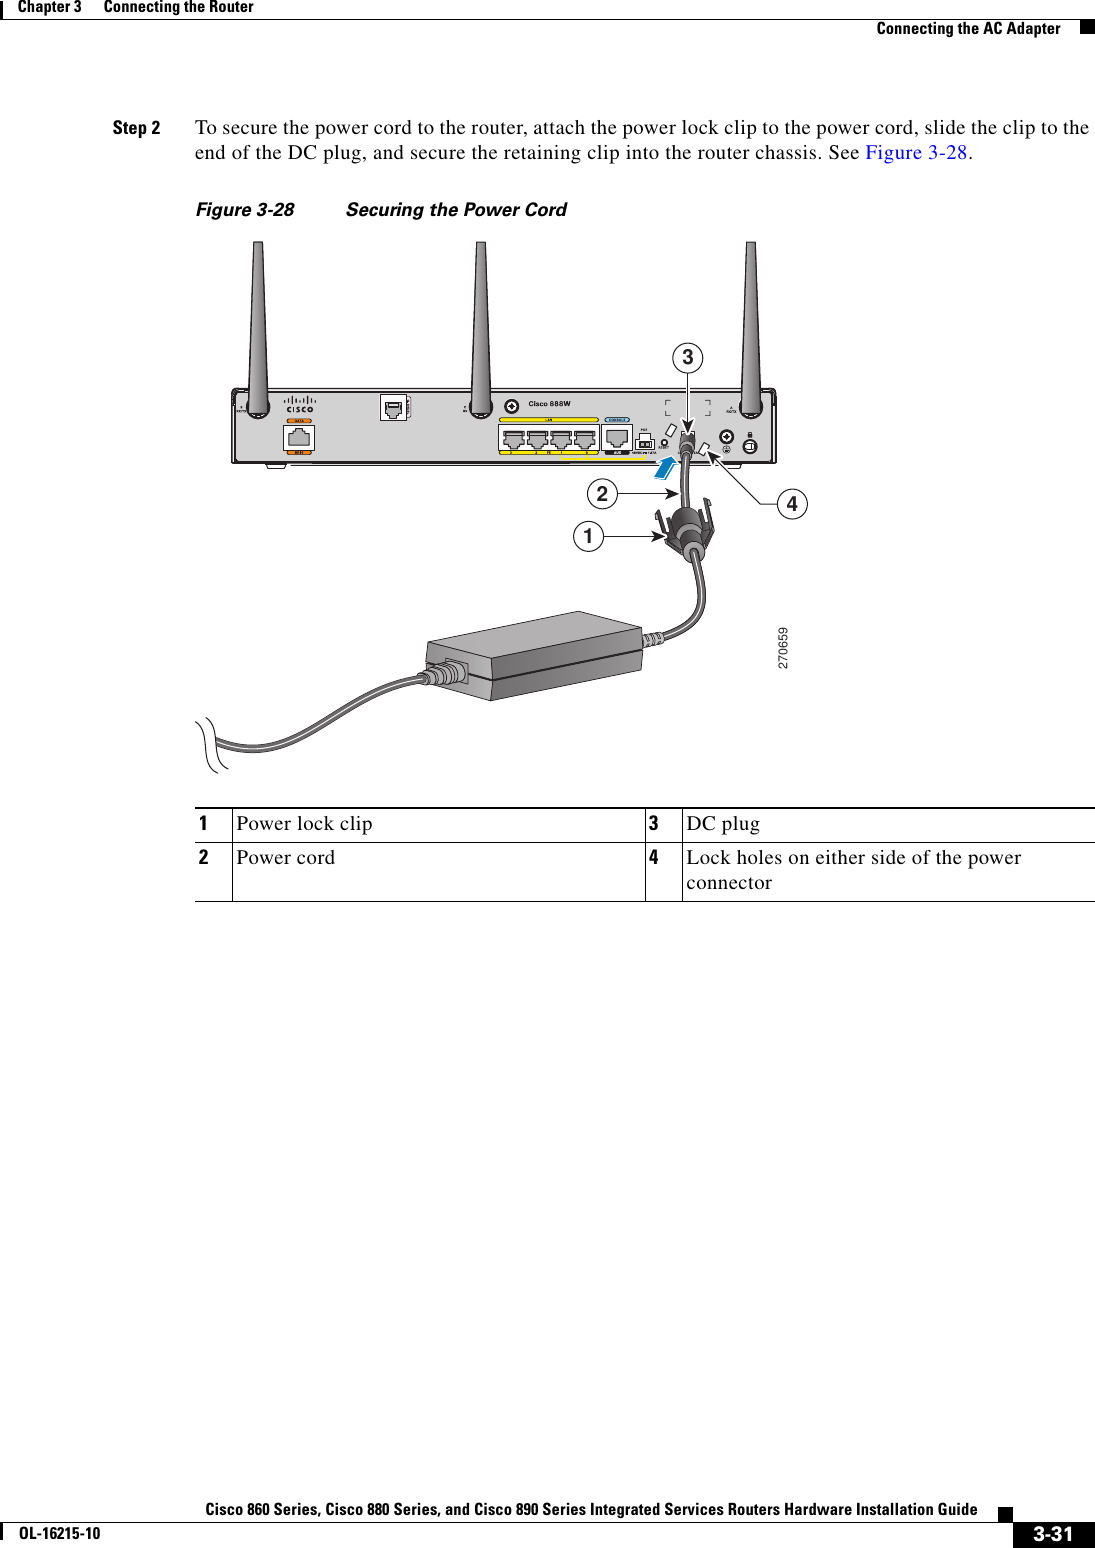
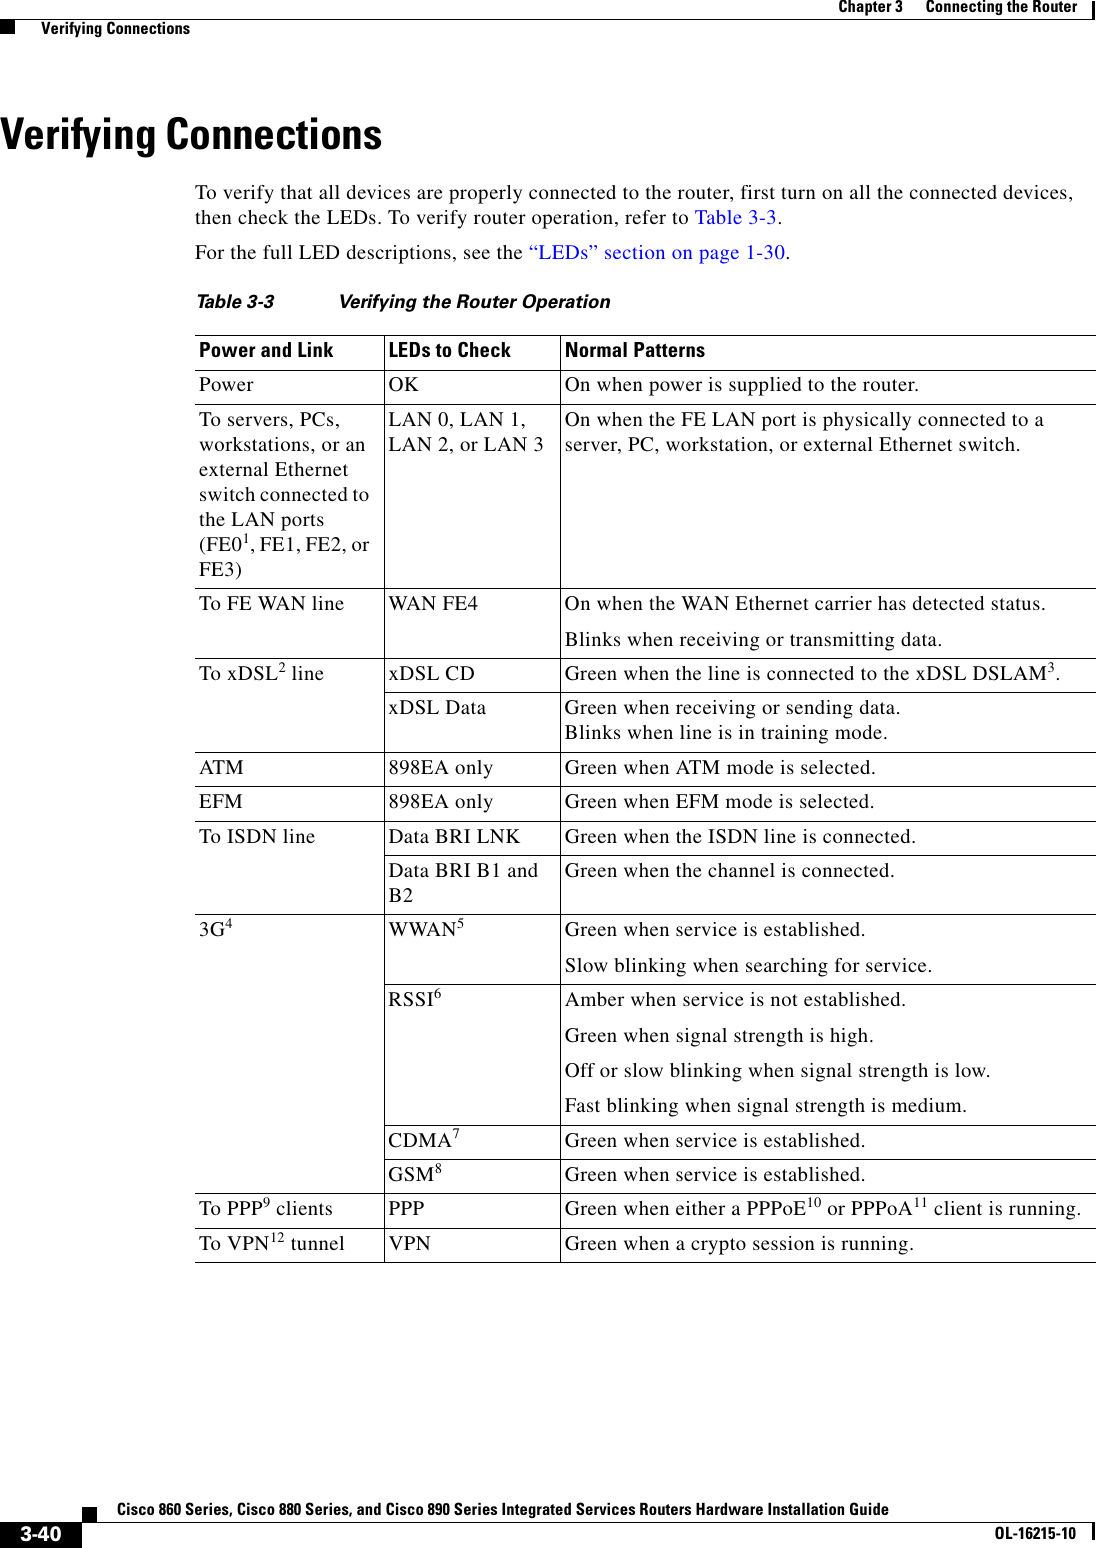
![3-11Cisco 860 Series, Cisco 880 Series, and Cisco 890 Series Integrated Services Routers Hardware Installation GuideOL-16215-10Chapter 3 Connecting the Router Connecting the 3G CardStep 2 Connect the DB-9 end of the console cable to the DB-9 end of the modem adapter. Step 3 Connect the DB-25 end of the modem adapter to the modem.Step 4 Make sure that your modem and the router auxiliary port are configured for the same transmission speed (up to 115200 bits per second [b/s] is supported) and support mode control with data carrier detect (DCD) and data terminal ready (DTR).Connecting the 3G CardNote For information on embedded multiband, multiservice WAN modems, see Configuring Cisco EHWIC and 880G for 3G (EV-DO Rev A) and Configuring Cisco EHWIC and 880G for 3.7G (HSPA+)/3.5G (HSPA). Note The Cisco 880G router does not support online insertion and removal (OIR) of the third-generation (3G) card. You must enter the shutdown command on the cellular interface before you remove the 3G card from the router. To connect and secure the 3G card, follow these steps:Step 1 Align the 3G card to the 3G express card slot, as shown in Figure 3-7. Keep the card parallel to the surface and firmly push the card into the slot.Tip Holding the 3G card on the flat metal surface makes it easier to align and insert the 3G card.Note When inserting the card into the 3G express card slot, you may hear a metal-on-metal sound as the 3G card rubs against the internal metal cage. The 3G card is designed to fit tightly into the 3G express card slot. Firm pressure may be required to insert the card.Note Global System for Mobile Communications (GSM) customers need to insert a SIM card, provided by their network carrier, into the 3G card.](https://usermanual.wiki/GemTek-Technology/CISCO867VAE.User-Manual-Part-2/User-Guide-1959036-Page-33.png)
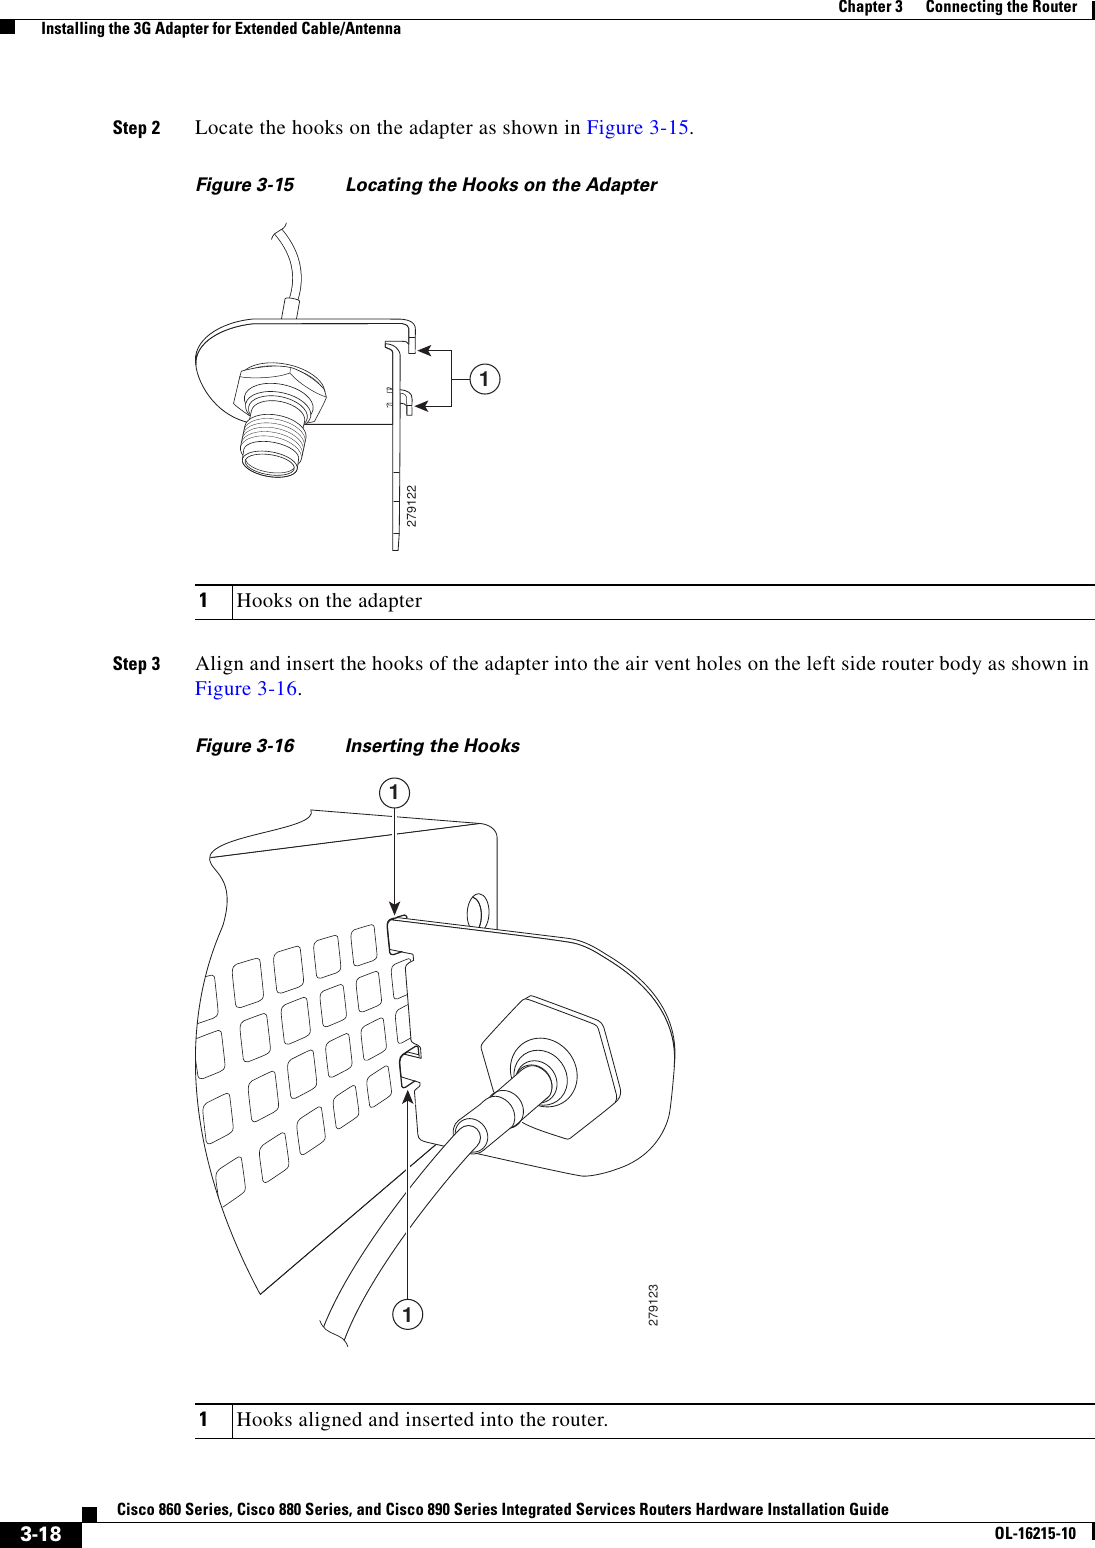
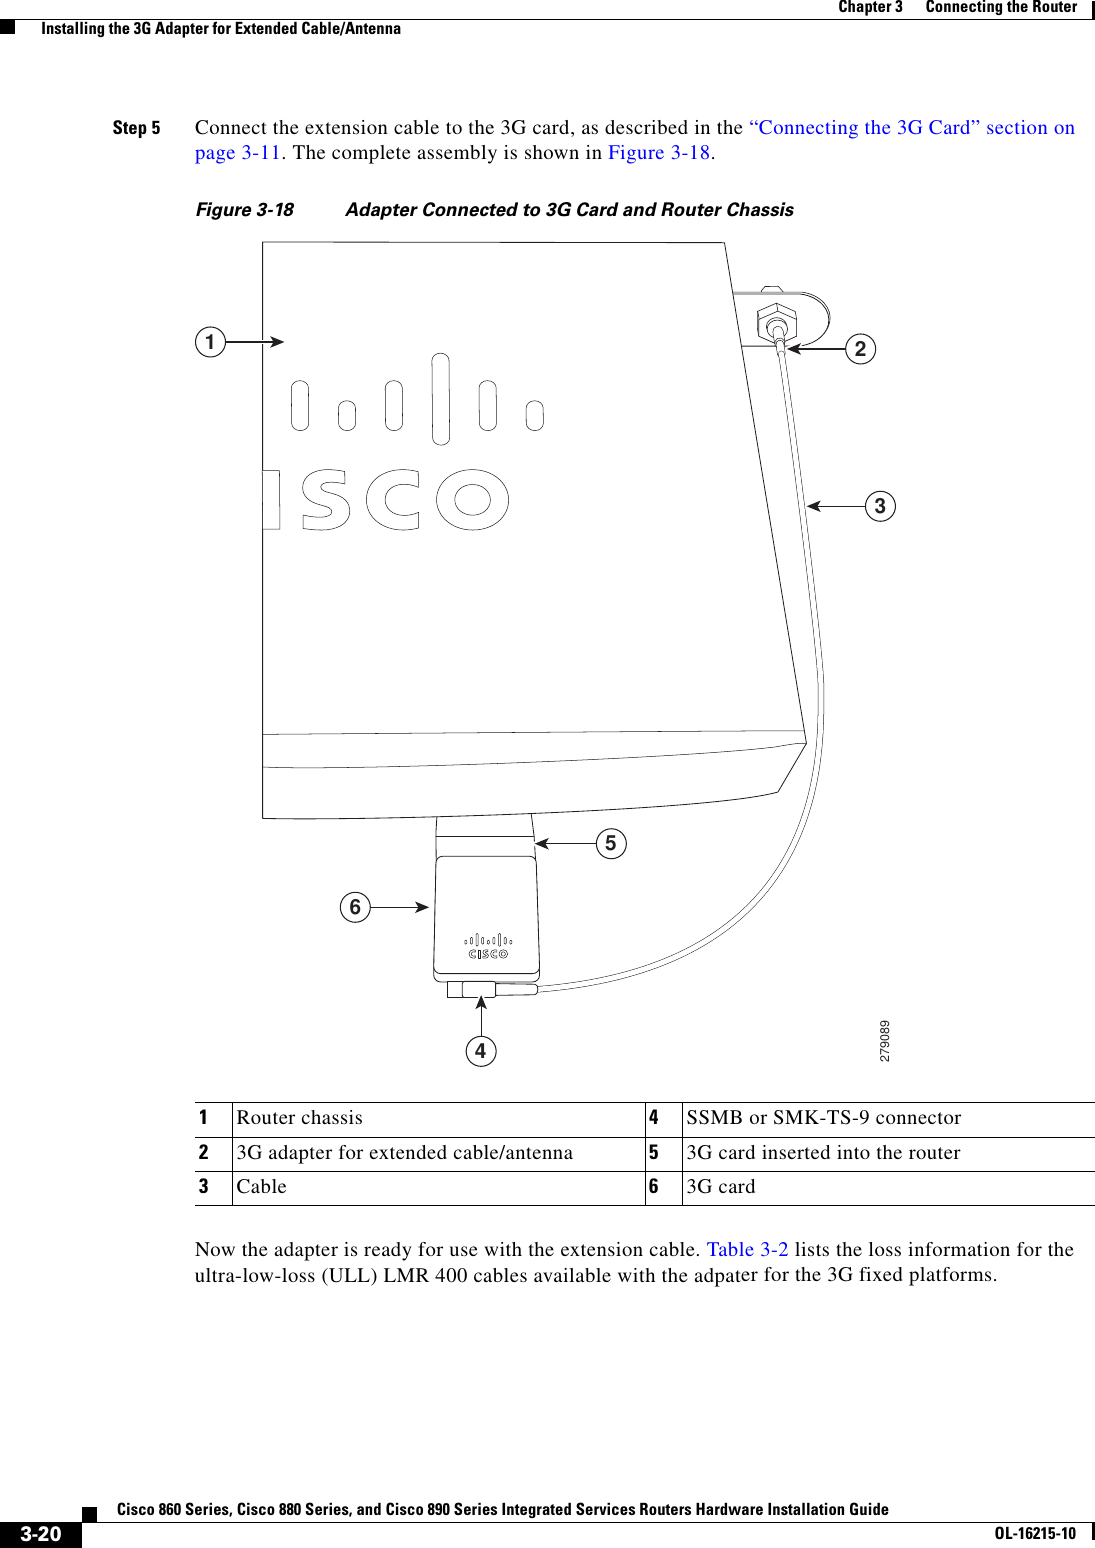
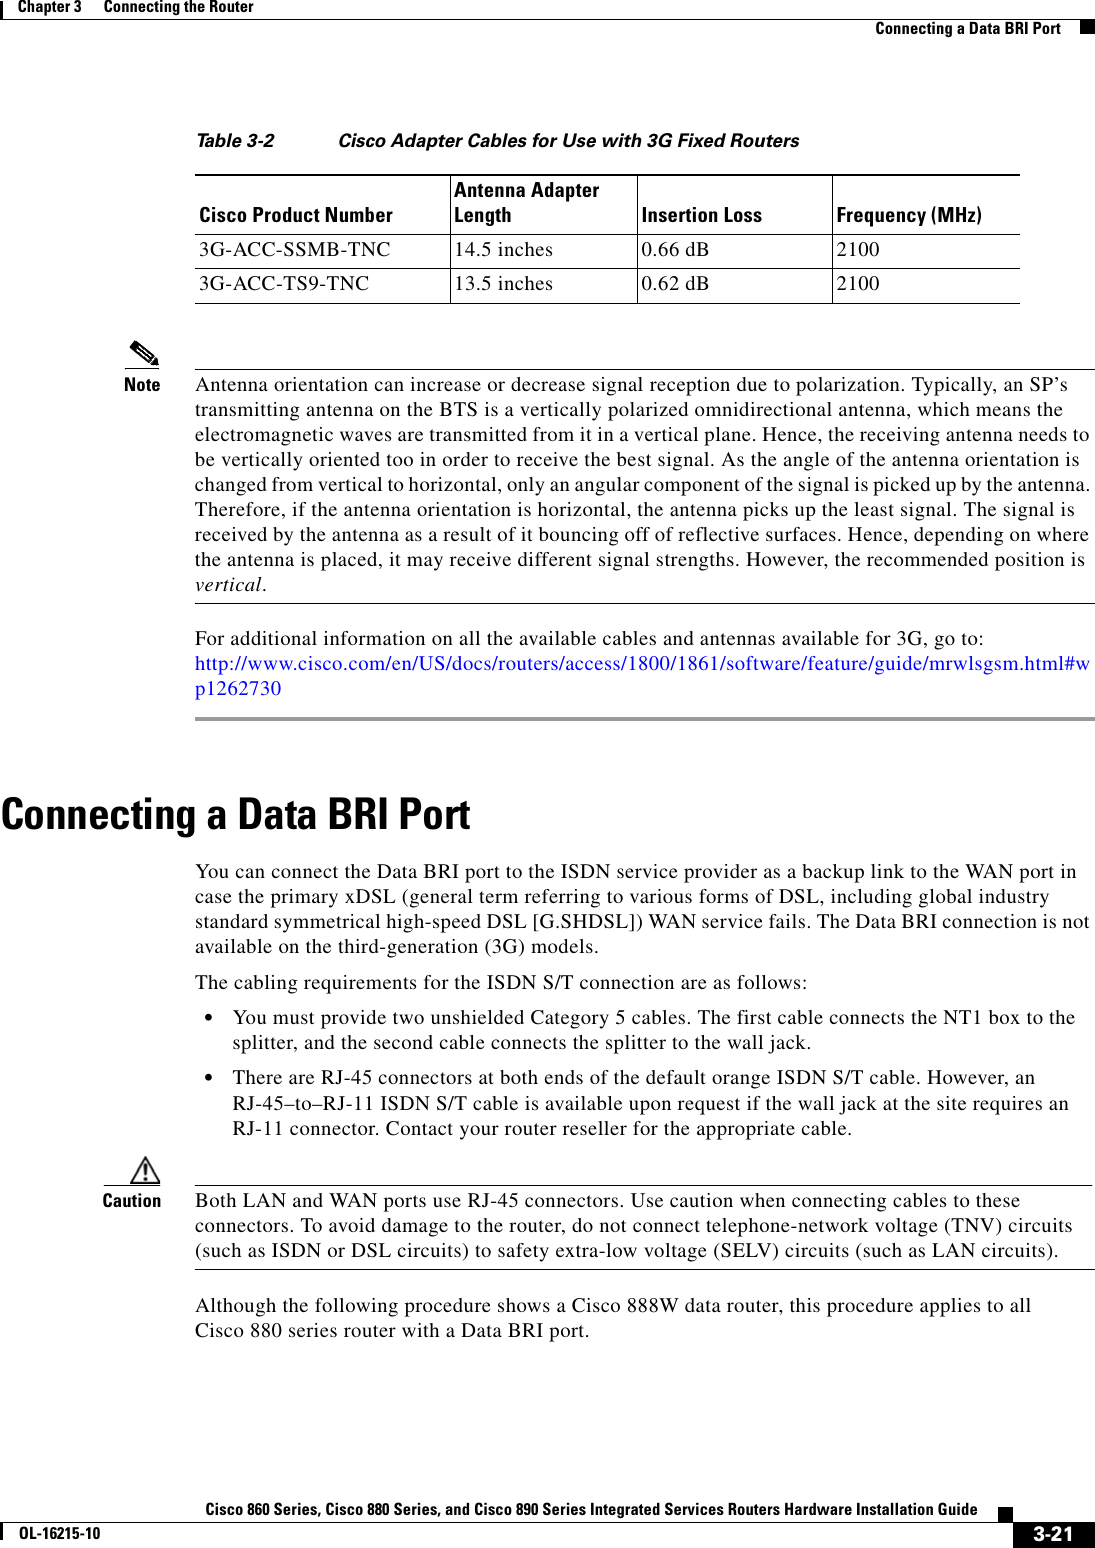
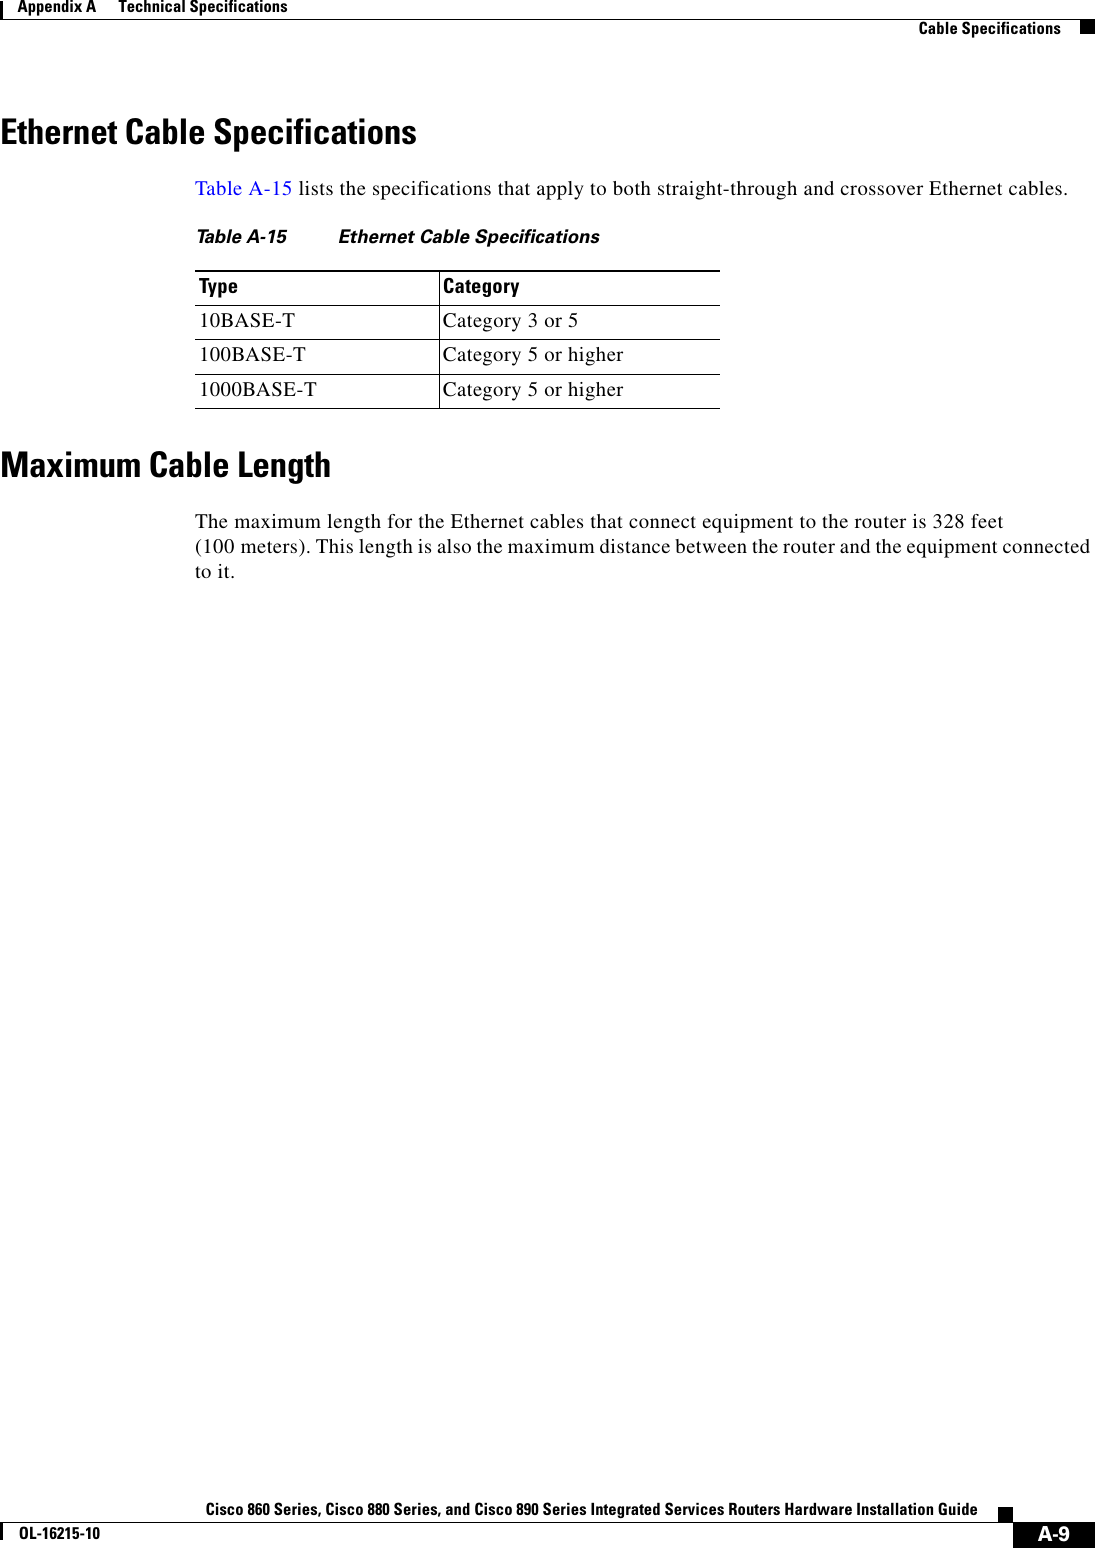
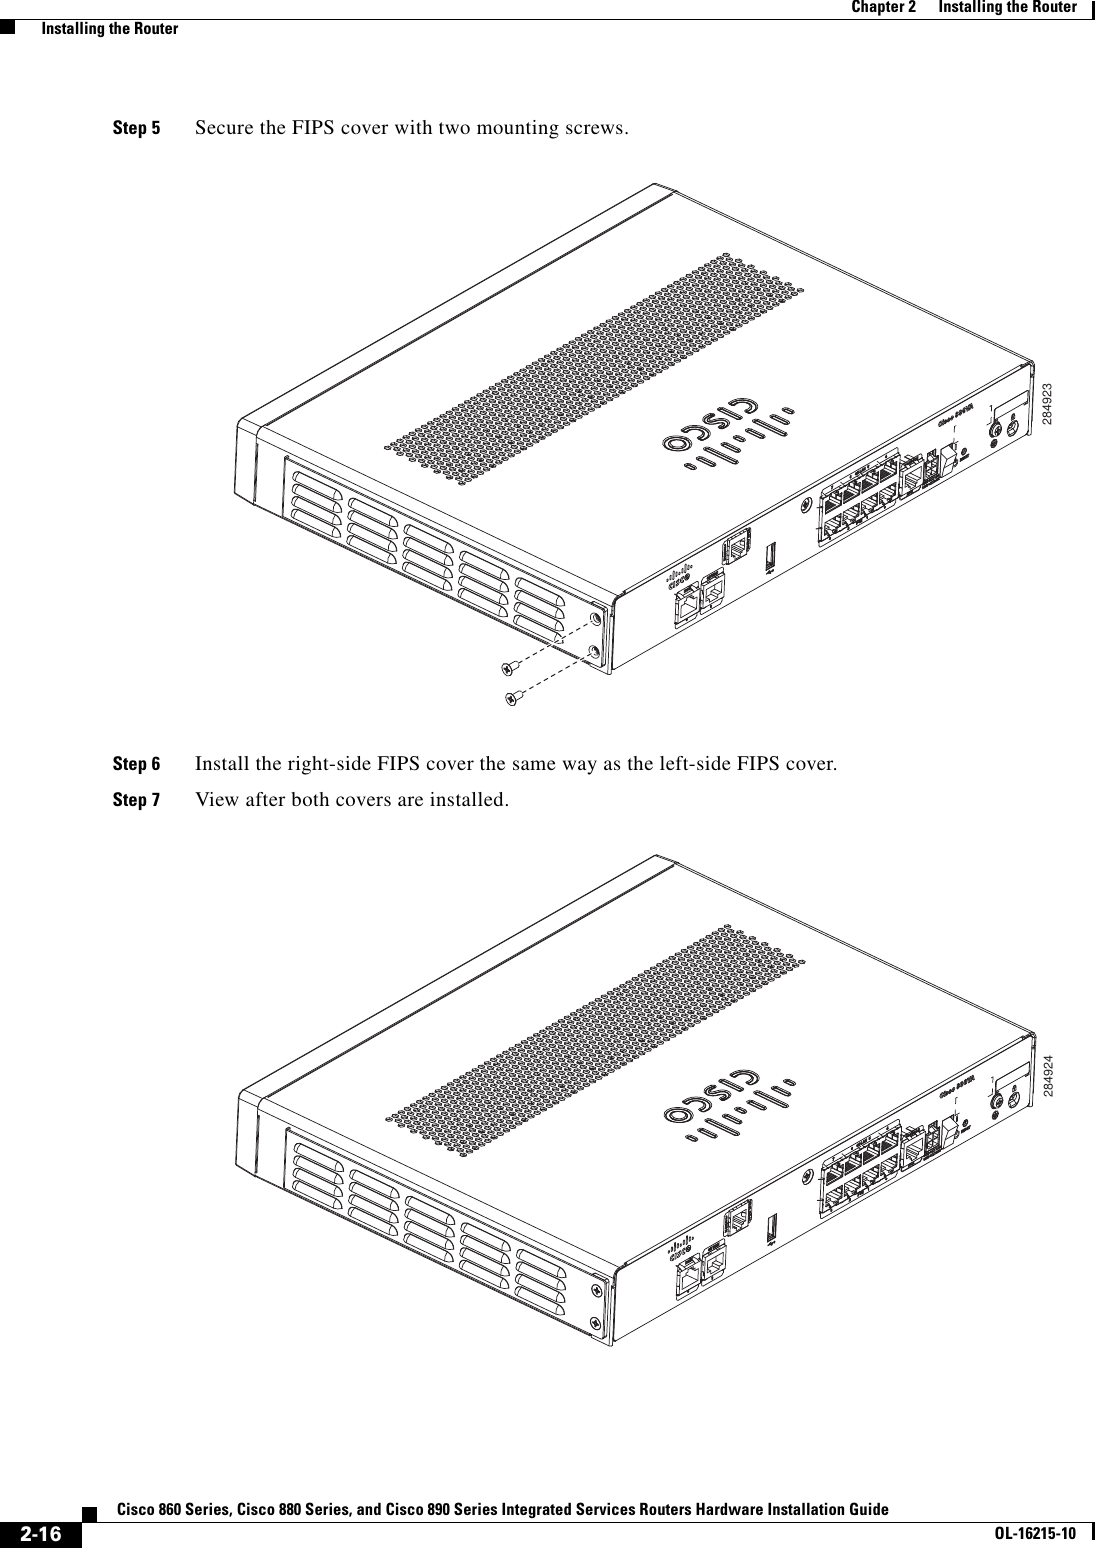
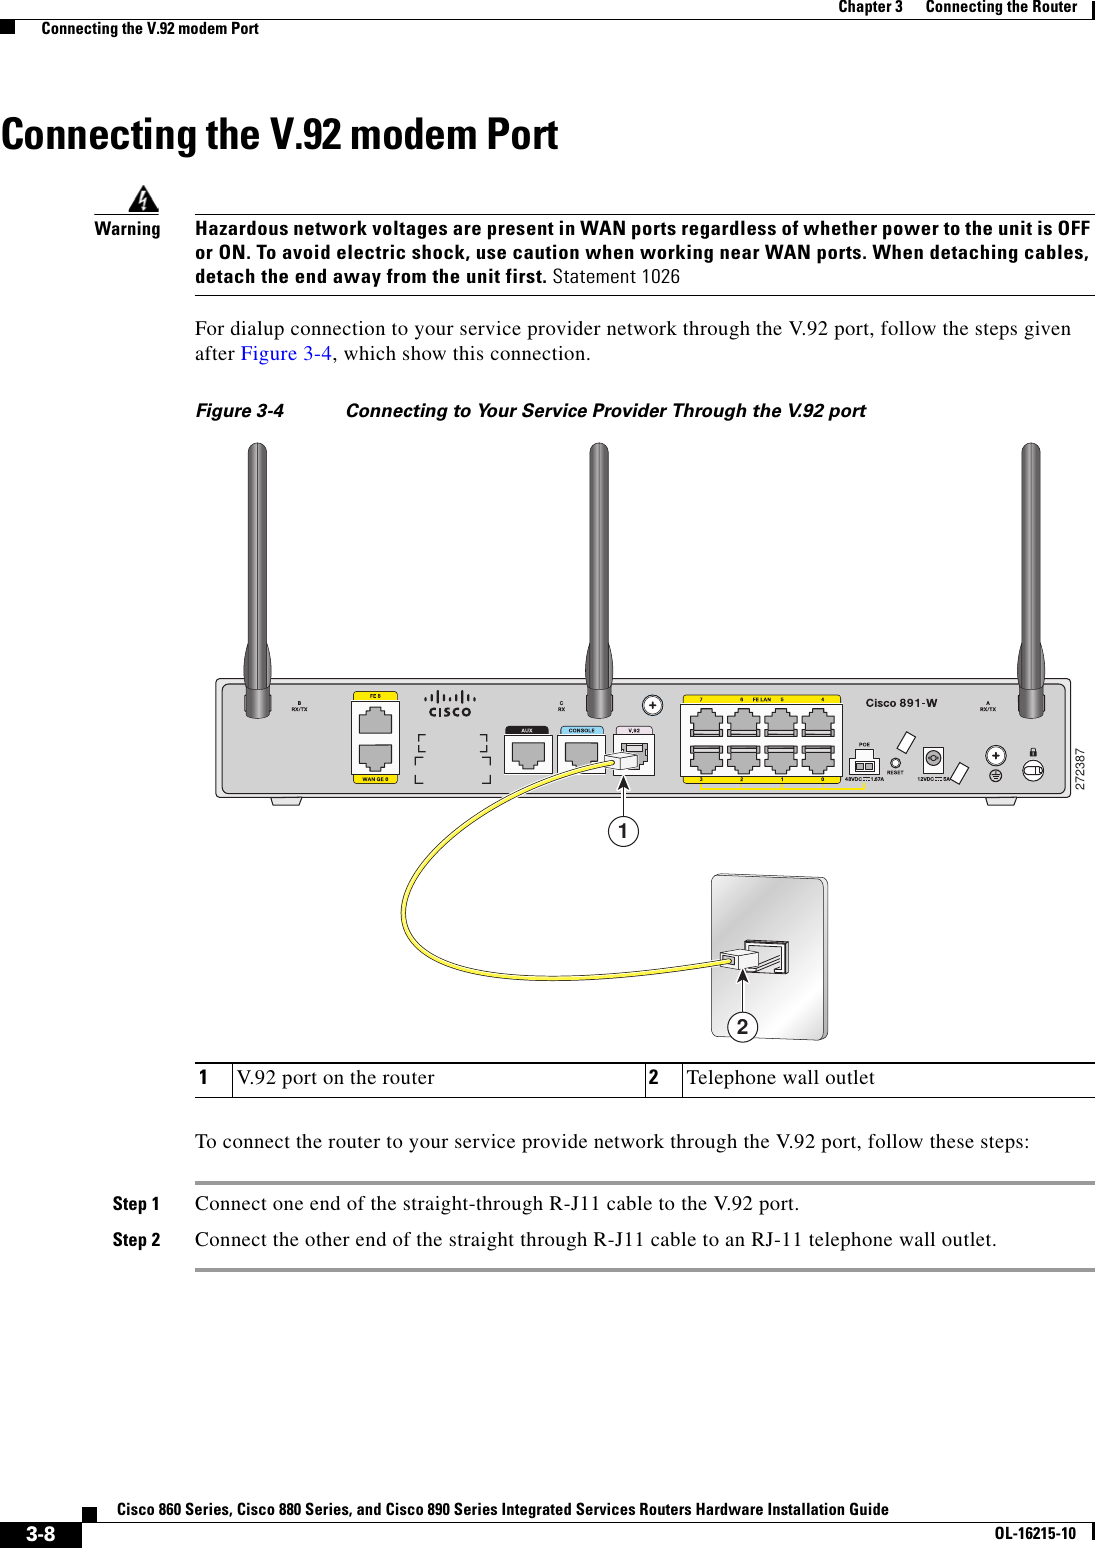
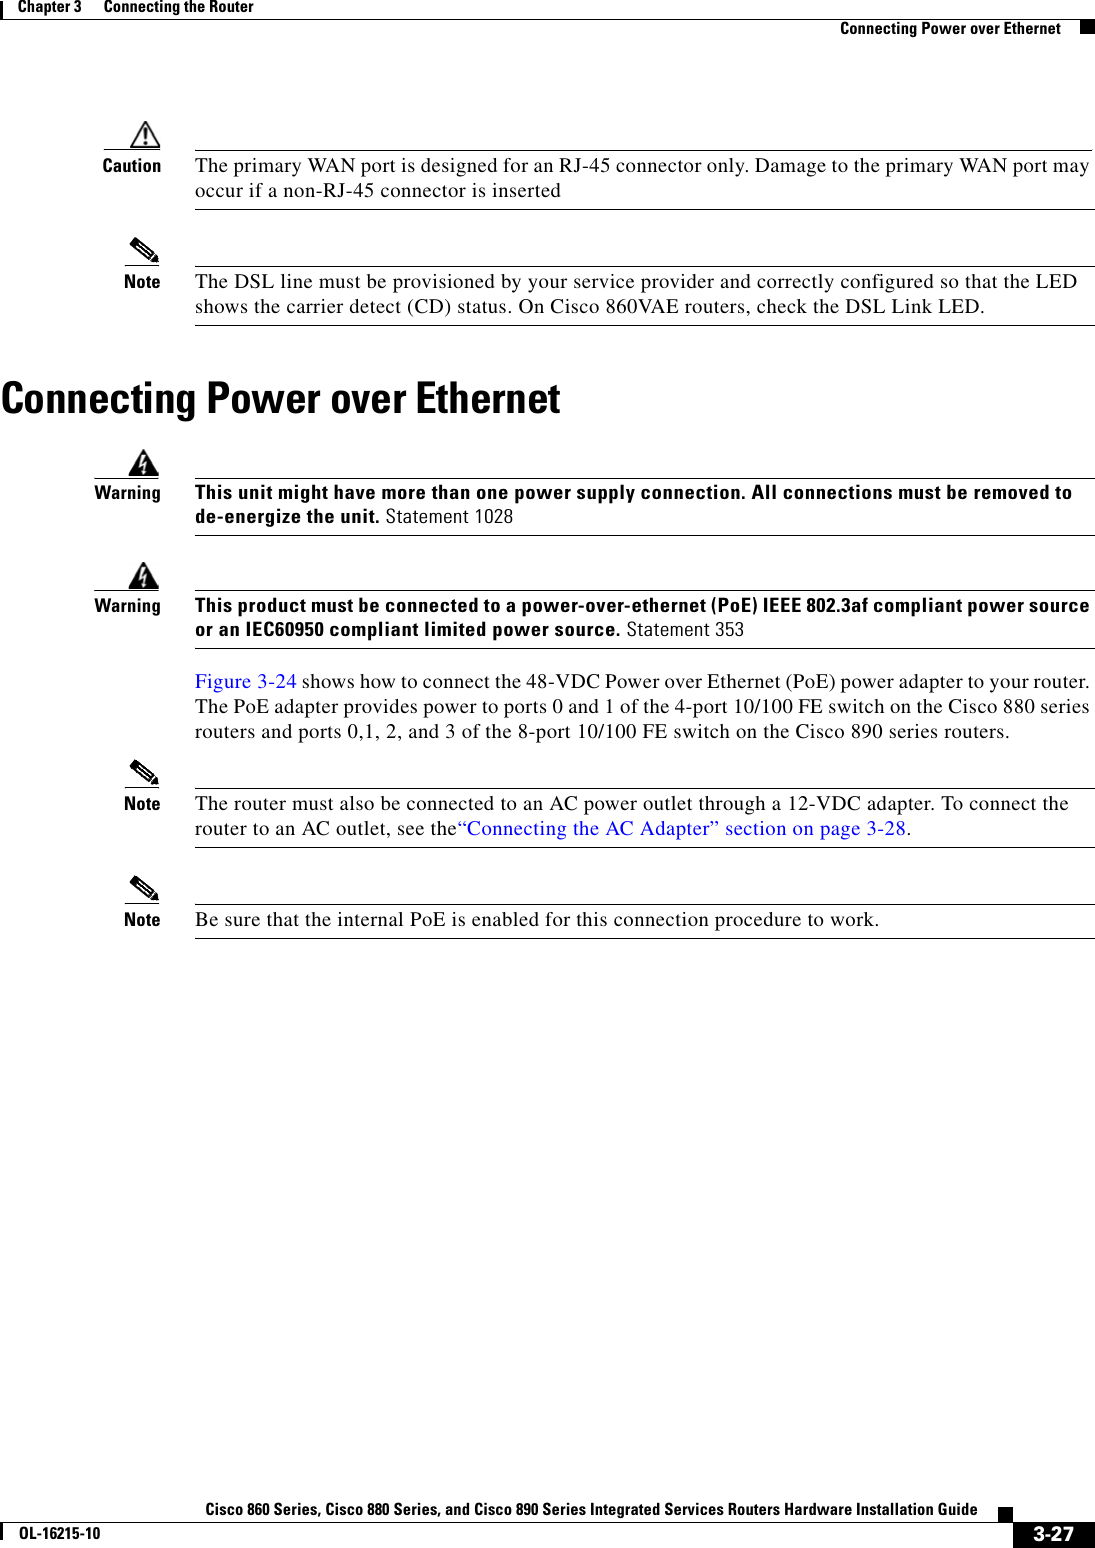
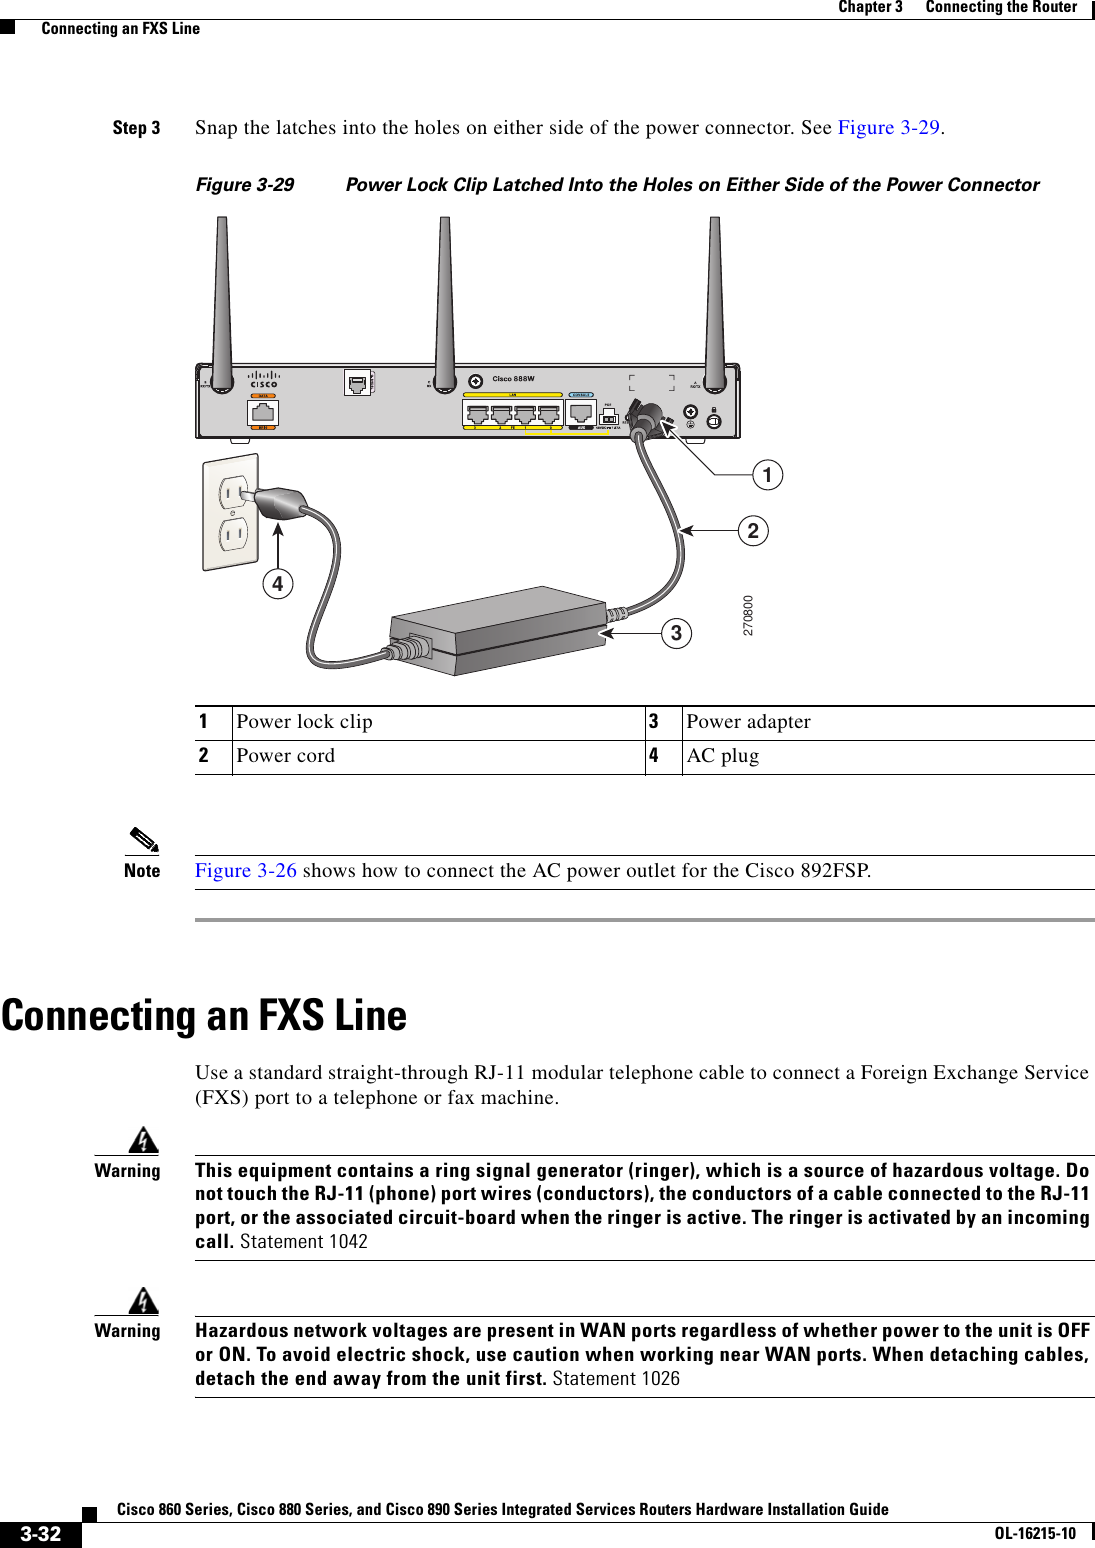
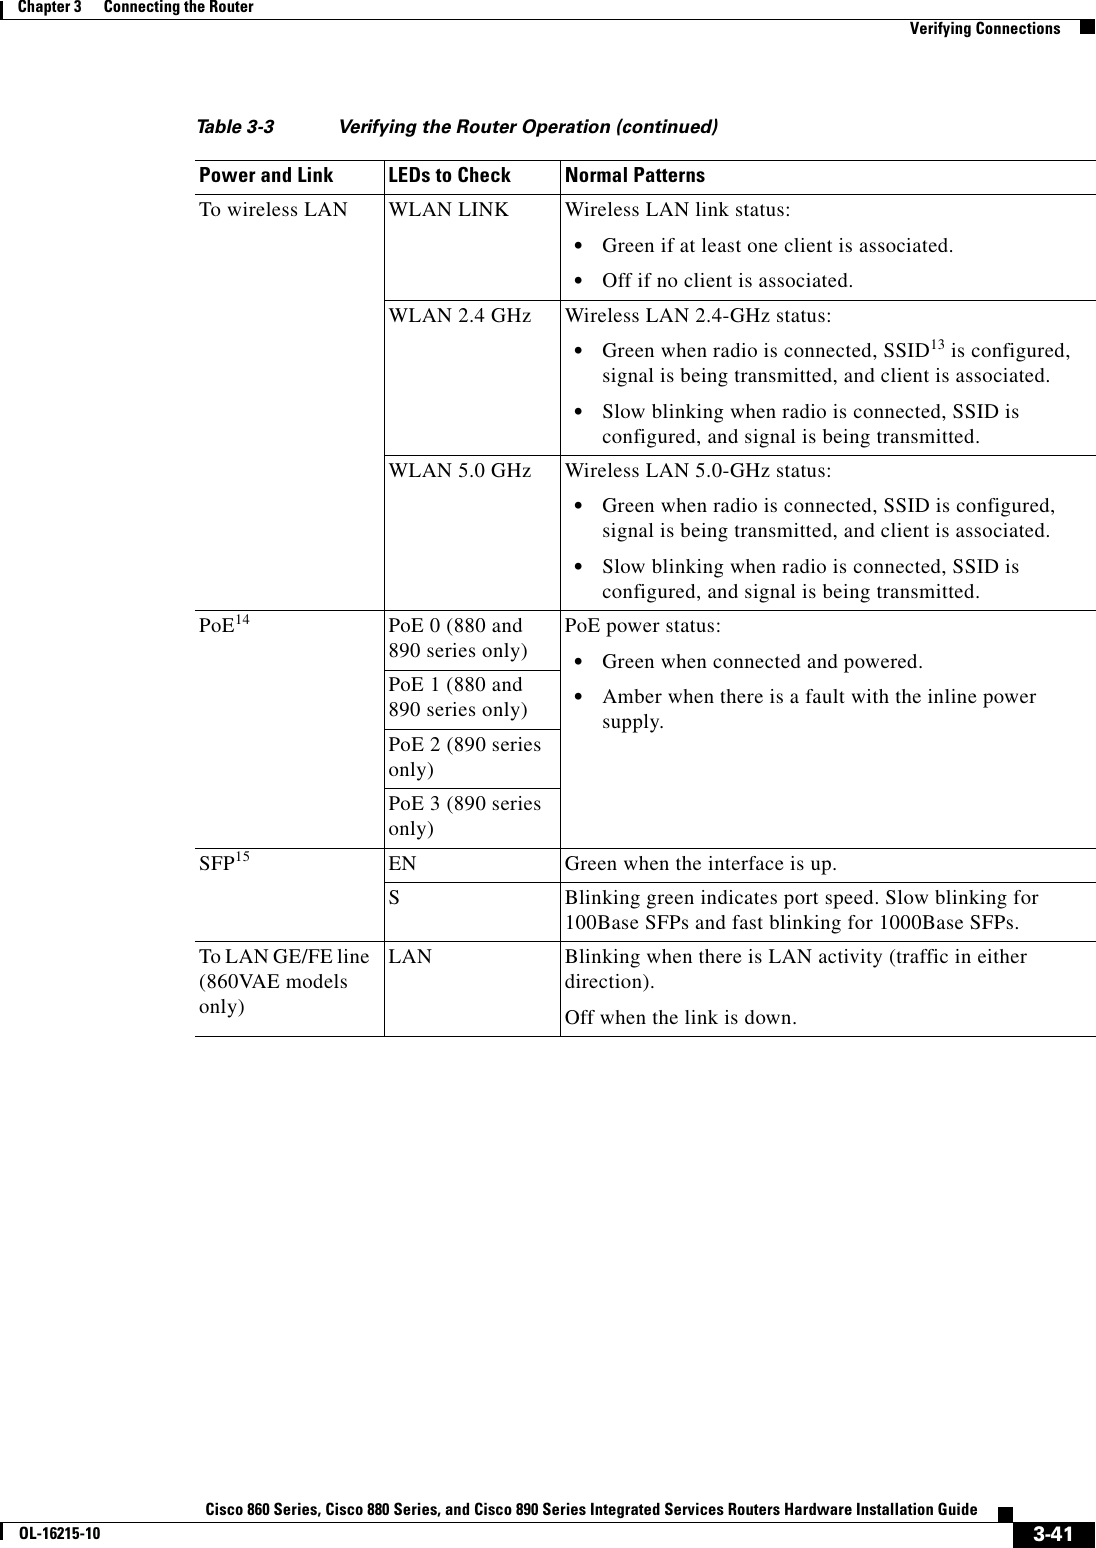
![3-21Cisco 860 Series, Cisco 880 Series, and Cisco 890 Series Integrated Services Routers Hardware Installation GuideOL-16215-10Chapter 3 Connecting the Router Connecting a Data BRI PortNote Antenna orientation can increase or decrease signal reception due to polarization. Typically, an SP’s transmitting antenna on the BTS is a vertically polarized omnidirectional antenna, which means the electromagnetic waves are transmitted from it in a vertical plane. Hence, the receiving antenna needs to be vertically oriented too in order to receive the best signal. As the angle of the antenna orientation is changed from vertical to horizontal, only an angular component of the signal is picked up by the antenna. Therefore, if the antenna orientation is horizontal, the antenna picks up the least signal. The signal is received by the antenna as a result of it bouncing off of reflective surfaces. Hence, depending on where the antenna is placed, it may receive different signal strengths. However, the recommended position is vertical.For additional information on all the available cables and antennas available for 3G, go to: http://www.cisco.com/en/US/docs/routers/access/1800/1861/software/feature/guide/mrwlsgsm.html#wp1262730Connecting a Data BRI PortYou can connect the Data BRI port to the ISDN service provider as a backup link to the WAN port in case the primary xDSL (general term referring to various forms of DSL, including global industry standard symmetrical high-speed DSL [G.SHDSL]) WAN service fails. The Data BRI connection is not available on the third-generation (3G) models. The cabling requirements for the ISDN S/T connection are as follows: • You must provide two unshielded Category 5 cables. The first cable connects the NT1 box to the splitter, and the second cable connects the splitter to the wall jack. • There are RJ-45 connectors at both ends of the default orange ISDN S/T cable. However, an RJ-45–to–RJ-11 ISDN S/T cable is available upon request if the wall jack at the site requires an RJ-11 connector. Contact your router reseller for the appropriate cable.Caution Both LAN and WAN ports use RJ-45 connectors. Use caution when connecting cables to these connectors. To avoid damage to the router, do not connect telephone-network voltage (TNV) circuits (such as ISDN or DSL circuits) to safety extra-low voltage (SELV) circuits (such as LAN circuits). Although the following procedure shows a Cisco 888W data router, this procedure applies to all Cisco 880 series router with a Data BRI port.Ta b l e 3-2 Cisco Adapter Cables for Use with 3G Fixed Routers Cisco Product NumberAntenna Adapter Length Insertion Loss Frequency (MHz)3G-ACC-SSMB-TNC 14.5 inches 0.66 dB 2100 3G-ACC-TS9-TNC 13.5 inches 0.62 dB 2100](https://usermanual.wiki/GemTek-Technology/CISCO867VAE.User-Manual-Part-2/User-Guide-1959036-Page-43.png)

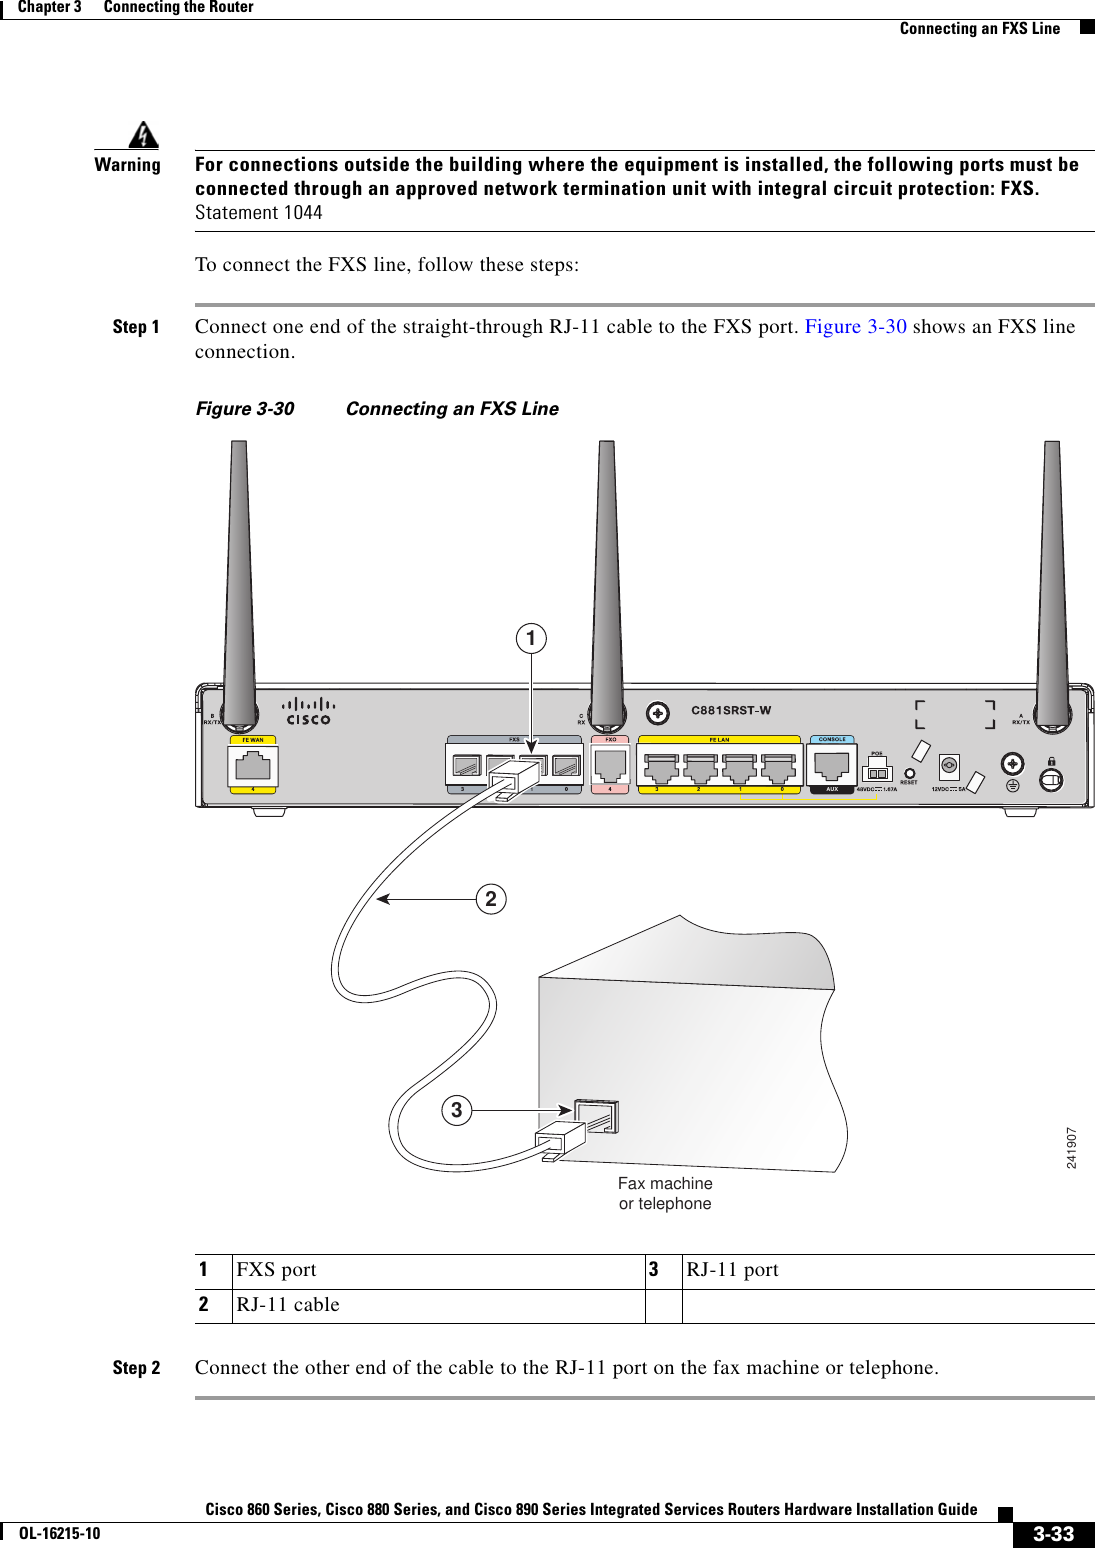

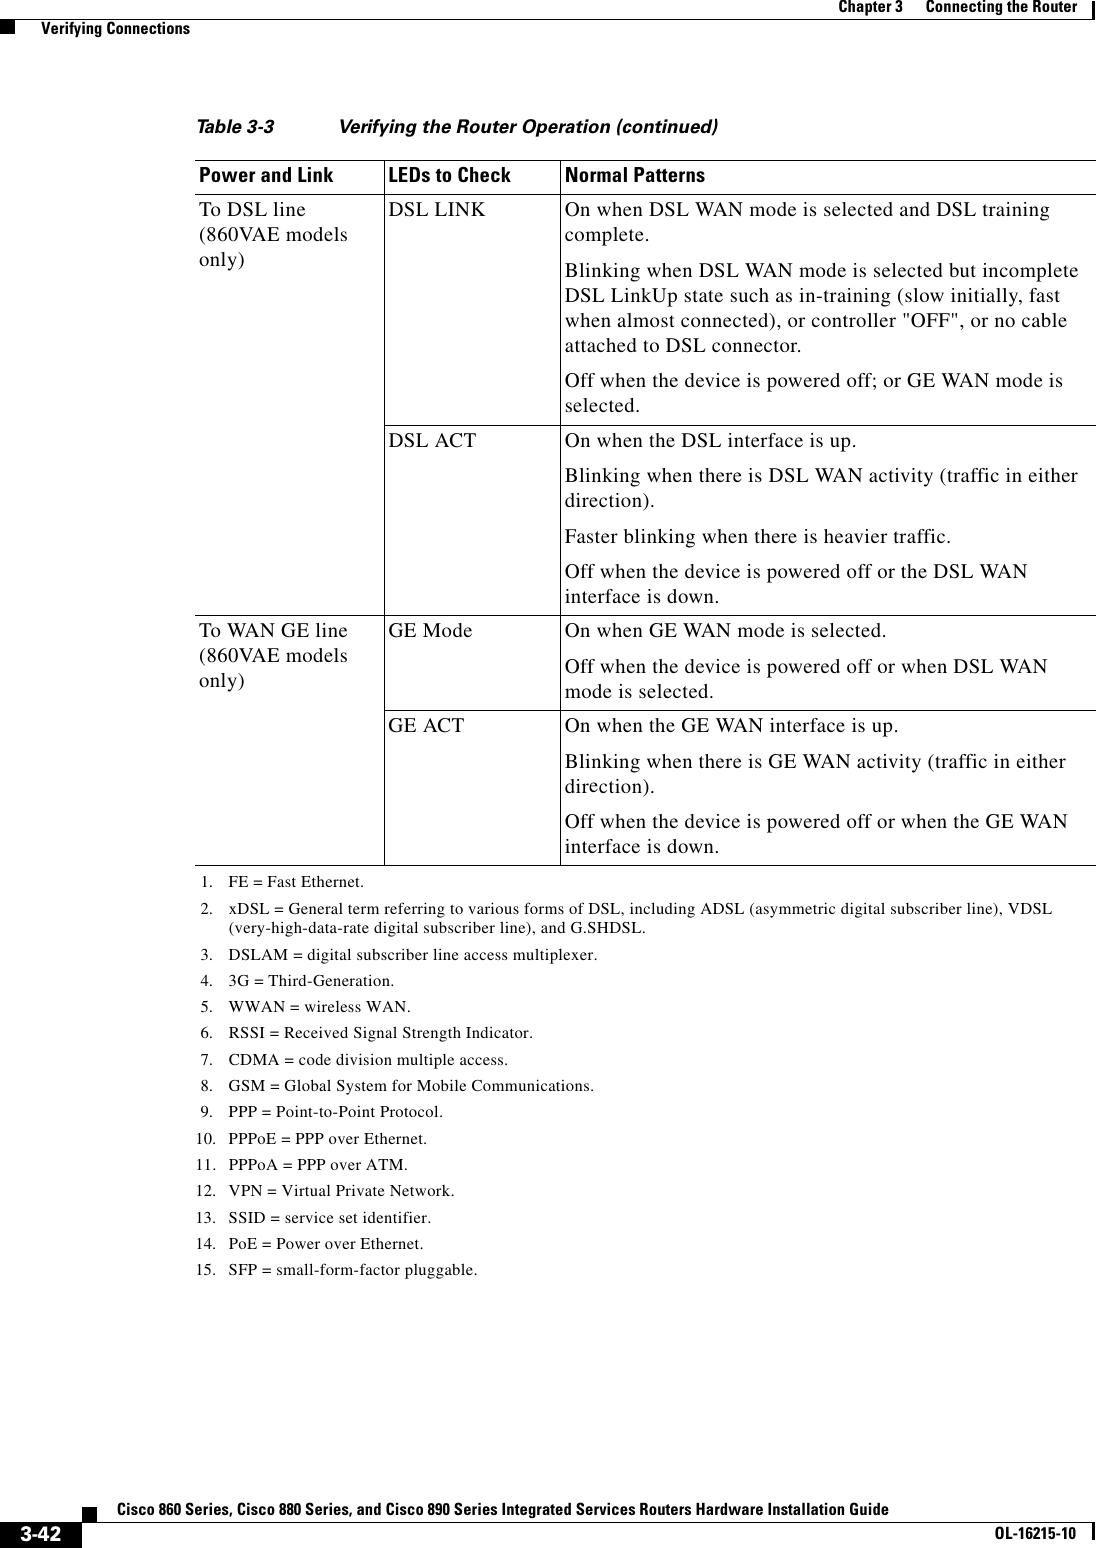
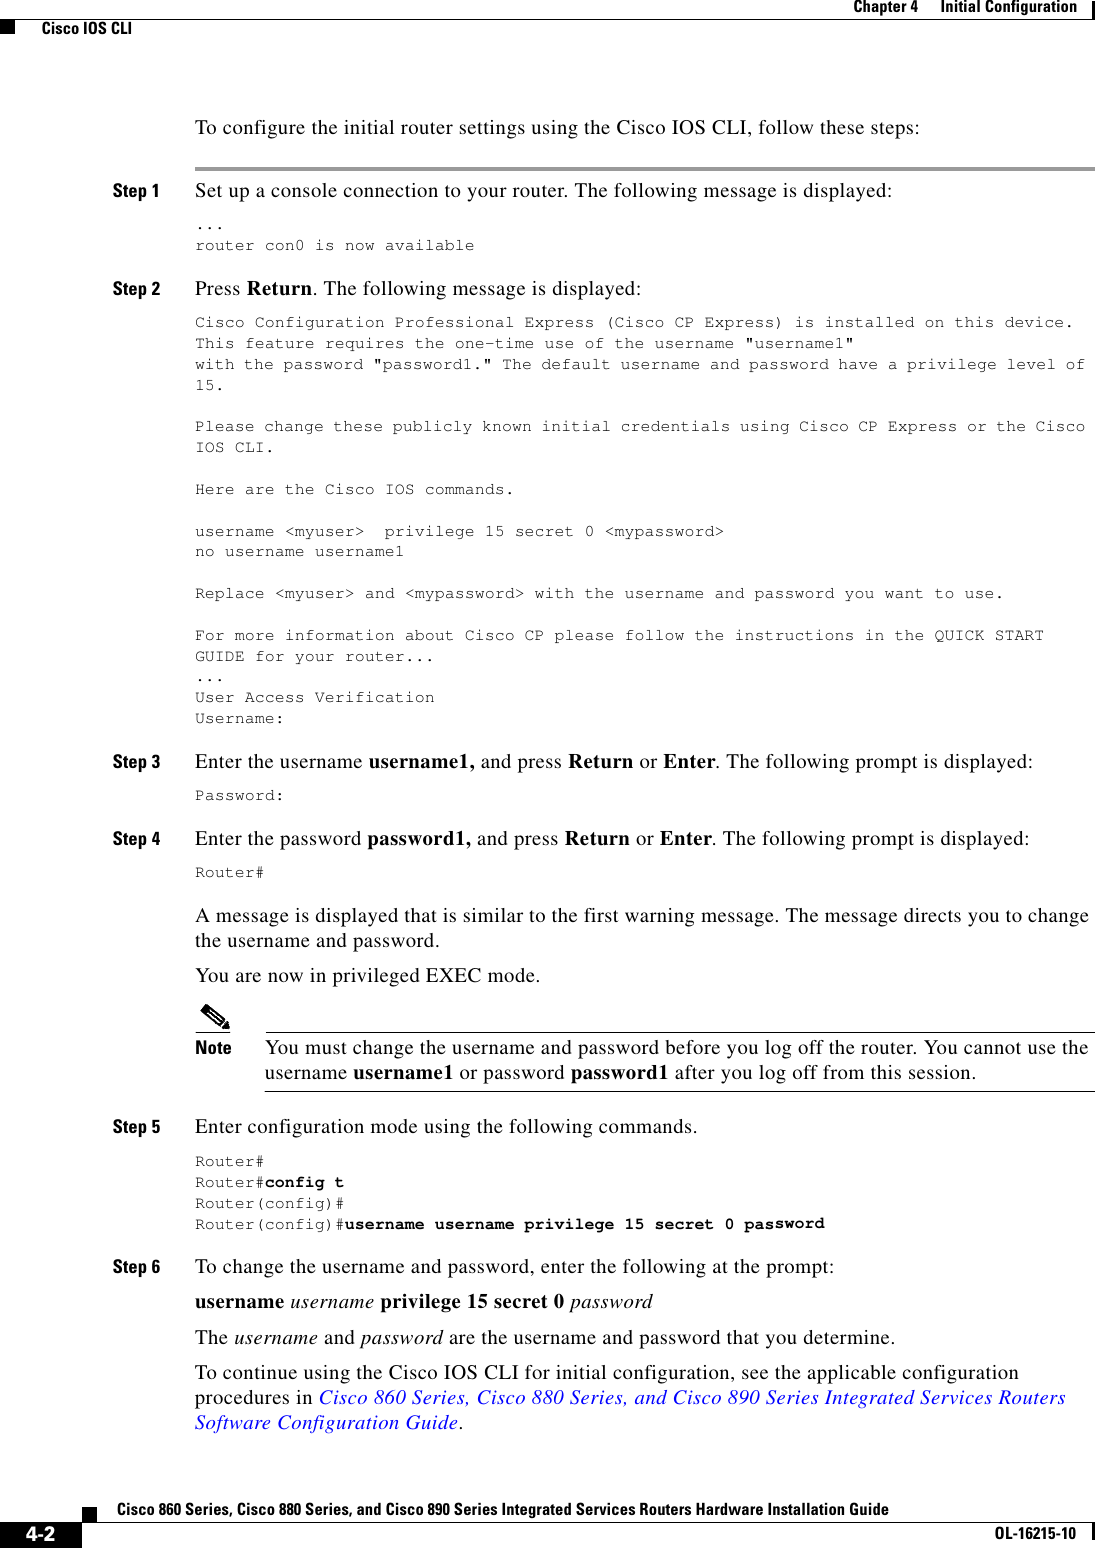

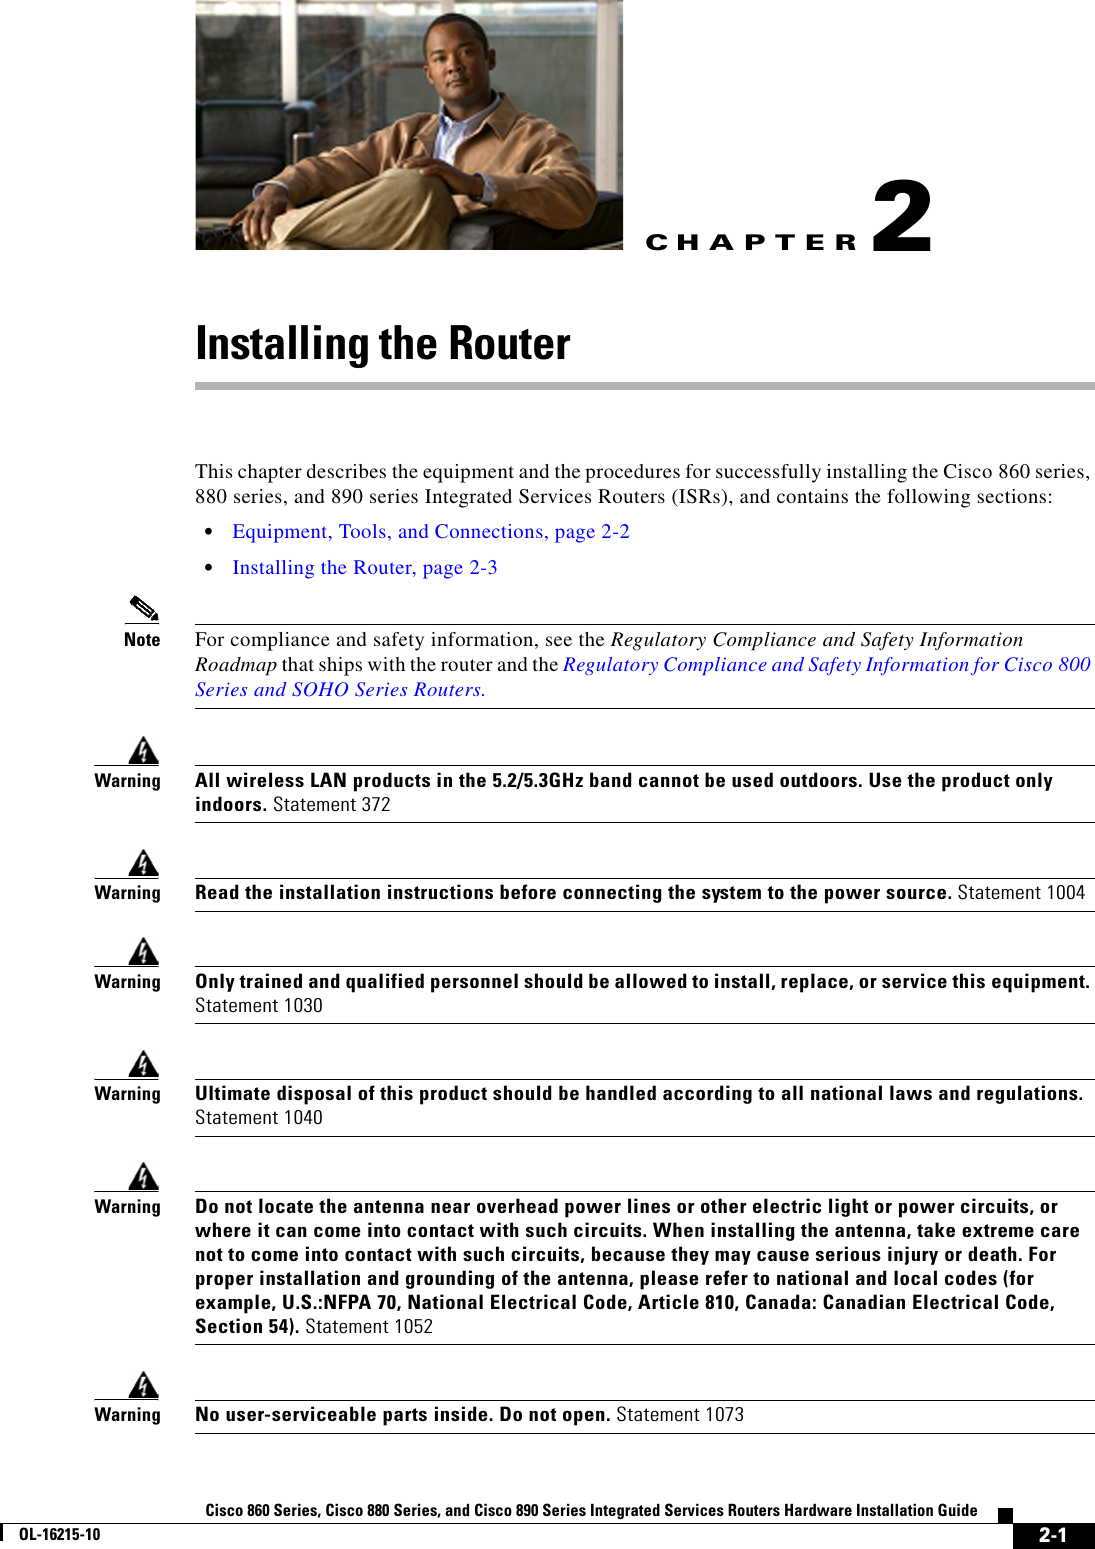
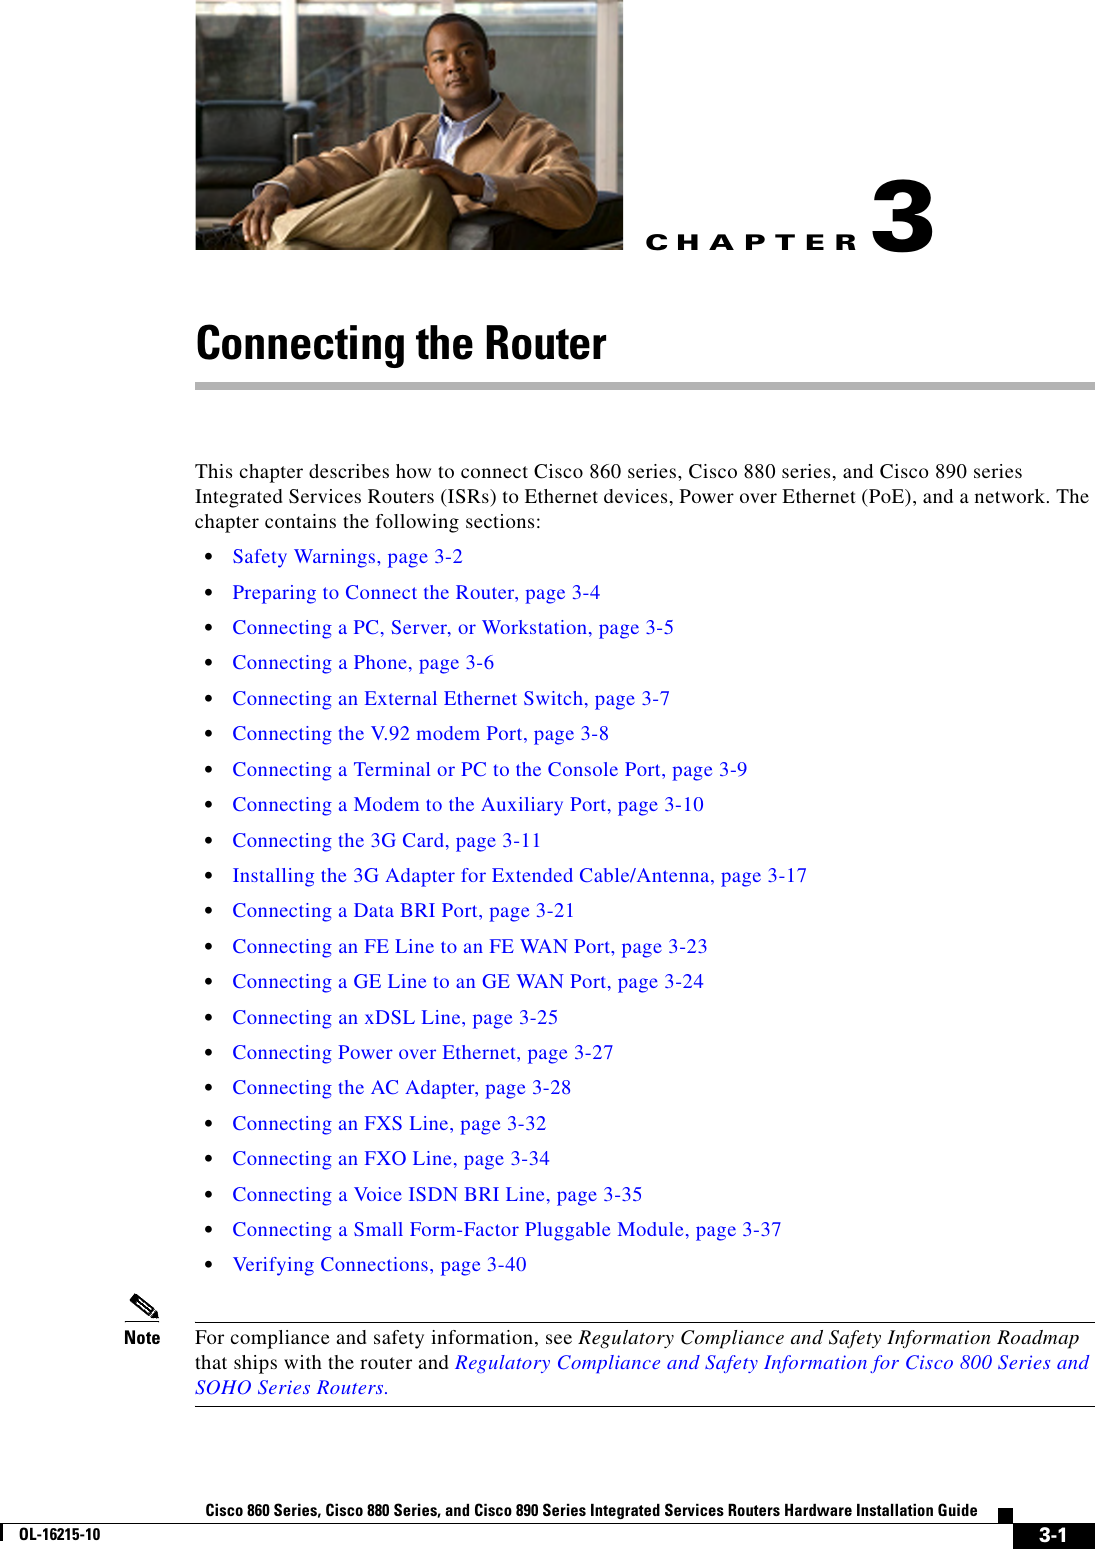
![4-3Cisco 860 Series, Cisco 880 Series, and Cisco 890 Series Integrated Services Routers Hardware Installation GuideOL-16215-10Chapter 4 Initial Configuration Setup Command FacilityNote Save your configuration changes regularly to avoid losing them during resets, power cycles, or power outages. Use the copy running-config startup-config command at the privileged EXEC mode prompt (Router#) to save the configuration to NVRAM.Step 7 Verify the initial configuration. See the “Verifying the Initial Configuration” section on page 4-5.Setup Command FacilityThe setup command facility guides you through the configuration process by prompting you for the specific information that is needed to configure your system. Use the setup command facility to configure a hostname for the router, to set passwords, and to configure an interface for communication with the management network.To use the setup command facility, you must set up a console connection with the router and enter the privileged EXEC mode. Note For instructions on how to set up a console connection, see the “Connecting a Terminal or PC to the Console Port” section on page 3-9.To configure the initial router settings by using the setup command facility, follow these steps:Step 1 Set up a console connection to your router, and enter privileged EXEC mode. For instructions on how to enter privileged EXEC mode, see Step 1 through Step 4 in the “Cisco IOS CLI” section on page 4-1.Step 2 In privileged EXEC mode, at the prompt, enter setup. yourname# setupThe following message is displayed:--- System Configuration Dialog ---Continue with configuration dialog? [yes/no]:You are now in the setup command facility.The prompts in the setup command facility vary, depending on your router model, on the installed interface modules, and on the software image. The following steps and the user entries (in bold) are shown as examples only.Note If you make a mistake while using the setup command facility, you can exit and run the setup command facility again. Press Ctrl-C, and enter the setup command at the privileged EXEC mode prompt (Router#). For more information on using the setup command facility, see “The Setup Command” chapter in Cisco IOS Configuration Fundamentals Command Reference, Release 12.2T.Step 3 To proceed using the setup command facility, enter yes.Continue with configuration dialog? [yes/no]: yes](https://usermanual.wiki/GemTek-Technology/CISCO867VAE.User-Manual-Part-2/User-Guide-1959036-Page-67.png)
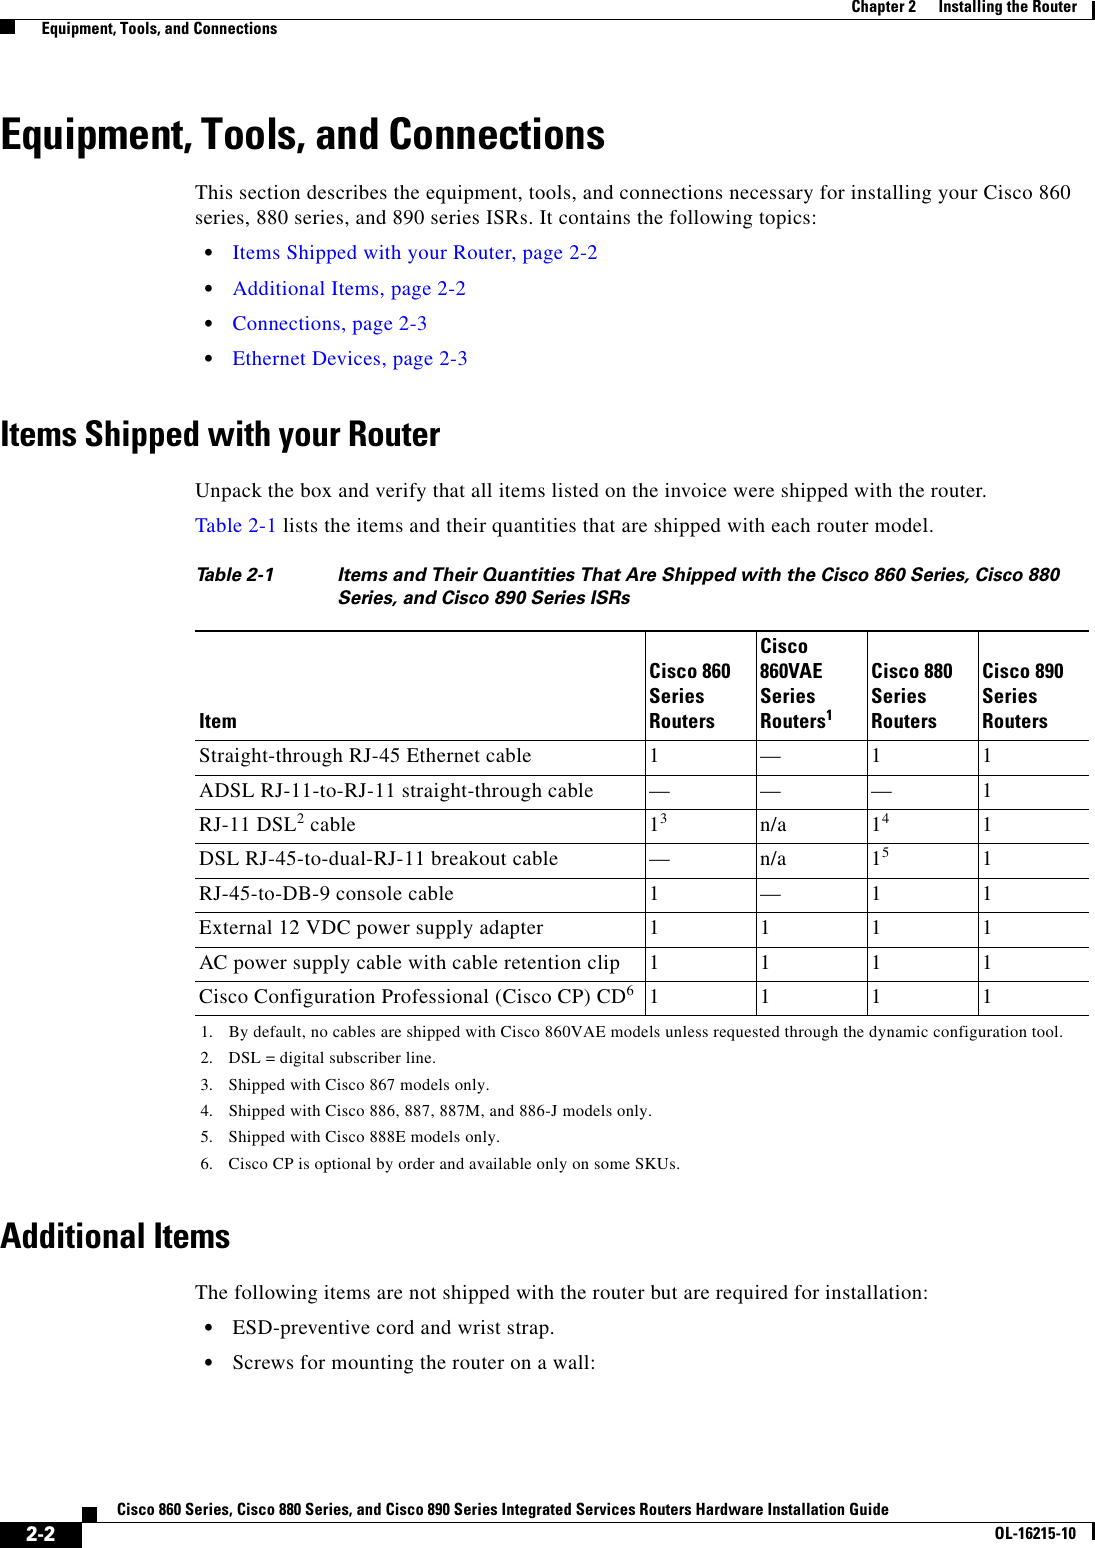
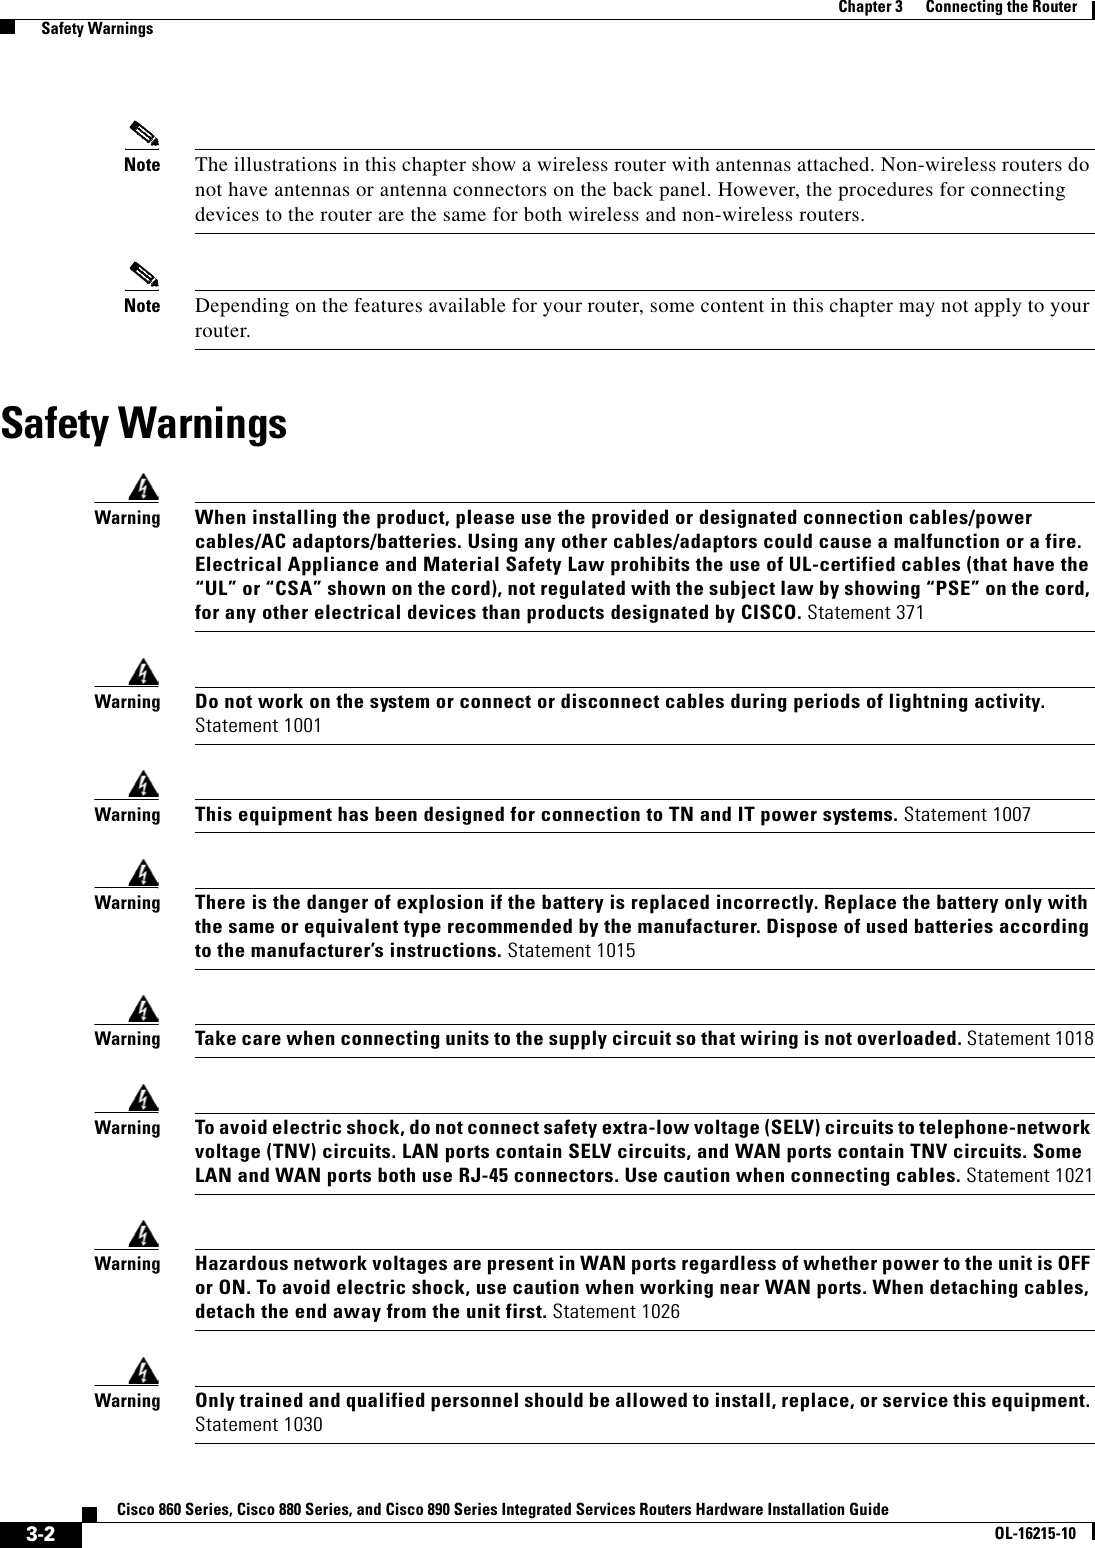
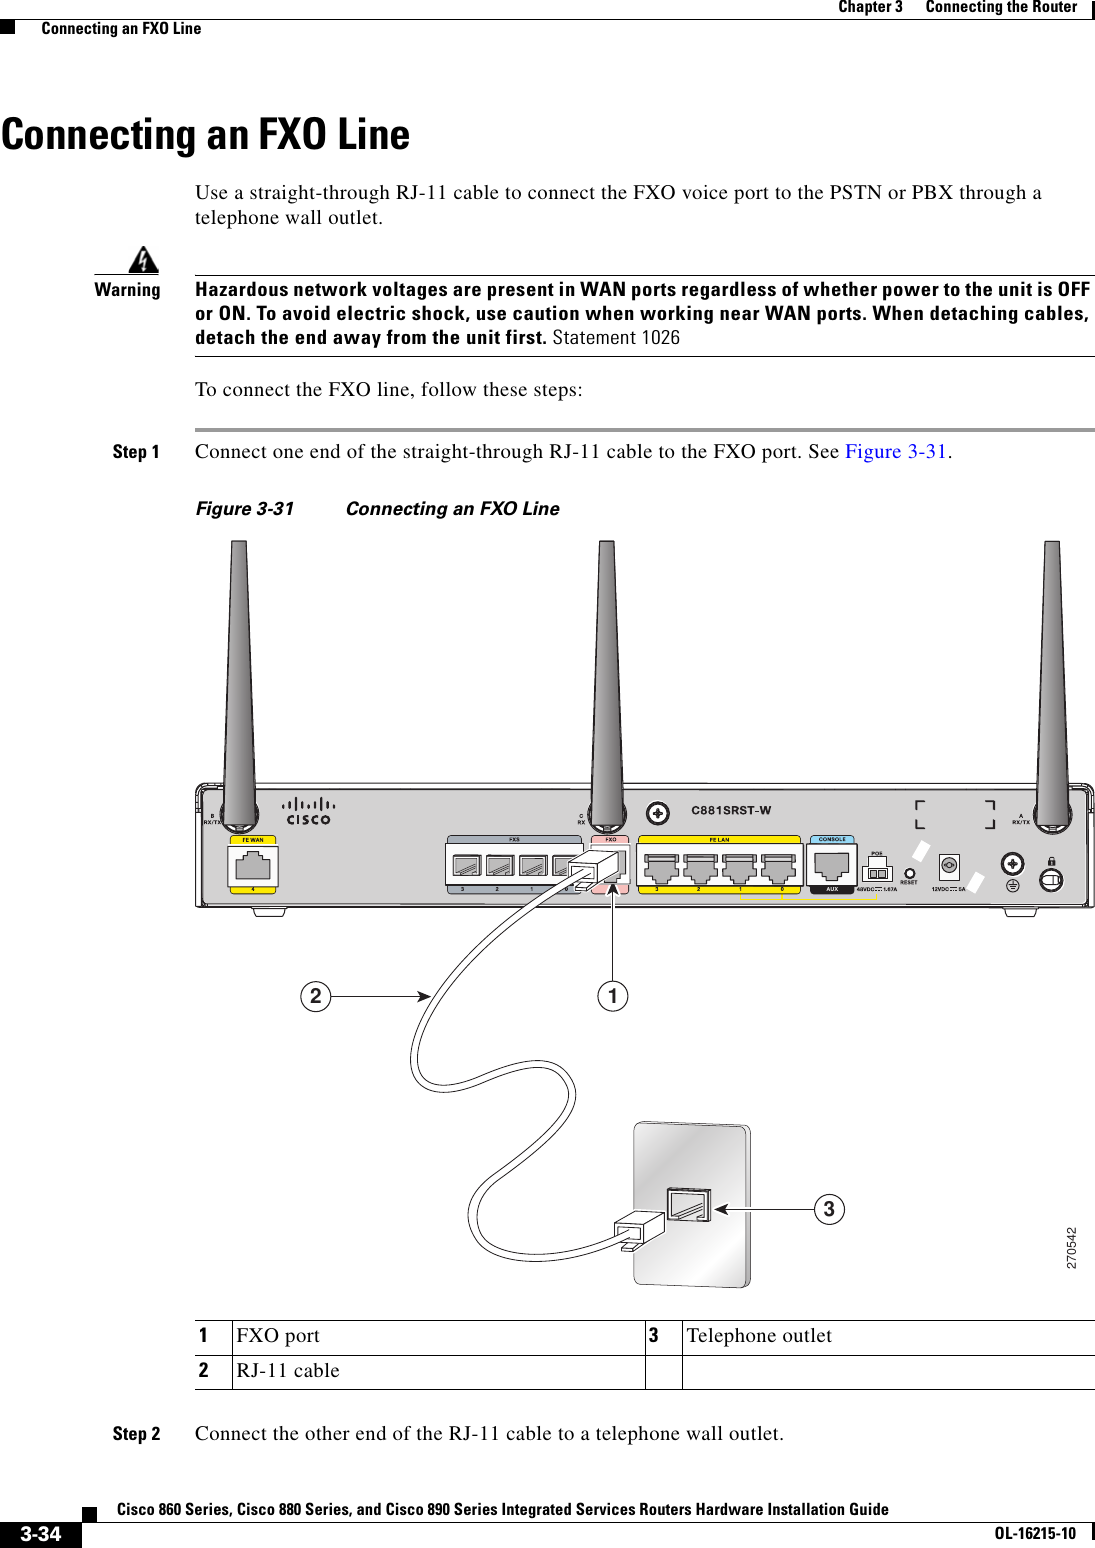
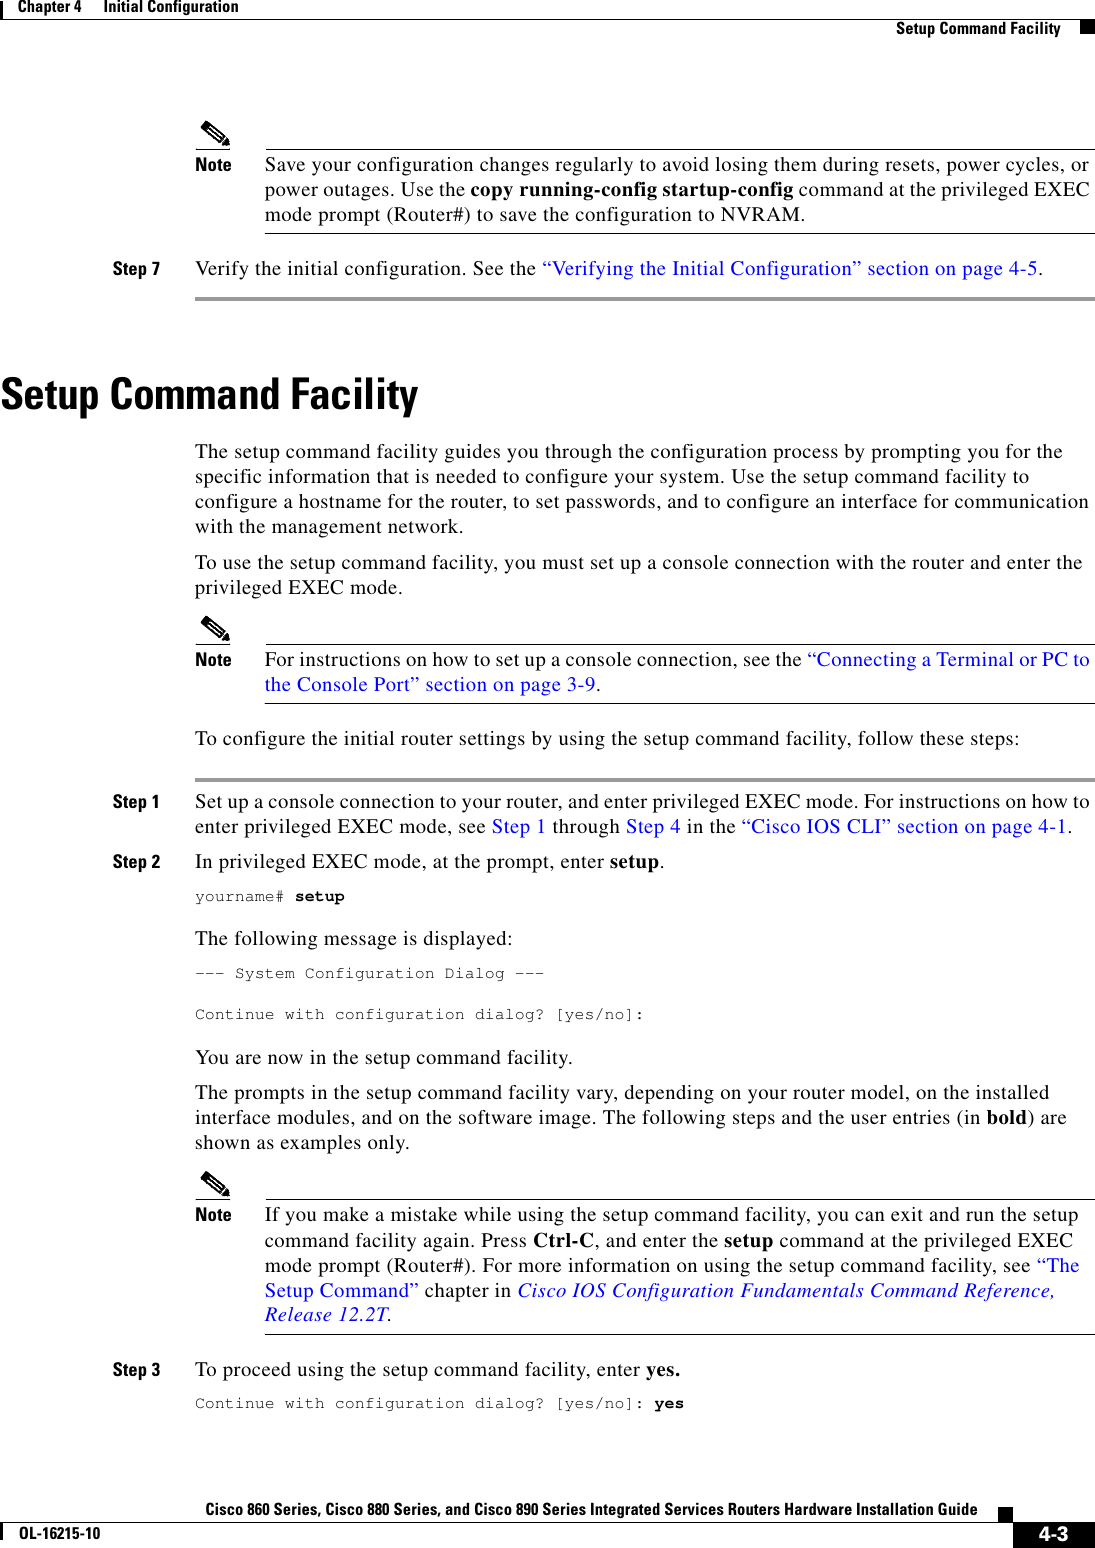
![4-4Cisco 860 Series, Cisco 880 Series, and Cisco 890 Series Integrated Services Routers Hardware Installation GuideOL-16215-10Chapter 4 Initial Configuration Setup Command FacilityStep 4 When the following messages appear, enter yes to enter basic management setup.At any point you may enter a question mark '?' for help.Use ctrl-c to abort configuration dialog at any prompt.Default settings are in square brackets '[]'.Basic management setup configures only enough connectivityfor management of the system, extended setup will ask youto configure each interface on the systemWould you like to enter basic management setup? [yes/no]: yesStep 5 Enter a hostname for the router (this example uses Router).Configuring global parameters:Enter host name [Router]: RouterStep 6 Enter an enable secret password. This password is encrypted (more secure) and cannot be seen when viewing the configuration.The enable secret is a password used to protect access toprivileged EXEC and configuration modes. This password, afterentered, becomes encrypted in the configuration.Enter enable secret: xxxxxxStep 7 Enter an enable password that is different from the enable secret password. This password is not encrypted (less secure) and can be seen when viewing the configuration.The enable password is used when you do not specify anenable secret password, with some older software versions, andsome boot images.Enter enable password: xxxxxxStep 8 Enter the virtual terminal password, which prevents unauthenticated access to the router through ports other than the console port.The virtual terminal password is used to protectaccess to the router over a network interface.Enter virtual terminal password: xxxxxxStep 9 Respond to the following prompts as appropriate for your network.Configure SNMP Network Management? [yes]: Community string [public]:A summary of the available interfaces is displayed.Step 10 Choose one of the available interfaces for connecting the router to the management network.Enter interface name used to connect to themanagement network from the above interface summary: fastethernet4Step 11 Respond to the following prompts as appropriate for your network.Configuring interface FastEthernet4:Use the 100 Base-TX (RJ-45) connector? [yes]: yesOperate in full-duplex mode? [no]: yesConfigure IP on this interface? [yes]: yes IP address for this interface: 172.1.2.3 Subnet mask for this interface [255.255.0.0] : 255.255.0.0 Class B network is 172.1.0.0, 26 subnet bits; mask is /16](https://usermanual.wiki/GemTek-Technology/CISCO867VAE.User-Manual-Part-2/User-Guide-1959036-Page-68.png)
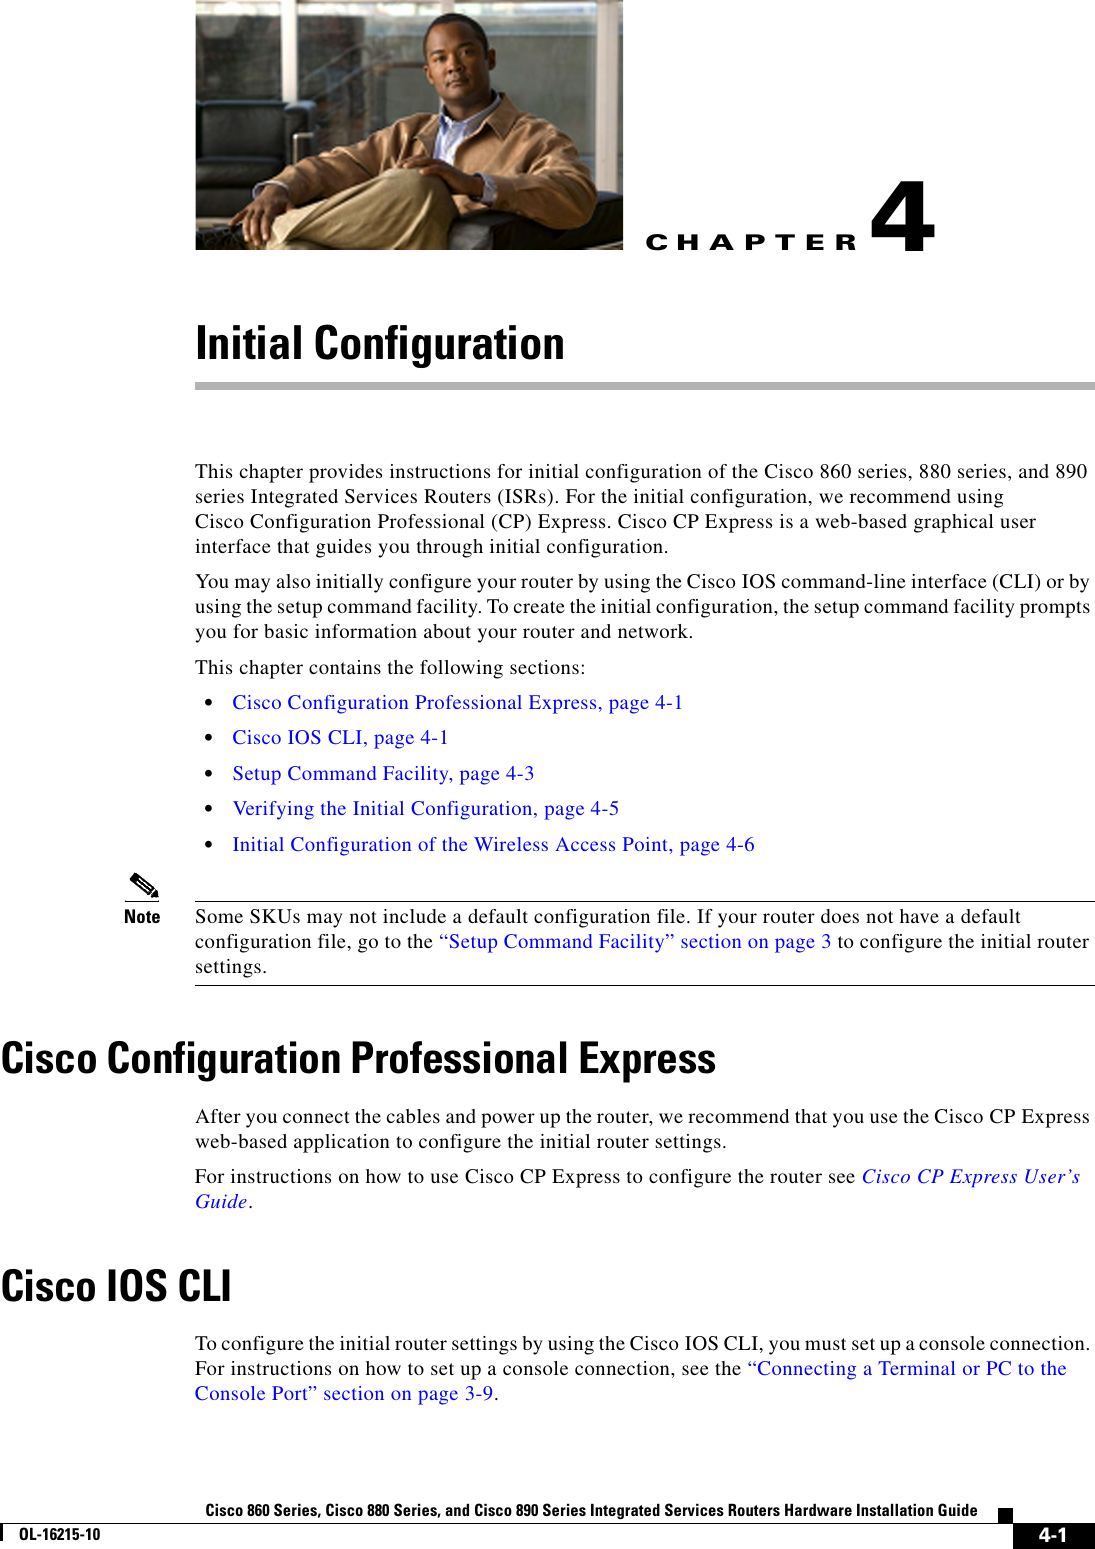
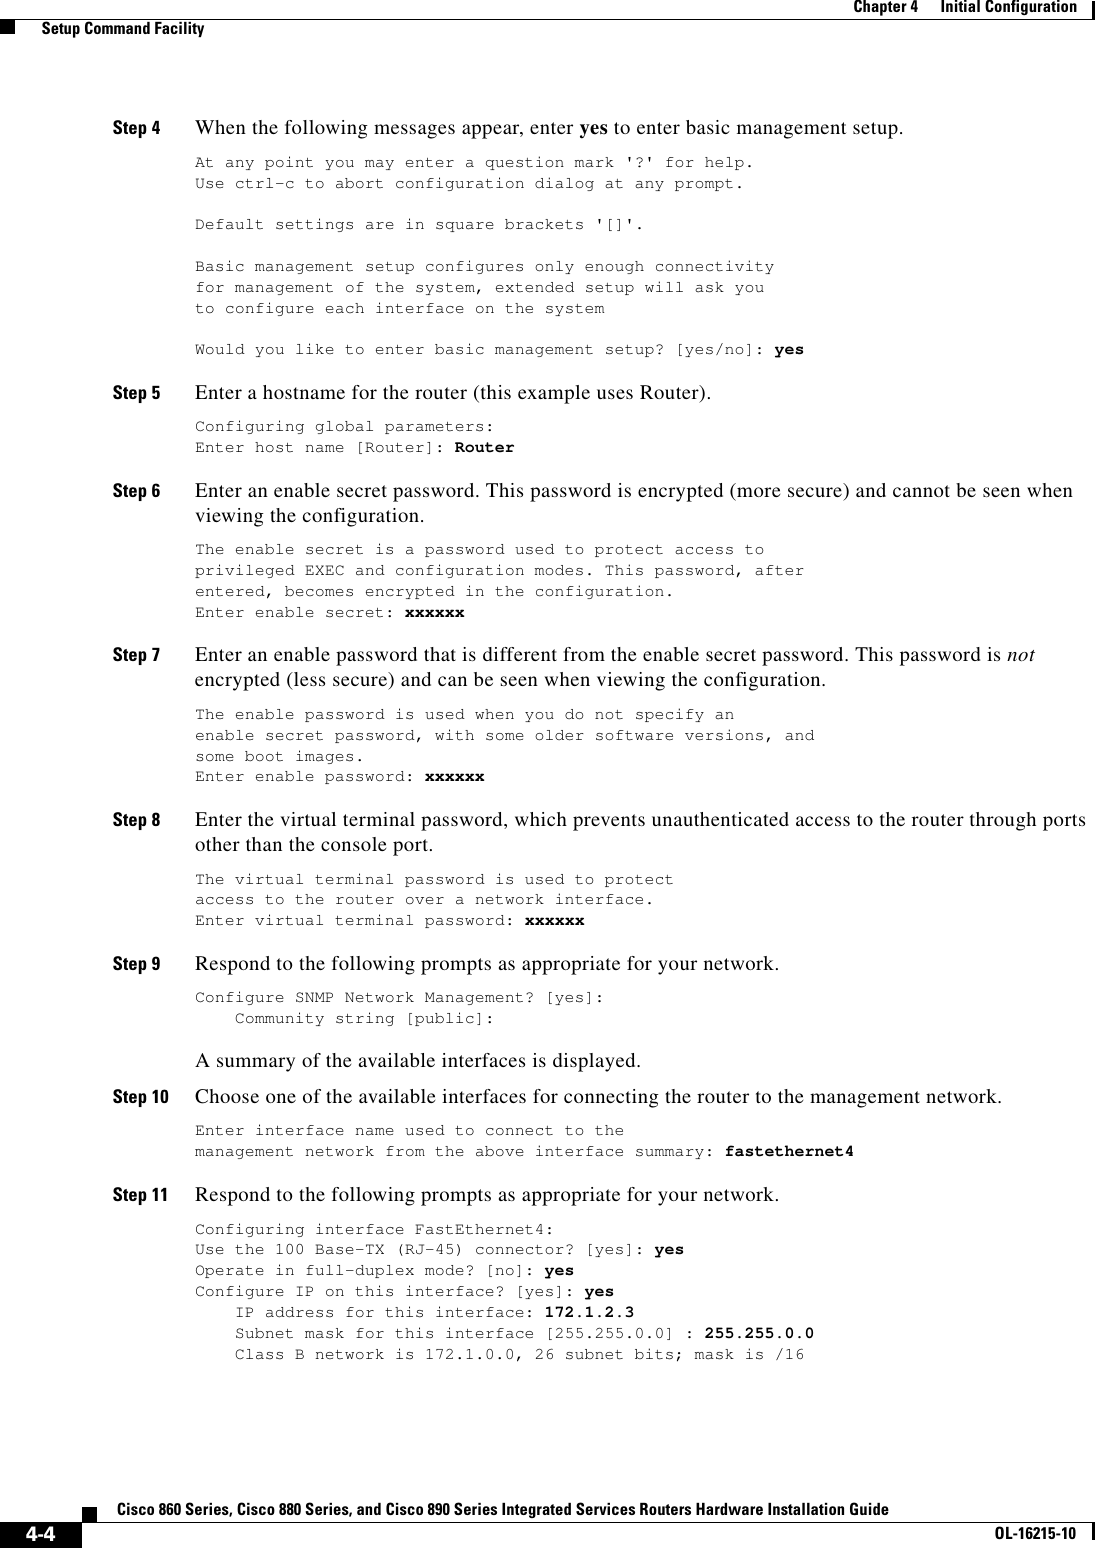
![4-5Cisco 860 Series, Cisco 880 Series, and Cisco 890 Series Integrated Services Routers Hardware Installation GuideOL-16215-10Chapter 4 Initial Configuration Verifying the Initial ConfigurationThe configuration is displayed:The following configuration command script was created:hostname Routerenable secret 5 $1$D5P6$PYx41/lQIASK.HcSbfO5q1enable password xxxxxxline vty 0 4password xxxxxxsnmp-server community public!no ip routing!interface FastEthernet4no shutdownspeed 100duplex autoip address 172.1.2.3 255.255.0.0!Step 12 Respond to the following prompts. Enter 2 to save the initial configuration.[0] Go to the IOS command prompt without saving this config.[1] Return back to the setup without saving this config.[2] Save this configuration to nvram and exit.Enter your selection [2]: 2Building configuration...Use the enabled mode 'configure' command to modify this configuration.Press RETURN to get started! RETURNThe user prompt is displayed.Router>Step 13 Verify the initial configuration. See the “Verifying the Initial Configuration” section on page 4-5 for verification procedures.After the initial configuration file is created, you can use the Cisco IOS CLI to perform additional configuration. Verifying the Initial ConfigurationTo verify that the new interfaces are operating correctly, perform the following tests: • To verify that the interfaces and line protocol are in the correct state—up or down—enter the show interfaces command. • To display a summary status of the interfaces configured for IP, enter the show ip interface brief command. • To verify that you configured the correct hostname and password, enter the show configuration command.After you complete and verify the initial configuration, you can configure your Cisco router for specific functions.](https://usermanual.wiki/GemTek-Technology/CISCO867VAE.User-Manual-Part-2/User-Guide-1959036-Page-69.png)