General Dynamics Itronix IX-WT11 IX-WT11 User Manual
General Dynamics Itronix Corporation IX-WT11
UserManual.wiki
>
General Dynamics Itronix
>
IX-WT11 User Manual
>
User Manual
Contents
1.
User Manual
2.
Users Guide
User Manual
Navigation menu
Upload a User Manual
Namespaces
Wiki Guide
HTML
PDF
Info
Views
User Manual
Discussion / Help
Navigation
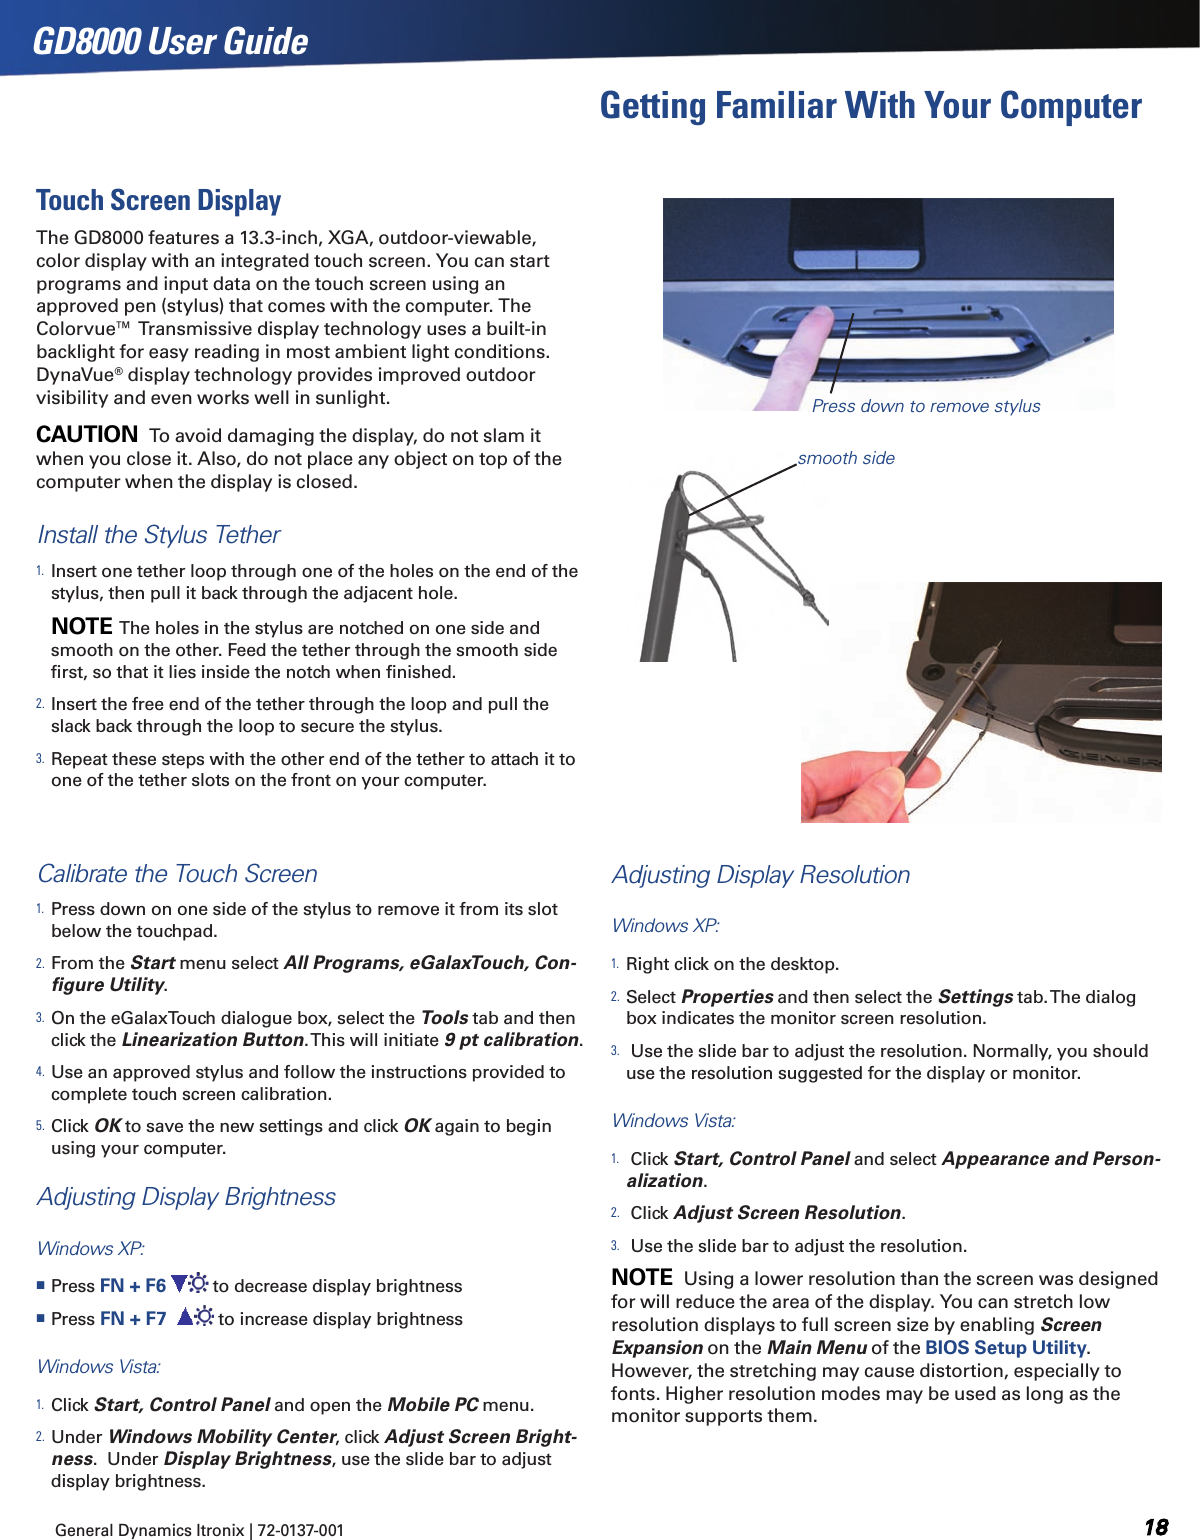
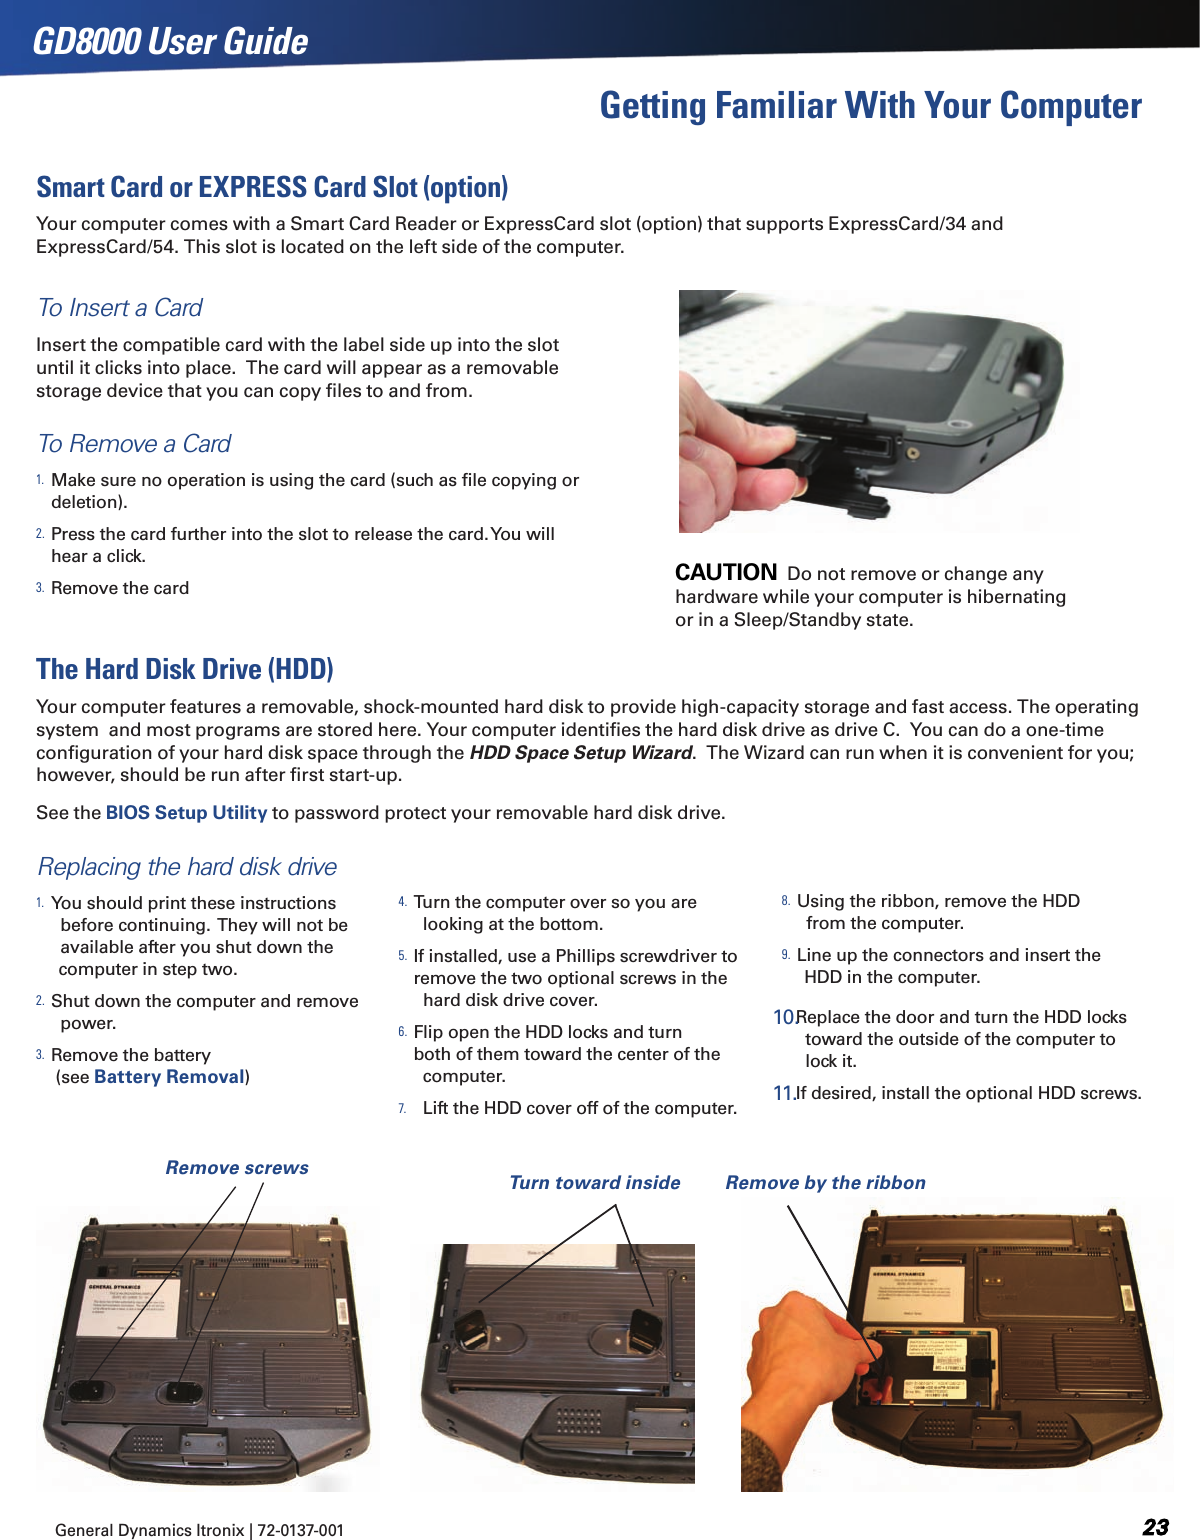
![General Dynamics Itronix | 72-0137-001 GD8000 User GuideNotices, Compliance and Safetydetergents are not recommended cleaning solutions and may void your warranty. For system decontamination recommendations please contact your service technician. Slots and openings in the computer case are for ventilation purposes. Do not block or cover these openings or the system could overheat. Do not place the product on a soft surface such as a bed, sofa, or rug where the ventilation slots and openings may be blocked. Do not place this product near or over a radiator or heat register. Do not place this product in a built-in installation unless proper ventilation is provided. Do not operate the computer at temperatures above 140°F (60°C) or below -10°F (-23C). Do not store the computer at temperatures above 167°F (75°C) or below -67°F (-55°C). Do not step on or place anything on the power cord. Do not slam the display lid when you close it. Do not place any object on top of the computer. If you use the computer with an extension cord, ensure that the total ampere ratings of all the devices sharing the extension do not exceed the rating of the extension cord or the rating of the wall outlet. Do not push foreign objects into the computer through any of the slots or openings. Dangerous voltages are present, which could cause electric shock, fire, or damage sensitive components. The computer is designed to withstand spills. If a spill occurs, immediately power off the computer and wipe it down. For best results, use a power strip with a built-in surge protector. Do not use inferior extension cords as this may result in damage to your computer. FAA regulations require that all transmit/receive devices be turned off during flight. If you have radios in your computer (including GPS) and your computer is equipped with a Radio ON/OFF Switch, please use it to turn your radios off during flight. If you have radios and you do not have a switch to turn the radios off, either leave your computer off during flight or contact your help desk for assistance.Service and Upgrade Safety and PrecautionsDo not service this product yourself. Opening or removing covers may expose you to dangerous voltage points or other risks and may void your warranty. Damage caused by servicing that is not authorized may void your warranty. If your computer needs service, remove power and turn it off, then contact authorized service personnel. Refer all servicing to authorized service personnel under the follow-ing conditions: When the power cord or plug is damaged or frayed. If the product does not operate normally when the operating Only the antenna with which an intentional radiator is authorized may be used with the intentional radiator.The WAN embedded antenna location is in the upper center edge of the display screen and is not to be modified.The WPAN embedded antenna location is near the lower left edge of the Keyboard and is not to be modified.The WLAN embedded dual antennas are located internally in the upper right and left edges of the display screen and are not to be modified.To comply with FCC RF exposure requirements when using the WAN radio transmitter, a minimum separation distance of 20 cm must be maintained between the upper center edge of the display screen antenna and all users/bystanders.When using the WLAN transmitter, a minimum separation distance of 20 cm must be maintained between the upper right and left edges of the display screen and all users/bystanders.,The WAN transmitter, WLAN transmitter and WPAN transmitter should be turned off before carrying the laptop PC in order to comply withFCC RF exposure requirements.The equipment has been approved to [Commission Decision “CTR21”] for pan-European single terminal connection to the Public Switched Telephone Network (PSTN). However, due to differences between individual PSTNs provided in different countries the approval does not, of itself, give an unconditional assurance of successful operation on every PSTN network termination point.In the event of problems, you should contact your equipment supplier in the first instance.SafetyDo not proceed beyond a WARNING or CAUTION until the indicated conditions are fully understood and met.Read these instructions carefully. Following these guidelines will help prevent damage to your computer and help protect your personal safety. Read and follow all WARNINGS, CAUTIONS and instructions marked on the product and noted in this documentation. Before using your computer, read the Power Management section to familiarize yourself with basic battery information and ensure optimum performance. CAUTION To reduce the risk of fire, only use a No. 26 AWG or larger telecommunication line cord. CAUTION This notebook computer is designed to be used with the provided dedicated AC Adapter or Vehicle Adapter. Unplug the computer from the power outlet before cleaning. Use a damp cloth for cleaning. Aerosols, solvents, or strong](https://usermanual.wiki/General-Dynamics-Itronix/IX-WT11.User-Manual/User-Guide-1077240-Page-7.png)

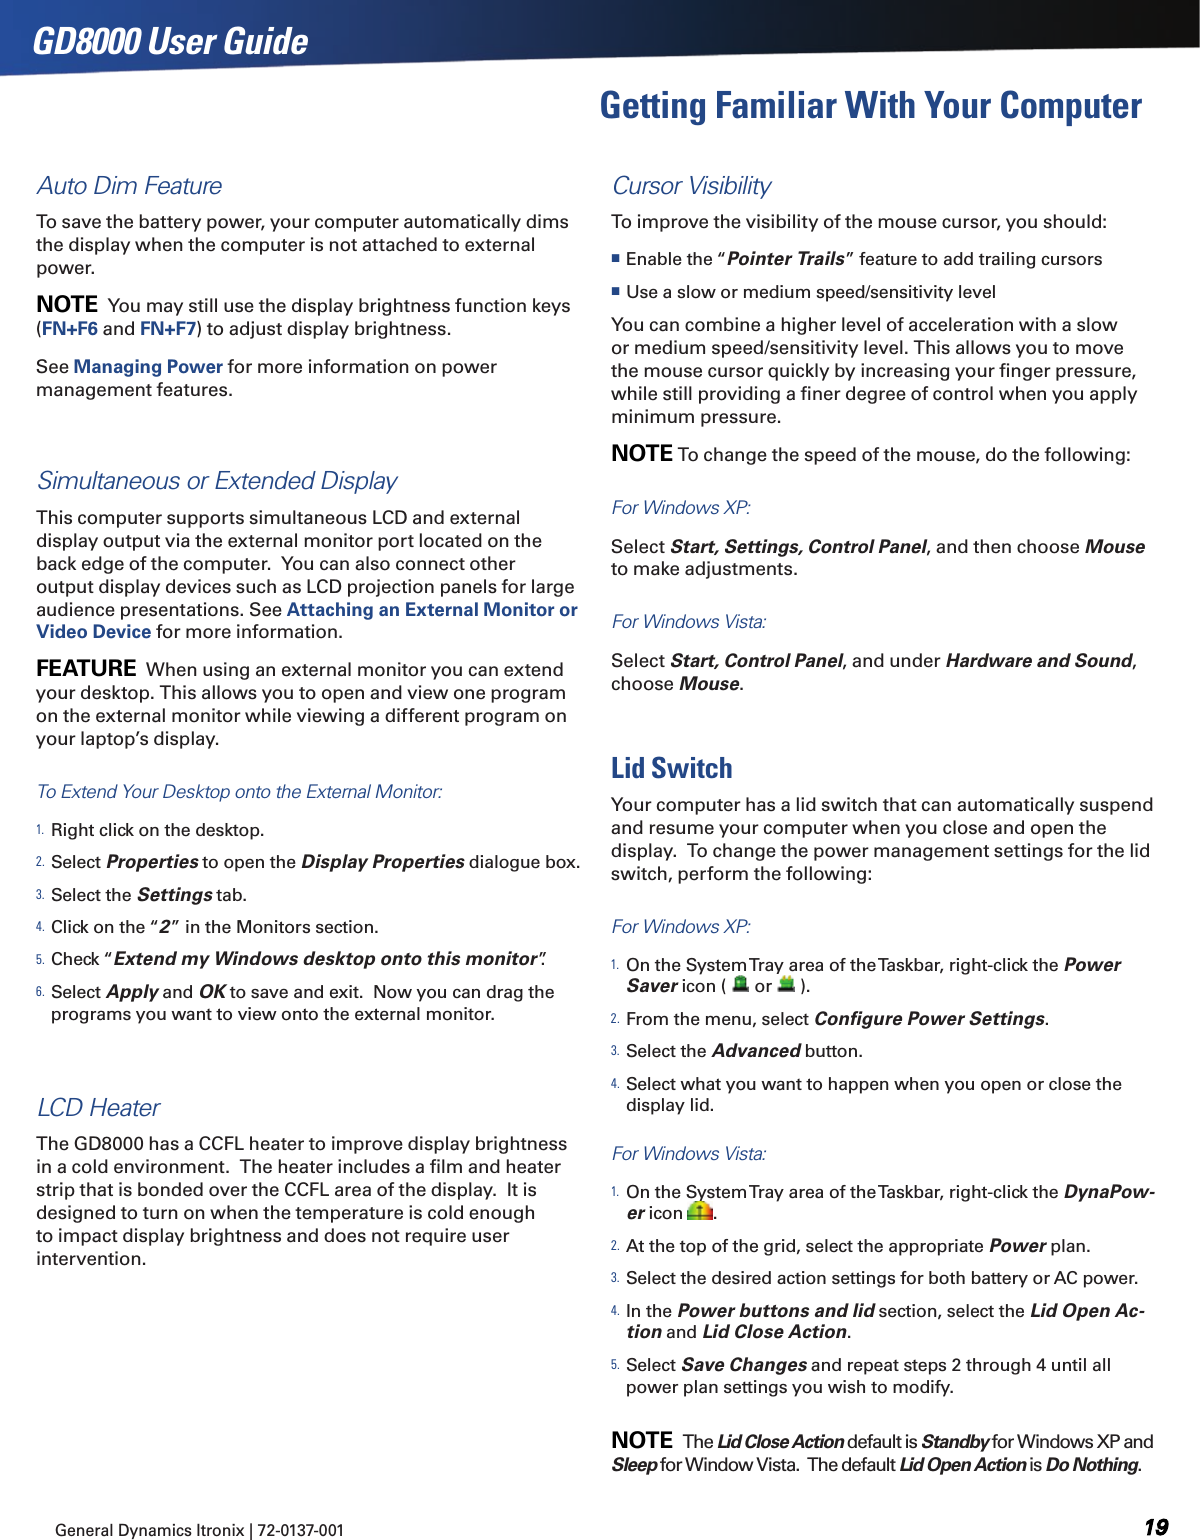

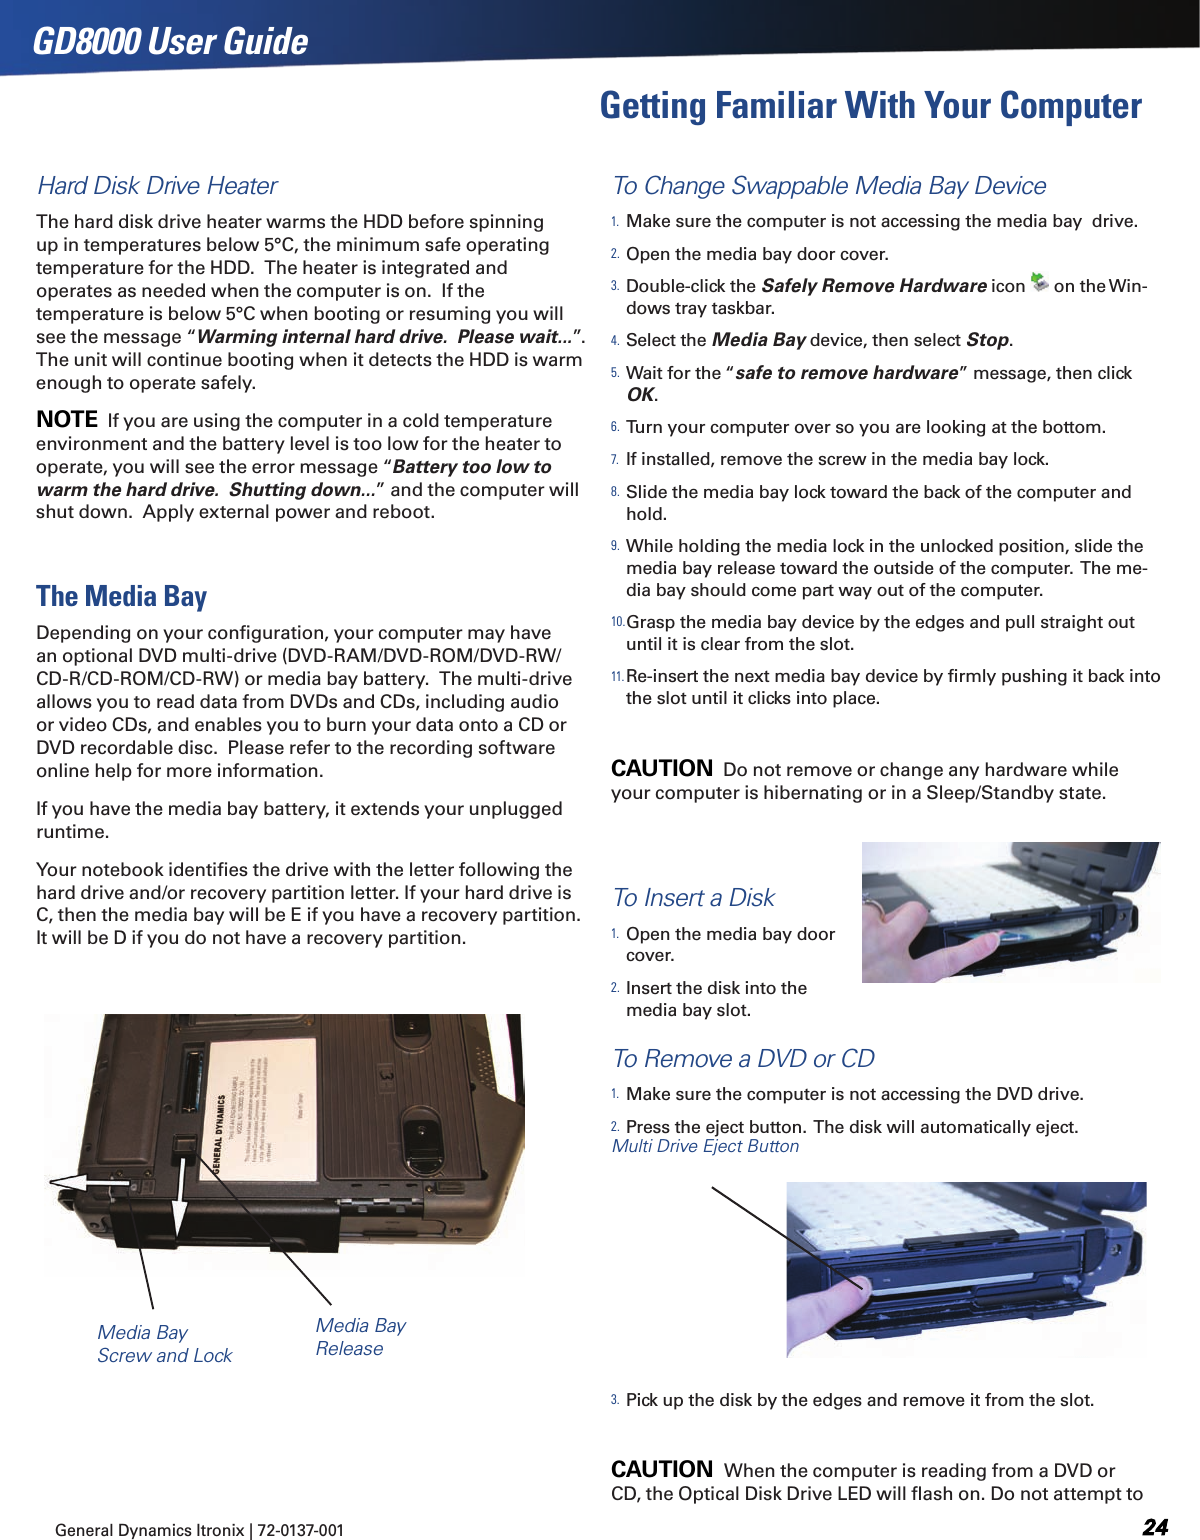


![General Dynamics Itronix | 72-0137-001 GD8000 User GuideTroubleshootingKeyboard and Mouse TroubleshootingSomething unexpected happens when I press a keyYou may have pressed a key combination that performs a Windows function. Make sure you are pressing the correct keys for the application you are running. Incorrect characters appear on the screen when I press certain keysYou may be in Num Lock mode. Press NUM LOCK to toggle Num Lock mode off. NUM LOCK is on the top row of buttons on your keyboard next to the F12 key.I have difficulty double-clicking the mouse fast enoughFor Windows XP: Select Start, Control Panel, Mouse. The Buttons tab contains the setting for the double-click speed.For Windows Vista: Select Start, Control Panel, Hardware and Sound. Then select Mouse to configure double-clicking speed and other options.Modem TroubleshootingThe modem doesn’t work When you first try to use HyperTerminal or similar application, the system responds with a message asking if you want to install the modem. Answer “Yes” to this question and follow the instructions on the screen to install it. Make sure the communication settings are correct in your application. Refer to the online help for your application.The modem doesn’t dial a number If you are using an external modem, make sure the cables are attached correctly. Make sure your communications parameters are correct in your application. Refer to the online help for your application.The modem dials and receives an answer but does not establish a connection You may have incorrect parameters selected for your application to talk with the remote modem. Refer to the online help for your application. You may need to adjust your modem’s baud rate or protocol selection.PC Cards I can’t remove the PC card Press the ejector button located inside the PC card door on the side of the computer. The button will pop out. Press the ejector button again to eject the PC card. Slide the card out. If the ejector button malfunctions when you press it, release the button and then press it again. Read ErrorIf a memory card that is not properly formatted is installed in the PC Card slot, it will cause this error.The computer locks up when I remove the PC cardBefore you remove the card, select the PC card icon ( or ) on the taskbar (in the tray area near the clock in the lower right corner) and choose “Stop [card name] card.”Miscellaneous TroubleshootingThe computer shuts off unexpectedly The computer has entered suspend mode. Press any key to resume from the standby state. Press the POWER button to resume from the hibernate state. The battery capacity may be low. Connect external power to charge the battery, or replace the battery with a fully charged one.The speaker volume is too high or too lowRefer to the audio section for instructions on adjusting volume.The computer won’t turn on Make sure a fully charged battery is properly installed. Connect external power to charge the battery if it is not charged. If you are using the AC adapter check the electrical outlet you are using to make sure it is working properly. If the computer does not turn on, reset the computer by holding down the POWER button for at least ten seconds, release it, then press the POWER button again.The computer won’t turn offFor Windows XP:1. Select Start, Shut down, Shut down.2. If that does not work, press CTRL+ALT+DEL and then select Task Manager. 3. If any programs are open, use your arrow keys to highlight each](https://usermanual.wiki/General-Dynamics-Itronix/IX-WT11.User-Manual/User-Guide-1077240-Page-54.png)