General Dynamics Itronix IX-WT11 IX-WT11 User Manual Users Guide

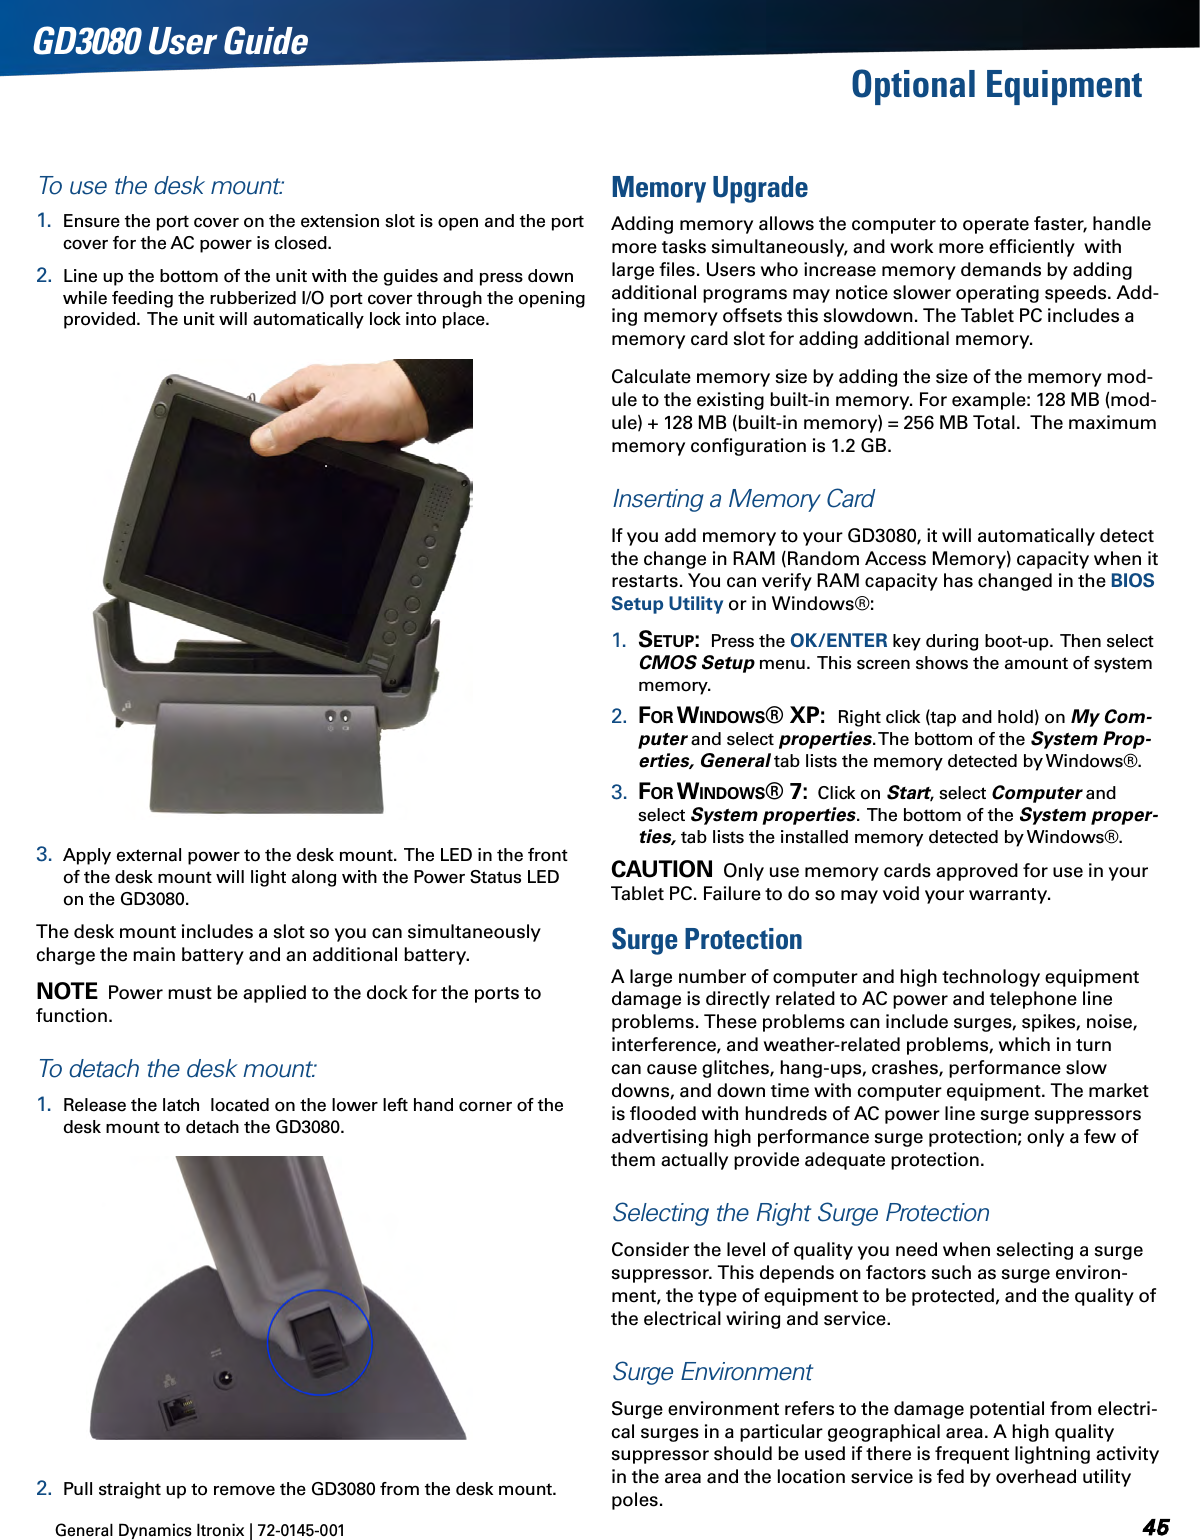
General Dynamics Itronix Corporation IX-WT11 Users Guide

Contents

Users Guide

General Dynamics Itronix | 72-0138-001  GD3080 User Guide
General Dynamics Itronix | 72-0145-001 GD3080 User GuideTable of Contents Notices and  Safety .................................................5Copyright Notice .................................................. 5Disclaimer ............................................................. 5Trademark and Patent Notice ............................ 5Compliance Statements ..................................... 5Compliance Statement for Canada ................... 6Safety Information .............................................. 7Service and Upgrade Safety and Precautions .................... 7Battery Pack Safety and Precautions ................................. 8Getting Started..........................................................9Unpacking Your System ..................................... 9Standard Parts ..................................................................... 9Standard Features ............................................................... 9Optional Accessories .......................................................... 9Where to Look For Information .......................................... 9Precautions ......................................................... 10Startup Problems .............................................. 10Best Practices for the GD3080 ......................... 10General Daily Operations .................................................. 10Tips for New Owners .........................................................11Power Management ......................................................... 12File Management .............................................................. 12Battery Charging ............................................................... 12Storage .............................................................................. 12Troubleshooting ................................................................. 13Front View .......................................................... 14Getting Familiar ...................................................... 14Left Side View .................................................... 15Right Side View .................................................. 15Top Edge View ................................................... 16Bottom Edge View ............................................. 16Back View ........................................................... 17Buttons and Hot Keys ....................................... 18FN and Hot Key Combinations ......................................... 19Programming Hot Keys ..................................................... 19Power Button .................................................................... 20RF ON/OFF Button ........................................................... 20Master Reset Key ............................................................. 20LED Status Indicators ........................................ 20Display and Pen Basics ..................................... 21Using the Pen / Stylus ....................................................... 21Changing the Display Orientation ..................................... 21Calibrating the Display ...................................................... 21Ambient Light Sensor ....................................................... 21Adjusting Screen Brightness ............................................ 22Ports and Connectors .......................................22Disk Drives .......................................................... 23The Hard Disk Drive (HDD) ............................................... 23Card Slots .......................................................................... 23Optional External Drives ................................................... 23Precautions for Handling DVDs and CDs ......................... 23Computer Security ............................................ 23Security Slot ...................................................................... 23Passwords ......................................................................... 24Fingerprint Scanner (Optional) .......................................... 24Stealth Mode ..................................................................... 24Trusted Platform Module (TPM) ....................................... 24Making Connections .............................................25Attaching Power ................................................ 25Attaching the AC Adapter ................................................. 25Turning the GD3080 On and Off ...................................... 25Ethernet ............................................................... 25Internet and Fax ................................................. 25Attaching USB Devices ..................................... 25Using PC Cards .................................................. 25Installing a PC Card ........................................................... 26Ejecting a PC Card ............................................................. 26Using Compact Flash Cards ............................. 26Installing a Compact Flash Card ....................................... 26Ejecting a Compact Flash Card ......................................... 26Audio ................................................................... 26Changing the Volume ....................................................... 26Attaching to the Desk Mount ........................... 26Wireless Communication ....................................27Turning Off Radios with the Radio On/Off Button ........... 27Bluetooth Radio (optional)................................ 27Read About Bluetooth ...................................................... 27Electromagnetic Interference (EMI) ................................. 27When to Use Landline Communication ........................... 27WLAN Radio (optional) ..................................... 27Read About WLAN ........................................................... 27GPS (optional) .................................................... 27Battery Power .........................................................28Battery Installation and Replacement ............ 28
General Dynamics Itronix | 72-0145-001GD3080 User GuideTable of Contents Installing the Battery ......................................................... 28Replacing the Real Time Clock Battery ............................ 29Battery Calibration ............................................29Windows® Level Battery Calibration ............................... 29BIOS Level Battery Calibration ......................................... 29Battery Charging ...............................................30Using the Battery ...............................................30About the Battery .............................................................. 30Monitoring Battery Power ................................................ 30Low Battery Alarms .......................................................... 30Managing Power................................................ 31Low-Power States ............................................................ 31Entering Low-Power States .............................................. 31Battery Tips ........................................................ 31Tip 1. Avoid Excessive Heat and Cold .............................. 31Tip 2. Prevent Wasted Power ........................................... 31Tip 3. Calibrate Your Battery ............................................. 32Tip 4. Get a Good Charge ................................................. 32Tip 5. Prevent Data Loss ................................................... 32Tip 6. Clean Terminals ....................................................... 32Tip 7. Storing Batteries ...................................................... 32BIOS Setup Utility ..................................................33Starting the BIOS Setup Utility ........................33Navigation and Help..........................................33The Menu Bar ................................................................... 33The Field and General Help Windows .............................. 33Tablet PC Input Pad ........................................................... 34The Main Menu .................................................. 35The Advanced Menu  ........................................ 35Trusted Computing ........................................................... 36SuperIO Configuration ...................................................... 36Fan Learning Function ....................................................... 37Stealth Mode Setup  ......................................................... 37Extended Configuration .................................................... 38Radio Configuration .......................................................... 39The Boot Menu ..................................................39The Security Menu ............................................40The Exit Menu  ................................................... 41Maintenance and Storage  ..................................42Battery Maintenance and Storage .................. 42Maintaining Batteries ........................................................ 42Storing Batteries ................................................................ 42Tablet PC Maintenance and Storage............... 42Maintaining Your Tablet PC ............................................... 42Care and Cleaning ............................................................. 42Storing Your Computer ..................................................... 42Data Backup .......................................................43Optional Equipment ............................................... 44Second Battery ..................................................44Attaching a Second Battery .............................................. 44Desk Mount ........................................................44To use the desk mount: .................................................... 45To detach the desk mount: ............................................... 45Memory Upgrade ..............................................45Inserting a Memory Card .................................................. 45Surge Protection ................................................45Selecting the Right Surge Protection ............................... 45Surge Environment ........................................................... 45Type of Equipment to be Protected.................................. 46Quality of Electrical Wiring and Service ........................... 46Equipment Selection ......................................................... 46Service and Support ..............................................47Client Care Center (CCC) ................................... 47Product Support - Downloads ......................... 47Troubleshooting .....................................................48For More Help ................................................................... 48Applications  ......................................................48My application locks up, acts strangely, or produces a Gen-eral Protection Fault (GPF) error ........................................ 48To restart your computer: ................................................. 48Communications programs don’t seem to work or they lock Windows® ........................................................................ 48When I rotate the display to portrait orientation my application does not work or does not display correctly .................... 48Batteries ..............................................................48The battery does not charge ............................................. 48The batteries take much longer than seven hours to charge 48The batteries don’t last very long ..................................... 48The gas gauge isn’t full after charging the battery ........... 49The gas gauge reads “full,” but the charging indicator light is still lit .................................................................................. 49My battery seems to have less and less capacity ........... 49Hard Disk   ..........................................................49The hard disk will not spin up so the computer can’t boot up 49
General Dynamics Itronix | 72-0145-001GD3080 User GuideTable of Contents I can’t save files because the disk is full .......................... 49Disk Read Error ................................................................. 49Hard disk recovery ............................................................ 49Landline Modems   ............................................49The modem doesn’t work ................................................ 49The modem doesn’t dial a number .................................. 49The modem dials and receives an answer but does not establish a connection ...................................................... 49Communications programs such as HyperTerminal don’t seem to work or they lock Windows® ............................ 49The modem dials and the answering modem generates tone, but our modem does not begin the training sequence to establish a connection .................................................. 49Miscellaneous  ................................................... 50The computer shuts off unexpectedly ............................. 50The speaker volume is too high or too low ...................... 50The computer won’t turn on ............................................. 50The computer won’t turn off............................................. 50The computer enters suspend mode too quickly ............ 50The computer doesn’t automatically suspend ................. 50The system date and time are incorrect ........................... 50I receive an “out of memory” error message .................. 50Holding down the Power button to reset the computer doesn’t always work ......................................................... 50PC Cards   ...........................................................50I can’t remove the PC card ............................................... 50Disk Read Error ................................................................. 50The system does not recognize the PC Card CD-ROM when it is inserted into the PC Card socket ............................... 50The computer locks up when I remove the PC card ....... 50Pen / Display ....................................................... 51When I try to use the pen on my display, nothing happens 51The display warps or pillows in high humidity ................. 51The touch screen doesn’t respond after a suspend ........ 51I cannot change the orientation ........................................ 51The display performance is slow ...................................... 51I can’t read the display ...................................................... 51The underlined, inverse, and hypertext characters are difficult to read on the screen ........................................................ 51I can’t see the cursor while using the DOS editor ........... 51The display appears to have random pixels darkened after scrolling.............................................................................. 51I changed my display resolution, but I see no difference on the screen .......................................................................... 51The display cuts off the right side of the application or page in portrait mode ..................................................................... 51FAQs .................................................................... 51How do I calibrate the pen/display?.................................. 51How do I change the main battery? ................................. 51How do I adjust the speaker volume? .............................. 52How do I clean the display screen? .................................. 52How do I change the display screen’s brightness? ......... 52How do I change the display orientation? ........................ 52How do I switch between Digitizer and Touch Screen modes? .............................................................................. 52How long will the battery last? ......................................... 52How do I optimize the GD3080 for left handed use?...... 52Where can I find the user manual? .................................. 52
General Dynamics Itronix | 72-0145-001  GD3080 User GuideIdentification:  GD3080Copyright Notice© Copyright 2012 General Dynamics Itronix. All rights reserved. No part of this document may be reproduced, transmitted, transcribed, stored in a retrieval system, or translated into any other language or computer language in whole or in part, in any form or by any means, whether it be electronic, mechani-cal, magnetic, optical, manual, or otherwise, without the prior written consent of General Dynamics Itronix.DisclaimerGeneral Dynamics Itronix reserves the right to revise the man-ual and make periodic changes to the content without a direct or inferred obligation to General Dynamics Itronix to notify any person of such revision or changes. General Dynamics Itronix does not assume responsibility for the use of this manual, nor for any patent infringements or other rights or third parties who may use the manual.This product is available for purchase under General  Dynamics Itronix’s standard terms and conditions of sale. General Dynamics Itronix hardware products may be recondi-tioned, or be manufactured from parts and components that may be new, used, rebuilt, or recycled and in some cases, the hardware product may not be new and may have been previ-ously installed. In any event, General Dynamics Itronix war-ranty terms apply.Trademark and Patent NoticeItronix is a registered trademark of General Dynamics Itronix.Microsoft® is registered trademarks of Microsoft Corporation.ENERGY STAR® is a registered trademark of the U.S. Envi-ronmental Protection Agency. As an ENERGY STAR® partner, General Dynamics Itronix has determined this computer meets ENERGY STAR® program requirements for computers.Compliance StatementsFederal CommuniCation Commission interFerenCe state-mentThis equipment has been tested and found to comply with the limits for a Class B digital device, pursuant to Part 15 of the FCC Rules. These limits are designed to provide reasonable protection against harmful interference in a residential instal-lation. This equipment generates, uses and can radiate radio frequency energy and, if not installed and used in accordance with the instructions, may cause harmful interference to radio communications. However, there is no guarantee that interfer-ence will not occur in a particular installation. If this equipment does cause harmful interference to radio or television recep-tion, which can be determined by turning the equipment off and on, the user is encouraged to try to correct the interference by one of the following measures: Reorient or relocate the receiving antenna. Increase the separation between the equipment and receiver. Connect the equipment into an outlet on a circuit different from that to which the receiver is connected. Consult the de aler or an experienced radio/TV technician for help.FCC Caution  To assure continued compliance, (example - use only shielded interface cables when connecting to computer or peripheral devices) any changes or modifications not expressly approved by the party responsible for compliance could void the user’s authority to operate this equipment.This device complies with Part 15 of the FCC Rules. Operation is subject to the following two conditions:(1) This device may not cause harmful interference, and(2) This device must accept any interference received, includ-ing interference that may cause undesired operation.imPortant note FCC radiation exPosure statementThis equipment has been tested and complies with FCC RF exposure limits set forth for the General Population/Uncon-trolled exposure environment. loCal restriCtion oF 802.11a/b/g/n radio usageCaution Due to the fact that the frequencies used by 802.11a/b/g/n wireless LAN devices may not yet be harmonized in all countries, 802.11a/b/g/n products are designed for use only in specific countries, and are not allowed to be operated in countries other than those of designated use. As a user of these products, you are responsible for ensuring that the products are used only in the countries for which they were intended and for verifying that they are configured with the correct selection of frequency and channel for the country of use. Any deviation from permissible settings and restrictions in the country of use could be an infringement of national law and may be punished as such. FCC radio FrequenCy interFerenCe requirements This device is restricted to indoor use due to its operation in the 5.15 to 5.25 GHz frequency range. FCC requires this product to be used indoors for the frequency range 5.15 to 5.25 GHz to reduce the potential for harmful interference to co-channel Mobile Satellite systems. High power radars are allocated as primary users of the 5.25 to 5.35 GHz and 5.65 to 5.85 GHz bands. These radar stations can cause interference with and /or damage this device. Warnings and CautionsWarning It is important that only authorized General Dynamics Itronix personnel attempt repairs on General Notices and  Safety
General Dynamics Itronix | 72-0145-001  GD3080 User GuideNotices and SafetyDynamics Itronix equipment as this might void any main-tenance contract with your company. Unauthorized service personnel might be subject to shock hazard on some General Dynamics Itronix equipment if removal of protective covers is attempted.The product you have purchased is powered by a rechargeable battery. The battery is recyclable and, under various state and local laws, it may be illegal to dispose of this battery into the municipal waste stream. Do not crush the battery or place it in a fire. Check with your local solid-waste officials for details on recycling options or proper disposal.Caution Internal components of the GD3080 computer will be damaged if exposed to contaminants. When dust covers, or the bottom access panel are open on the computer, shield the unit from all contaminants such as liquids, rain, snow, and dust.Internal radio(s) may have an individual FCC Identifier which are not applicable to this configuration. Only the FCC ID shown on the label located on the bottom of the computer is appli-cable. The computer must not be co-located or operating in conjunction with any other antenna or transmitter than speci-fied in the filing. This device may contain a WLAN radio transmitter, and a PAN radio transmitter. When using the WLAN transmitter, a mini-mum separation distance must be maintained between the upper right and left edges of the display screen and all users/bystanders.  The WLAN/PAN transmitter should be turned off before carrying the computer to comply with FCC RF exposure requirements.In the event of problems, you should contact your equipment supplier in the first instance.This product is intended to be supplied by a Listed Power Unit and output rated 12V DC input voltage, 4.16A .Caution Under Industry Canada regulations, this radio transmitter may only operate using an antenna of a type andmaximum (or lesser) gain approved for the transmitter by Industry Canada. To reduce potential radio interference to other users, the antenna type and its gain should be so chosen that the equivalent isotropically radiated power (e.i.r.p.) is not more than that necessary for successful communication.Sous la réglementation d’Industrie Canada, ce transmetteur radio ne peut fonctionner en utilisant une antenne d’un type et un maximum (ou moins) gain approuvées pour l’émetteur par Industrie Canada. Pour réduire le risque d’interférence aux autres utilisateurs, le type  ’antenne et son gain doivent être choisis de manière que la puis-sance isotrope rayonnée équivalente (PIRE) ne dépasse pas ce qui est nécessaire pour une communication réussie.This device complies with Industry Canada license-exempt RSS standard(s). Operation is subject to the following two con-ditions: (1) this device may not cause interference, and (2) this device must accept any interference, including interference that may cause undesired operation of the device.Cet appareil est conforme avec Industrie Canada exempts de licence standard RSS (s). Le fonctionnement est soumis aux deux conditions suivantes: (1) cet appareil ne peut pas provoquer d’interférences et (2) cet appareil doit accepter toute interférence, y compris les interférences qui peuvent causer un mauvais fonc-tionnement de l’appareil.Compliance Statement for CanadaCAUTION:  Industry Canada - Class BThis digital apparatus does not exceed the Class B limits for radio noise emissions from digital apparatus as set out in the interference-causing equipment standard entitled “Digital Apparatus,” ICES-003 of Industry Canada. Cet appareil numérique respecte les limites de bruits radioélec-triques applicables aux appareils numériques de Classe B prescrites dans la norme sur le matérial brouilleur: “Appareils Numériques,” NMB-003 édictée par l’Industrie. (1) this device may not cause interference,and (2) this device must accept any interference, including interference that may cause undesired operation of the d e v i c e .”Under Industry Canada regulations, this radio transmitter may only operate using an antenna of a type and maximum (or lesser) gain approved for the transmitter by Industry Canada. To reduce potential radio interference to other users, the antenna type and its gain should be so chosen that the equiva-lent isotropically radiated power (e.i.r.p.) is not more than that necessary for successful communication.Sous la réglementation d’Industrie Canada, ce transmetteur radio ne peut fonctionner en utilisant une antenne d’un type et un maximum (ou moins) gain approuvées pour l’émetteur par Industrie Canada. Pour réduire le risque d’interférence aux autres utilisateurs, le type d’antenne et son gain doivent être choisis de manière que la puis-sance isotrope rayonnée équivalente (PIRE) ne dépasse pas ce qui est nécessaire pour une communication réussie. This device complies with Industry Canada license-exempt RSS standard(s). This device complies with Industry Canada license-exempt RSS standard(s). Operation is subject to the following two conditions: (1) this device may not cause interference, and (2) this device must accept any interference, including interfer-ence that may cause undesired operation of the device.Cet appareil est conforme avec Industrie Canada exempts de licence standard RSS (s). Le fonctionnement est soumis aux deux conditions suivantes: (1) cet appareil ne peut pas pro-voquer d’interférences et (2) cet appareil doit accepter toute interférence, y compris les interférences qui peuvent causer un mauvais fonctionnement de l’appareil.RF exposure warning: The equipment complies with RF exposure limits set forth for an uncontrolled environment. The antenna(s) used for this transmitter must not be co-located or operating in conjunction with any other antenna or transmitter.
General Dynamics Itronix | 72-0145-001  GD3080 User GuideNotices and SafetyL’equipement est conforme aux limites d’exposition aux RF etablies pour un environnement non controle. L’antenne (s) utilisee pour ce transmetteur ne doit pas etre co-localises ou fonctionnant en conjonction avec une autre antenne ou transmetteur.This device is restricted to indoor use due to its operation in the 5.15 to 5.25 GHz frequency range. IC requires this product to be used indoors for the frequency range 5.15 to 5.25 GHz to reduce the potential for harmful interference to co-channel Mobile Satellite systems. High power radars are allocated as primary users of the 5.25 to 5.35 GHz and 5.65 to 5.85 GHz bands. These radar stations can cause interference with and /or damage this device.Ce dispositif est limite a une utilisation en interieur a cause de son fonctionnement dans la gamme 5.15 a 5.25 GHz. IC exige que ce produit soit utilise a l’interieur de la  gamme de frequence 5,15 a 5,25 GHz pour reduire les risques d’interference nuisible a la  co-canal systemes mobiles par satellite. Radars a haute puissance sont designes comme utilisateurs principaux de l’5,25 a 5,35 GHz et 5,65 a 5,85 GHz. Ces stations radar peut provoquer des interferences avec et / ou endommager l’appareSafety Information Enclosed with each GD3080 notebook computer is the radio spe-cific safety information. Do not proceed without reviewing the information provided in that document. Do not proceed beyond a WARNING or CAUTION until the indi-cated conditions are fully understood and met. Read these instructions carefully. Following these guidelines will help prevent damage to your computer and help protect your personal safety. Read and follow all warnings and instructions marked on the product and noted in this documentation. The first time you use your computer, we recommend that you carefully read the section on Power Management to familiar-ize yourself with basic battery information and ensure optimum performance Caution  This notebook computer is designed (only) to be used with the Manufacturer provided dedicated AC Adapter or Vehicle Adapter. Unplug the computer from the power outlet before cleaning. Use a damp cloth for cleaning. Aerosols, solvents, or strong deter-gents are not recommended cleaning solutions and may void your warranty.  For system decontamination recommendations please contact your service technician. Slots and openings in the computer case are for ventilation pur-poses. Do not block or cover these openings or the system could overheat. Do not place the product on a soft surface such as a bed, sofa, or rug where the ventilation slots and openings may be blocked. Do not place this product near or over a radiator or heat register. Do not place this product in a built-in installation unless proper ventilation is provided. Do not store the computer at temperatures above 167°F (75°C) or below -67°F (-55°C). Do not step on or place anything on the power cord. Do not slam the display lid when you close it. Do not place any object on top of the computer when the display is closed. If you use the computer with an extension cord, ensure that the total ampere ratings of all the devices sharing the extension do not exceed the rating of the extension cord or the rating of the wall outlet. Do not push foreign objects into the computer through any of the slots or openings. Dangerous voltages are present, which could cause electric shock,  fire, or damage sensitive components. The computer is designed to withstand spills. If a spill occurs, power off the computer and wipe it down before continuing to use the computer. For best results, use a power strip with a built-in surge protector. Do not use inferior extension cords as this may result in damage to your computer. FAA regulations require that all transmit/receive devices be turned off during flight.  If you have radios in your computer (including GPS) and your computer is equipped with a radio on/off switch, please use it to turn your radios off during flight.  If you have radios and you do not have a switch to turn the radios off, either leave your computer off during flight or contact your help desk for assistance.Service and Upgrade Safety and Precautions Do not attempt to service this product yourself, as opening or removing covers may expose you to dangerous voltage points or other risks and may void your warranty. Refer all servicing to qualified service personnel. Unplug this product from the wall outlet and refer servicing to authorized service personnel under the following conditions: When the power cord or plug is damaged or frayed . If the product does not operate normally when the operating in-structions are followed. Adjust only those controls that are covered by the operating instructions since improper adjustment of other controls may result in damage and will often require extensive work by a qualified technician to restore the product to normal condition. If the product exhibits a distinct change in performance, indicating a need for service. Do not upgrade or service this computer without prior authoriza-tion from the manufacturer. Damage caused by servicing that is not authorized may void your warranty. Before performing any manufacturer authorized service or up-grade, first follow these instructions: Prevent damage from static electricity by following ESD precau-tions. Place the computer on a clean, flat surface. Turn off the computer and disconnect the power supply. Undock the computer if it is in a docking device (such as an office dock or vehicle dock).
General Dynamics Itronix | 72-0145-001  GD3080 User GuideNotices and Safety Disconnect any attached peripherals. Disconnect any attached network, telephone or telecommunication line. Remove any  media in your computer’s slots or bays. Remove the battery (See Battery Removal). Remove the SSD (See SSD Removal).Battery Pack Safety and Precautions Warning!  There is danger of explosion if the battery is incorrectly replaced.  Replace only with the same or equivalent type recommended by the manufacturer.  Dispose of used batter-ies promptly and according to the manufacturer’s instructions. Warning!  Batteries may explode if not handled properly. Do not disassemble, open, puncture or dispose of battery packs in a fire. The battery pack could burst or explode releasing haz-ardous chemicals. Warning!  Keep battery packs away from children. Observe the safety instructions printed on the battery. Only use approved Lithium-Ion (extended -- 56.24WHr) battery packs with your computer and replace the battery pack only with the approved part. Do not abuse, deliberately pierce, or subject the battery pack to excessive impact. Immediately discontinue use of the battery if it appears damaged or abnormal in any way, consult your local provider for advice. Do not immerse the battery pack in liquid. Do not short together the battery connections. Do not store the battery pack with metallic objects due to the risk of short circuit. Battery chemical leakage is harmful. In the unlikely event of bat-tery leakage; DO NOT TOUCH. In case of accidental contact with the eyes or skin, immediately wash with running water and seek medical advice. In the case of accidental ingestion, seek immedi-ate medical attention. Dispose of used batteries according to local regulations. Recycle if at all possible. Avoid exposing batteries to extremely hot or cold temperatures for long periods. To prevent possible damage to the battery, the GD3080 does not allow the battery to charge if the internal tem-perature of the battery gets too low (< 5°C or < 41°F) or too high (> 50°C or > 122°F). Follow Battery Tips for use and storage.
General Dynamics Itronix | 72-0145-001GD3080 User GuideYour new GD3080 features the most innovative advances in portable computing technology. It combines state-of-the-art ergonomics and a rugged, durable architecture to provide you with a Tablet PC that is compact, powerful, and easy to use virtually anywhere. Designed for a wide range of business productivity applica-tions, the GD3080 is an ideal choice for mobile workers who are on the go throughout the day.  It offers flexibility, durabil-ity and dependability along with ruggedness and portability to make it quick and easy to transport to any work location, indoors, outdoors, or in your vehicle.This document contains all the information you need to set up and use your new Tablet PC. Unpacking Your SystemAfter opening the package, carefully inspect the contents. Con-tact your dealer if any items are missing or appear damaged. The shipping carton should contain a GD3080 Tablet PC with the following features and parts:Standard Parts GD3080 Tablet  PC AC Adapter and Power Cord   (1) Digitizer Pen with Tether (5) Pen Replacement Tips and (1) Removal Tool Cleaning Cloth GD3080 Quick Start GuideStandard Features 8.4” XGA (1024X768) TFT LCD sunlight-viewable DynaVue™  Active Matrix Color Display  Display with two touch functions, an active digitizer touch panel and a passive touchscreen Seven (7) Hot keys Internal 56K V.92 V.92/K56 flex  Fax/Modem RF ON/OFF button Internal Gigabyte Ethernet LAN  Lithium-Ion Battery Two (2) USB 2.0 Ports One Type  II  PC Card Slot One Type  II  Compact Flash Slot Audio Jacks for external speakers and microphone Internal Speaker and Microphone Multi-I/O Expansion Connector Second Battery Connector (to attach the optional second battery) Microsoft®  Windows® XP Tablet PC Edition 2005 3-year limited warranty DDR Memory Hard Driver Heater Solid State DriveOptional AccessoriesThe following items are normally optional, but some vendors may include them in the standard package. Some items may not be available in some countries, or some vendors may choose not to carry all the items. A complete list of optional peripherals and accessories is listed on the General Dynamics Itronix website. Carry Case POGO Desk Mount Second Battery External USB Floppy Disk Drive External USB DVD/CD-RW Drive RJ-11 Cable Shoulder Strap Tip and Ring Cable USB 2.0 Port Replicator USB to Serial CableCaution   When purchasing any of the accessories listed above, purchase only those accessories that are approved for use with your computer. The above accessories are proprietary items. Your system vendor can obtain these approved acces-sories. If you use items that are not approved for use with this computer, you may cause your computer to malfunction, or to emit or receive electromagnetic radiation in excess of local regulations. For non-proprietary accessories such as PC Cards or printers, ensure that the accessory functions properly in your computer before making the purchase. Your system ven-dor may be able to recommend reliable brands and models.Where to Look For InformationAbout Your GD3080 Tablet PCThis User Guide describes the key elements and functions of your computer. Read it thoroughly before you begin using your GD3080 and refer to it when needed.   Please refer to the Service and Support section if you have more questions or need more help.About Windows® XPFor extensive information and help about Windows®, from the Start Menu, click on either of the following: Help and Support. View extensive Tablet PC Help. From here you can also view several Tablet PC Tutorials. Get Going with Tablet PC. Learn the basic information about using your Tablet PC.Getting Started
General Dynamics Itronix | 72-0145-001GD3080 User GuideGetting StartedAbout Windows® 7For information and help with Windows® 7, select Start, Help and Support, How to get started with your computer. You can also browse or search help topics to learn more about using the Windows® 7 Operating System.PrecautionsYou can use your computer under a wide range of environmen-tal conditions. However, to ensure long use and continued high performance, consider the following factors when setting up your computer:  Follow all warnings and instructions noted in this documenta-tion, including the notification section. Follow all warnings and instructions noted in Windows® Help and Support, found on the Start Menu. The first time you use your computer, we recommend that you carefully read the section on Power Management to familiar-ize yourself with basic battery information and ensure optimum performance. Warning!  There is danger of explosion if the battery is incorrectly replaced.  Replace only with the same or equivalent type recommended by the manufacturer.  Dispose of used batter-ies according to the manufacturer’s instructions. Caution  Internal components of the GD3080 will be dam-aged if exposed to contaminants when doors are open on the computer. Shield the unit from all contaminants such as liquids, rain, snow, and dust. Unplug the computer from the power outlet before cleaning. Use a damp cloth for cleaning. Do not use aerosols, solvents, or strong detergents. Some vents and openings in the computer case are for venti-lation purposes. Do not block or cover these openings or the system could overheat. There is a label on the bottom of the GD3080 containing informa-tion on the power requirements of this system. These require-ments must be followed. If you are unsure of your local power supply, consult your dealer or local power company. Do not step on or place anything on the power cord. If you use the computer with an extension cord, ensure that the total ampere ratings of all the devices sharing the extension do not exceed the rating of the extension cord or the rating of the wall outlet. Unless instructed, never push foreign objects into the computer through any of the slots or openings. Dangerous voltages are present, which could cause electric shock,  fire, or damage sensi-tive components. For best results, use a power strip with a built-in surge protec-tor. Do not use inferior extension cords as this may result in damage to your computer. Do not operate the GD3080 at temperatures above 140°F (60°C) or below -4°F (-20C). Do not store the GD3080 at temperatures above 167°F (75°C) or below -67°F (-55°C).Startup ProblemsIf your computer does not start properly, try these solutions: Connect the AC adapter to charge the battery if it is not charged.note  The Power Status LED should be solid blue and the Power LED on the AC adapter should be lit if the AC adapter is connected and functioning properly. Additionally, one of the power icons should appear in the task tray. If the AC adapter is connected, make sure the electrical outlet you are using works. Check to make sure the battery is installed and charging prop-erly. If the battery does not begin charging, remove the battery, con-nect the AC adapter, and turn on the computer by pressing the power button; then reinstall the battery. The Battery Status LED  is orange while the battery is charging.The Troubleshooting section lists additional solutions you can try.Best Practices for the GD3080Follow these recommended practices to maximize the service life of the equipment and provide resolution to common issues.  General Daily OperationsMissing Case Feet, Port Covers and Doors  Inspect for broken, loose or missing parts and fasteners.  Missing port covers or doors create contaminant entry points which may lead to system failure. Replacement port covers, doors, and case feet are available as field kits. Contact your support representative for order requests.Screen Cleaning: The GD3080 display, with proper usage and cleaning, will last for the anticipated field life of the product (3 to 5 years) without significant degradation in view ability or function. For mild cleaning tasks use the micro-fiber cleaning cloth pro-vided with your unit.  Tougher contaminates such as oily finger-prints may require light dampening with clean water, and will be effective for most contaminants without damaging the screen surface.  This method should always be tried before stronger solutions are considered. For tougher cleaning tasks, a mixture of isopropyl alcohol and Water (50/50) used with the cleaning cloth is effective and will not damage the touchscreen surface.  Never use paper products such as paper towels or wipes to clean the display surface. Paper products are abrasive and act much like fine sandpaper causing irreversible damage to the screen surface and anti-glare hard coat.
General Dynamics Itronix | 72-0145-001GD3080 User GuideGetting Started Both replacement Display Cleaning Cloths and approved Display Cleaning solution are available as Field Kits. Contact your sup-port representative for order requests.Screen Overlay Use: A screen overlay is recommended for environments with high contaminant potential. A screen overlay provides protection from damage caused by use of foreign objects or surface contaminants, and maximizes the useful life of the screen surface.  Worn, scratched, or otherwise damaged screen overlays can be replaced. Contaminants on the screen overlay surface should be removed by following the same cleaning methods noted above. The screen overlay has a negligible impact on overall display brightness/viewability and provides enhanced screen clarity while maximizing the screen surface useful life. Screen overlays are available as field kits. Contact your support representative for order requests.Use of the Touchscreen Stylus: If your GD3080 has the optional integrated touchscreen use the included stylus. Foreign objects such as ball point pens or hand tools should never be used for touchscreen input; they will cause damage to the screen surface. A clean finger tip can be used for touchscreen input without damaging the screen surface. Fingertip use may introduce contaminants to the touchscreen surface and increase periodic screen cleaning requirements. Replacement styluses are available as field kits. Contact your Support Representative for order requests.note Available field kits can be ordered through the iCare Servenet Portal, or by contacting the Client Care Center (CCC) at 800-638-9270, option 2.  Access to the iCare Servenet Portal requires a User Name and Password. Portal access will be setup upon request.Ensure that the computer is operated and stored within its specified temperature range. Operating Temperature -4° F to 140° F (-20° C to 60° C) Storage Temperature -67° F to 167° F (-55° C to 75° C)Conserve battery charge when possible to maximize battery life during daily use.Partial discharge/charge cycles are preferred compared to draining the battery completely and recharging.Avoid prolonged exposure to temperature extremes. Cold temperature extremes may result in reduced available energy from the battery. This energy is recoverable as the battery warms to a nominal temperature of 68° F (20°C). Prolonged exposure to high temperatures can result in a perma-nent reduction in available energy from the battery.   Battery charging is disabled below 32° F (0°C) and above 113° F (45°C) to protect the lithium-Ion cells in the battery.Power DownExit all applications, and shutdown or reboot at the end of each work day.  If the computer is left powered overnight, ensure that all applications are closed and perform a restart prior to beginning daily operations. This practice ensures that all applications (and system resources used by those applications) are reinitialized each work day. Unless an application is specifically designed for 24/7 operation, a daily practice of restarting (resetting) an application can mini-mize the potential for a wide variety of operational anomalies often perceived as a hardware failure.Tips for New Owners Read the Troubleshooting section for common questions and answers about the GD3080  Take the Windows® tutorials For WindoWs® xP:  select Get Going with Tablet PC from the Start Menu.   For WindoWs® 7:  select Tablet PC Tutorials. Take responsibility for backup.  Back up files often. Users who need to manage large amounts of data may wish to use backup devices such as a ZIP drive. Don’t leave passwords anywhere on your Tablet PC or carrying case Be careful when placing your Tablet PC on an airport security conveyor belt.  In most airports, security conveyor belts are safe for computers. If you are not sure, ask the security staff. You should keep a close eye on your computer.  Tape your business card to the Tablet PC and accessories.  In the workplace, Tablet PCs and accessories may often look exactly alike, leading to equipment mix ups. Prevent such mix ups by placing your name on your equipment.  Use a lock.  For added security, consider purchasing a Kensing-ton lock to secure the Tablet PC to a desk or table. Develop ergonomic work habits.  The science of ergonomics studies the relationship between health and a suitable work environment. For more information on ergonomics, contact your nearest computer bookstore, or local library. The Internet also has information on this and other related subjects.note  Using a computer for extended periods of time with a poor workstation setup or incorrect work habits can cause health problems.
General Dynamics Itronix | 72-0145-001GD3080 User GuideGetting StartedPower ManagementPower Management Applications: The use of Windows® Power Management or GD3080 Power Saver (if equipped) applications is recommended to provide maximum battery run time and prolong battery service life. Default settings allow the GD3080 to enter a Standby/Suspend state after a set period of inactivity. Extending or disabling the Standby/Suspend time-out period will increase power con-sumption and reduce operational time on battery power.The GD3080 will resume/wake from standby state by pressing the Power Button.Display backlight power settings: Extending or disabling the display backlight time-out period increases power consumption and reduces operational time on battery power.  The display backlight will resume power with keyboard or cursor activity.Shutdown: Shutdown the GD3080 when it will not be used for extended periods to conserve battery power. Depending on the configu-ration of the GD3080 there are specific considerations: Basic Configuration – No PC Card devices, RF Modems or exter-nal device connections. When using a basic configuration unit, there are no special considerations for power management. Integrated RF Devices – Disable integrated or user installed RF devices when not in use as they can consume battery power un-necessarily Externally connected devices – Some externally connected de-vices may be powered by the GD3080.  It is best to exit any appli-cation utilizing these devices prior to powering off. Restarting the application should reinitialize the device.  Externally connected devices or peripherals using GD3080 battery power may result in reduced battery run times.File ManagementbaCkuPs:  It is good practice to backup essential data and files periodically. Any data or files stored in volatile memory (RAM) can be lost in the event of a hard reset or unexpected shut-down. Contacts, tasks, calendar, email, and documents should be safeguarded against loss.Battery Charging Charge the battery at room temperature (approximately 68° F [20° C]) for best results.  Charge acceptance is optimum at this temperature and requires the least amount of time to fully recharge.  At room temperature the GD3080 battery requires approximately 3 - 3.5 hours to recharge from a fully discharged state. Charge the GD3080 Battery at the end of each work day:1.  Exit all applications and power off.2.  Connect to external power; verify external power LED.3.  Verify charge indicator LED. At the beginning of each work day, check for battery charge status (recommend fully charged) During each work day:1.  Connect AC charger or vehicle power adapter whenever possible.2.  Verify charging indicator LED.StorageStoring the GD3080 for five (5) days or less Install the battery pack and connect the GD3080 to external power and allow the battery pack to fully charge.   The charging LED will be solid orange while charging and green when battery charging is complete. Shut down the GD3080 and store in a cool, dry location.Storing the GD3080 for longer than five (5) days. Lithium-Ion batteries can be permanently damaged if the GD3080 is stored for extended periods requiring battery replace-ment.  If the computer will be stored for more than 5 days, backup files and data, fully charge the battery, and then discharge it to 40% and remove the battery.  The GD3080 and battery should be stored in a cool, dry location.When storing Lithium-Ion battery packs for extended periods, con-sider these factors Fully charged Lithium-Ion battery packs deteriorate faster than partly discharged ones. For ideal storage, charge the packs to 100% and then discharge them to a 40% charge before storage. Do not allow stored Lithium-Ion packs to discharge completely, as this may permanently damage them. Stored packs should be recharged to 40% capacity every six (6) months. Storing packs at temperatures near 0°C (45°F) slows down self-discharge and battery aging; packs that are stored for a long period should be kept at low temperatures where practical. note Store batteries as close as practical to 0°C (45°F) with-out allowing the batteries to freeze or reach 0°C (32°F). If you store battery packs at normal ambient temperatures, use the following charge policy to maintain battery pack condition:  Store batteries within the temperature range of 15°C to 30°C (59°F to 86°F). Charge installed packs every 5 days to maintain their charge capac-ity. Charge uninstalled packs every six (6) months to 100%, then dis-charge to 40% and return to storage.
General Dynamics Itronix | 72-0145-001GD3080 User GuideGetting StartedTroubleshootingThese are basic troubleshooting tips.  For more complete help with troubleshooting, see the Troubleshooting section. Battery Power – Battery does not charge Battery Power – Short run time Lock-ups Determine if the digitizer, touchscreen, or keypad inputs are recognized. Attempt to close any programs that are not responding (press the SECURITY key, Task Manager). If Task Manager does not list any suspect programs/applica-tions, perform a reboot. Restart applications and try the specific operation again. If the Shut down Menu does not respond, press and hold the power button for approximately 10 seconds to perform a forced shutdown. note  Any unsaved data will be lost when using this shutdown method. RF Communications If coverage is historically good at a location, check the signal strength. Reposition the computer slightly to increase signal strength. Wait approximately five (5) minutes. Determine if there is RF activity.  Applications provided with RF devices generally provide diagnostic capability. If not resolved, exit all applications, restart the applications, and try RF communications again. If not resolved, connect external power and perform a restart. Restart applications and try RF communications again. Additional Information is Available The GD3080 Getting Started Guide included with the original shipment packaging. The GD3080 factory installed Windows® image includes a resident help file with a link on the desktop; alternately Help can be accessed via the following path: Start -> All Programs -> Mobile Computer Tools. Please contact your support representative for any additional questions.
General Dynamics Itronix | 72-0145-001GD3080 User GuideFront View 12345768#Feature Description1Power Button Press this button to turn the unit on or off or to hibernate.2Speaker Use the integrated speaker for audio output3Ambient Light Sensor When enabled, the Ambient light sensor adjusts the display backlight in response to ambient light conditions. It is disabled by default. See Display and Pen Basics for more information.4Hot Keys Speeds common functions such as changing the display orientation5Fingerprint Scanner Optional fingerprint scanner for additional security.6Display 8.4” XGA (1024X768) outdoor transmissive display with digitizer control panel and optional touch screen7LED Status Indicators The LEDs light up when a particular function of the computer is active8Microphone Use the sealed, integrated microphone for audio inputGetting Familiar
General Dynamics Itronix | 72-0145-001GD3080 User GuideGetting FamiliarFeature DescriptionSecurity Slot Your computer has a security slot that can be used with a standard laptop locking device, such as a Kensington Lock.#Feature Description1Fax/modem RJ-11 Jack The fax/modem can transmit data using the 56 Kbps V.90 or V.92 protocol, and send and receive faxes at 14.4 Kbps.22 USB 2.0 ports The universal serial bus (USB) enables you to attach keyboards, a mouse, scanners, printers and other USB devices.  USB devices can be chained together on a single cable.3CF Slot Housing for (optional) GPS electronics and antenna or CF slot for compact flash cards and devices.4Audio-Out Jack Connect external speakers or a stereo headset to this jack to listen to multimedia (mono only).5Audio-In Jack Connect a microphone to this jack to record audio.Left Side ViewSecurity Slot12345Right Side View
General Dynamics Itronix | 72-0145-001GD3080 User GuideGetting Familiar#Feature Description1POGO 32 Pins Connector Use this POGO connector with the desk mount.2DC-in Jack Power the Tablet PC by connecting the AC adapter or vehicle adapter.#Feature Description1Pen Storage Slot Store the pen / stylus here when not using it.2LAN RJ-45 Jack With an Ethernet LAN (Local Area Network) you can make LAN connections without installing PC cards.  Connection speed is 10/100/1000 Mbps.3Type II PC Card Slot The PC card slot supports 32 bit CardBus 2.1 interface as well as Zoom Video when in land-scape orientation. You can use this slot with PC card radios.4Pen Tether Slot Thread your pen tether through this slot.2 3 41Top Edge View21Bottom Edge View
General Dynamics Itronix | 72-0145-001GD3080 User GuideGetting Familiar#Feature Description1Pen / Stylus Slot Use the pen provided with your Tablet PC to navigate and input on the touch panel display. Store it in the slot when not using it.2Hand Strap Allows GD3080 to be held with one hand (optional device). 3Pen Tether Attach a pen tether to the tether slot to keep the pen with the Tablet PC.4Thermal Grate Covers the fan. Do not cover this grate while using the GD3080.5Master Reset Key Use the stylus tip in this hole to perform a hard reset of your GD3080. You will then need to press the power button to restart the computer.Caution  Any unsaved files or data will be lost during a hard reset.6RF ON/OFF Button This button enables/disables WLAN, Bluetooth, and GPS radios.7Second Battery Connector Attach a second, external battery to this connector to extend battery life.2 3 41Back View567
General Dynamics Itronix | 72-0145-001GD3080 User GuideGetting FamiliarButtons and Hot KeysThe GD3080 has seven Hot Keys to speed com-mon functions. Additionally, it has a Power Button, an RF On/Off Button, and a Master Reset Key.#Icon Hot Key Description1Rotate Key Use this key to switch between portrait and landscape orientation on the display. It rotates the screen in 90° increments. You can also program it to execute a specific function.note  You will need to calibrate the display for each orientation and choose a primary orientation.Some applications may not display as well in portrait orientation. For example, you may need to scroll right to view all the contents on the page.2Security Key Press this key like you would press CTRL+ALT+DEL on a desktop computer.3Escape Key Press this key to go back or escape to the previous context or window. You can also program it to execute a specific function.4OK/Enter Key Press this key just like you would press the ENTER key on a desktop computer.  For example, use this key to execute a command, implement an action, navigate deeper or move forward through content.5Line Up Key Press this key to move the cursor up one line. You can also program it to execute a specific function.6Line Down KeyPress this key to move the cursor down one line. You can also program it to execute a specific function.7Function Key (Fn)Press this key in combination with another key to perform more functions.  See the standard key combinations listed below.7654321
General Dynamics Itronix | 72-0145-001GD3080 User GuideGetting FamiliarFN and Hot Key CombinationsFunction Key Icons DescriptionFN + LINE UP  Page upFN + LINE DOWN     Page downFN + OK/ENTER KEY   Speaker volume downFN + ESCAPE  Speaker volume upFN + SECURITY  Display brightness downFN + ROTATE  Display brightness upProgramming Hot KeysYou can program the ESCAPE, ROTATE, LINE UP and LINE DOWN hot keys to perform specific functions. To program one of these hot keys, do the following:1.  Select the Buttons / Device / Brightness Properties icon   in the taskbar.  2.  Then, select the Tablet Button tab.  This allows you to associate any of the above listed buttons with any .exe or .com in the system.
General Dynamics Itronix | 72-0145-001GD3080 User GuideGetting FamiliarPower ButtonThe POWER BUTTON  is located at the top left corner above the display when the unit is in landscape orientation.  Press this button to turn the unit on or off or hibernate.RF ON/OFF ButtonThis button is located on the back of the Tablet PC. It turns off Bluetooth® and disables WLAN and GPS radios.Master Reset KeyThe MASTER RESET KEY is located in a recessed hole on the back of the Tablet Ph. To perform a hard reset, insert the end of a paper clip into this hole. You will then need to press the POWER BUTTON to restart the computer.Caution Any unsaved files or data will be lost during a hard reset.LED Status IndicatorsThe GD3080 has four LED (Light Emitting Diode) sta-tus indicators located left of the display when the unit is in landscape orientation.  The LEDs light up when a particular function of the computer is active. LED numbers are from top to bottom when the Tablet PC is in landscape orientation.# Icon LED Light Description1Wireless Radio Status LEDSolid Blue Integrated radio(s) are powered on2HDD Status LED Blinking Green Accessing the hard disk drive3Battery Status LED Green Fully chargedOrange ChargingRed Battery capacity is less than 10%4Power Status LED Solid Blue Unit is turned onBlinking Blue Unit is suspended note  LEDs can be disabled by using the BIOS Setup Utility to activate Stealth Mode.
General Dynamics Itronix | 72-0145-001GD3080 User GuideGetting FamiliarDisplay and Pen BasicsYour GD3080 has an 8.4” TFT XGA outdoor viewable DynaVue™transmissive display with digitizer control panel and touch screen. It is an active matrix color display with integrated graphics capabilities that provides excellent readability both indoors and outdoors.Using the Pen / StylusUse the pen/stylus provided with your GD3080 Tablet PC like you would use a mouse on a desktop PC. The following common mouse functions can all be performed with your pen:single-CliCk:  Tap once with the pendouble-CliCk:  Tap twice with the pen.right-CliCk:  In Digitizer Mode, tap while holding down the button on the pen. In Touch Screen Mode, tap and hold.mouse-rollover:  In Digitizer Mode, hover your pen above the display.  For example, when you roll your mouse over an icon you see a popup description of the icon.  Hover your pen over the icon to see this description.In addition to these mouse functions, you can use the pen to draw or write in some Tablet PC applications. Caution  Use only the pen included with the unit. Never use sharp, hard, or abrasive implements on the touch panel such as ball point pens, pencils, or keys. They could damage the screen.Changing the Display OrientationYou can change between landscape and portrait orientation by pressing the Rotate Hot Key  . Each time you press the key, the screen rotates 90° counter-clockwise. You can also change the orientation via the input panel by tapping CTRL+ALT and then selecting one of the arrow keys.note  Not all configurations support 360° rotation and some applications may not display properly in portrait orientation.Calibrating the DisplayYour GD3080 has two touch modes, Digitizer and Touchscreen.  To calibrate the display for the mode you are using: 1.  Ensure you are in the mode you want to calibrate.2.  From the Start Menu, select All Programs, Mobile Computer Tools, Tablet Calibration.  3.  Follow the on screen instructions.Ambient Light SensorYour Tablet PC display has an ambient light-sensor near the display. It auto-matically dims the display backlight in low light conditions. When enabled, this feature conserves battery power.  To enable or disable the ambient light sensor, perform the following:1.  Select the Buttons / Device / Brightness Properties icon   in the taskbar. 2.  Select the Auto adjust LCD brightness tab. 3.  From the Auto adjust LCD brightness tab you can activate or deactivate the auto brightness adjust. You can also choose the backlight brightness level for four differ-ent categories of ambient light level: dark, indoor, outside, and blaze.
General Dynamics Itronix | 72-0145-001GD3080 User GuideGetting FamiliarAdjusting Screen BrightnessIf you have trouble reading your display, you can adjust the screen brightness using hot keys.  An on-screen brightness bar  pops up to show the brightness levels when you press one of the following: Press FN+ROTATE    to increase brightness  Press FN+SECURITY    to decrease brightness note  If the Auto Adjust Brightness function is enabled, the backlight adjustment may change depending on ambient light conditions.See Maintenance and Storage for information on how to clean the display.Ports and ConnectorsIcon Ports and Connectors Connection LocationRJ-11 Phone line/modem (internet and fax) Right SideRJ-45 Ethernet Top EdgeDC-in AC adapter (power) Bottom Edge2 USB Universal Serial Bus 2.0 USB peripherals such as a mouse or printer Right SidePOGO 32 Pins Connector Desk mount Bottom EdgeAudio In Microphone Right SideAudio Out Speakers or headphones Right SidePC Card Slot Type II PC Cards Top EdgeCompact Flash Slot Compact Flash Cards Right Side
General Dynamics Itronix | 72-0145-001GD3080 User GuideGetting FamiliarDisk DrivesYour GD3080 comes with several components for reading and writing (recording) information. The Hard Disk Drive (HDD)The hard disk drive provides high-capacity storage and fast access.  The operating system and most programs are stored here. Your GD3080 identifies the hard disk drive as drive C:. Your hard disk drive may include an optional hard drive heater to allow operation in certain environments.  There is also a solid state hard drive option.Card SlotsYou can also use the PC Card Slot and Compact Flash Card Slot for additional data storage.Optional External DrivesThe GD3080 has three Universal Serial Bus (USB) external drive options that may be connected to the Tablet USB ports.  You do not have to power down the Tablet PC to connect any of these drives because they are “hot pluggable.” USB Floppy Disk Drive (FDD):  The floppy disk drive provides a convenient way of storing and transferring small files. It uses standard 3.5-inch, 1.44 MB disks. usb Cd-rom drive:  The CD-ROM drive can be used to read data from CDs, including audio or video CDs.  usb dvd / Cd-rW:  The DVD / CD-RW drive is a read/write drive. It can be used to write data to a recordable CD. It can also read data from DVDs and CDs, including audio or video disks. note  The GD3080 identifies the drive with the letter following the highest partition letter.  For example, if your highest drive partition is drive E:, the DVD/CD-RW or CD-ROM will be assigned to drive F:.  However, the floppy drive will always get assigned to drive A: or B:.Precautions for Handling DVDs and CDsKeep these precautions in mind when handling DVDs and CDs. Always hold the disk by the edges; avoid touching the surface of the disk Use a clean, dry, cloth to remove dust, smudges, or fingerprints. Wipe from the center outward Do not write on the surface of the disk Extremes in temperature may damage disks. Store disks in a cool dry place Do not use benzene, thinners, or cleaners with detergent to clean DVDs or CDs.  Only use cleaning kits designed for DVDs or CDs Do not bend or drop the disks Do not place objects on top of disks Do not expose to direct sunlight for long periodsComputer SecurityYour computer includes several different security features to help prevent theft and protect data. These include a security slot, multiple levels of password protection, an optional fingerprint scanner, and stealth mode.Security SlotA security slot located on the left side of the computer lets you connect a Kensington compatible computer security lock. You can connect the computer to an immovable object to prevent theft. Insert the lock into the notch and turn the key to secure the lock. Some keyless models are also available.  See the documentation that comes with your lock for more information.
General Dynamics Itronix | 72-0145-001GD3080 User GuideGetting FamiliarPasswordsPasswords protect your computer from unauthorized access. When set, no one can access the computer without entering the correct password. There are three types of passwords you can set: suPervisor PassWord secures your computer against unau-thorized entry to critical parameters in the BIOS Utility user PassWord secures your computer against unauthorized use, and allows limited access to the BIOS Utility hard disk PassWord protects your data by preventing unauthorized access to your hard disk, even if the hard disk is physically removed from the computer and installed in another computernote   Do not forget your setup and hard disk password!  If you forget your password, please get in touch with your dealer or an authorized service center.Fingerprint Scanner (Optional)The optional swipe style fingerprint scanner can be used for all standard security uses. The optional fingerprint scanner provides a greater level of security and convenience for your GD3080 and your private data. Use the fingerprint scanner instead of passwords for the following:  Logging in to your Tablet PC Logging into secure websites or when opening password pro-tected applications Providing encryption security for individual filesFingerprint Scanner SoftwareBefore using the fingerprint scanner, you must first install compatible software. There are various software packages available.Caution  Before installing any third party software, ensure it is approved for use with your Tablet PC.note  When accessing some secure websites, you may need to specify you are using the scanner instead of a password. Refer to the fingerprint scanner software documentation for setup instructions.Stealth ModeYour computer has a Stealth Mode feature for users who may need to use it where light or sound could be dangerous or disruptive, such as military personnel. Enabling Stealth Mode allows you to disable sound and light features such as system beeps, the fan, and the display backlight. Refer to the BIOS Setup Utility section to configure the Stealth Mode feature.Trusted Platform Module (TPM)The TPM can be enabled or disabled in the System BIOS utility under the Advanced, Trusted Computing section.  TPM provides a platform root of trust which uniquely identifies a particular platform and provides various crypto capabilities including hardware-protected storage. See the TPM vendor’s help files for more information.
General Dynamics Itronix | 72-0145-001  GD3080 User GuideYour GD3080 is equipped with a full array of ports and connectors, including standard input/output (I/O) ports for quickly and easily adding peripherals such as a USB printer. Refer to documentation included with individual devices for details on connecting these devices to your computer. Along with the standard ports found on most computers, your computer also includes modem and LAN ports for advanced communications technology.Caution  Keep port doors closed when not in use.  Internal components of the GD3080 will be damaged if exposed to con-taminants. When dust covers, the PC card door, or the bottom access panel are open on the computer, shield the unit from all contaminants such as liquids, rain, snow, and dust.Attaching PowerYou can operate the computer while the battery is charging on external power or on battery power.Attaching the AC Adapter1.  Connect the supplied AC adapter power cord to the AC adapter.2.  Connect the AC adapter to the DC power port on your com-puter.3.  Connect the AC adapter power cord to an AC outlet.Alternately, you can attach the optional vehicle adapter. Turning the GD3080 On and OffTo turn on the computer      Press the Power Button  once, and then give the system time to respond. The Power LED  should illuminate and the unit should boot into Windows®. To turn off the computer      WindoWs® xP:  From the Start menu, select Turn Off Com-puter, then select Turn Off. WindoWs® 7:  From the Start menu, select Turn Off Com-puter, then select Turn Off.note  If you need to leave the system for a short time, or if you want to conserve battery power, you can put the computer into hibernation mode by pressing the power button.  See Managing Power for additional information.Caution  Shutting down the computer improperly could result in lost or corrupted data.EthernetThe Ethernet LAN Local Area Network (RJ-45 Jack) on the top edge of the computer enables you to make LAN connections without installing PC cards. Connection speed is 10/100/1000 Mbps.Internet and FaxThe fax/modem RJ-11 jack can transmit data using the 56 Kbps V.90 or V.92 protocol, and send and receive faxes at 14.4 Kbps.  In some countries, local regulations may not permit the use of the fax/modem designed for this system.  In this case, you may use a PCMCIA modem.Caution  Plug your modem into an analog telephone jack only.  Most homes use analog lines.  Do not use digital lines, such as PBX and ISDN systems found in many offices.  Digi-tal lines may damage your modem.  If you are unsure as to the type of port you have to plug into, contact your building superintendent. Simple detection and protection devices are also available at most computer stores and should be used to protect the GD3080.note  Port access to connect the modem is disabled for the Australian market.Attaching USB DevicesThe two Universal Serial Bus (USB) 2.0 ports enable you to attach USB devices such as keyboards, a mouse, scanners, and printers.  Using PC CardsThe GD3080 has a Type II PC Card Slot located on the top side of the computer.  It supports 32 bit CardBus 2.1 interface as well as Zoom Video™ when in landscape orientation. You can use this slot to interface between your GD3080 and a variety of communications devices, such as network adapters, SCSI adapters, fax/modems, and PC card radios.  It can also provide additional data storage capacity.Making ConnectionsUSBPC Card SlotEthernetRJ11 / Internet Fax
General Dynamics Itronix | 72-0145-001 GD3080 User GuideMaking ConnectionsInstalling a PC Card1.  The top side of a PC Card is usually identified with a label. Insert the card into the slot with the top up and the edge with pinhole contacts going in first. You will feel some resistance as the card slides into the back of the slot.2.  PC Cards require drivers, or a program that allows the operat-ing system to use a specific device. Many drivers are included with Windows®, but if not, you will be prompted to install the driver included with your card.note  Please read the instructions included with individual PC Cards. Some cards may be inserted with power on, while others require that the computer be turned off. Ejecting a PC CardFor Windows® XP and Windows® 7:1.  First, exit the application using the card.2.  Left-click on the Safely Remove Hardware icon  on the taskbar and stop the card operation.3.  Press the slot eject button once to pop it out; then press it again to eject the PC Card.Using Compact Flash CardsYour GD3080 can use Type 1 Compact Flash Cards for secure data storage. If you store any user-installed application pro-grams and associated data on Compact Flash, these programs and data will not be lost after a hard reset. Files stored on Com-pact Flash Cards can be created, deleted, moved and amended in exactly the same manner as files stored in memory.  The Compact Flash slot is also used to house the optional GPS radio and antenna.Installing a Compact Flash Card1.  Open the Compact Flash port cover on the right side of the computer. 2.  Position the Compact Flash Card with the label facing up and carefully insert it into the socket. Your GD3080 should automati-cally detect most Compact Flash Cards.Ejecting a Compact Flash CardFor Windows® XP and Windows® 7:1.  First, exit the application using the card.2.  Left-click on the Safely Remove Hardware icon  on the tray taskbar and left click on the Compact Flash Card operation.  3.  Press the slot eject button once to pop it out; then press it again to eject the Compact Flash Card.AudioYour GD3080 has integrated audio as well as audio jacks so you can connect external audio components.Compact Flash Card1234#Feature Description1Microphone Integrated microphone for audio input2Speaker Integrated speaker for audio output3Headphone jackConnect external speakers or a stereo headset4Microphone jackConnect an external microphone for audio recordingChanging the Volume Use the volume function keys:  FN + ESC = Volume Up;  FN + OK = Volume Down, or Open the Windows® volume control program by double-tap-ping the Speaker icon  in the taskbar.Attaching to the Desk MountUse the POGO connector to connect the Desk Mount or cus-tom external devices.POGO Connector
General Dynamics Itronix | 72-0145-001  GD3080 User GuideThe GD3080 has superior wireless capabilities. Depending on your configuration, it supports up to four optional wireless radio technologies:  PC card wireless technologies; Bluetooth, Wireless LAN (WLAN), and GPS.Each GD3080 comes standard with  three antennas for wireless communication; two WLAN and one Bluetooth.  GPS and PC Card radio antenna are optional accessories.Use only the supplied or an approved antenna(s). Unauthor-ized antennas, modifications, or attachments could impair data quality, damage the cord, or result in violation of FCC regula-tions.Your GD3080 has an RF ON/OFF button on the back. This can be used to turn off Bluetooth and disable WLAN, WWAN, and GPS radios.  The radios can also be enabled or disabled in the BIOS on the Advanced tab, Extended Configuration. Turning Off Radios with the Radio On/Off Button1.  Turn your  Tablet PC over so you are looking at the back of the unit.2.  Press the radio On/Off button.tional LAN. Desktop client systems can be located in places where running cable is impractical or impossible. Desktop PCs can be redeployed anywhere within a facility as frequently as needed, making wireless ideal for temporary workgroups and fast-growing organizations. Electromagnetic Interference (EMI) Electromagnetic Interference (EMI) is generated by switching circuitry closets or Uninterruptable Power Source (UPS) systems found near computer rooms and can block the radio signal. Look for significant sources of electromagnetic radiation. The problem may emanate from a source between location and the radio base station.When to Use Landline CommunicationIf the tips above do not improve radio signal strength, switch to landline communication. Switching to landline communica-tion is faster than searching for and trying to improve the radio signal. WLAN Radio (optional)The GD3080 may include an integrated Wireless Local Area Network (WLAN) capability.  See the radio help file on your computer desktop for more information.Read About WLANWLAN provides all the features and benefits of traditional LAN technologies, such as Ethernet, without the limitations of wires or cables. It enables mobility and flexibility without compro-mising connectivity for today’s mobile user.GPS (optional)Your GD3080 may include a Global Positioning System (GPS).  The GPS is a worldwide radio-navigation system formed from a constellation of satellites and their ground stations.  These satellites are used by the GPS as reference points to calculate positions accurate within five meters.Wireless CommunicationRadio on/off buttonBluetooth Radio (optional)The GD3080 includes an integrated Class 1 Bluetooth® option. Its maximum range is about 100 meters.Read About BluetoothBluetooth® systems create a personal-area network (PAN), that may fill a room or may encompass no more distance than that between the cell phone on a belt-clip and the headset on your head.When Bluetooth® capable devices come within range of one another, an electronic conversation automatically takes place to determine whether they have data to share or whether one needs to control the other. The devices form a network.Once this network is established, the devices randomly hop frequencies in unison so they stay in touch with one another and avoid other networks that may be operating in the same room.Applying wireless LAN technology to desktop systems pro-vides an organization with flexibility impossible with a tradi-
General Dynamics Itronix | 72-0145-001  GD3080 User GuideThe GD3080 uses Dynamic Power Management ( DPM ) so you can reduce the amount of energy used, especially during periods of inactivity.  It  is powered by a smart Lithium-ION battery pack. A CMOS coin battery maintains the Real Time Clock and CMOS memory.  There is also an optional second external battery pack that effectively doubles your battery powered runtime.Battery Installation and ReplacementOver time, the battery’s capacity gradually decreases. We recommend that you replace your battery when you notice that it begins to store significantly less charge. Change the main battery pack as follows (you may want to print this topic for reference).Caution  The GD3080 battery and unit are only weather sealed when the battery is properly installed and the bat-tery door is closed.  Shelter the computer when you install or replace the battery.  To prevent damage when the unit is in use, keep the battery door closed with all screws in place and secured tightly.  Installing the BatteryCaution   The GD3080 should always be shut down prior to battery removal, because data may be lost when the battery is removed. 1.  Turn off the computer.2.  Unplug the power supply if connected.3.  Turn the computer upside down.  4.  Remove the three screws on the secondary battery, if installed and remove the battery.5.  Using a Phillips screwdriver, remove the six screws from the battery cover and remove the battery cover.Caution   Internal components of the GD3080 will be dam-aged if exposed to contaminants. When dust covers, the PC card door, or the bottom access panel are open on the com-puter, shield the unit from all contaminants such as liquids, rain, snow, and dust.6.  Using the tab on the battery, lift the battery pack up and out of the battery bay.7.  Orient the replacement battery correctly and insert it into the battery compartment, making sure it is fully seated.8.  Replace the battery cover over the battery bay and install the six screws.9.  Install the secondary battery if equipped.10. Completely charge the battery before using the Tablet PC on battery power.NOTE  When the battery is installed and the computer is con-nected to AC power it starts charging automatically.  At moder-ate temperatures, approximately 70° Fahrenheit (21°C), the battery will be fully charged in 3-5 hours. In warmer or cooler temperatures, the battery can take much longer to fully charge. Battery calibration is disabled if the temperature is > 122°F (50°C) or < 41°F (5°C).Battery Power
General Dynamics Itronix | 72-0145-001 GD3080 User GuideBattery PowerReplacing the Real Time Clock BatteryThe Real Time Clock has a replaceable coin battery located under the battery pack. Only replace with the same coin cell type as the original.1.  Remove the battery pack.2.  Lift the coin battery out of the holder.3.  Install a new coin battery with the positive terminal up.4.  Re-install the battery pack.A Field Kit is available - visit the General Dynamics Itronix web-site for a full list of available kits.Battery CalibrationThe battery calibration process fully charges, discharges, and recharges the battery.  This allows the Windows® battery gas gauge to accurately monitor battery status. It is recommended you calibrate your battery: The first time you use it After it has been stored for awhile If the gas gauge has become inaccurate. For optimum performance, we recommend calibrating the bat-tery and optional secondary battery every three monthsYou can calibrate your main battery or optional second exter-nal battery from the BIOS Setup Utility. You can also calibrate the main battery from within Windows®.Windows® Level Battery CalibrationFor WindoWs® xP:  To run the Battery Calibration program from Windows®, select  Start, Programs, and Mobile Com-puter Tools .After starting calibration, the Battery Calibration application requires no further input from the user. The calibration consists of four steps:1.  Partial Discharge.2.  Charge: The battery is fully charged to 100 %.3.  Discharge and calibrate: First, the battery is discharged all the way down to zero.  Then the battery is ‘calibrated’ but not charged. You may stop the process after this point and let the battery charge outside of the battery calibration application.4.  Charge: If the battery calibration continues running, the battery will fully charged to 100%. note  The unit will not go into suspend mode while Battery Calibration is running.Caution  Do not disconnect AC power while Battery Cali-bration is running.  If AC remains disconnected for more than two minutes, the application will terminate. Caution  Do not remove the battery while Battery Calibra-tion is running. Doing so will cause the application to terminate immediately.BIOS Level Battery Calibration1.  Plug in the AC adapter.2.  Restart the computer and when the startup screen appears, press the OK/ENTER  hot key. This starts the Setup Utility.3.  Select the Setup function “Battery Calibration”.  Press the LINE UP  or LINE DOWN  keys to select the option4.  Press the OK/ENTER key to continue.5.  Next, choose which battery you want to calibrate, the primary battery or optional secondary battery.6.  You will be prompted to make sure the AC adapter and Battery are present.  Do this and then Select Yes to begin “battery auto-learning.”Battery calibration takes from 10 to 16 hours, depending on how much power the battery already contains. You can speed up calibration by starting with a fully charged battery.  note  External power is required for battery calibration.
General Dynamics Itronix | 72-0145-001 GD3080 User GuideBattery PowerBattery ChargingWhen you use the AC adapter to connect your GD3080 to a power outlet, the internal battery automatically begins to recharge. While the battery is charging, the Battery Status LED   turns orange after 6-12 seconds and stays solid orange until the battery is fully charged. When the battery is fully charged, the LED will turn green.If your computer is turned off, a fully discharged battery takes about 3 hours to recharge. If your computer is turned on and is not in suspend mode , it takes about 3-5 hours to recharge the battery. Refer to the following table:Charging disChargingSystem On 3-5 hours  3 hoursSystem Off (Suspend to RAM and Suspend to Disk)3 hours _ note  A fully charged Lithium-Ion battery can run the Tablet PC for approximately 3 hours of normal use. (According to Bat-tery Mark benchmark tests.)  Use of external devices, such as the wireless radio, cause increased battery consumption.If a second external battery is attached to your GD3080, this battery will begin charging once the main battery is fully charged.Using the BatteryAbout the BatteryThe battery is a Lithium-Ion “smart” battery.  It contains a temperature sensor and a memory device that stores informa-tion about the battery, such as how much charge is left and how many times it has been recharged.  The parameters for the “management” of the battery are also kept in the battery’s memory.  The life expectancy will depend strongly on the care of the battery, the individual usage pattern and the GD3080’s specific configuration.Caution Shutdown the computer and remove from external power before removing the battery to prevent potential loss of data.The battery pack is most efficient at room temperature.  How-ever, its efficiency fails as the temperature varies from that range.  The following chart shows approximate capacity values with respect to temperatures.Temperature Capacity-10°C 50%0°C 80%20°C 100% 45°C 100%55°C 80%To prevent damage, the charge circuitry is turned off for tem-peratures that are too high (above approximately 115°F or 46°C) or too low (below approximately 32°F or 0°C).  Your GD3080 is equipped with a fan to remove heat from the processor. Caution  The thermal grate gets warm during use of the GD3080.  Do not block the flow of air to the thermal grate. note  A “cold-soaked” battery has an even lower capacity and may not power a unit.Monitoring Battery PowerThere are two ways to monitor how much power the battery has left:1.  Hover your pen over the battery icon in the taskbar to check your battery power status.  The status will show as a pop-up.2.  Alternately, select Start, Control Panel.  If you are in Category View, select Performance and Maintenance, and then select Power Options. If you are in Classic View, select Power Op-tions and then tap the Power Meter tab to see how much battery power remains.note  If you do not see the battery icon, enable it in Start, Control Panel, Power  Options. Choose the Advanced tab and select “Always show icon on the taskbar.”Low Battery AlarmsCaution  When battery power is low, the alarm beeps or displays a warning on your screen. Take immediate action, such as saving files or connecting to the AC adapter, or data may be lost.  When the computer alerts you that the battery is low, immedi-ately do one of the following:1.  Connect the AC power adapter2.  Save your work and then select Shut Down from the Start menu3.  Turn off the computer and replace the discharged battery with a charged battery (See Battery Charging).note  Do not restart the computer until you have connected to an AC adapter or replaced the discharged battery with a charged battery. Refer to Battery Tips for more information about how you can conserve battery power. Refer to Managing Power for infor-mation about how you can setup your computer to effectively manage power for your unique use patterns.
General Dynamics Itronix | 72-0145-001 GD3080 User GuideBattery PowerManaging PowerYour computer has power management capability so you can reduce the amount of energy used, especially during periods of inactivity.  Effective use of power management options can greatly conserve and extend your battery life. The power man-agement unit monitors system activity, such as the hard drive, keyboard, mouse, or any devices attached to a port. If it does not detect activity for a period of time, the computer stops some or all of these devices in order to conserve energy. Your computer employs a power management scheme that supports ACPI (Advanced Configuration and Power Interface), allowing for maximum power conservation and maximum performance at the same time. Windows® handles all power-saving chores for your computer.For more information search for Power Options in Microsoft® Help and Support.Low-Power StatesYour computer can enter three different low-power states to conserve power:  Standby/Sleep, Hibernate and Power Off. These states can be entered manually or after a period of inactivity. Standby/SleepMost devices in the system are powered off, but the contents of system memory are retained. Standby/Sleep is sometimes referred to as Suspend to RAM. When the computer returns from standby mode, the desktop appears with the same files and programs open as when the computer was suspended. Resume time is very quick.HibernateHibernate, or Suspend to Disk, is similar to Standby, except that the current state of the computer is copied to the hard disk in a special file. After this occurs, all devices in the computer are turned off. When the computer returns from hibernation, the desktop appears with the same files and programs open as when the computer was suspended. Hibernation saves more power than standby, but takes slightly longer to resume. Power OffAll applications are closed and the system is shutdown.Entering Low-Power States From the Start Menu, select Shut Down to display a dialog that allows you to manually enter  low-power states.Battery TipsTip 1. Avoid Excessive Heat and Cold Your battery will last longer during the day if it is used, charged and stored between 50°F and 86°F (10°C and 30°C).  Charge the battery nightly where the temperature will remain around 68°F (20°C). Your battery may not last as long through the day if you charge it at higher or lower temperatures. Allow unrestricted airflow while the computer is connected to external power. Make sure that the fan inlet and outlet are unob-structed. Avoid exposing batteries to hot or cold temperatures for long periods.How your battery behaves in warm conditions To prevent possible damage to the battery, the system may not allow a charge if the battery temperature is above 122°F (50°C), such as in a closed, unattended vehicle during the summer. In this case, the Battery Power Indicator   may indicate that the computer has stopped charging your battery; however, your battery may not be fully charged. If possible, turn off or suspend your computer while the battery is charging in a warm environment to avoid over-heating. In warmer temperatures, your battery may take much longer to fully charge.How your battery behaves in cold conditions When using a battery in cold conditions, the battery capacity may drain significantly faster. To prevent possible damage to the battery, the system will not allow a charge if the battery temperature is below 41°F (5°C), such as in a closed, unattended vehicle during the winter. In this case, the Battery Power Indicator   may indicate that the computer has stopped charging your battery; however, this does not necessarily mean that your battery is fully charged. In cooler temperatures, your battery can take much longer to fully charge.Tip 2. Prevent Wasted Power Manually turn off or suspend your computer whenever you are not using it. Reduce the screen brightness. Decrease brightness by pushing FN + ROTATE  +.   Increase brightness by pushing FN + SECURITY  + .   Use the AC adapter or vehicle adapter whenever possible. Select either the Portable/Laptop or Max Battery power scheme. Both of these power schemes help to conserve battery power. Max Battery provides the most battery conservation by always keeping the processing speed lower. However, this may affect your application performance. Portable/Laptop automati-cally adjusts the processing speed as required by your applica-tions.
General Dynamics Itronix | 72-0145-001 GD3080 User GuideBattery Power When running on battery power, make sure your system sus-pends automatically after a few minutes of inactivity. PC Cards, radios, custom applications, or modified system settings may affect this. Remove PC Cards and unplug peripherals when you are not us-ing them. They may draw power from the system even when not in use. Avoid operating the fax/modem, or audio and video applications when using battery power. Operating a fax/modem, video, or audio equipment increases the computer’s power requirements. Don’t use screen savers as they draw excessive current, espe-cially “3D” screen savers. Avoid or minimize using applications that keep the CPU busy a large percentage of the time. The following will help you deter-mine if your system is running such applications:Identifying power wasting programsTo determine if applications or processes are keeping the CPU busy1.  Start the Task Manager utility. To open the Windows® Task Manager, right-click an empty space on the taskbar, and then select Task Manager.2.  Select the Performance tab to view running applications and the Process tab to view running processes.3.  Watch the CPU usage. It is okay if the processor usage is oc-casionally 100 percent, but if it is 100 percent most of the time, this may indicate a problem.What to do if applications are keeping the CPU busy If possible, close applications that keep the CPU busy when you are not using them. Turn off or suspend your computer whenever you are not using it. This will help to conserve power. Install the Mobile System Monitor utility. This utility throttles the CPU when running on battery power. You can set the throttle level to 25%, 50%, 75% or 100%. Throttling may affect application performance. Some applica-tions keep the CPU busy waiting for user input or radio mes-sages.  Throttling the CPU will unlikely affect the performance of these applications. Other applications, especially graphics-intensive mapping, video and DVD playback applications, may be visibly slower if you throttle the CPU. You will want to adjust the throttling to an acceptable level.to install mobile system monitor1.  Select Start, Run... 2.  Enter the following command: “C:\Drivers\Throttle\Setup.exe”After installing this utility, you can set the throttle level by right-clicking the Mobile System Monitor icon in the System Tray area of the Taskbar.Inform your organization’s help desk. They may have an updated version of the application.Tip 3. Calibrate Your BatteryOver time, the accuracy of the Windows® battery gas gauge may be affected by repeated charging and discharging of the battery. Calibrating the battery every three or four months helps to keep the gas gauge accurate. For information on cali-brating the battery, refer to Battery Calibration.Tip 4. Get a Good Charge Your computer will charge more quickly if it is turned off or suspended. In warmer or cooler temperatures, your battery can take much longer to fully charge. If your battery is charged in a cold (less than 41°F/5°C) or very warm (greater than 122°F/50°C) environment, it is possible that the Battery Charge LED will indicate that the charge has stopped; however, this does not necessarily mean that your battery is fully charged.Tip 5. Prevent Data LossFollow these guidelines to prevent data loss when removing your battery or storing your computer: You will lose data if you remove the battery while the computer is operating or suspended. To prevent this, shutdown your computer or put it into hibernate (suspend-to-disk) mode before removing your battery. If you plan to store your computer for more than a few days, shutdown your computer. Remove the battery before storing the computer.Tip 6. Clean TerminalsDirty terminals can be a cause of charging problems. Clean battery terminals with a cotton swab dipped in isopropyl alco-hol. Make sure that the alcohol has evaporated before reinstall-ing the battery.Tip 7. Storing Batteries Store the battery within the recommended temperature range: 10°C to 30°C (50°F to 86°F). Unused or stored batteries can lose power over time. When you install a battery that has not been used for awhile, connect exter-nal power to the computer and fully charge your battery. Battery calibration may increase the capacity of a battery stored for a period of time. For information on calibrating the battery, refer to Battery Calibration. It is recommended that the battery is recharged every six months while in storage.
General Dynamics Itronix | 72-0145-001  GD3080 User GuideThe BIOS Setup Utility allows you to configure your computer’s basic settings. When you turn your computer on, the system reads this information to initialize the hardware so that it will operate correctly. You can use the BIOS Setup Utility to change your computer’s start-up configuration. For example, you can change your system’s security routine.Starting the BIOS Setup UtilityYou can only start the Setup Utility shortly after the computer has been turned on. When you see the message “Press Enter button to enter  SETUP” display at the bottom of the screen, press the OK/ENTER key  .You will then see the following screen:Use your LINE UP  or LINE DOWN  hot keys to highlight “CMOS Setup Menu” and press the OK/ ENTER  key.  The system will start the Setup Utility and display the main menu of the utility.Caution  Incorrect settings can cause your system to malfunction.  To correct mistakes, return to Setup and restore the Setup Defaults by going to the Exit Menu and selecting “Load Optimal Defaults”.Navigation and HelpThe Menu BarThe Setup Utility has five menu options in the Menu Bar (1) at the top of the window. To navigate between the screens you must tap on the screen with the pen/stylus to see the Tablet PC Input Pad and use the arrow keys or attach a USB keyboard.The Tablet PC Input Pad is used to navigate through BIOS screens:main  Use for basic system configurationadvanCed  Use to set the advanced featuresboot  Use to select the sequence of boot devices that are searched to load an operating system.seCurity  Use to set user and supervisor passwords exit  Use to exit the current Setup sessionThe Field and General Help Windowsthe Field helP WindoW (2)  is on the right side of each menu.  It displays the help text for the currently selected field.  This text updates as you move the cursor from field to field.the Field list (3) is on the lower left side of the BIOS Setup Utility screen.  It displays the actual field titles and entry fields for the BIOS settings.the navigation menu (4) is on the lower left side of the BIOS Setup Utility screen.  It displays the navigation keys used with an external keyboard.note  The Field Help Window refers to keys that are only available via an external USB keyboard.  If you do not have an external keyboard attached to your GD3080, use the Setup Utility’s Tablet PC Input Pad described below:BIOS Setup Utility
General Dynamics Itronix | 72-0145-001 GD3080 User GuideBIOS Setup Utilitythe general helP WindoW describes the Tablet PC Input Pad keys and their functions.  You can access it by selecting F1 on the Tablet PC Input Pad. However, the following keys are not available during Setup unless you have an external USB key-board attached to the Tablet PC:HOME F2/F3 F8 ENDTablet PC Input PadThe Setup Utility has a unique Tablet PC Input Pad that appears  when you hover over or tap your pen anywhere on the screen.  Use the Tablet PC Input Pad to navigate between setup screens, between fields on each screen and to make any field changes. To avoid making unintentional field changes, we recommend you do not open the panel from the bottom right side of your screen. Instead, tap anywhere on the left side of the display.To navigate between the five menu screens, tap the left or right arrows on the input pad. To toggle through the fields, tap the up and down arrows.  Alternately, you can use the LINE UP and LINE DOWN hot keys to toggle through the fields. Press the OK/ENTER key to view a list of options for each field. If you need to input characters, tap FNA on the Tablet PC Input Pad to expand it to a larger Tablet PC Input Pad  that includes characters.  Press FNA again to return to the small input pad.note  The Tablet PC Input Pad disappears after a few sec-onds of inactivity and when you change screens.The Tablet PC Input Pad
General Dynamics Itronix | 72-0145-001 GD3080 User GuideBIOS Setup UtilityThe Main MenuField Setting FunctionAMIBIOS For information onlyVersionMotherboard For information onlyVersionProcessor For information onlyType and SpeedSystem Memory For information onlySizeSystem Time HH:MM:SS Configure system timeSystem Date MM/DD/YYYY Configure system dateDigitizer Calibration Opens the  Digi-tizer Calibration UtilityBegins the digitizer calibration.  Once you have calibrated the dis-play, the computer will restart. The Advanced Menu Field Setting FunctionTrusted Computing Sub-Menu Configure settings related to TPMSuperIO Configuration Sub-Menu Configure I/O port interrupt and IRQ settingsFan Learning Function Sub-Menu Fan Learning Function will take 2 minutes to finish procedureStealth Mode  ConfigurationsSub-Menu Depending on Stealth Mode setting, LED, FAN Beeps, LCD Brightness, Audio and Wireless devices will keep silent when you needExtended  ConfigurationSub-Menu Other special function settings including low battery beep, radio wakeup, etc.
General Dynamics Itronix | 72-0145-001 GD3080 User GuideBIOS Setup UtilityTrusted ComputingField Setting FunctionTCG/TPM Support yes NoEnable/Disable TPM TCG (TPM 1.1/1.2) support in BIOSExecute TPM  Commanddon’t Change Disabled EnabledEnable (Activate) / Disable (Deacti-vate) / Don’t change (leave settings in last configuration) Enable (Activate) / Disable (Deacti-vate) Command to TPMTPM Enable/Disable StatusDisabled This displays the current status of the TPMTPM Owner Status Unowned This displays the current Ownership status of the TPM  SuperIO ConfigurationField Setting FunctionSerial Port1 AddressDisabled    3F8/irq4    3E8/IRQ4    2E8/IRQ3Select serial port 1 interrupts and IRQ set-tingsSerial Port2 AddressDisabled   2F8/irq3   3E8/IRQ4    2E8/IRQ3Select serial port 2 interrupts and IRQ set-tingsSerial Port3 AddressDisabled    3F8    2F8   3e8    2E8Sets address for serial port 3 Serial Port3 IRQIRQ4    IRQ5   IRQ10    IRQ11Sets IRQ for serial port 3 Serial Port4 AddressDisabled    3F8    2F8    3E8   2e8Sets address for serial port 4Serial Port4 IRQIRQ3    irq6   IRQ10    IRQ11Sets IRQ for serial port 4
General Dynamics Itronix | 72-0145-001 GD3080 User GuideBIOS Setup UtilityFan Learning FunctionThe purpose of the Fan Learning Function is to calibrate the fan’s performance.  The fan’s throughput will be decreased over time and the Fan Learning Function adjusts the fan’s efficiency allowing the fan to operate properly.Stealth Mode Setup The GD3080 has stealth mode capability so it can be used in an environment where sound and light could be dangerous to the user.If stealth mode is set to Disabled, the LEDs, fan, system beeps, audio, display brightness, and wireless devices operate nor-mally.  If stealth mode is Enabled, you can individually set each option to On or Off.Option Stealth Mode  Function Disabled Stealth Mode Function EnabledOn OffledsLEDs function as normal All LEDs function normally LEDs remain off (not lit)Fan Fan functions as normal Fan functions normally FAN does not run (beware of over-heating the unit)audio Audio functions as normal. (The default volume level is set to mid range.)Audio volume levels are maintained when unit powers upAudio volume is set to zero when unit powers upsystem beePsBeeps are heard during POST.System beeps (battery low, no boot device)System beeps are disableddisPlay brightnessThe default brightness level is mid range.Brightness levels are maintained when unit powers upBrightness levels set to zero when unit powers upWireless deviCesWireless devices func-tion as normal.All wireless devices are turned on when unit powers upAll wireless devices are turned off when unit powers up
General Dynamics Itronix | 72-0145-001 GD3080 User GuideBIOS Setup UtilityExtended ConfigurationField Setting FunctionVanderpool Technology enabled DisabledIntel (r) Virtualization Technology -- allows a platform to run multiple operating systems an application in independent partitions.   With virtualization, one computer system can function as multiple “virtual” systems.Core Multi-Processing enabled DisabledEnabled -- Use multi-processing core Disabled -- Use only one processor coreAuto DIM disabled EnabledEnabled  --  Display will dim slightly when on battery power. Disabled  --  Display brightness will not dim when on battery power.USB Port2 2.0 Option enabled DisabledEnabled  =  bottom/backside USB port is USB 2.0 Disabled  = bottom/backside USB port is USB 1.1Slow Charge Function disabled EnabledEnabled  --  Slow charge function is enabled Disabled  --  Battery charges at normal rateBattery Low Warning Beepenabled DisabledEnabled  --  System will sound 3 beeps every 10 seconds if battery charge drops below 7% Disabled  --  System will not sound if battery is low  Rotate Button sCreen rotation Backlight ToggleScreen Rotation -- Pressing Rotate button will rotate screen. Backlight Toggle -- Pressing Rotate button will toggle the backlight on and off.Disk Configuration ide AHCIIDE Combined  --  Standard IDE Configuration Mode AHCI Mode  --  Advanced Configuration Mode for SATA driveBluetooth Wakeup disabled EnabledEnabled  --  System will awake up from standby if a Bluetooth signal is detected Disabled  --  System will not awake up from standby if a Bluetooth signal is detectedLCD ON By Power Buttondisabled EnabledEnabled  --  If display is set in OS to turn off, it will turn back on with power button during runtime. Disabled  --  Display will not turn on with power button during runtime; pressing button will cause the unit to hibernate.S4 Wakeup disabled EnabledEnabled  --  System will awake up from standby if S4 signal is detected Disabled  --  System will not awake up from standby if a S4 signal is detectedResume on AC power Insertiondisabled EnabledEnabled --  System will wake from standby or hibernation state when AC power is inserted. Disabled -- System will not wakeup when AC power is inserted. Power button will cause unit to hibernate if pressed.GPS Power Option disabled EnabledTurn on/off GPSRadio Configuration Sub-Menu Radio function settings, including Bluetooth and Wireless LANOSPM Performance Counter0 1Select the following timers for OS power management to be used: 1  =  OS uses ACPI Power Management Timer 0  =  Allow OS to use either ACPI Management Timer or Internal Processor Clock
General Dynamics Itronix | 72-0145-001 GD3080 User GuideBIOS Setup UtilityRadio ConfigurationField Setting FunctionBluetooth Power Optionenabled    DisabledEnable or disable Bluetooth powerWireless LAN enabled    DisabledEnable or disable Wireless LAN The Boot MenuField Setting Function1st  Boot Device   (multiple devices may be displayed)Removable Dev.    CD/DVD    hdd: sata:Pm-toshiba mk   Network:Realtek Boot Agent    USB Device    DisabledSpecifies the boot sequence from the available devices. A device enclosed in parenthesis has been enabled in the cor-responding type menu.    Removable Devices = FDD    CDROM = CDROM    Realtek Boot Agent = Ethernet boot   note  There are a variety of boot devices available, only cur-rently installed options are displayedNetwork Boot (PXE) Enabled  disabledIf Enabled boot from the network becomes available.Quiet Boot enabled    DisabledIf Disabled: Displays normal POST messages.  If Enabled: Displays OEM Logo instead of POST messages.
General Dynamics Itronix | 72-0145-001 GD3080 User GuideBIOS Setup UtilityThe Security MenuField Setting FunctionSupervisor Password Installed    not installedInformation OnlyUser Password Installed    not installedInformation OnlyChange Supervisor Password N/A Install or Change the passwordChange User Password N/A Install or Change the passwordClear  User Password N/A Clears/Removes the User Password (NOTE: This option only displays if a User Password has been installed)Password Check setuP AlwaysDetermines when a password is required by the system. note  This option only displays if password(s) are installed
General Dynamics Itronix | 72-0145-001 GD3080 User GuideBIOS Setup UtilityThe Exit Menu Field Screen FunctionSave Changes and ExitExit system setup after saving the changes. F10 key can be used for this operationDiscard Changes and ExitExit system setup without saving any changes. Esc key can be used for this opera-tion.Discard Changes Discards changes done so far to any of the setup questions. F7 key can be used for this operation.Load Optimal DefaultsLoad Optimal Default values for all the setup questions. F9 key can be used for this opera-tion.
General Dynamics Itronix | 72-0145-001  GD3080 User GuideThe GD3080 is rugged and weather resistant. Handle it with the normal care required by any sophisticated electronic equipment, and the computer will provide reliable service even under harsh field conditions.Follow the guidelines in this section to care for your unit. Battery Maintenance and StorageMaintaining BatteriesFollow these guidelines to maintain performance of Lithium-Ion (Li-on) batteries.    Avoid exposing batteries to extremely hot or cold temperatures for long periods. To prevent possible damage to the battery, the GD3080 does not allow the battery to charge if the internal tem-perature of the battery gets too low (< 5°C or < 41°F) or too high (> 50°C or > 122°F). Charge the battery nightly where the temperature will remain around 20°C (68°F). Re-calibrate your battery every three months or when your bat-tery performance degrades.Storing Batteries Store the battery within the recommended temperature range:  10°C to 30°C (50°F to 86°F). Unused or stored batteries can lose power over time. When you install a battery that has not been used for awhile, connect exter-nal power to the computer and charge the battery. After storage, battery calibration may increase its capacity. Tablet PC Maintenance and StorageMaintaining Your Tablet PCFollow these guidelines to help maintain the condition and performance of your computer.  Turn off the computer when you are not using it. Charge the batteries daily or whenever their capacity is low. Operate the computer within the recommended temperature ranges of  -23°C to +60°C (-9.4°F to +140°F). Care and CleaningPhysiCal insPeCtion  Periodically inspect the computer and accessories for wear, damage, loose or missing parts. Identify-ing and correcting potential problems early can help reduce the need to return the unit for service.outside Case   Like all tools, the outside of the computer will get dirty with use. The case is made of painted magnesium and polycarbonate blend (plastic) doors and covers. These areas can be cleaned with a solution of one part mild cleanser and one part water. Do not use ammonia, abrasive cleaners, or bleach as this may damage the unit.  To clean the outside case, follow the procedure below. 1.  Disconnect external power and turn off the computer.2.  Using a soft, dry cloth (do not use paper products because they can scratch the surface, add a small amount of cleaning solu-tion to the cloth and clean the computer case.3.  Wipe off any excess liquid with a soft cloth. disPlay   Periodically inspect the display to make sure the brightness function is operating properly and that all pixels are operational. To clean the display assembly, use the same clean-ing solution and procedure described earlier for the outside case. In some cases, you can use a small amount of isopropyl alcohol to remove streaks or smears. Use a soft, clean cloth to clean the display. Do not use paper products because they can scratch the screen. A Display Cleaning Kit is available. external PoWer ConneCtor   The external power connector may sometimes be exposed to moisture and/or contamination causing an unreliable connection to the external power source.  Clean the connector using a cotton swab dipped in isopropyl alcohol. rJ-11/ rJ-45 / usb ConneCtors   Make sure these con-nectors are operating properly. During normal use, the con-nector pins can get dirty or become broken, bent, or pushed out of place. Clean the connector with a cotton swab dipped in isopropyl alcohol. i/o Ports   Make sure the audio and Multi-IO ports are oper-ating properly. Periodically inspect the ports for damage or contamination, and make sure their covers are attached and closed when not in use. The I/O covers can be replaced without returning the unit for service. Contact your local support per-son for more information.PC Card door and ConneCtor   Whenever possible, make sure this door is closed and latched properly. When the PC Card door is closed, it provides a watertight seal for the PC Card socket. Shield the area from all contaminants such as liquids, rain, snow, and dust when the door is open. Make sure the PC Card connector is operating properly by reading from or writing to a PC Card.Storing Your ComputerIf you plan to store the computer, please follow the storage guidelines listed below.  Files and data should be saved before storing the computer. Contact your organization’s help desk about the procedure for backing up files or data. Exit all applications and use the appropriate procedure to exit from your operating system. Turn off the computer by going to the Start menu and selecting Shutdown. Remove the battery from the unit and store it in a dry place.Maintenance and Storage
General Dynamics Itronix | 72-0145-001GD3080 User GuideMaintenance and Storage Store the computer within the recommended temperature ranges of -55°C to +75°C (-67°F to +167°F).  If you use PC cards, refer to the manufacturer’s instructions you received with the card for storage and care information.Data BackupRegularly backup your data to ensure the greatest data integrity, provide the fastest recovery options, and minimize downtime.After you have installed all applications and have your computer configured as desired, create a backup of drive C: using the Hard Disk Backup and Recovery Utility.  Then use the Windows® Backup Utility frequently to backup data.  It is recommended you set the backup utility to run automatically.Saving Important System Information By default your computer is set up to automatically save certain critical information, such as the registry, on a regular basis. This information is saved as a restore point. You can also create restore points manually by using the System Restore Utility.  Select Start, All Programs, Accessories, System Tools, System Restore.  Then, follow the instructions in the Wizard.Backing Up Files in Windows® XP:   Select Start, All Programs, Accessories, System Tools, Backup. You can schedule backups to run automatically on a regular basis.  To set this up, talk to your help desk or IT department.Backing Up Files in Windows® 7:  Select Start, Control Panel.  Under System and Security select Back up your computer.  From here you can set up backup, cre-ate a system image or create a system repair disc.Backing Up Drive C:  You can make an exact copy of drive C: and save the backup image on the Recovery Partition of your hard disk (usually drive D:).  In the future, you can restore drive C: to its previous state if it becomes corrupted.  To make a backup copy of drive C:, use the Hard Disk Backup and Recovery Utility. Select Start, All Programs, Mobile Computer Tools, Hard Disk Backup and Recovery.  You will be prompted for additional information.note  The Hard Disk Backup and Recovery Utility is only available on computers configured with a recovery partition.Data RecoveryThere are several methods to restore your data.  Start with the least destructive and fastest recovery options, listed below in the order in which you should restore data.1.  Restore system information.2.  Restore a backup using the Windows® Backup Utility.3.  Restore the entire contents of drive C:Option 1:  Restoring System Information Windows® XP:   If you have problems with your system, restore system infor-mation to an earlier state, or Restore Point. Select Start, All Programs, Accessories, System Tools, System Restore. Then, follow the instructions in the Wizard.Windows® 7:   Select Start, Control Panel, System and Maintenance, Backup and Restore Center.  On the Tasks menu on the left-hand side of the screen select Repair Windows® using System Restore.Option 2 : Restoring a Backup Windows® XP:  Select Start, All Programs, Accessories, System Tools, Backup.  Then follow the instructions in the wizard to restore files and settings.Windows® 7: Select Start, Control Panel, System and Security.  Under Backup and Restore select Restore files from backup.  From here you can select a backup file to restore.Option 3: Restoring Drive C:If you used the Hard Disk Backup and Recovery Utility to create a backup disk image you can use it to restore drive C:.  Caution  Restoring a previously saved disk image overwrites the entire contents of drive C:.  Before running this process, save your data to another location, such as a USB flash drive. note   The Hard Disk Backup and Recovery Utility is only available on computers configured with a recovery partition. If it is not available, you will either need to contact your company’s help desk about obtaining a recovery CD or return your unit for service.Windows® XP:   Select Start, All Programs, Mobile Computer Tools, Hard Disk Backup and Recovery and follow the prompts.Windows® 7:  Select Start, Control Panel, System and Security.  Under Backup and Restore select Restore files from backup then select Recover system settings or your computer.
General Dynamics Itronix | 72-0145-001  GD3080 User GuideThe GD3080 has several equipment and accessory options to further enhance your mobile computing experience.A complete list of optional peripherals and accessories is listed on the General Dynamics Itronix website.Caution   When purchasing any additional accessories, purchase only those accessories that are approved for use with your Tablet PC. Some accessories are proprietary items and can be obtained through your system vendor. If you use items that are not approved for use with this Tablet PC, you  may cause it to malfunction, or to emit or receive electromagnetic radiation in excess of local regulations. For non-proprietary accessories such as PC Cards or printers, ensure that the accessory functions properly with your computer before mak-ing the purchase. Your system vendor may be able to recom-mend reliable brands and models. Second BatteryFor longer battery life, you can attach an optional second, exter-nal battery to the connector on the back of the Tablet PC.  The external battery connector is sealed against the Tablet case.Attaching a Second Battery1.  Remove the two left feet (1) on the back of the unit.2.  Line up the second battery connector (2) with the connector on the external battery. 3.  Press until battery is firmly seated. 4.  Tighten the three screws to secure the battery in place.5.  Screw the feet into the battery for safekeeping.6.  Use the Setup Utility Calibration program to calibrate the battery.Desk MountThe GD3080 ‘s desk mount enables you to experience desktop functionality with your GD3080. The desk mount includes the following ports: Stand POGO connector (this is the unit interface) DC in 2 USB 2.0 ports 15-pin CRT port for an external monitor Extra battery charger RJ45 connectorOptional EquipmentExtra Battery Charging SlotStand Holder Connector (unit interface)LED15-pin CRT port for External MonitorUSB 2.0 portsPOGO Connector
General Dynamics Itronix | 72-0145-001  GD3080 User GuideOptional EquipmentTo use the desk mount:1.  Ensure the port cover on the extension slot is open and the port cover for the AC power is closed.2.  Line up the bottom of the unit with the guides and press down while feeding the rubberized I/O port cover through the opening provided.  The unit will automatically lock into place.  3.  Apply external power to the desk mount.  The LED in the front of the desk mount will light along with the Power Status LED  on the GD3080.The desk mount includes a slot so you can simultaneously charge the main battery and an additional battery.note  Power must be applied to the dock for the ports to function.To detach the desk mount:1.  Release the latch  located on the lower left hand corner of the desk mount to detach the GD3080.2.  Pull straight up to remove the GD3080 from the desk mount.Memory UpgradeAdding memory allows the computer to operate faster, handle more tasks simultaneously, and work more efficiently  with large files. Users who increase memory demands by adding additional programs may notice slower operating speeds. Add-ing memory offsets this slowdown. The Tablet PC includes a memory card slot for adding additional memory. Calculate memory size by adding the size of the memory mod-ule to the existing built-in memory. For example: 128 MB (mod-ule) + 128 MB (built-in memory) = 256 MB Total.  The maximum memory configuration is 1.2 GB.Inserting a Memory CardIf you add memory to your GD3080, it will automatically detect the change in RAM (Random Access Memory) capacity when it restarts. You can verify RAM capacity has changed in the BIOS Setup Utility or in Windows®:1.  setuP:  Press the OK/ENTER key during boot-up.  Then select CMOS Setup menu.  This screen shows the amount of system memory.2.  For WindoWs® xP:  Right click (tap and hold) on My Com-puter and select properties. The bottom of the System Prop-erties, General tab lists the memory detected by Windows®.3.  For WindoWs® 7:  Click on Start, select Computer and select System properties.  The bottom of the System proper-ties, tab lists the installed memory detected by Windows®.Caution  Only use memory cards approved for use in your Tablet PC. Failure to do so may void your warranty.Surge ProtectionA large number of computer and high technology equipment damage is directly related to AC power and telephone line problems. These problems can include surges, spikes, noise, interference, and weather-related problems, which in turn can cause glitches, hang-ups, crashes, performance slow downs, and down time with computer equipment. The market is flooded with hundreds of AC power line surge suppressors advertising high performance surge protection; only a few of them actually provide adequate protection. Selecting the Right Surge ProtectionConsider the level of quality you need when selecting a surge suppressor. This depends on factors such as surge environ-ment, the type of equipment to be protected, and the quality of the electrical wiring and service. Surge EnvironmentSurge environment refers to the damage potential from electri-cal surges in a particular geographical area. A high quality suppressor should be used if there is frequent lightning activity in the area and the location service is fed by overhead utility poles.
General Dynamics Itronix | 72-0145-001  GD3080 User GuideOptional EquipmentType of Equipment to be ProtectedIf the computer is equipped with a modem, the modem should also be surge protected. Protecting the power line without pro-tecting the modem line provides only partial protection. Quality of Electrical Wiring and ServiceWiring should be up to current NEC standards and have veri-fied good AC grounds. It is important that your computer system be plugged into a grounded AC outlet when charging and that all peripherals connected to your system reference the same AC ground.Equipment SelectionThere are a number of companies that sell quality surge suppressors. When you are looking for a surge suppressor, consider these options. Expect to pay at least $50 for a good quality surge suppressor. The surge suppressor should be a UL 1449, 497, and 1283 listed for surge suppression, modem surge protection, and RFI/EMI noise filtering respectively. The surge suppressor should have diagnostic LEDs that verify good AC ground, proper wiring, and proper surge operation. On/off switches that light are not recommended since they can produce electrical noise. The Joule ratings should be a minimum of 480 Joules for the AC surge circuit. The Joule ratings should be a minimum of 240 Joules for the modem. The modem surge circuit should present low capacitance to the modem line or it will slow the transmission rate. Capacitance should be specified at less than 50 picofarads. Quality surge suppressor manufacturers generally offer a life-time warranty. Consider obtaining a protected equipment coverage policy which insures the equipment in the event of surge damage. The devices that will be attached to the computer also need to be surge protected.
General Dynamics Itronix | 72-0145-001 GD 3080 User GuideWe are committed to providing you world class support services that ensure the lowest total cost of ownership for your hardware investment. The icareServices program will help you maximize end user productivity and decrease overall system operating cost. Client Care Center (CCC)General Dynamics Itronix Client Care Center – The CCC is an internal central point for telephone warranty support for all General Dynamics Itronix products.  Our Technical Service Representatives know your product and provide input and sup-port for problem resolution.One call to the convenient Client Care Center number at (1-800-638-9270, Opt 2) allows a single entry point of access to meet all your needs.  You may also use the web portal at www.gd-itronix.com/CCC.  The CCC receives calls from 5am-5pm Pacific Daylight Time, Monday through Friday (except on holidays).  Sorry, 1-800 numbers ARE NOT accessible from Mexico.Technical Service Representatives provide the following sup-port services:  Product troubleshooting  RMA origination for service return  RMA status check on product service   Check status warranty/service kit orders  Coordinate requests for product upgrades  Wireless Radio registration  icareServeNet registration and trainingGeneral Dynamics Itronix offers service uplift programs for clients who wish to expand their support coverage beyond the basic warranty.  Coverage and details of these programs are available online at www.gd-itronix.com Product Support - DownloadsIt is easy to get the software updates you need to keep your configuration current and get the most from your product. Click here to get current downloads.  note  Downloads are listed by model and product number (GD3080).  Service and Support
General Dynamics Itronix | 72-0145-001  GD3080 User GuideThis section is designed to help you determine and fix problems you might encounter while operating the GD3080.Try the following steps in order: 1.  First, look through the categories in this section for a solution. 2.  If you do not find a solution for your problem here, try one of the resources listed below under “For More Help.”3.  If you are having a problem with a computer application , use the online help that comes with the application to find a solu-tion.4.  If you still cannot resolve your problem, contact the help desk at your organization.For More Help Windows® Help is already installed on your system.  To access this information, select Start, Help and Support. Take the Windows® Tutorials.  Select Start, Get Going with Tablet PC. Third-party Windows® manuals are available from your local bookstore. Applications My application locks up, acts strangely, or produces a General Protection Fault (GPF) error Press CTRL+ALT+DEL to start the Logon Protector, then select the Task Manager.  Click the Applications tab on the Task Manager and look for the application that is having problems.  If the application is hung, the Status column will say “Not Re-sponding” after the task name.  Click on the unresponsive task/application, then click the End Task button. If you have tried to resolve the problem and your application still does not respond, you may need to restart your computer. To restart your computer:using WindoWs® xP: Select Start, Shut Down, Restart.  using WindoWs® 7:  Select Start, Shut Down, Restart. If the computer does not restart, the keyboard may be locked up.  Hold the Power Button for ten seconds or use the reset on the bottom of the unit.  Caution!  This will result in a loss of all unsaved data. The data on the hard disk could be corrupted.  Run CHKDSK. Windows® may be out of memory or resources.  You can try to close some open programs to free up some memory or exit  Windows® and restart Windows® by selecting Start, Shut Down, Restart.Communications programs don’t seem to work or they lock Windows®When you first try to use your communications application, the system responds with a message asking if you want to install the modem. Answer “Yes” to this question and follow the instructions on the screen to install it.When I rotate the display to portrait orientation my application does not work or does not display cor-rectlySome applications do not display or work properly in portrait orientation due to the rugged nature of your Duo-Touch‘s dis-play screen.  Use these applications in landscape orientation.BatteriesThe battery does not charge To prevent possible damage to the battery, the system will not allow a charge if the battery temperature is extremely hot or cold (such as in a closed, unattended vehicle). If possible, charge the battery in a location with a moderate temperature of around 20°C (68°F). If possible, turn off the computer while the battery is charging. If the battery is new or has been stored for a week or more, fol-low this procedure:1.  Make sure the computer is turned off.2.  Unscrew and open the battery cover, then remove the battery.3.  Connect the AC adapter to the computer and an AC wall outlet, and then turn on the computer by pressing the Power Button.  The Power Status LED will be solid blue when connected to external power. 4.  Let the computer complete the boot process.  Then reinstall the battery and replace the battery door.5.  Allow the system to remain idle for one hour with the AC adapt-er connected to the computer.  The Battery Status LED    is orange when the battery starts charging.6.  If the battery still fails to charge after an hour, remove the bat-tery, wait several seconds, and then install it again.7.  If the battery does not begin charging within several min-utes, return the unit for service.The batteries take much longer than seven hours to chargeUnder moderate temperatures, about 21°C (70ºF), the comput-er’s battery takes approximately 3 hours to completely charge while suspended and 3-5 hours to charge while powered on.  Under extremely cold or hot temperatures, however, the bat-tery can take up to 16 hours to fully charge. The batteries don’t last very longAs your battery ages, the maximum capacity that it can hold naturally decreases, and even the best maintained batteries eventually need to be retired. Consider replacing the battery if you are not getting the usage you need from it.Troubleshooting
General Dynamics Itronix | 72-0145-001  GD3080 User GuideTroubleshootingThe gas gauge isn’t full after charging the battery This may indicate that the charging process terminated prema-turely.  Calibrate the battery to align the gas gauge with the battery capacity.The gas gauge reads “full,” but the charging indica-tor light is still litIf you charge your battery daily, rely on the gas gauge read-ing to determine battery capacity. The charging process may continue even if the gas gauge reads full. External power can be removed because the battery is virtually full.My battery seems to have less and less capacity If your battery is new, or if you are using it for the first time, you will need to calibrate it prior to using it. As your battery ages, the maximum capacity that it can hold naturally decreases, and even the best maintained batteries eventually need to be retired. Consider replacing the battery if you are not getting the usage you need from it.Hard Disk  The hard disk will not spin up so the computer can’t boot upThis occurs if the unit is exposed to extremely low tempera-tures. This is not a hardware failure associated with the hard disk.  Allow the computer to warm to room temperature.  The minimum cold or soft boot temperature is 5°C (41°F).I can’t save files because the disk is fullReport this situation to your supervisor or your organization’s help desk.Disk Read ErrorAny card in the PC card socket except for a properly formatted memory card will cause this error since it is trying to read the PC card.Hard disk recoveryYour hard disk may have a recovery partition containing a copy of the original drive C: factory disk image. If you have a recovery partition, you can access it from Windows® or from a bootable USB floppy or CD:To recover your hard disk from Windows®From within Windows®, select Start, All Programs, Mobile Computer Tools, Hard Disk Recovery.To recover your hard disk 1.  Attach an external USB keyboard and an external USB floppy or CD-ROM drive with the unit turned off.2.  Press F11 while the unit is booting up to get to the Boot Menu.3.  Select Disk Recovery from the menu.Landline Modems  The modem doesn’t work When you first try to use HyperTerminal or similar application, the system responds with a message asking if you want to install the modem. Answer “Yes” to this question and follow the instructions on the screen to install it. Make sure the communication settings are correct in your ap-plication. Refer to the online Help for your application.The modem doesn’t dial a numberCheck these things: If you are using an external modem, make sure the cables are attached correctly. Make sure your communications parameters are correct in your application. Refer to the online Help for your application.The modem dials and receives an answer but does not establish a connection You may have incorrect parameters selected for your application to talk with the remote modem. Refer to the online Help for your application. You may need to adjust your modem’s baud rate or protocol selection.Communications programs such as HyperTerminal don’t seem to work or they lock Windows® If you are using the internal modem, be sure to specify the proper communications port .  When you first try to use HyperTerminal or similar application, the system responds with a message asking if you want to install the modem. Answer “Yes” to this question and follow the instructions on the screen to install it.The modem dials and the answering modem gener-ates tone, but our modem does not begin the train-ing sequence to establish a connectionAlthough the problem may appear to originate from the com-puter, the source of the problem is the answering modem. Try setting up the answering modem to generate the correct V.22 tone, which can usually be done by sending an AT command to the modem.
General Dynamics Itronix | 72-0145-001  GD3080 User GuideTroubleshootingMiscellaneous The computer shuts off unexpectedly The computer has entered suspend mode Suspend mode. Press the power button to resume. The battery capacity may be low. Connect external power to charge the battery, or replace the battery with a fully charged one. The battery contacts may be dirty.  Turn off the computer, remove the battery, and clean the contacts.The speaker volume is too high or too lowIncrease the volume by pressing FN+ESCAPE; decrease the volume by pressing FN+OK/ENTER KEY.The computer won’t turn on The battery may not be installed properly, or it may not be fully charged. Make sure a fully charged battery is properly installed. Connect external power to charge the battery if it is not charged. If you are using the AC adapter, check the electrical outlet you are using to make sure it is working properly. If the GD3080 does not turn on, restart the computer by holding down the Power Button for at least 10 seconds and then release it. If the Power Button does not work to reset the unit, press the Master Reset Key on the back side of your GD3080.The computer won’t turn offPress and hold the Power Button for at least 10 seconds.The computer enters suspend mode too quicklyWhen there is no activity for a period of time, the computer turns off or enters suspend mode. To extend this time, use the Power Management program and increase the non-activity time to enter suspend. The computer doesn’t automatically suspend Check to make sure the COM ports are off. For example, exit any application that uses COM ports. Make sure external power is not connected. Depending on power settings, some systems will not suspend automatically when they are connected to external power. Make sure the standby time is set properly in the Power Man-agement program.The system date and time are incorrectReset the correct date and time by choosing the Date/Time icon from Control Panel and making the appropriate changes.I receive an “out of memory” error message Too many applications may be running at the same time. Close applications you don’t need. If you’re using desktop wallpaper, set wallpaper to None. To do this, choose Display from Control Panel and make the appropri-ate change. Make sure you have enough space on your hard disk . Contact your supervisor or your organization’s help desk for assistance. Set up a permanent swap file. Contact your supervisor or your organization’s help desk for assistance.Holding down the Power button to reset the com-puter doesn’t always work Try resetting the computer again. If this doesn’t work, press the SECURITY KEY. Alternately, use your stylus tip to press the Master Reset Key on the back of the unit. If none of these solutions work, remove all power, including the battery pack, and allow the unit to remain idle for ten minutes. After ten minutes, connect external power and retry.PC Cards  I can’t remove the PC card  Press the ejector button located inside the PC card door on the side of the computer. The button will pop out. Press the ejector button again to eject the PC card.  Slide the card out.  If the ejector button malfunctions when you press it, release the button and then press it again.Disk Read ErrorAny card in the PC Card socket except for a properly formatted memory card will cause this error since it is trying to read the PC Card.The system does not recognize the PC Card CD-ROM when it is inserted into the PC Card socket There is a delay of 10 to 15 seconds before the CD-ROM drive is recognized. Drivers may not be installed. Contact your organization’s help desk for assistance.The computer locks up when I remove the PC cardBefore you remove the card, select the PC card icon  on the taskbar (in the tray area near the clock in the lower right cor-ner), and choose “Stop [card name] card.”
General Dynamics Itronix | 72-0145-001  GD3080 User GuideTroubleshootingPen / DisplayWhen I try to use the pen on my display, nothing happens If you cannot select objects accurately with the pen, you may need to recalibrate the display. Select Start, All Programs, Mobile Computer Tools, Tablet Calibration.  Then follow the on screen instructions. If you are using a conventional pen/stylus, verify you are in touch screen mode. To do this, press the LINE UP and LINE DOWN ar-row keys simultaneously. You will hear one beep when entering Touch Screen Mode and two beeps when entering Digitizer Mode. Check the tip of your pen/stylus. It should be replaced when worn. Five replacement tips and a tip removal tool are provided in your package.The display warps or pillows in high humidityThe computer remains functional; however, moving the com-puter to a more suitable environment will allow the display to recover.The touch screen doesn’t respond after a suspendThe touch screen needs a few seconds to work after a suspend.  Wait a moment and try again.I cannot change the orientationYour screen resolution may be set too low.  To adjust screen resolution, follow these instructions:For WindoWs® xP: Increase screen resolution by selecting Start, Control Panel, Display Properties. Then select the Set-tings tab and adjust the resolution.  For WindoWs® 7:  Select Start, Control Panel, Appearance and Personalization.  Adjust the resolution by selecting Adjust Screen Resolution under the Display heading.note  Not all configurations support 360° rotation.The display performance is slowThe temperature may be too cold.  Move the computer to a warmer operating environment.  I can’t read the display Adjust the brightness level up by pressing FN+ROTATE  and adjust it down by pressing FN+SECURITY. Your display may be turned off. Tap once on the display with your pen. If that doesn’t work the automatic power-saving mode may have shut off (suspended) the computer. Press the power button to resume.The underlined, inverse, and hypertext characters are difficult to read on the screenChange the color scheme.For WindoWs® xP:  From the Start Menu select the Control Panel.  Choose Display and then tap the Appearance tab to make changes to the color scheme.For WindoWs® 7:  From the Start Menu select the Control Panel.  Choose Appearance and Personalization and select Change the theme under the Personalization heading to make changes to the color scheme.I can’t see the cursor while using the DOS editorPress INSERT on the input panel to change from insert mode to overwrite mode and to enable a block cursor. When it defaults to insert mode, the DOS editor uses an underline cursor which is less visible than the block cursor for overwrite mode. The display appears to have random pixels darkened after scrollingContact your supervisor or your organization’s help desk for information about correcting this problem.I changed my display resolution, but I see no differ-ence on the screenTry restarting your computer for the changes to take effect.  The display cuts off the right side of the application or page in portrait modeSome applications do not display properly in portrait mode.  For example, you may need to scroll to the right to see all of the contents on the page.  For best visibility, use the landscape orientation to operate most applications.FAQsHow do I calibrate the pen/display?1.  First ensure you are in the mode (digitizer or touch screen) and orientation (landscape or portrait) you want to calibrate.2.  Select Start, All Programs, Mobile Computer Tools, Tablet Calibration.  3.  Follow the on screen instructions.How do I change the main battery?1.  Turn off the Tablet PC and remove external power.2.  Turn the unit over and remove the cover screw with a Phillips screwdriver.3.  Lift out the battery and replace it with a new battery.4.  Screw the cover on and press the power button .
General Dynamics Itronix | 72-0145-001  GD3080 User GuideTroubleshootingHow do I adjust the speaker volume?You can change speaker volume by tapping the volume icon in the Windows® tasktray or by using the following hot key combinations: Press FN+ESCAPE to increase volume Press FN+ENTER to decrease volumeHow do I clean the display screen?To clean the display assembly, use the same cleaning solution and procedure described earlier for the outside case. In some cases, you can use a small amount of isopropyl alcohol to remove streaks or smears. Use a soft, clean cloth to clean the display. Do not use paper products because they can scratch the screen.How do I change the display screen’s brightness? Press FN+ROTATE to increase display brightness.   Press FN+SECURITY to decrease display brightness.How do I change the display orientation?You can change between landscape and portrait orientation by pressing the ROTATE HOT KEY. You can also change the orientation via the input panel by tapping CTRL+ALT and then selecting one of the arrow keys.note  Some applications may not display properly in portrait orientation.How do I switch between Digitizer and Touch Screen modes?using hot keys:  Press the LINE UP and LINE DOWN hot keys simultaneously to switch the display between digitizer and touch screen modes while in Windows®. You will hear one beep for touch screen mode and two beeps for digitizer mode.using WindoWs®:1.  Select the Buttons / Device / Brightness Properties icon  in the taskbar. 2.  Select the Device On / Off  tab. 3.  Select the Digitizer / Touch Screen button to change be-tween digitizer and touch screen modes.How long will the battery last?The main Lithium-Ion battery lasts approximately 3 hours with normal use.  You can increase your runtime on battery power by using a second external battery.How do I optimize the GD3080 for left handed use? You can select a left-handed preference. Select Start, Control Panel, Tablet and Pen Settings. Then select the Settings tab and check Left-handed in the Handedness and Menu location fields. You can change the screen orientation 90°, 180°, or even 270°.  See the answer to “How do I change the display orientation?” above.    You can change the hand strap on the back of the Tablet PC for the use that best suits you.  Where can I find the user manual? Start the computer and launch the desktop shortcut for  GD3080 Help.

Navigation menu