General Dynamics Itronix IX250RIM902 User Manual Help
General Dynamics Itronix Corporation Help
Contents
- 1. Users Manual
- 2. IX550 Users Manual
IX550 Users Manual

GoBook Pro Help Page 1 of 74
file://C:\WINDOWS\TEMP\~hh6357.htm 5/23/01
Getting Started
Congratulations on your purchase of the Itronix GoBook Pro computer! Your new GoBook Pro
features the most innovative advances in portable computing technology. It combines state-of-the-art
ergonomics with a rugged, durable architecture to provide you with a notebook computer that is
compact, powerful, rugged and easy to use. Designed for a wide range of business and personal
productivity applications, the GoBook Pro is an ideal choice for use in applications that require the
ultimate in ruggedness, durability, performance and intrinsic safety.
For maximum expandability without compromising portability, the GoBook Pro accommodates a
number of modules, including USB interfaces and one PC card slot. The high capacity hard disk drive
provides you with plenty of storage space for multimedia files and applications.
The GoBook Pro features a standard 81-key Nitevue® keyboard (82-key international). The high-
resolution 10.4-inch touch screen LCD panel provides clear and crisp viewing with touch screen
convenience.
This User’s Guide contains all the information you need to set up and use your new GoBook Pro. It
describes all the features of the GoBook Pro in an easy-to-read yet thorough manner.
GoBook Pro Help 1. Getting Started Topics
GoBook Pro Help Page 2 of 74
file://C:\WINDOWS\TEMP\~hh6357.htm 5/23/01
Unpacking Your System
Inside your packaging you will find:
lItronix GoBook Pro computer
lPower cord
lAC adapter
lBattery
l2 Styluses
lGoBook Pro Quick Start Guide
You may have additional components or peripherals if you ordered these items separately. Check your
packing slip for a complete list of items included in your package.
79_0100_001
© 2001 Itronix Corporation. All rights reserved.
Precautions
You can use your computer under a wide range of environmental conditions. However, to ensure long
use and continued high performance, consider the following factors when setting up your computer:
lFollow all warnings and instructions noted in this documentation and in the Windows Help
program.
lThe first time you use your computer, we recommend that you carefully read Power Management
to familiarize yourself with some battery basics to ensure optimum battery performance
lUnplug the computer from the power outlet before cleaning. Use a damp cloth for cleaning. Do
GoBook Pro Help
1. Getting Started Topics

GoBook Pro Help Page 3 of 74
file://C:\WINDOWS\TEMP\~hh6357.htm 5/23/01
not use aerosols, solvents, or strong detergents
lSlots and openings in the computer case are for ventilation purposes. Do not block or cover these
openings or the system could overheat
lOn the bottom of the GoBook Pro, there is a label with information on the power requirements of
this system. These requirements must be followed. If you are unsure of your local power supply,
consult your dealer or local Power Company
lDo not step on or place anything on the power cord
lIf you use the computer with an extension cord, ensure that the total ampere ratings of all the
devices sharing the extension do not exceed the rating of the extension cord or the rating of the
wall outlet
lNever push foreign objects into the computer through any of the slots or openings. Dangerous
voltages are present, which could cause electric shock or fire, or damage sensitive components
lFor best results, use a power strip with a built-in surge protector. Do not use inferior extension
cords as this may result in damage to your computer
79_0100_001
© 2001 Itronix Corporation. All rights reserved.
Checklists
After opening the package, carefully inspect the contents. Contact your dealer if any items are missing
or appear damaged. The shipping carton should contain the following:
STANDARD
lA GoBook Pro computer
lA battery
lAn AC adapter with power cord
GoBook Pro Help
1. Getting Started Topics

GoBook Pro Help Page 4 of 74
file://C:\WINDOWS\TEMP\~hh6357.htm 5/23/01
l2 Styluses
lQuick Start Guide
OPTIONS
The following items are normally optional, but some vendors may include them in the standard package.
Some items may not be available in some countries, or some vendors may choose not to carry all the
items.
lAdditional battery pack
lShoulder Strap
lAudio adapter cable
CAUTION When purchasing any of the accessories listed above, purchase only those accessories that
are approved for use with your computer. The above accessories are proprietary items. Your system
vendor can obtain these approved accessories. If you use items that are not approved for use with this
computer, you may cause your computer to malfunction, or to emit or receive electromagnetic radiation
in excess of local regulations. For non-proprietary accessories such as PC Cards or printers, ensure that
the accessory functions properly in your computer before making the purchase. Your system vendor
may be able to recommend reliable brands and models.
Features
High Capacity Hard Disk Drive
The computer has a high capacity hard disk drive, enabling you to install your favorite programs and
store large multimedia files.
Full Array of Ports and Connectors
Your computer includes standard ports for connecting to peripherals such as USB devices and
monitors. USB ports allow you to add many other peripherals.
Bright SVGA LCD
Your computer has a bright, easy to view SVGA LCD panel with integrated touch screen.
Built-in Speaker and Microphone
The speaker and internal microphone enable you to run a variety of multimedia applications. An
optional audio adapter cable is available for connecting external speakers (headphones) and
microphone.
Function Keys

GoBook Pro Help Page 5 of 74
file://C:\WINDOWS\TEMP\~hh6357.htm 5/23/01
Function keys allow you to suspend your computer, shut the LCDs off, and give you easy control of
audio and your monitor.
Where to Look For Information
About Your Computer
This User’s Manual describes the key elements of your computer. New users can find a simple step-by-
step orientation in this chapter.
About Windows
The Windows Online Help, found on the Start menu, offers extensive Windows assistance. Welcome
to Windows offers an online orientation for new Windows users. You can find it in:
Start/Programs/Accessories/System Tools.
79_0100_001
© 2001 Itronix Corporation. All rights reserved.
The First Time. . .
Using your computer for the first time involves:
lInstalling the battery
lConnecting the AC adapter to the computer
lCalibrating and charging the battery
Installing the Battery
Make sure the computer is sheltered when you install the battery; the computer is not weather sealed
until the battery is properly installed. The battery should be fully charged before you operate the unit on
battery power. To get the most from your battery, follow the guidelines in Power Management.
To install the battery
GoBook Pro Help
1. Getting Started Topics

GoBook Pro Help Page 6 of 74
file://C:\WINDOWS\TEMP\~hh6357.htm 5/23/01
1. Align the battery connectors and place the battery in the computer.
2. Slide the battery latch to the locked position.
3. Make certain that the battery latch engages properly.
NOTE When the battery is installed and the computer is connected to AC power, see Connecting the
AC Adapter below, it starts charging automatically. At moderate temperatures, approximately 70°
Fahrenheit (21°C), the battery will be fully charged in four to six hours. In warmer or cooler
temperatures, the battery can take much longer to fully charge. Refer to Power Management for
additional information.
Connecting the AC Adapter
To connect the AC adapter
1. Connect the AC adapter power cord to the AC adapter.
2. Connect the AC adapter to the power jack at the right side of your computer.
3. Connect the AC adapter power cord to an AC outlet.
4. Lift the display to open the LCD.
5. Open the LCD panel to a comfortable viewing angle.
6. Press FN On (FN+spacebar) to turn ON the power.
Turning the Computer On and Off
You can operate the computer while the battery is charging, while on external power , or on battery
power only.
To turn on the computer
lPress the FN On (spacebar) once, and then give the system time to respond.
To turn off the computer
1. Press FN Off (Q key) to enter Off Mode
2. From the Start menu, click Shut Down. Then, from the Shut Down Windows screen select Shut
Down and click OK.
3. Press FN+F10 to Suspend to Disk
4. Close the lid (monitor) of the computer. To enable this option go to Start, Settings, Control
Panel, and Power Management. Choose the Advanced tab and select Standby or Shutdown from
GoBook Pro Help Page 7 of 74
file://C:\WINDOWS\TEMP\~hh6357.htm 5/23/01
the Display lid suspend/resume drop down box.
Computer Off In Off Mode, the contents of your computer’s memory are held intact, while
practically all the rest of the components in your computer either turn off completely, or reduce power
consumption to a minimum. In Off Mode, your computer remains active, but with a minimum possible
power consumption. Return the computer to full power by pressing FN On (spacebar). A fully-charged
battery can maintain in Off Mode for many hours.
Suspend to Disk (Hibernate) FN+F10 enters Suspend to DiskMode. This is similar to turning off the
computer, except that the current state of the computer is copied to the hard disk as a special file. In a
Suspend to Disk there is no power consumption. When the computer returns from suspend mode , the
desktop appears with the same files and programs open as when the computer was suspended. Suspend
to Disk is very useful when you don’t want to take the time to shut down all open programs one by one
to shut off the computer. This mode is also called hibernation mode.
CAUTION Shutting down the computer improperly could result in lost or corrupted data.
Adjusting the Volume
Volume for the computer is adjusted by using function key combinations.
l FN + F6 decreases the volume
l FN + F7 increases the volume
l FN + F5 toggles the volume mute on or off
You can also adjust the volume with the Windows volume control applet, which is located on the
taskbar and looks like this .
NOTE Adjusting the volume using the function keys produces only a slight change with each press. It
may take several presses to increase or decrease the volume to a level that you desire.
79_0100_001
© 2001 Itronix Corporation. All rights reserved.
Calibrating the Touch Screen
GoBook Pro Help 1. Getting Started Topics

GoBook Pro Help Page 8 of 74
file://C:\WINDOWS\TEMP\~hh6357.htm 5/23/01
Your GoBook Pro computer has a touch screen display. Follow the guidelines below to calibrate the
touch screen for optimum use.
Calibrating the touch screen
To calibrate the touch screen click the Start menu, select Programs, UPDD or Touch screen, and then
select “Calibrate. This opens the touch screen calibration program.
Calibrating the touch screen involves touching and releasing on the X with the stylus on your screen.
This action aligns the background image with the screen.
NOTE If you cannot select objects accurately with the stylus you may need to re-calibrate the touch
screen. This can be accomplished by revisiting the procedure above.
Adjusting the Screen
You can adjust the display brightness for better viewing.
Use the following keys to make adjustments:
Setting the Date and Time
To set the date and time
1. Click the Start button, select Settings, select Control Panel, and double-click the Date / Time
icon.
2. From the Date / Time Properties menu, make changes to the Time and Date, and then close this
CAUTION
lAlways use an approved stylus or your finger.
lNever use sharp, hard, or abrasive implements on the
touch screen such as ball point pens, pencils, or keys.
They could damage the screen.
lTo clean the touch screen panel, apply a household glass
cleaner to a soft, clean, dry cloth and wipe the screen.
To Do This... Press
Brighten the display FN+F3
Darken the display FN+F2
GoBook Pro Help Page 9 of 74
file://C:\WINDOWS\TEMP\~hh6357.htm 5/23/01
screen by clicking OK.
79_0100_001
© 2001 Itronix Corporation. All rights reserved.
Startup Problems?
If your computer does not operate, try these solutions.
lConnect the AC adapter to charge the battery if it is not charged.
NOTE The Power LED on the AC adapter should be lit as well as the external power LED
activity indicator on the GoBook Pro if the AC adapter is connected and functioning properly.
Additionally, one of the following power icons should appear in the task tray.
lIf the AC adapter is connected, make sure the electrical outlet you are using works.
lCheck to make sure the battery is installed and charged properly.
lIf the battery doesn’t begin charging, remove the battery, connect the AC adapter, and turn on
the computer by pressing FN On. Reinstall the battery. The 2nd indicator light blinks while the
battery is charging.
The Troubleshooting section of this manual lists additional solutions you can try.
79_0100_001
© 2001 Itronix Corporation. All rights reserved.
Getting Familiar with Your Computer
The GoBook Pro computer is a ruggedized , weather-sealed, intrinsically safe laptop computer system
GoBook Pro Help
1. Getting Started Topics
GoBook Pro Help Page 10 of 74
file://C:\WINDOWS\TEMP\~hh6357.htm 5/23/01
built for the demanding environment of the mobile worker. Designed for use by mobile workforces, this
computer is a superior work tool for collecting, managing, and communicating information in the field.
The following pages describe the external and internal features of your GoBook Pro computer.
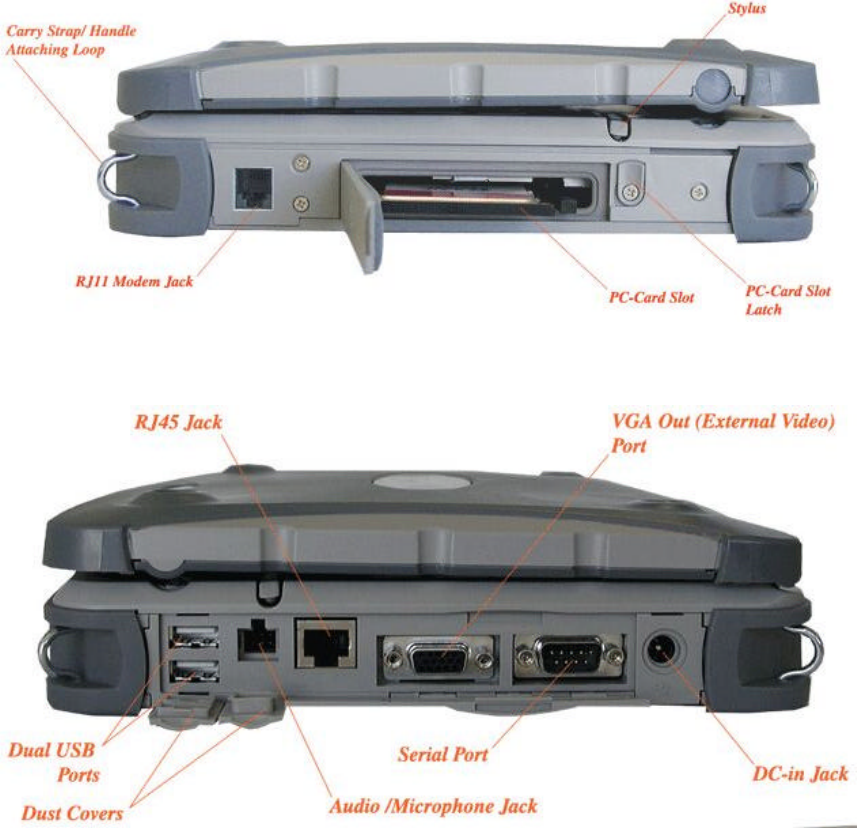
Individual Parts
The following diagrams and descriptions provide an overview of your GoBook Pro computer.
Front View
Back View
GoBook Pro Help 2. Getting Familiar with Your Computer Topics
GoBook Pro Help Page 11 of 74
file://C:\WINDOWS\TEMP\~hh6357.htm 5/23/01
Left Side View
Right Side View
Bottom View
LED Activity Indicators
The activity indicators, located between the keyboard and the touch screen, light up when a particular
function of the computer is active. Each indicator is marked with a corresponding symbol and is visible
when the lid is open or closed. LED numbers are from left to right
GoBook Pro Help Page 12 of 74
file://C:\WINDOWS\TEMP\~hh6357.htm 5/23/01
79_0100_001
© 2001 Itronix Corporation. All rights reserved.
Keyboard Basics
The keyboard on the GoBook Pro computer looks much like the keyboard of a typewriter and operates
in almost the same way. While typewriter keys put characters on paper, the keys on the laptop enter
characters in the computer and perform certain functions, depending on the application or program.
The GoBook Pro computer features:
Icon & LED
#Function LED Description
LED #1
Power Status Amber The computer is powered and operating
Blinking
Amber The battery is low
Not lit The computer is suspended or off
LED #2
Charge Status Amber The computer is attached to AC power and the
battery is fully charged
Blinking
Amber The computer is attached to AC and the battery
is charging
Not lit The computer is not attached to AC power
LED #3
Disk Status (HW) Amber The hard disk drive is being accessed
Not lit The hard disk drive is not being accessed
LED #4
Radio Status Green RF modem is on and in range
Amber RF modem is on and out of range
Blinking
Green A message is waiting
Blinking
Amber RF is transmitting
Not lit RF modem is off
LED #5 BlueTooth Status
(HW) Amber The BlueTooth radio is powered on
Not lit The BlueTooth radio is not powered on
GoBook Pro Help
2. Getting Familiar with Your Computer Topics

GoBook Pro Help Page 13 of 74
file://C:\WINDOWS\TEMP\~hh6357.htm 5/23/01
l81-key US keyboard; 82-key international keyboard
lTwelve function keys, F1-F12
lEmbedded numeric keypad
lMouse keys and cursor control keys
Restarting the Computer
Primary Keys
Press… To do this
CTRL+ALT+DEL twice Soft reboot the computer.
CAUTION All open and unsaved data will be lost.
Press and hold both mouse
buttons for about ten seconds
and then release the buttons.
Reset the computer
Key Description
ALT The alt (alternate) key is used with other keys to perform special tasks.
Pressing CTRL+ALT+DEL twice resets the computer, processing stops and
the computer attempts to restart the operating system .
ALT GR The ALT GR key, a special function key found on the 82-key international
keyboard, when pressed and held, allows you to use characters in the bottom
right of a three character key.
BACKSPACE The BACKSPACE key, sometimes represented on the keyboard as a left
arrow, moves the cursor one position to the left. The character to the left of the
cursor is erased.
CAPS LOCK Pressing the CAPS LOCK key one time locks keys A through Z in the UPPER
CASE position. Pressing the CAPS LOCK key again returns the letters to
lower case. While in the upper case mode, pressing the SHIFT key results in
lowercase characters when entered. You still have to use the SHIFT key to
display characters located on the upper portion of the keyboard. For example,
press SHIFT+8 to type an asterisk (*), even when the CAPS LOCK key is
activated.
The CAPS LOCK activity indicator is on when the keyboard is in CAPS
LOCK mode. This indicator can be found in the windows tray at the lower
right corner of the screen.

GoBook Pro Help Page 14 of 74
file://C:\WINDOWS\TEMP\~hh6357.htm 5/23/01
Arrow Keys
The arrow keys are defined by the software application.
The UP ARROW key usually moves the cursor up one line. In some cases, you can use the up arrow to
make selections from menus and scrollable list boxes.
The DOWN ARROW key usually moves the cursor down one line. In Windows, you can use the down
arrow to make selections from menus and scrollable list boxes.
The RIGHT ARROW key usually moves the cursor one character position to the right.
The LEFT ARROW key usually moves the cursor one character position to the left.
Function Keys
Hold the FN key while pressing the numbered function key.
Key Description
CTRL The CTRL (control) key works with other keys to perform a variety of functions.
ENTER The ENTER key signals the computer that you have completed your entry. This is
your way of telling the computer to process the information that you have entered.
ESC The ESC (escape) key cancels the current line if you are working in DOS. In some
DOS applications, pressing the ESC key backs you out of your last menu selection.
In Windows, the ESC key allows you to exit a pop-up window or message box.
PRTSC In Windows, pressing the FN+PRTSC
(print screen) key copies the current screen or
window to the clipboard so you can paste it into documents. Pressing
ALT+PRT SC
key copies the active window to the clipboard.
SHIFT The SHIFT
key changes the keys A through Z to the UPPER CASE position. When
you press an alphabetic key, the character appears as a capital letter. When you press
SHIFT with other keys, the characters on the upper part of the keys appear. For
example, pressing SHIFT+7 displays an ampersand (&).
FN
Function. Some special keys have been established to perform important tasks when
pressed and held with the FN key. These keys are described later in this document.
The FN key legend is color keyed to other special keys on the keyboard
SPACEBAR Use the SPACEBAR to enter a space and move the cursor one character to the
right.
TAB The TAB key moves the cursor to the next tab stop or field. Tab stops are defined
by your operating system or application program. Press the TAB key to move from
one field or text box to another.

GoBook Pro Help Page 15 of 74
file://C:\WINDOWS\TEMP\~hh6357.htm 5/23/01
Numeric Keypad
The numeric keypad is embedded in the keyboard area. The embedded keypad emulates the numeric
keypad typically found on a full-size keyboard. It is arranged like a calculator for applications that
require you to key many numbers or for use. For example, with the Calculator in the standard
Windows Accessories.
Pointing Stick
The pointing stick is a pressure sensitive pointing device that provides all the features of a two-button
mouse. Its primary function is to move the cursor around the screen.
Using Your Pointing Stick
Clicking
1. First, place your fingers on the pointing stick.
2. Gently move your finger in the direction you want the cursor to move. The stick detects the
change in pressure and moves the cursor in the corresponding direction.
3. The left and right buttons located directly below the pointing stick are the same in function as
those on a two-buttoned mouse. Clicking these buttons makes selections, drags objects, or
performs a variety of other functions depending on the software. To select an object, first move
the pointer over the object you want to select, and then press the left button one time. The
functions of these buttons are software specific.
NOTE The pointing stick also has the ability to do a left button click if it is tapped.
Double-clicking
lDouble-clicking is a common technique for selecting objects or launching programs from icons.
Once you have moved the pointer over the object you wish to select, rapidly press the left button
two times. This action is commonly referred to as “double-clicking” an object.
NOTE Double-clicking can also be accomplished by double-tapping with the pointing stick.
Function key Description
FN+F2 Decreases LCD brightness
FN+F3 Increases LCD brightness
FN+F5 Toggles the audio between mute and on
FN+F6 Decrease volume
FN+F7 Increase volume
FN+F8 Toggles between LCD/CRT displays
FN+F10 Suspend to Disk
FN+SPACEBAR Turns on computer
FN+Q Turn off computer

GoBook Pro Help Page 16 of 74
file://C:\WINDOWS\TEMP\~hh6357.htm 5/23/01
Dragging
lMove the pointer to the desired location then press down the left button. While still holding down
the left button, move the pointer to the desired location. Release the button.
lMove the pointer to the desired location. Tap the pointing stick twice quickly as if you were
double-clicking, however do not remove your finger after the second tap. Move the cursor to the
desired location. Lift your finger to finish dragging.
Adjust the pointing stick settings by selecting Settings/Control Panel/Mouse/Buttons. These settings
allow you to change the orientation of the pointing stick from right-handed to left-handed, and fine-tune
the pointer movement and timing of clicks.
General Guidelines
The mobile computer uses a Liquid Crystal Display (LCD), which is the type of screen used on many
notebook and sub-notebook computers. One problem experienced on computers with an LCD display,
especially in cold environments, is that the cursor seems to “disappear” whenever the mouse is moved
quickly. To improve the visibility of the mouse cursor, you should:
lEnable the “Pointer Trails” feature to add trailing cursors.
lUse a slow or medium speed/sensitivity level.
You can combine a higher level of acceleration with a slow or medium speed/sensitivity level. This will
allow you to move the mouse cursor quickly by increasing your finger pressure, while still providing a
finer degree of control when you apply minimum pressure.
NOTE To change the speed of the mouse, from the Start Menu select Settings, Control Panel, and
then choose Mouse to make adjustments.
Connecting an External Keyboard or Mouse
You can use your GoBook Pro computer with an optional external keyboard, numeric keypad, or
mouse. The devices are “hot swap” capable, which means you do not have to power down the GoBook
Pro to connect these devices to the USB connection located on the right side of the unit.
79_0100_001
© 2001 Itronix Corporation. All rights reserved.
GoBook Pro Help 2. Getting Familiar with Your Computer Topics
GoBook Pro Help Page 17 of 74
file://C:\WINDOWS\TEMP\~hh6357.htm 5/23/01
Disk Drives
The Hard Disk Drive
The hard disk provides high-capacity storage and fast access. Windows and most programs are stored
here. Your GoBook Pro identifies the hard disk drive as drive C.
79_0100_001
© 2001 Itronix Corporation. All rights reserved.
The PC Card Slot
The PC card slot can be used as an interface between your computer and a variety of communications
devices, such as network adapters, SCSI adapters, fax/modems, or they can be used to provide
additional data storage capacity. Your computer’s PC Card slot supports Type I, or II PC Cards, 32-bit
CardBus cards, and Zoomed Video cards. Type III PC Cards require an optional extender card.
Installing a Card
1. The top side of a PC Card is usually identified with a label. Insert the card into the slot with the
top up and the edge with pinhole contacts going in first. You will feel some resistance as the card
slides into the back of the slot.
2. PC Cards require drivers, or a program that allows the operating system to use a specific device.
Many drivers are included with Windows, but if not, you will be prompted to install the driver
included with your card.
3. In Windows 98, the computer will beep twice to indicate successful installation. A single beep
means that there was a problem recognizing the card. There is no beep with other versions of
Windows software .
NOTE Please read the instructions included with individual PC Cards. Some cards may be inserted
with power on, while others require that the computer be turned off.
GoBook Pro Help 2. Getting Familiar with Your Computer Topics

GoBook Pro Help Page 18 of 74
file://C:\WINDOWS\TEMP\~hh6357.htm 5/23/01
Removing a PC Card
1. If a PC Card is in use, you must shut down the PC Card before removing it.
2. Click the PC Card icon on the right side of the Windows tray taskbar , then click Stop.
3. When the Windows message appears, telling you that it is safe to remove the card, click OK.
4. Press the eject button on the PC Card slot to release the eject button (it is spring loaded and
remains hidden until it is pressed).
5. Press the eject button again to release the PC Card.
79_0100_001
© 2001 Itronix Corporation. All rights reserved.
Connecting to an External Monitor
The GoBook Pro has a 15-Pin VGA monitor port to connect your computer to an external monitor.
Using the VGA monitor port for dual display
You may use an external monitor simultaneously with your GoBook Pro’s LCD.
1. Use the FN+F8 hot keys to cycle through the CRT/LCD settings or do the following:
2. Locate the 15-pin VGA monitor port on the right side panel of your GoBook Pro and connect the
video signal cable from the external monitor to the monitor port.
3. Connect the monitor’s power cable to a power outlet and turn on the monitor.
4. If the new monitor has not automatically been detected and is not displaying what appears on
your GoBook Pro’s LCD screen, open the Control Panel.
5. Double-click Display. The Display Properties window opens.
GoBook Pro Help 2. Getting Familiar with Your Computer Topics

GoBook Pro Help Page 19 of 74
file://C:\WINDOWS\TEMP\~hh6357.htm 5/23/01
6. Click the Settings tab.
7. Click the Advanced button.
8. Click the S3DuoVue tab. The screen shown at the right appears.
9. Select the CRT box to enable display on an external monitor.
10. You can also use the FN+F8 hot keys to cycle through the CRT/LCD settings.
79_0100_001
© 2001 Itronix Corporation. All rights reserved.
Making Connections
Your computer is equipped with a full array of ports and connectors, including standard input/output
(I/O) ports for quickly and easily adding peripheral devices such as printers and monitors. Refer to
documentation included with individual devices for details on connecting these devices to your
computer. Your computer may also include modem and LAN (optional) ports, offering advanced
communications technology.
Right Side Connectors
1 Serial Port
The 9-pin serial port can be used to connect your computer to serial devices such as fax/modem or
serial mouse. This port is identified as COM1 and is 16550A compatible.
2 LAN RJ-45 Jack (optional)
With the built-in Ethernet LAN combo, you can make LAN connections without installing PC cards.
Connection speed is 10/100 Mbps.
3 USB (Universal Serial Bus) Ports (2 Connectors)
The Universal Serial Bus (USB) is the latest standard for attaching input devices, scanners, and other
devices to a PC. USB devices can be chained together on a single cable. USB is 1.1 compliant.
GoBook Pro Help
3. Making Connections Topics
GoBook Pro Help Page 20 of 74
file://C:\WINDOWS\TEMP\~hh6357.htm 5/23/01
4 Microphone/Audio Connector
Connect a microphone to this port to record audio. Connect external speakers or a stereo headset to
listen to multimedia.
5 External Monitor Connector
Connect an external monitor to this port.
79_0100_001
© 2001 Itronix Corporation. All rights reserved.
Left Side Connectors
1 PC-Card Slot
Use this slot to connect PCMCIA-card devices.
2 Fax/modem RJ-11 Jack
The fax/modem can transmit data using the 56 Kbps V.90 protocol, and send and receive faxes at 14.4
Kbps. In some countries, local regulations may not permit the use of the fax/modem designed for this
system. In this case, you may use a PCMCIA modem.
CAUTION Plug your modem into an analog telephone jack only. Most homes use analog lines. Do not
use digital lines, such as the PBX and ISDN systems found in many offices. Digital lines may damage
your modem.
79_0100_001
© 2001 Itronix Corporation. All rights reserved.
If You Have a Wireless Modem
If your GoBook Pro computer is equipped with a wireless modem, you must first register it with the
GoBook Pro Help
3. Making Connections Topics

GoBook Pro Help Page 21 of 74
file://C:\WINDOWS\TEMP\~hh6357.htm 5/23/01
appropriate network provider.
Before using your wireless modem you must sign up for service with a wireless network provider.
When you register, you will need to furnish the network provider with your modem ID and the
computer’s serial number. This information is printed on a label located on the bottom of your GoBook
Pro computer.
Registering Your Wireless Modem
Air Card 300 (CDPD)
When the computer is booting, you may be asked if you want to make the Sierra Wireless AirCard 300
your primary network interface card. For this procedure, click Yes and run Wireless Expert.
NOTE Wireless Expert should start automatically.
Call your preferred cellular data provider and tell them the AirCard EID displayed on the first screen.
Then follow the on-screen procedures.
Air Card 350 (CDPD)
When the computer is booting, you may be asked if you want to make the Sierra Wireless AirCard 350
your primary network interface card. For this procedure, click Yes and run Wireless Expert.
NOTE Wireless Expert should start automatically.
Call your preferred cellular data provider and tell them the AirCard EID displayed on the first screen.
Then follow the on-screen procedures.
RIM 902M (Mobitex) for Cingular
Record the radio ID and the GoBook Pro Serial number as labeled on the bottom of the GoBook Pro or
shipping box. With your company registration account information, call Cingular at 1-800-662-4839
and request registration. Run a reliable radio application to verify registration was successful.
Cisco Aironet Wireless LAN
Contact your local area network administrator to setup your computer for your network.
CAUTION Your modem generates radio frequency (RF) signals. Do not operate the radio modem
before you have registered it with a network provider. The network will not accept a signal from an
GoBook Pro Help
4. Wireless Modem Topics

GoBook Pro Help Page 22 of 74
file://C:\WINDOWS\TEMP\~hh6357.htm 5/23/01
unregistered device. Unauthorized use of your radio modem may interfere with local business or
government communications, resulting in fines or other legal action.
79_0100_001
© 2001 Itronix Corporation. All rights reserved.
Wireless Modem LED Status
Air Card 300 (CDPD)
The wireless modem is powered ON after reboot, or resume, as indicated by the wireless modem LED
activity indicator being a steady green. It can be turned off by right clicking on the PC Card icon in the
system task tray, and selecting “Stop Sierra Wireless AirCard 300 CDPD”. It can then be repowered by
doing a suspend/resume or a reboot.
Air Card 350 (CDPD)
The wireless modem is powered on after reboot or resume as indicated by the wireless modem LED
activity indicator being a steady green. It can be turned off by right clicking on the PC-Card icon in the
system task tray, and selecting “ Stop Sierra Wireless AirCard 350 CDPD “. It can then be repowered
by doing a suspend/resume or a reboot.
RIM 902M (Mobitex) for Cingular
The wireless modem LED activity indicator has three states when a DataTac wireless modem is
installed. They are:
lSolid Green LED – Wireless modem is ON and in range, regardless of the state of the computer
lFlashing Green LED – Wireless modem is ON, and has a Message Waiting from the network
lLED Off – Wireless Modem is OFF. No power is supplied to the wireless modem
lSolid Yellow LED - Wireless modem is ON and out of range
lFlashing Yellow LED - Wireless modem is on and transmitting
GoBook Pro Help
4. Wireless Modem Topics

GoBook Pro Help Page 23 of 74
file://C:\WINDOWS\TEMP\~hh6357.htm 5/23/01
Cisco Wireless LAN
The wireless modem is powered ON after initial boot, reboot, or resume as indicated by the wireless
modem LED activity indicator being solid green. It can be turned off by right clicking the PC Card icon
in the system task tray, then selecting “Stop Cisco Systems 340 Series Wireless LAN Adapter”. It can
be repowered by doing a suspend/resume, or by rebooting the computer.
79_0100_001
© 2001 Itronix Corporation. All rights reserved.
Installing Your Wireless Modem Software
Installing the Software for Your Wireless Modem
Following are the installation procedures for installing the software for your wireless modem.
Air Card 300 (CDPD)
lSoftware comes pre-installed
Air Card 350 (CDPD)
lSoftware comes pre-installed
RIM 902M (Mobitex) for Cingular
The RIM 902M radio is automatically installed through the Plug and Play feature of the Windows
operating system. Once installed the radio can be accessed as COM4.
1. To verify the radio is installed and functioning correctly, a hyperterminal session can be used to
access RIM’s built in diagnostic program.
2. To access this diagnostic program, create a hyterterminal session direct to COM4 with 8 data
bits, no parity, 1 stop bit, and hardware handshaking.
3. Once a connection has been established, type “menu” (lower case, without the quotes) and press
GoBook Pro Help
4. Wireless Modem Topics

GoBook Pro Help Page 24 of 74
file://C:\WINDOWS\TEMP\~hh6357.htm 5/23/01
enter. The RIM Diagnostic screen should appear.
This diagnostic program allows the user to send a short message either to yourself or another device on
the network. For more information on how use the built-in diagnostics, visit the RIM website at
www.rim.net.
Cisco Wireless LAN
lDriver comes pre-installed
79_0100_001
© 2001 Itronix Corporation. All rights reserved.
Using Your Wireless Modem
Following are the procedures for using your wireless modem.
Air Card 300 (CDPD)
lRun Watcher from the desktop , or from the Start, Programs, SierraWireless, Aircard3xx menu.
lVerify signal strength is green and radio LED in ON.
Air Card 350 (CDPD)
lRun Watcher from the desktop, or from the Start, Programs, SierraWireless, Aircard3xx menu.
lVerify signal strength is green and radio LED activity indicator is ON.
RIM 902D (Mobitex) for Cingular
lWith the exception of the built-in diagnostic program of the RIM radio, there are no standard
applications shipped that allow the RIM 902M radio to be used for communication.
The RIM 902M radio understands two protocols: MASC, and; RIM access protocol (RAP). To use the
GoBook Pro Help
4. Wireless Modem Topics

GoBook Pro Help Page 25 of 74
file://C:\WINDOWS\TEMP\~hh6357.htm 5/23/01
RIM 902M radio, an application that uses one of these protocols must be installed on the computer and
configured to communicate on COM4.
Cisco Wireless LAN
lGo to your preferred LAN application and run normally
CAUTION While the radio is operating, the antenna must be at least 4.0 cm from all persons in order to
comply with the FCC RF exposure limit. Radio (wireless modem) operators must make sure their radio
unit is in compliance with these FCC regulations. See Optional Equipment and Accessories for
important information about vehicle-mounted antennas.
79_0100_001
© 2001 Itronix Corporation. All rights reserved.
Power Management
Using the Battery
Monitoring Battery Power
There are two ways to monitor how much power the battery has left.
1. Click Start, Settings, Control Panel, Power Management (Power Options); then click the Power
Meter tab.
2. Moving the cursor to the battery icon on the taskbar , without selecting anything, is the simplest
way to check on battery power status. The status will show as a pop-up when you mouse-over
the icon.
NOTE If you do not see the battery icon on the taskbar, enable it in Start, Settings, Control Panel,
Power Management. Choose the Advanced tab and select “Always show icon on the taskbar.”
Low Battery Alarms
GoBook Pro Help
5. Power Mangement Topics

GoBook Pro Help Page 26 of 74
file://C:\WINDOWS\TEMP\~hh6357.htm 5/23/01
How your computer responds to a low battery condition can be set by going to Start, Settings, Control
Panel, Power Management, Alarms.
Two different power alarms can be enabled or disabled: the Low Battery Alarm, and the Critical Battery
Alarm. Use the slidebar to set the power level at which the alarms are activated. Click on the Action
button to choose whether the alarm sounds, displays a message, or both.
CAUTION When battery power is low, the battery LED activity indicator will flash, and the alarm will
beep or display a warning on your screen. Take immediate action, such as saving files or connecting to
the AC adapter , or data may be lost.
When the computer alerts you that the battery is low, immediately do one of the following:
lConnect the AC power adapter
lSave your work, and suspend to disk (Hibernate) by pressing FN+F10
lSave your work, then select Shut Down from the Start menu
lPress FN+Q to turn off the computer (or suspend to disk) and replace the discharged battery with
a charged battery (See Changing the Battery later in this section).
NOTE Do not restart the computer until you have connected to an AC adapter, or replaced the
discharged battery with a charged battery.
79_0100_001
© 2001 Itronix Corporation. All rights reserved.
Battery Charging
When you use the AC adapter to connect your GoBook Pro to a power outlet, the internal battery will
automatically begin to recharge. While the battery is charging, the External Power Battery Charge LED
activity indicator on the indicator panel will be flashing. When the battery is fully charged, the
External Power Battery Charge LED activity indicator will turn solid.
If your computer is turned off, or suspended to RAM, a fully discharged battery will take about 4 hours
GoBook Pro Help
5. Power Mangement Topics

GoBook Pro Help Page 27 of 74
file://C:\WINDOWS\TEMP\~hh6357.htm 5/23/01
to recharge. If your computer is turned on and is not in suspend mode , it will take about 6 hours to
recharge the battery. Refer to the following table:
Power Saving Modes
Adjust the default power management settings in the Power Management (Power Options) dialog box
in the Control Panel. The Power Management (Power Options) dialog box allows you to set different
actions to take when the computer is left idle for a certain amount of time.
Suspend Mode
There are several possible settings for suspend mode, which can be selected in the Power Management
(Power Options) dialog box: You may suspend to RAM, suspend to disk (Hibernate), or disable
suspend altogether, which is not recommended.
Suspend to RAM
In a suspend to RAM, the contents of your computer’s memory are held intact, while practically all the
rest of the components in your computer either turn off completely, or reduce power consumption to a
minimum. In a Suspend to RAM, your computer remains active but with the minimum possible power
consumption. Return the computer to full power by pressing any key. When the computer returns from
suspend mode, the desktop appears with the same files and programs open as when the computer was
suspended. A fully-charged battery can maintain a Suspend to RAM for many hours.
Suspend to Disk (Hibernate)
Suspend to Disk (Hibernate) is similar to turning off the computer, except that the current state of the
computer is copied to the hard disk as a special file. When the computer returns from suspend mode,
the desktop appears with the same files and programs open as when the computer was suspended.
Suspend to Disk (Hibernate) is very useful when you don’t want to take the time to shut down all open
programs one by one to shut off the computer, only to have to open the same programs and files the
next time you use the computer. This mode is also called hibernation mode.
Suspend-to-Disk Partition
In order to Suspend to Disk, you must have a special suspend-to-disk partition on your hard disk drive.
This partition is pre-installed on your computer. The pre-installed partition is large enough to store all
system memory.
Initiating Suspend Mode
Charging Discharging
System On 6 - 7 hours 3-4 hours
System Off (suspend to
RAM) 4 hours —

GoBook Pro Help Page 28 of 74
file://C:\WINDOWS\TEMP\~hh6357.htm 5/23/01
There are four ways to initiate suspend mode. The settings can be adjusted in the Power Management
dialog box:
lThe computer will automatically enter suspend mode when not used for a set period of time
lSelecting the Stand by button in the Shut Down Windows dialog box
lPressing the suspend/system off function key (FN + Q)
lClosing the lid (display) if enabled in power settings.
Power Saving Tips
lAvoid operating the fax/modem, or audio and video applications when using battery power.
Operating a fax modem, video, or audio equipment increases the computer’s power requirements.
lDecreasing monitor brightness can also save power. Decrease brightness by pushing FN + F2.
Increase it by pushing FN + F3.
When to Replace the Battery
Over time, the battery’s capacity gradually decreases. We recommend that you replace your battery
when you notice that it begins to store significantly less charge.
Changing the Battery
Change the main battery pack as follows:
1. Turn off the computer.
2. Disconnect external power .
3. Close the display and turn the computer over.
4. slide the latch to the un-locked position and slide the battery out of the compartment.
5. Make sure the replacement battery is properly orientated. Insert the battery into the battery
compartment. Check that the latch locks back into position. Slide the latch to the locked position.
Heat Considerations
The computer’s processor has been specially designed to consume little power, and generates very little
heat. However, working in a hot environment, or working for long periods may raise the temperature.
Your computer takes the following steps to lower temperature:
1. The cooling fan is turned on. You may hear the fan and feel air coming from a vent near the left
front of the computer when this happens.

GoBook Pro Help Page 29 of 74
file://C:\WINDOWS\TEMP\~hh6357.htm 5/23/01
If the temperature continues to rise:
2. Processor activity is reduced. You may notice a slight loss of performance when this happens.
If the computer overheats:
3. The processor will stop functioning and the computer will shutdown.
79_0100_001
© 2001 Itronix Corporation. All rights reserved.
Customizing Your BIOS Settings
This chapter explains how to use the Setup Utility to modify the BIOS settings. The Setup Utility
displays and allows modification of the GoBook Pro components and the configuration of devices that
are connected to it. This information is used to test and initialize components at start-up time and to
make sure everything runs properly when the system is operating.
The BIOS is installed with a set of default values. You may be able to increase system performance by
changing some of the timing values in the Setup Utility, but this can be limited by the kind of hardware
you are using. In certain circumstances, the system may generate an error message that asks you to
make changes to the CMOS settings using the Setup Utility. This happens when the system finds an
error during the POST (Power On Self Test) that it carries out at startup.
If you are not sure how to configure the BIOS settings we suggest that you select Auto
Configuration with Optimal Settings on the Main Menu screen, then exit saving changes. This loads
optimized default settings for normal use.
Using the BIOS Setup Utility
The BIOS Setup Utility allows you to configure your computer’s basic settings. When you turn your
computer on, the system reads this information to initialize the hardware so that it can operate correctly.
Use the BIOS Setup Utility to change your computer’s start-up configuration. For example, you can
change the security and power management routines of your system.
Starting the BIOS Setup Utility
You can only start the Setup Utility shortly after the computer has been turned on. A prompt appears
GoBook Pro Help
6. Customizing Your BIOS Topics

GoBook Pro Help Page 30 of 74
file://C:\WINDOWS\TEMP\~hh6357.htm 5/23/01
on the computer display that says “Press F2 to run Setup.” When you see this prompt, press the F2 key
and the system will start the Setup Utility and display the main menu of the utility.
Navigation and Help
The Menu Bar
The Setup Utility has these six menu options in the Menu Bar at the top of the window:
The Legend Bar
You can use the keys in the legend bar at the bottom of the Setup Window to make selections or exit
the current menu.
The Field and General Help Windows
The Field Help Window is on the right side of each menu. It displays the help text for the currently
selected field. This text updates as you move the cursor from field to field.
The General Help Window describes the legend keys and their alternates. You can display it by
pressing F1 or ALT+H on any menu.
Main Use for basic system configuration
Advanced Use to set the advanced features
Security Use to set user and supervisor passwords and the backup and virus-check
reminders
Power Use to configure power management features
Boot Use to select the sequence boot devices that are searched to load an operating
system
Exit Use to exit the current Setup session
Key Function
F1 or ALT+H General Help Window
ESC Exit this menu
Left/Right Arrow Keys Select a different menu
Up/Down Arrow Keys Move the cursor up or down between fields
TAB or SHIFT+TAB Cycle the cursor up and down
HOME or END Move the cursor to the top or bottom of the window
PgUp or PgDn Move the cursor to the next or previous page
F5 or -Select the Previous Value for the field
F6 or + or Space Select the Next Value for the field
F9 Load the Default Configuration values for this menu
F10 Save and exit
Enter Execute command or Select Submenu
ALT+R Refresh the screen
GoBook Pro Help Page 31 of 74
file://C:\WINDOWS\TEMP\~hh6357.htm 5/23/01
79_0100_001
© 2001 Itronix Corporation. All rights reserved.
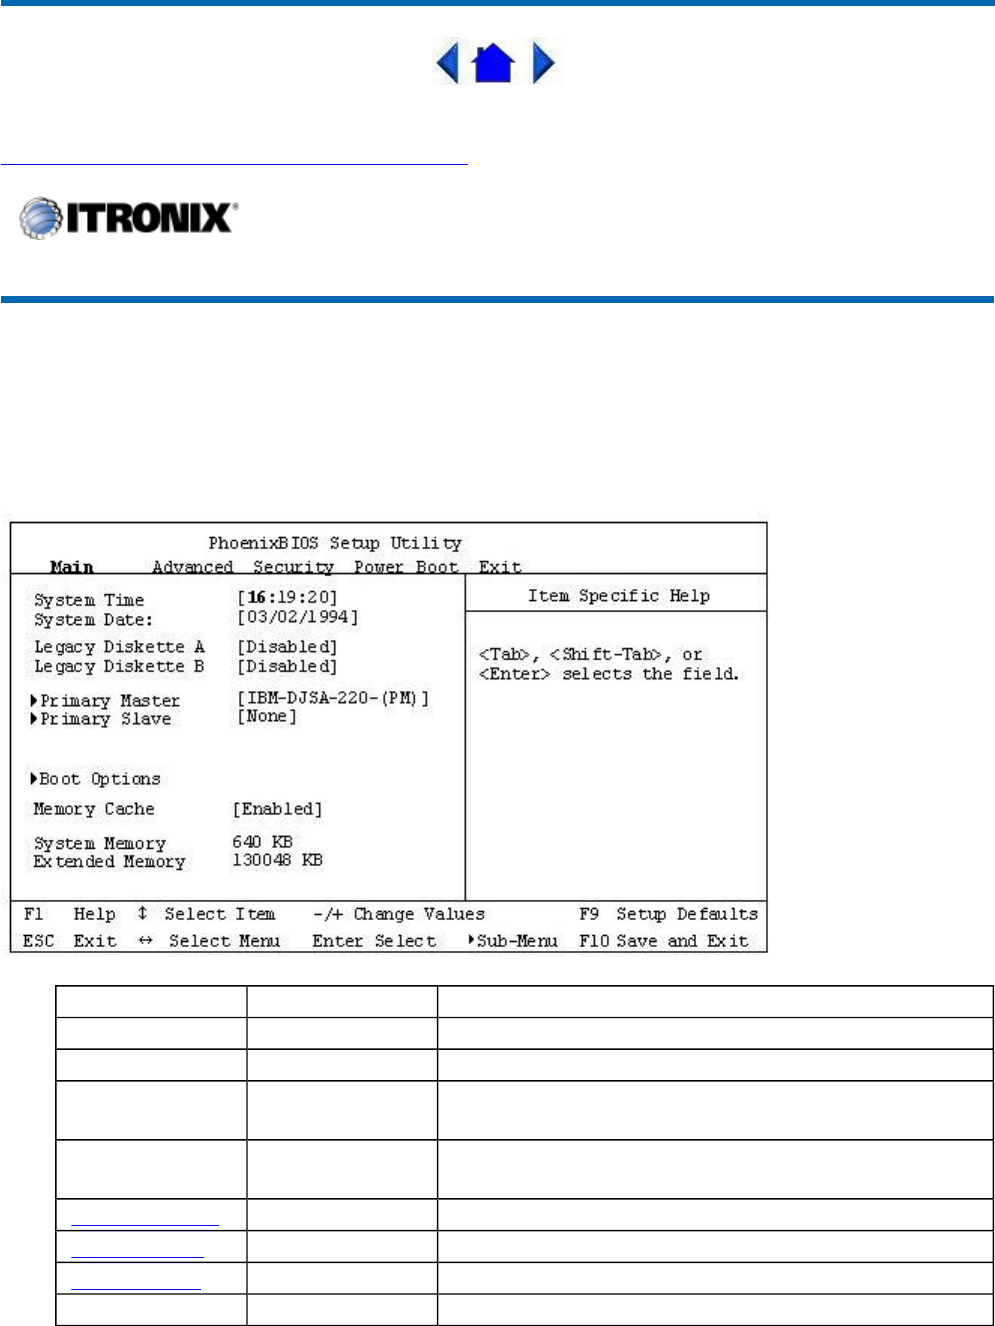
The Main Menu
You can change the system date and time on the main menu and view system and extended memory.
GoBook Pro Help
6. Customizing Your BIOS Topics
Field Setting Function
System Time HH:MM:SS Set the system time
System Date MM/DD/YYYY Set the system date
Legacy Diskette
ADisabled Selects floppy type
Legacy Diskette
BN/A Selects floppy type
Primary Master sub-menu Set drive settings
Primary Slave sub-menu Set drive settings
Boot Options sub-menu Set boot options
Memory Cache Enabled Sets the state of the memory cache
GoBook Pro Help Page 32 of 74
file://C:\WINDOWS\TEMP\~hh6357.htm 5/23/01
Primary Master
The drive type is automatically detected by the BIOS. You can use this menu to view the hard disk
configuration.
System Memory N/A Displays amount of conventional memory detected
during boot up
Extended
Memory N/A Displays the amount of extended memory detected
during boot up
Field Setting Function
Type User
None
Auto
1-39
CD-ROM
ATAPI
Removable
User=User enters parameters of
hard-disk drive
None=Autotyping is not able to
supply the drive type or end user
has selected None, disabling any
drive that may be installed.
Auto=Autotyping, the drive itself
supplies the correct drive
information.
1-39=User selects pre-determined
type of hard-disk drive
CD-ROM=CD-ROM drive is
installed
ATAPI Removable=removable
disk drive is installed
Total Sectors N/A
Maximum Capacity N/A
Sectors 1 to 63 Number of sectors per track

GoBook Pro Help Page 33 of 74
file://C:\WINDOWS\TEMP\~hh6357.htm 5/23/01
Primary Slave
Multi-Sector Transfers Disabled
Standard
2 sectors
4 sectors
8 sectors
16 sectors
Any selection except Disabled
determines the number of sectors
transferred per block. Standard is
1 sector per block
LBA Mode Control Enabled
Disabled Enabling LBA causes Logical
block Addressing to be used in
place of Cylinders, Heads, &
Sectors
32-Bit I/O Enabled
Disabled Enables 32-bit communication
between CPU and IDE card.
Requires PCI or local bus.
Transfer Mode Standard
Fast PIO 1
Fast PIO 2
Fast PIO 3
Fast PIO 4
Selects the method for
transferring the data between the
hard disk and system memory.
The Setup menu only lists those
options supported by the drive
and platform.
SMART Monitoring Enabled
Disabled Turn on Self-Monitoring
Analysis-Reporting Technology,
which monitors condition of the
hard drive and reports when a
catastrophic IDE failure is about
to happen
Ultra DMA Mode: Mode 0
Mode 1
Mode 2
Disabled

GoBook Pro Help Page 34 of 74
file://C:\WINDOWS\TEMP\~hh6357.htm 5/23/01
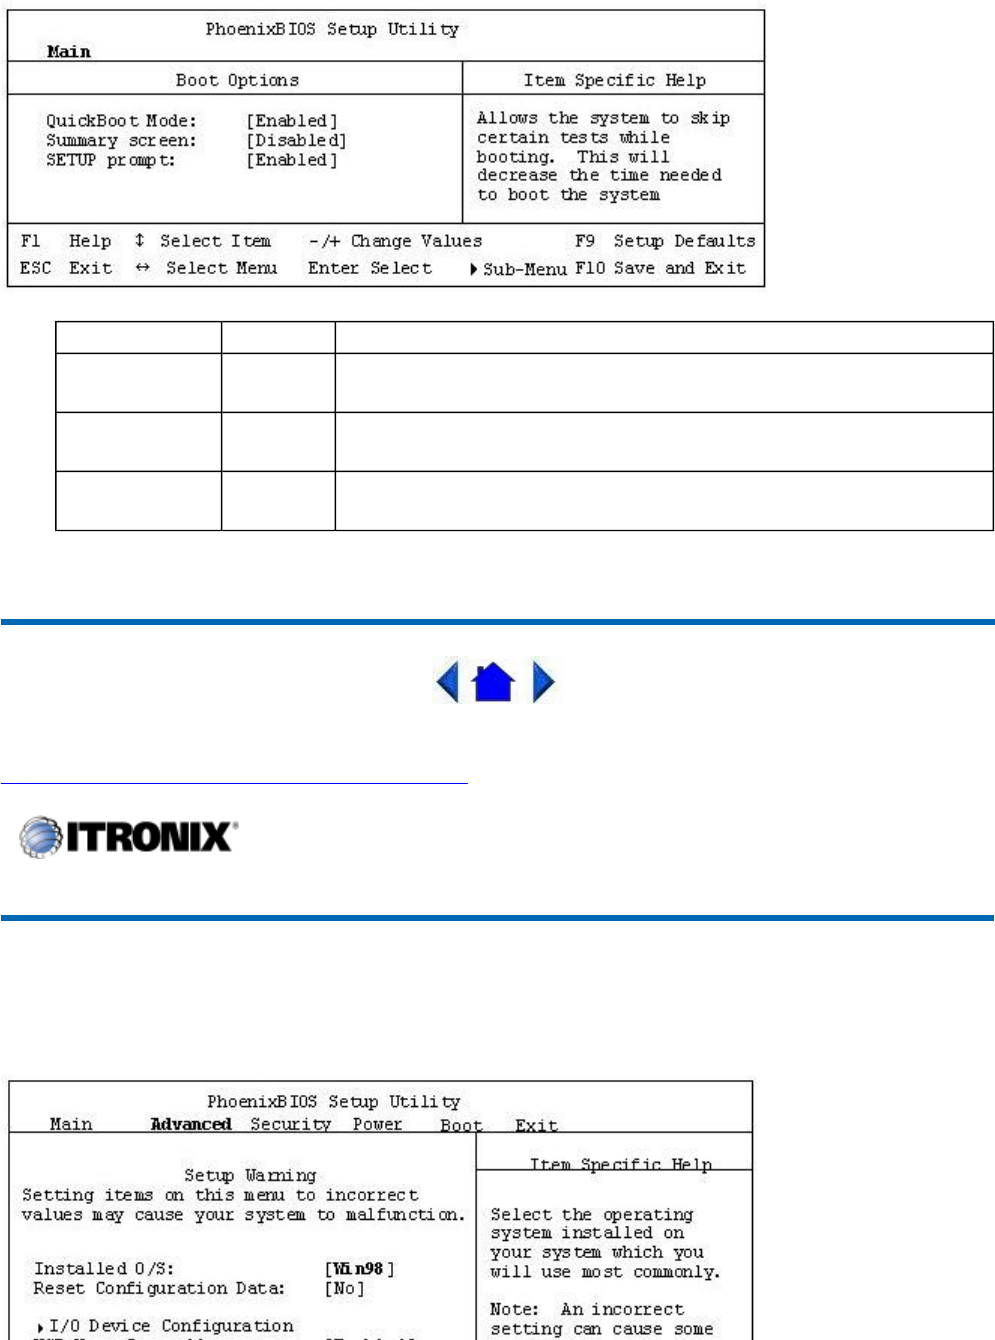
Boot Options
Field Setting Function
Type Auto
None
CD-ROM
User
Auto=Autotyping, the drive itself
supplies the correct drive
information.
None=Autotyping is not able to
supply the drive type or end user
has selected None, disabling any
drive that may be installed.
CD-ROM=CD-ROM drive is
installed
User=User enters parameters of
hard-disk drive
Multi-Sector Transfers N/A Specify the number of sectors per
block for multiple sector transfers.
LBA Mode Control N/A Enabling LBA causes Logical
Block Addressing to be used in
place of Cylinders, Heads &
Sectors.
32 Bit I/O Disabled
Enabled Enables or disables 32 bit IDE
data transfers
Transfer Mode Standard
Fast PIO 1
Fast PIO 2
Fast PIO 3
Fast PIO 4
FPIO 3 / DMA
1
FPIO 4 / DMA
2
Select method for moving data
to/from the drive.
SMART Monitoring N/A
Ultra DMA Mode Disabled
Mode 0
Mode 1
Mode 2
Selects the Ultra DMA mode used
for moving data to/from the drive
GoBook Pro Help Page 35 of 74
file://C:\WINDOWS\TEMP\~hh6357.htm 5/23/01
79_0100_001
© 2001 Itronix Corporation. All rights reserved.
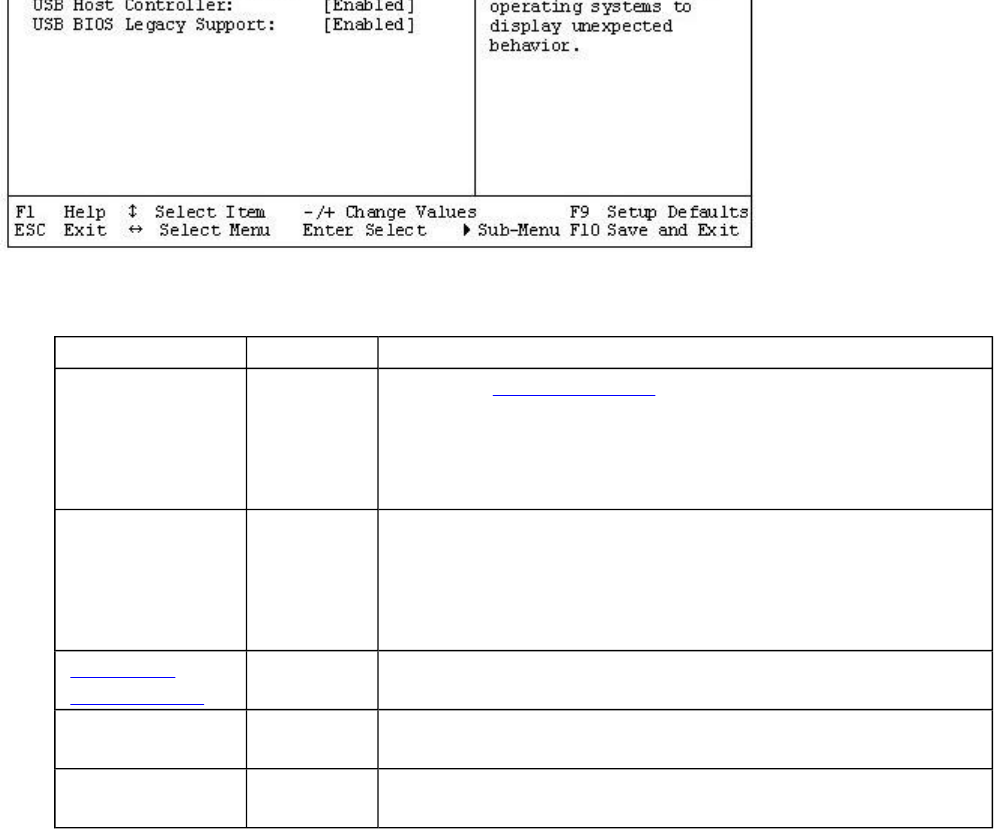
The Advanced Menu
Field Setting Function
QuickBoot
Mode Enabled
Disabled Enabled allows the system to skip certain tests while booting,
decreasing the time needed to boot.
Summary
Screen Enabled
Disabled Displays system configuration summary screen during boot up.
SETUP
Prompt Enabled
Disabled Displays "Press <F2> for Setup" during boot up." Disabling this
option does not disable <F2>, only the display of the message.
GoBook Pro Help
6. Customizing Your BIOS Topics
GoBook Pro Help Page 36 of 74
file://C:\WINDOWS\TEMP\~hh6357.htm 5/23/01
WARNING Incorrect settings can cause your system to malfunction. To correct mistakes, return to
Setup and restore the Setup Defaults by pressing F9.
I/O Device Configuration Menu
The CPU communicates with external devices such as printers through devices called Input/Output
(I/O) ports such as serial ports. These I/O devices require the use of system resources such as I/O
addresses and interrupt lines. If these devices are Plug and Play, either the BIOS can allocate the
devices during POST, or the operating system can do it. If the I/O devices are not Plug and Play, they
may need to be set manually in Setup.
On some systems, the chipset manages the communication devices. Other systems have, instead, a
separate I/O chip on the motherboard for configuring and managing these devices.
Many systems allow you to control the configuration settings for the I/O ports. Use this menu to
specify how the I/O (Input and Output) ports are configured:
lManually by you.
Field Setting Function
Installed O/S: Other
Win95
Win98
WinMe
WinNT2K
Select the operating system you use most often
Reset
Configuration
Data:
Yes
No Yes erases all configuration data in a section of memory for
ESCD (Extended System Configuration Data) which stores
the configuration settings for non-PnP plug-in devices.
Select yes when required to restore the manufacturer's
defaults
I/O Device
Configuration sub-menu Configure I/O Devices
USB Host
Controller Disabled
Enabled Enables or Disables the USB hardware
USB BIOS
Legacy Support Disabled
Enabled Enables or Disables support for USB Keyboards and Mice.
GoBook Pro Help Page 37 of 74
file://C:\WINDOWS\TEMP\~hh6357.htm 5/23/01
lAutomatically by the BIOS during POST
lAutomatically by a PnP Operating System such as Windows 95 after the Operating System boots.
79_0100_001
© 2001 Itronix Corporation. All rights reserved.
The Security Menu
Field Setting Function
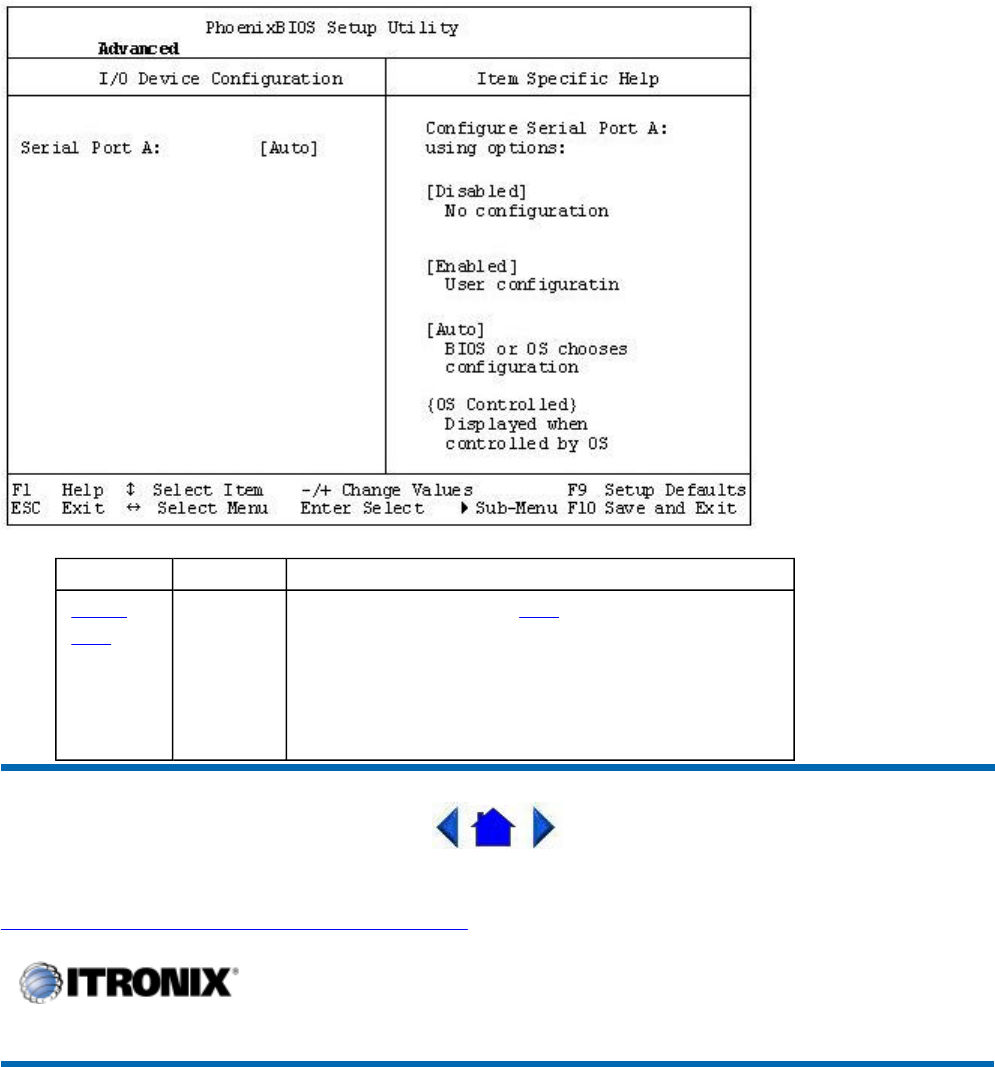
Serial
port A: Disabled
Enabled
Auto
Disabled turns off the port .
Enabled requires you to enter the base
Input/Output address and the Interrupt number
on the next line
Auto makes the BIOS configure the port
automatically during POST.
GoBook Pro Help
6. Customizing Your BIOS Topics
GoBook Pro Help Page 38 of 74
file://C:\WINDOWS\TEMP\~hh6357.htm 5/23/01
Enabling Supervisor Password requires a password for entering Setup. The passwords are not case
sensitive. Pressing Enter at either Set Supervisor Password or Set User Password displays a dialog box
like this:
Field Setting Function
Set User
Password Up to seven
alphanumeric
characters
Pressing Enter displays the dialog box for entering
the user password. In related systems, this
password gives restricted access to SETUP menus.
Set Supervisor
Password Up to seven
alphanumeric
characters
Pressing Enter displays dialog box for entering the
supervisor password. In related systems, this
password gives full access to Setup menus.
Password on
boot Enabled
Disabled Enabled requires a password on boot. Requires
prior setting of the Supervisor password.
If supervisor password is set and this option
disabled, BIOS assumes user is booting.
Diskette
access Enabled
Disabled Enabled requires a password to boot from or access
the floppy disk.
fixed disk boot
sector Normal
Write Protect Write protects the boot sector on the hard disk for
virus protection. Requires a password to format or
Fdisk the hard disk.
System backup
reminder
Virus check
reminder
Disabled
Daily
Weekly
Monthly
Displays a message during boot up asking (Y/N) if
you have backed up the system or scanned it for
viruses.
Message returns on each boot until you respond
with "Y".
Daily displays the message on the first boot of the
day, weekly on the first boot after Sunday, and
monthly on the first boot of the month.
GoBook Pro Help Page 39 of 74
file://C:\WINDOWS\TEMP\~hh6357.htm 5/23/01
NOTE In some systems, the User and supervisor passwords are related; you cannot have a User
password without first creating a Supervisor password. In other systems, you can create and use them
independently
79_0100_001
© 2001 Itronix Corporation. All rights reserved.
The Power Menu
The options available in power management depend upon the hardware installed in your system. Those
shown here are from a typical system.
GoBook Pro Help
6. Customizing Your BIOS Topics

GoBook Pro Help Page 40 of 74
file://C:\WINDOWS\TEMP\~hh6357.htm 5/23/01
Field Setting Function
Power
Savings Disabled
Customized
Maximum Power
Savings
Maximum
Performance
Maximum options: pre-defined
values. Select Customize to make
your own selections from the
following fields. Disabled turns off all
power management.
Idle
Mode On
Off Turn of/off the Idle Mode power
savings.
Standby
Timeout Off
1 min
2 min
4 min
6 min
8 min
12 min
16 min
Inactivity period required to put
system in Standby (partial power
shutdown).
Auto
Suspend
Timeout
Off
5 min
10 min
15 min
20 min
30 min
40 min
60 min
Inactivity period required after
Standby to Suspend (maximum power
shutdown).
Suspend
Mode Suspend
Save to Disk Low power state to enter when the
suspend timeout has occurred
Hard
Disk
Timeout
Disabled
10 sec
15 sec
30 sec
45 sec
1 min
2 min
4 min
6 min
8 min
10 min
15 min
Inactivity period of hard disk required
before standby (motor off).
Video
Timeout Disabled
10 sec
15 sec
30 sec
45 sec
1 min
2 min
4 min
Set inactivity period required before
independently turning off monitor.
Disabled turns CRT off in Standby.
GoBook Pro Help Page 41 of 74
file://C:\WINDOWS\TEMP\~hh6357.htm 5/23/01
79_0100_001
© 2001 Itronix Corporation. All rights reserved.
The Boot Menu
When you turn on your computer, it attempts to load the operating system (such as Windows 98) from
the device of your choice. If it cannot find the operating system on that device it attempts to load it
from one or more other devices according to the order specified in the Boot Menu. Boot devices can
include hard drives, floppy drives, CD-ROMs, removable devices and network cards.
NOTE Specifying any device as a boot device on the Boot Menu requires the availability of an
operating system on that device. Most PCs come with an operating system already installed on hard-
drive C.
6 min
8 min
10 min
15 min
Resume
On
Modem
Ring
Off
On Wakes up system when an incoming
call is detected on the modem.
Resume
On Time Off
On Wakes up system at predetermined
time.
Resume
Time XX:XX:XX Predetermined time to wake up the
system
GoBook Pro Help
6. Customizing Your BIOS Topics
GoBook Pro Help Page 42 of 74
file://C:\WINDOWS\TEMP\~hh6357.htm 5/23/01
79_0100_001
© 2001 Itronix Corporation. All rights reserved.
The Exit Menu
You use the exit menu to leave the BIOS Setup Utility . ESC does not exit this menu. You must select
on of the items from the menu or menu bar to exit.
Field Setting Function
Removable Devices N/A Shows removable devices
Hard Drive N/A Shows hard drive(s)
CD-ROM N/A Shows CD-ROM(s)
GoBook Pro Help
6. Customizing Your BIOS Topics

GoBook Pro Help Page 43 of 74
file://C:\WINDOWS\TEMP\~hh6357.htm 5/23/01
79_0100_001
© 2001 Itronix Corporation. All rights reserved.
Optional Equipment and Accessories
Field Function
Exit Saving
Changes After making your selections on the Setup menus, this option stores the
selections displayed in the menus in CMOS, a special section of memory that
stays on after your turn your system off. It then exits the SETUP program.
The next time you boot your computer, the BIOS configures your system
according to the Setup selections stored in CMOS.
During boot up, PhoenixBIOS attempts to load the values saved in CMOS. If
those values cause the system boot to fail, reboot and press [F2] to enter
Setup. In setup, you can get the Default Values or try to change the
selections that caused the boot to fail.
Exit
Discarding
Changes
Use this option to exit Setup without storing in CMOS any new selections
you may have made. The selections previously in effect remain in effect.
Use Setup
Settings
Load Setup
Defaults To display the default values for all Setup menus, select "Load Setup
Defaults" from the Main Menu.
If during boot up, the BIOS program detects a problem in the integrity of
values stored in CMOS, it displays these messages:
System CMOS checksum bad - run SETUP
Press <F1> to resume, <F2> to Setup
The CMOS values have been corrupted or modified incorrectly, perhaps by an
application program that changes data stored in CMOS.
Press [F1] to resume the boot or [F2] to run Setup with the ROM default
values already loaded into the menus. You can make other changes before
saving the values to CMOS.
Discard
Changes If during a Setup Session, you change your mind about changes you have
made and have not yet saved the values to CMOS, you can restore the values
you previously saved to CMOS.
Save
Changes Saves all the selections without exiting Setup. You can return to the other
menus if you want to review and change your selections.

GoBook Pro Help Page 44 of 74
file://C:\WINDOWS\TEMP\~hh6357.htm 5/23/01
Vehicle Adapter
The Vehicle Adapter is an optional device that supplies power from the vehicle battery to operate the
computer and charge the battery installed in the unit. It typically connects to the vehicle battery using
the cigarette lighter socket.
To prevent possible damage to the battery, the system will not allow the battery to charge at extreme
temperatures. Be aware of the following charging characteristics, especially if the computer is left
unattended in a closed vehicle.
To connect the vehicle adapter
1. Insert the vehicle adapter’s power cord into the power port on the right side of the computer.
2. Insert the cigarette lighter adapter into the vehicle’s cigarette lighter socket, turning it slightly to
make a good connection.
The power light illuminates to indicate that current is reaching the vehicle adapter. When you
connect the vehicle adapter, it automatically begins charging the computer’s battery. At moderate
temperatures, around 21°C (70ºF), the battery will be fully charged in approximately four to five
hours. Under extremely cold or hot temperatures, or if the system is on, however, it will take
longer to charge the battery (up to seven hours).
79_0100_001
© 2001 Itronix Corporation. All rights reserved.
GoBook Pro Help 7. Optional Equipment and Accessories Topics
Temperature Charging Activity
<5°C (<41°F) Battery will not charge
GoBook Pro Help 7. Optional Equipment and Accessories Topics

GoBook Pro Help Page 45 of 74
file://C:\WINDOWS\TEMP\~hh6357.htm 5/23/01
Vehicle Cradle
The vehicle cradle is a vehicle-based docking station designed to safely secure the computer in the
vehicle. A standard key lock located on the front of the cradle locks the computer onto the cradle for
security purposes. You can use the vehicle cradle to:
lCharge batteries
lCommunicate with other devices
lAutomatically connect to an external RF antenna
PRECAUTIONS
lThere are no user-replaceable parts within the vehicle cradle, so do not open the cradle case. The
vehicle cradle is internally protected. It resets automatically if there is a power fault.
lDo not use the vehicle cradle to charge the computer battery overnight. Turn off the vehicle
cradle at the end of each work day to prevent draining the voltage in your vehicle’s battery below
starting levels.
Charging Batteries
The vehicle cradle is designed to charge the computer’s battery with voltage from the vehicle battery
while you are traveling between jobs. Follow the procedure below to charge a battery.
To charge a battery installed in the computer
1. Place the computer onto the vehicle cradle, making sure it is securely latched.
2. If charging is required it begins automatically. LED #2 flashes.
3. When the battery is fully charged, LED #2 will be on steady.
Important
lA temperature of 0°C to 60°C (32°F to +140°F) is
recommended when charging batteries with the vehicle
cradle. Batteries may not charge successfully outside this
temperature range.
lIf you charge your battery daily, rely on the gas gauge
reading to determine battery capacity. The gas gauge
displayed by the Power Meter may show that the battery is
full, but charging continues. This happens because the

GoBook Pro Help Page 46 of 74
file://C:\WINDOWS\TEMP\~hh6357.htm 5/23/01
Communicating with Other Devices
Connect the external device to either of the USB ports on the back of the cradle, and then place the
GoBook Pro onto the vehicle cradle. You can install or remove the computer from the vehicle cradle
without connecting or disconnecting the cables.
External Antennas
An external RF antenna also can be connected to the cradle using the TNC RF connector on the back of
the vehicle cradle. FCC regulations require that users of vehicle-mounted antennas must use only
antennas authorized for use with the GoBook Pro in order to meet FCC RF exposure limits. Please
contact your organizations’s help desk for a list of approved vehicle-mounted antennas. For mounting
installation and/or mounting instructions for these types of antennas, see the instructions that
accompany each antenna.
RF Antenna Placement
WARNING Improper installation and/or operating configurations of permanent and magnetic vehicle-
mounted antennas may cause FCC RF exposure limits to be exceeded. Vehicle-mounted antennas must
be placed at least 20 cm from operators and bystanders.
Placement of a vehicle-mounted antenna
1. Measure and identify an area 20 cm (8 inches) in from the edges of the vehicle roof (see diagram
below).
2. Place the antenna within that area.
To maximize RF performance, position the antenna in the center of the vehicle roof.
charging process is trying to put a little more capacity into
the battery. External power can be removed at this time
since the battery is virtually full.
lIf your battery is new or has not been used for several
weeks, rely on the indicator light to determine when the
battery is fully charged. The gas gauge is unreliable in
these cases; it may read 100 percent, but the actual
capacity is only 10 percent.
GoBook Pro Help Page 47 of 74
file://C:\WINDOWS\TEMP\~hh6357.htm 5/23/01
Cleaning or Replacing Cradle Contact Pins
The contact pins on the vehicle cradle are exposed to contamination and stress when the computer is
installed and removed from the cradle during normal daily operation.
If the pins become dirty, they can be cleaned with an electrical contact cleaner. The power and ground
pins are pins 3 and 8 respectively. When charging problems are encountered and replacement pins are
not available, other pins in the contact assembly can be used to field fix the unit until replacement parts
are available.
79_0100_001
© 2001 Itronix Corporation. All rights reserved.
Surge Protection
A large number of computer and high technology equipment damage is directly related to AC power
and telephone line problems. These problems can include surges, spikes, noise, interference, and
weather-related problems, which in turn can cause glitches, hang-ups, crashes, performance slow
downs, and down time with computer equipment. The market is flooded with hundreds of AC power
line surge suppressors advertising high performance surge protection; only a few of them actually
provide adequate protection.
This section provides guidelines for selecting a quality surge suppressor to be used with your GoBook
Pro, and it helps identify a few sources for products with acceptable performance.
Selecting the Right Surge Protection
Consider the level of quality you need when selecting a surge suppressor. This depends on factors such
as surge environment, the type of equipment to be protected, and the quality of the electrical wiring and
GoBook Pro Help 7. Optional Equipment and Accessories Topics

GoBook Pro Help Page 48 of 74
file://C:\WINDOWS\TEMP\~hh6357.htm 5/23/01
service.
Surge Environment
Surge environment refers to the damage potential from electrical surges in a particular geographical
area. A high quality suppressor should be used if there is frequent lightning activity in the area and the
location service is fed by overhead utility poles.
Type of Equipment to be Protected
If the computer is equipped with a modem, the modem should also be surge protected. Protecting the
power line without protecting the modem line provides only partial protection.
Quality of Electrical Wiring and Service
Wiring should be up to current NEC standards and have verified good AC grounds. It is important that
your computer system be plugged into a grounded AC outlet when charging and that all peripherals
connected to your system reference the same AC ground.
Selecting the Right Equipment
There are a number of companies that sell quality surge suppressors such as Sutton Designs, APC, and
Panamax. When you are looking for a surge suppressor, consider these things.
lExpect to pay at least $50 for a good quality surge suppressor.
lThe surge suppressor should be a UL 1449, 497, and 1283 listed for surge suppression, modem
surge protection, and RFI/EMI noise filtering respectively.
lThe surge suppressor should have diagnostic LEDs that verify good AC ground, proper wiring,
and proper surge operation. Lighted on/off switches are not recommended since they can produce
electrical noise.
lThe Joule ratings should be a minimum of 480 Joules for the AC surge circuit.
lThe Joule ratings should be a minimum of 240 Joules for the modem.
lThe modem surge circuit should present low capacitance to the modem line or it will slow the
transmission rate. Capacitance should be specified at less than 50 picofarads.
lQuality surge suppressor manufacturers generally offer a lifetime warranty.
lConsider obtaining a protected equipment coverage policy which insures the equipment in the
event of surge damage.
lThe devices that will be attached to the computer also need to be surge protected.
GoBook Pro Help Page 49 of 74
file://C:\WINDOWS\TEMP\~hh6357.htm 5/23/01
79_0100_001
© 2001 Itronix Corporation. All rights reserved.
Parallel Adapter
79_0100_001
© 2001 Itronix Corporation. All rights reserved.
Maintenance and Storage
The GoBook Pro is ruggedized and weather resistant. Handle it with the normal care required by any
sophisticated electronic equipment, and the computer will provide reliable service even under harsh field
conditions.
Follow the guidelines in this section to care for your unit.
Touch Screen Care
GoBook Pro Help 7. Optional Equipment and Accessories Topics
GoBook Pro Help
8. Maintenance and Storage Topics
CAUTION
lAlways use an approved stylus or your finger.
lNever use sharp, hard, or abrasive implements on the
touch screen such as ball point pens, pencils, or keys.

GoBook Pro Help Page 50 of 74
file://C:\WINDOWS\TEMP\~hh6357.htm 5/23/01
79_0100_001
© 2001 Itronix Corporation. All rights reserved.
Hard Drive Care and Handling
All hard drives contain media for data storage in the form of a rotating disk, read/write head(s), a
motor, and electronics for interfacing and control. Each hard drive type can be susceptible to damage
from severe shock and other stressful environmental impacts. The degree of susceptibility to damage is
directly related to the individual hard drive and mounting system employed.
When reading or writing to the hard disk , the head is “flying” on a thin layer of air, micro-inches above
the disk. A shock can cause the read/write head to contact the spinning disk, resulting in immediate loss
of stored data and possible physical damage to the disk. It could also create loose debris in the drive
enclosure that may cause progressive damage over time.
To reduce exposure to high operating shocks, the GoBook Pro uses power modes for the hard drive
that prevent the read/write heads from being positioned over the disk when it is not being used: idle
mode and standby mode.
You can reduce the risk of damage to the hard drive and increase the reliability of the hard drive and
data integrity by following the recommendations below.
Internal Hard Drives
lDo not intentionally drop the computer. The unit is designed to withstand the day to day rigors of
the mobile environment and provide years of reliable service. The useful life of the product can be
enhanced by not intentionally abusing it.
lWhenever possible suspend the unit by pressing FN+Q before moving it from one location to
They could damage the screen.
lTo clean the touch screen panel, apply a household glass
cleaner to a soft, clean, dry cloth and wipe the screen.
GoBook Pro Help
8. Maintenance and Storage Topics

GoBook Pro Help Page 51 of 74
file://C:\WINDOWS\TEMP\~hh6357.htm 5/23/01
another. This will unload the read/write heads and spin down the disk.
lMaintain the environmental seal of the computer by keeping PC Card access door closed and
latched. Also avoid exposing the unit to extreme temperatures or moisture when the door is open.
lPeriodically backup or archive important files and data.
External PC Card Hard Drives
Each PC Card hard drive manufacturer provides specific guidelines for the care and handling of the
product. In addition, follow these recommendations:
lWhen the PC Card hard drive is not inserted in a PC Card socket, store the hard drive in a
protective carrying case. This will help protect it from inadvertent shocks.
lAlways use care when handling the hard drive. Do not drop, bend, flex, or crush it.
lAvoid exposing the PC Card hard drive to extreme moisture, heat, or sunlight.
lKeep all debris out of the connector to ensure good electrical connections.
lThere are no user repairable parts in the PC Card hard drive. Do not attempt to disassemble any
part of the hard drive. The warranty will be voided if drive seals are broken or screws have been
removed.
lPeriodically backup or archive important files and data.
If you encounter or suspect hard drive problems, you can run SCANDISK, which provides a description
of file usage and syntax on selected drives. SCANDISK will identify any failures on the hard drive and
prompt you for corrective action based on selected options. If problems are found, it may be necessary
to run SCANDISK several times to determine the extent and severity of the problem. SCANDISK may
discover multiple bad clusters. Up to ten bad clusters can be allowed before returning the computer for
service. After you have run SCANDISK and the problem persists or becomes more severe, or if
SCANDISK finds more than ten bad clusters, return the unit for service.
79_0100_001
© 2001 Itronix Corporation. All rights reserved.
GoBook Pro Help
8. Maintenance and Storage Topics

GoBook Pro Help Page 52 of 74
file://C:\WINDOWS\TEMP\~hh6357.htm 5/23/01
Battery Maintenance and Storage
Maintaining Batteries
Follow these guidelines to maintain performance of Lithium-Ion (Li-on) batteries.
lAvoid exposing batteries to extremely hot or cold temperatures for long periods. To prevent
possible damage to the battery, the GoBook Pro does not allow the battery to charge if the
internal temperature of the battery gets too low (< 5°C or < 41°F) or too high (> 50°C or > 122°
F).
lCharge the battery nightly where the temperature will remain around 20°C (68°F).
lRe-calibrate your battery when your battery performance degrades.
Storing Batteries
lStore the battery within the recommended temperature range: 10°C to 30°C (50°F to 86°F).
lUnused or stored batteries can lose power over time. When you install a battery that has not been
used for awhile, connect external power to the computer and charge the battery.
lAfter storage, battery calibration may increase its capacity.
79_0100_001
© 2001 Itronix Corporation. All rights reserved.
Computer Maintenance and Storage
Maintaining Your Computer
Follow these guidelines to help maintain the condition and performance of your computer.
lTurn off the computer when you are not using it.
GoBook Pro Help
8. Maintenance and Storage Topics
GoBook Pro Help Page 53 of 74
file://C:\WINDOWS\TEMP\~hh6357.htm 5/23/01
lCharge the batteries daily or whenever their capacity is low.
lOperate the computer within the recommended temperature ranges of 0°C to +60°C (32°F to
+140°F).
Care and Cleaning
Physical Inspection Periodically inspect the computer and accessories for wear, damage, loose or
missing parts. Identifying and correcting potential problems early can help reduce the need to return the
unit for service.
Outside Case Like all tools, the outside of the computer will get dirty with use. The case is made of
painted Magnesium and polycarbonate blend (plastic) doors and covers. These areas can be cleaned
with a solution of one part Formula 409™ and one part water. Follow the procedure below.
To clean the outside case
1. Disconnect external power and turn off the computer.
2. Remove the battery.
3. Using a soft, dry cloth (do not use paper products because they can scratch the surface), add a
small amount of cleaning solution to the cloth and clean the computer case.
4. Wipe off any excess liquid with a soft cloth.
5. Reinstall the battery.
Display Periodically inspect the display to make sure the brightness function is operating properly.
To clean your touch screen
To clean the display assembly, use the same cleaning solution and procedure described earlier for the
outside case. In some cases, you can use a small amount of isopropyl alcohol to remove streaks or
smears. Use a soft, clean cloth to clean the display. Do not use paper products because they can scratch
the screen.
External Power Connector The external power connector may sometimes be exposed to moisture
and/or contamination causing an unreliable connection to the external power source.
Clean the connector using a cotton swab dipped in isopropyl alcohol.
RJ-11/ RJ-45 / USB Connectors Make sure these connectors are operating properly. During normal
use, the connector pins can get dirty or become broken, bent, or pushed out of place. Clean the
connector with a cotton swab dipped in isopropyl alcohol.
Keyboard Check all keys to make sure they are working properly. To clean the keyboard, use the
same cleaning solution and procedure described above for the outside case.

GoBook Pro Help Page 54 of 74
file://C:\WINDOWS\TEMP\~hh6357.htm 5/23/01
If keyboard problems persist, the keyboard might need to be replaced. This can be done without
returning the unit for service. Contact your local support person for more information.
I/O Ports Make sure the video, serial, and audio ports are operating properly. Periodically inspect the
ports for damage or contamination, and make sure the cover is attached to the computer. The I/O cover
can be replaced without returning the unit for service. Contact your local support person for more
information.
PC Card Door and Connector Whenever possible, make sure this door is closed and latched
properly. When the PC Card door is closed, it provides a watertight seal for the PC Card socket. Shield
the area from all contaminants such as liquids, rain, snow, and dust when the door is open.
Make sure the PC Card connector is operating properly by reading from or writing to a PC Card.
Cradle Contacts The cradle contacts on the bottom of the computer may get dirty with daily use.
Connectors can be cleaned with a cotton swab dipped in isopropyl alcohol.
Storing Your Computer
You can store the GoBook Pro for approximately 7 - 10 days without losing data as long as the battery
is fully charged to begin with.
If you plan to store the computer for more than 7 - 10 days, follow these storage guidelines.
To store the computer
1. Files and data should be saved before storing the computer.
Contact your organization’s help desk about the procedure for backing up files or data.
2. Exit all applications and use the appropriate procedure to exit from your operating system.
3. Turn off the computer.
4. Remove the battery from the unit and store it in a dry place.
5. Store the computer within the recommended temperature ranges of -40°C to +75°C (-40°F to
+167°F).
If you use PC cards, refer to the manufacturer’s instructions you received with the card for
storage and care information.
79_0100_001
© 2001 Itronix Corporation. All rights reserved.

GoBook Pro Help Page 55 of 74
file://C:\WINDOWS\TEMP\~hh6357.htm 5/23/01
Error Messages
The following are possible error and warning messages you may encounter while operating the GoBook
Pro computer. The messages described in this section are listed below.
Error and warning messages are generated by several different sources including:
lPower On Self Test (POST)
lMS-DOS
lWindows
lApplications
POST Messages
When the GoBook Pro computer restarts, it tests its hardware components. This test is called the
Power On Self Test (POST) . If the system finds an error during this test, it displays an error message.
Some POST errors can occur before anything can be displayed on the screen. In this case, the computer
issues a series of beeps, then stops working. This type of error indicates a serious hardware problem,
and you should contact your supervisor or your organization’s help desk.
The most common POST error messages are listed next along with solutions you can try.
Failure Fixed Disk
Fixed disk is not working or not configured properly. Check to see if fixed disk is attached properly.
Run Setup. Find out if the fixed-disk type is correctly identified.
Stuck key
Stuck key on keyboard .
Keyboard error
Keyboard not working.
Keyboard Controller Failed
GoBook Pro Help
A. Error Messages Topics

GoBook Pro Help Page 56 of 74
file://C:\WINDOWS\TEMP\~hh6357.htm 5/23/01
Keyboard controller failed test. May require replacing keyboard controller.
Keyboard locked - Unlock key switch
Unlock the system to proceed.
Monitor type does not match CMOS - Run SETUP
Monitor type not correctly identified in Setup
Shadow Ram Failed at offset: nnnn
Shadow RAM failed at offset nnnn of the 64k block at which the error was detected.
System RAM Failed at offset: nnnn
System RAM failed at offset nnnn of in the 64k block at which the error was detected.
Extended RAM Failed at offset: nnnn
Extended memory not working or not configured properly at offset nnnn.
System battery is dead - Replace and run SETUP
The CMOS clock battery indicator shows the battery is dead. Replace the battery and run Setup to
reconfigure the system.
System CMOS checksum bad - Default configuration used
System CMOS has been corrupted or modified incorrectly, perhaps by an application program that
changes data stored in CMOS. The BIOS installed Default Setup Values. If you do not want these
values, enter Setup and enter your own values. If the error persists, check the system battery or contact
your dealer.
System timer error
The timer test failed. Requires repair of system board.
Real time clock error
Real-Time Clock fails BIOS hardware test. May require board repair.
Check date and time settings
BIOS found date or time out of range and reset the Real-Time Clock. May require setting legal date
(1991- 2099).
Previous boot incomplete - Default configuration used

GoBook Pro Help Page 57 of 74
file://C:\WINDOWS\TEMP\~hh6357.htm 5/23/01
Previous POST did not complete successfully. POST loads default values and offers to run Setup. If the
failure was caused by incorrect values and they are not corrected, the next boot will likely fail. On
systems with control of wait states, improper Setup settings can also terminate POST and cause this
error on the next boot. Run Setup and verify that the wait-state configuration is correct. This error is
cleared the next time the system is booted.
Memory Size found by POST differed from CMOS
Memory size found by POST differed from CMOS.
Diskette drive A error
Diskette drive B error
Drive A: or B: is present but fails the BIOS POST diskette tests. Check to see that the drive is defined
with the proper diskette type in Setup and that the diskette drive is attached correctly.
Incorrect Drive A type - run SETUP
Type of floppy drive A: not correctly identified in Setup.
Incorrect Drive B type - run SETUP
Type of floppy drive B: not correctly identified in Setup.
System cache error - Cache disabled
RAM cache failed and BIOS disabled the cache. On older boards, check the cache jumpers. You may
have to replace the cache. See your dealer. A disabled cache slows system performance considerably.
CPU ID:
CPU socket number for Multi-Processor error.
EISA CMOS not writeable
ServerBIOS2 test error: Cannot write to EISA CMOS.
DMA Test Failed
ServerBIOS2 test error: Cannot write to extended DMA (Direct Memory Access) registers.
Software NMI Failed
ServerBIOS2 test error: Cannot generate software NMI (Non-Maskable Interrupt).
Fail-Safe Timer NMI Failed

GoBook Pro Help Page 58 of 74
file://C:\WINDOWS\TEMP\~hh6357.htm 5/23/01
ServerBIOS2 test error: Fail-Safe Timer takes too long.
device Address Conflict
Address conflict for specified device.
Allocation Error for: device
Run ISA or EISA Configuration Utility to resolve resource conflict for the specified device.
CD ROM Drive
CD ROM Drive identified.
Entering SETUP ...
Starting Setup program
Failing Bits: nnnn
The hex number nnnn is a map of the bits at the RAM address which failed the memory test. Each 1
(one) in the map indicates a failed bit . See errors 230, 231, or 232 above for offset address of the
failure in System, Extended, or Shadow memory.
Fixed Disk n
Fixed disk n (0-3) identified.
Invalid System Configuration Data
Problem with NVRAM (CMOS) data.
I/O device IRQ conflict
I/O device IRQ conflict error.
PS/2 Mouse Boot Summary Screen:
PS/2 Mouse installed.
nnnn kB Extended RAM Passed
Where nnnn is the amount of RAM in kilobytes successfully tested.
nnnn Cache SRAM Passed
Where nnnn is the amount of system cache in kilobytes successfully tested.

GoBook Pro Help Page 59 of 74
file://C:\WINDOWS\TEMP\~hh6357.htm 5/23/01
nnnn kB Shadow RAM Passed
Where nnnn is the amount of shadow RAM in kilobytes successfully tested.
nnnn kB System RAM Passed
Where nnnn is the amount of system RAM in kilobytes successfully tested.
One or more I2O Block Storage Devices were excluded from the Setup Boot Menu
There was not enough room in the IPL table to display all installed I2O block-storage devices.
Operating system not found
Operating system cannot be located on either drive A: or drive C:. Enter Setup and see if fixed disk and
drive A: are properly identified.
Parity Check 1 nnnn
Parity error found in the system bus. BIOS attempts to locate the address and display it on the screen. If
it cannot locate the address, it displays ????. Parity is a method for checking errors in binary data. A
parity error indicates that some data has been corrupted.
Parity Check 2 nnnn
Parity error found in the I/O bus. BIOS attempts to locate the address and display it on the screen. If it
cannot locate the address, it displays ????.
Press <F1> to resume, <F2> to Setup,
<F3> for previous
Displayed after any recoverable error message. Press <F1> to start the boot process or <F2> to enter
Setup and change the settings. Press <F3> to display the previous screen (usually an initialization error
of an Option ROM, i.e., an add-on card). Write down and follow the information shown on the screen.
Press <F2> to enter Setup
Optional message displayed during POST. Can be turned off in Setup.
PS/2 Mouse:
PS/2 mouse identified.
Run the I2O Configuration Utility
One or more unclaimed block storage devices have the Configuration Request bit set in the LCT. Run
an I2O Configuration Utility (e.g. the SAC utility).

GoBook Pro Help Page 60 of 74
file://C:\WINDOWS\TEMP\~hh6357.htm 5/23/01
System BIOS shadowed
System BIOS copied to shadow RAM.
UMB upper limit segment address: nnnn
Displays the address nnnn of the upper limit of Upper Memory Blocks, indicating released segments of
the BIOS which can be reclaimed by a virtual memory manager.
Video BIOS shadowed
Video BIOS successfully copied to shadow RAM.
79_0100_001
© 2001 Itronix Corporation. All rights reserved.
MS-DOS Messages
The MS-DOS operating system may display a warning or error message if it encounters a problem with
a command in the CONFIG.SYS or AUTOEXEC.BAT file, or a command that you entered at the DOS
prompt. Following are a few of the most common MS-DOS messages.
Bad command or file name
A command was entered that is spelled incorrectly or does not exist on the computer.
Invalid media type reading drive X (where X is any drive letter)
Abort, Retry, Fail?
The media may not be formatted. Press a to abort, then format the card using the MS-DOS Format
command, or from Windows using the Format Disk command.
Invalid drive specification
You tried to access a drive that does not exist. This can happen if you try to access drive D, but the
media is not loaded. Report this error to your supervisor or help desk.
GoBook Pro Help A. Error Messages Topics
GoBook Pro Help Page 61 of 74
file://C:\WINDOWS\TEMP\~hh6357.htm 5/23/01
Non-System disk or disk error
Replace and press any key when ready
This can occur if media is in the card socket and you restart the computer. Remove the media, and then
press any key.
Not ready reading drive X (where X is any drive letter)
Abort, Retry, Fail?
Make sure that the media is inserted fully into the card socket, then press r to retry.
79_0100_001
© 2001 Itronix Corporation. All rights reserved.
Windows Messages
Windows messages are typically self-explanatory. (See Appendix B Troubleshooting, for more
information).
Application Messages
Both MS-DOS and Windows applications may display messages if a warning or error condition occurs.
Refer to the online Help or other documentation for the application that generated the message.
79_0100_001
© 2001 Itronix Corporation. All rights reserved.
Troubleshooting
This section is designed to help you determine and fix problems you might encounter while operating
the GoBook Pro computer. Try the following things in order:
GoBook Pro Help
A. Error Messages Topics

GoBook Pro Help Page 62 of 74
file://C:\WINDOWS\TEMP\~hh6357.htm 5/23/01
lFirst look through the categories in this section for a solution.
lIf you don’t find a solution for your situation here, try one of the resources listed below.
lIf you are having a problem with a computer application , use the online Help that comes with the
application to find a solution.
lIf you still cannot resolve your problem, contact the help desk at your organization.
Applications
My application locks up, acts strangely, or produces a General Protection Fault (GPF) error
lIf you’ve tried to resolve the problem and your application still doesn’t respond, you may need to
restart your computer as described below.
To reboot your computer, select Start, Shut Down, Restart, or press CTRL+ALT+DEL twice.
If the computer does not restart, the keyboard may be locked up. Reset the computer by holding
down the two mouse buttons for at least 10 seconds and then release the buttons.
lThe data on the hard disk could be corrupted. Run SCANDISK.
lWindows is out of memory/resources. Exit Windows and restart Windows.
Communications programs such as HyperTerminal, or Procomm Plus don’t seem to work or they lock
Windows
lWhen you first try to use HyperTerminal or similar application, the system responds with a
message asking if you want to install the modem. Answer “Yes” to this question and follow the
instructions on the screen to install it.
lVerify with your company that your computer has an internal modem installed.
79_0100_001
© 2001 Itronix Corporation. All rights reserved.
GoBook Pro Help
B. Troubleshooting Topics

GoBook Pro Help Page 63 of 74
file://C:\WINDOWS\TEMP\~hh6357.htm 5/23/01
Batteries
The battery does not charge
lTo prevent possible damage to the battery, the system will not allow a charge if the battery
temperature is extremely hot or cold (such as in a closed, unattended vehicle). If possible, charge
the battery in a location with a moderate temperature of around 20°C (68°F).
lIf possible, turn off the computer while the battery is charging.
lIf the battery is new or has been stored for a week or more, follow this procedure:
1. Make sure the computer is turned off.
2. Remove the battery.
3. Connect the AC adapter to the computer and an AC wall outlet, and then turn on the computer
by pressing the FN+ON (spacebar).
4. Reinstall the battery.
5. Allow the system to remain idle for one hour with the AC adapter connected to the computer.
The Charging LED activity indicator blinks when the battery starts charging.
6. If the battery still fails to charge after an hour, remove the battery, wait several seconds, and then
install it again.
If the battery does not begin charging within several minutes, return the unit for service.
The batteries take much longer than seven hours to charge
lUnder moderate temperatures, about 21°C (70ºF), the computer’s battery takes approximately 4
to 5 hours to completely charge. Under extremely cold or hot temperatures, however, the battery
can take up to 16 hours to fully charge.
The batteries don’t last very long
lAs your battery ages, the maximum capacity that it can hold naturally decreases, and even the
best maintained batteries eventually need to be retired. Consider replacing the battery if you are
not getting the usage you need from it.
GoBook Pro Help
B. Troubleshooting Topics

GoBook Pro Help Page 64 of 74
file://C:\WINDOWS\TEMP\~hh6357.htm 5/23/01
The gas gauge isn’t full after charging the battery
lThis may indicate that the charging process terminated prematurely.
The gas gauge reads “full,” but the indicator light is still On
lIf you charge your battery daily, rely on the gas gauge reading to determine battery capacity. The
charging process may continue even if the gas gauge reads full. External power can be removed
because the battery is virtually full.
My battery seems to have less and less capacity
lOver time as your battery ages, the maximum capacity that it can hold naturally decreases, and
even the best maintained batteries eventually need to be retired. Consider replacing your battery if
you are not getting the usage you need from it.
79_0100_001
© 2001 Itronix Corporation. All rights reserved.
Display
The display performance is slow
lThe temperature may be too cold. Move the computer to a warmer operating environment.
I can’t read the display
lAdjust the backlight .
lThe automatic power-saving mode may have shut off (suspended) the computer. Press FN+ON
(spacebar) to resume.
The underlined, inverse, and hypertext characters are difficult to read on the screen
lChange the color scheme. From the Start Menu select Settings, Control Panel, choose Display,
and then click the Appearance tab to make changes to the color scheme.
GoBook Pro Help
B. Troubleshooting Topics

GoBook Pro Help Page 65 of 74
file://C:\WINDOWS\TEMP\~hh6357.htm 5/23/01
lMake the online hypertext jumps black by adding the line JumpColor=0,0,0 to the [Windows
Help] section of WIN.INI.
I can’t see the cursor while using the DOS editor
lPress FN+insert to change from insert mode to overwrite mode to enable a block cursor. When it
defaults to insert mode, the DOS editor uses an underline cursor which is less visible than the
block cursor for overwrite mode.
The display appears to have random pixels darkened after scrolling
lContact your supervisor or your organization’s help desk for information about correcting this
problem.
I changed my display resolution, but I see no difference on the screen
lTry restarting your computer for the changes to take effect.
79_0100_001
© 2001 Itronix Corporation. All rights reserved.
Hard Disk
The hard disk will not spin up so the computer can’t boot up
lThis occurs if the unit is exposed to extreme low temperatures. This is not a hardware failure
associated with the hard disk . Allow the computer to warm to room temperature.
I can’t save files because the disk is full
lReport this situation to your supervisor or your organization’s help desk.
Diskette Read Error
lAny card in the PC card socket except for a properly formatted memory card will cause this error
since it is trying to read the PC card.
GoBook Pro Help
B. Troubleshooting Topics

GoBook Pro Help Page 66 of 74
file://C:\WINDOWS\TEMP\~hh6357.htm 5/23/01
79_0100_001
© 2001 Itronix Corporation. All rights reserved.
I/O Ports
I can’t access a serial port
lMake sure another application is not using the same port .
lMake sure the correct COM port is selected in your application. Refer to the online Help for your
application.
79_0100_001
© 2001 Itronix Corporation. All rights reserved.
Keyboard
Something unexpected happens when I press a key
lYou may have pressed a key combination that performs a Windows function. Make sure you are
pressing the correct keys for the application you are running.
Incorrect characters appear on the screen when I press certain keys
lYou may be in NUM LOCK mode. Press FN+NUM LOCK to toggle NUM LOCK mode off.
GoBook Pro Help
B. Troubleshooting Topics
GoBook Pro Help
B. Troubleshooting Topics

GoBook Pro Help Page 67 of 74
file://C:\WINDOWS\TEMP\~hh6357.htm 5/23/01
79_0100_001
© 2001 Itronix Corporation. All rights reserved.
Landline Modems
The modem doesn’t work
lWhen you first try to use HyperTerminal or similar application , the system responds with a
message asking if you want to install the modem. Answer “Yes” to this question and follow the
instructions on the screen to install it.
lMake sure the communication settings are correct in your application. Refer to the online Help
for your application.
The modem doesn’t dial a number
Check these things:
lIf you are using an external modem, make sure the cables are attached correctly.
lMake sure your communications parameters are correct in your application. Refer to the online
Help for your application.
The modem dials and receives an answer but does not establish a connection
lYou may have incorrect parameters selected for your application to talk with the remote modem.
Refer to the online Help for your application.
lYou may need to adjust your modem’s baud rate or protocol selection.
Communications programs such as HyperTerminal or Procomm Plus don’t seem to work or they lock
Windows
lIf you are using the internal modem, be sure to specify the proper communications port .
lWhen you first try to use HyperTerminal or similar application, the system responds with a
GoBook Pro Help
B. Troubleshooting Topics

GoBook Pro Help Page 68 of 74
file://C:\WINDOWS\TEMP\~hh6357.htm 5/23/01
message asking if you want to install the modem. Answer “Yes” to this question and follow the
instructions on the screen to install it.
The modem dials and the answering modem generates tone, but our modem does not begin the training
sequence to establish a connection
Although the problem may appear to originate from the computer, the source of the problem is the
answering modem.
lTry setting up the answering modem to generate the correct V.22 tone, which can usually be
done by sending an AT command to the modem.
lAdd %!1300AO to the initialization string. If used, this command must be sent immediately
before the command to dial the desired phone number and sent again before re-dialing the number
since the modem will default to the original setting at the end of the session.
79_0100_001
© 2001 Itronix Corporation. All rights reserved.
Miscellaneous
The computer shuts off unexpectedly
lThe computer has entered suspend mode . Press a key to turn it back on.
lThe battery capacity may be low. Connect external power to charge the battery, or replace the
battery with a fully charged one.
The speaker volume is too high or too low
lIncrease the volume by pressing FN+F7; decrease the volume by pressing FN+F6.
The computer won’t turn on
lThe battery may not be installed properly, or it may not be fully charged. Make sure a fully
charged battery is properly installed.
GoBook Pro Help
B. Troubleshooting Topics

GoBook Pro Help Page 69 of 74
file://C:\WINDOWS\TEMP\~hh6357.htm 5/23/01
lConnect external power to charge the battery if it is not charged.
lIf you are using the AC adapter , check the electrical outlet you are using to make sure it is
working properly.
lIf the GoBook Pro computer does not turn on, restart the computer by holding down both mouse
buttons for at least 10 seconds and then release the buttons.
The computer won’t turn off
lPress and hold the FN+Q keys.
The computer enters suspend mode too quickly
lWhen there is no activity for a period of time, the computer turns off or enters suspend mode. To
extend this time, use the Power Management program and increase the non-activity time to enter
suspend.
The computer doesn’t automatically suspend
lCheck to make sure the COM ports are off. For example, exit any application that uses COM
ports.
lMake sure external power is not connected. Depending on power settings, some systems will not
suspend automatically when they are connected to external power.
The system date and time are incorrect
lReset the correct date and time by choosing the Date/Time icon from Control Panel and making
the appropriate changes.
I receive an “out of memory” error message
lToo many applications may be running at the same time. Close applications you don’t need.
lRun MS-DOS applications in full screen rather than a window. Press ALT+ENTER to toggle
between full screen and window mode.
lIf you’re using desktop wallpaper, set wallpaper to None. To do this, choose Display from
Control Panel and make the appropriate change.
lMake sure you have enough space on your hard disk . Contact your supervisor or your
organization’s help desk for assistance.
lSet up a permanent swap file. Contact your supervisor or your organization’s help desk for
assistance.
Holding down the two mouse buttons to reset the computer doesn’t always work
GoBook Pro Help Page 70 of 74
file://C:\WINDOWS\TEMP\~hh6357.htm 5/23/01
lTry resetting the computer again. If this doesn’t work, remove all power, and allow the unit to
remain idle for ten minutes. After ten minutes, connect external power and retry.
79_0100_001
© 2001 Itronix Corporation. All rights reserved.
Mouse
I have difficulty double-clicking the mouse fast enough
lFrom the Start Menu, select Settings, Control Panel, and then choose Mouse. The Buttons tab
contains the setting for the double-click speed.
I can’t see the mouse pointer
lThe mouse pointer may be off the screen. Move the mouse until it reappears on the screen.
lFrom the Start Menu, select Settings, Control Panel, and then choose Mouse. The Motion tab
contains settings for the mouse speed and muse trails.
79_0100_001
© 2001 Itronix Corporation. All rights reserved.
PC Cards
GoBook Pro Help
B. Troubleshooting Topics
GoBook Pro Help
B. Troubleshooting Topics

GoBook Pro Help Page 71 of 74
file://C:\WINDOWS\TEMP\~hh6357.htm 5/23/01
I can’t remove the PC card
lPress the ejector button located inside the PC card door on the side of the computer. The button
will pop out. Press the ejector button again to eject the PC card. Slide the card out.
lIf the ejector button malfunctions when you press it, release the button and then press it again.
Diskette Read Error
lAny card in the PC Card socket except for a properly formatted memory card will cause this error
since it is trying to read the PC Card.
The system does not recognize the PC Card CD-ROM when it is inserted into the PC Card socket
lThere is a delay of 10 to 15 seconds before the CD-ROM drive is recognized.
lDrivers may not be installed. Contact your organization’s help desk for assistance.
The computer locks up when I remove the PC card
lBefore you remove the card, select the PC card icon in the system “tray” area of the screen (near
the clock in the lower right corner), and choose “Stop [card name] card.”
79_0100_001
© 2001 Itronix Corporation. All rights reserved.
Pen/Touch Screen
When I try to use the stylus on my touch screen, nothing happens
lIf you cannot select objects accurately with the stylus, you may need to recalibrate the touch
screen.
To calibrate the touch screen
1. From the Start Menu, select Programs, UPDD, and then choose Calibrate.
GoBook Pro Help
B. Troubleshooting Topics
GoBook Pro Help Page 72 of 74
file://C:\WINDOWS\TEMP\~hh6357.htm 5/23/01
2. Follow the instructions on the screen to calibrate the touch screen.
The touch screen display warps or pillows in high humidity
lThe computer remains functional; however, moving the computer to a more suitable environment
will allow the display to recover.
79_0100_001
© 2001 Itronix Corporation. All rights reserved.
Wireless Modems
How can I tell if my CDPD radio is working?
Try the following procedure:
1. From the Start Menu, select Programs, then “Sierra Wireless”, then “Aircard3XX”, then
“WirelessExpert”
2. Press the Next Button
3. If you encounter an error message, follow the on screen instructions.
4. Verify or enter the correct NEI (Network IP address) and DNS (Domain Name Server IP
address) for your CDPD network registration
5. Press the Next Button. WirelessExpert then automatically perform a series of tests. If a red X is
displayed in any check box, then an error resulted from that test.
6. If a red X is displayed in the check box next to “Scan for Valid CDPD channel” then your CDPD
radio cannot “hear” the cellular network. You are either out of RF coverage or have a RF
performance problem. Check your RF coverage and antenna position. Press Back to repeat test.
7. If a red X is displayed in the check box next to “Register with CDPD Network” then your CDPD
radio failed to register with the network. Check your CDPD network registration status with your
CDPD provider. Press Back to repeat test
GoBook Pro Help
B. Troubleshooting Topics

GoBook Pro Help Page 73 of 74
file://C:\WINDOWS\TEMP\~hh6357.htm 5/23/01
8. If a red X is displayed in the check box next to “Ping the network” then your CDPD radio cannot
deliver a packet to itself through the CDPD network. Check with your CDPD network provider
to verify your NEI and DNS are correct. If your NEI and DNS are correct, you may be at the
edge of RF coverage or have a RF performance problem. Check your RF coverage and antenna
position. Press Back to repeat test.
9. If a green check is displayed in all three of the above check boxes, then your CDPD radio is
working properly. If you continue to have CDPD communication problems, check with your
application support personnel to investigate your networking and application setup.
How can I tell if my ARDIS/MOTIENT or RAM/BSW/Cingular radio is working?
lEnable a RIM Radio communication session
1. From the Start Menu, select Programs, Communications, then Terminal.
2. Double-click the “Make a new session” icon to bring up the Session Properties dialogue box. On
the Communications Tab, enter a name for the session, select modem “RIM Radio on COM4”,
then click the configure button.
3. Under the Device Properties Port Settings tab, check Manual Dial and configure the Connection
Properties as follows:
4. Click OK to save these settings and return to Session Properties.
5. Enter any digit in the Telephone Number block and click OK, then click OK again. This will
bring up the Connection Dialing status window for your terminal session. In this box you will see
an OK and a X box in the upper right hand corner. Click OK. The terminal session will come up
again with a question mark (?) and an X.
6. Type “menu” (entered keys will not be displayed) at the cursor to enter the diagnostic screen and
view options for the session. The diagnostic will establish communications with the RF Modem
and begin updating.
Q – Quit the diagnostic and reset the radio. (ARDIS/MOTIENT & RAM/BSWD)
H – Displays RF Modem firmware and date. (ARDIS/MOTIENT & RAM/BSWD)
I – Toggle interactive Serial Mode Enabled. (RAM/BSWD)
B – Displays RF Modem battery level (Displayed as a percentage - inaccurate). (ARDIS/
Baud Rate 9600
Data Bits 8
Parity None
Stop Bits 1
Flow Control Hardware

GoBook Pro Help Page 74 of 74
file://C:\WINDOWS\TEMP\~hh6357.htm 5/23/01
MOTIENT & RAM/BSWD)
R – Displays RSSI level in dBuV (dBuV - 107 = dBm). (ARDIS/MOTIENT & RAM/BSWD)
D – Displays RF Modem system status. (ARDIS/MOTIENT & RAM/BSWD)
P – Ping, which can be used to send a system check to yourself. (ARDIS/MOTIENT & RAM/
BSWD)
N – Set the current network. (ARDIS/MOTIENT & RAM/BSWD)
7. Select an option from the menu for your session. For troubleshooting purposes, D, R, and P will
generally establish if the RF Modem is functional.
Displaying RF Modem system status verifies that the computer can communicate with the RF
Modem through the terminal application and allows the display of RF Modem specific
information. Entering “D” will result in a display similar to the one below:
LLI=880C746 RSSI=21%-94 dBuV Battery Level=40% Network=ARDIS
Contact=Yes Protocol=MDC Power Save=Enabled Rx/Tx Enabled/Enabled
Radio Chan=2183 Base ID=C2/01/13/13
Monitoring Receive Signal Strength Indicator (RSSI) level establishes connectivity within the coverage
area. Entering “R” will result in a display similar to the one below:
Updating RSSI Level
RSSI=21% -94 dBuV
Pinging a unit by sending a message to itself through the network confirms the network connectivity.
Entering “P” will result in a display similar to the one below:
Ping: Sending SDU to yourself
PING: STATUS SDU has been sent
Received SDU from 8800C746 - length 42
79_0100_001
© 2001 Itronix Corporation. All rights reserved.