Gentex UAHL5C Universal Garage Door Opener Transmitter User Manual AV HL5 indd
Gentex Corporation Universal Garage Door Opener Transmitter AV HL5 indd
Gentex >
Users Manual

The HomeLink® Wireless Control System provides a convenient way to replace up to three hand-held radio-
frequency remotes used to activate devices such as gate operators, garage door openers, entry door locks,
security systems, even home lighting. The below steps are generic programming instructions; for Genie
and Sommer garage door openers please go directly to the HomeLink website. Additional information and
programming videos can be found at www.HomeLink.com and www.youtube.com/HomeLinkGentex.
Precautions!
Before programming HomeLink to a garage door opener or gate operator, make sure that people and
objects are out of the way of the device to prevent potential harm or damage. When programming a garage
door opener, it is advised to park outside of the garage. Do not use HomeLink with any garage door opener
that lacks safety stop and reverse features as required by U.S. federal safety standards (this includes
any garage door opener model manufactured before April 1, 1982). A garage door that cannot detect an
object signaling the door to stop and reverse does not meet current U.S. federal safety standards. It is also
recommended that a new battery be placed in the hand-held remote (garage door opener remote) of the
device for quicker and more accurate training. Some vehicles may require the ignition switch to be turned
on or to the “accessories” position for programming and/or operation of HomeLink.
Keep the hand-held remote (garage door opener remote) of the device you are programming for use in other
vehicles as well as for future HomeLink programming. It is also suggested that upon the sale of the vehicle,
the programmed HomeLink buttons be erased for security purposes. Refer to “Erasing HomeLink Buttons”.
Programming a New HomeLink Button
1. Press and release the HomeLink button that you would like to program.
The HomeLink indicator light will fl ash orange slowly (if not, refer to “Erasing
HomeLink Buttons”).
2. Position the hand-held remote (garage door opener remote) 1–3 inches
(2–8 cm) away from the HomeLink button that you would like to program.
Note: Some hand-held remotes (garage door opener remotes) may
actually train better at a distance of 6-12 inches (15-20 cm). Keep this in
mind if you have diffi culty with the programming process.
3. While the HomeLink indicator light is fl ashing orange, press and hold the
hand-held remote button. Continue pressing the hand-held remote button until
the HomeLink indicator light changes from orange to green. You may now
release the hand-held remote button.
Note: Some devices may require you to replace this “Programming
a New HomeLink Button” step 3 with procedures noted in the “Gate
Operator / Canadian Programming” section.

In the event that there are still programming diffi culties or questions, additional HomeLink information and
programming videos can be found at www.HomeLink.com and www.youtube.com/HomeLinkGentex. For
Genie and Sommer garage door openers please go directly to the HomeLink website.
Gate Operator / Canadian Programming
Canadian radio-frequency laws require transmitter remote signals to “time-out” (or quit) after several
seconds of transmission, which may not be long enough for HomeLink to pick up the signal during
programming. Similar to this Canadian law, some U.S. gate operators are designed to “time-out” in the
same manner. The indicator LED on the hand-held remote will go off when the device times out, indicating
that it has fi nished transmitting.
Programming a New HomeLink Button (cont’d.)
4. Press the HomeLink button that you would like to program and observe
the indicator light.
• If the indicator light remains constant green, your device should
operate when the HomeLink button is pressed. At this point, if your device
operates, programming is complete.
• If the indicator light rapidly fl ashes green, fi rmly press, hold for
two seconds and release the HomeLink button up to three times to
complete the programming process. At this point if your device operates,
programming is complete. If the device does not operate, continue with
the next step of the programming instructions.
5. At the garage door opener motor, (security gate motor, etc...) locate the
“Learn”, “Smart”, or “Program” button. This can usually be found where the
hanging antenna wire is attached to the motor-head unit (see the device’s
manual to identify this button). The name and color of the button may vary by
manufacturer.
Note: A ladder and/or second person may simplify the following steps.
6. Firmly press and release the “Learn”, “Smart”, or “Program” button. You
now have 30 seconds in which to complete step 7.
7. Return to the vehicle and fi rmly press, hold for two seconds and release
the HomeLink button up to three times. At this point programming is complete
and your device should operate when the HomeLink button is pressed and
released.
8. If status indicator arrows appear next to the indicator light, please proceed
to the “Garage Door Two-Way Communication” section.
Gate Operator / Canadian Programming (cont’d.)
If you live in Canada or you are having diffi culties programming a gate operator or garage door opener
by using the programming procedures, replace “Programming a New HomeLink Button” step 3 with the
following:
While the HomeLink indicator light is fl ashing orange, press and release (“cycle”) your device’s hand-held
remote every two seconds until the HomeLink indicator light changes from orange to green. You may now
release the hand-held remote button.
Note: If programming a garage door opener or gate operator, it is advised to unplug the device during
the “cycling” process to prevent possible overheating.
Proceed with “Programming a New HomeLink Button” step 4 to complete.
Using HomeLink
To operate, simply press and release the programmed HomeLink button. Activation will now occur for the
trained device (i.e. garage door opener, gate operator, security system, entry door lock, home/offi ce lighting,
etc.). For convenience, the hand-held remote of the device may also be used at any time.
Erasing HomeLink Buttons
To erase programming from the three buttons (individual buttons cannot be erased but can be
“reprogrammed” as outlined below), follow the step noted:
Press and hold the two outer HomeLink buttons for at least 10 seconds. The LED indicator will change
from continuously lit to rapidly fl ashing. Release both buttons. Do not hold for longer than 20 seconds.
HomeLink is now ready to be programmed at any time beginning with “Programming a New HomeLink
Button” - step 1.
Reprogramming a Single HomeLink Button
To program a previously trained button, follow these steps:
1. Press and hold the desired HomeLink button. DO NOT release the button.
2. The indicator light will begin to slowly fl ash orange after 20 seconds. The HomeLink button can be
released at this point. Proceed with “Programming a New HomeLink Button” - step 3.
3. If you do not complete the programming of a new device to the button, it will revert to the previously
stored programming.
Garage Door Two-Way Communication
HomeLink has the capability of communicating with your garage door opener. HomeLink can receive and
display “closing” or “opening” status messages from compatible garage door opener systems. At any time,
HomeLink can also recall and display the last recorded status communicated by the garage door opener to
indicate your garage door being “closed” or “opened”.
HomeLink has the capability of receiving this communication from the garage door opener at a range up
to 820 feet (250 m). Range may be reduced by obstacles such as houses or trees. You may have to slow
your vehicle speed to successfully receive the garage door opener communication.
*HomeLink® and the HomeLink House® logo are registered trademarks of Gentex Corporation.
Programming Two-Way Communication
Within fi ve seconds after programming a new HomeLink button, both of
HomeLink’s garage door status indicators will fl ash rapidly green indicating
that the garage door two-way communication has been enabled. If your
garage door status indicators fl ashed, two-way communication programming
is complete.
If the garage door status indicators do not fl ash, additional HomeLink
information and programming videos can be found online at www.HomeLink.
com and www.youtube.com/HomeLinkGentex.
Using Two-Way Communication
Recall and display (at any time) the last recorded garage door status message
communicated to HomeLink by simultaneously pressing HomeLink buttons
1 and 2 for two seconds. HomeLink will display the last recorded status for
three seconds.
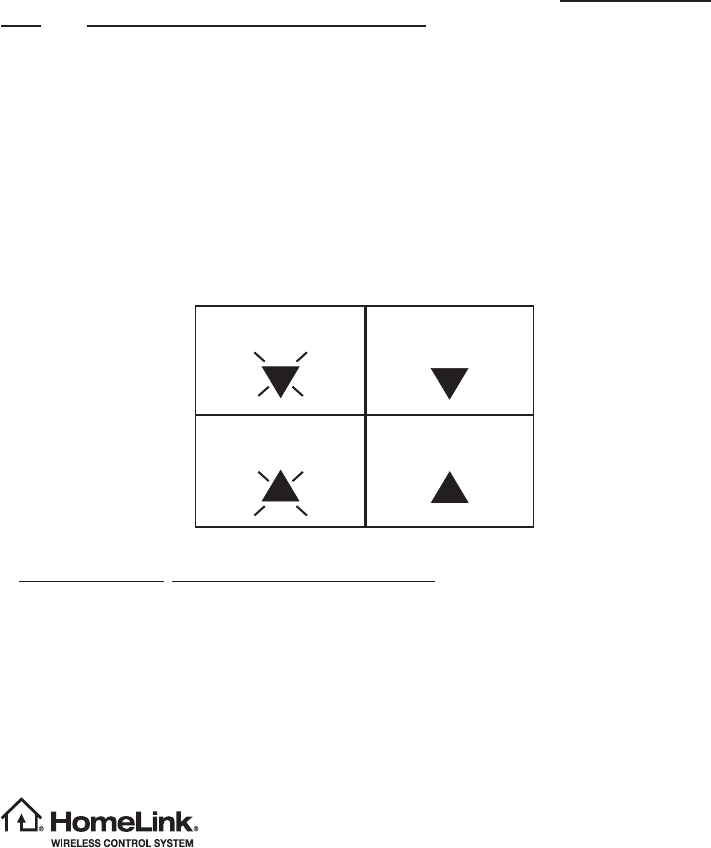
If two-way communication programming is successful, HomeLink will display
the status of your garage door opener with arrow indicators (see below).
Garage Door Opener
OPENING Garage Door Opener
OPENED
Solid
Green
Garage Door Opener
CLOSING Garage Door Opener
CLOSED
Blinking
Orange Solid
Green
Blinking
Orange
In the event that there are still programming diffi culties or questions, additional HomeLink information and programming videos can be found
at www.HomeLink.com, www.youtube.com/HomeLinkGentex, or by calling the toll-free HomeLink-hotline at 1-800-355-3515.
This device complies with FCC rules part 15 and Industry Canada RSS-210. Operation is subject to the following two conditions: (1) This
device may not cause harmful interference, and (2) This device must accept any interference that may be received including interference that
may cause undesired operation. WARNING: The transmitter has been tested and complies with FCC and IC rules. Changes or modifi cations
not expressly approved by the party responsible for compliance could void the user’s authority to operate the device.
This equipment complies with FCC radiation exposure limits set forth for an uncontrolled environment. End Users must follow the specifi c
operating instructions for satisfying RF exposure compliance. This transmitter must be at least 20 cm from the user and must not be co-
located or operating in conjunction with any other antenna or transmitter.
The term “IC:” before the certifi cation/registration number only signifi es that Industry Canada technical specifi cations were met.