GeoPro LBS GPM1000 GeoPro Messenger User Manual Quick Guide
GeoPro LBS Inc. GeoPro Messenger Quick Guide
Contents
- 1. User Manual 1
- 2. Quick Guide
- 3. User Manual 2
Quick Guide

GeoProMessengerQuickStartGuidev0.1
PRE‐RELEASEPage109/07/2010
GeoProMessengerQuickStartGuide
ThisreferenceguideisdesignedtoprovideyouwithclearinstructionsonhowtogetstartedusingtheGeoProMessengerinthefield.
Foradditionalinformation,refertotheGeoProMessengerUserGuide.
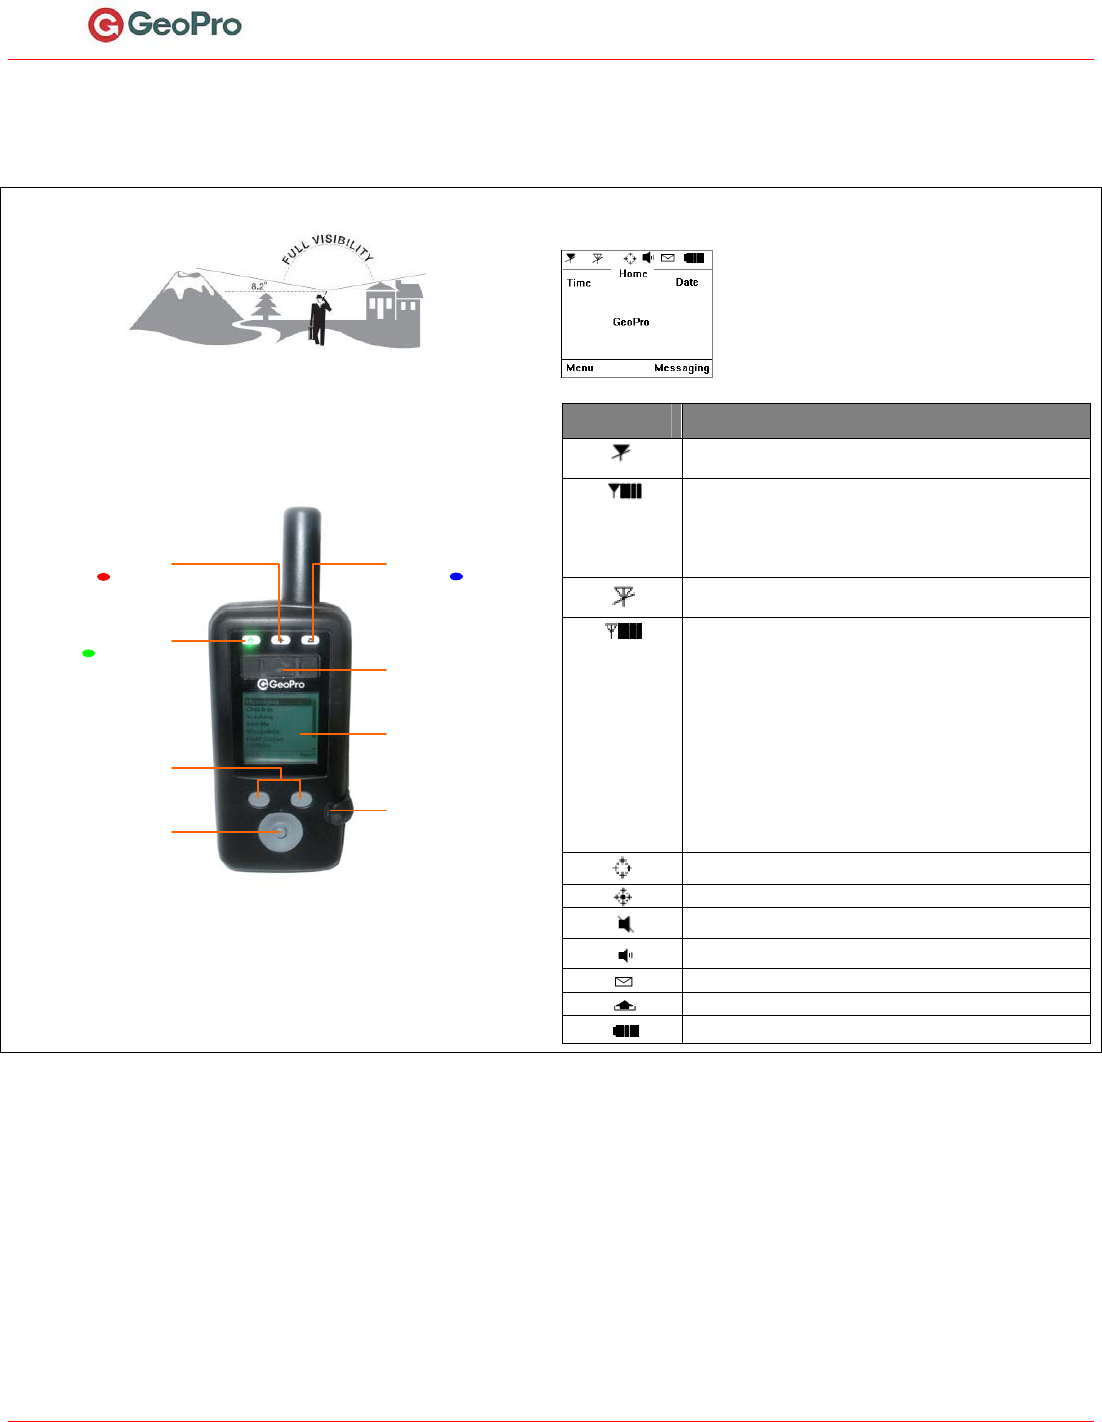
SatelliteReception
TheGeoProMessengeroperatesmosteffectivelywithafullandclearvisibilityof
thesky(asshown)toacquireaGPSfixandtransmityourmessagesoverthe
Iridiumsatellitenetwork.Thisprocessshouldtakelessthan1minute,butmay
takeseveralminutesifthelineofsightisobstructedorthedevicehasmoved
morethan500milessinceitslastGPSfix.
GeoProMessengerOverview
Emergency
RedLED
Power
GreenLED
MessageWaiting
BlueLED
EmergencyButton
Liftcoverandpress
for3seconds
LCDDisplay
Monochrome,
textonly
USBPort
Chargebattery,sync
withDeviceManager
Softkeys
(Left/Right)
Accessdevicefunctions
Joystick
Poweron,navigate
menus,selectoptions
Figure1:GeoProMessengerMainFeatures
Usethesoftkeysandjoysticktonavigate.Thejoystickallowsscrollingthough
menusandmakingselectionsasfollows:
Movejoystickleft=Gobacktopreviousscreen
Movejoystickdown/up=Scrollmenus;viewadditionalmenuoptions
Pressjoystickstraightdown=Selectthehighlightedmenuoption
Home Screen
TheHomescreenisyourentrypointtotheGeoPro
Messenger.Itconsistsofcommunicationandpower
managementicons(seetablebelow)atthetop,time
anddate,andmenusforaccesstothedevicefunctions
atthebottom.
IconDescription
IridiumtransceiverisOFF.Thisisthedefaultdevicestate
forpowermanagement.
IridiumtransceiverisONwithreal‐timesignalstrength
representedbythenumberofverticalbars.Thisisthe
devicestatewhileactivelysendingandreceivingmessages.
Thisprocessismanagedautomaticallybythedeviceand
requiresnouserintervention.
GPSreceiverisOFF.Thisisthedefaultdevicestatefor
powermanagement.
GPSreceiverisONwithreal‐timesatelliteacquisition
statusrepresentedbythenumberofverticalbars:
1Bar=Time&Date
2Bars=2DFix
3Bars=3DFix;HDOPmorethan2.0
4Bars=3DFix;HDOPlessthan2.0
Thereceiverisonlyturnedonwhenanewpositionis
requiredforamessage.Thedeviceisnottransmittingon
theIridiumnetwork.Tomaximizepowermanagement,the
receiveristurnedonfortheminimumtimerequiredtoget
avalidfix(3D).Thisprocessismanagedautomaticallyby
thedeviceandrequiresnouserintervention.
TrackingisOFF.
TrackingisON.
AllaudioalertsareOFF.
AudioalertsareON.
NewmessagesinInbox.
MessagesqueuedinOutbox.
Batterypowerindicator:5bars=fullycharged.
PowerOn/OffYourGeoProMessenger
1. TopowerontheGeoProMessenger,pressthejoystickstraightdownand
holdfor3seconds.Thegreenpowerlightilluminatestoindicatethatthe
deviceisON.Ifunused,thedevicegoesintosleepmodeafterapreset
timetoconservebatterypower.Whenthedeviceisinsleepmode,the
greenpowerlightflashes.Thedevicewillwakeupperiodicallytocheck
formessages.Tobringthedeviceoutofsleepmode,pressandholdthe
joystickfor3seconds.
2. WhentheGeoProMessengerispoweredon,thefollowingmessage
displays:WouldyouliketosetyourfieldstatustoIn?Formore
information,refertotheSetYourFieldStatussection.
3. TopowerofftheGeoProMessenger,fromtheMainMenuselectPower
Offandthenpressthejoystick.Thefollowingmessagedisplays:Would
youliketosetyourfieldstatustoOut?Formoreinformation,refertothe
SetYourFieldStatussection.
SetYourFieldStatus
WhenyouarereadytostartorfinishusingyourGeoProMessenger,youmust
setyourfieldstatus.Whenyourfieldstatusissetto‘In’,thecheck‐inor
trackingschedulesdefinedintheGeoProWebApplicationwillautomaticallybe
applied.YourfieldstatuscanbesetduringthepowercycleorviatheField
Statusmenu.
Tosetfieldstatusduringthepowercycle:
WhenpoweringontheGeoProMessenger,youarepresentedwithan
optiontosetyourFieldStatus.
IfyouselectYes,thedevicewillsetyourfieldstatusto‘In’and
transmitamessagetotheGeoProWebApplication.
IfyouselectNo,thedevicewillnotsetyourFieldStatus(i.e.,apply
theschedulesdefinedintheGeoProWebApplication),andwillload
theHomescreen.

GeoProMessengerQuickStartGuidev0.1
PRE‐RELEASEPage209/07/2010
TosetfieldstatusfromtheFieldStatusmenu:
1. SelectFieldStatusfromtheMainMenu.TheFieldStatusscreenappears.
Tosetyourfieldstatusto‘In’,presstheInsoftkey.
Tosetyourfieldstatusto‘Out’,presstheOutsoftkey.
2. AmessageissenttotheGeoProWebApplicationindicatingyourfield
status.ClickOKtoexit.
NOTE:Itisimportanttosetyourfieldstatusto‘Out’whenpoweringyour
deviceofftoensurethatyourcheck‐inscheduleissuspendedautomatically
andtheGeoProWebApplicationdoesnotescalatemissedcheck‐ins.
SettheEmergencyMode
TheEmergencyserviceenablesapersoninthefieldtodeclareanemergency
thattriggersanescalationprocessandresponsefromyourdesignated
contacts.
NOTE:Yourescalationprocesshasbeensetbyyourorganization’s
Administrator.
1. LifttheEmergencybuttoncover(seeFigure1).
2. PressandholdtheEmergencybuttonfor3seconds.
3. TheEmergencyLEDwillstartflashingandthedevicewilltransmita
messagetotheGeoProWebApplication.
4. TheGeoProWebApplicationwilltransmitaresponsetoconfirmyour
Emergency.Followtheon‐screenpromptstoconfirmyourEmergency.
5. Onceconfirmed,theEmergencyLEDwillturnsolidred.
NOTE:WheninEmergencyMode,theGeoProMessengerwillautomatically
transmitpositionupdatesevery5minutesuntiltheEmergencyiscancelled.
CreateandSendaCheck‐in
TheGeoProWebApplicationenablesCheck‐inrulestobeestablishedfor
GeoProMessengerusers.TorespondtoaCheck‐in,followthesesteps:
1. PresstheMenusoftkey(seeFigure1).
2. SelectCheck‐InfromtheMainMenu.TheCheck‐Inscreenappears.
3. SelectSendCheck‐Infromthelist.
4. PresstheYessoftkeytosendthecheck‐inmessage.
NOTE:IfaCheck‐inreminderappearsonthescreen,presstheYessoftkeyto
sendtheCheck‐in.
SuspendCheck‐inSchedule
ACheck‐inschedulerequirescheckinginperiodically.However,theremaybe
occasionswhenyoucannotrespondaccordingtotheschedule.Forthis
purpose,youcanselectapredefinedCheck‐insuspensionperiod.
1. PresstheMenusoftkey.
2. SelectCheck‐InfromtheMainMenu.TheCheck‐Inscreenappears.
3. SelectSetSuspension.TheSetSuspensionscreendisplays.
4. Selectthesuspensiontimeintervalfromthelist(from30minsto12
hours)andpressSetusingthejoystick.
5. AmessageissenttotheGeoProWebApplicationsettingthesuspension
time.PressOKtoexit.
SelectorComposeaTextMessage
1. PresstheMessagessoftkeyontheHomescreen,orselectMessaging
fromtheMainMenu.TheMessagingscreenappears.
2. SelectComposefromtheMessagingmenu.
3. OntheSelecttheRecipientscreen:
Toenteranewrecipientusingtheonscreenkeyboard,selectEnter
Address.PressDonewhenfinished.
Tosendamessagetoanexistingrecipient,selecttherecipientfrom
thelist.Selectthemessagetype(Email,GeoPro,orSMS)thatyou
wanttouse.
4. OntheSendToscreen,selectarecipientfromthelistandpresstheMsg
Textsoftkey.
5. OntheMessagescreen:
TosendapredefinedmessagecreatedinDeviceManager,select
Choosecannedmessages.SelectamessagefromtheCanned
Messageslist.
Totypeanewmessageusingtheon‐screenkeyboard,selectEnter
Text.Usethejoysticktoselectletters.PressDonewhenfinished.
Messagesarelimitedto160characters.
6. Tosendyourmessage,selectNext.TheOptionsscreenletsyousendthe
messagedirectlyortosaveitasadraft.
7. PressSendtosendthemessage,orpressSaveasDrafttocontinue
composingitlater.
8. Themessageisaddedtoyouroutbox.PressOKtoreturntotheHome
screen.
CreateandSendaWaypoint
WaypointsenableyoutosavetheGPScoordinatesofaspecificfieldlocation
andsharethisinformationwithcolleagues.
1. PresstheMenusoftkey.
2. SelectWaypointsfromtheMainMenu.TheWaypointsscreenappears.
Tocreateanewwaypoint,selectNew.ThedevicedisplaystheGPS
data,ifavailable.
Toselectanexistingwaypoint,selectList.Selectawaypointfrom
theWaypointslist.
3. Whenavalidfixisacquired,presstheNextsoftkey.
4. Composeadescriptionforthewaypoint.
5. PresstheAddsoftkey.
6. PressYestosendthewaypoint,orpressNotostorethewaypointonthe
GeoProMessenger.
7. AmessageissenttotheGeoProWebApplicationindicatingthenew
waypoint.PressOKtoreturntotheHomescreen.
CreateandSendaSee‐Me
See‐MeenablesyoutoshareyourlocationviaemailorSMSwithpeoplewho
donothaveaccesstotheGeoProWebApplication.
1. PresstheMenusoftkey.
2. SelectSee‐MefromtheMainMenu.TheSelecttheRecipientscreen
appears.
3. SelectEnterAddresstoenteranewrecipientusingtheonscreen
keyboard,orselectanexistingrecipientfromthelist.
4. OntheSelectAddressscreen,selectthemessagetype(EmailorSMS)
thatyouwanttouse.
5. OntheSendToscreen,selectarecipientfromthelistandpresstheMsg
Textsoftkey.
6. EnterthetextoftheSee‐MemessageandpresstheSendsoftkey.
7. Themessageisaddedtoyouroutbox.PressOKtoreturntotheHome
screen.
Tracking
SelectTrackingfromtheMainMenu.
Tosettrackingonoroff,ontheTrackingscreenselecttheOn/Offoption,
andthenselecteithertheOnorOffoption.
Tosetthereportinginterval,selectReportingRateoption,andthenselect
oneoptionfromthelistofpredefinedintervals(from1minto1day).
SelectYestoconfirmthereportingratechange.