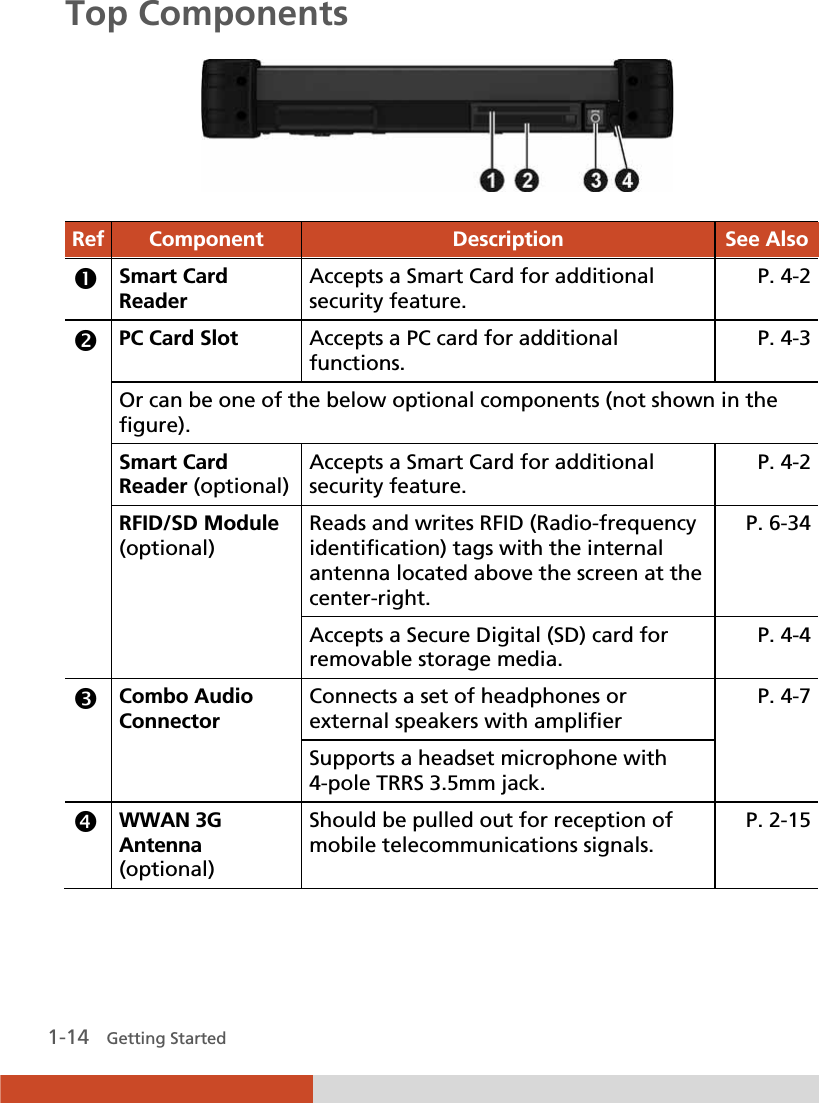
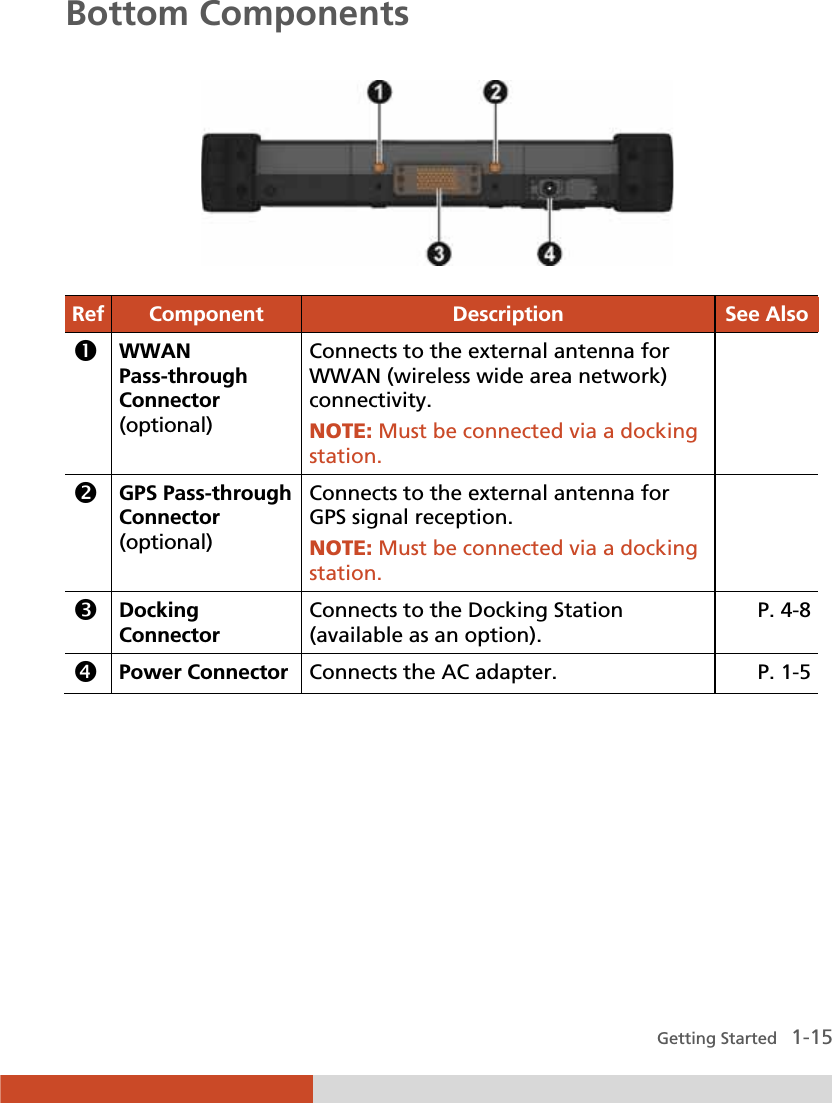
Getac Technology E110 Tablet PC User Manual E110
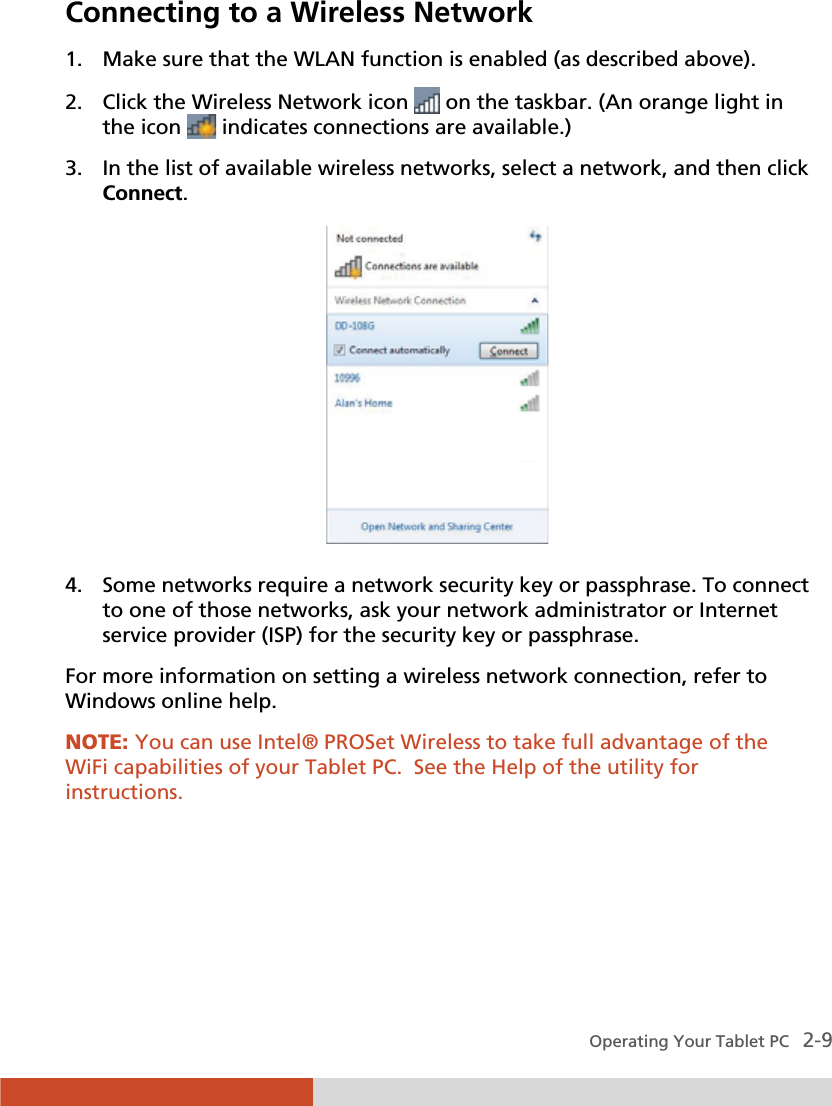
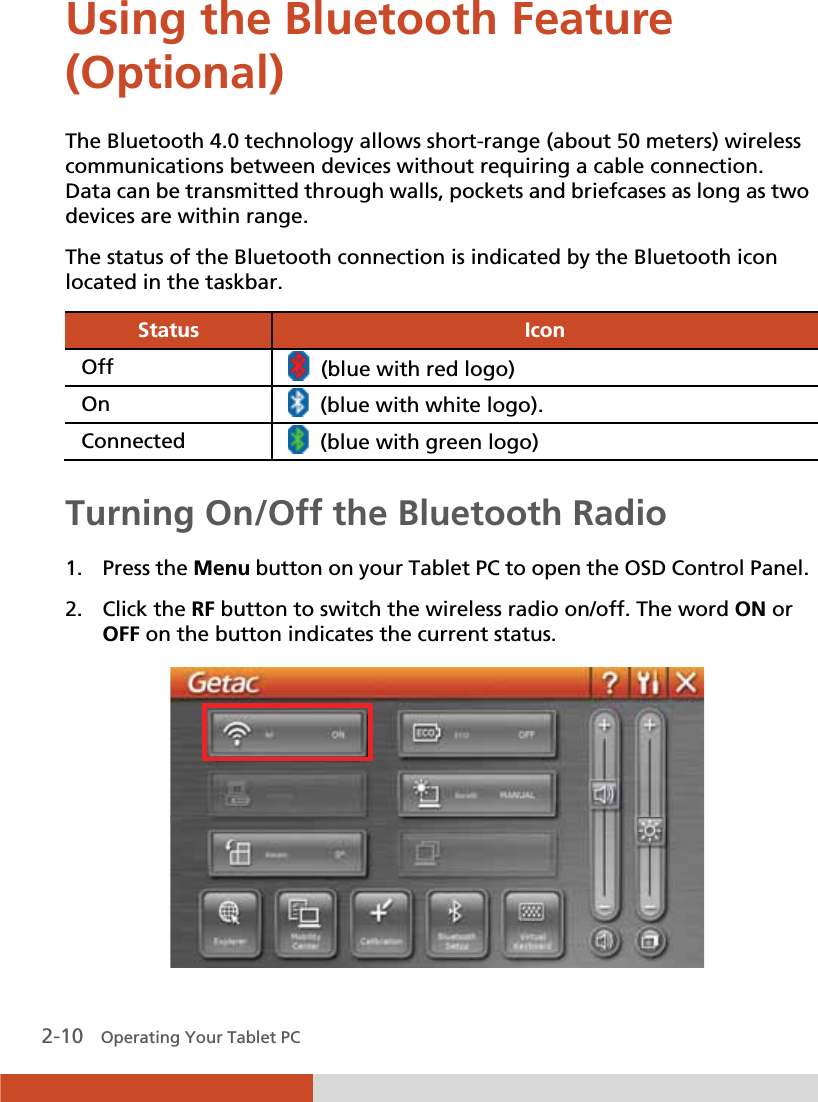
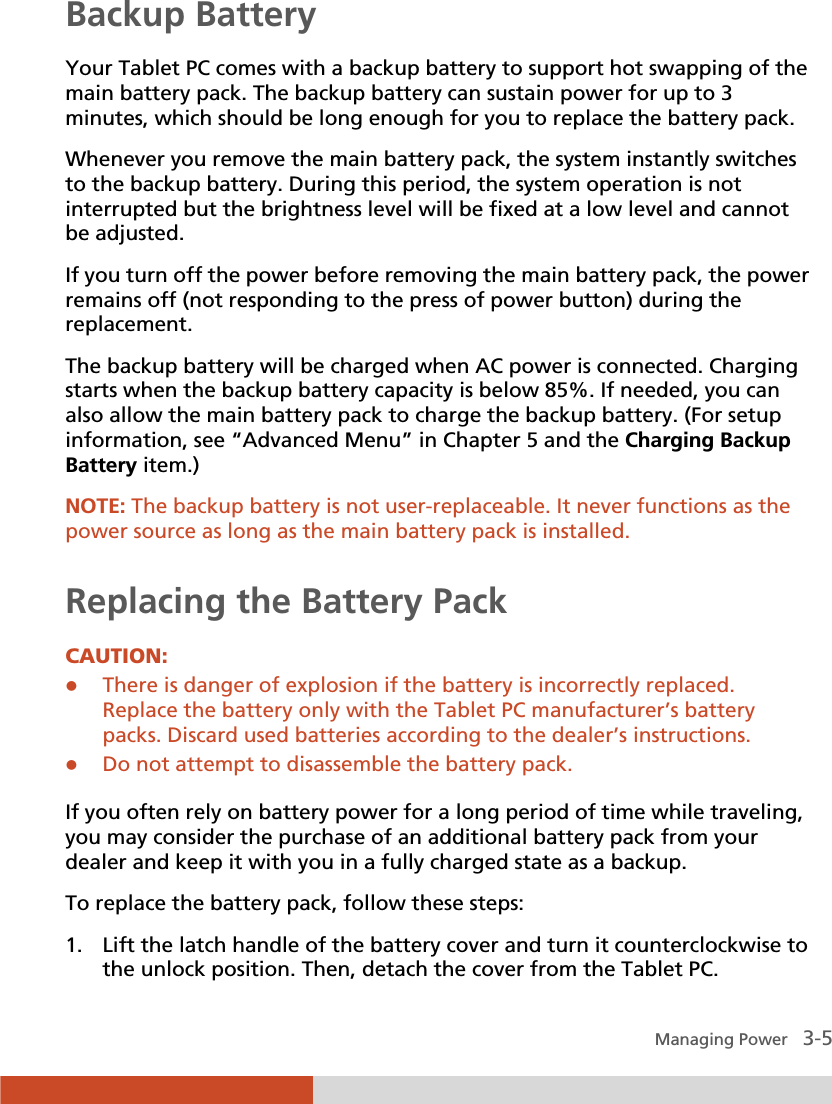
Getac Technology Corporation Tablet PC E110
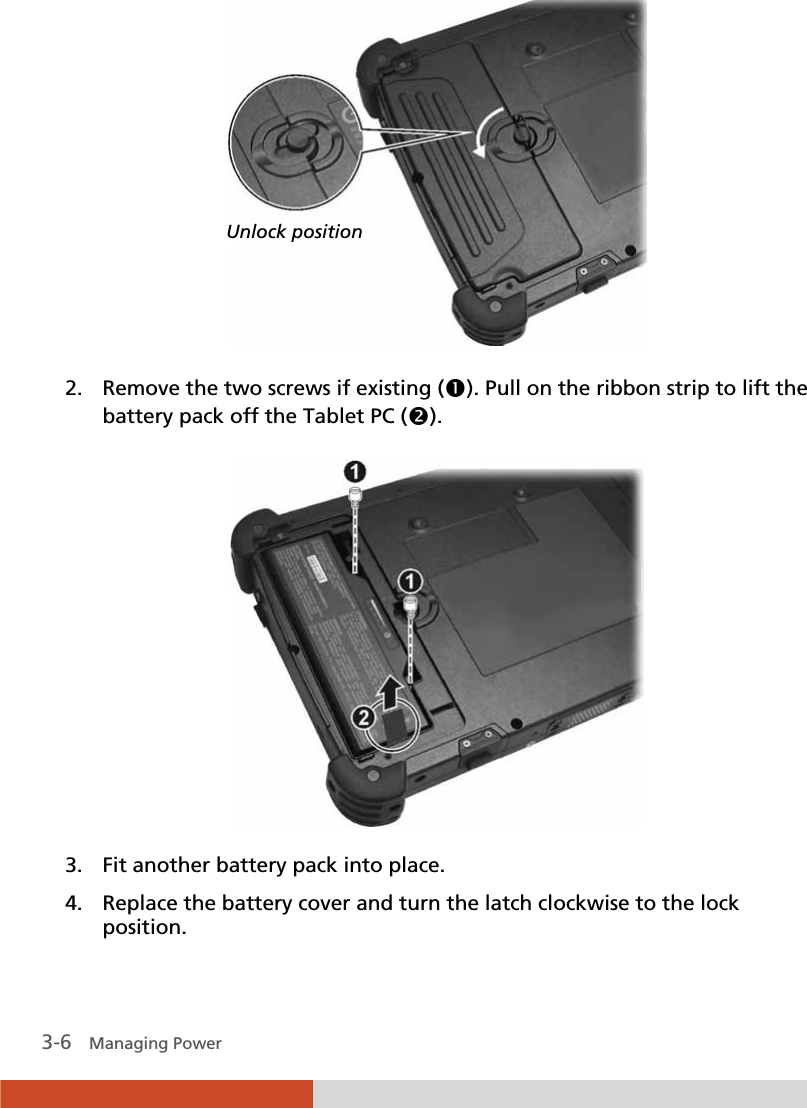
UserManual.wiki
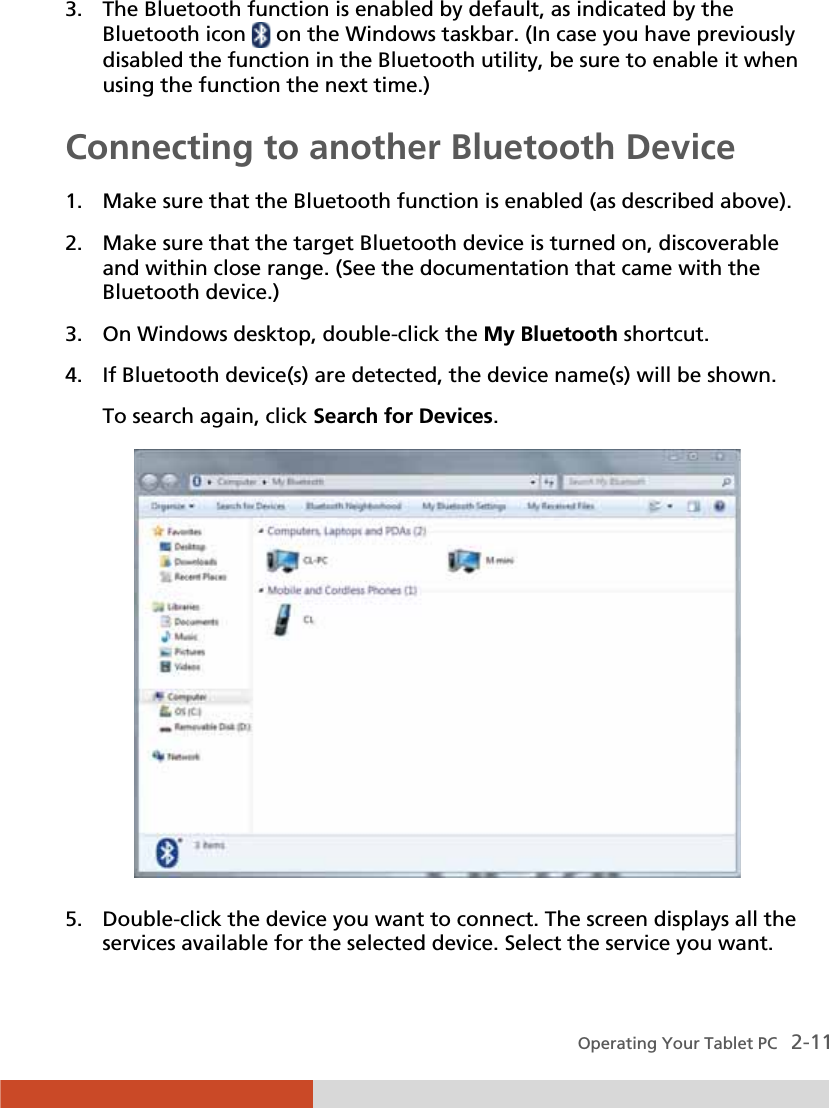
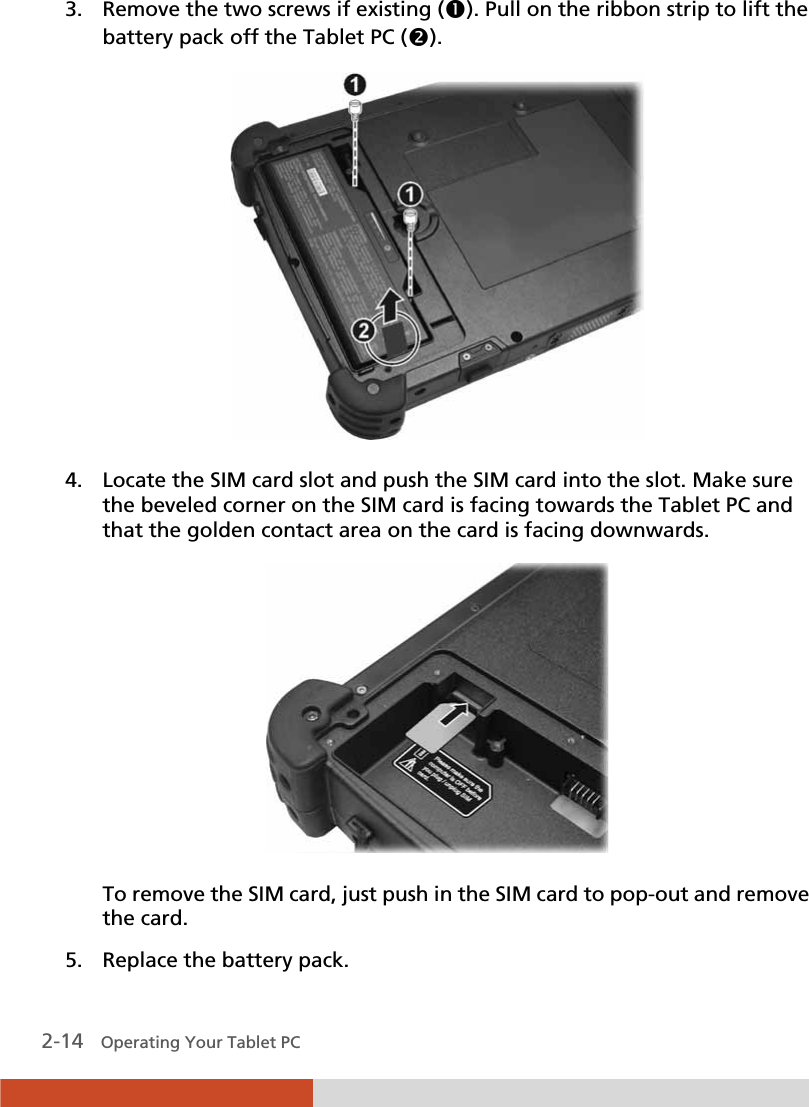
>
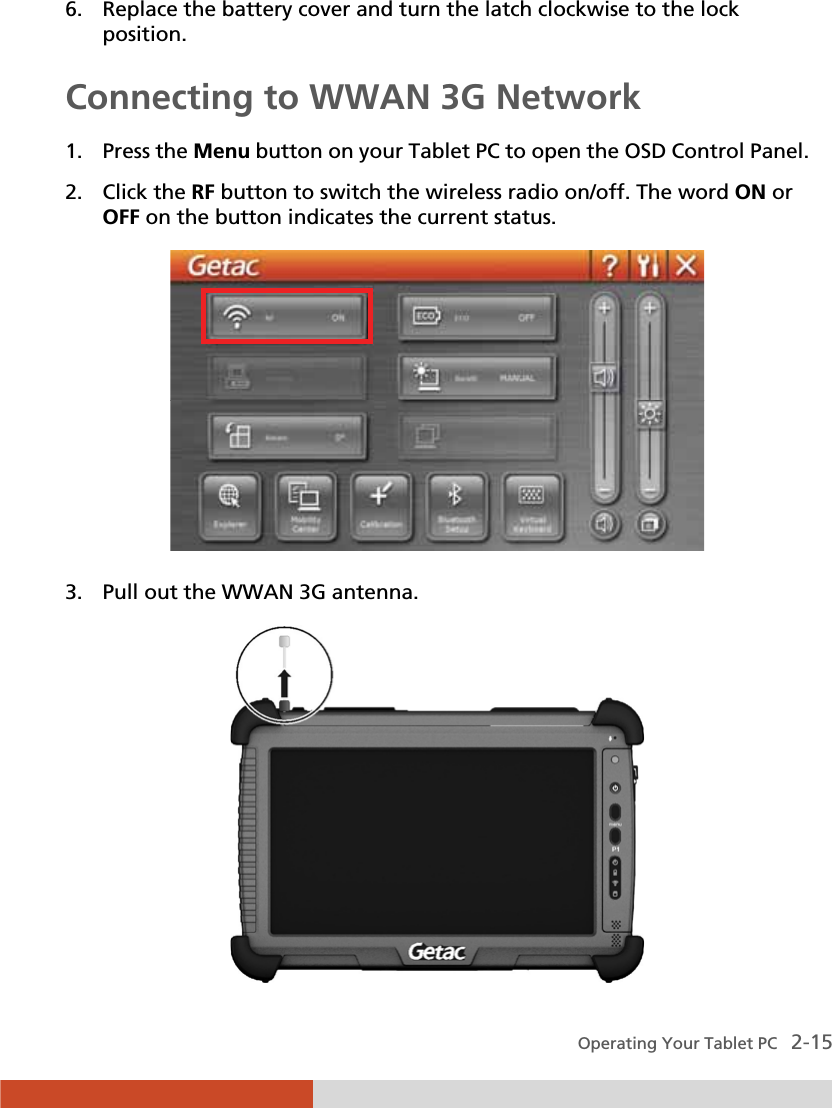
Getac Technology
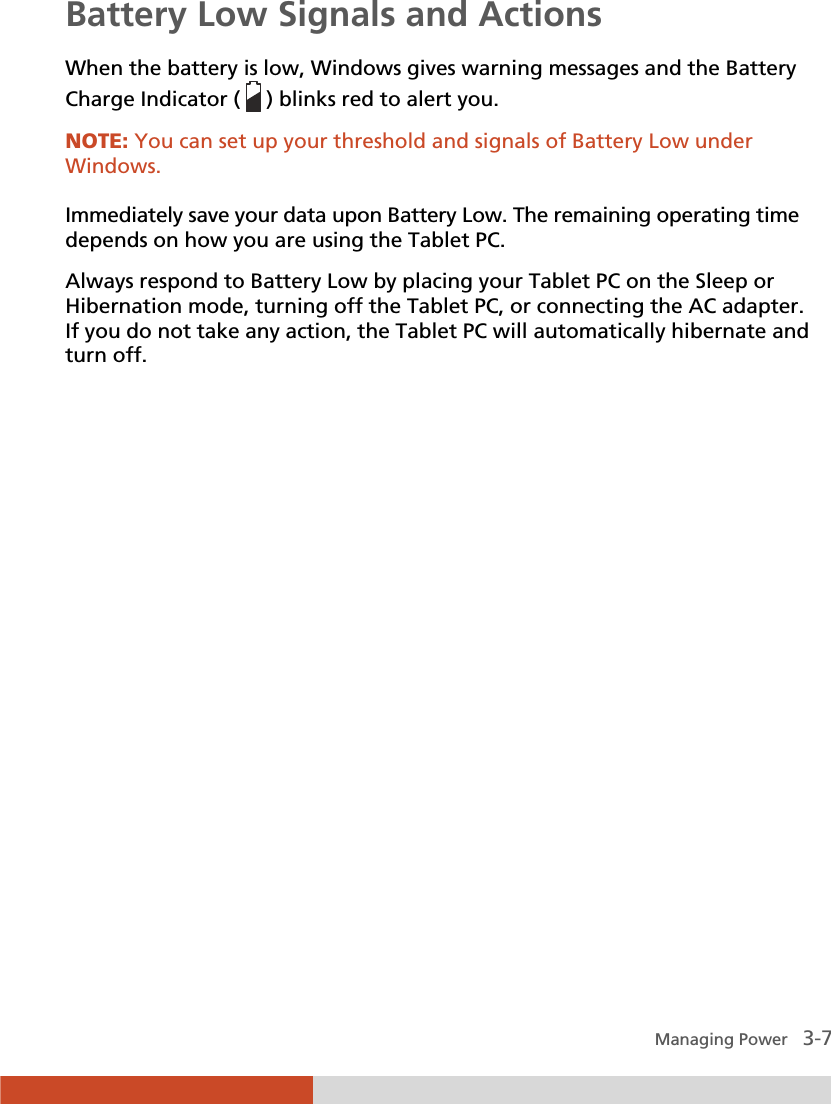
>
E110 User Manual
User Manual
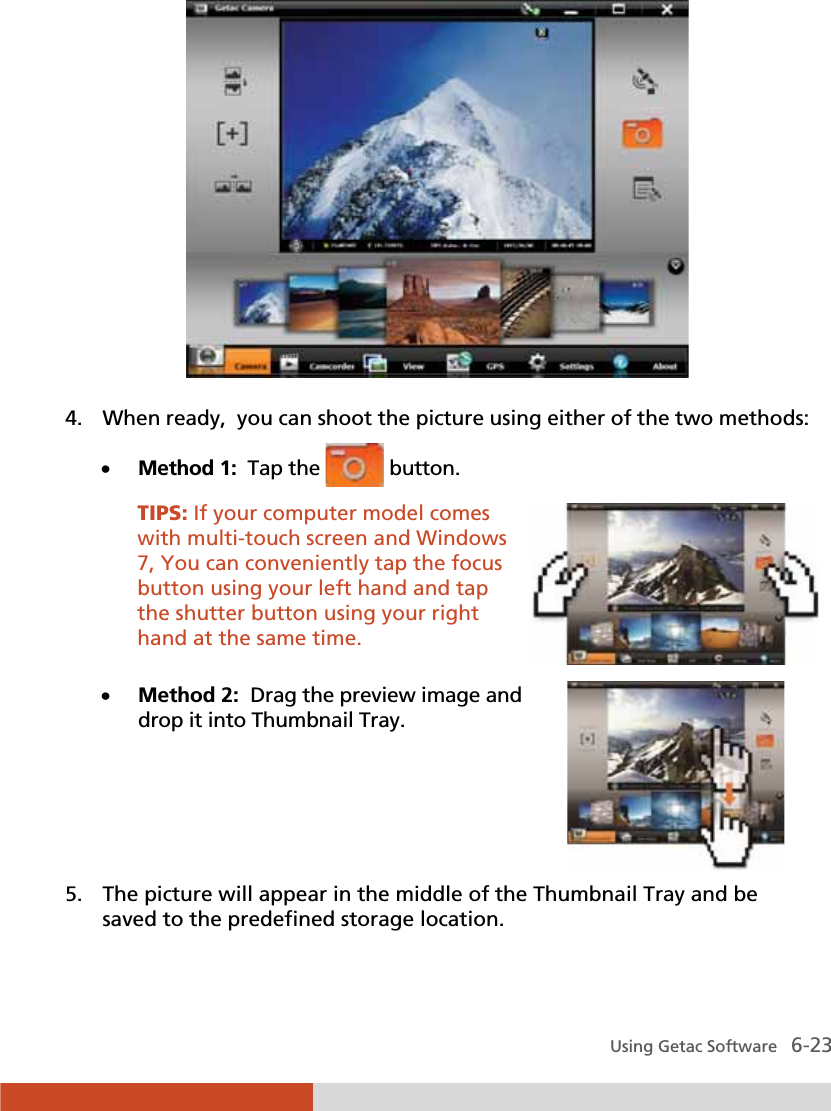
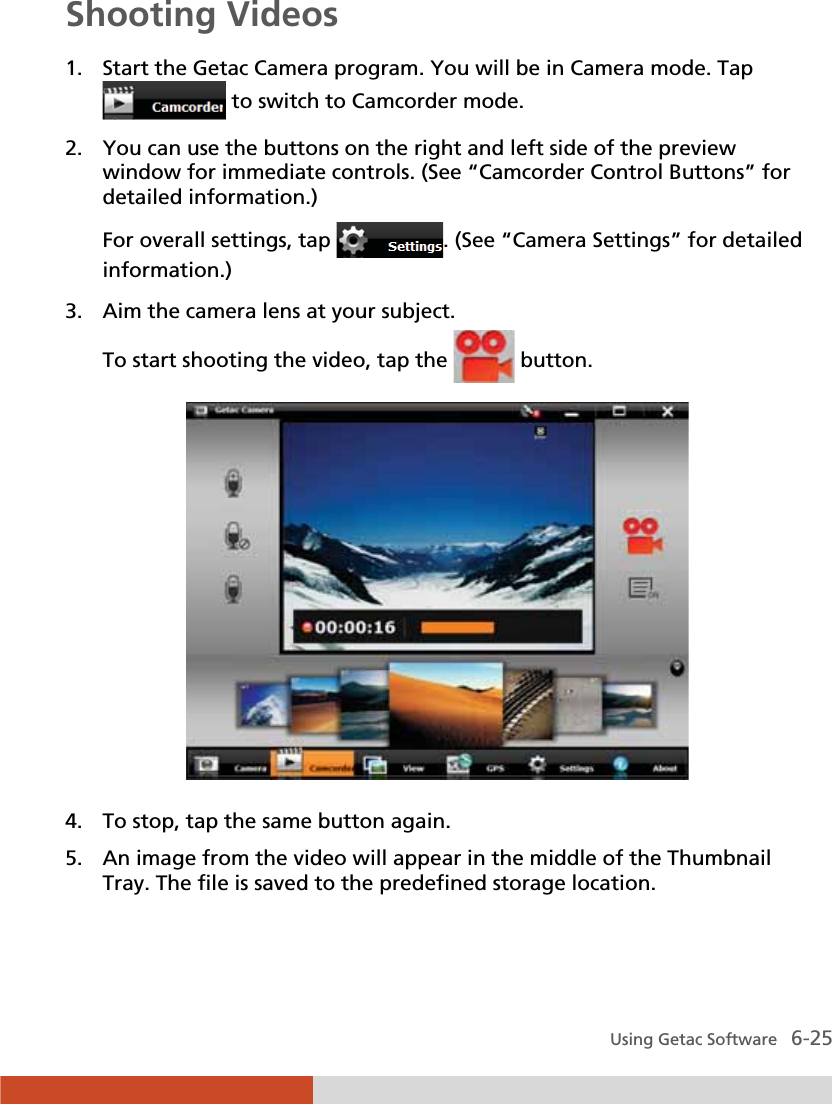
Navigation menu
Upload a User Manual
Namespaces
Wiki Guide
HTML
PDF
Info
Views
User Manual
Discussion / Help
Navigation

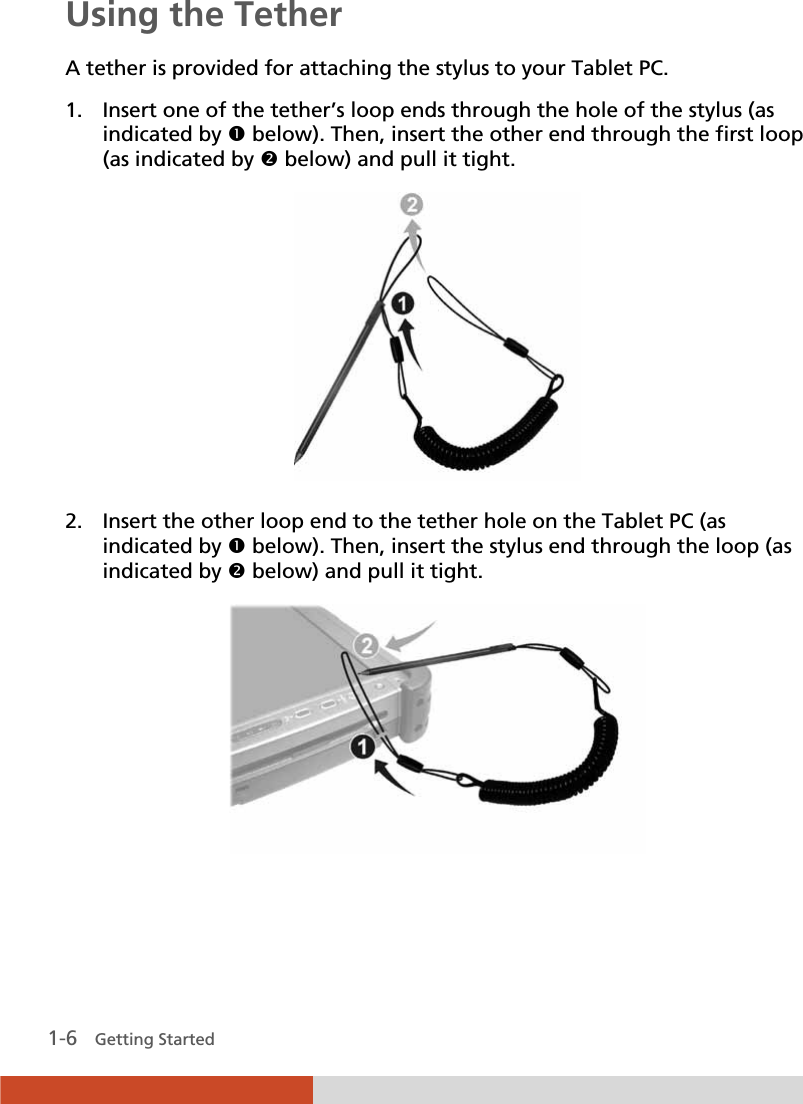


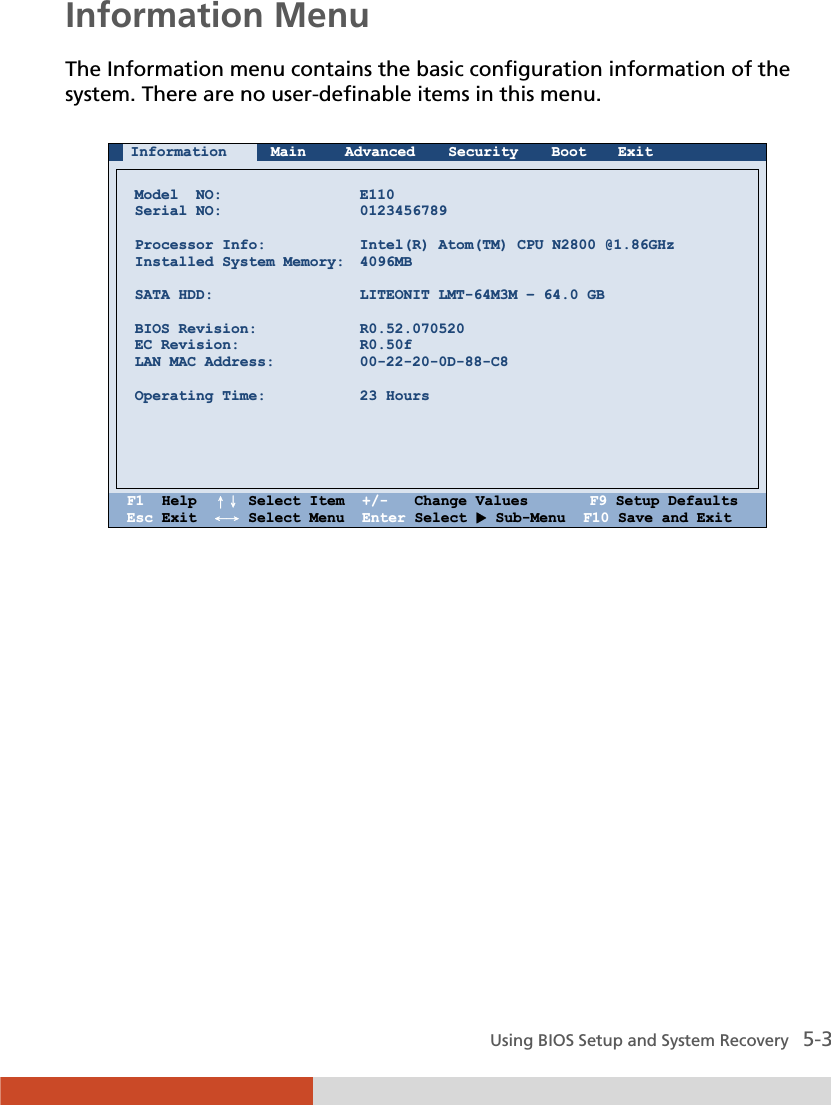
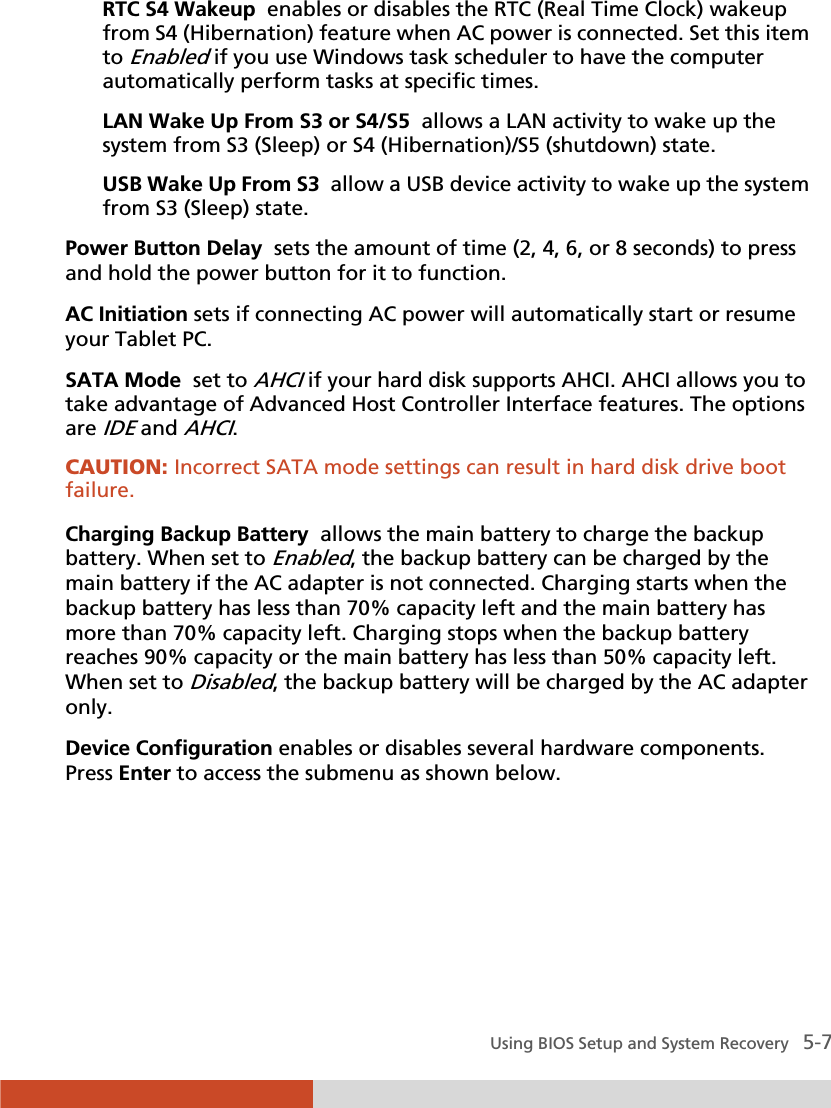
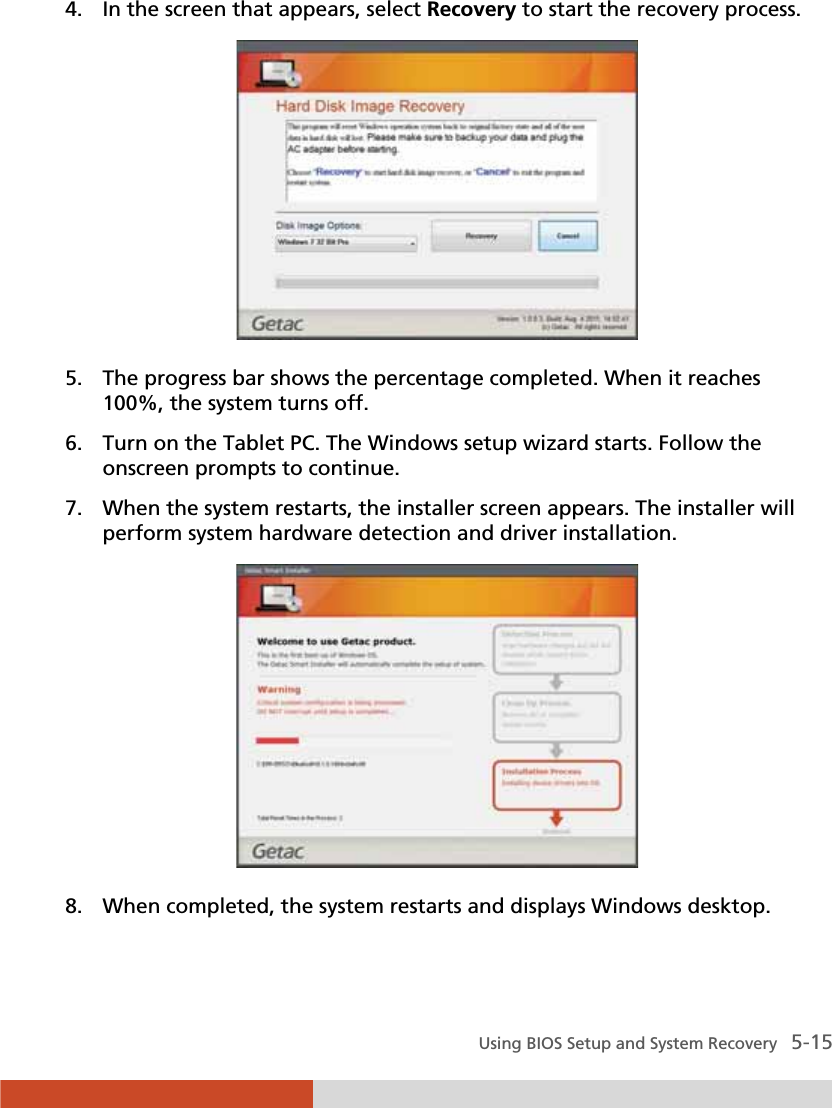
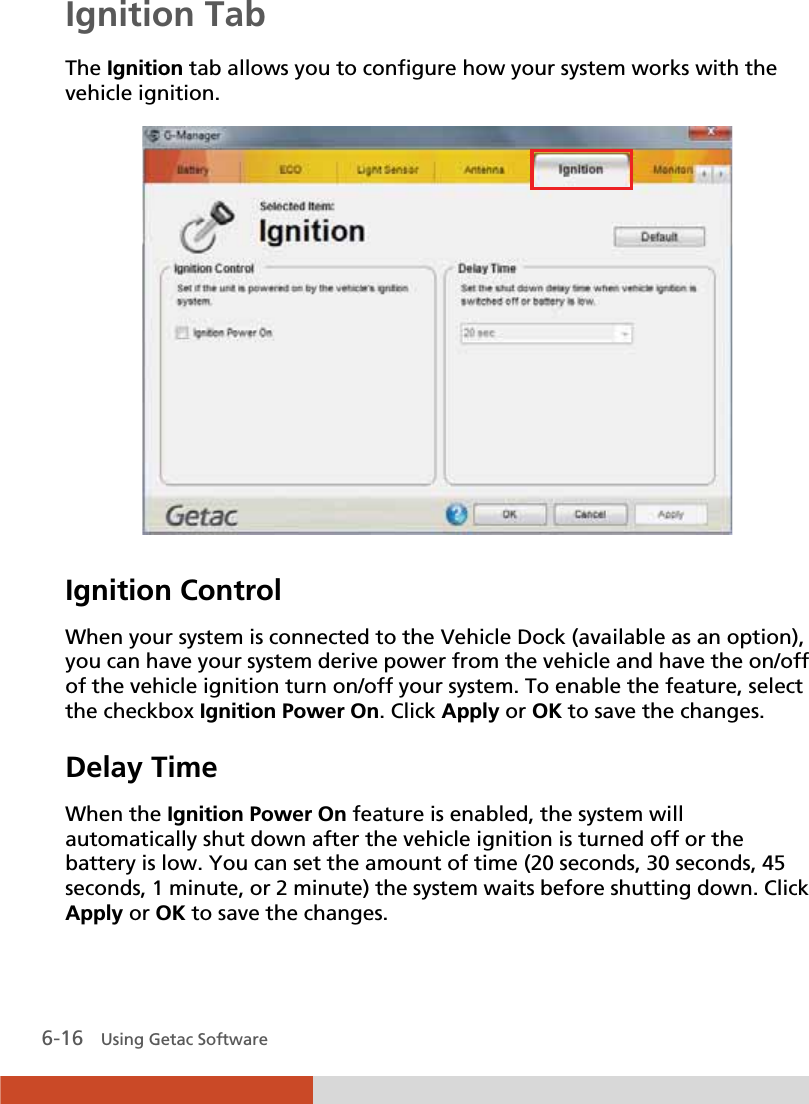
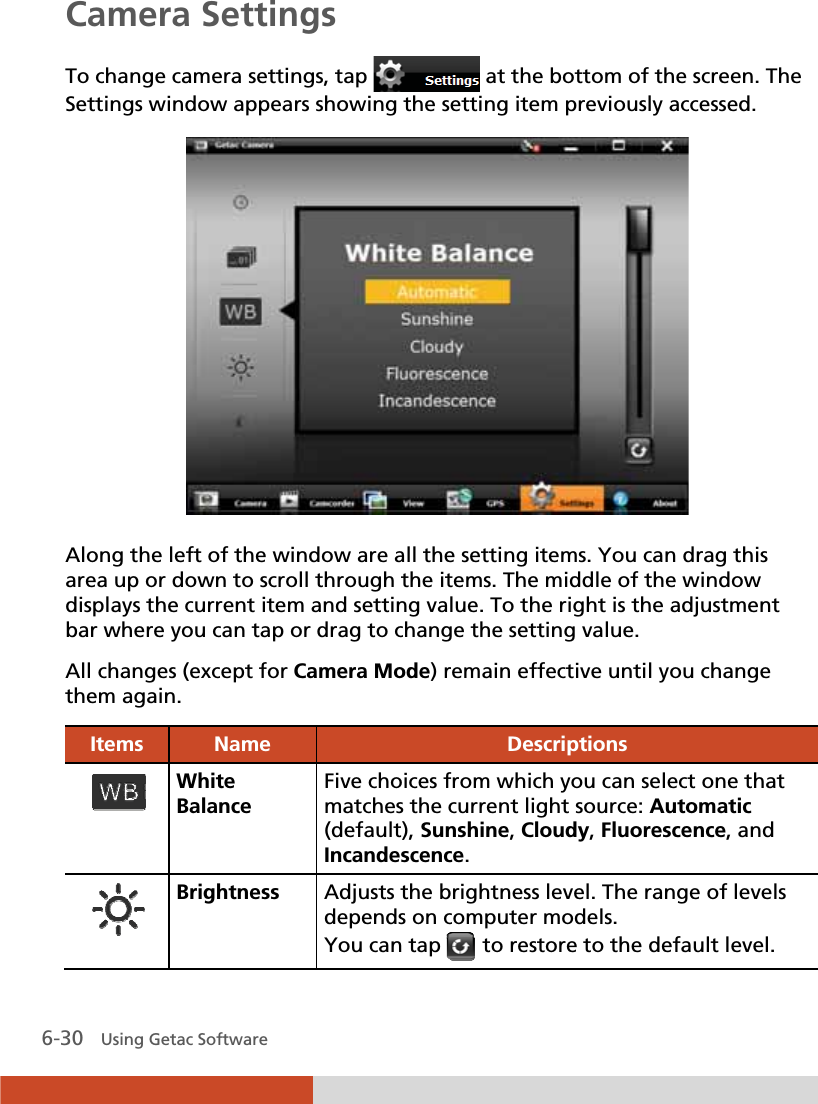
![5-4 Using BIOS Setup and System Recovery Main Menu The Main menu contains the various system settings. Information Main Advanced Security Boot Exit System Date: System Time: Legacy USB Support: [05/09/2012] [11:33:08] [Enabled] Item Specific Help View or set system date. F1 Help ɥɧ Select Item +/- Change Values F9 Setup Defaults Esc Exit ɤɦ Select Menu Enter Select X Sub-Menu F10 Save and Exit System Date sets the system date. System Time sets the system time. Legacy USB Support enables or disables the system’s support for Legacy USB device in DOS mode. 04](https://usermanual.wiki/Getac-Technology/E110/User-Guide-1772217-Page-60.png)
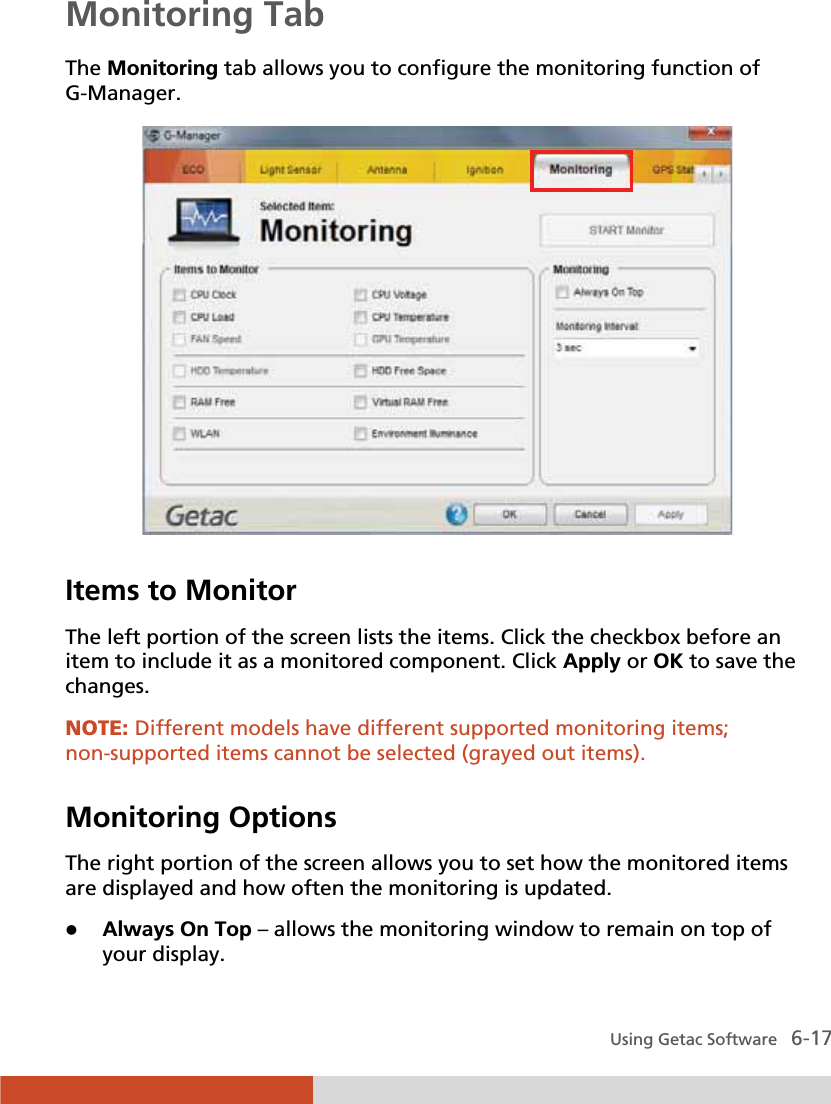
![Using BIOS Setup and System Recovery 5-5 Advanced Menu The Advanced menu contains the advanced settings. Information Main Advanced Security Boot Exit X Intel (R) Rapid Start TechnologyX Wake Up Capability Power Button Delay: AC Initiation: SATA Mode: Charging Backup battery: X Device Configuration [No delay] [Disabled] [AHCI] [Disabled] Item Specific Help iRST – Intel (R) Rapid Start Technology Configuration F1 Help ɥɧ Select Item +/- Change Values F9 Setup Defaults Esc Exit ɤɦ Select Menu Enter Select X Sub-Menu F10 Save and Exit Intel (R) Rapid Start Technology cofigures iRST. Press Enter to access the submenu as shown below.](https://usermanual.wiki/Getac-Technology/E110/User-Guide-1772217-Page-61.png)
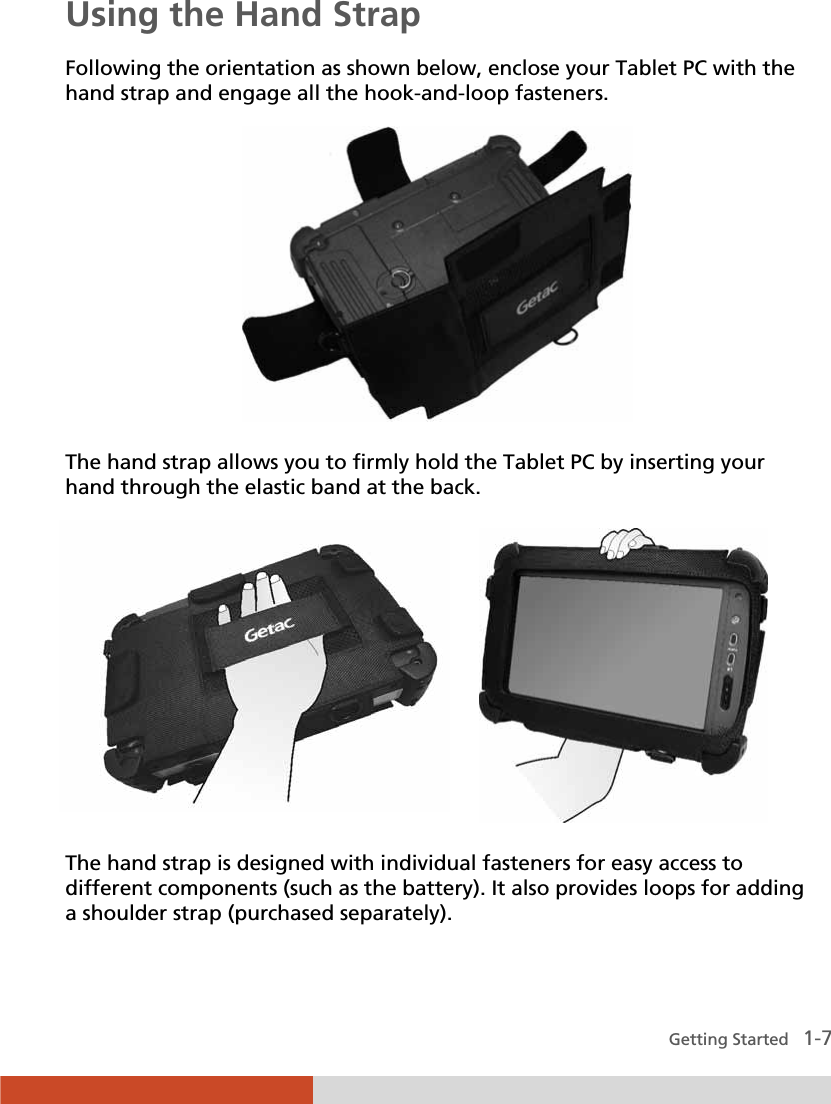
![5-6 Using BIOS Setup and System Recovery Advanced Intel (R) Rapid Start Technology Item Specific Help iRST Support: [Disabled] Enable iRST. F1 Help ɥɧ Select Item +/- Change Values F9 Setup Defaults Esc Exit ɤɦ Select Menu Enter Select X Sub-Menu F10 Save and Exit iRST Support enables of disables iRST, which gets your system up and running faster Wake Up Capability specifies events for waking up the system from S3/S4/S5 state. Press Enter to access the submenu as shown below. Advanced Wake Up Capability Item Specific Help RTC S4 Wakeup LAN Wake Up From S3 or S4/S5:USB Wake Up From S3 [Disabled] [Disabled] [Disabled] Control the value to enable wakeup from the RTC S4. F1 Help ɥɧ Select Item +/- Change Values F9 Setup Defaults Esc Exit ɤɦ Select Menu Enter Select X Sub-Menu F10 Save and Exit DisabledDisabled](https://usermanual.wiki/Getac-Technology/E110/User-Guide-1772217-Page-62.png)
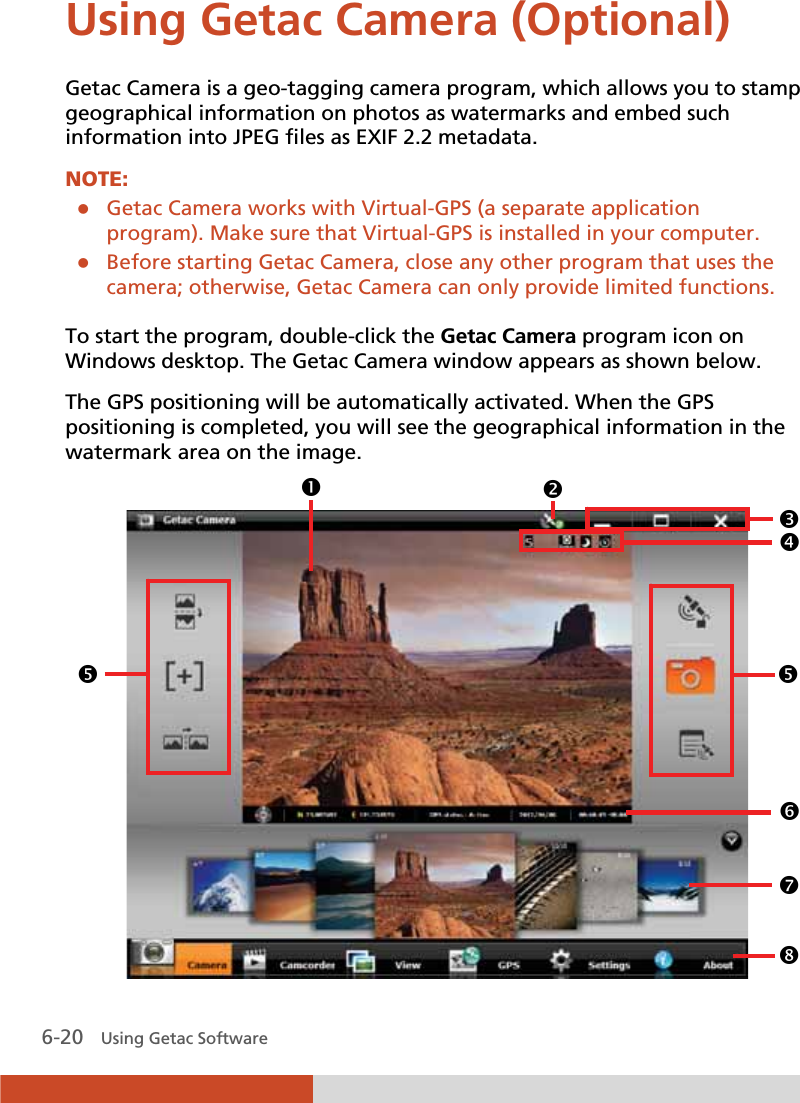
![5-8 Using BIOS Setup and System Recovery Advanced Device Configuration Item Specific Help Wireless LAN: WWAN: Bluetooth Media Card Reader:Smart Card Reader:HD Audio: [ ] [Enabled] [Enabled] [Enabled] [Enabled] [Enabled] Set WLAN device to enable/disable. F1 Help ɥɧ Select Item +/- Change Values F9 Setup Defaults Esc Exit ɤɦ Select Menu Enter Select X Sub-Menu F10 Save and Exit You can enable or disable the following items: z Wireless LAN z WWAN (3G) z Bluetooth z Media Card Reader (SD) z Smart Card Reader z HD Audio (High Definition Audio) NOTE: The availability of the items depends on your model. Enabled](https://usermanual.wiki/Getac-Technology/E110/User-Guide-1772217-Page-64.png)
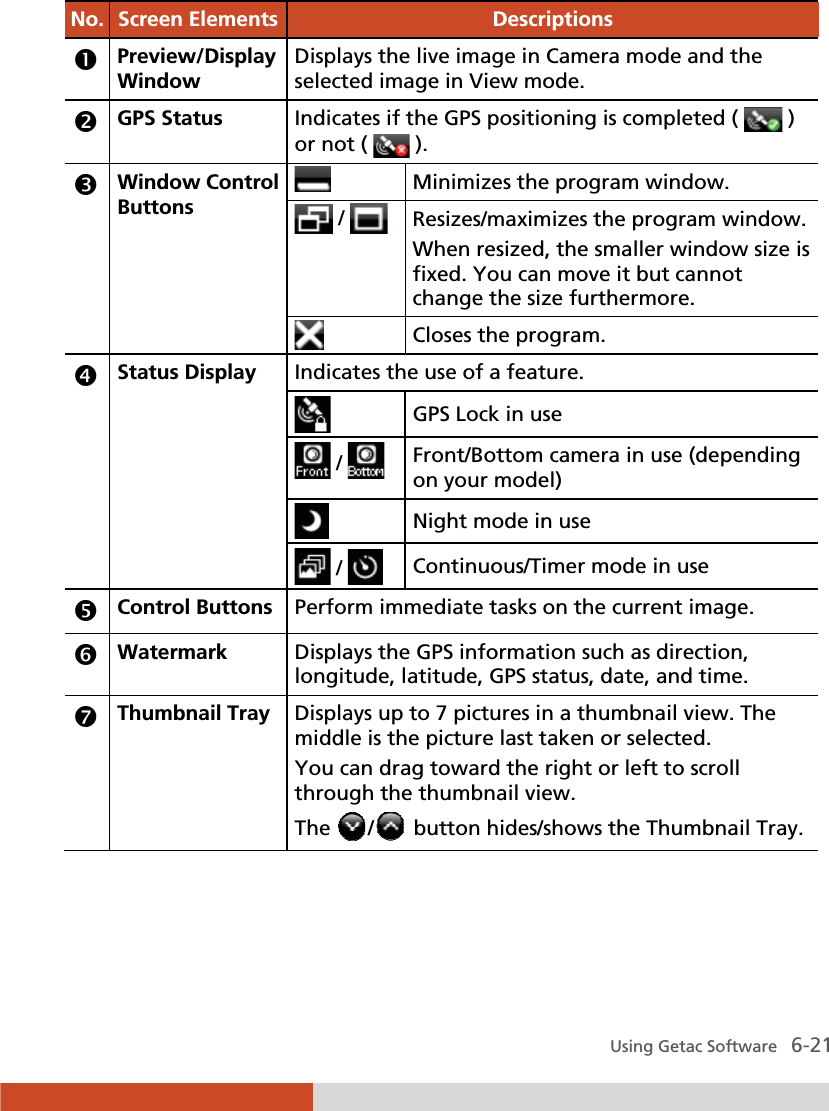
![Using BIOS Setup and System Recovery 5-9 Security Menu The Security menu contains the security settings, which safeguard your system against unauthorized use. Information Main Advanced Security Boot Exit Supervisor Password Is: User Password Is: Set Supervisor Password: Set User Password: Authenticate User on Boot: Set HDD00 Password: HDD00 Password State: X TPM Configuration Cleared Cleared [Enter] [Enter] [Disabled] [Enter] Cleared Item Specific Help Set or clear the Supervisor account’s password. F1 Help ɥɧ Select Item +/- Change Values F9 Setup Defaults Esc Exit ɤɦ Select Menu Enter Select X Sub-Menu F10 Save and Exit NOTE: z You can set the user password only when the supervisor password has been set. z If both the administrator and user passwords are set, you can enter any of them for starting up the system and/or entering BIOS Setup. However, the user password only allows you to view/change the settings of certain items. z A password setting is applied right after it is confirmed. To cancel a password, leave the password empty by pressing the Enter key. Supervisor/User Password Is shows whether you have set the supervisor/user password or not for the system. Set Supervisor/User Password sets the supervisor/user password. When typing the password, first make sure that Num Lock is off, and then type the Enter](https://usermanual.wiki/Getac-Technology/E110/User-Guide-1772217-Page-65.png)
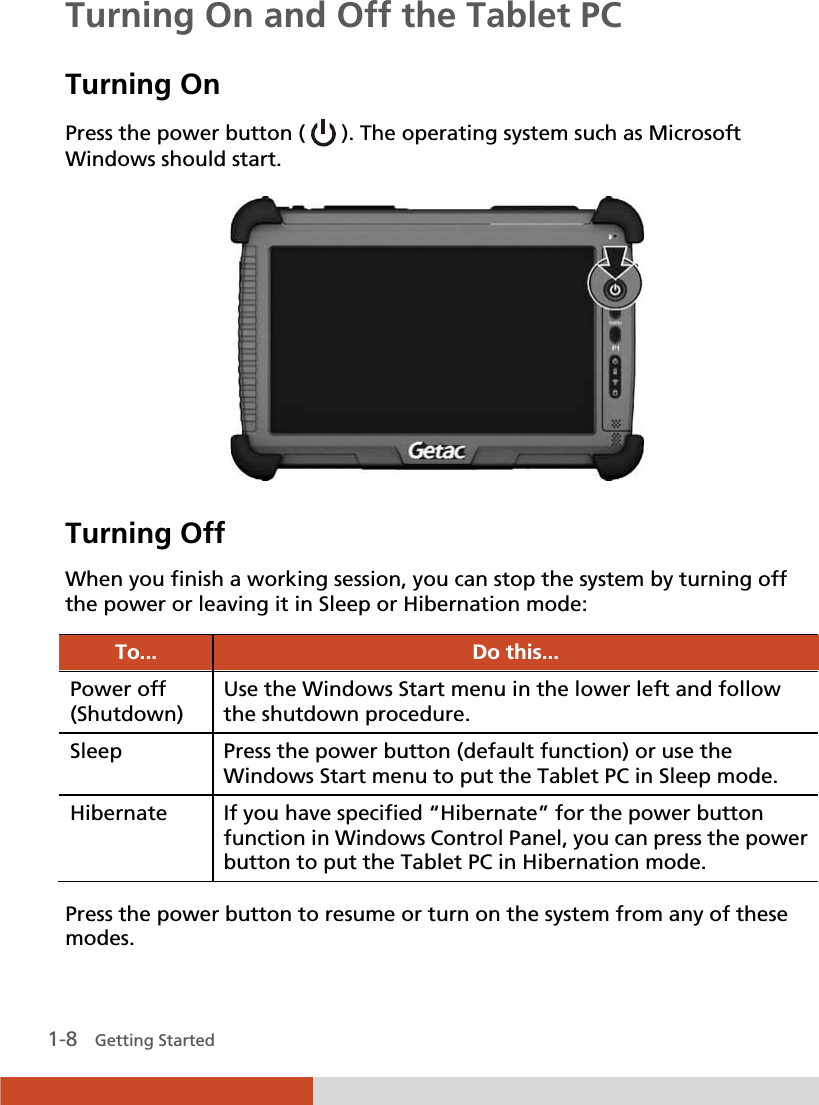
![5-10 Using BIOS Setup and System Recovery password in the entry fields and press Enter. Confirm your password by typing it again and pressing Enter. You can set the supervisor/user password to be required for starting up the system and/or entering BIOS Setup. Authenticate User on Boot allows you to enable or disable the entering of password for booting up your system. Once the password is successfully set and this item is enabled, it is required for booting up the system. Set HDD00 Password sets the password for locking the Primary Master hard disk drive. After setting a password, the hard disk drive can only be unlocked by the password no matter where it is installed. HDD00 Password State shows whether you have set the hard disk password or not. TPM Configuration sets various TPM parameters. Press Enter to access the submenu as shown below. TPM Support enables or disables TPM (Trusted Platform Module) support. TPM (Trusted Platform Module) is a component on your computer’s mainboard that is specifically designed to enhance platform security by providing a protected space for key operations and other security critical tasks. Security TPM Configuration Item Specific Help TPM Support: Current TPM State: TPM Action: [ ] [Disabled and Deactivated][No Change] This is used to decide whether TPM support should be enabled or disabled. F1 Help ɥɧ Select Item -/+ Change Values F9 Setup Defaults Esc Exit ɤɦ Select Menu Enter Select X Sub-Menu F10 Save and Exit Enabled](https://usermanual.wiki/Getac-Technology/E110/User-Guide-1772217-Page-66.png)


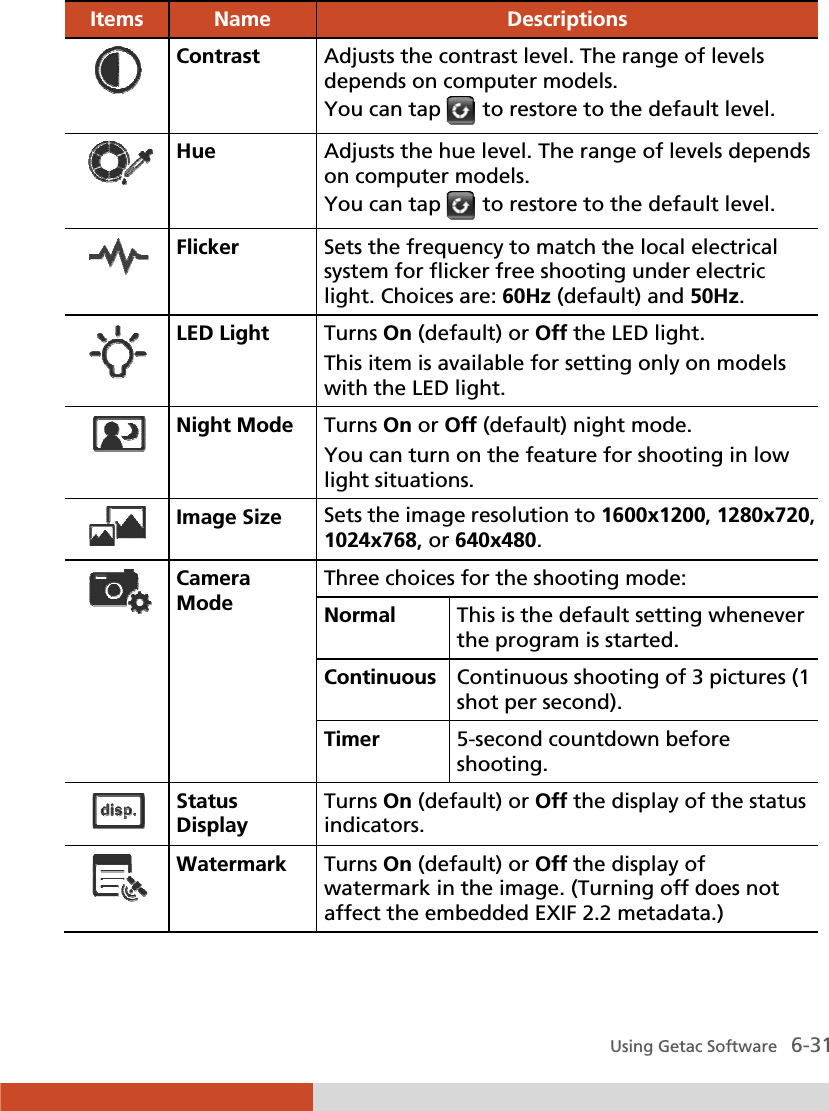
![6-32 Using Getac Software Items Name Descriptions Shutter Sound Turns On (default) or Off the sound played upon photo shooting. Power Saving Sets if power saving works for the program. System (default) The Camera program enters power saving mode according to the settings of Windows’ Power Options. Never The Camera program will not enter power saving mode while the program window is open. But when the program window is minimized, the System setting overrides. Camera Switch Not supported by your model. Folder Path Sets the storage location of the images. To change to a different folder, tap Browse and select the folder. The default location is User\[user name]\Pictures folder that contains the original images. A subfolder named Thumbs contains a copy of the same images (with filename prefix Thumb_) for the thumbnail view. NOTE: If you are adding or deleting images using File Explorer, make sure to work on both the correct folder and its Thumbs subfolder. Time Option Displays the time throughout the program according to one of the two choices: System time zone (default) The time zone setting of the computer is taken into consideration. If the current location is in daylight saving time, the time will be adjusted accordingly.](https://usermanual.wiki/Getac-Technology/E110/User-Guide-1772217-Page-104.png)