Giant Electronics P1808 400MHz-470MHz Professional Walkie Talkie User Manual YOUR NEW RADIO
Giant Electronics Ltd 400MHz-470MHz Professional Walkie Talkie YOUR NEW RADIO
UserManual.wiki
>
Giant Electronics
>
P1808 User Manual
User manual
Navigation menu
Upload a User Manual
Namespaces
Wiki Guide
HTML
PDF
Info
Views
User Manual
Discussion / Help
Navigation

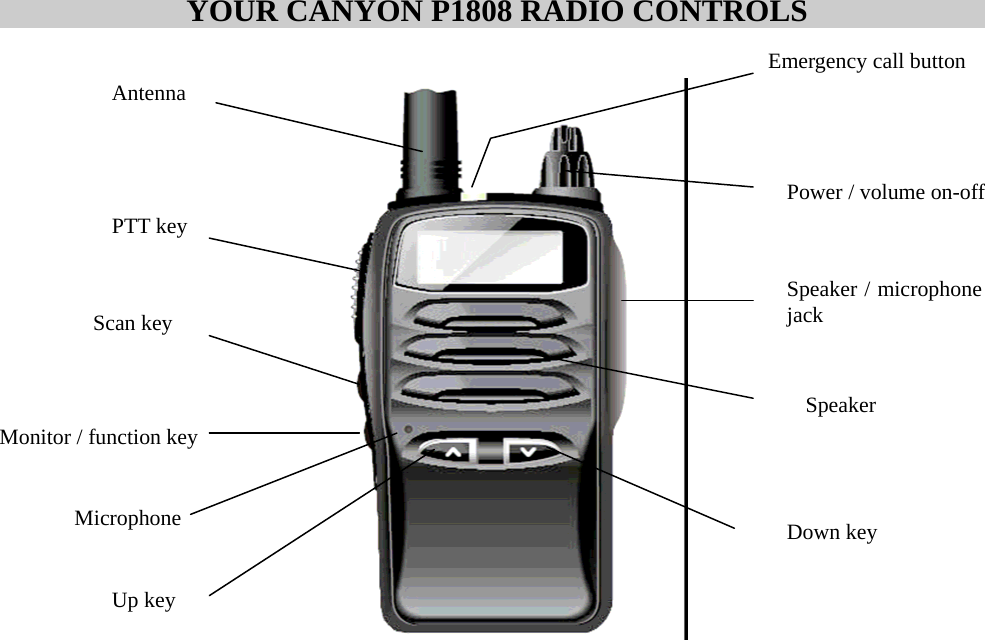
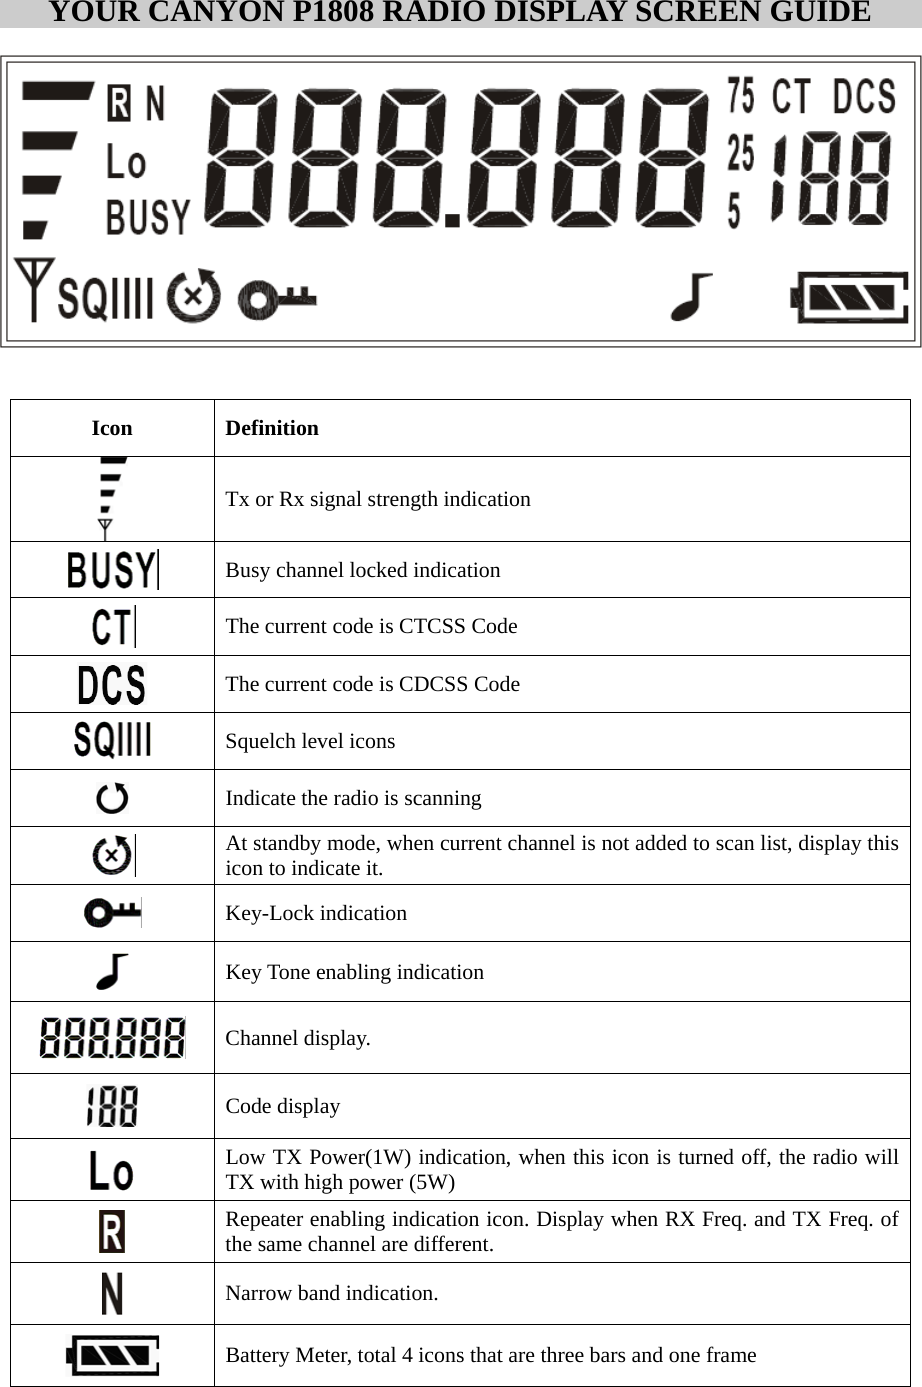
![BASIC OPERATION Connect antenna Insert the base of the attached antenna into SMA connector and coincided with each other by clockwise rotate antenna, make sure the antenna has set. To disconnect antenna: Counter clockwise rotate the base of the antenna until pull out it from SMA connector. Turn your radio on and off To turn on the power Rotate the PWR/VOL knob by clockwise until beep sound is heard. All icons and frequencies appeared on the screen. (Due to have automatic squelch function, the speaker will not send out any sound before receiving call.) To turn off the power Simply rotate the PWR/VOL knob by counterclockwise. All displays will disappear and the radio is off. . Note: Please turn off the radio before charging. Adjust volume Rotate PWR/VOL while holding down MON /FUN key until you reach a comfortable listening level. Rotate PWR/VOL clockwise to increase the volume or counterclockwise to decrease the volume. Backlight The function is useful in dark environment. Except PTT key, any key pressing can activate the backlight for 5 seconds. To inactivate the backlight, you can press PTT key. Monitor There are multiple channels shared among all users on the “take turn” basis. For uninterrupted communication, do not talk on a channel if someone else is currently talking on it. To check for activity on a channel before you talk, press and hold MON /FUN key. If you hear static, the channel is clear to use. To exit the function, release MON /FUN key. Talking and listening To communicate, all radios in your group must be set to the same channel and interference eliminator code. • To talk, press and hold PTT key. The red LED indicator light glows continuously when transmitting. • To receive messages, release PTT key. For maximum clarity, hold the radio two to three inches away from your mouth and speak directly into the microphone, do not cover the microphone while talking. Emergency alarm Emergency alarm is used to call others for help when emergency event happens based on home channel. Hold down EMG button for 2 seconds the radio will enter emergency mode. To exit emergency mode, press PTT button. Note: 1. The busy channel lockout feature will be disabled during emergency mode. 2. When the battery is low, the radio still can transmit. Home channel selecting The radio has 32 (maximum) channels to use. You can press [UP] or [DOWN] to select a channel as home channel at standby mode. Transmitting power setting The radio can transmit by 1w/5w. When 1w is selected, will appear on the display. Press and hold SCAN button for 2 seconds at standby mode to switch the setting. Scan Use scanning to monitor channels and codes for transmissions or to find someone in your group who has accidentally](https://usermanual.wiki/Giant-Electronics/P1808/User-Guide-955438-Page-8.png)