Giant Electronics P1808 400MHz-470MHz Professional Walkie Talkie User Manual YOUR NEW RADIO
Giant Electronics Ltd 400MHz-470MHz Professional Walkie Talkie YOUR NEW RADIO
User manual

CANYON User Manual
Model: P1808
CONTENT
YOUR CANYON P1808 RADIO CONTROLS...........................................................................................6
YOUR CANYON P1808 RADIO DISPLAY SCREEN GUIDE..................................................................7
BASIC OPERATION....................................................................................................................................8
Connect antenna.............................................................................................................................................8
Turn your radio on and off.............................................................................................................................8
Adjust volume................................................................................................................................................8
Backlight........................................................................................................................................................8
Monitor ..........................................................................................................................................................8
Talking and listening .....................................................................................................................................8
Emergency alarm...........................................................................................................................................8
Home channel selecting.................................................................................................................................8
Transmitting power setting............................................................................................................................8
Scan................................................................................................................................................................8
MENU OPERATION ....................................................................................................................................9
Squelch Level Setting....................................................................................................................................9
Keypad Tone Setting .....................................................................................................................................9
Roger Beep Setting........................................................................................................................................9
Busy Channel Lockout Setting......................................................................................................................9
Scan List Setting............................................................................................................................................9
Priority Channel Setting ................................................................................................................................9
Keypad Lock Setting ...................................................................................................................................10
TECHNICAL SPECIFICATION ................................................................................................................10
Safety and General Information
Important Information on Safe and Efficient Operation Read
This Information Before Using Your Radio.
Transmit and Receive Procedure
Your two-way radio contains a transmitter and a receiver. To control your exposure and ensure compliance with the
general population/uncontrolled environment exposure limits, always adhere to the following procedure:
Transmit no more than 50% of the time.
To transmit (talk), press the Push to Talk (PTT) button.
To receive calls, release the PTT button.
Transmitting 50% of the time, or less, is important because the radio generates measurable RF energy exposure only
when transmitting (in terms of measuring standards compliance).
To assure optimal radio performance and make sure human exposure to radio frequency electromagnetic energy is within
the guidelines set forth in the above standards, always adhere to the following procedures.
Portable Radio Operation and EME Exposure
Antenna Care
Use only the supplied or an approved replacement antenna. Unauthorized antennas, modifications, or
attachments could damage the radio and may violate FCC regulations.
DO NOT hold the antenna when the radio is “IN USE.” Holding the antenna affects the effective
range.
Two-way Radio Operation
When using your radio as a traditional two-way radio, hold the radio in a vertical position with the microphone 1 to 2
inches (2.5 to 5 cm) away from the lips.
Body-worn Operation
To maintain compliance with FCC/Health Canada RF exposure guidelines, if you wear a radio on your body when
transmitting, always place the radio in a supplied or approved clip, holder, holster, case, or body harness for this product.
Use of non-approved accessories may exceed FCC/Health Canada RF exposure guide lines.
If you do not use one of the supplied or approved body worn accessories, and are not using the radio held in the normal
use position, ensure the radio and its antenna are at least 1 inch (2.5 cm) from your body when transmitting.
Electromagnetic Interference/Compatibility
Note: Nearly every electronic device is susceptible to electromagnetic interference(EMI) if inadequately shielded,
designed or otherwise configured for electromagnetic compatibility.
Facilities
To avoid electromagnetic interference and/or compatibility conflicts, turn off your radio in any facility where posted
notices instruct you to do so. Hospitals or health care facilities may be using equipment that is sensitive to external RF
energy.
Aircraft
When instructed to do so, turn off your radio when on board an aircraft. Any use of a radio must be in accordance with
applicable regulations per airline crew instructions.
Medical Devices - Pacemakers
The Advanced Medical Technology Association recommends that a minimum separation of 6 inches (15 cm) be
maintained between a handheld wireless radio and a pacemaker. These recommendations are consistent with the
independent research by, and recommendations of the U.S. Food and Drug Administration.
Persons with pacemakers should:
ALWAYS keep the radio more than 6 inches (15 cm) from their pacemaker when the radio is turned ON.
Not carry the radio in the breast pocket.
Use the ear opposite the pacemaker to minimize the potential for interference.
Turn the radio OFF immediately if you have any reason to suspect that interference is taking place.
Medical Devices - Hearing Aids
Some digital wireless radios may interfere with some hearing aids. In the event of such interference, you may want to
consult your hearing aid manufacturer to discuss alternatives.
Other Medical Devices
If you use any other personal medical device, consult the manufacturer of your device to determine if it is adequately
shielded from RF energy. Your physician may be able to assist you in obtaining this information.
Safety and General Use While Driving
Check the laws and regulations on the use of radios in the area where you drive. Always obey them. When using your
radio while driving, please:
Give full attention to driving and to the road.
Use hands-free operation, if available.
Pull off the road and park before making or answering a call if driving conditions so require.
Operational Warnings
For Vehicles with an Air Bag
Do not place a portable radio in the area over an air bag or in the air bag deployment area. Air bags inflate with great
force. If a portable radio is placed in the air bag deployment area and the air bag inflates, the radio may be propelled with
great force and cause serious injury to occupants of the vehicle.
Potentially Explosive Atmospheres
Turn off your radio prior to entering any area with a potentially explosive atmosphere, unless it is a radio type especially
qualified for use in such areas as “Intrinsically Safe.”
Do not remove, install, or charge batteries in such areas. Sparks in a potentially explosive atmosphere can cause an
explosion or fire resulting in bodily injury or even death.
Note: The areas with potentially explosive atmospheres referred to above include fueling areas such as below decks on
boats, fuel or chemical transfer or storage facilities, areas where the air contains chemicals or particles, such as
grain, dust, or metal powders, and any other area where you would normally be advised to turn off your vehicle
engine. Areas with potentially explosive atmospheres are often but not always posted.
Blasting Caps and Areas
To avoid possible interference with blasting operations, turn off your radio when you are near electrical blasting caps, in
a blasting area, or in areas posted: “Turn off two-way radio.” Obey all signs and instructions.
Operational Cautions
Antennas
Do not use any portable radio that has a damaged antenna. If a damaged antenna comes into contact with your skin, a
minor burn can result.
Batteries
All batteries can cause property damage and/or bodily injury such as burns if a conductive material such as jewelry, keys,
or beaded chains touch exposed terminals. The conductive material may complete an electrical circuit (short circuit) and
become quite hot. Exercise care in handling any charged battery, particularly when placing it inside a pocket, purse, or
other container with metal objects.
Battery Charger Safety Instructions
Save these Instructions
1. Do not expose the charger to rain or snow.
2. Do not operate or disassemble the charger if it has received a sharp blow, or has been dropped or damaged in any
way.
3. Never alter the AC cord or plug provided with the unit. If the plug will not fit the outlet, have the proper outlet
installed by a qualified electrician. An improper condition can result in a risk of electric shock.
4. To reduce the risk of damage to the cord or plug, pull the plug rather than the cord when disconnecting the charger
from the AC receptacle.
5. To reduce the risk of electric shock, unplug the charger from the outlet before attempting any maintenance or
cleaning.
6. Use of an attachment not recommended or sold by Service Center may result in a risk of fire, electric shock, or
personal injury.
7. Please turn off the radio before charging.

Safety Training Information
Your radio generates RF electromagnetic energy during transmit mode.
This radio is designed for and classified as “Occupational Use Only”, meaning it must be used only during
the course of employment by individuals aware of the hazards, and the ways to minimize such hazards.
This radio is NOT intended for use by the “General Population” in an uncontrolled environment.
This radio has been tested and complies with the FCC RF expo-sure limits for “Occupational Use Only”.
In addition, your Giant radio complies with the following Standards and Guidelines with regard to RF energy and
electromagnetic energy levels and evaluation of such levels for exposure to humans:
FCC OET Bulletin 65 Edition 97-01 Supplement C, Evaluating Compliance with FCC Guidelines for Human
Exposure to Radio Frequency Electromagnetic Fields.
American National Standards Institute (C95.1-1999), IEEE Standard for Safety Levels with Respect to Human
Exposure to Radio Frequency Electromagnetic Fields, 3 kHz to 300GHz
American National Standards Institute (C95.3-1999), IEEE Recommended Practice for the Measurement of
Potentially Hazardous Electromagnetic Fields– RF and Microwave
The following accessories are authorized for use with this product. Use of accessories other than those specified
may result in RF exposure levels exceeding the FCC requirements for wireless RF exposure.; Belt
echargeable Li-Ion Battery Pack and Speaker-microphone . Clip ,R
To ensure that your expose to RF electromagnetic energy is within the FCC allowable limits for
occupational use, always adhere to the following guidelines:
DO NOT operate the radio without a proper antenna attached, as this may damaged the radio and
may also cause you to exceed FCC RF exposure limits. A proper antenna is the antenna supplied
with this radio by the manufacturer or antenna specifically authorized by the manufacturer for use with this
radio.
DO NOT transmit for more than 50% of total radio use time(“50% duty cycle”). Transmitting more than 50% of
the time can cause FCC RF exposure compliance requirements to be exceeded. The radio is transmitting when
the TX indicator lights red. You can cause the radio to transmit by pressing the “PTT” switch.
ALWAYS keep the antenna at least 2.5 cm (1 inch) away from the body when transmitting and only use the
Giant belt-clips when attaching the radio to your belt, etc., to ensure FCC RF exposure compliance requirements
are not exceeded. To provide the recipients of your transmission the best sound quality, hold the antenna at least
5 cm(2 inches) from your mouth, and slightly off to one side.
The information listed above provides the user with the information needed to make him or her aware of RF exposure,
and what to do to assure that this radio operates with the FCC RF expo-sure limits of this radio.
Electromagnetic Interference/Compatibility
During transmissions, your radio generates RF energy that can possibly cause interference with other devices or systems.
To avoid such interference, turn off the radio in areas where signs are posted to do so. DO NOT operate the transmitter
in areas that are sensitive to electromagnetic radiation such as hospitals, aircraft, and blasting sites.
Occupational/Controlled Use
The radio transmitter is used in situations in which persons are exposed as consequence of their employment provided
those persons are fully aware of the potential for exposure and can exercise control over their exposure.
FCC Information
This device complies with Part 15 of the FCC Rules. Operation is subject to the condition that this device does not cause
harmful interference.
Warning: Changes or modifications to this unit not expressly approved by the party responsible for compliance could
void the user's authority to operate the equipment.
NOTE: This equipment has been tested and found to comply with the limits for a Class B digital device, pursuant to Part
15 of the FCC Rules. These limits are designed to provide reasonable protection against harmful interference in a
residential installation. This equipment generates, uses, and can radiate radio frequency energy and, if not installed and
used in accordance with the instructions, may cause harmful interference to radio communications. However, there is
no guarantee that interference will not occur in a particular installation. If this equipment does cause harmful
interference to radio or television reception, which can be determined by turning the equipment off and on, the user is
encouraged to try to correct the interference by one or more of the following measures:
- Reorient or relocate the receiving antenna.
- Increase the separation between the equipment and receiver.
- Connect the equipment into an outlet on a circuit different from that to which the receiver is connected.
- Consult the dealer or an experienced radio TV technician for help.
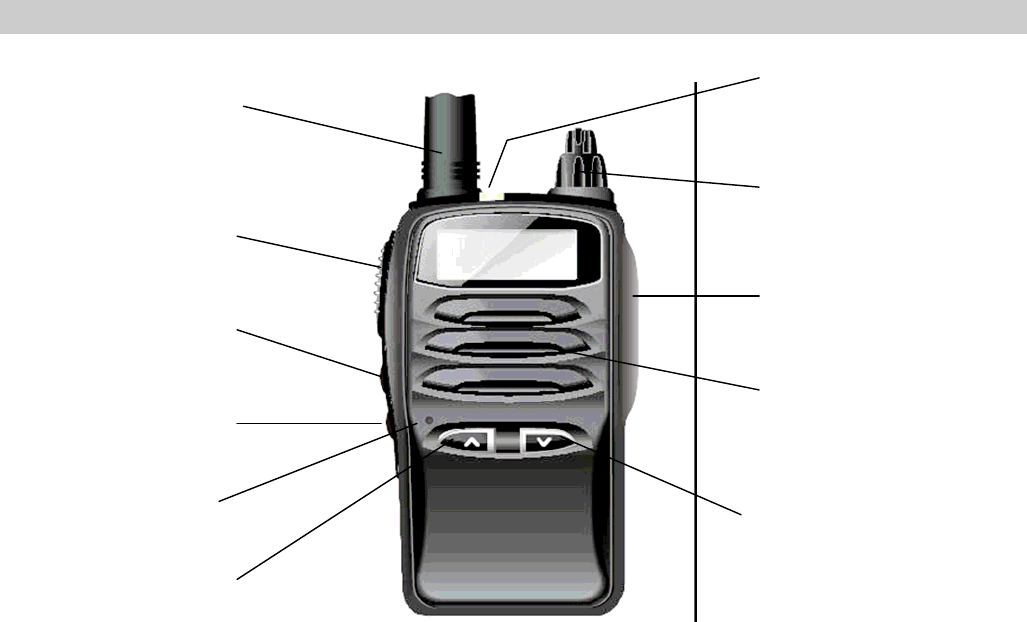
YOUR CANYON P1808 RADIO CONTROLS
Emergency call button
Antenna
PTT key
Monitor / function key
Scan key
Power / volume on-off
Speaker / microphone
j
ack
Speaker
Microphone Down key
Up key
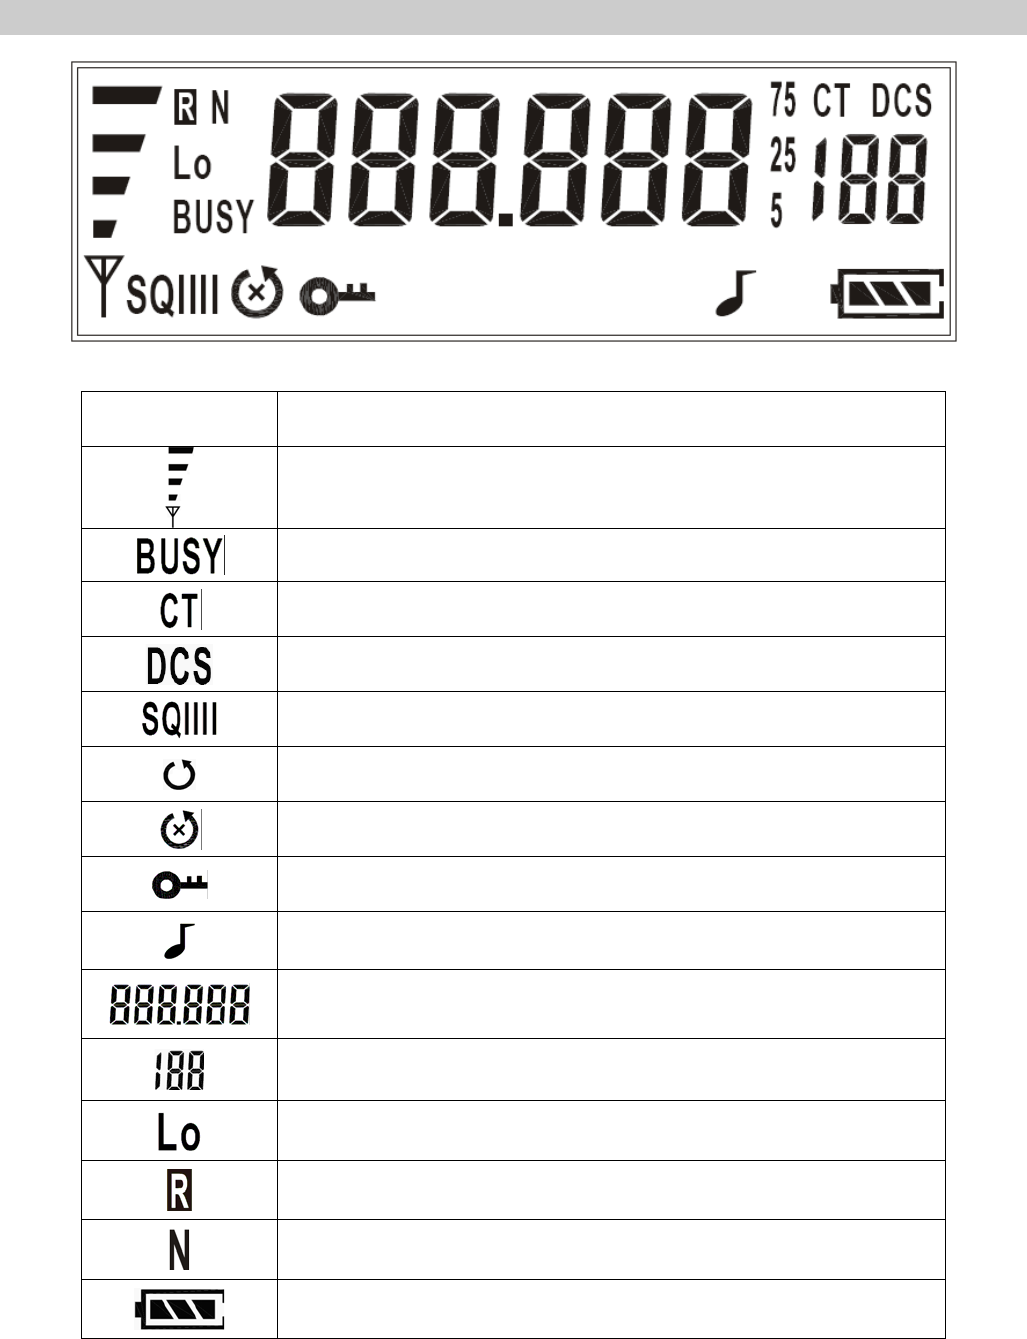
YOUR CANYON P1808 RADIO DISPLAY SCREEN GUIDE
Icon Definition
Tx or Rx signal strength indication
Busy channel locked indication
The current code is CTCSS Code
The current code is CDCSS Code
Squelch level icons
Indicate the radio is scanning
At standby mode, when current channel is not added to scan list, display this
icon to indicate it.
Key-Lock indication
Key Tone enabling indication
Channel display.
Code display
Low TX Power(1W) indication, when this icon is turned off, the radio will
TX with high power (5W)
Repeater enabling indication icon. Display when RX Freq. and TX Freq. of
the same channel are different.
Narrow band indication.
Battery Meter, total 4 icons that are three bars and one frame

BASIC OPERATION
Connect antenna
Insert the base of the attached antenna into SMA connector and coincided with each other by clockwise rotate antenna,
make sure the antenna has set.
To disconnect antenna:
Counter clockwise rotate the base of the antenna until pull out it from SMA connector.
Turn your radio on and off
To turn on the power
Rotate the PWR/VOL knob by clockwise until beep sound is heard. All icons and frequencies appeared on the screen.
(Due to have automatic squelch function, the speaker will not send out any sound before receiving call.)
To turn off the power
Simply rotate the PWR/VOL knob by counterclockwise. All displays will disappear and the radio is off.
.
Note: Please turn off the radio before charging.
Adjust volume
Rotate PWR/VOL while holding down MON /FUN key until you reach a comfortable listening level.
Rotate PWR/VOL clockwise to increase the volume or counterclockwise to decrease the volume.
Backlight
The function is useful in dark environment. Except PTT key, any key pressing can activate the backlight for 5 seconds.
To inactivate the backlight, you can press PTT key.
Monitor
There are multiple channels shared among all users on the “take turn” basis. For uninterrupted communication, do not
talk on a channel if someone else is currently talking on it. To check for activity on a channel before you talk, press and
hold MON /FUN key. If you hear static, the channel is clear to use.
To exit the function, release MON /FUN key.
Talking and listening
To communicate, all radios in your group must be set to the same channel and interference eliminator code.
• To talk, press and hold PTT key. The red LED indicator light glows continuously when transmitting.
• To receive messages, release PTT key.
For maximum clarity, hold the radio two to three inches away from your mouth and speak directly into the microphone,
do not cover the microphone while talking.
Emergency alarm
Emergency alarm is used to call others for help when emergency event happens based on home channel.
Hold down EMG button for 2 seconds the radio will enter emergency mode.
To exit emergency mode, press PTT button.
Note: 1. The busy channel lockout feature will be disabled during emergency mode.
2. When the battery is low, the radio still can transmit.
Home channel selecting
The radio has 32 (maximum) channels to use. You can press [UP] or [DOWN] to select a channel as home channel at
standby mode.
Transmitting power setting
The radio can transmit by 1w/5w. When 1w is selected, will appear on the display.
Press and hold SCAN button for 2 seconds at standby mode to switch the setting.
Scan
Use scanning to monitor channels and codes for transmissions or to find someone in your group who has accidentally
changed channels. When priority scan feature is enabled, the priority channel will be scanned after every normal channel,
no matter the priority channel is added into scan list or not.
To start scanning, briefly press SCAN key. The scan indicator is shown.
When the radio detects channel activity, it stops scanning and you can hear the transmission. To respond to the
transmission, press PTT.
If scan stops on a channel that you don’t want to listen, briefly press UP or DOWN button to resume scanning for the
next active channel.
To exit the function, press SCAN key again.
MENU OPERATION
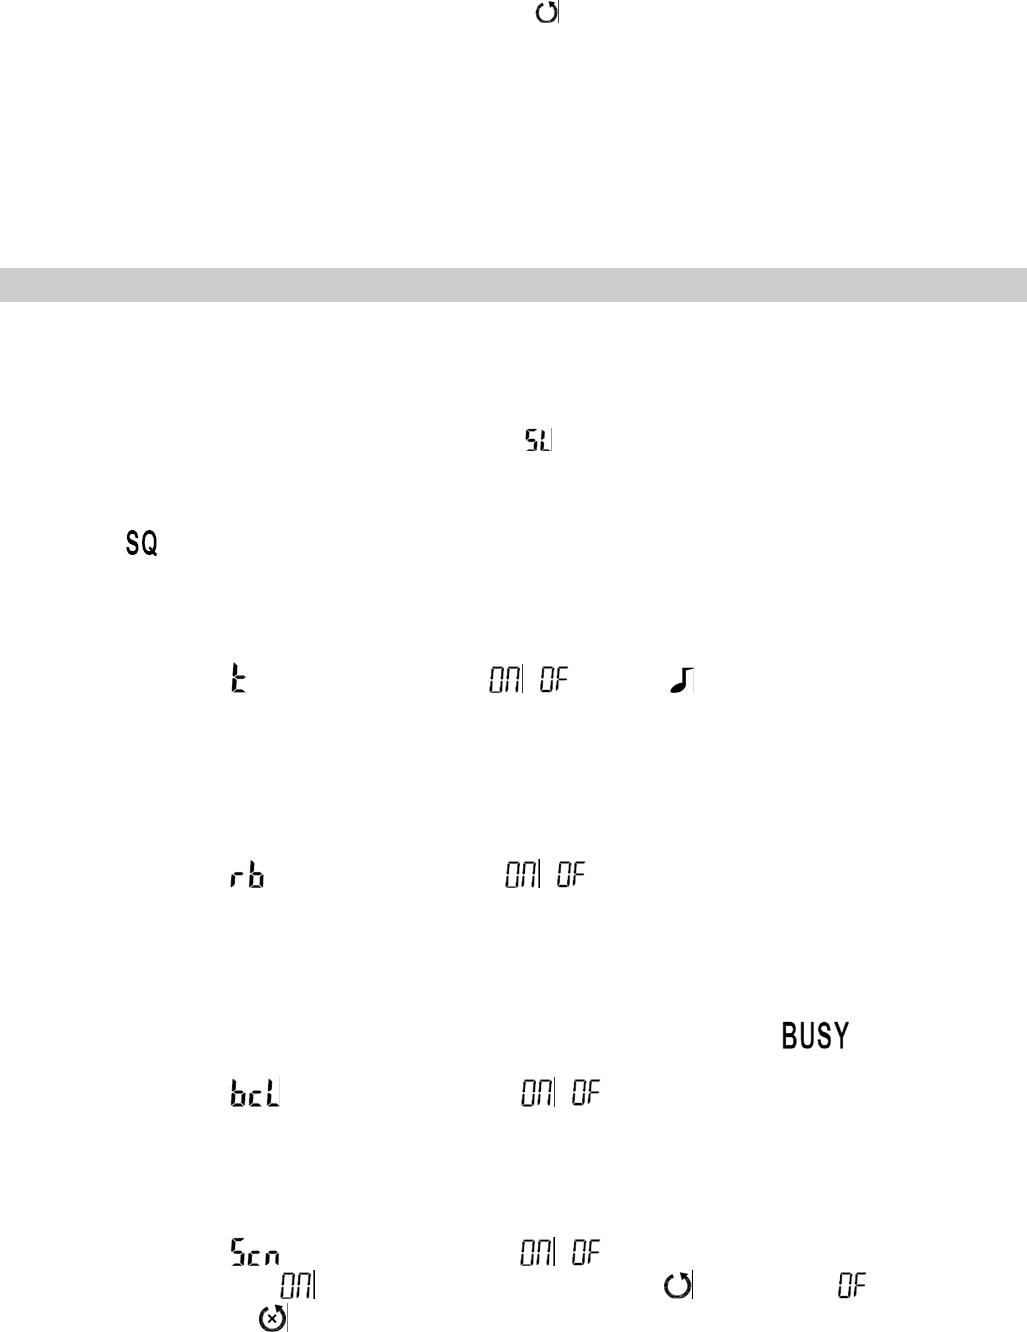
Squelch Level Setting
The adjustable Squelch allows you to optimize the radios sensitivity. It also allows you to increase the sensitivity and receive
weaker signals. There are 5 decreasing levels of sensitivity.
1. Press MON/FUN until the current squelch level flashes and appears.
2. Press UP/DOWN button to increase or decrease the squelch level.
3. Press PTT to set or MON/FUN to continue set up.
Note: Level 1 ( and one bar icon display) is the most sensitive level, which means the radio can receive very weak signal.
While at level 5, the radio can only receive at strong signal.
Keypad Tone Setting
You may enable or disable the speaker key tones. You will hear the key tone each time a button is pushed.
1. Press MON/FUN until appears. The current setting / flashes and appears.
2. Press UP/DOWN to turn on or off.
3. Press PTT to set or MON/FUN to continue set up.
Roger Beep Setting
If this feature is enabled, the radio transmits a unique tone when you finish transmitting. In the same way as saying “Roger" or
"Over", it lets others know you are finished talking.
1. Press MON/FUN until appears. The current setting / flashes.
2. Press UP/DOWN to turn on or off.
3. Press PTT to set or MON/FUN to continue set up.
Busy Channel Lockout Setting
The busy channel lockout feature helps to ensure not interrupt the communication between the radios using the channel
which you selected. When you press PTT to transmit, the radio will generate a beep and will appear to alert
you the channel you selected is busy.
1. Press MON/FUN until appears. The current setting / flashes.
2. Press UP/DOWN to turn on or off.
3. Press PTT to set or MON/FUN to continue set up.
Scan List Setting
The current channel can be added to scan list or delete from scan list.
1. Press MON/FUN until appears. The current setting / flashes.
2. Press UP/DOWN to select. “ ” means add the channel to scan list and will appears. “ ” means delete the
channel from scan list and will appear.
3. Press PTT to set or MON/FUN to continue set up.
Priority Channel Setting
Once a channel was set to priority channel, it will be scanned after every normal channel when scan is initiated by pressing
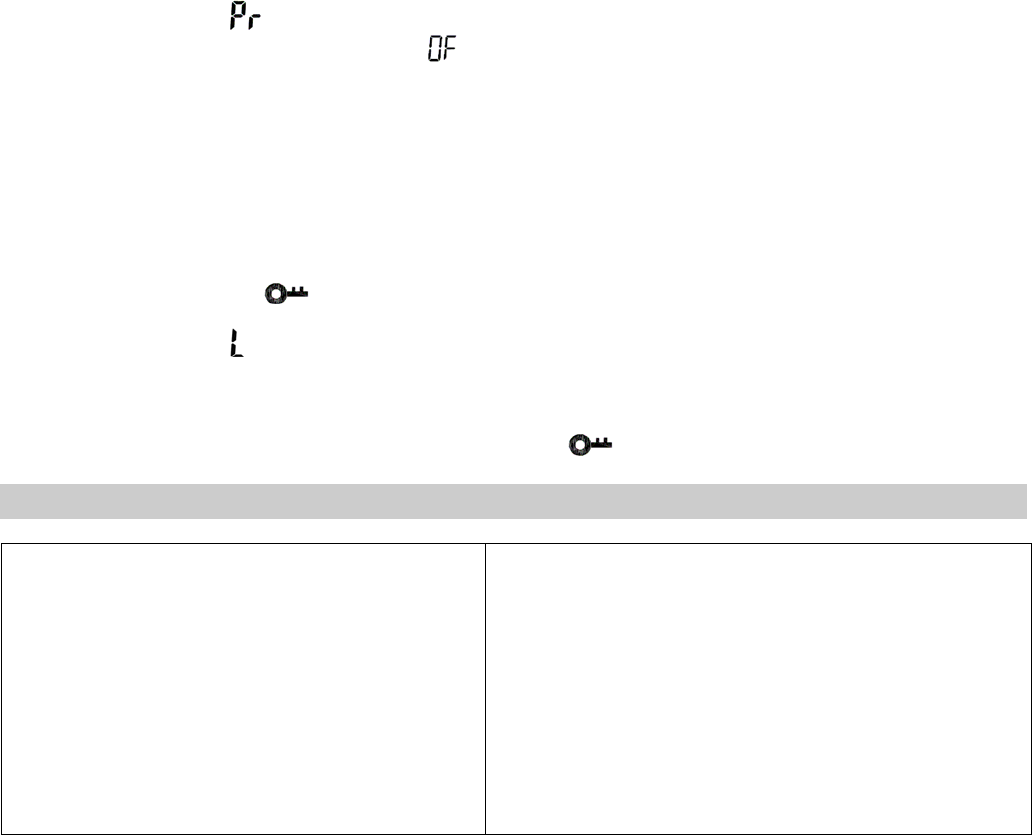
scan button.
1. Press MON/FUN until appears. The current setting flashes.
2. Press UP/DOWN to select a desired channel or to disable the function.
3. Press PTT to set or MON/FUN to continue set up.
Note: when the priority channel is set, no matter the priority channel is added into scan list or not, once scan is initiated, it will
be priority scan.
Keypad Lock Setting
The keypad lock disables the Up and Down buttons and will not disable PTT, SCAN and EMG buttons. It also disables the
scan function, but allows you to use the MON/FUN to monitor the channel.
When the keypad is locked, the will show in the display.
1. Press MON/FUN until appears. The current setting flashes.
2. Press UP/DOWN to turn on or off.
3. Press PTT or MON/FUN to set.
To unlock the radio, press and hold SCAN for 3 seconds and until is no longer displayed.
TECHNICAL SPECIFICATION
Channels
CTCSS
CDCSS
Frequency Band
Operation temperature
Frequency stability Vs temperature
Bandwidth
Tx power
Clear Range
Power adaptor
Battery Type
Battery life (5/5/90 duty cycle and at high TX power mode)
Water Proof Grade
32 (maximum)
38
83
400~470MHz
-20 ~+55℃℃
+/-2.5ppm
12.5kHz/25KHz
5W / 1W
12Km
Input:110-240v-50/60Hz 0.2A
Ouput:12.5v, 400mA
7.2V 1100mAh Li-Ion
7.0 hrs
IPX2