Gibson Innovations AJT4400 Clock Radio User Manual
Gibson Innovations Limited Clock Radio
UserManual.wiki
>
Gibson Innovations
>
AJT4400 User Manual
User Manual
Navigation menu
Upload a User Manual
Namespaces
Wiki Guide
HTML
PDF
Info
Views
User Manual
Discussion / Help
Navigation
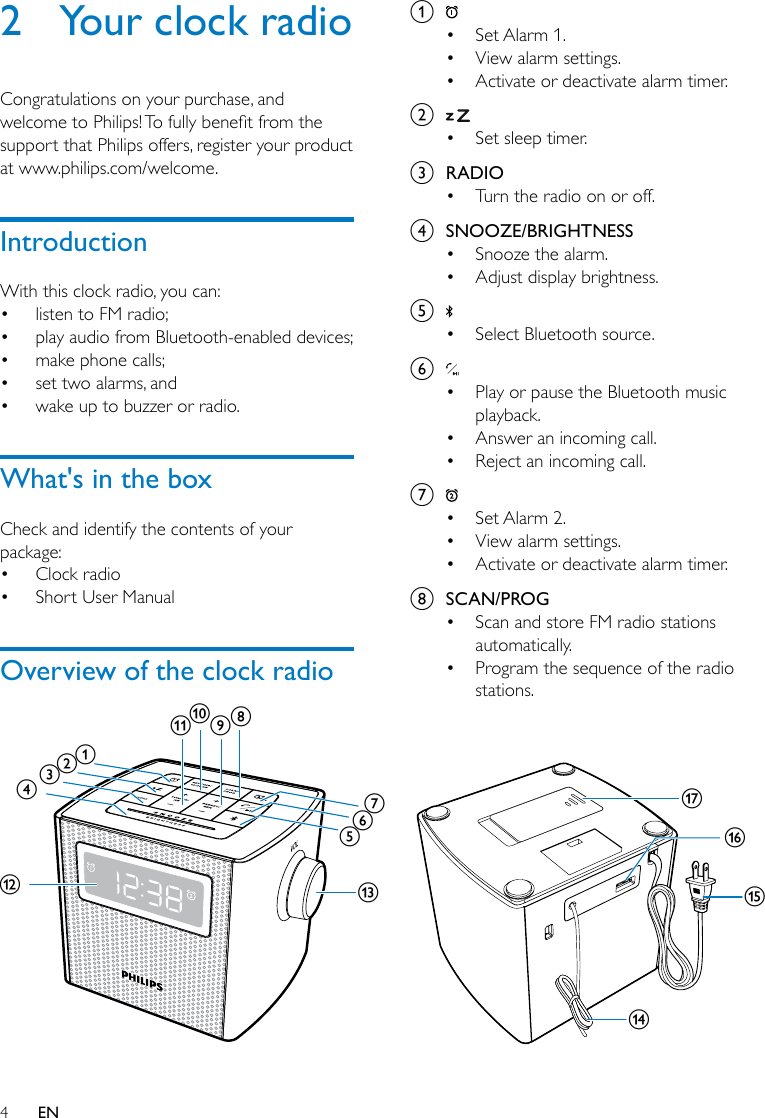
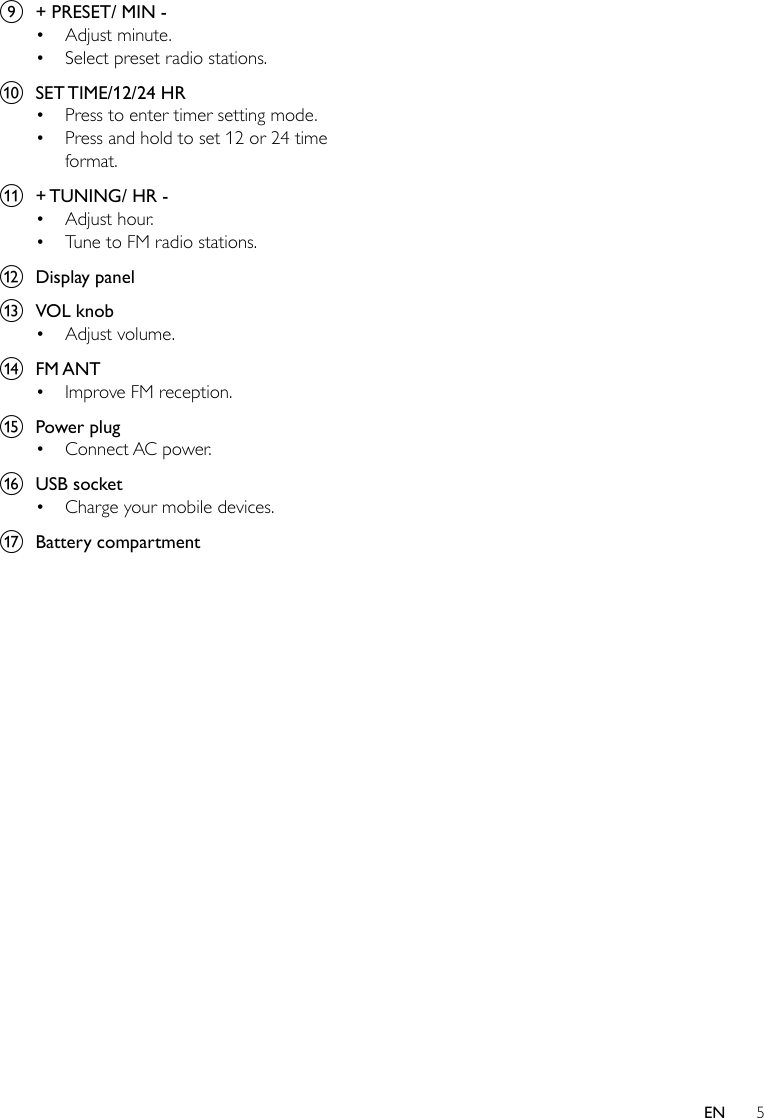

![8EN5 Use Bluetooth devicesWith this clock radio, you can listen to audio from Bluetooth-enabled devices and control the incoming call through Bluetooth.Connect a deviceNote •Make sure that your Bluetooth device is compatible with this product. •Before pairing a device with this product, read its user manual for Bluetooth compatibility. •This product can memorize a maximum of 4 paired devices. •Make sure that Bluetooth function is enabled on your device, and your device is set as visible to all other Bluetooth devices. •The operational range between this product and a Bluetooth device is approximately 10 meters (30 feet). •Any obstacle between this product and a Bluetooth device can reduce the operational range. •Keep away from any other electronic device that may cause interference.1 Press to enter Bluetooth mode. » Bluetooth iconashesquicklyonthedisplay.2 On your Bluetooth device, enable Bluetooth and search for Bluetooth devices (refer to the user manual of the device).3 When [Philips AJT4400B] is displayed on your device, select it to start pairing and connection. If necessary, enter default password “0000”. » After successful pairing and connection, iconstopsashing,andtheclockradio beeps twice.Note •If your Bluetooth device has been paired with AJT4400Bbefore,youjustneedtondout[AJT4400B] on your Bluetooth menu, then start the connection.To disconnect the Bluetooth-enabled device:• Press and hold for 3 seconds;• Disable Bluetooth on your device; or• Move the device beyond the communication range.To connect another Bluetooth-enabled device:• Disable Bluetooth on the current device, and then connect another device.Enter Bluetooth pairing mode• Press and hold to enter Bluetooth pairing mode if you fail to search for "Philips AJT4400B" or cannot pair with the clock radio. » The clock radio beep once. » TheBluetoothiconashesquickly.Play audio from Bluetooth-enabled deviceNote •If there is an incoming call on the connected mobile phone, music play pauses.After successful Bluetooth connection, play audio on the Bluetooth device. » Audio comes out from the clock radio.• You can press to start, pause or resume play.](https://usermanual.wiki/Gibson-Innovations/AJT4400/User-Guide-2635189-Page-10.png)
![9ENBluetooth icon statusBluetooth icon DescriptionFlashingquickly(at1Hz) Connecting or waiting for connectionFlashslowly(at2Hz,with single beep)PairingSolid Bluetooth icon ConnectedBluetooth icon off Bluetooth function is turned offClear the pairing informationIn Bluetooth mode, press and hold for 10 seconds. » [BT RESET] scrolls on the display panel, then all the Bluetooth pairing information is erased. » The clock radio returns to Bluetooth mode automatically after erasion is completed.Control your phone callAfter Bluetooth connection, you can control your incoming phone call with this product.Button FunctionPress to answer an incoming call.During a call, press to end the current call.Press and hold to reject an incoming call.Note •Music play pauses when there is an incoming call.](https://usermanual.wiki/Gibson-Innovations/AJT4400/User-Guide-2635189-Page-11.png)
![10 EN6 Set alarm timerSet alarmYou can set two alarms to ring at different time.Note •Make sure that the clock is set correctly.1 Press and hold or for two seconds to activate alarm setting mode. » The hour and minute digits and the alarm icon ( or ) begin to blink.2 Press + TUNING/ HR - to set hour.3 Press + PRESET/ MIN - to set minute.4 Press or toconrm. » [buz] (buzzer) or your last listened frequencyblinks.5 Press + TUNING/ HR - or + PRESET/ MIN - to select an alarm source: buzzer or your last listened channel.6 Press or toconrm.Tip •If buzzer is selected as alarm source, volume increases gradually. •If your last listened radio station is selected as alarm source, rotate the volume knob to adjust the alarm volume.Activate/deactivate alarm timer• Press or repeatedly to activate or deactivate the alarm timer. » or appears if the alarm timer is on and disappears if it is off.• To stop the alarm, press the corresponding or . » The alarm repeats ringing for the next day. Snooze the alarm• When alarm sounds, press SNOOZE. » The alarm snoozes and repeats ringing nine minutes later.](https://usermanual.wiki/Gibson-Innovations/AJT4400/User-Guide-2635189-Page-12.png)
![11EN7 Other featuresSet sleep timerThis clock radio can switch to standby mode automatically after a preset period.• Press repeatedly to select the sleep timer period (in minutes). To deactivate the sleep timer:In sleep timer setting mode, press repeatedly until [OFF] (off) appears.Charge your deviceWith this clock radio, you can charge your external devices, such as your cell phone, MP3 player or other mobile devices. • Use a USB cable (not supplied) to connect your device with the clock radio. » Once the device is recognized, the charging starts.15 30 60 90 120OFFNote •The maximum current for USB charging is 1A. •It is not guaranteed to charge all devices with this product.Adjust display brightnessPress BRIGHTNESS repeatedly to select different brightness levels.](https://usermanual.wiki/Gibson-Innovations/AJT4400/User-Guide-2635189-Page-13.png)