Gigaset Communications SL785 UPCS Base Station User Manual Master BA SL565
Gigaset Communications GmbH UPCS Base Station Master BA SL565
UserManual.wiki
>
Gigaset Communications
>
SL785 User Manual
User manual
Navigation menu
Upload a User Manual
Namespaces
Wiki Guide
HTML
PDF
Info
Views
User Manual
Discussion / Help
Navigation
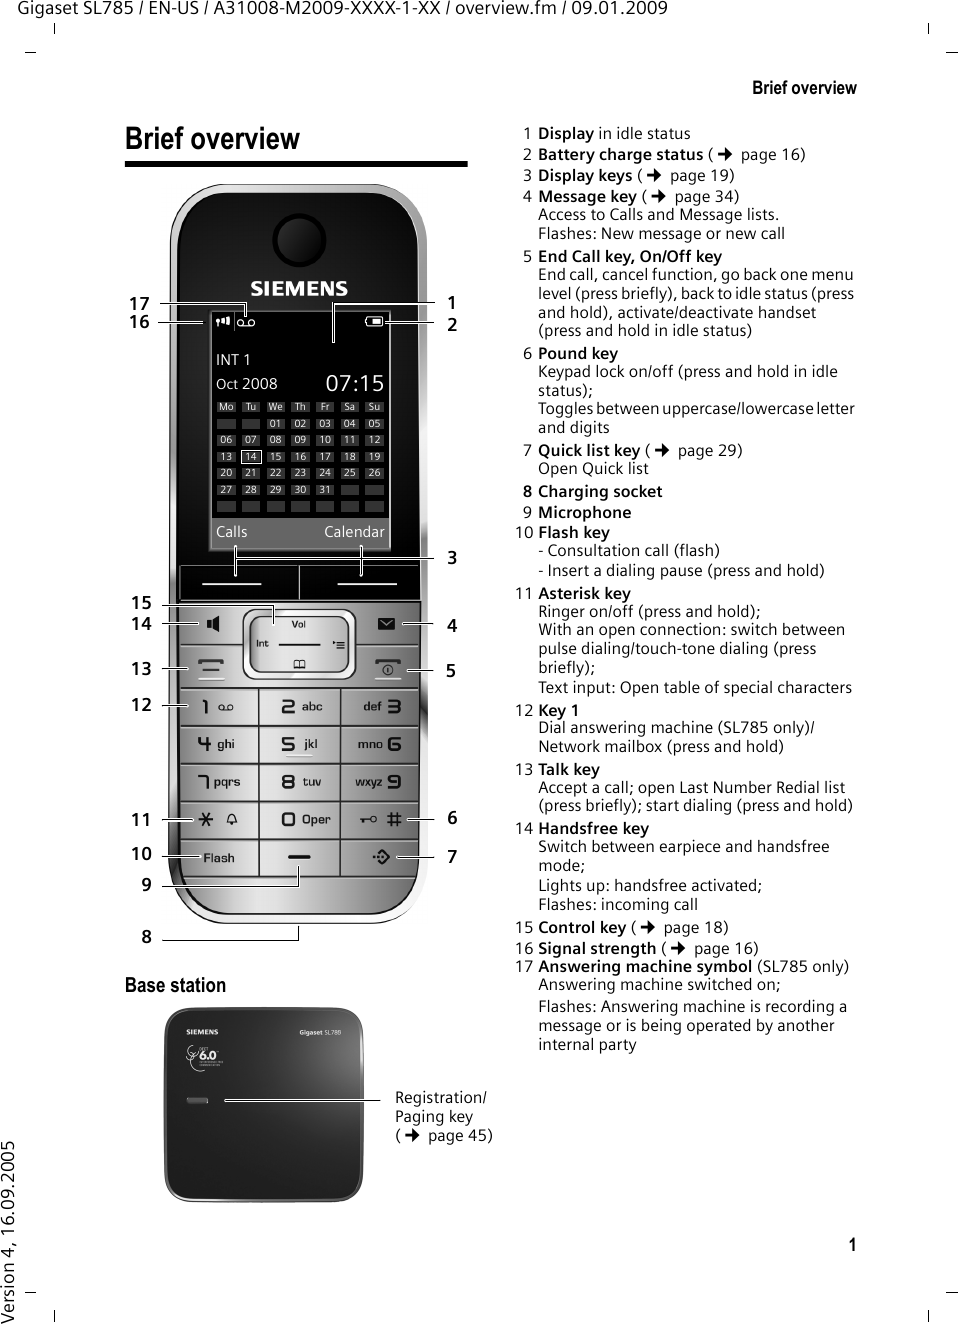


![55Handset settingsGigaset SL785 / EN-US / A31008-M2009-XXXX-1-XX / registr_sett.fm / 09.01.2009Version 4, 16.09.2005Activating/deactivating advisory tonesYour handset uses advisory tones to tell you about different activities and statuses. The following advisory tones can be acti-vated/deactivated independently of each other:uKey click: Every key press is confirmed.uAcknowledgment tones: –Confirmation tone (ascending tone sequence): At the end of an entry/setting and when a new entry arrives in the Answering Machine list or Call lists–Error tone (descending tone sequence): When you make an incorrect entry–Menu end tone: When scrolling to the end of a menu uBattery low beep: The battery requires charging.In idle status:t ¢Advisory Tones¤Change multiple-line input:Key Tones: Select On or Off.Confirmation: Select On or Off.Battery: Select On, Off or In Call. The battery warning tone is activated/deactivated and only sounds during a call. §Save§ Press the Display key.Setting your own area codeTo transfer phone numbers (e.g., in vCards), it is essential that your area code (international and local area code) is saved on the phone.Some of these numbers are already pre-set.v ¢Ï ¢Telephony ¢Area CodesCheck that the (pre)set area code is cor-rect.¤Change multiple-line input:qSelect/change input field. rNavigate in the input field.ÑIf necessary, delete number: press the Display key.~Enter number.§Save§ Press the Display key.Example:Restoring the handset default settingsYou can reset individual settings and changes that you have made.The following settings are not affected by a resetuRegistration to the base stationuDate and timeuEntries in the calendaruEntries in the directory, Quick list, Call listsv ¢Ï ¢Reset ¢Handset Reset§Yes§ Press the Display key.Please noteYou can also set the call volume, ring-ers, and advisory tones through the menu (¢page 25).Area CodesInternational code:00 - 1Local area code:0 - [ ]ÛSave](https://usermanual.wiki/Gigaset-Communications/SL785/User-Guide-1065179-Page-55.png)

![63Additional functions in the PC interfaceGigaset SL785 / EN-US / A31008-M2009-XXXX-1-XX / appendix.fm / 09.01.2009Version 4, 16.09.2005Transferring dataYou can synchronize your telephone direc-tory with Outlook using the Gigaset QuickSync program (see the program's Help functions).During the transfer of data between hand-set and PC, you will see Data transfer in progress on the display. During this time, the keypad is disabled, and incoming calls will be ignored.Updating the firmware¤Connect your phone to your PC using the USB cable supplied (¢page 16).¤Start the Gigaset QuickSync program on your PC.¤Establish a connection to your handset.¤Select [Settings] ¢[Device Proper-ties] to open the [Device] tab¤Click [Firmware Update]This launches the firmware update. The data is initially loaded from the update server over the Internet. The amount of time this takes depends on the speed of your Internet connection. The display on your phone is switched off, and the Message key f and Handsfree key d start flashing.The update process can take up to 10 min-utes (not including the download time). Do not interrupt the process or remove the USB cable. Once the update is com-plete, your phone will automatically restart. Procedure in case of an errorIf your phone does not work properly fol-lowing the update, repeat the update process. If you cannot establish a connec-tion to the PC, proceed as follows:¤Remove the USB cable from the tele-phone¤Remove the battery (¢page 12)¤Press and hold keys 4 and L simultaneously¤Replace the battery¤Reconnect the USB cable¤Release keys 4 and L simultane-ouslyProceed as described under "Updating the firmware".Bluetooth ò Qualified Design IdentityThe Bluetooth QD ID for your Gigaset SL78H is: B013322.](https://usermanual.wiki/Gigaset-Communications/SL785/User-Guide-1065179-Page-63.png)