Gogo Business Aviation SIPWFHS WiFi SIP Handset User Manual FCC labelx
Gogo Business Aviation LLC WiFi SIP Handset FCC labelx
Users Manual

The Airborne SmartPhone System
Installation Manual
Installation Manual part number D12004
Revision E, March 2010
Aircell
303 South Technology Court, Building A
Broomfield, CO 80021
United States of America
Distribution Statement: This publication is for the Satellite Telephone products only and is to be used
by Customers and authorized Aircell agents only. Send requests for additional copies of this document
to Corporate Publications Coordinator or e-mail at (0cpc@Aircell.com).
Welcome to

Page i
Aircell confidential and proprietary D12004-E, March 2010
PROPRIETARY NOTICE
This document and the information disclosed herein are proprietary data of Aircell. Neither this document nor
the information contained herein shall be used, reproduced, or disclosed to others without prior written
authorization of Aircell, except to the extent required for installation of recipient’s equipment.
Notice
Freedom of Information Act (5 USC 552) and Disclosure of
Confidential Information Generally (18 USC 1905)
Aircell is furnishing this document in confidence. The information disclosed here falls within exemption (b)(4) of
USC 552 and the prohibitions of 18 USC 1905. For further information, please contact:
Corporate Publications Coordinator
Aircell
303 South Technology Court, Building A
Broomfield, CO 80021
Telephone: (303) 301-0200
FAX: (303) 301-0279
© 2010 Aircell
All Rights Reserved.
Information in this document is subject to change without notice and does not represent a commitment on the
part of Aircell.
Trademark Acknowledgements
Aircell and Aircell Axxess are registered trademarks of Aircell Business Aviation Services and its affiliates. All
rights reserved.
Trademarks and service marks owned by third parties are the property of their respective owners.
Microsoft Windows® is a registered trademark of Microsoft Corporation in the United States and other
countries.
MagnaStar® is a registered trademark of Raytheon Company.
Inmarsat® is a registered trademark of the International Maritime Satellite Organization (IMSO) and is licensed
by IMSO to Inmarsat® Limited and Inmarsat® Ventures plc. Inmarsat’s product names are either trademarks or
registered trademarks of Inmarsat®.
Linksys™ is a registered trademark of Cisco systems.
uniHub™ is a registered trademark of On-Go, Inc.
Airshow® (4000 & Genisys) are registered trademarks of Rockwell Collins Corporation.
Unilink® is a registered trademark of Universal Avionics Systems Corporation.

Page ii
Aircell confidential and proprietary D12004-E, March 2010
RECORD OF REVISIONS
REVISION DESCRIPTION
RELEASE
DATE
RELEASED
BY
Draft Draft Document
November
2005 Aircell
Draft 2 Draft Document March 2006 Aircell
A Original Document April 2006 Aircell
B Revised for the addition of the 2-Channel Expansion
Transceiver and Custom Retract HS.
December
2006 Aircell
C
Revised for the addition of AHI-1, AHI-2, and ACA
components and incorporated miscellaneous editorial
comments and revisions.
March 2007 Aircell
D
Revised for the addition of the Low Power CTR, WiFi
and LEMO handsets, the Remote Diversity Antennas,
ACA II and AHI-2 Revision B.
January 2008 Aircell
E
Revised for the addition of the SIP WiFi Handset GUIs
and supporting text; revised Figure 2.1.A to show
WLAN connections for the CTR; revised the D12031
reference wiring diagram; added the ACA II WiFi
disable feature; added the WiFi handset screens;
rewrote the On-Go Faxing Service activation (AHI-2)
part of Section 4.11.; clarified the DO-160E and RS-232
requirements in Section 7.0., and incorporated
miscellaneous editorial comments and revisions.
March 2010 Aircell

Page iii
Aircell confidential and proprietary D12004-E, March 2010
TABLE OF CONTENTS
Subject Page
1PROPRIETARY NOTICE.......................................................................................................................................... 2i
2RECORD OF REVISIONS ....................................................................................................................................... 2ii
3TABLE OF CONTENTS.......................................................................................................................................... 2iii
4LIST OF FIGURES................................................................................................................................................ 2viii
5LIST OF FIGURES.................................................................................................................................................. 2ix
6LIST OF TABLES .................................................................................................................................................... 2x
71.0 INTRODUCTION .................................................................................................................................21-1
81.1. General................................................................................................................................................21-1
91.2. Unpacking...........................................................................................................................................21-4
11.3. Planning..............................................................................................................................................21-4
11.4. List of Abbreviations and Acronyms ...............................................................................................21-4
11.5. Advisories...........................................................................................................................................21-6
11.6. FCC Compliance ................................................................................................................................21-7
11.7. List of Related Publications..............................................................................................................21-7
12.0 DESCRIPTION AND OPERATION .....................................................................................................22-1
12.1. Introduction ........................................................................................................................................22-1
12.1.1. Aircell Axxess® II Standard Installation Block Diagram ............................................................22-1
12.1.2. Aircell Axxess® II Installation Block Diagram showing optional Expansion Transceiver .....22-2
12.1.3. Aircell Axxess® II Installation Block Diagram showing the optional AHIs and ACA ..............22-3
22.1.4. Aircell Axxess® Standard Components ......................................................................................22-4
22.1.5. Aircell Axxess® Optional Components (AHIs in lieu of an Aircell Axxess CTR) ....................32-5
22.2. Description and Overview.................................................................................................................32-6
22.2.1. Aircell Axxess® II 2-Channel Satellite Transceiver (ST 4200) and Mounting Tray ..................32-6
22.2.2. Aircell Axxess® 2-Channel Expansion Transceiver and Mounting Tray (optional) ................32-7
22.2.3. Aircell Axxess® Cabin Telecommunications Router (CTR) and Mounting Tray .....................32-8
22.2.4. Aircell Axxess® Remote Diversity Antenna (RDA).....................................................................32-9
22.2.5. Aircell Axxess® Handset Interface (AHI-1) (optional in lieu of CTR) ......................................32-10
22.2.6. Aircell Axxess® Handset / Fax Interface (AHI-2) (optional in lieu of CTR).............................32-11
22.2.7. Aircell Axxess® Call Alerter (ACA) (optional) ...........................................................................32-12
32.2.8. Aircell Axxess Call Alerter II (ACA II) (optional).......................................................................32-12
32.2.9. Aircell Axxess® Standard SIP Handset (with Audio Panel Interface).....................................32-13
32.2.10. Aircell Axxess WiFi SIP Handset (with no Audio Panel Interface) .........................................32-13
32.2.11. Aircell Axxess Flush-Mount SIP Handset (with no Audio Panel Interface) ...........................32-14
32.2.12. Aircell Axxess® Custom-Retractable SIP Handset (with no Audio Panel Interface).............32-14
32.2.13. Aircell Axxess LEMO SIP Handset (with no Audio Panel Interface) ......................................32-15
32.2.14. Reserved for product expansion ...............................................................................................32-15
32.2.15. Reserved for product expansion ...............................................................................................32-15
32.2.16. Reserved for product expansion ...............................................................................................32-15
32.2.17. Reserved for product expansion ...............................................................................................32-15
42.2.18. Reserved for product expansion ...............................................................................................32-15
42.2.19. Reserved for product expansion ...............................................................................................32-15
42.2.20. Aircell Axxess® Satellite One-Channel Patch Antenna ...........................................................32-15
42.2.21. Aircell Axxess Satellite Two-Channel Patch Antenna .............................................................32-16

Page iv
Aircell confidential and proprietary D12004-E, March 2010
42.2.22. Reserved for product expansion ...............................................................................................32-16
43.0 INSTALLATION PROCEDURES ........................................................................................................33-1
43.1. Planning..............................................................................................................................................33-1
43.2. Equipment Location ..........................................................................................................................33-1
43.3. Cable Routing.....................................................................................................................................33-1
43.4. Antenna Selection..............................................................................................................................33-2
53.5. Handset Selection..............................................................................................................................33-2
53.6. Component Locations.......................................................................................................................33-2
53.6.1. Aircell Axxess ® II 2-Channel Satellite Transceiver (ST 4200) .................................................33-2
53.6.2. Aircell Axxess 2-Channel Expansion Transceiver (ST 4020)....................................................33-2
53.6.3. Aircell Axxess® Cabin Telecommunications Router (CTR).......................................................33-3
53.6.4. Aircell Axxess Remote Diversity Antenna (RDA) (optional) .....................................................33-3
53.6.5. Aircell Axxess Handset Interface (AHI-1) (optional) ..................................................................33-3
53.6.6. Aircell Axxess Handset / Fax interface (AHI-2) (optional) .........................................................33-3
53.6.7. Aircell Axxess Call Alerter (ACA) (optional) ...............................................................................33-3
53.6.8. Aircell Axxess® Call Alerter II (ACA II) (optional) .......................................................................33-4
63.6.9. Aircell Axxess Standard SIP Handset (with Audio Panel Interface) ........................................33-4
63.6.10. Aircell Axxess WiFi SIP Handset and Base Station (with no Audio Panel Interface).............33-4
63.6.11. Aircell Axxess Flush-Mount SIP Handset (with no Audio Panel Interface) .............................33-4
63.6.12. Aircell Axxess Custom-Retractable SIP Handset (with no Audio Panel Interface) ................33-4
63.6.13. Aircell Axxess® LEMO SIP Handset (with no Audio Panel Interface).......................................33-5
63.6.14. Reserved for product expansion .................................................................................................33-5
63.6.15. Reserved for product expansion .................................................................................................33-5
63.6.16. Reserved for product expansion .................................................................................................33-5
63.6.17. Reserved for product expansion .................................................................................................33-5
63.6.18. Reserved for product expansion .................................................................................................33-5
73.6.19. Reserved for product expansion .................................................................................................33-5
73.6.20. Iridium Satellite Antenna ..............................................................................................................33-5
73.7. Power, Handset, and Audio Cabling ................................................................................................33-5
73.8. Ring Detect .........................................................................................................................................33-5
73.9. Reserved for product expansion......................................................................................................33-5
73.10. Cabling................................................................................................................................................33-6
73.11. Satellite Antenna Installation Cable Guide .....................................................................................33-8
74.0 TESTING AND SETUP........................................................................................................................34-1
74.1. Introduction ........................................................................................................................................34-1
74.2. Testing ................................................................................................................................................34-1
84.3. Test Equipment ..................................................................................................................................34-1
84.4. Test Results........................................................................................................................................34-2
84.5. Maintenance and Continued Airworthiness....................................................................................34-2
84.6. Telephone Operations (Standard Handset Shown)........................................................................34-3
84.7. Quick System Check Out ..................................................................................................................34-3
84.7.1. Placing a call from the Aircraft ....................................................................................................34-4
84.7.2. Placing a call to the Aircraft .........................................................................................................34-4
84.8. Aircell Axxess® II (ST 4200) PBX Configuration and Setup Guide................................................34-5
84.8.1. Product Overview ..........................................................................................................................34-5
84.8.2. Configuration with Web Browser (Revision M and previous)...................................................34-5

Page v
Aircell confidential and proprietary D12004-E, March 2010
94.8.3. Configuration Menu.......................................................................................................................34-6
94.8.4. Network Configuration..................................................................................................................34-7
94.8.5. Definitions for the Network Parameters Settings ......................................................................34-7
94.8.6. Trunk Line Provisioning ...............................................................................................................34-8
94.8.6.1. In-bound Call Configuration.....................................................................................................34-8
94.8.6.2. Out-bound Calls Configuration..............................................................................................34-10
94.8.6.3. Extension Provisioning ..........................................................................................................34-11
94.8.6.4. Voice Parameter......................................................................................................................34-12
94.8.6.5. Switch User..............................................................................................................................34-13
94.8.6.6. ACA Configuration (Aircell Axxess® Call Alerter)................................................................34-13
14.8.6.7. Call Detail Record (CDR) ........................................................................................................34-14
14.8.6.8. Maintenance.............................................................................................................................34-15
14.8.6.9. Saving the Configuration Changes.......................................................................................34-16
14.8.6.10. Set to Defaults.........................................................................................................................34-16
14.8.6.11. Rebooting the phone remotely..............................................................................................34-16
14.8.7. Configuration with Web Browser (Revision N and subsequent)............................................34-17
14.8.8. Configuration Menu.....................................................................................................................34-18
14.8.9. Network Configuration................................................................................................................34-19
14.8.10. Definitions for the Network Parameters Settings ....................................................................34-19
14.8.11. Trunk Line Provisioning .............................................................................................................34-20
14.8.11.1. In-bound Call Configuration ..................................................................................................34-20
14.8.11.2. Out-bound Calls Configuration .............................................................................................34-22
14.8.11.3. Extensions Provisioning........................................................................................................34-24
14.8.11.4. Voice Parameter......................................................................................................................34-25
14.8.11.5. Switch User..............................................................................................................................34-26
14.8.11.6. ACA Configuration (Aircell Axxess® Call Alerter) ...............................................................34-26
14.8.11.7. Call Detail Record (CDR)........................................................................................................34-27
14.8.11.8. Maintenance ............................................................................................................................34-27
14.8.11.9. Set to Defaults.........................................................................................................................34-28
14.8.11.10. Rebooting the phone remotely............................................................................................34-28
14.9. Aircell Axxess® CTR (router) Configuration and Setup via PC interface...................................34-29
14.10. Aircell Axxess® Handset Setup, Menus and Operational Checkout Guide ...............................44-32
14.11. Aircell Axxess® Data Call Functionality Checkout Guide............................................................44-53
14.12. Aircell Axxess® ST 4200 DHCP Server Activation (mandatory if no CTR installed) .................44-60
15.0 CLEANING ..........................................................................................................................................45-1
15.1. Introduction ........................................................................................................................................45-1
15.2. Recommended Cleaning Materials ..................................................................................................45-1
15.3. Procedure ...........................................................................................................................................45-1
16.0 FITS AND CLEARANCES ..................................................................................................................46-1
16.1. Aircell Axxess II 2-Channel Satellite Transceiver (ST 4200) .........................................................46-1
16.2. Aircell Axxess 2-Channel Expansion Transceiver (ST 4020) ........................................................46-1
16.3. Aircell Axxess Cabin Telecommunications Router (CTR).............................................................46-1
16.4. Aircell Axxess Remote Diversity Antenna (RDA) ...........................................................................46-1
16.5. Aircell Axxess Handset Interface (AHI-1) (optional).......................................................................46-1
16.6. Aircell Axxess Handset / Fax Interface (AHI-2) (optional) .............................................................46-1
16.7. Aircell Axxess Call Alerter (ACA) (optional) ...................................................................................46-1
16.8. Aircell Axxess Call Alerter II (ACA II) (optional) .............................................................................46-1
16.9. Aircell Axxess Standard SIP Handset (with Audio Panel Interface).............................................46-1
16.10. Aircell Axxess WiFi SIP Handset (with no Audio Panel Interface) ...............................................46-1

Page vi
Aircell confidential and proprietary D12004-E, March 2010
16.11. Aircell Axxess Flush-Mount SIP Handset (with no Audio Panel Interface) .................................46-2
16.12. Aircell Axxess Custom-Retractable SIP Handset (with no Audio Panel Interface).....................46-2
16.13. Aircell Axxess LEMO SIP Handset (with no Audio Panel Interface).............................................46-2
16.14. Reserved for product expansion......................................................................................................46-2
16.15. Reserved for product expansion......................................................................................................46-2
16.16. Reserved for product expansion......................................................................................................46-2
16.17. Reserved for product expansion......................................................................................................46-2
16.18. Reserved for product expansion......................................................................................................46-2
16.19. Iridium Satellite Antennas (Standard One-Channel and Dual Two-Channel Patch) ...................46-2
17.0 SYSTEM SPECIFICATIONS...............................................................................................................47-1
17.1. Purpose...............................................................................................................................................47-1
17.2. Product Definition..............................................................................................................................47-1
17.3. Associated Reference Documents...................................................................................................47-1
17.4. Technical Specifications...................................................................................................................47-1
17.4.1. Aircell Axxess II Satellite Transceiver (ST 4200)........................................................................47-1
17.4.2. Aircell Axxess® Satellite Expansion Transceiver (ST 4020) (optional) ....................................47-3
17.4.3. Aircell Axxess® Cabin Telecommunications Router (CTR).......................................................47-6
17.4.4. Aircell Axxess® Remote Diversity Antenna (RDA) (optional) ...................................................47-7
17.4.5. Aircell Axxess Handset Interface (AHI-1) (optional in lieu of CTR)..........................................47-8
17.4.6. Aircell Axxess® Handset / Fax Interface (AHI-2) (optional in lieu of CTR)...............................47-9
17.4.7. Aircell Axxess® Call Alerter (ACA) (optional) ...........................................................................47-10
17.4.8. Aircell Axxess® Standard SIP Handset (with Audio Panel interface).....................................47-10
17.4.9. Aircell Axxess® WiFi SIP Handset (with no Audio Panel interface) .......................................47-11
17.4.10. Aircell Axxess® Flush-Mount SIP Handset (with no Audio Panel Interface) .........................47-12
17.4.11. Aircell Axxess® Custom-Retractable SIP Handset (with no Audio Panel Interface).............47-13
17.4.12. Aircell Axxess® LEMO SIP Handset (with no Audio Panel interface).....................................47-14
17.4.13. Reserved for product expansion ...............................................................................................47-15
17.4.14. Reserved for product expansion ...............................................................................................47-15
17.4.15. Reserved for product expansion ...............................................................................................47-15
17.4.16. Reserved for product expansion ...............................................................................................47-15
17.4.17. Reserved for product expansion ...............................................................................................47-15
17.4.18. Reserved for product expansion ...............................................................................................47-15
17.4.19. Iridium Satellite Antenna ............................................................................................................47-15
18.0 SPECIAL TOOLS, FIXTURES, AND EQUIPMENT............................................................................48-1
18.1. Introduction ........................................................................................................................................48-1
18.2. Test Setup and Calibration ...............................................................................................................48-1
19.0 PARTS LIST ........................................................................................................................................49-1
19.1. Introduction ........................................................................................................................................49-1
19.2. Parts List.............................................................................................................................................49-1
19.2.1. Aircell Axxess II 2-Channel Satellite Transceiver (ST 4200) .....................................................49-1
19.2.2. Aircell Axxess 2-Channel Expansion Transceiver (ST 4020)....................................................49-1
19.2.3. Aircell Axxess® Cabin Telecommunications Router (CTR).......................................................49-2
19.2.4. Aircell Axxess Remote Diversity Antenna (RDA).......................................................................49-2
19.2.5. Aircell Axxess Handset Interface (AHI-1) (optional in lieu of CTR)..........................................49-2
19.2.6. Aircell Axxess Handset / Fax Interface (AHI-2) (optional in lieu of CTR).................................49-2
19.2.7. Aircell Axxess® Call Alerter (ACA) (optional) .............................................................................49-3
19.2.8. Aircell Axxess Standard SIP Handset (with Audio Panel Interface) ........................................49-3

Page vii
Aircell confidential and proprietary D12004-E, March 2010
19.2.9. Aircell Axxess WiFi SIP Handset (with no Audio Panel Interface) ...........................................49-3
19.2.10. Aircell Axxess Flush-Mount SIP Handset (with no Audio Panel Interface) .............................49-3
19.2.11. Aircell Axxess® Custom-Retractable SIP Handset (with no Audio Panel Interface)...............49-4
19.2.12. Aircell Axxess LEMO SIP Handset (with no Audio Panel Interface) ........................................49-4
19.2.13. Reserved for product expansion .................................................................................................49-4
19.2.14. Reserved for product expansion .................................................................................................49-4
19.2.15. Reserved for product expansion .................................................................................................49-4
19.2.16. Reserved for product expansion .................................................................................................49-4
19.2.17. Reserved for product expansion .................................................................................................49-4
19.2.18. Reserved for product expansion .................................................................................................49-4
19.2.19. Iridium Satellite Antenna ..............................................................................................................49-4
110.0 WIRING DIAGRAMS.........................................................................................................................410-1
110.1. Wiring Diagrams ..............................................................................................................................410-1
1Appendix A: Aircell Axxess® Customer Custom System Configuration Form............................................ A-1
2Appendix B: Aircell Axxess® Troubleshooting Procedures .......................................................................... B-1
2Appendix C: Aircell Axxess® Instructions for Continued Airworthiness ..................................................... C-1

Page viii
Aircell confidential and proprietary D12004-E, March 2010
LIST OF FIGURES
Figure Title Page
2Figure 2.1.A. Aircell Axxess Standard Installation Block Diagram ............................................................42-1
2Figure 2.1.B. Aircell Axxess Installation Block Diagram showing the Expansion Transceiver ..............42-2
2Figure 2.1.C. Aircell Axxess Installation Block Diagram showing optional AHIs and ACA.....................42-3
2Figure 2.1.D. Aircell Axxess Standard Components....................................................................................42-4
2Figure 2.1.E. Aircell Axxess Optional Components.....................................................................................42-5
2Figure 2.2. Aircell Axxess II (ST 4200) Transceiver and Mounting Tray.................................................42-6
2Figure 2.3. Expansion Transceiver (ST 4020) and Mounting Tray ..........................................................42-7
2Figure 2.4. Cabin Telecommunications Router (CTR) and CTR Mounting Tray ....................................42-8
2Figure 2.5. Remote Diversity Antenna .......................................................................................................42-9
2Figure 2.7. ACA...........................................................................................................................................42-12
2Figure 2.8. Standard SIP Handset and Cradle.........................................................................................42-13
2Figure 2.9. WiFi SIP Handset and Base Station ......................................................................................42-13
2Figure 2.9. Flush-Mount SIP Handset and Cradle...................................................................................42-14
2Figure 2.10. Custom-Retractable SIP Handset and Retractor .................................................................42-14
2Figure 2.11. LEMO SIP Handset..................................................................................................................42-15
2Figure 2.12.A. Single Patch Antenna ...........................................................................................................42-15
2Figure 2.12.B. Dual Patch Antenna ..............................................................................................................42-16
2Figure 3.1. Shield Ground Termination......................................................................................................43-7
2Figure 4.1. Handset Keyboard ....................................................................................................................44-3
2Figure 4.2. IP_PBX Configuration Login Screen.......................................................................................44-5
2Figure 4.3. Configuration Menu Screen .....................................................................................................44-6
2Figure 4.4. Network Configuration Screen ................................................................................................44-7
2Figure 4.5. DISA (Direct Inward System Answer) Mode Web Page.........................................................54-8
2Figure 4.6. Auto-Attendant Mode Web Page .............................................................................................54-8
2Figure 4.7. Out-bound Calls Configuration Web Page ...........................................................................54-10
2Figure 4.8. Extension Provisioning Screen .............................................................................................54-11
2Figure 4.9. Voice Parameter Screen .........................................................................................................54-12
2Figure 4.10. Switch Current User Screen...................................................................................................54-13
2Figure 4.11. ACA Configuration Screen.....................................................................................................54-13
2Figure 4.12. CDR Screen..............................................................................................................................54-14
2Figure 4.13. CDR Backup Screen ...............................................................................................................54-14
2Figure 4.14. Maintenance Screen ...............................................................................................................54-15
2Figure 4.15. Login Password Screen .........................................................................................................54-15
2Figure 4.16. Saving the Configuration Change Screen ............................................................................54-16
2Figure 4.17. IP_PBX Configuration Login Screen.....................................................................................54-17
2Figure 4.18. Configuration Menu Screen ...................................................................................................54-18
2Figure 4.19. Network Configuration Screen ..............................................................................................54-19
2Figure 4.20. Select PBX Switch Matrix Web Page.....................................................................................54-20
2Figure 4.21. DISA (Direct Inward System Answer) Mode Web Page.......................................................54-20
2Figure 4.22. Auto-Attendant Mode Web Page ...........................................................................................54-21
2Figure 4.23. Out-bound Calls Configuration Web Page ...........................................................................54-22

Page ix
Aircell confidential and proprietary D12004-E, March 2010
LIST OF FIGURES
Figure Title Page
2Figure 4.24. Extensions Provisioning Screen ...........................................................................................54-24
2Figure 4.25. Voice Parameter Screen .........................................................................................................54-25
2Figure 4.26. ACA Configuration Screen.....................................................................................................54-26
2Figure 4.27. CDR Screen..............................................................................................................................54-27
2Figure 4.28. Maintenance Screen ...............................................................................................................54-27
2Figure 4.29. WiFi Connections....................................................................................................................54-29
2Figure 4.30. WiFi Activation Screens .........................................................................................................54-30
2Figure 4.31.A. WiFi Tab Activation Screen..................................................................................................54-31
2Figure 4.31.B. WiFi Security Activation Screen..........................................................................................54-31
2Figure 4.32. AHI-2 Connector view .............................................................................................................54-55
2Figure 4.33. Configuration Hotlink Screen ................................................................................................54-55
2Figure 4.34.A. Main Configuration Screen ..................................................................................................54-56
2Figure 4.34.B. Main Configuration Screen (continued)..............................................................................54-57
2Figure 4.34.C. Main Configuration Screen (continued)..............................................................................54-58

Page x
Aircell confidential and proprietary D12004-E, March 2010
LIST OF TABLES
Table Title Page
2Table 3.1. Satellite Channel RF Antenna Cable Guide ................................................................................53-9
2Table 4.1. Network Parameters Settings ......................................................................................................54-7
2Table 4.2. In-bound Calls Configuration Parameters ..................................................................................54-9
2Table 4.3. Out-bound Calls Configuration Parameters .............................................................................54-10
2Table 4.4. Extension Provisioning Configuration Parameters .................................................................54-12
2Table 4.5. SIP Authentication Configuration Parameters .........................................................................54-12
2Table 4.6. Network Parameters Settings ....................................................................................................54-19
2Table 4.7. In-bound Calls Configuration Parameters ................................................................................54-21
2Table 4.8. Out-bound Calls Configuration Parameters .............................................................................54-23
2Table 4.9. Extension Provisioning Configuration Parameters .................................................................54-25
2Table 4.10. SIP Authentication Configuration Parameters.....................................................................54-25
Introduction, Section 1 Page 1-1
Aircell confidential and proprietary D12004-E, March 2010
1.0 INTRODUCTION
1.1. General
Aircell Axxess® is one of the products in the Aircell family of SATCOM systems. It is a multi-channel, SATCOM
system designed for medium-to-large business aircraft. With its “network neutral” design philosophy, Aircell
Axxess equips aircraft with a modular, flexible cabin architecture that serves the operator’s needs today, and
provides the ability to upgrade as new technologies and links become available in the years to come.
Aircell Axxess comes standard with two built-in channels of Iridium satellite communications for quality,
worldwide voice and narrowband data services with full PBX functionality. Also standard are Aircell’s new
Handsets with large-format color displays, advanced noise reduction technology and standard ear bud/headset
jacks. Optional wireless capabilities include a full 802.11b/g WiFi “hotspot” which, when paired with a broadband
connection, can be used to operate personal laptops, Personal Digital Assistants (PDAs) and other WiFi devices
in the cabin.
By using Aircell Axxess integrated expansion ports, additional links can be added to suit an operator’s needs.
These include up to two additional Iridium channels, Inmarsat® broadband connections. Additional system
capabilities are coming on line regularly.
This installation manual (Aircell Axxess manual number D12004) provides the required instructions to install the
Aircell Axxess II (Airborne SmartPhone) Satellite Telephone System. This system allows for two-way
communications from the aircraft, including voice over Iridium or data connection over Iridium (via the Iridium on-
board modem). Please refer to Section 2.1. for Block Diagrams.
General Installation Notes (standard configuration consists of a ST 4200, CTR, and Handsets and/or
optional ACA and/or optional Expansion Transceiver)
• The Satellite Transceiver (Aircell Axxess II (ST 4200)): May be installed outside of the pressure vessel. The
Aircell Axxess II (ST 4200) unit contains the Internet Protocol (IP)-Private Branch Exchange (PBX) functions
and will provide one (1) wired Ethernet connection for system setup, two (2) Iridium voice/data channels, and
on-board modems that will accept RS-232 serial data. The RS-232 connections can be used for Iridium dial
up data, Short Message Service (SMS), and Short Burst Data (SBD) connections.
Examples: The following are some examples of products at the time of this publication have passed
Aircell compatibility testing. Please contact the listed manufacturers and/or Aircell Technical Support for
the latest interface details:
Personal Computer (PCs): Dial up data service, Iridium’s ISP Direct Internet 2.0 software and service
recommended due to data compression capabilities;
Cabin Entertainment Systems: Collins Air Show Genesys and 4000;
Multi-Function Display Systems: Universal Avionics UniLink 70X;
Fax Machines: Aircell / On-Go uniHub™ Fax Adapter and service required; and
Flight tracking: Flight Explorer tracking service’s using a Latitude Technologies Corp Skynode LMC,
Global Positioning System (GPS) and Iridium data connection module.
• The optional 2-Channel Expansion Transceiver (ST 4020). May be installed outside of the pressure vessel.
This is a convenient way to turn your Aircell Axxess 2-channel Iridium system into a 4-channel Iridium
system.

Introduction, Section 1 Page 1-2
Aircell confidential and proprietary D12004-E, March 2010
• The Cabin Telecommunications Router (Aircell® Axxess™ CTR) must be installed within the pressure vessel;
the CTR will provide the system interface options for up to eight (8) wired Session Initiation Protocol (SIP)
Handsets, one (1) wired Ethernet connection for system setup, and for WiFi connections.
• Although designed and packaged for airborne use, the Aircell Axxess CTR is a normal router and will
accommodate most Ethernet printers. Once connected to an available Ethernet port on the Axxess system
and powered on, the printer will receive an IP address and will be accessible from laptop computers
connected either wired or wirelessly to the CTR. Printer driver software may have to be loaded on individual
computers and your IT department can help with that issue.
• The SIP or Voice over IP (VoIP) Handset (SIP Handsets) must be installed within the pressure vessel; will
provide a voice connection to other SIP HSs and over the Iridium satellite network via the Aircell Axxess
CTR to the Axxess II (ST 4200).
• Aircell Axxess Call Alerter (ACA and ACA II). The ACA must be installed within the pressure vessel. The
ACA provides ten (10) switch outputs to control external call alerting devices/annunciators which can be
lights, chimes, Sonalerts, etc. The ACA is powered via Aircell Power-over-Ethernet Data Interface (APoEDI)
48 VDC generated by the CTR for APoEDI. The ACA does not provide power to call alerting devices. The
ACA is connected via the CTR. The ACA is controlled by the Aircell Axxess ST 4200 PBX which can
configure and program the ACA. The ACA utilizes one (1) of the CTR’s APoEDI-wired handset interfaces
available. With an ACA installed, Aircell Axxess can operate with a maximum of nine (9) wired SIP handsets.
One (1) ACA can be installed in place of any SIP handset (connected to a CTR).
• ACA II is the same as the ACA except it offers a cockpit handset ringer disable and CTR WiFi functions.
• Iridium-approved antennas are mounted on the top of the aircraft to provide the Radio Frequency (RF)
interface for the aircraft-to-satellite connection.
Iridium services are available when the aircraft is in the air or on the ground. The Iridium satellite
communications link is provided using the Iridium LEO (Low Earth Orbit or 485 miles altitude) array of 66
satellites that enable total earth coverage.
General Installation Notes (assumes an optional configuration with AHIs installed)
• Aircell Axxess Handset Interface (AHI-1). The AHI-1 must be installed within the pressure vessel. AHI-1
can be daisy-chained to provide up to two (2) handsets per AHI-1 unit. AHI-1 contains an Ethernet switch (5
port), internal power supplies, and a power supply for implementation of the Aircell Power-over-Ethernet
Data Interface (APoEDI). APoEDI provides power to handsets or peripheral subsystems. The AHI-1 unit
passes Ethernet/IP-based control signals to/from the Aircell Axxess II (ST 4200) and other peripheral
subsystems. AHI-1 units utilize and pass through aircraft power allowing daisy-chain configurations, i.e. any
unit can be placed downstream. Power for the system is drawn from the 28 VDC aircraft power bus, and
utilized by all peripheral subsystems (AHIs, CTR, etc.). An ACA can be hooked up to an AHI-1 in place of a
handset.
• Aircell Axxess Handset Interface (AHI-2). The AHI-2 must be installed within the pressure vessel. AHI-2 can
only provide up to one (1) handset. The AHI-2 also offers a Plain Old Telephone System (POTS)-to-serial
converter and serial-to-Ethernet interface. One (1) POTS line that can be configured as store-and-forward
FAX over Iridium port only – same as the On-Go UCH-300 or if SIU is installed, a RT FAX over Inmarsat
port. The AHI-2 rev B and up has a RS-232 to Ethernet converter. One (1) RS-232 serial port for Dial up
Data applications. The AHI-2 passes Ethernet/IP-based control signals to/from the Aircell Axxess ST and/or
peripheral subsystems, such as the Cabin Telecommunications Router (CTR). AHI-2 units utilize and pass
through aircraft power. This feature allows a daisy-chain configurations, i.e. a AHI-1 unit can be placed
downstream. AHI-2s require secondary 28 VDC power supply for ATA. Internal AHI-2 components still
receive 28 VDC power from aircraft bus via the existing wiring.
• Aircell Axxess Call Alerter (ACA and ACA II). The ACA must be installed within the pressure vessel. The
ACA provides ten (10) switch outputs to control external call alerting devices/annunciators which can be
lights, chimes, Sonalerts, etc. The ACA is powered via APoEDI 48 VDC generated by the R/T for APoEDI.
The ACA does not provide power to call alerting devices. The ACA is connected via AHI-1 or AHI-2. The
ACA is controlled by the Aircell Axxess ST PBX which can configure and program the ACA. The ACA

Introduction, Section 1 Page 1-3
Aircell confidential and proprietary D12004-E, March 2010
utilizes one (1) of the AHIs APoEDI-wired handset interfaces available. ACA II is the same as the ACA
except it offers a HS ringer disable and CTR WiFi functions.
• Aircell supports the maximum number of (2) AHI-1s per installation; (3) AHI-2s per installation; and (1) ACA.
• The maximum system interconnect length (between the Aircell Axxess® (ST 4200) and the last Aircell AHI-
1/AHI-2/CTR) is 150 ft. (70’ to the first AHI, 40’ to the second AHI, and 40’ to the third AHI).
• AHI-1s and AHI-2s can be installed in any sequence.
• SIP handsets connected to an AHI will be powered from that AHI (via power over Ethernet).
• Maximum number of SIP handsets using AHI interfaces is five (5).
• With an ACA installed, Aircell Axxess can operate with a maximum of four (4) SIP handsets.
• One (1) ACA can be installed in place of any SIP handset (connected to AHI-1 or AHI-2).
AHI-2 Specific Installation Notes
• AHI-2s need separate aircraft 28 VDC power for the use of the J5 and J6 data ports.
• AHI-2 Data Port A (J-5 connection) is designed to be connected to the aircraft Fax via Tip/Ring (On-Go
designed software interface using an internal On-Go uniHub™ Iridium Fax Adapter) (Revision C and later
AHI-2 On-Go adapter can be used as a POTS over Inmarsat port if SIU Revision E or later is installed).
• AHI-2 Data Port B (J6 connection) is designed to be for RS-232 serial connection.
• For activation of Fax forwarding service with On-Go, the following information must be supplied to Aircell
Customer Service: ID of the AHI-2 Port A (J-5 connector ID is the internal On-Go uniHub™’s S/N); and the
S/N of the Aircell Axxess II (ST 4200) (the On-Go Fax Adapter will use Iridium channel # 2).
• AHI-2 Data Port B (J-6 connection) RS-232 serial connection designed for a Dial up data PC connection,
Airshow Network, Genesys systems, UniLink and Telelink.
• The Aircell Axxess II (ST 4200) RS-232 data connections are also available at the ST 4200 and optional ST
4020 units.
The Aircell Axxess II (ST 4200), the Expansion Transceiver, CTR, RDAs, AHI-1 and AHI-2, ACA, and SIP
Handsets were tested to the applicable DO-160E categories of Temperature and Altitude, Temperature
Variation, Humidity, Shock and Crash Safety, Vibration, Power Input, Voltage Spike and RF Emission. Various
equipment specifications and results are found in Section 7.0.
Install Aircell Axxess components in locations that are free of water, spray, or other fluids, whether by direct
contact or condensation. When installing the Aircell Axxess System in the aircraft, carefully follow this
Installation Manual.
Any alteration of this product voids the FAA or Federal Communications Commission (FCC) certification
and the Aircell warranty. This publication is not to be used in lieu of a Supplementary Type Certificate (STC)
or any other FAA approval. FAA Form 337 approval is usually required for installation of this equipment.
Note
WiFi is not activated on unit’s ship out from Aircell. Refer to Section 4.9. for WiFi activation details.
Note
The material in this manual is subject to change. Before planning or performing any installation operation, check
with Aircell 2www.Aircelldealers.com Dealer Info website to verify that this manual is complete and is the latest
Revision. The Record of Revisions, Record of Temporary Revisions, Service Bulletin List, and List of Effective
Pages found at the front of this manual must match that issued as current by Aircell.
2www.Aircelldealers.com will have additional information that may be useful such as, 2Technical Bulletins and Tech
Tips and 2Installation and Troubleshooting Tips.

Introduction, Section 1 Page 1-4
Aircell confidential and proprietary D12004-E, March 2010
Aircell welcomes your comments, suggestions, and corrections concerning this manual. Please include in your
correspondence the publication number, equipment part number, page or figure number, and a brief description
of any problem or consideration you noted. Please send your comments to:
2cpc@aircell.com
or
Aircell
Corporate Publication Coordinator
303 South Technology Court, Bldg A
Broomfield, CO 80021
1.2. Unpacking
Unpack the equipment carefully to save and ensure the integrity of the shipping package. Inspect each
component for possible shipping damage. Report any damage to Aircell immediately. Use original packing
material to return equipment to Aircell.
1.3. Planning
Proper and careful planning is essential for reliable system performance and ease of maintenance. The following
are some considerations to follow when planning the installation:
Æ Study this manual carefully to get the complete picture of the installation process.
Æ Visit
2www.Aircelldealers.com for additional information that may be useful, such as 2Technical Bulletins and
Tech Tips and 2Installation and Troubleshooting Tips.
Æ Plan the location of the required equipment to ensure that the cable restrictions are met.
Æ Verify that adequate airflow is provided for equipment cooling.
Æ Check cable routing, connector access (90 degree or straight), and determine cable lengths.
Æ Ensure easy accessibility to connectors for future repairs.
Æ Plan rack or tray layout to accommodate dual (side-by-side) equipment mounting.
1.4. List of Abbreviations and Acronyms
A Ampere IP Internet Protocol
AC Advisory Circular IPL Illustrated Parts List
ACA Aircell Axxess Call Alerter LEO Low Earth Orbit
AHI Aircell Axxess Handset Interface LOS Line Of Sight
APoEDI Aircell Power-over-Ethernet Data Interface LRU Line Replaceable Unit
ATA Aircell Axxess Terminal Adapter mA milliampere = .001 of an ampere
AWG American Wire Gauge MHz Megahertz
CDR Call Detail Record MIL Military
CFR Code of Federal Regulations milliohm milliohm = .001 of an ohm
CTR Cabin Telecommunications Router MSL Mean Sea Level
dB Decibel MTBF Mean Time Between Failures
DC Direct Current mV millivolt = .001 of a volt
DER Designated Engineering Representative NEMA National Electrical Manufacturers Association
DHCP Dynamic Host Configuration Protocol OSHA Occupational Safety and Health Administration
DISA Direct Inward System Answer PBX Private Branch Exchange
Introduction, Section 1 Page 1-6
Aircell confidential and proprietary D12004-E, March 2010
List of Abbreviations and Acronyms (continued)
DTMF Dual Tone Multi Frequency PDA Personal Digital Assistant
ESN Electronic Serial Number P/N Part Number
FAA Federal Aviation Administration POTS Plain Old Telephone System
FCC Federal Communications Commission RF Radio Frequency
GHz Gigahertz RMA Return Material Authorization
GPS Global Positioning System RS-232 Serial binary data interconnection
HS Handset SAE Society of Automotive Engineers
HTML Hyper Text Markup Language SBD Short Burst Data
HTTP Hyper Text Transfer Protocol SIP Session Initiation Protocol
ICD Interface Control Drawing SMS Short Message Service
IFE In-Flight Entertainment S/N Serial Number
IMSO International Maritime Satellite Organization SSA Subscriber Service Agreement
ST Satellite Transceiver Trunk Phone Line
ST 4020 Aircell Axxess® Expansion Transceiver unit V Volts
ST 4200 Aircell Axxess II Satellite Transceiver unit VDC Volts Direct Current
STC Supplemental Type Certificate VoIP Voice over Internet Protocol
URL Uniform Resource Locator WiFi Wireless Fidelity per IEEE 802.11b and
802.11g wireless networking standard
DO-
160E
Environmental conditions and test procedures for airborne equipment development are produced by
RTCA. The Federal Aviation Administration (FAA) generally accepts these conditions and procedures.
RTCA Radio Technical Commission for Aeronautics: a private, not-for-profit corporation that brings industry and
government together to address the needs of the aeronautical community.
1.5. Advisories
WARNING
Statements in this Section contain critical safety information. Read these statements carefully before installing
this unit.
WARNING
Observe standard safety precautions and wear safety glasses to prevent personal injury while installing this unit
in the aircraft.
WARNING
Shut off power before connecting or disconnecting the Telephone System Components (Aircell Axxess system),
as voltage transients may damage the unit or the interface wiring.
WARNING
Follow the manufacturer’s safety guidelines when using any solvents, epoxies, flammable liquids, or any other
materials during the installation processes. Some of these products are toxic to the skin, eyes, and respiratory
tract. Avoid prolonged contact and use only in well-ventilated areas.
WARNING
Components or subassemblies found in this unit may contain materials such as beryllium oxide, acids, lithium,
radioactive material, mercury, etc. that can be hazardous to your health. If the component enclosure seal is
broken, precautions must be taken against personal contact or inhalation in accordance with Occupational
Safety and Health Administration (OSHA) requirements 29 Code of Federal Regulations (CFR) 1910.1000 or
superseding documents. Any alteration of this product voids the FAA or Federal Communications
Commission (FCC) certification and the Aircell warranty.

Introduction, Section 1 Page 1-5
Aircell confidential and proprietary D12004-E, March 2010
DNS Domain Name System PC Personal Computer
2. Additionaltextinusermanual
Description and Operation, Section 2 Page 2-1
Aircell confidential and proprietary D12004-E, March 2010
2.0 DESCRIPTION AND OPERATION
2.1. Introduction
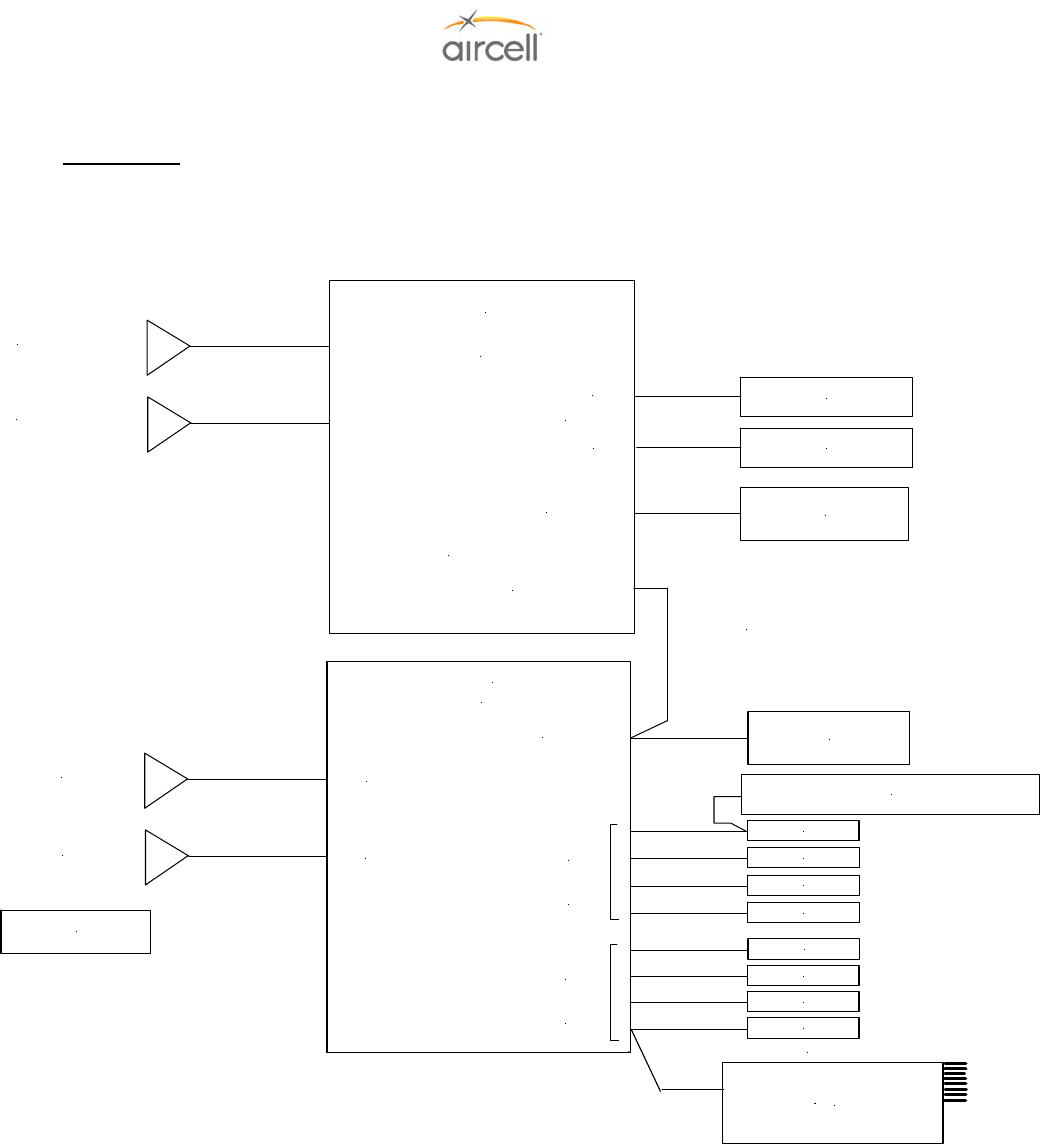
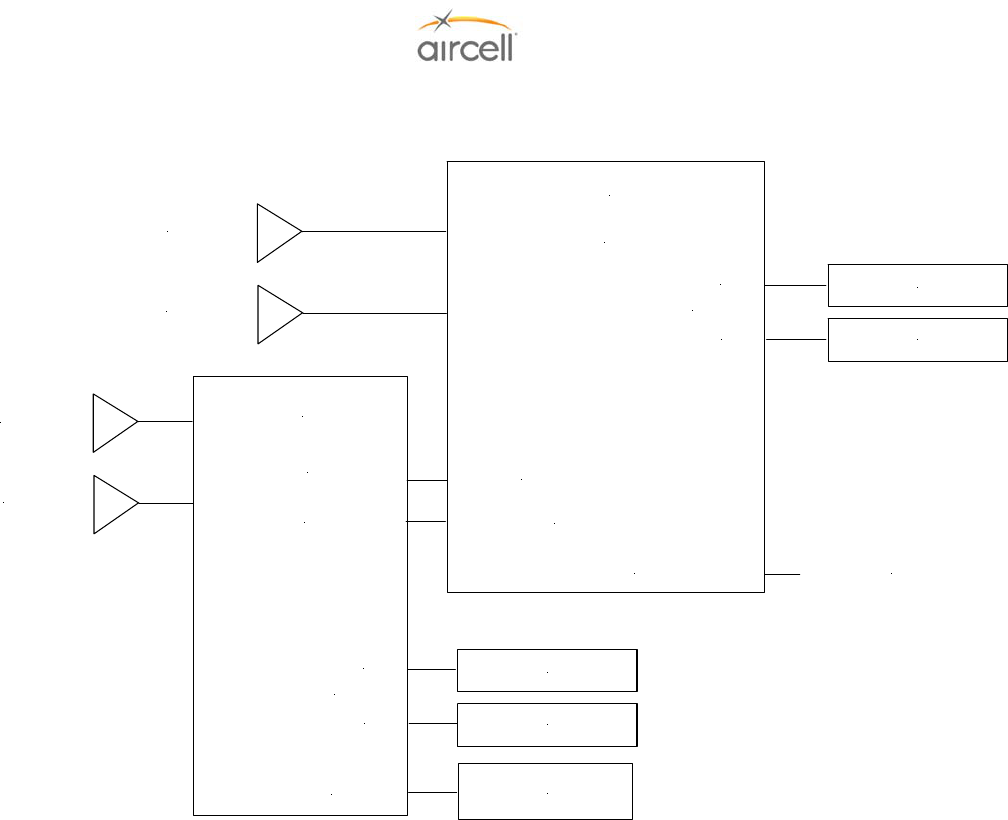
2.1.1. Aircell Axxess® II Standard Installation Block Diagram
Figure 2.1.A. Aircell Axxess Standard Installation Block Diagram
Axxess II (ST4200)
PBX
Axxess CTR
#1 IRIDIUM Antenna
Axxess SIP HS
(System Pwr
& Signal conn.)
Handset
(Ethernet)
Interfaces
HS Comm 1
Connector
ST to CTR
Communications Data
(Ethernet)
#2 IRIDIUM Antenna
#1 WiFi Antenna (Optional)
& 2 Channel
Iridium Transceiver
Cabin Telecom Router
WLAN
A
WLAN
B
#2 WiFi Antenna (Optional)
Secondary System
Configuration Port
Ethernet connection
(Sys Comm. conn. )
Ethernet connection
(Test Port conn.)
Audio Panel Interface
From Standard SIP HS Connector only
Primary System
Configuration Port
RS 232 Data Device
Connection
RS 232 Data Device
Connection
1 - 4
SIP HSs
Ethernet connection
(CTR / Data Expansion conn.)
Axxess SIP HS
Axxess SIP HS
Axxess SIP HS
Axxess SIP HS
Axxess SIP HS
Axxess SIP HS
Axxess SIP HS
#2 RS232
#1 RS232
(Channel Expansion conn.)
Handset
(Ethernet)
Interfaces
HS Comm 2
Connector
5-8
SIP HSs
Optional ACA
Connects into a
HS position in place
of one of the eight
HS locations
OR
Axxess SIP WiFi HSs
(optional)
Description and Operation, Section 2 Page 2-2
Aircell confidential and proprietary D12004-E, March 2010
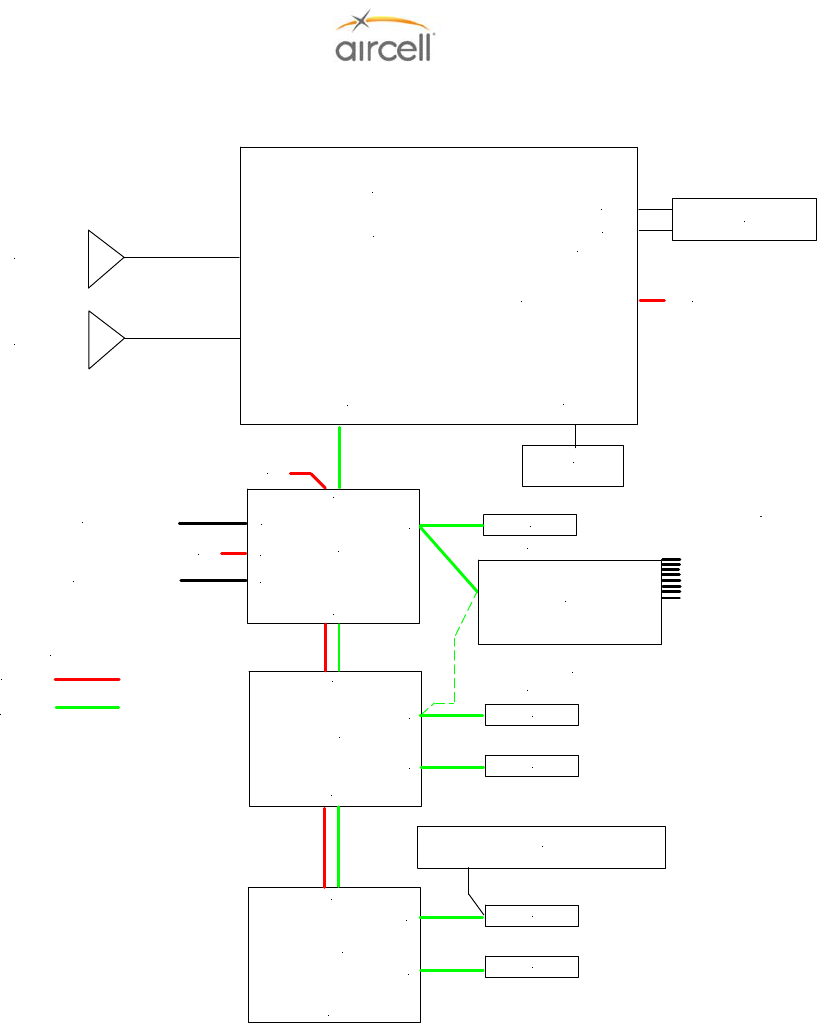
2.1.2. Aircell Axxess® II Installation Block Diagram showing optional Expansion Transceiver
Figure 2.1.B. Aircell Axxess Installation Block Diagram showing the Expansion Transceiver
Axxess II (ST4200)
PBX
#1 IRIDIUM Antenna
(System Pwr
& Signal conn.)
To CTR: See Figure 2.1.A.
#2 IRIDIUM Antenna
& 2 Channel
Iridium Transceiver
Secondary System
Configuration Port
Ethernet connection
(Test Port conn.)
RS 232 Data Device
Connection
RS 232 Data Device
Connection
Ethernet connection
(CTR / Data Expansion conn.)
#2 RS232
#1 RS232
(Channel Expansion conn.)
#3 IRIDIUM Antenna
#4 IRIDIUM Antenna
Optional
Expansion Transceiver
(ST 4020)
2 Channel Iridium
(System Pwr
& Signal conn.)
RS 232 Data Device
Connection
RS 232 Data Device
Connection
#4 RS232
#3 RS232
(Channel Expansion conn.)
Ethernet connection
(Data Expansion conn.)
Ethernet connection
(Test Port conn.)
Description and Operation, Section 2 Page 2-3
Aircell confidential and proprietary D12004-E, March 2010
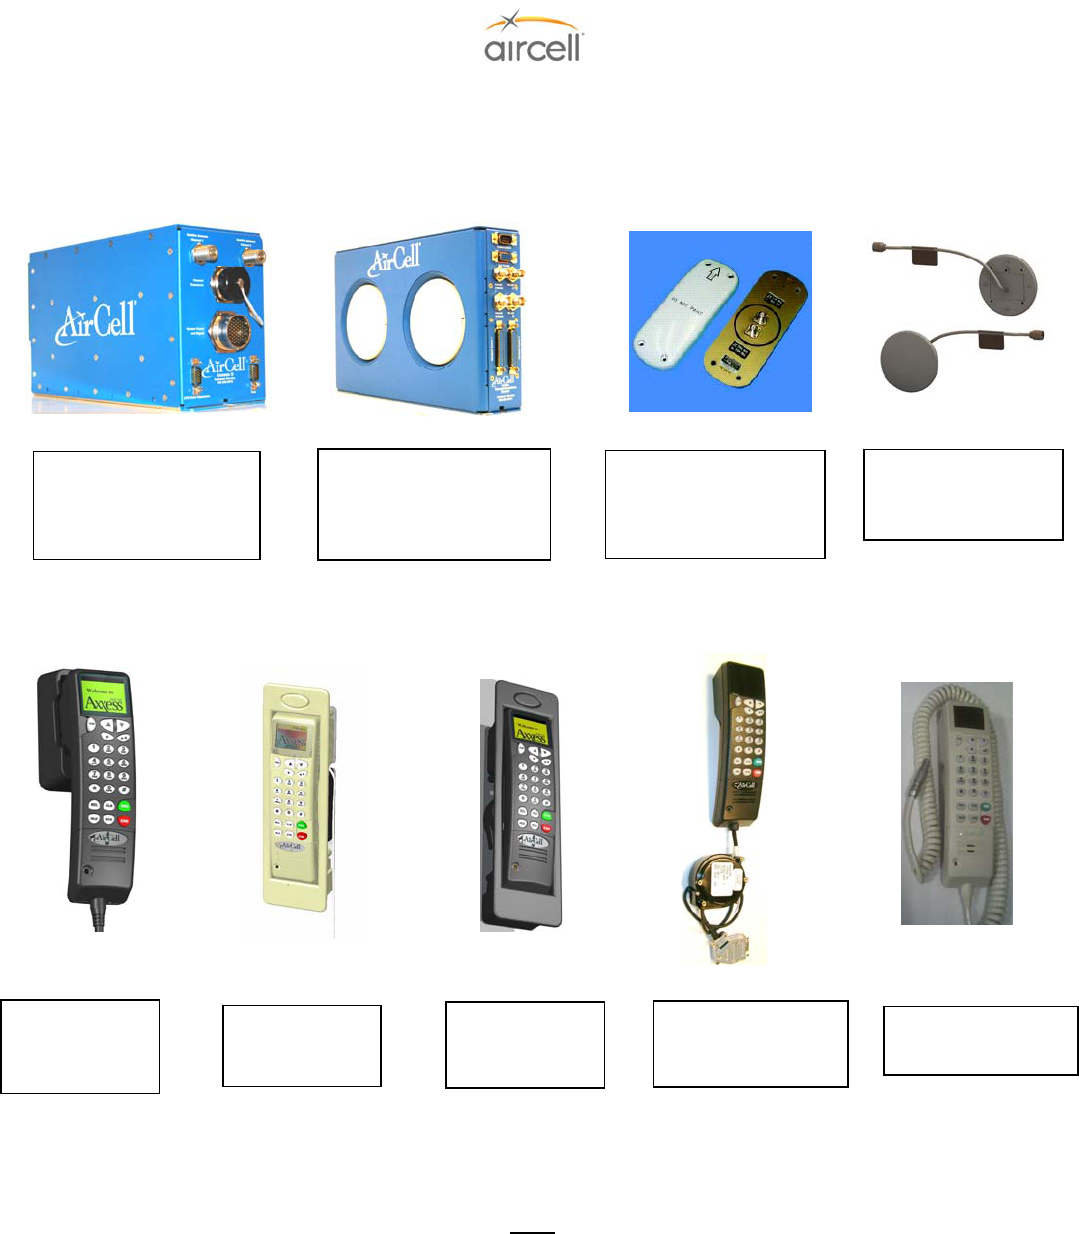
2.1.3. Aircell Axxess® II Installation Block Diagram showing the optional AHIs and ACA
Axxess II (ST 4200)
PBX
#1 IRIDIUM Antenna
#2 IRIDIUM Antenna
& 2 Channel
Iridium Transceiver
Ethernet connection
(Test Port conn.)
Audio Panel Interface
from Standard SIP HS Connector only
Primary System
Configuration Port
RS 232 Data Device
Connection
Ethernet connection
(CTR / Data Expansion conn.)
Axxess SIP HS
Axxess SIP HS
Axxess SIP HS
Axxess SIP HS
#2 RS232
#1 RS232
28VDC
AHI-1
Axxess SIP HS
28VDC
POTS FAX (J5) connection
(System Power and Signal conn)
Alternate ACA path in place of a SIP HS
(System Power and
Signal conn)
AHI-1
AHI-2
RS-232 Data (J6) connection
28VDC
J5
J6
J1
OR
Key
28VDC Power
System Signal
(Ethernet)
J1
J1
J2
J2
J4
J3
J4
J3
J4
J3
J2
Optional ACA;
Connects into a
HS position in place
of one of the eight
HS locations
OR
Figure 2.1.C. Aircell Axxess Installation Block Diagram showing optional AHIs and ACA
Description and Operation, Section 2 Page 2-4
Aircell confidential and proprietary D12004-E, March 2010
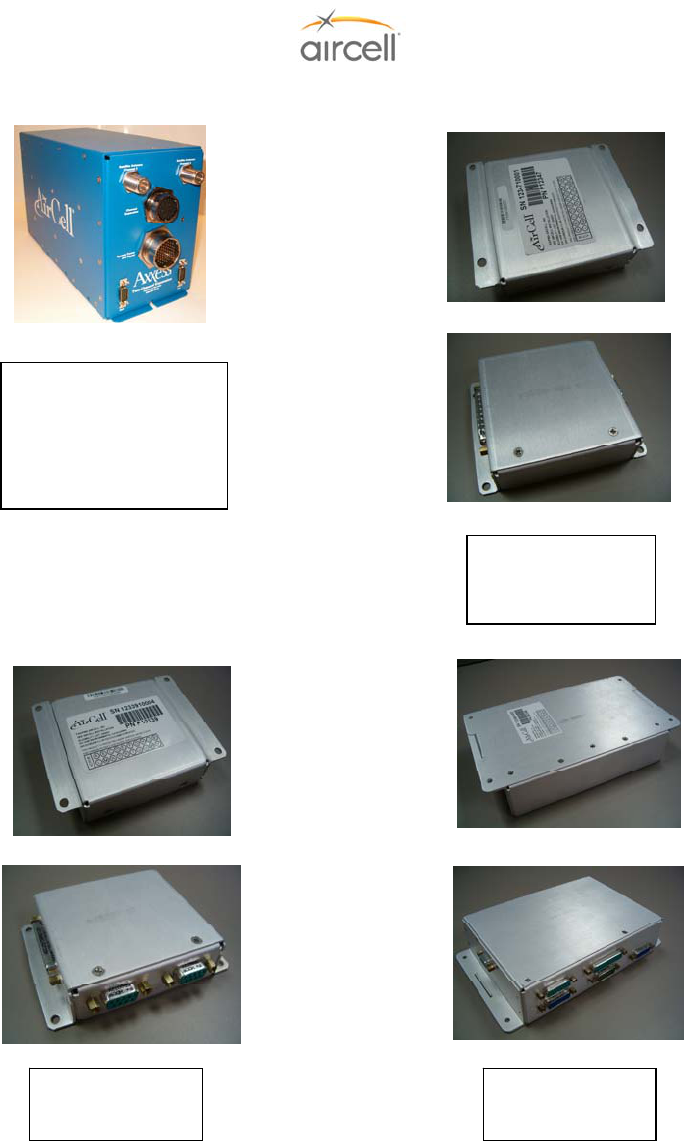
2.1.4. Aircell Axxess® Standard Components
The Aircell Axxess Telephone System provides both voice and data transfer options. The system
enables telephone communications when the aircraft is on the ground or in the air via satellite, plus the
option to have multiple Handsets in the aircraft for conference calls.
Figure 2.1.D. Aircell Axxess Standard Components
Note
Refer to Aircell Antenna Installation Manual P/N 800-10355 for other antenna options and details.
Iridium Two-channel
Patch Antennas
P/N 015-11203-001
(Top Mount Only)
Aircell Axxess II (ST 4200)
Dual-Channel Satellite
Transceiver and PBX
P/N P12023
Aircell Axxess CTR
Cabin Telecommunications
Router
P/N P12083, P12083-001
Standard SIP
Handset
P/N P12248-00X
Flush-Mount SIP
Handset
P/N P12192-00X
Custom-Retractable
SIP Handset
P/N P12793-00X
WiFi SIP Handset
P/N P12857-00X
Remote Diversity
Antennas
P/N P12344
LEMO SIP Handset
P/N P12865-00X
Description and Operation, Section 2 Page 2-5
Aircell confidential and proprietary D12004-E, March 2010
2.1.5. Aircell Axxess® Optional Components (AHIs in lieu of an Aircell Axxess CTR)
Figure 2.1.E. Aircell Axxess Optional Components
Axxess AHI-2
P/N P12346
Axxess AHI-1
P/N P12339
Aircell Axxess Expansion
Transceiver
(ST 4020)
Dual-Channel Satellite
Transceiver
P/N P12679
Axxess
ACA P/N 12347 or
ACA II P/N 12924
Description and Operation, Section 2 Page 2-6
Aircell confidential and proprietary D12004-E, March 2010
2.2. Description and Overview
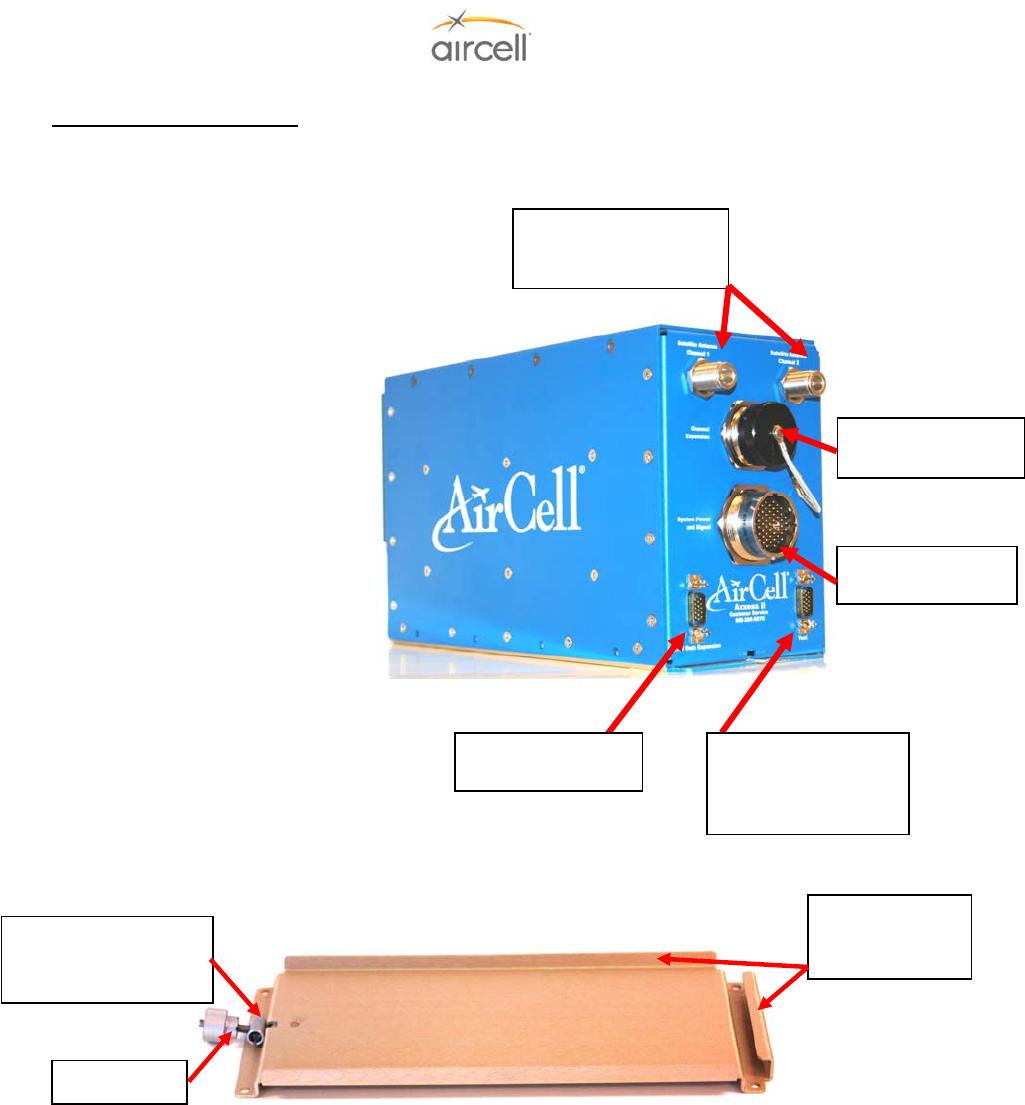
2.2.1. Aircell Axxess® II 2-Channel Satellite Transceiver (ST 4200) and Mounting Tray
The Transceiver is 12.66” long,
4.85” wide, and 7.0” high (1/2 ATR). The
finish is textured blue powder-coating over
chemical film. The Transceiver’s mounting
tray secures the unit with a flange at the
back and a locking device in the front.
Detents provide locking for the knob, to
ensure that the Transceiver will stay in
place when it experiences vibration. A
split-rolled tube provides spring tension to
keep the knob locked in position. An
optional rail mounting kit is also available.
(Refer to Section 6.0, Interface Control
drawing (ICD) D12016, for details).
All of the electrical connections to
the Transceiver are on the front of the box,
which offers convenient access for
maintenance. The location of the
Transceiver in the equipment rack, may
suggest the use of 90º connectors.
The Aircell Axxess II can be either
installed in the pressurized cabin area or
the non-pressurized area suitible for
avionics equiptment. Keep in mind the RF
coax lengths and routing.
Refer to Section 7.4.1., Aircell
Axxess ST System Specifications, for
details regarding the environmental
requirements for this unit.
Figure 2.2. Aircell Axxess II (ST 4200) Transceiver and Mounting Tray
The Mounting Tray is alodine-processed aluminum (Chem Film per Mil-C-5541, class 3 or equivalent) to reduce
the possibility of corrosion and to provide a stable grounding path. Four (4) No. 10 Unx / M5 fasteners are used
to secure the tray to the aircraft structure. Location considerations for the Mounting Tray (P/N P12107) are:
accessibility for maintenance, lengths of required cables, and wiring. Section 7.4.1., System Specifications,
identifies the environmental requirements of the Transceiver. The optional Mounting Rails (Kit P/N P12273) are
alodine-processed aluminum (Chem Film permit-C-5541, Class 3 or equivalent) also. Optional Rails are
mounted to the Transceiver via eight (8) supplied #8 fasteners, six (6) No. 10 Unx / M5 fasteners are used to
secure the Mounting Rails to the aircraft structure.
Flange and side
retention to secure
the Transceiver.
Split tube offers screw
tension to the locking
device.
Detents
System Power and
Si
g
nal Connector
Satellite Antenna Channel
1 and 2 (Type N Female
Connector)
Channel Expansion
Connector
CTR/Data Expansion
Connecto
r
Test Connector
PC to System,
Configuration and
Status Connection
Description and Operation, Section 2 Page 2-7
Aircell confidential and proprietary D12004-E, March 2010
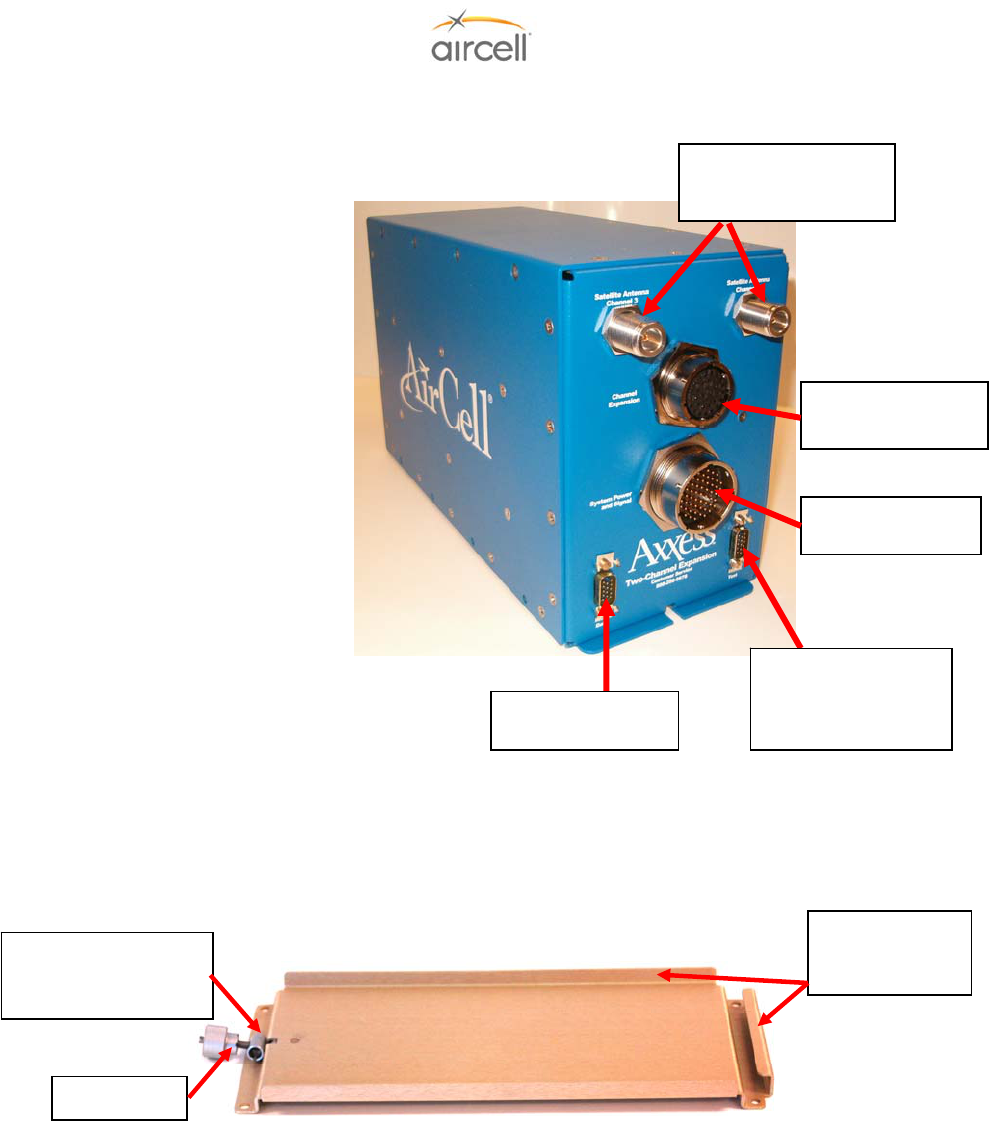
2.2.2. Aircell Axxess® 2-Channel Expansion Transceiver and Mounting Tray (optional)
>>Install the ST 4020 close to the ST 4200; the expansion connecters wiring
between the STs must be less then 6 feet.<<
The Transceiver is 12.66” long,
4.85” wide, and 7.0” high (1/2 ATR).
The finish is textured blue powder-
coating over chemical film. The
Transceiver’s mounting tray secures the
unit with a flange at the back and a
locking device in the front. Detents
provide locking for the knob, to ensure
that the Transceiver will stay in place
when it experiences vibration. A split-
rolled tube provides spring tension to
keep the knob locked in position. An
optional rail mounting kit is also
available. (Refer to Section 6.0, ICD
D12155, for details).
All of the electrical connections
to the Transceiver are on the front of
the box, which offers convenient access
for maintenance. The location of the
Transceiver in the equipment rack may
suggest the use of 90º connectors.
The Aircell ST 4020 can be either
installed in the pressurized cabin area or
the non-pressurized area suitible for
avionics equiptment. Keep in mind the RF
coax lengths and routing.
Refer to Section 7.4.2., Aircell
Axxess ST 4020 System Specifications,
for details regarding the environmental
requirements for this unit.
Figure 2.3. Expansion Transceiver (ST 4020) and Mounting Tray
The Mounting Tray is alodine-processed aluminum (Chem Film per Mil-C-5541, class 3 or equivalent) to reduce
the possibility of corrosion and to provide a stable grounding path. Four No. 10 Unx / M5 fasteners are used to
secure the tray to the aircraft structure. Location considerations for the Mounting Tray (P/N P12107) are:
accessibility for maintenance, lengths of required cables, and wiring. Section 7.4.2., System Specifications,
identifies the environmental requirements of the Transceiver. The optional Mounting Rails (Kit P/N P12273) are
alodine-processed aluminum (Chem Film permit-C-5541, Class 3 or equivalent) also. Optional Rails are
mounted to the Transceiver via eight (8) supplied #8 fasteners, six (6) No. 10 Unx / M5 fasteners are used to
secure the Mounting Rails to the aircraft structure.
Flange and side
retention to secure
the Transceiver.
Split tube offers screw
tension to the locking
device.
Detents
System Power and
Si
g
nal Connector
Satellite Antenna Channel
3 and 4 (Type N Female
Connector)
Channel Expansion
Connector
Data Expansion
Connecto
r
Test Connector
PC to System,
Configuration and
Status Connection
Description and Operation, Section 2 Page 2-8
Aircell confidential and proprietary D12004-E, March 2010
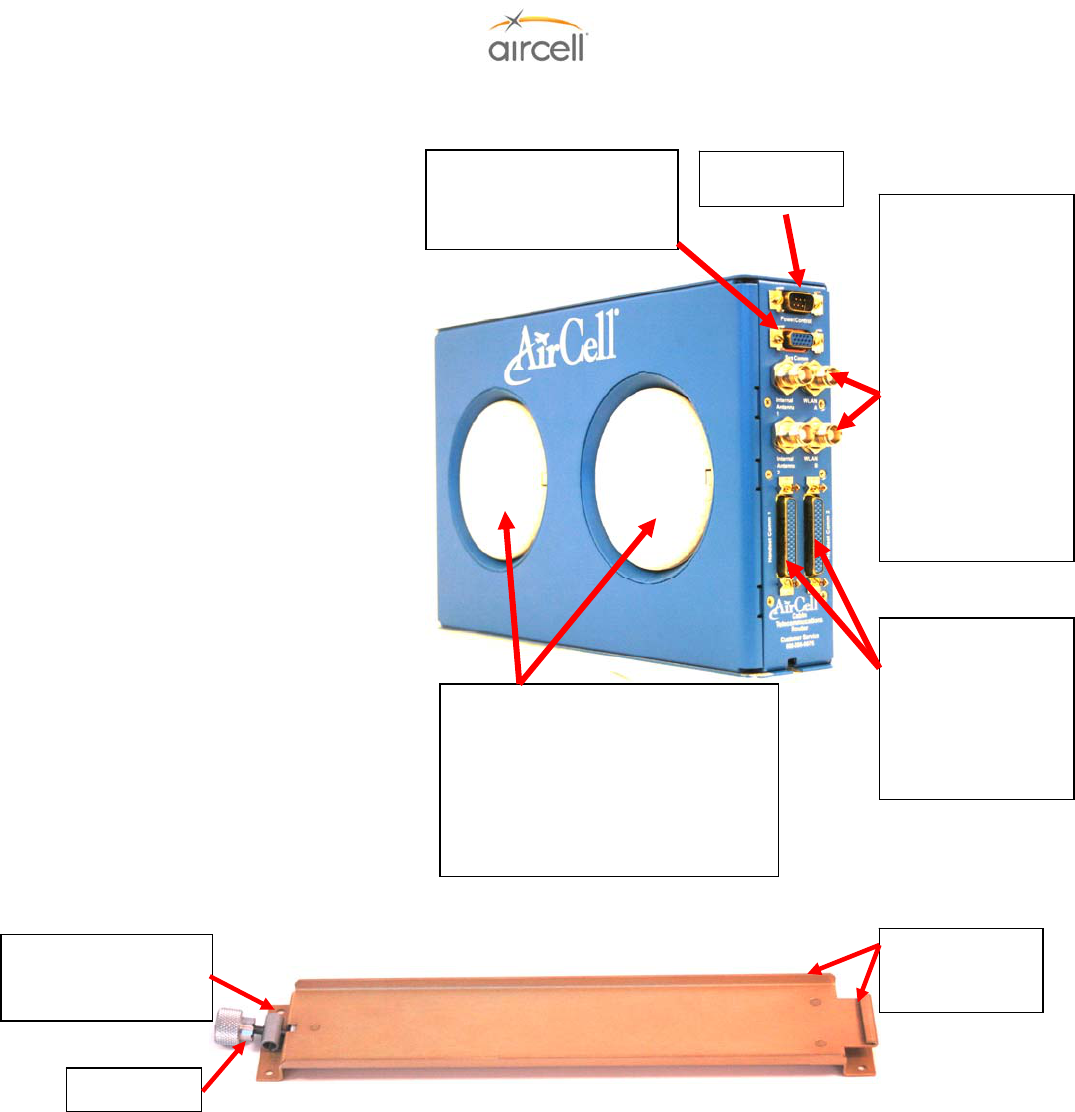
2.2.3. Aircell Axxess® Cabin Telecommunications Router (CTR) and Mounting Tray
The CTR is 12.44” long, 2.25”
wide, and 7.62” high (1/4 ATR). The finish
is textured blue powder-coating over
chemical film. The CTR’s mounting tray
secures the unit with a flange at the back
and a locking device in the front. Detents
provide locking for the knob, to ensure that
the CTR will stay in place when it
experiences vibration. A split, rolled tube
provides spring tension to keep the knob
locked in position. An optional rail
mounting kit is also available. (Refer to
Section 6.0, ICD 12017, for details).
All of the electrical connections to
the CTR are on the front of the box, which
offers convenient access for maintenance.
The location of the CTR in the equipment
rack, may suggest the use of 90º
connectors.
The CTR will need to be installed
in the pressurized cabin. Locate the CTR
in a non-metallic encloser facing the cabin
area intended for WiFi use. This will help
with RF data device comunication to the
built in WiFi antennas. Optional remote-
mounted WiFi antennas are available.
Refer to Section 7.4.3., Aircell
Axxess CTR System Specifications, for
details regarding the environmental
requirements for this unit.
Figure 2.4. Cabin Telecommunications Router (CTR) and CTR Mounting Tray
The Mounting Tray is alodine-processed aluminum (Chem Film per Mil-C-5541, class 3 or equivalent) to reduce
the possibility of corrosion and to provide a stable grounding path. Four (4) No. 6 Unx / M3.5 Machine Screws
are used to secure the tray to the aircraft structure. Location considerations for the Mounting Tray (P/N 310-
10949-001) are: accessibility for maintenance, lengths of required cables, and wiring. Section 7.4.3., System
Specifications, identifies the environmental requirements of the CTR. The optional Mounting Rails (Kit P/N
P12273) are alodine-processed aluminum (Chem Film permit-C-5541, Class 3 or equivalent) also. Optional
Rails are mounted to the CTR via eight (8) #8 supplied fasteners, six (6) No.10 Unx / M5 Machine fasteners are
used to secure the Mounting Rails to the aircraft structure.
System Communications Data
Connector
PC to System, Configuration
and Status Connection
Internal WiFi and
Optional External WiFi
Antenna TNC Female
Connectors.
P/N P12284 TNC 50
ohm Load Plugs (not
shown) are installed if
WiFi is not required.
2 coax assemblies P/N
12017 (TNC to TNC),
Internal Antenna 1 & 2
to WLAN A & B for
Internal Antenna use.
WLAN A & B to
External Antennas for
optional External
Antenna Use.
Handset Comm 1 and
2 Connectors
Handset (Ethernet)
Interfaces
Handset Comm 1 for
up to 4 HSs and
Comm 1 & 2 for up to
8 HSs
Power / Control
Connecto
r
Split tube offers screw
tension to the locking
device.
Detents
Flange and side
retention to secure
the Transceiver.
Internal WiFi Antennas
WiFi is not activated on unit’s ship out from
Aircell. Refer to Section 4.9 for WiFi
activation details.
Locate in a non-metallic encloser facing the
cabin area intended for WFi use.
Optional remote-mounted WiFi antennas
are available.
Description and Operation, Section 2 Page 2-9
Aircell confidential and proprietary D12004-E, March 2010
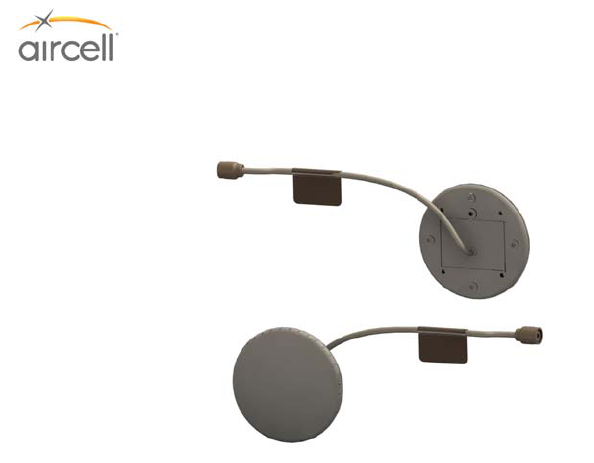
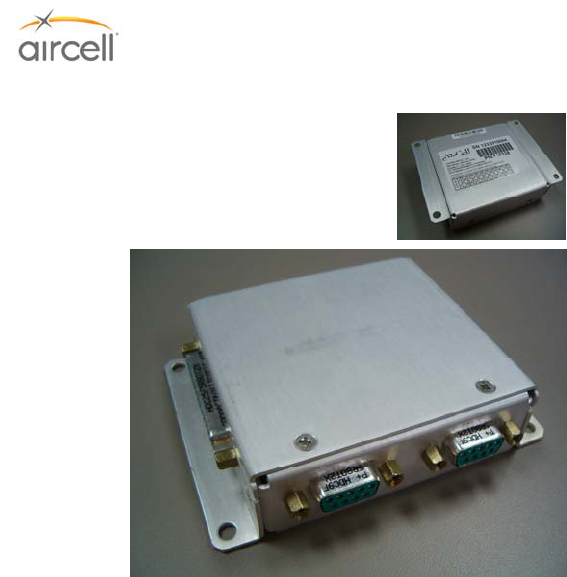
2.2.4. Aircell Axxess® Remote Diversity Antenna (RDA)
The Remote Diversity Antenna (RDA) is Aircell part number
P12344. Two (2) are required for use on the CTR when the
included antennas are not used. The antenna is low profile
that provides coverage at 2.4 GHZ 802.11 (WiFi) protocol.
Mechanical configuration is spherical-radius molded radome
intended solely for use in the aircraft cabin. It has a cable
with a TNC Male. Refer to Section 7.4.4., Aircell Axxess
RDA System Specifications, for details regarding the
environmental requirements for this unit.
Figure 2.5. Remote Diversity Antenna
Description and Operation, Section 2 Page 2-10
Aircell confidential and proprietary D12004-E, March 2010
2.2.5. Aircell Axxess® Handset Interface (AHI-1) (optional in lieu of CTR)
The AHI-1 is 4.12” long, 3.07” wide, and 1.0” high
(Refer to Section 6.0, ICD D12105, for full details).
Must be installed within the pressure vessel. AHI-1
can be daisy-chained to provide up to a maximum of
five (5) SIP handsets – one (1) or two (2) handsets
per AHI-1 unit. AHI-1 contains Ethernet switch (5-
port), internal power supplies, and a power supply for
implementation of the Aircell Power-over-Ethernet
Data Interface (APoEDI). APoEDI provides power to
handsets or peripheral subsystems. The AHI-1 unit
passes Ethernet/IP based control signals to/from the
Aircell Axxess ST and other peripheral subsystems.
AHI-1 units utilize and pass through aircraft power
allowing daisy-chain configuration; i.e. any unit can
be placed downstream. Power for the system is
drawn from the 28 VDC aircraft power bus, and
utilized by all
peripheral subsystems AHIs, etc. An ACA can be Figure 2.5. AHI-1
hooked up to an AHI-1 in place of a handset.
The Aircell Axxess Handset Interface 1 (AHI-1) is a subsystem that is used in conjunction with Aircell
Axxess-series products for implementation of air-to-ground telecommunication services, including voice
and data communications. The AHI-1 provides interfaces between the Aircell Axxess System
Communications backbone and two Aircell Axxess Corded SIP handsets or other peripheral
subsystems. Figure 2.1.C. is a block diagram of the AHI-1 interface.
The Aircell Axxess Handset Interface AHI-1 is intended for installation and operation in the aircraft cabin.
It is not designed for operation in areas of the aircraft that are exposed to extreme environmental
conditions, very high or very low temperatures, conditions where condensation may occur, or very high
altitude conditions.
Refer to Section 7.4.5., Aircell Axxess AHI-1 System Specifications, for details regarding the
environmental requirements for this unit.
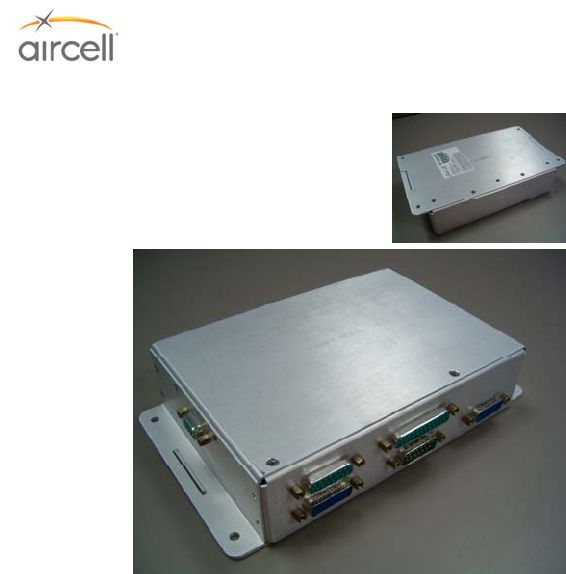
Description and Operation, Section 2 Page 2-11
Aircell confidential and proprietary D12004-E, March 2010
2.2.6. Aircell Axxess® Handset / Fax Interface (AHI-2) (optional in lieu of CTR)
The AHI-2 is 8.5” long, 5.05” wide, and 1.8” high
(Refer to Section 6.0, ICD DD12159, for details).
Must be installed within the pressure vessel. The
AHI-2 is composed of a POTS-to-Serial converter
and serial-to-Ethernet interface. The POTS line can
be configured as store-and-forward FAX port, same
as On-Go UCH-100/300 or as an Inmarsat real time
FAX connection if Aircell SIU also installed. The
serial-to-Ethernet interface can be used as an RS-
232 dialup data port. The AHI-2 passes Ethernet/IP
based control signals to/from the Aircell Axxess ST
and/or peripheral subsystems, such as the Cabin
Telecommunications Router. AHI-2 units utilize and
pass through aircraft power. This feature allows a
daisy-chain configuration, i.e., any unit can be placed
downstream. AHI-2 also requires a secondary 28
VDC power supply for ATA (internal On-Go
adapters). Internal AHI components still receive
28 VDC power from the aircraft bus via the existing wiring. Figure 2.6. AHI-2
The Aircell Axxess Handset Interface 2 (AHI-2) is a subsystem that is used in conjunction with Aircell
Axxess Satellite Transceiver products for implementation of air-to-ground telecommunication services,
including voice and data communications. The AHI-2 module includes all of the functions of the smaller
AHI-1 module with the exception that it has only one Handset Interface, and it also contains two (2)
Aircell Axxess Terminal Adapter (ATA) functions. The AHI-2 provides interfaces to the Aircell Axxess ST
System Communications backbone for one Aircell Axxess Corded SIP handset or Aircell Axxess Call
Alerter (ACA) and one (1) POTS device. The POTS devices may be standard FAX machine. The two
(2) ATA functions connect the POTS devices to the Aircell Axxess ST backbone by providing central
office emulation, protocol conversion, buffering, and FAX store-and-forward functions. The ATA
functions also provide a reliable end-to-end data link to the appropriate ground server via the Aircell
Axxess satellite transceiver product and the Iridium satellite communication network. The AHI-2 also
contains a five-port Ethernet switch (with two (2) ports allocated to the ATA functions), internal power
supply(s), and a power supply for implementation of the Aircell Power over Ethernet Data Interface
(APoEDI), which provides power to a handset or ACA. The AHI-2 passes through power and
communications to other subsystems that are connected to the Aircell Axxess System Communications
backbone. Figure 2.1.C. is a block diagram of the AHI-2 interface. The Aircell Axxess handset interface
is intended for installation and operation in the aircraft cabin. It is not designed for operation in areas of
the aircraft that are exposed to extreme environmental conditions, very high or very low temperatures,
conditions where condensation may occur, or very high altitude conditions.
Refer to Section 7.4.6., Aircell Axxess AHI-2 System Specifications, for details regarding the
environmental requirements for this unit.
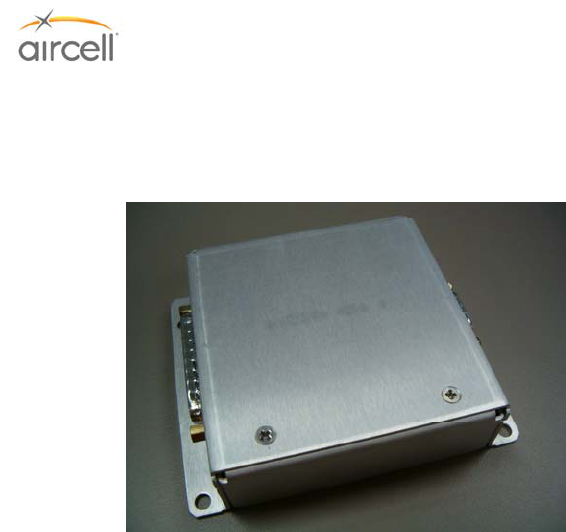
Description and Operation, Section 2 Page 2-12
Aircell confidential and proprietary D12004-E, March 2010
2.2.7. Aircell Axxess® Call Alerter (ACA) (optional)
The ACA is 4.12” long, 3.4” wide, and 1.0” high
(Refer to Section 6.0, ICD D12160, for details).
Aircell Axxess Call Alerter (ACA). The ACA must be
installed within the pressure vessel. Provides 8
switch outputs to control external call alerting
devices/annunciators which can be lights, chimes,
Sonalerts, etc. Powered via APoEDI 48VDC
generated by the CTR or AHI for APoEDI. ACA
does not provide power to call alerting devices. ACA
is connected via CTR, AHI-1 or AHI-2. The ACA is
controlled by the Aircell Axxess ST PBX which can
configure and program the ACA. The ACA utilizes
one of the eight (8) APoEDI-wired handset interfaces
available from the CTR or one of the five (5)
available handset ports from an AHI.
Figure 2.7. ACA
The Aircell Axxess ACA is a subsystem that is used in conjunction with Aircell Axxess-series products
for implementation of air-to-ground telecommunication services, including voice and data
communications. The ACA provides call alerting functions. The ACA provides eight (8) switch ports to
control external call alerting devices. Each alerter switch port circuit consists of an isolated switch. It
should be noted that the ACA provides switches for enabling call alerting devices; it provides no power
to the alerter device. Any power that is required for operating call alerting devices must be externally
provided. Each of the ACA switches has a maximum current capability of 0.5 amperes, and the switch is
sensitive to voltage polarity. The ACA has two (2) connector interfaces: J1 (system interface connector)
and J2 (alerter interface connector). Figure 2.1.C. is a block diagram of the ACA interface. The Aircell
Axxess Call Alerter is intended for installation and operation in the aircraft cabin. It is not designed for
operation in areas of the aircraft that are exposed to extreme environmental conditions, very high or very
low temperatures, conditions where condensation may occur, or very high altitude conditions.
Refer to Section 7.4.7., Aircell Axxess ACA System Specifications, for details regarding the
environmental requirements for this unit.
2.2.8. Aircell Axxess Call Alerter II (ACA II) (optional)
ACA II is the same as the ACA except for the additional capabilities to disable a selectable handset(s)
and associated annunciators. These options are selectable during installation. The ACA II is able to
detect the status of discrete input ports. A “ground” (ring/CTR WiFi disable) or “open” (ring enabled) is
detected and then that status is converted to an Ethernet message and passed on to the ST 4200 via
the Ethernet bus. This discrete is then selectable to disable a Handset extension from ringing and/or
disable the CTR WiFi operation. This is done via the ST 4200 PBX ACA configuration. Refer to Section
4.8.11.6. for programming details. Refer to Section 6.0, ICD D12329, for details. Refer to Section 10,
ICD D12031, for wiring interfaces.
Refer to Section 7.4.7., Aircell Axxess ACA II System Specifications, for details regarding the
environmental requirements for this unit.
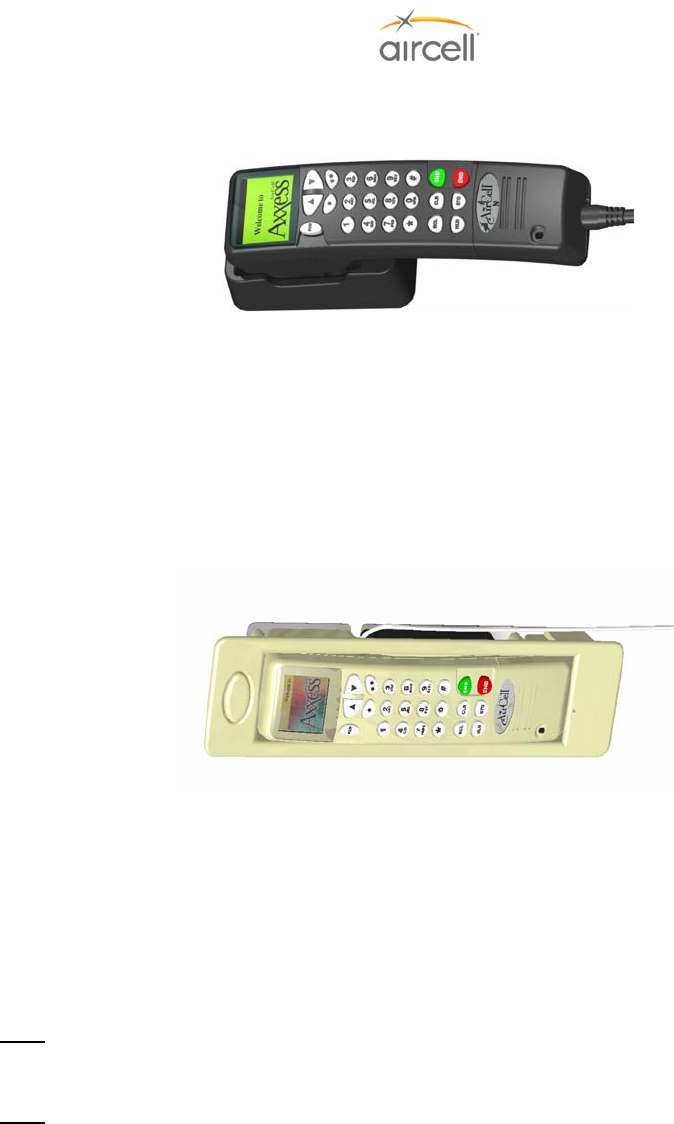
Description and Operation, Section 2 Page 2-13
Aircell confidential and proprietary D12004-E, March 2010
2.2.9. Aircell Axxess® Standard SIP Handset (with Audio Panel Interface)
Figure 2.8. Standard SIP Handset and Cradle
The Handset provides voice communications and control of the Aircell Axxess System. The Handset
supplies and receives information to and from the transceiver through the CTR. The standard 21-inch
coil cord will extend to about 100 inches. The Handset and Cradle come in three (3) distinctive colors of
your choice: black, beige, or gray. Mount the Handset and Cradle in any position keeping accessibility in
mind. Only this HS has an Audio Panel interface option. Refer to Section 7.4.8., Aircell Axxess
Standard SIP Handset Specifications, for details regarding the environmental requirements for this unit.
2.2.10. Aircell Axxess WiFi SIP Handset (with no Audio Panel Interface)
Figure 2.9. WiFi SIP Handset and Base Station
The Handset provides voice communications and control of the Aircell Axxess System. The Handset
supplies and receives information to and from the transceiver through the CTR. The Handset and Base
Station come in three (3) distinctive colors of your choice: black, beige, or gray. Mount the Handset and
Base Station in any position keeping accessibility in mind. Refer to Section 7.4.9., Aircell Axxess WiFi
SIP Handset Specifications, for details regarding the environmental requirements for this unit.
Note: This handset requires CTR part number P12083 Rev L or later, or CTR part number P12083-001
Rev B or later.
Note: The Aircell Axxess Wi-Fi Handset will provide about three hours of talk time and over ten hours of
standby time. The handset is only charging when placed in the charging cradle and when the avionics
are turned on. Fully charging a completed depleted handset will require about two hours. After one
hour, the handset will be usable for up to 80% of its rated talk and standby times. It is recommended
that all users be advised to always keep the handset in the charging cradle when it is not being used for
an actual call. This will ensure that the battery is fully charged during each flight and immediately
available for calls at the start of a subsequent flight.
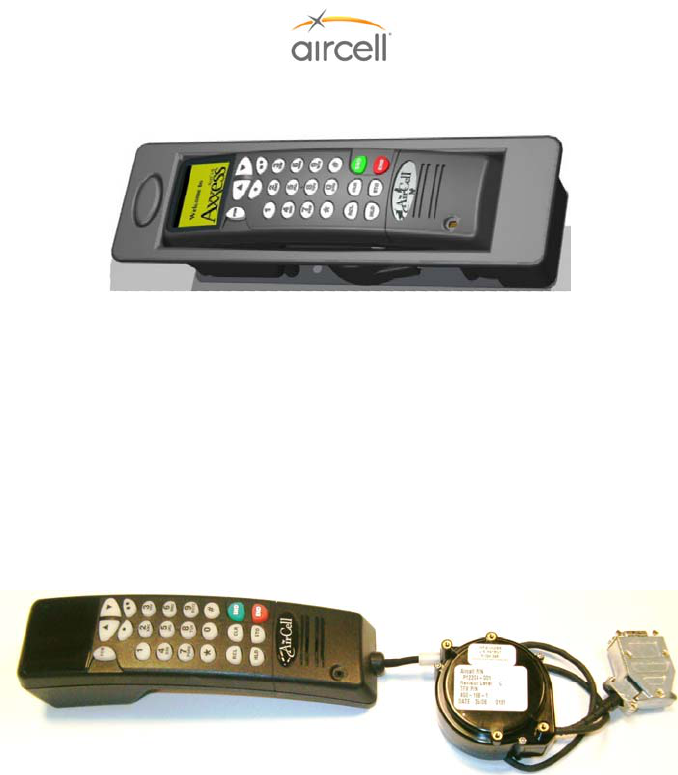
Description and Operation, Section 2 Page 2-14
Aircell confidential and proprietary D12004-E, March 2010
2.2.11. Aircell Axxess Flush-Mount SIP Handset (with no Audio Panel Interface)
Figure 2.9. Flush-Mount SIP Handset and Cradle
The Handset provides voice communications and control of the Aircell Axxess System. The Handset
supplies and receives information to and from the transceiver through the CTR. The retracting cord will
extend about 50 inches (Revision L of the Flush-Mount Handset and subs, 65 inches). The Handset and
Cradle come in three (3) distinctive colors of your choice: black, beige, or gray. Mount the Handset and
Cradle in any position keeping accessibility in mind. Refer to Section 7.4.10., Aircell Axxess Flush-
Mount SIP Handset Specifications, for details regarding the environmental requirements for this unit.
2.2.12. Aircell Axxess® Custom-Retractable SIP Handset (with no Audio Panel Interface)
Figure 2.10. Custom-Retractable SIP Handset and Retractor
The Handset provides voice communications and control of the Aircell Axxess System. The Handset
supplies and receives information to and from the transceiver through the CTR. The retracting cord will
extend about 50 inches (Revision C of the Custom-Retractable Handset and subs, 65 inches). The
Handset comes in three (3) distinctive colors of your choice: black, beige, or gray. Mount the Handset in
any position keeping accessibility in mind. Refer to Section 7.4.11., Aircell Axxess Custom-Retractable
SIP Handset Specifications, for details regarding the environmental requirements for this unit.
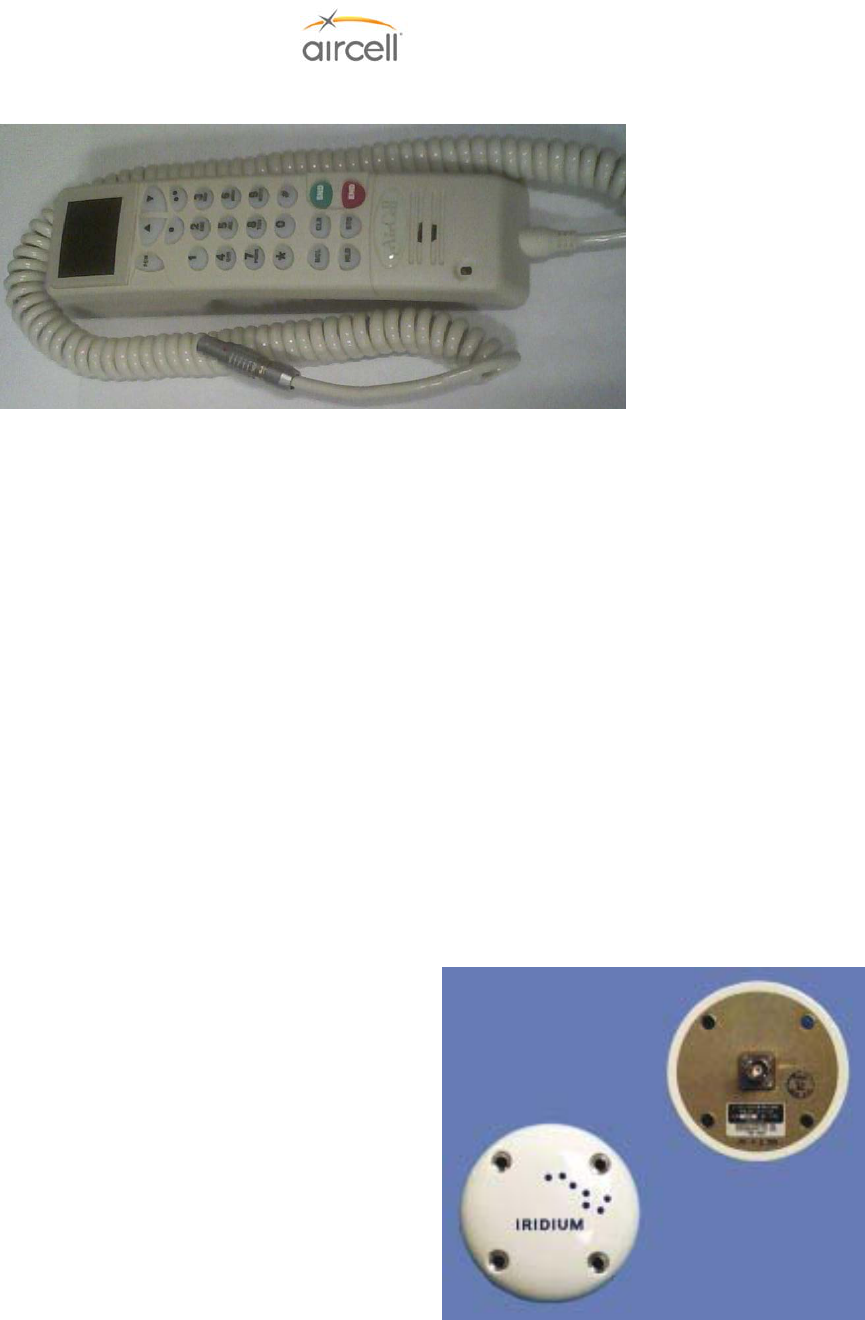
Description and Operation, Section 2 Page 2-15
Aircell confidential and proprietary D12004-E, March 2010
2.2.13. Aircell Axxess LEMO SIP Handset (with no Audio Panel Interface)
Figure 2.11. LEMO SIP Handset
The Handset provides voice communications and control of the Aircell Axxess System. The Handset
supplies and receives information to and from the transceiver through the CTR. The standard 21-inch
coil cord will extend to about 100 inches. The Handset comes in three (3) distinctive colors of your
choice: black, beige, or gray. Mount the Handset in any position keeping accessibility in mind. Refer to
Section 7.4.12., Aircell Axxess LEMO SIP Handset Specifications, for details regarding the
environmental requirements for this unit.
2.2.14. Reserved for product expansion
2.2.15. Reserved for product expansion
2.2.16. Reserved for product expansion
2.2.17. Reserved for product expansion
2.2.18. Reserved for product expansion
2.2.19. Reserved for product expansion
2.2.20. Aircell Axxess® Satellite One-Channel Patch
Antenna
The Patch Antenna is Aircell P/N 015-10306-001. One
is required for each Iridium Satellite channel. This
antenna is a low profile Iridium/GPS antenna that
provides continuous coverage from 1565 MHz to
1626.5 MHz for excellent Iridium applications.
Mechanical configuration is a spherical-radius molded
ray dome that provides enhanced protection against
rain, ice, and lightening strikes. Qualified for high-
speed military aircraft as well as general aviation
applications, it has a TNC female connector.
Figure 2.12.A. Single Patch Antenna
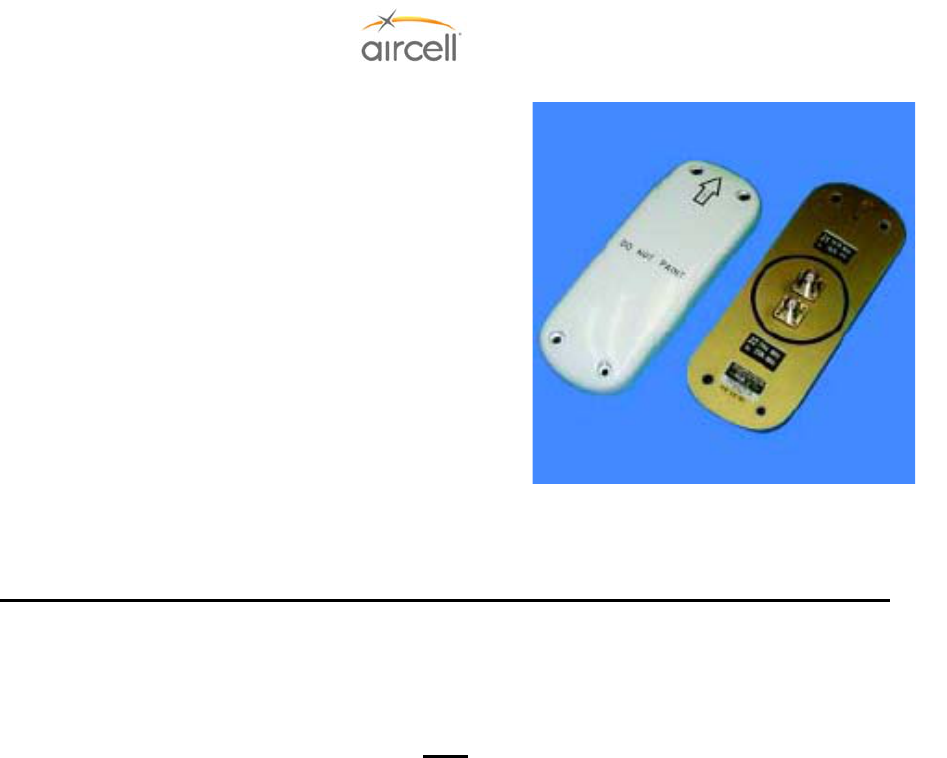
Description and Operation, Section 2 Page 2-16
Aircell confidential and proprietary D12004-E, March 2010
2.2.21. Aircell Axxess Satellite Two-Channel Patch Antenna
The Dual Patch Antenna is Aircell P/N 015-11203-001.
Only one is required for a dual Iridium installation. This
antenna is a low profile combination Iridium/GPS
antenna that provides continuous coverage from 1565
MHz to 1626.5 MHz. The mechanical configuration is
an oblong molded radome that provides protection
against rain, ice, and lightening strikes. It is qualified for
high-speed military aircraft as well as general aviation
applications. This antenna has two TNC female
connectors.
Figure 2.12.B. Dual Patch Antenna
Refer to Aircell Antenna Installation Manual P/N 800-10355 for options and installation details.
Requirements of the applicable FARs may stipulate that proper Designated Engineering Representative
(DER) engineering documents (8110-3) be supplied or that the installation be performed in accordance
with an acceptable Supplemental Type Certificate (STC) for mounting these types of antennas. These
are the responsibilities of the Installer.
Note
Antenna Bonding
As with any communication equipment, bonding the Antenna to airframe is essential for optimum
performance. Ensure that the Antenna is bonded to the aircraft skin. Properly bonded, there should be
2.5 milliohms or less between the mounting screws and airframe ground. Care in bonding has been
shown to eliminate erratic or poor system performance. Iridium Antenna bonding is essential for proper
performance (as with any antenna).
2.2.22. Reserved for product expansion

Installation Procedures, Section 3 Page 3-1
Aircell confidential and proprietary D12004-E, March 2010
3.0 INSTALLATION PROCEDURES
3.1. Planning
Careful planning for the install of the Aircell Axxess® will ensure an efficient install with minimum down time for
the aircraft and will ensure optimal system performance and easy maintenance access in the future. Study the
aircraft for optimal antenna location, plan equipment locations with service in mind, and select the proper cabling
before ordering. The Customer will be pleased to get the aircraft back in service promptly as the result of your
planning.
Refer to Aircraft manufacturing guidelines and/or to FAA AC 43.13-1B and 2A. FAA AC 43.13-1B (Acceptable
Methods, Techniques, and Practices) Chapter 11, and FAA AC 43.13-2A (Acceptable Techniques, and
Practices-Aircraft Alterations) Chapters 2 and 3 provide excellent guidelines to ensure a good installation.
A field-approved FAA Form 337 that references a STC as a basis for a follow-on field approval, references to
acceptable approvable data and/or DER documentation (Form 8110-3) approving installation data, is the usual
required documentation path for the installation of this system.
Note
Requirements of the applicable FARs may stipulate that proper DER engineering documents (Form 8110-3) be
supplied or that the installation be performed in accordance with an acceptable STC.
3.2. Equipment Location
The Aircell Axxess (ST 4200) can either be located in the pressure cabin or out of the pressure cabin (in the
avionics bay, where rain or harsh environments will not be present.) Refer to the Systems Specifications Section
7.4.1., for further details regarding the environment requirements, as the Transceiver is not weather proof. Avoid
a completely “sealed” chamber, as ambient air movement is required to cool the transceiver. When considering
the use of ram-air for cooling, ensure that rainwater will not be ingested and sprayed onto the equipment.
Cooling can extend the Mean Time Between Failure (MTBF) of electronic equipment located in a tightly packed
avionics bay, so a fan may be a worthwhile consideration.
The optional 2-Channel Expansion Transceiver (ST 4020). May be installed outside of the pressure vessel. It is
a convenient way to turn your Aircell Axxess 2-channel Iridium system into a 4-channel Iridium system.
The CTR will need to be installed in the pressurized cabin. Locate the CTR in a non-metallic encloser,
preferably upper cabin area, facing the area intended for WiFi use. This will help with RF data device
communication to the built in WiFi antennas. Optional remote-mounted WiFi antennas are available.
Note
Wi-Fi is not activated on unit’s ship out from Aircell at this time. Refer to Section 4.9. for Wi-Fi activation details.
If this is a new installation of an Aircell Axxess System, select RF cabling as specified in this manual to satisfy
the approved requirements of the system. Keep the cable attenuation as low as possible in the cable run from
the Transceiver to the Satellite Antenna, as the performance of the system will be greatly affected by this cable
attenuation.
3.3. Cable Routing
Draw a cable routing diagram for the aircraft. Refer to Wiring Diagram in Section 10.0 to determine the required
cables, then measure and record the required cable lengths on a worksheet. Consider the use of straight or 90
degree connectors to satisfy the bend radius requirements of the coax and wiring. Allow for adequate bend
radius, service loops, and stress relief in all cable routes. Follow the cable specifications of Tables 3.1. Clear
Installation Procedures, Section 3 Page 3-2
Aircell confidential and proprietary D12004-E, March 2010
and concise specifications when ordering parts will ensure an efficient install. The Vendors provide coax cable
loss decibel (dB) and VSWR data for the aircraft records.
3.4. Antenna Selection
Refer to Aircell Antenna Installation Manual P/N 800-10355 for options and installation details.
3.5. Handset Selection
Five (5) types of SIP HS are available: a standard SIP HS, flush-mount SIP HS, custom-retractable SIP, LEMO
SIP and Wireless WiFi SIP HS. All five HSs will mount and look like the previous versions of Aircell® HSs. The
difference will be with the wiring type and interface connections. It is advisable to install at least two (2) HSs,
one (1) cockpit location and one (1) cabin location.
You can have up to eight (8) HSs (ST 4200 Revision N and subsequent will support 10 HSs) if desired (however,
if an ACA is installed to the CTR, the maximum number of wired HSs is seven (7) from the CTR; if the optional
AHIs are installed without the CTR, the maximum number of wired HSs is five (5)). Since the CTR will only
support eight (8) wired HSs, the additional two (2) HSs will need to be powered by an AHI-1 or an AHI-2, or the
HSs need to be WiFi, or some combination thereof. Please refer to Section 6.0, D12059, D12060, D12304,
D12305 and D12130/D12398 for the HS details.
Note
Only the standard SIP HS will have Audio Panel interface capabilities. This interface will be at the HS connector
(optional WiFi SIP Handsets are to be part of product expansion).
Note
When up to eight (8) Handsets (or ten (10) HSs for ST 4200 Revision N and subsequent) are installed, only three
(3) HS at a time per channel can conference to each other or two (2) HS can conference to a ground caller. The
system also provides an Audio Panel interface from a standard SIP HS connection integration into the aircraft
communication system. The Wiring Diagram in Section 10.0 provides wiring definitions for the Audio Panel and
SIP Handsets.
3.6. Component Locations
Refer to Section 7.0, System Specifications, for details regarding the environmental requirements of the Aircell
Axxess components. Refer to Section 6.0 for Mechanical installation details.
3.6.1. Aircell Axxess ® II 2-Channel Satellite Transceiver (ST 4200)
Typically, the transceiver would be located in the avionics equipment bay. However, when choosing the
location of the transceiver, the requirement to keep the cable loss below 3.0 dB from the Transceiver to
the Satellite Antenna is a major consideration. This requirement is to ensure the best overall system
performance. Refer to Table 3.1. to properly select the coax cables required to meet these
requirements. Refer to Section 7.4.1., Aircell Axxess ST System Specifications, for details regarding the
environmental requirements for this unit. Refer to Section 6.1., ICD D12016, for mechanical installation
details.
Note
Multiple RS-232/Modem connectors are allowed, but only one (1) data appliance can be connected at a
time per Iridium channel, to prevent appliance malfunction.
3.6.2. Aircell Axxess 2-Channel Expansion Transceiver (ST 4020)
Install the ST 4020 close to the ST 4200; the expansion connecters wiring between the STs must be less
then 6 feet. Typically, the transceiver would be located in the avionics equipment bay. However, when
choosing the location of the transceiver, the requirement to keep the cable loss below 3.0 dB from the
Transceiver to the Satellite Antenna is a major consideration. This requirement is to ensure the best
overall system performance. Refer to Table 3.1 to properly select the coax cables required to meet
these requirements. Refer to Section 7.4.2., ACA System Specifications, for details regarding the

Installation Procedures, Section 3 Page 3-3
Aircell confidential and proprietary D12004-E, March 2010
environmental requirements for this unit. Refer to Section 6.2., ICD D12155, for mechanical installation
details.
Note
Multiple RS-232/modem connectors are allowed, but only one (1) data appliance can be connected at a
time per Iridium channel, to prevent appliance malfunction.
3.6.3. Aircell Axxess® Cabin Telecommunications Router (CTR)
Typically, the CTR would be located in the cabin/pressurized cabin keeping in mind that the WiFi
antennas located on the CTR should be located facing the main area of intended use, as high up as
practical, in a non-metallic enclosure / area. However, when choosing the location of the CTR there is
the option of remote mountable WiFi antennas, the requirement would then be to choose a location that
will allow a coax run from the CTR to the remote WiFi antennas. Refer to the Systems Specifications
Section 7.4.3. Refer to Section 6.3., ICD D12017, for mechanical installation details.
Note
WiFi is not activated on unit’s ship out from Aircell at this time. Refer to Section 4.9. for WiFi activation
details.
3.6.4. Aircell Axxess Remote Diversity Antenna (RDA) (optional)
Refer to Section 6.4., ICD D12403, for mechanical installation details.
The Aircell Axxess RDA will need to be installed in the pressurized cabin.
Refer to Section 7.4.4., RDA System Specifications, for details regarding the environmental
requirements for this unit.
Note
The coaxial cables from the CTR to the Remote Diveristy Antennas need to be equal in length, even
though the Remote Diversity Antennas may be in different locations. The total coax RF loss should not
exceed 3dB @ 2.450 Gigahertz (GHz) and the VSWR should be less than 1.3 when the cable is
terminated in a 50-ohm load.
3.6.5. Aircell Axxess Handset Interface (AHI-1) (optional)
Refer to Section 6.5., ICD D12105, for mechanical installation details.
The Aircell Axxess AHI-1 will need to be installed in the pressurized cabin.
Refer to Section 7.4.5., AHI-1 System Specifications, for details regarding the environmental
requirements for this unit.
3.6.6. Aircell Axxess Handset / Fax interface (AHI-2) (optional)
Refer to Section 6.6., ICD D12159, for mechanical installation details.
The Aircell Axxess AHI-2 will need to be installed in the pressurized cabin.
Refer to Section 7.4.6., AHI-2 System Specifications, for details regarding the environmental
requirements for this unit.
3.6.7. Aircell Axxess Call Alerter (ACA) (optional)
Refer to Section 6.7., ICD D12160, for mechanical installation details.
The Aircell Axxess ACA will need to be installed in the pressurized cabin.
Refer to Section 7.4.7., ACA System Specifications, for details regarding the environmental
requirements for this unit.

Installation Procedures, Section 3 Page 3-4
Aircell confidential and proprietary D12004-E, March 2010
3.6.8. Aircell Axxess® Call Alerter II (ACA II) (optional)
Refer to Section 6.8., ICD D12329, for mechanical installation details.
The Aircell Axxess ACA II will need to be installed in the pressurized cabin.
Refer to Section 7.4.7., ACA II System Specifications, for details regarding the environmental
requirements for this unit.
3.6.9. Aircell Axxess Standard SIP Handset (with Audio Panel Interface)
Typically, the HSs would be located in the main cockpit area. However, when choosing the location of
the SIP HS it is advisable to at least install two (2) HSs, one (1) in the cockpit and one (1) in the cabin.
The handset user access is an important consideration. If the Audio Panel interface is used, the HSs
should be located in the cockpit area. However, when choosing the location of this HS to be used with
an Audio Panel interface, it is advisable to install it at a location that the flight crew can see the display
and access the keypad while HS is in its locking cradle.
Refer to Section 6.9., ICD D12059, for mechanical installation details and Section 10.0 for Wiring
interface details. Refer to Section 7.4.8., Standard SIP Handset, for details regarding the environmental
requirements for this unit.
3.6.10. Aircell Axxess WiFi SIP Handset and Base Station (with no Audio Panel Interface)
Typically, the WiFi HSs would be located in the main cockpit area. However, when choosing the location
of the WiFi HS, it is advisable to at least install two (2) HSs, one (1) in the cockpit and one (1) in the
cabin. The handset user access is an important consideration.
Refer to Section 6.10., ICD D12031 and D12398, for mechanical installation details and Section 10.0 for
Wiring interface details. Refer to Section 7.4.9., WiFi SIP Handset, for details regarding the
environmental requirements for this unit.
3.6.11. Aircell Axxess Flush-Mount SIP Handset (with no Audio Panel Interface)
Typically, the HSs would be located in the main cabin area. However, when choosing the location of the
SIP HS it is advisable to at least install two (2) HS, one (1) in the cockpit and one (1) in the cabin. The
handset user access is an important consideration.
Refer to Section 6.11., ICD D12060, for mechanical installation details and Section 10.0 for Wiring
interface details.
Refer to Section 7.4.10., Flush-Mount SIP Handset, for details regarding the environmental requirements
for this unit.
3.6.12. Aircell Axxess Custom-Retractable SIP Handset (with no Audio Panel Interface)
Typically, the HSs would be located in the main cabin area. However, when choosing the location of the
SIP HS it is advisable to at least install two (2) HSs, one (1) in the cockpit and one (1) in the cabin. The
handset user access is an important consideration.
Refer to Section 6.12., ICD D12304, for mechanical installation details and Section 10.0 for Wiring
interface details.
Refer to Section 7.4.11., Custom-Retractable SIP Handset, for details regarding the environmental
requirements for this unit.

Installation Procedures, Section 3 Page 3-5
Aircell confidential and proprietary D12004-E, March 2010
3.6.13. Aircell Axxess® LEMO SIP Handset (with no Audio Panel Interface)
Typically, the HSs would be located in the main cabin area. However, when choosing the location of the
SIP HS it is advisable to at least install two (2) HSs, one (1) in the cockpit and one (1) in the cabin. The
handset user access is an important consideration.
Refer to Section 6.13., ICD D12304, for mechanical installation details and Section 10.0 for Wiring
interface details.
Refer to Section 7.4.12., Custom-Retractable SIP Handset, for details regarding the environmental
requirements for this unit.
3.6.14. Reserved for product expansion
3.6.15. Reserved for product expansion
3.6.16. Reserved for product expansion
3.6.17. Reserved for product expansion
3.6.18. Reserved for product expansion
3.6.19. Reserved for product expansion
3.6.20. Iridium Satellite Antenna
For installation details and options, refer to Aircell Antenna Installation Manual P/N 800-10355.
3.7. Power, Handset, and Audio Cabling
When considering the location of the Aircell Axxess CTR and Aircell Axxess ST Transceiver, longer CTR-to-
Transceiver and longer handset cabling, rather than longer antenna cable runs, will enhance the performance of
the system. Use shielded twisted pairs of wire, as shown in the Wiring Diagrams (Section 10.0) to reduce
interference. Size the power leads to maintain the proper supply voltage within the limits identified in the System
Specifications (Section 7.0) and satisfy the requirements of FAA AC 43.13-1B. The telephone system will detect
low battery voltage and shut the system off.
3.8. Ring Detect
The Ring Detect (refer to Wiring Diagrams, Section 10.0) offers an annunciator function to be made available in
the aircraft. The operating conditions are as follows:
Pin U on the Aircell Axxess ST system Power and Signal connector will go low (ground) when the telephone
rings for any (Iridium channel 1-4) incoming call. Use this logic for a visual annunciator or a Sonalert. Pin U will
be low (ground) for 2-second and off (open) for four (4) seconds. This cycle will continue until the telephone is
answered or the call attempt is terminated.
Note
Refer to the Axxess Call Alerter (ACA) for a programmable ringing option. The ACA Aircell Axxess Call Alerter
will drive up to 8 programmable alerting devices. Refer to Section 2.2.6.
3.9. Reserved for product expansion

Installation Procedures, Section 3 Page 3-6
Aircell confidential and proprietary D12004-E, March 2010
3.10. Cabling
Note
Wire and Coax Installation
Installation of wire and antenna coax cables should be installed according to approved aircraft manufacturing
guidelines and/or FAA procedures documented in Advisory Circular 43.13-1B. Consider cable slack, protection
from heat, and protection from chafing when installing system wiring.
Good installation practices will ensure maximum performance from the Aircell Axxess® System. Advisory
Circular 43.13-2A (Acceptable Techniques, and Practices - Aircraft Alterations), Chapter 2.27, and Advisory
Circular 43.13-1B (Acceptable Methods, Techniques, and Practices), Chapter 11, provide excellent guidelines to
ensure a good installation. When building the system wire harness and RF cables, observe the following:
1. Plan the Aircell Axxess cable routing so that it does not interfere with flight control cables or follow heavy
current-carrying cables, hydraulic lines, or fuel lines.
2. It is essential to use military specification connectors or connectors approved for use on aircraft.
3. This document and attached ICDs only shows a suggested circuit breaker size, wire size and type for a
typical installation:
• It is the responsibility of the Installation Agency to ensure proper wire type and size and the use
of a properly rated circuit protection device (circuit breaker). In addition, ensure that the 28 VDC
bus the equipment is to be connected to can handle the additional electrical load.
• Install circuit protection (circuit breaker) of the proper amperage to handle the power
requirements and protect the wiring.
• Refer to Aircraft manufacturing guidelines and/or refer to FAA Advisory Circular 43.13-1B,
Section 11 (Aircraft Electrical Systems) for the proper wire types and circuit protection
recommendations. All wiring and coax cabling shall conform to the flammability requirements of
FAR 25.869.
• Single wire conductors shall conform to Aircraft manufacturing guidelines and/or Fluoropolymer-
Insulated Society of Automotive Engineers (SAE)-AS22759, also known as Military (MIL)-W-
22759.
• Shielded wire conductors shall conform to Aircraft manufacturing guidelines and/or
Fluoropolymer-Insulated National Electrical Manufacturers Association (NEMA) WC 27500, also
known as MIL-DTL-27500.
• These wires shall be used for Power, Ground, Low Speed Signal, and Shield Drains.
• Aircell Axxess Satellite Transceiver (ST 4200) - size power wires and circuit protection to handle
six (6) ampere current draw @ 28 VDC.
• Aircell Expansion Transceiver (ST 4020) - size power wires and circuit protection to handle six
(6) ampere current draw @ 28 VDC.
• Aircell Axxess CTR - Size power wires and circuit protection to handle four (4) amp current draw
@ 28 VDC.
• AHI-1 - Size power wires and circuit protection to handle 0.15 A @ 28 VDC max. with no
Handsets attached; each SIP HS connected to this AHI will add 0.35 A max.
• AHI-2 - Size power wires and circuit protection to handle 0.15 A @ 28 VDC max. with no
Handsets attached; each SIP HS connected to this AHI will add 0.35 A max.; Note: an additional
0.25 A @ 28 VDC max will be required for Data/Fax Terminal Adapters .
The Wiring Diagrams in Section 10.0 provide manufacturing instructions for the wire harnesses. Notes
on the wiring diagrams provide essential instructions that will save you needless rework during
installation.
4. Provide proper grounding of the equipment by isolating chassis, power return wires, signal wires and
shield grounds.
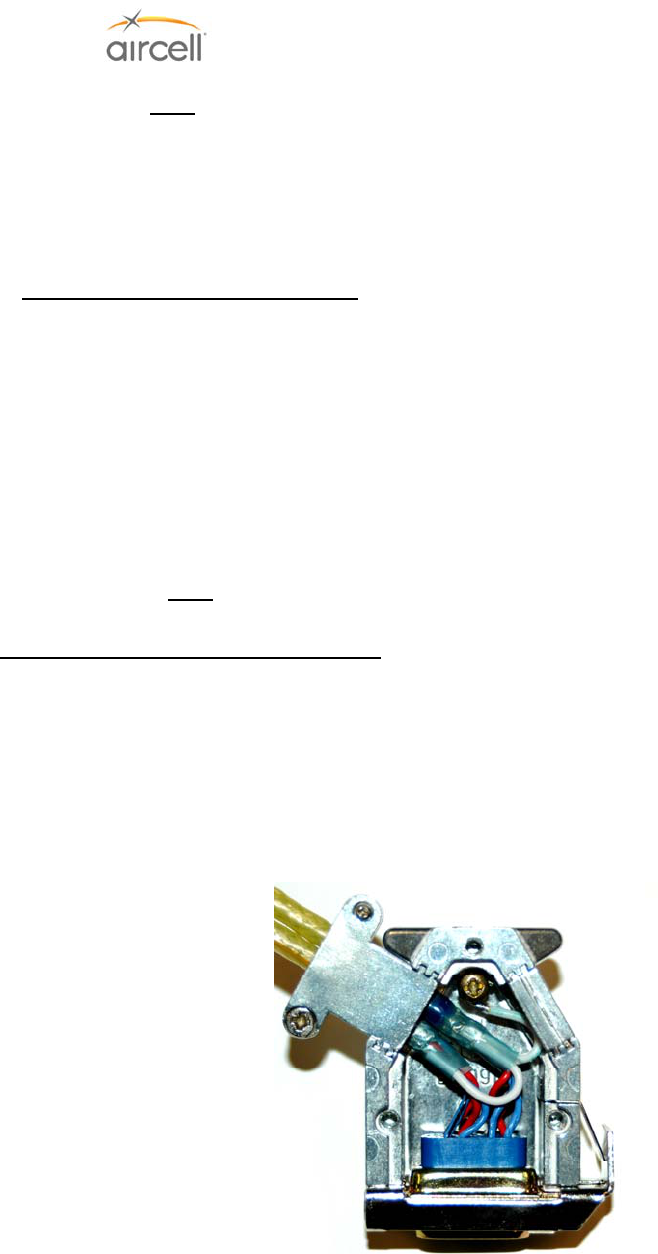
Installation Procedures, Section 3 Page 3-7
Aircell confidential and proprietary D12004-E, March 2010
Note
Component Bonding
As with any communication equipment, bonding the equipment to airframe ground is essential for
optimum performance and lightning protection. Ensure that the equipment mounting provisions are
bonded to the shelf, and the shelf is bonded to airframe ground. Properly bonded, there should be 2.5
milliohms or less between the mounting tray and airframe ground. Care in bonding has been shown to
eliminate erratic or poor system performance.
Additional Shield Drain information
As an option, up to four (4) 22 American Wire Gauge (AWG) 7” drains may be combined on a single
grounding strap and then routed to airframe chassis. The ground strap should be as short as possible,
but may be realized with a maximum of 24” of insulated (18 AWG or larger).
5. To reduce EMI/RFI to an acceptable level, all signal and power lines require shielded cables. Refer to
the wiring diagrams in Section 10.0.
6. Antenna coaxial cables are required for this installation. Part 25 aircraft must meet FAR 25.1359
requirements, which does not allow for the use of PVC-type insulation. Refer to Section 3.11. for coax
recommendations.
7. Ethernet Cable (Hi-Speed Data) (Tensolite P/N NF24Q100 or equivalent) will be required for all Ethernet
connections.
Note
Refer to Section 10.0. D12031, for specific information regarding selection of high speed Ethernet cable.
Ethernet and Hi-Speed Data Conductors
• Ethernet, Hi-Speed Data Conductors shall conform to Fluoropolymer-Insulated, 24 AWG, Two-Pair
(Minimum), 100 Ohm, Copper Braid-Shielded Cable meeting both the Transmission Performance
Specifications of TIA/EIA-568B, Category 5e, and the Flammability Requirements of FAR 25.869.
Note at the time of this publication Aircell has found Tensolite P/N NF24Q100 acceptable. There
may be Other Ethernet, Hi-Speed Data Conductors that meet the same criteria to be found
acceptable.
• Coax and Ethernet cables can be costly. Prior to bidding the installation, it is advisable that you
evaluate how much cable will be required and the related cost.
Sample: Ethernet, Hi-Speed Data Conductors and
shield ground termination shown. It is advisable
and important for EMI considerations to carry the
shields into the connecter housing, and then break
out a shield drain that will connect to the provided
connector housing bonding screw.
Figure 3.1. Shield Ground Termination

Installation Procedures, Section 3 Page 3-8
Aircell confidential and proprietary D12004-E, March 2010
Good wiring practices can be obtained from Advisory Circular 43.13-1B and should be followed. Here are a few
reminders. Know the harness routing and equipment location before you begin fabricating the harness.
Measure and record the harness and coax lengths required and add a few feet for good measure. It is easy to
cut to fit, but hard to stretch the wires. Identify and mark the wires in accordance with Advisory Circular 43.13-
1B. Refer to Section 10.0, ICD D12031 for mating connector layouts. Aircell strongly recommends that you
purchase coax assemblies from PIC, ECS, or EMTEQ, so that a test record accompanies the installation data.
This practice also minimizes those hard-to-track-down cabling problems. Refer to Table 3.1 for coax
recommendations.
3.11. Satellite Antenna Installation Cable Guide
Important
Refer at Aircell Antenna Installation Manual P/N 800-10355 for details on special Inmarsat® filtering, Iridium to
Inmarsat®, and other Antenna separation details.
When the installation requires cable lengths from the transceiver to the Satellite Antenna greater than 110 feet,
please contact Aircell Customer Service @ 1-888-286-9876 or your preferred cable Vendor.
The RF coaxial cable performance from the Transceiver to the Satellite Antenna is critical. Keep this cable
length as short as practical to enhance the satellite telephone performance. The total RF loss should not exceed
3.0 dB @ 1600 MHz and the VSWR should be less than 1.4:1, when the cable is terminated in a 50-ohm load.
Refer to Section 10.0, ICD D12031 (Wiring Diagrams).
Low-loss 50-ohm cable should be used for this interface. Three (3) recommended Vendors are:
Vendors Phone
PIC 1-800-742-3191
ECS 1-800-327-9473
EMTEQ 1-888-679-6170
Satellite Channel RF Antenna Cable
(One Cable will be required per Satellite Antenna connection)
Refer to Table 3.1, Satellite Channel RF Antenna Cable Guide, on the following page for cable lengths, and
suggested Vendors and part numbers for connectors, cables and adapters.
Transceiver Satellite
Antenna
Cable
Installation Procedures, Section 3 Page 3-9
Aircell confidential and proprietary D12004-E, March 2010
Suggested Part Numbers
Cable
Length
Suggested
Vendors
50-Ω Type
“N” Male
Connector
50-Ω
Double
Shielded
Coax
Cable
Straight
TNC Male
Connector
Right
Angle TNC
Male
Connector
Straight
“N” Male
Connector
“N”
Female to
TNC Male
Adapter
0-20 feet
ECS
EMTEQ
PIC
CNS922
NMS240-1
190310
311501
PFLX240-
500
S33141
CTS922
TMS240-1
190308
CTR922
TMR240-1
190309
20-40 feet
ECS
EMTEQ
PIC
CNS122
NMS400-1
190410
311201
PFLX400-
500
S22089
CTS122
TMS400-1
190408
CTR122
TMR400-1
190409
40-60 feet
ECS
EMTEQ
PIC
CNS022
NMS500-1
190410
310801
PFLX500-
500
S22089
CTS022
TMS500-1
190408
CTR022
TMR500-1
190409
60-75 feet ECS CNS002 310701 CTS002 CTR002
75-110 feet EMTEQ NMS900-1
PFLX900-
500 NMS900-1 See Below*
*Requires an Amphenol P/N 79825 or Maury Microwave P/N 8817B
Table 3.1. Satellite Channel RF Antenna Cable Guide

Installation Procedures, Section 3 Page 3-10
Aircell confidential and proprietary D12004-E, March 2010
This Page Intentionally Blank

Testing and Setup, Section 4 Page 4-1
Aircell confidential and proprietary D12004-E, March 2010
4.0 TESTING AND SETUP
4.1. Introduction
Now that the installation is complete and you have complied with the wiring and cabling requirements of
this Manual (D12004), perform a final check of the Direct Current (DC) power input connections to the
Aircell Axxess® II System. Verify that ground and 28 VDC connections to the unit are correct and on the
proper pin numbers. This will ensure confidence when you apply power to the unit for the first time.
After verifying that the DC power inputs are on the proper power pins, pull open the circuit breaker and
connect the power cable to the Aircell Axxess II (ST 4200) Transceiver. Close the circuit breaker.
CAUTION
Before disconnecting or reconnecting Aircell Axxess components, pull open the power circuit breaker to
avoid damage to the Aircell Axxess components or the aircraft wiring.
Notes
Up to eight (8) Handsets (ST 4200 Revision N and subsequent will support 10 HSs) can be connected to
the Aircell® Axxess™ system (if an ACA is installed to the CTR, the maximum number of wired HSs is
seven (7) from the CTR; if the optional AHIs are installed, the maximum number of wired HSs is five (5));
since the CTR will only support eight (8) wired HSs, the additional two (2) HSs will need to be powered
by an AHI-1 or an AHI-2, or the HSs need to be WiFi, or some combination thereof.
Only three (3) HS at a time per Iridium channel can conference to each other, or two (2) HS can
conference to a ground caller. The system also provides an Audio Panel interface from a Standard SIP
HS connection into the aircraft communication system. Multiple RS-232/modem connections are
allowed, but to prevent application malfunction, only one (1) data appliance can be connected at a time
per Iridium channel. The wiring diagrams in Section 10.0 provide wiring definitions for the Handsets,
Audio Panel and RS-232 connections.
4.2. Testing
It is advisable to first set up and configure the system via the Handset interfaces per Section
4.10. Part A, and Personal Computer interface per Section 4.8. To test the system, placing calls to
and from the Satellite network will be required. Full operational testing of the Aircell Axxess II System
should be accomplished in accordance with test procedures outlined in this Installation Manual, Section
4.10., Part C and Section 4.11. Complete the required paperwork to activate the system. For Iridium
telephone activation, be sure that the Subscriber Service Agreement (SSA) have been properly
filled out and faxed to Aircell Customer Service @ 1-888-398-1800.
When the system has passed the operational test, verify that all Handsets are operational and can be
used at the same time (maximum three (3) HSs at a time), as in a HS to HS to HS conference call.
Include for the aircraft records all cable certifications, wire marking data, special diagrams used for the
installation. Be sure to include the Subscriber Service Agreement (SSA) in the documentation
paperwork for the aircraft. This ensures that the Owner has a record of the installed serial numbers,
corresponding phone number and electronic serial numbers.
4.3. Test Equipment
• A Laptop PC with an RJ 45 Ethernet connection port (WiFi capabilities if available);
• A Web Browser installed (Internet Explorer); and
• No other special test equipment is required to determine the operational status of the Aircell
Axxess System.
Testing and Setup, Section 4 Page 4-2
Aircell confidential and proprietary D12004-E, March 2010
4.4. Test Results
Documentation of the test results is important for the aircraft Owner. All paperwork, special drawings,
cable routings, and special installation procedures should be included for the aircraft records.
4.5. Maintenance and Continued Airworthiness
Design and manufacturing of the Aircell Axxess® System allows for “On-Condition Maintenance.” On-
condition maintenance means that no periodic service requirements are required to maintain continued
airworthiness of the system. No maintenance is required until the equipment does not perform the
intended function. Cable harness repair, RF cable maintenance, and antenna replacement can be
accomplished in the field. Refer to Appendix B for detailed information on troubleshooting procedures.
Please consult Aircell LLC Technical Support to help evaluate any problem that is not resolved by
following the troubleshooting procedures in Appendix B. A Return Material Authorization (RMA) is
required for all repairs or exchanges on items returned to Aircell. After obtaining an RMA return the
Aircell Axxess components to the factory for repair. If you require a loaner unit to maintain
telecommunications operation during Aircell repairs, please call Aircell Customer Service and request
that a serviceable unit be sent to you before removing the installed unit. After factory repair or receiving
the serviceable component, consult the Aircell Installation Manual (D12004) for post-installation checkout
and procedures to verify proper system operation in the aircraft. If component is an Iridium transceiver,
be sure to activate the replacement serviceable unit (call Customer Service @ 1-888-286-9876) before
testing it for operation as the previous Electronic Serial Number (ESN) / Phone Number combination will
no longer be valid.
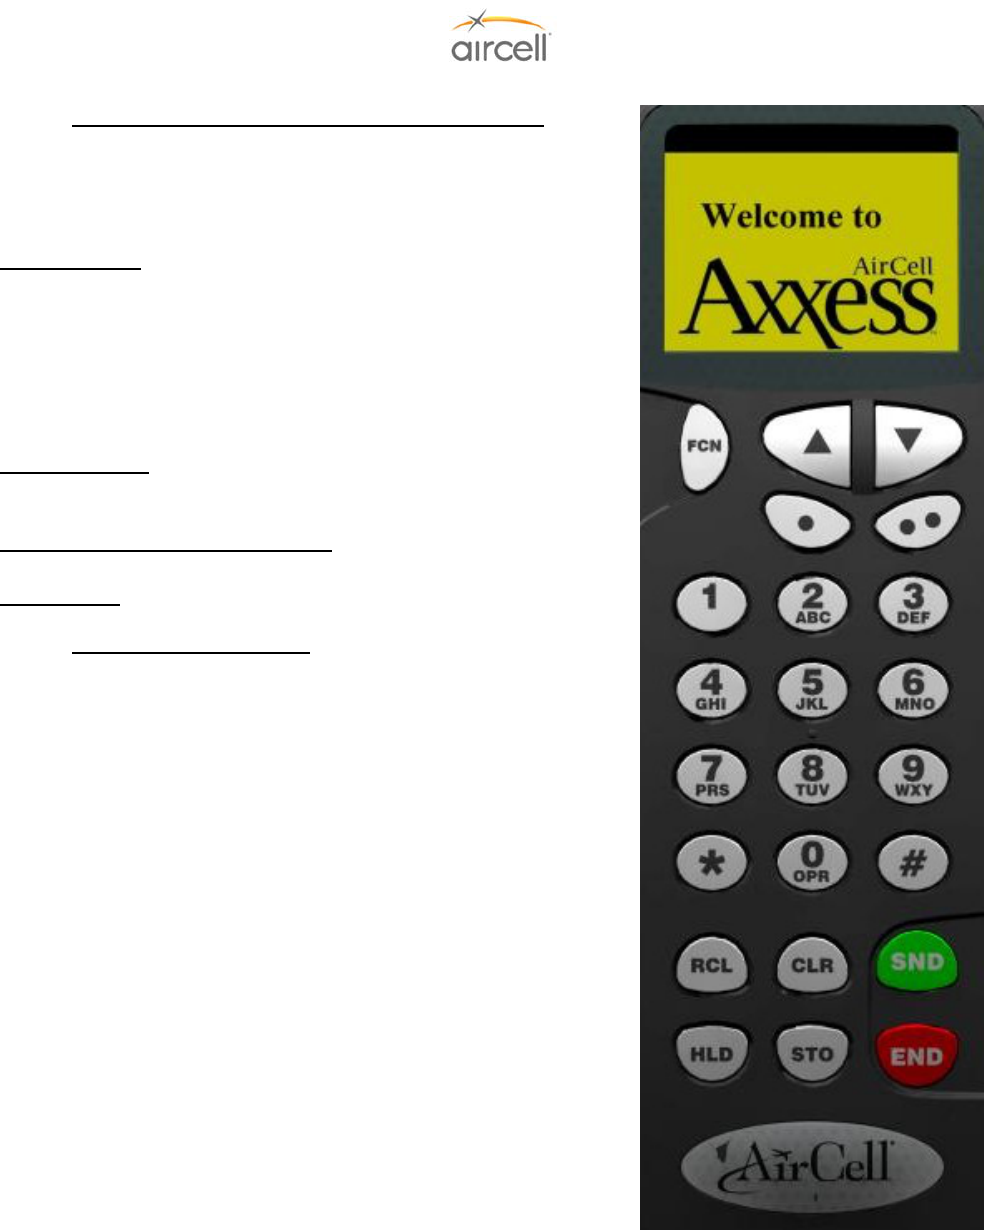
Testing and Setup, Section 4 Page 4-3
Aircell confidential and proprietary D12004-E, March 2010
4.6. Telephone Operations (Standard Handset Shown)
The operation of the Aircell Axxess® SIP Handset is very similar to
that of a typical cell phone. The Aircell phone will power up as the
Avionics Master switch is placed in the ON position and remain ON
until the Avionics Master is again switched OFF.
To place a call: Verify that the system is in service and note on the
Handset that the system has registered on the Satellite network
(Extension # and the Dialing instructions indication should be in
view.). Enter the telephone number on the keypad, and press SND.
Note: To place a call, nine (9) must be entered first, then the country
code (USA/Canada=1), then the balance of the phone number.
Example: 9 + 1 303 379 0278 SND, this will call Aircell Customer
Service.
To receive a call, lift the Handset out of the cradle and press SND. If
you are holding the Handset and it rings, press SND to receive the
call.
To adjust the volume in the earpiece, press the UP/DOWN arrows in
the upper right corner of the Handset.
To end a call, press END and return the Handset to the cradle.
4.7. Quick System Check Out
The System can be checked out while the aircraft is on the ground, if
the aircraft is outside (clear view of sky).
It is advisable to first Set Up and Configure the system via the PC and
Handset interface per Section 4.8. and 4.10.
Full operational testing of the Aircell Axxess System should be
accomplished in accordance with test procedures outlined in Section
4.10. and 4.11.
Figure 4.1. Handset Keyboard

Testing and Setup, Section 4 Page 4-4
Aircell confidential and proprietary D12004-E, March 2010
4.7.1. Placing a call from the Aircraft
Lift the Handset from the cradle and observe the following:
• Verify an illuminated display and that the display indicates Extension # and the Dialing
instructions. (This usually takes about 70 seconds after power is applied to the system.)
• Place a call by entering 9 + country code + phone number on the keyboard and then press SND.
Example: 9 + 1 303 379 0278 SND, this will call Aircell Customer Service.
• Verify that the system is providing a clear communications link, and then press END to terminate
the call.
• If multiple Handsets are installed, repeat the above procedure for all locations.
• Conferencing Handset-to-Handset and or Handset-to-Audio Panel can also be checked at this
time. Audio panel-to-Handset operations will be per the particulars on how the Aircell Axxess ®
audio is interfaced to the Audio Panel.
4.7.2. Placing a call to the Aircraft
Two-Stage Calling to Aircraft from Ground Phones
(two-stage dialing may be a less-costly alternative to direct
dialing).
Calls from USA/Canada
Dial 1 + 480.768.2500 (listen for prompt) +
Aircraft Iridium Telephone Number (8816.XXX.XXXXX).
Calls from Outside USA/Canada
Dial IDD prefix of the country you are calling from
+1 (USA Country Code) + 480.768.2500 (listen for prompt) +
Aircraft Iridium Telephone Number (8816.XXX.XXXXX).
Direct Dialing to the Aircraft from Ground Phones
Dial IDD prefix of the country you are calling from
(USA/Canada = 011) + Aircraft Iridium Telephone Number
(8816.XXX.XXXXX).
Note
Cellular or ground phones require international dialing capability.
Some cellular and long-distance providers may not recognize the
8816 Iridium Country Code.
Utilizing Two-Stage dialing will solve this problem in the US, as your
call is placed to a 480 area code (Arizona).
Please refer to Aircell Axxess® User Manual for more details. Copies are available at
2http://www.aircell.com/service/serv_manuals.php.
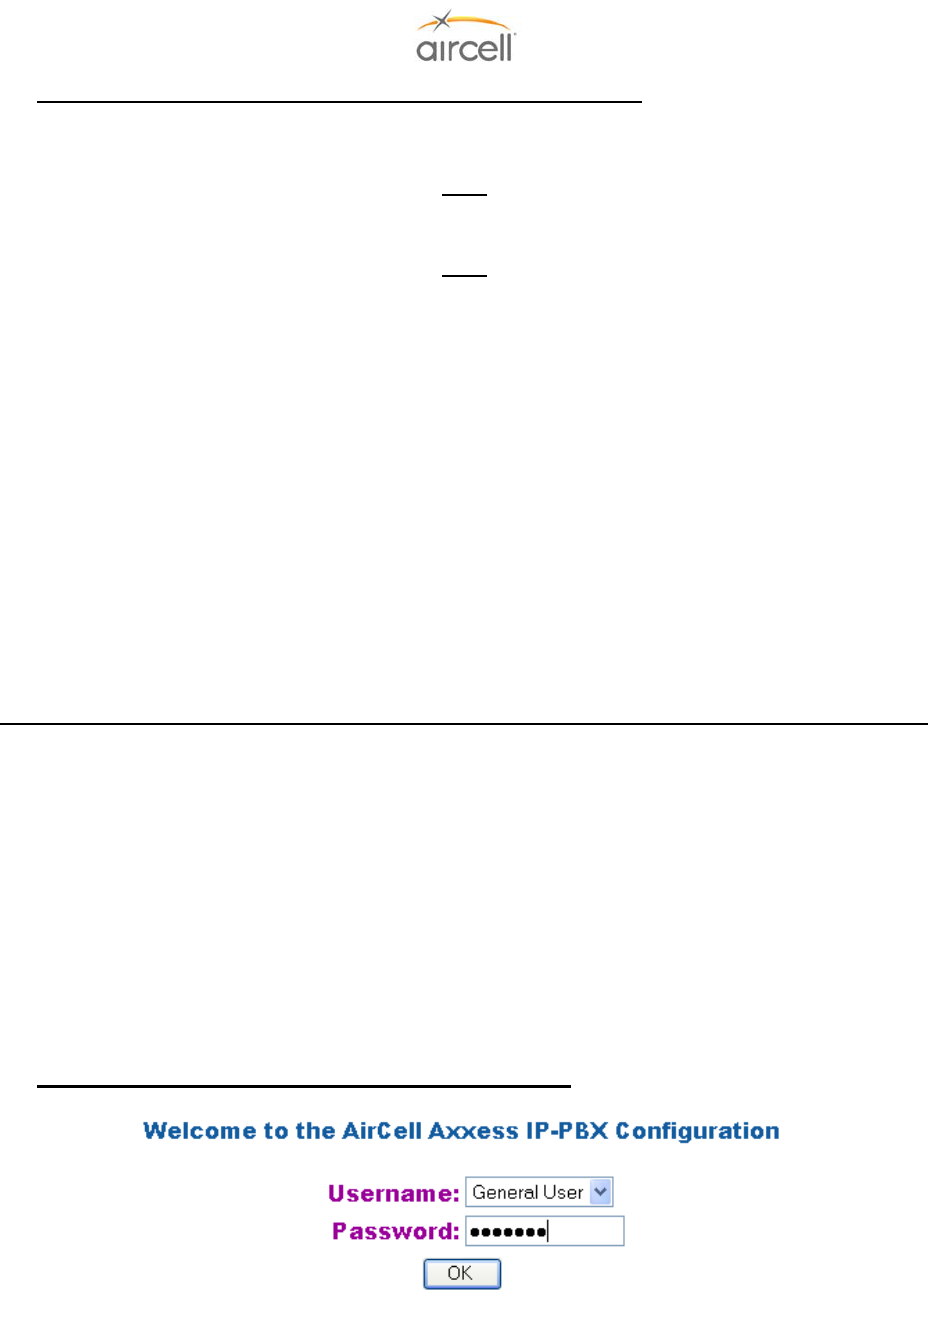
Testing and Setup, Section 4 Page 4-5
Aircell confidential and proprietary D12004-E, March 2010
4.8. Aircell Axxess® II (ST 4200) PBX Configuration and Setup Guide
The Aircell Axxess ST 4200 unit contains the IP-PBX functions and two (2) Iridium Transceivers. If this is a new
installation or a Handset change, please go to Section 4.10., Part A before starting this Section.
Note
The CTR Configuration and Setup is per Section 4.9. and the Handset Configuration and Setup is per Section
4.10. Please refer to these Sections in conjunction with this Section.
Note
If this installation has only AHIs installed with no CTR, proceed to Section 4.12. before starting this Section.
The Aircell Axxess system is customizable and programmable via a PC interface to a Web address, either thru a
WiFi connection (if available) or RJ-45 wired Ethernet connection (refer to Section 10.0 for details on the wired
RJ-45 provisions).
4.8.1. Product Overview
Aircell Axxess IP-PBX is a next generation IP network PBX based on industry open standard SIP
(Session Initiation Protocol).
Key Features:
• Dual Tone Multi Frequency (DTMF) / Call progress tone detection and generation;
• Telephony Features: Direct Inward System Answer (DISA) or Auto-Attendant, Call Transfer, Three
Party Call, Call Detail Record (CDR) and CDR save; and
• Management Interface: Full Web Interface.
4.8.2. Configuration with Web Browser (Revision M and previous)
This Section (4.8.2. to 4.8.6.11.) is applicable to ST 4200 Revision M and previous.
The Aircell Axxess IP PBX has an:
1. Embedded Web server that will respond to Hyper Text Transfer Protocol (HTTP) GET/POST
requests.
Aircell Axxess IP PBX also has embedded Hyper Text Markup Language (HTML) pages that allow the
user to the Aircell Axxess IP PBX through:
2. A Web browser such as “Microsoft’s Internet Explorer 5.0” Login-Accessing the Web Configuration
Menu.
The IP PBX Web Configuration Menu can be accessed by the following Uniform Resource
Locator (URL):
http://192.168.1.200/
The default address of IP-PBX is 192.168.1.200.
The IP-PBX will respond with the following login screen:
Figure 4.2. IP_PBX Configuration Login Screen
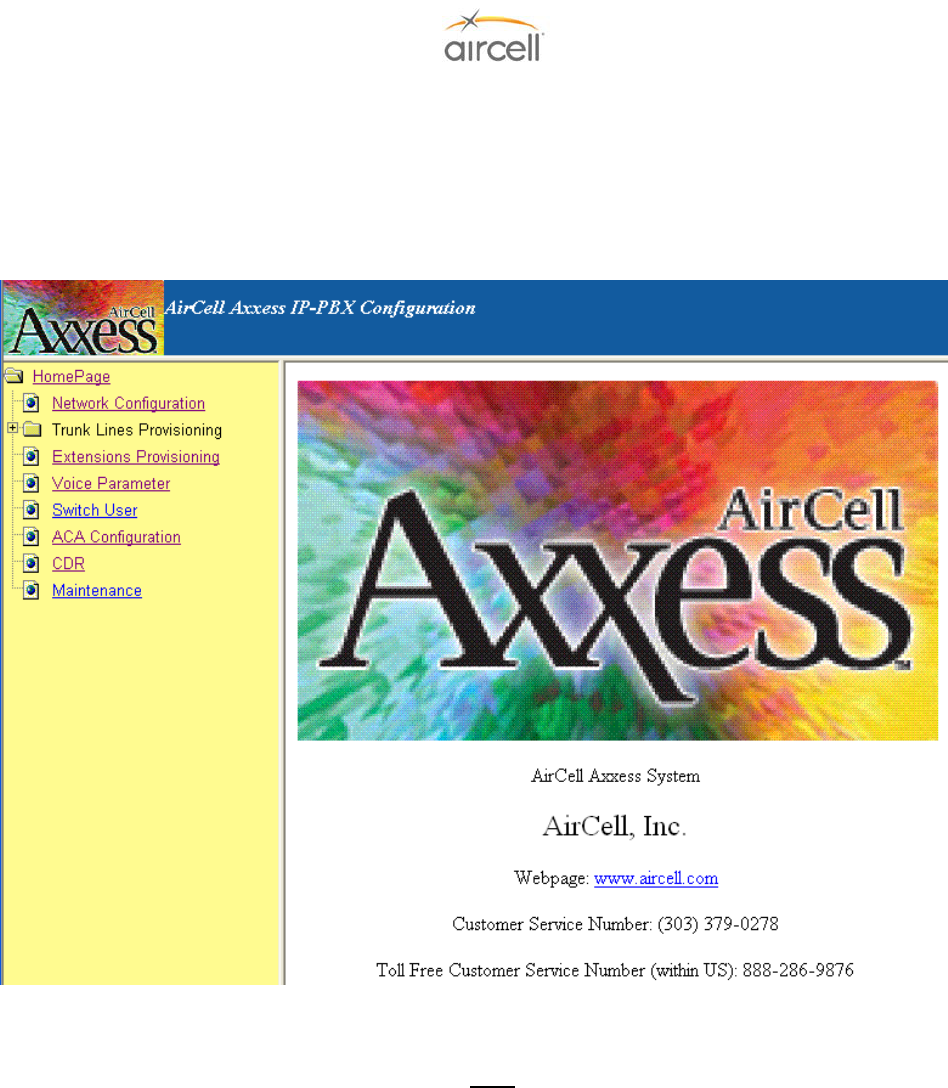
Testing and Setup, Section 4 Page 4-6
Aircell confidential and proprietary D12004-E, March 2010
There are two categories of users and please remember the password is case sensitive!
1. Administrator: Access for Aircell use only.
2. General User: Installer and User access (factory default password for General User is “letmein”)’.
4.8.3. Configuration Menu
After login, the main configuration menu will appear:
Figure 4.3. Configuration Menu Screen
Note
To make a change on the following Configuration Menus, do the following:
1. Use the “Browse” buttons to refresh configuration information as required.
2. Use the “OK” buttons to activate the changes for final save.
3. Use the “Save” button on the Maintenance Menu to final save the changes.
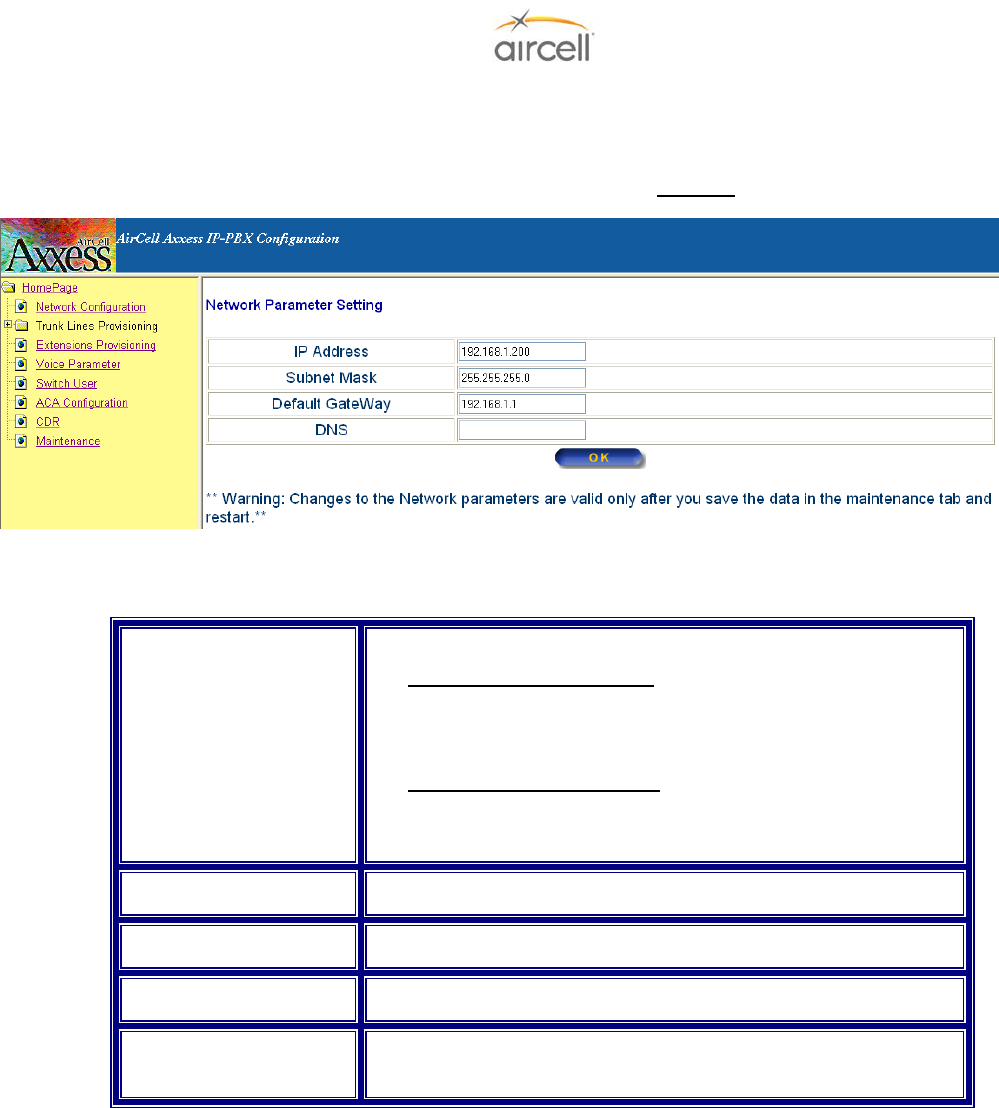
Testing and Setup, Section 4 Page 4-7
Aircell confidential and proprietary D12004-E, March 2010
4.8.4. Network Configuration
On the menu side bar, click Network Configuration and the Network configuration web page will appear.
(Network Configuration has no User Configuration Options; DO NOT change the settings.)
Figure 4.4. Network Configuration Screen
4.8.5. Definitions for the Network Parameters Settings
Dynamic Host
Configuration Protocol
(DHCP) Server
(Default is Disabled)
The IP-PBX will operate in the following two modes:
- 1. DHCP server ENABLED, all field values for Static IP Mode
are not used and IP-PBX will acquire an IP address from the
first DHCP server it finds on the LAN. NOTE: Field values will
be saved in flash memory.
- 2. DHCP server DISABLED, IP address, Subnet Mask,
Default Gateway, Domain Name System (DNS) will need to
be configured (see below). The IP address will be reset to
“192.168.1.200” by default.
IP Address The default value is “192.168.1.200”.
Subnet Mask The default value is “255.255.255.0”.
Default Gateway The default value is “192.168.1.1.”
DNS The default value is blank and the IP-PBX can only support one
(1) DNS Server.
Table 4.1. Network Parameters Settings
Once a change is made, the user will need to press the “OK” button in the Network the Configuration
Menu. Changes of the Network parameters are effective only after they are saved and the IP-PBX
restarted. The users can save changes and restart the IP-PBX in the Maintenance tab.
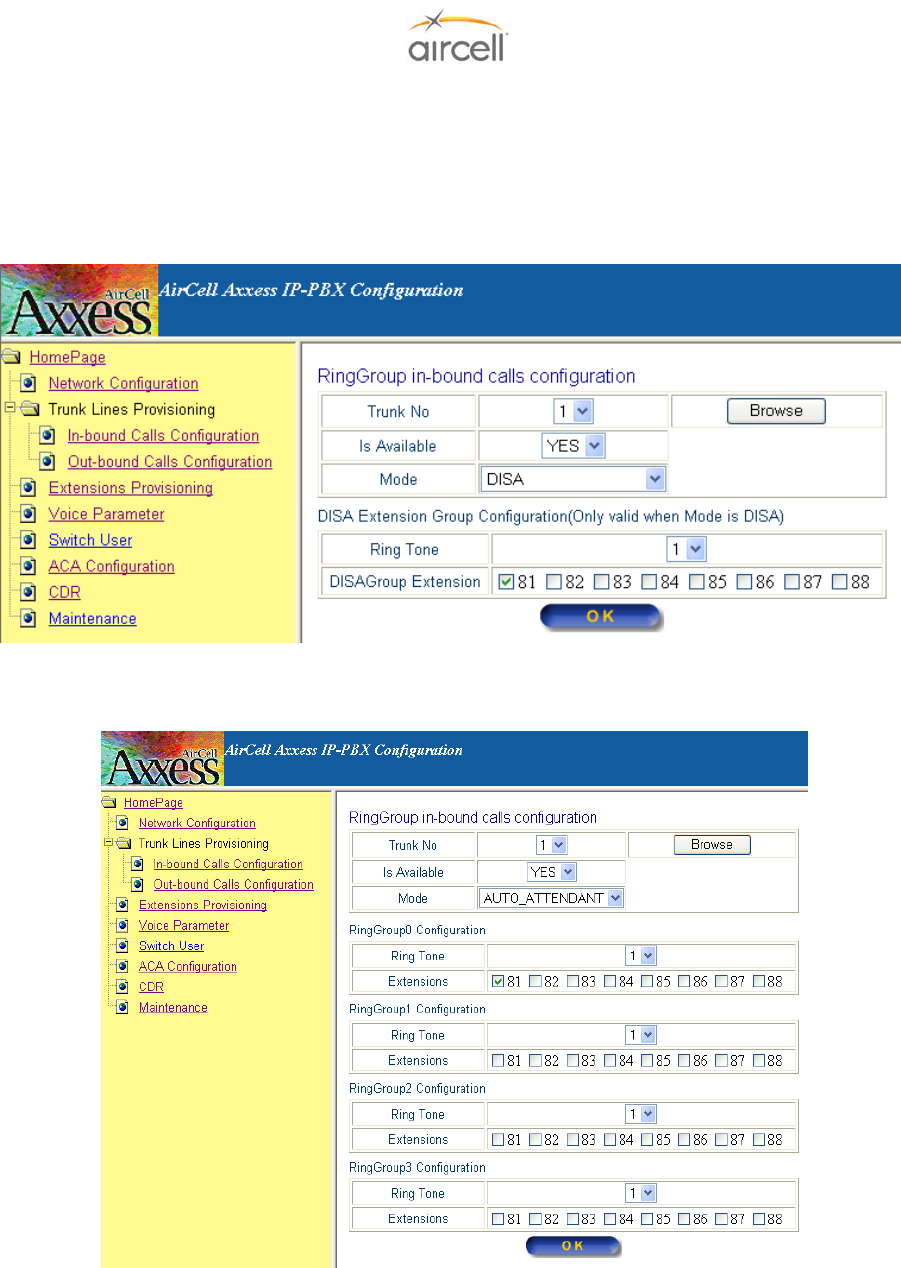
Testing and Setup, Section 4 Page 4-8
Aircell confidential and proprietary D12004-E, March 2010
4.8.6. Trunk Line Provisioning
4.8.6.1. In-bound Call Configuration
On the menu side bar, click “In-bound Calls Configuration”; the following In-bound Calls
Configuration web page will appear:
Figure 4.5. DISA (Direct Inward System Answer) Mode Web Page
Figure 4.6. Auto-Attendant Mode Web Page
Testing and Setup, Section 4 Page 4-9
Aircell confidential and proprietary D12004-E, March 2010
The definitions of all the In-bound Calls Configuration parameters in the Configuration Menu are:
Table 4.2. In-bound Calls Configuration Parameters
AUTO-ATTENDANT Voice Message Option (ST 4200 Revision H and subsequent)
A pre-recorded voice will ask you how to direct your call into the aircraft by selecting an extension
number.
A customizable recorded voice and message can be recorded over the pre-recorded message (the
Aircell pre-recorded voice will ask you how to direct your call into the aircraft by selecting an extension
number).
Press *63 on Handset Extension 81 (only extension 81 can pre-record messages); this will start a
voice menu process. You will be instructed on how to leave a new voice message to help the
incoming caller direct their call.
Procedural steps are:
• Press * 63 then SND on a Handset and instructions will start;
• Press * when asked to start your custom recording;
• Press # then 2 when you are done recording;
• Press End; and
• Call the aircraft to verify your new customized voice message.
Example voice message: “You have reached Aircraft NXXX; if you would like to connect to the cockpit,
press 81; if you would like to connect to the cabin, press 82.”
Trunk # (Trunk # is the
Iridium channel #)
Trunk # will be 1, 2, 3, or 4. The “Browse” button will refresh the following
configuration information of the selected Trunk.
Is Available Status of current Trunk:
“Yes”- Trunk is installed and available.
“No” - Trunk is not installed and unavailable.
Mode
(Note: DISA is Direct
Inward System Answer)
(Default is DISA)
There are two modes for in-bound calling:
1. DISA: The DISA Mode Web Page will show and the ring group will have only
one value -- DISA ring group. This ring group includes 8 extensions maximum.
2. AUTO-ATTENDANT: The Auto_Attendant Web Page will show. There are four
(4) ring groups in this mode and each ring group includes 8 extensions maximum.
User can click the button “OK” to save and update changes of “Mode” and “Is
Available” Configuration.
Ring Tone The Ring Tone will be operative when the Is Available is set to “Yes”. There are
four different types of ring tones in this version (default is “1”).
Ring group Extensions
(Note: the Handset
Extensions 81 to 88 are
identified on the
Handsets.)
The Ring group Extensions will be operative when the Is Available is set to “Yes”.
It can be set by two modes:
1. DISA: There is one Ring group for DISA mode. It is called DISA Ring group.
Check the box of the desired extension to add it to the DISA Ring group and Un-
check the box of the unwanted extension to remove it from the DISA Ring group
(default is “ALL Extensions” checked).
2. AUTO_ATTENDANT: There are four Ring groups for AUTO_ATTENDANT
mode. User can add or remove the extensions included in the Ring group;
however, an extension may only be used in one ring group at a time in the same
Trunk. Ring group changes will be saved after the “OK” button is pushed.
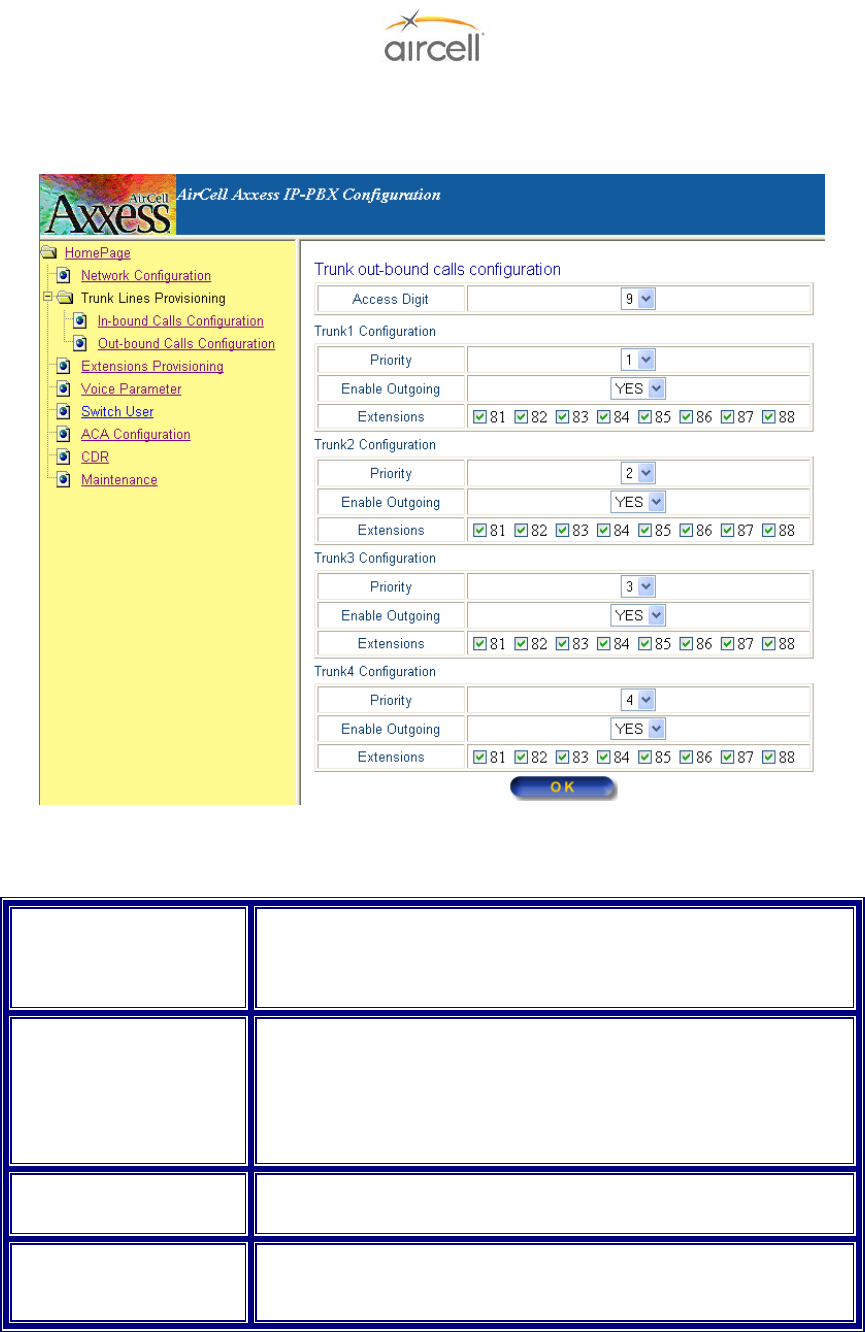
Testing and Setup, Section 4 Page 4-10
Aircell confidential and proprietary D12004-E, March 2010
4.8.6.2. Out-bound Calls Configuration
On the menu side bar, click “Out-bound Calls Configuration”; the Out-bound Calls Configuration
web page will appear.
Figure 4.7. Out-bound Calls Configuration Web Page
The definitions of the Out-bound Calls Configuration parameters in the Configuration Menu are:
Access Digit Numbers 0, 1, 2, 3, 4, 5, 6, 7, 8, or 9 allows calls to be outbound
/gives outbound access call is an outbound call. Otherwise the
current call is inter-com call. Changes are saved after pushing
the button “OK” (default is “9”).
Priority There are four different priorities [1-4] for each Trunk. The priority
1# is the highest and the priority 4# is the lowest and each Trunk
has different priority. If we modify a Trunk with priority 1 to priority
2, then the Trunk with priority 2 will be changed to priority 1
automatically. This rule is used to ensure each Trunk has a
different priority.
Enable Outgoing “Yes”- enabled for outbound
“No” - the opposite (default is “YES”).
Ring Group Extensions Extensions that are included in the Ring Group Extensions will
use this Trunk to make an outbound call. “OK” saves (default is
“ALL EXTENSIONS” checked).
Table 4.3. Out-bound Calls Configuration Parameters
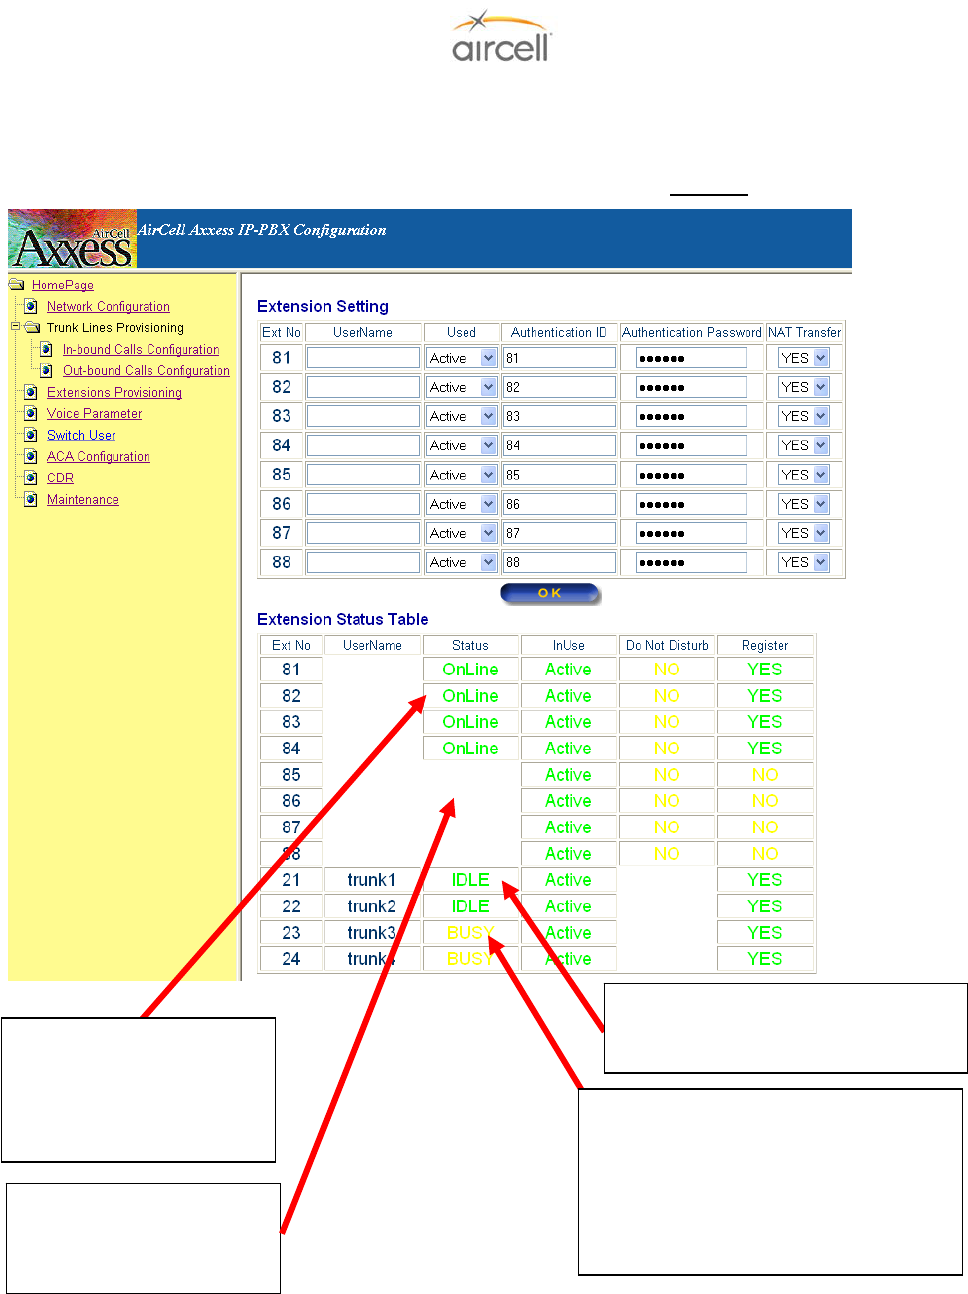
Testing and Setup, Section 4 Page 4-11
Aircell confidential and proprietary D12004-E, March 2010
4.8.6.3. Extension Provisioning
On the menu side bar, click “Extension Provisioning”; the web page Extension Provisioning will
appear.
(Extension Provisioning has no User Configuration Options; DO NOT change settings.)
Figure 4.8. Extension Provisioning Screen
Status OnLine: Shows
Handsets Extensions that
are recognized and
available for use by the
Aircell Axxess PBX.
Status IDLE: Shows Trunk # (Iridium
channel #) is available to the Aircell
A
xxess PBX.
Status BUSY: Shows Trunk # (Iridium
channel #) is not available to the Aircell
Axxess PBX. That channel might be in
use, aircraft does not have a clear view
of sky, service is not activated, or has a
transceiver, coax, or antenna problem.
Status ______: Shows
Handsets Extensions that
are not available to the
A
ircell Axxess PBX.
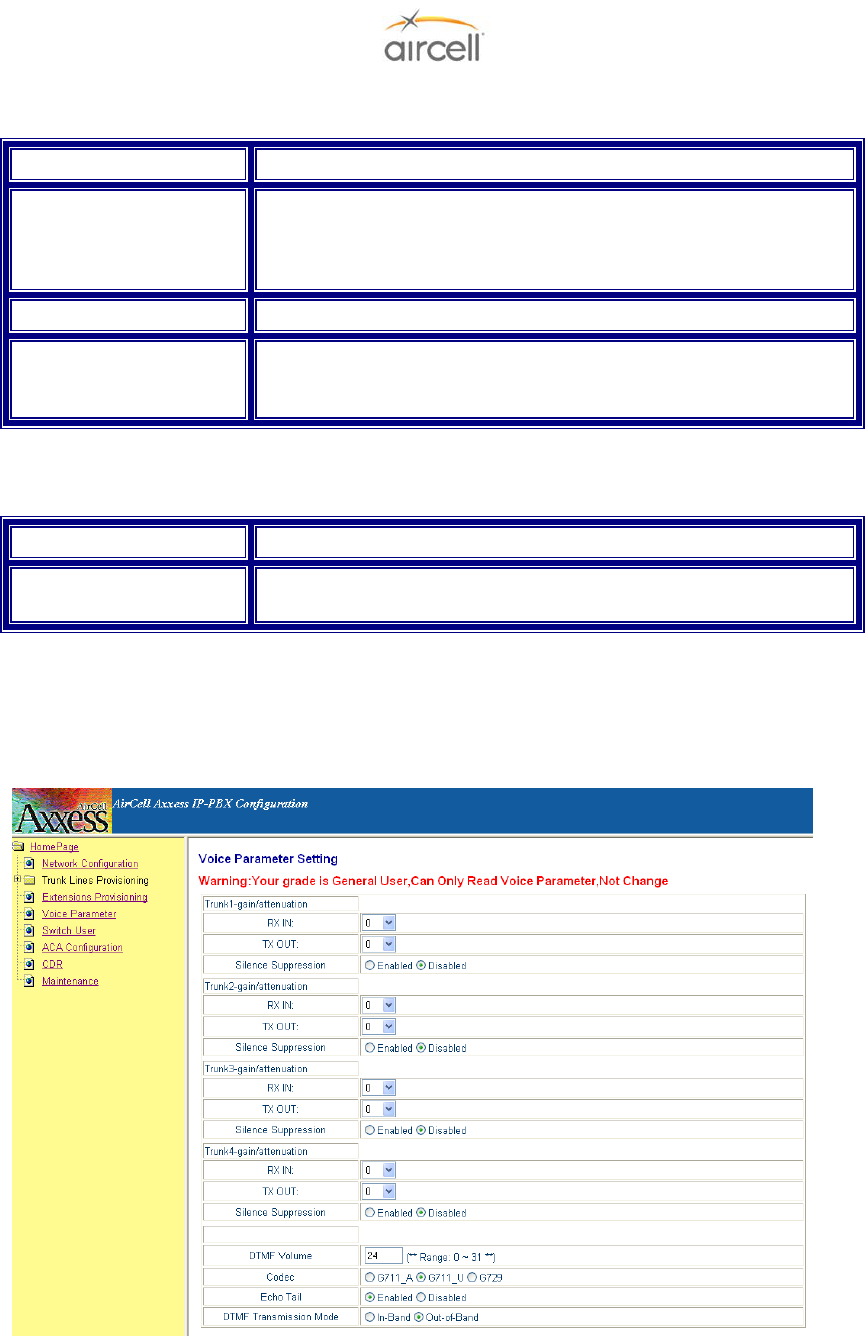
Testing and Setup, Section 4 Page 4-12
Aircell confidential and proprietary D12004-E, March 2010
The definitions of Extension Provisioning configuration parameters in the Configuration Menu are:
Username The username of the current extension.
Used The status of extension. The “Yes” means that the current
extension is enabled and the IP-PBX will accept its register. The
“No” means that the current extension is not enabled and the IP-
PBX will refuse to register.
NAT transfer Not supported now.
Status Table Status Table displays the status of all extensions and Trunks.
Register column states whether the extension or Trunk has
registered successfully.
Table 4.4. Extension Provisioning Configuration Parameters
The definitions of all the SIP Authentication configuration parameter in the Configuration Web are:
Username The field contains the SIP username used for SIP authentication
Authentication Password The field contains the SIP password used for SIP authentication, it
is used together with the above SIP Username
Table 4.5. SIP Authentication Configuration Parameters
4.8.6.4. Voice Parameter
(This area can is only accessible by Aircell and it is highly advisable that these settings stay at
recommended defaults.)
Figure 4.9. Voice Parameter Screen
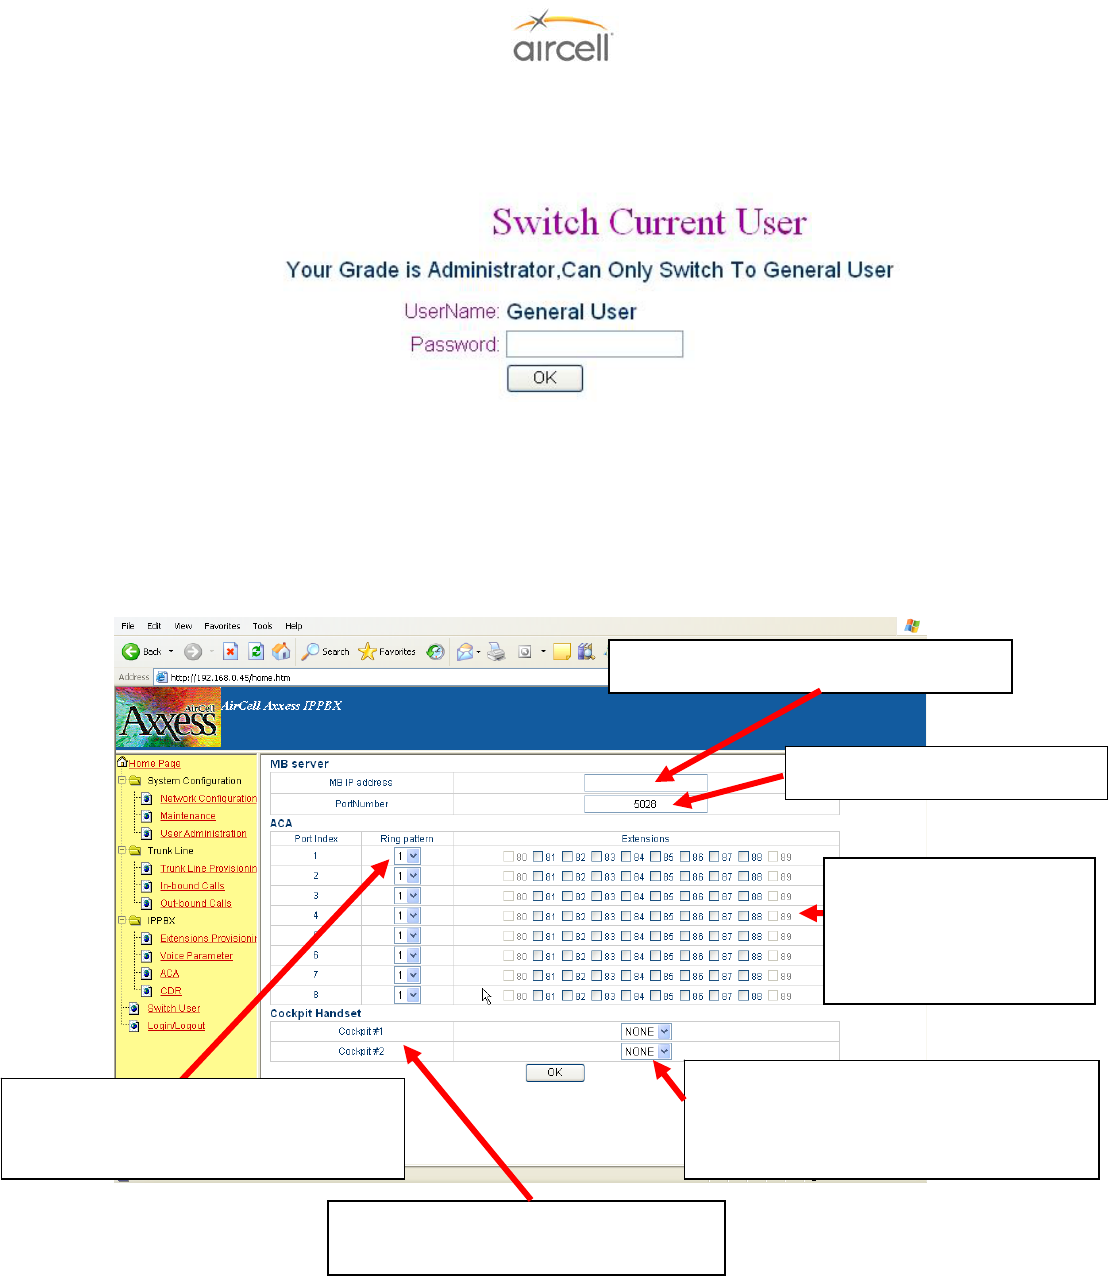
Testing and Setup, Section 4 Page 4-13
Aircell confidential and proprietary D12004-E, March 2010
4.8.6.5. Switch User
On the menu side bar click Switch User, the Switch User web page will appear:
Figure 4.10. Switch Current User Screen
Web Server will tell user which grade is enabled. User inputs the correct password “letmein” for
General User and click the “OK” button.
4.8.6.6. ACA Configuration (Aircell Axxess® Call Alerter)
On the menu side bar, click “ACA Configuration”; the web page ACA Configuration will appear.
Figure 4.11. ACA Configuration Screen
Placing a check in an
Extension Box will cause
that ACA Port to activate
when that extension is
ringing.
Ring Pattern 1 will provide a continuous
connection. Ring Pattern 2 will provide
an open, close, open, etc., connection.
Reflects the wired positions for Pin 13 for
Cockpit 1 and Cockpit 2. (ACA II only).
Cockpit handset(s) selection can be any
selection from extension 80 to 89; the
selected handset(s) will not ring when the
discrete Pin 13 is grounded (ACA II only).
Enter this port number “5028”
Enter this IP address “192.168.1.10
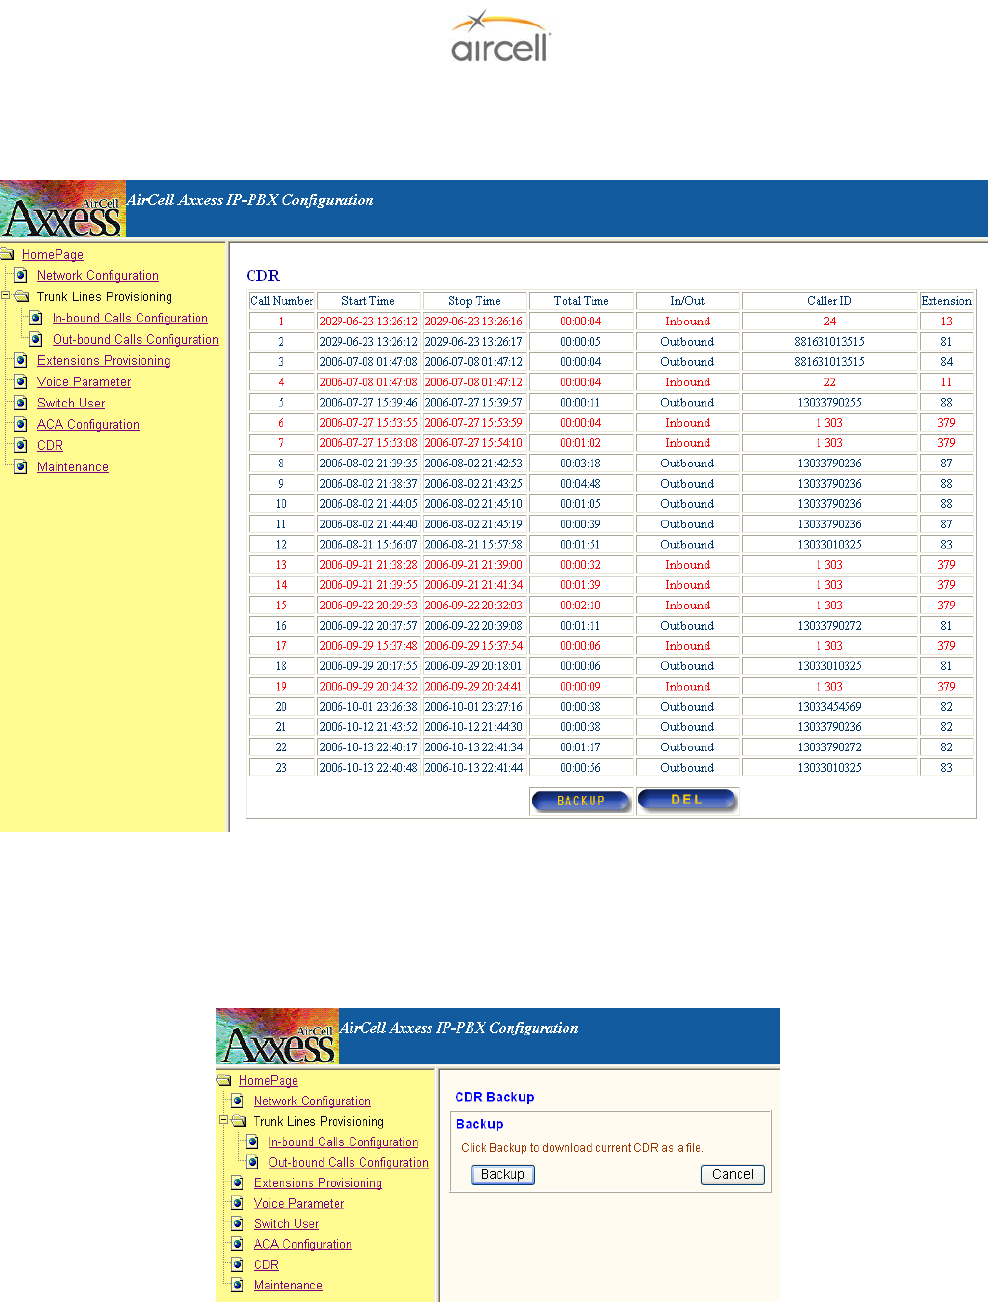
Testing and Setup, Section 4 Page 4-14
Aircell confidential and proprietary D12004-E, March 2010
4.8.6.7. Call Detail Record (CDR)
General User click “CDR” in the menu side bar; the CDR web page will show as follows:
Figure 4.12. CDR Screen
The CDR will show user the Start Time, Stop Time, Total Time, Inbound / Outbound, Caller ID and
Extension of every call (both call out and call in). “DEL” selection: Use this to delete the CDR.
Backup selection: To record all or part of the CDR. This function will convert the data to a text file that
you can View / Cut / Paste / Copy and then use as required.
Figure 4.13. CDR Backup Screen
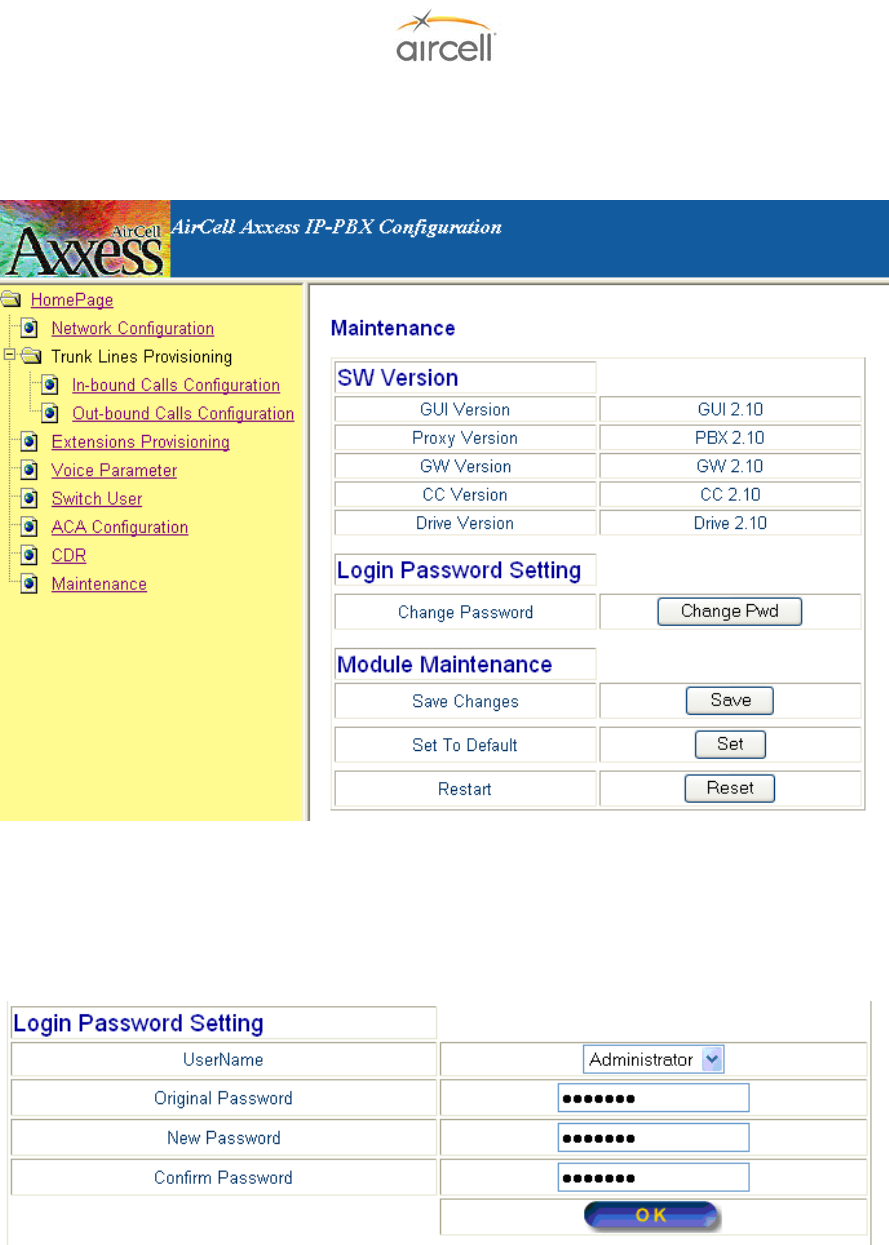
Testing and Setup, Section 4 Page 4-15
Aircell confidential and proprietary D12004-E, March 2010
4.8.6.8. Maintenance
On the menu side bar, click “Maintenance”; the Maintenance web page will appear.
Figure 4.14. Maintenance Screen
It will show user the current version of the IP-PBX software.
User can change web login password when “Change Password” is activated. Web Server will show
the following page.
Figure 4.15. Login Password Screen
Input of correct current password is required before new password change can be made. User grade
Administrator may modify the password of both Administrator and General User grades.
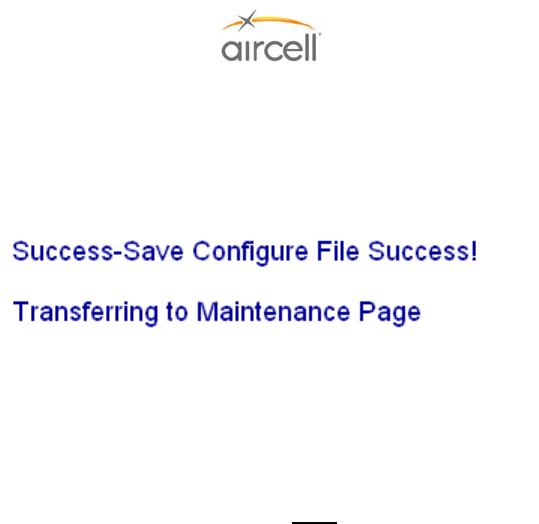
Testing and Setup, Section 4 Page 4-16
Aircell confidential and proprietary D12004-E, March 2010
4.8.6.9. Saving the Configuration Changes
Once a change is made, the user will need to press the “Save” button in the “Maintenance”
Configuration Menu. The IP-PBX will then display the following screen to confirm that the changes
have been saved.
Figure 4.16. Saving the Configuration Change Screen
4.8.6.10. Set to Defaults
User can press the “Set to Defaults” button in the “Maintenance” Configuration Menu. This will set
all the factory defaults back to there original positions.
Note
It is advised NOT to press “Set to Defaults” on the Rev G ST 4200. This will reconfigure the Voice
Parameter settings to undesirable settings.
4.8.6.11. Rebooting the phone remotely
User can press the “Reset” button in the “Maintenance” Configuration Menu. At this point, the user
can re-login to the IP-PBX after waiting for about 70 seconds.
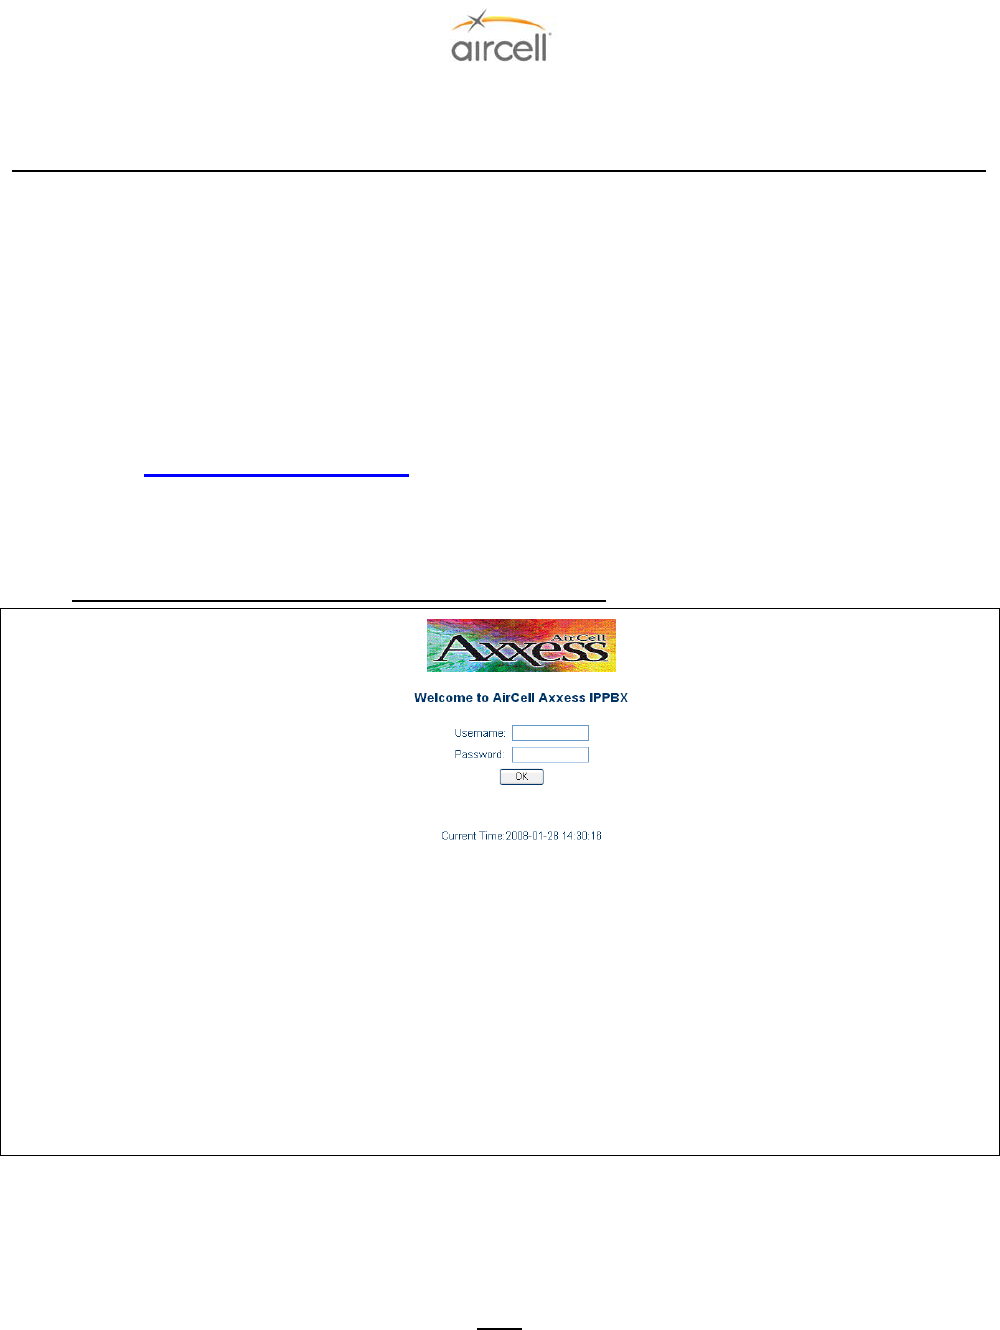
Testing and Setup, Section 4 Page 4-17
Aircell confidential and proprietary D12004-E, March 2010
4.8.7. Configuration with Web Browser (Revision N and subsequent)
This Section (4.8.7. to 4.8.11.11.) is applicable to ST 4200 Revision N and subsequent.
The Aircell Axxess® IP PBX has an:
1. Embedded Web server that will respond to Hyper Text Transfer Protocol (HTTP) GET/POST
requests.
Aircell Axxess IP PBX also has embedded Hyper Text Markup Language (HTML) pages that allow the
user to the Aircell Axxess IP PBX through:
2. A Web browser such as “Microsoft’s Internet Explorer 5.0” Login-Accessing the Web Configuration
Menu.
The IP PBX Web Configuration Menu can be accessed by the following Uniform Resource
Locator (URL):
2http://192.168.1.200/
The default address of IP-PBX is 192.168.1.200.
The IP-PBX will respond with the following login screen:
Figure 4.17. IP_PBX Configuration Login Screen
There are two categories of users and please remember the password is case sensitive!
1. Administrator: Access for Aircell use only.
2. General User: Installer and User access (factory default password for General User is “letmein”)’.
Note
This screen is also utilized for the Switch User feature.
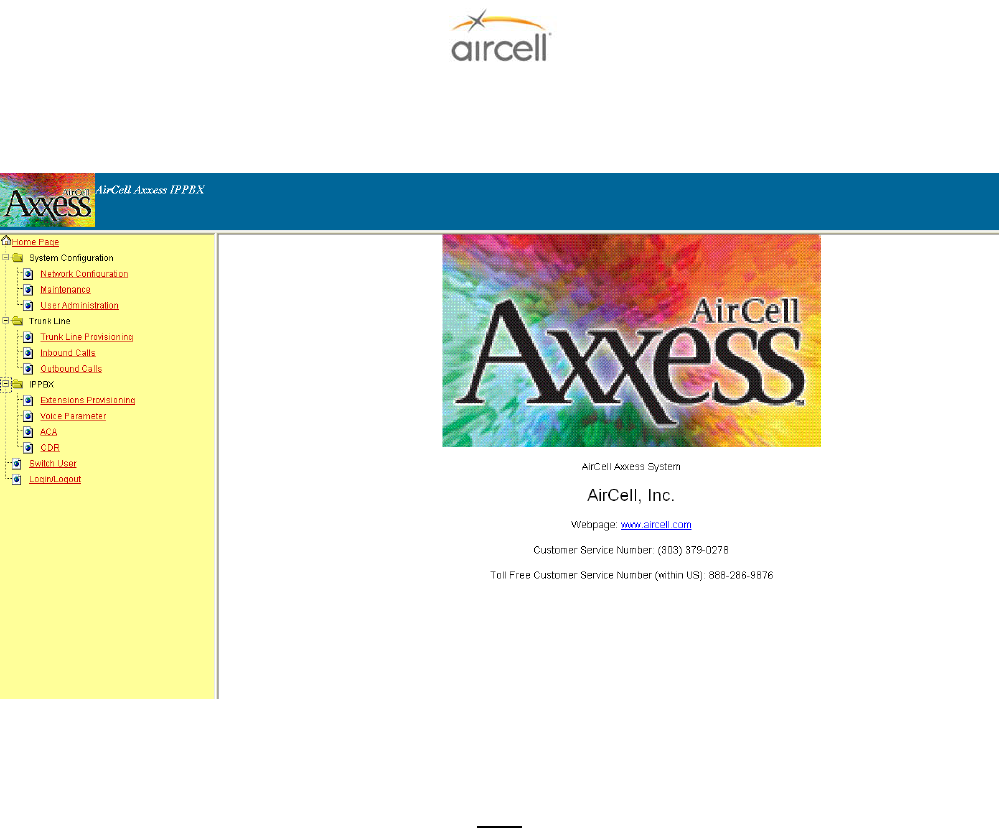
Testing and Setup, Section 4 Page 4-18
Aircell confidential and proprietary D12004-E, March 2010
4.8.8. Configuration Menu
After login, the main configuration menu will appear:
Figure 4.18. Configuration Menu Screen
Note
To make a change on the following Configuration Menus, do the following:
1. Use the “Browse” buttons to refresh configuration information as required.
2. Use the “OK” buttons to activate the changes for final save.
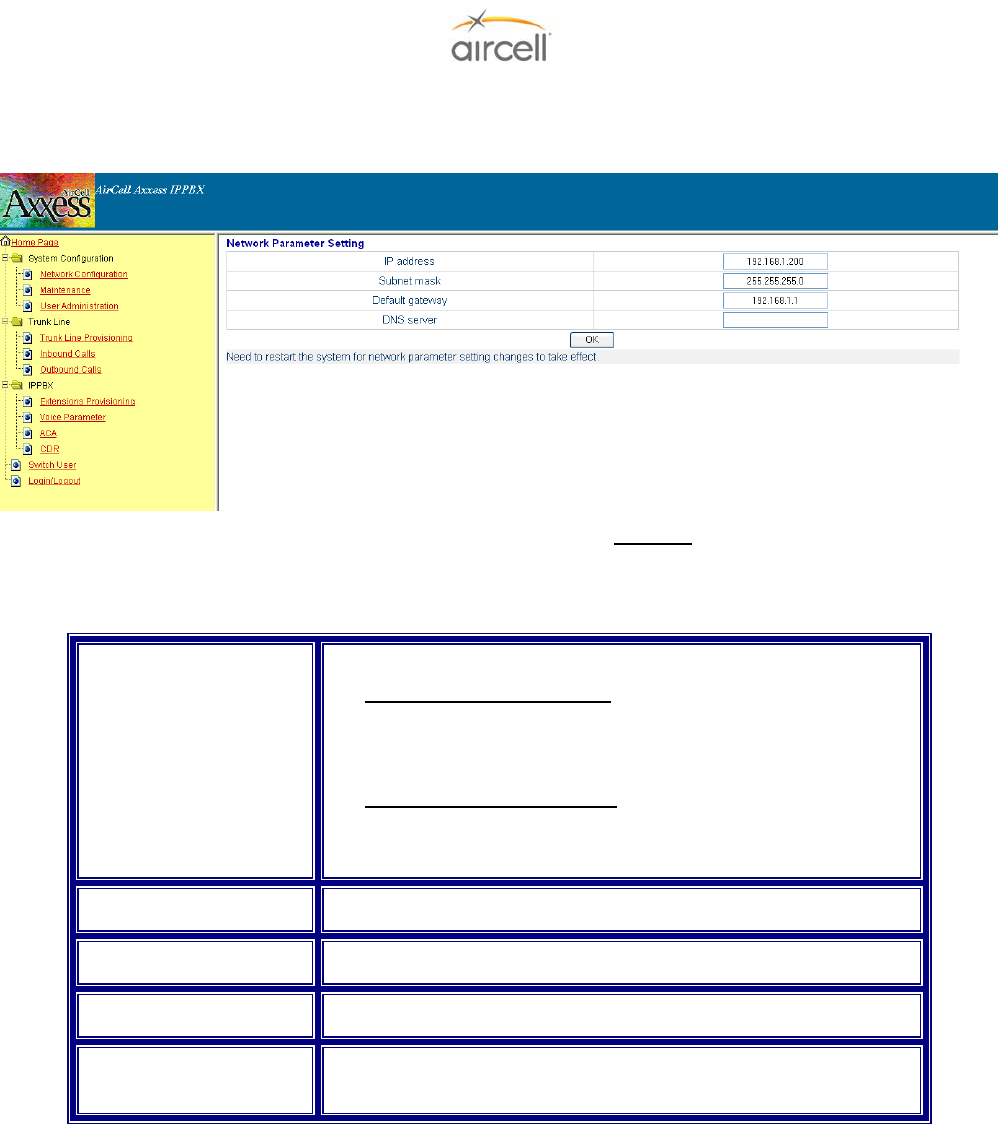
Testing and Setup, Section 4 Page 4-19
Aircell confidential and proprietary D12004-E, March 2010
4.8.9. Network Configuration
On the menu side bar, click Network Configuration and the Network Configuration web page will appear.
(Network Configuration has no User Configuration Options; DO NOT change the settings.)
Figure 4.19. Network Configuration Screen
4.8.10. Definitions for the Network Parameters Settings
Dynamic Host
Configuration Protocol
(DHCP) Server
(Default is Disabled)
The IP-PBX will operate in the following two modes:
- 1. DHCP server ENABLED, all field values for Static IP Mode
are not used and IP-PBX will acquire an IP address from the
first DHCP server it finds on the LAN. NOTE: Field values will
be saved in flash memory.
- 2. DHCP server DISABLED, IP address, Subnet Mask,
Default Gateway, Domain Name System (DNS) will need to
be configured (see below). The IP address will be reset to
“192.168.1.200” by default.
IP Address The default value is “192.168.1.200”.
Subnet Mask The default value is “255.255.255.0”.
Default Gateway The default value is “192.168.1.1.”
DNS The default value is blank and the IP-PBX can only support one
(1) DNS Server.
Table 4.6. Network Parameters Settings
Once a change is made, the user will need to press the “OK” button in Network the Configuration Menu.
Changes of the Network parameters are effective only after they are saved and the IP-PBX restarted.
The users can save changes and restart the IP-PBX in the Maintenance tab.
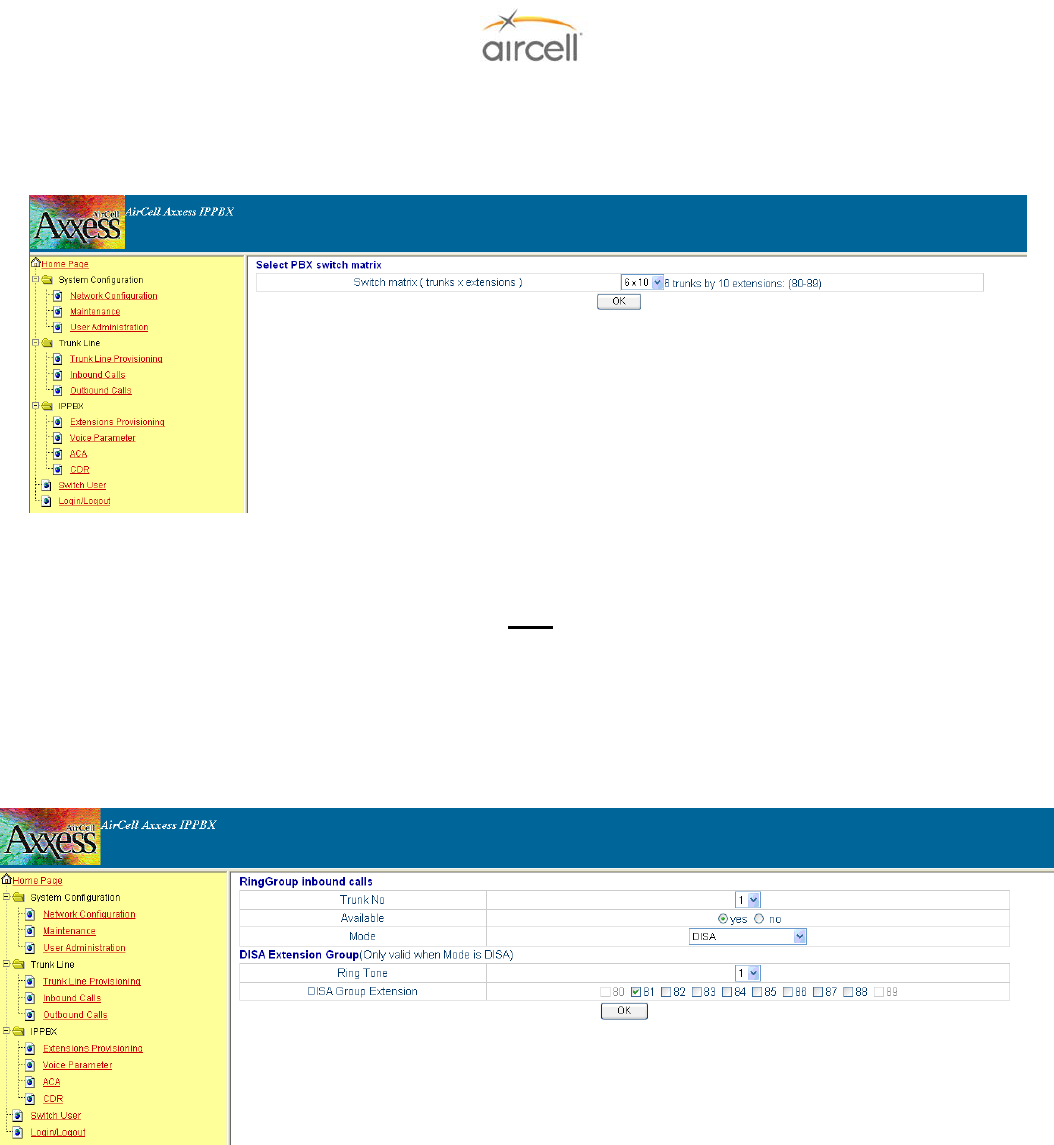
Testing and Setup, Section 4 Page 4-20
Aircell confidential and proprietary D12004-E, March 2010
4.8.11. Trunk Line Provisioning
On the menu side bar, click Trunk Line Provisioning and the Trunk Line Provisioning web page will
appear.
Figure 4.20. Select PBX Switch Matrix Web Page
The Select PBX switch matrix is selectable between 6 trunks x 10 extensions or 8 trunks x 8 extensions.
Note
Select this option first before continuing with other configurations. If you change this setting, you will need to redo
all other configuration settings.
4.8.11.1. In-bound Call Configuration
On the menu side bar, click “In-bound Calls”; the following In-bound Calls Configuration web page
will appear:
Figure 4.21. DISA (Direct Inward System Answer) Mode Web Page
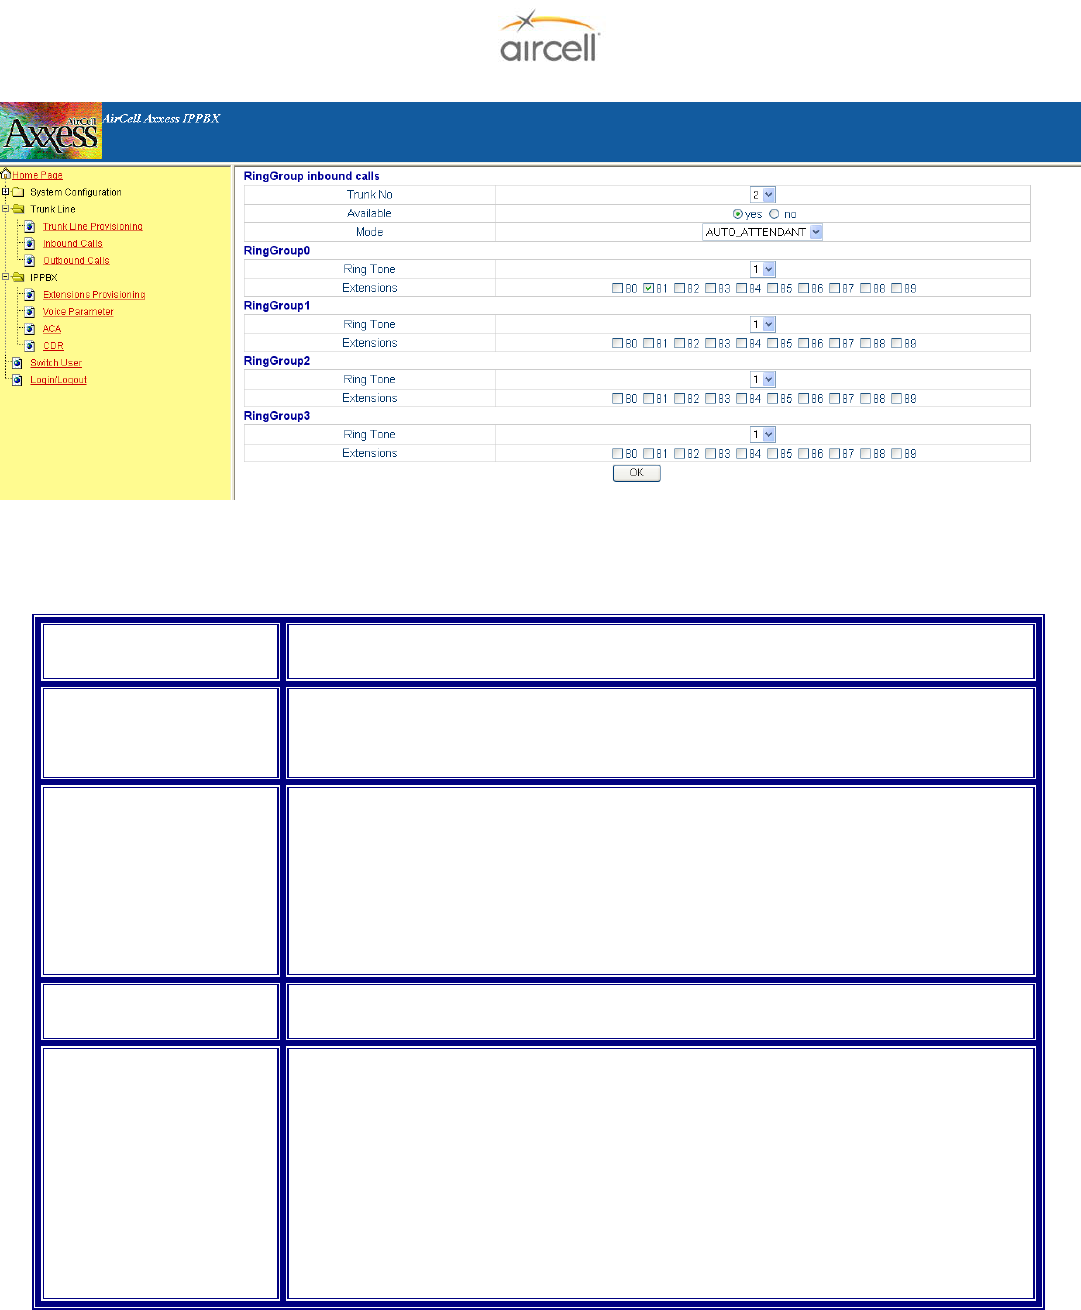
Testing and Setup, Section 4 Page 4-21
Aircell confidential and proprietary D12004-E, March 2010
Figure 4.22. Auto-Attendant Mode Web Page
The definitions of all the In-bound Calls Configuration parameters in the Configuration Menu are:
Table 4.7. In-bound Calls Configuration Parameters
Trunk # (Trunk # is the
Iridium channel #)
Trunk # will be 1, 2, 3, or 4. The “Browse” button will refresh the following
configuration information of the selected Trunk.
Is Available Status of current Trunk:
“Yes”- Trunk is installed and available.
“No” - Trunk is not installed and unavailable.
Mode
(Note: DISA is Direct
Inward System Answer)
(Default is DISA)
There are two modes for in-bound calling:
1. DISA: The DISA Mode Web Page will show and the ring group will have only
one value -- DISA ring group. This ring group includes 8 extensions maximum.
2. AUTO-ATTENDANT: The Auto_Attendant Web Page will show. There are four
(4) ring groups in this mode and each ring group includes 8 extensions maximum.
User can click the button “OK” to save and update changes of “Mode” and “Is
Available” Configuration.
Ring Tone The Ring Tone will be operative when the Is Available is set to “Yes”. There are
four different types of ring tones in this version (default is “1”).
Ring group Extensions
(Note: the Handset
Extensions 81 to 88 are
identified on the
Handsets.)
The Ring group Extensions will be operative when the Is Available is set to “Yes”.
It can be set by two modes:
1. DISA: There is one Ring group for DISA mode. It is called DISA Ring group.
Check the box of the desired extension to add it to the DISA Ring group and Un-
check the box of the unwanted extension to remove it from the DISA Ring group
(default is “ALL Extensions” checked).
2. AUTO_ATTENDANT: There are four Ring groups for AUTO_ATTENDANT
mode. User can add or remove the extensions included in the Ring group;
however, an extension may only be used in one ring group at a time in the same
Trunk. Ring group changes will be saved after the “OK” button is pushed.
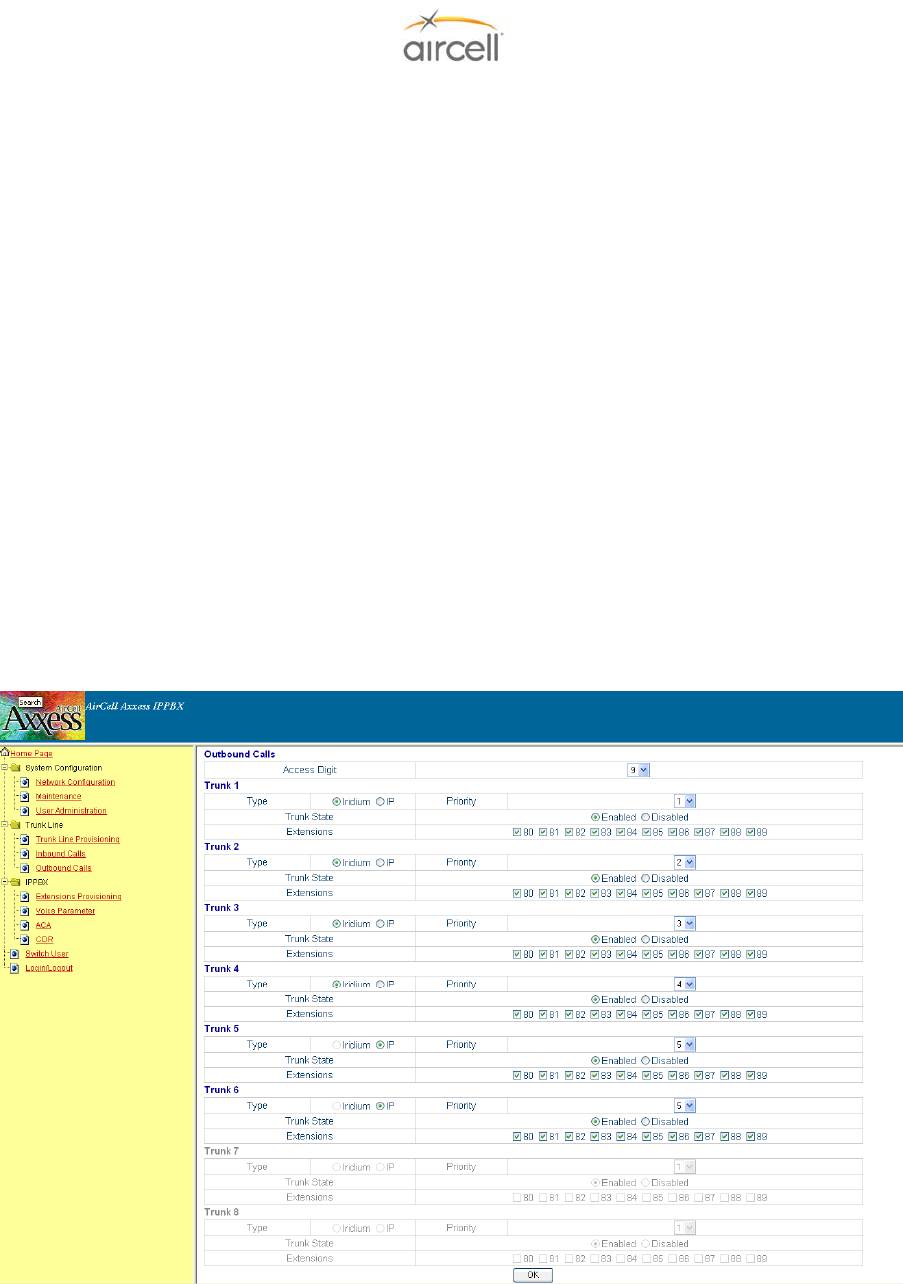
Testing and Setup, Section 4 Page 4-22
Aircell confidential and proprietary D12004-E, March 2010
AUTO-ATTENDANT Voice Message Option (ST 4200 Revision H and subsequent)
A pre-recorded voice will ask you how to direct your call into the aircraft by selecting an extension
number.
A customizable recorded voice and message can be recorded over the pre-recorded message (the
Aircell pre-recorded voice will ask you how to direct your call into the aircraft by selecting an extension
number).
Press *63 on Handset Extension 81 (only extension 81 can pre-record messages); this will start a
voice menu process. You will be instructed on how to leave a new voice message to help the
incoming caller direct their call.
Procedural steps are:
• Press * 63 then SND on a Handset and instructions will start;
• Press * when asked to start your custom recording;
• Press # then 2 when you are done recording;
• Press End; and
• Call the aircraft to verify your new customized voice message.
Example voice message: “You have reached Aircraft NXXX; if you would like to connect to the cockpit,
press 81; if you would like to connect to the cabin, press 82.”
4.8.11.2. Out-bound Calls Configuration
On the menu side bar, click “Out-bound Calls”; the Out-bound Calls Configuration web page will
appear.
Figure 4.23. Out-bound Calls Configuration Web Page
For information regarding Trunks 5-8, refer to Aircell Axxess Satellite Interface Unit Installation Manual P/N
D12694.
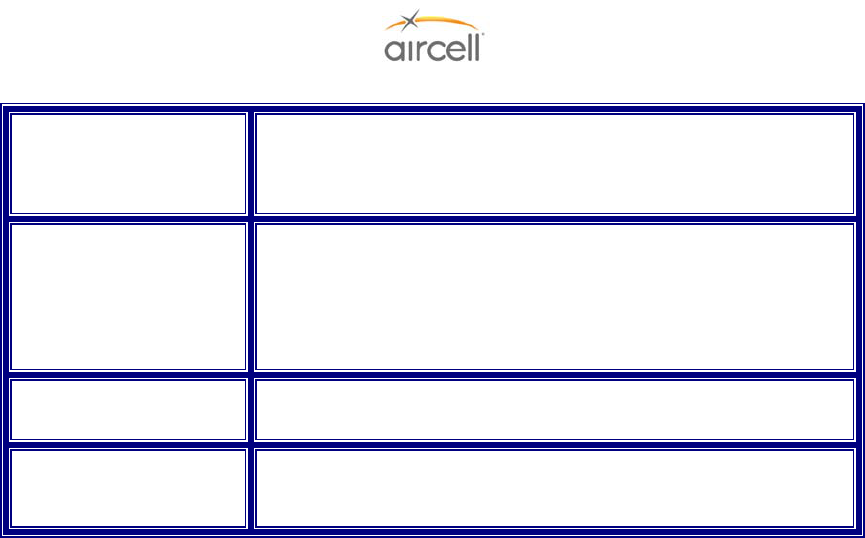
Testing and Setup, Section 4 Page 4-23
Aircell confidential and proprietary D12004-E, March 2010
The definitions of the Out-bound Calls Configuration parameters in the Configuration Menu are:
Access Digit Numbers 0, 1, 2, 3, 4, 5, 6, 7, 8, or 9 allows calls to be outbound
/gives outbound access call is an outbound call. Otherwise the
current call is inter-com call. Changes are saved after pushing
the button “OK” (default is “9”).
Priority There are four different priorities [1-4] for each Trunk. The priority
1# is the highest and the priority 4# is the lowest and each Trunk
has different priority. If we modify a Trunk with priority 1 to priority
2, then the Trunk with priority 2 will be changed to priority 1
automatically. This rule is used to ensure each Trunk has a
different priority.
Enable Outgoing “Yes”- enabled for outbound
“No” - the opposite (default is “YES”).
Ring Group Extensions Extensions that are included in the Ring Group Extensions will
use this Trunk to make an outbound call. “OK” saves (default is
“ALL EXTENSIONS” checked).
Table 4.8. Out-bound Calls Configuration Parameters
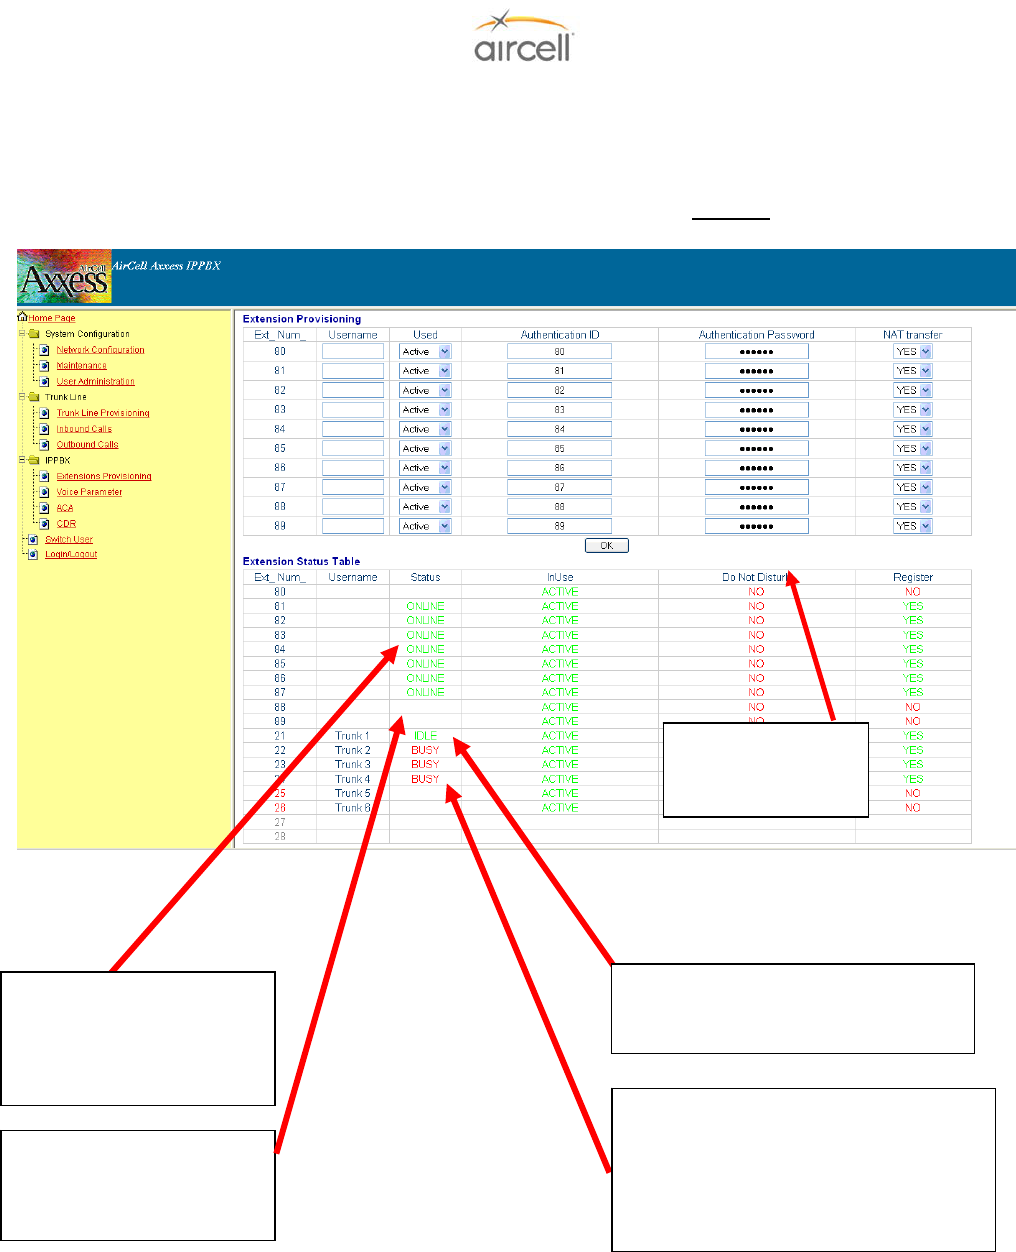
Testing and Setup, Section 4 Page 4-24
Aircell confidential and proprietary D12004-E, March 2010
4.8.11.3. Extensions Provisioning
On the menu side bar, click “Extensions Provisioning”; the web page Extensions Provisioning will
appear.
(Extension Provisioning has no User Configuration Options; DO NOT change settings.)
Figure 4.24. Extensions Provisioning Screen
Status OnLine: Shows
Handsets Extensions that
are recognized and
available for use by the
A
ircell Axxess PBX.
Status IDLE: Shows Trunk # (Iridium
channel #) is available to the Aircell
A
xxess PBX.
Status BUSY: Shows Trunk # (Iridium
channel #) is not available to the Aircell
Axxess PBX. That channel might be in
use, aircraft does not have a clear view
of sky, service is not activated, or has a
transceiver, coax, or antenna problem.
Status ______: Shows
Handsets Extensions that
are not available to the
A
ircell Axxess PBX.
*62 to activate Do
Not Disturb feature
on Handset
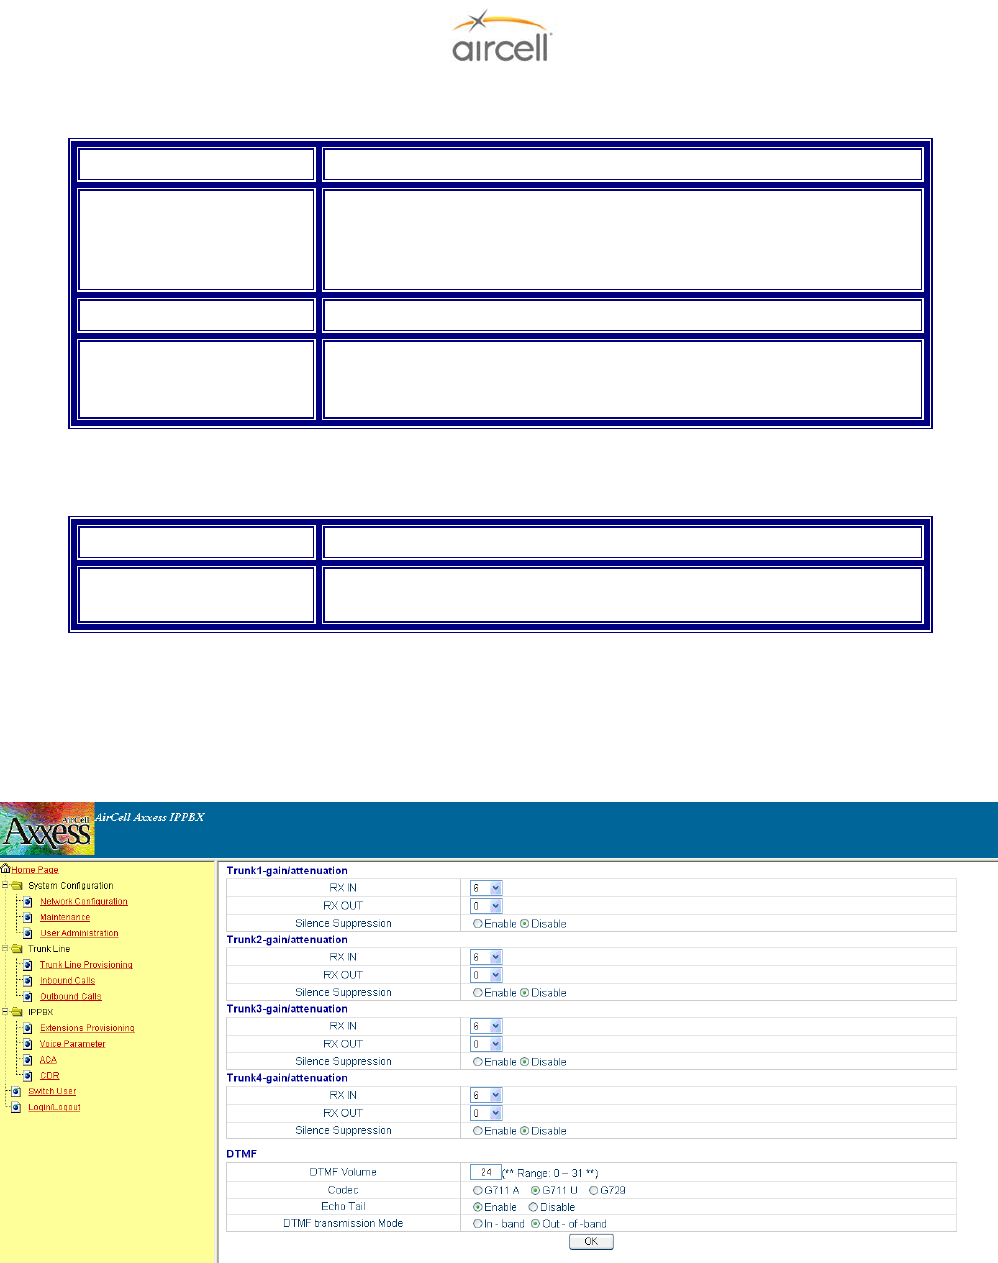
Testing and Setup, Section 4 Page 4-25
Aircell confidential and proprietary D12004-E, March 2010
The definitions of Extension Provisioning configuration parameters in the Configuration Menu are:
Username The username of the current extension.
Used The status of extension. The “Yes” means that the current
extension is enabled and the IP-PBX will accept its register. The
“No” means that the current extension is not enabled and the IP-
PBX will refuse to register.
NAT transfer Not supported now.
Status Table Status Table displays the status of all extensions and Trunks.
Register column states whether the extension or Trunk has
registered successfully.
Table 4.9. Extension Provisioning Configuration Parameters
The definitions of all the SIP Authentication configuration parameter in the Configuration Web are:
Username The field contains the SIP username used for SIP authentication
Authentication Password The field contains the SIP password used for SIP authentication, it
is used together with the above SIP Username
Table 4.10. SIP Authentication Configuration Parameters
4.8.11.4. Voice Parameter
This area can is only accessible by Aircell and is shown for reference only (at the time of publication
ST 4200 Revision L and subsequent).
Figure 4.25. Voice Parameter Screen
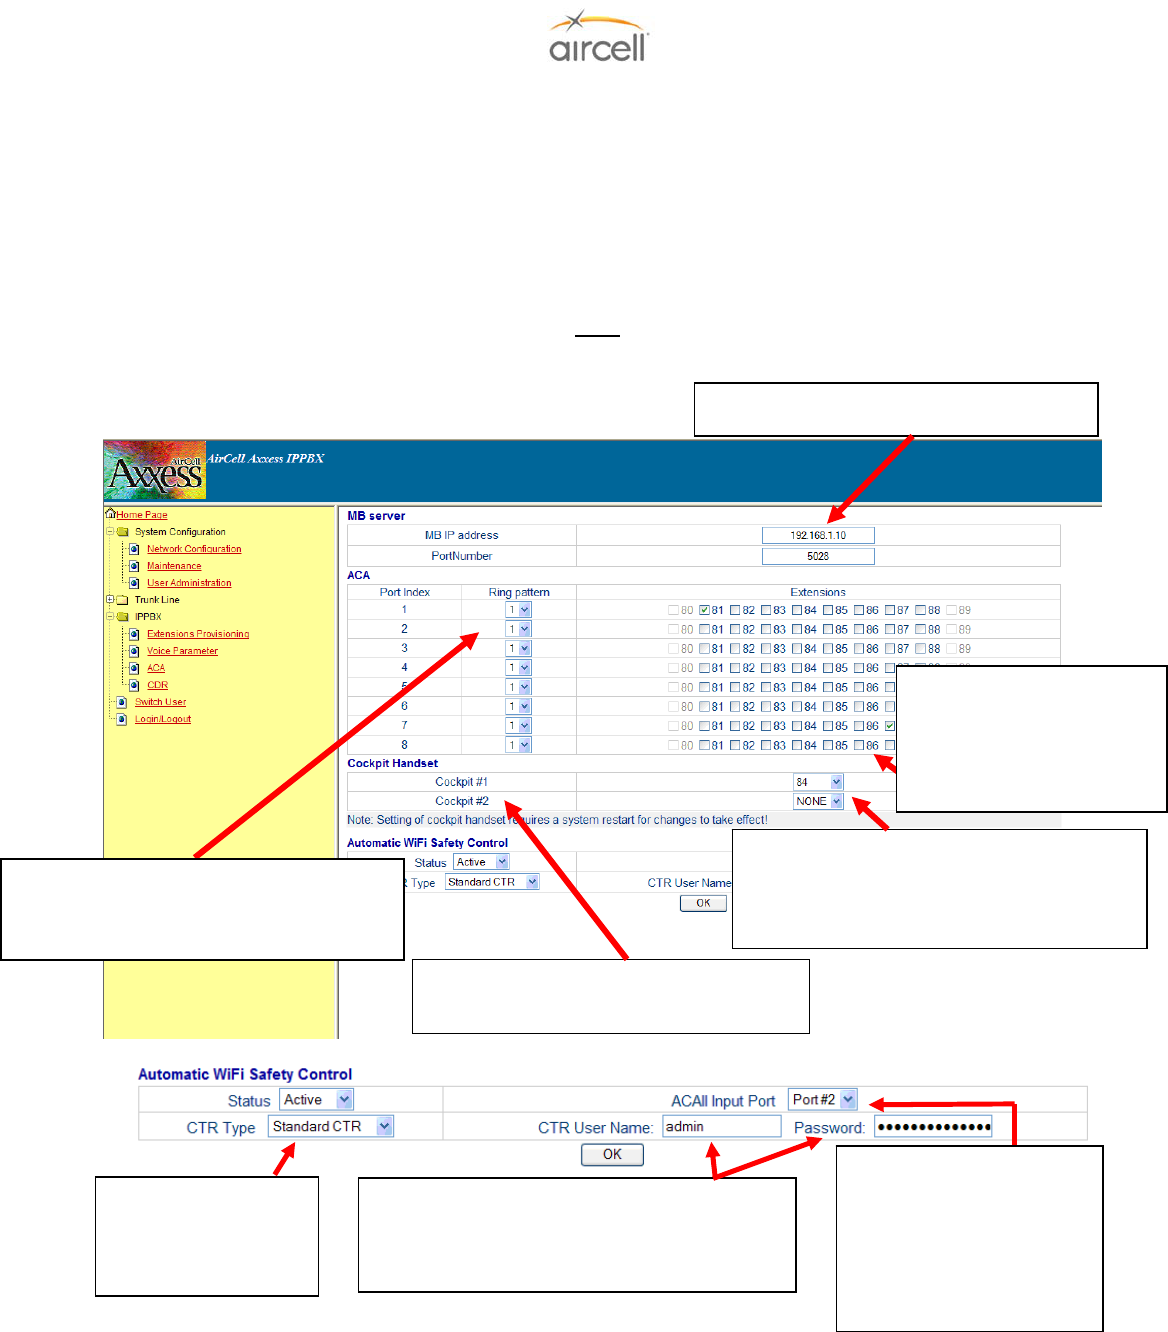
Testing and Setup, Section 4 Page 4-26
Aircell confidential and proprietary D12004-E, March 2010
4.8.11.5. Switch User
On the menu side bar click Switch User, the Main Login page appears.
Web Server will tell user which grade is enabled. User inputs the correct password “letmein” for
General User and click the “OK” button.
4.8.11.6. ACA Configuration (Aircell Axxess® Call Alerter)
Note
ST 4200 Revision M and subsequent are required for ACA II ringer disable functions.
Figure 4.26. ACA Configuration Screen
Placing a check in an
Extension Box will cause
that ACA Port to activate
when that extension is
ringing.
Ring Pattern 1 will provide a continuous
connection. Ring Pattern 2 will provide
an open, close, open, etc., connection.
Enter this IP address “192.168.1.10:5028”
Reflects the wired positions for Pin 13 for
Cockpit 1 and Cockpit 2. (ACA II only).
Cockpit handset(s) selection can be any
selection from extension 80 to 89; the
selected handset(s) will not ring when the
discrete Pin 13 is grounded (ACA II only).
Only select “Standard
CTR” for either the
Standard CTR or the
Low Power CTR.
This is the same username and password
used to enter the CTR setup screens; Aircell
default is User name “admin” and Password
“*aircell1*.
Reflects the wired position
Pin 13 (ISO_IN1) for Port
1 and Pin 12 (ISO_IN2)
for Port 2 (ACA II only).
When the corresponding
Pin is grounded, WiFi will
be disabled.
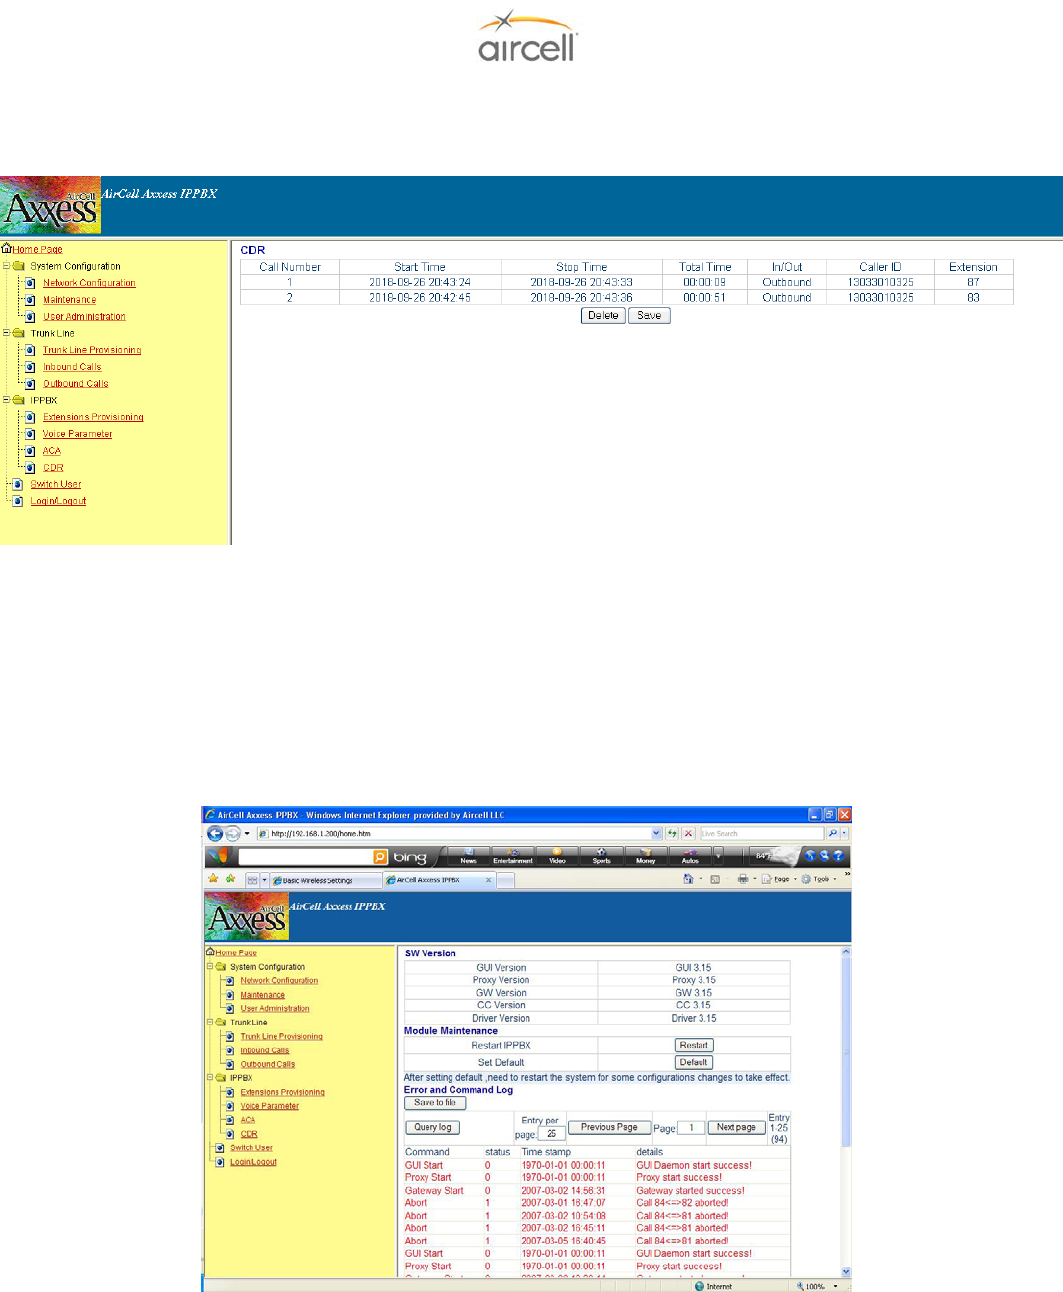
Testing and Setup, Section 4 Page 4-27
Aircell confidential and proprietary D12004-E, March 2010
4.8.11.7. Call Detail Record (CDR)
General User click “CDR” in the menu side bar; the CDR web page will show as follows:
Figure 4.27. CDR Screen
The CDR will show user the Start Time, Stop Time, Total Time, Inbound / Outbound, Caller ID and
Extension of every call (both call out and call in). “Delete” selection: Use this to delete the CDR.
Save selection: To record all or part of the CDR. This function will convert the data to a text file that
you can View / Cut / Paste / Copy and then use as required.
4.8.11.8. Maintenance
On the menu side bar, click “Maintenance”; the Maintenance web page will appear.
Figure 4.28. Maintenance Screen
It will show the User the current version of the IP-PBX software.

Testing and Setup, Section 4 Page 4-28
Aircell confidential and proprietary D12004-E, March 2010
4.8.11.9. Set to Defaults
User can press the “Set to Defaults” button in the “Maintenance” Configuration Menu. This will set
all the factory defaults back to there original positions.
Note
It is advised NOT to press “Set to Defaults” on the Rev G ST 4200. This will reconfigure the Voice
Parameter settings to undesirable settings.
4.8.11.10. Rebooting the phone remotely
User can press the “Restart” button in the “Maintenance” Configuration Menu. At this point, the
user can re-login to the IP-PBX after waiting for about 60 seconds.
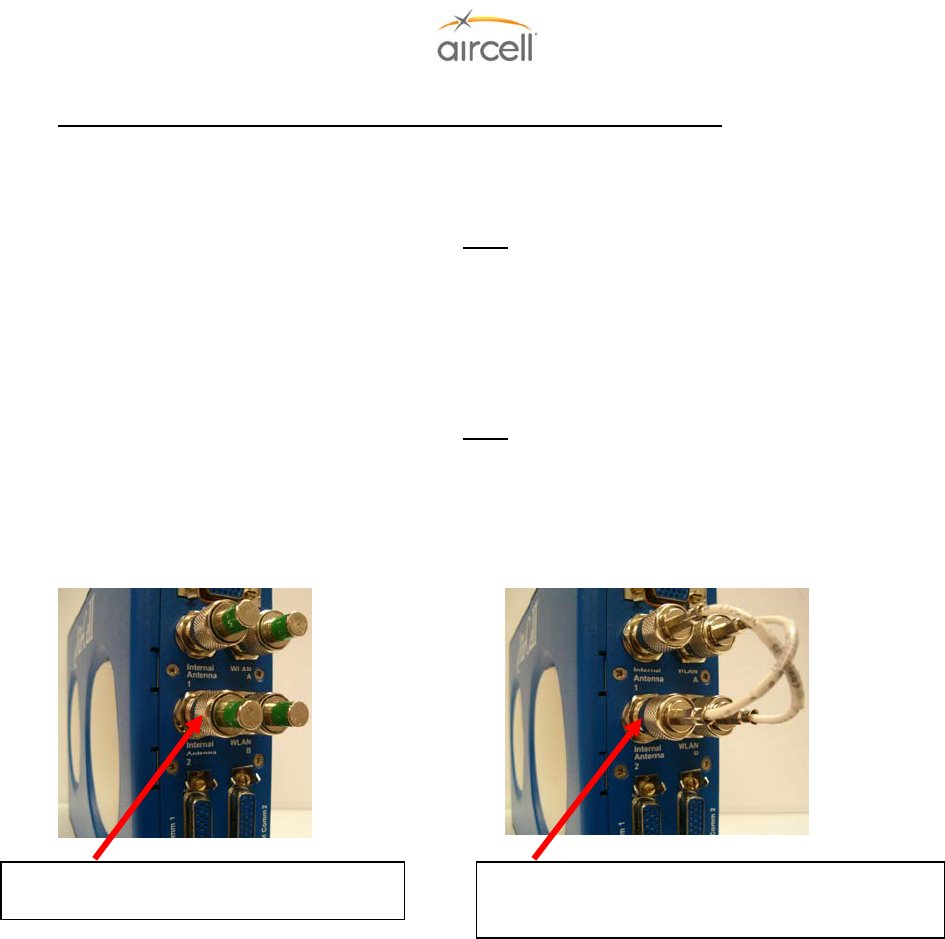
Testing and Setup, Section 4 Page 4-29
Aircell confidential and proprietary D12004-E, March 2010
4.9. Aircell Axxess® CTR (router) Configuration and Setup via PC interface
The Aircell Axxess CTR is the link for wired Handsets, wireless Handsets, PCs and other wireless
devices to communicate with the ST 4200 PBX unit.
Note
This Section is shown only as a reference on how to activate and the FAA approval recommendations
that may be required.
WiFi is noted in this manual for provisioning details. Product expansion may include such items as WiFi
laptop and WiFi SIP handset connectivity.
Note
WiFi is not activated until the following procedures are followed.
1. This product is WiFi capable with the installation of two (2) P/N P12017 jumper coax assemblies (TNC to
TNC) for the use the Internal WiFi Antennas, or connection of WLAN A and B connecters to External
Antennas for optional External Antenna Use.
Figure 4.29. WiFi Connections
2. The completion of the proper FAA approval will be required for each aircraft when the Standard Power
CTR (P/N P12083) (less than 100 mW) WiFi is activated. Requirements of the applicable FARs may
stipulate that proper DER engineering documents (FAA Form 8110-3) be supplied or that the installation
be performed in accordance with an acceptable STC. A Flight Manual Supplement may also be required
that may place limitations of WiFi use during certain flight profiles. The proper approval is the
responsibility of the installing agency prior to activating and using WiFi onboard an aircraft.
OR
3. The completion of the proper FAA approval will be required for each aircraft when the Low Power CTR
(P/N 12083-001) (less than 25 mW) WiFi is activated. It may be possible to install a Low Power CTR on
a FAA Field Approval 337 document. Requirements of the applicable FARs may stipulate that proper
DER engineering documents (FAA Form 8110-3) be supplied. A Flight Manual Supplement may also be
required that may place limitations of WiFi use during certain flight profiles. The proper approval is the
responsibility of the installing agency prior to activating and using WiFi onboard an aircraft. Please
contact your local FAA office for guidance on obtaining a Field Approval 337 for Low Power CTR
installation.
2 P/N P12017 coax assemblies shown installed, (TNC to
TNC), Internal Antenna 1 & 2 to WLAN A & B for Internal WiFi
Antenna use.
4 P/N P12284 TNC 50 ohm Load Plugs shown
installed if WiFi is not re
q
uired.
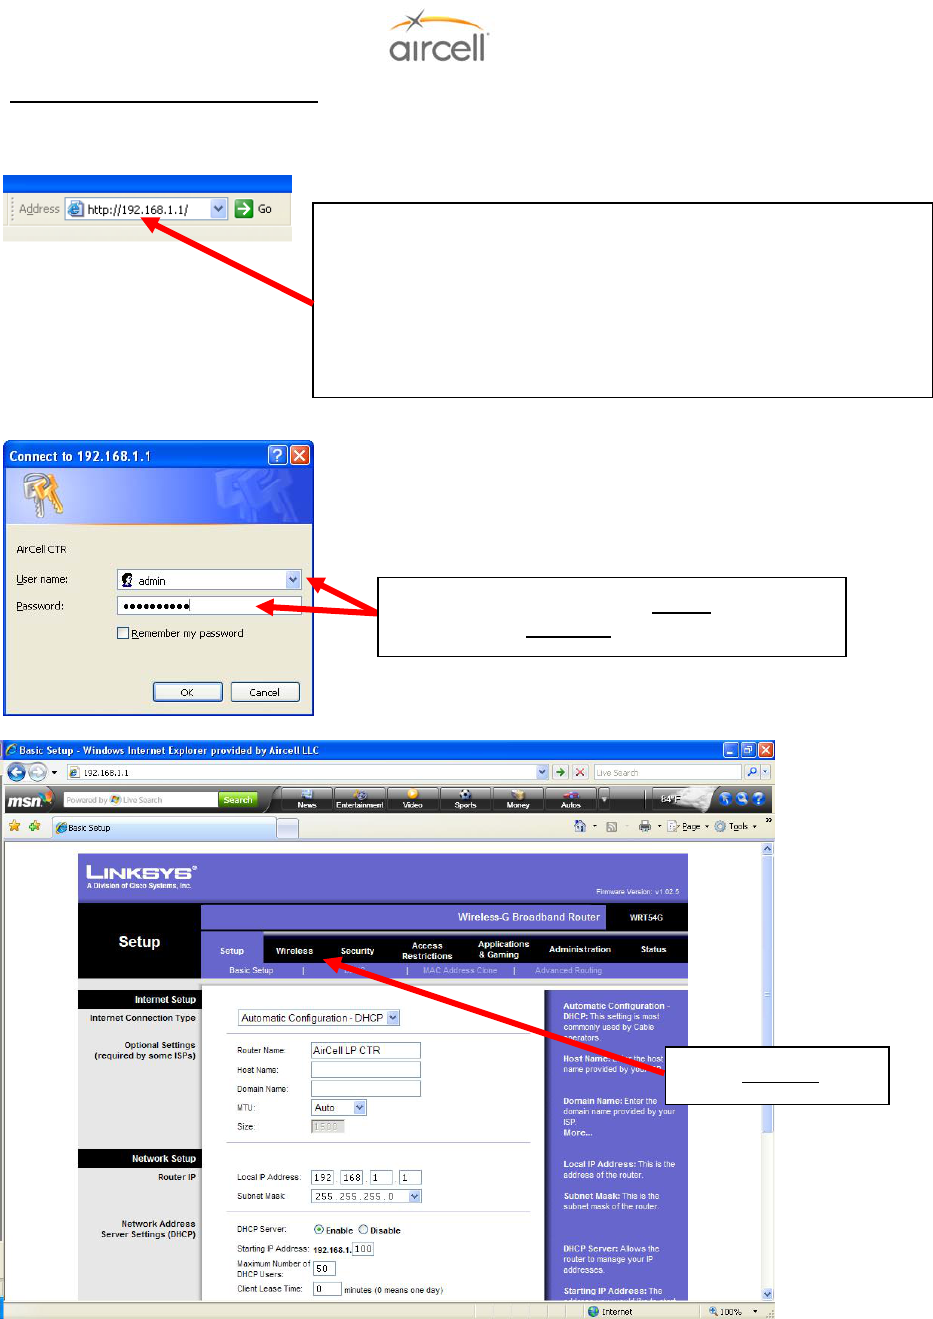
Testing and Setup, Section 4 Page 4-30
Aircell confidential and proprietary D12004-E, March 2010
4. CTR WiFi activation instructions
To access the CTR WiFi router setup page, use the same procedures and RJ-45 connection as
described in Section 4.8. of this Manual. Note: you can not connect to this page via WiFi.
Figure 4.30. WiFi Activation Screens
Log in using User name admin and
password *aircell1* “case sensitive!”
Select Wireless Tab
Using a Web browser such as “Microsoft’s Internet Explorer
5.0”, login to access the Web Configuration Menu.
The CTR Router Web Configuration Menu can be
accessed by the following URL:
http://192.168.1.1/
The default address of the CTR router is 192.168.1.1.
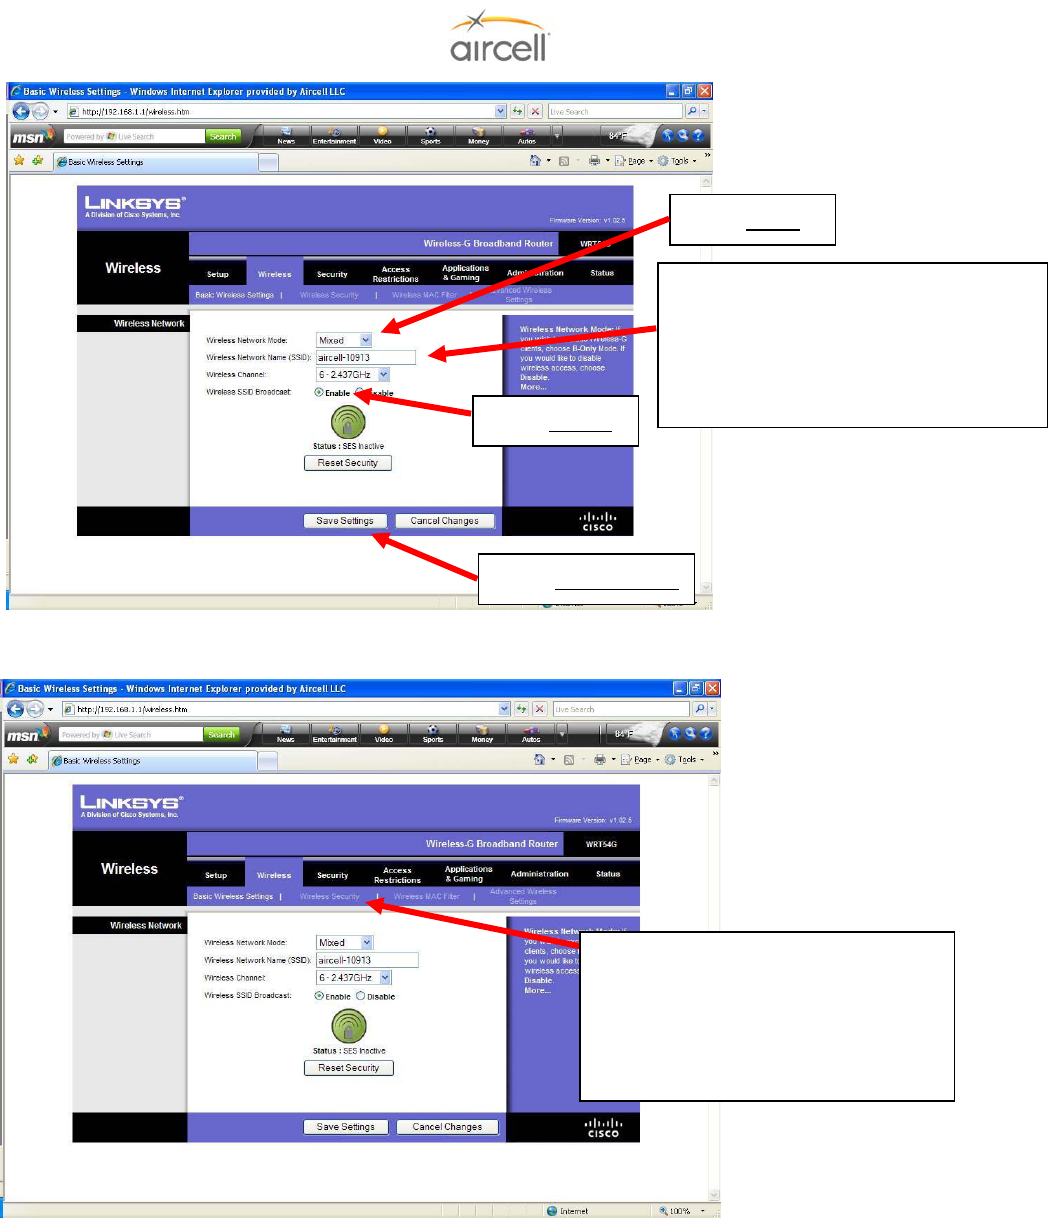
Testing and Setup, Section 4 Page 4-31
Aircell confidential and proprietary D12004-E, March 2010
Figure 4.31.A. WiFi Tab Activation Screen
Figure 4.31.B. WiFi Security Activation Screen
When finished, exit the Web Browser.
If Wireless Security is desired, select
this tab and proceed with caution.
Read all displayed instructions. If
Security setting is forgotten, the CTR
may need to be returned to Aircell for
the default settings to be restored.
Select Enable
Select Save Settings
If you choose to rename your SSID, no
spaces are permitted; sample rename is
Aircell-NXXX. Make note of this name;
this is now your Wi-Fi hotspot SSID
name (do not use spaces in the SSID
name).
Select Mixed

Testing and Setup, Section 4 Page 4-32
Aircell confidential and proprietary D12004-E, March 2010
4.10. Aircell Axxess® Handset Setup, Menus and Operational Checkout Guide
Part A: Wired SIP Handset Setup
The only handset setup that is required is to set up each Handset for to its own extension Number. Eight (8)
extensions (ST 4200 Revision N and subsequent will support ten (10) extensions) are available and are
identified as Extension 81 to 88 (or 80 to 89 for ST 4200 Revision N and subsequent):
• The Handset display will show the existing Extension Number.
• Handsets are shipped with a default extension set at 81.
• Each Handset must be assigned a unique Extension Number.
• To properly set up the PBX features as described in Section 4.8., the Handset will need to first be
identified with their own Extension Numbers.
• When replacing a Handset you will need to change the replacement Handsets Extension Number to the
same Extension Number as the removed Handset (if the Extension Number is not known, look at the
other installed Handsets to see what Extension Numbers might be available for use). It is advisable to
verify how the Customer may need their Extensions Numbers set up.
SIP Handset Extension Change Procedure
1. From the Main Display, press the FNC key, then the 4 key.
2. Use the up and down keys to select Admin Configuration from the Setup Menu, press SND.
3. Enter password “1234” using Handset key pad and press SND (password # entry is slow to respond,
enter a # and pause for the “X” to display before entry of next #)
4. Use the up and down keys to select the Extension Number option from the Admin Configuration
Menu; press SND.
5. Enter STO to edit Extension #, enter new # and press SND. The New Extension # will now display.
6. Press END to exit back to Main Display.
7. Verify New Extension # is still displayed.
Note
After the Handset Extensions are changed, the following may be required for the PBX to recognize the new
Handset Extension Numbers.
Note
For the following Display screens, whenever a FCN key and a numeric key are required, press the FCN key first,
then press the numeric key .
Please cycle the Aircell Axxess System power, or disconnect and reconnect the Handset connectors.

Testing and Setup, Section 4 Page 4-33
Aircell confidential and proprietary D12004-E, March 2010
Part B: Aircell WiFi SIP Handset Setup
NOTE:
This handset requires Aircell CTR part number P12083 Rev L or later, or Aircell CTR part number
P12083-001 Rev B or later.
Pressing SND (green key) for one (1) second will power up the handset.
Pressing END (red key) for ten (10) seconds will power off the handset.
1. If the Handset has already registered with the PBX, continue with step 2; otherwise perform the following
sub-steps:
a. Press “FCN 4” to bring up the setup menu of the Handset.
b. Press “2” or using the “▲” and “▼” keys select “2: admin configuration” from the list, press
“SND”.
c. Enter the password “000000” (6 zeros) (refer to Display 30).
d. Verify that the display shows “XXXXXX” and you may need to press SND to proceed.
e. Select option 2 “Network” (refer to Display 31) by pressing “2” or using up/down arrows to
highlight Network and press “SND”.
f. Select option 1 “Profile” (refer to Display 32) by pressing “1” or using up/down arrows to highlight
Profile (refer to Displays 33-35).
g. To scan for AP, use up/down arrows to select an empty profile, then press “SND” (you may need
to press CLR to first delete all and then rescan).
h. Use the up/down arrows to highlight the desired SSID of the CTR connected to the ATP, then
press “SND” to select.
i. Cycle power by pressing and holding END until the screen goes blank and then press SND and
verify that the handset registers with the PBX.
2. Verify the default extension is set to 81. If not, perform the following sub-steps:
a. Press “FCN 4” to bring up the setup menu of the Handset.
b. Press “2” or using the “▲” and “▼” keys select “2: admin configuration” from the list, press
“SND”.
c. Enter the password “000000” (6 zeros).
d. From the Admin Configuration menu, select option 3 “SIP Account” (refer to Display 36).
e. Highlight “User name” and press STO to edit.
f. Use FCN key to display “123” on the screen, press CLR to delete characters, and then enter
your desired extension number (for example, 81-88).
g. Press STO to save.
h. Repeat for “User number” (refer to Display 37).
i. Press down and verify that the User password is “1234”. If not, change to the User password to
“1234” and press STO to save.
j. If any changes are made press SND to save.
3. From the Admin Configuration menu, select option 4 “SIP Server” (refer to Display 38) and verify the
following:
a. Press “FCN 4” to bring up the setup menu of the Handset.
b. Press “2” or using the “▲” and “▼” keys select “2: admin configuration” from the list, press
“SND”.
c. Enter the password “000000” (6 zeros).
d. Address is set to 192.168.1.200. If not, change the Address by Pressing STO then CLR and the
FCN key to display “123” on the screen and then enter “192*168*1*200” and then STO to save.
e. Domain is blank.
f. Port is set to 5060.
g. Use is checked.
h. If any changes are made, press SND to save.

Testing and Setup, Section 4 Page 4-34
Aircell confidential and proprietary D12004-E, March 2010
Part B: SIP Handset Display Menu System
Display 0: While the Handset is booting.
Display 1: After the Handset has booted, but is not ready or not yet registered on the Aircell Axxess® Server.
Display 2: If the Handset has been unable to register with the Aircell Axxess server.
Welcome to
Extension XX
Setu
p
Menu: Press FCN 4
Waiting for
S
y
stem Availabilit
y
…
Extension XX
Unable to Register

Testing and Setup, Section 4 Page 4-35
Aircell confidential and proprietary D12004-E, March 2010
Display 3: After the Handset has registered with the Aircell Axxess® server and is available for calls:
Note
This does not show availability or status of the Iridium Transceivers.
Corded SIP Version WiFi SIP Version
Display 4: While user is dialing a phone number.
Display 5: While the call is being set up through the telephone network, the word “Dialing” will appear
underneath the number.
Extension XX
Extension XX
913033790237
Dialing
Press END to end call
Extension XX
913033790237
Press SND to place call
Pr
ess
C
LR
to
bac
k
space
Press END to cancel
n
sion XX
Setup Menu: Press FCN 4
To Call USA/Canada,
Dial 9 + 1 + XXX+XXX+XXXX
To Call Outside USA/Canada,
Dial 9 + Country Code + Number
Or Dial Extension Number

Testing and Setup, Section 4 Page 4-36
Aircell confidential and proprietary D12004-E, March 2010
Display 6: After call setup is complete and the call is in progress ( after the call is ended, return to Display 3):
Corded SIP Version WiFi SIP Version
Display 7: When there is an incoming call from an external source (the Handset is ringing):
“Incoming Call” flashes on and off. Name and phone number (from the Caller ID function) will not be provided for
incoming Iridium calls.
Display 8: When there is an incoming call from another extension (the Handset is ringing).
“Incoming Call” flashes on and off. The extension number is displayed.
Extension XX
Extension XX
Press SND to answer
Extension XX
Press SND to answe
r
Extension XX
Guest
913033790237
Call In Pro
g
ress
Press END to end call
Press HLD to hold or more options
<Display name (if available)>
<Display phone # (if available)>
Incoming Call
Extension YY
Incoming Call

Testing and Setup, Section 4 Page 4-37
Aircell confidential and proprietary D12004-E, March 2010
Display 9: While a call is on hold (user has pressed HLD during a call).
Display 10: While a call is on hold, and the user is dialing a new number for a call transfer or call conference.
Display 11: While the call is being set up to the third party (the user may perform a call conference in any case
or an attended call transfer if the third party is another extension).
If the call to the third party is ended before the conference is initiated, then the Handset returns to Display 9.
Extension XX
Press END to end call to third party
Press FCN
3
for conference
Dialing Third Party:
<Display phone # of third party>
Call Holdin
g
Extension XX
Press END to transfer call
Press
SND
to call third party
Extension XX
Press END to end call
Di
a
l
t
hir
d
pa
r
ty
&
S
ND f
o
r
co
nf
e
r
e
n
ce
Pr
ess
HLD t
o
r
e
tri
e
v
e
ca
ll
Dial extension and END to transfe
r
<Display phone #, if available>
Call Holding
<Display phone # being dialed>
Call Holding

Testing and Setup, Section 4 Page 4-38
Aircell confidential and proprietary D12004-E, March 2010
Display 12: While a call is on hold, and the third party has answered the call, and the third party is another
extension (the user may perform a call conference in any case or an attended call transfer if the third party is
another extension).
Corded SIP Version WiFi SIP Version
If the user ends the call to the third party without initiating the 3-way conference, then the Handset returns to
Display 9.
Display 13: After the user has initiated the 3-way conference (an attended call transfer may still be performed
by ending the call from the user’s extension, but only if one of the remaining two parties is another extension).
(Phone numbers are not displayed because the Handset will not know which of the three parties remain in the
conference - one party may drop out without the Handset knowing). After the call is ended, Handset returns to
Display 3.
Extension XX
Extension XX
Call In Progress
Press END to end call
Extension XX
Press END to end call to third party
Press FCN
3
for conference
Conference: Waiting
<Display phone # of 3rd party>
Call Holding

Testing and Setup, Section 4 Page 4-39
Aircell confidential and proprietary D12004-E, March 2010
Display 14: Earpiece volume level display, shown for two seconds after earpiece volume level is changed by
pressing arrow keys (▲ or ▼), then Handset returns to original display (or returns to original display immediately
if CLR is pressed) (Note: two second reversion to original display or CLR command does not apply to SIP WiFi
Handsets).
This function works whether a call is in progress or not (but the user can only evaluate the earpiece volume level
during a call). The STO function saves the earpiece volume level in non-volatile memory; if the user does not
press STO, the earpiece volume level reverts to the previous setting after a power cycle.
Display 15: Ringer volume level display, shown for two seconds after ringer volume level is changed by
pressing FCN 1 and arrow keys (▲ or ▼), then return to original display (or return to original display immediately
if CLR is pressed) (Note: two second reversion to original display or CLR command does not apply to SIP WiFi
Handsets).
If the Handset is not currently ringing, the ringer will be activated (using the ring pattern selected in the user
configuration) each time an arrow key is pressed. The STO function saves the ringer volume level in non-volatile
memory; if the user does not press STO, the ringer volume level reverts to the previous setting after a power
cycle.
Extension XX
Press CLR to exit
Press
STO
to save
Extension XX
Press CLR to exit
Press STO to save
Earpiece Volume
<Show earpiece volume level graph>
Ringer Volume
<Show ringer volume level graph>
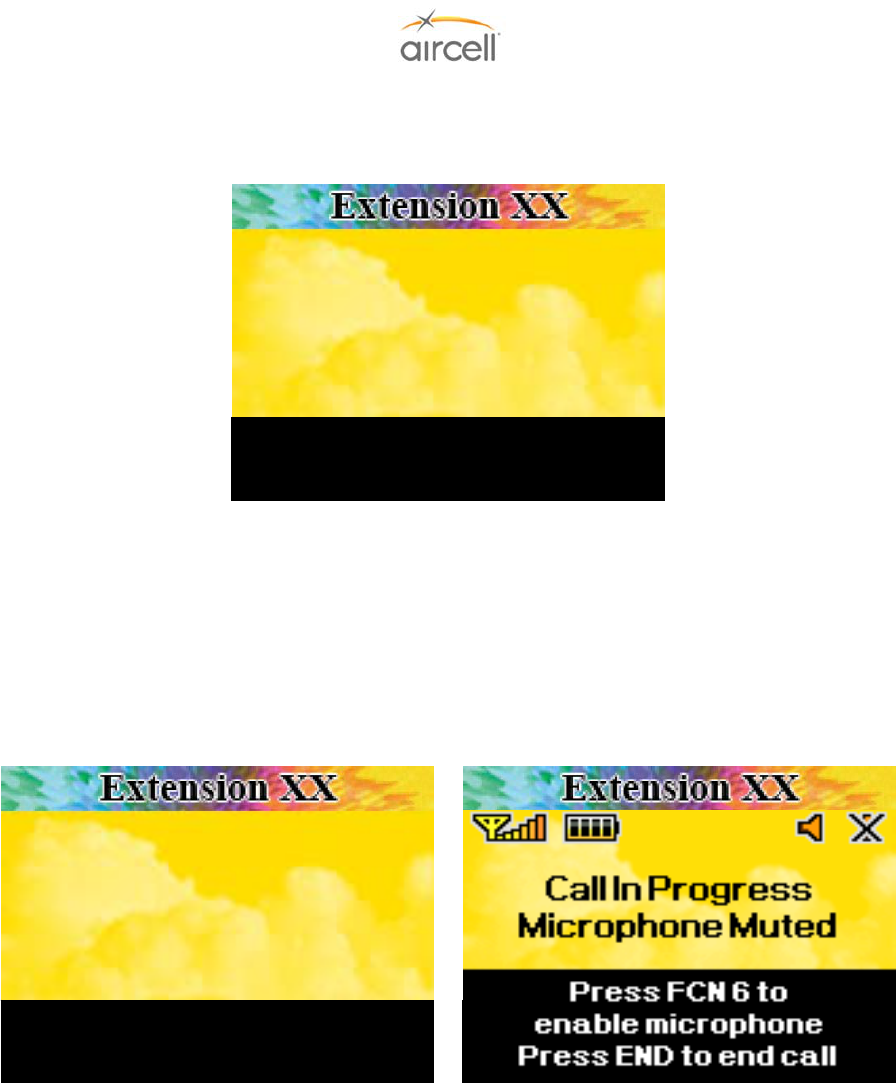
Testing and Setup, Section 4 Page 4-40
Aircell confidential and proprietary D12004-E, March 2010
Display 16: Key tone volume level display, shown for two seconds after key tone volume level is changed by
pressing FCN 2 and arrow keys (▲ or ▼), then the Handset returns to original display (or returns to original
display immediately if CLR is pressed).
In this mode, the key tone will be heard each time the arrow key is pressed so that the user can evaluate the key
tone volume level while he/she is adjusting it. The STO function saves the key tone volume level in non-volatile
memory; if the user does not press STO, the key tone volume level reverts to the previous setting after a power
cycle.
Display 17: When microphone mute is activated with FCN 6, “MICROPHONE MUTE” is added to the display,
but the remainder of the display will not be changed (Note: this feature is only enabled in SIP WiFi Handsets
during a call).
Corded SIP Version WiFi SIP Version
Extension XX Extension XX
Press END to end call
Press FCN 6 to enable microphone
Guest
XX
Call In Progress
MICROPHONE MUTE
Extension XX
Press CLR to exit
Press STO to save
Key Tone Volume
<Show ke
y
tone volume level
g
ra
p
h>

Testing and Setup, Section 4 Page 4-41
Aircell confidential and proprietary D12004-E, March 2010
Display 18: When the user presses FCN 5 (to lock the Handset).
Display 19: After the Handset has been locked.
When the keypad unlock code is pressed by the user, the characters will be displayed as “XXX,” with one “X”
displayed for each character entered. 333 is the default code. The keypad will only respond to numerals; no
other functions are available when the lock function is activated. If an incorrect 3 digit code is entered, the “XXX”
character display will automatically clear to a blank line.
Extension XX
Handset Locked
<Display “X” for each character pressed here>
Enter 3-digit code to unlock
Extension XX
Press END to cancel
Press
STO
to lock Handset
LOCK HANDSET?
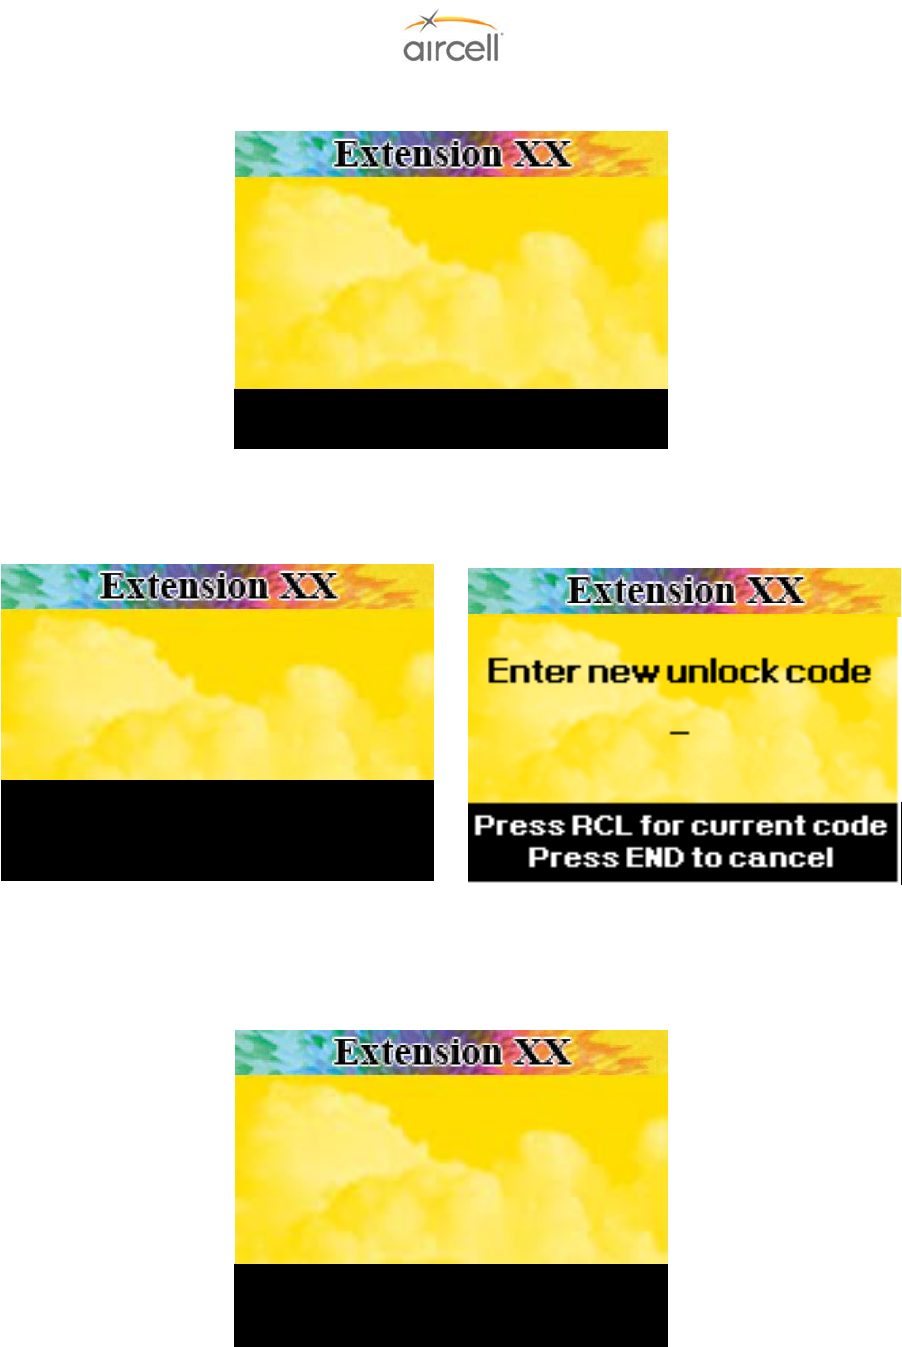
Testing and Setup, Section 4 Page 4-42
Aircell confidential and proprietary D12004-E, March 2010
Display 20: When the user presses FCN 0 to change the Handset unlock code.
Characters will be displayed as “XXXXXX,” with one “X” displayed for each key pressed. 888888 is the default
code (for SIP WiFi, the default is 000000). Actual characters that were pressed by the user will not display.
Display 21: After the user has entered the security code to change the Handset unlock code (FCN 0).
Corded SIP Version WiFi SIP Version
The code will be exactly 3 digits. Display three character locations with a highlighted cursor that moves to the
next character location after the previous character is entered.
Display 22: If the user has pressed RCL to view the current Handset unlock code.
If user presses STO, go to display 21.
Extension XX
Extension XX
Press END to cancel
Press STO to change code
Extension XX
Enter new unlock code:
<Display code as it is entered>
Press RCL for current code
Press STO to store new code
Press END to cancel
Extension XX
Enter Security
Code (6 Digits):
<Di
sp
l
ay
“X” f
o
r
eac
h k
ey
p
r
essed
h
e
r
e
>
Enter END to cancel
CURRENT LOCK CODE:
<dis
p
la
y
current code>
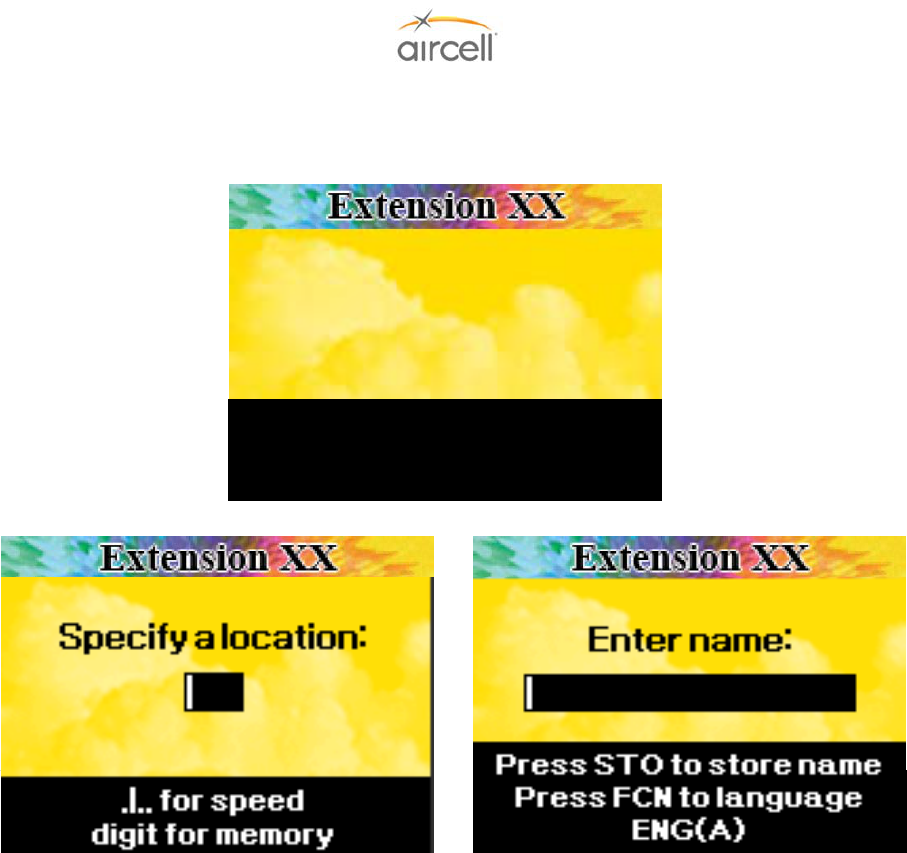
Testing and Setup, Section 4 Page 4-43
Aircell confidential and proprietary D12004-E, March 2010
Display 23: This is the phonebook alphabetic storage display. The user types in a phone number as if he/she is
going to dial the number and then presses STO, followed by a memory location (1 to 99). After that, this screen
is displayed:
Corded SIP Version
WiFi SIP Additional Displays
Display 7 character locations after the Enter Name: prompt. A highlighted cursor will appear in the character
location that is being selected. Letters and Numerals may be entered directly from the keypad Keys. “Example,
Press 2 for 2, press 22 for A, press 222 for B”.
For WiFi SIP Handsets, you must specify a numeric location for the stored number. After selecting a numeric
location, enter the desired name for the stored number. Press STO to save the stored number; you may also
change the alpha characters prior to saving (capitals, numerics and special characters) by pressing the FCN key.
Extension XX Extension XX
Extension XX
Press
STO
t
o store name
Pr
ess
C
LR
to
bac
k
space
Enter Name:
<Display name entered>

Testing and Setup, Section 4 Page 4-44
Aircell confidential and proprietary D12004-E, March 2010
Display 24: This is the phonebook display that is displayed after the user presses RCL, then a memory location
(1 to 99).
Corded SIP Version WiFi SIP Version
The phone book information from the center of the list is always highlighted (reverse video). The entire list will
move up or down with the ▲ or ▼ keys in numerical order by memory location (1 to 99). The stored name will
be displayed first, followed by as many characters in the stored phone number as can fit on the display, followed
by “…” if there is more information to display. If there is no name stored for a memory location, the stored
number will be displayed.
Display 25: Setup menu (accessible by FCN 4).
Corded SIP Version WiFi SIP Version
User can press ▲ or ▼ keys to move highlighted option up or down, or user may select the desired number of
the option on the keypad.
AirCell Handset
P12184
1: User Configuration
2: Admin Configuration
3: Version Information
Pr
ess
S
ND
to
se
l
ect
Press END to exit menu
Press END to exit
Press CLR to clear
Press ▲ and ▼ to scroll list
Press # to see more info
Press STO to edit
3: <display name #3>…
4: <display name #4>…
5: <display name #5>…
AirCell Handset
P12184
1: User Configuration
2: Admin Configuration
(Password Required)
3: Version Information
Pr
ess
S
ND
to
se
l
ect
Press END to exit menu
Press END to cancel
Press CLR to edit number
Press ▲ and ▼ to scroll list
Press # to see more info
Press SND to dial numbe
r
3: <display name #3>…
4: <display name #4>…
5: <display name #5>…

Testing and Setup, Section 4 Page 4-45
Aircell confidential and proprietary D12004-E, March 2010
Display 26: User Configuration menu.
User can press ▲ or ▼ keys to move highlighted option up or down, or user may select the desired number of
the option on the keypad to view the current settings.
Display 27: Admin Configuration Menu:
Note
These instructions pertain to Standard, Flush-Mount, LEMO and Custom-Retractable Handsets. See
Displays 30 through 37 for SIP WiFi Handset instructions.
1234 is the default Password to enter Admin Configuration (password number entry is slow to respond, enter a
number and pause for the number to display before entry of next number). The only changes required in this
area are for Extension Number, such as for first time system setup or a Handset change. It is highly advisable
not to change any other settings in this area.
Administrator can press ▲ or ▼ keys to move highlighted option up or down, or administrator may select the
desired number of the option on the keypad.
Press END to exit menu
Press SND to select
Admin Configuration
1: Extension Number
2: IP Address
3: Subnet Mask
4: SIP Server (PBX) IP Address
5: Change Security Code
6: Change Admin Password
Press END to exit menu
Press SND to select
User Configuration
1: Earpiece Volume Level
2: Ringer Volume Level
3: Key Tone Volume Level

Testing and Setup, Section 4 Page 4-46
Aircell confidential and proprietary D12004-E, March 2010
Display 28: Advanced User Configuration menu.
Administrator can press ▲ or ▼ keys to move highlighted option up or down, or administrator may select the
desired number of the option on the keypad.
Display 29: The hardware and software version display (from the Version Information menu item in Display
25).
Press END to cancel
AirCell Handset
P12184
H/W Ver: <display version>
S/W Ver: <display version>
Press END to exit menu
Press SND to select
Advanced Setup
Configuration
Do Not Change Unless
Authorized By AirCell!
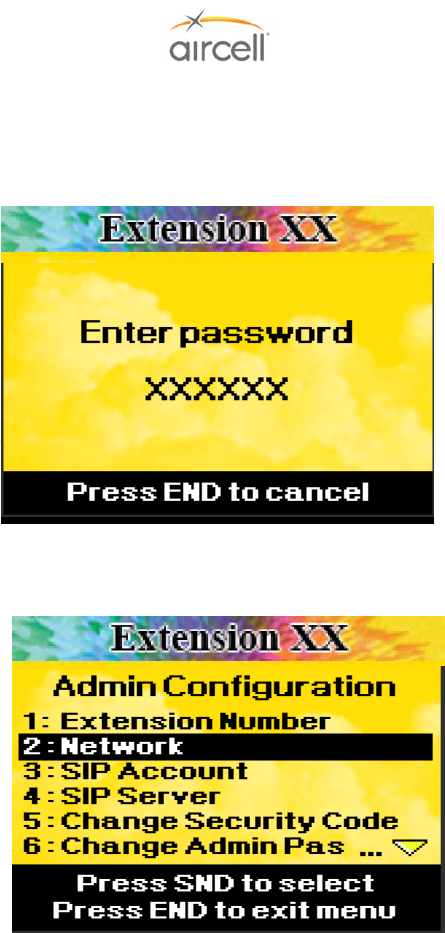
Testing and Setup, Section 4 Page 4-47
Aircell confidential and proprietary D12004-E, March 2010
Display 30: Admin Configuration Menu: These instructions pertain to WiFi handsets. 000000 is the default
Password to enter Admin Configuration. The only changes required in this area are for Extension Number, such
as for first time system setup or a Handset change. To use the WiFi handset, you must be registered with the
available network. It is highly advisable not to change any other settings in this area.
Display 31: Press 2 to register with the available network.
Extension XX
Extension XX
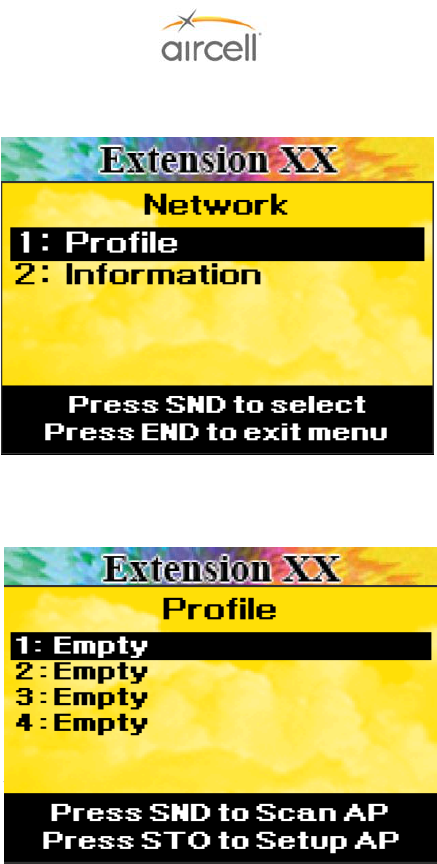
Testing and Setup, Section 4 Page 4-48
Aircell confidential and proprietary D12004-E, March 2010
Display 32: Press 1 to set up the network profile.
Display 33: Press SND to scan for available network access points (AP).
Extension XX
Extension XX
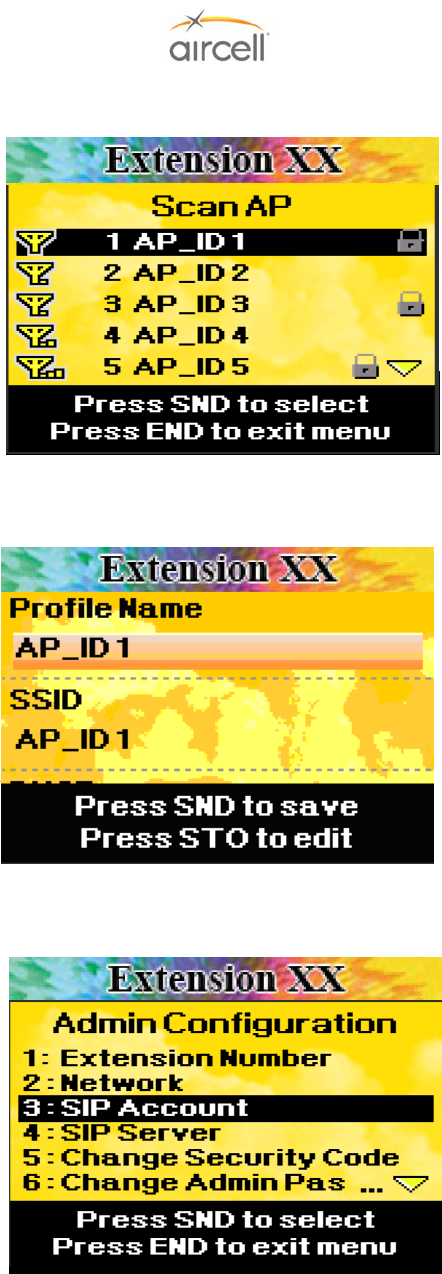
Testing and Setup, Section 4 Page 4-49
Aircell confidential and proprietary D12004-E, March 2010
Display 34: Using the up and down keys, select the AP of the CTR that is installed on the airplane. Press SND.
Display 35: Press SND to save. It is advisable not to change any settings in this area.
Display 36: Press 3 to set the extension number.
Extension XX
Extension XX
Extension XX
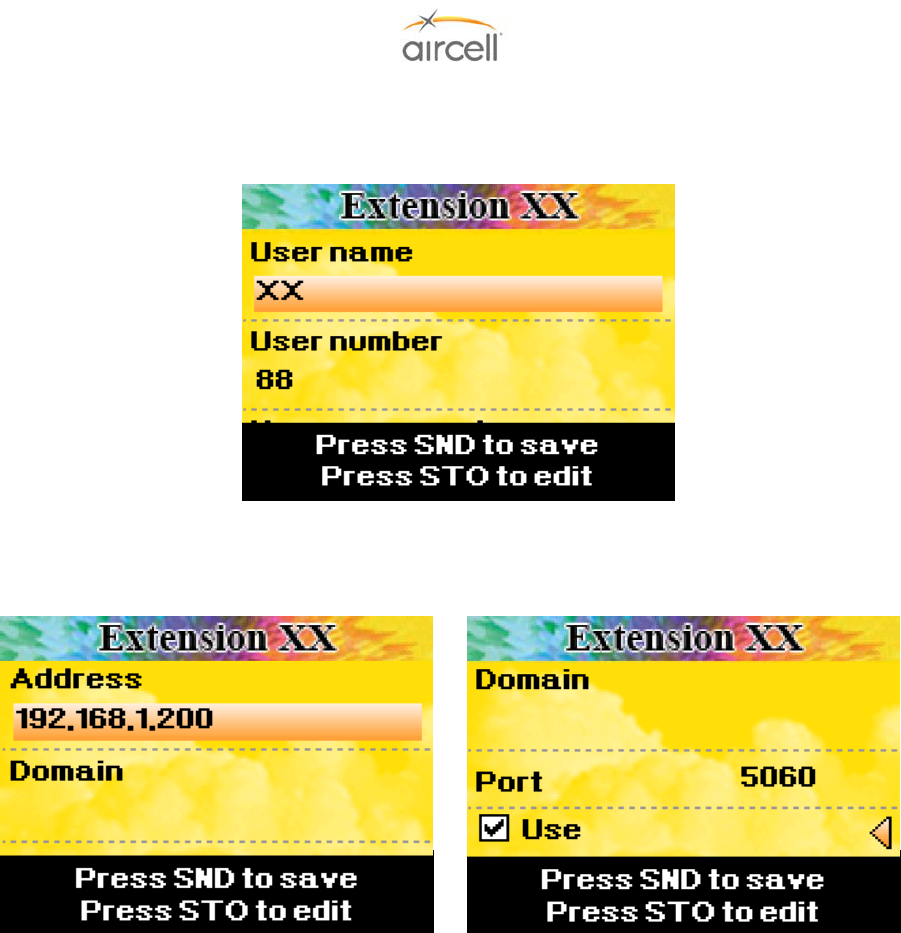
Testing and Setup, Section 4 Page 4-50
Aircell confidential and proprietary D12004-E, March 2010
Display 37: Using the up and down keys, highlight User name and press STO. Enter any desired name and
press STO to save the name. Using the up and down keys, highlight the User number and press STO. Enter
the desired extension number and press STO to save the number.
Display 38: This screen is preconfigured prior to shipment. It is advisable not to change any settings in this
area.
Extension XX Extension XX
Extension XX

Testing and Setup, Section 4 Page 4-51
Aircell confidential and proprietary D12004-E, March 2010
Part C: Iridium Operation through the Aircell Axxess® SIP Handsets
1. Turn power on to the Aircell Axxess system and verify that the SIP Handset has power and the display has
stabilized.
2. Using a SIP Handset, place a test call using Iridium to a known local phone number that will be answered,
such as a nearby office phone (a test call to a cell phone should only be used if the cell phone is in an area
of known good coverage). This first call should default to Channel 1 of the Aircell Axxess system.
If the call is not processed through using the SIP Handset, proceed to Troubleshooting Procedures in
Appendix B.
3. If the first SIP Handset call is successful, maintain that call up and initiate a second Iridium call using a
second SIP Handset in the aircraft. This will utilize Channel 2 of the Aircell Axxess.
If the call is not processed through using the SIP Handset, proceed to Troubleshooting Procedures in
Appendix B.
4. If all the test calls are successful, terminate the calls and verify that the system is ready for new call. If data
functionality is to be tested, proceed to Section 4.11. Otherwise, turn off the avionics master switch to
complete the checkout if no testing of other systems is required.
Placing an Iridium call from the Aircraft:
Lift the Handset from the cradle and observe the following:
• Verify an illuminated display and that the display indicates Extension # and the Dialing instructions. (This
usually takes about 70 seconds after power is applied to the system.);
• Place a call by entering 9 + country code + phone number on the keyboard and then press SND.
Example: 9 + 1 303 379 0278 SND, this will call Aircell Customer Service;
• Verify that the system is providing a clear communications link, and then press END to terminate the call;
• If multiple Handsets are installed, repeat the above procedure for all locations; and
• Conferencing Handset-to-Handset and or Handset-to-Audio Panel can also be checked at this time.
Audio Panel-to-Handset operations will be per the particulars on how the Aircell Axxess audio is
interfaced to the Audio Panel.
Testing and Setup, Section 4 Page 4-52
Aircell confidential and proprietary D12004-E, March 2010
Placing a Iridium call to the Aircraft:
Two-Stage Calling to Aircraft from Ground Phones
Two-stage dialing may be a less-costly alternative to direct dialing.
Calls from USA/Canada
Dial 1 + 480.768.2500 (listen for prompt) +
Aircraft Iridium Telephone Number (8816.XXX.XXXXX).
Calls from Outside USA/Canada
Dial IDD prefix of the country you are calling from
+1 (USA Country Code) + 480.768.2500 (listen for prompt)
+ Aircraft Iridium Telephone Number (8816.XXX.XXXXX).
Direct Dialing to the Aircraft from Ground Phones
Dial IDD prefix of the country you are calling from
(USA/Canada = 011) + Aircraft Iridium Telephone Number
(8816.XXX.XXXXX).
Note
Cellular or ground phones require international dialing capability. Some
cellular and long-distance providers may not recognize the 8816 Iridium
Country Code.
Utilizing Two-Stage dialing will solve this problem in the US, as your call is
placed to a 480 area code (Arizona).
Please refer to Aircell Axxess® User Manual for more details. Copies are available at
2http://www.aircell.com/service/serv_manuals.php
Testing and Setup, Section 4 Page 4-53
Aircell confidential and proprietary D12004-E, March 2010
4.11. Aircell Axxess® Data Call Functionality Checkout Guide
Aircell Axxess Satellite Telephone System: this system allows for two-way communications from the aircraft,
including voice over Iridium or data connection over Iridium (via the Iridium on-board modem).
There are two (2) Iridium data channels available on the Aircell Axxess II Satellite Transceiver (ST 4200). Two
(2) additional data channels are available on the Expansion Transceiver (ST 4020).
Note
Personal Computers Dial up data service, offered by Iridium is highly recommended. Direct Internet
2.0 offers data compression capabilities, easy Installation and Set Up. The software and ISP service
is free; you only pay for Iridium connection time.
Please visit 2http://www.Iridium.com/ and go to the Direct Internet 2.0 Sections for the details.
1. Using a standard serial cable, connect the laptop computer configured per above note to the 9-pin D-
type connector wired to Channel 1 of the Aircell Axxess II (ST 4200). Initiate a data call from the laptop
computer. While connecting, Call progress can be monitored on the laptop. Once connected, a
message will show on the laptop screen indicating connection. Open a web browser and bring in a web
page (something simple, Google.com). Note this is a 2.4 Kbps connection that, when using Iridium
Direct Internet, can be enhanced up to 10 Kbps.
2. Terminate the data call on Channel 1 by selecting “Disconnect” on the laptop computer and allowing the
process to finish completely before further steps.
3. Reconnect the laptop computer to the 9-pin D-type connector wired to Channel 2 of the Aircell Axxess
ST.
4. Initiate a data call from the laptop computer. The sequence will be the same as in Step 2 and 3 above.
If any anomalies are observed, troubleshoot as described above. Upon completion, terminate the call
and allow the process to finish completely.
5. If any In Flight Entertainment (IFE) equipment is connected to the Aircell Axxess ST, this is a good
opportunity to attempt an upload/download, as the aircraft does not have to be airborne.
Note
It is suggested that IFE equipment be wired to Channel 2. As voice calls will most likely use Channel 1, this
will allow greater availability of Channel 2 for frequent or automatically scheduled data uploads/downloads.)
Note
It is suggested that Dial up Data equipment be wired to Channel 2. As voice calls will most likely use
Channel 1, this will allow greater availability of Channel 2.
Note
Only one (1) data device can be connected to a channel at a time. If the channel is provisioned for another
data port or another device, please disconnect the device that is not required.
Note
When entering a Dial up Data Call Number, do not use the number nine (9) to access an outside line. The
RS-232 wired data connection is dedicated to the Iridium channel it is wired to.
A typical Dial up data number should be entered as:
00 (Iridium IDD prefix + Country Code + Phone number.)
Example 001-303-XXX-XXXX Colorado phone #, and 008816000025 Iridium Internet Server phone #.
If difficulties are unresolved, contact Aircell Customer Support at 1-888-286-9876.

Testing and Setup, Section 4 Page 4-54
Aircell confidential and proprietary D12004-E, March 2010
FOR Aircell On-Go Faxing Service ACTIVATION (applies to the external UCH 100 or UCH 300 fax adapters):
Call Aircell Customer Service 1-888-286-9876, 1-303.301.0278 and provide the following information:
• S/N of the Aircell Axxess® (ST 4200) (Located on the back of the unit)
• The Iridium Channel that the On-Go uniHub™ Fax adapter will be connected to.
• S/N of the On-Go uniHub™ Fax adapter.
• An upFax number will be assigned to the Aircraft.
FOR Aircell On-Go Faxing Service via Iridium (sffax) or Faxing via Inmarsat (classic_rtfax) (applies to the
optional AHI-2 internal onboard fax adapter) (Faxing via Inmarsat requires Aircell AHI-2 Revision C or later and
SIU Revision E or later; refer to Aircell SIU installation Manual D12379):
The following AHI-2 GUI setup pages are from AHI-2 Revision C. Previous revisions have similar GUIs.
Note: Please refer to Technical Bulletin 108 and/or Aircell Axxess Installation Manual D12004, Revision D, for
AHI-2 Revision B and earlier detailed setup and configuration instructions.
All AHI-2 ports must have separate IP addresses and only one (1) port, J5 connection can be activated for
faxing. If these procedures are not followed, there is a high probability of Iridium channel 2 becoming
unavailable, and may additionally cause undesirable data calls and the resulting billable minutes, which Aircell
has no liability.
If POTS Faxing connections are not needed, then nothing is required for Handset operation through the AHI-2.
If only a single AHI-2 (recommended), you will have by default settings a 2-wire POTS connection to port A (J5
connection) and a RS-232 data connection to port B (J6 connection).
The following outlines are the procedure for configuring AHI-2 units for aircraft installation. The procedures are
detailed for single AHI-2 installation.
Configuration Setup
The following setup is required for configuration of the AHI-2 for FAX operations:
1. Connect the Ethernet port of a set-up computer (typically a laptop) to the Aircell Axxess system
configuration and troubleshooting port using an appropriate Ethernet cable (refer to Aircell Axxess
Installation Manual D12004 Section 4.8 (Configuration and Setup) and Section 10.0 (Wiring
Diagrams) for wiring interface requirements).
2. The set-up computer must have an Internet browser installed to view and change configuration
pages (such as “Microsoft Internet Explorer 5.0”).
This Section outlines the procedure for configuring an AHI-2. The factory defaults are: Side A (J5) is setup for
use with a 2-wire POTS faxing device (RT-Fax) and Side B (J6) is setup for data device use (RT-Data). Aircraft
installation containing a single AHI-2 unit will work fine with this configuration.
Note: A MAC address (On-Go Device ID) is assigned to each port (refer to Figure 4.32).
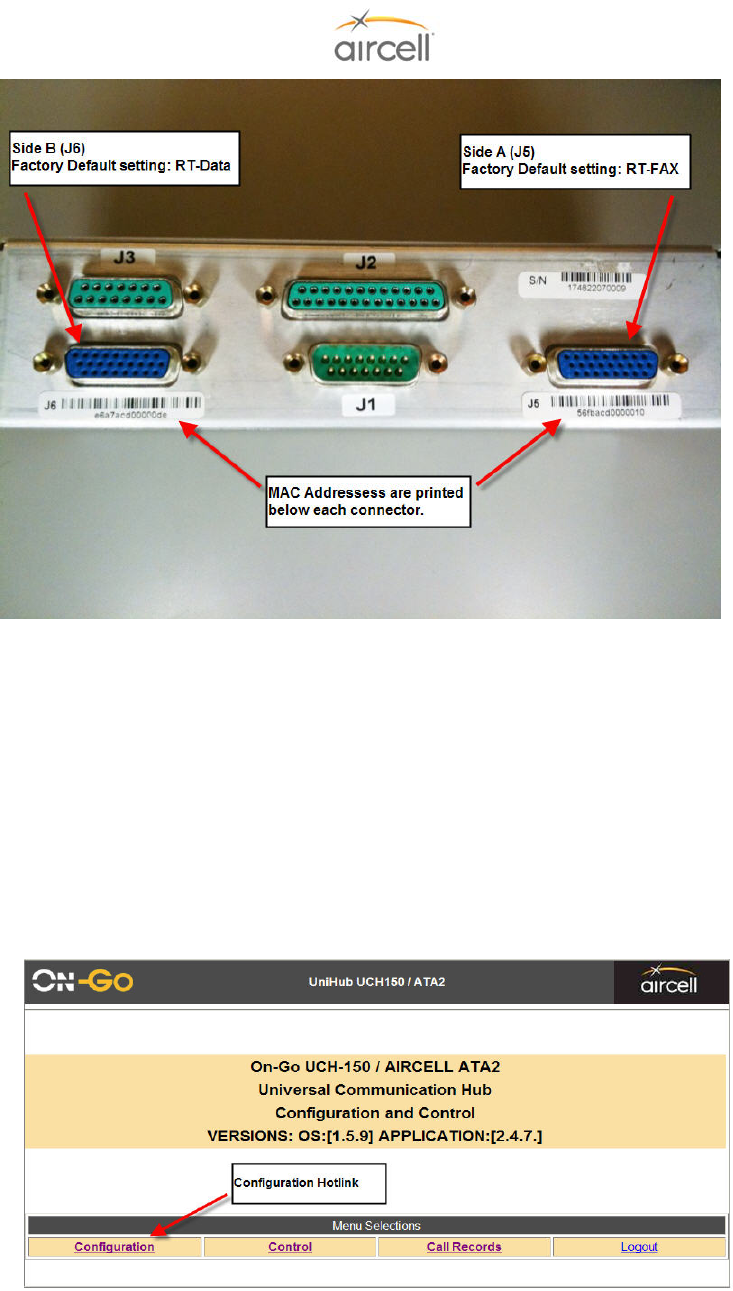
Testing and Setup, Section 4 Page 4-55
Aircell confidential and proprietary D12004-E, March 2010
Figure 4.32. AHI-2 Connector view
1. The system must have been powered up for at least 120 to 360 seconds, allowing the system
components to boot. When the Handsets show their dialing instructions, the system is fully booted.
2. On the set-up computer, start the Internet browser and enter IP address for one of the ports into the
browser address bar: 192.168.1.215 (for Port A J5 connector) and 192.168.1.216 (for Port B J6
connector).
3. AHI-2, Revision C and subsequent, requires a user password (“aircell1ahi2“). Revision
B and earlier AHI-2 passwords may be “abcdefg” or “aircell1ahi” (do not type the quotation
marks).
4. Once the initial webpage has loaded, click on the Configuration hotlink.
Figure 4.33. Configuration Hotlink Screen
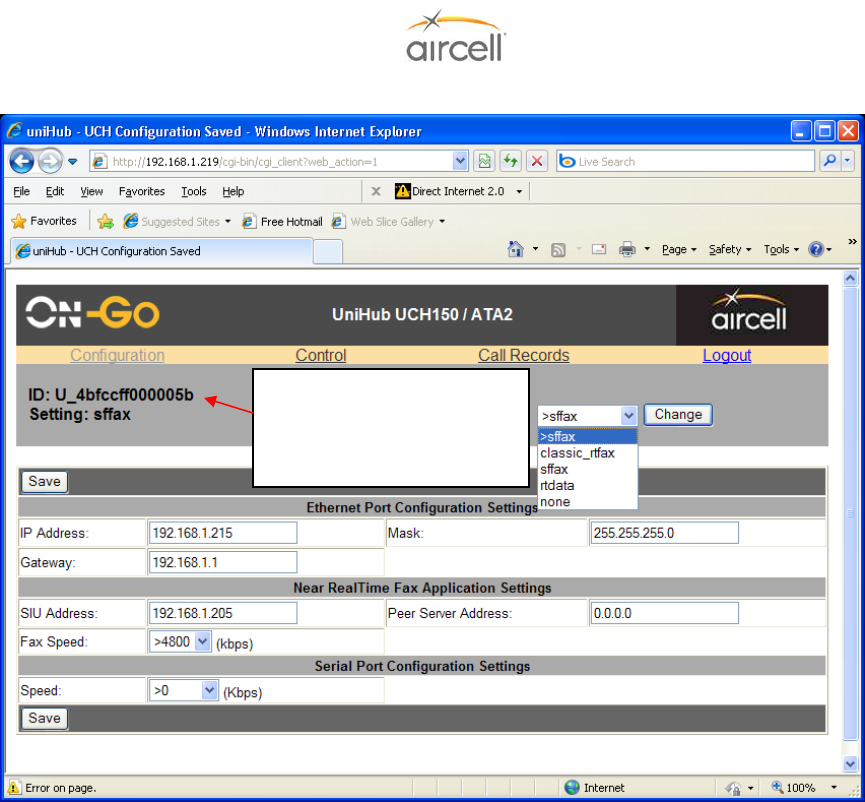
Testing and Setup, Section 4 Page 4-56
Aircell confidential and proprietary D12004-E, March 2010
5. Once the Configuration page has loaded, the System Configuration page will be displayed.
Figure 4.34.A. Main Configuration Screen
6. Once the System Configuration page has loaded, confirm the On-GO Device ID matches the
placard below port A (J5 connector). Record this number because it will be required for the
activation of the Iridium FAX services (sffax).
7. On the left hand side under the IP address are the current settings for the AHI-2 port you’re
currently accessing.
8. Select the correct fax mode (default is Real Time fax or “classic_rtfax” for FAXing over Inmarsat;
select store and forward fax “sffax” for FAX over Iridium) from the drop down menu on the right side
of the screen.
Verify the On-Go Device ID
matches the placard below
port A (J5 connector) that
you’re configuring.
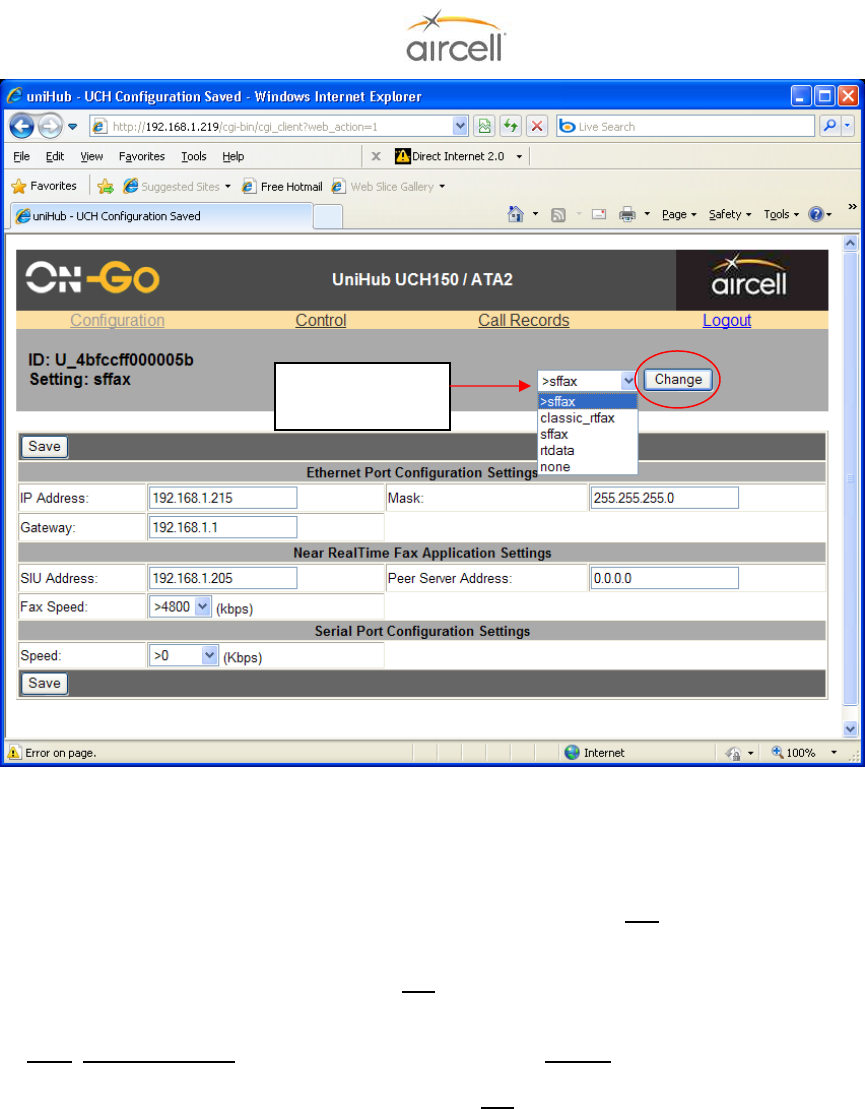
Testing and Setup, Section 4 Page 4-57
Aircell confidential and proprietary D12004-E, March 2010
Figure 4.34.B. Main Configuration Screen (continued)
9. Click on the Change button after selecting a fax mode. Now wait for AHI-2 to complete the save
cycle.
10. After this save is done, click on the displayed “Reset” link.
11. After approximately 120-360 seconds, go to the url http://192.168.1.219.
12. Log in using the password “aircell1ahi2”.
13. Change the IP address back to 192.168.1.215.
Note: AHI-2 Revision B and earlier you just need to select SF-Fax (for FAXing over Iridium). Select
the Local tab; from the Application line, select sffax, then select Save. After save has completed,
power cycle the AHI-2. Now log back in 192.168.1.215 to verify your selection have been saved.
See Technical Bulletin 108 and/or Aircell Axxess® Installation Manual D12004, Revision D, for AHI-2,
Revision B, and earlier configuration details.
Select the FAX
mode desired.
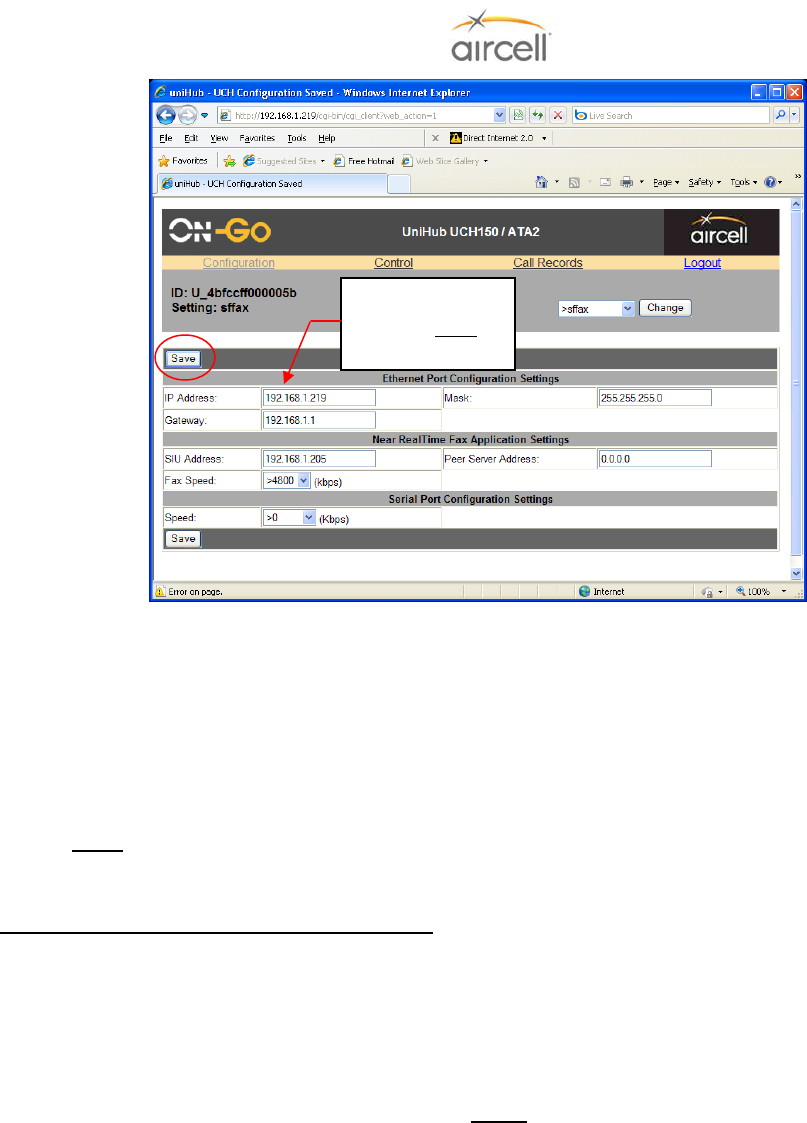
Testing and Setup, Section 4 Page 4-58
Aircell confidential and proprietary D12004-E, March 2010
Figure 4.34.C. Main Configuration Screen (continued)
14. Click on the Save button. Now wait for AHI-2 to complete the save cycle.
15. After this save is done, click on the displayed “Reset” link.
16. After 120-360 seconds have elapsed, go to URL: http://192.168.1.215 to verify your selection have
been saved.
17. To set side B, follow the above instructions, choosing the proper option from the dropdown menu
(such as rt-data in order to use Airshow) and using url 192.168.1.216 for side B.
Note: rt-data is the default of side B (J6).
18. The AHI-2 unit is ready for FAX and dial-up data use.
For Aircell On-Go Faxing Service over Iridium (applies to the AHI-2 internal onboard fax adapter):
Call Aircell Customer Service 1-888-286-9876, 1-303.301.0278 and provide the following information:
• S/N of the Aircell Axxess® ST (Located on the back of the unit)
• S/N of the AHI-2 and or the AHI-2 J-5 Data Port ID (ID located just beneath the J-5 Port. This ID is the
S/N of the internal On-Go FAX adapter.)
• A upFax number will be assigned to the Aircraft.
Notes
The 2-wire POTS Fax Machine interface can only be connected the AHI-2 J-5 connector. The J-5 POTS
connection uses an internal On-Go uniHub™. This Iridium Fax Adapter is the interface to only the #2 Iridium
Phone Number (Iridium channel 2).
You can test the FAX machine to AHI-2 interface prior to activating FAX services by taking the Fax machine
off-hook entering keys ##8 and then placing FAX machine back on-hook. After 30-60 seconds, the AHI-2’s
FAX adapter should reply back with an On-Go UniHub status page. This status page will also include port
J5 connector Device ID.
AHI-2, Revision C and later, J5 can also be set up for FAX over Inmarsat via an SIU Revision E or later, and
FAXing will be through an Inmarsat provider.
Change the IP
Address back to
192.168.1.215
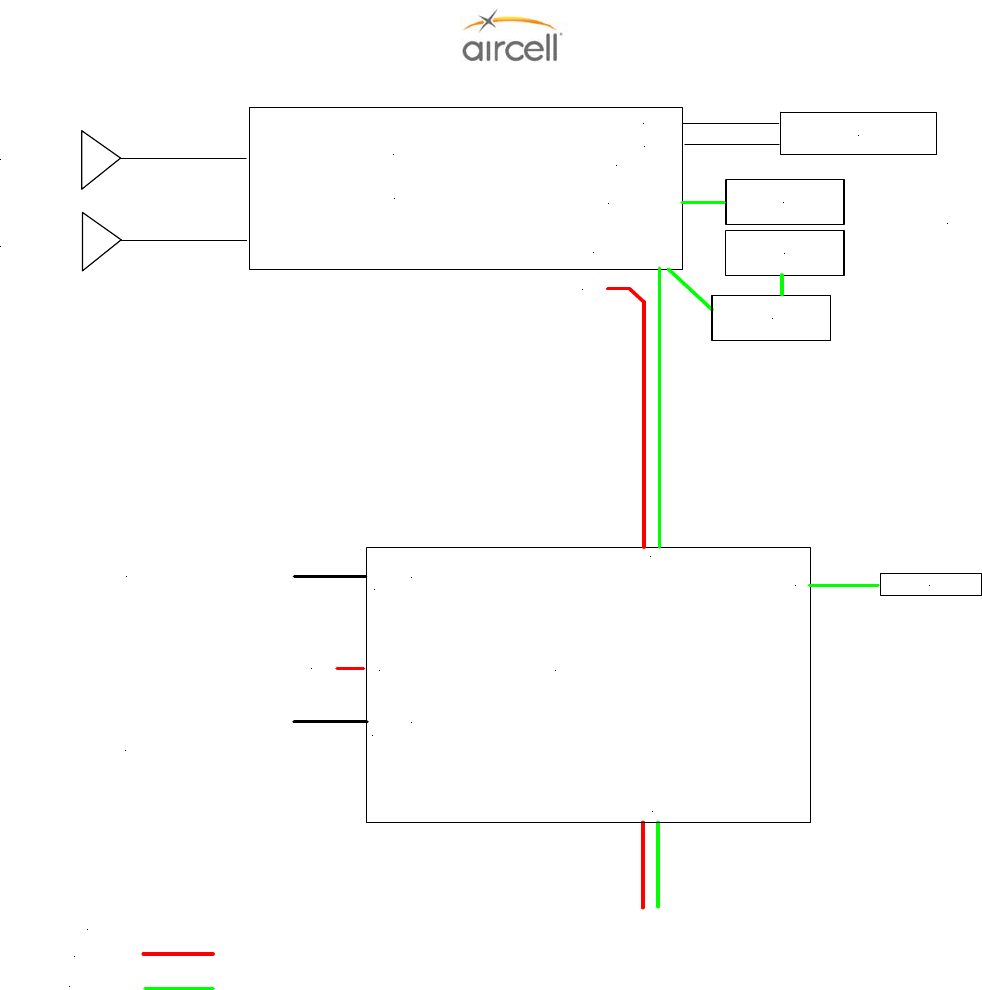
Testing and Setup, Section 4 Page 4-59
Aircell confidential and proprietary D12004-E, March 2010
Axxess II (ST 4200)
PBX
#1 IRIDIUM Antenna
#2 IRIDIUM Antenna
& 2 Channel
Iridium Transceiver
Ethernet connection
(Test Port conn.)
ST 4200
Configuration Port
RS 232 Data Device
Connection
#2 RS232
#1 RS232
(System Power and
Signal conn.)
28VDC
Key
28 VDC Power
System Signal
(Ethernet)
POTS Fax Data port A (J5) connection
Note: There can only be one Fax port in a system.
This FAX Port will be using Iridium Channel 2 or
Inmarsat via an SIU.
Axxess SIP HS
AHI-2
RS-232 Data port B (J6) connection
Will use Iridium Channel 2
28VDC
J5 (Port A)
J6 (Port B)
J1
J4
J3
J2
PC / Laptop RJ45
Ethernet connection port
to either ST 4200 or CTR
IP Address >192.168.1.216
Remote Port >2007
Application >None or rt-data (dial-up data call)
IP Address >192.168.1.215
Remote Port >2006
Application >None (change to SF-Fax for Fax over Iridium;
change to classic_rtfax for Fax over Inmarsat)
CTR/Data Expansion
CTR
Configuration Port
CTR
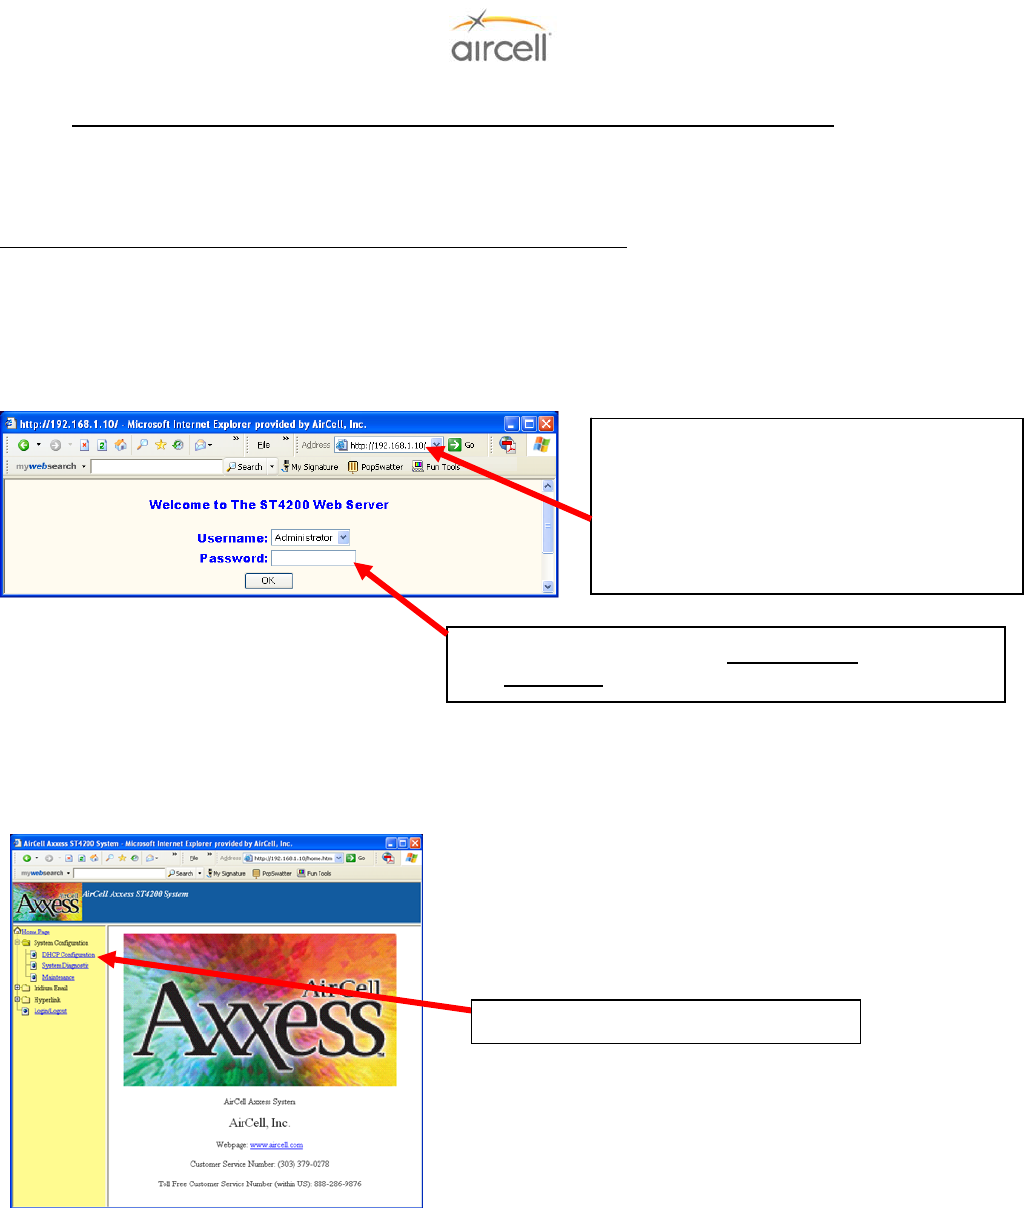
Testing and Setup, Section 4 Page 4-60
Aircell confidential and proprietary D12004-E, March 2010
4.12. Aircell Axxess® ST 4200 DHCP Server Activation (mandatory if no CTR installed)
DHCP will need to be enabled in the ST4200 unit (only for installations with no CTR installed).
If a CTR is installed, the CTR has DHCP enabled, and the CTR hands out the IP addresses to the HSs and other
devices.
ST 4200 DHCP activation instructions for an Aircell Axxess installation:
The Aircell Axxess system is customizable and programmable via a PC interface to a Web address, either thru a
WiFi connection (if available) or RJ-45 wired Ethernet connection (refer to Section 10.0 for details on the wired
RJ-45 provisions).
Select DHCP Confi
g
uration
Using a Web browser such as “Microsoft’s
Internet Explorer 5.0” to Login-Accessing
the Web Configuration Menu.
The ST 4200MB Web Configuration Menu
can be accessed by the following URL:
http://192.168.1.10
Log in using User name Administrator and password
aircell1mb “case sensitive!”
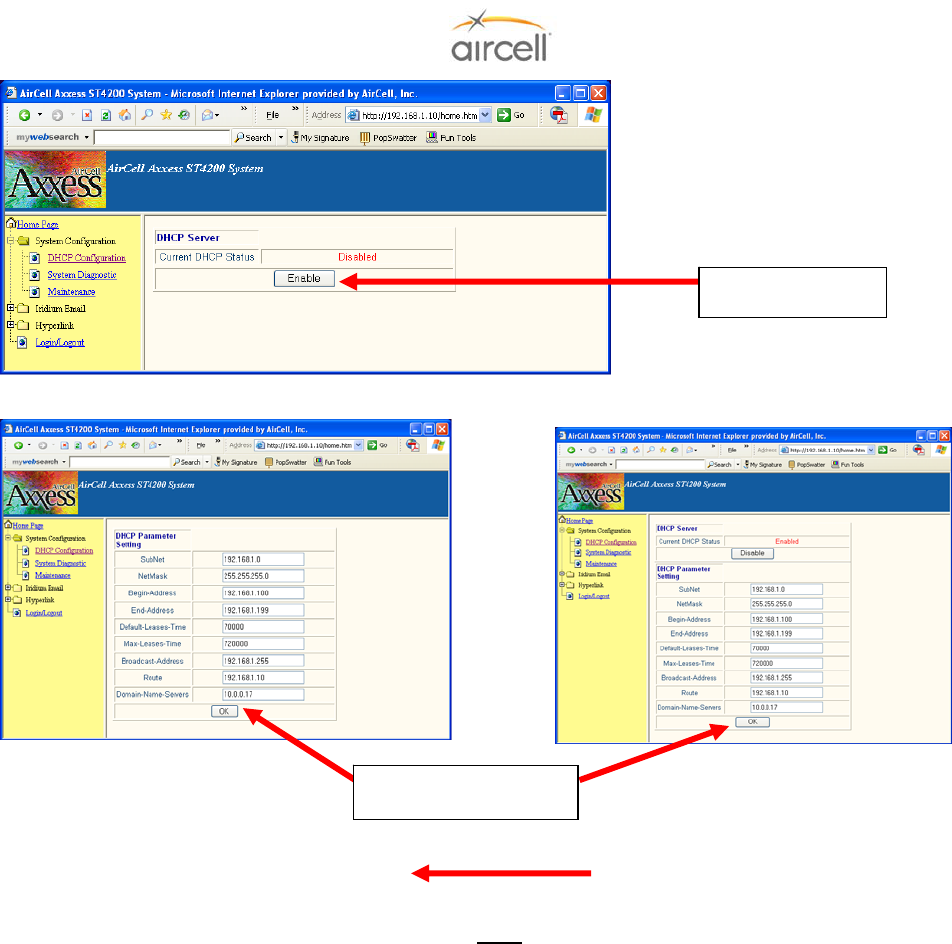
Testing and Setup, Section 4 Page 4-61
Aircell confidential and proprietary D12004-E, March 2010
When finished, exit the Web Browser.
Note
If you are unable to access the ST4200 MB page, your PC may need to be temporarily set up for a static
IP address.
During the following procedures, make note of your existing settings to be able to return your PC to your
original configuration. Your PC may have and need these areas set up a certain way for other
applications.
Select Enable
Select OK & OK
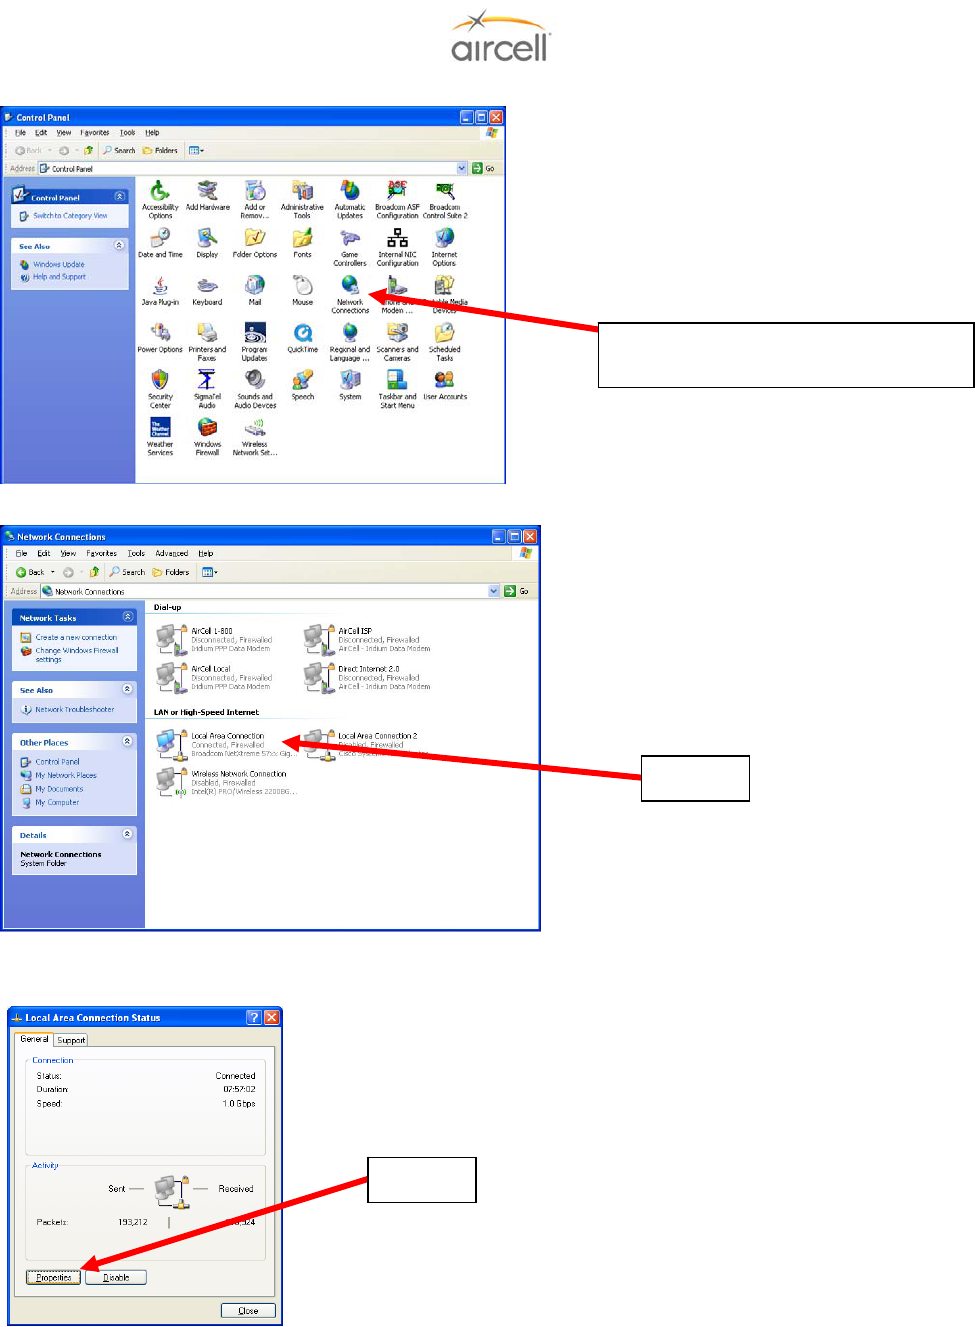
Testing and Setup, Section 4 Page 4-62
Aircell confidential and proprietary D12004-E, March 2010
Select “Network Connections” from
Control Panel
Select
Select
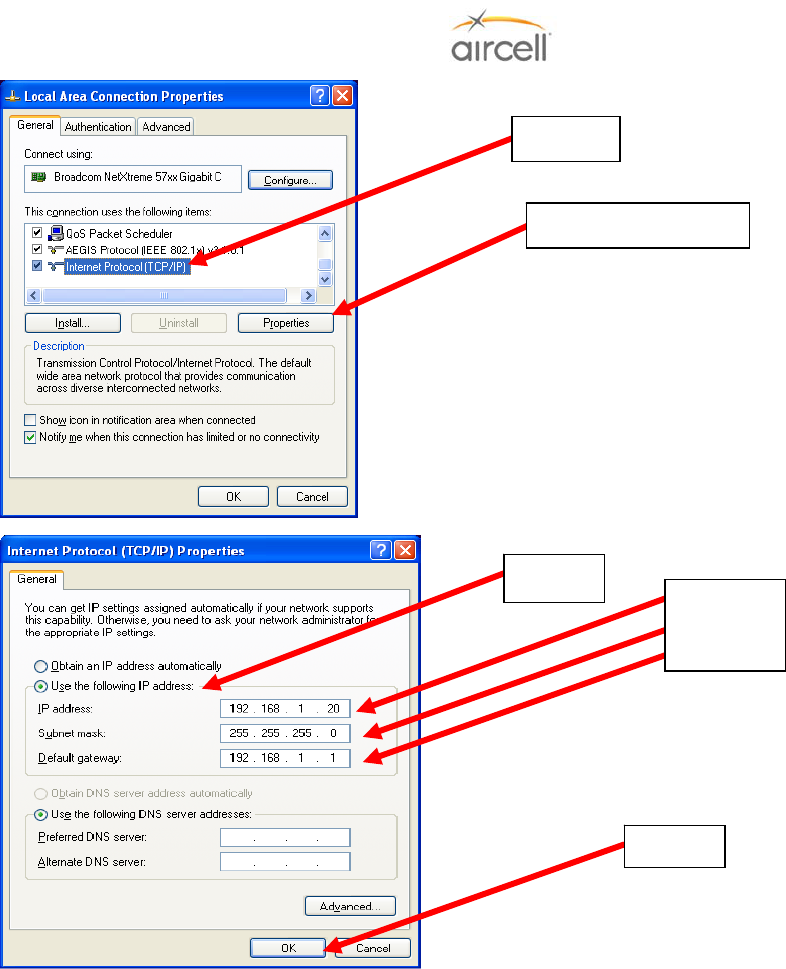
Testing and Setup, Section 4 Page 4-63
Aircell confidential and proprietary D12004-E, March 2010
Now enable the ST4200 DHCP as described in the first part of Section 4.12.
Return your PC to its original settings if desired.
Proceed to setting up the HS extensions per Section 4.10. of this manual.
Recycle Power on the to the Aircell Axxess® II System (HS(s) should now show their dialing instruction;
this process could take up to six (6) minutes).
Proceed to Section 4.8. of this manual for PBX configuration.
.
Select “Properties”
Select
Enter
These
Numbers
Select
Select
Cleaning, Section 5 Page 5-1
Aircell confidential and proprietary D12004-E, March 2010
5.0 CLEANING
5.1. Introduction
The appearance of a completed installation is an important aspect of Customer satisfaction. Finger prints,
smudges, wire clippings, and metal shavings should all be removed before the Customer inspects your work.
Vacuum the affected area and clean the surrounding area completely.
5.2. Recommended Cleaning Materials
Mild soap and water for most plastics is recommended.
CAUTION
Use Isopropyl Alcohol carefully as it may react with some plastics in the area. Isopropyl Alcohol should be used
to clean connector contacts and metal parts, if required.
5.3. Procedure
When Isopropyl Alcohol is used for the cleaning coax connectors, be sure to use a foam type Q-Tip to prevent
the residue that can be left by a cotton Q-Tip.

Cleaning, Section 5 Page 5-2
Aircell confidential and proprietary D12004-E, March 2010
This Page Intentionally Blank
Fits and Clearances, Section 6 Page 6-1
Aircell confidential and proprietary D12004-E, March 2010
6.0 FITS AND CLEARANCES
The attached sheets provide additional installation instructions for the Aircell Axxess® II System. In addition to
general notes, the attached sheets include the unit dimensional information, mounting provision dimensions,
connector pin-out and connector orientation diagrams.
Note
The Notes and Tables on these pages are very important; study them carefully.
6.1. Aircell Axxess II 2-Channel Satellite Transceiver (ST 4200)
ICD D12016 Revision E, 4 pages 11x17 will follow this page.
6.2. Aircell Axxess 2-Channel Expansion Transceiver (ST 4020)
ICD D12155 Revision C, 4 pages 11x17 will follow this page.
6.3. Aircell Axxess Cabin Telecommunications Router (CTR)
ICD D12017 Revision M, 5 pages 11x17 will follow this page.
6.4. Aircell Axxess Remote Diversity Antenna (RDA)
ICD D12403 Revision A, 4 pages 11x17 will follow this page.
6.5. Aircell Axxess Handset Interface (AHI-1) (optional)
ICD D12105 Revision A, 2 pages 11x17 will follow this page.
6.6. Aircell Axxess Handset / Fax Interface (AHI-2) (optional)
ICD D12159 Revision A, 2 pages 11x17 will follow this page.
6.7. Aircell Axxess Call Alerter (ACA) (optional)
ICD D12160 Revision A, 2 pages 11x17 will follow this page.
6.8. Aircell Axxess Call Alerter II (ACA II) (optional)
ICD D12329 Revision A, 2 pages 11x17 will follow this page.
6.9. Aircell Axxess Standard SIP Handset (with Audio Panel Interface)
ICD D12059 Revision D, 2 pages 11x17 will follow this page.
6.10. Aircell Axxess WiFi SIP Handset (with no Audio Panel Interface)
ICD D12130 Revision C, 2 pages 11x17 will follow this page.
ICD D12398 Revision B, 2 pages 11x17 will follow this page.
Fits and Clearances, Section 6 Page 6-2
Aircell confidential and proprietary D12004-E, March 2010
6.11. Aircell Axxess Flush-Mount SIP Handset (with no Audio Panel Interface)
ICD D12060 Revision C, 2 pages 11x17 will follow this page.
6.12. Aircell Axxess Custom-Retractable SIP Handset (with no Audio Panel Interface)
ICD D12304 Revision E, 2 pages 11x17 will follow this page.
6.13. Aircell Axxess LEMO SIP Handset (with no Audio Panel Interface)
ICD D12305 Revision B, 2 pages 11x17 will follow this page.
6.14. Reserved for product expansion
6.15. Reserved for product expansion
6.16. Reserved for product expansion
6.17. Reserved for product expansion
6.18. Reserved for product expansion
6.19. Iridium Satellite Antennas (Standard One-Channel and Dual Two-Channel Patch)
For installation details and options, refer to Aircell Antenna Installation Manual P/N 800-10355.

System Specifications, Section 7 Page 7-1
Aircell confidential and proprietary D12004-E, March 2010
7.0 SYSTEM SPECIFICATIONS
7.1. Purpose
This Section provides the specifications for Aircell Axxess® components along with various mounting options.
7.2. Product Definition
The Aircell Axxess Standard System utilizes the P12023 Dual Satellite Transceiver (Aircell Axxess II (ST 4200)),
P12083 Cabin Telecommunications Router (Aircell Axxess CTR), and up to 8 SIP Handsets, P12248-00X
(Standard), P12192-00X (Flush Mount), P12793-00X (Custom Retractable) and and P12865-00X (LEMO).. The
System is intended for aircraft applications requiring subscriber interface to the Iridium Satellite network. The
integral modem provides data communication through an RS-232 Serial Data port for carry on computers and /
or wired directly for avionics equipment. Data/Modem speed is typically 2.4 Kbps when operating on the Iridium
network. An Audio Panel interface allows the unit to be used with cockpit audio systems and provides
microphone bias. High-quality Intercom Conferencing, which includes the Audio Panel interface, has been
incorporated. Ring Detect provide notification of incoming call and to pilots and passengers. Various Antenna
options and Handset options are available.
7.3. Associated Reference Documents
RTCA/DO-160E, Environmental Conditions and Test Procedures for Airborne Equipment
7.4. Technical Specifications
7.4.1. Aircell Axxess II Satellite Transceiver (ST 4200)
The ST 4200 is comprised of the following items (connector manufacturing P/Ns are shown for reference
only):
P12023 ....................................................Dual Satellite Transceiver (ST 4200)
050-11088-55 ..........................................System Power and Signal Connector, Circular 55-SKT MIL-
C26482 (MS3126), SIZE 22 (ARRAY CONN PWF06F22-
55SA612)
P12690 (with ST 4020 installation) .........Channel Expansion Connector, MIL-C-26482, SIZE 18, 32-PIN,
(ARRAY CONNECTOR P/N PWF06F18-32P)
P12190 ....................................................CTR Data Expansion (ETHERNET) Connector, MIL-DTL-24308
(D-SUB), SIZE 1 (HI-DENSITY), 15-SKT W/HOOD
(POSITRONIC DD15F10GVL0)
P12190 ....................................................Test (Ethernet) connector, MIL-DTL-24308 (D-SUB), SIZE 1
(HI-DENSITY), 15-SKT W/HOOD (POSITRONIC
DD15F10GVL0)
P12107 ....................................................Mounting Tray, 1/2 ATR
Optional in place of Mounting Tray
P12273 ....................................................Kit includes two (2) P12125 Mounting Rails with eight (8)
pan-head Phillips screws.
System Specifications, Section 7 Page 7-2
Aircell confidential and proprietary D12004-E, March 2010
Dimensions
Transceiver Unit ................................................................12.66” L x 4.85” W x 7.0” H
(32.16 cm x 12.32 cm x 17.78 cm)
Transceiver Unit in ½ ATR Tray........................................12.83” L x 5.04” W x 7.46” H
(32.59 cm x 12.80 cm x 18.95 cm)
Largest Connector (System Power and Signal)................2.6“ in length from ST to connecter end
Weights
Satellite Transceiver Unit .....................................8.5 lbs. (3.8 kg)
Mounting Tray ......................................................0.56 lbs. (0.25 kg)
Optional Mounting ................................................0.5 lbs. / SET (0.23 kg)
System Connectors (All).......................................0.8 lbs. (0.36 kg)
Power Requirements 28 VDC, 6.0 A maximum
Application Note
This note documents the typical current draw requirements for a typical Aircell Axxess® ST system
installed. Actual values should be measured and recorded for each system installation.
Description...............................................28 VDC
Standby ...................................................< 0.37 A
Transmit Avg (1 channel) ........................< 0.43 A
Transmit Avg (2 channels) ......................< 0.50 A
Transceiver Heaters ................................< 2.7 A
• Transceiver Heaters: When the temperature on the inside of the Transceiver is < -20C / -4F, the
heaters will turn on. For example, on a 28 VDC system, the heaters will draw an additional 2.7 A. At
full power transmit, the average current is 2.7A plus 0.5 A, or 3.2 A. Please note that in general, the
transceivers are warm enough, even if located outside of the temperature-controlled cabin. The
heaters generally won’t be on.
System Connectors
Transceiver Unit ...................................................(ST - Satellite Antenna port, Type N Female)
(ST – System Power and Signal port)
(ST – Channel Expansion Port)
(ST – CTR /Data Expansion port)
(ST – Test port)
Antenna ................................................................TNC (Female), Satellite antenna port at antenna
Mating Connectors ...............................................TNC Male (to the Antenna port)
Type N Male (to the ST - Satellite Antenna port)
050-11088-55 (ST – System Power and Signal port)
NA at this time (ST – Channel Expansion Port)
P12190 (ST – CTR /Data Expansion port)
P12190 (ST – Test port)

System Specifications, Section 7 Page 7-3
Aircell confidential and proprietary D12004-E, March 2010
Iridium Operating Frequency Range ....................1616-1627 Megahertz (MHz)
Transmit Power ....................................................7 W max
Ring Detector ……………………………Two second ON -Four seconds OFF for incoming calls
Current capability ....................................2 Amperes DC (SINK only)
Voltage, withstand……………… .............60 VDC
RS-232/Modem Port
Hardware Flow Control………………......RTS and CTS
DTE Speed…………………………..........19.2 kbps (8 data bits, one stop bit, no parity)
Data Rate (Iridium)………….…….. .........2.4 Kbps, typical
Protocol, Error Correction…...……… ......MNP4
NOTE
RS-232 ports on the ST 4200 require Hardware Flow Control signals (RTS and CTS) for proper
operation. The RS-232 ports behave as Data Communications Equipment (DCE), and will assert CTS
when the associated Iridium channel is available. A connected data device (Data Terminal Equipment or
DTE) must assert RTS prior to transmitting data or making requests of the Iridium channel (e.g.
AT+CSQ?). The DTE must also observe the status of the CTS signal. Any data transmitted from the
DTE while CTS is de-asserted will be ignored by the ST 4200.
Environmental (RTCA/DO-160E)
Temperature and Altitude…….................Section 4, Category F2 ((55K ft MSL, -55°C to +70°C
(-67°F to +158°F) operating, -55°C to +85°C (-67°F to +158°F)
storage)
Temperature Variation……. ....................Section 5, Category B
Humidity………………………..................Section 6, Category A
Shock and Crash Safety..........................Section 7, Category B
Vibration………………………..................Section 8, Category S (Curves C, L, M, and Y)
Magnetic Effect........................................Section 15, Category Z
Power Input…………………… ................Section 16, Category B (22 to 30.3 VDC)
Voltage Spike………………….................Section 17, Category B
RF Emission…………………...................Section 21, Category M
7.4.2. Aircell Axxess® Satellite Expansion Transceiver (ST 4020) (optional)
The ST 4020 is comprised of the following items (connector manufacturing P/Ns are shown for reference
only):
P12679 ....................................................Dual Satellite Transceiver (ST 4020)
050-11088-55 ..........................................System Power and Signal Connector, Circular 55-SKT MIL-
C26482 (MS3126), SIZE 22 (ARRAY CONN PWF06F22-
55SA612)
P12690 ....................................................Channel Expansion Connector, MIL-C-26482, SIZE 18, 32-PIN,
(ARRAY CONNECTOR P/N PWF06F18-32P)
P12190 ....................................................CTR/Data Expansion (ETHERNET) Connector, MIL-DTL-24308
(D-SUB), SIZE 1 (HI-DENSITY), 15-SKT W/HOOD
(POSITRONIC DD15F10GVL0)
System Specifications, Section 7 Page 7-4
Aircell confidential and proprietary D12004-E, March 2010
P12190 ....................................................Test (Ethernet) connector, MIL-DTL-24308 (D-SUB), SIZE 1
(HI-DENSITY), 15-SKT W/HOOD (POSITRONIC
DD15F10GVL0)
P12107 ....................................................Mounting Tray, 1/2 ATR
Optional in place of Mounting Tray
P12273 ....................................................Kit includes (2 each), P12125 Mounting Rails with eight (8)
pan-head Phillips screws.
Dimensions
Transceiver Unit ................................................................12.66” L x 4.85” W x 7.0” H
(32.16 cm x 12.32 cm x 17.78 cm)
Transceiver Unit in ½ ATR Tray........................................12.83” L x 5.04” W x 7.46” H
(32.59 cm x 12.80 cm x 18.95 cm)
Largest Connector (System Power and Signal)................2.6“ in length from ST to connecter end
Weights
Satellite Transceiver Unit ........................8.2 lbs. (3.7 kg)
Mounting Tray ........................................0.56 lbs. (0.25 kg)
Optional Mounting Rails ..........................0.5 lbs. / SET (0.23 kg)
System Connectors (All)..........................0.8 lbs. (0.36 kg)
Power Requirements.............................28 VDC, 6.0 A max.
Application Note
This note documents the typical current draw requirements for a typical Aircell Axxess® ST 4020 system
installed. Actual values should be measured and recorded for each system installation.
Description...............................................28 VDC
Standby ...................................................< 0.37 A
Transmit Avg (1 channel) ........................< 0.43 A
Transmit Avg (2 channels) ......................< 0.50 A
Transceiver Heaters ................................< 2.7 A
• Transceiver Heaters: When the temperature on the inside of the Transceiver is < -20C / -4F, the
heaters will turn on. For example, on a 28 VDC system, the heaters will draw an additional 2.7 A. At
full power transmit, the Average Current is 2.7A plus 0.5 A, or 3.2 A. Please note that in general, the
transceivers are warm enough, even if located outside of the temperature-controlled cabin. The
heaters generally won’t be on.
System Connectors
Transceiver Unit……….……….…… ....................(ST - Satellite Antenna port, Type N Female)
(ST – System Power and Signal port)
(ST – Channel Expansion Port)
(ST – Data Expansion port)
(ST – Test port)

System Specifications, Section 7 Page 7-5
Aircell confidential and proprietary D12004-E, March 2010
Antenna……………………………….....................TNC (Female), Satellite antenna port at antenna
Mating Connectors ………………….....................TNC Male (to the Antenna port)
Type N Male (to the ST - Satellite Antenna port)
050-11088-55 (ST – System Power and Signal port)
NA at this time (ST – Channel Expansion Port)
P12190 (ST – Data Expansion port)
P12190 (ST – Test port)
Iridium Operating Frequency Range ....................1616-1627 MHz
Transmit Power ....................................................7 W max
Ring Detector……………………………..Two second ON -Four seconds OFF for incoming calls
Current capability ....................................2 Amperes DC (SINK only)
Voltage, withstand ...................................60 VDC
RS-232/Modem Port
Hardware Flow Control............................RTS and CTS
DTE Speed..............................................19.2 kbps (8 data bits, one stop bit, no parity)
Data Rate (Iridium) ..................................2.4 Kbps, typical
Protocol, Error Correction........................MNP4
NOTE
RS-232 ports on the ST 4200 require Hardware Flow Control signals (RTS and CTS) for proper
operation. The RS-232 ports behave as Data Communications Equipment (DCE), and will assert CTS
when the associated Iridium channel is available. A connected data device (Data Terminal Equipment or
DTE) must assert RTS prior to transmitting data or making requests of the Iridium channel (e.g.
AT+CSQ?). The DTE must also observe the status of the CTS signal. Any data transmitted from the
DTE while CTS is de-asserted will be ignored by the ST 4200.
Environmental (RTCA/DO-160E)
Temperature and Altitude…….................Section 4, Category F2 ((55K ft MSL, -55°C to +70°C
(-67°F to +158°F) operating, -55°C to +85°C (-67°F to +158°F)
storage)
Temperature Variation……. ....................Section 5, Category B
Humidity………………………..................Section 6, Category A
Shock and Crash Safety..........................Section 7, Category B
Vibration………………………..................Section 8, Category S (Curves C, L, M, and Y)
Magnetic Effect........................................Section 15, Category Z
Power Input…………………… ................Section 16, Category B (22 to 30.3 VDC)
Voltage Spike………………….................Section 17, Category B
RF Emission…………………...................Section 21, Category M

System Specifications, Section 7 Page 7-6
Aircell confidential and proprietary D12004-E, March 2010
7.4.3. Aircell Axxess® Cabin Telecommunications Router (CTR)
The CTR is comprised of the following items (connector manufacturing P/Ns are show for reference
only):
P12083 ....................................................Cabin Telecommunications Router (Aircell Axxess CTR)
OR
P12083-001.............................................Cabin Telecommunications Router (Aircell Axxess CTR)
(Low Power)
P12064 ....................................................(1 each for up to 4 HSs, 2 each for up to 8 HSs), Handset
Comm 1 and 2 Data Interface Connector, MIL DTL-24308 (D-
SUB), SIZE 3 (HI-DENSITY), 44-PIN W/HOOD (POSITRONIC
DD44M10GVLX-923.25)
P12236 ....................................................System Communications Data (ETHERNET) Connector, MIL-
DTL-24308 (D-SUB), SIZE 1 (HI-DENSITY), 15-PIN W/HOOD
(POSITRONIC DD15M10GVLX)
P12066 ....................................................Power / Control Connector, MIL-DTL-24308 (D-SUB), SIZE 1
(LO-DENSITY), 9-SKT W/HOOD (POSITRONIC
SD9F10GVLX)
P12017 ....................................................Two (2) coax assemblies (TNC to TNC), Internal Antenna 1 and
2 to WLAN A and B
310-10949-001 ........................................Mounting Tray, ¼ ATR
Optional in place of Mounting Tray
P12273 ....................................................Kit includes (2 each), P12125 Mounting Rails with eight (8) pan-
head Phillips screws.
Dimensions
CTR Unit............................................................................12.44” L x 2.25” W x 7.62” H
...........................................................................................(31.60 cm x 5.72 cm x 19.35 cm)
CTR Unit in ¼ ATR Tray ...................................................13.13” L x 2.43” W x 8.06” H
...........................................................................................(33.35 cm x 6.17 cm x 20.47 cm)
Largest Connector (HS COM 1 and 2)..............................1.84“ inches in length from CTR to connector
end
Weights
CTR Unit..................................................3.85 lbs. (1.75 kg)
Mounting tray...........................................0.25 lbs. (0.11 kg)
Optional Mounting Rails ..........................0.5 lbs. / SET (0.23 kg)
System Connectors .................................1.0 lbs. (0.45 kg)
Power Requirements 28 VDC, 4.0 A max.
Application Note
This note documents the typical current draw requirements for Aircell Axxess® CTR system installed. A
typical install would be a CTR with two (2) standard or flush-mount wired SIP Handsets. Actual values
should be measured and recorded for each system installation.

System Specifications, Section 7 Page 7-7
Aircell confidential and proprietary D12004-E, March 2010
Description:..............................................28 VDC
Standby ...................................................<0.43A
• Additional wired Handsets will add about 0.35 A each to the current load of the system.
• ACA will add about 0.12 A to the current load of the system.
System Connectors
CTR Unit..................................................(CTR - Handset Comm 1 and 2 ports)
(CTR - System Comm. port)
(CTR - Power /Control port)
Mating Connectors ..................................P12064 (CTR - Handset Comm 1 and 2 ports)
P12236 (CTR - System Comm. port)
P12066 (CTR- Power/Control port)
RF Transmission Characteristics
Operating Frequency Range...................2.400 to 2.483 GHz
Transmit Power (Standard CTR).............Less than 0.1 W max (less than 100 mW)
Radiated Power (Low Power CTR) .........Less than 0.025 W max (less than 25 mW)
Per 802.11 b and 802.11g Wireless Broadband Router FCC
Part 15 regs)
Environmental (RTCA/DO-160E)
Temperature and Altitude…….................Section 4, Category A4 ((15K ft MSL, -15°C to +40°C
(+5°F to +104°F) operating, -30°C to +70°C (-22°F to +158°F)
storage)
Shock and Crash Safety..........................Section 7, Category B
Vibration………………………..................Section 8, Category S (Curves C, L, M, and Y)
Magnetic Effect........................................Section 15, Category Z
Power Input…………………… ................Section 16, Category B (22 to 30.3 VDC)
Voltage Spike………………….................Section 17, Category B
RF Emission…………………...................Section 21, Category M
7.4.4. Aircell Axxess® Remote Diversity Antenna (RDA) (optional)
The RDA is comprised of the following items:
P12344 ....................................................Remote Diversity Antenna (RDA)
Dimensions
RDA .........................................................3.75” Diameter x .65” H
(9.53 cm x 1.65 cm)
Weights
RDA .........................................................0.175 lbs. (0.08 kg)
System Specifications, Section 7 Page 7-8
Aircell confidential and proprietary D12004-E, March 2010
System Connectors
P13271 ....................................................Connector, Coaxial, TNC, Plug, Straight, Crimp
Environmental, RTCA/DO-160E
Temperature and Altitude…….................Section 4, Category A4 ((15K ft MSL, -15°C to +40°C)
(+5°F to +104°F) operating, -30°C to +70°C (-22°F to +158°F)
storage)
Shock and Crash Safety..........................Section 7, Category B
Vibration………………………..................Section 8, Category S (Curves C, L, M, and Y)
Magnetic Effect........................................Section 15, Category Z
RF Emission…………………...................Section 21, Category M
7.4.5. Aircell Axxess Handset Interface (AHI-1) (optional in lieu of CTR)
The AHI-1 is comprised of the following items:
P12339 ....................................................AHI-1 (Aircell Axxess Handset Interface)
Dimensions
AHI-1 Unit................................................4.12” L x 3.07” W x 1.0” H
(10.46 cm x 7.8 cm x 2.54 cm)
Weights
AHI-1 Unit.................................................49 lbs. (0.22 kg)
Power Requirements.............................28 VDC, 0.15 A max. for APoEDI (Aircell Power-over-Ethernet
Data Interface)
Note: each SIP HS connected to this AHI will add 0.35 A max.
System Connectors
P12526 (AHI-1 PoE)................................J3 and J4 Connector, MIL-DTL-24308 (D-SUB), PLUG,
9-PIN, CRIMP 20-24, WITH EMI HOOD (POSITRONIC
RD9M10GEZ)
P12524 (AHI-1 Data In)...........................J1 Connector, MIL-DTL-24308 (D-SUB), PLUG,
15-PIN, CRIMP 20-24, WITH EMI HOOD (POSITRONIC
RD15M10GEZ)
P12525 (AHI-1 Data Out) ........................J2 Connector, MIL-DTL-24308 (D-SUB), PLUG,
25-PIN, CRIMP 20-24, WITH EMI HOOD (POSITRONIC
RD2510MGEZ)
Environmental, RTCA/DO-160E
Temperature and Altitude…….................Section 4, Category A4 ((15K ft MSL, -15°C to +55°C)
(+5°F to +131°F) operating, -30°C to +70°C (-22°F to +158°F)
storage)
Shock and Crash Safety..........................Section 7, Category B
Vibration………………………..................Section 8, Category S (Curves C, L, M, and Y)
Magnetic Effect........................................Section 15, Category Z
Power Input…………………… ................Section 16, Category B (22 to 30.3 VDC)

System Specifications, Section 7 Page 7-9
Aircell confidential and proprietary D12004-E, March 2010
Voltage Spike………………….................Section 17, Category B
RF Emission…………………...................Section 21, Category M
7.4.6. Aircell Axxess® Handset / Fax Interface (AHI-2) (optional in lieu of CTR)
The AHI-2 is comprised of the following items:
P12346 ....................................................AHI-2 (Aircell Axxess Handset Interface)
Dimensions
AHI-2 Unit................................................8.5” L x 5.05” W x 1.8” H
(21.59 cm x 12.83 cm x 4.57 cm)
Weights
AHI-2 Unit................................................1.41 lbs. (0.64 kg)
Power Requirements.............................28 VDC, 0.15 A max. for APoEDI (Aircell Power-over-Ethernet
Data Interface) and 28 VDC, 0.25 A max for Data/Fax Terminal
Adapters.
Note: Each SIP HS connected to this AHI will add 0.35 A max.
System Connectors
12527 (AHI-2 Power In)...........................J1 Connector, MIL-DTL-24308 (D-SUB), PLUG, 15-SOCKET,
CRIMP, CABLE-MOUNT, WITH EMI STRAIN RELIEF
(POSITRONIC RD15F10GT2X)
P12526 (AHI-2 PoE)................................J4 Connector, MIL-DTL-24308 (D-SUB), PLUG,
9-PIN, CRIMP 20-24, WITH EMI HOOD (POSITRONIC
RD9M10GEZ)
P12524 (AHI-2 Data In)...........................J3 Connector, MIL-DTL-24308 (D-SUB), PLUG,
15-PIN, CRIMP 20-24, WITH EMI HOOD (POSITRONIC
RD15M10GEZ)
P12525 (AHI-2 Data Out) ........................J2 Connector, MIL-DTL-24308 (D-SUB), PLUG,
25-PIN, CRIMP 20-24, WITH EMI HOOD (POSITRONIC
RD25M10GEZ)
P12533 (AHI-2 ATA) ...............................J5 and J6 Connectors, MIL-DTL-24308 (DA-26), PLUG, 22-PIN,
CABLE-MOUNT, WITH EMI STRAIN RELIEF (DD26M10GEZ)
Environmental, RTCA/DO-160E
Temperature and Altitude…….................Section 4, Category A4 ((15K ft MSL, -15°C to +55°C)
(+5°F to +104°F) operating, -30°C to +70°C (-22°F to +158°F)
storage)
Shock and Crash Safety..........................Section 7, Category B
Vibration………………………..................Section 8, Category S (Curves C, L, M, and Y)
Magnetic Effect........................................Section 15, Category Z
Power Input…………………… ................Section 16, Category B (22 to 30.3 VDC)
Voltage Spike………………….................Section 17, Category B
RF Emission…………………...................Section 21, Category M

System Specifications, Section 7 Page 7-10
Aircell confidential and proprietary D12004-E, March 2010
7.4.7. Aircell Axxess® Call Alerter (ACA) (optional)
The ACA is comprised of the following items:
P12347 ....................................................ACA (Aircell Axxess Call Alerter)
or
P12924 ....................................................ACA II (Aircell Axxess Call Alerter)
Dimensions
ACA Unit..................................................4.12” L x 3.4” W x 1.0” H
(10.47 cm x 8.64 cm x 2.54 cm)
Weights
ACA Unit..................................................0.34 lbs. (0.15 kg)
Power Requirements.............................48VDC, 0.12 A max. from a AHI or CTR, for APoEDI (Aircell
Power-over-Ethernet Data Interface (the ACA II needs
additional 20 mA max from 28 VDC power)
System Connectors
P12528 (ACA IN).....................................Power/Control Connector, MIL-DTL-24308 (D-SUB), PLUG, 9
SOCKET, CRIMP 20-24, WITH EMI HOOD (POSITRONIC
RD9F10GEX)
P12529 (ACA OUT).................................J2 Connector, MIL-DTL-24308 (D-SUB), PLUG, 25-SOCKET
CRIMP, CABLE-MOUNT, WITH EMI STRAIN RELIEF
(POSITRONIC RD25F10GEX)
Environmental, RTCA/DO-160E
Temperature and Altitude…….................Section 4, Category A4 ((15K ft MSL, -15°C to +55°C)
(+5°F to +131°F) operating, -30°C to +70°C (-22°F to +158°F)
storage)
Shock and Crash Safety..........................Section 7, Category B
Vibration………………………..................Section 8, Category S (Curves C, L, M, and Y)
Magnetic Effect........................................Section 15, Category Z
RF Emission…………………...................Section 21, Category M
7.4.8. Aircell Axxess® Standard SIP Handset (with Audio Panel interface)
The SIP Standard HS is comprised of the following items:
P12248-00X ............................................SIP HS (Standard) (-001 Black, -002 Beige, -003 Lt. Gray)
P12190 ....................................................Connector, MIL-DTL-24308 (D-SUB), SIZE 1 (HI-DENSITY),
15-SKT W/HOOD (POSITRONIC DD15F10GVLO)
Dimensions
SIP Standard Handset Unit .....................7.8” L x 2.10” W x 1.9” H
(19.81 cm x 5.33 cm x 4.83 cm)
SIP Standard Handset Cradle.................4.10” L x 2.70” W x 1.60” H
(10.41 cm x 6.86 cm x 4.06 cm)
Handset Connector, 15 Pin .....................1.85“ L x 1.25“ W x 2.05”H

System Specifications, Section 7 Page 7-11
Aircell confidential and proprietary D12004-E, March 2010
Weights
SIP standard Handset Unit......................1.25 lbs. (0.57 kg)
Handset Connector .................................0.2 lbs. (0.09 kg)
Power Requirements.............................48 VDC, 0.1 A max. (the SIP HSs receive power from the CTR
or AHI)
System Connectors
SIP Handset Unit.....................................Connector, High-density, 15 Pin D-Sub (Male)
Mating Connectors ..................................P12190 Connector, High-density, 15 Socket D-Sub (Female)
Audio Panel Interface
Transmit Mic Bias Voltage.......................+6 VDC (for P12248-00X Revision M and previous, and +12
VDC for Revision N and subsequent)
Transmit Mic Input Level .........................100 millivolt (mV) RMS, typical
Transmit Mic Input Impedance................300 ohms
Receive Output Level ..............................150 mV RMS, typical
Receive Output Impedance.....................75 ohms
Headset Interface (mini jack on Handset)
Transmit Mic Bias Voltage.......................+6 VDC
Transmit Mic Input Level .........................100 mV (max)
Receive Output Level ..............................100 mW (max) into 16 ohms
Environmental (RTCA/DO-160E)
Temperature and Altitude…….................Section 4, Category A4 ((15K ft MSL, -15°C to +55°C)
(+5°F to +131°F) operating, -30°C to +70°C (-22°F to +158°F)
storage)
Shock and Crash Safety..........................Section 7, Category B
Vibration………………………..................Section 8, Category S (Curves C, L, M, and Y)
Magnetic Effect........................................Section 15, Category Z
RF Emission…………………...................Section 21, Category M
7.4.9. Aircell Axxess® WiFi SIP Handset (with no Audio Panel interface)
The WiFi SIP HS is comprised of the following items:
P12857-00X ............................................WiFi SIP HS (-001 Black, -002 Beige, -003 Lt. Gray)
P12861-00X ............................................Cradle (Base Station) (-001 Black, -002 Beige, -003 Lt. Gray)
P12190 ....................................................Connector, MIL-DTL-24308 (D-SUB), SIZE 1 (HI-DENSITY),
15-SKT W/HOOD (POSITRONIC DD15F10GVLO)
Talk Time ................................................Provides about three hours of talk time and over ten hours of
standby time.
System Specifications, Section 7 Page 7-12
Aircell confidential and proprietary D12004-E, March 2010
Dimensions
WiFi SIP Handset Unit.............................7.98” L x 2.11” W x 1.93” H
(25.86 cm x 7.62 cm x 6.35 cm)
WiFi SIP Handset Cradle ........................4.10” L x 2.70” W x 1.60” H
(10.41 cm x 6.86 cm x 4.06 cm)
Handset Connector, 15 Pin .....................1.85“ L x 1.25“ W x 2.05”H
Weights
WiFi SIP Handset and Cradle .................0.5 lbs. (0.23 kg)
WiFi Handset Cradle ...............................0.93 lbs. (0.42 kg)
Power Requirements.............................28 VDC, 0.27 A max.
System Connectors
SIP Handset Unit.....................................Connector, High-density, 15 Pin D-Sub (Male)
Mating Connectors ..................................P12190 Connector, High-density, 15 Socket D-Sub (Female)
RF Transmission Characteristics
Operating Frequency Range...................2.400 to 2.483 GHz
Transmit Power .......................................Less than 0.01 W max (less than 10 mW)
Per 802.11 b and 802.11g Wireless Broadband Router FCC
Part 15 regs)
Headset Interface (mini jack on Handset)
Transmit Mic Bias Voltage.......................+6 VDC
Transmit Mic Input Level .........................100 mV (max)
Receive Output Level ..............................100 mW (max) into 16 ohms
Environmental (RTCA/DO-160E)
Temperature and Altitude…….................Section 4, Category A4 ((15K ft MSL, -15°C to +55°C)
(+5°F to +131°F) operating, -30°C to +70°C (-22°F to +158°F)
storage)
Shock and Crash Safety..........................Section 7, Category B
Vibration………………………..................Section 8, Category S (Curves C, L, M, and Y)
Magnetic Effect........................................Section 15, Category Z
Power Input…………………… ................Section 16, Category B (22 to 30.3 VDC)
Voltage Spike………………….................Section 17, Category B
RF Emission…………………...................Section 21, Category M
7.4.10. Aircell Axxess® Flush-Mount SIP Handset (with no Audio Panel Interface)
The SIP Flush-Mount HS is comprised of the following items:
P12192-00X ............................................SIP HS (Flush-Mount) (-001 Black, -002 Beige, -003 Lt. Gray)
P12190 ....................................................Connector, MIL-DTL-24308 (D-SUB), SIZE 1 (HI-DENSITY),
15-SKT W/HOOD (POSITRONIC DD15F10GVLO)
System Specifications, Section 7 Page 7-13
Aircell confidential and proprietary D12004-E, March 2010
Dimensions
SIP Flush-Mount Handset Unit................10.18” L x 3.00” W x 2.50” H
(25.86 cm x 7.62 cm x 6.35 cm)
Handset Connector, 15 Pin .....................1.85“ L x 1.25“ W x 2.05” H
Weights
SIP Flush-Mount Handset Unit................1.5 lbs. (0.68 kg)
Handset Connector .................................0.2 lbs. (0.09 kg)
Power Requirements.............................48 VDC, 0.1 A max. (the SIP HSs receive power from the CTR
or AHI)
System Connectors
Sip Handset Unit .....................................Connector, High-density, 15 Pin D-Sub (Male)
Mating Connectors ..................................P12190 Connector, High-density, 15 Socket D-Sub (Female)
Headset Interface (mini jack on Handset)
Transmit Mic Bias Voltage.......................+6 VDC
Transmit Mic Input Level .........................100 mV (max)
Receive Output Level ..............................100 mW (max) into 16 ohms
Environmental (RTCA/DO-160E)
Temperature and Altitude…….................Section 4, Category A4 ((15K ft MSL, -15°C to +55°C)
(+5°F to +131°F) operating, -30°C to +70°C (-22°F to +158°F)
storage)
Shock and Crash Safety..........................Section 7, Category B
Vibration………………………..................Section 8, Category S (Curves C, L, M, and Y)
Magnetic Effect........................................Section 15, Category Z
RF Emission…………………...................Section 21, Category M
7.4.11. Aircell Axxess® Custom-Retractable SIP Handset (with no Audio Panel Interface)
The SIP Custom-Retractable HS is comprised of the following items:
P12793-00X ............................................SIP HS (Custom Retractable)
(-001 Black, -002 Beige, -003 Lt. Gray)
P12190 ....................................................Connector, MIL-DTL-24308 (D-SUB), SIZE 1 (HI-DENSITY),
15-SKT W/HOOD (POSITRONIC DD15F10GVLO)
Dimensions
SIP Custom Retractable Handset Unit.................7.8” L x 2.1” W x 1.9” H
(19.8 cm x 5.3 cm x 4.8 cm)
Retractable Reel Unit ...........................................2.6” L x 2.6” W x 1.3” H
(6.6 cm x 6.6 cm x 3.3 cm)
Handset Connector, 15-Pin ..................................1.85“L x 1.25“W x 2.05”H
System Specifications, Section 7 Page 7-14
Aircell confidential and proprietary D12004-E, March 2010
Weights
SIP Flush-Mount Handset Unit................1.5 lbs. (0.68 kg)
Handset Connector .................................0.2 lbs. (0.09 kg)
Power Requirements.............................48 VDC, 0.1 A max. (the SIP HSs receive power from the CTR
or AHI)
System Connectors
Sip Handset Unit .....................................Connector, High-density, 15-Pin D-Sub (Male)
Mating Connectors ..................................P12190 Connector, High-density, 15 Socket D-Sub (Female)
Headset Interface (mini jack on Handset)
Transmit Mic Bias Voltage.......................+6 VDC
Transmit Mic Input Level .........................100 mV (max)
Receive Output Level ..............................100 mW (max) into 16 ohms
Environmental (RTCA/DO-160E)
Temperature and Altitude…….................Section 4, Category A4 ((15K ft MSL, -15°C to +55°C)
(+5°F to +131°F) operating, -30°C to +70°C (-22°F to +158°F)
storage)
Shock and Crash Safety..........................Section 7, Category B
Vibration………………………..................Section 8, Category S (Curves C, L, M, and Y)
Magnetic Effect........................................Section 15, Category Z
RF Emission…………………...................Section 21, Category M
7.4.12. Aircell Axxess® LEMO SIP Handset (with no Audio Panel interface)
The SIP LEMO HS is comprised of the following items:
P12865-00X ............................................SIP HS (Standard) (-001 Black, -002 Beige, -003 Lt. Gray)
P12531 ....................................................Connector, Circular, LEMO, Plug, 4-socket (LEMO
FGG.1B.304.CYCD42)
Dimensions
SIP LEMO Handset Unit..........................7.8” L x 2.10” W x 1.9” H
(19.81 cm x 5.33 cm x 4.83 cm)
Handset Connector, LEMO .....................1.85“ L x 1.25“ W x 2.05”H
Weights
SIP LEMO Handset Unit..........................0.7 lbs. (0.3 kg)
Handset Connector .................................0.05 lbs. (0.02 kg)
Power Requirements.............................48 VDC, 0.1 A max. (the SIP HSs receive power from the CTR
or AHI)

System Specifications, Section 7 Page 7-15
Aircell confidential and proprietary D12004-E, March 2010
System Connectors
SIP Handset Unit.....................................Connector, High-density, 4 Pin LEMO
Mating Connectors ..................................P12532 Connector, Circular, LEMO, Receptacle, 4-socket
Headset Interface (mini jack on Handset)
Transmit Mic Bias Voltage.......................+6 VDC
Transmit Mic Input Level .........................100 mV (max)
Receive Output Level ..............................100 mW (max) into 16 ohms
Environmental (RTCA/DO-160E)
Temperature and Altitude…….................Section 4, Category A4 ((15K ft MSL, -15°C to +55°C)
(+5°F to +131°F) operating, -30°C to +70°C (-22°F to +158°F)
storage)
Shock and Crash Safety..........................Section 7, Category B
Vibration………………………..................Section 8, Category S (Curves C, L, M, and Y)
Magnetic Effect........................................Section 15, Category Z
RF Emission…………………...................Section 21, Category M
7.4.13. Reserved for product expansion
7.4.14. Reserved for product expansion
7.4.15. Reserved for product expansion
7.4.16. Reserved for product expansion
7.4.17. Reserved for product expansion
7.4.18. Reserved for product expansion
7.4.19. Iridium Satellite Antenna
For specifications details and options, refer to Aircell Antenna Installation Manual P/N 800-10355.

System Specifications, Section 7 Page 7-16
Aircell confidential and proprietary D12004-E, March 2010
This Page Intentionally Blank

Special Tools, Fixtures, and Equipment, Section 8 Page 8-1
Aircell confidential and proprietary D12004-E, March 2010
8.0 SPECIAL TOOLS, FIXTURES, AND EQUIPMENT
8.1. Introduction
No special tools are required for the installation of the Aircell Axxess® II Satellite Transceiver (ST 4200),
Aircell Axxess 2-Channel Expansion Transceiver (ST 4020), Cabin Telecommunications Router (CTR)
or SIP Handsets.
8.2. Test Setup and Calibration
• A Laptop PC with a RJ 45 Ethernet connection port; or
• A Laptop with WiFi capabilities if WiFi connections are available; and
• A Web Browser installed (Internet Explorer)
No other special test equipment is required to determine the operational status of the Aircell Axxess
System.
Refer to Section 4.0 on testing for the procedure to verify that the unit is serviceable.

Special Tools, Fixtures, and Equipment, Section 8 Page 8-2
Aircell confidential and proprietary D12004-E, March 2010
This Page Intentionally Blank