Good Life UP1621 Guardian User Manual Guardian v4 040109 en
Good Life LLC Guardian Guardian v4 040109 en
User Manual

The Guardian™ Instruction Manual
www.pestrepellerultimate.com
Good Life® is proud to introduce the world’s first indoor and outdoor 12-in-1 pest repeller, The Guardian™. Carefully designed with a
tremendous amount of research, the Guardian includes more features than any other pest repeller on the market. Whether you use it to
repel pests or as a personal safety device you can enjoy the multiple power options, convenient remote control, strobe light, motion
sensor, Select a Pest™ Technology, and much more!
In This Package
1 Guardian™
1 Plastic Rain Jacket
1 Keychain Remote
1 AC Adapter
1 Instruction Manual
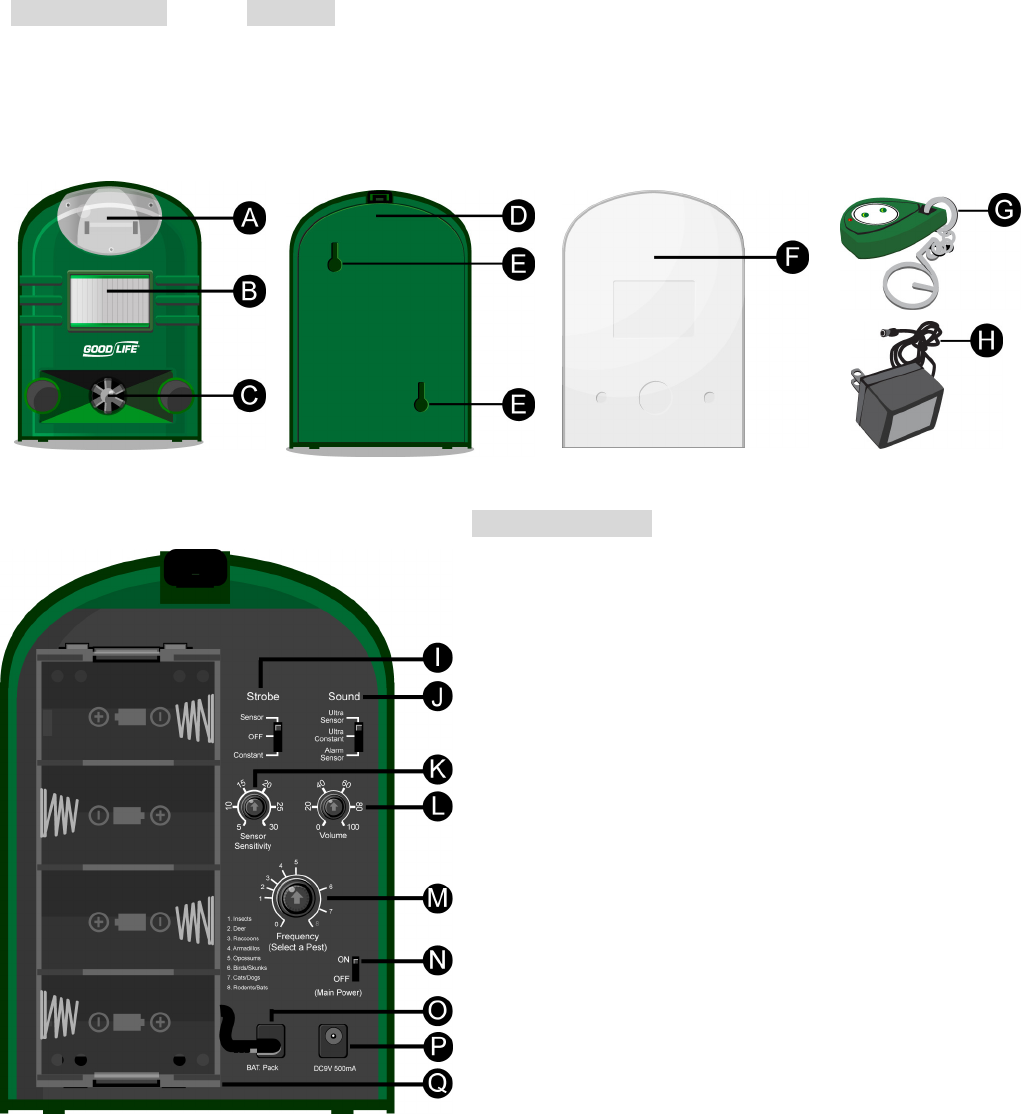
Part List
A – Strobe Light
B – Motion Sensor
C – Speaker
D – Back Cover
E – Mounting Holes
F – Rain Jacket
G – Remote Control
H – AC Adapter
I – Strobe Setting
J – Sound Setting
K – Sensor Sensitivity
L – Volume Dial
M – Frequency Dial
N – Power Switch
O – Battery Plug-in
P – AC Plug-in
Q – Battery Compartment
(D Battery x 4)
I - Getting Started
1. Remove the Back Cover (D). Make sure the Power Switch (N)
is set to “Off”.
2. Adjust the Strobe Setting (I) to the option of your choice:
“Sensor”, “Constant“ or “Off”. See Section III - “Adjusting the
Strobe Settings” for more details.
3. Adjust the Sound Setting (J) to the option of your choice: “Ultra
Sensor”, “Ultra Constant”, or “Alarm Sensor”. See Section IV -
“Adjusting the Sound Settings” for more details.
4. Adjust the sensitivity of the Motion Sensor (B) by turning the
Sensor Sensitivity Dial (K) to your preferred sensitivity level.
See Section V - “Adjusting the Motion Sensor” for more details.
5. Set the Volume Dial (K) to your preferred volume level. See
Section VI - “Adjusting the Volume Dial” for more details.
6. Set the Frequency Dial (M) to the pest you want to repel. See
Section VII - “Adjusting the Frequency Settings” for more details.
7. Select your power source. You may insert 4 D-size batteries into
the Battery Compartment (Q) or use electrical power by
inserting the AC Adapter (H) into the AC Adapter Plug-in (P).
8. Power the unit on by setting the Power Switch (N) to “ON”.
Reattach the Back Cover (D) to the back of the unit.
9. Install the Guardian inside or outside in your preferred location.
You may hang it using the Mounting Holes (E) or place it on any
flat surface. See Section VIII - Installation” for more details. Enjoy
your new Guardian!

II – Quick Settings for Common Pests
Below you will find the recommended Strobe, Sound, Frequency, and Installation settings for several common pests and uses. If you do
not see your pest listed below or would like more detailed information please read Sections III – VIII in this manual.
Bats in Attic
Strobe: Constant
Sound: Ultra Constant
Frequency Dial: 6-8
To Install: Place in attic or where you suspect the bats are
entering the roof area.
Medium Sized Pests in Yard
Strobe: Constant or Off
Sound: Ultra Sensor / Constant
Frequency Dial: 2-8
Motion Sensor: Adjust to preference
To Install: Place near ground level for small pests. For larger
pests place at body level of pest
Squirrels / Raccoons in Attic
Strobe: Constant or Off
Sound: Ultra Constant
Frequency Dial: 3-6
To Install: Place in attic or crawl space depending on location of
pest.
To Use for Personal Safety
Strobe: Sensor
Sound: Alarm Sensor
Volume: 40-100
Motion Sensor: Adjust to preference
To Install: Place near area you want to protect such as hallways,
doorways, yard areas, RVs, etc
III -
Adjusting the Strobe Settings
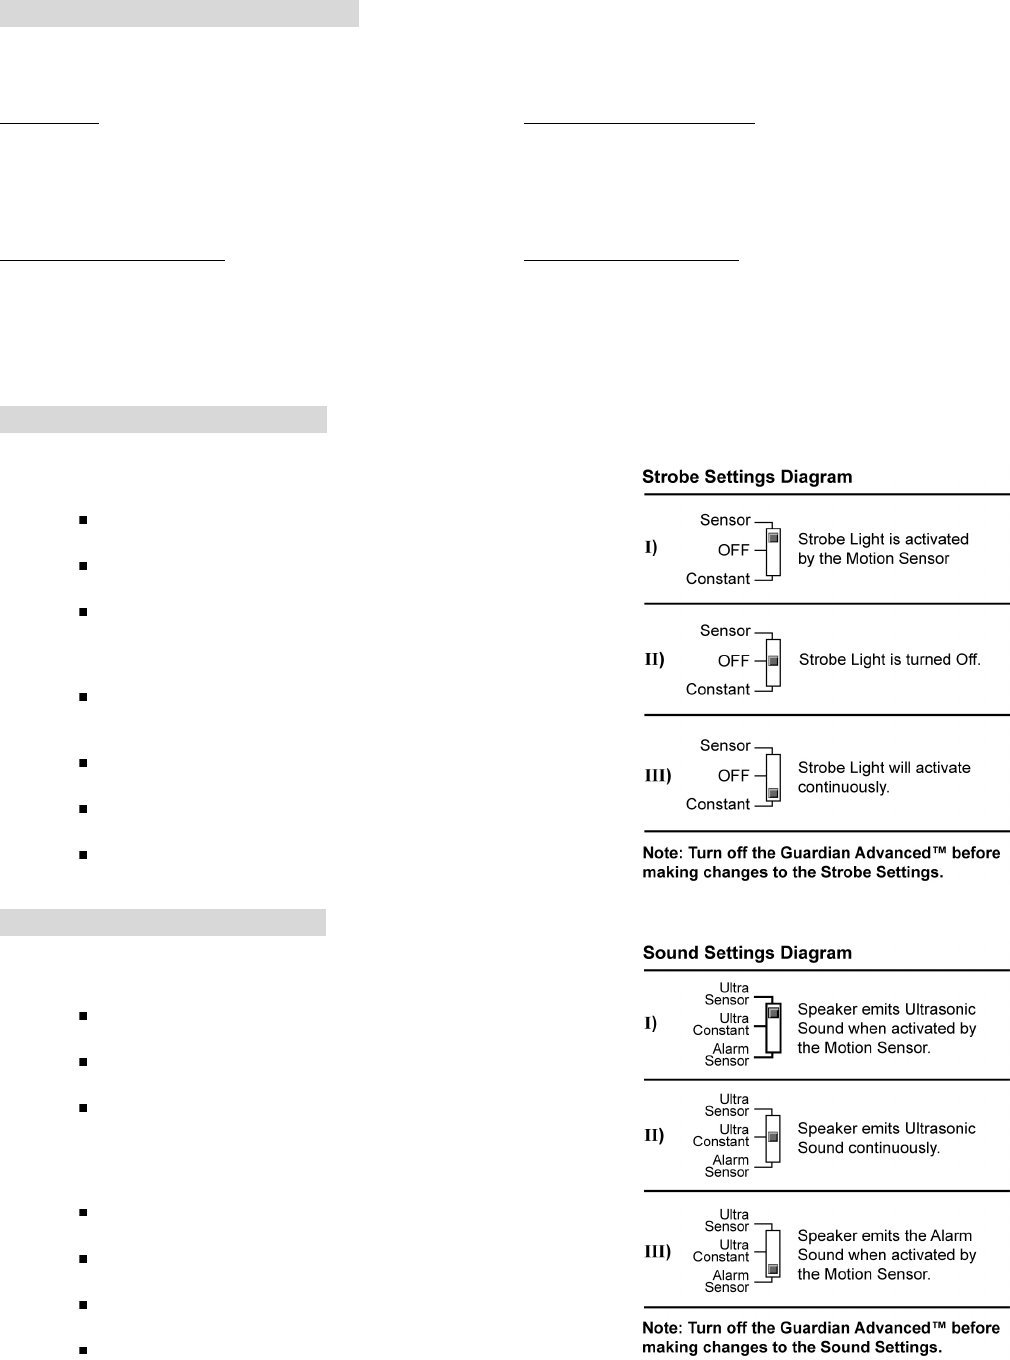
I. Sensor: The Strobe Light (A) will activate only when triggered by the
Motion Sensor (B)
Best used to repel large pests that will easily set off the Motion
Sensor
If you are using batteries, this setting conserves power compared
to the “Constant” setting
If the Strobe Light is set to “Sensor”, then the sound must be set to
either “Ultra Sensor” or “Alarm Sensor”
II. Off: The Strobe Light (A) is turned off.
Can be used with any sound setting.
III. Constant: The Strobe Light (A) will activate continuously.
Best used to repel small pests (such as insects) that will not be
detected by the Motion Sensor
If you are not sure exactly where the pests are located, this setting
may be easier for you to use than the Motion Sensor.
If the Strobe Light is set to “Constant”, then the sound must also be
set to “Ultra Constant”.
IV -
Adjusting the Sound Settings
I. Ultra Sensor: The Speaker (C) will emit Ultrasonic Sound only when it
is activated by the Motion Sensor (B).
Best used to repel large pests that will easily set off the Motion
Sensor
If you are using batteries, this setting conserves power compared
to the “Constant” setting
If the sound is set to “Ultra Sensor”, then the Strobe Light must also
be set to “Sensor” (or “Off”).
I. Ultra Constant: The Speaker (C) will emit Ultrasonic Sound
continuously.
Best used to repel small pests (such as insects) that will not be
detected by the Motion Sensor
If you are not sure exactly where the pests are located, this setting
may be easier for you to use than the motion sensor.
We recommend using the AC Adapter (H) with this setting
because the continuous sound will drain the batteries quickly.
If the sound is set to “Ultra Constant”, then the Strobe Light must

also be set to “Constant” (or “Off”)
III. Alarm Sensor: When you want to use the Guardian in “Alarm” mode, a loud and audible alarm will sound off when the Motion
Sensor (B) is activated.
Best used to repel large pests that will easily set off the Motion Sensor
The sound will be audible to humans when the Frequency Dial (M) is set to any setting
This setting can be used for personal safety to ward off intruders (human or pest) from your property. This works best
when the Strobe Light is set to “Sensor” as well.
If the sound is set to “Alarm Sensor”, then the Strobe Light must also be set to “Sensor” (or “Off”).
V -
Adjusting the Motion Sensor
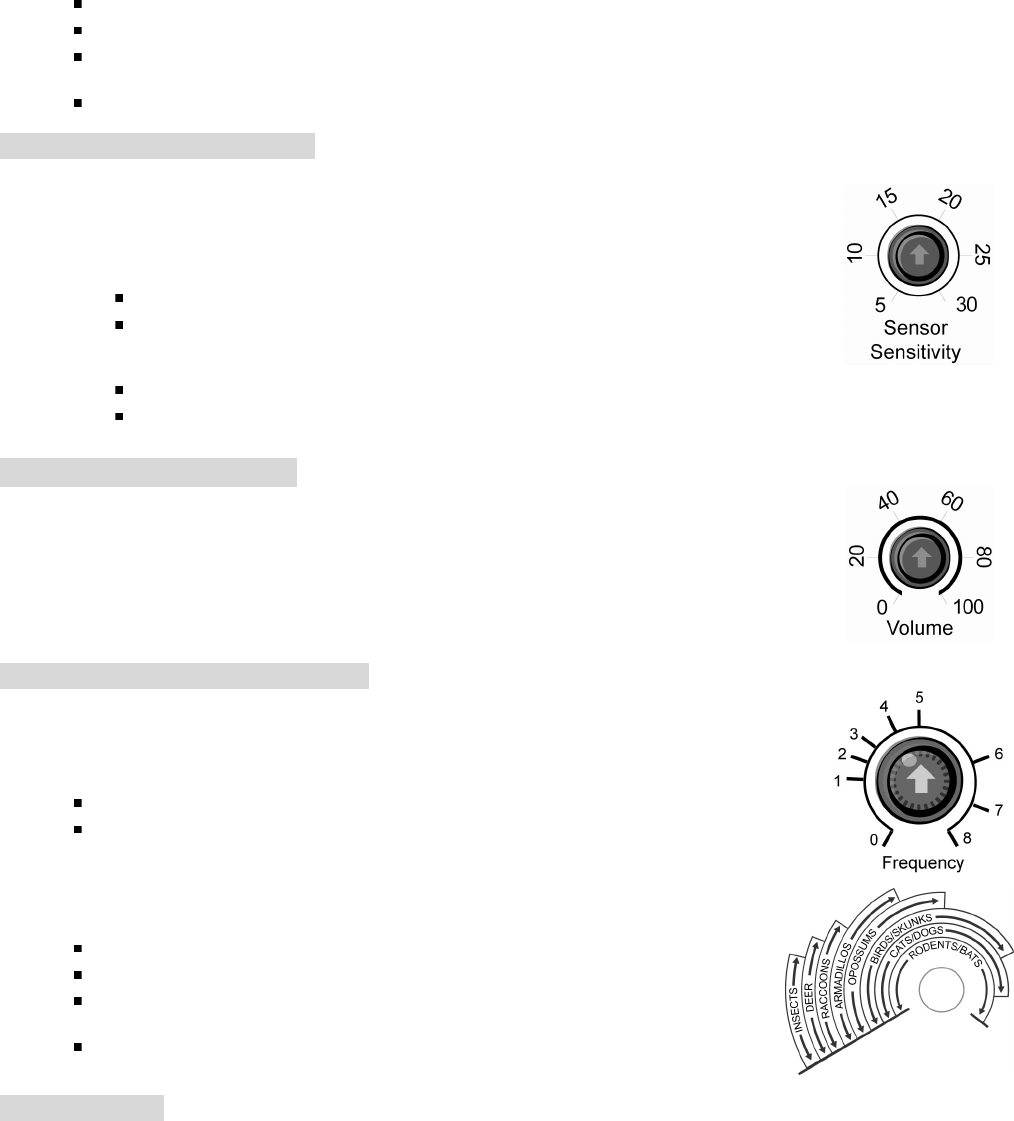
The Sensor Sensitivity Dial (K) controls the sensitivity of the Motion Sensor. Numbers on the dial are
shown in meters. Not all Strobe and Sound settings use the Motion Sensor. To determine if your settings
use the Motion Sensor, refer to the list below:
Settings that use the Motion Sensor:
Strobe Setting (I) - “Sensor”
Sound Setting (J) - “Ultra Sensor” and “Alarm Sensor”
Settings that do not use the Motion Sensor:
Strobe Setting (I) - “Constant” and “Off”
Sound Setting (J) - “Ultra Constant”
VI
-
Adjusting the Volume Dial
The Volume Dial allows you to adjust the volume of the audible Alarm. You may need to try the dial at
several different frequency settings for optimal results.
Settings 0-4 will typically be audible to humans, while settings 5-8 should be inaudible to humans.
You will only need to adjust the Volume Dial if you are using the “Alarm Sensor” setting. Otherwise, you
may skip this step.
VII -
Adjusting the Frequency Settings
The Frequency Dial (M) allows you to choose the specific types of pests you want to repel using
our exclusive Select a Pest™ Technology. The frequency dial only applies to the “Ultra Constant”
and “Ultra Sensor” settings. If you are using the “Alarm Sensor” setting, the Frequency dial will be
deactivated.
You may need to
try the dial at several different frequency settings for optimal results.
Settings 0-4 will typically be audible to humans, while settings 5-8 should be
inaudible to humans.
The Frequency Chart (see diagram on right) can be found on the inside of the Back Cover (D) of
the unit and displays the range of the Frequency Dial in more detail.
Below are common pests and their suggested alternate frequency settings:
Squirrels – Frequency Settings 3-8
Insects – Frequency Setting 1 will work if you do not mind hearing the high-pitched
sound. If you would rather not hear the sound, use Frequency Settings 5-8.
Bats – Frequency Settings 5-8
VIII -
Installation
The Guardian has been designed so that you can use it virtually anywhere. Choose between 2 easy installation options:
1. Place the unit on any flat surface such as counter tops, window seals, ledges, shelves, patios, and more.
2. Mount the unit using the Mounting Holes (H) on the Back Cover (D). The most common places to mount the Guardian
include fences, walls, and trees.
If you are installing the Guardian outside, we recommend using it with the included Rain Jacket (F).

IX - Using the Guardian™ as a Personal Safety Device
The Guardian™ can be used as a Personal Safety Device to ward off intruders (human or pests) from your property. We recommend
using both the Strobe Light (on the “Sensor” setting) and the Alarm Sound (on the “Alarm Sensor”setting) together so that when motion
is detected, the unit will activate both the Strobe Light and the Alarm. Place the Guardian™ near doors, hallways or anywhere else in
your home where you would like to detect motion.
X -
Remote Control
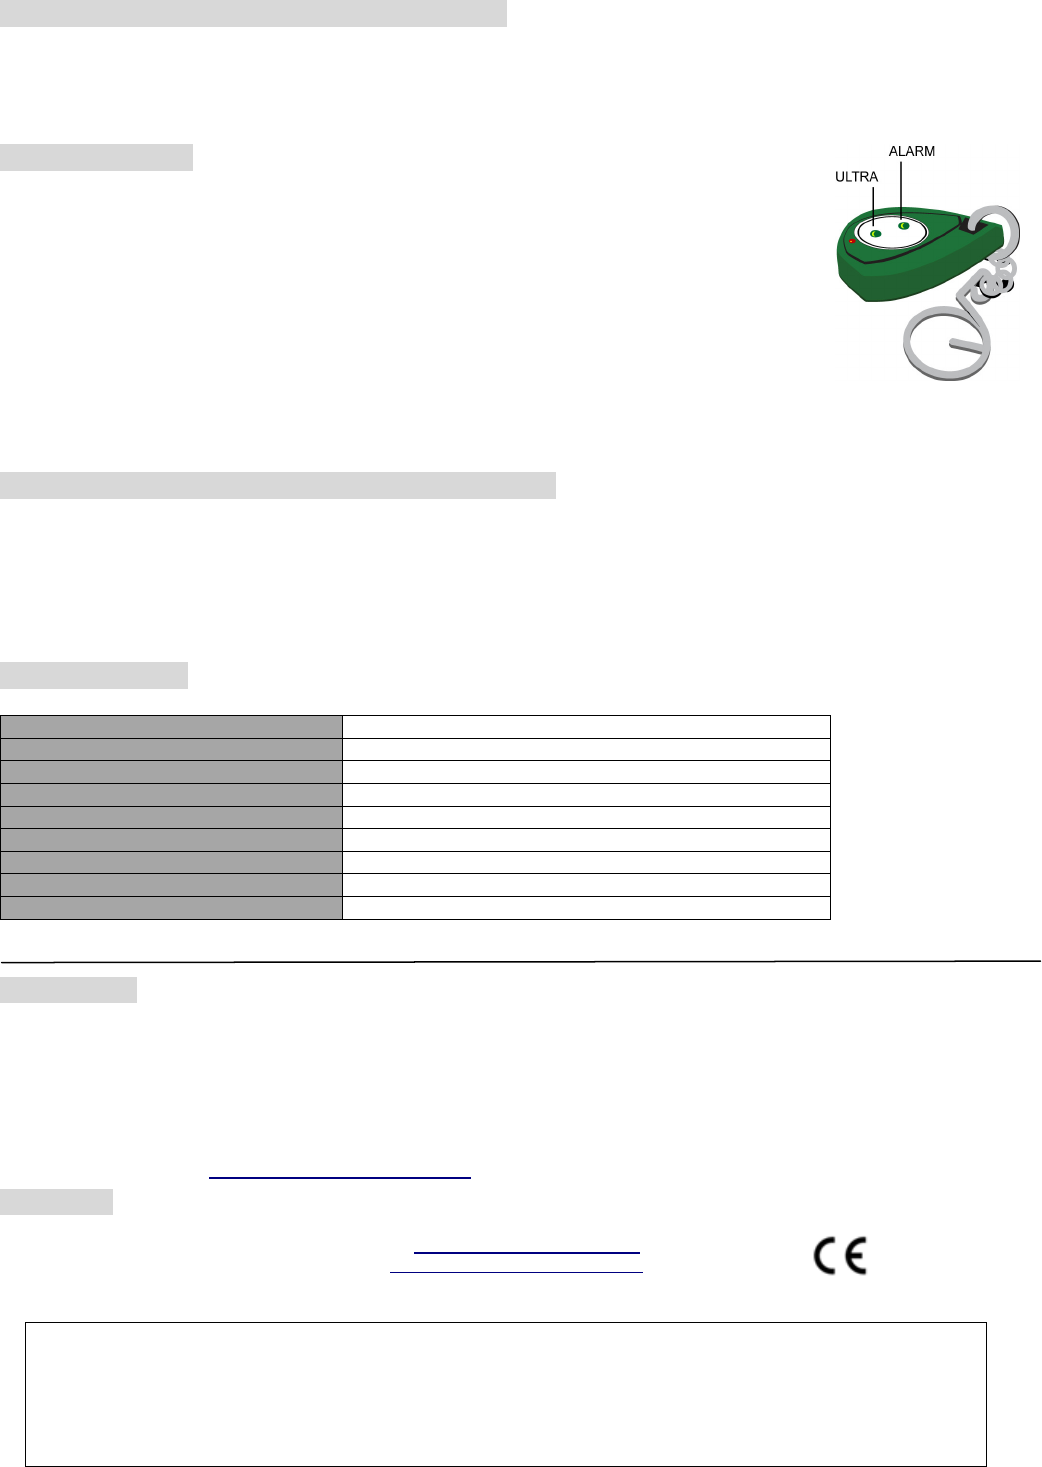
The Guardian™ Remote Control allows you to conveniently activate the unit from up to 75 feet away! There
are two buttons on the front of the remote: Alarm and Ultra.
Alarm Button – When pressed, the unit emits the Alarm Sound. This will work on the sound settings of
“Ultra Sensor” and “Alarm Sensor” only. If the sound setting is “Ultra Constant”, the remote will not trigger
the Alarm Sound.
Ultra Button – When pressed, the unit emits the Ultrasonic Sound, no matter if the sound is set to “Ultra”,
“Off”, or “Alarm”.
Note: If the sound is set to “Ultra Sensor” and the unit is sounding off, the first time you push any button on
the remote it will stop the “Ultra Sensor” sound . The second time you push the button, it will activate the
Audible Alarm. If you want to stop the alarm sound, simply push the Ultra button again.
The Guardian™ must
be turned on for the
remote to work
XI - Rechargeable Battery Compartment (Sold Separately)
The optional Rechargeable Battery Compartment replaces the standard Battery Compartment (Q) and can be used to recharge the
batteries when the Guardian™ is not in use. The Rechargeable Battery Compartment holds 5 C-size rechargeable batteries (not
included). When recharging batteries, make sure the DC jack from the Compartment is firmly connected into the Battery Plug-in (O).
Note: Only rechargeable batteries should be used with the Rechargeable Battery Compartment. Using non-rechargeable
batteries may damage the unit and will void your warranty.
XII - Specifications
Dimensions 5” W x 7 ¼” H x 3 ½” D
Sound (Alarm & Ultrasonic) 5000 sq ft sound distance, 120dB (adjustable) Max, ±/-5dB
Motion Sensor Distance 5 feet to 100 feet
Activation Time Triggers for a duration of 7-9 seconds
Strobe Light 1 flash per second, 10 seconds total
Remote Control Activates from up to 75 feet (direct line of site required)
Battery (remote control) 12V / L1028 x 1 (included)
Battery (Guardian) 1.5V / D Size x 4 (not included)
AC Adapter AC 120V, 9V/600mA x 1
Return Policy
All Good Life products (except those marked as "All Sales Final") are backed by a 30 Day Money Back Guarantee and 1 Year
Manufacturer's Warranty. To return a product, you must first call our Customer Care Center to receive a Return Merchandise
Authorization (RMA) number. Returns and Exchanges sent without an RMA number clearly displayed on the outside of the
package will be returned to sender.
Your 30 Day Guarantee and 1 Year Warranty start the day you receive your order. Returns must be postmarked by no later than the 30th
day to be eligible for a refund. We do not refund initial shipping costs or return shipping costs. Refused packages will be charged a
$10 fee. Before calling visit www.goodlifecompany.com/returns for details.
Contact Us
Toll Free: (800) 657-8214
Outside US: (541) 245-4488
Website: www.pestrepellerultimate.com
Email: customerservice@goodlifellc.com
© 2006 – 2009 Good Life®, LLC. Disclaimer: The Guardian™ is not a professional home security device although it can alert you to the presence of an intruder.
This device complies with Part 15 of the FCC Rules. Operation is subject to the following two conditions: (1) this device may
not cause harmful interference and (2) this device must accept any interference received, including interference that may cause
undesired operation