Graco 406676D Grease Jockey Lubrisystem Repair Kit Users Manual 406676D. Kit, English
2015-04-02
: Graco Graco-406676D-Grease-Jockey-Lubrisystem-Repair-Kit-Users-Manual-685825 graco-406676d-grease-jockey-lubrisystem-repair-kit-users-manual-685825 graco pdf
Open the PDF directly: View PDF ![]() .
.
Page Count: 2
- GENUINE GRACO PARTS AND ACCESSORIES
- Part No: 563762
- 406676D
- Loctite® is a registered trademark of the Loctite Corporation.
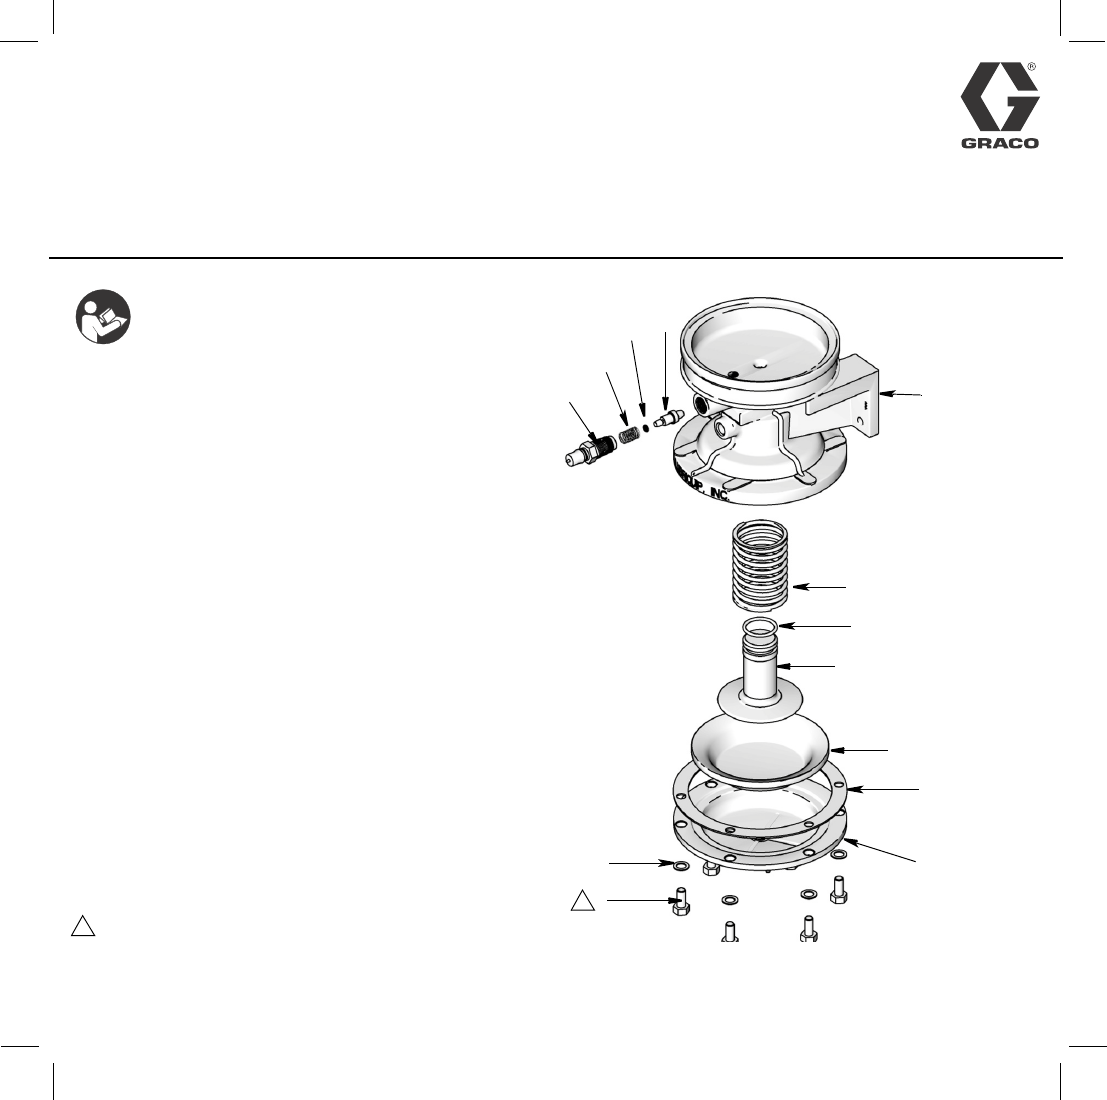
- 1. Remove fill stud fitting (15) from pump body.
- 2. Remove check valve spring (6) and check valve piston (16). Replace o-ring (3) and reinstall check valve piston.
- 3. Install new check valve spring (6).
- 4. Apply pipe dope to fitting (15) and reinstall.
- 5. Remove screws (1) and washers (2). Remove air chamber cover (10) from pump body (14).
- 6. Remove pump gasket (5) and diaphragm (9).
- 7. Remove lube piston (8) and piston return spring (7) taking care not to scratch lube piston or bore of pump body (14).
- 8. Install new piston return spring (7).
- 9. Lubricate lube piston o-ring (4) on new piston (8) with grease.
- 10. Replace lube piston (8), again taking care not to scratch lube piston or bore of pump body (14).
- 11. Replace diaphragm (9) and gasket (5).
- 12. Reinstall air chamber cover (10). Apply Loctite® to screws (1). Replace washers (2) and screws (1). Torque cover screws (1) to 15-22 ft. lbs. (20 - 30 N.m).
- Loctite® is a registered trademark of the Loctite Corporation.
Important Safety Instructions
Read all instructions in this manual.
Ref. Description Qty.
1 SCREW, 3/8” x 3/4” 6
2 WASHER, flat, 3/8” 6
3 O-RING, fluoroelastomer A, 70
DURO, 1/16”
1
4 O-RING, fluoroelastomer A, 70
DURO, 1/8”
1
5 GASKET, pump 1
6 SPRING, check valve 1
7 SPRING, return, piston 1
8PISTON, lube 1
9 DIAPHRAGM 1
10 COVER, chamber 1
14 BODY, pump *
15 FITTING, coupling 3/8” x 1/4” *
16 PISTON, check valve *
* For reference only. Not included in kit.
GENUINE GRACO PARTS AND ACCESSORIES
Grease Jockey
Lubrisystem Repair Kit
Part No: 563762 406676D
Graco Inc. P.O. Box 1441 Minneapolis, MN 55440-1441
406676 Rev, C 10/2010 - Original instructions.
Copyright 2008, Graco Inc. is registered to I.S. EN ISO 9001
6
7
8
9
10
2
1
5
3
ti11523
1
14
16
15
4
Apply Loctite® to screws (1). Torque to 15-22 ft.-lbs.
1
Loctite® is a registered trademark of the Loctite Corporation.
EN

REPAIR INSTRUCTIONS
1. Remove fill stud fitting (15) from pump body.
2. Remove check valve spring (6) and check valve
piston (16). Replace o-ring (3) and reinstall
check valve piston.
3. Install new check valve spring (6).
4. Apply pipe dope to fitting (15) and reinstall.
5. Remove screws (1) and washers (2). Remove
air chamber cover (10) from pump body (14).
6. Remove pump gasket (5) and diaphragm (9).
7. Remove lube piston (8) and piston return spring
(7) taking care not to scratch lube piston or bore
of pump body (14).
8. Install new piston return spring (7).
9. Lubricate lube piston o-ring (4) on new piston (8)
with grease.
10. Replace lube piston (8), again taking care not to
scratch lube piston or bore of pump body (14).
11. Replace diaphragm (9) and gasket (5).
12. Reinstall air chamber cover (10). Apply Loctite®
to screws (1). Replace washers (2) and screws
(1). Torque cover screws (1) to 15-22 ft. lbs. (20 -
30 N.m).
