Grandstream Networks GRP2612P IP Phone User Manual
Grandstream Networks, Inc. IP Phone
UserManual.wiki
>
Grandstream Networks
>
GRP2612P User Manual
User Manual
Navigation menu
Upload a User Manual
Namespaces
Wiki Guide
HTML
PDF
Info
Views
User Manual
Discussion / Help
Navigation
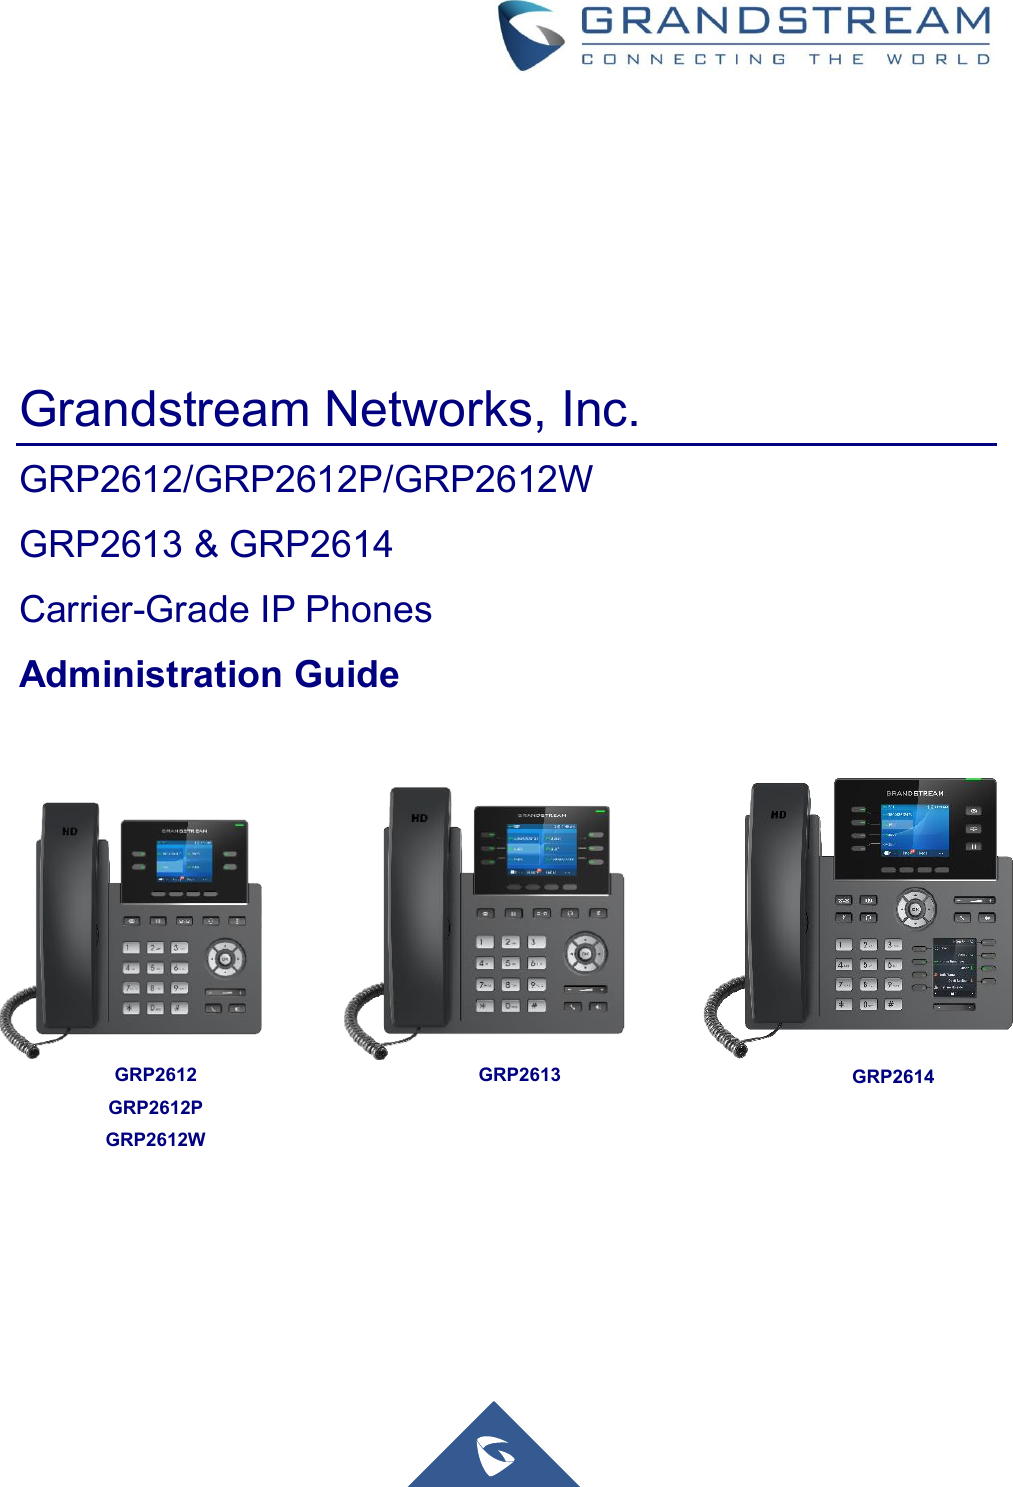
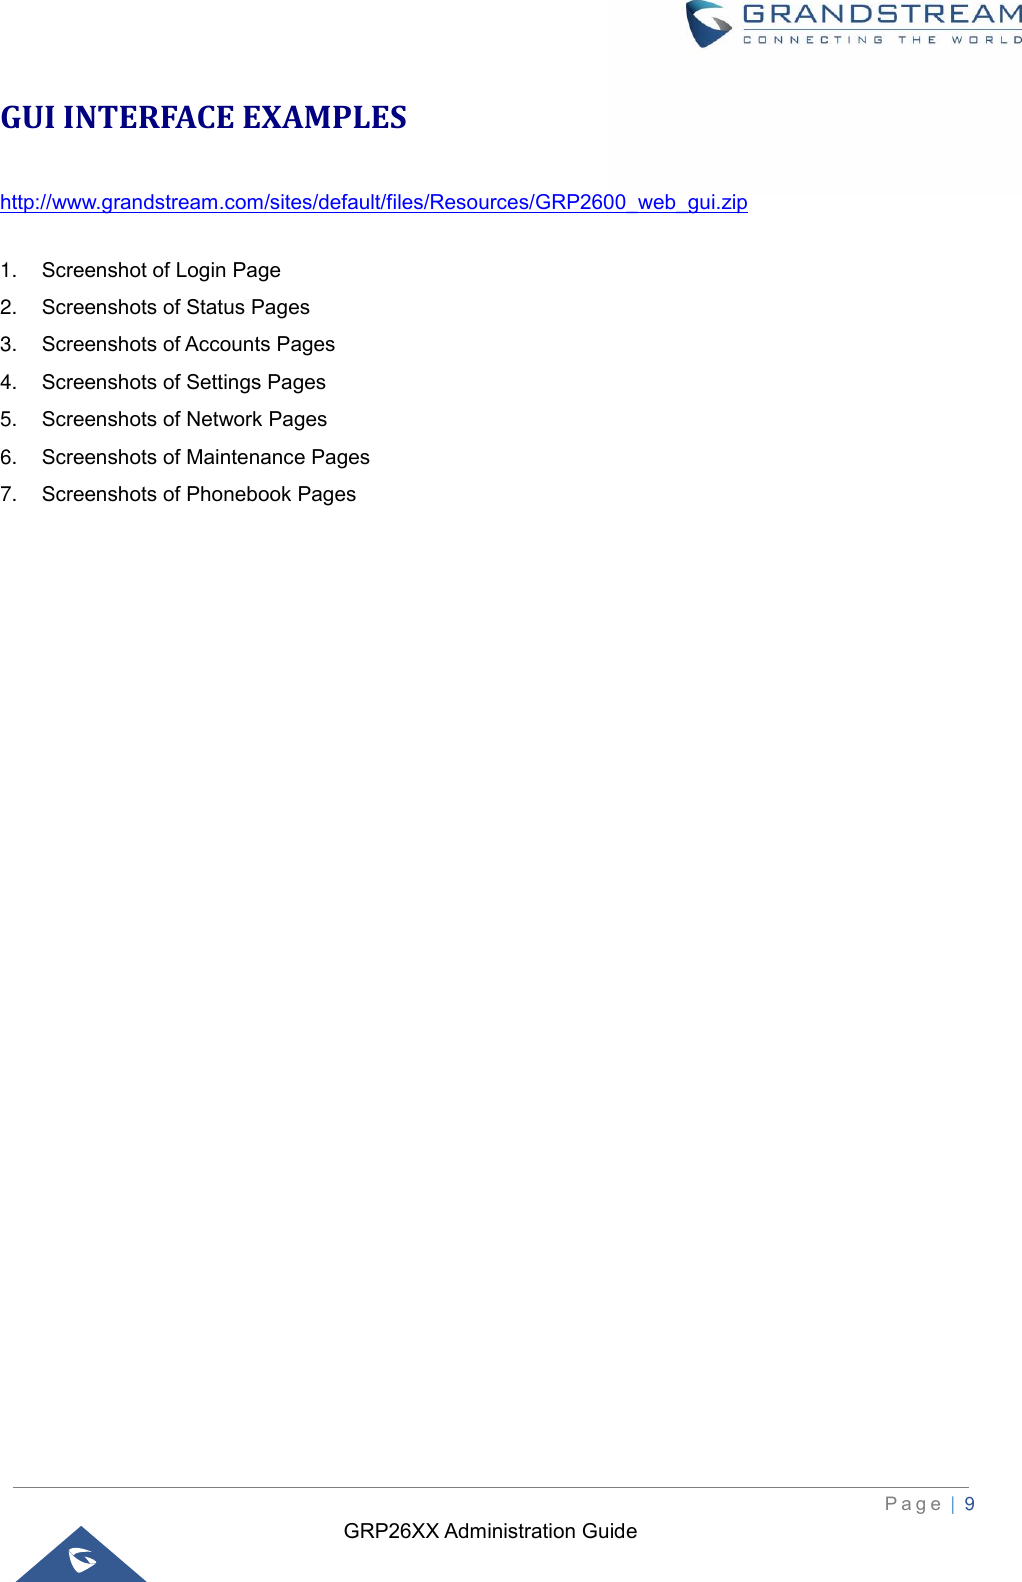
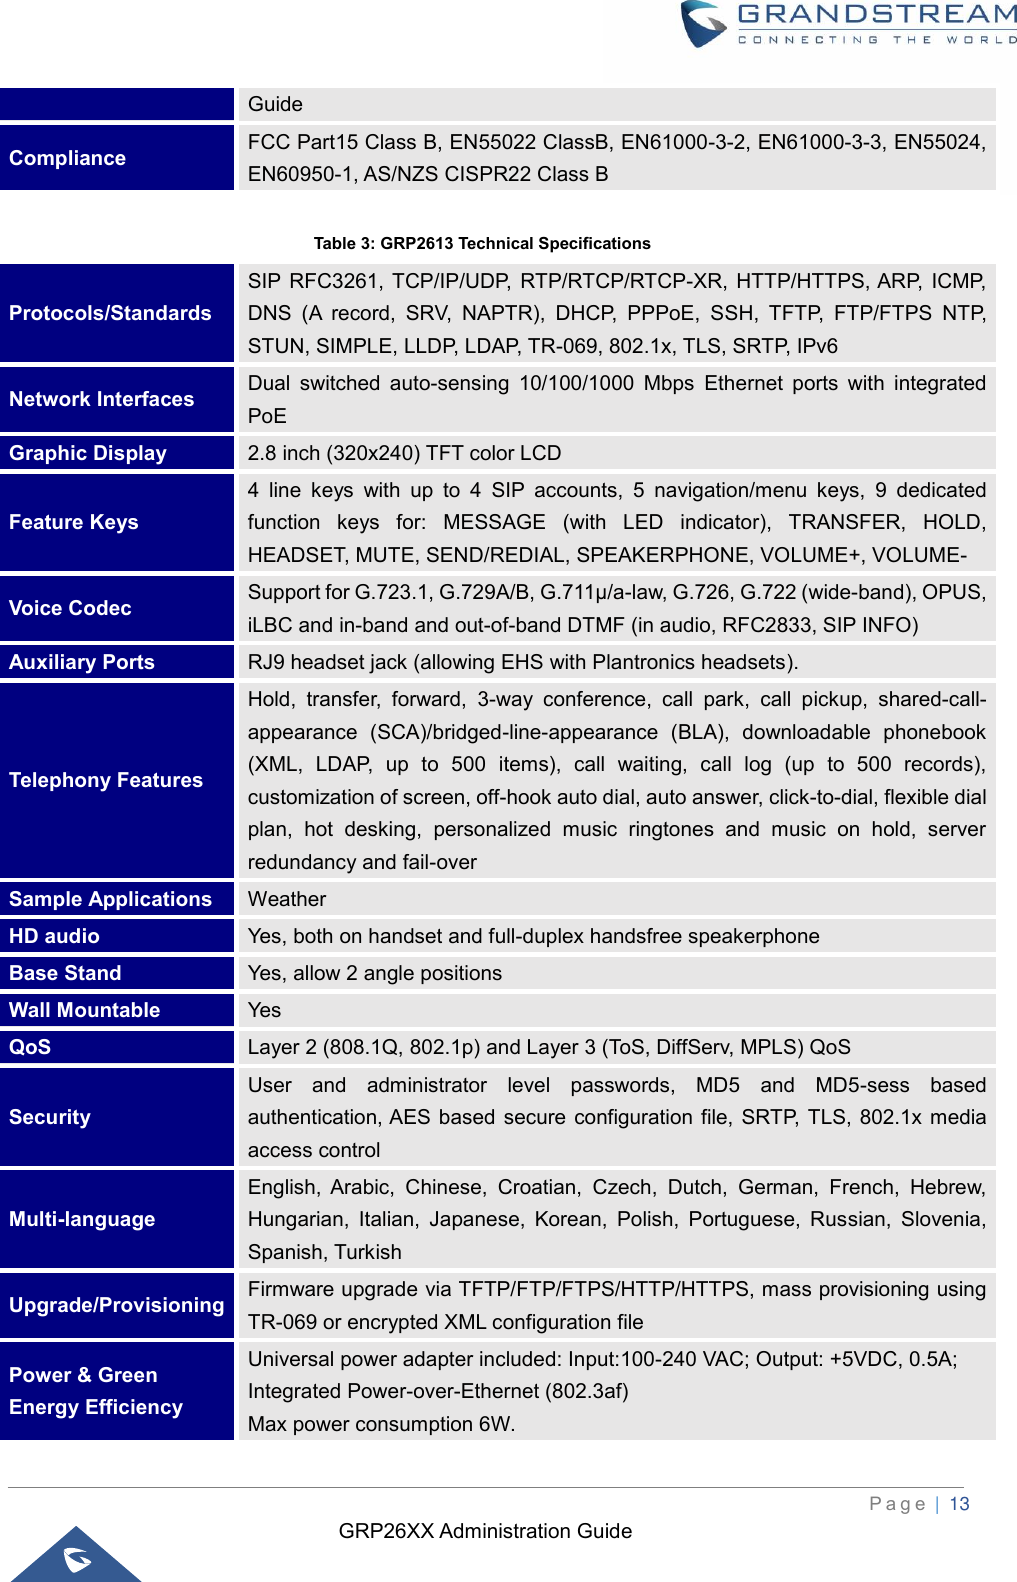
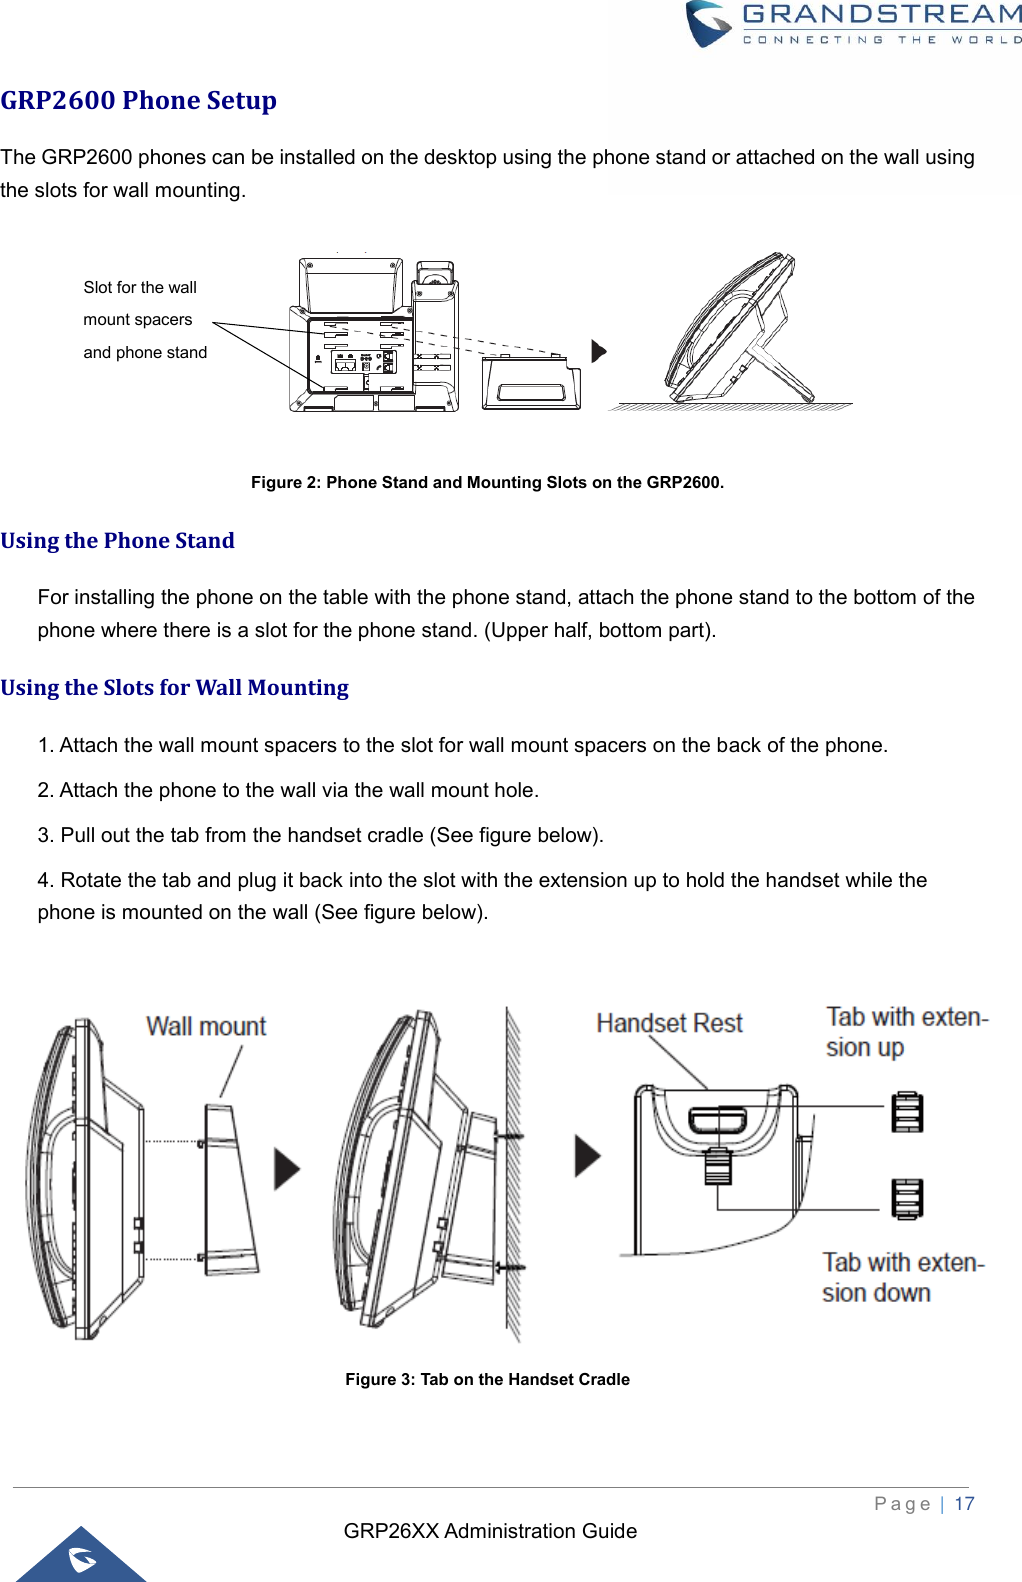
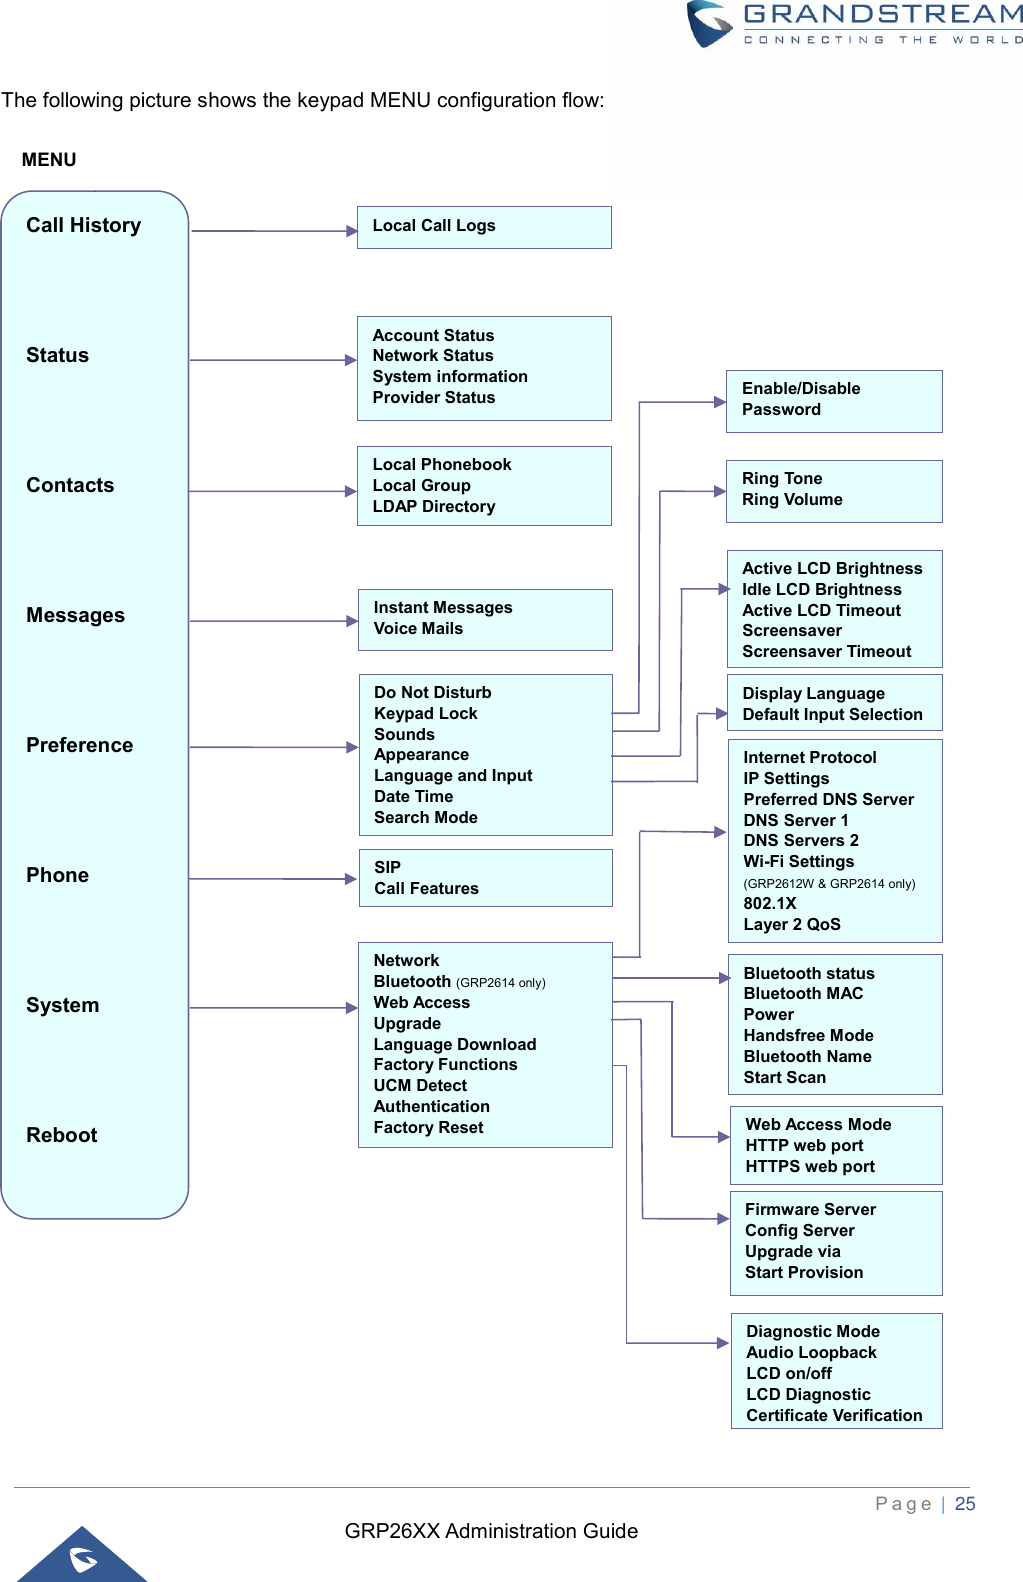
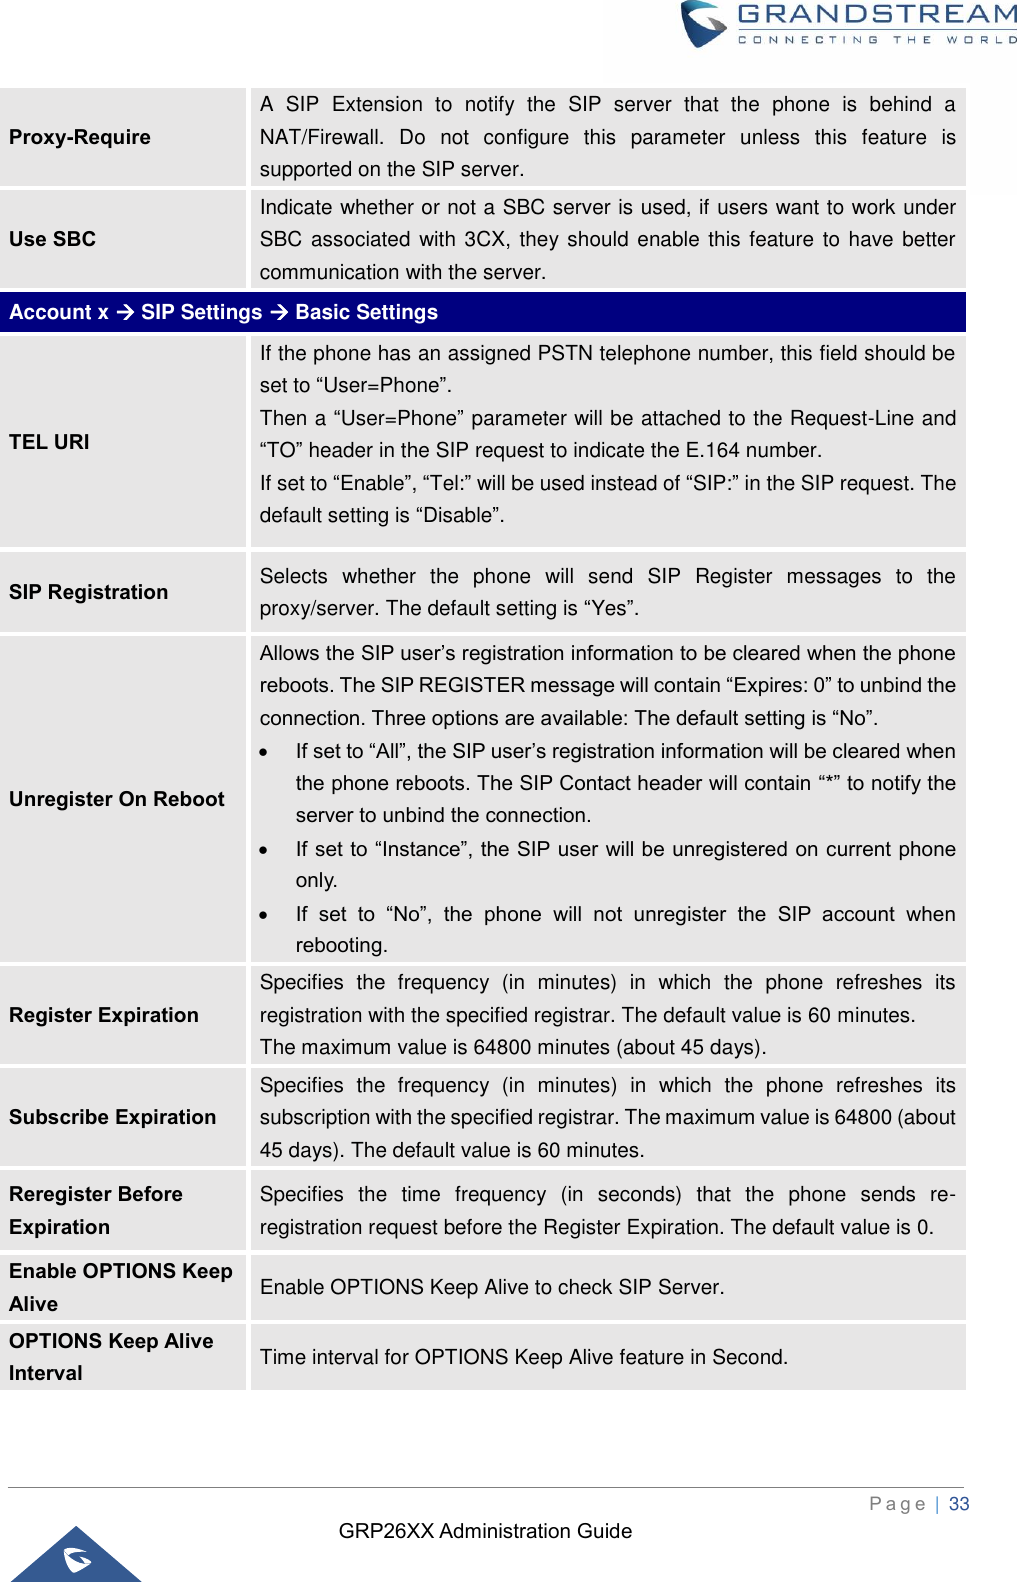
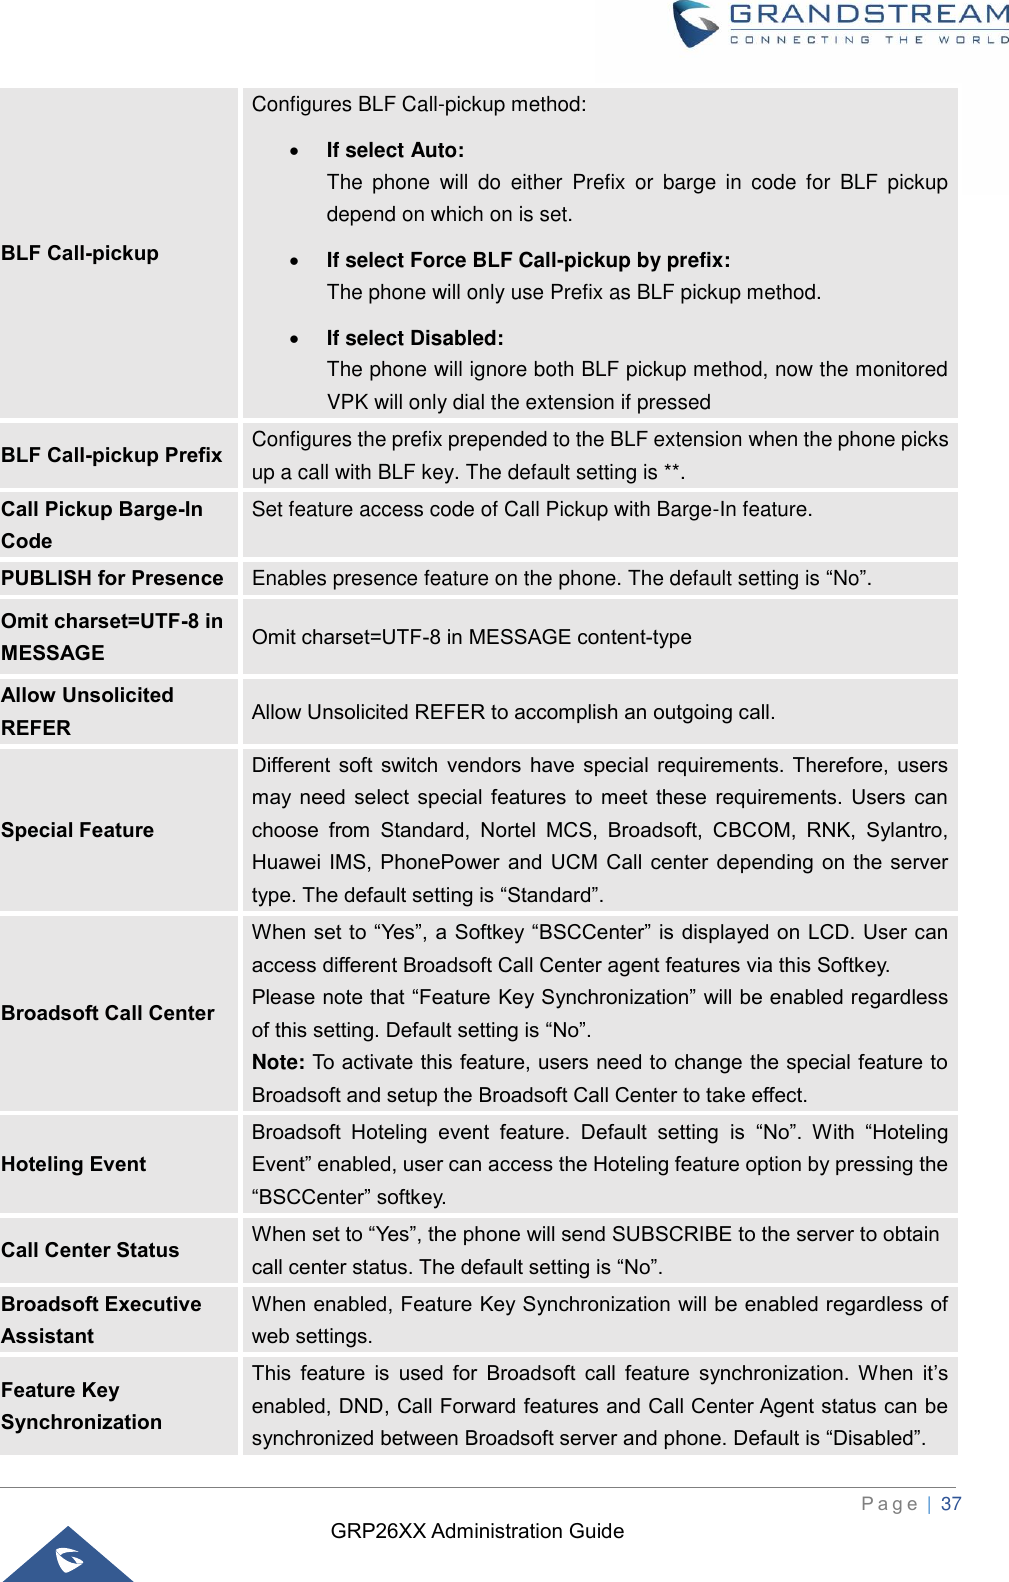
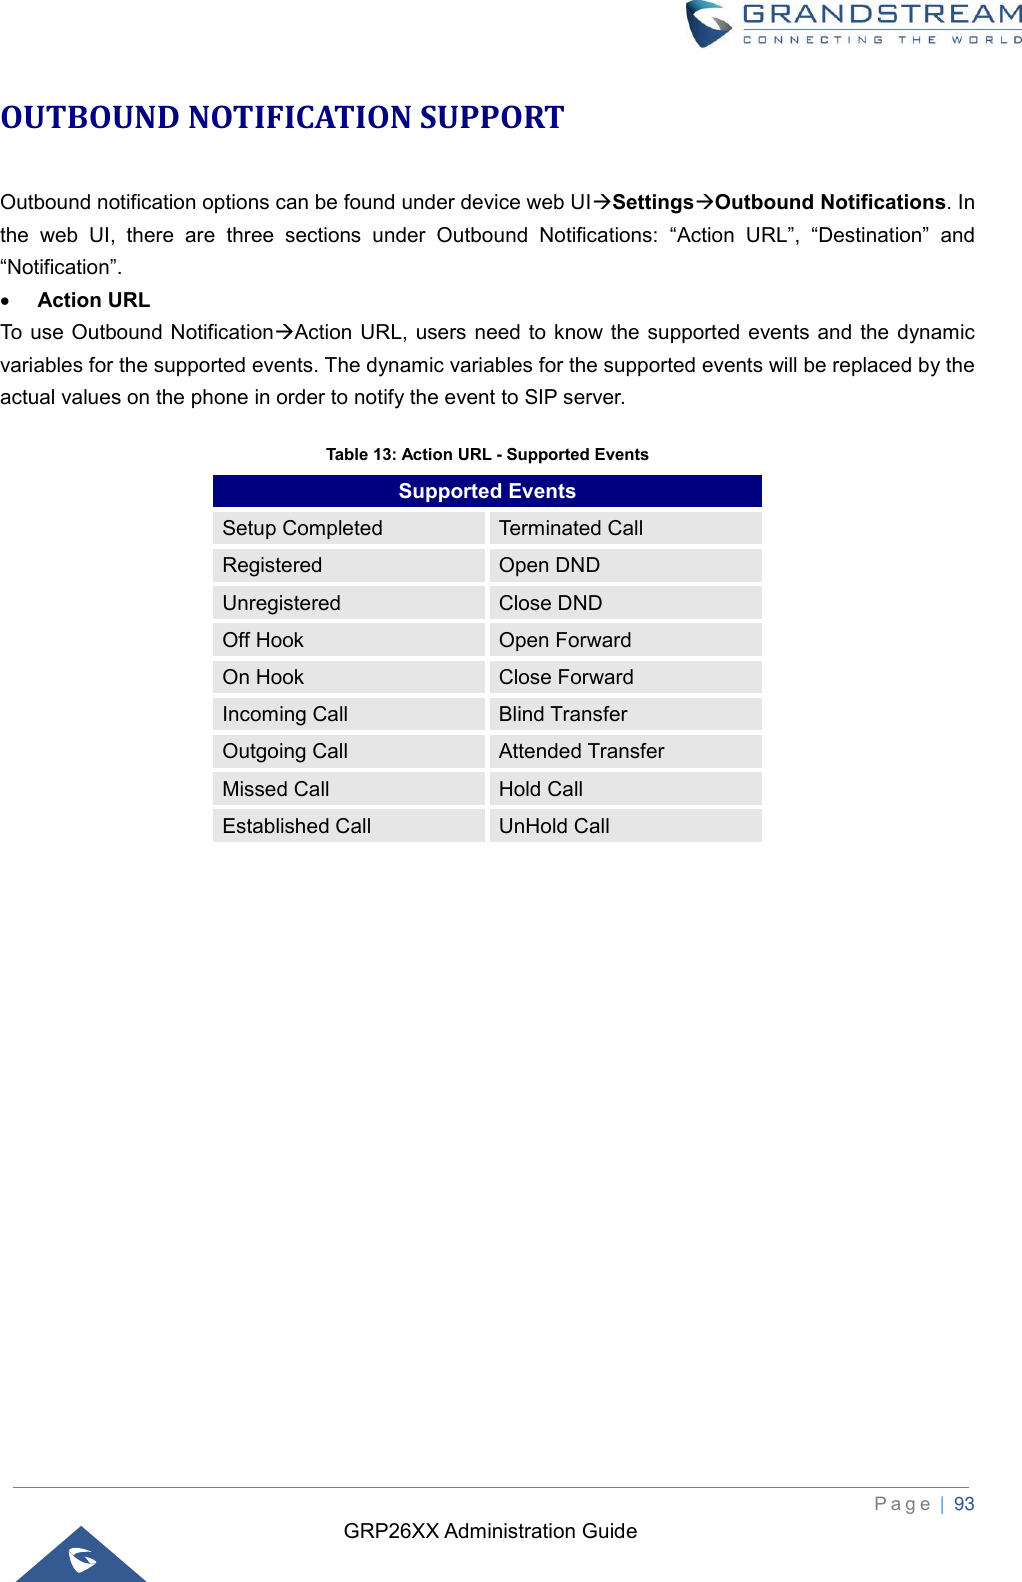
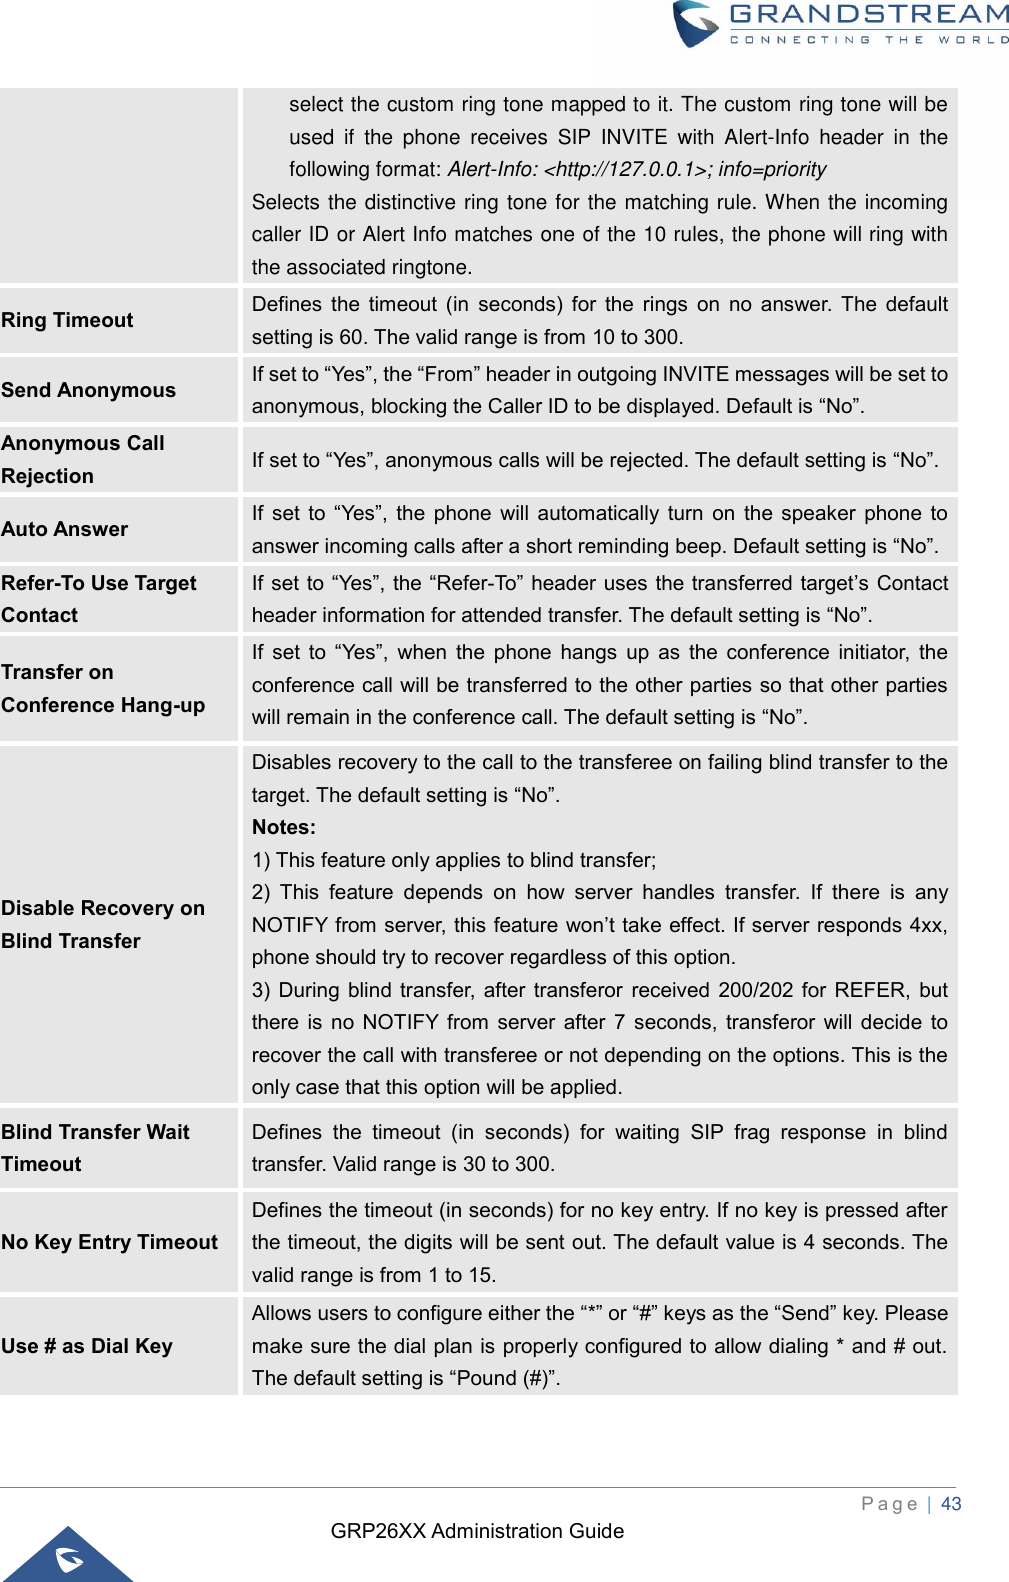
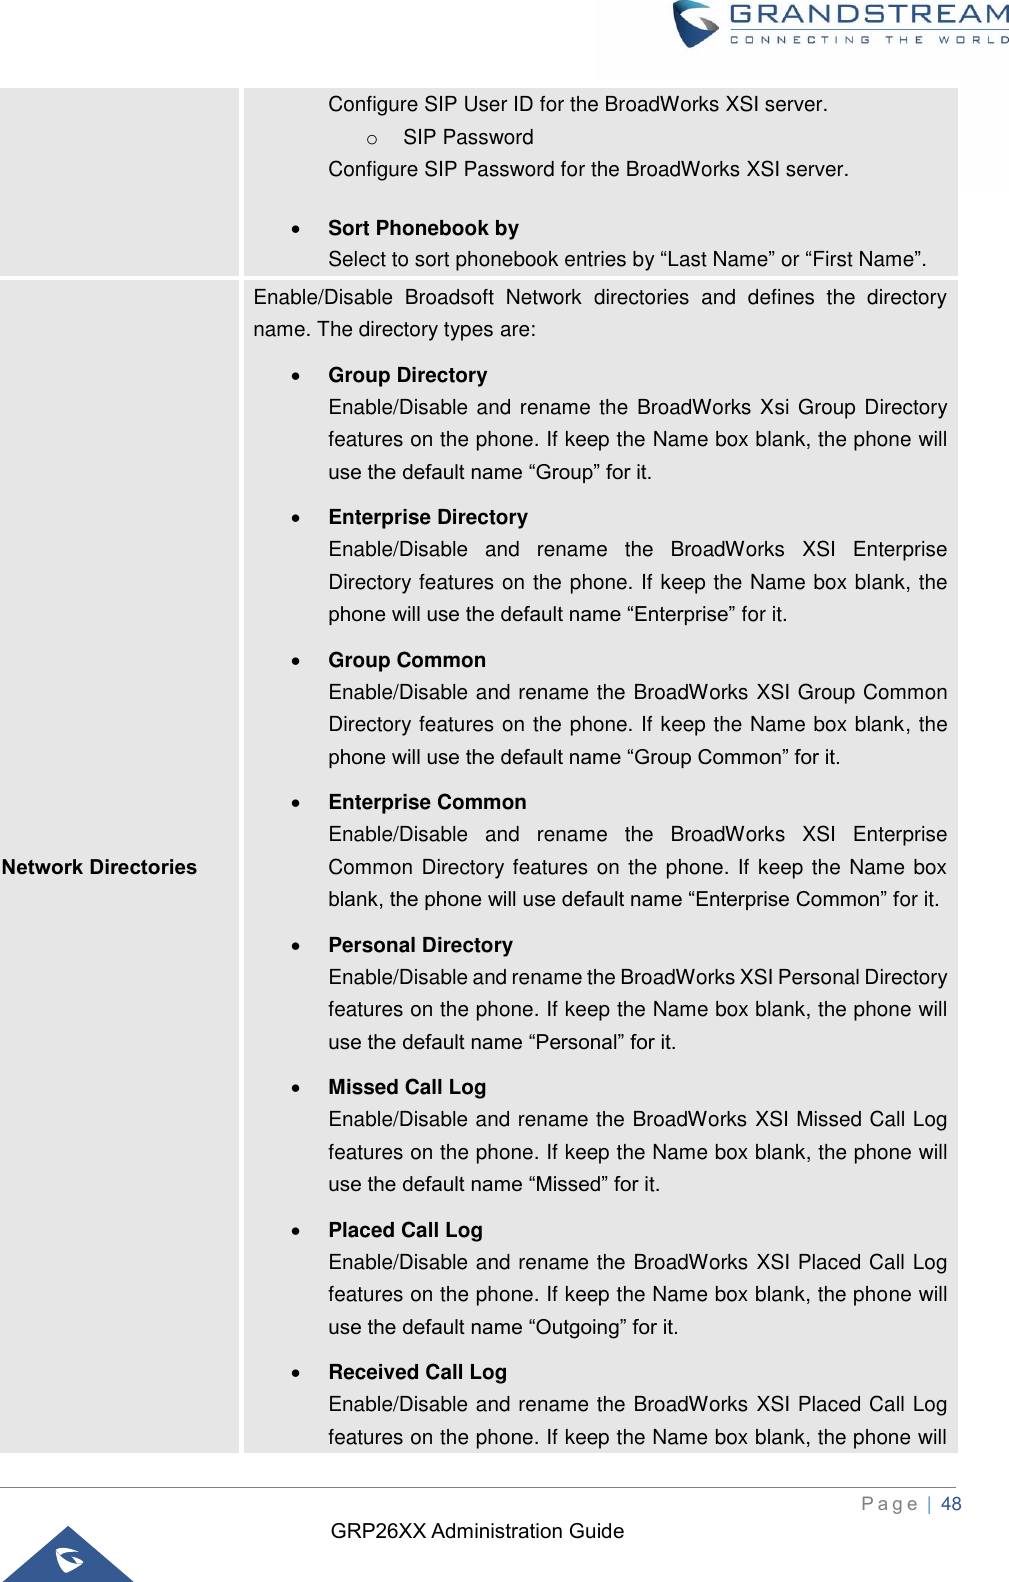
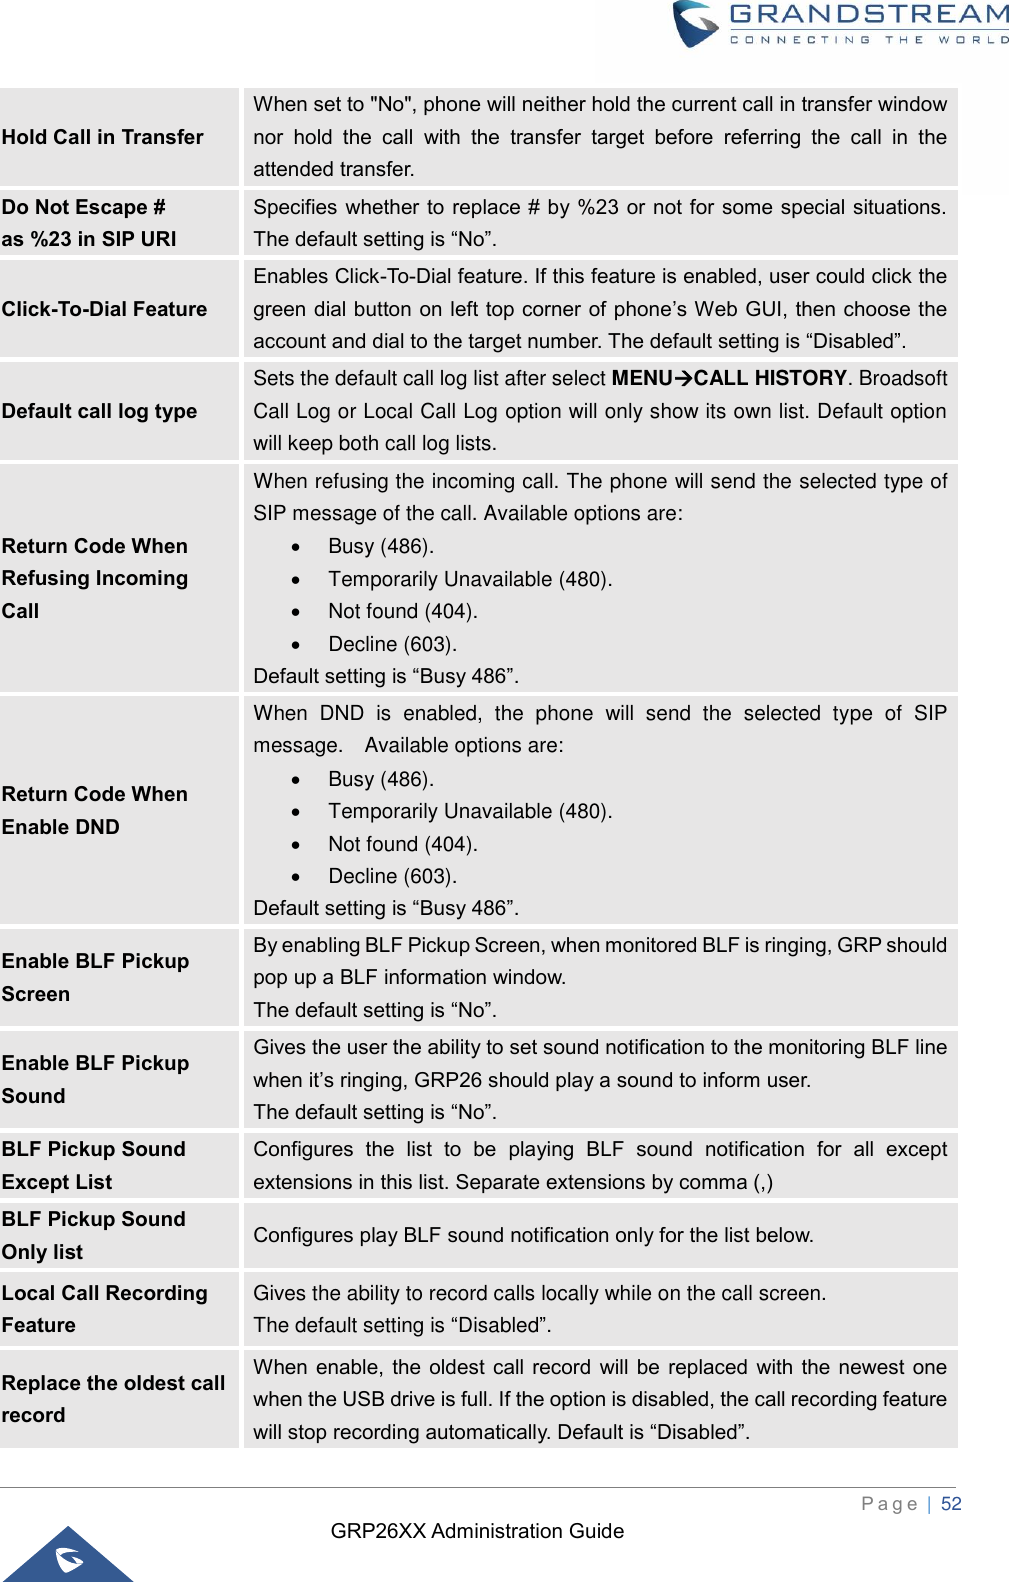
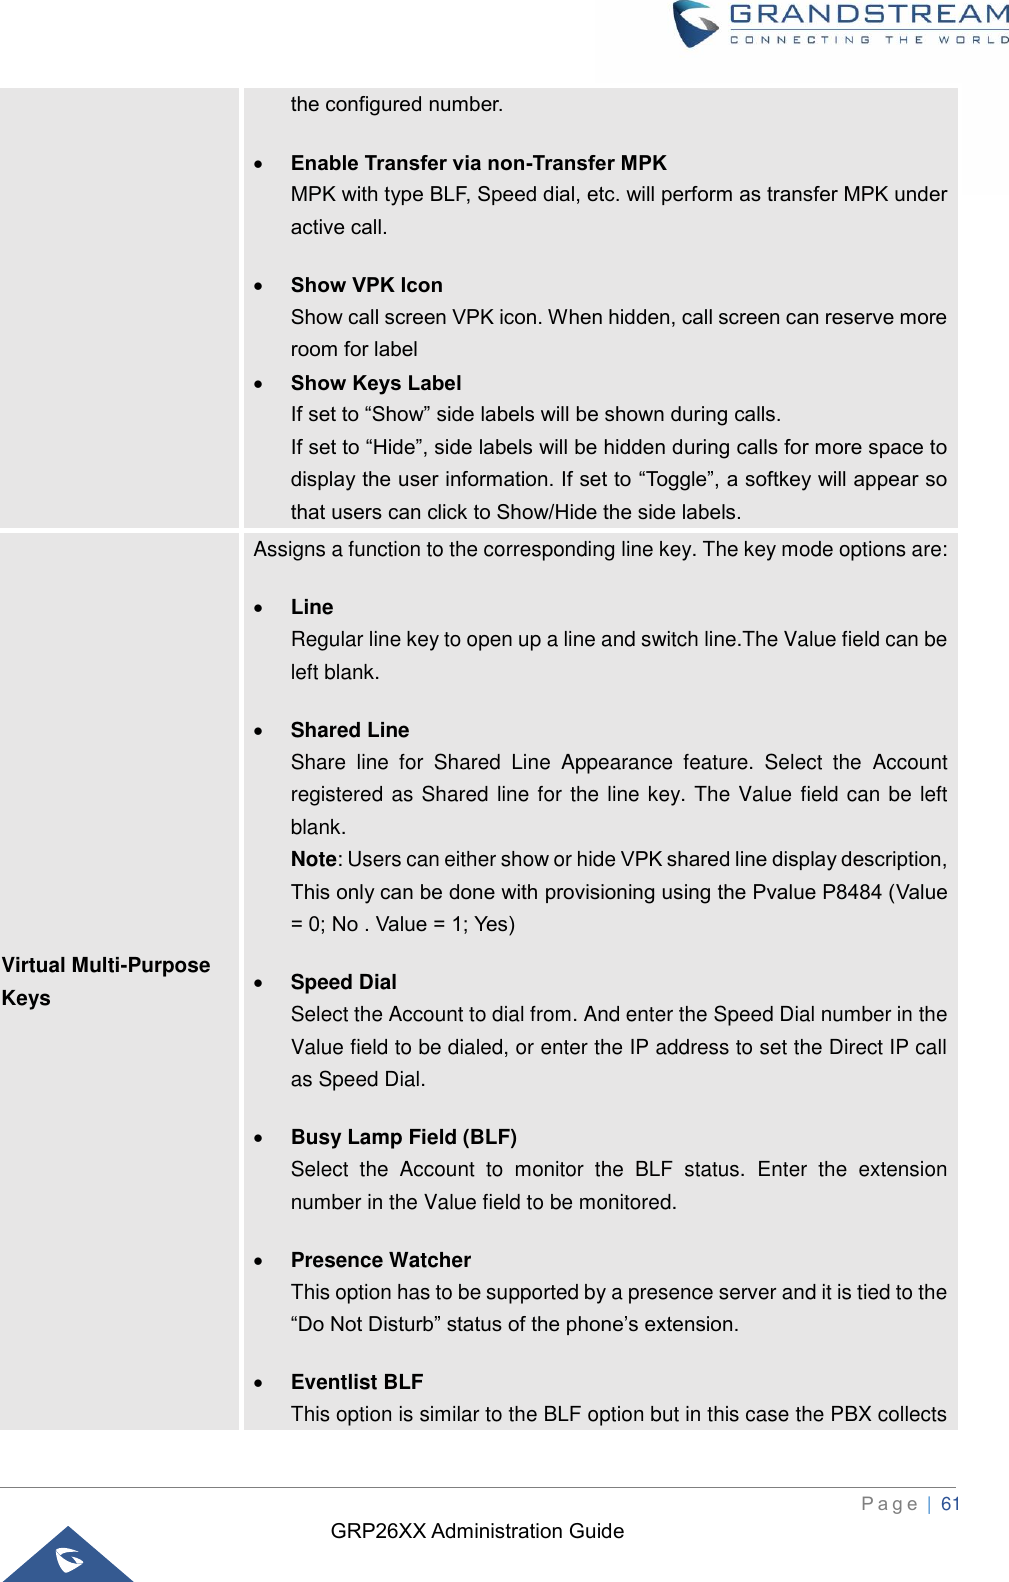
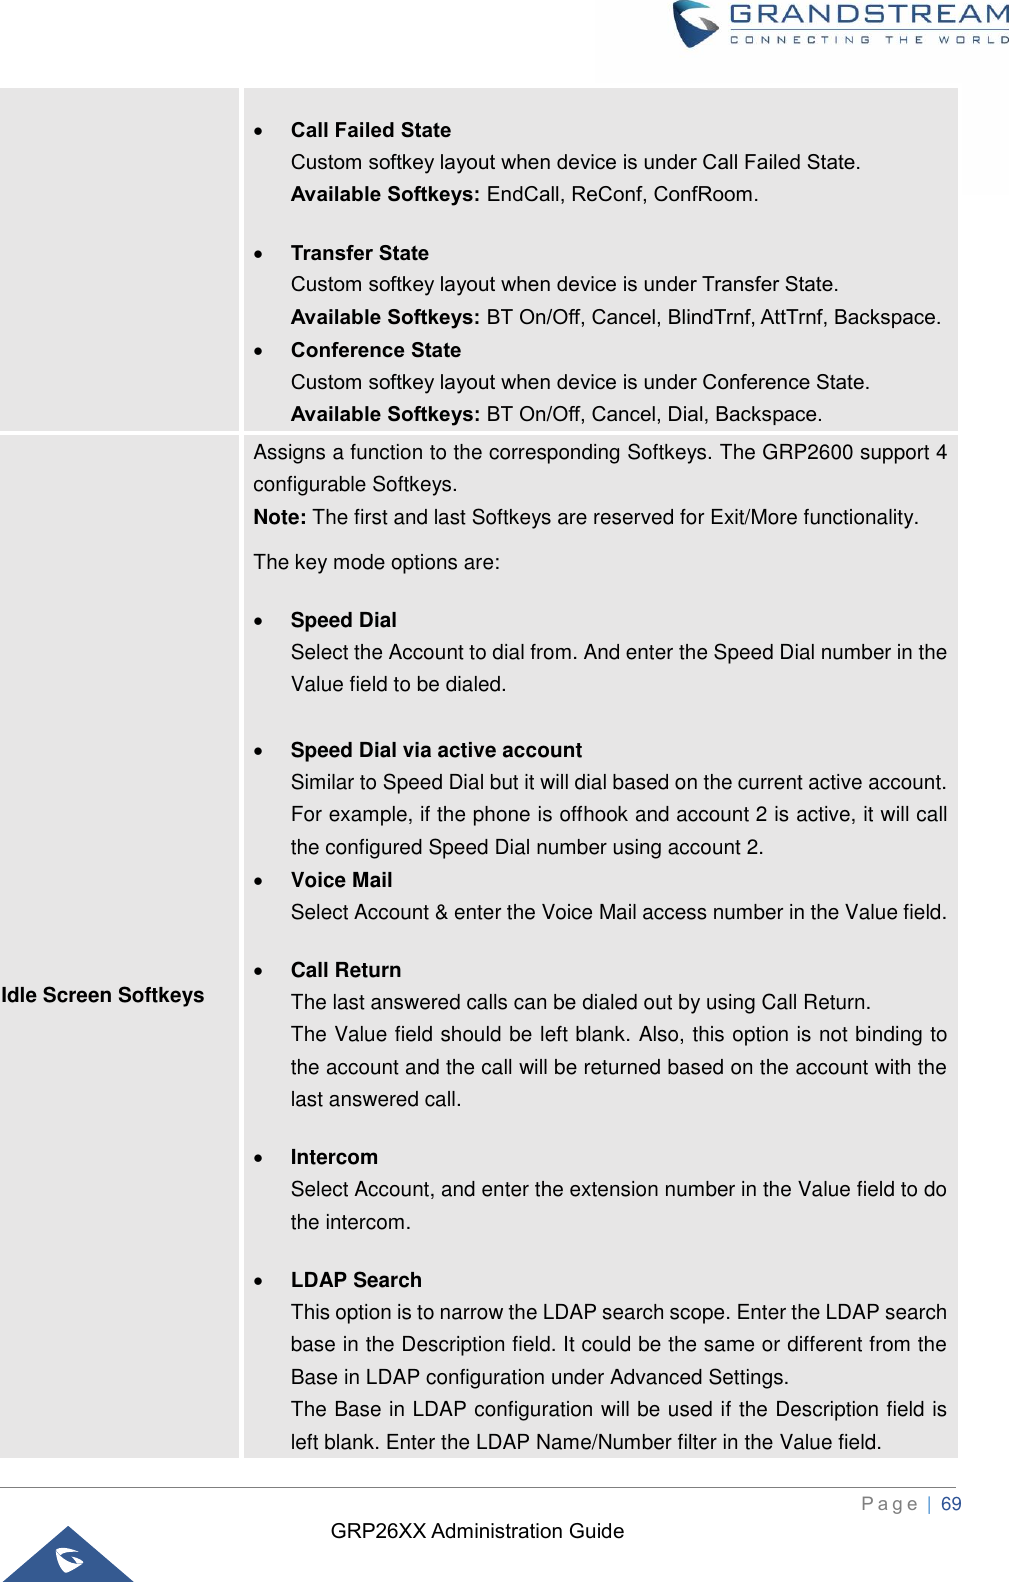
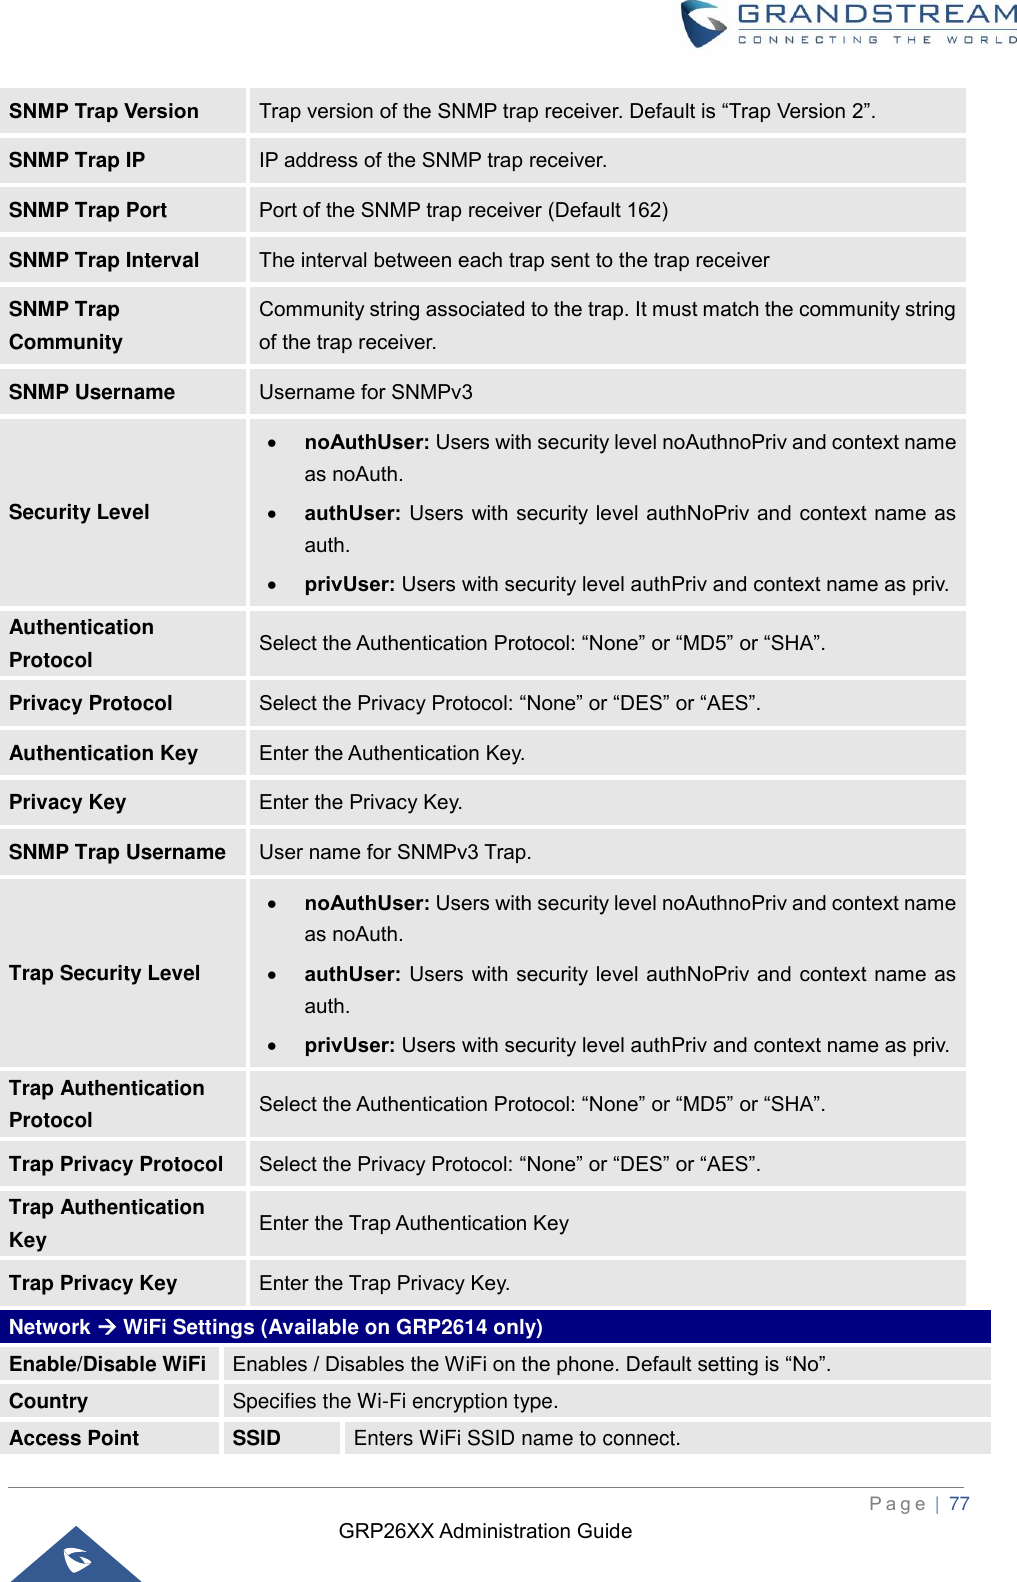
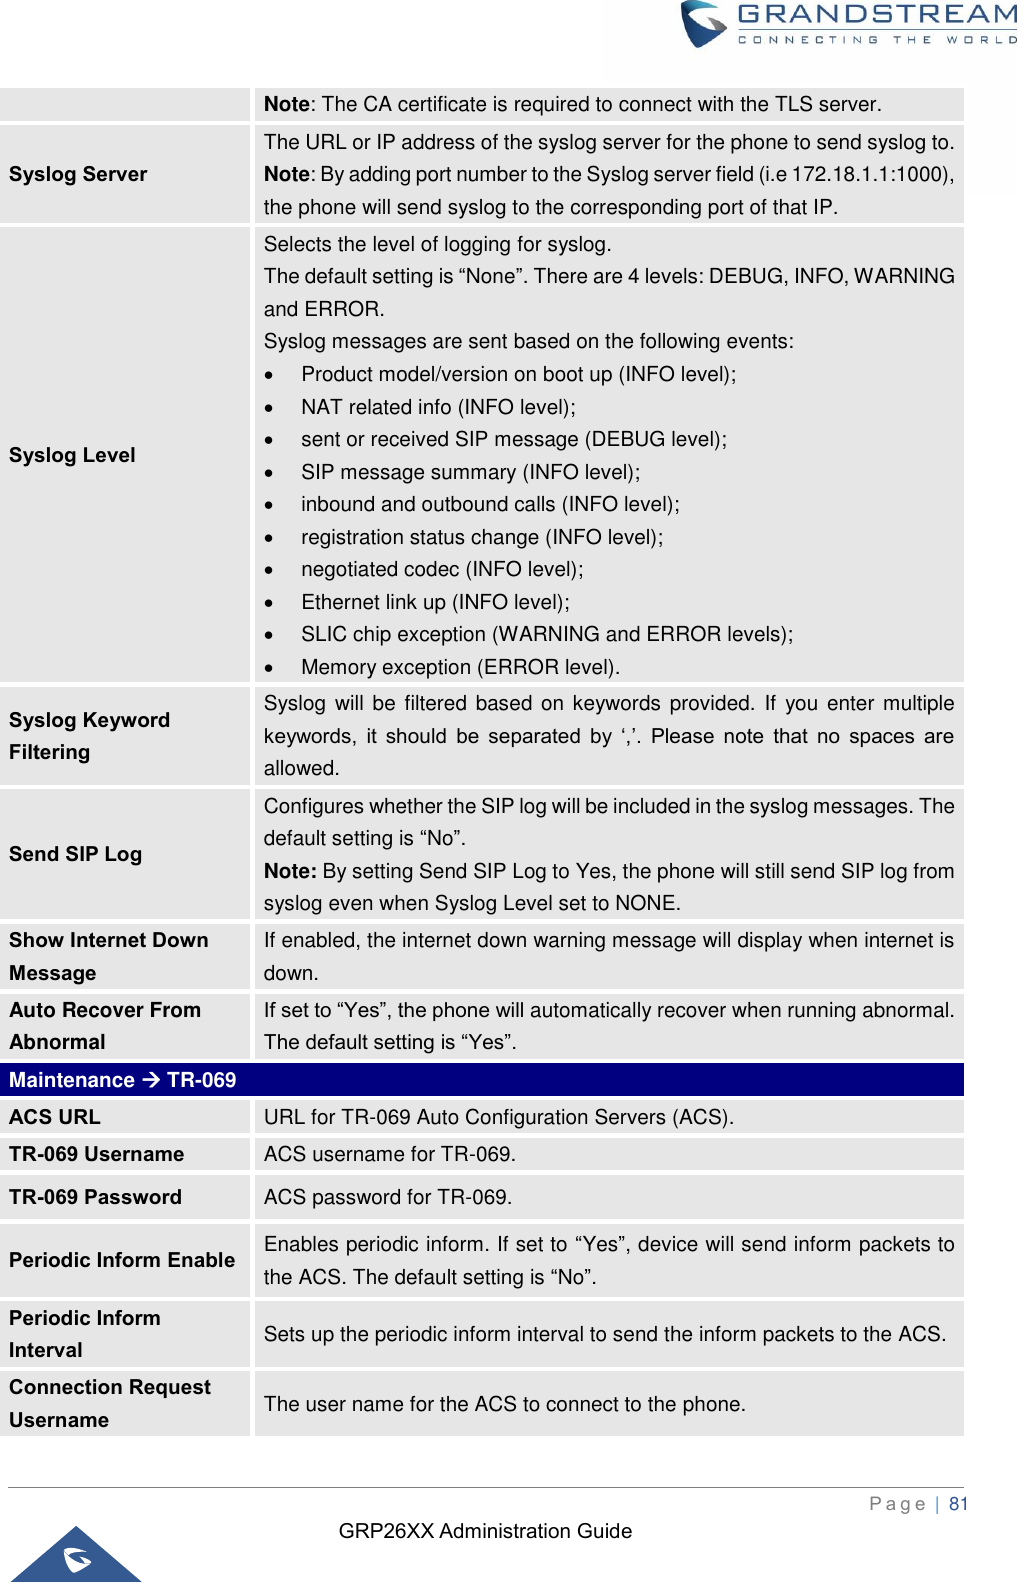
![GRP26XX Administration Guide P a g e | 41 Dial Plan Prefix Configures the prefix to be added to each dialed number. Dial Plan A dial plan establishes the expected number and pattern of digits for a telephone number. This parameter configures the allowed dial plan for the phone. Default setting is “{ x+ | \+x+ | *x+ | *xx*x+ }”. Dial Plan Rules: 1. Accepted Digits: 1,2,3,4,5,6,7,8,9,0 , *, #, A,a,B,b,C,c,D,d; 2. Grammar: x – any digit from 0-9 X – digits from 0-9, and letters from a-z, A-Z. a) xx+ - at least 2-digit numbers b) xx — only 2-digit numbers c) ^ — exclude d) [3-5] — any digit of 3, 4, or 5 e) [147] — any digit of 1, 4, or 7 f) <2=011> - replace digit 2 with 011 when dialing g) | — the OR operand h) {X123} — match Z123, e123, 5123, … i) Flag T when adding a “T” at the end of the dial plan, the phone will wait for 3 seconds before dialing out. This gives users more flexibility on their dial plan setup. E.g. with dial plan 1XXT, phone will wait for 3 seconds to let user dial more than just 3 digits if needed. Originally the phone will dial out immediately after dialing the third digit. j) Back slash “\” — can be used to escape specific letters. E.g. if { \p\a\r\k\+60 } dial plan is configured, park+60 should be able to pass dial plan check. This also can be used to escape Mark and User-unreserved characters. Mark = “-“ / “_” / “.” / “!” / “~” / “*” / “’” / “(“ / “)” User-unreserved = “&” / “=” / “+” / “$” / “,” / “;” / “?” / “/” • Example 1: {[369]11 | 1617xxxxxxx} Allow 311, 611, and 911 or any 10 digit numbers with leading digits 1617; • Example 2: {^1900x+ | <=1617>xxxxxxx} Block any number of leading digits 1900 or add prefix 1617 for any dialed 7 digit numbers; • Example 3: {1xxx[2-9]xxxxxx | <2=011>x+} Allows any number with leading digit 1 followed by a 3-digit number, followed by any number between 2 and 9, followed by any 7-digit number OR Allows any length of numbers with leading digit 2, replacing the 2 with 011 when dialed. • Example 4: If we set the dial plan with {\*123}, it should allow input *123 to pass dial plan check.](https://usermanual.wiki/Grandstream-Networks/GRP2612P/User-Guide-4183055-Page-41.png)
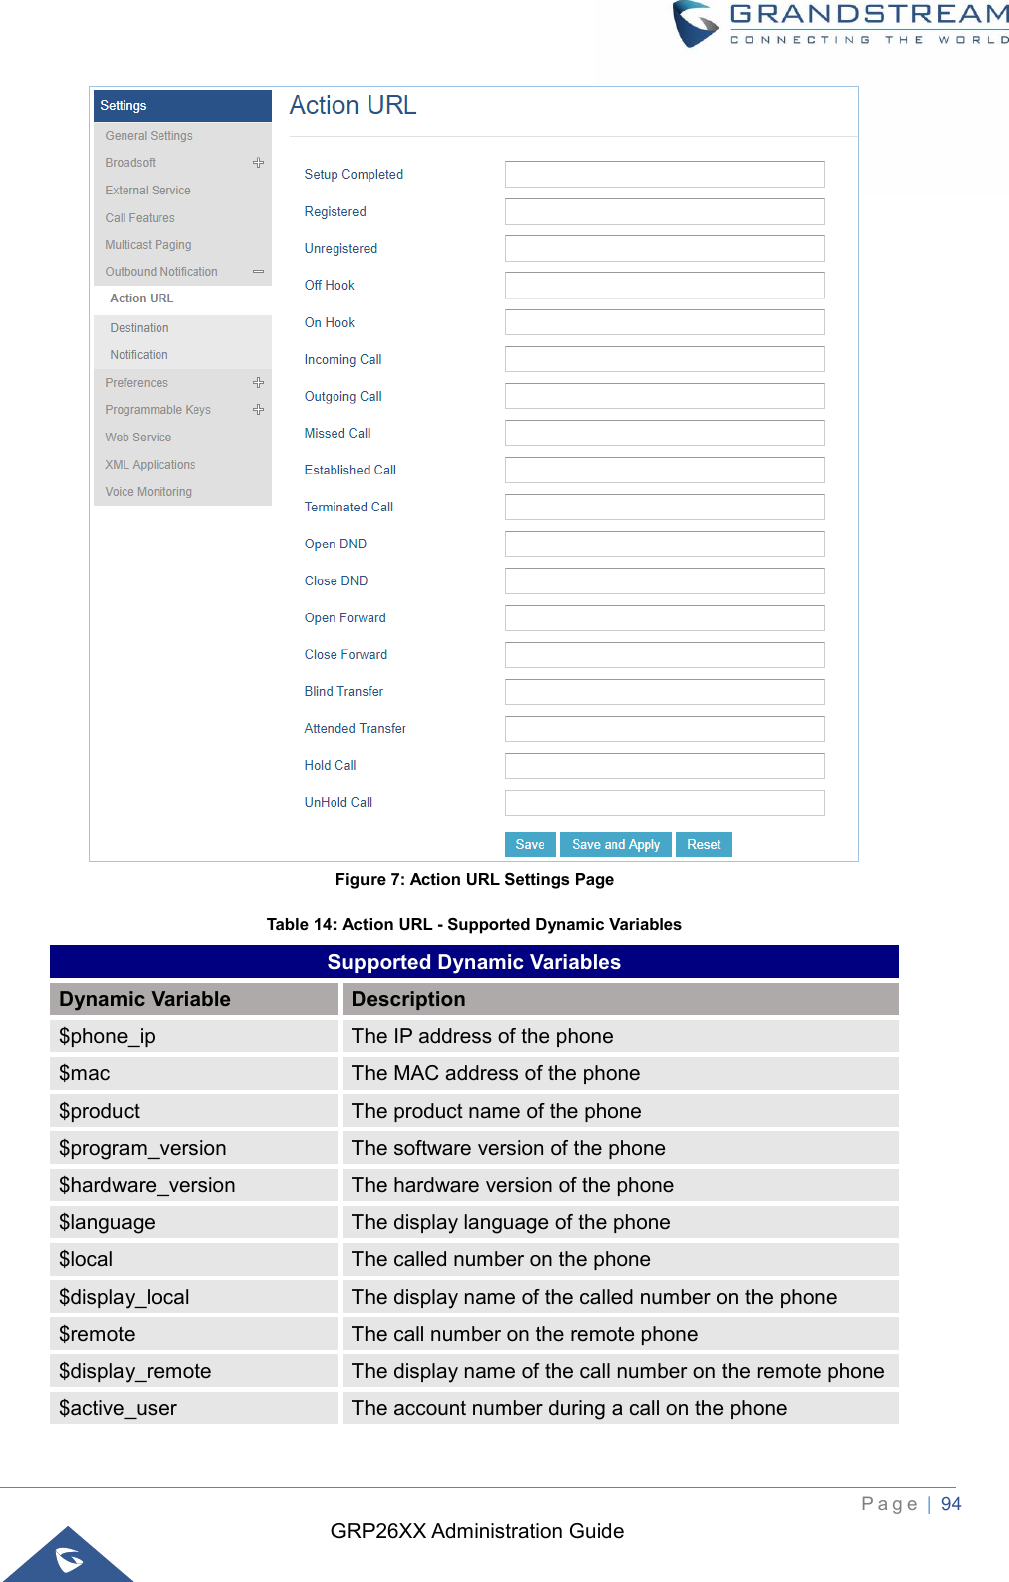
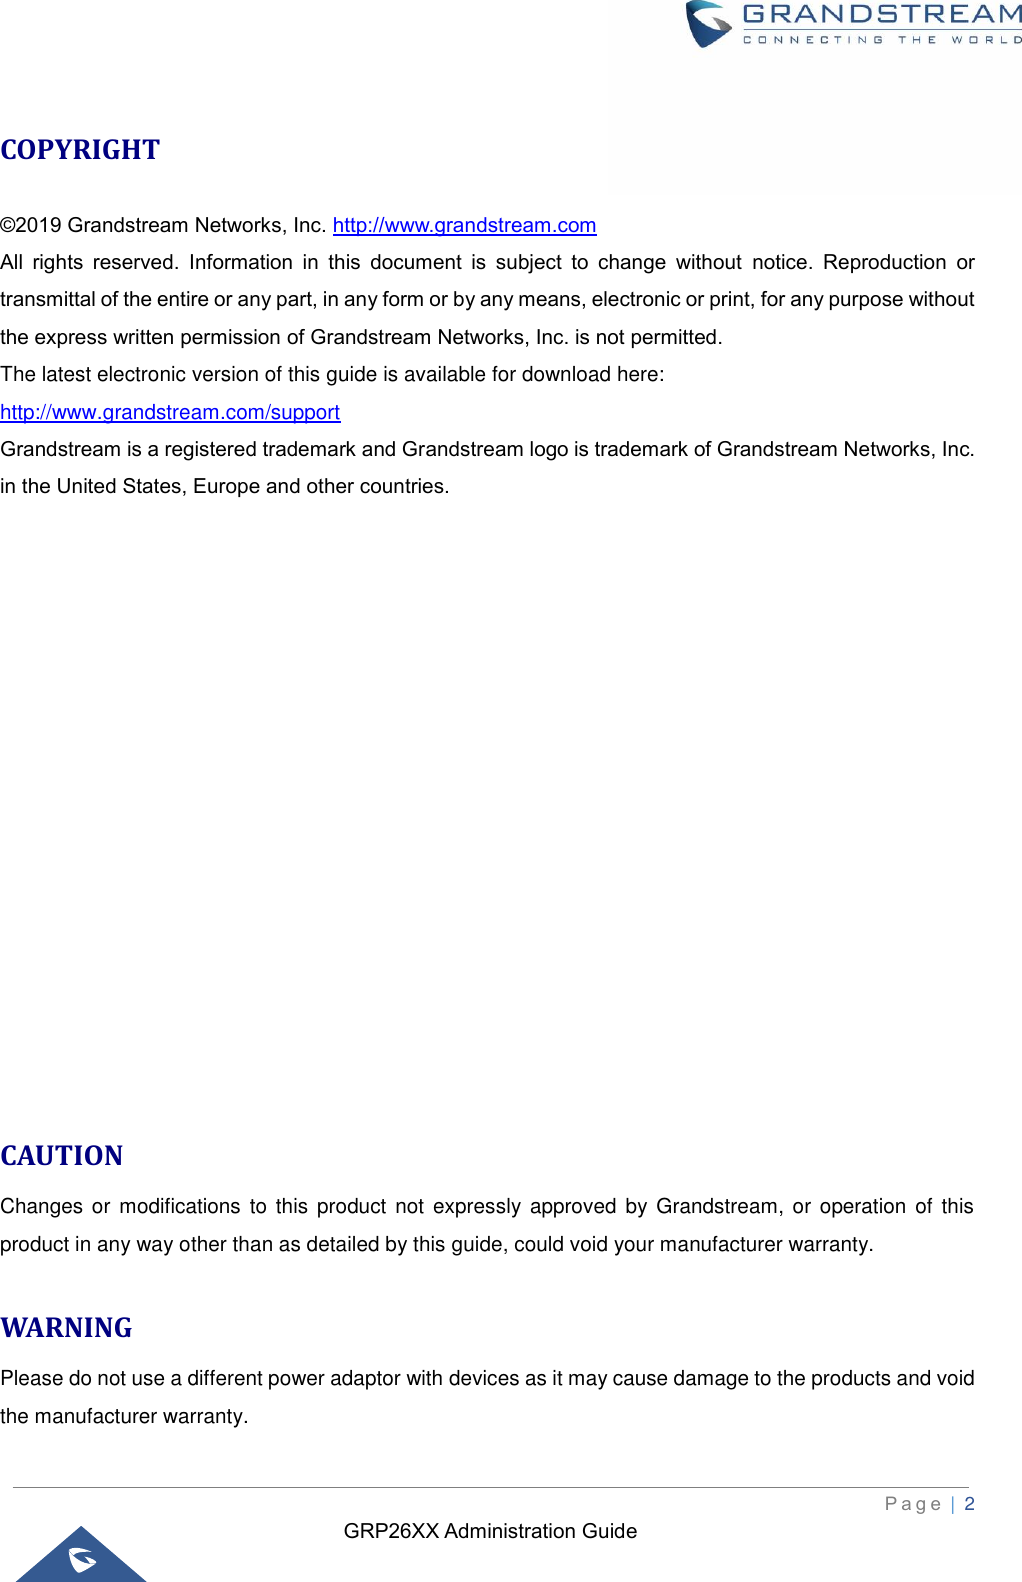
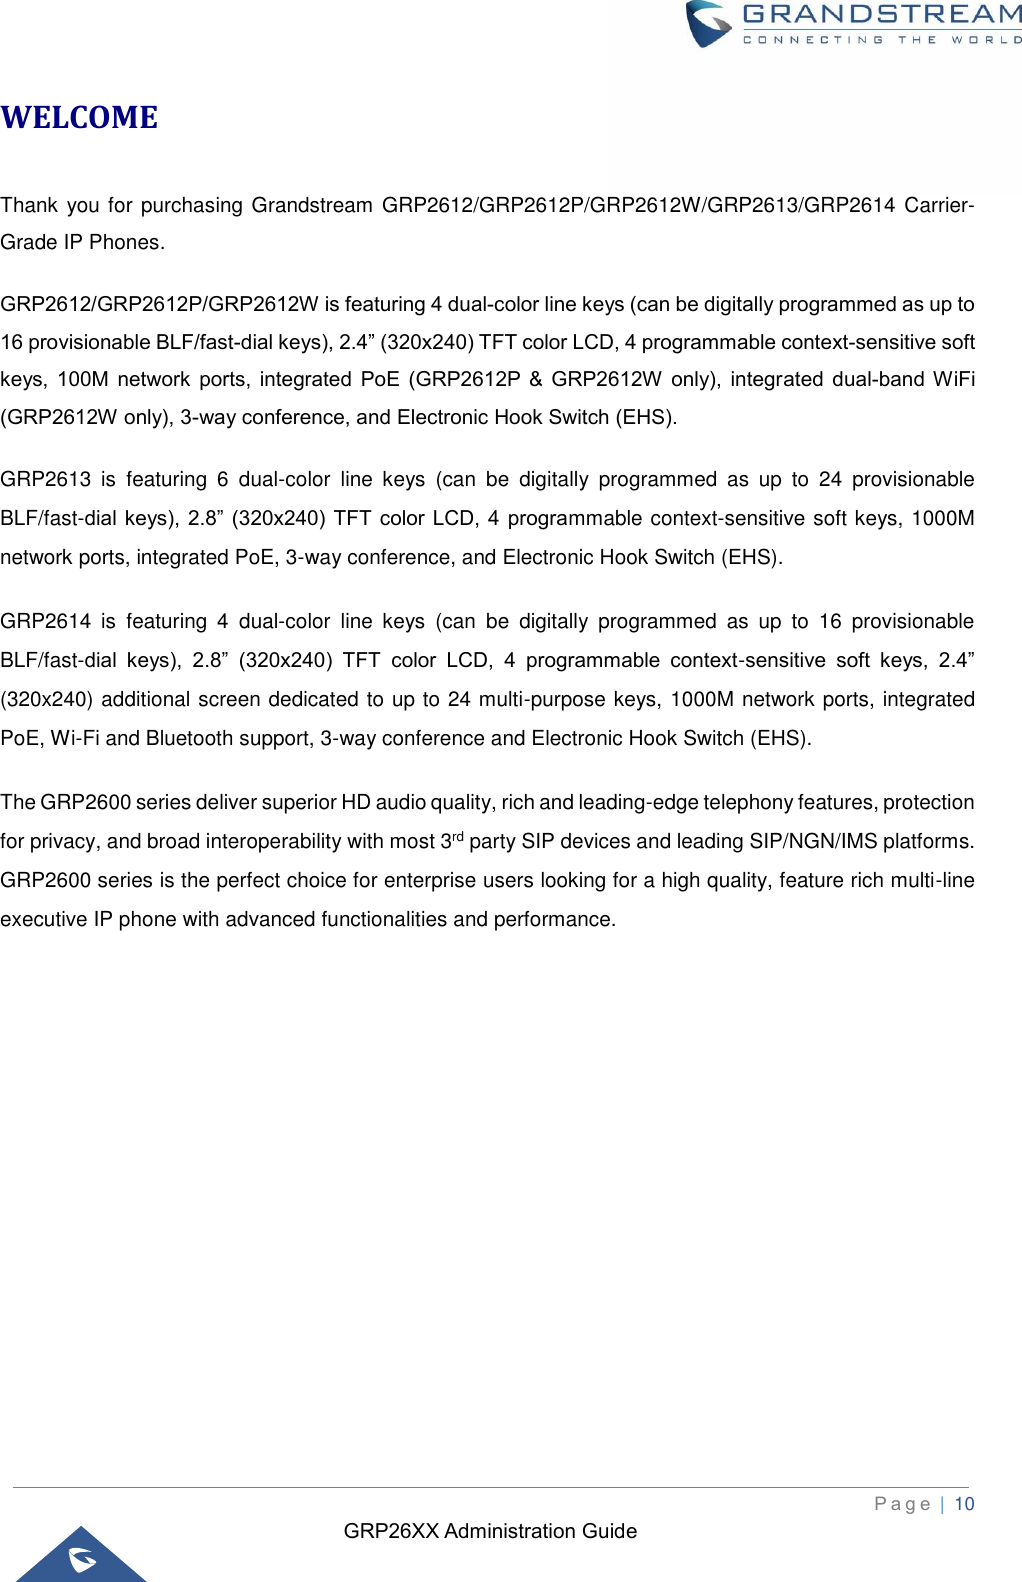
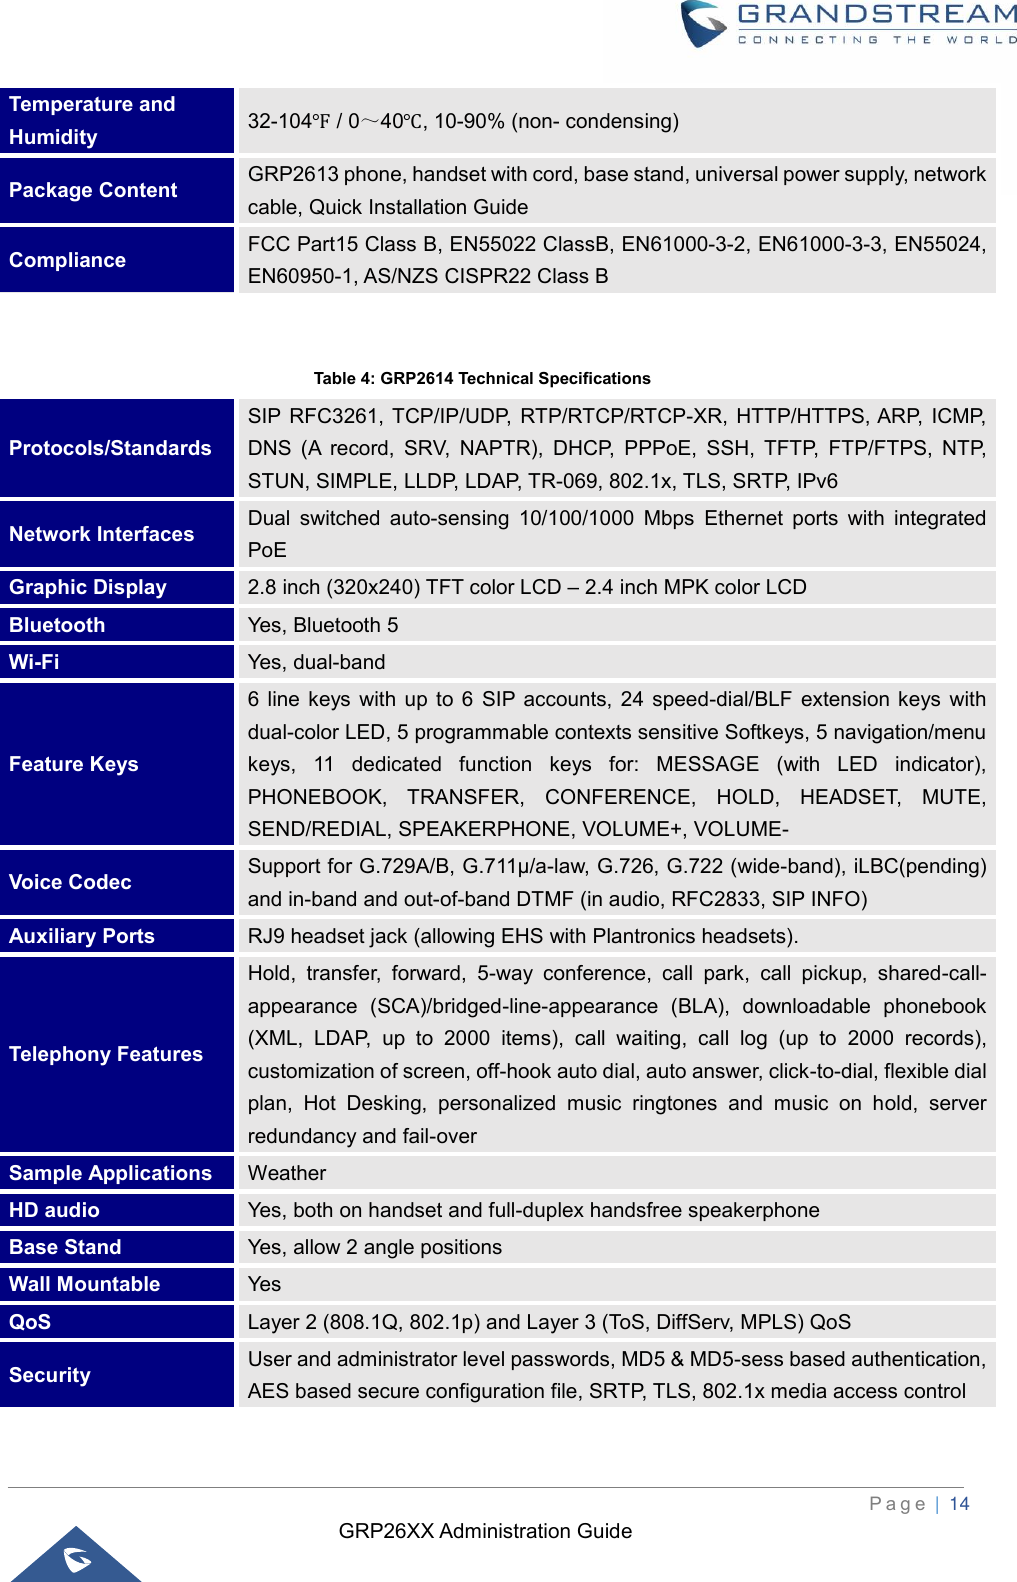
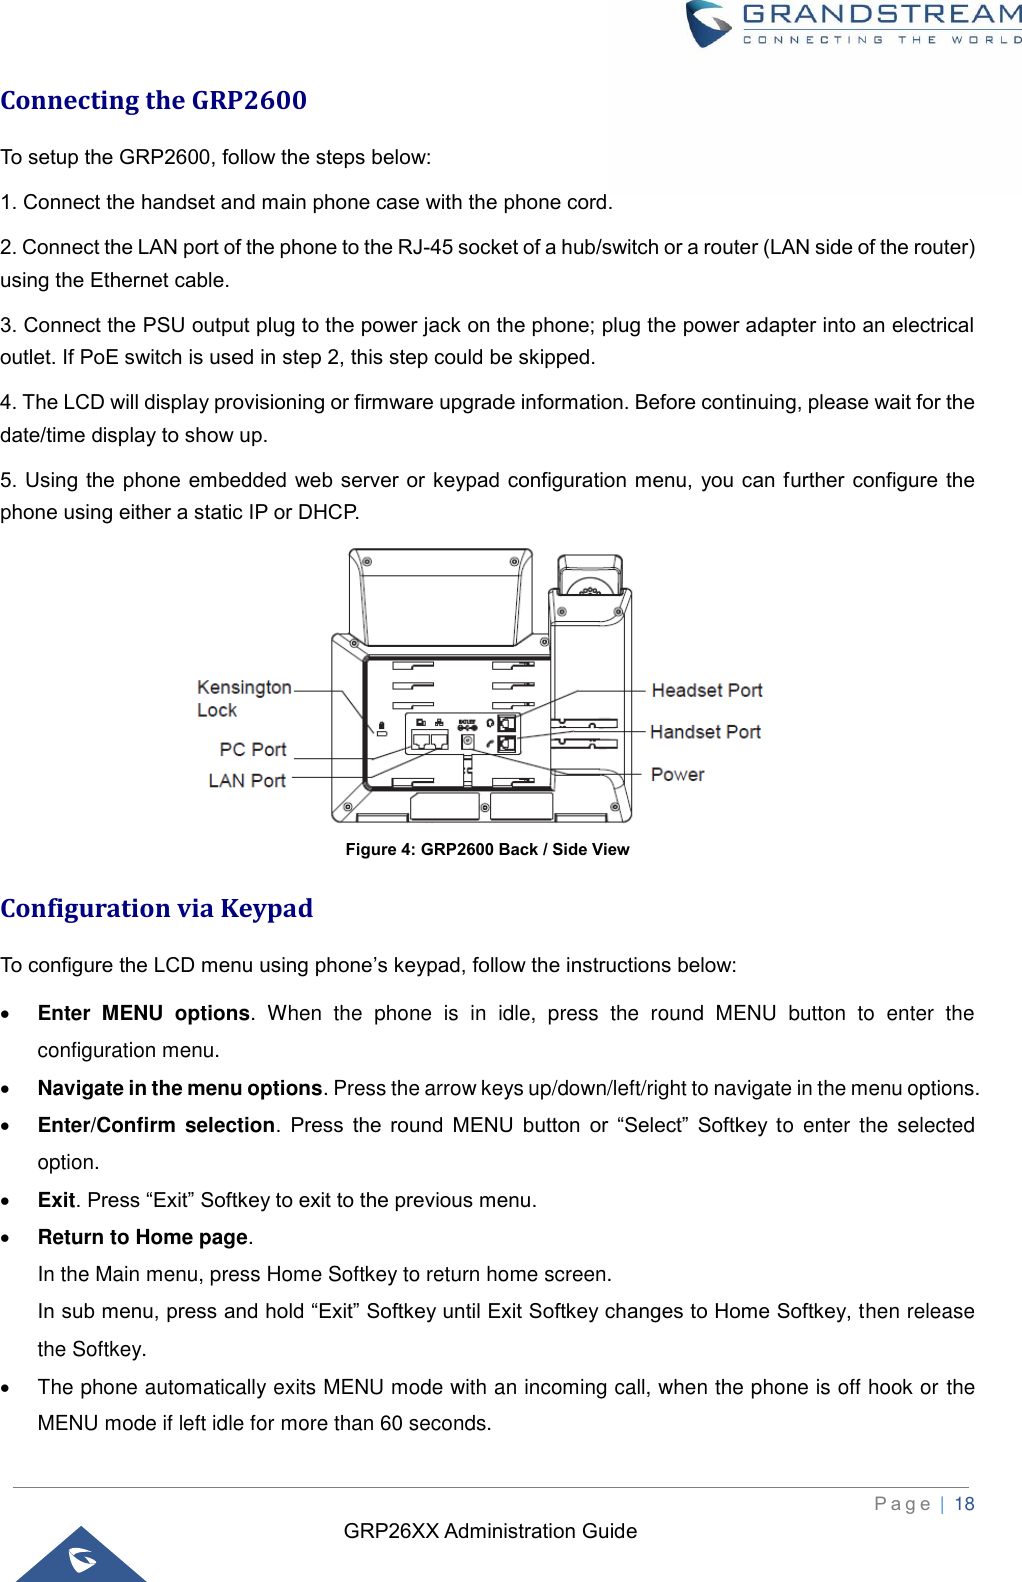
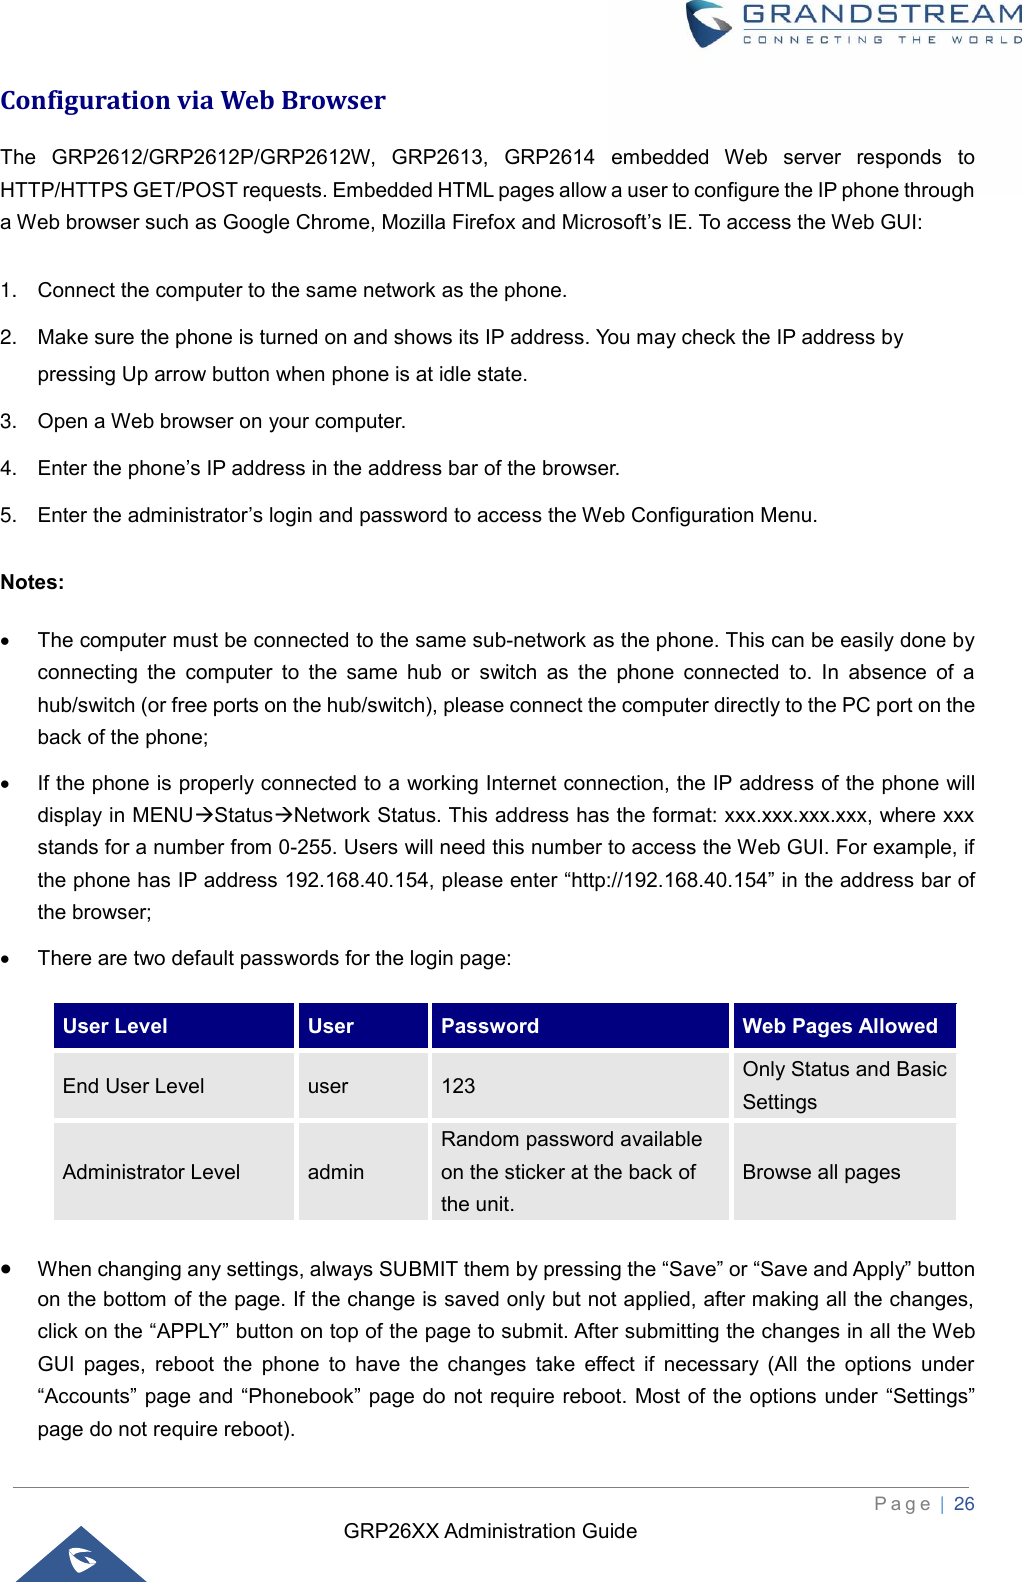
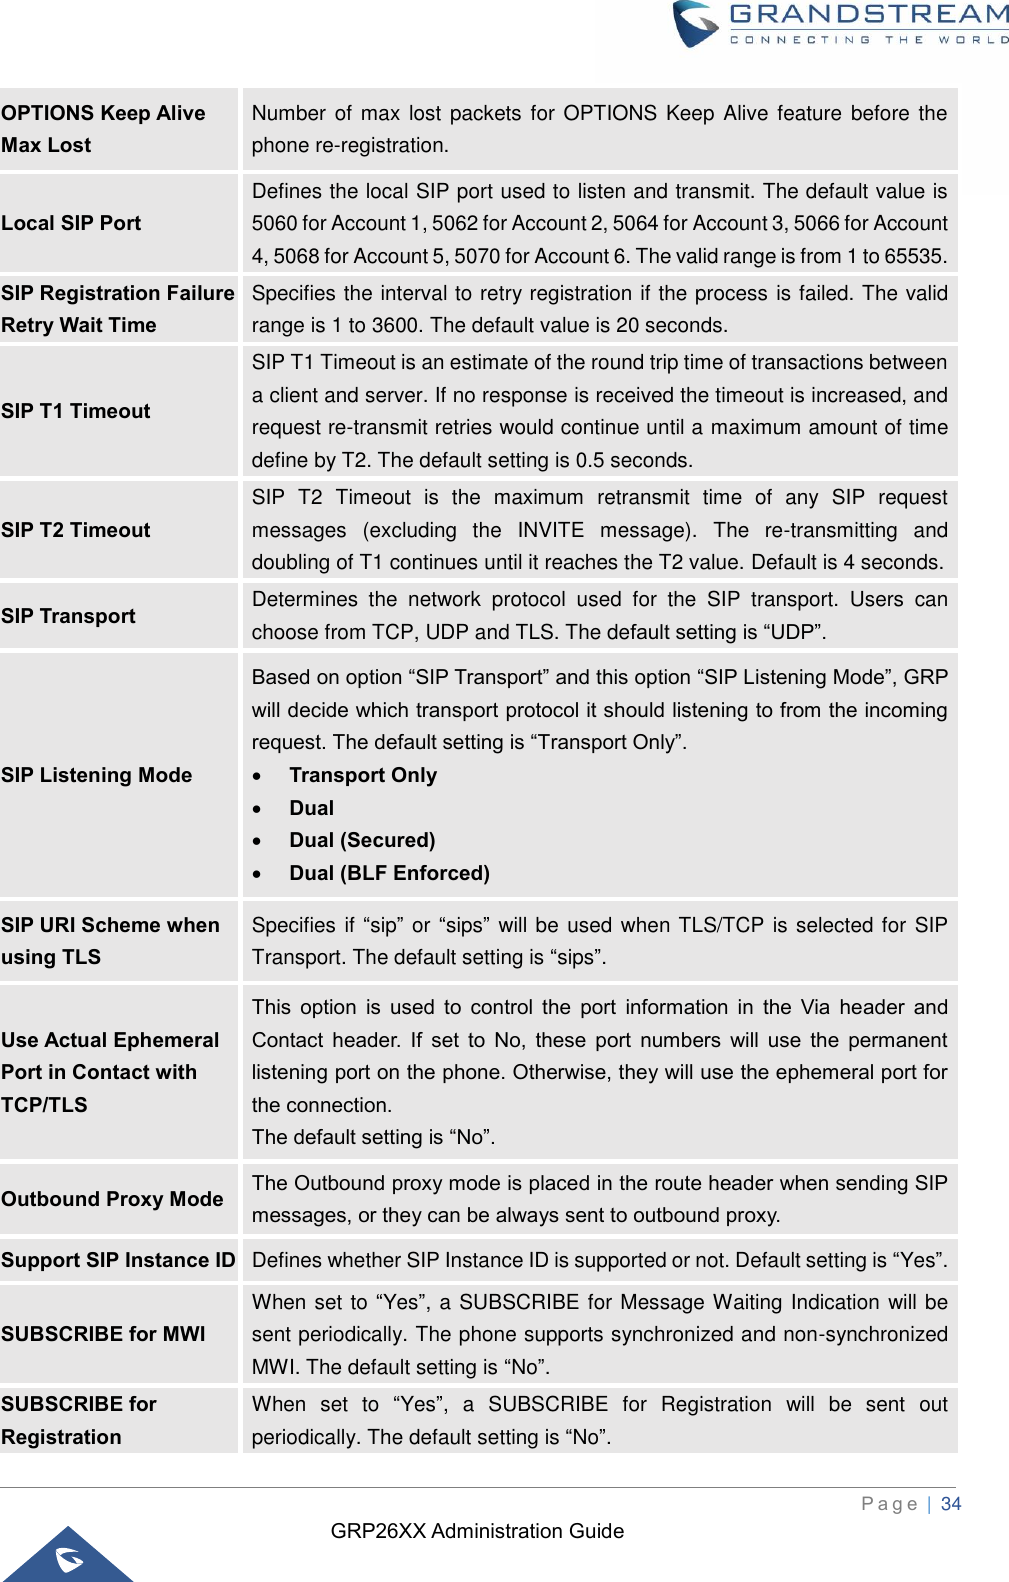
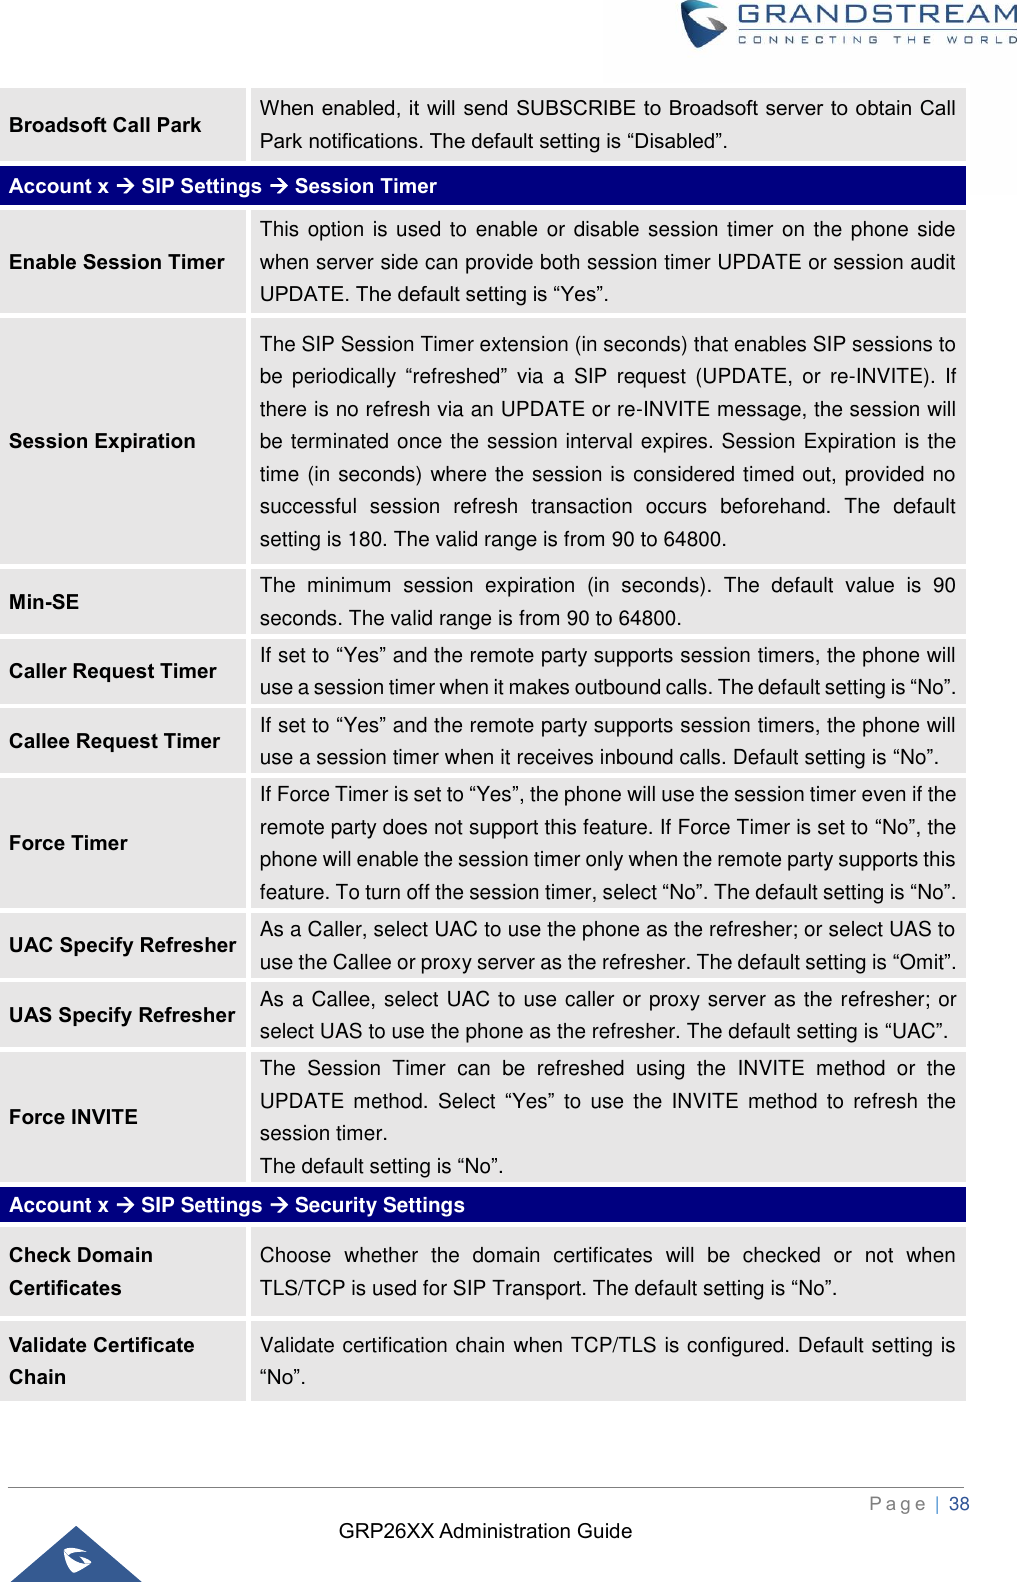
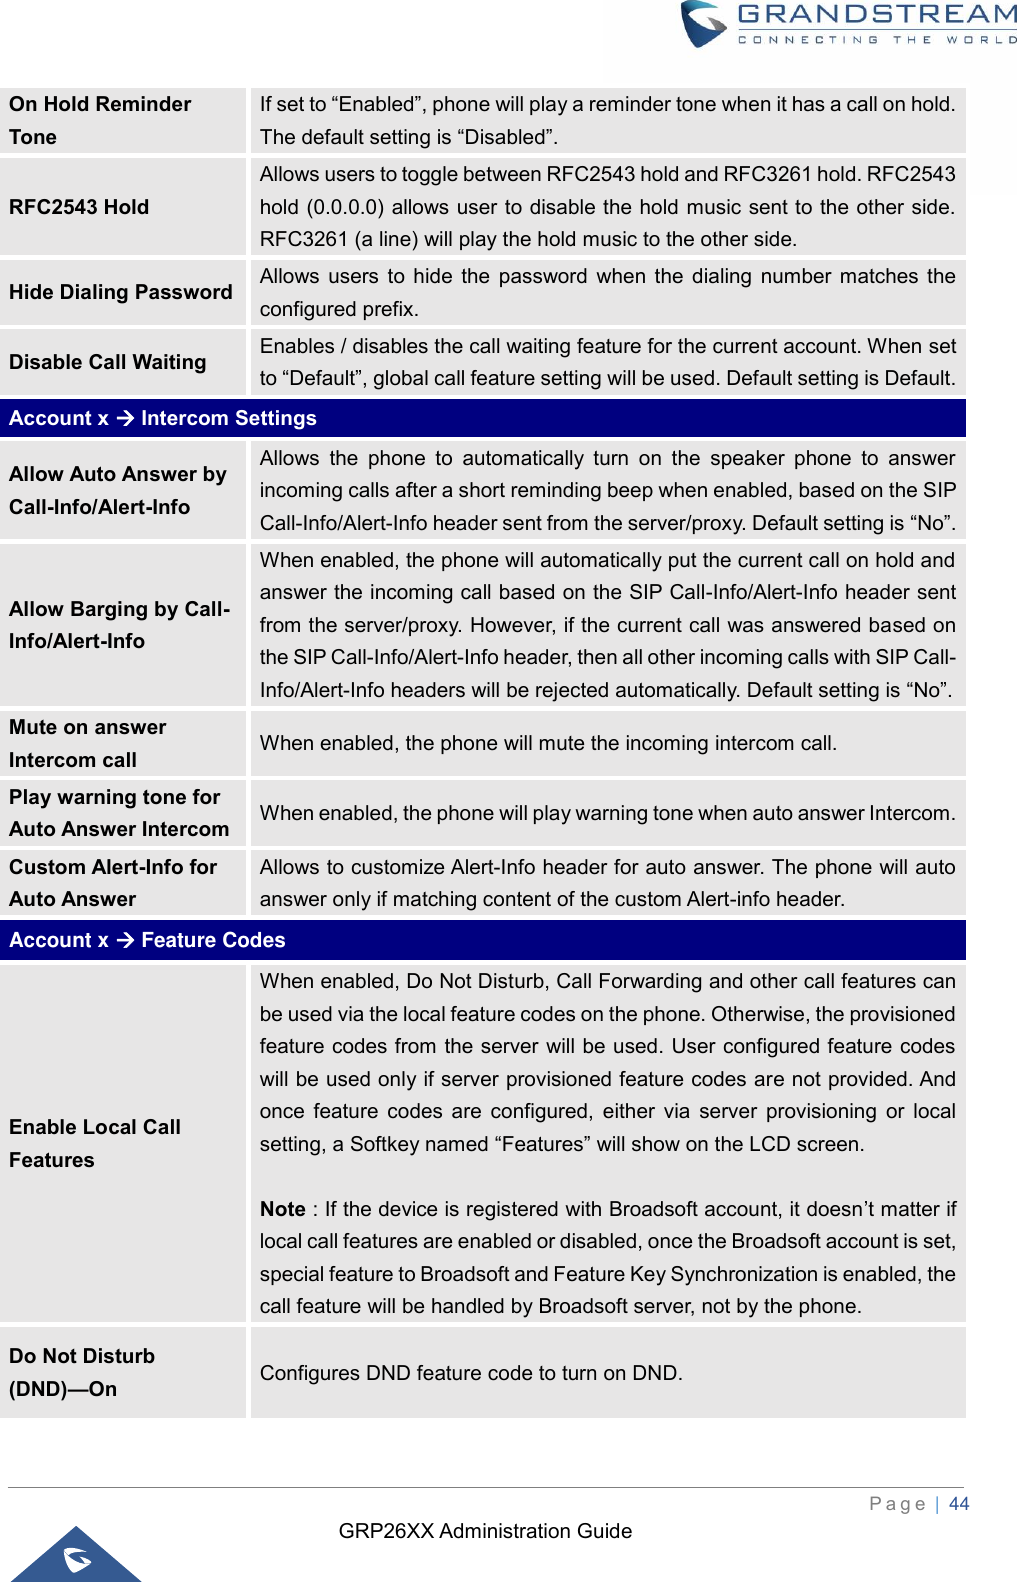
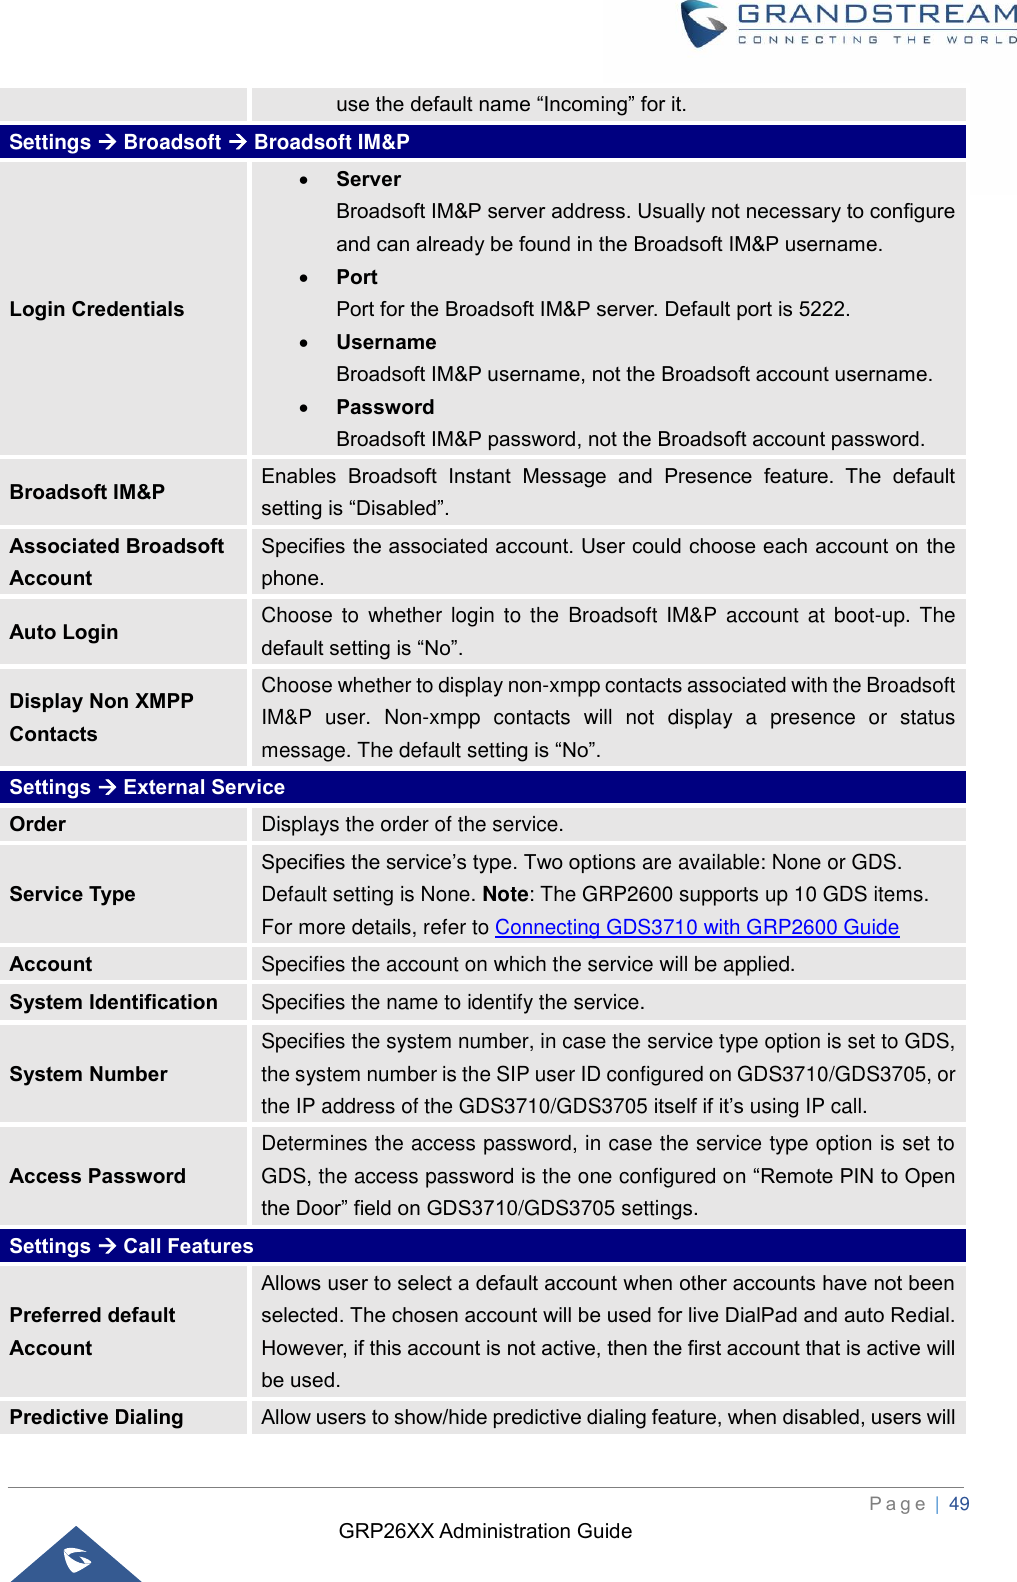
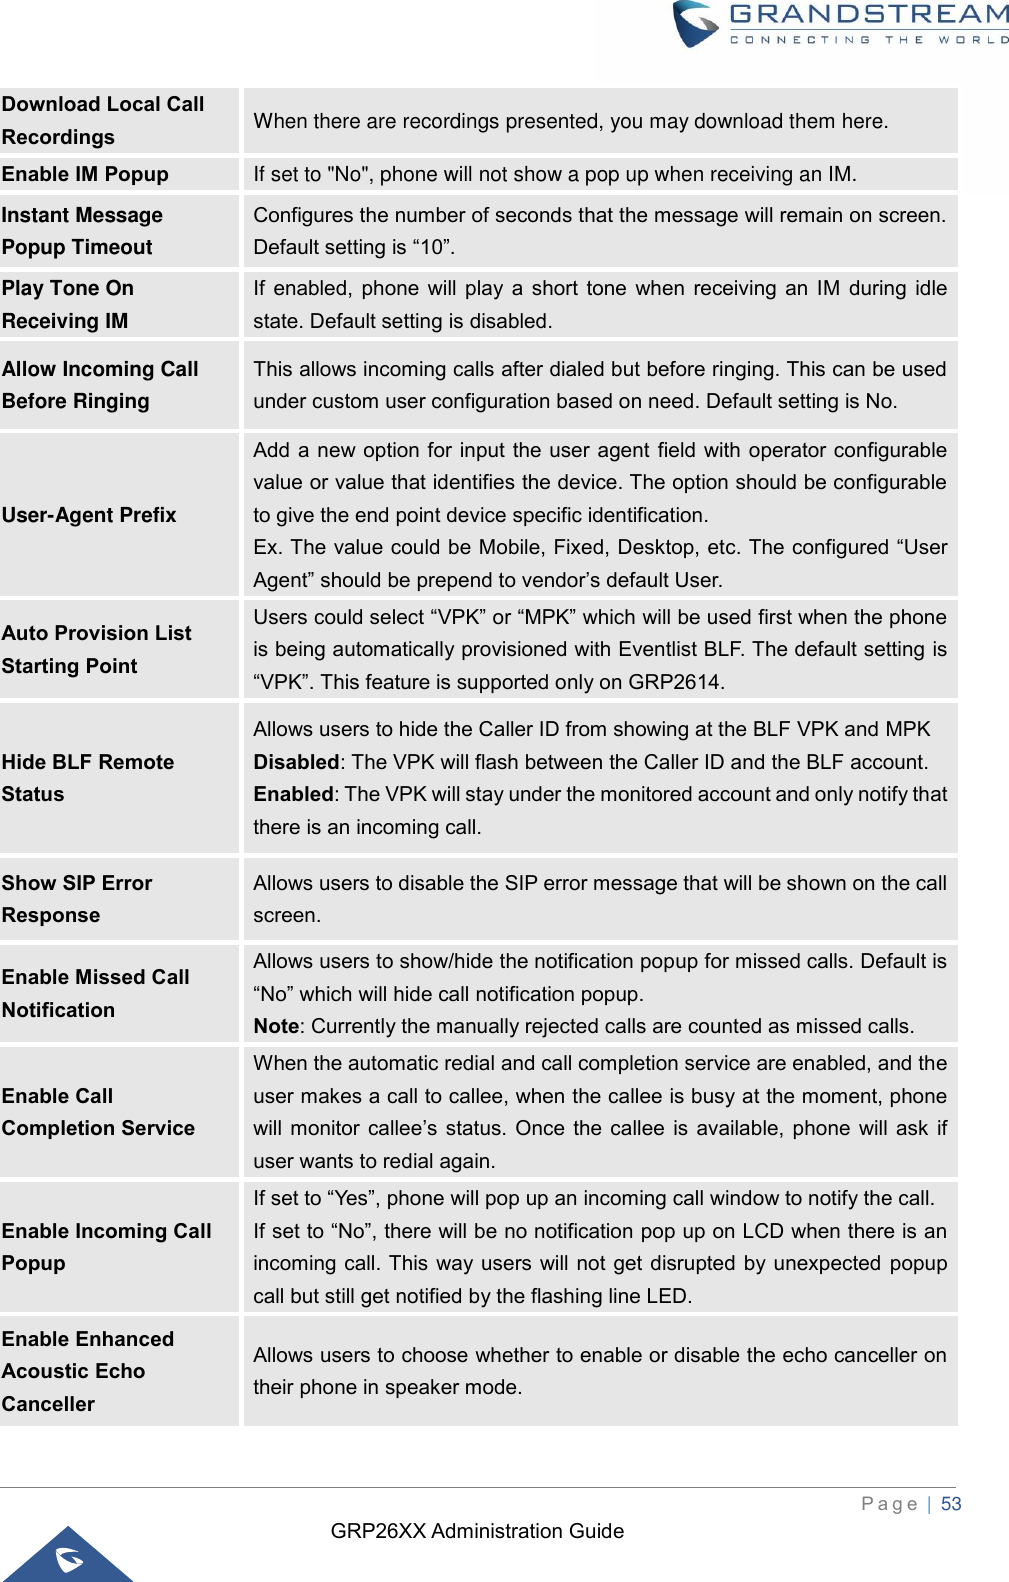
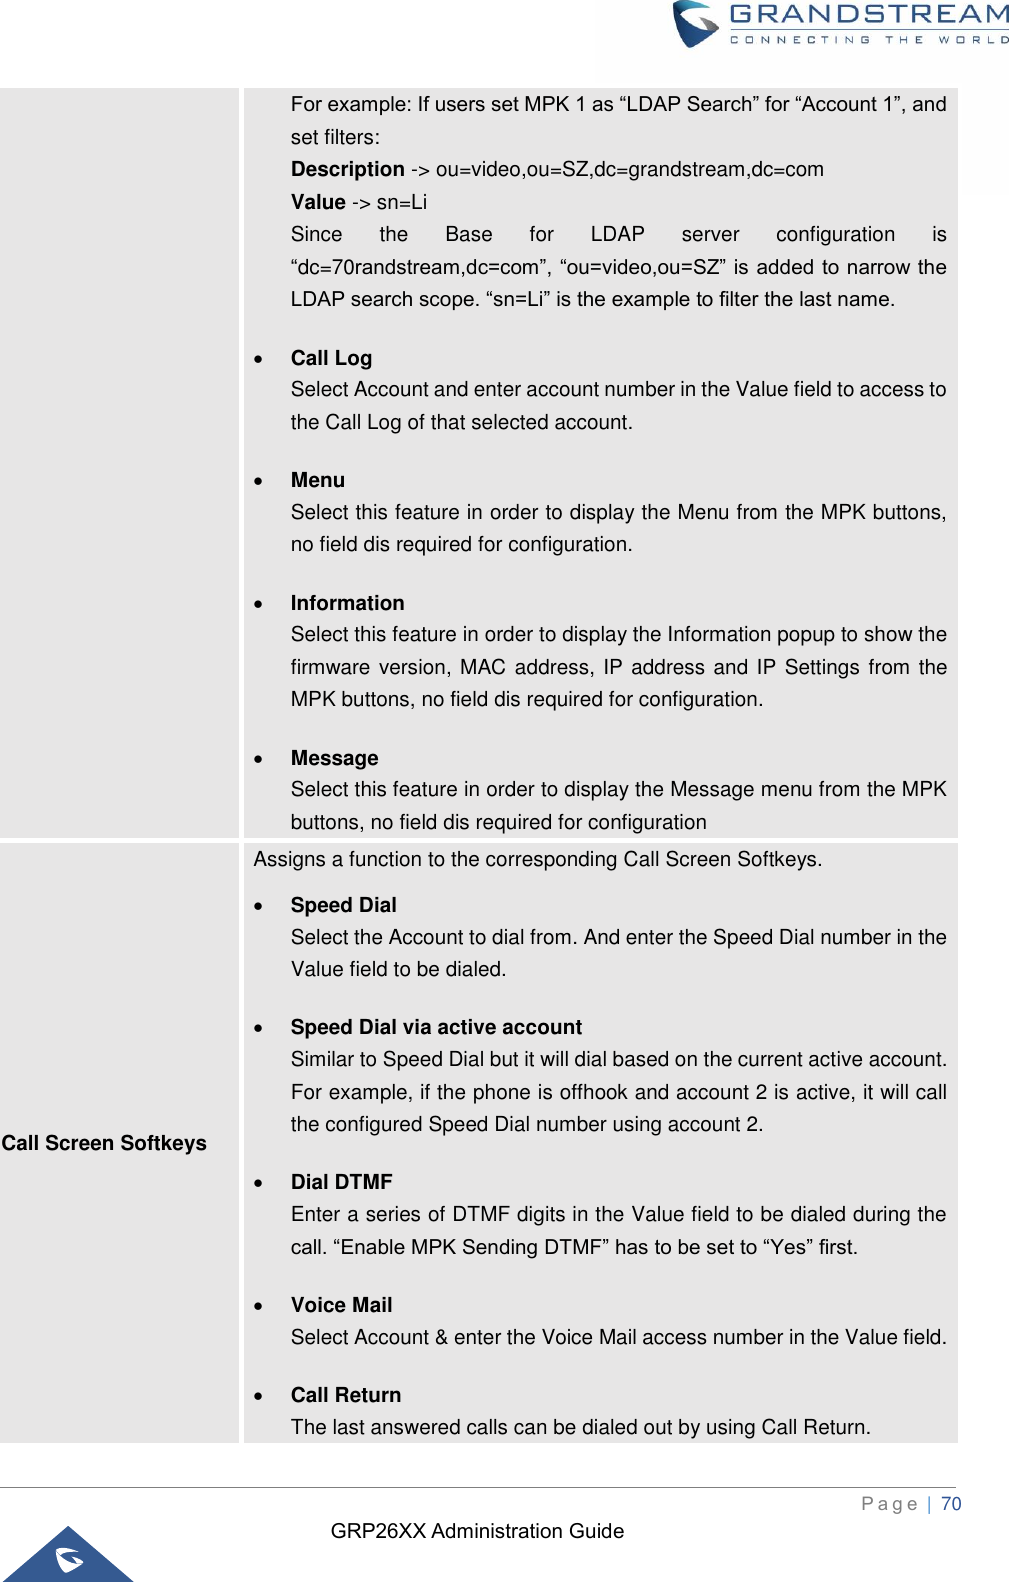
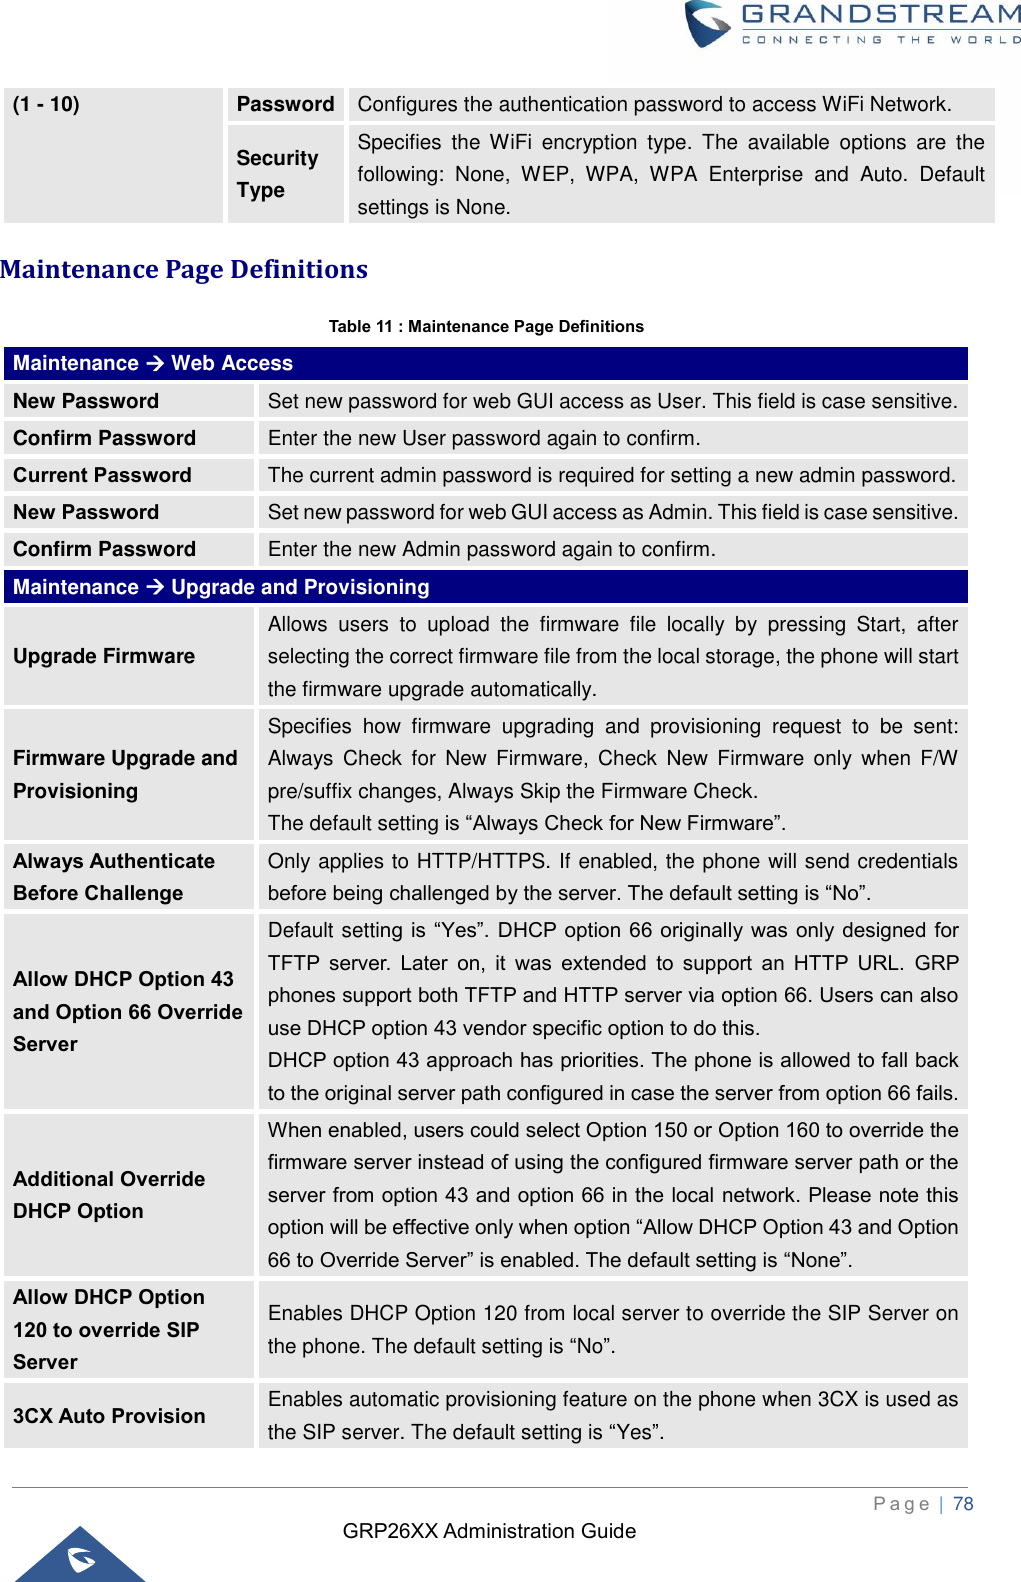
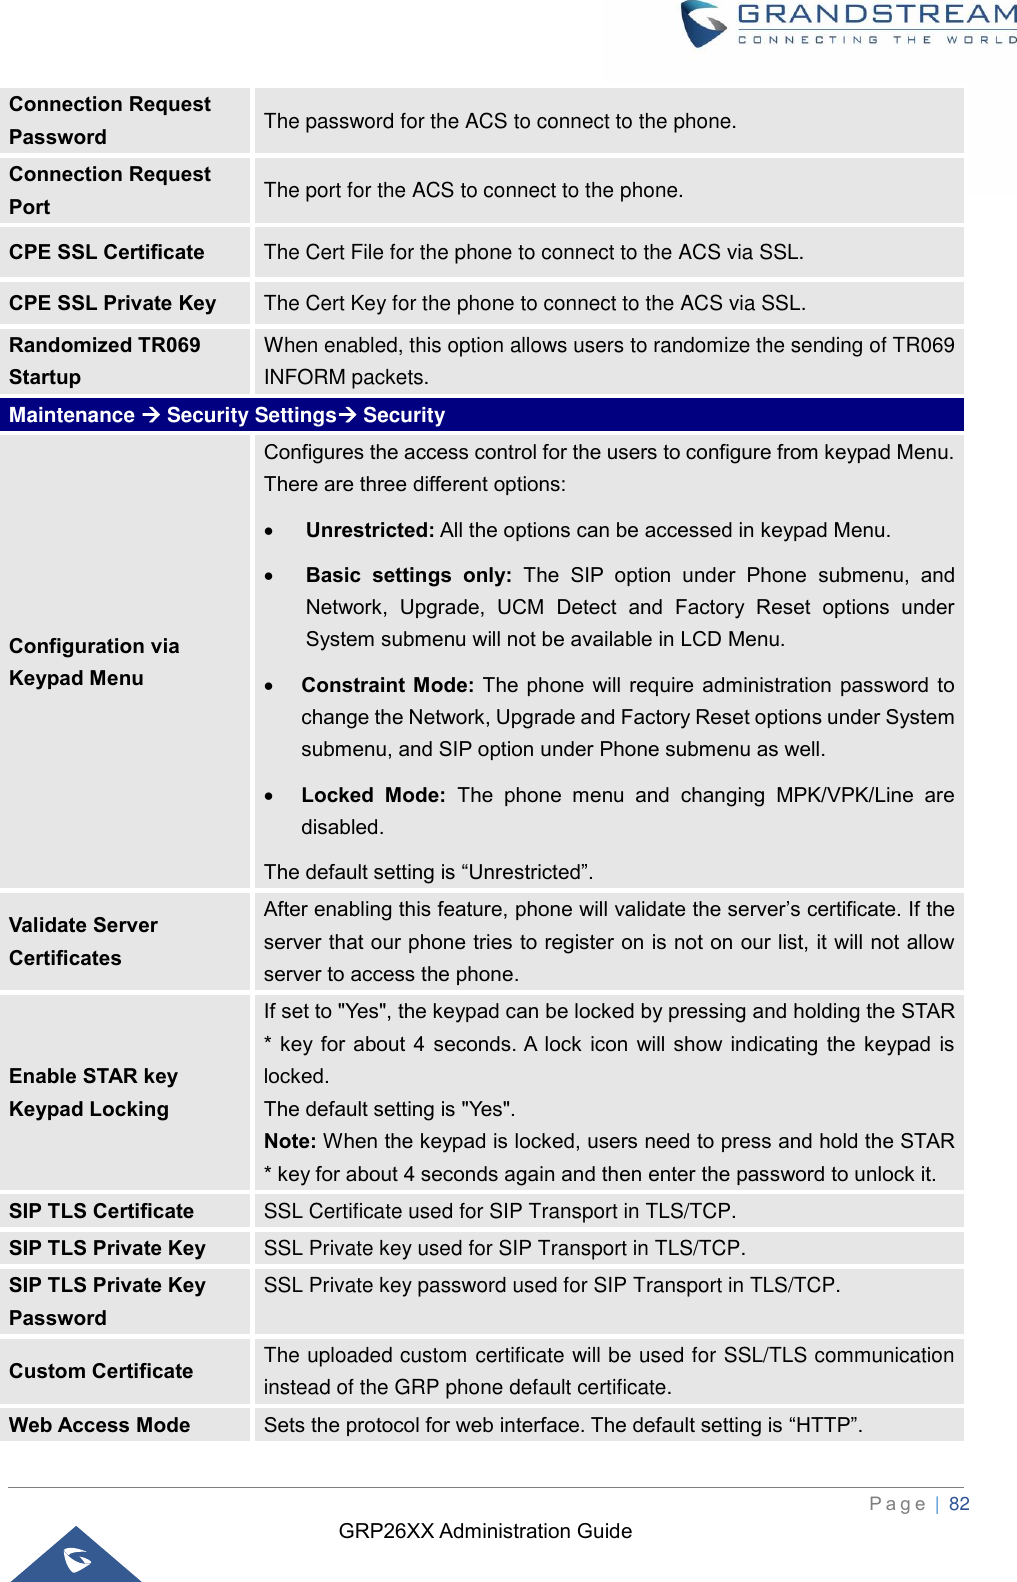
![GRP26XX Administration Guide P a g e | 42 • Example 5: If we set the dial plan with {\$123}, it should allow input $123 to pass dial plan check. • Example 6: If we set the dial plan with {12\_3}, it should allow input 12_3 to pass dial plan check. Example of a simple dial plan used in a Home/Office in the US: { ^1900x. | <=1617>[2-9]xxxxxx | 1[2-9]xx[2-9]xxxxxx | 011[2-9]x. | [3469]11 } Explanation of example rule (reading from left to right): • ^1900x. — prevents dialing any number started with 1900; • <=1617>[2-9]xxxxxx — allows dialing to local area code (617) numbers by dialing 7 numbers and 1617 area code will be added automatically; • 1[2-9]xx[2-9]xxxxxx |- allows dialing to any US/Canada Number with 11 digits length. • 011[2-9]x — allows international calls starting with 011; • [3469]11 — allows dialing special and emergency numbers 311, 411, 611 and 911. Note: In some cases, where the user wishes to dial strings such as *123 to activate voice mail or other applications provided by their service provider, the * should be predefined inside the dial plan feature. An example dial plan will be: {*x+ } which allows the user to dial * followed by any length of numbers. Call Log Configures Call Log setting on the phone. You can log all calls, only log incoming/outgoing calls (missed calls will not be logged), or disable call log. The default setting is “Log All Calls”. Account Ring Tone Allows users to configure the ringtone for the account. Users can choose from different ringtones from the dropdown menu. Note: User can also choose silent ring tone. Match Incoming Caller ID Specifies matching rules with number, pattern or Alert Info text (up to 10 matching rules). When the incoming caller ID or Alert Info matches the rule, the phone will ring with selected distinctive ringtone. Matching rules: • Specific caller ID number. For example, 8321123; • A defined pattern with certain length using x and + to specify, where x could be any digit from 0 to 9. Samples: xx+ : at least 2-digit number; xx : only 2-digit number; [345]xx: 3-digit number with the leading digit of 3, 4 or 5; [6-9]xx: 3-digit number with the leading digit from 6 to 9. • Alert Info text Users could configure the matching rule as certain text (e.g., priority) and](https://usermanual.wiki/Grandstream-Networks/GRP2612P/User-Guide-4183055-Page-42.png)
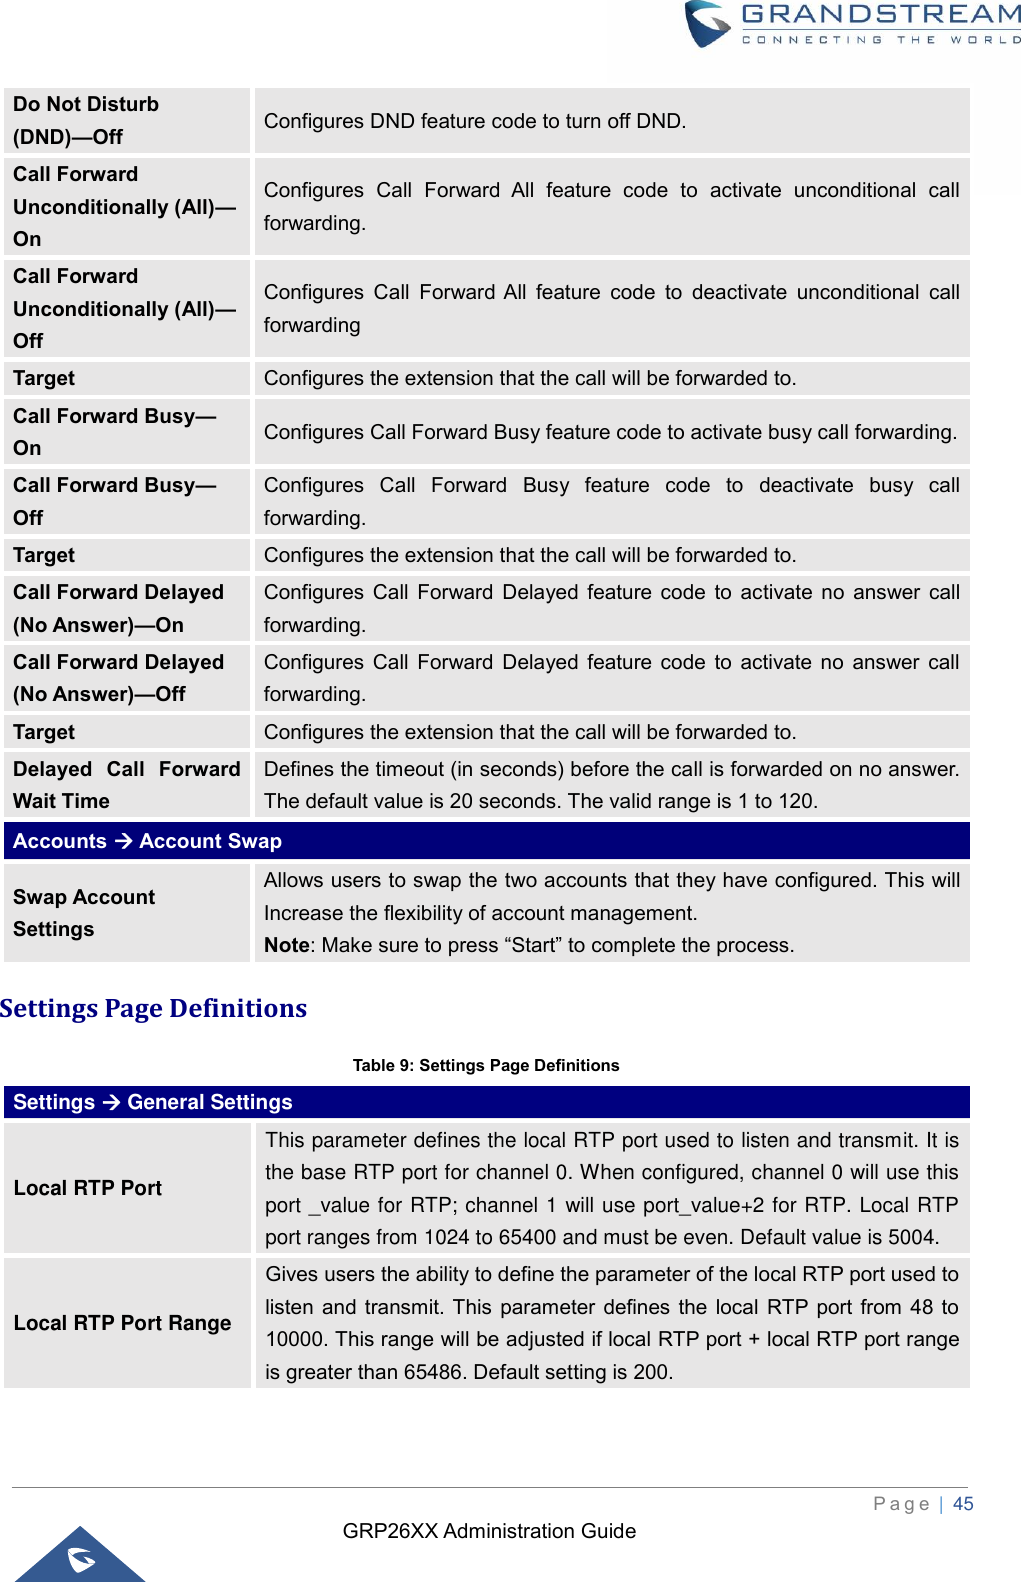
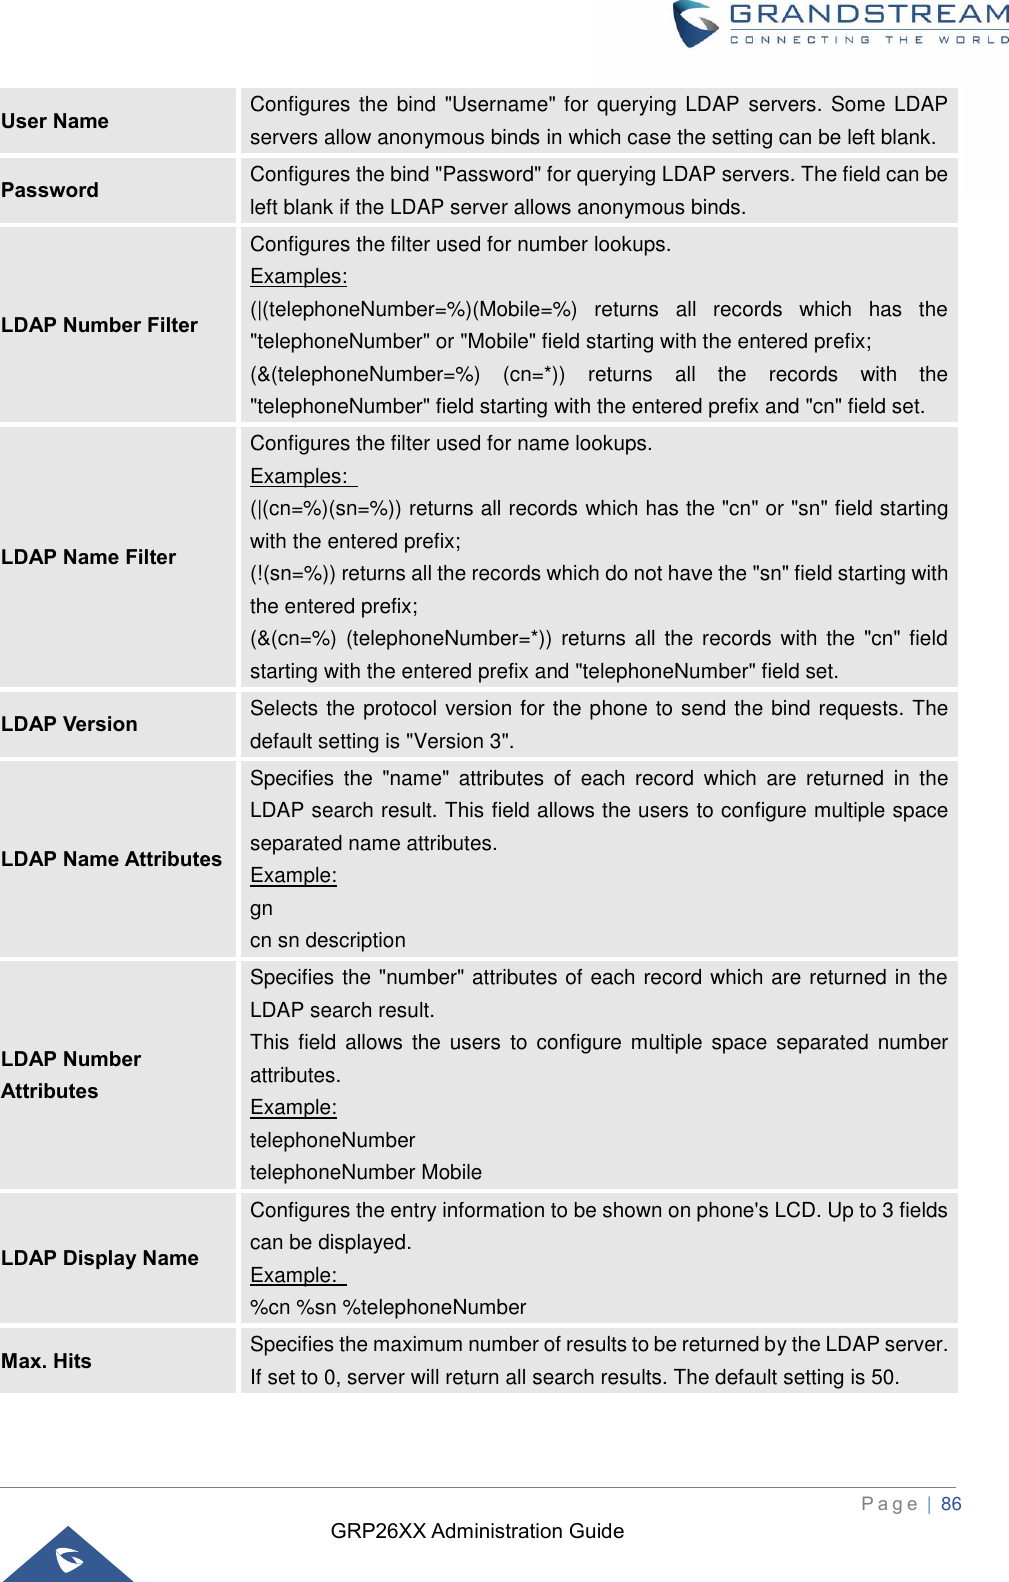
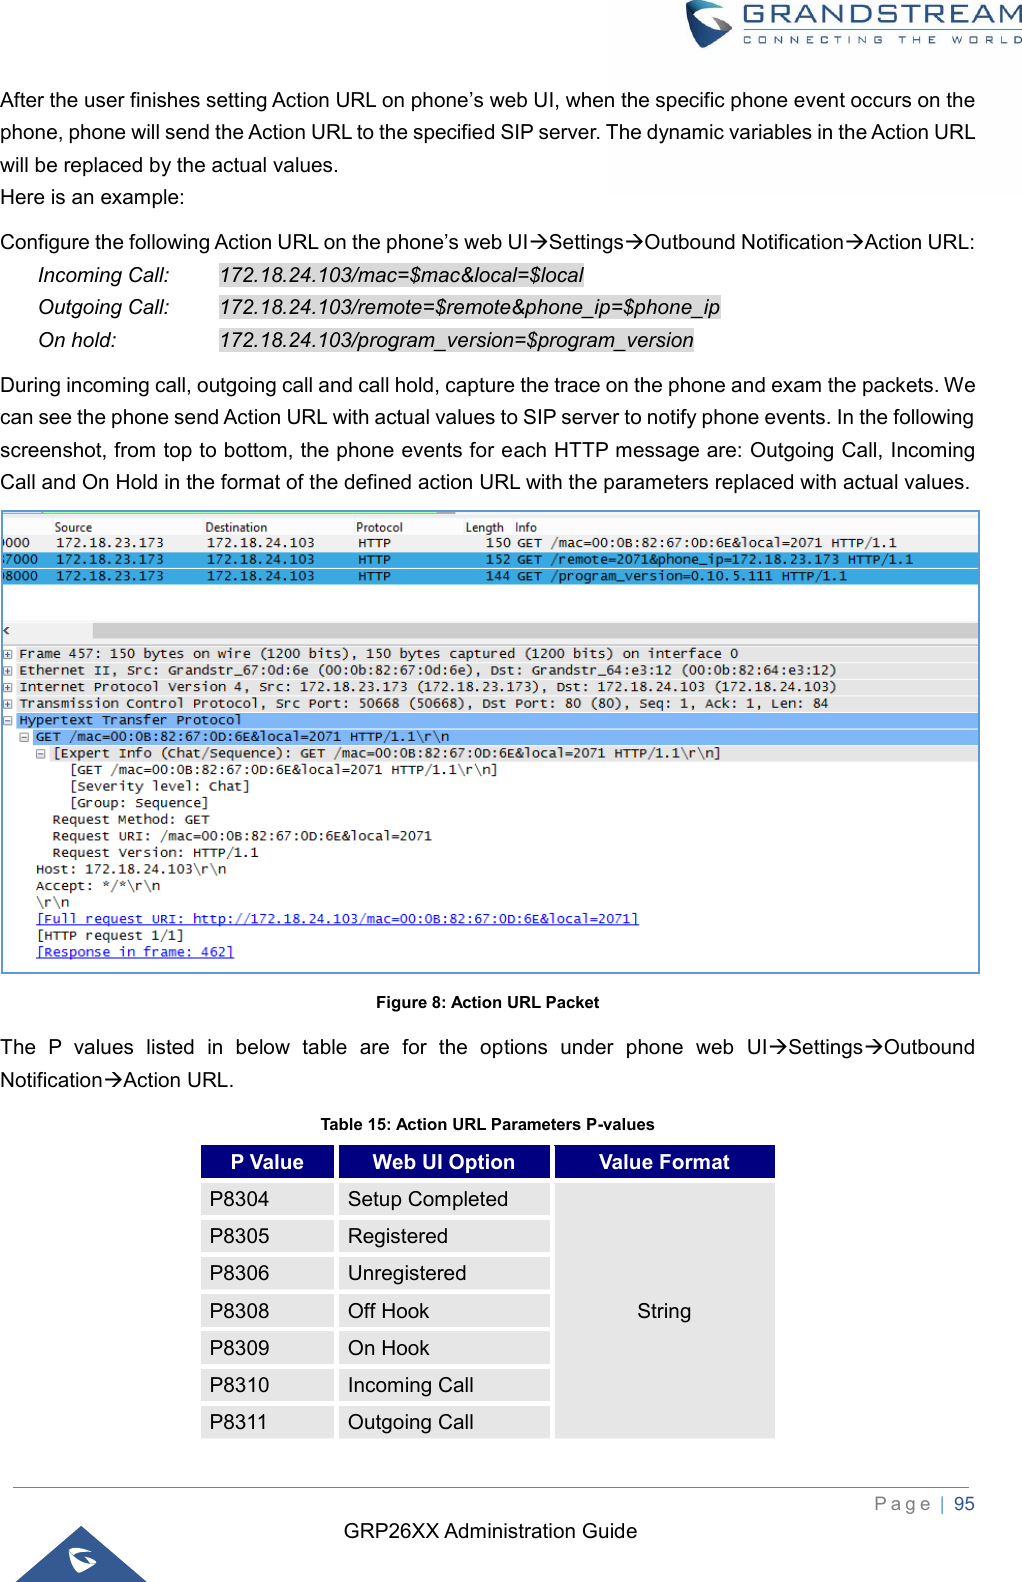
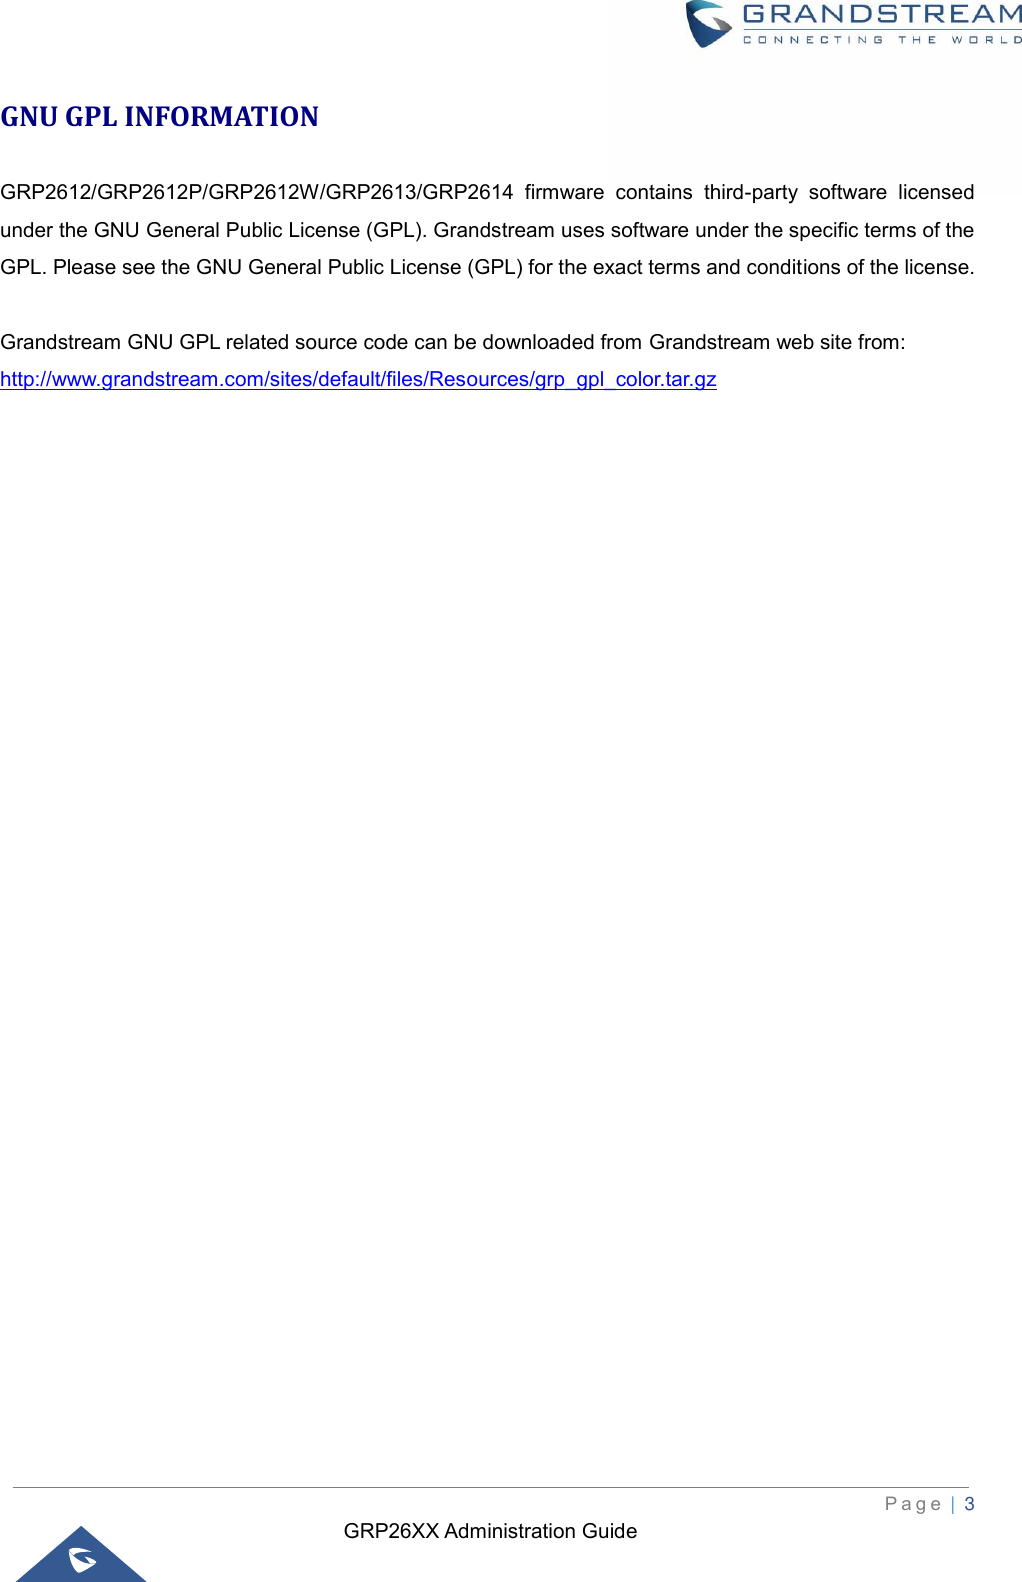
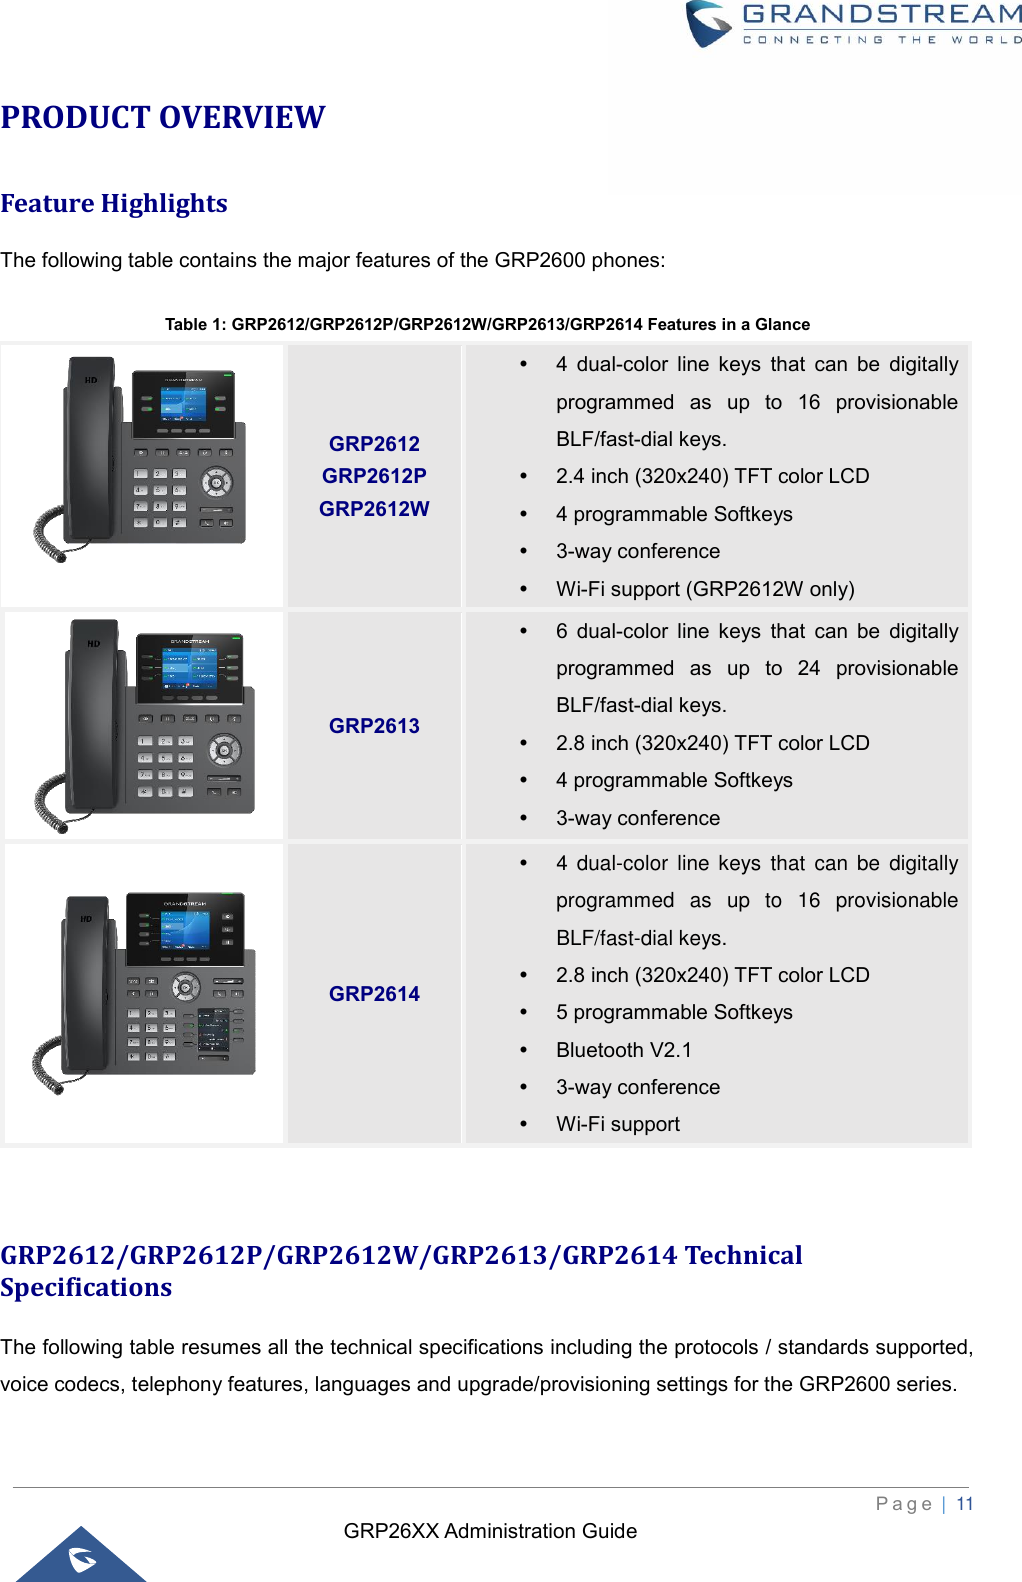
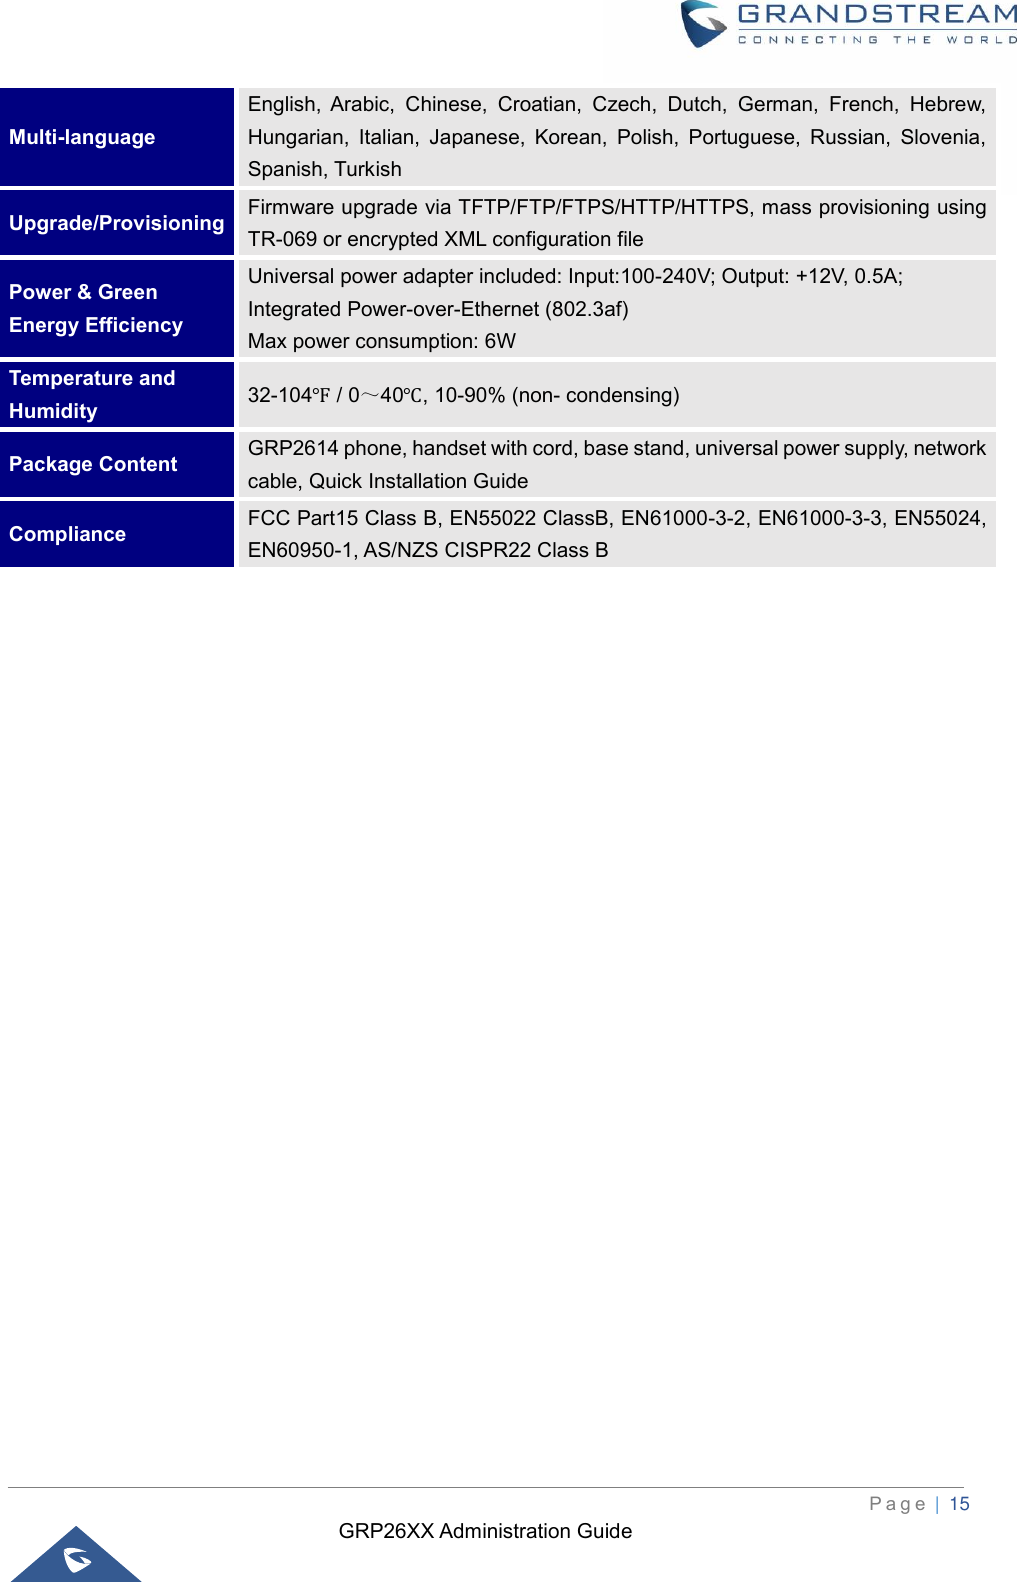
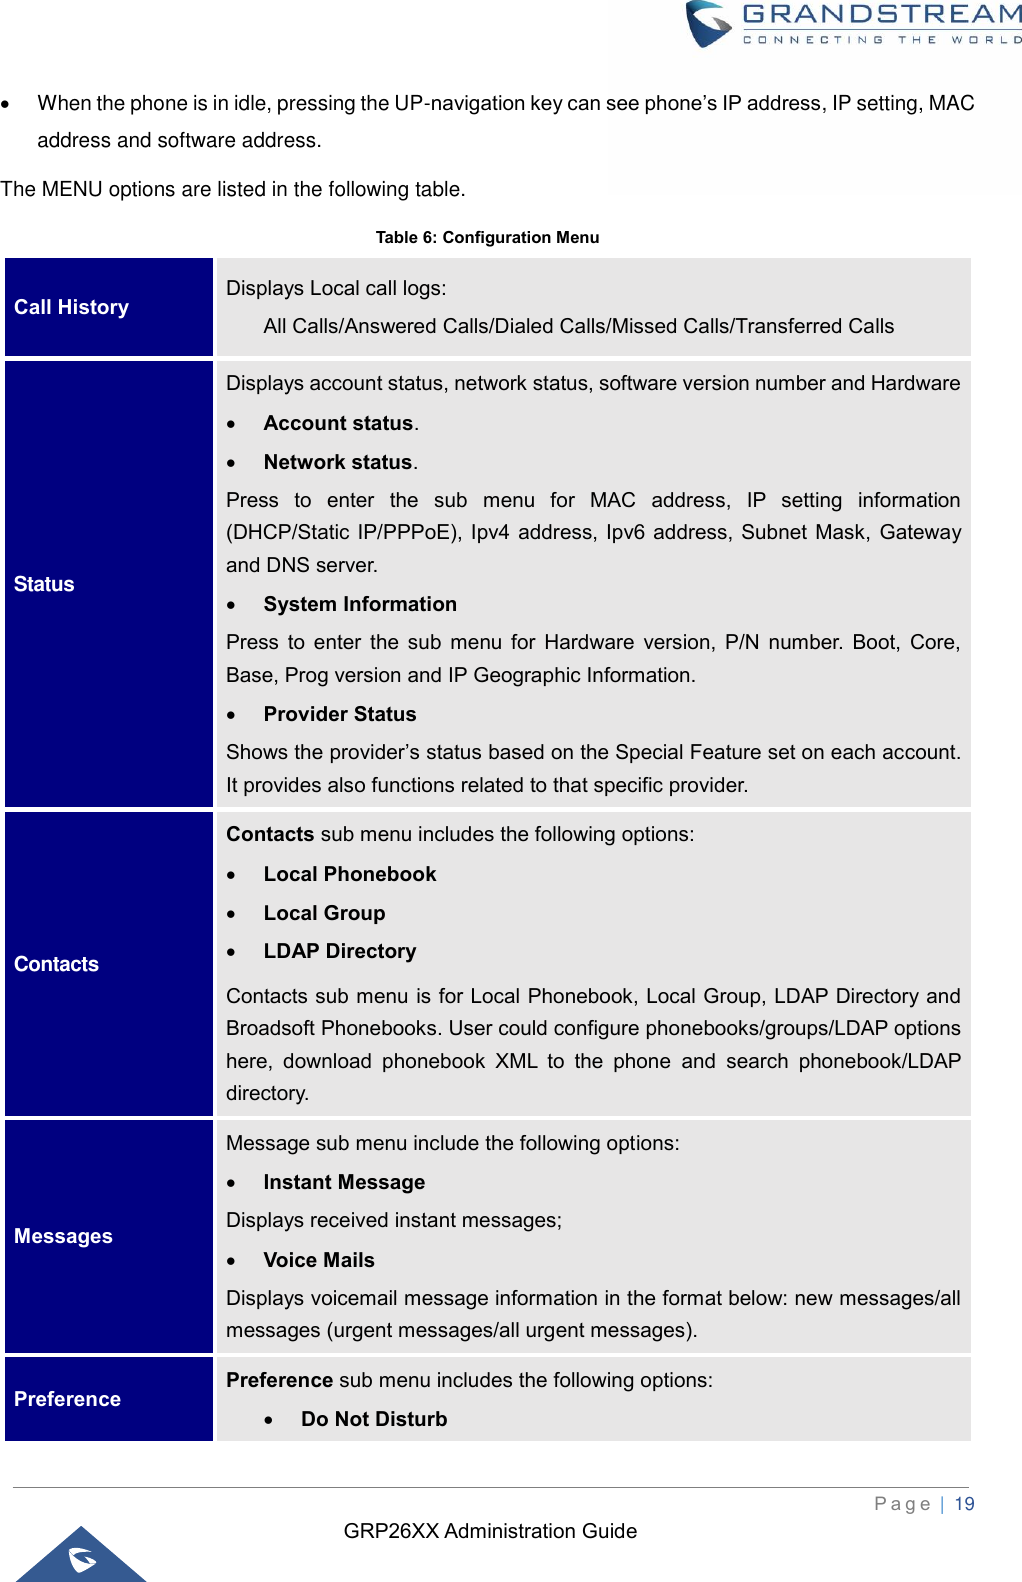
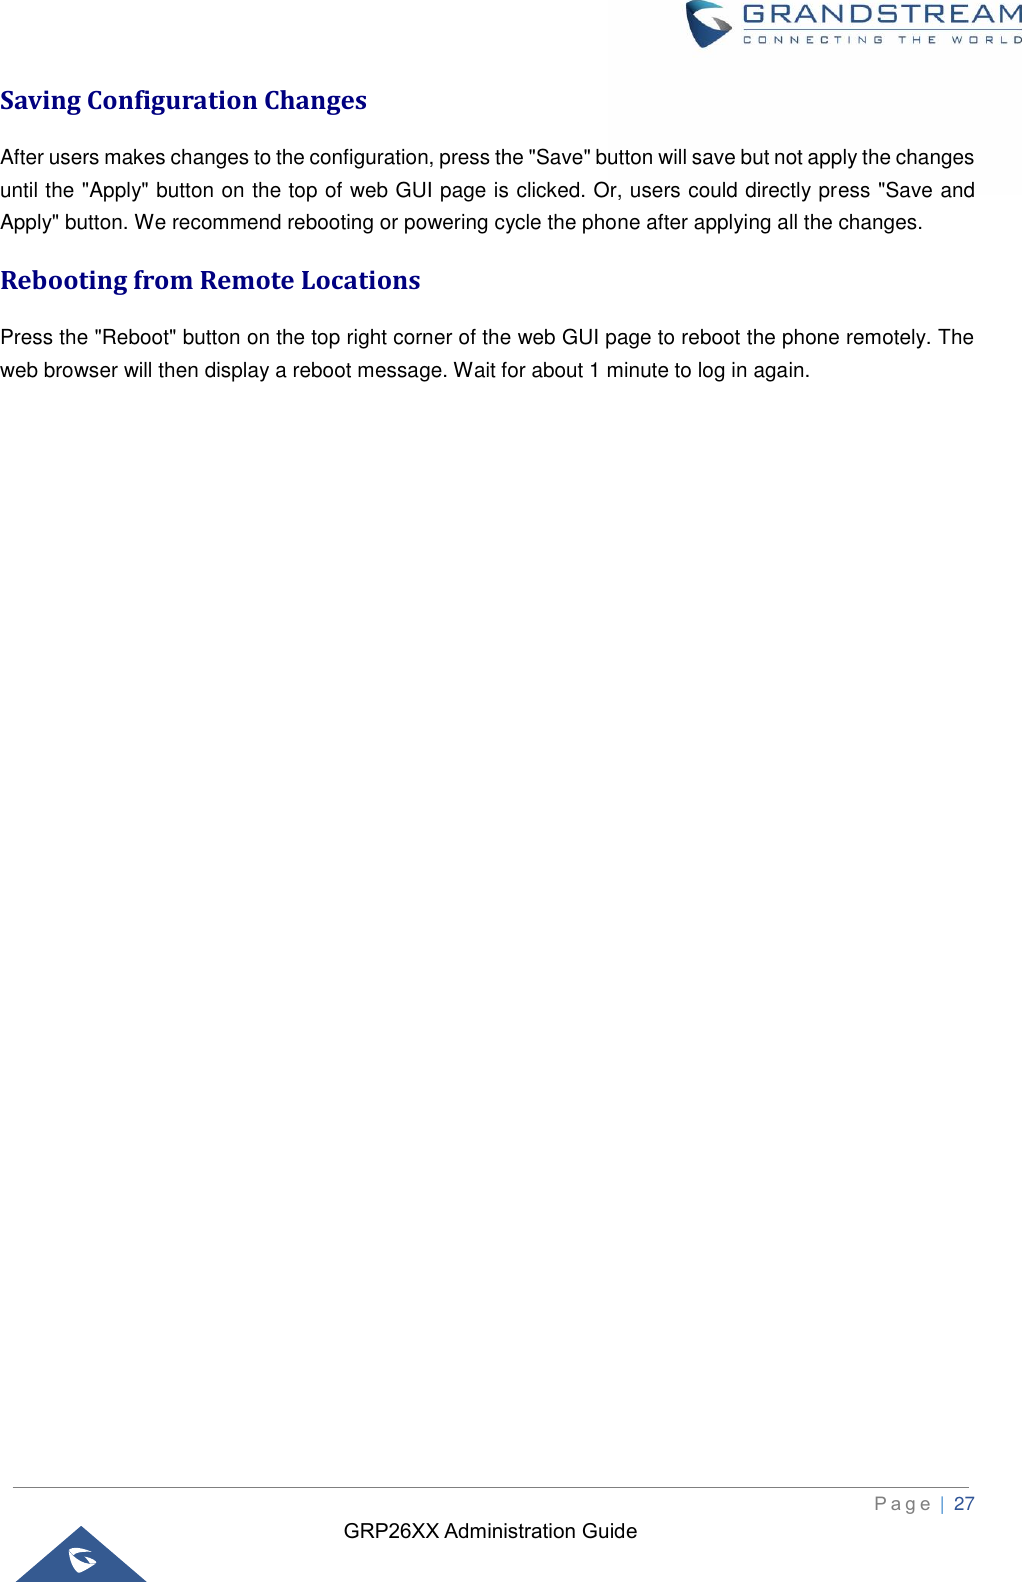
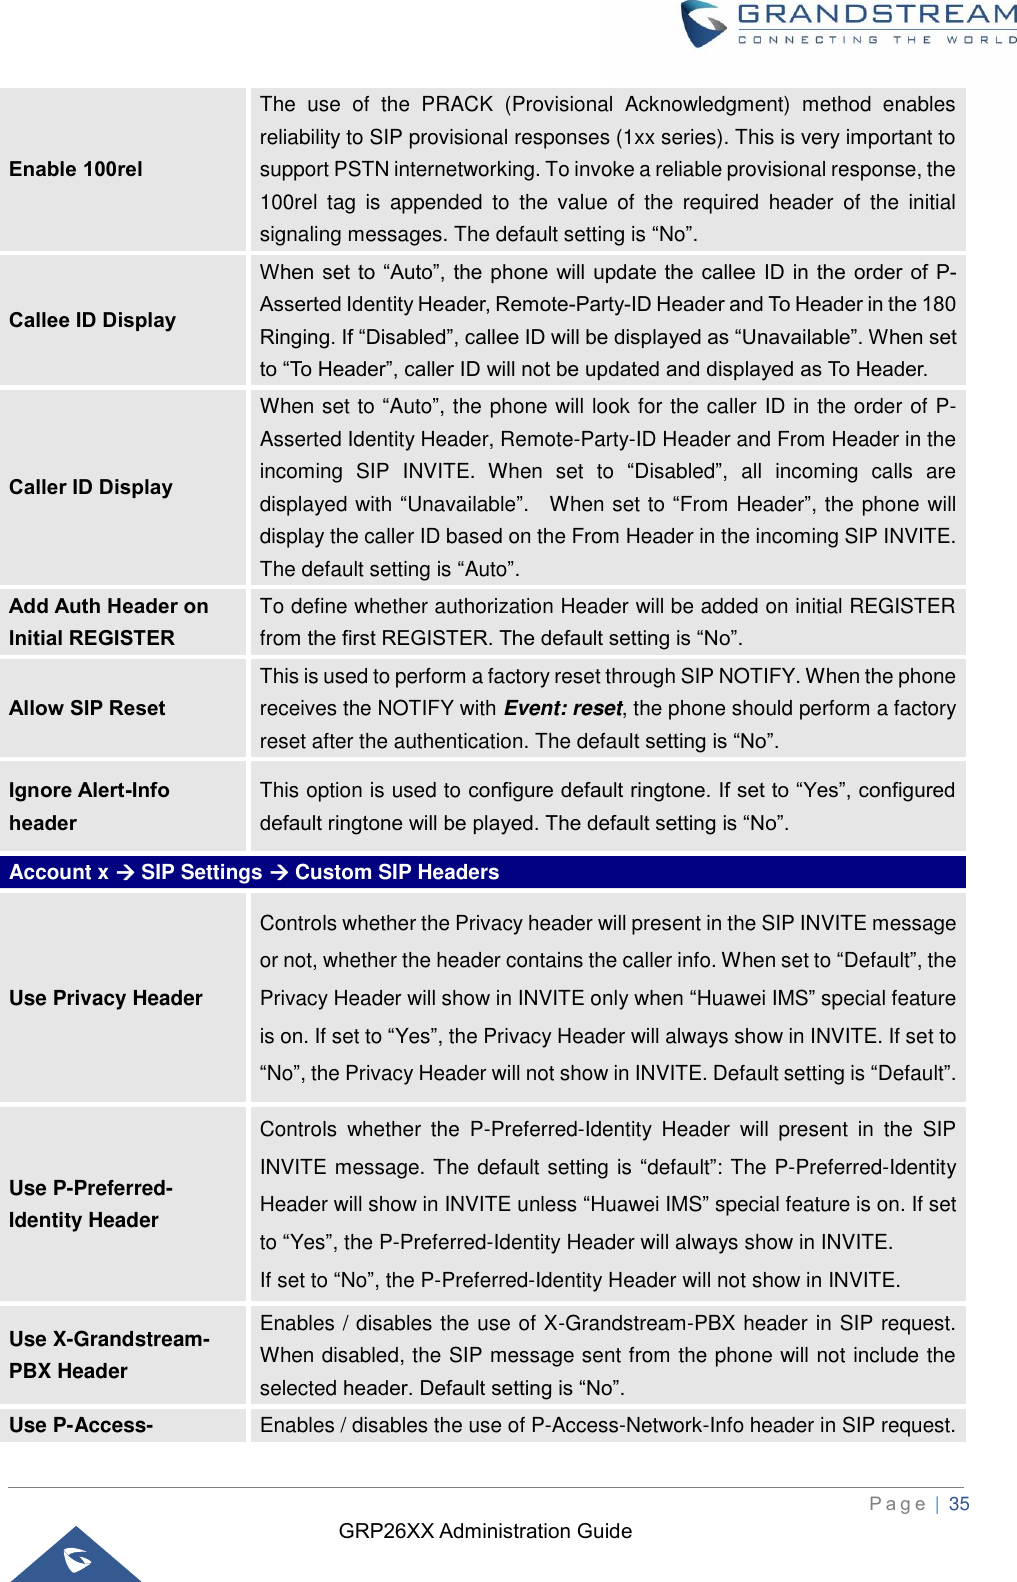
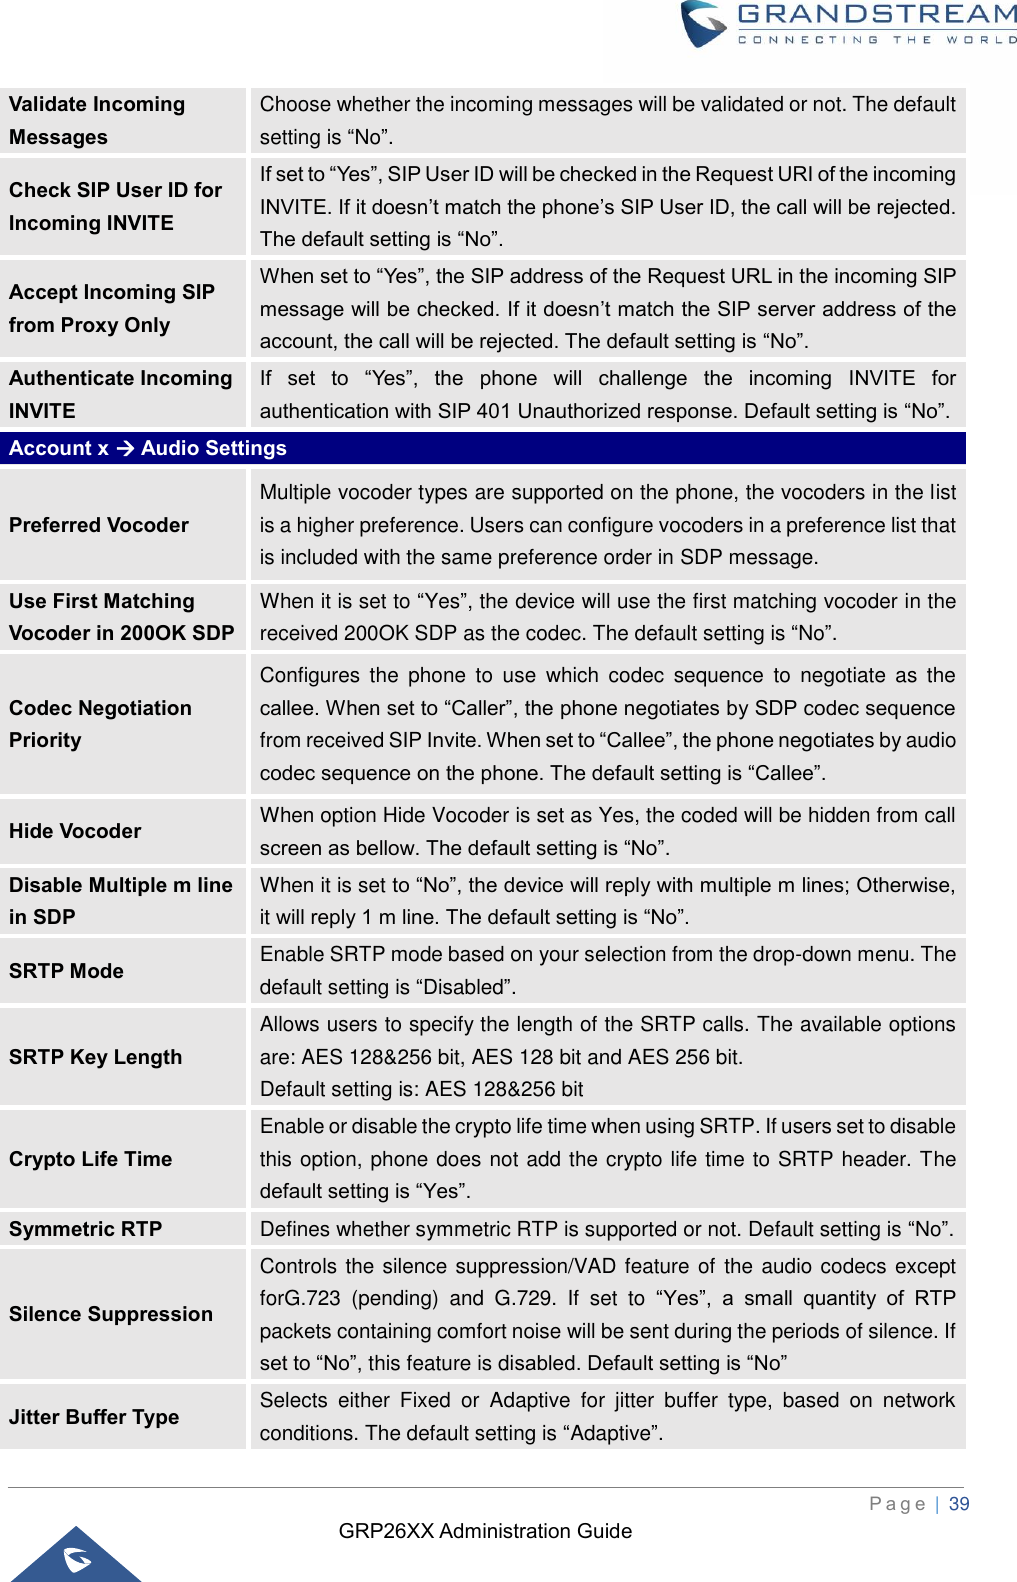
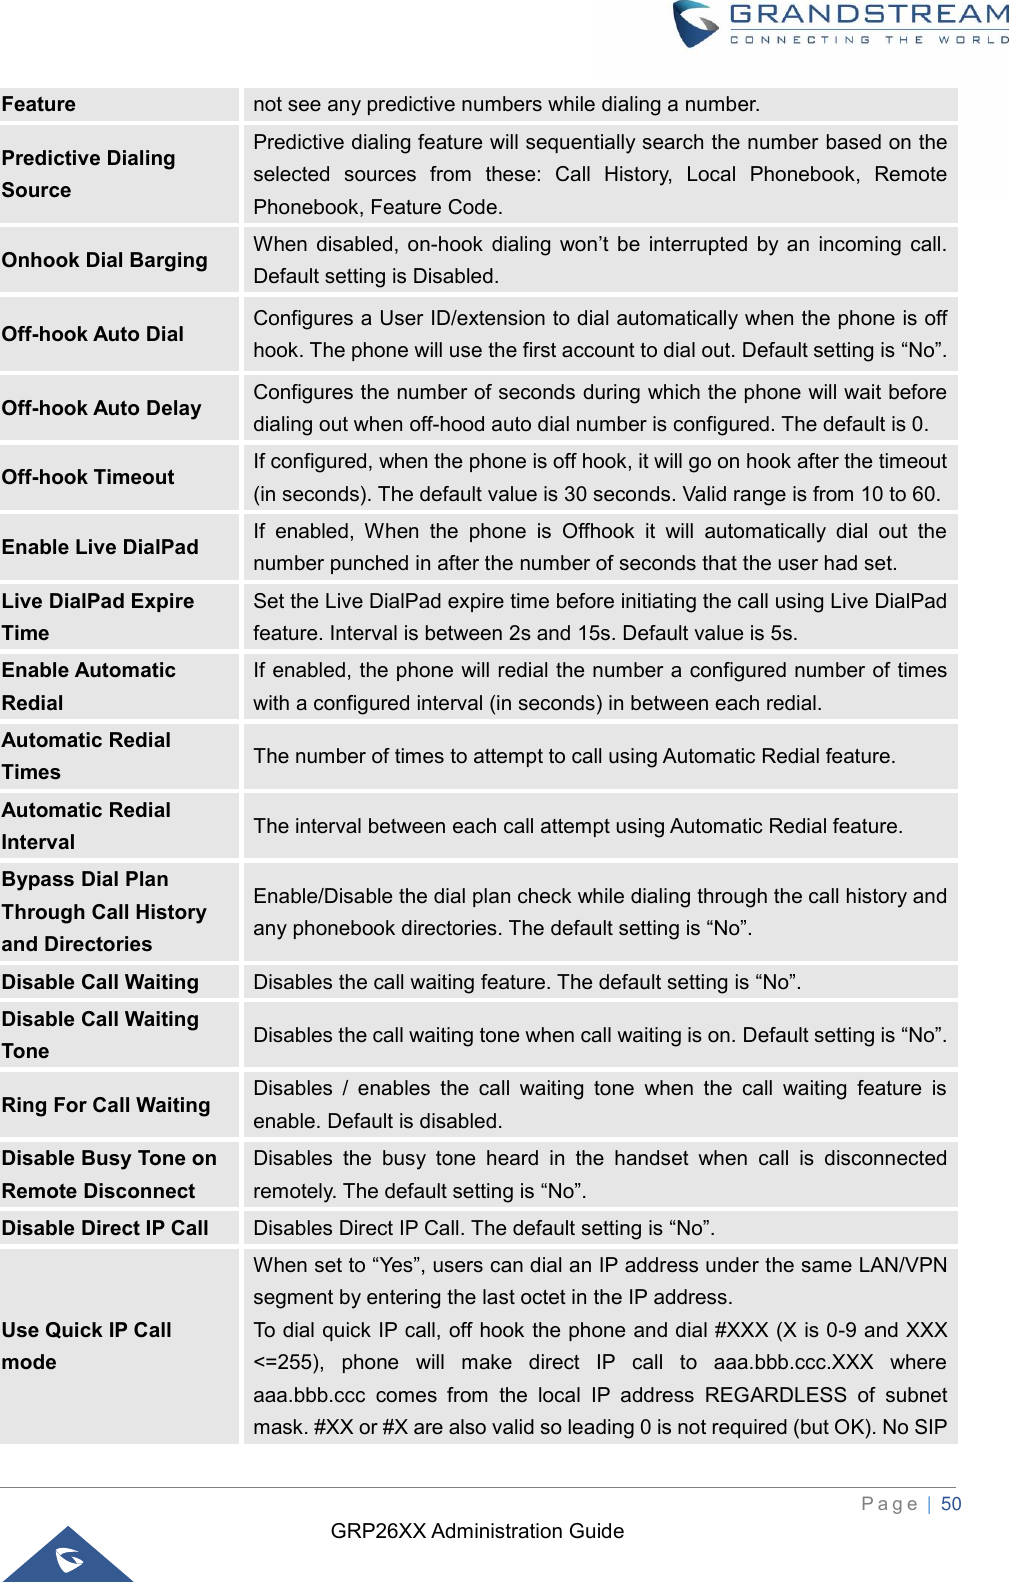
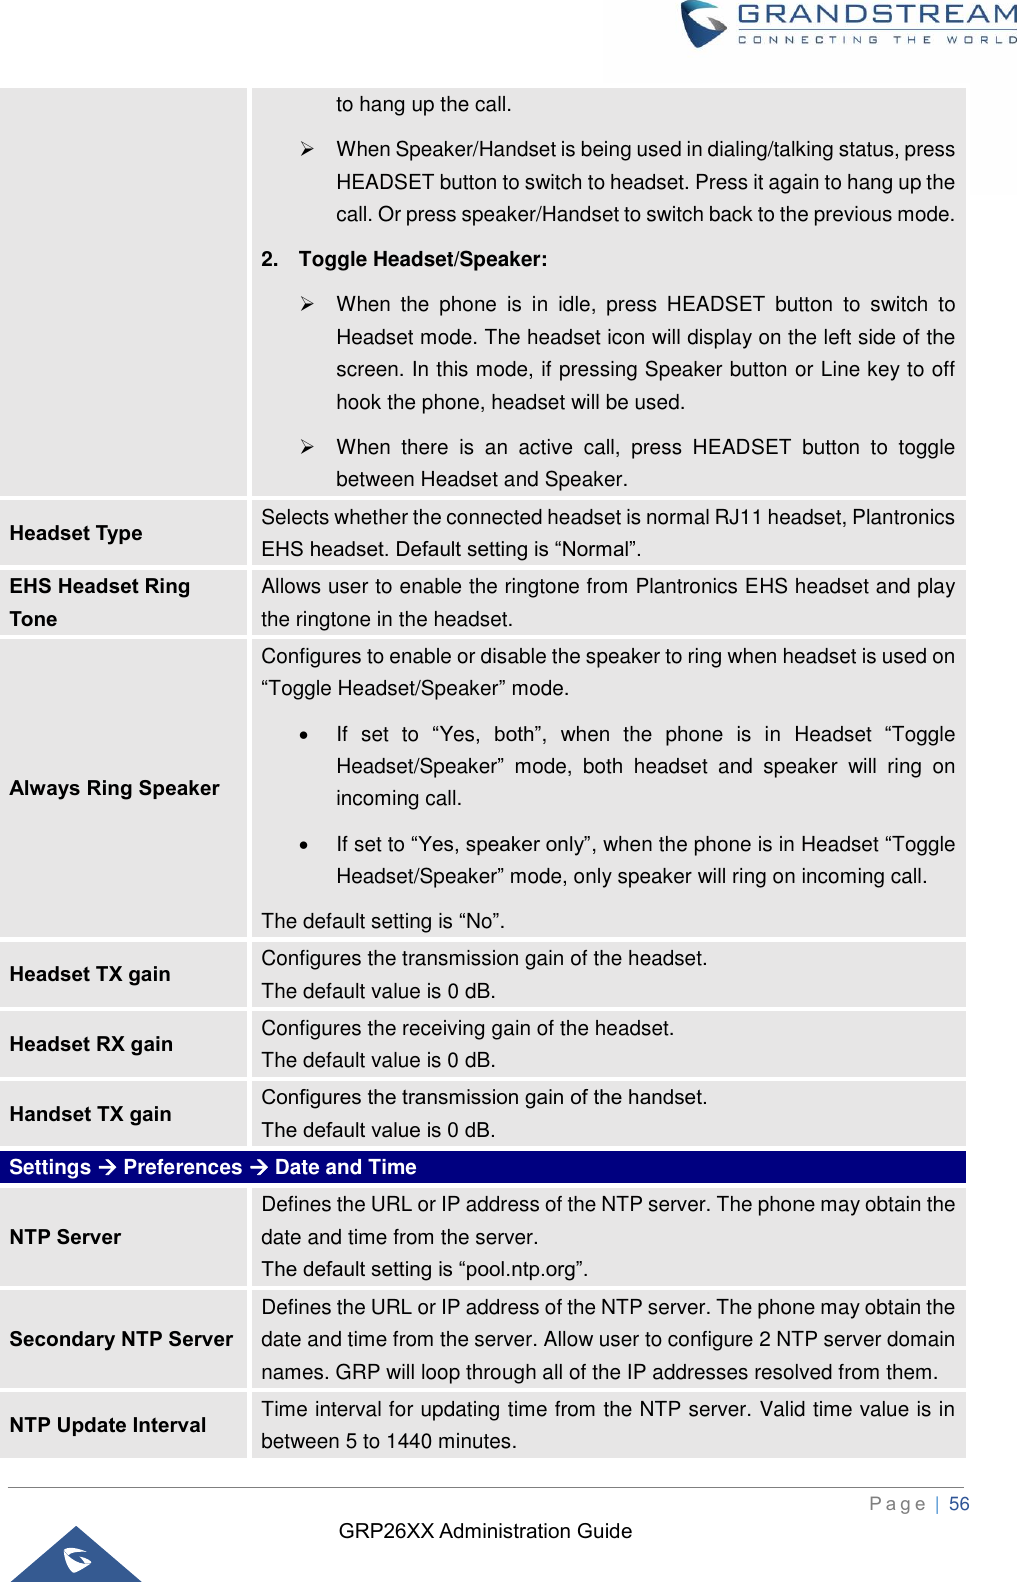
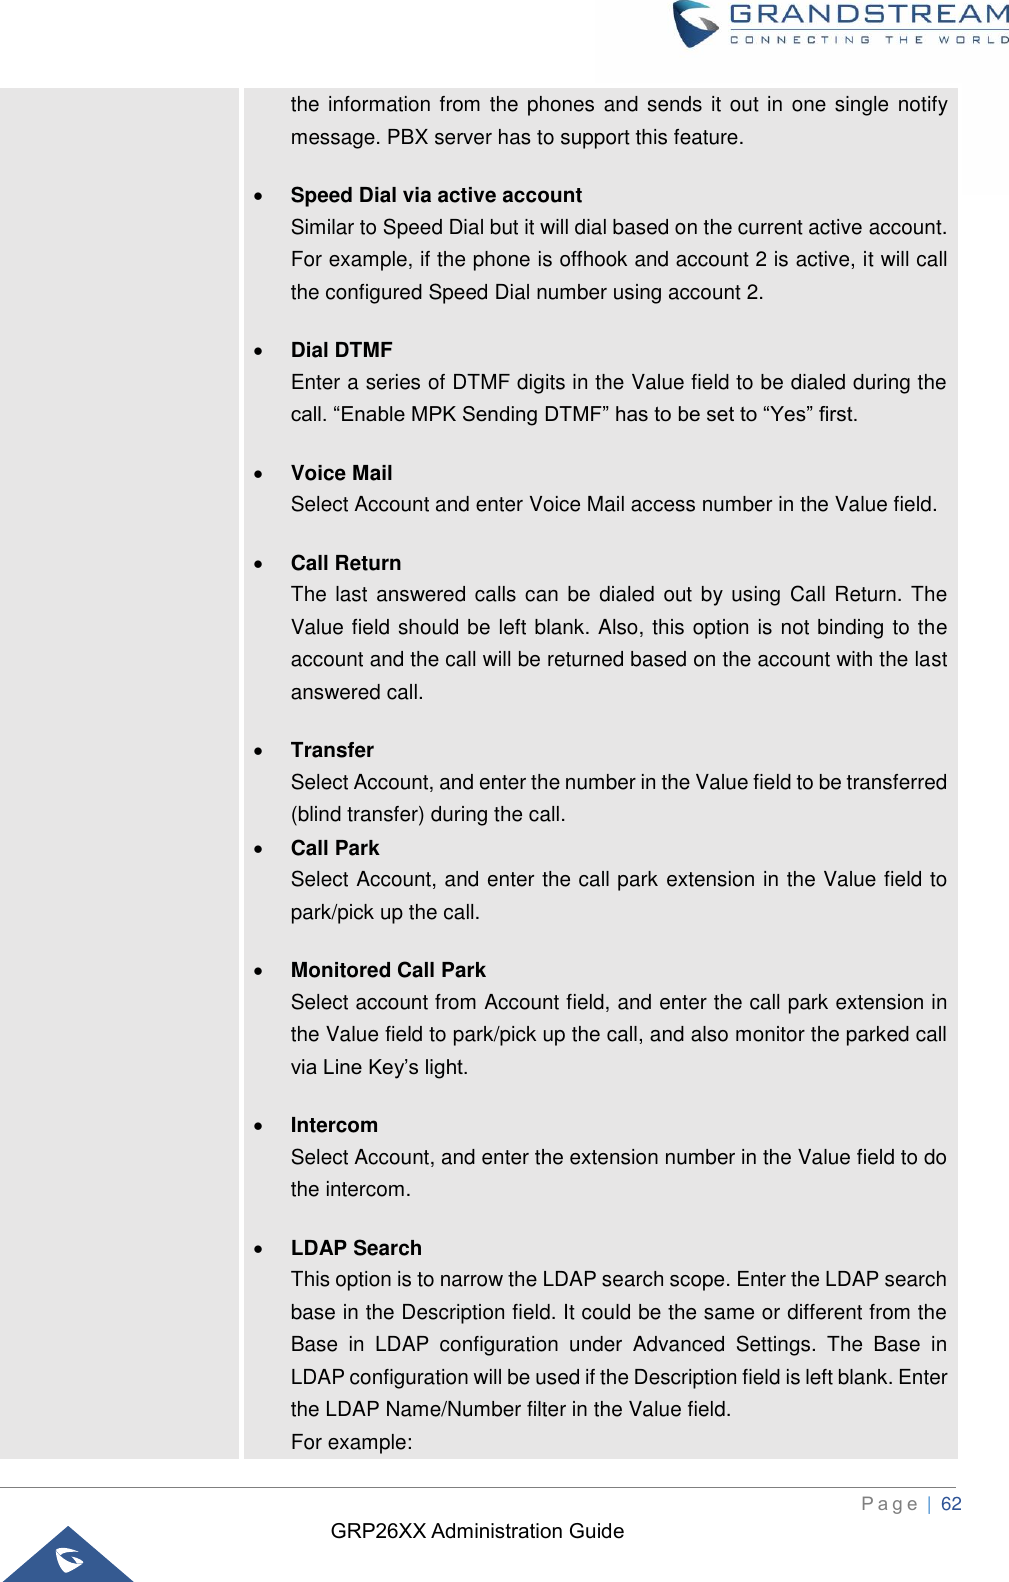
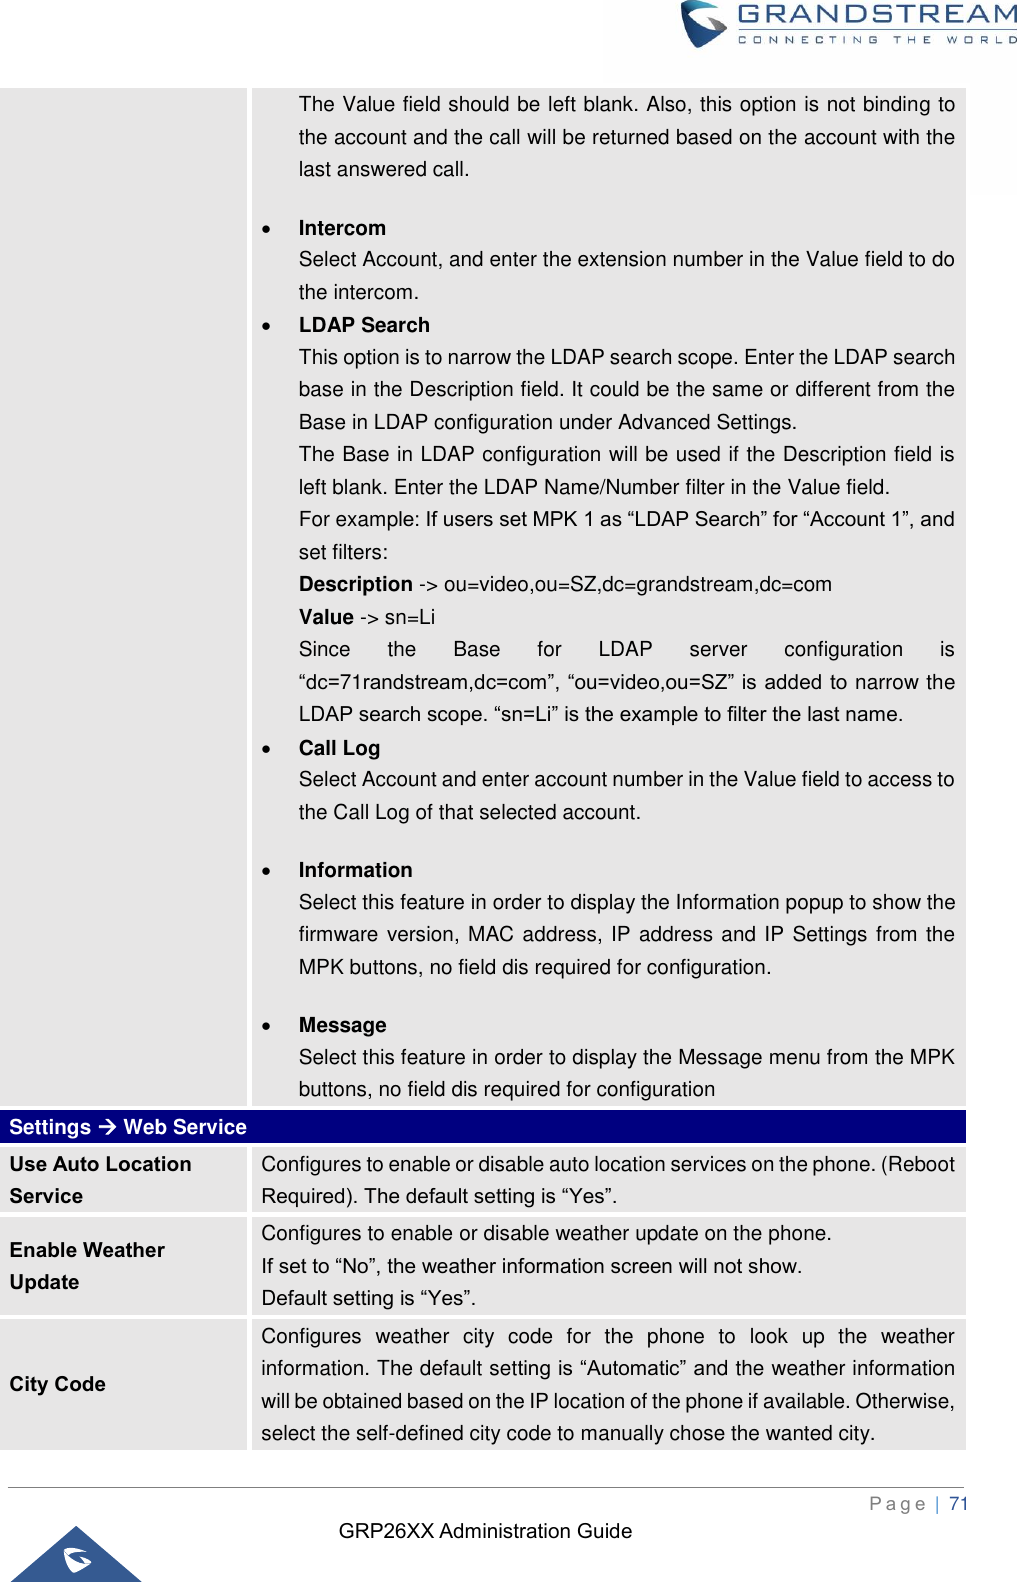
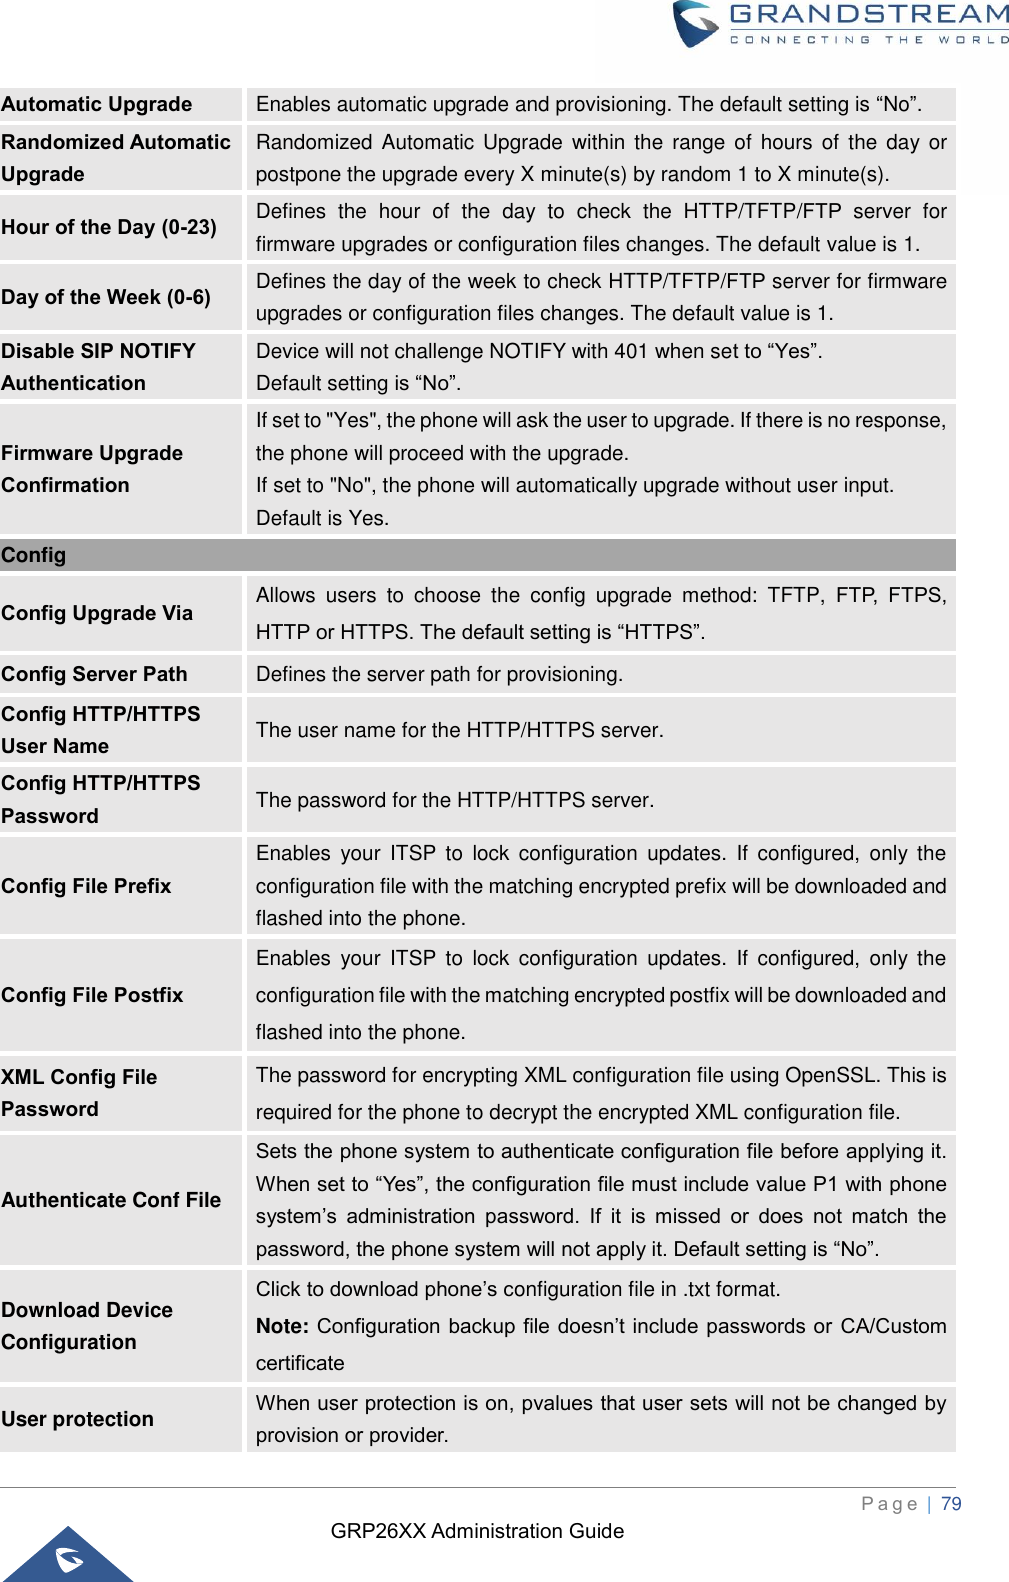
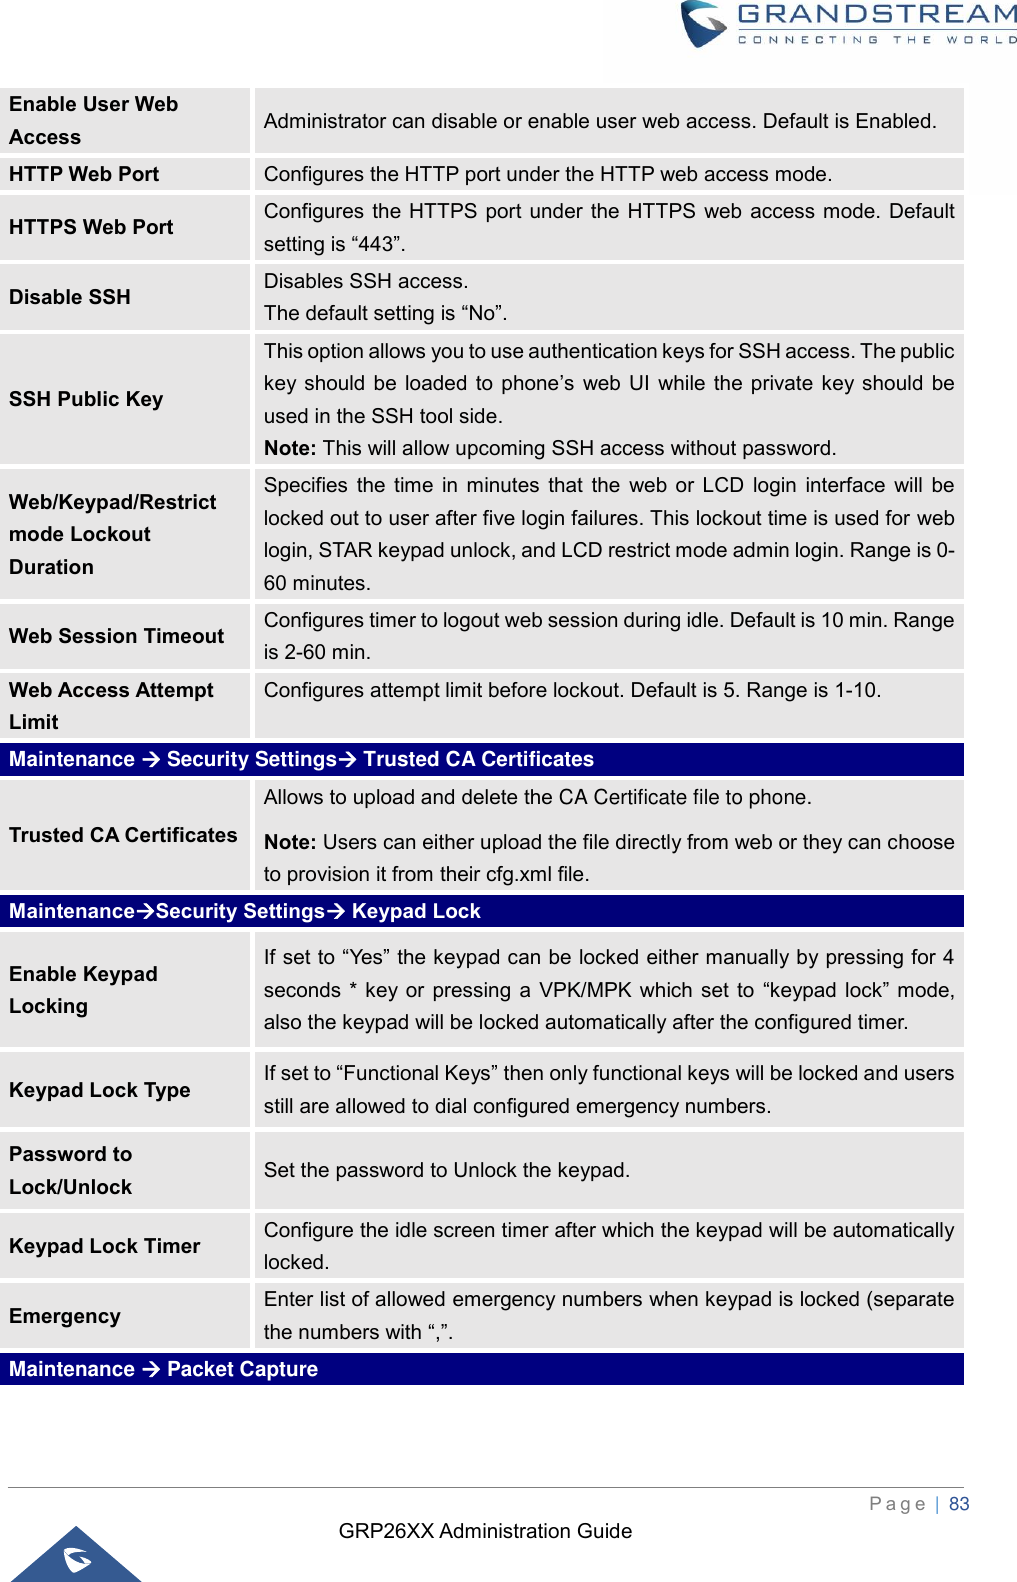
![GRP26XX Administration Guide P a g e | 47 Outbound Notification Enable Outbound Notification Indicates whether Outbound Notification feature is enabled. Default is “Enabled”. For more details refer to [OUTBOUND NOTIFICATION SUPPORT]. Settings → Broadsoft → Broadsoft XSI XSI Configures XSI Directory. • Server Configure the BroadWorks Xsi server URI. If the server uses HTTPS, please add the header “HTTPS” ahead of the Server URI. For instance, “https://SERVER_URI”. • Port Configure the BroadWorks Xsi server port. The default port is 80. If the server uses HTTPS, please configure 443. • XSI Actions Path This feature allows users to configure the deployment path for Broadsoft XSI Actions. If it is empty, the path “com.broadsoft.xsi-actions” will be used. • Broadsoft Contact Download Interval Configures the Broadsoft phonebook download interval (in minutes). If set to 0, automatic download will be disabled. Valid range is 5 to 720. • XSI Authentication Type: o Login Credentials o SIP Credentials o Account 1/2/3/4/5/6 Select XSI Authentication Type. SIP User ID need to be configured if SIP account is selected. • Login Credentials o Login Username. Configure the Username for the BroadWorks XSI server. o Login Password. Configure the password for the BroadWorks XSI server. • SIP Credentials o SIP User Name. Configure SIP Username for the BroadWorks XSI server. o SIP User ID.](https://usermanual.wiki/Grandstream-Networks/GRP2612P/User-Guide-4183055-Page-47.png)
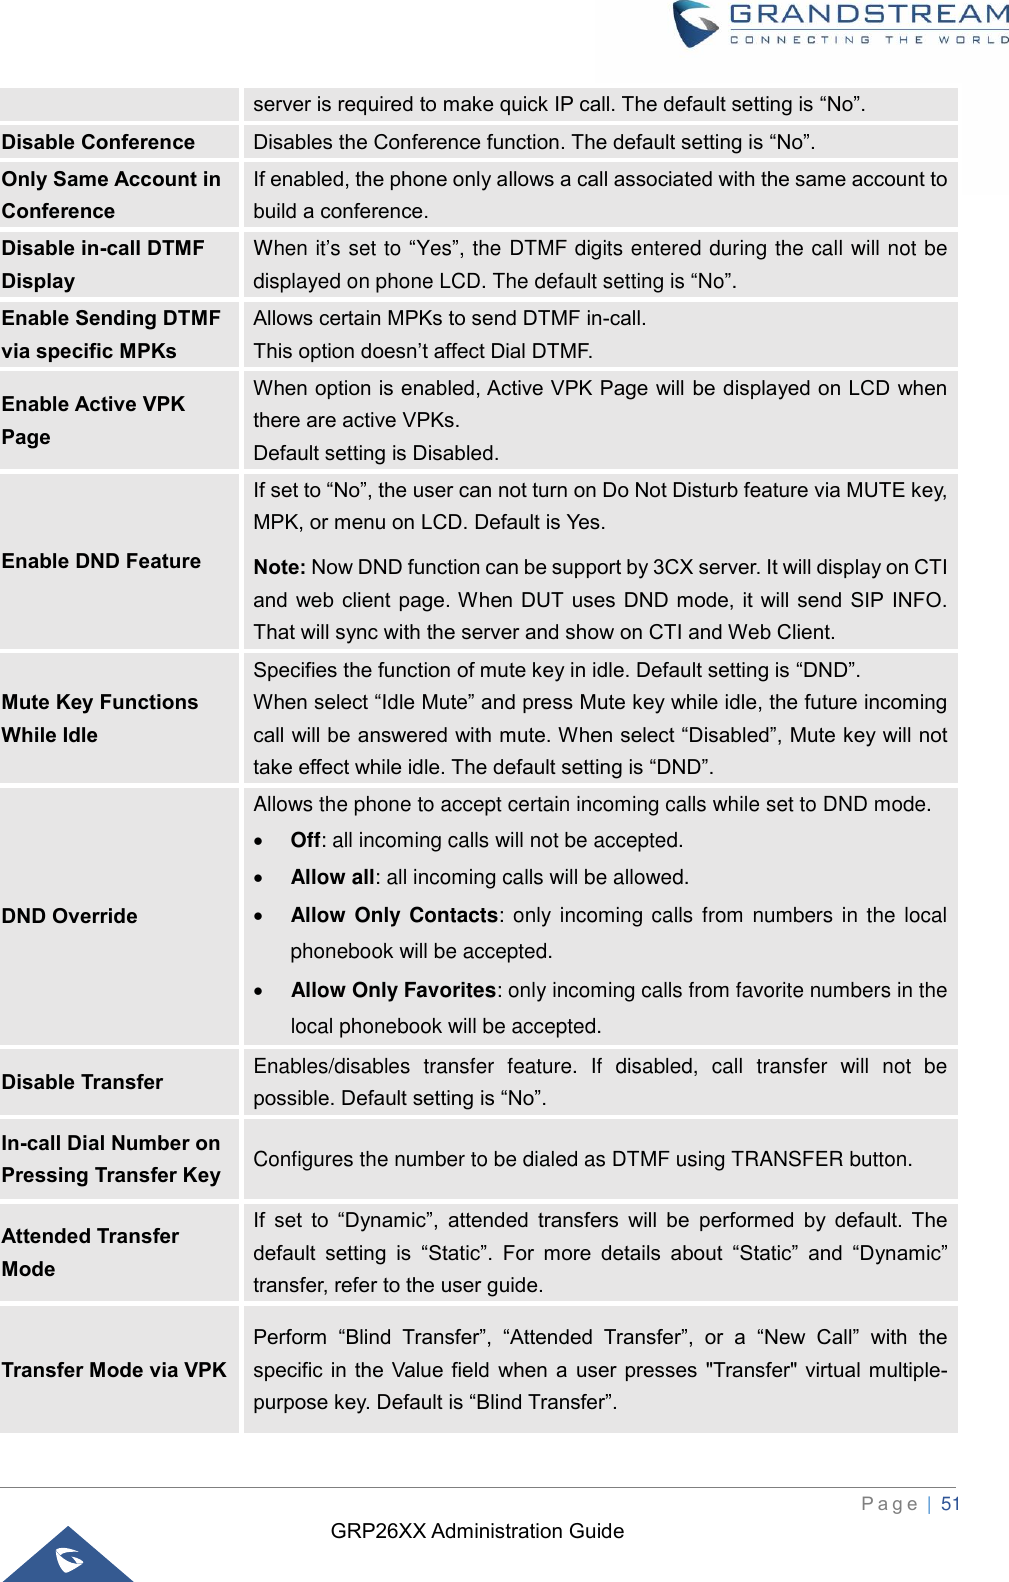
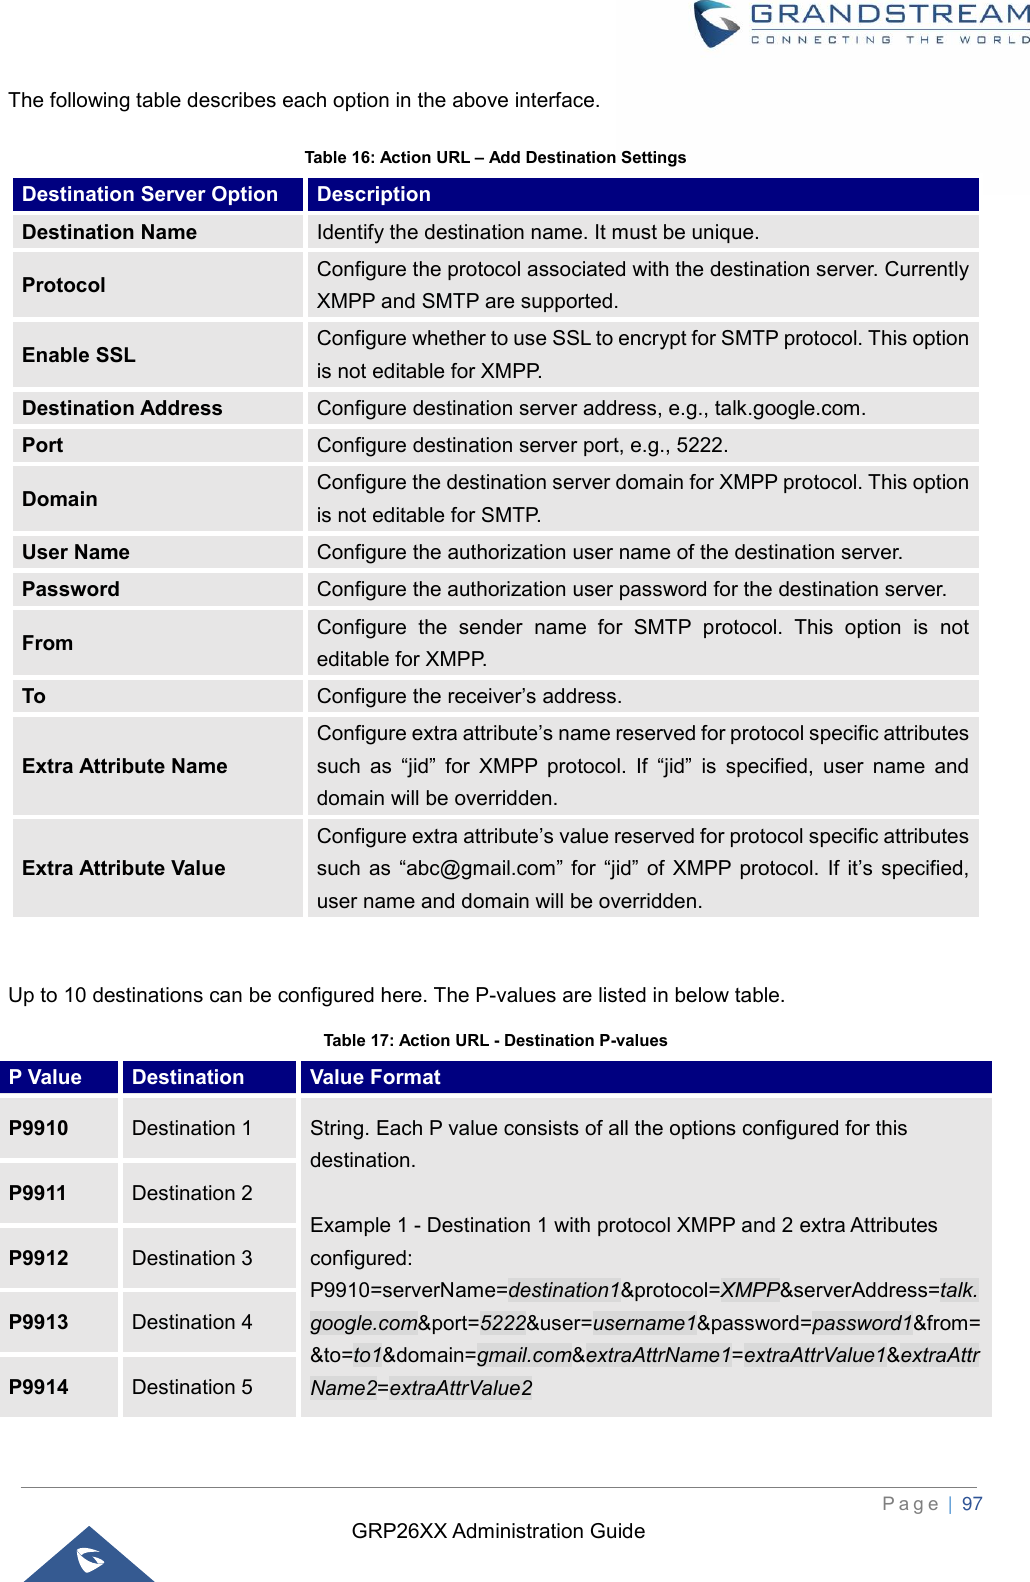
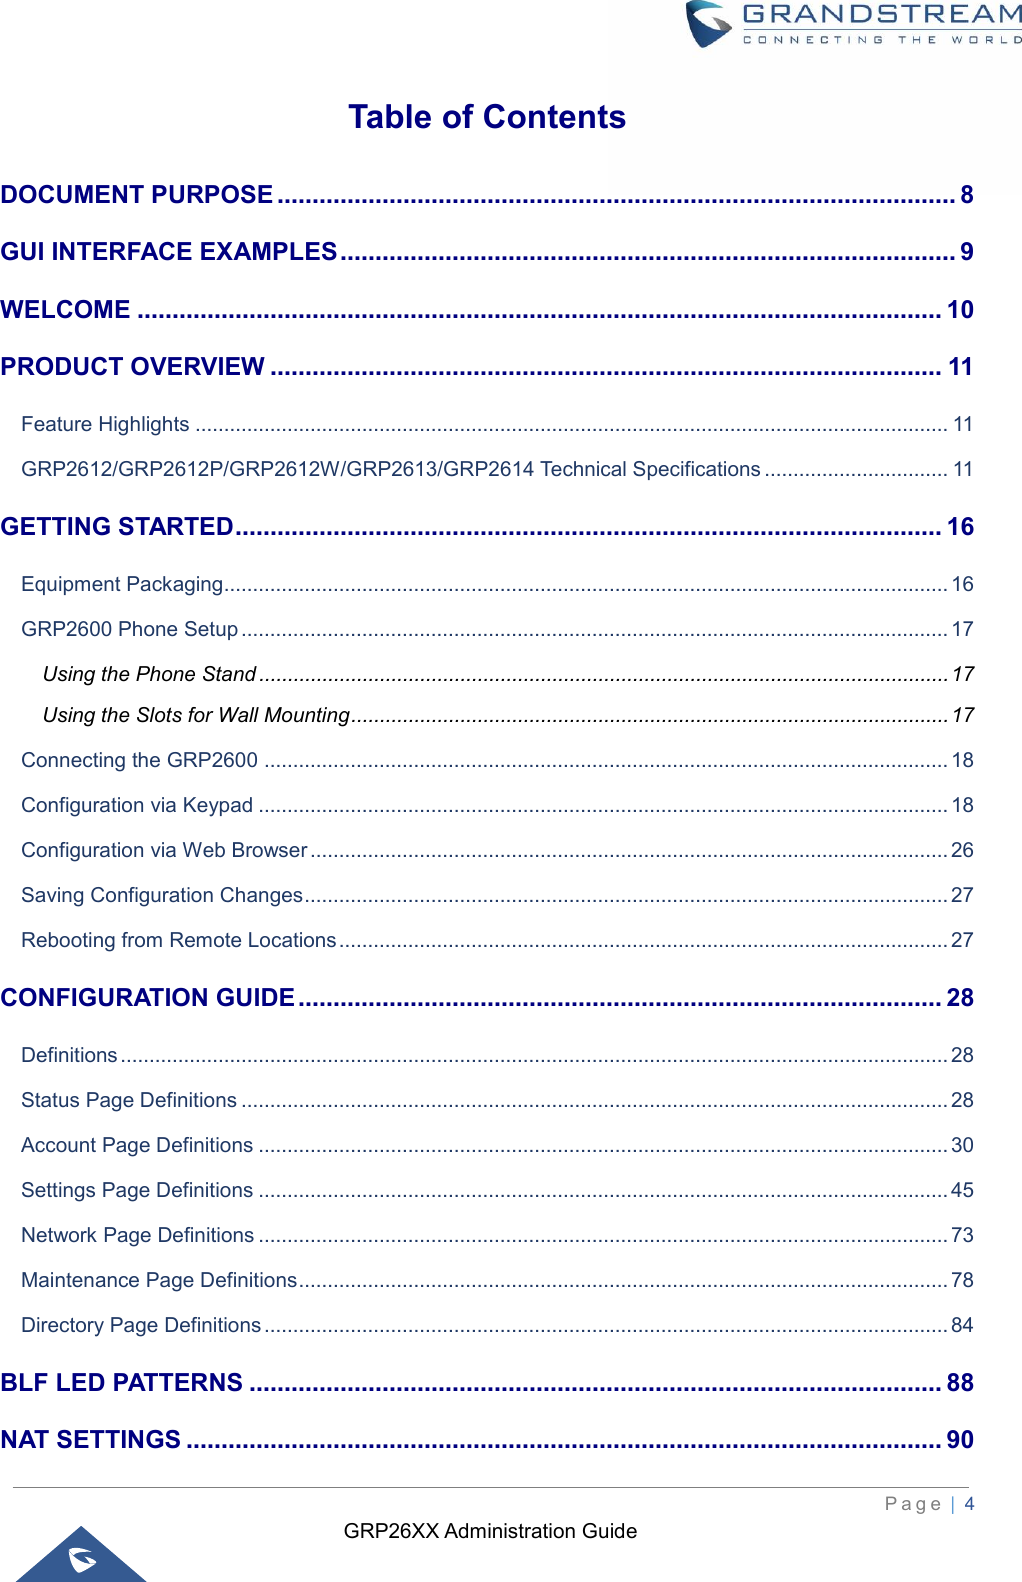
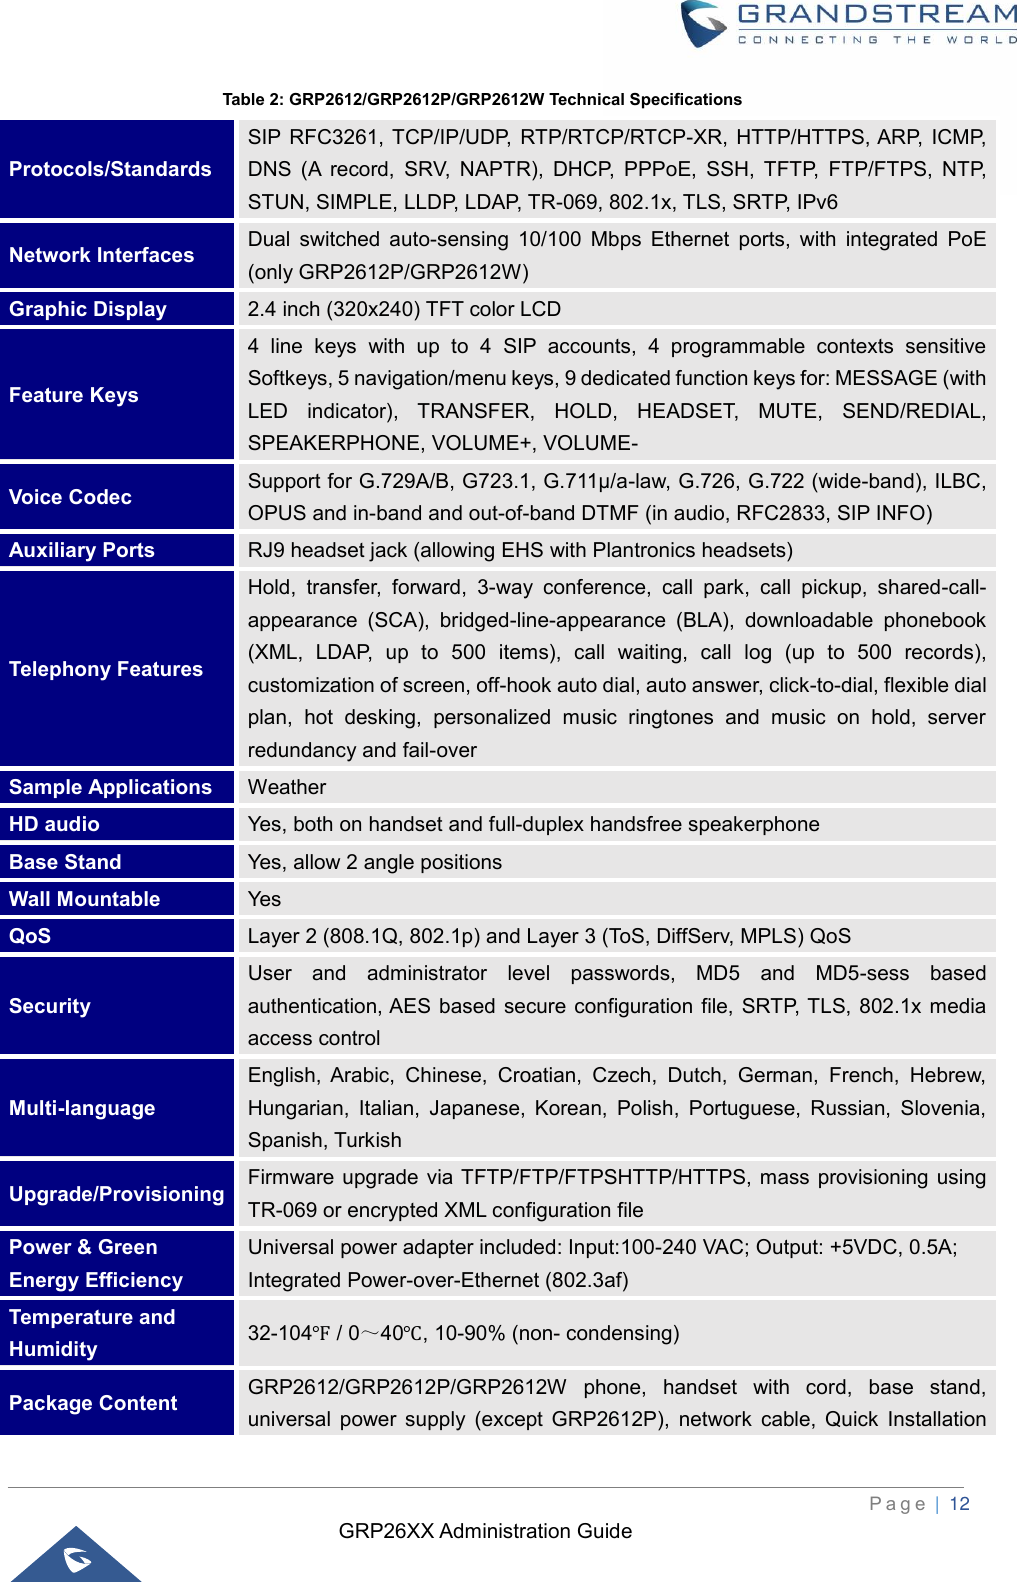
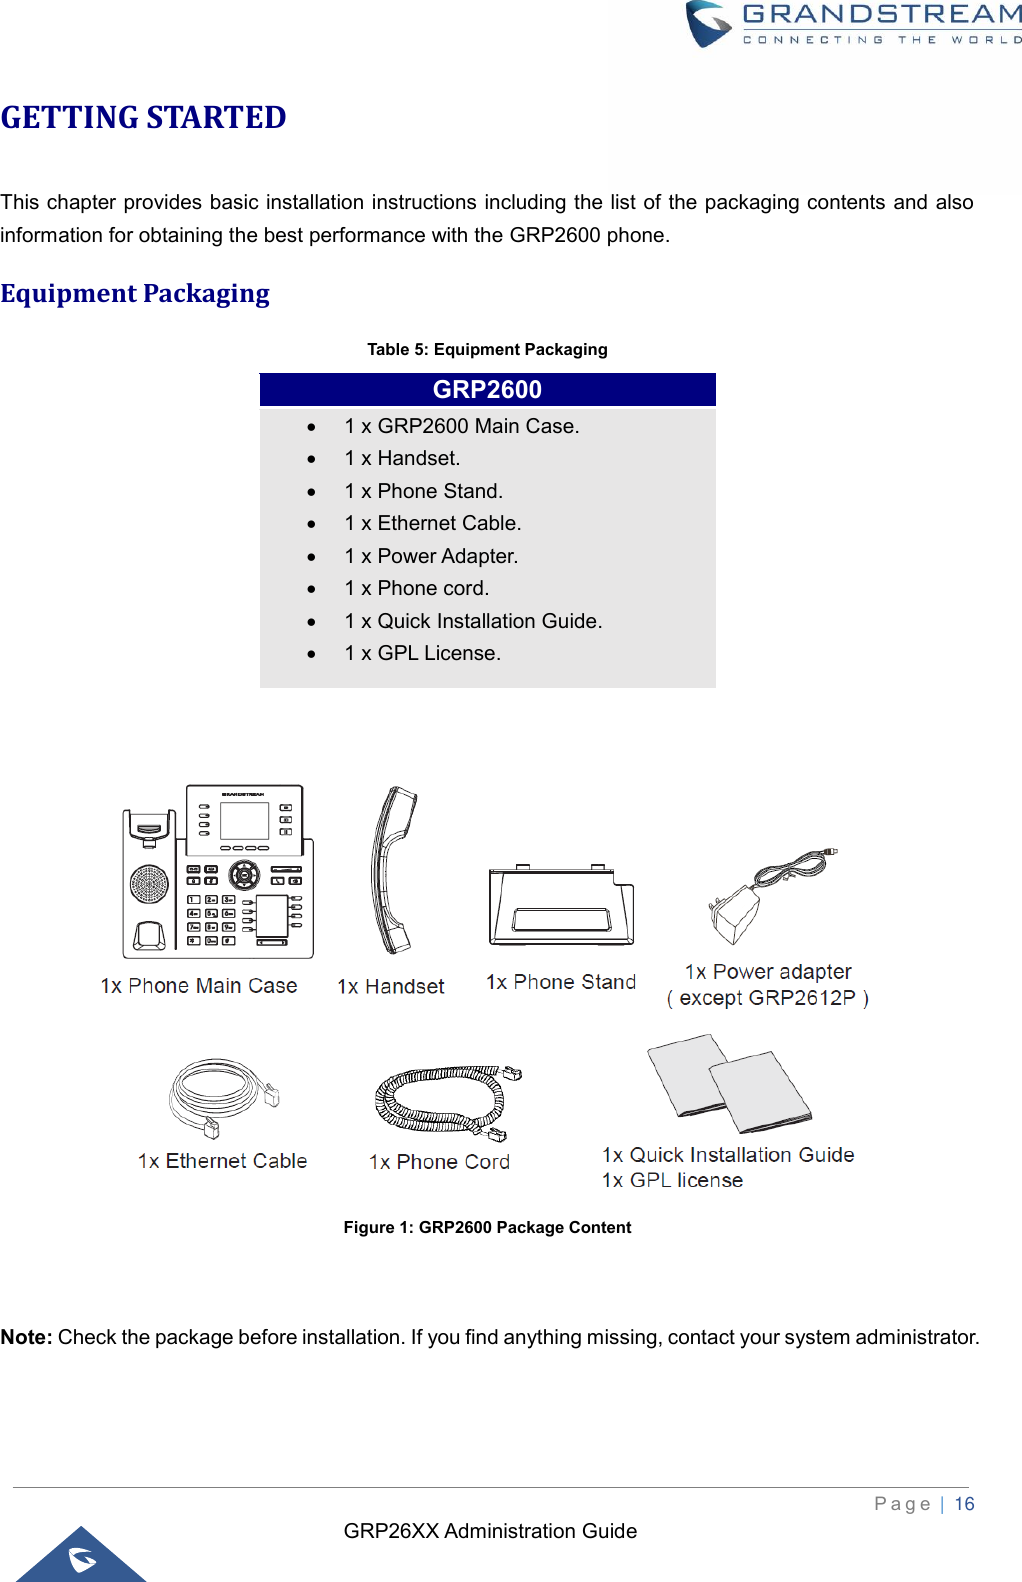
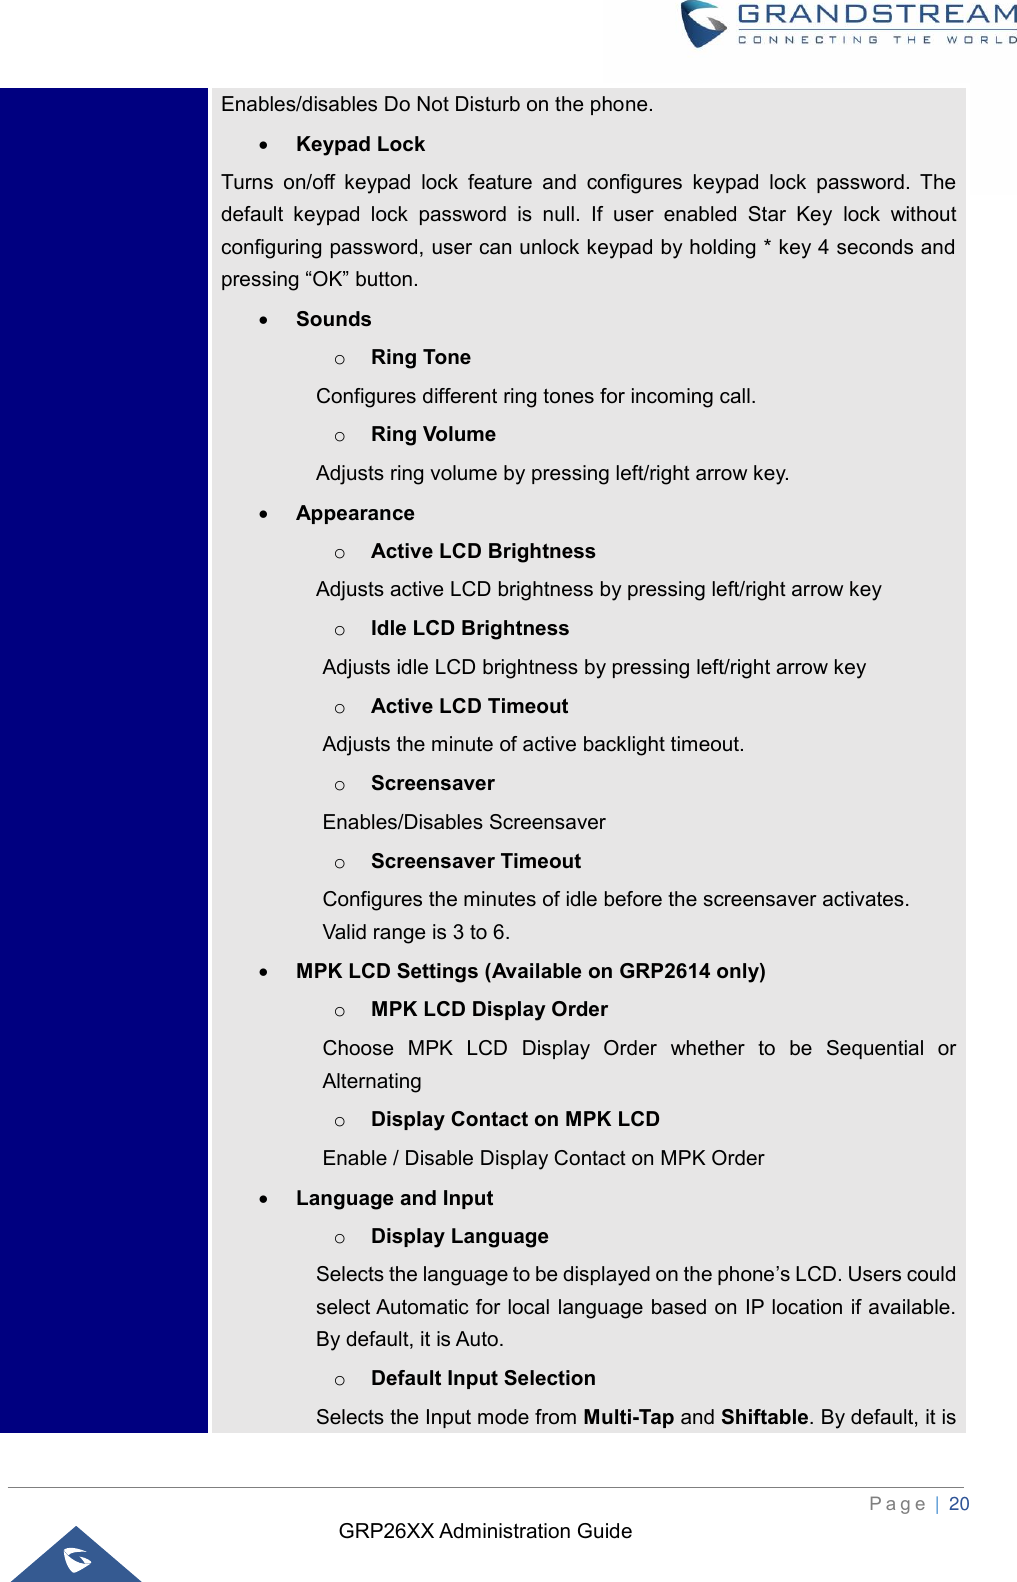
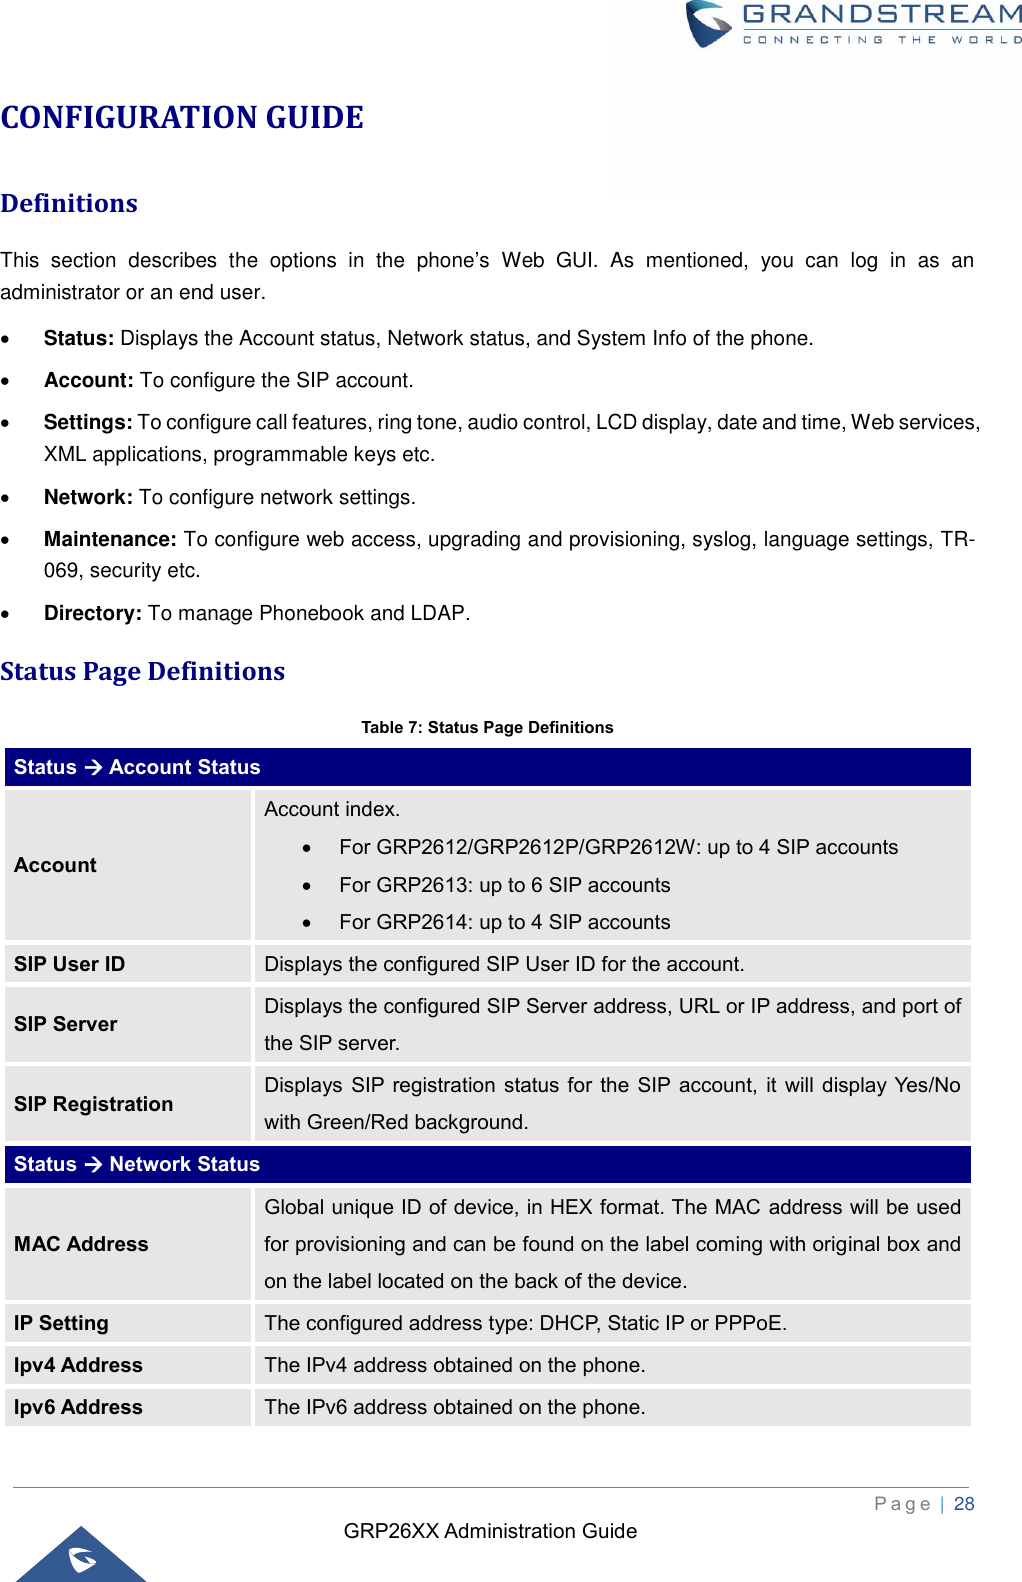
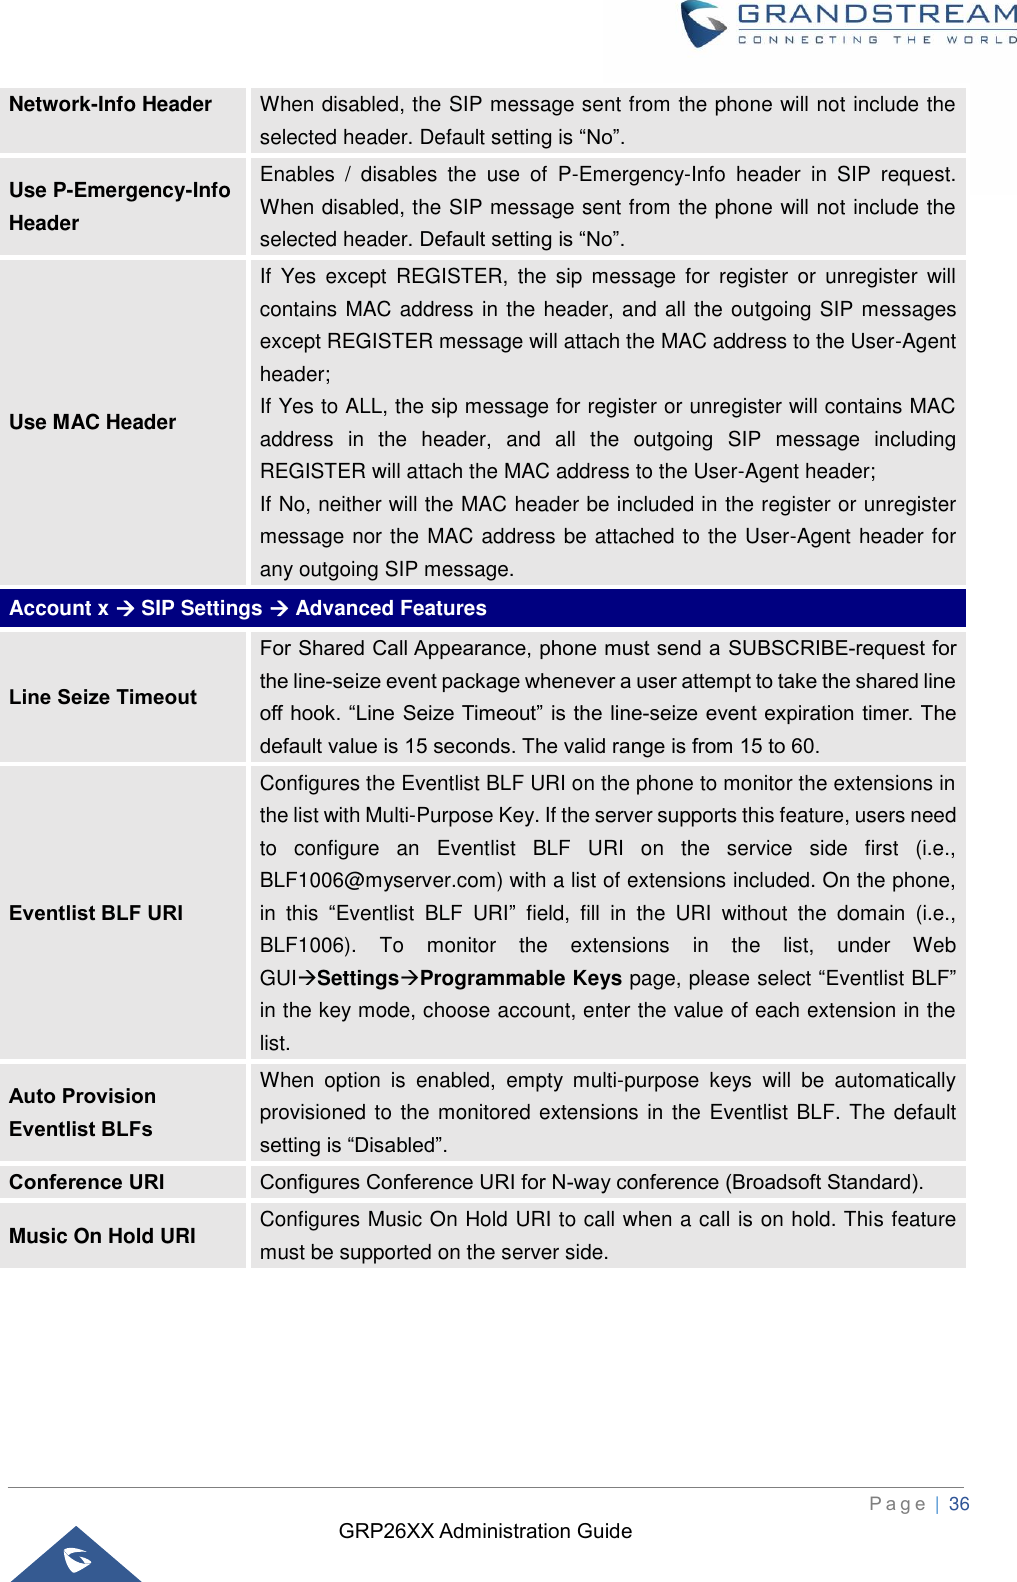
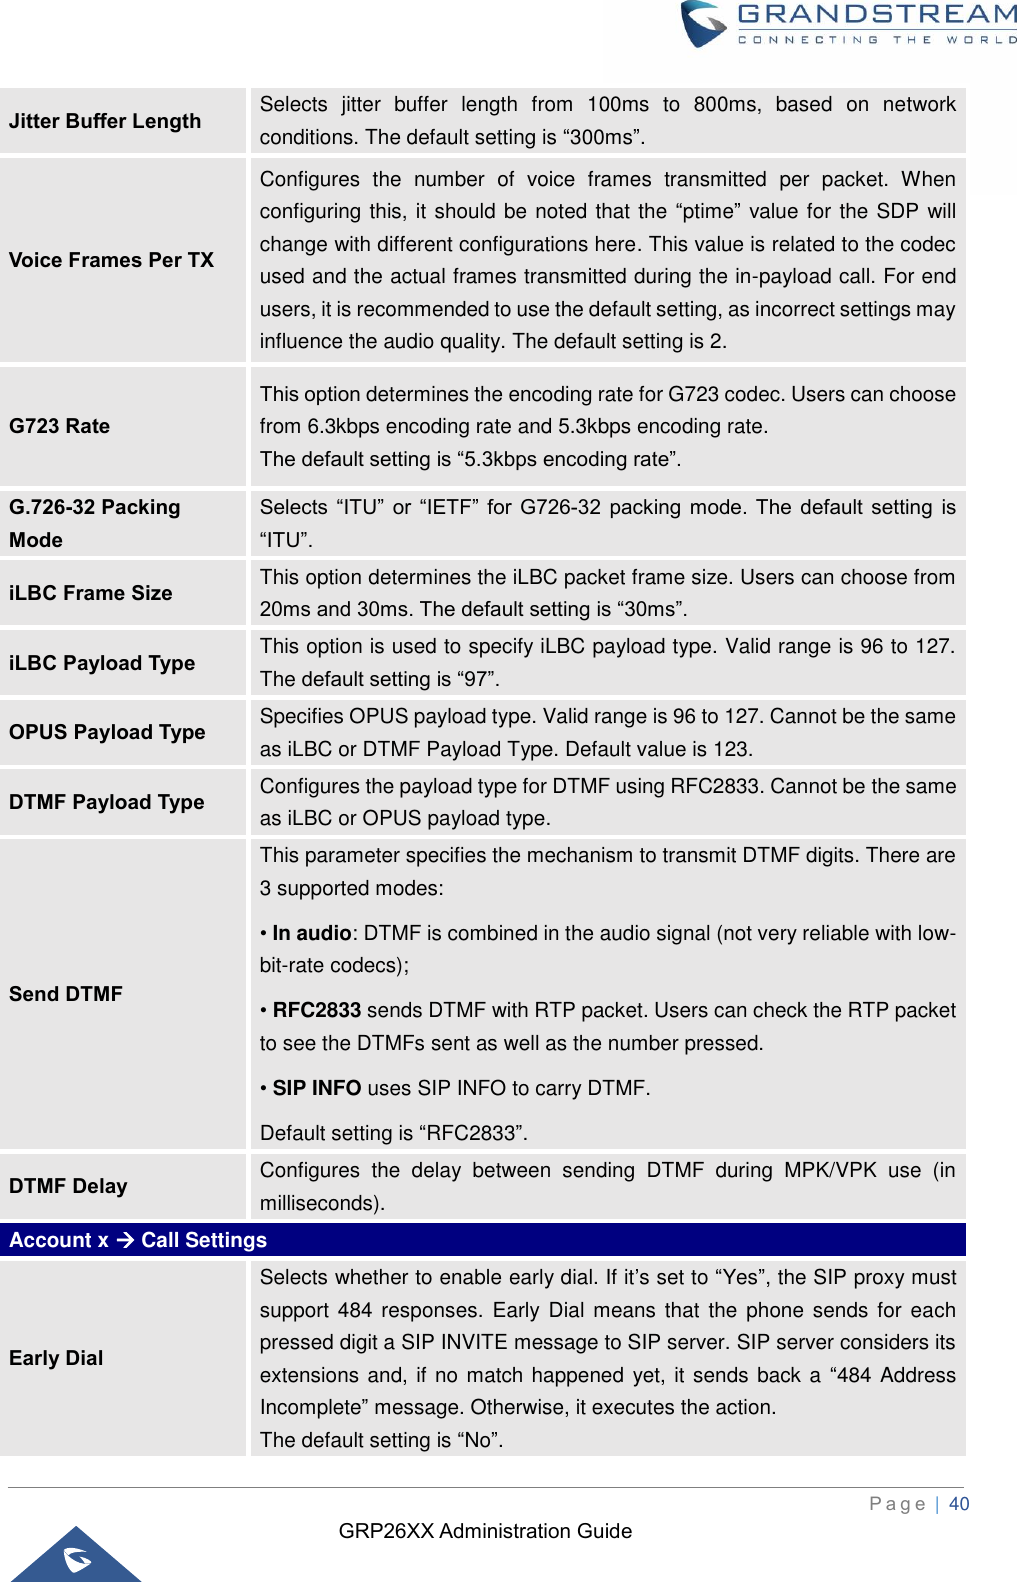
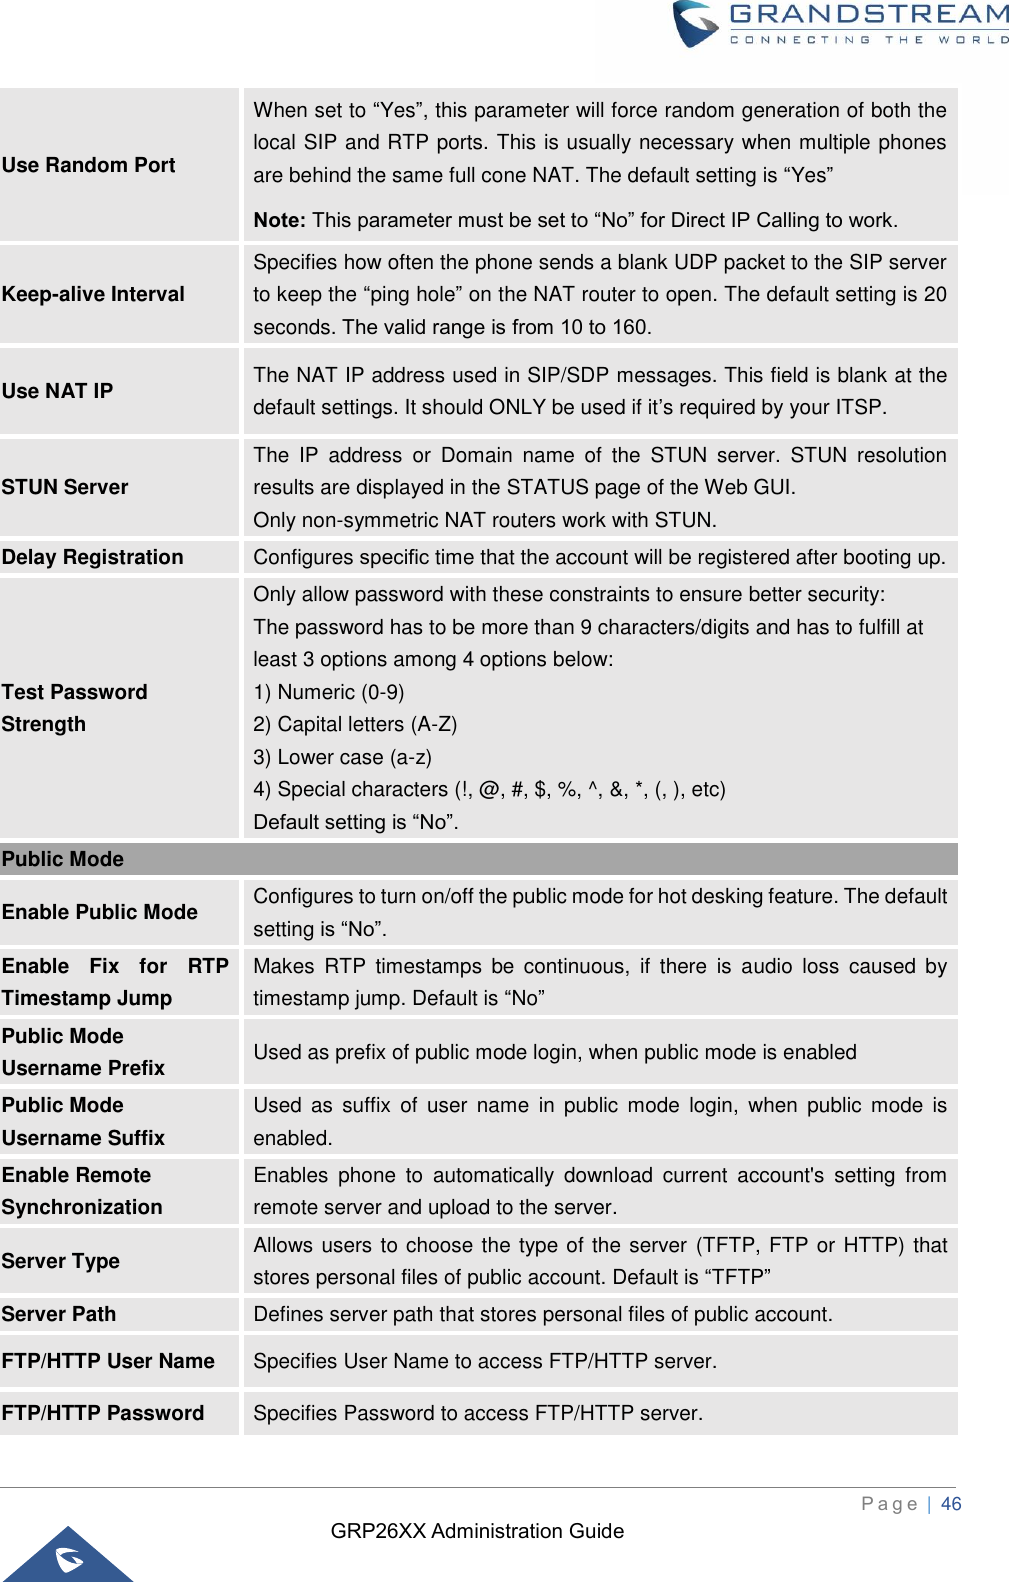
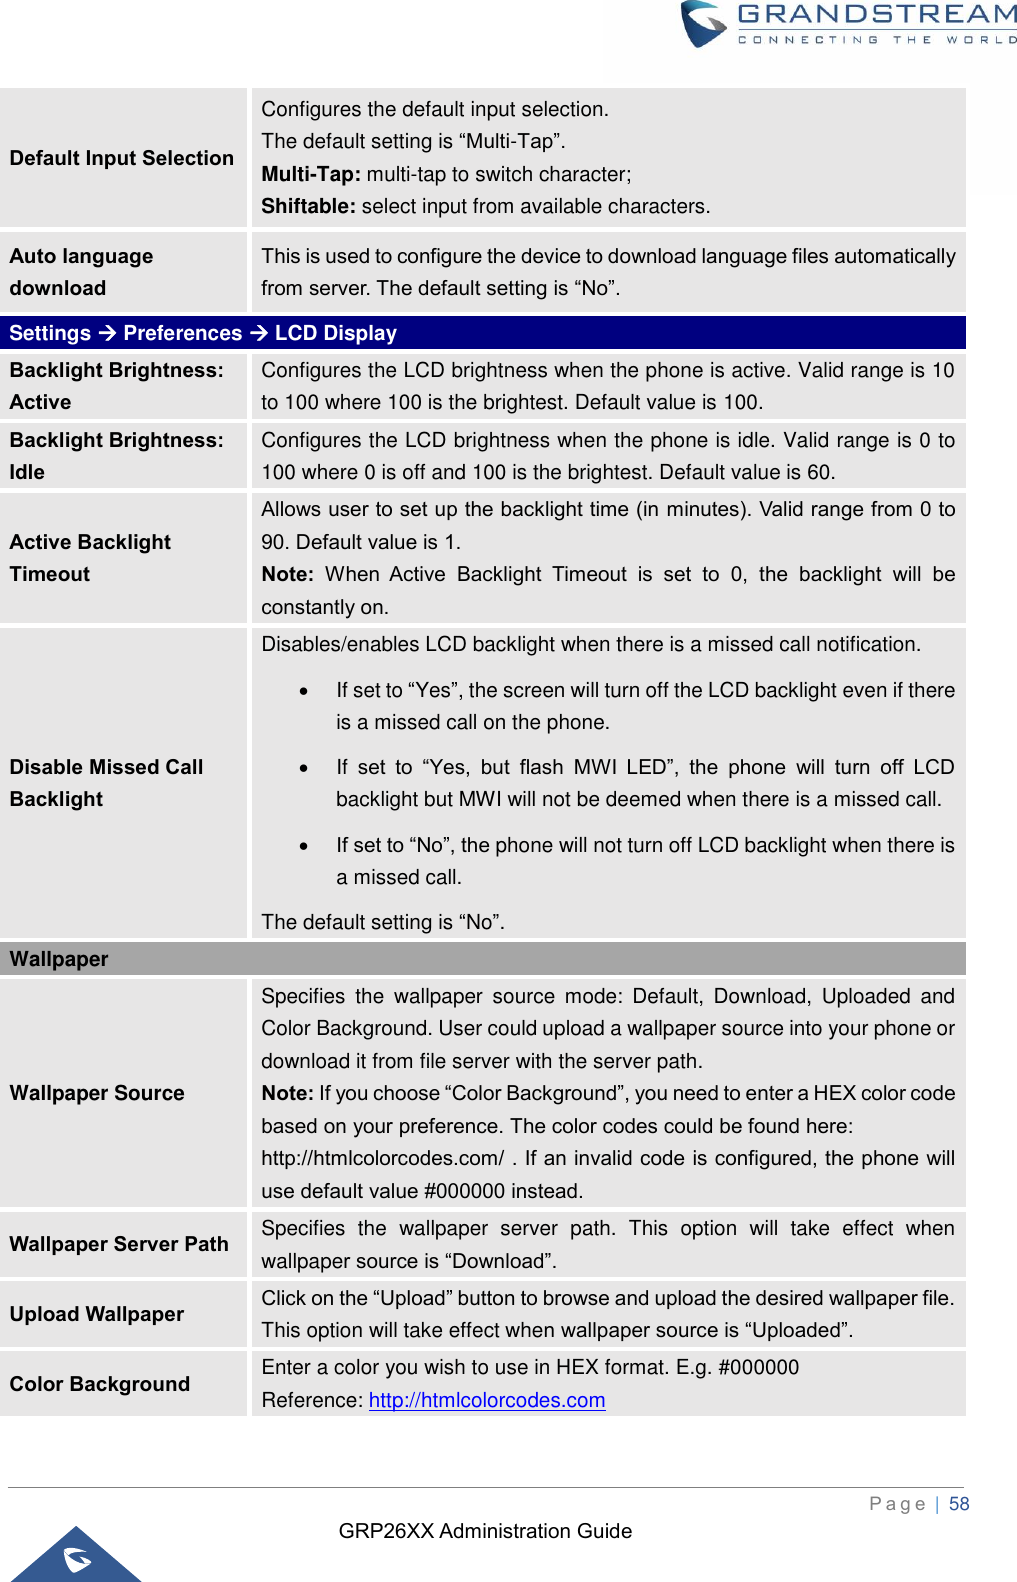
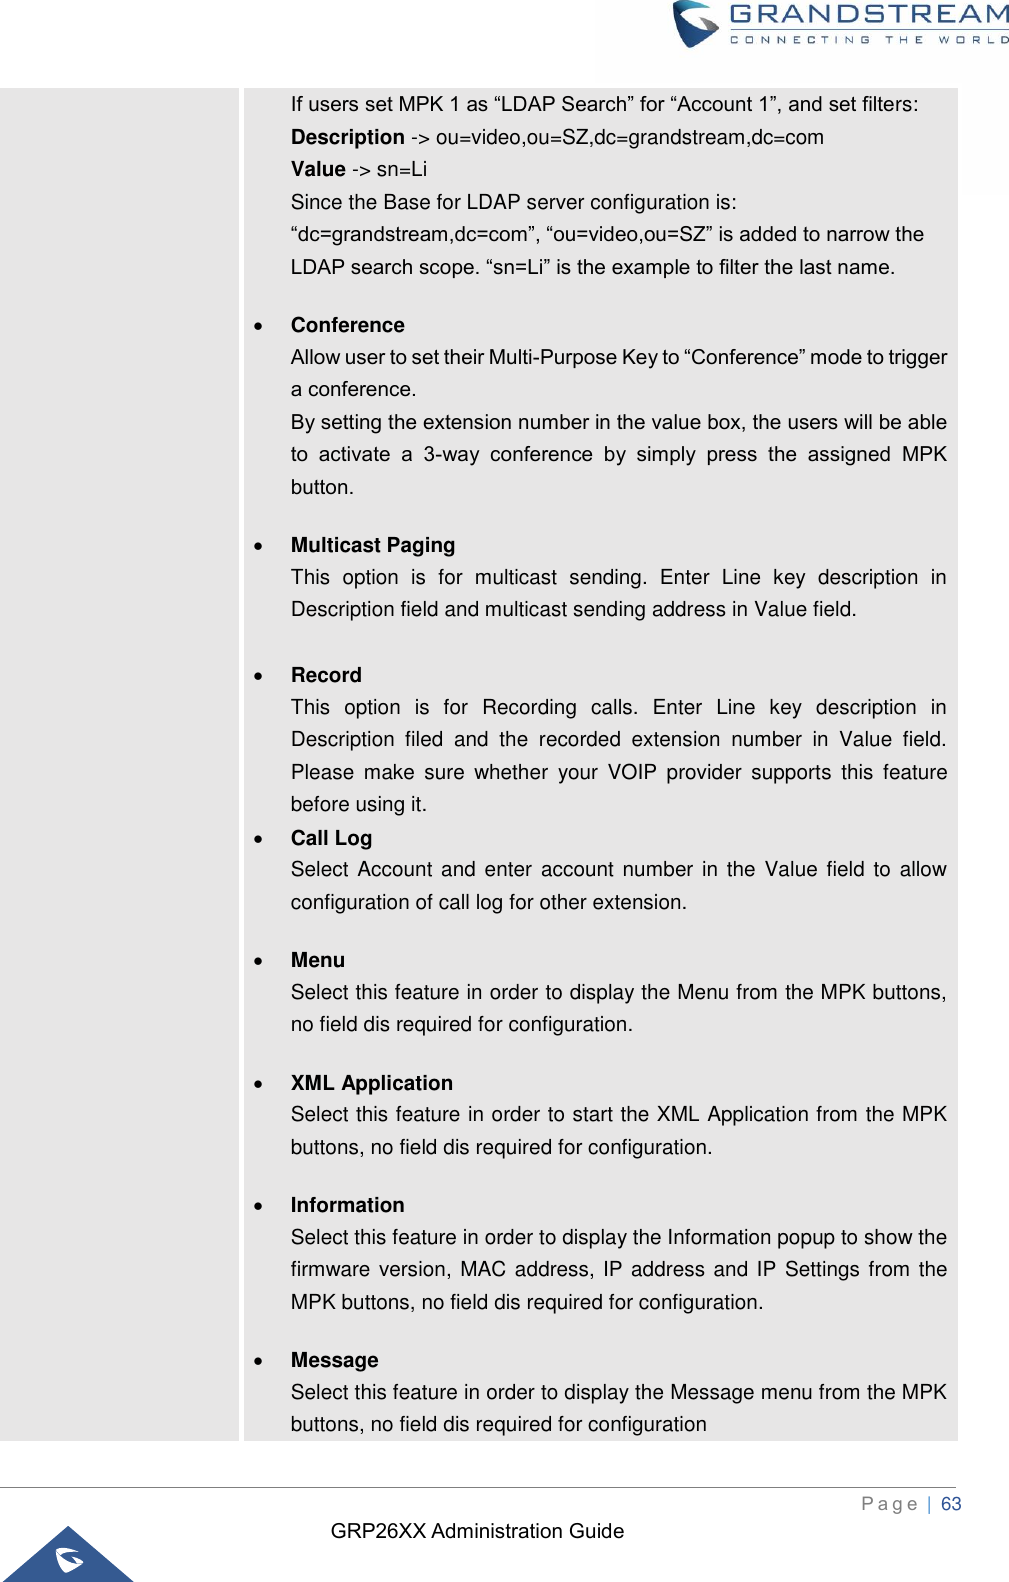
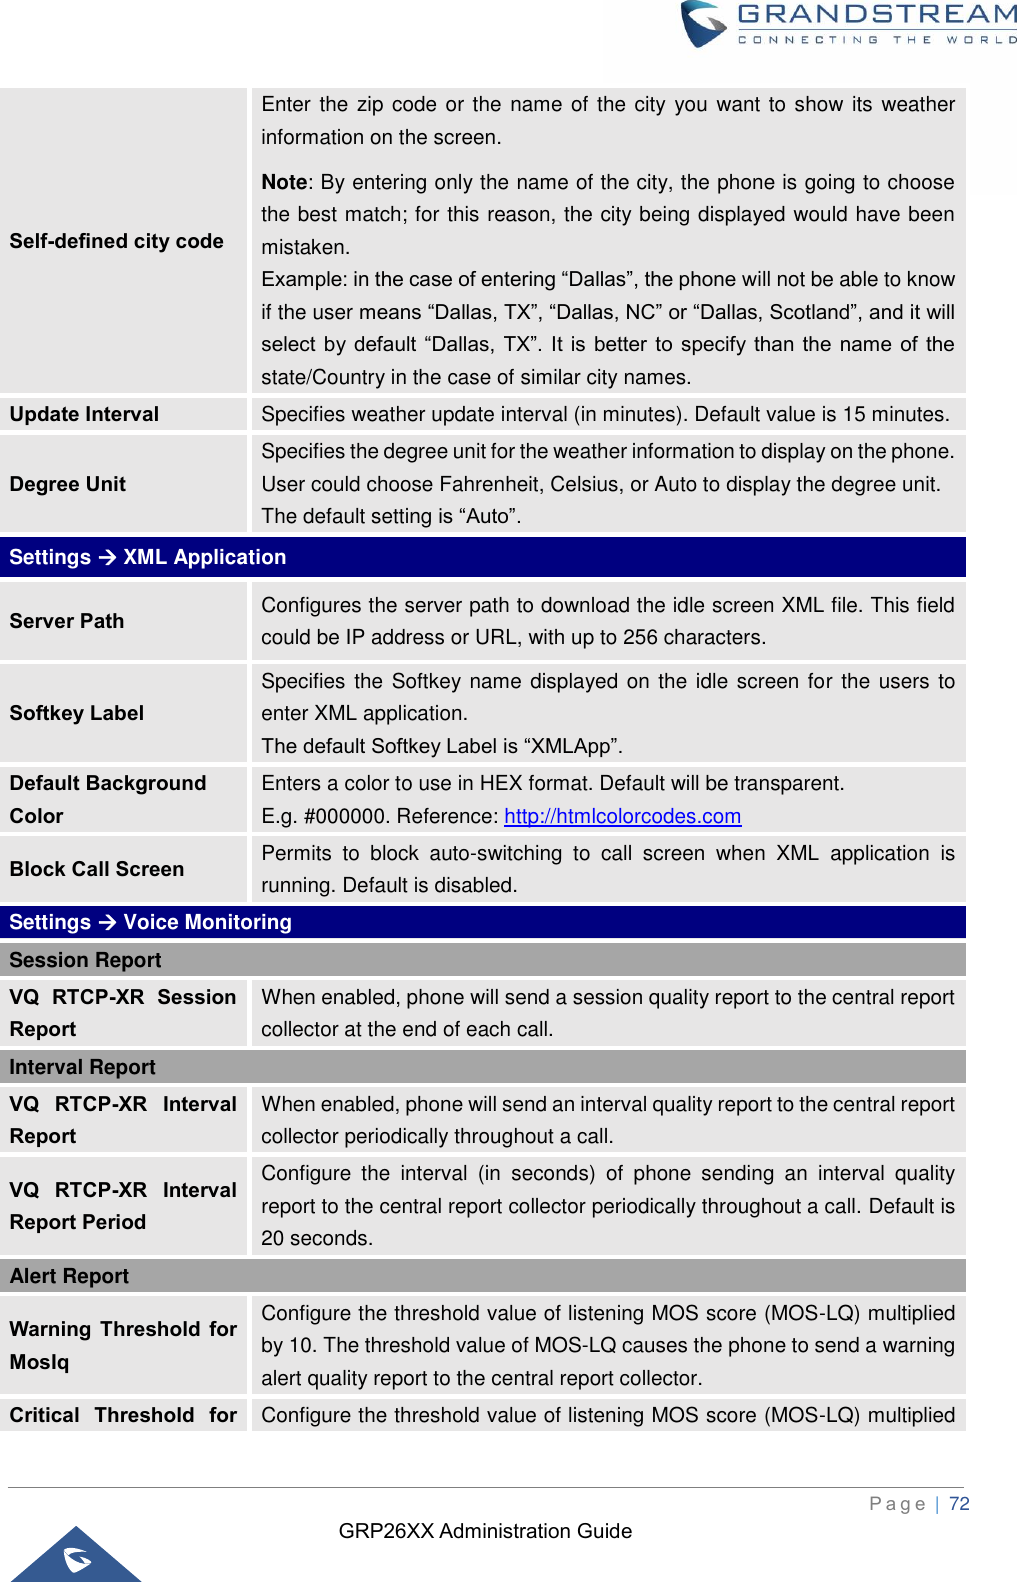
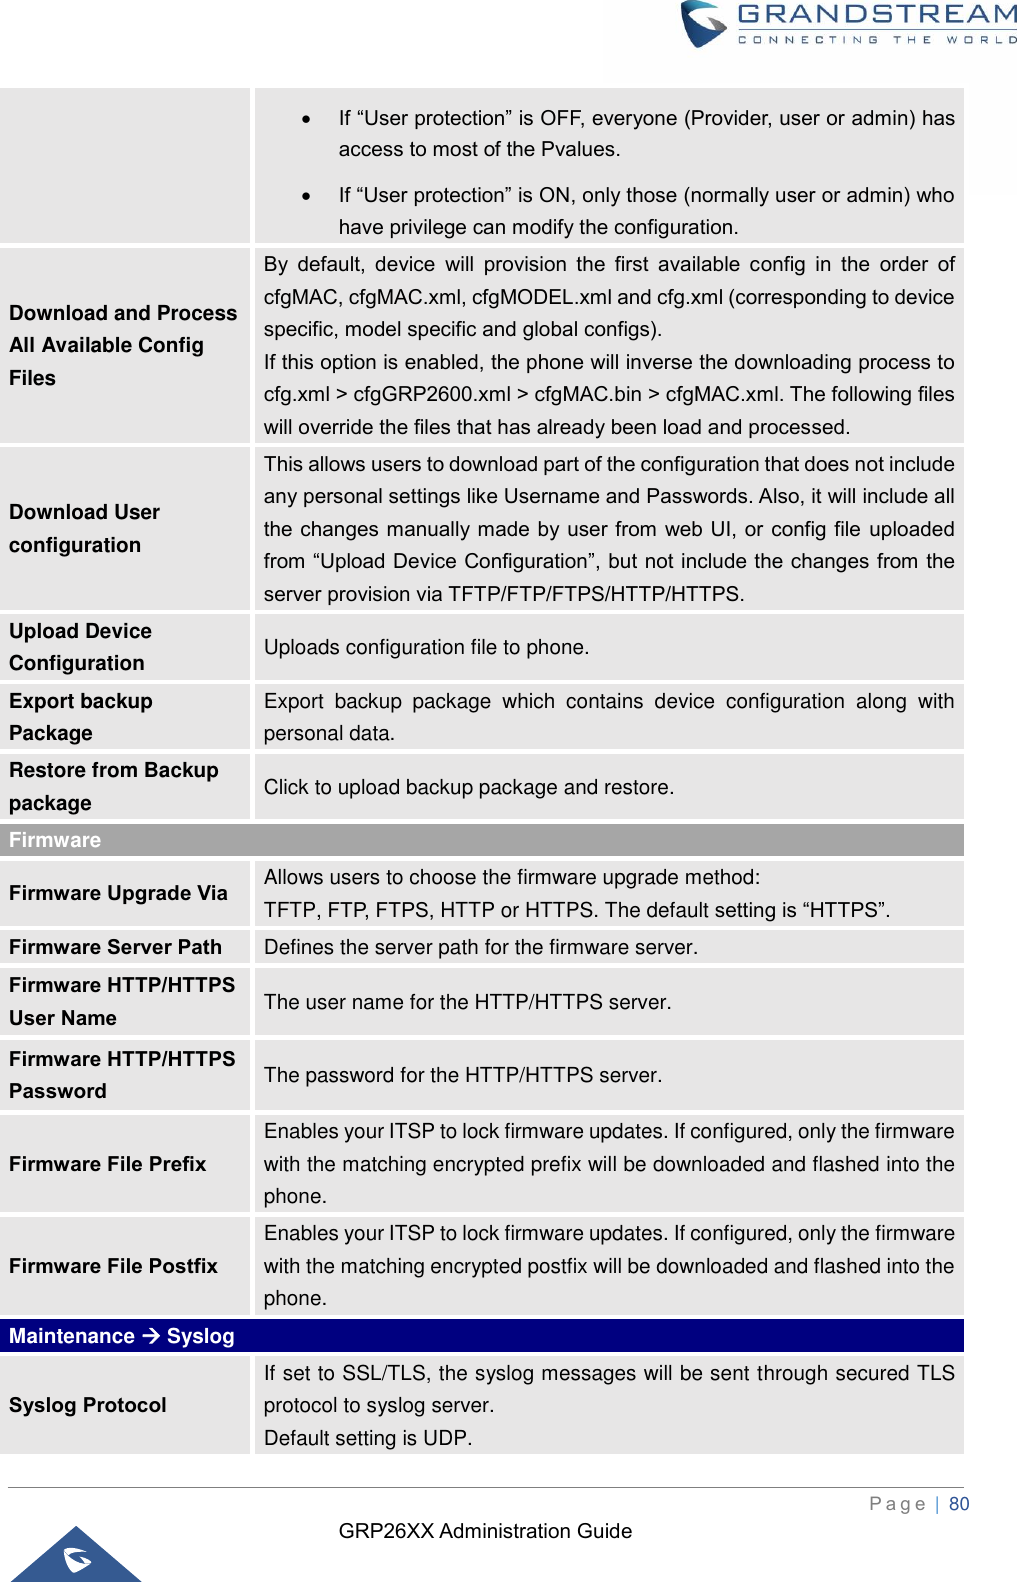
![GRP26XX Administration Guide P a g e | 54 Settings → Multicast Paging Allowed in DND Mode Allow Multicast Paging when DND mode is enabled. Default Setting is “No”. Paging Barge During active call, if incoming multicast page is higher priority (1 being the highest) than this value, the call will be held and multicast page will be played. The default setting is “Disabled”. Paging Priority Active If enabled, during a multicast page if another multicast is received with higher priority (1 being the highest) that one will be played instead. The default setting is “Disabled”. Multicast Paging Codec The codec for sending multicast pages, there are 5 codecs could be used: PCMU, PCMA, G.726-32, G.729A/B, G.722 (wide band). Default setting is “PCMU”. Multicast Channel Number Multicast Channel Number (0-50). 0 for normal RTP packets, 1-50 for Polycom multicast format packets. Multicast Sender ID Outgoing caller ID that displays to your page group recipients (for multicast channel 1 – 50). Multicast Listening Defines multicast listening addresses and labels. For example: • “Listening Address” should match the sender’s Value such as “237.11.10.11:6767” • “Label” could be the description you want to use. For details, please check the “Multicast Paging User Guide” on our Website. Settings → Outbound Notification Action URL For detailed instruction for this part, please refer to: [OUTBOUND NOTIFICATION SUPPORT] Section in this Administration Guide. • Setup Completed • Registered • Unregistered • Register Failed • Off Hook • On Hook • Incoming Call • Outgoing Call • Missed Call • Answered Call • Rejected Call • Forwarded Call • Established Call](https://usermanual.wiki/Grandstream-Networks/GRP2612P/User-Guide-4183055-Page-54.png)
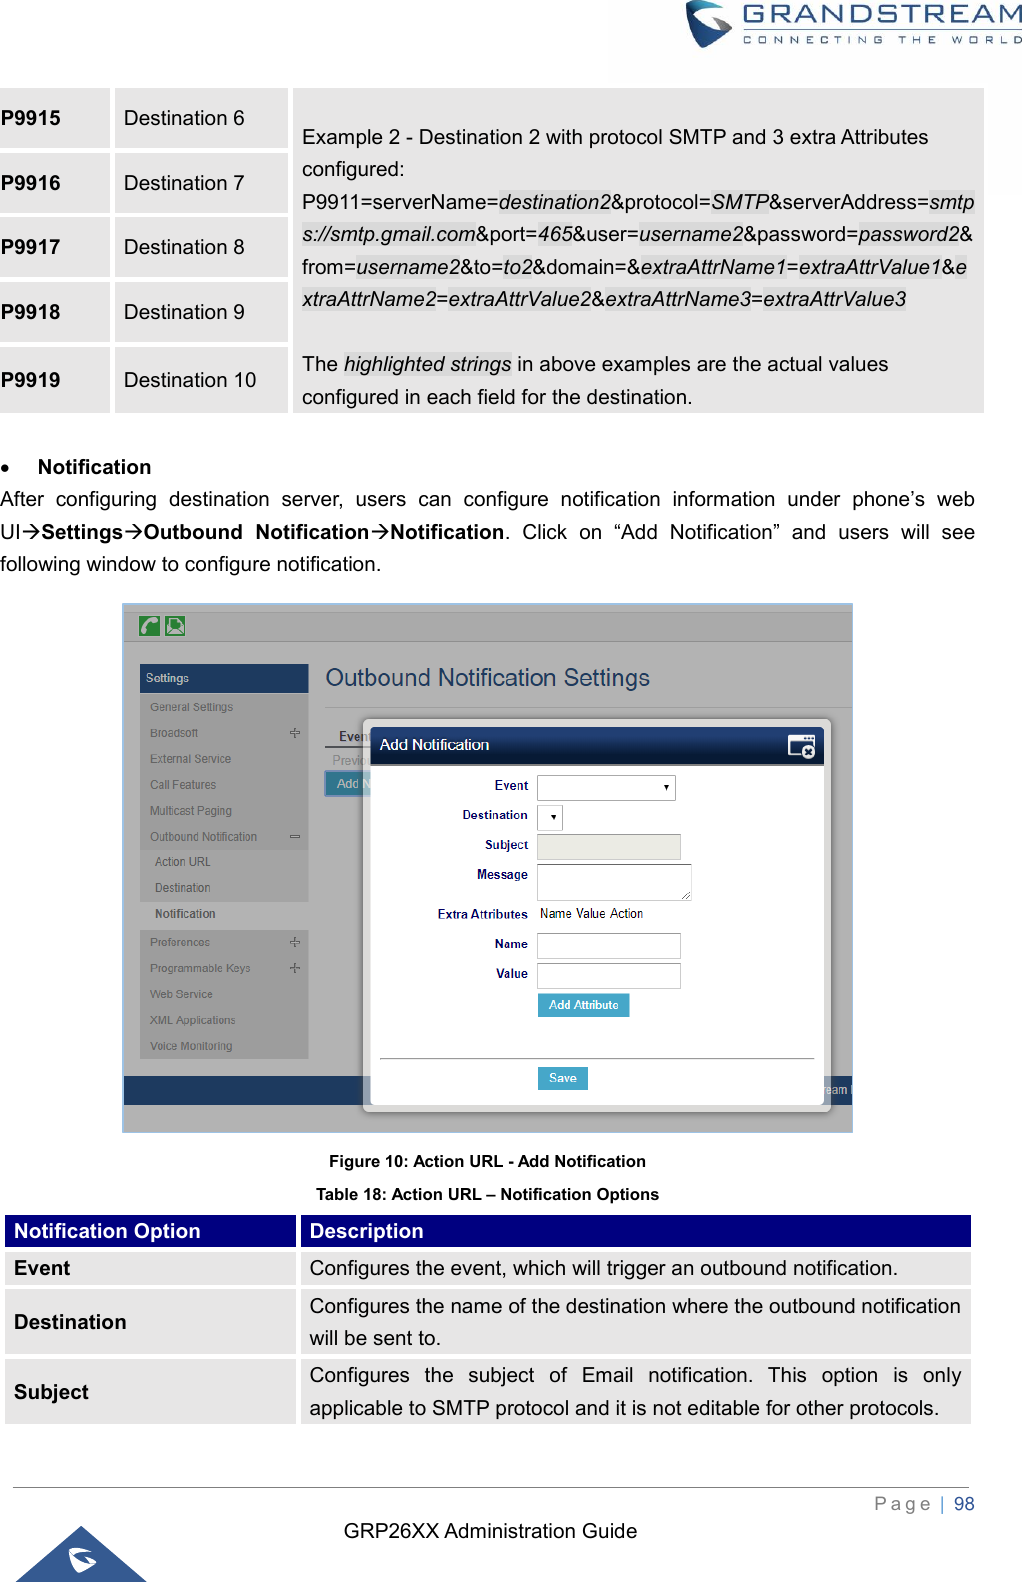
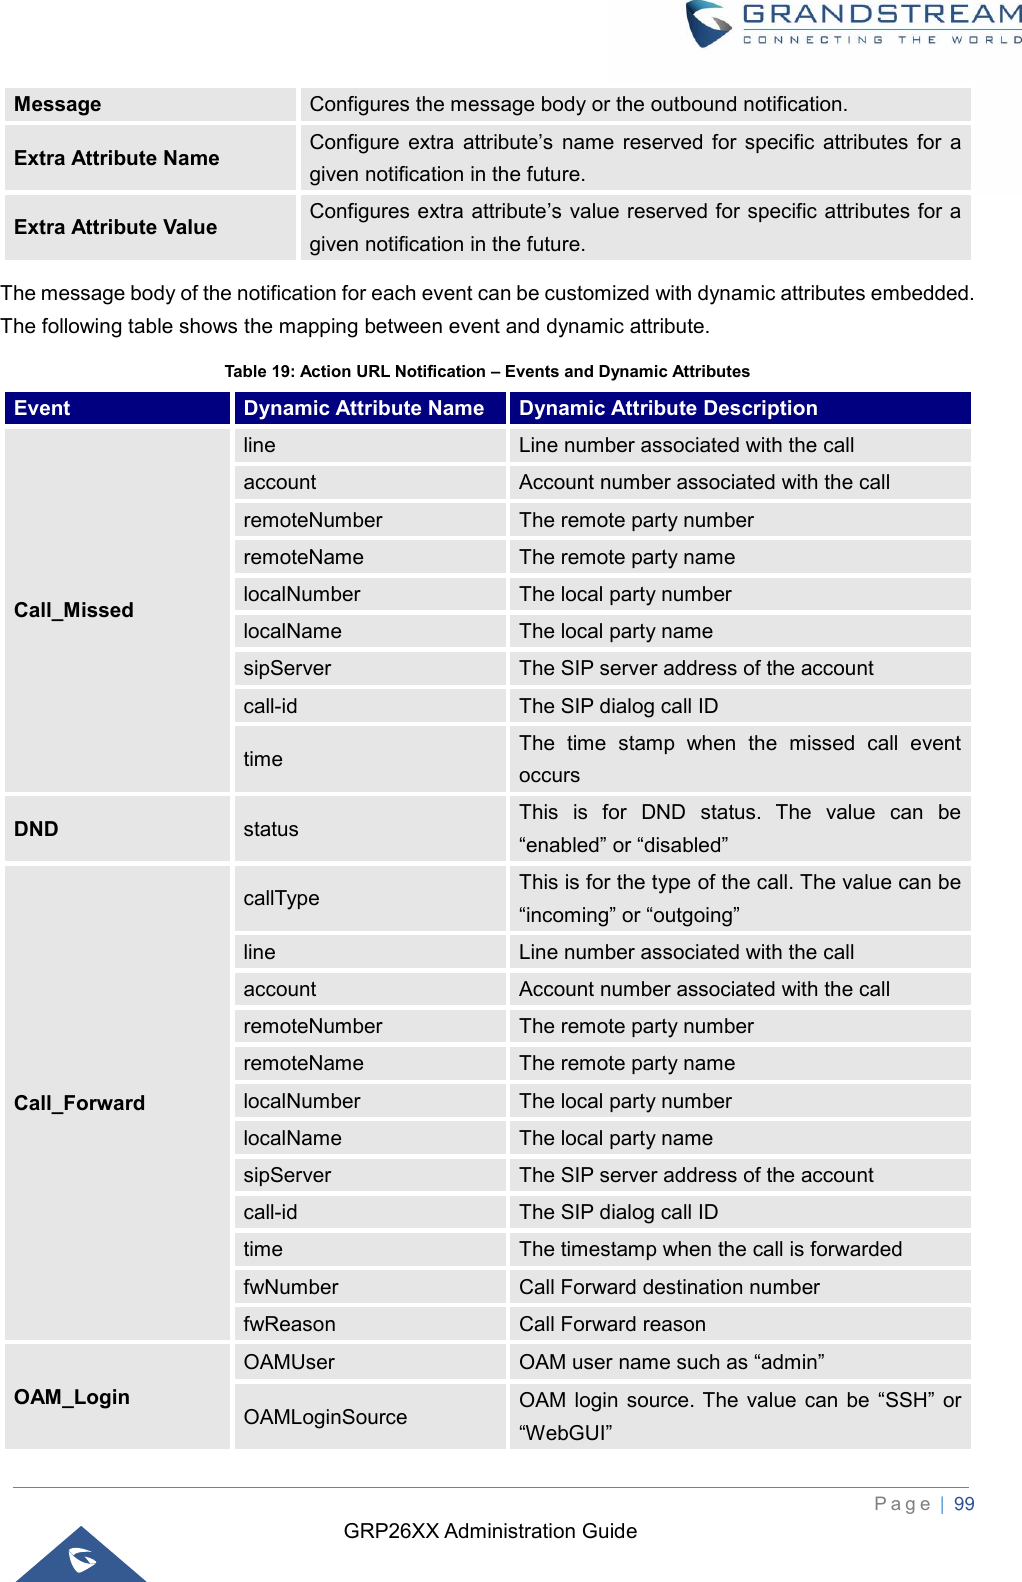
![GRP26XX Administration Guide P a g e | 55 • Terminated Call • Idle to Busy • Busy to Idle • Open DND • Close DND • Open Forward • Close Forward • Open Unconditional Forward • Close Unconditional Forward • Open Busy Forward • Close Busy Forward • Open No Answer Forward • Close No Answer Forward • Blind Transfer • Attended Transfer • Transfer Finished • Transfer Failed • Hold Call • UnHold Call • Mute Call • IP Change • Auto-Provision Finish Destination Up to 10 destinations can be configured here. For detailed instruction for this part, please refer to: [OUTBOUND NOTIFICATION SUPPORT] Section in this Administration Guide. Notification Specifies the message body of the notification for each event that can be customized with embedded dynamic attributes. For more details, refer to [OUTBOUND NOTIFICATION SUPPORT] section in this Administration Guide. Settings → Preferences → Audio Control Headset Key Mode When headset is connected to the phone, users could use the HEADSET button in “Default Mode” or “Toggle Headset/Speaker”. 1. Default Mode: ➢ When the phone is in idle, press HEADSET button to off hook the phone and make calls by using headset. Headset icon will display on the screen in dialing/talking status. ➢ When there is an incoming call, press HEADSET button to pick up the call using headset. ➢ When there is an active call using headset, press HEADSET button](https://usermanual.wiki/Grandstream-Networks/GRP2612P/User-Guide-4183055-Page-55.png)
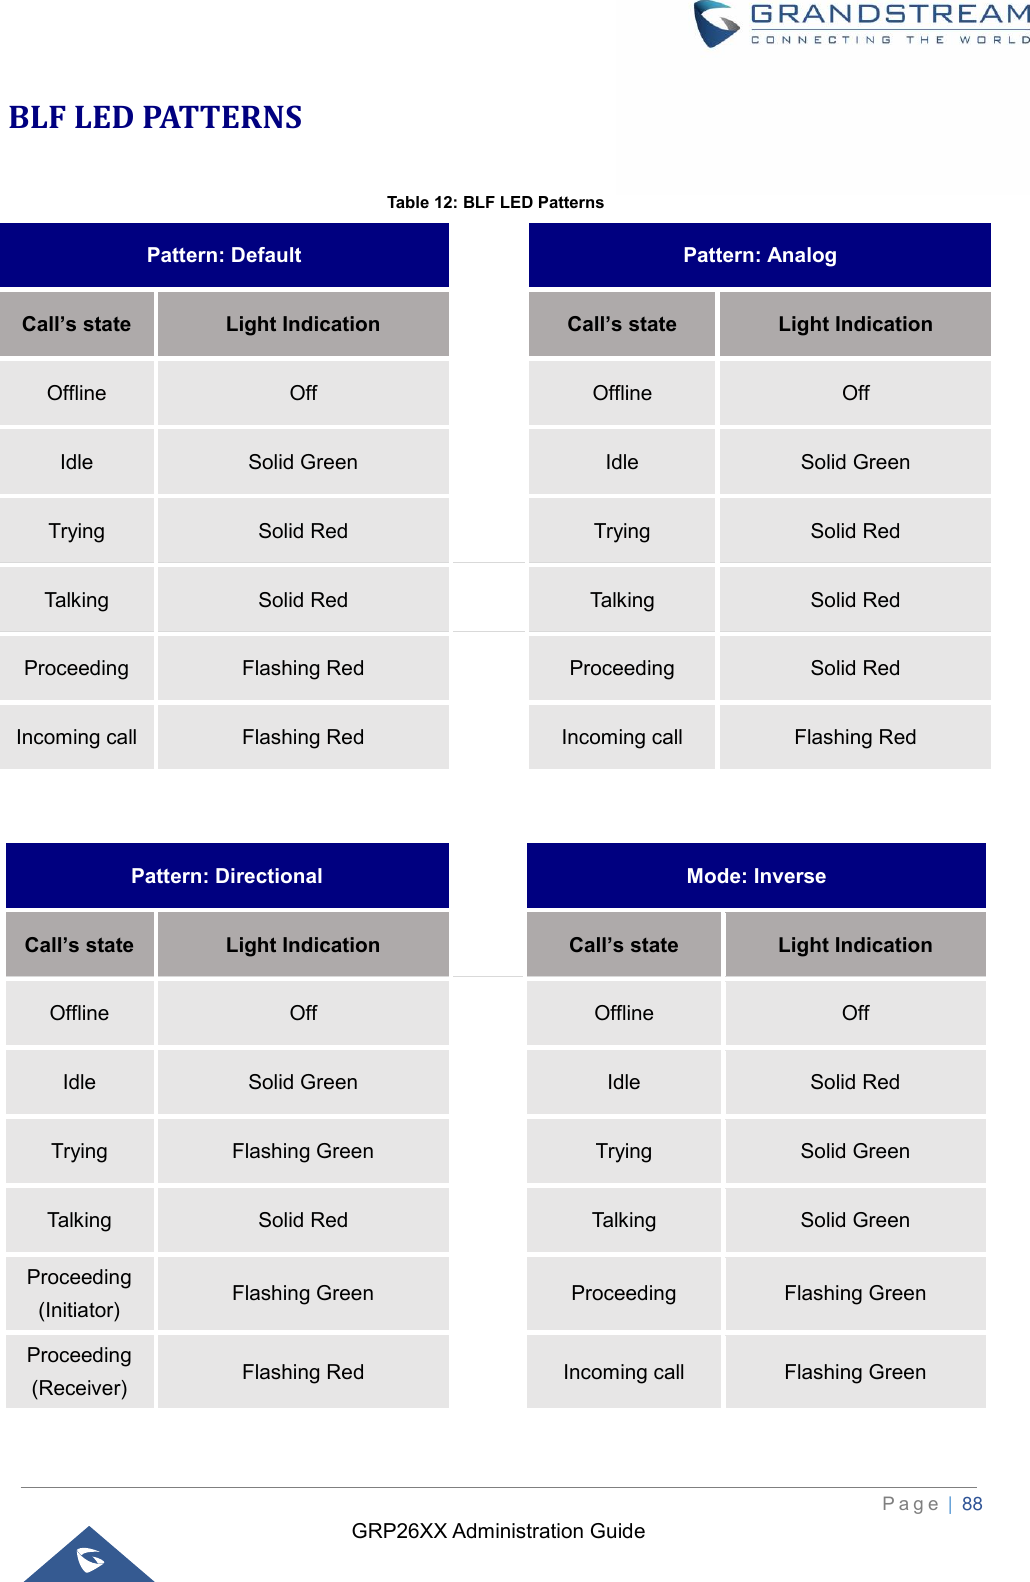
![GRP26XX Administration Guide P a g e | 57 The default setting is “1440” minutes. Allow DHCP Option 42 Override NTP Server Defines whether DHCP Option 42 should override NTP server or not. When enabled, DHCP Option 42 will override the NTP server if it’s set up on the LAN. The default setting is “Yes”. Time Zone Configures the date/time used on the phone according to the specified time zone. Self-Defined Time Zone This parameter allows the users to define their own time zone. The syntax is: std offset dst [offset], start [/time], end [/time] Default is set to: MTZ+6MDT+5,M4.1.0,M11.1.0 MTZ+6MDT+5 This indicates a time zone with 6 hours offset with 1 hour ahead (when daylight saving) which is U.S central time. If it is positive (+) if the local time zone is west of the Prime Meridian (A.K.A: International or Greenwich Meridian) and negative (-) if it is east. M4.1.0,M11.1.0 The 1st number indicates Month: 1,2,3.., 12 (for Jan, Feb, .., Dec) The 2nd number indicates the nth iteration of the weekday: (1st Sunday, 3rd Tuesday…) The 3rd number indicates weekday: 0,1,2,..,6( for Sun, Mon, Tues, … ,Sat) Therefore, this example is the DST which starts from the First Sunday of April to the 1st Sunday of November. Date Display Format Configures the date display format on the LCD. The following formats are supported. The default setting is yyyy-mm-dd: • yyyy-mm-dd: 2012-07-02 • mm-dd-yyyy: 07-02-2012 • dd-mm-yyyy: 02-07-2012 • dddd, MMMM dd: Friday, October 12 • MMMM dd, dddd: October 12, Friday Time Display Format Configures the time display in 12-hour or 24-hour format on the LCD. The default setting is in 12-hour format. Show Date on Status Bar Allows users to display time and date on the top panel of the LCD screen. Default setting is Disabled. Settings → Preferences → Language Display Language Selects display language on the phone. There are 21 languages can be set as display language, user could also choose “Auto” or “Downloaded Language” as display language. The default setting is “Auto”.](https://usermanual.wiki/Grandstream-Networks/GRP2612P/User-Guide-4183055-Page-57.png)
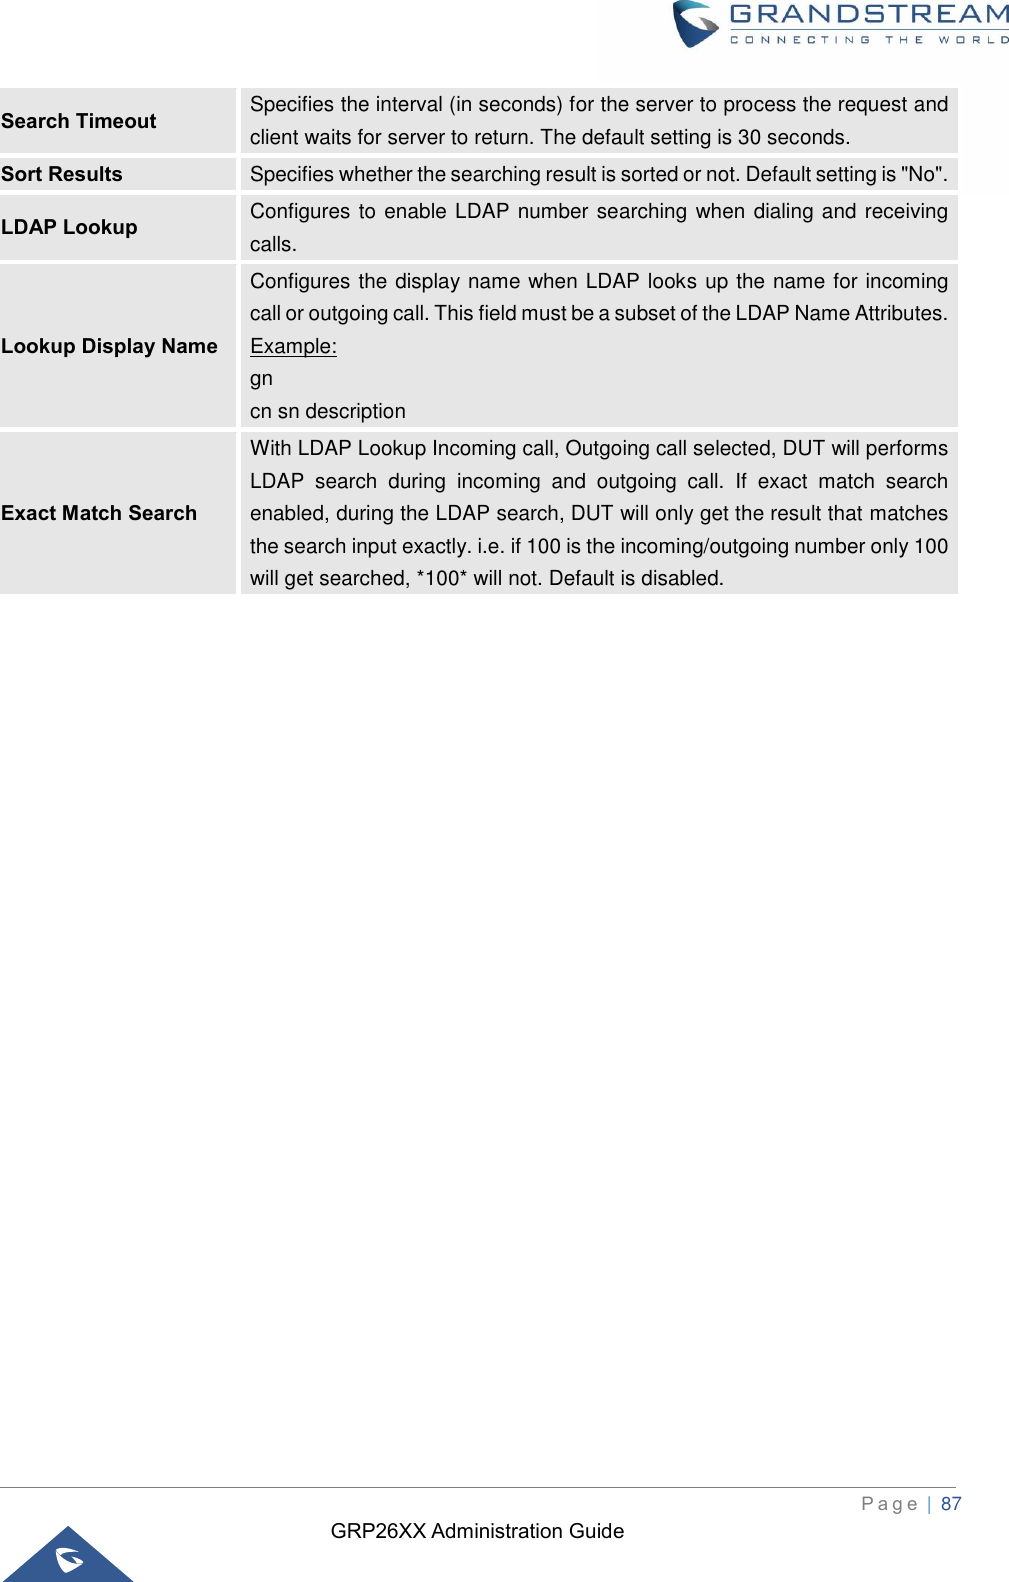
![GRP26XX Administration Guide P a g e | 59 Please note the user must select “Color Background” in “Wallpaper Source” option in order to use the configurable color background code. Screensaver Screensaver Configures Screensaver Feature, or “to enable Screensaver feature if no VPK is active”. Please note this option is also available under LCD→ Menu→ Preference→ Appearance. The phone will consider the page active if VPK is in Early (ringing), Trying (dialing) and Confirmed (talking) status when VPK is configured with mode “BLF”, “Eventlist BLF” or “Presence”. By default, screensaver is enabled. Screensaver Source Sets the location where screensaver is loaded from. Show Date and Time Allows to see time, date and weather on phone’s screensaver mode Screensaver Timeout Configures the minutes of idle before the screensaver activates. Valid range is 3 to 6. The default time is 3 minutes. Screensaver Server Path Configures the server path which contains download screensaver definition XML. Screensaver XML Download Interval Configures the screensaver XML download interval (in minutes). If set to 0, automatic download will be disabled. Valid range is 5 to 720. Settings → Preferences → MPK LCD Settings (Available on GRP2614 only) MPK LCD Display Order Select MPK LCD Display Oder to be either Sequential or Alternating. Display Contact on MPK LCD Select whether or not to display contact on MPK LCD. By default, it’s set NO. Wallpaper Source for MPK LCD Select Uploaded to display the uploaded wallpaper on the MPK LCD. Upload Wallpaper for MPK LCD Upload an image for the MPK LCD wallpaper Settings → Preferences → LED Control BLF LED Pattern This is used to configure the color and pattern of the LED based on status updates. The default setting is “Default”. The BLF LED Patterns are listed in [Table 12: BLF LED Patterns]. Disable VM/MSG power light flash The VM/MSG light cannot flash even though there’s an unread voice mail or message when set to “Yes”. Default settings is “No”. BLF LED Pattern Explanation Form Users could view the color and pattern of the LED status based on the BLF status update. Settings → Ring Tone Call Progresses Tones System Ring Tone Dial Tone Second Dial Tone Configures ring or tone frequencies based on parameters from local telecom. The default value is North American standard. Frequencies should be configured with known values to avoid uncomfortable high pitch sounds.](https://usermanual.wiki/Grandstream-Networks/GRP2612P/User-Guide-4183055-Page-59.png)
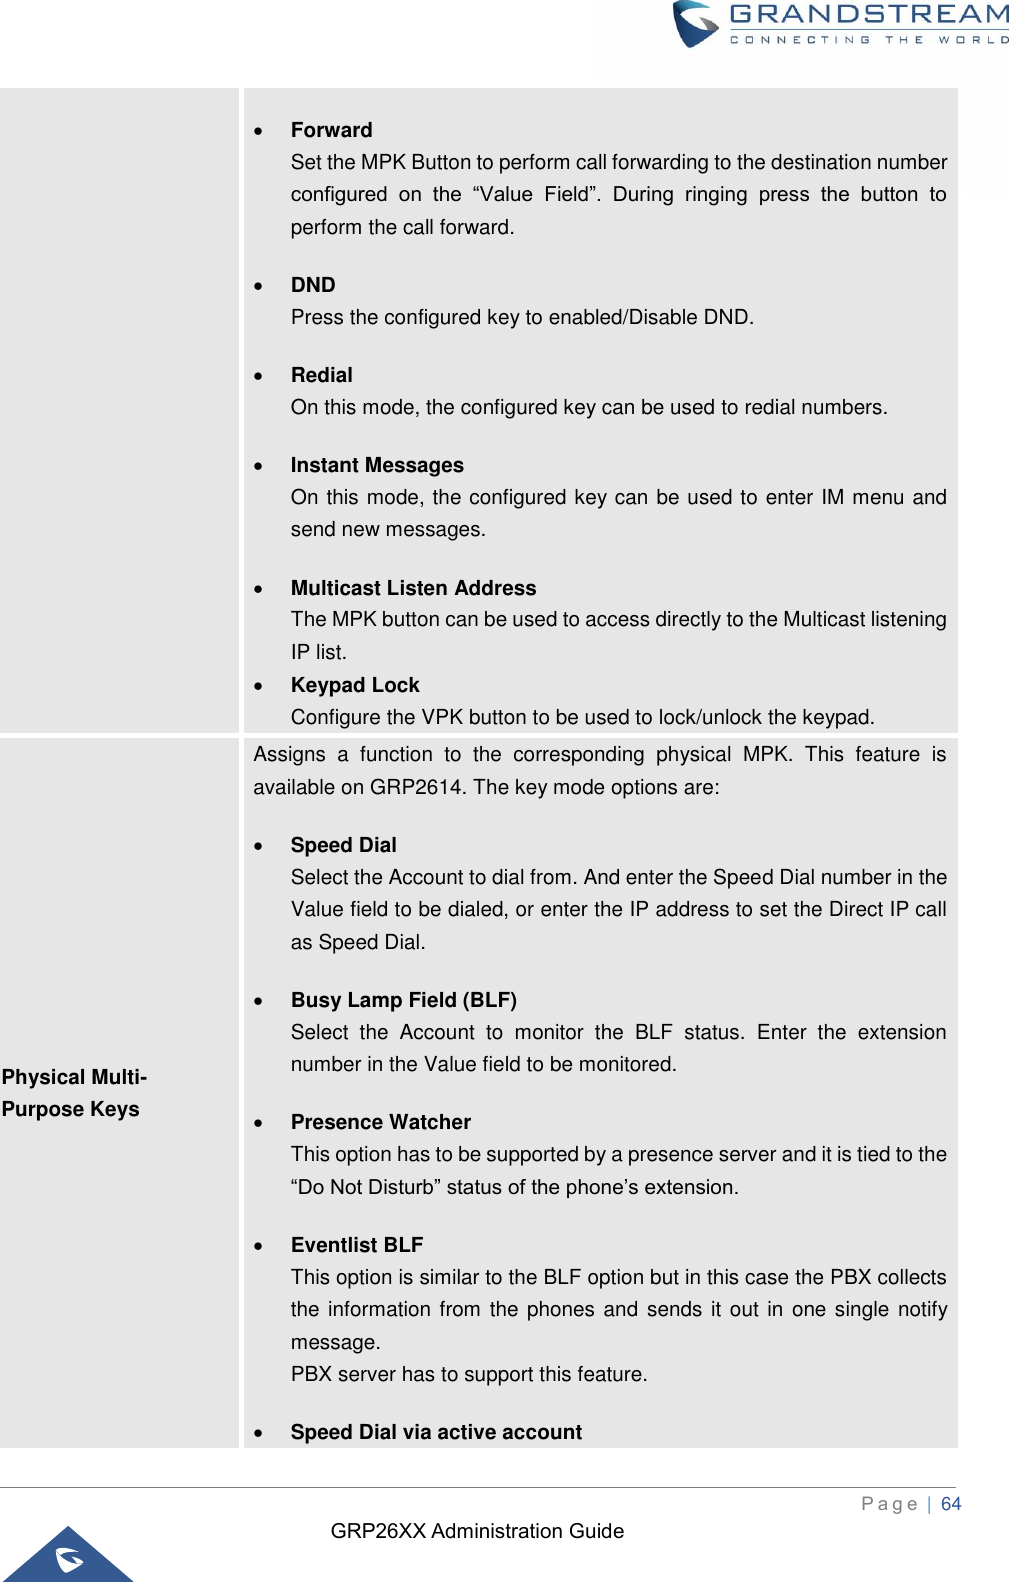
![GRP26XX Administration Guide P a g e | 60 Message Waiting Ring Back Tone Call-Waiting Tone Call-Waiting Tone Gain Busy Tone Reorder Tone Syntax: f1=val,f2=val[,c=on1/off1[-on2/off2[-on3/off3]]]; (Frequencies are in Hz and cadence on and off are in 10ms) ON is the period of ringing (“On time” in ‘ms’) while OFF is the period of silence. In order to set a continuous ring, OFF should be zero. Otherwise it will ring ON ms and a pause of OFF ms and then repeat the pattern. Up to three cadences are supported. Speaker Ring Volume Configures speaker ring volume. The valid range is 0 to 7. The default setting is 5. Lock Volume Allows to lock the ring tone volume. When enabled, the ring volume cannot be changed from phone LCD. Default setting is Disabled. Notification Tone Volume Configures notification tone volume. The valid range is 0 to 7 and default setting is 5. Default Ringtone Allows to set Default Ringtone as their Global ringtone. Note: The ring tone set in individual accounts have higher priority to this setting. If the user wants the default ring tone to be used globally, he needs to set the ring tone of each account to Default Ring Tone; Otherwise, it will be whichever the ring tone you set. Important: The Priority goes as: Contact Ring Tone → Account Ring Tone → Default Ring Tone. Settings → Programmable Keys Virtual Multi-Purpose Keys Settings • Show Label Background If enabled, the VPK label’s background will match the status of the VPK and will no longer be transparent • Use Long Label If enabled, the VPK label will extend as far as possible. • Key Mode If set to “Line Mode”, the amount of VPKs will be the amount of lines you can have. If set to “Account Mode”, the lines will be grouped by account, so the VPKs could hold more lines in one account. For example, with line mode, when the line is in use, by pressing the VPK, nothing is going to happen. In Account Mode, when the line is in use, by pressing the VPK, a new line will be initiated. • Transfer Mode via VPK Allows users to configure “Transfer” VPK to do either Blind or Attended Transfer. They can also set their Transfer key to make a new call with](https://usermanual.wiki/Grandstream-Networks/GRP2612P/User-Guide-4183055-Page-60.png)
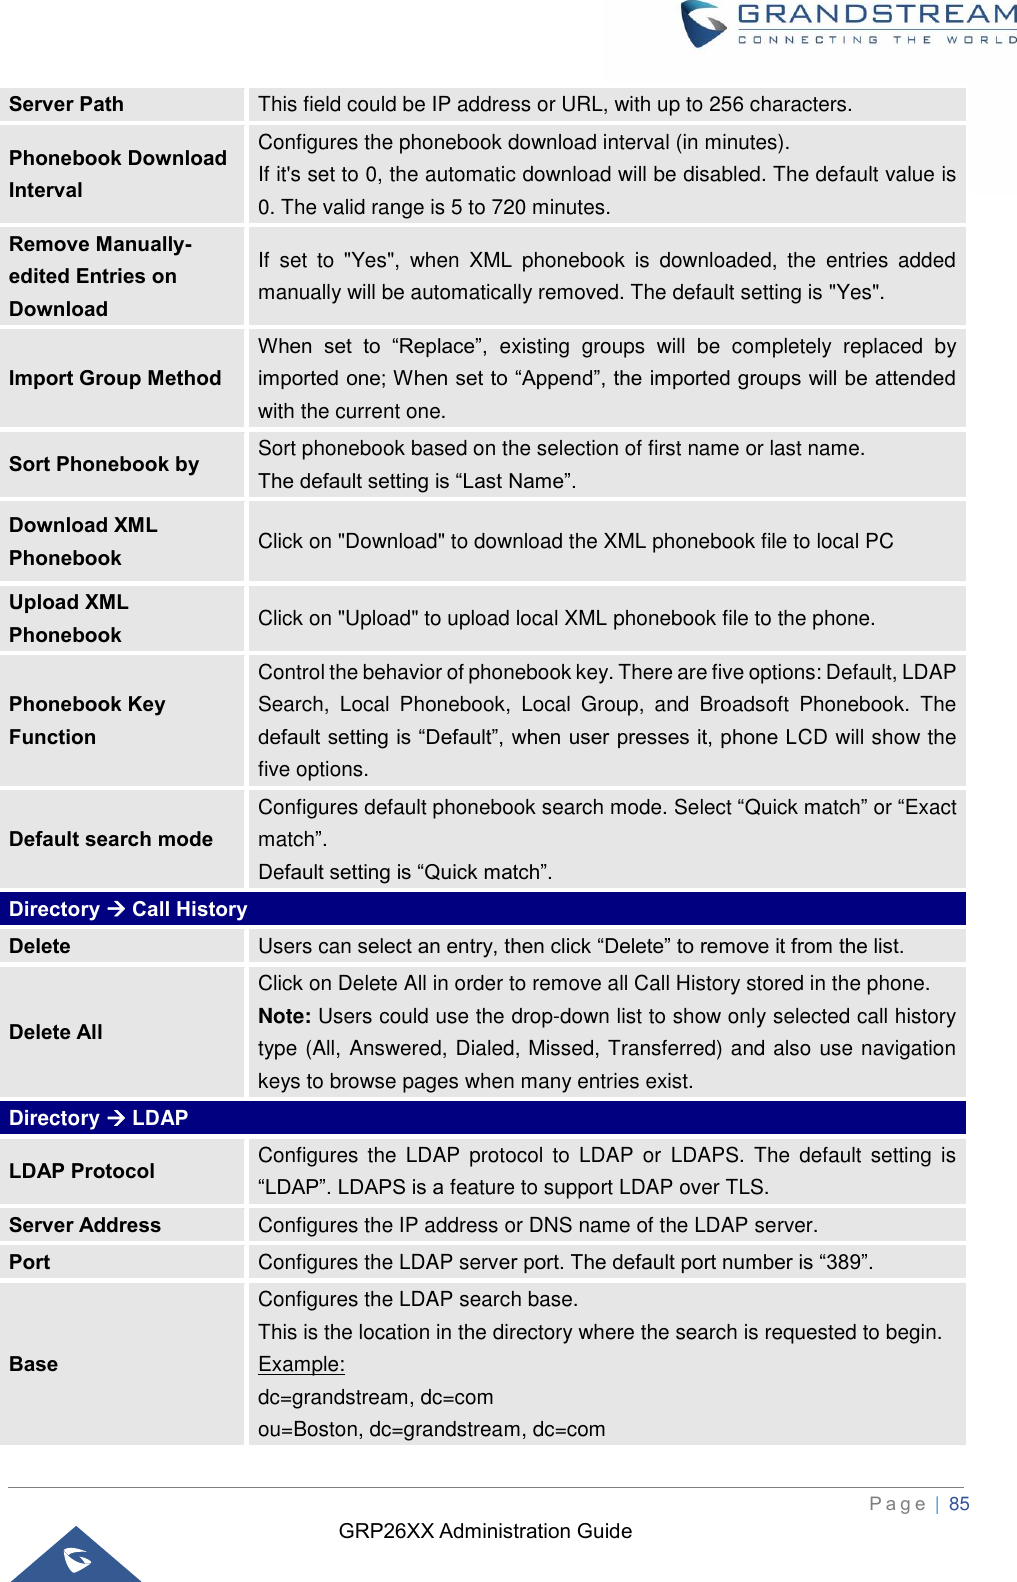
![GRP26XX Administration Guide P a g e | 84 Status Displays packet capture status. When user starts to capture trace file, it will show “RUNNING” status, otherwise, it will show “STOPPED”. With RTP Packets Defines whether the packet capture file contains RTP or not. The default setting is “No”. Maintenance → Tools Provision For more details please refer to [GRP2600 TOOLS]. Factory Reset Ping Traceroute Directory Page Definitions Directory → Contacts Search Bar Allows users searching for phonebook entries. Add Contact Specifies Contact’s First Name, Last Name, Phone Number, Accounts and Groups Blacklist, Whitelist, Work, Friends and Family) to add one new contact in phonebook. Note: If the contact number belongs to Blacklist group, the call from this number will be blocked. If the contact number belongs to Whitelist group, when the phone is on DND mode, the call from whitelist number will be allowed. Edit Contact Edits selected contact. Delete All Contacts Deletes all contacts from phonebook. NOTE: a message prompt will be displayed so that users will confirm to delete or cancel the operation, in order to prevent users from losing contacts when deleting them accidentally. Directory → Group Management Add Group Specifies Group’s name to add new group. More than 30 Groups can be added. Edit Group Edits selected group. Directory → Phonebook Management Enable Phonebook XML Download Configures to enable phonebook XML download. Users could select HTTP/HTTPS/TFTP to download the phonebook file. The default setting is "Disabled". HTTP/HTTPS User Name The user name for the HTTP/HTTPS server. HTTP/HTTPS Password The password for the HTTP/HTTPS server. Phonebook XML Configures the server path to download the phonebook XML.](https://usermanual.wiki/Grandstream-Networks/GRP2612P/User-Guide-4183055-Page-84.png)