Grandstream Networks GWN7600LR Long Range Wi-Fi Access Point User Manual Quick Start Guide
Grandstream Networks, Inc. Long Range Wi-Fi Access Point Quick Start Guide
UserManual.wiki
>
Grandstream Networks
>
GWN7600LR User Manual
>
Quick Start Guide
Contents
1.
Quick Start Guide
2.
quick Start Guide
Quick Start Guide
Navigation menu
Upload a User Manual
Namespaces
Wiki Guide
HTML
PDF
Info
Views
User Manual
Discussion / Help
Navigation
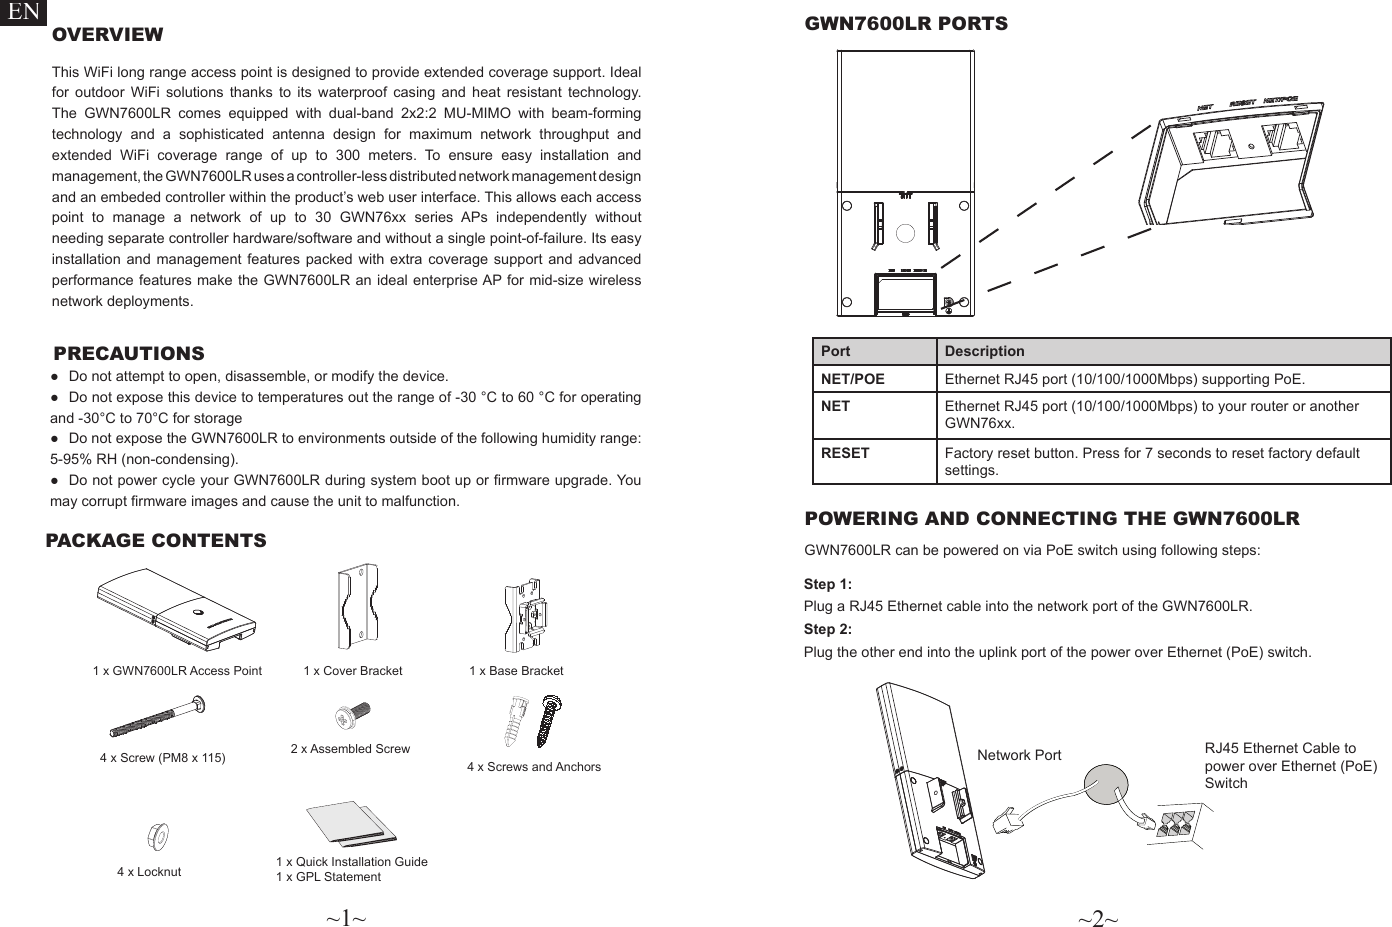
![~5~ ~6~CONNECT TO GWN7600LR DEFAULT WIFI NETWORK GWN7600LR can be used as standalone access point out of box, or after factory reset with Wi-Fi enabled by default.After powering the GWN7600LR and connecting it to the network, GWN7600LR will broad-cast a default SSID based on its MAC address GWN[MAC’s last 6 digits] and a random password.Note: GWN7600LR’s default SSID and password information are printed on the MAC tag of the unit. Method 2: Discover GWN7600LR using GWN Discovery Tool1. Download and install GWN Discovery Tool from the following link:http://www.grandstream.com/tools/GWNDiscoveryTool.zip 2. Open the GWN DiscoveryTool, and click on Scan.3. The tool will discover all GWN76XX Access Points connected on the network showing their MAC and IP addresses.4. Click on Manage Device to be redirected directly to the GWN7600LR’s conguration interface, or type in manually the displayed IP address on your browser.Notes : ●Make sure that the GWN7600LR is not already paired with another GWN76xx Access Point as slave, or GWN7000 Router Series, otherwise the conguration interface cannot be accessed. ● If the GWN7600LR is already paired, make sure to unpair it rst, or do a factory reset. ●It is customer’s responsibility to ensure compliance with local regulations for frequency bands, transmit power and others.A computer connected to the GWN7600LR’s SSID, or to the same network as the GWN-7600LR can discover and access its conguration interface using one of the below methods:Method 1: Discover GWN7600LR using its MAC Address1. Locate the MAC address on the MAC tag of the unit, which is on the underside of the device, or on the package.2. From a computer connected to same network as the GWN7600LR, type in following ad-dress using GWN7600LR’s MAC address on your browser https://gwn_<mac>.localExample: If a GWN7600LR has the MAC address 00:0B:82:8C:4D:F8, this unit can be ac-cessed by typing https://gwn_000b828c4df8.local on the browser. ACCESSING THE CONFIGURATION INTERFACEUsing one of the above methods, the login screen will appear. Type in “admin” in both User-name and Password elds and click on Sign In.Refer to online documents and FAQ for more detailed information: http://www.grandstream.com/our-productsLabel's content is for reference only, subject to actual production.](https://usermanual.wiki/Grandstream-Networks/GWN7600LR.Quick-Start-Guide/User-Guide-3588621-Page-4.png)