Grandstream Networks GXV3140H IP Multimedia Phone User Manual GXV3140H usermanual
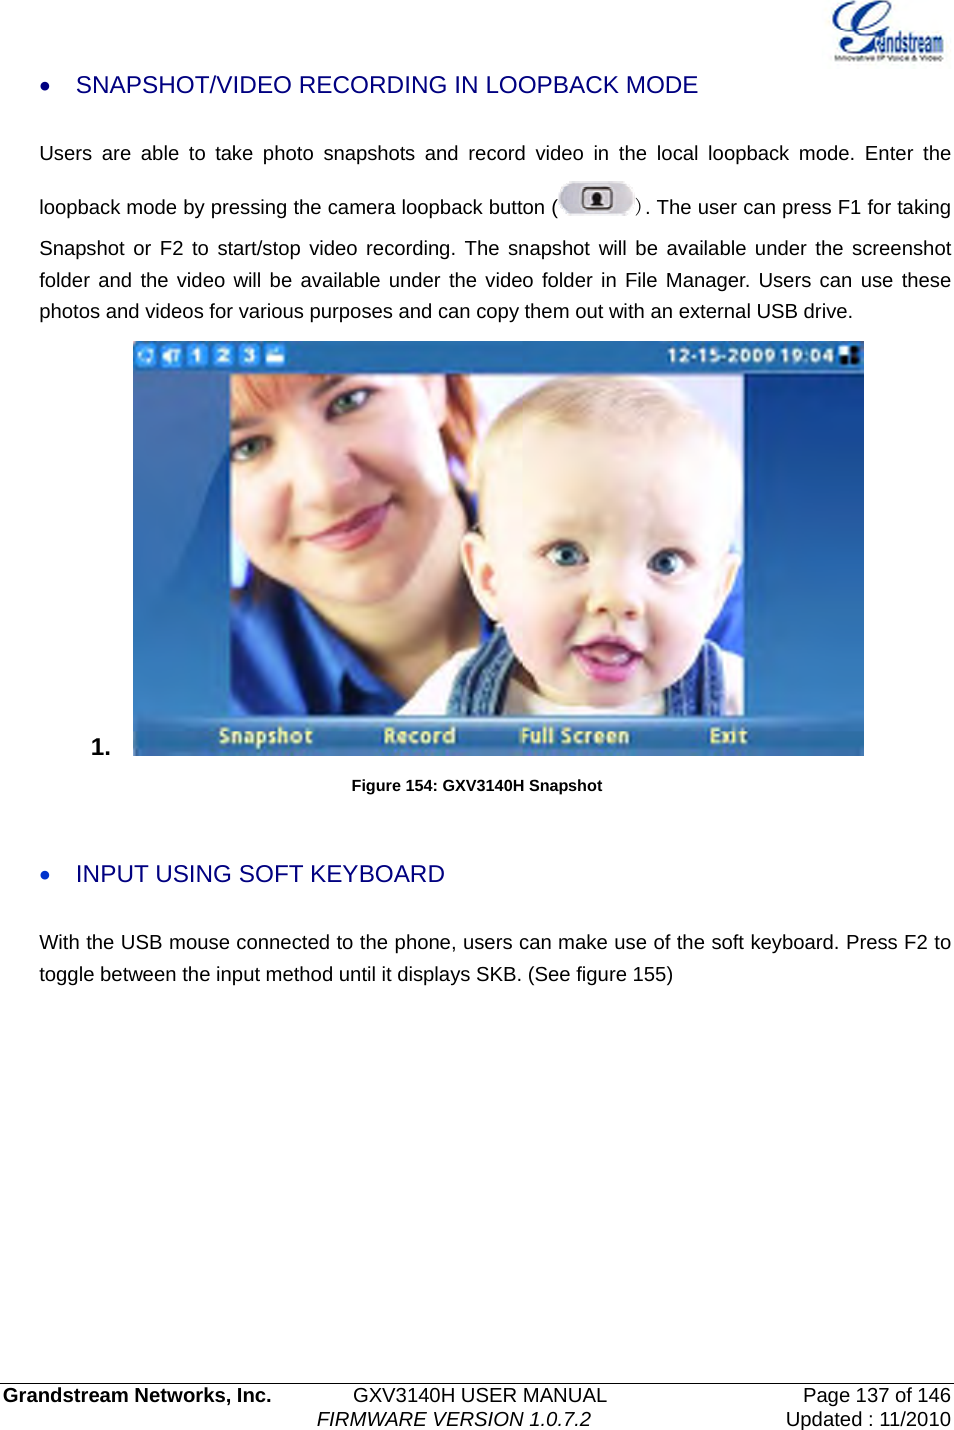
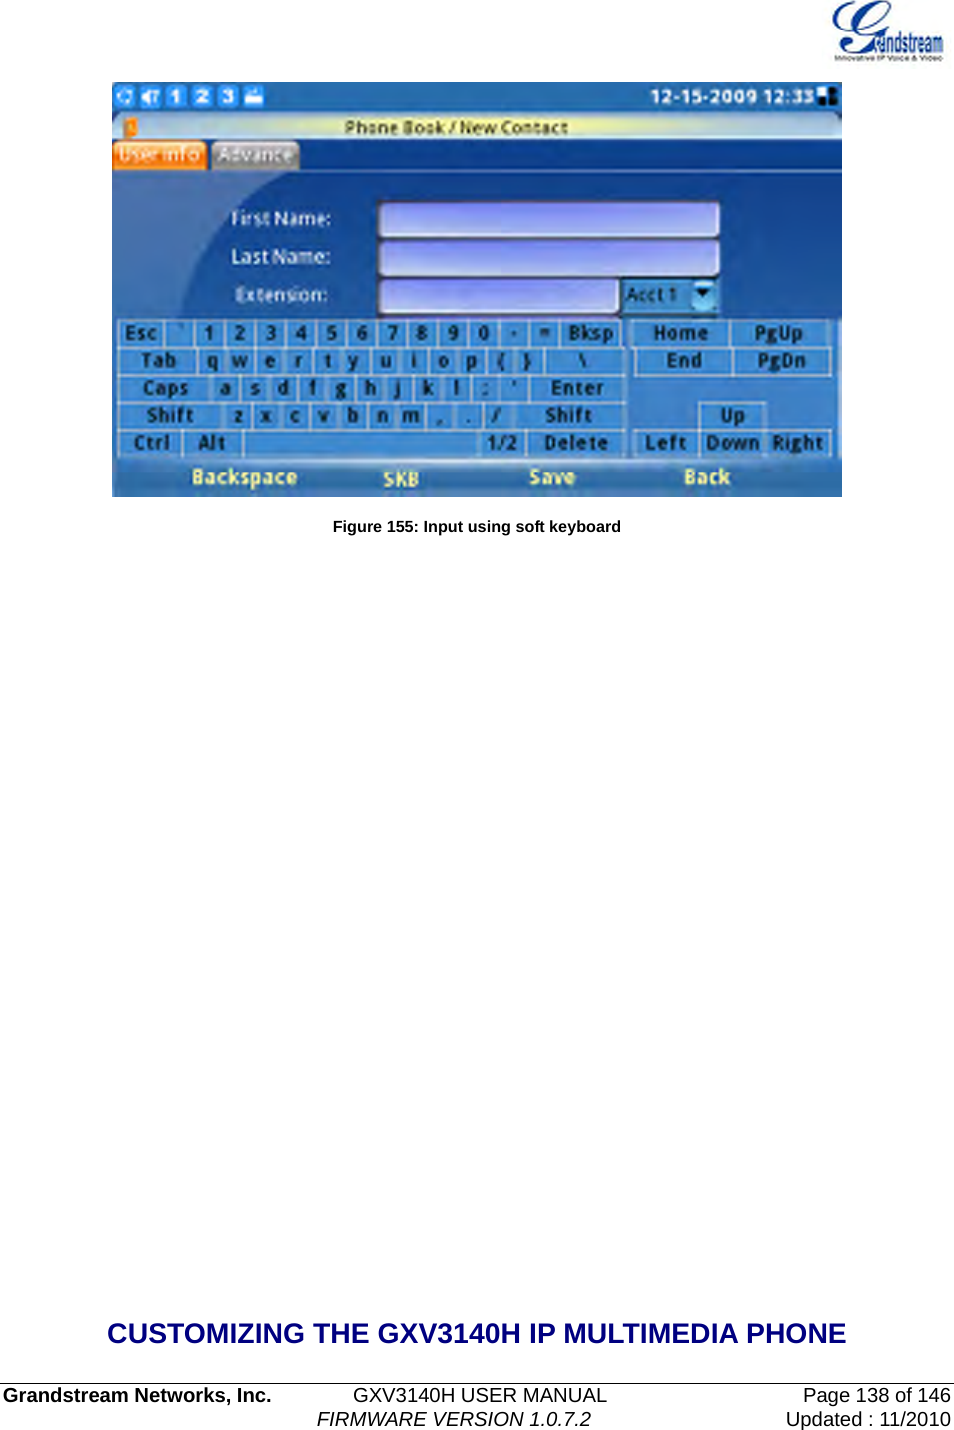
Grandstream Networks, Inc. IP Multimedia Phone GXV3140H usermanual
UserManual.wiki
>
Grandstream Networks
>
GXV3140H User Manual
Users manual
Navigation menu
Upload a User Manual
Namespaces
Wiki Guide
HTML
PDF
Info
Views
User Manual
Discussion / Help
Navigation


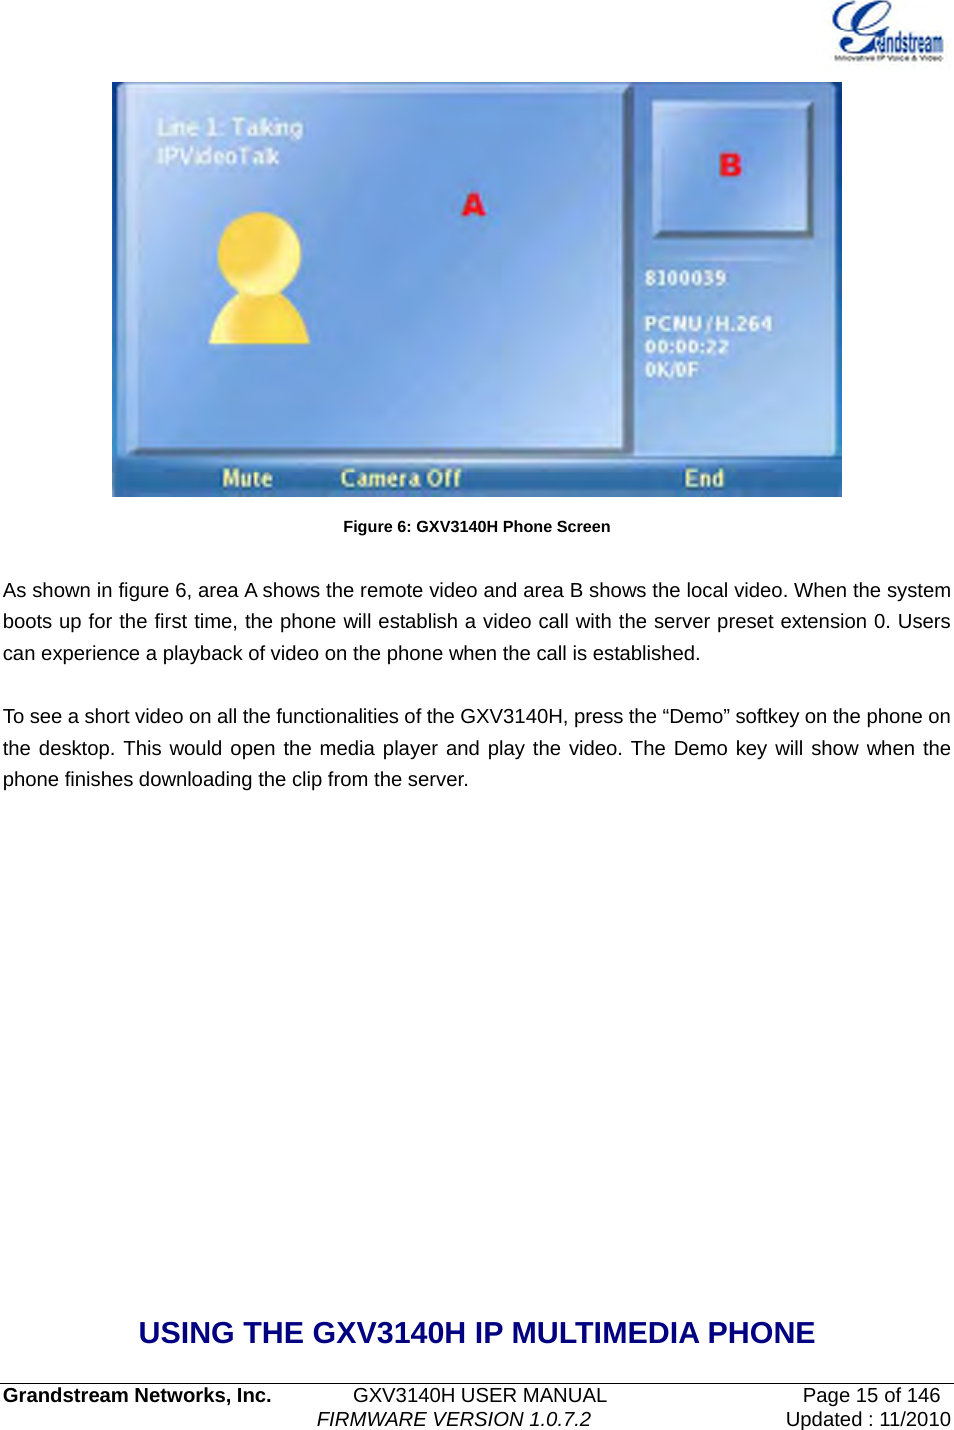
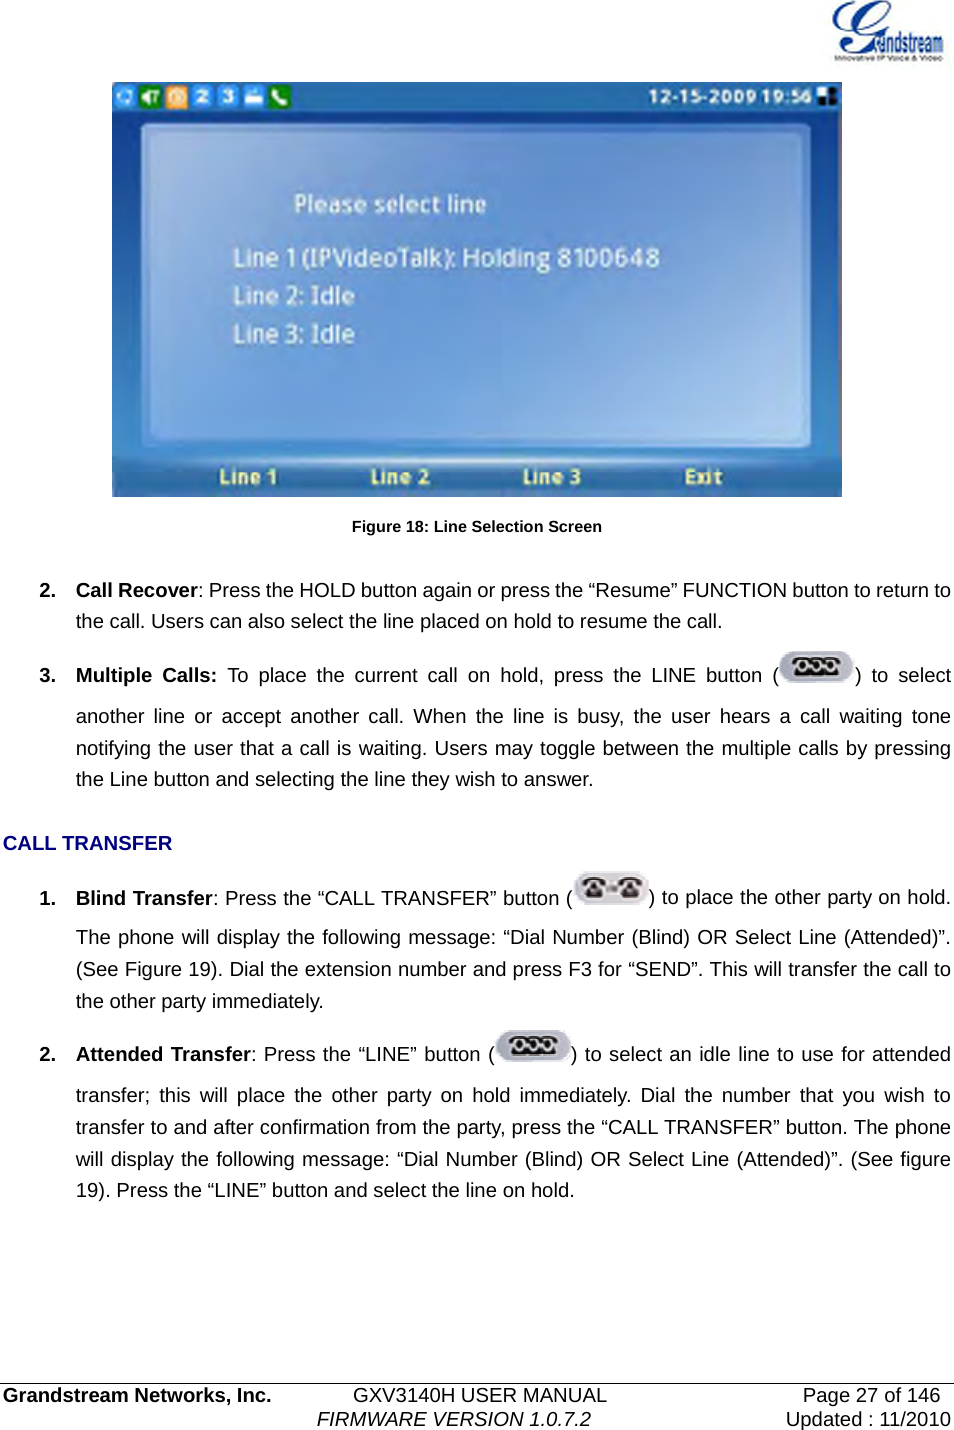
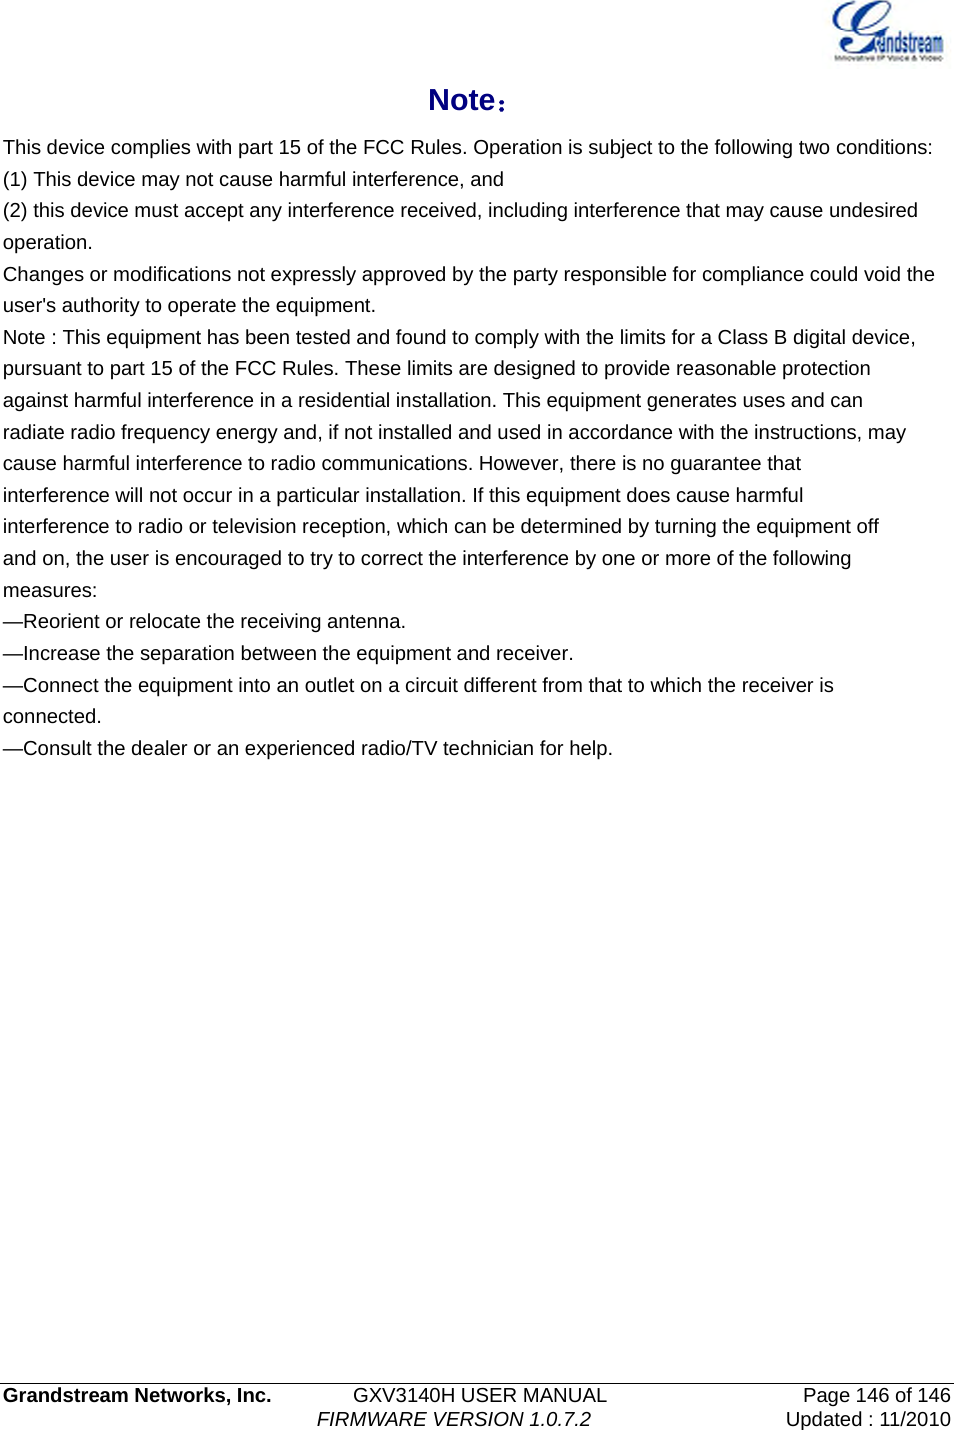
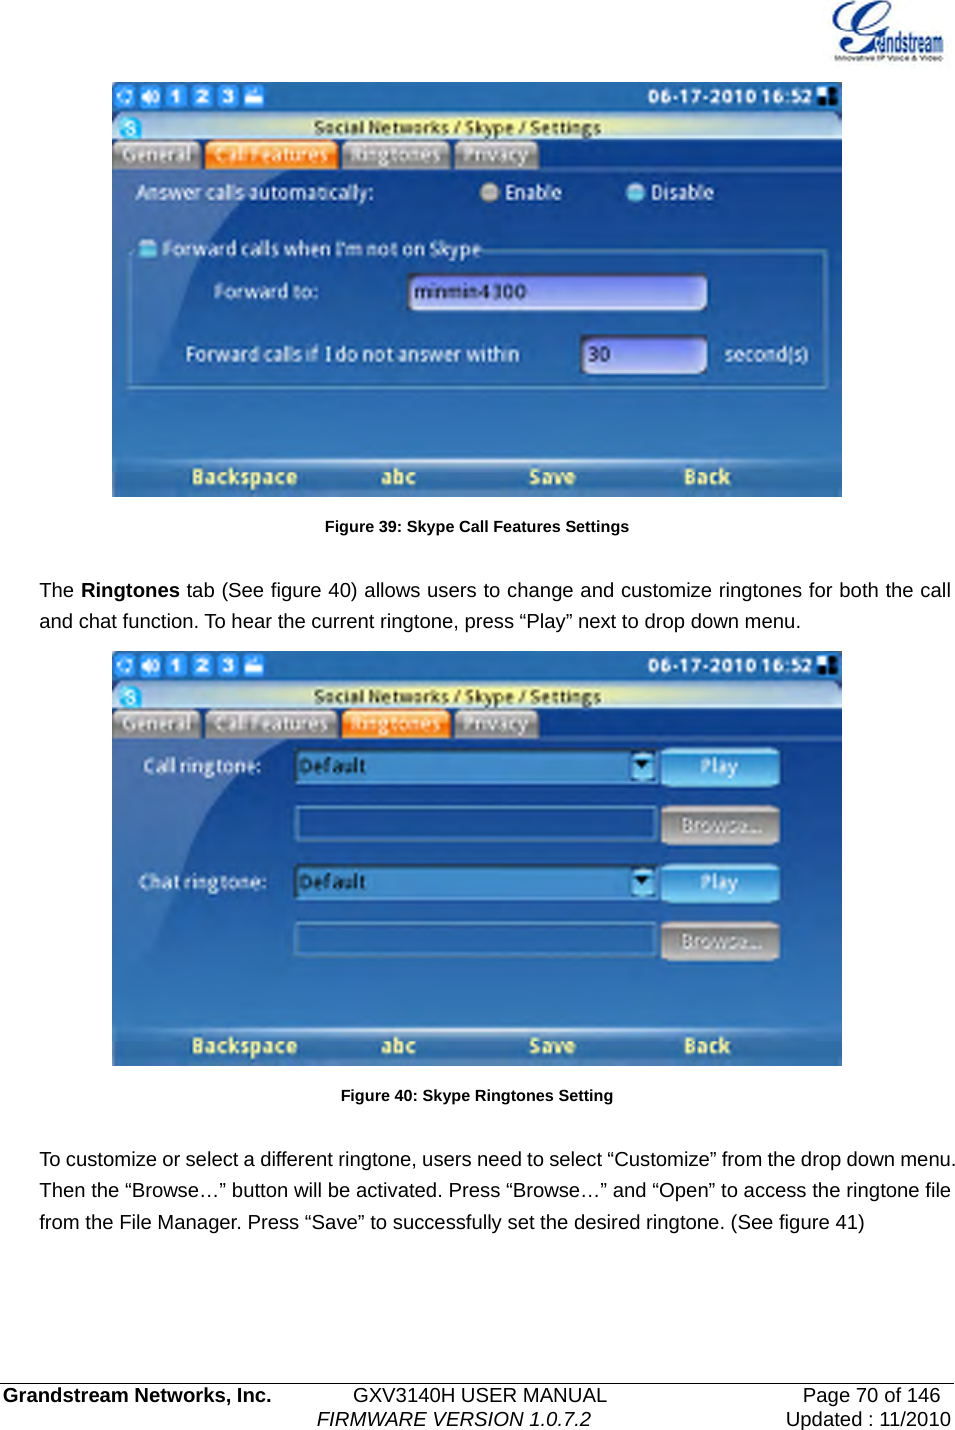
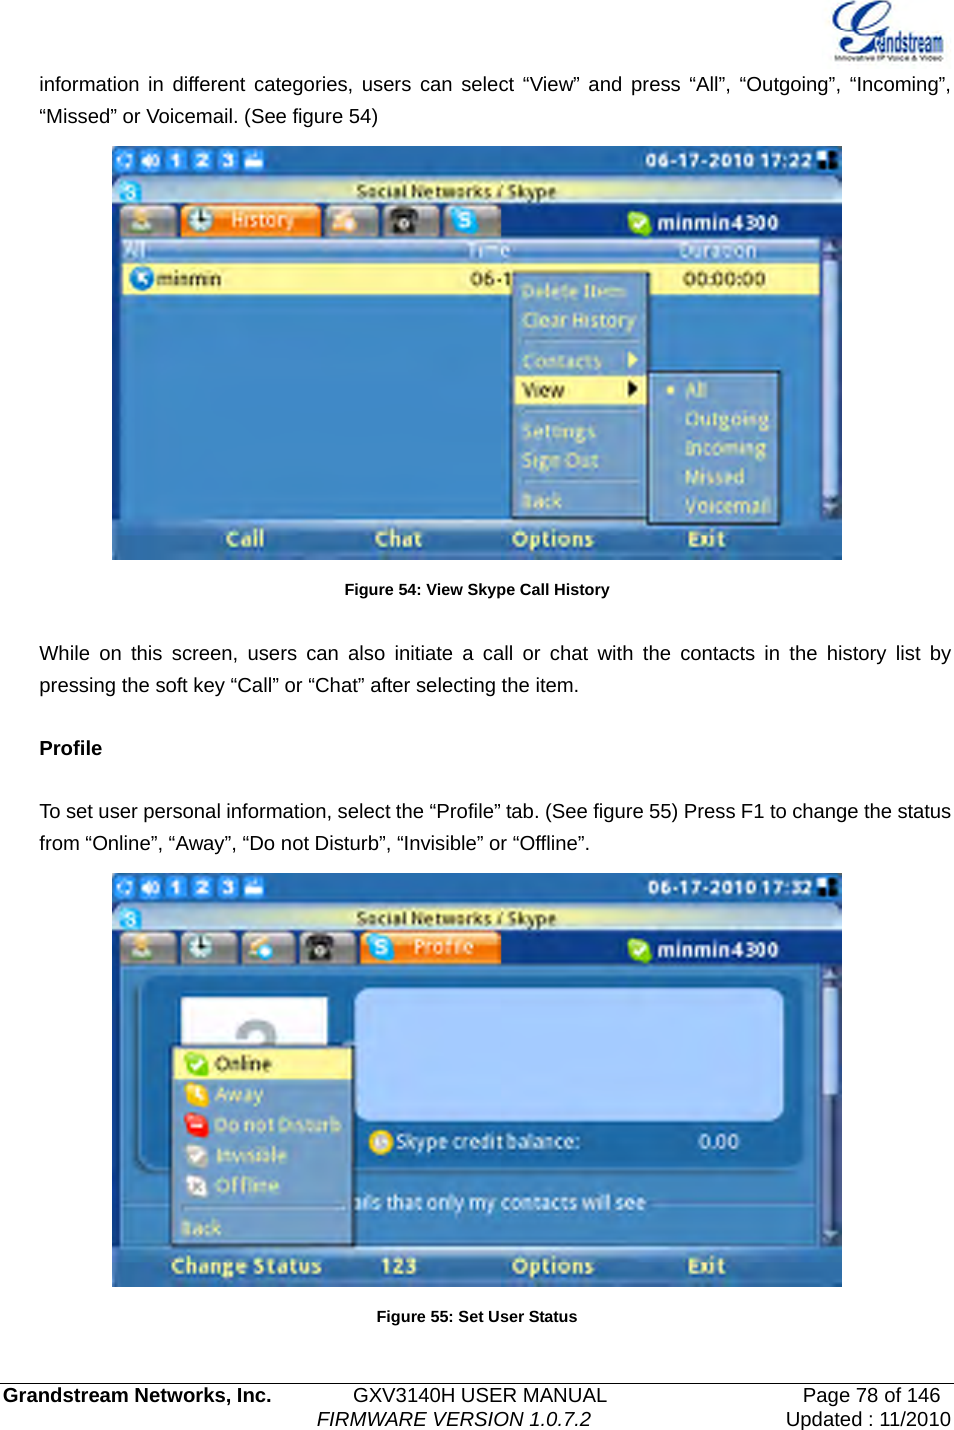
![Grandstream Networks, Inc. GXV3140H USER MANUAL Page 36 of 146 FIRMWARE VERSION 1.0.7.2 Updated : 11/2010 permits. Otherwise the video quality will be impaired due to packet loss Video Packet Size The Default value is 1400, range from 100 to 1400. It is recommended to use 600~800 if you have an Outbound Proxy or Media Gateway. Video Rate Control Frame, TMN8 or GOP. The Default setting is Frame. TMN8 is good for bandwidths larger than 384kbps Video Frame Skipping Skips bad video frames as they are received The Default setting is No. I-Frame Reference Only When enabled, all P frames will only have reference to previous I frames. This method may improve video quality when the network has heavy packet loss. It will have modest increase in bandwidth usage. The Default setting is No. Packetization-Mode The packetization mode (0 or 1) for the H.264 video packets. The default setting is 0. Redundant P-frame This setting allows the phone to send redundant P-frames of I frames. When an I frame is delayed or has packet loss, the redundant P-frames will be used instead. It may make video phone call less prone to errors and thus make the video stream more robust towards error propagation, but may increase bandwidth usage. The default setting is set to No. Adaptive MB Intra Refresh This parameter specifies whether Adaptive MB Intra Refresh is used or not. It may protect most important MBs (macro blocks) subjected to packet loss and to avoid error propagation. The intra-refresh rate is adapted according to the video packet loss rate. It may increase bandwidth usage. The default setting is set to No. Video Packet Loss Rate Specifies the video packet loss rate for the Adaptive MB Intra Refresh. Users can choose from: Less than 5%, Less than 10%, Less than 15%, Less than 20%, Less than 25%. The default setting is set to Less than 10%. Advanced Settings/Ring Tone Call Progress Tones Using these settings, users can configure ring or tone frequencies based on parameters from the local telecom provider. By default, they are set to the North American standard. Frequencies should be configured with known values to avoid uncomfortable high pitch sounds. Syntax: f1=val,f2=val[,c=on1/off1[-on2/off2[-on3/off3]]];](https://usermanual.wiki/Grandstream-Networks/GXV3140H/User-Guide-1397274-Page-36.png)
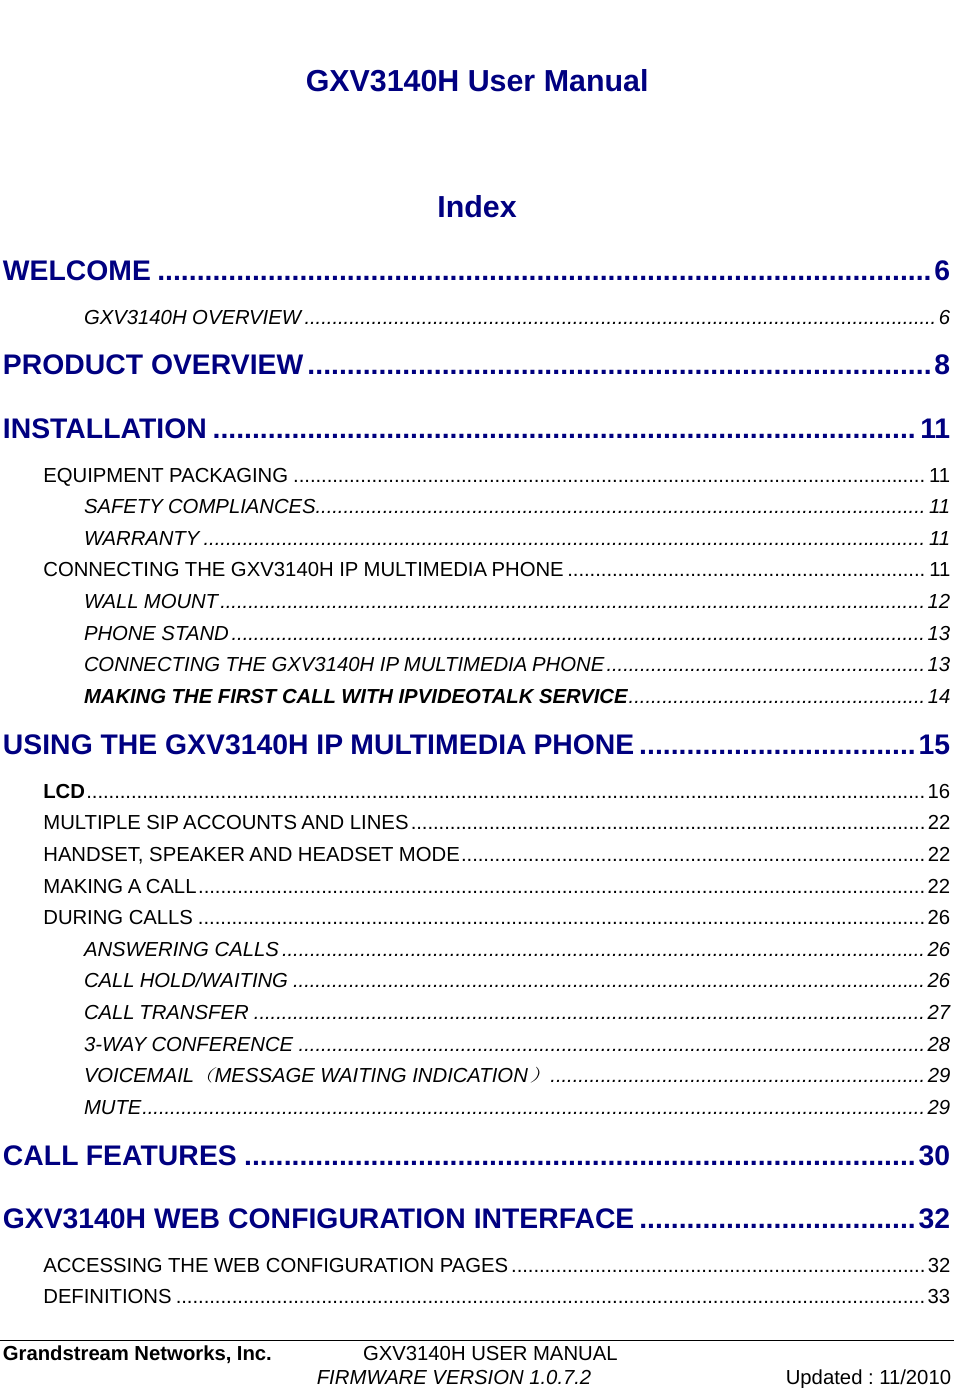
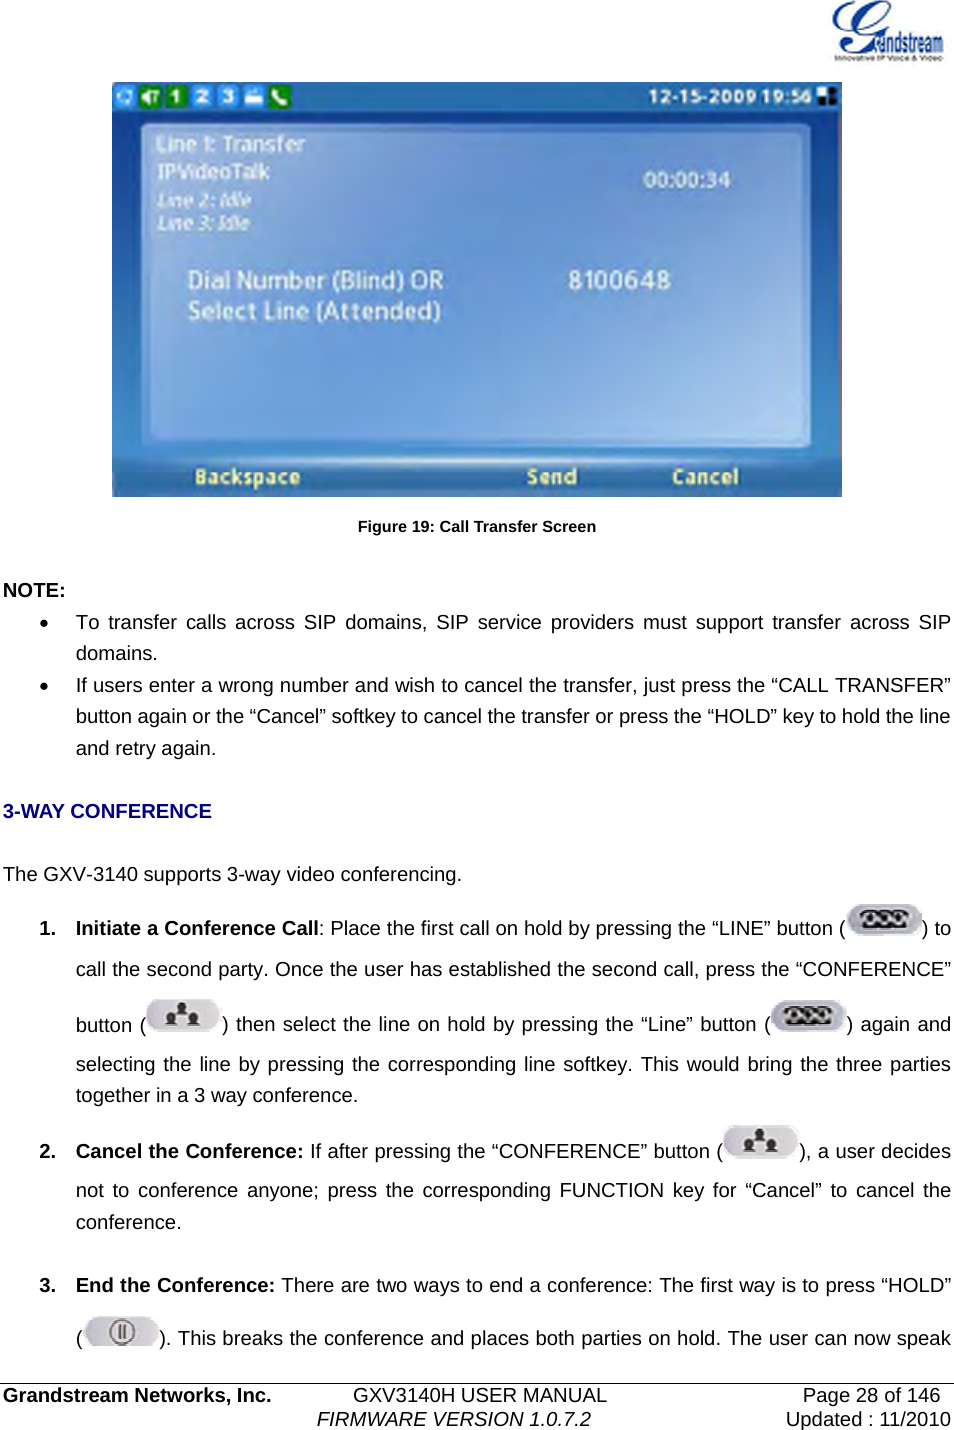
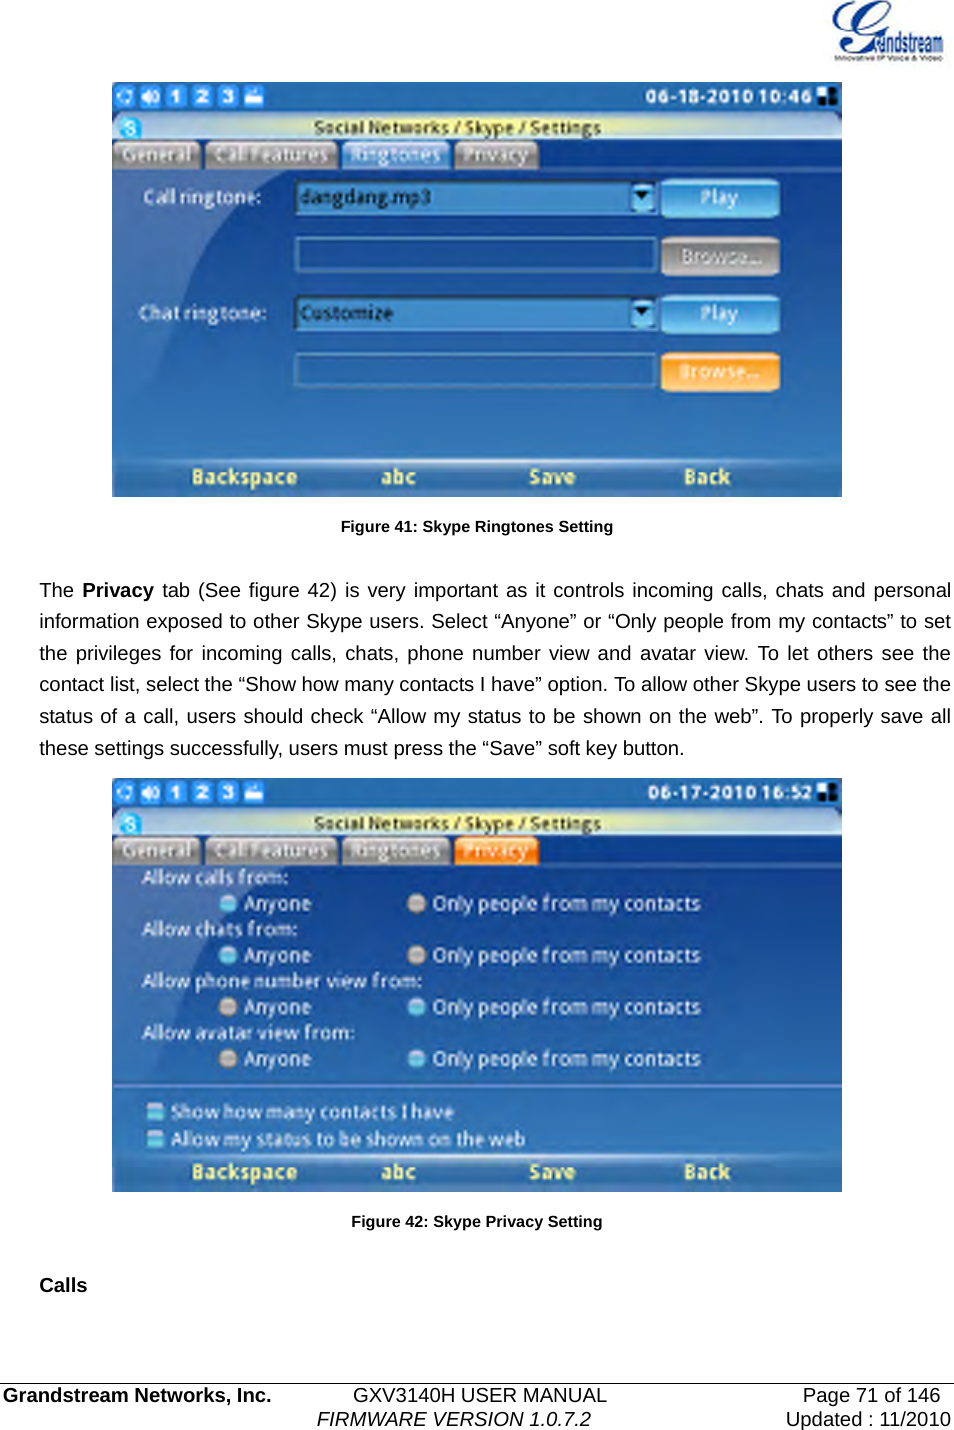
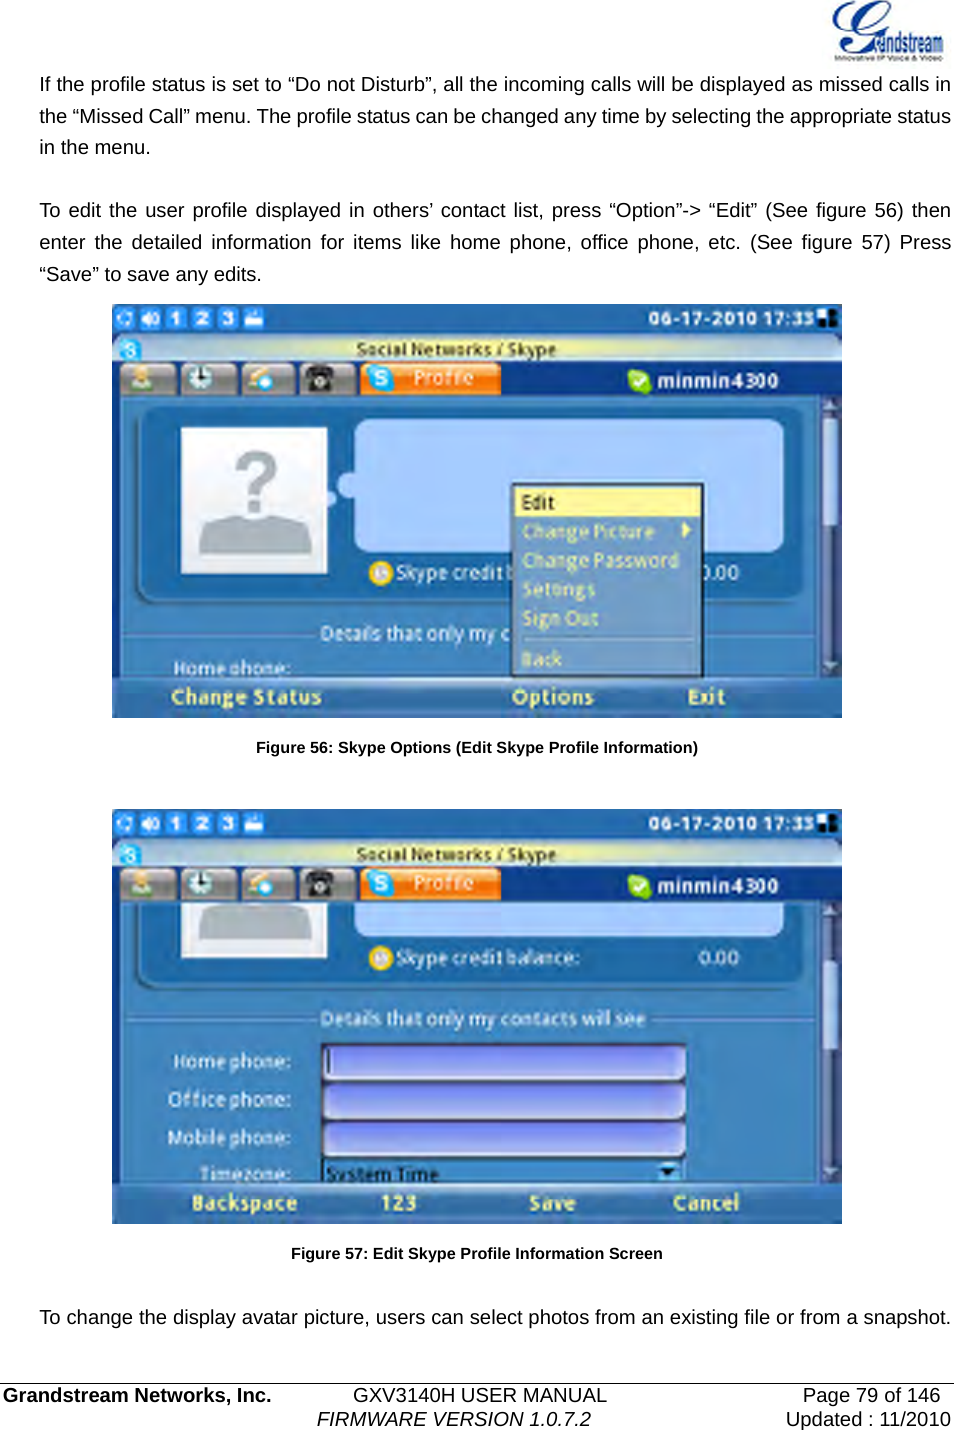
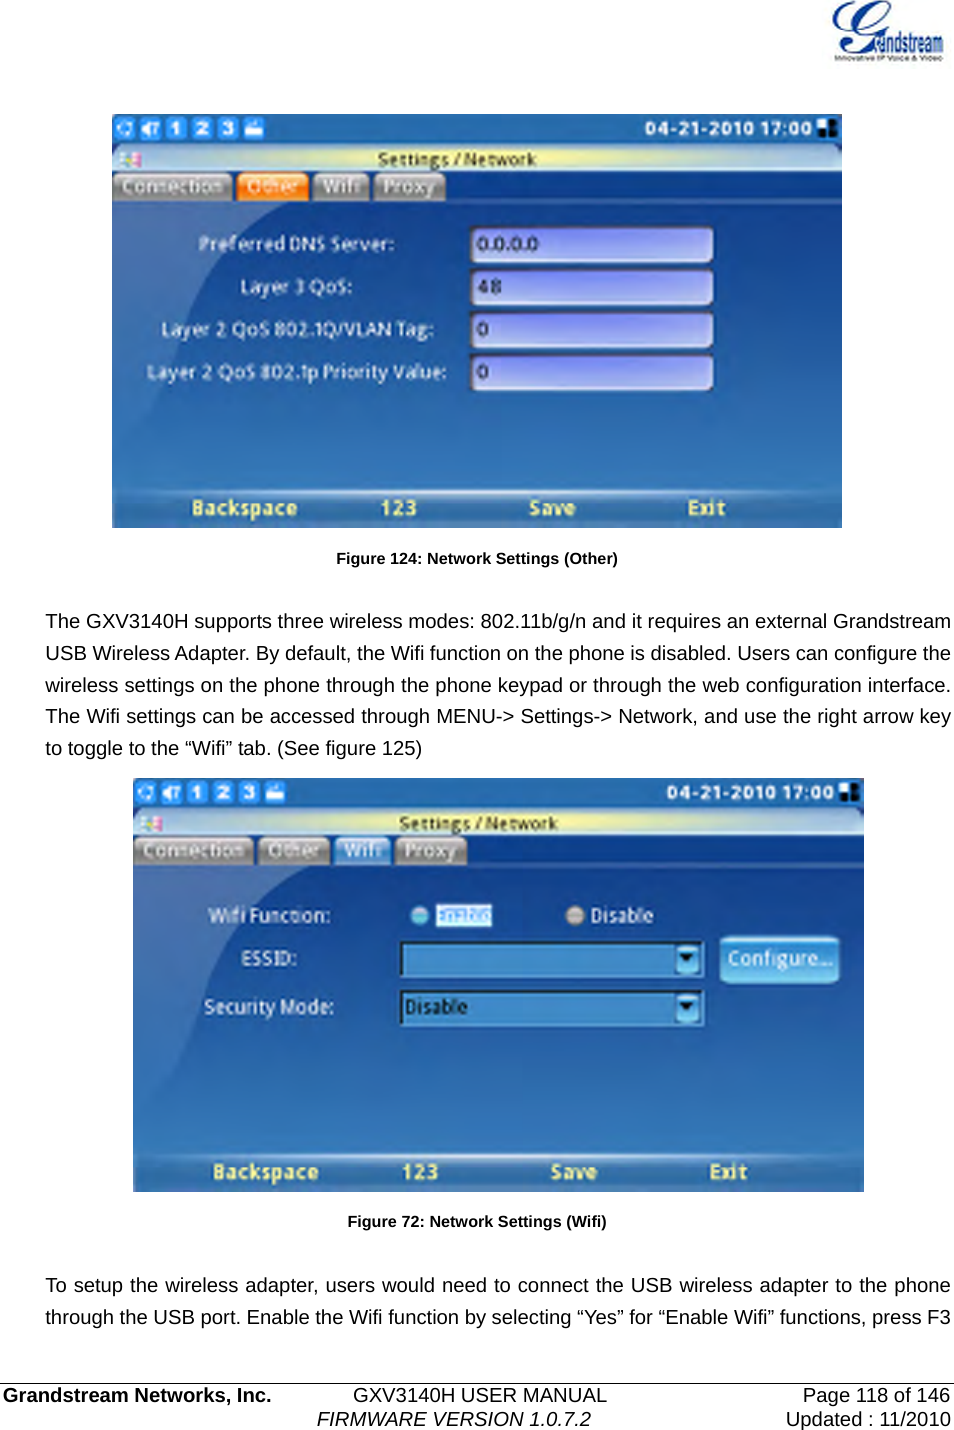
![Grandstream Networks, Inc. GXV3140H USER MANUAL Page 38 of 146 FIRMWARE VERSION 1.0.7.2 Updated : 11/2010 default setting is set to “Auto”. ESSID This parameter sets the ESSID for the Wireless network. Press “Scan” to scan for the available wireless network and add it. Users can also press “Add” to add the ESSID directly. Security Mode This parameter defines the security mode used for the wireless network. The following are supported: WEP/Shared, WEP/OPEN, WPA PSK TKIP, WPA PSK AES, WPA2 PSK TKIP, WPA2 PSK AES. The default setting is set to “Disabled”. Users will need to enter the corresponding authentication password for the security mode. Maintenance/Time Settings NTP Server This parameter defines the URL or IP address of the NTP (Network Time Protocol) server. The GXV3140H phone may obtain the date and time from the server. The default setting is ntp.ipvideotalk.com. DHCP Option 42 override NTP server Select Yes for the user to allow DHCP Option 2 to override the NTP server if there is one on the LAN. The default setting is NO. Time Zone This parameter controls the date/time display according to the specified time zone. Self-Defined Time Zone This parameter allows the users to define their own time zone. Syntax: std offset dst [offset], start [/time], end [/time] Default is set to: MTZ+6MDT+5,M3.2.0,M11.1.0, MTZ+6MDT+5 This indicates a time zone with 6 hours offset with 1 hour ahead which is U.S central time. If it is positive (+) if the local time zone is west of the Prime Meridian (A.K.A: International or Greenwich Meridian) and negative (-) if it is east. M3.2.0,M11.1.0 The 1st number indicates Month: 1,2,3.., 12 (for Jan, Feb, .., Dec) The 2nd number indicates the nth iteration of the weekday: (1st Sunday, 3rd Tuesday…) The 3rd number indicates weekday: 0,1,2,..,6( for Sun, Mon, Tues,..,Sat) Therefore, this example is the DST which starts from the second Sunday of March to the 1st Sunday of November. Maintenance/Web & Telnet Access](https://usermanual.wiki/Grandstream-Networks/GXV3140H/User-Guide-1397274-Page-38.png)
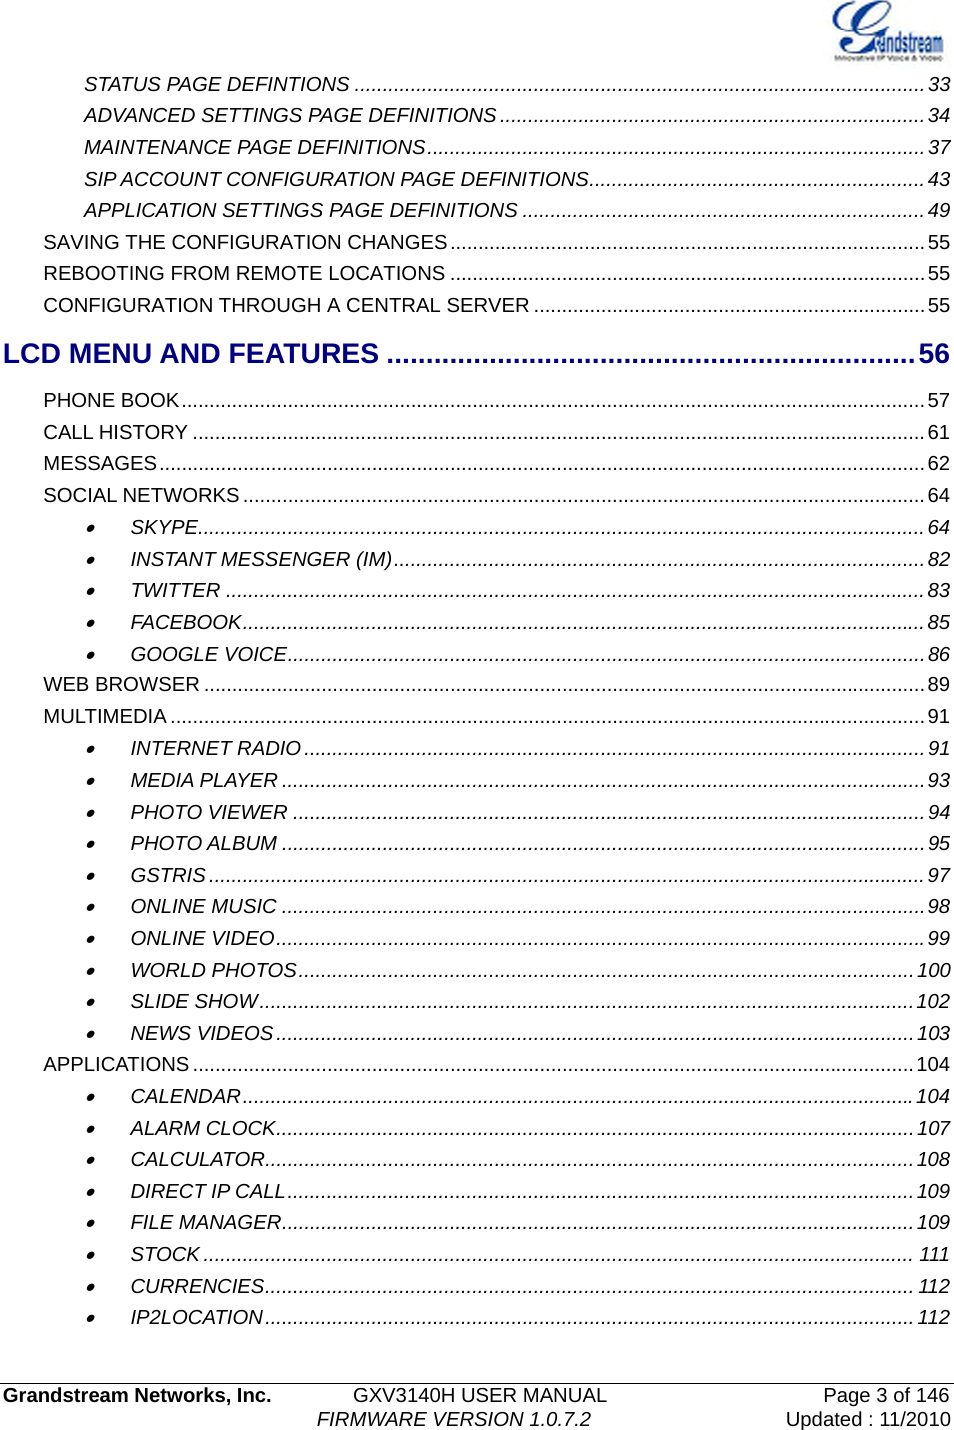
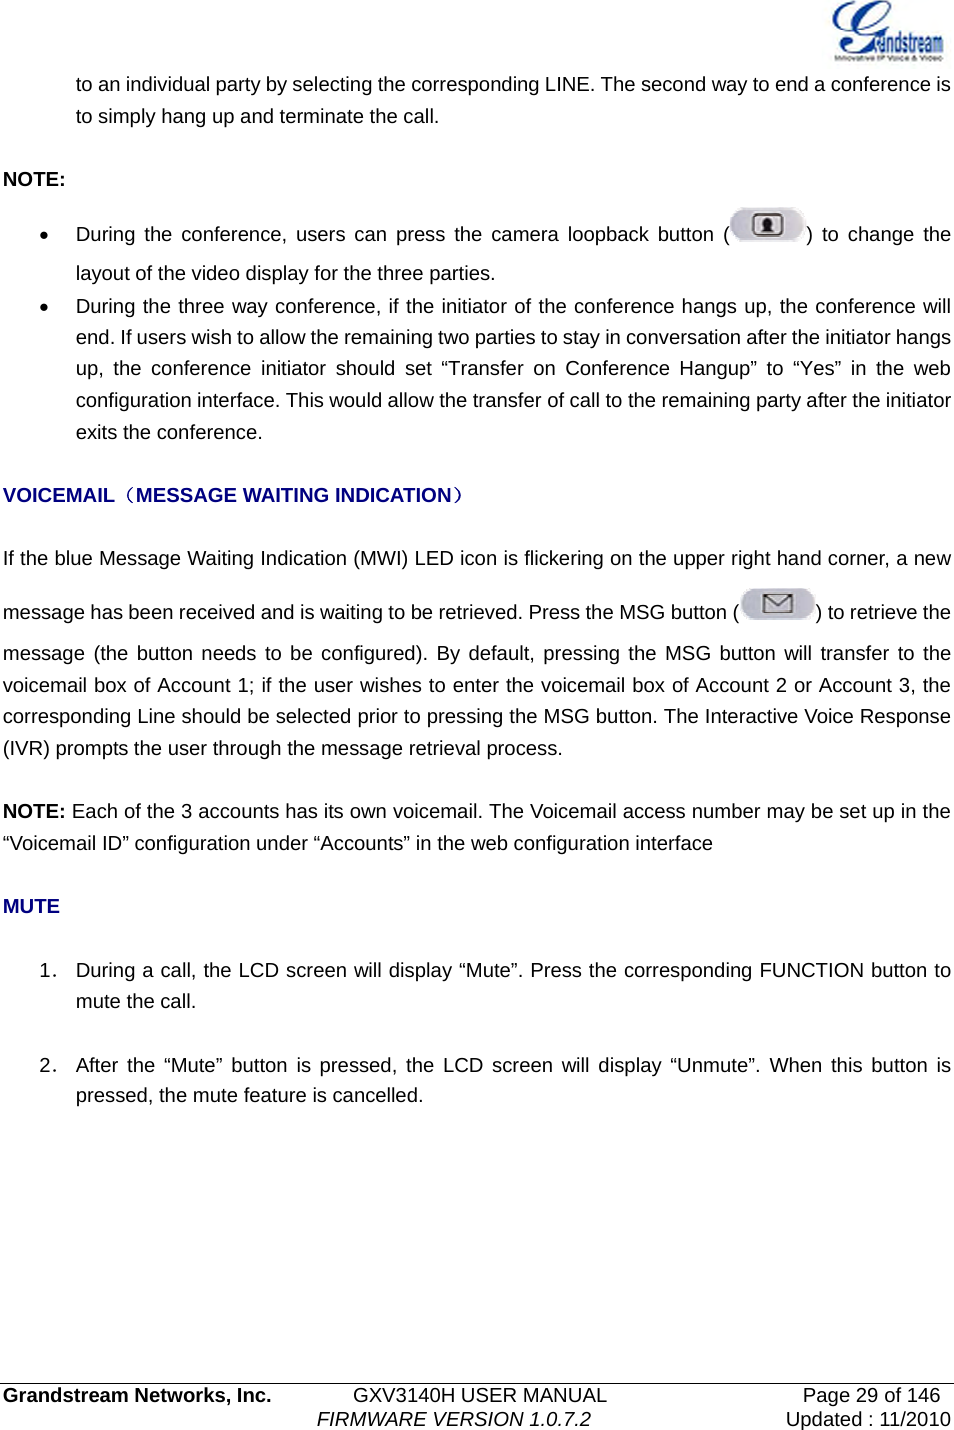
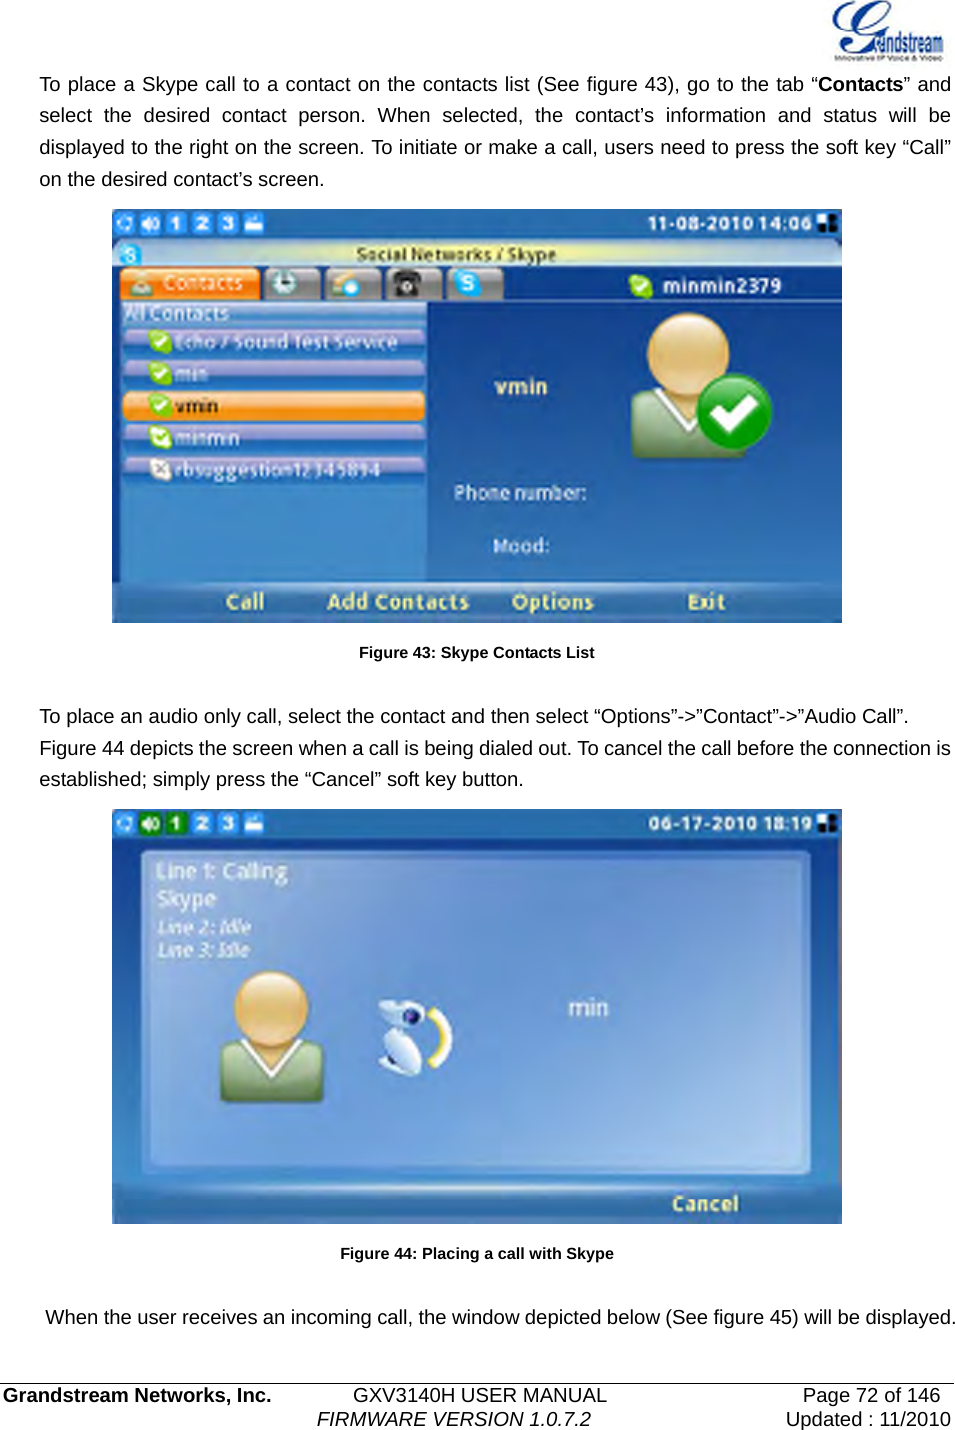
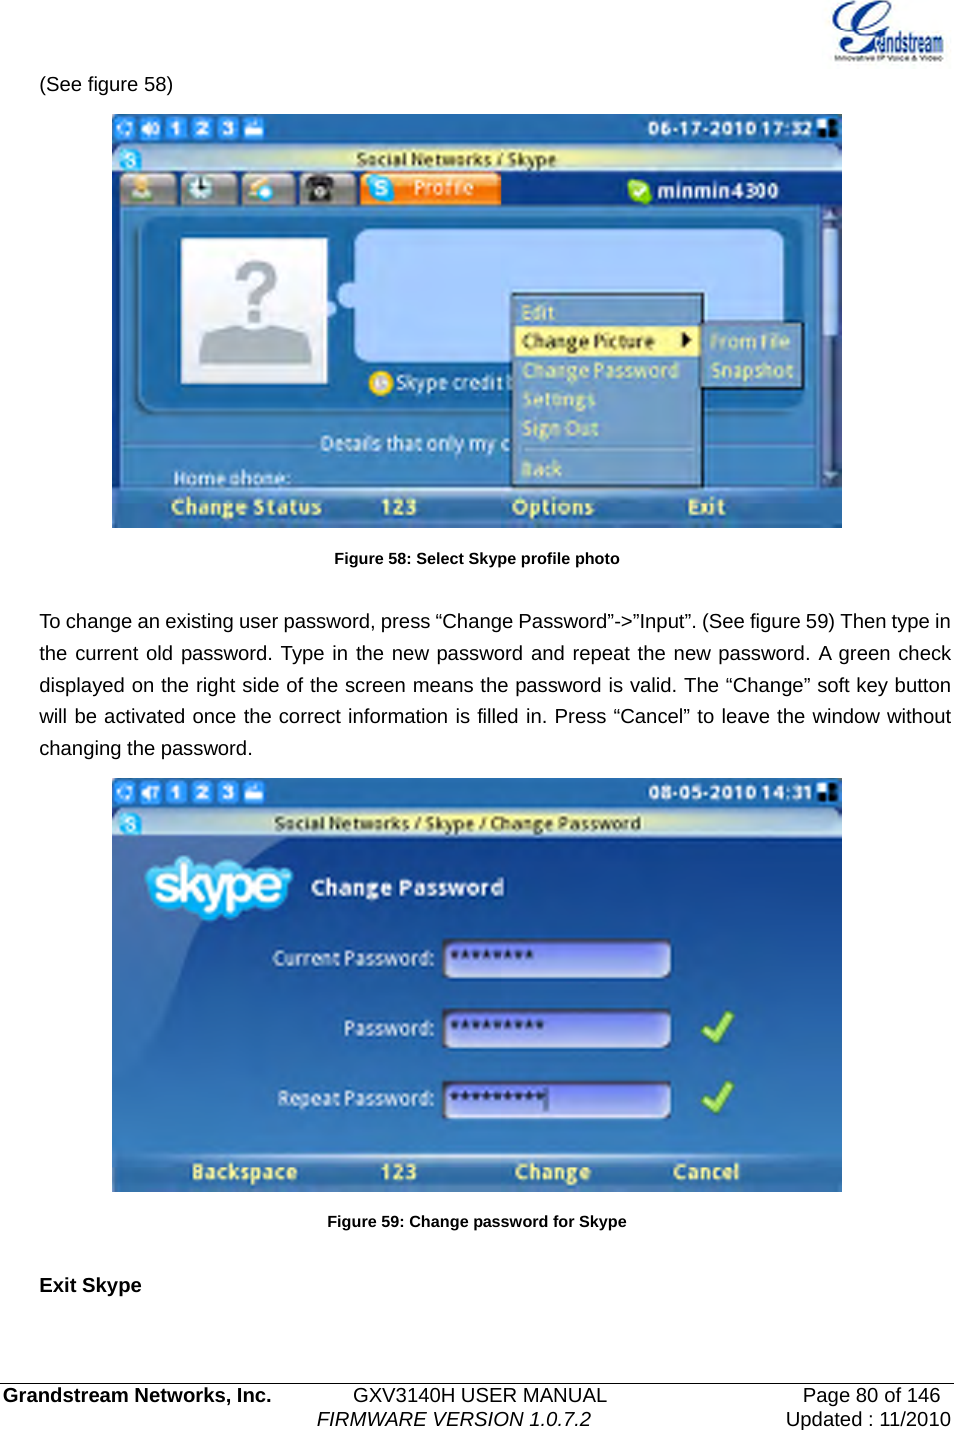
![Grandstream Networks, Inc. GXV3140H USER MANUAL Page 47 of 146 FIRMWARE VERSION 1.0.7.2 Updated : 11/2010 The maximum value is 64 frames. Adjusting these values will also change the jitter buffer. The phone has an algorithm for setting the jitter buffer and the jitter buffer rate is around 20-200ms. For end-users, it is recommended to use the default setting, as incorrect settings may influence the quality of audio. G723 Rate This defines the encoding rate for G723 vocoder, and can be 6.3Kb/s or 5.3Kb/s. Please confirm with your service provider. Jitter Buffer Type Users can select either Fixed or Adaptive based on network conditions. The default is Adaptive. Jitter Buffer Length User can select Low, Medium, or High based on network conditions. The default is Medium. Account/Call Settings Dial Plan Prefix Sets the prefix added to each dialed number. Dial Plan Dial Plan Rules: 1. Accepted Digits: 1,2,3,4,5,6,7,8,9,0 , *, #, A,a,B,b,C,c,D,d 2. Grammar: x - any digit from 0-9; a) xx+ - at least 2 digit numbers b) xx. - only 2 digit numbers c) ^ - exclude d) [3-5] - any digit of 3, 4, or 5 e) [147] - any digit of 1, 4, or 7 f) <2=011> - replace digit 2 with 011 when dialing g) | - the OR operand • Example 1: {[369]11 | 1617xxxxxxx} Allow 311, 611, and 911 or any 10 digit numbers with leading digits 1617 • Example 2: {^1900x+ | <=1617>xxxxxxx} Block any number of leading digits 1900 or add prefix 1617 for any dialed 7 digit numbers • Example 3: {1xxx[2-9]xxxxxx | <2=011>x+} Allows any number with leading digit 1 followed by a 3 digit number, followed by any number between 2 and 9, followed by any 7 digit number OR Allows any length of numbers with leading digit 2, replacing the 2 with 011 when dialed.](https://usermanual.wiki/Grandstream-Networks/GXV3140H/User-Guide-1397274-Page-47.png)
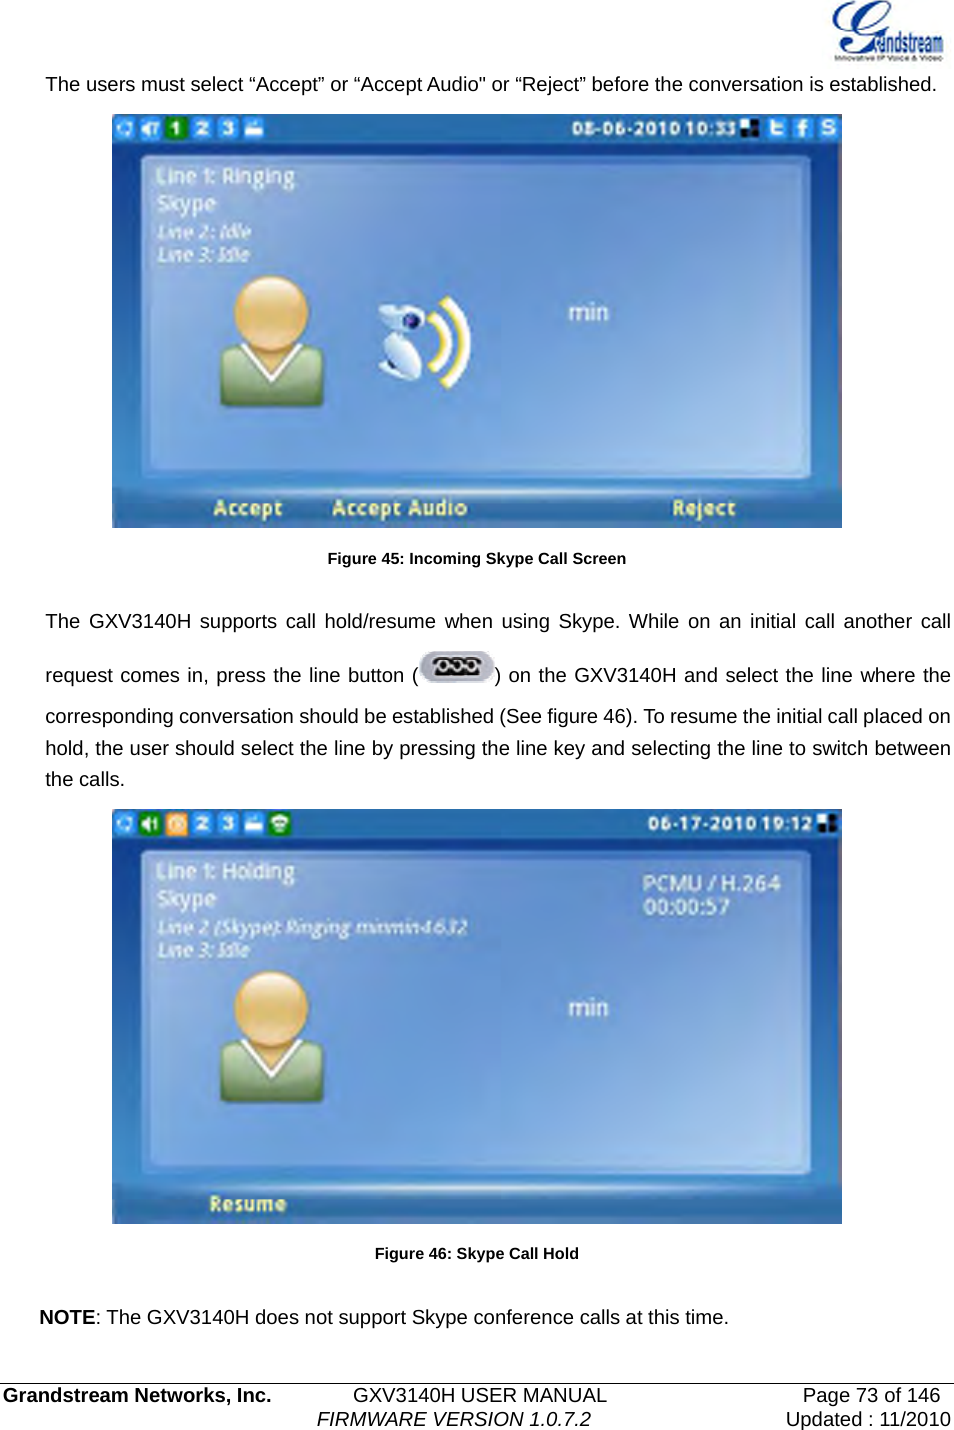
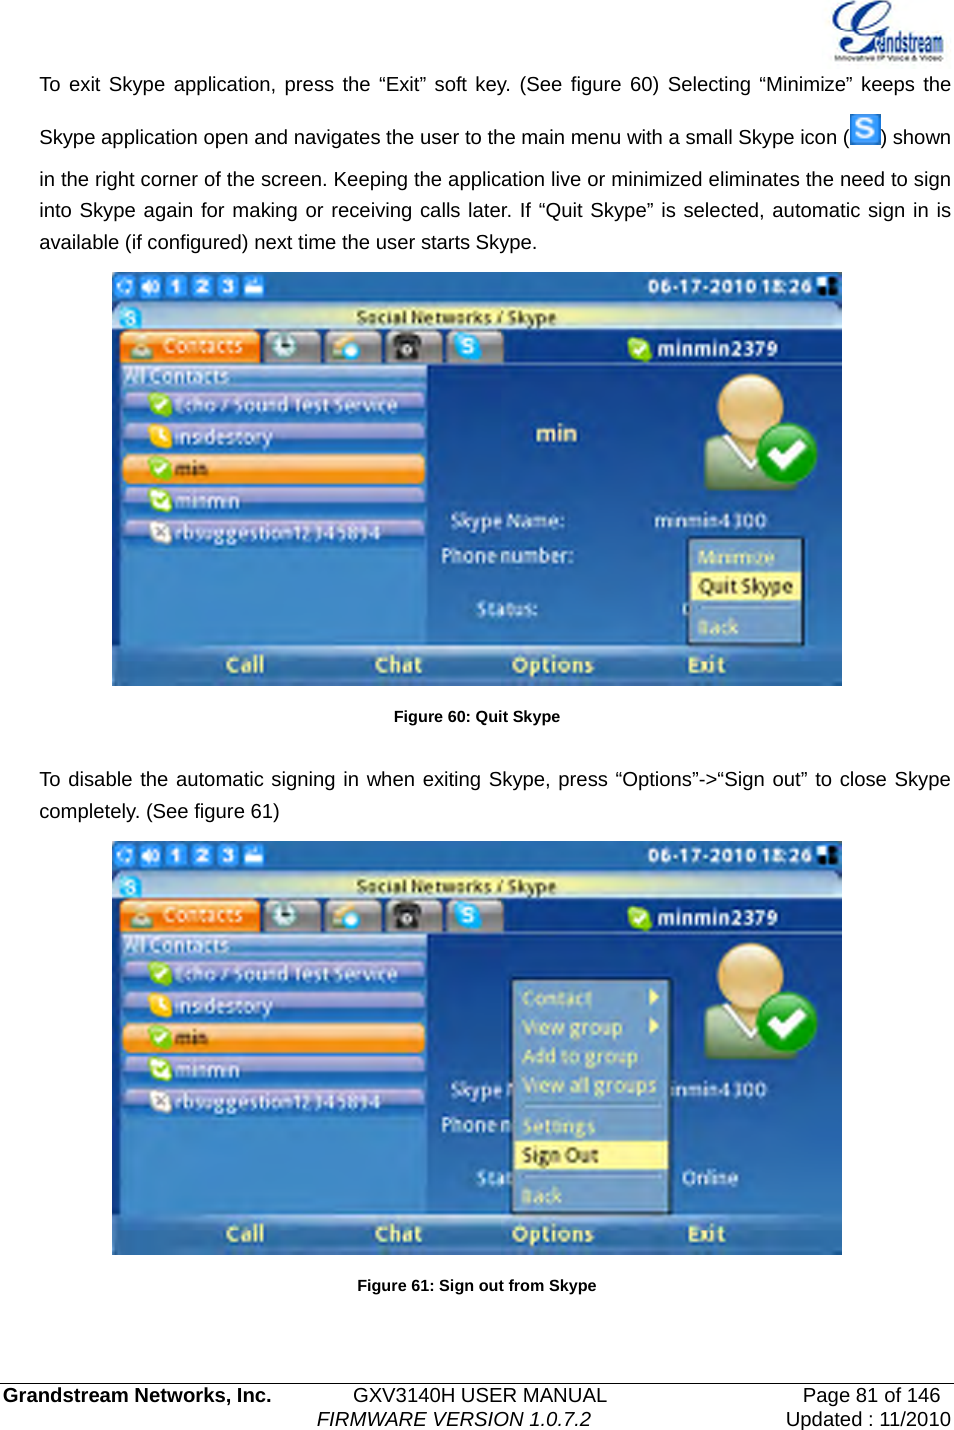
![Grandstream Networks, Inc. GXV3140H USER MANUAL Page 48 of 146 FIRMWARE VERSION 1.0.7.2 Updated : 11/2010 3. Default: Outgoing – {x+} Allow any length of numbers. Example of a simple dial plan used in a Home/Office in the US: { ^1900x. | <=1617>[2-9]xxxxxx | 1[2-9]xx[2-9]xxxxxx | 011[2-9]x. | [3469]11 } Explanation of example rule (reading from left to right): • ^1900x. - prevents dialing any number started with 1900 • <=1617>[2-9]xxxxxx - allows dialing to local area code (617) numbers by dialing 7 numbers and 1617 area code will be added automatically • 1[2-9]xx[2-9]xxxxxx |- allows dialing to any US/Canada Number with 11 digits length • 011[2-9]x. - allows international calls starting with 011 • [3469]11 - allow dialing special and emergency numbers 311, 411, 611 and 911 NOTE: In some cases where the user wishes to dial strings such as *123 to activate voice mail or other applications provided by their service provider, the * should be predefined inside the dial plan feature. An example dial plan will be: { *x+ } which allows the user to dial * followed by any length of numbers. Early Dial The default setting is NO. Use only if the proxy supports 484 response. Refer to Use Target Contact The default is NO. If set to YES, then for Attended Transfer, the “Refer-To” header uses the transferred target’s contact header information. Auto Answer The default setting is NO. If it is set to YES, the GXV3140H will play a “beep” sound and answer the phone automatically on the speaker. Send Anonymous If set to YES, the “From” header in the outgoing SIP messages will be set to anonymous to block the caller ID from displaying. The default setting is NO. Anonymous Call Rejection The default setting is NO;If set to YES,any anonymous call will be rejected(with 486 Busy message) Special Feature Different soft switch vendors have special requirements; therefore users may need to select special features to meet these requirements. Users can choose from Standard, CBCOM, RNK, China Mobile, ZTE IMS and Mobotix depending on their need. The default setting is Standard. Enable Call Features The default is set to YES. If it is set to NO, call features are disabled. Call Forward Unconditional Sets the number to forward to unconditionally.](https://usermanual.wiki/Grandstream-Networks/GXV3140H/User-Guide-1397274-Page-48.png)


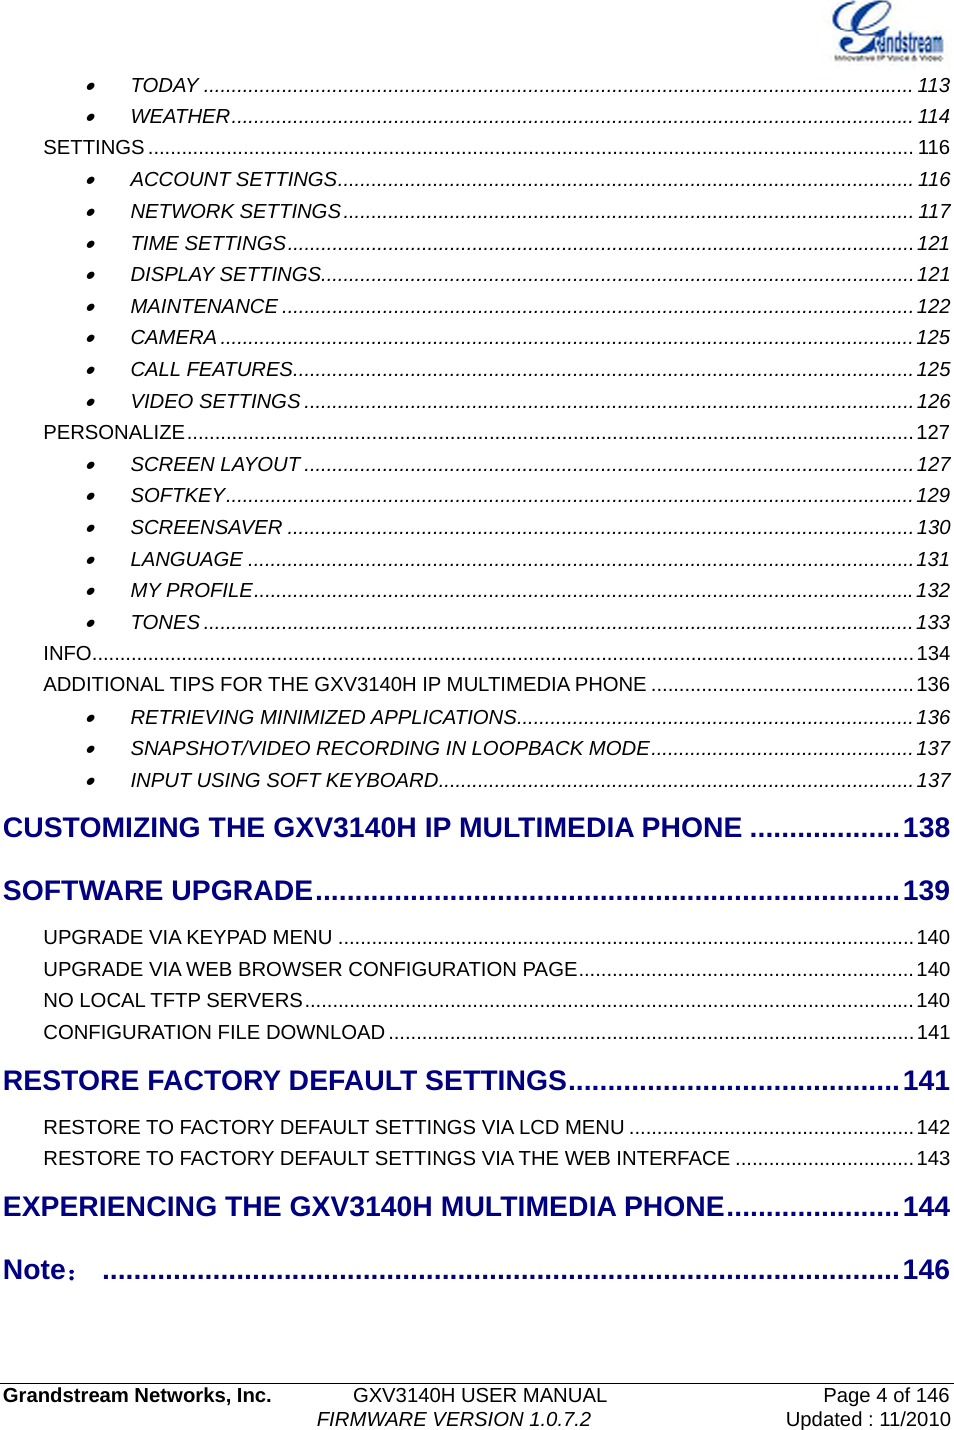
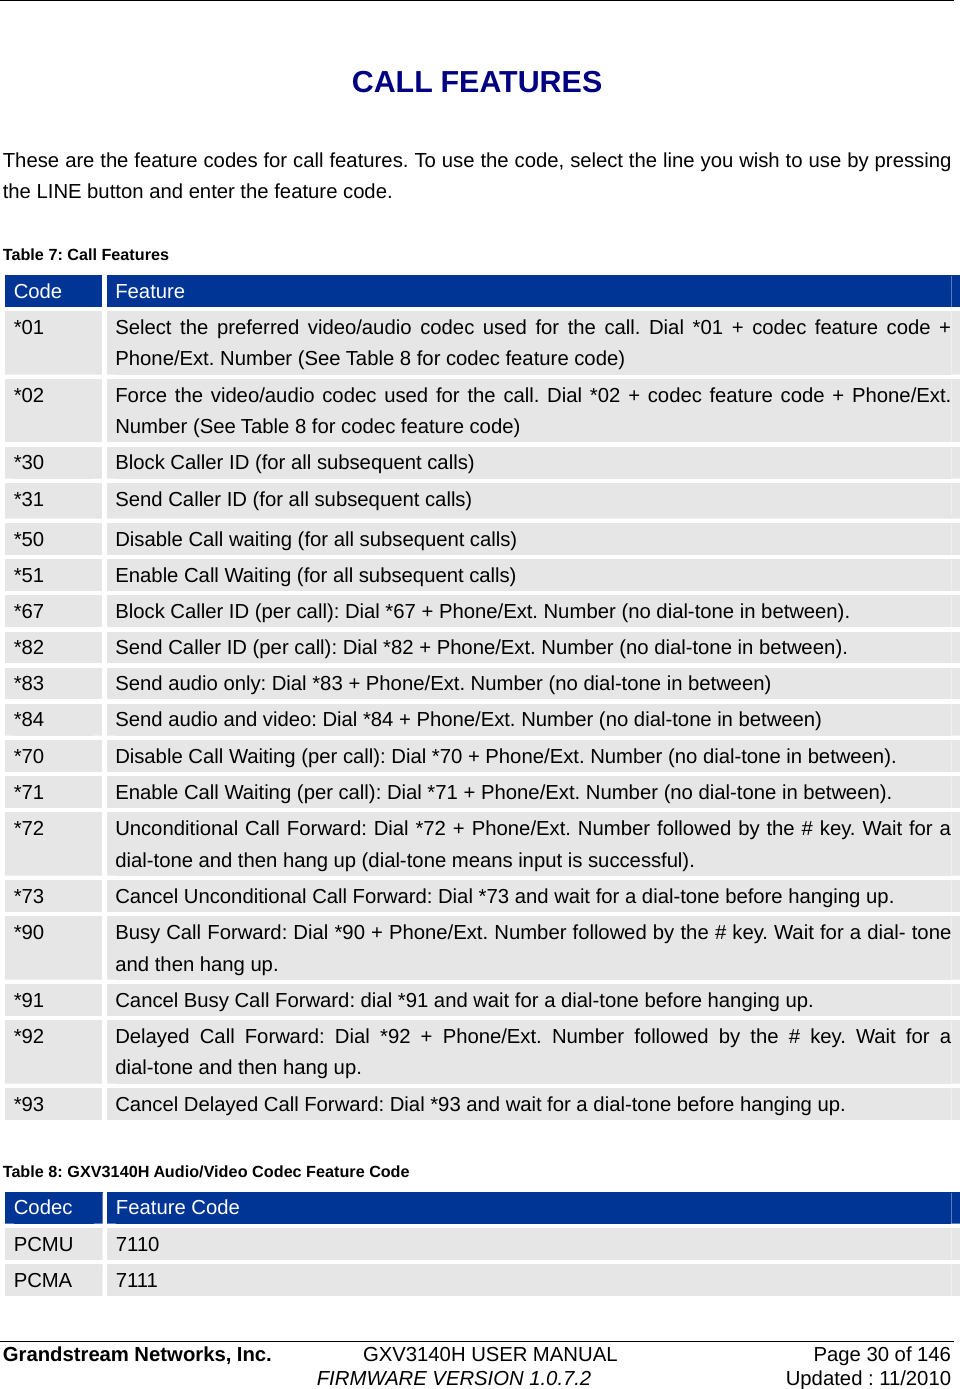
![Grandstream Networks, Inc. GXV3140H USER MANUAL Page 141 of 146 FIRMWARE VERSION 1.0.7.2 Updated : 11/2010 Instructions for local firmware upgrade: 1. Unzip the firmware files and put all of them in the root directory of the TFTP server. 2. Connect the PC running the TFTP server and the GXV3140H device to the same LAN segment. 3. Launch the TFTP server and go to the File menu -> Configure -> Security to change the TFTP server's default setting from "Receive Only" to "Transmit Only" for the firmware upgrade. 4. Start the TFTP server and configure the TFTP server in the phone’s web configuration interface. 5. Configure the Firmware Server Path to the IP address of the PC. 6. Update the changes and reboot the GXV3140H. End users can also choose to download a free HTTP server from http://httpd.apache.org/ or use Microsoft IIS web server. NOTE: When the GXV3140H boots up, it will send a TFTP or HTTP request to download the configuration file cfgxxxxxxxxxxxx” (“xxxxxxxxxxxx” is the MAC address of the phone). If it is a normal TFTP or HTTP upgrade, the following messages “TFTP Error from [IP ADRESS] requesting cfg000b82023dd4: File does not exist. Configuration File Download” can be ignored in the TFTP/HTTP server log. CONFIGURATION FILE DOWNLOAD Grandstream SIP Devices can be configured via the Web Interface as well as via a Configuration File (binary or XML) through TFTP or HTTP/HTTPS. The “Config Server Path” is the TFTP or HTTP/HTTPS server path for the configuration file. It needs to be set to a valid URL, either in FQDN or IP address format. The “Config Server Path” can be the same or different from the “Firmware Server Path”. A configuration parameter is associated with each particular field in the web configuration page. A parameter consists of a Capital letter P and 2 to 3 (Could be extended to 4 in the future) digit numeric numbers. i.e., P2 is associated with the “Admin Password” in the ADVANCED SETTINGS page. For a detailed parameter list, please refer to the corresponding firmware release configuration template. When Grandstream Device boots up or reboots, it will issue a request for a configuration XML file named “xxxxxxxxxxxx.xml” followed by a file named “cfgxxxxxxxxxxxx”, where “xxxxxxxxxxxx” is the MAC address of the device, i.e., “cfg000b820102ab”. The configuration file name should be in lower case letters. For more details on XML provisioning, please refer to: http://www.grandstream.com/support/gxv_series_phone/GXV3140H/documents/GXV3140H_xml_provisioning.pdf RESTORE FACTORY DEFAULT SETTINGS](https://usermanual.wiki/Grandstream-Networks/GXV3140H/User-Guide-1397274-Page-141.png)