Grandstream Networks GXV3275 IP Multimedia Phone User Manual USERS MANUAL 2 OF 2
Grandstream Networks, Inc. IP Multimedia Phone USERS MANUAL 2 OF 2
Contents
- 1. User Manual
- 2. User Manual 1
- 3. User Manual 2
- 4. REGULATORY MANUAL
- 5. USERS MANUAL 1 OF 2
- 6. USERS MANUAL 2 OF 2
USERS MANUAL 2 OF 2
GXV3275 User Manual
TOOLS
Grandstream Co., Ltd
Software Version:1.0.0.9 Document Version:0.2
95
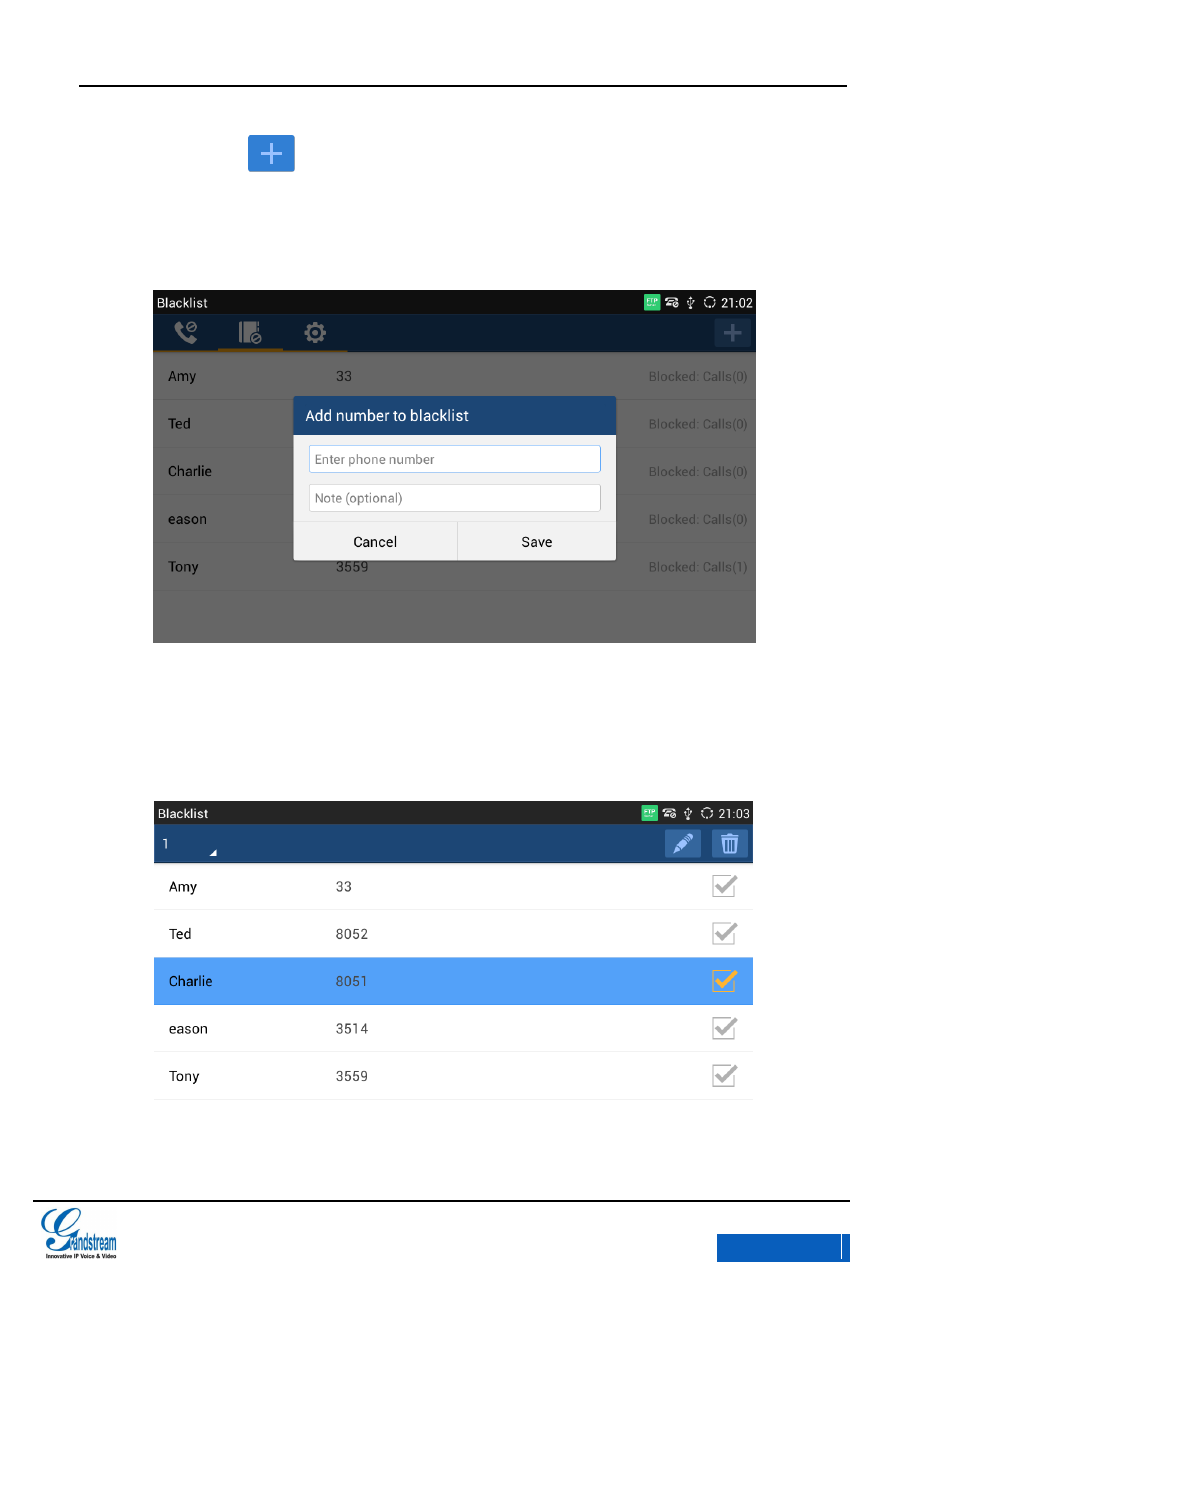
Long press on the upper right corner to add number to blacklist. There are 3 ways
to add number: Manually add, Add from contacts, Add from Call History. Select one way
and tap on”OK” to add the corresponding number to blacklist.
Figure 91 GXV3275 Manually Add Number to Blacklist
Long press one blacklist log to enter the editing mode to edit or delete the selected
contacts. Users could edit the contact If select one blacklist entry only. See figure 92.
x-PDFDivision
GXV3275 User Manual
TOOLS
Grandstream Co., Ltd
Software Version:1.0.0.9 Document Version:0.2
96
Figure 92 GXV3275 Editing Blacklist List
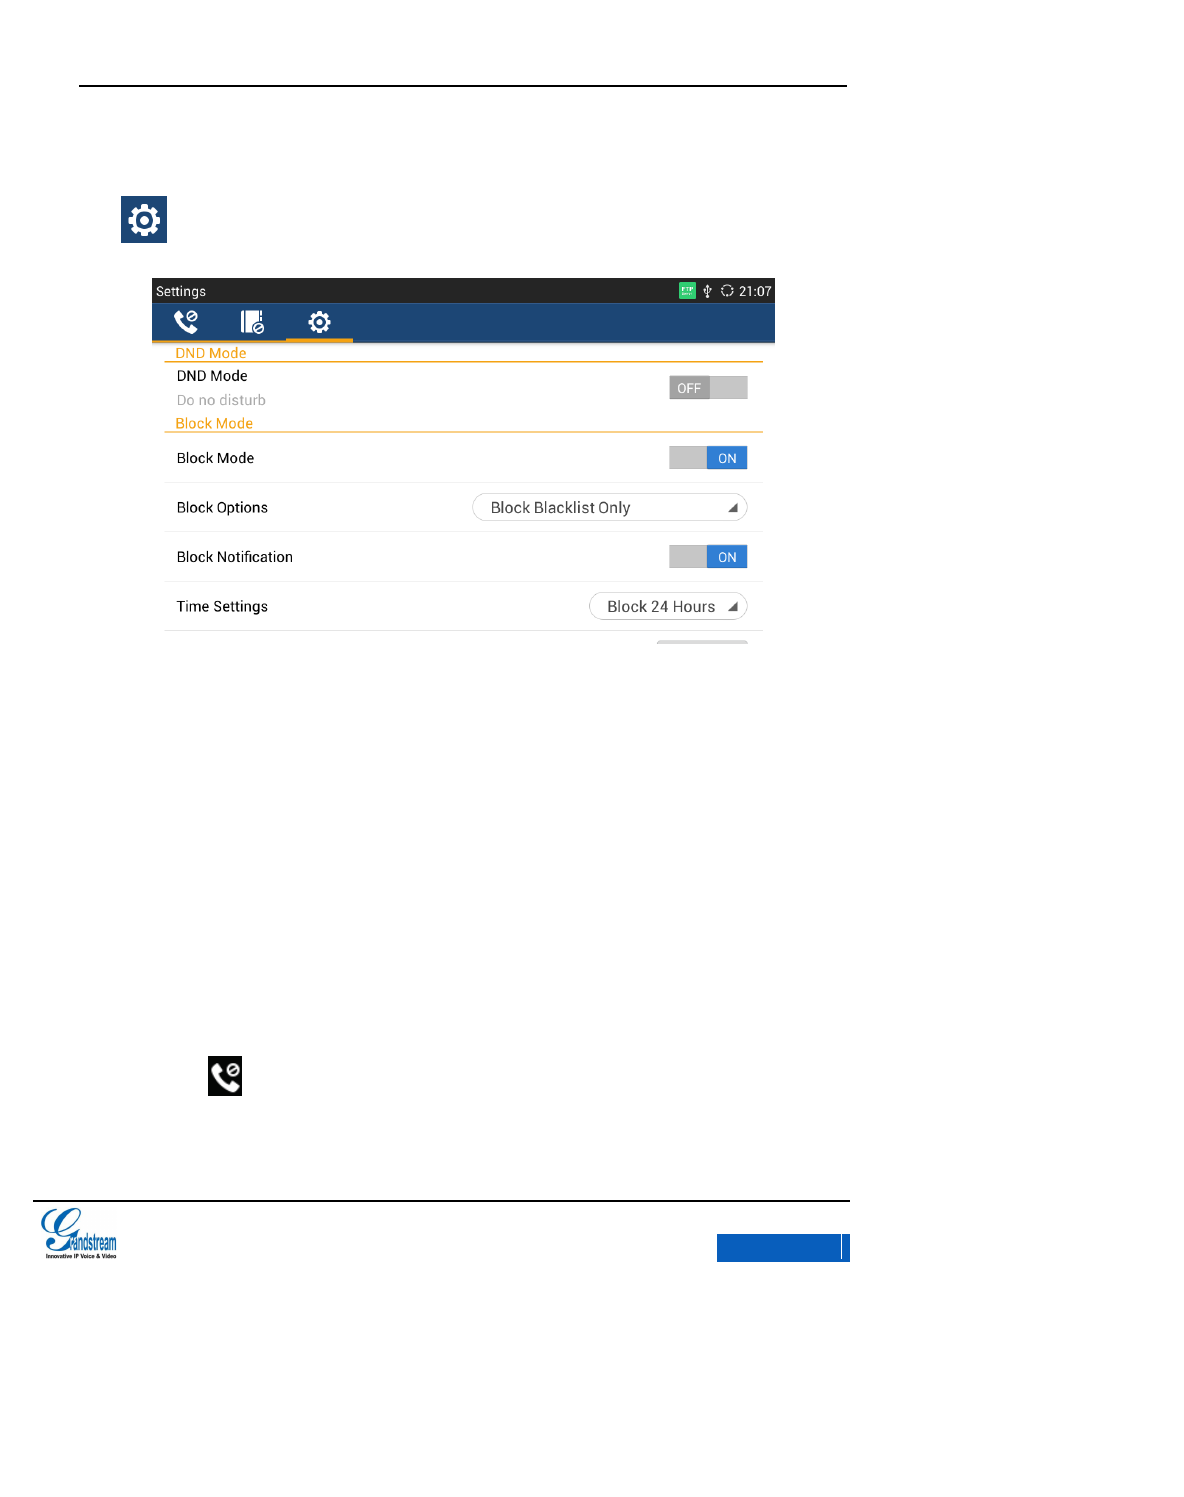
: Blacklist Settings.
Figure 93 GXV3275 Blacklist Settings
DND Mode: Turn on/off DND mode. Once it’s turned on, the phone would reject all incoming
calls.
Block Mode: Turn on/off Block Mode. Once it's turned on, the incoming calls from the numbers
in the blacklist will be rejected.
Block Options: Set the types of incoming calls. This option is valid once the Block Mode is
turned on.
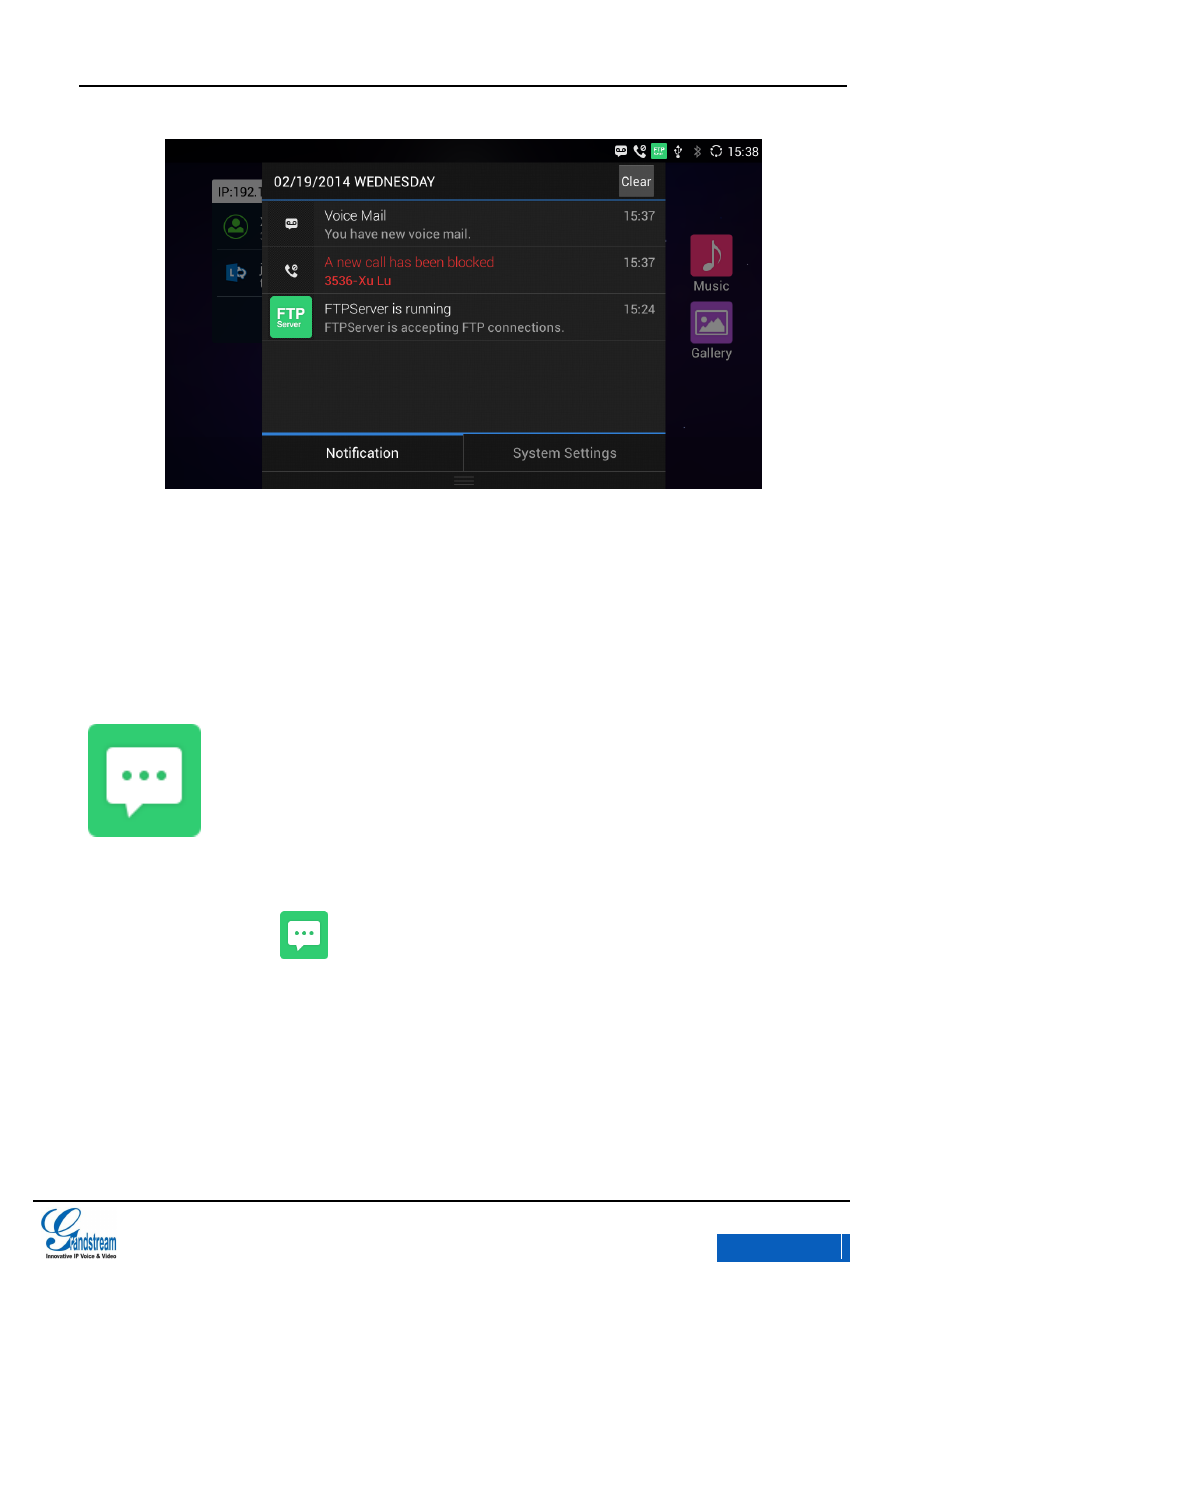
Block Notification: Set up whether to notify user after blocked calls. Once it's turned on, the
block icon will be displayed in the status bar after the device blocked calls. Users could
go to the notification bar to view details. See figure 94.
x-PDFDivision
GXV3275 User Manual
TOOLS
Grandstream Co., Ltd
Software Version:1.0.0.9 Document Version:0.2
97
Figure 94 GXV3275 Blacklist –Block History Notification
Time Settings: Set up the block schedule.
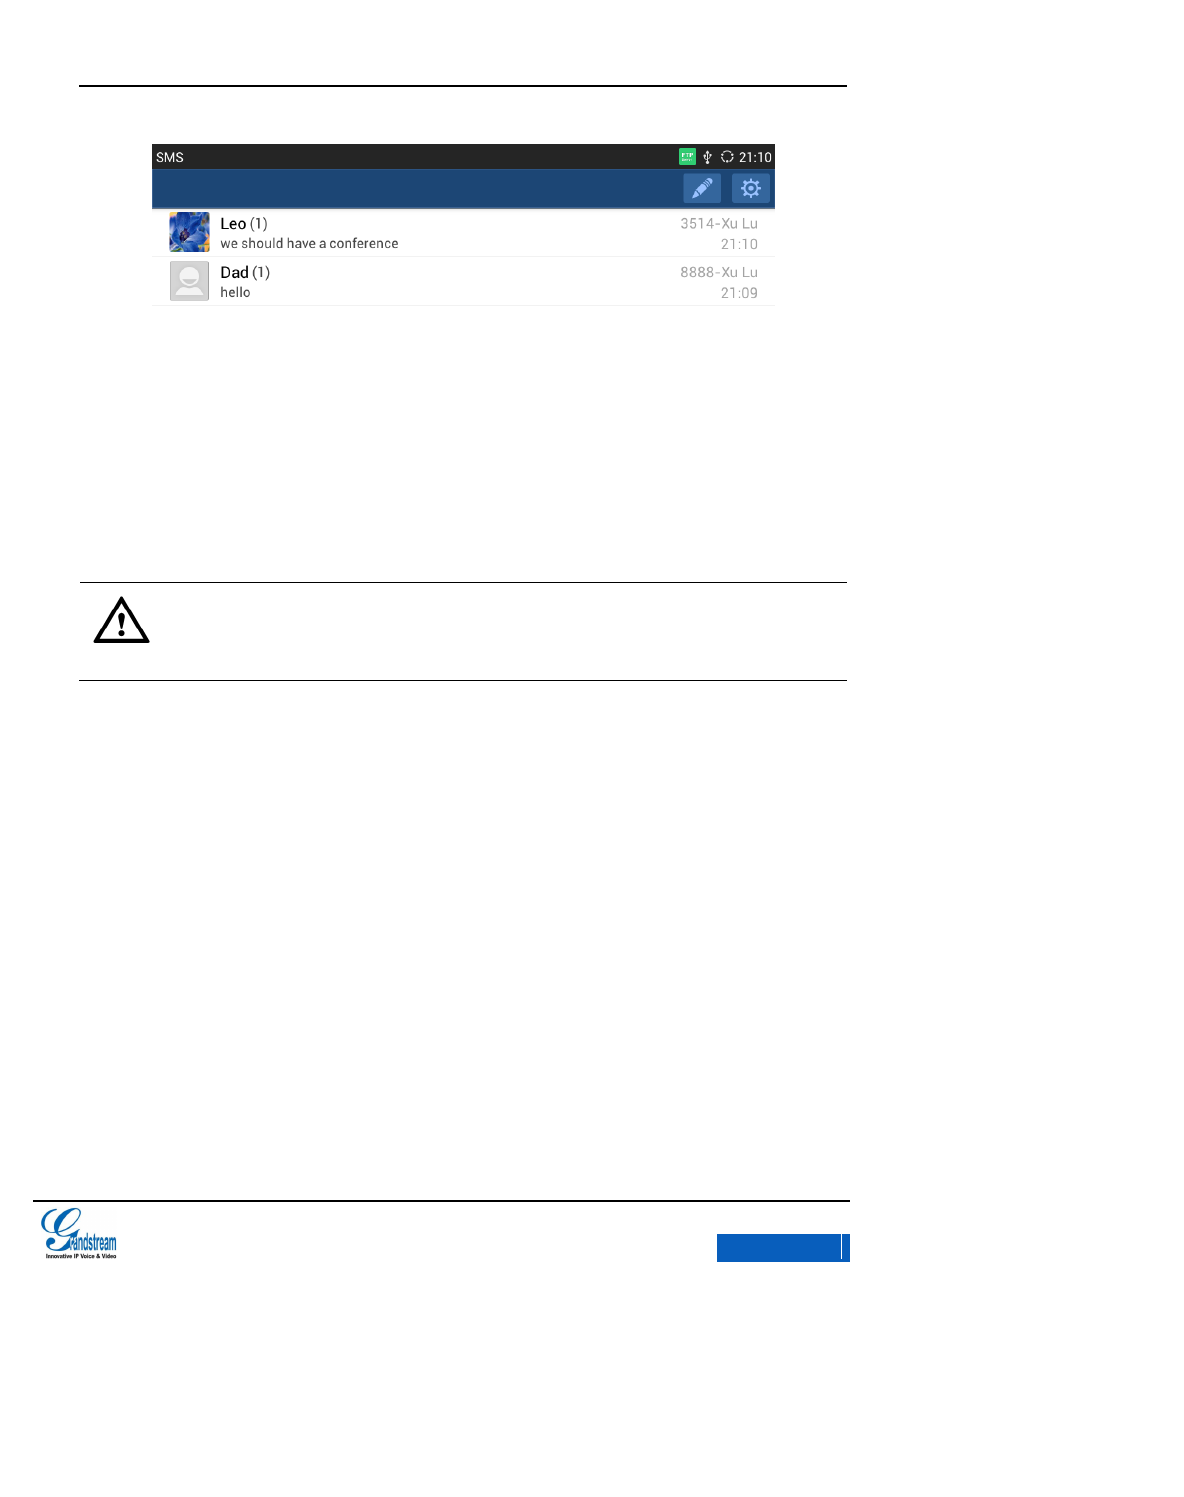
SMS
GXV3275 enables you to send/receive text message between phones or other devices equipped
with SMS function. Click in the main menu to enter SMS page as shown in figure 95 below.
x-PDFDivision
GXV3275 User Manual
TOOLS
Grandstream Co., Ltd
Software Version:1.0.0.9 Document Version:0.2
98
Figure 95 GXV3275 SMS List
Note:
SMS function is not available in all countries and regions, for more information, please
contact your service provider.
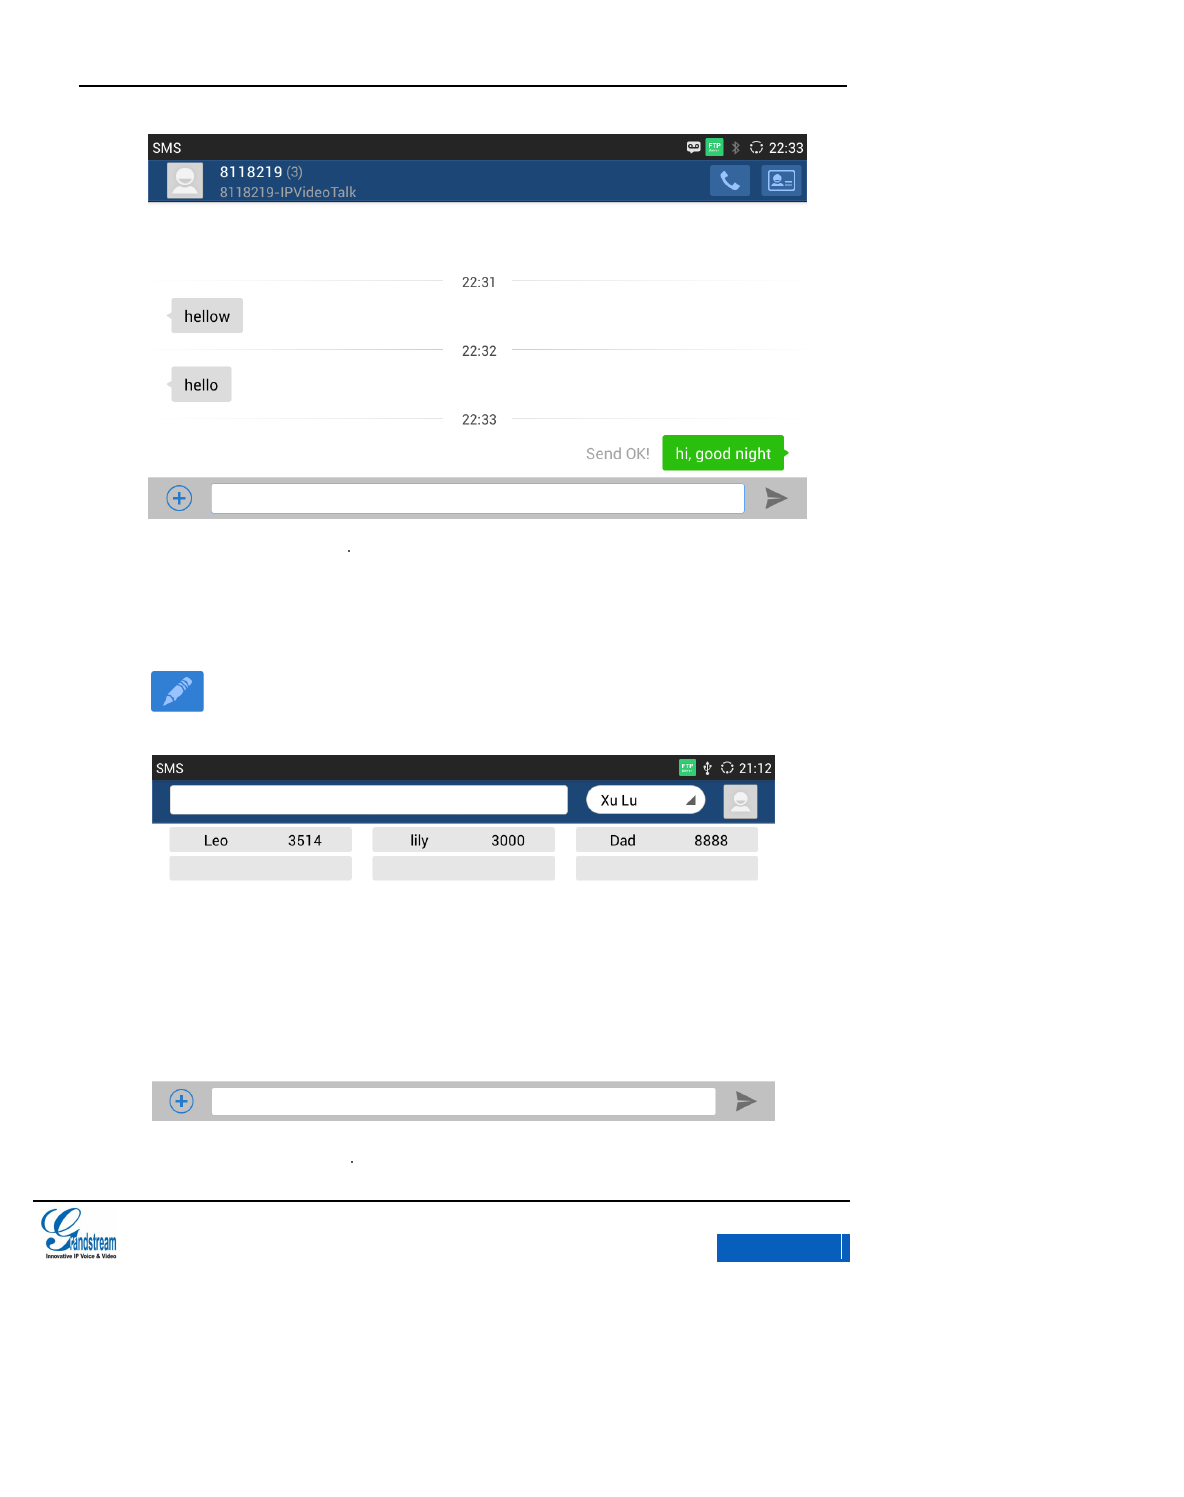
VIEW SMS
The SMS page displays the received and sent SMS list, which are classified by contacts names or
numbers as well as sorted by the time receive or send SMS. Tap on one specific SMS entry to view
the interaction with the details of the contact's message, as shown in figure 96 below.
x-PDFDivision
GXV3275 User Manual
TOOLS
Grandstream Co., Ltd
Software Version:1.0.0.9 Document Version:0.2
99
Figure 96 GXV3275 Send SMS
NEW SMS
Tap on in the toolbar on the SMS page to access SMS draft page. See figure 97.
Figure 97 GXV3275 New SMS
x-PDFDivision
GXV3275 User Manual
TOOLS
Grandstream Co., Ltd
Software Version:1.0.0.9 Document Version:0.2
100
1. Select the account to send SMS in the drop-down menu.
2. Add contact. GXV3275 supports adding contact from the Contacts as well as directly input
phone number.
Input the number in the textbox then input comma to add another contact.
Press to select contacts or groups from the Contacts.
3. Click the textbox below to bring out the intelligent keyboard.
4. Input the message via the keyboard then touch “Send”.
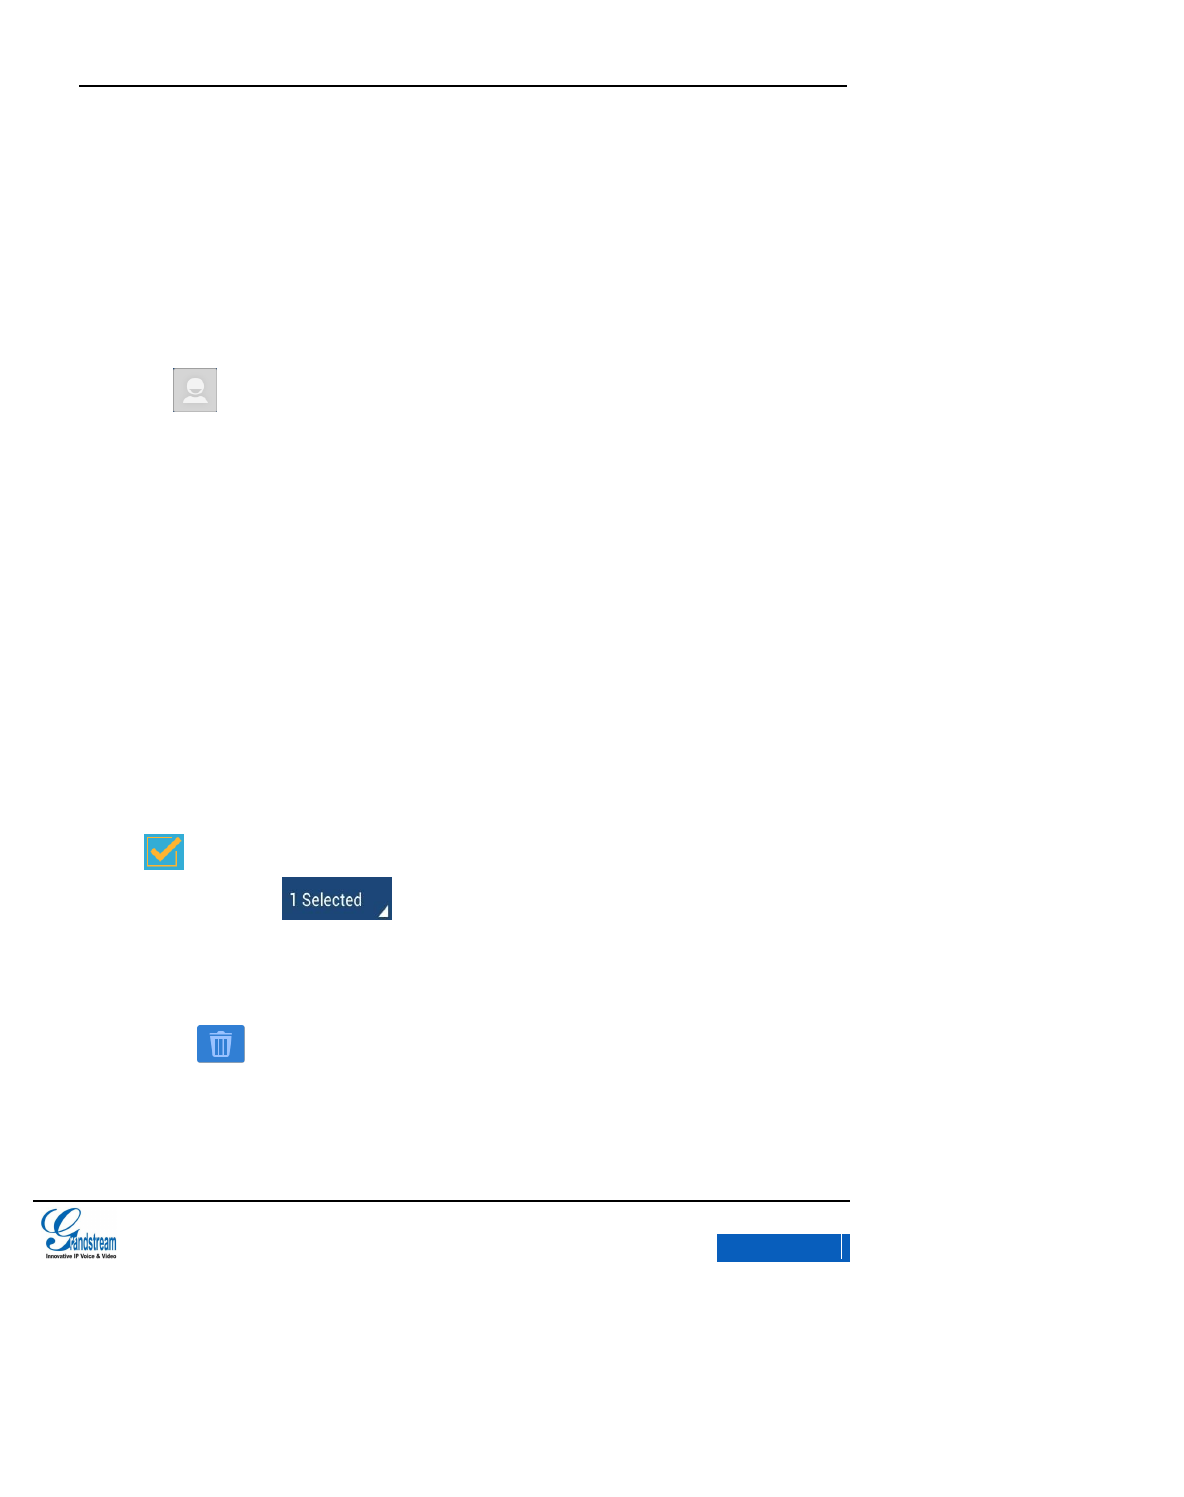
MANAGE SMS
DELETE SMS
1. Long press one SMS to entry the editing mode.
2. Check the SMS you would like to delete and when it turns to blue background and the icon
indicates the SMS has been selected and click again to unselect the SMS. Users
could also tap on on the upper left corner to batch select/unselect.
Select all indicates selects all SMS in the list.
Unselect all indicates unselect all SMS in the list.
3. Press to delete the selected message.
x-PDFDivision
GXV3275 User Manual
TOOLS
Grandstream Co., Ltd
Software Version:1.0.0.9 Document Version:0.2
101
RECORDER
Users could record conference, institution and personal notes via GXV3275 Recorder conveniently.
There is no time limit to recording time and the larger the available storage capacity is, the longer
the recording time is. Users could also find the recording file in the recorder and listen to it.
Figure 98 GXV3275 Recorder
NORMAL RECORDER
x-PDFDivision
GXV3275 User Manual
TOOLS
Grandstream Co., Ltd
Software Version:1.0.0.9 Document Version:0.2
102
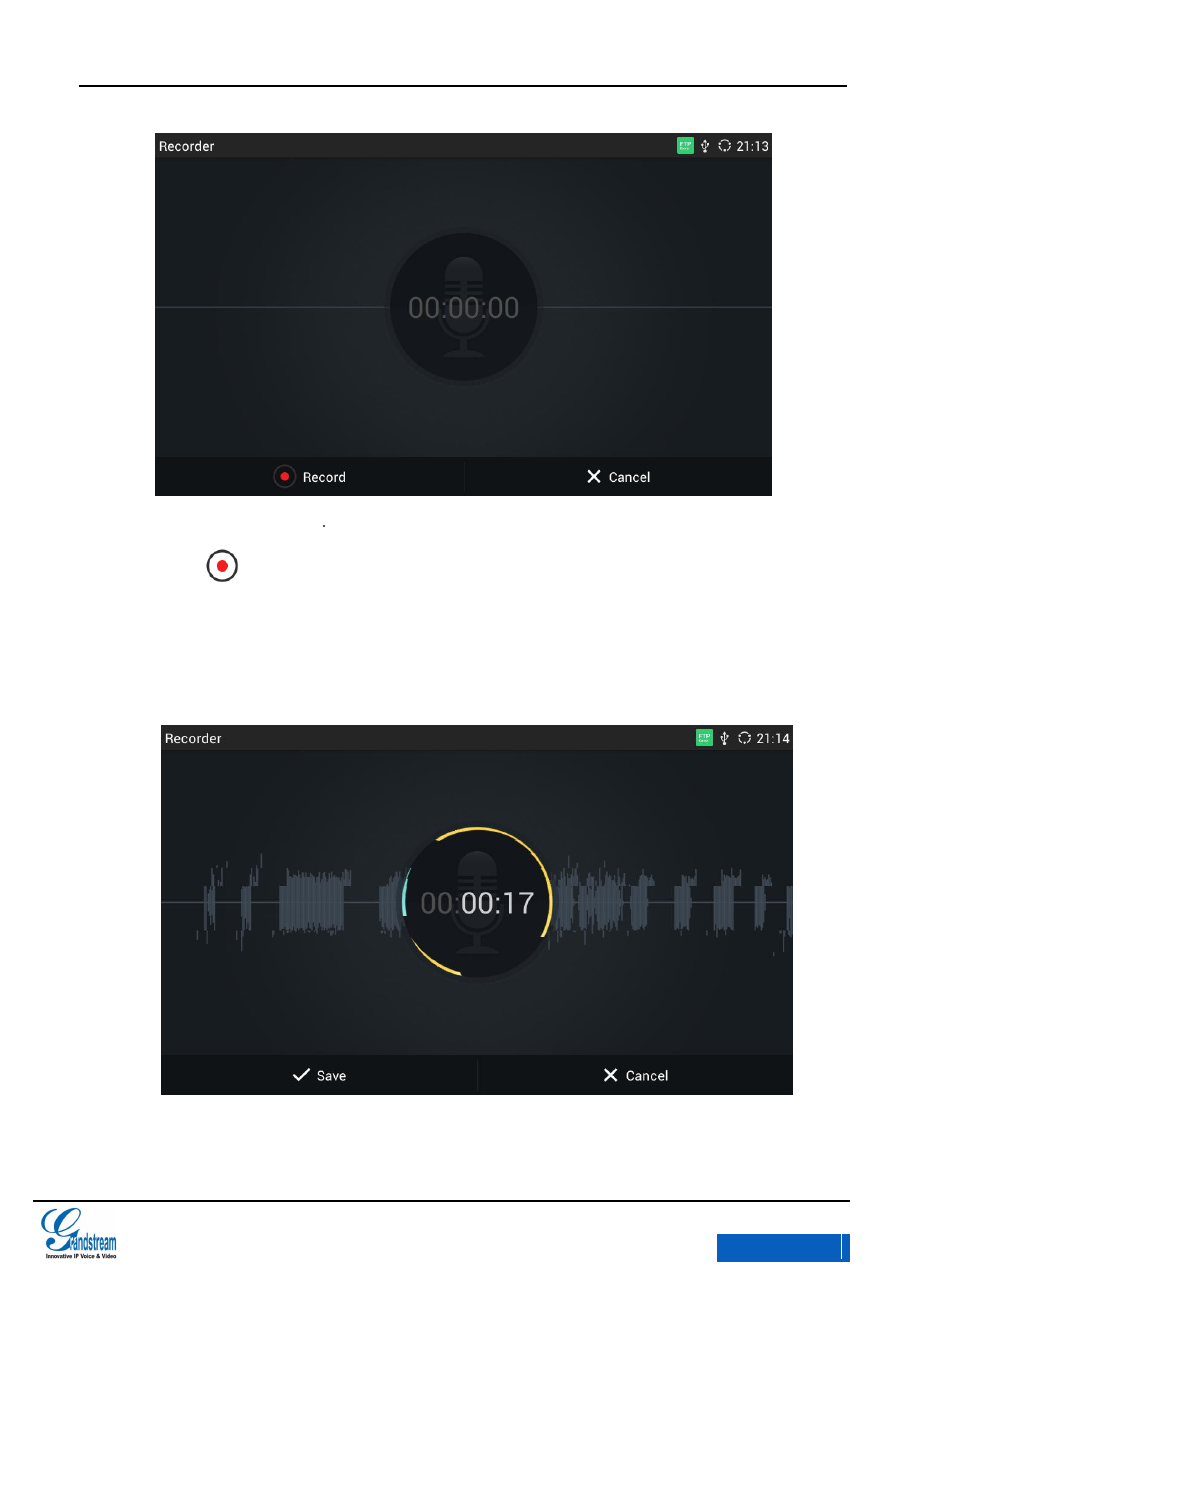
Figure 99 GXV3275 Normal Recorder
1. Tap on to initiate recording.
2. Click “Save” to save the record file, click “Cancel” will bring out the dialog for users to
confirm whether to save the file or not and to stop recording.
Figure 100 GXV3275 Normal Record-Recording
x-PDFDivision
GXV3275 User Manual
TOOLS
Grandstream Co., Ltd
Software Version:1.0.0.9 Document Version:0.2
103
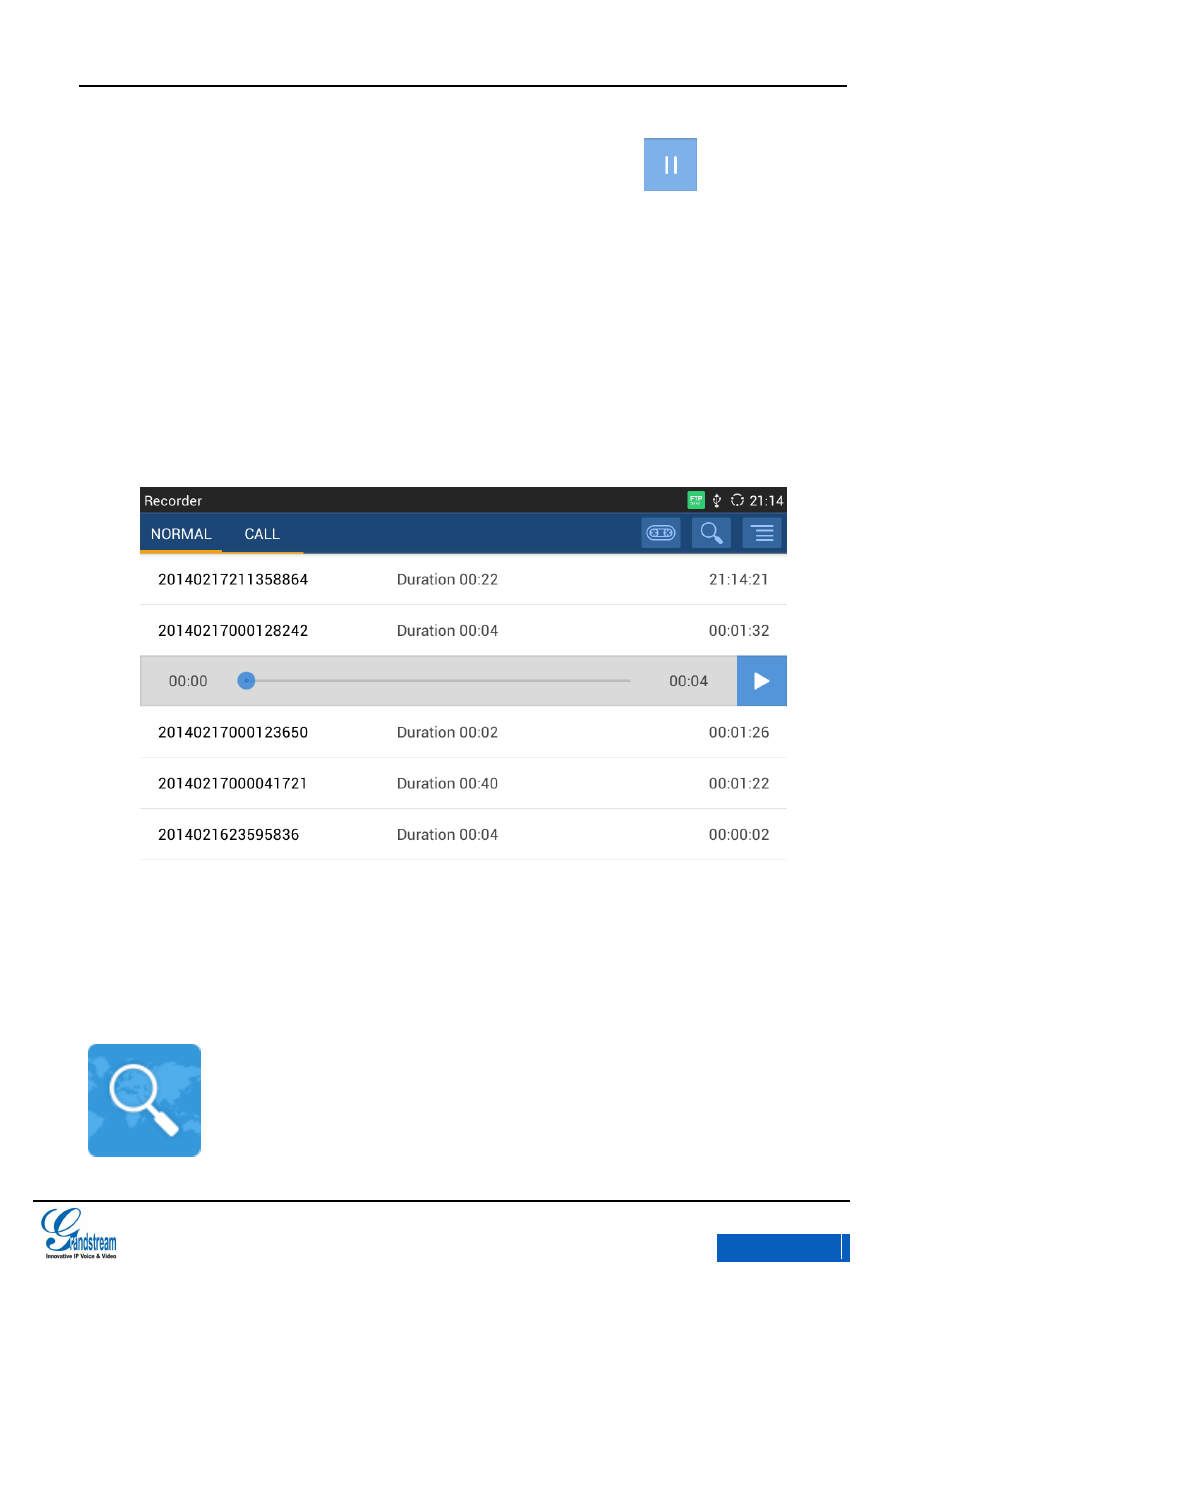
3. Go back to the Recorder page, select one recording file and click on the right of the
progress bar to play the file.
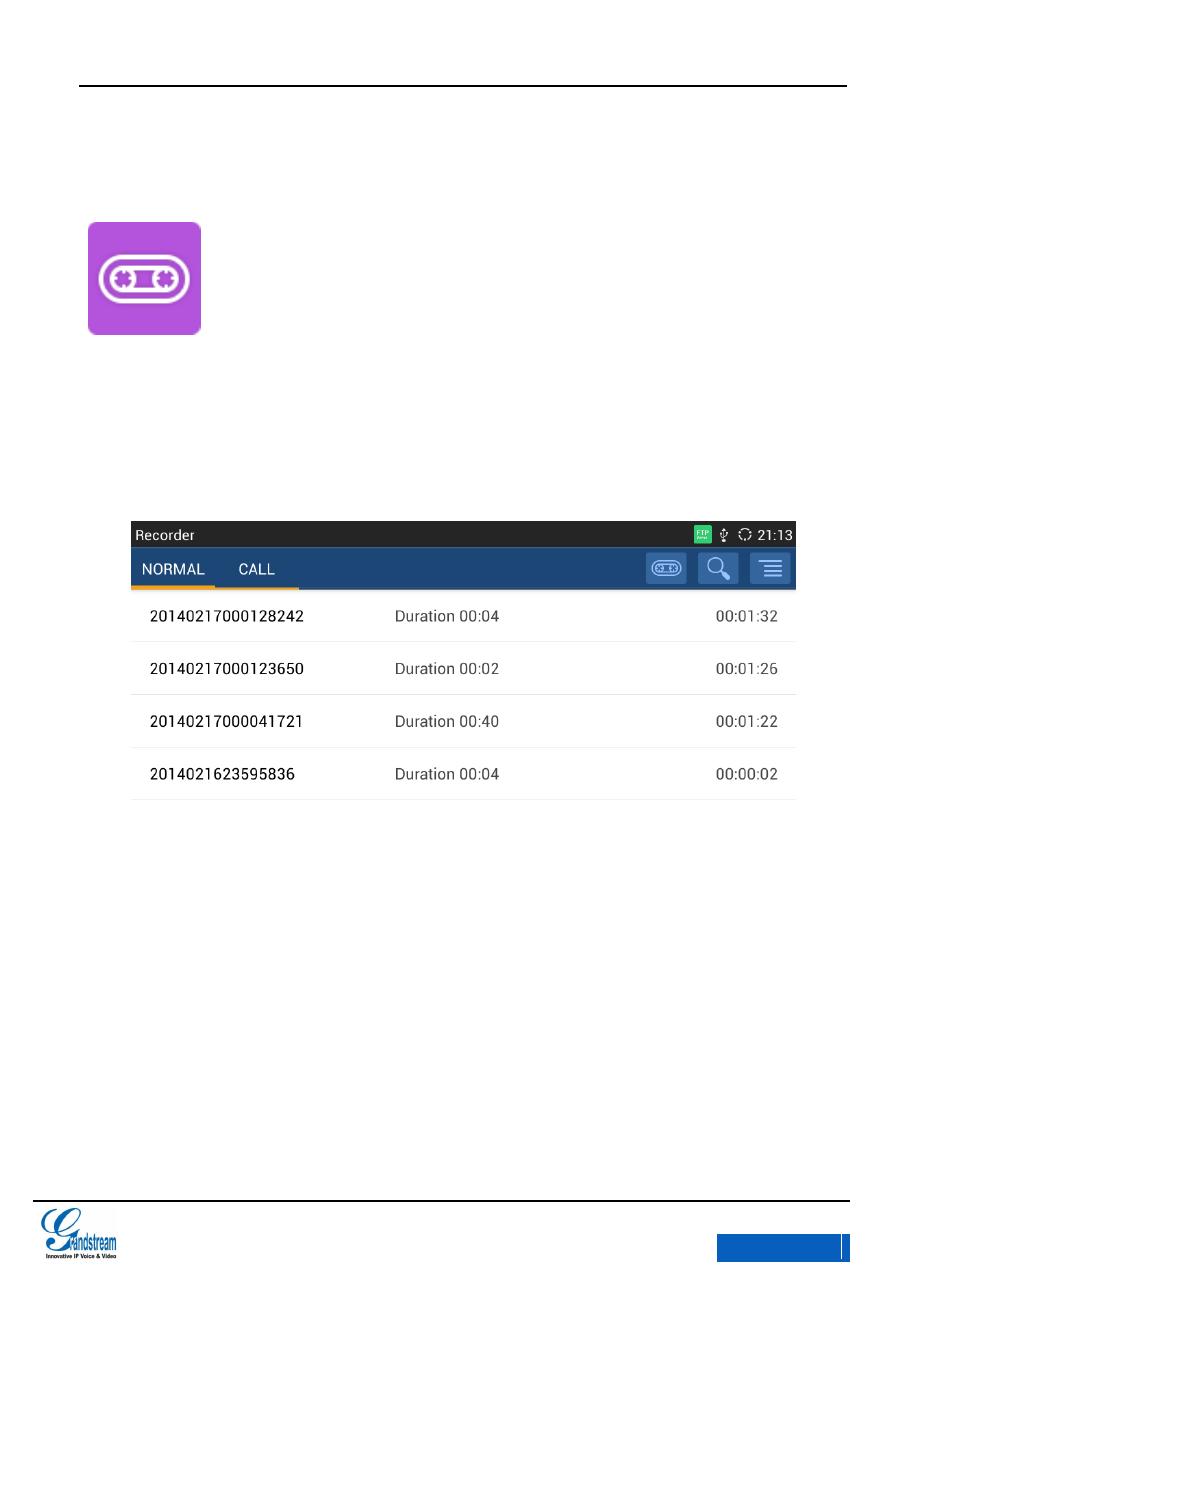
CALL RECORDER
In the process of an active call, the recording file will be saved on the phone. Users can only listen
to it via Recorder. See figure 101 below.
Figure 101 GXV3275 Call Recordings
IP LOCATION
x-PDFDivision

GXV3275 User Manual
TOOLS
Grandstream Co., Ltd
Software Version:1.0.0.9 Document Version:0.2
104
Based on the IP address provided, the following information will be given: Country, Region and City.
See figure 102.
Figure 102 GXV3275 IP Location
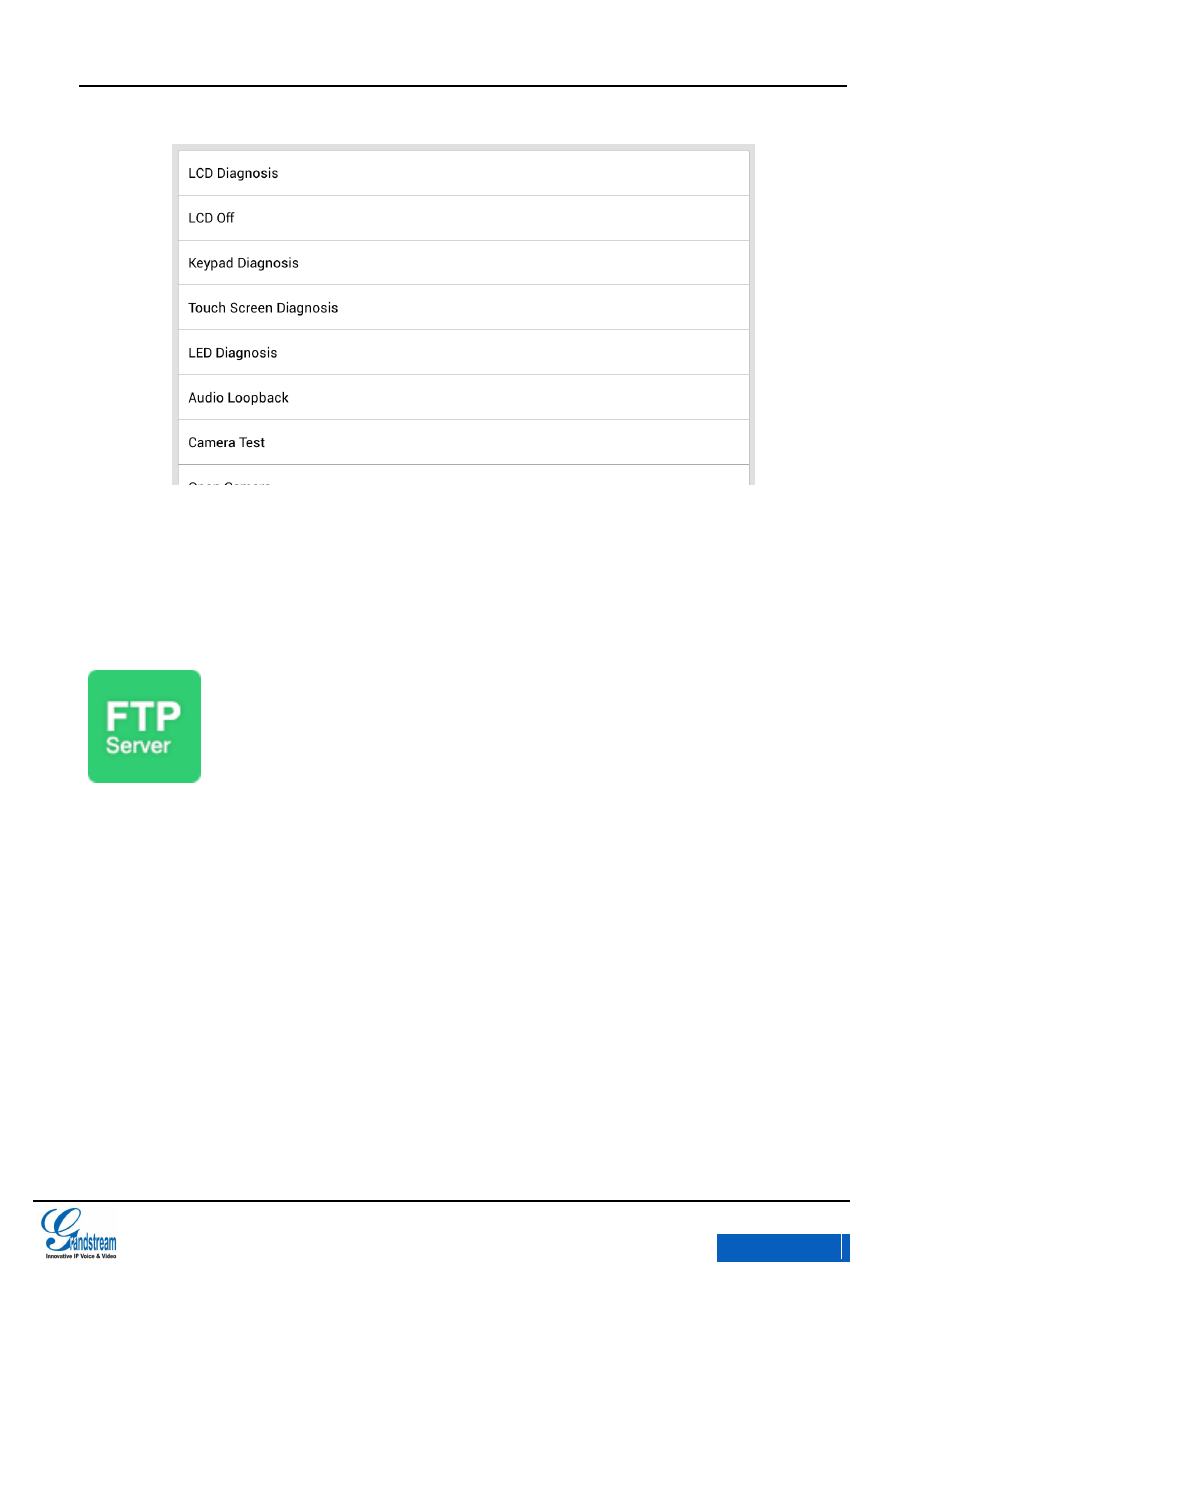
DIAGNOSIS
Users could make operation like LCD Diagnosis, Keypad Diagnosis, LED Diagnosis, Audio
Loopback and Camera Test on GXV3275 via built-in Diagnosis app.
x-PDFDivision
GXV3275 User Manual
TOOLS
Grandstream Co., Ltd
Software Version:1.0.0.9 Document Version:0.2
105
Figure 103 GXV3275 Diagnosis
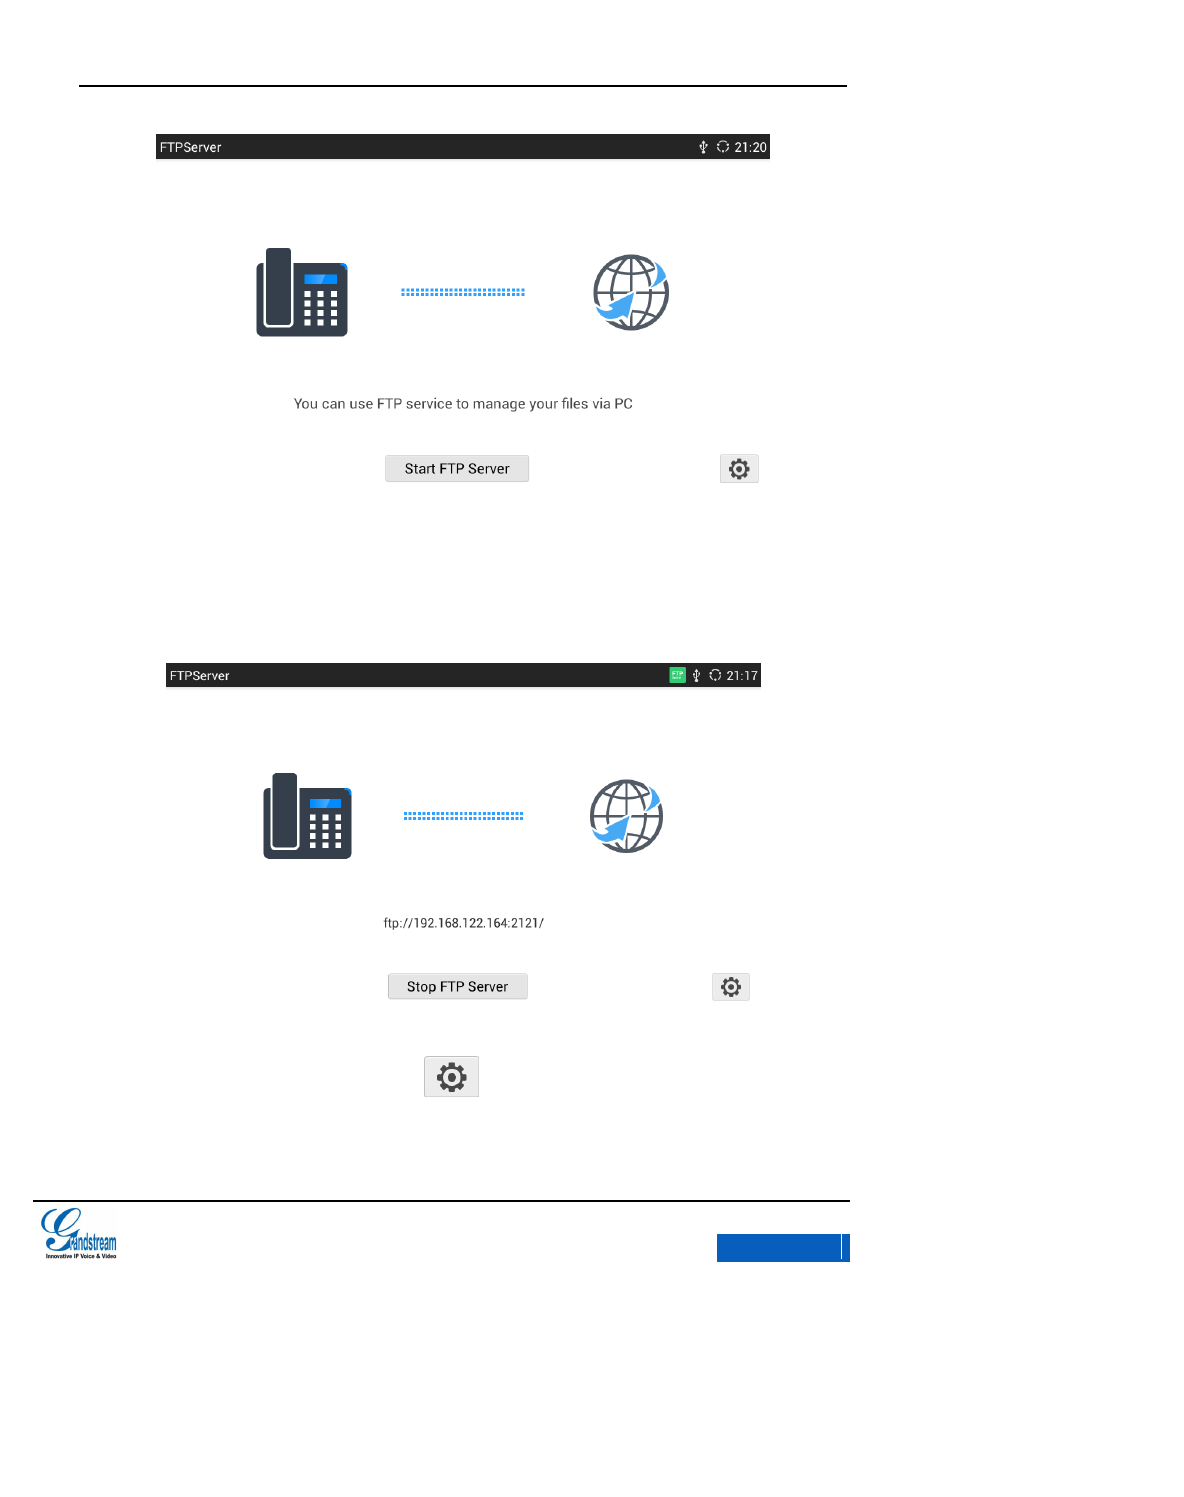
FTP SERVER
Gxv3275 supports file transfer via FTP server. As shown in figure 104.Users can tap on “Start FTP
Server” to activate it.
x-PDFDivision
GXV3275 User Manual
TOOLS
Grandstream Co., Ltd
Software Version:1.0.0.9 Document Version:0.2
106
Figure 104 GXV3275 FTP Server
Once enabled, the field is shown in figure 105. Input the FTP address in the browser on the
computer. i.e., ftp://192.168.124.136:2121/
Figure 105 GXV3275 FTP Server- Start FTP Server
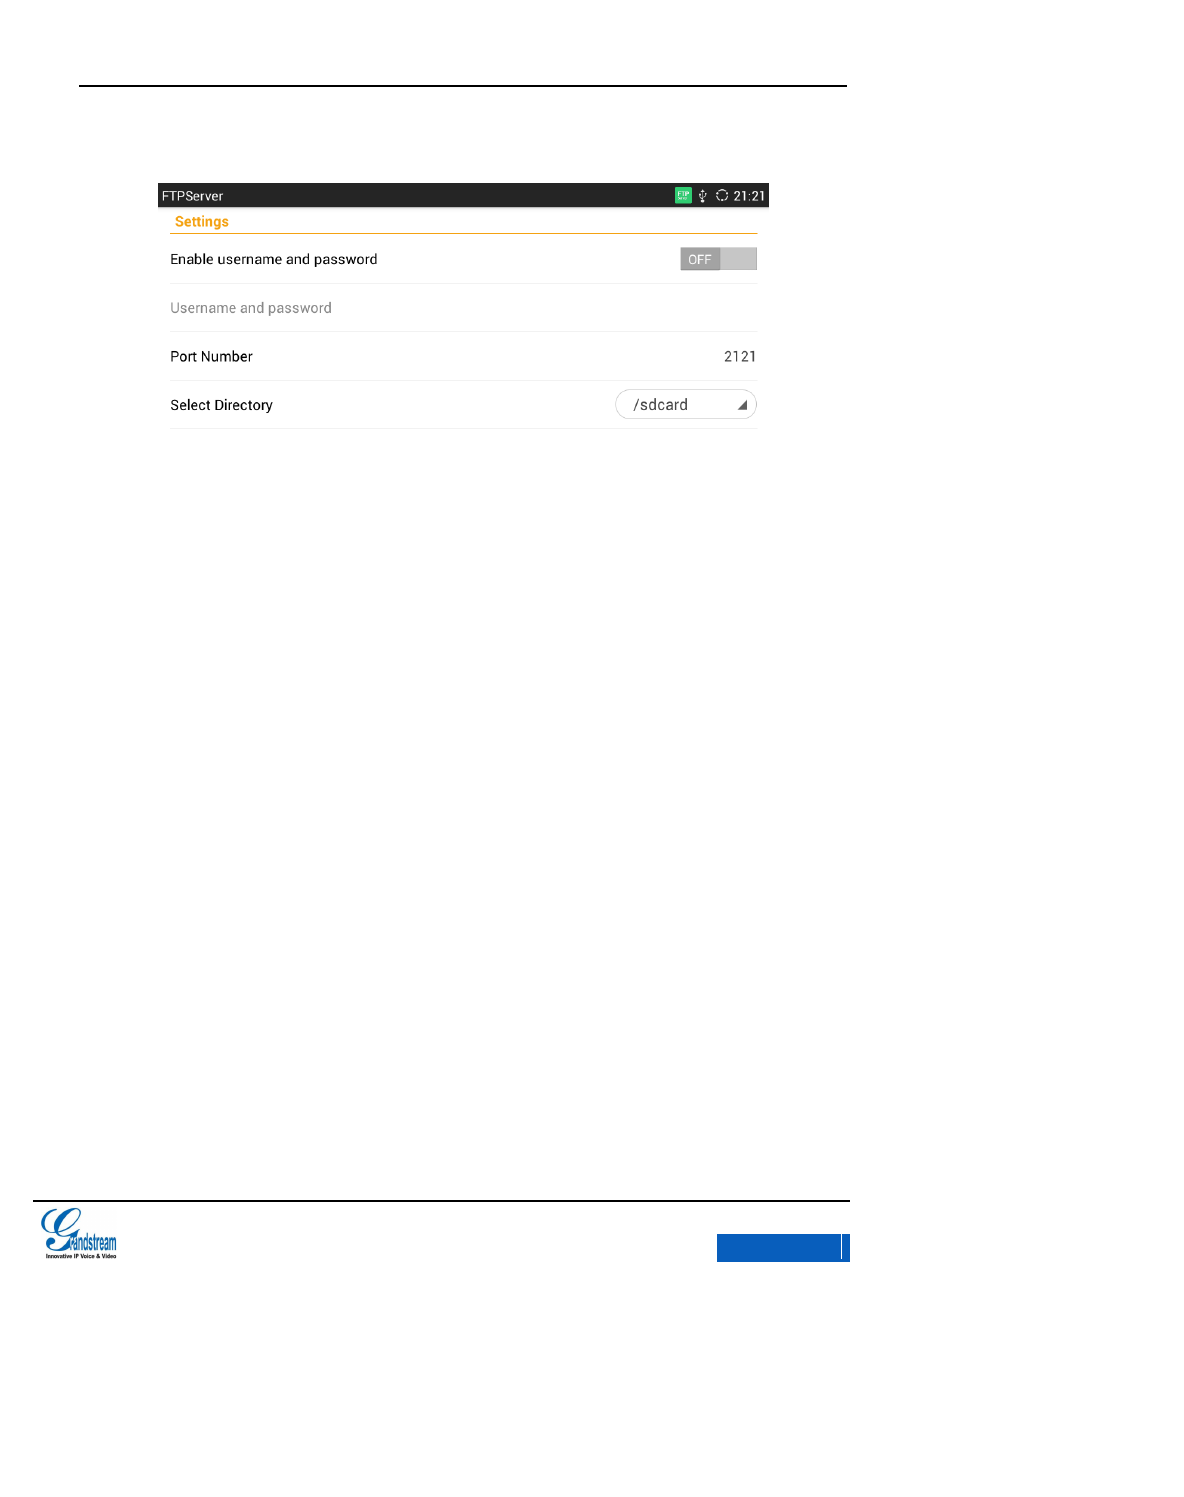
Before start the FTP server ,you can tap on on the lower right corner of the page to access
the settings .You can set the username and password, port number and the file directory to login the
x-PDFDivision
GXV3275 User Manual
TOOLS
Grandstream Co., Ltd
Software Version:1.0.0.9 Document Version:0.2
107
remote server.
Figure 106 GXV3275 FTP Server Settings
x-PDFDivision

GXV3275 User Manual
MULTIMEDIA
Grandstream Co., Ltd
Software Version:1.0.0.9 Document Version:0.2
108
MULTIMEDIA
GXV3275 supports rich multimedia applications, users can play music and images on the device as
well as surf the Internet to view news.
GALLERY
Gallery could be used to view pictures from GXV3275 internal storage. Click in the main
menu to enter gallery.
x-PDFDivision
GXV3275 User Manual
MULTIMEDIA
Grandstream Co., Ltd
Software Version:1.0.0.9 Document Version:0.2
109
Figure 107 GXV3275 Gallery
The image folder from GXV3275 local storage will present on the Gallery page in the form of
thumbnails, click the specific folder to enter image list interface.
Click on the upper right to enable camera to take photos or videos.
Click the image folder to enter images list page, as shown in figure 108.
x-PDFDivision
GXV3275 User Manual
MULTIMEDIA
Grandstream Co., Ltd
Software Version:1.0.0.9 Document Version:0.2
110
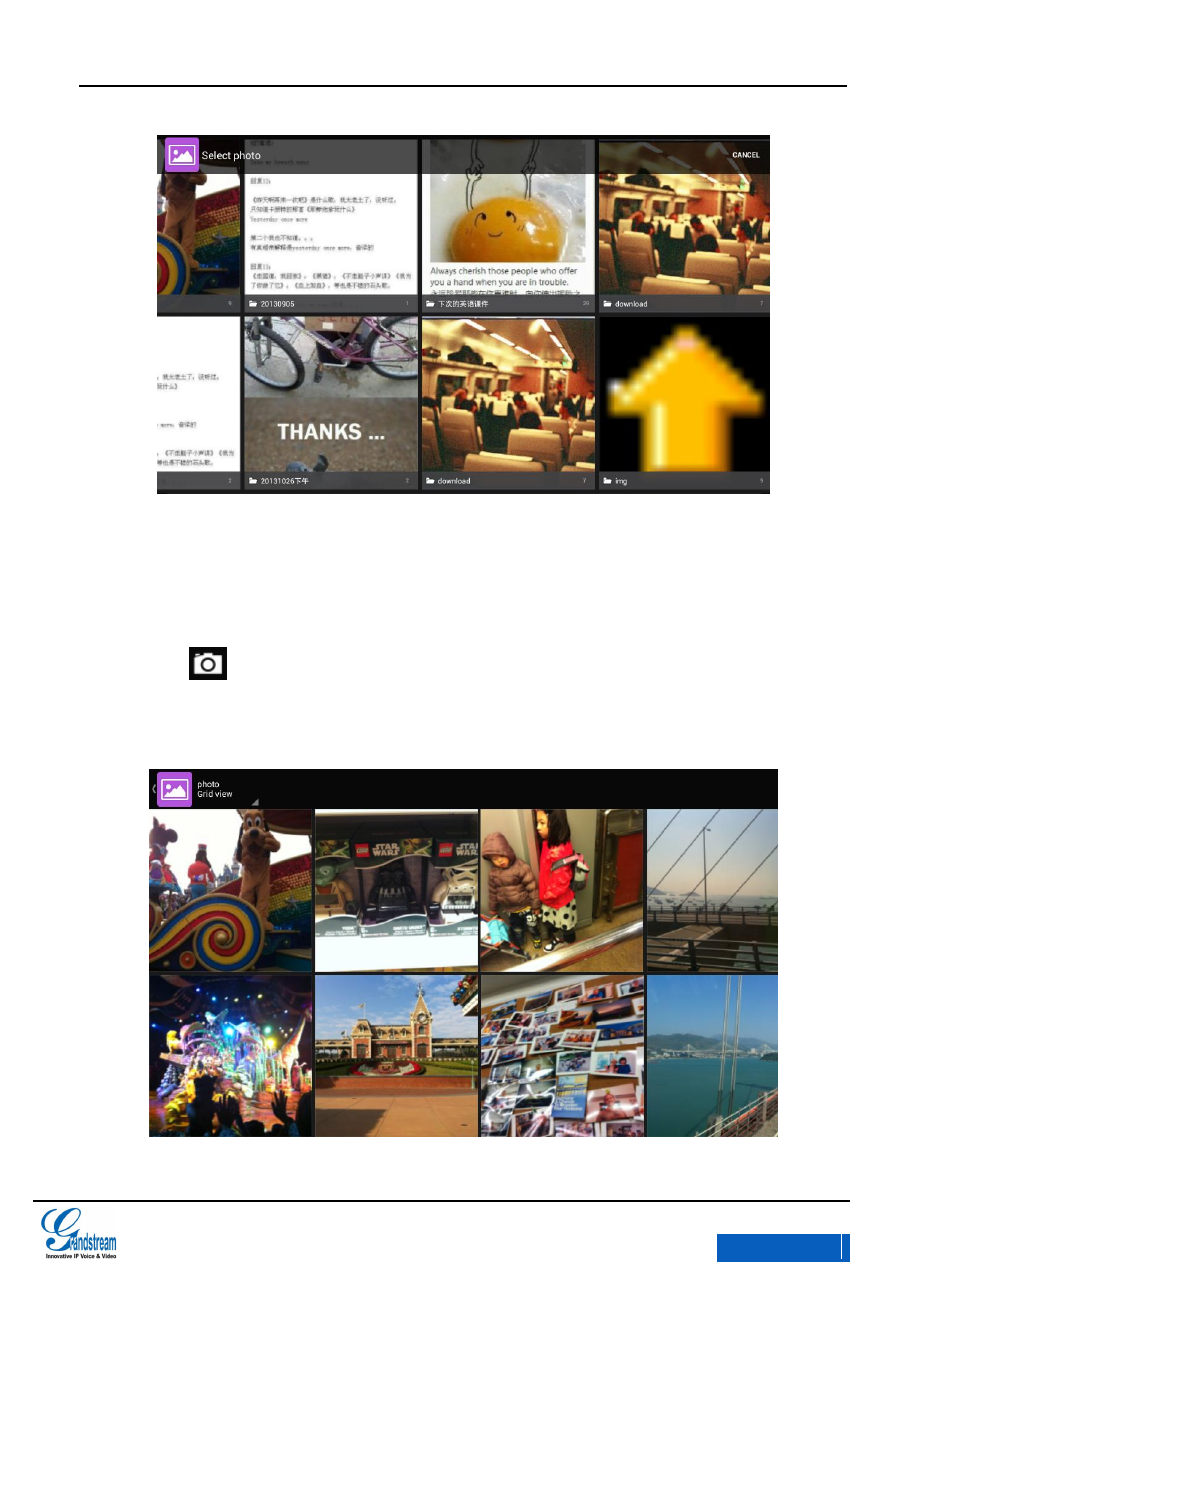
Figure 108 GXV3275 Gallery-Images List
Tap the slider to the left or right to flip to view all the images.
Two modes to display images: users could tap on the switch button on the upper left corner
to view images via Grid or Slide.
Click the specific image to view it in full screen mode. See figure 109.
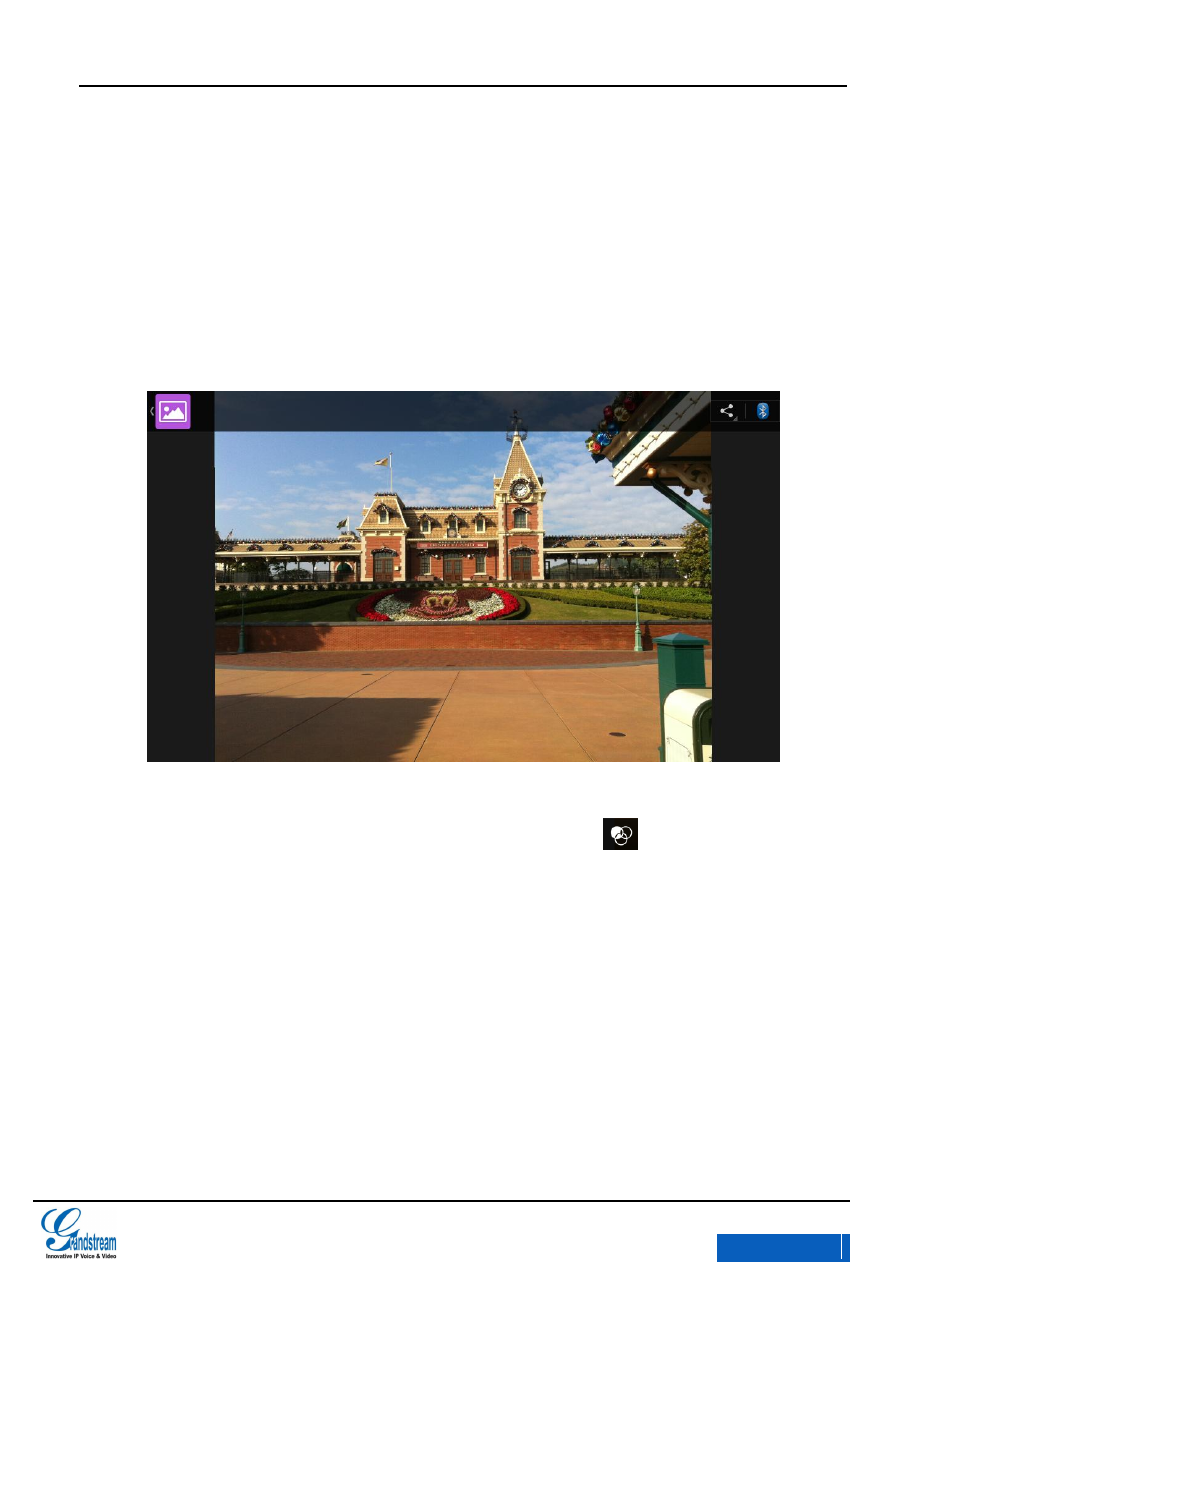
Figure 109 GXV3275 Gallery- View Image in Full Screen
Tap on the screen when the image is in full screen and click on the lower left corner to
edit the image. Users could add effect to the image as well as crop/rotate the image, ect.
The second way is to click the Menu button to edit the image.
x-PDFDivision

GXV3275 User Manual
MULTIMEDIA
Grandstream Co., Ltd
Software Version:1.0.0.9 Document Version:0.2
111
Figure 110 GXV3275 Gallery- Edit Image
Figure 111 GXV3275 Gallery- Edit Image via Menu Options
Zoom In/ out :Users could zoom in/out the image via finger gestures.
Share: Click on the upper right corner of the image to select one mode to send the
image.
x-PDFDivision

GXV3275 User Manual
MULTIMEDIA
Grandstream Co., Ltd
Software Version:1.0.0.9 Document Version:0.2
112
Long press one image to enter the editing mode. Users could choose one or multiple images
to make operations like send, delete and rotate.
Figure 112 GXV3275 Gallery- Editing Image
BROWSER
Users could browse webpage, view news and watch video via the built-in GXV3275 Browser. Press
on in the main menu to open Browser.
x-PDFDivision
GXV3275 User Manual
MULTIMEDIA
Grandstream Co., Ltd
Software Version:1.0.0.9 Document Version:0.2
113
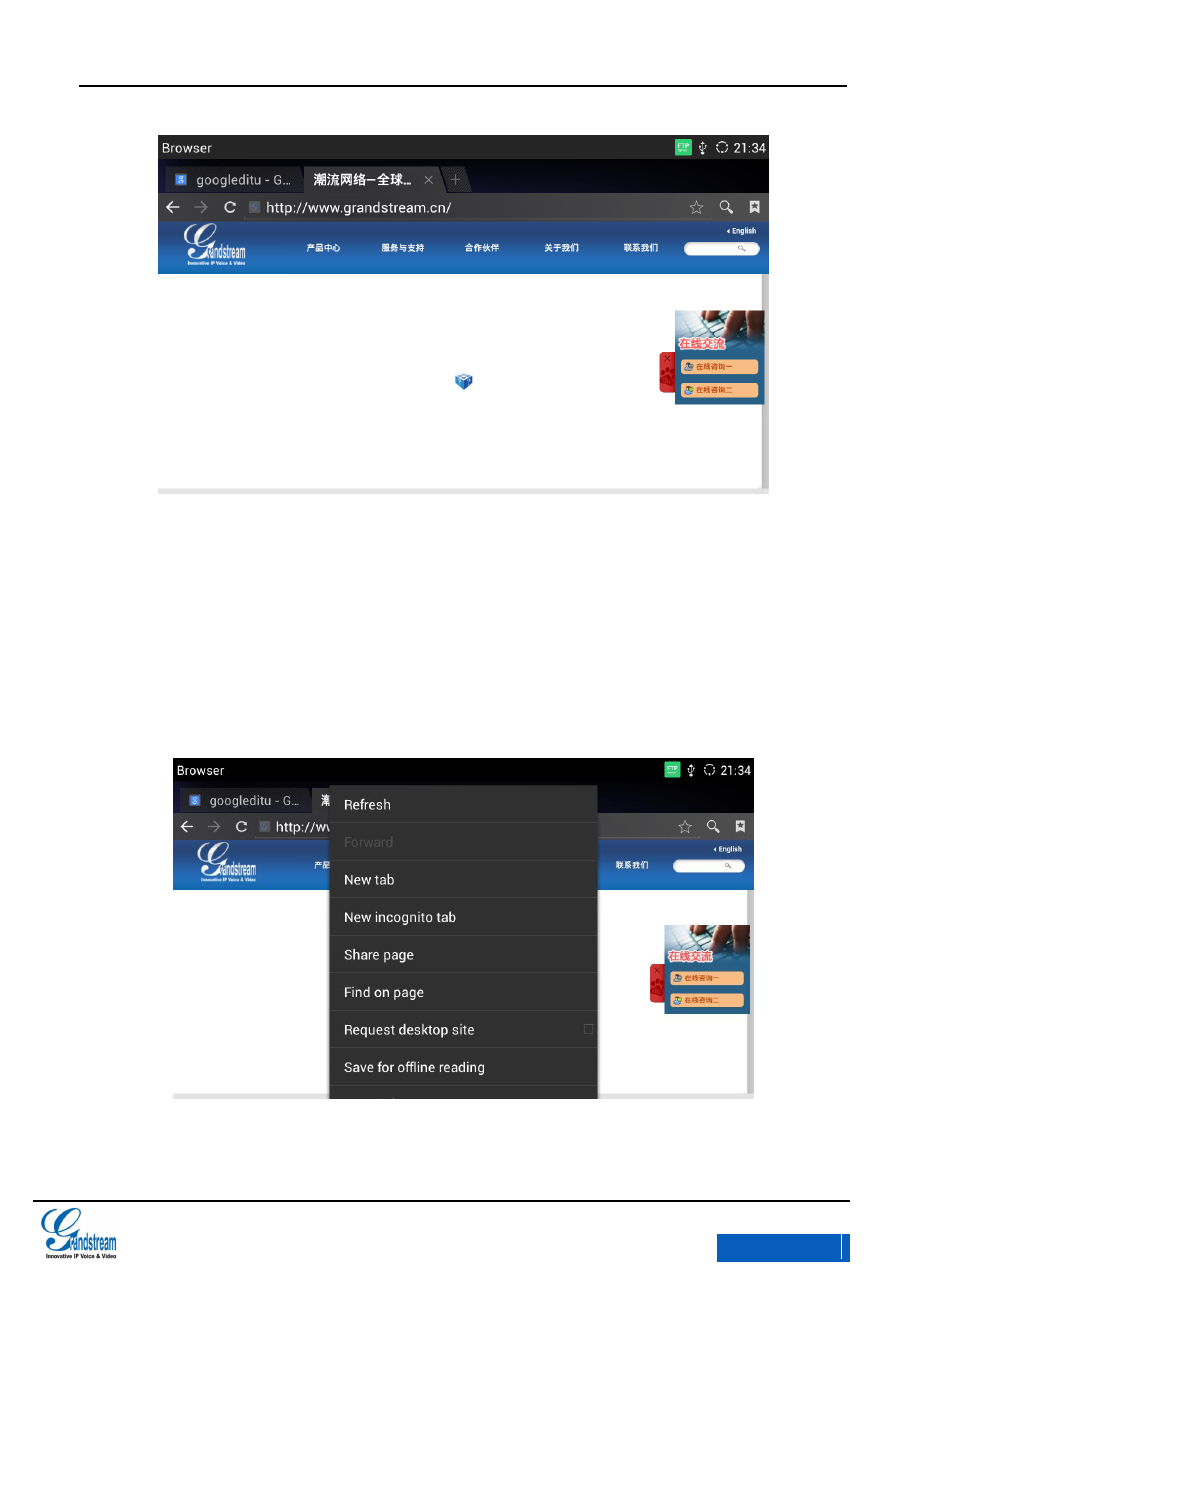
Figure 113 GXV3275 Browser
Slide up and down with slide gesture to scroll the screen.
Zoom in/out the page via zoom gesture.
Press the menu button on the phone to open the menu bar for more operations. AS shown
in figure 114.
Figure 114 GXV3275 Operating Browser via Menu Options
x-PDFDivision
GXV3275 User Manual
MULTIMEDIA
Grandstream Co., Ltd
Software Version:1.0.0.9 Document Version:0.2
114
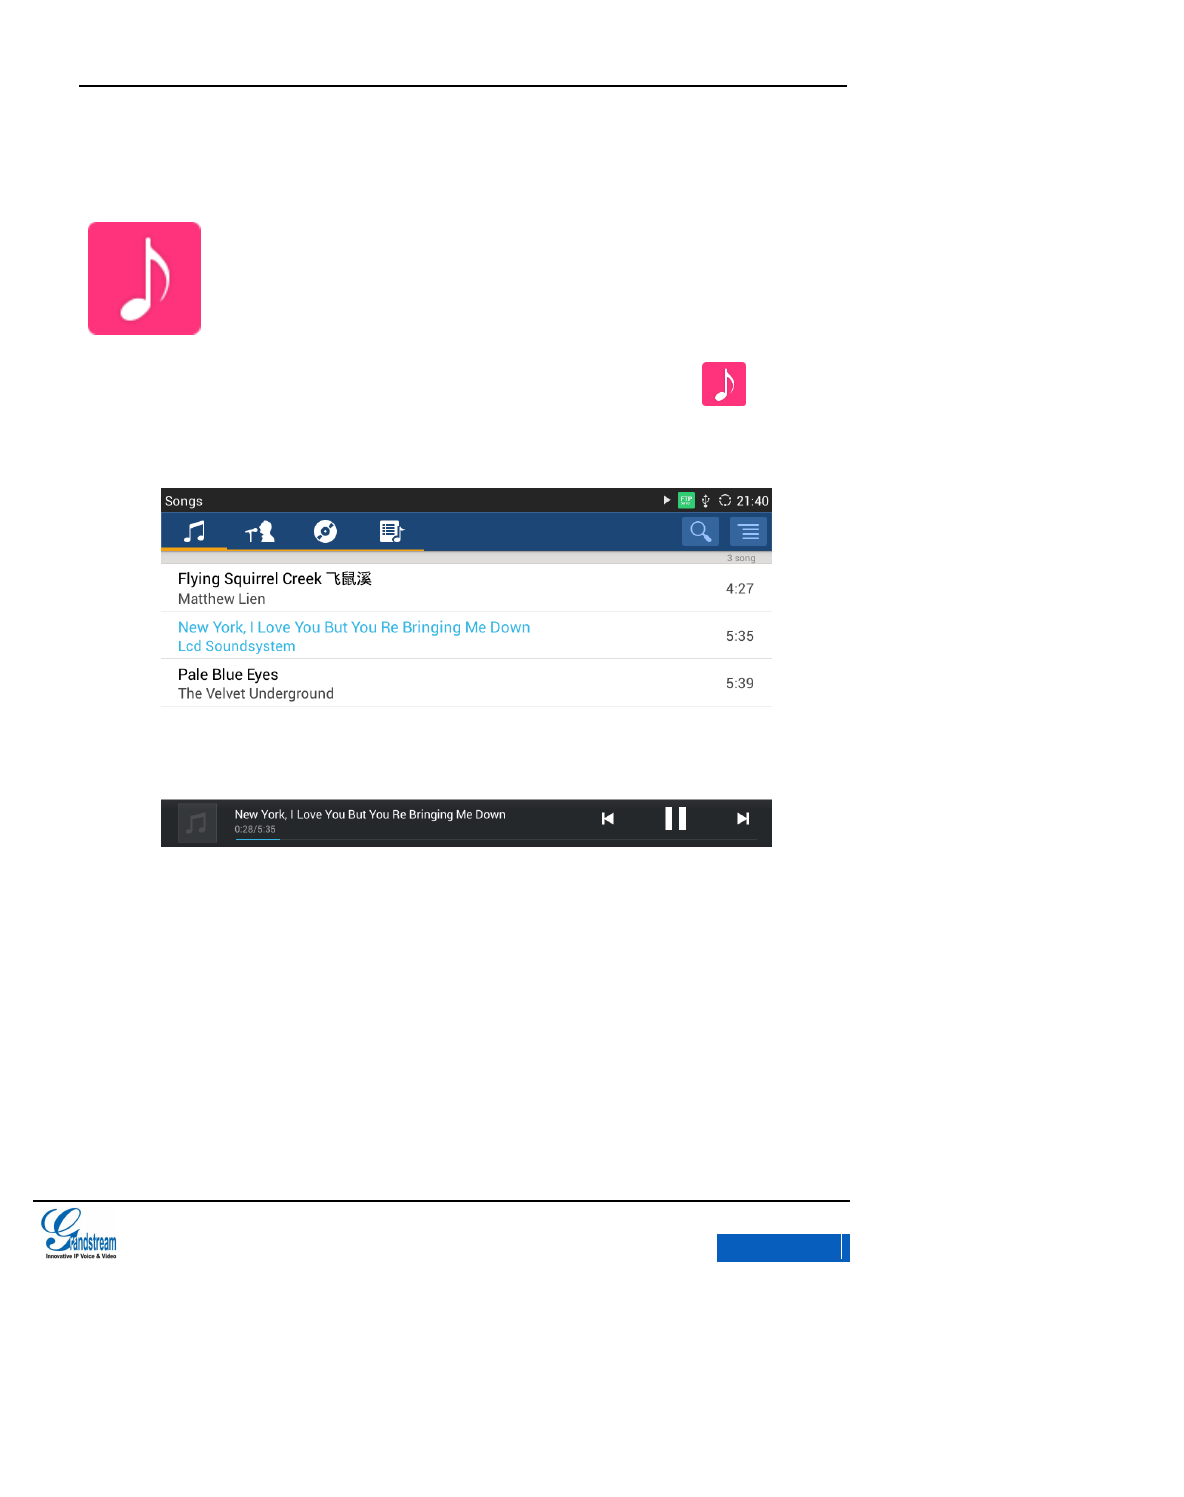
MUSIC
Users could play the audio file on the phone or from the external storage. Press in the main
menu to enable Music.
Figure 115 GXV3275 Music Interface
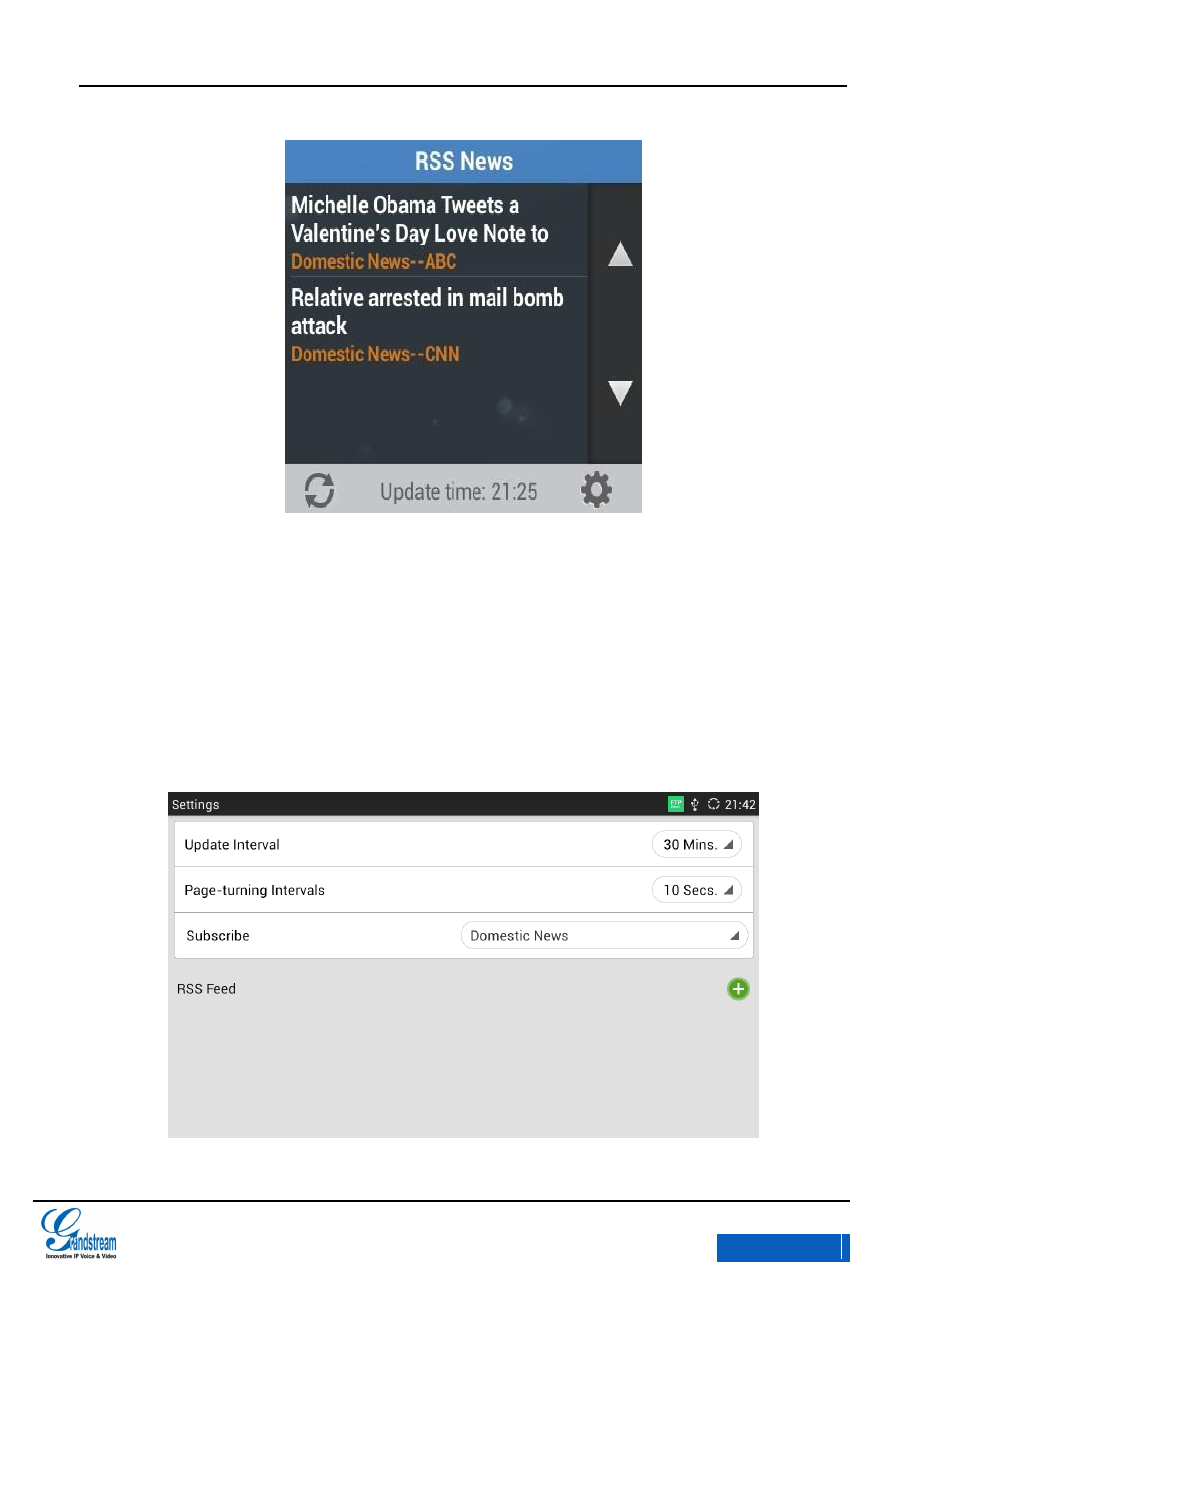
RSS NEWS
Rss News is a desktop widget with which users could view the latest news. When the phone is
running on idle screen, click the Menu button and select Edit Widgets in the pop-up menu, find RSS
News and drag it to the blank area of the desktop.
x-PDFDivision
GXV3275 User Manual
MULTIMEDIA
Grandstream Co., Ltd
Software Version:1.0.0.9 Document Version:0.2
115
Figure 116 GXV3275 RSS News Widget
Click the up/down arrow on the right of RSS News to flip up or down.
Click the Refresh button on the left bottom of RSS News to refresh the news.
Click the Settings button on the right bottom of RSS News to set up News Update Interval,
Page-turning Intervals, Subscribe and RSS Feeds.
x-PDFDivision
GXV3275 User Manual
MULTIMEDIA
Grandstream Co., Ltd
Software Version:1.0.0.9 Document Version:0.2
116
Figure 117 GXV3275 RSS News Settings
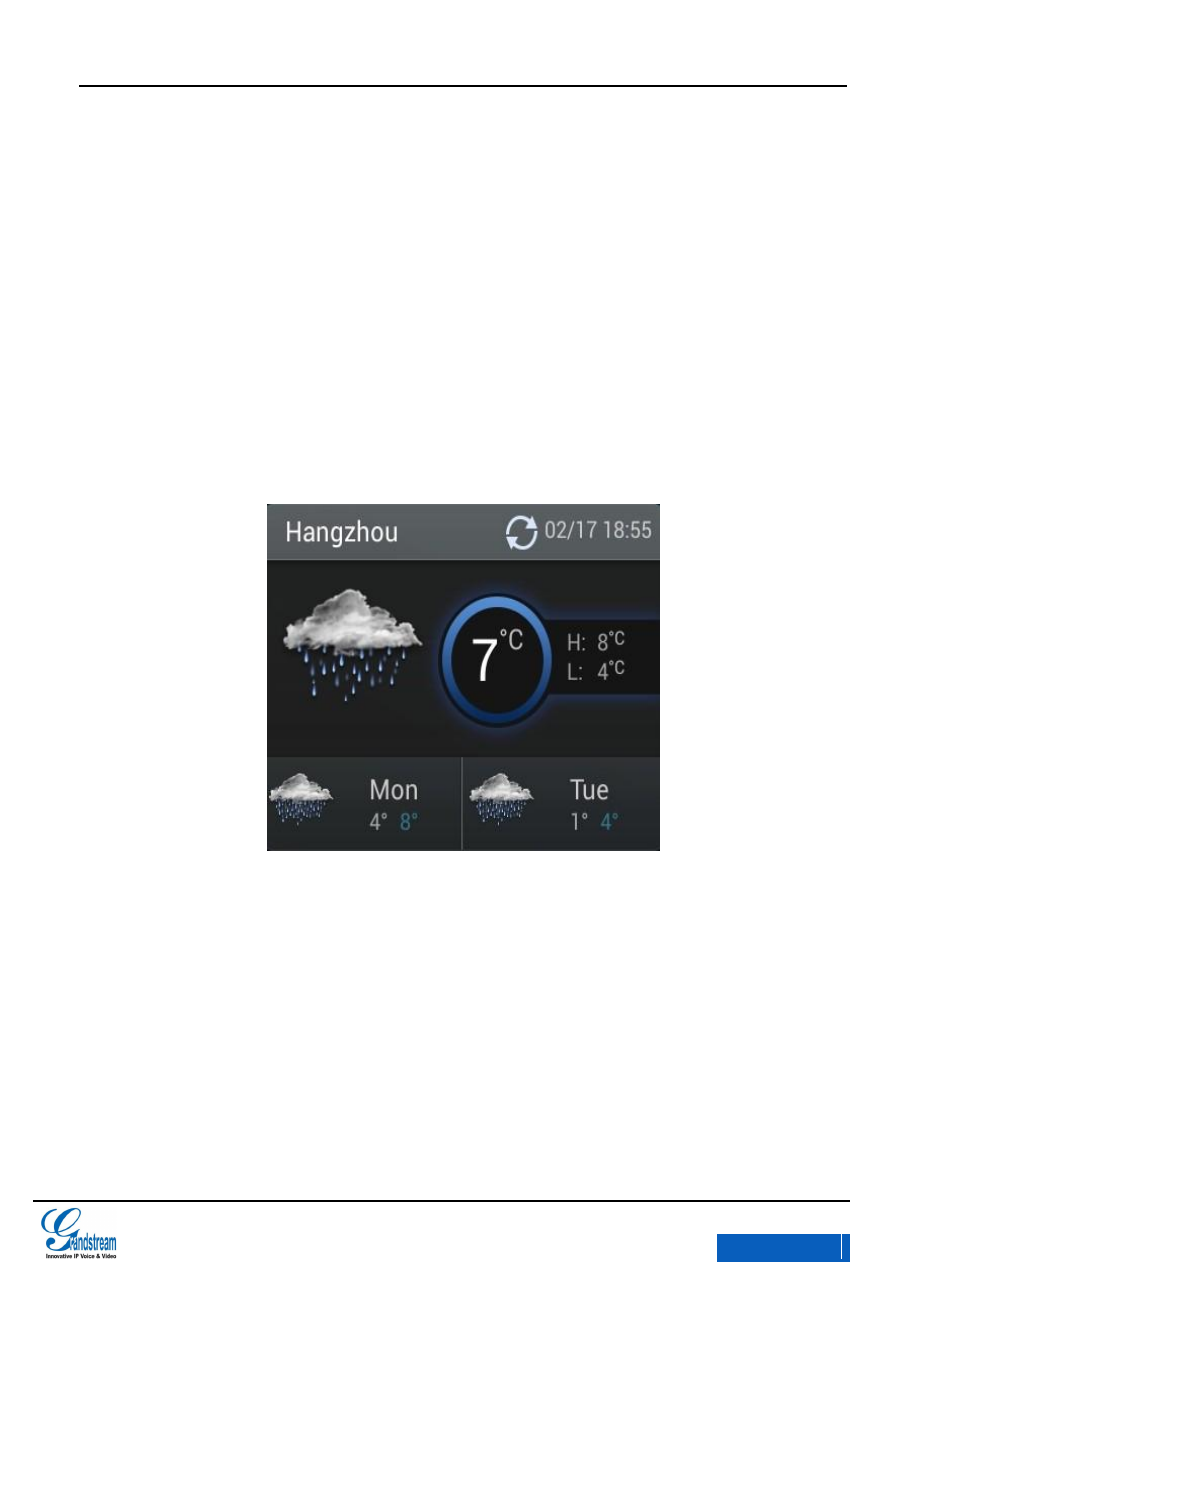
WEATHER FORECAST
Weather Forecast is a desktop widget with which users can view real-time weather information. The
way to add it is when the phone running on idle screen, Click the menu button and select Edit
Widgets in the pop-up menu items, find the Weather Forecast and drag it to the blank area of the
desktop.
Figure 118 GXV3275 Weather Forecast Widget
Click the Refresh button on the upper right corner to update weather data.
Click other area on the widget field to enter the detailed interface, as shown in figure 119.
x-PDFDivision
GXV3275 User Manual
MULTIMEDIA
Grandstream Co., Ltd
Software Version:1.0.0.9 Document Version:0.2
117
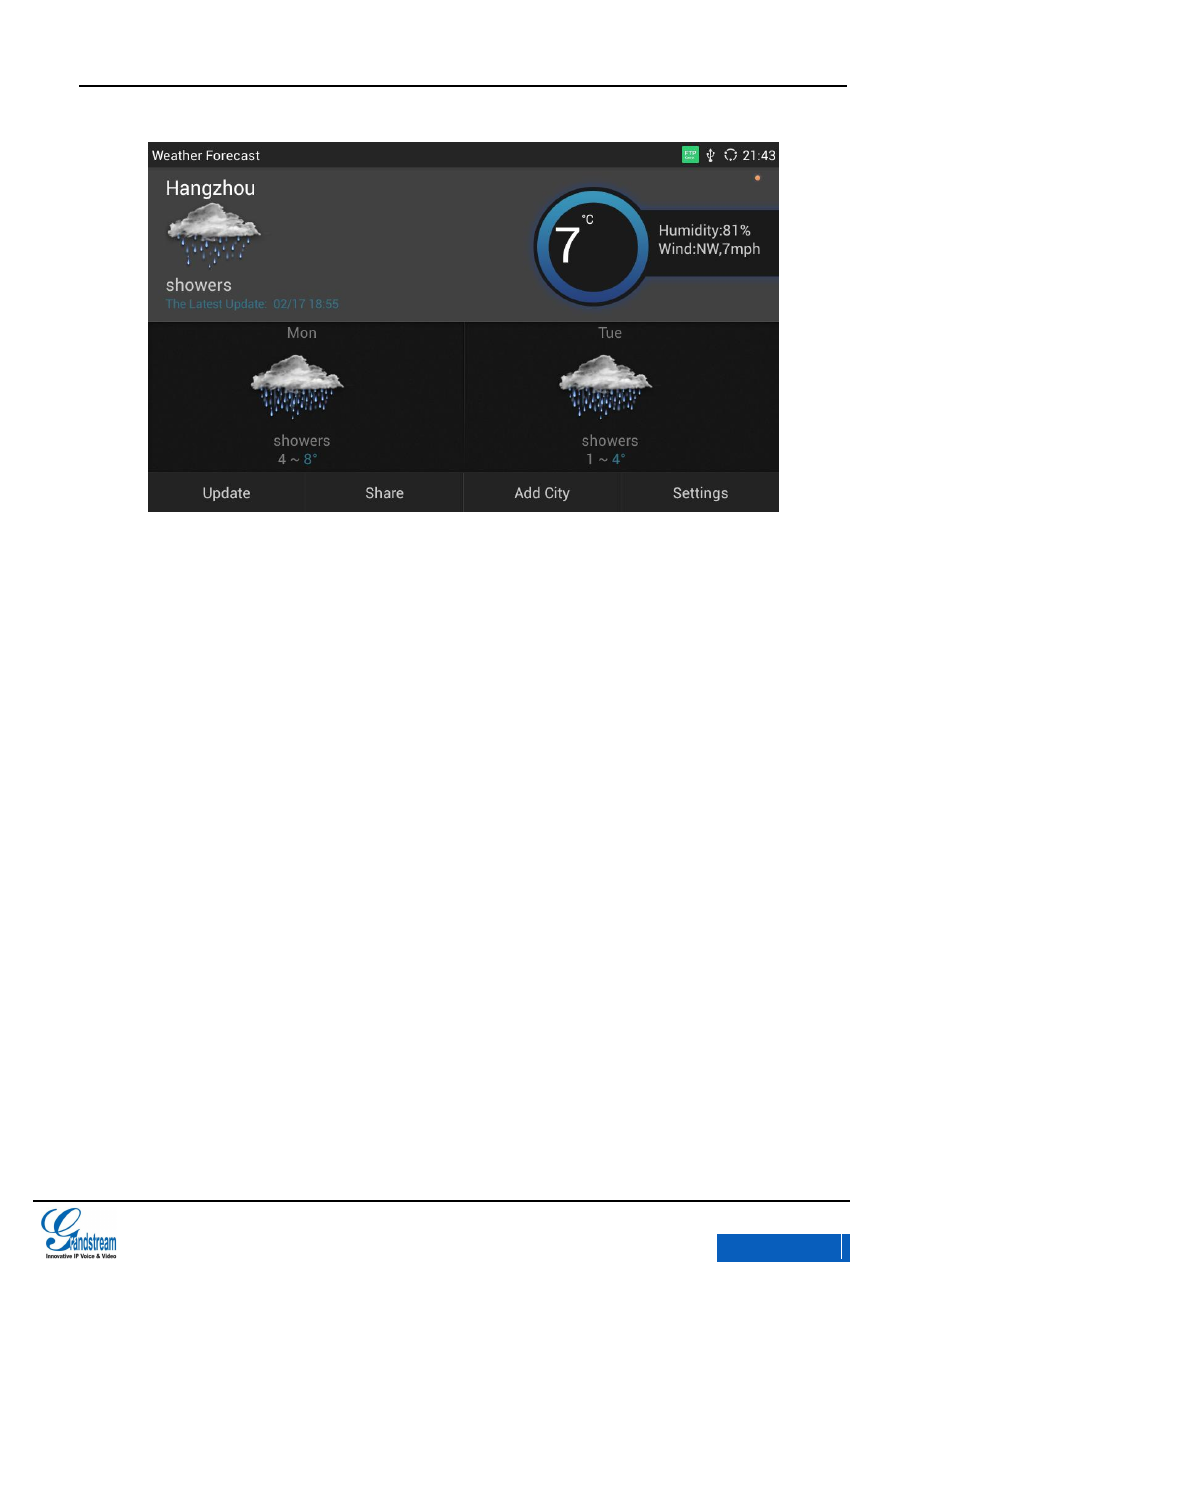
Figure 119 GXV3275 Weather Forecast- Details Interface
Users could set up Update, Share, Add City and other settings on the toolbar below the Weather
Forecast detailed interface.
x-PDFDivision
GXV3275 User Manual
GS MARKET
Grandstream Co., Ltd
Software Version:1.0.0.9 Document Version:0.2
118
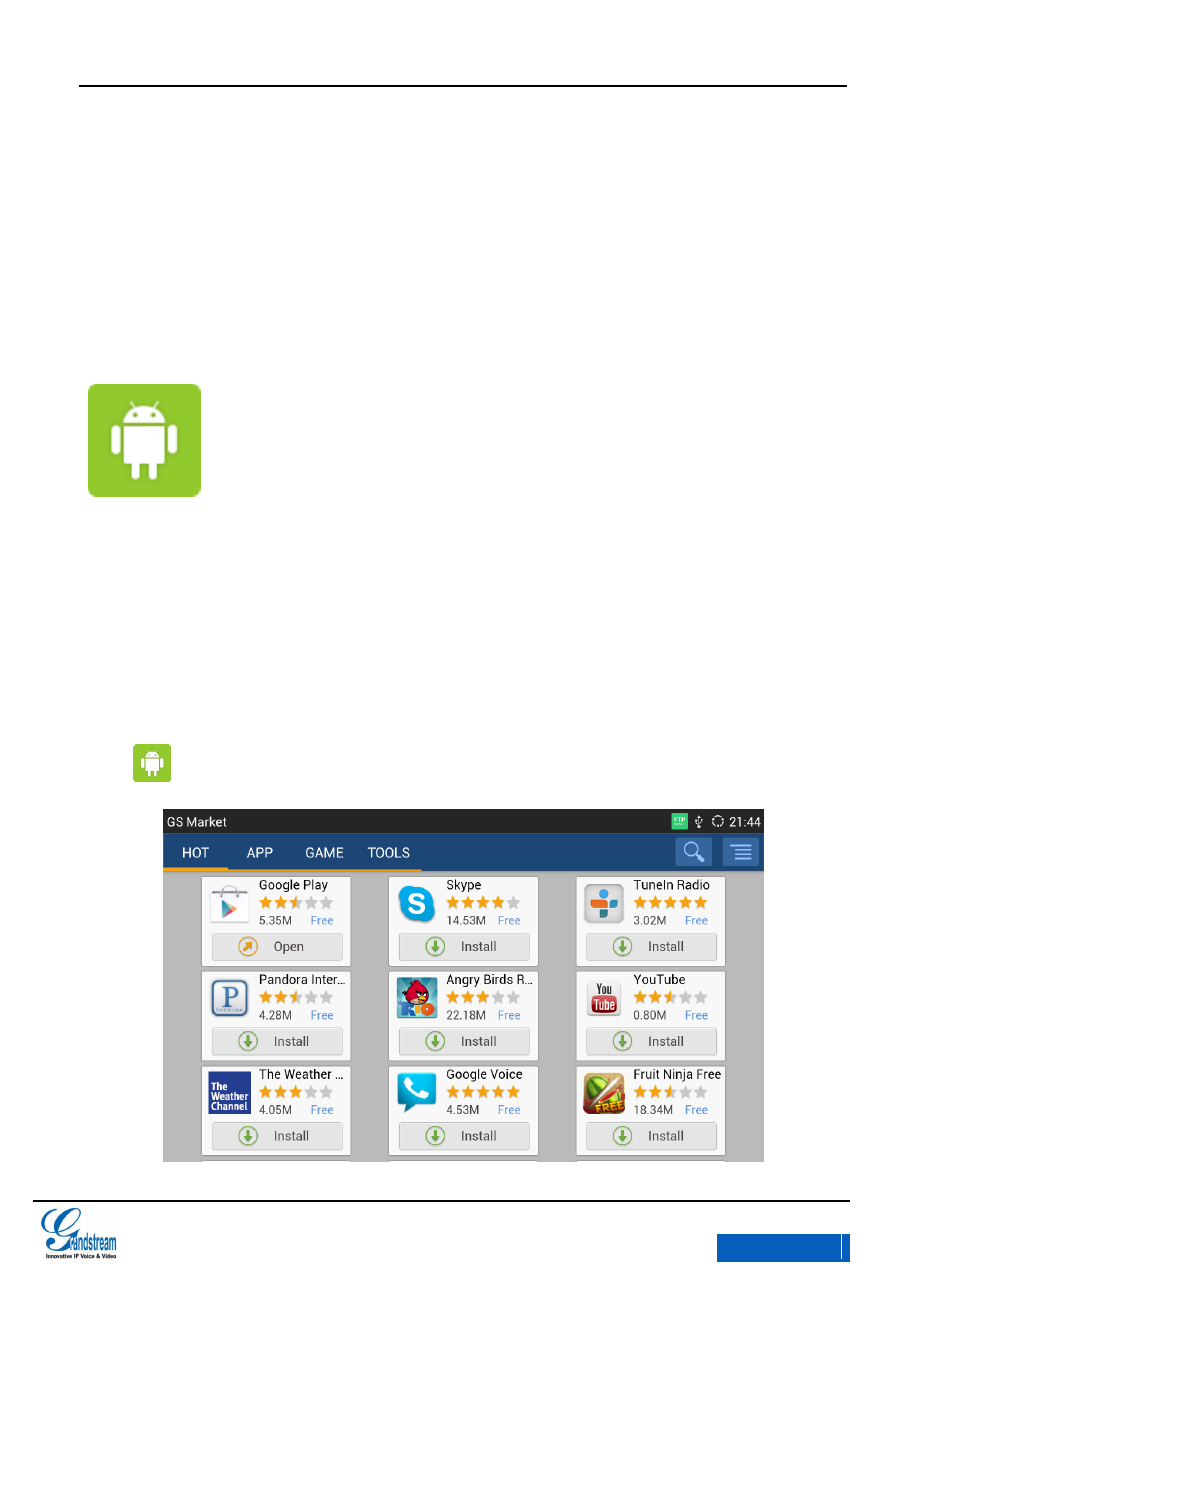
GS MARKET
GXV3275 provides direct access to apps via built-in GS Market app. Users could download the
apps from the market and install to local.
VIEW APP’S DETAILS
Click in the main menu to access GS Market.
x-PDFDivision
GXV3275 User Manual
GS MARKET
Grandstream Co., Ltd
Software Version:1.0.0.9 Document Version:0.2
119
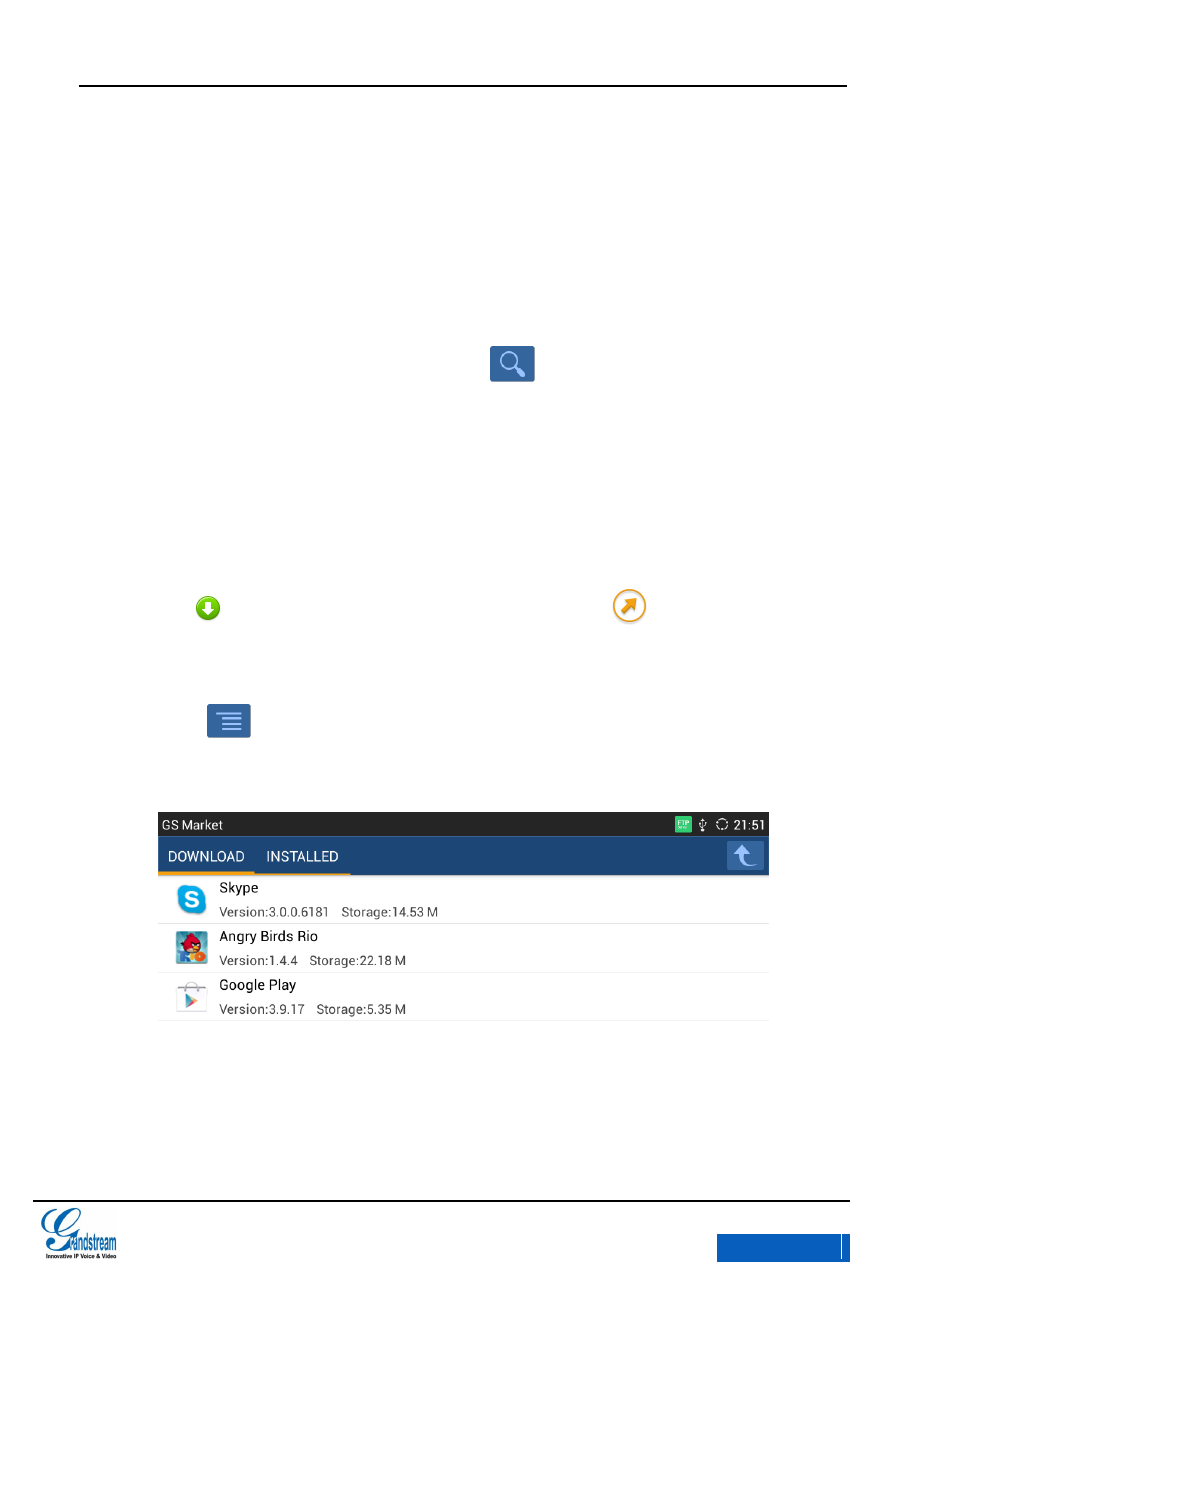
Figure 120 GXV3275 GS Market
Click the app icon to view details and users evaluation.
SEARCH APPS
Users could view the apps by category, or tap on to bring out the textbox and input the
keyword of the app to search.
DOWNLOAD AND INSTALL APPS
Click below the app to download and install it. The icon will be shown below the
downloaded app, click the icon to open the corresponding app.
Tap on on the upper right of the page to view the download apps and installed apps.
As shown in figure 121.
x-PDFDivision
GXV3275 User Manual
GS MARKET
Grandstream Co., Ltd
Software Version:1.0.0.9 Document Version:0.2
120
Figure 121 GXV3275 GS Market-Download
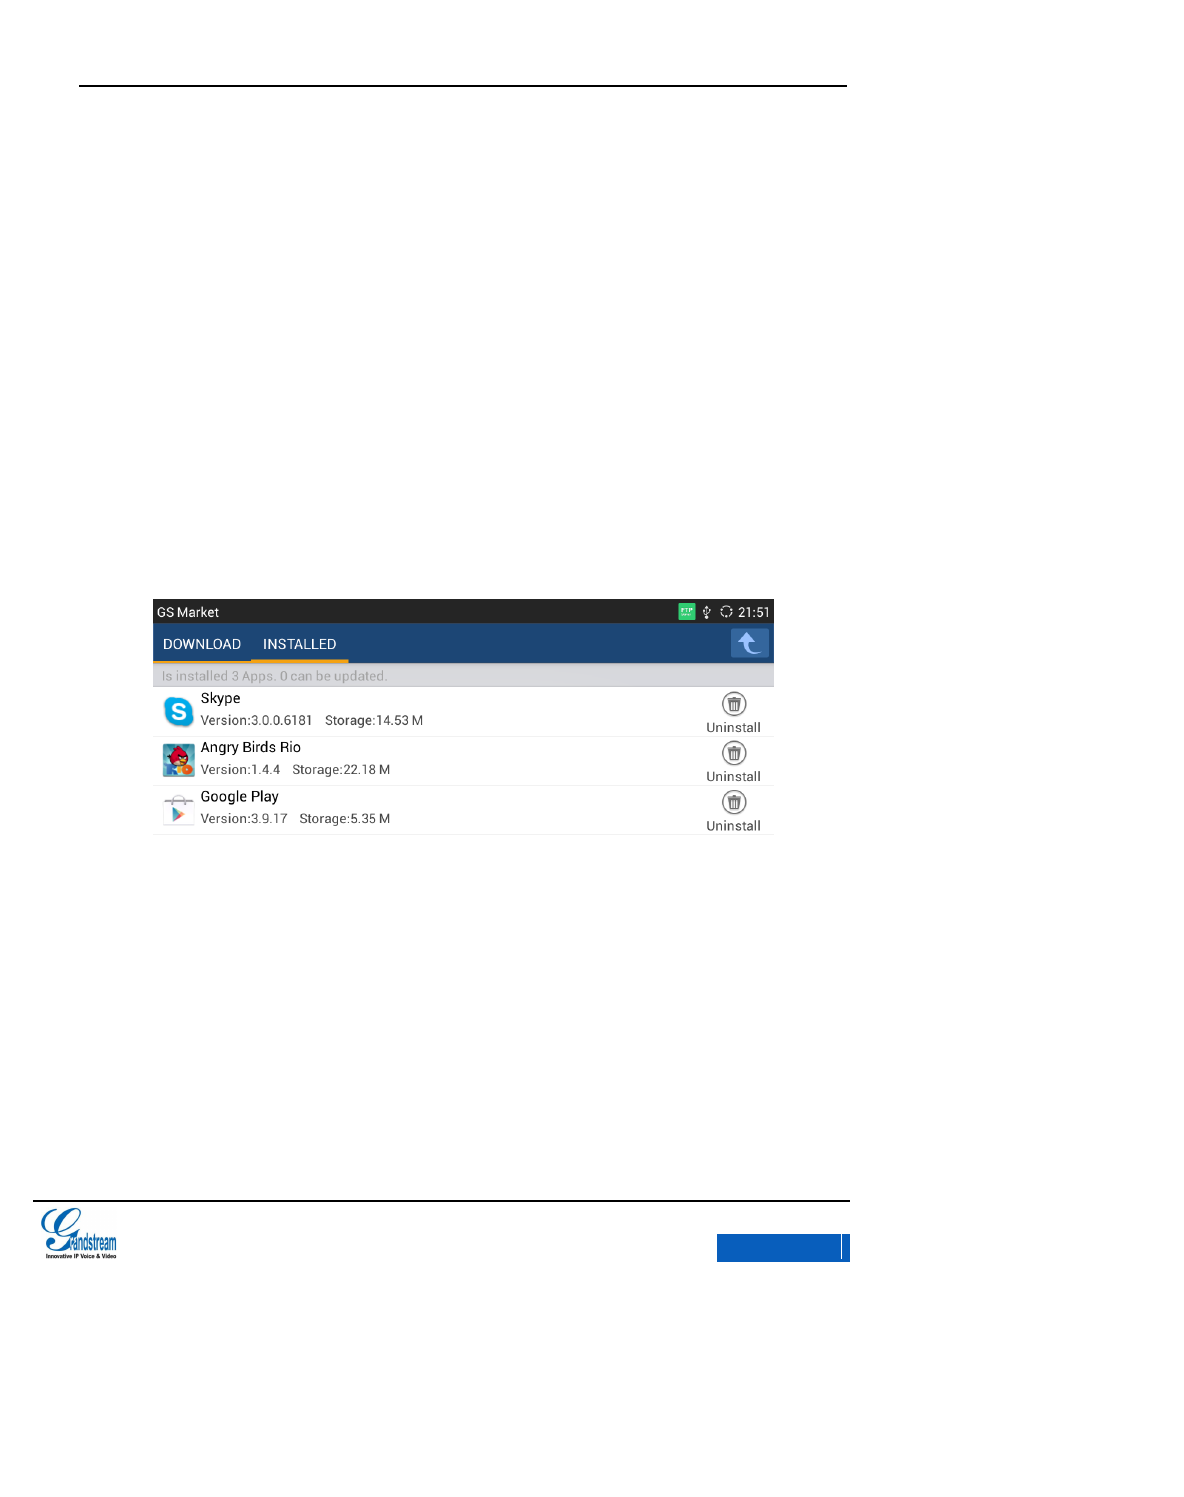
The installing process will be automatically started after downloaded the app. Users could
tap on Installed tab to view the installed apps, or uninstall the downloaded apps on this
page.
UPDATE APPS
The GXV3275 will automatically detect if there is new version available for the installed apps to
upgrade when the network connection is normal. User can view the relevant information and update
apps on the Installed page, as shown in figure 122below.
Figure 122 GXV3275 GS Market - Installed
x-PDFDivision

GXV3275 User Manual
CONNECTING TO NETWORKS AND DEVICES
Grandstream Co., Ltd
Software Version:1.0.0.9 Document Version:0.2
121
CONNECTING TO NETWORKS AND DEVICES
NETWORK
Network connection has a variety of ways, one is wired connection via the cables, and the other
way is to connect via Wi-Fi.
ENABLE ETHERNET
Follow the steps below to turn on Ethernet:
1. Insert the cable into the LAN port behind the phone then go to Settings and click Network to
enter Network Settings.
2. Click Ethernet Settings and choose IPv4 or IPv6 to enter Settings.
3. Set the address type to static IP then set up the IP address and subnet mask.
x-PDFDivision

GXV3275 User Manual
CONNECTING TO NETWORKS AND DEVICES
Grandstream Co., Ltd
Software Version:1.0.0.9 Document Version:0.2
122
DHCP
If there are no requirements for network, users could select DHCP to reduce the risk of network
disconnection. The steps 1 and 2 to obtain DHCP are the same as the steps in Ethernet Settings.
Step 3 is to select DHCP.
ENABLE PPPoE
If the network is ADSL, users can connect to the network by means of dial-up. The steps 1 and 2 to
enable PPPoE can be set following the steps above in Turn on Ethernet. Step 3 is to choose PPPoE
to enter the corresponding Settings page and input the relevant account ID and password.
WI-FI
Please make sure that Wi-Fi has been turned on if users choose to use it for network connection.
ENABLE WI-FI
There are two ways to enable Wi-Fi:
Go to Settings and tap on Network to enter Wireless& Network Settings page, tap on the Wi-Fi
switch button to enable it.
Click to enable Wi-Fi in the drop-down status bar.
The phone will automatically connect to the available Wi-Fi once enabled, users need to go to Wi-Fi
Settings page to enter the password if the Wi-Fi requires password to login.
x-PDFDivision
GXV3275 User Manual
CONNECTING TO NETWORKS AND DEVICES
Grandstream Co., Ltd
Software Version:1.0.0.9 Document Version:0.2
123
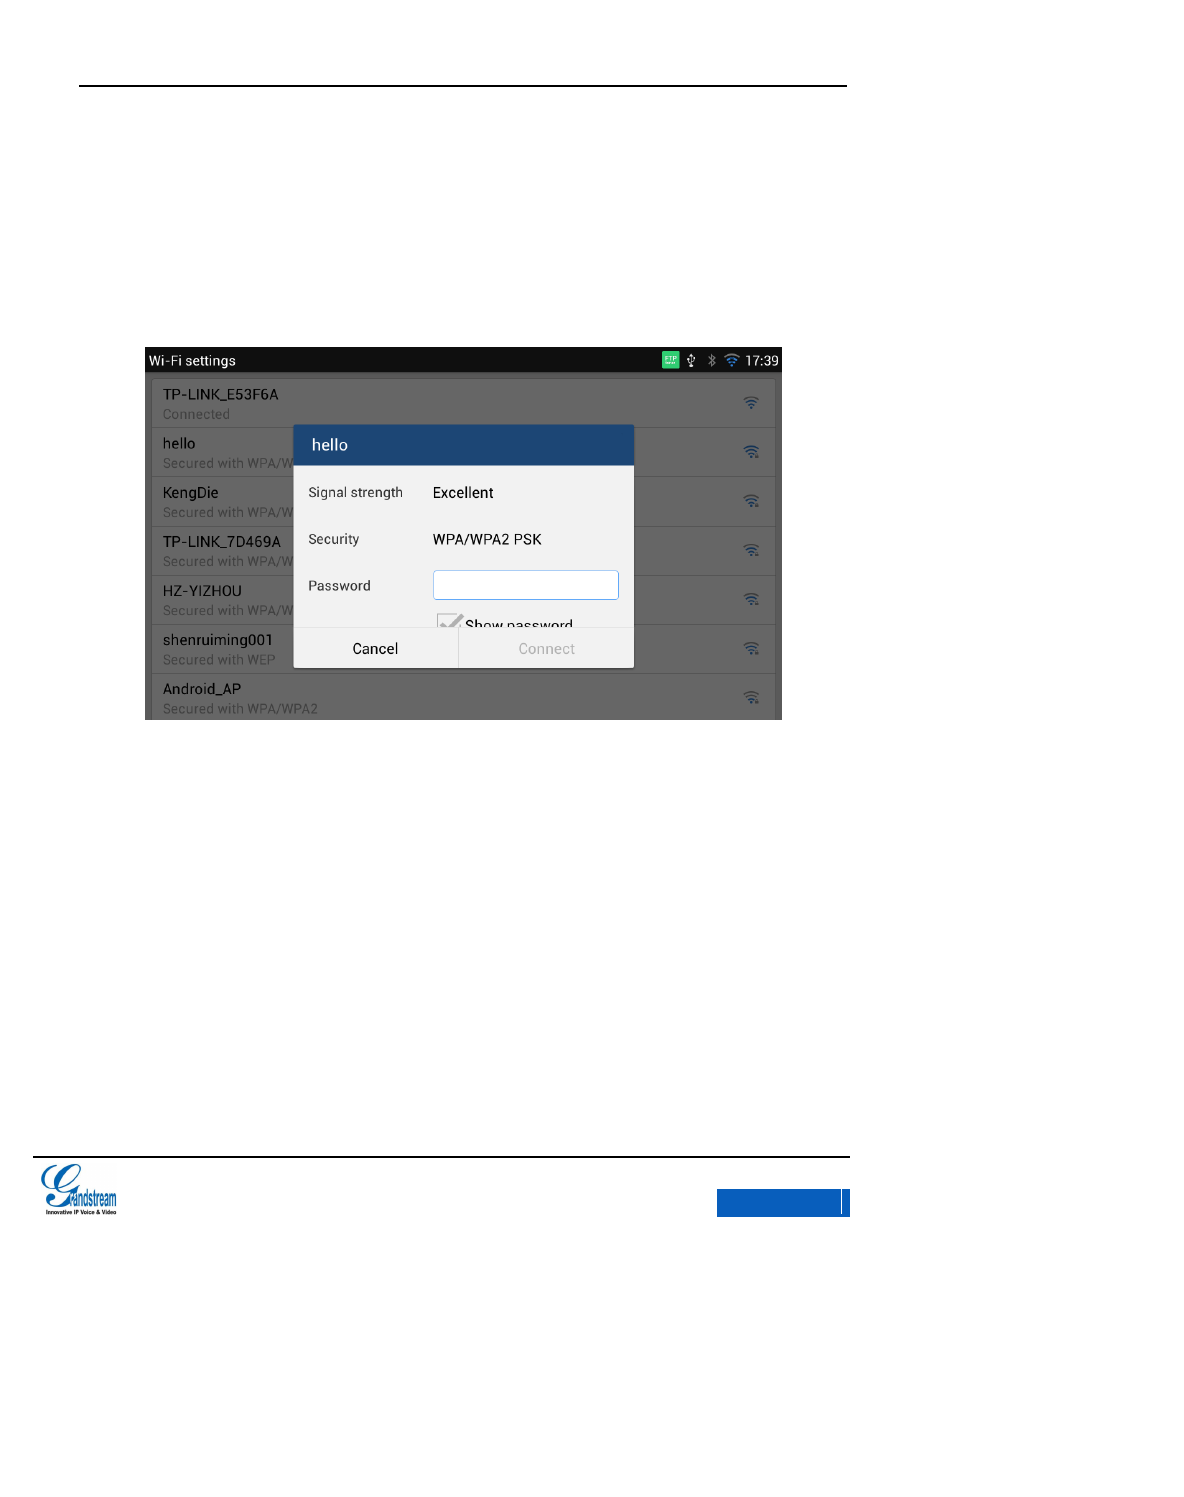
SEARCH AND ADD WI-FI
The phone will automatically search the available WI-Fi Within the effective range once enabled.
Tap on the SSID and input the right password in the pop-up dialog, click Connect to connect to the
selected Wi-Fi.
Figure 123 GXV3275 Wi-Fi Connection
BLUETOOTH
Users could use the Bluetooth to transfer files as well as make calls and listen to the music.
ENABLE BLUETOOTH
There are two ways to enable Bluetooth:
Go to Settings and click Network to enter Wireless& Network Settings page. Click the switch to
enable the Bluetooth.
x-PDFDivision
GXV3275 User Manual
CONNECTING TO NETWORKS AND DEVICES
Grandstream Co., Ltd
Software Version:1.0.0.9 Document Version:0.2
124
Click to enable the Bluetooth in the drop-down status bar.
Users need to pair the Bluetooth after enabled it then put it into use.
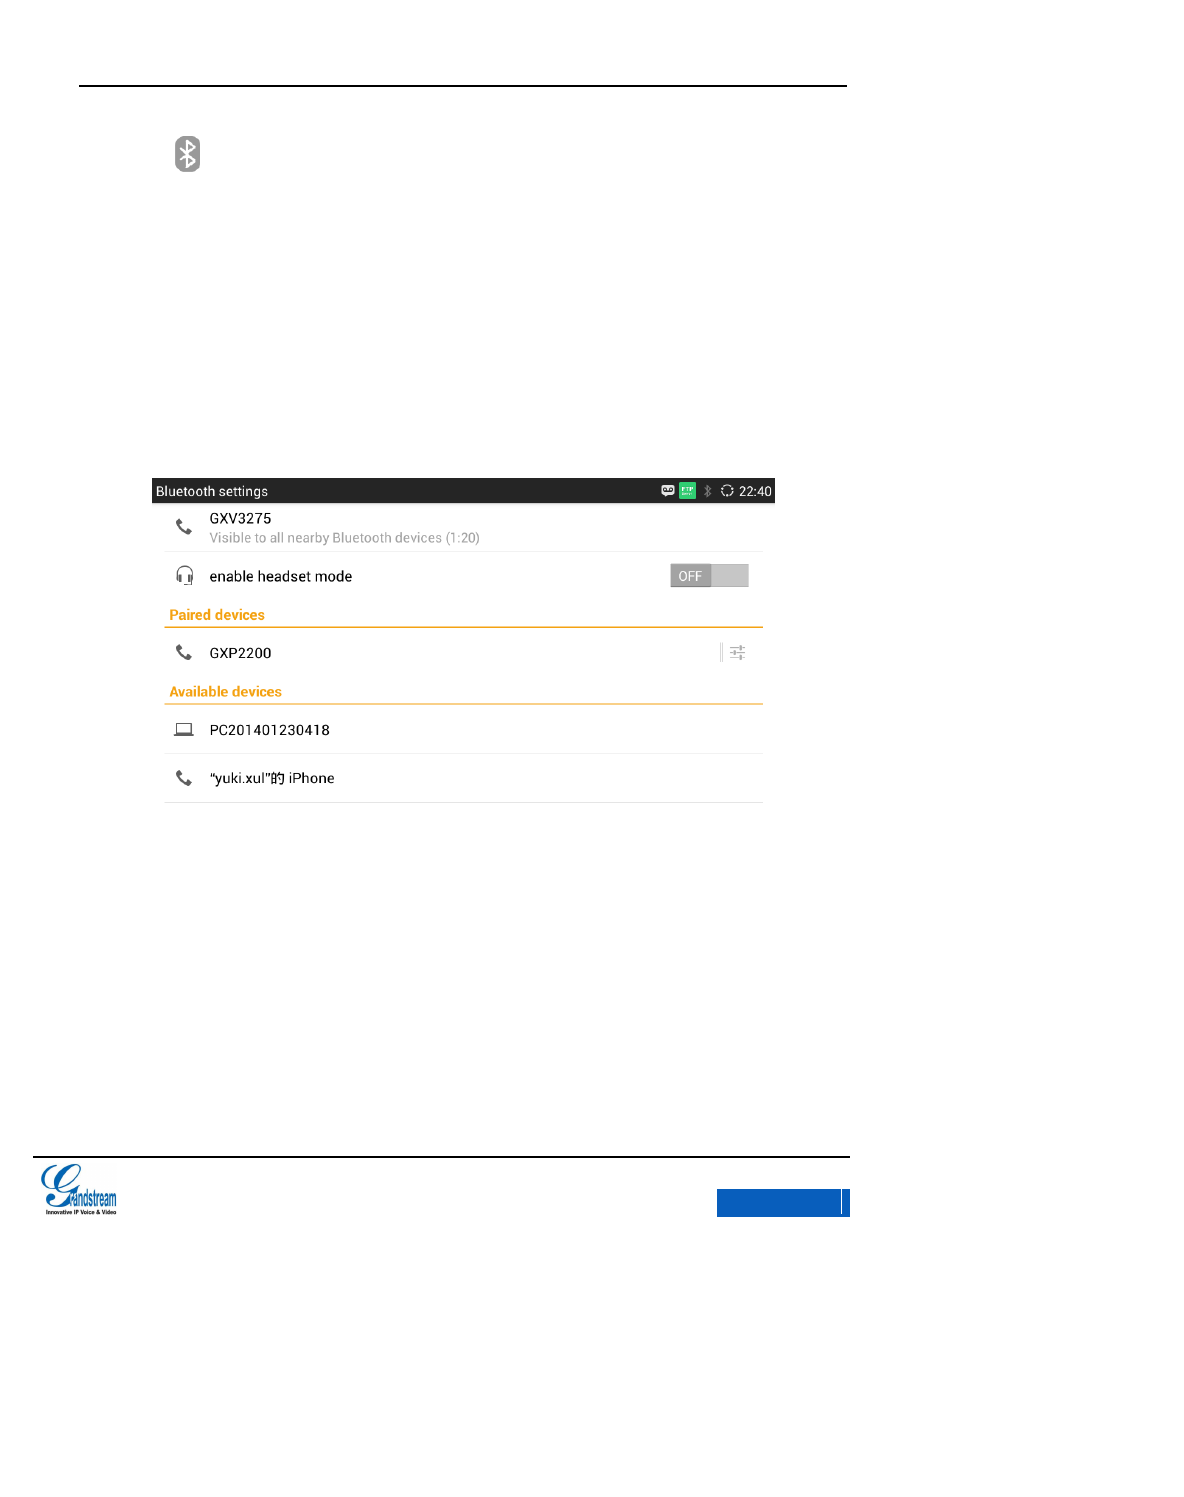
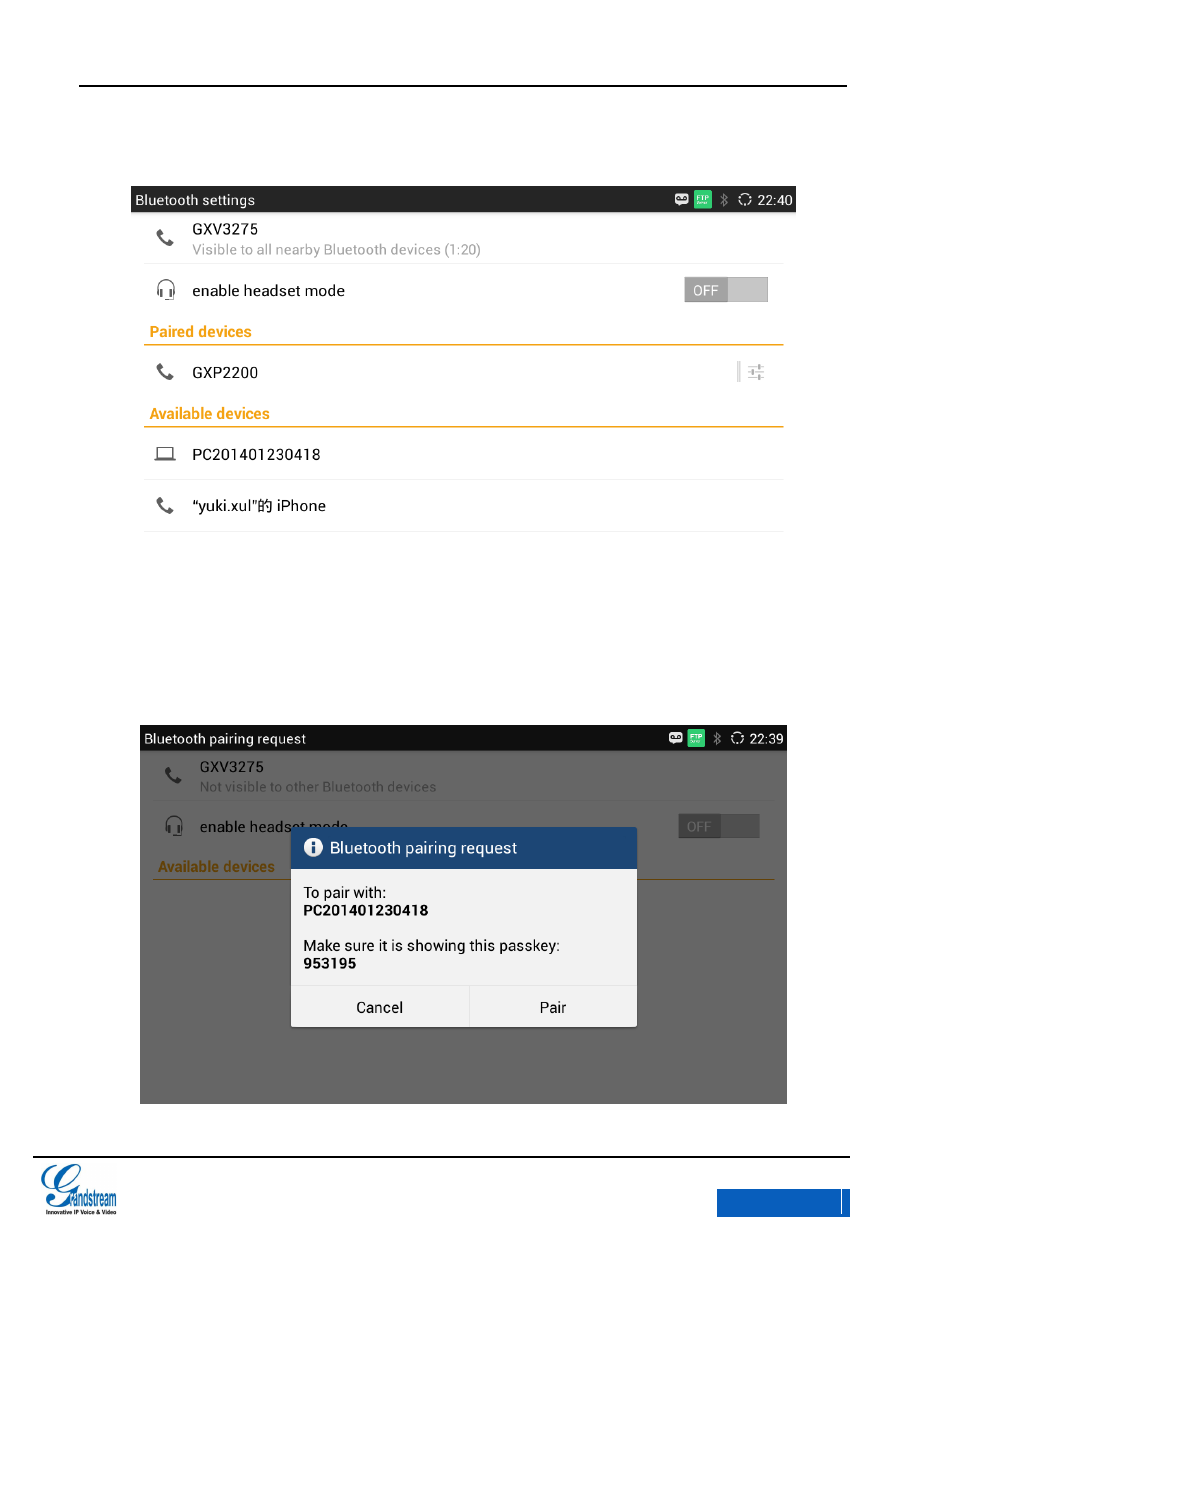
BLUETOOTH SETTINGS
Users could set up whether all the discovered Bluetooth in range will show or not on the Bluetooth
Settings page once enabled the Bluetooth, the available detection duration is 2 minutes.
Figure 124 GXV3275 Bluetooth Settings
SEARCH AND PAIR BLUETOOTH
On the Bluetooth Settings page will display the IDs of all paired and available devices. If the device
you would like to pair with does not show up in the list, you can manually search the Bluetooth
devices nearby. Follow the steps below to search and pair the Bluetooth:
x-PDFDivision
GXV3275 User Manual
CONNECTING TO NETWORKS AND DEVICES
Grandstream Co., Ltd
Software Version:1.0.0.9 Document Version:0.2
125
1. Tap on the Menu button and select Search Device in the pop-up menu.
Figure 125 GXV3275 Search Bluetooth
2. Search for the device you want to pair in the Available Devices.
3. Tap on the device ID on GXV3275, The pop-up dialog is shown in figure 126:
Figure 126 GXV3275 Pair Bluetooth
x-PDFDivision
GXV3275 User Manual
CONNECTING TO NETWORKS AND DEVICES
Grandstream Co., Ltd
Software Version:1.0.0.9 Document Version:0.2
126
4. Tap on the Pair button to pair Bluetooth. This is a two-way operation, namely the Bluetooth
that being requested to pair should accept the pairing request. Users could find the device
ID in the Paired Devices after pairing successfully.
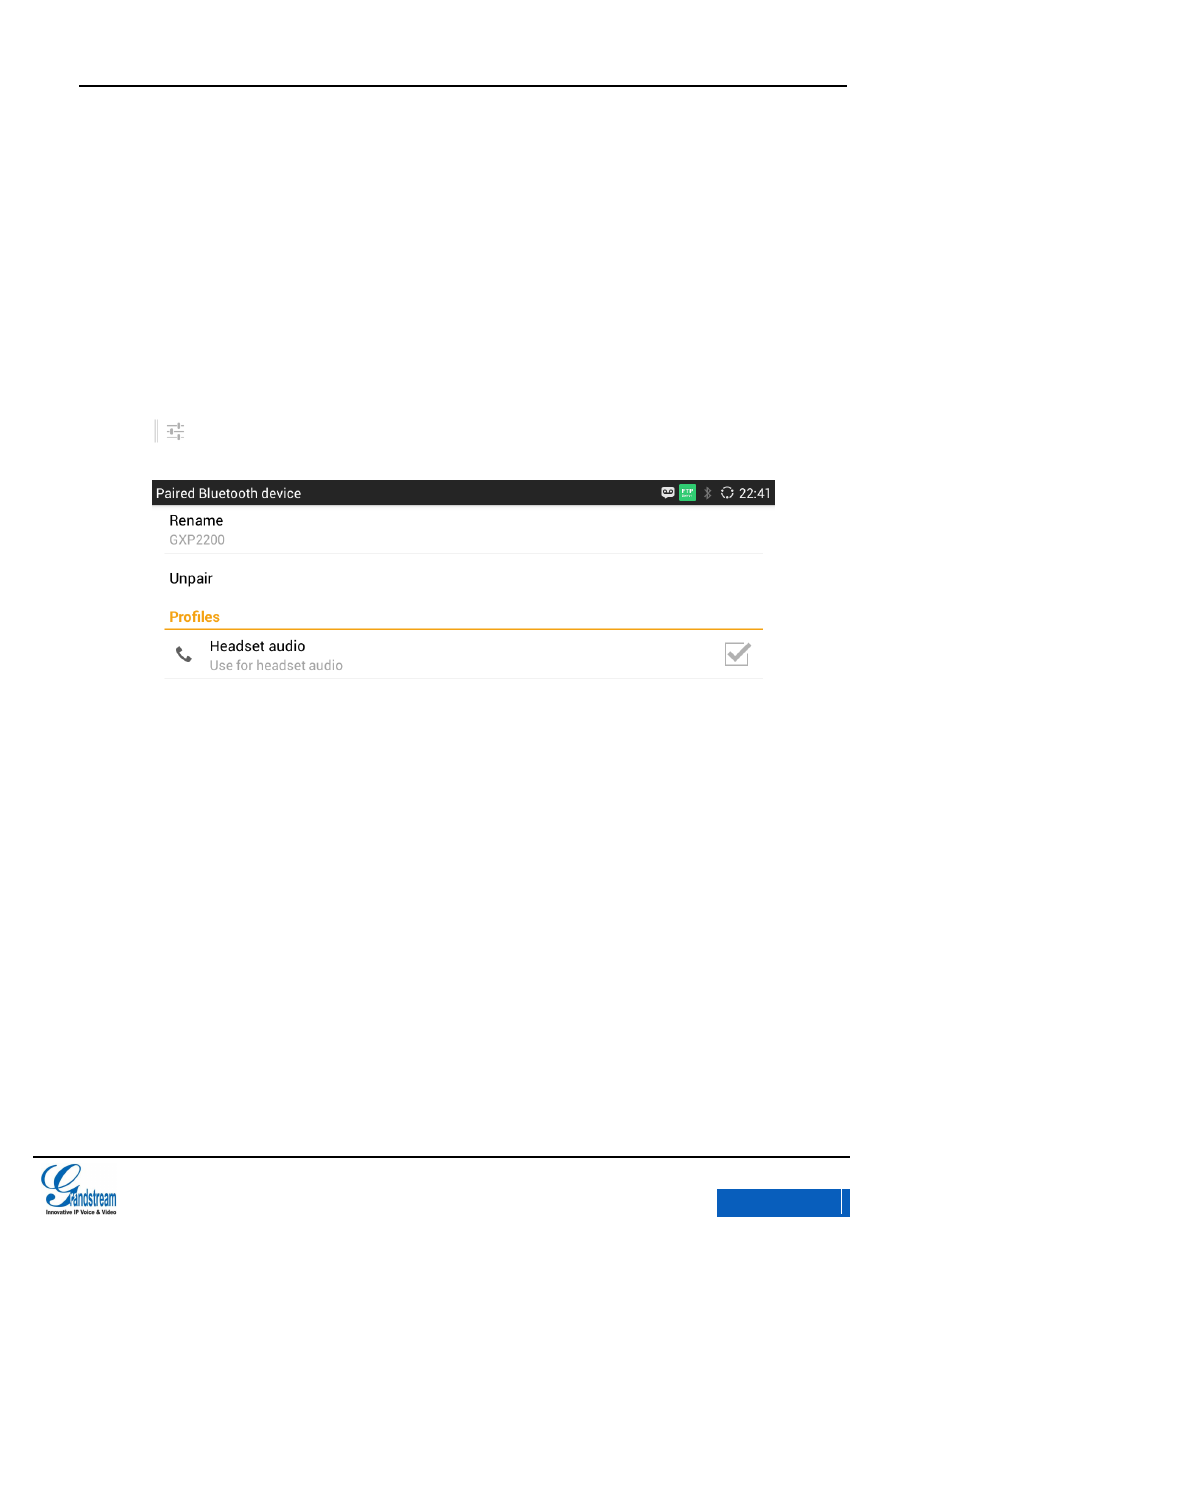
CONNECTING TO A BLUETOOTH DEVICE
Users could find the pairing Bluetooth in the Paired Devices. Tap on it to connect. The connected
device will display the corresponding status.
Tap on to unpair Bluetooth as well as rename and configure it.
Figure 127 GXV3275 Bluetooth Device Settings
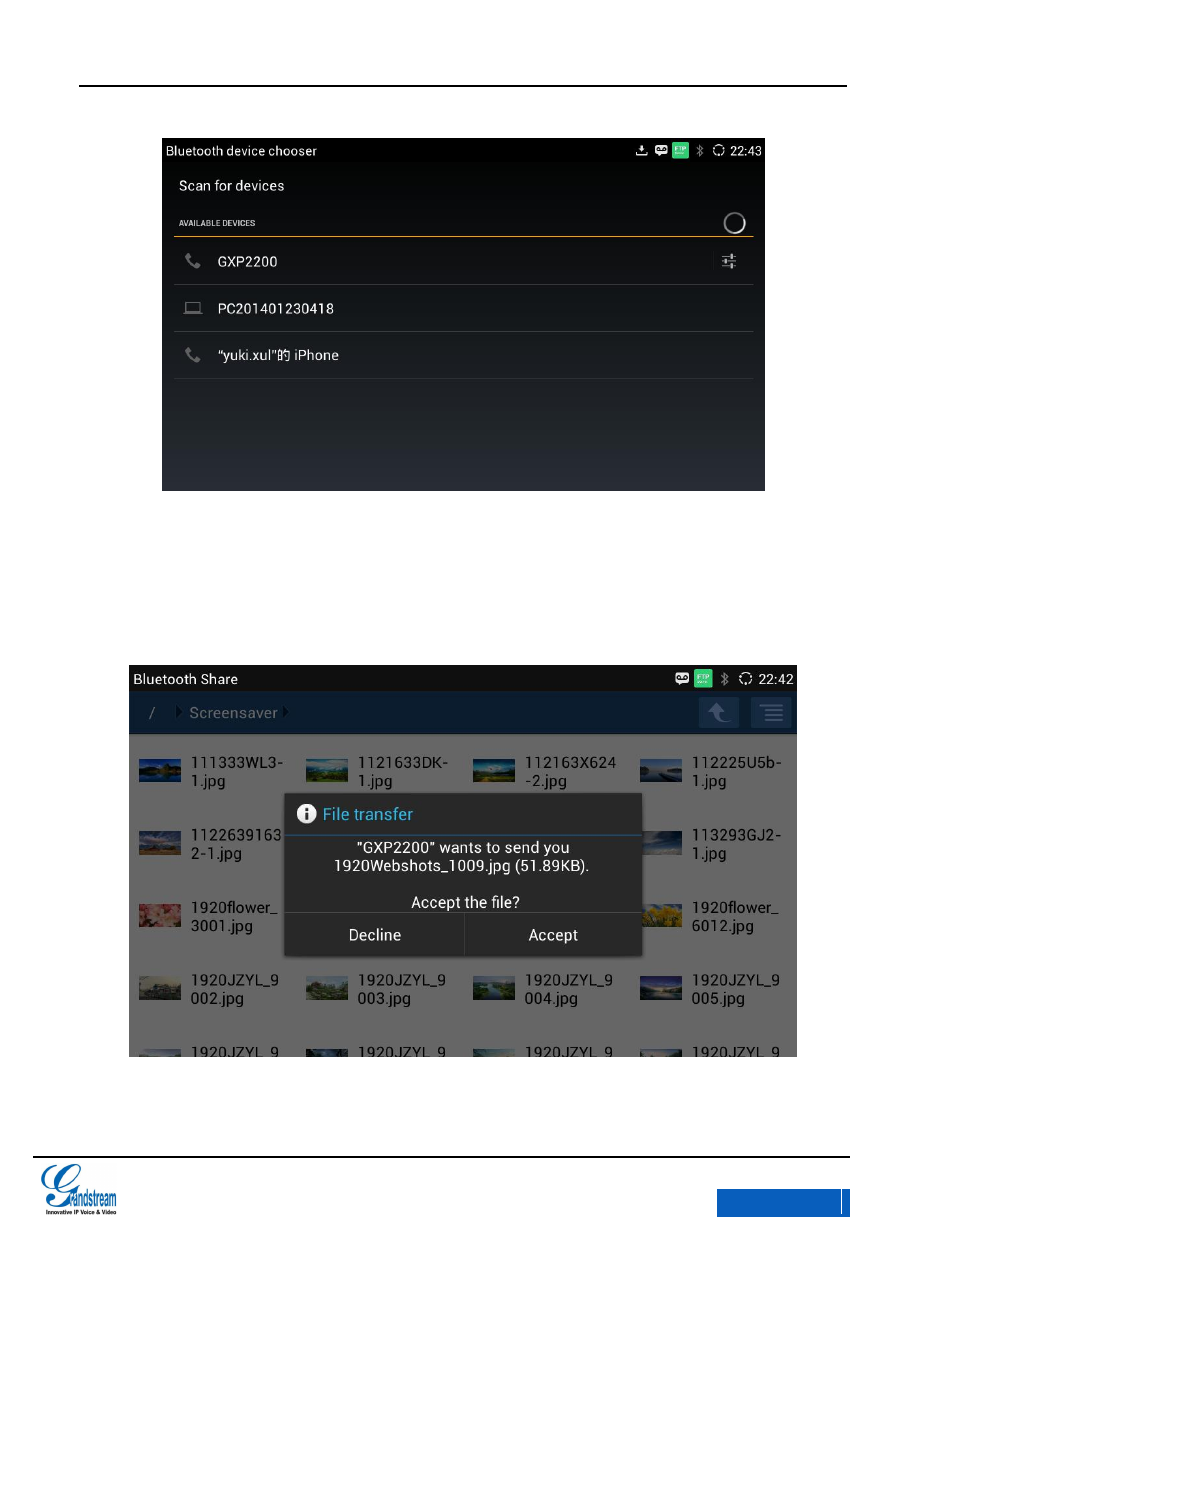
SEND FILES VIA BLUETOOTH
Users could transmit file and Contacts data via Bluetooth when the Bluetooth is connected
successfully. Select one target device and click “Send” to transmit file. See figure 128.
x-PDFDivision
GXV3275 User Manual
CONNECTING TO NETWORKS AND DEVICES
Grandstream Co., Ltd
Software Version:1.0.0.9 Document Version:0.2
127
Figure 128 GXV3275 Send File via Bluetooth
The GXV3275 will display the following page as shown in figure 129 when receiving a request to
transmit file. Click “Yes” to download the file under SD Card/Bluetooth directory.
Figure 129 GXV3275 Transmit File via Bluetooth
x-PDFDivision

GXV3275 User Manual
CONNECTING TO NETWORKS AND DEVICES
Grandstream Co., Ltd
Software Version:1.0.0.9 Document Version:0.2
128
USE BLUETOOTH HEADSET FOR CALLS
。
Users could switch voice channel in the process of calls once Bluetooth headset is connected
successfully. Refer to the chapter
Via Bluetooth
for details.
EHS HEADSET
Insert headset connector to into the LINE port on the back of GXV3275, a headset icon will show on
the status bar as shown in figure 129. The EHS headset will ring synchronously when there is an
incoming call. Refer to the EHS Headset Manual for detailed operations. Refer to the chapter
Via
EHS Headset to
learn how to switch EHS headset voice channel.
Figure 130 GXV3275 EHS Headset Status
Go to http://www.grandstream.cn/Wenti_view.aspx?Id=110to view headset compatibility.
EXTERNAL USB DEVICE
Insert the USB device to the USB port on the right side of the GXV3275, a USB device icon will
show on the status bar. Users could also open the File Manager to view external USB drive status
and the files stored in it. See figure 131.
x-PDFDivision

GXV3275 User Manual
CONNECTING TO NETWORKS AND DEVICES
Grandstream Co., Ltd
Software Version:1.0.0.9 Document Version:0.2
129
Figure 131 GXV3275 External USB Drive Status
EXTERNAL SD CARD
Insert the SD card to the SD port on the right side of the GXV3275, a SD card icon will show on the
status bar. Users could also open the File Manager to view the external SD card status and the files
stored in it. See figure 132.
x-PDFDivision

GXV3275 User Manual
CONNECTING TO NETWORKS AND DEVICES
Grandstream Co., Ltd
Software Version:1.0.0.9 Document Version:0.2
130
Figure 132 GXV3275 External SD Card Status
x-PDFDivision

GXV3275 User Manual
GXV3275 LCD SETTINGS
Grandstream Co., Ltd
Software Version:1.0.0.9 Document Version:0.2
131
GXV3275 LCD SETTINGS
The GXV3275 LCD MENU provides easy access to the settings on the phone that
making it more convenient to accommodate users’ habits. There are two ways to Follow open
Settings:
Click in the main menu.
Press the Menu button when the phone is running on idle and select “System
Settings” in the pop-up menu.
The Settings page is shown in figure 133.
x-PDFDivision

GXV3275 User Manual
GXV3275 LCD SETTINGS
Grandstream Co., Ltd
Software Version:1.0.0.9 Document Version:0.2
132
Figure 133 GXV3275 System Settings
PERSONALIZED ACCOUNT
Personalized Account allows users to set up varied ring tone and personalized features to each
account. Go to Personalized Account page, tap on one account to set. The account will show up
with registration status on the right side of the Personalized Account menu.
Ringtone: Select ringtone for the incoming call. If choose Custom Ringtone, users could
select the custom ringtone in the File Manager. Users could view the name of selected
music files in the Ringtone Settings on LCD as well as Web GUI.
Auto-Answer: Select whether to answer automatically for the incoming call. If set to “Always”,
the phone will enable the speaker automatically to answer the incoming call after it rings for
the first time. If set to Enable Intercom/Paging or Select “Broadcast” in Feature Key
Synchronization option in the Call Settings, it will answer the call based on SIP header info
sent from the server/proxy.
Shared Call Appearance (SCA): Select the shared-call-appearance (SCA) of the account,
including whether to enable the shared account, whether to enable Barge-in, and whether to
auto fill in the CallPark service code, set up CallPark service code and Seize Line timeout.
Call Forwarding: Select the call forwarding features for the account.
x-PDFDivision

GXV3275 User Manual
GXV3275 LCD SETTINGS
Grandstream Co., Ltd
Software Version:1.0.0.9 Document Version:0.2
133
WIRELESS & NETWORK
Users could configure network connection features via Wireless & Network.
Ethernet settings: Set up a series of network parameters like DHCP.
Wi-Fi: Check/uncheck to turn on/off Wi-Fi. The GXV3275 would automatically scan the
available Wi-Fi and connect to it once enabled Wi-Fi.
Wi-Fi settings: Set up and manage W-Fi access point.
Bluetooth: Check/uncheck to turn on/off Bluetooth to connect the phone with other Bluetooth
devices once enabled Bluetooth.
Bluetooth settings: Set up relative parameters connecting to other devices via Bluetooth.
VPN: Manage VPN.
OpenVPN: Add new VPN configuration files
Proxy settings: Set up proxy server.
Additional Network Settings: Set up Qos and 802.1x mode.
Tethering and portable hotspot: Set up portable Wi-Fi hotspot.
SOUND
Users could configure the GXV3275 ringtone, plays music and video and speak volume via Sound.
Silent Mode: Check/uncheck to enable/disable silent mode. In the Silent mode, all
applications will be set to mute other than alarm and media.
Volumes: Tap on Volumes and scroll the slider to left/right to adjust the volume for Ringtone ,
Media and Alarm;
Ringtone. Select phone's default ringtone for incoming call;
x-PDFDivision

GXV3275 User Manual
GXV3275 LCD SETTINGS
Grandstream Co., Ltd
Software Version:1.0.0.9 Document Version:0.2
134
Notification tone: Select notification tone for applications like SMS.
DISPLAY
Use Display to configure the screen display parameters like brightness and screen saver.
Brightness: Tap on Brightness and scroll the slider to left/right to adjust the brightness on the
GXV3275 LCD;
Screen timeout: Tap to set the timeout interval before the LCD turns dark form idle screen.
Screen Saver: Set the parameters like screen saver images and interval.
Landscape screen: Set all screens landscaped.
STORAGE
Check the internal storage of the phone.
APPLICATIONS
Use the Applications to view the running details about the applications installed on the GXV3275, to
manage applications and set permission for the installations. Slide left/right to view the download
application and the size as well as running status of all applications on the phone and in the SD card,
or manage the running applications.
x-PDFDivision
GXV3275 User Manual
GXV3275 LCD SETTINGS
Grandstream Co., Ltd
Software Version:1.0.0.9 Document Version:0.2
135
LOCATION ACCESS
Set whether to let app to use Google location service to collect location data.
SECURITY SETTINGS
Set up the security parameters on the phone.
Screen lock. Set up pattern or password for screen lock. Please set up the pattern with the
Wizard.
Owner info. Display owner info on the lock screen.
Display password. The screen will display the input value when users input the password if
check the option. Uncheck not to display the input value when input the password;
Device administrators. Add or delete device administrators.
Unknown sources. Check/uncheck to enable/disable permission to install applications that
you obtained from web sites, email, or other locations other than GS Market;
Note:
It is recommended to download Apps from the GS market for the security of
user’s data.
Verify apps. Disallow or warn before apps installation that may cause harm.
Trusted credentials. Display trusted certificates or other certificates.
Install from SD card. Install encrypted certificate from SD card.
Clear credentials. Remove all certificates and reset the password.
x-PDFDivision

GXV3275 User Manual
GXV3275 LCD SETTINGS
Grandstream Co., Ltd
Software Version:1.0.0.9 Document Version:0.2
136
LANGUAGE &KEYBOARD
Language. Tap to open a list of language options.
Spell checker. Configure whether to check spellings and select the available spell-checker
tool.
Personal dictionary. Add words to user dictionary.
Keyboard & input methods. Set up the default input method.
Android keyboard(AOSP). Set up whether to use Android keyboard and configure Android
keyboard.
Text-to-speech (TTS) output: Set up TTS.
Moue/trackpad. Set up the point speed.
ACCOUNTS
Accounts allows users to add Google account, Exchange account and email account. Users could
also make sync settings via Google Play account or associated account on GXV3275.
The steps to add account can be set following the steps in chapter
Manage Contacts
.
The account can be synchronized with the following procedures once being added successfully:
Google Play. Download Google Play from GS market, open it after the download. Google
Play will automatically login with the added Google account.
Figure 134 GXV3275 Google Play-Add Account
x-PDFDivision

GXV3275 User Manual
GXV3275 LCD SETTINGS
Grandstream Co., Ltd
Software Version:1.0.0.9 Document Version:0.2
137
Contacts. The contact synchronizes with Google account will show in the Contacts. Refer to
the chapter
Manage Contacts-Account
for details.
DATE &TIME
Enable and Use Specified NTP Server Address. Set the specified NTP server URL or IP
address.
Set date. Set the date on GXV3275 manually if not set auto sync.
Set time. Set the time on GXV3275 manually if not set auto sync.
Select time zone. Set the time zone on GXV3275.
Use 24-hour format. Check/uncheck to display the time using 24-hour time format or not.
Choose date format. Select the Month/Day/Year format.
ABOUT PHONE
About Phone displays the GXV3275's Account Status, Network Status and System Info.
Account status. Displays the account name and registration status on the GXV3275.
Network status. Displays MAC Address, IP Address info, ect.
System Info. Displays the system version of the GXV3275.
ADVANCED SETTINGS
Users could open Advanced Settings to configure Account Advanced Settings, Upgrade, Syslog&
Factory Reset.
x-PDFDivision

GXV3275 User Manual
GXV3275 LCD SETTINGS
Grandstream Co., Ltd
Software Version:1.0.0.9 Document Version:0.2
138
Account. Tap on “Account” and select one account to input the necessary information to
register the account, which includes Account Activation, Account Name, SIP Server, ect.
Save the settings to fulfill registration.
Upgrade. Input the software info to upgrade via firmware server.
Syslog. Select the syslog level and Syslog Server Address.
Factory Reset. Restore the GXV3275 to factory default settings.
Developer mode. Adjust the phone via ADB tool.
REBOOT
Reboot your phone.
x-PDFDivision

GXV3275 User Manual
GXV3275 WEB GUI
Grandstream Co., Ltd
Software Version:1.0.0.9 Document Version:0.2
139
GXV3275 WEB GUI
DEFINITIONS
This chapter introduces the GXV3275 Web GUI. As mentioned, you can log in as an administrator
or a user.
Status: Displays the Account Status, Network Status, and System Info of the phone;
Account (1-6): To configure each of the SIP accounts. Including General Info, Network
Settings, SIP Settings, Encoding Settings, Call Settings.
Advanced Settings: General Settings, Call features, Video, Audio, MPK General Settings,
MPK Settings;
Maintenance: Network Settings, Time Settings, Web/SSH Access, Upgrade, Syslog, Logcat,
Debug, webmaster, Contacts, LDAP and Device Manager.
x-PDFDivision
GXV3275 User Manual
GXV3275 WEB GUI
Grandstream Co., Ltd
Software Version:1.0.0.9 Document Version:0.2
140
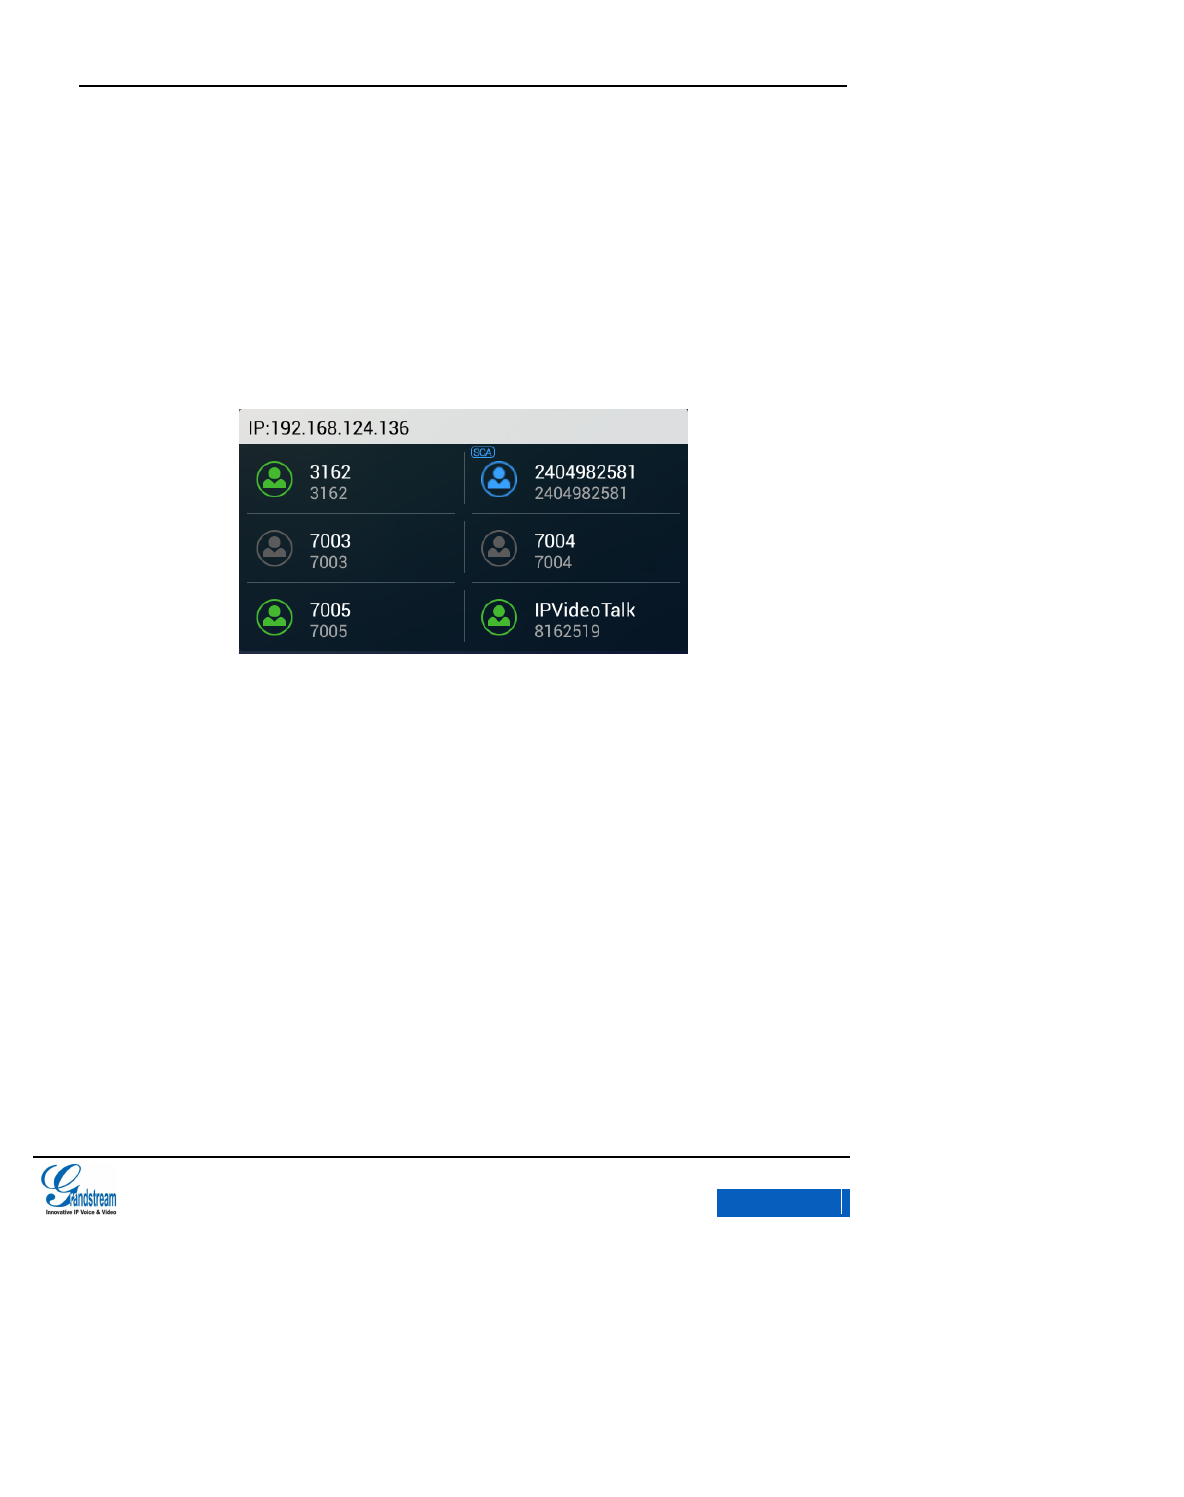
ACCESSING GXV3275 WEB GUI
IP ADDRESS
Users could view the GXV3275 IP Address via Account widget on the As shown in figure 135.
Figure 135 GXV3275 Desktop Widget-Account
TO ACCESS THE GXV3275 WEB GUI
1. Connect the computer to the same network as the phone;
2. Open a Web browser on your computer, enter the phone’s IP address in the address bar of the
browser; for example: http://192.168.124.111;
x-PDFDivision
GXV3275 User Manual
GXV3275 WEB GUI
Grandstream Co., Ltd
Software Version:1.0.0.9 Document Version:0.2
141
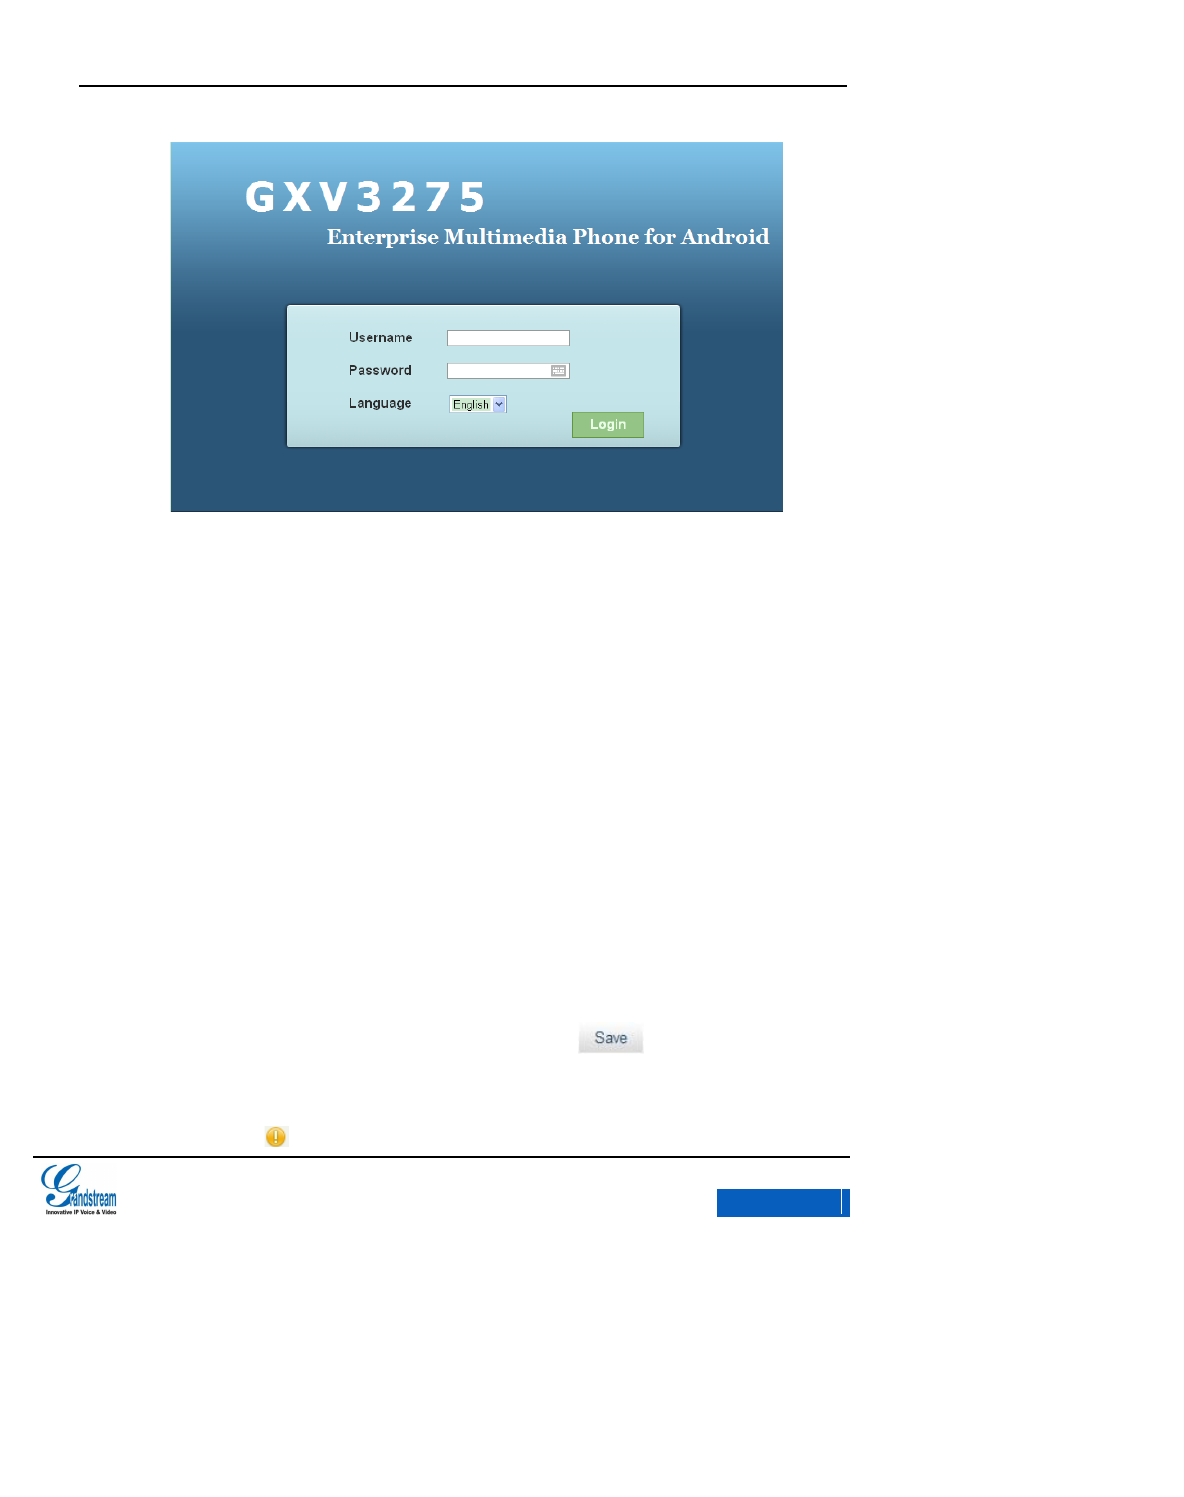
Figure 136 GXV3275 Web GUI-Login
3. Press the “Enter” button and input the administrator’s login and password in the prompt box.
The default login name for the administrator is "admin". The default administrator password is
set to "admin".
4. Select the language being used on Web page in the drop-down menu of the language bar.
Chinese and English are optional.
5. Click “Login” to access the Web GUI.
SAVE CHANGES
When changing any settings, always SUBMIT them by pressing on the bottom of each
page or press the “Enter” Button, the Web browser will prompt to indicate having saved successfully.
For those options with next to them, users must reboot the phone for the changes to take
x-PDFDivision
GXV3275 User Manual
GXV3275 WEB GUI
Grandstream Co., Ltd
Software Version:1.0.0.9 Document Version:0.2
142
effect.
CONFIGURE WEB PAGE
GXV3275 WEB page includes Status, Account, Advanced Settings and Maintenance. Users could
login the phone with varied username and the corresponding access permissions are DIFFERENT.
See table 8.
Table 8 Users Access Permissions
User Type
Username
Password
Access Permissions
End-user
user
Custom
Status, some basic settings in the
Advanced Settings and Maintenance
Administrator
Administrator
admin
admin
All Pages
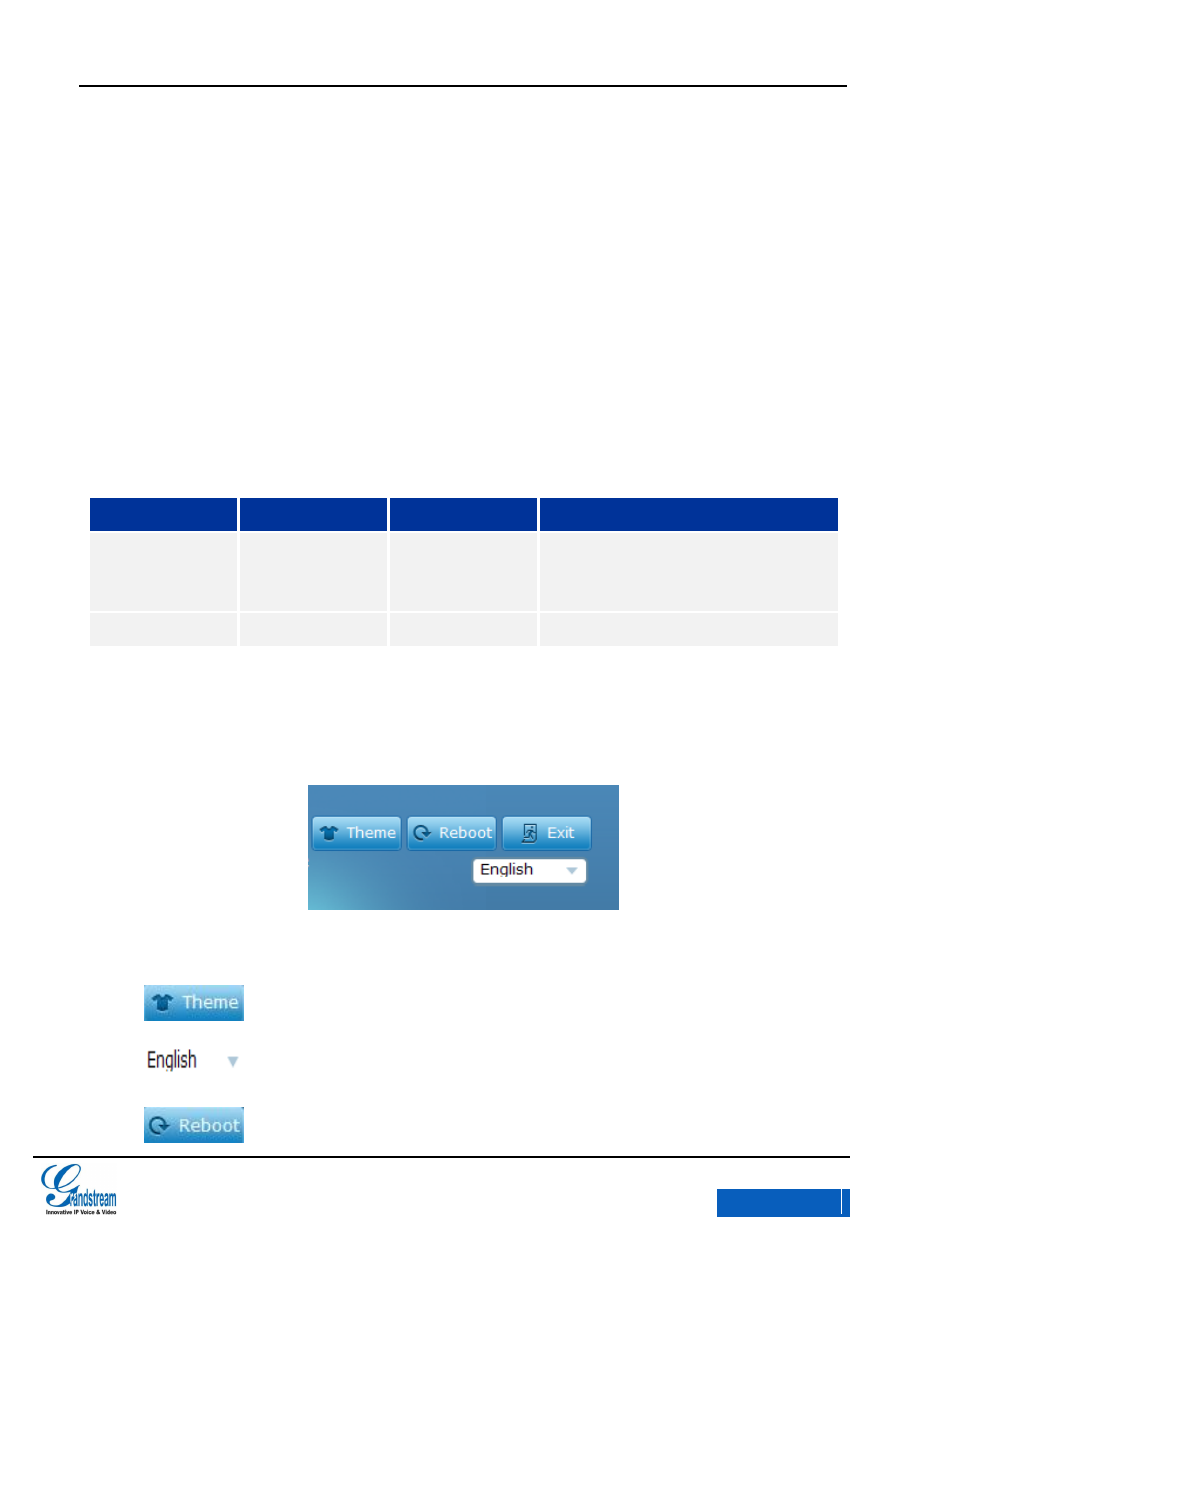
TOOLBAR
The toolbar is on the upper right corner of the WEB page. As shown in figure 137.
Figure 137 GXV3275 Web GUI-Toolbar
Select the page color
Select the language.
Reboot the phone.
x-PDFDivision
GXV3275 User Manual
GXV3275 WEB GUI
Grandstream Co., Ltd
Software Version:1.0.0.9 Document Version:0.2
143
Logout.
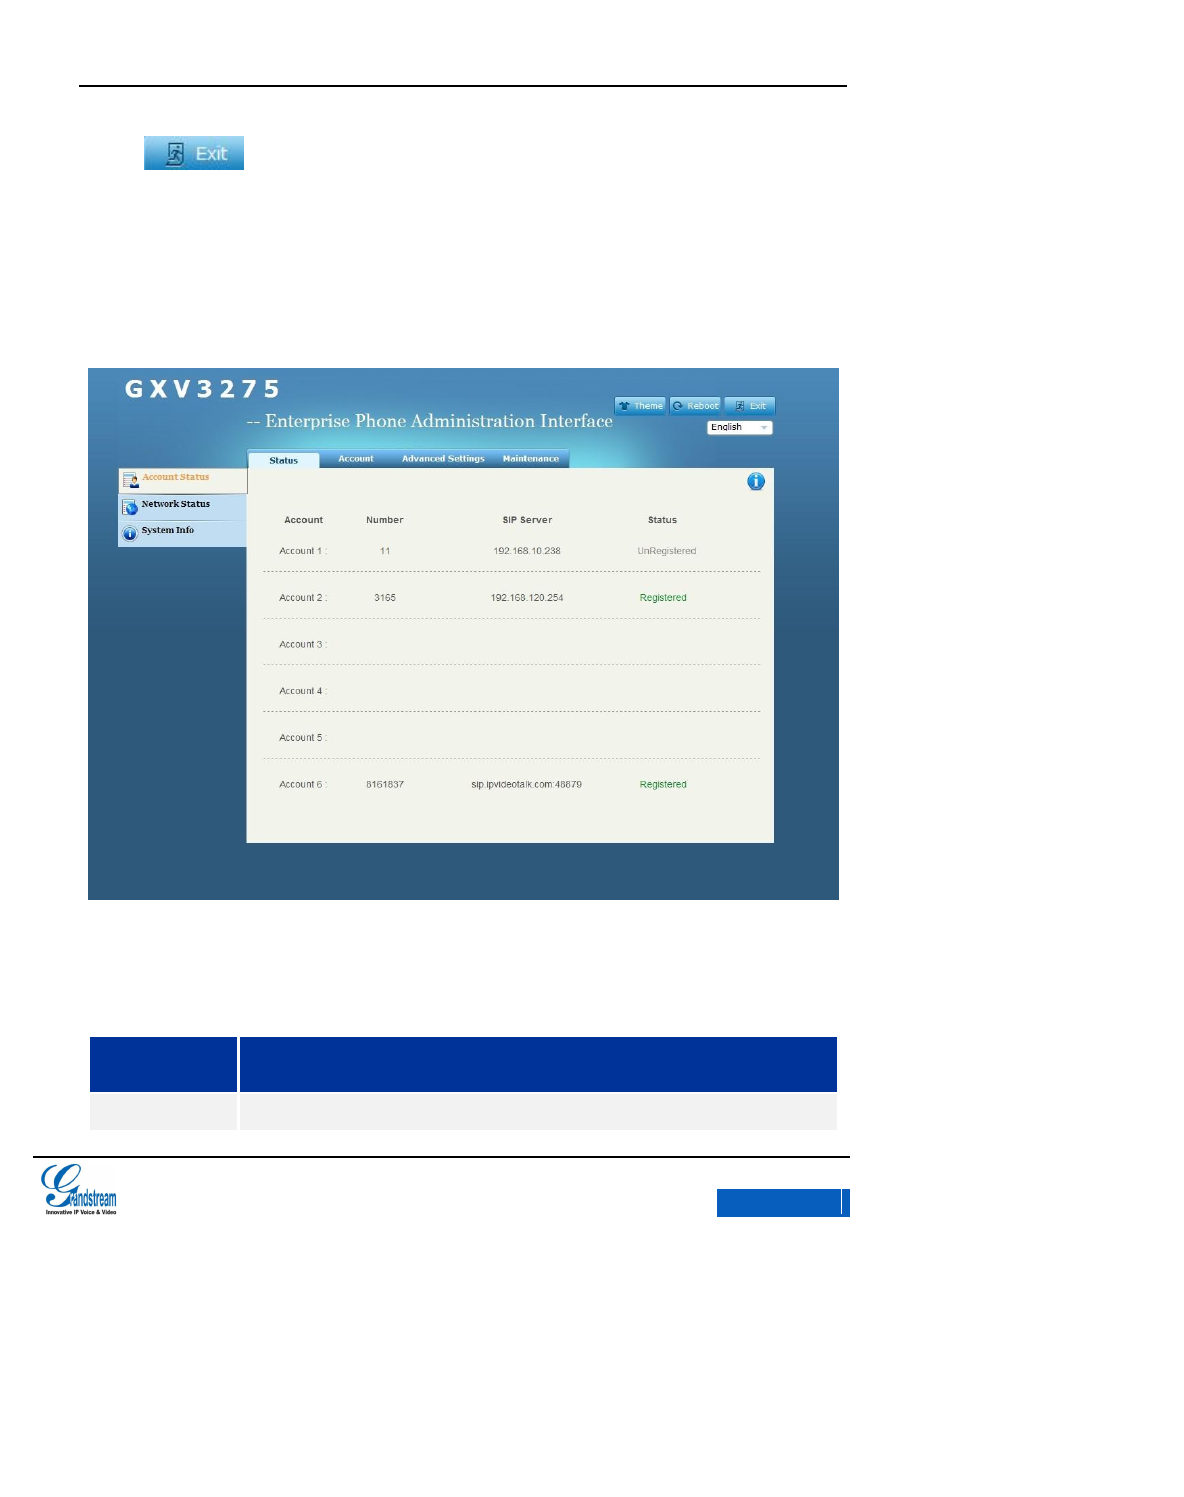
STATUS
GXV3275 Status page includes Account Status. Network Status and System Info. Users could click
the corresponding option on the left navigation bar to enter each subpage. See figure 138.
Figure 138 GXV3275 Web GUI Status-Account Status
Table 9 Status/Account Status Parameters
Parameters
Description
Account
All the 6 SIP accounts on the phone.
x-PDFDivision
GXV3275 User Manual
GXV3275 WEB GUI
Grandstream Co., Ltd
Software Version:1.0.0.9 Document Version:0.2
144
Number
The number or extension corresponds to each account.
SIP Server
The SIP server the account registers with
Status
Two registration status for the SIP account: Registered and Unregistered.
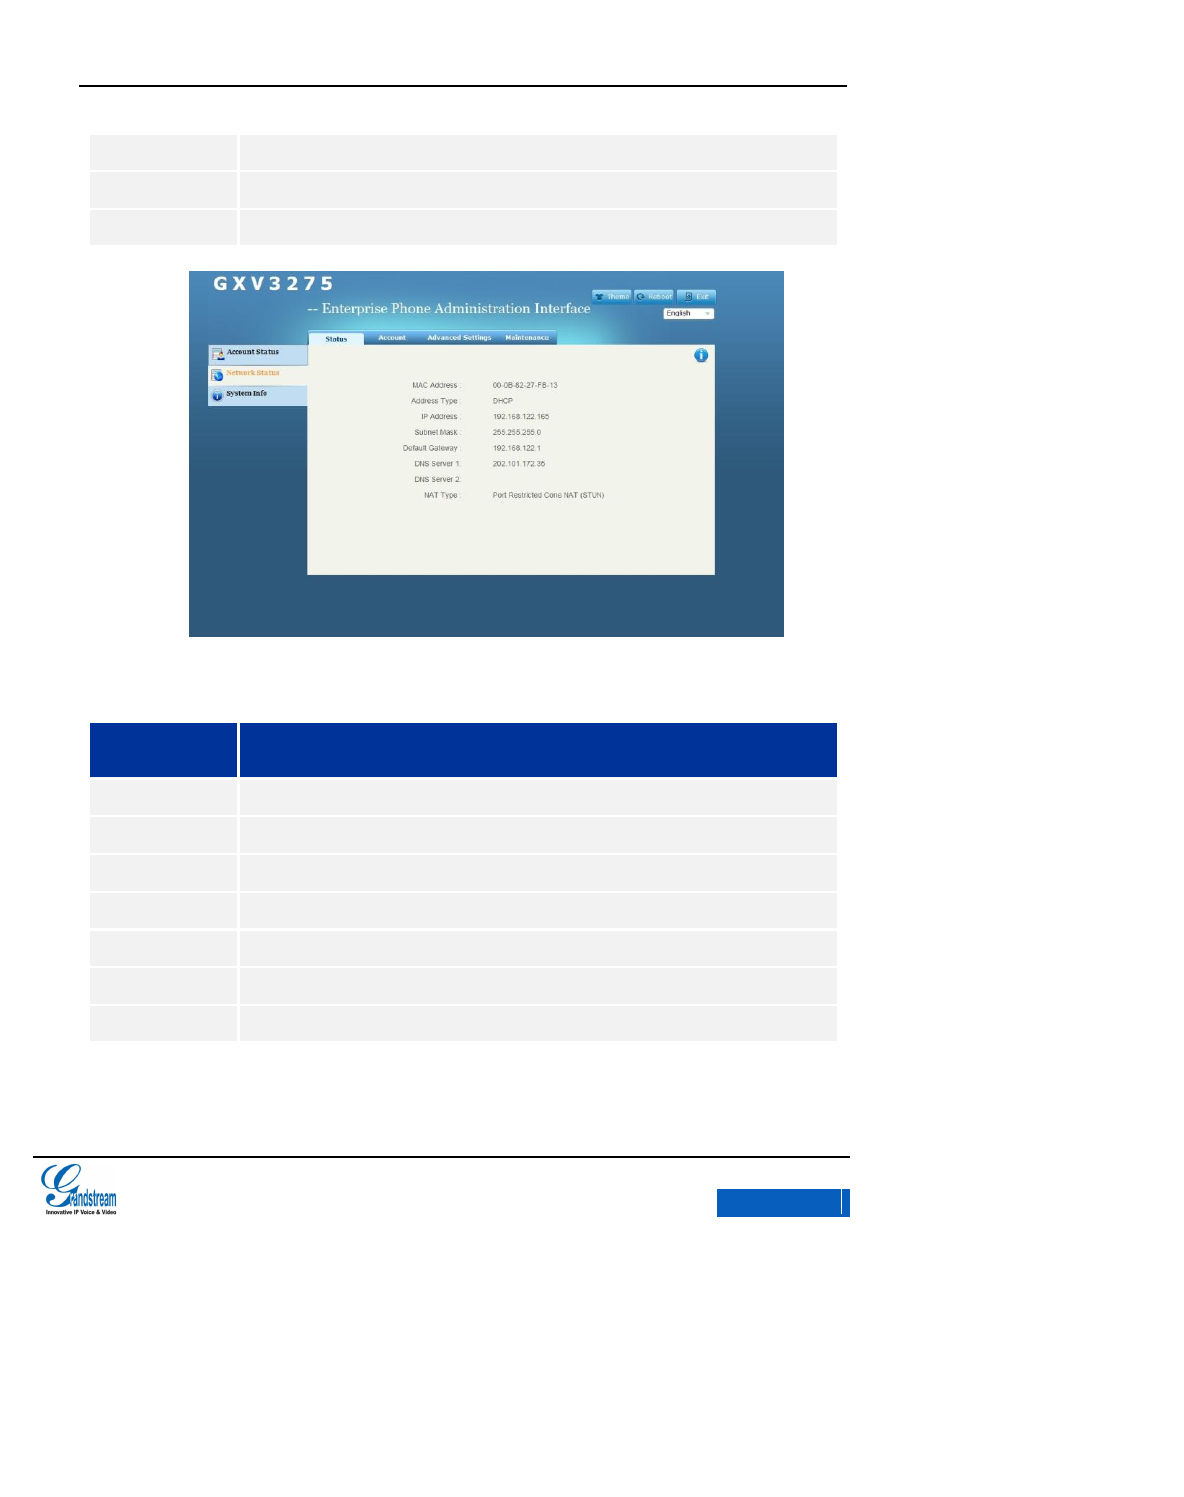
Figure 139 GXV3275 Web GUI Status-Network Status
Table 10 Status/Network Status Parameters
Parameters
Description
MAC Address
GXV3275 MAC address.
Address Type
The configured address type: DHCP, Static IP or PPPoE.
IP Address
IP address of the phone.
Subnet Mask
Subnet mask of the phone.
Default Gateway
Default gateway of the phone.
DNS Server
DNS Server of the phone.
NAT Type
The type of NAT connection used by the phone.
x-PDFDivision
GXV3275 User Manual
GXV3275 WEB GUI
Grandstream Co., Ltd
Software Version:1.0.0.9 Document Version:0.2
145
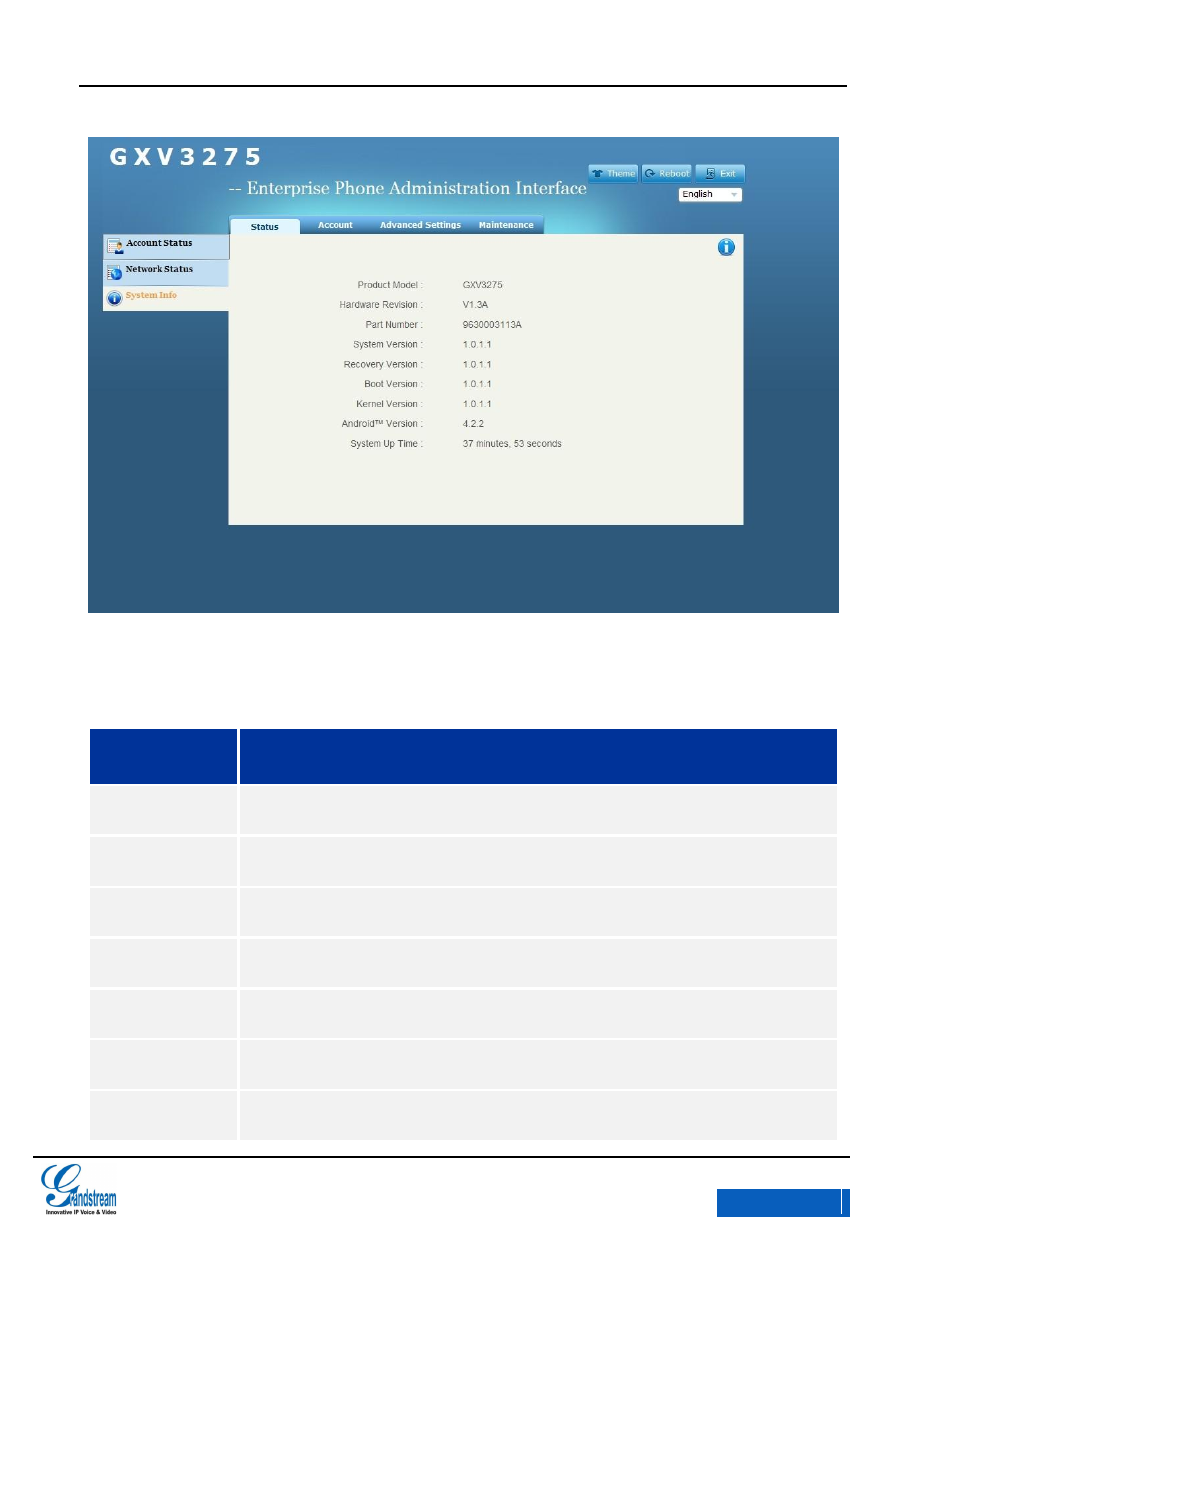
Figure 140 GXV3275 Web GUI Status-System Info
Table 11 Status/System Info Parameters
Parameters
Description
Product Model
Product model of the phone.
Hardware Revision
Hardware version number.
Part Number
Product part number.
System Version
Firmware version. This is the main software release version.
Recovery Version
Recovery image version.
Boot Version
Booting code version.
Kernel Version
Kernel version.
x-PDFDivision
GXV3275 User Manual
GXV3275 WEB GUI
Grandstream Co., Ltd
Software Version:1.0.0.9 Document Version:0.2
146
Android Version
Android OS version.
System Up Time
System up time since the last reboot.
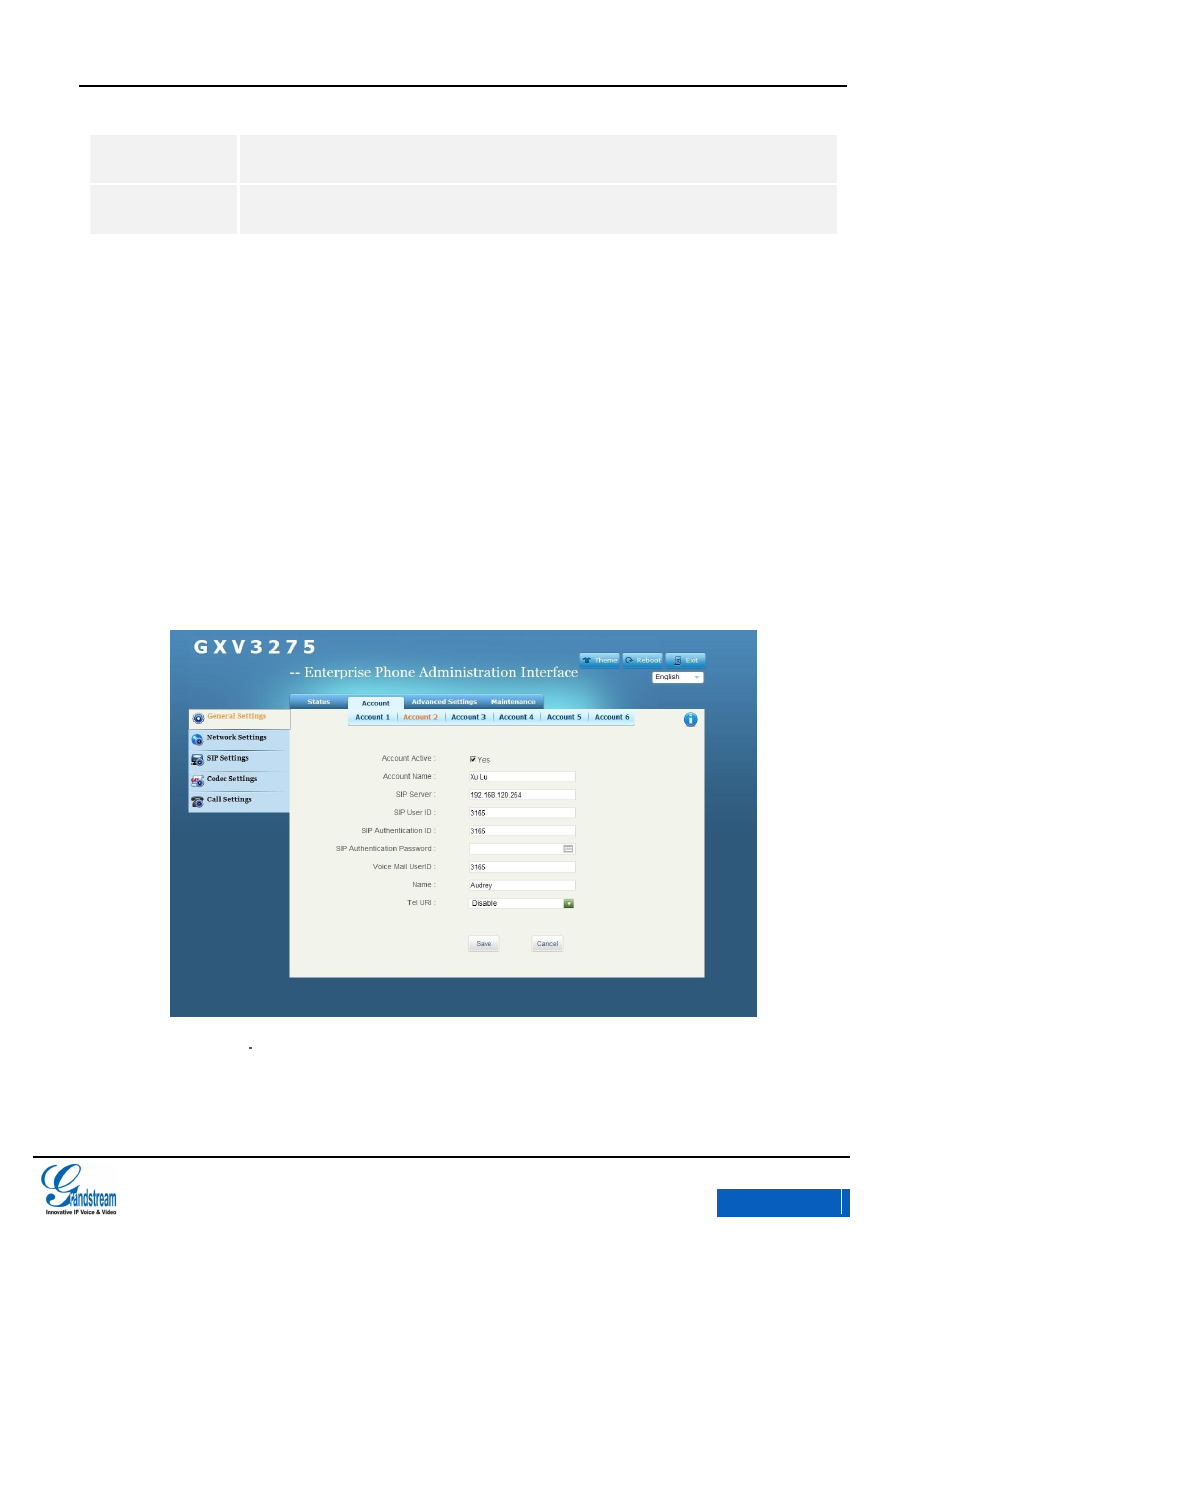
ACCOUNT
Users could configure each account on Account page.GXV3275 has six independent SIP accounts that
can be configured on an individual configuration page. Users could select Account X in the menu bar on
WEB GUI to enter the corresponding account configuration page. See figure 141.
The account page has five parts as General Settings, Network Settings, SIP Settings, Codec Settings
and Call Settings. User could click the corresponding option on the navigation bar on the left to configure
the subpage respectively.
Figure 141 GXV3275 Web GUI Account -General Settings
Table 12 Account/General Settings Parameters
x-PDFDivision

GXV3275 User Manual
GXV3275 WEB GUI
Grandstream Co., Ltd
Software Version:1.0.0.9 Document Version:0.2
147
Parameters
Descriptions
Account Active
This field indicates whether to activate the account. The phone will not send login
message to the SIP server if uncheck this option.
Account Name
The name associated with each account to be displayed on the LCD.
SIP Server
The URL or IP address of the SIP server. This is provided by your VoIP service
provider (ITSP).
SIP User ID
User account information, provided by your VoIP service provider (ITSP). It's usually
in the form of digits similar to phone number or actually a phone number.
SIP Authentication
ID
SIP service subscriber's Authenticate ID used for authentication. It can be identical to
or different from the SIP User ID.
SIP Authentication
Password
The account password required for the phone to authenticate with the ITSP (SIP)
server before the account can be registered.
Voice Mail UserID
This parameter allows you to access voice messages by pressing the MESSAGE
button or Dial the Access Number button on the phone.
Name
The SIP server subscriber's name (this function should be supported by SIP server)
that will be used for Caller ID display.
Tel URI
The default is “Disabled”. If the phone has an assigned PSTN telephone number, this
field should be set to "Enabled", or should be set to “Disabled”. If set to "Enable",
Then a "User=Phone" parameter will be attached to the Request-Line and "TO"
header in the SIP request.
x-PDFDivision

GXV3275 User Manual
GXV3275 WEB GUI
Grandstream Co., Ltd
Software Version:1.0.0.9 Document Version:0.2
148
Figure 142 GXV3275 Web GUI Account-Network Settings
Table 13 Account/Network Settings Parameters
Parameters
Description
Outbound Proxy
IP address or URL of the Outbound Proxy, Media Gateway, or Session Border
Controller. It's used by the phone for Firewall or NAT penetration in different network
environments. If a symmetric NAT is detected, STUN will not work and ONLY an
Outbound Proxy can provide a solution.
Secondary
Outbound Proxy
IP address or URL of the Secondary Outbound Proxy.
DNS Mode
This parameter controls how the Search Appliance looks up IP addresses for
hostnames. There are three modes: A Record, SRV, NATPTR/SRV. The default
setting is "A Record". If the user wishes to locate the server by DNS SRV, the user
may select "SRV" or "NATPTR/SRV".
x-PDFDivision

GXV3275 User Manual
GXV3275 WEB GUI
Grandstream Co., Ltd
Software Version:1.0.0.9 Document Version:0.2
149
NAT Traversal
This parameter configures whether the NAT traversal mechanism is activated.
If set to "STUN" and STUN server is configured, the phone will route according to the
STUN server. If NAT type is Full Cone, Restricted Cone or Port-Restricted Cone, the
phone will try to use public IP addresses and port number in all the SIP&SDP
messages.
The phone will send empty SDP packet to the SIP server periodically to keep the
NAT port open if it is configured to be "Keep-alive". Configure this to be “NO" if an
outbound proxy is used. "STUN" cannot be used if the detected NAT is symmetric
NAT.
Set this to "VPN" if OpenVPN is used.
Proxy-Require
A SIP Extension to notify the SIP server that the phone is behind a NAT/Firewall.
x-PDFDivision
GXV3275 User Manual
GXV3275 WEB GUI
Grandstream Co., Ltd
Software Version:1.0.0.9 Document Version:0.2
150
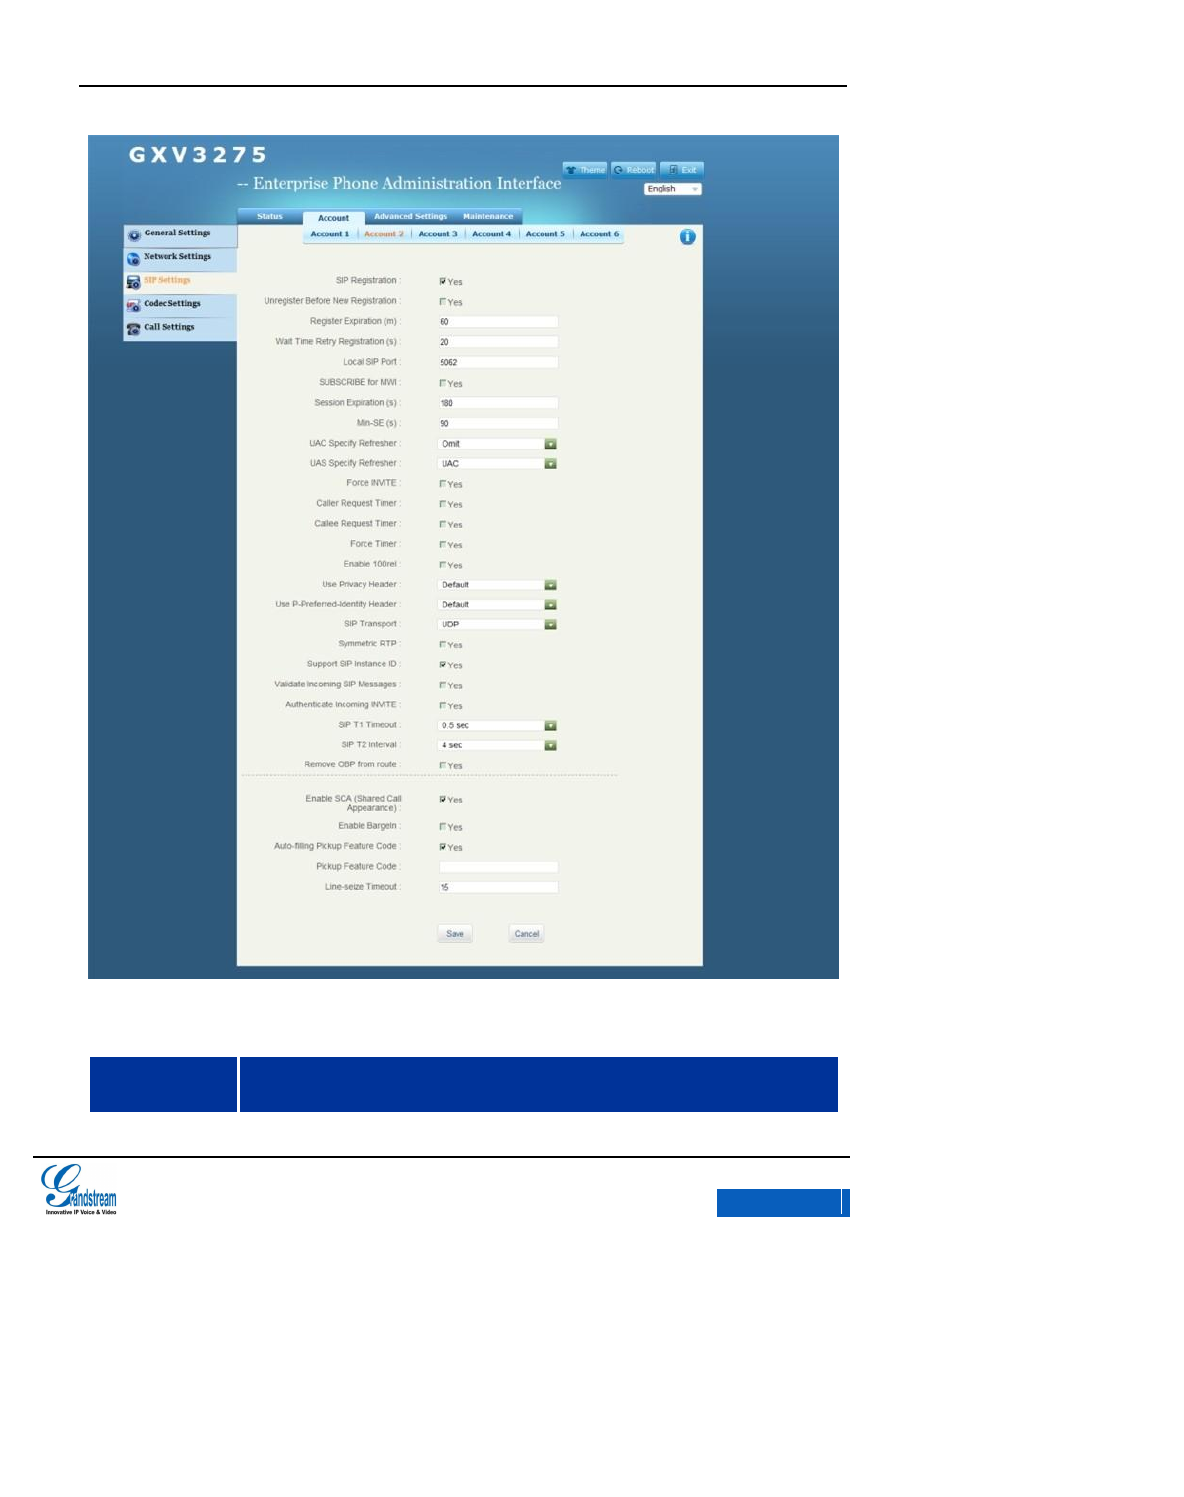
Figure 143 GXV3275 Web GUI Account-SIP Settings
Table 14 Account/SIP Settings Parameters
Parameters
Description
x-PDFDivision

GXV3275 User Manual
GXV3275 WEB GUI
Grandstream Co., Ltd
Software Version:1.0.0.9 Document Version:0.2
151
SIP Registration
The default setting is "Yes”. Selects whether or not the phone will send SIP Register
messages to the proxy/server. If set to "No”, the phone will not send SIP Register
messages to the proxy/server.
Unregister Before
New Registration
If set to "Yes", the SIP user's registration information will be cleared when the phone
reboots. The SIP Contact header will contain "*" to notify the server to unbind the
connection. The default setting is "No".
Register Expiration
(m)
Specifies the frequency (in minutes) in which the phone refreshes its registration with
the specified registrar. The default value is 60 minutes (1 hour). The maximum value
is 64800 minutes (about 45 days). The minimum value is 1 minute.
Wait Time Retry
Registration (s)
The default value is 20 seconds. The amount of time in which the phone will retry the
registration process in the event that is failed.
Local SIP Port
Defines the local SIP port used to listen and transmit.
SUBSCRIBE for
MWI
The default setting is "No". When set to "Yes", a SUBSCRIBE for Message Waiting
Indication will be sent periodically.
Session Expiration
(s)
Session Expiration is the time (in seconds) where the session is considered timed
out, provided no successful session refresh transaction occurs beforehand. The
default value is 180 seconds.
The SIP Session Timer extension that enables SIP sessions to be periodically
"refreshed" via a SIP request (UPDATE, or re-INVITE). If there is no refresh via an
UPDATE or re-INVITE message, the session will be terminated once the session
interval expires.
Min-SE (s)
The minimum session expiration (in seconds). The default value is 90 seconds.
UAC Specify
Refresher
As a Caller, select UAC to use the phone as the refresher; or select UAS to use the
Callee or proxy server as the refresher.
UAS Specify
Refresher
As a Callee, select UAC to use caller or proxy server as the refresher; or select UAS
to use the phone as the refresher.
x-PDFDivision

GXV3275 User Manual
GXV3275 WEB GUI
Grandstream Co., Ltd
Software Version:1.0.0.9 Document Version:0.2
152
Force INVITE
The Session Timer can be refreshed using the INVITE method or the UPDATE
method. Select "Yes" to use the INVITE method to refresh the session timer.
Caller Request
Timer
If set to "Yes" and the remote party supports session timers, the phone will use a
session timer when it makes outbound calls.
Callee Request
Timer
If set to "Yes" and the remote party supports session timers, the phone will use a
session timer when it receives inbound calls.
Force Timer
If Force Timer is set to "Yes", the phone will use the session timer even if the remote
party does not support this feature. If Force Timer is set to "No", the phone will enable
the session timer only when the remote party supports this feature.
To turn off the session timer, set caller Request Timer, callee Request Timer and
Force Timer all to "No".
Enable 100rel
The use of the PRACK (Provisional Acknowledgment) method enables reliability to
SIP provisional responses (1xx series). This is very important in order to support
PSTN internetworking. To invoke a reliable provisional response, the 100rel tag is
appended to the value of the required header of the initial signaling messages.
Use Privacy
Header
Defines whether or not the Privacy header will be in the SIP INVITE message. The
default setting is “default”.
Use
P-Preferred-Identit
y Header
Defines whether or not the P-Preferred-Identity header will be in the SIP INVITE
message. The default setting is “default”.
SIP Transport
Determines the network protocol used for the SIP transport. Users can choose from
UDP / TCP /TLS. The default setting is “UDP”.
Symmetric RTP
Defines whether symmetric RTP is supported or not.
Support SIP
Instance ID
Defines whether SIP Instance ID is supported or not. The default setting is "Yes".
x-PDFDivision

GXV3275 User Manual
GXV3275 WEB GUI
Grandstream Co., Ltd
Software Version:1.0.0.9 Document Version:0.2
153
Validate Incoming
SIP Messages
Defines whether the incoming SIP messages will be validated or not.
Validate Incoming
INVITE Session
If set to "Yes", the phone will response to SIP 401 Unauthorized to validate the
incoming INVITE message. The default setting is "No".
SIP T1 Timeout
The default setting is 0.5 seconds. SIP T1 Timeout is the RTT (Round-Trip Time)
evaluation between the server and client. If the wait time is long, please choose a
larger value in order to guarantee the stability.
SIP T2 interval
The default setting is 4 seconds. This option configures the SIP Protocol T2 Timer (In
Seconds). T2 Timer determines the time interval of INVITE Response and
non-INVITE Request.
Remove OBP from
route
The default setting is "No". This is used for the SIP Extension to notify the SIP server
that the device is behind a NAT/Firewall.
Enable SCA
If set to”Yes”, SCA (Broadsoft standard) will be used as the register account. The
default setting is "No".
Enable BargeIn
If set to”Yes”, users could barge the current call on the shared line. The default
setting is "No".
Auto-filling Pickup
Feature Code
If set to” Yes”, call park will be automatically filled in. The default setting is "No".
Pickup Feature
Code
Configure pickup service code for call park
Line-seize Timeout
Configure the timeout (in seconds).The default setting is "15 seconds".
x-PDFDivision
GXV3275 User Manual
GXV3275 WEB GUI
Grandstream Co., Ltd
Software Version:1.0.0.9 Document Version:0.2
154
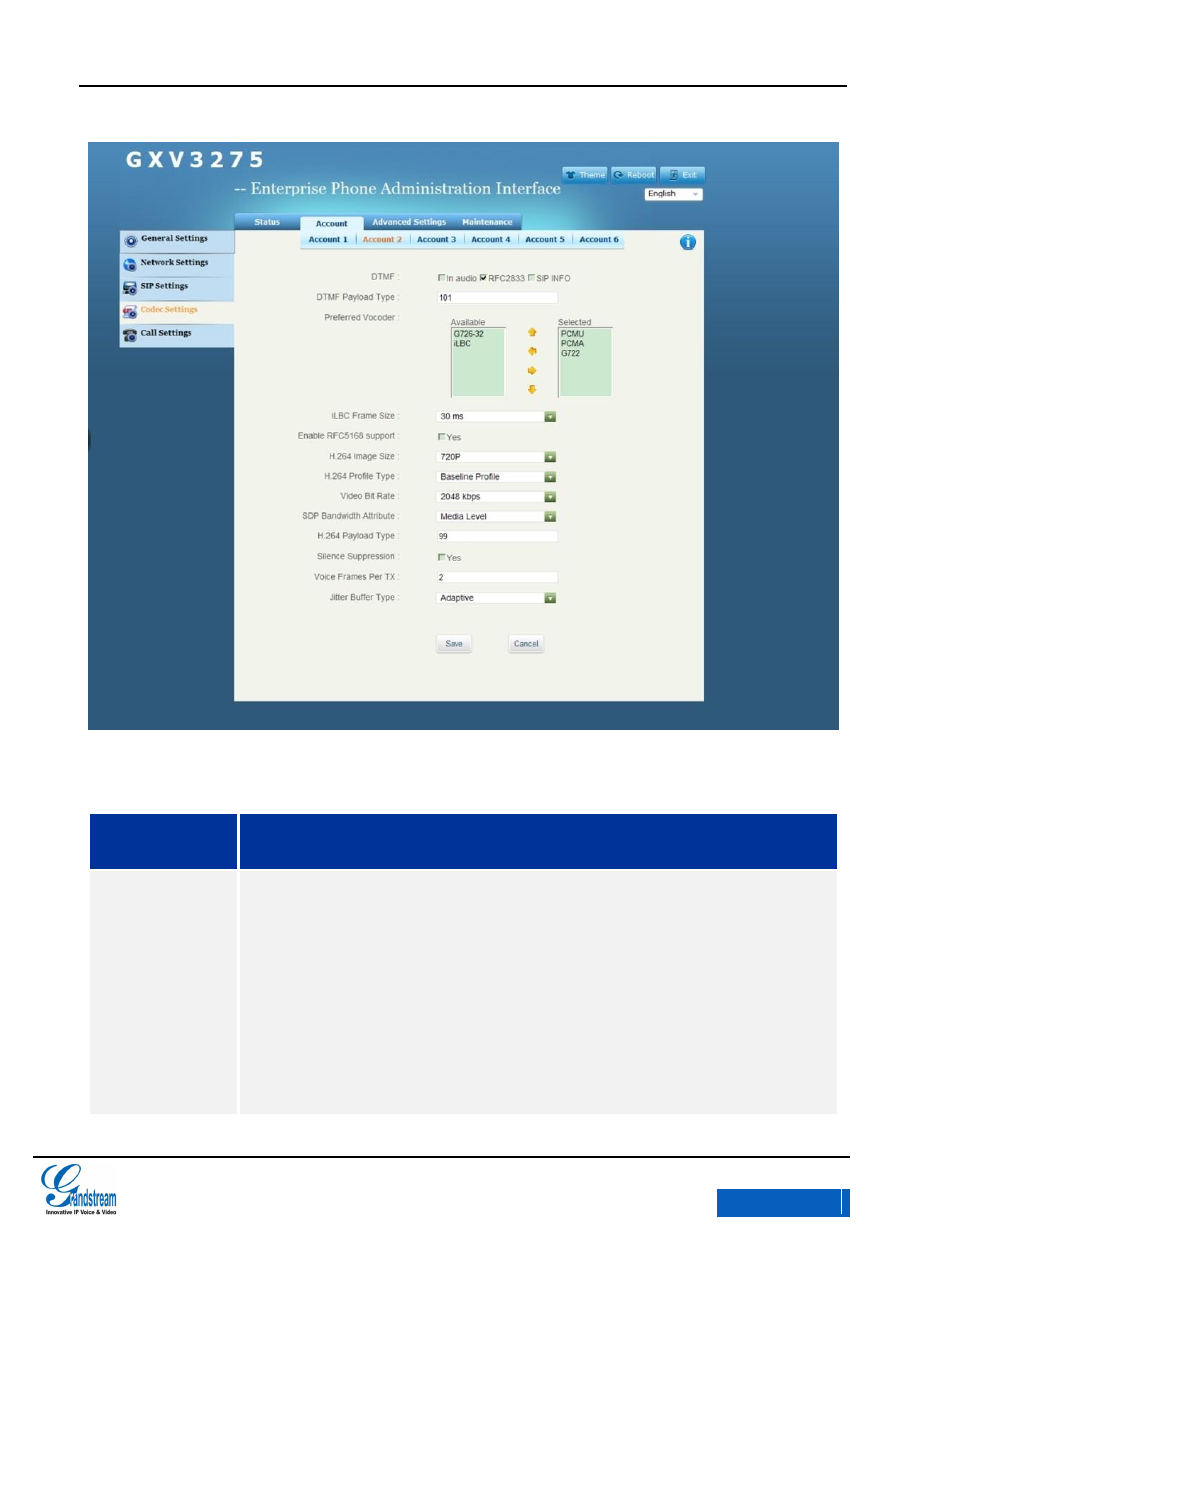
Figure 144 GXV3275 Web GUI Account- Codec Settings
Table 15 Account/Codec Settings Parameters
Parameters
Description
DTMF
This parameter specifies the mechanism to transmit DTMF digits. There are 3
supported modes:
In audio: DTMF is combined in the audio signal (not very reliable with low-bit-rate
codecs),
Via RTP (RFC2833). DTMF signal with identified RTP packets, it can be learnt that
the package in the RTP packet header is DTMF packet and the type of DTMF signal.
Via SIP INFO. Use INFO message of SIP signaling to carry DTMF signal. The main
deficiency is DTMF signal and media package may not synchronized due to the
separate transition of SIP control signaling and Real Time Protocol (RTP).
The default is RFC2833.
x-PDFDivision

GXV3275 User Manual
GXV3275 WEB GUI
Grandstream Co., Ltd
Software Version:1.0.0.9 Document Version:0.2
155
DTMF Payload
Type
Species the DTMF payload type using RFC2833. The default is 101.
Preferred Vocoder
45 different vocoder types are supported on the phone, including G.711 A-law
(PCMA), G.711 U-law (PCMU), G.722, G.726-32and iLBC.
Users can configure vocoders in a preference list that is included with the same
preference order in SDP message.
Support RFC5168
If set to “Yes”, the video call would support RFC5168. The default setting is "No".
H.264 Image Size
Supports 720P、4CIF、VGA 、CIF、 QVGA、 QCIF.
Video Bite Rate
Configure the bite rate for video call. The default setting is "2048kbps ".
SDP Bandwidth
Attribute
Standard, Media Level, Session Level, No
H.264 Payload
Type
Input H.264Payload value. The range is 96-127. The default setting is 99.
SRTP
The default setting is "Disable". Users could choose force SRTP execution or
execute SRTP with negotiation mode.
Silence
suppression
Controls the Silence suppression/ Voice activity detection(VAD).If set to “Yes”, the
phone will send a small quantity of VDA packets other than the voice packets when
no voice stream detected during a call. The default setting is "No".
x-PDFDivision

GXV3275 User Manual
GXV3275 WEB GUI
Grandstream Co., Ltd
Software Version:1.0.0.9 Document Version:0.2
156
Voice Frames Per
TX
Configures the number of voice frames transmitted per packet.( The maximum value
of IS limit that based on Ethernet packets is recommended to be 1500 bytes or
120Kbit/s)
When configuring this, it should be noted that the "ptime" value for the SDP will
change with different configurations here. This value is related to the codec used and
the actual frames transmitted during the in payload call.
i.e., If set the first code to G. 723 and “voice frame/TX" to 2, for the reason G. 723
voice frame includes 30 milliseconds of audio, the "ptime" value is 60 milliseconds
in the SDP packet of INVITE request. Similarly if set the first code to G. 729/ G. 711/
G. 726 and “voice frame/TX" to 2, then the "ptime" value is 20 milliseconds.
If the "Speech frame/TX” exceeds its the maximum value, the phone will save the
maximum value to correspond with the choice of the first coding.
PCM maximum value: 10 frame (x10 milliseconds) ;
G.726 maximum value: 20 frame (x10 milliseconds) ;
G.723 maximum value: 32 frame (x10 milliseconds) ;
G.729 maximum value: 64 frame (x10 milliseconds) ;
Adjust the above parameters will also change the dynamic jitter buffer. The phone
has a dynamic jitter buffer processing algorithm. The jitter buffer scope is 20 to 200
milliseconds.
For end users, it is recommended to use the default setting, as incorrect settings may
influence the audio quality.
Jitter Buffer Type
Selects either Fixed or Adaptive based on network conditions. The default setting is
"Adaptive".
Jitter Buffer Length
The default setting is "Medium". Selects Low, Medium, or High based on network
conditions.
x-PDFDivision
GXV3275 User Manual
GXV3275 WEB GUI
Grandstream Co., Ltd
Software Version:1.0.0.9 Document Version:0.2
157
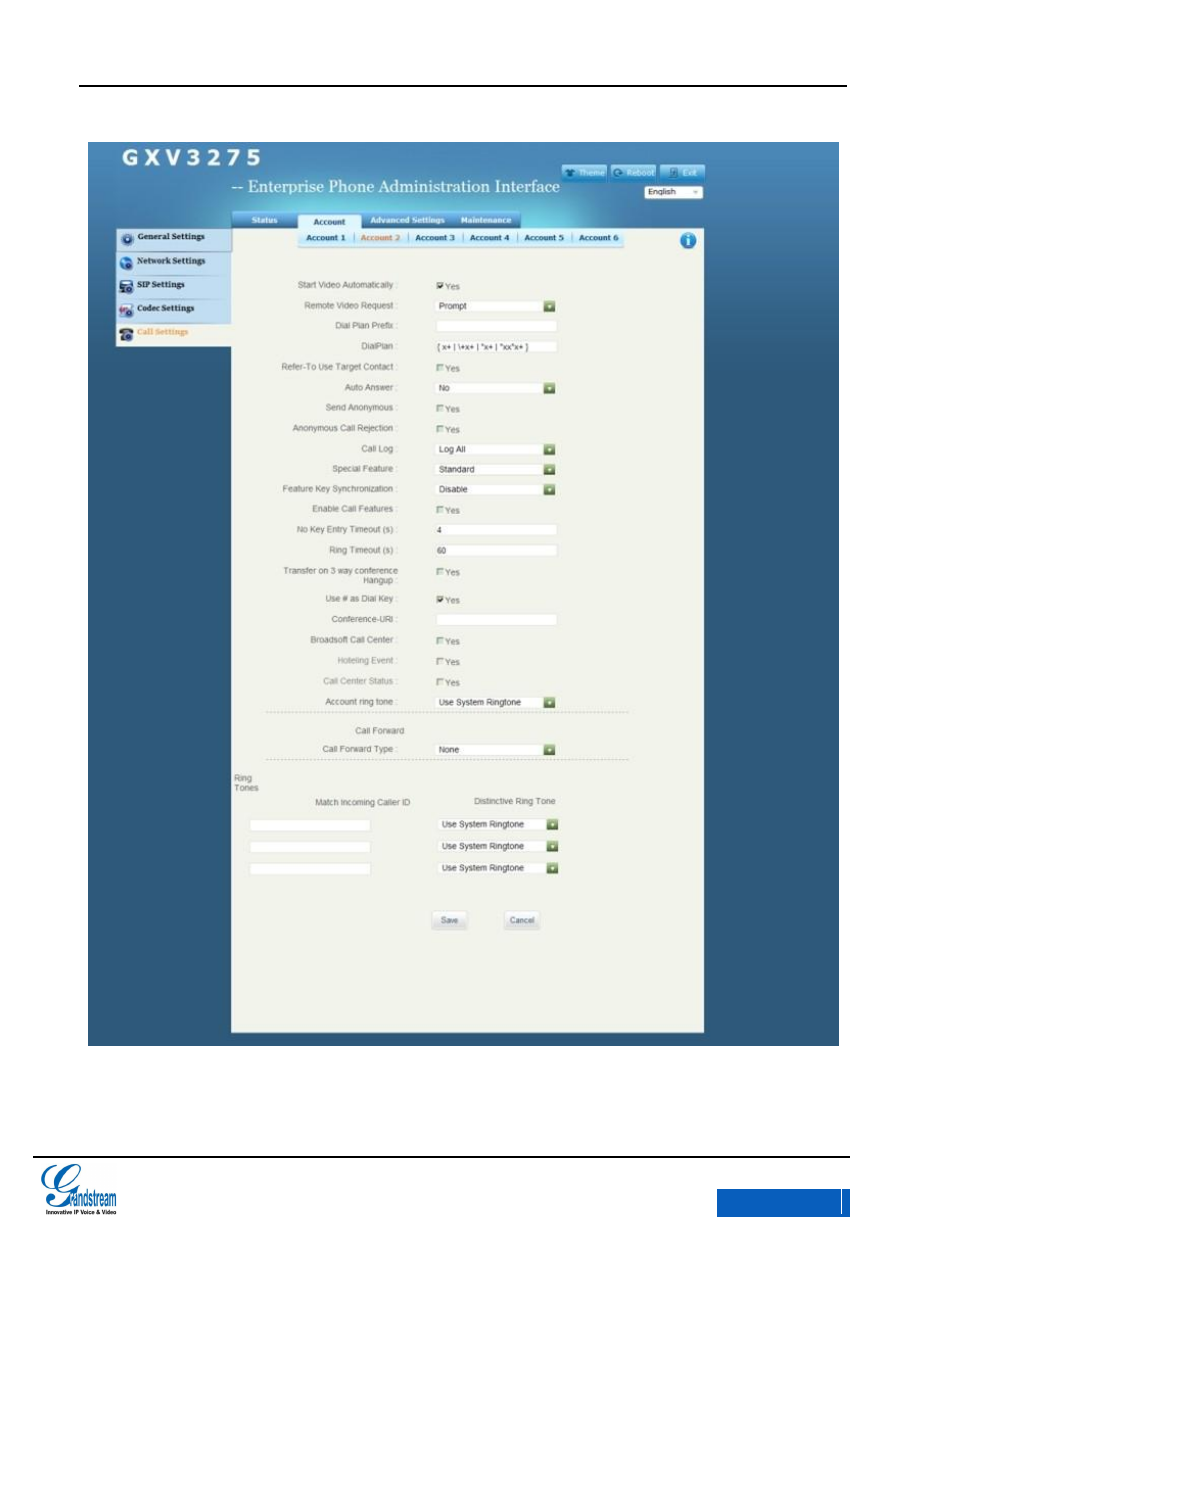
Figure 145 GXV3275 Web GUI Account – Call Settings
Table 16 Account/Call Settings Parameters
x-PDFDivision
GXV3275 User Manual
GXV3275 WEB GUI
Grandstream Co., Ltd
Software Version:1.0.0.9 Document Version:0.2
158
Parameters
Description
Start Video
Automatically
Press the Conference button will automatically connect the active line to the
conference.
Remote Video
Request
Configure video request type. Three options are available: Prompt, Accept, deny.
The default setting is “Prompt”.
Dial Plan Prefix
Set dial prefix. Any numbers dialed with this account will automatically add this
prefix
Dial Plan
Dial Plan Rules:
1. Accepted Digits: 1,2,3,4,5,6,7,8,9,0 , *, #;
2. Grammar:
x - any digit from 0-9;
xx - at least 2 digit numbers from 0-9;
^ - exclude
[3-5] - any digit of 3, 4, or 5
[147] - any digit of 1, 4, or 7
<2=011> -when the digit is 2, it will be replaced with 011
Set to {x+} allows dial out with all digits.
3. Example:
{[369]11 | 1617xxxxxxx} –- allows dialing numbers 311, 611 and 911 and 1617 area
code
{^1900x+ | <=1617>xxxxxxx} –prevents dialing any number started with 1900 and
1617 area code will be added automatically when dialing number with 7 digits length;
Refer-To Use
Target Contact
The default setting is "No". If set to "Yes" and the server support this function, the
phone will use the "Refer-To" header for attended transfer.
Auto Answer
The default setting is "No". If set to "Yes", the phone will automatically turn on the
speaker phone to answer incoming calls.
Send Anonymous
If set to "Yes", the "From" header in outgoing INVITE messages will be set to
anonymous, essentially blocking the Caller ID to be displayed.
Anonymous Call
Rejection
The default setting is "No”. If set to "Yes", anonymous calls will be rejected.
x-PDFDivision

GXV3275 User Manual
GXV3275 WEB GUI
Grandstream Co., Ltd
Software Version:1.0.0.9 Document Version:0.2
159
Call Log
Three options. The default is “log all calls”.
log all calls: Log all calls;
Only log incoming/outgoing calls: Disable Missed calls record.
Disable call log: Disable call record.
Special Feature
The default setting is "Standard". Users may need to select special features to meet
the specific requirements of different soft switch vendors.
Feature Key
Synchronization
Call features can be synchronized with SIP server.
Enable Call
Features
The default settings is "no". The local supports call transfer, call waiting and call
forwarding.
i.e.: * 72 + number means sets unconditional transfer number via call function.
When the local call function conflicts with the server, local call function can be shut
down.
Please refer to chapter
Activate Call Features
for more details.
No Key Entry
Timeout (s)
Defines the timeout (in seconds) for no key entry. If no key is pressed after the
timeout, the digits will be sent out. The default value is 4 seconds.
Ring Timeout (s)
Defines the timeout (in seconds) for the rings on no answer. The default setting is 60
seconds.
Use # as Dial Key
Allows users to configure the "#" key as the "Send" key. If set to "Yes", the "#" key will
immediately dial out the input digits. In this case, this key is essentially equivalent to
the "Send" key. If set to "No", the "#" key is included as part of the dialing string.
x-PDFDivision

GXV3275 User Manual
GXV3275 WEB GUI
Grandstream Co., Ltd
Software Version:1.0.0.9 Document Version:0.2
160
3-Party
Conference host
transfer the call
Defines whether the call will be transferred once the conference host hangs up the
phone. If check, the other two parties will still on line if the host hangs up.The default
is uncheck.
Conference URI
Configure Conference URI(Broadsoft Standard)according to N-way conference
Broadsoft Call
Center
Enable Broadsoft Call Center. The default setting is “No”.
Hoteling Event
Enable Broadsoft event function. The default setting is “No”. Enable Broadsoft Call
Center to make this take into effect.
Call Center Status
Enable Broadsoft Call Center Status. The default setting is “No”. Enable Broadsoft
Call Center to make this take into effect.
Account Ring Tone
Allows users to configure different ringtone for the account.
One System Ring Tone:Once selected, all calls will ring the System Ring
Tone.
Multiple Customer Ring Tone:Once selected, all calls corresponds to the
specified account will ring the Customer Ring Tone. Users could also upload
the mp3 files as the ringtones.
Call Forward
Set Call Forward function.
Call Forward Type
Specifies the Call Forward Type in the drop-down menu:
None: Disable Call Forward
Unconditional: Forward all calls to particular number
Time based: Forward calls based on the time range.
Others: when phone is busy or not answered.
Match Incoming
Caller ID
This option defines the corresponding incoming ringtone. Users can choose different
ringtones.
Custom Ringtone
This option defines the corresponding incoming ringtone. Users can choose different
ringtones.
Upload Local MOH
Audio File
Click the "Browse" button to upload the audio file from PC. MOH audio file must
be in.Wav or.Mp3 format.
Warning: It may take a long time to upload MP3 format file, please wait patiently.
The button will display as "processing" in the file uploading process, when
finished uploading the button will change back to "browse".
x-PDFDivision
GXV3275 User Manual
GXV3275 WEB GUI
Grandstream Co., Ltd
Software Version:1.0.0.9 Document Version:0.2
161
Enable Local MOH
If set to “Yes”, the local MOH will be enabled. Users should upload the local MOH
audio file. Users could play this MOH audio file while holding the call once enabled
this function. The default setting is “No”.
ADVANCED SETTINGS
Users could set Security, Call Features, and Audio on the Advanced Settings page. Select
Advanced Settings in the menu bar on WEB GUI. See figure 146.
The account page has six parts as General Settings, Call Features, Video settings, Tone Generator,
MPK General Settings, MPK LCD Settings. User could click the corresponding option on the
navigation bar on the left to configure respectively.
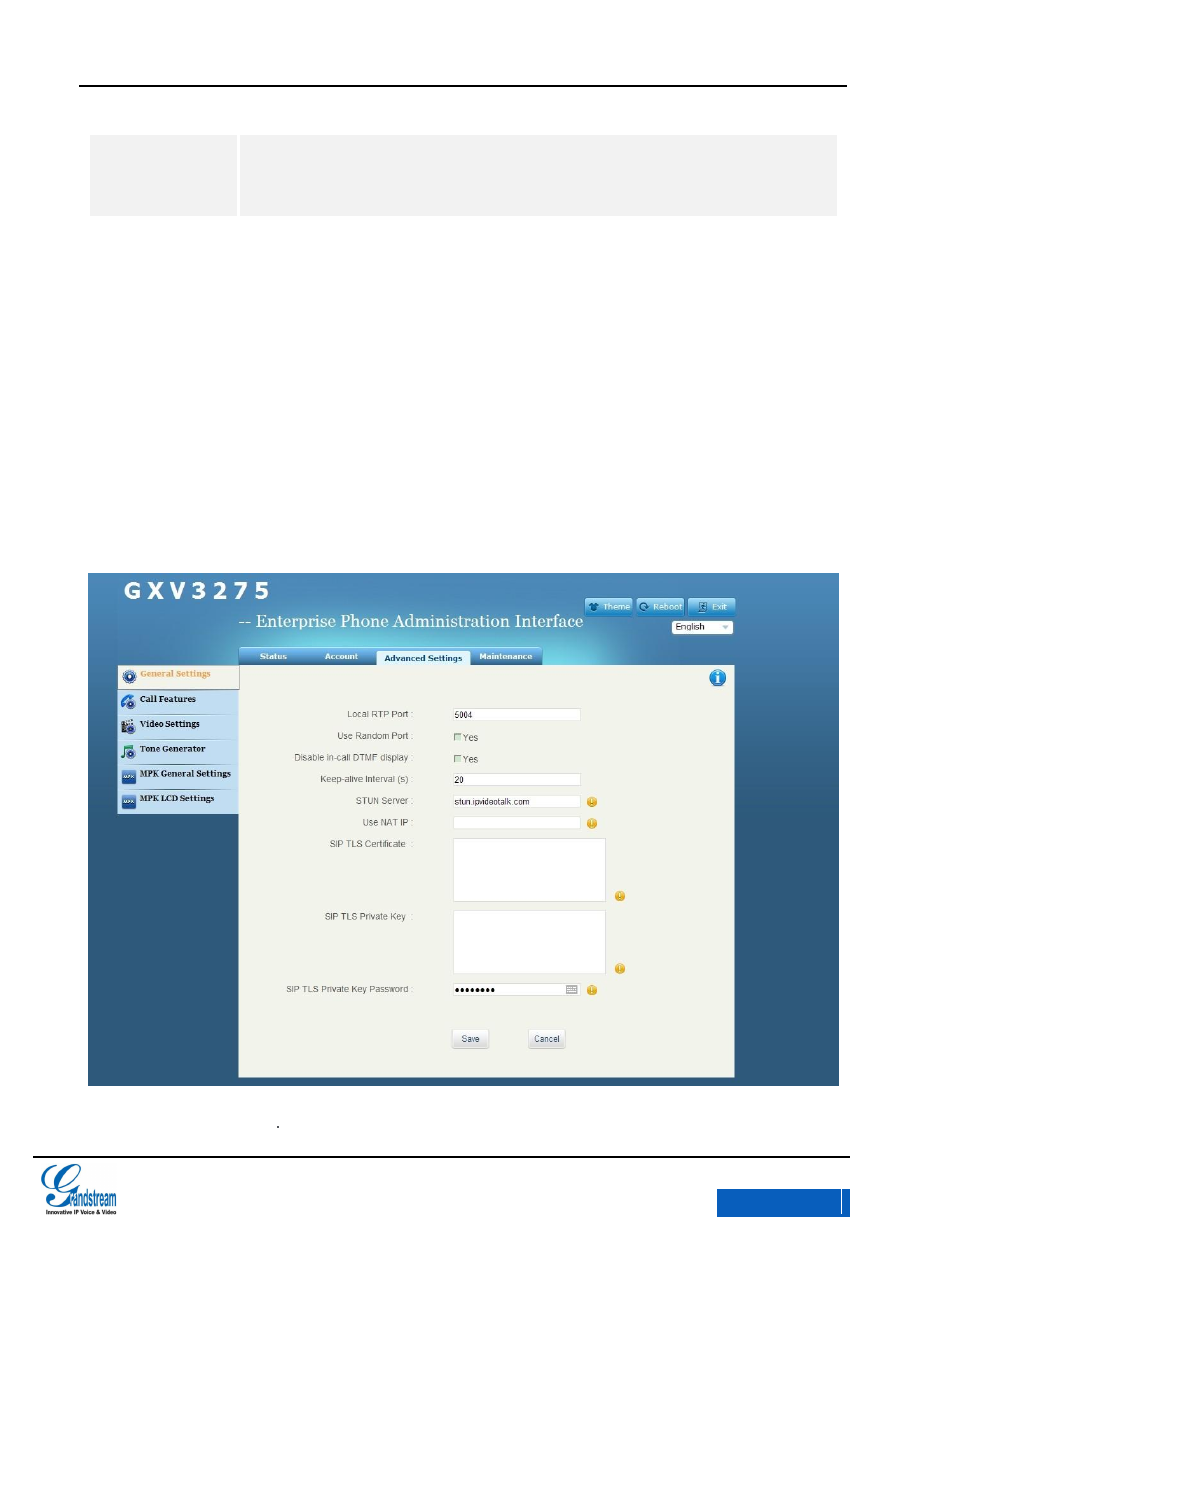
Figure 146 GXV3275 Web GUI-Advanced Settings
x-PDFDivision

GXV3275 User Manual
GXV3275 WEB GUI
Grandstream Co., Ltd
Software Version:1.0.0.9 Document Version:0.2
162
Table 17 Advanced Settings/General Settings Parameters
Parameters
Description
Local RTP Port
Defines the local RTP-RTCP port pair used to listen and transmit. It is the base RTP
port for channel 0.
Users should configure 2 ports for one RTPdialogue: one for RTP and the other for
RTCP.
When configured, channel 0 will use this port_value for RTP and the port_value+1 for
its RTCP; channel 1 will use port_value+2 for RTP and port_value+4 for RTCP. The
default value is 5004.
Use Random Port
When set to "Yes", this parameter will force random generation of both the local SIP
and RTP ports. This is usually necessary when multiple phones are behind the same
full cone NAT. The Default setting is "Yes".
Disable in-call
DTMF display
Disable in-call DTMF.
Keep-alive Interval
(s)
Specifies how often the phone sends a blank UDP packet to the SIP server in order
to keep the port on the NAT router to open. The default setting is 20 seconds.
STUN Server
The IP address or Domain name of the STUN server to solve NAT Traversal.
Use NAT IP
The NAT IP address used in SIP/SDP messages. This field is blank at the default
settings.
SIP TLS Certificate
GXV3275 supports SIP over TLS via the built-in private key and SSL certificate. The
custom SSL certificate used for SIP over TLS should be in X.509 format.
SIP TLS Private
Key
Users could custom SSL private key. The custom SSL Private key used for SIP over
TLS should be in X.509 format.
SIP TLS Private
Key Password
Defines the SSL Private key password used for SIP over TLS.
x-PDFDivision
GXV3275 User Manual
GXV3275 WEB GUI
Grandstream Co., Ltd
Software Version:1.0.0.9 Document Version:0.2
163
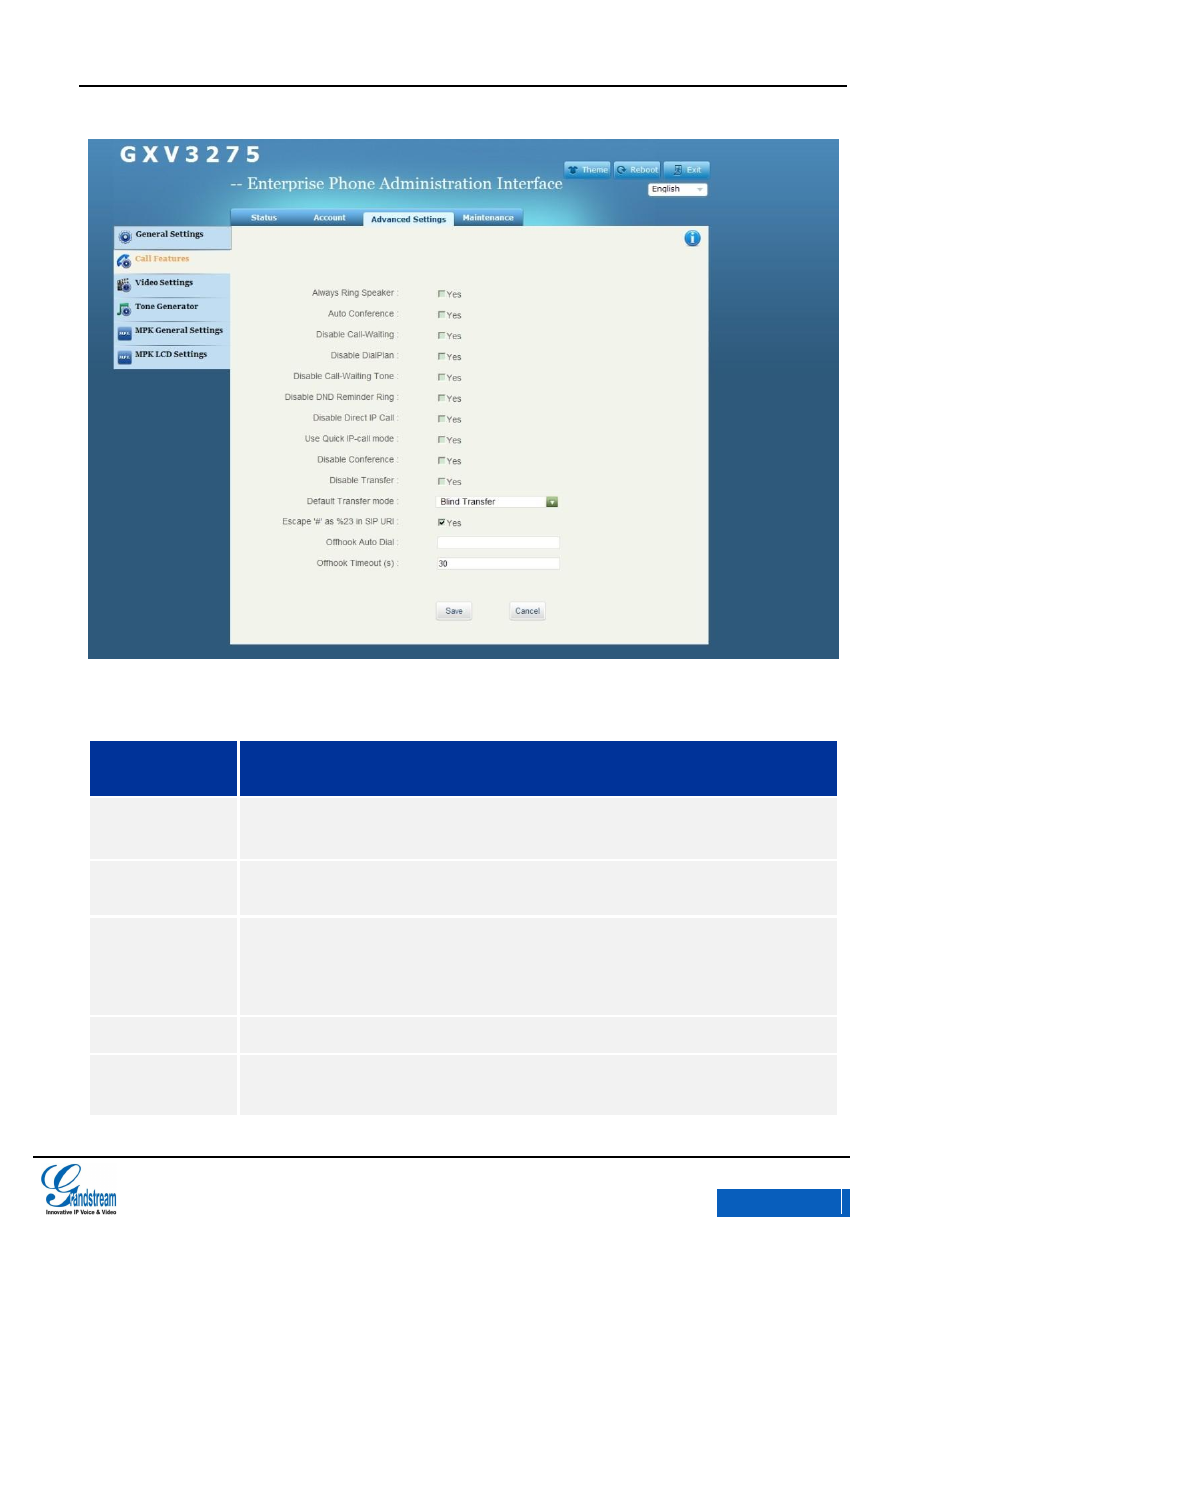
Figure 147 GXV3275 Web GUI Advanced Settings-Call Features
Table 18 Advanced Settings/Call Features Parameters
Parameters
Description
Always Ring
speaker
If set to “Yes”, the incoming call will ring through speakers when using headphones.
The default is "No".
Auto Conference
If set to “Yes”, when during an active or more calls, users could press the Conference
icon to join all the current lines on the phone. The default setting is "No".
Disable
Call-Waiting
The default setting is "No". If set to “Yes”, disables the call waiting on the third party
when two table telephone set up calls.
Disable Dialplan
If set to "Yes", disables dialing plans. The default setting is "No".
Disable
Call-Waiting Tone
The default setting is "No". If set to "Yes”, disable the call waiting tone when call
waiting is on.
x-PDFDivision

GXV3275 User Manual
GXV3275 WEB GUI
Grandstream Co., Ltd
Software Version:1.0.0.9 Document Version:0.2
164
Disable DND
Reminder Ring
The default setting is "No". If set to "Yes", the ring splash that indicates an incoming
call when DND is enabled will not be played.
Disable IP-Call
mode
The default setting is "No". If set to "Yes", the phone cannot make IP calls via IP-Call
mode.
Use Quick IP-Call
mode
Users can dial an IP address under the same LAN/VPN segment by entering the last
octet in the IP address.It is recommended that enable this mode when using the
restricted static IP.
Go to Settings>Advanced Settings page, set “Fast IP Dial Mode”to “Yes”, dial #XXX
(X is 0-9 and XXX <=255), phone will make direct IP call to aaa.bbb.ccc.XXX where
aaa.bbb.ccc comes from the local IP address REGARDLESS of subnet mask.
Disable
Conference
The default setting is "No". If set to "Yes", the Conference function will be disabled.
Disable Transfer
The default setting is "No". If set to "Yes", the “TRANSFER” function key will be
disabled. All Transfer operations will be failed.
Default Transfer
Mode
Blind transfer and attended transfer is optional.
Escape # as %23
in SIP URI
The default setting is "Yes". Replaces “#” by “%23” for some special situations.
Offhook Auto Dial
The phone will only use the first account to dial out. Once enabled, only one
extension could realize this function while others can’t. The phone will dial
automatically the number when the phone is offhook or press the hands-free button.
Offhook Timeout(s)
The phone will exit the dial-up interface when offhook timeout. The default is "30
seconds ".
x-PDFDivision

GXV3275 User Manual
GXV3275 WEB GUI
Grandstream Co., Ltd
Software Version:1.0.0.9 Document Version:0.2
165
Figure 148 GXV3275 Web GUI Advanced Settings-Video Settings
Table 19 Advanced Settings/Video Settings Parameters
Frame Rate
Configure the frame rate for SIP video call. The default setting is “15 Frames/
Second”.
x-PDFDivision
GXV3275 User Manual
GXV3275 WEB GUI
Grandstream Co., Ltd
Software Version:1.0.0.9 Document Version:0.2
166
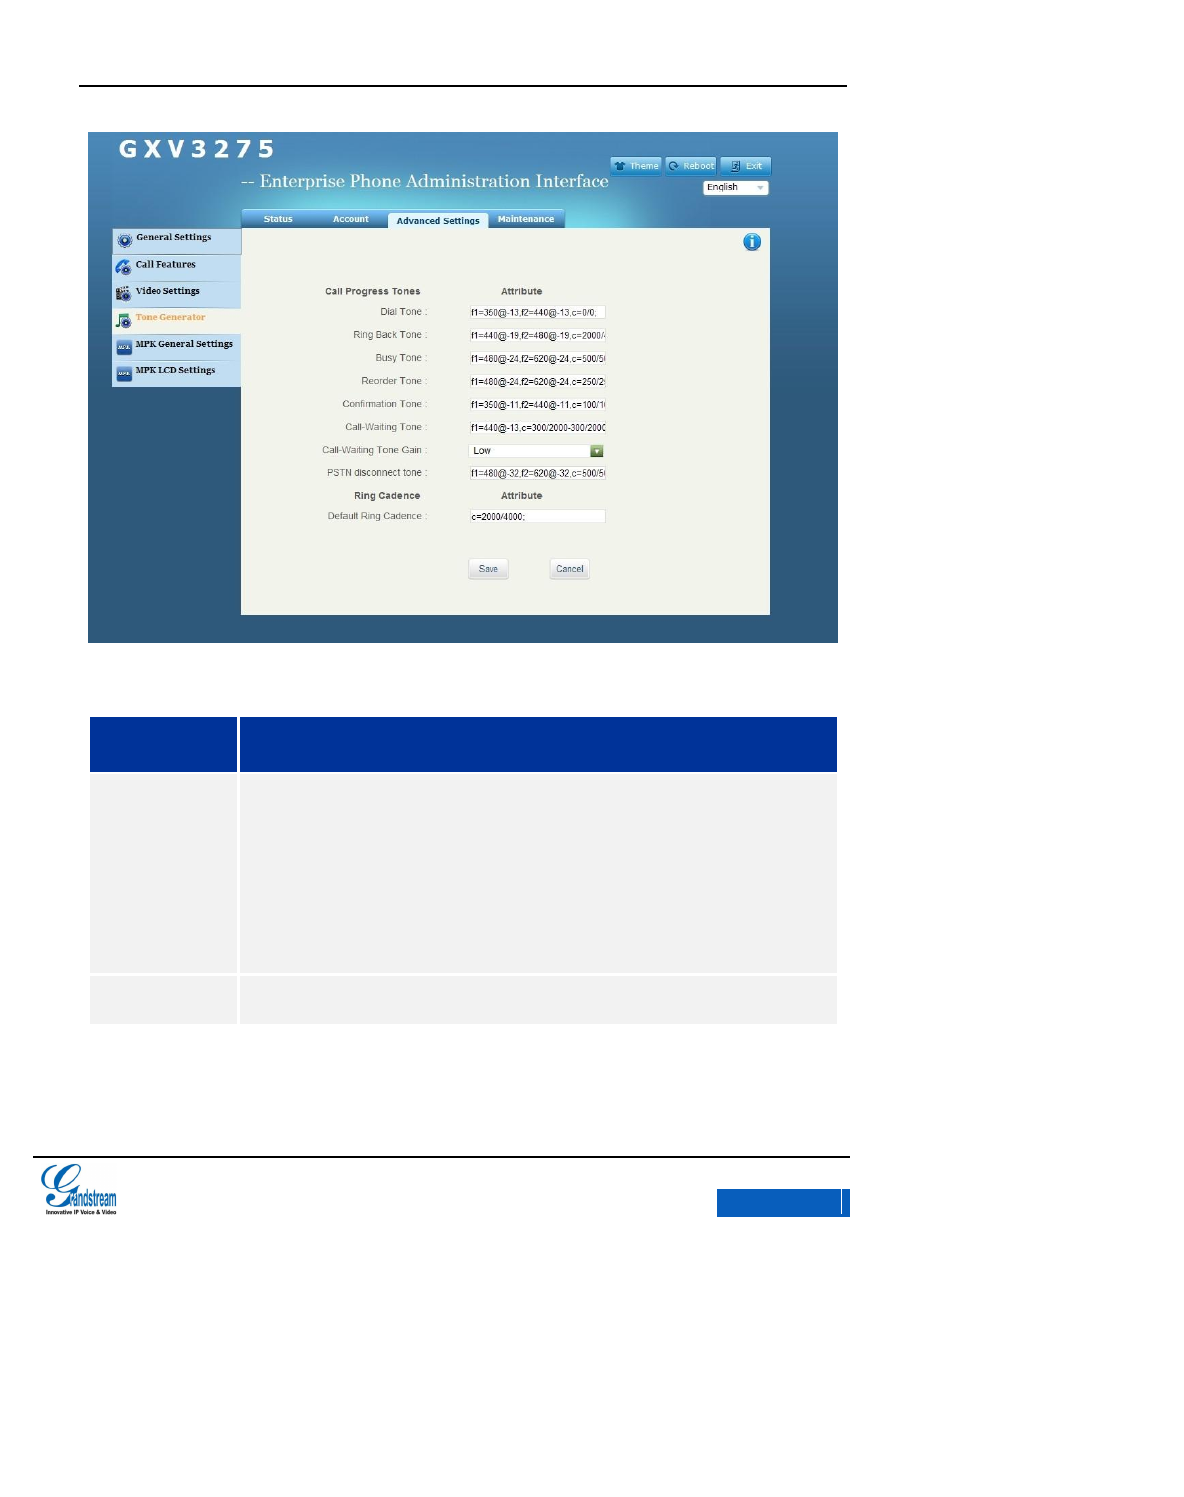
Figure 149 GXV3275 Web GUI Advanced Settings-Tone Generator
Table 20 Advanced Settings- Tone Generator Parameters
Parameters
Description
Call Progress
Tones
Users can configure ring or tone frequencies based on parameters from the local
telecom provider. By default, they are set to the North American standard.
Frequencies should be configured with known values to avoid uncomfortable high
pitch sounds. ON is the period of ringing (“On time” in ‘ms’) while OFF is the period of
silence. In order to set a continuous ring, OFF should be zero. Otherwise it will ring
ONms and a pause of OFFms and then repeat the pattern. Up to three cadences are
supported.
Ring Back Tone
This defines the ring cadence for the phone. The default setting is: c=2000/4000.
x-PDFDivision
GXV3275 User Manual
GXV3275 WEB GUI
Grandstream Co., Ltd
Software Version:1.0.0.9 Document Version:0.2
167
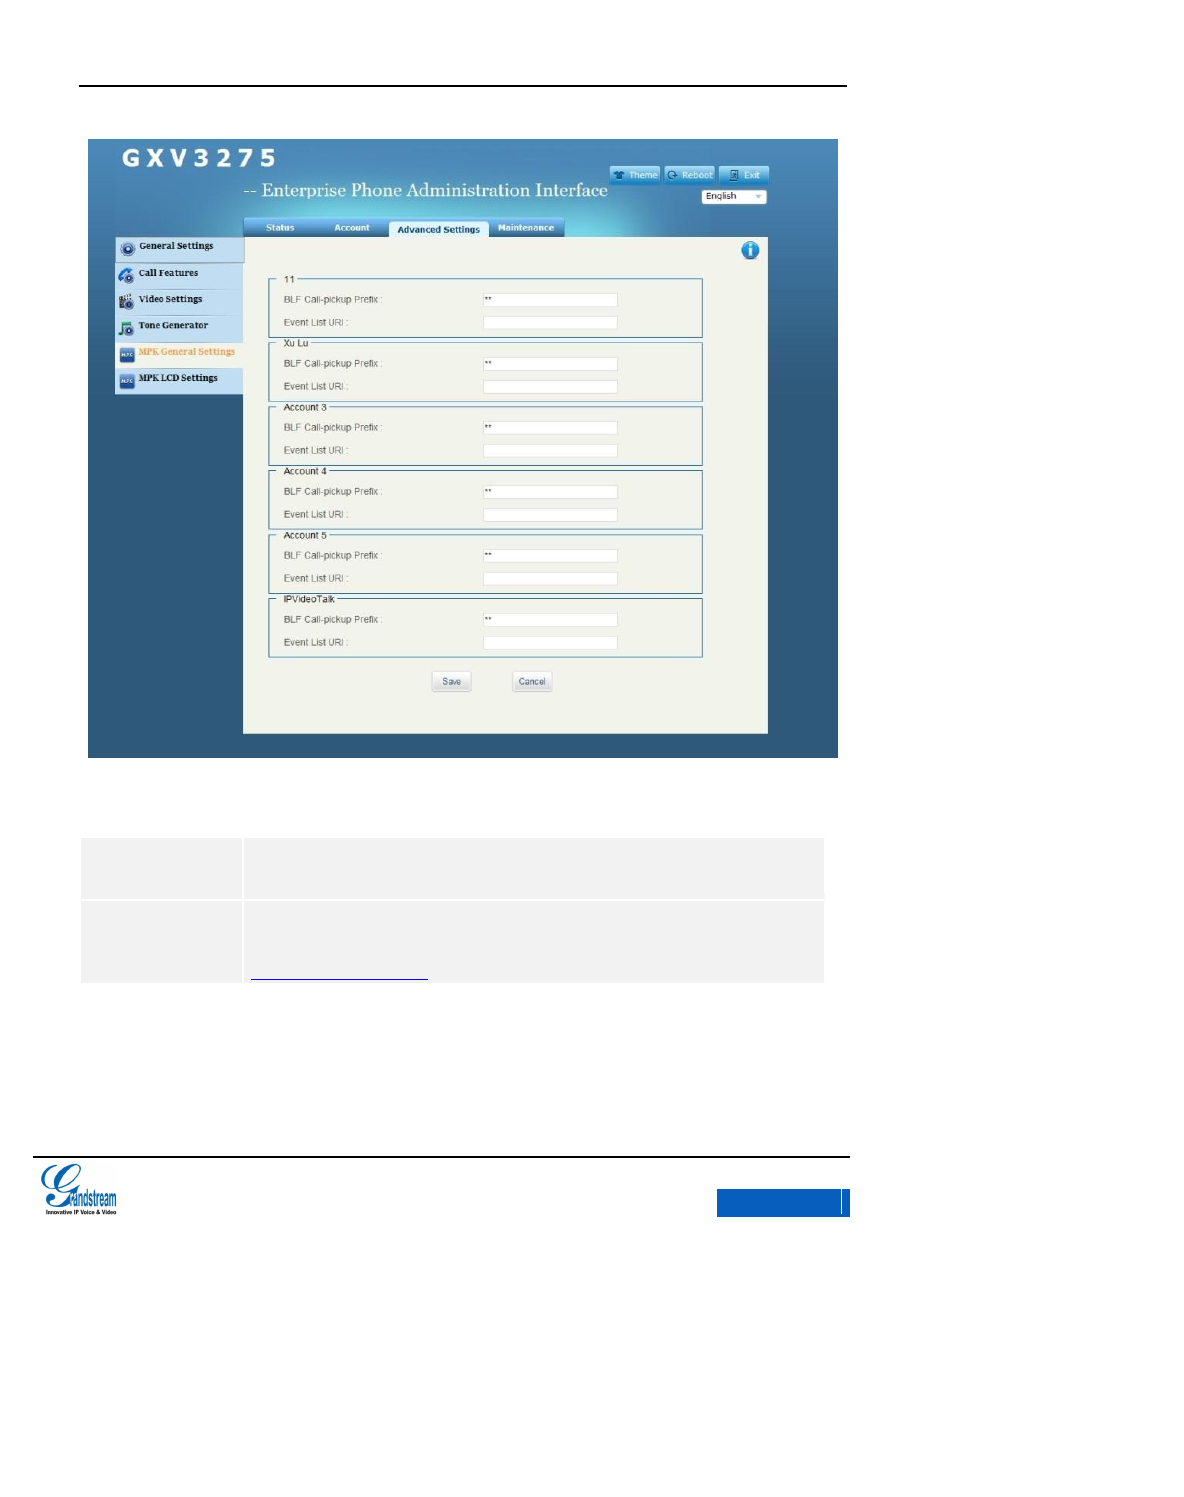
Figure 150 GXV3275 Web GUI Advanced Settings-MPK General Settings
Table 21 Advanced Settings/ MPK General Settings Parameters
BLF Call-pickup
Prefix
The prefix when the phone using MPK to call up. Each account is set to “**”by
default.
Event List URI
The Event List URI in MPK list, it requires server support. Users should firstly
configure a Event List URI including expanded list on the server (i.e.:
BLF1006@myserver.com) and fill in URI without a domain name (i.e.:BLF1006).
x-PDFDivision
GXV3275 User Manual
GXV3275 WEB GUI
Grandstream Co., Ltd
Software Version:1.0.0.9 Document Version:0.2
168
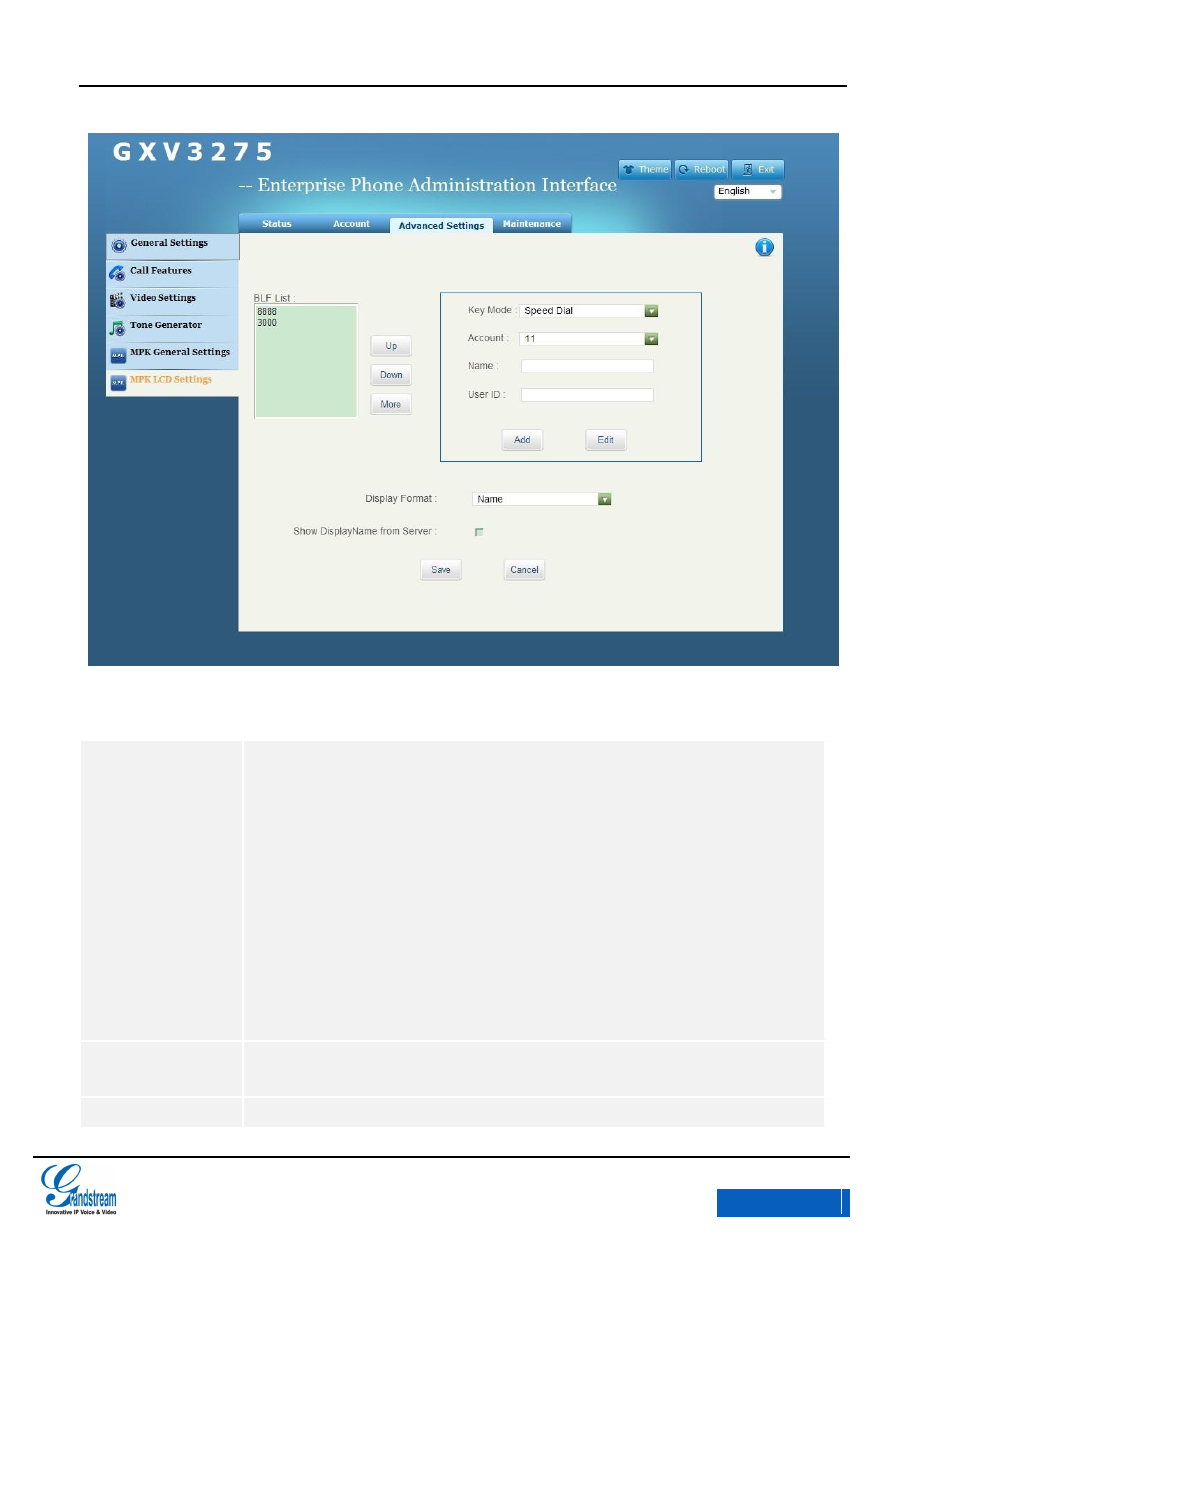
Figure 151 GXV3275 Web GUI Advanced Settings- MPK LCD Settings
Table 22 Advanced Settings/ MPK LCD Settings Parameters
Key Mode
Configure MPK key mode on the GXV3275 extension board
Speed Dial: Dial the uesr ID on the extension board.
BLF: Monitor the call ID status on the extension board.
Call Transfer: Transfer the current active call to the user ID on the
extension board.
Call Intercom: Paging/Intercom User ID on the expansion board.
Speed Dial via Active: Similar to Speed Dial. The difference is to call via
the activated account. i.e., if account 2 is activated when offhook, the
phone will call the user ID on the extension board via account 2.
Dial DTMF: Dial DTMF of user ID on the extension board in an active call.
Call Park: Configure call park code when park or answering the call.
MPK List
The configured MPK will be displayed in MOK list. Users cold user up/down button
or more buttons to move, edit and delete the members in the list.
Account
Configure the SIP account MPK key uses.
x-PDFDivision

GXV3275 User Manual
GXV3275 WEB GUI
Grandstream Co., Ltd
Software Version:1.0.0.9 Document Version:0.2
169
Name
Configure the name of the corresponding MPK key
User ID
Configure the user ID of the corresponding MPK key
Display Format
Display MPK format: User name, User ID, User ID(User Name)
Show Display
Name from Server
MAINTENANCE
Users could configure the Upgrade, TR-069 and Time &Date on GXV3275. Select Maintenance in
the WEB GUI menu bar to enter the maintenance page. See figure 152.
x-PDFDivision
GXV3275 User Manual
GXV3275 WEB GUI
Grandstream Co., Ltd
Software Version:1.0.0.9 Document Version:0.2
170
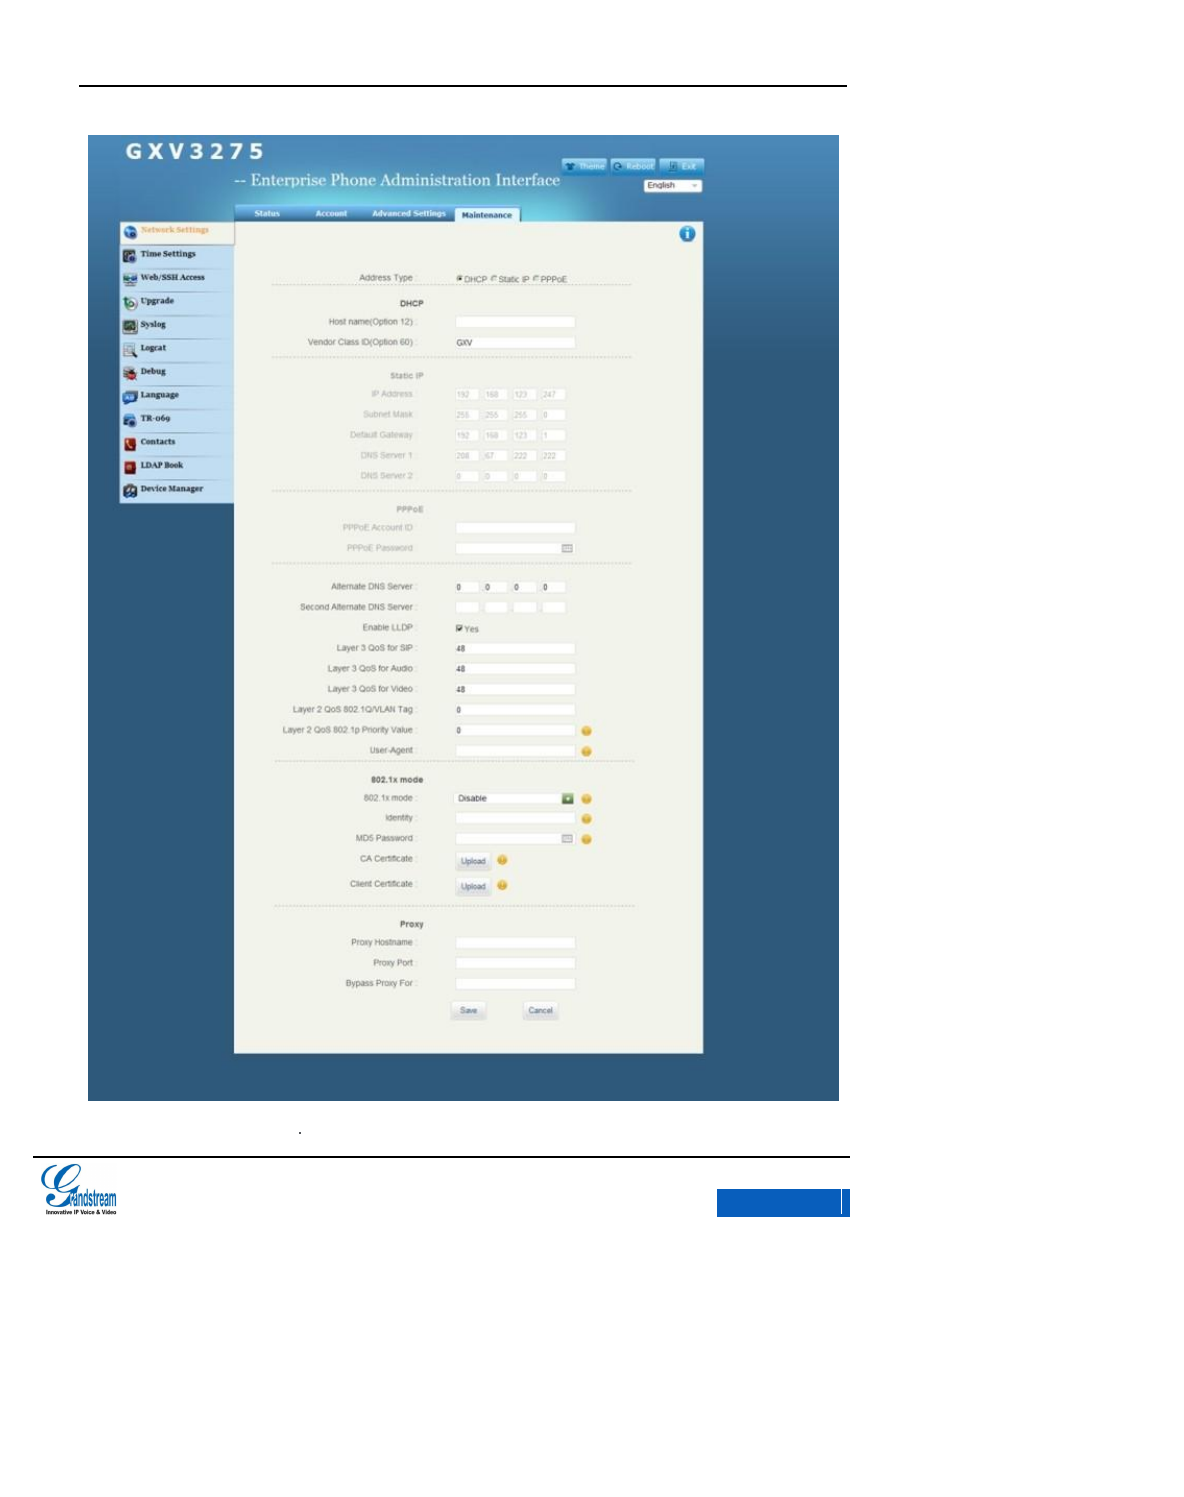
Figure 152 GXV3275 Web GUI-Maintenance
x-PDFDivision
GXV3275 User Manual
GXV3275 WEB GUI
Grandstream Co., Ltd
Software Version:1.0.0.9 Document Version:0.2
171
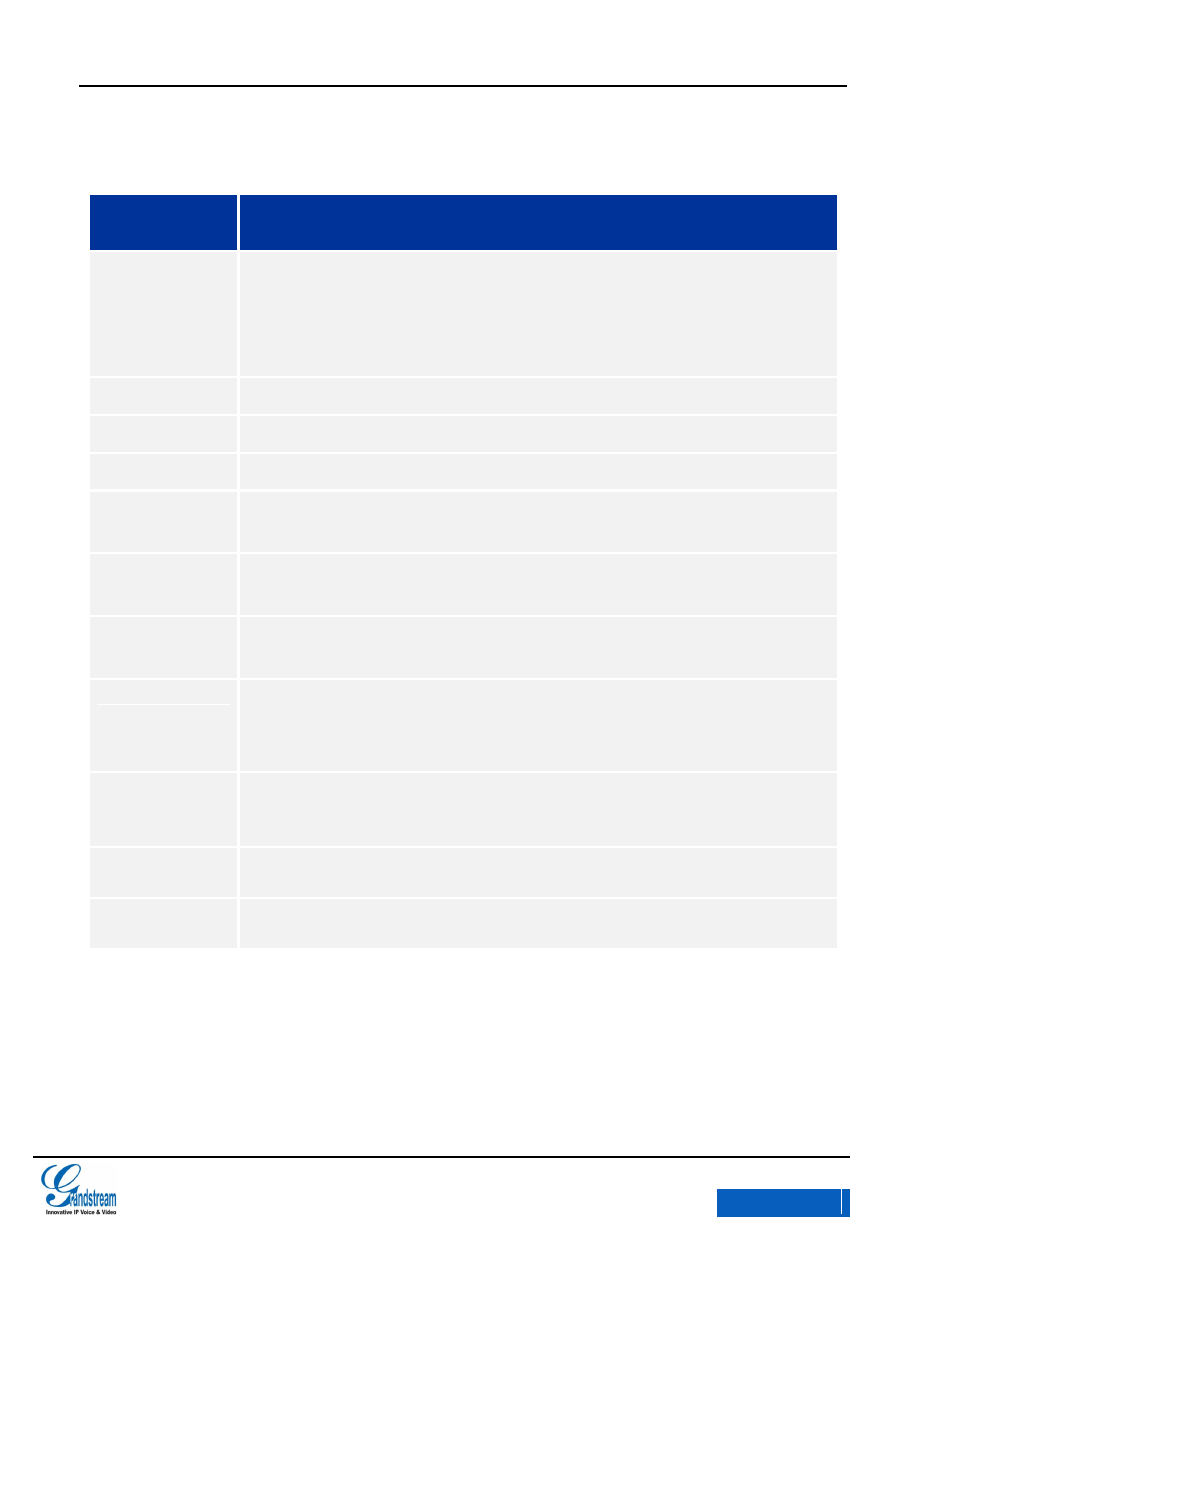
Table 23 Maintenance/Network Settings Parameters
Parameters
Specifications
Address Type
Allows users to obtain IP address via the following modes
DHCP: Obtain IP address form DHCP server automatically.
PPPoE: Dial up via PPPoE.
Static IP: Static IP address configured by administrator.
DNS Server 1
Enter the DNS Server 1.
DNS Server 2
Enter the DNS Server 2.
Enable LLDP
Layer 3 QoS for
SIP
Defines the Layer 3 QoS parameter for SIP packets. This value is used for IP
Precedence, Diff-Serv or MPLS.
Layer 3 QoS for
Audio
Defines the Layer 3 QoS parameter for Audio packets. This value is used for IP
Precedence, Diff-Serv or MPLS.
Layer 3 QoS for
Video
Defines the Layer 3 QoS parameter for Video packets. This value is used for IP
Precedence, Diff-Serv or MPLS.
Layer 2 QoS
802.1Q/VLAN Tag
Assigns the VLAN Tag of the Layer 2 QoS packets. The default value is 0.
NOTE: If the Layer 2 is uncertain, please don’t modify the Layer 2 tag and priority.
Wrong configuration may cause IP access failure on the phone.
Layer 2 QoS
802.1p Priority
Value
Assigns the priority value of the Layer2 QoS packets. The Default value is 0.
802.1x mode
Allows the user to enable 802.1 x modes on the phone.
Procy
Connect to the proxy server.
x-PDFDivision
GXV3275 User Manual
GXV3275 WEB GUI
Grandstream Co., Ltd
Software Version:1.0.0.9 Document Version:0.2
172
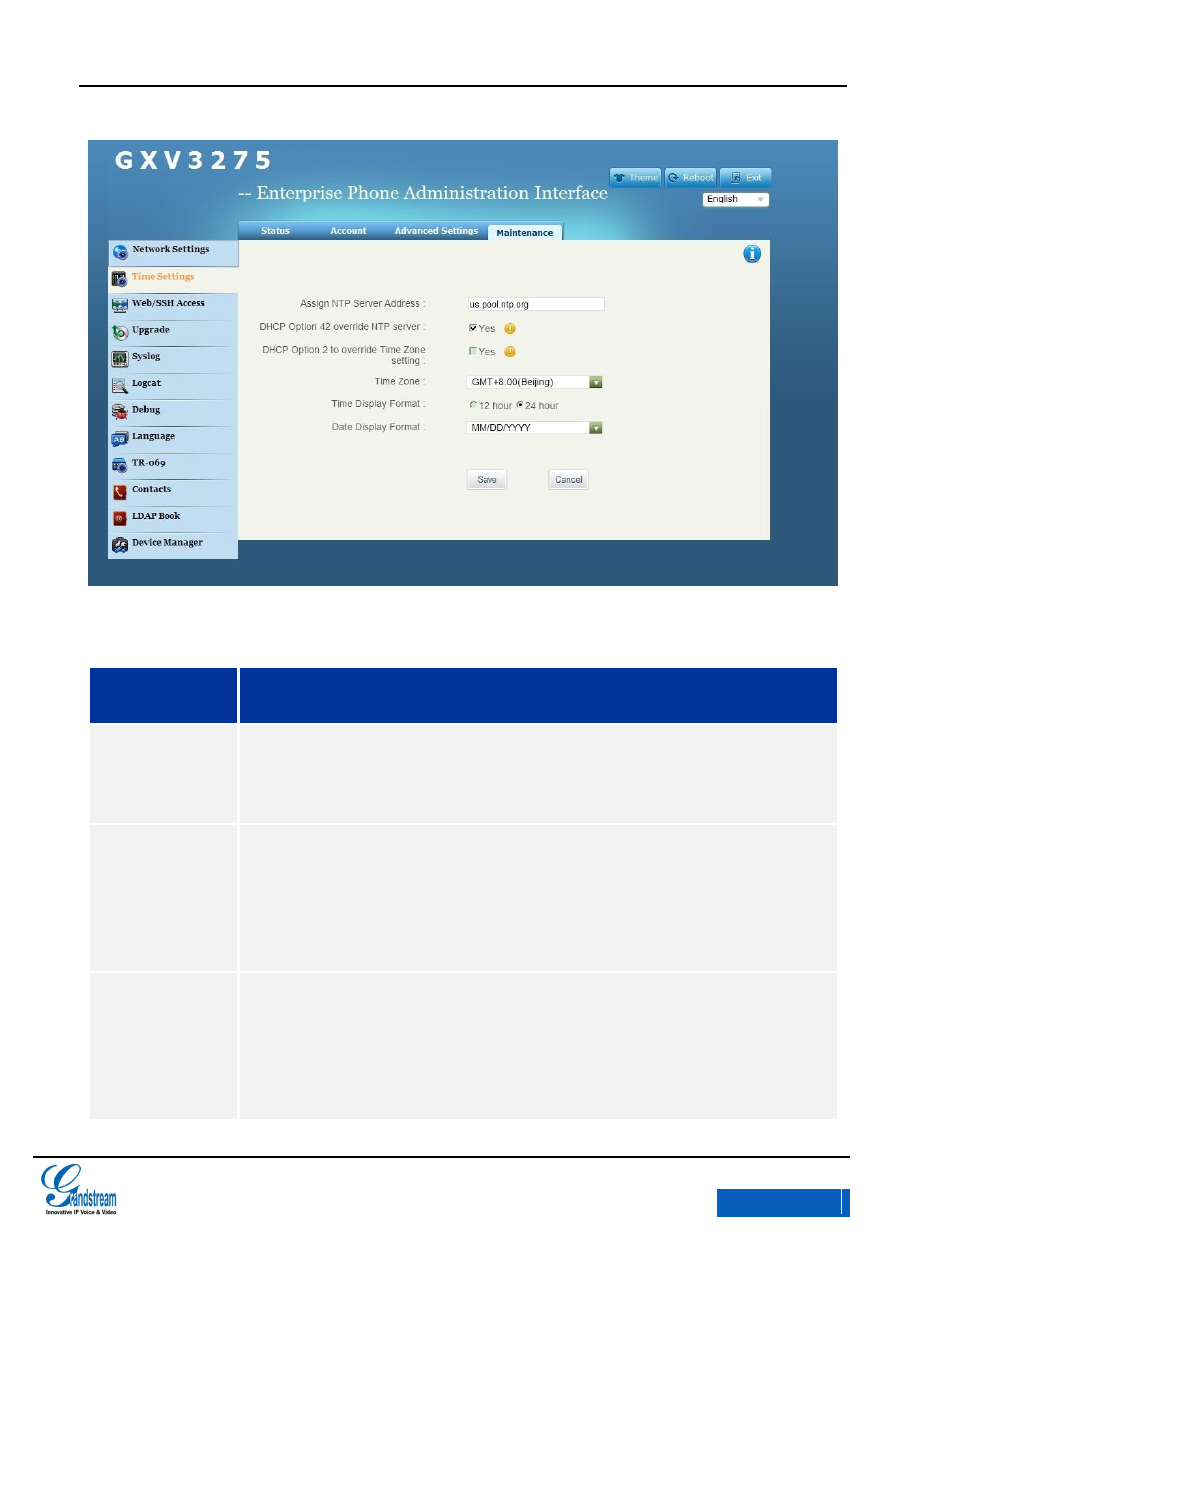
Figure 153 GXV3275 Web GUI Maintenance-Time Settings
Table 24 Maintenance-Time Settings Parameters
Parameters
Specification
Assigned NTP
Server Address
Defines the URL or IP address of the specified NTP server to synchronize the date
and time with NTP server.
DHCP Option 42
override NTP
server
Defines whether DHCP Option 42 should override NTP server or not. When enabled,
DHCP Option 42 will override the NTP server to synchronize the date and time on the
phone. The default setting is "Yes".
DHCP Option 2 to
override Time
Zone setting
Allows device to get provisioned for Time Zone from DHCP Option 2 in the local
server automatically. The default setting is "No".
x-PDFDivision
GXV3275 User Manual
GXV3275 WEB GUI
Grandstream Co., Ltd
Software Version:1.0.0.9 Document Version:0.2
173
Time Zone
Controls the date/time display according to the specified time zone. If DHCP Option2
is enabled, the DHCP server will skip this setup to control the time zone configuration
on the phone directly.
Time Display
Format
Configures the time display format on the LCD.
Date Display
Format
Configures the date display format on the LCD.
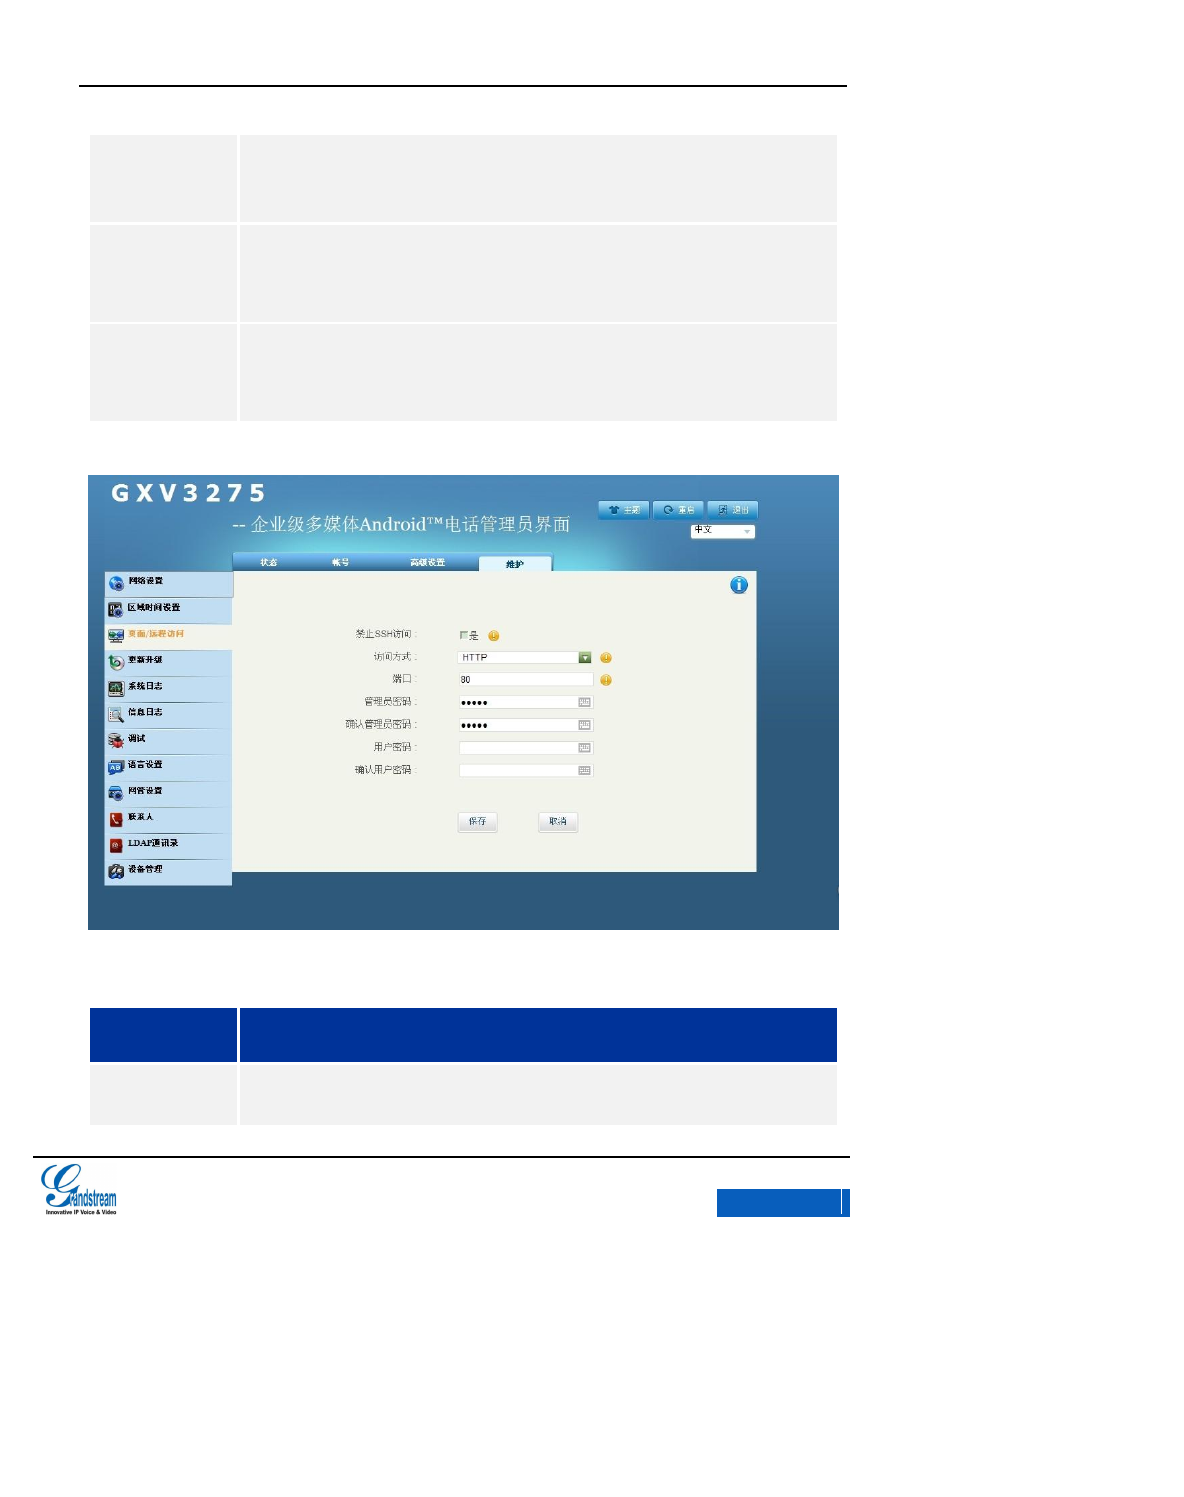
Figure 154 GXV3275 Web GUI Maintenance-Web/SSH Access
Table 25 Maintenance/ Web/SSH Access Parameters
Parameter
Description
Disable SSH
The default setting is “No”. If set to “Yes”, the phone will not allow any SSH access to
the phone.
x-PDFDivision

GXV3275 User Manual
GXV3275 WEB GUI
Grandstream Co., Ltd
Software Version:1.0.0.9 Document Version:0.2
174
Access Method
Allows users to select HTTP or HTTPS for Web Access.
Port
This field is for customizing the port for Web Access via HTTP. By default, HTTP
uses port 80 and HTTPS uses port 443.
Admin Password
Allows users to change the admin password. Only the administrator could configure
the Advanced Configuration page. This field is case sensitive with a maximum length
of 32 characters.
User Password
Allows the administrator to set the password for user-level GUI access. This field is
case sensitive with a maximum length of 32 characters.
x-PDFDivision
GXV3275 User Manual
GXV3275 WEB GUI
Grandstream Co., Ltd
Software Version:1.0.0.9 Document Version:0.2
175
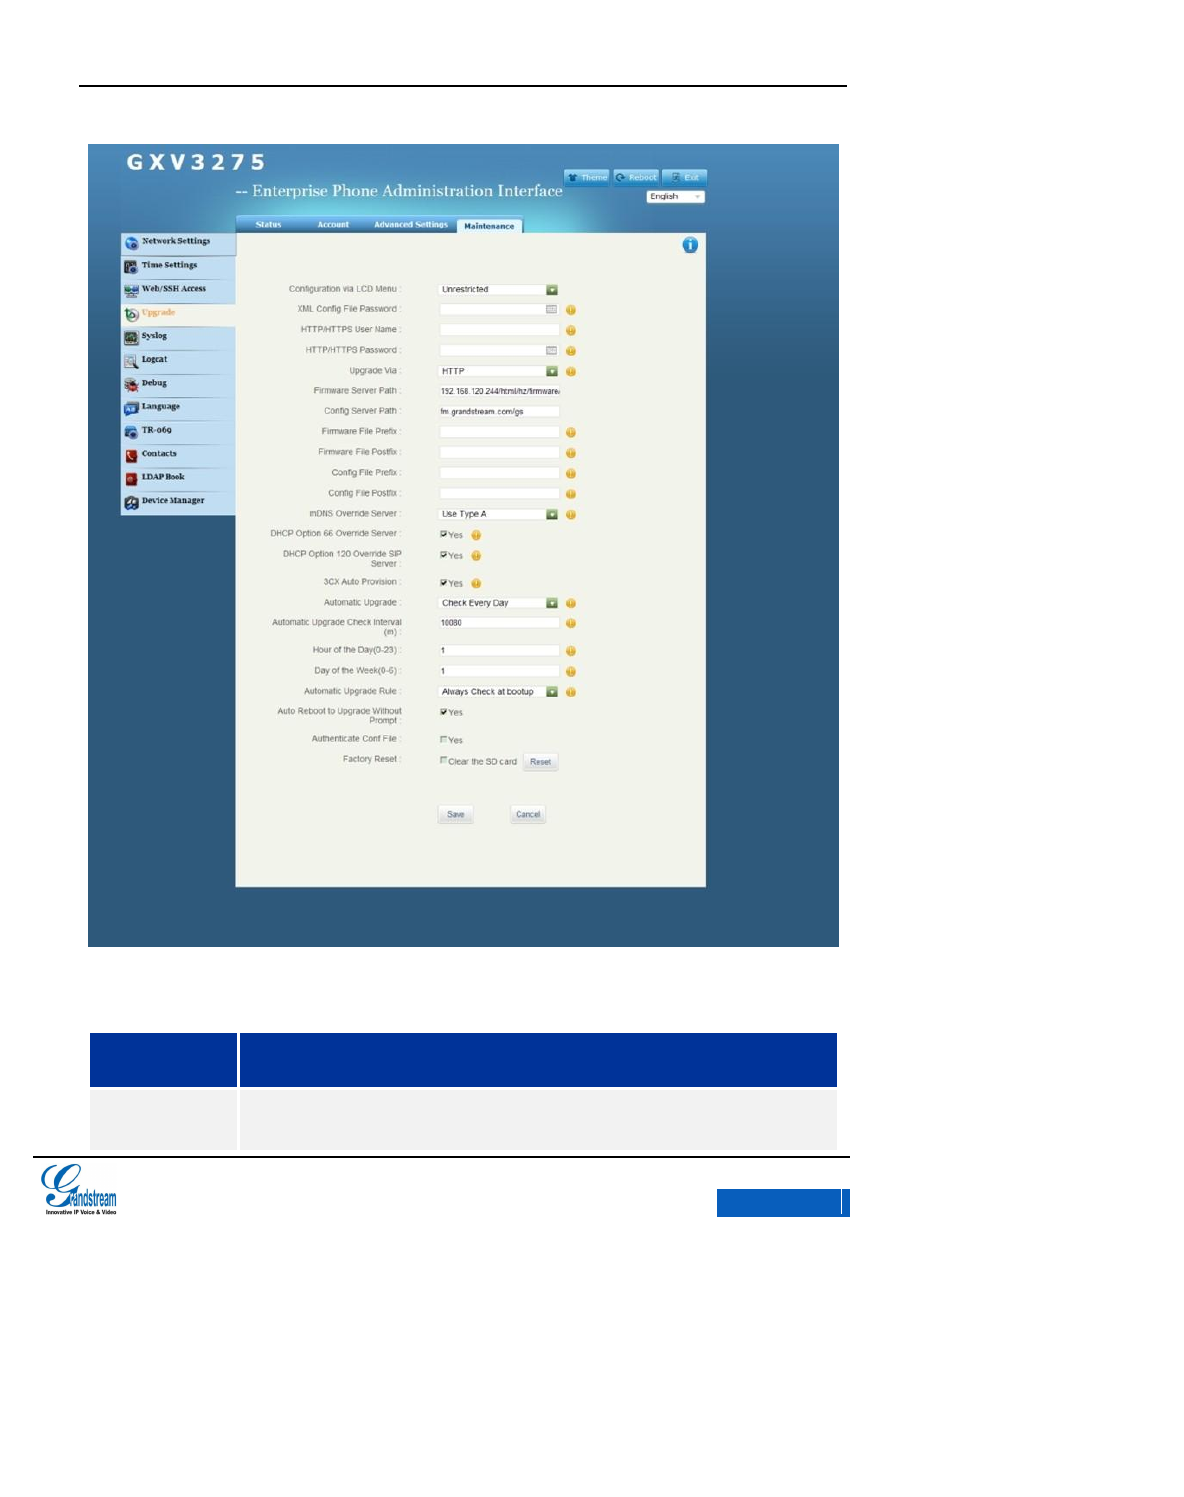
Figure 155 GXV3275 Web GUI Maintenance-Upgrade
Table 26 Maintenance/Upgrade Parameters
Parameters
Description
Configuration via
LCD Menu
Set LCD menu configuration permission. No Limited or General Settings is optional.
x-PDFDivision

GXV3275 User Manual
GXV3275 WEB GUI
Grandstream Co., Ltd
Software Version:1.0.0.9 Document Version:0.2
176
XML Config File
Password
The password for encrypting the XML configuration file using OpenSSL. This is
required for the phone to decrypt the encrypted XML configuration file.
HTTP/HTTPS User
Name
Input the authenticated user name if HTTP/HTTPS or configured server adopts User
authentication mode.
HTTP/HTTPS
Password
Input the authenticated user password if HTTP/HTTPS or configured server adopts
User authentication mode.
Upgrade Via
Allows users to choose the firmware upgrade method: TFTP, HTTP, HTTPS or
manual upload.
Firmware Server
Path
Defines the IP address or domain name for the firmware upgrade server.
Configure Server
Path
Defines the IP address or domain name for the file server.
Firmware File
Prefix
The default setting is “Empty”. If configured, only the firmware with the matching
encrypted prefix will be downloaded and flashed into the phone. This option appeals
to service provider. End users don't need to fill in this option.
Firmware File
Postfix
The default setting is “Empty”. End users don't need to fill in this option.
Configure File
Prefix
The default setting is “Empty”. End users don't need to fill in this option.
Configure File
Postfix
The default setting is “Empty”. End users don't need to fill in this option.
mDNS Server
If set to “Yes”, the device allows mDNS to rewrite configure/firmware server. The
default setting is “Yes”.
DHCP Option 66
Override Server
The default setting is “No”. If set to “Yes”, the device will obtain IP address as well as
firmware upgrade server address via DHCP(configured via DHCP). The address will
override the path the “Firmware Server Path” specifies to fulfill auto deployment. The
upgrade will use force TFTP.
DHCP Option 120
Override SIP
Server
Enables DHCP Option 120 from local server to override the SIP Server on the phone.
3CX Auto
Provision
Enables automatic provision feature on the phone when 3CX is used as the SIP
server.
x-PDFDivision

GXV3275 User Manual
GXV3275 WEB GUI
Grandstream Co., Ltd
Software Version:1.0.0.9 Document Version:0.2
177
Automatic Upgrade
This function is set for the network service provider. The default setting is "No".
If set the checking time for every week/day/intervals, the Auto Upgrade and the
corresponding configurations will be enabled. Input the period time for checking
software upgrade or configuring upgrade in the textbox. The shortest interval is 60
minutes.
If set to “No”, the device only to upgrade when reboot.
Period Time of
Upgrade Checking
Specifies the time period to check for firmware upgrade (in minutes). The default
setting is 10080 minutes (7 days).
Hour of the Day
(0-23)
Defines the hour of the day(0-23) to check the HTTP/TFTP server for firmware
upgrades or configuration files changes.
Day of the Week
(0-6)
Defines the day of the week(0-6) to check the HTTP/TFTP server for firmware
upgrades or configuration files changes.
Automatic Upgrade
Rule
Defines the rules for automatic upgrade.
Automatic Reboot
for Upgrade
without confirm
boxes
If set to “Yes”, the device will reboot automativally for upgrade after downloading the
upgrade firmware. Otherwise the prompt for reboot will pop up on LCD before reboot.
The default setting is “Yes”.
Authenticate Conf
File
If set to “Yes”, Authenticates configuration file before acceptance.
Factory Reset
Restore to factory default settings.
Restore mode: Reset all data, Reset VoIP data, Reset user data. Press the Reset
button after selecting the reset mode.
Note: Please back up data before reset in order to avoid data loss.
x-PDFDivision
GXV3275 User Manual
GXV3275 WEB GUI
Grandstream Co., Ltd
Software Version:1.0.0.9 Document Version:0.2
178
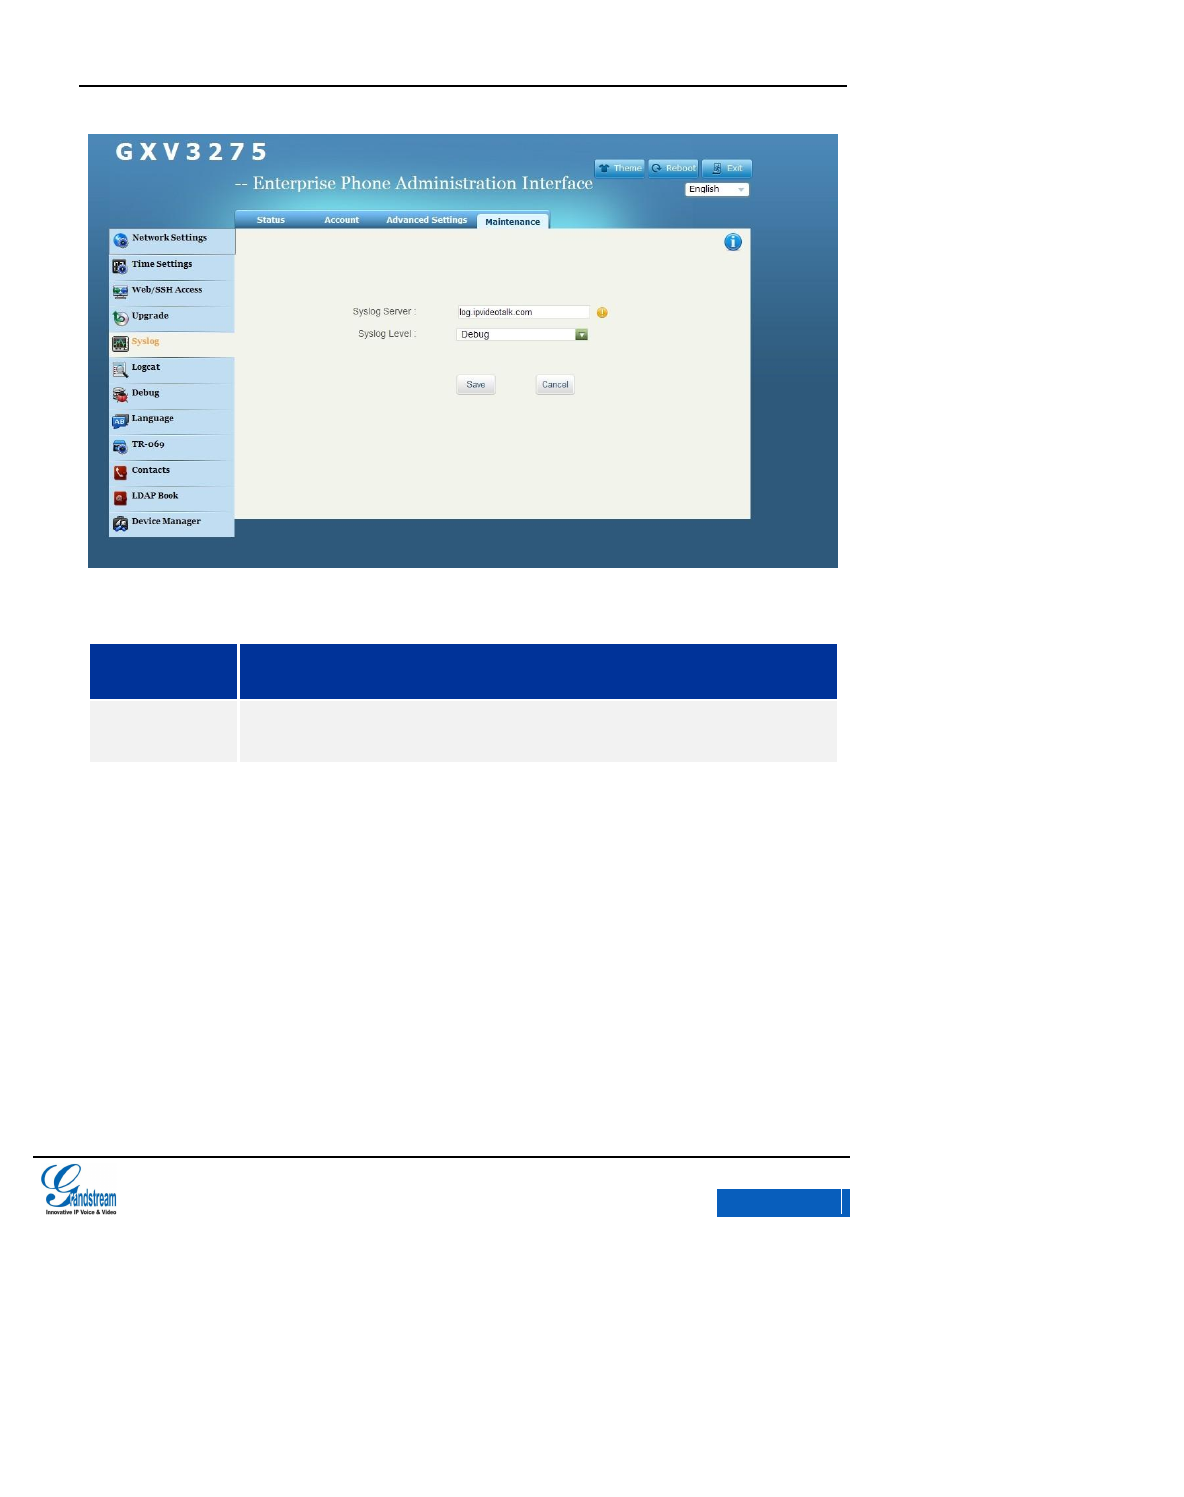
Figure 156 GXV3275 Web GUI Maintenance-Syslog
Table 27 Maintenance/Syslog Parameters
Parameters
Description
Syslog Server
The URL/IP address for the syslog server. This function appeals to the VOiP service
server.
x-PDFDivision
GXV3275 User Manual
GXV3275 WEB GUI
Grandstream Co., Ltd
Software Version:1.0.0.9 Document Version:0.2
179
Syslog Level
Selects the level of logging for syslog. The default setting is None. It means send no
syslog.
The 4 levels from high to low are: DEBUG, INFO, WARNING and ERROR.
Syslog messages are sent based on the following events:
product model/version on boot up (INFO level);
NAT related info (INFO level);
sent or received SIP message (DEBUG level);
SIP message summary (INFO level);
inbound and outbound calls (INFO level);
registration status change (INFO level);
negotiated codec (INFO level);
ethernet link up (INFO level);
SLIC chip exception (WARNING and ERROR levels);
Memory exception (ERROR level).
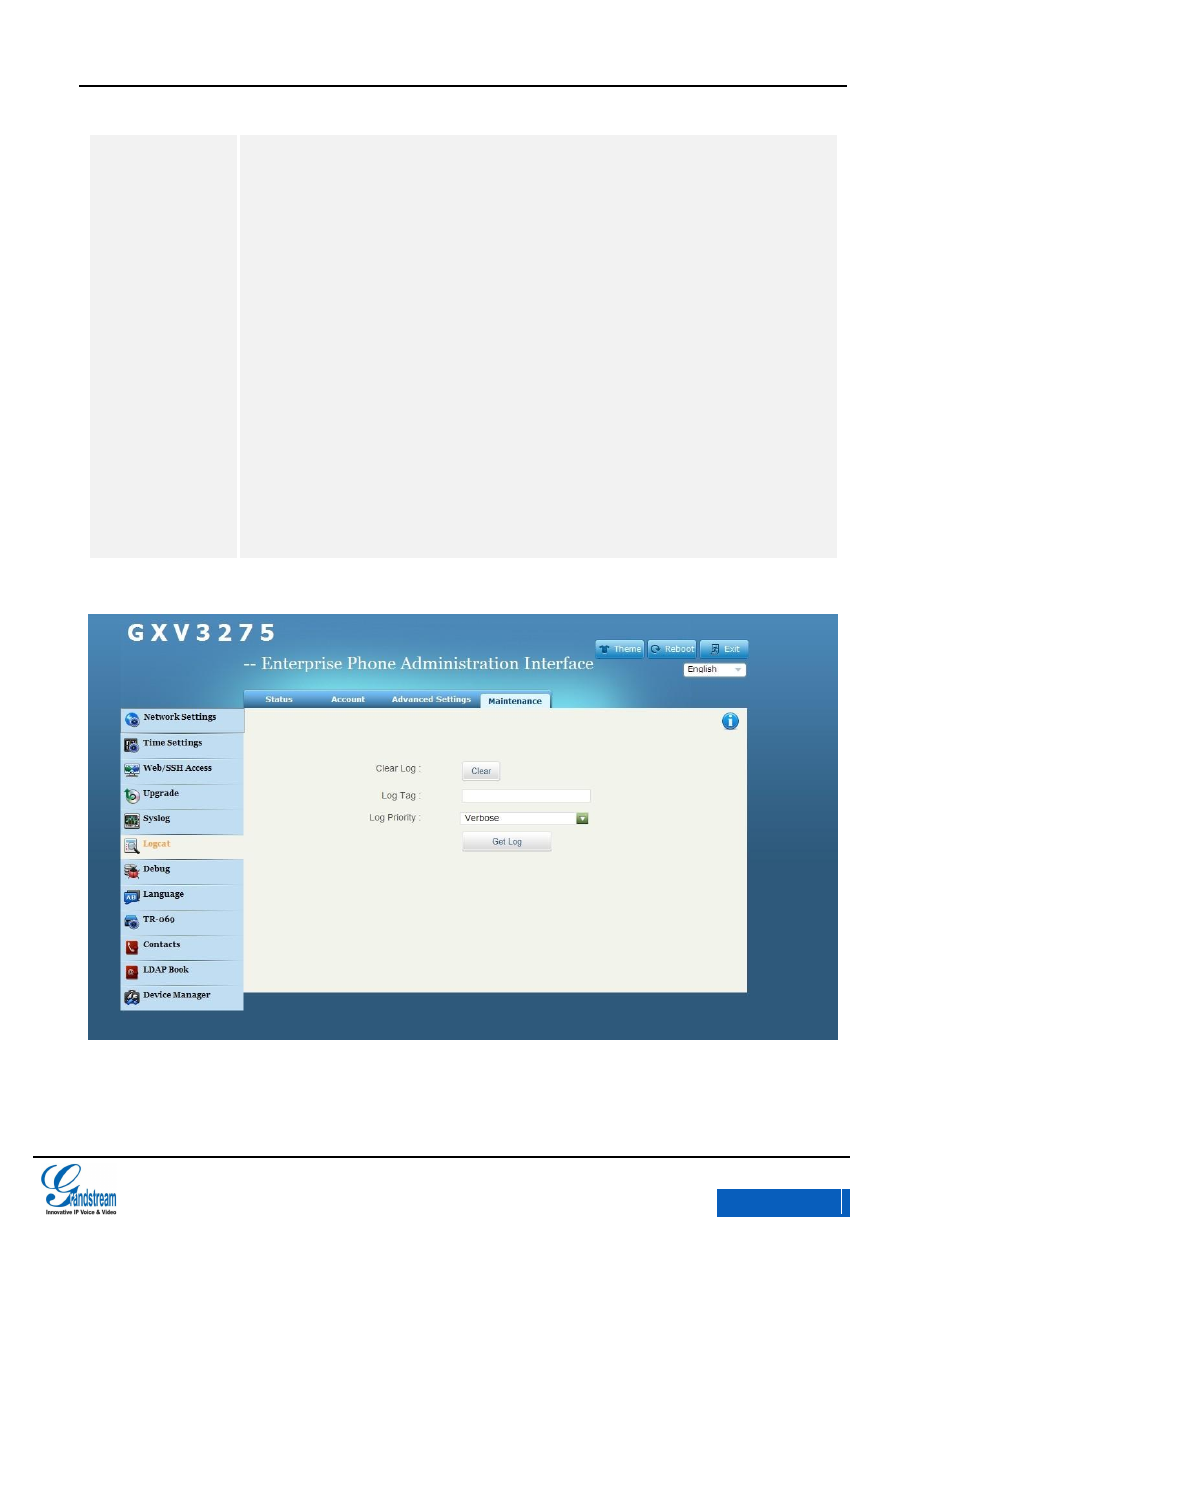
Figure 157 GXV3275 Web GUI Maintenance-Logcat
Table 28 Maintenance/Logcat Parameters
x-PDFDivision
GXV3275 User Manual
GXV3275 WEB GUI
Grandstream Co., Ltd
Software Version:1.0.0.9 Document Version:0.2
180
Parameters
Description
Clear Log
Press the clear log button to clear log.
Log Tag
Specifies the log tag to filter the log.
Log Level
Selects the log priority in the drop-down menu.
Figure 158 GXV3275 Web GUI Maintenance –Debug
Table 29 Maintenance/Debug Parameters
Parameters
Description
Capture Trace
Press Start to start capturing a trace and press Stop to discontinue .Capture Trace
will help to diagnosis. The default is disabled.
x-PDFDivision
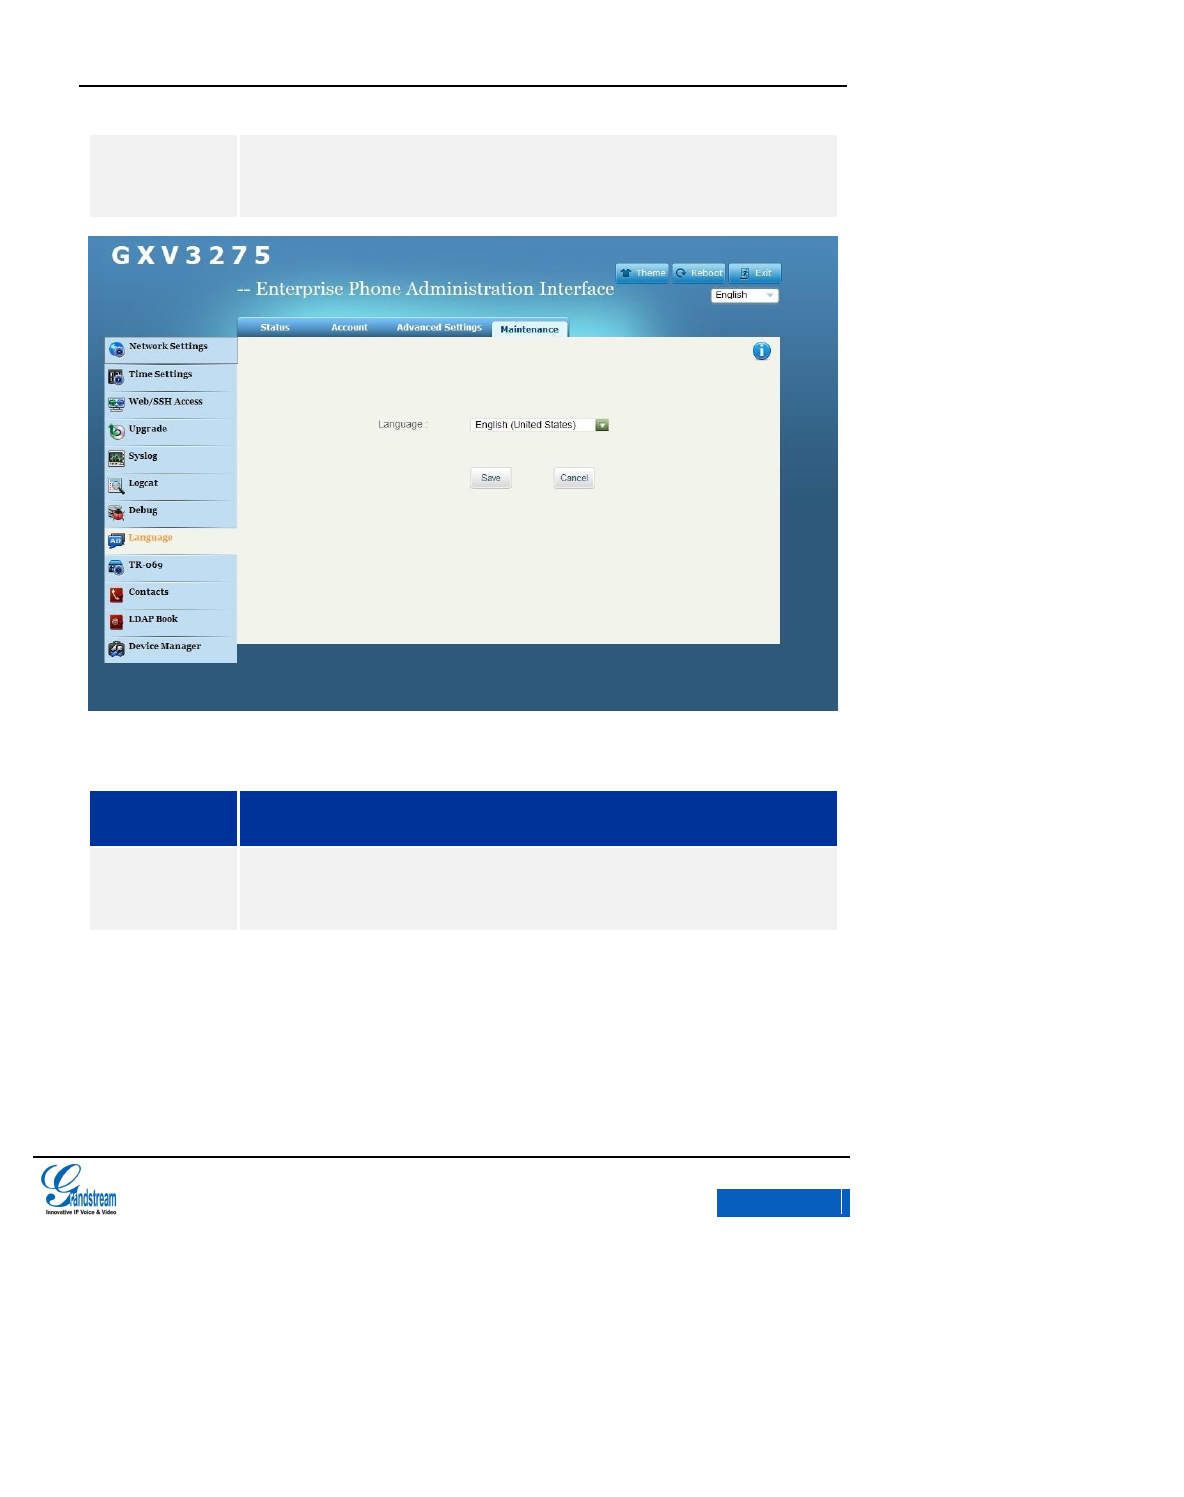
GXV3275 User Manual
GXV3275 WEB GUI
Grandstream Co., Ltd
Software Version:1.0.0.9 Document Version:0.2
181
View Trace
Press LIST to view the list of captured traces. It will show the time when the trace was
captured. Click on the name of the file to download and view the trace.
Figure 159 GXV3275 Web GUI Maintenance-Language
Table 30 Maintenance-Language Parameters
Parameters
Description
Language
Select the language displayed on the phone. GXV3275 supports multi language:
Chinese, English, Spanish, French, Russian and etc.
x-PDFDivision
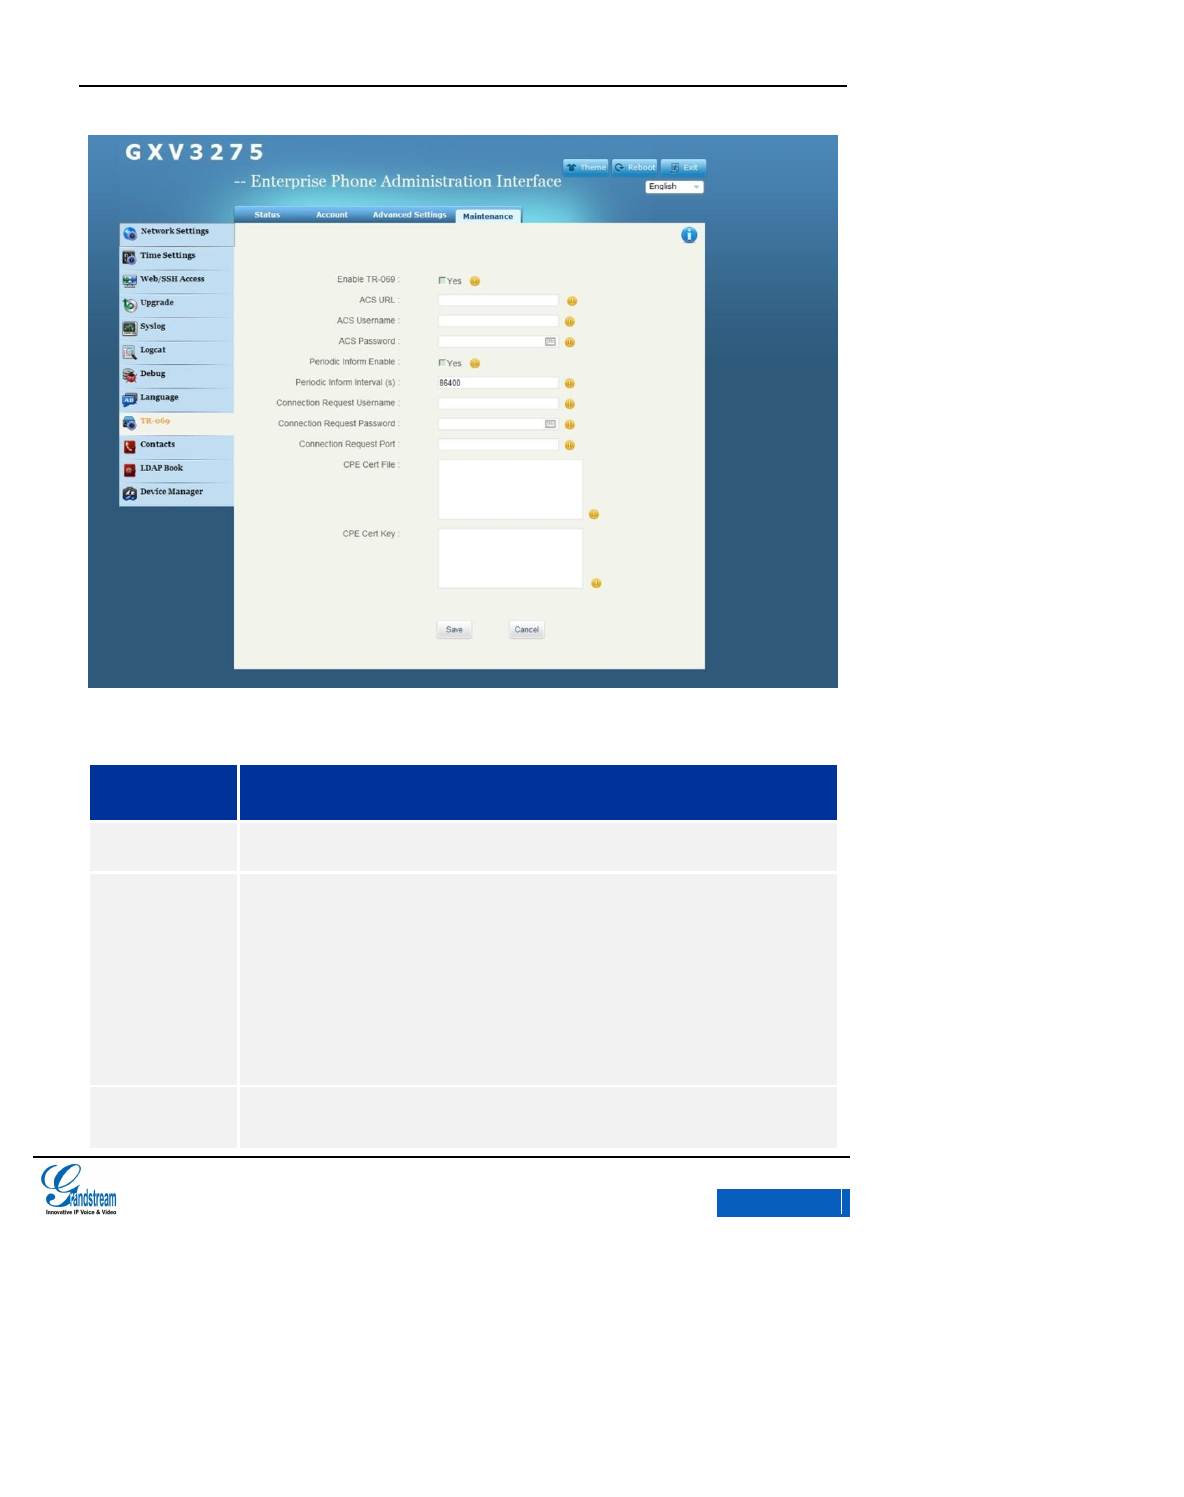
GXV3275 User Manual
GXV3275 WEB GUI
Grandstream Co., Ltd
Software Version:1.0.0.9 Document Version:0.2
182
Figure 160 GXV3275 Web GUI Maintenance-TR-069
Table 31Maintenance/TR-069 Parameters
Parameters
Description
Enable TR-069
If set to "Yes", the phone will send session connection request to the ACS.
ACS URL
URL for TR-069 Auto Configuration Servers (ACS). There are 2 methods toidentify
ASC server:
IP Address
i.e: http://10.10.10.1:9090
Domain Name
i.e:http://huawei.acs.com:9090
NOTE: 9090 is the port number of ASC server
ACS username
ACS username to authenticate TR-069 when the phone sends connecting request to
ASC. It should be in accordance with ASC configuration.
x-PDFDivision
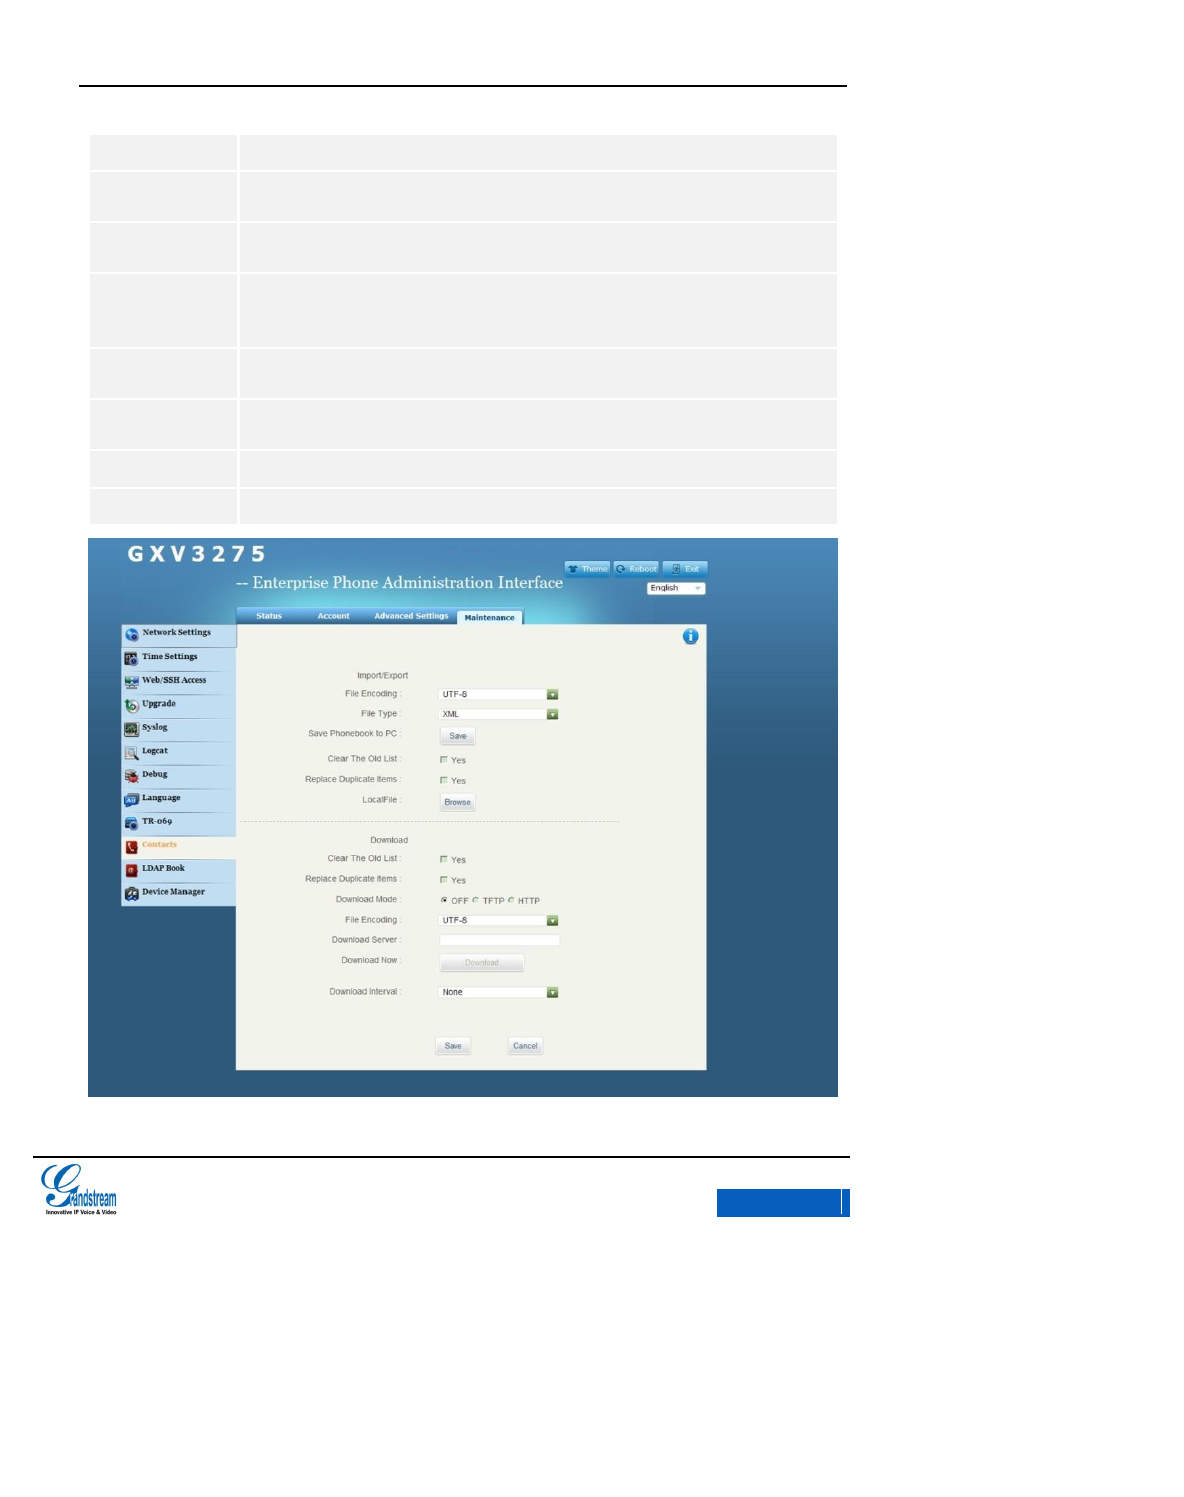
GXV3275 User Manual
GXV3275 WEB GUI
Grandstream Co., Ltd
Software Version:1.0.0.9 Document Version:0.2
183
ACS password
ACS password for TR-069. It should be in associated with ASC configuration.
Periodic Inform
Enable
If set to "Yes", the phone will send inform packets to the ACS periodically.
Periodic Inform
Interval (s)
Sets up the periodic inform interval (in seconds) to send the inform packets to the
ACS.
Connection
Request
Username
The username to authenticate ACS when the ASC server sends connecting request
to the phone. It should be in associated with ASC configuration.
Connection
Request Password
The password for the ACS to connect to the phone. The phone should in accordance
with ACS server configuration.
Connection
Request Port
The port for the ACS to connect to the phone. It cannot be occupied by other
applications, i.e: the device can’t use the port that SIP 5060 or 5004 uses.
CPE Cert File
The Cert File for the phone to connect to the ACS via SSL.
CPE Cert Key
The Cert Key for the phone to connect to the ACS via SSL.
Figure 161 GXV3275 Web GUI Maintenance-Contacts
x-PDFDivision
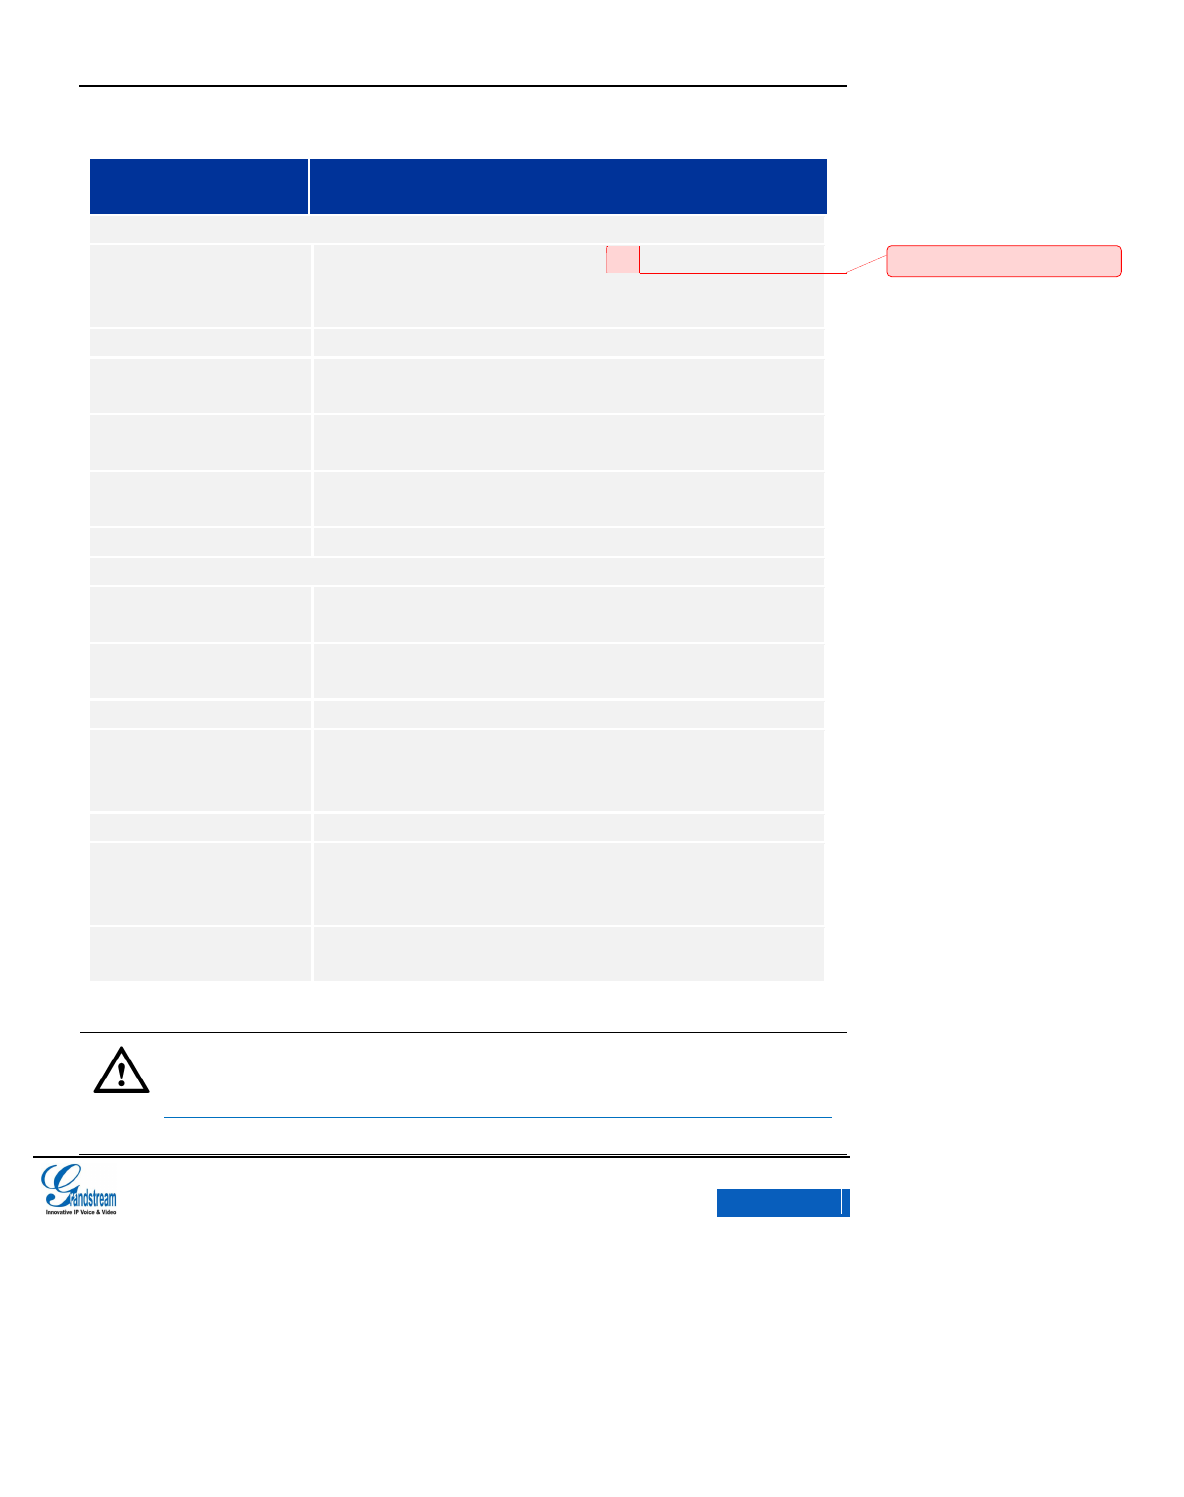
GXV3275 User Manual
GXV3275 WEB GUI
Grandstream Co., Ltd
Software Version:1.0.0.9 Document Version:0.2
184
Table 32 Maintenance/Contacts Parameters
Parameters
Description
Import/Export
File Encoding
Supports import/export Contacts: UTF-8,GBK,UTF-16,UTF-32,Big5,
Big5-HKSCS ,Shift-JIS ,IOS8859-1 ,IOS8859-15 ,
Windows-1251,EUC-KR.
File Type
Supports import/export Contacts: XML,VCard,CSV.
Save Phonebook to PC
Allow users to save XML file to PC.Click Save to save the pop-up XML
file to PC.
Clear The Old List
The phone will delete all the old list before downloading new ones if
check. The default is uncheck.
Replace Duplicate Items
The phone will delete all the duplicated items before downloading new
ones if check. The default is uncheck.
Local File
Click Browse to select XML file and download it to the phone.
Download
Clear The Old List
The phone will delete all the duplicated items before downloading new
ones if check. The default is uncheck.
Replace Duplicate Items
The phone will delete all the duplicated items before downloading new
ones if check. The default is uncheck.
Download Mode
Select network download mode: OFF/TFTP/HTTP.
File Encoding
Supports import/export Contacts: UTF-8,GBK,UTF-16,UTF-32,Big5,
Big5-HKSCS,Shift-JIS,IOS8859-1,IOS8859-15,
Windows-1251,EUC-KR. The default is UTF-8.
Download Server
Set up the server to download with from network.
Download Now
Click Download to download Contacts file to the phone from the
configured server.
Note: The contacts file must be the formatted file the phone supports.
Download Interval
The interval to download from server. The default is None, namely will
not automatically request download, users can set up as needed.
Note: Please download phonebook for more GXV3275 xml info; refer to GXV3275 xml
Contacts Guide for details.
http://www.grandstream.com/products/gxp_series/gxV3275/documents/gxV3275_xml_phone
批注 [J1]: 缺少其他文件编码
x-PDFDivision
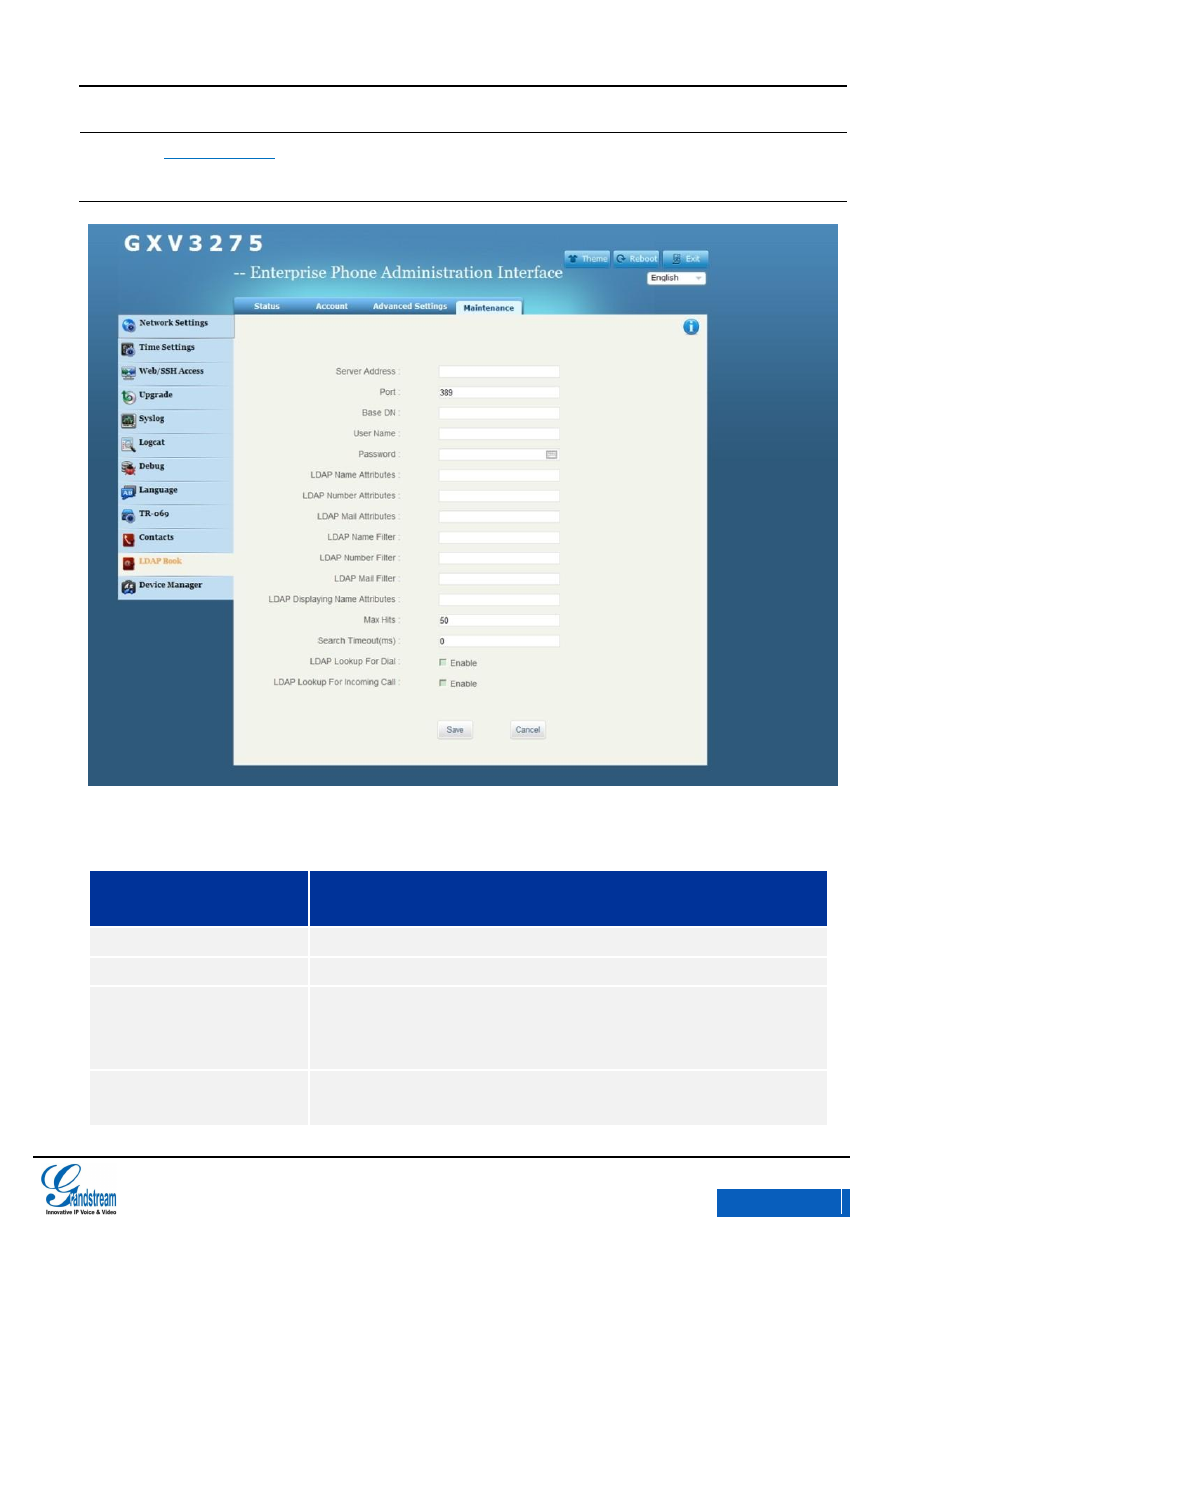
GXV3275 User Manual
GXV3275 WEB GUI
Grandstream Co., Ltd
Software Version:1.0.0.9 Document Version:0.2
185
book_guide.pdf
Figure 162 GXV3275 Web GUI Maintenance-LDAP Book
Table 33 Maintenance/LDAP Book Parameters
Parameters
Descriptions
Server Address
LDAP server address, users could input IP address or domain name.
Port
Set up the port number of LDAP server.
Base DN
Set up the base DN to inquire on the serve ,namely under which
directory to inquire contacts.i.e., dc=grandstream, dc=com
ou=Boston, dc=grandstream, dc=com
User Name
Set up the username to login LDAP server. Some LDAP servers
support anonymous login without username.
x-PDFDivision

GXV3275 User Manual
GXV3275 WEB GUI
Grandstream Co., Ltd
Software Version:1.0.0.9 Document Version:0.2
186
Password
Set up the password to login LDAP server. If the LDAP server
support anonymous, users could login without password.
LDAP Name Attributes
Set up the name attribute of each record returned from LDAP search.
It allows users to configure multiple name attribute separated by
spaces. i.e., gn cn sn description。
LDAP Number Attributes
Set up the number attribute of each record returned from LDAP
search. It allows users to configure multiple number attribute
separated by spaces. i.e.,
telephoneNumber
telephoneNumber Mobile。
LDAP Mail Attributes
Set up the mail attribute of each record returned from LDAP search.
It allows users to configure multiple mail attribute separated by
spaces. i.e.,
mail
mail mailbox。
LDAP Name Filter
Set up the filter when configure name inquiry.i.e.,
(|(telephoneNumber=%)(Mobile=%) return all “telephoneNumber” or
contacts with specified filter value in “Mobile” f.
(&(telephoneNumber=%) (cn=*)) return all contacts with specified
filter value with “cn“ field in “telephoneNumber”.
LDAP Number Filter
Set up the filter when configure number inquiry.i.e.,
(|(telephoneNumber=%)(Mobile=%) return all “telephoneNumber” or
contacts with specified filter value in “Mobile”.
(&(telephoneNumber=%) (cn=*)) return all contacts with specified
filter value and the set “cn“ field in “telephoneNumber”.
LDAP Mail Filter
Set up the filter when configure mail inquiry.i.e.,
(|(mail=%)(mailBox=%)) return all contacts with specified filter value
in “Mail” or“Mailbox” .
(!(mail=%)) return all contacts without specified filter value in “Mail” ;
(&(mail=%) (cn=*)) return all contacts with specified filter value and
the set “cn“field in “mail”.
LDAP Displaying Name
Attributes
Display onscreen name attribute, up to three attributes. Such
as:%cn %sn %telephoneNumber
Max Hits
Set up the max hit return to the LDAP server. If set to “0”, the server
will return all searched results. The default setting is 50.
Search Timeout(ms)
Set up the search timeout return after inputting search info.The
x-PDFDivision
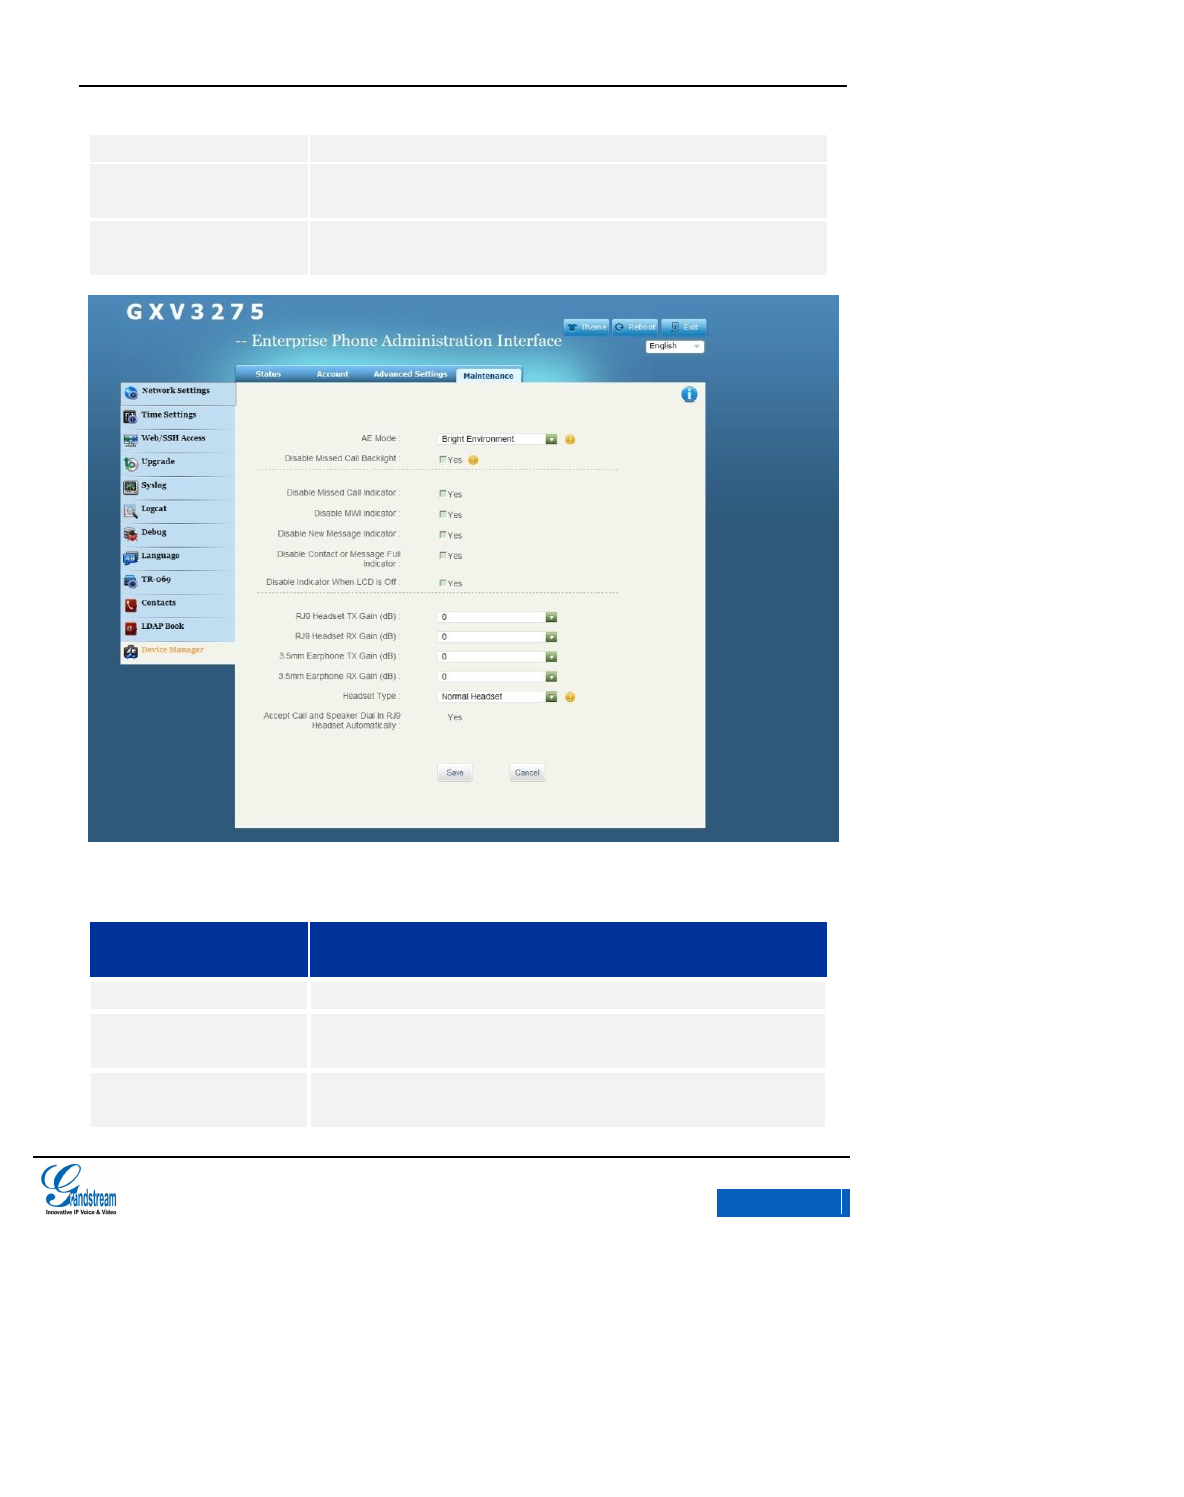
GXV3275 User Manual
GXV3275 WEB GUI
Grandstream Co., Ltd
Software Version:1.0.0.9 Document Version:0.2
187
default setting is “0”.
LDAP Lookup For Dial
Set up whether to appy LDAP lookup for dial. The default setting is
“No”.
LDAP Lookup For
Incoming Call
Set up whether to appy LDAP lookup for incoming call. The default
setting is “No”.
Figure 163 GXV3275 Web GUI Maintenance-Device Manager
Table 34 Maintenance/Device Manager Parameters
Parameters
Description
AE Mode
Bright environment and dark environment are optional.
Disable Missed Call
Backlight
If set to “Yes”, the LCD backlight will be disabled when there is a
missed call. The default setting is “No”.
Disable Missed Call
Indicator
If set to “Yes”, the LCD backlight will be disabled when there is a
missed call. The default setting is “No”.
x-PDFDivision
GXV3275 User Manual
GXV3275 WEB GUI
Grandstream Co., Ltd
Software Version:1.0.0.9 Document Version:0.2
188
Disable MWI Indicator
Set up whether to disable LED MWI Indicator when there is a unread
message. The default setting is “No”.
Disable New Message
Indicator
If set to “Yes”, the indicator will be disabled when there is a new
message. The default setting is “No”.
Disable Contact or
Message Full Indicator
If set to “Yes”, the indicator will be enabled when the storage of
contacts or messages is full. The default setting is “No”.
Disable Indicator When
LCD is Off
If set to “Yes”, the indicator will be disabled when LCD is Off. The
default setting is “No”.
RJ9 Headset TX Gain
(dB)
The headphone volume setting controls the sent-out audio signal.
The default is “0”.
RJ9 Headset RX Gain
(dB)
The headphone volume setting controls the received audio signal.
The default is “0”.
3.5mm Earphone TX
Gain (dB)
3.5mm Earphone RX
Gain (dB)
Headset Type
Select Normal headset or EHS headset type.
Accept Call and Speaker
Dial In RJ9 Headset
Automatically
Set whether to accept call and speaker Dial In RJ9 Headset
automatically.
x-PDFDivision

GXV3275 User Manual
UPGRADING AND PROVISIONING
Grandstream Co., Ltd
Software Version:1.0.0.9 Document Version:0.2
189
UPGRADING AND PROVISIONING
GXV3275 supports software upgrade via TFTP or HTTP/HTTPS. Go to Advanced Settings page to
configure.
CONFIGURATION FILE DOWNLOAD
Grandstream SIP Devices can be configured via the WEB Interface as well as via a Configuration
File (binary or XML) through TFTP or HTTP/HTTPS. The “Config Server Path” is the TFTP, HTTP
or HTTPS server path for the configuration file. It needs to be set to a valid URL, either in FQDN or
IP address format. The "Config Server Path" can be the same or different from the "Firmware
Server Path".
A configuration parameter is associated with each particular field in the web configuration page. A
parameter consists of a Capital letter P and multiple digit numeric numbers. i.e., P2 is associated
with the “Admin Password” in the Web GUI->Maintenance->Web/SSH Access page.
Note: For a detailed parameter list, please refer to the corresponding firmware release configuration
template.
x-PDFDivision
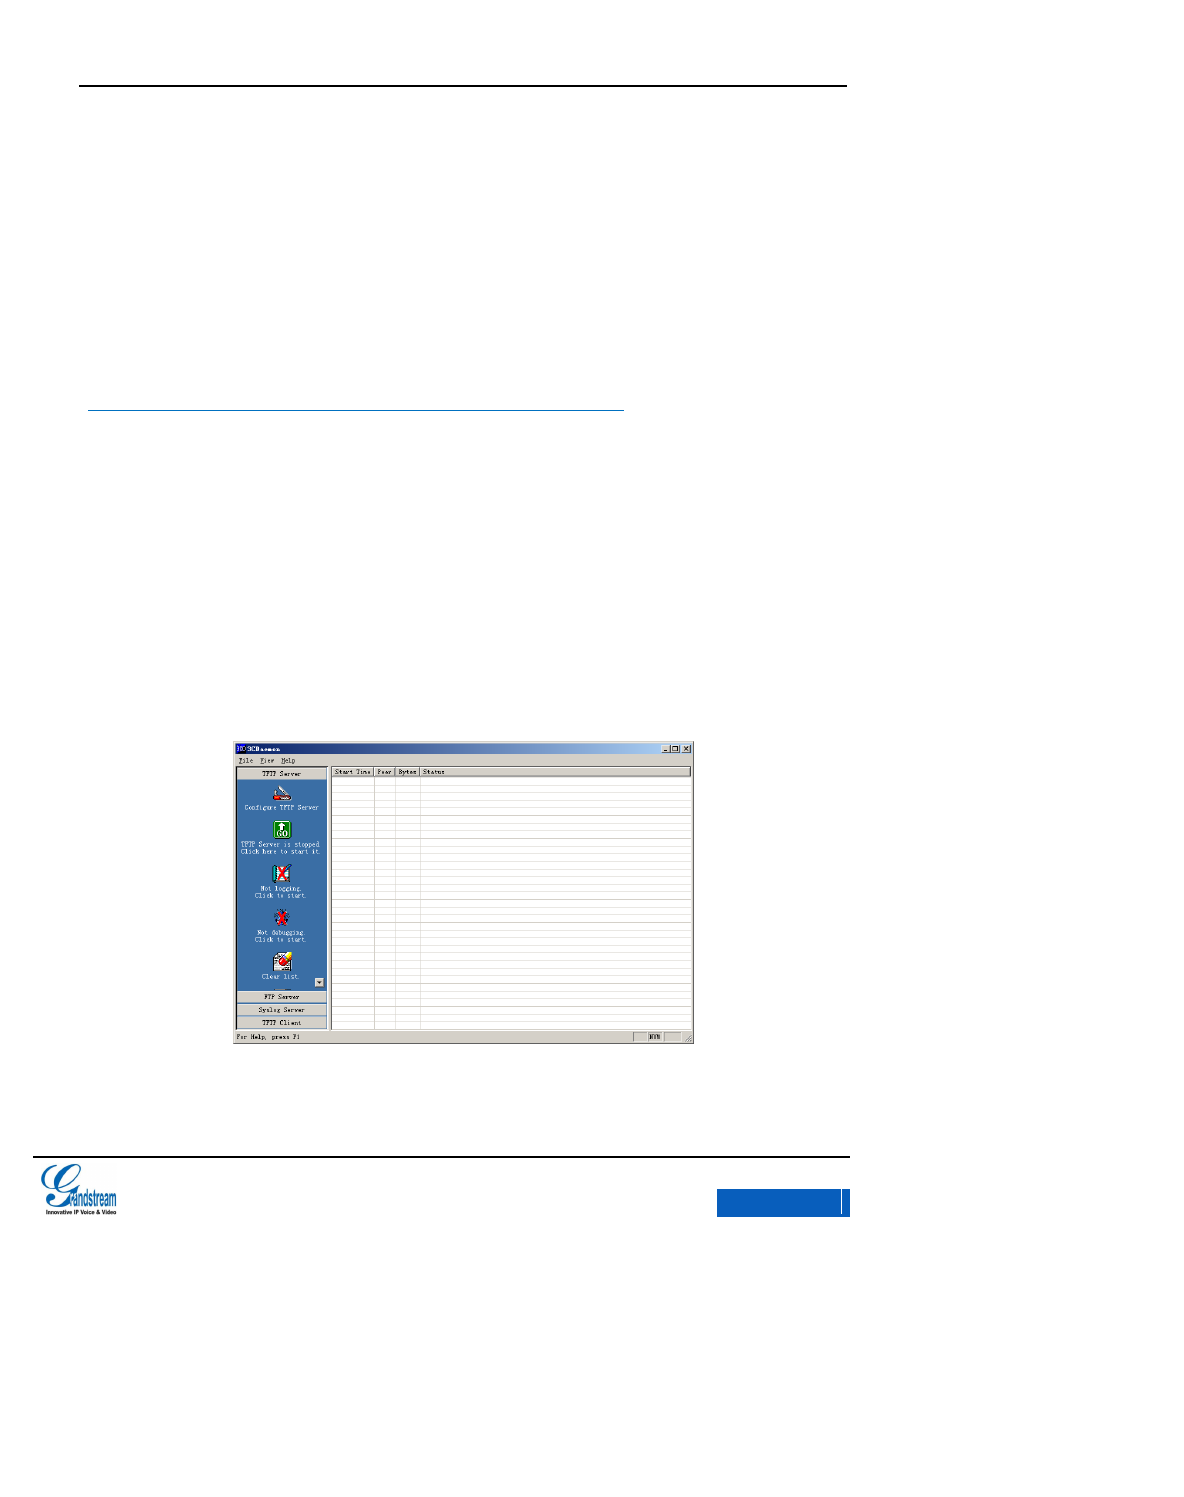
GXV3275 User Manual
UPGRADING AND PROVISIONING
Grandstream Co., Ltd
Software Version:1.0.0.9 Document Version:0.2
190
When a Grandstream Devices boots up or reboots, it will issue a request for a configuration XML file
named "cfgx.xml" followed by a file named "cfgxxxxxxxxxxxx", where "xxxxxxxxxxxx" is the MAC
address of the device, i.e., "cfg000b820102ab". The configuration file name should be in lowercase
letters.
For more details on XML provisioning, please refer to:
http://www.grandstream.com/general/gs_provisioning_guide_public.pdf
CONFIGURE SERVER
CONFIGURE TFTP SERVER
The following chapter will take 3CDaemon TFTP as an example.
1. Open the HTTP server, as shown in figure 164 below.
Figure 164 HFTP Server Interface
2. Click “Configure TFTP Server”to bring out the dialog as shown in figure 165.
x-PDFDivision

GXV3275 User Manual
UPGRADING AND PROVISIONING
Grandstream Co., Ltd
Software Version:1.0.0.9 Document Version:0.2
191
Figure 165 HFTP Server Interface -Configure Dialog
3. Set the path to save the file under “Upload/Download”in“TFTP Configuration”tab.
Figure 166 Set HFTP Server Path
4. Select the path then click “Ok” to bring out the following dialog.
Figure 167 Confirm Changes
x-PDFDivision
GXV3275 User Manual
UPGRADING AND PROVISIONING
Grandstream Co., Ltd
Software Version:1.0.0.9 Document Version:0.2
192
5. Click “Yes” to confirm changes.
6. Click “Ok” to close the dialog.
Note: The file uploaded to sever should be unzipped.bin file.
CONFIGURE HTTP SERVER
The following chapter will take 3CDaemon TFTP as an example.
You could obtain Apache HTTP server installation provisioning from http://httpd.apache.org, and
follow the wizard to complete the default installation.
The following chapter will take using Apache HTTP Server2.2 in Windows XP as an example.
1. Open Apache server, go to Start > All Programs > Apache HTTP Server 2.2 > Monitor Apache
Servers on a PC installed with Apache server.
The icon in the notification area of the taskbar indicates the Apache server has been
enabled. Select "Start" to enable the server when see .
2. Save the file under the following path: Installation Path\Apache Software
Foundation\Apache2.2\htdocs.
Note
If the file is saved under htdocs folder, the URL format for the phone to access
Apache server is: http:// IP address of the PC installed with Apache server. i.e.,
http://192.169.1.51
If the file is saved under htdocs subfolder, the URL format for the phone to
access Apache server is: http:// IP address of the PC installed with Apache server
/Subfolder Name. i.e., http://192.169.1.51/filename
x-PDFDivision
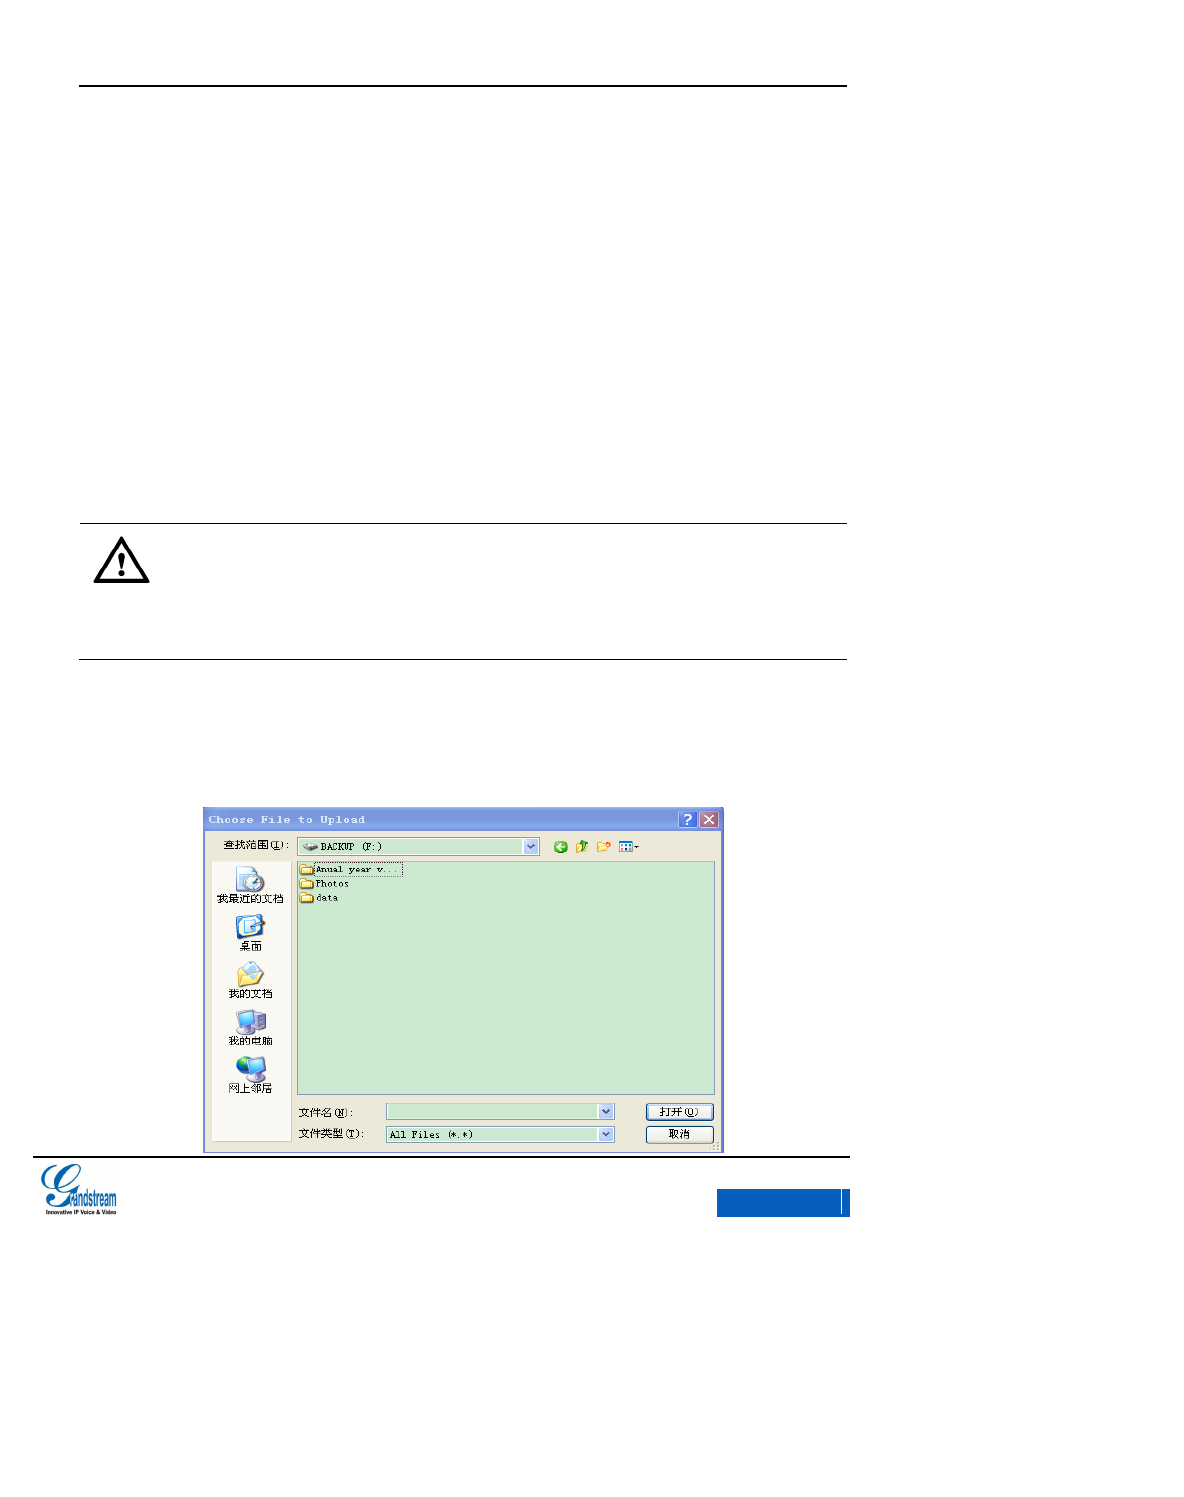
GXV3275 User Manual
UPGRADING AND PROVISIONING
Grandstream Co., Ltd
Software Version:1.0.0.9 Document Version:0.2
193
FIRMWARE UPDATE
GXV325 supports the following ways to update
Update via upload firmware file
Manual update via firmware file
Auto update via firmware server
This chapter will introduce the three upgrade methods in details.
Note:
It is HIGHLY recommended that an Uninterruptible Power Supply (UPS) be used
in conjunction with the device in the process of update or it might be fail.
Please unpack the compression package before upload the file for update.
UPDATE VIA UPLOAD FIRMWARE FILE
1. Go to Maintenance> Upgrade, set the update type to “Manual” and click the Upload button.
x-PDFDivision
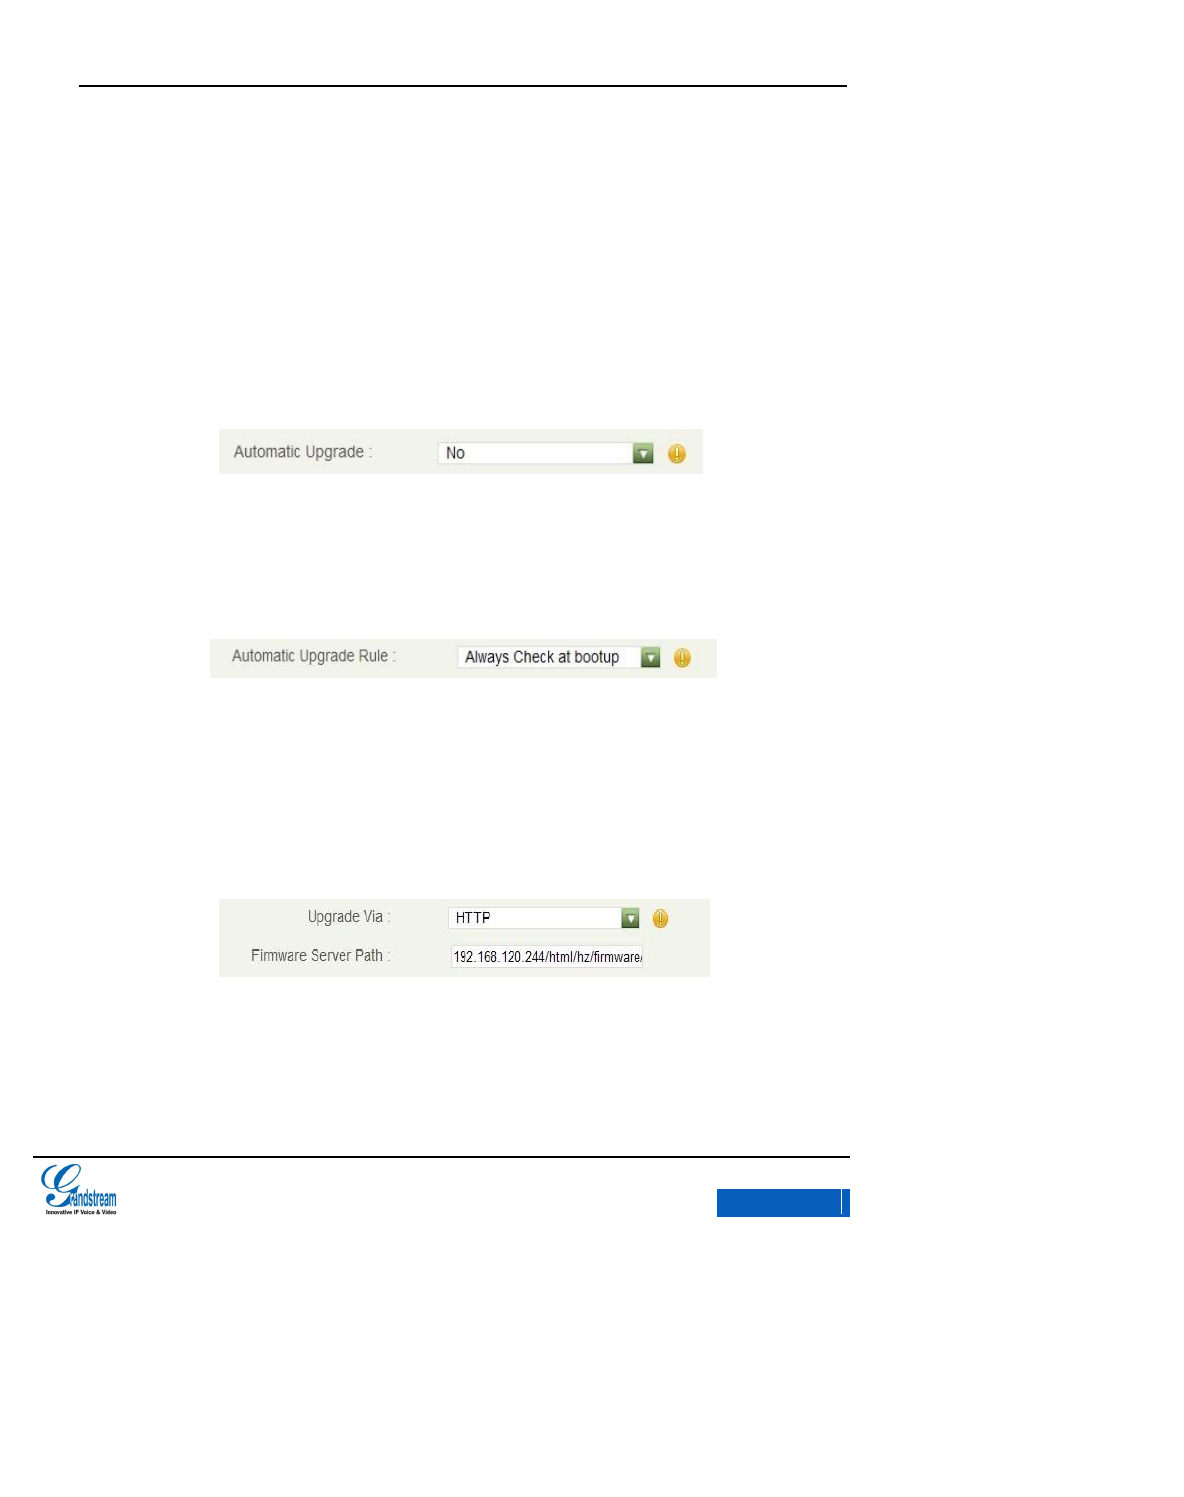
GXV3275 User Manual
UPGRADING AND PROVISIONING
Grandstream Co., Ltd
Software Version:1.0.0.9 Document Version:0.2
194
Figure 168 Select Firmware File
2. The pop-up dialog will show on screen, users could confirm to update according to the prompt.
MANUAL UPDATE
The steps to update file via HTTP are the same as via TFTP. Theis chapter will take via TFTP as an
example.
1. Go to Maintenance>Upgrade, Select “No” in “ Automatic Upgrade” ,as shown in figure 169.
Figure 169 Set up Auto Update
2. Go to Maintenance>Upgrade, Select “Always Check at Bootup” in “Automatic Upgrade Rule”
option, as shown in figure 170.
Figure 170 Set up Automatic Upgrade Rule
3. Set up upgrade mode and upgrade server. Select “TFTP”in “Upgrade Via”option and input
the local TFTP server address in the “Firmware Server Path” option. URL and IP address are
optional. See figure 171.
Figure 171 Set up Firmware update Mode
x-PDFDivision
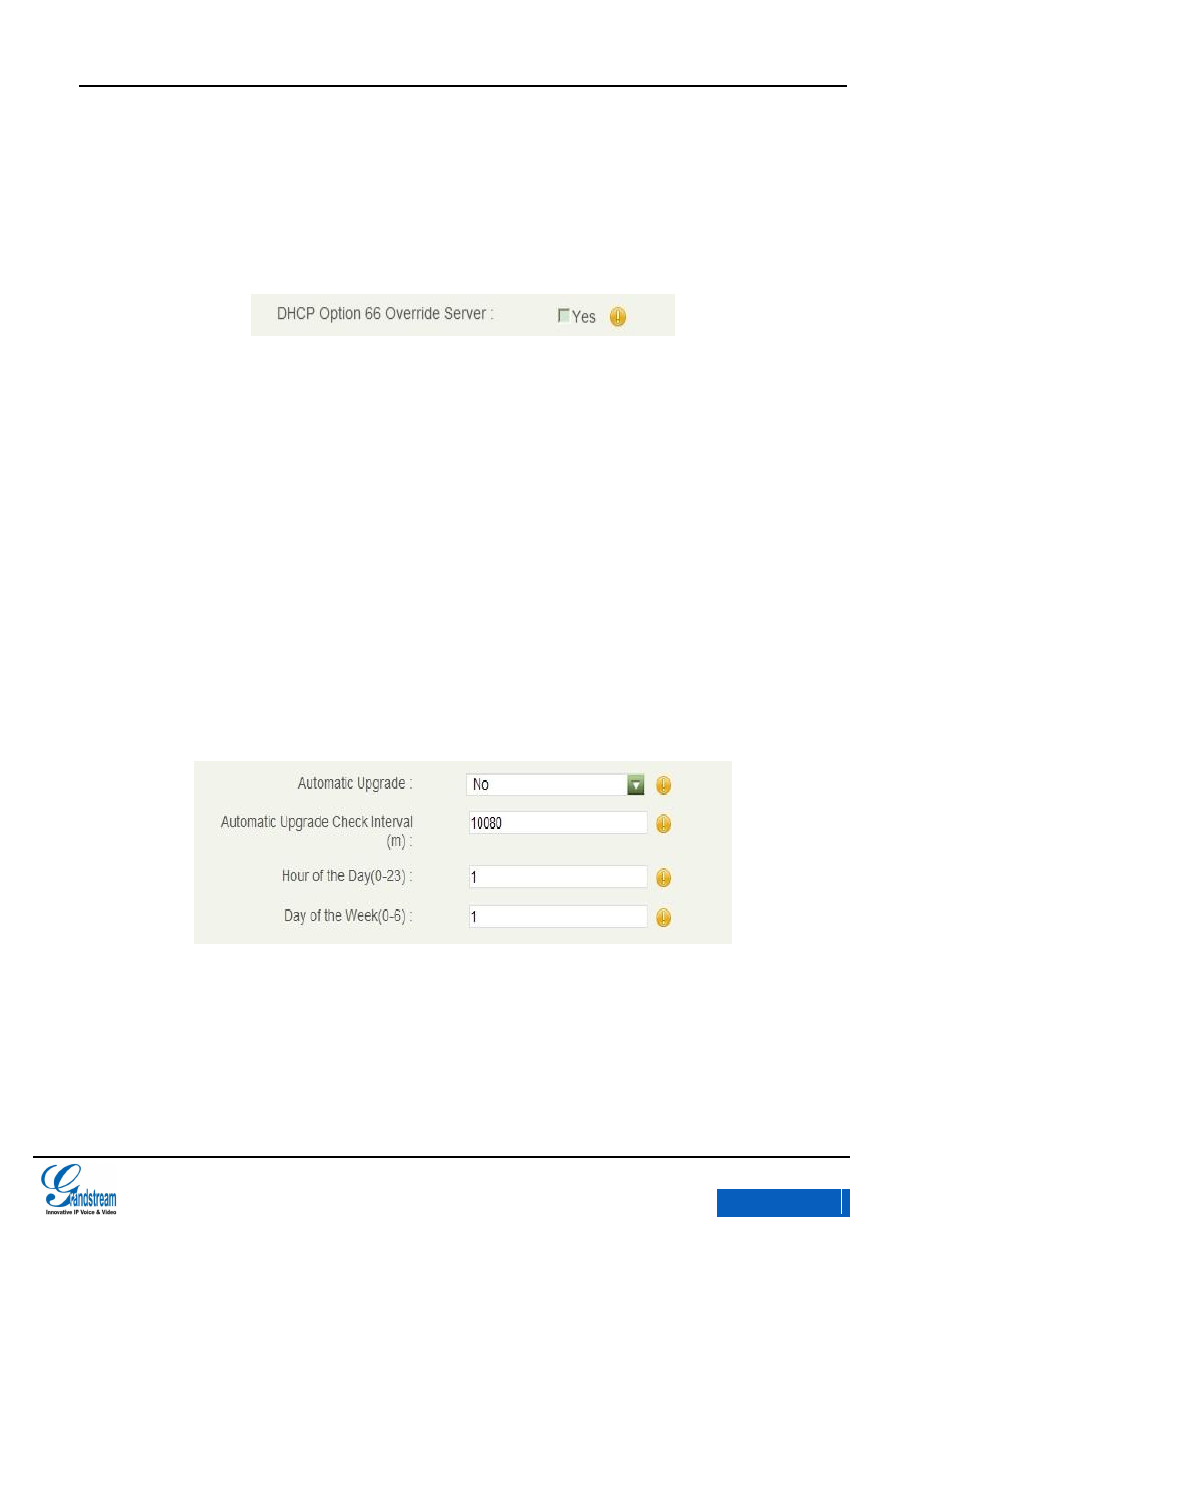
GXV3275 User Manual
UPGRADING AND PROVISIONING
Grandstream Co., Ltd
Software Version:1.0.0.9 Document Version:0.2
195
4. Uncheck “DHCP Option 66 Override Server”, as shown in figure169.If check, it allows the
phone to obtain IP address as well as the upgrade server address via DHCP. This address will
override the “Firmware server path” configured in step 3.
Figure 172 Set up whether to Enable Option 66 Override Server
5. Click “Save” to save the change.
6. Click the Reboot icon to boot up the phone and upgrade the device.
AUTO UPGRADE
The steps to upgrade via HTTP are the same as steps via TFTP. This chapter will take via TFTP as
an example
1. Go to Maintenance>Upgrade, set up the rational upgrade check interval in “Automatic
Upgrade” option as shown in figure 173.
Figure 173 Automatic Upgrade Setting
2. Go to Maintenance>Upgrade, Select “Always Check at Bootup” in “Automatic Upgrade Rule”
option, as shown in figure 174.
x-PDFDivision
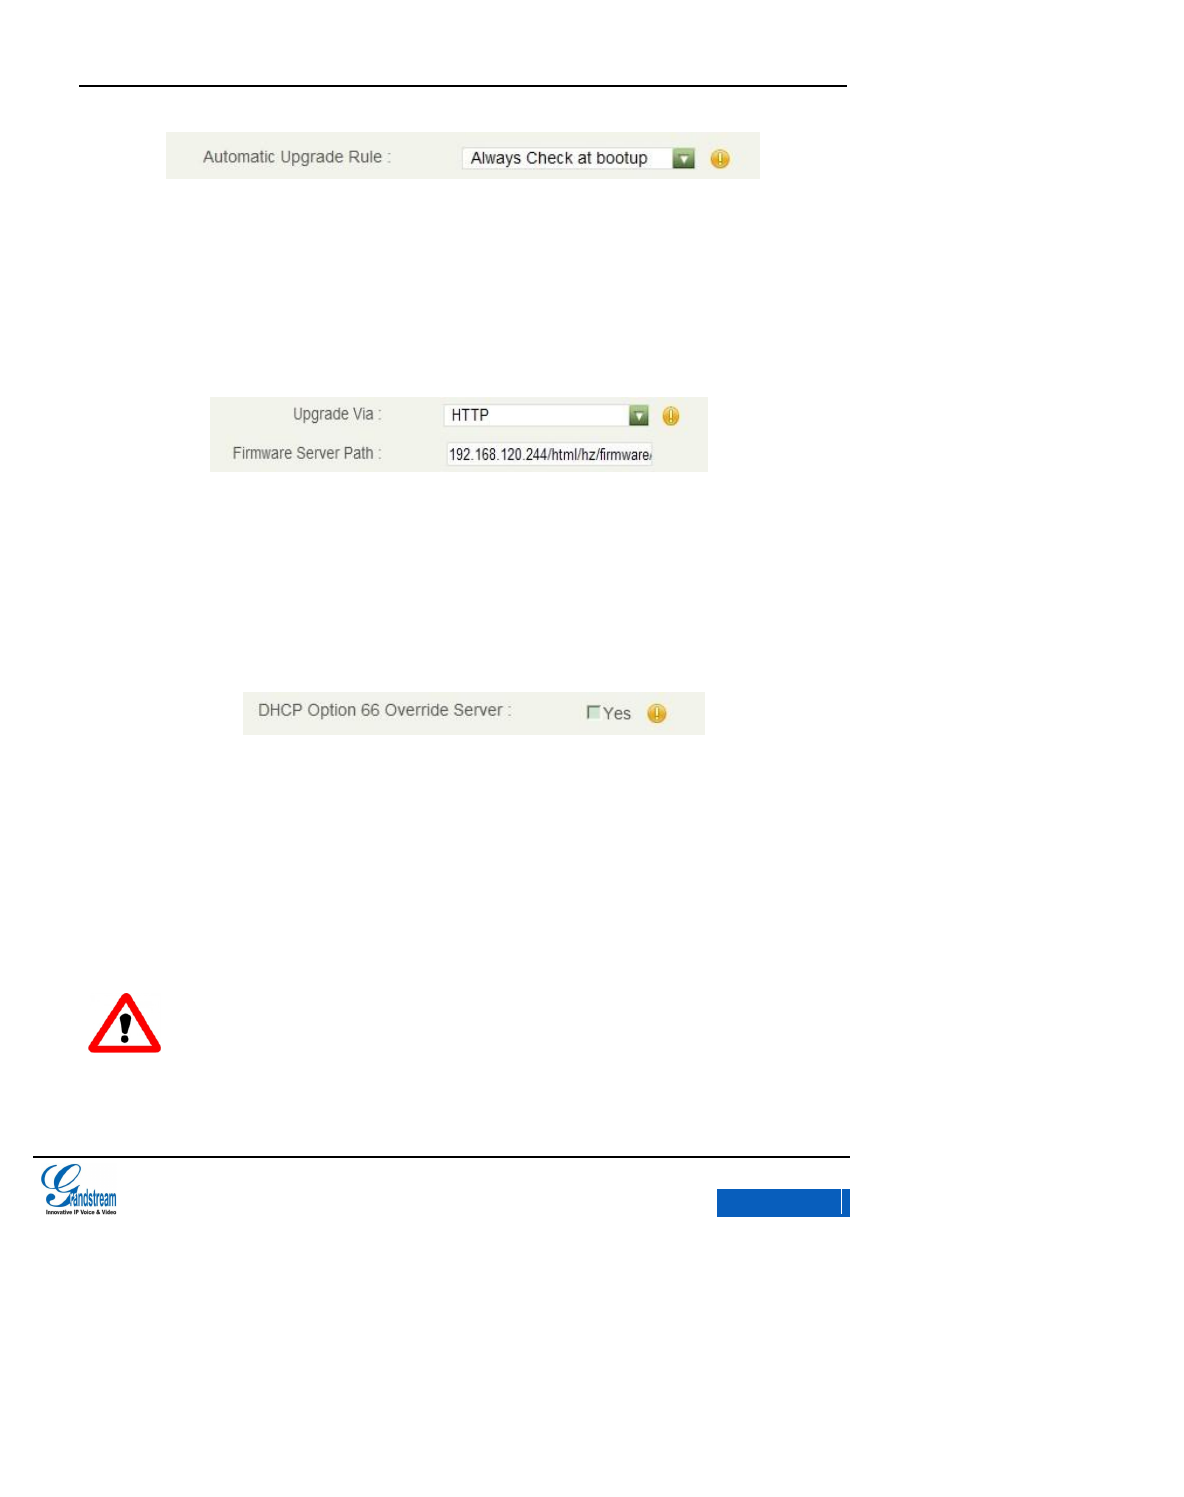
GXV3275 User Manual
UPGRADING AND PROVISIONING
Grandstream Co., Ltd
Software Version:1.0.0.9 Document Version:0.2
196
Figure 174 Automatic Upgrade Rule Setting
3. Set up upgrade and upgrade server. Select “TFTP”in “Upgrade Via ”option and input the
local TFTP server address in the “Firmware Server Path” option. URL and IP address are
optional. See figure 175.
Figure 175 Upgrade Setting
4. Uncheck “DHCP Option 66 Override Server”, as shown in figure 180.If check, it allows the
phone to obtain IP address as well as the upgrade server address via DHCP. This address will
override the “Firmware server path” configured in step 3.
Figure 176 Set up Whether to Enable DHCP Option 66 Server
5. Click “Save” to save the change.
The phone will automatically upgrade when detects new firmware version on the sever.
FACTORY RESET
Warning!
x-PDFDivision
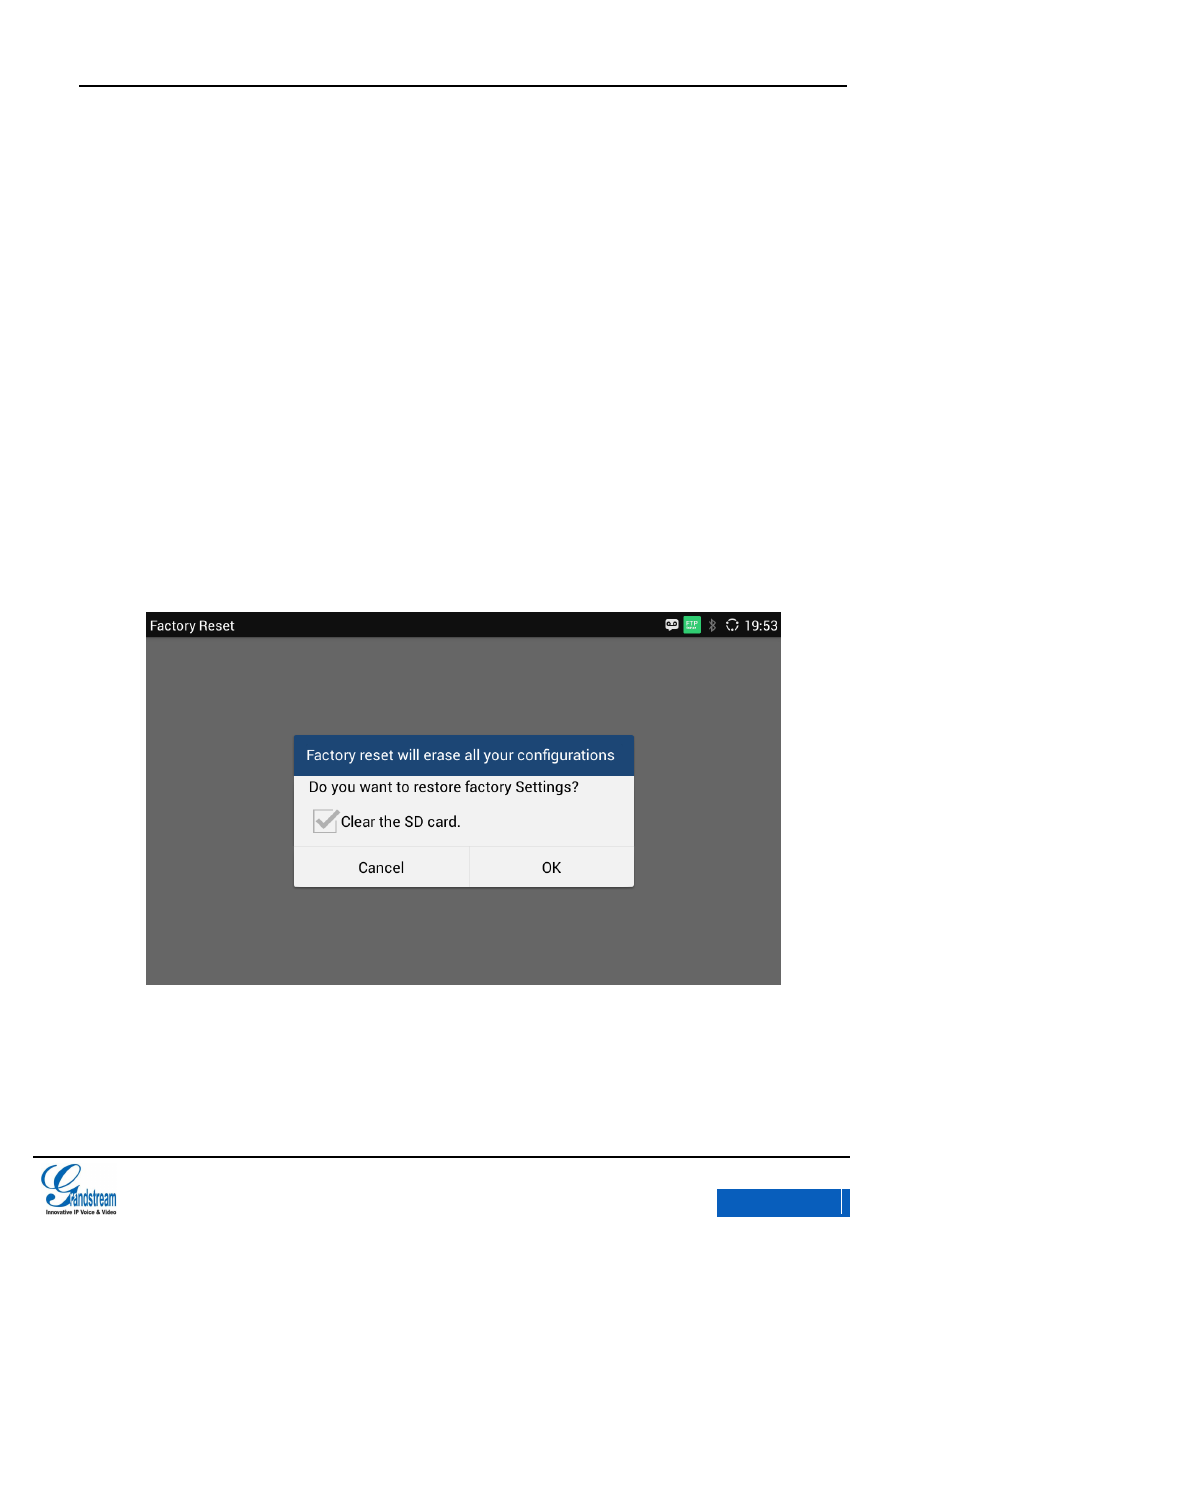
GXV3275 User Manual
UPGRADING AND PROVISIONING
Grandstream Co., Ltd
Software Version:1.0.0.9 Document Version:0.2
197
WARNING: Restoring the Factory Default Settings will DELETE all configuration information on the
phone. Please backup or print all the settings before you restore to the factory default settings.
Grandstream is not responsible for restoring lost parameters and cannot connect your device to
your VoIP service provider
VIA LCD MENU
Follow the steps below to restore the GXV3275 to the factory default settings.
1. Press the MENU button and tap on Settings on GXV3275 desktop, or go to onscreen
MENU->Settings >Advanced Settings >Factory Reset;
2. Tap on Factory Reset to bring out the dialog as shown in figure 177.
Figure 177 Factory Reset
3. Click OK to restore the phone to factory settings.
x-PDFDivision
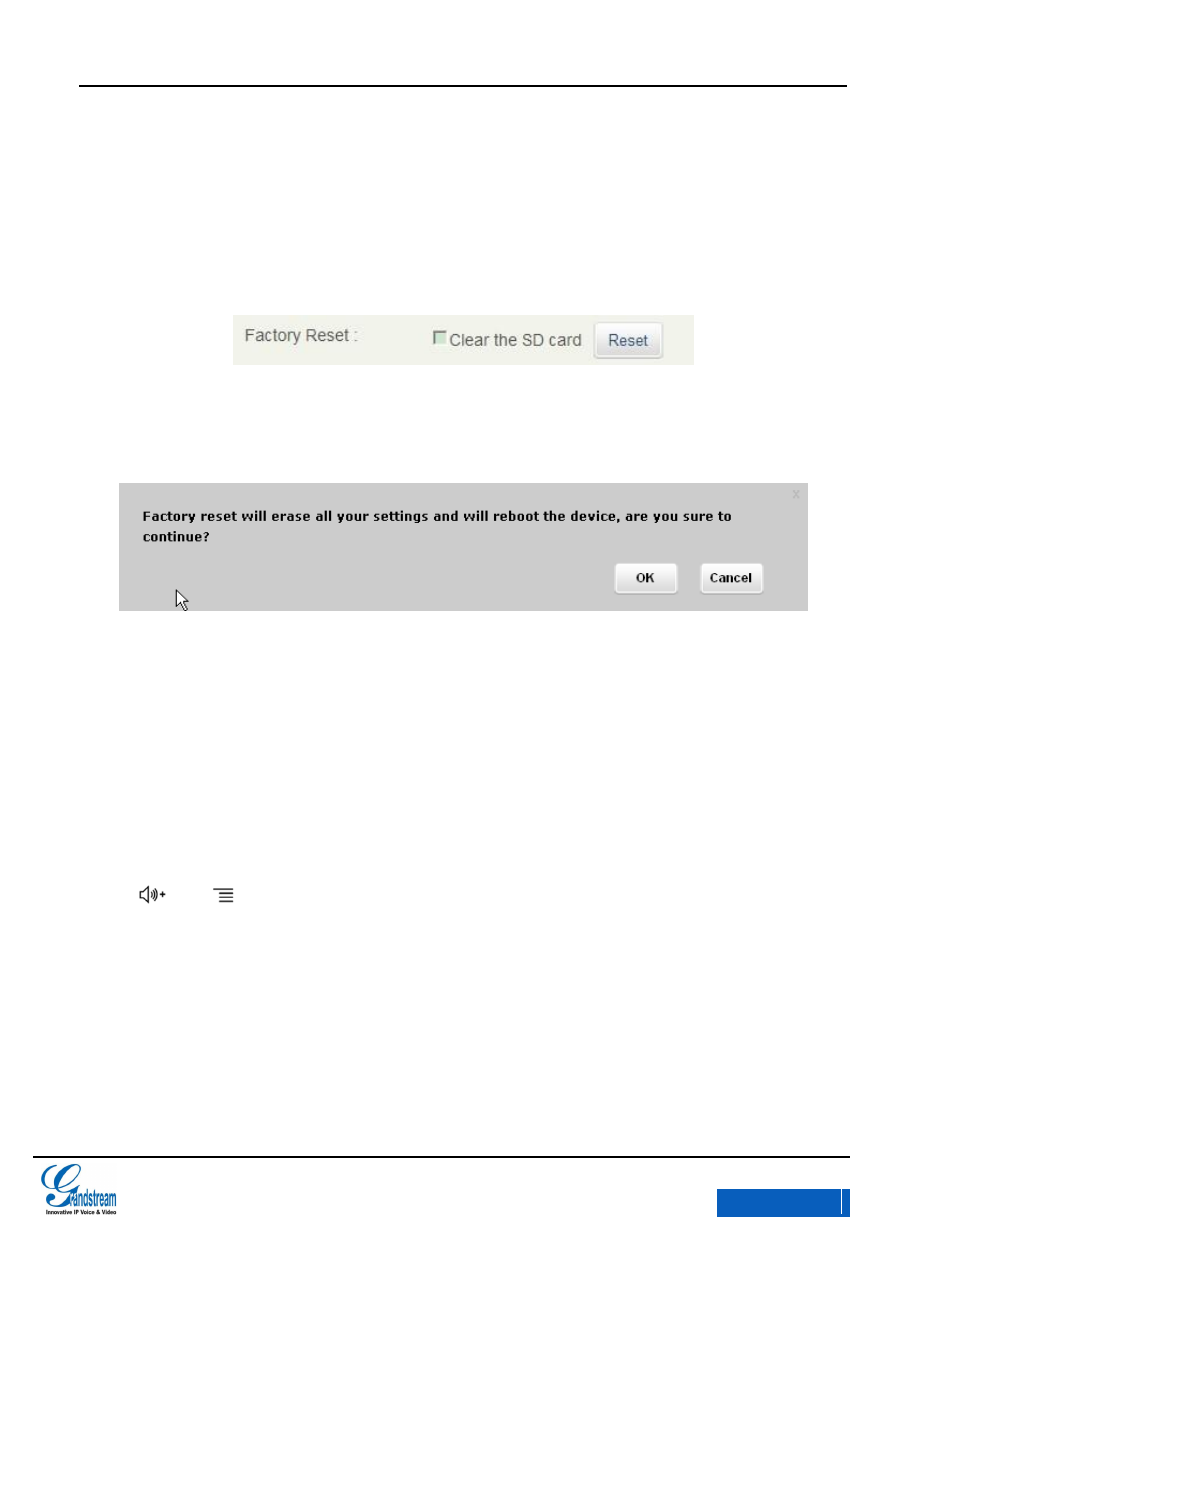
GXV3275 User Manual
UPGRADING AND PROVISIONING
Grandstream Co., Ltd
Software Version:1.0.0.9 Document Version:0.2
198
VIA THE WEB GUI
1. Login GXV3275 Web GUI and go to Maintenance->Upgrade page;
2. Click on the Reset button for Factory reset. See figure 178.
Figure 178 Web GUI-Factory Reset
3. A dialog box will pop up shown in figure 179;
Figure 179 Web GUI-Confirm Factory Reset
4. Click OK to restore the phone to factory settings.
VIA BUTTONS
When the message waiting indicator LED goes out the first time after the GXV3275 is powered,
press and at the meanwhile. When the indicator is on again, the phone will restore to
factory settings.
x-PDFDivision

GXV3275 User Manual
FAQs
Grandstream Co., Ltd
Software Version:1.0.0.9 Document Version:0.2
199
FAQs
Q: Why my GXV3275 screen is dark?
Please check whether your phone is powered on. Please ensure that the GXV3275 is connected
correctly to the power adapter.
Q: Why my GXV3275 touch screen is not sensitive?
Check that the power adaptor for GXV3275 is the original 12V BY adaptor.
Q: Why I can’t hear the dial tone through my GXV3275?
Please ensure that all units of the GXV3275 have been installed and connected correctly. Please
refer to <GXV3275 Quick Installation Guide> to install the phone.
Q: Why my GXV3275 doesn’t ring when there is an incoming call?
Please check whether the phone volume has been set to minimum. Tap on to turn up the
volume.
Q: Where can I check the GXV3275 IP address?
Please tap on the Account icon on the desktop then check the IP address on the upper left corner of
the page. See figure 184.
x-PDFDivision

GXV3275 User Manual
FAQs
Grandstream Co., Ltd
Software Version:1.0.0.9 Document Version:0.2
200
Q: How to change the user password?
Please login the WEB GUI, go to Maintenance->Web/SSH Access and input new password in the
textbox of” User Password” option, save the change then reboot the phone.
Please visit our website: http://www.grandstream.cn/ for answers to your more questions.
x-PDFDivision