Grandstream Networks GXV3370 IP Multimedia Phone User Manual YZZGXV3370
Grandstream Networks, Inc. IP Multimedia Phone YZZGXV3370
UserManual.wiki
>
Grandstream Networks
>
GXV3370 User Manual
User Manual
Navigation menu
Upload a User Manual
Namespaces
Wiki Guide
HTML
PDF
Info
Views
User Manual
Discussion / Help
Navigation


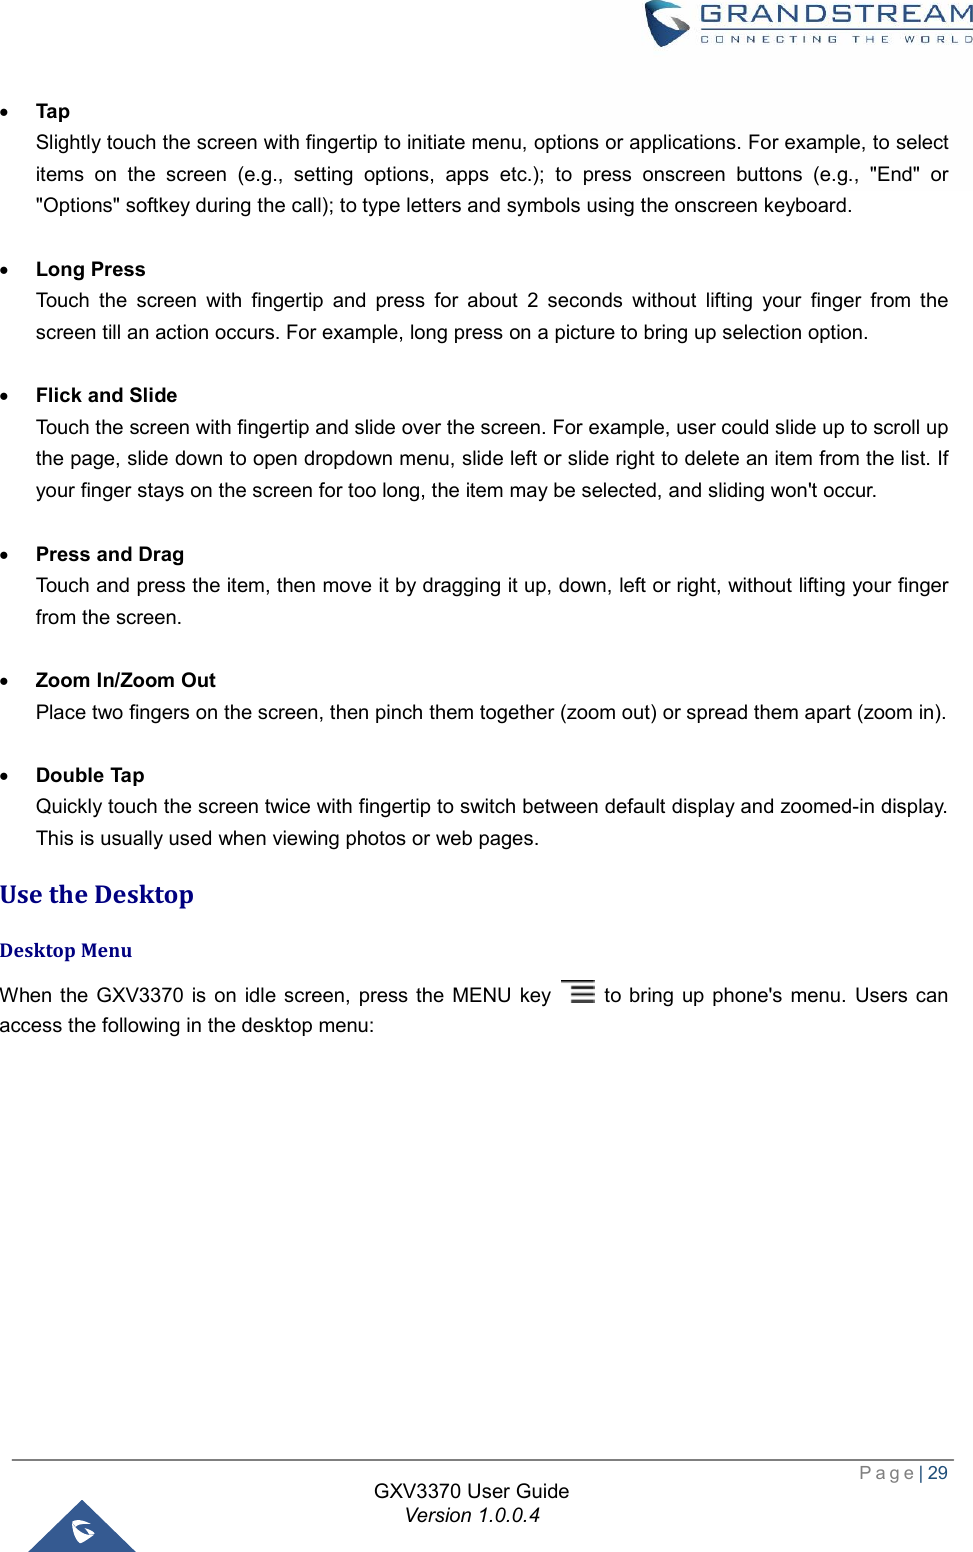
![Page| 30 GXV3370 User Guide Version 1.0.0.4 Figure 11: GXV3370 Desktop Menu · Desktop page Add, delete or edit desktop pages. · Wallpaper Select wallpaper from Local gallery or from the available system Wallpapers · Widgets Add widgets to the desktop by touching and holding the widget from the widget menu. · Management Manage running applications on the GXV3370. For more details, please refer to section [Manage Running Applications]. Add Widget to Desktop The GXV3370 provides widgets like account bar, clock, contactsetc. Users could conveniently add those widgets to the desktop as preferred. To add a widget: 1. Press the Menu key or long press on an empty space on the idlescreenand select "Widgets". 2. Different widgets will be displayed on theright side of the screen. 3. Select and drag the widget to the desired spot to be placed on the desktop. Please make sure there is enough space on the desktop. Otherwise, the widget won't be added.](https://usermanual.wiki/Grandstream-Networks/GXV3370/User-Guide-3847944-Page-31.png)
![Page| 32 GXV3370 User Guide Version 1.0.0.4 · Certain widgets such as Clock can be resized on the desktop. To resize a widget, touch and press the widget for about 2 seconds. Then lift your finger from the screen. This will bring up the white frame as shown in [Figure 14: Resize Digital Clock Widget]. Touch and drag the border of the frame to adjust the size. Figure 14: Resize Digital Clock Widget · Move/deleteApplication/Widget To move a shortcut/widget to a different spot on the desktop or to a different idle screen, touch and press the item for about 1 seconds until a recycle bin icon shows up on the top of the screen. Drag the item up/down/left/right to the destination spot on the screen. Lift your finger once done.To delete the item/widget, press on it for about 1 seconds then move it to the recycle bin on the top of the screen. Figure 15: Move Clock Widget](https://usermanual.wiki/Grandstream-Networks/GXV3370/User-Guide-3847944-Page-33.png)
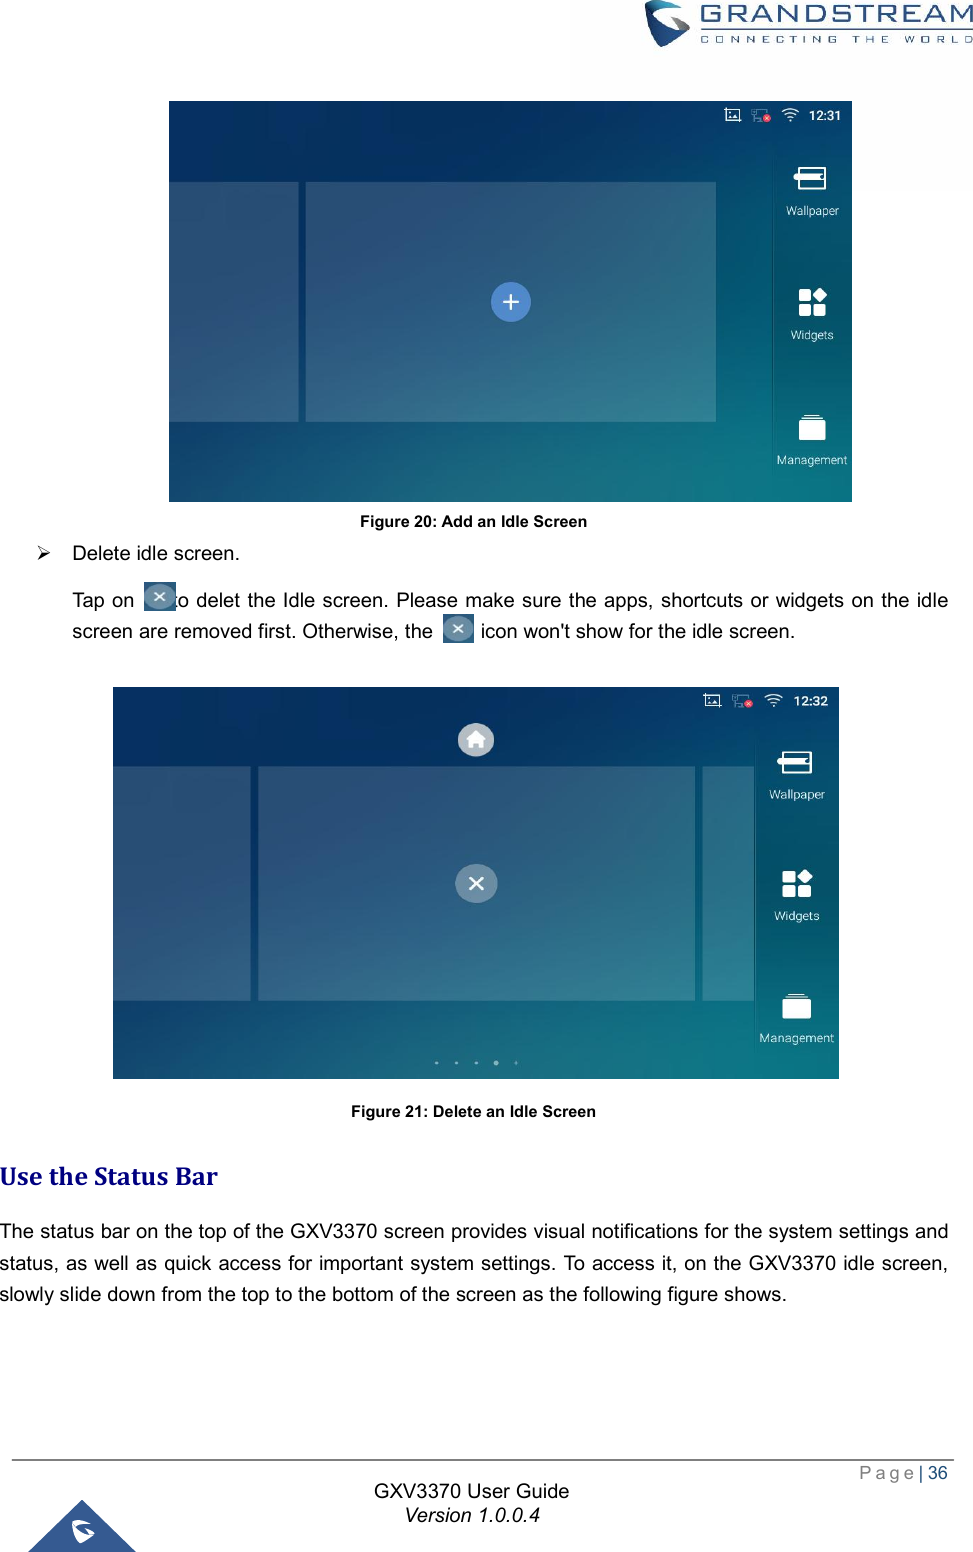
![Set Up Idle Screen · Set home screen Follow the steps below to set up the HOME screen.1. GXV3370 is up and running on2. Press the MENU button . This will zoom out all the screens as shown in Home Idle Screen]. 3. The screen withdisplayed is the HOME screen. Others are shown with icon to select the corresponding screen as the new HOME screen.Figure · Add/Delete idle screen As shown in [Figure 19: Set up Home Idle ScreenUsers could add or delete idle screen. Ø Add idle screen. Tap onto add a new idle screen.GXV3370 User Guide Version 1.0.0.4 steps below to set up the HOME screen. is up and running on idle screen. . This will zoom out all the screens as shown in [Figure displayed is the HOME screen. Others are shown with icon. Tap on the icon to select the corresponding screen as the new HOME screen. Figure 19: Set up Home Idle Screen Set up Home Idle Screen], this sectionshows the available desktop Users could add or delete idle screen. to add a new idle screen. Page| 35 Figure 19: Set up . Tap on the icon ectionshows the available desktop screens.](https://usermanual.wiki/Grandstream-Networks/GXV3370/User-Guide-3847944-Page-36.png)

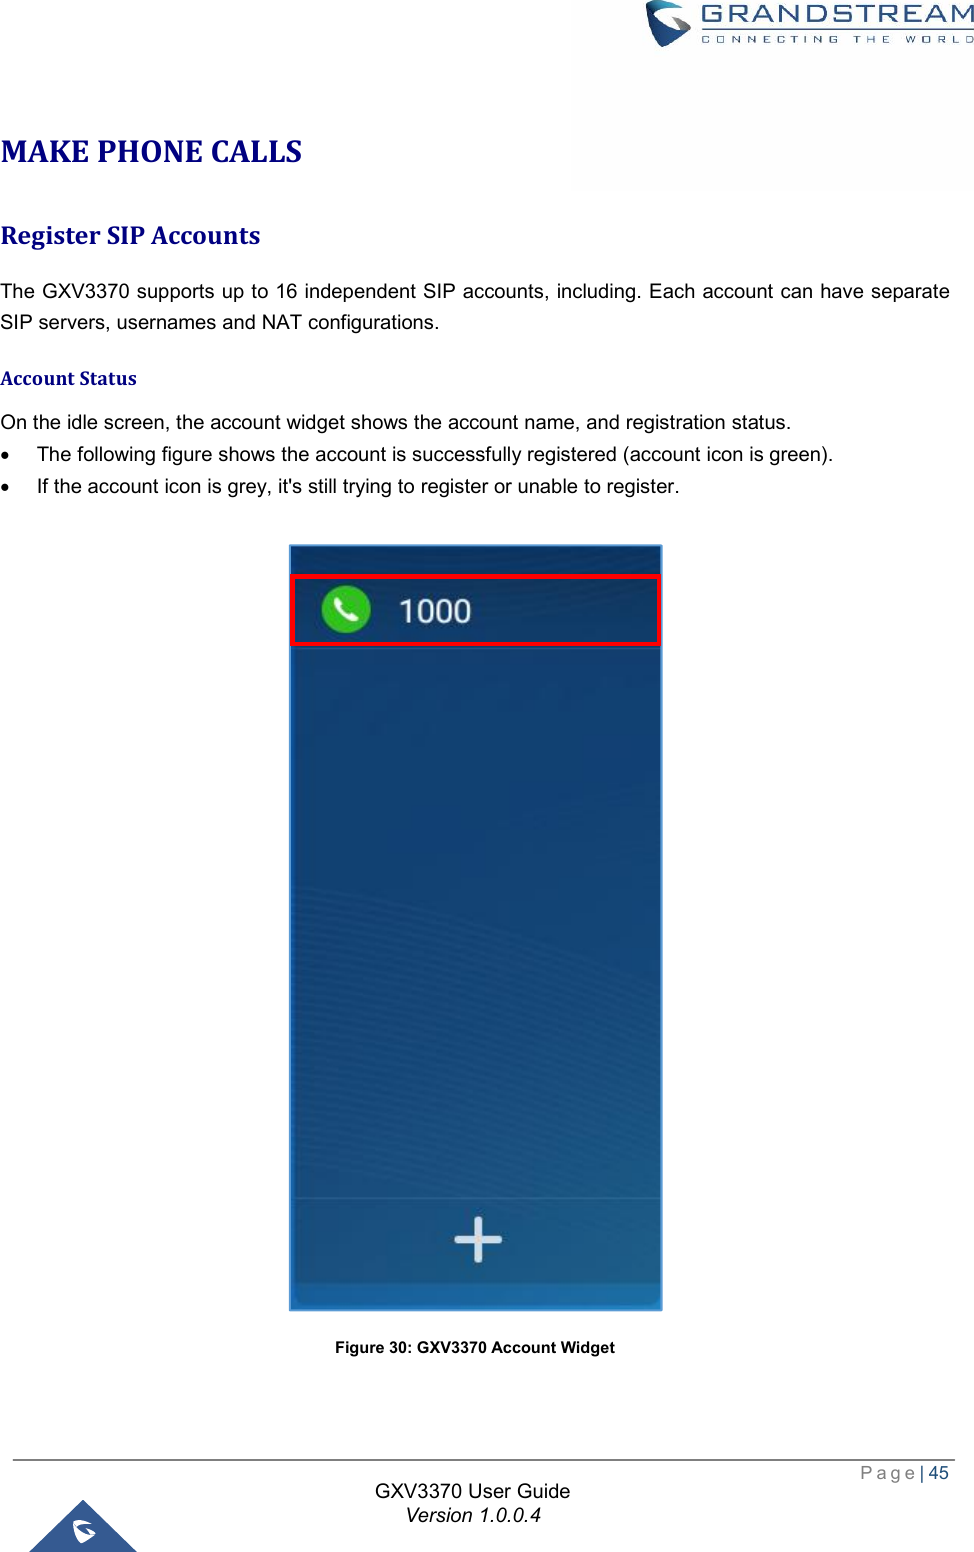
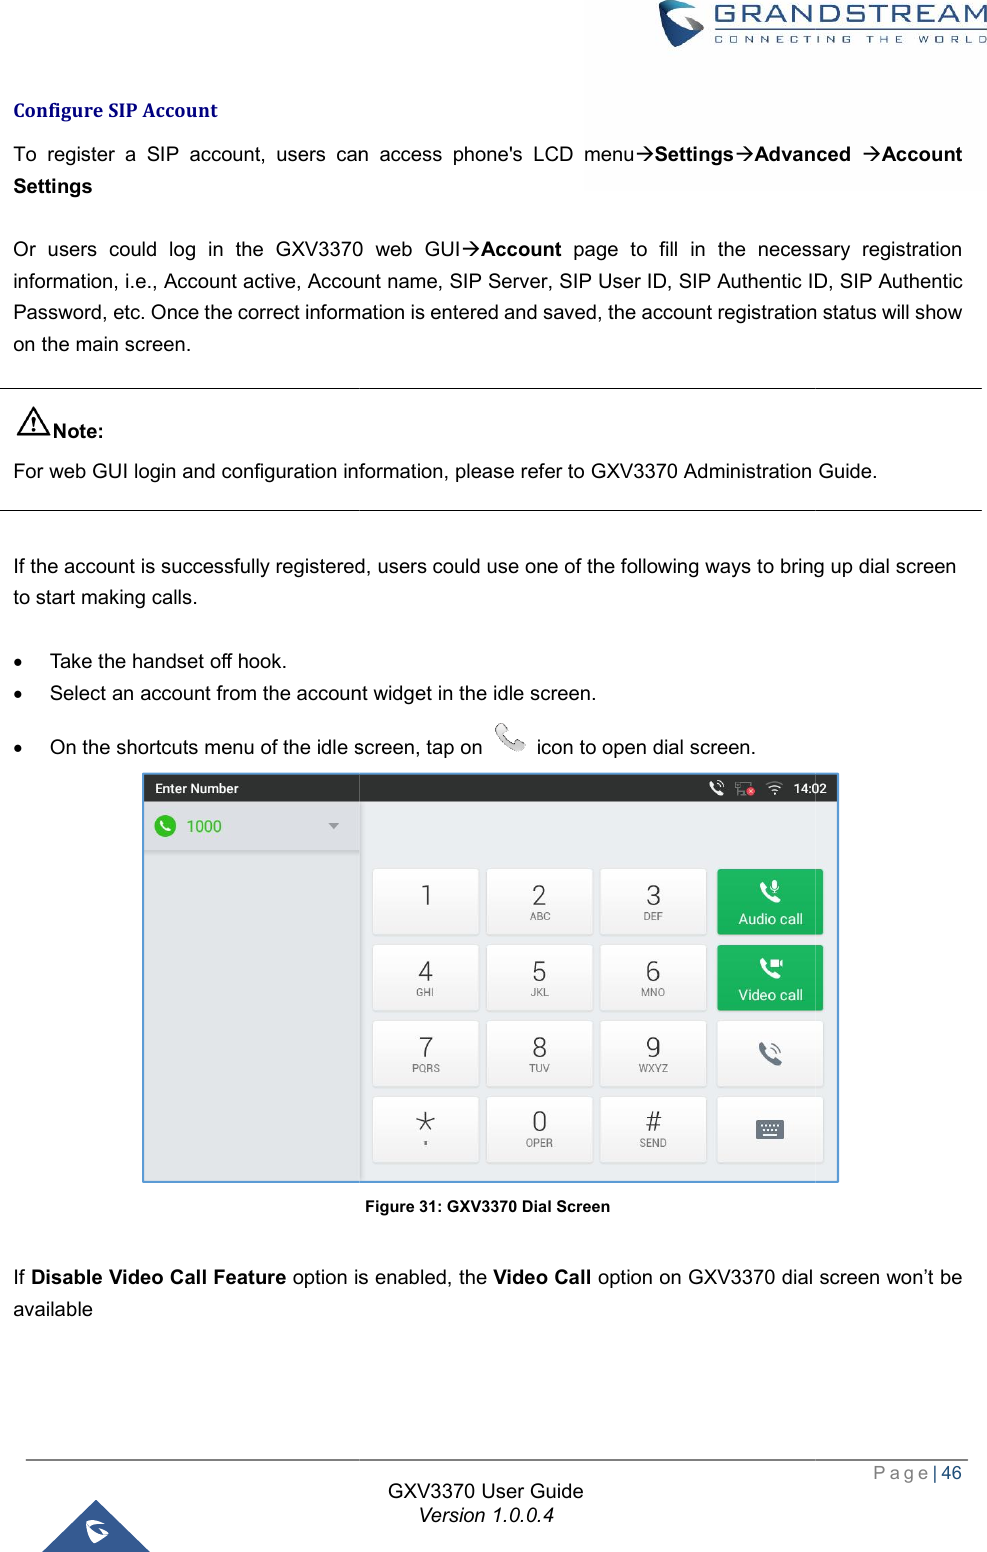
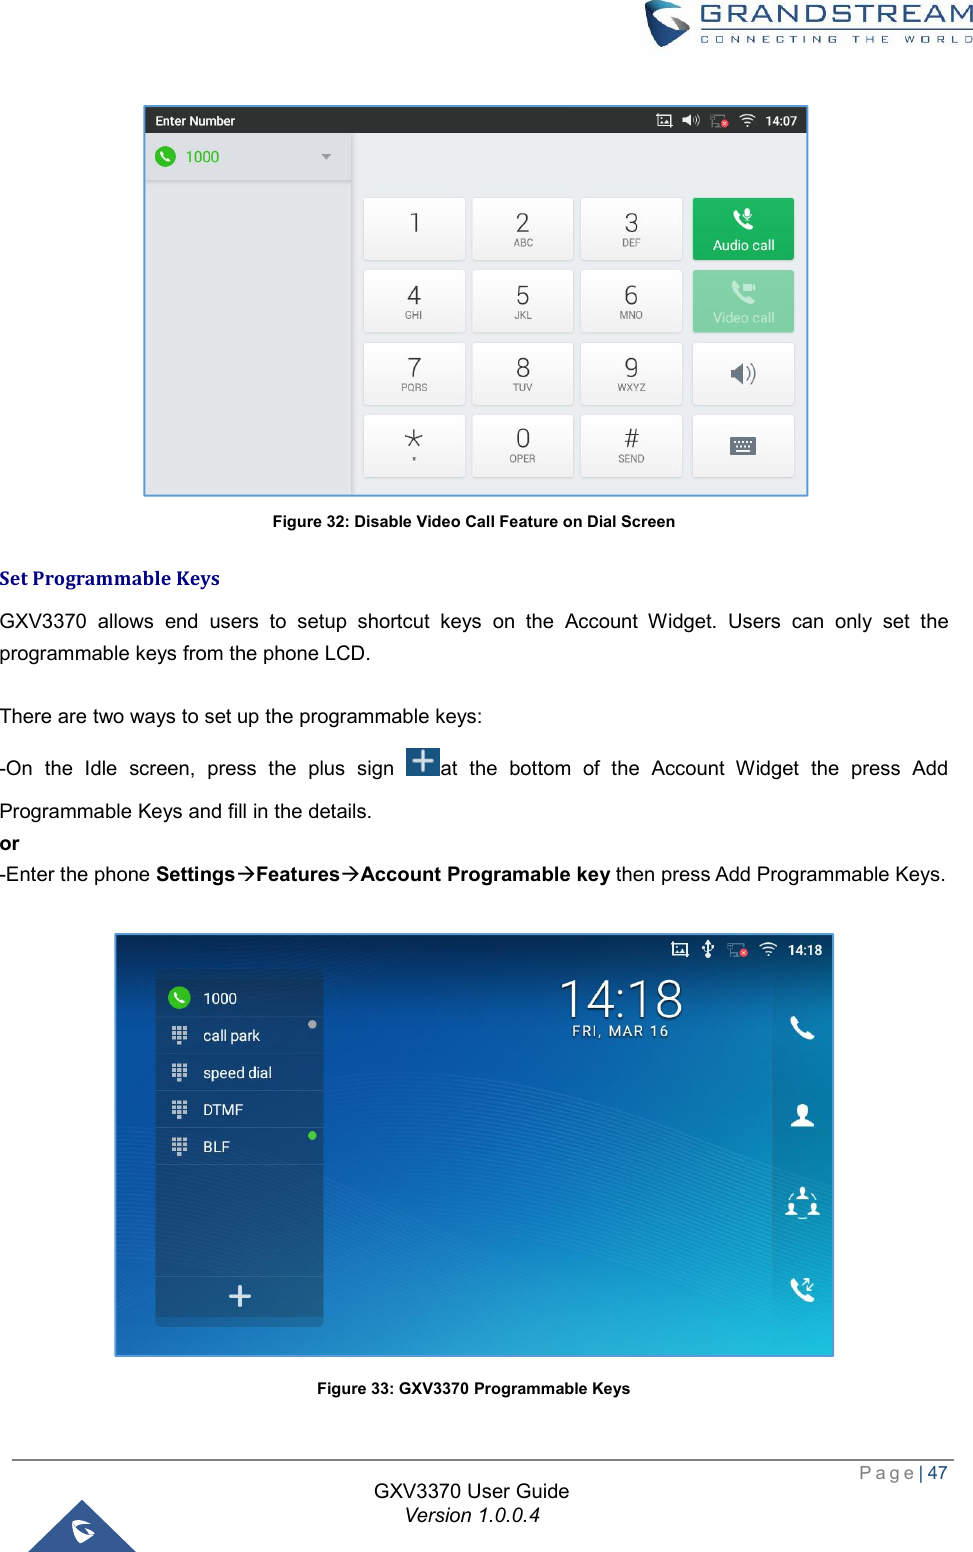
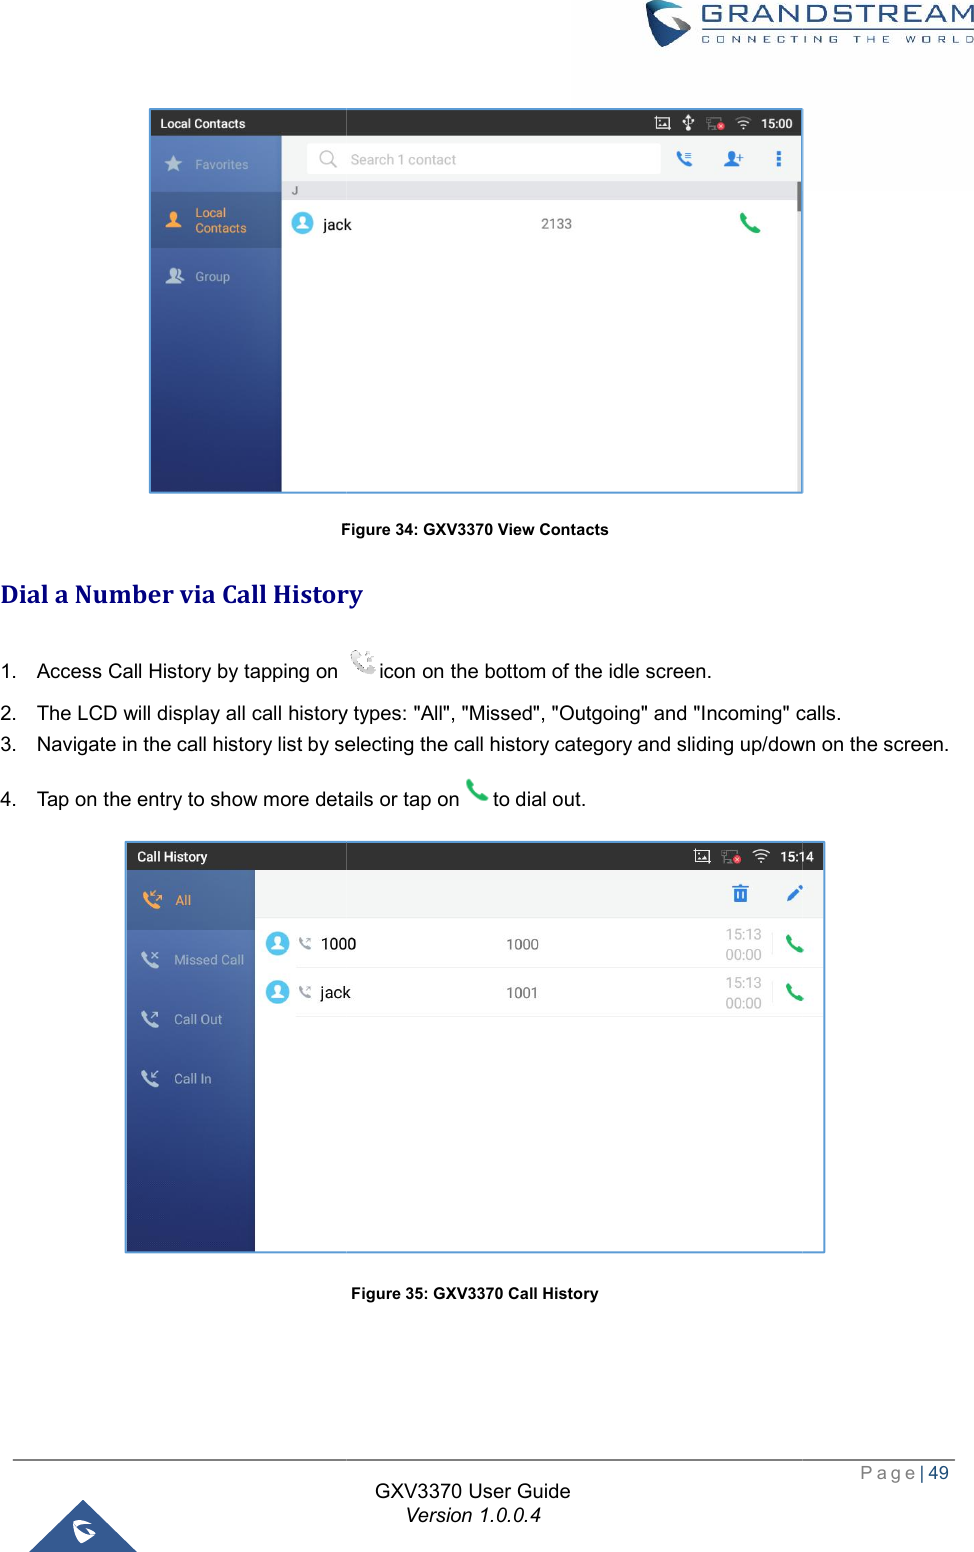
![Page| 48 GXV3370 User Guide Version 1.0.0.4 Dial a Number Directly 1. Use the methods mentioned above to open dial screen [Figure 31: GXV3370 Dial Screen]. 2. Select the account to dial out on the left panel of the dial screen. The selected account will be displayed in green 3. Enter the digits to be dialed out using the keypad. If the digit matches call history, a list of numbers will be displayed for users to select from. 4. Tap on (audio call only) or (video call) to send the number. If no key is pressed, by default the call will be automatically dialed out after 4 seconds timeout. Note: · By default, the "No Key Entry Timeout" is 4 seconds, meaning if no key is pressed after entering a number, the call will be automatically sent out after the timeout. The timeout interval can be configured under web GUIàAccountàCall Settings. · GXV3370 allows users to press # key as SEND key. This behavior can be disabled via option "Use # as Dial Key" under web GUIàAccountàCall Settings. · When the user enters the digit on the dial screen, if there is digit matching call history, or contacts name/number, the drop-down list will show the numbers. For example, if "John" is saved in the contacts, entering 5 (JKL) 6 (MNO) 4 (GHI) 6 (MNO) will show call log with 5646 as the first four digits, as well as John's number. Users could then directly select one of them from the list, instead of entering all the digits. Redial Users can dial out the last dialed number if there is dialed call log, using the same SIP account making the call last time. 1. Enter the dial screen. 2. A list of dialed calls will be displayed on the left side of the dial pad. Tap on the number you would like to call, the number will be added to the dialing field, press Audio call or Video call to redial. Dial a Number via Contact Follow the steps below to dial a number via Contact. 1. Access Contacts by tapping on icon on the left side of the idle screen. 2. Navigate in the contacts entries by sliding up/down on the screen. 3. Tap on the dial icon for the contact .](https://usermanual.wiki/Grandstream-Networks/GXV3370/User-Guide-3847944-Page-49.png)


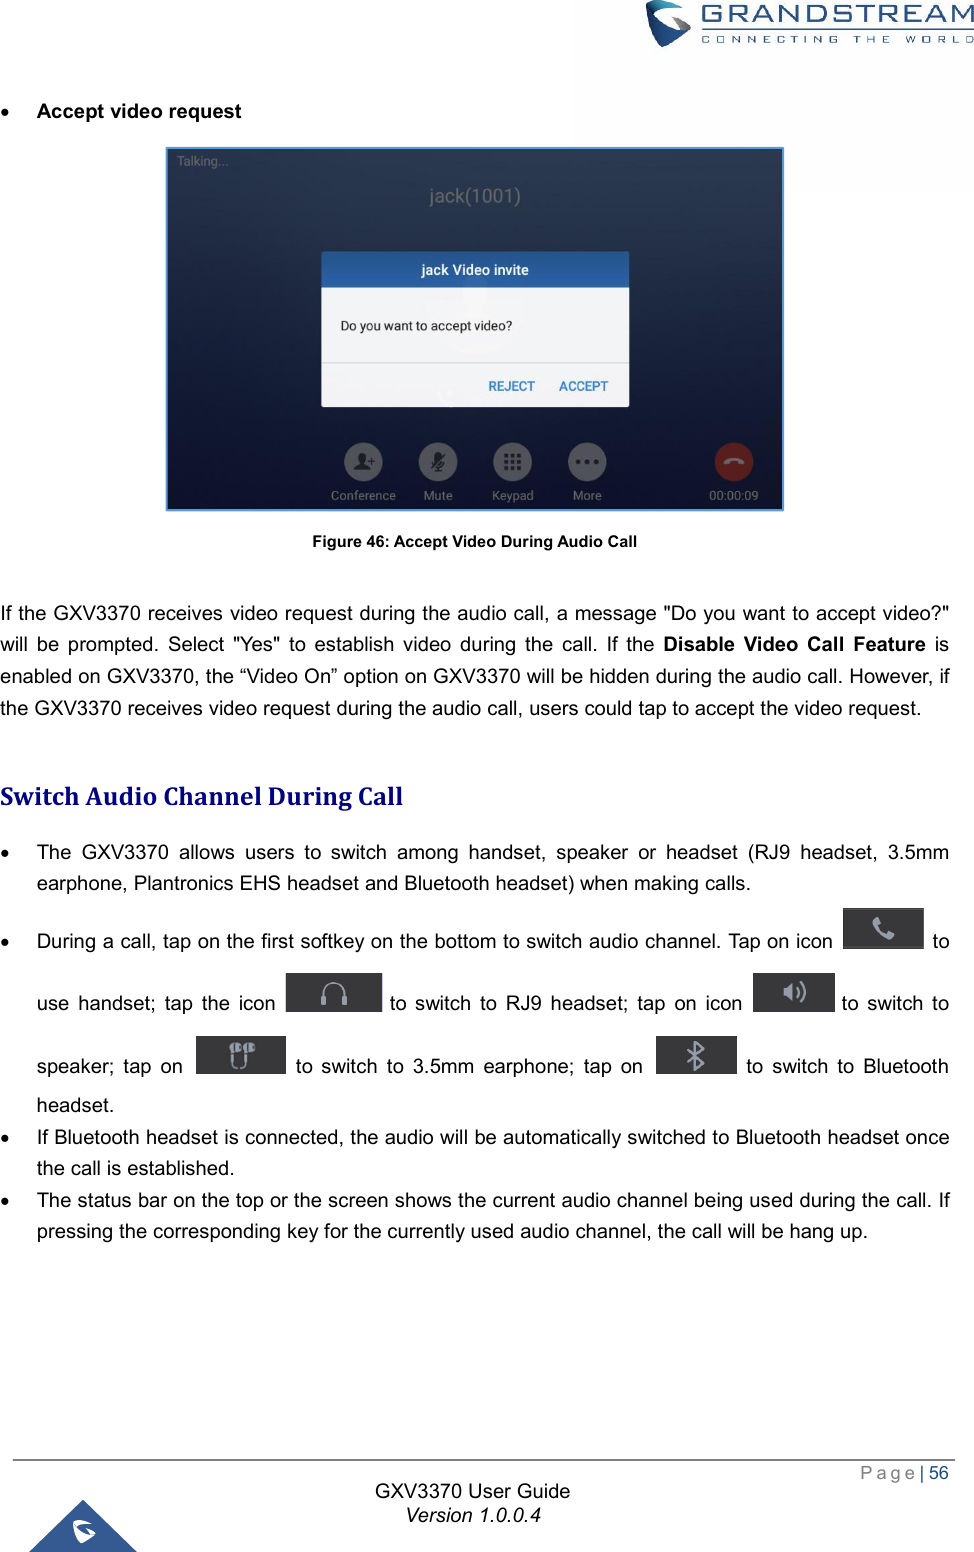
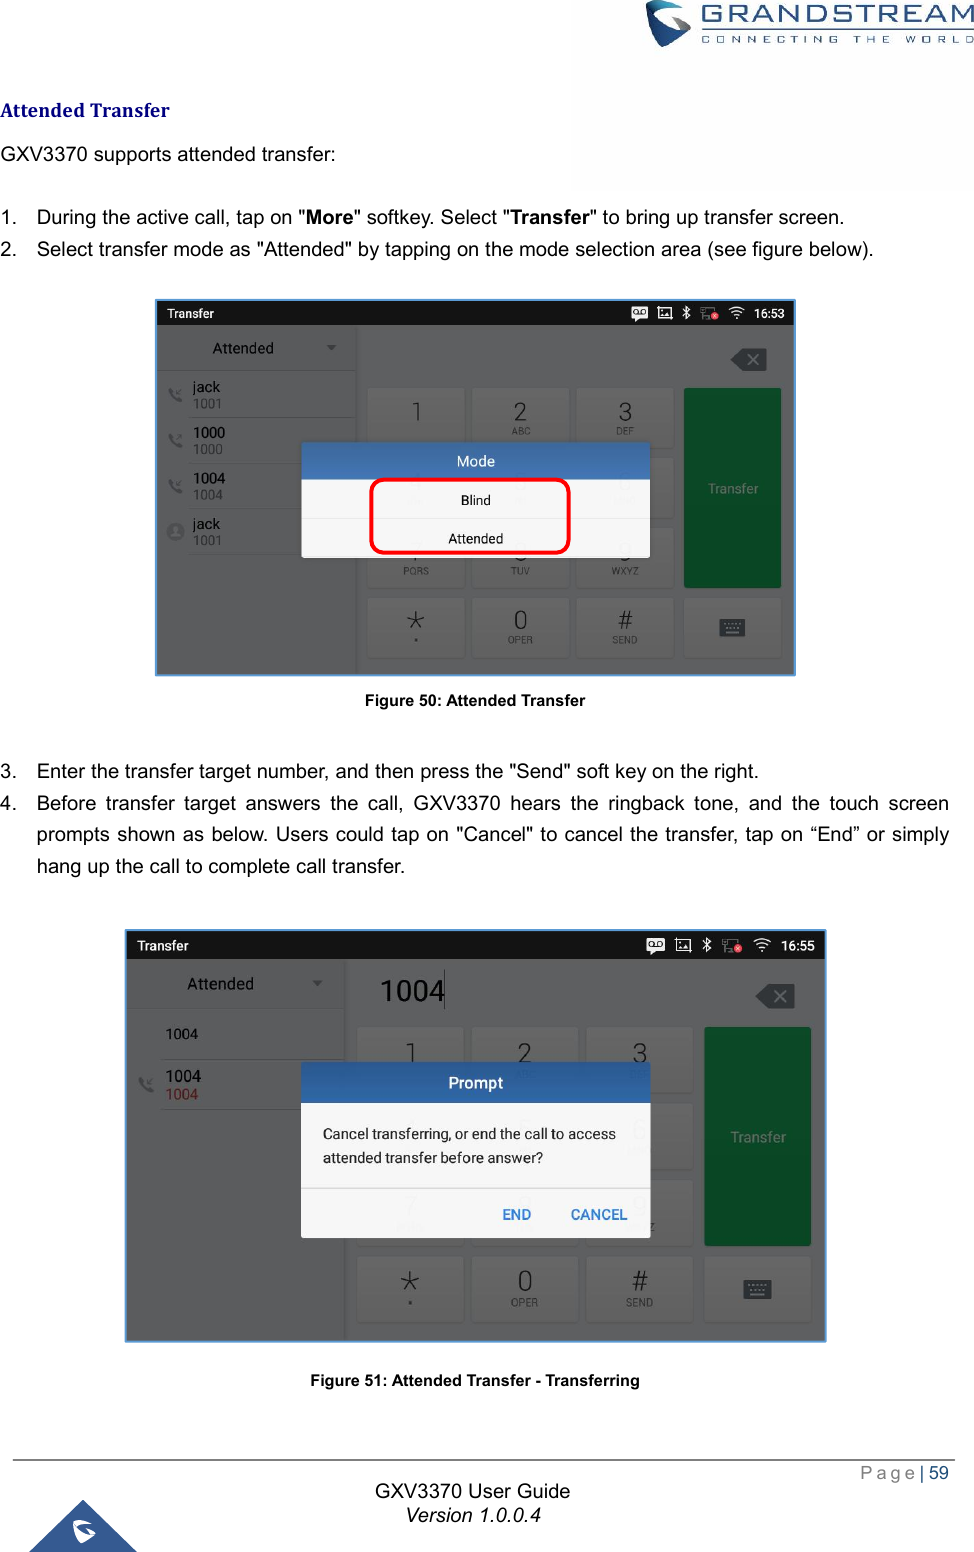
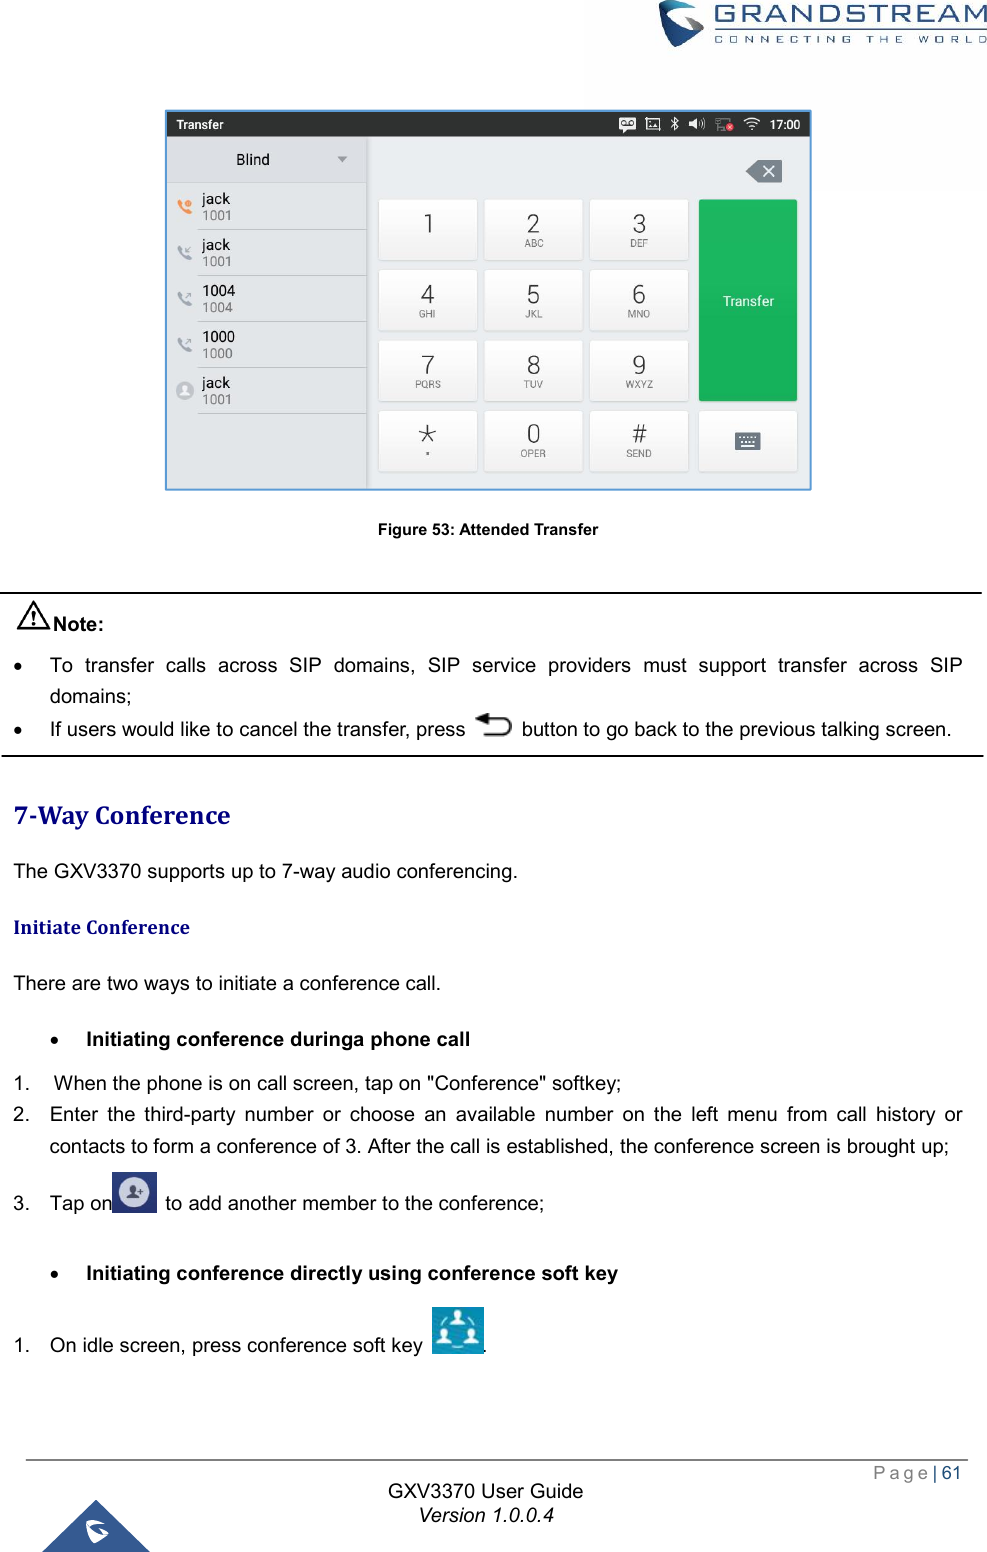
![Page| 58 GXV3370 User Guide Version 1.0.0.4 Call Transfer A call can be transferred to another party during the call. The GXV3370 supports blind transfer and attended transfer. Blind Transfer 1. During the active call, tap on "More" softkey. 2. Select "Transfer" to bring up the transfer screen. 3. Select transfer mode as "Blind" by tapping on the highlight area in [Figure 49: Blind Transfer]. The default transfer mode is "Blind". 4. Enter the digits. 5. Tap on "Send" softkey. 6. The call will be transferred and GXV3370 will hang up the call. Figure 49: Blind Transfer Note: · If wrong digits are entered, tap on to delete the digit one by one; · If users would like to cancel the transfer, press button to go back to the previous talking screen.](https://usermanual.wiki/Grandstream-Networks/GXV3370/User-Guide-3847944-Page-59.png)

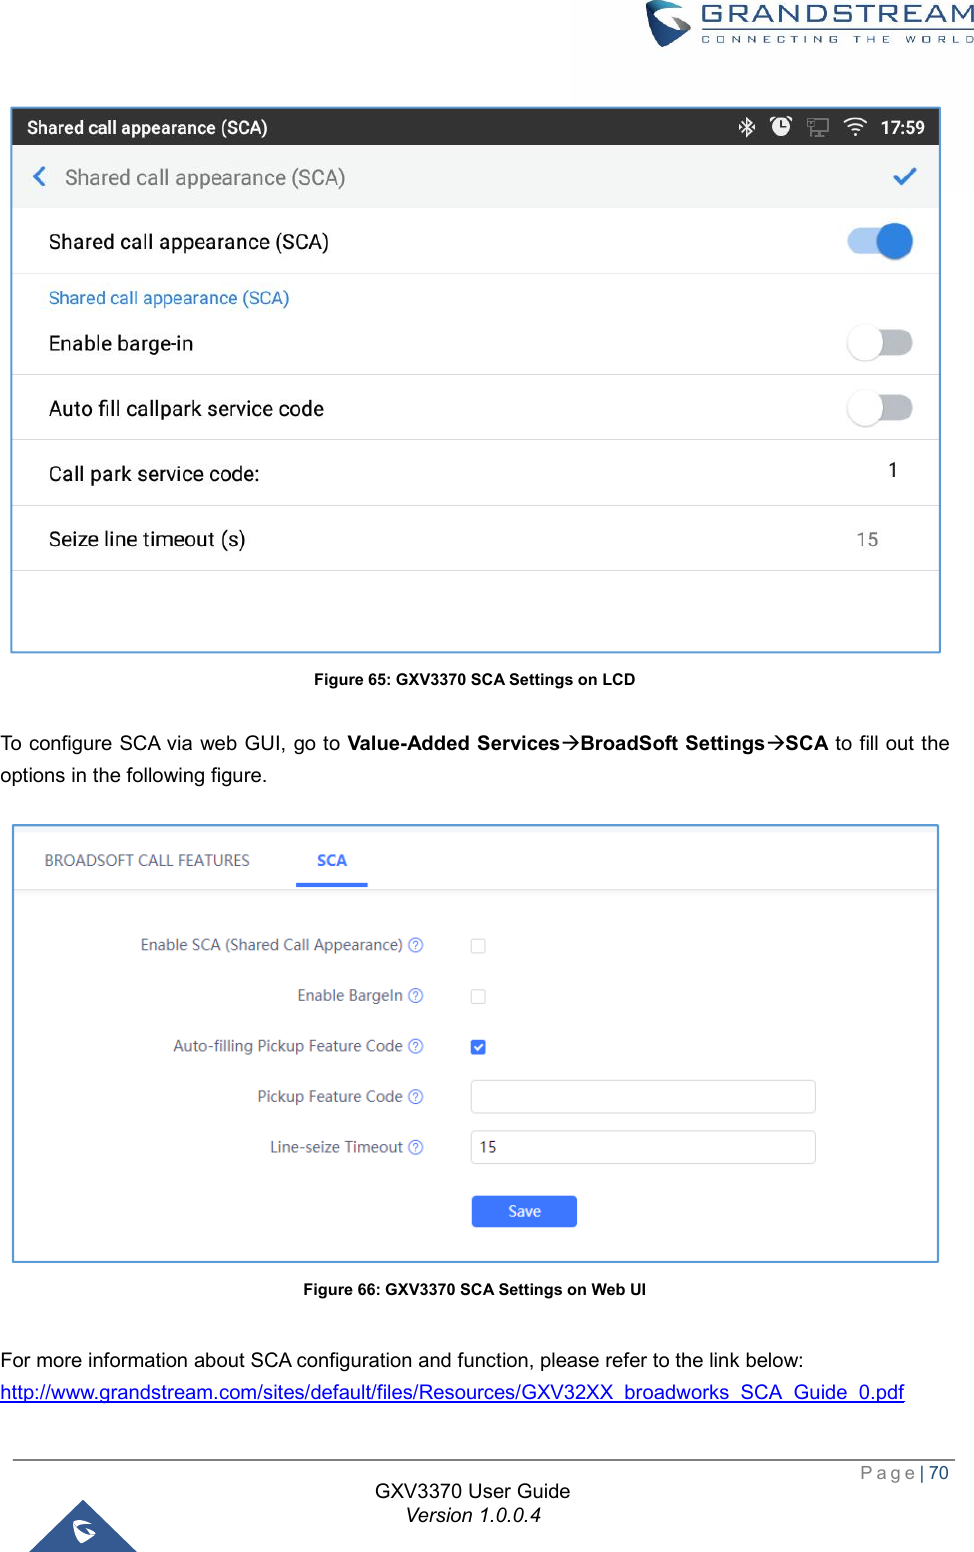
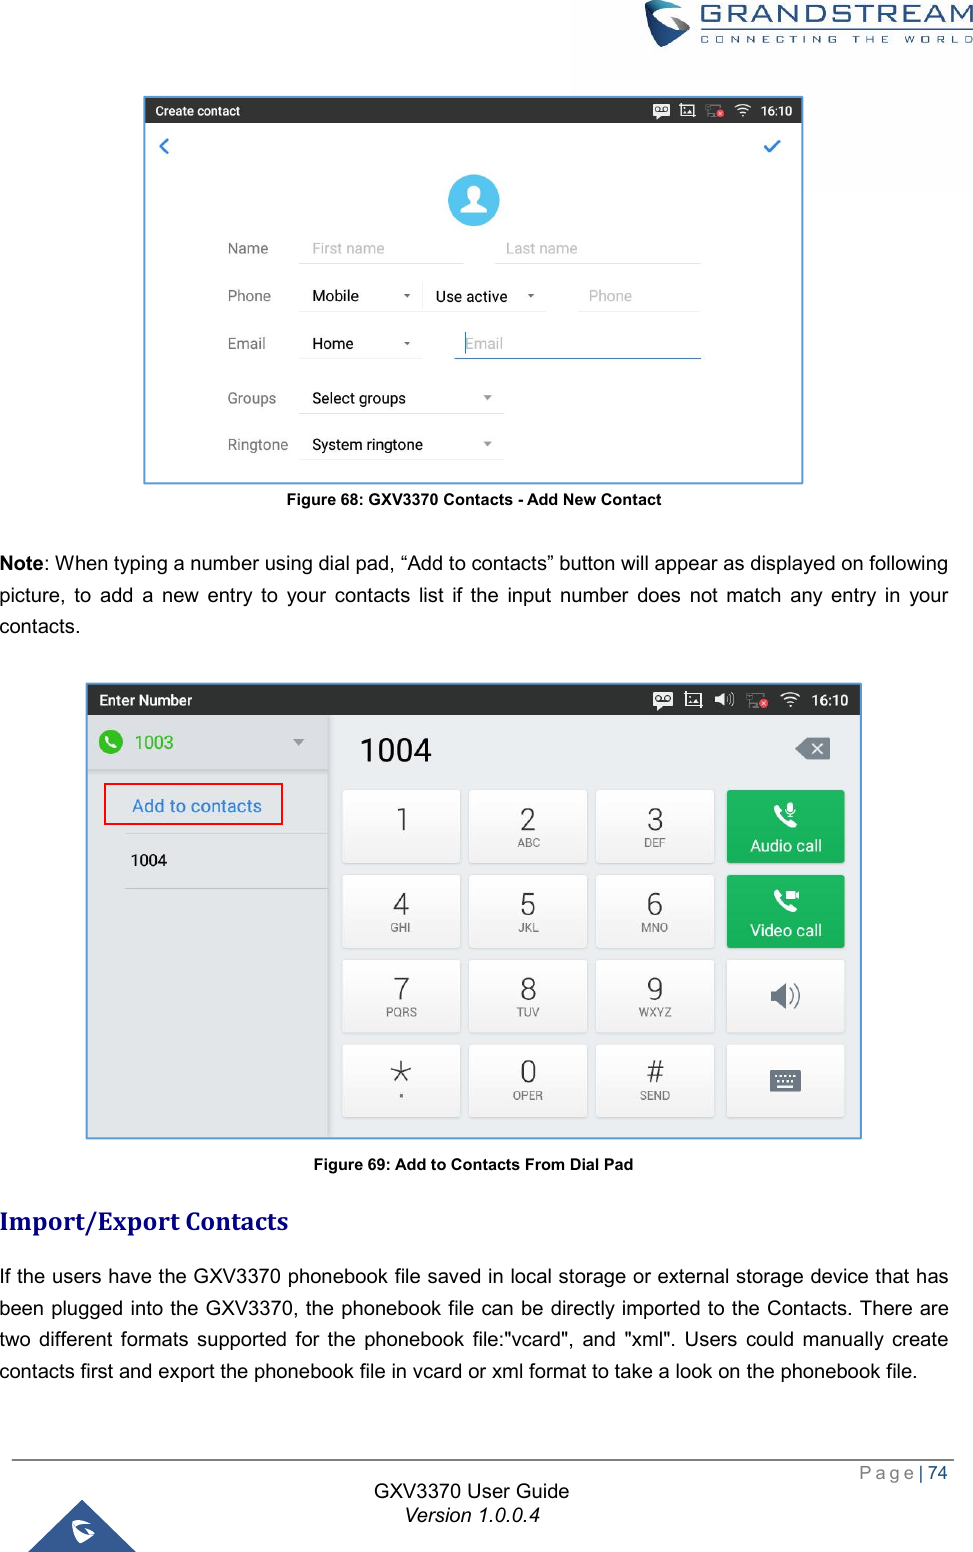
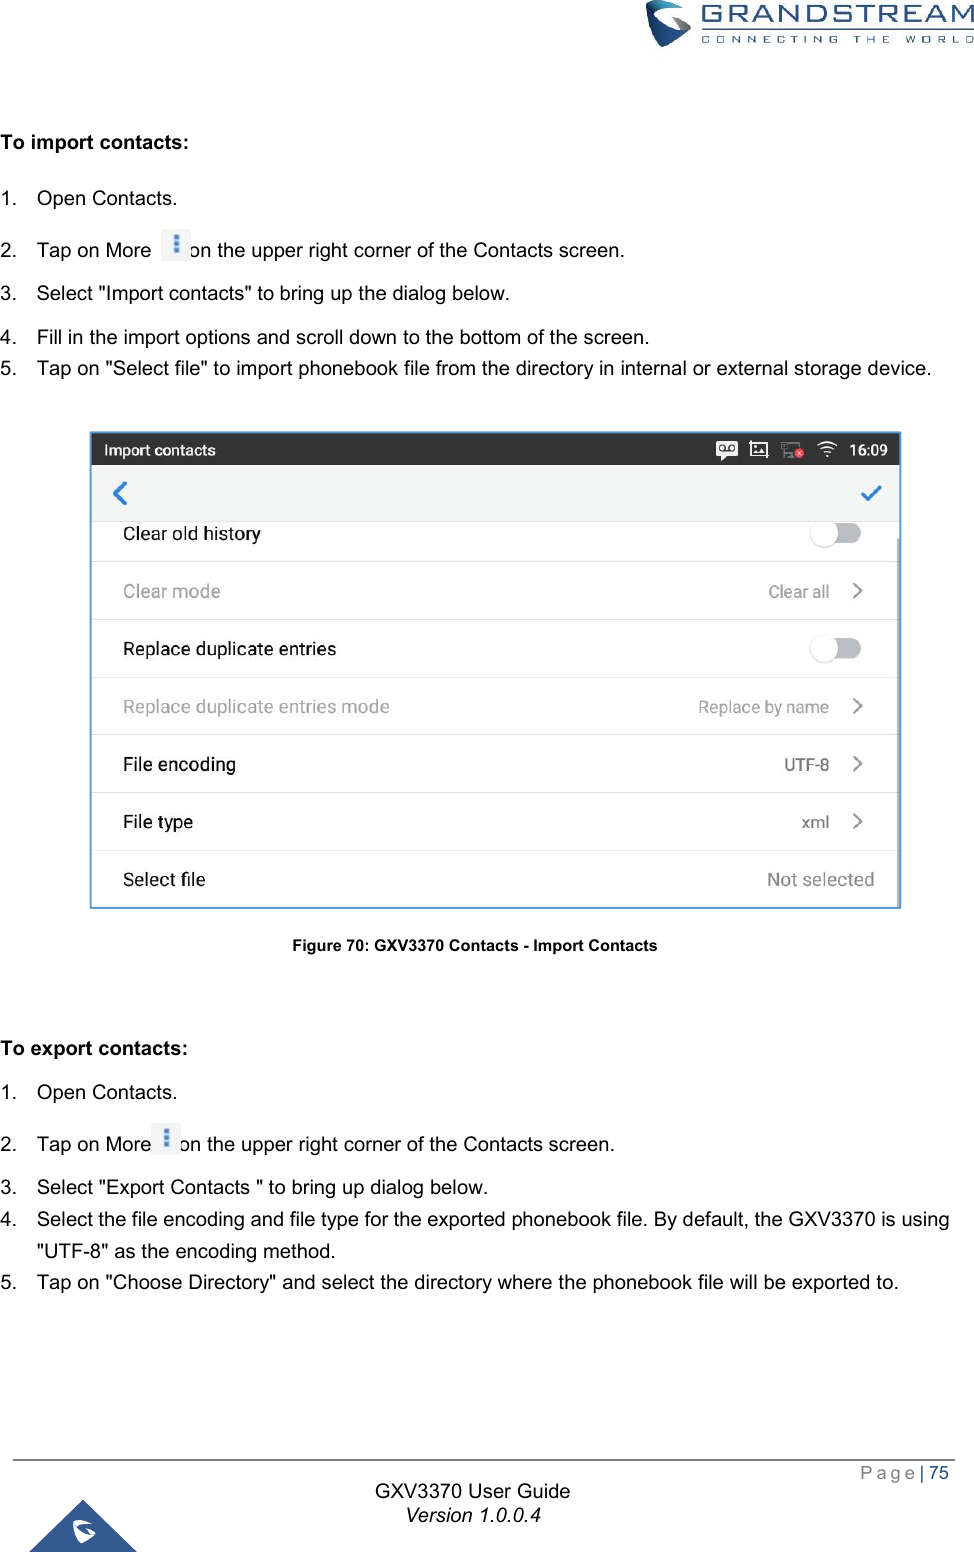
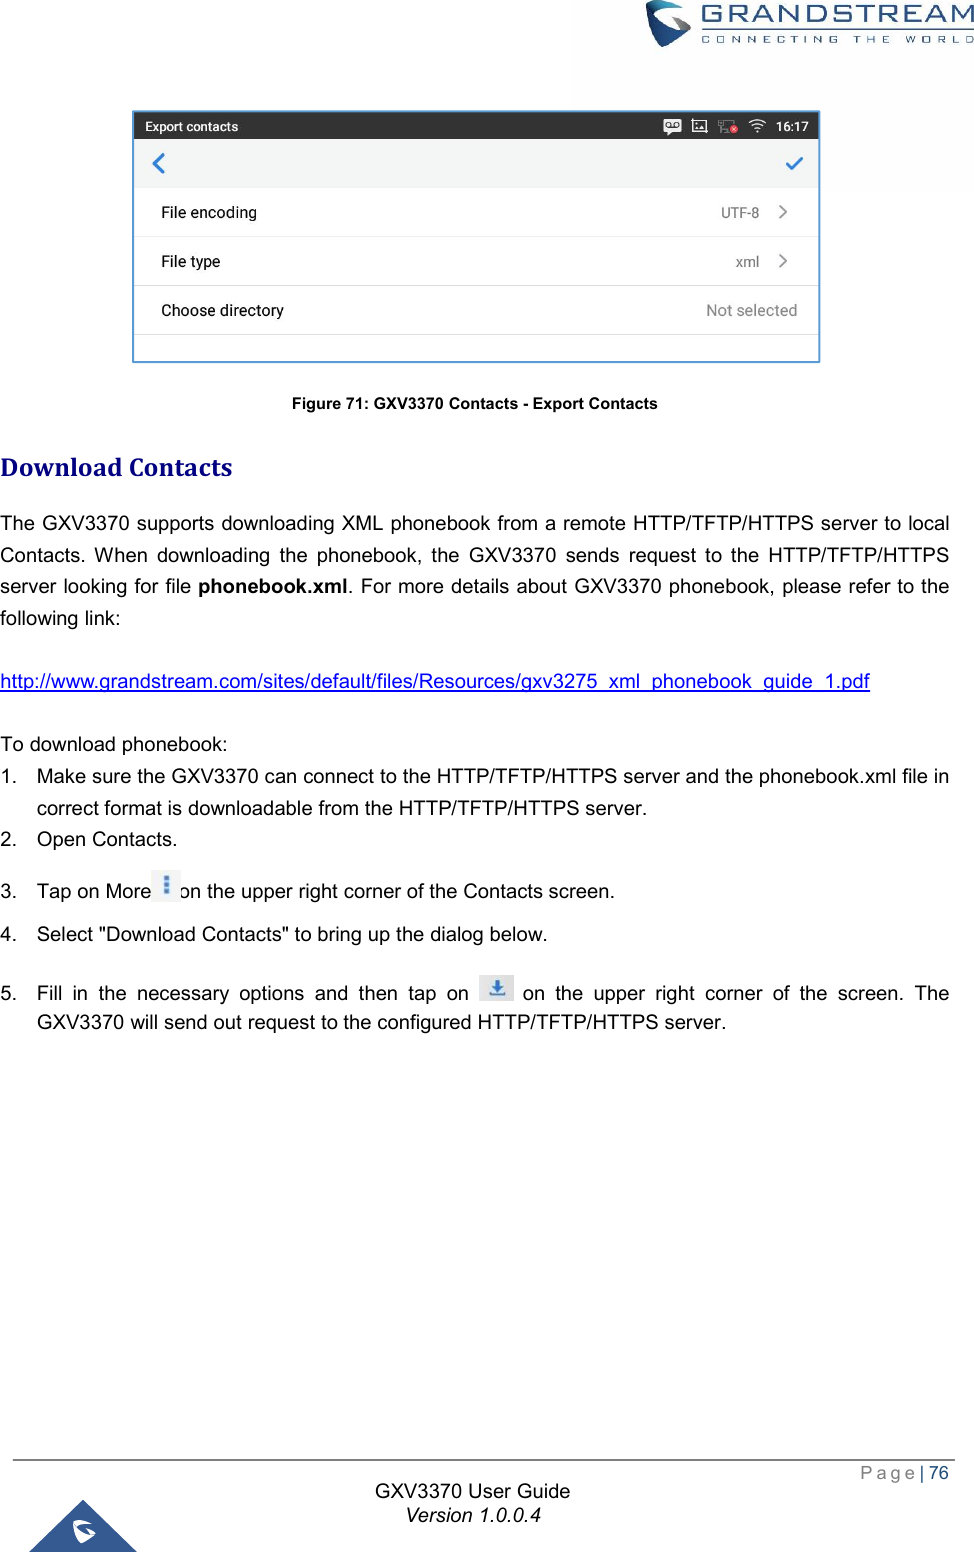
![Page| 73 GXV3370 User Guide Version 1.0.0.4 CONTACTS The GXV3370 supports local, LDAP and BroadWorks Xsi Contacts. To access GXV3370contacts, on the phone’s idle screen, tap on icon on the right panel.The following figure shows Contacts on the GXV3370. Figure 67: GXV3370 Contacts The BS Contacts is the BroadWorks Xsi Contacts. It needs to be configured with the remote BroadWorks server to enable this feature. Local Contacts The local contacts can save up to 1000 entries. Users can manage contacts by adding, deleting and modifying single contacts, downloading contacts from HTTP/TFTP server, importing contacts from external storage and exporting contacts to external storage. Add Single Contacts 1. On the Local Contacts menu Tap on to bring up "Create Contact" dialog to manually add a new contact. See [Figure 68: GXV3370 Contacts - Add New Contact]. 2. Type First name, Last name, Phone number and other information for the new contacts. Please make sure the account number field is selected so the GXV3370 will use this account to dial out the new contact. The account number field is located on the left of the "Phone" filed as highlighted below.](https://usermanual.wiki/Grandstream-Networks/GXV3370/User-Guide-3847944-Page-74.png)
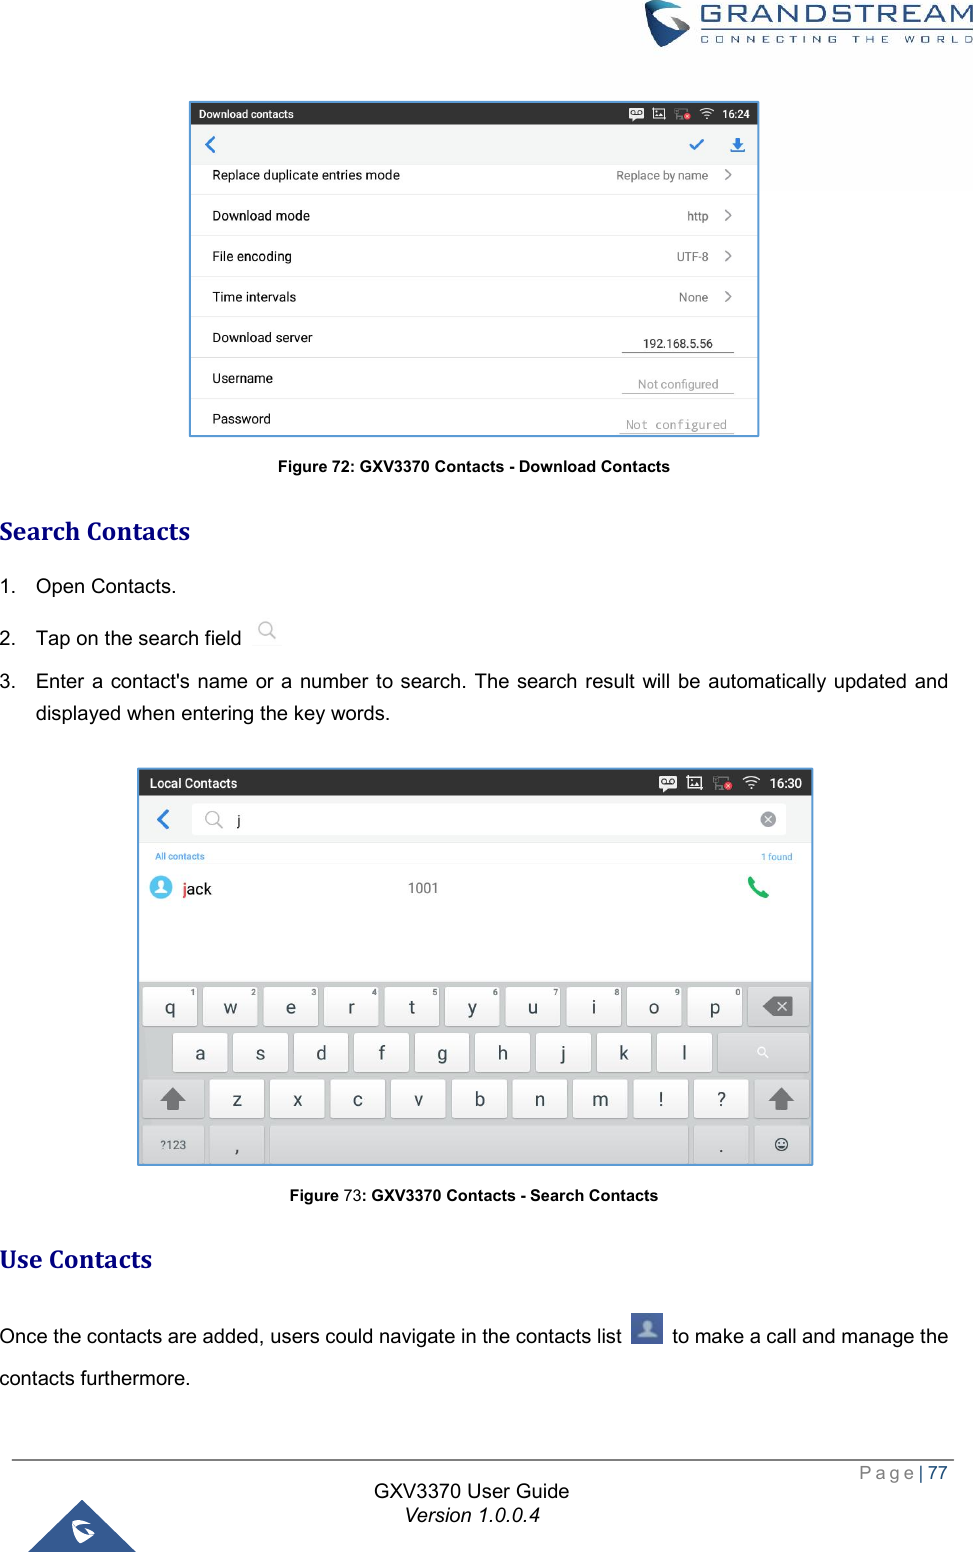
![Page| 78 GXV3370 User Guide Version 1.0.0.4 Make a Call to Contacts Scroll up/down to find the contact in the list and tap on to call this contact. Select Contacts 1. Scroll up/down to find the contact in the list. 2. Touch and press on the contact for about 2 seconds to show more options such as Delete contact, add to blacklist etc. 3. To select a batch of contacts at the same time, press More on the upper right corner of the contacts screen and select Batch operation, Tap on the checkbox for the contacts to be selected. indicates the contact is selected. Figure 74: GXV3370 Contacts - Select Contacts Add Contacts to Favorites 1. Select the contact/contacts to be added as described in [Select Contacts]. 2. Then tap on to add the contacts selected to Favorites There are two other methods to add contacts to favorites. · Directly pressing on the contactand tap on to add the contact to favorite. · Tapping on “Favorites”on the Contacts screen to navigate to favorites category and tap on to select the contacts to be added to favorites then tap on .](https://usermanual.wiki/Grandstream-Networks/GXV3370/User-Guide-3847944-Page-79.png)
![Page| 79 GXV3370 User Guide Version 1.0.0.4 Figure 75: Add Contacts to Favorites Edit Contacts 1. Tap on a contact from the contacts list 2. Tap on to edit the contact. Send Contacts to Desktop Shortcut 1. Long press on the contact 2. Tap on Send to Desktop from the menu. Share Contacts Via Bluetooth Users can share a single contact or a batch of contacts. Refer to the following steps to do so: · Sharing a single contact: 1. Long press on the contact 2. Select “Send” from the menu then choose the Bluetooth device that you want to share the contact with. · Sharing a batch of contacts: 1. Select the contacts as described in [Select Contacts]. 2. Press on to share the selected contacts via Bluetooth Add Contacts to Blacklist Users can add a single contact or a batch of contacts to the black list. Refer to the following steps to do so: · Add a single contact to black list:](https://usermanual.wiki/Grandstream-Networks/GXV3370/User-Guide-3847944-Page-80.png)
![Page| 80 GXV3370 User Guide Version 1.0.0.4 1. Long press on the contact 2. Select "Add to Blacklist" from the menu. · Add a batch of contacts to black list: 1. Select contacts as described in [Select Contacts]. 2.Press on to add the selected contacts to the blacklist Add Group Open Contacts and tap on to access “Group”. To add a new group, tap on and name the new group. Figure 76: GXV3370 Contacts - Add New Group Add contacts to Group To add contacts to a group, tap on the group then tap on , check the contacts to be added to the group and press . Note: · Users could also select a group for the contact when adding or editing the contact. · Ringtone can be assigned in group as well as single contact. If the group has ringtone set to "Custom Ringtone", this ring tone has the highest priority when there is an incoming call to the contact.](https://usermanual.wiki/Grandstream-Networks/GXV3370/User-Guide-3847944-Page-81.png)