Grandstream Networks GXV3370 IP Multimedia Phone User Manual YZZGXV3370
Grandstream Networks, Inc. IP Multimedia Phone YZZGXV3370
User Manual
Grandstream Networks, Inc.
GXV3370
IP Multimedia Phone for Android
User Guide
Grandstream Networks, Inc.
IP Multimedia Phone for Android
TM

Page| 1
GXV3370 User Guide
Version 1.0.0.4
COPYRIGHT
©2018 Grandstream Networks, Inc. http://www.grandstream.com
All rights reserved. Information in this document is subject to change without notice. Reproduction or
transmittal of the entire or any part, in any form or by any means, electronic or print, for any purpose
without the express written permission of Grandstream Networks, Inc. is not permitted.
The latest electronic version of this guide is available for download here:
http://www.grandstream.com/support
Grandstream is a registered trademark and Grandstream logo is trademark of Grandstream Networks, Inc.
in the United States, Europe and other countries.
CAUTION
Changes or modifications to this product not expressly approved by Grandstream, or operation of this
product in any way other than as detailed by this guide, could void your manufacturer warranty.
WARNING
Please do not use a different power adaptor with devices as it may cause damage to the products and void
the manufacturer warranty.

Page| 2
GXV3370 User Guide
Version 1.0.0.4
FCC Statement
This equipment has been tested and found to comply with the limits for a Class B digital device, pursuant
to part 15 of the FCC Rules. These limits are designed to provide reasonable protection against harmful
interference in a residential installation. This equipment generates uses and can radiate radio frequency
energy and, if not installed and used in accordance with the instructions, may cause harmful interference
to radio communications. However, there is no guarantee that interference will not occur in a particular
installation.
If this equipment does cause harmful interference to radio or television reception, which can be determined
by turning the equipment off and on, the user is encouraged to try to correct the interference by one or
more of the following measures:
--Reorient or relocate the receiving antenna.
--Increase the separation between the equipment and receiver.
--Connect the equipment into an outlet on a circuit different from that to which the receiver is connected.
--Consult the dealer or an experienced radio/TV technician for help.
This device complies with FCC radiation exposure limits set forth for an uncontrolled environment and it
also complies with Part 15 of the FCC RF Rules. This equipment must be installed and operated in
accordance with provided instructions and the antenna(s) used for this transmitter must be installed to
provide a separation distance of at least 20 cm from all persons and must not be co-located or operating in
conjunction with any other antenna or transmitter. Endusers and installers must be provide with antenna
installation instructions and consider removing the no-collocation statement.
This device complies with Part 15 of the FCC Rules. Operation is subject to the following two conditions: (1)
this device may not cause harmful interference, and (2) this device must accept any interference received,
including interference that may cause undesired operation.
Caution
Any changes or modifications not expressly approved by the party responsible for compliance could void
the user’s authority to operate the equipment.
CE Authentication
Hereby, Grandstream
Networks, Inc. declares that the radio equipment
Directive 2014/53/EU.
The full text of the EU declaration of conformity is available at the following internet address:
http://www.grandstream.com/support/resources/
GXV3370 User Guide
Version 1.0.0.4
Networks, Inc. declares that the radio equipment
GXV3370is
in compliance with
The full text of the EU declaration of conformity is available at the following internet address:
http://www.grandstream.com/support/resources/
Page| 3
in compliance with
The full text of the EU declaration of conformity is available at the following internet address:

Page| 4
GXV3370 User Guide
Version 1.0.0.4
GNU GPL INFORMATION
GXV3370 firmware contains third-party software licensed under the GNU General Public License (GPL).
Grandstream uses software under the specific terms of the GPL. Please see the GNU General Public
License (GPL) for the exact terms and conditions of the license.
Grandstream GNU GPL related source code can be downloaded from Grandstream web site from:
http://www.grandstream.com/sites/default/files/Resources/gxv33XX_gpl.zip

Page| 5
GXV3370 User Guide
Version 1.0.0.4
Table of Content
DOCUMENT PURPOSE ............................................................................................... 14
CHANGE LOG .............................................................................................................. 15
Firmware Version 1.0.0.4 ................................................................................................................ 15
WELCOME .................................................................................................................... 16
PRODUCT OVERVIEW ................................................................................................. 17
Feature Highlights ........................................................................................................................... 17
GXV3370 Technical Specifications .................................................................................................. 18
GETTING STARTED ..................................................................................................... 21
Equipment Packaging ..................................................................................................................... 21
Description of the GXV3370 ............................................................................................................ 22
Front View ............................................................................................................................... 22
Back View ................................................................................................................................ 23
Side View................................................................................................................................. 24
Connecting and Setting Up the GXV3370........................................................................................ 24
Using the Phone Stand ............................................................................................................ 24
Using the Slots for Wall Mounting ............................................................................................. 25
Connecting the GXV3370 ............................................................................................................... 26
GETTING TO KNOW GXV3370 .................................................................................... 27
Use the Touchscreen ...................................................................................................................... 27
Use the Desktop ............................................................................................................................. 29
Desktop Menu.......................................................................................................................... 29
Add Widget to Desktop ............................................................................................................ 30
Manage Desktop Items ............................................................................................................ 31
Set Wallpapers ........................................................................................................................ 33
Manage Running Applications .................................................................................................. 33
Idle Screen ..................................................................................................................................... 34
Switch Idle Screens ................................................................................................................. 34

Page| 6
GXV3370 User Guide
Version 1.0.0.4
Set Up Idle Screen ................................................................................................................... 35
Use the Status Bar .......................................................................................................................... 36
Notifications in Status Bar ............................................................................................................... 38
System Settings in Status Bar .................................................................................................. 40
Use the GXV3370 Keys .................................................................................................................. 40
Keypad Shortcut Functions ...................................................................................................... 41
Use the On-Screen Keyboard ......................................................................................................... 42
Use the Message Waiting Indicator ................................................................................................. 44
MAKE PHONE CALLS ................................................................................................. 45
Register SIP Accounts .................................................................................................................... 45
Account Status......................................................................................................................... 45
Configure SIP Account ............................................................................................................. 46
Set Programmable Keys .......................................................................................................... 47
Dial a Number Directly .................................................................................................................... 48
Redial ............................................................................................................................................. 48
Dial a Number via Contact .............................................................................................................. 48
Dial a Number via Call History ........................................................................................................ 49
Answer a Call ................................................................................................................................. 50
Single Incoming Call ................................................................................................................ 50
Multiple Calls/Call Waiting ........................................................................................................ 52
Call Progress Status ................................................................................................................ 53
Call Hold ......................................................................................................................................... 53
Call Recording ................................................................................................................................ 54
Mute ............................................................................................................................................... 54
Turn on Video during Audio Call ...................................................................................................... 55
Switch Audio Channel During Call ................................................................................................... 56
DTMF During Call ........................................................................................................................... 57
Call Transfer ................................................................................................................................... 58
Blind Transfer........................................................................................................................... 58
Attended Transfer .................................................................................................................... 59
7-Way Conference .......................................................................................................................... 61

Page| 7
GXV3370 User Guide
Version 1.0.0.4
Initiate Conference ................................................................................................................... 61
Remove Party from Conference ............................................................................................... 63
End Conference ....................................................................................................................... 64
Hold and Resume Conference ................................................................................................. 64
Auto Conference Mode ............................................................................................................ 64
Missed Call ..................................................................................................................................... 64
DND (Do Not Disturb) ..................................................................................................................... 65
Voicemail/Message Waiting Indication ............................................................................................. 66
Call Forward ................................................................................................................................... 67
Shared Call Appearance (SCA) ....................................................................................................... 69
Call Features .................................................................................................................................. 71
CONTACTS ................................................................................................................... 73
Local Contacts ................................................................................................................................ 73
Add Single Contacts ....................................................................................................................... 73
Import/Export Contacts ................................................................................................................... 74
Download Contacts ......................................................................................................................... 76
Search Contacts ............................................................................................................................. 77
Use Contacts .................................................................................................................................. 77
Make a Call to Contacts ........................................................................................................... 78
Select Contacts ........................................................................................................................ 78
Add Contacts to Favorites ........................................................................................................ 78
Edit Contacts ........................................................................................................................... 79
Send Contacts to Desktop Shortcut .......................................................................................... 79
Share Contacts Via Bluetooth .................................................................................................. 79
Add Contacts to Blacklist ......................................................................................................... 79
Add Group ............................................................................................................................... 80
Add contacts to Group ............................................................................................................. 80
Contacts Storage Status .......................................................................................................... 81
HARASSMENT INTERCEPTION .................................................................................. 82
Blocked Contacts ............................................................................................................................ 82
Block History ................................................................................................................................... 82
Blocked call notification ............................................................................................................ 83
Delete Block History ................................................................................................................. 83

Page| 8
GXV3370 User Guide
Version 1.0.0.4
Edit Blacklist ............................................................................................................................ 84
Intercept Anonymous calls .............................................................................................................. 85
BROADWORKS XSI CONTACTS ................................................................................ 86
CALL HISTORY ............................................................................................................ 87
Local Call History ............................................................................................................................ 87
Dial Out from Call History ......................................................................................................... 88
Call History Options ................................................................................................................. 88
Delete Call History ................................................................................................................... 88
Call History Details ................................................................................................................... 89
Broadworks XSI Call History ........................................................................................................... 89
FILE MANAGER ........................................................................................................... 90
Copy and Paste Files ............................................................................................................... 90
Move Files ............................................................................................................................... 91
Send Files ............................................................................................................................... 92
Delete Files .............................................................................................................................. 93
Rename a File ......................................................................................................................... 93
Files Operations ....................................................................................................................... 95
Downloads ...................................................................................................................................... 95
Diagnosis ........................................................................................................................................ 96
CAMERA ....................................................................................................................... 98
Take Picture .................................................................................................................................... 98
Record Video .................................................................................................................................. 98
Camera Settings ............................................................................................................................. 99
Angle Adjustment ............................................................................................................................ 99
Gallery .......................................................................................................................................... 100
Screensaver ................................................................................................................................. 102
BROSWER .................................................................................................................. 105
BS-IM&P ..................................................................................................................... 108
ACTION URL .............................................................................................................. 109

Page| 9
GXV3370 User Guide
Version 1.0.0.4
CONNECTING GXV3370 TO GDS3710 DOOR SYSTEM .......................................... 111
CONNECT TO NETWORK AND DEVICES ................................................................ 112
Ethernet ........................................................................................................................................ 112
WI-FI ............................................................................................................................................ 112
Turn On/Off Wi-Fi ................................................................................................................... 112
Add Wi-Fi Networks ............................................................................................................... 112
Wi-Fi Settings Shortcut .......................................................................................................... 114
Bluetooth ...................................................................................................................................... 114
Turn On/Off Bluetooth ............................................................................................................ 115
Change Bluetooth Device Name ............................................................................................ 115
Pair GXV3370 with a Bluetooth Device .................................................................................. 115
Unpair a Bluetooth Device ...................................................................................................... 116
Bluetooth Settings Shortcut .................................................................................................... 116
EHS Headset ................................................................................................................................ 117
USB Headset ................................................................................................................................ 117
USB .............................................................................................................................................. 119
SD Card ....................................................................................................................................... 119
HDMI Device ................................................................................................................................ 120
EXPERIENCING THE GXV3370 APPLICATION PHONE .......................................... 122

Page| 10
GXV3370 User Guide
Version 1.0.0.4
Table of Tables
Table 1: GXV3370 Features in a Glance ................................................................................................ 17
Table 2: GXV3370 Technical Specifications ............................................................................................ 18
Table 3: Equipment Packaging ............................................................................................................... 21
Table 4: GXV3370 Front View ................................................................................................................ 22
Table 5: GXV3370 Back View ................................................................................................................ 23
Table 6: GXV3370 Side View ................................................................................................................. 24
Table 7: GXV3370 Status Bar Notification Icons ..................................................................................... 38
Table 8: GXV3370 Keys ......................................................................................................................... 41
Table 9: GXV3370 MWI LED Status ....................................................................................................... 44
Table 10: GXV3370 Feature Code ......................................................................................................... 71
Table 11: GXV3370 Diagnosis troubleshooting tests ............................................................................... 96

Page| 11
GXV3370 User Guide
Version 1.0.0.4
Table of Figures
Figure 1: GXV3370 Package Content .................................................................................................... 21
Figure 2: GXV3370 Front ....................................................................................................................... 22
Figure 3: GXV3370 Back View ............................................................................................................... 23
Figure 4: GXV3370 Side View ................................................................................................................ 24
Figure 5: Built in Stand and Mounting Slots on GXV3370 ....................................................................... 25
Figure 6: Tab on The Handset Cradle ..................................................................................................... 25
Figure 7: GXV3370 Back / Side View ..................................................................................................... 26
Figure 8: GXV3370 Default Home Screen .............................................................................................. 27
Figure 9: GXV3370 Onscreen Menu ...................................................................................................... 28
Figure 10: GXV3370 Finger Gestures on the Touch Screen.................................................................... 28
Figure 11: GXV3370 Desktop Menu ....................................................................................................... 30
Figure 12: Add Widget to the Desktop .................................................................................................... 31
Figure 13: Open Clock Widget ............................................................................................................... 31
Figure 14: Resize Digital Clock Widget................................................................................................... 32
Figure 15: Move Clock Widget ............................................................................................................... 32
Figure 16: GXV3370 Choose Wallpaper ................................................................................................. 33
Figure 17: GXV3370 Recent Applications ............................................................................................... 34
Figure 18: GXV3370 Switch Idle Screens ............................................................................................... 34
Figure 19: Set up Home Idle Screen ...................................................................................................... 35
Figure 20: Add an Idle Screen ................................................................................................................ 36
Figure 21: Delete an Idle Screen ............................................................................................................ 36
Figure 22: GXV3370 Top Status Bar ...................................................................................................... 37
Figure 23: GXV3370 Top Status Bar – Notification ................................................................................. 37
Figure 24: System Settings in Status Bar ............................................................................................... 40
Figure 25: GXV3370 Keys ..................................................................................................................... 40
Figure 26: GXV3370 Onscreen Keyboard - English Keyboard ................................................................ 42
Figure 27: GXV3370 Onscreen Keyboard - Lowercase and Uppercase .................................................. 42
Figure 28:English Keyboard - Number and Symbols .............................................................................. 43
Figure 29: English Keyboard - More Symbols ......................................................................................... 43
Figure 30: GXV3370 Account Widget ..................................................................................................... 45
Figure 31: GXV3370 Dial Screen ........................................................................................................... 46
Figure 32: Disable Video Call Feature on Dial Screen ............................................................................ 47
Figure 33: GXV3370 Programmable Keys .............................................................................................. 47
Figure 34: GXV3370 View Contacts ....................................................................................................... 49
Figure 35: GXV3370 Call History ........................................................................................................... 49
Figure 36: Single Incoming Call – Audio ................................................................................................. 50
Figure 37: Single Incoming Call – Video ................................................................................................. 51
Figure 38: Single Incoming Call – Preview-1 .......................................................................................... 51

Page| 12
GXV3370 User Guide
Version 1.0.0.4
Figure 39: Single Incoming Call – Preview-2 .......................................................................................... 52
Figure 40: Call Waiting ........................................................................................................................... 52
Figure 41: Touch to Return to Call Screen .............................................................................................. 53
Figure 42: Call on Hold .......................................................................................................................... 53
Figure 43: GXV3370 Call Recording ...................................................................................................... 54
Figure 44: GXV3370 Call Mute .............................................................................................................. 55
Figure 45: Turn on Video During Audio Call ............................................................................................ 55
Figure 46: Accept Video During Audio Call ............................................................................................. 56
Figure 47: Switch Audio Channel during Call .......................................................................................... 57
Figure 48: DTMF Buttons during call ...................................................................................................... 57
Figure 49: Blind Transfer ........................................................................................................................ 58
Figure 50: Attended Transfer .................................................................................................................. 59
Figure 51: Attended Transfer - Transferring ............................................................................................ 59
Figure 52: Attended Transfer – Split ....................................................................................................... 60
Figure 53: Attended Transfer .................................................................................................................. 61
Figure 54: GXV3370 Conference Screen ............................................................................................... 62
Figure 55: GXV3370 Conference - Add Existing Call to Conference ....................................................... 62
Figure 56: 3-Way Conference Call Established ...................................................................................... 63
Figure 57: GXV3370 Conference - Remove Party from Conference ....................................................... 63
Figure 58: Missed Call Screen ............................................................................................................... 65
Figure 59: Enable/Disable DND ............................................................................................................. 66
Figure 60: Retrieve Voicemail ................................................................................................................ 67
Figure 61: Unconditional Call Forward ................................................................................................... 67
Figure 62: Call Forward – Unconditional ................................................................................................. 68
Figure 63: Call Forward - Time Based .................................................................................................... 68
Figure 64: Call Forward - Busy/No Answer/DND .................................................................................... 69
Figure 65: GXV3370 SCA Settings on LCD ............................................................................................ 70
Figure 66: GXV3370 SCA Settings on Web UI ....................................................................................... 70
Figure 67: GXV3370 Contacts ............................................................................................................... 73
Figure 68: GXV3370 Contacts - Add New Contact .................................................................................. 74
Figure 69: Add to Contacts From Dial Pad ............................................................................................. 74
Figure 70: GXV3370 Contacts - Import Contacts .................................................................................... 75
Figure 71: GXV3370 Contacts - Export Contacts .................................................................................... 76
Figure 72: GXV3370 Contacts - Download Contacts .............................................................................. 77
Figure 73: GXV3370 Contacts - Search Contacts ................................................................................... 77
Figure 74: GXV3370 Contacts - Select Contacts .................................................................................... 78
Figure 75: Add Contacts to Favorites ..................................................................................................... 79
Figure 76: GXV3370 Contacts - Add New Group .................................................................................... 80
Figure 77: GXV3370 Contacts - Storage Status ..................................................................................... 81
Figure 78: List of blocked contacts ......................................................................................................... 82
Figure 79: Block History ......................................................................................................................... 83

Page| 13
GXV3370 User Guide
Version 1.0.0.4
Figure 80: Blocked Call Notification ........................................................................................................ 83
Figure 81: GXV3370 Blacklist - Add Number to Blacklist ........................................................................ 84
Figure 82: Manually Add Number to Blacklist ......................................................................................... 84
Figure 83: Intercept Anonymous Calls .................................................................................................... 85
Figure 84: GXV3370 Call History ........................................................................................................... 87
Figure 85: GXV3370 Call History – Options ............................................................................................ 88
Figure 86: GXV3370 Call History - Details .............................................................................................. 89
Figure 87: GXV3370 File Manager – Copy File ...................................................................................... 90
Figure 88: Paste File .............................................................................................................................. 91
Figure 89: GXV3370 File Manager - Move ............................................................................................. 91
Figure 90: GXV3370 File Manager - Options .......................................................................................... 92
Figure 91: Delete File(s) via File Manager .............................................................................................. 93
Figure 92: Rename File ......................................................................................................................... 94
Figure 93: Downloaded files page .......................................................................................................... 95
Figure 94: GXV3370 Diagnosis .............................................................................................................. 96
Figure 95: GXV3370 Camera ................................................................................................................. 98
Figure 96: GXV3370 Camera Settings ................................................................................................... 99
Figure 97: Recent pictures and videos page ......................................................................................... 100
Figure 98:Edit picture ........................................................................................................................... 100
Figure 99:GXV3370 Gallery ................................................................................................................. 101
Figure 100: GXV3370 Gallery - Picture Options ................................................................................... 102
Figure 101: Use Local Images ............................................................................................................. 103
Figure 102: Use Network Images ......................................................................................................... 103
Figure 103: Network Image Path .......................................................................................................... 104
Figure 104: GXV3370 Web Browser .................................................................................................... 105
Figure 105: GXV3370 Browser Menu Options ...................................................................................... 106
Figure 106: Open New Window in Browser .......................................................................................... 106
Figure 107: GXV3370 Web Browser-Bookmarks .................................................................................. 106
Figure 108: GXV3370 Connect to Wi-Fi ............................................................................................... 113
Figure 109: GXV3370 Connect to Wi-Fi-Show Advanced Options ........................................................ 113
Figure 110: Wi-Fi Settings Shortcut ...................................................................................................... 114
Figure 111: GXV3370 Bluetooth - Paired Device .................................................................................. 116
Figure 112: Bluetooth Settings Shortcut ............................................................................................... 116
Figure 113: USB Headset Connected ................................................................................................... 117
Figure 114: USB Headset Used for Call ............................................................................................... 118
Figure 115: Switch Between Speaker and USB mode .......................................................................... 118
Figure 116: USB Storage Device Connected to GXV3370 .................................................................... 119
Figure 117:HDMI Notification ............................................................................................................... 120
Figure 118:HDMI Video Resolution ...................................................................................................... 120
Figure 119: HDMI Output Control ......................................................................................................... 121

Page| 14
GXV3370 User Guide
Version 1.0.0.4
DOCUMENT PURPOSE
This document describes how to configure the GXV3370 via phone's LCD menu and web UI menu to fully
manipulate phone's features. To learn advanced functions of GXV3370, please visit
http://www.grandstream.com/support to download the latest “GXV3370Administration Guide”.
This guide covers following topics:
§ Product Overview
§ Getting started
§ Getting to know GXV3370
§ Make phone calls
§ Contacts
§ Harassment Interception
§ Call history
§ File manager
§ Camera
§ Browser
§ BS IM&P
§ Action URL
§ Connect to network and devices
§ Experiencing the GXV3370 applications

Page| 15
GXV3370 User Guide
Version 1.0.0.4
CHANGE LOG
This section documents significant changes from previous versions of user guide for GXV3370. Only major
new features or major document updates are listed here. Minor updates for corrections or editing are not
documented here.
Firmware Version 1.0.0.4
·
This is the initial version.

Page| 16
GXV3370 User Guide
Version 1.0.0.4
WELCOME
Thank you for purchasing Grandstream GXV3370 IP Multimedia Phone for AndroidTM. The GXV3370 IP
Video Phone for Android combines a 16-line IP video phone with a multi-platformvideoconferencing
solution and the functionality of an Android tablet to offer an all-in-one communicationssolution. The phone
features a 7” 1024x600 capacitive touch screen TFT LCD,Mega pixel camera, dual Gigabit portswith
PoE/PoE+, HD audio and video, integratedWi-Fi (802.11a/b/g/n) &Bluetooth, rich peripheral interfaces,
and Android 7.0. By combining a state-of-the-art IP video phone, an advanced video conferencing solution,
and the functionality of a tablet, businesses throughoutthe world can now use the GXV3370 for all
communication and productivity needs.
PRODUCT OVERVIEW
Feature Highlights
The following tables contain the major features of the
Table
GXV3370
·
16 lines with up to 16 SIP, up to 7
720p 30fps HD
contacts, call history with up to 1000 records
·
Dual switched 10/100/1000Mbps network ports,
5GHz
SD, HDMI, EHS with Plantronics headsets sup
·
7" (1024x600
pixel CMOS sensor camera with privacy shutter
·
HD wideband audio,
acoustic chamber, advancedacoustic echo cancellation and
excellent double
·
Runs the
·
Built
-
GDS370x series of access control devices.
·
Offers a multi
Business, and more)
·
Create
GXV3370
GXV3370 User Guide
Version 1.0.0.4
The following tables contain the major features of the
GXV3370:
Table
1: GXV3370 Features in a Glance
16 lines with up to 16 SIP, up to 7
-
way audio conference and 3
720p 30fps HD
video conference, phonebook with up to 1000
contacts, call history with up to 1000 records
Dual switched 10/100/1000Mbps network ports,
Dual band 2.4 &
5GHz
WiFi (802.11a/b/g/n), PoE/PoE+, Bluetooth
4.0+EDR
SD, HDMI, EHS with Plantronics headsets sup
port
7" (1024x600
) capacitive (5 points) touch screen TFT LCD, mega
pixel CMOS sensor camera with privacy shutter
HD wideband audio,
full-duplex Hands-
free speakerphone with HD
acoustic chamber, advancedacoustic echo cancellation and
excellent double
-talk performance
Runs the
Android™ Operating System 7.0.
-
in support for GXV series of video surveillancecameras, and
GDS370x series of access control devices.
Offers a multi
-
platform video conferencing solution (Skype, Skype for
Business, and more)
Create
Android applications for any bus
iness need to run on
GXV3370
using Google's API and Grandstream's SDK toolkit
Page| 17
way audio conference and 3
-way
video conference, phonebook with up to 1000
Dual band 2.4 &
4.0+EDR
, USB,
) capacitive (5 points) touch screen TFT LCD, mega
free speakerphone with HD
acoustic chamber, advancedacoustic echo cancellation and
in support for GXV series of video surveillancecameras, and
platform video conferencing solution (Skype, Skype for
iness need to run on
using Google's API and Grandstream's SDK toolkit
.
Page| 18
GXV3370 User Guide
Version 1.0.0.4
GXV3370 Technical Specifications
The following table resumes all the technical specifications including the protocols / standards supported,
voice codecs, telephony features, languages and upgrade/provisioning settings for the phone GXV3370.
Table 2: GXV3370 Technical Specifications
Protocols/Standards SIP RFC3261, TCP/IP/UDP, RTP/RTCP, HTTP/HTTPS, ARP, ICMP, DNS (A
record, SRV, NAPTR), DHCP, PPPoE, SSH, TFTP, NTP, STUN, SIMPLE,
LLDP-MED, LDAP, TR-069, 802.1x, TLS, SRTP, IPv6, OpenVPN®.
Network Interfaces Dual switched 10/ 100/ 1000 Mbps ports with integrated PoE/PoE+
Graphic Display 7" 1024x600 capacitive touch screen (5 points) TFT LCD
Camera Tiltable mega-pixelCMOS camera with privacy shutter,720P@30fps
Bluetooth Yes, integrated. Bluetooth 4.0 + EDR.
Wi-Fi Yes, dual-band 2.4 & 5GHz with 802.11 a/b/g/n
Auxiliary Ports RJ9 headset jack (allowing EHS with Plantronics headsets), 3.5mm stereo
headset with microphone, USB port, SD, HDMI-out(1.4 up to 720p30fps)
Feature Keys 2 function touch keys VOLUME +/-,3 dedicated Android touch keys HOME,
MENU, and BACK
Voice Codec G.711µ/a, G.722 (wide-band), G.726-32, iLBC, Opus, G.729A/B in-band and
out-of-band DTMF (In audio, RFC2833, SIP INFO), VAD, CNG, AEC, PLC, AJB,
AGC, ANS
Video Codec and
Capabilities
H.264 BP/MP/HP, video resolution up to 720p, frame rate up to 30 fps, bit rate up
to 2Mbps,3-way video conference (720p@30fps),anti-flickering, auto focus and
auto exposure
Telephony Features Hold, transfer, forward (unconditional/no-answer/busy), call park/pickup, 7-way
audio conference(including the host), shared-call-appearance (SCA) /
bridged-line-appearance (BLA), virtual MPK,downloadable contacts (XML,
LDAP, up to 1000 items), call record(local and server), call log (up to 1000
records), call waiting, auto answer,XML customization of screen, click-to-dial,
flexible dial plan, hot desking, personalized music ringtonesand music on hold,
server redundancy & fail-over
Sample Applications Local apps: Contacts, Call History, File Manager, MPK, Settings, Browser,
Voicemail, Clock, Recorder, SMS, etc.
Page| 19
GXV3370 User Guide
Version 1.0.0.4
Support 3rd party apps: Skype, Google Hangouts, Skype for Business, etc.
API/SDK available for advanced custom application development.
Applications
Deployment
Allow Android 7.0 compliant applications to be developed, downloaded and run in
the embedded device with provisioning control
HD Audio Yes, HD handset and speakerphone with support for wideband audio
Base Stand Yes, integrated stand with multiple adjustable angles. Wall mountable
QoS Layer 2 QoS (802.1Q, 802.1p) and Layer 3 (ToS, DiffServ, MPLS) QoS
Security User and administrator level passwords, MD5 and MD5-sess based
authentication, 256-bit AES encrypted configuration file, TLS, SRTP, HTTPS,
802.1x media access control
Multi-language English, German, Italian, French, Spanish, Portuguese, Russian, Croatian,
Chinese, Korean, Japanese, and more
Upgrade/ Provisioning
Firmware upgrade via TFTP / HTTP / HTTPS or local HTTP upload, mass
provisioning using TR-069 or AES encrypted XML configuration file
Power and Green
Energy Efficiency
Universal power adapter included:Input: 100-240VAC 50-60Hz; Output 12VDC
1.5A
Integrated PoE* 802.3af Class 3, PoE+802.3at, Class 4
*When using PoE to power up phone, the USB port won’t work.
Physical Dimension: 252mm (W) x 211mm (L) x 84mm (H)
Unitweight: 1.08kg
Packageweight: 1.77kg
Temperature and
Humidity
Operation: 0oC to 40oC
Storage: -10oC to 60oC
Humidity: 10% to 90% Non-condensing
Package Content GXV3370 phone, handset with cord, base stand, universal power supply,
network cable, screen cleaning cloth, quick installation guide, brochure, GPL
license
Compliance FCC: Part 15 (CFR 47) Class B; UL 60950 (power adapter); Part68 (HAC)
CE: EN55022 Class B, EN55024, EN61000-3-2, EN61000-3-3, EN60950-1,
EN62479, RoHS
RCM: AS/ACIF S004; AS/NZS CISPR22/24; AS/NZS 60950; AS/NZS 4268
IC:ICES 003, RSS 247, CS 03, RSS 102

Page| 20
GXV3370 User Guide
Version 1.0.0.4
GETTING STARTED
This chapter provides basic installation instructions
information for obtaining the best performance with the
Equipment Packaging
Note:Check
the package before installation. If you find anything missing, contact your system
administrator.
·
1 x
·
1 x Handset.
·
1 x Phone Card.
·
1
·
1 x 12V Power Adapter.
·
1 x Wall Mount.
·
1 x Screen Cleaning Cloth.
·
1 x Quick Installation Guide.
·
1 x GPL License.
Figure
GXV3370 User Guide
Version 1.0.0.4
This chapter provides basic installation instructions
including the list of the packaging contents and also
information for obtaining the best performance with the
GXV3370.
Table 3: Equipment Packaging
the package before installation. If you find anything missing, contact your system
GXV3370
1 x
GXV3370 Main Case.
1 x Handset.
1 x Phone Card.
1
x Ethernet Cable.
1 x 12V Power Adapter.
1 x Wall Mount.
1 x Screen Cleaning Cloth.
1 x Quick Installation Guide.
1 x GPL License.
Figure
1: GXV3370 Package Content
Page| 21
including the list of the packaging contents and also
the package before installation. If you find anything missing, contact your system
Description of the GXV3370
Front View
Item Name
Description
1 Front Camera
Mega pixel front camera. The angle can be
can be blocked by scrolling up/down the wheel on the back of the
camera.
2 MWI LED Indicator
To indicate
using the LED indicator.
3 LCD
7" (1024x600) capacitive (5 points) touch screen.
4 Back
Tap to go back to the previous menu.
5 Menu
Tap to view options for different screens or applications.
6 Home
Tap to go back to
seconds
7 Volume Up
Tap to turn up the call volume and media volume.
8 Volume Down
Tap to turn down the call volume and media volume.
9 Handset
Off
9
GXV3370 User Guide
Version 1.0.0.4
Figure 2: GXV3370 Front
Table 4: GXV3370 Front View
Description
Mega pixel front camera. The angle can be
adjusted,
can be blocked by scrolling up/down the wheel on the back of the
camera.
To indicate
message status, call status and phone's system status
using the LED indicator.
7" (1024x600) capacitive (5 points) touch screen.
Tap to go back to the previous menu.
Tap to view options for different screens or applications.
Tap to go back to
Home
screen; or touch and press for about 2
seconds
to take a screenshot of phone’s screen.
Tap to turn up the call volume and media volume.
Tap to turn down the call volume and media volume.
Off
hook to use handset as the audio channel for calls and media.
1
3
5
4
7
6
8
Page| 22
adjusted,
and the camera
can be blocked by scrolling up/down the wheel on the back of the
message status, call status and phone's system status
Tap to view options for different screens or applications.
screen; or touch and press for about 2
hook to use handset as the audio channel for calls and media.
2
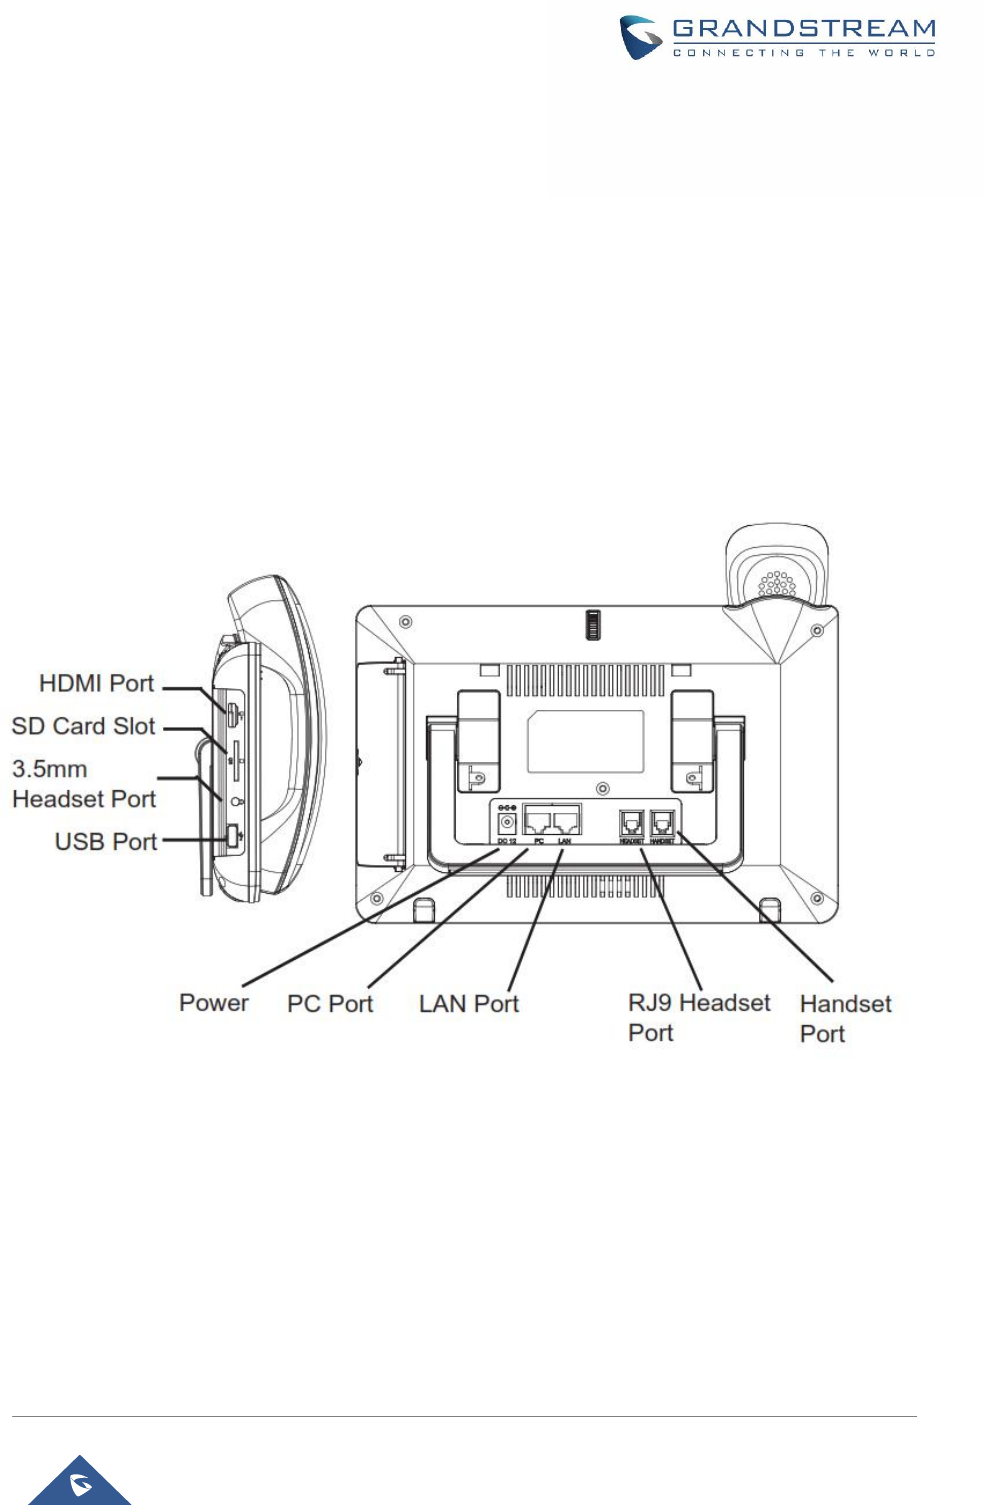
Back View
Item Name
1 Camera Adjusting Wheel
2 Phone Stand (built-in)
3 Handset Port
4 Headset Port
5 LAN Port
6 PC Port
7 Power Jack
8 Side Connectors Cover
7
7
GXV3370 User Guide
Version 1.0.0.4
Figure 3: GXV3370 Back View
Table 5: GXV3370 Back View
Description
Scroll up/down to adjust the camera angle.
Adjust the phone stand angle to place the phone on the desk.
RJ9 handset connector port.
RJ9 headset connector port (supporting EHS with Plantronics
headset).
10/100/1000Mbps RJ-
45 port connecting to Ethernet.
PoE is supported.
10/100/1000Mbps RJ-
45 port connecting to PC.
12V DC Power connector port.
Open the cover for USB port, SD card slot, 3.5mm headset port
and mini HDMI port.
1
34
5
6
Page| 23
Adjust the phone stand angle to place the phone on the desk.
RJ9 headset connector port (supporting EHS with Plantronics
45 port connecting to Ethernet.
45 port connecting to PC.
Open the cover for USB port, SD card slot, 3.5mm headset port
2
Page| 24
GXV3370 User Guide
Version 1.0.0.4
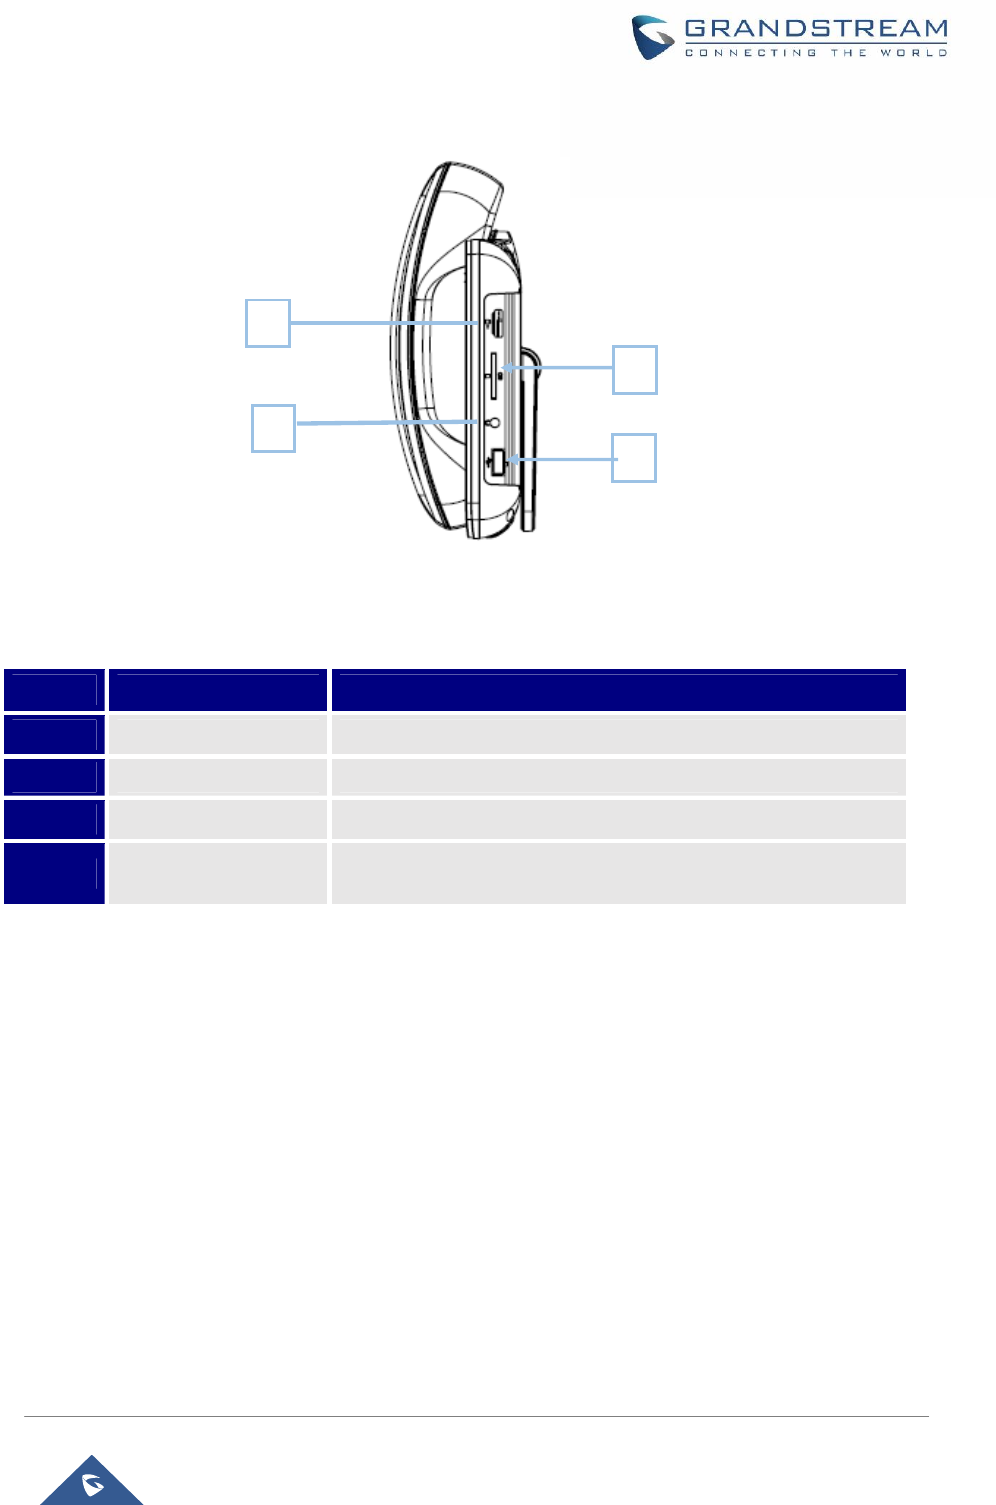
Side View
Figure 4: GXV3370 Side View
Table 6: GXV3370 Side View
Item Name Description
1 HDMI Port Connect display device to the HDMI port via HDMI cable.
2 SD Card Port Connect SD storage device to the SD Card Slot.
3 3.5mm Headset Port Connect 3.5mm headset.
4 USB Port USB devices can be connected via the USB port. For example,
connect a USB flash drive to save captured pictures.
Connecting and Setting Up the GXV3370
The GXV3370 can be installed on the desktop using the built-in stand or attached on the wall using the
slots for wall mounting.
Using the Phone Stand
The GXV3370 has a built-in phone stand. To set up the GXV3370 as your desk phone, follow the steps
below:
1. Take the phone stand out on the back and adjust the angle to place the phone steady on the desk;
2. Connect the handset and main phone case with the phone cord;
3. Connect the LAN port of the phone to the RJ-45 socket of a hub/switch or a router (LAN side of the
router) using the Ethernet cable;
1
2
3
4
Page| 25
GXV3370 User Guide
Version 1.0.0.4
4. Connect the 12V DC output plug to the power jack on the phone; plug the power adapter into an
electrical outlet. If PoE switch is used in step 3, this step could be skipped;
The LCD will display the booting up screen or firmware upgrading information. Before continuing, please
wait for the main screen display to show up.
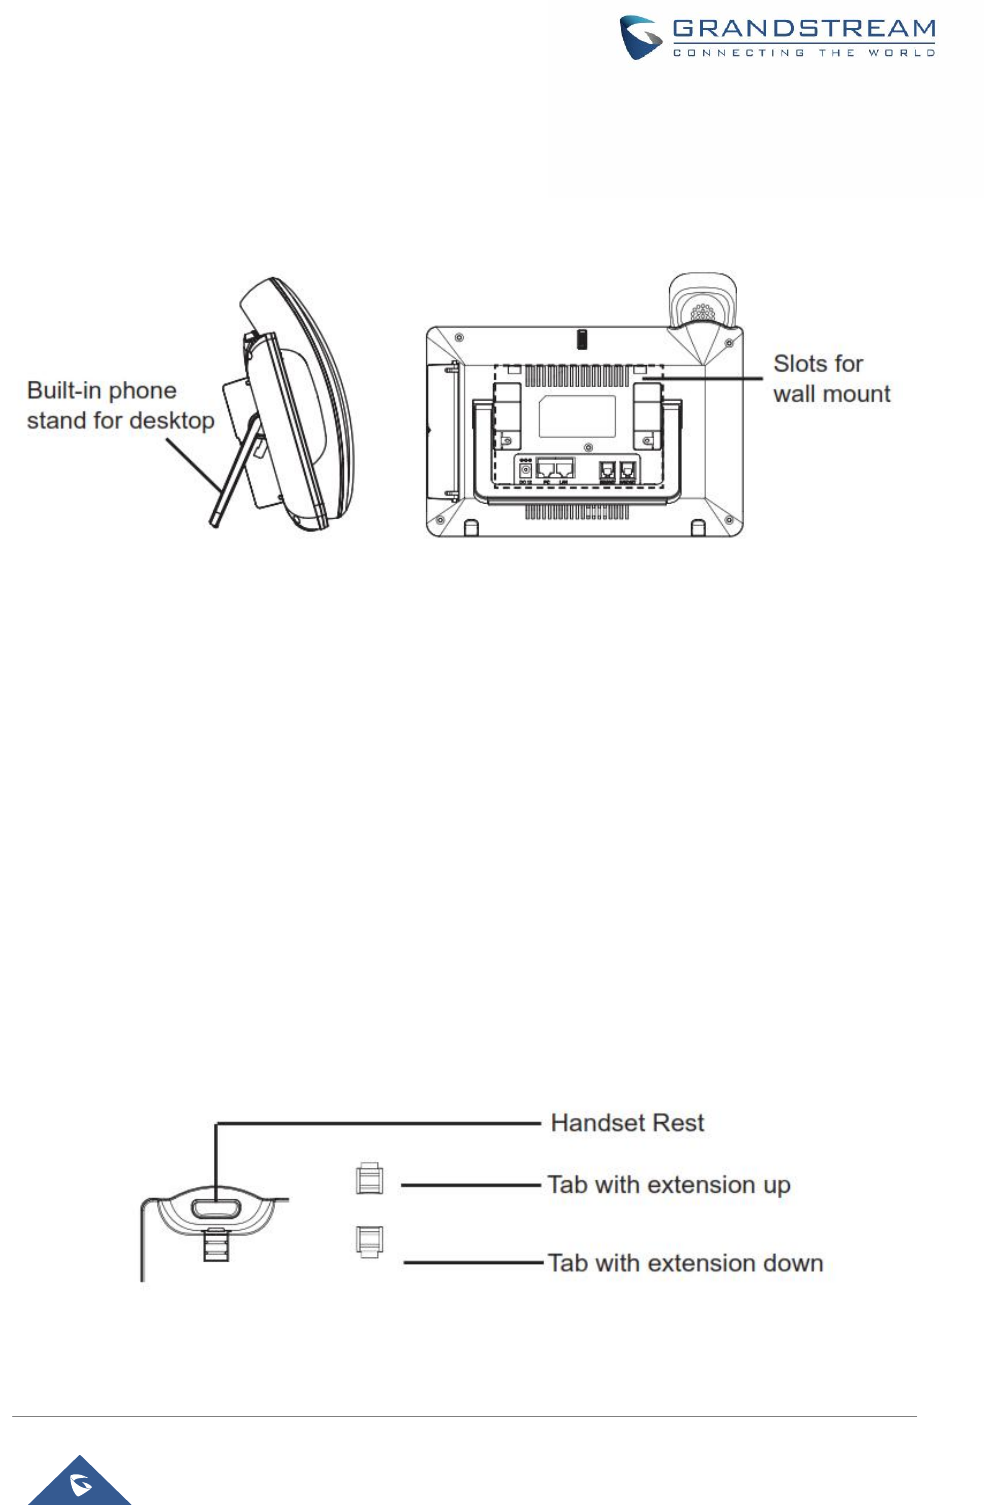
Figure 5: Built in Stand and Mounting Slots on GXV3370
Using the Slots for Wall Mounting
1. Attach the wall mount to the slots on the back of the phone;
2. Attach the phone to the wall via the wall mount hole;
3. Pull out the tab from the handset cradle (see figure below);
4. Rotate the tab and plug it back into the slot with the extension up to hold the handset while the
phone is mounted on the wall.
5. Connect the handset and main phone case with the phone cord;
6. Connect the LAN port of the phone to the RJ-45 socket of a hub/switch or a router (LAN side of the
router) using the Ethernet cable;
7. Connect the 12V DC output plug to the power jack on the phone; plug the power adapter into an
electrical outlet. If PoE switch is used in step 3, this step could be skipped;
The LCD will display the booting up screen or firmware upgrading information. Before continuing,
please wait for the main screen display to show up.
Figure 6: Tab on The Handset Cradle
Page| 26
GXV3370 User Guide
Version 1.0.0.4
Connecting the GXV3370
To setup your GXV3370, please follow the steps below:
1. Connect the handset and main phone case with the phone cord;
2. Connect the LAN port of the phone to the RJ-45 socket of a hub/switch or a router (LAN side of the
router) using the Ethernet cable;
3. Connect the 12V DC output plug to the power jack on the phone; plug the power adapter into an
electrical outlet. If PoE switch is used in step 2, this step could be skipped;
4. The LCD will display booting up or firmware upgrading information. Before continuing, please wait
for the main screen display to show up;
5. Using the web configuration interface or from the menu of the touch screen, you can further
configure network connection using static IP, DHCP and etc.
Figure 7: GXV3370 Back / Side View
Page| 27
GXV3370 User Guide
Version 1.0.0.4
GETTING TO KNOW GXV3370
Use the Touchscreen
When the phone boots up in HOME screen, the LCD will display as below. A registered account is shown
in the following figure and users might need register their own account to have the account status
displayed.
Figure 8: GXV3370 Default Home Screen
Swipe from right to left to show the application menu of the phone. the settings and applicationsinstalled
will be brought up as shown below.
The Status Bar shows time, network
connectivity, signal strength, notification
information etc...
Date and Time
Shortcut: Contacts
Shortcut: Call History
Shortcut: Conference
Shortcut: Phone Dialer
Accountinformation Widget.Up to 8
accounts/Programmable-keys can
be displayed.
Page| 28
GXV3370 User Guide
Version 1.0.0.4
Figure 9: GXV3370 Onscreen Menu
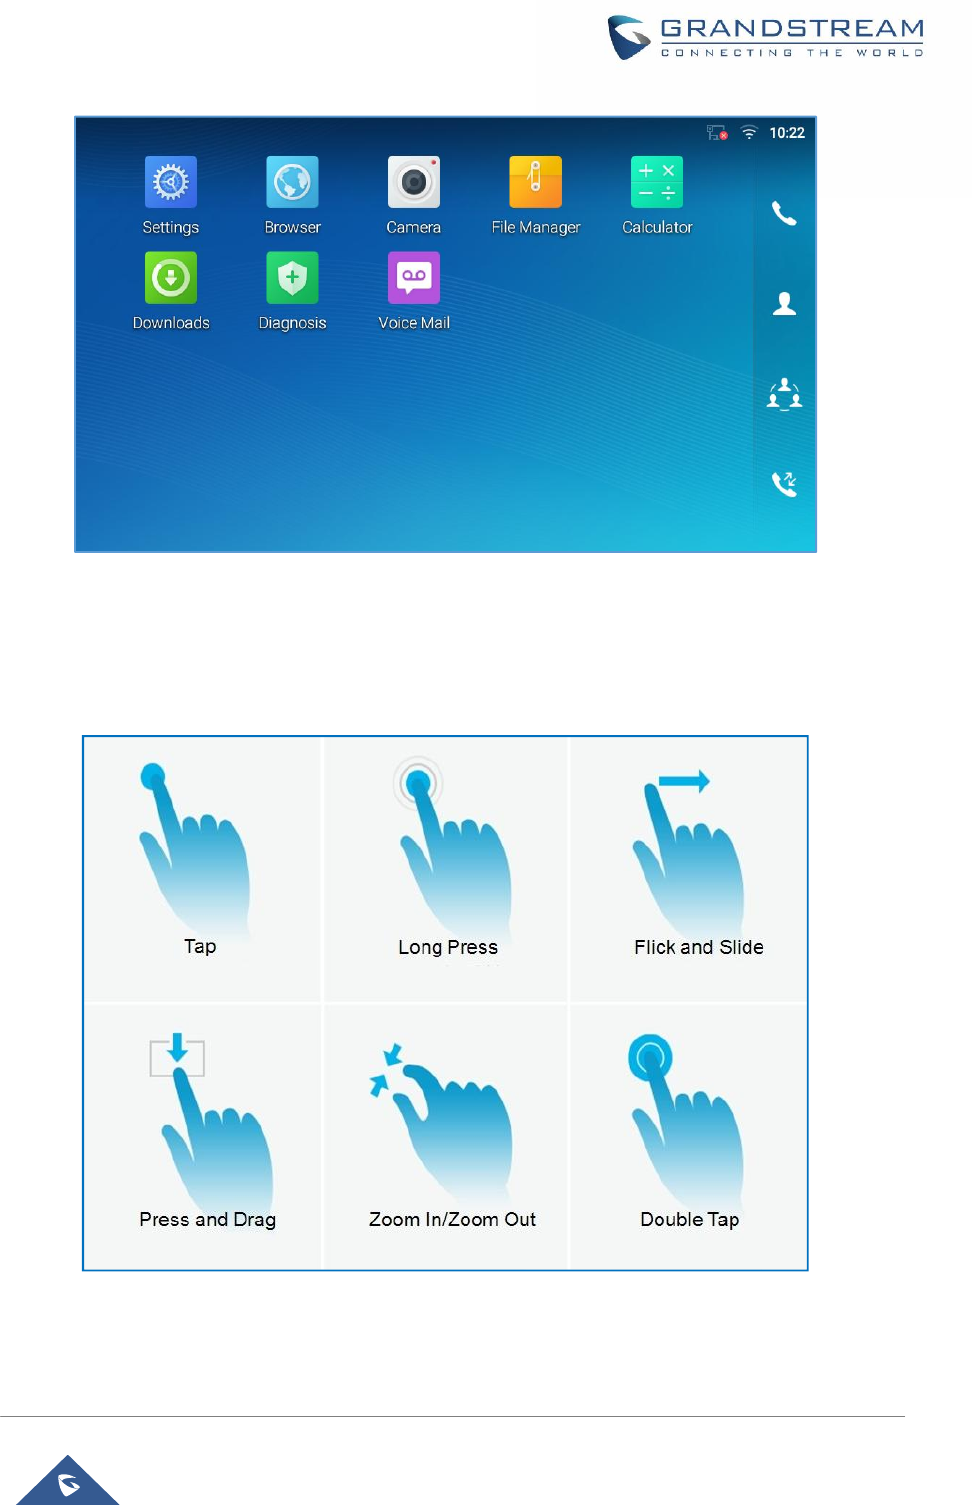
To fully manipulate the GXV3370 capacitive touch screen, use your fingers to operate the following on the
GXV3370 icons, buttons, menu items, onscreen keyboard etc.
Figure 10: GXV3370 Finger Gestures on the Touch Screen

Page| 29
GXV3370 User Guide
Version 1.0.0.4
·
Tap
Slightly touch the screen with fingertip to initiate menu, options or applications. For example, to select
items on the screen (e.g., setting options, apps etc.); to press onscreen buttons (e.g., "End" or
"Options" softkey during the call); to type letters and symbols using the onscreen keyboard.
·
Long Press
Touch the screen with fingertip and press for about 2 seconds without lifting your finger from the
screen till an action occurs. For example, long press on a picture to bring up selection option.
·
Flick and Slide
Touch the screen with fingertip and slide over the screen. For example, user could slide up to scroll up
the page, slide down to open dropdown menu, slide left or slide right to delete an item from the list. If
your finger stays on the screen for too long, the item may be selected, and sliding won't occur.
·
Press and Drag
Touch and press the item, then move it by dragging it up, down, left or right, without lifting your finger
from the screen.
·
Zoom In/Zoom Out
Place two fingers on the screen, then pinch them together (zoom out) or spread them apart (zoom in).
·
Double Tap
Quickly touch the screen twice with fingertip to switch between default display and zoomed-in display.
This is usually used when viewing photos or web pages.
Use the Desktop
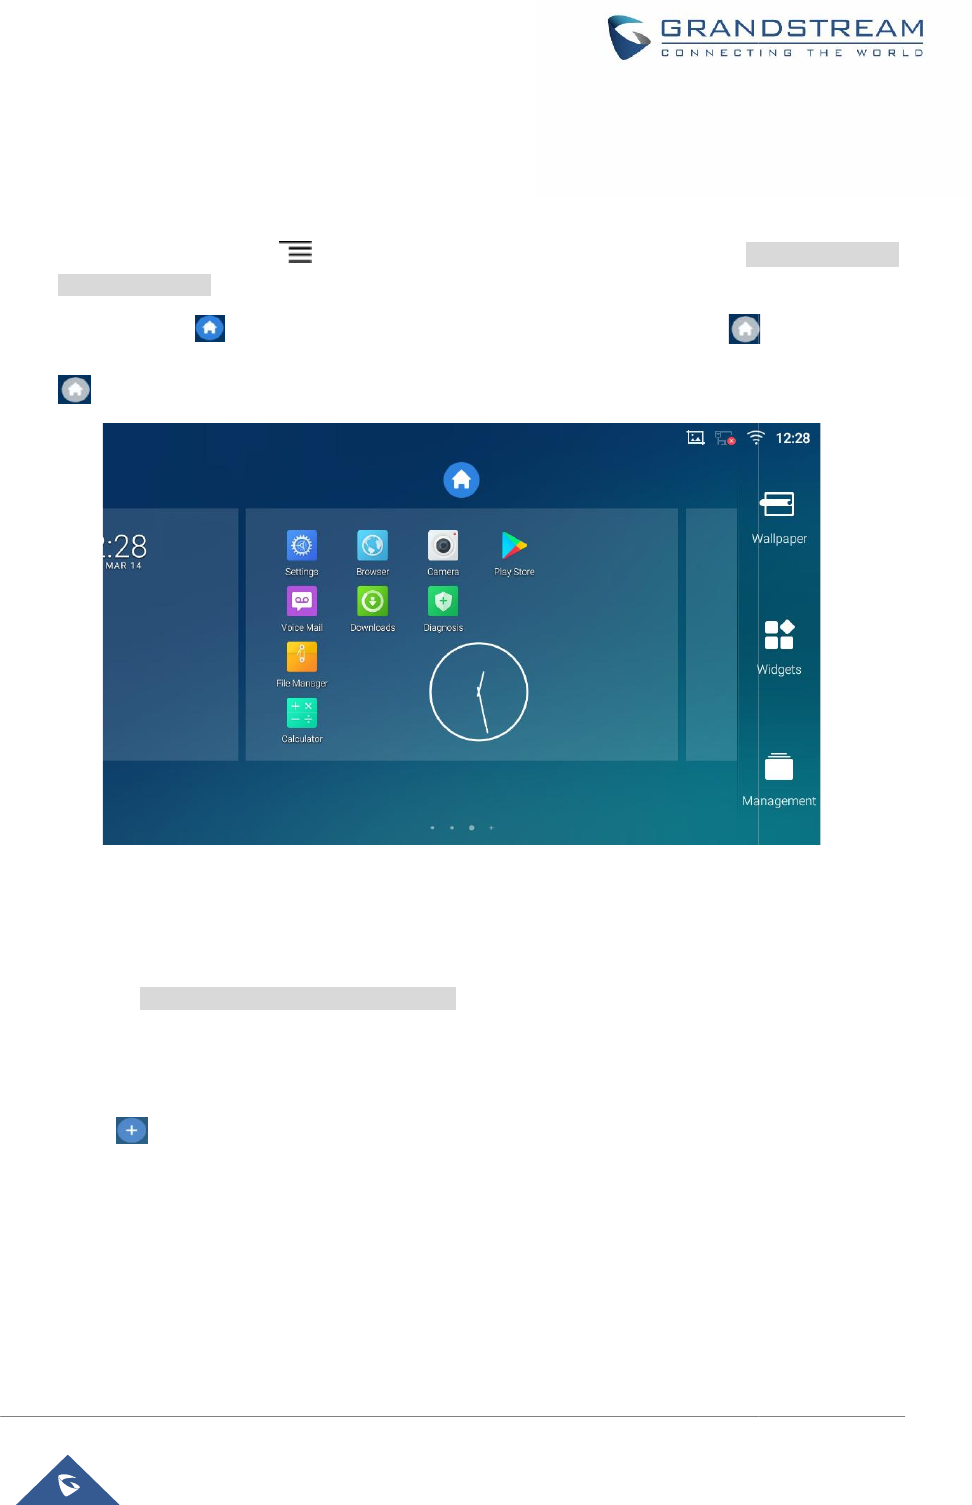
Desktop Menu
When the GXV3370 is on idle screen, press the MENU key to bring up phone's menu. Users can
access the following in the desktop menu:
Page| 30
GXV3370 User Guide
Version 1.0.0.4
Figure 11: GXV3370 Desktop Menu
·
Desktop page
Add, delete or edit desktop pages.
·
Wallpaper
Select wallpaper from Local gallery or from the available system Wallpapers
·
Widgets
Add widgets to the desktop by touching and holding the widget from the widget menu.
·
Management
Manage running applications on the GXV3370. For more details, please refer to section [Manage
Running Applications].
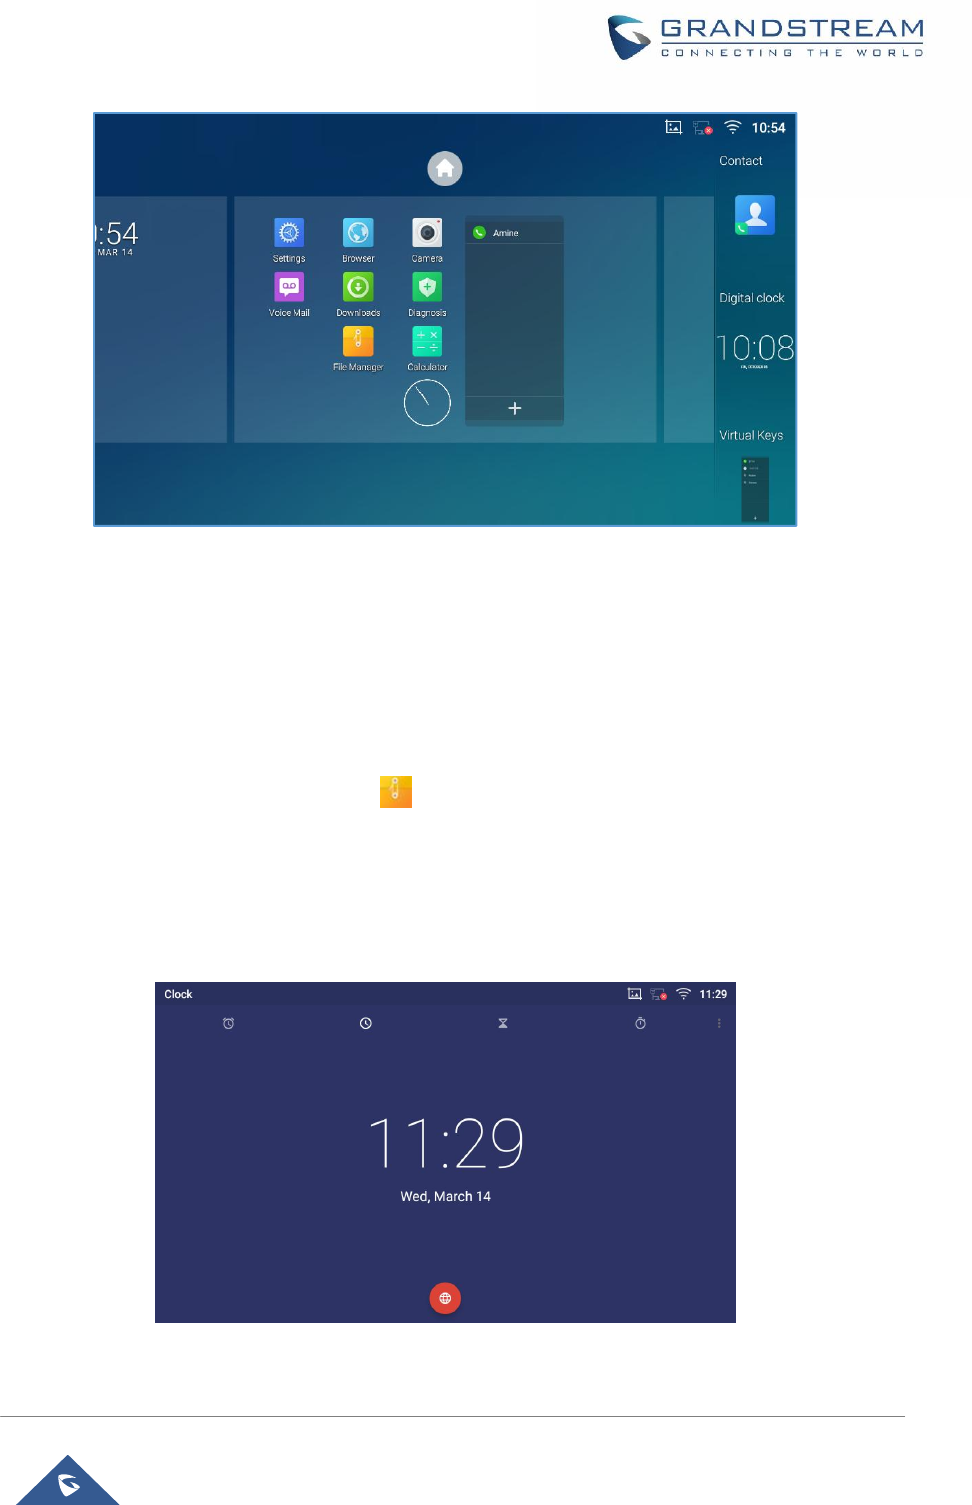
Add Widget to Desktop
The GXV3370 provides widgets like account bar, clock, contactsetc. Users could conveniently add those
widgets to the desktop as preferred. To add a widget:
1. Press the Menu key or long press on an empty space on the idlescreenand select "Widgets".
2. Different widgets will be displayed on theright side of the screen.
3. Select and drag the widget to the desired spot to be placed on the desktop. Please make sure there is
enough space on the desktop. Otherwise, the widget won't be added.
Page| 31
GXV3370 User Guide
Version 1.0.0.4
Figure 12: Add Widget to the Desktop
Manage Desktop Items
On the GXV3370 desktop, users could tap on the desktop items to manage shortcuts and widgets. The
following operations can be done:
·
Tap on the shortcut icon to open the application.
For example, tap on "File Manager" icon to access file manager application.
·
Tap on the widget to open and edit it.
For example, tap on the digital clock on the desktop. The clock settings will be brought up for users to
set up timer, stopwatch or alarm.
Figure 13: Open Clock Widget
Page| 32
GXV3370 User Guide
Version 1.0.0.4
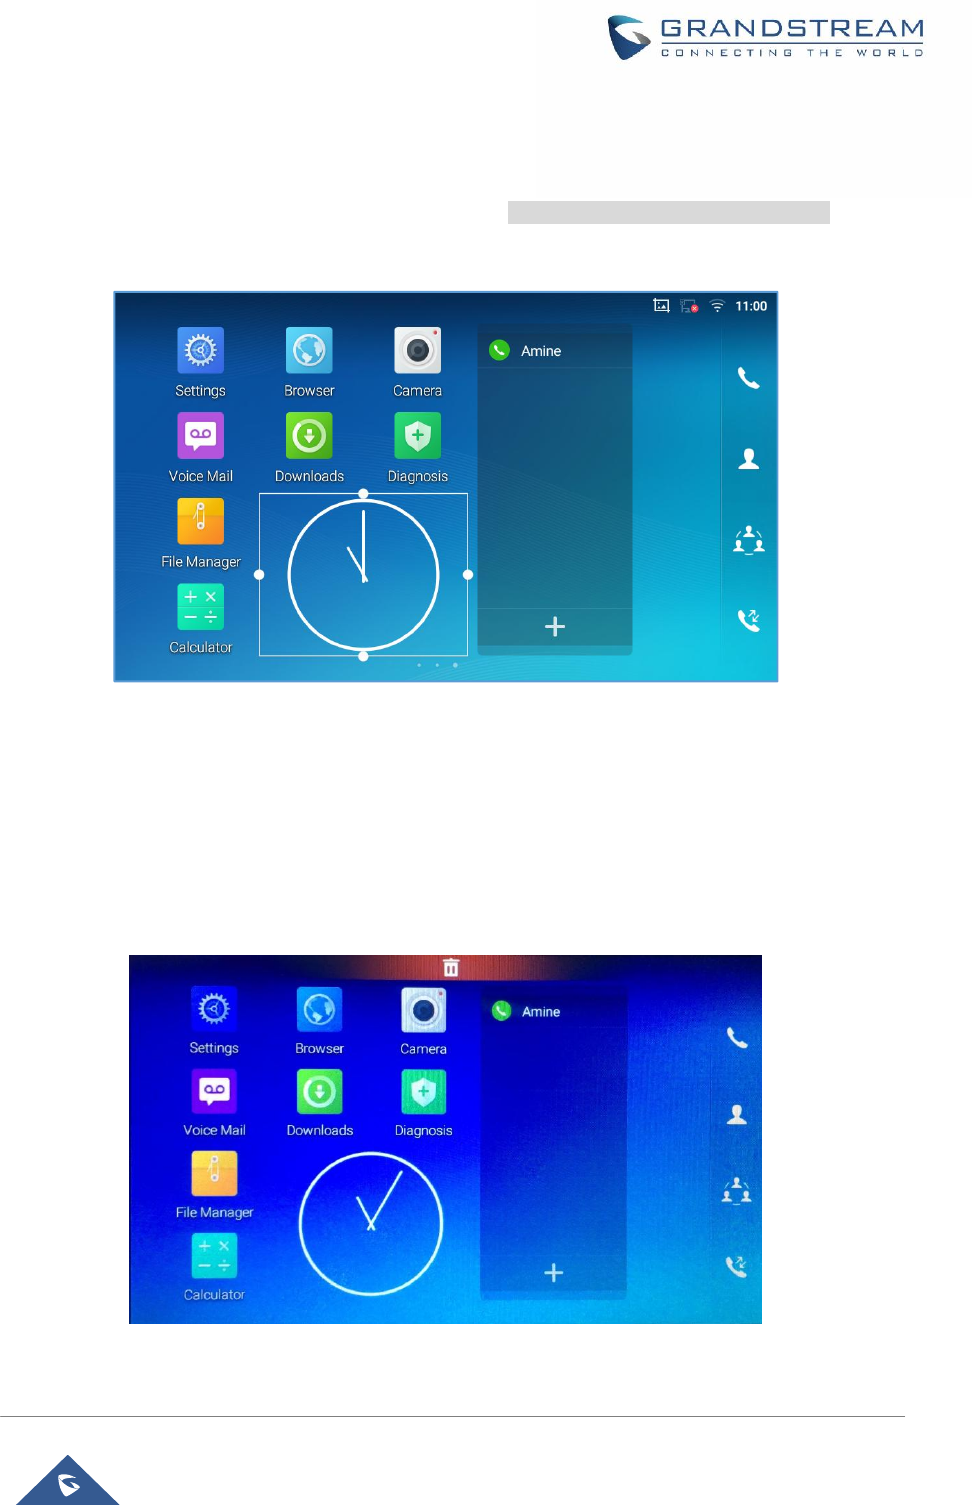
·
Certain widgets such as Clock can be resized on the desktop.
To resize a widget, touch and press the widget for about 2 seconds. Then lift your finger from the
screen. This will bring up the white frame as shown in [Figure 14: Resize Digital Clock Widget]. Touch
and drag the border of the frame to adjust the size.
Figure 14: Resize Digital Clock Widget
·
Move/deleteApplication/Widget
To move a shortcut/widget to a different spot on the desktop or to a different idle screen, touch and
press the item for about 1 seconds until a recycle bin icon shows up on the top of the screen. Drag the
item up/down/left/right to the destination spot on the screen. Lift your finger once done.To delete the
item/widget, press on it for about 1 seconds then move it to the recycle bin on the top of the screen.
Figure 15: Move Clock Widget
Page| 33
GXV3370 User Guide
Version 1.0.0.4
Note:
Deletingan application icon will systematically pop up a window asking the permission touninstall the
application from the screen. Press ok to uninstall or press cancel to abort.
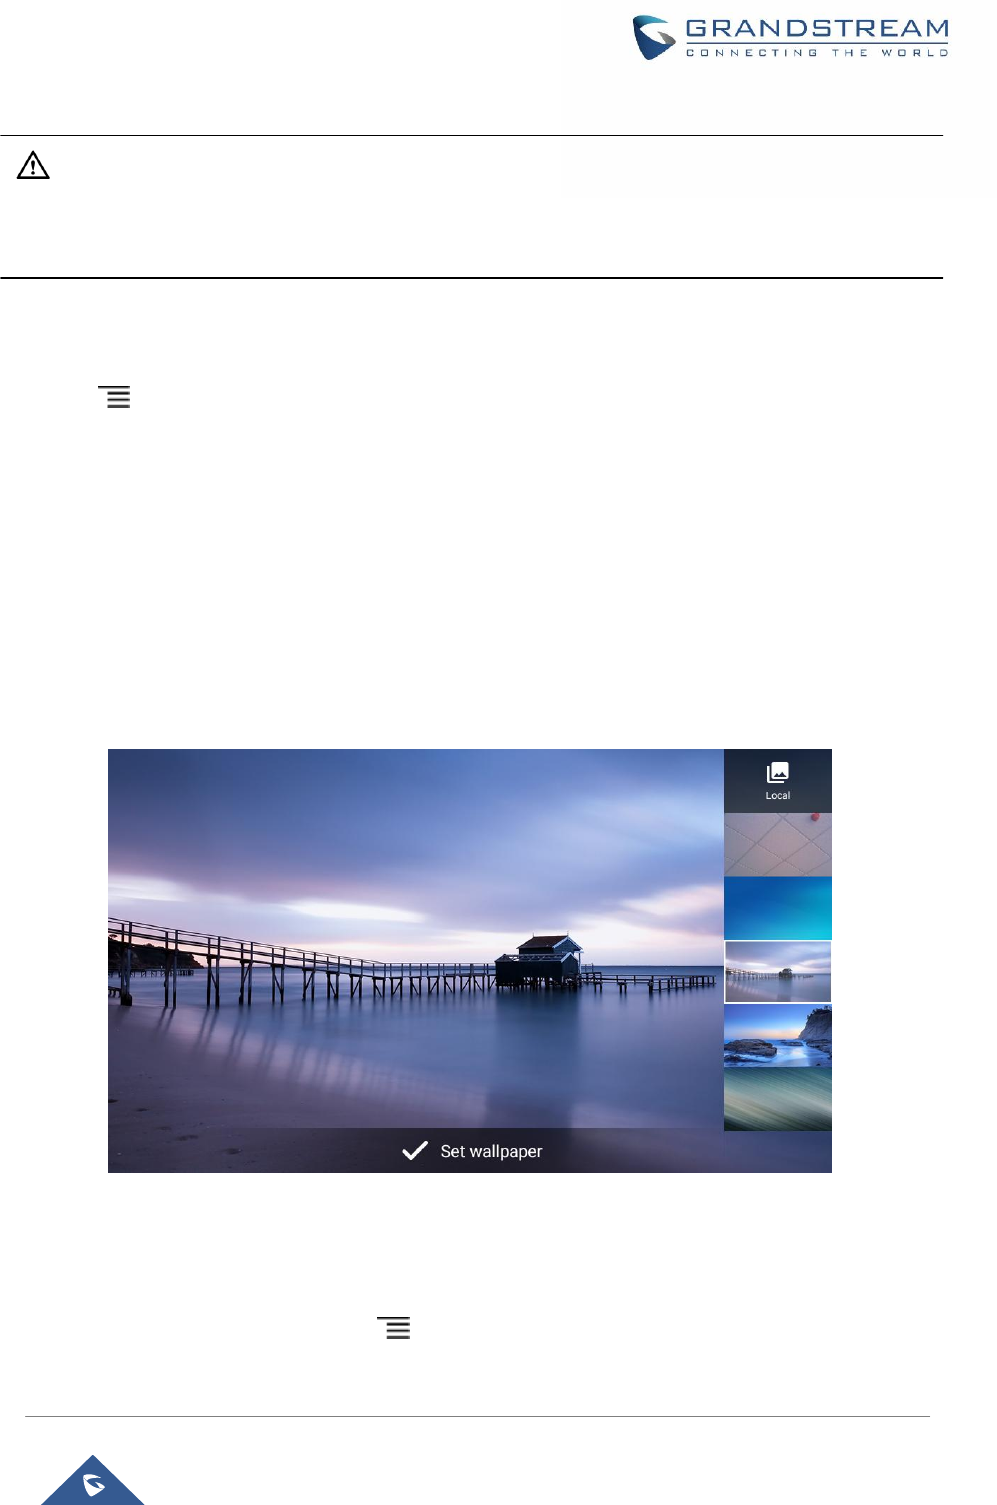
Set Wallpapers
On the GXV3370 desktop, touch and press on an empty spot for about 2 seconds or users could press
menu key and select "Wallpaper" to set up the wallpaper for the desktop. Users could select wallpaper
from different categories:
·
Local
Open Gallery application and tap on the picture to preview. Touch and drag the picture to adjust the
frame that will be used as wallpaper. Then tap on "Set Wallpaper" to set the selected area of the
picture as wallpaper.
·
Wallpapers
On the right side of the Wallpaper menu of theGXV3370. Select the picture from the default wallpapers
available to preview and then tap on "Set wallpaper".
Figure 16: GXV3370 Choose Wallpaper
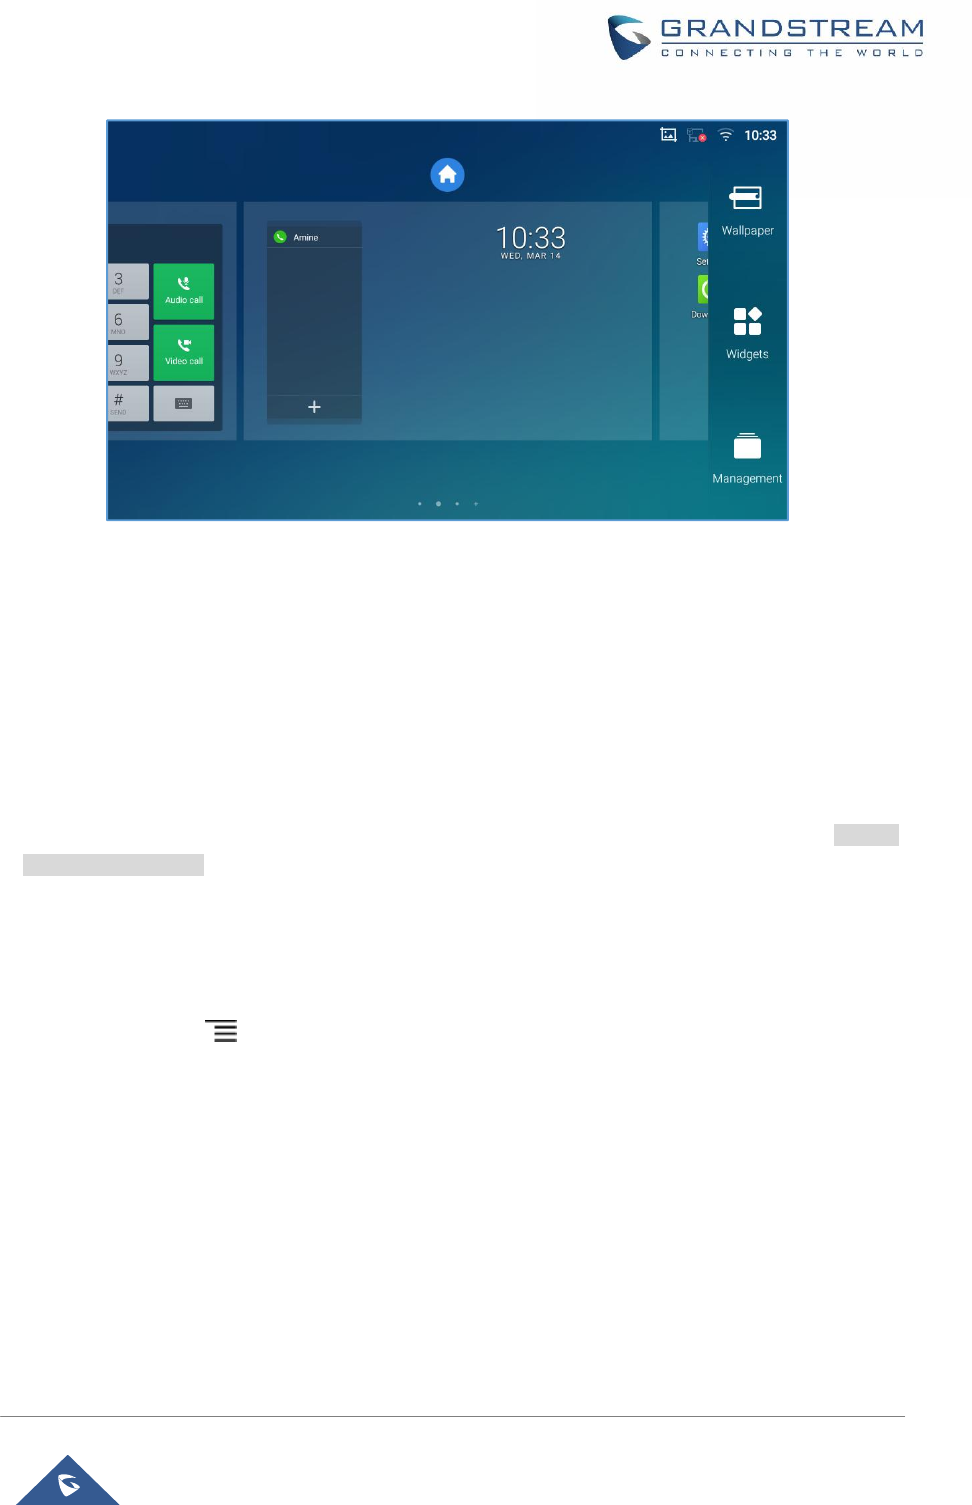
Manage Running Applications
On the GXV3370 desktop, press an empty spot for about 2 seconds then select “Management” or select
"Management" after pressing Menu button .
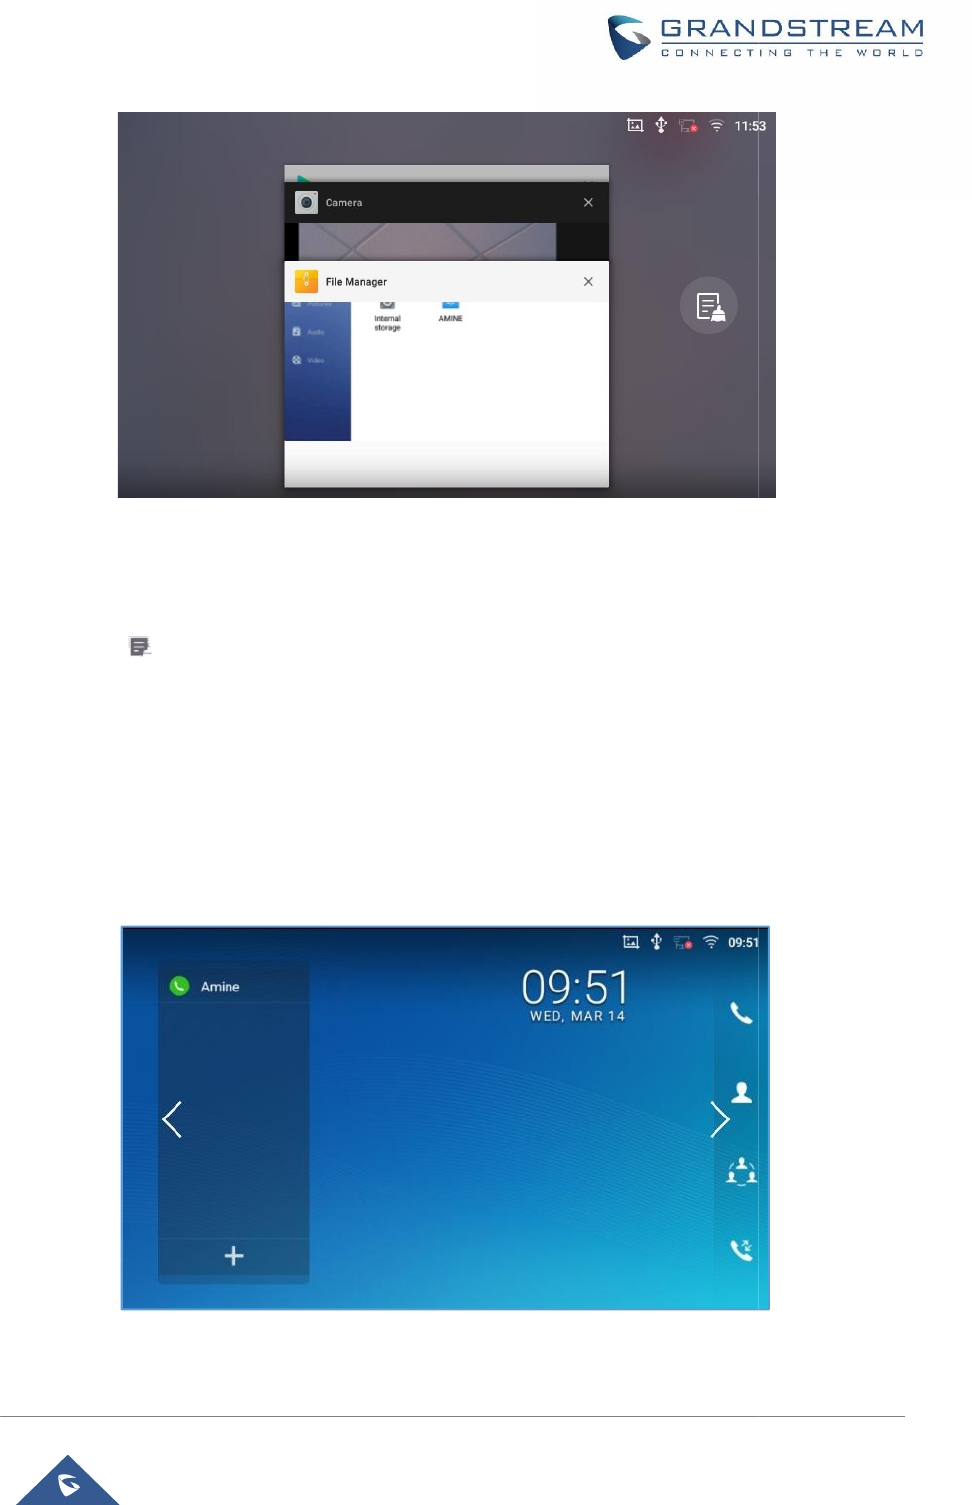
Figure
Users could use the thread manager to do the following:
·
Slide the running thread to the left or right to stop the
·
Tap on icon
to delete all running threads.
·
Tap on "Application" softkey to access application menu for advanced management options.
Idle Screen
Switch Idle Screens
The GXV3370
supports multiple idle screens by sliding the screen horizontally.
slightly touch an empty area and slide to the left or right using your finger to switch between different idle
screens.
Figure
GXV3370 User Guide
Version 1.0.0.4
Figure
17: GXV3370 Recent Applications
Users could use the thread manager to do the following:
Slide the running thread to the left or right to stop the
application.
to delete all running threads.
Tap on "Application" softkey to access application menu for advanced management options.
supports multiple idle screens by sliding the screen horizontally.
On the
GXV3370
slightly touch an empty area and slide to the left or right using your finger to switch between different idle
Figure
18: GXV3370 Switch Idle Screens
Page| 34
Tap on "Application" softkey to access application menu for advanced management options.
GXV3370
screen,
slightly touch an empty area and slide to the left or right using your finger to switch between different idle
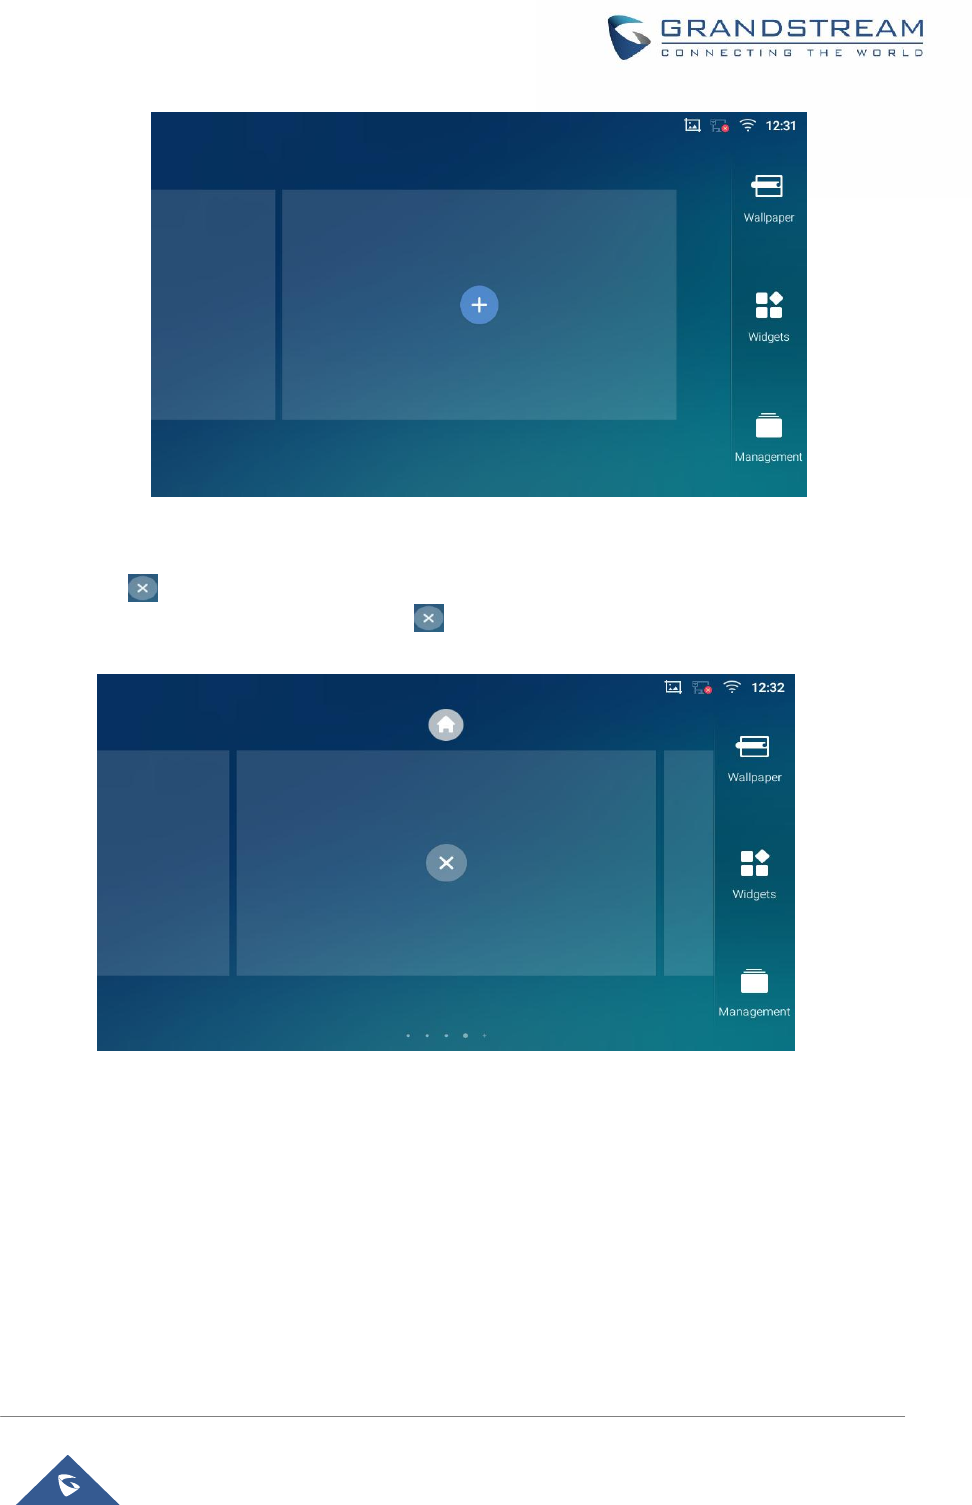
Set Up Idle Screen
·
Set home screen
Follow the
steps below to set up the HOME screen.
1. GXV3370
is up and running on
2. Press the MENU button
. This will zoom out all the screens as shown in
Home Idle Screen].
3. The screen with
displayed is the HOME screen. Others are shown with icon
to select the corresponding screen as the new HOME screen.
Figure
·
Add/Delete idle screen
As shown in [Figure 19:
Set up Home Idle Screen
Users could add or delete idle screen.
Ø Add idle screen.
Tap on
to add a new idle screen.
GXV3370 User Guide
Version 1.0.0.4
steps below to set up the HOME screen.
is up and running on
idle screen.
. This will zoom out all the screens as shown in
[
Figure
displayed is the HOME screen. Others are shown with icon
. Tap on the icon
to select the corresponding screen as the new HOME screen.
Figure
19: Set up Home Idle Screen
Set up Home Idle Screen
], this s
ectionshows the available desktop
Users could add or delete idle screen.
to add a new idle screen.
Page| 35
Figure
19: Set up
. Tap on the icon
ectionshows the available desktop
screens.
Page| 36
GXV3370 User Guide
Version 1.0.0.4
Figure 20: Add an Idle Screen
Ø Delete idle screen.
Tap on to delet the Idle screen. Please make sure the apps, shortcuts or widgets on the idle
screen are removed first. Otherwise, the icon won't show for the idle screen.
Figure 21: Delete an Idle Screen
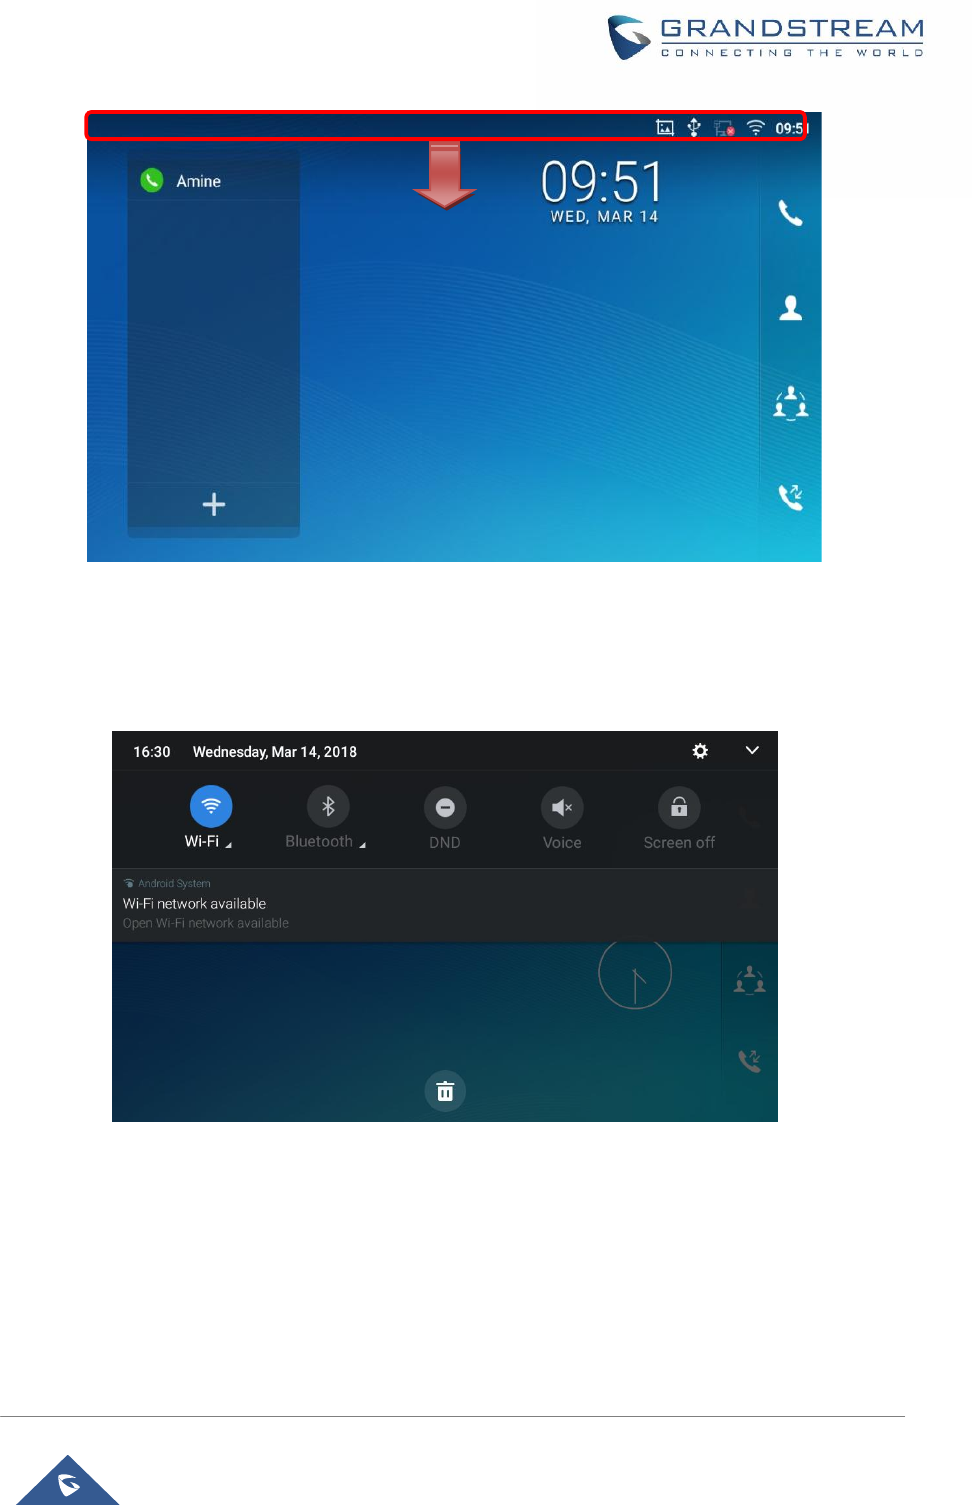
Use the Status Bar
The status bar on the top of the GXV3370 screen provides visual notifications for the system settings and
status, as well as quick access for important system settings. To access it, on the GXV3370 idle screen,
slowly slide down from the top to the bottom of the screen as the following figure shows.
Page| 37
GXV3370 User Guide
Version 1.0.0.4
Figure 22: GXV3370 Top Status Bar
The running process and notifications will show up in the list. For example, the following figures indicate
that there is a notification for an available Wi-Fi network.
Figure 23: GXV3370 Top Status Bar – Notification
·
Tap on the notification message to view the details.
·
Slide the notification message to the left or the right side to remove it.
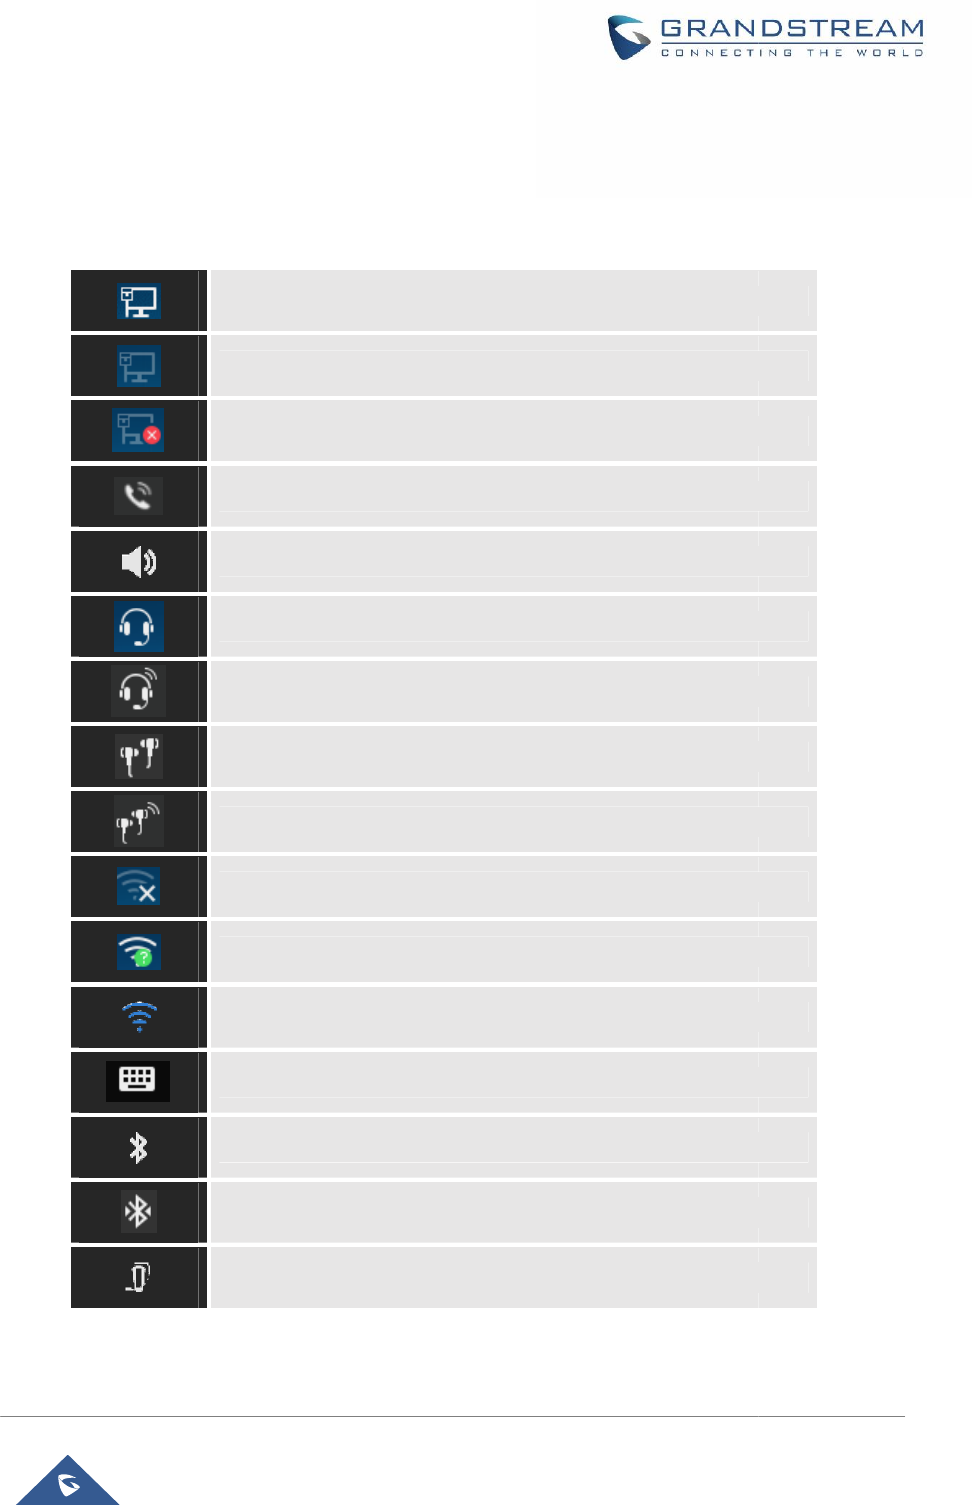
Notifications in Status Bar
The following table describes the icons used on the status bar for notification purpose.
Table
7
Network connected via Ethernet cable.
Trying to connect to the network via Ethernet cable.
Network disconnected via Ethernet cable.
Handset is off hook.
Speaker is being used.
RJ9 headset is
RJ9 headset
3.5mm earphone is connected
3.5mm earphone is being used for calls.
Wi-
Fi is enabled and still not
Wi-
Fi network is available.
Wi-
Fi is enabled and connected.
Onscreen keyboard is activated.
Bluetooth is enabled but not
Bluetooth is enabled and
Bluetooth headset is connected.
GXV3370 User Guide
Version 1.0.0.4
The following table describes the icons used on the status bar for notification purpose.
7
: GXV3370 Status Bar Notification Icons
Network connected via Ethernet cable.
Trying to connect to the network via Ethernet cable.
Network disconnected via Ethernet cable.
Handset is off hook.
Speaker is being used.
(x)
RJ9 headset is
connected.
RJ9 headset
is being used for calls.
3.5mm earphone is connected
.
3.5mm earphone is being used for calls.
Fi is enabled and still not
connected.
Fi network is available.
Fi is enabled and connected.
Onscreen keyboard is activated.
Bluetooth is enabled but not
connected.
Bluetooth is enabled and
connected.
Bluetooth headset is connected.
Page| 38
Bluetooth headset is being used for calls.
Downloading files via Bluetooth.
Alarm is set up and enabled.
DND is enabled.
Silent mode is enabled. When it's on, the
won't produce ring tone/notification tone from phone's speaker.
SD Card is inserted.
SD Card space full.
USB flash drive is inserted.
Downloading files via Internet connection.
Unread voicemail to be retrieved.
Incoming call from blacklist contact.
Camera is disabled.
Contact storage is full.
HDMI cable is connected to display device.
The phone is powered up using PoE.
Call forward is set up.
PPPoE is connected.
PPPoE is not connected.
Warning message.
GXV3370 User Guide
Version 1.0.0.4
Bluetooth headset is being used for calls.
Downloading files via Bluetooth.
Alarm is set up and enabled.
DND is enabled.
Silent mode is enabled. When it's on, the
incoming call/message
won't produce ring tone/notification tone from phone's speaker.
SD Card is inserted.
SD Card space full.
USB flash drive is inserted.
Downloading files via Internet connection.
Unread voicemail to be retrieved.
(x)
Incoming call from blacklist contact.
Camera is disabled.
Contact storage is full.
HDMI cable is connected to display device.
The phone is powered up using PoE.
Call forward is set up.
PPPoE is connected.
PPPoE is not connected.
Warning message.
Page| 39
incoming call/message
won't produce ring tone/notification tone from phone's speaker.
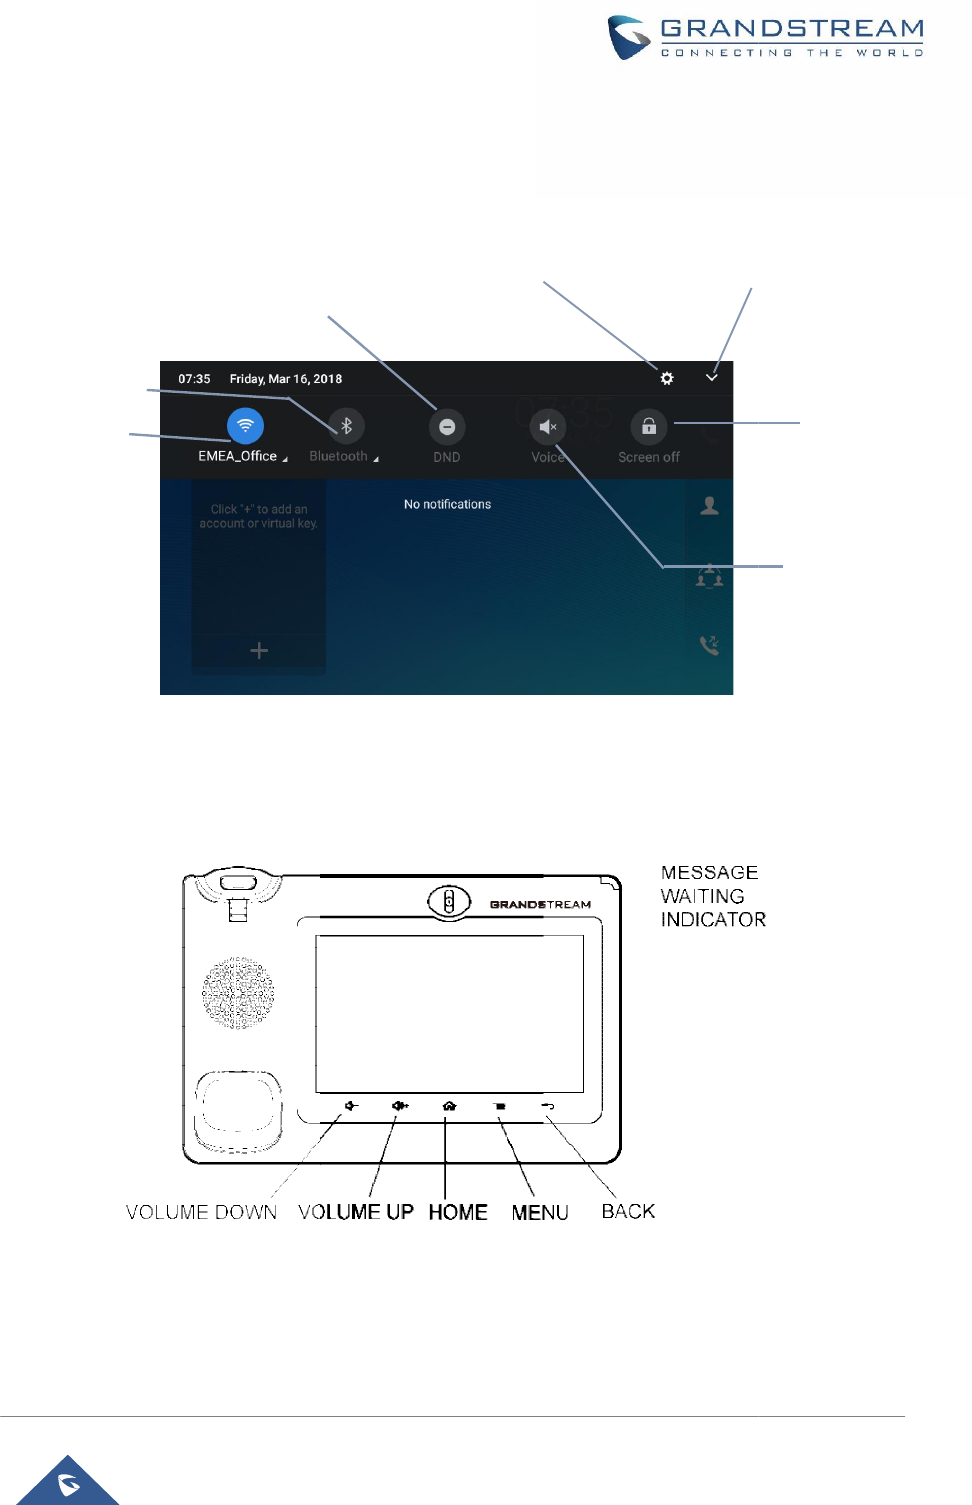
System Settings in Status Bar
Slide down the top status bar and select
Figure
Use the GXV3370Keys
Turn on/off DND. When DND is
on, all the calls to the registered
accounts will be blocked.
Turn on/off Bluetooth.
Turn on/off Wi-Fi.
GXV3370 User Guide
Version 1.0.0.4
Slide down the top status bar and select
System Settings
. Users will see the following settings.
Figure
24: System Settings in Status Bar
Figure 25: GXV3370 Keys
Turn on/off DND. When DND is
on, all the calls to the registered
accounts will be blocked.
Go to phone Settings
Show more options
Page| 40
. Users will see the following settings.
Turn on/off LCD display.
Turn on/off
the voice of
the phone
Show more options
Volume Down
Tap to turn down the call volume and media volume.
Volume Up
Tap to turn up the call volume and media volume.
Home
Tap to go back to
take a screenshot
Menu
Tap to view options for different screens or applications.
Back
Tap to go back to the previous menu.
Keypad Shortcut Functions
The GXV3370
supports keys shortcuts for certain special system functions.
·
Screenshot
Press and hold the Home button
be accessed via FileManagerà
Pictures
·
Firmware upgrade via SD card
For users
that could not use remote upgrade or could not access the phone's Web GUI to upload firmware,
upgrading via external
SD card is an alternative. Follow the steps below to upgrade GXV3370 via SD card.
1. Download the firmw
are file to PC and save it in SD card
2. Insert the SD card to GXV3370.
3. Power cycle the GXV3370 and
the 5 LCD keys on the bottom of the screen will light up
4.
Wait for the LCD keys light to turn off.
5.
Once the light is off, immediately press and hold both keys
(the third LCD key from the left) at the same time.
6.
Release the keys when the LCD screen displays the upgrading bar.
7. The GXV3370 will
start upgrading and
8. Wait until the upgrading is done.
9. The GXV3370 will reboot itself.
10.
Check the firmware status and remove the SD card.
GXV3370 User Guide
Version 1.0.0.4
Table 8: GXV3370 Keys
Tap to turn down the call volume and media volume.
Tap to turn up the call volume and media volume.
Tap to go back to
Home
screen; or touch and press for about 2 seconds
take a screenshot
Tap to view options for different screens or applications.
Tap to go back to the previous menu.
supports keys shortcuts for certain special system functions.
for about 2
seconds to capture screenshot. The screenshot can
Pictures
. The screenshot picture size is 1024x600 pixels.
that could not use remote upgrade or could not access the phone's Web GUI to upload firmware,
SD card is an alternative. Follow the steps below to upgrade GXV3370 via SD card.
are file to PC and save it in SD card
.
the 5 LCD keys on the bottom of the screen will light up
Wait for the LCD keys light to turn off.
Once the light is off, immediately press and hold both keys
(the first LCD key from the left) and
(the third LCD key from the left) at the same time.
Release the keys when the LCD screen displays the upgrading bar.
start upgrading and
display the upgrading process in the screen.
Check the firmware status and remove the SD card.
Page| 41
screen; or touch and press for about 2 seconds
to
seconds to capture screenshot. The screenshot can
. The screenshot picture size is 1024x600 pixels.
that could not use remote upgrade or could not access the phone's Web GUI to upload firmware,
SD card is an alternative. Follow the steps below to upgrade GXV3370 via SD card.
the 5 LCD keys on the bottom of the screen will light up
.
(the first LCD key from the left) and
Page| 42
GXV3370 User Guide
Version 1.0.0.4
Note:
Upgrading via USB storage device is not supported on the GXV3370.
Use the On-Screen Keyboard
The GXV3370 onscreen keyboard can be activated by tapping on an input field.
·
English Keyboard
This is the default keyboard on GXV3370.
Figure 26: GXV3370 Onscreen Keyboard - English Keyboard
To switch input between lowercase and uppercase, tap on (lowercase) or (uppercase).
Figure 27: GXV3370 Onscreen Keyboard - Lowercase and Uppercase
·
Number and symbols
To input number and symbols, tap
to switch back.
Figure
28
Tap on
to access more symbols.
Figure
Note:
·
To configure keyboard and input options, go to
Keyboard & Input Methods.
·
Users could touch and press the key on the keyboard for about 2 seconds to input the alternative
character. For example, touch and
GXV3370 User Guide
Version 1.0.0.4
To input number and symbols, tap
on the default keyboard to switch to number/symbols. Tap on
28
:English Keyboard - Number and Symbols
to access more symbols.
Figure
29: English Keyboard - More Symbols
To configure keyboard and input options, go to
SettingsàBasicà
Language & Keyboard
Users could touch and press the key on the keyboard for about 2 seconds to input the alternative
press the "+" key for about 2 seconds can get the selection "±".
Page| 43
on the default keyboard to switch to number/symbols. Tap on
Language & Keyboard
Users could touch and press the key on the keyboard for about 2 seconds to input the alternative
press the "+" key for about 2 seconds can get the selection "±".

Page| 44
GXV3370 User Guide
Version 1.0.0.4
Use the Message Waiting Indicator
The GXV3370 message waiting indicator LED is on the upper right corner of the device. It could notify the
users with different messages and status of the phone. Please refer to the status description below. The
priority for the LED indicator is from high to low in the following table.
Table 9: GXV3370 MWI LED Status
Color
LED Status Description
Fast Flashing Incoming call
Solid Calling, Talking, Conferencing, Screensaver on when the
LCD is off
Slow Flashing
A call is on hold
Flashing Missed call (s), New voicemail (s), New SIP Message (s)
Solid High memory usage, Maximum contact storage
Fast Flashing Upgrading
OFF OFF Normal
Page| 45
GXV3370 User Guide
Version 1.0.0.4
MAKE PHONE CALLS
Register SIP Accounts
The GXV3370 supports up to 16 independent SIP accounts, including. Each account can have separate
SIP servers, usernames and NAT configurations.
Account Status
On the idle screen, the account widget shows the account name, and registration status.
·
The following figure shows the account is successfully registered (account icon is green).
·
If the account icon is grey, it's still trying to register or unable to register.
Figure 30: GXV3370 Account Widget
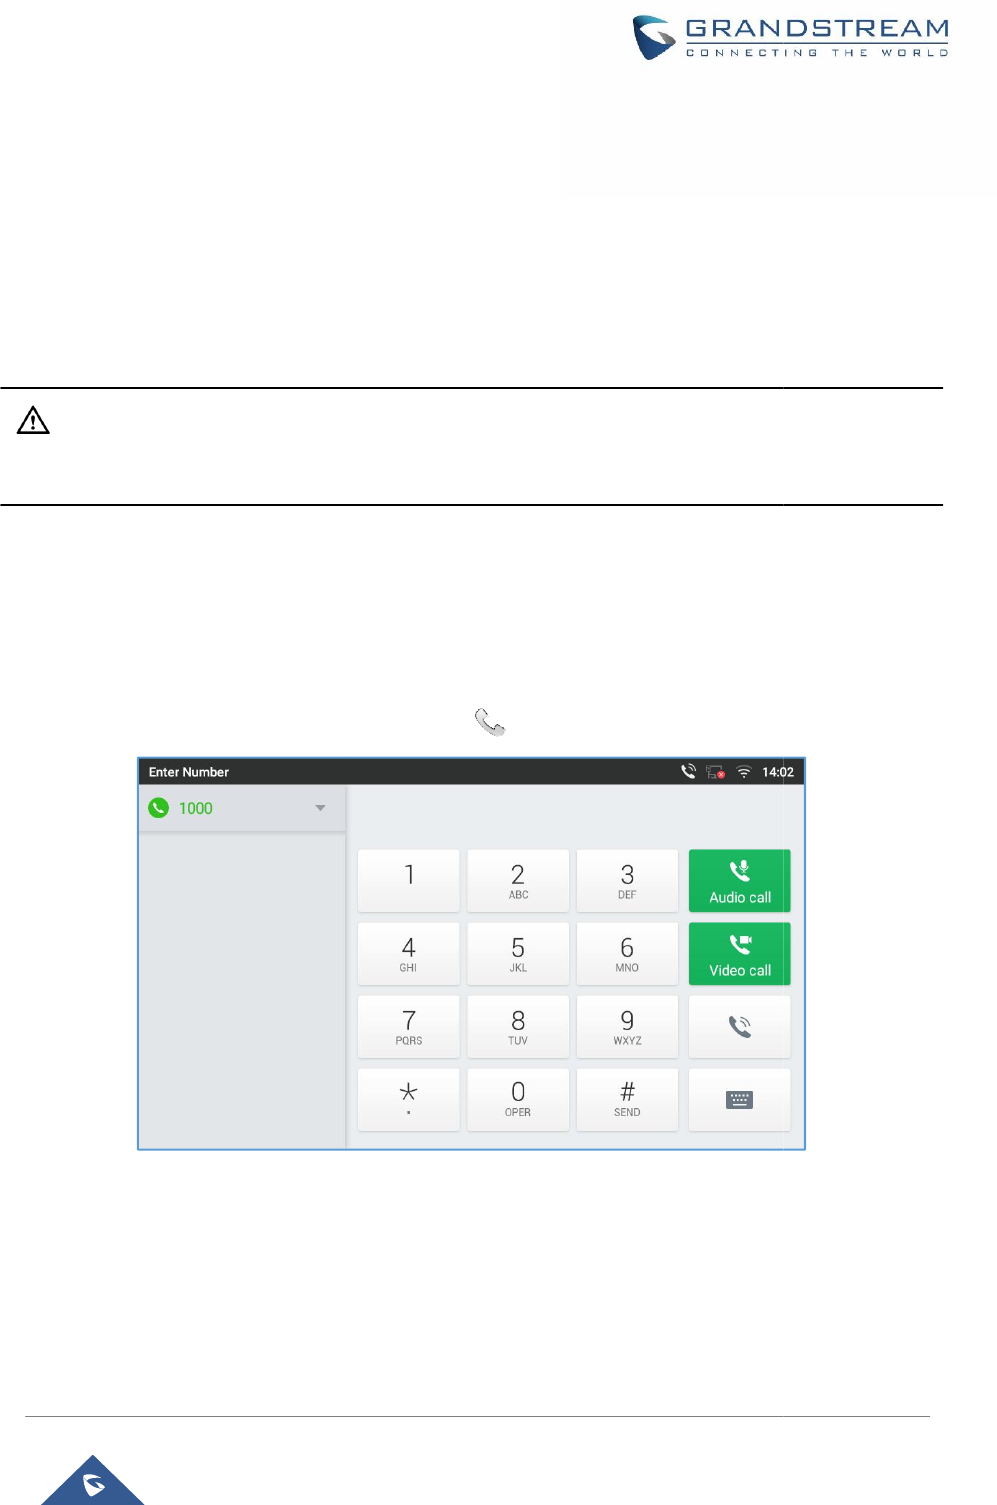
Configure SIP Account
To register a SIP account,
users can access
Settings
Or users could log in the
GXV3370
information, i.e., Account active, Account name, SIP Server, SIP User ID, SIP Authentic ID, SIP Authentic
Password, etc. Once the correct information is entered and saved, the account registration status will sho
on the main screen.
Note:
For web GUI login and configuration information, please refer to
If the account is successfully registered, users could use one of the following ways to bring up dial screen
to start making calls.
·
Take the handset off hook.
·
Select an account from the account widget in the idle screen.
·
On the shortcuts menu
of the idle screen, tap on
If Disable Video Call Feature
option is enabled, the
available
GXV3370 User Guide
Version 1.0.0.4
users can access
phone's LCD menuàSettingsà
Advanced
GXV3370
web GUIàAccount
page to fill in the necessary registration
information, i.e., Account active, Account name, SIP Server, SIP User ID, SIP Authentic ID, SIP Authentic
Password, etc. Once the correct information is entered and saved, the account registration status will sho
For web GUI login and configuration information, please refer to
GXV3370
Administration Guide.
If the account is successfully registered, users could use one of the following ways to bring up dial screen
Select an account from the account widget in the idle screen.
of the idle screen, tap on
icon to open dial screen.
Figure 31: GXV3370 Dial Screen
option is enabled, the
Video Call option on GXV3370
dial screen
Page| 46
Advanced
àAccount
page to fill in the necessary registration
information, i.e., Account active, Account name, SIP Server, SIP User ID, SIP Authentic ID, SIP Authentic
Password, etc. Once the correct information is entered and saved, the account registration status will sho
w
Administration Guide.
If the account is successfully registered, users could use one of the following ways to bring up dial screen
dial screen
won’t be
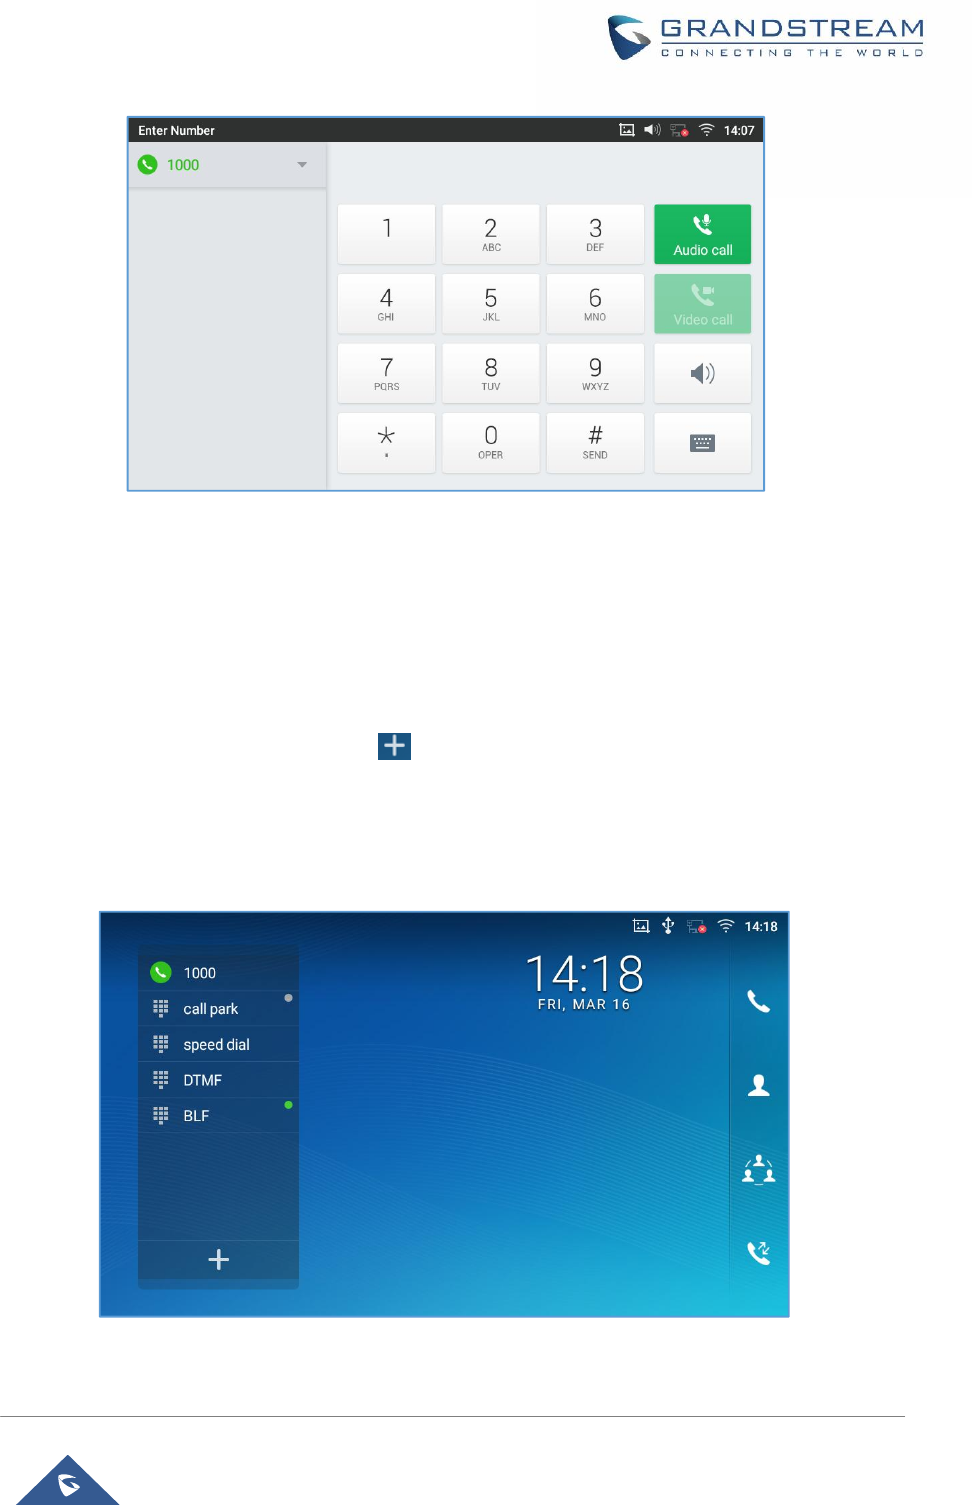
Page| 47
GXV3370 User Guide
Version 1.0.0.4
Figure 32: Disable Video Call Feature on Dial Screen
Set Programmable Keys
GXV3370 allows end users to setup shortcut keys on the Account Widget. Users can only set the
programmable keys from the phone LCD.
There are two ways to set up the programmable keys:
-On the Idle screen, press the plus sign at the bottom of the Account Widget the press Add
Programmable Keys and fill in the details.
or
-Enter the phone SettingsàFeaturesàAccount Programable key then press Add Programmable Keys.
Figure 33: GXV3370 Programmable Keys
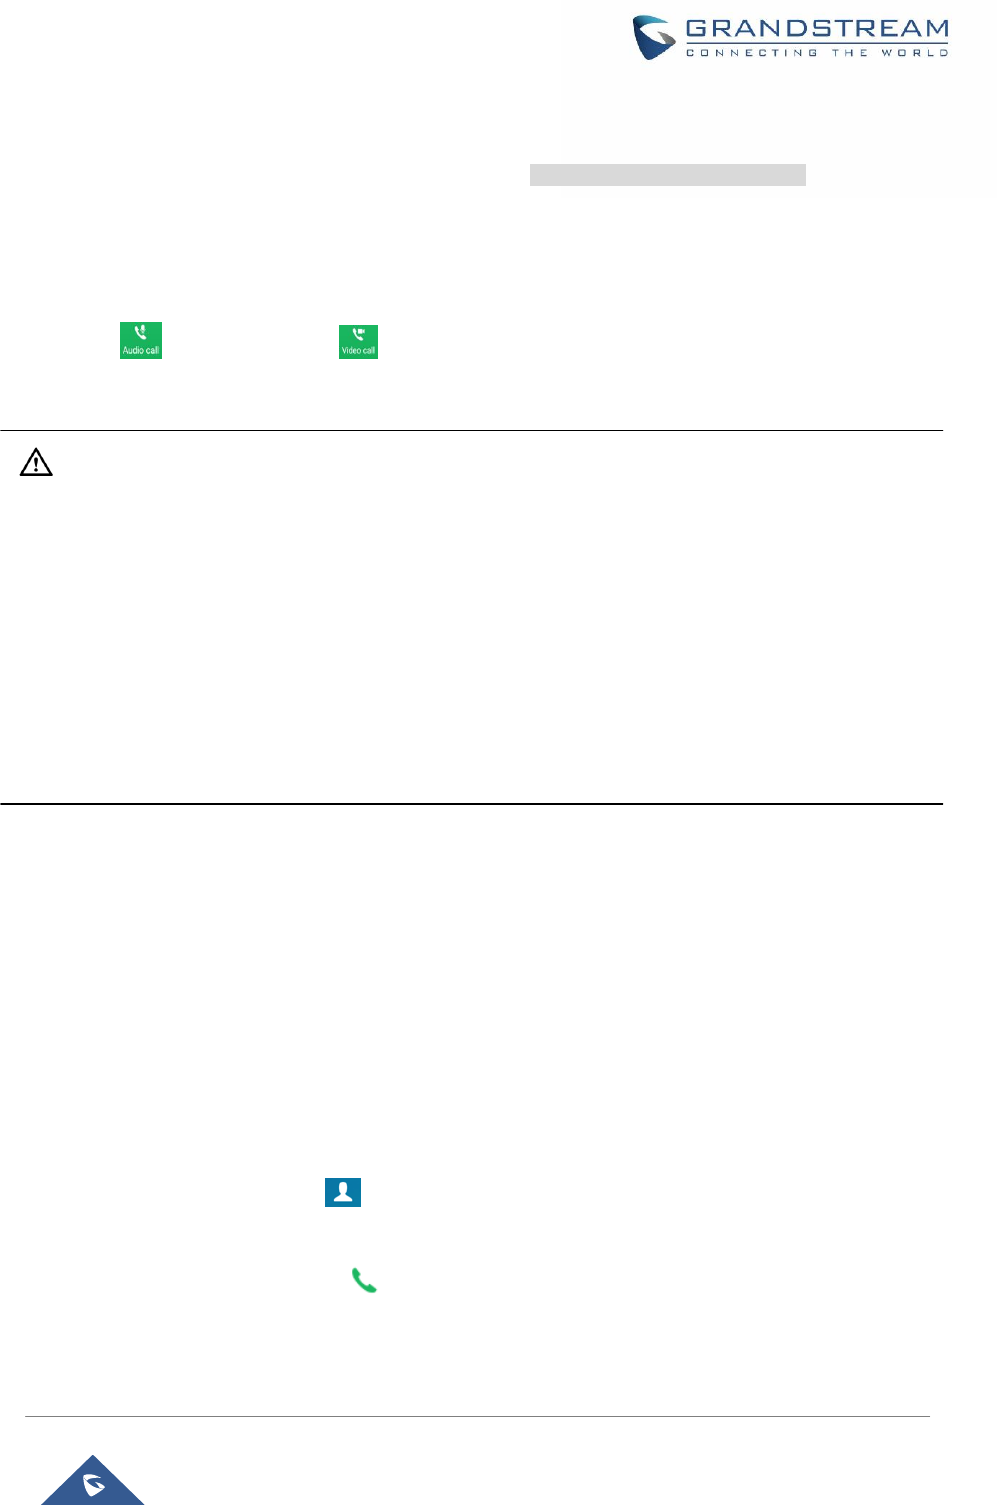
Page| 48
GXV3370 User Guide
Version 1.0.0.4
Dial a Number Directly
1. Use the methods mentioned above to open dial screen [Figure 31: GXV3370 Dial Screen].
2. Select the account to dial out on the left panel of the dial screen. The selected account will be
displayed in green
3. Enter the digits to be dialed out using the keypad. If the digit matches call history, a list of numbers will
be displayed for users to select from.
4. Tap on (audio call only) or (video call) to send the number. If no key is pressed, by default
the call will be automatically dialed out after 4 seconds timeout.
Note:
·
By default, the "No Key Entry Timeout" is 4 seconds, meaning if no key is pressed after entering a
number, the call will be automatically sent out after the timeout. The timeout interval can be configured
under web GUIàAccountàCall Settings.
·
GXV3370 allows users to press # key as SEND key. This behavior can be disabled via option "Use #
as Dial Key" under web GUIàAccountàCall Settings.
·
When the user enters the digit on the dial screen, if there is digit matching call history, or contacts
name/number, the drop-down list will show the numbers. For example, if "John" is saved in the
contacts, entering 5 (JKL) 6 (MNO) 4 (GHI) 6 (MNO) will show call log with 5646 as the first four digits,
as well as John's number. Users could then directly select one of them from the list, instead of entering
all the digits.
Redial
Users can dial out the last dialed number if there is dialed call log, using the same SIP account making the
call last time.
1. Enter the dial screen.
2. A list of dialed calls will be displayed on the left side of the dial pad. Tap on the number you would like
to call, the number will be added to the dialing field, press Audio call or Video call to redial.
Dial a Number via Contact
Follow the steps below to dial a number via Contact.
1. Access Contacts by tapping on icon on the left side of the idle screen.
2. Navigate in the contacts entries by sliding up/down on the screen.
3. Tap on the dial icon for the contact .
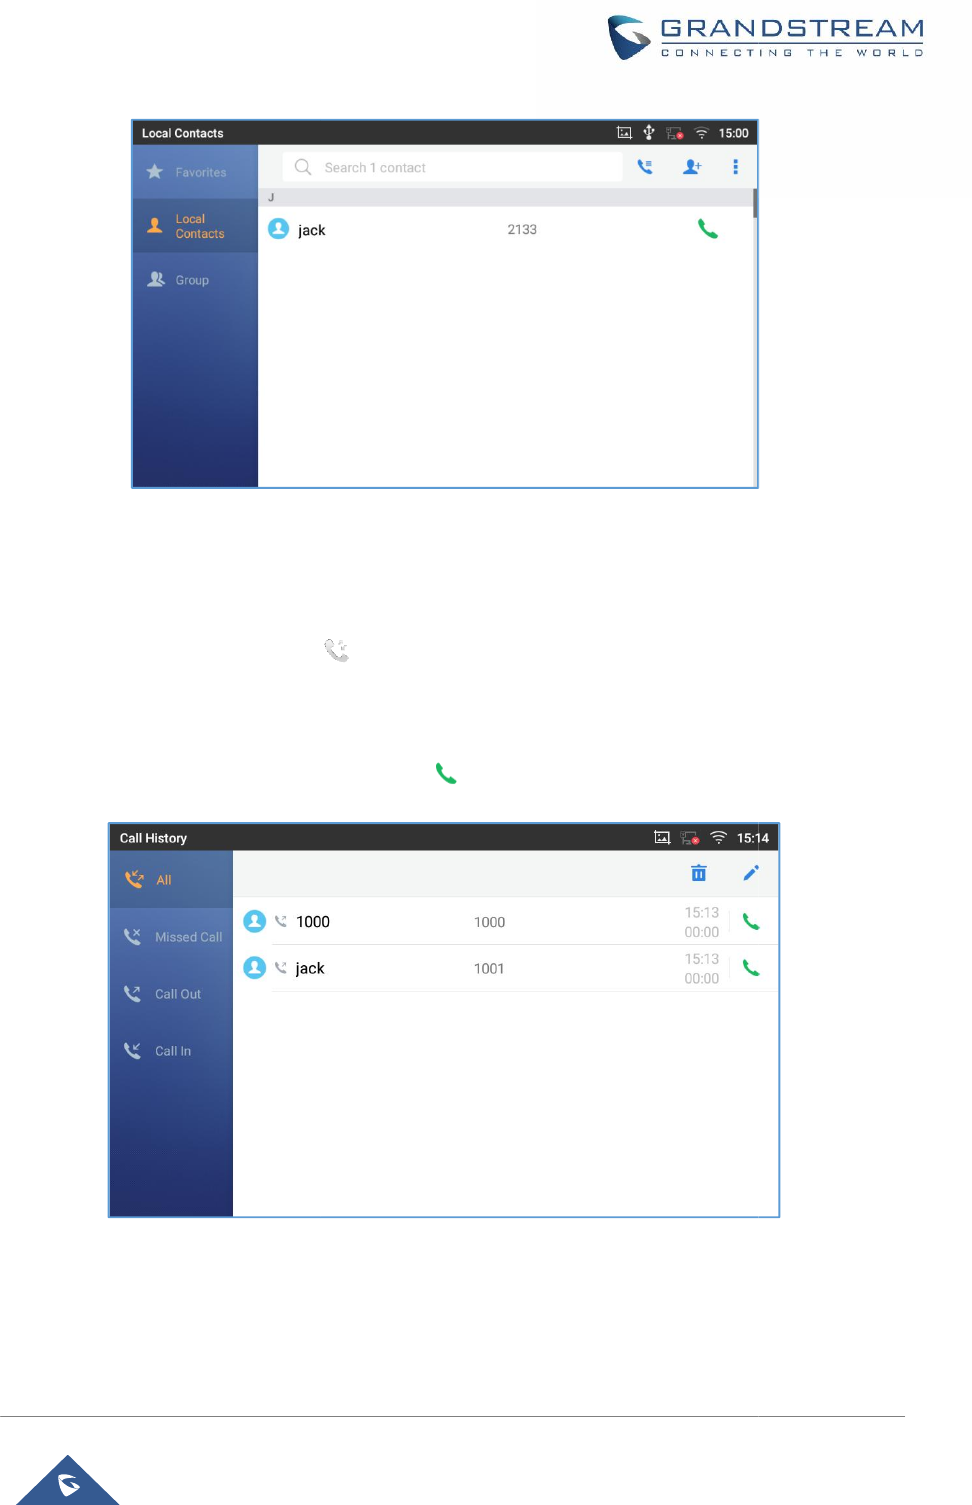
Figure
Dial a Number via
Call History
1. Access
Call History by tapping on
2.
The LCD will display all call history types: "All", "Missed", "Outgoing" and "Incoming" calls.
3. Navigate in the call
history list by selecting the call history category and sliding up/down on the screen.
4. Tap on the entry
to show more details or tap on
GXV3370 User Guide
Version 1.0.0.4
Figure
34: GXV3370 View Contacts
Call History
Call History by tapping on
icon on the bottom of the idle screen.
The LCD will display all call history types: "All", "Missed", "Outgoing" and "Incoming" calls.
history list by selecting the call history category and sliding up/down on the screen.
to show more details or tap on
to dial out.
Figure 35: GXV3370 Call History
Page| 49
The LCD will display all call history types: "All", "Missed", "Outgoing" and "Incoming" calls.
history list by selecting the call history category and sliding up/down on the screen.
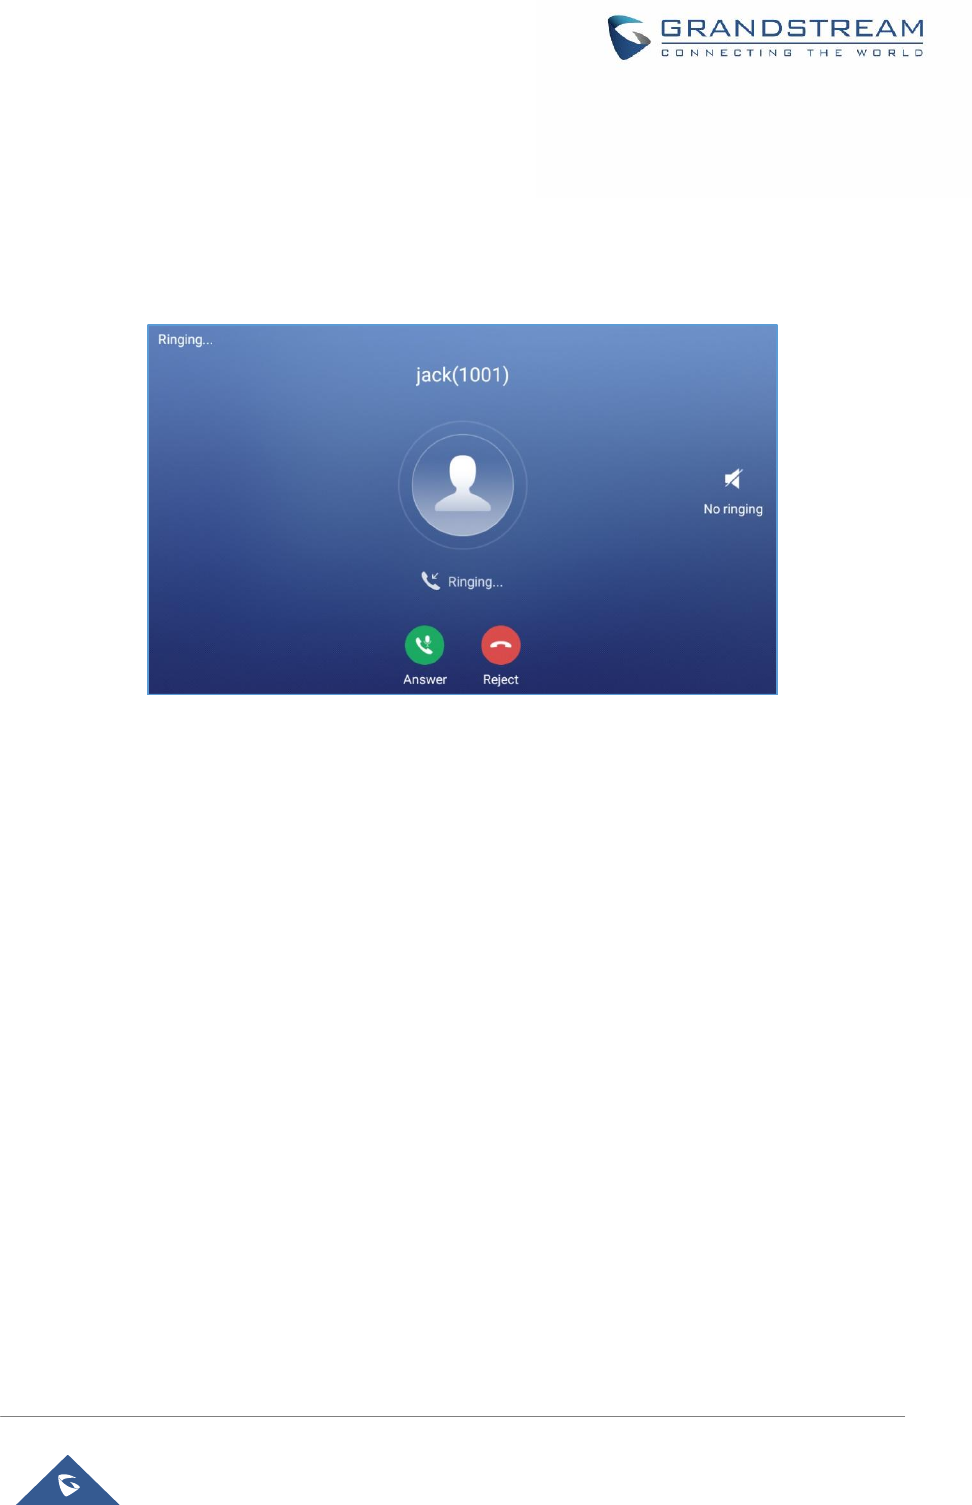
Page| 50
GXV3370 User Guide
Version 1.0.0.4
Answer a Call
Single Incoming Call
·
When the phone is in idle and there is an incoming audio call, the phone will show the call screen as
below. Tap on "Answer" softkey to answer the call via speaker or pick up the handset the answer the
call.
Figure 36: Single Incoming Call – Audio
·
When the phone is in idle and there is an incoming video call, the phone will show the call screen as
below. To answer the call with audio only, tap on "Audio" to answer the call via speaker. To answer the
call with both audio and video, tap on "Video". During video call or pick up the handset. the audio will
switch to handset if picking up the handset.
Note: Users could select the Video Display Mode on phone’s Web UIàPhone SettingsàVideo
Settings. Set the video display mode to "Original proportion", "Equal proportional cutting" or
"Proportional add black edge".
If set to "Original proportion", the phone displays video in its original proportion. If the video display
proportion is different from the one of the phone, the phone will stretch or compress video to display it. If
set to "Equal proportional cutting", the phone will cut video to meet its own display proportion. If set to
"Proportional add black edge", the phone will display video in its original proportion, if still exists spare
space, the phone will add black edge on it.
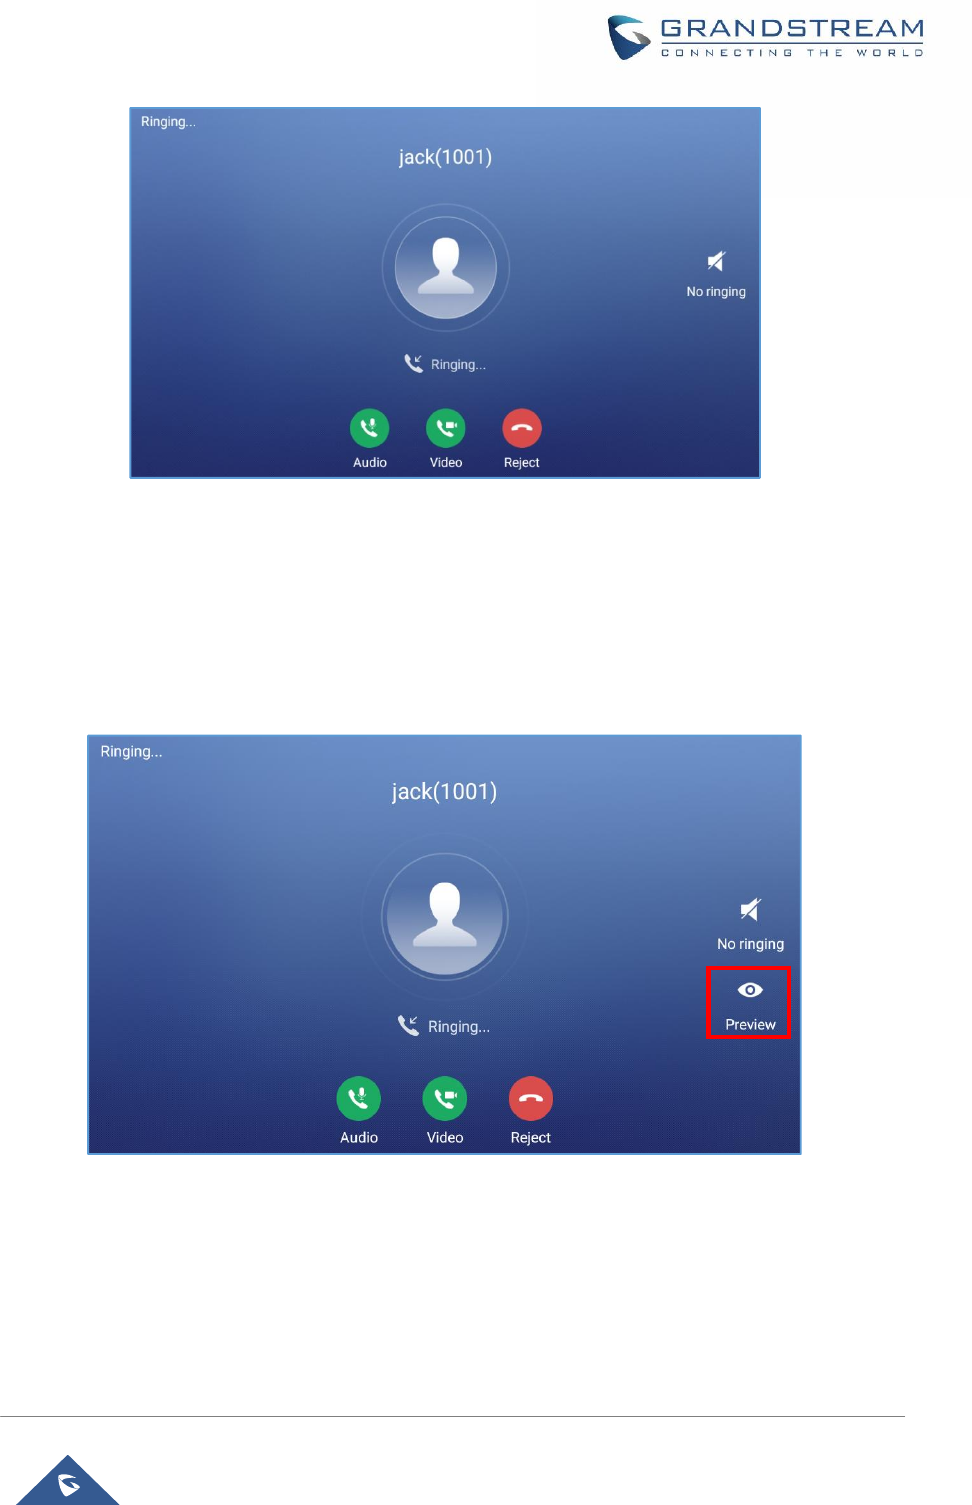
Page| 51
GXV3370 User Guide
Version 1.0.0.4
Figure 37: Single Incoming Call – Video
·
If the phone set the “Preview” feature for the incoming call from Web UI, the phone will display one
more key “Preview” when there is an incoming video call. End users will preview the remote end
without answering the video call. After previewing, end user can tap on Answer key to answer the
video call, or “Reject” key to reject it. This feature should be supported by the SIP server. Please
contact service provider for more information.
Figure 38: Single Incoming Call – Preview-1
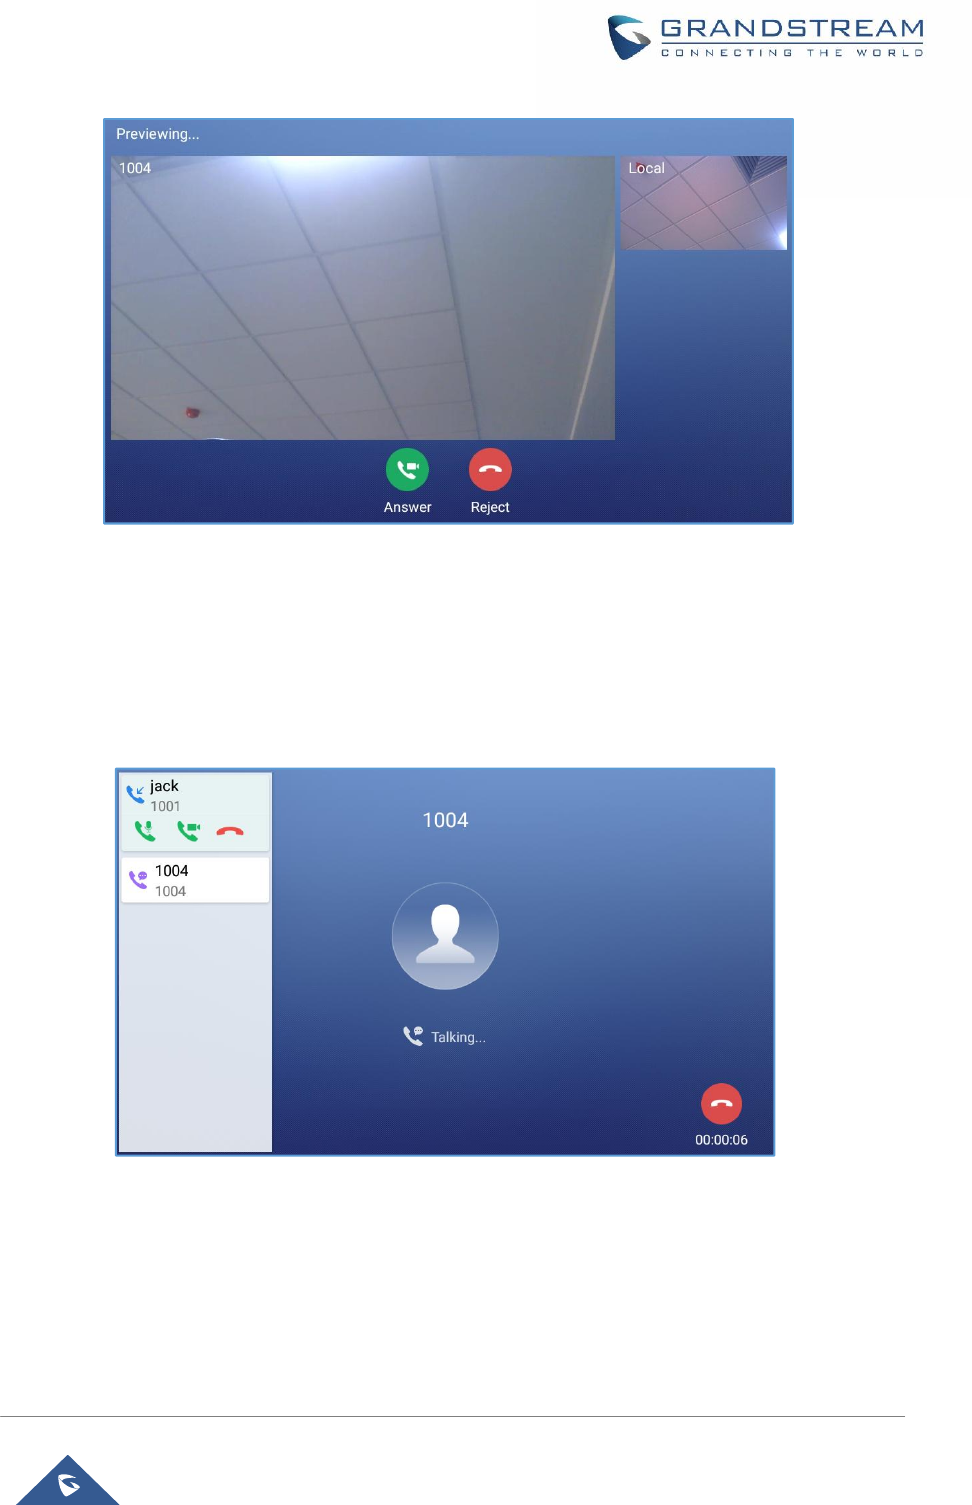
Page| 52
GXV3370 User Guide
Version 1.0.0.4
Figure 39: Single Incoming Call – Preview-2
Multiple Calls/Call Waiting
1. When there is another incoming call during active call, users will hear a call waiting tone, with the LCD
displaying the caller name and ID for the incoming call. In the prompt window, it shows new incoming
call from "Bill" with the caller number; the account bar in purple is the current active call with "Ricky".
Figure 40: Call Waiting
2. Similar to single incoming call, if the incoming call is video call, users can choose to Audio Answer or to
Video Answer
3. Once the new call is answered, the current active call will be placed on hold. If the new call is rejected
by tapping on "Reject" softkey, the current active call will not be interrupted.
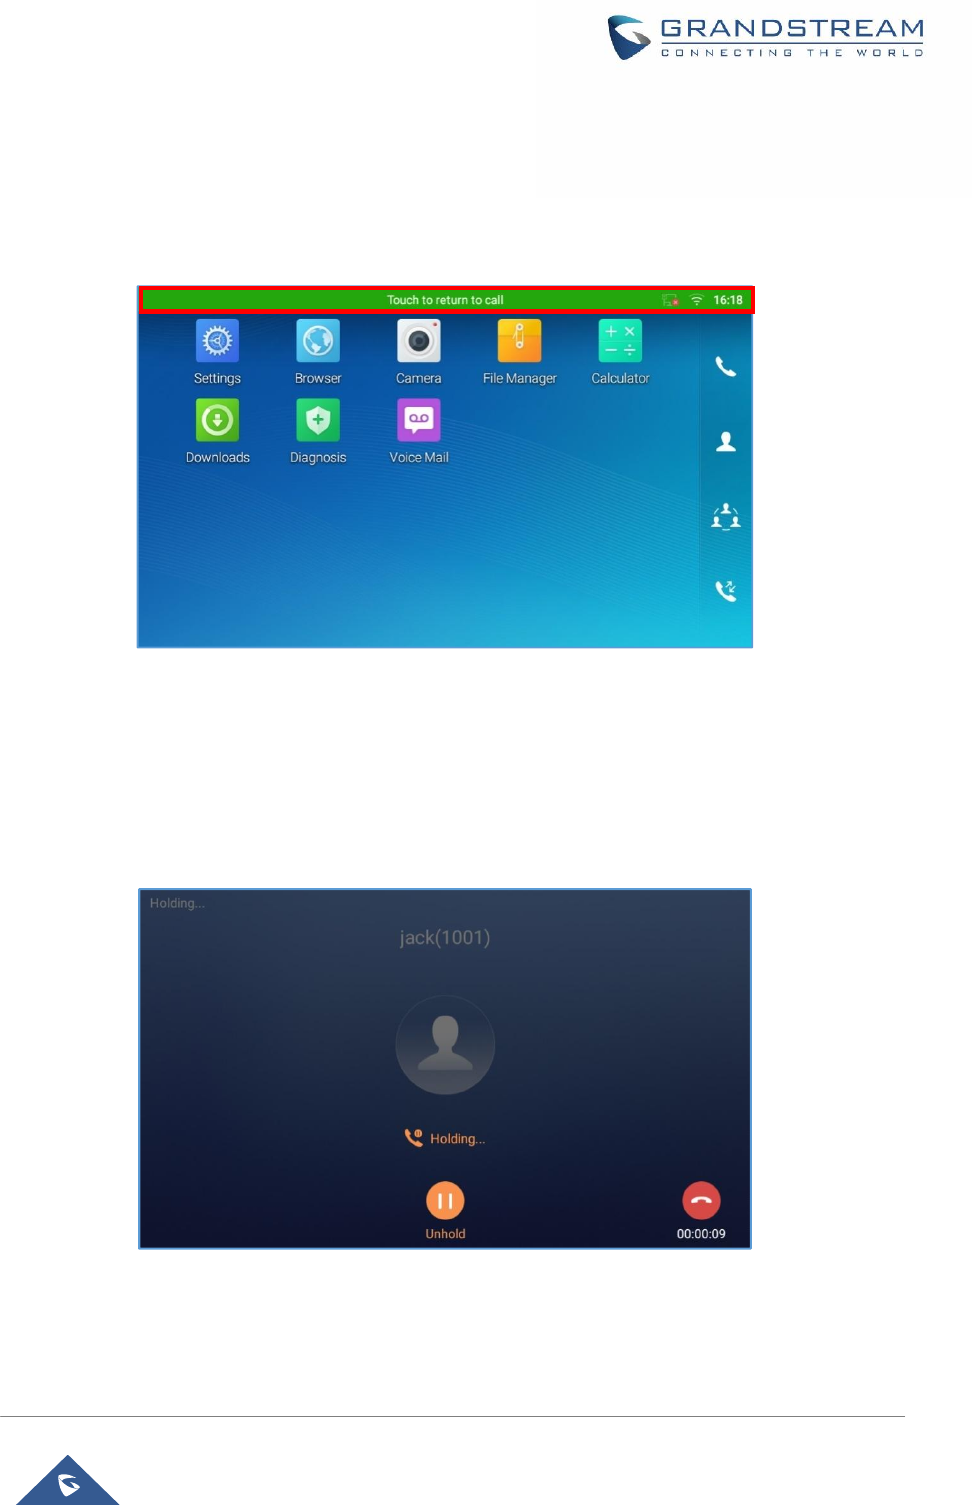
Page| 53
GXV3370 User Guide
Version 1.0.0.4
Call Progress Status
During an active call if Home Button is pressed, the phone will go back to the home screen and the
call-in-progress status will be shown on the GXV3370 status bar, once clicking the bar it will go back to call
screen.
Figure 41: Touch to Return to Call Screen
Call Hold
During the active call, press HOLD softkey on the bottom of the screen to put the call on hold. The LCD
screen will show as below. To resume the call, press UNHOLD softkey on the bottom of the screen.
Figure 42: Call on Hold
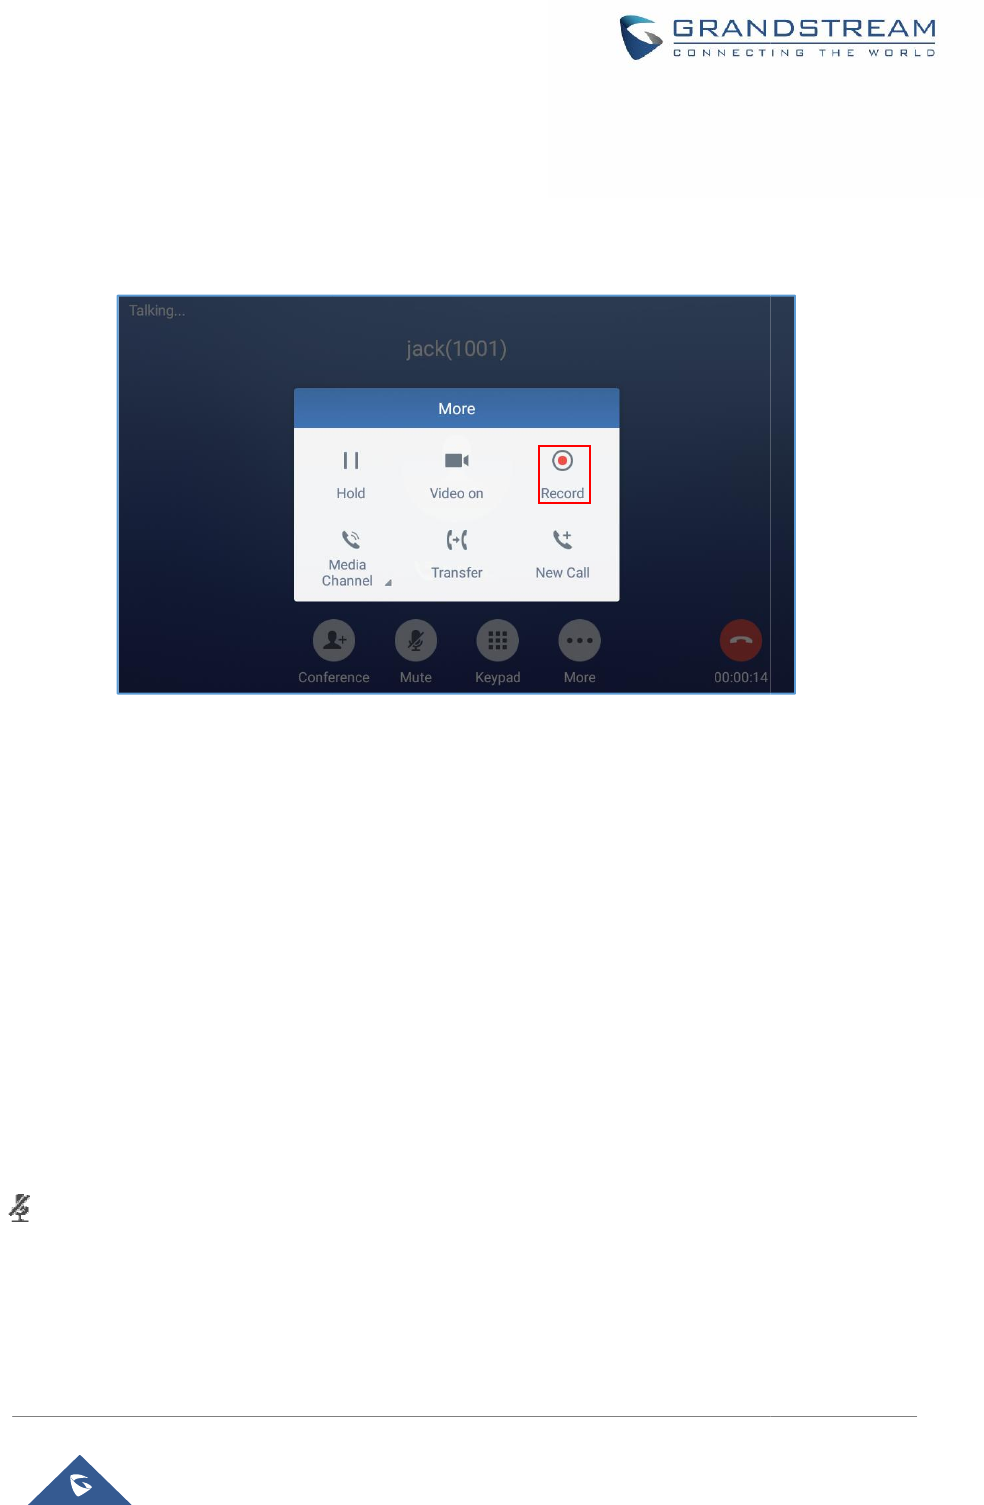
Call Recording
1. During the call, users could re
cord the conversation to
Recording" on the call screen.
2. If need to sto
p the recording, tap on "More"
3.
The recording files can be retrieved from the
Figure
Notes:
Users can configure the
recording mode via the Web GUI
Mode. Three modes are available:
·
Record Locally: T
he phone will use the local tape recorder for call recording, and the audio file will
be saved in accordance with the tape recorder setup.
·
Record on PortaOne: T
he phone will send SIP INFO message with “record” header to the server.
·
Record on UCM: The pho
ne will send the recording feature code to the UCM server to request for
recording and the recording function will be executed by the UCM.
Mute
During an active call, press the MUTE softkey
will be displayed in the status bar on the top of the screen. Press the UNMUTE softkey on the bottom
of the screen to unmute the call.
GXV3370 User Guide
Version 1.0.0.4
cord the conversation to
the phone by tapping on "More"
p the recording, tap on "More"
à"Stop Recording" or hang up the call.
The recording files can be retrieved from the
GXV3370 application "Recorder"à"
Call" category.
Figure
43: GXV3370 Call Recording
recording mode via the Web GUI
àAdvanced Settingsà
Call features
he phone will use the local tape recorder for call recording, and the audio file will
be saved in accordance with the tape recorder setup.
he phone will send SIP INFO message with “record” header to the server.
ne will send the recording feature code to the UCM server to request for
recording and the recording function will be executed by the UCM.
During an active call, press the MUTE softkey
on the bottom of the screen to mute the call. The mute icon
will be displayed in the status bar on the top of the screen. Press the UNMUTE softkey on the bottom
Page| 54
the phone by tapping on "More"
à"Start
Call" category.
Call features
àRecord
he phone will use the local tape recorder for call recording, and the audio file will
he phone will send SIP INFO message with “record” header to the server.
ne will send the recording feature code to the UCM server to request for
on the bottom of the screen to mute the call. The mute icon
will be displayed in the status bar on the top of the screen. Press the UNMUTE softkey on the bottom
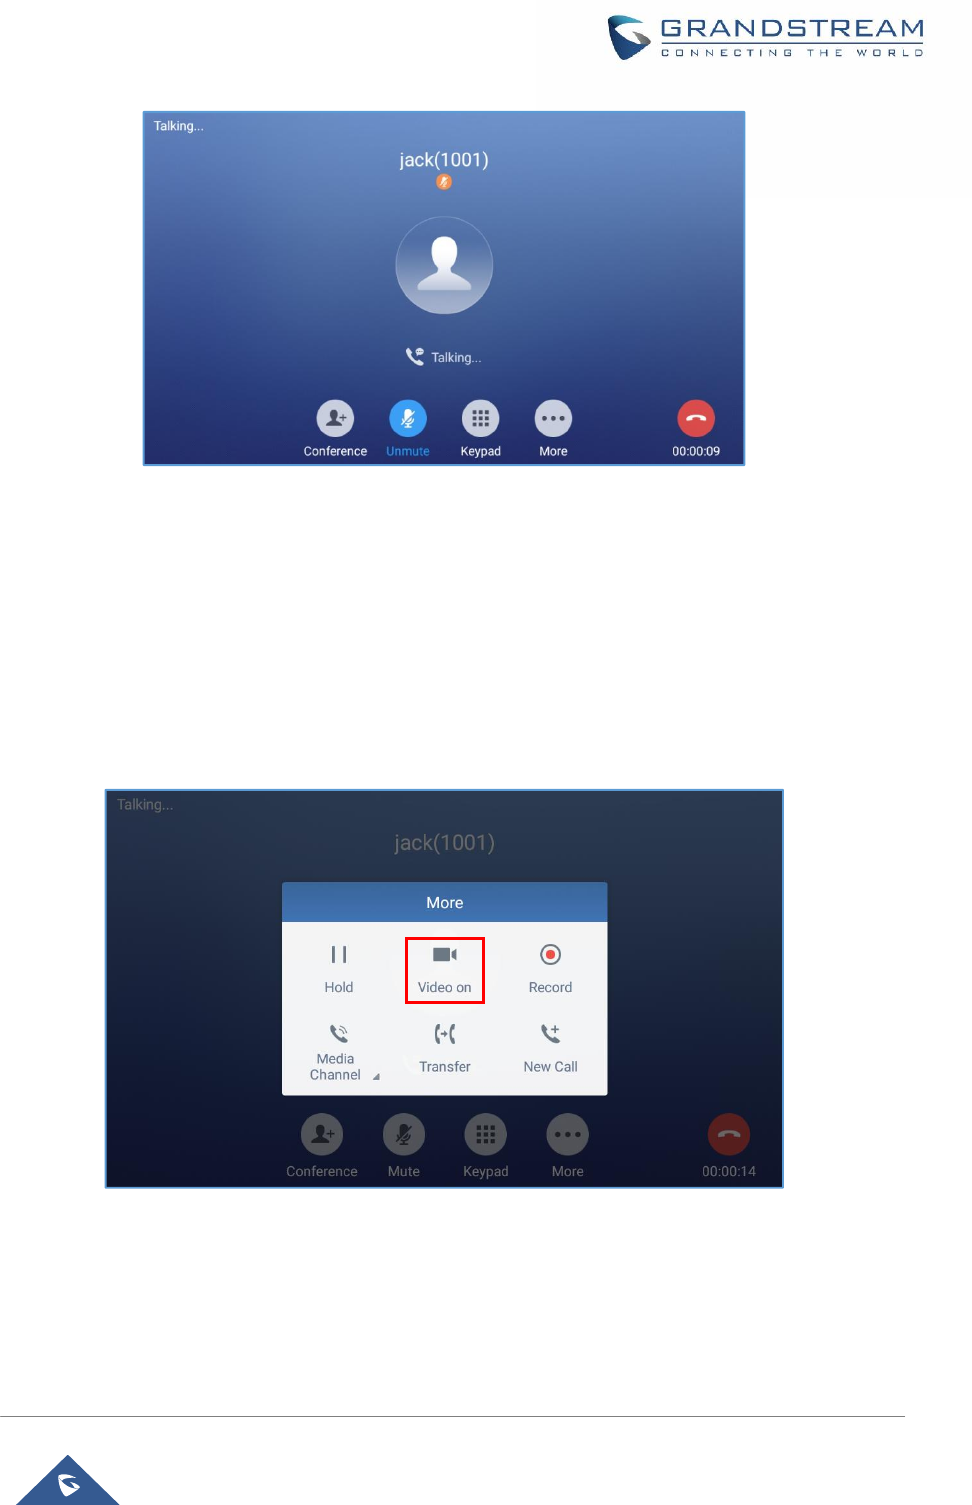
Page| 55
GXV3370 User Guide
Version 1.0.0.4
Figure 44: GXV3370 Call Mute
Turn on Video during Audio Call
Users could establish audio call first and then turn on video or accept video request during the call if the
other party supports video call as well.
·
Turn on video during audio call
During an active audio call, on the call screen, tap on "More" and select "Video On", a video request
will be sent to the other party.
Figure 45: Turn on Video During Audio Call
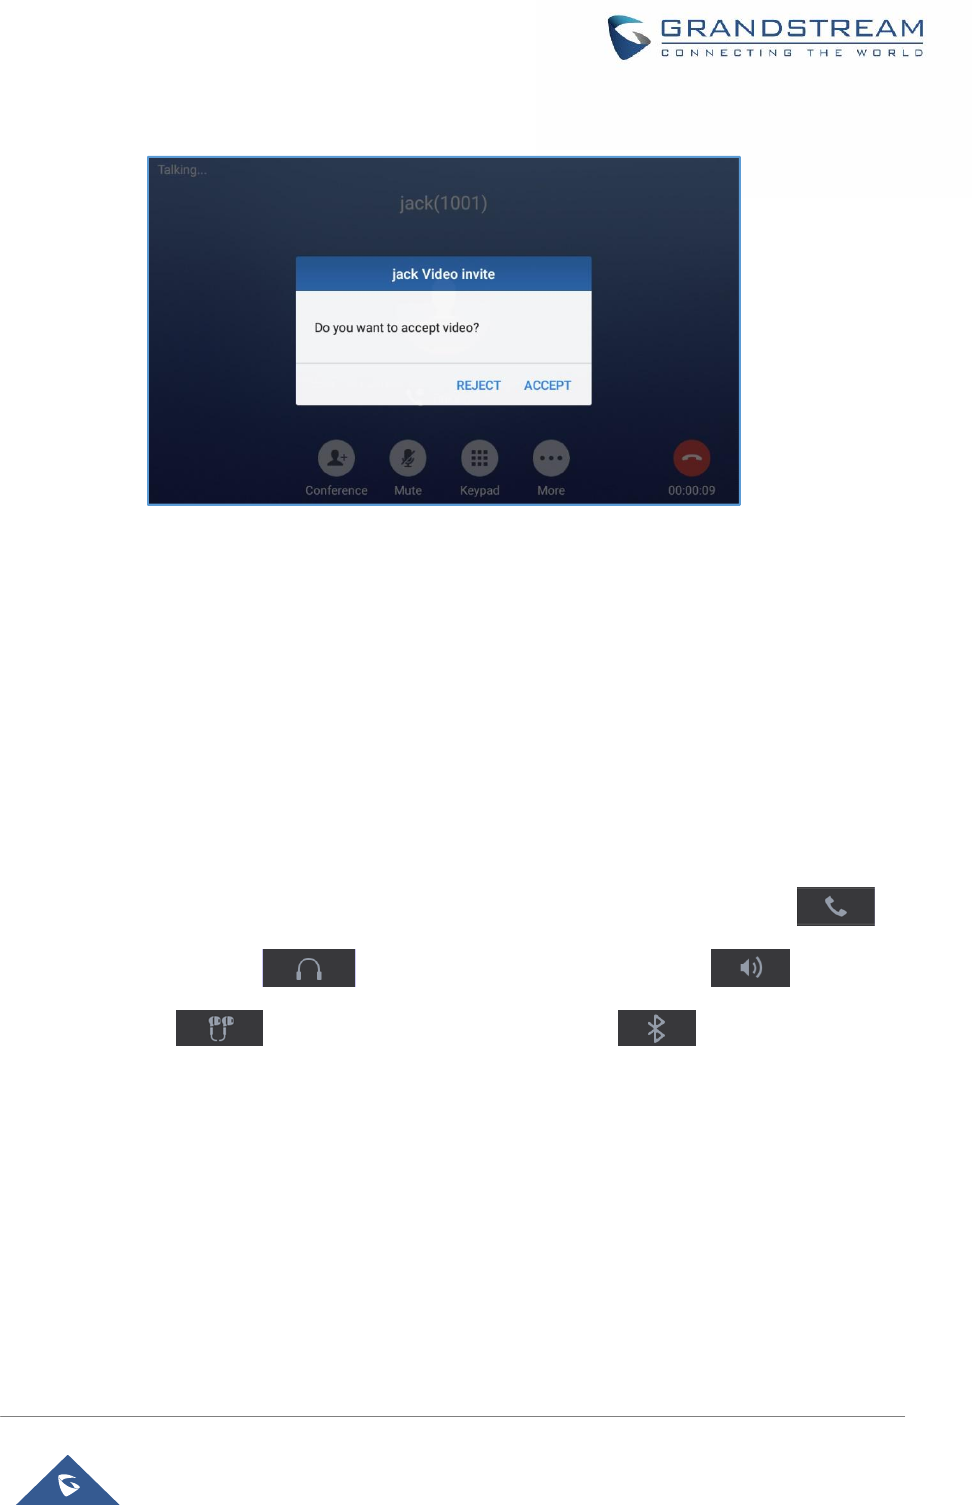
Page| 56
GXV3370 User Guide
Version 1.0.0.4
·
Accept video request
Figure 46: Accept Video During Audio Call
If the GXV3370 receives video request during the audio call, a message "Do you want to accept video?"
will be prompted. Select "Yes" to establish video during the call. If the Disable Video Call Feature is
enabled on GXV3370, the “Video On” option on GXV3370 will be hidden during the audio call. However, if
the GXV3370 receives video request during the audio call, users could tap to accept the video request.
Switch Audio Channel During Call
·
The GXV3370 allows users to switch among handset, speaker or headset (RJ9 headset, 3.5mm
earphone, Plantronics EHS headset and Bluetooth headset) when making calls.
·
During a call, tap on the first softkey on the bottom to switch audio channel. Tap on icon to
use handset; tap the icon to switch to RJ9 headset; tap on icon to switch to
speaker; tap on to switch to 3.5mm earphone; tap on to switch to Bluetooth
headset.
·
If Bluetooth headset is connected, the audio will be automatically switched to Bluetooth headset once
the call is established.
·
The status bar on the top or the screen shows the current audio channel being used during the call. If
pressing the corresponding key for the currently used audio channel, the call will be hang up.
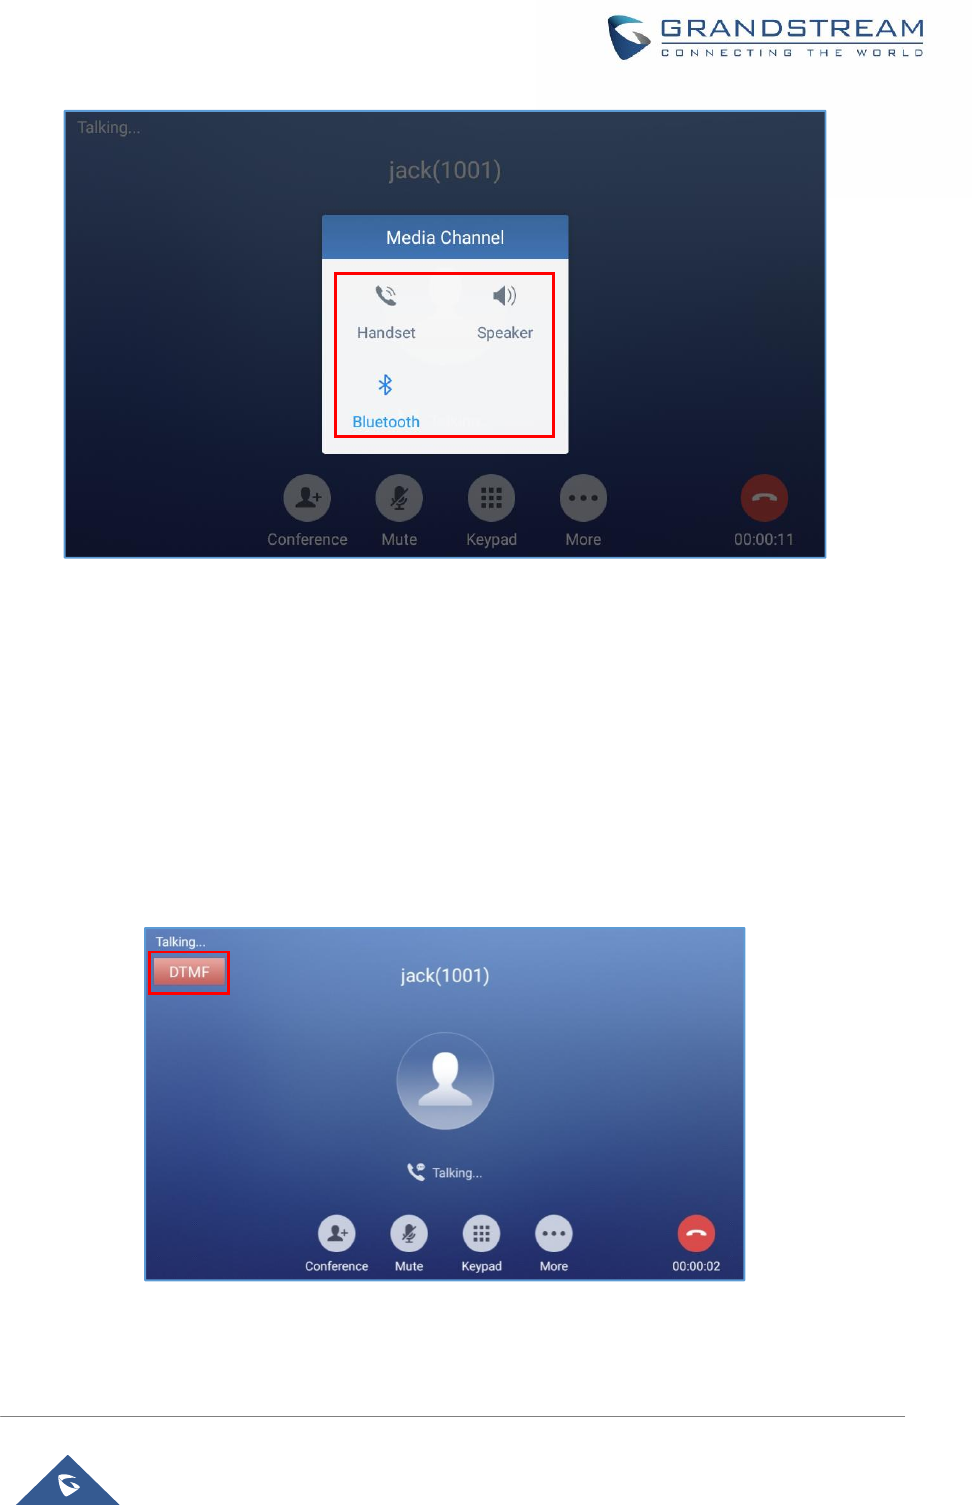
Page| 57
GXV3370 User Guide
Version 1.0.0.4
Figure 47: Switch Audio Channel during Call
DTMF During Call
During an Audio/Video call, the user can show DTMF buttons and each one of them can perform a different
action. This feature can be configured by following adding a programmable key as shown on this previous
section:
1. Set the Key mode of the programmable key as Dial DTMF and specify its name.
2. In “DTMF Content" field,set the digits to be sent via DTMF when pressing the DTMF button
3. Choose the wanted “Dial DTMF Condition”.
Figure 48: DTMF Buttons during call
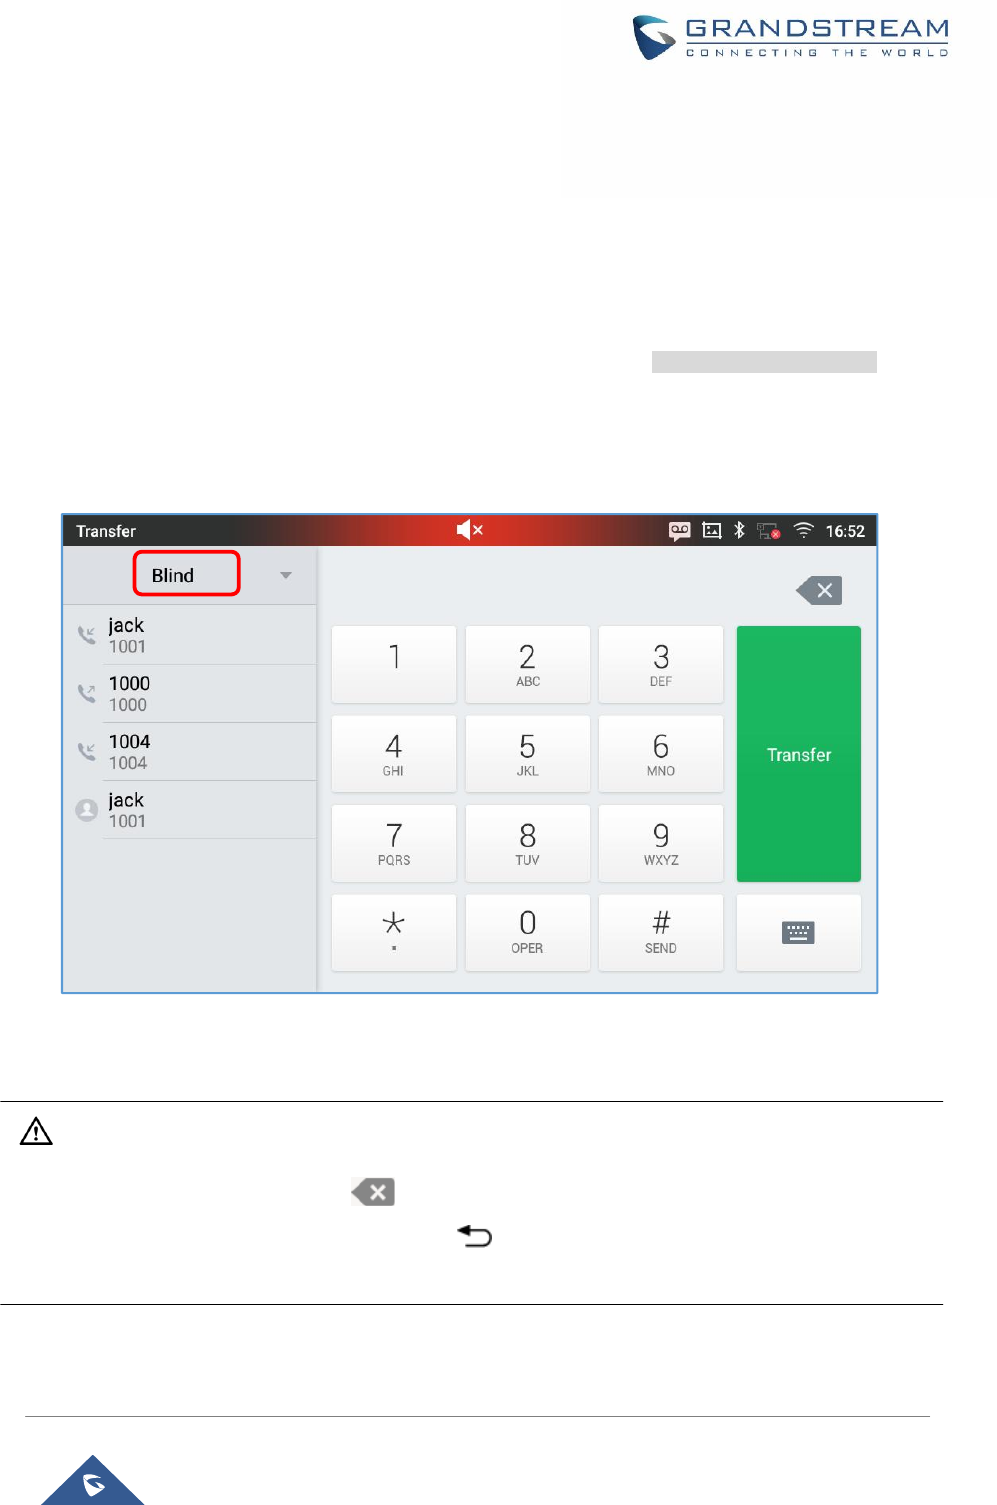
Page| 58
GXV3370 User Guide
Version 1.0.0.4
Call Transfer
A call can be transferred to another party during the call. The GXV3370 supports blind transfer and
attended transfer.
Blind Transfer
1. During the active call, tap on "More" softkey.
2. Select "Transfer" to bring up the transfer screen.
3. Select transfer mode as "Blind" by tapping on the highlight area in [Figure 49: Blind Transfer]. The
default transfer mode is "Blind".
4. Enter the digits.
5. Tap on "Send" softkey.
6. The call will be transferred and GXV3370 will hang up the call.
Figure 49: Blind Transfer
Note:
·
If wrong digits are entered, tap on to delete the digit one by one;
·
If users would like to cancel the transfer, press button to go back to the previous talking
screen.
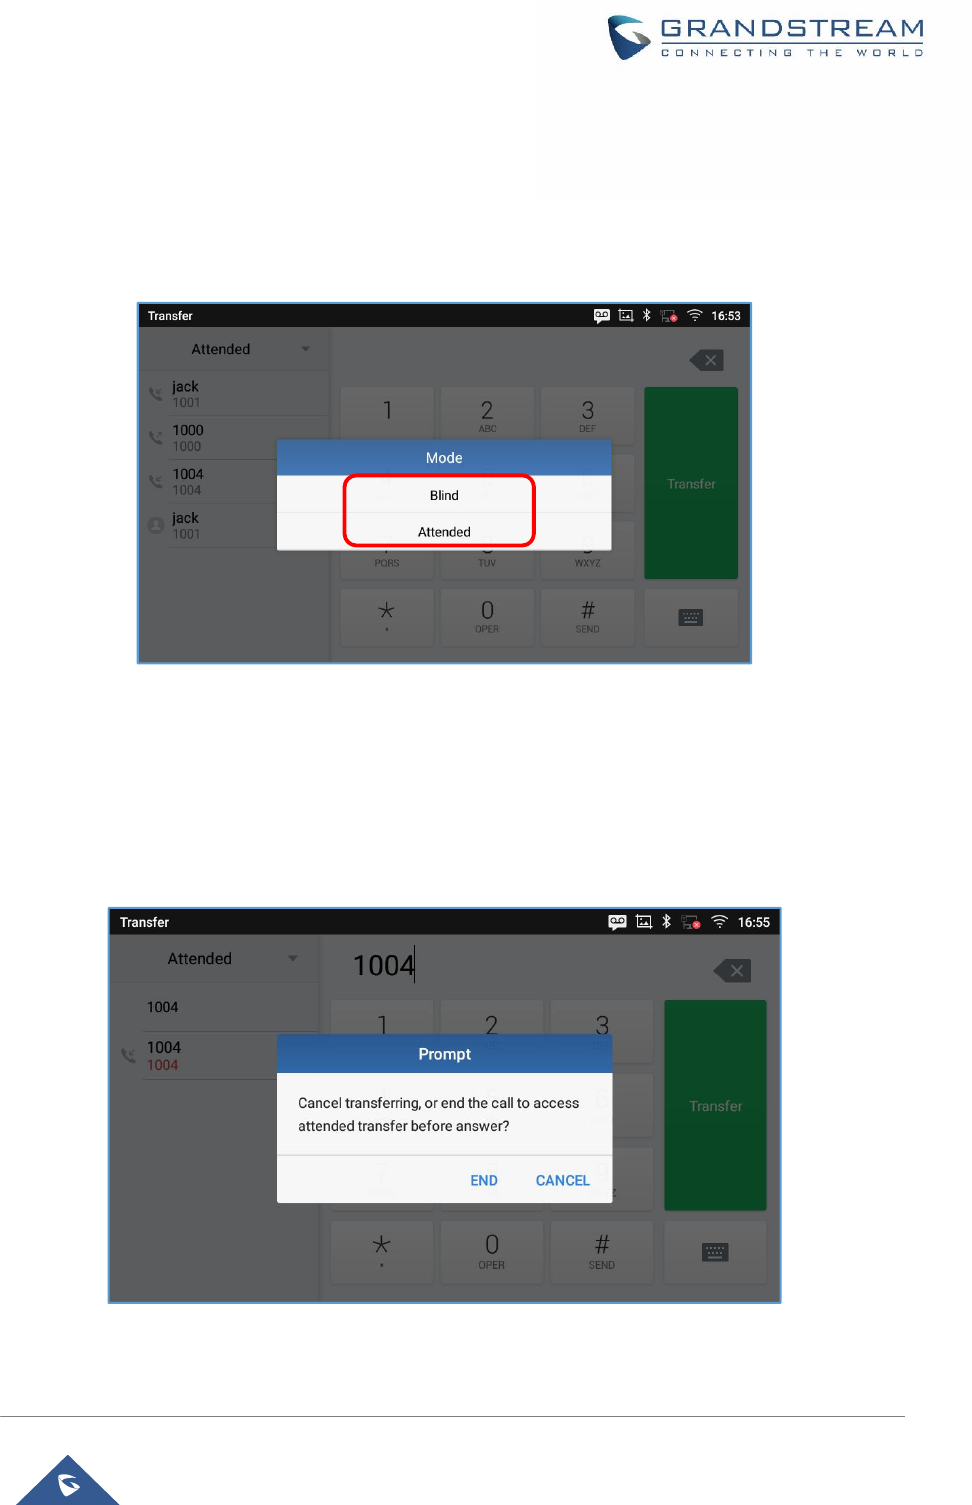
Page| 59
GXV3370 User Guide
Version 1.0.0.4
Attended Transfer
GXV3370 supports attended transfer:
1. During the active call, tap on "More" softkey. Select "Transfer" to bring up transfer screen.
2. Select transfer mode as "Attended" by tapping on the mode selection area (see figure below).
Figure 50: Attended Transfer
3. Enter the transfer target number, and then press the "Send" soft key on the right.
4. Before transfer target answers the call, GXV3370 hears the ringback tone, and the touch screen
prompts shown as below. Users could tap on "Cancel" to cancel the transfer, tap on “End” or simply
hang up the call to complete call transfer.
Figure 51: Attended Transfer - Transferring
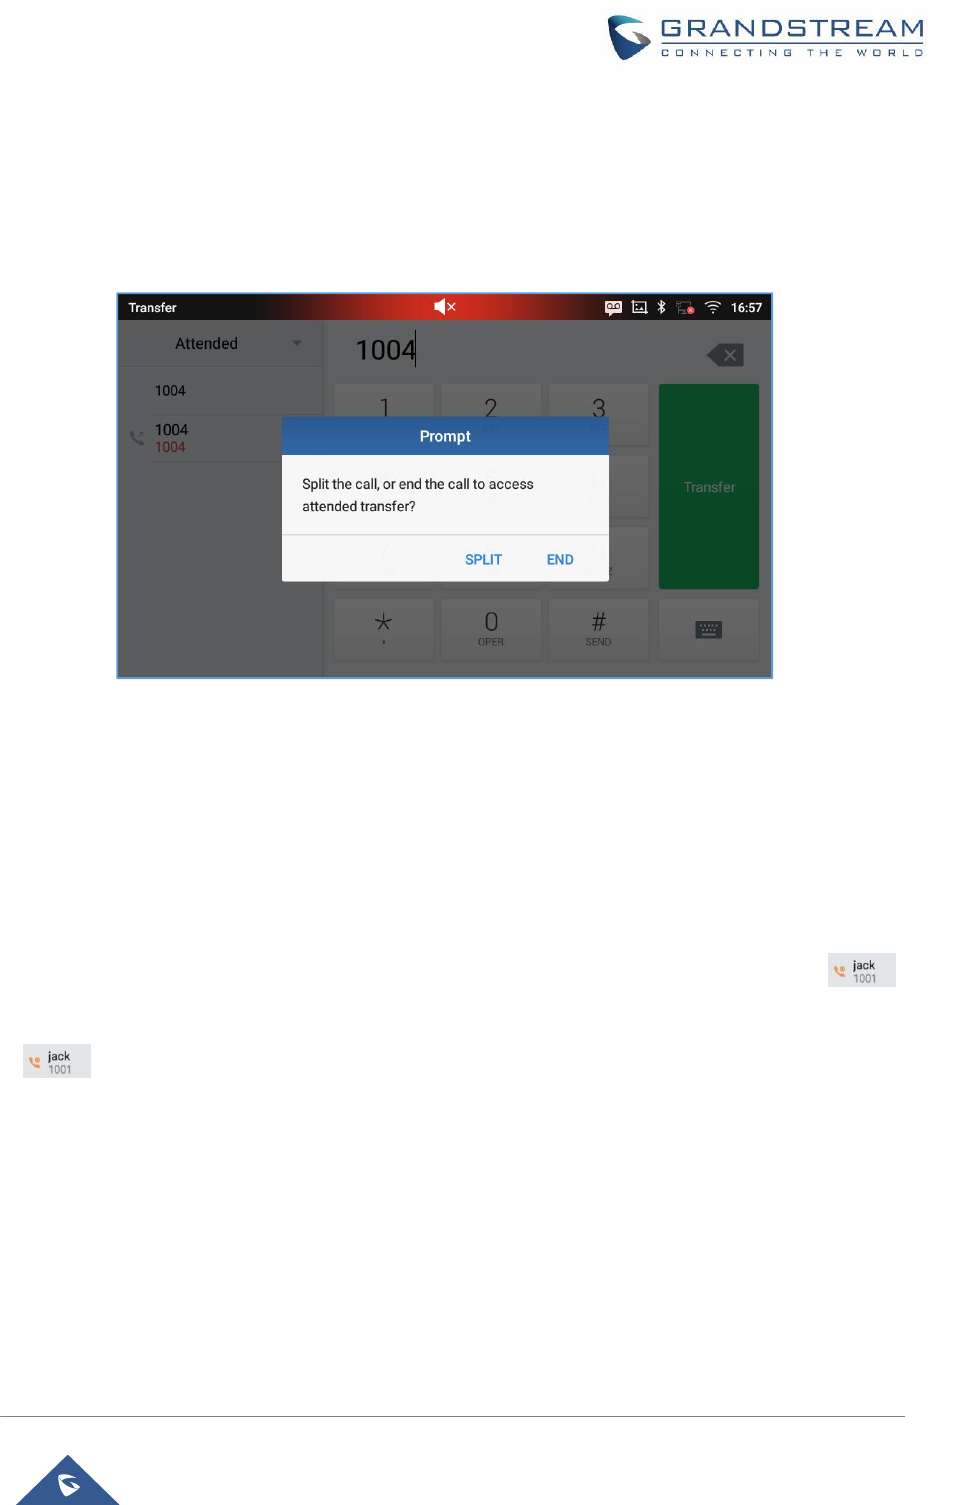
Page| 60
GXV3370 User Guide
Version 1.0.0.4
5. After transfer target answers the call, the following screen will be shown up. If the user simply hangs
up or taps on “End” soft key, the call wil be transferred, and GXV3370 will hang up the call. If the user
taps on "Split" soft key to separate the calls, the user will talk to the second established call while the
first call is on hold.
Figure 52: Attended Transfer – Split
6. Besides attended transfers above, users could also consult the third party first before transferring the
call.
7. During the active call, tap More then New Call to make the second call. This will place the current call
on hold.
8. The second call establishes after the call is answered.
9. During the active call, tap on "More" softkey.
10. Select "Transfer" to bring up transfer screen. The other call on hold will be displayed such as .
11. Select transfer mode as “Attended” in the transfer mode bar and tap on the call on hold such as
to transfer the call.
12. The call will be transferred, and GXV3370 will hang up the call.
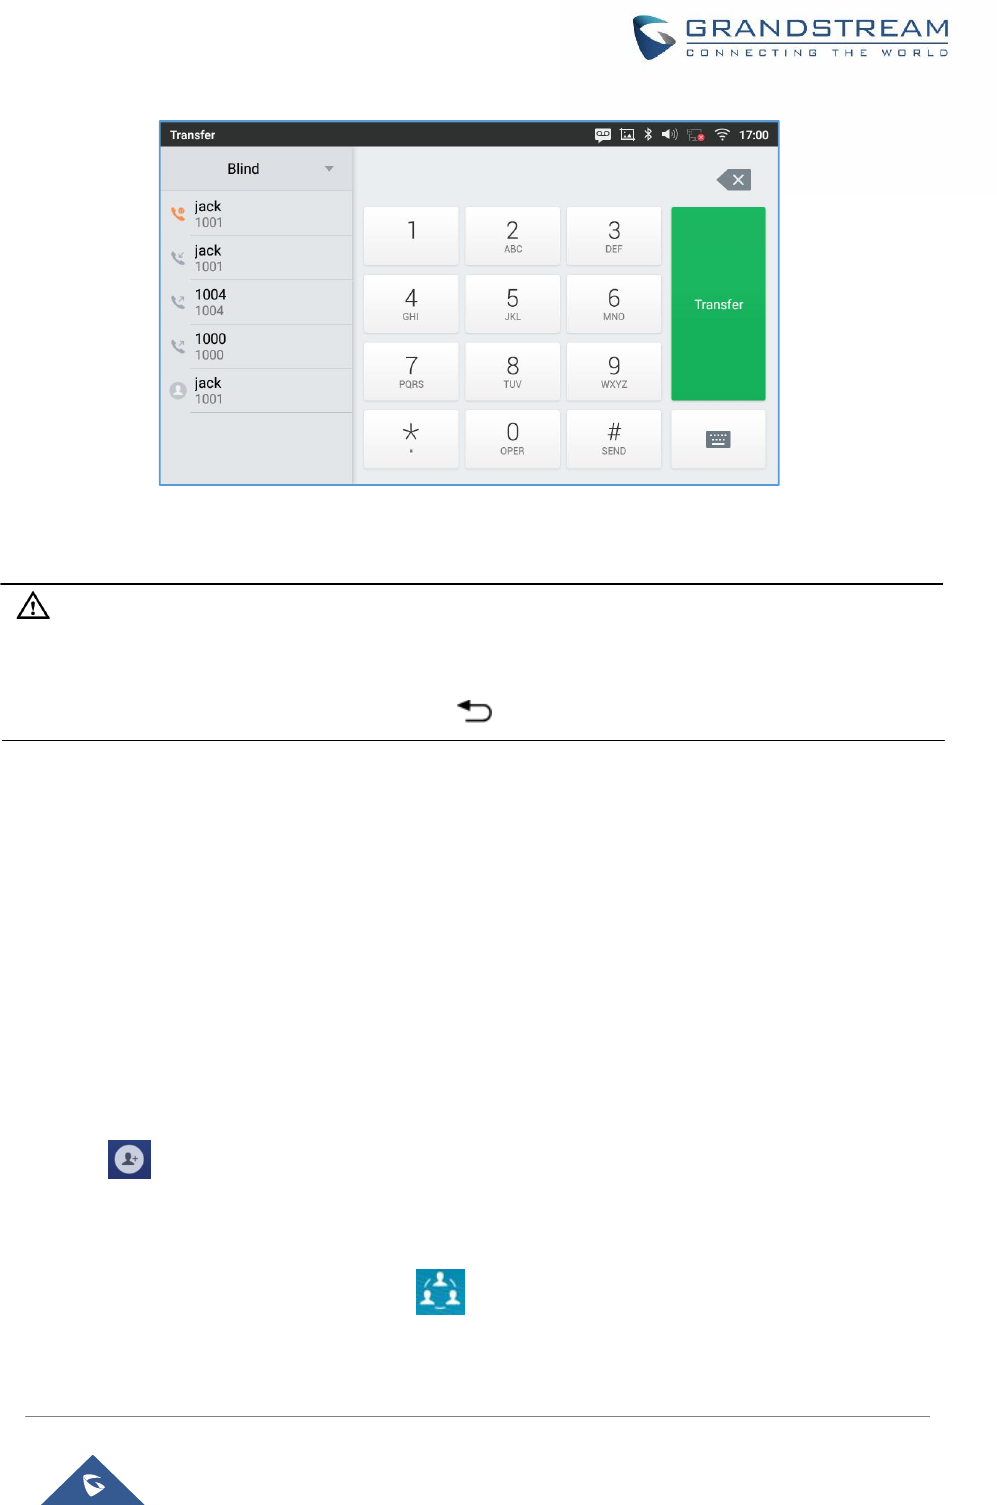
Page| 61
GXV3370 User Guide
Version 1.0.0.4
Figure 53: Attended Transfer
Note:
·
To transfer calls across SIP domains, SIP service providers must support transfer across SIP
domains;
·
If users would like to cancel the transfer, press button to go back to the previous talking screen.
7-Way Conference
The GXV3370 supports up to 7-way audio conferencing.
Initiate Conference
There are two ways to initiate a conference call.
·
Initiating conference duringa phone call
1. When the phone is on call screen, tap on "Conference" softkey;
2. Enter the third-party number or choose an available number on the left menu from call history or
contacts to form a conference of 3. After the call is established, the conference screen is brought up;
3. Tap on to add another member to the conference;
·
Initiating conference directly using conference soft key
1. On idle screen, press conference soft key .
Page| 62
GXV3370 User Guide
Version 1.0.0.4
2. Tap on to add the members of the conference.
Figure 54: GXV3370 Conference Screen
If there are calls on hold, they will show up when adding member to the conference. Users could then
tap on the call to add it to the conference directly.
Figure 55: GXV3370 Conference - Add Existing Call to Conference
3. Repeat the above steps to add more parties into the conference. The following figure shows a 3-way
conference established.
Page| 63
GXV3370 User Guide
Version 1.0.0.4
Figure 56: 3-Way Conference Call Established
Remove Party from Conference
To remove a party from the conference:
1. Tap on Members icon. The below window will show up giving the possibility to Mute enablevideo
Enlarge or hang up.
2. Tap on icon to remove the a party from the conference.
Figure 57: GXV3370 Conference - Remove Party from Conference
Page| 64
GXV3370 User Guide
Version 1.0.0.4
End Conference
To end the conference, tap on to disconnect all the parties from the conference. GXV3370 will
hang up the call. If the remote party hangs up the call itself, it will be disconnected from the conference but
other parties on GXV3370 will stay in the existed conference.*
Hold and Resume Conference
During the conference, users could tap on More softkey then tap on Hold to hold the conference at any
time. To resume the call tap on Unhold.
Auto Conference Mode
The GXV3370 also supports "Auto Conference" which allows users to establish conference call in a quick
and easy way, instead of adding the other parties one by one. To enable Auto Conference feature, go to
web GUIàPhone SettingsàCall SettingsàCall Features and set "Auto Conference" to "Yes".
To esablish call with auto conference when there are 1 or more calls on the GXV3370, simply tap on
"More" softkey and select "Conf". All the calls on GXV3370 will be brought into the conference.
Note:
·
During the conference, if the initiator of the conference hangs up , the conference will end. If users
wish to allow the remaining parties to stay in conversation after the initiator hangs up, the conference
initiator should set "Transfer on 3-way Conference Hang up" to "Yes" in web GUIàAccountàCall
Settings. This would allow the remaining parties to stay in the conference after the initiator exists the
conference.
Missed Call
When there is a missed call, the LCD will show missed call dialog on the idle screen.
Page| 65
GXV3370 User Guide
Version 1.0.0.4
Figure 58: Missed Call Screen
Users can tap on the missed call entry to access the missed call log. To close the missed call screen and
return to the idle screen, tap on on the upper right of the dialog.
DND (Do Not Disturb)
When DND is on, the incoming calls to the GXV3370 will be blocked for all registered accounts with a
reminder ring produced.
To turn on/off DND:
1. Touch and drag the status bar down on the GXV3370 idle screen.
2. Tap on the DND icon to turn it on. The status bar shows icon indicating DND is
on.
3. Tap on the DND icon to turn if off.
Page| 66
GXV3370 User Guide
Version 1.0.0.4
Figure 59: Enable/Disable DND
Note:
·
When the phone is in an active call, turning on/off DND won't affect the current active call. It will take
effect starting from the next incoming call.
Voicemail/Message Waiting Indication
When there is a new voicemail, the Message Waiting Indication (MWI) LED icon will blink in red on the
upper right corner of the GXV3370 and will show up in the status bar.
To retrieve the voicemail:
1. Tap on the Message icon from the applications section to bring up voicemail screen. All the
registered accounts and the number of voicemails are displayed there.
2. Tap on the account to dial into the voicemail box. Then follow the Interactive Voice Response (IVR) for
the message retrieval process.
Page| 67
GXV3370 User Guide
Version 1.0.0.4
Figure 60: Retrieve Voicemail
For each account, the Voicemail User ID can be set up under web GUIàAccount XàCall Settings:
"Voice Mail Access Number". This is the number that will be dialed out to access voicemail message when
tapping on the account in Voice Mail screen.
Call Forward
Call forward feature can be set up from GXV3370 LCD or web GUI.
·
From LCD
Go to onscreen MenuàSettingsàFeaturesàCall Forward. Select account name and tap on Call
Forwarding to activate the feature. Then the list of options will be available. Select the option Call
Forward Mode to configure the call forward type (Unconditional, Time Based, Others) and then enter
necessary number in the fields.
Figure 61: Unconditional Call Forward
Page| 68
GXV3370 User Guide
Version 1.0.0.4
·
From Web GUI
Log in GXV3370 web GUI and go to AccountpageàCall Settings. By default, Call Forward feature is
set to "None". The Call Forward feature options are:
Ø Unconditional Forward: All the incoming calls will be forwarded to the number set up in "All To"
field.
Figure 62: Call Forward – Unconditional
Ø Time Based Forward: All the incoming calls will be forwarded to the number as schedule in the
time period. During the setup time, the call will be forwarded to the number in "In Time Forward
To:" field. Other period the call will be forwarded to the number in "Out Time Forward To:" field.
Figure 63: Call Forward - Time Based
Ø Call Forward on Busy / Call Forward No Answer / Call Forward on DND: The incoming call will
be forwarded when the GXV3370 is busy or no answer after certain interval "Delayed Call Forward
Wait Time (s)", or if the phone is on DND mode then the call will be forwarded to the configured
destination number.
Page| 69
GXV3370 User Guide
Version 1.0.0.4
Figure 64: Call Forward - Busy/No Answer/DND
Shared Call Appearance (SCA)
The GXV3370 supports shared call appearance by the Broadsoft standard. This feature allows members
of the SCA group to shared SIP lines and provides status monitoring (idle, active, progressing, hold) of the
shared line. When there is an incoming call designated for the SCA group, all of the members of the group
will be notified of an incoming call and will be able to answer the call from the phone with the SCA
extension registered.
All the users that belong to the same SCA group will be notified by visual indicator when a user seizes the
line and places an outgoing call, and all the users of this group will not be able to seize the line until the line
goes back to an idle state or when the call is placed on hold (with the exception of when multiple call
appearances are enabled on the server side).
In the middle of the conversation, there are two types of hold: Public Hold and Private Hold. When a
member of the group places the call on public hold, the other users of the SCA group will be notified of this
by the yellow-flashing button and they will be able to resume the call from their phone by pressing the line
button. However, if this call is placed on private-hold, no other member of the SCA group will be able to
resume that call.
To enable shared call appearance, the user would need to register the shared line account on the phone.
In addition, they would need to enable SCA and configure SCA options via LCD or web GUI.
To configure SCA via LCD, go to SettingsàFeaturesàShared Call Apprearance and select one account
first Then tap on "Shared Call Appearance (SCA)" switch to turn it on.
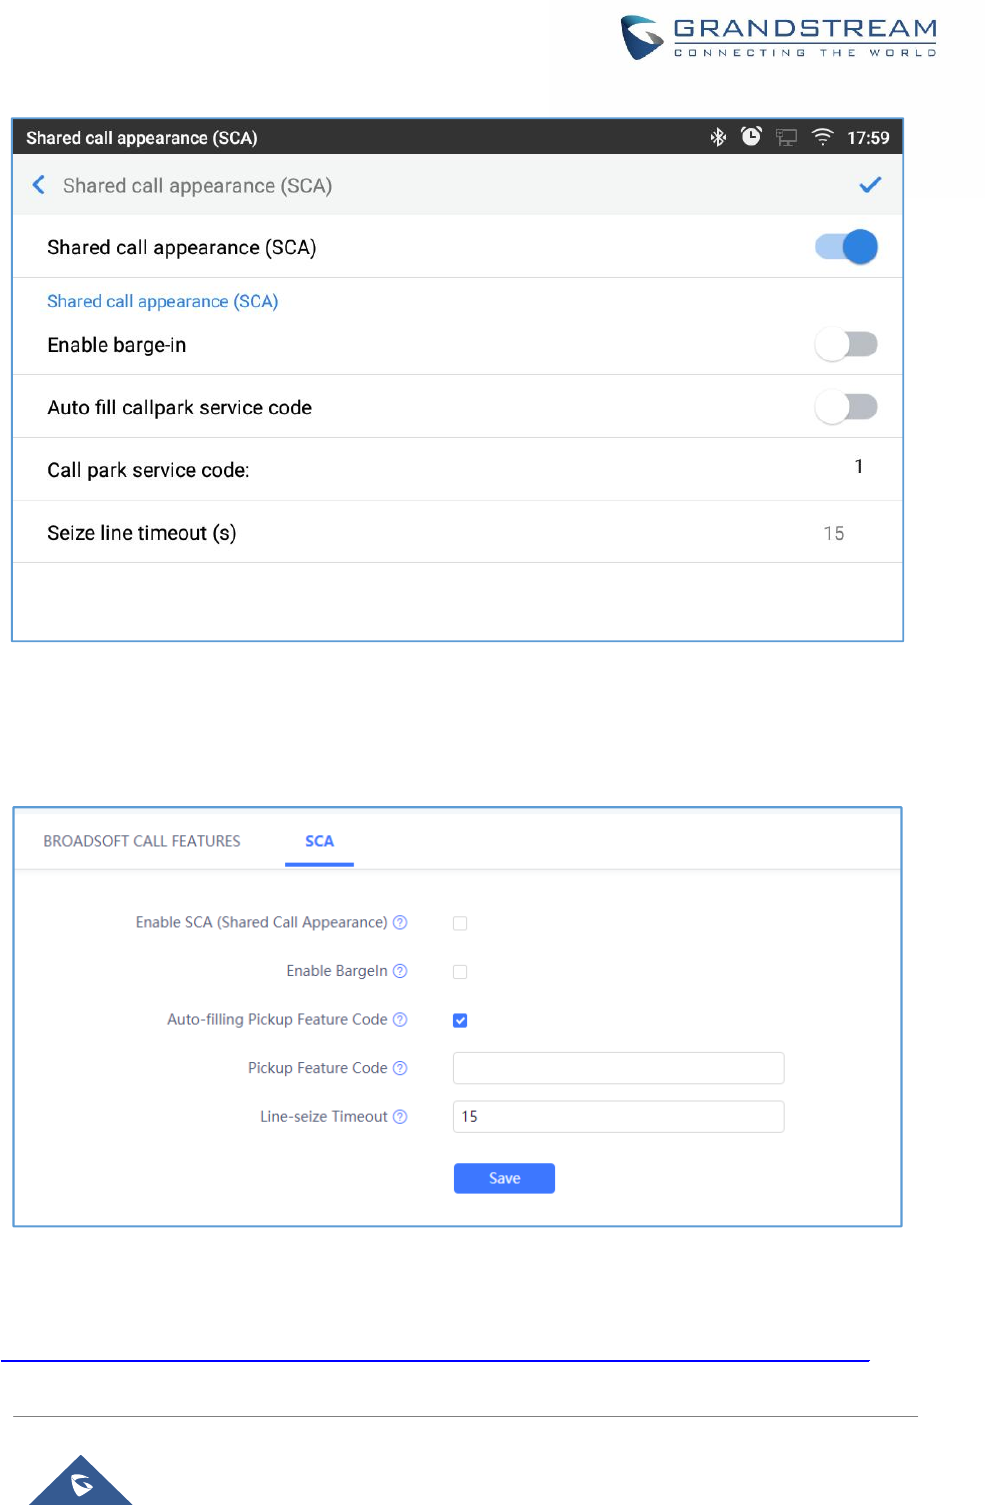
Page| 70
GXV3370 User Guide
Version 1.0.0.4
Figure 65: GXV3370 SCA Settings on LCD
To configure SCA via web GUI, go to Value-Added ServicesàBroadSoft SettingsàSCA to fill out the
options in the following figure.
Figure 66: GXV3370 SCA Settings on Web UI
For more information about SCA configuration and function, please refer to the link below:
http://www.grandstream.com/sites/default/files/Resources/GXV32XX_broadworks_SCA_Guide_0.pdf

Page| 71
GXV3370 User Guide
Version 1.0.0.4
Call Features
The GXV3370 supports traditional and advanced telephony features including caller ID, caller ID with
caller Name, call waiting, call forward etc. Before using the following feature codes, please make sure
"Enable Call Features" option is set to "Yes" under web GUIàAccount pageàCall Settings.
Table 10: GXV3370 Feature Code
*01
Use Preferred Codec (per call)
·
Dial *01 followed by the preferred codec code and the phone number.
·
The phone will try to use this codec during the call.
·
Codec code:
PCMU: 7110
PCMA: 7111
G726-32: 72632
G722: 722
iLBC: 7201
For example, if the user would like to use PCMA as the preferred codec to call
phone number 334455, enter *017111334455.
*02
Force Codec (per call)
·
Dial *02 followed by the preferred codec code and the phone number.
·
The phone will be forced to use this codec during the call.
·
Codec code:
PCMU: 7110
PCMA: 7111
G726-32: 72632
G722: 722
iLBC: 7201
For example, if the user would like to use PCMA to call phone number 334455,
enter *027111334455.
*30 Block Caller ID(for all subsequent calls)
·
Dial *30.
*31 Send Caller ID(for all subsequent calls)
·
Dial *31.
*50 Disable Call Waiting
·
Dial *50.

Page| 72
GXV3370 User Guide
Version 1.0.0.4
*51 Enable Call Waiting
·
Dial *51.
*67 Block Caller ID(per call)
·
Dial *67 followed by the phone number.
*82 Send Caller ID(per call)
·
Dial *82 followed by the phone number.
*70 Disable Call Waiting(per Call)
·
Dial *70 followed by the phone number.
*71 Enable Call Waiting(per Call)
·
Dial *71 followed by the phone number.
*72 Unconditional Call Forward. To set up unconditional call forward:
·
Dial *72 followed by the phone number to forward the call.
*73 Cancel Unconditional Call Forward. To cancel the unconditional call forward:
·
Dial *73.
*74 Paging Call
·
Dial *74 followed by the phone number to send the paging call.
*83 Force Audio Calling (per call)
·
Dial *83 followed by the phone number to send the audio call.
*84 Force Video Calling (per call)
·
Dial *84 followed by the phone number to send the video call.
*90 Busy Call Forward. To set up busy call forward:
·
Dial *90 followed by the phone number to forward the call.
*91 Cancel Busy Call Forward. To cancel the busy call forward:
·
Dial *91.
*92
Delayed Call Forward. To set up delayed call forward:
·
Dial *92 followed by the number to forward the call. The default timeout
before the call is forwarded is 20 seconds.
*93 Cancel Delayed Call Forward. To cancel the delayed call forward:
·
Dial *93.
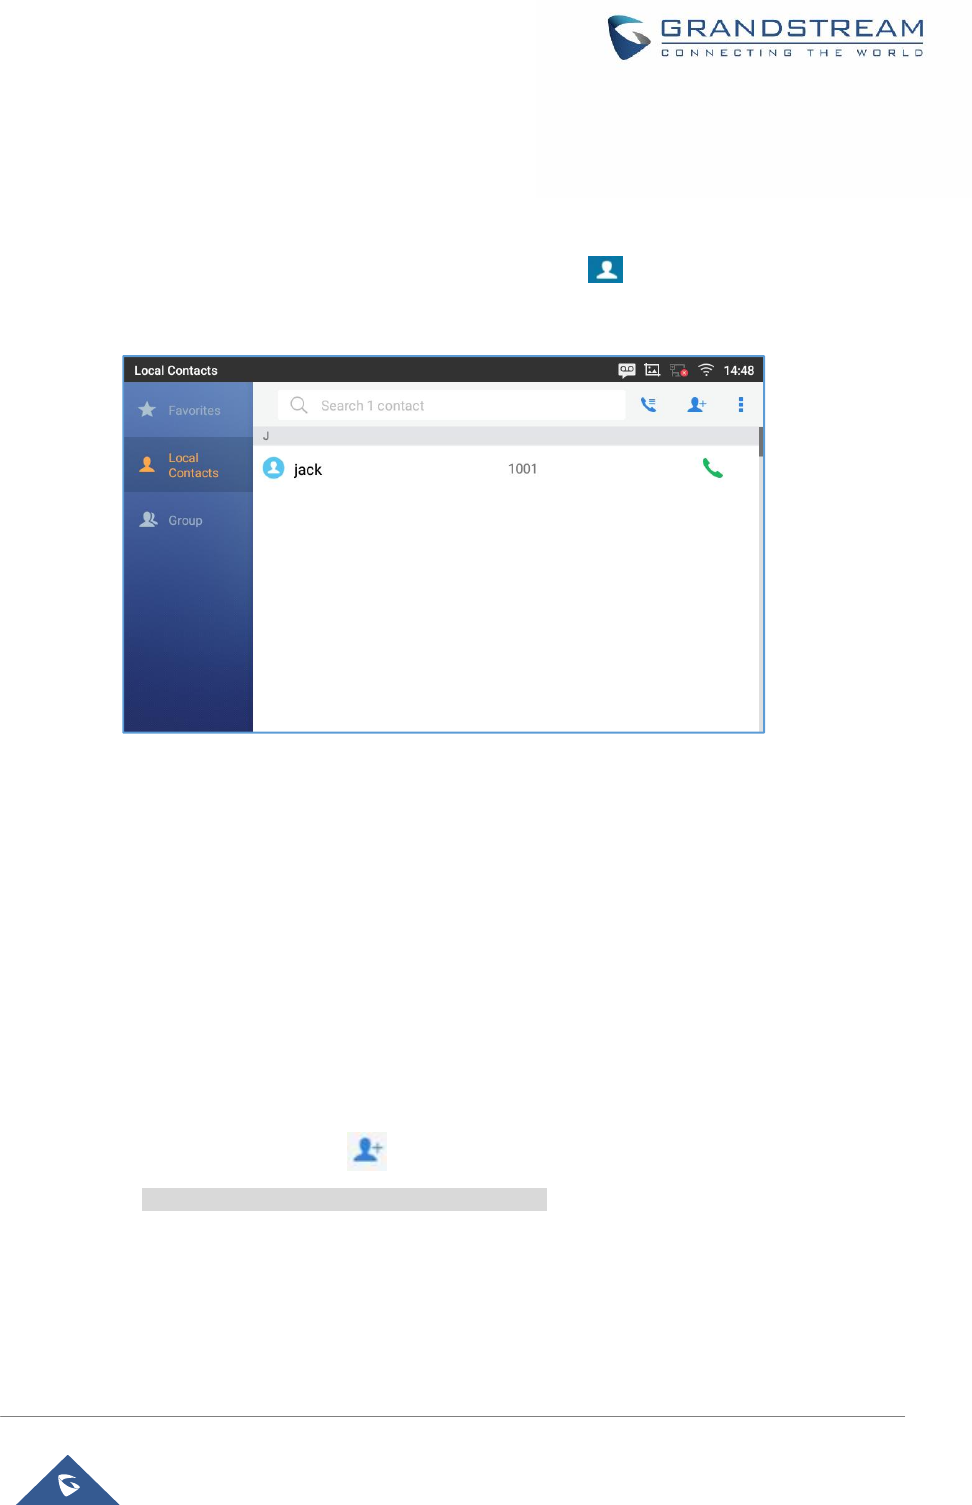
Page| 73
GXV3370 User Guide
Version 1.0.0.4
CONTACTS
The GXV3370 supports local, LDAP and BroadWorks Xsi Contacts.
To access GXV3370contacts, on the phone’s idle screen, tap on icon on the right panel.The following
figure shows Contacts on the GXV3370.
Figure 67: GXV3370 Contacts
The BS Contacts is the BroadWorks Xsi Contacts. It needs to be configured with the remote BroadWorks
server to enable this feature.
Local Contacts
The local contacts can save up to 1000 entries. Users can manage contacts by adding, deleting and
modifying single contacts, downloading contacts from HTTP/TFTP server, importing contacts from
external storage and exporting contacts to external storage.
Add Single Contacts
1. On the Local Contacts menu Tap on to bring up "Create Contact" dialog to manually add a new
contact. See [Figure 68: GXV3370 Contacts - Add New Contact].
2. Type First name, Last name, Phone number and other information for the new contacts. Please make
sure the account number field is selected so the GXV3370 will use this account to dial out the new
contact. The account number field is located on the left of the "Phone" filed as highlighted below.
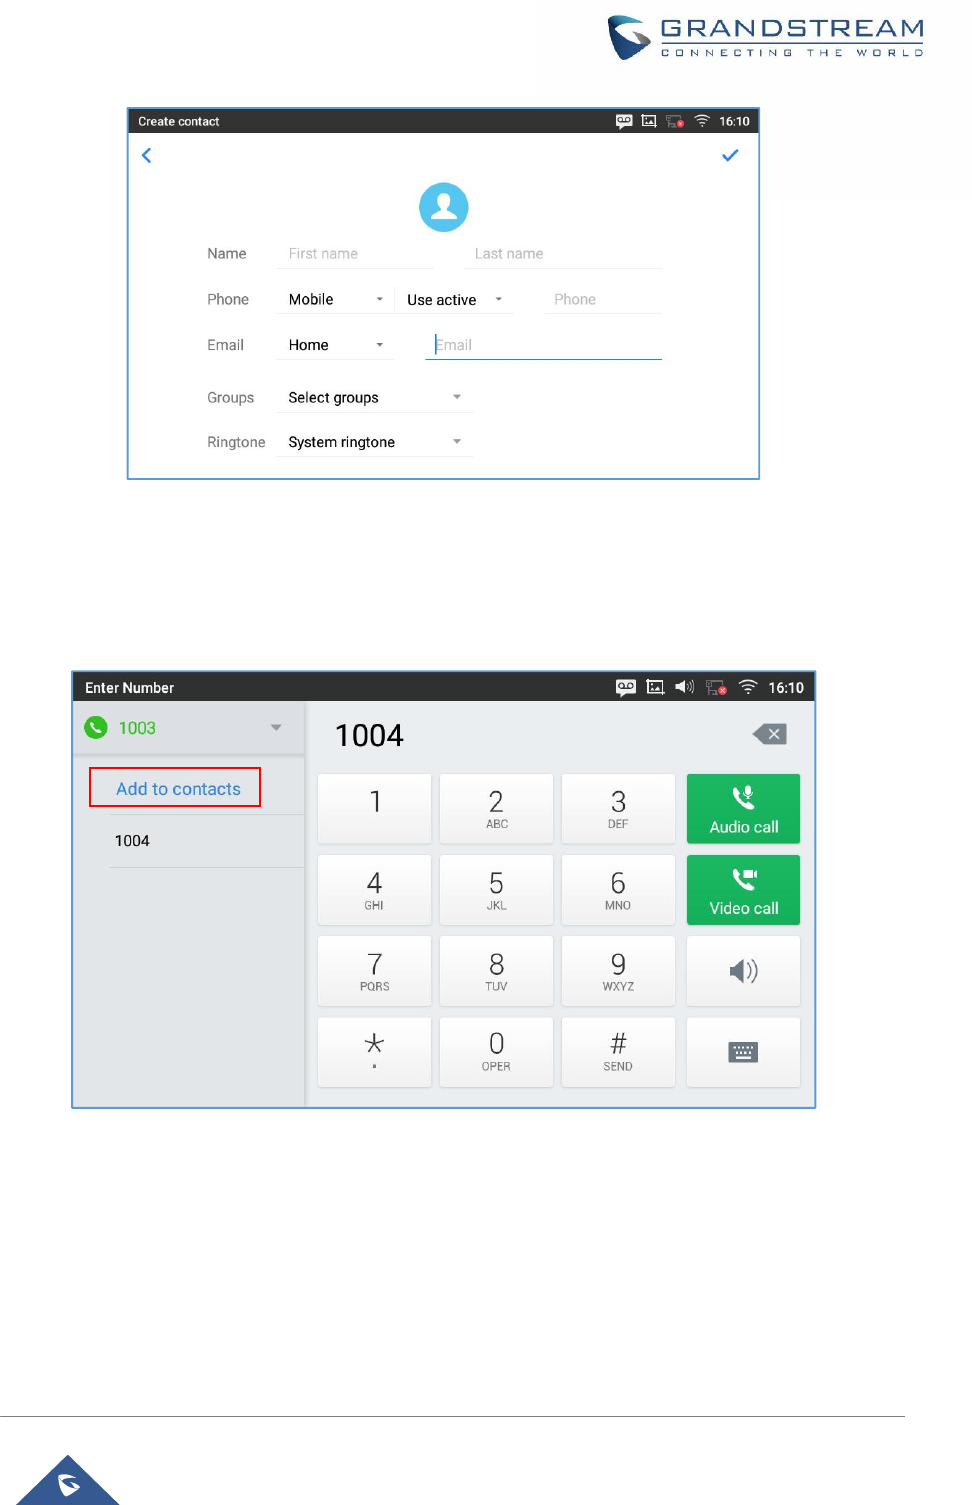
Page| 74
GXV3370 User Guide
Version 1.0.0.4
Figure 68: GXV3370 Contacts - Add New Contact
Note: When typing a number using dial pad, “Add to contacts” button will appear as displayed on following
picture, to add a new entry to your contacts list if the input number does not match any entry in your
contacts.
Figure 69: Add to Contacts From Dial Pad
Import/Export Contacts
If the users have the GXV3370 phonebook file saved in local storage or external storage device that has
been plugged into the GXV3370, the phonebook file can be directly imported to the Contacts. There are
two different formats supported for the phonebook file:"vcard", and "xml". Users could manually create
contacts first and export the phonebook file in vcard or xml format to take a look on the phonebook file.
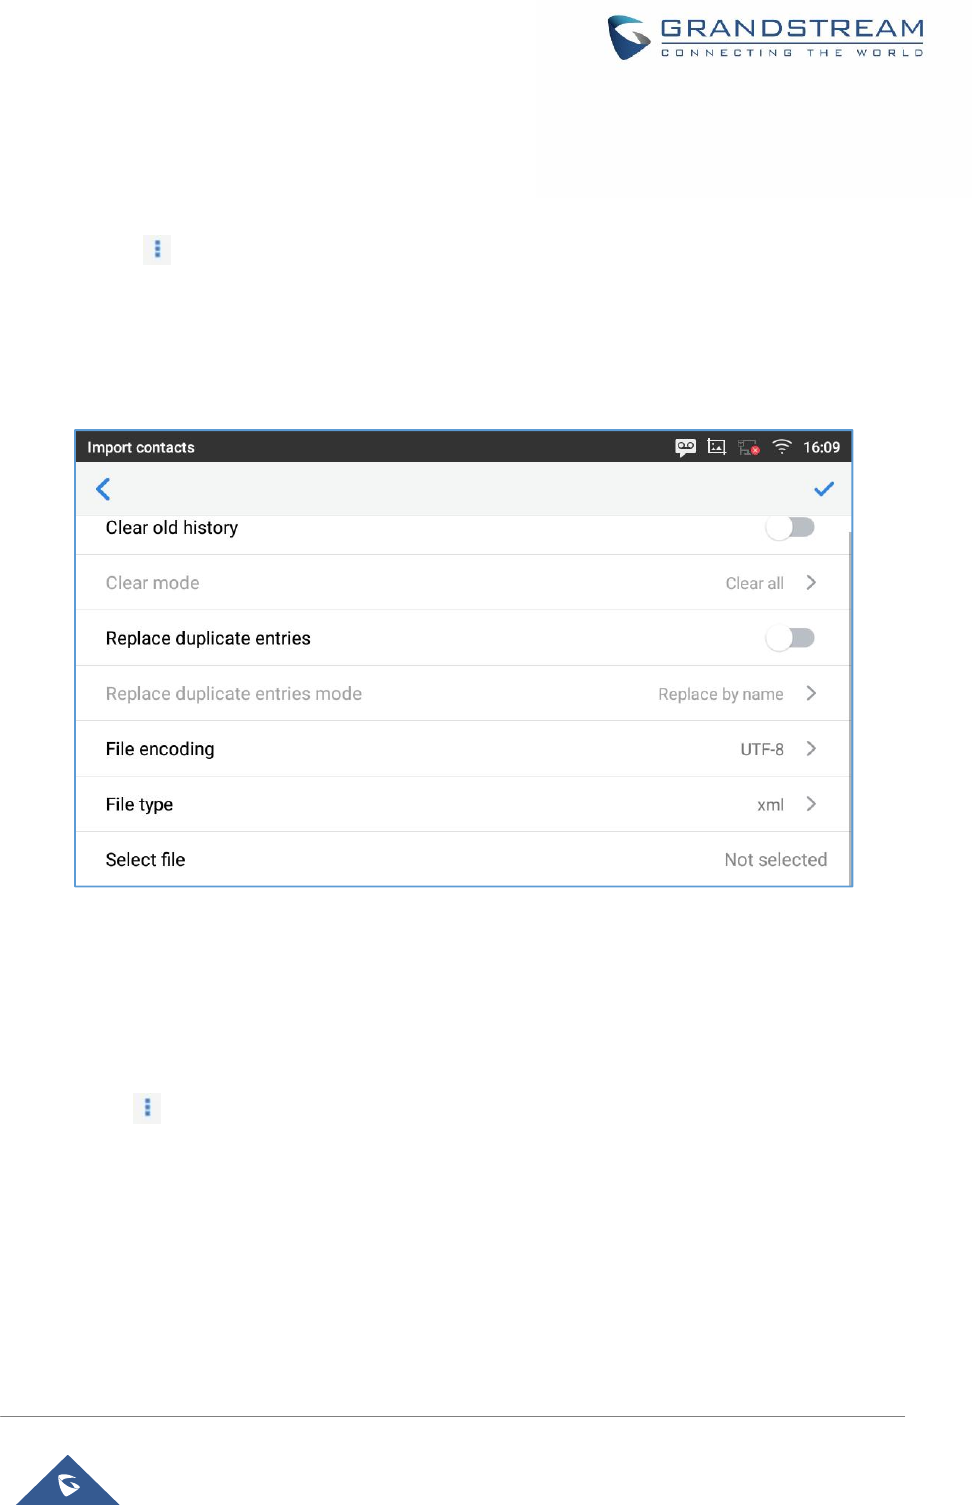
Page| 75
GXV3370 User Guide
Version 1.0.0.4
To import contacts:
1. Open Contacts.
2. Tap on More on the upper right corner of the Contacts screen.
3. Select "Import contacts" to bring up the dialog below.
4. Fill in the import options and scroll down to the bottom of the screen.
5. Tap on "Select file" to import phonebook file from the directory in internal or external storage device.
Figure 70: GXV3370 Contacts - Import Contacts
To export contacts:
1. Open Contacts.
2. Tap on More on the upper right corner of the Contacts screen.
3. Select "Export Contacts " to bring up dialog below.
4. Select the file encoding and file type for the exported phonebook file. By default, the GXV3370 is using
"UTF-8" as the encoding method.
5. Tap on "Choose Directory" and select the directory where the phonebook file will be exported to.
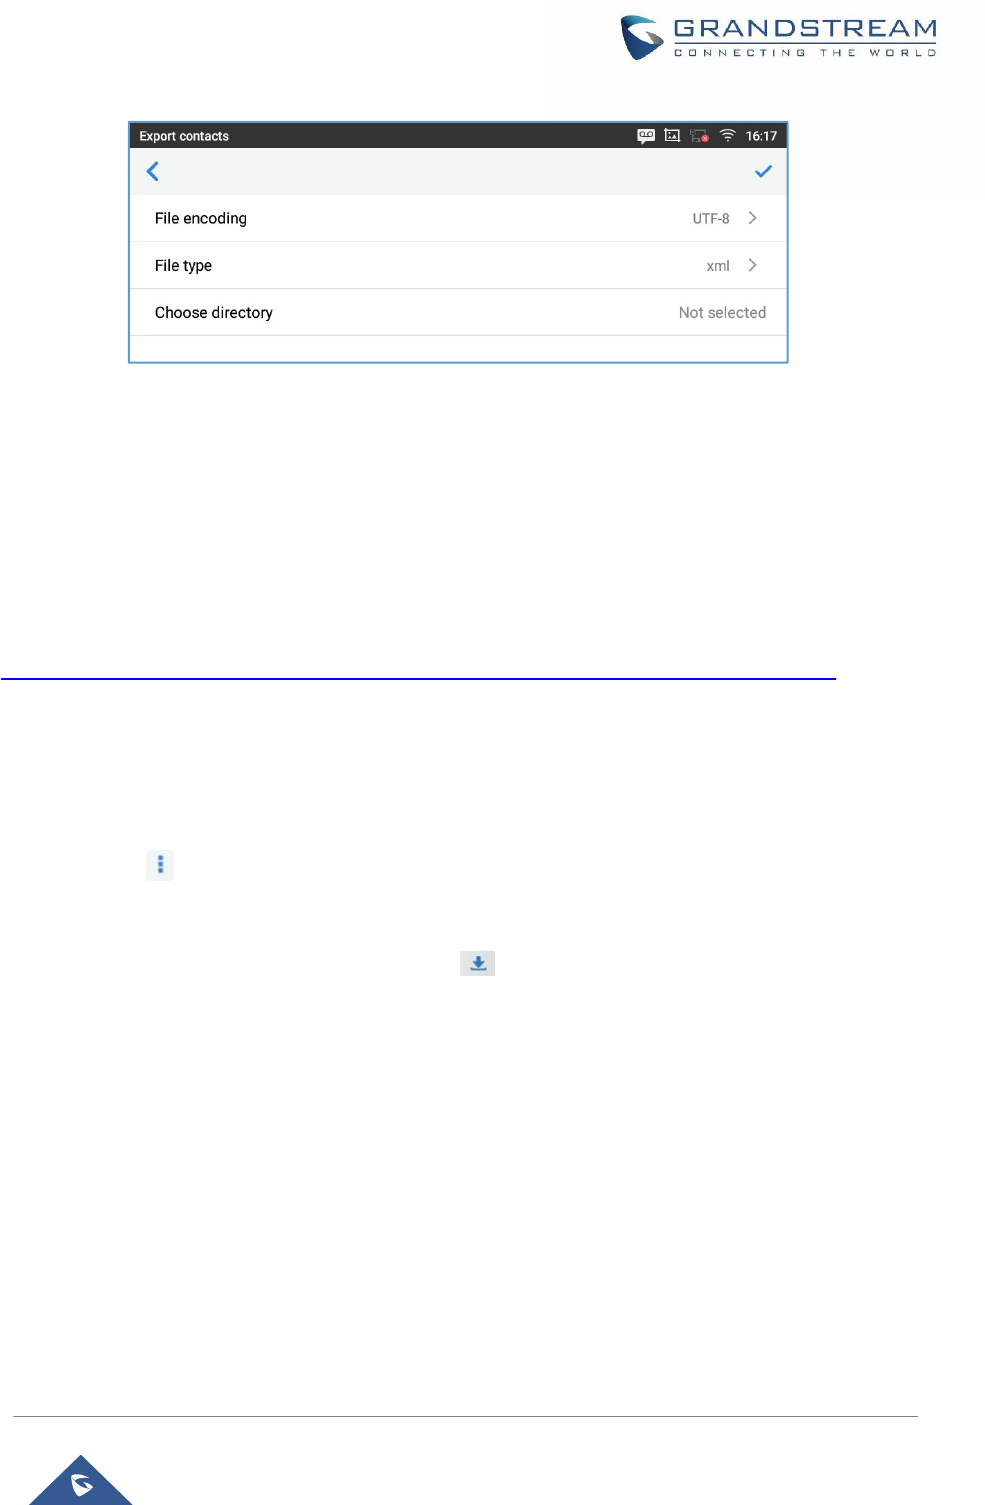
Page| 76
GXV3370 User Guide
Version 1.0.0.4
Figure 71: GXV3370 Contacts - Export Contacts
Download Contacts
The GXV3370 supports downloading XML phonebook from a remote HTTP/TFTP/HTTPS server to local
Contacts. When downloading the phonebook, the GXV3370 sends request to the HTTP/TFTP/HTTPS
server looking for file phonebook.xml. For more details about GXV3370 phonebook, please refer to the
following link:
http://www.grandstream.com/sites/default/files/Resources/gxv3275_xml_phonebook_guide_1.pdf
To download phonebook:
1. Make sure the GXV3370 can connect to the HTTP/TFTP/HTTPS server and the phonebook.xml file in
correct format is downloadable from the HTTP/TFTP/HTTPS server.
2. Open Contacts.
3. Tap on More on the upper right corner of the Contacts screen.
4. Select "Download Contacts" to bring up the dialog below.
5. Fill in the necessary options and then tap on on the upper right corner of the screen. The
GXV3370 will send out request to the configured HTTP/TFTP/HTTPS server.
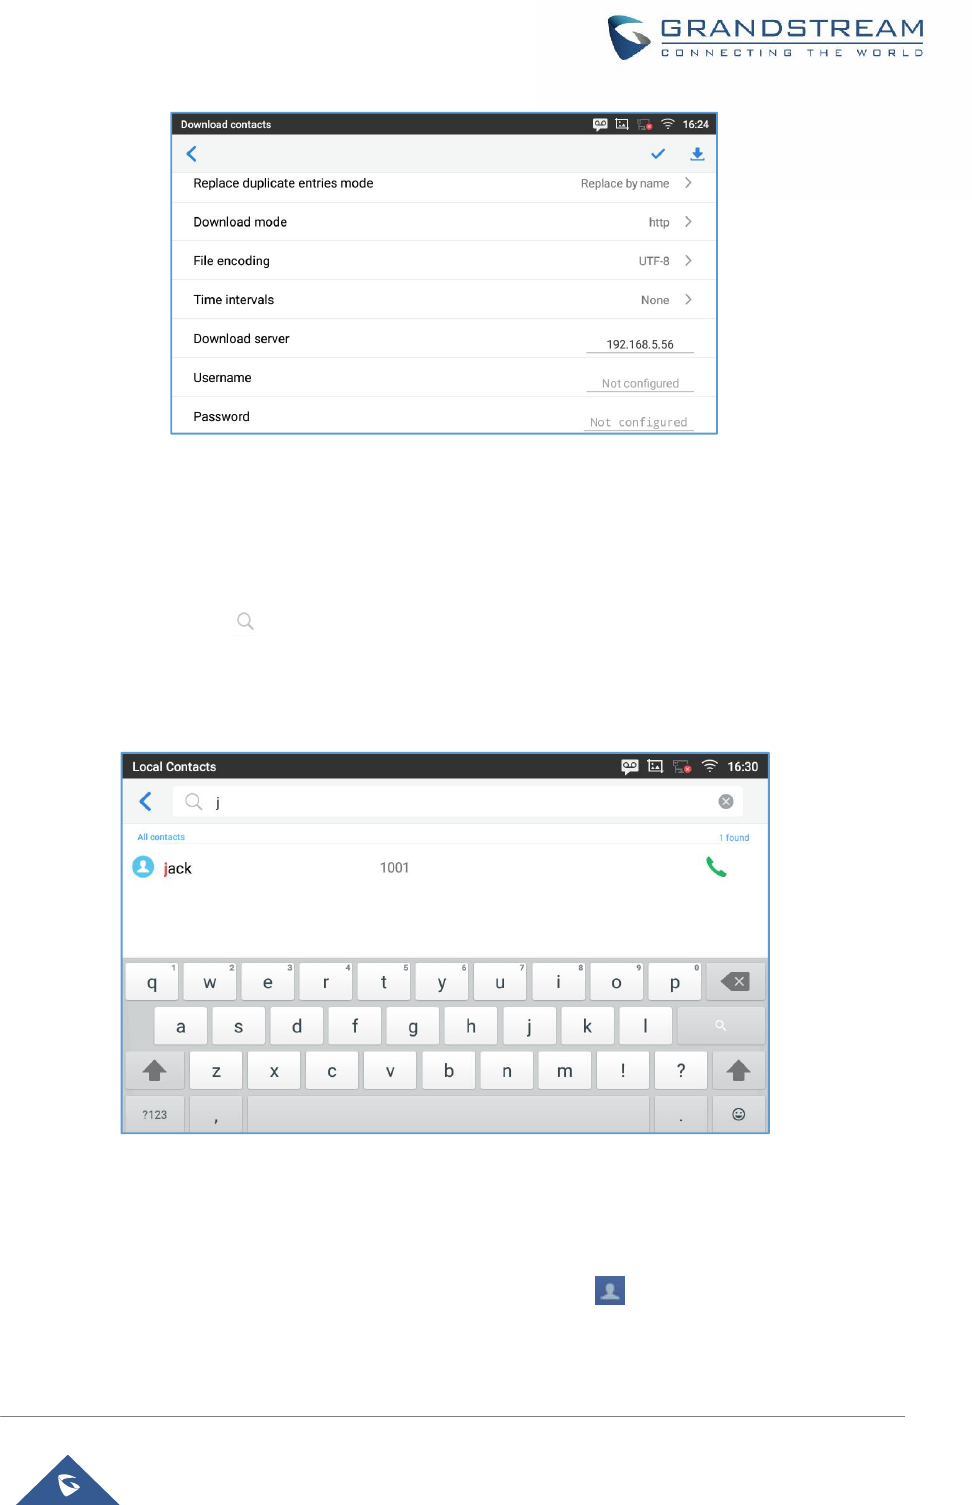
Page| 77
GXV3370 User Guide
Version 1.0.0.4
Figure 72: GXV3370 Contacts - Download Contacts
Search Contacts
1. Open Contacts.
2. Tap on the search field
3. Enter a contact's name or a number to search. The search result will be automatically updated and
displayed when entering the key words.
Figure 73: GXV3370 Contacts - Search Contacts
Use Contacts
Once the contacts are added, users could navigate in the contacts list to make a call and manage the
contacts furthermore.
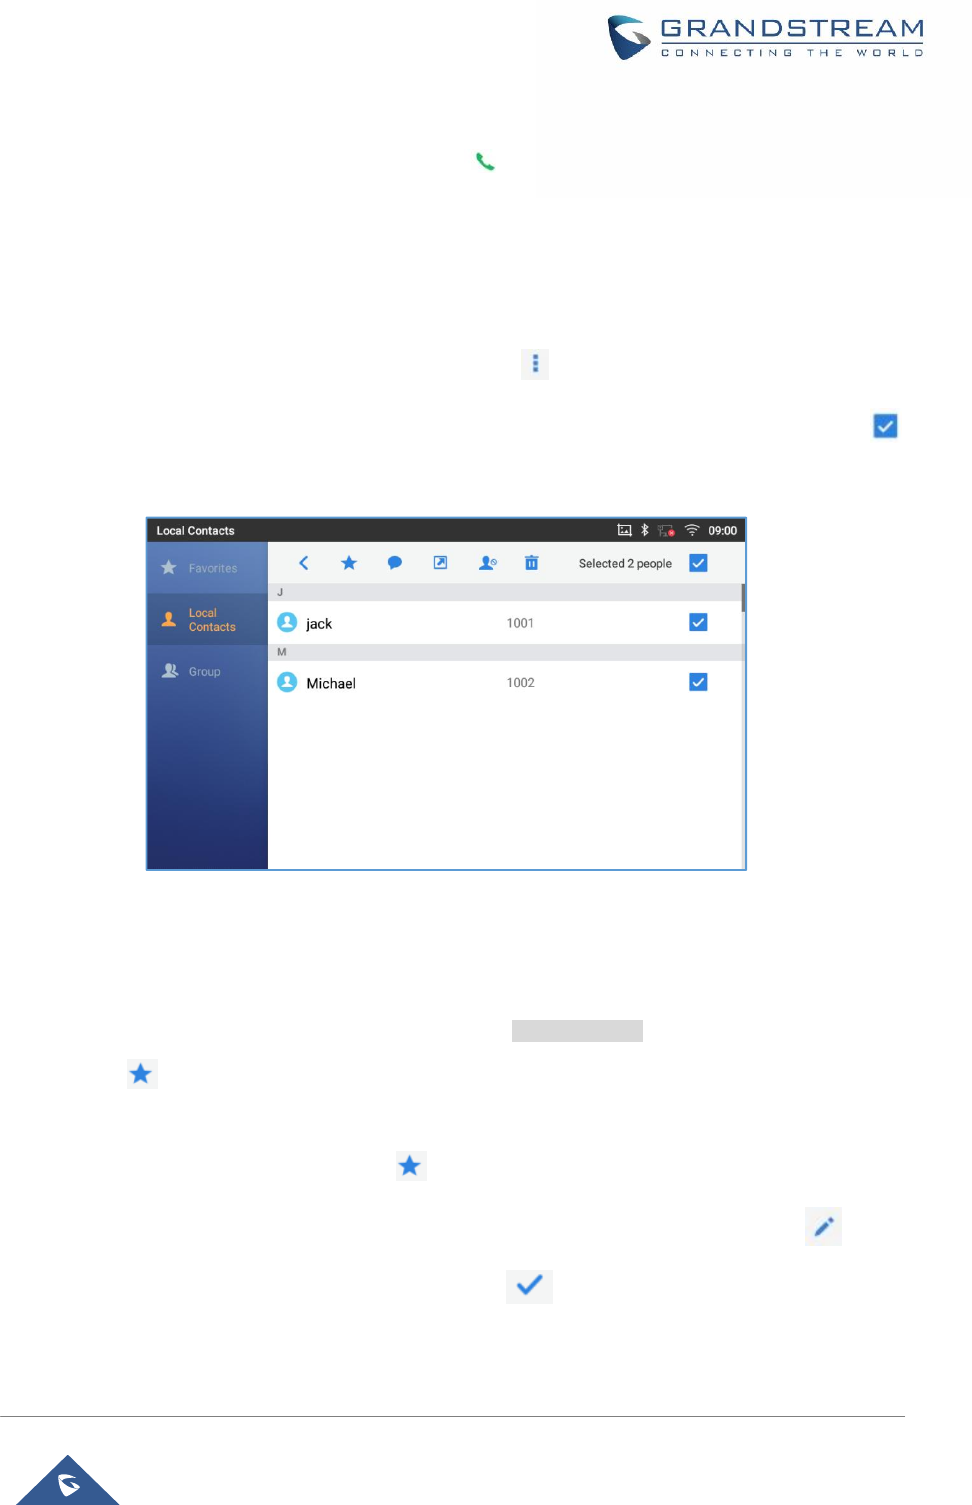
Page| 78
GXV3370 User Guide
Version 1.0.0.4
Make a Call to Contacts
Scroll up/down to find the contact in the list and tap on to call this contact.
Select Contacts
1. Scroll up/down to find the contact in the list.
2. Touch and press on the contact for about 2 seconds to show more options such as Delete contact, add
to blacklist etc.
3. To select a batch of contacts at the same time, press More on the upper right corner of the contacts
screen and select Batch operation, Tap on the checkbox for the contacts to be selected.
indicates the contact is selected.
Figure 74: GXV3370 Contacts - Select Contacts
Add Contacts to Favorites
1. Select the contact/contacts to be added as described in [Select Contacts].
2. Then tap on to add the contacts selected to Favorites
There are two other methods to add contacts to favorites.
·
Directly pressing on the contactand tap on to add the contact to favorite.
·
Tapping on “Favorites”on the Contacts screen to navigate to favorites category and tap on to
select the contacts to be added to favorites then tap on .
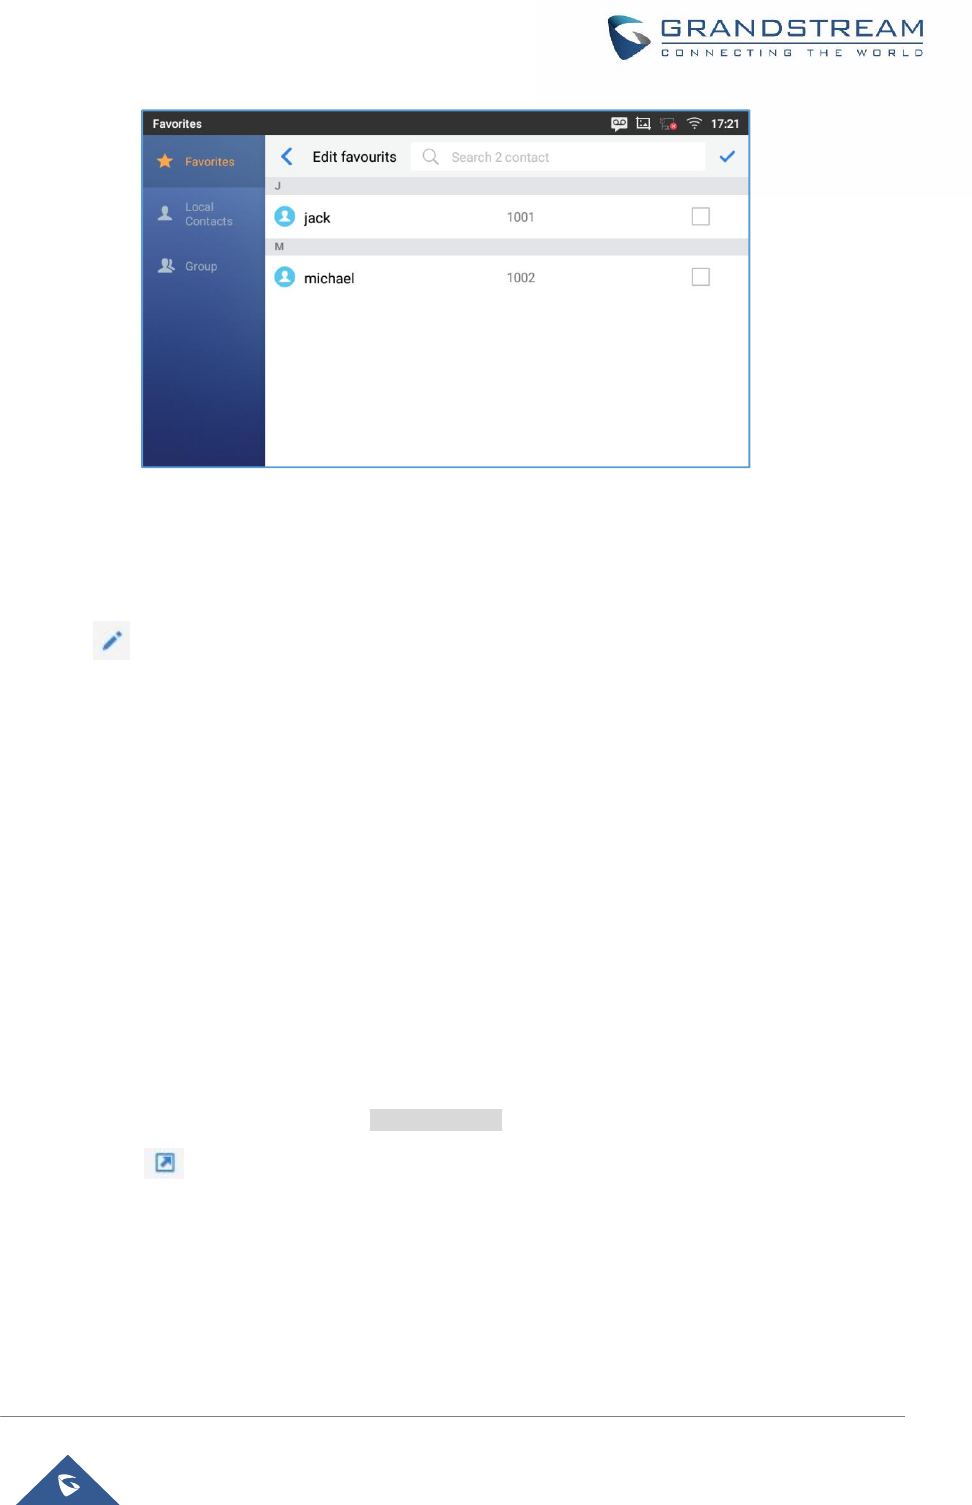
Page| 79
GXV3370 User Guide
Version 1.0.0.4
Figure 75: Add Contacts to Favorites
Edit Contacts
1. Tap on a contact from the contacts list
2. Tap on to edit the contact.
Send Contacts to Desktop Shortcut
1. Long press on the contact
2. Tap on Send to Desktop from the menu.
Share Contacts Via Bluetooth
Users can share a single contact or a batch of contacts. Refer to the following steps to do so:
·
Sharing a single contact:
1. Long press on the contact
2. Select “Send” from the menu then choose the Bluetooth device that you want to share the contact with.
·
Sharing a batch of contacts:
1. Select the contacts as described in [Select Contacts].
2. Press on to share the selected contacts via Bluetooth
Add Contacts to Blacklist
Users can add a single contact or a batch of contacts to the black list. Refer to the following steps to do so:
·
Add a single contact to black list:
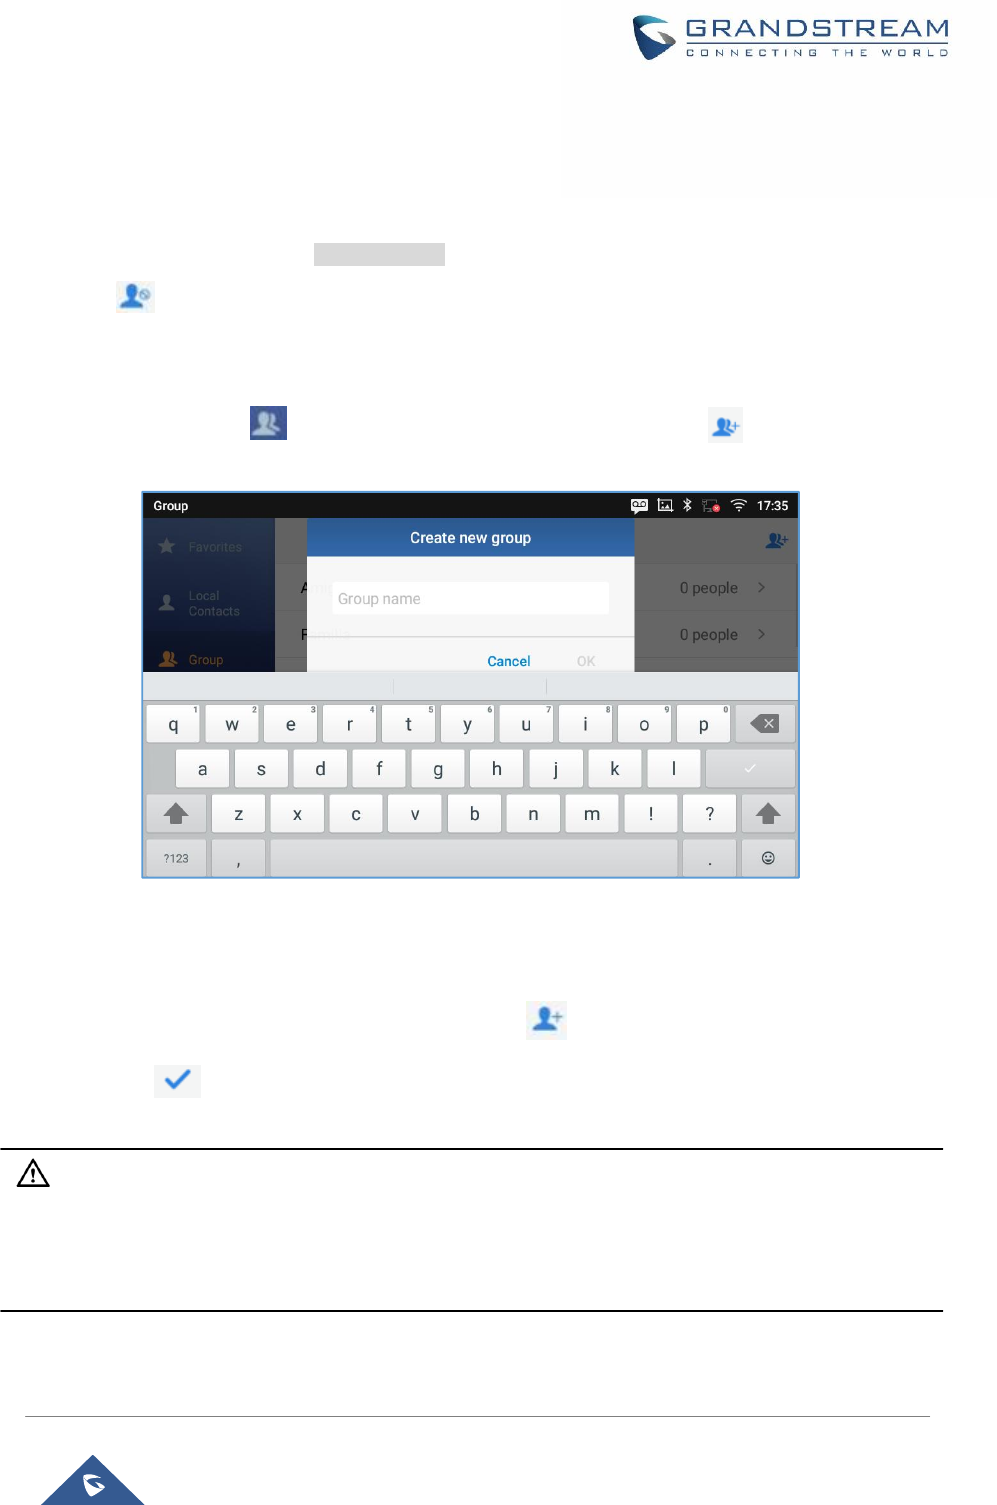
Page| 80
GXV3370 User Guide
Version 1.0.0.4
1. Long press on the contact
2. Select "Add to Blacklist" from the menu.
·
Add a batch of contacts to black list:
1. Select contacts as described in [Select Contacts].
2.Press on to add the selected contacts to the blacklist
Add Group
Open Contacts and tap on to access “Group”. To add a new group, tap on and name the new
group.
Figure 76: GXV3370 Contacts - Add New Group
Add contacts to Group
To add contacts to a group, tap on the group then tap on , check the contacts to be added to the
group and press .
Note:
·
Users could also select a group for the contact when adding or editing the contact.
·
Ringtone can be assigned in group as well as single contact. If the group has ringtone set to "Custom
Ringtone", this ring tone has the highest priority when there is an incoming call to the contact.
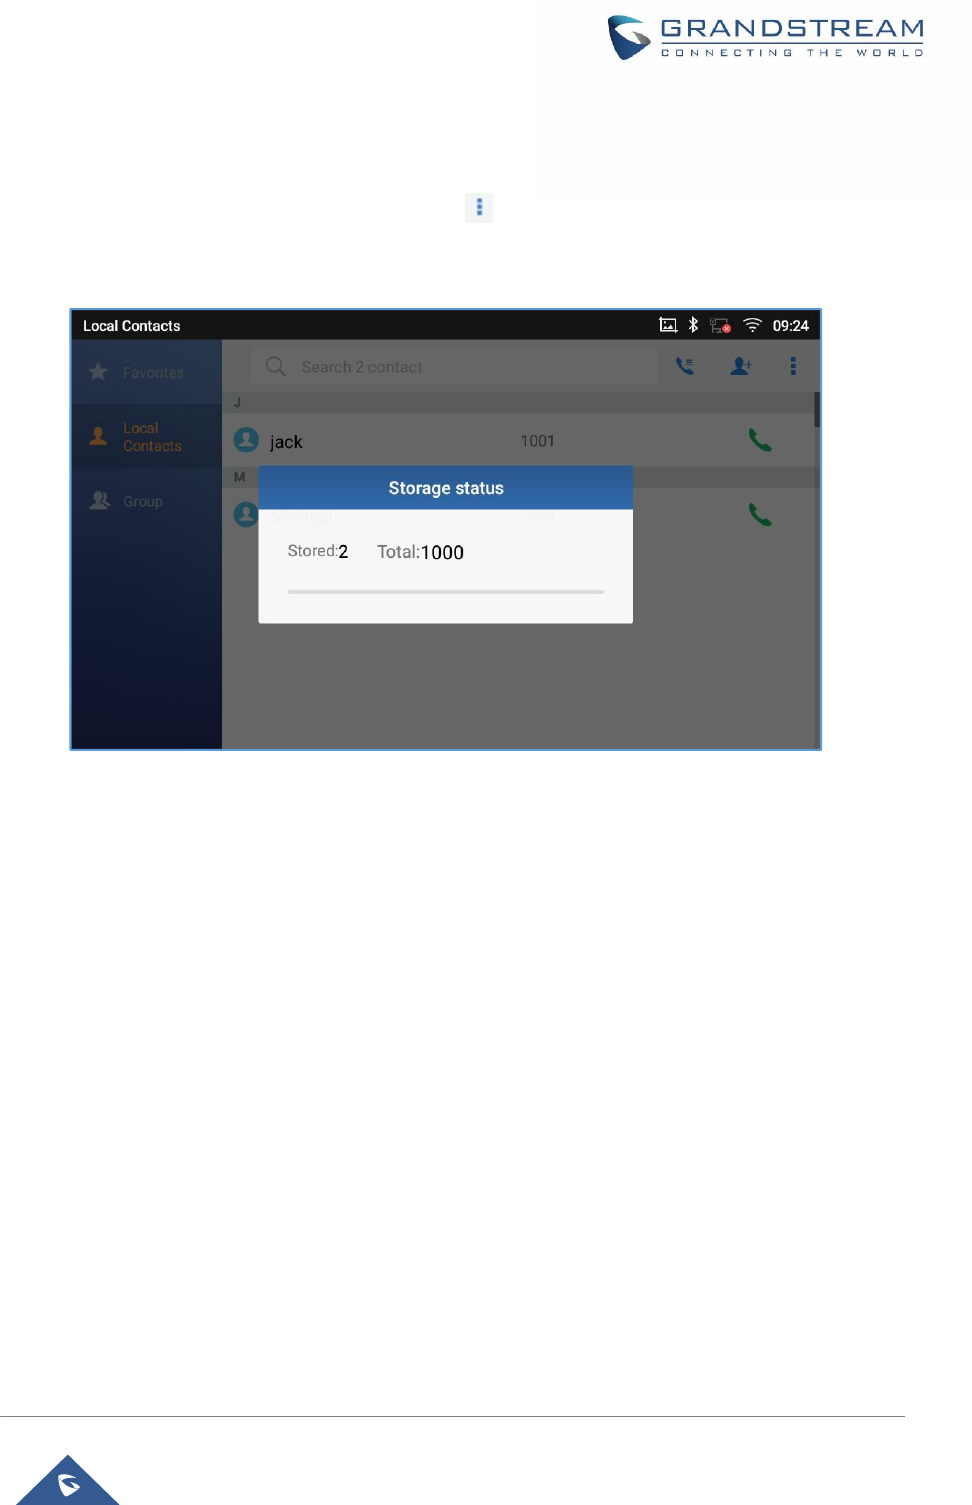
Page| 81
GXV3370 User Guide
Version 1.0.0.4
Contacts Storage Status
The GXV3370 default maximum contacts storage is up to 1000. To check contact storage status, tap on
More on the upper right corner of the contacts screen to bring up contacts options, scroll down and
select "Storage Status".
Figure 77: GXV3370 Contacts - Storage Status
Note:
Users could increase the number of maximum contacts storage to more than 1000 contacts on GXV3370. Users
may access the phone through telnet and change the P value P1688 to another number (<=10000) to increase
the default contacts storage. In this case, if users increase this default P value, the phone resource will be cost,
and the phone performance will be slower.
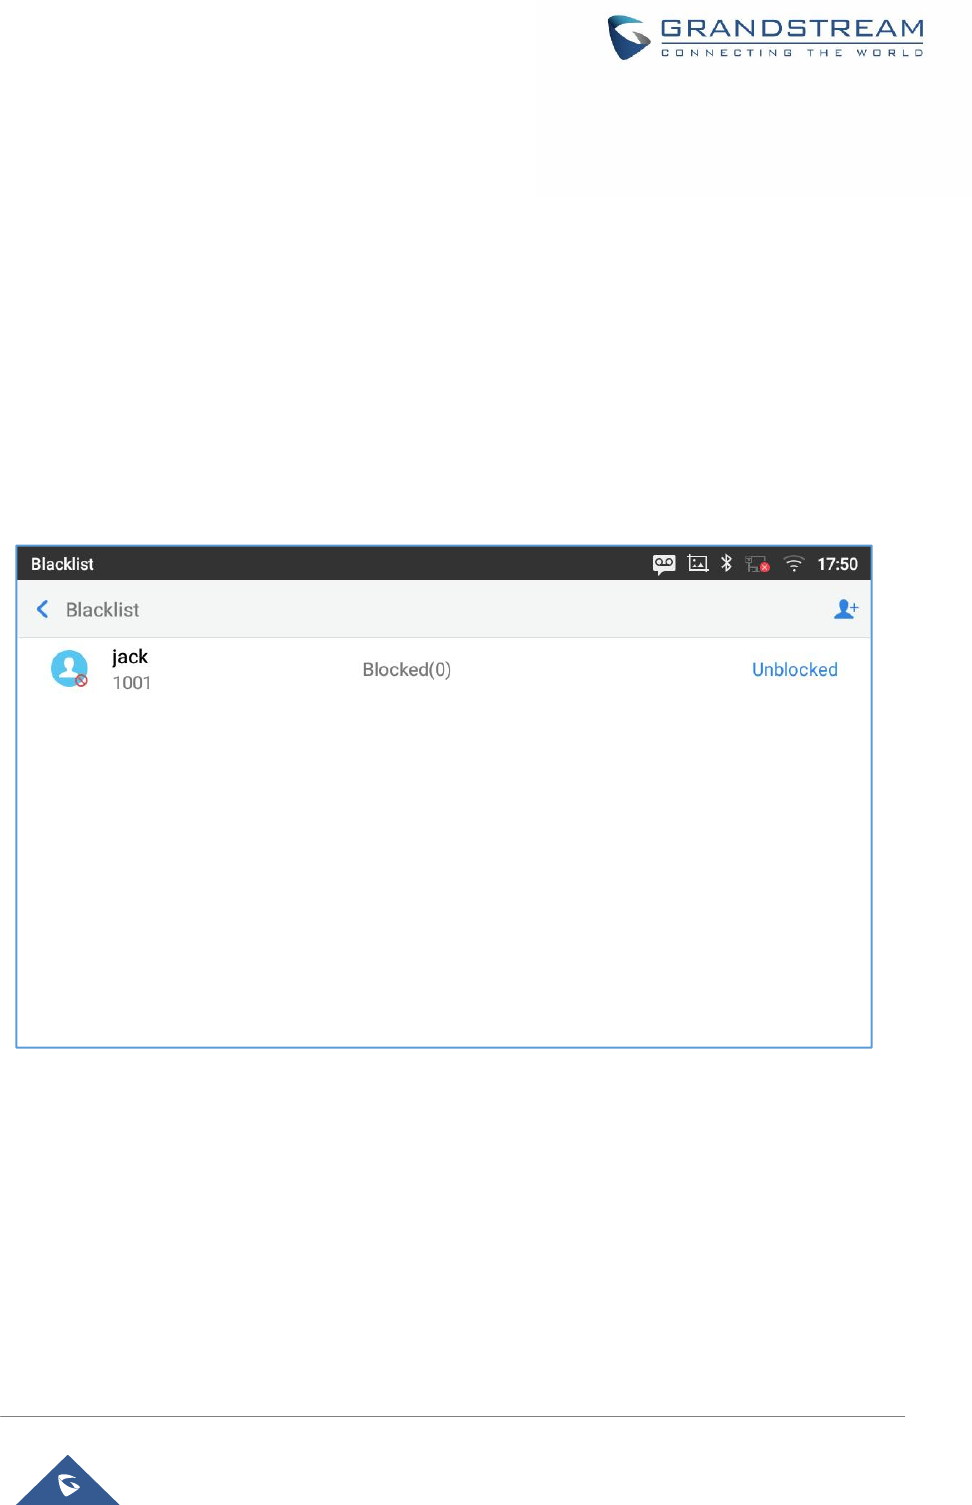
Page| 82
GXV3370 User Guide
Version 1.0.0.4
HARASSMENT INTERCEPTION
The GXV3370 has blacklist support for users to manage incoming calls. To access blacklist, tap on
“Settings” icon then under “Features”, access “Harassment Interception”.
Blocked Contacts
The blocked Contacts are the contacts that were added to the blacklist, the GXV3370 will block any calls
coming from these contacts.To show the blocked contacts tap on Blacklist from the Harassment
Interception page.
Figure 78: List of blocked contacts
Block History
To show the history of blocked contacts/numbers, tap on the call history icon from home screen and press
“Blocked”.
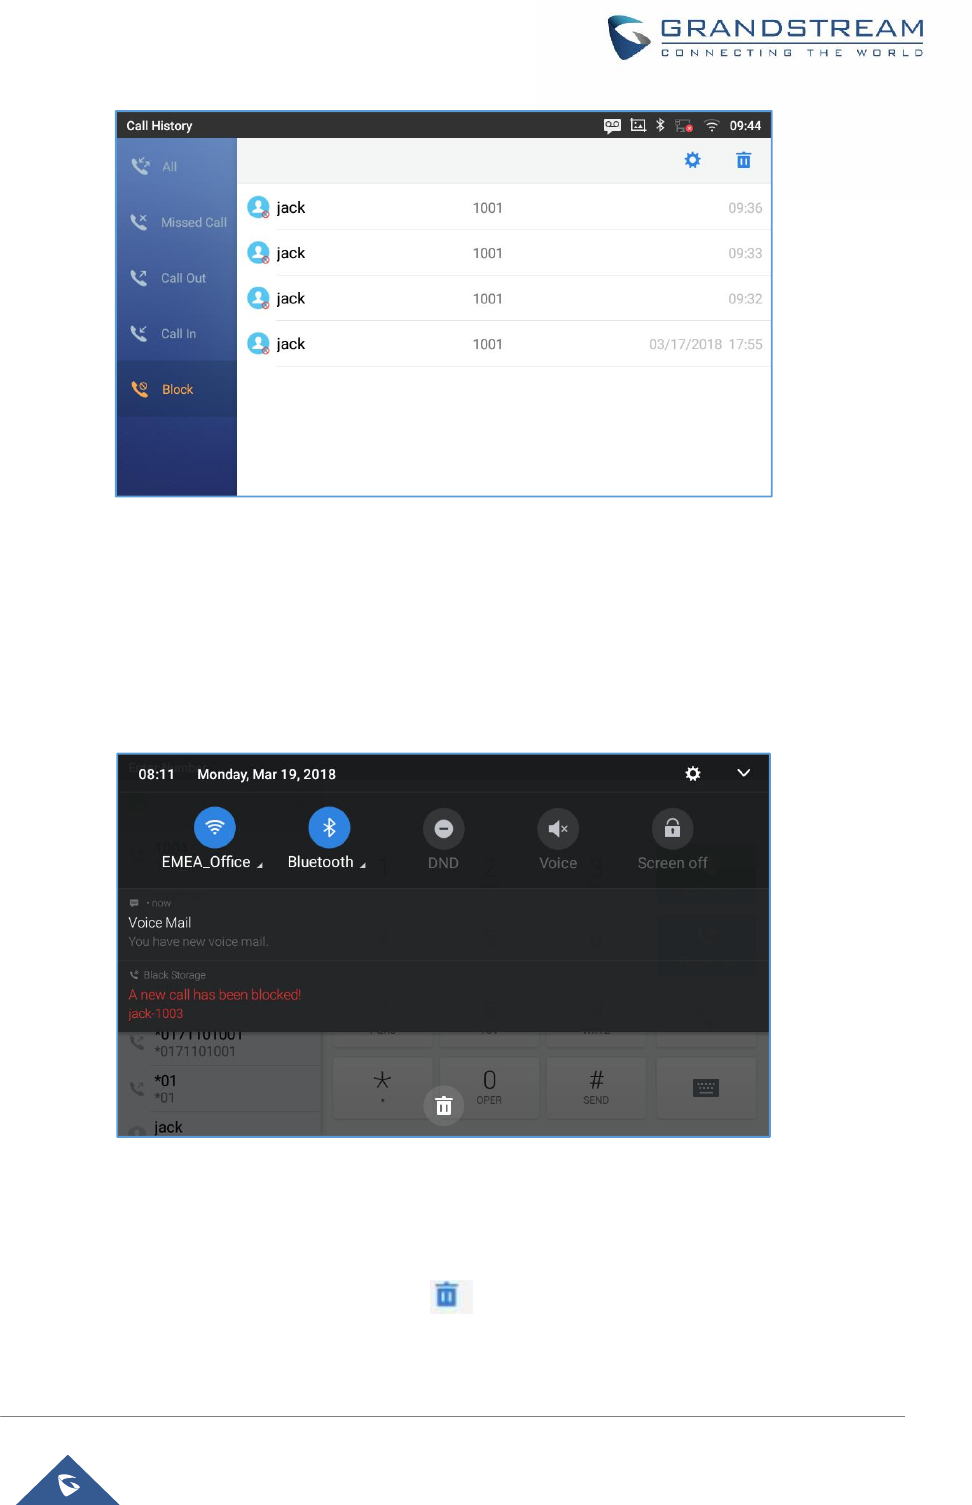
Page| 83
GXV3370 User Guide
Version 1.0.0.4
Figure 79: Block History
Blocked call notification
The GXV3370 will notify the user when a call is blocked by triggering the notification sound and showing
Blocked History notification on the status bar.
Figure 80: Blocked Call Notification
Delete Block History
1. In the block history, tap on the recycle bin icon
2. Confirm the deletion of the complete blocking record by pressing “OK”
Page| 84
GXV3370 User Guide
Version 1.0.0.4
Edit Blacklist
Tap on Blacklist under the Harassment Interception Menu to show the blacklisted contacts
·
Add number to blacklist
1. Tap on to start adding new entry to the blacklist. The blacklist can be added manually, from
contacts, or from call history.
Figure 81: GXV3370 Blacklist - Add Number to Blacklist
2. The following figure shows manually addingnumber to blacklist. Once Manually add option is selected,
a window will be prompted for users to enter the phone number in the first field and name/note in the
second field (optional). Tap on OK to finish the adding operation.
Figure 82: Manually Add Number to Blacklist
Page| 85
GXV3370 User Guide
Version 1.0.0.4
·
Edit Blacklist
1. In the blacklist, touch and press the entry for about 2 seconds a prompt allowing changing the
name/note is displayed
2. Change the name/note.
3. Tap on OK once done.
·
Delete Blacklist
Users can Delete/unblock contacts from the black list using two methods:
1. From the black list menu press on “Unblocked”to no longer block the calls from coming from this
contact.
2. From the contacts menu, long press on the contact and press“Remove from Blacklist”.
Intercept Anonymous calls
The GXV3370 gives the possibility to intercept anonymous calls for each account registered:
1. Enter the harassment Interception Menu.
2. Check Intercept Anonymous Calls as shown on the figure below.
3. Check the account to apply the interception.
Figure 83: Intercept Anonymous Calls

Page| 86
GXV3370 User Guide
Version 1.0.0.4
BROADWORKS XSI CONTACTS
Besides the Local and LDAP phonebook, the GXV3370 also supports BroadWorks Xsi contacts if
BroadWorks XSP server is available within the network. Please refer to the following link for more details
about how to use BroadWorks Xsi Contacts on the GXV3370:
http://www.grandstream.com/sites/default/files/Resources/GXV_XSI_Guide.pdf
Page| 87
GXV3370 User Guide
Version 1.0.0.4
CALL HISTORY
The GXV3370 supports local and BroadWorks Xsi Call history. Tap on idle screen to access Call
history. The following figure shows the call history on the GXV3370.
Figure 84: GXV3370 Call History
Local Call History
There are four different categories in the local call history. Users could tap on the icon on the top menu to
access the corresponding call logs:
·
All
·
Missed calls
·
Call Out
·
Call In
·
Blocked (if any)
Page| 88
GXV3370 User Guide
Version 1.0.0.4
Dial Out from Call History
Tap on one of the call history entry to call this number directly. The phone will use the same account as the
call log when dialing out.
Call History Options
·
Touch and press the call history entry for about 2 seconds until more option window pops up
·
Users can edit this number before calling, add this number to contacts, add this number to balcklist
etc…
Figure 85: GXV3370 Call History – Options
Delete Call History
·
Delete the entire call history
Users can delete the complete call history by pressing the directly afeter accessing the call history
page.
·
Delete a single call history entry
Users can delete a single call history entry by pressing the entry for about 2 seconds to bring up the
options then select Delete call history.
·
Delete multiple call history entries
o
Press on the top right corner of the screen and select the entries to be deleted
o
Tap on to delete the entries.

Page| 89
GXV3370 User Guide
Version 1.0.0.4
Call History Details
For each call history entry, users could tap on the entry to access the details.
Figure 86: GXV3370 Call History - Details
The following operations could be done:
·
Dial out this number directly.
·
Bring up dial screen with the call history number. Users could edit the number before
dialing out.
·
Add to Blacklist
·
Delete the entry.
·
Options ,"Create a New Contacts", "Add to an Existing Contact”.
Broadworks XSI Call History
Besides the Local Call History, the GXV3370 also supports BroadWorks Xsi call history if BroadWorks XSP
server is available within the network. Please refer to the following link for more details about how to use
BroadWorks Xsi Call History on the GXV3370:
http://www.grandstream.com/sites/default/files/Resources/GXV_XSI_Guide.pdf
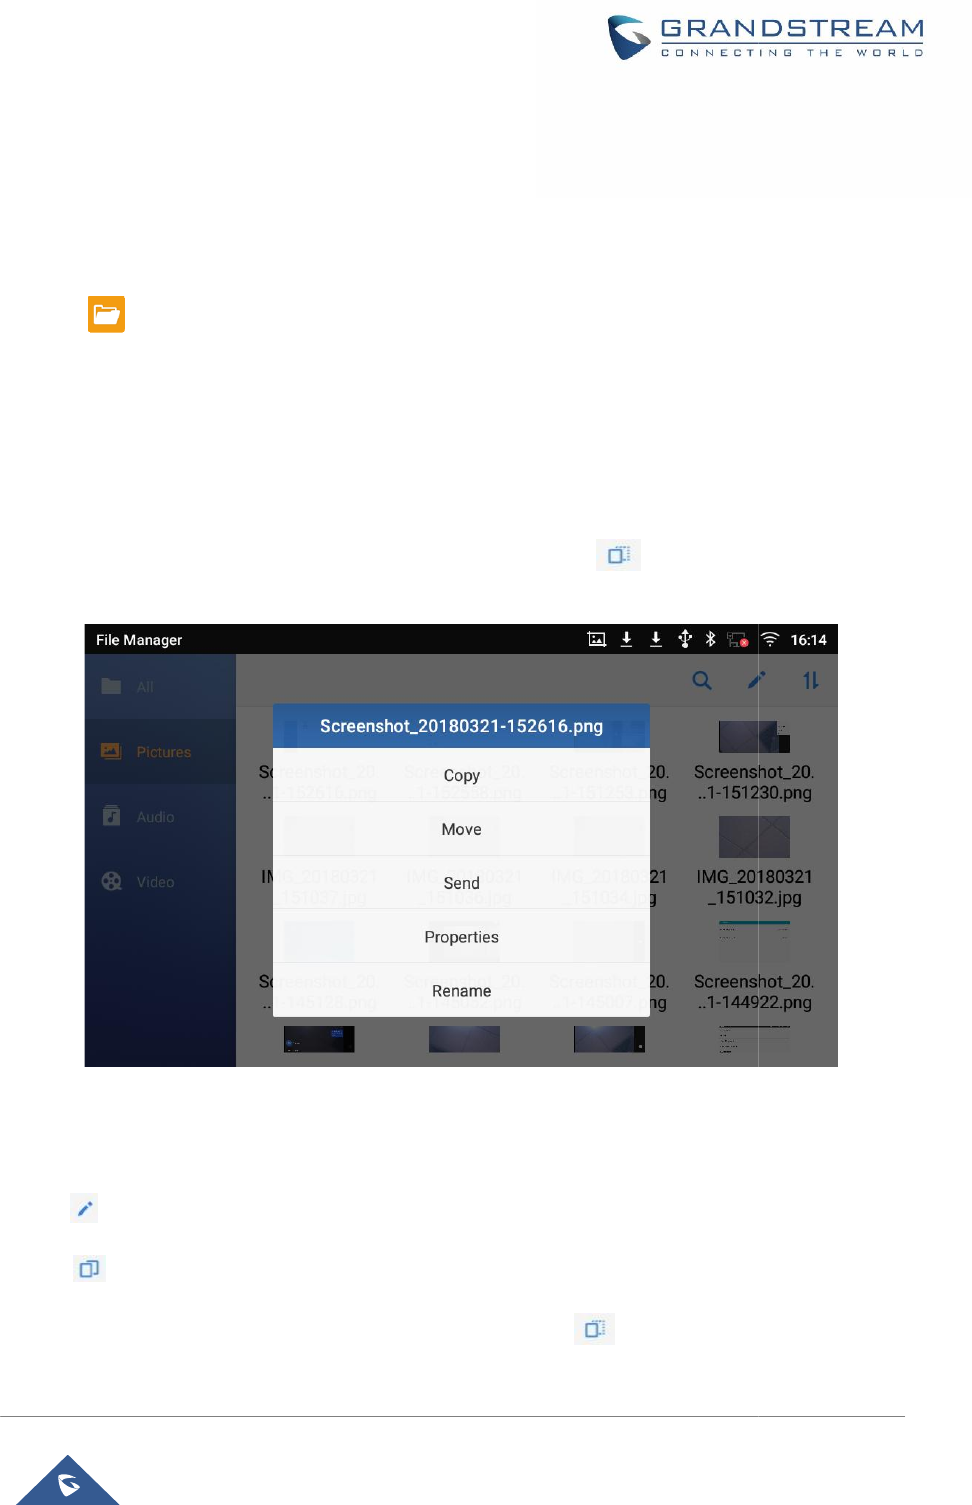
FILE MANAGER
File Manageris a tool that allows users to delete, move, copy/past, send and rename files. It helps users to
access and manage files in local storage as well as external storag
drive). Tap
on the phone's menu or desktop to launch File Manager application.
Copy and Paste Files
Follow the steps below to copy and
paste
1.
Open file manager and navigate to the directory of the file to be copied. Touch and press on the file for
about 2 seconds until
the option s window pops up then press Copy.
2.
Select the location to which you want to past the file and press on
Figure
Or
1- Press on
the top right corner of the screen and select the files to copy
2-Tap on to copy the files selected
3-S
elect the directory to which you want to past the files then press
GXV3370 User Guide
Version 1.0.0.4
File Manageris a tool that allows users to delete, move, copy/past, send and rename files. It helps users to
access and manage files in local storage as well as external storag
e devices (e.g, SD card/USB flash
on the phone's menu or desktop to launch File Manager application.
paste
a file on the GXV3370:
Open file manager and navigate to the directory of the file to be copied. Touch and press on the file for
the option s window pops up then press Copy.
Select the location to which you want to past the file and press on
.
Figure
87: GXV3370 File Manager–Copy File
the top right corner of the screen and select the files to copy
elect the directory to which you want to past the files then press
.
Page| 90
File Manageris a tool that allows users to delete, move, copy/past, send and rename files. It helps users to
e devices (e.g, SD card/USB flash
Open file manager and navigate to the directory of the file to be copied. Touch and press on the file for
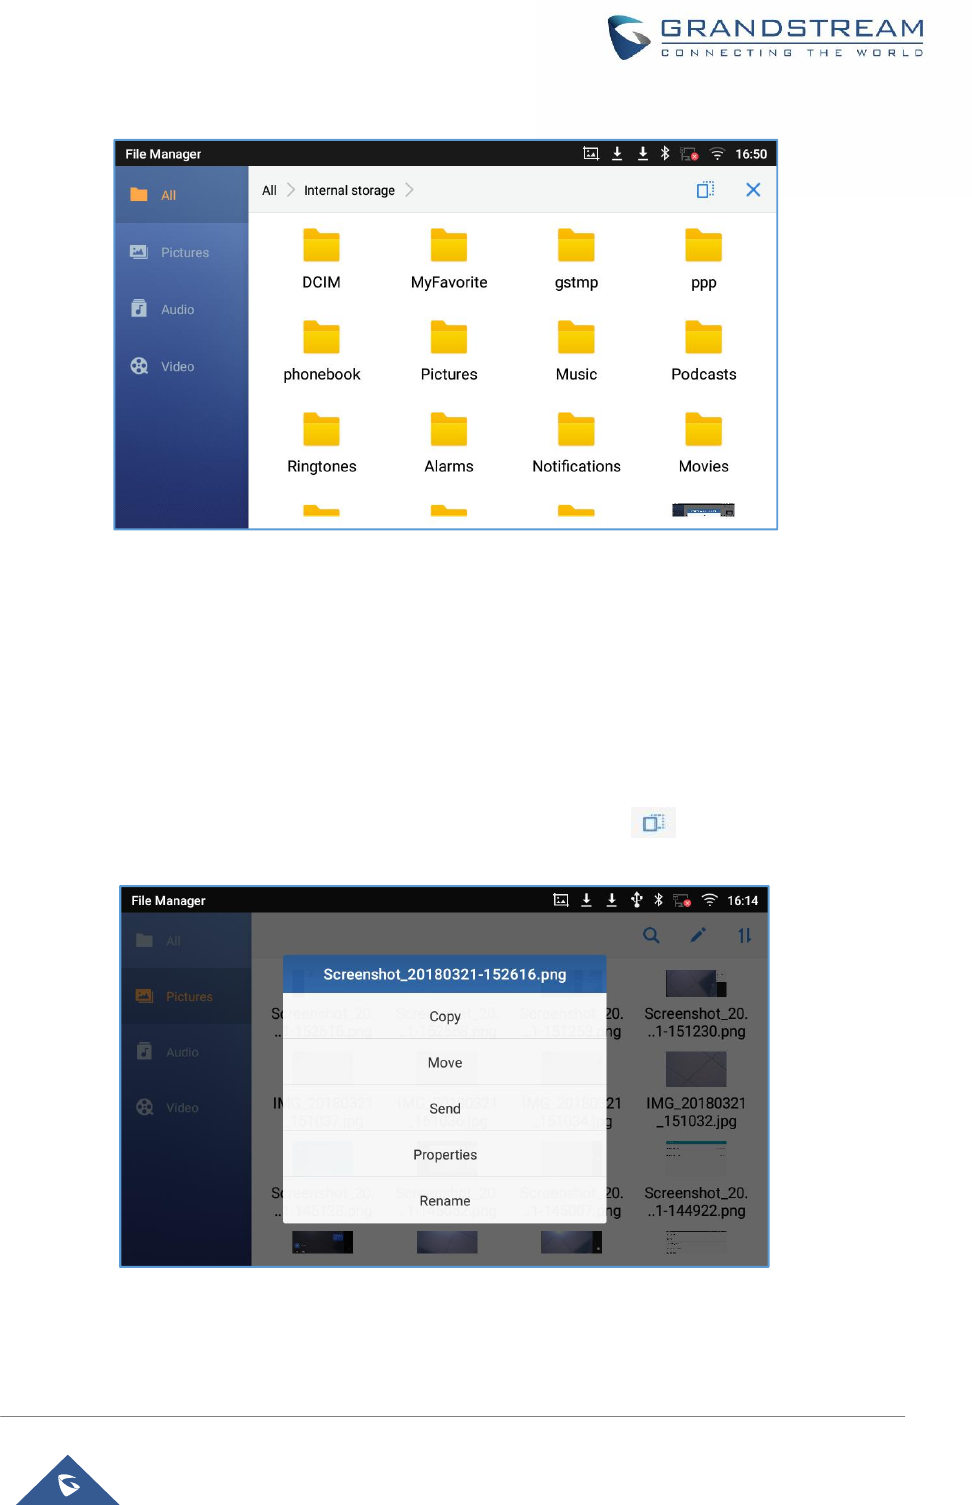
Page| 91
GXV3370 User Guide
Version 1.0.0.4
Figure 88: Paste File
Move Files
The steps to move a file are similar to the steps to copy/paste a file. The difference is once the file is
moved, the file will not be kept in the source folder. Follow the steps below to move a file on the GXV3370.
1. Open file manager and navigate to the directory of the file to be moved. Touch and press on the
file for about 2 seconds until the options window pops up then press Move.
2. Select the location to which you want to past the file and press on
Figure 89: GXV3370 File Manager - Move
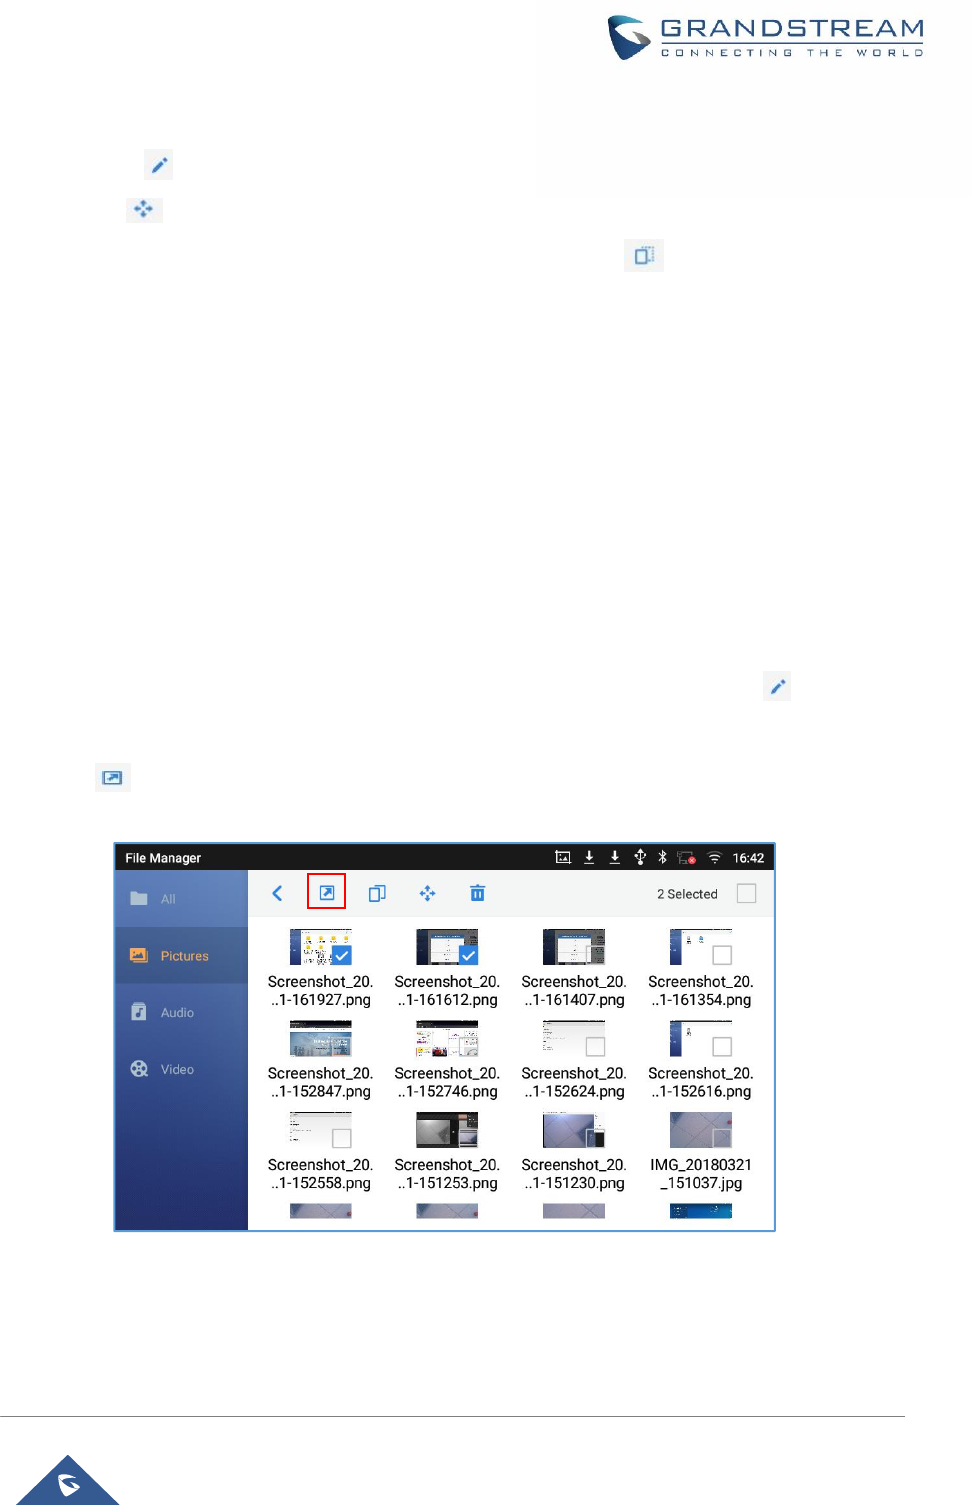
Page| 92
GXV3370 User Guide
Version 1.0.0.4
Or
1. Press on the top right corner of the screen and select the files to move
2. Tap on to move the files selected
3. select the directory to which you want to past the files then press
Send Files
The users can send a file via Bluetooth. Please make sure Bluetooth is turned on and connected to the
Bluetooth devices. Otherwise, users will be directed to set it up before the file can be sent out.
To send a file:
1. Open file manager and navigate to the directory of the file to be sent over. Touch and press on the file
for about 2 seconds and press send
2. Select the Bluetooth device to which the file will be transferred
Or
1. Open file manager and navigate to the directory of the file to be sent over then press on
2.The check boxes will appear then check the files to be sent over
3. Press on to send the selected files via Bluetooth then choose the Bluetooth devices to send the files
to.
Figure 90: GXV3370 File Manager - Options

Page| 93
GXV3370 User Guide
Version 1.0.0.4
Delete Files
1. Open file manager and navigate to the directory of the file to be deleted. Touch and press on the file for
about 2 seconds until more options appear.
2. Scroll down and select “Delete”
Or
1. Open file manager and navigate to the directory of the file/files to be deleted the click on
2. The check boxes will appear then check the files to delete
3. Press on to delete the files selected
4. Tap on OK to confirm
Figure 91: Delete File(s) via File Manager
Rename a File
1. Open file manager and navigate to the directory of the file to be renamed. Touch and press on the file
for about 2 seconds until more options appear
2. Tap on "Rename". A new dialog window will pop up for users to enter the new name.
3. Tap on OK.
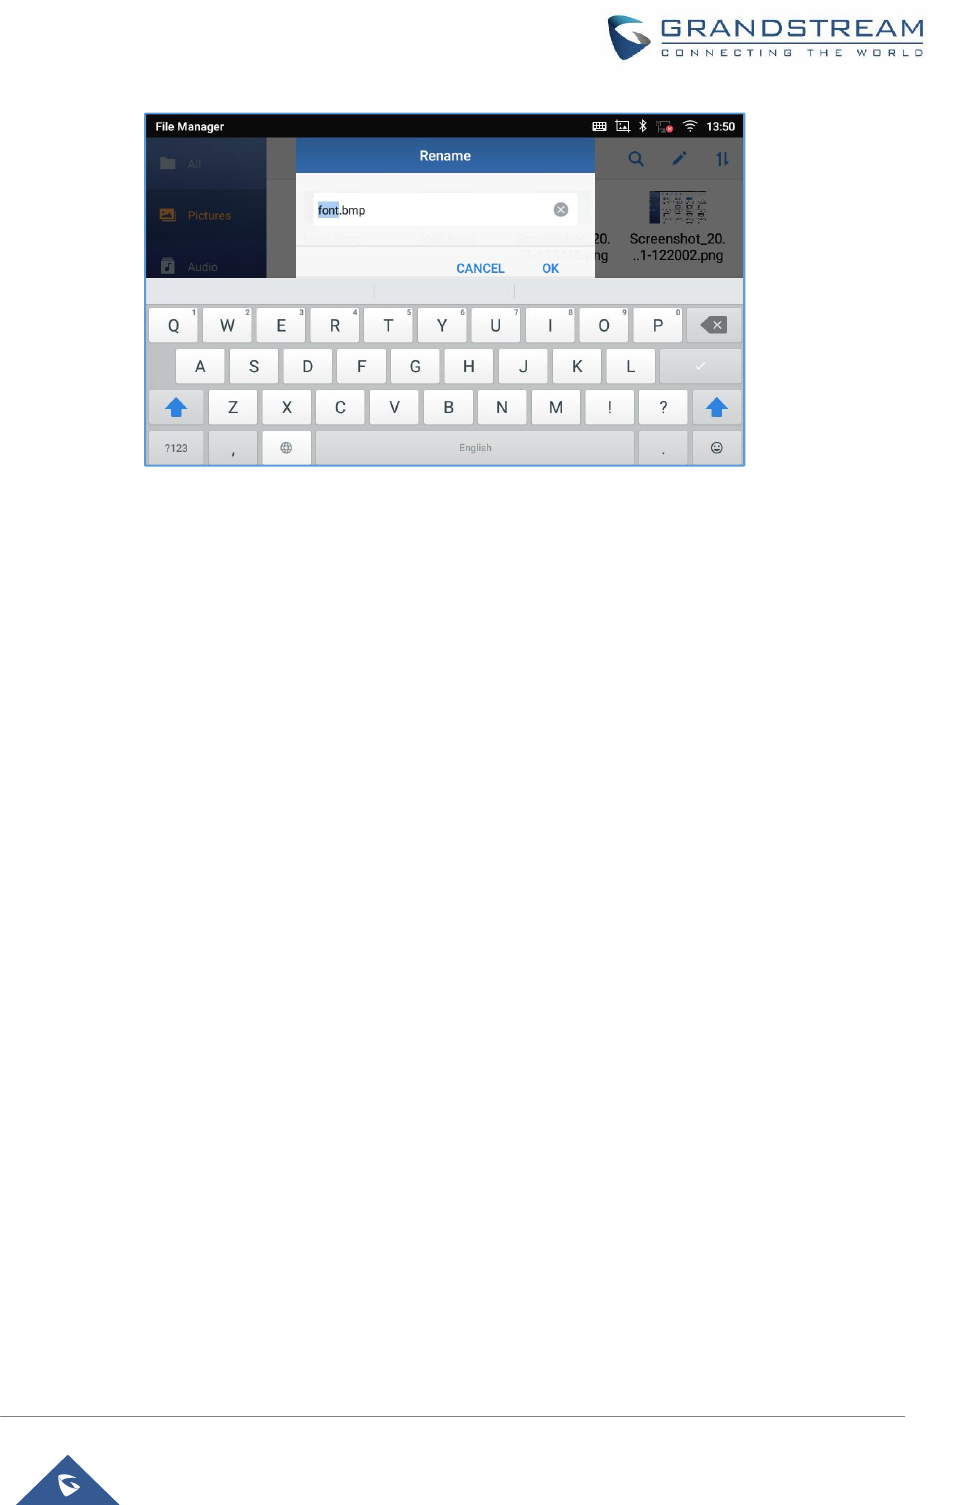
Page| 94
GXV3370 User Guide
Version 1.0.0.4
Figure 92: Rename File
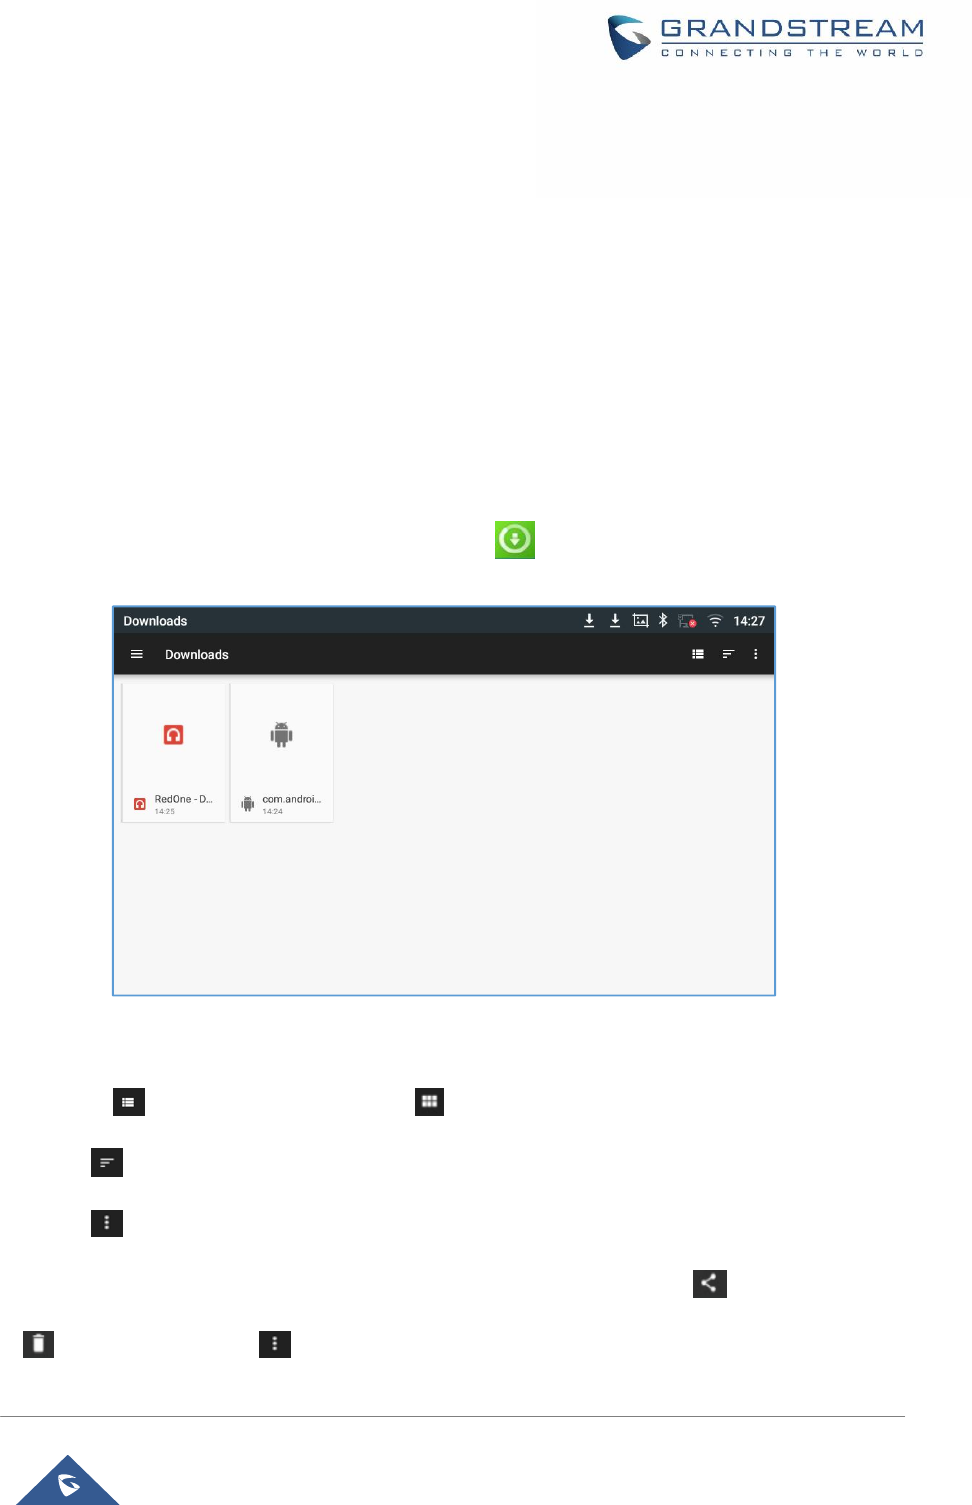
Page| 95
GXV3370 User Guide
Version 1.0.0.4
Files Operations
Users could long press on each file to select it then perform the following operations on the selected file.
Copy:To copy the file
Move:To movethe file from one location to another without leaving the file on the source folder
Send: Make sure to enable Bluetooth on the phone to send the file to other devices.
Properties:Toshow the details of the file.
Rename:To rename the file.
Delete: To delete the file.
Downloads
Downloadedfilescan be accessedon the phone by tapping on the phone's desktop.
Figure 93: Downloaded files page
·
Tap on the file to open it.
·
Tap on to show the files as a list or tap on to show the files as large icons
·
Tap on to sort the files by Name or by Date Modified.
·
Tap on to show more options (show file size, create folder)
·
Long press on the fileto make the checkbox appears, then users could tap on to share the file, on
to delete the file or on to show more options such as copy, move or rename the file.

Diagnosis
The GXV3370 provides a built-
in diagnosis application for users to troubleshoot hardware issues related to
LCD, keypad, and touch screen, LED as well as extension board connection.Tap
or desktop to launch Diagnosis application. The following figure shows the diagnosis menu. After selecting
the option, users could follow the diagnosis instruction to troubleshoot the device.
The following table describes the options available under “Diagnosis” used for
issues:
Table 11
:
LCD Diagnosis
Tests the colors of the LCD.
LCD Off
Tests turning on/off the LCD.
Keypad Diagnosis
Tests the available keypad buttons on the
Touch Screen Diagnosis
Tests the touch screen
LED Diagnosis
Tests all the LEDs on the
Audio Loopback test
Tests the
Built-in Speaker test
Tests the GXV3370’s speaker.
Camera Test
Tests the camera sensor.
Certification check
Tests the certification for
System Info
This part includes the
·
·
·
GXV3370 User Guide
Version 1.0.0.4
in diagnosis application for users to troubleshoot hardware issues related to
LCD, keypad, and touch screen, LED as well as extension board connection.Tap
on the phone's menu
or desktop to launch Diagnosis application. The following figure shows the diagnosis menu. After selecting
the option, users could follow the diagnosis instruction to troubleshoot the device.
Figure 94: GXV3370 Diagnosis
The following table describes the options available under “Diagnosis” used for
troubleshooting hardware
:
GXV3370 Diagnosis troubleshooting tests
Tests the colors of the LCD.
Tests turning on/off the LCD.
Tests the available keypad buttons on the
GXV3370
Tests the touch screen
on all the parts of LCD’s phone.
Tests all the LEDs on the
GXV3370 phone.
Tests the
GXV3370’s MIC and speaker.
Tests the GXV3370’s speaker.
Tests the camera sensor.
Tests the certification for
GXV3370
Video IP Phone for Android.
This part includes the
GXV3370
phone’s system Info, such as:
MAC Address
Total Memory
Available Memory
Page| 96
in diagnosis application for users to troubleshoot hardware issues related to
on the phone's menu
or desktop to launch Diagnosis application. The following figure shows the diagnosis menu. After selecting
troubleshooting hardware
Video IP Phone for Android.
phone’s system Info, such as:

Page| 97
GXV3370 User Guide
Version 1.0.0.4
·
Android Version
·
System Version
·
Recovery Version
·
U-boot Version
·
TP Firmware Version
·
Kernel Version
·
Hardware Version
·
CPE Version
·
Camera Serial Number
·
DDR Serial Number
·
Flash Serial Number
·
TP Serial Number
·
LCD Serial Number
·
Wi-Fi Serial Number
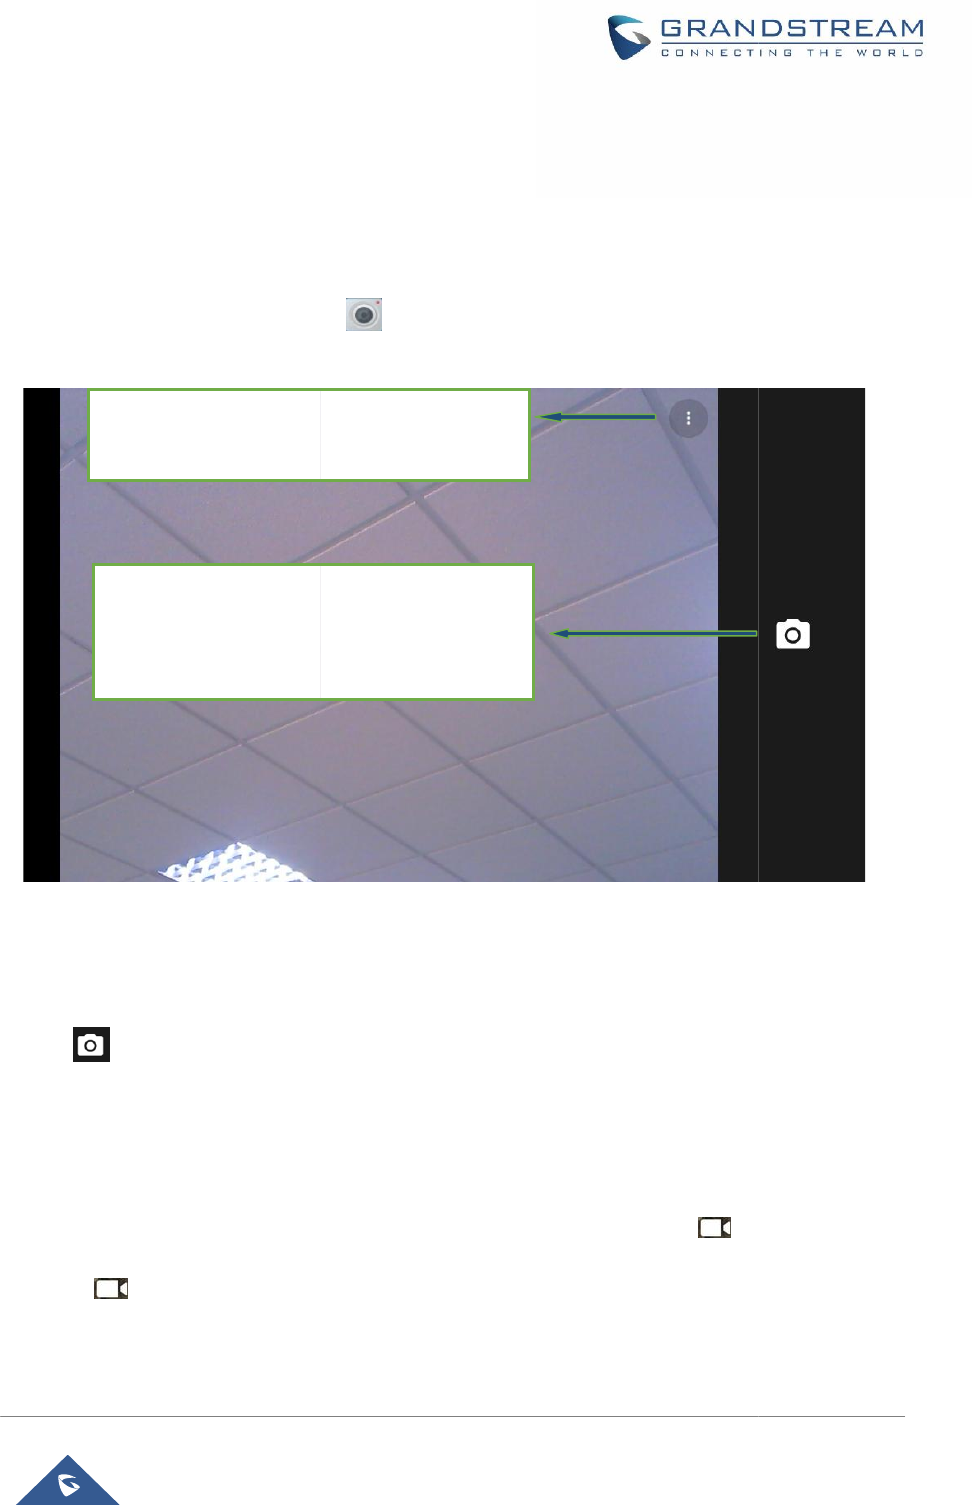
CAMERA
The GXV3370 has built-
in Camera to support taking pictures and recording videos. Users can also use the
camera during SIP video calls as well as video calls via 3rd party applications. To access Camera to take
pictures and videos, tap on Camera icon
Take Picture
1. Press to take picture.
2.
The captured picture can be accessed under
3. To view the last taken pictures, s
wipe from
Record Video
1. S
wipe from left to right on camera screen or press menu button
mode.
2. Tap on to start recording.
3. T
he recorded video can be accessed under
4.
To view the last recorded videos, s
Show option:
- Camera Grid Lines
- Timer
Take Picture/Video:
If camera mode is "Taking Picture", t
button to take a picture.
If camera
mode is "Taking Video", it will show Red
button. Tap on it to start/stop taking video.
GXV3370 User Guide
Version 1.0.0.4
in Camera to support taking pictures and recording videos. Users can also use the
camera during SIP video calls as well as video calls via 3rd party applications. To access Camera to take
pictures and videos, tap on Camera icon
on idle screen.
Figure 95: GXV3370 Camera
The captured picture can be accessed under
File ManageràInternal Storageà
DCIM
wipe from
right to left on camera screen.
wipe from left to right on camera screen or press menu button
, then tap on
to select the
he recorded video can be accessed under
File ManageràInternal Storageà
DCIM
To view the last recorded videos, s
wipe from right to left on camera screen.
If camera mode is "Taking Picture", t
ap on the Blue
mode is "Taking Video", it will show Red
button. Tap on it to start/stop taking video.
Page| 98
in Camera to support taking pictures and recording videos. Users can also use the
camera during SIP video calls as well as video calls via 3rd party applications. To access Camera to take
DCIM
àCamera.
to select the
video
DCIM
àCamera.
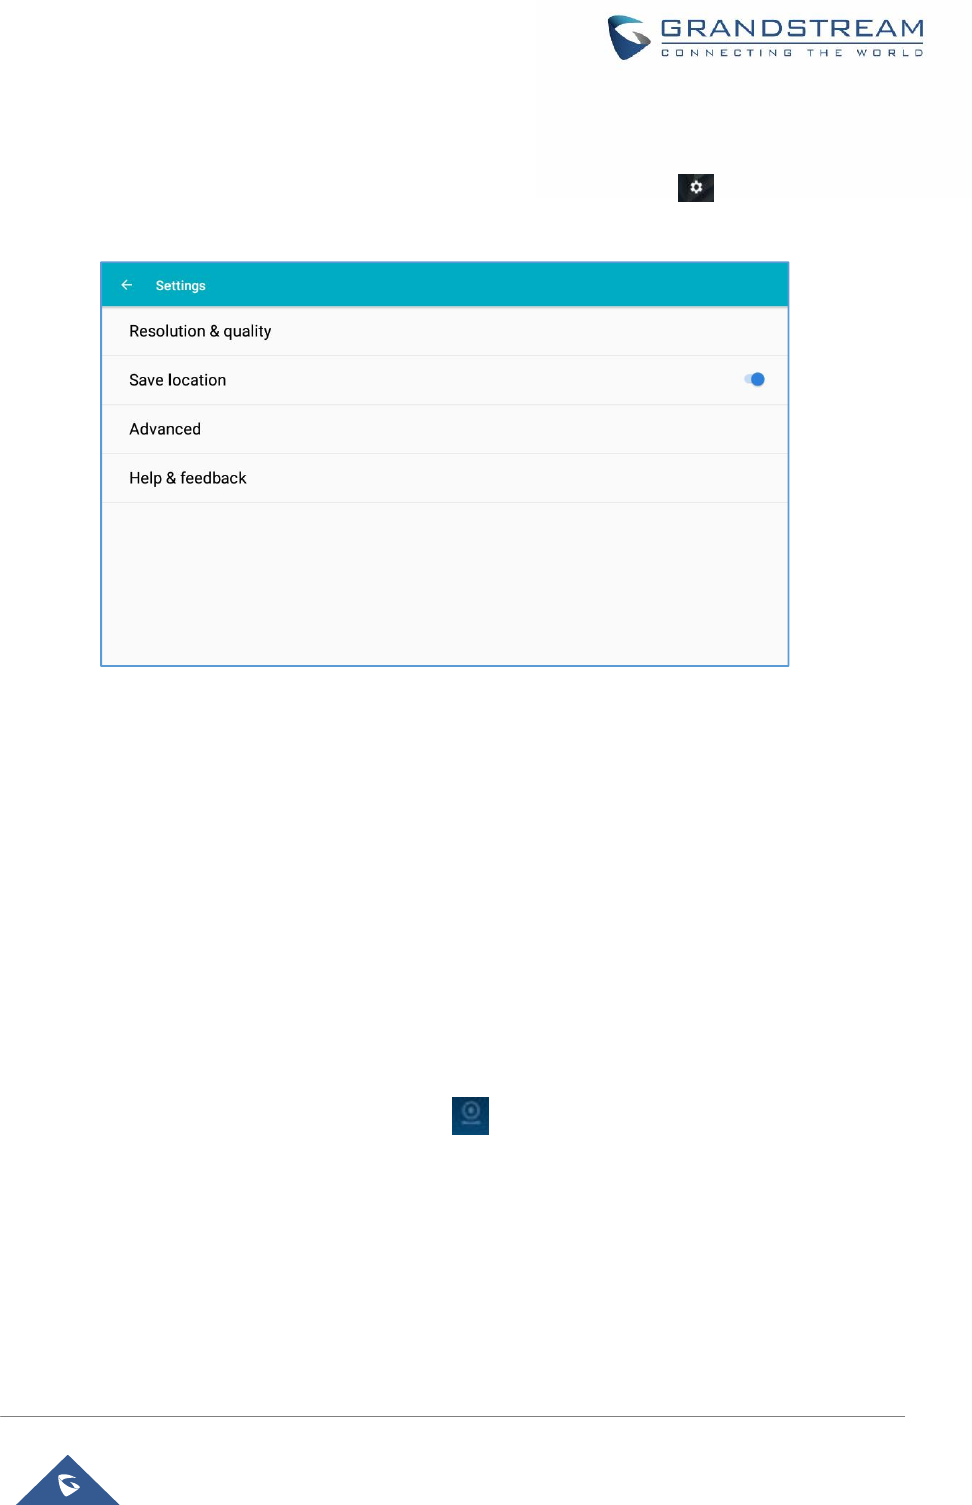
Page| 99
GXV3370 User Guide
Version 1.0.0.4
Camera Settings
Swipe from left to right on camera screen or press menu button, then press to show the camera
settings.
Figure 96: GXV3370 Camera Settings
The available settings on this page are:
·
Resolution & Quality: set the resolution and the quality for Pictures and Video
·
Save location: Set weather to add the location details to the picture/ video captured or not
·
Advanced: enable/disable the Manual Exposure mode.
Angle Adjustment
On the back of the GXV3370 camera, users could scroll the wheel up/down to adjust the camera angle. If
users scroll the camera all the way up until the icon shows up on the status bar of the screen, the
camera is turned off.
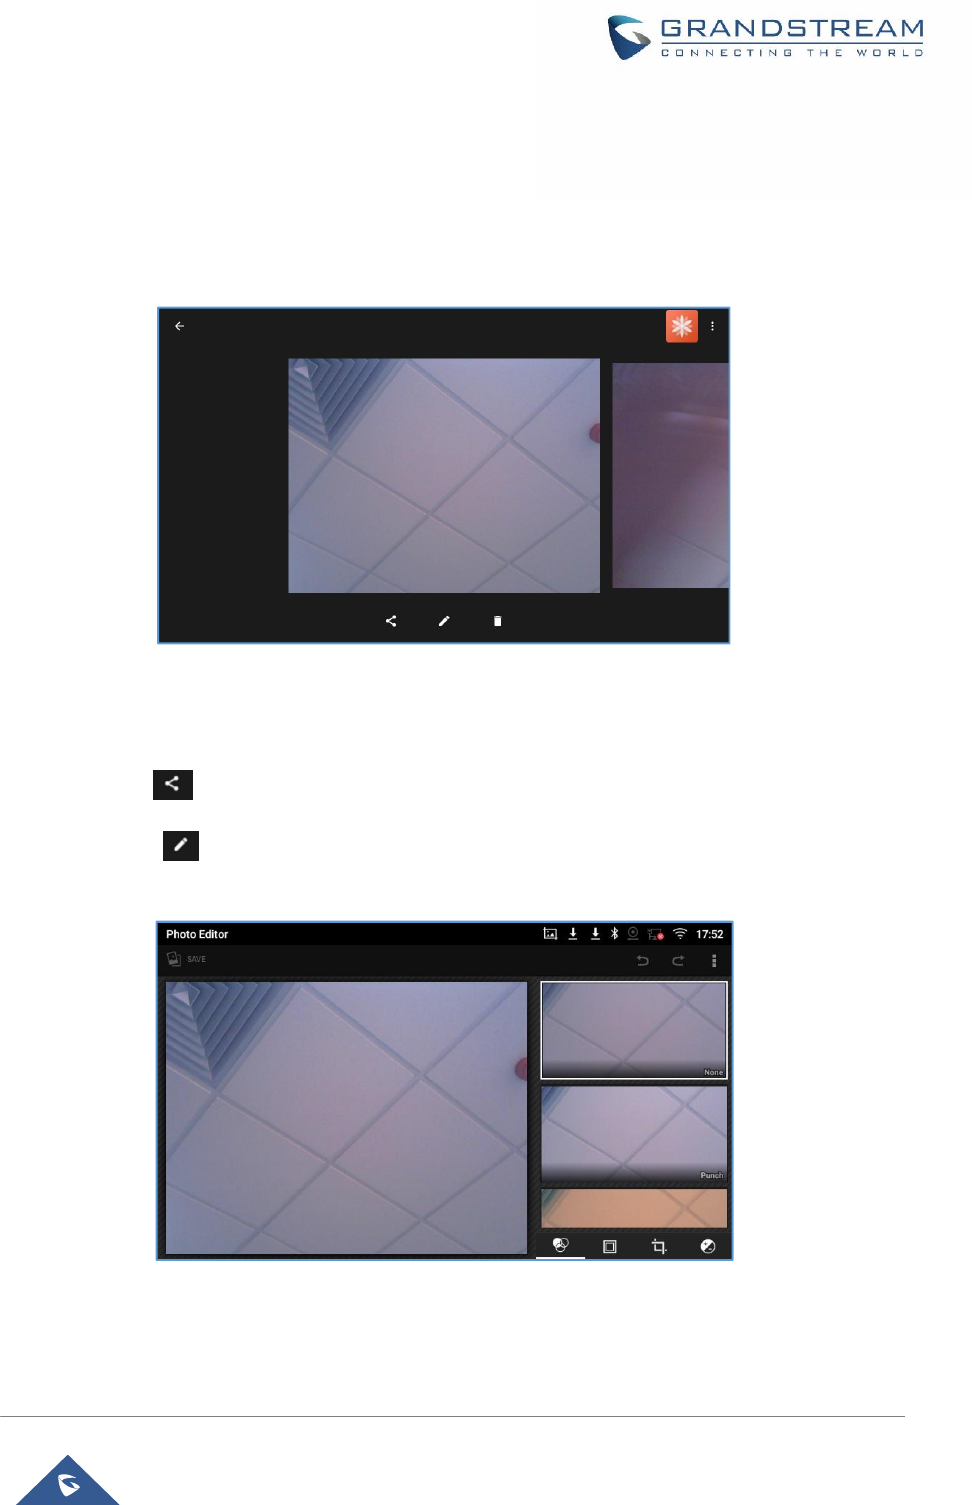
Page| 100
GXV3370 User Guide
Version 1.0.0.4
Gallery
The GXV3370 has built-in Gallery for users to view pictures and play videos from GXV3370 internal
storage. Users could also perform basic editing tasks on pictures under Gallery page.
To access the recently taken pictures or recorded videos, open the camera and swipe from right to left on
the camera screen.
Figure 97: Recent pictures and videos page
On this page, users have the ability to perform operations, such as:
·
Tapping on button to share the file via Bluetooth or a 3rd party application.
·
Tapping on button to edit and customize pictures. Users can add filters, crop, rotate
pictures… etc.
Figure 98:Edit picture
Note: Videos cannot be edited from the gallery
Page| 101
GXV3370 User Guide
Version 1.0.0.4
·
Gallery page
To access the Gallery, open the camera and swipe from right to left on the camera screen then press on
.
Figure 99:GXV3370 Gallery
On this page from the upper left corner, users can sort the pictures and videos by Album, Location or Time.
·
View pictures
Access one group of pictures and videosand select "Grid View" or "Filmstrip View" from upper left
corner of the screen to set view mode of the pictures. Tap on a specific picture to view the picture in full
screen.
·
Pictures Options
When the picture is displayed in full screen, press the Menu button . A list of options will be
available for users to select, including "Delete", “Slideshow”, "Edit", "Rotateleft”, “Rotate right", "Crop"
or "Set Picture as”, etc.
Page| 102
GXV3370 User Guide
Version 1.0.0.4
Figure 100: GXV3370 Gallery - Picture Options
·
Take picture/video
Tap on on the upper right of the Gallery pageto start taking pictures or videos using the
GXV3370 built-in camera.
·
Select multiple pictures
Touch and press on one of the pictures for about 2 seconds until the picture is highlighted in blue.
Tap on other pictures to select multiple pictures. On the upper right of the Gallery screen, users can
tap on to share the pictures via Bluetooth,tap on to share the pictures via a third party
application or tap on to delete the selected pictures.
Screensaver
User can set screensaver from the phone’s idle screen under Settings
à
Basic
à
Display
à
Screensaver.
Page| 103
GXV3370 User Guide
Version 1.0.0.4
Figure 101: Use Local Images
Users can set Screensaver to Clock or Screensaver.
·
Clock: When setting the screen saver to Clock the phone will show a clock on the screen when
the phone goes to standby mode. Press to set the clock as Digital or Analog and
Enable/Disable the Night mode.
·
Screensaver: Users can set Screensaver from the local images, the default directory
(Screensavers), or from Internal storage, or they can set a folder in a remote HTTP server to
display images contained on it as screensaver.
Figure 102: Use Network Images
Page| 104
GXV3370 User Guide
Version 1.0.0.4
Click on Use network images and set the path of the remote screensaver folder.
Figure 103: Network Image Path
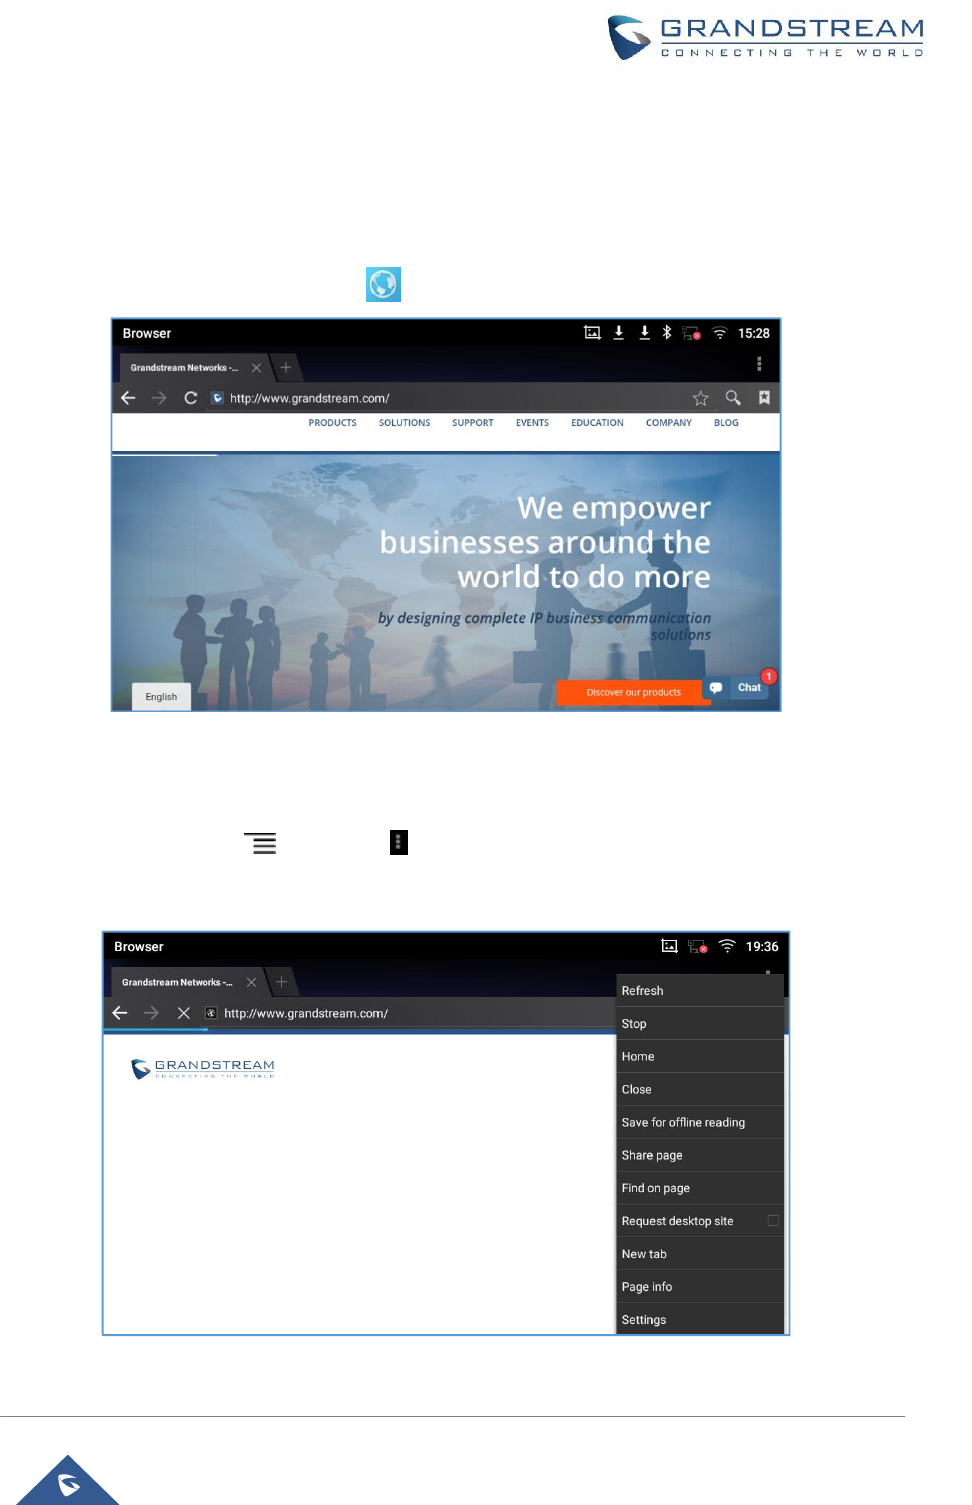
Page| 105
GXV3370 User Guide
Version 1.0.0.4
BROSWER
GXV3370 browser could be used in a similar way as a PC-based web browser. Users can open web pages,
bookmarks, view history, search …etc. Tap on the idle screen to launch the Browser application.
Figure 104: GXV3370 Web Browser
·
Touch the screen and scroll up/down/left/right to view the web page.
·
Use two fingers on the screen to pinch in or spreading out the page.
·
Press the MENU button to or press to access more options including refresh New Tab, find
on page, etc.

Page| 106
GXV3370 User Guide
Version 1.0.0.4
Figure 105: GXV3370 Browser Menu Options
·
To open a new window, tap on icon on the right side of the tab.
Figure 106: Open New Window in Browser
·
To open Bookmarks, History and Saved Pages, tap the icon on the upper right of the Browser.
Figure 107: GXV3370 Web Browser-Bookmarks

Page| 107
GXV3370 User Guide
Version 1.0.0.4

Page| 108
GXV3370 User Guide
Version 1.0.0.4
BS-IM&P
GXV3370 supports BroadSoft Instant Message and Presence (IM&P) feature. This service is a
multi-tenant Instant Message & Presence service based on the Extensible Messaging and Presence
Protocol (XMPP) and works with any XMPP compatible client. Please refer to the following link for more
details about how to use BroadSoft IM&P on the GXV3370:
http://www.grandstream.com/sites/default/files/Resources/GXV_IM%26P_Guide.pdf

Page| 109
GXV3370 User Guide
Version 1.0.0.4
ACTIONURL
GXV3370 supports ActionURL module, and it is used to set the URL for various kinds of phone events on
phone web GUI, and when the corresponding event occurs on the phone, phone will send the configured
URL to SIP server. To use ActionURL module, users need to know the supported events in this module,
and also added the dynamic variables of the supported events on phone web GUI. The dynamic variables
of the supported event will be replaced by actual values of the phone, in order to notify the event to SIP
server. Please refer to GXV3370 Administration Guide and ActionURL User Guide for the configuration
details.
http://www.grandstream.com/sites/default/files/Resources/ActionURL_Guide.pdf

Page| 110
GXV3370 User Guide
Version 1.0.0.4

Page| 111
GXV3370 User Guide
Version 1.0.0.4
CONNECTING GXV3370 TO GDS3710 DOOR SYSTEM
The GXV3370 offers a powerful integration with GDS3710 Door System and allows users to open the door,
initiates call to the GDS3710 and gets real time audio/video stream.
The GXV3370 can be connected with the GDS3710 in two different ways, either using peering mode
(without a SIP server) or through a SIP server. For more details, please refer to following guide:
http://www.grandstream.com/sites/default/files/Resources/Connecting_the_GDS3710_with_GXV32XX_C
onfiguration_Guide.pdf

CONNECT TO NETWORK AND DEVICES
The GXV3370
supports a variety of network connecti
including EHS headset (Plantronics), USB, SD card and Bluetooth device. Users can connect the
GXV3370and transfer files from/to the
GXV3370
Ethernet
Ethernet connec
tion is turned on as DHCP by default. If you would like to use Ethernet connection for
network access, please make sure the Ethernet cable is plugged in to the LAN port on the back of the
GXV3370.
To configure Ethernet settings on
GXV3370
1. Go to GXV3370's Settingsà
Network
2. Touch IPv4 settings.
3. Tap on "IPV4
Address Type" to select DHCP, Static IP or PPPoE as the address type.
Ø
For DHCP, save the setting and the
server in the network.
Ø For static IP, enter
IP Address, Subnet Mask, Default Gateway, DNS Server and Alternative DNS
server for the GXV3370
to correctly connect to network.
Ø
For PPPoE, enter PPPoE account ID a
PPPoE server.
WI-FI
WI-FI is supported and built-
in on the
available within the area.
Turn On/Off Wi-Fi
1. Go to GXV3370's Settings.
2. Touch Network.
3. Check or uncheck the option for
Wi
Or, users could open the top status bar and tap on WI
Add Wi-Fi Networks
1. Once Wi-Fi is turned on,
GXV3370
2. Go to GXV3370's Settings.
3. Touch Network.
GXV3370 User Guide
Version 1.0.0.4
CONNECT TO NETWORK AND DEVICES
supports a variety of network connecti
ons (Ethernet, Wi-
Fi) and device connections,
including EHS headset (Plantronics), USB, SD card and Bluetooth device. Users can connect the
transfer files from/to the
GXV3370
using a USB connection, SD card or Bluetooth.
tion is turned on as DHCP by default. If you would like to use Ethernet connection for
network access, please make sure the Ethernet cable is plugged in to the LAN port on the back of the
GXV3370
LCD:
Network
àEthernet Settings.
Address Type" to select DHCP, Static IP or PPPoE as the address type.
For DHCP, save the setting and the
GXV3370
should be able to get IP address from the DHCP
IP Address, Subnet Mask, Default Gateway, DNS Server and Alternative DNS
to correctly connect to network.
For PPPoE, enter PPPoE account ID a
nd password so the GXV3370
can get IP address from the
in on the
GXV3370. GXV3370
can be connected to network if Wi
Wi
-Fi.
Or, users could open the top status bar and tap on WI
-FI icon to turn it on/off.
GXV3370
will automatically start the scanning within the range.
Page| 112
Fi) and device connections,
including EHS headset (Plantronics), USB, SD card and Bluetooth device. Users can connect the
using a USB connection, SD card or Bluetooth.
tion is turned on as DHCP by default. If you would like to use Ethernet connection for
network access, please make sure the Ethernet cable is plugged in to the LAN port on the back of the
Address Type" to select DHCP, Static IP or PPPoE as the address type.
should be able to get IP address from the DHCP
IP Address, Subnet Mask, Default Gateway, DNS Server and Alternative DNS
can get IP address from the
can be connected to network if Wi
-Fi is
will automatically start the scanning within the range.
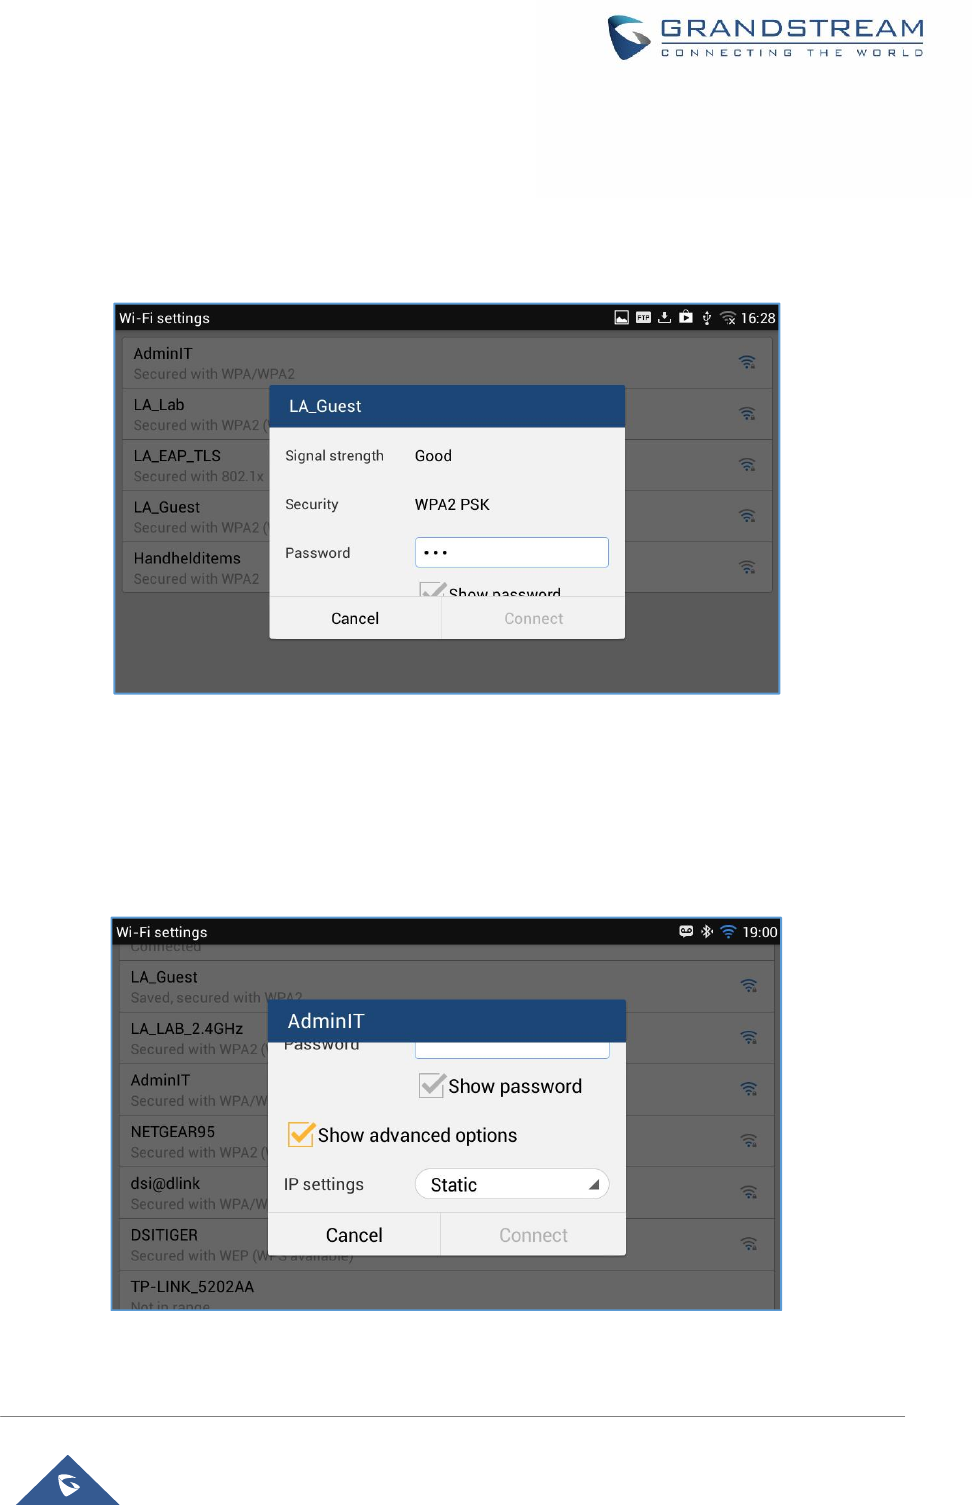
Page| 113
GXV3370 User Guide
Version 1.0.0.4
4. Touch Wi-Fi Settings.
5. A list of Wi-Fi networks will be displayed as scanning result. Tap on the SSID and enter the correct
password information to connect to the selected Wi-Fi network.
6. The phone will start connecting to the Wi-Fi. The status bar will show Wi-Fi signal strength.
7. Once it's added and the password is remembered, the GXV3370 will connect to it again when the
SSID is within the range.
Figure 108: GXV3370 Connect to Wi-Fi
8. The previous steps allow the GXV3370 to connect the Wi-Fi network with DHCP setting by default. If it
needs to be connected the Wi-Fi with static IP settings, please scroll down the setting window and tap
to check the “Show advanced options”. Then the window will show up the IP settings at the bottom. If
the Static is selected, the system will require end user to input IP address, Gateway, Network prefix
length and DNS 1 and DNS 2 addresses.
Figure 109: GXV3370 Connect to Wi-Fi-Show Advanced Options
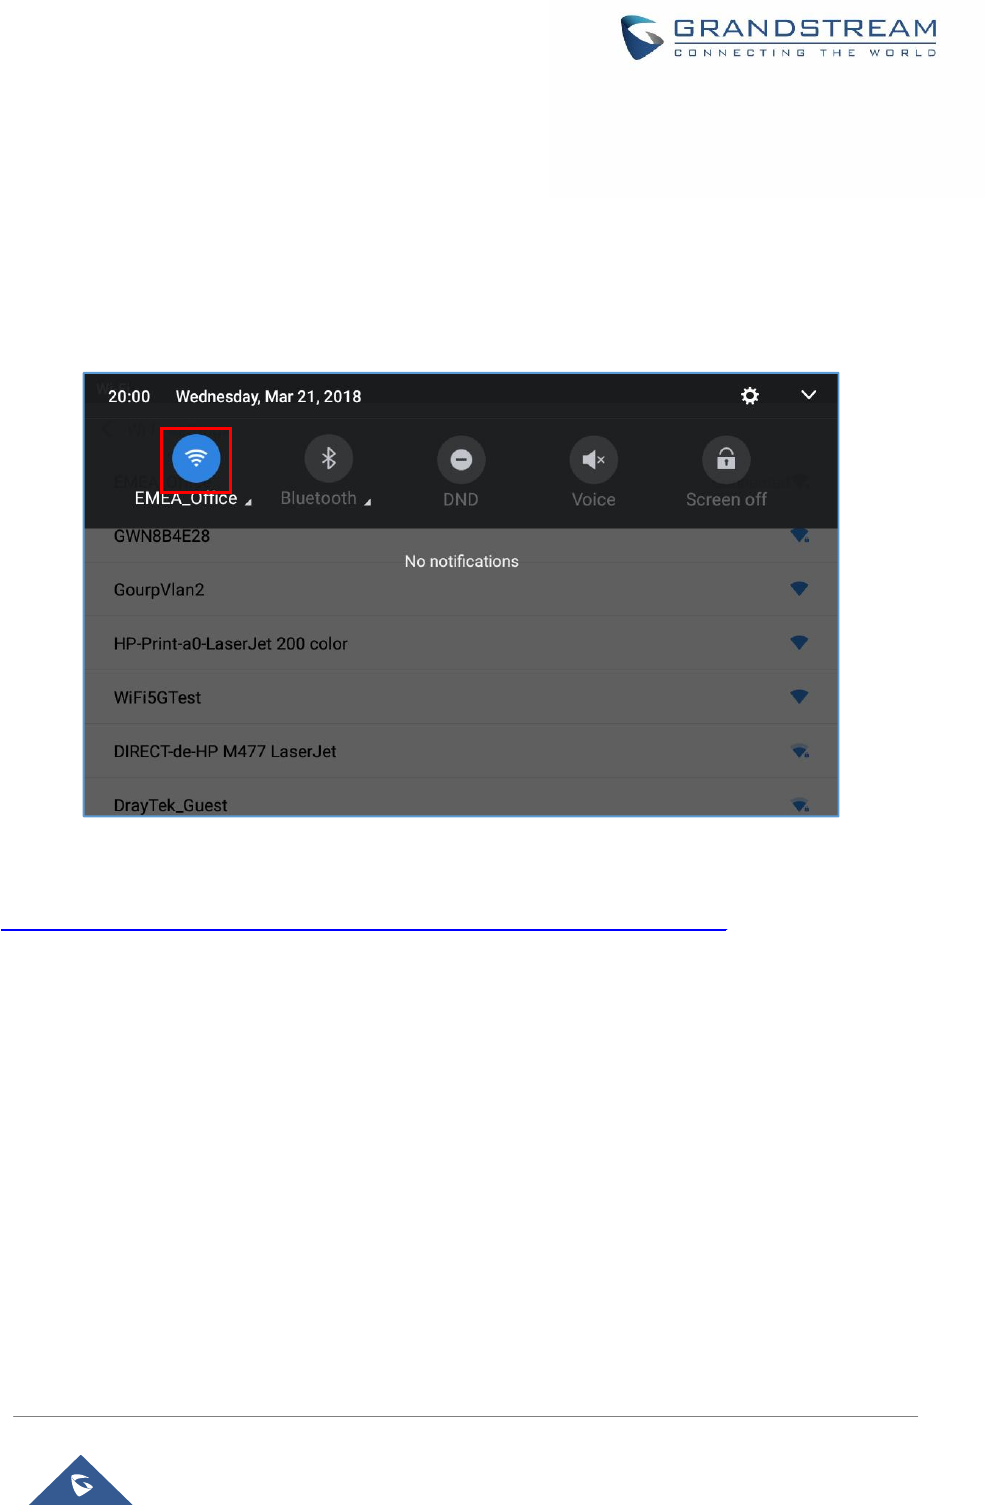
Page| 114
GXV3370 User Guide
Version 1.0.0.4
9. If there is a need to modify the saved Wi-Fi network setting, the end user should tap and long press the
SSID bar in the Wi-Fi setting page. The system will pop up a prompt and then users need to tap on
“Modify Network”. Then, the phone system will pop up a new window to allow user to check the Wi-Fi
parameters and change the setting by checking the “Show advanced options” at the bottom.
Wi-Fi Settings Shortcut
User can enter the Wi-Fi settings by sliding the Status Bar, then long Press on the Wi-Fi icon.
Figure 110: Wi-Fi Settings Shortcut
For more information about how to use Wi-Fi on the GXV3370, please refer to the link below:
http://www.grandstream.com/sites/default/files/Resources/gxv3275_wifi_guide_0.pdf
Bluetooth
Bluetooth is a proprietary, open wireless technology standard for exchanging data over short distances
from fixed and mobile devices, creating personal area networks with high levels of security. The GXV3370
supports Bluetooth, version 4.0 + EDR. Users could use Bluetooth to transfer files, share contact
information with other Bluetooth portable devices, use Bluetooth headset for making calls, switch calls to
the GXV3370 from mobile devices using Bluetooth hands-free profile, and listen to media (music or other
audio output) from the GXV3370.
To connect to a Bluetooth device, turn on GXV3370’s Bluetooth radio first. The first time when using a new
Bluetooth device with the GXV3370, "pair" the device with GXV3370 so that both devices know how to
connect securely to each other. After that, users could simply connect to a paired device. Turn off
Bluetooth if it's not used.

Bluetooth settings are under
GXV3370
Turn On/Off Bluetooth
1. Go to GXV3370's Settingsà
Basic
2. Check or uncheck
Bluetooth option
Or, users could open the top status bar
Change Bluetooth Device Name
The GXV3370 uses "GXV3370
XXXXXX
last 6 digits
of the phone’s Bluetooth MAC address
connecting them. Follow the steps below to change the name:
1. Go to GXV3370's Settingsà
Basic
2. Turn on Bluetooth.
3. Select Additional settings.
4. Press "Device name".
5. Enter a name and tap on "
Rename
Pair GXV3370 with a
Bluetooth Device
Before connecting GXV3370
with other Bluetooth device, users must pair them first. They will stay paired
afterwards unless they are unpaired.
1. Go to GXV3370's Settingsà
Basic
2. turn on Bluetooth.
3. Tap Additional settings
and select “Visible to nearby Bluetooth devices”
phone
visible to all nearly Bluetooth devices.
4. The GXV3370
scans and displays the IDs of all available Bluetooth devices in range. If
would like to pair with does not show up in the list
turned on and set to be discoverable.
5. If the GXV3370
stops scanning before the other device is ready, press
6.
Once the Bluetooth device shows up in the result, tap on it to start pairing. Confirm the passkey in the
prompted message (if any). Or if passcode is required, please refer to the device's documentation or
other procedures to obtain the passcode.
GXV3370 User Guide
Version 1.0.0.4
GXV3370
's SettingsàBasicàBluetooth.
Basic
àBluetooth.
Bluetooth option
.
Or, users could open the top status bar
à tap on Bluetooth icon to turn it on/off.
XXXXXX
"
as Bluetooth device name by default where “XXXXXX” are the
of the phone’s Bluetooth MAC address
. The device name will be visible to other devices when
connecting them. Follow the steps below to change the name:
Basic
àBluetooth
Rename
".
Bluetooth Device
with other Bluetooth device, users must pair them first. They will stay paired
Basic
àBluetooth
and select “Visible to nearby Bluetooth devices”
to make
visible to all nearly Bluetooth devices.
scans and displays the IDs of all available Bluetooth devices in range. If
would like to pair with does not show up in the list
(available devices)
, ensure that the other device is
turned on and set to be discoverable.
stops scanning before the other device is ready, press
button
to scan again
Once the Bluetooth device shows up in the result, tap on it to start pairing. Confirm the passkey in the
prompted message (if any). Or if passcode is required, please refer to the device's documentation or
other procedures to obtain the passcode.
Page| 115
as Bluetooth device name by default where “XXXXXX” are the
. The device name will be visible to other devices when
with other Bluetooth device, users must pair them first. They will stay paired
to make
the GXV3370
scans and displays the IDs of all available Bluetooth devices in range. If
the device you
, ensure that the other device is
to scan again
.
Once the Bluetooth device shows up in the result, tap on it to start pairing. Confirm the passkey in the
prompted message (if any). Or if passcode is required, please refer to the device's documentation or
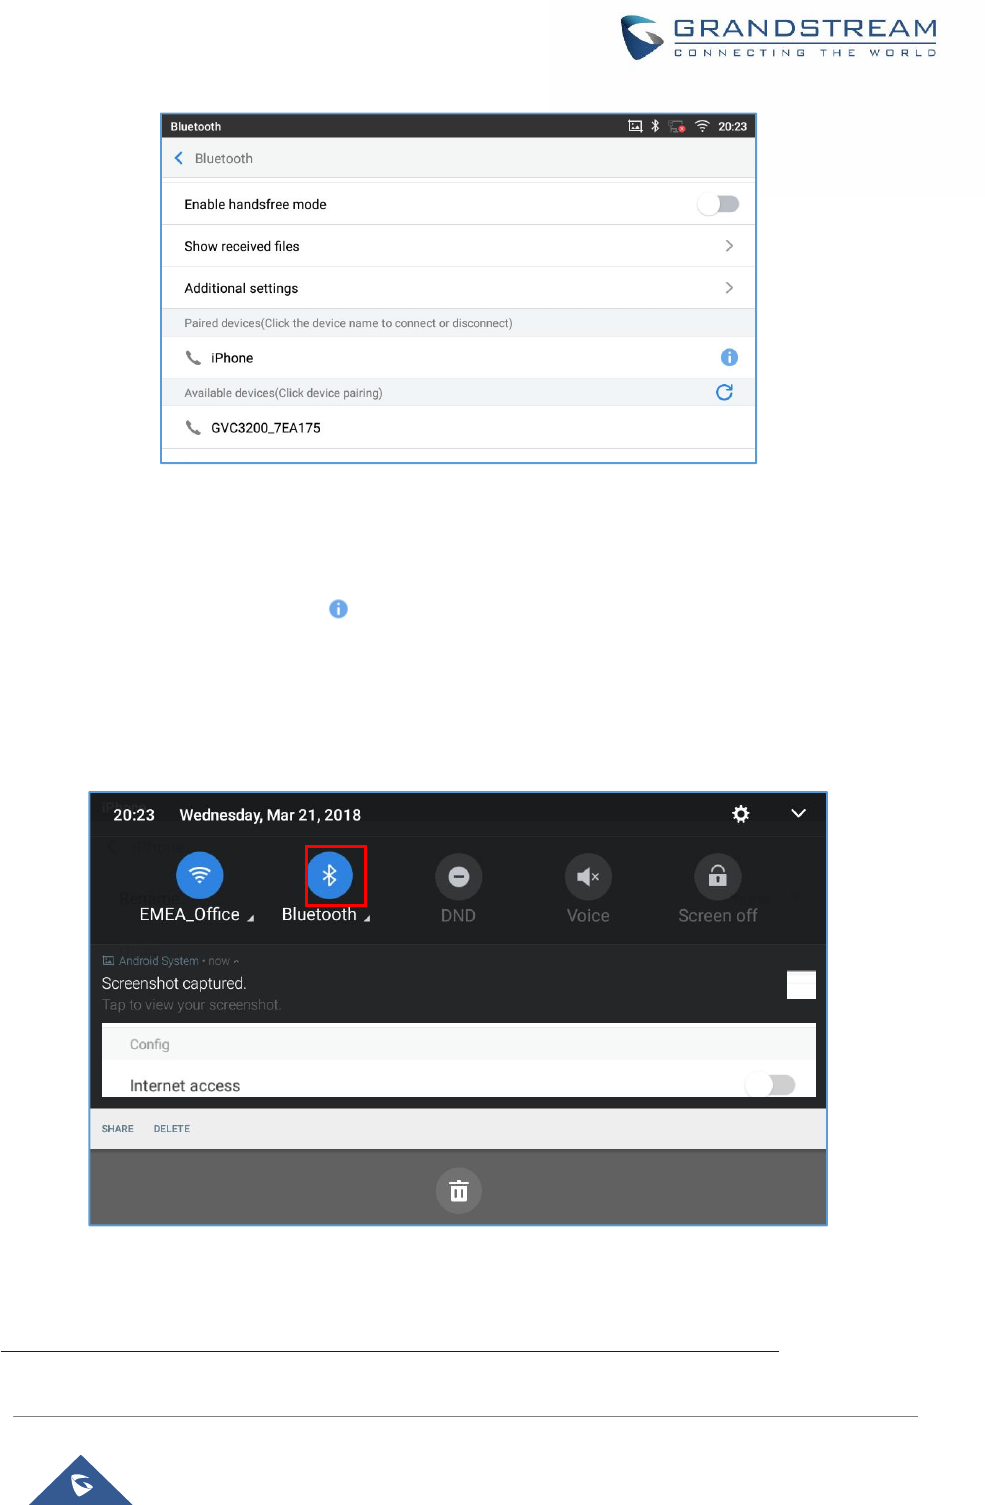
Page| 116
GXV3370 User Guide
Version 1.0.0.4
Figure 111: GXV3370 Bluetooth - Paired Device
Unpair a Bluetooth Device
1. In the Bluetooth settings, tap on button corresponding to the Bluetooth device.
2. SelectUnpair.
Bluetooth Settings Shortcut
User can enter the Bluetooth settings by sliding the Status Bar, then long Press on the Bluetooth icon.
Figure 112: Bluetooth Settings Shortcut
For more information about Bluetooth feature on the GXV3370, please refer to the link below:
http://www.grandstream.com/sites/default/files/Resources/gxv3275_bluetooth_guide_1.pdf
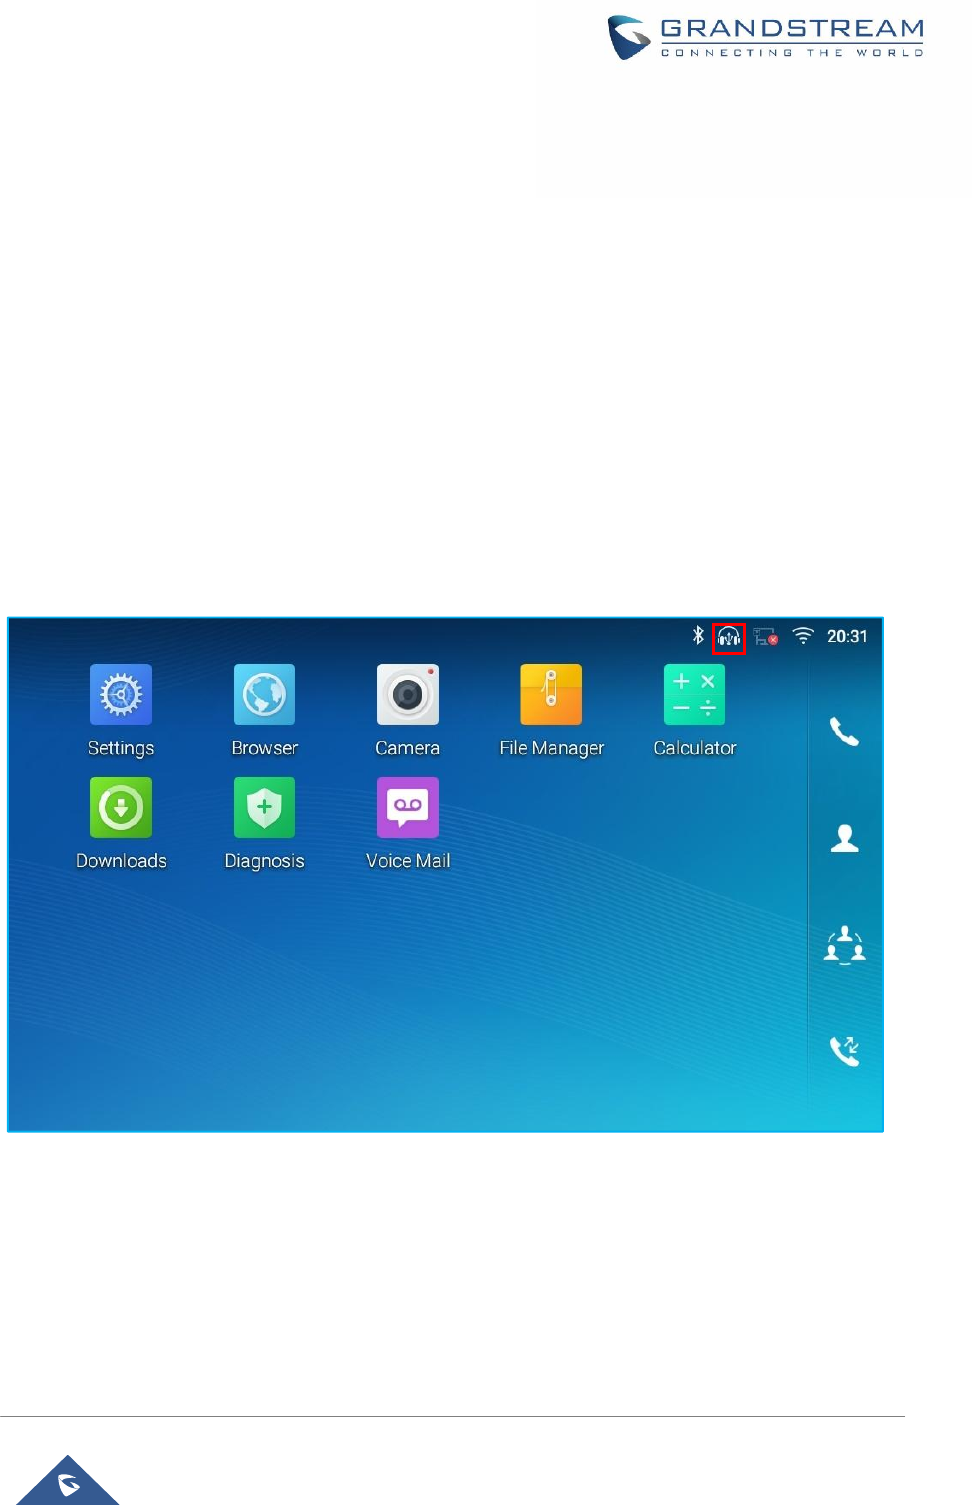
Page| 117
GXV3370 User Guide
Version 1.0.0.4
EHS Headset
The GXV3370 supports normal RJ9 headset and EHS headset. To use Plantronics EHS headset:
1. Go to the GXV3370 web GUIàSystem SettingsàComponents & PeripheralsàVoice Control:
Headset Type. Select "Plantronics EHS" and reboot the phone to take effect.
2. Connect EHS Headset to the GXV3370. Insert headset connector into the RJ9 headset port on the
back of GXV3370.
Note: If “Disable RJ9 Headset Auto Detect” is enabled, the RJ9 headset will not be detected and the icon
will not appear on the LCD, users need to click the handset icon during the call to switch to RJ9 headset.
USB Headset
The GXV3370supports USB Headset, once the headset plugged, it will be detected automatically, and the
following icon will be shown on the top right of the status bar, this means a USB headset is connected.
Figure 113: USB Headset Connected
In the calling page, user can press on the USB headset button (shown in figure below) to enable USB
headset. The status bar shows the icon modified indicating that the USB headset is being used for
speaking.
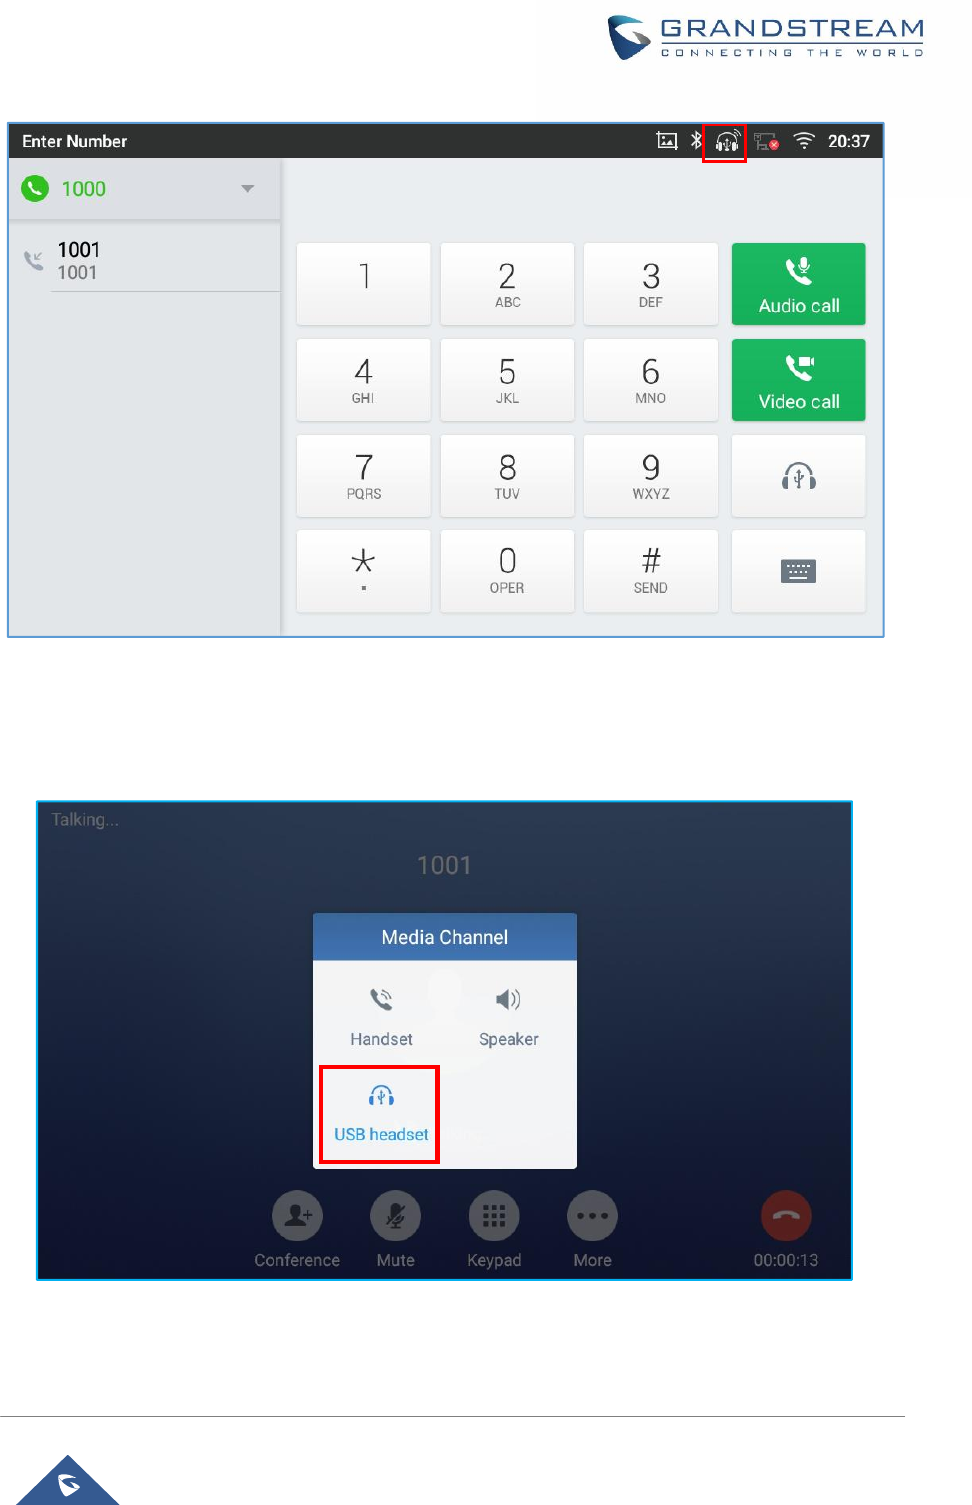
Page| 118
GXV3370 User Guide
Version 1.0.0.4
Figure 114: USB Headset Used for Call
During the call, users can tap on “More” then “Media Channel” to toggle between Handset Speaker and
USB Headset.
Figure 115: Switch Between Speaker and USB mode
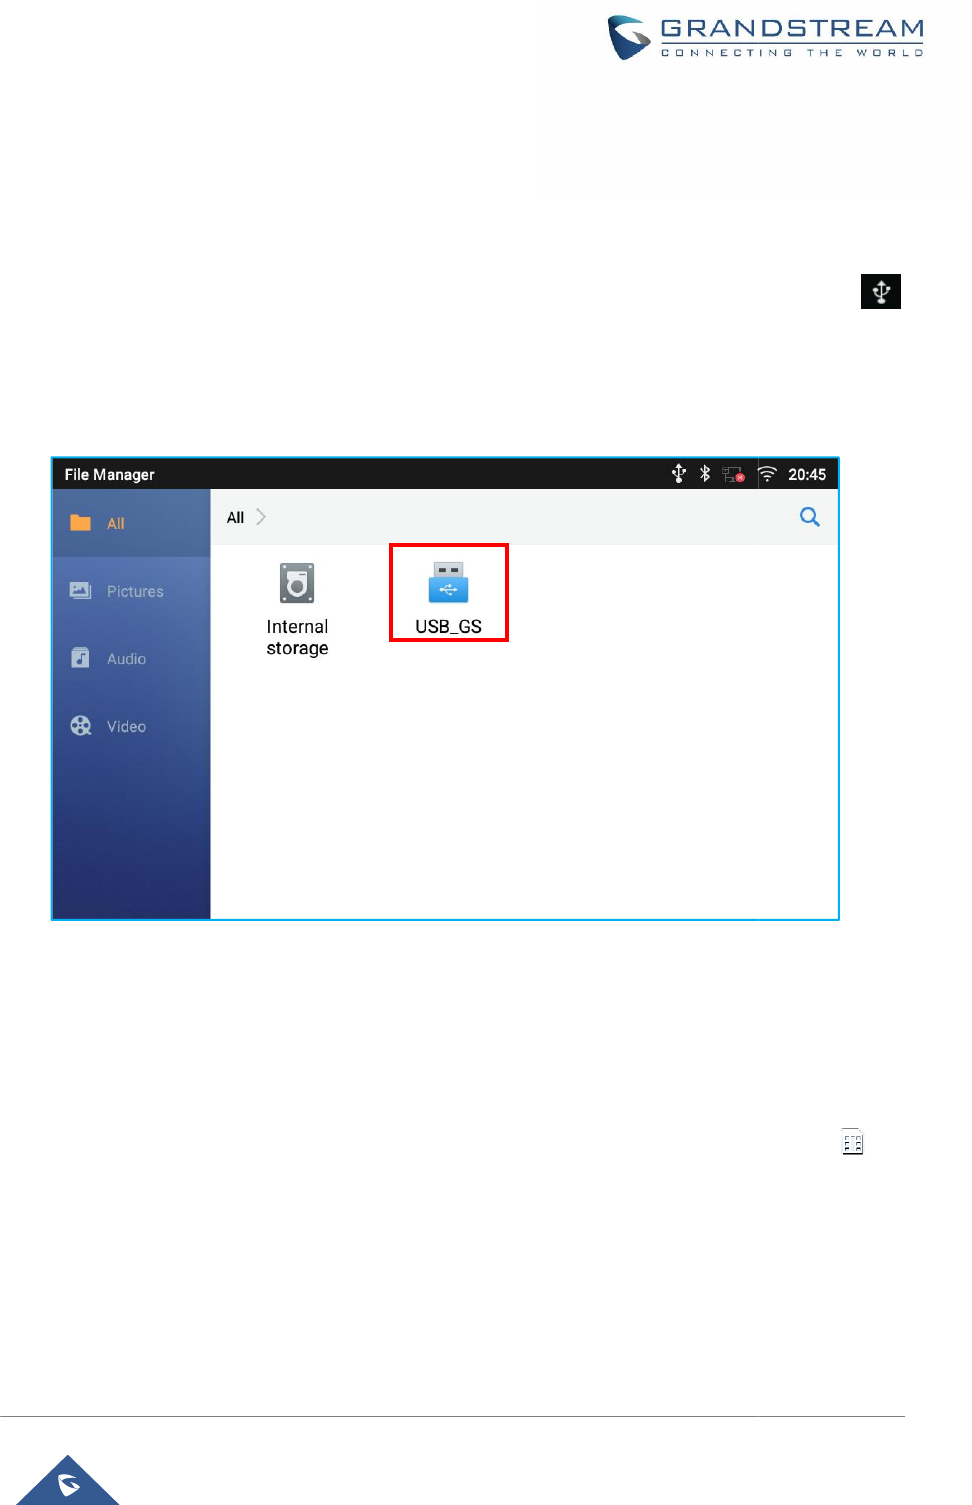
USB
The GXV3370
supports USB connection with USB storage devices. To connect and access USB storage
device:
1. Insert an
USB storage device into USB port at the back of the
2. It will take a few seconds for the
GXV3370
will show on the status bar.
3. To access USB storage, go to
GXV3370
manage your data.
Figure 116
: USB Storage Device Connected to
SD Card
1.
Insert your SD card into SD Card slot at the back of
inserted with right direction on the
GXV3370
2. It will take a few seconds for the
GXV3370
show on the status bar.
3. To access SD Card, go to
GXV3370
GXV3370 User Guide
Version 1.0.0.4
supports USB connection with USB storage devices. To connect and access USB storage
USB storage device into USB port at the back of the
GXV3370.
GXV3370
to prepare the connection. Then the USB storage icon
GXV3370
MENUàFile Managerà USB
. Tap on it to access and
: USB Storage Device Connected to
GXV3370
Insert your SD card into SD Card slot at the back of
GXV3370
. Please make sure the SD Card is
GXV3370
as indicated on the SD card slot.
GXV3370
to prepare the connection. Then the SD Card icon
GXV3370
MENUàFile ManageràSD card
. Tap on it to manage your data.
Page| 119
supports USB connection with USB storage devices. To connect and access USB storage
to prepare the connection. Then the USB storage icon
. Tap on it to access and
. Please make sure the SD Card is
to prepare the connection. Then the SD Card icon
will
. Tap on it to manage your data.
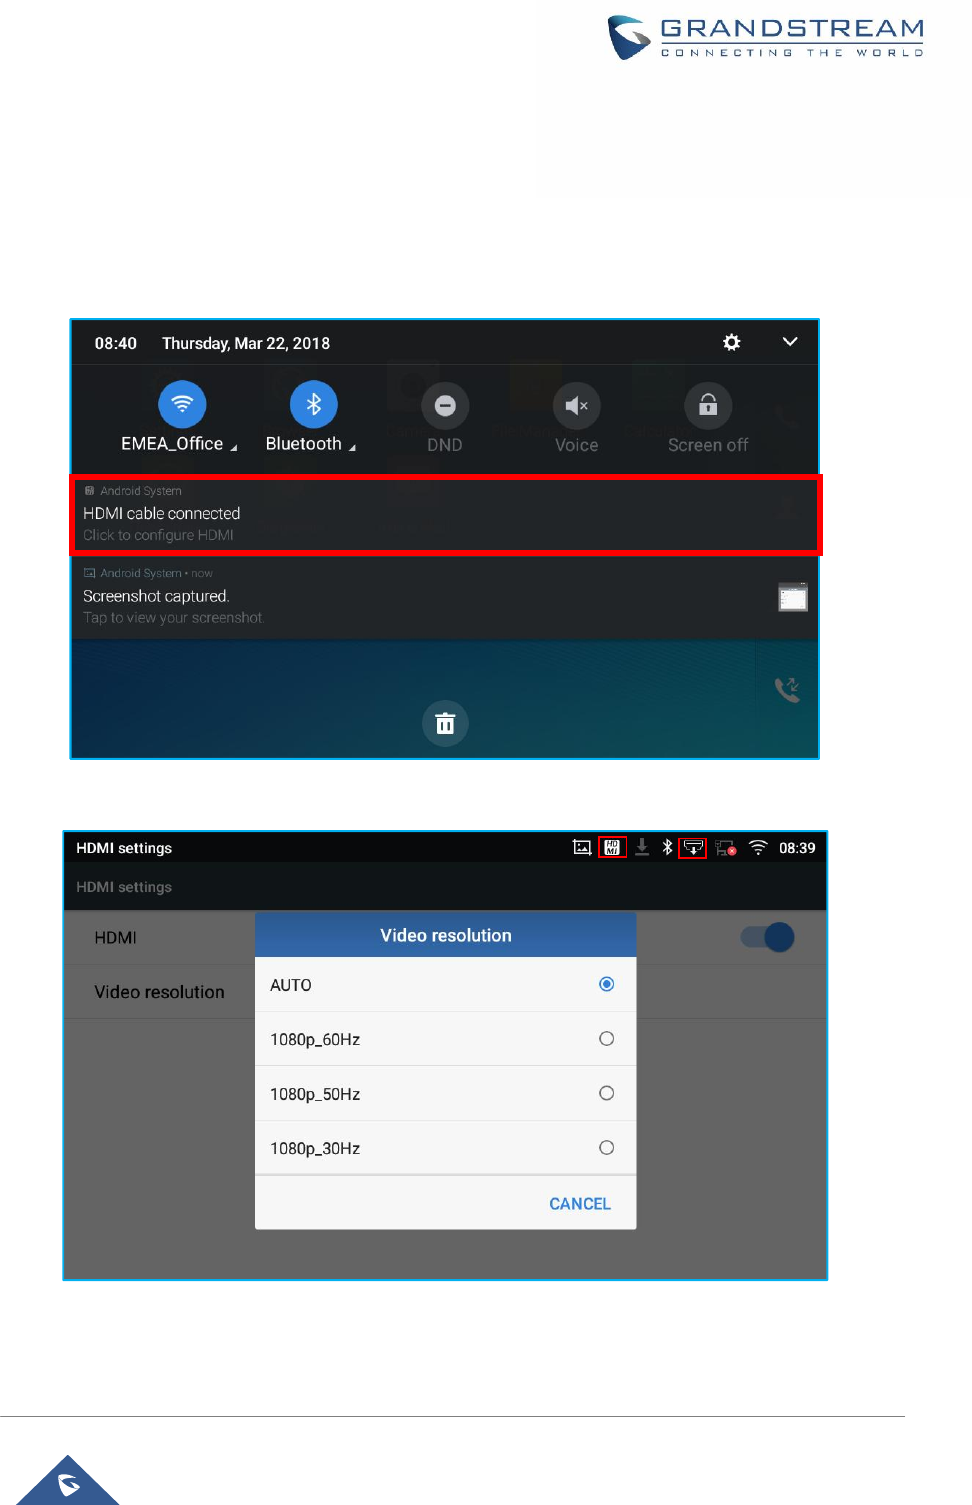
Page| 120
GXV3370 User Guide
Version 1.0.0.4
HDMI Device
1. Plug one end of the HDMI cable into the HDMI port on the GXV3370.
2. Plug the other end of the HDMI cable into the HDMI port on the LCD display or TV.
3. The HDMI icon will be displayed on the status bar with a notification giving access to the HDMI
settings.
4. Press on the Notification to enable/disable HDMI and set the resolution
Figure 117:HDMI Notification
Figure 118:HDMI Video Resolution
5. On the GXV3370’ Web GUI, go to SystemSettingsàComponents & PeripheralsàPeripherals
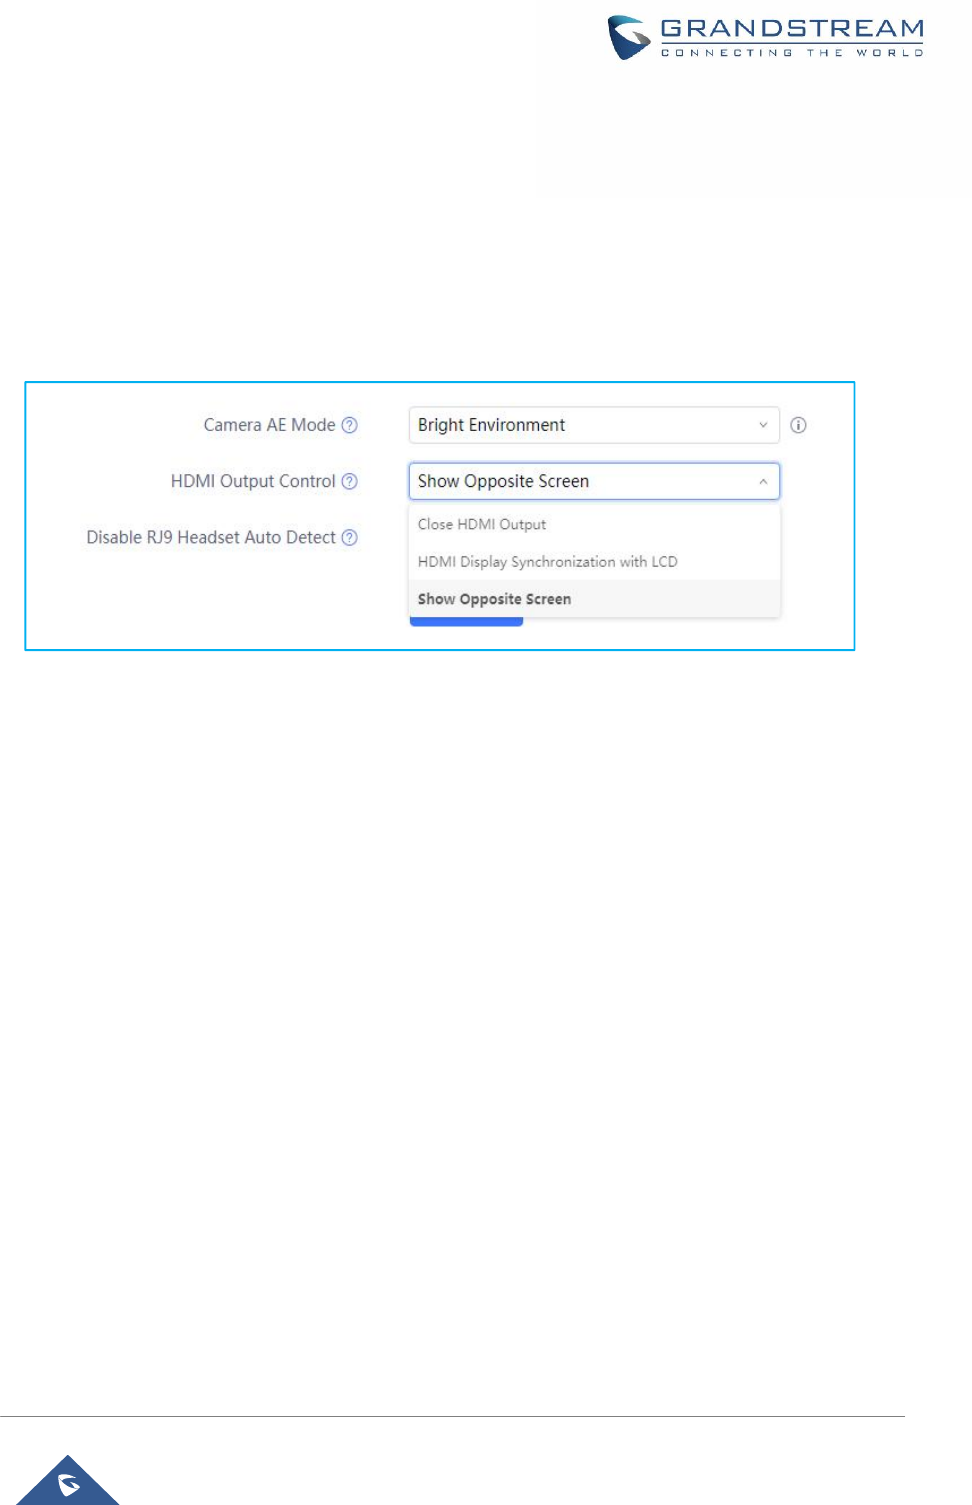
Page| 121
GXV3370 User Guide
Version 1.0.0.4
Interface Management and set the HDMI Output Control” parameter. It allows end users to set the HDMI
output mode from “Close HDMI output”, “HDMI display synchronization with LCD”, “and Show remote
screen”. If “Close HDMI output” is selected, the HDMI output feature will be turned off. If “HDMI display
synchronization with LCD” is selected, the pictures displayed on the remote HDMI device will always be
same as the GXV3370’s LCD display. If “Show remote screen” is selected, the remote HDMI device will
display the same picture with the phone’s LCD screen unless displaying the remote side’s video in full size
mode during a video call.
Figure 119: HDMI Output Control

Page| 122
GXV3370 User Guide
Version 1.0.0.4
EXPERIENCING THE GXV3370 APPLICATION PHONE
Please visit our website: http://www.grandstream.com to receive the most up- to-date updates on firmware
releases, additional features, FAQs, documentation and news on new products.
We encourage you to browse our product related documentation, FAQs and User and Developer Forum
for answers to your general questions. If you have purchased our products through a Grandstream
Certified Partner or Reseller, please contact them directly for immediate support.
Our technical support staff is trained and ready to answer all your questions. Contact a technical support
member or submit a trouble ticket online to receive in-depth support.
Thank you again for purchasing Grandstream Enterprise Application phone, it willbe sure to bring
convenience and color to both your business and personal life.
* Android is a trademark of Google LLC.
* Skype and Skype for Business are Registered Trademarks of Microsoft Corporation.
© 2002-2014 OpenVPN Technologies, Inc.
OpenVPN is a registered trademark of OpenVPN Technologies, Inc.
HDMI, the HDMI Logo, and High-Definition Multimedia Interface are trademarks or
registered trademarks of HDMI Licensing LLC in the United States and other countries.