Grandway Technology MD20XYSERIES Digital Automatic Blood Pressure Monitor User Manual MD2020 Manual Lab
Grandway Technology (Shenzhen) Limited Digital Automatic Blood Pressure Monitor MD2020 Manual Lab
UserManual.wiki
>
Grandway Technology
>
MD20XYSERIES User Manual
User Manual
Navigation menu
Upload a User Manual
Namespaces
Wiki Guide
HTML
PDF
Info
Views
User Manual
Discussion / Help
Navigation
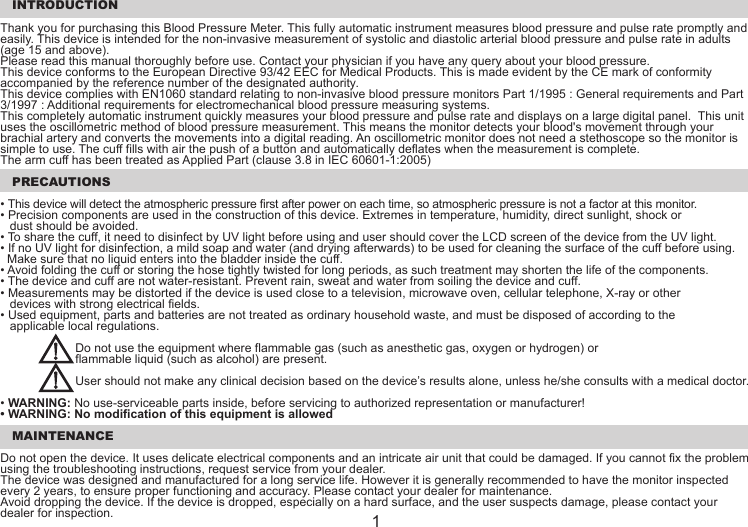
![INSTALL / CHANGE BATTERIES1. Pull out the battery cover on the back side of the unit as directed.2. Battery door will pop up instantly. Remove the used batteries and insert new ones as shown. Make sure the polarities (+) and (-) are correct.3. Push battery cover down to close it.4. Use only R6P, LR6 or AA alkaline batteries,do not use rechargeable batteries.5. Only same type batteries are allowed to usetogether. CAUTION• Insert the batteries as shown in the battery compartment. If not, the device will not work or even be damaged.• When [ ] blinks and "E6" appears in the display, replace all batteries with new ones. Do not mix old and new batteries. It may shorten the battery life, or cause the device to malfunction.• [ ] appears when batteries are new. When battery power becames weak, [ ] and "E6" will appear on display.• Battery life varies with the ambient temperature and may be shorter at low temperature.• Remove the batteries if the device is not to be used for a long time. Batteries may leak and cause a malfunction.• If the battery leaks: - Do not allow the leaking fluid to come in contact with skin or clothing. If already in contact, flush the affected are immediately with clean water and seek medical advice. - Do not allow the leaking fluid to come in contact with eyes. If already in contact, DO NOT rub; rinse with clean water immediately and seek medical advice. - Take extra precautions to keep a leaking battery away from fire as there is a danger of ignition or explosion.To open:Pull out from hereTo close:Insert the battery cover tothe 3 lock first, and then pushdown to close it 2](https://usermanual.wiki/Grandway-Technology/MD20XYSERIES/User-Guide-2199410-Page-3.png)
![TO SET CLOCKPress and hold [ ] button to enter clock setting mode1. "Year” will blink on display automatically2. Press / button to select year3. Press [ ] button to confirm and "Month" will blink4. Press / button to select month5. Press [ ] button to confirm and "Day" will blink6. Press / button to select day7. Press [ ] button to confirm and "Hour" will blink8. Press / button to adjust to desired hour9. Press [ ] button to confirm and "Minute" will blink10. Press / button to adjust to desired minute11. Press [ ] button to confirm and settings are done8](https://usermanual.wiki/Grandway-Technology/MD20XYSERIES/User-Guide-2199410-Page-9.png)
![TO MEASURE YOUR BLOOD PRESSURE1. Place the cuff on the arm (preferably the left arm). Sit quietly during measurement.2. Press [ ] button to start. The deflation icon and measurement record number is displayed briefly. Then the cuff starts to inflate. It is normal for the cuff to feel very tight. The inflaction number is displayed during measurement.Note: If you wish to stop inflation at any time, press the [ ] button again.3. When inflation is complete, deflation starts automatically and the [ ] blinks, indicating that the measurement is in progress. Once the pulse is detected, the mark flashes with each pulse beat.4. When the measurement is complete, the systolic and diastolic pressure readings and pulse rate are displayed and stored. The cuff exhausts the remaining air and deflates completely.9Deflation for start measuring Record number and User ID are displayedInflation in progressMeasurement result shown[ ] icon blinks](https://usermanual.wiki/Grandway-Technology/MD20XYSERIES/User-Guide-2199410-Page-10.png)
![TO USE THE MEMORY FUNCTIONThis monitor has a memory capable of storing 240 sets of readings for each user. Every time you complete the measurement, the monitor automatically stores blood pressure and pulse rate.Recalling the average data• Press [ ] button to enter the memory mode, the average blood pressure on last 3 measurements is displayed.• Press [ ] to view average data for AM period• Press [ ] one more time to view average data for PM periodRecalling the previous measurement record• Press [ ] button to enter the memory mode, the average blood pressure on last 3 measurements is displayed.• Press [ ] to view the previous measuremnt record12Press [ ] Press [ ] Press [ ] again](https://usermanual.wiki/Grandway-Technology/MD20XYSERIES/User-Guide-2199410-Page-13.png)
![DELETING ALL DATA STORED IN MEMORYDeleting all data stored in memory• Press [ ] to go into average data display.• Press and hold [ ] and [ ] for 2 seconds to delete all memory records.13All memories clearedPress [ ]Press and hold [ ] and [ ] at the same time](https://usermanual.wiki/Grandway-Technology/MD20XYSERIES/User-Guide-2199410-Page-14.png)
![BLUETOOTH CONNECTIONThis monitor works with iPod touch, iPhone or iPad by Bluetooth connection. Please installapplication (APP) - BPM Smart to your devices from the App Store before you start.Transfer data from your monitor to your smartphone or tablet devices • Press any key to start up the monitor. Press [ ] or [ ] to select the target user profile and press [ ] or [ ] to confirm your selection.• Press and hold [ ] and [ ] buttons to turn on the bluetooth connection. The bluetooth icon [ ] is flashing.• Launch the app. and go to the data transfer section. Press the “Connect” button. The data transfer icon is rotating.• When connected, the bluetooth icon [ ] on the monitor will stop flashing. The data transfer icon in the app. will stop rotating and change to blue.• Press [ ] button on the monitor to send data to the app. and the data transfer icon is rotating while the app. is receiving data.• Once the data transfer icon is stop rotating, the date transfer process is finished. 14Data Transfer Data Transfer IconConnect Button](https://usermanual.wiki/Grandway-Technology/MD20XYSERIES/User-Guide-2199410-Page-15.png)
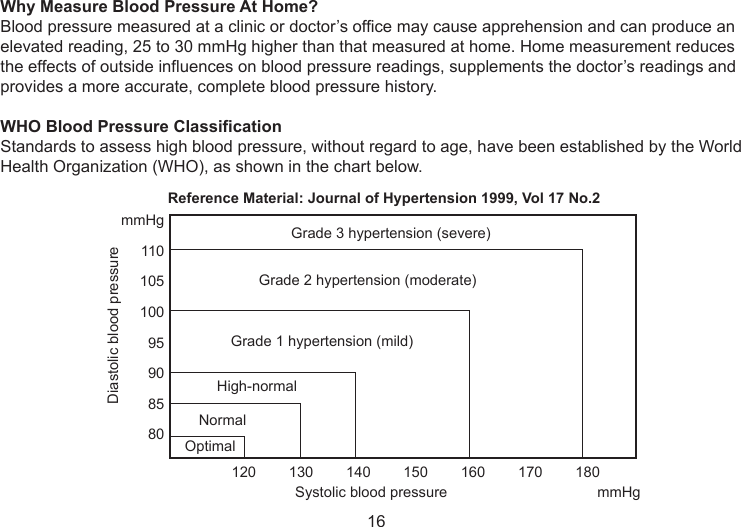
![WHAT IS AN IRREGULAR HEARTBEAT?This blood pressure monitor provides a blood pressure and pulse rate measurement even when an irregular heartbeat occurs. An irregular heartbeat is defined as a heartbeat that varies by 25% from the average of all heartbeats during the blood pressure measurement. It is important that you are relaxed, remain still and do not talk during measurements.Note: We recommend contacting your physician if you see this [ ] indicator frequently. ABOUT BLOOD PRESSUREWhat Is Blood Pressure?Blood pressure is the force exerted by blood against the walls of the arteries. Systolic pressure occurs when the heart contracts. Diastolic pressure occurs when the heart expands. Blood pressure is measured in millimeters of mercury (mmHg). One’s natural blood pressure is represented by the fundamental pressure, which is measured first thing in the morning while one is still at rest and before eating.What Is Hypertension And How Is It Controlled?Hypertension, an abnormally high arterial blood pressure, if left unattended, can cause many health problems including stroke and heart attack. Hypertension can be controlled by altering one’s lifestyle, avoiding stress, and with medication under a doctor’s supervision. To prevent hypertension or to keep it under control:• Do not smoke• Exercise regularly• Reduce salt and fat intake• Have regular physical checkups• Maintain proper weight15](https://usermanual.wiki/Grandway-Technology/MD20XYSERIES/User-Guide-2199410-Page-16.png)